

Panasonic KX-TC18000B User Manual

Panasonic
900MHz Cordless Phone
Model No. KX-TC1800B
Pulse-or-tone dialing capability
Operating Instructions
PLEASE READ BEFORE USE AND SAVE.
Charge the battery for
4 hours before initiai use.
• Contents by Section n
Getting Started
Making/Answering Calls
Speed Dialer
OnO'Touch Dialer
Special Features
Things You Should Know
Referencia rápida
Attach your purchase receipt here.
For your future reference
Serial No
(found on th* Dcncxr of ih« urn)
Name arxj address of dealer
For product service
•Partasonic Servtcenters are listed in the servicenter directory.
When you ship the product
•Carefully pack your unit, preferably in (he original carton.
•Attach a letter, detailing the symptom, to the outside of the carton.
Symptort)
•Send the unit to an authorized servicenter. prepaid and adequatety
•Do not serxt your unit to the Panasonic Consunier Electronics Company
Panasonic Consumer Electronics Company,
Division of Matsushita Electric Corporation of America
One Panasonic Way. Secaucus, New Jersey 07094
Panasonic Sales Company,
Division of Matsushita Electric of Puerto Rico, Inc.
Ave. 65 de Infantería. Km. 9.5, San Gabriel Industrial Park
Carolina, Puerto Rico 00985
_______________
insured.
listed below or to executive or regional sales offices.
These locations do not repair consumer products.
_
Dale of purctiaM
Printed m Malaysia
PQQX12177ZA-BM FM0699MN0<g>
Getting Started
1-A Accessories
□ AC Adaptor
Order No. KX-TCA1-G
□ Telephone Line Cord .. . one
□ Battery..............................one
Order No. P-P501 (KX-A36)
□ Battery Cover
Order No. PQKK10089Z1
□ Belt Clip............................one
Order No. PQKE10079Z1
•For extra orders, call
1-800-332-5368.
......................
...................
one
one
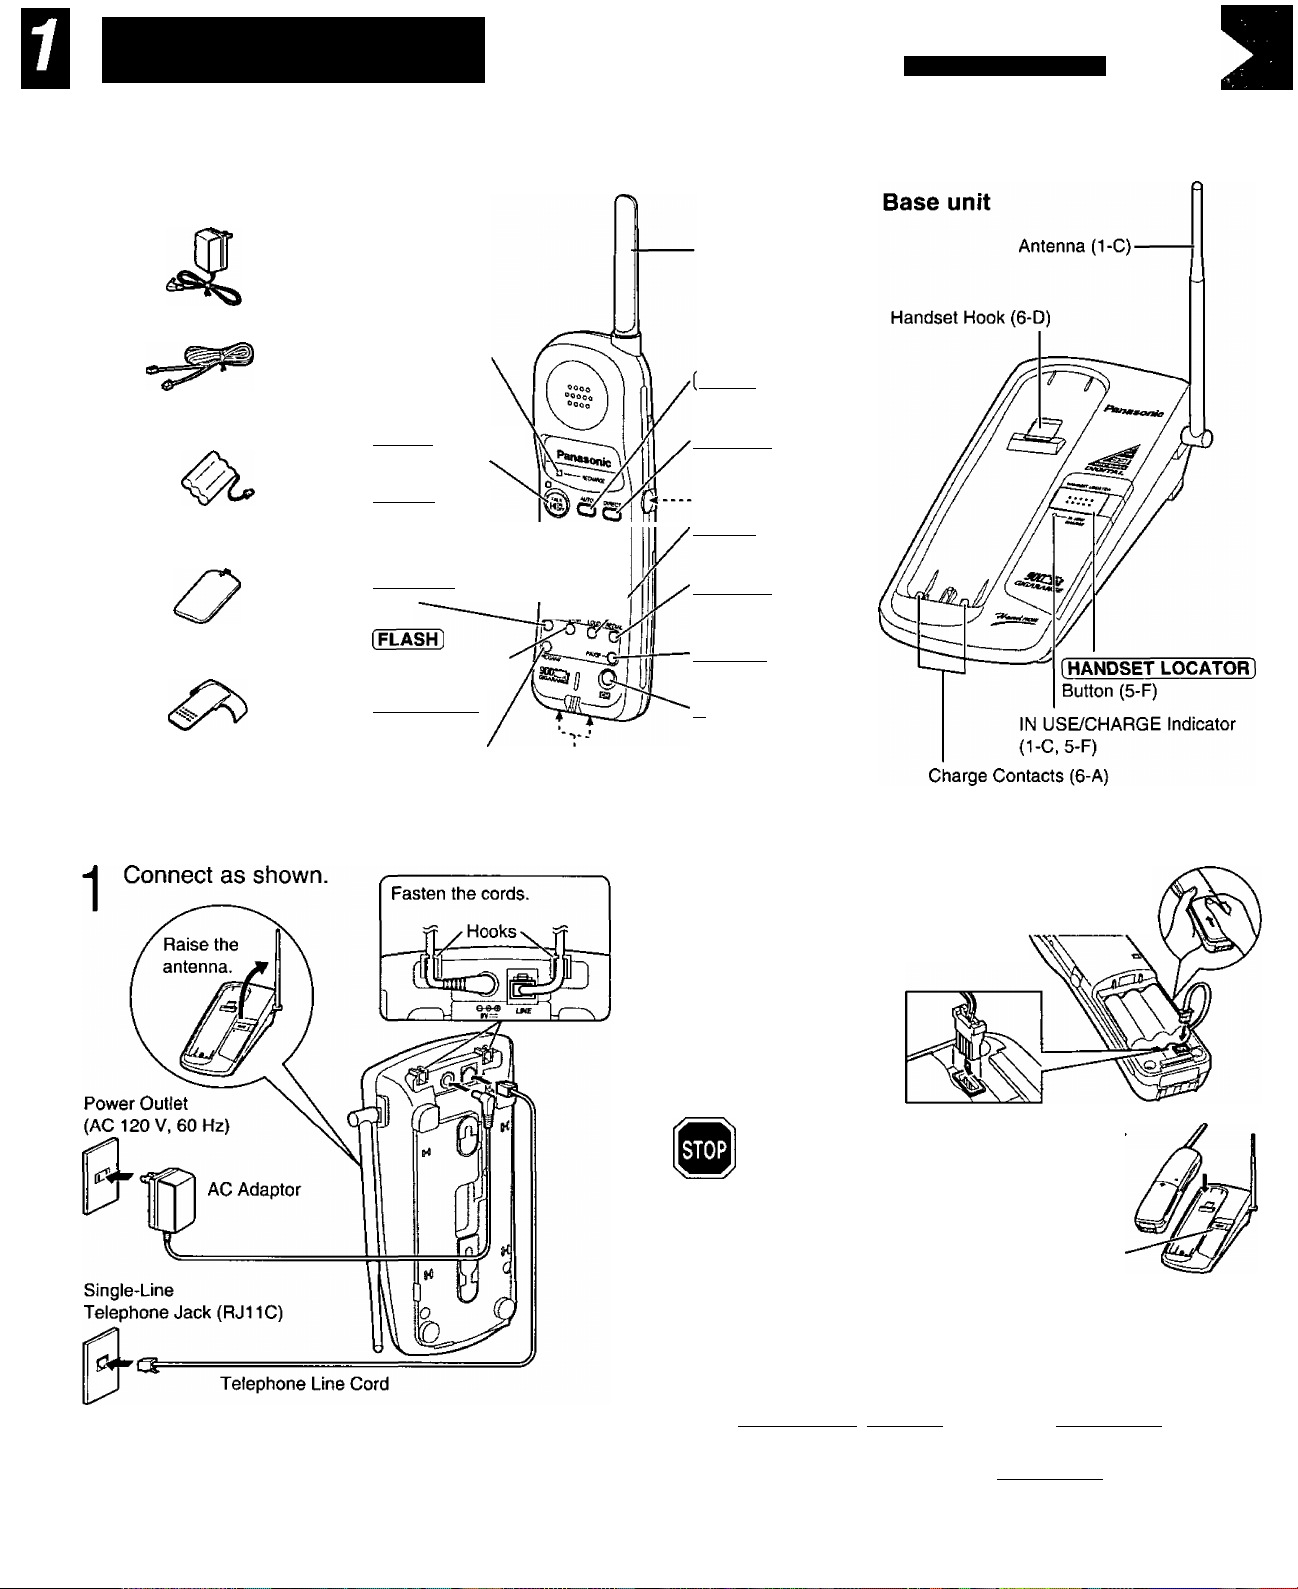
1-B Location of Controls
Handset
RECHARGE
Indicator (6-A)
[TALK] Button and
Indicator (2-A)
[TONE] Button
(5-D)
(RINGER) Button
(2-B)
Button (5-A, 5-B)
[PROGRAM]
Button {1-C,
3-A, 4-A, 5-A)
S®®
f® ® ®
S’®
---- Charge Contacts (6-A)
Antenna
AUTO] Button
(1-C, 3-A, 5-A)
[DIRECT) Button
(4-A)
Headset Jack (1-E)
[LOUD] Button
(2-A)
[REDIAL] Button
(2-A)
[PAUSE] Button
(5-E)
[^ (Channel)
Button (2-A)
1-C Settings
•USE ONLY WITH Panasonic AC ADAPTOR KX-TCA1
(Order No. KX-TCA1-G).
•The AC adaptor must remain connected at all times.
(It is normal for the adaptor to feel warm during use.)
•To connect a standard telephone on the same line,
see section 6-F,
Install the battery in the handset,
and close the battery cover,
locking it into place.
Charge the battery for 4 hours
•See section 6-A tor more details.
•The IN USE/CHARGE indicator lights.
IN USE/CHARGE Indicator
To select the dialing mode TONE (preset) or PULSE
You can program the dialing mode using the handset near the base
unit. The TALK indicator light must be off before programming.
® twice (PULSE)
Press [ PROGRAM 1»[ AUTO 1 ■» OR »[PROGRAM].
® twice (TONE)
•To cancel during programming, press [PROGRAM]. Start again
from the beginning.
• If 3 beeps sound during programming, a wrong key was pressed.
Start again from the beginning.
Getting Started Section 1
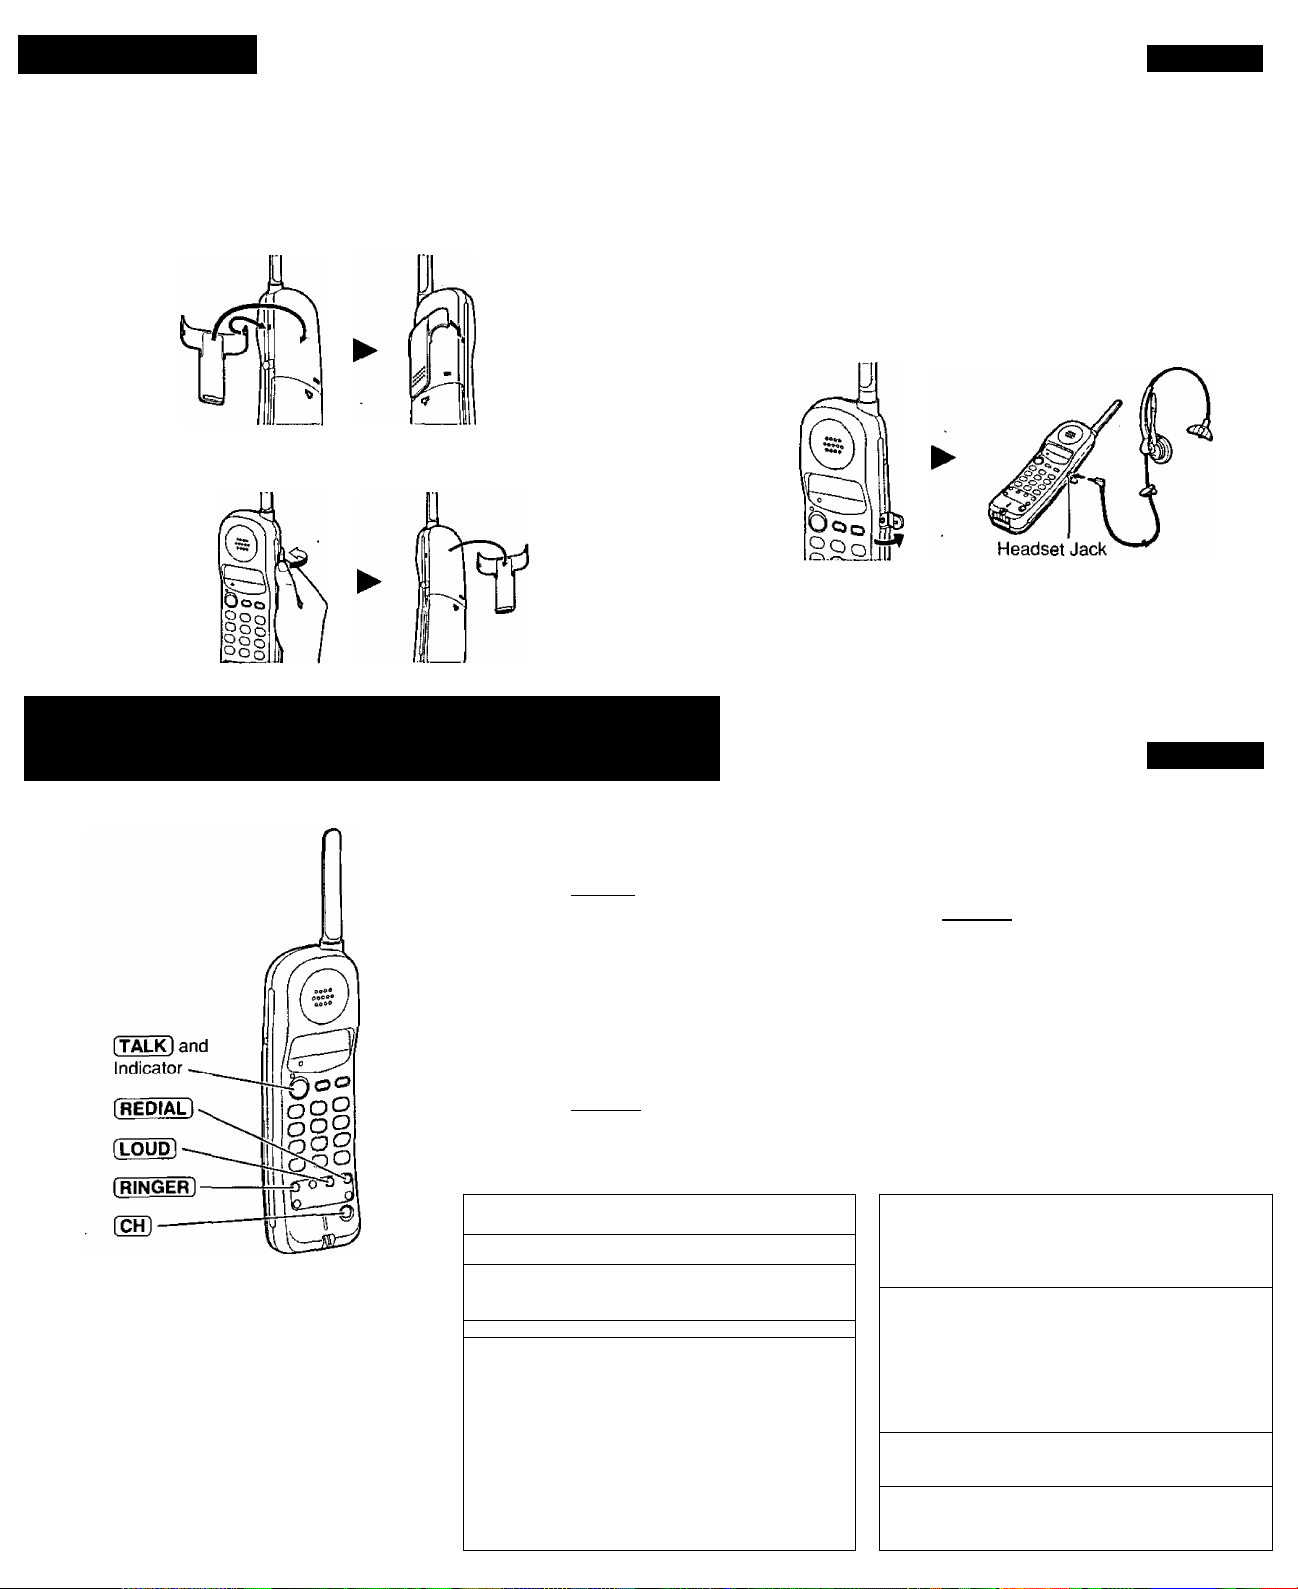
1-D Belt Clip
You can hang the handset on your belt or pocket using the belt clip.
To attach the belt clip
To remove the belt clip
1-E Optional Headset
Plugging an optional headset into the handset allows a hands-free phone
conversation. Please use only the Panasonic KX-TCA90 headset. To
order, call the accessories telephone number in section 1-A.
Connecting the optional headset to the handset
Open the headset jack cover and connect the optional headset to the
headset jack as shown.
When the optional headset is connected to the handset, be sure to use ^
the headset to talk with the caller. If you want to have a normal I
cordless phone conversation, disconnect the headset.
2\ Making/Answering Calls
2-A Making Calis 2-B Answering Calls
Press iTALkl.
1
•The TALK indicator lights.
• If an alarm tone sounds, see 6-E.
Dial a telephone number.
2
To hang up,
press (TALK] or place the
3
handset on the base unit.
•The indicator light goes out.
To redial the last number dialed Selecting the ringer volume
Press (TALK] ^ (REDIAL).
>For best operating performance,
see section 6-C.
Lighted handset keypad
The handset dialing buttons will light
when you press a button or lift the
handset off the base unit, and flash
when a call is received. The lights will go
out about 10 seconds after pressing a
button, lifting the handset or answering
a call.
To select the receiver volume
Press fLOUD] while talkinq.
• Each time you press the button, the volume
level will change from MEDIUM (preset) to
HIGH to LOW.
If noise interferes with the
conversation
Press (CHl to select a clearer channel or
move closer to the base unit.
Section 2
If the handset is off the base unit,
press (TALK).
•You can also answer a call by pressing
any dialing button (o) fo ®- ® 0*" ®
{—Any Key Talk).
OR
If on the base unit,
just lift Up.
i
The TALK indicator light must be off.
•To select HIGH (preset) or LOW,
press [RINGER],
Each time you press the button, the ringer
volume will change and the selected
volume will ring.
•To turn the ringer OFF,
press and hold (RINGER] until 2 beeps
sound.
•To turn the ringer ON,
press (RINGER).
The ringer will sound at the HIGH level.
 Loading...