

Panasonic KX-TC1696B User Manual

Panasonic
900MHz Cordless Phone
Model No. KX-TC1700B
KX-TC1696B
Pulse-or-tone dialing capability
Operating Instructions
PLEASE READ BEFORE USE
AND SAVE.
Charge the battery for about 4 hours before initial use.
KX-TC1700B
Caller ID Compatible
Before Initial Use
Please read IMPORTANT SAFETY
INSTRUCTIONS on pages 47-48 before use.
Read and understand all instructions.
Thank you for purchasing the Panasonic cordless
teiephone.
' Caller ID and Visual Call Waiting {Call Waiting ID), where available, are
i telephone company services. After subscribing to Caller ID, this phone
will display the caller’s name and phone number. An added service,
, Visual Call Waiting, will display the second caller’s name and phone
■ number during call waiting.
^ Attach your purchase receipt here. "j
For your future reference
Serial No.
{found on the bottom of the unit)
Name and address of dealer
___________________
Date of purchase
For Best Performance
Battery Charge
A rechargeable Ni-Cd battery
powers the handset. Charge the
battery for about 4 hours before
initial use (p. 12).
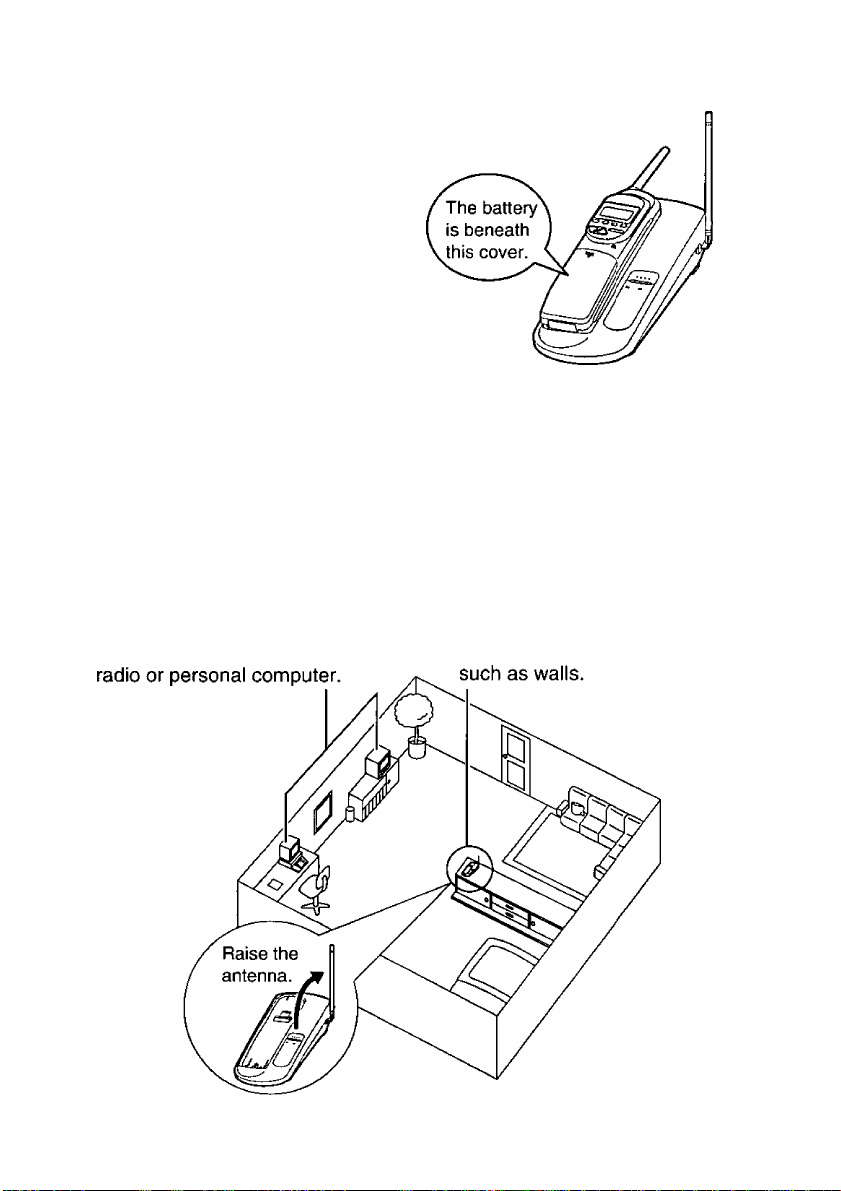
Base Unit Location
Calls are transmitted between the base unit and the handset using wireless
radio waves. For maximum distance and noise free operation, the
recommended base unit location is:
Away from electrical
appliances such as a TV,
In a HIGH and CENTRAL
location with no obstructions,

Location of Controls
Handset Display...................................................................................... 9
Settings...................................................................................................11
Connections.........................................................................................11
Battery Charge.....................................................................................12
Selecting the Dialing Mode
Selecting the Line Mode.......................................................................15
Storing the Area Code.........................................................................16
Storing the Second Area Code
Setting the Auto Talk Feature
Selecting the Ringer Volume...............................................................19
Wall Mounting......................................................................................20
Making Calls..........................................................................................21
Answering Calls.......................................................................................23
................................................................................
..................................................................
...........................................................
.............................................................
6
14
17
18
Speed Dialer............................................................................................24
Storing Phone Numbers in Memory.....................................................24
Dialing a Stored Number......................................................................25
¿Msmi33S@(t!3MiSsai
Caller ID Service.....................................................................................26
Using the Caller List................................................................................28
Viewing the Caller List..........................................................................28
Calling Back from the Caller List..........................................................30

Editing the Caller’s Phone Number
Storing the Caller List Information in Speed Dialer Memory................32
Erasing the Caller List Information......................................................33
Voice Mail Service..................................................................................34
Storing an Access Number in Your Voice Mail
Setting the Voice Mail Tone................................................................36
Listening to Voice Mail Message(s)
Special Features....................................................................................38
Automatic Security Code Setting
Handset Locator..................................................................................38
One-Touch Dialer................................................................................39
FLASH Button.....................................................................................40
For Call Waiting Service Users
Temporary Tone Dialing (For Rotary or Pulse Service Users) ..........41
How to Use the PAUSE Button
(For Analog PBX Line/Long Distance Service Users)....................41
....................................................
...................................
....................................................
........................................................
..........................................................
31
35
37
38
41
Battery Replacement..............................................................................42
Adding Another Phone...........................................................................43
Before Requesting Help.........................................................................44
Important Safety Instructions
FCC and Other Information....................................................................49
.................................................................
47
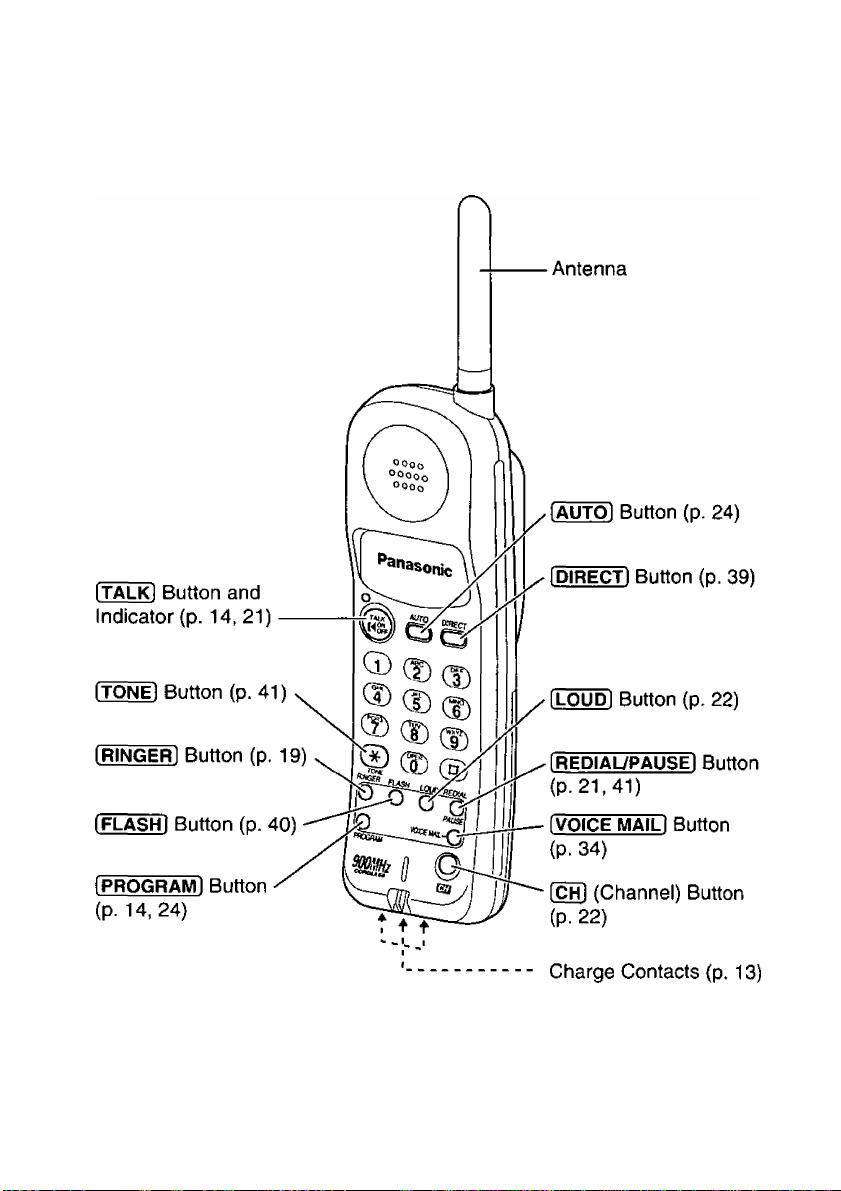
Location of Controls
Handset (Front side)
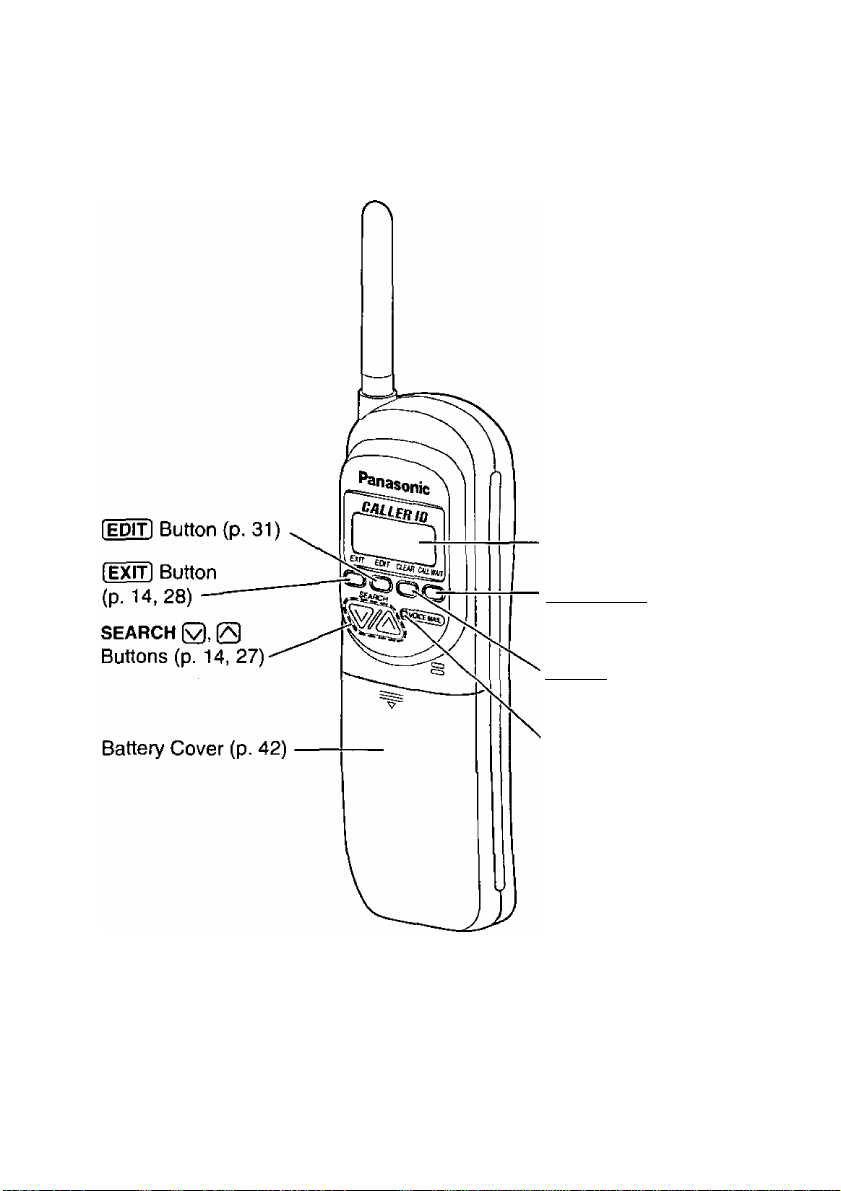
Handset (Back side)
Display (p. 9)
[CALL ^ITl Button
(p.41)
[clear! Button
(p. 16, 25,33)
VOICE MAIL Indicator
(P- 34)
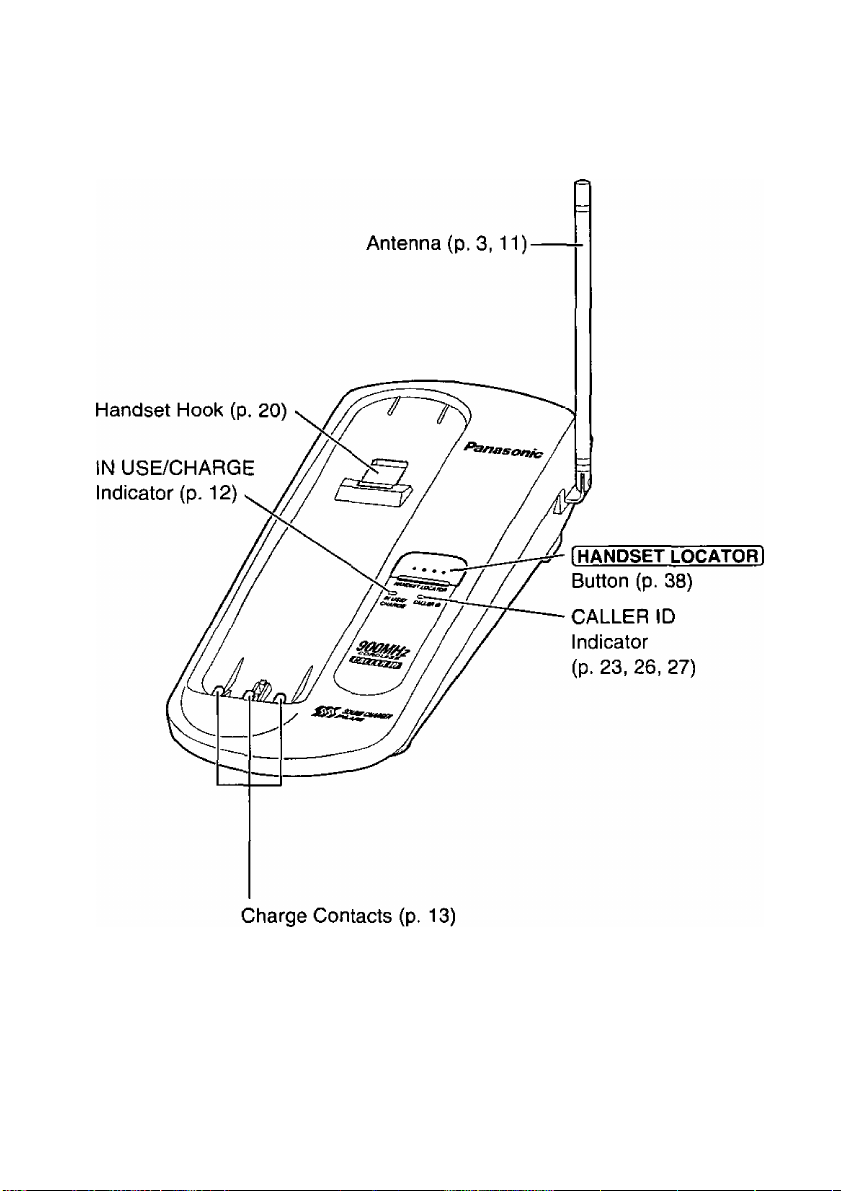
Location of Controls
Base unit
8

Handset Display
The handset gives you instructions and information on the display.
These display prompts are shown below.
The Caller List is empty.
No items
Recharge
12 new calls
12 new
v=New
stored
J HI..
{a mi
calls
A=oid
The battery needs to be charged. Place the
handset on the base unit to charge the battery
(p. 12).
The display shows the number of new calls and
the present battery strength while the handset is
on the base unit.
This display will be shown when:
- you lift the handset off the base unit, or
- SEARCH 0 or 0 is pressed when the handset
is off the base unit.
To search from the most recent call, press
SEARCH 0 (New key). To search from the oldest
call, press SEARCH 0 (old key) (p. 28).
Talk
01-06-35 tilB]
Out of range
Save error
TINA ROBINSON
1-000-222-3333
During a conversation, the display counts the
length of the call (ex. 1 hour, 6 minutes and 35
seconds). The present battery strength is also
displayed (p. 12).
The handset has lost communication with the base
unit (p. 21).
While programming, the handset lost
communication with the base unit. Move closer to
the base unit.
When a call is received, the display shows the
caller’s name and number after the first ring.

Handset Display
JACK SMITH
111-2222
11:20A JAN12 x3
Paging
NANCY BROWN
1-00Û-222-3333
---
Waiting
Please lift up
and try again
---
This is a name from the Caller List.
The display shows:
— the caller’s name,
— the caller’s number,
— the time and date of the last call
{ex. Jan. 12, 11:20 AM), and
— the number of times called (ex. 3 times).
The base unit is paging the handset (p. 38).
A second call is received during a conversation
(p. 41).
SEARCH 0 or 0 was pressed while the
handset was on the base unit. Lift the handset
and press SEARCH 0 or @ again.
10
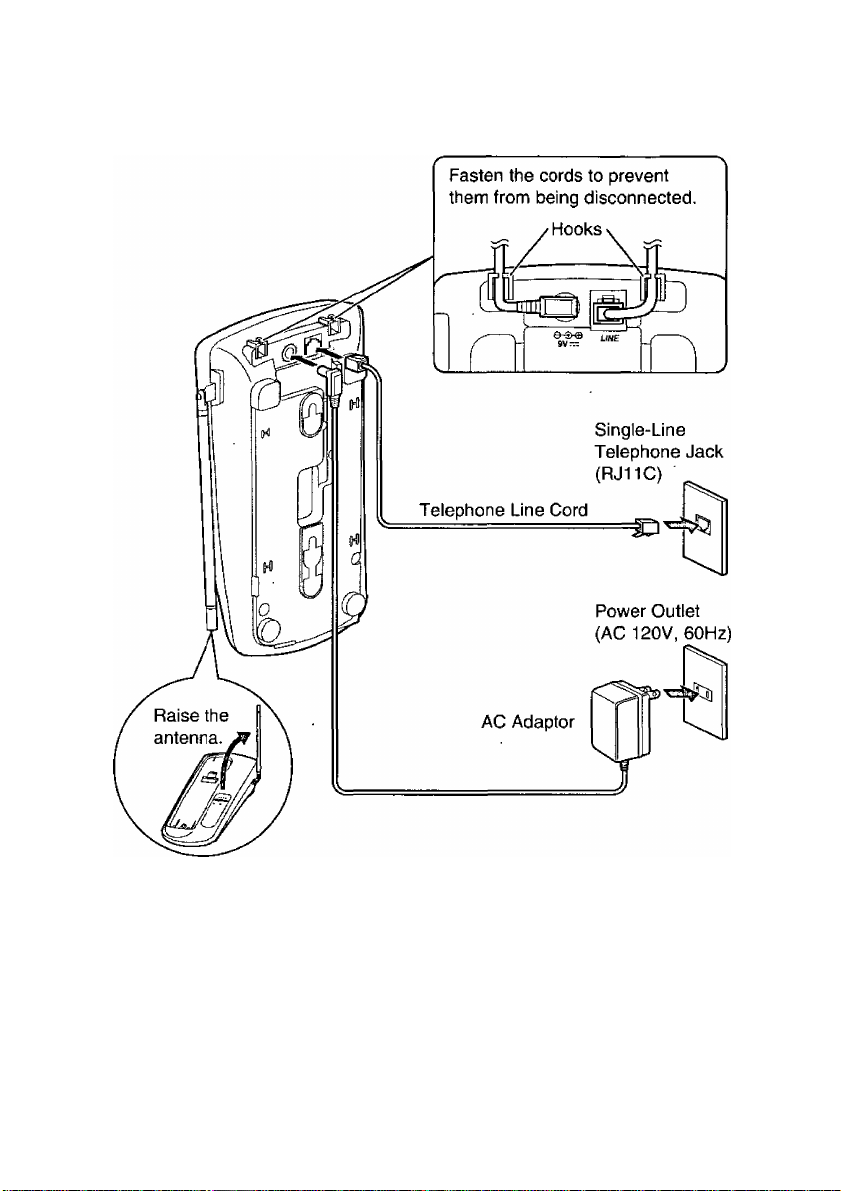
Settings
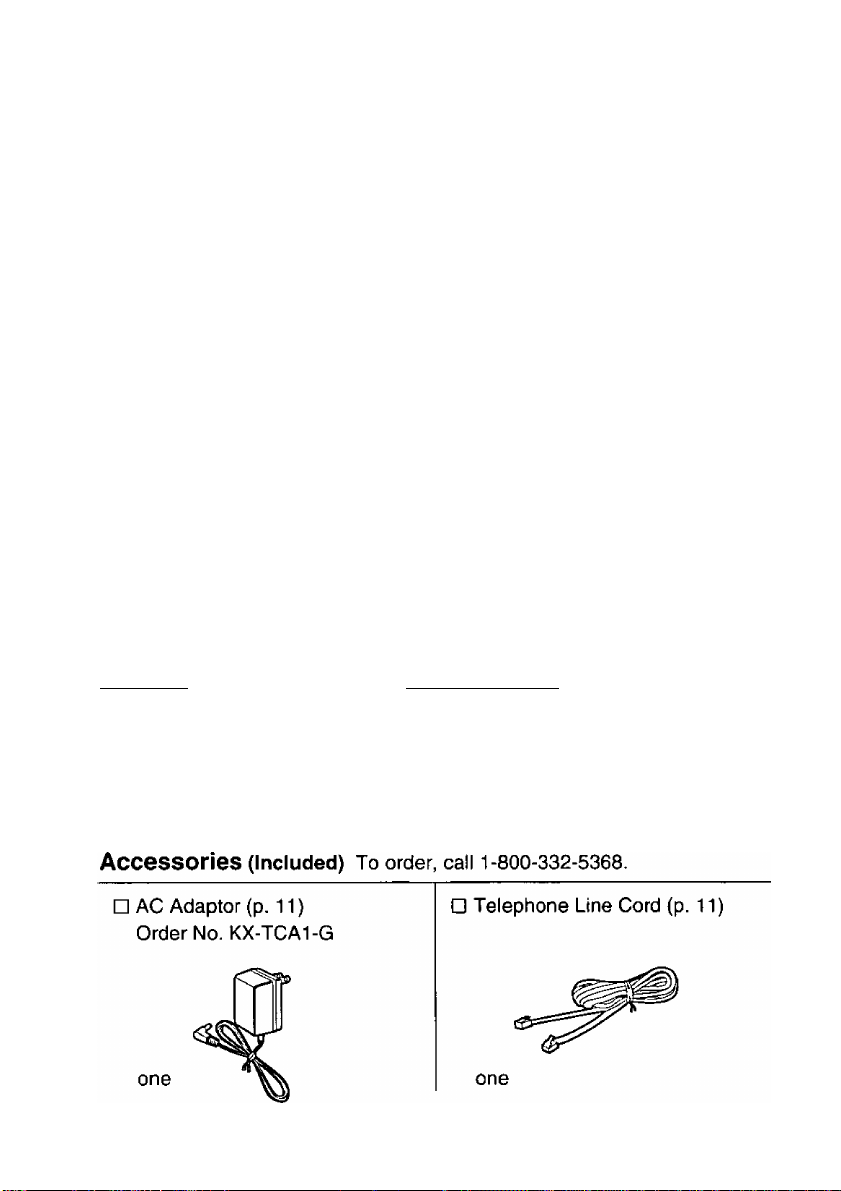
Connections
® USE ONLY WITH Panasonic AC ADAPTOR KX-TCA1
(Order No. KX-TCA1-G).
® The AC adaptor must remain connected at all times. (It is normal for the
adaptor to feel warm during use.)
« To connect a standard telephone on the same line, see page 43.
• If your unit is connected to a PBX which does not support Caller ID and
voice mail services, you cannot access those services.
11

^ Settings
Battery Charge
Place the handset on the base unit
and charge for about 4 hours before
initial use.
» The IN USE/CHARGE indicator
lights.
Battery strength
You can check the present battery strength on the display while the
handset is on the base unit, while it is in use (making/answering a call
etc.), or after viewing the Caller List, programming, etc.
The battery strength will remain for 5 seconds after using the handset, then
the display will return to the stand-by mode (see next page).
The battery strength is as shown in the chart below.
Display prompt
{III]
{ 111
{ I]
(flashing)
Battery strength
Fully charged
Medium
Low
Needs to be charged.
Recharge
Recharge the battery when;
— “Recharge” is displayed,
— “( Bl” flashes on the display, or
— the handset beeps every minute while it is in
use.
o If you DO NOT recharge the handset battery for more than 15 minutes,
the display will keep indicating “Recharge” and/or “ i D ] ” will continue
to flash.
Recharge
12
.{ B]

Battery information
After your Panasonic battery is fully charged (p. 12);
Operation
While in use (TALK)
While not in use (Stand-By)
• Battery life may be shortened depending on usage conditions, such as
viewing the Caller ID Caller List, and ambient temperature.
• Clean the handset and the base unit charge contacts with a soft dry
cloth once a month. Clean more often if the unit is subject to
grease, dust or high humidity. If not, the battery may not charge
properly.
• If the battery is fully charged, you do not have to place the handset on the
base unit until “Recharge” is displayed and/or “( D1” flashes. This will
maximize the battery life.
• The battery cannot be overcharged.
Approx, battery life
Up to about 8 hours
Up to about 21 days
Stand-by mode [The handset is off the base unit.)
The handset goes into the stand-by mode after you finish using the
handset {making/answering a call, viewing the Caller List, etc.).
The display is blank, but the handset can receive calls.
The battery life is conserved in this mode.
13

Settings
Selecting the Dialing iVlode
You can program the dialing mode by using the handset near the base
unit. If you have touch tone service, set to ‘Tone”. If rotary or pulse service
is used, set to “Pulse”. Your phone comes from the factory set to “Tone”.
The TALK indicator light must be off before programming.
Press I PROGRAM I.
1
o The TALK indicator flashes.
Press SEARCH 0 (Next key) repeatedly
2
until “Set dial mode ?” is displayed.
Press SEARCH 0 (Yes key).
3
To select “Pulse”, press SEARCH 0.
OR
To select ‘Tone”, press SEARCH 0.
• A long beep sounds and the mode is
saved.
• The handset will return to the stand-by
mode.
• To cancel during programming, press I EXIT) or [PROGRAM), then start
from step 1.
o If 3 beeps sound and the display shows “Save error”, move closer to
the base unit and try again. If “Save error” is still displayed, place the
handset on the base unit. Restart from step 1.
Save AUTO# ?
v=Next A=Yes
Set dial mode ?
v-Next A=Yes
Dial mode
v=Tone A-Pulse
Dial mode
Pulse
Dial mode
Tone
, If a power failure occurs, the mode will return to the factory preset (Tone). |
‘ Reprogram if necessary. ;
14

Selecting the Line Mode
If the line is connected to a low voltage system such as a PBX, set to “B”.
Otherwise, the Visual Call Waiting (Call Waiting ID) Service may not be
accessible (p. 41).
Your phone comes from the factory set to “A”.
The TALK indicator light must be off before programming.
Press IPROGRAMI.
1
o The TALK indicator flashes.
Press SEARCH 0 (Next key) repeatedly
2
until “Set line mode ?” is displayed.
Press SEARCH 0 (Yes key).
3
To select “B”, press search
OR
To select “A", press SEARCH (3o A long beep sounds and the mode is
saved.
® The handset will return to the stand-by
mode.
o To cancel during programming, press I EXIT] or IPROGRAMI. then start
from step 1.
o If 3 beeps sound and the display shows “Save error”, move closer to
the base unit and try again. If “save error” is still displayed, place the
handset on the base unit. Restart from step 1.
Save AUTO# ?
v-Next A=Yes
Set line mode ?
v=Next A=Yes
Line mode
v=A A=B
Line mode
Line mode
If a power failure occurs, the mode will return to the factory preset (“A”).
Reprogram if necessary.
15

Settings
Storing the Area Code
We recommend that you program your area code first before using the
Caller ID feature {p. 26). Then incoming calls from the same area code will
be recorded in the Caller List without the area code. You do not have to
remove the area code before calling back or storing. Also, when incoming
calls from a different area code are received, “1” will be added before the
area code automatically.
The TALK indicator iight must be off before programming.
Press [PROGRAM).
• The TALK indicator flashes.
O Press SEARCH 0 (Next key) repeatedly
^ until “Area code ?” is displayed.
Press SEARCH 0 (Yes key).
• The current setting is displayed.
The factory preset is “
Enter your area code.
• If you enter a wrong number, press
[CLEAR], then enter the correct number.
Press [PROGRAMi (Save key).
• A long beep sounds and the code is
saved.
» The handset will return to the stand-by
mode.
® To cancel during programming, press [exit], then start from step 1.
-----
Save AUTO# ?
v=Next A=Yes
Area code ?
v=Next A=Yes
Area code
Enter area code
Area code
PROGRAM=Save
Area code
: 123
:123
To erase the area code
Press I PROGRAMi SEARCH 0 (Next key) 3 times ^
SEARCH 0 (Yes key) [CLEAR] [PROGRAM] (Save key).
« If a “2nd area code” has been stored (p. 17), it wil] also be cleared
automatically.
J6
 Loading...