

Page 1

Please read before use.
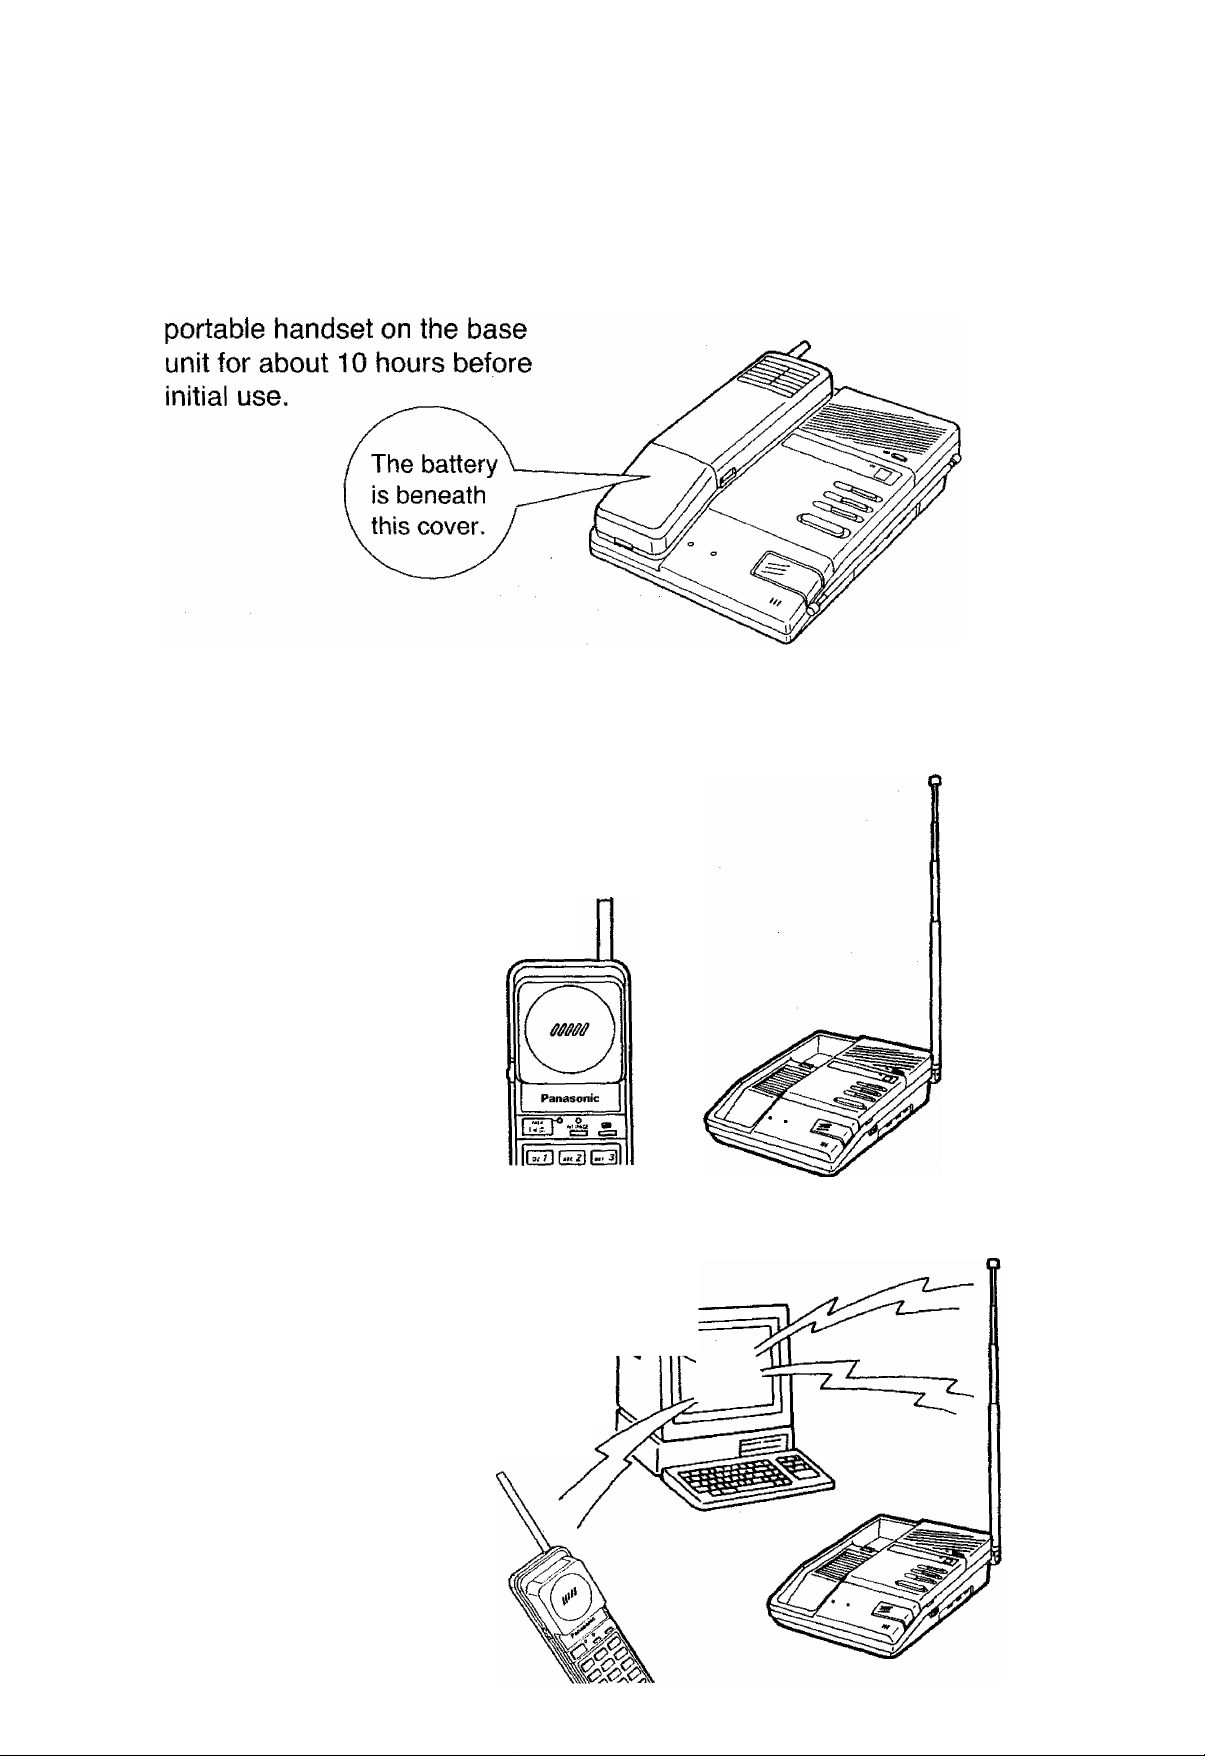
Charge the battery for about 10 hours before initial use.
XNZ
Itl
IIP
JUd
Page 2

Introduction (Features)
Thank you for purchasing the KX-T4300BA, which is an excellent
cordless telephone with an answering system. Besides playing back
your greeting message and recording callers’ messages, it includes
the following features.
Telephone features:
Redialing the last dialed number (p. 19)
Dialing a stored number from memory (p. 22-25)
Intercom—Having a conversation between one person using the
base unit and another person using the portable handset (p. 26)
Maintaining the best sound by selecting the clearest channel (p. 28)
Answering system features:
Listening to recorded messages (p. 33)
Monitoring an incoming call (p. 35)
Recording your own message (p. 35)
Remote operation from a touch tone phone (p. 36)
Remote operation from the portable handset (p. 45)
Accessories
AC Adaptor
(P- 10)
one
Wall Mounting Adaptor
(p. 55) (p. 55) (p. 55)
Screw
Micro Cassette
Tape (MC-30)
(PP- 9, 56)
one
Washer
one
two
©
two
_ o _
Page 3
Precaution
To power the portable handset,
charge its battery by placing the
Extend the antennas fully for
best performance.
Be careful when extending ^
the rubber antenna, or it may
suffer permanent damage.
Do not place the unit near
electrical appliances or r—t—
obstacles. This might cause
interference or shorten the
possible operating range while
using the cordless telephone.
Page 4

Contents
Location of controls ............................................................................ 6
Installation ........................................................................................... 9
Setting up the unit........................................................................... 9
Recording a greeting message ......................................................12
Charging the portable handset battery
Setting selectors .................................................................................15
i r :■ i y,: y-y
<Basic operation>
Making calls.......................................................................................18
Answering calls ..................................................................................20
..........................................
14
Automatic dialing ...............................................................................22
Storing phone numbers into memory
Dialing a stored number from memory
<Advanced operation>
Intercom between the base unit and the portable handset
Other features ....................................................................................28
Selecting the clearest channel
FLASH button (To use the hookswitch feature)
Using call waiting feature.............................................................. 29
PAUSE button (For users behind a PBX)
Temporary tone dialing ..................................................................29
<Basic operation>
Turning on the answering system
......................................................
......................................................
...........................................
....................
.....................................
■....................25
..............
...........................
23
26
28
29
29
30
Listening to the recorded messages
To listen to messages.....................................................................33
To rewind/fast forward the tape
To reset the tape.............................................................................34
To save old messages
Monitoring an incoming call
Recording your own message.............................................................35
....................................................................34
................................................................35
.................................................32
......................................................
34
Page 5

<Advanced operation>
Remote operation from a touch tone phone
To play back all messages
To play back new messages only
To reset the tape.......................................................................... .40
To record your own message (Marker message) ..........................41
To monitor the room sound...........................................................41
To re-record the greeting message
To skip the greeting message (For outside callers)
To turn off the answering system
To turn on the answering system
Remote operation from the portable handset
To play back all messages
To play back new messages only
To reset the tape............................................................................48
To record your own message .......................................................49
To monitor an incoming call...........................................................49
To monitor the room sound
To turn off the answering system .................................................51
To turn on the answering system
................................ ..
.................................................
...............................................
.................................................
.................................................
...........................................................
................................................
.........................................................
.................................................
......................................
.........................
......................
....................................
36
38
39
42
43
44
44
45
46
47
50
52
The portable handset battery.............................................................53
Battery replacement ................................................................... 54
Wall mounting ............................................................................... 55
Maintenance
Troubleshooting guide...................................................................... 58
Safety instructions .........................................................................
...................................................................................
56
61
Page 6
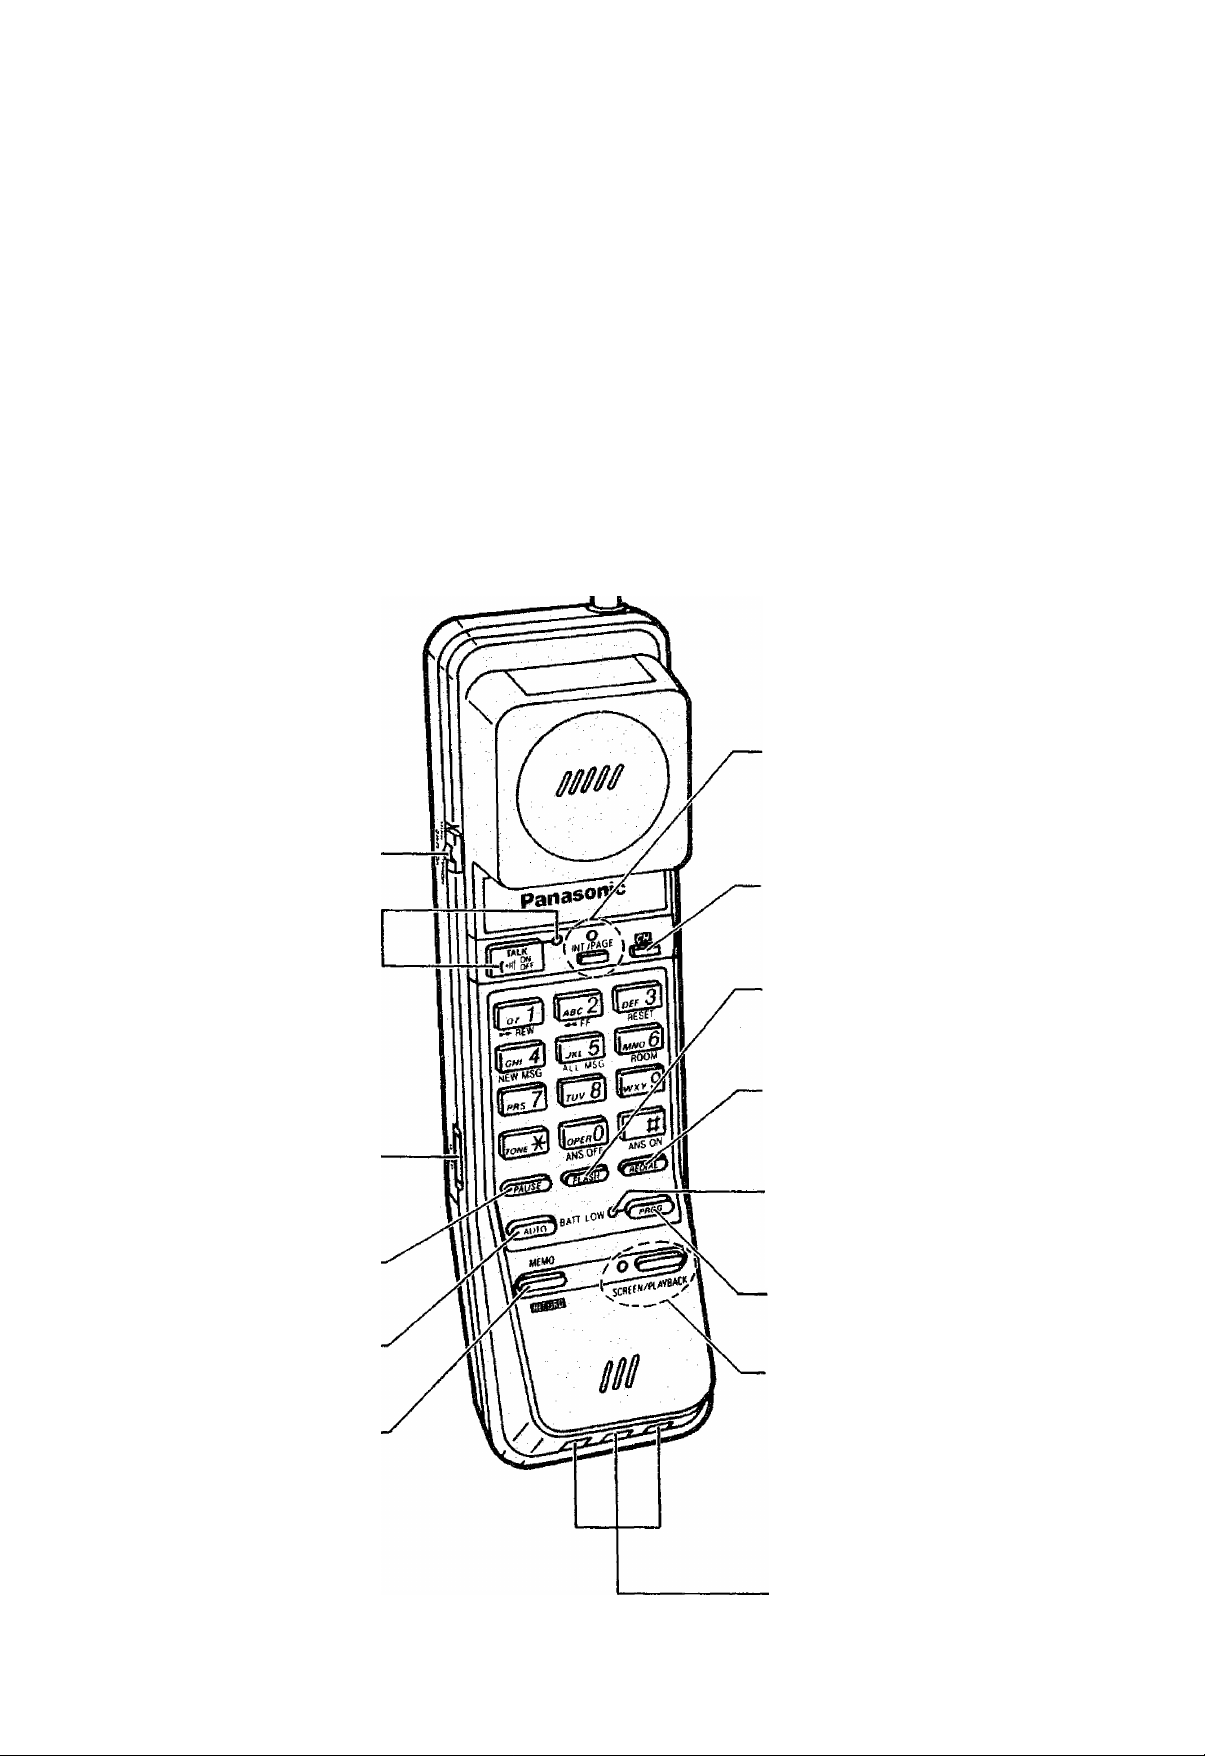
Location of controls
Portable handset
Antenna (p. 3)-
VOLUME Selector
(p.15)
------------------------
INT’ (lntercom)/PAGE
Button and Indicator
(p. 26)
TALK Button and
Indicator (p. 19)—
POWER/RINGER
Switch (p. 15)
PAUSE Button
(P-29)
-----------------
AUTO Button
(p. 23)
MEMO RECORD
Button (p. 49)
----------------
CH (Channel) Button
(p. 28)
FLASH Button
(P. 29)
REDIAL Button
(P. 19)
ВАТТ (Battery)
LOW indicator
(P- 53)
PROG (Program)
Button (p. 23)
SCREEN/
PLAYBACK Button
and Indicator (p. 45)
Battery Charge
Contacts (p. 53)
Page 7

Base unit
DIALING MODE Selector (p. 17)
VOX SENS Selector (p. 17)
ANSWER ON Button and Indicator (p. 30)
Call-Counter (pp. 13, 32)
IN USE indicator (p. 35)
Handset Guide (p. 55)
Cassette Panel (p. 9)
Memory Card (p. 24)
Battery Charge
Contacts (p. 53)-^
CHARGE Indicator (p. 14)-
IN USE/INTERCOM Indicator-*
MIC (Microphone) (p. 13)
MESSAGE ALERT
Selector (pp. 17, 32)
—RINGS Selector
(pp. 16, 36) :
REMOTE CODE
Selector (p. 37)
VOLUME Control
(p. 13)
PAGE/INTERCOM Button (p. 26)
Page 8

In the cassette panel
GREETING RECORD Button
(p.13)---------------------------------
GREETING CHECK Button
(p. 13)
MEMO RECORD Button
(p. 35)
POWER ON/OFF Button (p. 31)
FF (Fast forward)
Button (p. 34) ,
REW (Rewind)
Button (p. 34)
STOP Button (p. 13)
MESSAGE PLAYBACK
Button (p. 33)
Page 9

Installation
Please complete the following preparations before use, or the unit will
not function properly.
—Setting up the unit. (See below.)
—Recording your greeting message. (See page 12.)
—Charging the portable handset battery. (See page 14.)
Setting up the unit
Be sure to insert the micro cassette tape before connecting the AC
adaptor.
To insert the micro cassette tape
Remove the stopper of the micro
cassette tape.
3
Open the cassette panel.
Insert the micro cassette tape with
the full reel to the right and the
exposed tape facing you.
Press down the micro cassette tape.
Page 10
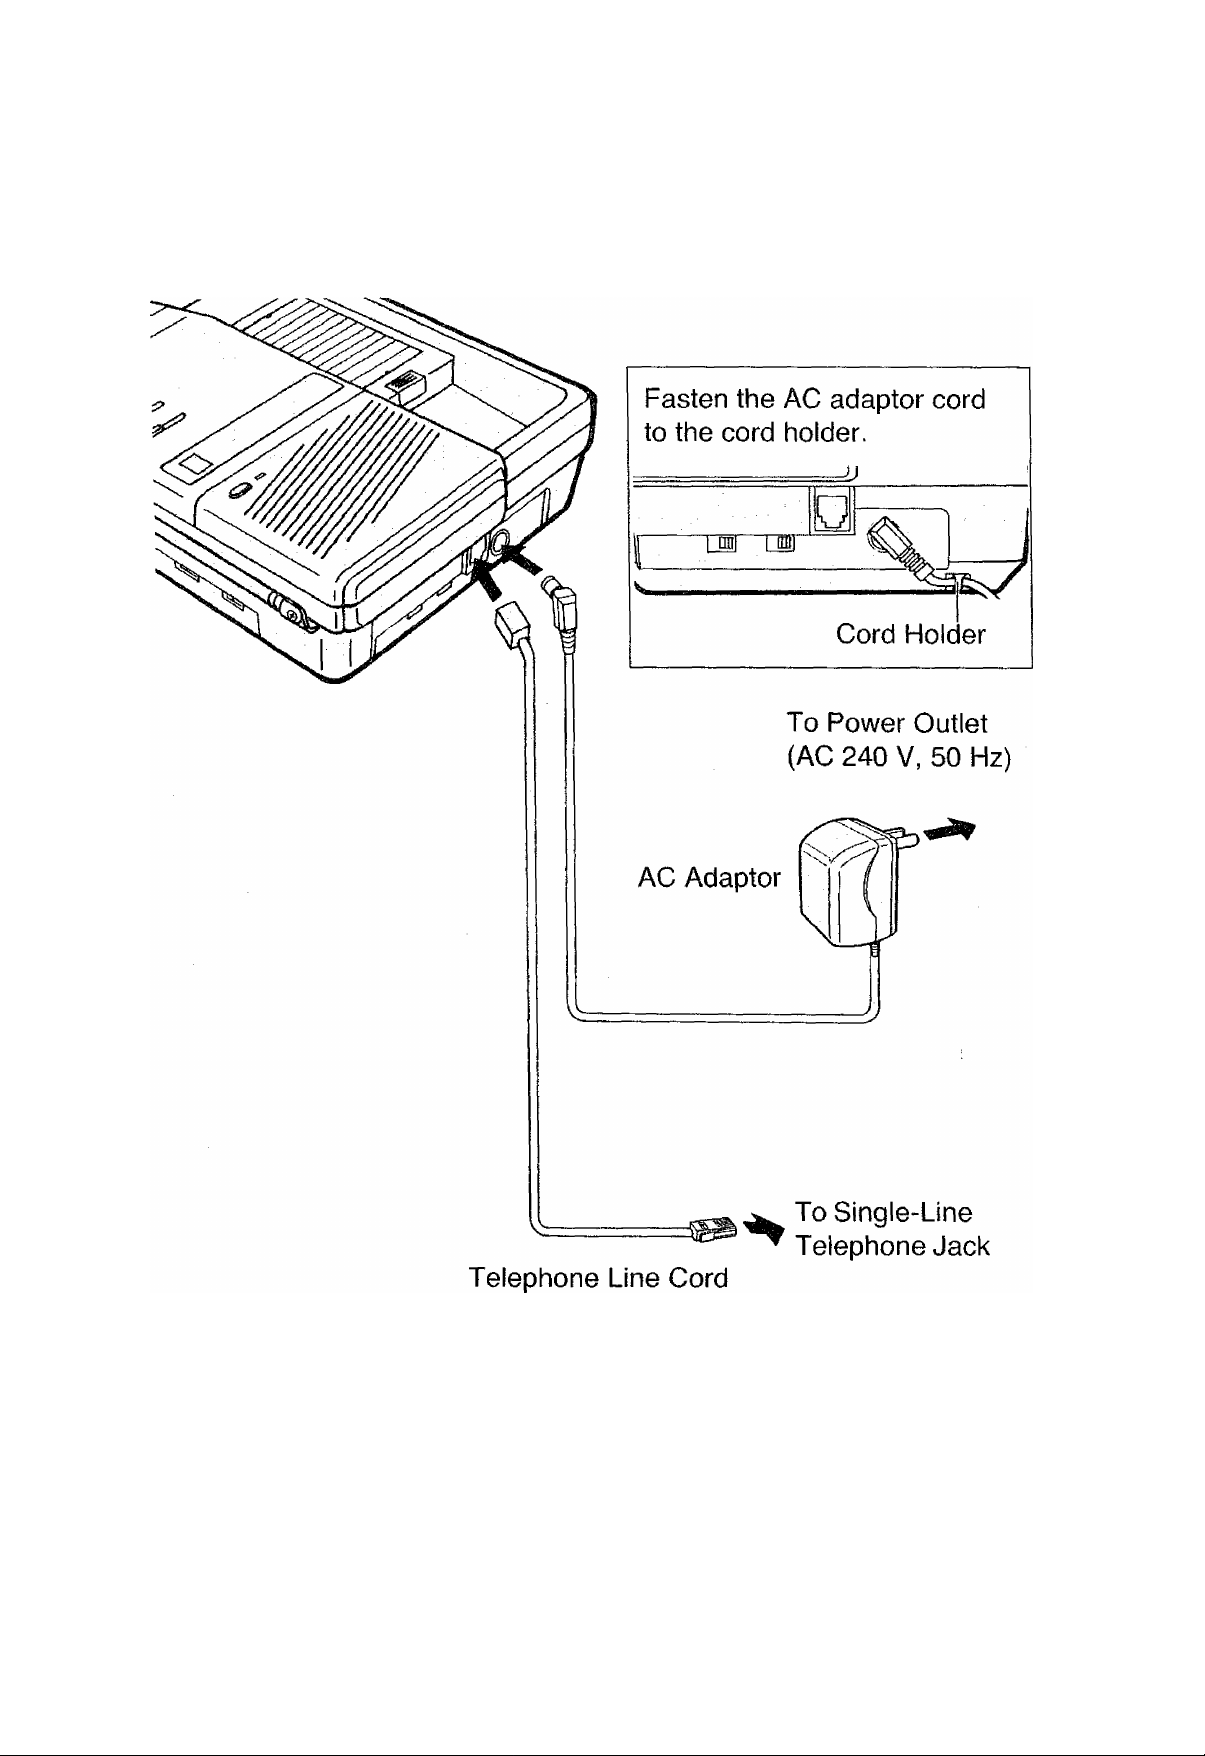
To connect the telephone line and AC adaptor
Connect as shown.
Note:
—For maximum range, place the base unit in a HIGH AND CENTRAL
LOCATION of the house, with no obstructions.
—USE ONLY Panasonic AC ADAPTOR KX-A11BA.
—The AC adaptor must remain connected at all times.
—The unit wilt not function during a power failure.
We recommend you connect a reserve telephone (standard
telephone) on the same line as power failure protection.
Page 11

Connection to another telephone
If you connect a reserve telephone (standard telephone) on the same
line to guard against a power failure, please purchase aT-adaptor
and connect as shown below.
To Single-Line Telephone Jack
t
T-Adaptor
tt
Page 12

Recording a greeting message
GREETING RECORD
Button
GREETING CHECK
Button
Call-Counter
STOP Button
VOLUME Control
POWER ON/OFF
Button
MIC (Microphone)
Sample of the greeting message
“Hello, this is Smith. Sorry, i can’t take your call. Please leave your
message after a long beep. You have up to 2 minutes. If you hear
6 long beeps, I’m sorry but you cannot record your message, so
please call me tomorrow. Thank you.”
—The recording time of each caller’s message is limited to a
maximum of 2 minutes.
—Please inform the callers of the following:
They must start recording after hearing a series of short tones
followed by a long beep. If 6 long beeps sound, it means that the
cassette tape is full so that their message cannot be recorded.
Page 13

Be sure that the Call-Counter light is on. If it is off, press the
POWER ON/OFF button to turn on the power.
Caution:
—The recording time is up to 30 seconds.
—Do not pause for over 2 seconds while recording. If 6 beeps sound
and the Call-Counter shows “E” (Error), start over again from step 1
of the following procedure.
J MESSAGE PL
MEMO
"CD
'y______
r ^ OYNAMta \ \\>
~S“ «3Ì/AW3/UI7Ì/» 1 ji \\\
GREETING V
CHECK RECORD
QD
dD
F ^
TER COM
M/c QQO
Open the cassette panel and press
the GREETING RECORD button.
1
—A series of short tones will sound,
followed by a long beep.
Immediately after the long beep,
speak clearly and loudly, 20 cm (8")
away from the MIC (Microphone).
—The Call-Counter counts up your
recording time.
To stop recording, press the STOP
button.
To check the greeting message
ILJ
MEMO
GRESTING
CHECK RECORD
( CD S
-When you want to re-record the greeting message, start over again
from step 1.
-When you use the other side of the tape, please record the greeting
message again.
MESSAGE
Press the GREETING CFIECK button
to play back the greeting message.
—Adjust the volume using the
VOLUME control on the right side
of the base unit.
Page 14

Charging the portable handset battery
To power the portable handset, charge its battery before initial use.
Panasonic rechargeable battery is Ni-Cd type which keeps best
capacity of battery at discharged condition when you recharge it.
Therefore, we recommend you to replace the handset on the base unit
every few days.
It is important NOT to recharge the battery after every tel-call.
Note:
—Charging is also necessary when the ВАТТ LOW indicator flashes
or a beep sounds every 15 seconds during a conversation.
(See page 53.)
—You can charge the battery when the POWER/RINGER switch is
set to either the ON or the OFF position.
Page 15
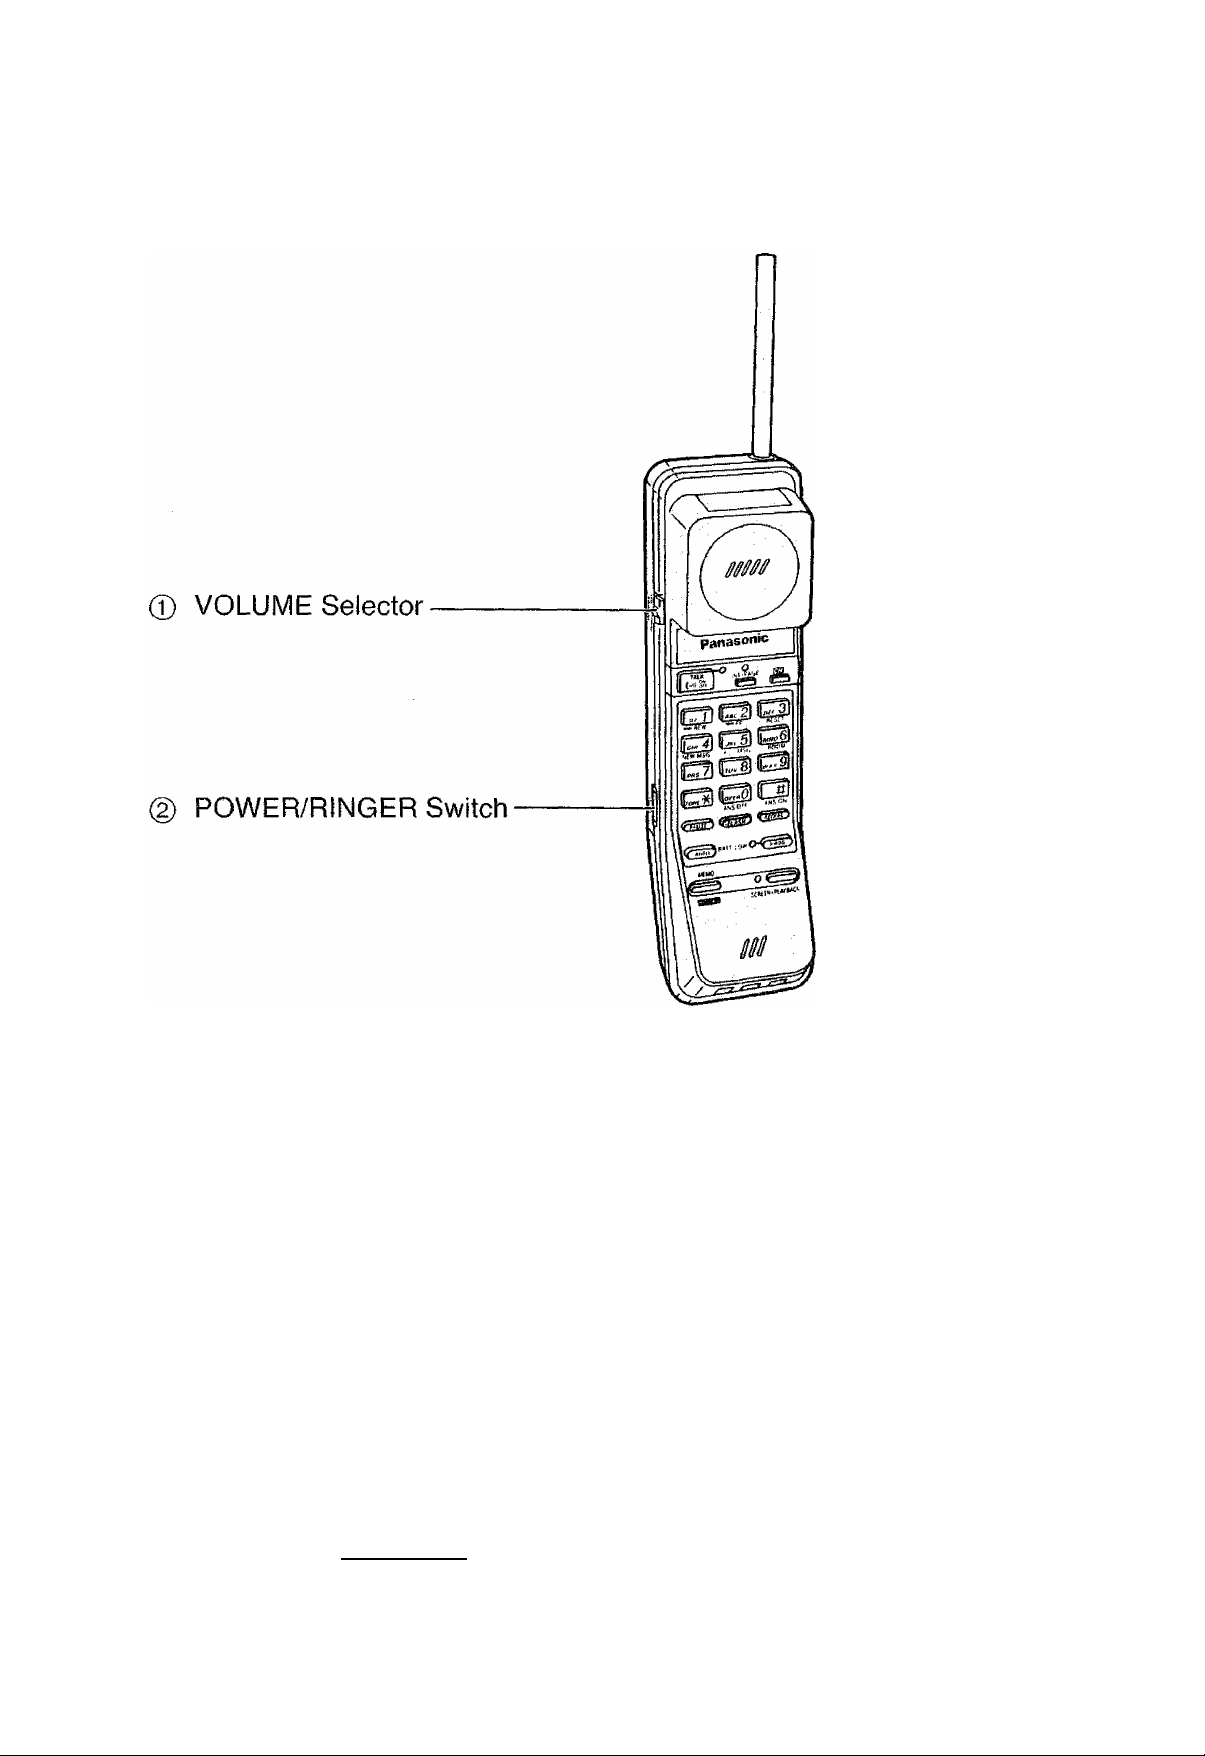
Setting selectors
© VOLUME Selector
VOLUME
NORMAL • • HIGH
EJ
POWER/RINGER Switch
POWER/RINGER
OFF•• ON
[ aiBUmiii 1
Set to the NORMAL position. When
the other party’s voice is difficult to
hear, set to the HIGH position.
Set to the ON position. When in the
OFF position, the battery power will
be saved, but the portable handset
will not ring.
A r
Page 16

REMOTE CODE Selector
@ RINGS Selector
QID
UTO
RINGS
Set the remote code number when
operating the answering system from
a touch tone phone. (See page 37.)
Select the desirable ring number.
2; The unit answers on the 2nd
ring.
4: The unit answers on the 4th
ring.
AUTO: When you want to use “Toll
saver”, set to the AUTO
position. (See page 36.)
Page 17

MESSAGE ALERT Selector
You will know that new messages
HID
ZfZj Lq
0/
MESt
5/AG5
VOX SENS Selector
vox SENS
LOW~^ C HIGH
ALERT
have been recorded by hearing the
beep sound from the base unit.
ON: When new messages have
been recorded, a short beep
sounds every 10 seconds.
The beeping stops after the
messages have been played
back.
OFF: No beep sounds.
If caller’s messages are cut off, the
tape continues to run after a caller
has replaced his handset, there are
tong pauses between or after
messages, set to the LOW position.
(Normally the selector is preset to the
HIGH position.)
® DIALING MODE Selector
DIALING
MODE
am
PULSE^ ^TONE
Set to the TONE position when your
telephone line has touch tone
service. If it has rotary service, set
to the PULSE position.
Page 18

Basic operation
Making calls
Note:
—If alarm tone sounds when you press the TALK button, approach
the base unit or place the portable handset on the base unit. Then
try again.
Page 19

Basic operation
Press the TALK button to get dial
tone.
—The TALK indicator light is on.
GZD
_ ABC 2 !
<^£W * ' Ff
Off 3|
flESfr
|g 1 1^^ 51 | mwo sj
NEW MSG AttMSC
I PBS 7 I \ rt/v 81
I TOtif XI
Dial a telephone number.
When the conversation is over, press
the TALK button or place the portable
handset on the base unit to hang up.
—The TALK indicator light goes out.
Press the FLASH button firmly.
The dial tone is heard, and you can dial the correct number.
Press the TALK button to get dial tone, then press the REDIAL button.
The last dialed number is automatically dialed.
Page 20

Basic operation
Answering calls
Make sure that the POWER/RINGER switch is in the ON position, or
the portable handset will not ring.
Extend the antenna fully.
t
TALK Indicator
TALK Button
POWER/RINGER
Switch:
Set to “ON”.
POWER/RiNGER
OFF•• ON
/—
I aaOief]
Page 21

If the portable handset is off the base unit:
When the telephone rings, press the
TALK button to answer the call.
—The TALK indicator light is on.
When the conversation is over, press
the TALK button or place the portable
handset on the base unit to hang up.
—The TALK indicator light goes out.
Basic operation
If the portable handset is on the base unit:
When the telephone rings, pick up
the portable handset to answer the
call.
—You can talk without pressing the
TALK button.
When the conversation is over, place
the portable handset on the base unit
or press the TALK button to hang up.
OH
Page 22

Basic operation
Automatic dialing
The unit can store 10 phone numbers, into memory. You can dial a
stored number automatically by pressing the AUTO button and one of
the dialing buttons.
AUTO Button
ВАТТ (Battery) LOW
Indicator
PROG (Program)
Button
Page 23

Basic operation
Storing phone numbers into memory
Each dialing button (0 through 9) functions as a memory station for
automatic dialing. Each station can store a 16-digit phone number.
Press the PROG button.
—The ВАТТ LOW indicator light is
on to show the unit is in the
programming mode.
Enter the phone number to be stored
2
GZI3 EZZl &
am 411 5 I
New MSG AliMSG
MHO 6|
fiOO«
i ^ I EZ3
up to 16 digits.
4
CD
ANS Off ANS ON
Езезо
•>* fl£W -M FF
ОШ 4
Nf(V MSG ЛИ MSC
ШЕ7
MHO
ROOM
gilQQ
I WN( ^ I |ОР£Я 0 I 1 ^
ANS OFF AHS ON
Press the AUTO button.
Press one of the dialing buttons
(0 through 9) to store the phone
number.
—A beep sounds and the ВАТТ
LOW indicator light goes out.
The phone number is then stored
into the memory location.
—To store other numbers, repeat
steps 1 through 4.
no
Page 24

Basic operation
To correct an error while storing
Press the PROG button to end the programming mode, then start
from step 1 on page 23 again to store the correct number.
To confirm a stored number
Store the phone number which you want to confirm into the same
memory station. You will hear one or two beeps.
2 beeps: The newly stored number is the same as the previously
stored one.
1 beep: The newly stored number is different from the previously
stored one.
To erase a stored number
1. Press the PROG button.
2. Press the AUTO button.
3. Press the dialing button of the memory station for the phone
number to be erased.
Memory card
Pull out the memory card and write down the names or phone
numbers associated with automatic dialing.
Page 25

Advanced operation
Dialing a stored number from memory
Press the TALK button to get dial
tone.
—The TALK indicator light is on.
Press the AUTO button.
3
(oj 11 iW
— iiEW «ff
l'~‘*1
WWMSG /lii MSG flOOM
[ pni 7 I ( ruv 8 I 1 WAty sj
1 TONC ^ 1 I
ANS Off ANS ON
Press the dialing button
(0 through 9) where the phone
number you want to dial is stored.
—The stored number is dialed
automatically.
Page 26

Advanced operation
Intercom between the base unit and the portable handset
You can use the unit as a 2-way intercom between the portable
handset and the base unit.
Paging the portable handset from the base unit
The base unit user:
Press the PAGE/INTERCOM button.
—Both units beep until the portable
handset user answers the paging.
If there is no answer, press the
PAGE/INTERCOM button again to
stop the paging.
3
TEflCOM
MIC
The portable handset user:
When the unit beeps and the
1NT7PAGE indicator flashes, press
the 1NT7PAGE button to answer the
paging.
The base unit user:
Speak to the paged party through the
MIC (Microphone).
000
The portable handset user:
When the conversation is over, press
the 1NT7PAGE button.
—Intercom calls can only be
terminated by the portable handset.
Page 27

Advanced operation
Paging the base unit from the portable handset
The portable handset user:
Press the INTVPAGE button.
—Both units beep while the
INTVPAGE button is pressed.
When you release the button, the
unit automatically switches to the
intercom mode. If there is no
answer, press the INTVPAGE
button again to end the intercom.
The base unit user:
When the unit beeps and the paging
party’s voice is heard, answer
through the MIC.
The portable handset user:
When the conversation is over, press
the INTVPAGE button.
—Intercom calls can only be
terminated by the portable handset.
Helpful hints:
—Even while in a conversation with an outside caller, the portable
handset user can page the base unit user by pressing the
INTVPAGE button. The outside call is put on hold then. To return to
the outside call, press the TALK button.
—If you hear two tones while using the intercom feature, it means
someone is calling from outside. These two tones replace the normal
ringing signal. You can answer the call by pressing the TALK button.
The intercom call is then terminated.
0-7
Page 28

Advanced operation
Other features
CH Button
FLASH Button
Selecting the clearest channel
A channel is a selected set of receiving and transmitting frequencies.
You may select the clearest one of the 5 available channels.
If you hear interference noise while
having a conversation, press the CH
button.
—Each time you press the CH button,
the next channel is selected. Press
the CH button repeatedly until the
clearest channel is selected.
—The selected channel number is
displayed on the Call-Counter.
^9ote:
—If the portable handset user is too far from the base unit, the CH
button does not function fully. Approach the base unit.
oo
Page 29

Advanced operation
FLASH button (To use the hookswitch feature)
The FLASH button functions as the hookswitch on a regular phone. If
you misdial or dial another phone number, press the FLASH button
firmly. The cal! is terminated and the dial tone is heard, then you can
dial the next phone number.
If your unit is connected to a PBX, pressing the FLASH button lightly
allows you to use special features of the PBX such as transferring an
extension call.
Using call waiting feature
To use this feature, you are required to subscribe to the call waiting
service offered by your local telephone company.
1. While having a conversation, another party calls and you hear a
tone.
2. Press the FLASH button lightly.
The first cal! is put on hold and you can answer the second call. To
return to the first caller, press the FLASH button again. The second call
is put on hold.
PAUSE bllttOIl (For users behind a PBX)
If your unit is connected to a PBX, you need to dial an access number
(usually 9) to get an outside line. In this case, inserting a pause
between the access number and the phone number is necessary
especially when redialing or storing the number into memory. Pressing
the PAUSE button once makes 3.5-second pause.
Temporary tone dialing
If your line has rotary service, pressing the TONE (-)f) button allows you
to change the dialing mode temporarily into tone. Then you can dial the
numbers or codes needed to operate the answering system or to use
electronic banking services and other special services.
When you hang up, the dialing mode returns to pulse automatically.
Page 30

Basic operation
Turning on the answering
system
Confirm that the ANSWER ON indicator light is on when you want to
use the answering system (e.g. before leaving home).
When the answering system is on, the ANSWER ON indicator light is
on and the unit receives an incoming call, plays back the greeting
message and records the callers’ messages.
Before using the answering system feature, you should record your
greeting message. See pages 12-13.
Page 31

Basic operation
Make sure that the Call-Counter light is on. If it is off, press the
POWER ON/OFF button to turn on the power.
When the AMSWER ON indicator light is off:
Press the ANSWER ON button to
turn on the answering system.
—The ANSWER ON indicator light
is on.
Helpful hints:
—When you want to use the unit only as a cordless telephone, press
the ANSWER ON button until the ANSWER ON indicator light goes
out. The answering system turns off.
To tare on the power of the base unit
If the Call-Counter light is off, the power of the base unit is turned off
and the answering system will not function.
Press the POWER ON/OFF button in
order to turn the power on and the
Call-Counter light is on.
Page 32

Basic operation
Listening to the recorded
messages
When incoming messages have been recorded, the Call-Counter
shows the number of recorded messages up to 9 in tota!.
If there are new messages which have not been listened to yet, the
Call-Counter flashes. When the MESSAGE ALERT selector is set to
the ON position, the base unit beeps every 10 seconds.
(See page 17.)
Call-Counter
\
FF Button
REW Button
STOP Button
MESSAGE PLAYBACK
Button
Page 33

To listen to messages
Basic operation
(
((
c
:rzr:—
MeSSAGE playbaS^
a STOP
1)
r
Note:
—To stop listening halfway, press the STOP button.
—10 seconds after having played back all the recorded messages,
the tape automatically rewinds to the beginning and resets itself.
The Call-Counter shows “0”. New messages are recorded over old
messages.
Press the MESSAGE PLAYBACK
button.
—The unit automatically rewinds the
tape and starts to play back the
messages.
—At the end of the last message,
3 beeps sound and the tape stops
automatically.
AUTO-LOGIC
When you use the MESSAGE PLAYBACK button to listen to the
recorded messages, the unit automatically;
®rewinds the tape and plays back the messages
®tells you the end of the last message by beeping 3 times
©rewinds the tape to reset
©prepares to record new messages (returns to the answer mode
by itself)
We named this MESSAGE PLAYBACK button’s feature
“AUTO-LOGICT
Page 34

Basic operation
To rewind/fast forward the tape
Keep pressing the REW button to
rewind the tape.
Keep pressing the FF button to fast
forward the tape.
—The unit rewinds/fast forwards the
tape while the REW/FF button is
pressed, and starts playback again
when you release the button.
Note;
—When the tape is completely rewound, a beep sounds and the tape
is reset. To listen to the recorded messages again, press the
MESSAGE PLAYBACK button within 10 seconds after the beep.
To reset the tape
After having played back all the recorded messages, the unit
automatically rewinds the tape to the beginning and resets itself. New
messages are recorded over old messages.
To save old messages
Play back the messages by pressing
1
the MESSAGE PLAYBACK button,
then press the STOP button at the
end of the messages you want to
save.
Press the ANSWER ON button to
turn on the answering system.
—The Call-Counter returns to “0”.
—The ANSWER ON indicator light is
on.
—The new messages will be
recorded after saved messages.
Page 35

Basic operation
McMiitoriiig an IncoHiliig cal!
While an incoming call is being recorded, you can monitor and answer
it if you wish.
When the unit answers a call, the
caller's message is heard through the
speaker on the base unit.
—Adjust the VOLUME control.
Helpful hints:
—To answer the call while monitoring, lift the portable handset or
press the TALK button.
Recording your own message
You may record a personal message on the tape. It can be heard by
anyone playing back messages remotely or manually.
M£SS.
iSf CH£CK BECOftD
( CD
PAGE/
Open the cassette panel and press
the MEMO RECORD button.
—A series of short tones will sound,
followed by a long beep.
Speak immediately after the long
beep, about 20 cm (8") away from
the MIC (Microphone).
—The IN USE indicator flashes.
To stop recording, press the STOP
button.
—The IN USE indicator light goes
out.
Page 36

Advanced operation From a touch tone phone
Remote operation from a touch
You can operate the answering system remotely from a touch tone
telephone while you are away from home.
The following features can be operated with a touch tone telephone.
—Playing back all messages (p. 38)
—Playing back new messages only
(p. 39)
—Rewinding and fast fonwarding
(p. 39)
—Resetting the tape (p. 40)
—Recording your own message
(p. 41)
—Monitoring the room sound (p. 41)
—Re-recording the greeting
message (p. 42)
—Skipping the greeting message
(p. 43)
—Turning off/on the answering
system (p. 44)
Note:
—Touch tone telephone must be the type where a tone is emitted for
as long as a number or digit is pressed. (When pressing the buttons
for remote operation, press each key pad for approximately
1-2 seconds.)
Toll saver
When you call the unit from a touch tone telephone, the number of
rings before the unit answers tells you if there are any new messages
or not.
To use this feature, set the RINGS
selector to the AUTO position.
If the unit answers on the 2nd ring:
There is at least one new message.
If the unit answers on the 4th ring:
There are no new messages.
2-1 i M
RINGS
\ ™
uro
Hang up immediately when you hear the 3rd ring. Because the 3rd
ring indicates there are no new messages and no need to make the
unit answer your call. This saves you the toll charge for the call.
Page 37

From a touch tone phone
Advanced operation
To set the remote code number
To get remote access, set your remote code number. The remote
code number prevents unauthorized persons from accessing your unit
and listening to your messages. The remote code number is made up
of 2 digits. The first digit is factory preset, and the second digit is
selectable (“1” or “2”).
Example:
If the factory preset number is “4”, then your code number could be
either “41 ’’ or “42“ depending on the position of the REMOTE CODE
selector.
The factory preset number is shown
on the label next to the REMOTE
CODE selector. This is the first digit
of your remote code number.
m m
■ "■ j* \mt m ^
I—7TT2
REMOTE CODE
Page 38

Advanced operation
To play back all messages
From a touch tone phone
S[2]@
S]®®
0®@
Remote code no.
Cal! your unit and press the remote
code number during the greeting
message playback.
—After a long beep, short beeps
sound to indicate the number of
recorded messages.
Press “5” within 4 seconds after the
short beeps.
—The unit rewinds the tape and
starts to play back all the recorded
messages. At the end of the last
message, 3 beeps sound.
To stop listening, hang up.
—Old messages are saved and new
messages will be recorded after
them.
Helpful hints:
—Even if you do not press “5” on step 2, all messages are played
back automatically.
Page 39

From a touch tone phone Advanced operation
To play back new messages only
You can listen to new messages only without replaying the previously
heard messages.
1
a®®
a®®
I
Remote code no.
Call your unit and press the remote
code number during the greeting
message playback.
—After a long beep, short beeps
sound to indicate the number of
recorded messages.
Press “4” within 4 seconds after the
short beeps.
—The unit rewinds the tape and
plays back the recorded messages
which have not been listened to
yet.
—To stop remote operation, hang up.
Mote:
•Even during the playback of old messages, you can skip them by
pressing “4”.
To rewied/fast forward the tape
Press “1 ” to rewind the tape.
Press “2" to fast forward the tape.
—The tape rewinds or fast forwards
for a few seconds and starts
playback.
.an ~
Page 40

Advanced operation
From a touch tone phone
To reset the tape
Within 10 seconds after or during playing back ail messages:
Press “3”.
—The unit rewinds the tape to the
beginning. New messages will be
recorded over the old messages.
—To stop remote operation, hang up.
Within 10 seconds after having played back new messages only:
Press “3”.
1
—The unit rewinds the tape to the
beginning of the newly recorded
messages and a beep will be
heard.
Press “3” again after hearing the
beep.
—The unit rewinds the tape to the
beginning.
—To stop remote operation, hang up.
Note:
-To cancel the resetting of the tape, press “2” before hanging up.
Page 41

From a touch tone phone Advanced operation
To record your own message (Marker message)
You can leave your own message on the tape after listening to the last
message.
1. After 3 beeps indicating the end of the last message, wait for
10 seconds and start to speak your message when 2 beeps sound.
2. To finish recording, hang up.
To monitor the room sound
You can monitor the sound in the room where the base unit is
installed for 30 seconds.
m®®
a®®
a®®
(HI®®
Remote code no.
Call your unit and press the remote
code number during the greeting
message playback.
—After a long beep, short beeps
sound to indicate the number of
recorded messages.
Press “6” within 4 seconds after the
short beeps.
—The sound in the room is heard.
—To stop remote operation, hang up.
Note:
—When 30 seconds are up, a beep indicating that the time is up will
sound. To monitor further, press “6” again within 10 seconds after
the beep.
Page 42

Advanced operation From a touch tone phone
To re-record the greeting message
1
2
3
m@n]
s®®
0®®
@®B
Remote code no.
Cail your unit and press the remote
code number during the greeting
message playback.
-After a long beep, short beeps
sound.
Press “7” within 4 seconds after the
short beeps.
—A series of short tones will sound
followed by a long beep.
Speak right after the long beep.
To stop recording, press “9”.
4
—A long beep sounds and the new
greeting message is played back
for confirmation.
—To stop remote operation, hang up.
Mote:
Do not pause for over 2 seconds while recording, or the recording
results in failure. If 6 beeps sound, start again from step 2.
When you want to re-record, start again from step 2.
Page 43

From a touch tone phone
Advanced operation
ge (For outside callers)
Callers can record their messages on the tape without listening to
your greeting message.
Call your unit and press “-)f ” during
the greeting message playback.
—The greeting message stops and a
series of short tones wilt sound,
followed by a long beep.
Start recording right after the long
beep.
Page 44

Advanced operation From a touch tone phone
To turn off the answering system
Call your unit and press the remote
code number during the greeting
message playback.
1
Qd)®
®(D®
0®®
@®Sl
Remote code no.
—After a long beep, short beeps
sound.
Press “0” within 4 seconds after the
short beeps.
—The answering system turns off.
To turn on the answering system
You may easily turn on the answering system even when you forgot to
turn it on.
1
00®
Cali your unit.
a®®
0®@
@®H
Telephone no.
Wait for 15 rings.
—When the unit answers your call,
the greeting message is heard.
Then, hang up.
—The answering system turns on.
Page 45

From the portable handset
Advanced operation
Remote operation from
the portable handset
You can operate the answering system remotely from your portable
handset using dialing buttons when the unit is in the answer mode.
When incoming message is being recorded, the SCREEN/PLAYBACK
indicator on the portable handset flashes slowly. When the recording
is over, 4 short beeps sound twice on the portable handset.
The following features are available with your portable handset.
—Playing back all messages (p. 46)
—Rewinding and fast forwarding
(p. 46)
—Playing back new messages only
(p. 47)
—Resetting the tape (p. 48)
—Recording your own message
(p. 49)
—Monitoring an incoming call (p. 49)
—Monitoring the room sound (p. 50)
—Turning off/on the answering
system (pp. 51,52)
If the SCREEN/PLAYBACK
indicator flashes when you
press the SCREEN/PLAYBACK
button, the answering system is
turned off. Press to turn on
the answering system.
Page 46

Advanced operation From the portable handset
To play back all messages
Press the SCREEN/PLAYBACK
button.
—The SCREEN/PLAYBACK
indicator light is on.
—Short beeps indicating the number
of recorded messages sound.
Press “5” (ALL MSG) after the short
beeps.
—Short tones sound while the tape
rewinds, then all messages are
played back.
—At the end of last message,
3 beeps sound.
To stop remote operation, press the
SCREEN/PLAYBACK button.
—The SCREEN/PLAYBACK
indicator light goes out.
To rewind/fast forward the tape during playback
“O O —-
T AL t <
Z) GZDI MNO 6
NEW mo All MSG
INT/PAGE №l
^FF
flESfr
BOOM
Press “1” (REW) to rewind the tape,
press “2” (FF) to fast forward the
tape during playback.
The unit rewinds or forwards the
tape for a few seconds and starts
playback.
Page 47

From the portable handset Advanced operation
To play back new messages only
Press the SCREEN/PLAYBACK
button.
—The SCREEN/PLAYBACK
indicator light is on.
—Short beeps indicating the number
of recorded messages sound.
Press “4" (NEW MSG) after the short
beeps.
—Short tones sound while the tape
rewinds, then new messages are
played back.
—At the end of the last message,
3 beeps sound.
To stop remote operation, press the
SCREEN/PLAYBACK button.
—The SCREEN/PLAYBACK
indicator light goes out.
Page 48

Advanced operation From the portable handset
To reset the tape
Within 10 seconds after or during playing back all messages:
Press's” (RESET).
—The unit rewinds the tape to the
beginning.
—New nnessages will be recorded
over the old nnessages.
—To stop remote operation, press
the SCREEN/PLAYBACK button.
Within 10 seconds after having played back new messages only
using “4” (NEW MSG)
Press “3” (RESET).
—The unit rewinds the tape to the
beginning of the newly recorded
messages and a beep sounds.
Press “3” (RESET) again after the
beep.
—The unit rewinds the tape to the
beginning.
—To stop remote operation, press
the SCREEN/PLAYBACK button.
Note:
—To cancel the resetting of the tape, press “2” before stopping the
remote operation.
Page 49

From the portable handset Advanced operation
To record your own message
Press the MEMO RECORD button.
—The SCREEN/PLAYBACK
indicator light is on.
—A series of short tones will sound,
followed by a long beep.
Speak with your portable handset
right after the long beep.
To stop recording, press the MEMO
RECORD button again.
—The SCREEN/PLAYBACK
indicator light goes out.
To monitor an incoming call
You will know that an incoming message is being recorded by the
slow flashing of the SCREEN/PLAYBACK indicator.
Press the SCREEN/PLAYBACK
button.
—The SCREEN/PLAYBACK
indicator turns to a steady light
from slow flashing, and you can
€
i 3
BAH LOWQ^'pfiOG 3
MEMO
O (L.ii\lJ
SCFIEEN/PL
listen to the incoming call,
—To stop remote operation, press
the SCREEN/PLAYBACK button
again.
Helpful hints:
—To answer the call while monitoring, press the TALK button.
Page 50

Advanced operation
From the portable handset
To monitor the room sound
You can monitor the sound in the room where the base unit is
installed for 30 seconds.
Press the SCREEN/PLAYBACK
button.
—The SCREEN/PLAYBACK
indicator light is on and short
beeps sound.
Press “6” (ROOM) after the short
beeps.
—The sound in the room where the
base unit is installed is heard.
To stop remote operation, press the
SCREEN/PLAYBACK button again.
—The SCREEN/PLAYBACK
indicator light goes out.
Mote:
—When 30 seconds are up, a beep indicating that the time is up will
sound. To monitor further, press “6” again within 10 seconds after
the beep.
Page 51

From the portable handset Advanced operation
To turn off the answering system
Press the SCREEN/PLAYBACK
button.
^The SCREEN/PLAYBACK
indicator tight is on to show the
answering system is on.
Press “0” (ANS OFF).
irOVfXl I #1
ANS ON
r
OPERATION FROM TONE PHONE
QZ I ! ABC DEF
n I 2
—The SCREEN/PLAYBACK
indicator light goes out.
Ca!l your unit.
3
To skip greeting
message, press O-
Rewind Fast Forward Reset
GHl
4
New Message
Playback
PRS
Ml Message
Playback Monitor
7
Greeting Message
Recording
JKL
5
A
TUV
Greeting Message
Recording Stop
MNO
6
Room
WKY
9
0
Greeting
Message Skip
Turn Off
®To turn on the answering system, call
your unit and wait for 15 rings. The
unit answers, then hang up.
'«9>Trk turn off tho nnrvAiorinn c^/cfQrrv
Press remote
code no
____
To monitor room
sound, pressai.
To re-record greeting message,
press Si, and speak after a long
beep. To stop recording,
press 0.
'
---------------------------------------------------------------------
®To play back all messages, press 0.
®To play back new messages, press0
®To rewind the tape, press 0.
®To fast forward the tape, press 0.
®To reset the tape, press 0.
®To record your own message, speak
after 2 beeps after playback.
^__________________________________________________
\A/hon \/nn nrocc Cl hllHnn nrPQQ firml\/
____
____
-
C -i
Page 52

Advanced operation From the portable handset
To turn on the answering system
Press the SCREEN/PLAYBACK
button.
—The SCREEN/PLAYBACK
indicator light is flashing to show
the answering system is off.
Press (ANS ON).
—The SCREEN/PLAYBACK
indicator light turns to a steady
light.
OPERATION FROM PORTABLE
HANDSET
jo/ 1 j I ABC 2
REW Ef
[ GHt 4 j 1JKL 5
WfWMSG ALL MSG
(PRS 7 1 1 ruV 8
IrO/ViXl (oPfflOl 1 -^1
АЫВОРЕ ANS ON
f PAUSB } C FLASH
1
1 -з!
RESET
ROOM
To stop remote operation, press the
SCREEN/PLAYBACK button.
¿TflT/rO ^ ВАЛ LOW
.................
MEMO
PftOG ')
oc
SCREEN/PLAiBACH
To record your own message;
1. Press the MEMO RECORD button.
2. Speak after hearing short tones
followed by a long beep.
.T Tn Qtnn rpcnriiinn nrOQQ tho MPMO
Page 53

The portable handset battery
The battery is charged continuously while the portable handset is on the
base unit. The battery cannot be overcharged.
If you keep the portable handset off the base unit, charging will be
required.
ANS OFF AN&ON
f
MEMO
(^3—7
1яыит /
О Г" .......
SCREEN/PLAYBACK
ВАТТ LOW Indicator
When the ВАТТ LOW indicator
flashes or a beep sounds every
15 seconds during a conversation, it
means the battery needs to be
charged.
Place the portable handset on the
base unit for about 10 hours.
Note:
—You can use the unit for a short period of time when the ВАТТ LOW
indicator flashes. Be sure to put the portable handset on the base
unit after use.
Clean the battery charge contacts with a soft cloth about once a
month, otherwise the portable handset may not be charged
properly.
Page 54

Battery replacement
Replace the battery with a new one if the ВАТТ LOW indicator flashes
after a few telephone calls even when the battery has been charged
for 10 hours.
Set the POWER/RINGER switch on
1
the portable handset to the OFF
position, to prevent the memory loss.
Remove the battery compartment
cover.
3
Replace the battery.
Close the cover and set the
POWER/RINGER switch to the ON
position.
Note:
—Please use only Panasonic KX-A36A battery.
—Remember to charge the battery for about 10 hours before use,
after replacing the battery.
Page 55

Wall mounting
This unit can be mounted on a wall using screws and washers
included.
Remove the handset guide from the
base unit.
'0-
♦
iP I I"
Turn the handset guide, then replace
it making its tab upward.
Tuck the telephone line cord inside
3
the wall mounting adaptor.
5
Screws and
Washers
10 cm
To Single-Line
Telephone Jack
Insert the tabs of the wall mounting
adaptor into the openings of the unit,
then push it in the direction of the
arrow. (Make sure the word “UP” on
the adaptor faces upward.)
Install screws and washers using the
wall template on this page.
Connect the telephone line cord to
the unit and to the single-line
telephone jack. Then mount the unit
securely on the screws as shown.
Waif Template
here
Dri
Drill here
10 cm
Page 56

Maintenance
Cassette tape
—For optimum sound quality and performance, we recommend that
you use the opposite side (slde-2) after six months and replace
the tape with a new one every year, assuming that the unit
answers about ten calls a day.
—Never place a cassette tape near a magnetic source, such as a
magnet or a TV set; because it may erase or distort the recorded
message on the tape.
—Slack in the tape can
be tightened by
rotating the tape reel
with an instrument like
a pencil, as shown.
Tape deck
Since the head and capstan assemblies are in contact with the tape,
dirt and residue from the tape may easily adhere to these parts,
causing distortion. These parts should be cleaned periodically in the
manner described below.
Clean the head surfaces, pinch roller and capstan with a cotton swab.
If these surfaces are extremely dirty, wipe them with the cotton swab
dampened with alcohol, then wipe them with a dry soft cloth.
Heads Pinch roller
Capstan
Mote:
—Do not bring magnetic or metal objects, such as a screwdriver, near
the head assemblies, as such objects could magnetize the heads.
—Do not oil any part of the unit.
Page 57

Cassette panel installation
If the panel comes off, replace it by pushing as shown.
Page 58

Troubleshooting guide
Sound flutters or fades.
—You are too far from the base unit. Approach it.
—Extend the antennas of the base unit and the portable handset fully.
I am encountering interference from anotfier unit.
—Select another channel, (p. 28)
—Set the portable handset and the base unit away from other electric
appliances.
When I press the TALK button to make a cal!, 3 beeps sound and
dial tone is not heard.
—Approach the base unit and try again.
—Place the portable handset on the base unit and try again.
—Make sure that the AC adaptor is connected.
The portable handset does not ring.
—The POWER/RINGER switch is in the OFF position. Set to the ON
position.
When 1 press the INT7PAGE button, 3 beeps sound and paging
cannot be done.
—Someone is operating the answering system.
—You are too far from the base unit. Approach it.
I cannot page the portable handset from the base unit.
—Paging cannot be done while the base unit is receiving an incoming
call or recording some messages.
—Set the POWER/RINGER switch to the ON position.
I cannot store a phone number into memory.
—You cannot store the number into memory while the unit is in the talk
mode or in the intercom mode.
—Do not pause for over 30 seconds while storing.
While storing the phone number, the unit starts to ring.
—You can answer the call by pressing the TALK button. The program
will be canceled: store the phone number again.
A beep sounds every 15 seconds during a conversation.
—Charge the battery fully, (p. 53)
While having an intercom call, two tones are heard.
—Someone is calling you from outside. Press the TALK button to
answer the outside call. Intercom call is terminated.
Page 59

The Call-Counter shows “E” (Error), or 6 quick beeps sound
during greeting message recording, and It results in failure.
—Re-record your greeting message. Speak clearly and loudly, and do
not pause for over 2 seconds while recording.
The answering system is on, but no incoming messages are
recorded.
The Call-Counter shows “E” (Error) when you return.
—The cassette tape is cut or is not inserted. Insert the tape or replace
it with a new one.
—The greeting message is recorded improperly or not recorded, so
no one can leave a message. Check and record a new greeting
message.
A beep sounds every 10 seconds on the base unit.
—New messages are recorded. Play back the messages.
i cannot operate the answering system by using the button of the
base unit.
—The portable handset user Is operating the answering system or
having a conversation. After the IN USE indicator or
IN USE/INTERCOM indicator light goes out, try again.
I cannot operate the answering system from a touch tone phone.
—Be sure that you press your correct remote code number.
—In some areas, a remote touch tone phone may not function due to
telephone line conditions such as line noise, echo, etc.
—The answering system may not respond if a touch tone phone
produces tones which are too short to activate the unit. Press each
button firmly and long.
—The answering system is off. Turn It on. (p. 44)
When the tape is played back, the sound level is low, even If the
VOLUtyiE control is set to maximum position.
—Clean the heads, (p. 56)
Some incoming messages have not been recorded up to their
end.
—Set the VOX SENS selector to the LOW position, (p. 17)
When pressing the SCREEN/PLAYBACK button, the
SCREEM/PLAYBACK indicator flashes.
I cannot operate the answering system with the portable handset.
—Press “#” to turn on the answering system, (p. 52)
Page 60

When pressing the SCREEN/PLAYBACK button, 3 beeps sound
and operation cannot be accomplished.
—Someone is operating the answering system.
—You are too far from the base unit. Approach it.
4 short beeps are heard twice from the portable handset.
—A new message is just recorded on your answering system.
7 7■7v^^7'i>'7^íf777Л:7■7£7^7:í .'Li.;- ::>7
After plugging in the AC adaptor, the cassette deck does not stop rewinding.
—Disconnect the AC adaptor, and insert the micro cassette tape.
Then connect the AC adaptor again.
The Cali-Counter showed when you returned home.
—Power failure took place. If new messages have been recorded
after the power is restored, the Call-Counter cannot count them, so
press the MESSAGE PLAYBACK button for confirmation.
I cannot use the unit during a power failure.
—The unit will not function during a power failure. We recommend
that you connect a reserve telephone (standard telephone) and use
it during a power failure, (p. 11)
The unit does not work.
—The connection of the unit was made improperly, (p. 10)
—The battery of the portable handset becomes weak. Charge the
battery fully, (p. 53)
The ВАТТ LOW Indicator flashes.
—Charge the battery fully, (p. 53)
I charged the battery for 10 hours, but the ВАТТ LOW indicator
flashes after a few telephone calls.
—Clean the battery charge contacts and charge once more. (p. 53)
—It is time to change the battery. Please replace with a new one.
(P- 54)
The beginning of the cassette tape has remained unrewound
after the unit rewinds the tape.
While operating the unit, the AC adaptor feels warm.
The CHARGE indicator Sight never goes out while the portable
handset is on the base unit.
—These are normal conditions.
Page 61

Safety instructions
Take special care to follow the
safety suggestions listed below.
Safety
1) Power Source: The unit should
be connected to a power supply
only of the type described in the
operating instructions or as
marked on the unit.
2) Nonuse Periods; When the unit
is not used, turn the power off.
When left unused for a long
period of time, the base unit
should be unplugged from the
household AC outlet.
Installations
Environment
1) Water and Moisture: Do not use
this unit near water—for
example, near a bath tub,
washbowl, sink, etc. Damp
basements should also be
avoided.
2) Heat; The unit should be
situated away from heat sources
such as radiators, kitchen
range, etc. It also should not be
placed in rooms where the
temperature is less than
(4rF) or greater than 40X
(104"F).
Placement
1) Stacking: Do not place heavy
objects on top of this unit.
2) Foreign Material: Care should
be taken so that objects do not
fall into and liquids are not
spilled into the unit. Do not
subject this unit to excessive
smoke, dust, mechanical
vibration, or shock.
3) Surface: Place the unit on a
flat, level surface.
For best performance
1 ) If noise prevents the
conversation from being
understood at the portable
handset, approach the base unit
to lessen the noise.
2) The portable handset should be
used at the “HIGH” volume
setting when the reception tone
is difficult to hear.
3) The portable handset should be
fully recharged on the base unit
when the ВАТТ LOW indicator
flashes.
4) The small-sized antenna of the
portable handset should not be
touched during use because of
its high sensitivity.
5) The possible calling distance
may be shortened when the unit
is used in the following places;
Near obstacles such as hills,
tunnels, undergrounds, near
metal objects such as wire
fences, etc.
Page 62

For your future reference
Serial No.
(found on the bottom of the unit)
Name of dealer
Dealer’s address
WARNING:
TO PREVENT FIRE OR SHOCK HAZARD, DO NOT EXPOSE THIS
PRODUCT TO RAIN OR ANY TYPE OF MOISTURE.
When a failure occurs which results in the internal parts becoming
accessible, disconnect AC adaptor immediately and return this unit to
service center.
Date of purchase
If there is any trouble, disconnect the unit from the telephone line and
connect a known working phone. If the known working phone
operates properly, do not reconnect the unit to the telephone line until
the trouble has been repaired, if the known working phone does not
operate properly, consult with a telephone company.
Page 63

CORDLESS TELEPHONE ANSWERING SYSTEM
Panasonic
MODEL NO. KX-T4300BA
Quick Reference Guide
Thank you for purchasing the Panasonic KX-T4300BA,
-Please read the Operating Instructions for details.
-Keep this leaflet for your next use.
Check the accessories:
n AC Adaptor
□ Telephone Line Cord . one Adaptor
□ Micro Cassette Tape . . one
.................
one □ Wall Mounting
................
□ Screw
□ Washer
.....................
..................
... . one
.. .. two
. . . . two
How to Set Up the Unit
1. Insert the tape before plugging in the AC adaptor.
Remove the stopper.
2. Connect the unit as shown.
Open the panel.
full reel to the right
and the exposed tape
facing you.
To Power Outlet
XNZ
To Single-Line
Telephone Jack
Page 64

How to Operate the Unit
Charge the portable handset battery before initial
use.
Place the portable
handset on the base unit
for about 10 hours.
Extend antennas fully during use.
TALK Button
POWER/RINGER
Switch :
Set to “ON”, or
the portable
handset will not
ring.
POWER/RINGER
OFF. * ON
f iTBlDiii
GREETING CHECK Button
GREETING RECORD Button
MIC (Microphone)
ANSWER ON
Button and Indicator-
STOP
Button
POWER
ON/OFF
Button
MESSAGE PLAYBACK Button
Sample of a greeting message:
“Hello, this is Smith. Sorry, I can’t take your call. Please leave your
message after a long beep. You have up to 2 minutes to record your
message. Thank you.”
Page 65

Recording a greeting message
Confirm that the ANSWER ON indicator light is on.
wosf
ffKW: 5V.Ì tf If Ci< t L S '
Cali-Counter
-If the light is off, press ANSWER ON to
turn on the answering system.
-If the Call-Counter light is off, press
POWER ON/OFF to turn on the power.
Open the panel and press GREETING
RECORD.
A series of short tones will sound, followed
by a long beep.
Speak clearly into the MIC, right after the long beep.
The Call-Counter counts up your recording
time, up to 30 seconds.
-Do not pause for over 2 seconds while
recording. If quick 6 beeps sound and the
Call-Counter shows“E (Error)”, start again
from step 1.
Press STOP to stop recording.
To check the greeting message, press
GREETING CHECK.
-If you wish to re-record, start from step 1.
Listening to the recorded incoming messages
Press MESSAGE PLAYBACK.
At the end of the last message, 3 beeps
sound and the tape stops. Then, the tape
rewinds and resets itself. The new
messages are recorded over old messages.
-To save messages, see page 34 in the
Operating Instructions.
(continued on next page)
Page 66

Making calls
Press TALK to get
dial tone.
if you have difficulty in dialing,
check the dialing mode. See page
17 in the Operating instructions.
Answering calls
conversation is over,
press TALK or place
the portable handset
on the base unit.
OR
If the portable handset is
off the base unit, press
TALK.
Attention
When the ВАТТ LOW indicator
flashes or a beep sounds every
15 seconds during a
conversation, place the portable
handset on the base unit to
charge the battery.
on the base unit, just lift it.
Do not place the unit near
electrical appliances or
obstacles. This might cause
interference or shorten the
possible operating range while
using the cordless telephone.
ВАТТ LOW Indicator
ОППШ-1 ГН сотл
n н и о
 Loading...