

Panasonic KX-T4168-B User Manual


Before Initial Use
Please read IMPORTANT SAFETY
INSTRUCTIONS on pages 48-49 before use.
Read and understand all instructions.
Thank you for purchasing the Panasonic cordiess
teiephone.
Attach your purchase receipt here.
For your future reference
Serial No.
(found on the bottom of the unit)
Date of purchase
Name of dealer
Dealer’s address
Accessories
□ AC Adaptor (p. 10)
one
___________
□ Telephone Line
Cord (p. 10)
one
□ Wall Mounting
Adaptor {p. 13)
one
For Best Performance
Battery Charge
To power the handset, charge
the battery for 10 hours before
initial use (p 11)
Operating Distance/Noise
Calls are transmitted between the base unit and the handset using
wireless radio waves For maximum distance and noise free operation,
the recommended base unit placement is
Away from electrical appliances
such as a TV, radio, or personal
In a HIGH and CENTRAL
location with no obstructions
Contents
Location of Controls
Display
......................................................................
..........................................................
Setting Up .................................................................
Connection........................................................................
Battery Charge .................................................................
Wall Mounting
...........................................................
Preparation for Handset.............................................
Setting the LCD Contrast.................................................
Setting the AUTO TALK Feature to ON
Making/Answering Calls
Making Calls with the Handset .......................................
Answering Calls with the Handset..................................
Making Calls with the Base Unit
Answering Calls with the Base Unit ...............................
..................................................
.........................
.....................................
......................
6
....................
.................
...................
...................
10
10
11
...................13
......................
...................
......................15
......................16
......................
......................
......................20
14
14
16
18
...................21
8
Caller ID Service ................................................................................22
Using the Caller List
Viewing the Caller List............................................................................24
Calling Back from the Caller List ...........................................................26
Editing the Caller’s Phone Number ......................................................27
Storing the Caller List Information in the Directory
Erasing the Caller List Information.......................................................29
Storing the Area Code............................................................................30
....................................................................
.............................
24
28

Using the Directory.......................................................................32
Storing Names and Numbers in the Directory
Steps lor Entering Names and Symbols ...............................................34
Finding Items in the Directory
Dialing from the Directory .....................................................................37
Changing an Item in the Directory
Erasing an Item from the Directory
...............................................................
.........................................................
......................................................
......................................
36
39
32
38
Intercom
Special Features
.......................................................................................
Transferring a Call Using Intercom ......................................................41
.........................................................................
For Call Waiting Service Users .............................................................43
Temporary Tone Dialing (For Rotary Service Users)...........................43
If Your Unit is Connected to a PBX .......................................................43
Automatic Security Code Setting
.........................................................
40
42
43
Battery Replacement ...................................................................44
Adding Another Phone ................................................................45
Before Requesting Help...............................................................46
Important Safety Instructions
......................................................
48
FCC and Other Information .........................................................50
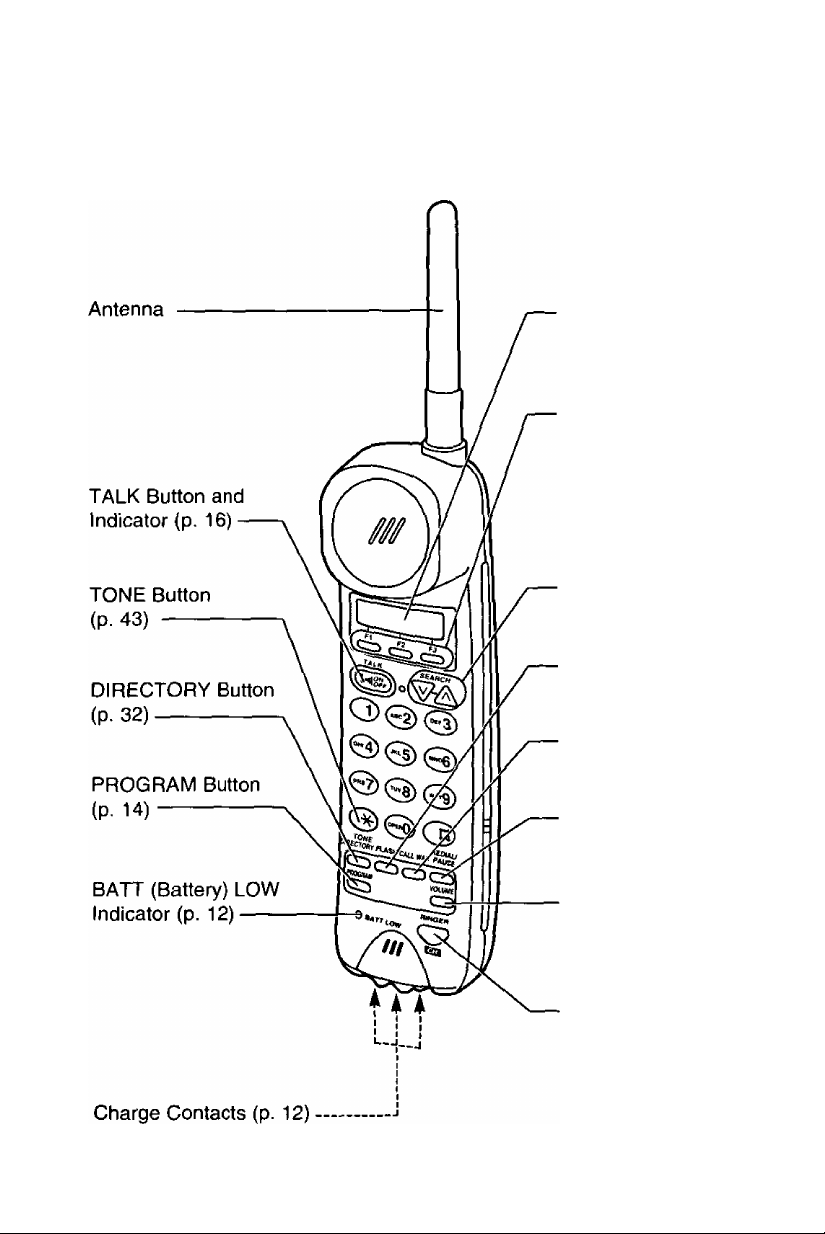
Location of Controls
Handset
Display (p, 8, 9)
Function Keys
{F1. F2, and F3)
activate instructions
that appear above
on the display
SEARCH (v, a)
Buttons (p. 24)
FLASH Button
(p. 16)
CALL WAIT Button
(p. 43)
REDIAUPAUSE
Button (p. 17, 43)
VOLUME/RINGER
Button (p. 17, 19)
CH (Channel)
Button (p. 17)
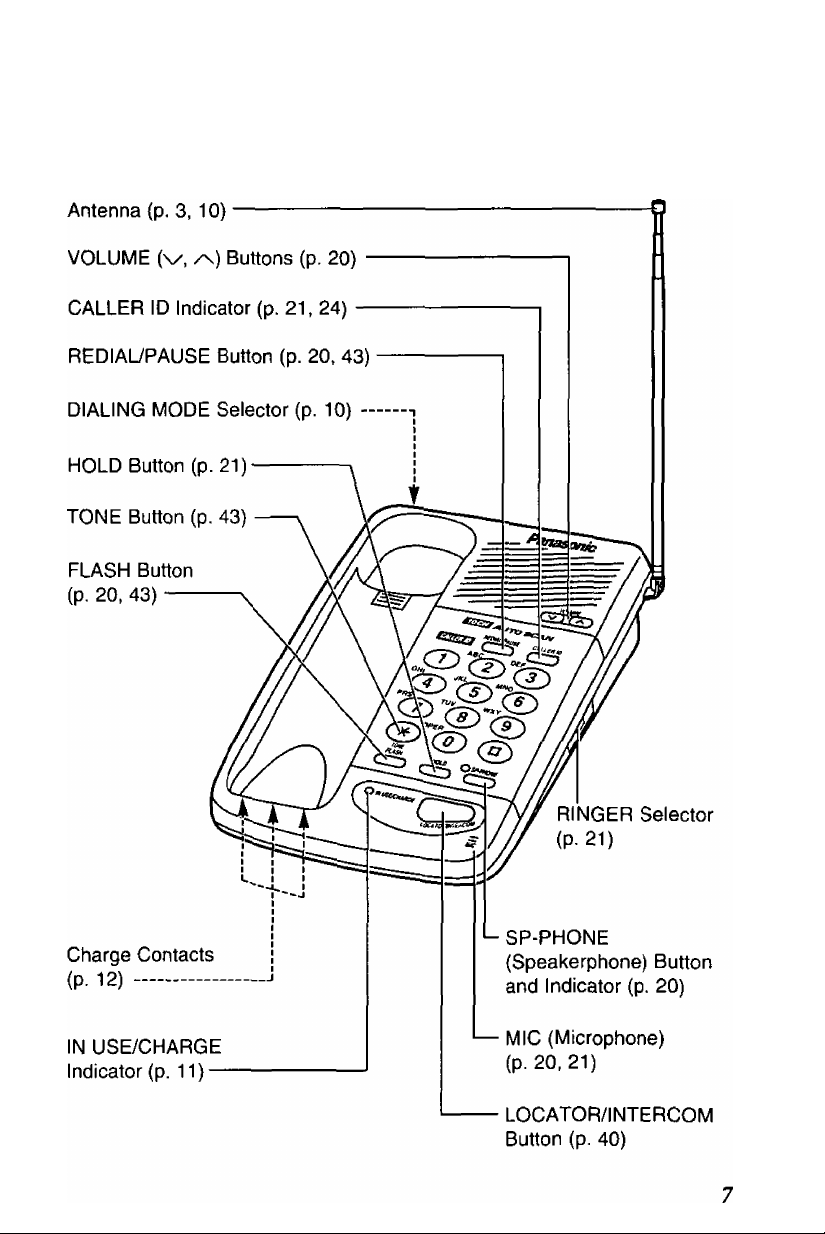
Base unit

Display
The handset gives you instructions and information on the display These
are the display prompts on pages 8, 9
In the battery saver mode, the display is blank until you use the handset
(P 11)
12 NEW CALLS
ВАТТ INTERCOM
1112222
01-06-35
OUT OF RANGE
BATTERY i B]
INTERCOM CH9
00-00-06 OFF
HOLD
00-02-14
INT
INT
The display shows the number of new calls in
the stand-by mode To check the battery
strength, press (fT) (ватт key) To page the
base unit, press (F3) (intercom key)
During a conversation, the display counts the
call duration
(Ex 1 hour, 6 minutes 35 seconds)
The handset has lost communication with the
base unit (p 46)
When you press (^ (ватт key), the display
shows the present battery strength (p 11)
(Ex The battery strength is low)
The handset and the base unit enter the
intercom mode (p 40) To end the intercom,
press (off key)
An outside call is put on hold by the handset
user To release the hold, press [TALKl or
(SP-PHONEl
SUSAN HAMMER
DIAL CLEAR NO
DIAL EDIT DATE
8
This
IS
a name from the Caller List information
Use the function keys as you need
The received caller’s phone number has an
error (*?)

OUT OF AREA
The caller dialed from an area which does not
provide the Caller ID service
PRIVATE CALLER
END OF NEW CALL
EXIT
END
EXIT
NO CALLERS
EXIT
ANNE
DIAL NO
NO ITEM STORED
MEMORY IS FULL
CLEAR EXIT
The caller has requested not to deliver their
information
You finished viewing the NEW CALLS in the
Caller List To exit, press (exit key)
At the end of the Caller List when you are
pressing [SEARCH] (v, a) To exit, press
(EXIT key)
The Caller List is empty To exit, press (FS]
(EXIT key)
This IS a name from the directory item Use the
function keys as you need
There’s no stored item at a dialing button you
pressed in the directory
During a storing procedure, the display shows
the directory memory is full
SAVE ERROR
During a programming procedure, the handset
has lost communication with the base unit
Move closer to the base unit
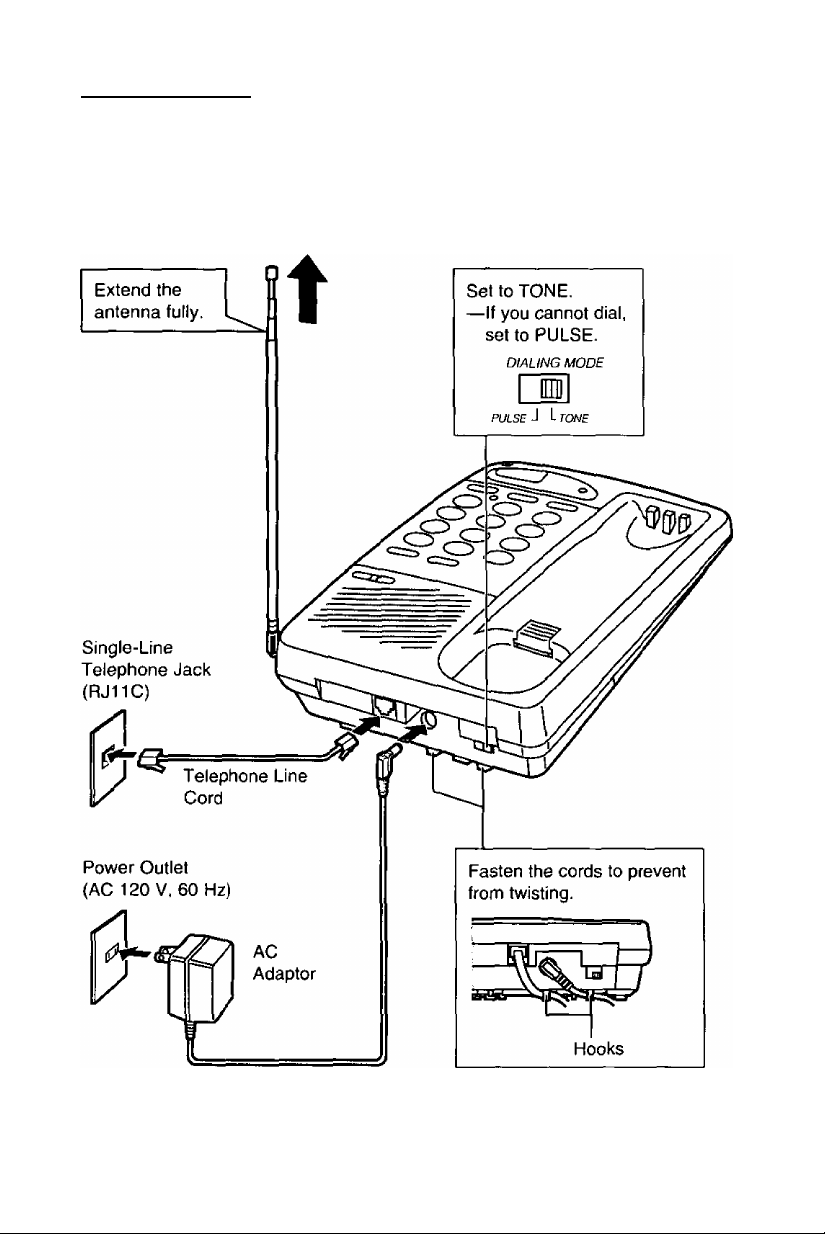
Setting Up
Connection
USE ONLY Panasonic AC ADAPTOR KX-A11. The adaptor must remain
connected at all times.
Notes:
—The AC adaptor may feel warm during use. This is normal.
—If you connect a reserve telephone on the same line, see page 45.
10

Battery Charge
Place the handset on the base unit for
10 hours.
—The IN USE/CHARGE indicator
lights.
IN USE/CHARGE Indicator
Battery saver mode
The handset goes into battery saver mode 5 minutes after you finished
using the handset (ex. such as making a call, viewing the caller list, etc.).
In this mode, the display is blank, but the handset receives calls.
To exit the battery saver mode, use the handset again. The display
automatically ‘wakes up’ from ‘sleeping’.
To check the battery strength
You can check the present battery strength while the handset is in the
battery saver or stand-by mode.
Press (El) (ватт key).
—If the display is blank, press one of the function keys to turn the display
on.
The display shows the present battery strength as shown in the chart
below.
Display prompt
(III]
( II]
( l]
Battery strength
Fully charged
Medium
Low
11

^ Setting Up
Recharge
When the ВАТТ LOW indicator flashes
or beeps intermittently, recharge the
battery.
oou
ooo
OOO
ВАТТ LOW Indicator
Standard battery life
If your Panasonic battery is fully charged;
While in use (TALK) Up to about 8 hours
While not in use (Stand-By) Up to about 14 days
—Battery life may vary depending on usage conditions and ambient
temperature.
—Clean the charge contacts with a soft cloth once a month, or the
battery may not charge properly.
—Once the battery is fully charged, you do not have to place the handset
on the base unit until the ВАТТ LOW indicator flashes.
—The battery cannot be overcharged.
72
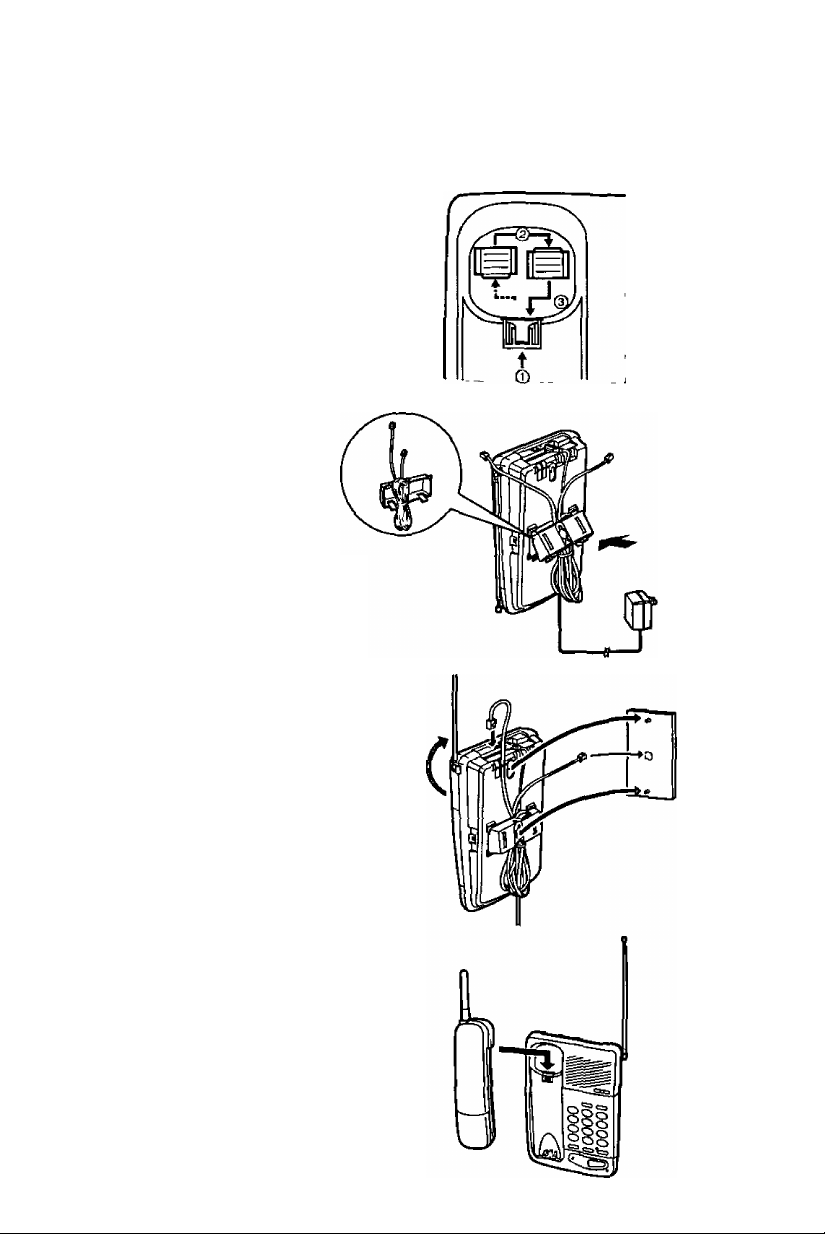
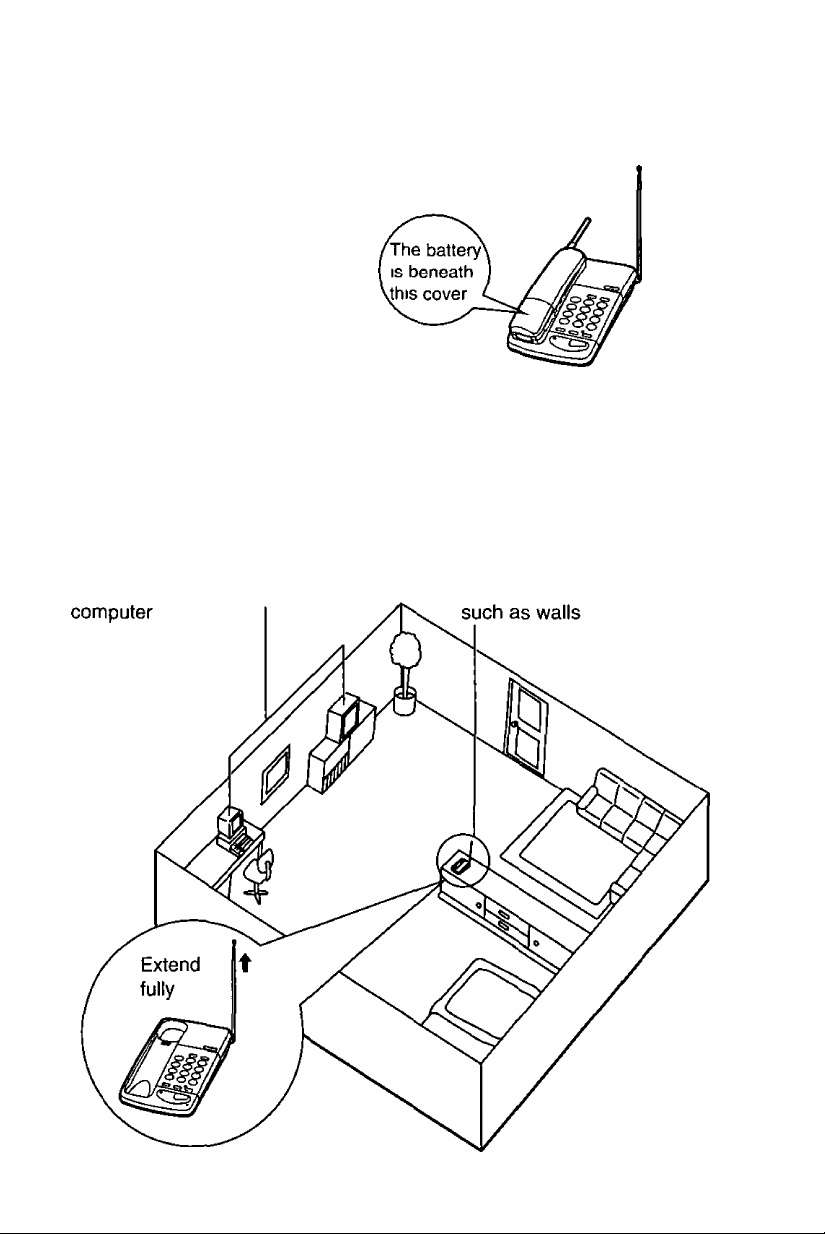
Wall Mounting
This unit can be mounted on a wall phone plate
Reverse the handset hook in
1
the cradle so the tab holds
the handset
© Push to remove
(2) Rotate 180'’
@ Replace it with the tab
facing upwards
Connect the AC adaptor
Tuck the telephone line
cord inside the wall
mounting adaptor, then
push It in the direction
of the arrow
—The word “UP” should face
upward
Connect the telephone line
cord Mount the unit, then
slide down
—Extend the antenna fully
To charge the battery:
Place the handset on the
handset hook as shown
—The IN USE/CHARGE
indicator lights
To Power
Outlet
13
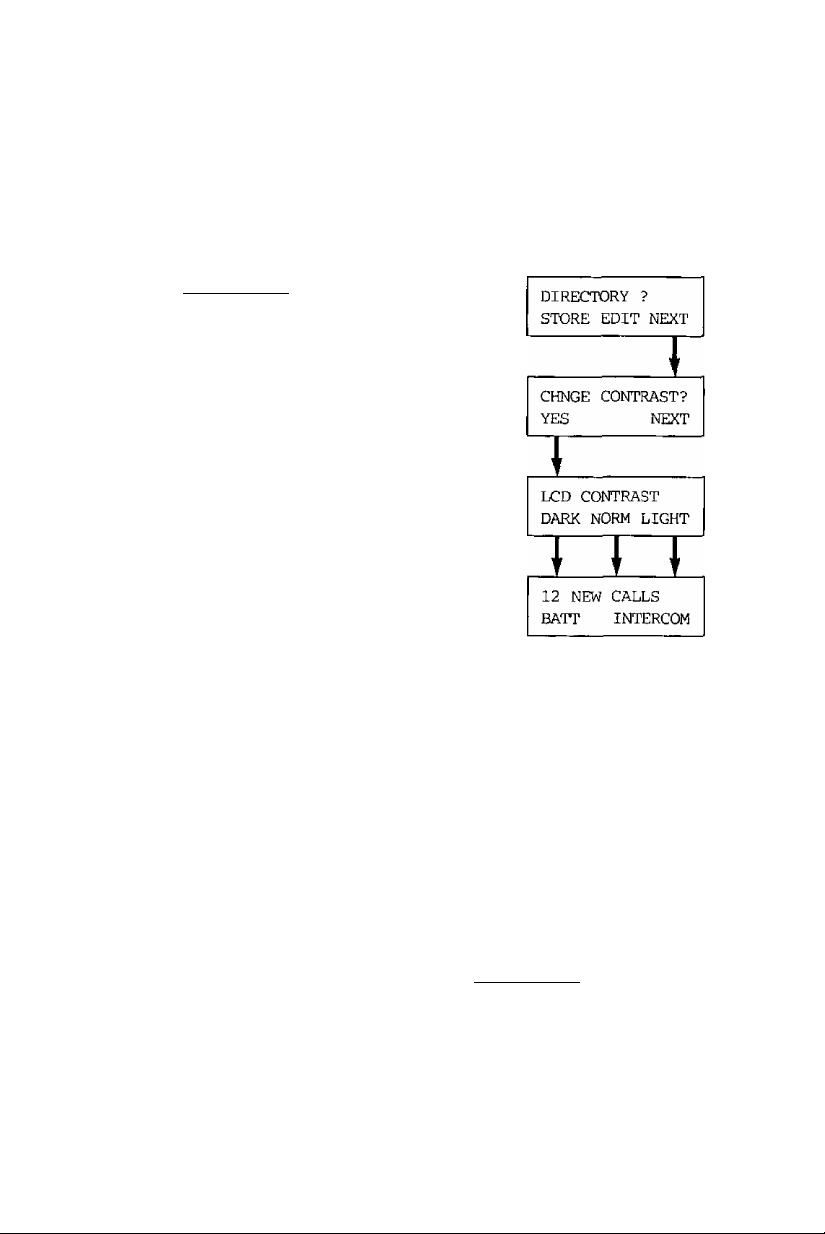
Preparation for Handset
Setting the LCD Contrast
You can select the LCD contrast among 3 levels (DARK, NORMAL and
LIGHT). NORMAL is the factory setting.
Press [PROGRAM].
1
Press (F3] [next key).
Press (fT) (yes key).
—The current setting flashes on the
display.
Select the desired level by pressing one
of the function keys.
To select DARK, press (FT) (dark key).
To select NORMAL, press (norm
key).
To select LIGHT, press (F^ (light
key).
—The selected setting flashes on the
display.
—After a few seconds, the handset
returns to the stand-by mode.
Note;
—To cancel the programming halfway, press [PROGRAM], Then restart
from step 1.
14

Setting the AUTO TALK Feature to ON
If you set the AUTO TALK feature to ON, you can answer a call by lifting
the handset on the base unit without pressing [TALK). If you want to use
this feature, program as follows. OFF is the factory setting.
Press (^OGRAM).
1
Press [F3] (next key) twice until “talk
SWITCHING?” is displayed.
Press (CHNG key).
—The current setting flashes on the
display.
Press [fT] (on key).
—The selected setting flashes on the
display.
—After a few seconds, the handset
returns to the stand-by mode.
Notes:
—To cancel the programming halfway, press [PROGRAM]. Then restart
from step 1.
—In order to be able to view Caller ID information before answering a
call, leave the AUTO TALK feature OFF.
—To set the AUTO TALK feature to OFF, press (F3) (off key) in step 4.
DIRECTORY ?
STORE EDIT NEXT
TALK SWITCHING?
CHNG
J
____ __
TALK
AUTO
CN
12 NEW CALLS
ВАТТ INTERCOM
NEXT
OFF
15

Making/Answering Calis
Making Calls with the Handset
(REDIAL/PAU^I
(VOLUME/RINGER]
-j Press [TALK]
—The indicator lights
2 Dial a phone number
—The dialed number is displayed
—The display starts counting the call
duration
—if you misdial, press (FLASH 1 firmly
then dial again
To hang up,
press [TALK] or place the handset on the
base unit
—The indicator light goes out
16
-I®
0001112222
0001112222
OO'OO-OO INT
 Loading...