

Page 1
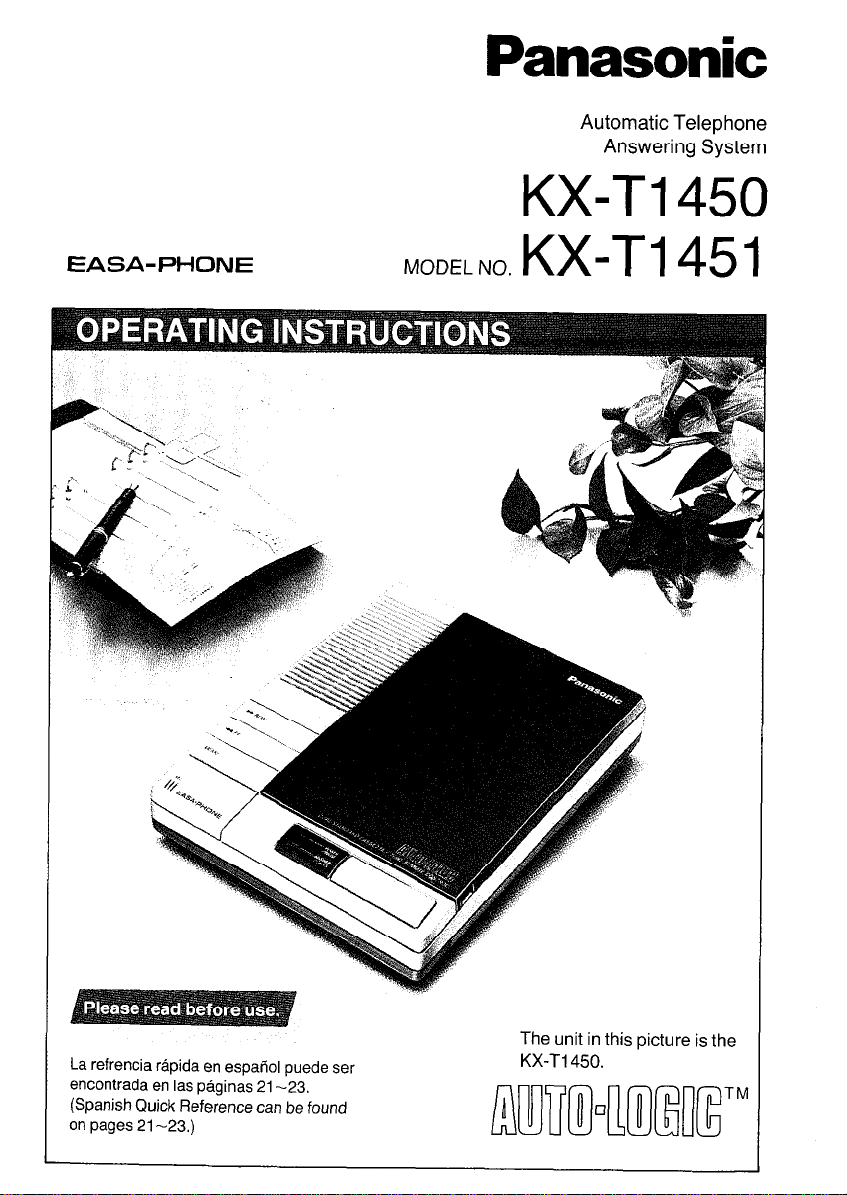
Panasonic
Automatic Telephone
Answering System
KX-T1450
EASA-PHONE
MODEL NO.
KX-T1451
La refrencia rapida en espatiol puede ser
encontrada en las peginas 21-23.
(Spanish Quick Reference can be found
on pages 21-23.)
The
unit
KX-Ti 450.
in this picture is the
Page 2
Table of Contents
Locations of the Controls ....................
Introduction
Preparation
TOLL SAVER .........................
How to Record an Outgoing Message (OGM)
CHECKING YOUR OGM . .
SAMPLE OGMS . . . . .
Setting Prior to Leaving
Listening to the Recorded Messages
Other Features
SAVING THE RECORDED MESSAGES .................
ERASING THE RECORDED MESSAGES ................
MONITORING THE INCOMING CALLS
How to Operate from a Remote Phone
SETTING THE REMOTE CODE. ....................
PLAYING BACK MESSAGES .......................
PLAYING BACK NEWLY-RECORDED MESSAGES
REWINDING/FAST FORWARDING TAPE
RECORDING A MARKER MESSAGE ................
RESETTING THE ICM TAPE FOR FUTURE MESSAGES
MONITORING ROOM SOUND
CHANGING THE OUTGOING MESSAGE .............
SKIPPING THE OGM FOR ICM RECORDING .........
SETTING/CANCELLING THE ANSWER MODE ........
...............................
CONNECTION ........................
INITIAL SETTINGS
CASSETTE TAPE INSTALLATION .......
RECORDING THE OGM . .
RECORDING THE CALLERS’ MESSAGES
PREPARING THE ICM TAPE . . . .
LISTENING TO THE MESSAGES ........
RE-PLAYING BACK ALL THE MESSAGES
RECORDING A PERSONAL MESSAGE (MESSAGE MEMO)
(MEMORY PLAYBACK) .........................
WHILE HEARING THE MESSAGES ...............
....................
..................
......................
4
5
.
. .
5
.
.
6
.
.
7
8
8
9
9
IO
10
11
12
13
13
14
15
15
16
.
16
17
17
.
18
18
19
i..
Troubleshooting Guide ...................
Referencia Rapida (Spanish Quick Reference)
Maintenance
CassetteTape ..........................
Others ................................
Accessory Order Information
Important Information ....................
...........................
..............
-1--
. 20
. 21
. 24
24
25
25
26
Page 3

Location of the Controls
Rewind (REW) Button
Fast Forward (FF) Button
(page 10)
MEMO Button
RING Selector (RINGS)
ANSWER/CALL Indicator -
(page 10)
I - (pane 6)
POWER ON/OFF Switch
L PLAYBACK/PAUSE Button
(page 10)
VOLUME CONTROL
REMOTE CODE Selector
Telephone Jack (page 4)
Telephone Line Jack (page 4)
CPC Selector (page 5)
Keep this overleaf unfolded while you are
reading this Operating Instructions. This
makes it easier to locate the controls and
switches mentioned in the instructions.
-2-
Page 4
Introduction
Thank you for purchasing the Panasonic Telephone
Answering System.
You can use this Model KX-T1450/KX-T1451 to:
w Answer calls and record messages when you cannot answer the telephone or do
not want to be disturbed
n Monitor (screen) calls
n Record your personal messages
By using the advanced remote-control features of your KX-T1450/KX-T1451, you can
also
w Call in from another touch tone telephone to listen to your messages
n Record a new Outgoing Message even when you are away from your unit
n Leave a message while you are away from your unit
We recommend that you read these Operating Instructions all
the way through before you set up and use your Answering
System.
/----- Accessories
l AC Adaptor . . . . . . . . . . . .
l
Telephone Cord . . . . . . .
l
outgoing Message Tape
(Standard Cassette) . .
l
incoming Message Tape
(Standard Cassette) .
-3-
. one
. one
. one
. one
Page 5
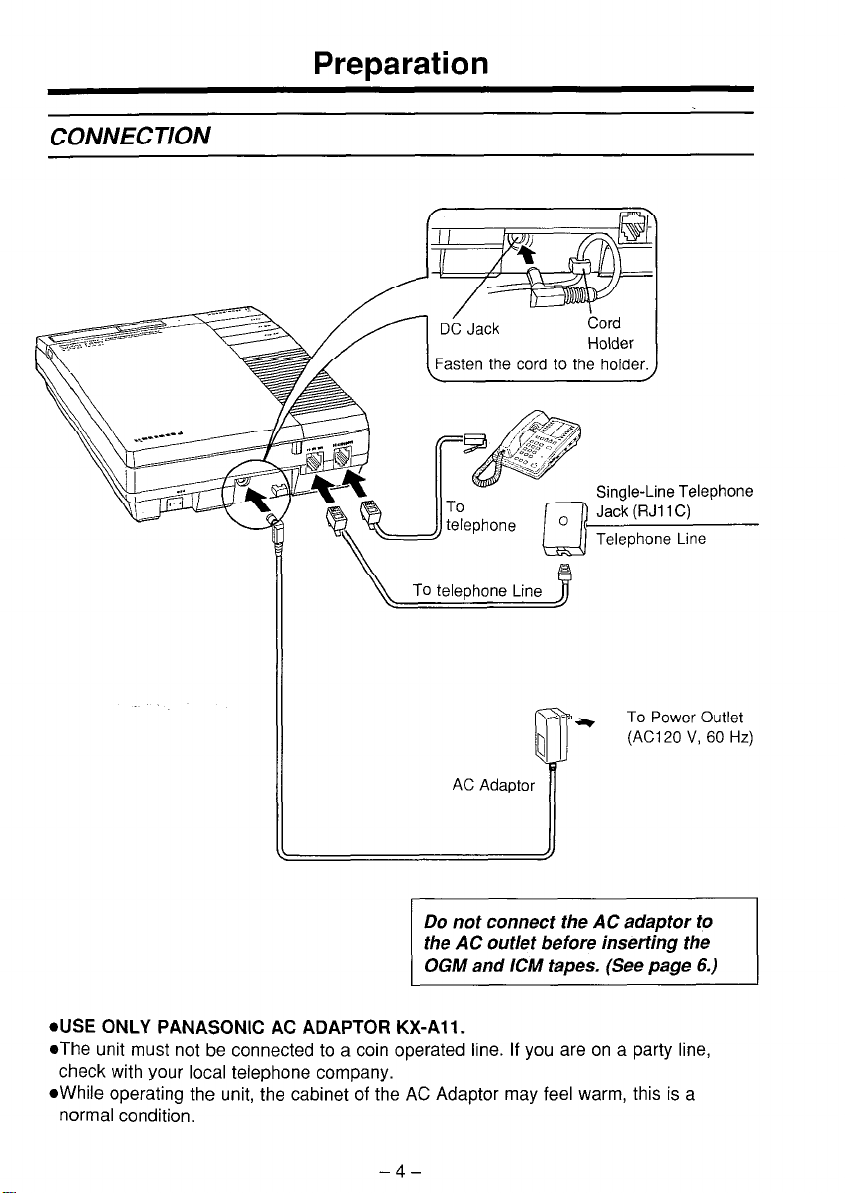
CONNECTION
Preparation
To
Power Outlet
(AC1 20 V, 60 Hz)
Do not connect the AC adaptor to
.USE ONLY PANASONIC AC ADAPTOR KX-All.
oThe unit must not be connected to a coin operated line. If you are on a party line,
check with your local telephone company.
l
While operating the unit, the cabinet of the AC Adaptor may feel warm, this is a
normal condition.
-4-
Page 6
Preparation
INITIAL SETTINGS
Calling Party Control (CPC) Setting
Set to “A”. (no call waiting service line.)
If you have call waiting service or
some Incoming Messages are
interrupted, set to “B”.
02 __............ The unit will answer a call on the
l
AUTO......
See “TOLL SAVER” on this
page.
Recording
l vox . . . . . . . .
01 minute..
(1 MIN)
Remote Code
The remote code number is made up of
2 digits.
The first digit is factory preset, and the
second digit is selectable. (2 or 8)
Also, refer to page 14 for your remote code
setting.
Time Selector
The unit will record for as long as
the caller speaks.
The unit will record up to I minute.
TOLL SAVER
The TOLL SAVER feature lets you avoid a toll charge when you call your unit and no
messages have been recorded.
1 Set the number of rings to AUTO.
elf the unit does not pick up on the third ring, hang up immediately. This means that
you have no messages and you have saved a toll charge.
n
The unit picks up on the second ring:
It means that at least one message has been recorded.
n
After you have played back all the messages from a remote phone, the unit will pick
up the next call on the fourth ring. If the unit picks up on the second ring, it means
that at least one new message has been recorded.
-5-
Page 7
CASSETTE TAPE INSTALLATION
1 Open the panel, and insert the Outgoing
Message (OGM) and Incoming Message
(KM) tapes as shown.
l
TWO cassette tapes are included. Use
Cl5 for OGM and C60 for ICM.
@Do not use endless loop cassette tape.
2 Connect the AC adaptor to the AC outlet.
3 Set the POWER ON/OFF switch to ON.
l
Preparation
The unit will start to reset the OGM tape.
NOTES:
03 minutes after connecting the AC adaptor,
the unit will be powered ON automatically
and reset the OGM tape even when the
POWER ON/OFF switch is not set to ON.
l
After you have changed the OGM tape:
Push OGM PLAY and REW simultaneously
to reset the OGM tape.
-6-
Page 8
How to Record an Outgoing Message (OGM)
Before operating your unit, you must record an Outgoing Message (OGM).
The OGM will inform the calling party of your absence and your message.
RECORDING THE OGM
1 Push OGM REC until a long beep is
heard, then release it.
2 After the long beep, speak clearly and
loudly into the microphone (MIC),
approximately 8 inches away.
l
The IN USE indicator will flash.
l
The recording time is up to the tape
length that you use.
POWER/IN USE Indicator
3 When recording is finished, push OGM
REC again.
l
The unit will rewind the tape to the
beginning, and be ready for Incoming
Calls.
NOTE:
If you pause for over 2 seconds while
recording, you will hear a series of warning
tones (6 beeps) and the unit will start
rewinding the tape. If this happens, start with
step 1 again after the unit stops rewinding.
-7-
Page 9
CHECKING YOUR OGM
You can check your OGM at any time.
I
Push OGM PLAY.
l
The unit will play back the OGM, then
rewind the tape to the beginning.
l
Use the VOLUME control on the left side
of your unit to regulate the volume
during playback if necessary.
l
To stop the operation while playing back
the OGM, push the OGM PLAY button.
NOTES:
l
The unit will automatically change to the
Answer mode 7 seconds after completing
the OGM recording or checking.
l
Answer mode:
When a call is received, the unit will
automatically answer and record Incoming
Messages on the ICM tape.
SAMPLE OGMS
When you have set the Recording Time to “VOX”
(For setting the recording time, see page 5.):
“Hello, this is the Smith residence. We cannot come to the phone right now. If you
would like us to call you back, please leave a message, including your name and
telephone number after the beep. Thank you for calling.”
“This is the Panasonic (your name or business) Sales Company. We are glad that
you called but our office is closed until 9 o’clock in the morning. If you leave a
message, including your name and telephone number after the beep, we will return
your call as soon as we can. Thank you.”
When you have set the Recording Time to “1 M/N”:
“Hello, this is (your name, business and/or telephone No.).
I am sorry I am not here to speak to you at the moment. Please leave a message
after the beep. You have up to 1 minute for recording. Thank you.”
-8-
Page 10

Setting Prior to Leaving
RECORDING THE CALLERS’ MESSAGES
1 Push POWER ON/OFF to ON.
l
The POWER indicator will light.
NOTES:
l
The unit will automatically switch itself to
the Answer mode 7 seconds after you set
the POWER ON/OFF switch or you
complete some other operations. When the
telephone rings, the unit will play back your
OGM, then it will record the callers’
messages on the tape.
elf you do not want to set the unit to the
Answer mode, set the POWER ON/OFF
switch to OFF.
PREPARING THE ICM TAPE
After reviewing the Incoming Messages, the unit will automatically reset itself to the
Answer mode. .
n
To record future messages after the last message;
leave the unit as is. All calls will be saved.
n
To record the future messages from the beginning of the tape;
1 Push REW.
-9-
Page 11

Listening to the Recorded Messages
l When Incoming Messages have been recorded, the ANSWER/CALL indicator will
flash. (Three flashes followed by a pause means that 3 messages were recorded.)
l ln case of a power interruption, the ANSWER/CALL indicator will flash slowly after the
power is restored.
LISTENING TO THE MESSAGES
1 Push PLAYBACK/PAUSE.
l The playback volume is adjustable using
the VOLUME control (left side on your
unit).
AUTO-LOGIC (One-Touch Operation):
At the touch of the PLAYBACK/PAUSE button, the unit will automatically rewind and
play back all the recorded messages. At the end of the last message, you will hear
3 beeps. After 7 seconds, the unit will reset itself to the Answer mode. All calls will be
automatically saved.
n Future Incoming Messages will be recorded after the last message.
n To record the future messages from the beginning of the tape, push the REW
button.
n To stop the tape temporarily during playback, push the PLAYBACK/PAUSE button
once. The IN USE indicator will flash. The tape will pause until you restart by
pushing it again.
n To rewind the tape, push the REW button.
n To fast forward the tape, push the FF button.
RE-PLAYING BACK ALL THE MESSAGES
1 Wait until the ANSWER/CALL indicator is lit after playing back all the messages.
2 Push PLAYBACK/PAUSE.
@The unit will play back all the recorded messages again.
elf you push the PLAYBACK/PAUSE button before the ANSEWR/CALL indicator is
lit, push the REW button to rewind the tape. Within 7 seconds after rewinding,
push the PLAYBACK/PAUSE button to re-play back all the messages.
-lO-
Page 12

Other Features
RECORDING A PERSONAL MESSAGE (MESSAGE MEMO)
You may record a personal message any time at home on the ICM tape. It will be
heard by anyone retrieving messages from the unit.
1
Push MEMO until a beep is heard.
2 Speak into the MIC.
l
The IN USE indicator will flash.
POWER/IN USE Indicator
/
3 When finished recording, push MEMO
again.
l
The IN USE indicator will stop flashing.
l
The ANSWER/CALL indicator will flash
to show that your message was
recorded, and the unit will be ready to
answer the phone call.
l
New messages will be automatically
recorded after your memo.
-II-
Page 13

SAVING THE RECORDED MESSAGES
You can save the desired messages.
1 Play back the tape through the message you want to save.
2 Push PLAYBACK/PAUSE to pause.
l
The IN USE indicator will flash.
3 Push PLAYBACK/PAUSE and REW
simultaneously.
l
The IN USE indicator will stop flashing.
l
The ANSWER/CALL indicator will light.
- 12-
Page 14

ERASING THE RECORDED MESSAGES
After you have played back the recorded messages, you can erase them by simply
pushing the KM ERASE button.
1 Push ICM ERASE until a beep is heard.
l
The unit will erase the recorded
messages while the tape is rewinding.
NOTE:
The tape can be erased even if the
record-prevention (knock-out) tabs have been
removed.
tab
MONITORING THE INCOMING CALLS
While an Incoming Message is being recorded, you can hear it, then you may
choose to pick up the telephone handset and speak to the caller before your caller
finishes leaving a message.
1 Adjust the volume control.
If you want to talk to the caller during
recording of the ICM, lift the telephone
handset and talk.
The unit will automatically stop recording and
be ready to answer the next phone call.
- 13-
Page 15

How to Operate from a Remote Phone
On the following pages, we explain how to:
n SETTING THE REMOTE CODE
w PLAYING BACK MESSAGES
n PLAYING BACK NEWLY-RECORDED MESSAGES (MEMORY PLAYBACK)
H REWINDING/FAST FORWARDING TAPE WHILE HEARING THE MESSAGES
n RECORDING A MARKER MESSAGE
n RESETTING THE ICM TAPE FOR FUTURE MESSAGES
n MONITORING ROOM SOUND
n CHANGING THE OUTGOING MESSAGE
n SKIPPING THE OGM FOR ICM RECORDING
n SETTING/CANCELLING THE ANSWER MODE
SETTING THE REMOTE CODE
To get remote access, you must set and remember your remote code number.
The REMOTE CODE number is made up of 2 digits, the first digit is factory preset, and
the second digit is selectable. (“2” or “8”)
REMOTE CODE
t
Remote Code number. The second digit is
selectable (2 or 8).
EXAMPLE: If the factory preset number is “4”, then your code number may be either
“42” or “48”, depending on the position of the selectable REMOTE code
switch.
- 14-
I
I
Page 16

How to Operate from a Remote Phone
PLAYING BACK MESSAGES
You can listen to the recorded messages by simply pushing your own code number.
1 Call your unit, and push the Code No. (2 digits) during the OGM.
l
A beep will sound, then other beeps will sound to tell you the
number of recorded messages, up to 8 times.
l
The unit will rewind the tape to the beginning. After a series of
short beeps, you will hear all the messages on the tape.
2 Listen to the recorded messages.
03 beeps will be heard after the last message.
3 Hang up.
l
AII calls will be saved automatically.
PLAYING BACK NEWLY-RECORDED MESSAGES
(MEMORY PLAYBACK)
When you have already heard the messages from a remote phone, you can skip them
and listen to the newly-recorded messages.
1 Call your unit, and push the Code No. during the OGM.
GHI
4
0
2 Push “4” right after you hear the beep tones indicating the
number of the recorded messages.
l
The unit will play back the new messages.
l
Even during the playback of previously heard messages, you
can skip them by pushing “4”.
- 15-
Page 17

HOW 10 uperare from a nemore rnone
REWINDING/FAST FOR WARDING TAPE WHILE HEA RING
THE MESSAGES
1 To Back Space 1
1 Push “1”.
l
1
The tape will be rewound for approximately 15 seconds
corresponding to the playback time.
0
1 To Skip Forward 1
ABC
2
1 Push “2”.
l
The tape will be skipped forward for approximately 15 seconds
corresponding to the playback time.
lo>
RECORDING A MARKER MESSAGE
After reviewing all the messages, you can leave your index message on the tape.
It can be heard by anyone retrieving messages.
1 Start to talk right after the last 2 beeps.
2 When recording is finished, hang up.
---Cl 0-secpause
- 16-
Page 18

RESETTING THE ICM TAPE FOR FUTURE MESSAGES
To record new Incoming Messages from the beginning of the tape, after the recorded
messages are played back or while they are being played;
1 Push “3”.
l
The unit will rewind the tape to the
beginning and a beep tone will be
heard when the tape has been reset. (
If you have used Memory Playback
Push “3”.
l
The unit will rewind the tape to the beginning of
newly-recorded messages
Push “3” again.
l
A beep tone will be heard and the
future messages will be recorded
from the beginning of the ICM tape.
if you have reset the tape by mistake
and a beep will be heard.
II
After all the messages
have been
played
the
After you have used
the
Memory Playback.
back.
Plavback
.
1 Push “2” after the tape has been reset (one-beep), then hang up.
l
The unit will advance the tape to the end of the recorded
messages.
MONiTORlNG ROOM SOUND
You can screen any sound in the room where the unit is installed for 30 seconds.
Call your unit and push
2
Push “5” right after you hear the beep tones indicating the
number of the recorded messages.
@You can listen for 30 seconds.
l
To listen further, push “5” again within 10 seconds of hearing
one beep.
the Code
-17-
No. during the OGM.
Page 19

How to Operate from a Remote Phone
CHANGING THE OUTGOING MESSAGE
You can re-record the Outgoing Message from a remote phone.
1 Call your unit, and push the Code No. during the OGM.
2 Push “7” right after you hear the beep tones indicating the
number of recorded messages.
l
Short beeps will be heard continuously until the OGM tape has
been reset, and then a long beep will be heard.
3 Speak clearly and loudly after you hear the long beep.
4 When recording is finished, push “9”.
l
The new Outgoing Message will be played back. So you can
check or amend it.
NOTE:
If you pause for over 2 seconds while recording, you will hear a
series of warning tones (6 beeps). If this happens, push “7” within 10
seconds of hearing these beeps, and repeat from step 2 again.
SKIPPING THE OGM FOR /CM RECORDING
If you or the caller does not want to hear the Outgoing Message, the unit can be
switched promptly to the Incoming Message mode.
I Call your unit.
2 Push “3~” during the OGM
3 Speak clearly and loudly after you hear the long beep to record
your Incoming Message.
- 18-
Page 20

How to Operate from a Remote Phone
SETTINGXANCELLING THE ANSWER MODE
You can easily set or cancel the Answer mode from a remote phone.
Call your unit.
. . . .
I
I
Ir
i-G-GA
OKiJ
0
2
Wait for 15 rings.
l
OGM will be heard, then hang up.
l
The unit will be ready to answer the next phone call.
Call your unit, and push the Code No. (2 digits) during the OGM.
2
Push “0”.
l
The unit will not pick up any calls.
El0
- 19-
Page 21

Troubleshooting Guide
Problem
l
The unit does not work when I push any Plug in the AC adaptor then switch
buttons. the power on.
01 cannot remove the cassette from the unit.
(The unit has been set to the Answer mode, l The OGM or KM cassette is cut or \
but no Incoming Message is recorded. is not inserted. Replace the cassette
The unit does not function. However, the
beep sounds 6 times and the Replace it with a new one.
ANSWER/CALL indicator flashes on and off l Ciean the heads. (See page 24.)
quickly.
‘While recording an Outgoing Message, the
beep sounds 6 times. Speak clearly and loudly, and do not
\.
‘When the Outgoing Message or the
Incoming Message tape is played back, the
sound level is low, even if the VOLUME
\ control is turned up fully.
Cause & Remedy
with a new one.
l
The OGM is recorded improperly.
Record a new OGM.
l
OGM cassette might be broken.
Rerecord your Outgoing Message. ’
pause for over 2 seconds while
recording.
l
Clean the Heads. (See Maintenance
instruction on page 24.)
J
J
\
I
/
I have played back all the recorded
messages and I want to record the next ready to record the next phone call.
phone call after the last previously recorded l ln case of the remote operation,
message. hang up.
push the button of a remote phone, but the
does not respond.
Some Incoming Messages have not been
recorded up to their end. (See page 5.)
The ICM tape continues to run after a caller Set the recording time selector to
hangs up.
- 20 -
l
Wait for 7 seconds. The unit will be
l
Make sure that you are entering
correct Code number.
oRecord the Outgoing Message in a
quiet place.
Set the CPC switch to “B”.
“1 MIN”.
:
Page 22

Referencia Rbpida
Cinta del Mensaje de Entrada (ICM)--\
Both de rebobinado (REW)
Both de avance rapid0 (FF)
Both de memorizaci6n
(MEMO)
Mickfono
Both OGM REC
Both OGM PLAY
h Cinta del Mensaie de Salida fOGM)
\
Both de reproduccihlpausa (PLAYBACK/PAUSE)
Ill
Both ICM ERASE
Conmutador de alimentacih ON/OFF
(ENCENDIDO/APAGADO)
PUESTA DE LA CINTA DEL CASETE
1
Abra el panel e inserte las cintas OGM e ICM.
2 Conecte el adaptador de CA en el terminal de CA.
3 Coloque el conmutador POWER ON/OFF en la position ON.
n Cuando cambie la cinta OGM: presione 10s botones OGM PLAY y REW
simultaneamente.
GRABACldN DEL MENSAJE DE SAL/DA
1 Presione OGM REC hasta que se escuche un pitido largo, luego deje de
presionarlo.
2 Hable con voz Clara y firme por el MIC.
l EI tiempo de grabacion OGM varia seglin la duration de la cinta empleada.
l No haga pausas de mas de 2 segundos mientras grabe.
3 Cuando acabe de hablar, presion el OGM REC.
VERlFlCACIdN DEL MENSAJE DE SALIDA
1 Presione el OGM PLAY para confirmar el mensaje de salida.
l La unidad reproducira el Mensaje de Salida y luego rebobinara la cinta hasta el
comienzo.
l La unidad cambiara automaticamente a la Modalidad de contestacion despues de
7 segundos de la reproducciob del MS.
-21 -
Page 23

PA RA ESCUCHA R LOS MENSA JES
Cuando el telefono suene, la unidad reproducira el mensaje de salida (OGM) y luego
grabara el mensaje de la persona que llama en la cinta.
1 Presione el PLAYBACK/PAUSE (Reproduction/Pause).
I Auto-Lbgico (Funcibn de un solo toque)
Un solo toque del baton PLAYBACK/PAUSE hate posible que la unidad
reproduzca 10s mensajes y suene 3 pitidos despues del ultimo mensaje. Luego,
despues de diez segundos, la unidad rebobinara la cinta y estara lista para grabar
nuevos mensajes desde el comienzo de la section ICM de la cinta.
MEMORIZACldN DEL MENSAJE
Para grabar un mensaje que va a ser oido por alguien usando el control remoto.
1 Presione el MEMO hasta que suene un pitido.
2 Hable por el MIC.
3 Cuando termine, presione el MEMO.
MONITOREO DE LOS MENSAJES DE LLEGADA
Usted puede escuchar el mensaje de llegada mientras se este grabando.
1 Ajuste el control de volumen.
l
Si desea hablar a la persona que llama durante la grabacion del mensaje, levante
el microtelefono y hable.
ALMACENAMIENTO DEL MENSAJE GRABADO
1 Reproduzca la cinta hasta el mensaje que desee alcamenar.
2 Presione el PLAYBACK/PAUSE para hater una pausa.
l
EI indicador IN USE destellara.
3 Presione el PLAYBACK/PAUSE y REW simultaneamente.
l
EI indicador IN USE dejara de destellar.
BORRADO DE LOS MENSAJES GRABADOS
1 Presione ICM ERASE.
l
La unidad rebobinara la cinta y a la vez, la unidad borrara 10s mensajes previos.
Los nuevos mensajes seran grabados desde el comienzo de la cinta.
- 22 -
Page 24

PARA ESCUCHAR MENSAJES DESDE OTRO TELEFONO A
DISTA NCIA
No. de codigo es de dos digitos.
El primer digit0 es preajustado en la
fabrica y el Segundo lo seleccionar Ud.
REMOTE CODE
seleccionable
Control Remoto del Tono
1 Marque el nlimero de telefono con solo un tono telefonico.
2 Cuando empiece el mensaje de salida, presione el ntimero de codigo (2 digitos)
firmemente y sonara otro pitido.
l Sonara un pitido para decirle el nljmero de mensajes grabados.
l EI contestador rebobinara la cinta de 10s mensajes de salida y 10s reproducira.
l
Despues de haberse reproducido el liltimo mensaje, sonara 3 pitidos.
3
Cuelgue el microtelefono.
l EI mensaje siguiente se grabara despues del ljltimo mensaje.
l Para grabar el mensaje de llegada (KM) desde el comienzo de la cinta, pulse el
baton “3” y cuelgue el telefono.
n
Retroceso:
Presione el botcn “1” para rebobinar unos 15 segundos de la cinta y reproducirla.
n
Avance por salto:
Presione el botcn “2” para hater que la cinta avance unos 1.5 segundos y para
reproducirla.
- 23 -
Page 25

Maintenance
Because the head and capstan assemblies are in contact with the tape, dirt and
residue from the tape can easily adhere to these parts, causing distortion. These parts
should be cleaned periodically in the manner described below.
l
Clean the head surface, pinch roller and capstan with a cotton swab.
If these surfaces are extremely dirty, dampen the cotton swab with alcohol.
Capstan Cotton swab
l
Do not bring magnetic or metal objects, such as a screwdriver, near the head
assemblies, as such objects could magnetize the heads.
l
Do not oil any part of the unit.
Cassette Tape
oFor optimum sound quality and performance,
we recommend that you use side two after six
months and replace the tape every year
assuming that the unit answers about ten calls
a day.
l
Should the cassette tape break or become
worn, replace it with a high quality “NORMAL”
tape. Use Panasonic (C30, C60, C90), TDK or
MAXELL cassette tape. Metal or chrome tape
cannot be used.
oNever place a cassette tape near a magnetic
source, such as a magnet or a TV set, because
it may erase the tape.
l
Slack in the tape can be tightened by rotating
the tape reel with a pencil, as shown.
- 24 -
,_------_----------
1
QUICK REFERENCE CARD
I
FOR TONE REMOTE CONTROL
1 n To set to the Answer mode remotelv
, 1. Dial the phone number.
, 2 Walt until 15 rings and hang up.
I 0 To turn off the unit remotelv
I 1 Dca thephonenumber. ’
; 2. Push mNo.l Listen to a beep1 q and then
hang up.
Page 26

Others
elf there is any trouble, disconnect the unit from the telephone line and connect a
known working phone. If the known working phone operates properly, have your
Panasonic unit repaired by one of the specified Panasonic Factory Service Centers. If
the known working telephone does not operate properly, consult with your telephone
company.
l Do not use benzine, thinner, or similar solvents. Do not use abrasive powder to clean
the cabinet. Wipe it with a soft cloth.
l
Keep the unit away from heating appliances and electrical noise generating devices
such as fluorescent lamps, motors and television. These noise sources can interfere
with the performance of the unit.
l The unit should be kept free of dust, moisture, high temperature and vibration, and
should not be exposed to direct sunlight.
oNever attempt to insert wires, pins, etc. into the vents or other holes of this unit.
Accessory Order Information
oReplacement parts and accessories are available through your local authorized parts
distributor.
oFor the authorized distributors in your area, call toll free: l-800-545-2672
lush your code number. ,
3 change the OGh
*To save the ICM.
*To record a
; Thsunitwill
play back.
hang up after
playback. I
marker messaae. I
I,
CASSETTE PANEL
If the panel comes off,
replace it by pushing
rib into the hole.
t
I
I
I
- 25 -
as shown.
Page 27

Important Information
If requested by the Telephone Company, inform them as follows:
l
FCC Registration No. . (found on the bottom of the unit)
l
Ringer Equivalence . . . 0.4 B
@The particular telephone line to which the equipment is connected.
In the event terminal equipment causes harm to the telephone network, the telephone
company should notify the customer, if possible, that service may be stopped.
However, where prior notice is impractical, the company may temporarily cease service
providing that they:
(a) Promptly notify the customer.
(b) Give the customer an opportunity to correct the problem with their equipment.
(c) Inform the customer of the right to bring a complaint to the Federal Communication
Commission pursuant to procedures set out in F.C.C. Rules and Regulations
Subpart E of Part 68.
The Telephone Company may make changes in its communications facilities,
equipment, operations or procedures, where such action is reasonably required in the
operation or its business and is not inconsistent with the rules and regulations in F.C.C.
Part 68.
If such changes can be reasonably expected to render any customer terminal
equipment incompatible with telephone company communications facilities, or require
modification or alteration of such terminal equipment, or otherwise materially affect its
use or performance, the customer shall be given adequate notice in writing, to allow
the customer an opportunity to maintain uninterrupted service.
“This equipment has been tested and found to comply with the limits for a Class B
computing device in accordance with the specifications set forth in Subpart J of Part 1.5
of the F.C.C. Rules.
If this equipment does cause interference to radio or television reception which can be
determined by turning the equipment on and off, use the equipment in another location
and/or utilize an electrical outlet different from that use by the receiver.”
Ringer Equivalence No. @EN):
The REN is useful in determining the quantity of devices you may connect to your
telephone line and still have all of those devices ring when your telephone line and still
have all of those devices ring when your telephone number is called. In most, but not
all areas, the sum of the REN’s of all devices connected to one line should not exceed
five (5.0). To be certain of the number of devices you may connect to your line, as
determined by the REN, you should contact your local telephone company to
determine the maximum REN for your calling area.
WARNING:
TO PREVENT FIRE OR SHOCK HAZARD, DO NOT EXPOSE THIS PRODUCT TO
RAIN OR ANY TYPE OF MOISTURE.
- 26 -
Page 28

Servicenter Directory
To locate an Authorized Servicenter in your area within the U.S.A.
DIAL TOLL FREE: l-800-545-2672
24
Hours a Day, 7 Days a Week
Consumers requiring as%stance with sewice matters should contact the appropriate Regional Adminlstratlon Office:
NORTHEAST
2250 Cabot Blvd.. West
Langhome. PA 19047 Arlington H;,gh&, IL 60005
215-741-0676 708-981-4842
COVWS:
CT, DE, ME, MD, MA, NH,
NJ, NY, PA, RI, VT, VA,
DC, WV, Eastern OH
Consumers requiring product lnformatlon of operating assistance with a consumer product should contact:
MIDWEST
425 East Aloonauin Road
covers:
IL. IN, IA. KS, KY, MI.
MN, MO, NE, ND, SD, WI.
Western OH
CONSUMER AFFAIRS DEPARTMENT 2F-3
50 Meadowland Parkway, Secaucus, N.J. 07094 (201) 348-9090
Your product is designed and manufactured to enaure a minimum of maintenance. However, should
your unit ever require service, a nationwide
INDEPENDENT SERVICENTERS is maintained to support your product’s warranty.
system of FACTORY SERVICENTERS and AUTHORIZED
WESTERN
6550 Katella Avenue
Cypress, CA 90630
714-373-7440
covers: Covers:
AK, AZ, CA, CO, ID. MT, AL, AR, FL, GA, LA, MS, NC,
NV, NM, OR, UT, WA, WY, OK, SC, TN, TX
HI
SOUTHERN
1854 Shackleford Court.
Suite 4105
Norcross, GA 30093
404-717-6860
Service in the U.S.A....
Factory Servicenters
MATSUSHITA SERVICES COMPANY
Division of Matsushita Electric Corporation of America
50 Meadowland Parkway, Secaucus, New Jersey 07094
ALABAMA
2523.5th Avenue, South
Blrmlngham. AL 35233
205-252-4195
CALIFORNIA
6550 Katella Avenue
Cypress, CA 90630
714-373-7426
930 South Mt. Vernon Ave
Sute 200
Colton. CA 92324
714-825-3110
BOODubuqueAvenue
So. San Franc~sco.
CA 94080
415-871-6373
20201 Sherman Way
Suite 102
Canoga Park, CA 91306
818-709-1775
3878 Ruffln Rd.. Sute A
San DIego, CA 92123
619-560-9200
COLORADO
1640 South Abilene
Suite D
Aurora. CO 80012
303-752-2024
FLORIDA
4115 W. Kennedy Boulevard
Tampa, FL 33606
813-289-9726
GEORGIA
4245 International Blvd
Suite C
Norcross, GA 30093
404-717-6880
HAWAII
99-859 lwawa Street,
Aiea. HI 96701
808-488-1996
ILLINOIS
425 E. Alaonwn Road
Arllngton”Hel~hts. IL 60005
708-981-4840
MARYLAND
Sulphur Spring Busmess
Park.
1638 Sulphur Spring Road,
Baltimore, MD 21227
301-242-2607
MASSACHUSETTS
383 University Avenue
Westwood, MA 02090
617-329-4280
MICHIGAN
8760 Hall Road
Rosati Heights Plaza
Sterling Heights. Ml 48314
313-739-1330
MINNESOTA
7850.12th Avenue. South
Airport Business Center,
Bloomtngton. MN 55425
612-854-8624
MISSOURI
11982 Dorsett Road
Maryland Heights,
MO 63043
314-739-5301
OHIO
1196 W. Kemper RD
Clnclnnatl. OH 45240
513-851-4180
PENNSYLVANIA
2250 Cabot Blvd West
Langhome, PA 19047
215-741-0661
Campbell’s Run
Busyness Center
500 Business Center Drive
Pittsburgh, PA 15205
412-788-2174
TENNESSEE
919.8th Avenue, South
Nashville. TN 37203
615-244-4434
TEXAS
7420 Harwn Dwe
Houston, TX 77036
713-781-1528
4500 Amon Carter Blvd
Fort Worth, TX 76155
817-685-1060
WASHINGTON
20425.84th Ave., South
Kent, WA 98032
206-872-7922
Service in Puerto Rico
MATSUSHITA ELECTRIC OF PUERTO RICO, INC.
Panasonic Sales Company/Factory Servicenter
San Gabriel lndustrlal Park, 65th Infantry Avenue KM 9.5 Carolina, Puerlo RICO 00630 (809) 750.5135
-z/ -
Page 29

Panasonic Telephone Products Limited Warranty
Panasonic Company, Panasonic Company (West) of America or Panasonic Sales
Company (collectively referred to as “Panasonic”) will repair this product with new or
rebuilt parts, free of charge, in the U.S.A. or Puerto Rico for one (1) year from the date of
original purchase in the event of a defect in material or workmanship.
Carry-in or mail-in service in the U.S.A. can be obtained during the warranty period from a
Matsushita Services Company (MSC) Factory Servicenter listed in the Servicenter
Directory. Or call i-800-545-2672, toll free, to locate an authorized MSC Servicenter.
Carry-in or mail-in service in Puerto Rico can be obtained during the warranty period by
calling the telephone numbers listed in the Servicenter Directory. This warranty is
extended only to the original purchaser. A purchase receipt or other proof of date of
original purchase will be required before warranty performance is rendered. This warranty
only covers failures due to defects in materials or workmanship which occur during normal
use. It does not cover damage which occurs in shipment or failures which are caused by
products not supplied by Panasonic or failures which result from accident, misuse, abuse,
neglect, mishandling, misapplication, alteration, modification, or commercial use of the
product, or service by anyone other than an MSC Factory Servicenter or authorized MSC
Servicenter, or damage that is attributable to acts of God.
Limits and Exclusions
There are no express warranties except as listed above. PANASONIC SHALL NOT BE
LIABLE FOR INCIDENTAL OR CONSEQUENTIAL DAMAGES RESULTING FROM
THE USE OF THIS PRODUCT, OR ARISING OUT OF ANY BREACH OF THIS
WARRANTY. ALL EXPRESS AND IMPLIED WARRANTIES, INCLUDING THE
WARRANTIES OF MERCHANTABILITY AND FITNESS FOR A PARTICULAR
PURPOSE, ARE LIMITED TO THE APPLICABLE WARRANTY PERIOD SET FORTH
ABOVE. Some states do not allow the exclusion or limitation of incidental or
consequential damages, or limitations on how long an implied warranty lasts, so the
above exclusions or limitations may not apply to you.
This warranty gives you specific legal rights and you may also have other rights which
vary from state to state. If a problem with this product develops during or after the
warranty period, you may contact your dealer or Servicenter. If the problem is not
handled to your satisfaction, then write to the Consumer Affairs Division at the
company address indicated back cover.
- 28 -
Page 30

if you ship the pfoducf
Carefully pack and send it prepaid, adequately insured and preferably in the
original carton.
Attach a postage-paid letter, detailing the complaint, to the outside of the carton.
DO NOT send the product to the Executive or Regional Sales offices. They are
NOT equipped to make repairs.
Product Service
I
Panasonic Servicenters for this product are listed on page 27.
Consult your authorized Panasonic dealer for detailed instructions.
I
For your future reference
Serial No.
Name of Dealer
Date of Purchase
Dealer’s Address
(found on the bottom of the unit)
I
1
1
Panasonic Company,
Division of Matsushita Electric Corporation of America
One Panasonic Way, Secaucus, New Jersey 07094
Panasonic Company (West) of America,
Division of Matsushita Electric Corporation of America
6550 Katella Avenue, Cypress, California 90630
Panasonic Sales Company (“PSC”),
Division of Matsushita Electric of Puerto Rico, Inc.
San Gabriel Industrial Park, 65th Infantry Avenue, KM 9.5, Carolina, Puerto Rico 00630
Printed in Japan
PQQX10063ZA F0392QO
 Loading...