

Page 1
Drivers and Utilities
Reference Guide
Model No. KX-P8420
Please carefully read the Operating Instructions and the Reference Guide before operating. Keep this
CD-ROM in the protective case.
Do not expose the CD-ROM to direct sunlight or extreme heat and do not scratch or smudge the surface of
the CD-ROM.
Page 2
The icons in this document indicate:
Features and functionality which require an optional hard disk drive.
See “Installing a hard disk drive” in the
Setup Manual
or
Operating Instructions
32
• Fiery WebTools, Fiery WebSpooler, Fiery WebLink, Fiery WebStatus, ColorWise and VisualCal are
trademarks of Electronics for Imaging, Inc.
• Apple, AppleTalk, LocalTalk, ColorSync, Macintosh, and TrueType are trademarks or registered trademarks
of Apple Computer, Inc.
• SunOS, Solaris and Java are trademarks or registered trademarks of Sun Microsystems, Inc. in the United
States and other countries.
• QuarkXpress is a trademark of Quark, Inc.
• CorelDRAW is a trademark of Corel Corporation.
• Netscape and Netscape Navigator are trademarks of Netscape Communications Corporation.
• Carta and Tekton are trademarks of Adobe Systems Incorporated or its subsidiaries and may be registered
in certain jurisdictions.
• Marigold and Oxford are trademarks of AlphaOmega Typography.
• Clarendon, Optima, Palatino, Stempel Garamond, Times, Helvetica and Univers are trademarks of LinotypeHell AG and/or its subsidiaries.
• Antique Olive is a registered trademark of M. Olive.
• Albertus, Gill Sans, Joanna and Times New Roman are trademarks of The Monotype Corporation registered
in the US Patent and Trademark Office and elsewhere.
• Eurostile is a trademark of Nebiolo.
• PANTONE is a trademark of Pantone, Inc.
• UNIX is a trademark of X/Open Company, Ltd.
• Microsoft, Windows and Windows NT are registered trademarks of Microsoft Corporation in the United
States and/or other countries.
• Pentium is a registered trademark of Intel Corporation.
• Centronics is a trademark of Centronics Data Computer Corporation.
• All other acknowledgments are trademarks or registered trademarks of their respective holders.
Features and functionality which require a minimum of 32 MB of SDRAM.
See “Installing additional memory” in the
Features and functionality available to printers operating in a networked environment.
See “Installing network cards” in the
Adobe, Acrobat, Adobe Photoshop, Adobe Illustrator, PostScript, PostScript 3,
Adobe Type Manager and the PostScript 3 logo are trademarks of Adobe Systems
Incorporated.
Fiery, Fiery Driven and the Fiery Driven logo are trademarks owned by Electronics for
Imaging and registered with the U.S. Patent and Trademark Office and in certain
other foreign jurisdictions.
:
. :
. :
Setup Manual
Setup Manual
or
Operating Instructions
or
Operating Instructions
.
It is granted from Microsoft Corporation to use Microsoft® Windows® Screen Shots.
Acrobat® Reader copyright ©1987-1997 Adobe Systems Incorporated. All rights reserved.
Specifications given in this guide are subject to change without notice.
© Electronics for Imaging, Inc. 1998
2
Page 3

Contents
Chapter 1
Printing from
Windows
Computers
Chapter 2
Printing from
Macintosh
Computers
Chapter 3
Printing from
UNIX
PostScript printing . . . . . . . . . . . . . . . . . . . . . . . . . . . . . . . . . . . . 5
Configuring PostScript printing options with Windows 95 . . . . . . . . . . . . . . . 6
Configuring PostScript printing options with Windows NT 4.0. . . . . . . . . . . 11
Configuring PostScript printing options with Windows 3.1. . . . . . . . . . . . . . 13
Windows print options . . . . . . . . . . . . . . . . . . . . . . . . . . . . . . . . 14
Semi Automatic Duplex printing. . . . . . . . . . . . . . . . . . . . . . . . . . . . . . . . . . 23
Setting up PostScript printing . . . . . . . . . . . . . . . . . . . . . . . . . . 25
Printing from a Macintosh application . . . . . . . . . . . . . . . . . . . . . . . . . . . . . 26
Macintosh print options . . . . . . . . . . . . . . . . . . . . . . . . . . . . . . . 28
Semi Automatic Duplex printing. . . . . . . . . . . . . . . . . . . . . . . . . . . . . . . . . . 33
Printing to the KX-P8420. . . . . . . . . . . . . . . . . . . . . . . . . . . . . . . 34
Workstations
Chapter 4
Managing
Print Jobs
About Fiery WebTools . . . . . . . . . . . . . . . . . . . . . . . . . . . . . . . . 37
Accessing Fiery WebTools. . . . . . . . . . . . . . . . . . . . . . . . . . . . . . . . . . . . . . 39
Using Fiery WebSpooler. . . . . . . . . . . . . . . . . . . . . . . . . . . . . . . 40
Duplicating, moving, and deleting jobs. . . . . . . . . . . . . . . . . . . . . . . . . . . . . 44
Changing print settings . . . . . . . . . . . . . . . . . . . . . . . . . . . . . . . . . . . . . . . . 46
Using the Job Log . . . . . . . . . . . . . . . . . . . . . . . . . . . . . . . . . . . . . . . . . . . . 47
Checking the printer status . . . . . . . . . . . . . . . . . . . . . . . . . . . . 49
Linking to other Web sites . . . . . . . . . . . . . . . . . . . . . . . . . . . . . 50
Using Fiery WebDownloader . . . . . . . . . . . . . . . . . . . . . . . . . . . 51
3
Page 4

Contents
Chapter 5
Working with
Color
The properties of color . . . . . . . . . . . . . . . . . . . . . . . . . . . . . . . . 53
The physics of color. . . . . . . . . . . . . . . . . . . . . . . . . . . . . . . . . . . . . . . . . . . 53
CIE color model . . . . . . . . . . . . . . . . . . . . . . . . . . . . . . . . . . . . . . . . . . . . . . 54
Hue, saturation, and brightness. . . . . . . . . . . . . . . . . . . . . . . . . . . . . . . . . . 54
Additive and subtractive color systems . . . . . . . . . . . . . . . . . . . . . . . . . . . . 55
Print device gamut . . . . . . . . . . . . . . . . . . . . . . . . . . . . . . . . . . . . . . . . . . . . 56
Controlling printed color . . . . . . . . . . . . . . . . . . . . . . . . . . . . . . 57
Maintaining print device consistency . . . . . . . . . . . . . . . . . . . . . . . . . . . . . . 57
Paper stock and toner . . . . . . . . . . . . . . . . . . . . . . . . . . . . . . . . . . . . . . . . . 57
Maintenance. . . . . . . . . . . . . . . . . . . . . . . . . . . . . . . . . . . . . . . . . . . . . . . . . 57
Using color effectively . . . . . . . . . . . . . . . . . . . . . . . . . . . . . . . . 58
A few rules of thumb . . . . . . . . . . . . . . . . . . . . . . . . . . . . . . . . . . . . . . . . . . 58
Color wheel . . . . . . . . . . . . . . . . . . . . . . . . . . . . . . . . . . . . . . . . . . . . . . . . . 59
Color and text. . . . . . . . . . . . . . . . . . . . . . . . . . . . . . . . . . . . . . . . . . . . . . . . 60
Raster images and vector images . . . . . . . . . . . . . . . . . . . . . . . 61
Optimizing files for processing and printing . . . . . . . . . . . . . . 62
Resolution of raster images . . . . . . . . . . . . . . . . . . . . . . . . . . . . . . . . . . . . . 62
Scaling . . . . . . . . . . . . . . . . . . . . . . . . . . . . . . . . . . . . . . . . . . . . . . . . . . . . . 63
Color management on the KX-P8420. . . . . . . . . . . . . . . . . . . . . 64
RGB Source. . . . . . . . . . . . . . . . . . . . . . . . . . . . . . . . . . . . . . . . . . . . . . . . . 65
Color rendering dictionaries. . . . . . . . . . . . . . . . . . . . . . . . . . . . . . . . . . . . . 66
CMYK Simulation. . . . . . . . . . . . . . . . . . . . . . . . . . . . . . . . . . . . . . . . . . . . . 67
Choosing colors in PostScript applications . . . . . . . . . . . . . . . . . . . . . . . . . 67
Appendix A
Fonts
Resident printer fonts. . . . . . . . . . . . . . . . . . . . . . . . . . . . . . . . . 69
Adobe Type 1 PostScript fonts. . . . . . . . . . . . . . . . . . . . . . . . . . . . . . . . . . . 69
TrueType fonts. . . . . . . . . . . . . . . . . . . . . . . . . . . . . . . . . . . . . . . . . . . . . . . 71
Glossary. . . . . . . . . . . . . . . . . . . . . . . . . . . . . . . . . . . . . . . . . . . . . . . . . . . . . . . . . . . . . . . 72
Index. . . . . . . . . . . . . . . . . . . . . . . . . . . . . . . . . . . . . . . . . . . . . . . . . . . . . . . . . . . . . . . . . . 75
4
Page 5

Chapter 1
Printing from Windows Computers
The following chapter describes where to set print options available using
the PostScript printer driver if you are running Windows® 95*
Windows NT 4.0*
PostScript printing
Custom print options available from the PostScript printer driver are
described in “Windows print options” on page 14. For additional information
on using KX-P8420 color management options, see “Chapter 5 Working
with Color”.
For information on installing the appropriate driver for your system and
setting up the environment for parallel printing with the KX-P8420, see
Chapter 4 of the
describes how to connect to the printer over the network, how to set up
networking for all supported network types, and how to install additional
KX-P8420 user software.
2
3
*
, or Windows 3.1*
Setup Manual
4
operating systems.
or
Operating Instructions
1
,
. This manual also
1
Microsoft® Windows® 95 operating system (hereafter Windows 95)
*
2
*
Microsoft® Windows NT® Workstation operating system, and Microsoft®
Windows NT® Server network operating system Version 4.0
(hereafter Windows NT 4.0)
3
*
Service Pack 3 or later version is required.
4
*
Microsoft® Windows® operating system Version 3.1
(hereafter Windows 3.1)
5
Page 6
Printing from Windows Computers
5
Configuring
PostScript
printing options
with Windows 9
This section describes configuring printing options for Windows 95 using
the Adobe PostScript printer driver provided on the KX-P8420 Driver &
Utility CD-ROM.
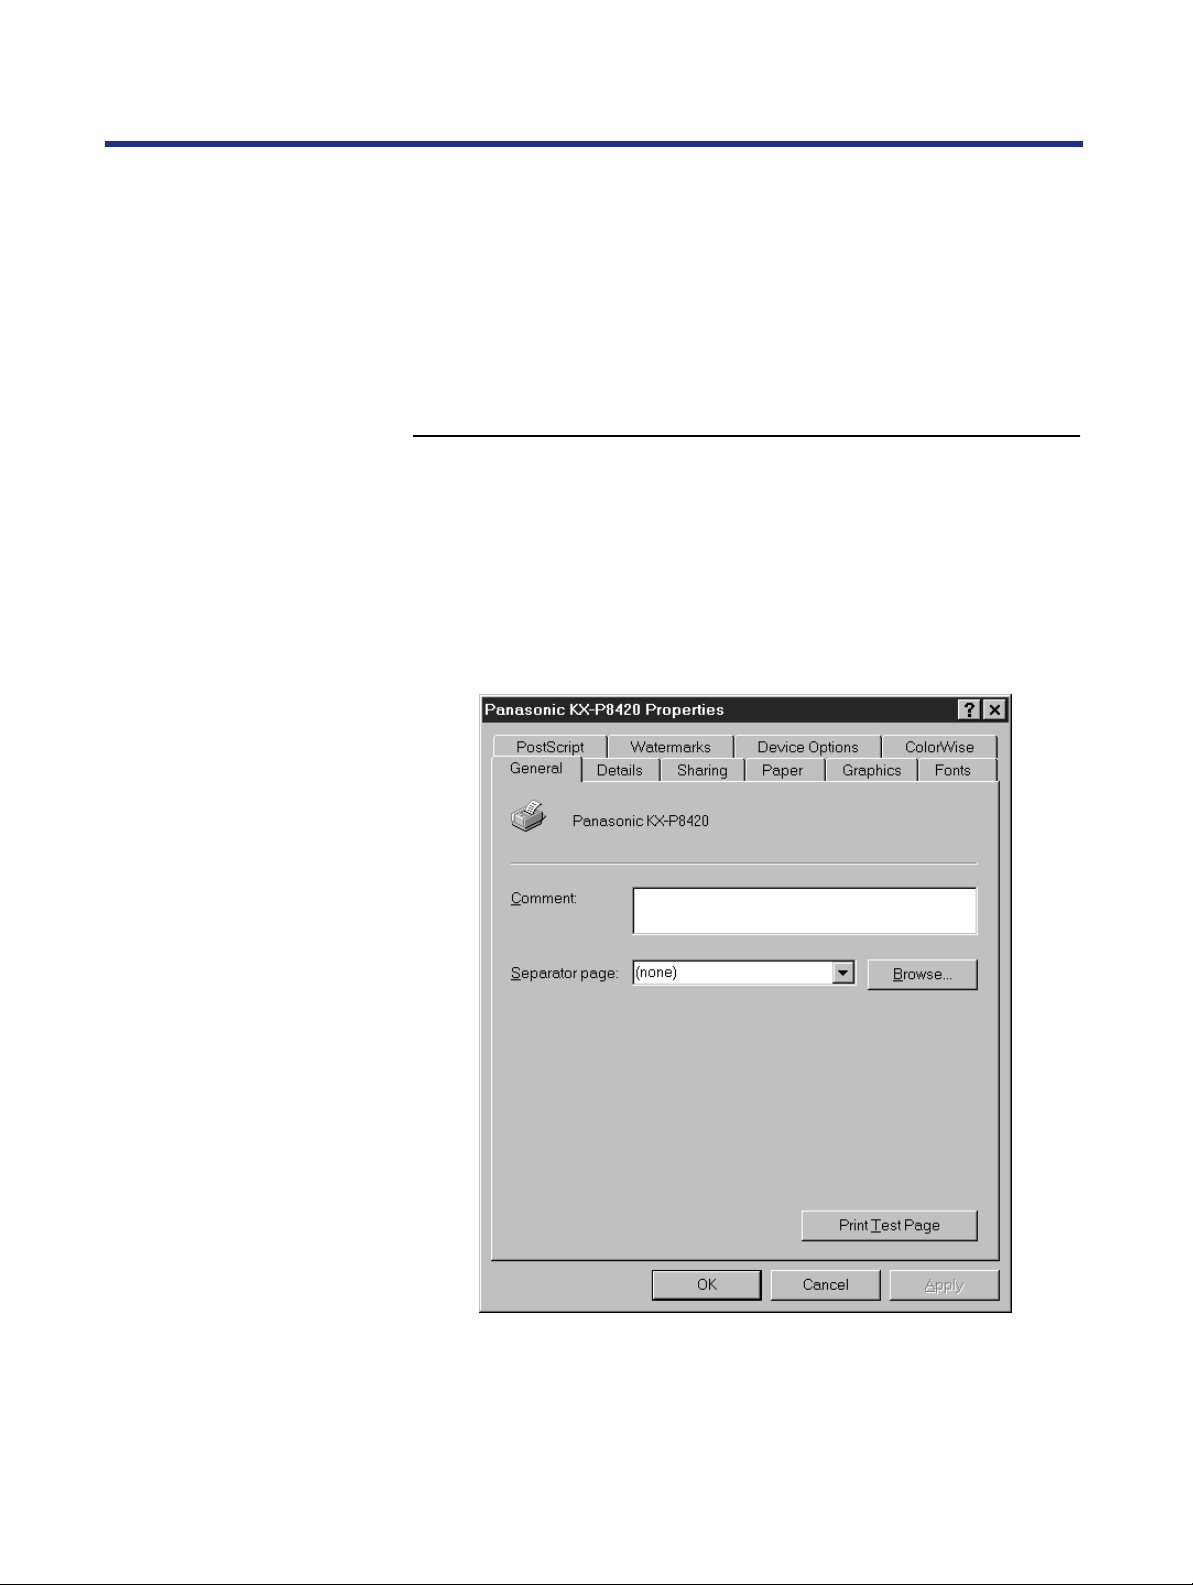
Print options are specified from the Printer Properties dialog box. This
dialog can be accessed using the steps described below, or by selecting
File>Print from within your application and clicking the Properties button.
To configure PostScript printing options:
1
2
From the Windows Start menu, select
Settings
Click the Panasonic KX-P8420 printer icon and select
Properties from the File menu.
The Printer Properties dialog box appears, with the General tab
displayed.
>
Printers .
6
Page 7

Printing from Windows Computers
3
Click the Paper tab.
4
5
Specify paper size, paper source, number of copies, and other print
options from this tab.
Click the More Options button in the Paper tab.
Specify whether or not to print a page border for your print job.
Click OK .
7
Page 8
Printing from Windows Computers
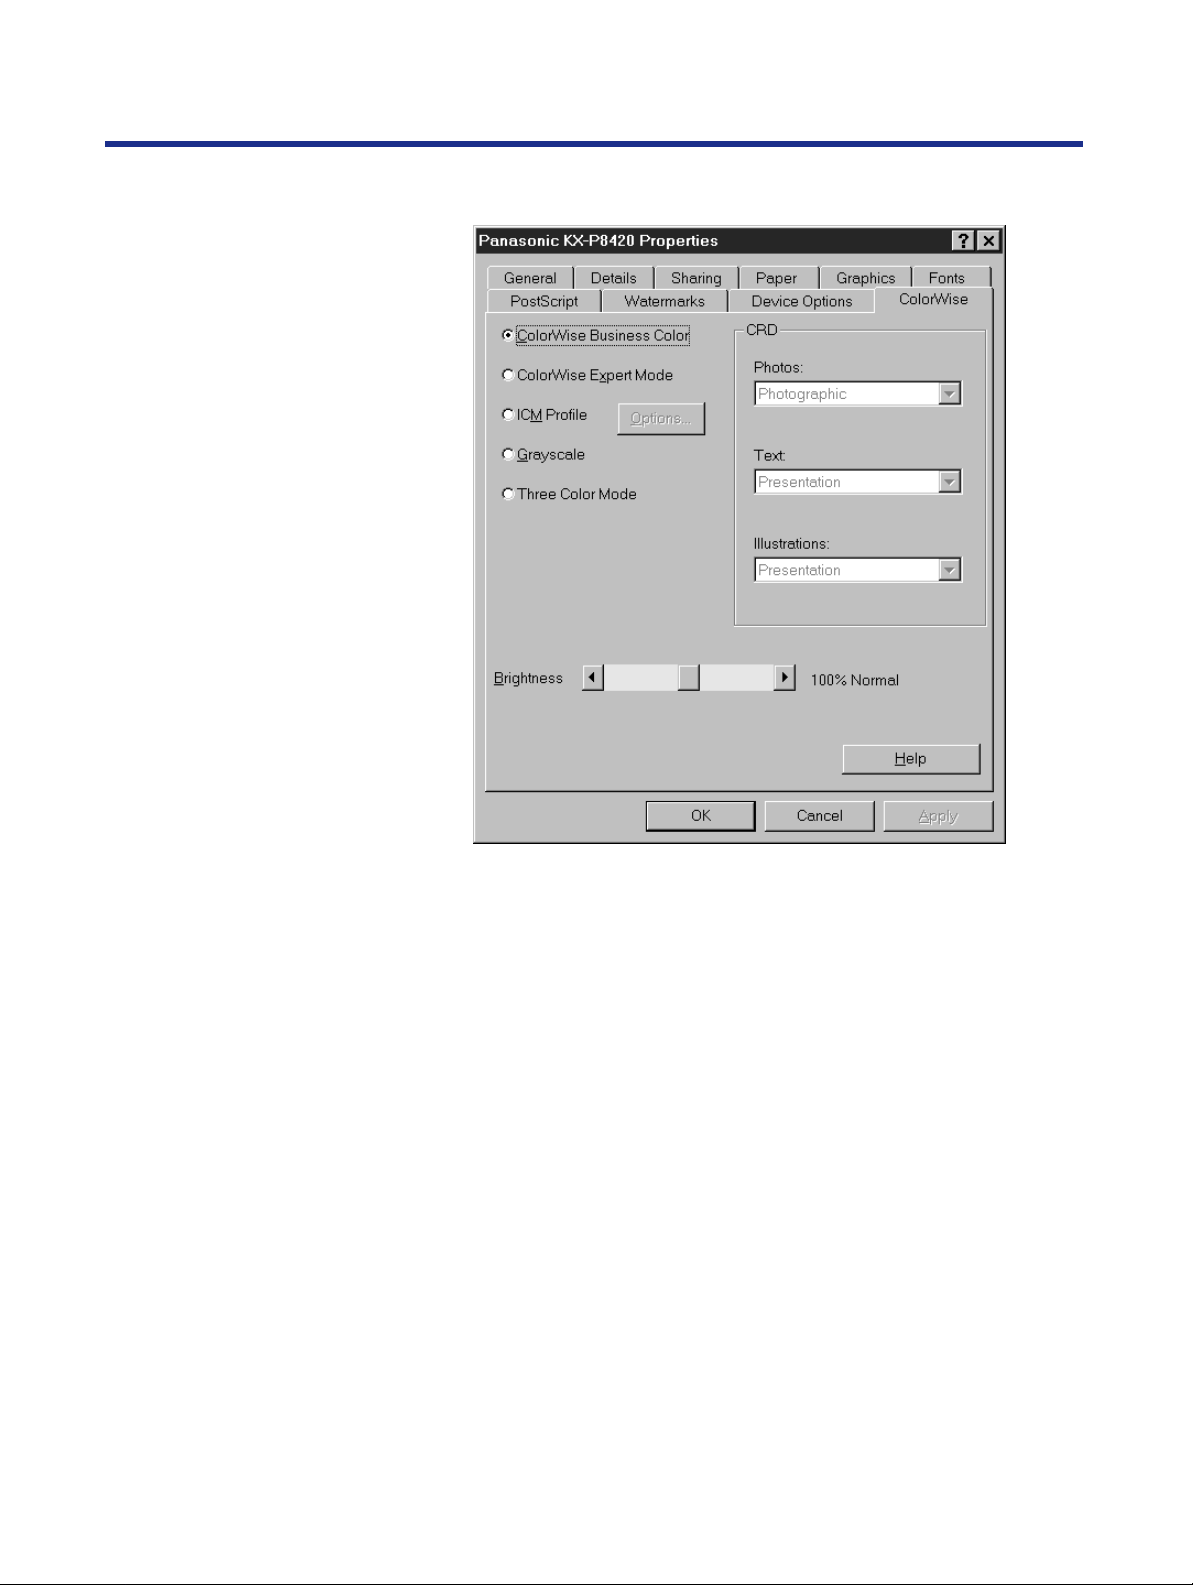
6
Click the ColorWise tab.
Specify color management settings from this tab. For information on
the print options available in this tab, see “Windows print options” on
page 14.
8
Page 9
Printing from Windows Computers
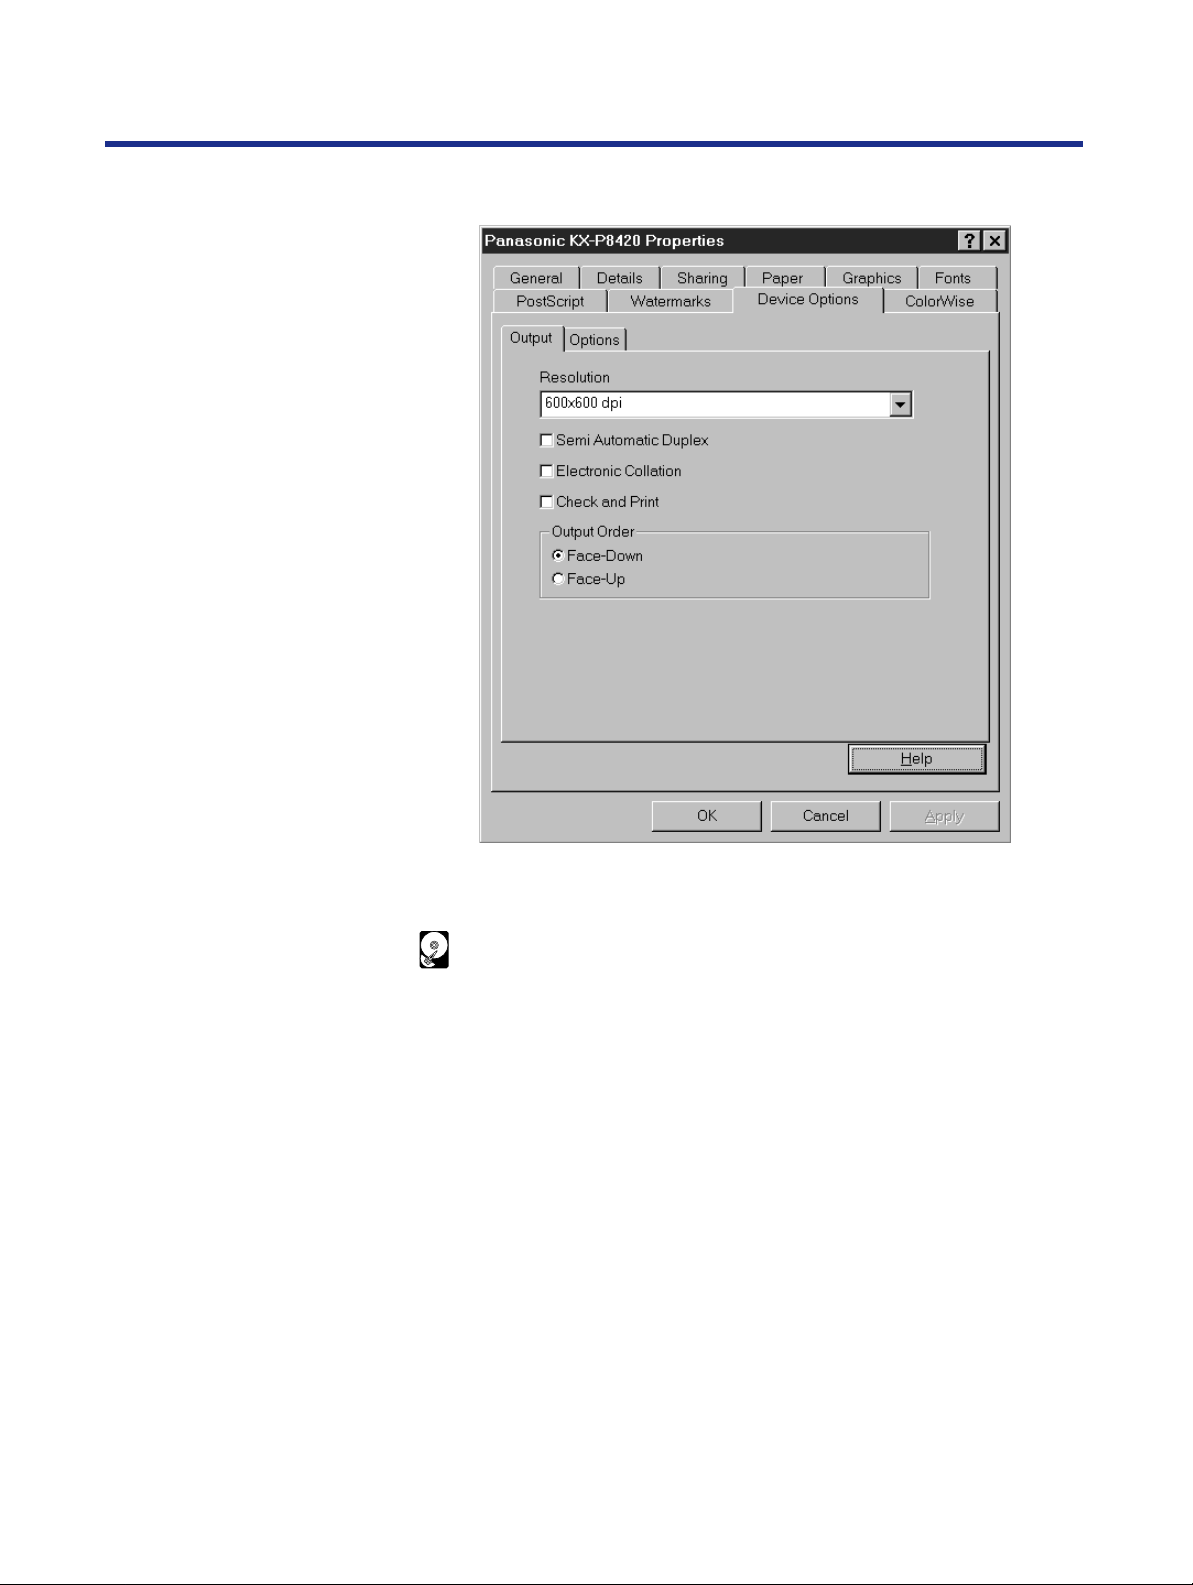
7
Click the
Device Options
tab.
Specify settings in the Output tab. For details on print option settings
you can make in this tab, see “Windows print options” on page 14.
The Check and Print and Electronic Collation options are available
only for printers with a hard disk drive.
9
Page 10

Printing from Windows Computers
8
Click the
Options
tab.
9
Features related to optional device, such as a Hard Disk or 2nd
Feeder are enabled only when you have specified them as installed
in this tab.
To add an option, select it from the Available Options area and click
Add. To remove an option, select it from the Installed Options area
and click Remove.
Click
OK
Apply
.
to apply any changes you made, then click
10
Page 11
Printing from Windows Computers
Configuring
PostScript
printing
options with
Windows NT 4.0
This section describes configuring printing options for Windows NT 4.0
systems. On Windows NT 4.0, PostScript printing options are set from the
Printer Properties dialog box and the Default Document Properties dialog
box.
To configure Postscript printing options:
1
2
3
From the
Settings
Click the Panasonic KX-P8420 printer icon, and select
Properties from the File menu.
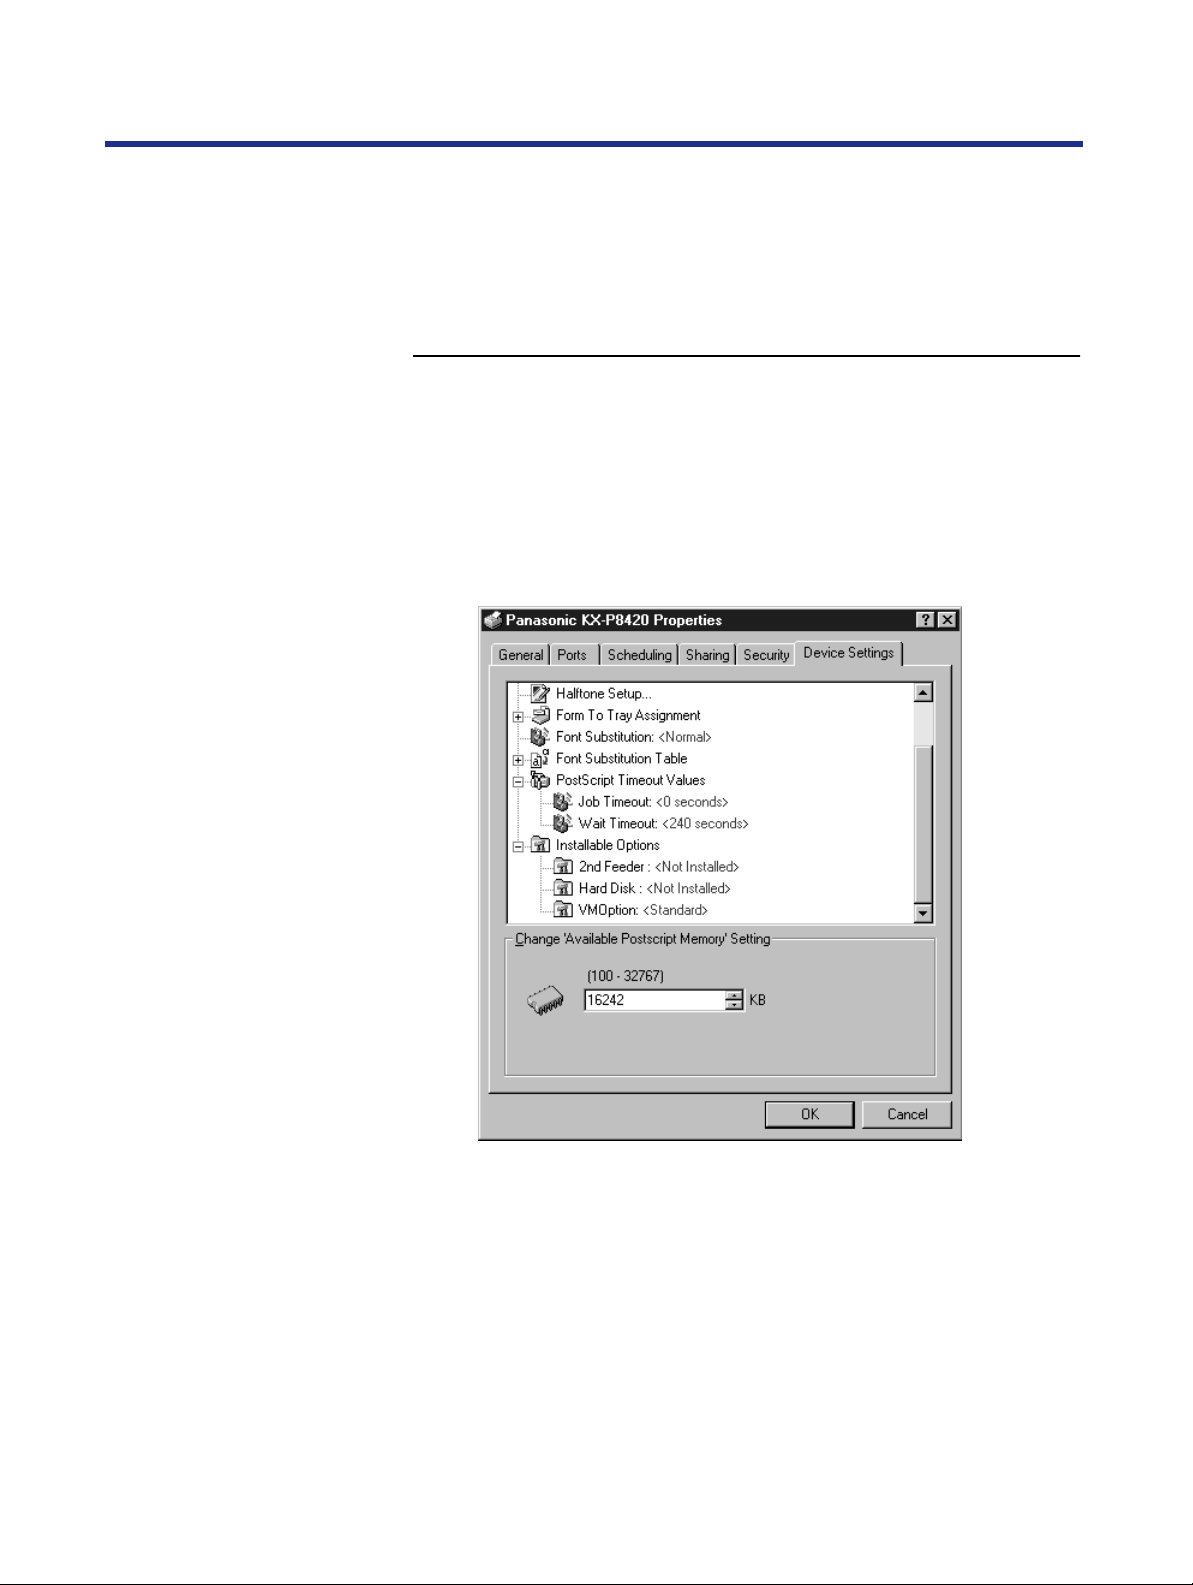
Click the Device Settings tab.
Windows NT 4.0
>Printers.
taskbar, select
4
5
6
If the available options do not appear, double-click the
Installable Options folder.
To specify which options are installed on the printer,
click on the option and then select a setting in the
Change ‘…’ Setting area at the bottom of the dialog
box.
Click OK .
11
Page 12
Printing from Windows Computers
7
8
Right-click the Panasonic KX-P8420 printer icon in the
Printers folder and select Document Defaults .
The Default Document Properties dialog box appears.
NOTE:
When printing from applications, this dialog box appears (select
•
Print, and then click the Properties button).
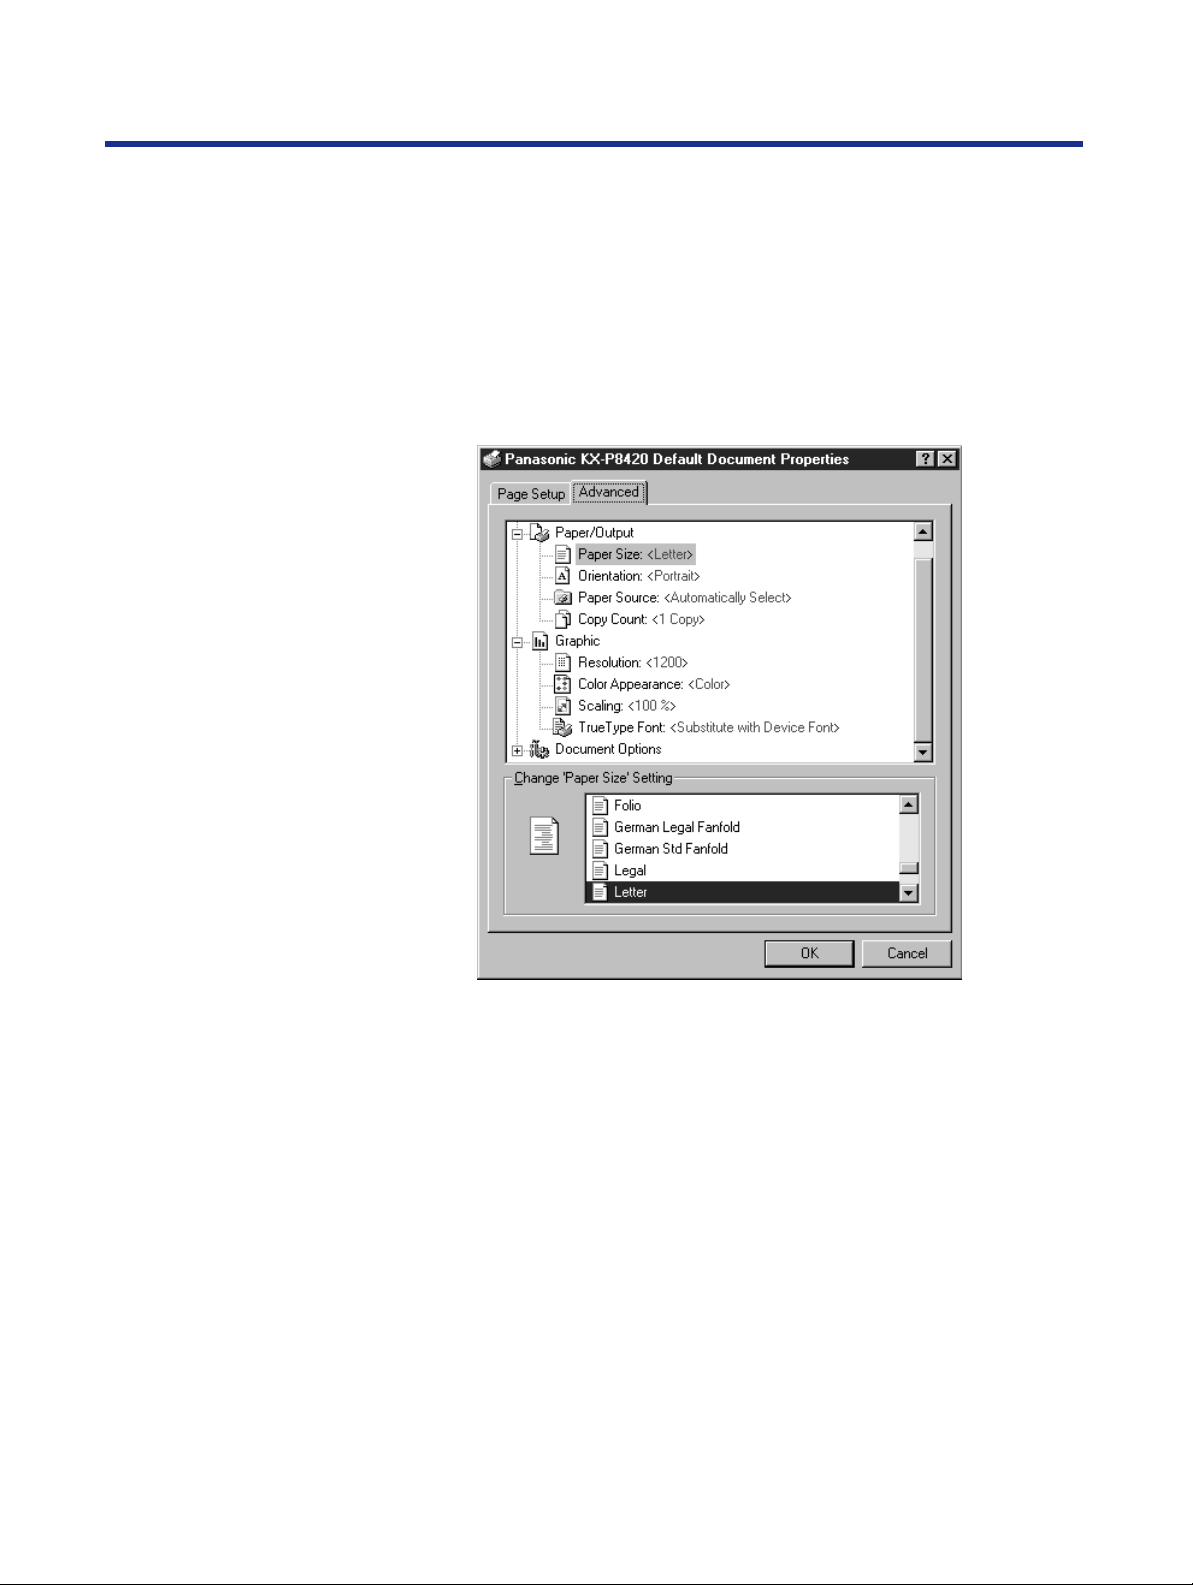
Click the Advanced tab.
12
9
10
Specify the appropriate settings for your print job.
From this tab you can specify all print option settings. These include
Paper Size and Paper Source (which can also be specified from the
Page Setup tab), listed under Paper/Output, and printer-specific
option settings listed under Document Options > Printer Features.
For information on valid print option settings, see “Windows print
options” on page 14.
Click OK .
Page 13
Printing from Windows Computers
Configuring
PostScript
printing
options with
Windows 3.1
This section describes configuring printing options for Windows 3.1 systems
using the Adobe PostScript printer driver from the KX-P8420 Driver & Utility
CD-ROM.
To configure PostScript printing options:
1
2
3
4
In the Main window, double-click the Control Panel icon.
Double-click the Printers icon.
In the Printers dialog box, select the Panasonic
KX-P8420 on LPT1 from the Installed Printers list box
and click Setup .
The Panasonic KX-P8420 on LPT1 dialog box appears. Print
options are specified from tabs in this dialog box.
For a description of print options, see “Windows print options” on
page 14. For a description of options not included in this table, refer
to the driver’s Help menu.
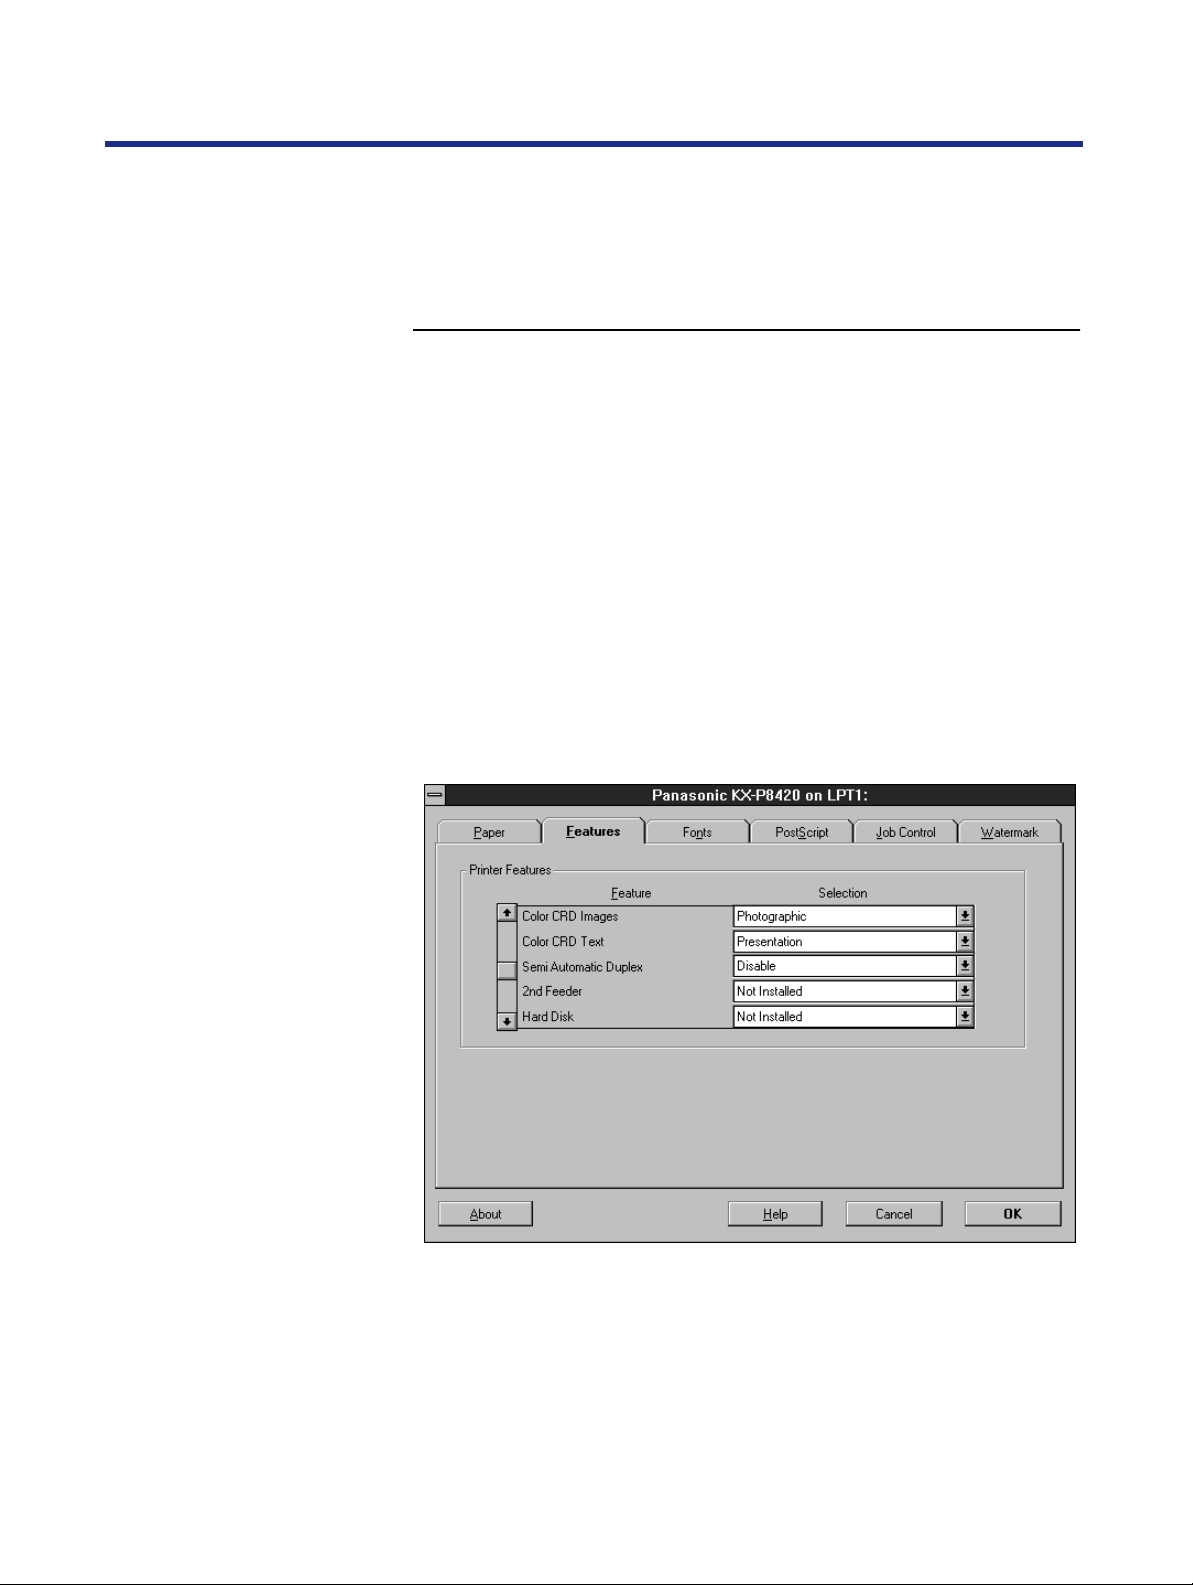
Click the Features tab.
Specify devices installed on the printer to enable print options
relating to those devices. Use the scroll bar to view all of the
available features. To specify a setting, select it from the feature’s
corresponding Selection menu.
13
Page 14

Printing from Windows Computers
Windows print options
The printer drivers that come with your printer have been customized to
provide additional print options specific to your KX-P8420 printer. Although
the PostScript printer driver interfaces vary between Windows 95,
Windows NT 4.0, and Windows 3.1 operating systems, the printing features
available from each driver, on each platform, are virtually the same.
The following table describes print options and settings available using the
PostScript printer driver with Windows 95, Windows NT 4.0, and
Windows 3.1 operating systems.
NOTE:
Print option names may vary depending on the version of Windows you
•
are using, and some print options appear only with certain versions of
Windows.
Print options below which are common in the Adobe PS driver are
described in Help of the driver. For more information, see also the Readme
file included on the KX-P8420 Driver & Utility CD-ROM.
1) PS error print
Even when the “Print PostScript Error Information” option is disabled (in
the PostScript tab of the Windows 95) Printer Properties dialog box for
Windows 95, a PostScript error page may be printed.
2) Pure binary data
Selecting “Pure binary data” as the data format (in the “Advanced
PostScript Options” section of the PostScript tab of Printer Properties
dialog box for Windows 95) might cause a printer error. Avoid using this
option.
3) Print as Negative image, Print as mirror image
Selecting these options (in the Graphics tab of the Printer Properties
dialog box for Windows 95) does not always produce the correct result.
4) Halftoning
The halftoning settings Screen angle and Screen frequency (in the
Graphics tab of the Printer Properties dialog box for Windows 95) are not
supported by the KX-P8420.
14
Page 15

Printing from Windows Computers
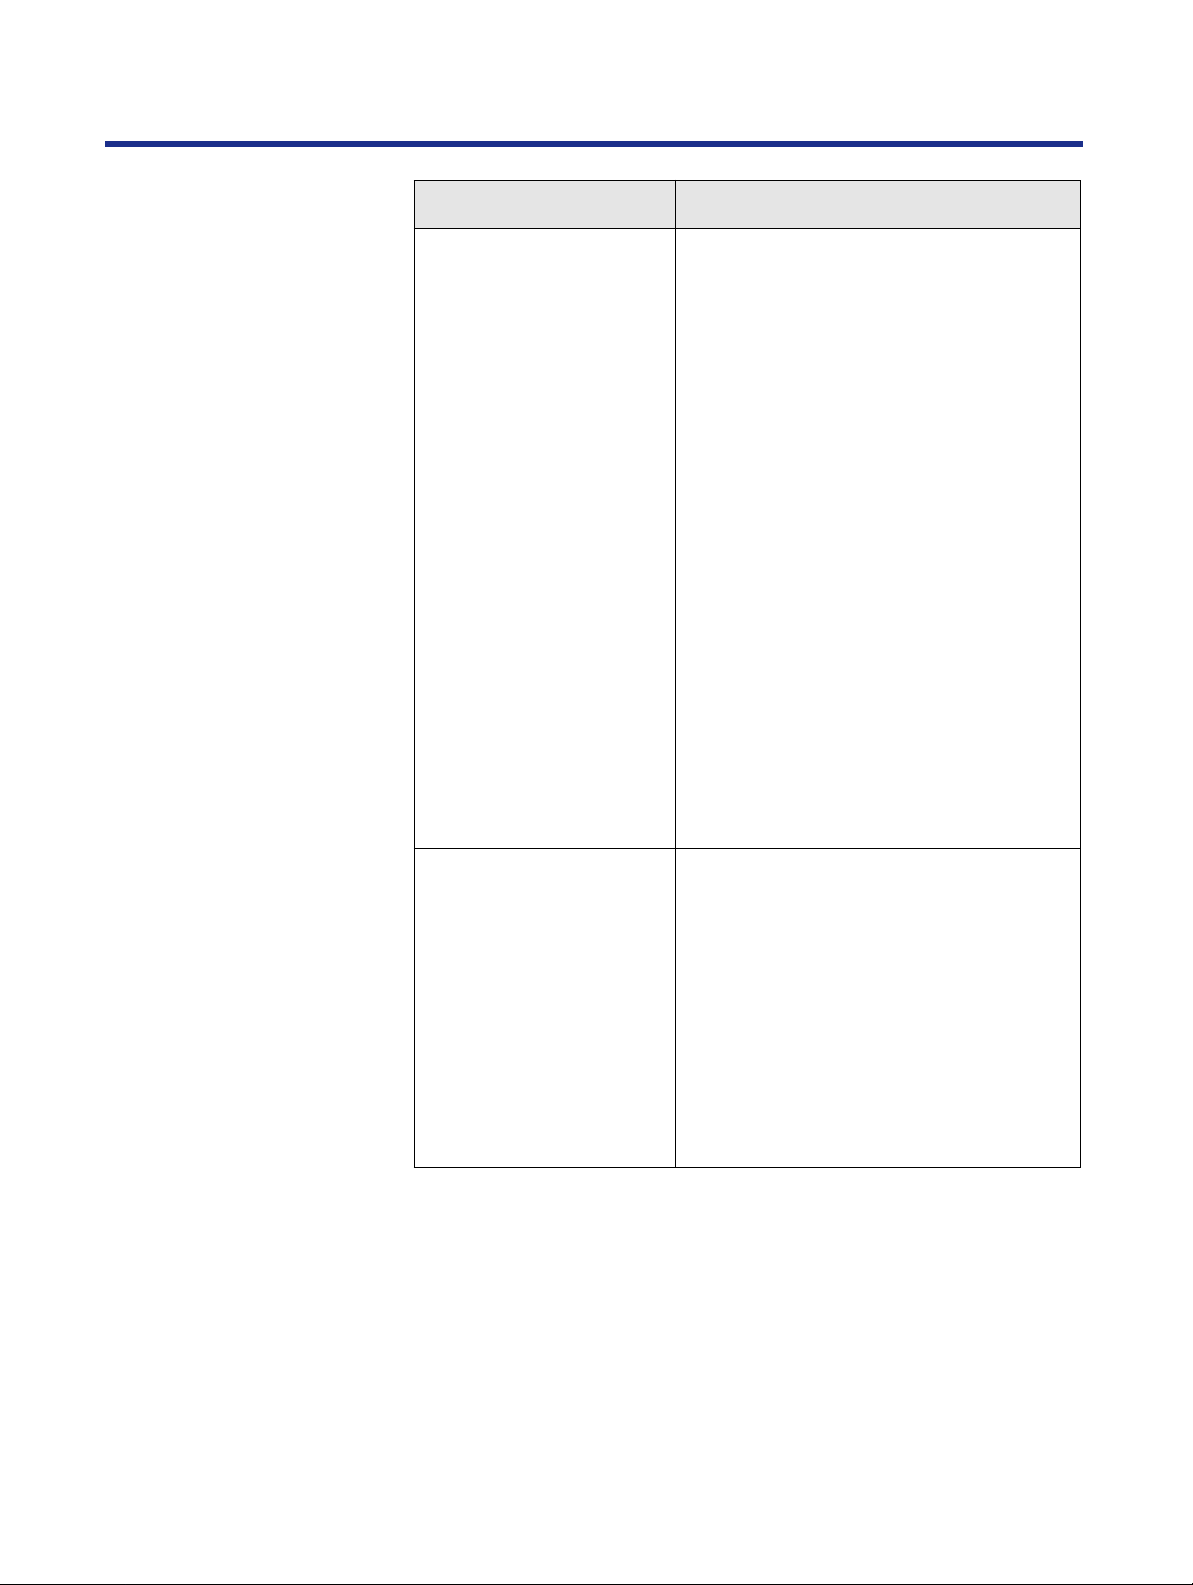
Print option Description
Brightness
85% to 115%
(Default: 100%)
Check and Print
(Default: Disable)
CMYK Simulation
SWOP-Coated/DIC/
Euroscale/None
(Default: None)
Adjust the color production on all color
channels to make the printed output lighter
or darker.
Allows you to print a single copy of a
multiple copy job that can be visually
checked before printing additional copies.
When the Check and Print copy has been
printed, you can specify the number of
additional copies of the job to print using
the Check and Print screens at the printer’s
front panel.
Check and Print is available only on
printers with a hard disk drive.
CMYK Simulation settings adjust CMYK
color data to simulate printing to an offset
press standard. Select SWOP-Coated to
simulate printing to a standard American
offset press; Euroscale to simulate a
European offset press, or DIC to simulate a
standard Japanese offset press. For more
information, see “CMYK Simulation” on
page 67.
NOTE:NOTE:NOTE:NOTE:
• This option is available only in ColorWise
Expert Mode in Windows 95.
15
Page 16

Printing from Windows Computers
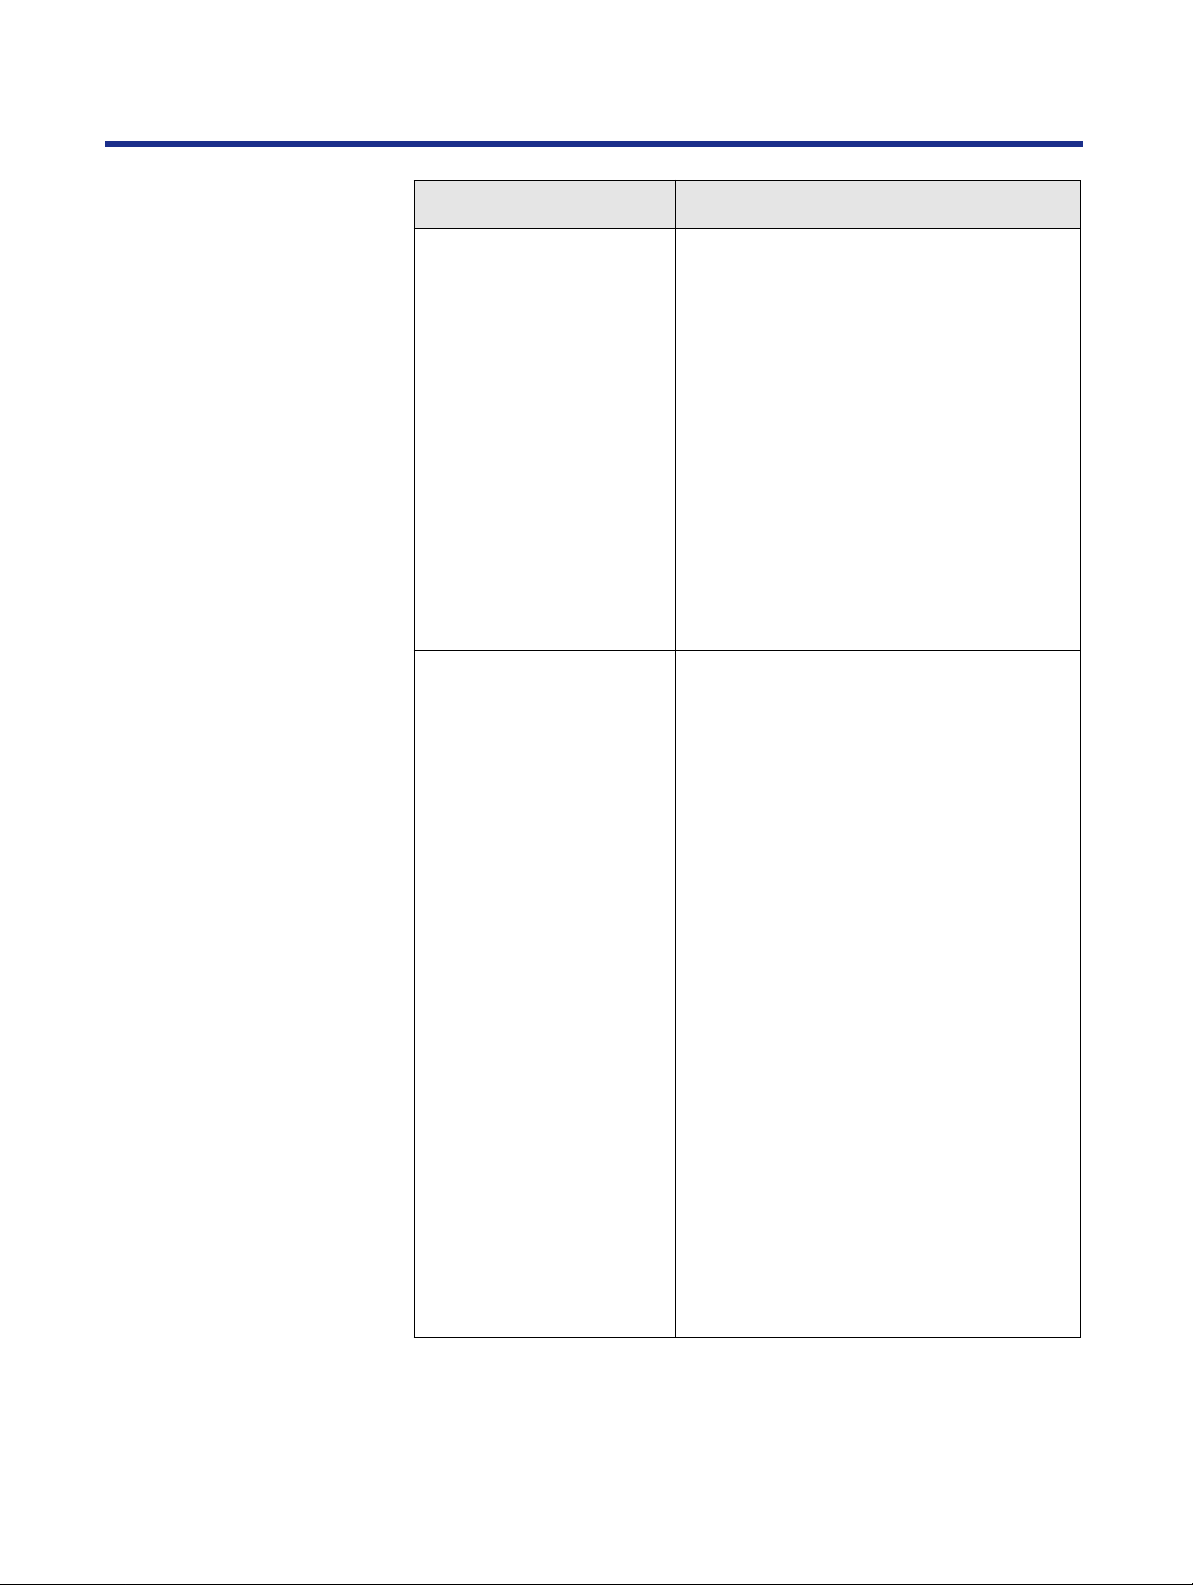
Print option Description
Color CRD Text
Color CRD Graphics
Color CRD Images
None/Photographic/
Presentation/Transparency
(Defaults:
Text—Presentation
Graphics—Presentation
Images—Photographic)
Color Mode
CMYK/CMY/Grayscale
(Default: CMYK)
Before an RGB image can be printed, the
file’s color data must be converted to the
printer’s CMYK color space. Color
rendering dictionaries apply optimal gamut
mapping methods to documents that
contain text, photographs and illustrations.
The Photographic CRD optimizes the range
of colors on the printer to produce the best
results for photographic or bitmapped
images.
The Presentation CRD optimizes the output
of pure, saturated colors such as those
used in business presentations.
The Transparency CRD improves the
correspondence between monitor colors
and printed color on transparency paper.
For additional information, see “Color
rendering dictionaries” on page 66.
NOTE:NOTE:NOTE:NOTE:
• Color rendering dictionaries cannot be
used with CMYK files.
By default your printer is set to print
documents in color (CMYK). Select
Grayscale to print documents in grayscale
or CMY to print using Cyan, Magenta and
Yellow toner only. This setting allows you to
print drafts of color images more quickly
than in CMYK mode. The CMY option is
only available when the printer’s print
resolution is set to 600 × 600 dpi. Selecting
the CMY option applies the Photographic
CRD to photos, and the Presentation CRD
to text and illustrations.
16
NOTE:NOTE:NOTE:NOTE:
• To select Grayscale for Windows NT 4.0/
Windows 3.1, see “Grayscale” on
page 19.
Page 17
Printing from Windows Computers
Print option Description
ColorWise Business Color
(Defaults:
Text—Presentation
Illustrations—Presentation
Photos—Photographic)
Before an RGB image can be printed, the
file’s color data must be converted to the
printer’s CMYK color space. Color
rendering dictionaries allow you to apply
optimal gamut mapping methods for text,
photographs and illustrations.
ColorWise Business Color specifies the
application of the Photographic color
rendering dictionary to photographic
objects, and the Presentation color
rendering dictionary to illustration and text
objects in a document. Use this option if
you are printing documents created in office
applications that include color charts or
mixed graphic and text elements.
For additional information, see “Color
rendering dictionaries” on page 66.
NOTES:
• When ColorWise Business Color is
selected, CRD settings are disabled.
Color rendering dictionaries cannot be
used with CMYK files.
• This option is available only in
Windows 95.
ColorWise Expert Mode ColorWise Expert Mode enables CRD
settings. You can select any combination of
these settings to customize the printing of
text graphic and illustration objects in your
documents. Use this option if you are
printing documents with a natural range of
colors as in a continuous tone photograph.
For additional information on CRDs, see
“Color rendering dictionaries” on page 66.
NOTE:NOTE:NOTE:NOTE:
• This option is available only in
Windows 95.
17
Page 18

Printing from Windows Computers
Print option Description
CRD
Photos/Text/Illustrations
(Defaults:
Photos—Photographic
Text—Presentation
Illustrations—Presentation)
Before an RGB image can be printed, the
file’s color data must be converted to the
printer’s CMYK color space. Color
Rendering Dictionaries (CRDs) apply
optimal gamut mapping methods to
documents that contain text, photographs
and illustrations.
The Photographic CRD optimizes the range
of colors on the printer to produce the best
results for photographic or bitmapped
images.
The Presentation CRD optimizes the output
of pure, saturated colors such as those
used in business presentations.
The Transparency CRD improves the
correspondence between monitor colors
and printed color on transparencies.
For additional information, see “Color
rendering dictionaries” on page 66.
NOTE:NOTE:NOTE:NOTE:
• CRDs cannot be used with CMYK files.
Device Options Optional printer accessories installed on
your printer must be specified from the
printer driver to enable their related
features. For example, the Check and Print
and Electronic Collation features are not
enabled unless a hard disk drive has been
specified as a device installed on the
printer. Options include: 2nd Feeder, Hard
Disk.
18
Electronic Collation
(Default: No)
If your printer has a hard disk, you can use
this option to collate copies of your print job.
This option allows the pages of each copy
of a print job to be printed in sequence. If
your printer does not have a hard disk drive
or this option is set to Off, multiple copies of
each page of a print job are printed in
sequence. To avoid unexpected results,
always specify collation using this option,
and turn off any collation option that may
exist in your application.
Electronic Collation is available only
on printers with a hard disk drive.
Page 19
Printing from Windows Computers
Print option Description
Grayscale By default your printer is set to print
documents in color (CMYK). Select
Grayscale to print documents in grayscale.
NOTES:
• Many applications offer black and white or
grayscale printing options. Use the
application’s grayscale option, if available,
for more efficient processing time.
• To enable Grayscale in Windows 3.1,
select None in all three CRD options in
the Features tab.
• To enable Grayscale in Windows NT 4.0,
select Document Defaults from the File
menu in the Printers folder, and select
None in all three CRD options in the
Advanced tab.
ICM Profile The Adobe PostScript 4.2.3 driver for
Windows 95 can convert RGB colors of a
file to a specified CMYK device target using
ICM (Image Color Matching) technology.
Install the ICM profile and select this option
to specify the use of an ICM device profile
installed on your computer.
To install the ICM profile,
1) Right-click the ICM profile Pakx
2010.icm in Windows\System\Color
folder.
2) Click Install In Place.
NOTES:
• When printing from Microsoft Office 97
applications, make sure the KX-P8420
ICM profile is not installed in the
Windows\System\Color folder. If the ICM
profile is installed, JPEG, BMP, and TIFF
images print incorrectly from Microsoft
Office 97.
• ICM is not copied if you install the
KX-P8420 printer driver by using the Add
Printer wizard. Copy the ICM profile
manually from KX-P8420 Driver & Utility
CD-ROM (English\Prntdrvr\Disk1) to
Windows\System\Color folder. Install the
ICM profile using the instructions above.
19
Page 20

Printing from Windows Computers
Print option Description
Output Order
Face-Down/Face-Up
(Default: Face-Down)
Print jobs sent to the KX-P8420 can be
output Face-Down or Face-Up.
Face-Down printing results in a print job
with the pages in sequential order, with the
first page at the bottom of a stack of printed
pages, face down.
Face-Up printing results in a print job with
the pages in sequential order, with the first
page at the bottom of a stack of printed
pages, face up.
NOTE:NOTE:NOTE:NOTE:
• Face-Up printing is automatically selected
when the Semi Automatic Duplex option
is enabled, or when printing on
transparencies or printing from the
multi-purpose tray.
Paper Size Paper and envelope sizes supported by the
printer can be specified by name. Options
include: Letter, A4, Legal size paper, and
Envelope #10 envelopes.
Paper Source
(Defaults:
AutoSelect Tray/
Automatically Select/
Auto Tray Select)
Paper and paper trays can be specified by
name from the Paper Source menu.
Options include: AutoSelect Tray, Auto
(Plain Paper), Auto (Transparency), MPT
Plain Paper, MPT Transparency, MPT
Label, MPT Coated Paper, MPT Envelope,
MPT Paper 2nd Side. Available Paper Size
options in the driver are limited by the
Paper Source selection. Be sure to specify
which paper source you would like to print
from before selecting the size of the paper
you are printing on.
20
NOTES:
• If the optional 2nd Feeder is installed,
Upper, Middle, Lower; Paper or
Transparency trays may also be selected
as the paper source from the driver (see
“Device Options” on page 18).
• When Transparency paper is used, the
Transparency CRD is automatically
applied to text, illustrations and
photographs in the document.
Page 21

Printing from Windows Computers
Print option Description
Resolution
(Default: 600 × 600 dpi)
RGB Source
EFIRGB/sRGB (PC)/
Apple Standard/Off
(Default: EFIRGB)
Specify the print resolution for your printer.
Options include: 600 × 600, 1200 × 600 or
1200 × 1200 dpi.
NOTES:
• With Windows 95, a Resolution option
also appears in the Graphics tab of the
Properties dialog box or Print dialog box
shown by selecting print menu from
application, but has no effect if set. Be
sure to set the Resolution option from the
Device Options tab.
• A minimum of 32 MB of SDRAM is
required for printing at 1200 × 600 or
1200 × 1200 dpi.
RGB source profiles allow you to define the
color space characteristics (such as the
white point, gamma and type of phosphors)
of the image’s source. When a source is
specified, the image’s RGB data can be
optimally converted to the color space and
gamut of the KX-P8420 printer.
The EFIRGB setting is optimal for color
conversions that will be sent to the
KX-P8420 printer. The sRGB (PC) setting
specifies the source space of a generic
Windows computer monitor. The Apple
Standard setting specifies the source space
of all standard Macintosh monitors.
NOTES:
• The RGB source setting overrides any
source color space profile you may have
specified using other color management
systems. In cases where you don’t want
this setting to override another specified
source color space, select Off.
• This option is available only in ColorWise
Expert Mode Windows 95 driver.
For additional information on source
profiles, see “RGB Source” on page 65.
21
Page 22

Printing from Windows Computers
Print option Description
Semi Automatic Duplex
(Default: Disable)
Simulation See “CMYK Simulation” on page 15.
Three Color Mode This option allows you to print draft color
Print on both sides of a page using the
Semi Automatic Duplex option. For details,
see the procedure for using the Semi
Automatic Duplex option on page 23.
NOTE:NOTE:NOTE:NOTE:
• It is highly recommended to install hard
disk drive (option) to use this feature
effectively.
copies or three color copies of documents.
When Three Color Mode is selected, the
printer prints using Cyan, Magenta and
Yellow toner only. This option is only
available when the printer’s print resolution
is set to 600 × 600 dpi. This option uses
only the same default combination of CRDs
used for ColorWise Business Color—the
Photographic CRD for photographic
objects, and the Presentation CRD for
illustration and text objects. For more
information, see “ColorWise Business
Color” on page 17.
22
Page 23

Semi Automatic Duplex printing
The Semi Automatic Duplex option allows you to print on two sides of a
single page.
The procedure for Semi Automatic Duplex printing varies depending on
whether your printer has a hard disk installed. If your printer has a hard disk
drive installed and the Semi Automatic Duplex option is selected, the printer
spools and prints all even-numbered pages in a job and, when the
Continue/Forward button is pressed at the printer, prints all odd-numbered
pages in the job. If your printer does not have a hard disk drive and this
option is selected, the printer prints an odd-numbered page and, when the
Continue/Forward button is pressed, prints the subsequent even-numbered
page in the job.
Follow the procedure outlined below to use the Semi Automatic Duplex
option.
To print using the Semi Automatic Duplex option:
1
2
3
4
Select the
KX-P8420 printer driver.
Print a document by selecting
application’s
The odd-numbered pages are printed.
When
Continue
pages from the job face down and bottom first in the
multi-purpose tray.
Press the
to print the even-numbered pages on the opposite side
of each page in the multi-purpose tray.
If the printer does not have a hard disk drive, the next oddnumbered page is printed automatically; repeat steps 3 and 4 for
every even-numbered page in the print job.
NOTE:
When the printer does not print the even-numbered pages after a
•
press of Continue/Forward button, remove the odd-numbered
pages and reload them in the multi-purpose tray.
Semi Automatic Duplex
File
menu.
Insert printed pages in MP tray, press
appears in the LCD, load the printed odd
Continue/Forward
button on the front panel
Print
option in the
from the
23
Page 24

Printing from Windows Computers
NOTE:
• We strongly recommend that you follow the guidelines for normal two-
sided printing.
— Do not load more than 50 sheets in the multi-purpose tray.
— Before loading paper in the multi-purpose tray, adjust it so that the
edges of the media are lightly touching the media guides of the multipurpose tray.
— Use heavier paper, at least 95 to 165 g/m2 (28 to 44 lbs. Bond) for
reliable feed. Do not load a thin sheet of paper in the multi-purpose
tray. It may cause a paper jam.
— It is strongly suggested to use color laser bond paper.
— Avoid printing photograph or graphic in solid color to prevent paper
jamming. It may cause a damage to the printer.
— Before printing on the first side, set the unprintable area [at least
15 mm (0.59") in length] on the top of paper. (See below.)
Unprintable area
[a : at least 15 mm (0.59")]
Paper feed
direction
a
Pollution of World
It is strongly recommended
that the sizes of photograph
and graphic printed on the
page are as small as
possible.
24
Page 25

Chapter 2
Printing from Macintosh Computers
The following chapter describes setting up PostScript printing from
Macintosh using the Adobe PostScript printer driver 8.5.1 provided on the
KX-P8420 Driver & Utility CD-ROM. This driver has been customized to
provide additional print options specific to your KX-P8420 printer.
Custom print options available from PostScript printer driver are described
in “Macintosh print options” on page 28.
Setting up PostScript printing
Once you have installed the PostScript printer driver, you can print to the
KX-P8420 just as you would print to any other printer. Simply specify the
KX-P8420 as the current printer by clicking on its icon in the Chooser desk
accessory. You will need to select the Page Setup dialog box from your
application’s file menu to set general printing options for your printer.
Additional print options can then be specified from your application’s Print
dialog box.
To set up the KX-P8420 in the Chooser:
1
2
3
4
5
6
Select Chooser from the Apple menu.
Ensure AppleTalk is active.
Click the AdobePS printer icon.
Select the correct AppleTalk zone if necessary.
Select the name of your KX-P8420.
If an icon is not displayed on the left of the printer name you
selected, click Create to set up the printer. See “Installing Macintosh
printing software” in the
Close the Chooser.
If your printer has a hard disk drive and 32 MB SDRAM installed,
KX-P8420_Direct, KX-P8420_Print, and KX-P8420_Hold print
connections automatically appear in the Chooser. Select
KX-P8420_Direct to print to the Direct connection, KX-P8420_Print
to print to the Print queue, or KX-P8420_Hold to print to the Hold
queue from the printers list.
If your printer does not have a hard disk drive installed, only the
KX-P8420_Direct connection appears in the list.
The first time you select the Direct connection, Print queue, or Hold
queue, you will be prompted to select a PPD.
Setup Manual
or
Operating Instructions
.
25
Page 26

Printing from Macintosh Computers
Printing from a Macintosh application
On the Macintosh, custom print options are specified in the Page Setup and
Print dialog boxes.
To print from a Macintosh application:
1
2
3
4
Make sure that any printer description files needed by
the application are installed on your Macintosh.
See Chapter 5 of the
Open the file you want to print from within the
application.
Select Page Setup from your application’s File menu.
Select the KX-P8420 from the Format for: pop-up
menu.
Setup Manual
or
Operating Instructions
.
26
5
You can specify PostScript options and page attribute options from
this dialog box.
Click OK.
Page 27

Printing from Macintosh Computers
6
7
Select Print from the application’s File menu.
Paper source, number of copies to print, and pages to print are
specified from the General pane of the Print dialog box.
Select Printer Specific Options from the pop-up menu
directly below the printer name.
8
Most print option settings are specified from the Printer Specific
Options pane of the Print dialog box. Use the scrollbar to view
additional options.
Each print option is described in the following section.
Specify the settings and click Print.
When you want to save the changes to the settings, click Save
Settings and then OK before clicking Print. The changes you made
will be the default settings until you make additional changes and
click Save Settings again.
27
Page 28

Printing from Macintosh Computers
Macintosh print options
The PostScript drivers that come with your printer have been customized to
provide additional print options specific to your KX-P8420 printer, as
described in the following table.
Print option Description
Brightness
85% to 115%
(Default: 100%)
Check and Print
(Default: Disable)
CMYK Simulation
SWOP-Coated/DIC/
Euroscale/None
(Default: None)
Adjust the color production on all color
channels to make the printed output lighter or
darker.
Allows you to print a single copy of a multiple
copy job that can be visually checked before
printing additional copies. When the Check
and Print copy has been printed, you can
specify the number of additional copies of the
job to print using the Check and Print screens
at the printer’s front panel. You can also use
Fiery WebSpooler to print remaining copies of
spooled check and print jobs.
Check and Print is available only on
printers with a hard disk drive.
CMYK Simulation settings can be used to
simulate popular offset printing press
standards. Select SWOP-Coated to simulate
printing to a standard American offset press;
Euroscale to simulate a European offset press,
or DIC to simulate a standard Japanese offset
press. For more information, see “CMYK
Simulation” on page 67.
28
Page 29

Printing from Macintosh Computers
Print option Description
Color CRD Text
Color CRD Graphics
Color CRD Images
None/Photographic/
Presentation/
Transparency
(Defaults:
Text—Presentation
Graphics—Presentation
Images—Photographic)
Color Matching
ColorSync Color
Matching/PostScript
Color Matching/Black
and White/Color/
Grayscale
Before an RGB image can be printed, the file’s
color data must be converted to the printer’s
CMYK color space. Color rendering
dictionaries apply optimal gamut mapping
methods to documents that contain text,
photographs and illustrations.
The Photographic CRD optimizes the range of
colors on the printer to produce the best
results for photographic or bitmapped images.
The Presentation CRD optimizes the output of
pure, saturated colors such as those used in
business presentations.
The Transparency CRD improves the
correspondence between monitor colors and
printed color on transparency paper.
For additional information, see “Color
rendering dictionaries” on page 66.
NOTE:
• Color rendering dictionaries cannot be used
with CMYK files. Note also that PS Color
Matching must be specified in the Print
dialog box to enable the use of CRDs.
The Adobe PostScript 8.5.1 driver can convert
RGB colors of a file to a specified CMYK
device target using ICC technology. Select this
option to specify the use of an ICC device
profile installed on your computer.
For information on how to install and use the
KX-P8420 ICC printer profile (ColorSync
profile), see “Installing the KX-P8420
ColorSync profile” in the
Operating Instructions
Setup Manual
.
or
Color Mode
CMYK/CMY/Grayscale
(Default: CMYK)
By default your printer is set to print
documents in color (CMYK).
Select Grayscale to optionally print documents
in grayscale.
Select CMY to print using Cyan, Magenta, and
Yellow toner only. This setting allows you to
print drafts of color images more quickly than
in CMYK mode. The CMY setting is available
only when Resolution is set to 600 × 600 dpi.
When this setting is selected, the default
settings for Color CRD Text, Color CRD
Graphics, and Color CRD Images are used
automatically.
29
Page 30

Printing from Macintosh Computers
Print option Description
Electronic Collation
(Default: No)
ICC Profiles The Adobe PostScript 8.5.1 driver can convert
This option allows the pages of each copy of a
print job to be printed in sequence. If your
printer does not have a hard disk drive or this
option is off, multiple copies of each page of a
print job are printed in sequence. To avoid
unexpected results, always select collation in
the print driver and turn off any collation option
that may exist in your application.
Electronic Collation is available only on
printers with a hard disk drive.
RGB colors of a file to a specified CMYK
device target using ICC technology. Select this
option to specify the use of an ICC device
profile installed on your computer.
For more information on rendering styles, see
“Color management on the KX-P8420” on
page 64. For information on how to install and
use the KX-P8420 ICC printer profile
(ColorSync profile), see “Installing the
KX-P8420 ColorSync profile” in the
Manual
or
Operating Instructions
Setup
.
Output Order
Face-Up/Face-Down
(Default: Face-Down)
Print jobs sent to the KX-P8420 can optionally
be output Face-Up or Face-Down. Face-Up
printing results in a print job with the pages in
sequential order, with the first page at the
bottom of a stack of printed pages, face up.
Face-Down printing results in a print job with
the pages in sequential order, with the first
page at the bottom of a stack of printed pages,
face down.
NOTE:
• Face-Up printing is automatically selected
when the Semi Automatic Duplex option is
enabled, or when printing on transparencies
or printing from the multi-purpose tray.
Paper (size) When the appropriate tray has been selected,
paper and envelope sizes supported by the
printer can be specified by name. Options
include: Letter, A4 and Legal size paper, and
Envelope #10 envelopes. The Paper option is
located in the Page Setup dialog box.
30
Page 31

Printing from Macintosh Computers
Print option Description
Paper Source Paper and paper trays can be specified by
name from the Paper Source menu on the
General screen of the print dialog. Options
include: AutoSelect Tray, Auto (Plain Paper),
Auto (Transparency), MPT Plain Paper, MPT
Transparency, MPT Label, MPT Coated
Paper, MPT Envelope, MPT Paper 2nd Side.
NOTES:
• If the optional 2nd Feeder has been specified
as installed when the driver is setup, Upper,
Middle, Lower; Paper or Transparency trays
may also be selected as the paper source
from the driver.
• When Transparency paper is used, the
Transparency CRD is automatically applied
to text, illustrations, and photographs in the
document.
Resolution Specify the print resolution for your printer.
Options include: 600 × 600, 1200 × 600 or
1200 × 1200 dpi.
NOTE:
• A minimum of 32 MB of SDRAM is required
for printing at 1200 × 600 or 1200 × 1200 dpi.
31
Page 32

Printing from Macintosh Computers
Print option Description
RGB Source
EFIRGB/sRGB (PC)/
Apple Standard/Off
(Default: EFIRGB)
RGB source profiles allow you to define the
color space characteristics (such as the white
point, gamma and type of phosphors) of the
image’s source. When a source is specified,
the image’s RGB data can be optimally
converted to the color space and gamut of the
KX-P8420 printer.
The EFIRGB setting is optimal for color
conversions that will be sent to the KX-P8420
printer. The sRGB (PC) setting specifies the
source space of a generic Windows computer
monitor. The Apple Standard setting specifies
the source space of all standard Macintosh
monitors.
NOTE:
• The RGB source setting overrides any
source color space profile you may have
specified using other color management
systems. In cases where you don’t want this
setting to override another specified source
color space, select Off.
For additional information, see “RGB Source”
on page 65.
Semi Automatic Duplex Print on both sides of a page using the Semi
Automatic Duplex option. For details, see the
procedure for using the Semi Automatic
Duplex option on page 33.
NOTE:
• It is highly recommended to install hard disk
drive (option) to use this feature effectively.
32
Page 33

Printing from Macintosh Computers
Semi Automatic Duplex printing
The Semi Automatic Duplex option allows you to print on two sides of a
single page.
The procedure for Semi Automatic Duplex printing varies depending on
whether your printer has a hard disk installed. If y our printer has a hard disk
drive installed and the Semi Automatic Duple x option is selected, the printer
spools and prints all odd-numbered pages in a job and, when the
Continue/Forward b utton is pressed at the printer, prints all even-n umbered
pages in the job. If your printer does not have a hard disk drive and this
option is selected, the printer prints an odd-numbered page and, when the
Continue/Forward b utton is pressed, prints the subsequent ev en page in the
job.
Follow the procedure outlined below to use the Semi Automatic Duplex
option.
To print using the Semi Automatic Duplex option:
1
2
Select Print from the application’s File menu.
Enable the Semi Automatic Duplex option from the
Printer Specific Options panel of the Print dialog box.
3
4
When Insert printed pages in MP tray, press
Continue appears in the LCD, load the printed odd-
numbered pages from the job face down and bottom first
in the multi-purpose tray.
Press the Continue/Forward button on the front panel
to print the even-numbered pages on the opposite side
of each page in the multi-purpose tray.
If the printer does not have a hard disk drive, the next oddnumbered page is printed automatically; repeat steps 3 and 4 for
every even-numbered page in the print job.
NOTE:
When the printer does not print the even-numbered pages after a
•
press of Continue/Forward button, remove the odd-numbered
pages and reload them in the multi-purpose tray.
33
Page 34

Chapter 3
Printing from UNIX Workstations
You can print to the KX-P8420 directly from UNIX. Jobs printed to the
KX-P8420 are sent to the Print queue and can be manipulated from
Macintosh and PC computers on the network by using WebSpooler.
The queue name and printer name are established by your system
administrator. In general, the queue name should be appended to the name
of the printer, for example, KX-P8420_print.
For information on setting up the printer for TCP/IP printing, see Chapter 3
of the
Setup Manual
Printing to the KX-P8420
You can use UNIX commands to print PostScript files and text files. In
general, the basic printing commands (lpr, lpq, lprm) can be used to send
print jobs to the KX-P8420. See your UNIX manual pages or other
documentation for information about UNIX commands.
The KX-P8420 queue name referred to in the following procedures is the
name defined in the printcap file by your system administrator.
or
Operating Instructions.
NOTE:
• Only PostScript or text files can be printed from UNIX.
To print from UNIX:
On a system running SunOS 4.1.x or another BSD-based
variant, use the lpr command to send a job to the KX-P8420 as
follows:
lpr -P
queuename
For example, if the Print queue of your KX-P8420 is named KXP8420, your
file is named Sample, and you want to print two copies, type:
lpr -P KXP8420 -# 2 Sample
-#
copies filename
34
Page 35

Printing from UNIX Workstations
On a system running Solaris 2.x or any System V
implementation of UNIX, use the lp command to send a job to
the KX-P8420 as follows:
lp -d
queuename
For example, if the Print queue of your KX-P8420 is named KXP8420, your
file is named Sample, and you want to print two copies, type:
lp -d KXP8420 -n 2 Sample
To display a list of jobs in the queue:
On a system running SunOS 4.1.x or another BSD-based
variant, use the lpq command to see printer jobs in the queue
as follows:
-n
copies filename
lpq -P
For example, if the Print queue of your KX-P8420 is named KXP8420, type:
lpq -P KXP8420
Your workstation displays the contents of the queue.
queuename
On a system running Solaris 2 or any System V
implementation of UNIX, use the lpstat command to see printer
jobs in the queue as follows:
lpstat -o
For example, if the Print queue of your KX-P8420 is named KXP8420, type:
lpstat -o KXP8420
Your workstation displays the contents of the queue.
queuename
35
Page 36

Printing from UNIX Workstations
To remove jobs from the queue:
NOTE:
• Unless you log in as the root user, you can remove only your own jobs.
On a system running SunOS 4.1.x or another BSD-based
variant, use the lprm command to remove jobs from the queue
as follows.
lprm -P
You can use the lpq command to check the job number.
For example, to remove job number 123 from the Print queue of your
KX-P8420 named KXP8420, type:
lprm -P KXP8420 123
The lprm command reports the names of any files it removes.
queuename jobnumber
On a system running Solaris 2.x or any System V
implementation of UNIX, use the cancel command to remove
jobs from the queue.
cancel
For example, to remove job number 123 from the Print queue of your
KX-P8420 named KXP8420, type:
cancel KXP8420-123
queuename-jobnumber
36
Page 37

Chapter 4
Managing Print Jobs
Fiery WebTools allow you to manage your printer from the Internet or your
company’s intranet. The KX-P8420 has its own home page, from which you
can select from a variety of tools.
About Fiery WebTools
You can access the Fiery WebTools over the network from a variety of
platforms. The KX-P8420 functions as an Internet or intranet server, and
has a home page that lets remote users view server functions and
manipulate jobs. Client computers require an Internet browser that supports
Java. The recommended browser versions are:
• Netscape Navigator 3.04 for Macintosh computers,
• Microsoft Internet Explorer 4.0.1 SP1 or Netscape Communicator 4.0.4
for Windows computers.
Netscape and Microsoft continue to release frequent updates to their
browsers. As support cannot be guaranteed for all versions, use the
versions specified above for best results.
NOTES:
• Microsoft Internet Explorer 3.x does not support the Fiery
WebDownloader.
• Displaying the WebSetup window with Macintosh computer is very slow.
Please set up the printer using a Windows computer which is accessible
to the printer.
For information about preparing the KX-P8420 and client workstations for
Fiery WebTools access, see “Setting up Fiery WebTools” in the
Manual
or
Operating Instructions
.
Setup
37
Page 38

Managing Print Jobs
You can access the following Fiery WebTools from the KX-P8420 home
page.
WebTool Description
Status Shows you the jobs currently processing and printing.
For information on using the Status WebTool, see
page 49.
WebSpooler Allows you to view, manipulate, reorder, reprint, and
delete jobs currently spooling, processing, or printing
on the KX-P8420. Allows you to print the remainder of
spooled Check and Print jobs and to view, print, and
delete the Job Log. For information on using
Fiery WebSpooler, see page 40.
WebLink Provides a link to another web page, provided you have
a valid Internet connection. You can set the WebLink
destination. For information on using WebLink, see
page 50.
WebDownloader
WebSetup Allows you to view and change the printer’s Setup
The Fiery WebSpooler is available only on printers with a hard disk drive
32
and a minimum of 32 MB of memory.
Allows you to download a PostScript file directly to the
printer, without first opening the file in an application.
For information on using Fiery WebDownloader, see
page 51.
configuration, including: System Setup options (System
Setup and Password), Network Setup options (Port
Setup, Protocol Setup, PServer Setup, and Service
Setup), and Printer Setup options (PS Setup). For
information on using Fiery WebSetup, see “Completing
setup from Fiery WebSetup” of the
Operating Instructions
.
Setup Manual
or
38
Page 39

Managing Print Jobs
Accessing
Fiery WebTools
To use the Fiery WebTools via the Internet or your site’s intranet, you need
an Internet browser and the IP address or DNS name of the KX-P8420.
To access the Fiery WebTools:
1
2
3
Start up your Internet browser application.
Enter the IP address or the DNS name of the KX-P8420
in the URL line of your browser.
Get the IP address or DNS name from your network administrator.
The Fiery WebTools home page appears.
The individual Fiery WebTools are listed on the left. To display
information about a particular tool, click the question mark next to its
name. To launch one of the Fiery WebTools, click its name.
39
Page 40

Managing Print Jobs
Using Fiery WebSpooler
Fiery WebSpooler lets you monitor and manipulate print jobs sent to the
KX-P8420. All jobs sent to the printer appear in the Fiery WebSpooler
window. You can view information about jobs, or duplicate, delete, or move
jobs between queues. The Fiery WebSpooler Job Log can also be printed
from your browser or exported as a text file and opened in other
applications.
NOTE:
• The Fiery WebTools for Macintosh and Windows computers are
fundamentally the same; differences are noted in this chapter.
Print jobs can be in one of the following queues:
Print Normal print jobs sent to the KX-P8420 appear in the Print
Hold Jobs sent to the Hold queue remain in the Hold queue until
queue. You can move and manipulate these jobs as
described below.
they are moved to the Print queue or deleted. If you need to
print the same document frequently, you can send it to the
Hold queue and move a copy of the job to the Print queue
every time you need to print it. You can also print large jobs
to the Hold queue and then move them to the Print queue
when other users are not printing.
Printed The jobs most recently sent to the KX-P8420 are saved in
the Printed queue. You can drag these jobs back to the Print
queue to print additional copies. By default the maximum
number of jobs that can be saved in the Printed queue is 10.
This number can be changed from Fiery WebSetup.
Check and
Print
Job spooling requires a printer with a hard disk drive and a minimum of
32 MB of memory. All jobs are stored on the KX-P8420 hard disk until sent
to the Print queue.
You can use the Fiery WebSpooler Job Log to view information about jobs
printed to the KX-P8420 for job accounting or reference purposes. The Job
Log can be printed or exported as a file and viewed in other applications.
Jobs specified from the printer driver as Check and Print
also appear in the Fiery WebSpooler window. These jobs
can be moved to the Print queue.
40
Page 41

To use Fiery WebSpooler:
Managing Print Jobs
1
On the left side of the Fiery WebTools home page, click
the WebSpooler button.
The Fiery WebSpooler main window appears.
Icons appear on buttons above the scroll list:
Update Click this button to update the information in the
Fiery WebSpooler main window.
Duplicate
and Print
Print Drag a document onto this button or select the
Hold Drag a document onto this button or select the
Delete/
Cancel
Drag a document onto this button or select the
document and click this button to duplicate it
and put the duplicate in the Print queue.
document and click this button to print it to the
Print queue.
document and click this button to save it in the
Hold queue.
Drag a file onto this button or select the
document and click this button to delete the file,
or cancel its processing or printing. To eliminate
the deletion verification notice, select
Preferences from the Edit menu, and turn off
the “Confirm file deletion” option in the
Preferences dialog box.
41
Page 42

Managing Print Jobs
The window is divided into regions that correspond to the different
queues.
Each job listed includes the document name, user name, page
description language (PDL), and file size.
NOTE:
• The file size of documents sent to the direct connection does
not appear.
The icons to the left of the job provide at a glance information about
jobs in each queue:
Printing Print
icon
Waiting Print
icon
Ripping RIP
icon
Print Print
icon
Hold Hold
icon
The job that is currently printing
appears in this list. It can be deleted to
cancel printing.
Jobs that have been processed and
are waiting to be printed appear in this
list. To cancel these jobs, you can
delete them. They are dimmed
because their settings cannot be
changed. Processed jobs can’t be
moved or canceled.
Jobs that are processing appear in the
Ripping list. They are dimmed
because their settings cannot be
changed. Processing jobs can’t be
moved or canceled.
Jobs that are waiting to be printed that
have not been processed appear with
the Print icon. Jobs in the Print list
appear in the order they will be
printed.
Jobs in the Hold queue appear with
the Hold icon. You can move a job to
the Print queue to print it.
42
Printed Printed
icon
Printed Alert
icon
Jobs that have been printed are saved
in the Printed queue and appear with
the Printed icon. By default the
number of jobs that may be stored in
the Printed queue is 10. This number
can be changed in WebSetup.
If a PostScript error occurred while a
job was printing, the error appears in
the Printed queue with an Alert icon
next to it. You can double-click the
Alert icon to display the error
message.
Page 43

Managing Print Jobs
2
Select Preferences from the Edit menu to specify how
Fiery WebSpooler operates.
You can use this window to specify that the KX-P8420:
Update Automatically every n seconds or update Manually—This
option lets you specify whether Fiery WebSpooler main window is
automatically updated at a specified interval, or whether it is
updated only when you select the Update command from the
Window menu or click the Update icon. By default, the
Fiery WebSpooler main window is updated automatically every 20
seconds.
NOTE:
• When automatic updating is on, data is coming from the
KX-P8420 across the network very frequently. This data adds to
the network traffic, and might slow down other network jobs. For
optimal network performance, turn off automatic updating. When
you want to view updated informations, select Update from the
Window menu or click the Update icon.
Confirm file deletion—Check this option if you want a confirmation
dialog box to appear before you delete a file.
NOTE:
• This option applies to the current session only.
43
Page 44

Managing Print Jobs
Duplicating, moving, and deleting jobs
Macintosh, Windows 95, and Windows NT 4.0 users who have entered the
correct Administrator password, if one has been set, can duplicate, move,
delete, and configure jobs for all users, and can reorder jobs within a queue.
You can select more than one job at a time. To select multiple, adjacent
jobs in the list, use Shift-click. To select multiple, nonadjacent jobs, use Ctrlclick.
■ Duplicating jobs
You can duplicate jobs in the Print, Printed, and Hold queues. When you
duplicate a job, the KX-P8420 creates a reference to the original file, so
duplicate files do not require the full amount of disk space on the KX-P8420.
As long as one of the duplicates remain, the KX-P8420 saves the file, so
you can delete all but one reference to a file.
To duplicate a job within a queue:
1
2
Select the job that you want to copy by clicking its name.
The selected job is highlighted.
Select Duplicate Job from the Edit menu.
The job appears at the bottom of the queue.
To duplicate and print a job:
1
2
Select the job that you want to copy by clicking its name.
The selected job is highlighted.
Click the Duplicate and Print icon, or drag the job to the
Duplicate and Print icon.
The job appears at the bottom of the Print queue.
44
Page 45

Managing Print Jobs
■ Moving jobs
You can move your jobs from the Hold queue and the Printed queue to the
Print queue. If you frequently print the same file, for example a fax cover
sheet, you can send it to the Hold queue and later drag a copy of the file to
the Print queue.
To move a job within a queue:
1
2
To move jobs between queues:
1
2
■ Deleting jobs
To delete a job from any of the queues:
Click the name of the job that you want to move.
The selected job is highlighted.
Drag the file to the new location in the queue.
Select the job that you want to move by clicking its name.
The selected job is highlighted.
Move the selected job to another queue by dragging it to
the queue icon of your choice or to the Hold or Print
section of the job list.
For example, move a job that is currently in the Hold queue to the
Print queue by dragging the job to the Print queue icon.
1
2
Select the job that you want to delete by clicking its
name.
Drag the selected job to the Delete icon or click the Delete
icon.
You can also select Delete from the Edit menu to delete a selected
job.
You can delete only your own jobs; system administrators who enter
the password can delete any job.
45
Page 46

Managing Print Jobs
Changing print settings
You can change the copy count for only Check and Print jobs in
Fiery WebSpooler main window.
You can override the copy count of a Check and Print job in the Override
print settings dialog box. The settings in this dialog box override the settings
in the front panel Printer Setup menu.
To change print settings for a job:
1
2
3
Double-click a Check and Print job or select the job and
select Override Print Settings from the Edit menu.
The Override Print Settings window appears.
Select the new settings from the pop-up menus.
Click OK.
46
Page 47

Managing Print Jobs
Using the Job Log
With the Fiery WebSpooler, you can view and print a log of all the jobs
printed to the KX-P8420. You can also export the Job Log as a tabdelimited text file and import into a database, spreadsheet or word
processing application for job accounting purposes. All jobs printed to
queues and to the Direct connection are listed in the Job Log. Although jobs
sent to the Direct connection do not appear in the Printed queue, they do
appear in the Job Log.
To display, print, and save the Job Log:
1
Select Show Job Log from the Window menu.
The Job Log window displays a list of all the jobs and information
about them as illustrated.
You can use the scroll bar at the bottom of the window to view all of
the fields.
The text in the Status column provides information about the job:
OK The job was printed normally.
ERROR A PostScript error occurred while a job was processing.
CANCEL The job was canceled before printing was completed.
NOTE:
• Some information may not be shown depending on the operating
system on which a job is printed.
47
Page 48

Managing Print Jobs
2
3
4
To print the Job Log, select Print Job Log from the File
menu.
The information displayed in the Job Log window prints to the
current KX-P8420. When you print the Job Log, totals are printed for
all appropriate columns.
To save the Job Log as a file that you can view with a
different application, select Export Job Log from the File
menu.
Enter a name for the log file, add the extension .txt if it is
not already there, and click Save.
The Job Log is saved as a text file, and the Job Log window
reappears.
You can view the information in any application that can read a text
file. Items are separated by tabs, but records are not separated by
CR code. So please edit the file to view it.
48
Page 49

Checking the printer status
You can see what jobs are currently processing and printing with the Status
WebTool.
To access the Status WebTool:
On the left side of the Fiery WebTools home page, click the
Status button.
The Status window appears in a new browser window.
Managing Print Jobs
You can close other browser windows and leave the Status window open to
continue checking the status of the KX-P8420. As long as you keep the
Status window open, it is dynamically updated at 30-second intervals.
49
Page 50

Managing Print Jobs
Linking to other Web sites
WebLink links you to the Panasonic home page (www.panasonic.co.jp/kme/
saga/color_printer/p8420_link.html), provided a valid Internet connection is
available. You can change the WebLink destination by holding down the
Control key and clicking the WebLink button. In the New URL field, type the
new WebLink address and click OK.
NOTE:
• Any change to the WebLink destination remains permanent until changed
again.
50
Page 51

Using Fiery WebDownloader
Using Fiery WebDownloader, you can send PostScript or text files to the
KX-P8420 without first opening the file in an application.
NOTE:
• Fiery WebDownloader cannot be used on Macintosh computers.
Managing Print Jobs
A downloaded file can be sent to the Direct connection or to the Print or
Hold queues.
NOTES:
• The Direct connection can be used on printers without a hard disk drive or
additional memory; however use of the Print and Hold queues requires a
printer with a hard disk drive and 32 MB of memory.
• Files sent to the Direct connection are printed as soon as the printer is
free to accept a print job.
• Files sent to the Print queue are spooled to the printer’s hard disk drive.
• Files sent to the Hold queue remain on the printer’s hard disk drive until
they are moved to the Print queue or deleted.
• PS or text files can be sent, but PCL files cannot.
• Font downloading is not available.
51
Page 52

Managing Print Jobs
Downloading a file to the printer:
1
2
3
Specify a file to download to the printer:
Enter a path to the file you want to download to the printer in the
Source File text field. Or click Browse to navigate to the file you want
to download.
From the Print Connection menu, select the connection
to which you want to download.
If your printer does not have an optional hard disk drive, Print and
Hold Queue options are dimmed in the Print Connection menu.
Click the Send file button.
The file is downloaded to the printer.
52
Page 53

Chapter 5
Working with Color
This chapter introduces concepts that are basic to color theory. You will
encounter some of these concepts (such as hue, saturation, and
brightness) when you work with color in applications; others provide useful
background information.
point for experimentation and further research.
The properties of color
What we call “color” is really a perceptual ability unique to humans and a
small number of animal species. Color theory is an attempt to systematize
the properties of color perception, which by nature is relative and
changeable. A color appears different depending on the other colors around
it, and individuals vary in their abilities to perceive color.
Color is a complex topic, so consider this a starting
The physics of color
The human eye can see electromagnetic radiation at wavelengths between
400 nanometers (purplish blue) and 700 nanometers (red). This range is
called the visible spectrum of light. We see pure spectral light as intensely
saturated or pure colors. Sunlight at midday, which we perceive as white or
neutral light, is composed of light from across the visible spectrum in more
or less equal proportions. Shining sunlight through a prism separates it into
its spectral components, resulting in the familiar rainbow of colors.
Like the sun, most light sources we encounter in our daily environment emit
a mixture of many light wavelengths, although the particular distribution of
wavelengths can vary considerably. Light from a tungsten light bulb, for
example, contains much less blue light than sunlight. Tungsten light
appears white to the human eye which, up to a point, can adjust to the
different light sources. However, color objects appear different under
tungsten light than they do under sunlight because of the different spectral
makeup of the two light sources.
The mixture of light wavelengths emitted by a light source is reflected
selectively by different objects. Different mixtures of reflected light appear
as different colors. Some of these mixtures appear as relatively saturated
colors, but most appear to us as grays or impure hues of a color.
53
Page 54

Working with Color
CIE color model
Hue, saturation, and brightness
In the 1930s, the Commission Internationale de l’Eclairage (CIE) defined a
standard color space, a way of defining colors in mathematical terms, to
help in the communication of color information. This color space is based on
research on the nature of color perception.
By mixing any two spectral colors in different proportions, we can create all
the colors found between them. For example, it is possible to create the
same gray by mixing blue-green and red light or by mixing yellow-green and
blue-violet light. This is possible because of a phenomenon peculiar to color
vision called metamerism. The eye does not distinguish individual
wavelengths of light. Therefore, different combinations of spectral light can
produce the same perceived color.
A color can be described in terms of three varying characteristics:
• Hue, or tint (the qualitative aspect of a color—red, green, or orange)
• Saturation, or the purity of the color
• Brightness, or relative position between white and black.
Many computer applications include dialog boxes in which you select colors
by manipulating hue, saturation, and brightness. For example, Photoshop
uses a square Color Picker which can be reconfigured according to your
preference.
54
Page 55

Working with Color
Additive and subtractive color systems
Color devices used in desktop publishing and printing
visible colors using a set of primary colors that are combined to create other
colors. There are two methods of creating a range of colors from a set of
primary colors. Computer monitors and scanners use the additive color
model. Printing technologies, including KX-P8420 print devices and offset
presses, use the subtractive color model.
simulate
the range of
■ Additive (RGB) color
Color devices that use the additive color model make a range of colors by
combining varying amounts of red, green, and blue light. These colors are
called the additive primaries. White is created by adding the maximum
amount of red, green, and blue light available. Black occurs wherever all
three colors are absent. Grays are created by adding varying amounts of all
three colors together. Combining varying amounts of any two of the additive
primaries creates a third, saturated hue.
A familiar device that uses this color model is the computer monitor.
Monitors have red, green, and blue phosphors that emit varying amounts
of light to display a given color. Scanners create digital representations of
colors by measuring their red, green, and blue components through colored
filters.
■ Subtractive (CMY and CMYK) color
The subtractive color model is used in color printing, and in color
photographic prints and transparencies. While the additive color model
simulates the visible spectrum of color by adding light of three primary hues,
the subtractive color model uses a “white” or neutral light source containing
light of many wavelengths. Inks, toners, or other colorants are used to
selectively absorb (subtract) certain wavelengths of light that otherwise
would be reflected or transmitted by the media in question.
The subtractive primaries are cyan, magenta, and yellow; they absorb
red, green, and blue light, respectively. Combining any two subtractive
primaries creates a new color that is relatively pure or saturated. For
example, you can make red by combining magenta and yellow, which
absorb green and blue light, respectively. White occurs when no colorant is
applied. Combining all three subtractive primaries in theory yields black, but
due to deficiencies of cyan, magenta, and yellow colorants, combining
these three primaries actually yields a muddy brown. Black colorant is
added to compensate for the deficiencies of cyan, magenta, and yellow
colorants, and consequently color printing uses four process colors: Cyan,
Magenta, Yellow, and blacK (CMYK). The use of black ink helps in
producing rich solid blacks and also allows for improved rendition of black
text.
55
Page 56

Working with Color
Print device gamut
Different color reproduction techniques have different color capabilities, or
gamuts. Color transparency films have comparatively large gamuts, as do
color monitors. The color gamut that can be produced using CMYK toners
on paper is smaller. This is why some colors that can be displayed on a
color monitor, especially bright saturated colors, cannot be reproduced
exactly by your KX-P8420 print device—nor, for that matter, can they be
reproduced on press using process colors. Moreover, different print devices
have different gamuts—some colors that your print device can produce
cannot be reproduced on an offset press, and vice versa. The following
illustration provides a graphical representation of this concept.
Color transparency film
RGB monitor
Offset press (white)
Other print device
You need to account for the gamut of your print device when designing on a
color monitor. When printed, colors that fall outside the print device’s gamut
are “mapped” to printable colors. This process, referred to as gamut
mapping, takes place when color data is converted or adjusted to meet the
color space and gamut requirements of a print device.
The KX-P8420 Color Printer is specially designed to perform gamut
mapping at high speed with high quality results. It provides these color
management features automatically, using either built-in default settings or
settings that you specify for a particular print job. For added flexibility, the
KX-P8420 color management system can also be used in combination with
color management systems on Macintosh and Windows computers.
56
Page 57

Controlling printed color
When working with color materials, whether they be presentations,
illustrations, or complicated page designs, you make aesthetic decisions
about the colors you use. Once you have decided on your goal, you then
need to realize it in print. Your color printing system becomes an ally in this
creative process to the extent that you can get results that are
• If you have designed a brochure to print on the KX-P8420, you want the
printed colors to match the design specification.
• If you are printing presentations on the KX-P8420, you want to preserve
the vivid colors in the monitor display.
• If you are working with color that will print on press, you want the
KX-P8420 output to match prepress proofs.
The type of print job and the final print device either the KX-P8420 printer or
an offset press, determine the methodology you use to achieve optimal
results.
No matter what your goals are, two hardware factors always impact color
print output: print device consistency and the range of colors the print
device can print, known as its gamut. These factors are covered briefly in
this chapter. Creating successful color documents and presentations also
requires an understanding of color management software as it is
implemented by the KX-P8420 and on your desktop computer. Most of this
chapter is devoted to discussing the various elements of color management
that contribute to predictable color results.
Working with Color
predictable
.
Maintaining print device consistency
Paper stock and toner
Maintenance
The factors described below affect print device consistency, as well as color
fidelity and overall output quality.
The paper and toner used by the print device can greatly affect printed
color. For best results, use the consumables recommended by the
manufacturer of your printer.
Problems such as streaking and insufficient or excessive amounts of one or
more toners arise when a print device does not receive periodic
maintenance. In addition to having it serviced regularly, monitor the color
production of your printer by making standard test prints at regular intervals.
You can do this easily by printing the KX-P8420 Test Page from the front
panel. Save the prints and show them to your system or site administrator if
recalibration becomes necessary.
57
Page 58

Working with Color
Using color effectively
The ability to print in color can greatly increase the effectiveness of your
message, whether you are printing a presentation or a newsletter, or
proofing an ad concept that will later be printed on press. Some potential
benefits of using color include:
• Conveying information rapidly by using color cues
• Making use of the emotive aspects of different colors
• Increasing impact and message retention
A few rules of thumb
Color can also be a source of distraction and discord if it is used poorly.
This section outlines some tips and concepts that will prove useful as you
approach designing color materials.
Try some of the following strategies for creating successful color materials:
• Rather than applying colors indiscriminately, use color to aid
comprehension. In presentations, graphs, and charts, use color to
highlight patterns and emphasize differences.
• In general, fewer colors work better than many colors.
• Use red as an accent color. Red is particularly effective when used in
otherwise monochromatic materials.
• Consider the tastes of your target audience when choosing colors.
• Keep a file of printed color pieces that appeal to you or strike you as
effective. Refer to it for ideas when designing your own documents.
58
Page 59

Working with Color
Color wheel
A color wheel is a helpful tool for understanding the interrelation of colors.
The colors on one side of the color wheel, from magenta to yellow, appear
to most people to be warm colors, while those on the other side, from green
to blue, appear to be cool. The distance between two colors on the color
wheel can help predict how they will appear when seen side by side. Colors
opposite one another on the wheel are called complements, and create a
striking contrast side by side. This can be the basis for a bold graphical
design, but it is an effect you should use with discretion since it can be
visually fatiguing. Other bold combinations to consider are split
complements (a color and the two colors adjacent to its complement) and
triads (three colors evenly spaced on the color wheel). Colors adjacent to
one another on the color wheel result in subtle harmonies.
The color wheel simplifies color relationships for the purpose of clarity,
showing only saturated or pure colors. Adding the myriad variations of each
hue to the palette (more or less saturated, darker or lighter) creates a
wealth of possibilities. Taking a pair of complements from the color wheel
and varying the saturation and brightness of one or both colors produces a
very different result from the pure complements. Combining a light tint of a
warm color with a darker shade of its cooler complement often gives
pleasing results. Combining a darker shade of a warm color with a light tint
of its cooler complement produces an unusual effect you may like.
Once you have mastered the concept of the color wheel, you have a good
framework for experimenting with color combinations. Many books targeted
at graphic designers show groups of preselected color combinations. Some
are organized by themes or moods, and some are based on a custom color
system such as PANTONE. The more you develop a critical facility for
judging color combinations, the more you will be able to trust your own eye
for color.
59
Page 60

Working with Color
Color and text
It is not a coincidence that the overwhelming majority of text you see is
printed in black toner on white paper. Text in black on white is highly legible
and is not fatiguing to read for extended periods. For many color materials,
using black text on a white background and confining color to graphic
elements and headings is a good choice.
Color text can add flair to documents printed on paper when used skillfully,
and is widely used in presentations. When using color text, avoid dazzling
text and background combinations created from primary complements,
especially red and cyan or red and blue; they are visually fatiguing and hard
to read. Color text is more legible when distinguished from its background
by a difference in lightness—for example, dark blue text on a light beige
background. In addition, using many different colors in a string of text
makes for a confused appearance and is hard to read. However, using a
single highlight color is an effective way to draw the reader’s eye to selected
words.
When using color text, keep in mind that small font sizes typically do not
print in color with the same sharpness as in black. In most applications,
black text prints exclusively in black toner while color text usually prints with
two or more toners. Any misregistration between the different toners on
paper causes color text to lose definition. You can make test prints to find
the smallest point size at which color text prints clearly. When using highend graphics applications that allow you to specify color as percentages of
cyan, magenta, yellow, and black, you can create pure cyan or pure
magenta text that prints with the same sharpness as black text. (Pure
yellow text is extremely hard to read on anything but a dark or
complementary background.)
60
Page 61

Raster images and vector images
Two broad categories of artwork can be printed from a personal computer
to a color printer: raster and vector images.
A raster image, also referred to as a bitmap, is composed of a grid of
pixels, each assigned a particular color value. The grid, when sufficiently
enlarged, resembles a mosaic made from square tiles. Examples of raster
images include scans and images created in painting or pixel-editing
applications, such as Adobe Photoshop and Painter.
The amount of information found in a raster depends on its resolution and
bit depth. The resolution of a raster describes the density of the pixels and
is specified in pixels per inch (ppi). The bit depth is the number of bits of
information assigned to each pixel. Black and white rasters require only one
bit of information per pixel. For photographic quality color, 24 bits of RGB
color information are required per pixel, yielding 256 separate levels of red,
green, and blue. For CMYK images, 32 bits per pixel are required.
When printing raster artwork, the quality of the output depends on the
resolution of the raster. If the raster’s resolution is too low, individual pixels
become visible in the printed output as small squares. This effect is
sometimes called “pixelation”.
Working with Color
In vector images, picture elements are defined mathematically as lines or
curves between points—hence the term “vector”. Picture elements can
have solid, gradient, or patterned color fills. Vector artwork is created in
illustration and drawing applications such as Adobe Illustrator and
CorelDRAW. Page layout applications such as QuarkXPress also allow you
to create simple vector artwork with their drawing tools. PostScript fonts are
vector-based as well.
Vector artwork is resolution-independent; it can be scaled to any size
without danger of pixels becoming visible in printed output.
61
Page 62

Working with Color
Optimizing files for processing and printing
The following sections provide tips on how to create image files that
produce the highest possible print quality while minimizing the processing
time and disk space they require.
Resolution of raster images
While a 72 ppi raster image appears sharp on a monitor, the same image
would likely appear pixelated when printed to the KX-P8420. Color print
devices are capable of much greater detail than monitors, and require
correspondingly higher resolution image files. However, high-resolution files
can be large, and therefore cumbersome to transmit over a network,
process for printing, store on disk, and edit.
Beyond a certain threshold, a higher image resolution greatly increases file
size while having a minimal effect on output quality. The optimal image
resolution depends on the resolution of the final print device. Aim for the
resolution that optimizes both file size and output quality.
The resolution of a raster, along with its bit depth and physical dimensions,
determine its file size. The following table shows the file sizes of color raster
images at different dimensions and resolutions.
File size at
Image
size
3" x 4" 0.4/0.5 MB 0.8/1.0 MB 1.4/1.8 MB 5.5/7.3 MB
5" x 7" 1.0/1.3 MB 2.3/3.0 MB 4.0/5.3 MB 16.0/21.4 MB
100 ppi 150 ppi 200 ppi 400 ppi
RGB/CMYK RGB/CMYK RGB/CMYK RGB/CMYK
62
8.5" x 11" 2.7/3.6 MB 6.0/8.0 MB 10.7/14.3 MB 42.8/57.1 MB
In this table, the shaded areas indicate that 200 ppi is typically the best
trade-off between image quality and file size. However, higher resolutions
(e.g., 250 to 300 ppi) may be needed for offset printing, when quality is of
the utmost importance, or for images containing sharp diagonal lines.
Page 63

Working with Color
Scaling
To find the best image resolution for your purposes, make test prints of
some raster artwork at different resolutions. Start with a high-resolution
image (400 ppi) and save versions at progressively lower resolutions, down
to 100 ppi, using a pixel-editing application such as Photoshop. Always
save a copy of the original high-resolution version in case you need to
revert to it. The high-resolution data cannot be recreated from a lower
resolution version.
Print the files and examine the output. You will likely begin to see a marked
deterioration in output quality at resolutions below 200 ppi, while above 200
ppi the improvement may be very subtle.
Image quality
100 ppi 200 ppi 300 ppi 400 ppi
Image resolution
Raster images prepared for offset printing may need to be at higher
resolutions than needed for proofing on your KX-P8420.
Ideally, each raster image should be saved at the
placed into the document and at the
the image resolution is correct for the print device, there is no quality
advantage to be gained by scaling an image down to a percentage of its
actual size. If you scale a large image down to a percentage of its actual
size, you incur unnecessary file transfer time because the image data for
the entire large image is sent to the printer. If an image is placed multiple
times at a markedly different sizes in a document, save a separate version
of the image at the correct size for each placement.
If you need to place an image at greater than 100% in a document,
remember that the output image resolution is affected. For example, if you
scale a 200 ppi image to 200%, the image is printed at 100 ppi.
optimal resolution
actual
size it will be
for the print device. If
63
Page 64

Working with Color
Color management on the KX-P8420
The KX-P8420 uses a simple and flexible color architecture that produces
excellent color results with default settings. It also allows you to customize
your color results using various color controls.
Settings for the following KX-P8420 options can be specified via print dialog
box options when you send a job. Some can also be set as defaults by the
administrator during KX-P8420 Setup. Settings specified via the print dialog
box override any equivalent settings at the printer’s front panel.
Color print option What it does
RGB Source
EFIRGB/sRGB (PC)/
Apple Standard/Off
(Default: EFIRGB)
CRD/Color CRD Text/
Color CRD
Graphics (Illustrations)/
Color CRD Images (Photos)
Photographic/Presentation/
Transparency
(Default:
Photographs—Photographic
Text—Presentation
Illustrations—Presentation)
Brightness
85% to 115%
(Default: 100%)
CMYK Simulation
SWOP-Coated/DIC/
Euroscale/None
(Default: None)
Applies an RGB source space definition
to RGB data.
Applies a KX-P8420 color rendering
dictionary (CRD) to objects (text,
photographs and illustrations) in an RGB
data file (see page 66).
With Windows 95, the ColorWise
Business Color setting assigns default
CRDs automatically.
For information on how various CRDs are
used for different types of elements in
documents, see pages 16,18 (Windows)
and page 29 (Macintosh).
Performs a color adjustment on all color
channels to make the printed output
lighter or darker.
Adjusts CMYK color data to simulate an
offset press standard or a custom color
gamut defined at your site. Selecting
None bypasses simulation.
64
ICM profiles Allows closer color matching between
monitor and printed output. Click the
option button to select a color matching
method, and specify a rendering intent.
Explanations of how these settings affect your print jobs are provided in the
following sections.
Page 65

Working with Color
RGB Source
The RGB Source option is used to provide a source color space definition
for RGB data in your document. The setting you specify for this option
overrides any source color space profiles you may have specified using
other color management systems. For example, if you specified a
ColorSync System Profile on the Macintosh computer, the RGB Source
setting specified in the Print dialog box overrides it. In cases where you
don’t want this setting to override another specified source color space,
select Off.
RGB Source Description
The source color space defined by this setting is
EFIRGB
optimal for color conversions that will be sent to a
KX-P8420 print device. It also allows for consistent
output across different operating systems.
sRGB (PC)
Apple Standard
PostScript RGB data is converted to CMYK data using the CRD specified
by the CRD option (see page 66). This type of RGB data contains its own
source color space information which is used as a reference point for the
conversion.
NonPostScript RGB data is converted using a general under-color-removal
conversion method. NonPostScript RGB data does not contain source color
space information and so cannot be converted using a CRD.
The sRGB (PC) setting specifies the source space
of a generic Windows computer monitor.
The Apple Standard setting specifies the source
space of all standard Macintosh computer monitors.
65
Page 66

Working with Color
Color rendering dictionaries
Color rendering dictionaries (CRDs) are used to perform color conversions
on RGB data. The following table describes the CRDs for KX-P8420
software and provides guidelines on when to use each one. Each color
rendering style uses a different gamut mapping method, such as
Photographic or Presentation, designed for a particular kind of color usage.
Rendering style Best used for
Photographic—Preserves tonal relationships in
images rather than exact colors. This rendering
style maps out-of-gamut RGB colors to printable
colors in a way that retains differences in
lightness. Color accuracy is sacrificed slightly in
favor of presenting color relationships in the way
the human eye perceives them. Photographic
rendering typically gives less saturated output
when printing out-of-gamut RGB colors than
Presentation Color rendering does.
Presentation—Creates bright saturated colors.
This rendering style does not try to match printed
colors precisely to displayed colors but instead
provides vibrant, dense colors. Photographic
images, however, are treated the same way as by
the Photographic rendering style.
Continuous tone
photographs,
including scans and
images from stock
photography CDs
Artwork and graphs
in presentations
and continuous
tone photographs
Transparency— Improves the correspondence
between monitor colors and printed color on
transparency paper.
NOTE:
Artwork and graphs
printed on
transparency paper
• The rendering styles referred to in the table cannot be used when
specifying a target device profile with a color management system such
as ColorSync or ICM.
66
Page 67

Working with Color
CMYK Simulation
Choosing colors in PostScript applications
If you are using the KX-P8420 to print proofs for an offset press job or to
simulate another print device, select the appropriate CMYK Simulation
setting. The CMYK Simulation setting specifies the offset press standard or
other color gamut that you want to simulate.
The CMYK Simulation setting you should specify depends on the press
standard for which the CMYK data was separated. For example, for images
that were separated for SWOP-Coated paper, select SWOP-Coated as the
CMYK Simulation setting. Select SWOP-Coated to simulate printing to a
standard American offset press; Euroscale to simulate a European offset
press, or DIC to simulate a standard Japanese offset press. For images that
were separated using a custom separation (such as a device-specific
separation or a separation produced with an ICC-profile), select None as
the CMYK Simulation setting
With PostScript applications, you can create colors using any of the color
models supported by the application. All PostScript applications support the
CMYK model; some also support the RGB model and other color models
based on monitor display values. PostScript applications also allow you to
select named colors using one or more color libraries, such as PANTONE.
The important thing to remember when creating or choosing colors is that
the displayed versions of those colors may not match KX-P8420 output or
the output of identically defined colors from other color print devices. For
this reason, you should use color matching to ensure predictable color
printing results with the KX-P8420.
■ Color reference files
Two color reference files have been included on the KX-P8420 Driver &
Utility CD-ROM: a CMYK color reference file, and a PANTONE color
reference file.
If you install the printer driver using the installer’s typical or compact
installation options, the CMYK and PANTONE color reference files are
automatically copied to the KX-P8420 directory on your hard disk. If the
color reference files have not been installed, insert the KX-P8420 Driver &
Utility CD-ROM into your CD-ROM drive and use the installer’s custom
option to select the reference files to copy to disk. You can also navigate to
the appropriate directory, and manually copy the files to your hard disk.
67
Page 68

Working with Color
■ Using the CMYK color reference page
The CMYK color reference page, included with your KX-P8420 user
software, let you see how various cyan, magenta, yellow, and black
combinations look when printed on your print device. Using the CMYK color
reference pages, you can easily determine the CMYK values to specify to
obtain the printed colors you want.
The CMYK color reference file is an 11-page, letter-size PostScript file.
To use the CMYK color reference pages, download the file using a
downloader utility such as the WebDownloader. (For instructions on using
the WebDownloader, see “Chapter 4 Managing Print Jobs”.) The printed
pages display groups of color patches in graduated combinations of yellow,
magenta, and cyan, and smaller patches that include 25, 50, and 75%
black. Refer to these pages to pick colors and specify process color values
in your application.
■ Using the PANTONE color reference pages
The PANTONE color reference pages, included with your KX-P8420 user
software, lets you determine the nearest CMYK values to match a given
color in the PANTONE color for coated paper.
To print the PANTONE reference pages, download the PANTONE file using
the WebDownloader. (For instructions on using the WebDownloader, see
“Chapter 4 Managing Print Jobs”.) The printed pages display PANTONE
color simulation names and numbers. Refer to these pages to see how
PANTONE colors defined in applications print on the KX-P8420 printer.
68
Page 69

Appendix A
Fonts
The following section lists the built-in fonts included with your KX-P8420
printer.
NOTE:
• All fonts that are pre-installed on your printer have also been included on
Resident printer fonts
Listed below are the 136 built-in printer fonts on the KX-P8420.
You can print the list of available fonts by printing “PS Font List”. See
“Printing pages from the front panel” in the
Instructions
multi-lingual extension.
For Macintosh computers, install the corresponding screen fonts from the
KX-P8420 Driver & Utility CD-ROM. For instructions, see “Installing
additional software for Macintosh users” in the
Instructions.
the KX-P8420 Driver & Utility CD-ROM. For information on how to install
these fonts on your computer, see “Installing additional software for
Windows users” in the
. PS Font List includes the CE font of each font which includes
Setup Manual
or
Operating Instructions.
Setup Manual
Setup Manual
or
Operating
or
Operating
Adobe Type 1 PostScript fonts
The KX-P8420 includes 117 Adobe Type 1 fonts:
• AlbertusMT, AlbertusMT-Italic, AlbertusMT-Light
• AntiqueOlive-Roman, AntiqueOlive-Bold, AntiqueOlive-Compact,
AntiqueOlive-Italic
• AvantGarde-Book, AvantGarde-BookOblique, AvantGarde-Demi,
AvantGarde-DemiOblique
• Bodoni, Bodoni-Bold, Bodoni-Italic, Bodoni-BoldItalic, Bodoni-Poster,
Bodoni-PosterCompressed
• Bookman-Demi, Bookman-DemiItalic, Bookman-Light,
Bookman-LightItalic
• Carta
• Clarendon, Clarendon-Bold, Clarendon-Light
• CooperBlack, CooperBlack-Italic
• Copperplate-ThirtyThreeBC, Copperplate-ThirtyTwoBC
• Coronet
• Courier, Courier-Bold, Courier-Oblique, Courier-BoldOblique
• Eurostile, Eurostile-Bold, Eurostile-ExtendedTwo,
Eurostile-BoldExtendedTwo
• GillSans, GillSans-Bold, GillSans-Italic, GillSans-BoldItalic,
GillSans-Condensed, GillSans-BoldCondensed, GillSans-Light,
GillSans-LightItalic, GillSans-ExtraBold
69
Page 70

Fonts
• Goudy, Goudy-Bold, Goudy-Italic, Goudy-BoldItalic, Goudy-ExtraBold
• Helvetica, Helvetica-Bold, Helvetica-BoldOblique, Helvetica-Condensed,
Helvetica-Condensed-Bold, Helvetica-Condensed-BoldObl,
Helvetica-Condensed-Oblique, Helvetica-Narrow, Helvetica-Narrow-Bold,
Helvetica-Narrow-BoldOblique, Helvetica-Narrow-Oblique,
Helvetica-Oblique
• JoannaMT, JoannaMT-Bold, JoannaMT-Italic, JoannaMT-BoldItalic
• LetterGothic, LetterGothic-Bold, LetterGothic-BoldSlanted,
LetterGothic-Slanted
• LubalinGraph-Book, LubalinGraph-BookOblique, LubalinGraph-Demi,
LubalinGraph-DemiOblique
• Marigold
• MonaLisa-Recut
• NewCenturySchlbk-Roman, NewCenturySchlbk-Bold,
NewCenturySchlbk-Italic, NewCenturySchlbk-BoldItalic
• Optima, Optima-Bold, Optima-Italic, Optima-BoldItalic
• Oxford
• Palatino-Roman, Palatino-Bold, Palatino-Italic, Palatino-BoldItalic
• StempelGaramond-Roman, StempelGaramond-Bold,
StempelGaramond-Italic, StempelGaramond-BoldItalic
• Symbol
• Tekton
• Times-Roman, Times-Bold, Times-Italic, Times-BoldItalic
• Univers, Univers-Bold, Univers-BoldExt, Univers-BoldExtObl,
Univers-BoldOblique, Univers-Condensed, Univers-CondensedBold,
Univers-CondensedBoldOblique, Univers-CondensedOblique,
Univers-Extended, Univers-ExtendedObl, Univers-Light,
Univers-LightOblique, Univers-Oblique
• ZapfChancery-MediumItalic
• ZapfDingbats
70
Page 71

Fonts
TrueType fonts
The KX-P8420 includes 19 TrueType fonts:
• Apple-Chancery
• ArialMT, Arial-BoldMT, Arial-ItalicMT, Arial-BoldItalicMT
• Chicago
• Geneva
• HoeflerText-Regular, HoeflerText-Black, HoeflerText-Italic,
HoeflerText-BlackItalic, HoeflerText-Ornaments
• Monaco
• NewYork
• TimesNewRomanPSMT, TimesNewRomanPS-BoldMT,
TimesNewRomanPS-ItalicMT, TimesNewRomanPS-BoldItalicMT
• Wingdings-Regular
■ About the optional font software
For more information on installing Adobe Type Manager (ATM) from Adobe
Systems, see “Installing additional software for Windows users” or
“Installing additional software for Macintosh users” in the
Operating Instructions
.
Setup Manual
or
71
Page 72

Glossary
Additive color model
A system in which color is produced by combining
primary lights additively. The additive primaries are
red, green, and blue. When added together in
proper amounts, these colors produce white. An
RGB video monitor is based on an additive color
model.
Additive primaries
Red, green, and blue light that is used in additive
color systems. The additive primaries combine to
produce white.
Banding
Visible steps between shades in a gradient.
Bit depth
Amount of information required for each pixel in a
raster image. Black and white images require only
one bit per pixel. Photographic quality color images
can require 24 or 32 bits per pixel.
Calibrated RGB
Color rendering dictionary (CRD)
A feature found in PostScript Level 3 color printers
that gives improved matching between the monitor
and printed output. Color rendering dictionaries are
used by the printer’s PostScript interpreter when
converting RGB data sent to the printer to CMYK
data used by the print engine.
Color rendering style
A feature of KX-P8420 color management software
that allows you to maintain the best possible
translation of color from one color device to
another. The KX-P8420 color rendering styles are:
photographic transparency and presentation.
Color space
A model for representing color in terms of
measurable values, such as the amount of red,
green, and blue in an image. RGB and CMYK color
spaces are based on color devices—monitors and
printers respectively. Other color spaces, such as
CIELAB are based on mathematical models, and
are device-independent—they are not based on
the color response of a particular device.
An RGB color space used by KX-P8420 color
management software as an interchange standard.
The Calibrated RGB color space is defined
according to the following specifications for a color
monitor: SMPTE phosphors, a white point D50,
and gamma of 2.2.
Calibration
The process of ensuring that a device behaves
consistently with respect to a set of specifications.
Color gamut
See
gamut.
Colorant
An ink, die, toner, paint or other pigment that
modifies the color of what it is applied to.
Composite printer
Any printer that can print directly in color without
first creating color separations. A composite is an
early proof of a printing job.
Continuous tone
An image containing gradient tones.
Custom color system
A system of named color swatches that can be
matched on press using process or spot colors.
PANTONE and TruMatch are examples of custom
color systems.
72
Page 73

Glossary
Density
A precise measurement of the light energy
transmitted or reflected by a surface in the
presence of a standard light source.
Densitometer
An instrument that measures density according to
a specified standard. Status T densitometers are
commonly used in the graphic arts industry.
Four-color printer
A printing device that uses cyan, magenta, yellow,
and black ink or toner.
Gamut
A range of colors. A device gamut is the range of
colors that a device, such as a printer, can
produce. An image gamut is the range of colors in
a particular image.
Gamut mapping
Metamerism
Phenomenon where two colors composed of
different combinations of light wavelengths appear
identical. The colors are called “metamers”.
Moiré
An undesirable pattern in images made using
halftone screens. Moiré can be caused by
improper screen angles, improper alignment of
halftone screens, or by certain types of patterns in
the image itself.
Named color
A color that is defined according to a custom color
system. For example, PANTONE 107 C is a
named color.
Offset lithography
Printing in which ink is transferred from printing
plates to a rubber blanket and then from the
blanket to paper.
The process whereby KX-P8420 color
management software compresses—“maps”—the
colors in a digital image to fit the color gamut of a
particular device.
Gradient fill
A color or grayscale fill made of smooth transitions
between two different colors or shades.
Graphics device interface (GDI)
Graphics and display technology used by
computers running Windows. GDI applications rely
on GDI rather than the PostScript language to
send words and pictures to printers.
Halftoning
A method for representing an original continuous
tone image using a pattern of dots of various sizes.
The pattern is determined by the line frequency,
screen angle, and dot shape.
Photographic rendering
A color rendering style that preserves tonal
relationships in images. Unprintable colors are
mapped to printable colors in a way that retains
differences in lightness, slightly sacrificing color
accuracy as necessary.
Pixel
The smallest distinct element of a raster image or
an image displayed on a monitor.
PostScript Level 2 or 3
Version of Adobe Systems’ PostScript language,
which is used to print and display pictures and text.
PostScript Level 3 includes many enhancements
to older versions of PostScript, including improved
color matching and the ability to control printerspecific features from applications.
73
Page 74

Glossary
Prepress proof
A print made from a set of film separations, or from
an electronic file, to simulate the results of printing.
A film proof is the last opportunity to catch
problems before the final printing.
Presentation graphics rendering
A color rendering style that does not try to precisely
match printed colors to displayed colors. It is
appropriate for bright saturated colors used in
illustrations and graphs.
Process colors
The four ink colors used to simulate full-spectrum
color images: process yellow, magenta, cyan, and
black.
QuickDraw
Graphics and display technology built into
Macintosh computers. QuickDraw applications rely
on QuickDraw rather than the PostScript language
to send words and pictures to printers.
Spot color
A color that is printed on its own separation plate
when separations are specified. A spot color is
printed using a special ink for that color, in contrast
to process colors that are printed using
combinations of cyan, magenta, yellow, and black.
Status T
A spectral response for graphic arts reflection
densitometers defined by ANSI (the American
National Standards Institute.)
Subtractive color model
A system in which color is produced by combining
colorants such as paint, inks, or dyes on media
such as paper or transparent film or acetate. The
subtractive primaries are cyan, magenta, and
yellow. All printing devices use the subtractive
color model, as do photographs and transparency
film. Many printers use cyan, magenta, yellow,
black colorants.
and
Subtractive primaries
Raster image
Electronic representation of a page or image using
a grid of points (called pixels) that are numerically
defined. Raster images can be black and white,
grayscale, indexed color, or photographic quality
color.
Separation
The process of separating a color image into the
primary color components for printing—cyan,
magenta, yellow, and black. Also used to refer to
the four sheets of film that result from the process
of separating a color image.
Source profile
A profile used by KX-P8420 to determine the
context for the color values specified in a digital
image.
Cyan, magenta, and yellow colorants used in
subtractive color systems. Combining the
subtractive primaries produces darker colors.
SWOP
The abbreviation for Specifications for Web Offset
Publications. A standard of specifications for
separations, proofs, and color printing usually
designed for magazine production.
Vector image
Graphic illustration created on computers where
picture elements are defined mathematically as
lines or curves between points. Includes artwork
created in illustration and page layout applications.
74
Page 75

Index
A
Accent color . . . . . . . . . . . . . . . . . . . . . . . . . . . . 58
Additive color model. . . . . . . . . . . . . . . . . . . . . . 55
Additive primaries . . . . . . . . . . . . . . . . . . . . . . . 55
Adobe PostScript printer driver v. 8.5.1 . . . . . . . 25
Adobe Type 1 PostScript fonts . . . . . . . . . . . . . 69
Apple Standard setting, RGB Source option . . . 65
B
Bit depth, of raster images. . . . . . . . . . . . . . 61, 62
Brightness . . . . . . . . . . . . . . . . . . . . . . . . . . . . . 54
Brightness option . . . . . . . . . . . . . . . . . . 15, 28, 64
C
Cancel
printing . . . . . . . . . . . . . . . . . . . . . . . . . . . . . 42
processing . . . . . . . . . . . . . . . . . . . . . . . . . . 42
Cancel command (UNIX). . . . . . . . . . . . . . . . . . 36
Changing print settings . . . . . . . . . . . . . . . . . . . 46
Charts, using color in . . . . . . . . . . . . . . . . . . . . . 58
Check and Print option. . . . . . . . . . . . 9, 15, 28, 40
Chooser . . . . . . . . . . . . . . . . . . . . . . . . . . . . . . . 25
CIE. . . . . . . . . . . . . . . . . . . . . . . . . . . . . . . . . . . 54
CIE color model . . . . . . . . . . . . . . . . . . . . . . . . . 54
CMYK color reference pages. . . . . . . . . . . . . . . 68
CMYK Simulation option . . . . . . . . . . . . 15, 28, 64
Color
accent color . . . . . . . . . . . . . . . . . . . . . . . . . 58
additive model. . . . . . . . . . . . . . . . . . . . . . . . 55
complements . . . . . . . . . . . . . . . . . . . . . . . . 59
controlling printing results. . . . . . . . . . . . . . . 57
custom color systems . . . . . . . . . . . . . . . . . . 59
physics of . . . . . . . . . . . . . . . . . . . . . . . . . . . 53
print options . . . . . . . . . . . . . . . . . . . . . . . . . 64
properties of . . . . . . . . . . . . . . . . . . . . . . . . . 53
split complements. . . . . . . . . . . . . . . . . . . . . 59
subtractive model . . . . . . . . . . . . . . . . . . . . . 55
subtractive primaries. . . . . . . . . . . . . . . . . . . 55
text . . . . . . . . . . . . . . . . . . . . . . . . . . . . . . . . 60
theory . . . . . . . . . . . . . . . . . . . . . . . . . . . . . . 53
triads. . . . . . . . . . . . . . . . . . . . . . . . . . . . . . . 59
using effectively . . . . . . . . . . . . . . . . . . . 58–60
wheel . . . . . . . . . . . . . . . . . . . . . . . . . . . . . . 59
Color CRD Graphics option . . . . . . . . . . . . . 16, 29
Color CRD Images option . . . . . . . . . . . . . . 16, 29
Color CRD Text option. . . . . . . . . . . . . . . . . 16, 29
Color Matching option . . . . . . . . . . . . . . . . . . . . 29
Color Mode option . . . . . . . . . . . . . . . . . . . . 16, 29
Color monitors,
Color rendering dictionaries (CRDs) . . . . . . . . . 66
Color rendering styles,
Color space . . . . . . . . . . . . . . . . . . . . . . . . . . . . 54
Color theory . . . . . . . . . . . . . . . . . . . . . . . . . . . . 53
Color wheel . . . . . . . . . . . . . . . . . . . . . . . . . . . . 59
Colorants . . . . . . . . . . . . . . . . . . . . . . . . . . . . . . 55
ColorSync System Profile . . . . . . . . . . . . . . 30, 65
ColorWise Business Color option. . . . . . . . . . . . 17
ColorWise Expert Mode option . . . . . . . . . . . . . 17
Commission Internationale de l’Eclairage,
Complements, color. . . . . . . . . . . . . . . . . . . . . . 59
Computer monitors,
Confirm file deletion option. . . . . . . . . . . . . . . . . 43
CRD option. . . . . . . . . . . . . . . . . . . . . . . . . . 18, 64
CRDs (color rendering dictionaries). . . . . . . . . . 66
see
Monitors
see
see
Monitors
Rendering styles
see
CIE
D
Default color controls set in Setup . . . . . . . . . . . 64
Deleting jobs in Fiery WebSpooler. . . . . . . . . . . 45
Device Options
specifying from printer driver. . . . . . . . . . . . . 18
Downloading files to the printer . . . . . . . . . . . . . 52
Duplicating jobs in Fiery WebSpooler . . . . . . . . 44
E
EFIRGB setting, RGB Source option. . . 21, 64, 65
Electronic Collation option . . . . . . . . . . . . 9, 18, 30
75
Page 76

Index
F
Face-Down/Face-Up option. . . . . . . . . . . . . 20, 30
Fiery WebDownloader . . . . . . . . . . . . . . . . . 38, 51
downloading files . . . . . . . . . . . . . . . . . . . . . 52
using to download color reference pages. . . 68
Fiery WebLink . . . . . . . . . . . . . . . . . . . . . . . 38, 50
Fiery WebSpooler . . . . . . . . . . . . . . . . . . . . 38, 40
cancel . . . . . . . . . . . . . . . . . . . . . . . . . . . . . . 41
deleting jobs . . . . . . . . . . . . . . . . . . . . . . 41, 45
duplicating jobs. . . . . . . . . . . . . . . . . . . . 41, 44
hold. . . . . . . . . . . . . . . . . . . . . . . . . . . . . . . . 41
moving jobs. . . . . . . . . . . . . . . . . . . . . . . . . . 45
preferences. . . . . . . . . . . . . . . . . . . . . . . . . . 43
print. . . . . . . . . . . . . . . . . . . . . . . . . . . . . . . . 41
update. . . . . . . . . . . . . . . . . . . . . . . . . . . . . . 41
Fiery WebTools
accessing from the printer’s home page. . . . 37
home page . . . . . . . . . . . . . . . . . . . . . . . . . . 37
overview . . . . . . . . . . . . . . . . . . . . . . . . . . . . 37
requirements for . . . . . . . . . . . . . . . . . . . 37, 39
Status . . . . . . . . . . . . . . . . . . . . . . . . . . . 38, 49
WebDownloader . . . . . . . . . . . . . . . . . . . 38, 51
WebLink . . . . . . . . . . . . . . . . . . . . . . . . . 38, 50
WebSetup. . . . . . . . . . . . . . . . . . . . . . . . . . . 38
WebSpooler . . . . . . . . . . . . . . . . . . . . . . 38, 40
File size, of raster images . . . . . . . . . . . . . . . . . 62
Font list . . . . . . . . . . . . . . . . . . . . . . . . . . . . . . . 69
Fonts
color text size . . . . . . . . . . . . . . . . . . . . . . . . 60
H
Halftoning. . . . . . . . . . . . . . . . . . . . . . . . . . . . . . 14
Hold queue. . . . . . . . . . . . . . . . . . . . . . . 40, 41, 42
HSB (hue, saturation, brightness) . . . . . . . . 53, 54
I
ICC Profiles . . . . . . . . . . . . . . . . . . . . . . . . . 29, 30
ICM Profile . . . . . . . . . . . . . . . . . . . . . . . . . . . . . 19
Internet Explorer. . . . . . . . . . . . . . . . . . . . . . . . . 37
J
Job Log . . . . . . . . . . . . . . . . . . . . . . . . . . . . . . . 47
Fiery WebSpooler. . . . . . . . . . . . . . . . . . 40, 47
L
Light, as property of color. . . . . . . . . . . . . . . . . . 53
Line art,
Lp command . . . . . . . . . . . . . . . . . . . . . . . . . . . 35
Lpq command . . . . . . . . . . . . . . . . . . . . . . . . . . 35
Lpr command. . . . . . . . . . . . . . . . . . . . . . . . . . . 34
Lprm command . . . . . . . . . . . . . . . . . . . . . . . . . 36
Lpstat command. . . . . . . . . . . . . . . . . . . . . . . . . 35
see
Vector images
G
Gamut . . . . . . . . . . . . . . . . . . . . . . . . . . . . . 56, 66
mapping . . . . . . . . . . . . . . . . . . . . . . . . . 56, 66
of monitors . . . . . . . . . . . . . . . . . . . . . . . . . . 56
of photographic transparencies . . . . . . . . . . 56
of print devices . . . . . . . . . . . . . . . . . . . . 56, 57
Glossary. . . . . . . . . . . . . . . . . . . . . . . . . . . . . . . 72
Graphs, using color in . . . . . . . . . . . . . . . . . . . . 58
Grayscale. . . . . . . . . . . . . . . . . . . . . . . . 16, 19, 29
76
M
Macintosh
printing . . . . . . . . . . . . . . . . . . . . . . . . . . . . . 26
selecting printer. . . . . . . . . . . . . . . . . . . . . . . 25
Metamerism . . . . . . . . . . . . . . . . . . . . . . . . . . . . 54
Microsoft Internet Explorer,
Misregistration of colors. . . . . . . . . . . . . . . . . . . 60
Monitors . . . . . . . . . . . . . . . . . . . . . . . . . . . . . . . 55
gamut of . . . . . . . . . . . . . . . . . . . . . . . . . . . . 56
phosphors. . . . . . . . . . . . . . . . . . . . . . . . . . . 55
More Options button. . . . . . . . . . . . . . . . . . . . . . . 7
Moving jobs in Fiery WebSpooler . . . . . . . . . . . 45
see
Internet Explorer
Page 77

Index
N
Netscape Communicator . . . . . . . . . . . . . . . . . . 37
O
Out-of-gamut RGB colors, printing. . . . . . . . . . . 66
Output Order option . . . . . . . . . . . . . . . . . . . . . . 30
P
Painting applications . . . . . . . . . . . . . . . . . . . . . 61
PANTONE color reference pages . . . . . . . . . . . 68
PANTONE color system . . . . . . . . . . . . . . . . . . 67
Paper option (paper size). . . . . . . . . . . . . . . . . . 30
Paper Size option. . . . . . . . . . . . . . . . . . . . . . . . 20
Paper Source option . . . . . . . . . . . . . . . . . . 20, 31
Phosphors . . . . . . . . . . . . . . . . . . . . . . . . . . . . . 55
Photographic CRD. . . . . . . . . . . 16, 17, 18, 29, 66
Photographic prints . . . . . . . . . . . . . . . . . . . . . . 55
Photographic transparencies . . . . . . . . . . . . . . . 55
gamut of . . . . . . . . . . . . . . . . . . . . . . . . . . . . 56
Physics of color . . . . . . . . . . . . . . . . . . . . . . . . . 53
Pixel-editing applications . . . . . . . . . . . . . . . 61, 63
Pixels in raster images. . . . . . . . . . . . . . . . . . . . 61
PostScript
printing files from UNIX. . . . . . . . . . . . . . . . . 34
PostScript applications
using color in. . . . . . . . . . . . . . . . . . . . . . 67–68
PostScript fonts . . . . . . . . . . . . . . . . . . . . . . . . . 69
PostScript printer fonts, included with printer. . . 69
PostScript printing
configuring printing options, Windows 3.1 . . 13
configuring printing options, Windows 95 . . . . 6
configuring printing options,
Windows NT 4.0. . . . . . . . . . . . . . . . . . . . . 11
Macintosh . . . . . . . . . . . . . . . . . . . . . . . . . . . 25
Preferences, Fiery WebSpooler. . . . . . . . . . . . . 43
Prepress proof . . . . . . . . . . . . . . . . . . . . . . . . . . 57
Presentation CRD . . . . . . . . . . . 16, 17, 18, 29, 66
Presentation print jobs
rendering styles appropriate for . . . . . . . . . . 66
using color in. . . . . . . . . . . . . . . . . . . . . . . . . 58
Print as mirror image . . . . . . . . . . . . . . . . . . . . . 14
Print as Negative image. . . . . . . . . . . . . . . . . . . 14
Print devices
consistency. . . . . . . . . . . . . . . . . . . . . . . . . . 57
gamut . . . . . . . . . . . . . . . . . . . . . . . . . . . 56, 57
test prints . . . . . . . . . . . . . . . . . . . . . . . . . . . 57
Print queue. . . . . . . . . . . . . . . . . . . . . . . . . . 40, 42
Printed queue. . . . . . . . . . . . . . . . . . . . . . . . 40, 42
Printer
maintenance . . . . . . . . . . . . . . . . . . . . . . . . . 57
paper stock . . . . . . . . . . . . . . . . . . . . . . . . . . 57
print options . . . . . . . . . . . . . . . . 15–22, 28–32
rendering style . . . . . . . . . . . . . . . . . . . . . . . 66
resident fonts . . . . . . . . . . . . . . . . . . . . . 69–71
selecting on the Macintosh . . . . . . . . . . . . . . 25
toner . . . . . . . . . . . . . . . . . . . . . . . . . . . . . . . 57
Printer description files. . . . . . . . . . . . . . . . . . . . 26
Printing
changing settings . . . . . . . . . . . . . . . . . . . . . 46
Macintosh . . . . . . . . . . . . . . . . . . . . . . . . . . . 26
raster images . . . . . . . . . . . . . . . . . . . . . . . . 61
UNIX workstations . . . . . . . . . . . . . . . . . 34–36
Prism . . . . . . . . . . . . . . . . . . . . . . . . . . . . . . . . . 53
Process colors . . . . . . . . . . . . . . . . . . . . . . . 55, 68
PS error print . . . . . . . . . . . . . . . . . . . . . . . . . . . 14
Pure binary data. . . . . . . . . . . . . . . . . . . . . . . . . 14
R
Raster images . . . . . . . . . . . . . . . . . . . . . . . . . . 61
bit depth . . . . . . . . . . . . . . . . . . . . . . . . . 61, 62
file size . . . . . . . . . . . . . . . . . . . . . . . . . . . . . 62
for offset press printing . . . . . . . . . . . . . . . . . 63
printing . . . . . . . . . . . . . . . . . . . . . . . . . . . . . 61
resolution . . . . . . . . . . . . . . . . . . . . . 61, 62, 63
scaling. . . . . . . . . . . . . . . . . . . . . . . . . . . . . . 63
Registration of colors . . . . . . . . . . . . . . . . . . . . . 60
Rendering styles . . . . . . . . . . . . . . . . . . . . . . . . 66
Resolution of raster images . . . . . . . . . . 61, 62, 63
Resolution option . . . . . . . . . . . . . . . . . . . . . 21, 31
RGB Source option . . . . . . . . . . . . . 21, 32, 64, 65
77
Page 78

Index
S
Saturation. . . . . . . . . . . . . . . . . . . . . . . . . . . . . . 54
Scanners . . . . . . . . . . . . . . . . . . . . . . . . . . . . . . 55
Semi Automatic Duplex option. . . . . . . . . . . 22, 32
Semi Automatic Duplex Printing . . . . . . . . . 23, 33
Setup, default color controls set in. . . . . . . . . . . 64
Simulation . . . . . . . . . . . . . . . . . . . . . . . . . . . . . 22
Solaris 2. . . . . . . . . . . . . . . . . . . . . . . . . . . . 35, 36
Spectral components of light . . . . . . . . . . . . . . . 53
Split complements . . . . . . . . . . . . . . . . . . . . . . . 59
sRGB (PC) setting,
RGB Source option. . . . . . . . . . . . 21, 32, 64, 65
Subtractive color model. . . . . . . . . . . . . . . . . . . 55
Subtractive primaries. . . . . . . . . . . . . . . . . . . . . 55
Sunlight . . . . . . . . . . . . . . . . . . . . . . . . . . . . . . . 53
SunOS 4 . . . . . . . . . . . . . . . . . . . . . . . . . . . . . . 36
T
TCP/IP (UNIX), printing . . . . . . . . . . . . . . . . . . . 34
Test prints . . . . . . . . . . . . . . . . . . . . . . . . . . . . . 57
Text
font size . . . . . . . . . . . . . . . . . . . . . . . . . . . . 60
using color with. . . . . . . . . . . . . . . . . . . . . . . 60
Three Color Mode option. . . . . . . . . . . . . . . . . . 22
Tint. . . . . . . . . . . . . . . . . . . . . . . . . . . . . . . . . . . 54
Transparencies, photographic. . . . . . . . . . . . . . 55
gamut of . . . . . . . . . . . . . . . . . . . . . . . . . . . . 56
Transparency CRD . . . . . . . . . . . . . 16, 18, 29, 66
Triads, color. . . . . . . . . . . . . . . . . . . . . . . . . . . . 59
Troubleshooting printing problems. . . . . . . . . . . 57
TrueType fonts. . . . . . . . . . . . . . . . . . . . . . . . . . 71
Type1 fonts . . . . . . . . . . . . . . . . . . . . . . . . . . . . 69
U
UNIX
BSD (Berkeley Software Distribution)
variant of. . . . . . . . . . . . . . . . . . . . . . . . . . . 36
displaying jobs in queue with . . . . . . . . . . . . 35
printing from . . . . . . . . . . . . . . . . . . . . . . 34–36
removing jobs from queue with. . . . . . . . . . . 36
System V. . . . . . . . . . . . . . . . . . . . . . . . . 35, 36
UNIX (TCP/IP), printing . . . . . . . . . . . . . . . . . . . 34
Using color effectively . . . . . . . . . . . . . . . . . . . . 58
V
Vector images . . . . . . . . . . . . . . . . . . . . . . . 61, 63
Visible spectrum of light. . . . . . . . . . . . . . . . . . . 53
W
Windows
custom print options . . . . . . . . . . . . . . . . 15–22
Windows 3.1
configuring PostScript printing options . . . . . 13
Windows 95
configuring PostScript printing options . . . . . . 6
Windows NT 4.0
configuring PostScript printing options . . . . . 11
Windows print options . . . . . . . . . . . . . . . . . . . . 14
78
PJWR1P8420MB
 Loading...