

Page 1

KX-P8420 Technical notes
Introduction
This document describes mainly the software issues about Panasonic Color Laser Printer KX-P8420 including the
explanation of basic features, software problems, troublesh ooting, etc.
Troubleshootings included in this document are also included in Panasonic KX-P8420 home page where the
customers can access to.
The most of the content of this document also applies to the printer part of Panasonic latest CSP model KX-P8100.
Please note that this document can be disclosed exclusively for persons in charge of services on KME color
products at Panasonic sal es companies because some information is related to the Service mode or factory setting.
The content itself can be reve ale d to the customers except for the items mentioned above.
Please refer to this document for your service activities regarding KX-P8420 software problems.
We hope that this document will be helpful and thank you in advance for your reading this document attentively.
Index:
1. KX-P8420 Color Features
2. KX-P8420 Color Calibration methods
3. KX-P8420 Consumables management
4. KX-P8420 Driver Features
5. KX-P8420 Driver and Utilities Setup
6. KX-P8420 Font Management
7. KX-P8420 WebTools
8. KX-P8420 Network General/Setup
9. Application Notes
10. KX-P8420 related miscellaneous topics
Page 2

1.KX-P8420 Color fe ature
The KX-P8420 uses a simple and flexib le color architecture that produces e xcel lent color results with def ault settings .
It also allows you to customize your color results using various color co ntrols.
Settings for the following KX-P8420 options can be specified via print dialog box options when you send a job.
This document describes how these options work on the color quality.
Color rendering Dictionaries(CRD)
Before an RGB image can be printed, the file color data must be converted to the printer CMYK color space.
Color rendering dictionaries (CRDs) are used to perform color conversions on RGB color space to CMYK color
space. The follo wing table describes the CRDs for KX-P8420 software and provides guid elines on when to use ea ch
one. Each color rendering style uses a different gamut mapping method, such as Photographic or Presentation,
designed for a particular kind of color usage.
Rendering style Best used for
Photographic
rendering style maps out-of-gamut RGB colors to printable colors in a way that retains
differences in lightness. Color accuracy is sacrificed slightly in favor of presenting color
relationships in the way the human eye perceives them. Photographic rendering typically
gives less saturated output wh en printing out-of-gamut RGB colors than
Presentation Color rendering does.
Presentation
printed colors precisely to displayed colors but instead provides vibrant, dense colors.
Photographic images, ho we ver, are treated the similar wa y a s by the Photog raphi c rendering
style.
Transparency
transparency paper.
—Preserves tonal relationships in images rather than exact colors. This
—Creates bright saturated colors. This rendering style does not try to match
— Improves the co rresponden ce betw een monito r colors and printed color on
Continuous tone
photographs,
including scans and
images from stock
photograph y CDs
Artwork and graphs
in presentations and
normal text file.
Artwork and graphs
printed on
transparency paper
NOTE:
-The rendering styles referred to in the table cannot be used when selecting host based color management system
such as ColorSync or ICM.
-Color rendering dictionaries cannot be used with CMYK files.
Page 3
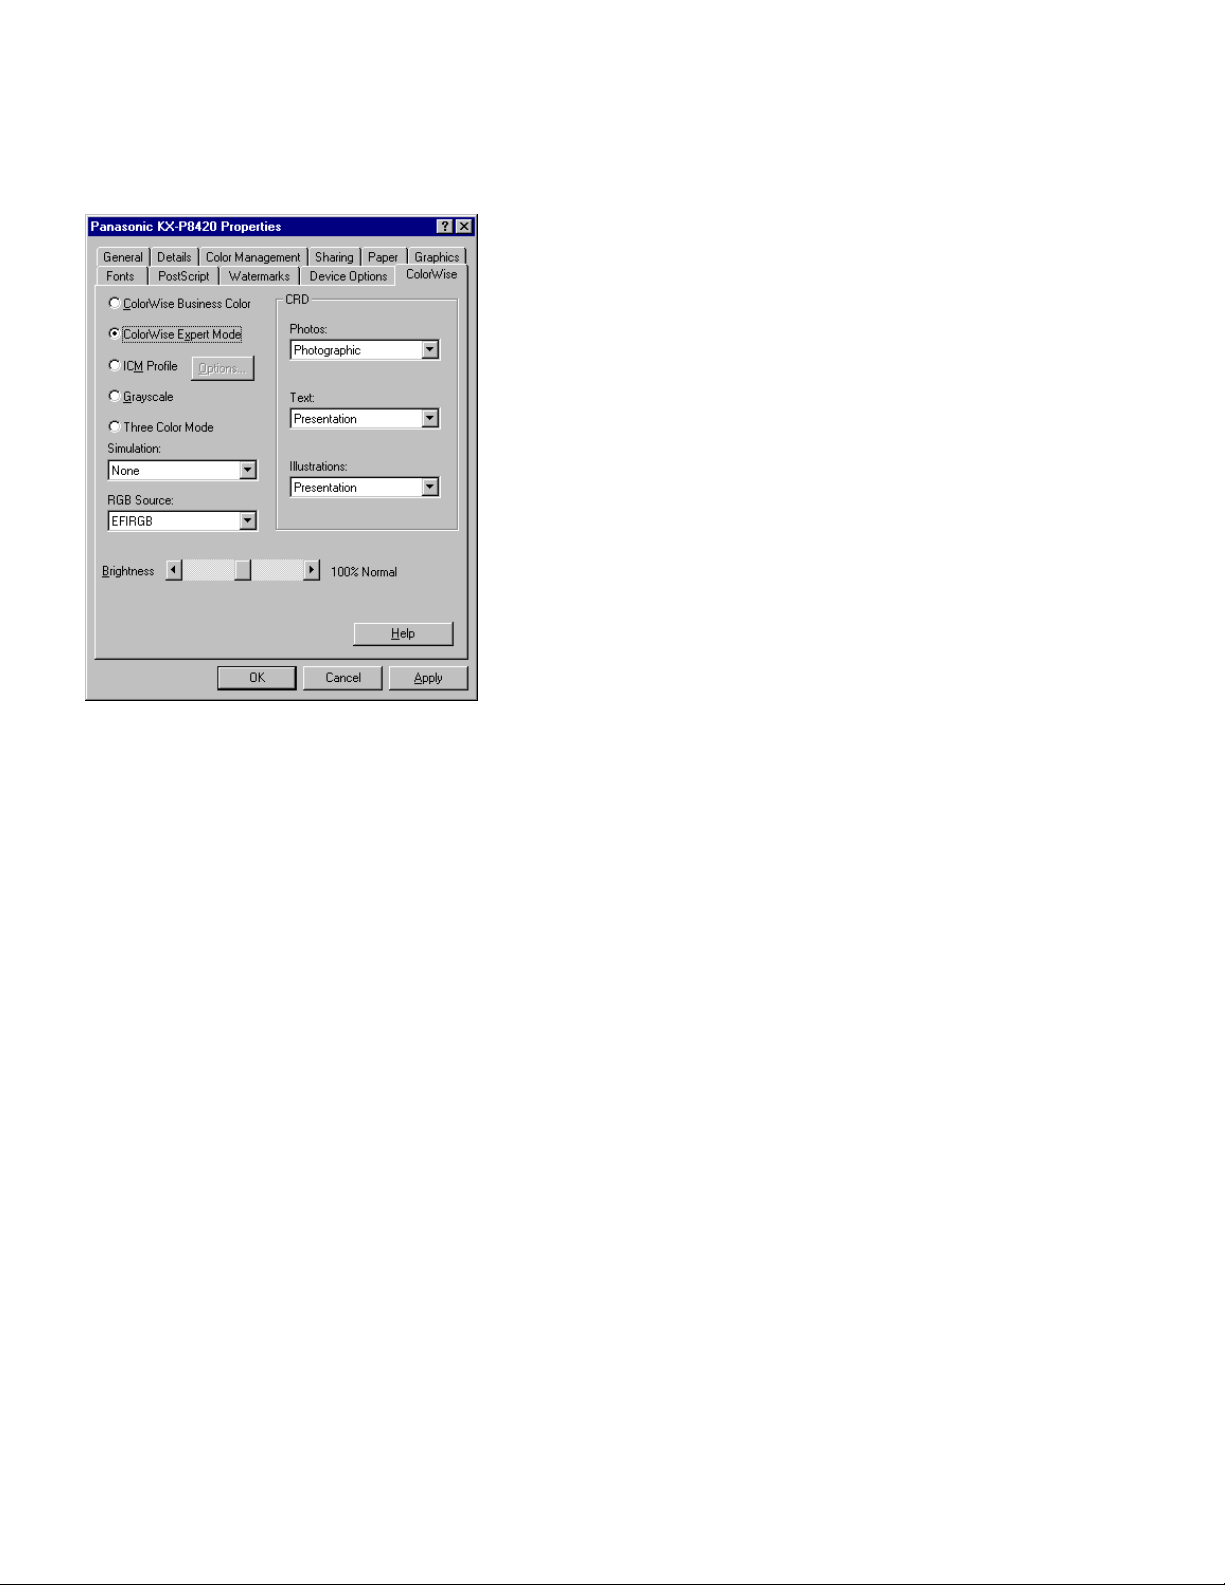
If you select ColorWise tab in Windows95 KX-P8420 Printer properties. In this tab, you can specify the various
P8420 color features described below. The screen is different depending on the platfor m you use, but the available
features are basically the same .
ColorWise Business Color
This option is available only with Windows95 driver and selected as the default option in ColorWise tab of the
Driver. Select ColorWise Business Color to automatically apply the Presentation color rendering dictionary to
illustration and text objects in a document, and the Photographic CRD to photographic objects. These CRDs
selection are also applied to the driver on ot her platforms(Win3.1,NT,Macintosh) as the def ault selections of CRDs.
ColorWise Business Color is ideal for plain paper documents containing a mixture of graphic and text elements .
Thus in most cases this option suits well for printing the document created using standard applications.
NOTE:
- If ColorWise Business Color is chosen, and Transparency is selected as the media type to print on, the
Transparency CRD will be automatically applied to text, illustrations, and photographic objects in the document.
ColorWise Expert Mode
Although selecting ColorWise Business Color produces excellent color quality in most cases, there may be times
customers want to adjust the color quality to their preferences.
By selecting ColorWise Expert Mode, KX-P8420 Windows95 driver enable them to do so using advanced options
such as CRDs selection, RGB source, Press simulation. The setting of these options can be changed without
selecting ColorWise Expert Mode with the driver on other platforms(Win3.1,NT,Macintosh).
NOTE:
- Applying Photographic CRD to illustration and text objects may cause the unexpected print quality such as the
Page 4

obscure characters.
- In most cases, applying Presentation CRD to image objects does not make the obvious difference on the color
quality, but the subtle difference.
- Selecting CRD is not effective when you print CMYK files.
RGB Source
PostScript RGB data is converted to CMYK data using the specified CRD. This type of RGB data contains its own
source color space information which is used as a reference point for the conversion. The RGB Source option is
used to provide a source color space definition for RGB data in your document.
RGB source Description
EFIRGB
sRGB (PC)
Apple Standard
In general, selecting Apple Standard produces the brightest color output followed by EFIRGB, then sRGB.
NOTE:
The source color space defined by this setting is optimal for color conversions that will be sent
to a KX-P8420 print device. It also allows for consistent output across different operating
systems.
The sRGB (PC) setting specifies the source space of a generic Windows computer monitor.
The Apple Standard setting specifies the source space of all standard Macintosh computer
monitors.
- Selecting RGB source is not effective when you print CMYK files.
Simulation
If you are using the KX-P8420 to print proofs for an offset press job, select the appropriate CMYK Simulation setting.
The CMYK Simulation setting specifies the offset press standard that you want to simulate. The CMYK Simulation
setting you should specify depends on the press standard for which the CMYK data was separated. For example, f or
images that were separated for SWOP-Coated paper, select SWOP-Coated as the CMYK Simulation setting. Select
SWOP-Coated to simulate printing to a standard American offset press; Euroscale to simulate a European offset
press, or DIC to simulate a standard Japanese offset press. For images that were separated using a custom
separation (such as a device -specific separation or a separation produced with an ICC-profile), select None as
the CMYK Simulation setting
None
- no simulation adjustments are made to the CMYK color data.
SWOP-coated
DIC
is a Japanese offset press standard of specifications for printing separations and proofs.
Euroscale
NOTE:
is a standard of specifications for printing separations a nd p roofs on coated paper.
is a European offset press standard of specifications f or printing separations and proofs.
- Simulation selection is applicable only to CMYK file.
Brightness
Use the Brightness setting to increase or decrease the overall brightness of a document by a maximum of 15
percent. When you select 115%, the print outcome become darkest while you get the brightest outcome by selecti ng
85%.
Page 5
ICM or ColorSync
ICM (Image Color Matching), ColorSync is a feature that allows closer color matching between what you see on the
screen and your printed output. Use ICM or ColorSync if you want to match printed pictures and bitmaps (for
example .bmp and .tif images) to the colors on the monitor. Clic k the O ption b utton to select an imag e color matching
method and rendering intent.
ICM is available only on Windows 95/98. Windows95 supports ICM1.0 and Windows98 supports ICM2.0. Both ICM
version support different CMM(color management module) and the pr int quality may differ slightly. P8420 supports
ICM version1.0, but can be used with ICM2.0. ColorSync version must be 2.01 or later.(MacOS7.6 or later).
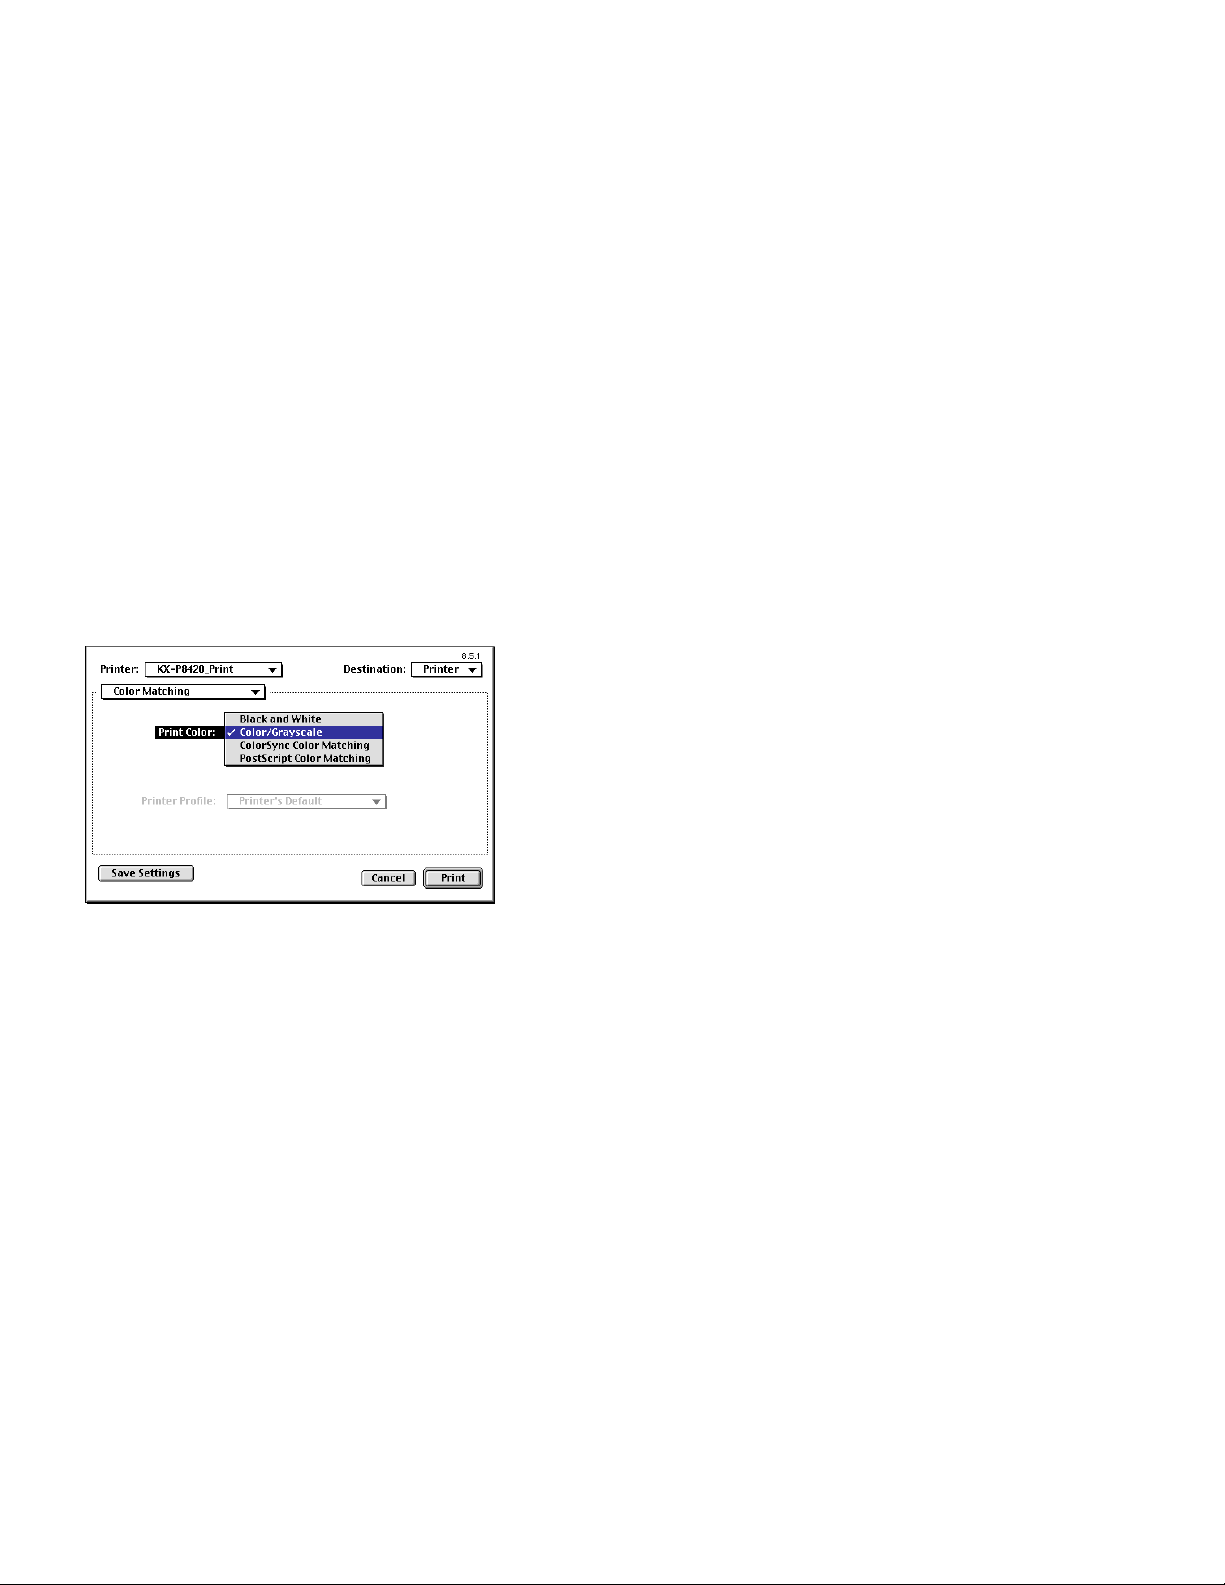
If you want to use ColorSync, select “ColorSync Color Matching” or “PostScr ipt Color Matching” as Print Color after
selecting “Color Matching” from the pop-up menu under the Printer pop-up menu in the Print dialog box sho wn when
you select “Print” from file menu within application. If you do not want to use ColorSync, select “Color/G rayscale”.
To utilize these features, ICM or ColorSync ICC profile have to be installed. Please follow the instruction on the
Operating instruction.
Some advanced applications (ex. Photoshop,CorelPhoto) have proprietary CMS(color management system).
You can use P8420 profiles with those CMS. Please ref er to application manuals for more detail.
NOTES:
- It is not recommended to use these feature s be cause in m ost cases , you get the almost same output as you get by
using Colorwise Business color mode.
- When printing from Microsoft Office 97 applications, make sure the KX-P8420 ICM profile is not installed in the
Windows¥System¥Color f older. If the ICM profile is installed, Microsoft Office9 7 files importing JPEG, BMP, and TIFF
images may not be printed correctly. (Printed bluish) The same pro blem also happens when you create pdf file using
Adobe distiller after making ps file using P8420 driver.
- ICM profile is copied to the folder named Color under Windows System directory after installation. But you have to
activate it before using this feature. 1)Right click the ICM Profile named “Pakx2010.icm” 2)Click “Install in Place.”
- ICM is not copied if you install the KX-P8420 printer driver by using the Add Printer wizard. Copy the ICM profile
manually from KX-P8420 Driver & Utility CD-ROM (English¥Prntdrvr¥Disk1) to Windows¥System¥Color folder.
Install the ICM profile using the instructions above .
- ICM or ColorSync does not work with some features(CRD selection,GrayScale,RGB source) at the same time.
- ICM effect may differ from application to application.
Page 6

Grayscale
Select Grayscale to print a document using 256 levels of gray. This option is useful for quickly producing preliminary
copies of color documents, or for producing documents to be fax ed.
NOTES:
- Many applications offer black and white or grayscale printing options. Use the application’s grayscale option, if
available, for more efficient processing time.
- To enable Grayscale in Windows 3.1, select None in all three CRD options in the Features tab.
- To enable Grayscale in Windows NT 4.0, select Document Defaults from the File menu in the Printers folder, and
select None in all three CRD options in the Advanced tab.
Three Color Mode
Select Three Color Mode to pr int a document using Cyan, Magenta and Yellow. Gray or Black are printed using
C,M,Y toner. Thus the darker area of the print outcome may have the poorer quality than normal printing mode using
CMYK toner. This option is useful for quickly producing draft copies of color documents.
NOTES:
- This option is only availa ble when the printer’s print resolution is set to 600 x 600 dpi.
- This option uses only the same default combination of CRDs used for ColorWise Business Color—the
Photographic CRD for photographic objects, and the Presentation CRD for illust ration and text objects.
Color Mode (CMYK/CMY/Grayscale)
With Windows3.1,NT,Macintosh driver, GrayScale or Three Color Mode can be selected by changing color Mode
option.
Reference file
With PostScript applications, you can create colors using any of the color models supported by the application. All
PostScript applications support the CMYK model; some also suppor t the RGB model and other color models based
on monitor display values. PostScript applications also allow you to select named colors using one or more color
libraries, such as PANTONE. CMYK and PANTONE color reference pages are provided on the KX-P8420 to help
you specify the desired color in the application.
Driver & Utility CD-ROM includes the reference pages in the form of downloadable PostScript files.
CMYK Color Reference
The CMYK Color Reference is a PostScript file (Cmyk_ref.ps), which can be printed using a PostScript downloader
utility, such as Fiery WebDownloader or from DOS prompt through parallel port by copy command (ex. copy
cmyk_ref.ps prn). If the file has not already been installed in the Panasonic KX-P8420 directory on your hard disk
drive, you can copy it from the English>Clrfiles directory on the KX-P8420 Driver & Utility CD-ROM to a directory of
your choice.
Each of the 11 pages display swatches in graduated combinations of yellow, magenta, and cyan, and smaller
patches that include 25%, 50%, and 75% black. The process colors are shown in 10% increments. You can specify
these colors, and colors in between, in any application that allows you to define colors as CMYK percentages—and
Page 7

use the pages to see how they will be printed on your particular printer.
NOTES:
The color output may not be fully match to the color y ou confirmed in the sw atches beca use the color output ma y
be affected by many aspects (driver settings, printer settings etc.), but should be very close to the color in the
swatches in normal usage.
PANTONE Coated Color Reference
The PANTONE Coated Color Reference is a PostScr ipt file (Pantone.ps), which can be pr inted using a PostScr ipt
downloader utility, such as Fiery WebDownloader or from DOS prompt through parallel port by copy
command (ex. copy cmyk_ref.ps prn). If the file has not already been installed in the Panasonic KX-P8420 directory
on your hard disk drive , you can copy it from the English>Clrfiles directory on the KX-P8420 Driver &
Utility CD-ROM to a directory of your choice.
The PANTONE color matching system is a standard color system within the graphic arts and prepress industries. It
specifies hundreds of spot colors, each identified with a unique number. Each PANTONE color is simulated on the
printer by printing an appropriate combination of process (CMYK) colors. The ability to simulate PANTONE colors is
a basic form of color management.
You can choose PANTONE colors in any application that allows you to define colors as named PANTONE colors—
and use the pages to see how the y will be printed on your particular printer. This applies to Vecor graphic application
such as CorelDraw. For how to choose PANTONE colors in applilcations, please refer to the manual.
The Pantone color No. Is transmitted to the Printer with PS data and then conver ted to CMYK color using inter nal
Pantone color conversion table. Thus the color looks very similar to the color you confirmed in the swatches.
As for Raster graphic application such as Adobe Photoshop, PANTONE color is converted to CMYK color using the
table residing in the application. So the color output are not similar to the color in the swatches compared to the case
of Vector graphic application.
The output of Pantone color may be affected by driver settings. Please use the default colorwise settings. Select
“None” as simulation setting if selected otherwise. Select 100% as Brightness setting is selected otherwise. Or if you
have used the color adju stment on the front panel menu, reset the setting.
Trouble: The color of the printout is m uch differ from the color you see on the screen.
Possible Cause: Driver settings is n ot used.
Corrective Action: Please select 100% as “Brightness” setting in the Driver properties or select None as “Simulation”
setting in the Driver properties.
Possi ble Cause: Correct RGB source is not used.
Corrective Action: In the driver properties, you can define RGB source from one of 3 options. (AppleStandard,
EFIRGB, sRGB). If you are using Macintosh, it is most recommended to select AppleStandard. If you are using
standard PC, select EFIRGB or sRGB. If you are using Windows95 KX-P8420 driver, select ColorWise Expert mode
to check which RGB source are being used. Please note that this setting does not affect when you print CMYK file.
Possible Cause: Printer is not correctly calibrated.
Page 8

Corrective Action: KX-P8420 provides 2 methods for calibr ating the printer (Bias Adjustment, Visual Calibration) and
another method to adjust the color output for the customer’s preference (Color Adjustment). Follow the instruction
described in the application manual.
Possi ble Cause: Screen monitor is not correctly calibrated.
Corrective Action: Some application like Photoshop can let you calibrate the monitor setting or specify monitor color
specification Follow the instruction described in the application manual.
Page 9
2.KX-P8420 Color Calibration methods
Output from color print devices is subject to changes in temper ature and humidity , and is pron e to drift over time , with
a resulting loss in color predictability. Where color accuracy and consisten c y are crucial, regular
calibration of the KX-P8420 is necessary. The color output of your KX-P8420 color printer is adjusted using three
different methods: Bias Adjustment, VisualCal, and ColorWise Color Adjustment.
Bias Adjustment
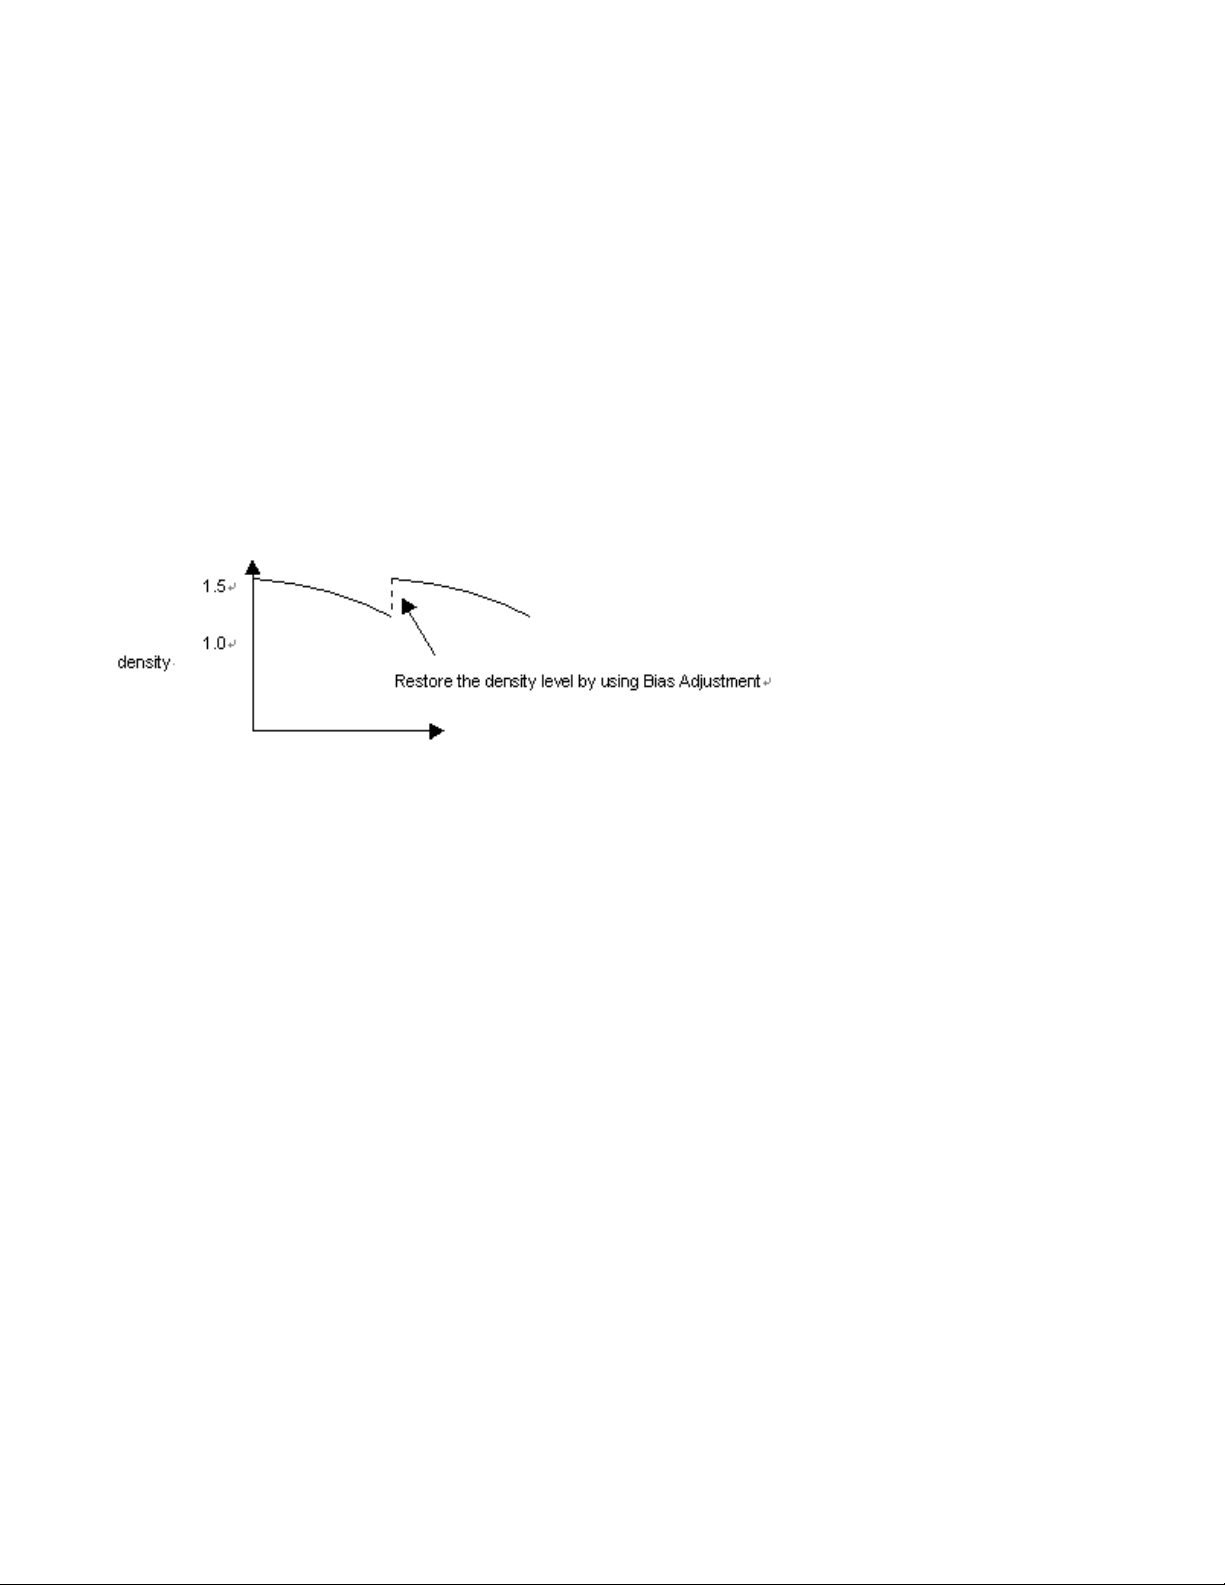
Used to adjust the overall color density. The overall density drift slightly as the number of printed pages increases.
Especially, the overall density tends to increase gradually as the number of pages printed for current Imaging Unit
increases. Bias adjustment is used to compensate for this kind of density drift. If you think color output has become
too dark or too bright compared to previously printed pages, perform the Bias Adjustment. It is also recommended
that you perform the Bias Adjustment after replacing the color imaging unit and/or the toner cartridge(s).
VisualCal
Used to optimize the printer’s range of color density and to adjust gr a y balance. If y ou think the gr a y color in a printed
image does not appear to be a pure gray, perform the VisualCal after performing the Bias Adjustment.
Color Adjustment
Used to adjust the overall brightness of color output and saturation of each color. Perform the Color Adjustment
after the Bias Adjustment and VisualCal calibration to adjust color output to your preference.
Please note that Bias Adjustment and VisualCal is for calibrating the printer to obtain the best color performance
while color adjustment is for adjusting the color to the preference. Please be careful in doing color adjustment
because adjusting to the preference for a certain purpose does not always works well for the other pur pose. It is
more recommended to adjust color by using driver setting or Application feature than using Color Adjustment.
NOTE:
- You cannot perform VisualCal or ColorAdjustment if the printer display error or warning message(s). If you
encounter the message(s), be sure to troubleshoot them in advance.
- You cannot perform VisualCal or ColorAdjustment while you are opening KX-P8420 WebTools. Please close
WebTools in advance.
- If you unintentionally enter incorrect value(s) dur ing VisualCal or ColorAdjustment, you may see the unexpected
color output quality. In this case, Reset or redo VisualCal or ColorAdjustment.
Page 10

Bias adjustment
The printer’s Bias Adjustment feature pro vide s basi c cont rol over the printer’s color production. The Bias Adjustment
screens, accessible via the front panel, allow you to override the printer’s current toner density and brightness
settings. Using the Bias Adjustment and calibration offset control s, y ou can increase or decrease the density of cy an,
magenta, yellow or black, and increase or decrease the overall brightness of all toner colors.
NOTE:
- Visual Calibration and Color Adjustment settings may affect the settings of Bias Adjustment.
— Reset VisualCal before performing the Bias Adjustment.
— Restore the settings in Color Adjustment to the default values (all 0) before using the Bias Adjustment.
- Changes made using Bias Adjustment are retained until the printer is recalibrated.
- The color density setting affect s the average life of toner.
- Save the Color Calibration Card for future calibrations.
Visual calibration
VisualCal TM is a calibration method that allows you to calibrate your printer to an ideal color output standard.
The calibration calculations performed by the controller softw are are base d on a series of values entered th rough the
front panel. The values used in the calculations are determined by evaluating toner densities and color combinations
produced on two specially designed calibration pages printed from the front panel.
Limit, 30% match calibration
The first VisualCal page, Limits, 30% Match, provides the basis for calculating the most acceptable luminosity
(brightness) of the toners. This page contains rows of CMYK dots in a graduated range of toner densities.
The variables needed to recalc ulate the
that can be fully distinguished against their fields in each row, and sequentially entering their
corresponding numeric values via the front panel. The variable needed to recalculate the
determined in a slightly different way- the user is required to identify the black dot which best matches a 30% dot
gain field. When all values have been entered, the printer’s toner density and luminosity settings are recalculated.
The human eye cannot distinguish the color very well if it is too bright or dar k. By eliminating the color range that is
difficult to distinguish, P8420 can take the most advantage of the available color density range and thus overall color
quality improves.
density
of the colored toners are determined by identifying the leftmost dots
luminosity
of the toners is
Page 11

Operation:
1.Enter number of the first circle virtually separated from the blank background.
2.Enter number of the first circle virtually separated from the solid color background.
3.Repeat step1.2. for K,C,M,Y.
4.Hold the page at the arms length. Enter the n umber of the circle that best blends with the background.
*If any of the entered values for any colors are 9, the Limits and 30% Match page is reprinted automatically.
Repeat step1.2,3.4.
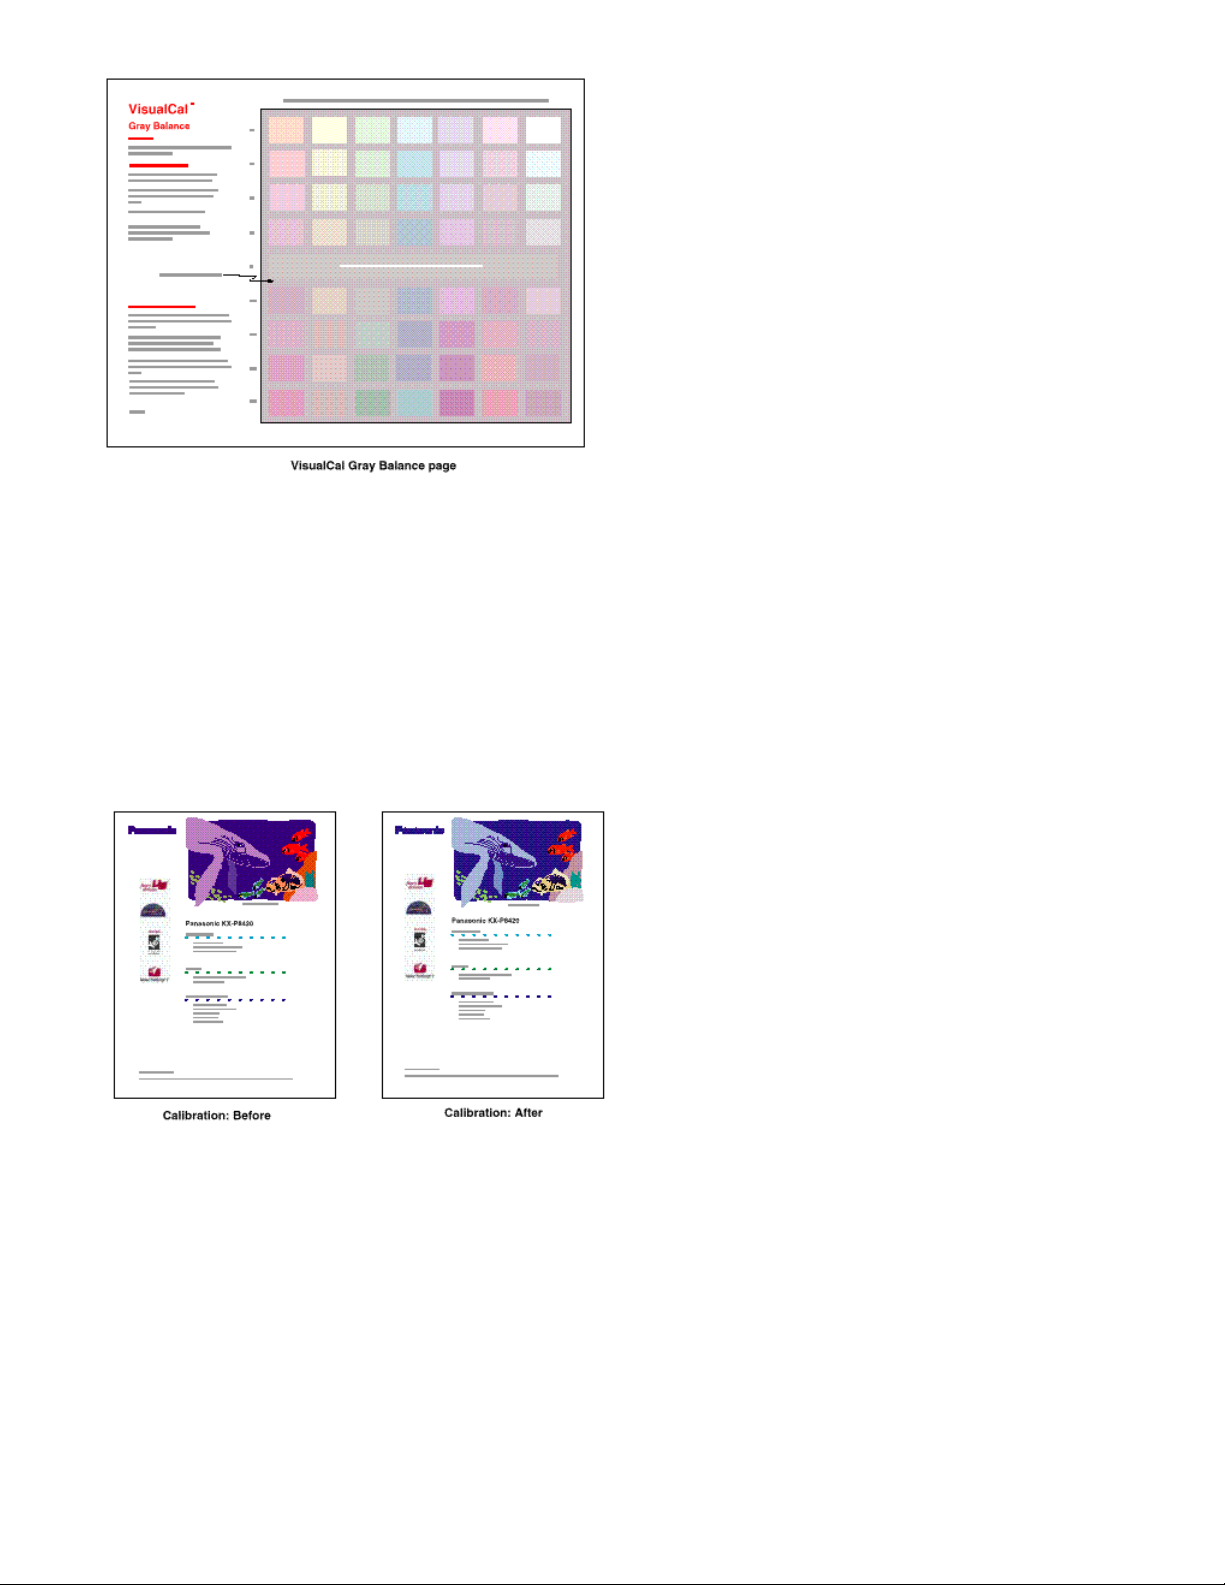
GrayBalance
The second VisualCal page, Gray Balance, provides the basis for calculating a neutral gray balance, that is, a CMY
gray that as closely as possible matches a pure K (BlacK) gray produced by the printer’s engine. This page consists
of rows of CMY gray patches on a field of gray produced solely from black. The variables needed to calculate the
printer’s most neutral gray balance are deter mined by identifying the CMY patch that best matches this field, and
entering its row and column location on the front panel. When the values have been entered, the printer’s gray
balance is recalculated.
By pressing continue key on the front panel, the 2
nd
line LCD shows the color corresponding each row of a
graybal an ce page succe ssively. Select the row that you think is the most suitable and enter press ke y. The sequence
of the color shown on LCD equals to the sequence of the color printed on graybalance page. For English, R(red)>Y(yellow)->G(green)->C(cyan)->B(blue)->M(magenta)->All.
Page 12
Operation:
1.Determine which patch composed of CMY toners have the most neutral gray that close to the background gray
composed of K toner.
2.Enter the value of row and column in front panel.
3.If the number of row is not 0, the Gray balance page is printed again. Repeat from 1.
4.When the current gray balance that is printed at row 0 matches most the background, gray balance is achieved.
Select 0 and continues.
Apply changes
Before applying the calibration changes compare the Color Test that uses the or iginal calibration values against the
Color Test that uses the new values. If you are satisfied with the printer’s calibration based on the new values, select
Yes from the Apply Changes screen that appears, and press the Enter button to recalibrate the printer based on the
previously entered values. If you are not satisfied with the printer’s calibration based on the new values, select No
from the Apply Changes screen that appears. Or if you want to reset the calibration, select Default.
Effect
Because the density level or color balance does not shift much in normal usage, the effect of VisualCal may not be
obvious in most cases. But if you feel the print quality has really deter iorated in a certain condition, this tool must
help improve the quality.
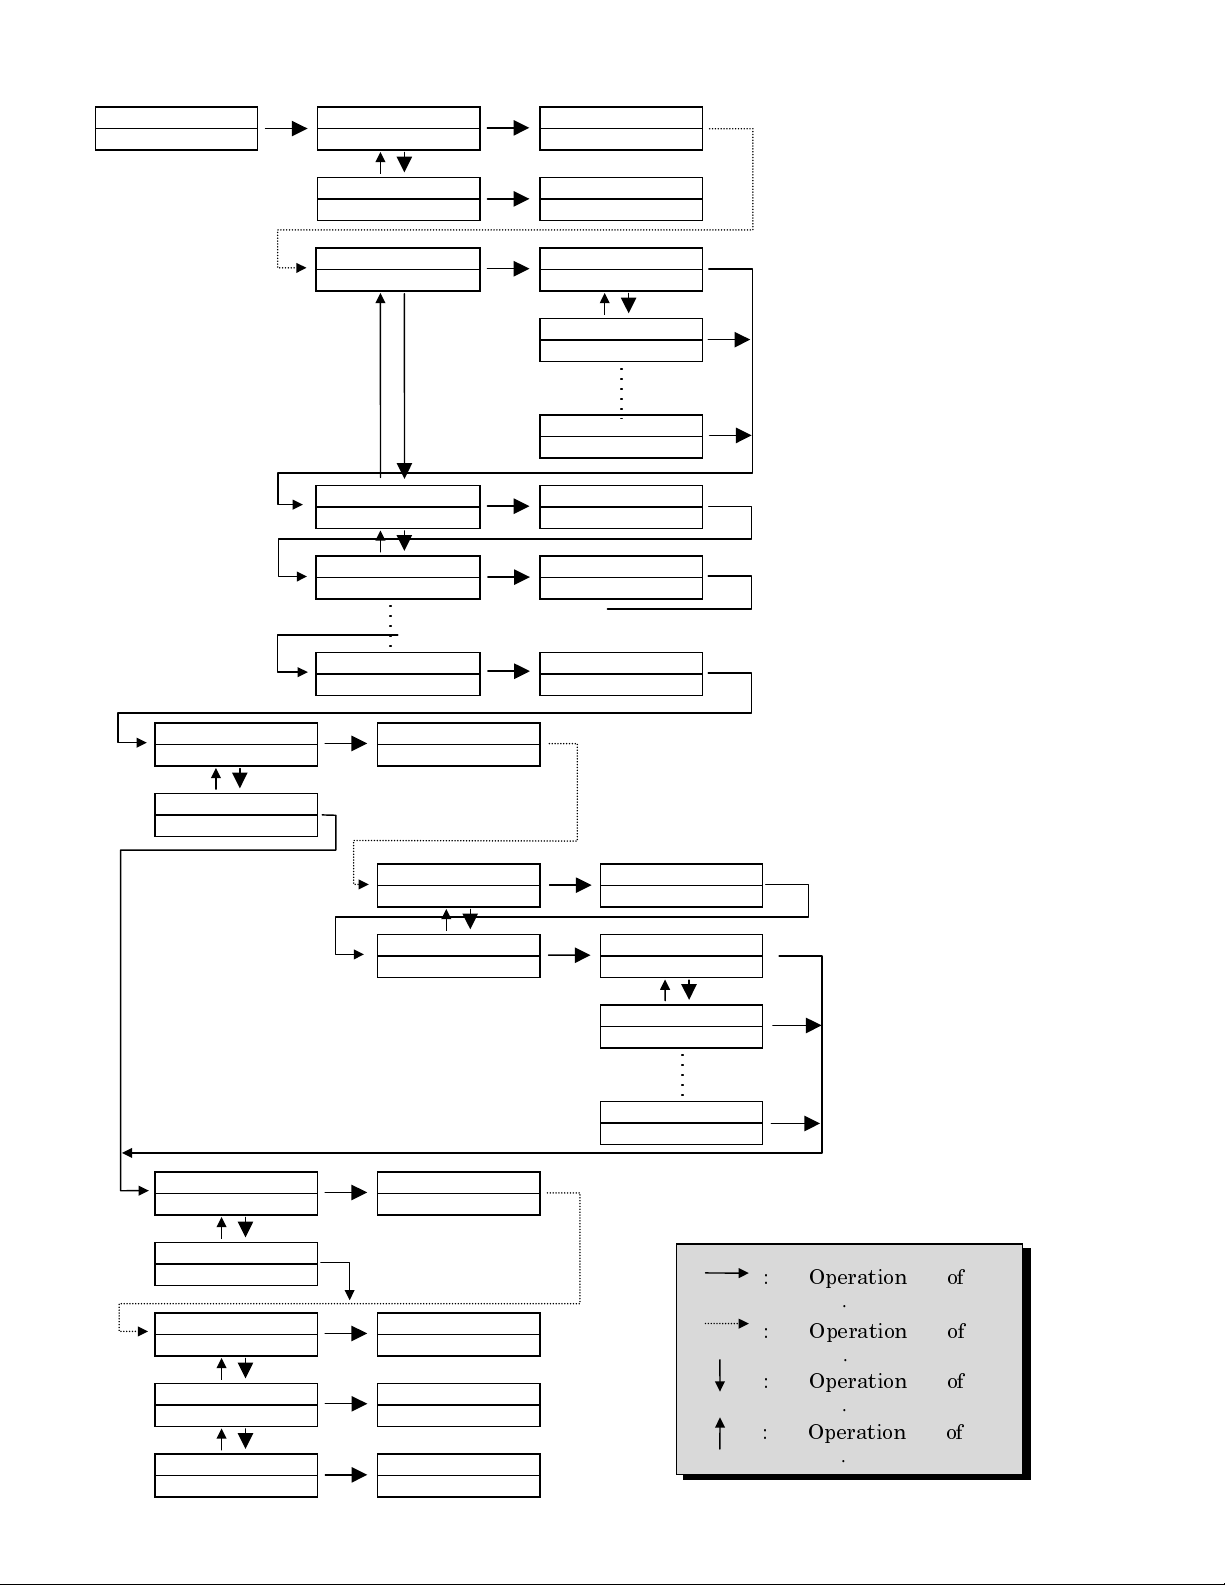
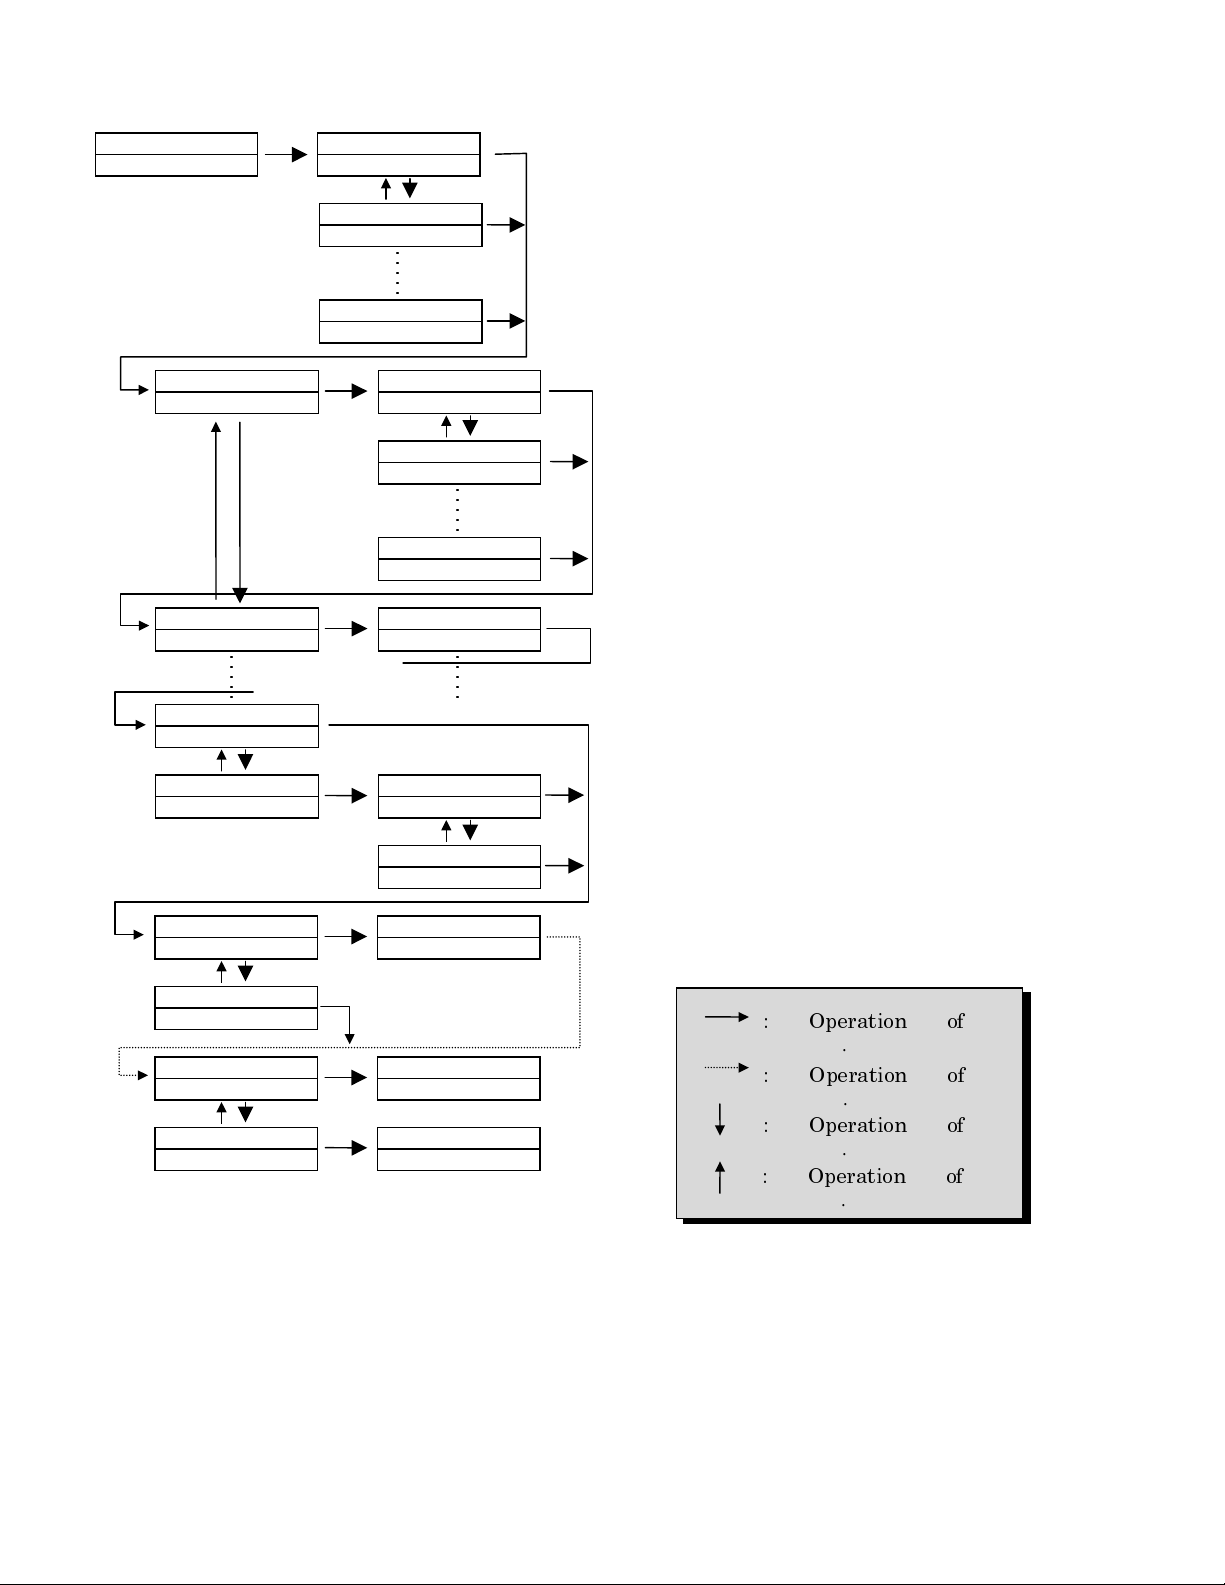
Operatin flow
Page 13

The chart attached “<Char t of Panel & Key Operation - Visual Calibration - >” illustrates the flow of VisualCal. As
you can see, the operation has some flexibility such as enabling bypassing of Color Test Printing. You can also see,
at the end of the operation, you can make the selections effective or abort all selections or return to the default
settings.
NOTE:
- If you select other languages than English in front panel language menu, the language used in the printouts
change accordingly. For Graybalance selection, Italian and Spani sh version of a printout has a translation problem.
In Italian, Yellow and Green is not translated in the front panel and shown as “Y” and “G” whereas shown as “G” and
“V” in the printout.
In Spanish, Blue is shown as “N” in front panel whereas sho wn as “A” in the printout. Because the order shown in the
front panel and the printout is the same, select the value on the front panel considering the order.
- The color o utput might become a little darker after calibration.
- Though GrayBalacne page can be skipped in Operation, GrayBalance setting should not be skipped.
- You can check whether visual calibration is performed or not by looking at configuration page.
Color adjustment
The printer’s color adjustment feature provides additional creative control over printer’s color production. The color
adjustment screens, accessible via the front panel, allow you to override the printer’s current toner density and
brightness settings. Using the color adjustment controls, y ou can also increase or decrease the
brightness of an image, or you can increase or decrease the density of each the following colors: red, yellow, green,
cyan, blue or magenta. For example, you may choose to make the blues in an image look surreal
by increasing the density of the blue and the cyan in the image, and increasing the brightness setting.
NOTE:
- You can check how color adju stme nt is performed or not by looking at configuration page.
- You can adjust only one color at a time.
- If you increase Brightness value, the output become brighter while increasing Brightness value in Printer Driver
makes the output darker.
- Changes made using Color Adjustment are retained until the printer is recalibrated. Or reset the adjusted colors to
the last calibration made using the Reset All to 0 option in the Adjust Color screen; or recalibrate
the printer using VisualCal.
The chart attached “
Adjustment.
In below chart,
Select “Reset All” to reset the adjustment of Colors.
<Chart of Panel & Key Operation - Color Adjustment - >”
illustrates the flow of Color
Select “Yes” to “ApplyChange” if you want to enable the selections or “No” if you do not.
TroubleShootings:
Trouble: Visual Calibration or Color Adjustment can not be performed.
Corrective Action:
Page 14

1)If error or warning messages are shown on front panel LCD, troubleshoot them.
2)If WebTools are used, close them first.
3)If still cannot be performed, turn off/on the printer and try again.
Trouble: A single color appears faded.
Possi ble Cause: The toner is almost depleted. Check the LCD message or maintenance menu on the front panel.
Corrective Action: Replace the color toner cartridge soon (depending on the complexity of your prints, you can
continue to print up to 100 more pages).
Possible Cause: The color density is set incorrectly in the printer panel.
Corrective Action: See “Chapter 7 Color Calibration” in Operating Instr uctions Manual. Color adjustment settings
may aff ect the color output. Reset the settings.
Trouble: Prints have dull, faded colors.
Corrective Action: Adjust or calibrate colors. See “Chapter 7 Color Calibration” in Operating Instructions manual.
Corrective Action: Make sure that the color imaging unit stays covered until immediately before installing it in the
printer. Exposure to light for more than 45 seconds can damage the color imaging unit.
Corrective Action: Make sure that the toner cartridges are installed correctly.
Corrective Action: Make sure that you use a high-quality laser paper: 60–105 g/m 2 (16-28 lbs.) paper in the media
trays and 75–165 g/m 2 (20–44 lbs.) paper in the multi-purpose tray.
Page 15
<Chart of Panel & Key Operation - Visual Calibration - >
Visual Calibration Endpoint Page Endpoint Page
Endpoint Print Printing
Endpoint Page Ready
Cancel
Endpoint Black Low
Black Low 4 * (0 to 9)
Black Low
5 (0 to 9)
Black Low
3 (0 to 9)
Endpoint Black High
Black High 4 * (0 to 9)
Endpoint Cyan Low
Cyan Low 4 * (0 to 9)
Endpoint 30% Match
30% Match 4 * (0 to 9)
Gray Balance Page Gray Balance Page
Print Printing
Gray Balance Page
Skip
Gray Balance Best Patch (row)
Best Patch (row) 0 * (-4 to 4)
Gray Balance Best Patch (col)
Best Patch (col) R
Color T est Color Test
Print Printing
Color T est
Skip
Best Patch (col)
Y
Best Patch (col)
All
Apply Changes Ready
No
Apply Changes Ready
Yes
Apply Changes Ready
Default
Page 16
<Chart of Panel & Key Operation - Color Adjustment - >
Color Adjustment Brightness
Brightness 0 * (-5 to 5)
Brightness
1 (-5 to 5)
Brightness
-1 (-5 to 5)
Adjust Color Red
Red 0* (-5 to 5)
Adjust Color Yellow
Yellow 0* (-5 to 5)
Adjust Color
Adjust None
Red
1 (-5 to 5)
Red
-1 (-5 to 5)
Adjust Color Reset All
Reset All No
Reset All
Yes
Color T est Color Test
Print Printing
Color T est
Skip
Apply Changes Ready
No
Apply Changes Ready
Yes
Page 17

3.KX-P8420 Consumable management
User replaceable components
When the printer panel indicates that a supply needs to be replaced, make sure that you have replacement supplies
on hand. The printer may continue to print until the supply is completely used up; but then it stops until you replace
the indicated supply.
1.Printer component:
“Image Unit wearing out.”
- Change the color imaging unit soon.
- Monochrome 57,000 pages or color 14,250 pages. Also uses pixel counter value (96B pixel) to check wearing out
status. When the number of pages reaches above numbers or pixel counter value reaches above value, it shows
wearing out status.
“Imaging Unit Worn out.”
- Change the color imaging unit now.
- Monochrome 60,000 pages or Color 15,000 pages. Also uses pixel counter value (101B pixel) to check worn out
status. When the number of pages reaches above numbers or pixel counter value reaches above value, it shows
worn out status.
2.Printer component:
“Low <Color> Toner”
- Change the color toner cartridge soon.
- 12,000 pages (Black) or 10,000 pages (CMY) * These figures are based on an average of 5% coverage of the
printable area and standard density for any one color.
Color Imaging Unit *1
Toner Cartridge *1, *2
- Low toner status is detected by the sensor inside the printer engine , so the number of pages vary depending on the
condition.
“<Color> Toner Empty”
- Change the color toner cartridge now.
- When 1.2B pixels are consumed after Toner low messa ge is shown.
After the toner is replaced while Low <Color> toner or <Color>Toner empty message are shown, KX-P8420
recognizes the toner replacement if the sensor detects “not toner empty” status for more than 400 image.
Fuser unit*3 (oil supply roll installed)
3.
“Fuser Unit wearing out ” alternates with “Oil Roll wearing out “
- Change the Fuser unit soon.
28,500 pages
Also uses pixel counter v alue which corresp onding to 30K sheet a v era ging 5% cov er age to chec k w earing out status.
When the number of pages reaches above numbers or pixel counter value reaches above value, it shows above
message.
Page 18

“Fuser Unit and Oil Roll Worn out”
- Change the Fuser unit now.
- 31,000 pages
*Paper 2
nd
side,transparency,coated paper,Label,envelope are counted as 2 pages for 1 copy.
4. Oil supply roll*3
“Oil Roll wearing out”
- Change the Oil supply roll now.
- 15,000 pages
“Oil Roll Worn out”
- Change the Oil supply roll now.
- 15,500 pages
*coated paper is counted as 2 pages for 1 copy.
*It is recommended to replace the cleaning pad when “Oil Roll W earing out” or “Oil Roll W orn out” message is sho wn.
The cleaning pad comes with Option Oil supply roll.
5. Transfer unit*4
“Transfer wearing out “
- Change the Transfer unit soon.
- 80,000 pages
* 1 These figures are based on an average of 5% coverage of the pr intable area and standard density for any one
color (refer to Example A below left: Monochrome 5% coverage). 4 colors (Cyan, Magenta, Yellow and
Black) are used for full color print. The frequency of replacement will vary, depending on the complexity of the prints
and the percentage of coverage of each color and pr int density. Example B below r ight is the case of full color print.
The percentage of coverage of each color is as follows. Cyan: 40%, Magenta: 22%, Yellow:
35%, Black: 20% If you continuously print with this setting, the average life of the Color Imaging Unit will be
shortened to about 2,500 pages. You can get the idea how much percentage of coverage is used in your document
by checking the values shown on Front panel “Image Area” menu. Please refer to the later chapter in this document.
*2 The star ter car tr idges that ship with the printer have an average life of approximately 3,000 pages, based on an
Page 19

average of 5% coverage.
* 3 Specialty media (Transparencies, coated paper, etc.) will result in shortening the life of a consumab l e to maintain
better print quality. When replacing the fuser unit, replace the oil supply roll as well. Do not insert
the used oil supply roll into the new fuser unit; it may damage the new fuser unit.
4 When you have just replaced Transfer unit, you must select Yes in the New Transfer Unit menu. See next section.
NOTE:
- If you print with high density when Low <Color> Toner is displayed, you may get faded printout before <Color>
Toner Empty is displayed.
- Please use the consumables specified by Panasonic sales company because these parts may differ depedinging
on the model No or the region.
Displaying the life of supplies and coverage of toner
KX-P8420 has a front panel menu function to show ho w much percentage of each consumable life remains to
be used. Please note that the values shown here is just the approximate value and are not always correct. So the
consumable wearing warning message might occur regardless of the displayed values.
Maintenance menu
Page Count - sho ws the pages your KX-P8420 has printed since your
purchase of the printer.
Toner Cartridge - shows the percentage of CYAN, MAGENTA, YELLOW and BLACK toner cartridges remaining.
NOTE:
- The remaining value of Toner become 0% when Low <Color> Toner message is shown. The value retur n to 100%
after the toner is replaced. Or may become 100% before replacement because of toner low sensor instability.
The printer recognize the toner replacement if low toner is not detected more than 400 pag es.
- The value become incorrect when the replaced cartr idge is a starter kit because P8420 assumes new cartridge is
not a starter kit.
- If you replace the toner cartridge before Low <Color> Toner or <Color> Toner Empty is displayed, the value of the
toner cartridge remaining will be incorrect.
- The rem aining value depends on how much coverage in the printable area are used.
- Theoretically the remaining value should be around 0% just before Low <Color> Toner message is shown. But
actually it does not especially when an average of coverage is too large or small. Because actual toner usage
depends on many factors(ex. coverage, printing pattern, temperature) When the average is too large, the value tend
to become 0% long before Low <Color> Toner message is shown.
Imaging Unit - shows the percentage of the life of color imaging unit remaining.
Page 20

Transfer Unit - shows the percentage of the Transfer unit remaining.
It shows the percentage of the Transfer unit remaining.
New Transfer Unit (No/Yes)
You must select Yes when you have just replaced Transfer unit. The life will be reset to 100% remaining by selecting
Fuser Unit - shows the percentage of the Fuser unit remaining.
*The remaining value may not be correct if high duty printing (large coverage) continues because this percentage
is only calculated using the number of sheet consumed and pixel counter values are not used.
Oil Roll - shows the percentage of the Oil roll remaining.
Image Area
Last— shows the percentage of the whole printable area covered by each toner in the previously printed page. This
menu cannot show the value correctly just after the printer was turned on.
CYAN: ###%
MAGENTA: ###%
YELLOW: ###%
BLACK: ###%
Average— shows the average percentage of the printable area covered by each toner of all pages printed since the
toner replacement.
CYAN: ###%
MAGENTA: ###%
YELLOW: ###%
BLACK: ###%
Service mode menu related to the consumables
Service mode has a menu that shows the number of sheets or pixels for each consumable as below. These menus
are located below Display Information/Display Counter menu.
Imaging Unit: Image = #: Shows the number of images used since last Imaging Unit replace ment.
Pixel = #; Shows the number of pixels used since last Imaging Unit replacement.
Transfe r Unit: Sheet = #; Shows the number of pages used since last transfer unit replacement.
Pixel = #: Shows the number of pixels used since last transfer unit replacement.
Oil roll: Shows the number of pages used since last oil roll replacement.
Page 21

MPT cork pad: shows the number of pages printed through Multi purpose tray since your purchase of the printer.
Total Page: sh ows the n umber of pages y our KX-P8420 h as printed since your purcha se of the printer. Same as user
mode menu “P age Count”.
Black toner cartrage: Shows the number of black toner pixels used since last black toner cartridge replacement.
Cyan toner cartrage: Shows the number of cyan toner pixels used since last cyan toner cartridge replacement.
Magenta toner cartrage: Shows the number of Magenta toner pixels used since last Magenta toner cartridge
replacement.
Yellow toner cartrage: Shows the number of yellow toner pixels used since last yellow toner cartridge replacement.
*The values for toner cartridges are shown in K(1000).
The printing area for each paper size is: Letter 4917x6400, A4 4758x6850, Legal 4917x8164 (HxV).
So if the whole printable area is printed, the value shown in above menu will be: 3146 9K for 1 letter sheet.
(4917x6400/1000) , 32592K for 1 A4 sheet, 40142K for 1 Legal sheet.
Based on these values together with the values shown in service mode/Display counter menu, the values shown on
user mode maintenance menu or Image area menu are calculated.
How the values show n on “Image Area” or “Maintenance menu are calculated.
*How the values shown on “Last” of “Image Area” menu is calculated.
The value = 100 x The number of pixels turned on for the last printed page/the number of total pixels for the default
paper size.(If default paper size is Letter, 4917x6400. Default paper size is Letter for America and A4 for other
regions.)
*How the values shown on “Average” of “Image Area” menu is calculated.
The value = 100 x The number of pixels turned on for the total printed pages with the current toner cartridge/the
number of total pixels for the default paper size multiplied by the number of the printed pages with the current toner
cartridge.
So if 10% image is printed for 100 times after the toner replacement, (letter size)
100 x (4917x6400x0.10) x 100/(4917x6400) x 1 00
*How the values shown on “Toner Cartridge” of “Remaining” menu is calculated.
The value = 100x(1 – the number of pixels turned on for the total printed pages with the current toner cartridge/the
life e xpectancy of current toner cartridge(3k for starter kit,10k for C , M,Y,12K for K) x the number of total pixels for the
default paper siz e x 0.05)
So if 10% image is printed for 100 times after the toner replacement, (letter size, k toner)
100 x (1 – (4917x6400x0.10) x 100/12k x (4917x6 400) x 0.05)
**The value is calculated assuming that the average coverage of each toner should be around 5%. So the more
actual coverage differ from 5%, the more remaining value become incorrect.
*How the values shown for other consumables on “Remaining” menu is calculated.
For other consumables, the values are calculated with the number of sheets instead of the number of pixels and the
Page 22

value of the lif e expectancy. For instance, the remaining value of fuser unit is calculated,
The value = 100 x (1 – the number of sheets printed with the current fuser unit/31000)
ID protection of consumables
KX-P8420 has a system by which prevents the Imaging unit and the fuser unit of another Panasonic product
(ex.KX-P8410) or other printers which use the same engine (ex.Phaser560) from being used with KX-P8420.
The Imaging unit and the fuser of each product has a unique ID number stored inside. KX-P8420 checks these ID
numbers. Then it shows error message and does not allow them to be used with if the ID number is not correct.
In addition, the ID number of the KX-P8420 Imaging unit is different between the one for America and the one for
other regions. So for example, the Imaging unit shipped to the U.S.A cannot be used with KX-P8420 shipped to
Europe.
Page 23

4.KX-P8420 driver features
The printer drivers that come with your printer have been customized to provide additional print options specific to
your KX-P8420 printer . Although the PostScript printer driver interfaces vary between Windows 95, Windo ws NT 4.0,
Windows 3.1 and Macintosh operating systems, the pr inting features available from each driver, on each platfor m,
are virtually the same. This document describes KX-P8420 specific print options and settings available using the
PostScript printer driver with Windows 95, Windows NT 4.0, Windows 3.1 and Macintosh platform except color
related features.
KX-P8420 Windows95 driver is developed based on Adobe PS driver version 4.2.3.
For Macintosh platform, AdobePS driver 8.5.1 and P8420 PPD is used as a P8420 driver.
PPD(PostScr ipt printer description) is a file that descr ibes printer specific features and is provided for all platforms
KX-P8420 supports.
For Windows3.1, Adobe PS driver 3.1.2 and P8420 PPD is used. For WindowsNT4.0, PSCRIPT.dll (Microsoft
PostScript driver) and P8420 PPD is used.
KX-P8420 Driver&Utility CD-ROM has a readme file for each versions of Adobe PS driver which include various
information common in all Adobe PS driver such as troubleshooting, know problems or others. Please also refer to
Help files included in each Adobe PS driver that giv es you the helpful hint as well.
System requirement:
Windows3.1x,Windows95,WindowsNT4.0 with SP3 (intel version) or later.
MacOS7.5x,7.6x,8.0.
Contrary to P8410, P8420 does not require much resources(RAM size, HDD remaining size) on PC. Only when you
need to use ATM and PS3 fonts, you need more than 20MB as a remaining HDD size.
NOTE:
The version of KX-P8420 Win95 d river is 4.2.3, which is certified as Win95 compatible b y Adobe and the latest driver
is 4.2.4 certified as Win98 compatible. The customer can use 4.2.4 version driver after they download from Adobe
home page together with KX-P8420 PPD file and as far as we have confirmed, it should work as Windows98 driver
with no problem although P8420 specific driver properties tab (Colorwise, Device Options) are replaced with Adobe
ddriver generic tab. In addition, the current driver 4.2.3 also shoul d work well with Windo ws98. Because there seems
not to be much different between these 2 versions and so far we have not found any problems related to the Adobe
driver version with Windows98 printing.
NOTE:
Though this document does not describe the functions common in all Adobe printers, please note the follo wings as a
reminder when you use those functions. See also the Readme file included on the KX-P8420 Driver & Utility CD-
Page 24
ROM.
1) PS error print
Even when the “Print PostScr ipt Error Infor mation” option is disabled (in the PostScript tab of the Windows 95)
Printer Properties dialog box for Windows 95, a PostScript error page may be printed.
2) Pure binary data
Selecting “Pure binary data” as the data format (in the “Advanced PostScript Options” section of the PostScript tab
of Printer Properties dialog box for Windows 95 or the equivalent setting in Windows3.1 printer driver) might cause
a printer error. Avoid using this option.
3) Print as Negative image, Print as mirror image
Selecting these options (in the Graphics tab of the Printer Properties dialog box for Windows 95) does not always
produce the correct result.
4) Halftoning
The halftoning settings Screen angle and Screen frequency (in the Graphics tab of the Printer Properties dialog box
for Windows 95) are not supported by the KX-P8420.
5) With Window s 95, a Resolution option also appears in the Gr aphics tab of the Properties dialog box or Print dialog
box shown b y selecting print menu from applicatio n, but has no effect if set. Be sure to set the Resolution option from
the Device Options tab.
6) Selecting EPS format as PostS cript output format may produce the unexpected print outcome. Because EPS is f or
exporting graphic data to other applications, it is not recommended to use otherwise. To create EPS file, it is
recommended to use an application that has a feature exporting to EPS format.
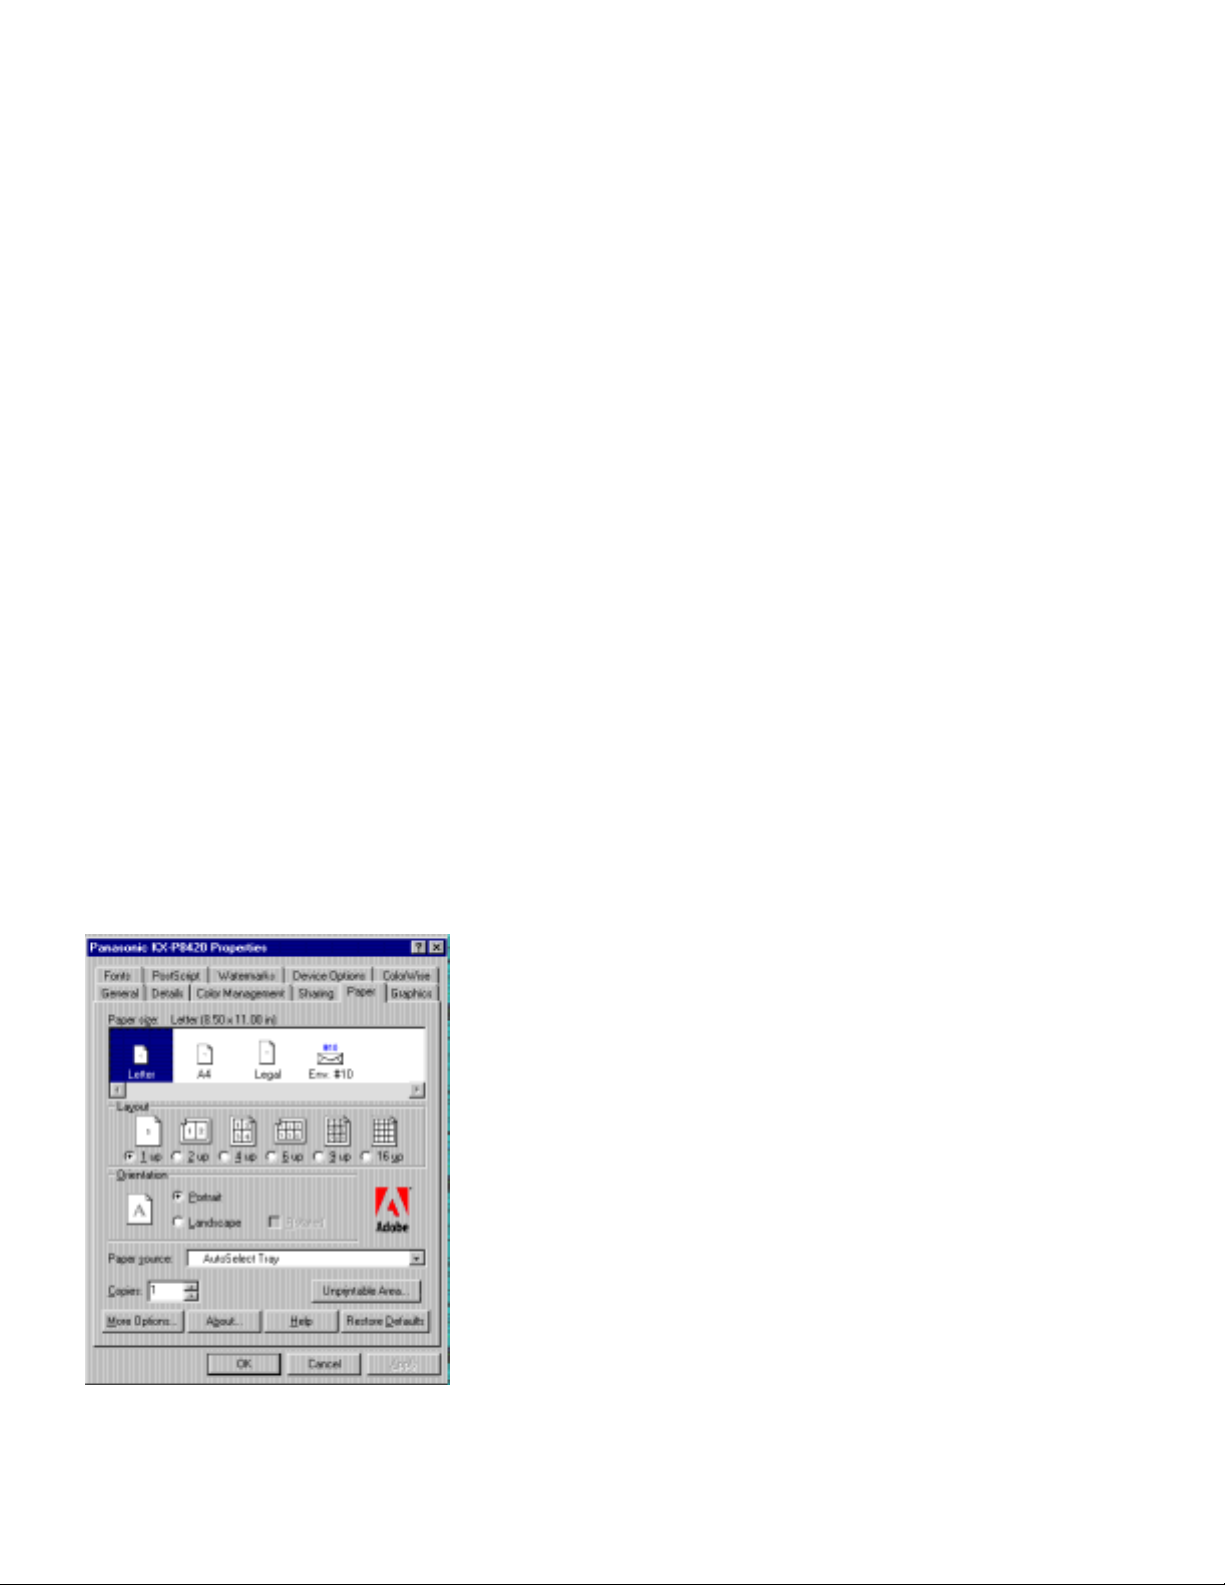
The following descriptions are based on Windows95 Printer Properties structure. But the Printer Properties for other
platforms hav e the basically same functions.
Paper handling
Paper size:
KX-P8420 supports 4 paper size(Letter,A4,Legal,Env#10). Please note that Env#10 can be pr inted only from MPT
Page 25

tray and so MPT Envelope should be selected as a “Paper Source” selecti on.
Be sure to use the right size or media type cassette or MPT tray for other paper size.
Paper sour ce:
This has following options. AutoSelectTray, Auto(Paper),Auto(Transparency),Upper,Middle,Lower,MPT Plain Paper
source, MPT Transparency,MPT Label,MPT Coated Paper,MPT Envelope,MPT 2
nd
side.
Please specify MPT <Media Type> when you want to print on a paper or special media type from MP tray.
Select AutoSelectTray or Auto(Plain paper) when you want to print Plain paper from a cassette. Be sure to use the
right size cassette. The printer automatically searches for the proper cassette.
Select Auto(Transparency) when you want to print on a transparency from a casstte. Be sure to use the right size
transparency cassette.
Select Upper or Middle or Lower when you want to print from a particular cassette.
Please note that these 3 options are availab le only when y ou specif y 2
nd
feeder as a installed option in De vice Optio n
tab.
NOTE:
The “Paper Source” option s are listed in the following sequence for the English version of KX-P8420 driver.
AutoSelect Tray, Auto(Paper), Auto(Transparency), Upper, Middle, Lower, MPT Plain Paper, MPT Transparency,
MPT Label, MPT Coated Paper, MPT Envelope, MPT Paper 2
nd
side.
The other language version of driver shows the translated words instead with the above sequence.
The translated words corresponding to MPT Plain paper and MPT Coated Paper in Italian and French is too long to
be distinguished from each other.
Graphics settings
Windows95 driver Graphic tab has the following settings.
Resolution:
This setting is not effective. Please change the resolution by the Resolution setting in Device Options tab.
Though this setting always shows 1200dpi, KX-P8420 print a document 600x600dpi at a default. The resolution can
be changed by resolution setting in device option tab.
Halftoning:
KX-P8420 does not support custom screens. It supports only built-in screen. So changing this setting is not eff ectiv e .
Printing Watermarks
The Watermar k feature of the Adobe Printer Driver lets you print text, independent of that provided by the printing
application, across the first page or every page of a document.
From the Printers folder, you can view and change all water mark options. The New and Edit options allow you to
define watermarks. The watermark definitions you specify in the New and Edit dialog boxes can be used for all
printers using Adobe PS driver and all documents. The selections you ma k e in the Watermarks properties dialog box
apply only to the current document.
You can select printing watermark in foreground or background. In windows95 driver, enable the option “In
background” if you want to print watermarks in background.
Page 26

NOTE:
- Not all applications support watermark printing. Please see AdobePS driver readme file.
- WindowsNT and Macintosh driver does not sup port watermark.
Printing resolution
By selecting 1200x600, 1200x1200dpi printing, you can get the more excellent print quality than you get from
600x600dpi printing.
NOTES:
- With Windo w s 95, a Resolution option also appe ars in the Graphics tab of the Properties dialog box or Print dialog
box shown by selecting print menu from application, but has no effect. Be sure to set the Resolution option from the
Device Options tab.
- A minimum of 48 MB of SDRAM is required for printing at 1200x 600 or 1200x1200 dpi.
- Though Gr aphi c tab or App lication dialog box shows 1200dpi, KX-P8420 print a document 600x600dpi at a default.
The resolution should be changed by the resolution setting in device option tab.
Duplex
The Semi Automatic Duplex option allows you to print on two sides of a single page. The procedure for Semi
Automatic Duplex printing varies depending on whether your printer has a hard disk installed. If your printer has a
hard disk drive installed and the Semi Automatic Duplex option is selected, the printer spools and pr ints all evennumbered pages in a job and, when the Continue/Forward button is pressed at the printer, pr ints all odd-numbered
pages in the job. If your printer does not have a hard disk dr ive and this option is selected, the printer prints an oddnumbered page and, when the Continue/Forward button is pressed, prints the subsequent even-numbered page in
the job. Thus it is strongly recommended to install HDD if you use this function often. For the detailed procedure,
refer to “Semi Automatic Duplex Printing” in Driver/Utilities Reference Guide.”
NOTE:
- When paper JAM occurs during Duplex process, the jammed pages are not printed again after JAM recovery.
- When the printer does not print the even-numbered pages after a press of Continue/Forward button, remove the
odd-numbered pages and reload them in the m ulti-purpose tray.
- We strongly recommend that you follow the guidelines for normal two-sided printing.
— Do not load more than 50 sheets in the multi-purpose tray.
— Before loading paper in the multi-purpose tray, adjust it so that the edges of the media are lightly touching the
media guides of the multi-purpose tray.
— Use heavier paper, at least 95 to 165 g/m 2 (28 to 44 lbs. Bond) for reliable feed. Do not load a thin sheet of paper
in the multi-purpose tray. It may cause a paper jam.
— It is strongly suggested to use color laser bond paper.
— Avoid printing photograph or graphic in solid color to prevent paper jamming. It may cause a damage to the
Page 27
printer.
— Before printing on the first side, set the unprintable area [at least 15 mm (0.59") in length] on the top of paper.
(See below.)
Collation
Electronic collation allows the pages of each copy of a print job to be printed in sequence. If chosen, a file is
downloaded to the hard disk drive, stored, and printed multiple times. This feature is automatically enabled only if
a hard disk drive is installed in the controller. You also ha v e to sp ecify HDD a s a installed o ption in driv er p roperties.
If there is no hard disk installed and electronic collation is chosen, then a “Conflict” screen will appear that alerts the
user that a hard disk is required if you are using Windows95 driver. If the user misrepresents to the controller that a
hard disk is installed when it truly is not, then the job will print without collation.
Some application have a collation feature in its print dialog, but it takes longer time because application hav e to se nd
all pages for all copies to the printer while only one copy need to be sent to the printer with Electronic collation.
To avoid unexpected results, alwa ys specify collation using this option, and turn off any collation option that ma y e xist
in your application. If application collation and electronic collation works at the same time, the number of pages
printed will multiply.
Interaction Between Application and Electronic Collation.
Electronic
Collation
Application
Collation
Result
On Off Electronic Collation.
On On Both application collation and electronic collation work.
Off Off Collation does not work.
Off On Application collation work.
Check&Print
The Check and Print option allows the user to print a single copy of a multiple copy job. This single copy can be
visually checked before print-ing addi tional copies . When the Chec k and Print copy has been printed, the user can
specify the number of additional copies to print by using the printer’s LCD panel.
The Check and Print option requires a hard disk. You also have to specify HDD as a installed option in driver
properties. If the user chooses the Check and Print option when no hard disk is installed, a “Conflict” screen will
appear in Windows95 driver.
Procedure
1)Enable Check&Print in printer properties and print a document.
st
2)1
copy is printed.
3)Specify the document and how many more copies y ou want to print on the fro nt panel, Chec k&P rint menu. You can
also cancel the printing by specifying zero as number of copies. Check&Print menu shows the Document name and
user name by which y ou can specify the desired document.
NOTE:
- The Check&Print menu shows User name and then Document name. Because LCD can show only upto 24
Page 28

characters, the document may not be recognizable if the user name is too long.
- When you print from Microsoft Word, the document name become long such as “Microsoft Word-xxx.doc”.
4)The additional copies are printed.
Check and Print jobs are also listed in “Check and Print” queue when you open WebSpooler screen and can print
these jobs by manupulating jobs on the WebSpooler.
Other platform
Macintosh:
You can specify the KX-P8420 specific features by selecting “Printer Specific Options” in Print dialog of the
Applications.
WindowsNT
You can specify the KX-P842 0 specific f eature by selecting “Advaced tab” in KX-P8420 document properties opened
from Print dialog of the Applications.
Page 29
Windows3.1
You can specify the KX-P8420 specific feature by selecting “Feature tab” in KX-P8420 document properties opened
from Print dialog of the Applications.
Other NOTES related to printer driver functions.
- The font downloader button that Windows3.1 driver has is not supported.
- In WindowsNT driver properties, there are many paper sizes not suppor ted by KX-P8420 but listed under paper
size list. These other paper sizes are provided by Window s and should be shown in the driver.
Trouble shooting related to printer driver.
Trouble: Printing via Parallel port sometimes produces PS error page saying IO error/interrupt error.
Possible Cause:
Something is wrong with Parallel cable or cable connection.
Corrective Action:
Check the Cable connection at both side (Printer, PC). If the problem still persi sts, try replacing the cable.
Trouble: Cannot make a print.
Possi ble Cause: Printer not operating.
Corrective Action: Make sure that you plugged in the printer and turned it on.
Corrective Action: Make sure that you connected the interface cable(s) properly.
Possi ble Cause: The appropriate driver is not used.
Corrective Action: If the communication link between your computer and the printer is working but the printer ejects a
blank page when printing from your application or through Windows. Make sure that the appropriate driver is
installed and that you have selected the printer correctly. Reinstall the driver again.
Trouble: Windows shows Time Out error during printing.
Possi ble Cause: The amount of printing data to be sent to the printer is too large by LPT port.
Corrective Action: Not use Windows print spooler or increase timeout value.
1)Select Start menu->Settings->Printers. 2)Select the icon “Panasonic KX-P8420”.
2)Click Right mouse button and select “Properties”. 4)Select “Detail” tab.
Page 30

5)Increase the value of “Not Selected”. Or 5)Click “Spool Settings...” button.
6)Select “Print directly to the Printer”.
Page 31

5.KX-P8420 Driver/Utilities Setup
This document describes installing software and setting up printing for all platforms KX-P8420 supports.
This document just gives you the guideline, so if you want to know more detailed instructions, please refer to the
operating instrunctions manual.
Windows95 platform
The following driver and utilities are provided for Windows95.
1.KX-P8420 printer driver, PPD file (English,Spanish,French,German,Italian version)
This driver is developed based on AdobePS driver version 4.2.3 and comes with PPD file which describes
KX-P8420 specific features.
2.Adobe Type Manager (ATM) (English version only)
ATM is used to manage PS3 fonts to be shown on PC screen.
3.PS3 fonts (Type1 and TrueType fonts)
4.Color reference files (cmyk_ref.ps, Pantone.ps for English,Spanish,French,German,Italian version)
5.ICM profile
How to install each items
1.Printer driver
There are 3 ways to install printer driver. 1. By using setup program. 2.Plug&Play 3.Add printer .
It is strongly recommended to use setup program to install because this program can install other items as well as
printer driver while Plug&Play and Add Printer can install only printer driver.
For the procedures, please follow the instruction “Installing the PostScrip printer driver for Windows95” in Operating
Instructions.
1)Install by setup program.
When you install KX-P8420 Driver&Utility CD-ROM on your PC, the autorun program automatically starts setup
prgram. If not, you can run the installer manually by double clicking the CD-ROM drive icon in My computer and
then find the Setup.exe file in the Installer folder and double cli ck it.
Setup program has 3 options to install.
Typical – Thi s option installs Printer driver, PPD , ATM, PS3 fonts
Page 32

Compact – Printer driver, PPD
Custom – You can select the items you want to install from the followings. Printer driver with PPD file,
ATM,PS3 fonts,Reference file
Please note that setup program only copies the necessary files to install ATM and PS3 fonts and you need the
additional steps for the installation explained later in this document.
This setup program recognize s the la ngu age of Windows95 you are using and automatically sele ct from one
of the 5 languages.
2)Plug&Play install, Add printer install.
You can install Printer driver and PPD file by these methods, but not other items.
Please specify the folder in KX-P8420 Driver&Utility CD-ROM that have a file named oemsetup.inf under the
folder that correspondes to the language you want to install. For English versi on driver, you have to specify
the folder “English¥Prntdrvr¥Disk1”
When the printer driver is installed, specify the option devices(2
nd
feeder, HDD) installed on your printer in
driver properties. This will enable use of functions related to these devices. For detailed procedure refer to O/I
manual.
2.ATM
By using install program, you can copies the necessary files to install ATM and PS3 fonts.
Then you can install ATM program by selecting program menu “ATM Installer” under “Panasonic KX-P8420” of
Windows Start menu. Or you can copy the necessary files for ATM installation from the folder ¥_atm_95 under
the CD-ROM. Then you can start ATM install program by double clicking the file “Install.exe”.
Below is the screen you will see after launching ATM installer. You should specify the directory where installed
PS3 files(PFB files,PFM files) are stored.
Page 33

3.PS3 fonts.
To install PS3 Type1 font, you have to install ATM first. Then open ATM program and select the de sired font(s)
Located under c:¥PS3Fonts¥Type1 and click Add button.
To install PS3 TrueType font, just copy the files under c:¥PS3Fonts¥TrueType to Windows Fonts folder you can
open from Control panel or use “Control Panel>Font>File>Install New Font menu”
4.Color reference files
You can copy these files by selecting this while you are installing using setup program. You need to specify
Custom option in the installer. Then the files are copied to under Panasonic KX-P8420 directory under
C:¥Program files. You can also copy these files directory from the directory ¥Clrfiles of your CD without using
Installer program.
6.ICM
When you install printer driver by using setup program, the ICM profile (Pakx2010.icm) automatically is installed
under Windows¥System¥Color folder. If it’s not, you can copy this file manually from the folder
“English¥Prntdrvr¥Disk1” of CD-ROM if you are using English version to under Windows¥System¥Color folder .
Then you have to select this file by mouse and then click right mouse button and select “Install In Place”.
How to uninstall driver and utilities.
1.Printer driver
Page 34

Select icon “Panasonic KX-P8420” under Settings>Printer menu of Windows Start menu and select “Delete” from
File menu.
2.ATM
Select “Uninstall ATM ...” button you can see in ATM program.
5. PS3 fonts .
Using program menu “Uninstall Panasonic KX-P8420” or remove the folder “c:¥PS3Fonts” manually.
5. Color reference files
Using program menu “Uninstall Panasonic KX-P8420” or remove the folder “Panasonic KX-P8420” manually.
5.ICM profile
Remove the file Pakx2010.icm manually.
WindowsNT platform
The following items are provided for WindowsNT
1. PPD file (English,Spanish,French,German,Italian version)
For NT platform, KX-P8420 provides PPD files to be used with Microsoft PostScript driver.
2. PS fonts (Type1 and TrueType fonts)
3. Color reference files (cm yk_ref.ps, Pantone.ps for English,Spanish,French,German,Italian version)
How to install each items
1.Printer driver
When you install KX-P8420 Driver&Utility CD-ROM on your PC, the autorun program automatically starts setup
prgram. If not, you can run the installer manually by double clicking the CD-ROM drive icon in My computer and
then find the Setup.exe file in the Installer folder and double cli ck it.
Setup program has 3 options to install.
Typical – This option installs PPD, PS3 fonts
Compact – PPD
Custom – You can select the items you want to install from the followings. Printer driver with PPD file,
(WindowsNT4.0 SP3 or later)
PS3 fonts,Reference file
Please note that setup program only copies the necessary files to install PS3 fonts and you need the additional
steps for the installation explained later in this document.
This setup program recognize s the la ngu age of Windows95 you are using and automatically sele ct from one
of the 5 languages.Please follow the instruction described in “Setting up PostScript printing with WindowsNT4.0”.
If it’s your first NT driver installation, WindowsNT asks you to insert WindowsNT CD-ROM to copy Microsoft
PostScript driver to the system. Insert CD-ROM and specify a file named PSCRIPT.dll included in WindowsNT
CD-ROM under i386 directory .
Please refer to the O/I manual for more d etail.
2) Add printer install.
Page 35

You can install Printer driver and PPD file by these methods, but not other items.
Please specify the folder in KX-P8420 Driver&Utility CD-ROM that have a file named oemsetup.inf under the
folder that correspondes to the language you want to install. For English versi on driver, you have to specify
the folder “English¥Prntdrvr¥Disk1”
When the printer driver is installed, specify the option devices(2
nd
feeder, HDD) installed on your printer in
driver properties. This will enable the use of functions related to these devices. For detailed procedure refer to O/I
manual.
After driver installation, please change the spool setting as follows. Otherwise you may encounter printing problem.
1) Select icon “Panasonic KX-P8420” under Settings>Printer menu of Windows Start menu and click mouse right
button and select “Properties.”
2)Select “Scheduling” tab.
3)Select “Spool print documents so program finishes printing faster” if selected otherwise.
4)Select “Start printing after last page is spooled”.
NOTE:
Page 36

- NT SP(Service pack) 3 should be installed before KX-P8420 driver installation.
2.PS3 fonts.
Please follow the instructions below to install Type1 fonts and True type fonts.
1)Select Start->Setting->Control Panel
2)Double click “Fonts”.
3)Select “Install New Font...” from File men u.
4)Specify the foloder which stores PS3 fonts in “Add Fonts” windows.
5)Select the necessary fonts and click Add button.
When you install Type1 font, 3 options can be selected.
1)”Convert Type1 Font to TrueType”
2)”Install Type1 Font Files for use on a PostScript Printer”.
3)”Copy Type1 Font Files to F onts Folder”.
All these options should be turned on.
3.Color reference files
You can copy these files by selecting this while you are installing using setup program. You need to specify
Custom option in the installer. Then the files are copied to under Panasonic KX-P8420 directory under
C:¥Program files. You can also copy these files manually from the directory ¥Clrfiles of your CD.
How to uninstall driver.
1. Printer driver
Select icon “Panasonic KX-P8420” under Settings>Printer menu of Windows Start menu and select “Delete” from
File menu.
2.PS3 fonts.
Using program menu “Uninstall Panasonic KX-P8420” or remove the folder “c:¥PS3Fonts” manually.
Remove copied fonts within “Font” icon of Control Panel.
3.Color reference files
Using program menu “Uninstall Panasonic KX-P8420” or remove the folder “Panasonic KX-P8420PS” manually.
4.Remove TrueType font and Type1 font installed on the system from Windows Control panel, Font.
Page 37

Windows3.1 platform
The following driver and utilities are provided for Windows95.
1.KX-P8420 printer driver (Adobe PS driver3.1.2, PPD file (English,Spanish,French,German,Italian version)
2.Adobe Type Manager (ATM) (English version only)
This application can be used to manage PS3 fonts to be shown on PC screen.
3.PS fonts (Type1 and TrueType fonts)
4.Color reference files (cmyk_ref.ps, Pantone.ps for English,Spanish,French,German,Italian version)
How to install each items
1.Printer driver
1
Start Windows and exit any applications that start automatically.
2
Insert the
3
In the
4
In the
5
In the
6
To install the Adobe PostScript printer driver navigate to: d:english¥prntdrvr¥win3x. Click OK.
7
In the
8
Select the
Unlisted or Updated Printer
KX-P8420 Driver & Utility CD-ROM
Main
window, double-click the
Printers
Install Driver
Install Driver
dialog box, click
dialog box, click
dialog box that appears, verify the path and click OK.
Panasonic KX-P8420
Control Panel
Add
, and then click
Browse
from the
dialog box and click OK.
into the CD-ROM drive.
icon and double-click the
Install
.
.
Add
Printers
icon.
The necessary files are installed from the KX-P8420 Driver & Utility CD-ROM to your hard disk. When installation is
complete, the Panasonic KX-P8420 on LPT1: appears in the Installed Printers list.
Please specify the folder in KX-P8420 Driver&Utility CD-ROM that correspondes to the language you want to
install. For English version driver, you have to specify the folder “English¥Prntdrvr¥Win3x”
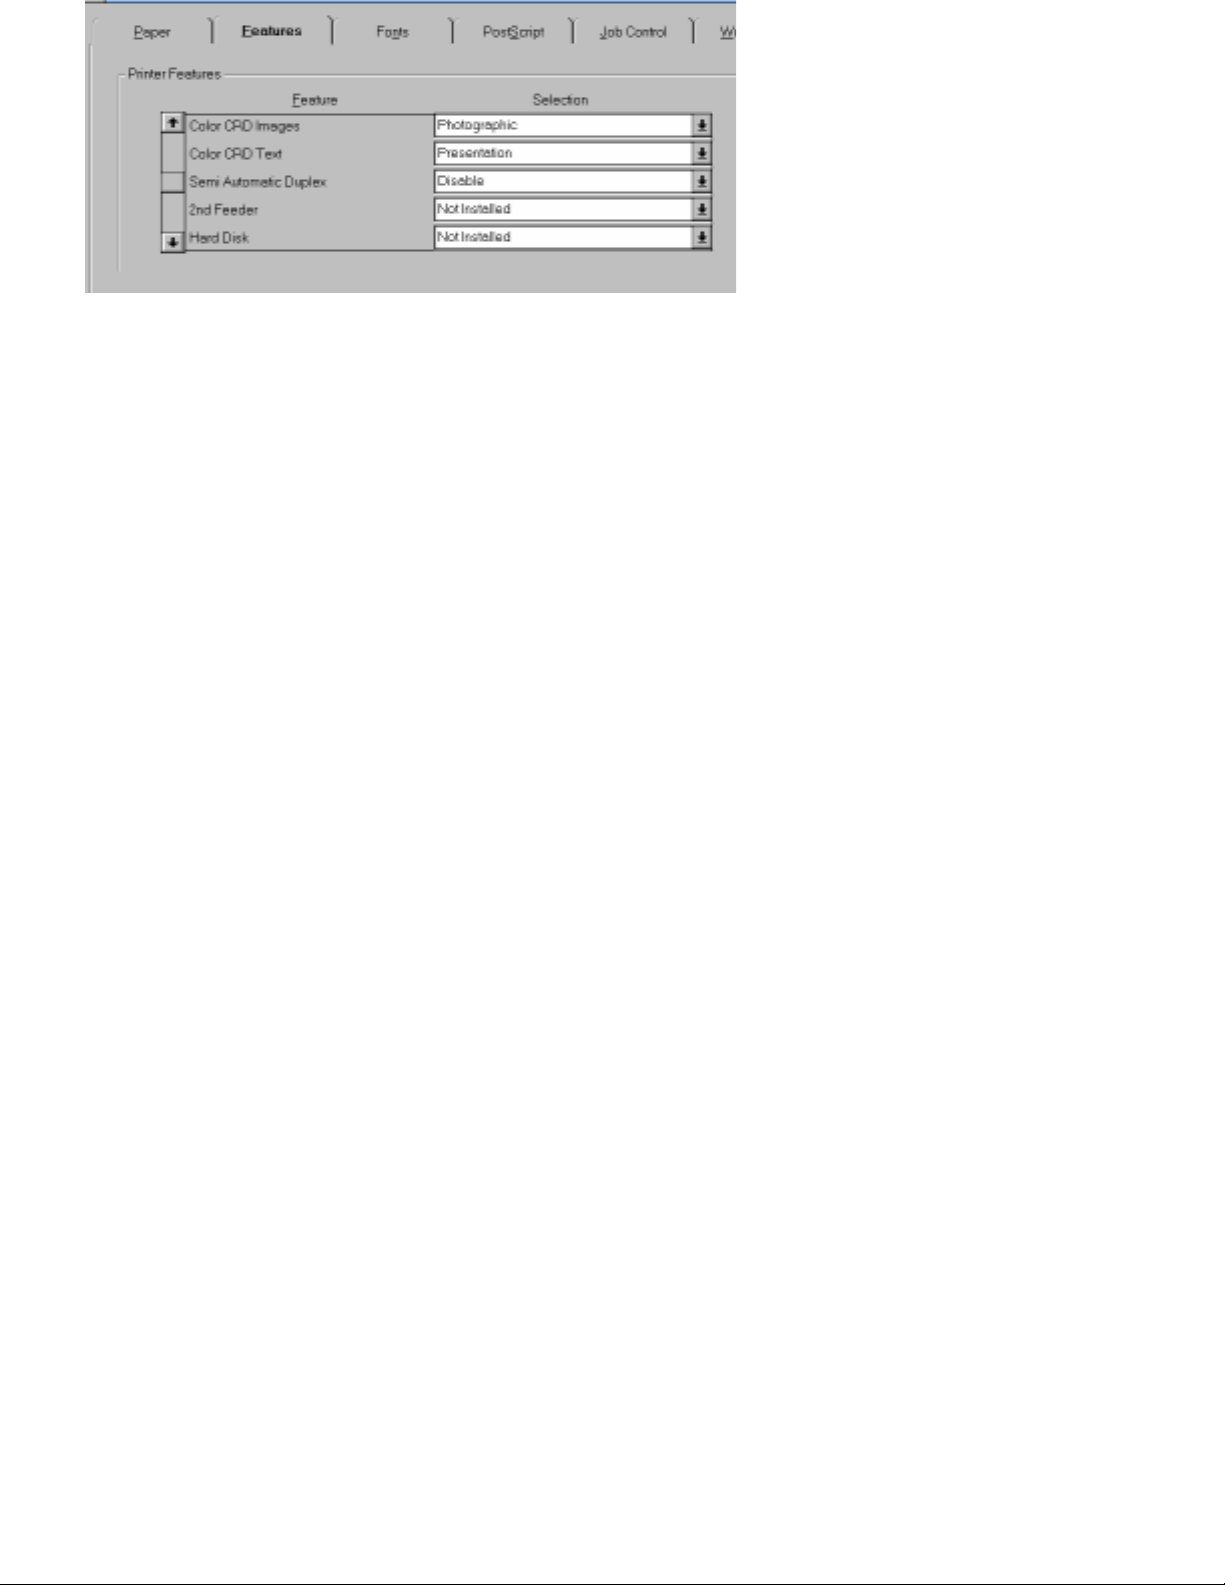
When the printer driver is installed, specify the option devices(2
Features tab of driver properties. Select 2
nd
feeder and HDD as a feature and select “Installed” as a selection.
nd
feeder, HDD) installed on your printer in
This will enable use of functions related to these devices. For detailed procedure refer to O/I manual.
2.ATM
Double click the install.e xe in the _atm_31 of the CD-ROM.
3.PS3 fonts.
Launch ATM program after ATM is installed. Cli c k Add... button and In the “Add ATM Fonts” dialog , specify Type1 font
Page 38

located under PSFonts¥Type1 of the CD-ROM and click Add button.
To install PS3 TrueType font, double click Fonts icon of Control Panel and click Add font button and specify the
fonts files under ¥PS3Fonts¥TrueType of the CD-ROM .
4.Color reference files
You can copy these files directory from the directory ¥Clrfiles of your CD.
How to uninstall driver and utilities.
1.Printer driver
Double click Pritners icon of Control Panel. Select Panasonic KX-P8420 ... from Installed Pr inters and click remove
button.
2. ATM
Select “Uninstall ATM ...” button you can see in ATM program.
2.PS3 fonts.,color reference files
If you have copied these files , mu st be remo v ed man ually. TrueType font should be removed from withi n “F ont” icon
of Control panel. ATM font should be removed using ATM.
NOTE:
- If you fail to install the Windows 3.1 driver after the message “This driver cannot be updated because it is currently
being used by Windows. Wait until Windows is finished using the driver and then try again” is displayed,
remove the file ctl3dv2.dll under ¥Windows¥system from the MS-DOS®*1 prompt and try to install the driver again.
Macintosh platform
The following driver and utilities are provided for Windows95.
1. KX-P8420 printer driver(AdobePS8.5.1), PPD file (English,Spanish,F rench,German,Italian versi o n)
2.Adobe Type Manager (ATM) (English version only)
This application can be used to manage PS3 fonts to be shown on PC screen.
3.PS fonts (Type1 and TrueType fonts)
4.Color reference files (cmyk_ref.ps, Pantone.ps for English,Spanish,French,German,Italian version)
5.ICM profile
How to install each items
1.Printer driver
Follow the instructions “Installing the Adobe PostScript printer driver” and “Setting up KX-P8420 in the Chooser”.
Please select the language version you want to use in procedure “Setting up KX-P8420 in the Chooser”. For more
detail, please refer to Network setup section.
2.ATM
Page 39

Select install program “ATM4.0.2 Lite/ATM(R)4.0.2 Installer “on the CD-ROM.
After installing ATM, you can configure ATM feature by (1)Click Apple mark (2)Select Control panel (3)Select ATM.
(4)After ATM control panel appears, do the configuration.
3.PS3 fonts.
Copy screen fonts and printer fonts under /PS3 fonts of CD-ROM to under HDD/System Folder/Fonts on your
Macintosh. This will enable the usage of TrueType fonts and ATM fonts.
*The font with the A mark at the left of the font name is “ATM” font and the font that has A mark and suitcase mark is
“Screen” font.
NOTE:
- It is strongly recommeded to install both ATM and PS3 fonts because printing the file including PS3 fonts not
installed in your Macintosh may cause unexpected results.
4.ColorSync
The Adobe PostScript 8.5.1 driver can convert RGB colors of a file to a specified CMYK device target using
ColorSync Color Management. The KX-P8420 Driver & Utility CD-ROM includes a ColorSync profile for the
KX-P8420. The KX-P8420 ColorSyn c profile (KX-P8420 Color Printer ICC) and monitor profile (EFIRGB ICC) can be
found in the ColorSync 2.0 directory. To install this file drag a copy to the System Folder/Preferences/ColorSync(TM)
Profiles folder. If you are using MacOS 8.5 or higher, the folder name the profiles should be copied to is to the
System Folder/ColorSync(TM) Profiles
Page 40

Printer profiles selected with ColorSync affect Col orSync compliant applications only.
ColorSync version must be 2.01 or greater.
With a document open, select
Select
$
Select
Select
&
Click
!"#
!"#
%
"' #
to save the changes to the settings in the dialog box.
from the
menu.
from the pop-up menu under the
or
!"#
from the
pop-up menu in the Print dialog box.
pop-up menu.
from the
pop-up menu.
The changes you made will be the default settings until you make additional changes and click Save Settings again.
(
Click .
To close the Print dialog box, click Ca ncel.
To print a document, click Print.
Color/GrayScal e m ust be specifie d in the Col or Mat ching sect ion of the Print dialog box to enable the use of CRDs.
%)*+ ,
Select
Select or double-click
$
Click
"
.
from
-
menu.
,
.
.
Select
&
Click
(
Close the
%)*+ %
.
.
,
dialog box.
If you feel the color output become darker after selecting EFIRGB, return to the original monitor profile or specify
“Apple Standard” as the RGB source option.
Page 41

TroubleShootings:
Trouble: KX-P8420 Windows3.1 driver cannot be installed showing the message “This driver cannot be
updated because it is currently being used by Windows. Wait until Windows is finished using the driver and
then try again”.
Corrective Action: Remove the file ctl3dv2.dll under ¥Windows¥system from the MS-DOS®*1 prompt and try to
install the driver again.
Trouble: KX-P8420 cannot print correctly when you print via WindowsNT.
Corrective Action: WindowsNT has a problem about spooling print jobs. Please select the following setting in driver
properties.
1) Select icon “Panasonic KX-P8420” under Settings>Printer menu of Windows Start menu and click mouse right
button and select “Properties.”
5)Select “Scheduling” tab.
6)Select “Spool print documents so program finishes printing faster” if selected otherwise.
7)Select “Start printing after last page is spooled”.
Page 42

6.KX-P8420 font Management
PC
Monitor
ATM
font
TrueType font (8420 has)
TrueType font (8420 does
Not have)
Printer font
Printer
TrueType
font
TrueType
font
Type1
font
Substitution table
Outline,bitmap,
Type42
This document describes how fonts are handled on PC screen and KX-P8420.
Both Windows and Macintosh computers support TrueType font sets as a standard. TrueType font is a kind of outline
font that can be scaled to multiple points without jagged appearance.
In addition, after installing KX-P8420 printer driver , another sets of f ont becom e av ailab le and these a re called printer
font. You can choose from both TrueType fonts and Printer fonts within most of standard applications.
KX-P8420 also has two types of resident f ont, True Type font and Type1 font. Type1 font is another type of outline f ont
which has a different mechanism to draw from TrueType font and this is the standard type of font for PS printer.
NOTE:
Some Graphic or DTP applications (ex.CorelDraw) require ATM and Type1 font installation to use Printer font.
TrueType font
Because P8420 does not support all TrueType font PC has, some TrueType font on PC are conver ted to Type1 font
when it’s sent to the printer. The substitution table P8420 printer driver has specifies how each True Type font is
converted. It’s also possible to send these TrueType fonts as outline or bitmap data to the printer.
In this case, you can get more accur ate print outcome than using substitution tab le, b ut y ou may experience slower
printing performance. KX-P8420 has some TrueType font that your PC may not support. All Tr ueType font data KXP8420 supports are included in KX-P8420 Driver/Utility CD-ROM and can be installed on your PC.
Type1 font. It is recommended to install these fonts to achieve the WYSIWIG output.
The printer font is shown on PC screen using TrueType font that has a similar typeface if ATM and corresponding
Page 43

Type1 font is not installed. In this case, the screen display does not match to the print outcome, though the difference
is not so obvious in most cases. When ATM(Adobe Ty pe Manager) is installed and Type1 font (also called ATM font)
is installed using ATM, the printer fonts on PC screen become matched to the print outcome. For installation of
TrueType font, ATM and Type1 f ont(ATM font), please refer to KX-P8420 Op erating Instructions manual.
Resident printer fonts
KX-P8420 has 136 built-in printer fonts. These fonts includes 117 Type1 font and 19 TrueType font. You can print the
list of available fonts by printing “PS Font List”. See “Printing pages from the front panel” in the Setup Manual or
Operating Instructions. PS Font List includes the CE font of each font which includes multi-lingual extension mainly
for Eastern European countries.
Please also refer to KX-P8420 Driver/Utilities Reference guide included KX-P8420 manual CD-ROM for
supported KX-P8420 resident font names.
NOTE:
- Certain characters of some fonts might not be printed correctly depending on the OS platform you use. When you
encounter this, select other similar fonts.
ATM
ATM is a program which manages Type1 fonts on screen.
KX-P8420 Driver/Utility CD-Rom includes 3 version of ATM.
Adobe Type Manager® version 4.0 for Windows® 95
Adobe Type Manager® version 3.02 for Windows3.1
Adobe Type Manager® for Macintosh platform.
For WindowsNT4.0, you can purchase ATM Delux from PC stores.
KX-P8420 Driver/Utility also includes readme files for each ATM version. These files include many helpful
information. It is recommeded to set “Smoothing font edges on screen” option.
NOTE:
- AdobeSansXMM and AdobeSerifMM under the C:¥Program Files¥Panasonic KX-P8420¥Atm_95¥PSfonts
Page 44

directory cannot be installed.
- After ATM fonts are installed, WordPad lists two same font name in font list for each ATM font installed. This is a
problem WordPad has.
- ATM fonts for CE font are not provided.
How TrueType fonts are printed.
The Adobe Printer Driver provides a number of different options for printing text with the desired fonts.
To print text with TrueType fonts, you can either let the Adobe Printer Dr iver substitute the best PostScript font or
printer-resident font for the TrueType fonts used in your document, or you can send the TrueType fonts to your printer
in the desired form. For printing text with PostScript fonts, you can either send the fonts in Type 1 format or choose
not to send the fonts at all.
Described below are the options available in Windows95 Printer Properties Font tab. These options are slightly
different depending on the platforms. Please refer to the Help of Printer properties.
• Send True Type fonts to printer according to the Font Substitution Table.
the font substitution table. The Font Substitution Table enables the user to specify which True Type fonts should be
replaced with built in printer fonts.
NOTE:
- Substition table does not list the TrueType font that KX-P8420 has as a Resident font.
• Always use PostScript fonts instead of True Type fonts:
howe ver, the job output from diff erent printers may look different.
If you use PostScript fonts, jobs will usually print f aster;
The Edit the Table button brings up
Page 45

• Always use Ture T ype f onts : If you use True Type fonts, jobs will usually print slow er; how e v er, the job output from
different printers will look identical.
Please refer to the Help file included in KX-P8420 printer properties, font tab for more detail.
There are 3ways to send a TrueType font to printer.
Outline – Change TrueType outline information to Type1 outline information and sends it to the printer.
Type3(bitmap) – The TrueType rasterizer on PC makes bitmaps and send this bitmap data to printer.
Type42 --- This sends TrueType font with almost no modification so that printer resident TrueType rasterizer can
handle TrueType font. This selection is most recommended.
NOTE:
Some printer font may not be correctly printed with this setting.
TroubleShooting:
Trouble: Fonts or texts shown on the screen do not match to the print outcome.
Possi ble Cause: The Type1 f onts that co rrespond to the printer fonts yo u are using are not installed on your PC.
Corrective Action: Install Type1 fonts by using ATM (Adobe Type Manager) included in “KX-P8420 Driver/Utility” CDROM. Please refer to Operating Instructions manual for more detail.
Trouble: Euro currency symbol can not be printed.
Corrective Action:
1)KX-P8420 has a resident “symbol” font. You can print euro symbol by specifying “symbol” f ont though the ch aracter
may not look like euro symbol on screen if “symbol” TrueType font including euro character is not installed on your
system.
On Windows95
(1)Select Symbol font (2)Press Num Lo ck key (3)Enter Alt+0160 key.
On Macintosh
(1)Select Symbol font (2)Press Option + T
2)You can download ATM font for Euro from Adobe site for free. (
)
Please install ATM included in KX-P8420 driver/utilities CD-ROM. After downloading the ATM font for Euro,
Page 46

register the font by ATM.
3)Microsoft or Apple periodically updates the TrueType fonts their system support to accommodate euro
character. Please refer to Microsoft or Apple site.
(1)WindowsNT SP4 includes the following fonts supporting euro character.
*Arial,CourierNew,TimesNewRoman
You can type euro character by entering Alt+0128 after selecting one of above three fonts.
(2)MacOS8.5 has several fonts including euro character as follows.
Apple Chancery, Capitals, Charcoal, Chicago, Courier, Gadged,Geneve, Helvetica, Hoefler Text, Monaco, New
York, Palatino, Sand, Skia, Symbol, Techno, Textile,Times
You can type euro character by enter ing Option-Shift-2 except symbol font which requires you to enter Option
-T.
When you want to use these TrueType font, select a kind of font that KX-P8420 does not suppor t as a Printer
resident font. KX-P8420 printer driver may converts the font specified on the system to the resident font that
has the same name if it has. Because KX-P8420 resident fonts do not support euro symbol except “symbol”
font, the euro character can not be printed correctly.
Ex.Capitals,Charcoal,Gadged,Sand,Skia,Techno,Textile
Please refer to KX-P8420 Driver/Utilities Reference guide included KX-P8420 manual CD-ROM for supported
KX-P8420 resident font names.
T
rouble:
Corrective Action: Set the options related to the font in Printer Properties back to the default if you ha v e changed a n y
one of them. In Windows95 Printer Properties, it can be done by clicking default button.
Corrective Action: If a Print dialog of an application you are using has settings related to font handling, change the
setting.
Corrective Action: Use the other fonts which have the similar type face.
Some characters in a particular font can not be printed.
Page 47

7.KX-P8420 WebTool
Fiery WebTools software comes pre-installed on the KX-P8420. Fiery WebTools include: WebSpooler, Status,
WebDownloader, WebSetup and WebLink when TCP/IP is enabled for the printer in Network Protocol Setup of front
panel menu. WebTools has screens for all 5 languages KX-P8420 supports. (English, German, French, Italian,
Spanish). Change the language by front panel language menu and turn on/off the printer and then use the
appropriate language version of browser.
Fiery WebTools are immediately available to clients that:
- Are connected to a TCP/IP network with a consistent set of IP addresses,
one for the printer and one for each computer connect to the printer.
- Have an Internet connection and a Java enabled Web browser.
The recommended browsers are:
- Netscape Navigator 3.04 for Macintosh computers,
- Microsoft Internet Explorer 4.0.1 SP1 or Netscape Communicator 4.0.4 for Windows computers.
Netscape and Microsoft continue to release frequent update s to their bro wsers . As support cannot be guaranteed for
all versions, use the versions specified above for best results.
- IE4.0 which is not SP1 version is not available because it takes long for WebTool Main GUI to appear .
Java applets for KX-P8420
WebTools
Java VM
Browser
KX-P8420PC
About Java:
KX-P8420 WebTools are Java Based program. So the browser should support the environment on which Java
program(Java applet) can be exe cuted. (Java VM) The browser listed above meet this requirement.
When KX-P8420 URL is entered in these browsers, the Java programs (Java applet) are downloaded from KXP8420 to your computers and then these progr ams are executed on your computers along with J a va VM the browser
support. Because there are compatibility issues between th e Java VM each browser supports, the available browser
for WebTools have a restriction described here.
NOTE:
- Screen resolution more than or equal to 800 x 600 dpi is required to use Fiery WebTools
- Screen color more than 256 color is recommended to use Fiery WebTools.
- It may take quite a while until WebTools main GUI or WebSetup screen appears depending on the configuraion of
Page 48

your PC and network environment. For a quick operation of WebTools, 100Mbps network and faster client PC are
strongly recommended.
- Microsoft Internet Explorer 3.x does not support the WebDownloader .
- Displaying the WebSetup window with Macintosh Navigator3.0.4 is very slow. Please set up the printer
using a Windows computer whi ch i s accessible to the printer.
- Navigator 4.0x for Macintosh does not support the WebSetup.
- It is not recommended to open WebTools at several locations simultaneously because it might adversely affect
network printing or slower the operation of Web Tools.
- WebDownloader is not supported for Macintosh Computers.
- The operation of Java applet might be unstable whe n running on very fast PC. When this happen s,
Turn off the JIT(just in time) compiler setting in the browser.
- Do not turn off the printer until you close all Web tools. Web tools might become unstable if you do.
- The screen size of WebTools screen are not adjustable with some exceptions.
- If Java Applet is not set to Enable, you can not access the Fiery
WebTools. Follow the next steps:
Netscape 4.x
1. Select Preferences in the Edit menu. The Preferences window appears.
2. Select Advanced in the Category.
3. Click the boxes next to Enable Java and Enable JavaScript.
4. Click OK.
Netscape 3.x
1. Select Netw ork Preferences in the Options menu. The Preferences window appears.
2. Click the Languages tab.
3. Click the boxes next to Enable Java, and Enable JavaScript.
4. Click OK.
Internet Explorer 4.x has a setting named “Run in sandbox” set as a default which restricts the operation of Java
applets and should be changed to “Enable “.
Internet Explorer 4.x
1. Select Internet Options in the View menu.
2. Click the Security tab.
3. Click the circle next to Custom (for e x pert users) in the Local Intranet zone.
4. Click Settings button. The Security Settings window appears.
5. Click Custom in Java permissions, and click Java Custom Settings button.
The Local intranet zone windo w a ppears.
6. Click the Edit Permissions tab, and click E nable in Run Unsigned Content.
7. Click OK three times.
Page 49

To use Fiery WebTools on each client workstation:
1
Enable TCP/IP on the KX-P8420.
2
Make sure the workstation has a valid, unique IP address.
3
Make sure the workstation is installed with an Internet browser.
*Check Pro xy setting and Java setting of the browser.
4
Launch the Internet browser.
5
Enter the IP address or DNS name of the printer if available in the browser’s URL line.
*Do not add the “0” in the following case.
(Wrong)http://179.060.027.181 (Correct) http://179.60.27.181
The printer’s home page appears. This home page has the following 5 functions.
Status:
WebSpooler:
HDD. Allows you to print the remainder of spooled Check and Print jobs and to view, print, and delete the Job Log.
WebLink:
can also change the WebLink destination to other site.
Shows you the jobs cu rrently processing and printing.
Allows you to view, manipulate, reorder, reprint, and delete jobs currently spooled on the KX-P8420
Provides a link to P ana sonic hom e page for KX-P8420, provided you have a valid Internet connection. You
Page 50

WebDownloader: WebDown-loader allows you to download a PostScript or text file directly to the printer, without
first opening the file in an application.
WebSetup: Allows you to view and change the printer’s Setup configuration, including: System Setup options
(System Setup and Password), Network Setup options (Port Setup, Protocol Setup, PServer Setup, and Service
Setup), and Printer Setup options (PS Setup).
Checking the printer status
You can see what jobs are currently being processed and printed using the Status WebTool.
To access the Status WebTool:
On the left side of the Fiery WebTools home page, click the Status button.
The Status window appears in a new browser window.
You can close other browser windows and leave the Status window open to continue checking the status of the KXP8420. As long as yo u k e ep the Status window open, it is dynamically updated at 30-second intervals. This tool also
can show printer error message when the printer is in error condition.
NOTE:
- 30 second interval can not be changed.
- The warning messages are not be shown such as “Low Toner” wearing out message.
Using Fiery WebSpooler
Fiery WebSpooler lets you monitor and manipulate print jobs sent to the KX-P8420 and stored on the queues on
KX-P8420 HDD. All jobs sent to the printer appear in the Fiery WebSpooler window. You can view information about
jobs(user name,document name,printing,processing), or duplicate, delete, or move jobs between queues. You can
also view the log of recent print jobs on WebSpooler screen. The Job Log can also be pr inted from your browser or
exported as a text file and opened in other applications.
NOTE:
- User name become unkown if you print from windowsNT,3.1,Unix.
KX-P8420 supports the following 5 queues, If HDD and 32MRAM is installed. The jobs on all queues except direct
queue are stored on HDD and can be manupilated by W ebS pooler. Among 5 que ues, 3 queues(direct,print,hold) can
be used for N/W printing.
Direct: If Direct queue is specified as a printer por t, print jobs are sent to this queue. Jobs are temporar ily stored in
Page 51

RAM. If HDD is not available, only this queue can be used f or N/W printing. The jobs sent to this queue are not stored
in Prnted queue. Files that sent to this queue are printed as soon as the printer become free to accept a print job.
Print: If Print queue is specified as a printer port, jobs sent to the KX-P8420 appear in the Print queue. Each job is
spooled to the print queue on HDD and then processed and printed on FIFO base. You can move and manipulate
the jobs on this queue using WebSpooler. This is the most recommended queue for N/W printing if HDD and 32MB
RAM is installed.
Hold: If Hold queue is specified as a printer port, jobs sent to the Hold queue remain in the Hold queue until they are
moved to the Print queue or deleted. If you need to print the same document frequently, you can send it to the Hold
queue and move a copy of the job to the Pr int queue every time you need to print it. You can also pr int large jobs to
the Hold queue and then move them to the Print queue when other user s are not printing.
Printed: The jobs most recently sent to the KX-P8420 are saved in the Printed queue. You can drag these jobs back
to the Print queue to print additional copies. By default the maximum number of jobs that can be sa ved in the Printed
queue is 10. This number can be changed up to 99 from Fiery WebSetup.
Check and Print: Jobs specified from the printer driver as Check and Print also appear in the Fiery WebSpooler
window. These jobs can be moved to the Print queue for printing.
For the detailed operation, please refer to “Managing Print Jobs” in KX-P8420 Driver/Utility reference.
Using the Job Log
With the Fiery WebSpooler, you can view and print a log of all the jobs printed to the KX-P8420. You can also export
the Job Log as a tab-delimited text file and impor t into a database, spreadsheet or word processing application for
job accounting purposes. All jobs printed to queues and to the Direct connection are listed in the Job Log. Although
jobs sent to the Direct connection do not appear in the Printed queue, they do appear in the Job Log.
NOTE:
- Some information such as document name or user n ame may not be shown depending on the operating system on
which a job is created.
- Please change to the extension of log file to TXT or HTM when you expor t the job log if the extension is shown
otherwise.
- CR code is not included in Job log file. So has to be entered manually.
Linking to other Web sites
WebLink links you to the Panasonic home page (www.kme.panasonic.co.jp/saga/color_printer/p8420_link.html),
provided a valid Internet connection is available. You can change the WebLink destination by holding down the
Control key and clicking the WebLink button. In the New URL field, type the new WebLin k address and click OK.
NOTE:
- Any change to the WebLink de stinatio n remains permanent until changed again.
- Once the destination has been changed, the previous one can not be retrieved. So Panasonic link address has to
be noted before change.
Page 52

Using Fiery WebDownloader
Using Fiery WebDownloader, you can send PostScript or text file s to the KX-P8420 without first opening the file in an
application.
PS file can be created using KX-P8420 driver. Select “Print to File” in Print dialog to create ps file.
After downloading is finished, information such as file name or file size are displayed.
NOTE:
- File size is not displa yed when ps file is downloaded to direct queue.
- EPS files, PCL files and PDF files can not be downloaded.
- Fiery WebDownloader cannot be used on Macintosh computers.
- Font downloading is not available though “Font” button appears on screen.
Fiery WebSetup
After you have performed an initial Setup from the printer’s front panel, you can continue the process of configuring
Setup options using Fiery WebSetup, one of the Fiery WebTools. If you want to use Netware or SMB as a network
connection, you have to use WebSetup to complete the configuration. You can also use Fiery WebSetup to remotely
view and modify Setup options later. WebSetup also has a function to let you define the password. Once the
password is defined, accessing WebSetup or manupilating print jobs on WebSpooler requires entering the
password.
In WebSetup, you have to click OK b utton or Save button every time you want to mov e to anoth er tab.
After you changed the setting in WebSetup, the printer should be rebooted to enable the configuration.
When you are closing WebSetup, it prompts you if you would like to reboot the printer or not. Please select “Yes” to
this prompt.
Printer Setup:
Page 53

Print to PS Error—Specify whether the KX-P8420 should print the available portion of a print job when it
encounters a PostScr ipt error. Select Yes to print an extra page with PostScript error messages. Select No to cancel
the job entirely whenever a PostScript error is encountered.
NOTE:
- In some cases, the extra page may be printed eve n when No is selected.
Cover Page—Specify whether the KX-P8420 prints a cover (job summary) page at the end of each print job. If you
select Yes, each print job is followed by a page containing the name of the user who sent the job, the document
name, the server name, the time the job was printed, the number of pages printed, and the status of the job.
NOTE:
- Some information may not be printed depending on the operating system on which a job is printed.
System Setup:
System Name—The default name of the printer appears in this text field. Edit the default name here. This is the
name you should enter when y ou configure a connection to the printer over AppleTalk.
Print Start Page—The KX-P8420 does not have Start Page. So please ignore this setting.
Enable Printed Queue—If your printer has a hard disk drive installed, select this option to cre ate a storage location
on the hard disk for the most rece nt print jobs. Users with Administrator privileges can use the WebSpooler to reprint
jobs in the printed queue without sending those jobs to the printer again.
Jobs Saved in Printed Queue—Specify the number of jobs (from 1-99) to be saved in the Printed Queue.
NOTE:
- Changing System name in WebSetup ch anges the following names.
*Printer name for AppleTalk.
*Default Server name for SMB printing.
*Printer name shown on configuration page.
- Once System name is changed from the default “KX-P8420”, it can not be changed again back to “KX-P8420”.
- Only 2 digits can be seen as IP address settings if you are using Netscape 4.x.
- Please do not forget password because this makes it impossible to use WebSetup again.
Trouble: Cannot access to KX-P8420 Fiery WebTools or WebTools do not work properly.
Page 54

Possi ble Cause: Network or TCP/IP connection is not estab lished.
Corrective Action: Check Network connection or TCP/IP connection by ping command.
Possi ble Cause: The Web Browser is not match ed to the re quirement.
Corrective Action: Use the version of Browser that are specified in the manual.
Possible Cause: The connection setting of the browser has to be changed
Corrective Action: Check the connection setting of the browser. If Proxy server is always accessed, change the
setting so that KX-P8420 can be directly accessed.
Possible Cause: Java applet is not set to Enable.KX-P8420 Fiery WebTools are Java based programs and Java
applet need to be fully enabled.
Correct Action: Please follow the procedures described in “Setting up Fiery WebTools in KX-P8420 Operating
Instructions manual.
Possi ble Cause: Ethernet configuration or Network environment has a problem.
Correct Action: Change Ether net speed of the printer by Ethernet por t setup menu. Or if your PC and KX-P8420 is
connected to the separate hub or network f acilities , re connect the PC o r KX-P8420 so that both are connected to the
same network facilities.
Possible Cause: Unnecessary 0 is added in URL address.
Correct Action: Do not add the “0” in the following case.
(Wrong)http://179.060.027.181 (Correct) http://179.60.27.181
Trouble: Cannot access to WebSetup using Ineternet Explorer 4.01 SP1.
Corrective Action: Change Java VM setting from “Run in sandbox” to Enable.
1. Select Internet Options in the View menu.
2. Click the Security tab.
3. Click the circle next to Custom (for e x pert users) in the Local Intranet zone.
4. Click Settings button. The Security Settings window appears.
Page 55

5. Click Custom in Java permissions, and clic k Java Custom Settings button.
The Local intranet zone windo w a ppears.
6. Click the Edit Permissions tab, and click E nable in Run Unsigned Content.
7. Click OK three times.
Page 56

8.KX-P8420 Network General/Setup
This document describes the necessary procedure to set up the network connection for each printing protocol KXP8420 supports.
P8420 Network General Information
Hardware Interface
KX-P8420 supports 2 types of Network Interface, Ethernet and TokenRing. Please refer to the table in next page that
describes I/F type, transmission speed for both card.
KX-P8420 has a following menu(“Network Port” menu) for your configuration of Network Interface. However, you do
not have to change the se settings because the d ef ault settings can be appli cable to mo st cases. Only when you ha v e
some trouble, please try to change these settings.
NOTE:
- P8420 does not support LocalTalk interface. So Macintosh and P8420 should be connected by Ethernet cable.
A) When the Ethernet card is installed in the printer:
Ethernet Speed
Auto-Detect/10Mbps/100Mbps [Auto-Detect*]
Select the speed at which data can be transferred over the Ethernet network or select Auto-Detect to automatically
detect the speed at which data can be transferred over the Ethernet network. Tr y to set 10Mbps or 100Mbps if you
have a troub le with Auto-Detect setting.
NOTE:
-The default transmission speed setting at front panel is Auto-Detect and this auto detection works correctly in
normal network environment. Ho w ever, if y ou are using Ethernet AUI port in a network configuration where there are
not much network packet flo wing, AUI port might not be recognized properly ev en when y ou select the speed setting
at either Auto-Detect or 10Mbps. In this case, you should select 10AUI in Transmission Speed setting in WebSetup.
B) When the Token Ring card is installed in the printer:
The following menus appear only when TokenRing board is installed.
Token Ring Speed
Auto-Detect/4 Mbps/16 Mbps [Auto-Detect*]
Select a speed at which data can be transf erred over the Token Ring network, or select Auto-Detect to automatically
detect the speed at which data can be transferred over the Token Ring network. Tr y to set 4Mbps or 16Mbps if you
have a troub le with Auto-Detect setting.
Max. Frame Size
632/1130/2154/4202 [4202*]
Page 57

Select a frame size for Token Ring communication. Normally the appropriate value is automatically used and has not
to be modified. 4204 is for achieving the best perf ormance in the Network.
Source Routing
Yes/No [No*]
Select YES to allow the packet to travel to its destination through routers on the network. The packet’s source,
specified using the routing options listed below, dictate the route that the packet will take. Select No for transparent
(no source) routing. “NO” should be the proper setting for most cases. You need to specify “Yes” if you are using the
type of TokenRing bridge called “Source Route bridge”.
NOTE:
- Req. All Route and Resp. All Route are displayed only when YES is
selected in Source Routing.
Req. All Route
Yes/No [No*]
If source routing is enabled, select Yes to allow all routers on the network to broadcast the presence of the printer to
clients, enabling packets from clients on the network to travel to the printer by any route.
Resp. All Route
Yes/No [No*]
If source routing is enabled, and Req. All Route is set to No, select Yes to allow all routers on the network to
broadcast the presence of clients to the printer, enabling packets from clients on the network to tra vel to the printer
by any route.
Software Interface
KX-P8420 supports the following 4 printing protocols.
Please refer to the chart next page about the relationship between network protocols. As for frame type, you do not
have to setup except when you use NPRINTER, Netware printing that requires the selection of frame type using
WebSetup.
1.LPD : Allows printing in TCP/IP network using an LPR client.
2.NPRINTER: Allows printing in Netware networks. Capable of
Running in bindery or NDS modes. Supports connection to 8 bindery servers plus an NDS connection
P8420 NPRINTER runs over IPX/SPX protocol, but needs TCP/IP connection for setup.
3.PAP: Allowing printing in AppleTalk network. Thus it allows printing from Macintosh to P8420 directly.
4.
SMB: Allows pr inting in Windows Networks. This is Microsoft’s file sharing protocol which allows a printer to be
shared among clients running Windows platforms. P8420 versions of SMB runs over TCP/IP connection.
Page 58

KX-P8420 physical connection
Physical Netw ork Interface Transmission Speed
Ethernet
Token Ring 4/16Mbps
RJ45 10/100Mbps
AUI 10Mbps
RJ45 (UTP (Type 3))
KX-P8420 protocol support
Physical Network Frame Type Protocol Stack LPD NCP PAP SMB
Ethernet 802.2
Ethernet
Token Ring
Ethernet 802.3
Ethernet II
Ethernet SNAP
Ethernet II TCP/IP
Ethernet SNAP AppleTalk - Token-Ring (802.2)
Token-Ring SNAP
Token-Ring SNAP TCP/IP
IPX/SPX -
IPX/SPX -
--
--
--
*Ethernet 802.2 for Netware 3.x,4.x, Ethernet 802.3 for Netware 3.x.
-
-
Protocol diagram
Application Layer
Presentation Layer
Session Layer
Transport Layer
Network Layer
Data Link
Layer
Media
Access
RPRINTER
NPRINTER
(NCP)
IPX/SPX
Ethernet
IEEE 802.2
IEEE 802.3
IEEE 802.2 SNAP
Ethernet
Ethernet
LPD
(LPR)
TCP/IP
Ethernet
Type II
SMB
NetBIOS
Token Ring
IEEE 802.2 SNAP
PAP
AppleTalk
Token Ring
IEEE 802.5
Physical Layer
AUI RJ45
DB9
Page 59

Support OS
OS LPD NCP PAP SMB
Windows NT 4.0
Windows 95 - - Windows 3.11 - - NetWare 3.x/4.x Macintosh - Solaris 2.4, 2.5.1
SunOS 4.1.x
*1 not recommended
*2 available when TCP/IP is installed.
*3 Netware is used as a server, Windows3.1,95,NT can be a client machine of this server.
Among above 4 protocols, 3 protocols enable peer to peer printing from the client PC or Macintosh to P8420.
NPRINTER enables server-based pr inting. The jobs sent from PC are stored on the queue on Netware server and
then transmitted to P8420. Server-based printing is also available if Windows NT4.0 is used as a print server.
-
*1
*2
*3
--
-
---
---
NOTE:
-For Printing via Netware server, only remote printer mode is supported. Pserver mode is not supported.
-It is not recommended to print to the printer connected directly to Netware server via lpt port.
If do so, it may cause garbage or blank page printing. Use network as a connection between Netware server and
printer.
- It is not recommended to print from WindowsNT via NT AppleTalk port because this may cause garbage printing.
- If there are two or more printers that use the same SMB name, only 1
So it is strongly recommended to change printer name(Server name) by using WebSetup/Network Setup/Service
Setup.
st
printer become available for SMB printing.
About Print Queue
When printing via network, 3 ports that corresponding to the following 3 queues are a v aila ble . The “Queue” is a place
where jobs sent from client machine are saved temporarily in RAM or HDD for printing later.
Direct:
RAM. If HDD is not av ailab le , only this queu e can be used f or N/W printing. The jobs sent to this queue are not stored
in Prnted queue. Files that sent to this queue are printed as soon as the printer become free to accept a print job.
If Direct queue is specified as a printer port, print jobs are sent to this queue. Jobs are temporarily stored in
Print:
If Print queue is specified as a printer port, jobs sent to the KX-P8420 appear in the Print queue. Each job is
spooled to the print queue on HDD and then processed and printed on FIFO base. You can move and manipulate
the jobs on this queue using WebSpooler. This is the most recommended queue for N/W printing if HDD and 32MB
RAM is installed.
Hold:
If Hold queue is specified as a printer port, jobs sent to the Hold queue remain in the Hold queue until they are
moved to the Print queue or deleted. If you need to print the same document frequently, you can send it to the Hold
Page 60

queue and move a copy of the job to the Pr int queue every time you need to print it. You can also pr int large jobs to
the Hold queue and then move them to the Print queue when other users are n ot printing. Both Print queue and Hold
queue is available when HDD and 32MB or more RAM is installed on the printer.
To utilize each queue, the port name should be specified as followi ng.
Queue
Direct
Print
Automatic (shown as
Systemname
Automatic
(shown as
Systemname
Automatic
Hold
(shown as
Systemname
Attach one of 3 queue names (_Direct, _Print, _Hold) at the end of Printer queue name specified by PCONSOLE.
When specified otherwise, the job is sent to direct queue if HDD is not installed or print queue if HDD and 32MB
or more RAM is installed.
At default, Systemname is Panasonic KX-P8420 and Servername is KX-P8420.
AppleTalk
_Direct)
_Print)
_Hold)
NetWare ()
Queuename
Queuename
Queuename
TCP/IP SMB
_DIRECT xjdirect ¥¥
_PRINT xjprint ¥¥
_HOLD xjhold ¥¥
Servername
Servername
Servername
¥direct
¥print
¥hold
When there is 2 or more KX-P8420 in one network, it is required to change names using W ebSetu p e xcept Appletal k
that automatically appends the number at the end of the name for each printer found on the Appletalk network.
(ex.Panasonic KX-P8420_Direct-2)
NOTE:
- If the printer has a hard disk drive and 32 MB of memory installed, Direct, Print, and Hold print connections are
automatically available. If the printer does not have a hard disk drive, only the Direct connection is available.
Printer IP address setup.
As a first step to setting up KX-P8420 network connection, you have to set up IP address on the printer.
1. Install the Ethernet card if not or TokenRing card. Please refer to the manual for more detail.
2. IP address setting. This is required for all printing protocols.
As a first step of network configuration, you need to obtain a unique IP address. Contact your network administrator
for this information.
Then you need to enter the obtained IP address, corresponding subnetmask and also Gateway address if required.
Please refer to the manual for the procedure in detail.
3.Confirm IP address setting is done properly by using “PING” command on client PC.
Please refer to the manual for the procedure or detail.
NOTE:
- IP address and subnet mask has to be properly set in order to set up KX-P8420 connection. Please refer to
network related document for more detail.
- Gateway address should be specified to print to KX-P8420 which is located in another segment of N/W.
Page 61

SMB Setup
SMB is a protocol which allows Windows users to share a file or a printer. KX-P8420 supports this protocol to enable
peer to peer printing from Windows95/98, WFW,WindowsNT4.0.
To setup SMB printing, you need to do the following procedure.
1)Set IP address of KX-P8420. Refer to “
2)Enable SMB protocol and Set SMB name(Server name) of KX-P8420 by WebSetup.
3)Change printer port to the specified Ser ver name in a printer properties that exists on a Windows machine from
which you want to print.
Enable SMB protocol and Server name.
To setup SMB printing, you need to use WebSetup/Network Setup.
1)Launch the Browser
2)Enter the valid P8420 URL address
3)When P8420 WebTools main GUI appears, click WebSetup button.
4)When WebSetup main Screen appears, click Network setup button.
5)When Network Setup appears, select Service setup.
In this tab, you have to enter the following item.
Enable Windows Printing Service -
sharing protocol built into Windows. Enabling SMB allows the KX-P8420 to be listed on the network
so that Windows clients can print to a particular print connection (Hold, Print, or Direct) on the KX-P8420 without any
Printer IP address setup”.
Enable this option to enable SMB(Server Message Block), the file and printer
other networking software. Windows (SMB) printing runs over TCP/IP, so TCP/IP must be configured on all the KXP8420 and on workstations that use Windows printing.
Server Name
name is “KX-P8420”.
NOTES:
- Lowercase characters are not allowed.
- Each printer should have a different server name, if sever al KX-P8420 printers are connecte d to the same netwo rk.
Comment
Domain W orkgroup
NOTE:
- Lowercase characters are not allowed.
Use WINS Server
their original network segment without a WINS name server. Therefore, to print a file to KX-P8420 located at the
different network segment, you n eed to specify the address of WINS server.
- The server name is the name of KX-P8420 that will appear on the network. As a default, Ser ver
- Server comments (optional) can contain information about the printer .
- Enter the workgroup or domain you want the KX-P8420 to appear in.
- Select to use a WINS name server. Broadcasts from SMB devices cannot be routed beyond
Page 62

IP Address - Enter the IP address of the WINS Server.
Change printer port in KX-P8420 properties
To print from Windows95/98 to P8420
1. From the Start menu, choose Settings, and click Printers.
2. Select the Panasonic KX-P8420 printer icon, and choose Properties from the File menu.
3. Click the Details tab in the Properties window and click Add Port.
4. In the Add Port dialog box, click Network, and click Browse to display your network environment.
5. Expand the levels to locate your printer. Clicking your printer icon shows 3 queues(direct, print,hold).
6. Select the queue you wish to print to and click OK.
7. In the Add Port dialog box, verify that the network path is correct and click OK.
8. When you click OK button, Windows may show you the message about downloading font. Click OK button here.
9.Close Properties window by clicking OK button.
NOTE:
- If the Hold queue is specified, all jobs sent to the printer will be held on the printer’s hard disk and will be visible in
Windows spooler box as well as the WebSpooler window until they are printed or deleted.
- If you do not know the name of the SMB Name Ser ver and SMB printing has been enabled on the printer, refer to
the printer’s Configuration page for this information.
- If the local network does not include a WINS server or WindowsNT machine, your printer may not be visible in the
Browse dialog box. In this case, you must type the correct path for the print connection in the “Specify the network
Page 63

path to the printer” box of the Add Port dialog box, for example: ¥¥KX-P8420¥direct.
- It is recommended to select print queue rather than direct queue if HDD is installed because direct queue cannot
hold the print jobs sent to the printer on the HDD and might lose print job if RAM is full.
To print from WindowsNT to P8420
1.From the
2. Select the
3. Click the
4. In the
The Port Name dialog box appears.
5. Enter the name of the printer port to print to, for example: ¥¥KX-P8420¥print and then click OK.
6. To confirm the connection, click the
7. Click
Start
menu, choose
Panasonic KX-P8420
Ports
tab in the
Printer Ports
Print Test Page
dialog box, select
and click OK. If the test page prints successfully, you are ready to print from the
Settings
printer icon, and choose
Properties
, and click
window and click
Local Port
General
Printers
, and then click
tab in the
.
Properties
Add Port
Printer Properties
from the
.
New Port
File
.
dialog box.
menu.
computer .
To print from Windows 3.1 to P8420
The following procedure describes how to prepare the computer for printing using SMB protocols.
1. In the
2. In the
to the appropriate port.
3. In Connect dialog, select the port and then click
4. If the
and queue name(direct,print,hold).
5. Confirm the path and then click the
Control Panel
Printers Control Panel
Connect Network Printer
window, double-click the
window, select Panasonic KX-P8420 and click
dialog box is displayed, select the server name that correspond to the KX-P8420
OK
button.
Printers
Network
icon.
..
Connect
to connect the
KX-P8420
Page 64

6. Click OK in the Connect dialog box.
7. Click Close in the Printers dialog box.
- If the local network does not include a WINS server or WindowsNT machine, your printer may not be visible in the
Browse dialog box. In this case, you must type the correct path for the print connection as the path. For example:
¥¥KX-P8420¥direct.
Page 65

Printing from Macintosh via Ethernet card
You can print from Macintosh to P8420 by PAP protocol. To setup, Ethernet card should be installed both on the
printer and Macintosh.
1. Enable Appletalk protocol first. Enter network protocol menu at the KX-P8420 front panel and select Enable
Appletalk menu and select “Yes”. This setting enables the KX-P8420 to communicate over AppleTalk networks.
2.Select Zone in which your printer should be located by Select Zone menu. The KX-P8420 searches the network for
AppleTalk zones in your network segment. Scroll through the list to select the AppleTalk zone in which you want the
KX-P8420 to appear. If your segment has only one zone, the KX-P8420 is assigned to that zone automatically. If no
AppleTalk zone can be found, your network may have no defined zones, or else the network cable has not been
connected.
3.Install Adobe Po stScript printer driver on your Macintosh.
1)Insert the
has the language name you want to install, then the
2)Double-click the
3) Click
your printer are installed.
4)Click
4.Setup KX-P8420 in the Chooser.
1) In the
NOTE:
- If necessary you may need to select the AppleTalk zone in which your printer is located.
2) Click the
KX-P8420 Driver & Utility CD-ROM
Installer
Yes
in the dialog box that appears. The Adobe PostScript printer driver and the PPD that corresponds to
Restart
Chooser
in the dialog box informing you that installation is complete.
, ensure
AdobePS
icon.
AppleTalk
printer icon in the
is enabled.
Chooser
in the CD-ROM drive and op en the
Adobe PS
.
folder.
English
folder or the f older that
3) Select the name of the KX-P8420 from the scroll list. At the default, the f ollo wing 3 queu e name shoul d be sho w n.
Panasonic KX-P8420_Direct, Panasonic KX-P8420_Print, or Panasonic KX-P8420_Hold.
NOTES:
- If the optional hard disk drive is not installed in the printer, only Panasonic KX-P8420_Direct appears.
Page 66

- The name of a printer corresponds to the system name that you can edit by using WebSetup.
4) Click
5) Confirm an icon appeared to the left of the printer name selected in step 3).
6) Select the name of the KX-P8420.
7) Click
8) In the dialog box that appears, click
If your printer does not have additio nal devices installed, skip to step 12.
9) From the pop-up menus, specify the device options installed on your printer. Click OK.
This step must be completed to enable features in the printer driver relating to devices installed on the printer.
Create
Setup
.
or
Setup
.
Configure
.
11) Close the
Chooser
.
Printing from Unix by using LPD protocol.
Set IP address of KX-P8420. Refer to “Printer IP address setup”.
2.Add KX-P8420 to your UNIX system.
1)Log in to your UNIX host as the root user.
2)Edit your
The following is a sample entry for the printer:
192.9.228.1<TAB>KX-P8420<TAB>#comments
where <TAB> indicates that you press the tab key.
The IP address is followed by the official host name, and these are followed by aliases, if any. Ty pe the entry exactly
as shown, without a space bef ore the IP add ress.
NOTE:
- For sites that use DNS (Domain Name System) or that use NIS or NIS+, consult the documentation or the network
administrator for instructions on publishing the printer entry.
3) Save and exit the hosts file.
4) Confirm the connection using the
/etc/hosts
file to include the printer as a network device.
ping
command.
3. Set up printing on a UNIX system running SunOS 4.
Page 67

1) On each workstation that will print to the printer, log in to your UNIX host as the root user.
2) Create an entry for the printer in your
/etc/printcap
file. The following is a sample pr intcap entry for the printer.
Note that the remote host name you enter in the rm line must exactly match the name you entered in the /etc/hosts
file.
KX-P8420q:¥
:lp=:¥
:rm=KX-P8420:¥
:rp=xjpr int:¥
:lf=/var/spool/lpd/KX-P8420q/log:¥
:sd=/var/spool/lpd/KX-P8420q:¥
:mx#0:sf:sb
The spool directory KX-P8420q is specified here, and the directory itself is created in step 3. Similarly, the log file is
specified here and created in step 4. The spool directory is write-protected (from ever yone but a daemon user and
daemon group); users cannot modify or remove files other than their own. It is possible to set up to two additional
printer entries, one with the rp name xjprint and one with the name xjhold. The r p name indicates the KX-P8420
queue to which jobs are sent when you print to the named printer. A printer entr y with the rp name xjhold routes all
jobs to the KX-P8420 Hold queue. Therefore, to pr int those jobs, they must be moved to the Print queue or deleted
using Fiery WebSpooler.
NOTE:
Printers without a hard disk drive and 32 MB of memory can not use Print or Hold queues (rp name: xjprint and
xjhold), they can only receive pr int jobs over the Direct connection. Use the rp name xjdirect if your KX-P8420
has no hard disk, or is configured with less than 32 MB of memory.
3)Create a spool directory for the printer in the
/var/spool
directory.
For example, enter the following:
mkdir -p /var/spool/lpd/KX-P8420q
chown daemon /var/spo ol/lpd/KX-P8 420q
4) Create the log files.
For example, enter the following:
cp /dev/null /var/spool/lpd/KX-P8420q/log
5) Reboot the machine.
Printing to the KX-P8420
You can use UNIX commands to print P ostScript files and te xt files . In general, the basic printing commands (lpr, lpq,
lprm) can be used to send print jobs to the KX-P8420. See your UNIX manual pages or other documentation for
information about UNIX commands. The KX-P8420 queue name referred to in the following procedures is the
name defined in the printcap file by your system administrator.
NOTE:
Only PostScript or te xt files can be printed from UNIX.
To print from UNIX:
Page 68

On a system running SunOS 4.1.x or another BSD-based variant, use the lpr command to send a job to the KXP8420 as follows:
lpr -P queuename -# copies filename
For example, if the Print queue of your KX-P8420 is named KXP8420, your file is named Sample, and you want to
print two copies, type: lpr -P KXP8420 -# 2 Sample
To display a list of jobs in the queue:
On a system running SunOS 4.1.x or another BSD-based variant, use the lpq command to see printer jobs in the
queue as follo ws:
lpq -P queuename
For e xampl e, if the Print queue of your KX-P8420 is named KXP8420, type:
lpq -P KXP8420
Your workstation displays the contents of the queue.
To remove jobs from the queue:
NOTE:
- Unless you log in as the root user, you can remove only your own jobs. On a system r unning SunOS 4.1.x or
another BSD-based variant, use the lprm command to remov e job s from the q ueue
as follows.
lprm -P queuename jobnumber
You can use the lpq command to check the job number.
For example, to remove job number 123 from the Print queue of your
KX-P8420 named KXP8420, type:
lprm -P KXP8420 123
The lprm command reports the names of any files it removes.
On a system running Solaris 2.x or any System V implementation of UNIX, refer to the document of the Unix
system .
Setting up TCP/IP and LPR printing with Windows NT 4.0 as a Print server.
Once you have installed the PostScript driver for Windows NT 4.0 complete the setup for the TCP/IP and lpr
connection as follows:
- Prepare the KX-P8420 to accept print jobs using TCP/IP and lpr protocols.
- Configure the workstation for the TCP/IP connection. Before you continue, ask the system administrator for the IP
address assigned to the KX-P8420 and the subnet mask as well as gat eway address, if they are u sed.
To prepare the KX-P8420 for TCP/IP and LPR printing:
1.Set IP address of KX-P8420. Refer to “
The TCP/IP Protocol and Microsoft TCP/IP Printing software should already be installed on the workstation for
Printer IP address setup”.
Page 69

Windows NT 4.0.
2. Set up TCP/IP and LPR printing for Windows NT 4.0:
1) Click the
2) Click the
Start
Panasonic KX-P8420
icon, and left-click
3)Click the
4)Click
Ports
Add Po rt
button, select
Properties
tab.
.
Settings
, and then click
printer icon, and select
).
Printers
Properties
.
from the
File
menu (or right-click the printer
The available port types are displayed.
5)Select
LPR Port
and click
New Port
.
If the LPR port is not listed, install the TCP/IP protocols and Microsoft TCP/IP Printing. For details, see your
documentation for Windows NT 4.0. If LPR Port is not found, install Microsoft TCP/IP printing service.
6) In the Name or address of server providing lpr box of the
Add LPR compatible printer
dialog box, enter the IP
address of the KX-P8420. If your network uses Domain Name Services (DNS), enter the DNS name assigned to the
KX-P8420 instead of the IP address.
7) Press
Tab
and type the internal name of the KX-P8420 in lowercase letters.
NOTES:
- Type this name exactly as shown; it is required for communication with the printer. The name must be one of these:
xjdirect
xjhold
xjprint
- Use the last two internal names only if your printer has a hard
disk drive and a minimum of 32 MB of memory.
8) Click OK. The workstation checks the address or DNS name that you entered and notifies yo u if it cannot resolve
the address.
9)Click
Close
Printer Ports
of the
window. The Ports property tab shows the new port configuration.
Page 70

10)Click
OK
to close the
Panasonic KX-P8420 Properties
should now print a test page to verify the connection.
dialog box. The new por t has been configured. You
11)Open the
Panasonic KX-P8420 Properties
dialog box. Click the
General
tab and click
Print Te st Page
.
When you print, your files are sent o ver the LPR Port connection to the KX-P8420.
12) Click
OK
to exit.
NOTE:
- You can also use lpr protocol printing from Wi ndows95 if you purchase lpr tool for Windows95 and install it.
Setting up TCP/IP and LPR printing with Windows NT 4.0
You can print from Windows3.1/95/NT4.0 using WindowsNT4.0 as a print server PC. The job sent from client PC is
spooled once on WindowsNT4.0 and then sent to KX-P8420.
1)Connect WindowsNT4.0 to printer following the procedure “Setting up TCP/IP and LPR pr inting with Windows NT
4.0” or To print from WindowsNT to P8420 in SMB setup.”
2)Open Panasonic KX-P8420 printer properties.
3)Select Share tab and enable “Shared” an d specify share name.
4)Click OK button.
5)Open printer properties of KX-P8420 on a client machine you wish to connect to the shared printer.
6)Specify the shared printer name in Add port dialog. (Procedure may differ depending on platfrom.)
Choose server WindowsNT4.0 and click this to show Printer icon. Select this.
Page 71

You can also print ps file from NT DOS prompt by using the following command.
Lpr -S <IP address of the printer> -P xjprint(or xjdirect if HDD is not installed) <the name of ps file>
Ex)
lpr -S 134.62.36.161 -P xjprint FONTS.PS
Troubleshooting:
Trouble:
using lpr port.
Corrective Action:
Open KX-P8420 Printer Properties. Select Scheduling tab. Enable “Spool print document so program finishes
printing faster”. And then enable “Start printing after last page is spooled.”
Corrective Action:
Install NT driver again by double clicking “Add Printer”.
Corrective Action.
Try to change IP address of the printer if another IP address is available and set printer port setting again.
Windows spooler show Printer error and jobs cannot be printed when printing from WindowsNT4.0
Page 72

Printing via Netware Print server
This section explains how to set up the NetWare server so that networked users can print to the printer from their
workstations. There are two stages to this setup:
The network administrator must set up a print queue on the NetWare ser ver so users can print to it, and the printer
can receive print jobs from it. Bef ore config uring a NetWare file server for printing to the KX-P8420, make sure that it
is connected to a functioning IPX network. Then, log in as the supervisor on a PC connected to the NetWare file
server, and configure the file server as described in the following sections. Before you begin, you’ll need to
determine the following names:
- The name of the NetWare file server on which you will define the printer as a new print server.
- The name of the NetWare print server. This name is used for communication between the printer and the NetWare
file server.
- The name to assign to the KX-P8420 Direct, Print or Hold queue. If you are defining a Print queue, the last five
characters must be _print. You need to set up at least one print queue on the NetWare server for jobs
that will be printed by the printer. Users will see and print to the name you assign to the Print queue.
Names should be as brief and descriptive as possible. Server names cannot begin with a period and cannot include
spaces or punctuation characters other than periods.
- Because KX-P8420 is linked to one Print Server that manages one of the 3 queues(Direct,Print,Hold), only one
type of 3 queues per a Netware fileserver can be used for Printing.
- To complete network setup, you will need to log in to the NetWare file ser ver and the new print server from the
printer. You will need a login name and, if access to the server is restricted, a login password.
The NetWare print server and print queue are created and configured from NetWare Print Console, a NetWare utility
that is stored in NetWare’s PUBLIC directory.
To setup printing using Netware,the following 3 major procedures are required.
1)Set IP address of KX-P8420. Refer to “
2)Enable IPX/SPX protocol by front panel “Network Protocol Setup” menu.
3)Set up the NetWare server for printing to the KX-P8420 by PCONSOLE.
4) Setup for linking P8420 with Netware file server by using WebSetup.
5)Setting up the port for IPX printing on your client PC.
Printer IP address setup”.
To set up the NetWare server for printing to the KX-P8420:
1. Log in to the NetWare server as the Supervisor.
2. At the NetWare MS-DOS prompt, type
The Available Options menu is displayed.
pconsole
Page 73

3. Select Change Current File Server and press the Enter key.
4. Using the arrow keys, select the file server name and press the Enter key.
You must select this file server later as the NetWare File Server in WebSetup>Network Setup.
5. Select Print Server Information from the Available Options menu.
6. Press the Inser t key, type a name for the new print server, and press the Enter key. Then press the Esc key. You
must select this print server later as the NetWare Print Server in WebSetup>Network Setup.
7. Select Print Queue Information from the Available Options menu.
8. Press the Insert key and type a name for a new print queue. Press the Enter key.
The print queue name you entered will be highlighted in the Print Queues list.
If the print server manages more than one print queue, you’ll have to select this name later in
WebSetup>Network Setup.
9. Mak e su re the print queue name y ou created is sele cted in the Print Queues menu, and press the Enter key. The
Print Queue Information menu is displayed.
10. In the Print Queu e Information menu, select Queue Servers, and press the Enter key .
Page 74

A blank Queue Servers list is displayed.
11. Press the Insert key. The Queue Server Candidates list is displayed.
12. Use the arrow keys to select the name of the print server
you created in step 6 and press the Enter k e y. The server name you select will appear in the Queue Se rvers list. You
have associated the selected printer queue with the print server you created in step 6.
13. Press the Esc key to exit all PCONSOLE windows.
14. Select Yes or press the Enter key to save changes to PCONSOLE.
After finishing the above procedu re, connect the specified queue server to the printer.
Setup for linking P8420 with Netware file server.
To setup Netware printing, you need to use WebSetup/Network Setup.
1)Launch the Browser
2)Enter the valid P8420 URL address
3)When P8420 WebTools main GUI appears, click WebSetup button.
4)When WebSetup main Screen appears, click Network setup button.
5)When Network Setup appears, select Protocol setup.
In this tab, you have to select the frame.
6)Select Frames—Click the Select Frames button to specify Ethernet frames for IPX protocol used with NetWare.
See your network administrator to verify which frame type to choose. In the IPX Frames dialog box, select frames
and use the Add and Remove buttons to specify the selected frames.
Select the following frame type.
Ethernet 802.2 – for Netware 3.x, 4.x
Ethernet 802.3 – for Netware ver3. x
Ethernet II – for TCP/IP
Ethernet SNAP – for Appletalk protocol
TokenRing
TokenRing SNAP – for Appletalk protocol
It is recommended to select all the available frame types. P8420 automatically selects the most appropriate frame
type.
7)Select Pserver Setup tab
- PServer Setup tab
Page 75

IPX (Novell NetWare) options are set in the PServer Setup tab.
You can modify both NetWare 3.x (Bindery) and NetWare 4.x (NDS) configurations from Fiery WebSetup. Turn on
the Enable NDS option if your netw o rk uses NetWare 4.x in native mode. Click Bindery Setup if your
network uses NetWare 3.x or use s NetWare 4.x in bindery emulation mode.
NOTE:
- If your network uses both NDS and Bindery, set up NDS first. Setting up NDS after Bindery will overwrite Bindery
Setup. If your network uses both NDS and Bindery, including using NetWare 4.x servers in bindery
emulation, the KX-P8420 cannot service NDS and bindery emulation servers on the same NDS tree.
- If you use NDS in Bindery mode, you have to configure the server, please refer to the manual for more detail.
PServer Setup (NetWare Services)
The Enable PServer mode option must be turned on if you have a Novell server connected. You can change the
PServer Poll Interval and modify either Bindery Setup or NDS Configuration.
A) PServer Setup (NDS Configuration)
In initial setup, the KX-P8420 was conne cted to the network and an NDS directory tree, with a Printer, a Print Server,
and one or more Print Queue objects for KX-P8420 jobs was configured. You can make any changes to that setup
through WebSetup. To modify NDS Setup you may need permission to browse the NDS tree. If access to the Print
Server is restricted, you’ll need a login passw ord. Note that the terms NetWare server, Novell server, and IPX server
are in common use and are used here interchangeably to mean the server on an IPX network running Novell
NetWare networking software.
To set up the NDS configuration:
1. Check the Enable NDS check box.
NDS has already been enabled. Uncheck this box only to remove NDS support.
2. Click Change T rees to open the Add NDS Tree window.
You can ha ve only one NDS tree, so the following process is required to change trees.
Page 76

3. Select the current NDS tree and click Remove.
4. Select the new NDS tree and click Add.
Your new NDS tree selection automatically overwrites any previous tree selection. If you change the NDS tree
selection and there are also current Bindery settings, you are alerted that they will be deleted. If you continue with
NDS Setup, you can replace Bindery settings afterwards. To exit NDS Setup, choose Cancel.
5. Click OK.
The Select login user window appears.
6. Select the User Login object from the display in the Select Login User window.
7. Enter a password if necessary.
8. Click Next. The Select Print Server window appears.
9. Select the print server from the display in the Select Print Server window.
Page 77

10. Enter a password if necessary.
11.Click OK. The Select Print Queue root window appears.
12. Select the print queue root from the display in the Select Print Queue Root windo w.
13. Enter a password if necessary.
14. Click Finish. The NDS Configuration window reappears, showing the new settings.
15. Click OK. You return to WebSetup window.
16. Click Save.
B) PServer Setup (Bindery Configuration)
Use Bindery Setup if you have already configured one or more binder y servers (file servers running NetWare 3.x or
NetWare 4.x in bindery emulation) with a Print Server and a Print Queue for KX-P8420 jobs. Before entering bindery
settings, be sure the KX-P8420 is connected to the networ k and the NetWare file ser ver is running. You’ll need a
login name, and, if access to the file server or print server is restricted, you’ll need a login password.
NOTE:
- The terms NetWare server, Novell server, and IPX file server are in common use and are used here
interchangeably to mean the server on an IPX network running Nov ell NetWare networking software.
Because you can set up more than one Novell server to handle KX-P8420 print jobs, Bindery Setup allows you to
add or delete new file server connections and view the connections you have selected.
To set up the Bindery Setup:
Page 78

1. Click the Bindery Setup button to display the Add Connections window.
2.
The Novell Setup window appears.
2. Click the server you want to add.
3. Click Add. The Add Server window appears.
4. Enter your user name and password.
5. Click Next. The Add Server window shows a list of print servers you can add.
6. Select a print server from the list on the left.
7. Enter a password if a password is required.
8. Click Finish.
You return to the main Novell Setup dial og box. The print server you selected in the step 6 appears.
9. Click OK. You return to WebSetup window.
10. Click Save.
Setting up IPX (Novell) printing with Windows 95
The following procedure describes how to prepare the computer for printing using IPX protocols.
Page 79

To set up IPX (Novell) printing:
1. Click the Start button, select Settings, and click Control Panel.
2. Double-click the Network icon.
Make sure that IPX/SPX-compatible Protocol is listed in the Installed Network Components section. For instructions,
see your Windows 9 5 documentation.
3. Close the Network window and the Control Panel window.
4. Click the Start button, select Settings, and then click Printers.
5. Click the Panasonic KX-P8420 printer icon, and select Properties from the File menu (or right-click the printer
icon, and left-click Properties).
6. Click the Details tab, and click Add Port. A list of connection options is displayed.
7. In the Add Port dialog box, click Network and specify the network path, or click Browse for a display of your
network environment.
8. Double-click the icon of the server you want to use for printing to the KX-P8420 and click OK.
9. Click the printer icon labeled with the NetWare print queue you will use and click OK.
10. In the Add Port dialog box, verify that the network path is updated, and click OK.
To confirm the connection, you can print a Windows 95 test page.
11.Click the General tab in the Properties dialog box, and click Print Test Page.
You are ready to print to the KX-P8420 from Windows applications. When you select Pr int, jobs are routed to the
print queue on the NetWare file server, and then sent to the KX-P8420.
NOTE:
- If the test page is not printed, perform the following steps:
1. Perform steps 1and 2 to display the Net work window.
2. Double-click IPX/SPX-compatible Protocol in the Configuration tab.
3. Click Advanced tab and select Frame Type.
4. Select the same value specified in WebSetup.
Setting up IPX (Novell) printing with Windows 3.1
The following procedure describes how to prepare the computer for printing using IPX protocols.
Novell Network should be installed befo rehand.
To set up IPX (Novell) printing:
1. In the Main g roup of the Program Manager, double-click the Windows Setup icon.
2. Click Change System Settings from the Options menu.
3. Click Novell NetWare (shell version 3.26 and above) from the Network menu.
4. Click OK. When prompted, restart Windows.
5. In the Control Panel window, double-click the Printers icon.
6. In the Printers Control Panel window, click Connect to connect the KX-P8420 to the appropriate port.
7. Select Network.
8. If the Connect Network Printer dialog box is display ed, sel ect the serve r and queue n am e that co rresp ond to the
Page 80

KX-P8420.
9. Confirm the path and then click the OK button.
10. Click OK in the Connect dialog box.
11. Click Close in the Printers dialog box.
Trouble shootings:
Trouble: Can print to P8420 via Netware3.x file server, but cannot via Netware4.x.
Possi ble Cause: Frame type is not correctly set up.
Corrective Action: Change Frame type by WebSetup. 802.3 should be included in the frame type selection.
Trouble: Cannot print via Netware file server because print jobs remain on the queue on the server.
Possi ble Cause: Print Server is not loaded.
Corrective Action: Load Print Server.
Possible Cause: Printing via Netware server is not corre ctly set up.
Corrective Action: Try to set up again according to the procedure described in the manual.
Trouble: Cannot print to P8420 through Network.
If you cannot reach the Printer by ping command, the possible causes could be:
Possible Cause: Network cab l e is not properly connected or network devices such as Hub do not work properly. If
you cannot reach to P8420 by ping command after network installation, this is likely to be the cause.
Corrective Action: Check Printer and PCs are properly connected or network devices work properly.
Possi ble Cause: IP address or Subnet mask is not properly set. If you cannot reach to P8420 by ping command
after network installation, this is likely to be the cause.
Corrective Action: Check IP address or Subnet mask of printer . If printer IP address is duplicated with other device ,
it should be changed. Or Subnet mask should be consistent.
If you can reach the printer by ping command, the possible causes could be:
Possible Cause: KX-P8420 WebTools are opened simultaneously at the several location. WebSetup and
WebSpooler uses Network port until they are closed. So network printing might fail because of shortage of
available Network port.
Corrective Action: Close WebTools.
Possi ble Cause: Network setting is not correctly configured.
Corrective Action: Configure the network setting again following the instructions described in the KX-P8420
Operating Instruction manual.
FAQ:
Q: Does P8 420 supports Netware Pserver mode?
A: P8420 supp orts Netware Remote printer mode, but not Pserver mode.
Page 81

Q: When uses WindowsNT as a server , wh at network protocol should be used to connect the server and
client PC.
A. LPR or SMB protocol can be used between P8420 and Windows NT. LPR is recommended because
WebTools has to be used to setup SMB printing whereas LPR can be used after enabling TCP/IP and setting up IP
addresses.
By sharing the printer connected to WindowsNT, this printer become connectable to client
PCs(WindowsNT,WFW,Windows95/98).
Q:WindowsNT3.51 driver is not supported, but is it possible to use WindowsNT3.51 as a printer server.
A: Printer driver has to be installe d for WindowsNT3.51 to become a printer server. It’s recommended to
Install Microsoft PS driver which comes with WindowsNT CD-ROM.
Q:Is DHCP protocol supported?
A:DHCP is not supported.
Q:Is SNMP protocol supported?
A:SNMP is not supported.
Q:Is it possible to print to KX-P8420 located at different network address via Router.
A: For LPR protocol, enter Router address as Gateway Address setting. For SMB printing, enter the IP address of
Wins server by We bSetup.
Page 82

9.Application Note
This section describes hints or notes that should be helpful if you remember when you print from particular
applications.
applications.
Please note screens showed here or procedures may differ depending on the version of the
1.Photoshop
When you select Print menu, the following dialog appears.
*Though “Print Quality” shows 1200dpi, KX-P8420 does not always print by 1200dpi. Select resolution in
Device Option tab of Printer Properties.
*Do not specify “Binary” as a Encoding method. It may cause PS error.
*Specify RGB if you want to make P8420 CRD effective or select CMYK if y ou w ant to use P8420 simul ation feature.
*For better perf o rmance, elect JPEG as a Encoding option. Please note that JPEG option may affect the print quality .
The following dialog appears after clicking Setup button.
*Select Properties to enter KX-P8420 Printer Properties dialog.
The following dialog appears after clicking Screens button.
Page 83

*Enable Use Printer’s default Screens. If it’s not, the screen setting specified below are used and pirntout may not
look good.
2.CorelPhoto
When you select Print menu, the f ollowing dialog appears.
*Always enable “Use color profile” setting. Otherwise color output quality may not be good.
After clicking “Properties” button, the following dialog appears.
*Select “Default” as Screen Frequency. If it’s not, the pirntout may not look good.
Clicking “PostScript Preference” button shows the following dialog.
Page 84

*Always enable “Use PostScript level 2 feature.
*Enable “Output color bitmap in RGB if you want to make KX-P8420 CRD effective. Or not enable if you want to
make KX-P8420 simulation feature effective.
*If you do not enable “Output color bitmap in RGB” option, it is recommended to specify P8420 profile to be used
with CorelPhoto Proprietary Color Management system. Please refer to the application manual.
*Enable JPEG compression and select qualit y factor if you want a better perf ormance. If you select higher val ue, the
print quality may deteriorate.
Page 85

3.CorelDraw
CorelDraw has the same option “Use color p rofile” as Core lPhoto, always enable this option.
Click Option button and then select Option s tab. The following dialog appears.
*Select “Default” as Screen Frequency. If it’s not, the pirntout may not look good.
After clikcing PostS cript Preferences, the following dialog appears.
*Enable “Output color bitmap in RGB if you want to make KX-P8420 CRD effective. Or not enable if you want to
make KX-P8420 simulation feature effective.
*If you do not enable “Output color bitmap in RGB” option, it is recommended to specify P8420 profile to be used
with CorelPhoto Proprietary Color Management system. Please refer to the application manual.
Page 86

3.Acrobat
*Though “Print Quality” shows 1200dpi, KX-P8420 does not always print by 1200dpi. Select resolution in
Device Option tab of Printer Properties.
*Enable Use Printer’s default Screens. If it’s not, the pirntout may not look good.
*Always select “Level2 Only” for better performance.
4.Illustrator
*Enable Use Printer’s default Screens in File/Document men u. If it’s not, the screen setting specified below are used
and pirntout may not look good.
*When you use Illustrator ver8, please specify “Level3” as PostScript option in Print dialog.
5.QuarkXpress ver3.3x
Select “Fiery” in “Use PDF for” option in PrinterSetup menu.
6.Write or MS Office for Windows3.1
If you are using some word processor applications on Windows3.1, you may see the paper source options are
shown as “Tray1,Tray2,...” instead of KX-P8420 original tray options such as “Auto(Paper), MPT transparency” when
you open the print dialog or application paper setup dialog. For selecting paper sources for these applications, use
KX-P8420 printer properties launched from the print dialog.
TroubleShooting:
Trouble: KX-P8420 always print PS error page when printing from Adobe Photoshop.
Possible Cause:
The print dialog of Adobe Photoshop has the setting by which user can select data type. (ASCII,Binary,JPEG).
Selecting Binary as a data type always produce PS error print and should be avoided.
Corrective Action:
Select ASCII or JPEG. Selecting JPEG produces much better performance and is recommended although it might
affect the print quality slightly.
Trouble:
KX-P8420 specific features are not available in Adobe PageMaker print dialog.
Page 87

Possi b le Cause: PPD (PostScript printer description) file is not copied to the specified folder or KX-P8420 PP D file is
not specified in PageMaker print dialog.
Corrective Action:
1)Copy PPD file named Pakx2010.ppd located under Windows sytem folder to the following folders .
For PageMaker6.5, Adobe¥PageMaker65¥RSRC¥UKENGLISH¥PPD4
For PageMaker6, Adobe¥PM6¥RSRC¥UKENGLISH¥PPD4
2)Select Print Menu of PageMaker.
3)Select “Panasonic KX-P8420” as PPD.
4)Click “Pap er” button or “Features” button to enable KX-P8420 specific features.
For more detail, please refer to the PageMaker’s manual.
Trouble: KX-P8420 cannot print correctly from QuarkXpress ver3.3x.
Corrective Action:
Select “Fiery” in “Use PDF for” option in PrinterSetup menu.
Trouble: The printout has a visible halftone pattern (round dot or rosette pattern as you can see at the offest
printing) and looks very harsh.
Possible Cause: The application screen settings are used instead of KX-P8420 resident screen pattern.
Corrective Action: Use the KX-P8420 resident screen pattern. Some application has a option like “Use Printer ‘s
default screen that let KX-P8420 decide whether screen, Printer resident screen or the a pplication screen shoul d be
used. Enable this option to activate the printer default screen. This setting can be found in the Print dialog or the
dialog ev oked fro m Print dialog or other dialog f or setting document information. If you cannot find, please ref er to the
manual for application.
For Illustrator, Enable Use Printer’s default Screens in File/Document menu.
For Photoshop, Click “Setup” button from “Print” dialog. Then click “Screens” button.
Then enable “Use Printer’s default Screens.”
For Acrobat, enable “Use Printer’s default Screens”.
For halftoning, refer to the following description.
KX-P8420 needs a halftoning process to print a color image. In the process of halftoning, colors and shading are
approximated by a pattern of pixels capable of only a limited number of discrete colors. A good example is a
newspaper photograph that renders gray tones with only black-and-white pixels.
Trouble: When printing the Microsoft Office files including imported graphic or images, the color output
become much different from the screen. (become bluish).
Corrective Action: Please remove KX-P8420 ICM profile if it is installed in the Windows¥System¥Color folder.
If the ICM profile is installed, JPEG, BMP, and TIFF images may not be printed correctly from Microsoft Office 97.
The same problem also happens when you create pdf file using Adobe distiller after making ps file using P8420
driver.
Page 88

Trouble: You are using the word processor software for Windows3.1 such as Write or MS Word and Paper
source options are shown as “Tray1,Tray2,...” instead of KX-P8420 original tray options such as
“Auto(Paper), MPT transparency” when you open the print dialog or the application paper setup dialog.
Corrective Action: For selecting paper sources for these applications, use KX-P8420 printer properties launched
from the print dialog.
Trouble: KX-P8420 cannot print cor rectly from WordP erfect for Wind ows95 if the file includes graphic pattern.
Corrective Action:
1)Select Start menu->Settings->Printers. 2)Select the icon “Panasonic KX-P8420”.
3)Click Right mouse button and select “Properties”. 4)Select “Paper” tab.
5)Click “Unprintable Area” button. 6)Select “Inches” as units.
7)Increase the value of “Top” to 0.18 if you are using Letter size paper.
(If you are using A4 size paper, this problem does not occur.)
8)Click “OK” button.
9)Select “Device Options” tab. 10)Select “Ouptut” tab.
11)Select “1200x1200” as “Resolution” 12)Click “Upd ate” button.
13)Click “OK” button. 14)Open WordPerfect file and print.
Or edit KX-P8420 PPD file (¥Windows¥system¥Pakx2010.ppd) as follows.
*DefaultResolution: 1200x1200dpi -> *DefaultRe solution: 600x600dpi
*ImageableArea Letter/Letter: "10.32 12.00 601.6 8 780.00" ->
*ImageableArea Letter/Letter: "10.32 15.9 601.68 776.22"
By doing these, troublshooting can be done without changing the settings of “Properties” although we are not fully
aware of the possible side effects caused by this modification.
So if a trouble happens after modifying PPD files, restore PPD file to the original one .
The original one is located under CD-ROM at the following directory if you are using English version of the driver.
¥ENGLISH¥PRNTDRVR¥DISK1¥PAKX2010.PPD
Trouble: KX-P8420 cannot print correctly Office97 files including rectangle and oval patterns created using
the buttons in Drawing tool bar when these patterns are specified as “Semitransparent” in “Format
Autoshape” menu. The overwritten area is not “Semitransparent”, but fully overwriteen when a pattern
overwrites on another pattern.
Corrective Action:
1)Select Start menu->Settings->Printers. 2)Select the icon “Panasonic KX-P8420”.
3)Click Right mouse button and select “Properties”. 4)Select “Paper” tab.
5)Click “Unprintable Area” b utton. 6)Select “Inches” as units.
7)Increase the value of “Top” to 0.18 if you are using Letter size paper.
(If you are using A4 size paper, this problem does not occur.)
8)Click “OK” button.
Page 89

9)Click “Update” button.10)Click “OK” button. 11)Open the file a nd print.
Or edit KX-P8420 PPD file (¥Windows¥system¥Pakx2010.ppd) as follow.
*DefaultResolution: 1200x1200dpi -> *DefaultRe solution: 600x600dpi
By doing this, troublshooting can be done without changing the settings of “Properties” although we are not fully
aware of the possible side effects caused by this modification.
So if a trouble happens after modifying PPD files, restore PPD file to the original one .
The original one is located under CD-ROM at the following directory if you are using English version of the driver.
¥ENGLISH¥PRNTDRVR¥DISK1¥PAKX2010.PPD
Page 90

10. KX-P8420 related miscellaneous topics
1.PostScript3 support
KX-P8420 supports Adobe genuine PostScript3 interpreter in its RIP board and also comes with AdobePS driver for
Windows3.1, Window s95 and Macintosh Platf orm and Microsoft PS driver f or Windo wsNT4.0. By using these drivers,
the customers can utilize the versatile PostScript features.
1)PostS cript Advantages
(1)Multi-platfrom support.
KX-P8420 can be used for printing not only from the platfor ms mentioned above and also from Unix platfor m if the
application that can export the file to ps format is installed.
(2)Low ove rhe ad.
Compared to GDI based color printer, PS printer requires much less host resources such as RAM size, virtual
memory because the most of the rasterizing job is done by the interpreter on the printer side and therefore the
amount of data sent to the printer from host has much less volume.
(3)Versality.
PostScript printing is suitable from lowend color printer segment to high end DTP, Graphic segment.
(4)PS font
Industrial standard PostS cript font(Type1) font is available with PostScript printer.
2)What is supported in PostScript level3 with KX-P8420.
(1)Smooth shading.
The smooth shading operator simplifies the process required to create a “gradient fill” and also can avoid the
unexpected “band” shown when gradient pattern is printed with older version PostScript interpreter.
(2)Masked Image
By using masked image operator, more complicated composite image that combines an element from one image
with a second image can be printed whereas older version PostScript interpreter often causes a “limitcheck” error.
(3)136 font support
Instead of the 35 fonts that is standard for oler version P ostScript devices, 136 embedd ed fonts are supported.
The purpose of new font sets is not only to provide customers with a broader typeface selection, but also to improve
system performance by minimizing font downloading. KX-P8420 also comes with all ATM fonts that corresponds to
embedded 136 fonts to let customers have true WYSIWIG PC environment.
(4)Idiom recognition
Idiom recognition is a feature which translates the complicated sets of PS commands into simple sets of high
performance commands. For instance, older version of graphic applications may send a many small bands data to
print gradient fill pattern. PostScript3 interpreter will translate them into smooth shading command which leads to
more efficient printing.
2)PS error print
Application -> PS driver + PPD file -> PS file -> PS interpreter -> Video Data
When PostScript interpreter inside the RIP board cannot handle all incoming PS file with a certain reason, it prints a
Page 91

page called PS Error print instead of Application file.
When this happens, check the following.
1)Check if correct Printer driver and PPD file is used.
2)If ps file is directly sent to the printer without using printer driver, check if ps file is damaged or not.
3)If data is very complicated, the additional memory may be required.
4)Check data transmission. For example, if you print using LPT port, check the cable connection.
5)Check fonts used in the file. If you find a font that is not found both in the system or printer, replace to the other
available fonts.
If you want to know more information about PS Error print.
1)Check Adobe homepage. It lists the various information about not only PS Error Print, but also many helpful
information about PS printer.
2)Check readme file provided by Adobe that is included “KX-P8420 Driver/Utility CD-ROM”.
2.Local print, Test
The paper size that can be used for local print such as Test Pr int, Configuration print, font list, Bias adjustment
pattern depends on the default paper size set in the factor y. For example, A4 is set as a default paper size in the
factory for KX-P8420 shipped to Europe. In this case, local print can only be printed with A4 cassette and if Letter
cassette is inserted, “Load A4 cassette” error is shown. These local print patter ns except Bias adjustment pattern
can be printed from Test Page menu of Front panel menu. Refer to the manual for detailed operation.
3.Supplementary to Front panel menu.
1)Power Saver mode.
KX-P8420 supports Power saver mode and enter this mode if the printer has no access such as following action for
more than 30 minutes.
(1)Print data
(2)Front panel
(3)Open/Close door, Cassette install,Remove
Or other customer intervention to the printer.
KX-P8420 exits this mode when printer is accessed in the ways mentioned above.
Power Saver mode can be enabled/disabled through the EnergyStar menu of Front Panel menu. At default Power
Saver mode is On.
2)Language selection.
KX-P8420 supports 5 languages for messages and user mode menu items shown on front panel. Language can be
switched through the language men u of Front panel menu. The default language has been co nfigu red to the suitable
one depending on the region shipped to in the f acto ry.
3)Reset Queue
Execute reset queue menus delete all the remaining jobs on each queue(Print,Pritned,Hold,Check&Print) and job
log.
Page 92

4.LCD error message “TEST FAILED/UP/DOWN CANCEL”.
KX-P8420 executes diagnostic process every time the printer is turned on to check if H/W has no problem.
If KX-P8420 shows this messages after turning on the printer, please check the following.
1)Press Cancel key. Printer starts initializing process. If not finished initializing and “Ready” is not shown on LCD, try
to turn off/on the printer again.
2)If same error message is shown again, press continue key. This shows printer error ID number.
(1)If error code no is one of the following codes, 0x1820,0x1821,0x1822,0x1823,0x1824,0x1825, the DIMM ROM
located on the 2
nd
slot labeled “J1” on KX-P8420 RIP board is likely to be broken. Replace the DIMM ROM with
another KX-P8420 DIMM ROM.
(2) If error code no is one of the following codes, 0x1811, 0x1812, 0x1813, 0x1814, 0x1815, 0x1816, 0x1817,
0x1818, 0x1819 the Flash ROM labeled “U33” on KX-P8420 RIP board is likely to be broken. Because this Flash
ROM itself is not a service part that can be replaced with another one, the RIP board has to be replaced.
(3) If error code no is one of the following codes, 0x300,0x301,0x302, the DIMM RAM located on the DIMM slot on
KX-P8420 RIP board is likely to be broken. Replace the DIMM RAM with another KX-P8420 DIMM RAM.
(4)If error code no is one of the following codes, 0x1001,0x1002,0x1003, there is something wrong with HDD or
HDD connection. Confir m the HDD cable is fixed firmly. Or replace the HDD cable with another one. If the problem
still persists, replace HDD with another one.
(5)If error code no is one of the following codes, 0x400, 0x401, 0x2001-0x2011, there is something wrong with
Ethernet card or Ethernet connection with PCI bus. Confirm the card is fixed to PCI bus socket firmly. If the problem
still persists, replace Ethernet card with another one.
5.When RIP board is replaced.
When KX-P8420 RIP board is replaced, the following information stored on the damaged RIP board cannot be
retrieved.
1)Panel settings incl udin g Network settings such as IP address, subnet mask, etc.
The customer has to configure again.
2)Default paper size, Language.
Default paper siz e and Languag e should be co nfigured beforehand by using Service mode menu. Plea se ref er to the
Service manual for the operation.
3)Pixel counter v alues
The pixel counter values of each toner cartr idge are stored on the Flash ROM on the RIP board and this values
cannot be modified. So after the replacement of the RIP board, the values related to toner cartridges shown on the
front panel maintenance menu or Image Area menu become incorrect until toner cartridge replacement. Toner
warning or replace error can be shown correctly because these errors can be detected by the sensor without being
affected by pixel counter values.
4)Color settings.
The customer has to configure these settings by using front panel Bias Adjustment menu or Visual Calib/Color
Adjustment menu if they have used these menus to calibrate color output.
Page 93

6.HDD trouble
Turning off the printer while RIP board is accessing its HDD drive might damage the HDD. This happens just after
printing is finished or when WebTools are accessed or network printing is being executed.
If HDD is damaged, sometimes printer keep showing “Initializing” and doe s not be co me “Ready” statsu.
When this happen, HDD unit has to be replaced.
7.Service mode menu
The followings are the caution for using KX-P8420 service mode that are not included in the KX-P8420 Ser vice
manual. Please refer to the manual for the detailed operation or other information.
1st level 2nd level 3rd level Note
(1) Display
Information
(2) Engine
Test
Display Tray
Status
Print T est
Sensor
Group B
Misc.
Components
Standard T r ay
Option 1 Tray
Option 2 Tray
Service Print 1
Service Print 2
Cyan Toner Cartridge
Magenta T oner Cartridge
Yellow Toner Cartridge
BlaToner Cartridge
Option Access Door
Charge Unit
Transfer Roller Solenoid
It shows a kind of casstte (Letter,Legal,..) which is inser ted into the
specific tray.But the display is not updated after replacing cassette
to another type while showing cassette type. You have to exit and
enter this menu again to show the type of replaced cassette
correctly.
Though “Printing” is not shown on LCD, service printing starts by
pressing Enter key. “Service Print1” uses default paper size (Letter
or A4 depending on the region). “Service Print2” uses Legal size
paper. Before executing service print1 or print2, insert the
corresponding cassette. Otherwise,Error LED blinks and Service
Print does not start.
Because of toner sensor characteristics, the status of toner
cartr idge sensor is unstable if the toner car tridge is removed. So
entering this menu shows “Installed” and “Removed” alternately. If
the toner cartridg e is installed, it keeps showing “Installed”.
The status shown here is the opposite of the actual sensor status.
So if the real staus is “Opened”, LCD shows “Closed”. If the real
status is “Closed”, LCD shows “Opened”.
It always shows “Installed”. But the printer always check to see
whether charger is installed correctly or not during initializing
process after turned on the printer normally . If the charger unit is not
installed, “Charger Not installed” is shown on LCD. So charger unit
sensor is tested without using this menu.
When exiting this menu by pressing Enter key, the location of
transfer roller may not retur n to “removed” position. So please turn
off and turn the printer again after executing this menu.
Page 94

8.Useful homepages
8.1 Adobe driver homepage
You can downloa d the latest Ado be PS driver from Adobe site.
You also can get the v arious information related to the Adobe products including PostScript printer.
http://www.adobe.com/
8.2 Panasonic KX-P8420 homepage.
By linking to Panasonic KX-P842 0 homepage you can get the various information related to this product.
(Specification, Troubleshooting, FAQ )
http://www.kme.panasonic.co.jp/saga/color_printer/p8420_link.html
Page 95

Appendix A
How to enable Java setting in Internet Explorer ver5.0.
Trouble:
WebSetup cannot be activated showing below message when you are using Internet Explorer ver5.0
Possible Cause:
Java setting is not enabled. (At default it is set as “Run in sandbox” that prohibits WebSetup operation.)
Corrective Action:
1.Select Tools/Internet Options menu.
2.Select Security Tab.
3.Click “Custom Level...” button.
4.When “Security Settings” dialog appears, find “Java” setting and select “Custom”.
5.Click “Java Custome Settings...” button.
6.Select “Enable” as “Run Unsigned Content”.
7.Click OK 8.Click OK 9.Click OK
 Loading...