

Page 1
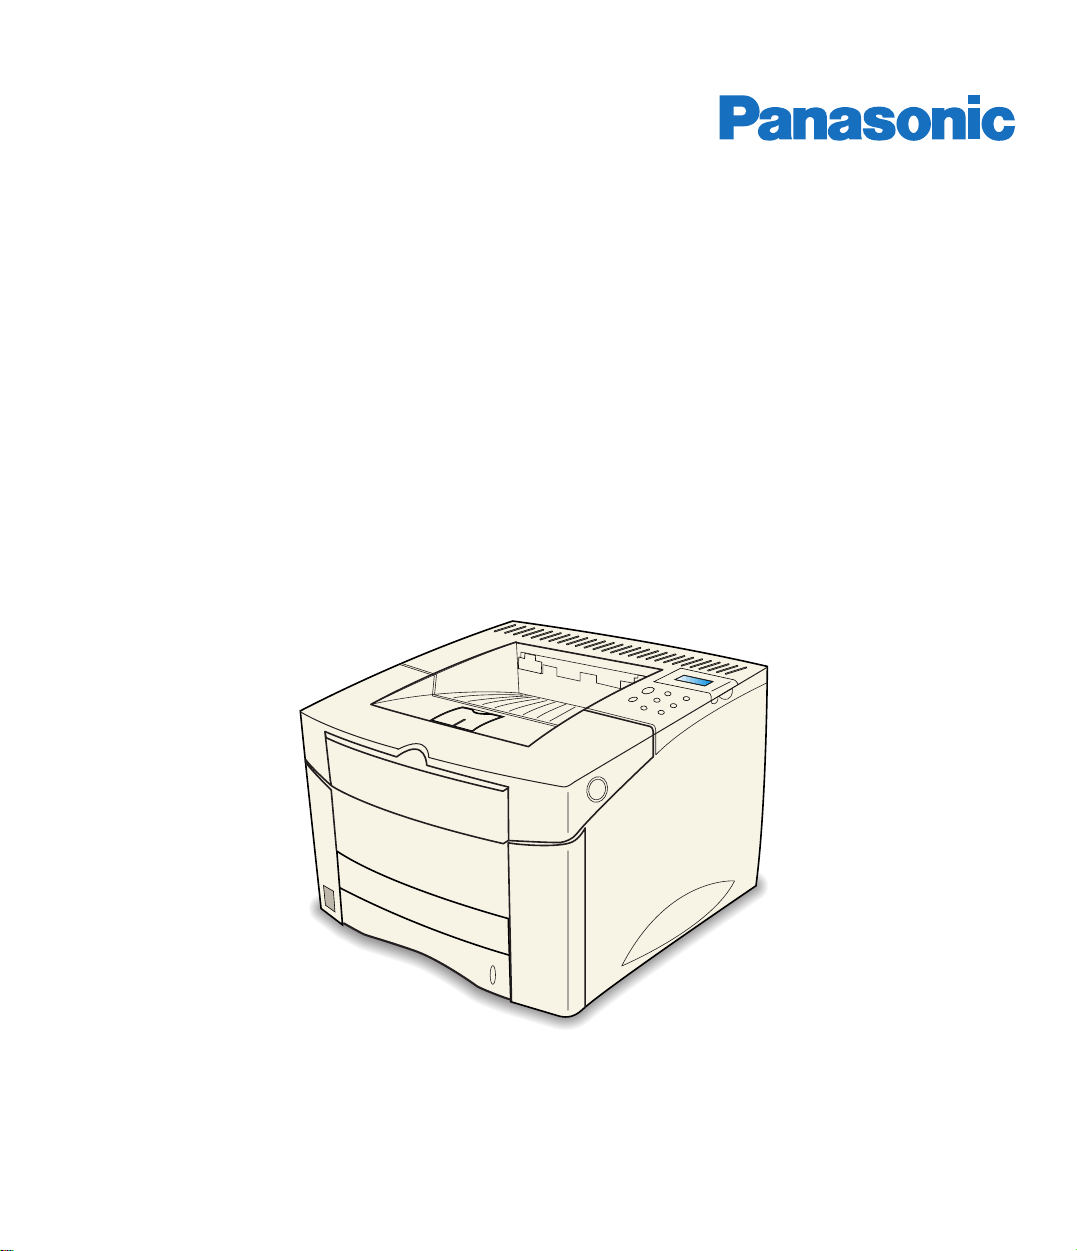
Laser Printer
Operating Instructions
KX-P7510
Model No. KX-P7500
≥ This manual describes for the Panasonic KX-P7500/KX-P7510 with Network Card KX-PNB2 Laser Printer.
≥ Please carefully read the Operating Instructions and the KX-PNB2 User’s Guide before operating.
Keep this CD-ROM in the protective case.
Do not expose the CD-ROM to direct sunlight or extreme heat and do not scratch or smudge the surface
of the CD-ROM.
Page 2
Thank you for purchasing the Panasonic Laser Printer.
2
KX-P7500
KX-P7510
The serial number is located on the label on the rear of the unit. For your convenience, record the
number below and keep this book along with your proof of purchase, in the event of a theft or for
future reference.
MODEL NO. NAME OF RESELLER
SERIAL NO. DATE OF PURCHASE
•
PostScript is a trademark of Adobe Systems Incorporated.
•
Apple, AppleTalk, LocalTalk, LaserWriter, Macintosh, and TrueType are registered trademarks of Apple
Computer, Inc.
•
IBM is a trademark of International Business Machines Corporation.
•
SunOS, Solaris and Java are trademarks or registered trademarks of Sun Microsystems, Inc. in the United
States and other countries.
•
Netscape and Netscape Navigator are trademarks of Netscape Communications Corporation.
•
NetWare®, Novell®, IPX and SPX are trademarks or registered trademarks of Novell, Inc.
•
Times and Helvetica are trademarks of Linotype-Hell AG and/or its subsidiaries.
•
UNIX is a trademark of X/Open Company, Ltd.
•
Microsoft, MS-DOS, Windows and Windows NT are either registered trademarks or trademarks of
Microsoft Corporation in the United States and/or other countries.
Centronics is a trademark of Centronics Data Computer Corporation.
•
•
Avery is a registered trademark and all Avery codes are trademarks of Avery Dennison Corporation.
•
Pentium is a registered trademark of Intel Corporation.
•
PCL is a trademark of Hewlett-Packard Company.
•
PowerPage is a registered trademark of Electronics For Imaging, Inc.
All other acknowledgments are trademarks or registered trademarks of their respective holders.
•
The KX-P7500 comes standard with 20 MB RAM and one 500-sheet cassette.
•
•
The KX-P7510 comes standard with network card (KX-PNB2). Install the network
utilities (Network Setup Tool) for network printing.
As an E
the E
(E
NERGY STAR
NERGY STAR
NERGY STAR
® Partner, Panasonic has determined that this product meets
® guidelines for energy efficiency.
is a U.S. registered mark.)
Screen shots reprinted with permission from Microsoft Corporation.
Acrobat® Reader copyright ©1987-1999 Adobe Systems Incorporated. All rights reserved.
The instructions are subject to change without notice.
© Kyushu Matsushita Electric Co., Ltd. 2000
Page 3

3
FOR USERS IN UNITED STATES
This equipment has been tested and found to comply with the limits for a Class B digital de vice , pursuant
to Part 15 of the FCC Rules. These limits are designed to provide reasonable protection against harmful
interference in a residential installation.
This equipment generates, uses, and can radiate radio frequency energy and, if not installed and used in
accordance with the instructions, may cause harmful interference to radio communications.
However, there is no guarantee that interference will not occur in a particular installation. If this
equipment does cause harmful interference to radio or television reception, which can be determined by
turning the equipment off and on, the user is encouraged to try to correct the interference by one or more
of the following measures:
•
Reorient or relocate the receiving antenna.
•
Increase the separation between the equipment and receiver.
Connect the equipment into an outlet on a circuit different from that to which the receiver is connected.
•
•
Consult the dealer or an experienced radio/TV technician for help.
The user may find the booklet “Something About Interference” available from FCC local regional offices
helpful.
FCC Warning:
recommended shielded interfacing cable when connecting to a host computer. Also, any unauthorized
changes or modifications to this equipment would void the user’s authority to operate this device.
If you have read this manual and tried the troubleshooting procedures and you are still having difficulty,
please contact the reseller from which the unit was purchased. You may also call the end user technical
support telephone number which is operational during East Coast business hours (9:00 AM to 7:00 PM).
The end user technical support number is 1-800-PANASYS.
This number is available within the U.S. only.
To assure continued FCC emission limit compliance, the user must use the
Technical Support Calls
Helpful Phone Numbers
To locate your nearest sales dealer CALL 1-800-742-8086
To order consumables CALL 1-800-833-9626
To order operating instructions/CD’s CALL 1-800-833-9626
To locate your nearest authorized service center CALL 1-800-726-2797
For technical support CALL 1-800-PANASYS
Automated 24-hour support via Fax back CALL 1-800-PANASYS
World Wide Web Technical & Driver Support http://www.panasonic.com/
office/printer
Page 4

4
End-user license agreement
THIS IS A LEGAL AGREEMENT BETWEEN YOU AND PANASONIC. CAREFULLY READ ALL THE TERMS
AND CONDITIONS OF THIS AGREEMENT PRIOR TO OPENING THE PACKET OF SOFTWARE
PROGRAM. OPENING THE PACKET INDICATES YOUR ACCEPTANCE OF THESE TERMS AND
CONDITIONS. If you do not agree to these terms and conditions, return the unopened packet and the other
components of the Panasonic product to the place of purchase and your money will be refunded. No refunds
will be given for the products that have an opened packet or missing components.
1. COPYRIGHT:
Panasonic has the right to license or has been granted to license the enclosed Software Program
(“SOFTWARE”), developed and copyrighted by Kyushu Matsushita Electric Co., Ltd. or its licensor
(“Licensor”). You acknowledge that you are receiving only a LIMITED LICENSE TO USE the SOFTWARE
and related documentation, and that you shall obtain no title, ownership nor any other rights in or to the
SOFTWARE and related documentation, all of which title and rights shall remain with Licensor and
Panasonic.
2. LICENSE:
(1) You have the non-exclusive rights to use the SOFTWARE on your computer. (2) If you wish to use the
SOFTWARE in your network, you may install the SOFTWARE into a network server and/or its clients and
use the copies of SOFTWARE in your network. (3) You may make reasonable quantities of copies of the
SOFTWARE solely f or bac kup or archiv al purposes. (4) You may not rent or lease the SOFTW ARE, b ut y ou
may transf er y our right under this License Agreement on a permanent basis, provided that y ou transfer this
Agreement, all copies of the SOFTWARE, all related documentation and your Panasonic product, and the
recipient thereof agrees to the terms of this Agreement. (5) You may not reverse engineer, decompile or
disassemble the SOFTWARE, except that in European Union and European Free Trade Association, you
may have the limited right to reverse engineer, decompile or disassemble the SOFTWARE solely to the
extent specifically permitted by the terms and conditions of Article 6 of the European Community’s Directive
for the Legal Protection of Computer Programs, OJL 122/42 (17 May 1991). (6) You may not use, copy,
modify, alter or transfer the SOFTWARE, any cop y thereof or its related documentation, in whole or in part,
except as expressly provided in this Agreement.
3. TERM:
This license is effective until terminated. You may terminate this Agreement at any time by destroying the
SOFTWARE and related documentation and all copies thereof. This license will also terminate if you fail to
comply with any term or condition of this Agreement. Upon such termination, you agree to destroy all
copies of the SOFTWARE and related documentation.
Page 5

4. LIMITED WARRANTY:
Within ninety (90) days of your receipt of the SOFTWARE, Panasonic warrants that the storage media on
which the SOFTWARE are furnished is free from defect in materials and workmanship under normal use,
and that it will repair or at its option replace any defective media at no charge to you, provided that such
defective media is returned to Panasonic within such ninety (90) days period.
5. LIMITATION OF LIABILITY:
EXCEPT AS STATED ABOVE, NEITHER PANASONIC NOR PANASONIC’S SUPPLIER MAKES OR
PASSES ON TO YOU OR OTHER THIRD PARTY, ANY WARRANTY OR REPRESENTATION INCLUDING,
BUT NOT LIMITED TO, THE IMPLIED WARRANTY OF MERCHANTABILITY AND FITNESS FOR A
PARTICULAR PURPOSE. WITHOUT LIMITING THE GENERALITY OF THE FOREGOING, NEITHER
PANASONIC NOR PANASONIC’S SUPPLIER WARRANTS THAT THE SOFTWARE WILL BE ERRORFREE OR THAT IT WILL MEET YOUR REQUIREMENTS. NEITHER PANASONIC NOR PANASONIC’S
SUPPLIER SHALL BE LIABLE FOR ANY DAMAGE SUFFERED BY YOU INCLUDING, BUT NOT
LIMITED TO, CONSEQUENTIAL, INCIDENTAL SPECIAL OR PUNITIVE DAMAGES. THE ABOVE
LIMITATIONS SHALL APPLY REGARDLESS OF THE FORM OF ACTION WHETHER IN CONTRACT,
TORT (INCLUDING NEGLIGENCE), STRICT PRODUCT LIABILITY OR OTHERWISE, EVEN IF SUCH
PARTY HAS BEEN ADVISED OF THE POSSIBILITY OF SUCH DAMAGES.
5
Page 6

Contents
6
End-user license agreement . . . . . . . . . . . . . . . . . . . . . . . . . . . .4
For your safety . . . . . . . . . . . . . . . . . . . . . . . . . . . . . . . . . . . . . .10
General . . . . . . . . . . . . . . . . . . . . . . . . . . . . . . . . . . . . . . . . . . . . . . . . . . . . 10
Power source . . . . . . . . . . . . . . . . . . . . . . . . . . . . . . . . . . . . . . . . . . . . . . .10
Laser safety. . . . . . . . . . . . . . . . . . . . . . . . . . . . . . . . . . . . . . . . . . . . . . . . .10
Ozone release. . . . . . . . . . . . . . . . . . . . . . . . . . . . . . . . . . . . . . . . . . . . . . .11
Moving the unit . . . . . . . . . . . . . . . . . . . . . . . . . . . . . . . . . . . . . . . . . . . . . .11
Caution labels . . . . . . . . . . . . . . . . . . . . . . . . . . . . . . . . . . . . . . . . . . . . . . . 11
Chapter 1
Before You
Start
Cautions. . . . . . . . . . . . . . . . . . . . . . . . . . . . . . . . . . . . . . . . . . . .15
CD-ROM . . . . . . . . . . . . . . . . . . . . . . . . . . . . . . . . . . . . . . . . . . . . . . . . . . . 16
Static electricity damage . . . . . . . . . . . . . . . . . . . . . . . . . . . . . . . . . . . . . . .16
Interface cable. . . . . . . . . . . . . . . . . . . . . . . . . . . . . . . . . . . . . . . . . . . . . . .17
Waste disposal method. . . . . . . . . . . . . . . . . . . . . . . . . . . . . . . . . . . . . . . .17
Features of the KX-P7500 Series. . . . . . . . . . . . . . . . . . . . . . . .17
Model description . . . . . . . . . . . . . . . . . . . . . . . . . . . . . . . . . . . . . . . . . . . . 17
High quality . . . . . . . . . . . . . . . . . . . . . . . . . . . . . . . . . . . . . . . . . . . . . . . . . 17
High speed . . . . . . . . . . . . . . . . . . . . . . . . . . . . . . . . . . . . . . . . . . . . . . . . . 17
Easy operation . . . . . . . . . . . . . . . . . . . . . . . . . . . . . . . . . . . . . . . . . . . . . .17
Networking capability (for KX-P7510) . . . . . . . . . . . . . . . . . . . . . . . . . . . . .18
Local port. . . . . . . . . . . . . . . . . . . . . . . . . . . . . . . . . . . . . . . . . . . . . . . . . . . 18
Other functions . . . . . . . . . . . . . . . . . . . . . . . . . . . . . . . . . . . . . . . . . . . . . .18
System requirements . . . . . . . . . . . . . . . . . . . . . . . . . . . . . . . . .19
With a Windows computer. . . . . . . . . . . . . . . . . . . . . . . . . . . . . . . . . . . . . . 19
With a Macintosh computer. . . . . . . . . . . . . . . . . . . . . . . . . . . . . . . . . . . . .19
Minimum space requirements . . . . . . . . . . . . . . . . . . . . . . . . . .20
Power source. . . . . . . . . . . . . . . . . . . . . . . . . . . . . . . . . . . . . . . .20
Unpacking . . . . . . . . . . . . . . . . . . . . . . . . . . . . . . . . . . . . . . . . . .21
Front side view . . . . . . . . . . . . . . . . . . . . . . . . . . . . . . . . . . . . . . . . . . . . . . 22
Rear side view. . . . . . . . . . . . . . . . . . . . . . . . . . . . . . . . . . . . . . . . . . . . . . .22
Overview of the operator panel . . . . . . . . . . . . . . . . . . . . . . . . .23
Operator panel buttons . . . . . . . . . . . . . . . . . . . . . . . . . . . . . . . . . . . . . . . . 24
Operator panel display . . . . . . . . . . . . . . . . . . . . . . . . . . . . . . . . . . . . . . . . 24
Page 7

Chapter 2
Setting up
the Printer
Contents
7
Preparing the printer. . . . . . . . . . . . . . . . . . . . . . . . . . . . . . . . . .26
Installing the toner cartridge . . . . . . . . . . . . . . . . . . . . . . . . . . .28
Loading media. . . . . . . . . . . . . . . . . . . . . . . . . . . . . . . . . . . . . . .30
About media . . . . . . . . . . . . . . . . . . . . . . . . . . . . . . . . . . . . . . . . . . . . . . . . 30
Loading paper in the 1st cassette . . . . . . . . . . . . . . . . . . . . . . . . . . . . . . . . 31
Loading paper in the MP (Multi-Purpose) tray. . . . . . . . . . . . . . . . . . . . . . . 36
Loading transparencies in the MP tray . . . . . . . . . . . . . . . . . . . . . . . . . . . .38
Loading envelopes in the MP tray. . . . . . . . . . . . . . . . . . . . . . . . . . . . . . . .39
Loading labels in the MP tray . . . . . . . . . . . . . . . . . . . . . . . . . . . . . . . . . . .41
Connecting the printer . . . . . . . . . . . . . . . . . . . . . . . . . . . . . . . .42
Using a parallel interface cable . . . . . . . . . . . . . . . . . . . . . . . . . . . . . . . . . . 42
Using a network cable. . . . . . . . . . . . . . . . . . . . . . . . . . . . . . . . . . . . . . . . .44
Connecting the power cord and power on . . . . . . . . . . . . . . . .45
Printing the test page from the operator panel . . . . . . . . . . . .46
Chapter 3
Installing
Software for
Windows
Chapter 4
Using the
Printer
Installing the printer driver (PCL Printer Driver) . . . . . . . . . . .49
Installing the printer driver for Windows 95/Windows 98/
Windows NT 4.0 . . . . . . . . . . . . . . . . . . . . . . . . . . . . . . . . . . . . . . . . . . . . 49
Installing the printer driver for Windows 3.1 . . . . . . . . . . . . . . . . . . . . . . . . 53
Installing the additional software . . . . . . . . . . . . . . . . . . . . . . .53
Installing the Status Display for Windows 95/Windows 98 . . . . . . . . . . . . .53
Installing the PostScript driver for Windows . . . . . . . . . . . . . .55
Installing the PostScript driver for Windows 95/Windows 98 . . . . . . . . . . . 55
Installing the PostScript driver for Windows NT 4.0 . . . . . . . . . . . . . . . . . . 61
Removing the KX-P7500 Series software. . . . . . . . . . . . . . . . .69
Using the operator panel . . . . . . . . . . . . . . . . . . . . . . . . . . . . . .72
Operator panel menus. . . . . . . . . . . . . . . . . . . . . . . . . . . . . . . . . . . . . . . . . 72
Changing printer settings . . . . . . . . . . . . . . . . . . . . . . . . . . . . . . . . . . . . . . 72
Overview of the printer menus . . . . . . . . . . . . . . . . . . . . . . . . . . . . . . . . . . 73
PRINTING MENU . . . . . . . . . . . . . . . . . . . . . . . . . . . . . . . . . . . . . . . . . . . . 75
CONFIG MENU. . . . . . . . . . . . . . . . . . . . . . . . . . . . . . . . . . . . . . . . . . . . . .79
JOB MENU . . . . . . . . . . . . . . . . . . . . . . . . . . . . . . . . . . . . . . . . . . . . . . . . .81
TEST MENU . . . . . . . . . . . . . . . . . . . . . . . . . . . . . . . . . . . . . . . . . . . . . . . . 83
I/O MENU . . . . . . . . . . . . . . . . . . . . . . . . . . . . . . . . . . . . . . . . . . . . . . . . . .84
PCL MENU . . . . . . . . . . . . . . . . . . . . . . . . . . . . . . . . . . . . . . . . . . . . . . . . .84
PS II MENU. . . . . . . . . . . . . . . . . . . . . . . . . . . . . . . . . . . . . . . . . . . . . . . . .86
Using the printer driver (PCL Printer Driver) . . . . . . . . . . . . . .87
Displaying the KX-P7500 Series properties windows . . . . . . . . . . . . . . . . . 87
Using the KX-P7500 Series printer driver . . . . . . . . . . . . . . . . . . . . . . . . . . 90
Overlay printing . . . . . . . . . . . . . . . . . . . . . . . . . . . . . . . . . . . . . . . . . . . . . . 95
Page 8

Contents
8
Chapter 4
Using the
Printer
Chapter 5
Care and
Maintenance
Manual Feed printing from MP tray. . . . . . . . . . . . . . . . . . . . . .98
Both side (Duplex) printing . . . . . . . . . . . . . . . . . . . . . . . . . . . .99
Menu setting procedure. . . . . . . . . . . . . . . . . . . . . . . . . . . . . . . . . . . . . . . . 99
Paper orientation for printing both sides of paper . . . . . . . . . . . . . . . . . . .100
Printing . . . . . . . . . . . . . . . . . . . . . . . . . . . . . . . . . . . . . . . . . . . . . . . . . . . 101
Maintaining the toner cartridge . . . . . . . . . . . . . . . . . . . . . . . .103
Toner cartridge life . . . . . . . . . . . . . . . . . . . . . . . . . . . . . . . . . . . . . . . . . .103
Distributing the toner . . . . . . . . . . . . . . . . . . . . . . . . . . . . . . . . . . . . . . . . . 103
Cleaning the printer . . . . . . . . . . . . . . . . . . . . . . . . . . . . . . . . .105
Cleaning the main unit. . . . . . . . . . . . . . . . . . . . . . . . . . . . . . . . . . . . . . . . 106
Cleaning LSU (Laser Scanning Unit) . . . . . . . . . . . . . . . . . . . . . . . . . . . .108
Clearing paper jams . . . . . . . . . . . . . . . . . . . . . . . . . . . . . . . . .109
Troubleshooting . . . . . . . . . . . . . . . . . . . . . . . . . . . . . . . . . . . .123
General printing problems. . . . . . . . . . . . . . . . . . . . . . . . . . . . . . . . . . . . .123
Poor print quality . . . . . . . . . . . . . . . . . . . . . . . . . . . . . . . . . . . . . . . . . . . .123
Macintosh problems . . . . . . . . . . . . . . . . . . . . . . . . . . . . . . . . . . . . . . . . . 125
PS (PostScript) problems . . . . . . . . . . . . . . . . . . . . . . . . . . . . . . . . . . . . .125
Operator panel messages . . . . . . . . . . . . . . . . . . . . . . . . . . . .126
Status messages. . . . . . . . . . . . . . . . . . . . . . . . . . . . . . . . . . . . . . . . . . . .126
Error messages. . . . . . . . . . . . . . . . . . . . . . . . . . . . . . . . . . . . . . . . . . . . .127
Repacking . . . . . . . . . . . . . . . . . . . . . . . . . . . . . . . . . . . . . . . . .130
Chapter 6
Options
Upgrade options . . . . . . . . . . . . . . . . . . . . . . . . . . . . . . . . . . . .135
Removing and replacing the printer cover. . . . . . . . . . . . . . .136
Installing additional printer memory. . . . . . . . . . . . . . . . . . . .143
Installing DRAM SIMM . . . . . . . . . . . . . . . . . . . . . . . . . . . . . . . . . . . . . . . 144
Installing a PostScript SIMM . . . . . . . . . . . . . . . . . . . . . . . . . .148
Kit contents . . . . . . . . . . . . . . . . . . . . . . . . . . . . . . . . . . . . . . . . . . . . . . . . 148
Installing a PS SIMM. . . . . . . . . . . . . . . . . . . . . . . . . . . . . . . . . . . . . . . . .149
Installing a Network Card for Ethernet . . . . . . . . . . . . . . . . . .151
Kit contents . . . . . . . . . . . . . . . . . . . . . . . . . . . . . . . . . . . . . . . . . . . . . . . . 151
Installing an IrDA/RS-232C interface kit . . . . . . . . . . . . . . . . .154
Kit contents . . . . . . . . . . . . . . . . . . . . . . . . . . . . . . . . . . . . . . . . . . . . . . . . 155
Installing the 2nd feeder (500 pages) . . . . . . . . . . . . . . . . . . .159
Kit contents . . . . . . . . . . . . . . . . . . . . . . . . . . . . . . . . . . . . . . . . . . . . . . . . 160
Page 9

Chapter 7
For
Macintosh
User’s
Guide
Contents
9
Printing a document using PS Option in Macintosh. . . . . . .171
Removing the printer cover. . . . . . . . . . . . . . . . . . . . . . . . . . .172
Installing a PostScript SIMM . . . . . . . . . . . . . . . . . . . . . . . . . .175
Kit contents . . . . . . . . . . . . . . . . . . . . . . . . . . . . . . . . . . . . . . . . . . . . . . . .175
Installing PS SIMM . . . . . . . . . . . . . . . . . . . . . . . . . . . . . . . . . . . . . . . . . .175
Installing a Network Card for Ethernet . . . . . . . . . . . . . . . . . .177
Kit contents . . . . . . . . . . . . . . . . . . . . . . . . . . . . . . . . . . . . . . . . . . . . . . . .178
Installing a LocalTalk/RS-232C Interface Card. . . . . . . . . . . .180
Kit contents . . . . . . . . . . . . . . . . . . . . . . . . . . . . . . . . . . . . . . . . . . . . . . . .180
Replacing the printer cover . . . . . . . . . . . . . . . . . . . . . . . . . . .183
Connecting network cables (For Network Printing) . . . . . . .186
Connecting the LocalTalk cable . . . . . . . . . . . . . . . . . . . . . . .187
Installing software. . . . . . . . . . . . . . . . . . . . . . . . . . . . . . . . . . .188
Installing LaserWriter printer driver. . . . . . . . . . . . . . . . . . . . . . . . . . . . . .188
Installing the PS driver . . . . . . . . . . . . . . . . . . . . . . . . . . . . . . . . . . . . . . .188
Printing from Macintosh. . . . . . . . . . . . . . . . . . . . . . . . . . . . . .191
The Page Setup dialog box. . . . . . . . . . . . . . . . . . . . . . . . . . . . . . . . . . . .192
The Print dialog box . . . . . . . . . . . . . . . . . . . . . . . . . . . . . . . . . . . . . . . . .194
Appendix
Specifications . . . . . . . . . . . . . . . . . . . . . . . . . . . . . . . . . . . . . .198
Printer . . . . . . . . . . . . . . . . . . . . . . . . . . . . . . . . . . . . . . . . . . . . . . . . . . . .198
Media. . . . . . . . . . . . . . . . . . . . . . . . . . . . . . . . . . . . . . . . . . . . . . . . . . . . .199
Cable. . . . . . . . . . . . . . . . . . . . . . . . . . . . . . . . . . . . . . . . . . . . . . . . . . . . .208
Bi-directional parallel interface . . . . . . . . . . . . . . . . . . . . . . . . . . . . . . . . .209
Controller. . . . . . . . . . . . . . . . . . . . . . . . . . . . . . . . . . . . . . . . . . . . . . . . . .210
Font Name Corresponding Table . . . . . . . . . . . . . . . . . . . . . . . . . . . . . . .211
Index. . . . . . . . . . . . . . . . . . . . . . . . . . . . . . . . . . . . . . . . . . . . . .213
Page 10

For your safety
General
Warning
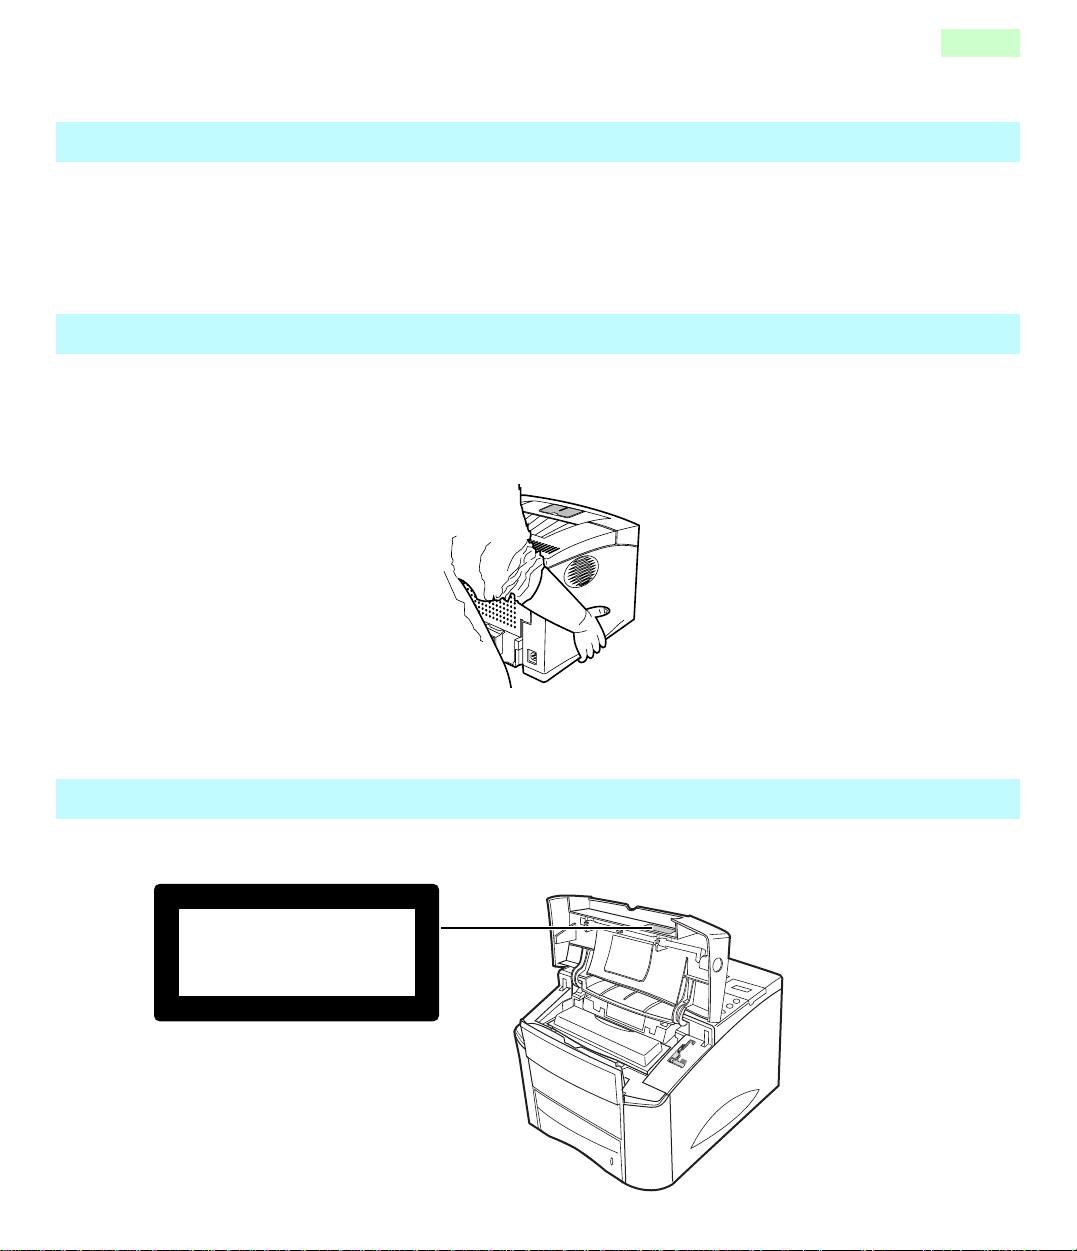
To prevent fire or shock hazard, do not expose this product to rain or any type of moisture.
•
Caution
•
Do not open covers and do not attempt to repair the unit yourself. Refer servicing to qualified
personnel.
Power source
Warning
•
The power source voltage of this unit is listed on the nameplate. Only plug the unit into an outlet
with the proper voltage.
•
When you operate this equipment, the outlet should be near the equipment and accessible.
To ensure safe operation the AC cord supplied must be inserted into standard three-prong AC
•
outlet which is effectively grounded (earthed) through the normal wiring.
The fact that the equipment operates satisfactorily does not imply that the power point is
•
grounded (earthed) and that the installation is completely safe. For your safety, if in any doubt
about the effective grounding (earthing) of the power point, consult a qualified electrician.
•
If the plug cannot be inserted into the AC outlet, contact a licensed electrician to replace the outlet
with a properly grounded (earthed) one. Do not defeat the purpose of the grounding (earthing)
plug (ex. do not use a conversion plug).
10
Laser safety
Caution
This printer utilizes a laser. Use of controls or adjustments or performance of procedures other
•
than those specified herein may result in hazardous radiation exposure.
Laser diode properties
Laser output : 5 mW max
Wavelength : 780 nm
Emission duration : Continuous
Page 11
Ozone release
Warning
•
Make sure that the printer is installed in a well ventilated room so as not to increase density of
ozone in the air. Since ozone is heavier than air, it is recommended that air at floor level be
ventilated.
Moving the unit
The printer weighs approximately 17 kg {37.4 lbs.}. The back of the printer should be facing you
when you move it. Turn the power off and remove the power cord when handling the unit.
11
Caution labels
(220–240 VAC equipment)
CLASS
KLASSE
CLASSE
CLASE
1 LASER PRODUCT
1 LASER PRODUKT
1 LASER PRODUIT
1 LÁSER PRODUCTO
Page 12

CAUTION : HOT SURFACE
ATTENTION : TEMPERATURE ELEVEE
VORSICHT : HEISS
PRECACION/ATTENZIONE : ALTA TEMPERATURA
12
Page 13
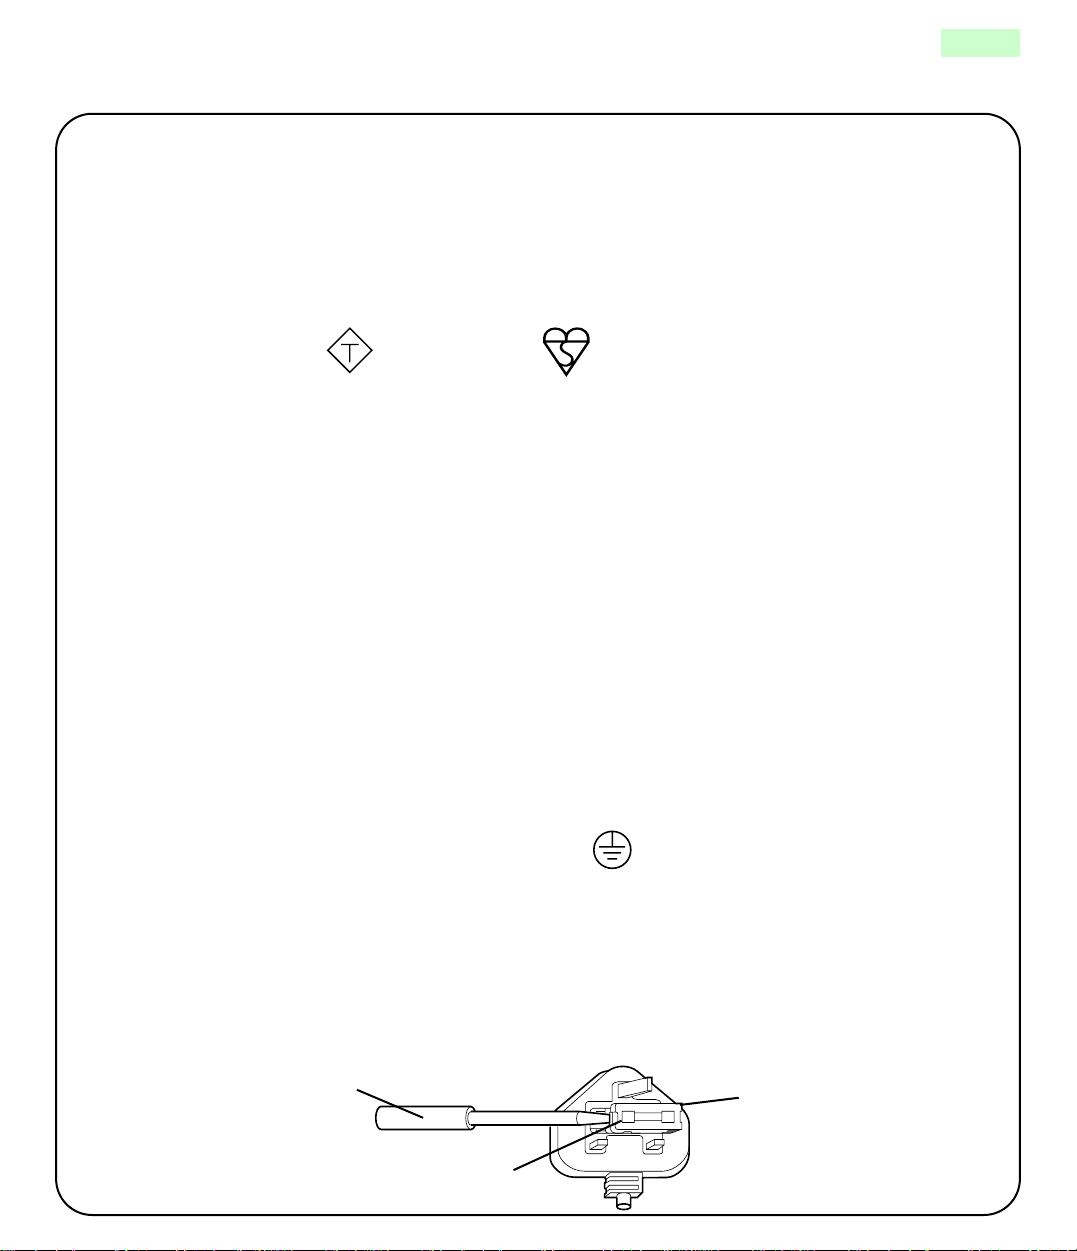
FOR USERS IN U.K.
IMPORTANT:
FOR YOUR SAFETY PLEASE READ THE FOLLOWING TEXT CAREFULLY
This printer is supplied with a moulded three pin mains plug each for your safety and convenience.
A 5 amp fuse is fitted in this plug. Should the fuse need to be replaced please ensure that the
replacement fuse has a rating of 5 amps and that it is approved by ASTA or BSI to BS 1362.
13
Check for the ASTA mark or the BSI mark on the body of the fuse.
If the plug contains a removable fuse cover you must ensure that it is refitted when the fuse is replaced.
If you lose the fuse cover the plug must not be used until a replacement cover is obtained.
A replacement fuse cover can be purchased from your local Panasonic Dealer.
IF THE FITTED MOULDED PLUG IS UNSUITABLE FOR THE SOCKET OUTLET IN YOUR HOME
THEN THE FUSE SHOULD BE REMOVED AND THE PLUG CUT OFF AND DISPOSED OF
SAFELY. THERE IS A DANGER OF SEVERE ELECTRICAL SHOCK IF THE CUT OFF PLUG IS
INSERTED INTO ANY 5 AMP SOCKET.
If a new plug is to be fitted please observe the wiring code as shown below.
If in any doubt please consult a qualified electrician.
WARNING:
IMPORTANT:
Green-and-Yellow:Earth Blue:Neutral Brown:Live
As the colours of the wire in the mains lead of this appliance may not correspond with the coloured
markings identifying the terminals in your plug, proceed as follows.
The wire which is coloured GREEN-AND-YELLOW must be connected to the terminal in the plug
which is marked with the letter E or by the Earth symbol , or coloured GREEN or GREEN-ANDYELLOW.
The wire which is coloured BLUE must be connected to the terminal in the plug which is marked with
the letter N or coloured BLACK.
THIS APPLIANCE MUST BE EARTHED.
The wires in this mains lead are coloured in accordance with the following code.
ASA
The wire which is coloured BROWN must be connected to the terminal in the plug which is marked with
the letter L or coloured RED.
How to replace the fuse:
SCREWDRIVER
Open the fuse compartment with a screwdriver and replace the fuse.
FUSE COVER
LN
FUSE
Page 14

Chapter 1
Before You Start
Before you set up your new printer, please read the following information.
14
Before You Start
“Cautions”
•
“Features of the KX-P7500 Series”
•
•
“System requirements”
“Minimum space requirements”
•
“Power source”
•
•
“Unpacking”
“Overview of the operator panel”
•
l page 15.
l page 19.
l page 20.
l page 21.
l page 17.
l page 20.
l page 23.
Page 15
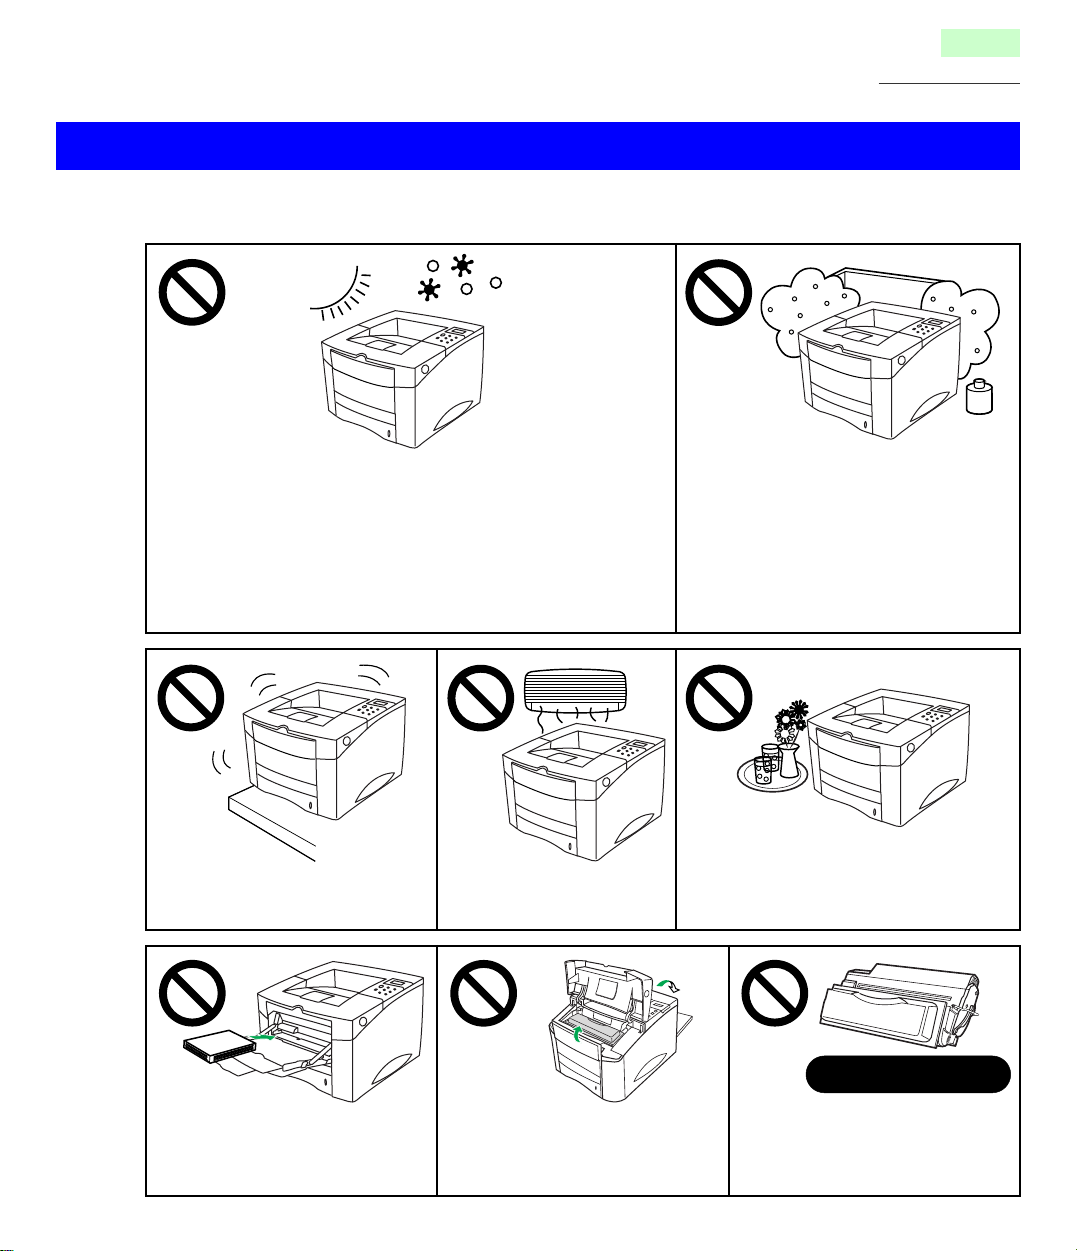
Cautions
To avoid problems, do not use the equipment under the following conditions:
15
Before You Start
• Direct exposure to sunlight
• Extremely high or low temperature
[temperature range: 10˚C to 32.5˚C (50˚F to 90.5˚F)]
• Extremely high or low humidity (humidity range: 30% to
80% RH)
• Condensation due to rapid change of temperature
\
• Unstable or unlevel surfaces
• Directly in front of air
conditioning vents
• Areas of poor ventilation
• Areas of high dust or chemical
fume concentration (solvent etc.)
• Do not keep liquids near the printer.
Accidental spills of liquid into the
printer can cause severe damage.
• Too much media/document
which exceeds the limit mark
on the guide of the tray.
• Top/Rear covers opened
while the printer is operating;
it may cause a media jam.
Not genuine toner
• Any toner other than genuine
Panasonic toner. It may
damage the printer.
Page 16

CD-ROM
To prevent accidental damage to the CD-ROM:
16
Before You Start
• Do not touch or write on the
surface of the disc.
• Do not place heavy objects on the disc case
or drop the case.
Static electricity damage
To prevent static electricity damage to any of the following components, touch a grounded metal
surface, such as the printer’s bare metal frame prior to touching the component.
• The interface connectors—parallel, network, RS-232C, LocalTalk, and IrDA
• Electrical components, connectors inside the printer, any components on the optional board
(network card*1, LocalTalk/RS-232C interface card, IrDA/RS-232C interface card or SIMMs)
• The connector pins on the 2nd feeder for the printer
• Do not leave the disc out of
the protective case.
• To clean the disc, hold the disc by its edges
and wipe it from the center to the edges with
a dry, soft cloth.
• Do not leave the disc in
direct sunlight or near heat
sources.
*1 Option for KX-P7500.
Page 17

Interface cable
Always use a shielded cable. Use of an unshielded cable can result in radio interference with data.
Waste disposal method
Waste material may be dumped or incinerated under conditions which meet national and local
environmental regulations.
Features of the KX-P7500 Series
The KX-P7500 Series provides fast, high-quality monochrome printing on plain paper, plus the ease
of operation and high performance you expect from a laser printer, including the following.
Model description
KX-P7500 •The KX-P7500 comes standard with 20 MB RAM and one 500-sheet cassette.
17
Before You Start
KX-P7510 •The KX-P7510 comes standard with network card (KX-PNB2). Install the
High quality
•Resolution—600 x 600 dpi, 1200 dpi class with ORT (Optimum Resolution Technology)
High speed
•Continuous printing
from 1st cassette
Letter: Maximum 17 PPM (pages per minute)
A4: Maximum 16 PPM
from MP tray
Maximum 12 PPM
Easy operation
•Printer driver—easily prints monochrome documents
network utilities (Network Setup Tool) for network printing. Refer to KX-PNB2
Quick installation guide.
Page 18

Networking capability (for KX-P7510)
• Supports 100 Base-TX and 10 Base-T
• Supports the following operating systems
—Windows® 95*1/Windows® 98*2/Windows NT® 4.0*
—Netware 3.X/Netware 4.X/Netware 5.0
—Macintosh
—UNIX
• Supports the following Print Protocols
—Windows IP Peer-to-Peer Printing
—Windows IPX Peer-to-Peer Printing
—Windows DLC Peer-to-Peer Printing
—LPR —PSERVER
—Netware Printing (PSERVER/RPRINTER in NDS and/or Bindery Mode)
• Supports the following Network Protocols
—TCP/IP —IPX/SPX —DLC/LLC
—AppleTalk —DHCP —BOOTP
—RARP —SNMP/MIB —HTTP
18
Before You Start
3
*1Microsoft® Windows® 95 operating system (hereafter Windows 95)
*2Microsoft® Windows® 98 operating system (hereafter Windows 98)
*3Microsoft® Windows NT® Workstation operating system, and Microsoft® Windows NT® Server
network operating system Version 4.0 (hereafter Windows NT 4.0)
Local port
• IEEE 1284 compliant
NOTE
• An ECP compatible parallel port supports Windows® 95/Windows® 98. To turn on the ECP
mode, use the computer’s BIOS setup. Refer to the computer’s documentation for details.
Other functions
• Built in Duplex function (printing both sides of paper)
• Emulation—PCL6, PS2 (option)
• Saving—Energy, T oner
Page 19

System requirements
You can use the printer in a networked environment and print from a PC compatible computer
running Windows or from a Macintosh computer.
With a Windows computer
The minimum hardware configuration required to use the printer with an IBM PC or compatible
includes:
•An IBM PC or compatible computer with a 486 processor or higher
•Windows 3.1, 3.11*
•Appropriate interface cables for your network or printer connection
•8 MB of RAM for Windows 3.1, 3.11 (16 MB recommended for some applications) or 16 MB for
Windows 95, Windows 98 and Windows NT 4.0
•20 MB available hard-disk space
•CD-ROM Drive
1
, Windows 95, Windows 98 or Windows NT 4.0*2 (Intel only)
19
Before You Start
*1Microsoft® Windows® operating system Version 3.1 or 3.11 (hereafter Windows 3.1, 3.11)
*2Service Pack 3 or later version is required.
With a Macintosh computer
The minimum hardware configuration required to use the printer with a Macintosh computer is:
•Mac OS 7.5X, 7.6X, 8.X, 9.0
•Appropriate interface cables for your network and printer connection.
•CD-ROM Drive
•Network Card for Ethernet (Page 177) or LocalTalk/RS-232C Interface Card (Page 180)
•Upgrade SIMM (PostScript SIMM) (Page 175)
You can connect KX-P7510 to Macintosh computer directly, though KX-P7500 needs either of the
optional cards, Ethernet network card or LocalTalk/RS-232C Interface Card.
Page 20
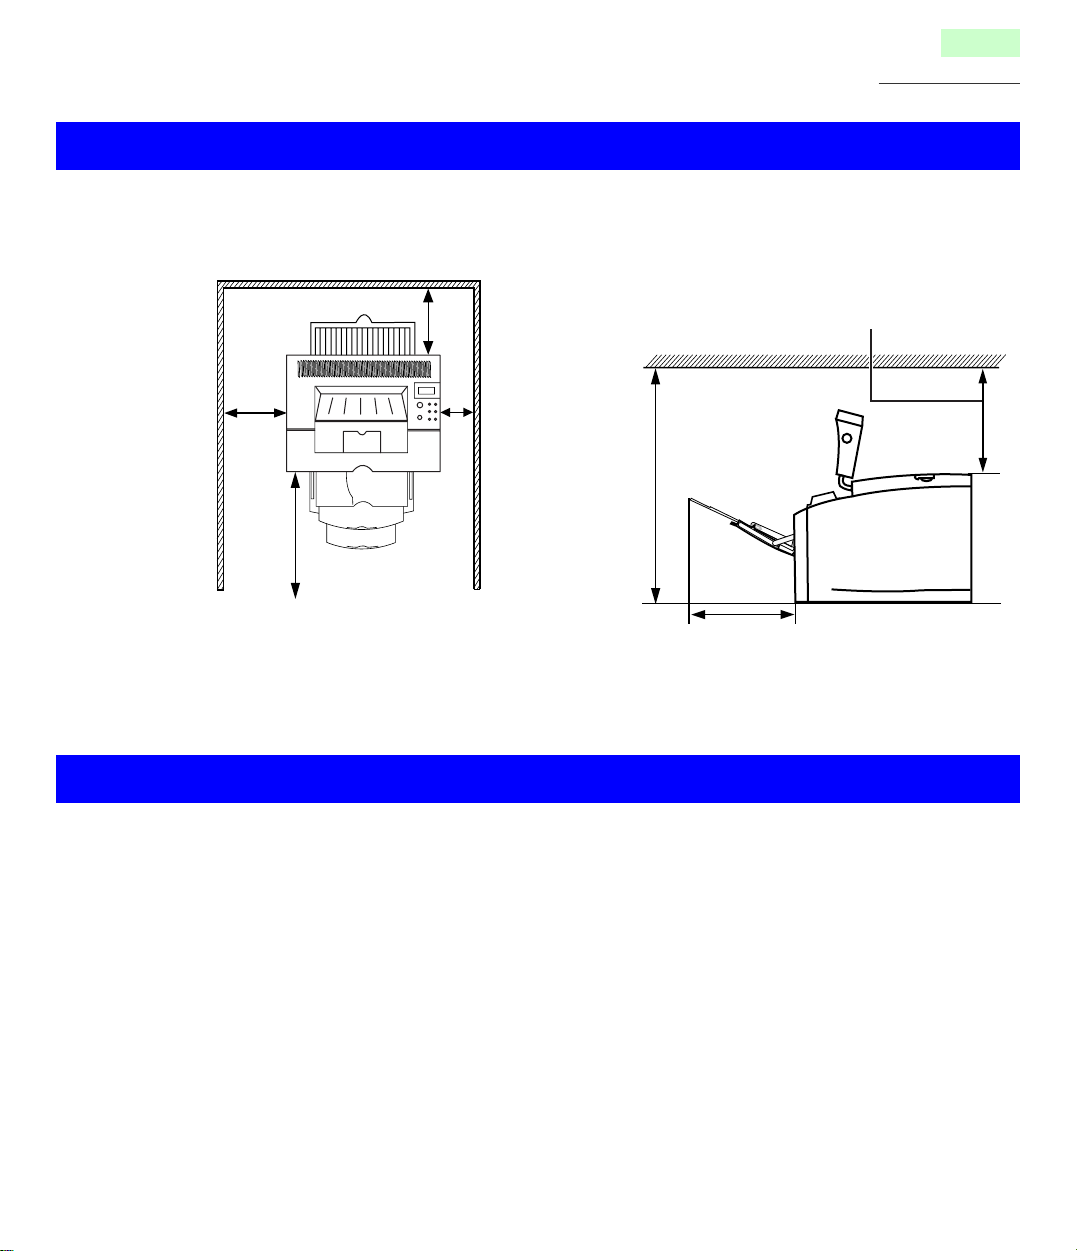
Minimum space requirements
20
Before You Start
12" (300 mm)
enough space to allow
opening of the rear cover
8" (200 mm)
enough space
for ventilation
20" (500 mm)
enough space so that
cassette can be removed
Power source
4" (100 mm)
12" (300 mm)
enough space to allow
opening of the top cover
and replacement of the
toner cartridge
24"
(600 mm)
10" (254 mm)
• The voltage level of the power source must not vary more than ±10% from the voltage level
marked on the nameplate (located on the back of the unit).
• Do not use an extension cord.
• Do not use a line conditioner, transient suppressor or surge protector as it may cause a machine
error.
Page 21
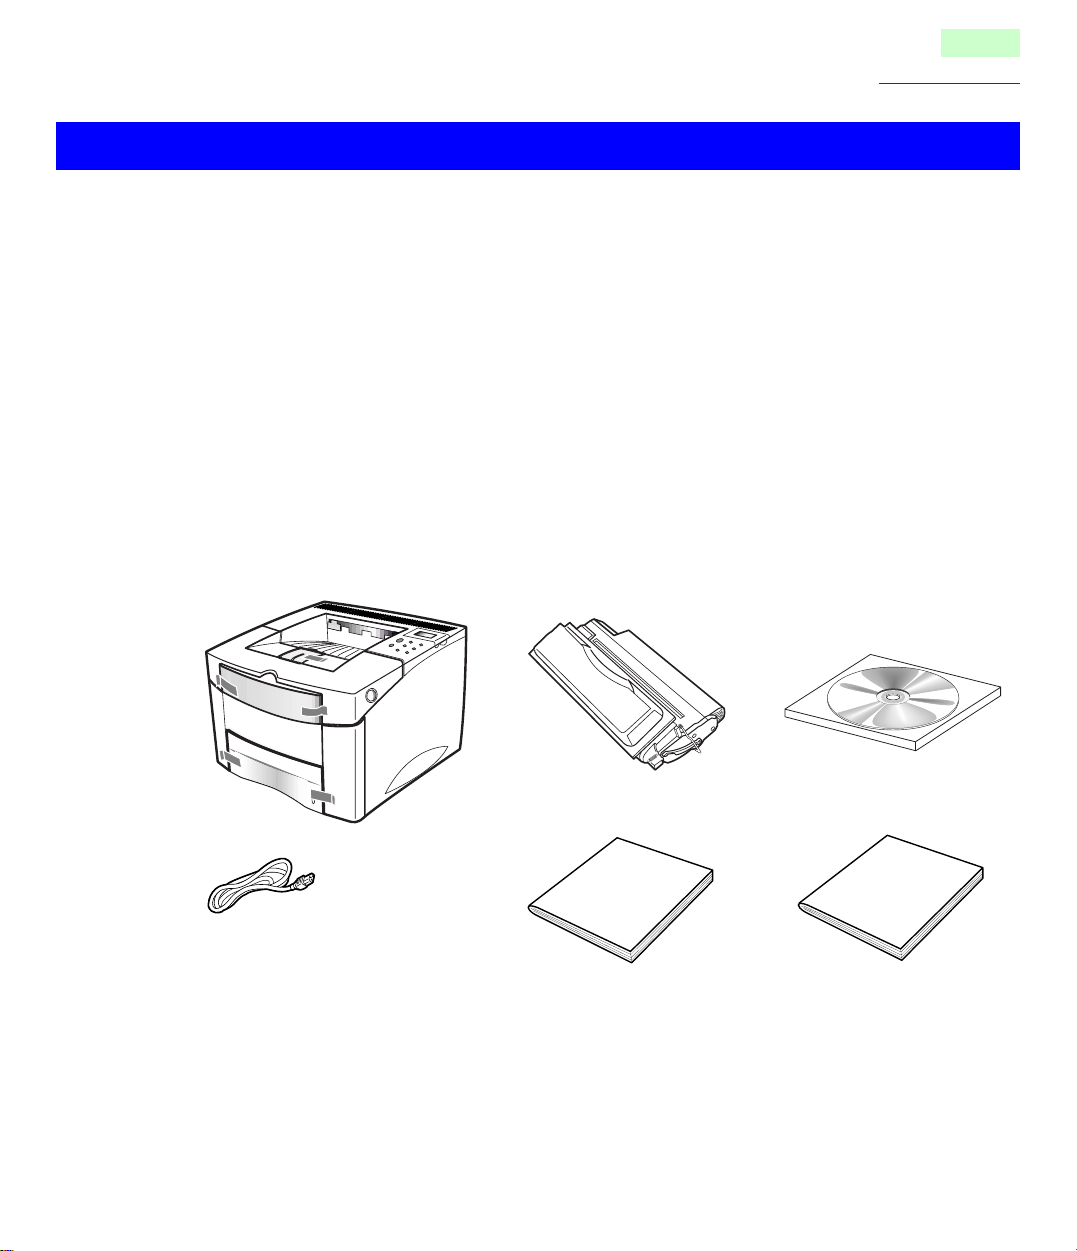
Unpacking
Make sure that all of the items shown below were provided and have not been damaged. Report
damage or shortages to the reseller from which the unit was purchased. Page 2 includes an area
for recording important information such as the name of reseller, serial number, and date of
purchase.
1. Printer
2. Toner cartridge
3. KX-P7500 Series CD-ROM
(includes Printer & Network card Software, Operating Manual and Acrobat Reader)
4. Power cord
5. Setup Guide
6. KX-PNB2 Network Card for Ethernet Quick Installation Guide (KX-P7510 only)
123
21
Before You Start
456
NOTES
• Save the original carton and packing materials for future shipping and transporting of the unit.
They have been specifically designed to protect the equipment during shipment.
• A printer cable is not included in the package items.
• Cable specifications:
The parallel cable should be compatible with the Centronics® parallel interface and IEEE
standard 1284.
Page 22
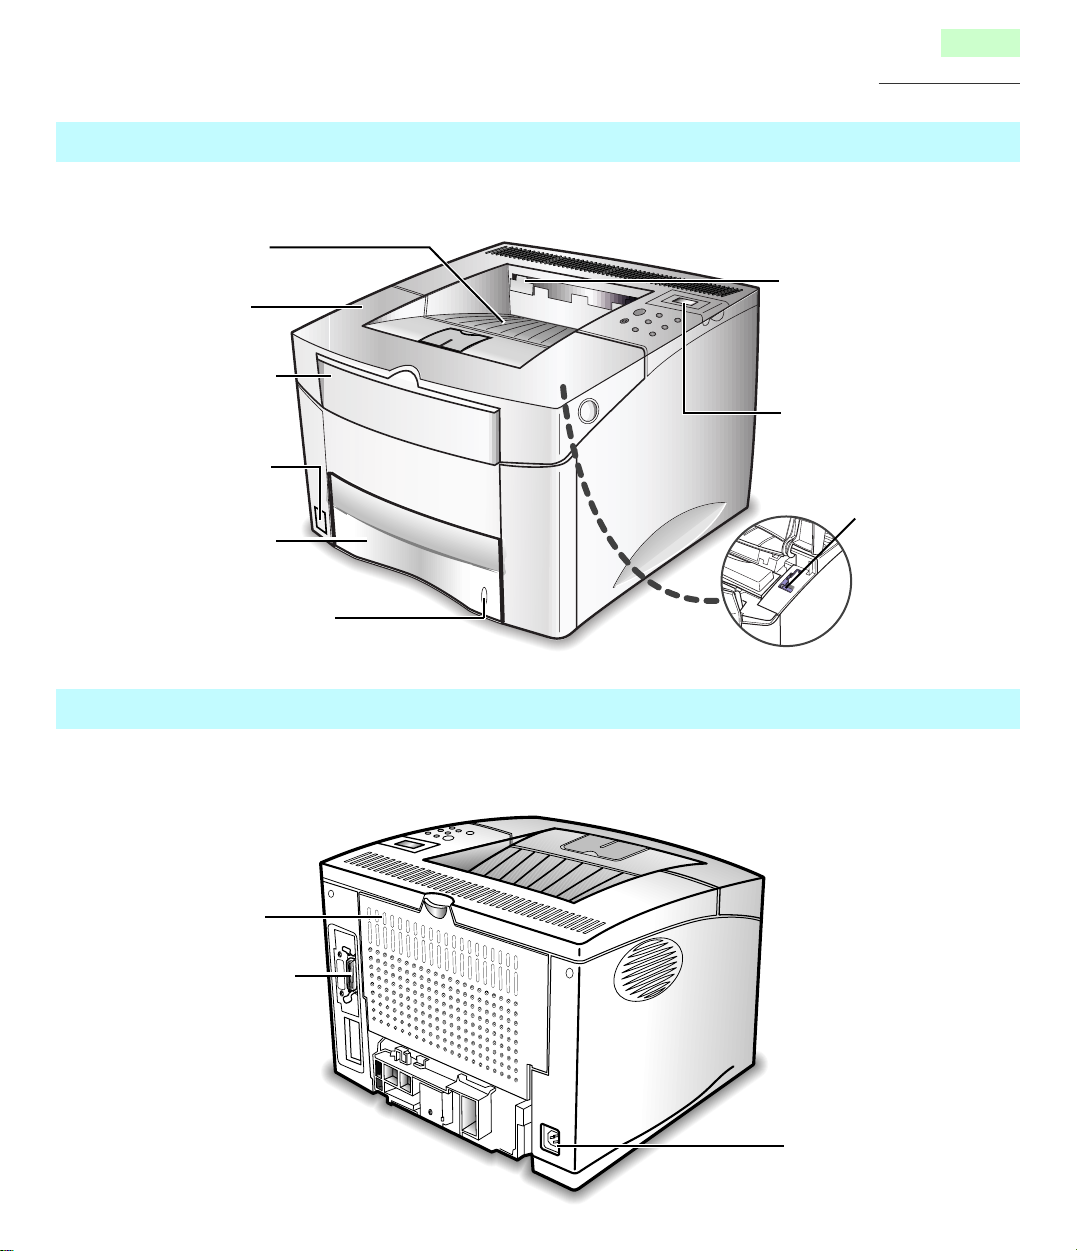
Front side view
The following illustration sho ws the front view of your printer and indicates the various main elements.
Output tray
(see page 130)
Top cover
(see page 28)
MP (Multipurpose) tray
(see page 36)
Power switch
(see page 45)
1st cassette
(1st tray)
(see page 31)
Paper level indicator *
* a window showing paper level
22
Before You Start
Print prevention sensor
(It prevents the printer
from printing when 250
sheets of paper are piled
up on the top output bin.)
Operator panel
(see page 23)
LSU (Laser
Scanning Unit)
cleaner (When
the top cover is
opened)
(see page 108)
Rear side view
The following illustration sho ws the rear view of your printer and indicates the various main elements.
Rear cover
(see page 118)
Parallel interface
connector
(see page 43)
AC inlet
(see page 45)
Page 23
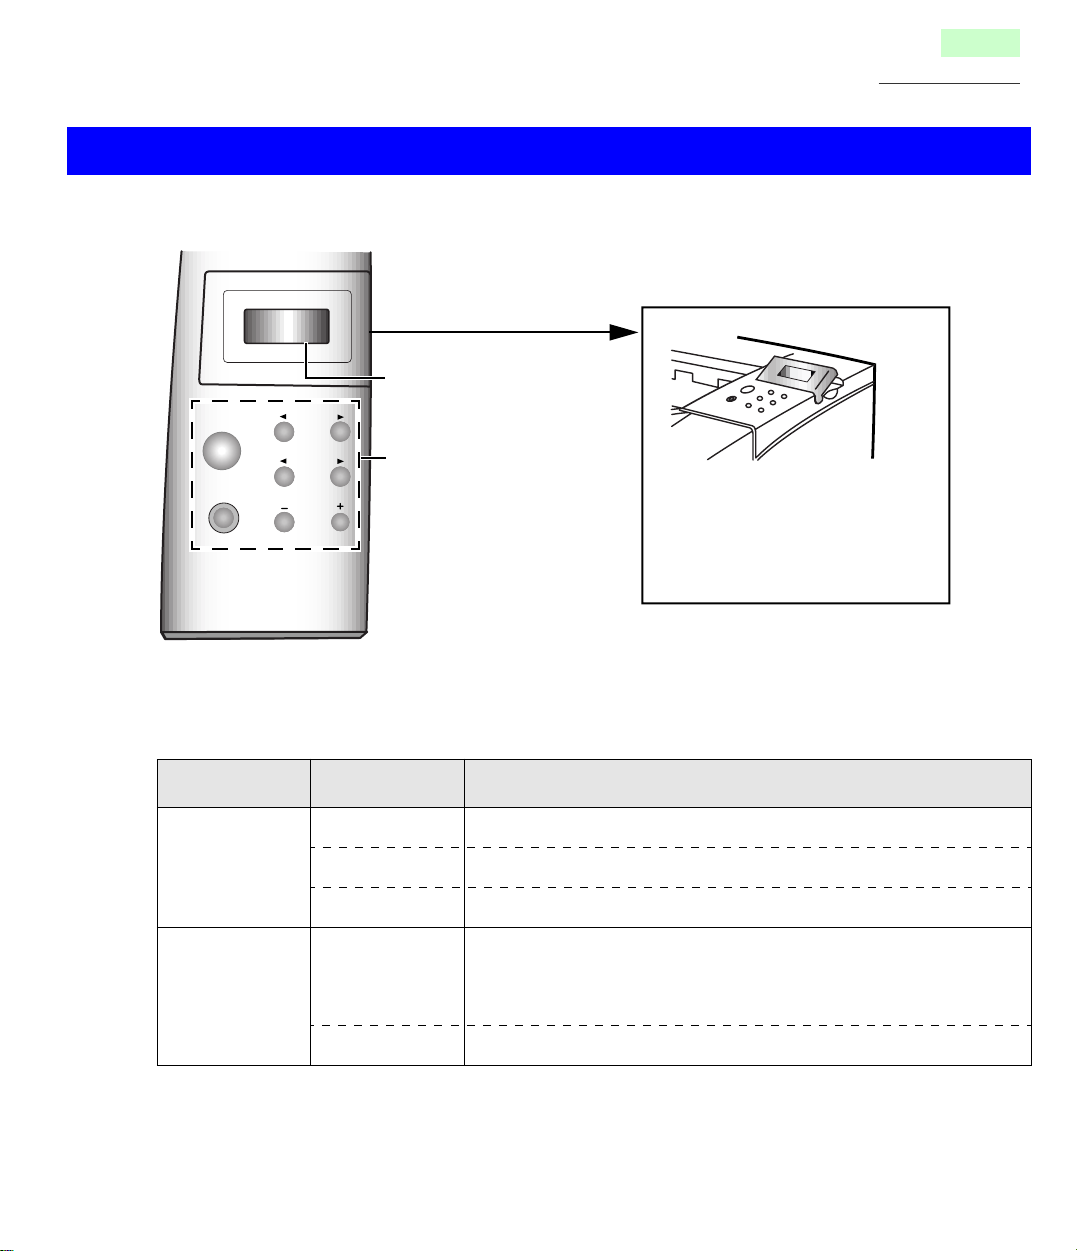
Overview of the operator panel
The operator panel, on the front right side of your printer, has a 2-line
LCD (Liquid Crystal Display) and eight buttons.
Operator panel display
ON LINE/
CONTINUE
ENTER/
CANCEL
MENU
ITEM
VALUE
Operator panel buttons
23
Before You Start
NOTE
• The LCD message display
tilts up for easy viewing.
ON LINE/CONTINUE button indicates a present activity of the printer.
Light Color Light State The Printer is ...
Green
On Online
(Ready)
Off Offline
Blinking Processing information
Orange
(Error)
On In Non-recoverable error state
• Solve the problems f or the error message , by going through
check lists and tests.
Blinking In recoverable error state
Page 24
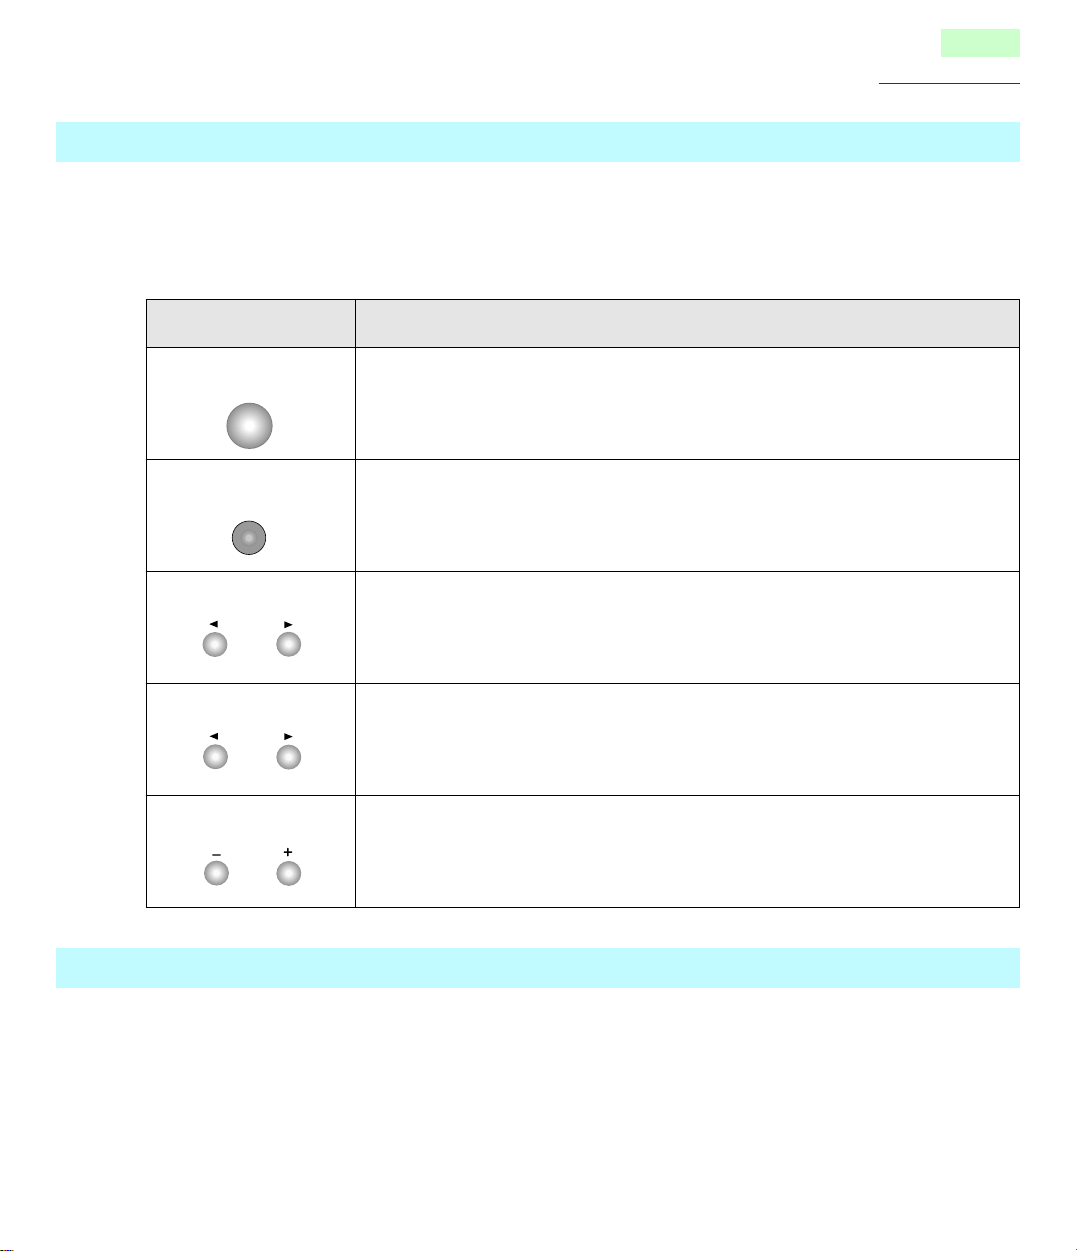
Operator panel buttons
Use the eight operator panel buttons to open a menu, scroll through a list of values, change printer
settings, and respond to printer messages. The following table describes the functions of each
button.
Button Function
24
Before You Start
ON LINE/CONTINUE • Places the printer either online or offline.
ON LINE/
CONTINUE
• Allows the printer, to continue printing when the printer is in
recoverable error state (Orange/Blinking).
ENTER/CANCEL • Cancels the print job that the printer is processing when the printer is
ENTER/
CANCEL
online.
• Saves the selected value for that item when the printer is offline.
MENU • Cycles through the operator panel menus.
2: previous menu, 1: next menu
MENU
ITEM • Cycles through the selected menu’s items.
2: previous item, 1: next item
ITEM
VALUE • Cycles through the selected menu item’s values.
ss
ss
: previous value, rrrr: next value
VALUE
Operator panel display
The display shows printer setting menus/items/values, error messages and status messages.
To change printer settings, see page 72.
For information about error messages and status messages, see page 126.
Page 25

Chapter 2
Setting up the Printer
This chapter describes setting up the KX-P7500 Series, connecting it to a PC compatible computer,
and powering on the printer. It also includes instructions on loading paper, guidelines for using the
MP (Multi-Purpose) tray and printing the test page.
25
Setting up the Printer
The general steps for setting up the printer are:
• “Preparing the printer” l page 26.
• “Installing the toner cartridge” l page 28.
• “Loading media” l page 30.
• “Connecting the printer” l page 42.
• “Connecting the power cord and power on” l page 45.
• “Printing the test page from the operator panel” l page 46.
Page 26
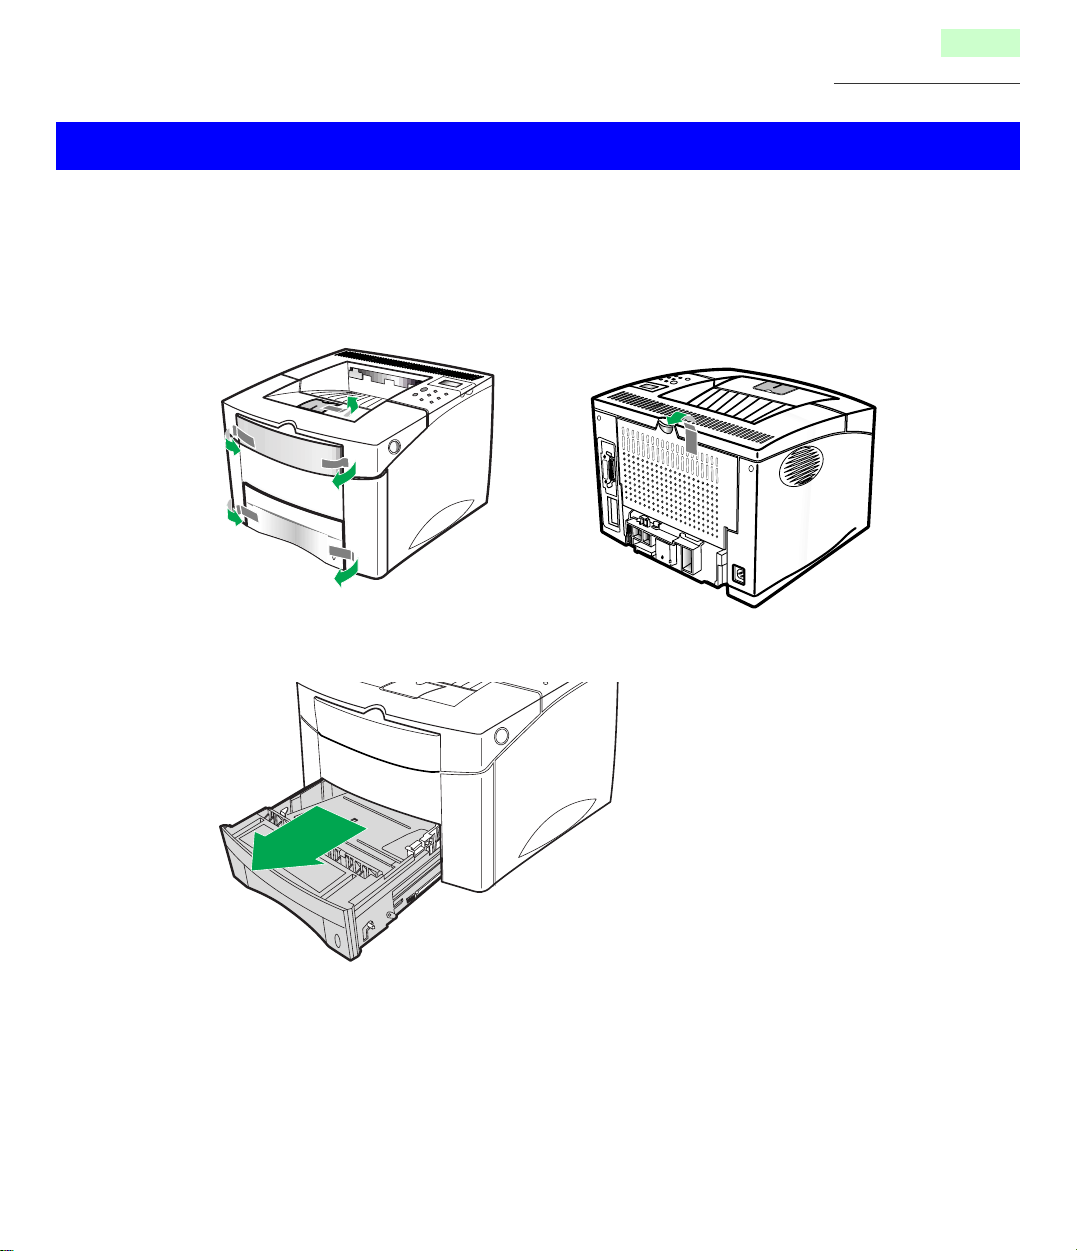
Preparing the printer
During the storage and transport of your printer, adhesive tape is used to block some of the
elements that may move or open unexpectedly and consequently be damaged.
26
Setting up the Printer
1
2
Before connecting up your printer and starting to use it, you must therefore
remove all the adhesive tapes.
Slide the cassette out of the printer.
Page 27
27
Setting up the Printer
3
4
a) Press down on the metal plate until it locks, locking it in place.
b) Remove the packaging material from the cassette carefully to prevent
any damage to the tab.
a
Tab
Slide the cassette completely into the printer.
b
Metal plate
Page 28
Installing the toner cartridge
28
Setting up the Printer
1
Remove the toner cartridge from its packaging.
CAUTION
• To prevent the toner cartridge from damages:
—Do not remove the toner cartridge from its packaging until you are ready to use it.
—Do not expose the toner cartridge to light for more than 3 minutes, it could damage the
cartridge.
—Do not expose the toner cartridge to direct sunlight.
—Do not open the shutter or touch the green drum surface inside the cartridge.
NOTE
• Save all packaging material for shipping purpose.
2
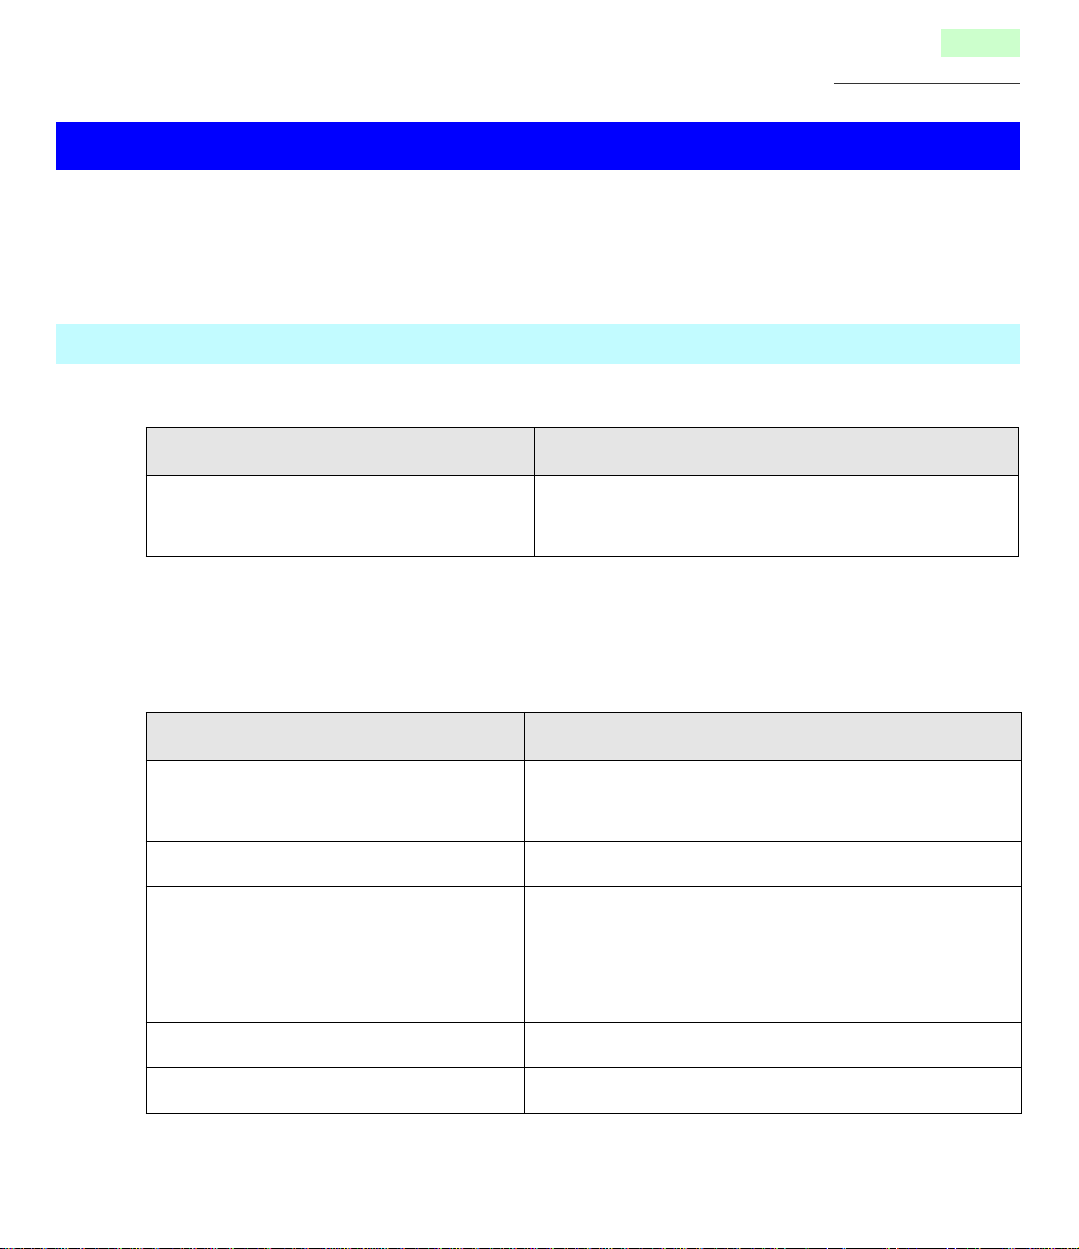
Open the top cover of the printer by pressing the button on right side of the
printer.
Page 29

29
Setting up the Printer
3
4
Rotate the toner cartridge and gently shake it from side to side about 10
times in the directions of the arrows to distribute the toner evenly inside the
cartridge.
a) Position the toner cartridge as shown with the arrow on the toner
cartridge pointing to the back of the printer. Slide the toner cartridge into
the printer as far as it will go.
b) Push the toner cartridge to set it properly as shown below.
5
Arrow
a
Push here
Close the top cover.
b
NOTES
• If toner gets on your clothing, wipe it off with a dry cloth and wash clothing in cold water.
• When continuous printing text at 5% coverage on Letter/A4 size, a toner cartridge lasts
an average of 8000 pages in simplex mode and default DENSITY mode.
Page 30
Loading media
Your printer has the 1st cassette that can hold up to 500 sheets of paper and the MP (MultiPurpose) tray that can hold up to 100 sheets of paper, 30 transparencies or 10 envelopes.
For detailed information about media, see page 199.
About media
■
For the 1st cassette
30
Setting up the Printer
Media Description
Laser paper
■
For the MP tray
The MP (multi-purpose) tray serves as an additional tray for loading any type of media that ranges
in size from 98 mm x 148 mm to 216 mm x 356 mm (3.87" x 5.83" to 8.5" x 14").
Media Description
Laser paper
Transparency
Labels AVERY 5160, AVERY 5161, AVERY 5162, AVERY
Envelope
One-sided printing: 60 to 90 g/m2 (16 to 24 lbs.)
Duplex printing: 75 to 90 g/m2 (20 to 24 lbs.)
One-sided printing: 60 to 161 g/m2 (16 to 43 lbs.)
Duplex printing*1: 75 to 90 g/m2 (20 to 24 lbs.)
3M CG3300
5163, AVERY 5660, AVERY 5661, AVERY 5662,
AVERY 5663, Avery L7159, Avery L7160, Avery
L7161, Avery L7162, Avery L7163, Avery L7164
(30 labels or less per sheet)
60 to 90 g/m2 (16 to 24 lbs.)
Cardstock
*1When you perform the duplex printing, you should not expect the same print quality and reliability
that you get with one-sided printing.
For notes and detailed media specification, see “Media” on page 199.
Up to 161 g/m2 (43 lbs.)
Page 31

Loading paper in the 1st cassette
NOTE
• The directions for loading paper in the OPT cassette of 2nd feeder differ from these directions
(see page 161).
31
Setting up the Printer
1
2
Pull the cassette completely out of the printer.
To load the paper of the Legal or Folio (24 lbs., 90 g/m2) size into the
cassette, push down the green le v er on the left side of the cassette to loc k it
into the small hole under the slot.
Cassette
Green lever
NOTES
• If the cassette is not properly adjusted, the printer might display an error message or
paper might jam.
• To reset the green lever,
a) Lift the green lever.
b) Release it into the slot.
b
Green lever
a
Page 32

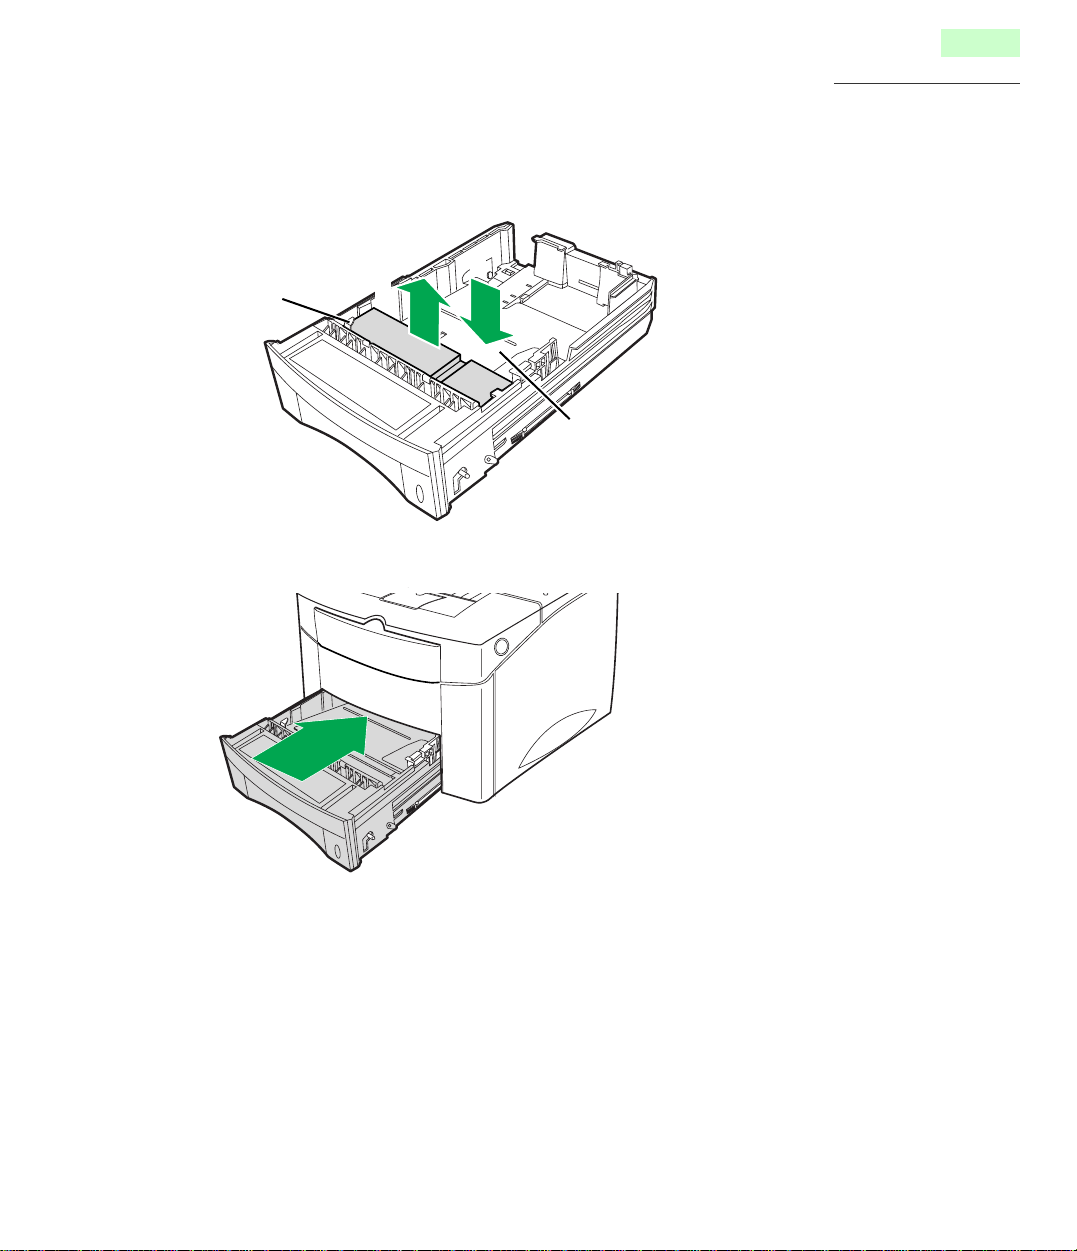
32
Setting up the Printer
3
4
Squeeze the back of the length guide and slide it to the desired paper size
until it clicks into place.
The paper sizes are indicated on the bottom of the cassette.
Length guide
Lift the rear right guide and slide it to match the width of the paper.
5
Rear right guide
Squeeze the width guide and slide it to the far right side of the cassette.
Page 33

33
Setting up the Printer
6
7
Press down on the metal plate until it clicks, locking it in place.
Fan the paper, and then tap it on a level surface to avoid paper jams or
skewed printing.
NOTE
• Reusing media that has been fed through the printer once (for example, after jams) can
reduce the life of the consumables and paper path components.
Page 34

34
Setting up the Printer
8
Place the paper against the rear side of the cassette and against the left
side of the cassette carefully to prevent any damage to the corner of the
paper by the tab.
Tab
Limit mark line
(
Fro
n
t
)
Printing side (down)
NOTES
• Do not fold or crease the paper.
• Place the paper with the recommended print side face down.
• Do not exceed the limit mark line on the cassette when the paper is held up.
9
• Do not mix different types or thicknesses of media in the cassette at one time; this may
cause a jam.
Squeeze the width guide and slide it to the left until it lightly rests against the
edge of the paper.
Page 35

35
Setting up the Printer
10
11
Make sure the paper is set below the tab on the cassette.
Gently slide the cassette back into the printer. The printer automatically
senses the size of paper loaded if the cassette is adjusted correctly.
CAUTION
• The cassette weighs approximately 4.7 kg {10.3 lbs.} when it is fully loaded. Hold it carefully with
both hands as shown below.
Page 36

Loading paper in the MP (Multi-Purpose) tray
MP tray provides a convenient way to print envelopes, transparencies, or other type of media
without having to unload the other tray.
For detailed information on media, see “Media” on page 199.
NOTE
• Reusing media that has been fed through the printer (for example, after jams) can reduce the life
of the consumables and paper path components.
36
Setting up the Printer
1
2
Open the MP tray and extend the tray by sliding it outward.
MP tray
Fan the paper, and then tap it on a level surface to avoid paper jams or
skewed printing.
NOTE
• Do not fold or crease the paper.
Page 37

37
Setting up the Printer
3
4
Place the paper against the side of the MP tray with the recommended print
side face up and the top edge going in first toward the printer as shown.
Limit mark line
Printing side (up)
NOTE
• Do not exceed the limit mark line on the paper guide.
Adjust the paper guide to the size of the paper inserted by pushing the
guide.
Page 38

Loading transparencies in the MP tray
Transparencies automatically feed from the MP tray. Some brand of transparencies may require
manual feeding. The MP tray is a tray that holds the transparencies of A4 or Letter, including up to
30 sheets.
NOTES
• Use only transparencies recommended for use in laser printers.
• The recommended transparency is 3M CG3300. If the print quality is poor, try printing on the
other side.
• Place transparencies on a flat surface to cool after removing them from the printer.
• You cannot load transparencies from the cassettes. Use the MP tray for loading transparencies.
For the MP tray, load the transparencies with side-to-be-printed facing up, and the top toward the
printer.
38
Setting up the Printer
Printing side (up)
NOTES
• Because transparencies are heavier than paper, do not load the trays to capacity.
• Remove each transparency from the output bin before printing another.
• Select “TRANSPARENCY” from Paper Type List Box of the printer driver.
For transparency specifications, see page page 203.
Page 39

Loading envelopes in the MP tray
Many types of envelopes can be printed from the MP tray or the OPT cassette. The types of
envelopes are COM-10, MONARCH, DL, C5 and C6 (60 to 90 g/m2[16 to 24 lbs.]). The printer will
automatically feed up to 10 envelopes. Printing performance depends on the construction of the
envelope.
NOTES
• Always test a few sample envelopes before purchasing large quantities.
• Select THICK paper from Paper Type List Box of the printer driver for better quality.
• For best performance, use envelopes made from 75 g/m
• Do not use envelopes that:
—Are damaged in any way.
—Use metal claps, string ties, metal folding bars.
—Contain windows, holes, cutouts or embossing.
—Have exposed flap adhesive when the flap is in the sealed or closed position.
2
(20 lbs. bond) paper.
39
Setting up the Printer
For envelope specifications, see page 205.
1
Open the MP tray and extend the tray by sliding it outward.
MP tray
Page 40

40
Setting up the Printer
2
3
Load up to 10 envelopes in the left side of MP tray with the side-to-be
printed facing up, and the postage-end toward the printer.
ic
on
Panas
Printing side (up)
Adjust the guide to touch the envelope stac k without bending the envelopes.
on
Panas
ic
Page 41

41
Setting up the Printer
4
5
Set the source item in the properties window to “Manual Feed” or “MP Tray”
(see page 98).
—To print continuously from the MP tray, set the source item to MP Tray.
—To print a sheet of paper from the MP tray, set the source item to Manual Feed.
Select “Thick” from Paper Type List Box of the printer driver.
NOTES
•Do not use an envelope curled down side, refer to the figure left below.
•When wrinkle occurs, try printing with the envelope flap tucked in as shown right below.
To load envelopes into the OPT cassette, see page 165.
Loading labels in the MP tray
Labels automatically feed from the MP tray.
NOTES
•About the available labels, see page 203.
•Use full label sheet. Partial sheets may cause labels to peel off during printing, resulting in a
paper jam.
•Avoid printing labels if the temperature is too high; doing so may damage consumables. The
adhesive material should be stable at 205°C (400°F), the printer’s maximum temperature.
•Do not use labels that have the backing sheet exposed.
•Do not print on both sides of labels.
•Select “Thick” from Paper Type List Box of the printer driver.
You cannot load labels from the cassettes. Use the MP tray for loading labels.
Page 42

42
Setting up the Printer
For the MP tray, load the labels with the side-to-be-printed facing up, and the short edge toward the
printer. Print a stack of 25 labels from the MP tray.
Printing side (up)
Connecting the printer
Using a parallel interface cable
To print directly from an IBM compatible computer, you need to connect your printer to the computer
with a parallel interface cable.
If you do not have a par allel interf ace cab le, y ou will need to purchase one from y our local computer
store or dealer (see “Bi-directional parallel interface” on page 209).
NOTE
• Use a shielded bi-directional parallel interface cable.
1
Make sure the printer and the computer to which it is to be connected are
turned off and disconnected from the AC outlet.
Page 43

43
Setting up the Printer
2
3
Connect the appropriate end of the parallel interface cable into the parallel
interface connector on the rear of the printer.
Push the clip at each end of the connector down into the notches on the
plug as shown.
Page 44

44
Setting up the Printer
4
Connect the other end of the parallel interface cable into the appropriate
parallel connector on your computer and tighten the screw.
NOTE
• The actual connector on the computer may differ depending on the man uf acturer of the computer.
Using a network cable
If you use KX-P7510 or KX-P7500 with the installed optional network card KX-PNB2, you can
connect your printer to an Ethernet 10/100 Base-T network.
MIDI/GAME PHONE LINE
LINE
LINE
OUT
IN
NOTE
• Use Category 5 shielded twisted pair cable with RJ-45 connector.
1
2
Make sure the printer and the computer are turned off.
Connect a shielded twisted pair network cable to the RJ-45 port on the rear
of the printer.
RJ-45 port
Page 45

45
Setting up the Printer
3
To setup the printer for the network, see the KX-PNB2 Network Card for
Ethernet Quick Installation Guide.
Connecting the power cord and power on
1
2
Connect the appropriate end of the power cord supplied to the AC inlet on
the rear of the printer.
Connect the other end into a suitable AC outlet.
3
Power the printer on by pressing the power switch.
You will hear some movement inside the printer, then “READY” is displayed on the operator
panel display. The printer is ready for printing.
Power switch
Operator panel display
NOTE
•When you power on your system for the first time, if “New Hardware Found” is displayed on the
computer screen, close the window, and install the printing software using the procedure
described in “Installing the printer driver” on page 49.
Page 46

Setting up the Printer
Printing the test page from the operator panel
Print a menu map page to make sure the printer is operating correctly.
For instructions of buttons on the operator panel, see page 23.
46
1
2
3
4
Make sure “READY” appears on the display.
RE
AD
Y
Press ON LINE/CONTINUE button.
“OFFLINE” appears on the display and the printer is off-line.
0F FL NE
Press MENU button or MENU button until “TEST MENU” is displayed.
I
TEST
MEN
Press ITEM button or ITEM button until “SELFTEST” is displayed.
U
5
SELFTEST
Press ENTER/CANCEL button to print.
“PRINTING PCL6” appears and remains on the display until the page prints.
The printer returns to the Ready state after printing.
Page 47

The test page is printed as shown below.
Menu Map
47
Setting up the Printer
Laser Printer
KX-P7500 Series
PRINTING MENU
PAPER = LETTER
MP SIZE = A4
COPIES = 1
ORIENT = P
TRAY = AUTO
T-MARGIN = 0.0
L-MARGIN = 0.0
DUPLEX = OFF
AUTO CR = LF
WIDE A4 = OFF
QUALITY = 600
CONFIG MENU JOB MENU
EMUL = AUTO
LOCKTRAY = NONE
PWR SAVE = OFF
AUTOCONT = ON
TON.SAVE = OFF
JAM RECV. = ON
TONERLOW = STOP
ORT MODE = ENHANCE
TIMEOUT = 15
DENSITY = MEDIUM
PAP.TYPE = NORMAL
MENU CLR
MOPT = ON
FUSER CLEAN
Page 48

Chapter 3
Installing Software for Windows
This chapter describes installing software.
48
Installing Software for Windows
Software Supported OS
PCL Printer Driver Windows 95/Windows 98/Windows NT 4.0/Windows 3.1, 3.11
Status Display Windows 95/Windows 98
PostScript Printer Driver Windows 95/Windows 98/Windows NT 4.0/Mac OS
Network Utilities* Windows 95/Windows 98/Windows NT 4.0
* A software is sometimes used to configure the network. For instructions on how to install Network
Utilities, refer to Network Card KX-PNB2 Quick Installation Guide.
For successful printing using the PostScript Printer Driver, you need to install the optional PS SIMM.
The general steps for installing the KX-P7500 Series software from the CD-ROM are:
• “Installing the printer driver” (PCL Printer Driver) l page 49
• “Installing the additional software” (Status Display) l page 53
• “Installing the PostScript driver for Windows 95/Windows 98” l page 55
• “Installing the PostScript driver for Windows NT 4.0” l page 61
• “Removing the KX-P7500 Series software” l page 69
Page 49

Installing Software for Windows
If you are setting up a printer that will be shared by many users, and you would like to make the
printer drivers available to others, you can exit the installer program and manually copy the printer
drivers and files from the KX-P7500 Series CD-ROM to the location of your choice. Use this
method, for example, to copy printer drivers to a server on your network, or to a floppy disk.
NOTE
• Windows 95/Windows 98 Plug and Play specifies the automatic detection of any new hardware
installed on your computer . If your printer is connected to the computer via the parallel port and it
is powered on when your computer is restarted, a window indicating new hardware has been
detected will appear, prompting you to install the manufacturer’s software. In this case, see
page 51.
Installing the printer driver (PCL Printer Driver)
To set up the printer as a PCL6 printer you must install the PCL Printer Driver f or Windows. This file
is included on the KX-P7500 Series CD-ROM.
49
Installing the printer driver for Windows 95/Windows 98/Windows NT 4.0
If autorun is enabled on your computer, when the KX-P7500 Series CD-ROM is inserted in the CDROM drive the installer runs automatically, allowing you to specify which files to install on your
computer.
NOTE
• If autorun is not enabled, you can run the installer by double-clicking the CD-ROM drive icon in
My Computer, or by double-clicking the Setup.exe file in the KX-P7500 Series CD-ROM.
To install the printer driver:
1
Insert the KX-P7500 Series CD-ROM in your CD-ROM drive.
The installer is launched automatically.
Page 50

50
Installing Software for Windows
2
In the Panasonic KX-P7500 Series window, select a language and click the
PCL Printer Driver from the installation options.
3
Click [NextÃ].
Page 51

51
Installing Software for Windows
4
5
Click [Finish].
Click Exit.
■ Using Plug and Play
For Windows 95
1
2
3
4
5
6
Turn on the printer.
When the “READY” is display ed on the operator panel, turn on the computer
and start Windows 95.
The Update Device Driver Wizard window is displayed.
Insert the KX-P7500 Series CD-ROM in your CD-ROM drive.
Click [NextÃ].
Click [Finish].
The Insert Disk window is displayed.
Click [OK] to close the Insert Disk window.
Page 52

52
Installing Software for Windows
7
8
9
10
Click [Browse...].
Select your CD-ROM driver and click [OK].
Click [OK].
The Panasonic KX-P7500 Series window is displayed.
Follow Step 2 through 4 on page 50 to complete the installation.
After installation, restart your system.
NOTE
• The Plug and Play installation procedure varies depending on the version of Windo ws 95. Ref er to
Help in Windows 95.
For Windows 98
1
2
Turn on the printer.
When the “READY” is display ed on the operator panel, turn on the computer
and start Windows 98.
3
4
5
6
7
8
The Add New Hardware Wizard window is displayed.
Insert the KX-P7500 Series CD-ROM in your CD-ROM drive.
Click [NextÃ].
Click on ( ) the CD-ROM driver check box, and click off the other item’s
check box.
Click [NextÃ].
Click [NextÃ].
The Panasonic KX-P7500 Series window is displayed.
Follow Step 2 through 4 on page 50 to complete the installation.
After installation, restart your system.
✔
Page 53

Installing the printer driver for Windows 3.1
To install the printer driver:
53
Installing Software for Windows
1
2
3
4
5
6
7
Start Windows and exit any applications that start automatically.
Insert the KX-P7500 Series CD-ROM in your CD-ROM drive.
Click File menu from the Program Manager window and click Run....
Click [Browse...] and select your CD-ROM drive from the [Drives:] box.
Select setup16.exe, and click [OK].
Click [OK].
The installer starts. The Panasonic KX-P7500 Series window is displayed.
Follow Step 2 through 4 on page 50 to complete the installation.
Installing the additional software
Installing the Status Display for Windows 95/Windows 98
The Status Display is a program which shows the current printer status.
NOTE
• The Status Display supports only Windows 95 and Windows 98.
To install the Status Display:
1
2
Insert the KX-P7500 Series CD-ROM in your CD-ROM drive.
The installer is launched automatically.
In the Panasonic KX-P7500 Series window, select the Status Display
from the installation options.
Page 54

54
Installing Software for Windows
3
Follow the instructions on the screen to complete the installation.
NOTE
• If autorun is not enabled, you can run the installer by double-clicking the CD-ROM drive icon in
My Computer, or by double-clicking the Setup.exe file in the KX-P7500 Series CD-ROM.
To run the Status Display:
The Status Display is a program which shows the current printer status.
NOTE
• You can not monitor the printer status which is connected by network.
1
Click [Start], select Programs, Panasonic, Panasonic KX-P7500 Series,
and then click Status Display.
The Status Display window is displayed and the Status Display icon appears in the system
tray.
Status Display icon
Page 55

Installing Software for Windows
Installing the PostScript driver for Windows
For successful printing using the PostScript Printer Driver , you need to install the optional PS SIMM.
Before installing the PostScript Printer Driver, make sure the optional PS SIMM is installed in the
printer.
CAUTION
• If you use PostScript Printer Driver without the optional PS SIMM installed, the printer prints out
many pages of characters.
Installing the PostScript driver for Windows 95/Windows 98
To install the PostScript Printer Driver for Windows 95/Windows 98:
55
1
2
Insert the KX-P7500 Series CD-ROM in your CD-ROM drive.
The installer is launched automatically.
In the Panasonic KX-P7500 Series window, select a language and click the
PostScript Printer Driver from the installation options.
Page 56

56
Installing Software for Windows
3
4
Click [NextÃ].
Click [NextÃ].
•
If you are printing to the parallel interface, select “Local printer”.
• If you are printing on the network, select “Local printer” and finish installing the printer
driver, then refer to Network Card KX-PNB2 Quick Installation Guide for network
configuration.
NOTE
• If you are a client and printing through Windows or NetWare server on the network, you
can install the printer driver by selecting “Network printer”.
Page 57

57
Installing Software for Windows
5
Click [Have\Disk...], and click on the Browse “X*1:\English*2\Ps\Win95_98”
and [OK], and then [OK].
*1CD-ROM drive name differs depending on your computer.
*2Select a language from English, Deutsch, Francais, Espanol or Italiano.
The printer name is displayed.
6
7
Click [NextÃ].
Select LPT1 and click [NextÃ].
Page 58

58
Installing Software for Windows
8
9
Select whether the KX-P7500 Series is default printer or not, and clic k [NextÃ].
Click [Finish].
•
If you do not want to print a test page, click “No”.
• If you want to print a test page, click “Yes [recommended]”.
Page 59

59
Installing Software for Windows
10
11
Click [OK].
Insert the original CD for Windows. Select the CD-ROM drive, then select
Win95 (or Win 98) folder. Click [OK].
NOTE
• When you insert Windows 95 Disk XX in STEP 11, select disk drive and click [OK].
12
Click [Finish].
Page 60

To set the PostScript driver features:
60
Installing Software for Windows
1
2
3
Click [Start], select Settings, then click Printers.
The Printers window is displayed.
Select Panasonic KX-P7500 Series PS icon.
Select Properties from the File menu.
The Panasonic KX-P7500 Series PS Properties window is displayed, with the General
tab displayed.
Each of the major program features can be viewed by clicking the tab.
4
5
Click the appropriate tab.
Select the required options.
Page 61

Installing the PostScript driver for Windows NT 4.0
To install the PostScript Printer Driver for Windows NT 4.0:
61
Installing Software for Windows
1
2
Insert the KX-P7500 Series CD-ROM in your CD-ROM drive.
The installer is launched automatically.
In the Panasonic KX-P7500 Series window, select the language and click
the PostScript Printer Driver from the installation options.
Page 62

62
Installing Software for Windows
3
4
Click [NextÃ].
Click [NextÃ].
•
If the printer is managed and configured on this computer or used for Network Peer-to-
Peer Printing, click “My Computer”.
Page 63

63
Installing Software for Windows
5
6
Click the check box next to the port(s) you want to use, and click [NextÃ].
Click [Have\Disk...].
Page 64

64
Installing Software for Windows
7
8
9
In the text field, type the name of the CD-ROM drive (for example, X:\), and
click [Browse...].
* CD-ROM drive name differs depending on your computer.
Browse to “X:\English*\PS\Winnt\7500PS”.
* Select a language from English, Deutsch, Francais, Espanol or Italiano.
Click [Open], and click [OK].
Page 65

65
Installing Software for Windows
10
11
Click [NextÃ].
Select whether the KX-P7500 Series is default printer or not, and click
[NextÃ].
Page 66

66
Installing Software for Windows
12
Click [NextÃ].
•
Click “Shared”, and enter a share name in the Share Name box, if you want to share the
printer with network users.
Select the operating system or systems used by clients from the Alternate Drivers box, if
you want to install a printer driver that those clients can automatically download when
they connect.
• Click “Not shared” if you don’t want to share the printer.
Page 67

67
Installing Software for Windows
13
Click [Finish].
•
If you do not want to print a test page, click “No”.
• If you want to print a test page, click “Yes [recommended]”.
A test print is performed and follow the instructions that appear on the screen.
14
15
16
Click [OK].
Insert the original CD for Windows NT 4.0.
In the text field, type “D*:\i386”, and click [OK].
* CD-ROM drive name differs depending on your computer.
Click [Finish].
Page 68

To set the PostScript driver features:
68
Installing Software for Windows
1
2
3
Click [Start], select Settings, then click Printers.
The Printers window is displayed.
Select Panasonic KX-P7500 Series PS icon.
Select Document Defaults... from the File menu.
The Panasonic KX-P7500 Series PS Default Document Properties window is displayed,
with the Page Setup tab displayed.
Each of the major program features can be viewed by clicking the tab.
4
5
Click the appropriate tab.
Select the required options.
Page 69

Installing Software for Windows
Removing the KX-P7500 Series software
If you need to remove the KX-P7500 Series software, perform the following steps.
■ For Windows 95/Windows 98 users
To remove the PCL Printer Driver:
69
1
2
3
To remove the Status Display:
1
2
3
4
To remove the PostScript Printer Driver:
Click [Start], select Programs, P anasonic, and click P anasonic KX-P7500
Series.
Click uninstall PCL Driver.
Follow the instructions that appear on the screen.
Click [Start], select Programs, P anasonic, and click P anasonic KX-P7500
Series.
Click Uninstall utility.
Click [Yes].
Follow the instructions that appear on the screen.
1
2
3
4
Click [Start], select Settings, and click Printers.
Select Panasonic KX-P7500 Series PS icon.
Click File menu, then click Delete.
Click [Yes].
Page 70

■ For Windows NT 4.0 users
To remove the PCL Printer Driver:
70
Installing Software for Windows
1
2
3
To remove the PostScript Printer Driver:
1
2
3
4
■ For Windows 3.1 users
Click [Start], select Programs, P anasonic, and click P anasonic KX-P7500
Series.
Click uninstall PCL Driver.
Follow the instructions that appear on the screen.
Click [Start], select Settings, and click Printers.
Select Panasonic KX-P7500 Series PS icon.
Click File menu, then click Delete.
Click [Yes].
To remove the PCL Printer Driver:
1
2
3
From the Program Manager, double-click the Panasonic KX-P7500 Series
icon.
Double-click the Uninstall PCL Driver icon.
Click [Yes].
Page 71

Chapter 4
Using the Printer
This chapter describes changing printer settings from operator panel, setting print options in the
printer driver, and special printing.
It also includes detail information about menus and functions of the operator panel.
71
Using the Printer
This chapter is divided into the following categories:
• “Using the operator panel” l page 72
• “Using the printer driver (PCL Printer Driver)” l page 87
• “Manual Feed printing from MP tray” l page 98
• “Both side (Duplex) printing” l page 99
Page 72

Using the operator panel
Operator panel menus
A number of menus are available on the printer to make it easy for you to change printer settings.
Some menus are displayed only if a specific option is installed in the printer.
When you select a new setting from the operator panel, the asterisk (¢) mov es next to the selected
setting to identify it as the current user default setting.
For instructions of the buttons on the operator panel, see page 23.
NOTE
• Change made from a software application override the user default settings made from the
operator panel.
Changing printer settings
72
Using the Printer
1
2
3
4
5
6
Make sure “READY” appears on
the display.
1. “READY” is
Press ON LINE/CONTINUE
displayed.
button.
“OFFLINE” appears on the display and
the printer is off-line.
Press MENU button until the
menu you need appears on the
display.
2
6
ON LINE/
CONTINUE
ENTER/
CANCEL
MENU
ITEM
VALUE
3
4
5
Press ITEM button until the men u
item you need appears on the
display.
Press VALUE button until the setting you need appears on the display.
Press ENTER/CANCEL button to save the selection.
An asterisk (¢) appears beside the current user default setting for that menu item.
Page 73

Overview of the printer menus
73
Using the Printer
Menus
Items
PRINTING
MENU
PAPER
MP SIZE
COPIES
ORIENT
TRAY
T-MARGIN
L-MARGIN
DUPLEX
AUTO CR
WIDE A4
QUALITY
CONFIG
MENU
EMUL
SWITCH
LOCKTRAY
PWR SAVE
AUTOCONT
TON.SAVE
JAM RECV
TONERLOW
JOB MENU TEST MENU PCL MENU
ORT MODE
TIMEOUT
DENSITY
PAP.TYPE
MENU CLR
MOPT
DUP.TOP
DUP.LEFT
S-BIND
L-BIND
FUSER CLEAN
SELFTEST
DEMOPAGE
FONTLIST
TYPEFACE
SYMBOL
LINES
PITCH
PT.SIZE
COURIER
Page 74

Some menus are displayed only if a required option is installed. They are as follows:
74
Using the Printer
Menus
Items
I/O MENU
If the LocalTalk/
RS-232C card is
installed in your printer
BAUDRATE
ROBU .XON
NETWORK MENU
If the Network card (KX-PNB2) is installed in your
printer
RESET NIC
CFG NET
TCP/IP
CFG TCP
LPD
DHCP
CFG ADRS
BOOTP
RARP
APL TALK
NETWARE
CFG NWAR
AUTO
EN_8023
EN_II
EN_8022
EN_SNAP
UPDATE
BOOT SVR
UNIX
WINDOWS
SV-IP B1
SV-IP B2
SV-IP B3
SV-IP B4
FACTORY DEFAULT
PRINT NET CFG
PS II MENU
If the PostScript
SIMM is
installed in your
printer.
FONT LIST
NOTE
• See KX-PNB2 Network Card User’s Guide.
Page 75

PRINTING MENU
Use the PRINTING MENU to define all settings relating to printer input and output, as well as the
specific
PRINTING MENU Items
print materials you are using with your printer.
Menu Item Values and Functions
75
Using the Printer
PRINTING
MENU
PAPER*
You need to check TRAY
setting (see page 77).
Each PAPER setting
varies, depending on
TRAY setting.
MP SIZE*
You need to check
DUPLEX setting (see
page 78). Each MP SIZE
setting varies, depending
on DUPLEX setting.
If the TRAY menu is AUTO, MP, MANUAL
LETTER (country specific); Factory Default
LEGAL, A4 (country specific), EXE, JIS B5, ISO B5,
COM-10, MONARCH, DL, C5, POST A6, C6, FOLIO
A5, STS, A6
If the TRAY menu is 1ST
LETTER (country specific), LEGAL, A4 (country
specific), EXE, JIS B5, ISO B5, FOLIO
If the TRAY menu is OPT
LETTER (country specific), LEGAL, A4 (country
specific), EXE, JIS B5, ISO B5, COM-10,
MONARCH, DL, C5, FOLIO
If the DUPLEX menu is not OFF (SHORT or LONG)
LETTER (country specific), LEGAL, A4 (country
specific), FOLIO
If the DUPLEX menu is OFF
LETTER (country specific), LEGAL, A4 (country
specific), EXE, JIS B5, ISO B5, COM-10,
MONARCH, DL, C5, POST A6, C6, FOLIO, A5, STS,
A6
If the DUPLEX menu is not OFF (SHORT or LONG)
LETTER (country specific), LEGAL, A4 (country
specific), FOLIO
The PAPER SIZE setting identifies the default formatting size for each tra y. It is important to select
*
the correct paper size from the menu when using trays.
Factory Default setting is either Letter or A4.
Page 76

Menu Item Value and Functions
76
Using the Printer
PRINTING
MENU
COPIES
ORIENT
1 to 999 (1; Factory Default)
The COPIES setting determines the number of copies printed for
each page. The printer does not automatically collate the copies.
For example, if you send three pages to print and set COPIES to 2,
the printer prints page 1, page 1, page 2, page 2, page 3, page 3.
P: Portrait (Factory Default)
L: Landscape
The ORIENT setting determines how the printing is oriented on the
page.
P (Portrait) means the printing is parallel to the short edge of the
paper.
L (Landscape) means the printing is parallel to the long edge of the
paper.
ABC......
Portrait Landscape
ABC......
Page 77

Menu Item Value and Functions
77
Using the Printer
PRINTING
MENU
TRAY
T-MARGIN 0.0" to 9.9" (0.0"; Factory Default) (Portrait)
AUTO (Factory Default)
1ST
MP
OPT (If the 2nd feeder is installed)
MANUAL
The TRAY setting identifies the default paper tray.
“AUTO” means that the printer feeds print material from the other
tray when one tray is empty. If you are using the same size and type
of print material in all the trays, the trays are automatically linked.
“1ST” means that the printer feeds from the 1st cassette unless it is
empty.
“MP” means that the printer feeds from the MP tray continuously
unless it is empty or closed.
Use the “MANUAL” selection when you want to print envelopes or
other print material one piece at a time through the MP tray. Press
the ON LINE/CONTINUE button on the panel to print another sheet.
“OPT” is available only if the 2nd feeder is installed. See “Installing
the 2nd feeder (500 pages)” on page 159.
0.0" to 6.5" (0.0"; Factory Default) (Landscape)
The T-MARGIN (TOP-MARGIN) menu item lets you select the top
margin of the print materials. Units are in inches. The maximum
value depends on the “PAPER” item setting (see page 75).
L-MARGIN 0.0" to 6.5" (0.0"; Factory Default) (Portrait)
0.0" to 9.9" (0.0"; Factory Default) (Landscape)
The L-MARGIN (LEFT-MARGIN) menu item lets you select the left
margin of the print materials. Units are in inches.The maxim um value
depends on the “PAPER” item setting (see page 75).
Page 78

Menu Item Value and Functions
78
Using the Printer
PRINTING
MENU
DUPLEX
AUTO CR LF (Factory Default)
OFF (Factory Default)
LONG
SHORT
In printing both sides of paper, select either LONG or SHORT which
is the binding edge. When you set margins, see page 82.
The printer can automatically print on both sides of paper.
Use the OFF selection when printing only one side of a sheet of
paper. For more information, see page 101.
LF + CR
The AUTO CR setting determines if the printer automatically
performs carriage return after a line feed control command.
LONG SHORT
A
B
A
B
WIDE A4
QUALITY 300
OFF (Factory Default)
ON
The WIDE A4 setting determines if it can print 80 columns in A4 size.
600 (Factory Default)
QUALITY setting determines the print resolution while printing the
page.
Page 79

CONFIG MENU
Use the CONFIG MENU to configure a variety of printer features.
CONFIG MENU Items
Menu Item Values and Functions
79
Using the Printer
CONFIG
MENU
EMUL
PWR SAVE OFF
AUTO (Factory Default)
PCL
PS II (If the PostScript SIMM is installed)
HEXDUMP
You can select the emulation for printing a document.
15 (Factory Default)
30
45
60
The PWR SA VE (POWER SAVE) menu item lets you reduce power
usage when the printer is idle. The PWR SAVE setting determines
the length of time (in minutes) the printer waits after the last print
job is received or pressing any button on the operator panel before
it automatically goes to a reduced power state. Full power mode is
restored when the printer receives a job or when you press any
button on the operator panel. To conserve energy and operating
cost, this printer is provided with a programmable power save
(PWR SA VE) feature. The printer is factory set with the power save
feature turned on and programmed to 15 minutes to comply with
NERGY
E
TAR
S
® requirements.
AUTOCONT ON (Factory Default)
OFF
The AUTOCONT (AUTO CONTINUE) setting determines whether
the printer continues printing after it detects paper mismatch.
If an error occurs and AUTOCONT is set to OFF, the printer stops
and waits for operator intervention. If the ON LINE/CONTINUE
button on the operator panel is pressed, the printer continues
printing regardless of paper mismatch. When AUTOCONT is set to
ON, the printer automatically resumes processing.
Page 80

Menu Item Values and Functions
80
Using the Printer
CONFIG
MENU
TON.SAVE OFF (Factory Default)
ON
The TON.SAVE (TONER SAVE) setting helps conserve the toner
cartridge by controlling how much toner the printer uses for print job.
Select OFF if toner conservation is not a concern.
But this setting may affect the print quality of your job.
JAM RECV OFF (Factory Default)
ON
When JAM RECV (JAM RECOVERY) is set to ON, the printer
keeps printed page until the printer signals that the page has
successfully exited the printer. The printer reprints the jammed
page. When JAM RECV is set to OFF, the printer does not reprint a
page that has been jammed after all the image has been drawn on
the page.
TONERLOW CONTINU (Factory Default)
STOP
This setting determines whether the printer continues printing after
the printer detects that the toner is low.
If the toner is low and TONERLOW is set to STOP, press the ON
LINE/CONTINUE button to print. In that case, replace the toner
cartridge or set the TONERLOW menu item to CONTINU.
SWITCH
(If the 2nd
feeder is
installed)
LOCKTRAY
(If the 2nd
feeder is
installed and
the SWITCH
menu item is
set to ON)
ON (Factory Default)
OFF
The ON setting makes the printer supply the paper from another
cassette when a cassette is empty.
In case of the OFF setting, an error message is displayed.
When the TRAY menu is AUTO, this Item is not displayed.
NONE (Factory Default)
1ST
OPT
MP
The tray set to LOCKTRAY doesn’t supply the paper when another
cassette is empty.
For example, if LOCKTRAY is set to MP, the tray is not switched to
MP tray.
Page 81

JOB MENU
Use the JOB MENU to define all settings relating to print quality, as well as Menu clear.
JOB MENU Items
Menu Item Values and Functions
JOB MENU ORT MODE ENHANCE (Factory Default)
81
Using the Printer
NORMAL
GRAY
Use the printer’s ORT (Optimum Resolution Technology) setting to
produce print with smooth angles, curves, and edges.
ENHANCE: Better Text Image
NORMAL: The printer’s ORT setting is disable.
GRAY: Better Photo Image
TIMEOUT
DENSITY
0 to 300
15 (Factory Default)
The TIMEOUT Setting determines the amount of time (in seconds)
the printer waits before printing the last page of a print job that does
not end with a command to print the page. When a print timeout
occurs, the printer prints the data in the print buffer.
0: No timeout.
LIGHT
MEDIUM (Factory Default)
DARK
Lighten or darken the print on the page by changing the DENSITY
setting.
The MEDIUM setting usually produces the best results.
Page 82

Menu Item Values and Functions
82
Using the Printer
JOB MENU PAP.TYPE
MENU CLR When you select MENU CLR (MENU CLEAR), the printer resets to
MOPT
NORMAL (Factory Default)
THICK
THIN
TRANSP.
The PAP.TYPE (PAPER TYPE) setting lets you specify the type of
print material installed in each tray.
Select NORMAL if the printer material is plain paper (16 to 28 lbs.).
Select THICK if the printer material is thick paper (over 28 lbs.),
high cotton paper, envelopes or labels.
Select THIN if the printer material is thin paper [60 g /m
and the air is humid.
Select TRANSP. if the printer material is transparencies.
The displayed number of print material types may differ depending
on the “PAPER” and “TRAY” item settings.
the factory default setting for each menu item.
ON (Factory Default)
OFF
This MOPT (Memory Optimization Technology) setting makes the
printer process more data by optimizing the memory. If the value is
set to ON, the complex data can be processed.
2
(16 lbs.)]
DUP.TOP
DUP.LEFT
S-BIND
5.0 (Factory Default)
0 to 9.9 mm (In increments of 0.1)
This item lets you select the top margin of the print materials when
the DUPLEX menu item is set to LONG (see page 78).
5.0 (Factory Default)
0 to 9.9 mm (In increments of 0.1)
This item lets you select the left margin of the print materials when
the DUPLEX menu item is set to LONG (see page 78).
0 (Factory Default)
0 to 22 mm (In increments of 1)
This item lets you select the left margin for the binding when short
edge duplexing (see page 78).
Page 83

Menu Item Values and Functions
83
Using the Printer
JOB MENU L-BIND
TEST MENU
Use the TEST MENU to print a variety of listings relating to available printer resources, printer
settings and print jobs.
TEST MENU Items
Menu Item Values and Functions
TEST
MENU
0 (Factory Default)
0 to 22 mm (In increments of 1)
This item lets you select the left margin for the binding when long
edge duplexing (see page 78).
FUSER
CLEAN
SELFTEST Select SELFTEST to print a configuration page. This menu item
If there happens random dirty spots on the back side of paper,
select FUSER CLEAN. It cleans fuser contamination.
FUSER CLEAN selection rotates the fuser about 10 seconds and
prints one duplex page of a specified pattern for fuser clean.
lets you make sure the printer is operating correctly.
For more information, see page 46.
DEMOPAGE Select DEMOPAGE to print the standard demonstration page.
Page 84

I/O MENU
This menu is only available if the optional LocalTalk/RS-232C Interface Card or optional IrDA/RS232C Interface kit is installed in your printer.
I/O MENU Items
I/O MENU BAUDRATE This setting lets you select the rate at which data is being sent to or
Menu Item Values and Functions
from your computer.
Setting the COM Port and printer setting at anything higher that
19200 bps will create unexpected errors in DOS mode.
300 to 115200
9600 (Factory Default)
ROBU.XON ON (Factory Default)
OFF
84
Using the Printer
PCL MENU
Use the PCL MENU to change printer settings that only affect jobs printed using the PCL emulation
printer language.
PCL MENU Items
Menu Item Values and Functions
PCL MENU FONTLIST You can print a font sample list showing all the fonts available for
PCL emulation. (See page 211)
TYPEFACE PCL 1 to PCL 54
PCL 1 (Factory Default)
Page 85

Menu Item Values and Functions
85
Using the Printer
PCL MENU SYMBOL
LINES
PITCH
ROMAN 8 to PCCYRILLIC
PC 8 (Factory Default)
List of symbol set name
A SYMBOL set is a set of alphabetic and numeric characters,
punctuation, and specific symbols used when printing with a
selected font.
In PCL emulation, a symbol set also defines which character will be
printed for each key on the keyboard (or more specifically, for each
code point).
5 to 128
A4: 64 (Factory Default)
Letter: 60 (Factory Default)
Use the LINES menu item to change the number of lines that print
on each page. The setting can range from 5 to 128 lines per page.
The printer sets the amount of space between each line based on
the Lines, Paper size, and Orientation settings.
0.44 to 99.99
10.00 (Factory Default)
If you choose a scalable monospaced font, you can select the font
pitch. PITCH refers to the number of fixed-space characters in a
horizontal inch of type.
You can select from 0.44 to 99.99 characters per inch in increments
of 0.01 cpi.
PT.SIZE You can select the character size for the font. PITCH or PT.SIZE
appears according to the value of TYPEFACE.
COURIER
REGULAR (Factory Default)
DARK
Page 86

PS II MENU
Menu Item Values and Functions
PS ll FONTLIST You can print a font sample list showing all the fonts available for
86
Using the Printer
PostScript 2 emulation.
Page 87

Using the printer driver (PCL Printer Driver)
Displaying the KX-P7500 Series properties windows
With Windows 95/Windows 98
Click
1
[Start]
The Printers window is displayed.
, select Settings , then click Printers .
87
Using the Printer
2
3
4
Select Panasonic KX-P7500 Series PCL6 icon.
Select Properties from the File menu.
The Panasonic KX-P7500 Series PCL6 Properties window is displayed, with the General
tab displayed.
Click the appropriate tab.
■
Each of the major program features can be viewed by clicking the tab.
Page 88

With Windows NT 4.0
Click
1
[Start]
The Printers window is displayed.
, select Settings , then click Printers .
88
Using the Printer
2
3
4
Select Panasonic KX-P7500 Series PCL6 icon.
Select Document Defaults... from the File menu.
The Panasonic KX-P7500 Series PCL6 Default window is displayed, with the Paper tab
displayed.
Click the appropriate tab.
■
Each of the major program features can be viewed by clicking the tab.
Page 89

With Windows 3.1
89
Using the Printer
1
2
3
4
5
Double click the Main icon in the Program Manager .
The Main window is displayed.
Double click the Control Panel icon.
Double click the Printers icon in the Control Panel window.
The Printers window is displayed.
Select the Panasonic KX-P7500 Series PCL6 , then click
The Panasonic KX-P7500 Series PCL6 window is displayed. Print options are specified
from tabs in this window.
Click the appropriate tab.
■
[Setup...]
.
CAUTION
Changes made from a software application override the user default setting made from
•
the operator panel.
Page 90

Using the KX-P7500 Series printer driver
The feature of the printer driver are arranged on nine tabs:
To access one of the tab dialog boxes, click the tab at the top of the properties windows.
90
Using the Printer
Each tab of
■
Paper tab
Orientation
Choose Portrait or
Landscape to
select the default
orientation of the
printed page.
Size
Select the paper
size.
Copies
Set the number of
copies you want to
print.
Panasonic KX-P7500 Series PCL6
is described as an example in this section.
Source
The source setting
identifies the default
paper tray.
Use different source
for first page
Click on the box to
specify different paper
source for the first and
following pages for your
print job. Click off if you
want to use the same
paper source for all
pages. The paper size
of the print job must be
the same. You may use
this function when
printing a first page as a
cover page or using
letterhead.
Reverse Print Job
Allows the user to cause all of
the physical pages in the print
job to be printed in reverse order .
Paper T ype
The Paper type setting lets you specify the type of print material
installed in each tray.
Select “Normal” if the printer material is plain paper. [60 to
105 g/m
Select “Thick” if the printer material is thick paper
[over 105 g/m
Select “Thin” if printer material is thin paper [60 g/m
air is humid.
Select “TRANSPARENCY” if the printer material is TRANSPARENCY
2
(16 to 28 lbs.)]
2
(28 lbs.)], high cotton paper, envelopes or labels.
2
(16 lbs.)] and the
Page 91

NOTES
If you want to know more about each menu, click the Help button. The help screen gives detailed
•
information about each menu.
•
When printing edge to edge there may be some loss of data at the edge due to mechanical and
physical restraints
■
Graphics
Graphics Mode
This setting can
image the page in
several different
ways.
≥≥
≥≥
Raster
Windows will send
all graphics to the
printer as bit map
raster images.
≥≥
≥≥
Vector
Windows will send
graphics to the
printer as a mixture
of Vector and raster
images.
ORT Mode*
Use the ORT
setting to
produce print
with smooth
angles, curves,
and edges.
1
91
Using the Printer
TrueType Mode
≥≥
≥≥
Download as
outline
The whole character
set for each
TrueType font
contained on the
page is sent down to
the printer in an
outline form.
≥≥
≥≥
Download as bit
Image
Each T rueType
character will be
sent as an individual
bitmap download
font on a leastrecently-used basis.
Resolution
For best results, set the Resolution option 600 dpi.
For faster printing and smaller memory requirements, use 300 dpi instead.
Toner Save Mode*
When it is set to on, the printer uses less toner quantity than when it is set to off.
1
*1 Select “Printer Default” to keep the predefined setting within the printer.
Page 92

NOTES
• Not all graphic images can print using the Vector setting. If you are using the Vector setting, and
your graphic images do not print as they appear on your computer screen select the Raster
setting and reprint your graphic.
• If you have a large number of TrueType fonts on your page then choosing Download as outline
option will cause a significant performance penalty. It may also cause you to o v erflow the memory
in your PCL6 Generic Printer.
• If you want to know more about each menu, click the Help button. The help screen gives detailed
information about each menu.
■ Finishing
Finish Mode
• Multiple pages per side
This process takes a Physical page and divides it into
smaller physical pages. Each Logical page is then
reduced and translated to fit into the new smaller
physical page. In this way multiple pages are printed
onto a single sheet.
Print page borders
The border will be drawn in margin area, if pages per
sheet are more than 2.
• Booklet Printing
Automatically prints your document as a duplex printing
job and arranges the pages so that the paper can be
folded in half after printing to produce a booklet.
• Fit to Page
This Job Finishing feature allows the end user to select
the size of the physical page to be printed on. A logical
page can be printed on a smaller or larger physical
page.
• Poster
You can enlarge a single page and print it on multiple
pages with overlaps. Poster printing is not suitable for
Duplex printing.
92
Using the Printer
Duplex
• None
Single sided printing
• Long Edge
Double sided printing aligned to the longest edge of the paper.
• Short Edge
Double sided printing aligned to the shorted edge of the paper.
NOTE
• If you want to know more about each menu, click the Help button. The Help screen gives detailed
information about each menu.
Page 93

■ Printer
Page Protection
This setting allows the printer to reserve
memory and is especially useful when
printing complex documents containing
text and graphics. This will help prevent
print overrun errors.
Memory
Select the value of the printer memory
installed in the printer.
After adding more memory, set the value
of the printer memory.
93
Using the Printer
NOTE
• If you want to know more about each menu, click the Help button. The Help screen gives detailed
information about each menu.
Page 94

94
Using the Printer
■ Overlays
You can superimpose an existing file across your final output. Typical example of Overlays are the
your company’s trademark in the header and its address in the footer.
Overlays
To select a file to be used as an overlay, enter the path to locate the bitmap file.
Load Overlay
You can use an externally source
file as an overlay.
Selected Overlay
Status
The preview area
shows any selected
bitmaps.
NOTE
• If you want to know more about each menu, click the Help button. The Help screen gives detailed
information about each menu.
Create Overlay
You can create a page overlay.
Delete Overlay
You can delete overlays.
Query Page Overlay
Query Page Overlay option
causes a Message box to appear
whenever a P age Ov erla y is sent
to the printer.
Page 95

Overlay printing
The overlay printing is configured in the following outline order.
95
Using the Printer
1. Create a file and
store an overlay
file.
http://www.XXX.com
To store a file as an overlay file:
1
Using an application such as Paint, create and sa v e the file that y ou w ant to
2. Open a document
overlay on a document.
2
Click Print from File menu and click Properties to display the Panasonic
KX-P7500 Series PCL6 Properties window.
on which you want
to overlay printing.
Population explosion
in the world over the
last decade
3. Print a document
on which you want
to overlay a file.
http://www.XXX.com
Population explosion
in the world over the
last decade
3
4
5
6
Click [Create\Overlay...] in the Overlays tab.
Enter a new file name or the same file name with OVP extension (ex.
WWW.OVP) in your desired directory as used in step 1 in the File Name
box.
Click [Save] for Windows NT 4.0 only.
Click [OK].
Page 96

96
Using the Printer
7
8
Actually you will be printing to a file, so no print-out will come from the printer. Your created file will
be stored as a OVP file.
To open a document and print it on the overlay file.
1
2
3
4
Click [OK].
Create New Page Overlay window is displayed.
Click [YES].
Open a document to print with the overlay and click Print from File menu.
Click Properties to display the Panasonic KX-P7500 Series PCL6
Properties window.
From the Overlay tab select the overlay file in the Overlays list box with
which you want to print a document.
If the overlay file is not displayed in the list box, click [Load\Overlay], browse the directory
in which you saved your graphic file (OVP file) and select the overlay file.
Click [OK].
5
Click [OK] to print the document to the KX-P7500 printer.
The document is printed on the overlay file.
NOTE
• Query Page Overlay option causes a Message bo x to appear whene v er a Page Overlay is sent to
the printer. This requests confirmation that you wish to download a page overlay. If this option is
unchecked, the selected page overlay file will always be sent to the printer. This option is not
active if NO OVERLAY is selected or if the present selected overlay has been permanently
downloaded to the printer.
Page 97

■ Watermarks
You can superimpose a line of text diagonally across your final output. Typical example of
Watermarks are the words “Draft” or “Secret”.
Text:
In order to create a
watermark you need
to specify the text for
the watermark in the
text box.
Size:
Use the slider to
change the text size
Angle:
Use the slider to
change the text angle
97
Using the Printer
Watermark
To print a watermark, you must first select it from the list.
Preview window
The text for the
watermark is
displayed in the
preview window.
The sliders left and
below the preview
window move the
watermarks central
position.
Fonts... button
To change the size,
font and style, click on
the Fonts... button.
Center Watermark
button
The CENTER
WATERMARK
button resets the
position to the
papers origin.
Color... button
To select a color or create a custom
color, click on the Color... button.
Page 98

Manual Feed printing from MP tray
The Manual Feed feature allows you to print on special paper from MP tray such as envelopes or
letterhead. If the Tray menu item is set to Manual, the printer will print only from MP tray. Manual
Feed is selected through the software or printer driver too.
For more information about the source item, see page 90.
98
Using the Printer
1
2
3
4
Select Manual Feed as the paper source.
•
Set the source item in the properties window to “Manual Feed”.
• You can select “MANUAL” as the paper source by setting the Tray item of the operator
panel menu.
Place a sheet of paper in the MP tray.
Print your document.
Press ON LINE/CONTINUE button when you are prompted.
Panasonic
Page 99

Both side (Duplex) printing
The printer can automatically print on both sides of paper by setting the Printing Menu or Finishing
tab of KX-P7500 Series PCL6 Driver.
NOTES
• Do not print on both sides of labels, transparencies, envelopes, or paper heavier than
90 g/m2 (24 lbs.).
This may damage the printer and cause a jam.
• You should not expect the same print quality and reliability that you get with one-sided printing.
Menu setting procedure
If you use the driver which has not the properties, you can select “DUPLEX” by setting the operator
panel menu.
99
Using the Printer
1
2
3
4
5
6
Make sure “READY” appears on the display.
Press ON LINE/CONTINUE button.
“OFFLINE” appears on the display and the printer is off-line.
Press MENU button until you see “PRINTING MENU”.
Press ITEM button until you see “DUPLEX”.
Press VALUE button until the setting you need appears on the display.
(For more information, see page 78).
Press ENTER/CANCEL button to save the selection.
An asterisk (¢) appears beside the current user default setting for that menu item.
NOTE
• Settings in the printer driver and software application override operator panel setting.
For instructions of setting the operator panel menu, see page 72.
Page 100

Paper orientation for printing both sides of paper
The printer prints the second sides of paper first, so paper such as letterhead and preprinted paper
needs to be oriented as illustrated in the figure below.
For the MP tray, load the first side facing down and the top toward you.
• Set the source item in the properties window to Manual Feed or MP Tray.
—To print continuously from the MP tray, set the source item to MP Tray.
—To print a sheet of paper from the MP tray, set the source item to Manual Feed.
The first side
facing down
100
Using the Printer
Top of first side
For the 1st cassette or the OPT cassette, load the first side facing up and the top toward the
printer.
The first side
facing up
Top of first side
For information about the OPT cassette, see page 159.
 Loading...