

Page 1

Laser Printer
Network Setup Guide
Model No. KX-P7310
KX-P7310 comes standard with an Ethernet network
interface. Read the Setup Guide FIRST for setup
procedures and necessary precautions for safety and
use. Then perform the network setup following this
guide.
For detailed information of network printing, see the
“Network” section in the Operating Instructions.
Keep this documentation in a safe place for future
reference.
TABLE OF CONTENTS
Setup for Network Printing
(For Windows) . . . . . . . . . . . . . . . . . . . . 1
Setting the Printer and Computer . . . . . . . . . . 1
Installing the Web Administrative Tool. . . . . . . 3
Setup for Network Printing (For Mac) . 3
Setup for Network Printing
(For Windows®*
1
)
Setting the Printer and Computer
For Network Administrator:
There are two methods of installing printer software for
Windows, Quick Printer Setup and Custom Printer
Setup. This Setup Guide only explains the Quick
Printer Setup. Custom Printer Setup enables to install
for a print server or make the easy installer for a client
computer, etc. If you want to use the Custom Printer
Setup, refer to “Network” section of the Operating
Instructions.
■ Reading the Operating Instructions
The Operating Instructions are installed in your
computer while installing the printer driver. Before
installing the printer driver, you can also read the
Operating Instructions on the printer CD-ROM following
these instructions:
Windows
*1
Microsoft® Windows® operating system (hereafter
Windows)
2
Microsoft® Windows® XP operating system (hereafter
*
Windows XP)
3
Microsoft® Windows Server™ 2003 operating system
*
(hereafter Windows Server 2003)
• Microsoft, Windows, Windows NT and Windows Server are
either registered trademarks or trademarks of Microsoft
Corporation in the United States and/or other countries.
• Apple, AppleTalk, LaserWriter, Mac, Macintosh and Mac OS
are trademarks of Apple Computer, Inc.
• Adobe, the Adobe logo, Acrobat, the Acrobat logo and
Acrobat Reader are either registered trademarks or
trademarks of Adobe Systems Incorporated in the United
States and/or other countries.
• All other acknowledgments are trademarks or registered
trademarks of their respective holders.
Acrobat® Reader® copyright © 1987-2001 Adobe Systems
Incorporated. All rights reserved.
The instructions are subject to change without notice.
Panasonic Communications Co., Ltd. 2003
(1) Insert the printer CD-ROM into your computer CD-
ROM drive.
The CD-ROM launches automatically.
NOTE
• If the CD-ROM does not launch automatically,
double click My computer icon, then double click
the CD-ROM icon.
(For Windows XP
click [Start] and click My Computer, then double
click the CD-ROM drive.)
(2) (Click language and) click Browse CD-ROM.
• To open and read the Operating Instructions on
your screen, Acrobat Reader program must be
installed in the computer. If you want to install it,
click Install Acrobat Reader and follow the
instructions on the screen.
(3) Double click the Network.pdf
(Manual \ English \ Network.pdf).
2
*
/ Windows Server™ 2003*3,
Page 2
Step 1: Setting up TCP/IP on the Computer
If the TCP/IP of your computer is already set, proceed to
the next step. If it is not set, consult with your network
administrator. Regarding the configuration of TCP/IP,
refer to the help menu or documentation for Windows.
Step 2: Setting up TCP/IP of the Printer
You need to set the IP Address, Subnet Mask and
Default Gateway for the printer. It can be set by using
one of the following two methods.
• Using the DHCP server
• Using the Network Setup Tool
If the administrator manages the network with a DHCP
server, it will automatically assign an IP Address, Subnet
Mask and Default Gateway. These can be viewed by
printing out the configuration page (see below).
You may need to contact your network administrator to
set up the TCP/IP address.
The following is the method using the Network Setup
Tool.
1 Turn the printer on.
2 Press PRINT/RESET button on the printer panel
more than 2 seconds and less than 5 seconds to
print the configuration page.
3 Confirm the MAC address on the configuration
page.
4 Insert the printer CD-ROM into the CD-ROM drive.
The CD-ROM launches automatically.
NOTE
• If the CD-ROM does not launch automatically,
double click My computer icon, then double click
the CD-ROM icon.
(For Windows XP / Windows Server 2003, click
[Start] and click My Computer, then double click
the CD-ROM drive.)
5 (Click language and) click KX-P7310 and click
Install Network Utilities.
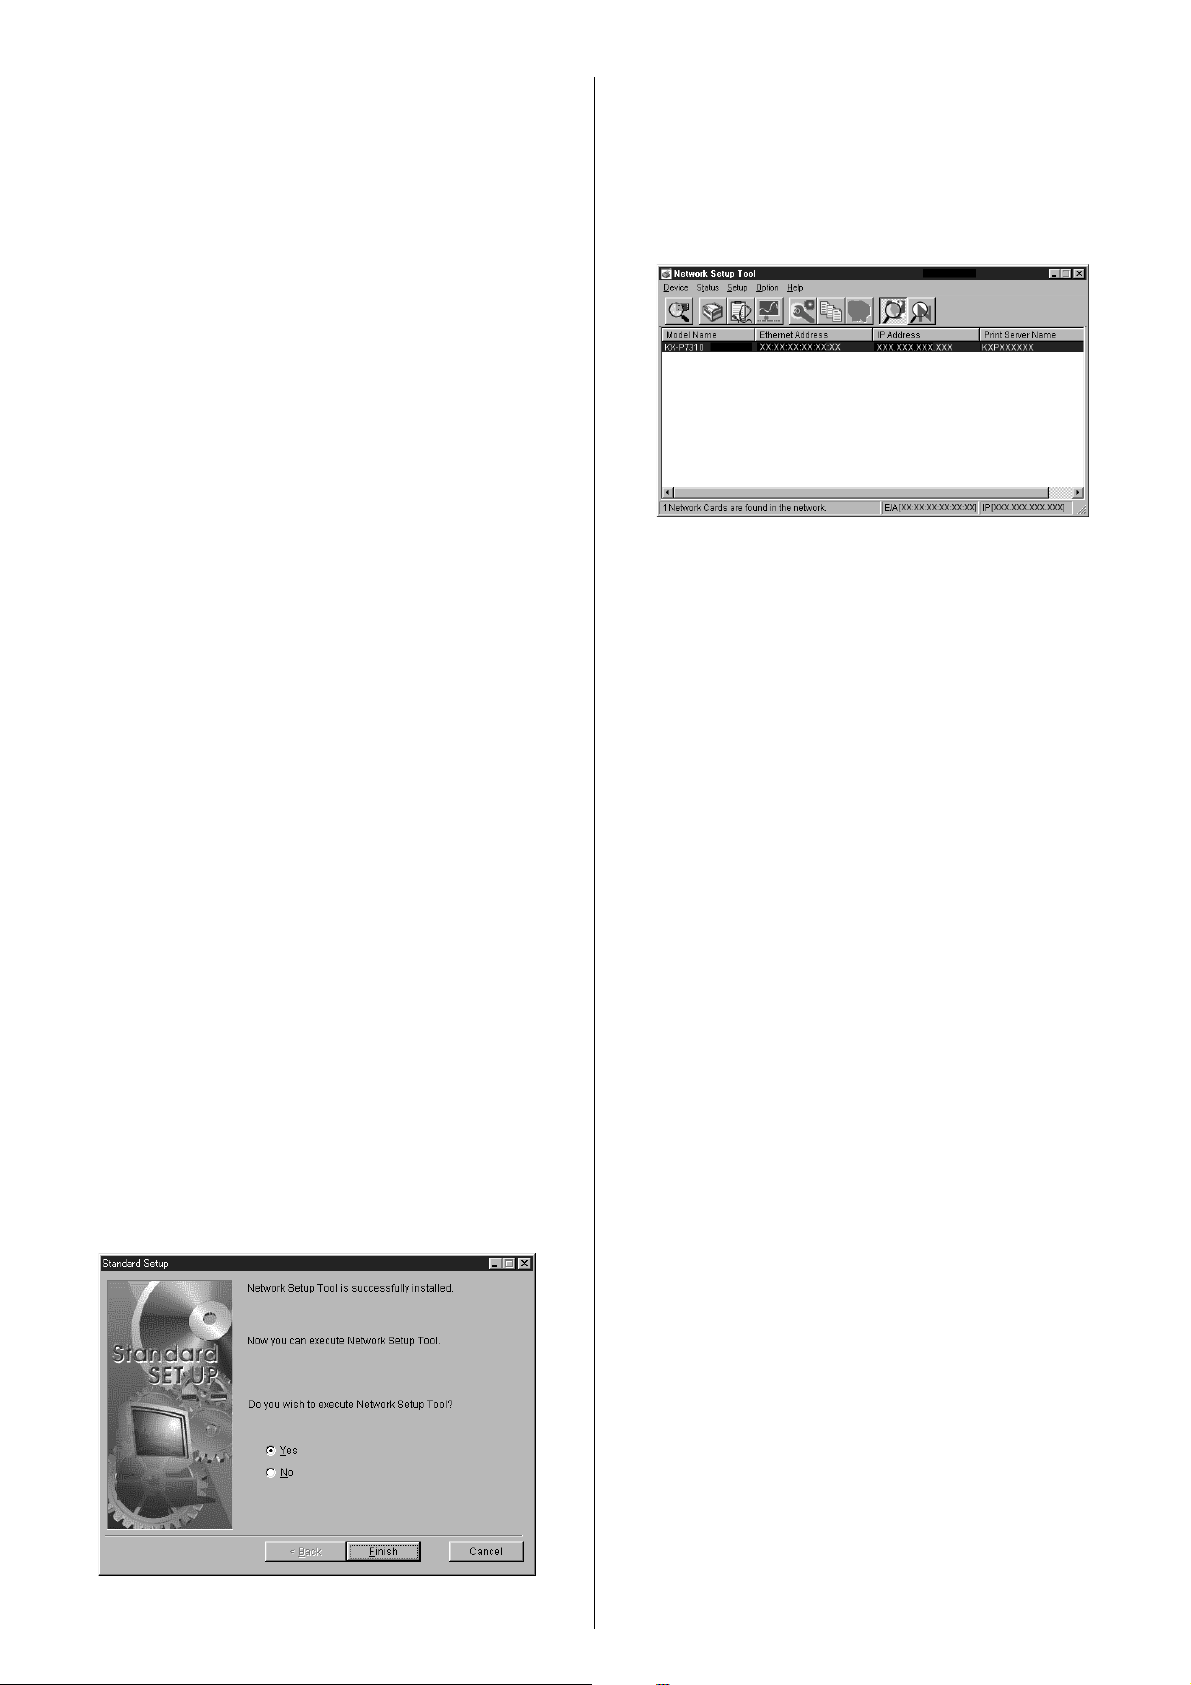
6 Follow the instructions until the screen below is
displayed.
7 Click on the Yes check button, and then click
[Finish].
8 Click the KX-P7310 printer you want to set up in the
list.
To select the printer, refer to the MAC address
confirmed at step 3.
9 Click the Setup menu and select Network Setup….
10 Click the TCP/IP tab.
11 Remove the check mark from Use DHCP/BOOTP
and Use RARP check box, then enter the IP
Address, Subnet Mask and Default Gateway. Click
[OK].
12 Confirm the setting and click [OK].
You will see the message “Do you wish to send the
setting to Network Printer?”.
13 Click [OK].
14 Click Device menu and select Exit.
Step 3: Installing the Printer Driver on the
Computer
1 Confirm the printer is ready for printing.
2 Insert the printer CD-ROM disk into the CD-ROM
drive.
The CD-ROM launches automatically.
NOTE
• If the CD-ROM does not launch automatically,
double click My computer icon, then double click
the CD-ROM icon.
(For Windows XP / Windows Server 2003, click
[Start] and click My Computer, then double click
the CD-ROM drive.)
3 (Click language and) click your printer.
4 Click Install Printer driver and Utilities.
The License Agreement window is displayed.
5 Click [Yes].
6 Click Quick Printer Setup and click [Next >].
2
Page 3

7 Click on the Select the Network port for KX-P7310
check button and click the printer assigned the IP
address in the previous step 2, then click [Next >].
The Select installed options window is displayed.
8 Click on the check box for the installed options in
your printer, then Click [Next >].
The Setup program starts installing the printer driver
and utilities.
The InstallShield Wizard Complete window is
displayed.
9 Click [Finish].
NOTE
• Change the spool setting to disable bi-directional
support in the printer driver as follows:
Installing the Web Administrative Tool
Web Administrative Tool enables the ability to manage
the device connected to the network. For the installation
and usage, see the Readme as follows:
1 Insert the printer CD-ROM in your CD-ROM drive.
The CD-ROM launches automatically.
NOTE
• If the CD-ROM does not launch automatically,
double click My computer icon, then double click
the CD-ROM icon.
(For Windows XP / Windows Server 2003, click
[Start] and click My Computer, then double click
the CD-ROM drive.)
For Windows 95*1 / Windows 98*2 / Windows Me*
(1) Display the printers folder (Start-Settings-Printers).
(2) Right click the printer and select Properties.
(3) Click the Details tab and click Spool Settings….
(4) Click on the Disable bi-directional support for
this printer check box.
For Windows NT® 4.0*4 / Windows 2000*
(1) Display the printers folder (Start-Settings-Printers).
(2) Right click the printer and select Properties.
(3) Click the Ports tab.
(4) Click Enable bidirectional support to remove the
check mark of the check box.
For Windows XP / Windows Server 2003
(1) Display the printers folder.
Windows XP Professional / Windows Server 2003:
Start-Printers and Faxes
Windows Home:
Start-Control Panel-Printers and Other Hardware-
Printers and Faxes
(2) Right click the printer and select Properties.
(3) Click the Ports tab.
(4) Click Enable bidirectional support to remove the
check mark from the check box.
5
3
2 (Click language and) click Browse CD-ROM.
3 Double click the Readme.txt
(Network\WebTool\English\Readme.txt).
4 See the System requirements.
(To install the Web Administrative Tool, Web server
is needed. Refer to the help menu of Windows to
install the Web server.)
NOTE
• For the IP address of the SMTP server, consult with
your network administrator.
Setup for Network Printing (For Mac)
Step 1: Installing the PPD File
1 Insert the printer CD-ROM into the CD-ROM drive.
2 Double click the CD-ROM icon, then double click
Mac OS or Mac OS X folder depending on the
operating system (see below).
Mac
*1Microsoft® Windows® 95 operating system (hereafter
Windows 95)
2
Microsoft® Windows® 98 operating system (hereafter
*
Windows 98)
3
Microsoft® Windows® Millennium Edition operating system
*
(hereafter Windows Me)
4
Microsoft® Windows NT® operating system Version 4.0
*
(hereafter Windows NT 4.0)
5
Microsoft® Windows® 2000 operating system (hereafter
*
Windows 2000)
Mac OS: Mac OS 8.5 - Mac OS 9.2
Mac OS X: Mac OS X 10.1 - Mac OS X 10.2
3 Double click the English folder and the PPD
Installer icon to install the printer’s PPD file, USB
printer class driver.
4 Follow the instructions on the screen to complete
the installation.
3
Page 4

Step 2: Setting up AppleTalk and TCP/IP on
the computer
Step 4: Connecting Your Computer to the
Printer
If the AppleTalk and TCP/IP of your computer are
already set, proceed to the next step. If they are not set,
consult with your network administrator. Regarding the
configuration of TCP/IP, refer to the help menu or
documentation for Macintosh.
NOTE
• Refer to “Network” section in the Operating Instructions
about setting the AppleTalk and TCP/IP to your
Macintosh.
Step 3: Setting up TCP/IP on the printer
You need to set the IP Address, Subnet Mask and
Default Gateway for the printer. It can be set by using
one of the following two methods.
• Using the DHCP server
• Using the Network Setup Tool
Network Setup Tool can operate in the Classic
environment only. When using it in Mac OS X 10.1 or
Mac OS X10.2, use it in the Classic environment.
If the administrator manages the network with DHCP
server, it will automatically assign an IP Address, Subnet
Mask and Default Gateway. These can be viewed by
printing out the configuration page (see below).
You may need to contact your network administrator to
set up TCP/IP.
1 Turn the printer on.
Be sure the printer is connected to the network and
turned it on in advance.
For Mac OS 8.5 - Mac OS 9.2
1 Click the Chooser from Apple menu and ensure
AppleTalk is Active.
NOTE
• If necessary, you may need to add the AppleTalk zone
where your printer is located.
2 Click the LaserWriter 8 printer icon.
3 Select the printer name from the scroll list.
4 Click [Create] or [Setup].
The following steps may differ depending on the version
of operating system, follow the instructions on the
screen.
5 Select Panasonic KX-P7310 and click [Select].
6 Click the option installed in your printer and select
Installed or total installed memory.
7 Click [OK].
8 Confirm an icon appeared to the left of the printer
name selected at step 3.
9 Close the Chooser.
2 Press PRINT/RESET button more than 2 seconds
less than 5 seconds.
3 Confirm the IP Address and MAC address on the
configuration page.
For Mac OS X 10.1 - Mac OS X 10.2
NOTE
• Log on the computer as an Administrator.
1 Open the Print Center.
• The Print Center is in the Utilities folder
(Macintosh HD: Applications:Utilities).
2 Select Add Printer... from the Printers menu.
3 Select AppleTalk as the connection type, and click
the printer name.
The printer name is displayed in the Printer List.
4 Confirm the Printer Model is set to Auto Select...
and click Add.
5 Close the Print Center.
Printed in Japan PJQQB0042ZA S1003B0
M
 Loading...