

Page 1
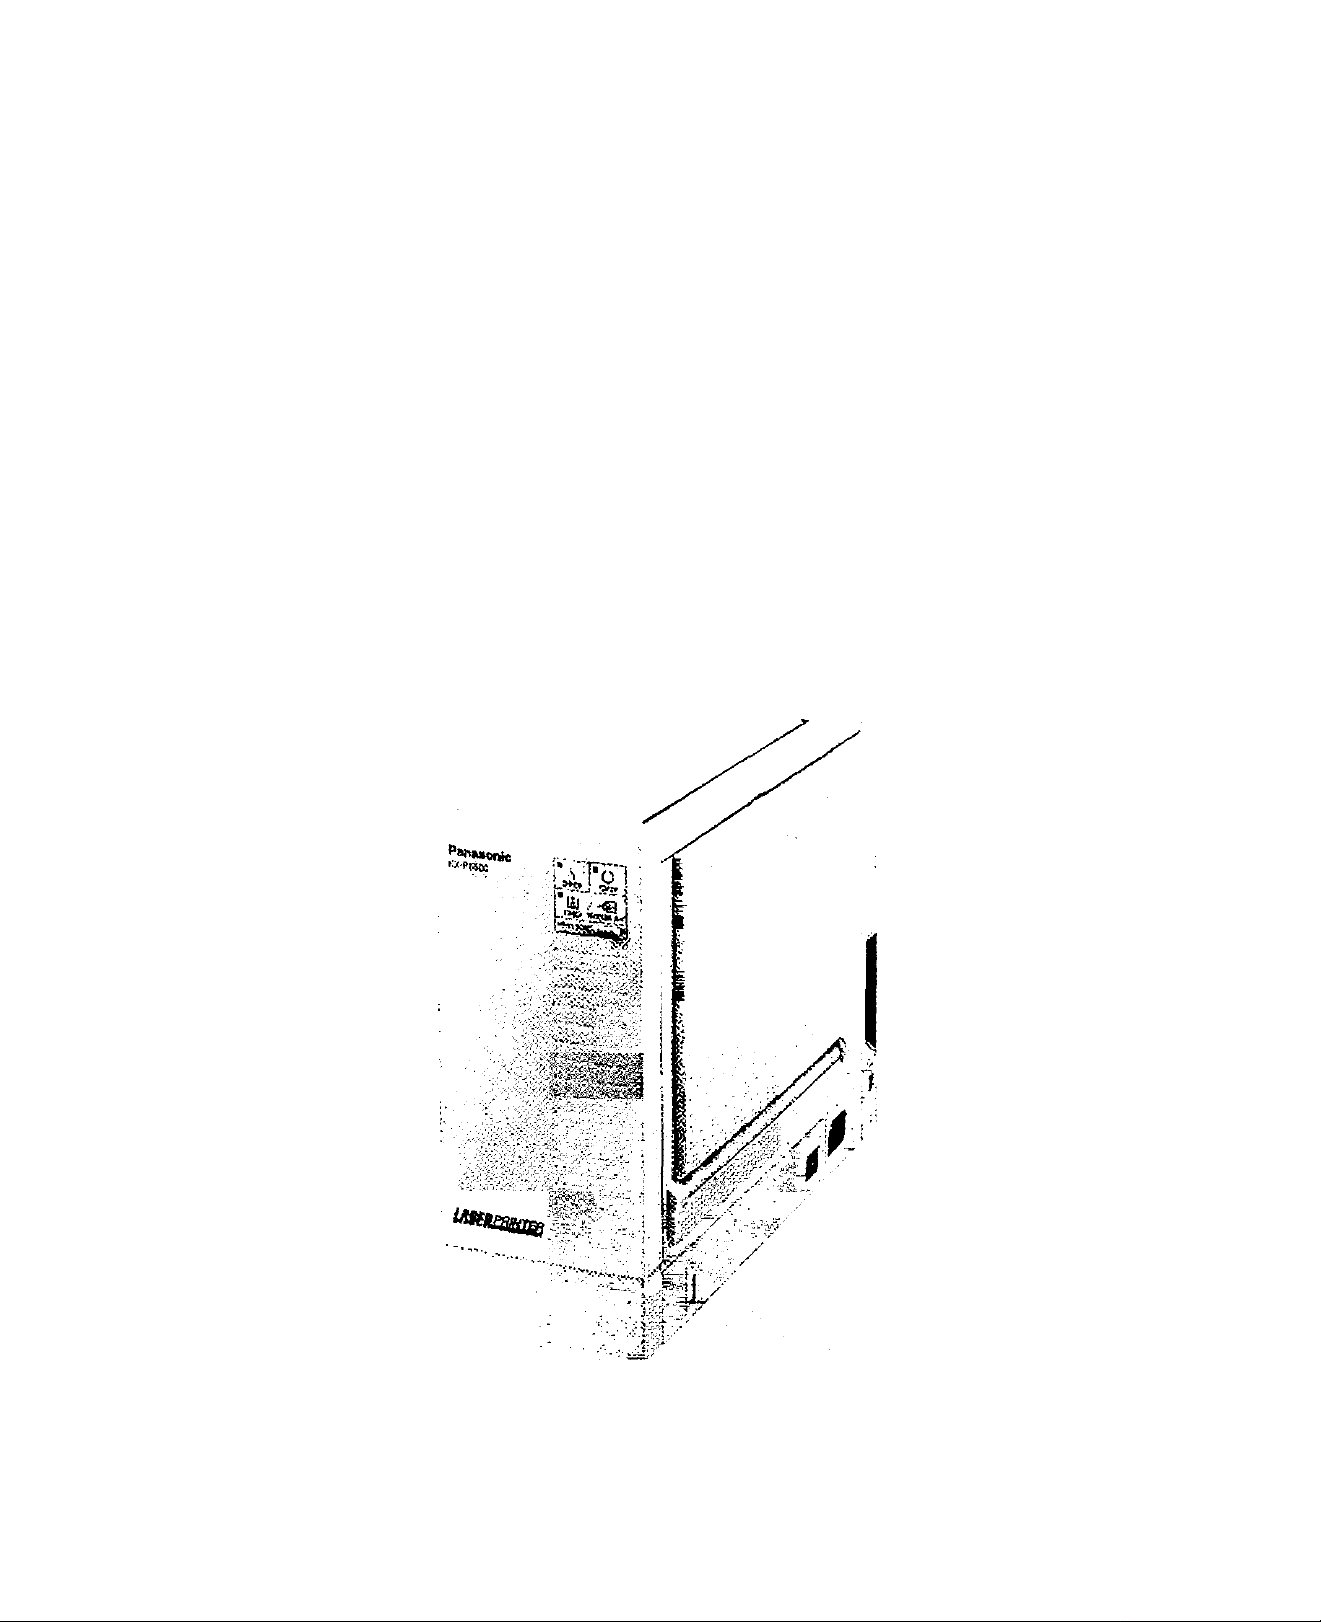
Laser Printer
Panasonic
Model No.
KX-P6500
Operating Instructions
Please read these instructions completely before operating this unit. Store this manual with care.
Page 2

End-User License Agreement
THIS IS A LEGAL AGREEMENT BETWEEN YOU AND PANASONIC. CAREFULLY READ ALL THE TERMS AND
CONDITIONS OF THIS AGREEMENT PRIOR TO OPENING THE PACKET OF SOFTWARE PROGRAM. OPENING
THE PACKET INDICATES YOUR ACCEPTANCE OF THESE TERMS AND CONDITIONS. If you do not agree to
these terms and conditions, return the unopened packet and the other components of the Panasonic product to the
place of purchase and your money will be refunded. No refunds will be given for the products that have an opened
packet or missing components.
1. COPYRIGHT:
Panasonic has the right to license or has been granted to license the enclosed Software Program (“SOFT
WARE"), developed and copyrighted by Kyushu Matsushita Electric Co., Ltd. or its licensor (“Licensor"’). You
acknowledge that you are receiving only a LIMITED LICENSE TO USE the SOFTWARE and related documen
tation, and that you shall obtain no title, ownership nor any other rights in or to the SOFTWARE and related
documentation, all of which title and rights shall remain with Licensor and Panasonic.
2. LICENSE:
(1 ) You have the non-exclusive right to use the three (3) copies of the SOFTWARE on three (3) computers. (2)'
You may install the SOFTWARE into a network server and use the SOFTWARE in your network. But the number
of the computer which uses the SOFTWARE simultaneously in the network is limited to the number defined in
the previous section (1 ). So far as the computer operates as a network server, the copy of SOFTWARE that is
installed into the network server is not counted as the number of copies hereof. (3) You may not copy,
reproduce, or permit to be copied or reproduced, the SOFTWARE or related documentation for any purpose,
except that you may either (a) make a reasonable quantity of copies of the SOFTWARE solely for backup or
archival purposes, or (b) transfer the SOFTWARE to a single hard disk, provided that you keep the original solely
for backup or archival purposes. (4) You may not rent or lease the SOFTWARE, but you may transfer your
right under this License Agreement on a permanent basis, provided that you transfer this Agreement, all copies
of the SOFTWARE, all related documentation and your Panasonic product, and the recipient thereof agrees to
the terms of this Agreement. (5) You may not reverse engineer, decompile or disassemble the SOFTWARE,
except that in European Union and European Free Trade Association, you may have the limited right to reverse
engineer, decompile or disassemble the SOFTWARE solely to the extent specifically permitted by the terms
and conditions of Article 6 of the European Community’s Directive for the Legal Protection of Computer
Programs, OJL 122/42 (17 May 1991). (6) You may not use, copy, modify, alter, or transfer the SOFTWARE,
or any copy thereof, in whole or in part, except as expressly provided in this Agreement.
3. TERM:
This license is effective until terminated. You may terminate this Agreement at any time by destroying the
SOFTWARE and related documentation and all copies thereof. This license will also terminate if you fail to
comply with any term or condition of this Agreement.Upon such termination, you agree to destroy all copies of
the SOFTWARE and related documentation.
4. LIMITED WARRANTY:
Within ninety (90) days of your receipt of the SOFTWARE, Panasonic warrants that the storage media on which
the SOFTWARE are furnished is free from defect in materials and workmanship under normal use, and that it
will repair or at its option replace any defective media at no charge to you, provided that such defective media
is returned to Panasonic within such ninety (90) days period.
5. LIMITATION OF LIABILITY:
EXCEPTAS STATED ABOVE, NEITHER PANASONIC NOR PANASONIC’S SUPPLIER MAKES OR PASSES
ON TO YOU OR OTHER THIRD PARTY, ANY WARRANTY OR REPRESENTATION INCLUDING, BUT NOT
LIMITED TO, THE IMPLIED WARRANTY OF MERCHANTABILITY AND FITNESS FOR A PARTICULAR
PURPOSE. WITHOUT LIMITING THE GENERALITY OF THE FOREGOING, NEITHER PANASONIC NOR
PANASONIC’S SUPPLIER WARRANTS THAT THE SOFTWARE WILL BE ERROR-FREE OR THAT IT WILL
MEET YOUR REQUIREMENTS. NEITHER PANASONIC NOR PANASONIC’S SUPPLIER SHALL BE LIABLE
FOR ANY DAMAGE SUFFERED BY YOU INCLUDING, BUT NOT LIMITED TO, CONSEQUENTIAL, INCI
DENTAL SPECIAL OR PUNITIVE DAMAGES.THE ABOVE LIMITATIONS SHALL APPLY REGARDLESS OF
THE FORM OF ACTION WHETHER IN CONTRACT, TORT (INCLUDING NEGLIGENCE), STRICT PRODUCT
LIABILITY OR OTHERWISE, EVEN IF SUCH PARTY HAS BEEN ADVISED OF THE POSSIBILITY OF SUCH
DAMAGES.
z
Page 3
Caution: This product utilizes a laser.
Use of controls or adjustments or performance of procedures other than those specified herein
may result in hazardous radiation exposure.
Do not open covers and do not attempt to repair the unit yourself. Refer servicing to qualified
personnel.
When you operate this equipment, the electrical outlet should be near the equipment and be
easily accessible.
Make sure that printer is installed in a spacious or well ventilated room so as not to increase
density of ozone in the air. Since ozone is heavier than air, it is recommended that air at floor
level be ventilated.
Warning: The power source voltage of this unit is listed on the nameplate. Plug the printer only into an
outlet with the proper voltage. To prevent fire or shock hazard, do not expose this product to
rain or moisture.
KX-PEP4
Laser diode properties
Laser output
Wavelength
Emission duration: Continuous
The serial number of the unit may be found on the label on the rear of the unit. For your convenience, record
this number below and retain this book along with your proof of purchase to serve as a permanent record of
your purchase.
5 mW max
788 nm
Made in JAPAN
CAUTION
Use of toner other than Genuine Panasonic
Toner KX-P458 can damage this process unit
and the printer’s fuser. THIS WILL VOID THE
WARRANTY OF THE PRINTER AND PROCESS UNIT.
MODEL NO.
SERIAL NO.
KX-P6500
NAME OF DEALER
DATE OF PURCHASE
HP, PCL and LaserJet are trademarks of Hewlett-Packard Company.
IBM and IBM PC are trademarks of International Business Machines Corporation.
Microsoft®, MS-DOS ® and Windows® are registered trademarks of Microsoft Corporation.
TrueType is a trademark of Apple Computer, Inc.
Intel is a trademark of Intel Corporation.
CompuServe is a trademark of CompuServe, Inc.
Centronics is a trademark of Centronics Data Computer Corporation.
Paintbrush is a trademark of ZSoft Corporation.
PageMaker is a trademark of Aldus Corporation.
CorelDRAW is a trademark of Corel Corporation.
EET^'^.TonrSavRT'^, Win Ref s^*^, Win Style r^'^, LaserAct^'^, WinPaneF“, HostPaneF'^ and MXr"^ are trademarks
of Destiny Technology Corporation.
As an Energy Star Partner, Panasonic has determined that this product meets
the Energy Star guidelines for energy efficiency.
All other acknowledgements are trademarks or registered trademarks of their respective holders.
All Rights Reserved. © COPYRIGHT 1995 KYUSHU MATSUSHITA ELECTRIC CO., LTD.
©COPYRIGHT, WinRefs’^“, 1993-1995, Destiny Technology Corporation.
©COPYRIGHT, WinStyler^'^, 1992-1995, Destiny Technology Corporation.
©COPYRIGHT, LaserAct^'^, 1990-1995, Destiny Technology Corporation.
©COPYRIGHT, WinPaneF'^, 1993-1995, Destiny Technology Corporation.
©COPYRIGHT, HostPanel™, 1993-1995, Destiny Technology Corporation.
©COPYRIGHT, MXt^”, 1995, Destiny Technology Corporation.
Any details given in these Operating Instructions are subject to change without notice.
Page 4

(110-120 Varea)
DANGER -Invisible laser
radiation when open and
interlock defeated.
AVOID DIRECT EXPOSURE
TO BEAM.
(220 - 240 V area)
Caution Label
(220 - 240 V area)
Caution,
hot surface
/3i\
CAimON-InvWblelaBV
radlatkin whan open and
Intarkxdtdetaatad.
AVaODtRECT EXPOSURE
TOBEAM.
VORaCHT-UnsictTtbVB
LaaerBtraNung,wenn
Abdeckung ga№iet tnd
SIctierheltewniagalung
OberbfOckL NICHT Dad
flTRAMI AUßfiCTTTM
ATTBITION-RiyonnOTMit
Idmí invisible dengweiDi an
cas dbuvertute el tonque
taefofttieet neutrafisie.
EXPOSmONDANGStEUSE
Al 1 CAKTPil 1
PEUQRO-CuandDsaabra
y sa bwdida el bloqueo, se
pnxiuoen ladleclonee
■JV18UQ909 Ifl90r>
EVITESELA EXPOSICIÓN
reORTTA A TAI PA QAVna
FOR USERS IN UNITED STATES
This equipment has been tested and found to comply with the limits for a Class B digital device, pursuant to Part
15 of the FCC Rules. These limits are designed to provide reasonable protection against harmful interference
in a residential installation.
This equipment generates, uses and can radiate radio frequency energy and, if not installed and used in
accordance with the instructions, may cause harmful interference to radio communications.
However, there is no guarantee that interference will not occur in a particular installation. If this equipment does
cause harmful interference to radio or television reception, which can be determined by turning the equipment
off and on, the user is encouraged to try to correct the interference by one or more of the following measures:
• Reorient or relocate the receiving antenna.
• Increase the separation between the equipment and receiver.
• Connect the equipment into an outlet on a circuit different from that to which the receiver is connected.
• Consult the dealer or an experienced radio/TV technician for help.
The user may find the booklet "Something About Interference" available from FCC local regional offices helpful.
FCC Warning: To assure continued FCC emission limit compliance, the user must use the recommended
shielded interfacing cable when connecting to a host computer. Also, any unauthorized changes or modifications
to this equipment would void the users authority to operate this device.
Technical Support Calls
If you have read this manual and tried the troubleshooting procedures and you are stilt having difficulty, please
contact the store from which the unit was purchased.
You may also call the end user technical support telephone number which is operational during East Coast
business hours (9:00 AM to 5:00 PM).
The end user technical support number is 1-800-222-0584.
This number is available within the U.S. only.
Helpful Phone Numbers
To locate your nearest sales dealer
To order consumables
To order operating instructions/manuals
To locate your nearest authorized service center
For technical support
Automated 24-hour support
Fax back
Electronic bulletin board
4
CALLI
CALLI
CALLI
CALLI
CALLI
CALLI
CALLI
CALLI
■800-742-
-800-222-
■206-395-
•800-222-
•800-222800-222-
-800-222-
■201-863-
8086
0584
7343
0584
0584
0584
0584
7845
Page 5

Table of Contents
Chapter 1
Chapter 2
Before You Start___________________________________________________________
Printer Features.........................................................................................8
Cautions..................................................................................................... 9
Minimum Space Requirements..........................................................9
Power Source.....................................................................................9
Unpacking............................................................................................... 10
System Requirements for Windows
System Requirements for MS-DOS...................................................... 11
Part Names............................................................................................. 11
Indicators and Button...................................................................... 12
Setup—
Preparation.............................................................................................. 13
Printer Stands Installation............................................................... 13
Process Unit Installation.................................................................. 13
Connecting the Printer and Power On
Loading Paper / Envelopes (Labels, Transparencies) .... 15
Loading Paper................................................................................. 15
Loading Envelopes (Labels, Transparencies)................................. 16
KX-P6500 for Workgroups Configuration Overview
Personal Configuration Overview.................................................... 17
Network Configuration Overview..................................................... 17
Server Configuration......................................................................................................17
Client Configuration........................................................................................................18
Network Configuration Example
Installing the Network Connection on Your PC
.....................................................
__________________________________________
............................................
...........................
....................................................................................
...............................
10
14
17
18
18
Chapter 3 Using the Printer in Windows ©______________________________________
Allocating Virtual Memory..................................................................... 19
For Windows 3.1 or Windows for Workgroups 3.11
For Windows 95.............................................................................. 19
Installing the KX-P6500 for Workgroups Software
Installing the Windows 3.1 Printer Driver & Utilities
Installing the Windows 95 Printer Driver & Utilities
Installing the Software on a Server/Personal
Installing the Software on a Client
.................................................................................
...............................................................
Printer Resource Sharing...................................................................... 23
Stop Sharing the Printer Resource.................................................. 23
Connecting a Client PC to a Shared Printer....................................... 23
Testing the Printer.................................................................................. 24
Removing the KX-P6500 for Workgroups Software
......................
............................
......................
.......................
.............................
19
20
20
21
21
22
24
Page 6

Table of Contents
Print Modes
.............................................................................................
25
Print Mode Selections .....................................................................25
Automatic Emulation Switching
When the Printer Configuration is Changed
.......................................................
...................................
25
25
Printing Documents.........................................................................25
Printing From a Windows Application
Printing From a DOS Application Within Windows
..........................................................................
.......................................................
Changing the Print Mode.................................................................26
From an Application...................................................................................................... 26
From the Control Panel in Windows..............................................................................26
From the Control Panel Tab of the KX-P6500 Console
..............................................
KX-P6500 Console..................................................................................27
Control Panel...................................................................................27
Local Queue....................................................................................29
Changing the Order of Print Jobs ..............................................................29
Remote Queue................................................................................30
Job Log............................................................................................31
KX-P6500 Console Menu Items
File................................................................................................................................. 32
View............................................................................................................................... 32
Settings..........................................................................................................................32
Network.........................................................................................................................33
Run................................................................................................................................33
......................................................
32
KX-P6500 GDI Mode ...............................................................................34
Using Options..................................................................................36
Using Overlay..................................................................................37
Overlaying and Printing a Document
............................................................................
Using Image Options.......................................................................40
Using 2 Up/4 Up
KX-P6500 PCL Mode
..............................................................................
..............................................................................
40
41
PCL Control Panel..........................................................................41
KX-P6500 Printer Status.........................................................................43
25
25
26
38
Chapter 4
Using the Printer in MS-DOS®
Printer Selection for DOS
....
.................................................................44
______________________________________
Controi Panel Software...........................................................................44
Installing the Control Panel Software
..............................................
44
KX-P6500 Control Panel.........................................................................46
File Menu.........................................................................................46
View Menu.......................................................................................47
Utility Menu......................................................................................48
Help Menu ......................................................................................48
Control Panel Settings.....................................................................49
Page Setting..................................................................................................................49
Font Setting ..................................................................................................................50
Print Quality Setting ...................................................................................................... 50
Memory Setting..............................................................................................................51
Other Setting.................................................................................................................. 52
Page 7

________________________________________________Table of Contents
KX-P6500 Control Panel Reporter....................................................... 52
Printer Status Messages .............................................................. 53
Chapter 5
Appendix
Care and Maintenance__________________________________________________
Cleaning the Printer............................................................................... 54
External........................................................................................... 54
Internal............................................................................................ 54
Troubleshooting..................................................................................... 55
Error Indication
Repacking Instructions
Options and Supplies
Adding Toner
Using a KX-P6100 Printer with KX-P6500 for
Workgroups Software
Printer Specifications
Paper Specifications
Paper Specifications
Paper and Envelope Sizes............................................................. 61
Types of Paper to Avoid.................................................................. 62
Two-sided Printing
Transparencies and Labels............................................................. 62
Envelope Specifications.................................................................. 63
Interface Specifications......................................................................... 64
Bidirectional Parallel Interface
Index........................................................................................................ 65
.....................................................................................
.........................................................................
............................................................................
..................................................................................
........................................................................
............................................................................
.............................................................................
......................................................................
..........................................................................
........................................................
56
57
58
58
59
60
61
61
62
64
Page 8

Chapter 1 Before You Start
Printer Features
Congratulations on your purchase of the KX-P6500. We are sure it will meet your printing needs and give you many
years of productive and efficient use.
GDI Mode ( P. 34)
GDI Mode takes advantage of Windows’ own inter
nal design to print documents four to five times faster
than most conventional printers can. Other printers
require Windows to translate a document into a
special printer language, such as PCL on LaserJet
printers. GDI Mode reduces overhead by eliminating
this translation step before starting to print. This
mode includes the following special features.
1st Page On Top: Prints your document in
reverse order ( c^P. 35).
Duplex Printing:
Overlay:
2 Up/4 Up:
Image:
Prints your document on both
sides of the paper ( P. 36).
Overlays an image over any
document ( d^P. 36).
Prints 2 or 4 pages on a single
sheet of paper to save paper
( i^P. 35).
Adjusts the brightness and con
trast of your output (c^ P.40).
PCL Mode (D^ P.41)
Enables you to print a file created with the MS-DOS
application or to print a PCL format file within Windows.
Printing from MS-DOS file (P. 25,44)
Allows printing from MS-DOS applications outside
Windows as well as from applications within Win
dows.
KX-P6500 for Workgroups
Software
• Provides three configuration options depend
ing on how you intend to use the printer.
Personal: For users that either do not have a
(Single User) network connection or do not plan to
share the printer with others on the
network.
Server: For users that plan to attach the
printer to their PC and have/plans to
have a network connection, and
may provide printer sharing to other
PCs on the network.
Client: For users that will not attach the
printer to their PC but do plan to use
the printer attached to another PC
on the network.
• enables you to install printer driver for
Windows 3.1 and Windows for Workgroups
3.11, or Windows 95
• enables you to setup the printer
• displays the printer status
• displays the recovery instructions when a
problem occurs
• manages all output to the printer
• provides the help system
Power Saving (P. 32)
Saves energy while the printer is idle.
Toner Saving (P. 32,50)
With TonrSavR turned on, your printer reduces the
amount of toner used to print the output. This feature
is useful for printing drafts before the final print to
save toner.
Edge Enhancement Technology
(EET) ( BS- P. 32, 51)
With Edge Enhancement turned on, your printer
smooths the jagged edges of text and line art.
8
Animated Help Feature (P. 43)
The KX-P6500 Printer Status alerts the user of com
mon operational errors. Click the [ ► I button for
animated help. This feature will walk you through the
steps required to get your printer running once again.
Bidirectional Parallel Interface
( P. 64)
Enables communication between the computer and
the printer.
Page 9
Cautions
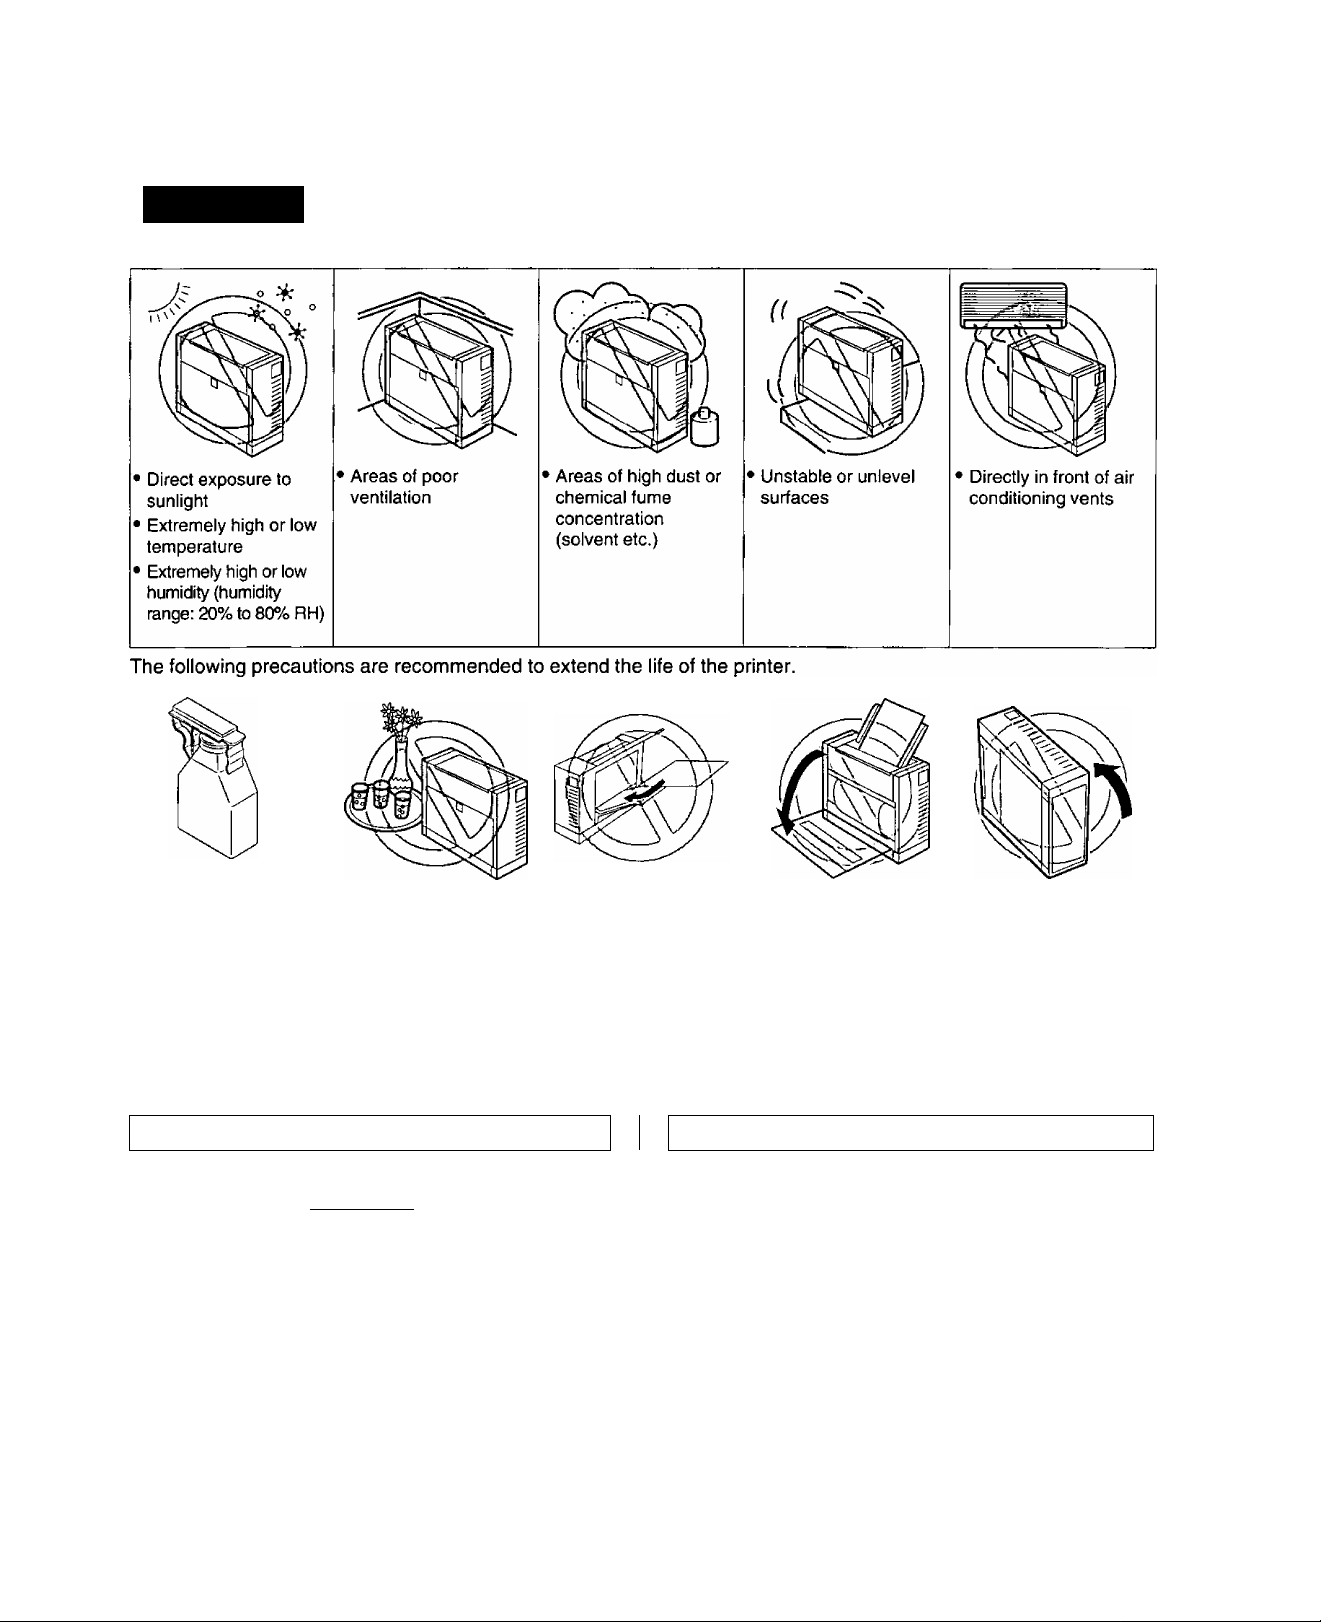
To avoid machine malfunction, do not use the printer under the following conditions.
Before You Start
0>
o
O
3
to
"n
(D
fl>
(D
• Use of toner other than
Genuine Panasonic
Toner KX-P458 can
damage this process
unit and the printer’s
fuser. THIS WILL VOID
THE WARRANTY OF
THE PRINTER AND
Do not keep liquids
near the printer.
Accidental spillage of a
liquid into the printer
can cause severe
damage.
PROCESS UNIT.
Minimum Space Requirements
(Rear)
/r:/~2::/ ~r:7\
2 cm (0.8")
(Left)
20 cm (8.0")
Left cover
opening space
Ventilation space
(Top
------------
(Front)
29 cm (11.5") Paper tray
opening space
2 cm (0.8")
Ventilation space
1/
/ (Right)
/
/
“L
Do not add paper to the
tray until it is empty: it
may cause a paper
jam.
Power Source
• Use a voltage level that does not vary more than ±10%
from the voltage level marked on the nameplate (lo
cated on the rear of the printer).
• Do not use an extension cord.
• This printer should be connected to a grounded outlet.
• Do not use a line conditioner, transient suppressor or
surge protector: it may cause a machine error.
Do not open the left
cover while the printer
is operating.
Do not place the printer
either on its left or right
side or on its front side
facing upward.
Page 10
Before You Start
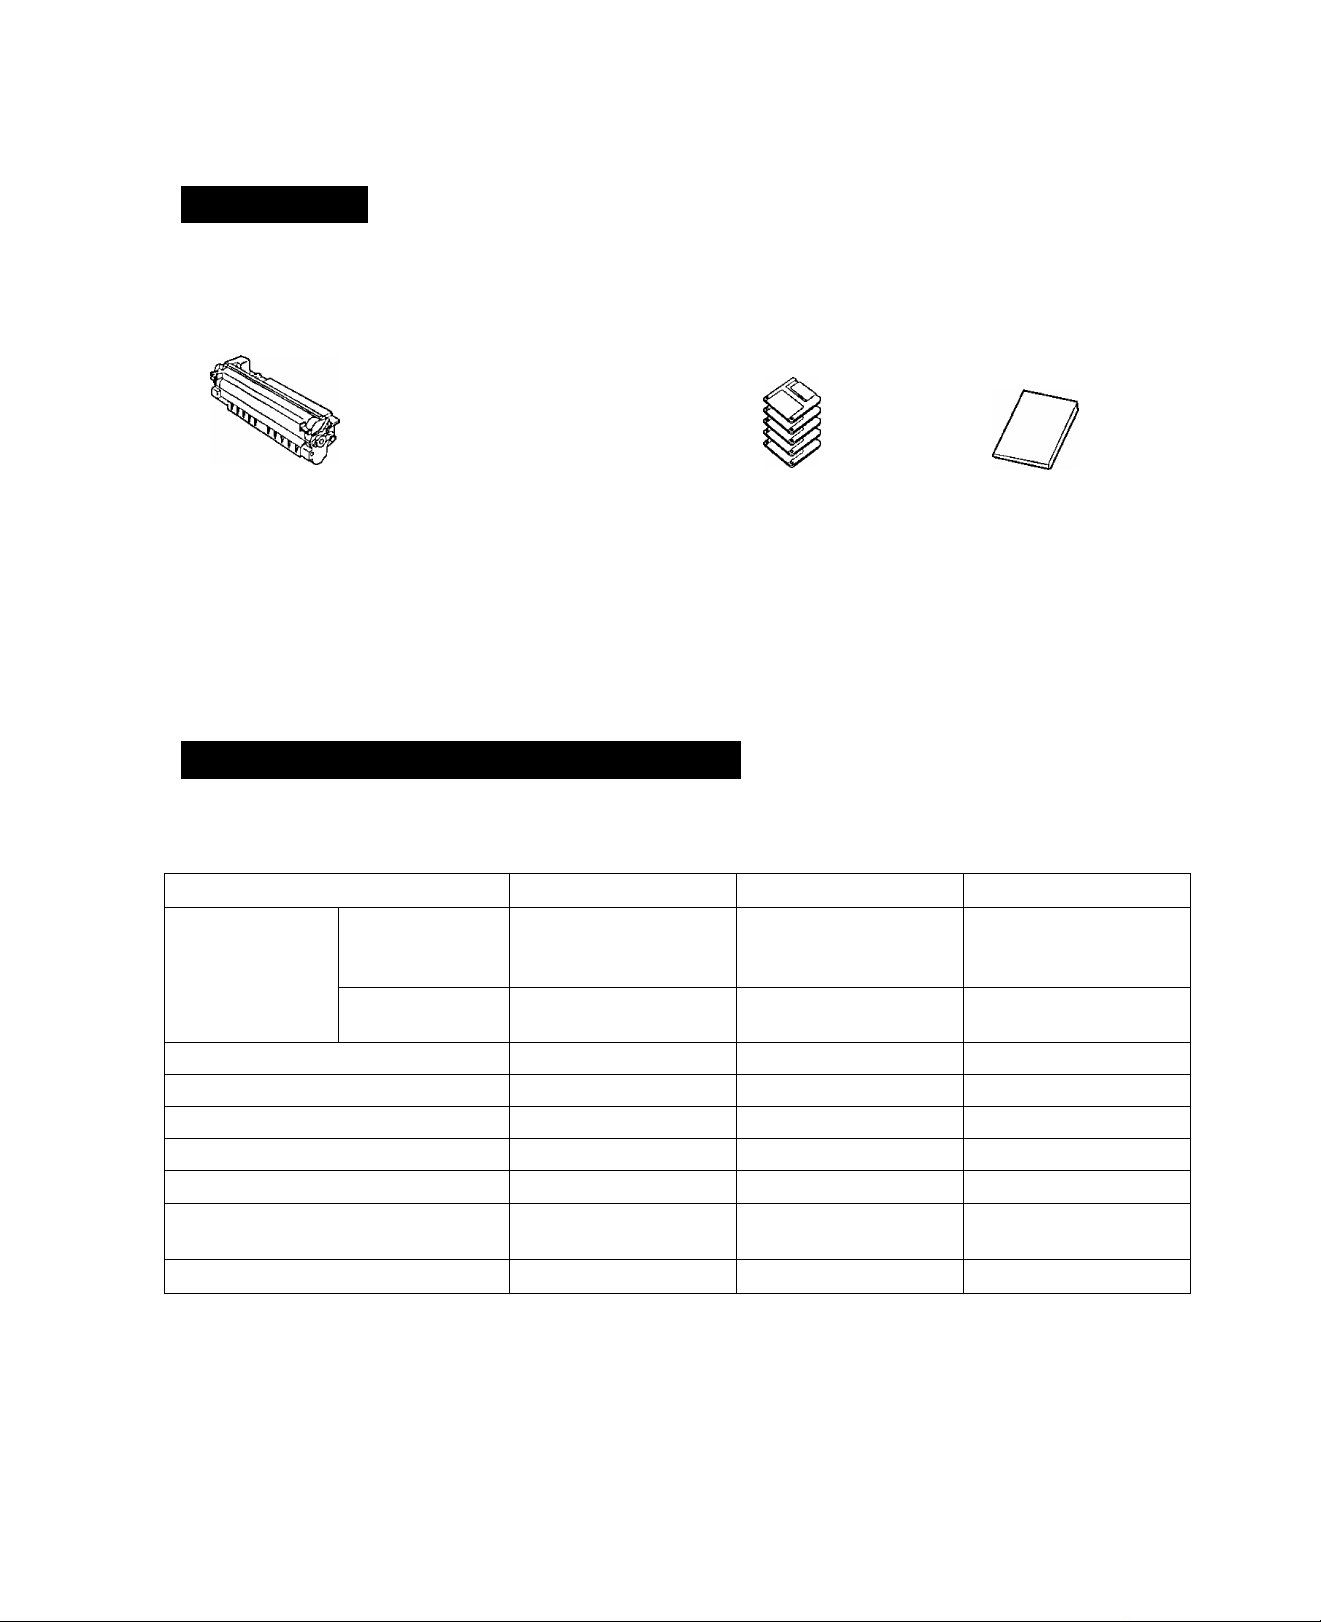
Unpacking
Make sure that all of the items shown below were provided and have not been damaged. Report damage or shortages
to the store from which the unit was purchased. Inside the front cover of this manual is an area for recording important
information such as the serial number, date of purchase and your dealer name.
Process Unit
(KX-PEP4)(cs= P. 13)
(enclosed in the printer)
Power Cord
(0®= P. 14)
Software Disks
(P. 20, 44)
Manual
Note:
• It is recommended that you save the original carton and packing materials for future shipping and transporting
of the printer. They have been specifically designed to protect your printer during shipment.
System Requirements for Windows
To run the KX-P6500 for Workgroups software, you need the hardware and software given in the following tables.
Hardware requirements differ between the three software configuration options: Personal, Server, and Client.
Hardware Requirements Personal
Minimum CPU
Minimum Processing Speed
Free Disk Space
Minimum RAM 4 MB
Centronics Parallel Port
Network Card X
Network cable, connector(s), and
terminator(s)
Network adapter driver
Windows 3.1 or
Windows for
Workgroups 3.11
Windows 95
i80386SX
i80386DX
16 MHz
16 MB
/ / X
X
X
Serve r(s)
¡80386DX
(i80486DX)*
¡80386DX
(i80486DX)*
33 MHz
16 MB
8 MB (16 MB *1)
/
/
/
Client(s)
i80386SX
(i80386DX)*
¡80386DX
16 MHz
16 MB
4 MB
/
/
/
‘ Recommended
16 MB of RAM is required to support all print modes simultaneously.
10
/ : required
X : not required
Page 11
Before You Start
Software Requirements
Windows
Minimum Virtual Memory
( P. 19)
MS-DOS 3.3 or later *3
*2 24 MB of Virtual Memory is required to support all print modes simultaneously.
*3 For Windows 95, MS-DOS is not required.
Personal Server(s) Client(s)
Windows 3.1, Windows
for Workgroups 3.11
or
Windows 95
12 MB 12 MB (24 MB *2) 12 MB
/ / /
System Requirements for MS-DOS
To run the Control Panel software, you need the following hardware and software.
Hardware Requirements:
• IBM-compatible 286 computer, or faster
• At least 640 KB PC memory (RAM)
• More than 800 KB hard disk space
• PC with a standard parallel printer port (bidirectional)
Software Requirements:
• MS-DOS 3.3 or later
Windows for
Workgroups 3.11
or
Windows 95
Windows for
Workgroups 3.11
or
Windows 95
/ ; required
C
3
*o
Q)
O
7T
5'
(Q
CO
<
Ui
(D
3
D
(D
C
(D
3
(D
№ i
■D
fu
3.
Part Names
Output tray (top cover)
(i^P. 15)
Left cover ( cg^P. 13, 57)
Paper support (P. 15)
Indicators and Button
(Front)
(0S= P. 12, 56)
Process unit
(i^ P. 13. 57)
Paper tray (P. 15)
Power switch (1®=' P. 14)
Power connector plug (I®* P. 14)
Frame ground terminal (d^ P. 14)-
Parallel interface connector ( P. 14)
(Rear)
fi)
3
(D
(A
11
Page 12
Before You Start
Indicators and Button
ERROR indicator
{ below, P. 56)
TONER/PROCESS UNIT
indicator ( below, P. 56)
Indicators
h
O
TONER/
READY
ERROR
u*
□
□ ■ □
□
N I /
■ □ ■
□ □
PROCEES
UNIT
■ □
N I /
□ □
V. I /
□
£
□
s
ERROR
TONER PROCESS UNIT
PRINT/RESET [
Warming up
Ready for printing
Receiving data, or printing
Data remains in the printer
Process Unit is not installed
Toner empty
B-
READY
READY indicator
( below, P. 56)
o
PRINT/RESET button
( below)
Printer status
+ Three indicators will light one after another.
■ : on : blinking {fast - with an interval of about 1 second)
□ : off ci: blinking (slow - with an interval of about 2.5 seconds)
• For error indication, refer to page 56.
PRINT/RESET button:
PRINT/RESET will execute one of the following functions depending on the status of the printer.
Indicators
o
S
READY
ERROR
□
□
: on □ : off ii: blinking (slow)
■
X I ^
□
TONER/
PROCESS
UNFT
□
□
Print a test page for DOS by pressing this button {< 5 seconds)
Reset the printer by pressing this button until the three indicators are lit
Print the remaining data by pressing this button (< 5 seconds)
Reset the printer by pressing this button until the three indicators are lit
Function
12
Page 13
Chapter 2 Setup
Preparation
Printer Stands Installation
Important;
To prevent any damage to the Process Unit,
observe the following precautions.
• Do not touch the green drum surface. Lift the
Process Unit by holding the green labeled tabs.
• Do not expose the Process Unit to light for more
than 5 minutes, or to direct sunlight.
• Do not keep the Process Unit near dust or dirt.
• Do not place the Process Unit in a high humidity
area.
Open the left cover by gently pulling the
1
cover release tab.
Open the plastic bag and remove the Process Unit.
0 Remove the protective sheet.
@ Remove the tapes.
3
(D
CO
0)
3
a
en
D)
3
a
T3
o
o
(D
CO
CO
C
3
rt»
3
CO
SL
5T
5*
3
2 Remove the Process Unit by grasping the
green labeled tabs and pulling it toward you.
2 Install the Process Unit by grasping the
green labeled tabs and pushing it firmly into
the printer.
Page 14

Setup
Close the left cover.
Connecting the Printer and Power On
This printer is equipped with a bidirectional parallel interface. If you do not have an interface cable, you will need to
purchase one from your local computer store or dealer.
^ Turn OFF the printer and computer.
Notes:
• PLEASE DO NOT THROW AWAY THE PACKING
MATERIALS. YOU MAY NEED THEM TO SHIP
OR TRANSPORT THE PRINTER.
• TO PROVIDE OPTIMUM PRINT QUALITY THE
UNIT MUST BE UPRIGHT AND KEPT LEVEL AT
ALL TIMES.
_____
0 Plug the other end of the cable into the
connector at the computer.
Notes:
• The actual connector on the computer
may differ depending on the manufac
turer of the computer.
• If the cable is connected to PC via
printer buffer or selector, the printer
may not print.
_.j
I
2 Plug one end of the cable into the parallel
interface connector of the printer.
Snap the clips into place.
If the cable has a frame ground wire, connect
it to the frame ground terminal.
Plug one end of the power cord into the
printer’s power connector plug.
Plug the other end of the power cord into a
3-prong AC wall socket.
0 Turn ON the printer and computer power
switches.
The printer is warming up.
The READY indicator, the ERROR indicator and
TONER/PROCESS UNIT indicator start lighting
one after another.
14
0 The printer is ready for printing.
The READY indicator is on.
Page 15
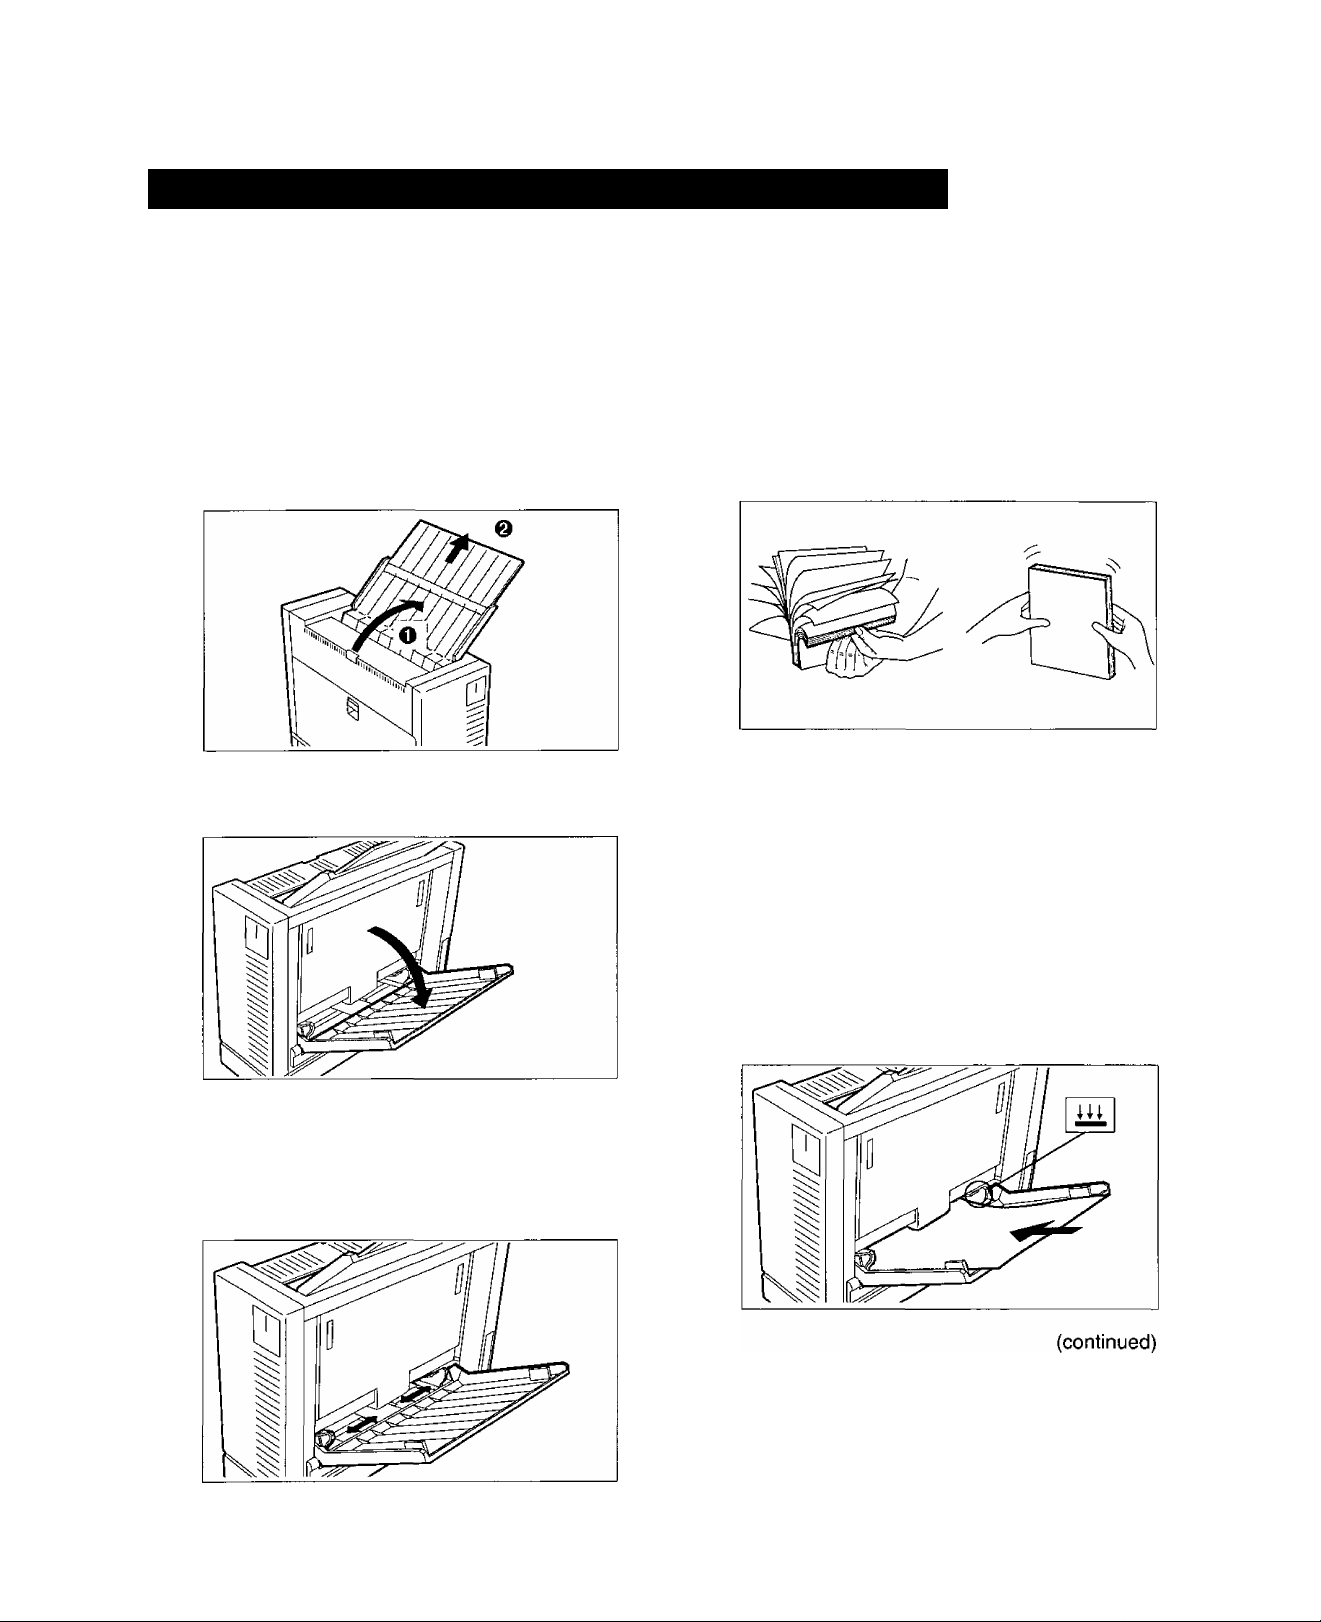
Setup
Loading Paper/Envelopes (Labels, Transparencies)
Loading Paper
This printer has a multi-purpose paper tray. The paper size selected through the GDI Mode ( P. 34) or PCL Mode
( P. 41) and your software application should also match the size of the paper in the paper tray for proper print
alignment.
O Open the output tray (top cover).
1
@ Extend the paper support by sliding it
upward.
2 Open the paper tray.
Fan the stack of paper and tap it on a level
surface to avoid paper jams or skewed print
ing.
Note:
• You may load up to 100 sheets of
75g/m2 (20 lbs.) paper in the paper tray.
Place the paper in the paper tray properly
and adjust the paper guides to your paper
size.
The height of paper should not exceed the limit
mark on the paper guide, or it may cause a paper
jam.
O
o
3
3
Q
o
5'
(Q
0)
-tJ
O
€
(D
o
3
o
&}
9:
5’
(O
■0
fi>
■D
<D
Separate the paper guides to the approxi
mate width of your paper.
Refer to the size indicators above the paper
guides for accurate paper width.
15
Page 16
Setup
Notes:
• If the paper guides are not adjusted properly, your printout may be skewed.
• Do not load paper of different types or thickness in the paper tray at one time; this may cause a paper jam.
• When you want to add more paper to the paper tray, you must first remove the remaining paper from the tray
and then place the entire stack of paper into the tray.
• Make sure you load the paper with the print side up. Most paper has instructions recommending the side to
be printed first. When using 60 g/m^ (16 lbs.) paper, always load the paper with the “non-curl side” up rather
than following instructions on the paper package.
• For more detailed information on paper, refer to “Paper Specifications” ( P. 61).
• Do not allow more than 50 sheets [75 g/m^ (20 ibs.)] to accumulate in the output tray. This may cause a paper
jam.
Loading Envelopes (Labels, Transparencies)
You may load either 30 sheets of labels, 30 transparencies, or up to 10 envelopes in the paper tray. You can use
Business Commercial #10, Monarch, International DL and International C5 envelopes. For more detailed information
on Envelopes, refer to “Envelope Specifications” ( irg= P. 63).
Notes:
• Make sure that all seams are properly sealed before loading envelopes.
• The envelopes must be loaded with the shorter side first to avoid a paper jam.
• When installing envelopes, the flaps should be face down.
•To print lengthwise on the envelope (along the longer side), set the printing mode to landscape
( cs=P. 34,41).
Perform steps 1 and 2 on page 15.
2 Adjust the paper guides to the approximate
width of your enveiope.
Piace the en veiopes in the paper tray with the
sides to be printed facing up. Position them
between the paper guides, and adjust the
guides untii you feel resistance.
16
Verify that your envelope matches the paper
size set through the GDi Mode ( P. 34) or
PCL Mode ( P. 41) and software applica
tion for proper print aiignment.
Page 17

Setup
KX-P6500 for Workgroups Configuration Overview
KX-P6500 for Workgroups provides three software configuration options depending on how you intend to use your
printer:
• Personal
Whether you use the printer in a network configuration or as a non-network printer, your configuration will provide all
the same print modes and printer features. Network and resource* sharing related features are not available in the
“Personal” configuration.
* A resource is a piece of data, software application, or hardware that can be accessed and used by multiple users
or system components. A resource provides a service.
Server
Client
Personal Configuration Overview
The Personal configuration is for users that are not connected to a network, or will not use the printer as a shared
network resource. If at some point, you choose to add network capabilities to your PC or you choose to allow the printer
to be a shared network resource, you will have to re-install the KX-P6500 for Workgroups software { c®" P. 20) and
select the Server User Type option ( P. 20). However, note the hardware requirements for Server PCs (i®" P. 10)
to ensure that you have the minimum hardware necessary to install as a Server.
Network Configuration Overview
Microsoft Windows for Workgroups or Windows 95 is designed as a peer-to-peer network. That is, each connected
PC is a peer to every other connected PC in the workgroup. This peer approach means that no PC in the workgroup
acts as a network administrator. The PC that has the printer connected to it performs some additional functions not
needed by PCs without a connected printer. Therefore, we have adopted the Client/Server terminology to differentiate
between those PCs that have a printer connected to them and those PCs that do not have a connected printer. A
Server is that peer with a connected and shared printer. A Client is a peer using a printer connected to a Server.
Note:
• For a peer to access another peer’s printer, both peers must have KX-P6500 for Workgroups software
{ D®* P. 20) installed and selected in their Windows printer list.
• A maximum of three PCs on the network can use KX-P6500 or KX-P6100 printer. If your network has more
than three PCs, the KX-PNW1 option (P. 58) is needed. The KXrPNWI can support a maximum of 25
PCs.
Server Configuration
The Server is the peer in the workgroup that has a printer connected to it. At installation, the KX-P6500 Setup program
asks if you wish to configure the PC as a Server or a Client. You must configure the PC with the attached printer as a
Server.
o
Q)
Q.
5'
CD
m
<
o
o
*o
o
CA
Î
o
3T
(Q
■D
CO
o
O
(Q
C
0»
5’
3
O
<
CD
"1
<
€
Note:
• If you previously installed and configured your PC as a Client, you must reinstall your printer as a Server
( c®* P. 20).
Any Server in the workgroup with KX-P6500 for Workgroups software ( c®* P. 20) installed can be effectively both a
Server and a Client. As a Server, that PC shares the connected printer with other peers in the workgroup. However,
when that server opts to print to a printer supported by another Server, that PC is acting as a Client to the other Server.
17
Page 18
Setup
___________
Client Configuration
The Client is a peer in the workgroup that wants to print to another peer’s printer.
Network Configuration Example
As you can see in the following figure, there are two PCs that have attached printers: Peer A with Printer A and Peer
D with Printer D. If Peer B chooses to print to Printer A, Peer B is the Client and Peer A is the Server for that print job.
If Peer A wants to print to Printer D, Peer A becomes a Client to Peer D, but Peer A remains the Server for Peer B’s
print job.
r Installing the Network Connection on Your PC
This section is for users that share the KX-P6500 printer on a network or for Clients that will use a shared printer. Skip
this section if you plan to install the Personal configuration option. To use the KX-P6500 in the network, the Windows
for Workgroups or Windows 95 network has been constructed in advance.
To install a network connection on your PC, you need a network card adapter {either an internal bus card, an external
PCMCIA card, or a parallel port version) and network software. Refer to your Microsoft documentation and network
interface card or network adapter documentation for specific details regarding network connectivity and configuration.
Using Microsoft Windows for Workgroups or Windows 95 will provide you the network connectivity necessary to use
the KX-P6500. Refer to the steps below to install a network connection on your PC.
Step
1 Setup a peer-to-peer Windows for
Workgroups or Windows 95
environment.
2 Enable the peer-to-peer network by
ensuring that peers can communicate
via the Mail and Chat applications.
3
Set Virtual Memory.
Action Comment
Refer to your Windows for Workgroups or Windows 95 and
network adapter documentation.
This step is recommended to ensure that your network is
operational and all connected network peers can
communicate.
Minimum virtual memory of 12 MB is required { ns* P. 19).
For Windows 3.1 or Windows for Workgroups 3.11.
permanent memory rather than temporary memory is
recommended.
n
18
Page 19

Chapter 3 Using the Printer in Windows
Allocating Virtual Memory
For Windows 3.1 or Windows for Workgroups 3.11
jhe KX-P6500 for Workgroups software requires a minimum of 12 MB of virtual memory for Personal, Client and Server
configurations.
To change the virtual memory, follow the instructions below. For more information on virtual memory, refer to the
Optimizing Windows section in the Microsoft Windows 3.1 User’s Guide.
1 Double click the Main icon from the
Program Manager screen.
Double click the Control Panel icon.
Double click the 386 Enhanced icon.
^ Click Virtual Memory
C If the size shown in the Virtual Memory dialog
box is less than 12,000 KB, then click
I
Change (.
Otherwise click \ Cancel to exit the dialog box.
0 Select the Type “Permanent” in the New
Swapfile Settings box.
For Windows 95
7 Increase the New size in the New Swapfile
Settings box to at least 12,000 KB.
Note;
• If you cannot increase the New size to
the desired figure, then select the Type
“Temporary" and set the virtual
memory size.
g Click [ж].
Click Yes .
10 Click
I
Restart Windows | to make the setting
effective.
(Q
о
о
D)
<
Д
c
m
(D
3
о
It is recommended that you let Windows manage your virtual memory. However, if you need to manually increase the
virtual memory, follow the instructions below.
1 Click the Start | button, move the pointer to
“Settings” and click “Control Panel”.
2 Double click the System icon.
“System Properties” window will be displayed.
Click the “Performance” tab.
4 1 Virtual Memory... |.
0 Click “Let me specify my own virtual memory
settings” button.
0 Increase the Minimum setting to at least 12.
У Click I OK
0 Click I Yes I.
0 Click fClose ].
10
I.
Click Yes to restart Windows.
19
Page 20

Using the Printer in Windows
Installing the KX-P6500 for Workgroups Software
The KX-P6500 for Workgroups software installation analyzes your system configuration, installs the software, and
makes the necessary changes to Windows startup files. Installation can be performed from the installation disks, the
Windows for Workgroups or Windows 95 network. Once a Server has installed the KX-P6500 for Workgroups software
on the Server PC, Clients can install Client software on the Client PC from disk #1 and then from across the network.
This instailation proceeds faster than disk installation.
The KX-P6500 for Workgroups software installations will create and let you use the following.
• KX-P6500 Console { P. 27) in the KX-P6500 Tools window
—includes printer drivers for Windows 3.1 and Windows for Workgroups 3.11, or printer drivers for Windows 95
—enables you to setup the printer in Windows
• KX-P6500 Control Panel { cw P. 44)
—enables you to setup the printer in MS-DOS
Notes:
• If you wish to discontinue installing the software during installation, first complete the installation procedure,
then use the Uninstall Utility to remove ( P. 24).
• Printer driver disks 2 of 4, 3 of 4 and 4 of 4 are the same and used for both Windows 95 and Windows 3.1.
r
Installing the Windows 3.1 Printer Driver & Utilities
^ To start Windows in the 386 Enhanced Mode,
type WIN at the DOS prompt and press
[ Enter] .
Insert the Windows 3.1 Printer Driver & Utilities disk 1 of 4 (#1) into disk drive A.
From the Program Manager, click “File’ Then click the “Run...” option.
A At the prompt, type A:\SETUP and click
The setup program has determined the following user
configuration for your KXP6500 installation. Make
any necessary changes and press [Continue].
Max. 15 characters are available for computer name.
User Type;
Computer Name:
Comments:
KX-P6500 Directory:
HOST Directory:
Continue
5a If you are installing the software on a
server/personal, click I Printer OTj.
5b
If you are installing the software on a client, click t No Printer I.
0 The Setup Program has determined the fol
lowing user configuration. If necessary,
make any changes to this window.
• UserType: Select personal. Client or Server depend
ing on your computer configuration.
• Computer Name: Type in the name of the computer
network or computer name, up to 15 characters, in the
Computer Name field.
• Comments: Type in any comments in the comments
field. For instance, software version No. or your name,
etc.
• KX-P6500 Directory: If you wish to install the KX-
P6500 for Workgroups software for Windows on an
other drive and/or directory, type the letter of the drive
and/or directory name in the KX-P6500 Directory field.
eanasonicIK'XEBSSOO
Personal
CUMPAU UF017
C:\KXP6500
C:\P6500CPS
Quit
©gag
Help
20
Page 21

Using the Printer in Windows
Host Directory: If you wish to install the Control
Panel Software for DOS on another drive and/or direc
tory, type the letter of the drive and/or directory name
in the Host Directory field.
Click Continue
s
r Continue Installation from-------------------------------
(§) \p\_skj
O
KXP6500 Server: I CUMPAU UF017 !
Q A If you wish to install the software from disks,
proceed to step 9.
8b
If you wish to install the software from
KX-P6500 Server, click on the “KXP6500
Server” button and select the server from
which you wish to continue installation.
• Make sure the KX-P6500 for Workgroups or
Windows 95 software has been installed on
the Server PC.
Rana son iclKX:g650plSetup
Continue
Note:
• If the Client’s Windows type (Windows for
Workgroups 3.11 or Windows 95) is differ
ent from that of Server’s, the software can
not be installed on a Client from the Server.
Install the software from disks.
Quit
10 The Setup Program has determined the
11
12
13
14 Click
Click Continue
following printer configuration.
The setup program has determined the following printer
configuration for your KXP6500 instaiiation. Make
any necessary changes and press [Continue].
Printer Type:
Parallel Port:
Default Connection to:
Options:
Continue
If necessary, make any changes to this win
dow.
Click Continue
Follow the instructions on the screen.
Remove the inserted disk.
1
Restart Now | to restart Windows.
nnstalling the Windows 95 Printer Driver & Utilities
Rana son iaK'X!R6500
Panasonic KX-P6500
LPT1:
Local
Main Tray
Quit
©Sfili)
Help
to
CO
■O
C/)
3
CP
3
(D
o
c
(A
o
Installing the Software on a Server/Personal
^ Turn the Printer on.
Confirm the READY indicator is lit.
2 Start computer using Windows 95.
“New Hardware Found” window will be
displayed.
• If the printer is not READY, “New Hardware
Found” window will not be displayed. After the
printer is READY, turn the computer off then
on again.
Click OK
“Install From Disk” window will be displayed.
Insert Windows 95 Printer Driver & Utilities
disk 1 of 4 (#1) into disk drive A.
Ciick OK
First, the “Panasonic KX-P6500 for Workgroups”
window appears, and then the “Panasonic
KX-P6500 Setup” window will appear.
Perform steps 5-14 of “Installing the Win
dows 3.1 Printer Driver & Utilities” on pages
20 and 21 to compiete the instaiiation.
(continued)
21
€
fi)
(D
Page 22

Using the Printer in Windows
Notes: |
• You can also install the Windows 95 Printer Driver & Utilities using the Add Printer icon of Windows 95. To do i
so, refer to the instructions on the label of the Windows 95 Printer Driver & Utilities disk 1 of 4.
• The Installation window lies behind other windows. To bring the installation window to the front, close other !
windows. i
Installing the Software on a Client
I
Start computer using Windows 95.
2 Insert the Windows 95 Printer Driver &
Utilities disk 1 of 4 (#1) into disk drive A.
Q Click the Start button, move the pointer
to “Settings” and click “Printers”.
Double click the Add Printer icon.
“Add Printer Wizard” window will be displayed.
Click Next>
0 Click “Network printer”.
^ Click I Next> I.
Type the network path or the queue name of
8
your printer in the Network path or queue
name box.
10 Click I Have Disk.. |.
“Install From Disk” window will be displayed.
Install From Disk
Insert the marxjfacture’s instalation dsk into
the drive selected, and then dick OK,
Copy manufacturer’s fiies from:
11 Click
Add Printer Wizard
CIckthe manufacturer and model of yourprinter. If yourprintercamewithan
instalation dsK dick Have Disk. If your printer is not Bsted, oonsiit vowprirter
documentation for a compatibte printer.
Printers:
OK
Cancel
Browse..
0 Click Next>
Add Printer Wizard
CIck the marxifactura'ardfTKxtel of your printer. If your printer came with an
installation dsk, dick Have Disk. If your printer is not listed, consult your printer
documentation tor a oorrpatibte printer.
Manufactures: Printets:
Apple LaserWriter
A
—
Apple Lasrwriter ii NT
Apple LaserWriter Personal NT
Apple LaserWriter Ilf
Apple LaserWriter Itg
▼
< Back
22
1 Apple
AT&T
Brother
Bull
Have Disk...
Next > Cancel
12
< Back Next >
Click “Panasonic KX-P6500” in the Printers box.
Cancel
13 Click I Next> I twice.
A
—
T
14 Click
First, the “Panasonic KX-P6500 for Workgroups”
vwndow appears, and then the “Panasonic
KX-P6500 Setup” window will appear.
I
Finish
1 5 Psi^orm steps 5-14 of “Installing the
Windows 3.1 Printer Driver & Utilities”
pages 20 and 21 to complete the installation.
Note:
• The Installation window lies behind other win
dows. To bring the installation window to the
front, close other windows.
on
Page 23

Using the Printer in Windows
Printer Resource Sharing
If during installation you have selected Personal or Client, skip this section.
The server printer must be shared and the client must be one of the authorized users of the server before a Client can
print to the KX-P6500 printer.
To share a printer resource the Server must perform the following steps:
1 From the Program Manager, double click the
Panasonic KX-P6500 Tools icon.
Double click the KX-P6500 Console icon.
0 Click the “Control Panel” tab or “Network”
menu.
^ Click
C Click on the item(s) that you want to share.
or “Share Printer”.
^ {i.e. GDI and PCL)
Click Clients .
i Stop Sharing the Printer Resource
To stop sharing the KX-P6500 printer resource, perform the following steps:
7a
To Remove unauthorized client(s):
• Select clients from the “Share with” list box,
then select the REMOVE button. (Select Re
move All will unauthorize all current connected
clients.)
7b To add authorized client(s):
• Select clients from the “Choose from" list box,
then select the Add button. (Select Add Alt will
authorize all current and thereafter connected
clients to share the printer.)
g Click ¡OKI.
Printer sharing will be established automatically
every time Windows starts up.
(O
a
o
o
5 3
0> fi)
w (Q
2 3-
o (D
CO <
—
=•
<
Perform steps 1 to 4 of “Printer Resource
Sharing” above.
2 Click off the item(s) that you want to stop
sharing.
3 Click [W
Connecting a Client PC to a Shared Printer
Before a Client can print, the Client must connect to a shared printer resource. To connect to a shared printer resource,
the Client must perform the following steps:
1 From the Program Manager, double click the
Panasonic KX-P6500 Tools icon.
2 Double click the KX-P6500 Console icon.
O Click the “Control Panel” tab or “Network’
menu.
4 Click ^ or “Connect to...”.
23
CD
O
ta
O)
Q
<d'
T3
o
Page 24

Using the Printer in Windows
g Click on the “Remote Printer on” button.
0 Select a Server you want to connect to.
Testing the Printer
To verify that the software installation was successful, perform the following steps:
If you are performing a test print on a
1
personal/server, be sure the printer’s cable
is attached to the printer parallel port that
was selected during Installation.
— or —
If you are performing a test print on client,
make sure the server has been selected for
All Print Mode. ( n®- Steps 1~8 above)
y The selected server can be used for all your
print modes by clicking on “Server of All
Virtual Printer” box.
0 Click [OK
y Select “Test Page” or “Configuration Page”
or both.
Click OK .
8
2 Make sure the printer is ready and paper is
loaded.
From the Program Manager double click the
Panasonic KX-P6500 Tools icon.
^ Double click the KX-P6500 Console icon.
Click the “Control Panel” tab.
5
Click the
6
The Print Test Page screen is displayed.
O'
(Print Test Page) button.
TEST
Note;
• It is recommended that you close all active
Windows applications before printing a test
page, and make sure that there are no print jobs
paused in the KX-P6500 Console ( P. 27).
Otherwise, test printing may not be possible.
Removing the KX-P6500 for Workgroups Software
If you need to remove the KX-P6500for Workgroups software, perform the following.
^ From the Program Manager, double click the
Panasonic KK-P6500 Tools icon.
3 Click [^.
“1
2 Double click the Uninstall Utility icon.
24
^ The one remaining file (delete.exe) and
directory must be manually removed by the
user after uninstallation.
Page 25

Using the Printer in Windows
Print Modes
Print Mode Selections
You can select either of the two print modes, GDI Mode {P. 34) or PCL Mode ( P. 41), according to your
requirements. If you cannot determine which print mode is best suited for your printing applications under Windows,
we recommend you always use GDI Mode first.
GDI Mode has the following features:
• faster printing, as much as five times faster for some
files
• manual duplex printing ( P. 36)
• 1st page on top {reverse order printing) ( P. 35)
• overlay ( P. 36)
PCL Mode Is effective in the following cases:
• when you want to print a file created with an MS-DOS
application '
• when you want to print a PCL format file
• when you want to print an ASCII formatted file
• when you want to print complex graphic files that
Windows may not display well
Automatic Emulation Switching
When you send a print job to the printer, the printer will determine which language is being used by the print job, and
the printer’s personality will automatically switch to that language (GDI or PCL). If the personality is switched, the
printer’s memory will be reconfigured and all user-downloaded data will be lost.
When the Printer Configuration is Changed
When the printer is changed to KX-P6500/KX-P6100 ( P. 59), you must select the “Local Printer Change” in the
Settings menu in the KX-P6500 Console window ( cS" P. 27, 33). When the RAM Expansion Board option ( P. 58)
is installed in the printer, Windows must be restarted.
Printing Documents
Printing From a Windows Application
(Q
CO
(D
CO
5’
(D
■o
12.
5‘
CD
X
(D
3
o
<.
5'
Once you have selected your print mode (GDI or PCL emulation *), just print from your Windows application as you
would to any other printer.
* Emulation means to operate like another printer.
Printing From a DOS Application Within Windows
If the KX-P6500 is in PCL Mode, it can print a DOS application file as follows: Double click the MS-DOS icon in the
Main window, start the DOS application and print a file. We recommend that you print a DOS application file after
exiting Windows because some applications may not allow you to print properly under Windows,
25
o
3T
(Q
o
c
■O
to
CO
o
€
fi)
<0
T3
S'
O
a
(D
(/)
Page 26

Using the Printer in Windows
[ Changing the Print Mode
There are three methods of changing the print mode between GDI Mode and PCL Mode (see A, B, and C).
A: From an Application
Most of the popular Windows applications allow you to change GDI Mode/PCL Mode. For example, to change the
mode in Microsoft Write, perform the following.
^ Select “Print Setup...” under the File Menu.
The Print Setup window will be displayed.
2 Select the desired print mode.
To change to GDI Mode or PCL Mode, select
“Panasonic KX-P6500 GDI on KXPGDI” or
“Panasonic KX-P6500 PCL on KXPPCL”.
B: From the Control Panel in Windows
*1 Double click the Main icon in the Program
Manager to display the Main window.
Double click the Control Panel icon in the
Main window.
Double click the Printers icon in the Control
Panel window.
Click OK
^ Select the desired print mode.
To change to GDI Mode or PCL Mode, select
"Panasonic KX-P6500 GDI on KXPGDI” or
"Panasonic KX-P6500 PCL on KXPPCL”.
g Click [Set As Default Printer
The print mode you selected in step 4 appears
in the Default Printer field.
Click Close
C: From the Control Panel Tab of the KX-P6500 Console
1 Double click the Panasonic KX-P6500 Tools
icon in the Program Manager to display the
Panasonic KX-P6500 Tools window.
2 Double click the KX-P6500 Console icon.
0 Click the “Control Panel” tab in the KX-P6500
Console window.
^ Click the Printer list box.
26
0 Select the desired print mode.
To change to GDI Mode or PCL Mode, select
“GDI» Panasonic KX-P6500 GDI” or “PCL»
Panasonic KX-P6500 PCL”.
Click Set As Default .
y Minimize the KX-P6500 Console.
Page 27

Using the Printer in Windows
KX-P6500 Console
The KX-P6500 Console provides a single access point to the four major program screens. The purpose of the KX-P6500
Console is to provide an easy means to configure the KX-P6500 printer and to monitor and control print jobs.
To display the KX-P6500 Console window, perform the following.
i From the Program Manager double click the
2 Double click the KX-P6500 Console icon.
Panasonic KX-P6500 Tools icon.
The Panasonic KX-P6500 Tools window will be
displayed.
K-XïeeSOOIGonsSlë
File View Settings Network Run Help
Local Queue J Remote Queue Job Log Y Control Panel
II
>
Resume №leta
Pause
I Job Name~
Status No current print job.
Each of the four major program features can be viewed by clicking the tab under the window menu bar. The four tabs
are:
• Control Panel
• Local Queue
• Remote Queue
• Job Log
For descriptions of the menu bar items, refer to “KX-P6500 Console Menu Items” on page 32.
-e
□ Show My Jobs Only
I Format I ^izeTtinrie l OwneT
The KX-P6500 Console window will be
displayed.
T A
Control Panel
The Control Panel provides the mechanism to configure and control the printer. Figure A { bs" P. 28) shows the Control
Panel tab of the KX-P6500 Console. The Control Panel is divided into six button categories, the Printer information
and printer selection display. The Printer group item presents the currently selected printer and provides a list of
additional printer selections. The printer selections applicable to your printer are:
• Panasonic KX-P6500 GDI
• Panasonic KX-P6500 PCL
(O,
(Q
O
3*
0)
3
3*
(D
■O
0
Û.
(D
X
■D
o>
Ol
o
o
o
o
3
<0
o
<D
O
o
3
T3
fi)
3
(D
1
27
Page 28

Using the Printer in Windows
To display the Control Panel features, click the “Control Panel” tab in the KX-P6500 Console window.
Figure A
File View Settings Network Run Help
Local Queue Remote Queue Job
T A O ☆ @
r Printer-----------------------------------------------
||T] GDI»Panasonic KX-P6500 GDI
ItS Print to: COMPAQ UF017 (Local) |
Use the list bar to highlight the print mode you want to use. Then, to apply the selected printer, click
I
Set As Default
The following table provides a brief description of the Control Panel buttons and refers you to the page number that
provides detailed information about the available features.
I.
You can also request the current printer status through the
Icon
Allows you to choose from three toner saving modes: light, medium, and dark.
Toner Saving
The off selection is for regular print toner use. Toner saving modes can
significantly reduce toner costs by extending the life of your toner cartridge.
Smooths the jagged edges of your line art and text characters.
A
CU) Density
Provides five shades of density. The default is 3.
KX:R6500ICon^le
Log Y
Control Panel
s a lirais
+1
Description
Set As Default
Local Printer Status
I
Local Printer Status].
Page
32
32
32
Power Saving
vl =
Printer Setup
Connect Port
PCL Control
RGL Panel
Jgl DOS Printing
DQS Options
Share Printer
^ Connect to
Client Monitor
Printer Status
Print Test
TEST Psge
Identifies the wait time between last printer use and start of printer power
saving.
Used to configure the printer.
Identifies the port where your printer is connected, such as LPT 1.
Displays the PCL Control Panel Menu.
Allows you to configure how DOS print job within Windows printing is to be
processed.
Allows you to share the printer with Clients.
Allows you to connect to a shared printer.
Allows you to view the Clients.
Allows you to select whether you want the Printer Status window to display
when an error occurs.
Allows you to print GDI 600 dpi test pages and configuration page.
32
33
33
33
33
33
33
33
43
24
28
Page 29

Using the Printer in Windows
Local Queue
The Local Queue is used to review the status of your queued print jobs. For Servers, all pending print jobs are local
to the Server. For Clients, the Local Queue represents print jobs that have been queued to a remote Server but are
not yet transferred to that remote Server.
To display the Local Queue features, click the “Local Queue” tab in the KX-P6500 Console window.
KX=R65001Gonsolg
File View Settings Network Run Help
Local Queue | Remote Queue Y Job Log Y Control Panel
II 0
Pause Resume
Job Name
Status No current print job.
The Local Queue displays:
• the print job name
• the format of the print job (GDI, PCL)
• the size of the print job in bytes
The job owner category is primarily applicable to the Server.
The Local Queue displays the status of the job currently being printed. For Clients, this status will display only when
the Client’s print jobs are being printed.
Note:
• Print job in the Local Queue will be displayed only when “Use Panasonic KX-P6500 Print Manager" is selected
in the Panasonic KX-P6500 GDI window ( P. 35).
^1©
Add Delete
□ Show My Jobs Only
Format
• the time the job was sent to the queue
• the owner of the print job
Size! Time Owner
] :
Changing the Order of Print Jobs
><
■b
O)
Ol
o
o
O
o
3
(0
o
CD
o
o
fl)
(D
c
CD
Both Servers and Clients support drag-and-drop jobs within the Local Queue to change the job order in the print queue.
Drag-and-drop is available for jobs that have not started printing. To drag-and-drop, perform the following steps:
^ Place the mouse cursor at the beginning of
the print job you want to select.
2 Press and hold the left mouse button.
2 While holding the left mouse button down,
move the mouse.
As you position the mouse, print jobs will be
highlighted.
^ Move the mouse to the last print job you want
to seiect.
2 Release the left mouse button.
The print job will remain highlighted.
Return the mouse cursor to the beginning of
the selection.
Note the l-bar cursor turns into an arrow when
the cursor is in the highlighted area.
29
Page 30

Using the Printer in Windows
y Depress and hold the left mouse button.
0 While holding the left mouse button down,
move the mouse arrow to the place you wish
to drop the selected print job(s).
The following table provides a brief description of the Local Queue button icons.
Icon Description
II
Allows you to pause printing.
Allows you to resume printing.
Allows you to add a print job to the print queue.
Allows you to delete the highlighted print job from the print queue.
Release the mouse button.
Remote Queue
The Remote Queue is used to review the status of your queued print jobs at the remote printer. This queue is primarily
for Clients to review their print jobs. Clients can select from among the shared printers through the “Show Print Queue
for:” list box.
To display the Remote Queue features, click the “Remote Queue” tab in the KX-P6500 Console window.
K-X!R65001Gonsote
File View Settings Network Run Help
Local Queue J Remote Queue Y Job Log Y Control Panel
II
PauseD>Resume Add Delete
iJob Name Format Size! Time I Owner
Print Servers Printer Status
Show Print Queue for:
□ Show My Jobs Only
Comments
Show Server
B
Show Print Queue for:
Allows the Clients to select from among the shared
printers. Clicking the list box will show you all available
shared printers.
Show Server
Clicking on the “Show Server” check box will display the
box B. This box will show you all the servers with their
status.
Show My Jobs Only
Clicking on the “Show My Jobs Only” check box will only
display your print jobs in box A.
30
Page 31

The Remote Queue displays:
Using the Printer in Windows
• the print job name
• the format of the print job (GDI, PCL)
• the size of the print job in bytes
The job owner category is primarily applicable to the Server. The drag-and-drop (reordering the print jobs) feature is
not available in the Remote Queue.
The following table provides a brief description of the Remote Queue button icons. The Remote Queue displays the
status of the job currently being printed.
Icon
II
Allows you to pause printing.
Allows you to resume printing.
• the time the job was sent to the queue
• the owner of the print job
Description
l>
Allows you to add a print job to the print queue.
Allows you to delete the highlighted print job from the print queue.
Job Log
The Job Log provides a historical log of the last 10 jobs queued for print. To display the log of the last 10 jobs, click
the “Job Log” tab in the KX-P6500 Console window.
K-X;R6500IGonsole
File View Settings Network Run Help
------------------
Local Queue Remote Queue Job Log [ Control Panel
Last 10 Print Jobs;
y y,
ITime ¡PrintedTo | Job Name [Format [Statuì
-----------------Sy--------------
X
*b
o>
CXI
o
o
o
o
3
(0
o
(D
3
(D
3
o
if
o
c
(D
C
(D
The Job Log displays:
• the time the job was printed
• the Server name
• the job name
The Job Log is more useful for Clients in workgroup environments, where there are multiple printers supporting differing
printer characteristics.
• the format of the print job (GDI, PCL)
• print result
31
(Q
O
O'
I”
o
Page 32

Using the Printer in Windows
KX-P6500 Console Menu Items
The KX-P6500 for Workgroups software provides the standard Windows menu items which are available in most
Windows applications, as well as application-specific menu items. Some of the menu items match the buttons available
on one of the tabbed displays. However, there are some printer functions that can be accessed only through the
pull-down menu, such as the setting of print priority.
File
The File pull-down menu provides selection to exit your application. This menu also provides selections to pause or
resume printing and add or delete a document to and from the queue.
View
The View pull-down menu allows you to define different ways to display the print queues. You can view a list of queued
print jobs, define the time stamp, or show a particular print queue.
Settings
The Settings pull-down menu allows you to define the default settings for many of the following printer features.
Toner Saving Mode
With Toner Saving Mode turned on, your printer will
reduce the amount of toner used to print. Black areas
and text are replaced by a light gray shading.
• Light Text and objects on the page have a black
outline along their left edge.
• Medium Text and objects on the page have a black
outline along left and right edges.
• Dark Text and objects on the page have a black
outline along ail edges. This setting is rec
ommended over Light and Medium if you
expect to fax or photocopy the document.
• Off This is the default setting and is recom
mended for the highest print quality.
If there are white vertical lines in the test print {Figure 1),
set the EET to a darker setting. If there are dark vertical
lines in the test print {Figure 3), set the EET to a lighter
setting.
I' II
Figure 1 Figure 2 Figure 3
Note:
• The Density settings interact with EET. When
you change the Density, readjust the EET set
ting.
Density
The Density setting allows you to define the darkness of
the dots placed on the paper. There are five settings:
Level 1,2, 3, 4, and 5.
EET (Edge Enhancement Technology)
With EET turned on, the KX-P6500 will smooth the
jagged edges of text and line art, giving the output a very
high quality appearance. There are three settings:
Light, Medium, and Dark. The factory default setting is
Medium. If the EET setting is too dark, the edges appear
to bulge.
The demo page of the test print ( P. 24) has an Edge
Enhancement test block. As a general guideline, select
the EET setting so as to make this block look like a
uniform gray block as shown in Figure 2.
Power Saving Mode
With Power Saving Mode turned on, you can save
energy by instructing your printer to enter a low power
consumption mode when it is idle for 15 minutes.
For USA: To conserve energy and reduce operating
cost, the printer is equipped with a programmable power
save feature. The printer is factory set with the power
save feature turned on and programmed to 15 minutes
to comply with EPA’s Energy Star requirements.
32
Page 33

Using the Printer in Windows
Printer Setup
The Printer Setup displays the primary printer settings
and configuration dialogue that also provides advanced
setting and features.
Connect Port
The Connect Port lets you select a different parallel port
for your printer. You can choose either LPT1, LPT2, or
LPT3. Your PC hardware configuration may limit your
individual options.
PCL Control Panel
The PCL Control Panel displays the PCL Control Panel
window { US’ P. 42). This control panel provides config
uration options for PCL printing from MS-DOS applica
tions printed from the MS-DOS icon command line under
Windows.
This setting is effective only when the “Spool as PCL
4.5" has been selected in the DOS Printing Option
window. See below.
DOS Printing Options
The DOS Printing Options provides print emulation op
tions for DOS printing.
You can select “Spool as PCL 4.5” or “Direct to Port” in
the Printing Mode list box.
Spool as PCL 4.5: makes the PCL Control Panel
settings effective.
Direct to Port: makes the DOS application’s settings
effective.
Some applications may not operate properly if the
“Spool as PCL 4.5” has been selected. In that case,
select “Direct to Port”.
Print Priority
Windows lets you run several applications at the same
time. This helps productivity but means you are sharing
your PC resources among several activities.
The KX-P6500’s priority settings let you control the
priority of the printing activity relative to other applica
tions running at the same time.
You can select High, Medium, or Low priority. Printing
at high priority produces output faster but may slow
down your system more than the other priority settings.
On the other hand, printing at lower priority lets your
other applications run faster but also means your docu
ment will take longer to print.
Local Printer Change
Clicking this selection will search which printer,
KX-P6500 or KX-P6100, is connected to serve as a local
printer and automatically change the printer driver to the
corresponding one.
Network
The Network pull-down menu allows you to share and connect to a network printer and Clients Monitor (if configured
as a Server) and change status settings, such as print job notifications.
O)
o
o
X
“b
Ol
O
o
3
w
o
(D
(D
3
c
Share Printer
This selection is only available to Server configured
users. When selected it will set the printer as Shared.
Connect to
This selection is available to Client and Server config
ured users. When selected it will display a list of avail
able printer Servers that can be selected.
Client Monitor
This selection is available to the Server and provides the
capability to monitor the print activities of Clients using
the printer.
Notify
This selection is available to all users and defines the
various status selections and their display options.
Selecting “Remote Status Report" allows you to see the
server’s Printer Status window on the client.
Change Name
This selection is available to all users and allows the user
to change the computer name. You must exit and restart
Windows before this change takes effect. The new
computer name must not exceed 15 characters.
Run
The Run pull-down menu allows you to examine the status of the printer and print a test page.
• The “Close Interpreter” selection can clear the PCL Printer icon after a DOS application has been printed using the
KX-P6100 printer.
33
3
0)
Page 34

Using the Printer in Windows
KX-P6500 GDI Mode
You can select the GDI Mode from an application, through the Control Panel’s Printer window, or through the Control
Panel tab of the KX-P6500 Console window {P. 27). The Panasonic KX-P6500 GDI window lets you select certain
settings for your print job.
To display the Panasonic KX-P6500 GDI window, perform the following.
Double click the Panasonic KX-P6500
1
Tools icon in the Program Manager.
The Panasonic KX-P6500 Tools window is dis
played.
2 Double click the KX-P6500 Console icon.
Click the “Control Panel” tab.
Orientation
f- Paper Size
(•) Portrait
O ^ndscape
® D
^ Click the Printer list box.
g Select “GDI» Panasonic KX-P6500 GDI”
0 Click “Settings” menu.
y Click “Printer Setup...”.
The Panasonic KX-P6500 GDI window is dis
played.
RanasoniciK‘X:R65uO
Copies:
Resoiution: 600 dpi
□ Enabie Photo Enhancement
Q Use Panasonic KX-P6500 Print Manager
@!0
OK
Cancel
Options
2Up/4Up
About...
34
Letter81/2x11 in
o Q
Monarch 3 7/8 X 7 1/2 in hi
Note;
• Some applications may not allow you to change the settings through the Panasonic KX-P6500 GDI
window. In that case, you can change the settings using the Control Panel in Windows as follows:
1. Perform steps 1 -4 of “From the Control Panel in Windows” on P. 26.
2. Click I Setu|^ in the Printers window.
3. Make the desired changes.
Page 35

Using the Printer in Windows
Paper Source
Your printer has only one paper source, the Main tray.
Orientation
Choose Portrait (vertical) or Landscape (horizontal).
Paper Size
Allows you to select a different paper size.
Copies
Allows you to determine how many copies of the docu
ment will be printed.
Resolution
Your printer provides two resolution settings:
600 X 600 dpi (dots per inch) and 300 x 300 dpi.
Higher resolution produces better quality output but
requires more time to print a document.
Enable Photo Enhancement
Selecting “Enable Photo Enhancement” will improve the
quality of the image output. However, by enabling photo
enhancement the KX-P6500 will require more time to
print a document.
An overrun situation has occured. To print the image
with Photo Enhancement On, reset the print resolution
to 300 dpi. To print in 600 dpi with Photo Enhancement
On, you must add additional memory. Contact your
Panasonic dealer for details.
Note:
• This feature may not be effective for some
applications.
Use Panasonic KX-P6500 Print Manager
Selecting “Use Panasonic KX-P6500 Print Manager"’
turns the Print Manager on when using GDI Mode. The
KX-P6500 Print Manager allows you to use:
• 1st page on top (reverse order printing) ( P. 35)
• Duplex Printing ( ds=* P. 36)
• Overlay ( P. 36)
• Local Queue ( i®- P. 29) both in GDI Mode as well as
in PCL Mode
However, the print speed will be slower when the
KX-P6500 Print Manager is activated.
1st Page On Top (Reverse Order)
The printer normally prints documents in page number
order (i.e. page 1 first). Clicking on the check box at the
left of “1 St page on top (Reverse order)" will instruct the
printer to print your output in reverse order.
OK
OK I to make your changes take effect and return
Click
to the previous screen.
Cancel
Click I Cancel | to ignore any changes you have made
and return to the previous screen.
Options
This button provides advanced GDI features, such as
duplex printing, overlay, and reverse printing. Also see
“Using Options” on page 36.
2 Up/4 Up
The printer lets you print 2 or 4 pages on a single sheet
of paper. Also see “Using 2 Up/4 Up” on page 40.
X
"O
O)
ui
o
o
O
a
o
Q.
(D
I
About
Click About to display the program version and copy
right information.
35
Page 36

Using the Printer in Windows
Using Options
Make sure that “Use Panasonic KX-P6500
Print Manager” is selected in the Panasonic
KX-P6500 GDI window { P. 34).
P Duplex Printing
□ Manual Duplexing
O Book Style
O Report Style
I
Q Print Instruction Page
Scaling
I— Print To File
100
%
1 C:\KXP6500\DEFAULT.GDI |
2 Click I Options I in the Panasonic KX-P6500
GDI window.
The Options screen is displayed.
OK
Cancel
Image
Overlay
Default
Help
Browse
Duplex Printing
You can print your file on both sides of the paper by first
selecting “Manual Duplexing”, then selecting either
Book or Report. When performing this feature, follow the
instructions displayed on the screen.
Scaling
Use Scaling to reduce or enlarge your output on the
printed page from 10% to 500%.
Print to File
If you select File Name, the output will go to a file instead
of the printer.
The print file is stored in GDI format. Use the Add button
on the Local Queue of the KX-P6500 Console
( US" P. 28) to print from a file.
Image
The Image feature lets you adjust the brightness and
contrast of your output. Also see “Using Image Options”
on page 40.
Overlay
The Overlay feature lets you overlay an image over any
document printed in GDI Mode (i®=- P. 37).
Default
Click
I
Default | to restore all settings to their default
values.
Help
Click
I
Help
P6500 for Workgroups Help system. Within the Help
system, you can select Contents to see a list of topics
related to the KX-P6500.
for detailed information about the KX-
36
Page 37

I
Using Overlay
You can use the Overlay feature to:
• Incorporate your letterhead on the first page of a business letter.
• Print your logo at the bottom of each page of a set of presentation slides.
• Overlay the word “Confidential” on every page of an important document.
• Print a special cover page or trailer page { us" below) for each print job.
Using the Printer in Windows
Ensure that the “Use Panasonic KX-P6500
1
Print Manager” is seiected in the Panasonic
KX-P6500 GDi window ( P. 34).
2 Ciick Options
The Options screen is displayed {P. 36).
O Ensure that the “Manuai Duplexing” in the
Duplex printing box is disabled.
^ Click I Overlay |.
The Overlay Options screen is displayed.
X
■b
O)
CJl
o
o
O
D
O
a
o
Print Cover Page
Select this feature to print a cover page on a separate
page before the remainder of the document.
Print Trailer Page
Select this feature to print a trailer page on a separate
page after the document has been printed.
Print Overlay
This feature will overlay your image on the pages of your
document. The effect is similar to printing your image on
a transparency, then putting the transparency over your
document.
• Select Overlay 1st Page to overlay the image only on
the first page of the document.
• Select Overlay All Pages to overlay the image on each
page of the document.
• Select Overlay From to overlay the image on a range
of pages within the document.
Browse
After selecting Print Cover Page, Print Trailer Page, or
Print Overlay, clicking | Browse | will let you search for
the GDI file in the file system.
37
Page 38

Using the Printer in Windows
Overlaying and Printing a Document
1 Using an application such as Paintbrush,
CorelDRAW or PageMaker, create and save
the graphic file that you want to overlay on a
document.
2 Verify the graphic by printing it, and
minimize the application.
Perform steps 1 to 7 of “KX-P6500 GDI Mode’
on page 34.
GanasoniclK‘X=R6500
Paper Source Main Tray
Orientation
----------------
®E)
OK
Cancel
Options
2Up/4Up
About...
Enter a new file name or the same file name
with the GDI extension (.GDI) and click | OK |.
• The GDI file extension must be used to desig
nate the difference between a GDI file and an
application file. Otherwise, the application file
will be overwritten by a GDI file.
y Click | 6k" I in the Panasonic KX-P6500 GDI
window.
0 Minimize the KX-P6500 Console window.
0 Double click the same application which you
minimized in step 2 and perform the print
operation.
Your created file will be stored as a GDI file.
10
Perform steps 2 to 7 of “KX-P6500 GDI Mode’
on page 34.
4 Click I Options I.
The Options window is displayed.
Scaling
r- Print To File
□ File Name | C:\KXP6500\DEFAULT.GOI || Browse
R Select “File Name” by clicking on the check
Scaling
r- Print To File
100
box at the left.
An X mark appears in the check box.
100
File Name C:\KXP6500\DEFAULT.GDI Browse
11 Select “Use Panasonic KX-P6500 Print Man
ager” by clicking on the check box.
An X mark appears in the check box.
eanasoniciK’X:R6500
Paper Source | Main Tray
Orientation
1
----
r Paper Size
---------
Portrait
1 riL;
O Landscape
---------
-
® □
|Letter81/2x11 In |
oQ
1 Monarch 37/8 X 71i2 in
a
Copies:
Resoiution: 600 dpi
QEnabie Photo Enhancement
Use Panasonic KX-P6500 Print Manager
□ 1 St page on top [Reverse Order]
m
OK
Cancel
Options
2Up/4Up
About...
1 2 3
38
Page 39

Using the Printer in Windows
Options
i Q Deselect “File Name” by clicking off the
check box at the left.
The X mark will be cleared from the check box.
Options
P Duplex Printing
Q Manual Duplexing
O 5°®*^ style |e!eI
O Report Style p“
□ Print Instruction Page
Scaling
f- Print To File
□ File Name C:\KXP6500\DEFAULT.GDI j Browse
100
OK
Cancel
Image
Overlay
Default
Help
14 Click I Overlay I
The Overlay Options window is displayed.
□ Print Cover Page
Q Print Trailer Page
□ Print Overlay
File Name: |C:\KXP650<nPRINT.GD)
File Name: m:\KXP6500\PRINT.GDI
File Name [ C:\KXP6500\OVERLAY.GDI
Cancel
Browse
Help
OK
ig Click
Browse
The Browse window is displayed.
Browse
File Name:
*.gdi
bookdn.gdi
gdiSOOpe.gdi
gdiSOOpe.gdi
overlay .gdi
print.gdi
reportdn.gdi
testl.gdi
List Files of Type: Drives:
GDI Rles [*.GDI]
Select File As: O Cover Page 0 Overlay O Trailer Page
Directories;
c:\kxp6500
t
4^
c:\
kxp6500
Cjhelp
O spool
1^ c: ms-dos 6
OK
Cancel
t
4^
17 Double click on the directory in which you
saved your graphic file (GDI file), then select
the file and click | OK 1-
The selected file will appear in a box in the
Overlay Options window.
18 Click
19 Click
I
OK I in the Overlay Options window.
I
Ok1 in the Options windows.
2Q Click I OK~| in the Panasonic KX-P6500 GDI
window.
21 Minimize the KX-P6500 Console window.
7s
X
■D
o>
cn
o
o
O
a
o
Q.
(D
I
O Overlay .1st Page
Q Overlay AH Pages
O Overlay From: [□ To: □]
15 Click on the desired selection (s).
For example, select Print Cover Page.
22
Print the desired document.
The graphic will be overlaid on the pages of your
document.
39
Page 40

Using the Printer in Windows
fusing Image Options
i Click I Options in the Panasonic KX-P6500
GDI window ( P. 34).
The Options screen is displayed.
2 Click [ Image
The Image Options screen is displayed.
Q5EEp(a№SB
Brightness Control
Dark Light
4-
Normal
P Contrast Control —
Smooth
4-
Default
--------------
Cancel
50
Sharp
-►
50
OK
The Image Options screen lets you adjust the appear
ance of your output. These adjustments only apply to
certain types of images and grayscales, not to text or
black line drawings. Refer to page 32, Toner Saving
Mode, for information on lightening the appearance of
text and some line art.
The figure at the right of the screen will change as you
move the controls, giving you a rough idea of the effect
of your adjustments.
Note:
• This feature may not be effective for some
applications.
Brightness Control
Drag the Brightness knob or click on the arrows to vary
the shades of gray, making the image output appear
lighter or darker.
Contrast Control
Drag the Contrast knob or click on the arrows to make
the image output appear sharper or smoother.
Using 2 Up/4 Up
i Click I 2 Up/4 in the Panasonic
KX-P6500 GDI window.
The 2 Up/4 Up Printing screen Is displayed.
2UpyjtUg
□ □
0 1 Up O 2 Up O 4 Up QDraw Frame Border
40
OK
Cancel
• 1 Up: prints normally.
• 2 up: prints two pages on one sheet of paper. In
portrait mode, the pages display side by side as in a
book.
• 4 up: prints four pages on one sheet of paper.
Draw Frame Border
If you click on Draw Frame Border, the printer will draw
a box around each page on the paper.
Page 41

Using the Printer in Windows
KX-P6500 PCL Mode
You can select PCL Mode from an application, through the Control Panel’s Printer window, or through the Control
Panel tab of the KX-P6500 Console window ( c®* P. 27).
PCL Control Panel
The KX-P6500 for Workgroups lets you print from MS-DOS applications. Your printer also provides a PCL Control
Panel similar to the conventional PCL printer’s key panel for DOS PCL printing. This allows you to change printer
settings for your DOS print jobs.
To display the Panasonic KX-P6500 PCL Control Panel, perform the following.
From the Program Manager double click the
1
Panasonic KX-P6500 Tools icon.
The Panasonic KX-P6500 Tools window
is displayed.
Double click the Panasonic KX-P6500
Console icon.
The KX-P6500 Console window is displayed.
//
Reset Help
Paper Size
^ Paper
Letter 8 1/2x11 in
O
Envelopes
Monarch 3 7/8x7 1/2 in
2 Click the “Control Panel” tab.
Click PCL Control Panel icon (
The Panasonic KX-P6500 PCL Control Panel
window is displayed.
RanasoniclK‘X:R6500IRGI!tGontrol
0
■
Defaults
—■
About Cancel
r Orientation
□
Auto Continue
®On
" Default Font
Font:
Courier Upright Medium
Symboi Set:
ROMAN-8
Pitch:
10
(?) Portrait
O Landscape
O of f
OK
7s
X
■b
O)
cn
o
o
O
O
Q.
(D
- Page Protection
Automatic
41
Page 42

Using the Printer in Windows
Reset
After clicking the Reset button, the current displayed
PCL Control Panel settings will be saved and the saved
settings will be applied to succeeding PCL jobs. Present
PCL printing job will not be affected.
Help
Click the Help button for detailed information about the
KX-P6500 for Workgroups Help System.
Paper Size
To select paper/envelope from within the Paper Size
box, first click on the paper/envelope icon. Then select
the paper/envelope size that you wish to use.
Paper Source
Your printer has only one paper source, the Main tray.
Copies
Allows you to determine how many copies of the docu
ment will be printed.
Lines/Page
Allows you to set the maximum number of lines that can
be printed on a page.
Orientation
Choose Portrait (vertical) or Landscape (horizontal).
Page Protection
Page Protection lets you select the reserve additional
memory for PAGE PROTECTION. If you choose Auto
matic, it additionally reserves memory to process the
entire page (in memory) composed with very dense or
complex graphics and text before printing out of page.
This setting assures complete printing. If you choose
Off, it does not reserve additional memory.
Default
Click Default I to restore all printer settings on the
screen to their default values.
About
Click I About
right information.
to display the program version and copy
OK
Click I OK I for your changes to take effect. When you
exit, the PCL Control Panel will load the PCL compatible
interpreter into your PC’s memory. This will save time
when printing from MS-DOS applications under Win
dows.
However, you can close the PCL compatible interpreter
and recover the memory. Click the KX-P6500 PCL
Control Panel icon, then click
I
Close
1.
Auto Continue
Specifies whether the printer should automatically
resume the current print job after an error is corrected.
Default Font
Default tont lets you select the default typeface, size,
and style for print jobs that are output from MS-DOS
applications and for Windows PCL print jobs. Both MS-
DOS and Windows applications can override the default
font selection.
• Please note that you do not have access to Windows
TrueType fonts for MS-DOS print jobs.
42
Cancel
Clicking
made to the PCL printer settings and will exit the PCL
Control Panel without loading the PCL compatible inter
preter.
Cancel
will disregard any changes you have
Page 43

KX-P6500 Printer Status
The Panasonic KX-P6500 Printer Status program has two primary functions:
• To let you monitor the status of the local printer.
• To alert you in case of a problem with your printer, such as paper out.
To display the Panasonic Printer Status window, perform the following.
Using the Printer in Windows
i From the Program Manager double click the
Panasonic KX-P6500 Tools icon.
2 Double click the KX-P6500 Console icon.
H
A
B
2 Click the “Control Panel" tab.
A Click Local Printer Status | in the Printer
box.
><
“b
O)
ui
o
o
<D
</)
0)
c
(A
A. This box shows an error or status message and
corresponding icon.
B. This box lists the name of the printer, the owner of
the print job, the format of the print job, the name
of the print job, and the page number for the job
currently being printed.
C. This box displays a picture of your printer. If a
problem has occurred, an arrow identifies where
the printer is affected. The display also provides
corrective action for each error or status message.
D. If you need additional help in resolving the problem,
click . This animated help feature will walk you
through the steps required to get your printer run
ning once again.
E. The Pause button lets you pause printing. For
example, you can pause in order to cancel the print
job from the application.
F. The Resume button lets you resume printing after
you have paused printing, or after recovering from
an error situation.
G. The Delete button lets you delete the job currently
printing. You must pause the job before you can
delete it, unless the printer itself is paused because
of an error.
H. Clicking this button will reduce the displayed
screen and the box C will disappear.
43
Page 44

Chapter 4 Using the Printer in MS-DOS
Printer Selection for DOS
The Printer driver is a part of the soft\ware that allo\A/s the application software to communicate with the printer via the
interface in use.
If you wish to use a DOS application software program, you must perform the printer driver selection in your application
software program.
The procedure will vary, depending on the software program. Consult your software package for proper procedures.
The Panasonic KX-P6500 will be your first choice. However, if the Panasonic KX-P6500 printer is not listed in your
software, you must select an alternative from the following table.
Printer Driver Selections (In order of priority)
Emulation
Panasonic KX-P6500
HP LaserJet Series IIP
Control Panel Software
The items listed in Control Panel are designed to correspond to the menu items on the front panel of a laser printer
and possible additional printer features. Therefore, the Control Panel offers the user a way to set printer configuration
settings and to know the printer’s status.
The Control Pane! software consists of two parts; Panasonic KX-P6500 Control Panel and KX-P6500 Control Panel
Reporter (Status Display). The KX-P6500 Control Panel can work either in text display mode (monochrome or color)
or graphics display mode on an IBM-compatible PC. Thus the screen designs in Control Panel will have two formats.
Text and Graphics, according to the user’s working PC configuration. The KX-P6500 Control Panel Reporter is a TSR
program. Since it is desirable to minimize the program code in a TSR, Control Panel Reporter uses only Text display
mode.
Note:
• If you have installed the KX-P6500 for Workgroups Software ( P. 20) in Windows, the Control Panel
soft wan
software has also been installed at the same time. You do not need to install it in this section.
Installing the Control Panel Software
To install the Control Panel software onto your hard disk, follow the instructions below.
^ Insert the Control Panel Software disk 4 of 4
into disk drive A.
At the prompt, type A:\Setup and press
[ Enter ] ■
44
Page 45

Using the Printer in MS-DOS
2 Press f Enter] to start the installation.
The Fast Installation window is displayed.
Fast Installation
Destination; C:\P6500CPS
Port: LPT1
Hot Key: Ctrt-Alt-R
Display Mode:
Add REPORT to Autoexec.bat;
Yes
If you do not wish to install the Control Panel
software, press f Esc] to exit.
GRAPHIC
NO
Is above correct?
No
j
Destination;
This is the disk drive and directory onto which your
software will be installed.
^ If you do not wish to change any settings,
press [ Enter ] and go to step 12.
2 If you wish to change a setting, seiect “No”
and press [ Enter].
The Input Destination Path screen is displayed.
If you wish to install the Control Panel
software on another drive and/or directory,
type the letter of the drive and/or directory
name, then press [ EntVr]. Otherwise just
press [ Enter ].
If you wish to change the port, use ®/^Qto
select the desired port, and press [ Enter].
Otherwise just press [ Enter].
If you wish to change the hot key, press i CtrT]
8
+ [ Alfl + your desired key (A to Z), and press
[ Enter] . Otherwise just press [ Enter].
Port:
The Parallel port to which your printer is connected.
Hot Key:
Combination of keys which displays the KX-P6500 Con
trol Panel Reporter window { n®* P. 52).
Display Mode:
With GRAPHIC mode selected, the display will show
graphics along with text. With TEXT mode selected, the
graphics will not appear on the screen.
Add REPORT to Autoexec.bat:
If you want the Reporter to be loaded automatically
whenever the computer is started or AUTOEXE.BAT is
performed, select “Yes”. Otherwise select “No”.
• The above settings in the Fast Installation window can
also be changed after installation of the Control Panel
software.
If you wish to change the display mode, use
[T]/CDto select the desired mode, and press
[ Enter]. Otherwise just press f Enter] .
10
If you wish to change the Add Report to
Autoexec.bat, use [ Tab ] to select “Yes”,
and press [ Enter]. Otherwise just press
[Enter].
11 If all the settings above are correct, press
[ Enter] to confirm.
• If you have made a mistake, select “No” by
using f Tab] , and press i^nter]. In this case,
you must perform steps 6~11 again.
12 The display will show the files being copied
from floppy disk to hard disk.
13 When the Control Panel software installation
is completed, the Complete Installation win
dow is displayed.
= 5
a S'
D- O
? o
1 =
I ®
So
D W
(D ^
CO
o
€
D>
O
O
14 Press [ Enter] to exit.
45
Page 46

Using the Printer in MS-DOS
KX-P6500 Control Panel
The Control Panel consists of 5 types of setting buttons {Page, Font, Quality, Memory and Other), and a title menu
bar.
To display the Panasonic KX-P6500 Control Panel Software window, perform the following:
^ At the DOS prompt (C;>), type CD P6500CPS
and press f Enter].
Panasonic KX-P6500 Control Panel Software
File View Utility Help
(c3= P.49)-
(b^ P.50).
( P. 50).
( P. 51}-
( P. 52)
□
a**«
Font
8
Quality
Memory
111
Other
Enter number of copies to print
Copies:
Lines/Page:
Orientation
O Portrait
Paper Feed ■
^ Auto
Changing the Printer Settings
----------
Landscape
Manual
□
1 Paper Size:
60 i
2 Type CPS6500 and press (Enter ].
The Panasonic KX-P6500 Control Panel
Software window is displayed.
Page Setup
Letter
Legal
A4
Executive
Monarch
Envelope #10
~7~\ Auto Continue
OK
t
4
Cancel
You can proceed through the Control Panel using the computer keyboad or computer mouse.
Keys
( Esc )
0/0
Œ/®
[ Enter)
Using the mouse: Highlight the selection and click the left mouse button.
Moves between menu bar and window
Moves between menu bar items
Moves between selections
Makes selection effective in current
window
Function
Keys
fTabl
[ Shift ] +[Tab]
Underlined
character
Function
Advances to the next field in current
window
Reverses to the previous field in current
window
Pulls down menu, displays window, or
executes selection
File Menu
The File option lets you open, save, or apply printer profiles, which can be stored in the printer or as files on your PC’s
disk drive. The File option also lets you exit the Control Panel.
Note:
• Be sure to save your settings in a profile before turning off the power. If you turn off the power without saving
the settings, they will return to the factory default settings. '
46
Page 47

Using the Printer in MS-DOS
When the File option is selected from the menu bar, a pull-down menu displays the following choices:
Panasonic KX-P6500 Control Panel Software
File View Utility Help
Open ProfileSave Profile
Save as...
Import Profile from Printer
Export Profile to Printer
Exit Alt-X
Open Profile
Selecting this option will allow you to open a printer
profile that was previously saved as a file on your PC’s
disk drive. Control Panel settings will be updated based
on the contents of the file. However, the profile will not
be sent to the printer unless you select the Export Profile
to Printer option on the File menu.
Save Profile
Selecting the Save Profile option will allow you to save
alt current settings in a profile on your PC’s disk drive.
If you opened a profile before making changes, this
option will replace the old profile with this new one, using
the same file name.
If you did not open a profile before making changes, the
Save option will prompt you for a file name and directory
before saving your profile to disk.
Save As
The Save As option lets you save the current profile to
a disk file. The Control Panel will prompt you to enter a
file name before saving the profile to disk.
Import Profile from Printer
This option reads the printer’s configuration settings and
uses them to create a printer profile. You can modify the
profile through Control Pane! options. You can also save
the profile to disk.
Export Profile to Printer
This option updates the printer with the current profile
settings.
Exit
Select this option to exit the Control Panel program. If
you have made changes but not saved them in a profile
or exported them to the printer. Control Panel will ask
you to confirm before exiting.
View Menu
This option shows all the settings in the current printer profile. Information can be viewed but not changed from this
screen.
View Printer Settings
Page Setup
Copies = 1
Lines/Page = 60
Orientation = Portrait
Paper Size = Letter
Auto Continue = On
Form Feed = Auto
r-Font Selection —
Typeface = Courier Md
Pitch = 10.00
Symbol Set = Roman-8
pPrint Quality
TonrSavR (tm) = Off
EET (R) = Off
Density = Level 3
-------------
---
----------
-----
pPrinter Memory
Page Protection = Auto
pOptions
Power Save = On
------------
-------------
OK
More
7s
X
T)
СЛ
о
о
о
о
■D
0)
Э
(0
I
47
Page 48

Using the Printer in MS-DOS
Utility Menu
The Utility menu lets you print several test pages, reset the printer, and connect the printer to a different port on your
PC.
Panasonic KX-P6500 Control Panel Software
File View Utility Help
Print ^IfTest Page
Print Control Panel Software Status
Reset Printer
^Connect...
Print Self-Test Page
Instructs the printer to do a self-test and then print a test
page. The test page contains information about the
printer’s current profile and can be used to determine
output quality.
Print Control Panel Software Status
Prints a page showing the printer’s current profile infor
mation.
Reset Printer
Selecting Reset Printer will send a RESET command to
the printer. This will reset all printer settings to their
factory default values. It will also clear the printer’s data
buffer, so all current print job information will be lost.
Connect
Select a parallel port to which your printer is connected.
Help Menu
Press the F1 key at any time for help. A screen will show more information on the field where the cursor is currently
located. Press [Altl + [h] to see the Help Index.
_____________________________ ________
H
Help Index F1
El
48
File
Panasonic KX-P6500 Controi Panei Software
View
Utiiity
Help
Heip Index F1
About
n
Show help index screen.
About
Select About to see the program name, version number,
and copyright information.
Page 49

Using the Printer in MS-DOS
Control Panel Settings
The Control Panel can handle five types of settings: Page, Font, Quality, Memory, and Other. When you change a
setting in one of these categories, then confirm by entering OK, Control Panel will send the updated settings to the
printer.
Page Setting
The Page Setup option lets you update settings that affect the page.
Form Feed
Select whether the printer will feed paper automatically
from a paper tray, or whether sheets of paper must be
manually fed to the printer one at a time.
If you start printing when Manual is selected, the
ERROR indicator on the printer will blink. If this occurs,
paper will not be fed to the printer unless you press
PRINT/RESET button for less than 5 seconds. However,
if Auto Continue check box is clicked on, the ERROR
indicator will blink for about 10 seconds, and then paper
will be automatically fed.
Copies;
Lines/Page:
Orientation
♦ Portrait
Landscape
Form Feed
♦ Auto
Manual
------
60
□
g Paper
1
Q Auto Continue
Page Setup
Size:
Letter
Legal
A4
Executive
Monarch
Envelope #10
OK
t
4
Cancel
Copies
Enter the number of copies that will be printed for each
print job. You can enter any number between 1 and 999.
Lines/Page
Enter the maximum number of text lines to be printed on
each page. You can enter any number between 5 and
128.
Note that if you change either orientation or paper size,
the number of lines per page will be updated automati
cally to reflect the current orientation and paper size
selections.
Orientation
Sets the printer to print in either Portrait (vertical) or
Landscape (horizontal) mode.
Paper Size
Select the size of the paper loaded in the printer.
Auto Continue
Specifies whether the printer should automatically con
tinue the current print job in the case of certain non-fatal
errors.
OK
Enter OK to update the printer with the settings as they
appear on the screen.
Cancel
Enter Cancel to ignore any changes made to the screen.
All fields will be restored to their earlier settings, and the
printer profile will not be updated.
X
■b
o>
cn
o
o
O
o
3
"O
0)
3
(D
49
Page 50

Using the Printer in MS-DOS
Font Setting
The font option lets you select settings that define the font used to print text. These settings include typeface, pitch or
point size, and symbol set.
Symbol Set
S »; Font Selection
Typeface;
Courier
Courier
Courier
Line Printer
Pitch:
Bd
Md
Mdlt
Md
10.00
12.00
Symbol Set;
PC-8
t
PC-6 Danlsh/Norwegian
PC-850
Roman-8
4^
t
OK
t
4>
Cancel
4^
Typeface
Used to select a typeface (the unique name given to a
specific set of characters and symbols with a character
istic design). The typeface, together with the symbol set
and point size (for proportional typefaces) or pitch (for
fixed space typefaces) will define a font.
A symbol set is a collection of alphabetic characters,
punctuation marks, and numeric and special symbols.
The Control Panel shows only the symbol sets available
for the typeface currently selected on the Fonts screen.
Pitch
Pitch or point size describe the size of a font’s charac
ters.
When you select a typeface, the Control Panel shows
only the symbol set and point size or pitch available for
that typeface.
Print Quality Setting
The Print Quality option lets you adjust the quality of your output.
Print Quality
TonrSavR (tm)
o Off
Light
Medium
Dark
rEET(R)
--------
Off
Light
« Medium
Dark
(-Density —
Level 1
Level 2
« Level 3
Level 4
Level 5
OK
Cancel
Toner Saving Mode
With Toner Saving Mode turned on, the KX-P6500 will
reduce the amount of toner used to print the image.
Black areas and text are replaced by a light gray shad
ing.
• Off: This is the default setting and is recommended
for the highest quality. Output appears normal.
• Dark: Text and graphics have a black outline along
all edges. This setting is recommended over Light and
Medium if you expect to fax or photocopy the docu
ment.
• Medium: Text and graphics have a black outline
along the left and right edges.
• Light: Text and objects on the page have a black
outline along the left edge.
50
Page 51

Using the Printer in MS-DOS
EET (Edge Enhancement Technology)
With EET turned on, the KX-P6500 will smooth the
jagged edges of text and line art, giving the output a very
high quality appearance. There are three settings:
Light, Medium, and Dark. The factory default setting is
Medium. If the EET setting is too dark, the edges appear
to bulge.
The print control panel software status ( P. 48) has
an Edge Enhancement test block. As a general guide
line, select the EET setting so as to make this block look
like a uniform gray block as shown in Figure 2.
If there are white vertical lines in the test print (Figure 1),
set the EET to a darker setting. If there are dark vertical
lines in the test print (Figure 3), set the EET to a lighter
setting.
Figure 1
Note:
• The Density settings interact with EET. When
you change the Density, readjust the EET set
ting.
Density
The Density option lets you choose from level 1 to level
5. To make the print lighter, choose a lower level button.
To make the print darker, choose a higher level button.
Memory Setting
The Memory option lets you control how memory is used in the printer to avoid printing problems that couid occur with
certain types of page images.
Figure 2
Figure 3
Page Protection
Specifies that the printer does not print a page until the
entire page is fully composed. This allows the printer to
print complex pages that would normally cause printer
overrun errors.
The settings for Page Protection are Off, Auto (default)
Letter, Legal, and A4. However, to use Letter, Legal or
A4 setting, you need to install a RAM Expansion Board
in the printer ( i®" P. 58).
Page Protection is not normally needed. However, if the
printer receives an unusually complicated page that
contains a complex image or layout, the printer might
start to print the page before the processor can finish
imaging the page. As a result the page might not print
correctly.
If you turn on Page Protection to Letter, Legal, or A4, the
printer reserves printer memory and does not begin
printing until the processor has finished imaging the
entire page. The page then prints correctly, although it
takes slightly longer to print.
When Auto is selected, the printer first analyzes each
page. If a page is complex. Page Protection is turned on
automatically: otherwise, the printer prints the page
without using Page Protection.
X
■D
O)
cn
o
o
O
o
TJ
0)
3
Q
I
51
Page 52

Using the Printer in MS-DOS
Other Setting
Choosing Other will allow control of the Power Saving Mode.
other
Power Save
Off
^ On
Power Save Mode
If the printer does not receive any activity from the
computer for 15 minutes when power save is On, the
printer will automatically drop down to low power usage
mode until it is needed again.
r ~OK
Cancel
KX-P6500 Control Panel Reporter
The Panasonic KX-P6500 Control Panel Reporter has two primary functions:
• allows you to control certain features of your printer.
• alerts you of any problems with your printer { eg" P. 53).
To display the Panasonic KX-P6500 Control Panel Reporter window, perform the following:
At the DOS prompt, type CD P6500CPS and press [Enter]•
2 Type REPORT and press [ Enter ].
• Please ignore this step if “Add Report to Au
toexec.bat” was set to “Yes” during installation
of the Control Panel software { «3= P. 44).
0 Press [ Ctrl ] + [ Alt ] + simultaneously.
The Panasonic KX-P6500 Control Panel
Reporter window is displayed.
52
Panasonic KX-P6500 Control Panel Reporter
Main Menu;
Enable Messages
Display Last Message
Deactivate Reporter
Change Hot Key
Change Colors
Help
Exit
Reporter is active on LPT1:
Page 53

Using the Printer in MS-DOS
Enable Messages
Enable Messages lets you once again view error mes
sages that have been disabled through the Disable
Message command.
Display Last Message
Display Last Message lets you review the last printer
error or warning message displayed by Reporter.
Deactivate Reporter
When Deactivate Reporter is selected, the Reporter
stops checking the printer’s status and does not display
error and warning messages.
Activate Reporter
When Activate Reporter is selected, the Reporter resu
mes checking the printer’s status and displays error and
warning messages.
Change Hot Key
The Hot Key lets you run Reporter from DOS or a DOS
program. Change Hot Key allows you to select a differ
ent hot key combination to run Reporter.
Change Colors
Change Colors allows you to select replacement colors
for your Reporter status and menu displays.
Help
Help displays the detailed information about the KXP6500’s Help system. Within the Help system, you can
select contents to see a list of topics related to the
KX-P6500.
Exit
Exit returns you to DOS. Reporter remains in memory,
able to monitor the printer, until you type REP /d at the
DOS prompt.
Printer Status Messages
The Panasonic KX-P6500 Control Panel Reporter program will alert the user to any errors. It displays a warning or
error message, identifies the problem area on the printer, and provides information regarding corrective action.
Panasonic KX-P6500 Printer Status Display
Message: XXXXXXXXXXX
Solution; XXXXXXXXXXXX
Continue
XXXXXXXXXXXXX
Disable Msg
Main Menu
Continue
This button allows you to continue displaying the printer
status messages.
Disable Msg
This button allows you to stop displaying the printer
status messages.
Main Menu
This button allows you to display the Main Menu
{P. 52).
X
■b
o>
CJ1
o
o
O
o
3
"D
fi)
3
<D
X
(D
■o
o
(D
53
Page 54

Chapter 5 Care and Maintenance
Cleaning the Printer
Periodic cleaning of the printer is recommended. The frequency of cleaning is dependent upon the environment in
which the printer is used. You should clean the printer:
• at least once a month,
• when you install a new Process Unit.
• when print quality has deteriorated.
E)^rnal
^ Turn the power OFF.
2 Clean the cover with a soft cloth.
______
Use any mild commercial cleaner.
Caution:
• Do not use benzine, thinner, aerosol
cleaners, or any abrasive powder to
clean the cabinet.
___
Internal
Turn the power OFF, open the left cover and
1
remove the Process Unit.
Before cleaning the inside of the printer, allow
the fuser to cool (about 5 minutes).
Clean the following areas with a dry cloth or a cotton swab.
With a dry cloth
• Pinch roller
• Feed roller
• Transfer roller
• Paper chute (Paper dust)
With a cotton swab
• Carefully wipe the tungsten wire and the laser
unit mirror by sliding a cotton swab from end
to end 4 to 5 times.
n
Laser unit mirror
54
Cautions:
• The printer must be turned OFF prior to
cleaning.
• Do not expose the Process Unit to light
for more than 5 minutes, or to direct
sunlight.
• Do not touch the green drum surface of
the Process Unit.
2 Close the left cover.
Page 55

Care and Maintenance
Troubleshooting
Many problems associated with the printer can be traced to improper setup or cabling. The following table will assist
you in identifying and correcting some of the more common problems.
Trouble Possible Cause Corrective Action
LED not blinking
Power on but printer not
printing data
No AC power
Interface cable not connected
Check power cord.
Check interface cable.
Stains on paper
Vertical line on paper
Very faint print
Horizontal faint grey
stripe(s) appear on the
printout
Paper jams occur
continually
After removing the
jammed paper, the
ERROR indicator still
blinks
Dirty paper path
Dirty paper path
Dirty tungsten wire
Dirty laser unit mirror Clean the laser unit mirror (P. 54).
Scratch on drum
Scratch on fuser roller
Toner may be empty
Print density not adjusted
Abnormal transfer corona
current
The Process Unit was exposed
to light for more than 5 minutes,
or to direct sunlight
The paper size selected through
the GDI Mode, PCL Mode, or
Control Panel and software
application are different from the
installed paper size
Paper fragment(s) remains in
the printer
Clean paper path (P. 54).
Clean paper path (P. 54).
Clean tungsten wire ( c®" P. 54).
Replace Process Unit.
Replace fuser. The printer requires service by an
Authorized Panasonic Service Center.
Shake the Process Unit or refill the toner in the
Process Unit { P. 58).
Select the proper print density (^ P. 32, 51),
Replace the transfer corona. The printer requires
service by an Authorized Panasonic Service
Center.
These stripes will automatically disappear after a
few hours.
Select the correct paper size through the GDI
Mode {cs" P. 34) or PCL Mode (P. 41), or
Control Panel ( P. 46) and application.
Move the sensor lever to the upright position by
using an object like a ball point pen. The
remaining fragment(s) will be ejected.
O
Q
fi)
3
(Q
(D
“D
5'
<0
o
c
CT
(D
CO
3"
o
o
5'
(O
Ejected paper is caught
between the paper
support and the output
tray
Paper jam has occured
There is a space between the
output tray and the paper
support
Follow the instructions displayed on the screen. If stains appear on the back of the
printed paper after a paper jam is cleared, it is recommended that you run several
test prints. For Windows users: (i®- P. 24)/For DOS users: { P. 48)
Slide the paper support down, then extend it
again to remove the space (Step 1 on page
15).
(continued)
55
Page 56

Care and Maintenance
Trouble
Printout is raggedy
Error Indication
Indicators
h
о
TONER/
READY
ERROR
S < у
Ш
□
□
□
V 1 /
■ □ ■
■
PROCESS
UNR
□
□
\ 1 У
□
□
М/ *2
*3
□ □
□
□
*1
■
■
Possible Cause Corrective Action
Screen fonts may be
selected
Replace the screen fonts with TrueType fonts. To show
only TrueType fonts in applications, follow the
procedure below.
1. Double click the Main icon in the Program Manager.
2. Double click the Control Panel icon.
3. Double click the Fonts icon.
4. Click [TrueType].
5. Select “Show Only TrueType Fonts in
Applications”, and click OK to exit the TrueType
dialog box.
Possible Cause
Output tray (top cover) is not open.
Open the output tray (top cover).
Recovery
Paper jam has occurred. Remove the jammed paper, then open the left cover
and close it.
Paper tray is empty.
Load paper in the paper tray and press the
PRINT/RESET button {< 5 seconds).
Left cover is open. Close the left cover.
RAM overflow or overrun has
Press the PRINT/RESET button (< 5 seconds).
occured.
Toner may be empty.
Toner may be empty and the life
cycle of the Process Unit has
Refill the toner orshake the Process Unit( P.58).
Install a new Process Unit when the toner supply is
depleted.
expired.
The life cycle of the Process Unit
has expired.
Process Unit is not installed.
Internal errors.
Install the Process Unit ( P. 13).
If the ERROR indicator is lit, turn the power off for a
few seconds then on again.
If the error continues, service by an Authorized
Panasonic Service Center is required.
■ : on : blinking (fast - with an interval of about 1 second)
□ : off : blinking (slow - with an interval of about 2.5 seconds)
You still can refill the toner, but it is recommended that you replace the Process Unit as soon as possible
to maintain maximum print quality.
*2 You can print additional pages until the toner supply is depleted, but it is recommended that you replace
the Process Unit as soon as possible to maintain maximum print quality.
Varies depending on the condition.
56
Page 57

Care and Maintenance
Repacking Instructions
It is highly recommended that you keep the original carton and ALL packing materials. Should you need to transport
or ship your printer, please follow these instructions.
Please Note:
• Should you need to send your printer to a Ser
vice Center, consult your dealer first.
• Please use the original carton and all of the
original packing material.
• Improper repacking of the printer may result in
a service charge to repair the unit or a cleaning
charge to remove spilled toner.
• Since the printer uses dry toner, extreme care
must be taken when handling. The printer
should be handled in the upright (vertical) posi
tion.
Material Required:
• Original Printer Carton and Packing Materials
• Original Process Unit Packing Materials
• Newspaper or drop cloth
• Shipping Tape and Scissors
^ Disconnect the AC line cord and the printer/
computer cable.
5 O Place the protective sheet over the green
drum.
& Put the Process Unit into the plastic bag
and close the bag.
Install the Process Unit by holding the green
labeled tabs and pushing it into the printer.
m
o
o
fi)
D
(D
“D
fi)
O
S'.
5'
CD
3
a
c
o
o'
3
<0
2 Close the paper support and the output tray
(top cover).
2 Open the left cover.
^ Remove the Process Unit by holding the
green labeled tabs and pulling it toward you.
g Repack the printer.
Page 58

Appendix
Options and Supplies
Please contact your local Panasonic dealer for availability. The following options and supplies include Instructions/
Installation Manuals.
Options
KX-P447 1 MB RAM Expansion Board KX-P458 Toner Cartridge — 2,000 page life
KX-P448 or KX-PEM5
KX-PEM6
KX-PNW1 *
Note:
• Page life is based upon printing 4% image area with repetitive printing of 10 pages.
With this option installed on the PC, the connected printer {KX-P6500/KX-P6100) can provide a service to a
maximum of 25 PCs.
2MB RAM Expansion Board
4MB RAM Expansion Board
WfW Multi User Pack
KX-PEP4
Process Unit — 15,000 page life
Supplies
Adding Toner
When the print is faint and the toner message is displayed, the toner supply may be almost depleted. However, the
printer may print additional pages if you shake the Process Unit a few times. Fill the toner in the Process Unit using
toner cartridge KX-P458. The instructions below are the outline procedures. For detailed instructions, please refer to
the KX-P458 instructions manual.
Extending the toner iife:
^ Shake the Process Unit.
0 Remove the affixed protective sheet from the
toner cartridge.
^ Place the toner cartridge on the Process
Unit, and slide the toner cartridge to the left
'1
Refuting the toner:
g Shake the Process Unit, and tap the toner
■1 Remove the Process Unit from the printer
( DS" Steps 1-5 on P. 57).
cartridge to let the toner fall into the Process
Unit.
2 open the toner cover of the Process Unit.
58
0 Remove the toner cartridge by sliding it to
the right and lifting.
Cautions:
Use of toner other than Genuine Panasonic
Toner KX-P458 can damage this process unit
and the printer’s fuser. THIS WILL VOID THE
WARRANTY OF THE PRINTER AND PRO
CESS UNIT.
Do not expose the Process Unit to light for more
than 5 minutes, or to direct sunlight.
Page 59

Appendix
Using a KX-P6100 Printer with KX-P6500 for Workgroups Software
You can use a KX-P6100 printer with KX-P6500 for Workgroups software ( vS" P. 20) in Windows. However, you
cannot connect both the KX-P6100 and KX-P6500 printers to the same server.
^ Be sure the KX-P6500 for Workgroups soft
ware has been installed on the Server PC.
2 Connect the KX-P6100 printer to the Server
PC, and turn the printer on.
At the DOS prompt, type WIN and press
[ Enter ] to start Windows in the 386 En
hanced Mode.
^ From the Program Manager, double click the
Panasonic KX-P6100 Tools icon.
0 Click the “Settings" menu.
Y Select “Local Printer Change’
Click “Printer On”.
8
0 Click [OK .
GDI» Panasonic KX-P6100 GDI and PCL»
Panasonic KX-P6100 PCL will be displayed in
the Printer box.
u>
n>
3
Q.
</>
C
*o
■O
<d'
in
c
w
3'
(Q
fU
X
-a
01
CD
£
■
Double click the KX-P6500 Console icon.
The KX-P6500 Console window will be dis
played.
1 Q Select “GDI» Panasonic KX-P6100 GDI” or
“PCL» Panasonic KX-P6100 PCL” depend
ing on your desired print mode.
^ Click Set As Default
to
"O
X
I
TJ
<T>
01
8
c
CO
05
O
w
CD
59
Page 60

Appendix
Printer Specifications
Printing Method:
Semiconductor Laser
Print Speed:
6 pages per minute (ppm) maximum {Letter size paper,
text mode, 5% image area, all originals)
Resoiution:
600 dots per inch (dpi) [when GDI mode] and 300 dpi
[when PCL mode]
Paper Feed:
1 Multi-purpose tray up to 100 sheets [75 g/m^ (20 lbs.)]
Paper Output:
Up to 50 sheets
Power Source:
Refer to the nameplate on the rear of the unit
Software Emulation :
HP LaserJet Series IIP
Fonts;
GDI mode:
(TrueType fonts in Windows)
PCL mode:
Courier 10 point, 12 pitch: Regular, Bold, Italic
Courier 12 point, 10 pitch: Regular, Bold, Italic
Line Printer 8.5 point, 16.66 pitch: Regular
RAM Buffer:
512 KB (expandable to a maximum of 1.5 MB with optional
1 MB RAM Board, 2.5 MB with 2 MB RAM Board and 4.5
MB with optional 4 MB RAM Board.)
Interface:
Bidirectional parallel (IEEE P1284)
Operating Environment:
10 to 32.5*C{50 to 90.5T]
20 to 80% RH
Storage Environment:
Oto 35’C (32 to 95*F}
10 to 80% RH
Dimensions:
132 (W) X 378 (D) X 287 (H) mm {5.2" x 14.9" x 11.3"}
Mass (Weight):
Approx. 6.5 kg {14.4 lbs.}
Consumables/Life:
Starter toner 1 _000 pages average (4% image area
with repetitive printing of 10 pages)
Toner cartridge: 2,000 pages average (4% image area
with repetitive printing of 10 pages)
Process unit; 15,000 pages average (4% image area
with repetitive printing of 10 pages)
4% image area means that the black area within the
printing area is 4%. Printing 8% image area continuously
will reduce the life of the toner and of the Process Unit to
about half as compared to printing 4% image area. The
‘Toner Saving Mode” allows you to save the toner and to
maintain the life of the Process Unit (P. 32, 50).
Power Consumption:
480 W TYPICAL (Printing with Fuser on)
9 W TYPICAL (Power Saving Mode)
Noise Level:
Printing: 45 dBA
Standby: Background noise level
CPU:
Motorola MC68EC000 (16MHz)
Power Saving Mode:
To conserve energy and reduce operating cost, this printer
is provided with a power save feature. If the printer has not
received data for 15 minutes, the printer will automatically
enter a power saving mode.
Emulation means to operate like another printer.
*2 This toner is installed in the Process Unit at the factory before shipment of the printer.
60
Page 61

Paper Specifications
This printer is designed to work well with most types of paper. However, differences in paper may have significant
effects on the quality of the print or the reliability of paper handling. It is strongly recommended that you always test
paper before purchasing it to make sure it provides desirable performance. The following guidelines will be helpful.
Paper Specifications
Appendix
Basic Weight:
60 to 135 g/m2 (16 to 36 lbs.)
Thickness:
3.7 to 7.5 mils (1 mil=Viooo")
Moisture Content:
4% to 6%
Smoothness:
100 to 300 Sheffield
Acid Content:
5.5 PH minimum
Fusing Compatibility:
Must not scorch, melt, offset material, or release
hazardous emissions when heated to 200°C (392*F) for
0.1 second
Note;
• Please store your paper according to the recommendations of the manufacturer.
Paper and Envelope Sizes
The following paper and envelope sizes are supported by the KX-P6500.
Cutting Dimensions:
±0.0313 inch of nominal, corners 90°±4*
Grain:
Long grain
Cut Edge Conditions:
Cut with sharp blades, no paper dust
Ash Content:
Not to exceed 10%
Curl:
No allowable curl toward the side to be printed
Packing:
Polylaminated moisture proof ream wrap
■O
■D
O
—t
fi)
3
a
■ o
0)
<D
CO
<D
o*
Q)
o'
3
<n
Medium
Paper Letter
Envelope
A5 and B5 size papers can be used only in the GDI Mode.
Name
Legal
A4
Executive
B5*
A5*
Business #10
Monarch
Internationa! DL
International C5
8.5" X 11" (216x279 mm)
8.5" X 14" (216x356 mm)
8.27" X 11.7" (210 X 297 mm)
7.25" X 10.5" (184.1 x 266.7 mm)
7.17" X 10.12" (182 X 257 mm)
5.83" X 8.27" (148 x 210 mm)
4.13" X 9.5" (104.9 X 241.3 mm)
3.88" X 7.5" (98.5 x 190.5 mm)
4.33" X 8.66" (110 X 220 mm)
6.4" x 9.02" (162x229 mm)
Dimension
61
Page 62

Appendix
Types of Paper to Avoid
• Extremely smooth or shiny paper or paper that is highly textured
• Coated papers
• Letterhead imprinted with low temperature or thermography. These materials may transfer onto the fusing
roller and cause damage. Any pre-printed paper should use inks compatible with 200°C (392T) for 0.1 second.
• Damaged or wrinkled paper, or paper with irregularities such as tabs, staples, etc.
• Multipart forms or carbonless paper
• Paper with a cotton and/or fibre content over 25%
□
Two-Sided Printing
Two-sided printing is possible. However, you should not expect the same print quality and reliability that you get with
one-sided printing. We strongly recommend that you follow the guidelines below.
• Use 75 to 90 g/m^ (20 to 24 lbs.) paper. [Do not use 60 g/m^ (16 lbs.) paper.]
• Do not load more than 50 sheets In the paper tray.
• Before loading paper in the tray, adjust it so that the edges are even.
Transparencies and Labels
You may also print on labels and transparencies that are made for the printer. Panasonic has tested and found that
the following work satisfactorily.
OHP
transparencies
Labels AVERY 5160, AVERY 5162
3M154, 3M688, 3M688C, SCOTCH8803,
3M/SCOTCH-CG3300, 3M PP2500
Avery Copier Labels (70 x 36 mm)
Avery White (105 x 37 mm) 16 labels per sheet
COPY TACKC-16, C-24
ESSELTE DATALINE,
ESSELTE KOPIETIKETTER
15914, 15917, 15920, 15922
FASTONALL COPY-LINE
' 18-030, 18-033, 18-034, 18-035, 18-036, 18-037
HERMA Copy-print 4455, 4464
YES
Labels cover the entire
backing material
1 Note:
1 • With any label stock, the labels
j must completely cover the back-
1 ing material. (figure below)
NO
The backing material is exposed.
62
Page 63

Envelope Specifications
Appendix
it is recommended that you purchase only high quality
envelopes with diagonal seams, as shown in the dia
gram below:
High quality envelopes have the following characteris
tics:
• A thin, sharply creased leading edge
• Paper weight or 90 g/m^ (24 lbs.)
• Flat, free of curls, wrinkles, nicks, etc.
It is not recommended that you use envelopes with any
of the following characteristics (using these may result
in paper jams):
• Irregularly shaped envelopes
• Envelopes with curls, wrinkles, nicks, twists, dog-ears
or other damage
• Envelopes with side seam construction
• Highly textured envelopes, or with extremely shiny
surfaces
• Envelopes that seal by removing a peel-off strip
• Envelopes with more than one flap to be sealed
• Self-adhesive envelopes
• Envelopes that are baggy or not sharply creased
• Embossed envelopes
• Envelopes that have previously been printed on
Do not attempt to print on any of the following types of
envelopes. These may cause damage to your printer.
• Envelopes with clasps, snaps or tie strings
(see Figure 1)
• Envelopes with transparent windows (see Figure 2)
• Envelopes that will melt, discolor, scorch offset or
release hazardous emissions when exposed to 200°C
(392T)for0.1 second
• Envelopes that use encapsulated types of adhesive
that do not require moistening but rely on pressure to
seal them
Always test a sample of the envelopes you are thinking
of buying. Confirm that the envelope performs accept
ably.
For best printing results
• Avoid printing in high humidity i.e., above 70%.
High humidity may cause the envelope to curt and pick
up excess toner.
High humidity may also cause the envelope to seal.
• Avoid printing below 10“C (SOT) with less than 30%
relative humidity.
Low temperature with low humidity may cause light
printing.
■0
fi)
■a
(D
<n
■o
o
o*
D)
o'
3
V)
Envelope storage is very important. Store them away
from moisture and humid air, where they can lay fiat and
their edges won’t be bent or damaged. The humidity
should not exceed 70% RH.
63
Page 64

Appendix
Interface Specifications
rBidirectional Parallel Interface
The bidirectional parallel interface is based on the IEEE P1284-B standard.
If your computer has a bidirectional parallel port, the printer driver and printer can take advantage of thefastest possible
data transfer.
Specifications:
connector type 57-30360 (AMPHENOL) or equivalent
cable
Pin configuration
use a shielded cable 2 meters (6.6 feet) or less in length
Signal pin
1
2 20 Data 1
3
4 22 Data 3
5
6 24 Data 5
7 25 Data 6
8 26
9 27 Data 8
10 28
11 29 Busy
12
Parallel Interface connector (printer side)
18 1
Return side
pin
19 n Strobe
21 Data 2
23
28
Signal
Data 4
Data 7
nAck
PError
Signal pin
13
14
15
16
17 FG
18
31 30
32
33
34
35
36 30 nSe lectin
Return side
pin
28
30
29
Signal
Select
nAutoFd
SG
+5V
ninit
nFault
Notes:
• “Return” denotes the return side wire of a twisted pair cable and is connected to signal ground.
• Be sure to use only a shielded cable. The printer will not operate properly if any of the pins are not connected.
64
Page 65

Index
Adding Toner ...................................................................58
Automatic emulation switching
Bidirectional parallel interface
Cable................................................................................64
Carton enclosures
Caution...............................................................................3
Cautions.............................................................................9
Changing the print mode
Cleaning printer................................................................54
external.........................................................................54
internal..........................................................................54
Configuration Overview
Installing the Network connection
Network Configuration
Client.........................................................................18
Server........................................................................17
Network example..........................................................18
Personal Configuration
Connecting a Client PC
Connecting the Printer and Power On..............................14
Connector type ................................................................64
Console window
Console Menu Items ....................................................32
File............................................................................32
Network.....................................................................33
Run............................................................................33
Settings
View
..........................................................................
Control Panel................................................................27
Job Log
Local Queue
Remote Queue
Consumables/Life.............................................................60
Control Panel Software
Installing........................................................................44
Control Panel Software window
File menu......................................................................46
Font setting...............................................................46, 50
Help menu................................................................46, 48
Memory setting.........................................................46, 51
Other setting
Page setting..............................................................46, 49
Print Quality setting
........................................................................
Exit............................................................................47
Export Profile to Printer.............................................47
Import Profile from Printer.........................................47
Open Profile
Save as
Save Profile...............................................................47
............................................................
...............................................................
.....................................................................
.................................................................
.............................................................
....................................................
..............................................................
.....................................................................
.............................................................
..................................................
........................................
...............................
.................................................
....................................................
.................................
.................................................
.................................................
....................................................
.......................................
8, 60, 64
46, 52
46, 50
25
10
26
17
18
17
17
23
27
32
32
31
29
30
44
46
46
47
Utility menu
Connect......................................................................48
Print Control Panel Software Status
Print SetfTest page ...................................................48
Reset Printer..............................................................48
View menu.................................................................46, 47
Control Panel Reporter
Control Panel Reporter window
Change Colors
Change Hot Key........................................................52, 53
Deactivate/Activate Reporter.........................................53
Display Last Message
Enable Messages..........................................................53
Exit
...........................................................................
Help .......................................................................52,53
Copies
Cotton swab .....................................................................54
...............................................................
..........................
.....................................................
.......................................
..........................................................
...................................................
...................................................................
46, 48
48
52
52
52, 53
53
52,53
34, 42, 49
[3
Density.......................................................................50,51
Duplexing..........................................................................36
Emulation......................................................................25, 60
Envelopes.........................................................................16
loading...........................................................................16
sizes..............................................................................61
Error indication..................................................................56
EET (Edge Enhancement Technology) ..................8, 32, 51
Feed roller ........................................................................54
Font Selection screen
Pitch
..............................................................................
Symbol Set....................................................................50
Typeface........................................................................50
Fonts.................................................................................60
Frame ground terminal.................................................11,14
Frame ground wire............................................................14
GDI Mode.............................................................................8, 34
GDI window.......................................................................34
Copies
....................................................................
Options......................................................................34, 35
Orientation..............................................................34,35
Landscape
Portrait...................................................................34, 35
Paper Size................................................................34,35
Paper Source
Resolution
Enable Photo Enhancement
Use Print Manager.................................................34, 35
1st page on top (Reverse Order)
2 Up/4 Up ........................................................... 34, 35, 40
............................................................
......................................................
.............................................................
............................................................
,. 34, 35
..................................
..........................
50
50
34,35
34, 35
34, 35
34, 35
34,35
■D
(D
3.
0)
o
o
CO
(D
O
5'
fi)
5'
3
CO
3
a
(D
X
65
Page 66

Index
Image Options screen.......................................................40
Brightness Control.........................................................40
Contrast Control
Indicators......................................................................11,12
ERROR
READY .........................................................................12
TONER/PROCESS UNIT
Installation
printer stands.................................................................13
process unit
Interface cable, parallel.....................................................14
Interface connector, parallel...........................................14, 64
KX-P6500 for Workgroups software..................................20
Installing
Removing
Labels............................................................................16, 62
Landscape .......................................................... 34,42,49
Left cover .........................................................................11
LINES/PAGE..................................................................42, 49
Loading Paper...................................................................15
Envelopes (Labels, Transparencies)
Minimum Space Requirements
Noise Level .......................................................................60
OHP Transparencies ........................................................62
Options..............................................................................58
Options screen
Duplex Printing
Image.........................................................................36, 40
Overlay .....................................................................36, 37
Print To File...................................................................36
Scaling...........................................................................36
Output Quality screen........................................................50
Density .........................................................................51
EET...............................................................................51
Toner Saving Mode
Output tray........................................................................11
.........................................................................
Windows 3.1 Printer Driver & Utilities
Windows 95 Printer Driver & Utilities
Manual Duplexing......................................................36
Print Instruction Page
............................................................
..............................................
...................................................................
........................................................................
........................
........................
......................................................................
.............................
...........................................
..................................................................
.............................................................
................................................
.......................................................
40
12
12
13
20
20
21
24
16
36
36
36
50
Overlay
Overlay Options Screen
9
.........................................................................
..................................................
Browse
......................................................................
Print Cover Page
Print Overlay.................................................................37
Overlay 1 st Page .....................................................37
Overlay All Pages......................................................37
Print Trailer Page..........................................................37
Packing Material ..............................................................14
Page Setup screen...........................................................49
Auto Continue ..............................................................49
Copies...........................................................................49
Lines/Page....................................................................49
Orientation (Portrait, Landscape) .................................49
Paper Feed (Auto, Manual)
Paper Size....................................................................49
Paper..........................................................................15,61
chute.............................................................................54
feed.............................................................................. 60
output............................................................................60
sizes.............................................................................61
specifications................................................................61
support......................................................................11, 15
tray...........................................................................11,15
Parallel interface ..........................................................60, 64
cable.............................................................................14
connector............................................................11, 14, 64
Part names
PCL Control Panel window..............................................41
Auto Continue .........................................................41,42
Copies......................................................................41,42
Default Font
Lines/Page...............................................................41,42
Orientation..............................................................41,42
Paper Size..............................................................41,42
Paper Source.........................................................41,42
Page Protection ......................................................41,42
Reset.......................................................................41,42
PCL Mode.....................................................................8,41
Photo Enhancement.....................................................34, 35
Pinch roller
Portrait .................................................................. 34, 42, 49
Power connector plug..................................................11,14
Power Consumption ........................................................60
Power cord..................................................................10,14
Power on..........................................................................14
Power Saving Mode
Power Source.....................................................................9
Power switch...............................................................11,14
Preparation.......................................................................13
Print Modes......................................................................25
GDI Mode
PCL Mode....................................................................41
......................................................................
Landscape..........................................................41,42
Portrait................................................................41,42
.......................................................................
..........................................................
.........................................
..........................................................
................................................
.....................................................................
36, 37
37
. 37
37
49
11
41,42
54
8, 32, 52
34
66
Page 67

PRINT/RESET button.......................................................12
Printer Features................................................................8
Printer Memory screen
Page Protection............................................................51
Printer stands...................................................................13
Printer Status....................................................................43
Printer Status window...................................................43
Printer Status Display.......................................................53
Continue
Disable Msg..................................................................53
Main Menu ...................................................................53
Printing
Two-Sided.....................................................................62
OHP Transparencies
Labels...........................................................................62
Printing Documents..........................................................25
From a Windows application
From a DOS application
Process unit.......................................................10,13,14,58
Repacking
Resolution........................................................................34
.......................................................................
........................................................................
...................................................
....................................................
........................................
...............................................
51
53
62
25
25
57
Index
Testing the Printer.............................................................24
Trademark Acknowledgement.............................................3
Transfer roller....................................................................54
Troubleshooting
Tungsten wire....................................................................54
Two-Sided Printing............................................................62
Types of Paper to Avoid....................................................62
Toner Saving Mode.................................................8, 32, 50
Use Print Manager............................................................35
2 Up/4 Up screen
Draw Frame Border.......................................................40
1 Up/2 Up/4 Up..............................................................40
Ventilation............................................................................9
Virtual Memory..................................................................19
Warning...............................................................................3
...............................................................
..............................................................
55
40
Sharing the Printer
Stop sharing..................................................................23
Software
disks..............................................................................10
installing
Specifications
envelopes
interface........................................................................64
paper............................................................................61
printer............................................................................60
Supplies............................................................................58
System Requirements
for Windows..................................................................10
for MS-DOS . . . ;..........................................................11
..................................................................
...........................................................
20, 44
.....................................................................
23
63
3
Q.
(D
X
67
Page 68

FOR USERS IN THE CONTINENTAL
UNITED STATES ONLY
Panasonic Warranty Policy
Panasonic Communications & Systems Company {“PCSC”) will repair or exchange your unit (exclusive of
Consumables and Limited Life Items listed below) with a new or comparable rebuilt unit in exchange for the
defective unit, free of charge, in the U.S.A. for (1) year from the date of original purchase in the event of a defect
in materials or workmanship.
Consumables and Limited Life Items
PCSC will repair/replace the Process Unit and/or Toner with new or rebuilt parts, free of charge, in the U.S.A.
for the shorter of ninety (90) days from the date of original purchase or the rated life of the item in the event of
a defect in materials or workmanship.
When you unpack your printer, you should find a process unit and power cord. If either/both of these parts are
missing or defective,
~ or-
If you have followed the set up instructions in this Operating Instructions manual and the printer fails to turn on
or “CALL SERVICE Exx” appears on the computer screen, please call 1-800-222-0584.
(xx denotes a two digit number representing an error code)
Printed in Japan
Panasonic Communications & Systems Company,
Computer Products Division
Division of Matsushita Eiectric Corporation of America
Two Panasonic Way, Secaucus, New Jersey 07094
Panasonic Saies Company
Division of Matsushita Electric of Puerto Rico, inc.
San Gabriel Industrial Park, 65th Infantry Avenue KM. 9.5
Carolina, Puerto Rico 00630
Matsushita Electric of Canada Limited
5770 Ambler Drive, Mississauga, Ontario, L4W 2T3
Matsushita Electric Industrial Co., Ltd.
Central P.O. Box 288, Osaka 530-91, Japan
PJQMA0074ZA S0795I0 O
 Loading...