

PANASONIC KITYH24DB4E5, KITYH34DB4E5, KITF50DB4E8, KITF43DB4E5, KITF34DB4E5 User Manual [de]
...Page 1
QUICK GUIDE / GUÍA RÁPIDA
GUIDA RAPIDA / KURZANLEITUNG
GUΙA RÁPIDO / SNELLE GIDS
E
CLOS
OPEN
OPEN
SE
CLO
ENGLISH 2 ~ 11
Before operating the unit, read these operating
instructions thoroughly and keep them for future
reference.
ESPAÑOL 12 ~ 21
Antes de utilizar la unidad, sírvase leer atentamente
estas instrucciones de funcionamiento y conservarlas
como futuro elemento de consulta.
ITALIANO 22 ~ 31
Prima di utilizzare l’unità si prega di leggere
attentamente le istruzioni e di conservare questo
opuscolo per potervi fare riferimento in futuro.
DEUTSCH 32 ~ 41
Bevor Sie das Gerät in Betrieb nehmen, lesen Sie bitte
diese Bedienungsanleitung aufmerksam durch und
bewahren Sie sie für die künftige Verwendung auf.
PORTUGUÊS 42 ~ 51
Antes de ligar a unidade, leia cuidadosamente
este manual de utilização e guarde-o para futura
referência.
F566077
Operating Instructions
Air Conditioner
Indoor Unit
CS-F14DB4E5 CS-F34DB4E5
CS-F18DB4E5 CS-F43DB4E5
CS-F24DB4E5 CS-F50DB4E5
CS-F28DB4E5
Outdoor Unit
Inverter Model
(HBE5 Series) (DBE5, DBE8 Series)
CU-YL24HBE5 CU-L24DBE5
CU-YL28HBE5 CU-L28DBE5
CU-YL34HBE5 CU-L34DBE5
CU-YL43HBE5 CU-L43DBE5
(GBE5 Series) CU-L34DBE8
CU-YL24GBE5 CU-L43DBE8
CU-YL28GBE5 CU-L50DBE8
CU-YL34GBE5
CU-YL43GBE5
Heat-pump Model
CU-B14DBE5 CU-B28DBE8
CU-B18DBE5 CU-B34DBE8
CU-B24DBE5 CU-B43DBE8
CU-B28DBE5 CU-B50DBE8
CU-B34DBE5
Cooling Model
CU-J14DBE5 CU-J24DBE8
CU-J18DBE5 CU-J28DBE8
CU-J24DBE5 CU-J34DBE8
CU-J28DBE5 CU-J43DBE8
CU-J34DBE5 CU-J50DBE8
NEDERLANDS 52 ~ 61
Lees voor u het apparaat gebruikt deze
gebruiksinstructies grondig en bewaar ze voor
toekomstig gebruik.
QUICK GUIDE / GUÍA RÁPIDA
GUIDA RAPIDA / KURZANLEITUNG
GUΙA RÁPIDO / SNELLE GIDS
© 2008 Panasonic HA Air-Conditioning (M) Sdn. Bhd.
(11969-T). All rights reserved. Unauthorized copying
and distribution is a violation of law.
Page 2
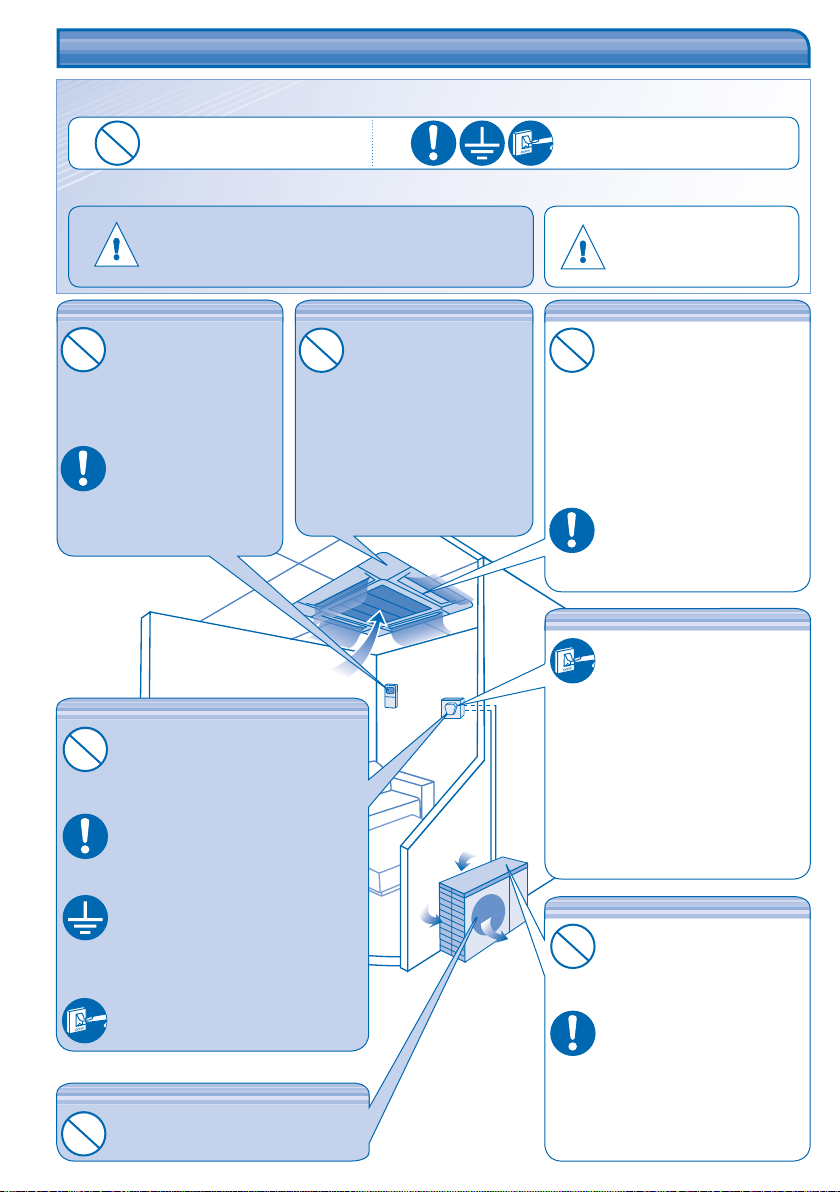
SAFETY PRECAUTIONS SAFETY PRECAUTIONS
Air outlet
Air outlet
Air inlet
Air inlet
Air inlet
DEFINITION
The instructions to be followed are classifi ed by the following symbols:
This symbol denotes an action
that is PROHIBITED.
To prevent personal injury, injury to others, or property damage, please observe the following.
Incorrect operation due to failure to follow instructions may cause harm or damage, the seriousness of which is classifi ed as below:
Warning
This sign warns of death or serious injury.
These symbols denote actions
that are COMPULSORY.
This sign warns of
Caution
injury or damage
to property.
Wireless Remote Control
• Do not use rechargeable
(Ni-Cd) batteries.
• Do not allow infants and
small children to play
with the remote control
to prevent them from
accidentally swallowing the
batteries.
• Remove the batteries if the
unit is not going to be used
for a long period of time.
• New batteries of the same
type must be inserted
following the polarity stated
to prevent malfunction of
the remote control.
Indoor Unit
• Do not install, remove and
reinstall the unit by yourself;
improper installation will
cause leakage, electric
shock or fi re. Please consult
an authorized dealer or
specialist for the installation
work.
• Do not insert your fi ngers or
other objects into the unit.
• Do not attempt to repair the
unit by yourself.
Air outlet
Air inlet
Indoor Unit
• Do not install the unit in a
potentially explosive atmosphere.
• Do not wash the unit with water,
benzene, thinner or scouring
powder.
• Do not use for other purposes
such as preservation of food.
• Do not use any combustible
equipment in front of the airfl ow
outlet.
• Do not expose directly to cold air
for a long period.
• Ensure that the drainage pipe is
connected properly. Otherwise,
leakage may occur.
• Aerate the room regularly.
Power Supply
• Switch off the power supply before
cleaning or servicing.
• Turn off the power supply if the
Power Supply
• Do not share the same power outlet with
other equipment.
• Do not modify power cords.
• Do not use extension cords.
• Do not operate with wet hands.
• Use the specifi ed supply cord.
• If the supply cord is damaged, it must be
replaced by the manufacturer, its service
agent or similarly qualifi ed persons in
order to avoid a hazard.
• This equipment must be earthed and
Air inlet
Air inlet
unit is not used for a long period
of time.
• This air conditioner is equipped
with a built-in surge protective
device. However, in order
to further protect your air
conditioner from being damaged
by abnormally strong lightning
activity, you may want to
disconnect it from the power
supply. Do not touch the air
conditioner during lightning, it may
cause electric shock.
strongly recommended to be installed
with Earth Leakage Circuit Breaker
(ELCB) or Residual Current Device
(RCD). Otherwise, it may cause electrical
shock or fi re in case of malfunction.
• In case of emergency or abnormal
conditions (burnt smell, etc), turn off the
power supply, and consult your nearest
dealer.
Air outlet
Outdoor Unit
• Do not sit or step on the unit, you
may fall down accidentally.
• Do not touch the sharp aluminum
fi n, sharp parts may cause injury.
• Ensure that the drainage pipe is
connected properly. Otherwise,
leakage may occur.
Outdoor Unit
• Do not insert your fi ngers or other objects
• After long periods of use, make
sure the installation rack is not
damaged.
into the unit, sharp parts may cause
2
injury.
Page 3
REGULATORY INFORMATION REGULATORY INFORMATION
TABLE OF CONTENTS
OPERATION CONDITION
NOTE :
This appliance is not intended for use by persons (including children) with reduced physical,
sensory or mental capabilities, or lack of experience and knowledge, unless they have been
given supervision or instruction concerning use of the appliance by a person responsible for
their safety. Children should be supervised to ensure that they do not play with the appliance.
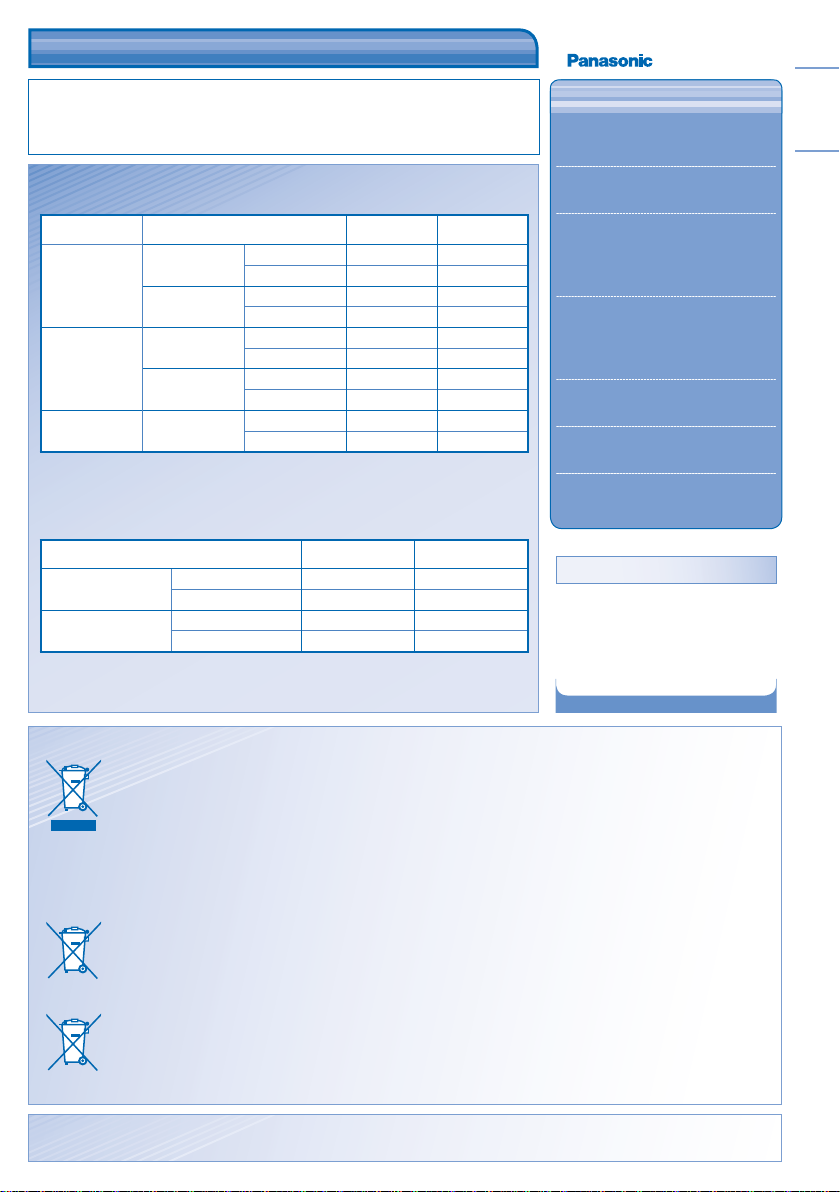
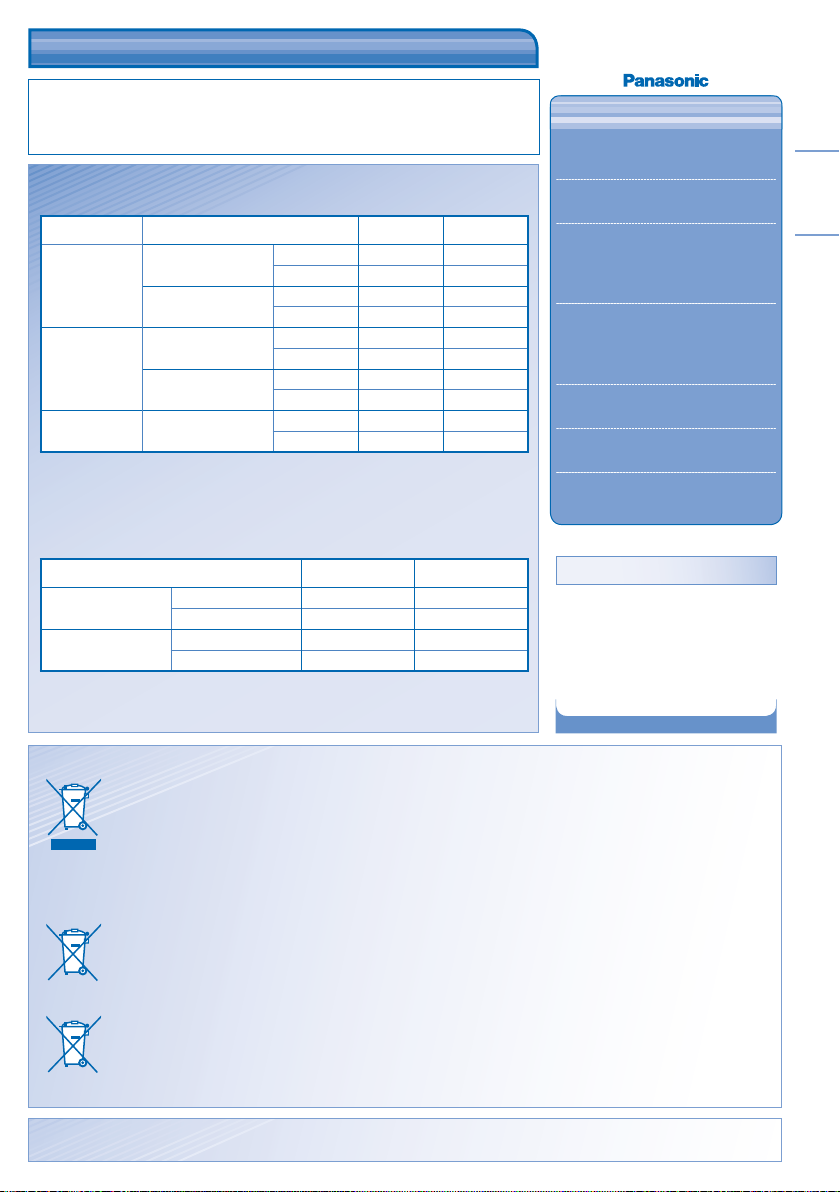
OPERATION CONDITION
Use this air conditioner under the following temperature range
Model Temperature (°C) Indoor Outdoor
Inverter
(GBE5, DBE5,
DBE8 Series)
Heat-pump
Cooling COOLING
NOTICE: This unit is still able to operate as a cooler with outdoor temperature as low as
-15°C*/ -10°C** in a non-living room, such as a computer room, with a room
temperature of 21°C or above, and room humidity up to 45%.
(CU-YL24HBE5, CU-YL28HBE5, CU-YL34HBE5, CU-YL43HBE5)
COOLING
HEATING
NOTICE: This unit is still able to operate as a cooler with outdoor temperature as low
as -5°C in a non-living room, such as a computer room, with a room
temperature of 21°C or above, and room humidity up to 45%.
COOLING
HEATING
COOLING
HEATING
Temperature (°C) Indoor Outdoor
Maximum 32 43
Minimum 21 -15*
Maximum 27 24
Minimum 16 -20
Maximum 32 43
Minimum 21 -10**
Maximum 27 24
Minimum 16 -10
Maximum 32 43
Minimum 21 -10**
Maximum 32 43
Minimum 21 -5
Maximum 27 24
Minimum 16 -15
Thank you for purchasing
Air Conditioner
TABLE OF CONTENTS
SAFETY PRECAUTIONS
REGULATORY INFORMATION
PRODUCT OVERVIEW &
OPERATIONS
(WIRELESS REMOTE CONTROL)
PRODUCT OVERVIEW &
OPERATIONS
(WIRED REMOTE CONTROL)
CARE & CLEANING
TROUBLESHOOTING
QUICK GUIDE
NOTE :
The illustrations in this manual are
for explanation purposes only and
may differ from the actual unit. It is
subjected to change without notice
for future improvement.
BACK COVER
4~5
6~8
10~11
2
ENGLISH
3
9
Information for Users on Collection and Disposal of Old Equipment and used Batteries
These symbols on the products, packaging, and/or accompanying documents mean that used electrical and
electronic products and batteries should not be mixed with general household waste.
For proper treatment, recovery and recycling of old products and used batteries, please take them to
applicable collection points, in accordance with your national legislation and the Directives 2002/96/EC and
2006/66/EC.
By disposing of these products and batteries correctly, you will help to save valuable resources and prevent
any potential negative effects on human health and the environment which could otherwise arise from
inappropriate waste handling.
For more information about collection and recycling of old products and batteries, please contact your local
municipality, your waste disposal service or the point of sale where you purchased the items.
Penalties may be applicable for incorrect disposal of this waste, in accordance with national legislation.
For business users in the European Union
If you wish to discard electrical and electronic equipment, please contact your dealer or supplier for further
information.
[Information on Disposal in other Countries outside the European Union]
These symbols are only valid in the European Union. If you wish to discard these items, please contact your
local authorities or dealer and ask for the correct method of disposal.
Note for the battery symbol (bottom two symbol examples):
This symbol might be used in combination with a chemical symbol. In this case it complies with the requirement
Pb
set by the Directive for the chemical involved.
• Do not switch ON the unit when waxing the fl oor. After waxing, aerate the room properly before operating the unit.
• Do not install the unit in oily and smoky areas.
3
Page 4
ADDRESS
AUTO
AUTO
TIMER
ON
SETRESET ADDRES
S
MODE
MODE
AIR SW
ING
FAN SPEED
AIR SWING
TIMER
OFF/ON
SET
CANCEL
SELECT
CLOCK
FAN SPEED
FILTER RESET
MANUAL
ODOUR WASH
MODE
AUTO
ECONOMY
PRODUCT OVERVIEW & OPERATIONS
PRODUCT OVERVIEW & OPERATIONS
(WIRELESS REMOTE CONTROL)
(WIRELESS REMOTE CONTROL)
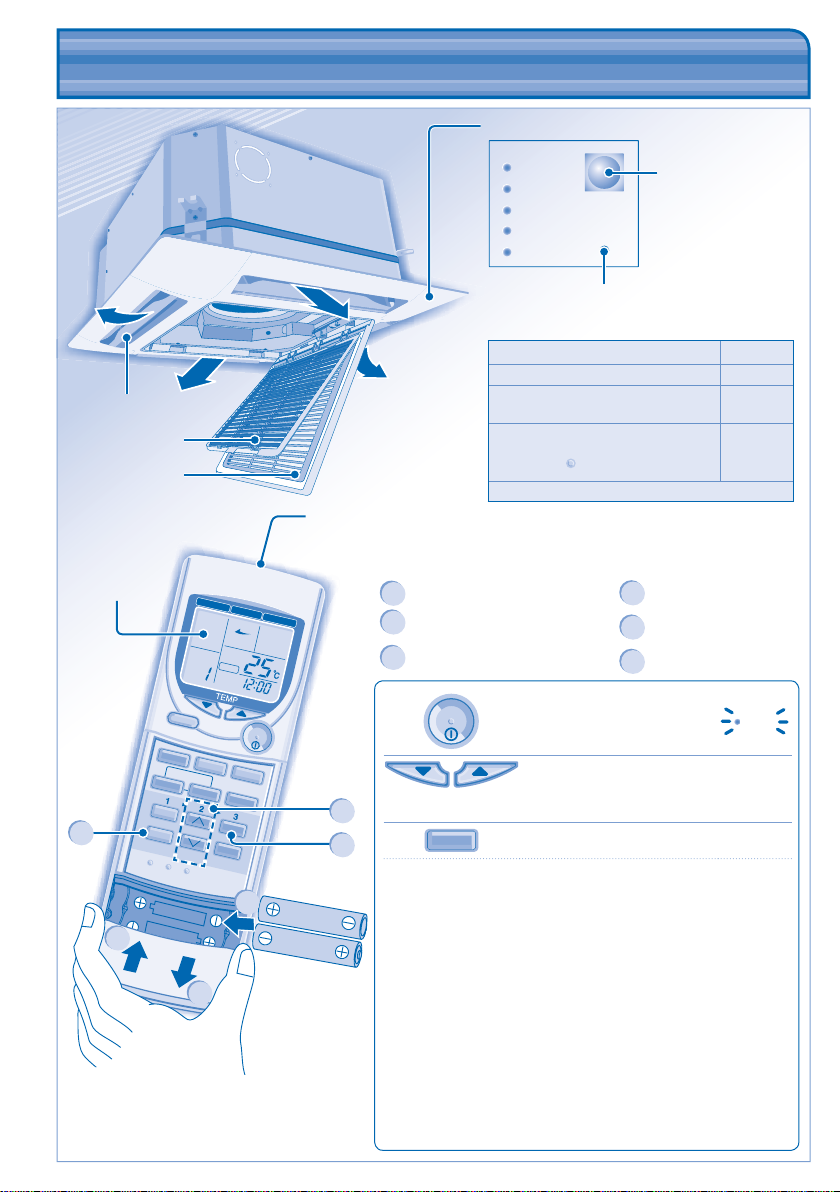
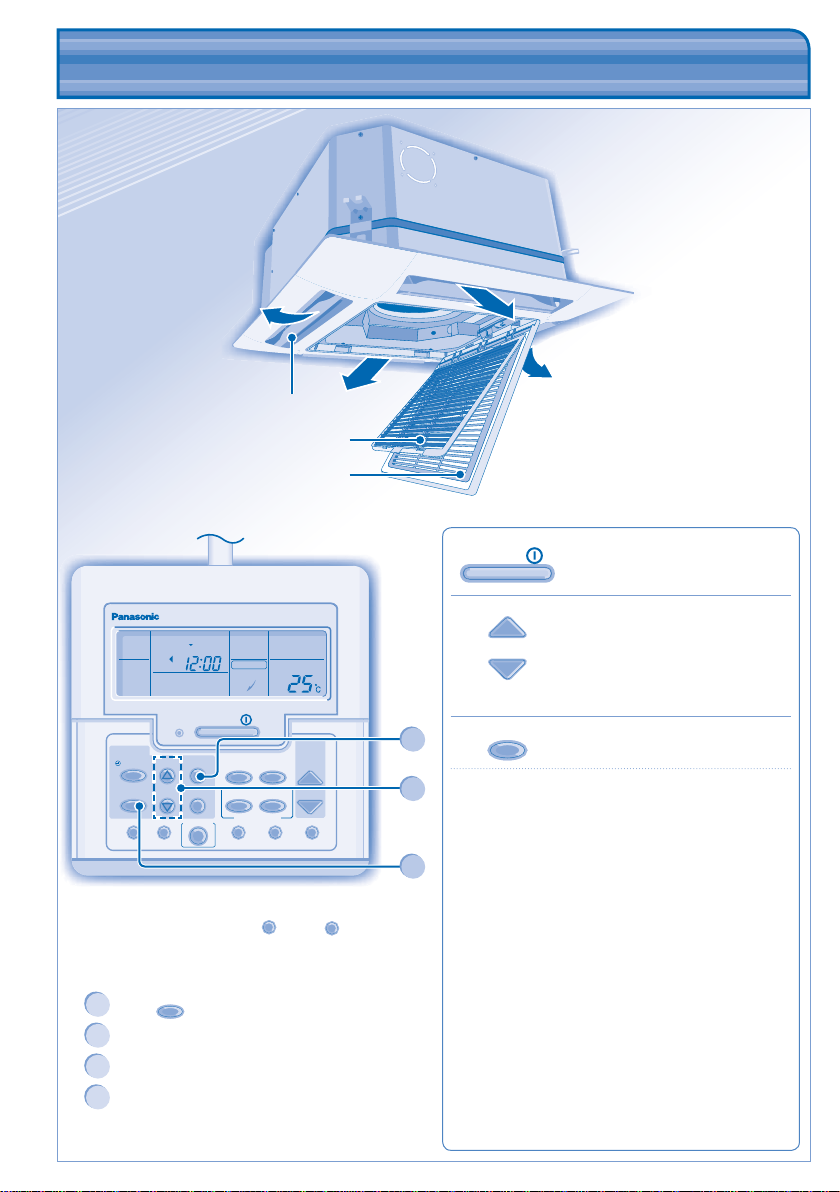
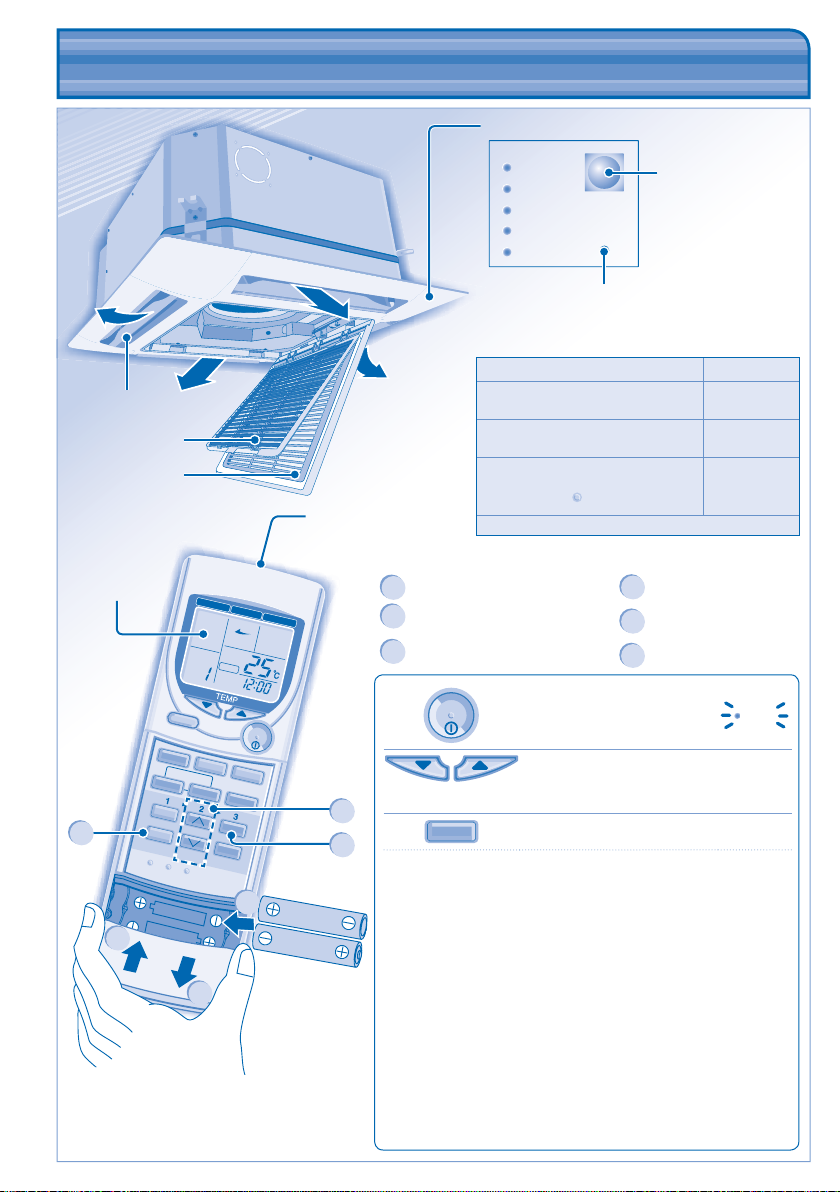
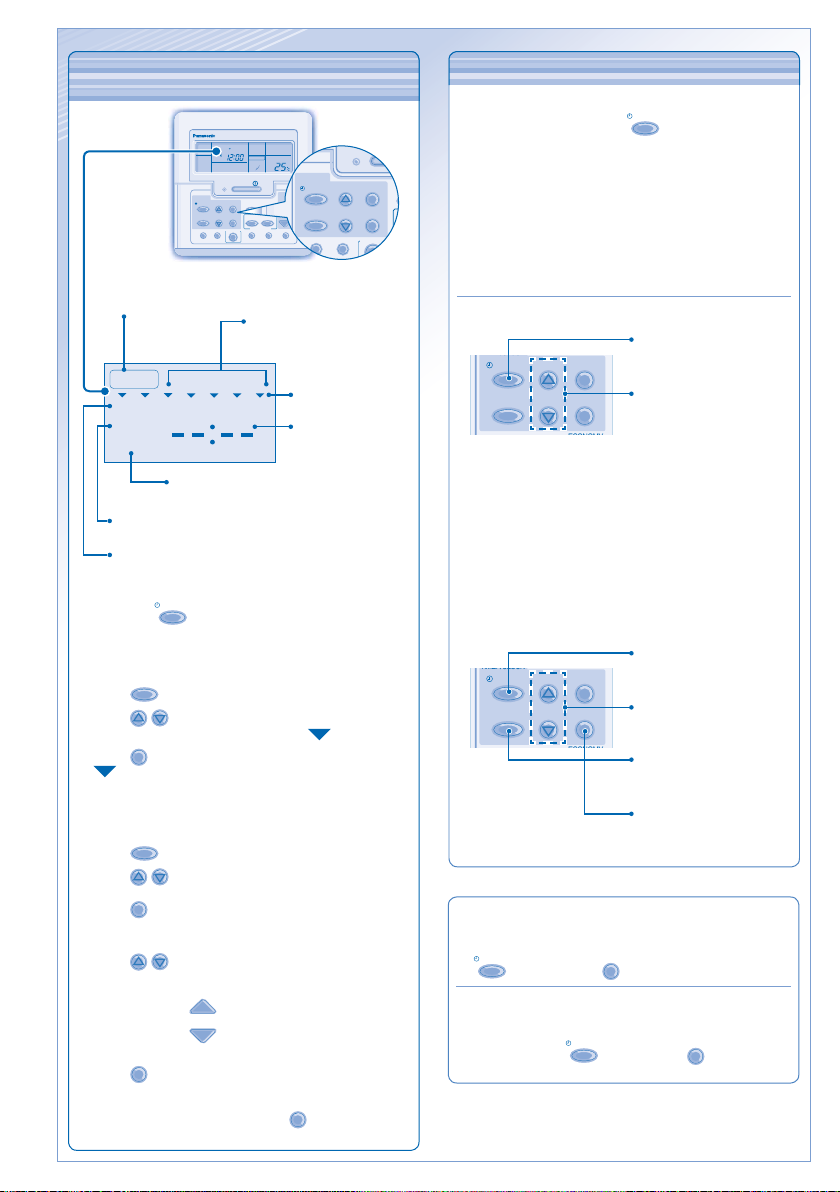
Control Panel
Airfl ow direction louver
Air fi lter
Intake grille
Remote control
display
3
6
Inverter / Heat-pump Model
CZ-RL513B
Cooling Model
CZ-RL013B
4
1
POWER
TIMER
FILTER
ECONOMY
ODOUR WASH
AUTO
Ray receiver
Auto OFF/ON button
• To operate the unit if the wireless remote control
is misplaced or malfunctioning.
Action Mode
Press once. Auto
Air is discharged
evenly
Press and hold until you hear 1 beep,
then release.
Cooling
1. Press and hold until you hear 2
beeps then release.
2. Press the
button for 5 seconds.
SET
Heating
Press the button to turn off.
Transmitter
Maximum distances: 8m
Remote Control Preparation
Press and pull out
1
Insert AAA or R03 batteries
2
(can be used ~ 1 year)
3
Press CLOCK
OFF/ON
TO TURN ON OR OFF THE
UNIT
Set time
4
Confi rm
5
Close the cover
6
POWER
TO SET TEMPERATURE
• Selection range: 16°C ~ 31°C.
4
5
MODE
TO SELECT OPERATION MODE
AUTO mode - For your convenience
2
• Unit selects operation mode according to temperature setting,
outdoor and room temperature.
HEAT mode - To enjoy warm air
• Unit takes a while to warm up.
(Applicable for Inverter / Heat-pump Model)
FAN mode - To enables air circulation in the room
COOL mode - To enjoy cool air
DRY mode - To dehumidify the environment
• Unit operates at low fan speed to give a gentle cooling operation.
• During soft dry operation, the indoor fan operates at a low fan
speed.
• The louvers movement might not align with the remote control
display.
Page 5
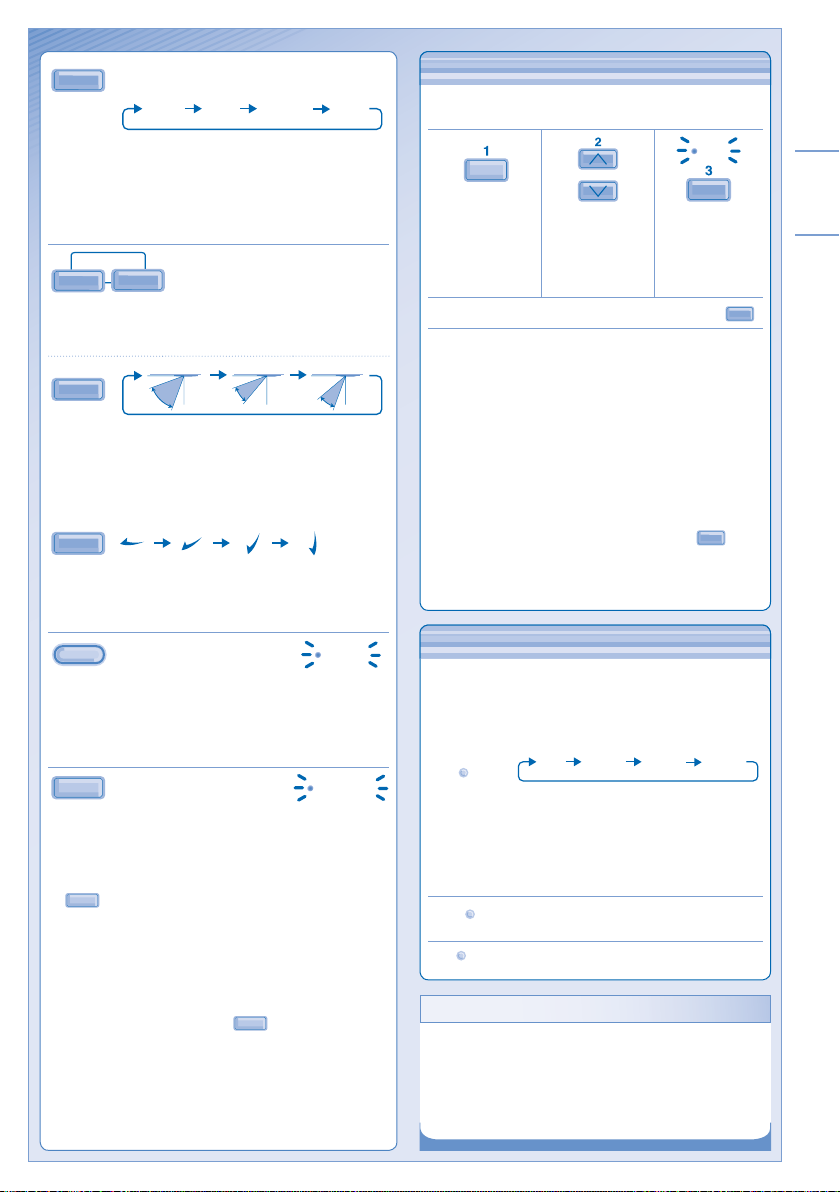
TO SET DAILY TIMER
FAN SPEED
HINTS
OPTIONAL SETTINGS
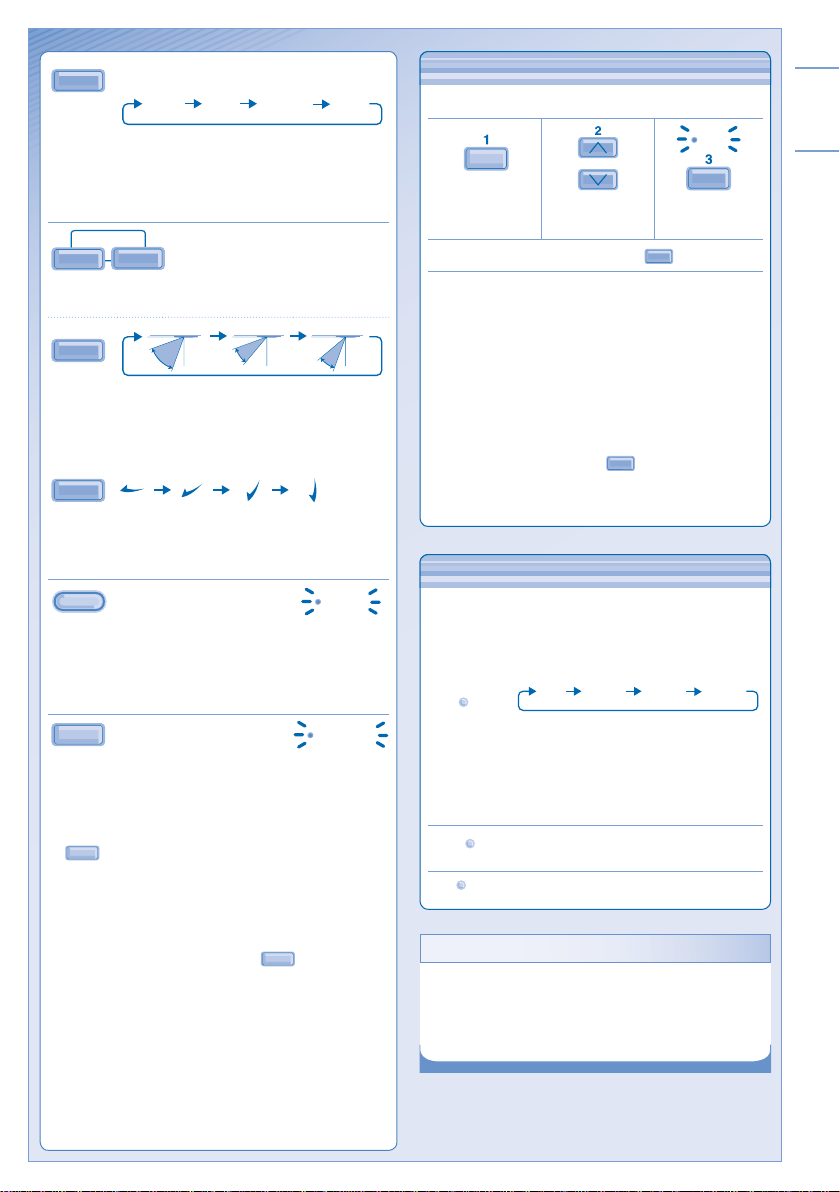
TO SELECT FAN SPEED (3 OPTIONS)
LOW MEDIUMAUTO HIGH
• For AUTO, the indoor fan speed is automatically
adjusted according to the operation mode.
• If the operation mode is set to Fan, the fan speed will
be fi xed at MEDIUM regardless of the temperature
setting.
AIR SWING
AUTO
TO ADJUST AIRFLOW
MANUAL
DIRECTION
• Keeps the room ventilated.
• The air is discharge evenly through 4 output vents.
AUTO 1 AUTO 2 AUTO 3
AUTO
• There are 3 options for auto vertical airfl ow direction.
• The vertical airfl ow louver swings up and down
automatically.
• Do not adjust the vertical airfl ow direction louvers by
hand.
MANUAL
• There are 4 options for manual vertical airfl ow
direction.
• The airfl ow direction can be adjusted as desired by
using remote control.
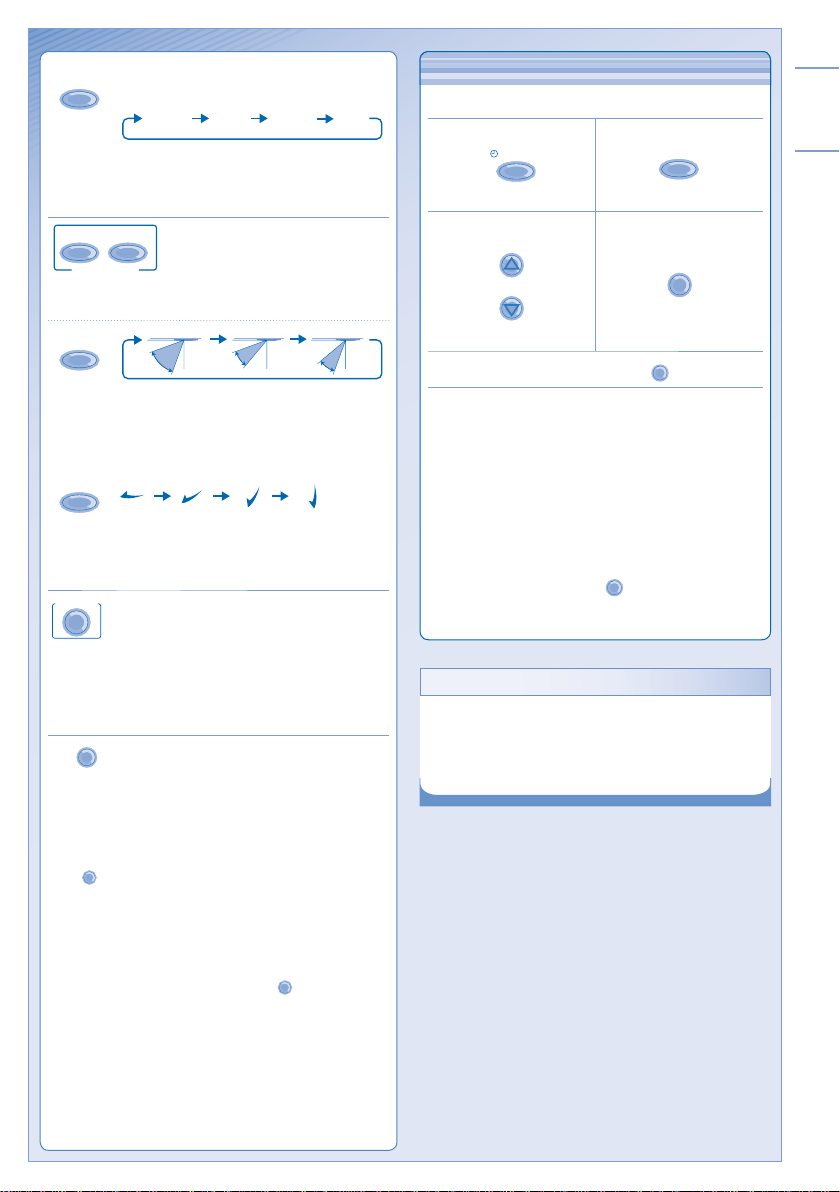
ECONOMY
TO REDUCE POWER
CONSUMPTION
ECONOMY
• Recommend to use when desired room temperature is
reached.
• Economy operation can be activated in all modes and
can be cancelled by pressing the respective button
again.
ODOUR WASH
ODOUR WASH
ODOUR REMOVING
• Applicable for all models.
• Helps to remove unpleasant odour from the
surrounding area during operation.
• To enable the odour removing function, press the
ODOUR WASH
once.
• To cancel, press the respective button again.
ODOUR CLEAR
• Applicable for Inverter model only.
• To remove odour and minimize the growth of odour
causing moulds in the air conditioner’s interior section.
• To enable this function, press the
ODOUR WASH
for more than
3 seconds.
• The unit will automatically perform Fan and Heating
modes for approximately 20 minutes and then stops
automatically.
• Recommended to open the windows during this
operation.
TO SET DAILY TIMER
• To turn ON or OFF the unit at a preset time.
TIMER
SELECT
Select ON or
Set the time. Confi rm.
SET
OFF timer.
• To cancel ON or OFF timer, press
CANCEL
.
• When ON timer is set, the unit may start early before
the actual set time in order to achieve the desired
temperature on time.
• Timer operation is based on the clock set in the remote
control and repeats daily once set. For clock setting,
please refer to Remote Control preparation.
• The timer closest to the current time will be activated
fi rst.
• If timer is cancelled manually, you can restore the
previous setting by pressing
SET
.
• If the main power is switched off for an hour or more,
the clock and timer will need to be set again.
OPTIONAL SETTINGS
• To avoid unintentional operation, you can
assign a different address to each indoor
unit.
• Press repeatedly to select your desired
address setting.
Address 1 Address 2Group Address 3
ADDRESS
• By default, ADDRESS 1 is selected. You
do not need to change this setting for
normal operation.
• If the address is set to GROUP, more
than one indoor unit can be operated at
the same time.
Press to restore the remote control’s default
RESET
setting.
Not used in normal operations.
SET
HINTS
• Set the temperature 1°C higher in cool mode or 2°C
lower in heat mode than the desired temperature to
achieve a 10% power saving.
• Use curtains to screen off sunlight and outdoor heat to
reduce power consumption during cool mode.
ENGLISH
5
Page 6
S
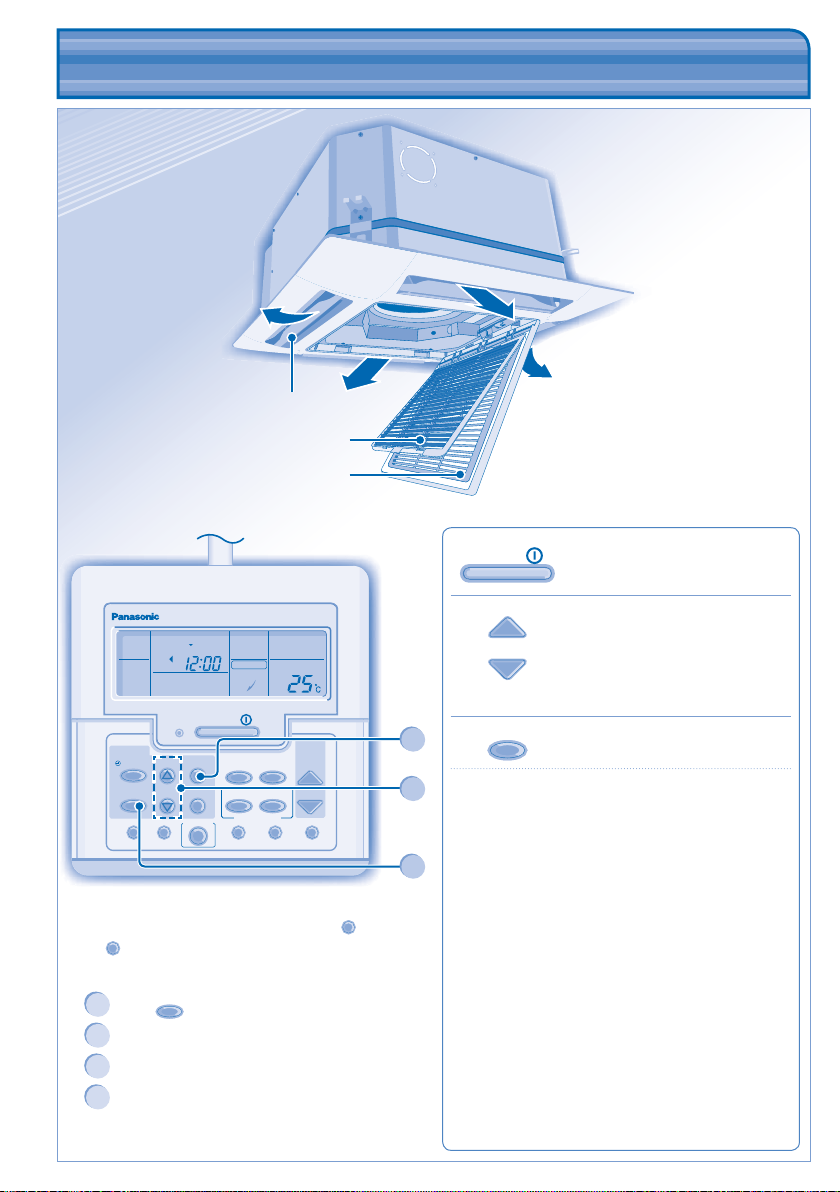
PRODUCT OVERVIEW & OPERATIONS
PRODUCT OVERVIEW & OPERATIONS
(WIRED REMOTE CONTROL)
(WIRED REMOTE CONTROL)
Airfl ow direction louver
FAN SPEED
OFF
SET
CANCEL
ECONOMY
/
ON
SPEED
AUTO
AIR SWING
AUTO 123
FAN
AUTO
AIR SWING
MANUAL
MON TUE WED THU FRI SAT SUN
ON
CZ-RD513C
TIMER/CLOCK
MODE
UP
SELECT
DOWN
CHECK ODOUR WASH VENTILATION TEST RUN FILTER RESET
CZ-RD513C
• For normal operation, the
buttons are not in use.
VENTILATION
Remote Control Preparation
1
2
3
4
ELECT
Press
Press to set day
Confi rm
Repeat steps 2 and 3 to set the
current time.
Air fi lter
Intake grille
AUTO
TEMP/
A/C No.
UP
MODE
DOWN
and
TEST RUN
Air is discharged
evenly
/
ON
OFF
UP
DOWN
TO TURN ON OR OFF THE UNIT
TO SET TEMPERATURE
• Selection range: 16°C ~ 31°C.
3
2
MODE
TO SELECT OPERATION MODE
AUTO mode - For your convenience
• Unit selects operation mode according to temperature
setting, outdoor and room temperature.
HEAT mode - To enjoy warm air
• Unit takes a while to warm up.
1
(Applicable for Inverter / Heat-pump Model)
FAN mode - To enables air circulation in the room
COOL mode - To enjoy cool air
DRY mode - To dehumidify the environment
• Unit operates at low fan speed to give a gentle cooling
operation.
• During soft dry operation, the indoor fan operates at a
low fan speed.
• The louvers movement might not align with the remote
control display.
6
Page 7
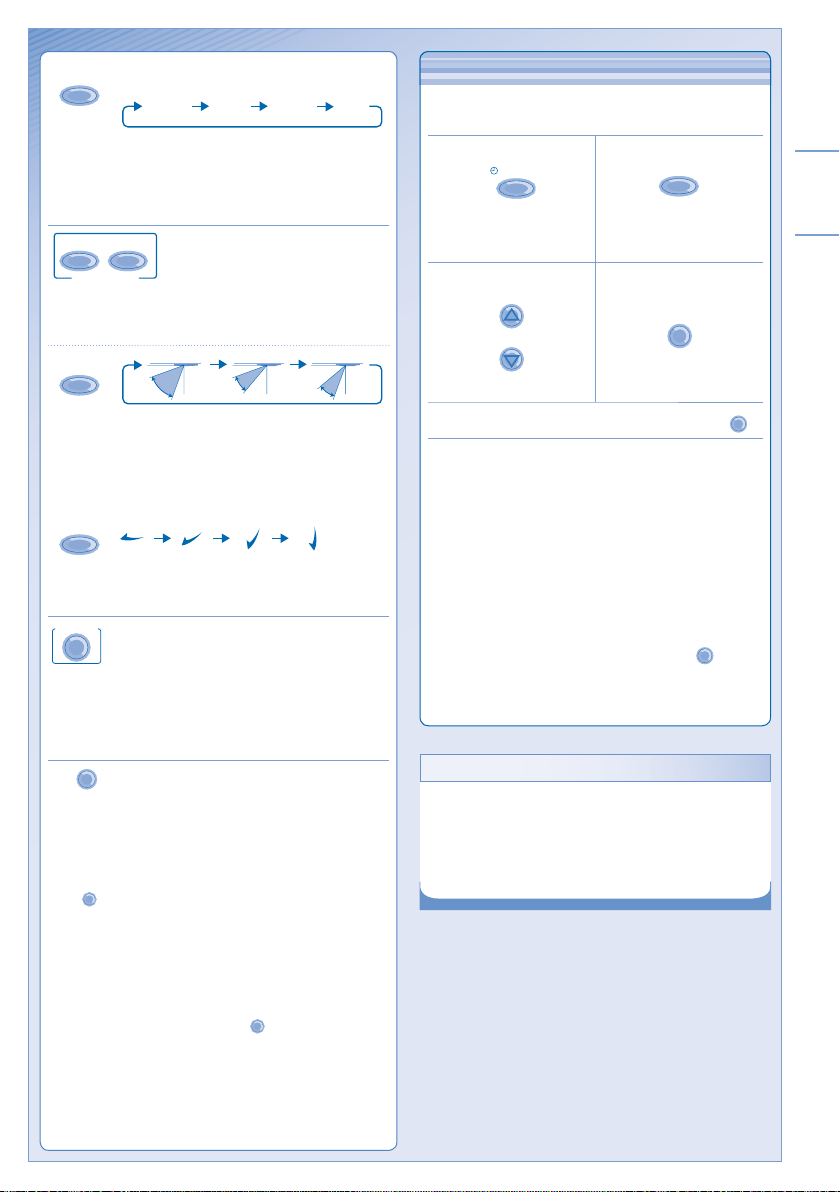
TO SET DAILY TIMER
FAN
HINTS
SPEED
TO SELECT FAN SPEED (3 OPTIONS)
LO MEDAUTO HI
• For AUTO, the indoor fan speed is automatically
adjusted according to the operation mode.
• If the operation mode is set to Fan, the fan speed will
be fi xed at MED regardless of the temperature setting.
AUTO
MANUAL
AIR SWING
TO ADJUST AIRFLOW
DIRECTION
• Keeps the room ventilated.
• The air is discharge evenly through 4 output vents.
AUTO
AUTO 1 AUTO 2 AUTO 3
• There are 3 options for auto vertical airfl ow direction.
• The vertical airfl ow louver swings up and down
automatically.
• Do not adjust the vertical airfl ow direction louvers by
hand.
MANUAL
• There are 4 options for manual vertical airfl ow
direction.
• The airfl ow direction can be adjusted as desired by
using remote control.
ECONOMY
TO REDUCE POWER CONSUMPTION
• Recommend to use when desired room temperature is
reached.
• Economy operation can be activated in all modes and
can be cancelled by pressing the respective button
again.
ODOUR WASH
ODOUR REMOVING
• Applicable for all models.
• Helps to remove unpleasant odour from the
surrounding area during operation.
• To enable the odour removing function, press the
once.
ODOUR WASH
• To cancel, press the respective button again.
ODOUR CLEAR
• Applicable for Inverter model only.
• To remove odour and minimize the growth of odour
causing moulds in the air conditioner’s interior section.
• To enable this function, press the
3 seconds.
ODOUR WASH
for more than
• The unit will automatically perform Fan and Heating
modes for approximately 20 minutes and then stops
automatically.
• Recommended to open the windows during this
operation.
TO SET DAILY TIMER
• To turn ON or OFF the unit at a preset time.
12
MODE
SELECT
Enter daily timer mode. Select ON or OFF timer.
34
UP
DOWN
SET
Set the time. Confi rm.
• To cancel ON or OFF timer, press
CANCEL
.
• When ON timer is set, the unit may start early before
the actual set time in order to achieve the desired
temperature on time.
• Timer operation is based on the clock set in the remote
control and repeats daily once set. For clock setting,
please refer to Remote Control preparation.
• The timer closest to the current time will be activated
fi rst.
• If timer is cancelled manually, you can restore the
previous setting by pressing
SET
.
• If the main power is switched off for an hour or more,
the clock and timer will need to be set again.
HINTS
• Set the temperature 1°C higher in cool mode or 2°C
lower in heat mode than the desired temperature to
achieve a 10% power saving.
• Use curtains to screen off sunlight and outdoor heat to
reduce power consumption during cool mode.
ENGLISH
7
Page 8
CHECK ODOUR WASH VE
MODE
SELECT
SET
CANCEL
OFF
/
O
TIMER/CLOCK
ECONOMY
UP
DOWN
CZ-RD513C
TIMER/CLOCK
TIMER/CLOCK
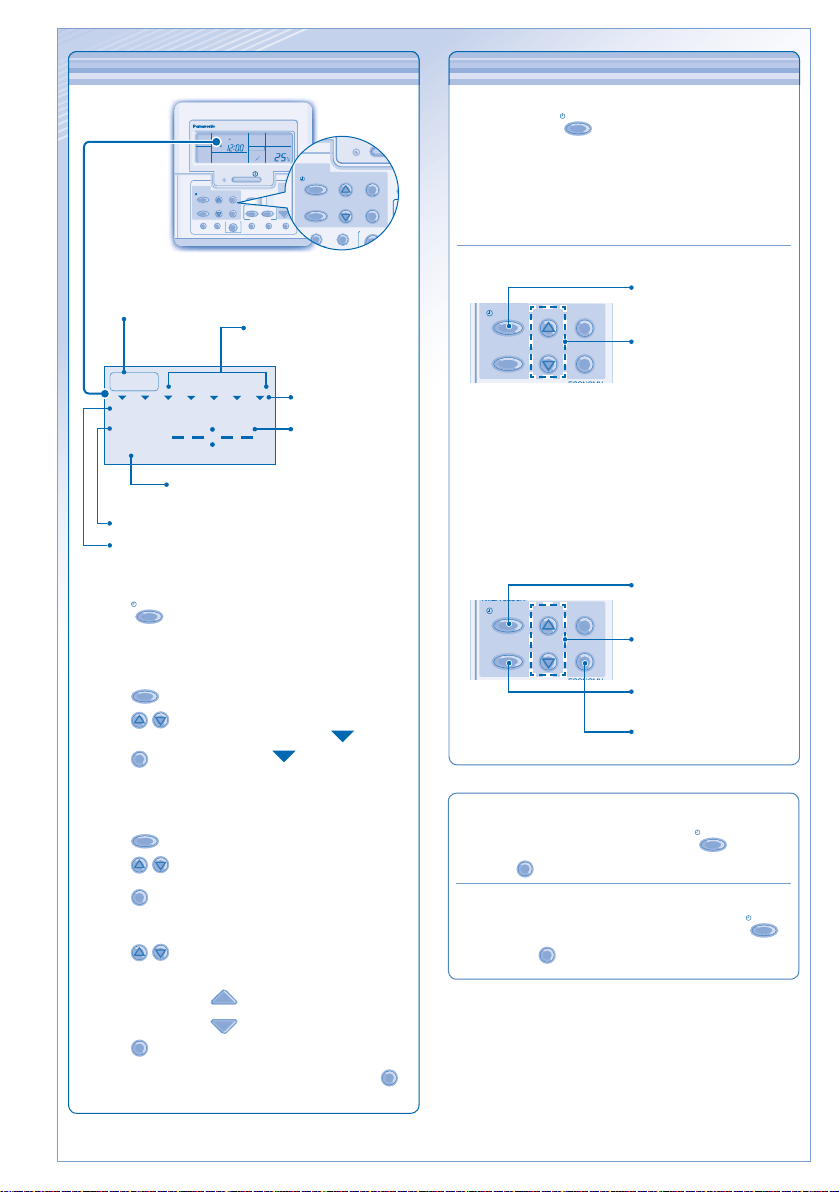
TO SET WEEKLY TIMER
OPERATION DETAILS
TO SET WEEKLY TIMER
MONTUE WED THU FRI SAT SUN
ON
OFF
CZ-RD513C
TIMER/CLOCK
UP
MODE
SET
DOWN
SELECT
CANCEL
ECONOMY
CHECK ODOUR WASH VENTILATION TEST RUN FILTER RESET
Will light up if Timer
operation is selected
FAN SPEED
AUTO
AUTO
AIR SWING
AUTO 123
/
ON
TEMP/
A/C No.
FAN
UP
MODE
SPEED
DOWN
MANUAL
AUTO
AIR SWING
6 different programs can
be set in a day (1 ~ 6)
OPERATION DETAILS
• Weekly timer is only applicable for wired remote
control, press
MODE
for 3 seconds to select daily
timer or weekly timer.
• Daily timer and weekly timer could not be set at the
same time.
• Promotes energy saving by allowing you to set up to
6 timers in any given day.
• Same timer program cannot be set on the same day.
Check Timer
1. Enter timer mode.
MODE
SELECT
UP
DOWN
SET
CANCEL
2. Select the day.
8
TIMER
MON TUE WED THU FRI SAT SUN
ON
OFF
1
23456
Indicate the
selected day
Time to be
selected (Interval
10 minutes)
OFF-Timer. To automatically
switch “OFF” the unit.
ON-Timer. To automatically switch “ON” the unit.
Day to be selected
Change Display
MODE
1. Press
for 3 seconds to change the display to
weekly timer.
Select days to run timer
SELECT
2. Press
3. Press
The selected day will be highlighted with .
Press
to enter day setting.
to select your desired day.
SET
to deselect or select mark.
Repeat this step includes other day.
Select ON/OFF Timer
SELECT
4. Press
5. Press
6. Press
to enter Timer 1.
to choose ON or OFF.
SET
to confi rm the selection.
Select Timer
7. Press
8. Press
• Repeat steps 5 to 8 to set Timer 2 to 6, or press
to select your desired time.
If you want to set together with your desired
temperature, press
SET
to confi rm the setting.
UP
DOWN
to select the temperature.
to cancel the related timers.
CANCEL
3. The display will show the program for each of the
selected day.
Modify Or Add Timer
• Perform check timer operation to select the day.
Repeat steps 4 to 8 to modify existing timer program,
or add any new timer program.
Cancel Timer
• Perform the step below to cancel the timer program
for a particular day.
1. Enter timer mode.
MODE
SELECT
UP
DOWN
SET
CANCEL
2. Select the day.
3. Press to enter day
4. Press to cancel the
Disable Weekly Timer
• To disable weekly timer setting, press
CANCEL
press
.
Enable Weekly Timer
• To enable previous weekly timer setting, press
then press
SET
.
setting.
timer set.
MODE
, then
MODE
,
Page 9

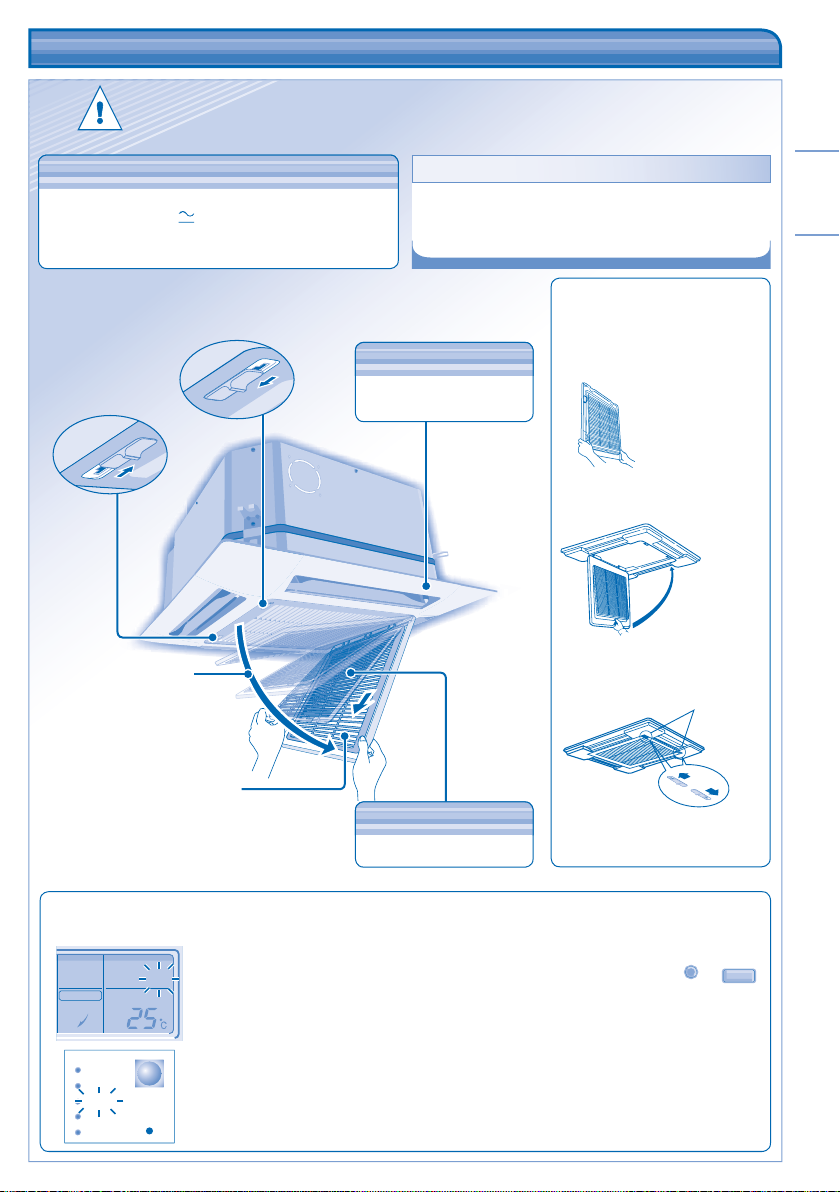
CARE & CLEANING CARE & CLEANING
WASHING INSTRUCTIONS
HINTS
2
Slowly pull down
the intake grille.
3
Remove the air fi lter
from the tabs and pull it
downwards.
1
Press the knobs.
Remove
CLOS
E
OPE
N
OPEN
CLOS
E
INDOOR UNIT
AIR FILTER
1
2
3
• Switch off the power supply before cleaning.
CAUTION
WASHING INSTRUCTIONS
• Do not use benzene, thinner or scouring powder.
• Use only soap ( pH7) or neutral household detergent.
• Do not use water hotter than 40°C.
Remove Air Filter Air Filter Installation
1
Press the knobs.
• Do not touch the aluminium fi n, sharp parts may cause injury.
HINTS
• Clean the fi lter regularly for best performance and to
reduce power consumption.
• Please consult your nearest dealer for seasonal
inspection.
INDOOR UNIT
Wipe the unit gently with a
soft, dry cloth.
1
Insert the air fi lter
to the tabs of the
intake grille.
2
ENGLISH
2
Slowly pull down
the intake grille.
3
Remove the air fi lter
from the tabs and pull it
downwards.
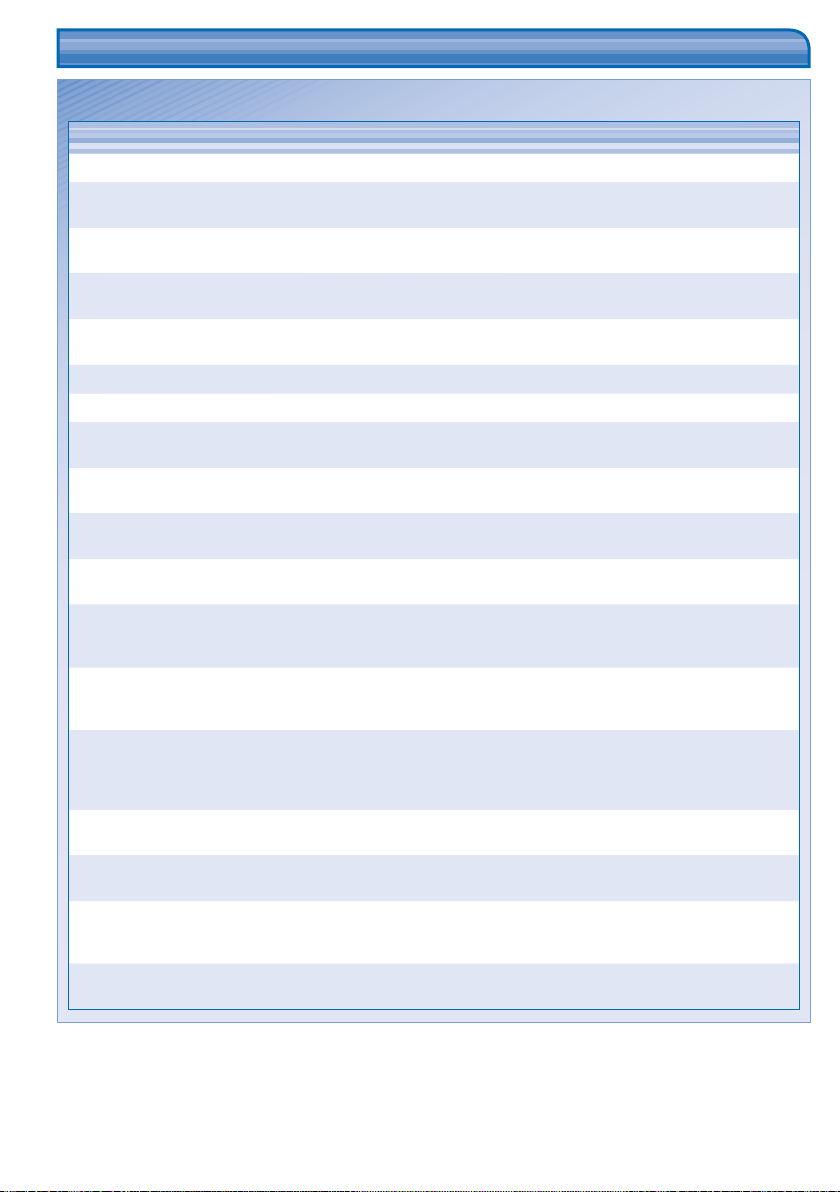
Air Filter Maintenance
Cleaning is needed when:
FAN SPEED
AUTO FAN
AUTO
AIR SWING
AUTO 123
POWER
TIMER
FILTER
ECONOMY
ODOUR WASH
COOL DRY
AUTO
FILTER
RESET
LOSE
C
OPEN
OPEN
OSE
CL
“FILTER RESET” appears on
the remote control display.
(For wired remote control)
“FILTER” lights up on the
indicator display.
(For wireless remote control)
Remove
AIR FILTER
Vacuum, wash and dry.
• lt is recommended to clean the air fi lter every 6
weeks.
• After the air fi lter is cleaned, press
reset.
• Do not operate without an air fi lter.
• Wash/rinse the air fi lter gently with water to avoid
damage to the air fi lter surface.
• Do not dry the part with a hair dryer or a stove.
• Replace any damaged air fi lter.
Slowly bring
up the intake
grille.
3
Press the knobs to the
CLOSE side.
/
FILTER RESET
Knob
FILTER RESET
to
9
Page 10
TROUBLESHOOTING TROUBLESHOOTING
Symptom
Cause
The following symptoms do not indicate malfunction.
The following symptoms do not indicate malfunction.
Symptom
Mist emerges from indoor unit. • Condensation effect due to cooling process.
Water fl owing sound during operation. • Refrigerant fl ow inside the unit.
The room has a peculiar odour. • This may due to damp smell emitted by the wall, carpet, furniture or
Indoor fan stops occasionally during automatic
fan speed setting.
Operation is delayed a few minutes after
restart.
Outdoor unit emits water/steam. • Condensation or evaporation occurs on pipes.
Timer indicator is always on. • The timer setting repeats daily once set.
Indoor fan stops occasionally during heating
operation.
Cracking sound can be heard during
operation.
Unit switch to FAN operation and air become
humid.
Outdoor unit emits noise during heating
operation.
Operation does not stop immediately after
pressed the OFF/ON button.
Operation stops occasionally. (“DEFROST”
appears on the remote control display)
Airfl ow does not start immediately after
operation is started. (“PRE HEAT” appears on
the remote control display)
Operation starts after power resumes. • Auto restart is in function and operates under previous setting.
During dry mode, cold air blow out.
Fan speed change occasionally during heating
mode.
Outdoor unit emits steam during heating
mode.
Cause
clothing.
• This helps to remove the surrounding odours.
• The delay is a protection to the unit’s compressor.
• To avoid unintended cooling effect.
• Changes of temperature cause the expansion/contraction of the unit.
• This happens when the room temperature reaches the set temperature,
operation switches to FAN mode and the humidity increase.
• This is due to changes infl ow of refrigerant gas when operation stops
and starts.
• Discharging heat is in process. Operation will stops automatically after
approximately 60 seconds.
• The unit is in defrosting mode, and the melted frost is drained from the
outdoor unit.
• The unit is warming up to provide warm air.
• The unit is running cooling operation with low fan speed to dehumidify
the room.
• The room temperature has reached the remote control setting. When the
room temperature drops again, the fan speed will resume to the remote
control settings.
• This is due to defrost operation happens at the heat exchanger.
10
Page 11
Symptom
Check
Check the following before calling for servicing.
FOR SEASONAL INSPECTION AFTER EXTENDED
NON-USE
NON SERVICEABLE CRITERIAS
FOR EXTENDED NON-USE
“ “CHECK”
Display on Wired Remote Control.
Check the following before calling for servicing.
Symptom
Heating/Cooling operation is not working
effi ciently.
Heating mode cannot be operated. • The unit is forced to operate at cooling mode only in a non-living room,
Noisy during operation. • Check if the unit has been installed at an incline or the intake grille is not
Remote control does not work.
(Wireless remote control display is dim or
transmission signal is weak.)
The unit does not work. • Check if the circuit breaker is tripped.
The unit does not receive the signal from the
remote control.
CHECK”
Display on Wired Remote Control.
Check
• Set the temperature correctly.
• Close all doors and windows.
• Clean or replace the fi lters.
• Clear any obstruction at the air inlet and air outlet vents.
such as a computer room.
closed properly.
• Insert the batteries correctly.
• Replace weak batteries.
• Check if timers have been set.
• Make sure the receiver not obstructed.
• Make sure the address is set correctly.
• Make sure the remote control signal transmission is within the range.
• Certain fl uorescent lights may interfere with signal transmitter. Please
consult your nearest dealer.
ENGLISH
If the CHECK indicator fl ashes on the wired
remote control.
FOR SEASONAL INSPECTION AFTER EXTENDED
NON-USE
• Checking of remote control batteries (wireless remote
control).
• No obstruction at air inlet and air outlet vents.
• After 15 minutes of operation, it is normal to have the
following temperature difference between air inlet and air
outlet vents:
Cooling: ≥ 8°C Heating: ≥ 14°C
FOR EXTENDED NON-USE
• Activate heat mode (Inverter/Heat-pump model) or Fan
mode (Cooling model) for 2~3 hours to remove moisture
left in the internal parts thoroughly.
• Turn off the power supply.
• Remove the remote control batteries (wireless remote
control).
• Turn off the unit.
• Turn on again after 3 minutes.
• If CHECK continues to blink, press
persist, please consult your nearest authorized dealer.
for error messages. If problem
CHECK
NON SERVICEABLE CRITERIAS
TURN OFF POWER SUPPLY then CALL Authorized
Distributor under the following conditions:
• Abnormal noise during operation.
• Water/foreign particles have entered the remote control.
• Water leaks from Indoor unit.
• Circuit breaker switches off frequently.
• Power cord becomes unnaturally warm.
• Switches or buttons are not functioning properly.
• The odour persists even after odour wash operation is
used continuously.
11
Page 12
Salida
de aire
Entrada
de aire
Entrada
de aire
Salida de aire
PRECAUCIONES DE SEGURIDAD PRECAUCIONES DE SEGURIDAD
Entrada de aire
DEFINICIÓN
Las instrucciones que deben seguirse están clasifi cadas mediante los siguientes símbolos:
Este símbolo denota una acción que
está PROHIBIDA.
Para prevenir daños personales, daños a otras personas o daños materiales, se deben seguir las instrucciones siguientes.
El uso incorrecto por no seguir las instrucciones puede causar daños o averías; su gravedad se clasifi ca con las indicaciones siguientes:
Advertencia
Control Remoto Inalámbrico
• No utilice pilas recargables
(Ni-Cd).
• No permita que bebés y niños
pequeños jueguen con el
mando a distancia para evitar
que ingieran accidentalmente
las pilas.
• Extraiga las pilas si no va a
utilizar la unidad durante un
periodo prolongado de tiempo.
• Para que el mando a distancia
funcione bien, es necesario
insertar las pilas según la
Esta indicación advierte del posible peligro de
muerte o de daños graves.
Unidad Interior
• No instale, desinstale ni
reinstale la unidad usted
mismo; una instalación
incorrecta podría causar fugas
de agua, descargas eléctricas
o incendios. Consulte con un
distribuidor autorizado o con
un especialista para realizar el
trabajo de instalación.
• No inserte sus dedos u otros
objetos en la unidad.
• No intente reparar la unidad
usted mismo.
polaridad indicada.
Estos símbolos denotan acciones
que son OBLIGATORIAS.
Esta indicación
advierte de los
Precaución
posibles daños
o desperfectos
materiales.
Unidad Interior
• No instale la unidad en una
atmósfera potencialmente explosiva.
• No lave la unidad con agua, benceno,
disolvente o limpiador en polvo.
• No utilice la unidad para otros fi nes,
como la conservación de alimentos.
• No utilice ningún equipo combustible
en la dirección del fl ujo de aire.
• No se exponga directamente al aire
frío durante un periodo prolongado
de tiempo.
• Verifi que que los tubos de drenaje
estén conectados adecuadamente.
De lo contrario, podrían producirse
pérdidas de agua.
• Ventile la habitación con regularidad.
Salida de aire
Entrada de aire
Fuente de energía
• Apague la unidad antes de proceder
a la limpieza o al mantenimiento.
• Desconecte la unidad si no va
a utilizarla durante un periodo
Fuente de energía
• No conecte otros aparatos a la misma toma
de corriente.
• No manipule los cables de alimentación.
• No utilice cables de extensión.
• No utilice la unidad con las manos mojadas.
• Utilice el cable de alimentación especifi cado.
• Para evitar riesgos, si el cable de alimentación
está dañado y es necesario cambiarlo, deberá
hacerlo el fabricante, un representante del
servicio técnico o una persona cualifi cada.
• Este equipo debe ser conectado a tierra y se
recomienda instalar con el disyuntor de fuga
a tierra (ELCB) o el dispositivo residual actual
(RCD). De otra manera, en caso de una falla,
pueden producirse peligrosas descargas
eléctricas o incendios.
• En caso de emergencia o condiciones
anormales (olor a quemado, etc.), apáguelo, y
consulte su proveedor más cercano.
Entrada
de aire
Entrada
de aire
Salida
de aire
prolongado de tiempo.
• Este aparato de aire acondicionado
dispone de un dispositivo incorporado
de protección frente a sobrecargas.
Sin embargo, y para evitar posibles
averias provocadas por tormentas
eléctricas especialmente violentas,
se recomienda desenchufar la
unidad. No toque el aparato de aire
acondicionado si hay tormentas:
podría sufrir una descarga eléctrica.
Unidad Exterior
• No se siente o pise la unidad, podría
caerse accidentalmente.
• No toque la aleta de aluminio, las
partes afi ladas pueden causar
heridas.
• Verifi que que los tubos de drenaje
estén conectados adecuadamente.
De lo contrario, podrían producirse
pérdidas de agua.
Unidad Exterior
• No inserte sus dedos u otros objetos en la
unidad, las partes afi ladas pueden ser dañinas.
12
• Después de haber utilizado la
unidad durante periodos de tiempo
prolongados, compruebe que el
bastidor de instalación no esté
dañado.
Page 13
CONTENIDO
INFORMACIÓN REGLAMENTARIA INFORMACIÓN REGLAMENTARIA
NOTA :
CONDICIONES DE FUNCIONAMIENTO
Este aparato no debe ser utilizado por personas (incluyendo niños) con discapacidades mentales,
sensoriales o físicas, o falta de experiencia y conocimiento, a menos que hayan recibido formación
o supervisión en relación al uso del aparato por una persona responsable por su seguridad. Los
niños deberían estar supervisados para asegurar que no juegan con el aparato.
CONDICIONES DE FUNCIONAMIENTO
Utilice este aparato de aire acondicionado dentro del siguiente intervalo de temperaturas
Modelo Temperatura (°C) Interior Exterior
Inversor
(Serie GBE5,
DBE5, DBE8)
Calefactor
Enfriamiento ENFRIAMIENTO
NOTICE: Esta unidad aún puede funcionar como un refrigerador con una temperatura exterior
de -15°C*/ -10°C** en una habitación no apta para vivienda, como una sala de
ordenadores, con una temperatura ambiente de 21ºC o más, y una humedad ambiente
de hasta un 45%.
(CU-YL24HBE5, CU-YL28HBE5, CU-YL34HBE5, CU-YL43HBE5)
ENFRIAMIENTO
CALENTAMIENTO
NOTICE: Esta unidad aún puede funcionar como un refrigerador con una temperatura exterior
de -5ºC en una habitación no apta para vivienda, como una sala de ordenadores, con
una temperatura ambiente de 21ºC o más, y una humedad ambiente de hasta un 45%.
ENFRIAMIENTO
CALENTAMIENTO
ENFRIAMIENTO
CALENTAMIENTO
Temperatura (°C) Interior Exterior
Máxima 32 43
Mínima 21 -5
Máxima 27 24
Mínima 16 -15
Máxima 32 43
Mínima 21 -15*
Máxima 27 24
Mínima 16 -20
Máxima 32 43
Mínima 21 -10**
Máxima 27 24
Mínima 16 -10
Máxima 32 43
Mínima 21 -10**
unidad de aire acondicionado
PRECAUCIONES DE SEGURIDAD
INFORMACIÓN REGLAMENTARIA
DESCRIPCIÓN DEL PRODUCTO Y
OPERACIONES
(CONTROL REMOTO INALÁMBRICO)
DESCRIPCIÓN DEL PRODUCTO Y
OPERACIONES
(CONTROL REMOTO CON CABLES)
CUIDADO Y LIMPIEZA
LOCALIZACIÓN DE AVERÍAS
GUÍA RÁPIDA
NOTA :
Las ilustraciones de este manual
sirven únicamente para describir
las explicaciones y pueden no
coincidir exactamente con las del
aparato suministrado. Están sujetas
a cambios sin previo aviso con el
fi n de mejorar el producto.
Muchas gracias por elegir una
CONTENIDO
12
13
14~15
16~18
19
20~21
CUBIERTA TRASERA
ESPAÑOL
Información para Usuarios sobre la Recolección y Eliminación de aparatos viejos y baterías usadas
Estos símbolos en los productos, embalajes y/o documentos adjuntos, signifi can que los aparatos eléctricos y
electrónicos y las baterías no deberían ser mezclados con los desechos domésticos.
Para el tratamiento apropiado, la recuperación y el reciclado de aparatos viejos y baterías usadas, por favor, observe las
normas de recolección aplicables, de acuerdo a su legislación nacional y a las Directivas 2002/96/CE y 2006/66/CE.
Al desechar estos aparatos y baterías correctamente, Usted estará ayudando a preservar recursos valiosos y a prevenir
cualquier potencial efecto negativo sobre la salud de la humanidad y el medio ambiente que, de lo contrario, podría surgir
de un manejo inapropiado de los residuos.
Para mayor información sobre la recolección y el reciclado de aparatos y baterías viejos, por favor, contacte a su
comunidad local, su servicio de eliminación de residuos o al comercio donde adquirió estos aparatos.
Podrán aplicarse penas por la eliminación incorrecta de estos residuos, de acuerdo a la legislación nacional.
Para usuarios empresariales en la Unión Europea
Si usted desea descartar aparatos eléctricos y electrónicos, por favor contacte a su distribuidor o proveedor a fi n de
obtener mayor información.
[Informacion sobre la Eliminación en otros Países fuera de la Unión Europea]
Estos símbolos sólo son válidos dentro de la Unión Europea. Si desea desechar estos objetos, por favor contacte con sus
autoridades locales o distribuidor y consulte por el método correcto de eliminación.
Nota sobre el símbolo de la bateria (abajo, dos ejemplos de símbolos):
Este símbolo puede ser usado en combinación con un símbolo químico. En este caso, el mismo cumple con los
Pb
requerimientos establecidos por la Directiva para los químicos involucrados.
• No encienda la unidad cuando encere el piso. Después de encerar, airee la habitación correctamente antes de encender la unidad.
• No instale la unidad en áreas aceitosas y ahumadas.
13
Page 14
ADDRESS
AUTO
AUTO
TIMER
ON
SETRESET ADDRES
S
MODE
MODE
AIR SW
ING
FAN SPEED
AIR SWING
TIMER
OFF/ON
SET
CANCEL
SELECT
CLOCK
FAN SPEED
FILTER RESET
MANUAL
ODOUR WASH
MODE
AUTO
ECONOMY
DESCRIPCIÓN DEL PRODUCTO Y OPERACIONES
DESCRIPCIÓN DEL PRODUCTO Y OPERACIONES
(CONTROL REMOTO INALÁMBRICO)
(CONTROL REMOTO INALÁMBRICO)
Panel de control
Persiana de dirección
del fl ujo de aire
Filtro de aire
Rejilla de entrada
Pantalla del
mando a
distancia
3
6
Modelo de Inversor / Bomba de calor
CZ-RL513B
Modelo de refrigeración
CZ-RL013B
14
1
POWER
TIMER
FILTER
ECONOMY
ODOUR WASH
AUTO
Receptor de la señal
Botón de ENCENDIDO/APAGADO automático
(auto OFF/ON)
• Para utilizar la unidad si el control remoto
inalámbrico está en mala posición o funciona mal.
Acción Modo
El aire se
distribuye a
partes iguales
Pulse una vez. Funcionamiento
automático
Pulse y mantener presionado hasta que
suene 1 pitido; después, soltar.
Enfriamiento
1. Pulse y mantener presionado hasta
Transmisor
Distancia máxima: 8m
que suenen 2 pitidos; después, soltar.
2.Pulse el botón
durante 5 segundos.
SET
Presione el botón para apagar.
Calentamiento
Preparación Del Mando A Distancia
Pulse y retírelo
1
Inserte pilas AAA o R03
2
(puede ser usado ~ 1 año)
3
Presione CLOCK
OFF/ON
CONECTAR O DESCONECTAR
LA UNIDAD
Ajuste la hora
4
Confi rmar
5
Cierre la tapa
6
POWER
PARA AJUSTAR LA TEMPERATURA
• Gama de selección: 16°C ~ 31°C.
4
5
MODE
SELECCIONAR MODO DE OPERACIÓN
MODO AUTOMÁTICO - Para su conveniencia
• La unidad selecciona automáticamente el modo de funcionamiento según
2
los ajustes de temperatura y las temperaturas interior y exterior.
MODO CALOR - Para disfrutar de aire caliente
• La unidad necesita un rato para calentarse.
(Válido para Modelos de Inversor / Bomba de calor)
MODO FAN - Permite la circulación del aire en la habitación
MODO FRÍO - Para disfrutar de aire frío
MODO DESHUMIDIFICACIÓN - Para deshumidifi car el ambiente
• La unidad funciona en la velocidad de ventilador baja para proporcionar
una agradable refrigeración.
• Durante el funcionamiento de secado ligero, el ventilador interior funciona
a una velocidad baja.
• El movimiento de las rejillas puede que no se alinee con la visualización
del control remoto.
Page 15
PARA ESTABLECER EL TEMPORIZADOR DIARIO
FAN SPEED
SUGERENCIA
AJUSTES OPCIONALES
PARA SELECCIONAR LA VELOCIDAD DEL
VENTILADOR (3 OPCIONES)
LOW MEDIUMAUTO HIGH
• Para AUTO (automático), la velocidad de ventilador de
interior es ajustada automáticamente según el modo de
operación.
• Si el modo de funcionamiento se encuentra en Ventilación, la
velocidad del ventilador se fi jará en MEDIUM sin importar la
confi guración de temperatura.
AIR SWING
AUTO
PARA REGULAR LA DIRECCIÓN
MANUAL
DE LA CORRIENTE DE AIRE
• Mantiene la habitación ventilada.
• El aire se descarga de forma uniforme a través de 4 tomas
de aire externas.
AUTO 1 AUTO 2 AUTO 3
AUTO
• Hay 3 opciones para la dirección automática del fl ujo vertical
de aire.
• El fl ujo de aire vertical oscila automáticamente hacia arriba y
abajo.
• No ajuste la persiana vertical de dirección del fl ujo de aire
manualmente.
MANUAL
• Hay 4 opciones para la dirección manual del fl ujo vertical de
aire.
• La dirección del aire puede ajustarse mediante el mando a
distancia en función de las necesidades del usuario.
ECONOMY
PARA REDUCIR EL
CONSUMO DE ENERGÍA
ECONOMY
• Se recomienda utilizarlo cuando se alcance la temperatura
ambiente deseada.
• El funcionamiento en ahorro de energía se puede activar
en todos los modos y se puede cancelar pulsando el botón
respectivo de nuevo.
ODOUR WASH
ODOUR WASH
ELIMINACIÓN DE MALOS OLORES
• Aplicable a todos los modelos.
• Ayuda a eliminar los malos olores de las zonas próximas
durante el funcionamiento.
• Para activar la función de eliminación de malos olores, pulse
ODOUR WASH
una vez.
• Para cancelarla, pulse el botón respectivo de nuevo.
ELIMINAR MALOS OLORES
• Aplicable sólo al modelo de Inversor.
• Para eliminar los malos olores y minimizar el aumento de
malos olores que causan moho en la parte interior del aire
acondicionado.
• Para activar esta función, pulse
ODOUR WASH
durante más de 3
segundos.
• La unidad usará automáticamente los modos de Ventilación y
Calefacción durante aproximadamente 20 minutos y luego se
parará automáticamente.
• Se recomienda abrir las ventanas durante este
funcionamiento.
PARA ESTABLECER EL TEMPORIZADOR DIARIO
• Conectar o desconectar la unidad a una hora
predeterminada.
TIMER
SELECT
Ajuste el
Ajuste la hora. Confi rmar.
SET
temporizador de
activación (ON) o
de desactivación
(OFF).
• Para cancelar el temporizador ON u OFF, pulse
CANCEL
• Cuando se active el temporizador, la unidad se iniciará
antes del tiempo actual predefi nido para conseguir la
temperatura deseada a tiempo.
• El funcionamiento del temporizador se basa en la
confi guración del reloj en el control remoto y se repite
cada día una vez confi gurado. Para confi gurar el reloj,
por favor, consulte la preparación del control remoto.
• El temporizador confi gurado a la hora actual se
activará primero.
• Si el temporizador se cancela manualmente, puede
restaurar la confi guración anterior pulsando
SET
.
• Si la alimentación principal se apaga durante una
hora o más, el reloj y el temporizador deberán ser
confi gurados de nuevo.
AJUSTES OPCIONALES
• Para evitar un funcionamiento no
intencionado, puede asignar una
dirección diferente a cada unidad interior.
• Pulse repetidamente para seleccionar la
confi guración de su dirección deseada.
Address 1 Address 2Group Address 3
ADDRESS
• Por defecto, se seleccionará ADDRESS
1. No necesita cambiar esta confi guración
para un funcionamiento normal.
• Si la dirección está confi gurada en
GROUP, se puede utilizar más de una
unidad interior al mismo tiempo.
Presione para restablecer el ajuste de
RESET
fábrica del mando a distancia.
No utilizado en operaciones normales.
SET
SUGERENCIA
• Ajuste la temperatura 1°C o más en el modo de frío
(cool) o 2°C menos que la temperatura deseada en el
modo de calor (heat) para ahorrar un 10% de energía.
• Use cortinas para proteger de luz solar y el calor
exterior y así reducir el consumo eléctrico durante el
modo de frío.
ESPAÑOL
.
15
Page 16
S
DESCRIPCIÓN DEL PRODUCTO Y OPERACIONES
DESCRIPCIÓN DEL PRODUCTO Y OPERACIONES
(CONTROL REMOTO CON CABLES)
(CONTROL REMOTO CON CABLES)
Persiana de dirección
del fl ujo de aire
Filtro de aire
Rejilla de entrada
FAN SPEED
AUTO
OFF
SET
CANCEL
ECONOMY
/
ON
SPEED
AUTO
AIR SWING
AUTO 123
FAN
AUTO
AIR SWING
MODE
MANUAL
TEMP/
A/C No.
DOWN
UP
MON TUE WED THU FRI SAT SUN
ON
CZ-RD513C
TIMER/CLOCK
MODE
UP
SELECT
DOWN
CHECK ODOUR WASH VENTILATION TEST RUN FILTER RESET
CZ-RD513C
• En funcionamiento normal, los botones
no se utilizan.
TEST RUN
Preparatión Del Mando A Distancia
1
2
3
4
ELECT
Pulse
Púlselo para establecer el día
Confi rmar
Repita los pasos 2 y 3 para confi gurar
la hora actual.
VENTILATION
El aire se distribuye
a partes iguales
/
ON
OFF
CONECTAR O DESCONECTAR LA
UNIDAD
UP
DOWN
PARA AJUSTAR LA
TEMPERATURA
• Gama de selección: 16°C ~ 31°C.
3
2
MODE
MODO AUTOMÁTICO - Para su conveniencia
SELECCIONAR MODO DE
OPERACIÓN
• La unidad selecciona automáticamente el modo de
funcionamiento según los ajustes de temperatura y las
temperaturas interior y exterior.
MODO CALOR - Para disfrutar de aire caliente
1
• La unidad necesita un rato para calentarse.
(Válido para Modelos de Inversor / Bomba de calor)
y
MODO FAN - Permite la circulación del aire en la
habitación
MODO FRÍO - Para disfrutar de aire frío
MODO DESHUMIDIFICACIÓN - Para deshumidifi car
el ambiente
• La unidad funciona en la velocidad de ventilador baja para
proporcionar una agradable refrigeración.
• Durante el funcionamiento de secado ligero, el ventilador
interior funciona a una velocidad baja.
• El movimiento de las rejillas puede que no se alinee con la
visualización del control remoto.
16
Page 17
PARA ESTABLECER EL TEMPORIZADOR DIARIO
FAN
SUGERENCIA
PARA SELECCIONAR LA VELOCIDAD
SPEED
DEL VENTILADOR (3 OPCIONES)
LO MEDAUTO HI
• Para AUTO (automático), la velocidad de ventilador de interior
es ajustada automáticamente según el modo de operación.
• Si el modo de funcionamiento se encuentra en Ventilación,
la velocidad del ventilador se fi jará en MED sin importar la
confi guración de temperatura.
AUTO
MANUAL
AIR SWING
PARA REGULAR LA DIRECCIÓN
DE LA CORRIENTE DE AIRE
• Mantiene la habitación ventilada.
• El aire se descarga de forma uniforme a través de 4 tomas
de aire externas.
AUTO
AUTO 1 AUTO 2 AUTO 3
• Hay 3 opciones para la dirección automática del fl ujo vertical
de aire.
• El fl ujo de aire vertical oscila automáticamente hacia arriba y
abajo.
• No ajuste la persiana vertical de dirección del fl ujo de aire
manualmente.
MANUAL
• Hay 4 opciones para la dirección manual del fl ujo vertical de aire.
• La dirección del aire puede ajustarse mediante el mando a
distancia en función de las necesidades del usuario.
ECONOMY
PARA REDUCIR EL CONSUMO DE
ENERGÍA
• Se recomienda utilizarlo cuando se alcance la temperatura
ambiente deseada.
• El funcionamiento en ahorro de energía se puede activar
en todos los modos y se puede cancelar pulsando el botón
respectivo de nuevo.
ODOUR WASH
ELIMINACIÓN DE MALOS OLORES
• Aplicable a todos los modelos.
• Ayuda a eliminar los malos olores de las zonas próximas
durante el funcionamiento.
• Para activar la función de eliminación de malos olores, pulse
una vez.
ODOUR WASH
• Para cancelarla, pulse el botón respectivo de nuevo.
ELIMINAR MALOS OLORES
• Aplicable sólo al modelo de Inversor.
• Para eliminar los malos olores y minimizar el aumento de
malos olores que causan moho en la parte interior del aire
acondicionado.
• Para activar esta función, pulse
segundos.
durante más de 3
ODOUR WASH
• La unidad usará automáticamente los modos de Ventilación y
Calefacción durante aproximadamente 20 minutos y luego se
parará automáticamente.
• Se recomienda abrir las ventanas durante este
funcionamiento.
PARA ESTABLECER EL TEMPORIZADOR DIARIO
• Conectar o desconectar la unidad a una hora
predeterminada.
12
MODE
Entre en modo de
temporizador diario.
SELECT
Ajuste el temporizador
de activación (ON) o de
desactivación (OFF).
34
UP
DOWN
SET
Ajuste la hora. Confi rmar.
•
Para cancelar el temporizador ON u OFF, pulse
CANCEL
• Cuando se active el temporizador, la unidad se iniciará
antes del tiempo actual predefi nido para conseguir la
temperatura deseada a tiempo.
• El funcionamiento del temporizador se basa en la
confi guración del reloj en el control remoto y se repite
cada día una vez confi gurado. Para confi gurar el reloj,
por favor, consulte la preparación del control remoto.
• El temporizador confi gurado a la hora actual se
activará primero.
• Si el temporizador se cancela manualmente, puede
restaurar la confi guración anterior pulsando
SET
.
• Si la alimentación principal se apaga durante una
hora o más, el reloj y el temporizador deberán ser
confi gurados de nuevo.
SUGERENCIA
• Ajuste la temperatura 1°C o más en el modo de frío
(cool) o 2°C menos que la temperatura deseada en el
modo de calor (heat) para ahorrar un 10% de energía.
• Use cortinas para proteger de luz solar y el calor
exterior y así reducir el consumo eléctrico durante el
modo de frío.
ESPAÑOL
.
17
Page 18
CHECK ODOUR WASH VE
MODE
SELECT
SET
CANCEL
OFF
/
O
TIMER/CLOCK
ECONOMY
UP
DOWN
CZ-RD513C
PARA ESTABLECER EL TEMPORIZADOR
SEMANALMENTE
DETALLES DE FUNCIONAMIENTO
TIMER/CLOCK
TIMER/CLOCK
PARA ESTABLECER EL TEMPORIZADOR
SEMANALMENTE
MONTUE WED THU FRI SAT SUN
ON
/
OFF
CZ-RD513C
TIMER/CLOCK
UP
MODE
SET
SELECT
CANCEL
DOWN
ECONOMY
CHECK ODOUR WASH VENTILATION TEST RUN FILTER RESET
Se ilumina cuando la operación
TIMER está seleccionada
TIMER
1
23456
MON TUE WED THU FRI SAT SUN
ON
OFF
OFF-Timer. Para apagar la
unidad automáticamente.
Temporizador ON Para encender la unidad
automáticamente.
Seleccionar el día
18
Cambiar la pantallay
1. Apretar el
pantalla al temporizador semanal.
Seleccione los días para usar el temporizador
2. Pulse
3. Pulse
El día seleccionado se resaltará con .
Pulse
Repetir este paso incluye otro día.
Seleccione temporizador ON/OFF
4. Pulse
5. Pulse
6. Pulse
Seleccione el Temporizador
7. Pulse para seleccionar su hora deseada.
Si desea confi gurarlo juntamente con su temperatura
deseada, pulse
temperatura.
8. Pulse
• Repita los pasos del 5 al 8 para confi gurar el
Temporizador del 2 al 6, o pulse
los temporizadores en cuestión.
MODE
durante 3 segundos para cambiar la
SELECT
para entrar en la confi guración diaria.
para seleccionar su día deseado.
SET
para deselecciona o seleccione el signo
.
SELECT
para entrar en el Temporizador 1.
para seleccionar ON u OFF.
SET
para confi rmar la selección.
UP
DOWN
para seleccionar la
SET
para confi rmar la confi guración.
FAN SPEED
AUTO
AUTO
AIR SWING
AUTO 123
ON
TEMP/
A/C No.
FAN
UP
MODE
SPEED
DOWN
MANUAL
AUTO
AIR SWING
6 Programas diferentes
pueden ser ajustados en
un día (1 ~ 6)
Indica el día
seleccionado
Seleccionar la hora
(Intervalo de 10
minutos)
CANCEL
para cancelar
DETALLES DE FUNCIONAMIENTO
• El temporizador semanal sólo se aplica al control
remoto con cables, pulse
MODE
durante 3 segundos
para seleccionar el temporizador diario o el
temporizador semanal.
• El temporizador diario y el temporizador semanal no
se han podido confi gurar al mismo tiempo.
• Promueve el ahorro de energía permitiéndole
confi gurar hasta 6 temporizadores en cualquier día
específi co.
• El programa del mismo temporizador no se puede
confi gurar en un mismo día.
Comprobar el temporizador
1. Entre en modo de
MODE
SELECT
UP
DOWN
SET
CANCEL
temporizador.
2. Seleccione el día.
3. La pantalla mostrará el programa de cada día
seleccionado.
Modifi car o añadir un temporizador
• Compruebe el funcionamiento del temporizador para
seleccionar el día. Repita los pasos del 4 al 8 para
modifi car el programa del temporizador existente, o
añadir el programa de cualquier nuevo temporizador.
Cancelar el temporizador
• Siga el paso inferior para cancelar el programa del
temporizador de un día específi co.
1. Entre en modo de
MODE
SELECT
UP
DOWN
SET
CANCEL
temporizador.
2. Seleccione el día.
3. Pulse para entrar en
la confi guración del
día.
4. Pulse para cancelar
la confi guración del
temporizador.
Desactivar el temporizador semanal
• Para desactivar la confi guración semanal, pulse
MODE
, y luego pulse
CANCEL
.
Activar el temporizador semanal
• Para activar la confi guración previa del temporizador
semanal, pulse
MODE
, y luego pulse
SET
.
Page 19
2
Abaje despacio la
rejilla de entrada.
3
Retire el fi ltro de aire de
las pestañas y retírelo
hacia abajo.
1
Pulse los botones.
Extraer
CLOS
E
OPE
N
OPEN
CLOS
E
FILTRO DE AIRE
1
2
3
CUIDADO Y LIMPIEZA CUIDADO Y LIMPIEZA
INSTRUCCIONES DE LAVADO
SUGERENCIA
UNIDAD INTERIOR
• Apague la unidad antes de limpiarla.
• No toque la aleta de aluminio, las partes afi ladas pueden causar
PRECAUCIÓN
INSTRUCCIONES DE LAVADO
• No utilice benceno, disolvente o limpiador en polvo.
• Utilice sólo jabones ( pH7) o detergentes domésticos
neutros.
• No utilice agua con una temperatura superior a 40°C.
Eliminar el fi ltro de aire Instalación del fi ltro de
1
Pulse los botones.
heridas.
SUGERENCIA
• Limpie el fi ltro regularmente para conseguir los mejores
resultados y reducir el consumo eléctrico.
• Consulte con su distribuidor más cercano para realizar
inspecciones periódicas.
UNIDAD INTERIOR
Limpie la unidad suavemente
con un paño suave y seco.
aire
1
2
Introduzca el fi ltro
de aire hacia las
pestañas de la
rejilla de entrada.
ESPAÑOL
2
Abaje despacio la
rejilla de entrada.
3
Retire el fi ltro de aire de
las pestañas y retírelo
hacia abajo.
Mantenimiento del fi ltro de aire
Es necesario limpiar cuando:
FAN SPEED
AUTO
AIR SWING
AUTO 123
POWER
TIMER
FILTER
ECONOMY
ODOUR WASH
AUTO FAN
COOL DRY
“FILTER RESET” aparezca en
FILTER
RESET
la pantalla del control remoto.
(Para control remoto con
cables)
“FILTER” se ilumina en la
pantalla del indicador.
(Para control remoto
AUTO
inalámbrico)
LOSE
C
OPEN
OPEN
OSE
CL
3
Extraer
FILTRO DE AIRE
Aspire, lave y seque.
Pulse los botones hacia el lado
CLOSE.
Suba despacio
la rejilla de
entrada.
Botón
• Se recomienda limpiar los fi ltros de aire cada 6
semanas.
• Después de limpiar el fi ltro de aire, pulse
para reiniciar.
FILTER RESET
/
FILTER RESET
• No lo utilice sin ningún fi ltro de aire.
• Lave/pase por agua el fi ltro de aire minuciosamente
para evitar cualquier daño en la superfi cie del fi ltro de
aire.
• No seque esa parte con un secador o estufa.
• Sustituya cualquier fi ltro de aire dañado.
19
Page 20
Señal
Causa
Las siguientes señales no indican un mal funcionamiento.
LOCALIZACIÓN DE AVERÍAS LOCALIZACIÓN DE AVERÍAS
Las siguientes señales no indican un mal funcionamiento.
Señal
Sale neblina de la unidad interior. • Efecto de condensación producido durante el proceso de enfriamiento.
Se escucha un sonido similar a agua fl uyendo
durante el funcionamiento.
Hay un olor extraño en la habitación. • Puede ocurrir debido al olor a humedad producido por las paredes, las
El ventilador interior se para de vez en cuando
con la velocidad del ventilador automática.
El aparato tarda varios minutos en funcionar
tras volver a encenderlo.
La unidad exterior emite agua o vapor. • Se produce condensación o evaporación en los tubos.
El indicador TIMER siempre está encendido. • Una vez confi gurado, el ajuste del temporizador se repite todos los días.
El ventilador interior se para de vez en cuando
durante la función de calentamiento.
Durante el funcionamiento es posible que
escuche algunos chasquidos.
La unidad cambia al proceso FAN (ventilar) y
el aire se vuelve húmedo.
La unidad externa emite ruidos durante el
funcionamiento.
El funcionamiento no se detiene
inmediatamente después de pulse el botón
ON/OFF.
El funcionamiento se detiene ocasionalmente.
(“DESCONGELAR” aparezca en la pantalla
del control remoto)
La circulación de aire no se inicia
inmediatamente después del inicio de
funcionamiento. (“PRE CALEFACCIÓN”
aparezca en la pantalla del control remoto)
El funcionamiento comienza luego de que la
falla de Energía sea reanudada.
Durante el modo de secado, se expulsa aire
frío.
La velocidad de ventilación a veces cambia
durante el modo de calefacción.
La unidad exterior emite vapor durante el
modo de calefacción.
Causa
• Flujo del refrigerante en el interior de la unidad.
alfombras, los muebles o las telas de la habitación.
• Con esto se eliminan los malos olores del ambiente.
• El retraso responde a un dispositivo de protección del compresor de la
unidad.
• Para evitar un efecto de enfriamiento indeseado.
• Los cambios de temperatura causan la expansión/contracción de la
unidad.
• Esto sucede cuando la temperatura ambiente alcanza la temperatura
predefi nida, la unidad pasa a modo FAN y aumenta la humedad.
• Esto se debe a cambios en la entrada de gas refrigerante cuando el
funcionamiento se para y se inicia.
• El calor de descarga está en proceso. El funcionamiento se detendrá
automáticamente pasados aproximadamente 60 segundos.
• La unidad se encuentra en modo de descongelación, y el hielo derretido
se evacua desde la unidad exterior.
• La unidad se calienta para proporcionar aire caliente.
• Auto rearranque está en función y opera bajo ajustes previos.
• La unidad utiliza el funcionamiento de refrigeración a baja velocidad de
ventilación para deshumidifi car la habitación.
• La temperatura ambiente ha alcanzado la confi guración del control
remoto. Cuando la temperatura ambiente vuelva a bajar, la velocidad de
ventilación volverá a la confi guración del control remoto.
• Esto se debe al funcionamiento de descongelación que tiene lugar en el
intercambiador de calor.
20
Page 21

Señal
Compruebe
Compruebe lo siguiente antes de llamar a un técnico.
PARA INSPECCIÓN ESTACIONAL DESPUÉS DE
UN
LARGO PERÍODO EN DESUSO
NO UTILICE LA UNIDAD SI
SI NO SE VA A UTILIZAR LA UNIDAD DURANTE
UN
PERIODO PROLONGADO DE TIEMPO
“CHECK” aparece en el control remoto con cables.
Compruebe lo siguiente antes de llamar a un técnico.
Señal
Las operaciones calor/frío no funcionan
efi cientemente.
El modo de calefacción no se puede utilizar. • La unidad está obligada a funcionar en modo de refrigeración sólo en
Funcionamiento ruidoso. • Compruebe si la unidad está instalada en una pendiente o si la rejilla de
El mando a distancia no funciona.
(La pantalla del control remoto inalámbrico
está oscura o la señal de transmisión es
débil.)
La unidad no funciona. • Compruebe si el disyuntor está activado.
La unidad no recibe la señal del mando a
distancia.
“CHECK” aparece en el control remoto con cables.
Compruebe
• Programe la temperatura correctamente.
• Cierre todas las puertas y ventanas.
• Limpie o sustituya los fi ltros.
• Limpie cualquier obstrucción en la entrada y salida de aire.
una habitación no habitable, como una sala de ordenadores.
entrada no está cerrada correctamente.
• Inserte las baterías correctamente.
• Reemplace las baterías débiles.
• Compruebe si los temporizadores han sido programados.
• Asegúrese de que el receptor no esté obstruido.
• Asegúrese de que la dirección esté confi gurada correctamente.
• Asegúrese de que la transmisión de la señal del control remoto se
encuentre dentro del espacio de alcance.
• Ciertas luces fl uorescentes puede interferir con el transmisor de señal.
Por favor consulte a su distribuidor más cercano.
ESPAÑOL
Si el indicador CHECK se ilumina en el
control remoto con cables.
PARA INSPECCIÓN ESTACIONAL DESPUÉS DE
LARGO PERÍODO EN DESUSO
•
Verifi que las pilas del mando a distancia
inalámbrico).
•
Compruebe que las tomas de entrada y salida de las rejillas
de ventilación no estén obstruidas.
•
Tras 15 minutos de funcionamiento, es normal que se
produzca la siguiente diferencia de temperatura entre las
tomas de entrada y salida de las rejillas de ventilación:
Enfriamiento:
SI NO SE VA A UTILIZAR LA UNIDAD DURANTE
PERIODO PROLONGADO DE TIEMPO
• Active el modo de calefacción (Modelo de Inversor/
Bomba de calor) o el modo de ventilación (Modelo
de refrigeración) durante 2 o 3 horas para eliminar
totalmente la humedad restante en las partes interiores.
•
Apague la unidad.
•
Extraiga las pilas del mando a distancia
inalámbrico).
≥ 8°C
Calentamiento:
(control remoto
• Apague la unidad.
• Enciéndala de nuevo pasados 3 minutos.
• Si CHECK continúa a parpadear, pulse
el problema continúa, consulte por favor su vendedor autorizado más
próximo.
UN
(control remoto
≥ 14°C
UN
para mensajes de error. Si
CHECK
NO UTILICE LA UNIDAD SI
Si se dan las siguientes circunstancias, CORTE LA
ALIMENTACIÓN y LLAME al distribuidor autorizado:
•
Si escucha ruidos extraños durante el funcionamiento.
•
Si entra agua o elementos extraños en el mando a distancia.
•
Si hay escapes de agua de la unidad interior.
•
Si el interruptor del circuito salta frecuentemente.
•
El cable de alimentación está demasiado caliente.
•
Los interruptores o los botones no funcionan correctamente.
• El olor persiste hasta después de utilizar la función de
lavado de malos olores continuamente.
21
Page 22

Uscita
aria
Ingresso
aria
PRECAUZIONI PER LA SICUREZZA PRECAUZIONI PER LA SICUREZZA
Ingresso aria
Uscita aria
Ingresso
aria
DEFINIZIONE
Le istruzioni sono classifi cate in varie tipologie, contrassegnate dai seguenti simboli:
Questo simbolo indica un’azione
PROIBITA.
Si prega di seguire attentamente quanto segue onde evitare lesioni personali, danni alle altre persone o danni materiali.
In caso di uso scorretto dovuto alla mancata osservanza delle istruzioni, si possono provocare iincidenti o danni di varia natura, la cui
gravità è indicata dai seguenti simboli:
Avvertenze
Questo simbolo indica un pericolo di morte o
lesioni gravi.
Questi simboli indicano azioni
OBBLIGATORIE.
Questo simbolo
Attenzione
indica un rischio
di lesioni o danni
materiali.
Telecomando wireless o senza fi li
• Non utilizzare batterie
ricaricabili (Ni-Cd).
• Non permettere a bambini
piccoli di giocare con il
telecomando, al fi ne di
evitare che ingeriscano
accidentalmente le batterie.
• Se si prevede che
l’apparecchio rimarrà
inutilizzata per un periodo di
tempo prolungato, rimuovere
le batterie.
• Usare batterie nuove dello
stesso tipo secondo la
polarità indicata per evitare
malfunzionamenti del
telecomando.
• Non condividere la presa di corrente con alri
apparecchi.
• Non modifi care i cavi di alimentazione.
• Non utilizzare cavi di prolunga.
• Non utilizzare con mani bagnate.
• Utilizzare il cavo di alimentazione specifi cato.
• Se il cavo di alimentazione è stato
danneggiato, rivolgersi al produttore, ad un
centro di assistenza autorizzato o ad un
tecnico qualifi cato onde evitare rischi.
• Questo apparecchio deve disporre di uno
scarico a terra; inoltre, si consiglia vivamente
di dotarlo di un interruttore differenziale
(ELCB) o un dispositivo di corrente residua
(RCD). Altrimenti, potrebbero verifi carsi
scosse elettriche o incendi in caso di
malfunzionamento.
• In caso di emergenza o di condizioni
anormali (puzza di bruciato, ecc.), spegnere
l’apparecchio e contattare il rivenditore più
vicino.
• Non inserire le dita o altri oggetti nell’unità.
I componenti affi lati potrebbero ferire.
22
Alimentazione
Unità Esterna
Unità Interna
• Non installare, rimuovere o
reinstallare l’apparecchio da soli;
un’installazione scorretta può
causare perdite, folgorazioni
o incendi. Per l’installazione
rivolgersi ad un rivenditore
autorizzato o ad un tecnico
specializzato.
• Non inserire le dita o altri oggetti
nell’unità.
• Non tentare di riparare
l’apparecchio da soli.
Uscita aria
Ingresso aria
Ingresso
aria
Ingresso
aria
Uscita
aria
Unità Interna
• Non installare l’apparecchio in
un’atmosfera potenzialmente
esplosiva.
• Non lavare l’unità con acqua,
benzene, solventi o polveri abrasive.
• Non utilizzare per scopi diversi
da quello previsto, come la
conservazione di alimenti.
• Non utilizzare materiali combustibili
nella direzione del fl usso d’aria.
• Non esporlo direttamente all’aria
fredda per un periodo di tempo
prolungato.
• Controllare che la tubazione di scarico
sia collegata correttamente. In caso
contrario si possono verifi care perdite.
• Aerare regolarmente l’ambiente.
Alimentazione
• Spegnere l’apparecchio prima di
pulirlo o di effettuare la manutenzione.
• Spegnere l’apparecchio se si prevede
che rimarrà inutilizzato per un periodo
di tempo prolungato.
• Questo condizionatore d’aria dispone
di un dispositivo di protezione da
sovratensione incorporato. Tuttavia,
per proteggere ulteriormente
l’apparecchio da fulmini di particolare
intensità si consiglia di disattivare
l’alimentazione durante i temporali.
Non toccare il condizionatore in
presenza di fulmini, poiché vi è il
rischio di rimanere folgorati.
Unità Esterna
• Non sedersi o camminare sull’unità, in
quanto si potrebbe cadere.
• Non toccare l’aletta in alluminio, le parti
affi liate potrebbero causare lesioni.
• Controllare che la tubazione di scarico
sia collegata correttamente. In caso
contrario si possono verifi care perdite.
• In seguito ad uso prolungato,
controllare che il telaio di installazione
non sia danneggiato.
Page 23

INDICE
NORMATIVE NORMATIVE
NOTA :
CONDIZIONI OPERATIVE
L’uso di questo apparecchio non è destinato a persone con capacità fi siche, sensoriali o mentali
ridotte (compresi i bambin i), o mancanza di esperienza o competenza, a meno che non siano
supervisionate o istruite sull’uso dell’apparecchio da una persona responsabile della loro sicurezza.
Fare attenzione che i bambini non giochino con l’apparecchio.
CONDIZIONI OPERATIVE
Questo condizionatore può essere utilizzato con temperature rientranti nel seguente intervallo
Modello Temperatura (°C) Interna Esterna
Invertitore
(Serie GBE5,
DBE5, DBE8)
Pompa di calore
Raffreddamento RAFFREDDAMENTO
NOTE: Questa unità è ancora in grado di operare la funzione di raffreddamento in una stanza non
utilizzata di continuo, come la stanza del computer, in condizioni di temperatura esterna
che raggiunga fi no a -15°C*/ -10°C** ed una temperatura ambiente di 21°C o superiore
con l’umidità interna fi no al 45%.
(CU-YL24HBE5, CU-YL28HBE5, CU-YL34HBE5, CU-YL43HBE5)
RAFFREDDAMENTO
RISCALDAMENTO
NOTE: Questa unità è ancora in grado di operare la funzione di raffreddamento in una stanza
non utilizzata di continuo, come la stanza del computer, in condizioni di temperatura
esterna che raggiunga fi no a -5°C ed una temperatura ambiente di 21°C o superiore con
l’umidità interna fi no al 45%.
RAFFREDDAMENTO
RISCALDAMENTO
RAFFREDDAMENTO
RISCALDAMENTO
Temperatura (°C) Interna Esterna
Massima 32 43
Minima 21 -5
Massima 27 24
Minima 16 -15
Massima 32 43
Minima 21 -15*
Massima 27 24
Minima 16 -20
Massima 32 43
Minima 21 -10**
Massima 27 24
Minima 16 -10
Massima 32 43
Minima 21 -10**
Grazie per aver acquistato un
climatizzatore
PRECAUZIONI PER LA SICUREZZA
NORMATIVE
PRESENTAZIONE DEL PRODOTTO
E OPERAZIONI
(TELECOMANDO WIRELESS O
SENZA FILI)
PRESENTAZIONE DEL PRODOTTO
E OPERAZIONI
(TELECOMANDO CABLATO)
PULIZIA E MANUTENZIONE
SOLUZIONE DEI PROBLEMI
GUIDA RAPIDA
COPERCHIO POSTERIORE
NOTA :
le illustrazioni contenute in questo
manuale sono riportate esclusivamente
a scopo esplicativo e potrebbero
differire dall’apparecchio vero e proprio.
I contenuti del presente manuale sono
soggetti a modifi ca senza preavviso
e verranno aggiornati in base alle
innovazioni future.
INDICE
22
23
24~25
26~28
29
30~31
ITALIANO
Informazioni per gli utenti sulla raccolta e l’eliminazione di vecchie apparecchiature e batterie usate
Questi simboli sui prodotti, sull’imballaggio, e/o sulle documentazioni o manuali accompagnanti i prodotti indicano che i
prodotti elettrici, elettronici e le batterie usate non devono essere buttati nei rifi uti domestici generici.
Per un trattamento adeguato, recupero e riciclaggio di vecchi prodotti e batterie usate, vi preghiamo di portarli negli
appositi punti di raccolta, secondo la legislazione vigente nel vostro Paese e le Direttive 2002/96/EC e 2006/66/EC.
Smaltendo correttamente questi prodotti e le batterie, contribuirete a salvare importanti risorse e ad evitare i potenziali
effetti negativi sulla salute umana e sull’ambiente che altrimenti potrebbero verifi carsi in seguito ad un trattamento
inappropriato dei rifi uti.
Per ulteriori informazioni sulla raccolta e sul riciclaggio di vecchi prodotti e batterie, vi preghiamo di contattare il vostro
comune, i vostri operatori per lo smaltimento dei rifi uti o il punto vendita dove avete acquistato gli articoli.
Sono previste e potrebbero essere applicate sanzioni qualora questi rifi uti non siano stati smaltiti in modo corretto ed in
accordo con la legislazione nazionale.
Per utenti commerciali nell’Unione Europea
Se desiderate eliminare apparecchiature elettriche ed elettroniche, vi preghiamo di contattare il vostro commerciante od il
fornitore per maggiori informazioni.
[Informazioni sullo smaltimento rifi uti in altri Paesi fuori dall’Unione Europea]
Questi simboli sono validi solo all’interno dell’Unione Europea. Se desiderate smaltire questi articoli, vi preghiamo di
contattare le autorità locali od il rivenditore ed informarvi sulle modalità per un corretto smaltimento.
Nota per il simbolo delle batterie (esempio con simbolo chimico riportato sotto il simbolo principale):
Questo simbolo può essere usato in combinazione con un simbolo chimico; in questo caso è conforme ai requisiti indicati
Pb
dalla Direttiva per il prodotto chimico in questione.
• Non ACCENDERE l’unità dopo aver passato la cera sul pavimento. Arieggiare adeguatamente la camera prima di utilizzare l’unità.
• Non installare l’unità in zone unte e fumose.
23
Page 24

ADDRESS
AUTO
AUTO
TIMER
ON
SETRESET ADDRES
S
MODE
MODE
AIR SW
ING
FAN SPEED
AIR SWING
TIMER
OFF/ON
SET
CANCEL
SELECT
CLOCK
FAN SPEED
FILTER RESET
MANUAL
ODOUR WASH
MODE
AUTO
ECONOMY
PRESENTAZIONE DELPRODOTTO E OPERAZIONI
PRESENTAZIONE DELPRODOTTO E OPERAZIONI
(TELECOMANDO WIRELESS O SENZA FILI)
(TELECOMANDO WIRELESS O SENZA FILI)
Pannello di controllo
Aletta di direzione del
fl usso d’aria
Filtro dell’aria
Griglia Di Ingresso
Display
telecomando
3
6
Modello Invertitore / Pompa di calore
CZ-RL513B
Modello con raffreddamento
CZ-RL013B
24
1
POWER
TIMER
FILTER
ECONOMY
ODOUR WASH
AUTO
Ricevitore a raggi
Tasto auto OFF/ON
• Come far funzionare l’unità se il telecomando
wireless non si trova o funziona male.
Azione Modalità
L’aria viene
scaricata in
maniera uniforme
Premere una volta. Automatico
Premere fi nché non si sente 1
“beep”, quindi rilasciare.
Raffreddamento
1. Premere fi nché non si sentono 2
“beep”, quindi rilasciare.
2.Premere il tasto
SET
per 5 secondi.
Riscaldamento
Premere il tasto per spegnere.
Trasmettitore
Distanza massima: 8m
Telecomando: Operazioni Preliminari
Premere ed estrarre
1
Inserire batterie AAA o R03
2
(può essere utilizzato per circa 1 anno)
3
Premere CLOCK
OFF/ON
PER ACCENDERE O
SPEGNERE L’UNITÀ
Impostare l’ora
4
Confermare
5
Chiudere il coperchio
6
POWER
PER IMPOSTARE LA TEMPERATURA
• Gamma di selezione: 16°C ~ 31°C.
4
5
MODE
PER SELEZIONARE LA MODALITÀ
OPERATIVA
MODALITÀ AUTO - Per la propria comodità
2
• L’unità seleziona automaticamente la modalità di funzionamento in base
all’impostazione e alla temperatura esterna e dell’ambiente.
MODALITÀ RISCALDAMENTO - Per godere dell’aria calda
• Occorre qualche istante perché l’apparecchio si riscaldi.
(Applicabile al Modello Invertitore / Pompa di calore)
MODALITÀ FAN - Per permettere la circolazione dell’aria nella stanza
MODALITÀ RAFFREDDAMENTO - Per godere dell’aria fresca
MODALITÀ DEUMIDIFICAZIONE - Per deumidifi care l’ambiente
• La ventola dell’unità opera a bassa velocità, al fi ne di eseguire
l’operazione di raffreddamento in maniera molto delicata.
• In modalità Soft dry, la ventola interna funziona a velocità ridotta.
• Il movimento delle feritoie di ventilazione può non essere allineato con il
display del telecomando.
Page 25

IMPOSTAZIONE DEL TIMER GIORNALIERO
FAN SPEED
SUGGERIMENTO
IMPOSTAZIONI OPZIONALI
SELEZIONE DELLA VELOCITÀ VENTOLA
(3 OPZIONI)
LOW MEDIUMAUTO HIGH
• Per la modalità automatica, la velocità della ventola interna
viene regolata automaticamente in base alla modalità
operativa.
• Se la modalità operativa è impostata su Fan, la
velocità del ventilatore si regolerà su livello MEDIUM
indipendentemente dall’impostazione della temperatura.
AIR SWING
AUTO
REGOLAZIONE DELLA DIREZIONE
MANUAL
DEL FLUSSO DELL’ARIA
• Mantenere l’ambiente ventilato.
• L’aria viene emessa uniformemente attraverso 4 aperture di
uscita.
AUTO 1 AUTO 2 AUTO 3
AUTO
• Esistono 3 opzioni per la regolazione automatica della
direzione verticale del fl usso dell’aria.
• Le feritoie di ventilazione verticale si so llevano e si
abbassano automaticamente.
• Non regolare manualmente l’aletta per la direzione del fl usso
d’aria verticale.
MANUAL
• Esistono 4 opzioni per la regolazione manuale della direzione
verticale del fl usso dell’aria.
• Il fl usso d’aria può essere direzionato come desiderato
tramite il telecomando.
ECONOMY
PER RIDURRE IL
CONSUMO DI CORRENTE
ECONOMY
• Si raccomanda di usare questa opzione quando la
temperatura ambiente desiderata è raggiunta.
• La funzione Economy può essere attivata in qualsiasi
modalità e può essere annullata premendo nuovamente il
tasto corrispondente.
ODOUR WASH
ODOUR WASH
RIMOZIONE DEGLI ODORI
• Applicabile a tutti i modelli.
• Aiuta ad eliminare odori sgradevoli nell’aria circostante
durante la funzione.
• Per attivare la funzione di rimozione degli odori, premere una
ODOUR WASH
volta
.
• Per annullare, premere nuovamente il tasto corrispondente.
ELIMINAZIONI DEGLI ODORI
• Applicabile solamente al Modello dell’Invertitore.
• Per eliminare gli odori e minimizzare il formarsi degli odori
che causano muffa nella sezione interna del condizionatore
d’aria.
• Per attivare questa funzione, premere
ODOUR WASH
per più di 3
secondi.
• L’unità attiverà automaticamente le modalità Fan
(Ventilazione) ed Heating (Riscaldamento) per circa 20
minuti, quindi si arresterà automaticamente.
• Si raccomanda di aprire le fi nestre durante questa
operazione.
IMPOSTAZIONE DEL TIMER GIORNALIERO
• Per accendere o spegnere l’unità a un’ora prestabilita.
TIMER
SELECT
Selezionare
l’accensione
Impostare
l’orario.
SET
Confermare.
(ON) o lo
spegnimento
(OFF) del timer.
• Per annullare l’accensione o spegnimento timer, premere
CANCEL
.
• Quando il timer è impostato su ON, l’unità può iniziare
l’operazione in anticipo sul tempo programmato, in modo
che raggiunga la temperatura desiderata in modo puntuale.
• Il funzionamento del timer si basa sull’orologio impostato
sul telecomando, e viene ripetuto ogni giorno una volta
impostato. Per l’impostazione dell’orologio fare riferimento
alla preparazione del telecomando.
• Il timer programmato all’ora che si avvicina di più a quella
corrente, sarà attivato per primo.
• Se si annulla il timer manualmente, è possibile ripristinare
SET
l’impostazione precedente premendo
.
• Se l’alimentazione non fornisce corrente per un’ora o più,
l’orologio ed il timer dovranno essere reimpostati.
IMPOSTAZIONI OPZIONALI
• Per evitare operazioni non volute, è possibile
attribuire un indirizzo diverso a ciascuna unità
interna.
• Premere ripetutamente per selezionare
l’impostazione di indirizzo desiderata.
Address 1 Address 2Group Address 3
ADDRESS
• ADDRESS 1 è selezionato come opzione
predefi nita. Non c’è bisogno di modifi care questa
impostazione per la normale funzione dell’unità.
• Se l’indirizzo è impostato su GROUP,
è possibile mettere in funzione
contemporaneamente più di un’unità interna.
Premere per ripristinare l’impostazione
RESET
predefi nita del telecomando.
Da non utilizzare in operazioni normali.
SET
SUGGERIMENTO
• Impostando una temperatura superiore di 1°C rispetto
alla temperatura desiderata in modalità raffreddamento
o inferiore di 2°C in modalità riscaldamento, si ottiene un
risparmio energetico pari al 10%.
• Per risparmiare energia mentre il condizionatore è in
modalità di raffreddamento, utilizzare delle tende per
impedire l’ingresso di calore e della luce solare.
ITALIANO
25
Page 26

S
PRESENTAZIONE DELPRODOTTO E OPERAZIONI
PRESENTAZIONE DELPRODOTTO E OPERAZIONI
(TELECOMANDO CABLATO)
(TELECOMANDO CABLATO)
Aletta di direzione del
fl usso d’aria
Filtro dell’aria
L’aria viene
scaricata in
maniera uniforme
Griglia Di Ingresso
/
ON
OFF
PER ACCENDERE O SPEGNERE
L’UNITÀ
UP
FAN SPEED
AUTO
OFF
SET
CANCEL
ECONOMY
/
ON
SPEED
AUTO
AIR SWING
AUTO 123
FAN
AUTO
AIR SWING
MODE
MANUAL
TEMP/
A/C No.
DOWN
UP
MON TUE WED THU FRI SAT SUN
ON
CZ-RD513C
TIMER/CLOCK
MODE
UP
SELECT
DOWN
CHECK ODOUR WASH VENTILATION TEST RUN FILTER RESET
DOWN
•
Gamma di selezione: 16°C ~ 31°C.
MODE
3
MODALITÀ AUTO - Per la propria comodità
2
•
L’unità seleziona automaticamente la modalità di
funzionamento in base all’impostazione e alla temperatura
esterna e dell’ambiente.
MODALITÀ RISCALDAMENTO - Per godere dell’aria calda
1
•
Occorre qualche istante perché l’apparecchio si riscaldi.
PER IMPOSTARE LA
TEMPERATURA
PER SELEZIONARE LA MODALITÀ
OPERATIVA
(Applicabile al Modello Invertitore / Pompa di calore)
CZ-RD513C
• In condizioni normali, il tasto
vengono utilizzati.
VENTILATION
Telecomando: Operazioni Reliminari
1
2
3
4
ELECT
Premere
Premere per impostare il giorno
Confermare
Ripetere i punti 2 e 3 per impostare l’ora corrente.
e
non
TEST RUN
MODALITÀ FAN - Per permettere la circolazione dell’aria
nella stanza
MODALITÀ RAFFREDDAMENTO - Per godere dell’aria
fresca
MODALITÀ DEUMIDIFICAZIONE - Per deumidifi care
l’ambiente
• La ventola dell’unità opera a bassa velocità, al fi ne di
eseguire l’operazione di raffreddamento in maniera molto
delicata.
• In modalità Soft dry, la ventola interna funziona a velocità
ridotta.
• Il movimento delle feritoie di ventilazione può non essere
allineato con il display del telecomando.
26
Page 27

IMPOSTAZIONE DEL TIMER GIORNALIERO
FAN
SUGGERIMENTO
SELEZIONE DELLA VELOCITÀ VENTOLA
SPEED
(3 OPZIONI)
LO MEDAUTO HI
• Per accendere o spegnere l’unità a un’ora prestabilita.
• Per la modalità automatica, la velocità della ventola interna viene
regolata automaticamente in base alla modalità operativa.
• Se la modalità operativa è impostata su Fan, la
velocità del ventilatore si regolerà su livello MED
indipendentemente dall’impostazione della temperatura.
AUTO
MANUAL
REGOLAZIONE DELLA
DIREZIONE DEL FLUSSO
AIR SWING
DELL’ARIA
• Mantenere l’ambiente ventilato.
• L’aria viene emessa uniformemente attraverso 4 aperture di
uscita.
AUTO
AUTO 1 AUTO 2 AUTO 3
• Esistono 3 opzioni per la regolazione automatica della direzione
verticale del fl usso dell’aria.
• Le feritoie di ventilazione verticale si so llevano e si abbassano
• Quando il timer è impostato su ON, l’unità può iniziare
automaticamente.
• Non regolare manualmente l’aletta per la direzione del fl usso
d’aria verticale.
MANUAL
• Il funzionamento del timer si basa sull’orologio
• Esistono 4 opzioni per la regolazione manuale della direzione
verticale del fl usso dell’aria.
• Il fl usso d’aria può essere direzionato come desiderato tramite il
telecomando.
ECONOMY
PER RIDURRE IL CONSUMO DI
CORRENTE
• Il timer programmato all’ora che si avvicina di più a
• Se si annulla il timer manualmente, è possibile
• Se l’alimentazione non fornisce corrente per un’ora o
• Si raccomanda di usare questa opzione quando la temperatura
ambiente desiderata è raggiunta.
• La funzione Economy può essere attivata in qualsiasi modalità
e può essere annullata premendo nuovamente il tasto
corrispondente.
ODOUR WASH
RIMOZIONE DEGLI ODORI
• Applicabile a tutti i modelli.
SUGGERIMENTO
• Impostando una temperatura superiore di 1°C rispetto
• Per risparmiare energia mentre il condizionatore è in
• Aiuta ad eliminare odori sgradevoli nell’aria circostante durante
la funzione.
• Per attivare la funzione di rimozione degli odori, premere una
volta
• Per annullare, premere nuovamente il tasto corrispondente.
ODOUR WASH
.
ELIMINAZIONI DEGLI ODORI
• Applicabile solamente al Modello dell’Invertitore.
• Per eliminare gli odori e minimizzare il formarsi degli odori che
causano muffa nella sezione interna del condizionatore d’aria.
• Per attivare questa funzione, premere
secondi.
ODOUR WASH
per più di 3
• L’unità attiverà automaticamente le modalità Fan (Ventilazione)
ed Heating (Riscaldamento) per circa 20 minuti, quindi si
arresterà automaticamente.
• Si raccomanda di aprire le fi nestre durante questa operazione.
IMPOSTAZIONE DEL TIMER GIORNALIERO
12
MODE
Accedere alla modalità
del timer giornaliero.
34
UP
DOWN
Impostare l’orario. Confermare.
• Per annullare l’accensione o spegnimento timer,
premere
CANCEL
.
l’operazione in anticipo sul tempo programmato, in
modo che raggiunga la temperatura desiderata in modo
puntuale.
impostato sul telecomando, e viene ripetuto ogni giorno
una volta impostato. Per l’impostazione dell’orologio
fare riferimento alla preparazione del telecomando.
quella corrente, sarà attivato per primo.
ripristinare l’impostazione precedente premendo
più, l’orologio ed il timer dovranno essere reimpostati.
alla temperatura desiderata in modalità raffreddamento
o inferiore di 2°C in modalità riscaldamento, si ottiene
un risparmio energetico pari al 10%.
modalità di raffreddamento, utilizzare delle tende per
impedire l’ingresso di calore e della luce solare.
SELECT
Selezionare l’accensione
(ON) o lo spegnimento
(OFF) del timer.
SET
SET
ITALIANO
.
27
Page 28

CHECK ODOUR WASH VE
MODE
SELECT
SET
CANCEL
OFF
/
O
TIMER/CLOCK
ECONOMY
UP
DOWN
CZ-RD513C
TIMER/CLOCK
TIMER/CLOCK
PER IMPOSTARE IL TIMER SETTIMANALE
INFORMAZIONI DI FUNZIONAMENTO
PER IMPOSTARE IL TIMER SETTIMANALE
FAN SPEED
AUTO
MONTUE WED THU FRI SAT SUN
ON
AIR SWING
AUTO 123
/
ON
OFF
CZ-RD513C
TIMER/CLOCK
FAN
UP
MODE
SET
SPEED
DOWN
SELECT
CANCEL
AUTO
AIR SWING
ECONOMY
CHECK ODOUR WASH VENTILATION TEST RUN FILTER RESET
Si illumina se viene selezionata
la funzione Timer
Si possono selezionare 6
diversi programmi in un
giorno (1 ~ 6)
TIMER
1
23456
MON TUE WED THU FRI SAT SUN
ON
OFF
OFF-Timer. Per spegnere
automaticamente il climatizzatore.
ON-Timer. Per accendere automaticamente il
climatizzatore.
Giorno da selezionare
28
Cambiare il Display
1. Premere il
a weekly timer (timer settimanale).
Selezionare i giorni per avviare il timer
2. Premere
3. Premere
Il giorno selezionato sarà evidenziato con un .
Premere
Per impostare un altro giorno, ripetere questo punto.
Selezionare le opzioni ON/OFF del Timer
4. Premere
5. Premere per scegliere ON o OFF.
6. Premere
Selezionare il Timer
7. Premere per scegliere l’ora desiderata.
Se si desidera eseguire contemporaneamente
l’impostazione della temperatura voluta, premere
DOWN
8. Premere
• Ripetere i punti dal 5 all’8 per impostare i Timer dal 2 al
6, oppure premere
MODE
per 3 secondi per cambiare il display
SELECT
per accedere all’impostazione dei giorni.
per scegliere il giorno desiderato.
SET
per deselezionare o selezionare il simbolo
.
SELECT
per accedere a Timer 1.
SET
per confermare la scelta.
UP
per selezionarla.
SET
per confermare l’impostazione.
CANCEL
per annullare i relativi timer.
AUTO
TEMP/
A/C No.
UP
MODE
DOWN
MANUAL
Indicare il giorno
selezionato
Orario da selezionare
(Intervalli di 10 minuti)
INFORMAZIONI DI FUNZIONAMENTO
• Il timer settimanale è attivabile solamente con il
telecomando cablato, premere
MODE
per 3 secondi
per selezionare il timer giornaliero o settimanale.
• I timer giornalieri e settimanali non possono essere
impostati contemporaneamente.
• Favorire il risparmio energetico impostando fi no a 6
timer per ciascun dato giorno.
• Lo stesso programma per il timer non può essere
impostato nello stesso giorno.
Controllo del Timer
1. Accedere alla
MODE
SELECT
UP
DOWN
SET
CANCEL
modalità del timer.
2. Selezionare il giorno.
3. Il display mostrerà il programma relativo a ciascun
giorno selezionato.
Modifi ca o aggiunta del timer
• Eseguire la funzione di controllo del timer per
selezionare il giorno. Ripetere i punti dal 4 all’8
per modifi care il programma di timer esistente o
aggiungere qualsiasi nuovo programma.
Annullare il timer
• Eseguire il punto seguente per annullare il
programma del timer relativo ad un giorno specifi co.
1. Accedere alla
MODE
SELECT
UP
DOWN
SET
CANCEL
modalità del timer.
2. Selezionare il giorno.
3. Premere per accedere
all’impostazione dei
giorni.
4. Premere per annullare
l’impostazione del
timer.
Disattivazione del timer settimanale
• Per disattivare l’impostazione settimanale, premere
MODE
, quindi
CANCEL
.
Attivazione del timer settimanale
• Per attivare la precedente impostazione settimanale
del timer, premere
MODE
, quindi
SET
.
Page 29

2
Rimuovere
lentamente,
spingendola in basso,
la griglia di immissione.
3
Togliere il fi ltro dell’aria
dalle alette spingendolo
in basso.
1
Premere le maniglie.
Rimuovi
CLOS
E
OPE
N
OPEN
CLOS
E
FILTRO DELL’ARIA
1
2
3
La pulizia è necessaria quando:
PULIZIA E MANUTENZIONE PULIZIA E MANUTENZIONE
ISTRUZIONI PER IL LAVAGGIO
SUGGERIMENTO
UNITÀ INTERNA
• Spegnere l’apparecchio prima di pulirlo.
• Non toccare l’aletta in alluminio, le parti affi liate potrebbero causare
ATTENZIONE
ISTRUZIONI PER IL LAVAGGIO
•
Non lavare l’apparecchio con benzene, solventi o polveri
abrasive.
• Impiegare esclusivamente saponi o detergenti neutri per la
casa ( pH7).
• Non usare acqua ad una temperatura superiore a 40°C.
lesioni.
SUGGERIMENTO
• Pulire il fi ltro con regolarità per ottenere prestazioni
ottimali e per ridurre i consumi.
• Consultare il rivenditore per una ispezione stagionale.
Rimozione del fi ltro dell’aria
1
Premere le maniglie.
OPEN
OSE
CL
2
Rimuovere
lentamente,
spingendola in basso,
la griglia di immissione.
3
Togliere il fi ltro dell’aria
dalle alette spingendolo
in basso.
Installazione del fi ltro
ITALIANO
dell’aria
UNITÀ INTERNA
Asciugare l’apparecchio
con un panno morbido e
asciutto.
LOSE
C
OPEN
Rimuovi
FILTRO DELL’ARIA
Aspirazione, pulizia e aria
asciutta.
1
Inserire il fi ltro
dell’aria nelle alette
della griglia di
immissione.
2
Sollevare
lentamente la
griglia di
immissione.
3
Maniglia
Premere le maniglie fi no al lato
CLOSE (chiusura).
Manutenzione del fi ltro dell’aria
La pulizia è necessaria quando:
FAN SPEED
AUTO
AIR SWING
AUTO 123
POWER
TIMER
FILTER
ECONOMY
ODOUR WASH
AUTO FAN
COOL DRY
“FILTER RESET” (RIPRISTINO
FILTER
RESET
FILTRO) appare sul display del
telecomando.
(Per il telecomando cablato)
“FILTER” si accende sul display
di indicazione.
(Per il telecomando senza fi li)
AUTO
• Si raccomanda di pulire i fi ltri dell’aria ogni 6 settimane.
• Dopo la pulizia del fi ltro dell’aria, premere
FILTER RESET
per eseguire il ripristino.
FILTER RESET
/
• Non mettere in funzione l’unità senza un fi ltro dell’aria.
• Lavare/sciacquare delicatamente il fi ltro dell’aria con
acqua per evitare danni alla superfi cie del fi ltro.
• Non asciugare la parte con un asciugacapelli o una
stufa.
• Sostituire qualsiasi fi ltro che risulti danneggiato.
29
Page 30

Condizione
Causa
Le condizioni seguenti indicano un guasto.
SOLUZIONE DEI PROBLEMI SOLUZIONE DEI PROBLEMI
Le condizioni seguenti indicano un guasto.
Condizione
Sembra che dall’unità interna fuoriesca della
nebbia.
Rumore di acqua durante il funzionamento. • Flusso del refrigerante all’interno dell’unità.
L’ambiente ha un odore particolare. • Può essere dovuto a un odore di umido proveniente dai muri, ai tappeti,
La ventola interna si arresta di tanto in tanto
quando si imposta la modalità di regolazione
automatica della velocità della ventola.
L’operazione è ritardata di qualche minuto
dopo il riavvio.
Dall’unità esterna fuoriesce acqua/vapore. • Condensa o evaporazione nei condotti.
L’indicatore Timer rimane sempre acceso. • L’impostazione Timer si ripete quotidianamente una volta impostata.
La ventola interna si arresta di tanto in tanto
quando si imposta la modalità riscaldamento.
Durante questa fase potrebbero udirsi dei
crepitii.
L’unità commuta sul funzionamento
ventilazione e l’aria diventa umida.
L’unità esterna produce rumori durante le
operazioni di riscaldamento.
La funzione non si arresta subito dopo
avere premuto il tasto OFF/ON.
Il funzionamento si arresta occasionalmente.
(“DEFROST” (SBRINAMENTO) appare sul
display del telecomando.)
Il fl usso dell’aria non si avvia immediatamente
dopo che la funzione è stata attivata. (“PRE
HEAT” (PRERISCALDAMENTO) appare sul
display del telecomando.)
Il funzionamento parte dopo una mancanza
di tensione.
Durante la modalità aria asciutta, viene
fatta uscire dell’aria fredda.
A volte la velocità del ventilatore cambia
durante la modalità di riscaldamento.
Dall’unità esterna fuoriesce del vapore
durante la modalità di riscaldamento.
Causa
• Effetto di condensa dovuto al processo di raffreddamento.
dai mobili o dagli indumenti presenti nella stanza.
• Ciò consente di eliminare gli odori circostanti.
• Il ritardo è una protezione del compressore dell’apparecchio.
• Funzionalità studiata per evitare un effetto di raffreddamento non
intenzionale.
• I cambiamenti di temperatura causano l’espansione/contrazione
dell’unità.
• Ciò si verifi ca quando la temperatura ambiente raggiunge la temperatura
impostata, la funzione passa alla modalità FAN e l’umidità aumenta.
• Ciò è dovuto ai cambiamenti nel fl usso di immissione del gas
refrigerante quando la funzione si arresta e si avvia.
• Rilascio del calore in atto La funzione si arresterà automaticamente
dopo circa 60 secondi.
• Questa unità si trova in modalità di sbrinamento e il ghiaccio sciolto è
spurgato dall’unità esterna.
• L’unità è in fase di riscaldamento per poter fornire aria calda.
• Il riavvio automatico è in funzione ed opera in base alle regolazioni
precedenti.
• L’unità esegue la funzione di raffreddamento ad una velocità del
ventilatore bassa, in modo da deumidifi care la stanza.
• La temperatura ambiente ha raggiunto quella impostata sul
telecomando. Quando la temperatura ambiente scende nuovamente, la
velocità del ventilatore si adeguerà alle impostazioni del telecomando.
• Ciò è dovuto al fatto che l’operazione di sbrinamento si verifi ca sullo
scambiatore di calore.
30
Page 31

Condizione
Controllare
Eseguire i controlli seguenti prima di rivolgersi all’assistenza.
PER L’ISPEZIONE STAGIONALE DOPO UN
PERIODO DI INATTIVITÀ PROLUNGATO
FUNZIONAMENTO ANOMALO
PRIMA DI LUNGHI PERIODI DI INATTIVITÀ
Visualizzazione di “CHECK” sul telecomando cablato.
Eseguire i controlli seguenti prima di rivolgersi all’assistenza.
Condizione
La modalità di riscaldamento/raffreddamento
non funziona in maniera effi ciente.
Non è possibile mettere in funzione la
modalità di riscaldamento.
Rumore durante il funzionamento. • Verifi care se l’unità è stata installata in posizione inclinata o se la griglia
Il telecomando non funziona.
(La luminosità del display del telecomando
wireless o la trasmissione del segnale è
debole.)
L’apparecchio non funziona. • Verifi care se è si è attivato l’interruttore di circuito.
L’unità non riceve il segnale dal telecomando. • Assicurarsi che il ricevitore non sia ostruito.
Visualizzazione di “CHECK” sul telecomando cablato.
Controllare
• Impostare la temperatura corretta.
• Chiudere tutte le porte e fi nestre.
• Pulire o sostituire i fi ltri.
• Eliminare le eventuali ostruzioni alle bocchette di ingresso ed uscita
dell’aria.
• L’unità è obbligata ad operare solamente la modalità di raffreddamento
prevista per una stanza poco utilizzata, come la stanza del computer.
di ingresso non è stata chiusa correttamente.
• Inserire le batterie in maniera corretta.
• Sostituire le batterie quasi scariche.
• Verifi care se sono stati impostati i timer.
• Assicurarsi che l’indirizzo sia impostato correttamente.
• Assicurarsi che il segnale di trasmissione del telecomando rientri nel
raggio di portata.
• Alcune luci fl uorescenti potrebbero interferire con il trasmettitore di
segnale. Consultare il proprio rivenditore più vicino.
ITALIANO
Se l’indicatore CHECK lampeggia sul
telecomando cablato.
PER L’ISPEZIONE STAGIONALE DOPO UN
PERIODO DI INATTIVITÀ PROLUNGATO
• Controllo delle batterie del telecomando (telecomando
wireless o senza fi li).
• Nessuna ostruzione alle bocchette di ingresso ed uscita
dell’aria.
• Dopo 15 dall’avvio, è normale che vi sia la differenza di
temperatura seguente tra le bocchette di ingresso e quelle
di uscita dell’aria:
Raffreddamento: ≥ 8°C Riscaldamento: ≥ 14°C
PRIMA DI LUNGHI PERIODI DI INATTIVITÀ
• Attivare la modalità di riscaldamento (Modello Invertitore/
Pompa di calore) o la modalità del ventilatore (Modello
con raffreddamento) per 2~3 ore in modo da rimuovere
ovunque l’umidità ancora presente nelle parti interne.
• Spegnere l’apparecchio.
• Togliere le batterie dal telecomando (telecomando wireless
o senza fi li).
• Spegnere l’unità.
• Dopo 3 minuti riaccenderla.
• Se CHECK continua a lampeggiare, premere
di errore. Se il problema persiste, rivolgersi al rivenditore autorizzato più
vicino.
per leggere i messaggi
CHECK
FUNZIONAMENTO ANOMALO
Se si verifi ca una delle seguenti condizioni, spegnere
immediatamente l’interruttore generale e chiamare il
rivenditore autorizzato:
• Durante il funzionamento si sentono rumori anomali.
• Penetrazione di acqua o di corpi estranei nel
telecomando.
• L’unità interna perde acqua.
• L’interruttore salvavita scatta frequentemente.
• Il cavo di alimentazione su surriscalda in modo anomalo.
• Funzionamento anomalo di interruttori o pulsanti.
• L’odore persiste anche quando la funzione antiodori è
usata continuamente.
31
Page 32

SICHERHEITSHINWEISE SICHERHEITSHINWEISE
Luftaustritt
Lufteintritt
Lufteintritt
Luftaustritt
Lufteintritt
DEFINITION
Bei den folgenden Symbolen handelt es sich um Verbote bzw. Gebote:
Eine unsachgemäße Bedienung infolge Missachtung der Bedienungsanleitung kann zu Verletzungen und Beschädigungen
führen. Um dies zu vermeiden, sind die folgenden Hinweise unbedingt zu beachten.
Die verwendeten Warnhinweise untergliedern sich entsprechend ihrer Wichtigkeit wie folgt:
32
Dieses Symbol weist darauf hin,
dass eine bestimmte Tätigkeit
NICHT durchgeführt werden darf.
Vorsicht
Die Nichtbeachtung dieses Hinweises kann zu
schweren Verletzungen oder gar zum Tod führen.
Infrarot-Fernbedienung
• Es sollten keine wiederaufl adbaren
Ni-Cd-Akkus verwendet werden.
• Kinder sollten Sie nicht mit der
Fernbedienung spielen lassen, da
sonst die Gefahr besteht, dass sie
Batterien verschlucken könnten.
• Nehmen Sie die Batterien aus
dem Batteriefach, wenn die
Fernbedienung längere Zeit nicht
benutzt wird.
• Um Fehlfunktionen der
Fernbedienung zu vermeiden, sind
stets zwei neue Batterien gleichen
Typs einzulegen, wobei die Polarität
zu beachten ist.
Stromversorgung
• Schließen Sie keine anderen elektrischen Geräte
zusammen mit dem Klimagerät an.
• Nehmen Sie keine Änderungen am Netzkabel
vor.
• Benutzen Sie kein Verlängerungskabel.
• Das Klimagerät darf nicht mit nassen oder
feuchten Händen bedient werden.
• Verwenden Sie nur das vorgeschriebene
Netzkabel.
• Bei Beschädigung des Netzkabels muss das
Kabel durch den Hersteller, seinen Kundendienst
oder eine entsprechend autorisierte Person
ausgewechselt werden, um eine Gefährdung für
Personen zu vermeiden.
• Das Klimagerät muss geerdet und sollte
möglichst mit einem FI-Schutzschalter versehen
werden. Ist dies nicht der Fall, könnte es unter
Umständen Stromschläge oder einen Brand
verursachen.
• Bei Störungen (z. B. verbranntem Geruch)
unterbrechen Sie die Spannungsversorgung und
wenden Sie sich an Ihren Fachhändler.
Außengerät
• Fassen Sie nicht in das Gerät und stecken Sie
auch keine Gegenstände hinein, die scharfkantigen
Einbauteile könnten sonst zu Verletzungen führen.
Innengerät
• Nehmen Sie den Ein- und Ausbau
bzw. die Neuinstallation dieses
Geräts nicht selbst vor. Eine
unsachgemäße Installation kann
elektrische Schläge oder Brände
verursachen oder dazu führen, dass
Wasser aus dem Gerät tropft. Bitte
wenden Sie sich daher an einen
Fachhändler bzw. Fachinstallateur.
• Fassen Sie nicht in das Gerät
und stecken Sie auch keine
Gegenstände hinein.
• Reparieren Sie das Gerät nicht
selbst.
Luftaustritt
Lufteintritt
Lufteintritt
Lufteintritt
Luftaustritt
Diese Symbole weisen darauf
hin, dass bestimmte Tätigkeiten
durchgeführt werden MÜSSEN.
Die Nichtbeachtung
dieses Hinweises
Achtung
kann zu
Verletzungen oder
zu Beschädigungen
führen.
Innengerät
• Das Gerät darf nicht an Orten installiert
werden, wo brennbare oder explosive
Gase entweichen können.
• Das Klimagerät darf nicht mit Wasser,
Benzin, Verdünner oder Scheuerpulver
gereinigt werden.
• Das Klimagerät darf nicht zweckentfremdet
werden, etwa zum Frischhalten von
Lebensmitteln.
• Keine Verbrennungsgeräte in den
Luftstrom des Geräts stellen.
• Halten Sie sich nicht zu lange im kalten
Luftstrom auf.
• Die Kondensatleitung muss korrekt
angeschlossen sein. Bei unsachgemäß
angeschlossener Kondensatleitung kann
Kondenswasser austreten.
• Lüften Sie den Raum regelmäßig.
Stromversorgung
• Unterbrechen Sie die Stromversorgung,
bevor Sie das Gerät reinigen oder warten.
• Unterbrechen Sie die Stromversorgung,
wenn das Gerät längere Zeit nicht benutzt
wird.
• Dieses Klimagerät ist mit einem eigenen
Überspannungsschutz versehen. Um Ihr
Klimagerät darüber hinaus jedoch gegen
häufi ge und starke Blitzeinschläge zu
schützen, sollten Sie die Stromversorgung
unterbrechen. Berühren Sie das
Klimagerät nicht während einem Gewitter,
um die Gefahr von Stromschlägen
auszuschließen.
Außengerät
• Stellen oder setzen Sie sich nicht auf das
Außengerät, Sie könnten herunterfallen und
sich verletzen.
• Fassen Sie nicht die scharfkantigen
Aluminiumlamellen an, Sie könnten sich
sonst verletzen.
• Die Kondensatleitung muss korrekt
angeschlossen sein. Bei unsachgemäß
angeschlossener Kondensatleitung kann
Kondenswasser austreten.
• Achten Sie nach langer Betriebsdauer
darauf, dass die Montagekonsole nicht
beschädigt ist.
Page 33

BESTIMMUNGEN UND VORSCHRIFTEN BESTIMMUNGEN UND VORSCHRIFTEN
HINWEIS :
INHALT
BETRIEBSBEREICHE
Dieses Gerät ist nicht zur Verwendung durch Personen (Kinder mit eingeschlossen) bestimmt,
welche eingeschränkte körperliche, sensorische oder geistige Fähigkeiten aufweisen bzw.
fehlende Erfahrung und Kenntnis im Umgang mit diesem Gerät haben. Solche Personen müssen
von einer für ihre Sicherheit verantwortlichen Aufsichtsperson zuerst instruiert oder während der
Gerätebedienung beaufsichtigt werden. Kinder sollten beaufsichtigt werden, um sicherzustellen,
dass sie nicht mit dem Gerät spielen.
BETRIEBSBEREICHE
Verwenden Sie dieses Klimagerät in folgenden Temperaturbereichen
Modell Temperatur (°C) Innen Außen
Inverter
(Baureihe
GBE5, DBE5,
DBE8)
Heiz-pumpe
Kühlen KÜHLEN
HINWEIS: Dieses Gerät kann in Technikräumen bei einer Außentemperatur bis -15°C*/ -10°C**,
einer Raumtemperatur von 21°C oder höher und einer Luftfeuchte bis 45% zu
Kühlzwecken verwendet werden.
(CU-YL24HBE5, CU-YL28HBE5, CU-YL34HBE5, CU-YL43HBE5)
KÜHLEN
HEIZEN
HINWEIS: Dieses Gerät kann in Technikräumen bei einer Außentemperatur bis -5°C, einer
Raumtemperatur von 21°C oder höher und einer Luftfeuchte bis 45% zu Kühlzwecken
verwendet werden.
KÜHLEN
HEIZEN
KÜHLEN
HEIZEN
Temperatur (°C) Innen Außen
Maximum 32 43
Minimum 21 -15*
Maximum 27 24
Minimum 16 -20
Maximum 32 43
Minimum 21 -10**
Maximum 27 24
Minimum 16 -10
Maximum 32 43
Minimum 21 -10**
Maximum 32 43
Minimum 21 -5
Maximum 27 24
Minimum 16 -15
Wir danken Ihnen für den Kauf
Ihres -Klimageräts
SICHERHEITSHINWEISE
BESTIMMUNGEN UND
VORSCHRIFTEN
PRODUKTÜBERSICHT UND
BEDIENUNG
(INFRAROT-FERNBEDIENUNG)
PRODUKTÜBERSICHT UND
BEDIENUNG
(KABELFERNBEDIENUNG)
PFLEGE UND REINIGUNG
STÖRUNGSSUCHE
KURZANLEITUNG
HINWEIS :
Die Abbildungen in diesem Handbuch
dienen nur Erläuterungszwecken und
können sich von dem tatsächlichen
Gerät unterscheiden. Sie können durch
künftige Verbesserungen am Gerät ohne
vorherige Ankündigung geändert werden.
INHALT
RÜCKSEITE
32
33
34~35
36~38
39
40~41
DEUTSCH
Benutzerinformation zur Sammlung und Entsorgung von veralteten Geräten und benutzten Batterien
Diese Symbole auf den Produkten, Verpackungen und/oder Begleitdokumenten bedeuten, dass benutzte elektrische und
elektronische Produkte und Batterien nicht in den allgemeinen Hausmüll gegeben werden sollen.
Bitte bringen Sie diese alten Produkte und Batterien zur Behandlung, Aufarbeitung bzw. zum Recycling gemäß Ihrer
Landesgesetzgebung und den Richtlinien 2002/96/EG und 2006/66/EG zu Ihren zuständigen Sammelpunkten.
Indem Sie diese Produkte und Batterien ordnungsgemäß entsorgen, helfen Sie dabei, wertvolle Ressourcen zu schützen
und eventuelle negative Auswirkungen auf die menschliche Gesundheit und die Umwelt zu vermeiden, die anderenfalls
durch eine unsachgemäße Abfallbehandlung auftreten können.
Wenn Sie ausführlichere Informationen zur Sammlung und zum Recycling alter Produkte und Batterien wünschen, wenden
Sie sich bitte an Ihre örtlichen Verwaltungsbehörden, Ihren Abfallentsorgungsdienstleister oder an die Verkaufseinrichtung, in
der Sie die Gegenstände gekauft haben.
Gemäß Landesvorschriften können wegen nicht ordnungsgemäßer Entsorgung dieses Abfalls Strafgelder verhängt werden.
Für geschäftliche Nutzer in der Europäischen Union
Wenn Sie elektrische oder elektronische Geräte entsorgen möchten, wenden Sie sich wegen genauerer Informationen bitte an
Ihren Händler oder Lieferanten.
[Informationen zur Entsorgung in Ländern außerhalb der Europäischen Union]
Diese Symbole gelten nur innerhalb der Europäischen Union. Wenn Sie solche Gegenstände entsorgen möchten, erfragen
Sie bitte bei den örtlichen Behörden oder Ihrem Händler, welches die ordnungsgemäße Entsorgungsmethode ist.
Hinweis zum Batteriesymbol (unten zwei Symbolbeispiele):
Dieses Symbol kann in Kombination mit einem chemischen Symbol verwendet werden. In diesem Fall erfüllt es die
Pb
Anforderungen derjenigen Richtlinie, die für die betreffende Chemikalie erlassen wurde.
•
Schalten Sie nicht das Gerät EIN, während Sie den Boden wachsen. Belüften Sie den Raum nach dem Wachsen sorgfältig, bevor Sie das Gerät einschalten.
•
Das Gerät darf nicht an Orten mit öl- bzw. rauchhaltiger Luft installiert werden.
33
Page 34

ADDRESS
AUTO
AUTO
TIMER
ON
SETRESET ADDRES
S
MODE
MODE
AIR SW
ING
FAN SPEED
AIR SWING
TIMER
OFF/ON
SET
CANCEL
SELECT
CLOCK
FAN SPEED
FILTER RESET
MANUAL
ODOUR WASH
MODE
AUTO
ECONOMY
Vorbereitung Der Fernbedienung
PRODUKTÜBERSICHT UND BEDIENUNG
PRODUKTÜBERSICHT UND BEDIENUNG
(INFRAROT-FERNBEDIENUNG)
(INFRAROT-FERNBEDIENUNG)
Anzeigefeld
Luftlenklamelle
Luftfi lter
Ansauggitter
Anzeige auf
dem Display
3
6
Inverter- und Kühl- / Heizmodelle
CZ-RL513B
Nur-Kühlmodellen
CZ-RL013B
34
1
POWER
TIMER
FILTER
ECONOMY
ODOUR WASH
AUTO
Infrarot-Empfänger
Taste auto OFF/ON
•
Wenn die Fernbedienung ausgefallen oder unauffi ndbar
ist, kann das Klimagerät ohne Fernbedienung durch
Drücken dieser Taste betrieben werden.
Tätigkeit Betriebsart
Die Zuluft wird
gleichmäßig
ausgeblasen
Einmal drücken. Automatik
Solange drücken, bis 1 Piepton ertönt,
dann loslassen.
Kühlbetrieb
1. Solange drücken, bis 2 Pieptöne
Infrarot-sender
Maximale entfernung: 8m
Vorbereitung Der Fernbedienung
Drücken und wegziehen
1
Batterien einlegen (AAA oder R03)
2
(Betriebsdauer etwa ein Jahr)
3
CLOCK drücken
OFF/ON
ertönen, dann loslassen.
2.Drücken Sie die Taste
5 Sekunden
SET
lang.
Drücken Sie die Taste erneut, um das Gerät auszuschalten.
Uhrzeit einstellen
4
Bestätigen
5
Batteriefach schließen
6
EIN- BZW. AUSSCHALTEN
DES GERÄTS
Heizbetrieb
POWER
EINSTELLEN DER TEMPERATUR
• Einstellbereich: 16°C ~ 31°C.
4
5
MODE
EINSTELLEN DER BETRIEBSART
AUTOMATIKBETRIEB (AUTO)
2
• Das Gerät wählt die Betriebsart in Abhängigkeit von der eingestellten
Temperatur, der Außen- und der Raumlufttemperatur automatisch.
HEIZBETRIEB (HEAT)
•
Es dauert etwas, bis das Gerät aufgeheizt ist
.
(Dies gilt nur für Inverter- und Kühl- / Heizmodelle)
UMLUFTBETRIEB (FAN) - Die Luft im Raum wird umgewälzt
KÜHLBETRIEB (COOL)
ENTFEUCHTUNGSBETRIEB (DRY)
• Das Innengerät läuft mit niedriger Ventilatordrehzahl, um sanft zu kühlen.
• In der Betriebsart Entfeuchten läuft der Ventilator mit einer niedrigen
Drehzahl.
• Die Bewegung der Lamellen stimmt nicht zwangsläufi g mit der Darstellung
auf der Fernbedienung überein.
Page 35

EINSTELLEN DES TAGESTIMERS
HINWEIS
WEITERE EINSTELLUNGEN
EINSTELLEN DES TAGESTIMERS
• Ein- bzw. Ausschalten des Geräts zu einer bestimmten Zeit.
FAN SPEED
EINSTELLEN DER
VENTILATORDREHZAHL
(3 EINSTELLUNGEN)
LOW MEDIUMAUTO HIGH
• In der Stellung AUTO wird die Drehzahl des
Innengeräteventilators automatisch an die jeweilige
Betriebsart angepasst.
• In der Betriebsart Umluft (FAN) ist die Ventilatordrehzahl
unabhängig von der Temperatureinstellung immer auf mittel
(MEDIUM) eingestellt.
AIR SWING
AUTO
MANUAL
AUSRICHTEN
DES LUFTSTROMS
• Drücken Sie
• Durch die richtige Lamellenposition wird die Luft gleichmäßig
im Raum verteilt.
• Wenn der Einschalt-Timer gestellt ist, kann das Gerät vor
• Die Luft wird gleichmäßig durch die 4 Luftauslässe
abgegeben.
AUTO 1 AUTO 2 AUTO 3
AUTO
• Für die Luftschwenkautomatik können 3 verschiedene
Schwenkwinkel genutzt werden.
• Die vertikale Luftlenklamelle schwenkt automatisch auf und ab.
• Stellen Sie die Luftlenklamellen für die vertikale
• Die Timerfunktion richtet sich nach der in der Fernbedienung
• Die Timer-Einstellung, die der aktuellen Uhrzeit am nächsten
• Wenn die Timer-Einstellung manuell gelöscht wurde, kann sie
Luftstromrichtung nicht manuell ein.
MANUAL
• Wenn die Stromzufuhr eine Stunde lang abgeschaltet ist,
• Bei manueller Einstellung der Luftlenklamelle können 4
verschiedene Stellungen genutzt werden.
• Die Luftstromrichtung kann über die Fernbedienung nach
WEITERE EINSTELLUNGEN
Bedarf angepasst werden.
ECONOMY
VERRINGERN DES
STROMVERBRAUCHS
ECONOMY
• Diese Funktion wird empfohlen, wenn die gewünschte
Raumtemperatur erreicht ist.
• Der Sparbetrieb kann in allen Betriebsarten verwendet und durch
erneutes Drücken der jeweiligen Taste wieder beendet werden.
ODOUR WASH
ODOUR WASH
GERUCHSENTFERNUNG
• Verfügbar bei allen Modellen.
• Diese Funktion dient dazu, während des Betriebs
unangenehme Gerüche zu entfernen.
• Zum Einschalten der Geruchsentfernung ist die Taste
ODOUR WASH
einmal zu drücken.
• Zum Ausschalten ist diese Taste erneut zu drücken.
GERUCHSNEUTRALISIERUNG
• Verfügbar nur bei Inverter-Modellen.
• Diese Funktion dient dazu, Schimmelbildung im
Geräteinneren zu verhindern und modrige Gerüche zu
beseitigen.
• Zum Einschalten dieser Funktion ist die Taste
ODOUR WASH
länger
HINWEIS
• Wenn die Temperatur im Kühlbetrieb 1°C höher oder im
als 3 Sekunden zu drücken.
• Das Gerät geht für etwa 20 Minuten automatisch in den
Umluft- und den Heizbetrieb und schaltet sich danach aus.
• Um den Stromverbrauch im Kühlbetrieb zu verringern,
• Es ist empfehlenswert, während der Nutzung dieser Funktion
die Fenster zu öffnen.
TIMER
SELECT
Wählen Sie den
Einschalt-bzw.
den Ausschalt-
Stellen Sie die
gewünschte
Uhrzeit ein.
SET
Bestätigen Sie
die Einstellung.
Timer aus.
CANCEL
, um den Einschalt- bzw. den Ausschalt-
Timer zu löschen.
der eingestellten Uhrzeit anlaufen, damit die gewünschte
Raumtemperatur zu diesem Zeitpunkt erreicht ist.
eingestellten Uhrzeit und wird täglich ausgeführt. Zum
Einstellen der Uhrzeit siehe unter „Vorbereitung der
Fernbedienung“.
ist, wird zuerst ausgeführt.
SET
durch Drücken der Taste
wiederhergestellt werden.
müssen die Uhrzeit und der Timer neu eingestellt werden.
• Um nicht unbeabsichtigt mit einer
Fernbedienung ein anderes Innengerät zu
bedienen, kann jedes Innengerät mit einer
eigenen Adresse versehen werden.
• Drücken Sie mehrmals, um die gewünschte
Adresse einzustellen.
ADDRESS
Address 1 Address 2Group Address 3
• Standardmäßig ist ADDRESS 1 eingestellt.
Im Normalfall braucht diese Einstellung nicht
geändert zu werden.
• In der Einstellung GROUP können mehrere
Innengerät gleichzeitig betrieben werden.
Drücken Sie diese Taste, um die Fernbedienung
RESET
zurückzusetzen.
Diese Taste wird im Normalbetrieb nicht benötigt.
SET
Heizbetrieb 2°C niedriger eingestellt wird als die gewünschte
Temperatur, kann bis zu 10% Strom gespart werden.
schließen Sie die Vorhänge, damit kein direktes Sonnenlicht
bzw. keine Wärme in den Raum gelangt.
DEUTSCH
35
Page 36

Vorbereitung Der Fernbedienung
S
PRODUKTÜBERSICHT UND BEDIENUNG
PRODUKTÜBERSICHT UND BEDIENUNG
(KABELFERNBEDIENUNG)
(KABELFERNBEDIENUNG)
Luftlenklamelle
FAN SPEED
OFF
SET
CANCEL
ECONOMY
/
ON
SPEED
AUTO
AIR SWING
AUTO 123
FAN
AUTO
AIR SWING
MANUAL
MON TUE WED THU FRI SAT SUN
ON
CZ-RD513C
TIMER/CLOCK
MODE
UP
SELECT
DOWN
CHECK ODOUR WASH VENTILATION TEST RUN FILTER RESET
CZ-RD513C
• Die Tasten
VENTILATION
und
TEST RUN
Normalbetrieb nicht benötigt.
Vorbereitung Der Fernbedienung
1
Drücken Sie die Taste
Drücken Sie diese Tasten, um den
2
Wochentag einzustellen
Bestätigen
3
Wiederholen Sie die Schritte 2 und 3,
4
um die aktuelle Uhrzeit einzugeben.
ELECT
Luftfi lter
Ansauggitter
AUTO
TEMP/
A/C No.
UP
MODE
DOWN
werden im
Die Zuluft wird
gleichmäßig
ausgeblasen
/
ON
OFF
EIN- BZW. AUSSCHALTEN
DES GERÄTS
UP
DOWN
EINSTELLEN DER TEMPERATUR
• Einstellbereich: 16°C ~ 31°C.
3
2
MODE
EINSTELLEN DER BETRIEBSART
AUTOMATIKBETRIEB (AUTO)
• Das Gerät wählt die Betriebsart in Abhängigkeit von
der eingestellten Temperatur, der Außen- und der
Raumlufttemperatur automatisch.
HEIZBETRIEB (HEAT)
1
• Es dauert etwas, bis das Gerät aufgeheizt ist.
(Dies gilt nur für Inverter- und Kühl- / Heizmodelle)
UMLUFTBETRIEB (FAN) - Die Luft im Raum wird
umgewälzt
KÜHLBETRIEB (COOL)
ENTFEUCHTUNGSBETRIEB (DRY)
• Das Innengerät läuft mit niedriger Ventilatordrehzahl,
um sanft zu kühlen.
• In der Betriebsart Entfeuchten läuft der Ventilator mit
einer niedrigen Drehzahl.
• Die Bewegung der Lamellen stimmt nicht zwangsläufi g
mit der Darstellung auf der Fernbedienung überein.
36
Page 37

HINWEIS
EINSTELLEN DES TAGESTIMERS
FAN
MANUAL
EINSTELLEN DER
SPEED
VENTILATORDREHZAHL
(3 EINSTELLUNGEN)
LO MEDAUTO HI
• Ein- bzw. Ausschalten des Geräts zu einer bestimmten Zeit.
• In der Stellung AUTO wird die Drehzahl des
Innengeräteventilators automatisch an die jeweilige
Betriebsart angepasst.
• In der Betriebsart Umluft (FAN) ist die Ventilatordrehzahl
Rufen Sie den Tagestimer
unabhängig von der Temperatureinstellung immer auf mittel
(MED) eingestellt.
AUTO
MANUAL
AIR SWING
AUSRICHTEN
DES LUFTSTROMS
• Durch die richtige Lamellenposition wird die Luft gleichmäßig
im Raum verteilt.
• Die Luft wird gleichmäßig durch die 4 Luftauslässe
abgegeben.
AUTO
• Für die Luftschwenkautomatik können 3 verschiedene
Schwenkwinkel genutzt werden.
AUTO 1 AUTO 2 AUTO 3
• Drücken Sie
• Wenn der Einschalt-Timer gestellt ist, kann das Gerät
• Die vertikale Luftlenklamelle schwenkt automatisch auf und ab.
• Stellen Sie die Luftlenklamellen für die vertikale
Luftstromrichtung nicht manuell ein.
• Die Timerfunktion richtet sich nach der in der
• Bei manueller Einstellung der Luftlenklamelle können 4
verschiedene Stellungen genutzt werden.
• Die Luftstromrichtung kann über die Fernbedienung nach
• Die Timer-Einstellung, die der aktuellen Uhrzeit am
Bedarf angepasst werden.
ECONOMY
• Wenn die Timer-Einstellung manuell gelöscht wurde,
VERRINGERN DES STROMVERBRAUCHS
• Diese Funktion wird empfohlen, wenn die gewünschte
Raumtemperatur erreicht ist.
• Wenn die Stromzufuhr eine Stunde lang abgeschaltet
• Der Sparbetrieb kann in allen Betriebsarten verwendet und durch
erneutes Drücken der jeweiligen Taste wieder beendet werden.
EINSTELLEN DES TAGESTIMERS
12
MODE
auf.
34
UP
DOWN
Stellen Sie die
gewünschte Uhrzeit ein.
CANCEL
, um den Einschalt- bzw. den
Ausschalt-Timer zu löschen.
vor der eingestellten Uhrzeit anlaufen, damit die
gewünschte Raumtemperatur zu diesem Zeitpunkt
erreicht ist.
Fernbedienung eingestellten Uhrzeit und wird täglich
ausgeführt. Zum Einstellen der Uhrzeit siehe unter
„Vorbereitung der Fernbedienung“.
nächsten ist, wird zuerst ausgeführt.
kann sie durch Drücken der Taste
werden.
ist, müssen die Uhrzeit und der Timer neu eingestellt
werden.
SELECT
Wählen Sie den
Einschalt-bzw. den
Ausschalt- Timer aus.
SET
Bestätigen Sie die
Einstellung.
SET
wiederhergestellt
DEUTSCH
ODOUR WASH
GERUCHSENTFERNUNG
• Verfügbar bei allen Modellen.
• Diese Funktion dient dazu, während des Betriebs
unangenehme Gerüche zu entfernen.
• Zum Einschalten der Geruchsentfernung ist die Taste
einmal zu drücken.
ODOUR WASH
• Zum Ausschalten ist diese Taste erneut zu drücken.
GERUCHSNEUTRALISIERUNG
• Verfügbar nur bei Inverter-Modellen.
• Diese Funktion dient dazu, Schimmelbildung im Geräteinneren
zu verhindern und modrige Gerüche zu beseitigen.
• Zum Einschalten dieser Funktion ist die Taste
als 3 Sekunden zu drücken.
ODOUR WASH
• Das Gerät geht für etwa 20 Minuten automatisch in den
Umluft- und den Heizbetrieb und schaltet sich danach aus.
• Es ist empfehlenswert, während der Nutzung dieser Funktion
die Fenster zu öffnen.
länger
HINWEIS
• Wenn die Temperatur im Kühlbetrieb 1°C höher oder
im Heizbetrieb 2°C niedriger eingestellt wird als die
gewünschte Temperatur, kann bis zu 10% Strom
gespart werden.
• Um den Stromverbrauch im Kühlbetrieb zu verringern,
schließen Sie die Vorhänge, damit kein direktes
Sonnenlicht bzw. keine Wärme in den Raum gelangt.
37
Page 38

CHECK ODOUR WASH VE
MODE
SELECT
SET
CANCEL
OFF
/
O
TIMER/CLOCK
ECONOMY
UP
DOWN
CZ-RD513C
TIMER/CLOCK
TIMER/CLOCK
EINSTELLEN DES WOCHENTIMERS
HINWEISE ZU DEN BETRIEBSARTEN
EINSTELLEN DES WOCHENTIMERS
CZ-RD513C
TIMER/CLOCK
MODE
SELECT
CHECK ODOUR WASH VENTILATION TEST RUN FILTER RESET
Erscheint im
Timerbetrieb
TIMER
1
23456
MON TUE WED THU FRI SAT SUN
ON
OFF
Ausschaltschalt-Timer. Schaltet das Gerät
automatisch aus (OFF).
Einschalt-Timer. Schaltet das Gerät automatisch ein (ON).
Einzustellender Wochentag
38
Wechseln der Anzeige
1. Drücken Sie die
Wochentimers zu wechseln.
Auswahl der Wochentage für den Timer
2. Drücken Sie die Taste
3. Drücken Sie die Taste , um den gewünschten Wochentag
auszuwählen.
Der ausgewählte Wochentag wird durch gekennzeichnet.
Drücken Sie die Taste
aktivieren oder zu deaktivieren .
Wiederholen Sie diesen Schritt für weitere Wochentage.
Auswahl des Einschalt- bzw. Ausschalt-Timers
4. Drücken Sie die Taste
gelangen.
5. Drücken Sie die Taste , um den Einschalttimer (ON) oder
den Ausschalttimer (OFF) auszuwählen.
6. Drücken Sie die Taste
Einstellen des Timers
7. Drücken Sie die Taste , um die gewünschte Schaltzeit
einzustellen.
Zusätzlich zur Schaltzeit können Sie mit den Tasten
die gewünschte Temperatur einstellen.
8. Drücken Sie die Taste
• Wiederholen Sie die Schritte 5 bis 8, um die Timerprogramme 2 bis
6 einzustellen, oder drücken Sie die Taste
Timerprogramme zu löschen.
MODE
3 Sekunden lang um zur Anzeige des
SELECT
SET
SELECT
SET
SET
FAN SPEED
AUTO
AUTO
MONTUE WED THU FRI SAT SUN
ON
AIR SWING
AUTO 123
/
ON
OFF
TEMP/
A/C No.
FAN
UP
SET
UP
MODE
SPEED
DOWN
CANCEL
DOWN
MANUAL
AUTO
AIR SWING
ECONOMY
Pro Tag können 6
verschiedene Programme
eingestellt werden (1 ~ 6)
Zeigt den ausgewählten
Wochentag an
Einzustellende Uhrzeit
(10-Minuten-Intervall)
, um den Wochentag zu bestimmen.
um den gewünschten Wochentag zu
, um zu Timerprogramm 1 zu
, um die Auswahl zu bestätigen.
UP
DOWN
auch
, um die Einstellung zu bestätigen.
CANCEL
, um die jeweiligen
HINWEISE ZU DEN BETRIEBSARTEN
• Der Wochentimer ist nur bei Kabel-Fernbedienungen
verfügbar. Um zwischen Tagestimer und
Wochentimer zu wechseln, ist 3 Sekunden lang die
MODE
Taste
zu drücken.
• Tagestimer und Wochentimer können nicht
gleichzeitig eingestellt werden.
• Erhöhte Energieersparnis durch die Möglichkeit, pro
Wochentag bis zu 6 Schaltvorgänge einzustellen.
• Ein Timerprogramm kann pro Tag nur einmal
eingestellt werden.
Überprüfen des Timerprogramms
1. Rufen Sie den Timer
MODE
SELECT
UP
DOWN
SET
CANCEL
auf.
2. Wählen Sie den Tag
aus.
3. Auf dem Display erscheint das Programm des jeweils
ausgewählten Tags.
Ändern oder Hinzufügen von Timerprogrammen
• Gehen Sie wie unter „Überprüfen des
Timerprogramms“ vor, um den gewünschten
Wochentag auszuwählen. Wiederholen Sie die
Schritte 4 bis 8, um ein bestehendes Timerprogramm
zu ändern, oder fügen Sie ein neues Timerprogramm
hinzu.
Löschen von Timerprogrammen
• Gehen Sie wie folgt vor, um das Timerprogramm
eines bestimmten Tages zu löschen.
1. Rufen Sie den Timer
MODE
SELECT
UP
DOWN
SET
CANCEL
auf.
2. Wählen Sie den Tag
aus.
3. Taste drücken, um
den Wochentag zu
bestimmen.
4. Taste drücken, um
die Timereinstellung
zu löschen.
Deaktivieren des Wochentimers
• Um den Wochentimer zu deaktivieren, drücken Sie
die Taste
MODE
, dann die Taste
CANCEL
.
Aktivieren des Wochentimers
• Um eine vorherige Wochentimereinstellung zu
aktivieren, drücken Sie die Taste
SET
.
MODE
, dann die Taste
Page 39

PFLEGE UND REINIGUNG PFLEGE UND REINIGUNG
REINIGUNGSANWEISUNGEN
HINWEIS
2
Klappen Sie das
Ansauggitter langsam nach
unten.
3
Lösen Sie den Luftfi lter aus
den Haltelaschen und ziehen Sie
ihn nach unten.
1
Drücken Sie die beiden
Schiebeverschlüsse
in Richtung OPEN.
Herausnehmen
CLOS
E
OPEN
OPEN
CLOS
E
LUFTFILTER
1
2
3
INNENGERÄT
• Unterbrechen Sie vor dem Reinigen die Stromzufuhr.
• Fassen Sie nicht die scharfkantigen Aluminiumlamellen an, Sie
ACHTUNG
REINIGUNGSANWEISUNGEN
• Verwenden Sie kein Benzin, Verdünner oder Scheuerpulver.
• Verwenden Sie nur Seife oder neutrale Haushaltsreiniger
(pH-Wert ca. 7).
• Verwenden Sie kein Wasser, das über 40°C warm ist.
könnten sich sonst verletzen.
HINWEIS
• Um eine optimale Leistung zu erzielen und die Stromaufnahme
• Wenden Sie sich für Wartungsinspektionen an Ihren
zu verringern, sind die Filter regelmäßig zu reinigen.
Fachhändler.
Entfernen des Luftfi lters
1
Drücken Sie die beiden
Schiebeverschlüsse
in Richtung OPEN.
LOSE
C
OPEN
OPEN
OSE
CL
2
Klappen Sie das
Ansauggitter langsam nach
unten.
3
Lösen Sie den Luftfi lter aus
den Haltelaschen und ziehen Sie
ihn nach unten.
INNENGERÄT
Wischen Sie das Gerät mit
einem weichen, trockenen
Tuch ab.
Herausnehmen
LUFTFILTER
Filter absaugen, waschen
und trocknen.
Einsetzen des Luftfi lters
1
Schieben Sie den
Luftfi lter unter die
Haltelaschen des
Ansauggitters
2
Klappen
Sie das
Ansauggitter
langsam nach
oben
3
Drücken Sie die beiden
Schiebeverschlüsse in Richtung
CLOSE.
Schiebeverschluss
DEUTSCH
Wartung des Luftfi lters
Eine Reinigung ist in folgenden Fällen erforderlich:
FAN SPEED
AUTO FAN
AUTO
AIR SWING
AUTO 123
POWER
TIMER
FILTER
ECONOMY
ODOUR WASH
COOL DRY
FILTER
Kabel-Fernbedienung: Auf
RESET
dem Display wird „FILTER
RESET“ angezeigt.
Infrarot-Fernbedienung:
Auf dem Anzeigefeld des
Empfängers leuchtet „Filter“.
AUTO
• Sie sollten die Luftfi lter alle sechs Wochen reinigen.
• Nach dem Reinigen des Luftfi lters drücken Sie
FILTER RESET
bzw.
FILTER RESET
, um die Meldung zurückzusetzen.
• Das Klimagerät darf nicht ohne Luftfi lter betrieben werden.
• Gehen Sie beim Waschen und Ausspülen des
Luftfi lters vorsichtig vor, damit die Filteroberfl äche
nicht beschädigt wird.
• Trocknen Sie die den Filter nicht mit einem Fön oder
auf einem Ofen.
• Beschädigte Luftfi lter sind zu ersetzen.
39
Page 40

STÖRUNGSSUCHE STÖRUNGSSUCHE
Die nachfolgend aufgeführten Symptome sind kein Anzeichen für eine Fehlfunktion.
Symptom
Mögliche Ursache
Die nachfolgend aufgeführten Symptome sind kein Anzeichen für eine Fehlfunktion.
Symptom
Aus dem Innengerät tritt Nebel aus
Während des Betriebs ist das Geräusch fl ießenden
Wassers zu hören
Im Raum herrscht ein eigenartiger Geruch
Der Innengeräteventilator bleibt in der
Ventilatorautomatik gelegentlich stehen.
Nach dem Neustart verzögert sich der Betrieb um
einige Minuten.
Aus dem Außengerät tritt Wasser oder Dampf aus.• Auf den Rohren kann Wasser kondensieren oder verdunsten.
Das TIMER-Symbol leuchtet immer.
Der Innengeräteventilator bleibt im Heizbetrieb
gelegentlich stehen.
Während des Betriebs kann ein Knacken zu hören
sein.
Gerät schaltet in Umluftbetrieb und Luft wird
feucht.
Außengerät gibt im Heizbetrieb Geräusche
von sich.
Das Klimagerät geht nach dem Ausschalten
nicht sofort außer Betrieb.
Betrieb stoppt zwischendurch. (Auf dem
Display wird „DEFROST“ (Abtauen)
angezeigt.)
Das Klimagerät geht nach dem Einschalten
nicht sofort in Betrieb. (Auf dem Display wird
„PRE HEAT“ (Vorheizen) angezeigt.)
Gerät läuft nach Stromausfall wieder an. • Der automatische Wiederanlauf erfolgt mit den vorherigen Einstellungen.
Im Entfeuchtungsbetrieb strömt kalte Luft aus
dem Gerät.
Die Drehzahl des Geräteventilators ändert sich
gelegentlich im Heizbetrieb.
Aus dem Außengerät tritt im Heizbetrieb
Dampf aus.
.
.•
.•
Mögliche Ursache
Durch die Abkühlung der Raumluft kondensiert Feuchtigkeit
•
Durch das Gerät strömt Kältemittel.
Dieser Geruch kann von Feuchtigkeit stammen, die von Wänden, Teppichen,
Möbeln oder Kleidungsstücken an die Raumluft abgegeben wird.
•
Dies dient dazu, Gerüche zu entfernen.
•
Hierbei handelt es sich um einen Schutzmechanismus des Geräts.
•
Die Timer-Funktion wird täglich ausgeführt.
•
Hierdurch wird verhindert, dass kalte Luft austritt.
•
Dehnung bzw. Kontraktion von Geräteteilen aufgrund von
Temperaturänderungen.
• Dies kann vorkommen, wenn die Raumtemperatur die eingestellte
Solltemperatur erreicht und das Gerät in den Umluftbetrieb schaltet,
wobei sich die Feuchtigkeit erhöht.
• Diese Geräusche entstehen durch Änderungen der Kältemittelströmung,
wenn das Gerät aus- und wieder eingeschaltet wird.
• Das Gerät gibt noch Wärme ab und wird nach etwa 60 Sekunden
automatisch ausgeschaltet.
• Das Gerät befi ndet sich im Abtaubetrieb, das Eis im Außengerät wird
geschmolzen.
• Das Gerät muss sich zuerst aufheizen, um die Luft zu erwärmen.
• Das Gerät läuft bei niedriger Ventilatordrehzahl im Kühlbetrieb, um die
Raumluft zu entfeuchten.
• Die Raumtemperatur hat die Einstellung auf der Fernbedienung erreicht.
Wenn die Raumtemperatur sinkt, stellt sich die Ventilatordrehzahl wieder
auf die über die Fernbedienung programmierte Drehzahl ein.
• Dies kommt vor, wenn der Wärmetauscher des Außengeräts abgetaut
wird.
.
40
Page 41

Überprüfen Sie folgende Punkte, bevor Sie sich an den Kundendienst wenden.
Symptom
Zu überprüfen
Anzeige „CHECK“ auf der Kabel-Fernbedienung.
KONTROLLEN NACH EINER LÄNGEREN
BETRIEBSUNTERBRECHUNG
KRITERIEN FÜR BETRIEBSUNTERBRECHUNG
LÄNGERE BETRIEBSUNTERBRECHUNG
Überprüfen Sie folgende Punkte, bevor Sie sich an den Kundendienst wenden.
Symptom
Das Gerät kühlt bzw. heizt nicht richtig. • Stellen Sie die Temperatur richtig ein.
Der Heizbetrieb lässt sich nicht einschalten. • Das Gerät wurde für einen Technikraum zwangsweise auf Kühlbetrieb
Das Gerät arbeitet laut. • Kontrollieren Sie, ob das Gerät eventuell verkantet eingebaut wurde,
Die Fernbedienung funktioniert nicht.
(Die Anzeige der Infrarot-Fernbedienung oder
das Sendesignal ist schwach.)
Das Gerät funktioniert nicht. • Überprüfen Sie, ob der Sicherungsautomat ausgelöst hat.
Das Gerät empfängt kein Signal von der
Fernbedienung.
Anzeige „CHECK“ auf der Kabel-Fernbedienung.
Zu überprüfen
• Achten Sie darauf, dass Fenster und Türen geschlossen sind.
• Reinigen oder ersetzen Sie die Luftfi lter.
• Stellen Sie sicher, dass die Luftein- und -austritte frei sind.
eingestellt.
oder ob die Frontabdeckung nicht richtig geschlossen ist.
• Legen Sie die Batterien richtig ein.
• Ersetzen Sie schwache Batterien.
• Überprüfen Sie, ob der Timer gestellt wurde.
• Stellen Sie sicher, dass der Empfänger nicht verdeckt ist.
• Achten Sie darauf, dass die Geräteadresse richtig eingestellt ist.
• Achten Sie darauf, dass die Infrarot-Sendedistanz zum Klimagerät nicht
zu groß ist.
• Bestimmte Leuchtstoffröhren können die Signalübertragung stören.
Wenden Sie sich in diesem Fall an Ihren Fachhändler.
DEUTSCH
Die CHECK-Anzeige der Kabelfernbedienung
blinkt
KONTROLLEN NACH EINER LÄNGEREN
BETRIEBSUNTERBRECHUNG
• Überprüfen Sie, ob die Batterien der Fernbedienung ersetzt
werden müssen (infrarot-fernbedienung).
• Stellen Sie sicher, dass die Luftein-und-austritte frei sind.
• Nach einem 15-minütigen Betrieb sollte dieTemperaturdifferenz
zwischen Lufteintritt und Luftaustritt folgende Werte aufweisen:
Kühlbetrieb: ≥ 8°C Heizbetrieb: ≥ 14°C
LÄNGERE BETRIEBSUNTERBRECHUNG
• Schalten Sie für 2 bis 3 Stunden den Heizbetrieb (bei Inverterund Kühl-/Heizmodellen) bzw. den Umluftbetrieb (bei
Nur-Kühlmodellen) ein, um im Gerät verbliebene Feuchtigkeit
restlos zu entfernen.
• Unterbrechen Sie die Stromversorgung.
• Entfernen Sie die Batterien aus der Fernbedienung (infrarotfernbedienung).
• Schalten Sie das Gerät aus.
• Schalten Sie es nach 3 Minuten wieder ein.
• Wenn „CHECK“ weiterhin blinkt, drücken Sie die Taste
Fehlermeldung abzufragen. Wenn das Problem weiterhin besteht,
wenden Sie sich an Ihren Fachhändler.
, um die
CHECK
KRITERIEN FÜR BETRIEBSUNTERBRECHUNG
SCHALTEN SIE DIE STROMZUFUHR AB und RUFEN
Sie unter folgenden Umständen einen autorisierten
Händler:
• Ungewöhnliche Geräusche während des Betriebs.
• Wasser/Fremdpartikel sind in die Fernbedienung
gelangt.
• Wasser tropft aus dem Innengerät.
• Der Sicherungsautomat schaltet sich häufi g ab.
• Das Stromkabel wird ungewöhnlich warm.
• Schalter oder Tasten funktionieren nicht
ordnungsgemäß.
• Trotz ständiger Nutzung der
Geruchsneutralisierungsfunktion sind Gerüche
vorhanden.
41
Page 42

PRECAUÇÕES DE SEGURANÇA PRECAUÇÕES DE SEGURANÇA
Saída de ar
Entrada de art
Entrada
de art
Entrada
de art
Saída
de ar
DEFINIÇÃO
As instruções a seguir são classifi cadas com os seguintes símbolos:
Este símbolo indica uma acção
PROIBIDA.
Para evitar ferimentos pessoais, ferimentos noutros utilizadores ou não danifi car outros bens, cumpra as instruções indicadas abaixo.
A utilização incorrecta devido ao incumprimento das instruções pode resultar em ferimentos ou danos cuja gravidade é classifi cada da seguinte forma:
Aviso
Este símbolo indica perigo de morte ou
ferimento grave.
Estes símbolos indicam acções
OBRIGATÓRIAS.
Este símbolo
Cuidado
indica perigo
de ferimento ou
danos de bens.
Controlo remoto sem fi o
• Não utilize pilhas
recarregáveis (Ni-Cd).
• Não deixe as crianças brincar
com o controlo remoto
para impedir que engulam
acidentalmente as pilhas.
• Remova as pilhas da unidade
se não a pretender utilizar
durante um período de tempo
prolongado.
• Introduza pilhas novas do
mesmo tipo seguindo as
indicações de polaridade
indicadas para evitar a avaria
do controlo remoto.
Unidade Interior
• Não instale, remova nem
reinstale a unidade. Uma
instalação incorrecta pode
causar fugas, choque eléctrico
ou incêndio. Consulte um
revendedor autorizado ou um
técnico especializado para
efectuar a instalação.
• Não introduza os seus dedos ou
quaisquer outros objectos dentro
da unidade.
• Não tente reparar a unidade.
Unidade Interior
• Não instale a unidade num ambiente
com risco elevado de explosão.
• Não lave a unidade com água,
benzina, diluente nem pó de limpeza
abrasivo.
• Não utilize a unidade para outros fi ns,
como, por exemplo, a conservação
de alimentos.
• Não coloque qualquer equipamento
de combustão em frente da saída de
ar.
• Não se exponha directamente ao ar
frio durante um período de tempo
prolongado.
• Certifi que-se de que o tubo de
drenagem foi ligado correctamente.
Caso contrário, podem surgir fugas.
• Areje regularmente a sala.
Saída de ar
Entrada de art
Fonte de alimentação
• Desligue a unidade antes de efectuar a
Fonte de alimentação
• Não partilhe a tomada eléctrica com outro
equipamento.
• Não modifi que os cabos de alimentação.
• Não utilize extensões eléctricas.
• Não utilize com mãos molhadas.
• Utilize o cabo de alimentação especifi cado.
• Se o cabo de alimentação estiver danifi cado,
terá de ser substituído pelo fabricante, agente
de assistência ou técnico qualifi cado para
evitar situações de perigo.
• Este equipamento deve ter ligação terra e é
recomendado que seja instalado com Disjuntor
de Fuga à Terra (ELCB) ou Dispositivo de
Corrente Residual (RCD). De outra forma,
pode provocar choque eléctrico ou incêndio
em caso de avaria.
• Em caso de emergência ou condições
anormais (cheiro a queimado, etc.), retire a
fi cha da tomada eléctrica e consulte o seu
fornecedor mais próximo.
Entrada
de art
Entrada
de art
Saída
de ar
limpeza ou a reparação.
• Desligue a unidade se não pretender
utilizá-la durante um período de tempo
prolongado.
• Este ar condicionado está equipado
com um dispositivo protector de
sobretensão integrado. No entanto, de
maneira a proteger o ar condicionado
de trovoadas anormalmente fortes,
deverá desligá-lo da alimentação.
Não toque no ar condicionado durante
as trovoadas, pois pode originar um
choque eléctrico.
Unidade Exterior
• Não sentar ou andar por cima da
unidade, você pode cair
acidentalmente.
• Não toque nas alhetas de alumínio, a
parte afi ada pode causar ferimentos.
• Certifi que-se de que o tubo de
drenagem foi ligado correctamente.
Unidade Exterior
• Não colocar os dedos ou outros objectos na
unidade, as partes afi adas podem provocar
42
ferimentos.
Caso contrário, podem surgir fugas.
• Após períodos de utilização
prolongados, certifi que-se de que
o suporte de instalação não está
danifi cado.
Page 43

ÍNDICE
INFORMAÇÕES REGULAMENTARES INFORMAÇÕES REGULAMENTARES
NOTA :
CONDIÇÃO DE FUNCIONAMENTO
Este dispositivo não se destina ao uso por pessoas (incluindo crianças) com reduzidas capacidades
físicas, sensoriais ou mentais, ou falta de experiência e conhecimento, excepto se tiverem supervisão
ou instrução relacionadas com o uso do dispositivo por uma pessoa responsável pela sua segurança. As
crianças devem ser supervisionadas para assegurar que não brincam com o dispositivo.
CONDIÇÃO DE FUNCIONAMENTO
Utilize este ar condicionado com o seguinte intervalo de temperatura
Modelo Temperatura (°C) Interior Exterior
Inversor
(Série GBE5,
DBE5, DBE8)
Bomba de calor
Arrefecimento ARREFECIMENTO
AVISO: Esta unidade é ainda capaz de funcionar como refrigerador com temperatura exterior tão
baixa como -15°C*/ -10°C**, numa sala sem vida, como uma sala de computadores com
uma temperatura ambiente de 21ºC ou mais e uma sala com humidade superior a 45%.
(CU-YL24HBE5, CU-YL28HBE5, CU-YL34HBE5, CU-YL43HBE5)
ARREFECIMENTO
AQUECIMENTO
AVISO: Esta unidade é ainda capaz de funcionar como refrigerador com temperatura exterior
tão baixa como -5ºC, numa sala sem vida, como uma sala de computadores com uma
temperatura ambiente de 21ºC ou mais e uma sala com humidade superior a 45%.
ARREFECIMENTO
AQUECIMENTO
ARREFECIMENTO
AQUECIMENTO
Temperatura (°C) Interior Exterior
Máximo 32 43
Mínimo 21 -5
Máximo 27 24
Mínimo 16 -15
Máximo 32 43
Mínimo 21 -15*
Máximo 27 24
Mínimo 16 -20
Máximo 32 43
Mínimo 21 -10**
Máximo 27 24
Mínimo 16 -10
Máximo 32 43
Mínimo 21 -10**
Obrigado por adquirir o Ar
Condicionado da
PRECAUÇÕES DE SEGURANÇA
INFORMAÇÕES
REGULAMENTARES
VISTA GERAL DO PRODUTO E
OPERAÇÕES
(CONTROLO REMOTO SEM FIO)
VISTA GERAL DO PRODUTO E
OPERAÇÕES
(CONTROLO REMOTO COM FIOS)
MANUTENÇÃO E LIMPEZA
RESOLUÇÃO DE PROBLEMAS
GUIA RÁPIDO
NOTA :
As ilustrações deste manual têm
apenas um carácter explicativo
e podem diferir da unidade
real. Estão sujeitas a alteração
sem aviso prévio para fi ns de
melhoramento futuro.
ÍNDICE
42
43
44~45
46~48
49
50~51
TAMPA TRASEIRA
PORTUGUÊS
Informações para Utilizadores referentes à Recolha e Eliminação de Equipamentos Velhos e Baterias
Estes símbolos nos produtos, embalagens e documentos signifi cam que os produtos eléctricos e electrónicos usados nao
podem ser misturados com os resíduos urbanos.
Para o tratamento apropriado, recuperação e reciclagem de produtos velhos e baterias usadas, solicitamos que os coloque em
pontos de recolha próprios, de acordo com a Legislacao Nacional e com as Directivas Europeias 2002/96/EC e 2006/66/EC.
A eliminação correcta deste produto ajudará a poupar recursos valioso e evitar quaisquer potenciais efeitos negativos na saúde
humana e no ambiente, os quais poderiam resultar de um tratamento incorrecto de Resíduos.
Para mais informacoes sobre a recolha e reciclagem de produtos velhos e baterias, por favor, contacte as autoridades locais
responsáveis pela recolha de resíduos ou o ponto de venda onde o produto foi adquirido.
De acordo com a legislacao nacional, podem ser apçlicadas multas caso seja feita a eliminação incorrecta destes resíduos.
Para Uitlizadores Não Particulares da União Europeia
Se pretender eliminar equipamentos eléctricos e electrónicos, por favor, contacte o seu Distribuídor ou Produtor para obter mais
informações.
[Informação sobre a eliminação noutros países fora da União Europeia]
Estes símbolos são válidos, apenas, na União Europeia. Se pretender eliminar este produto contacte, por favor, as autoridades
locais responsáveis pela recolha de resíduos ou o ponto de venda onde o produto foi adquirido e solicite informação sobre o
método de eliminação correcto.
Nota para os símbolos de baterias (dois exemplos de símbolos):
Pb
Este símbolo pode ser utilizado em conjugação com um símbolo químico. Neste caso, terá de proceder em conformidade com o
estabelecido na Directiva referente aos produtos químicos utilizados.
• Não LIGUE a unidade quando encerar o pavimento. Depois de encerar o pavimento, deve deixar a sala arejar devidamente
antes de ligar a unidade.
• Não instalar a unidade em áreas com óleos e fumos.
43
Page 44

ADDRESS
AUTO
AUTO
TIMER
ON
SETRESET ADDRES
S
MODE
MODE
AIR SW
ING
FAN SPEED
AIR SWING
TIMER
OFF/ON
SET
CANCEL
SELECT
CLOCK
FAN SPEED
FILTER RESET
MANUAL
ODOUR WASH
MODE
AUTO
ECONOMY
VISTA GERAL DO PRODUTO E OPERAÇÕES
VISTA GERAL DO PRODUTO E OPERAÇÕES
(CONTROLO REMOTO SEM FIO)
(CONTROLO REMOTO SEM FIO)
Painel de controlo
Placa de direcção do
fl uxo de ar
Filtro do ar
Grelha De
Entrada
Visor do Controlo
Remoto
3
6
Modelo Inversor / Bomba de calor
CZ-RL513B
Modelo Arrefecimento
CZ-RL013B
44
1
POWER
TIMER
FILTER
ECONOMY
ODOUR WASH
AUTO
Receptor de
frequências
Botão auto OFF/ON
• Para colocar a unidade a funcionar se o controlo
remoto sem fi os foi substituído ou não funcionar.
Acção Modo
Ar é
descarregado
uniformemente
Prima uma vez. Automático
Prima sem soltar até ouvir 1 sinal
sonoro e, em seguida, liberte.
Arrefecimento
1. Prima sem soltar até ouvir 2 sinal
sonoro e, em seguida, liberte.
2. Premir o botão
durante 5
SET
Aquecimento
segundos.
Transmissor
Distância máxima: 8m
Prima o botão para desligar.
Preparação Do Controlo Remoto
Premir e puxar
1
Introduza pilhas AAA ou R03
2
(pode ser utilizado ~ 1 ano)
3
Premir CLOCK
OFF/ON
PARA LIGAR OU DESLIGAR
(ON/OFF) A UNIDADE
Confi gurar a hora
4
Confi rmar
5
Feche a tampa
6
POWER
PARA CONFIGURAR A TEMPERATURA
4
• Alcance de selecção: 16°C ~ 31°C.
5
2
MODE
MODO AUTOMÁTICO - Para sua conveniência
• A unidade selecciona o modo de funcionamento de acordo com a
PARA SELECCIONAR O MODO DE
OPERAÇÃO
programação da temperatura e as temperaturas exterior e ambiente.
MODO DE AQUECIMENTO - Para desfrutar de ar quente
• A unidade demora um pouco a aquecer.
(Aplicável para o Modelo Inversor / Bomba de calor)
MODO FAN (VENTOINHA) - Para permitir a circulação de ar na sala
MODO DE ARREFECIMENTO - Para desfrutar de ar fresco
MODO SECO - Para desumidifi car o ambiente
• A unidade opera a uma velocidade baixa da ventoinha para dar uma
refrigeração suave.
• Durante a operação, a ventoinha interior funciona a uma velocidade baixa.
O movimento dos difusores pode não alinhar com o visor do controlo remoto.
•
Page 45

DEFINIR O TEMPORIZADOR DIÁRIO
FAN SPEED
SUGESTÃO
CONFIGURAÇÕES OPCIONAIS
PARA SELECCIONAR A VELOCIDADE DO
VENTILADOR (3 OPÇÕES)
LOW MEDIUMAUTO HIGH
• Para AUTO, a velocidade da ventoinha interior é ajustada
automaticamente de acordo com o modo de operação.
• Se o modo de funcionamento está defi nido para Ventoinha,
a velocidade desta será fi xada em MEDIUM (médio)
independentemente da temperatura defi nida.
AIR SWING
AUTO
PARA AJUSTAR A DIRECÇÃO
MANUAL
DO FLUXO DE AR
• Mantém a ventilação da sala.
• O ar é descarregado uniformemente através dos 4 orifícios
de saída.
AUTO 1 AUTO 2 AUTO 3
AUTO
• Existem 3 pontos para a direcção automática do fl uxo de ar
vertical.
• As placas verticais do fl uxo de ar oscilam automaticamente
para cima e para baixo.
• Não ajuste manualmente as placas verticais da direcção do
fl uxo de ar.
MANUAL
• Existem 4 pontos para a direcção manual do fl uxo de ar
vertical.
• O direccionamento do ar pode ser regulado como desejado
através do controlo remoto.
ECONOMY
PARA REDUZIR O
CONSUMO DE ENERGIA
ECONOMY
• Recomendada a utilização quando a temperatura ambiente
desejada é alcançada.
• O funcionamento de economia pode ser activado em todos
os modos e pode ser cancelado premindo novamente o
respectivo botão.
ODOUR WASH
ODOUR WASH
REMOÇÃO DE ODORES
• Aplicável a todos os modelos.
• Ajuda a remover odores desagradáveis da área circundante
durante o funcionamento.
• Para permitir a função de remoção de odores, premir uma
ODOUR WASH
vez
.
• Para cancelar, premir o respectivo botão novamente.
LIMPAR ODORES
• Aplicável apenas ao modelo inversor.
• Para remover odores e minimizar o crescimento de bolores
que causam mau cheiro na secção interior do aparelho de ar
condicionado.
• Para permitir esta função, premir
ODOUR WASH
durante mais de 3
segundos.
• A unidade executará automaticamente os modos
Fan (ventoinha) e Heating (aquecimento) durante
aproximadamente 20 minutos e depois pára
automaticamente.
• Recomendado abrir as janelas durante esta operação.
DEFINIR O TEMPORIZADOR DIÁRIO
• Para LIGAR (ON) ou DESLIGAR (OFF) a unidade num
tempo predefi nido.
TIMER
SELECT
Seleccione a
Confi gure a hora. Confi rme.
SET
função ON ou OFF
do temporizador.
• Para cancelar o temporizador ON ou OFF, prima
CANCEL
.
• Quando é defi nido o temporizador para ON (ligado), a
unidade pode começar antes da hora defi nida para alcançar
a temperatura desejada a tempo.
• O funcionamento do temporizador é baseado na
confi guração do relógio no controlo remoto e repete
diariamente uma vez confi gurado. Para confi gurar o relógio,
por favor consulte a preparação do Controlo Remoto.
• O encerramento do temporizador para a hora actual será
activado primeiro.
• Se o temporizador for cancelado manualmente, pode
restaurar as defi nições anteriores premindo
SET
.
• Se a alimentação estiver desligada durante uma hora ou
mais, o relógio e o temporizador terão que voltar a ser
defi nidos.
CONFIGURAÇÕES OPCIONAIS
• Para evitar o funcionamento não intencional,
pode atribuir um endereço diferente a cada
unidade interior.
• Premir repetidamente para seleccionar a sua
confi guração de endereço desejada.
Address 1 Address 2Group Address 3
ADDRESS
• Por defeito, é seleccionado ADDRESS 1
(endereço 1). Você não precisa de mudar esta
defi nição para o funcionamento normal.
• Se o endereço está defi nido para GROUP
(grupo), podem ser colocadas a funcionar
mais do que uma unidade interior ao mesmo
tempo.
Prima para restabelecer as confi gurações padrão
RESET
do controlo remoto.
Não utilizado em operações normais.
SET
SUGESTÃO
• Defi na a temperatura para 1°C acima no modo frio ou
2°C abaixo no modo calor da temperatura desejada para
conseguir 10% de poupança de energia.
• Utilize cortinas para evitar a luz solar e o calor exterior, para
reduzir o consumo de energia durante o modo frio.
PORTUGUÊS
45
Page 46

S
VISTA GERAL DO PRODUTO E OPERAÇÕES
VISTA GERAL DO PRODUTO E OPERAÇÕES
(CONTROLO REMOTO COM FIOS
(CONTROLO REMOTO COM FIOS)
Placa de direcção do fl uxo de ar
Ar é descarregado
uniformemente
Filtro do ar
Grelha De Entrada
/
ON
OFF
PARA LIGAR OU DESLIGAR (ON/
OFF) A UNIDADE
UP
MON TUE WED THU FRI SAT SUN
ON
FAN SPEED
AUTO
AIR SWING
AUTO 123
AUTO
DOWN
PARA CONFIGURAR A
TEMPERATURA
• Alcance de selecção: 16°C ~ 31°C.
/
ON
UP
DOWN
OFF
SET
CANCEL
ECONOMY
FAN
SPEED
AUTO
AIR SWING
MODE
MANUAL
TEMP/
A/C No.
DOWN
3
UP
2
CZ-RD513C
TIMER/CLOCK
MODE
SELECT
CHECK ODOUR WASH VENTILATION TEST RUN FILTER RESET
1
CZ-RD513C
• Em condições normais de funcionamento, os
botões de reprogramação
podem ser utilizados.
Preparação Do Controlo Remoto
1
2
3
4
46
ELECT
Premir
Premir para confi gurar o dia
Confi rmar
Repetir os passos 2 e 3 para confi gurar a
hora actual.
VENTILATION
e
não
TEST RUN
MODE
PARA SELECCIONAR O MODO DE
OPERAÇÃO
MODO AUTOMÁTICO - Para sua conveniência
• A unidade selecciona o modo de funcionamento de acordo
com a programação da temperatura e as temperaturas
exterior e ambiente.
MODO DE AQUECIMENTO - Para desfrutar de ar quente
• A unidade demora um pouco a aquecer.
(Aplicável para o Modelo Inversor / Bomba de calor)
MODO FAN (VENTOINHA) - Para permitir a circulação de
ar na sala
MODO DE ARREFECIMENTO - Para desfrutar de ar fresco
MODO SECO - Para desumidifi car o ambiente
• A unidade opera a uma velocidade baixa da ventoinha para
dar uma refrigeração suave.
• Durante a operação, a ventoinha interior funciona a uma
velocidade baixa.
• O movimento dos difusores pode não alinhar com o visor do
controlo remoto.
Page 47

DEFINIR O TEMPORIZADOR DIÁRIO
FAN
SUGESTÃO
PARA SELECCIONAR A VELOCIDADE DO
SPEED
VENTILADOR (3 OPÇÕES)
LO MEDAUTO HI
•
Para AUTO, a velocidade da ventoinha interior é ajustada
automaticamente de acordo com o modo de operação.
• Se o modo de funcionamento está defi nido para Ventoinha,
a velocidade desta será fi xada em MED (médio)
independentemente da temperatura defi nida.
AUTO
MANUAL
AIR SWING
PARA AJUSTAR A DIRECÇÃO
DO FLUXO DE AR
• Mantém a ventilação da sala.
• O ar é descarregado uniformemente através dos 4 orifícios
de saída.
AUTO
AUTO 1 AUTO 2 AUTO 3
• Existem 3 pontos para a direcção automática do fl uxo de ar
vertical.
• As placas verticais do fl uxo de ar oscilam automaticamente
para cima e para baixo.
• Não ajuste manualmente as placas verticais da direcção do
fl uxo de ar.
MANUAL
•
Existem 4 pontos para a direcção manual do fl uxo de ar vertical.
• O direccionamento do ar pode ser regulado como desejado
através do controlo remoto.
ECONOMY
PARA REDUZIR O CONSUMO DE
ENERGIA
• Recomendada a utilização quando a temperatura ambiente
desejada é alcançada.
• O funcionamento de economia pode ser activado em todos
os modos e pode ser cancelado premindo novamente o
respectivo botão.
DEFINIR O TEMPORIZADOR DIÁRIO
• Para LIGAR (ON) ou DESLIGAR (OFF) a unidade num
tempo predefi nido.
12
MODE
Entre no modo
temporizador diário.
SELECT
Seleccione a função ON
ou OFF do temporizador.
34
UP
DOWN
SET
Confi gure a hora. Confi rme.
• Para cancelar o temporizador ON ou OFF, prima
CANCEL
.
• Quando é defi nido o temporizador para ON (ligado),
a unidade pode começar antes da hora defi nida para
alcançar a temperatura desejada a tempo.
• O funcionamento do temporizador é baseado na
confi guração do relógio no controlo remoto e repete
diariamente uma vez confi gurado. Para confi gurar o
relógio, por favor consulte a preparação do Controlo
Remoto.
• O encerramento do temporizador para a hora actual
será activado primeiro.
• Se o temporizador for cancelado manualmente, pode
restaurar as defi nições anteriores premindo
SET
.
• Se a alimentação estiver desligada durante uma hora
ou mais, o relógio e o temporizador terão que voltar a
ser defi nidos.
PORTUGUÊS
ODOUR WASH
REMOÇÃO DE ODORES
• Aplicável a todos os modelos.
• Ajuda a remover odores desagradáveis da área circundante
durante o funcionamento.
•
Para permitir a função de remoção de odores, premir uma
vez
• Para cancelar, premir o respectivo botão novamente.
ODOUR WASH
.
LIMPAR ODORES
• Aplicável apenas ao modelo inversor.
• Para remover odores e minimizar o crescimento de bolores
que causam mau cheiro na secção interior do aparelho de ar
condicionado.
• Para permitir esta função, premir
segundos.
•
A unidade executará automaticamente os modos Fan
ODOUR WASH
durante mais de 3
(ventoinha) e Heating (aquecimento) durante aproximadamente
20 minutos e depois pára automaticamente.
• Recomendado abrir as janelas durante esta operação.
SUGESTÃO
• Defi na a temperatura para 1°C acima no modo frio ou
2°C abaixo no modo calor da temperatura desejada
para conseguir 10% de poupança de energia.
• Utilize cortinas para evitar a luz solar e o calor exterior,
para reduzir o consumo de energia durante o modo frio.
47
Page 48

CHECK ODOUR WASH VE
MODE
SELECT
SET
CANCEL
OFF
/
O
TIMER/CLOCK
ECONOMY
UP
DOWN
CZ-RD513C
TIMER/CLOCK
TIMER/CLOCK
PARA CONFIGURAR TEMPORIZADOR SEMANAL
DETALHES DA OPERAÇÃO
PARA CONFIGURAR TEMPORIZADOR SEMANAL
FAN SPEED
AUTO
AUTO
MONTUE WED THU FRI SAT SUN
ON
AIR SWING
AUTO 123
/
ON
OFF
CZ-RD513C
TIMER/CLOCK
UP
MODE
DOWN
SELECT
CHECK ODOUR WASH VENTILATION TEST RUN FILTER RESET
TEMP/
A/C No.
FAN
SET
UP
MODE
SPEED
CANCEL
DOWN
MANUAL
AUTO
AIR SWING
ECONOMY
Acender-se-á se operação
de Timer está selecionada
Podem ser ajustados 6
diferentes programas por
dia (1 ~ 6)
TIMER
1
23456
MON TUE WED THU FRI SAT SUN
ON
OFF
OFF-Timer. Para automáticamente
apagar a unidade.
ON-Timer. Para automáticamente ON a unidade.
Dia a ser seleccionado
48
Mudança de Mostrador
1. Prima o
Seleccione os dias para o temporizador
2. Premir
3. Premir
Seleccionar o temporizador ON/OFF (ligar/desligar)
4. Premir
5. Premir
6. Premir
Seleccionar o temporizador
7. Premir para seleccionar o tempo desejado.
8. Premir
• Repetir os passos 5 a 8 para defi nir o Temporizador 2
MODE
durante 3 segundos para mudar o
mostrador de Timer semanal.
SELECT
para entrar na defi nição do dia.
para seleccionar o dia desejado.
O dia seleccionado será destacado com .
SET
Premir
para ligar ou desligar a marca .
Repetir este passo inclui outro dia.
SELECT
para entrar Timer 1 (temporizador 1).
para escolher ON (ligado) ou OFF
(desligado).
SET
para confi rmar a selecção.
Se deseja defi nir em conjunto com a temperatura
desejada, premir
UP
DOWN
para seleccionar a
temperatura.
SET
para confi rmar a defi nição.
CANCEL
a 6, ou premir
relacionados.
para cancelar os temporizadores
Indique o dia
seleccionado
Hora a ser
seleccionada
(Intervalo 10
minutos)
DETALHES DA OPERAÇÃO
• O temporizador semanal só se aplica ao controlo
remoto com fi o, premir
MODE
durante 3 segundos
para seleccionar o temporizador diário ou o
temporizador semanal.
• O temporizador diário e o temporizador semanal não
podem ser defi nidos ao mesmo tempo.
• Promove a poupança de energia permitindo que
você defi na até 6 temporizadores em qualquer dia.
• O mesmo programa de temporizador não pode ser
defi nido no mesmo dia.
Verifi car Temporizador
1. Entre no modo
MODE
SELECT
UP
DOWN
SET
CANCEL
temporizador.
2. Seleccione o dia.
3. O visor mostrará o programa para cada dia
seleccionado.
Modifi car ou adicionar temporizador
• Executar a operação de verifi cação do temporizador
para seleccionar o dia. Repetir os passos 4 a 8 para
modifi car o programa de temporizador existente ou
adicione qualquer programa de temporizador novo.
Cancelar o temporizador
• Executar o passo abaixo para cancelar o programa
de temporizador para um determinado dia.
1. Entre no modo
MODE
SELECT
UP
DOWN
SET
CANCEL
temporizador.
2. Seleccione o dia.
3. Premir para entrar na
defi nição do dia.
4. Premir para cancelar
a defi nição do
temporizador.
Desactivar o Temporizador Semanal
• Para desactivar a defi nição semanal, premir
depois premir
CANCEL
.
MODE
Activar o Temporizador Semanal
• Para activar a defi nição do temporizador semanal
anterior, premir
MODE
, depois premir
SET
.
,
Page 49

2
Lentamente puxe
a grelha de
entrada.
3
Remover o fi ltro de ar
das patilhas e puxar
para baixo.
1
Premir os botões.
Remova
CLOS
E
OPE
N
OPEN
CLOS
E
FILTRO DO AR
1
2
3
MANUTENÇÃO E LIMPEZA MANUTENÇÃO E LIMPEZA
INSTRUÇÕES DE LIMPEZ
SUGESTÃO
UNIDADE INTERIOR
• Desligue a unidade antes de efectuar a limpeza.
• Não toque nas alhetas de alumínio, a parte afi ada pode causar
CUIDADO
INSTRUÇÕES DE LIMPEZ
• Não utilize benzina, diluente nem pó de limpeza abrasivo.
• Utilize apenas sabões ( pH7) ou detergente de uso
doméstico neutro.
• Não utilize água com uma temperatura superior a 40°C.
Remover o fi ltro de ar Instalação do fi ltro de ar
1
Premir os botões.
ferimentos.
SUGESTÃO
• Limpe regularmente o fi ltro para obter o melhor
desempenho possível e reduzir o consumo de energia.
• Contacte o revendedor local para efectuar a inspecção
sazonal.
UNIDADE INTERIOR
Limpe cuidadosamente
a unidade com um pano
macio e seco.
1
Inserir o fi ltro de
ar nas patilhas da
grelha de
entrada.
2
PORTUGUÊS
2
Lentamente puxe
a grelha de
entrada.
3
Remover o fi ltro de ar
das patilhas e puxar
para baixo.
Manutenção do fi ltro de ar
É necessário limpar quando:
FAN SPEED
AUTO FAN
AUTO
AIR SWING
AUTO 123
POWER
TIMER
FILTER
ECONOMY
ODOUR WASH
COOL DRY
AUTO
FILTER
RESET
LOSE
C
OPEN
OPEN
OSE
CL
FILTRO DO AR
Aparece “FILTER RESET”
(reiniciar fi ltro) no visor
do controlo remoto.
(para controlo remoto com fi o)
Acende “FILTER” (fi ltro) no
visor indicador.
(para controlo remoto sem fi o)
3
Remova
Premir os botões para o lado
CLOSE (fechar).
Aspirar, lavar e secar.
• Recomenda-se a limpeza dos fi ltros do ar de seis em
seis semanas.
• Após o fi ltro de ar ser limpo, premir
para reiniciar.
• Não coloque a funcionar sem o fi ltro de ar.
• Lave/limpe cuidadosamente o fi ltro de ar com água
para evitar danos à superfície do fi ltro de ar.
• Não seque a parte com o secador ou estufa.
• Substituir qualquer fi ltro de ar danifi cado.
FILTER RESET
Lentamente
levante a
grelha de
entrada.
Botão
FILTER RESET
/
49
Page 50

Sintoma
Causa
Os seguintes sintomas não indicam uma avaria do aparelho.
RESOLUÇÃO DE PROBLEMAS RESOLUÇÃO DE PROBLEMAS
Os seguintes sintomas não indicam uma avaria do aparelho.
Sintoma
Sai névoa da unidade interior. • Efeito de condensação devido ao processo de arrefecimento.
Ouve-se o fl uxo de água quando a unidade
está a funcionar.
A sala tem um odor estranho. • Pode ser devido a um odor de humidade produzido pela parede,
O ventilador interior pára ocasionalmente
quando o modo de velocidade automática do
ventilador está programado.
O funcionamento é atrasado durante alguns
minutos após a reprogramação.
A unidade exterior produz água/vapor. • Existe condensação ou evaporação nos tubos.
O indicador do temporizador permanece
ligado.
O ventilador interior pára ocasionalmente no
modo de aquecimento.
Pode ser ouvido um ruído tipo estalido durante
o funcionamento.
O aparelho comuta para funcionamento com
ventilação e o ar humedece-se.
O aparelho externo está a fazer ruídos
durante as operações de aquecimento.
O funcionamento não pára imediatamente
após premir o botão ON/OFF (ligar/desligar).
O funcionamento ocasionalmente pára.
(Aparece “DEFROST” (descongelar) no visor
do controlo remoto)
O fl uxo de ar não começa imediatamente após
a operação iniciar. (Aparece “PRE HEAT” (préaquecimento) no visor do controlo remoto)
O funcionamento parte depois de uma
interrupção no fornecimento eléctrico.
Durante o modo seco, é expelido ar frio.
A velocidade da ventoinha muda
ocasionalmente durante o modo de
aquecimento.
A unidade exterior emite vapor durante o
modo aquecimento.
Causa
• Fluxo do líquido de refrigeração no interior da unidade.
alcatifa, mobília ou vestuário.
• Isto ajuda a remover os odores do ambiente.
• O atraso é um mecanismo de protecção do compressor da unidade.
• A programação do temporizador é activada diariamente depois de
programada.
• Para evitar o efeito de arrefecimento acidental.
• Mudanças de temperatura causam a expansão/contracção da unidade.
• Isto acontece quando a temperatura ambiente alcança a temperatura
defi nida, o funcionamento muda para o modo FAN (ventoinha) e a
humidade aumenta.
• Isto deve-se a mudanças no fl uxo de entrada do gás refrigerante
quando o funcionamento pára ou começa.
• A descarga de calor está em processo. O funcionamento irá parar
automaticamente após aproximadamente 60 segundos.
• A unidade está em modo descongelar e o gelo derretido é drenado da
unidade exterior.
• A unidade está a aquecer para fornecer ar quente.
• O reinício automático está a funcionar e funciona em função das
regulações anteriores.
• A unidade está a funcionar em refrigeração com a ventoinha a baixa
velocidade para desumidifi car o ambiente.
• A temperatura ambiente alcançou a defi nição do controlo remoto.
Quando a temperatura ambiente volta a cair, a velocidade da ventoinha
regressará às defi nições do controlo remoto.
• Isto deve-se à operação descongelar no permutador de calor.
50
Page 51

Sintoma
Verifi fi car
Verifi fi que o seguintes antes de pedir assistência.
PARA UMA INSPECÇÃO SAZONAL APÓS NÃO
UTILIZAÇÃO PROLONGADA
CRITÉRIOS SEM MANUTENÇÃO
PARA PREPARAR A UNIDADE PARA UM PERÍODO
DE INACTIVIDADE PROLONGADO
Aparece “CHECK” (verifi car) no visor do controlo remoto com fi o.
Verifi fi que o seguintes antes de pedir assistência.
Sintoma
O modo de aquecimento/arrefecimento não
está a funcionar de maneira efi ciente.
O modo aquecimento não pode funcionar. • A unidade é forçada a funcionar apenas no modo de arrefecimento
Ruído durante o funcionamento. • Verifi car se a unidade foi instalada numa inclinação ou se a grelha
O controlo remoto não funciona.
(O visor do controlo remoto sem fi os está
escuro ou o sinal de transmissão é fraco.)
A unidade não funciona. • Verifi que se o disjuntor disparou.
A unidade não recebe o sinal do controlo
remoto.
Aparece “CHECK” (verifi car) no visor do controlo remoto com fi o.
Verifi fi car
• Confi gure a temperatura correctamente.
• Feche todas as portas e janelas.
• Limpe ou substitua os fi ltros.
• Limpe qualquer obstrução que se encontra na entrada do ar e nas
aberturas de ventilação de saída do ar.
numa sala inanimada, como uma sala de computador.
interna não está fechada adequadamente.
• Introduza as pilhas devidamente.
• Substitua as pilhas gastas.
• Verifi que se o temporizador foi confi gurado.
• Certifi que-se que o receptor não está obstruído.
• Certifi que-se que o endereço está correcto.
• Certifi que-se que o sinal de transmissão do controlo remoto está no
alcance.
• Algumas luzes fl uorescentes podem interferir com o transmissor de
sinal. Por favor consulte o seu representante mais próximo.
PORTUGUÊS
Se o indicador CHECK piscar no controlo
remoto com fi o.
PARA UMA INSPECÇÃO SAZONAL APÓS NÃO
UTILIZAÇÃO PROLONGADA
• Verifi que as pilhas do controlo remoto (controlo remoto
sem fi os).
• Os orifícios de entrada e saída devem estar desobstruídos.
• Após 15 minutos de funcionamento, é normal que a
seguinte diferença de temperatura se verifi que entre os
orifícios de entrada e saída:
Arrefecimento: ≥ 8°C Aquecimento: ≥ 14°C
PARA PREPARAR A UNIDADE PARA UM PERÍODO
DE INACTIVIDADE PROLONGADO
• Activar o modo aquecimento (Inversor/modelo bomba de
calor) ou modo Fan (ventoinha) (Modelo arrefecimento)
durante 2~3 horas para remover completamente a
humidade deixada nas partes internas.
• Desligue a unidade.
• Remova as pilhas do controlo remoto (controlo remoto sem
fi os).
• Desligar a unidade.
• Voltar a ligar após 3 minutos.
• Se CHECK continuar a piscar, premir
problema persistir, por favor consulte o seu fornecedor autorizado mais
próximo.
para mensagens de erro. Se o
CHECK
CRITÉRIOS SEM MANUTENÇÃO
DESLIGUE O SISTEMA DE ALIMENTAÇÃO e CONTACTE
o Distribuidor Autorizado nas seguintes condições:
• Ruído anormal durante o funcionamento.
• Água/partículas estranhas entraram no controlo remoto.
• Fuga de água da unidade interior.
• Os interruptores do disjuntor desligam-se frequentemente.
• O fi o distribuidor de corrente aquece de forma anormal.
• Os interruptores ou botões não estão a funcionar
devidamente.
• O odor persiste mesmo depois da operação de lavagem
de odores ser usada continuamente.
51
Page 52

Aanzuig
Uitblaas
Aanzuig
Aanzuig
VEILIGHEIDSMAATREGELEN VEILIGHEIDSMAATREGELEN
Uitblaas
DEFINITIE
De op te volgen instructies worden aangeduid met de volgende symbolen:
Dit symbool verwijst naar een
handeling die VERBODEN is.
Om persoonlijk letsel, letsel aan anderen en schade aan eigendommen te voorkomen, dient u de volgende instructies op te volgen.
Onjuiste bediening wegens het niet opvolgen van de instructies kan leiden tot letsel of schade, waarvan de ernst wordt
geclassifi ceerd zoals hieronder is aangegeven:
Waarschuwing
Met dit teken wordt u gewaarschuwd voor de
dood of ernstig letsel.
Deze symbolen verwijzen naar
handelingen die VERPLICHT zijn.
Met dit teken wordt
Opgepast
u gewaarschuwd
voor letsel of
schade aan
eigendommen.
Draadloze Afstandsbediening
• Gebruik geen oplaadbare (NiCd) batterijen.
• Laat peuters en jonge kinderen
niet met de afstandsbediening
spelen om te voorkomen dat
zij de batterijen per ongeluk
doorslikken.
• Verwijder de batterijen indien
het apparaat gedurende lange
tijd niet zal worden gebruikt.
• Plaats nieuwe batterijen
van hetzelfde type met de
aangegeven polariteit. Zo
voorkomt u defecten aan de
afstandsbediening.
• Sluit geen andere apparaten aan op hetzelfde
stopcontact.
• Breng geen wijzigingen aan aan het netsnoer.
• Gebruik geen verlengsnoer.
• Bedien het apparaat niet met natte handen.
• Gebruik het voorgeschreven netsnoer.
• Indien het netsnoer beschadigd is, moet het
worden vervangen door de fabrikant, een
servicevertegenwoordiger van de fabrikant of
een gelijkwaardig gekwalifi ceerd persoon om
een mogelijk gevaar te voorkomen.
• Deze apparatuur moet geaard worden en het is
strengstens aanbevolen een aardlekschakelaar
(ELCB) of een differentieelschakelaar (RCD)
te installeren. Anders kan, bij functionele
storingen, een elektrische schok of brand
veroorzaakt worden.
• Schakel in noodgevallen of abnormale
omstandigheden (brandgeur, enz.) de
stroomtoevoer uit en vraag uw dichtsbijzijnde
handelaar om advies.
• Steek geen vingers of voorwerpen in het
apparaat, daar scherpe delen blessures kunnen
52
veroorzaken.
Stroom Toevoer
Buitendeel
Binnendeel
• U dient de installatie niet zelf
te installeren, te verwijderen en
opnieuw te installeren. Onjuiste
installatie kan leiden tot lekkage,
een elektrische schok of brand.
Neem contact op met een
erkende dealer of specialist voor
de installatiewerkzaamheden.
• Steek niet uw vingers of vreemde
voorwerpen in het apparaat.
• Probeer de installatie niet zelf te
repareren.
Uitblaas
Aanzuig
Aanzuig
Aanzuig
Uitblaas
Binnendeel
• Plaats de installatie niet in een
omgeving waarin mogelijk een gevaar
voor explosie bestaat.
• Reinig de installatie niet met water,
benzeen, verdunner of schuurpoeder.
• Gebruik het apparaat niet voor
andere doeleinden, zoals voor het
conserveren van voedsel.
• Gebruik in de buurt van de uitblaas
geen apparatuur die werkt met
brandstoffen.
• Stel het apparaat niet voor lange tijd
direct bloot aan koude lucht.
• Zorg ervoor dat de afvoerleiding
correct is aangesloten. Als dit niet het
geval is, kan er lekkage ontstaan.
• Ventileer de kamer regelmatig.
Stroom Toevoer
• Schakel de voeding uit voordat u het
apparaat reinigt of er onderhoud aan
pleegt.
• Schakel de voeding uit als het
apparaat voor lange tijd niet zal
worden gebruikt.
• Deze airconditioner is uitgerust
met een ingebouwd apparaat
voor bescherming tegen hoge
stroomtoevoer. Om uw airconditioner
verder te beschermen tegen
beschadiging door buitengewoon
sterke bliksemactiviteit, kunt u deze
loskoppelen van de stroombron. Raak
de airconditioner niet aan tijdens
bliksem, het kan dan een elektrische
schok geven.
Buitendeel
• Ga niet op het apparaat zitten of staan,
daar u zou kunnen vallen.
• Raak niet de aluminium vin aan, het
scherpe deel kan letsel veroorzaken.
• Zorg ervoor dat de afvoerleiding
correct is aangesloten. Als dit niet het
geval is, kan er lekkage ontstaan.
• Controleer na een lange
gebruiksperiode het installatierek op
beschadiging.
Page 53

INHOUDSOPGAVE
INFORMATIE OVER WETGEVING INFORMATIE OVER WETGEVING
OPMERKING :
GEBRUIKSOMSTANDIGHEDEN
Dit apparaat is niet bestemd voor gebruik door personen (kinderen inbegrepen)
met verminderde fysieke, sensorische of mentale capaciteiten, of zonder ervaring
of kennis, tenzij onder toezicht van of na instructie door een persoon die voor hun
veiligheid verantwoordelijk is. Pas op, dat kinderen niet met het apparaat spelen.
GEBRUIKSOMSTANDIGHEDEN
Gebruik deze airconditioner binnen het volgende temperatuurbereik
Model Temperatuur (°C) Binnen Buiten
Inverter
(GBE5, DBE5,
DBE8-series)
Warmtepomp
Koelen KOELEN
ATTENTIE: Ook bij buitentemperaturen van -15°C*/ -10°C** is dit toestel nog in
(CU-YL24HBE5, CU-YL28HBE5, CU-YL34HBE5, CU-YL43HBE5)
KOELEN
VERWARMEN
ATTENTIE: Ook bij buitentemperaturen van -5°C is dit toestel nog in staat koelen in
KOELEN
VERWARMEN
KOELEN
VERWARMEN
staat koelen in een niet-woonruimte met een ruimtetemperatuur van
21°C of hoger en een luchtvochtigheid van maximaal 45%.
Temperatuur (°C) Binnen Buiten
een niet-woonruimte met een ruimtetemperatuur van 21°C of hoger en
een luchtvochtigheid van maximaal 45%.
Maximum 32 43
Minimum 21 -15*
Maximum 27 24
Minimum 16 -20
Maximum 32 43
Minimum 21 -10**
Maximum 27 24
Minimum 16 -10
Maximum 32 43
Minimum 21 -10**
Maximum 32 43
Minimum 21 -5
Maximum 27 24
Minimum 16 -15
Hartelijk dank voor de
aanschaf van de -
airconditioner
INHOUDSOPGAVE
VEILIGHEIDSMAATREGELEN
INFORMATIE OVER
WETGEVING
PRODUCTOVERZICHT &
BEDIENING
(DRAADLOZE
AFSTANDSBEDIENING)
PRODUCTOVERZICHT &
BEDIENING
(BEDRADE
AFSTANDSBEDIENING)
ONDERHOUD & REINIGING
PROBLEMEN OPLOSSEN
SNELLE GIDS
OPMERKING :
De afbeeldingen in deze handleiding zijn alleen
bedoeld als toelichting en kunnen afwijken van
het daadwerkelijke uiterlijk van het apparaat.
Deze handleiding kan zonder voorafgaande
kennisgeving worden gewijzigd ter verbetering.
ACHTERKLEP
52
53
54~55
56~58
59
60~61
NEDERLANDS
Informatie voor gebruikers betreffende het verzamelen en verwijderen van oude uitrustingen en lege batterijen
Deze symbolen op de producten, verpakkingen, en/of begeleidende documenten betekenen dat gebruikte elektrische en
elektronische producten en batterijen niet met het algemene huishoudelijke afval gemengd mogen worden.
Voor een correcte behandeling, recuperatie en recyclage van oude producten en lege batterijen moeten zij naar de bevoegde
verzamelpunten gebracht worden in overeenstemming met uw nationale wetgeving en de Richtlijnen 2002/96/EC en 2006/66/EC.
Door deze producten en batterijen correct te verwijderen draagt u uw steentje bij tot het beschermen van waardevolle middelen
en tot de preventie van potentiële negatieve effecten op de gezondheid van de mens en op het milieu die anders door een
onvakkundige afvalverwerking zouden kunnen ontstaan.
Voor meer informatie over het verzamelen en recycleren van oude producten en batterijen, gelieve contact op te nemen met uw
plaatselijke gemeente, uw afvalverwijderingsdiensten of de winkel waar u de goederen gekocht hebt.
Voor een niet-correcte verwijdering van dit afval kunnen boetes opgelegd worden in overeenstemming met de nationale wetgeving.
Voor zakengebruikers in de Europese Unie
Indien u elektrische en elektronische uitrusting wilt vewijderen, neem dan contact op met uw dealer voor meer informatie.
[Informatie over de verwijdering in andere landen buiten de Europese Unie]
Deze symbolen zijn enkel geldig in de Europese Unie. Indien u wenst deze producten te verwijderen, neem dan contact op met uw
plaatselijke autoriteiten of dealer, en vraag informatie over de correcte wijze om deze producten te verwijderen.
Opmerking over het batterijensymbool (beneden twee voorbeelden):
Dit symbool kan gebruikt worden in verbinding met een chemisch symbool. In dat geval wordt de eis, vastgelegd door de Richtlijn
Pb
voor de betrokken chemische producten vervuld.
• Schakel het apparaat niet in wanneer u net de vloer geboend hebt. Lucht de kamer na het boenen eerst goed, alvorens het apparaat te gebruiken.
• Installeer het apparaat niet op plaatsen met olieachtige dampen of rook.
53
Page 54

ADDRESS
AUTO
AUTO
TIMER
ON
SETRESET ADDRES
S
MODE
MODE
AIR SW
ING
FAN SPEED
AIR SWING
TIMER
OFF/ON
SET
CANCEL
SELECT
CLOCK
FAN SPEED
FILTER RESET
MANUAL
ODOUR WASH
MODE
AUTO
ECONOMY
PRODUCTOVERZICHT & BEDIENING
PRODUCTOVERZICHT & BEDIENING
(DRAADLOZE AFSTANDSBEDIENING)
(DRAADLOZE AFSTANDSBEDIENING)
Controlepaneel
Jaloezie voor richting
luchtstroom
Luchtfi lter
Toevoerrooster
Display van de
afstandsbediening
3
6
Inverter- / Warmtepompmodel
CZ-RL513B
Koelmodel
CZ-RL013B
54
1
POWER
TIMER
FILTER
ECONOMY
ODOUR WASH
AUTO
Sensor
Knop auto OFF/ON
• Het apparaat bedienen, indien de afstandsbediening niet
gevonden wordt of niet correct functioneert.
Actie Stande
Druk 1 maal op de knop. Automatisch
De lucht wordt
gelijkmatig
uitgeblazen
Transmitter
Houd de knop ingedrukt totdat u 1 pieptoon
hoort en laat de knop vervolgens los.
1. Houd de knop ingedrukt totdat u 2
pieptonen hoort en laat de knop vervolgens
los.
2. Druk 5 seconden op de
SET
-toets.
Bij verwarmen
Druk op de toets, om uit te schakelen.
Bij koelen
Maximale afstand: 8m
De Afstandsbediening Gereedmaken
Erop drukken en uittrekken
1
Plaats AAA- of R03-batterijen
2
(kan ~ 1 jaar gebruikt worden)
3
Druk op CLOCK
OFF/ON
HET TOESTEL AAN- OF
UITSCHAKELEN
Tijd instellen
4
Bevestig
5
Sluit het deksel
6
POWER
DE TEMPERATUUR INSTELLEN
• Instellingsbereik: 16°C ~ 31°C.
4
MODE
DE BEDRIJFSMODUS KIEZEN
5
AUTO MODUS - Voor uw gemak
• De installatie kiest de stand op basis van de temperatuurinstelling, de
2
buiten- en kamertemperatuur.
VERWARMINGSMODUS - Genieten van warme lucht
• Het apparaat heeft enige tijd nodig om op te warmen.
(Geldt voor Inverter- / Warmtepompmodel)
FAN-MODUS - Om voor luchtcirculatie in de kamer te zorgen
KOELINGSMODUS - Genieten van koude lucht
DROOGMODUS - Drogen van de omgeving
• Het apparaat werkt bij lage ventilatorsnelheid om zo voor een aangename
koeling te zorgen.
• Tijdens het zachte drogen, werkt de binnenventilator op geringe
ventilatorsnelheid
• De beweging van de jaloezieën stemt eventueel niet overeen met de
indicatie op de afstandsbediening.
Page 55

FAN SPEED
DE DAGELIJKSE TIMER INSTELLEN
TIP
OPTIONELE INTSTELLINGEN
VENTILATIESNELHEID SELECTEREN
(3 OPTIES)
LOW MEDIUMAUTO HIGH
• Op AUTO wordt de snelheid van de binnenventilator
automatisch aangepast, in overeenstemming met de
bedrijfsmodus.
• Indien de bedrijfsmodus op FAN staat, wordt de
ventilatorsnelheid vastgezet op MEDIUM, ongeacht de
ingestelde temperatuur.
AIR SWING
AUTO
RICHTING VAN DE
MANUAL
LUCHTSTROOM AANPASSEN
• Hiermee houdt u de kamer geventileerd.
• De lucht wordt gelijkmatig afgevoerd doorheen 4
luchtuitlaten.
AUTO 1 AUTO 2 AUTO 3
AUTO
• Er bestaan 3 opties voor de automatische verticale
luchtstroomrichting.
• Het rooster voor de verticale luchtstroom zwaait automatisch
op en neer.
• Stel de verticale jaloezieen niet met de hand af.
MANUAL
• Er bestaan 4 opties voor de handmatige verticale
luchtstroomrichting.
• De blaasrichting kan met behulp van de afstandsbediening
worden ingesteld.
ECONOMY
HET ENERGIEVERBRUIK
REDUCEREN
ECONOMY
• Gebruik is aanbevolen, wanneer de gewenste temperatuur
bereikt is.
• Economisch bedrijf kan in alle bedrijfsfuncties geactiveerd
worden en kan geannuleerd worden door opnieuw op de
desbetreffende toets te drukken.
ODOUR WASH
ODOUR WASH
GEURBEVRIJDING
• Geldt voor alle modellen.
• Helpt, tijdens het bedrijf, de omgeving van onaangename
geur te bevrijden.
• Om de geurbevrijdingsfunctie te activeren, moet u één keer
ODOUR WASH
op
drukken.
• Om te annuleren, moet u opnieuw op de desbetreffende toets
drukken.
GEURVERWIJDERING
• Geldt uitsluitend voor Invertermodel.
• Om de geur te verwijderen en de ontwikkeling van geuren,
die schimmels binnenin de airconditioner veroorzaken, te
minimaliseren.
• Om deze functie te activeren, moet u minstens 3 seconden
ODOUR WASH
op
drukken.
• Het apparaat zal dan automatisch, gedurende ongeveer 20
minuten, ventileren en verwarmen.
• Het wordt aanbevolen, tijdens dit bedrijf de ramen te openen.
DE DAGELIJKSE TIMER INSTELLEN
• Om het apparaat op de geprogrammeerde tijd IN of UIT te
schakelen.
TIMER
SELECT
Stel de timer in
Stel de tijd in. Bevestig.
SET
op ON of OFF.
• Om the ON of OFF-timer te annuleren moet u op
CANCEL
drukken.
• Wanneer de ON-timer ingesteld is, start het apparaat
eventueel vroeger dan de actueel ingestelde tijd, om op
tijd de gewenste temperatuur te bereiken.
• De timerwerking baseert op de klok, zoals deze op
de afstandsbediening ingesteld is en wordt dagelijks
herhaald, zodra ingesteld. Voor het instellen van
de klok verwijzen wij naar de voorbereiding van de
afstandsbediening.
• De timer, die het dichtst bij de actuele tijd ingesteld is,
wordt het eerst geactiveerd.
• Indien de timer handmatig geannuleerd wordt, kunt u de
voorgaande instelling herstellen door op
SET
the drukken.
• Indien de hoofdstroomtoevoer langer dan een uur
uitgeschakeld was, moet de klok en de timer opnieuw
ingesteld worden.
OPTIONELE INTSTELLINGEN
• Om te vermijden, dat het apparaat
per ongeluk inschakelt, kunt u elk
binnenapparaat een extra adres toewijzen.
• Druk herhaaldelijk, om uw gewenste
adresinstelling te kiezen.
ADDRESS
Address 1 Address 2Group Address 3
• Als standaard is ADDRESS 1 gekozen.
Voor normaal bedrijf hoeft u deze instelling
niet te veranderen.
• Indien het adres ingesteld is op GROUP, kan
tegelijkertijd meer dan één apparaat lopen.
Druk op deze toets, om de standaardinstelling
RESET
van de afstandsbediening terug te zetten.
Deze toets wordt in normaalbedrijf niet gebruikt.
SET
TIP
• Zet de temperatuur, in de koelmodus, 1°C hoger of,
in de verwarmingsmodus, 2°C lager dan de gewenste
temperatuur, om 10% energie te sparen.
• Gebruik gordijnen om zonlicht en warmte van buiten te weren,
om, tijdens de koeling, het energieverbruik te reduceren.
NEDERLANDS
55
Page 56

S
PRODUCTOVERZICHT & BEDIENING
PRODUCTOVERZICHT & BEDIENING
(BEDRADE AFSTANDSBEDIENING)
(BEDRADE AFSTANDSBEDIENING)
Jaloezie voor richting
luchtstroom
Luchtfi lter
Toevoerrooster
FAN SPEED
AUTO
OFF
SET
CANCEL
ECONOMY
/
ON
SPEED
AUTO
AIR SWING
AUTO 123
FAN
AUTO
AIR SWING
MODE
MANUAL
TEMP/
A/C No.
DOWN
UP
MON TUE WED THU FRI SAT SUN
ON
CZ-RD513C
TIMER/CLOCK
MODE
UP
SELECT
DOWN
CHECK ODOUR WASH VENTILATION TEST RUN FILTER RESET
CZ-RD513C
• Bij normaal gebruik worden de knoppen
en
niet gebruikt.
TEST RUN
De Afstandsbediening Gereedmaken
1
2
3
4
ELECT
Druk op
Druk hierop, om de dag in te stellen
Bevestig
Herhaal de stappen 2 en 3, om de
actuele tijd in te stellen.
VENTILATION
De lucht wordt
gelijkmatig
uitgeblazen
/
ON
OFF
HET TOESTEL AAN- OF
UITSCHAKELEN
UP
DOWN
DE TEMPERATUUR INSTELLEN
• Instellingsbereik: 16°C ~ 31°C.
3
2
MODE
DE BEDRIJFSMODUS KIEZEN
AUTO MODUS - Voor uw gemak
• De installatie kiest de stand op basis van de
temperatuurinstelling, de buiten- en kamertemperatuur.
VERWARMINGSMODUS - Genieten van warme lucht
• Het apparaat heeft enige tijd nodig om op te warmen.
1
(Geldt voor Inverter- / Warmtepompmodel)
FAN-MODUS - Om voor luchtcirculatie in de kamer
te zorgen
KOELINGSMODUS - Genieten van koude lucht
DROOGMODUS - Drogen van de omgeving
• Het apparaat werkt bij lage ventilatorsnelheid om zo
voor een aangename koeling te zorgen.
• Tijdens het zachte drogen, werkt de binnenventilator op
geringe ventilatorsnelheid
• De beweging van de jaloezieën stemt eventueel niet
overeen met de indicatie op de afstandsbediening.
56
Page 57

DE DAGELIJKSE TIMER INSTELLEN
FAN
MANUAL
TIP
VENTILATIESNELHEID SELECTEREN
SPEED
(3 OPTIES)
LO MEDAUTO HI
• Op AUTO wordt de snelheid van de binnenventilator automatisch
aangepast, in overeenstemming met de bedrijfsmodus.
• Indien de bedrijfsmodus op FAN staat, wordt de
ventilatorsnelheid vastgezet op MED, ongeacht de ingestelde
temperatuur.
AUTO
MANUAL
AIR SWING
RICHTING VAN DE
LUCHTSTROOM AANPASSEN
• Hiermee houdt u de kamer geventileerd.
• De lucht wordt gelijkmatig afgevoerd doorheen 4
luchtuitlaten.
AUTO
AUTO 1 AUTO 2 AUTO 3
• Er bestaan 3 opties voor de automatische verticale
luchtstroomrichting.
• Het rooster voor de verticale luchtstroom zwaait automatisch
op en neer.
• Stel de verticale jaloezieen niet met de hand af.
• Er bestaan 4 opties voor de handmatige verticale
luchtstroomrichting.
• De blaasrichting kan met behulp van de afstandsbediening
worden ingesteld.
ECONOMY
HET ENERGIEVERBRUIK REDUCEREN
• Gebruik is aanbevolen, wanneer de gewenste temperatuur
bereikt is.
• Economisch bedrijf kan in alle bedrijfsfuncties geactiveerd
worden en kan geannuleerd worden door opnieuw op de
desbetreffende toets te drukken.
DE DAGELIJKSE TIMER INSTELLEN
• Om het apparaat op de geprogrammeerde tijd IN of UIT
te schakelen.
12
MODE
Ga naar de modus voor
de dagelijkse timer.
34
UP
DOWN
Stel de tijd in. Bevestig.
• Om the ON of OFF-timer te annuleren moet u op
drukken.
• Wanneer de ON-timer ingesteld is, start het apparaat
eventueel vroeger dan de actueel ingestelde tijd, om op
tijd de gewenste temperatuur te bereiken.
• De timerwerking baseert op de klok, zoals deze op
de afstandsbediening ingesteld is en wordt dagelijks
herhaald, zodra ingesteld. Voor het instellen van
de klok verwijzen wij naar de voorbereiding van de
afstandsbediening.
• De timer, die het dichtst bij de actuele tijd ingesteld is,
wordt het eerst geactiveerd.
• Indien de timer handmatig geannuleerd wordt, kunt
u de voorgaande instelling herstellen door op
drukken.
• Indien de hoofdstroomtoevoer langer dan een uur
uitgeschakeld was, moet de klok en de timer opnieuw
ingesteld worden.
SELECT
Stel de timer in op ON
of OFF.
SET
CANCEL
SET
the
NEDERLANDS
ODOUR WASH
GEURBEVRIJDING
• Geldt voor alle modellen.
• Helpt, tijdens het bedrijf, de omgeving van onaangename
geur te bevrijden.
• Om de geurbevrijdingsfunctie te activeren, moet u één keer
op
drukken.
ODOUR WASH
• Om te annuleren, moet u opnieuw op de desbetreffende toets
drukken.
GEURVERWIJDERING
• Geldt uitsluitend voor Invertermodel.
• Om de geur te verwijderen en de ontwikkeling van geuren,
die schimmels binnenin de airconditioner veroorzaken, te
minimaliseren.
• Om deze functie te activeren, moet u minstens 3 seconden
op
drukken.
ODOUR WASH
• Het apparaat zal dan automatisch, gedurende ongeveer 20
minuten, ventileren en verwarmen.
• Het wordt aanbevolen, tijdens dit bedrijf de ramen te openen.
TIP
• Zet de temperatuur, in de koelmodus, 1°C hoger of, in de
verwarmingsmodus, 2°C lager dan de gewenste temperatuur,
om 10% energie te sparen.
•
Gebruik gordijnen om zonlicht en warmte van buiten te
weren, om, tijdens de koeling, het energieverbruik te
reduceren.
57
Page 58

CHECK ODOUR WASH VE
MODE
SELECT
SET
CANCEL
OFF
/
O
TIMER/CLOCK
ECONOMY
UP
DOWN
CZ-RD513C
TIMER/CLOCK
TIMER/CLOCK
DE WEKELIJKSE TIMER INSTELLEN
BEDIENINGSDETAILS
DE WEKELIJKSE TIMER INSTELLEN
CZ-RD513C
TIMER/CLOCK
MODE
SELECT
CHECK ODOUR WASH VENTILATION TEST RUN FILTER RESET
Licht op wanneer de
Tijdschakeling werking
ingesteld
TIMER
1
23456
MON TUE WED THU FRI SAT SUN
ON
OFF
UIT (OFF) tijdschakelaar. Om automatisch
het toestel UIT “ OFF” te schakelen.
AAN (ON) Tijdschakeling. Om automatisch het
toestel AAN “ON” te zetten.
Dag die ingesteld moet worden
Beeldscherm veranderen
1. Druk 3 seconden op de
veranderen tot week (weekly) Tijdschakelaar.
58
Kies de dagen, waarop de timer loopt
2. Druk op
3. Druk op
Kies ON/OFF Timer
4. Druk op
5. Druk op , om ON of OFF te kiezen.
6. Druk op
Kies Timer
7. Druk op , om uw gewenste tijd te kiezen.
8. Druk op
• Herhaal de stappen 5 t/m 8, om de Timers 2 t/m 6 in te
SELECT
, om naar de daginstelling in te gaan.
, om uw gewenste dag te kiezen.
De gekozen dag wordt met gemarkeerd.
SET
Druk op
, om de keuze ongedaan te maken of kies
de -markering.
Herhaal deze stap voor andere dagen.
SELECT
, om naar Timer 1 te gaan.
SET
, om de keuze te bevestigen.
Indien u tegelijkertijd uw gewenste temperatuur wenst
te stellen, druk dan op
SET
, om de instelling te bevestigen.
stellen of druk op
te schakelen.
CANCEL
FAN SPEED
AUTO
AUTO
MONTUE WED THU FRI SAT SUN
ON
AIR SWING
AUTO 123
/
ON
OFF
TEMP/
A/C No.
FAN
UP
SET
UP
MODE
SPEED
DOWN
CANCEL
DOWN
MANUAL
AUTO
AIR SWING
ECONOMY
6 verschillende
programma’s kunnen in
een dag ingesteld worden
(1 ~ 6)
Wijst de gekozen
dag aan
Tijd die ingesteld
moet worden
(Interval 10 minuten)
MODE
in om het beeldscherm te
UP
DOWN
, om de temperatuur te kiezen.
, om de desbetreffende timers uit
BEDIENINGSDETAILS
• De wekelijkse timer betreft uitsluitend bedrade
afstandsbedieningen; druk 3 seconden op
de dagelijkse of de wekelijkse timer te kiezen.
• De dagelijkse en de wekelijkse timer kunnen niet
tegelijkertijd ingesteld worden.
• Begunstigt energiebesparing, door voor elke dag
maximaal 6 timers in te stellen.
• Hetzelfde timerprogramma kan niet op dezelfde dag
ingesteld worden.
Timercontrole
SELECT
3. In de display verschijnt nu het programma voor elke
gekozen dag.
Verander timer of voeg timer toe
• Voer de timercontrole voor de gekozen dag uit.
Herhaal de stappen 4 t/m 8, om het bestaande
timerprogramma te modifi ceren, of voeg een nieuw
timerprogramma toe.
Timerannulering
• Voer de stappen hieronder uit, om het
timerprogramma voor een bepaalde dag te annuleren.
SELECT
De wekelijkse timer uitschakelen
• Om de wekelijkse instelling uit te schakelen moet u op
MODE
in
De wekelijkse timer inschakelen
• Om de voorgaande wekelijkse instelling in te
schakelen, moet u op
drukken.
MODE
UP
DOWN
MODE
UP
DOWN
en daarna op
SET
CANCEL
SET
CANCEL
1. Ga naar de
timermodus.
2. Kies de dag.
1. Ga naar de
timermodus.
2. Kies de dag.
3. Druk hierop, om naar
de daginstelling te
gaan.
4. Druk hierop, om de
timerinstelling te
annuleren
CANCEL
drukken.
MODE
en daarna op
MODE
om
SET
Page 59

ONDERHOUD & REINIGING
REINIGINGSINSTRUCTIES
TIP
2
Trek de inlaatrooster
langzaam naar
beneden.
3
Verwijder de luchtfi lter
uit de lipjes en trek hem
naar beneden.
1
Druk op de knoppen.
Verwijderen
CLOS
E
OPE
N
OPEN
CLOS
E
LUCHTFILTER
1
2
3
BINNENDEEL
ONDERHOUD & REINIGING
• Schakel de voeding uit voordat u het apparaat reinigt.
• Raak niet de aluminium vin aan, het scherpe deel kan letsel
OPGEPAST
REINIGINGSINSTRUCTIES
• Gebruik geen benzeen, verdunner of schuurpoeder.
• Gebruik alleen zeep ( pH7) of milde reinigingsmiddelen
voor huishoudelijk gebruik.
• Gebruik geen water dat warmer is dan 40°C.
veroorzaken.
TIP
• Voor de beste prestaties en maximale energiebesparing
reinigt u het fi lter regelmatig.
• Neem contact op met de dichtstbijzijnde dealer voor
seizoeninspecties.
Verwijder de luchtfi lter Installatie luchtfi lter
1
Druk op de knoppen.
2
Trek de inlaatrooster
langzaam naar
beneden.
LOSE
C
OPEN
OPEN
OSE
CL
BINNENDEEL
Veeg de installatie zachtjes
af met een zachte, droge
doek.
Verwijderen
1
Plaats de luchtfi lter
onder de lipjes van
de inlaatrooster.
2
3
NEDERLANDS
Doe de
inlaatrooster
nu langzaam
omhoog.
Knop
3
Verwijder de luchtfi lter
uit de lipjes en trek hem
naar beneden.
Onderhoud luchtfi lter
De fi lter moet gereinigd worden wanneer:
FAN SPEED
AUTO FAN
AUTO
AIR SWING
AUTO 123
POWER
TIMER
FILTER
ECONOMY
ODOUR WASH
COOL DRY
AUTO
FILTER
RESET
LUCHTFILTER
Stofzuigen, wassen en
drogen.
In de display van de
afstandsbediening “FILTER
RESET” verschijnt.
(bij bedrade afstandsbediening)
Op de indicatordisplay: “FILTER”
begint te branden.
(bij draadloze afstandsbediening)
Druk de knoppen nu naar CLOSE.
• Het is aan te raden de luchtfi lters om de zes weken
schoon te maken.
• Nadat de luchtfi lter gereinigd is, moet u op
FILTER RESET
drukken, om terug te zetten.
FILTER RESET
/
• Laat het apparaat niet zonder luchtfi lter lopen.
• Was/spoel de luchtfi lter voorzichtig uit met water en
wees hierbij voorzichtig, dat u het oppervlak van de
luchtfi lter niet beschadigt.
• Droog het deel in geen geval met een haardroger of
boven de verwarming.
• Een beschadigde luchtfi lter moet vervangen worden.
59
Page 60

De volgende symptomen geven niet een defect aan.
PROBLEMEN OPLOSSEN PROBLEMEN OPLOSSEN
Symptoom
Oorzaak
De volgende symptomen geven niet een defect aan.
Symptoom
Er komt damp uit de binnendeel. • Condensatie door koelproces.
Tijdens werking klinkt er geluid van stromend
water.
De ruimte heeft een vreemde geur. • Dit is mogelijk een geur van vochtigheid die afkomstig is van de muur,
De binnenventilator stopt af en toe wanneer de
ventilatorsnelheid is ingesteld op automatisch.
Het apparaat begint pas na enkele minuten
vertraging nadat het opnieuw is opgestart.
Er komt water/stoom uit de buitendeel. • Verdamping of condensatie vindt plaats op de leidingen.
Timerindicator is altijd aan. • Nadat de timer is ingesteld, worden de instellingen dagelijks uitgevoerd.
De binnenventilator stopt af en toe tijdens
verwarmen.
Tijdens de werking kan een kraakgeluid
hoorbaar zijn.
Apparaat gaat over op FAN-modus en lucht
wordt vochtig.
Buitenunit maakt geluid tijdens verwarmen. • Dit is te wijten aan veranderingen in de toestroom van koelgas, wanneer
De werking wordt niet onmiddellijk gestopt,
nadat op de ON/OFF-toets werd gedrukt.
Werking stopt af en toe. (In de display van de
afstandsbediening “ONTDOOIEN” verschijnt)
De luchtstroming start niet onmiddellijk nadat
het apparaat gestart werd. (In de display van
de afstandsbediening “VOORVERWARMING”
verschijnt)
Start automatisch na stroomuitval. • Automatische herstart is in werking en apparaat functioneert volgens
Tijdens het drogen wordt koude lucht
uitgeblazen.
Tijdens de verwarming verandert de
ventilatorsnelheid af en toe.
Tijdens het verwarmen geeft het
buitenapparaat damp af.
Oorzaak
• Stromend koelmiddel in het apparaat.
het tapijt, meubels of kleding.
• Zo verdrijft u de omgevingsgeuren.
• De vertraging dient ter bescherming van de compressor van de
installatie.
• Onbedoeld koelen voorkomen.
• Temperatuurveranderingen veroorzaken expansie of contractie van het
apparaat.
• Dit gebeurt, wanneer de kamertemperatuur de ingestelde temperatuur
bereikt, het apparaat in de ventilatiemodus schakelt en de vochtigheid
toeneemt.
de werking gestopt en gestart wordt.
• Hitte wordt afgevoerd. De werking stopt automatisch na ongeveer 60
seconden.
• Het apparaat ontdooit en gesmolten ijs loopt uit het buitenapparaat.
• Het apparaat warmt op, om warmte te leveren.
voorgaande instelling.
• Het apparaat koelt met lage ventilatiesnelheid, om de ruimte te
ontvochtigen.
• De kamertemperatuur heeft de per afstandsbediening ingestelde
waarde bereikt. Wanneer de kamertemperatuur weer achteruitgaat, gaat
de ventilator weer lopen met de snelheid, die per afstandsbediening
ingesteld is.
• Dit is te wijten aan ontdooiing op de warmtewisselaar.
60
Page 61

Symptoom
Controleer
Controleer het volgende voordat u een onderhoudsmonteur belt.
“CHECK” verschijnt op de display van de betrade afstandsbediening.
VOOR SEIZOENSINSPECTIE, NADAT HET
APPARAAT LANG NIET IN GEBRUIK WAS
OMSTANDIGHEDEN WAARIN U HULP MOET
INROEPEN
BIJ LANGDURIGE INACTIVITEIT
Controleer het volgende voordat u een onderhoudsmonteur belt.
Symptoom
Verwarmings-/Koelingswerking werkt niet
effi cient.
Het apparaat kan niet in de
verwarmingsmodus lopen.
Luidruchtig tijdens werking. • Controleer, of het apparaat niet geïnstalleerd is op een schuine plaats of
Afstandsbediening werkt niet.
(De controledisplay van de afstandsbediening
is gedimd of het transmissiesignaal is zwak.)
Het apparaat werkt niet. • Controleer of de stroomonderbreker ontkoppeld is.
Het apparaat ontvangt geen signaal van de
afstandsbediening.
Controleer
• Stel de temperatuur correct in.
• Sluit alle deuren en ramen.
• Maak de fi lters schoon of vervang ze.
• Verwijder elke obstructie bij de lucht in- en openingen.
• Het apparaat moet uitsluitend in de koelmodus werken in een nietwoonruimte, zoals bv. een computerruimte.
het inlaatrooster niet goed gesloten is.
• Plaats de batterijen correct.
• Vervang zwakke batterijen.
• Controleer of de timers zijn ingesteld.
• Controleer, of de ontvanger niet geblokkeerd wordt.
• Zorg, dat het adres correct ingesteld is.
• Zorg, dat u met de afstandsbediening binnen het bereik van de
signaaltransmissie blijft.
• Het een en ander fl uorescerend licht kan eventueel de signaalzender
storen. Vraag uw dichtstbijzijnde handelaar om raad.
“CHECK” verschijnt op de display van de betrade afstandsbediening.
Indien de CHECK-indicator op de bedrade
afstandsbediening knippert.
VOOR SEIZOENSINSPECTIE, NADAT HET
APPARAAT LANG NIET IN GEBRUIK WAS
• Controleer de batterijen van de afstandsbediening
(draadloze afstandsbediening).
• Controleer de inlaat- en uitlaatopeningen op blokkades.
• Het is normaal dat na 15 minuten gebruikstijd
het temperatuurverschil tussen de aanzuig- en
uitblaasopeningen als volgt is:
Bij koelen: ≥ 8°C Bij verwarmen: ≥ 14°C
BIJ LANGDURIGE INACTIVITEIT
• Activeer de verwarmingsmodus (Inverter-/
warmtepompmodel) of de ventilatiemodus (Koelmodel)
voor 2 ~ 3 uur, om het vocht in de binnendelen volledig te
verwijderen.
• Schakel de voeding uit.
• Verwijder de batterijen uit de afstandsbediening (draadloze
afstandsbediening).
• Schakel het apparaat uit.
• Schakel het apparaat na 3 minuten weer in.
• Indien CHECK voortdurend knippert, moet u op
foutmeldingen. Indien het probleem blijft bestaan, moet u uw
dichtstbijzijnde geautoriseerde handelaar om advies vragen.
OMSTANDIGHEDEN WAARIN U HULP MOET
INROEPEN
SCHAKEL DE STROOMTOEVOER UIT en RAADPLEEG
een erkend dealer onder de volgende omstandigheden:
• Een abnormaal lawaai tijdens de werking.
• Water of vreemde deeltjes zijn in de afstandsbediening
binnengedrongen.
• Er lekt water uit de binnendeel.
• De zekering springt regelmatig uit.
• De stroomdraad wordt onnatuurlijk warm.
• De schakelaars of knoppen werken niet zoals het hoort.
• De geur bestaat ook nog, nadat de geur voortdurend
uitgewassen werd.
CHECK
NEDERLANDS
drukken voor
61
Page 62

MEMO MEMO
Page 63

MEMO MEMO
Page 64

QUICK GUIDE/GUÍA RÁPIDA/GUIDA RAPIDA/
ADDRESS
AUTOAUTO
TIMER
ON
SETRESET ADDRESS
MODE
MODE
AIR SWING
FAN SPEED
AIR SWING
TIMER
OFF/ON
SET
CANCEL
SELECT
CLOCK
FAN SPEED
FILTER RESET
MANUAL
ODOUR WASH
MODE
AUTO
ECONOMY
WIRELESS REMOTE CONTROL
CONTROL REMOTO INALÁMBRICO
TELECOMANDO WIRELESS O SENZA FILI
INFRAROT-FERNBEDIENUNG
CONTROLO REMOTO SEM FIO
DRAADLOZE AFSTANDSBEDIENING
WIRED REMOTE CONTROL
CONTROL REMOTO CON CABLES
TELECOMANDO CABLATO
KABELFERNBEDIENUNG
CONTROLO REMOTO COM FIOS
BEDRADE AFSTANDSBEDIENING
QUICK GUIDE/GUÍA RÁPIDA/GUIDA RAPIDA/
KURZANLEITUNG/GUIA RÁPIDO/SNELLE GIDS
KURZANLEITUNG/GUIA RÁPIDO/SNELLE GIDS
WIRELESS REMOTE CONTROL • •
INFRAROT-FERNBEDIENUNG • •
CONTROL REMOTO INALÁMBRICO • •
CONTROLO REMOTO SEM FIO • •
DRAADLOZE AFSTANDSBEDIENING
TELECOMANDO WIRELESS O SENZA FILI • •
WIRED REMOTE CONTROL • •
KABELFERNBEDIENUNG • •
MON TUE WED THU FRI SAT SUN
ON
CZ-RD513C
TIMER/CLOCK
UP
F566077
MODE
SELECT
CHECK ODOUR WASH VENTILATION TEST RUN FILTER RESET
Pursuant to at the directive 2004/108/EC, article 9(2)
Panasonic Testing Centre
Panasonic Service Europe, a division of
Panasonic Marketing Europe GmbH
Winsbergring 15, 22525 Hamburg, F.R. Germany
DOWN
SET
CANCEL
ECONOMY
CONTROL REMOTO CON CABLES • •
CONTROLO REMOTO COM FIOS • •
FAN SPEED
AUTO
AUTO
AIR SWING
AUTO 123
/
ON
OFF
FAN
MODE
SPEED
MANUAL
AUTO
AIR SWING
1
MODE
Inverter/Heat-pump
model
AUTO HEAT
DRY
COOL
FAN
Cooling model
Select the desired mode.
Seleccione el modo deseado.
Selezionare la modalità desiderata.
Wählen Sie die gewünschte Betriebsart aus.
Seleccione o modo de funcionamento pretendido.
Selecteer de gewenste stand.
AUTO FAN
DRY COOL
2
OFF/ON
3
Start/stop the operation.
Inicie/detenga el funcionamiento.
Avviare/arrestare l’apparecchio.
Schalten Sie das Gerät ein bzw. aus.
Ligue/Desligue a unidade.
Start/stop het apparaat.
Select the desired temperature.
Seleccione la temperature deseada.
Selezionare la temperatura desiderata.
Stellen Sie die gewünschte T emperatur ein.
Programe a temperatura desejada.
Stel de gewenste temperatuur in.
TELECOMANDO CABLATO • •
BEDRADE AFSTANDSBEDIENING
1
/
ON
OFF
2
TEMP/
A/C No.
UP
DOWN
3
Panasonic Corporation
Website: http://panasonic.net/
MODE
Inverter/Heat-pump
model
AUTO HEAT
DRY
COOL
FAN
Cooling model
AUTO FAN
DRY COOL
UP
DOWN
Start/stop the operation.
Inicie/detenga el funcionamiento.
Avviare/arrestare l’apparecchio.
Schalten Sie das Gerät ein bzw. aus.
Ligue/Desligue a unidade.
Start/stop het apparaat.
Select the desired mode.
Seleccione el modo deseado.
Selezionare la modalità desiderata.
Wählen Sie die gewünschte Betriebsart
aus.
Seleccione o modo de funcionamento
pretendido.
Selecteer de gewenste stand.
Select the desired temperature.
Seleccione la temperature deseada.
Selezionare la temperatura desiderata.
Stellen Sie die gewünschte T emperatur ein.
Programe a temperatura desejada.
Stel de gewenste temperatuur in.
Printed in Malaysia
OSTH0806-02
 Loading...