

Panasonic Jetwriter KX-P7305, KX-P7305 - MONO DUPLEX LASER PRINTER 19PPM, KX-P7310 User Manual
This section contains information on cautions, parts identification, loading media
and printing and printer setup (Windows & Mac).
This section contains information on cleaning the printer, replacing supplies,
clearing jams, troubleshooting, error messages, repacking and specifications of
the printer, media to be used and interface.
This section contains the information to configure the printer on a network.
Settings and Printing (Print.pdf)
Maintenance and Specifications (Mainte.pdf)
Network (Network.pdf)
Laser Printer
Operating Instructions
Model No. KX-P7305 / KX-P7310
KX-P7305 is supplied without a network interface. KX-P7310 comes standard with a USB, Parallel,
and Network interfaces. The Operating Instructions consist of the following 3 files.
• Print.pdf
• Mainte.pdf
• Network.pdf
These files can be opened by clicking on the hilighted names below. The printer’s setup, operation,
and features are described on the following pages of this file.
Please carefully read the Operating Instructions before operating.
Keep the printer CD-ROM in a safe place for future reference.
Do not expose the CD-ROM to direct sunlight or extreme heat and do not scratch or smudge the
surface of the CD-ROM.

2
Thank you for purchasing a Panasonic Laser Printer. We are sure it will meet your printing needs
and give you many years of productive and efficient use.
Printing in PCL and PostScript
In addition to printing in the PCL Emulation or PostScript® Emulation for Microsoft® Windows®
operating system, it also provides compatibility for Macintosh using the PageStyler II driver in the
PostScript Emulation.
Paper handling
■ Media tray (universal cassette):
Supports loading both Letter and Legal 75 g/m
2
(20 lb.) paper up to 250 sheets.
Transparency or envelope can be also loaded.
■ Manual feed:
Supports loading media (Letter/Legal paper, transparency, label and Envelope) one page at a
time.
Automatic Duplex Printing (see “Duplex Printing” on page 58 (Windows),
page 96 or page 114 (Macintosh) in “Settings and Printing”)
Automatically prints your (most be two pages or more) document on both sides of the paper.
Watermark Printing (see “Watermark Printing” on page 60 in “Settings and Printing”)
Imbeds a watermark (CONFIDENTIAL, DRAFT, etc.) into any document.
Overlay Printing (see “Overlay Printing” on page 64 in “Settings and Printing”)
Overlaps the overlay data (image or characters) over any document.
2 Up / 4 Up (see “Assigning Multiple Pages per Sheet” on page 55 (Windows), “Setting the
Layout Menu” on page 89 or “Setting the Layout Menu” on page 105 (Macintosh) in “Settings
and Printing”)
Prints 2 or 4 pages on a single sheet of paper to save paper.
(Continued)
Features

3
Power Saving (see “Remote Control Panel” on page 28 in “Settings and Printing”)
Saves energy while the printer is idle.
Remote Control Panel (see “Remote Control Panel” on page 28 in “Settings and Printing”)
Supports making changes to the printer’s default settings for compatibility with application
software running in the MS-DOS® operating system.
Animated Help Feature (see “Status Display” on page 68 (Windows) in “Settings and
Printing”)
The Printer Status Display alerts the user of common operational errors. Click the ! button for
animated help. This feature will walk you through the steps required to get your printer running
again.
Bi-directional Parallel Interface or USB (Hi-Speed USB 2.0) Interface
(see “Parallel (IEEE1284) Interface” on page 59 or “USB (Universal Serial Bus) Interface” on
page 61 in “Maintenance and Specifications”)
Supports communication between the computer and printer using the parallel or USB 2.0
interface.
Networking (KX-P7310 only) (see “Network” section)
Supports print data through the network interface (10 Base-T and 100 Base-TX Ethernet).

4
•DestinyTM, PageStylerTM and LaserActTM are trademarks of Destiny Technology Corporation.
• Microsoft, Windows, Windows NT and Windows Server are either registered trademarks or
trademarks of Microsoft Corporation in the United States and/or other countries.
• Adobe, the Adobe logo, Acrobat, the Acrobat logo, Adobe Type Manager, ATM and PostScript are
either registered trademarks or trademarks of Adobe Systems Incorporated in the United States
and/or other countries.
• Apple, AppleTalk, iMac, LaserWriter, Mac, Mac OS, Macintosh and TrueType are trademarks of
Apple Computer, Inc.
• Netscape and Netscape Navigator are registered trademarks of Netscape Communications
Corporation in the United States and other countries.
• Pentium is a trademark of Intel.
• Dutch and Swiss are trademarks of Bitstream Inc.
• ITC Avant Garde Gothic, ITC Zapf Chancery and ITC Zapf Dingbats are trademarks of
International Typeface Corporation.
• Hewlett-Packard, HP, JetDirect and PCL are either trademarks or registered trademarks of
Hewlett-Packard Company and/or its subsidiaries.
• Novell and NetWare are registered trademarks of Novell, Inc., in the United States and other
countries.
• IPX and IPX/SPX are trademarks of Novell, Inc.
• Avery and all other related brands and product names are trademarks of Avery Dennison
Corporation.
• UNIX is a trademark of X/Open Company Ltd.
• CorelDRAW is a registered trademark of Corel Corporation or Corel Corporation Limited in
Canada, the United States and/or other countries.
• 3M and 3M logo are trademarks or registered trademarks of 3M.
• NEC is a trademark of NEC Corporation.
• XEROX is a trademark of XEROX CORPORATION.
• The USB-IF Logos are trademarks of Universal Serial Bus Implementers Forum, Inc.
All other acknowledgments are trademarks or registered trademarks of their respective holders.
As an ENERGY STAR® Partner, Panasonic has determined that this product
meets the E
NERGY STAR
®
guidelines for energy efficiency.
(E
NERGY STAR and the ENERGY STAR certification mark are registered US
marks.)

5
Screen shot(s) reprinted with permission from Microsoft Corporation.
Acrobat® Reader Copyright © 1987-2001 Adobe Systems Incorporated. All rights reserved.
LaserAct
TM
6 Copyright © 2002, Destiny Technology Corp. Ver. 2.0 All Rights Reserved.
PageStyler
TM
II Copyright © 2002, Destiny Technology Corp. Ver. 1.0 All Rights Reserved.
© 2000, Bitstream Inc.
Copyright © 1998-2003 silex technology, Inc.
© 2000 Wind River Systems, Inc. All rights reserved.
End-user should not copy the program on the ROM in the printer.
End-user cannot be guaranteed against the program on the ROM in the printer by Wind River Co.,
Ltd.
The operating instructions are subject to change without notice.
© Panasonic Communications Co., Ltd. 2003
Settings and Printing
Settings and Printing NetworkMaintenance and Spec.
1
Basics . . . . . . . . . . . . . . . . . . . . . . . . . . . . . . . . . . . . . . . . 2
Contents of Basics Section . . . . . . . . . . . . . . . . . . . . . . . . . . . . . . 2
Cautions . . . . . . . . . . . . . . . . . . . . . . . . . . . . . . . . . . . . . . . . . . . . . 3
Part Names . . . . . . . . . . . . . . . . . . . . . . . . . . . . . . . . . . . . . . . . . . . 5
Printer Panel . . . . . . . . . . . . . . . . . . . . . . . . . . . . . . . . . . . . . . . . . . 6
About Media . . . . . . . . . . . . . . . . . . . . . . . . . . . . . . . . . . . . . . . . . . 9
Loading Media and Printing . . . . . . . . . . . . . . . . . . . . . . . . . . . . . 11
Index . . . . . . . . . . . . . . . . . . . . . . . . . . . . . . . . . . . . . . . . . . . . . . . 25
Windows . . . . . . . . . . . . . . . . . . . . . . . . . . . . . . . . . . . . 27
Contents of Windows Section . . . . . . . . . . . . . . . . . . . . . . . . . . . 27
Remote Control Panel . . . . . . . . . . . . . . . . . . . . . . . . . . . . . . . . . 28
Setting the Printer Driver . . . . . . . . . . . . . . . . . . . . . . . . . . . . . . . 44
Status Display . . . . . . . . . . . . . . . . . . . . . . . . . . . . . . . . . . . . . . . . 68
Index . . . . . . . . . . . . . . . . . . . . . . . . . . . . . . . . . . . . . . . . . . . . . . . 80
Macintosh . . . . . . . . . . . . . . . . . . . . . . . . . . . . . . . . . . . 82
Contents of Macintosh Section . . . . . . . . . . . . . . . . . . . . . . . . . . 82
Setting the Printer Driver (Mac OS 8.5 - Mac OS 9.2) . . . . . . . . 83
Setting the PS Printer Driver
(Mac OS X 10.1 - Mac OS X 10.2) . . . . . . . . . . . . . . . . . . . . . . . . 98
Index . . . . . . . . . . . . . . . . . . . . . . . . . . . . . . . . . . . . . . . . . . . . . . 116

Contents of Basics Section
MacintoshWindows
Basics
Basics
2
Basics
Contents of Basics Section . . . . . . . . . . . . . . . . . . . . . . . . . . . . . . 2
Cautions . . . . . . . . . . . . . . . . . . . . . . . . . . . . . . . . . . . . . . . . . . . . . 3
Part Names . . . . . . . . . . . . . . . . . . . . . . . . . . . . . . . . . . . . . . . . . . . 5
Printer Panel . . . . . . . . . . . . . . . . . . . . . . . . . . . . . . . . . . . . . . . . . . 6
Indicators . . . . . . . . . . . . . . . . . . . . . . . . . . . . . . . . . . . . . . . . . . . . . . 6
PRINT / RESET Button . . . . . . . . . . . . . . . . . . . . . . . . . . . . . . . . . . . 8
About Media . . . . . . . . . . . . . . . . . . . . . . . . . . . . . . . . . . . . . . . . . . 9
Available Media and Media Size . . . . . . . . . . . . . . . . . . . . . . . . . . . . 9
Available Paper Weights and Capacity . . . . . . . . . . . . . . . . . . . . . . 10
Recommended Media . . . . . . . . . . . . . . . . . . . . . . . . . . . . . . . . . . . 10
Loading Media and Printing . . . . . . . . . . . . . . . . . . . . . . . . . . . . . 11
Margins and Print Area . . . . . . . . . . . . . . . . . . . . . . . . . . . . . . . . . . 12
Using the Media Tray. . . . . . . . . . . . . . . . . . . . . . . . . . . . . . . . . . . . 13
Using the Manual Feed . . . . . . . . . . . . . . . . . . . . . . . . . . . . . . . . . . 21
Index . . . . . . . . . . . . . . . . . . . . . . . . . . . . . . . . . . . . . . . . . . . . . . . 25
Contents of Basics Section
Cautions
MacintoshWindows
Basics
Basics
3
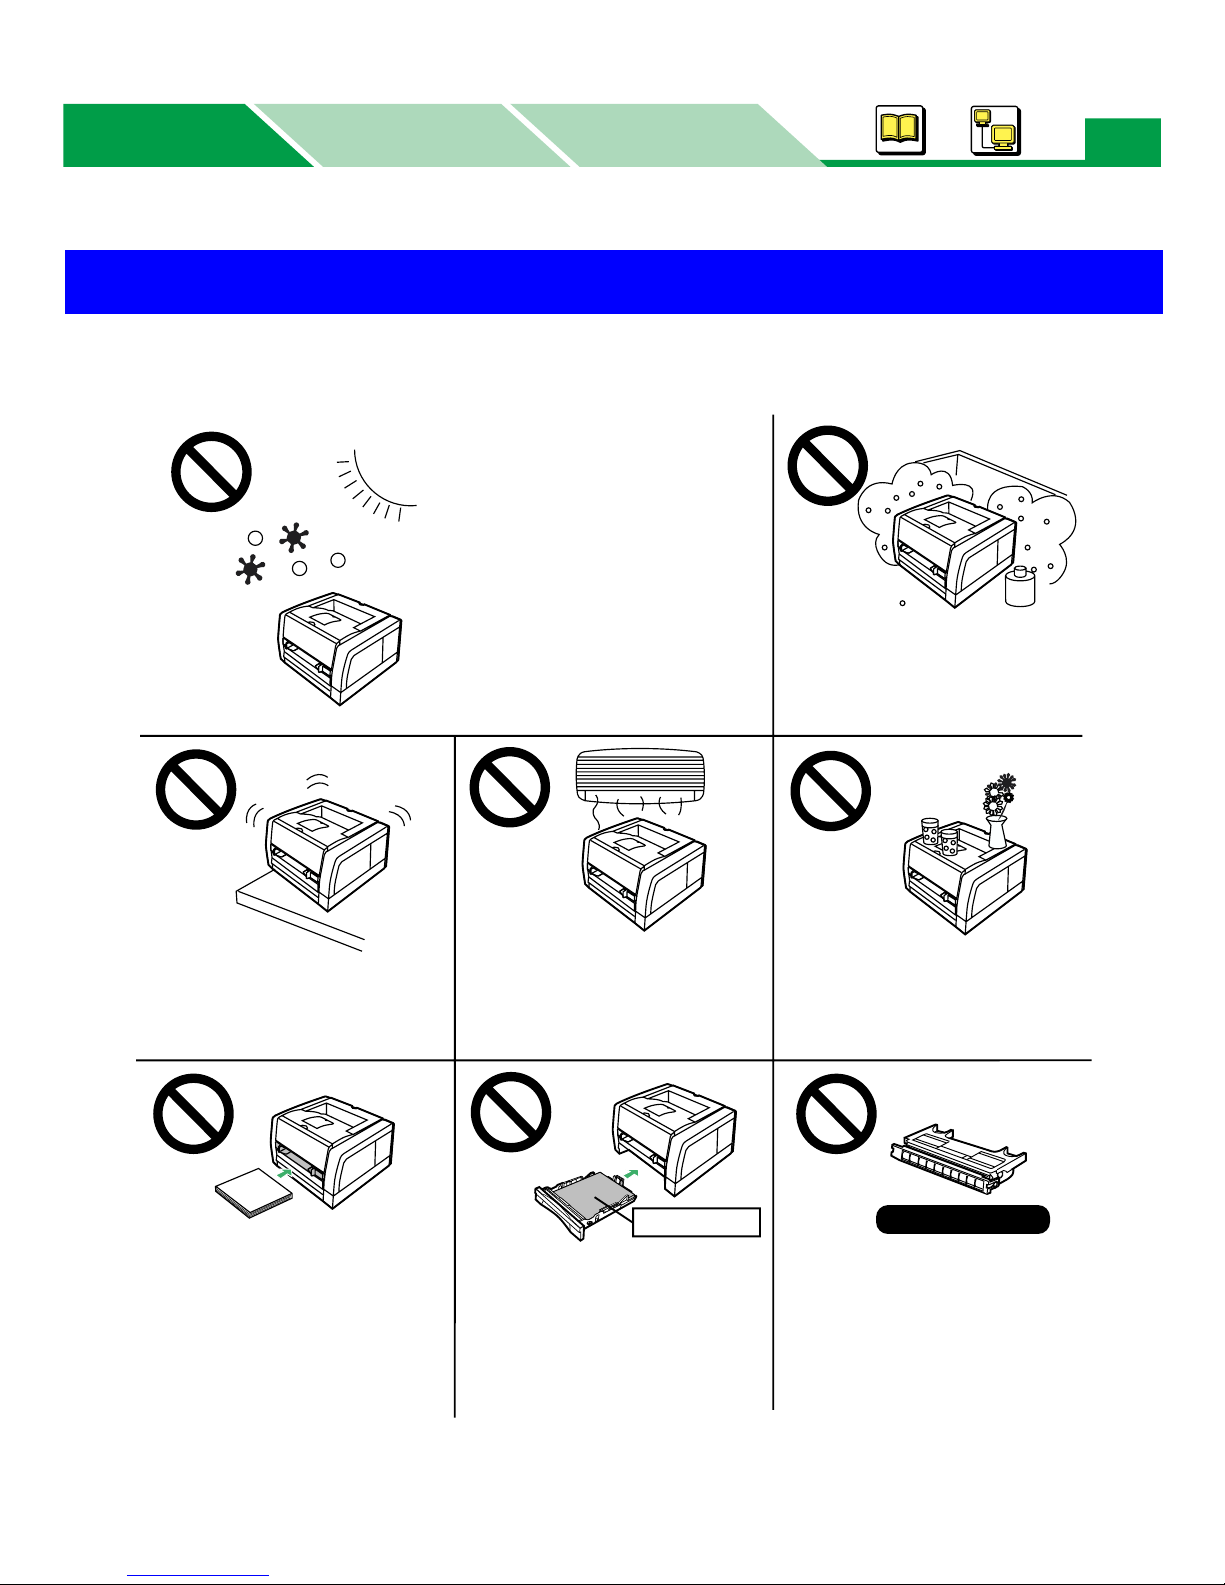
To avoid machine malfunction, do not use the equipment under the following conditions:
Cautions
Ink jet media
Not genuine toner
• Insert a stack of media into
the manual feed. (Insert
media one page at a time.)
• Media for ink jet printers
(paper, transparency, etc.) or
transparency for color laser
printers; may wrap around the
fuser heat roller and cause
damage, and may need to be
replaced.
• Any toner other than genuine
Panasonic toner; it may
damage the printer.
• Unstable or unlevel surfaces. • Directly in front of air
conditioning vents.
• Liquids near the equipment.
• Areas of poor ventilation.
• Areas of high dust or chemical
fume concentration.
(solvent etc.)
• Direct exposure to sunlight.
• Extremely high or low
temperature [temperature
range: 10°C to 32.5°C
(50°F to 90.5°F)]
• Extremely high or low humidity.
(humidity range: 20% to 80%
RH)
• Condensation due to rapid
change of temperature.

Cautions
MacintoshWindows
Basics
Basics
4
■ Static Electricity Damage
To prevent static electricity damage to any of the following components, touch a grounded
metal surface, such as the printer’s bare metal frame prior to touching the component.
• Interface connectors : parallel, USB, connector for 2nd feeder and network (KX-P7310
only)
• Electrical components, connectors inside the printer
■ Interface Cable
Always use a shielded interface cable. Use of an unshielded cable can result in radio
interference with data.
■ Power Source
Do not use a line conditioner, transient suppressor or surge protector, it may cause a
printer error.
■ Ventilation Space
Adequate ventilation space is required between the printer and any walls,
20 mm (8 inches) is recommended.
Part Names
MacintoshWindows
Basics
Basics
5
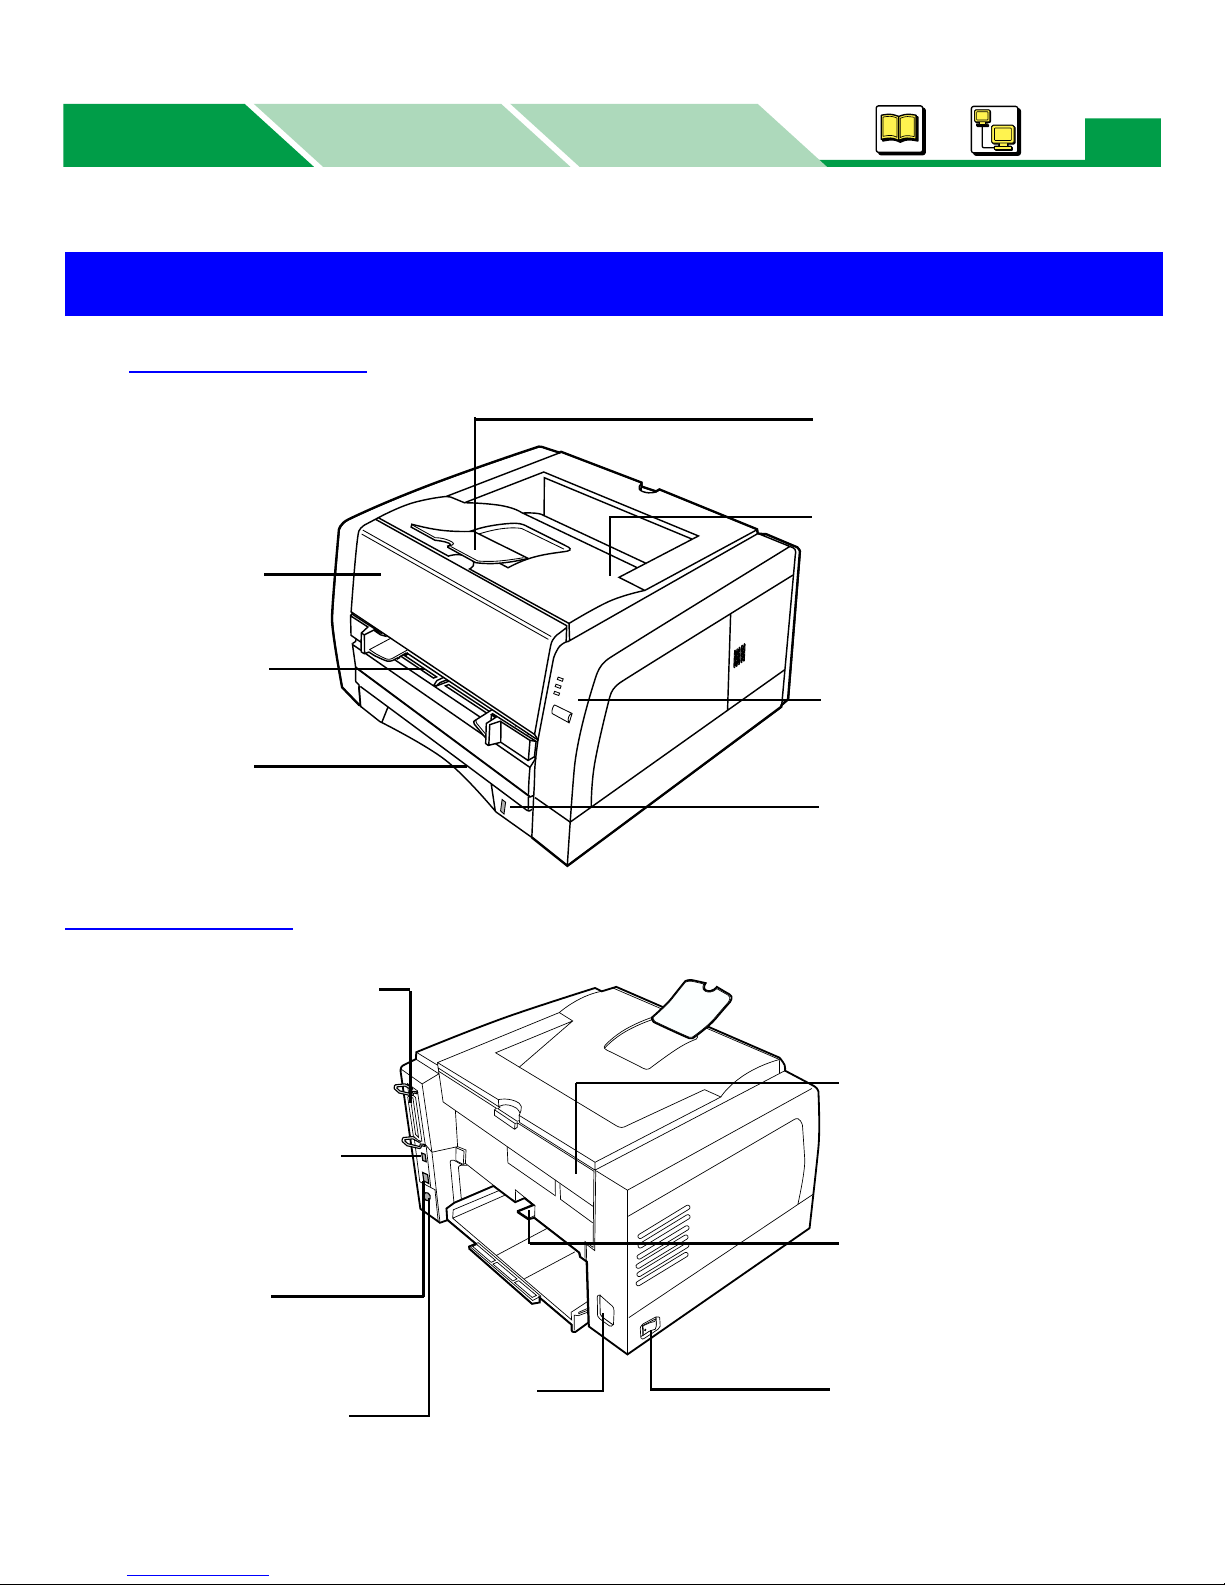
■ Front Side View
Rear Side View
Part Names
Manual feed
(see pages 9 , 21)
Media tray
(see pages 9, 13)
Printer panel
(see page 6)
Paper support
(see pages 17, 21)
Output tray
Front cover
Paper level indicator
(see pages 15)
USB interface connector
(see page 61 in
“Maintenance and
Specifications”)
Parallel interface connector
(see page 59 in
“Maintenance and
Specifications”)
Rear cover (see pages 11,
17, 21)
Jam release pan (see page
22 or 25 in “Maintenance
and Specifications”)
AC inlet
Power switch
Network interface
connector (Ethernet)
– KX-P7310 only
Connector for 2nd feeder
(option)
Printer Panel
MacintoshWindows
Basics
Basics
6
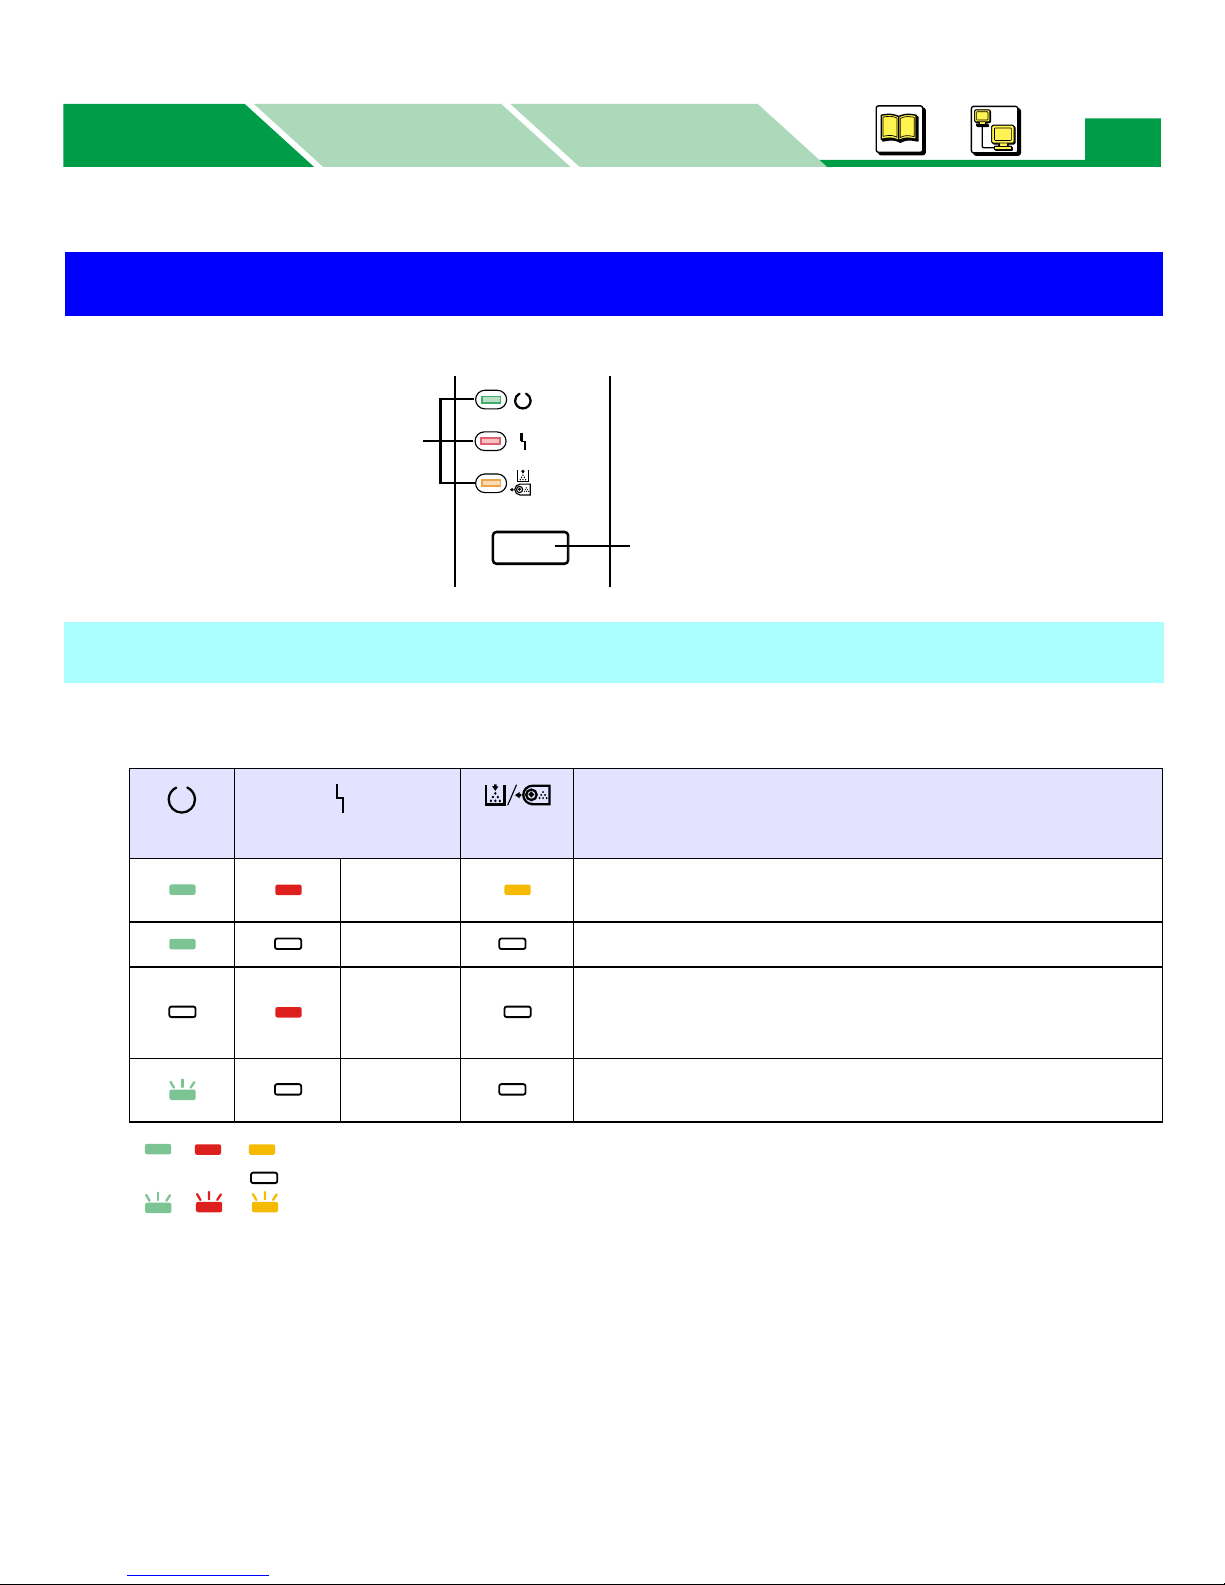
Three indicators show the following printer’s status.
: Indicator is lit.
: Indicator is turned off.
: Indicator is blinking.
*1The status may be different depending on the printer’s condition.
Printer Panel
Indicators
Printer Status
Printer is warming up (the three indicators light one after
another).
Printer is ready for printing or in the sleep mode.
Internal Error occurs. - - ->Turn the printer off and back
on again.
If the problem persists, call for service on your printer.
Printer is receiving data printing or data remains in
Memory. (See page 8 for additional information).
READY
ERROR
TONER/
DRUM UNIT
PRINT / RESET
PRINT / RESET button
Indicators
READY
ERROR
TONER/
DRUM UNIT
*
1
*
1
Printer Panel
MacintoshWindows
Basics
Basics
7
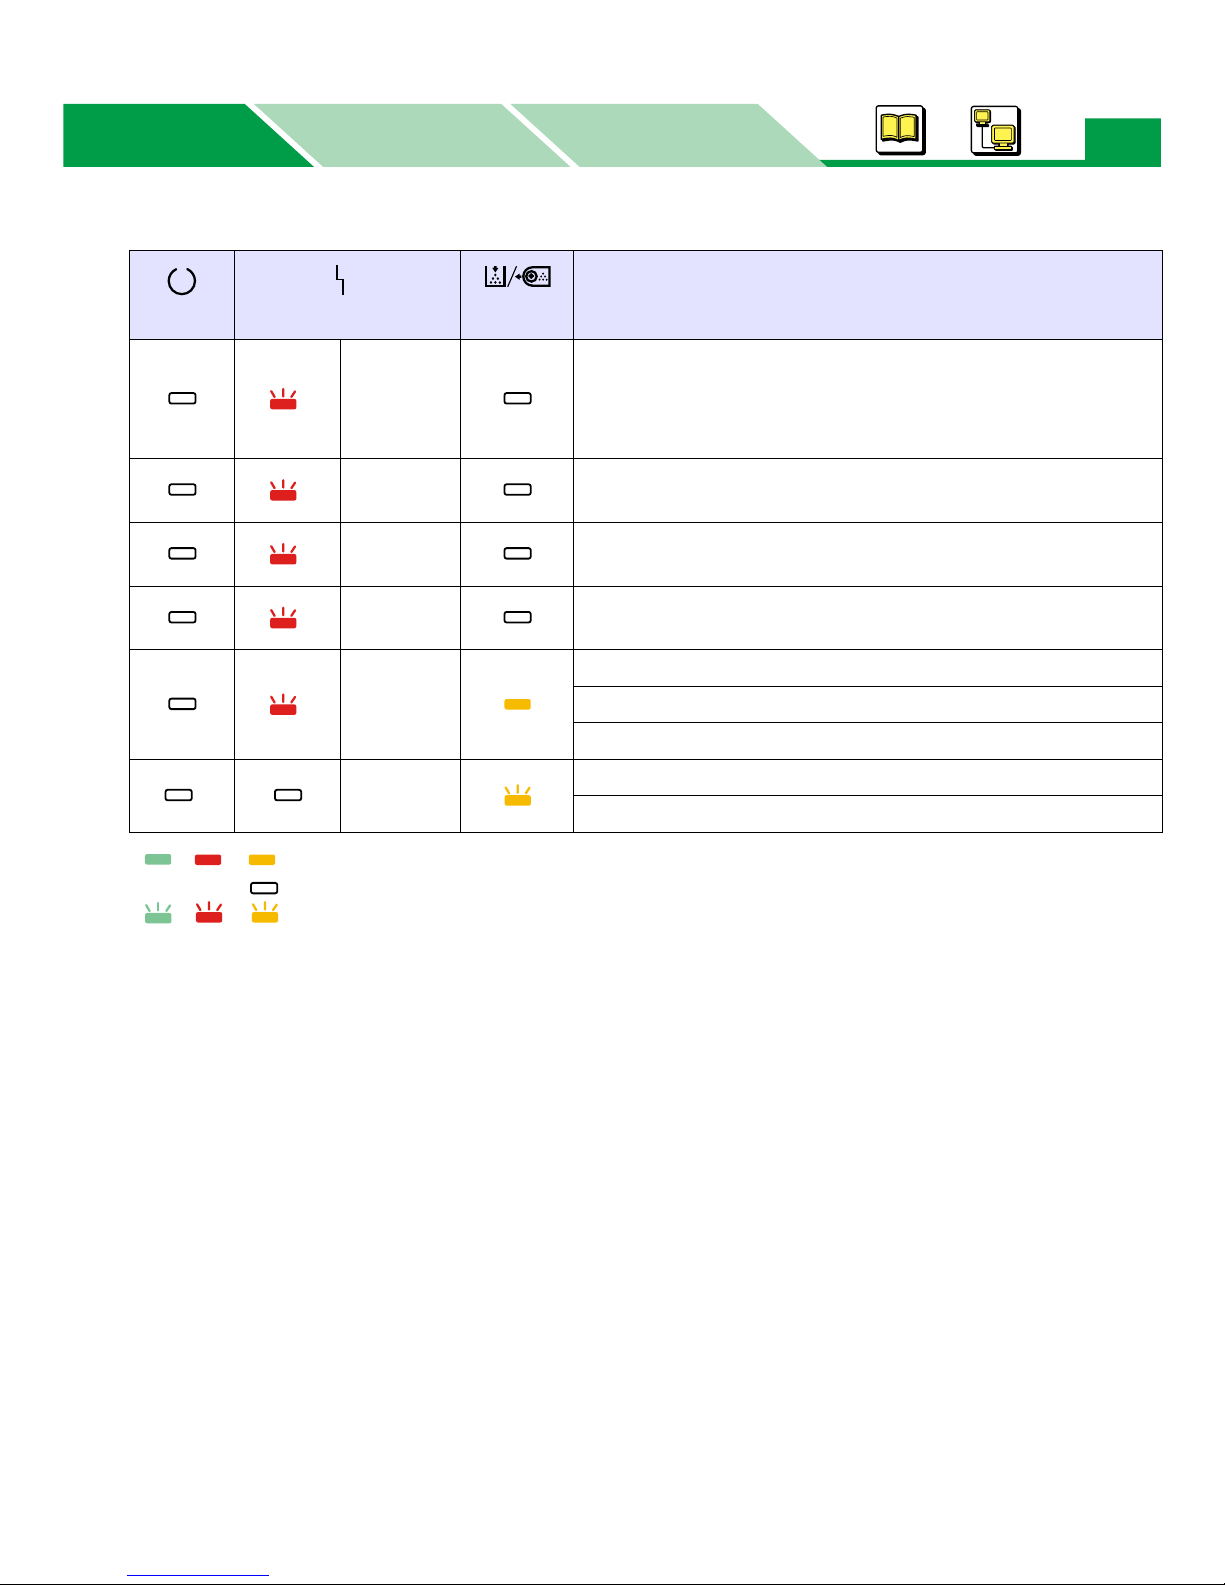
: Indicator is lit.
: Indicator is turned off.
: Indicator is blinking.
*1The status may be different depending on the printer’s condition.
Printer Status
On: 0.5 s
Off: 0.5 s
Front cover is open. RAM overflow or Overrun has
occurred.
See “Maintenance and Specifications” for
troubleshooting.
On: 0.5 s
Off: 2 s
Media jam has occurred.
On: 1 s
Off: 0.5 s
Manual feed is empty.
On: 1 s
Off: 1 s
Media tray (standard) or lower tray (2nd feeder) is empty.
Media tray (standard) is not installed.
On: 0.5 s
Off: 0.5 s
Drum unit is not installed in the printer.
Toner may be empty.
Drum unit is worn out.
Drum unit is wearing out.
Toner is low.
READY
ERROR
TONER/
DRUM UNIT
*
1
Printer Panel
MacintoshWindows
Basics
Basics
8
The printer executes the following action depending on the printer status by pressing this
button.
: Indicator is lit.
: Indicator is blinking.
: Indicator is turned off.
*1The status may be different depending on the printer’s condition.
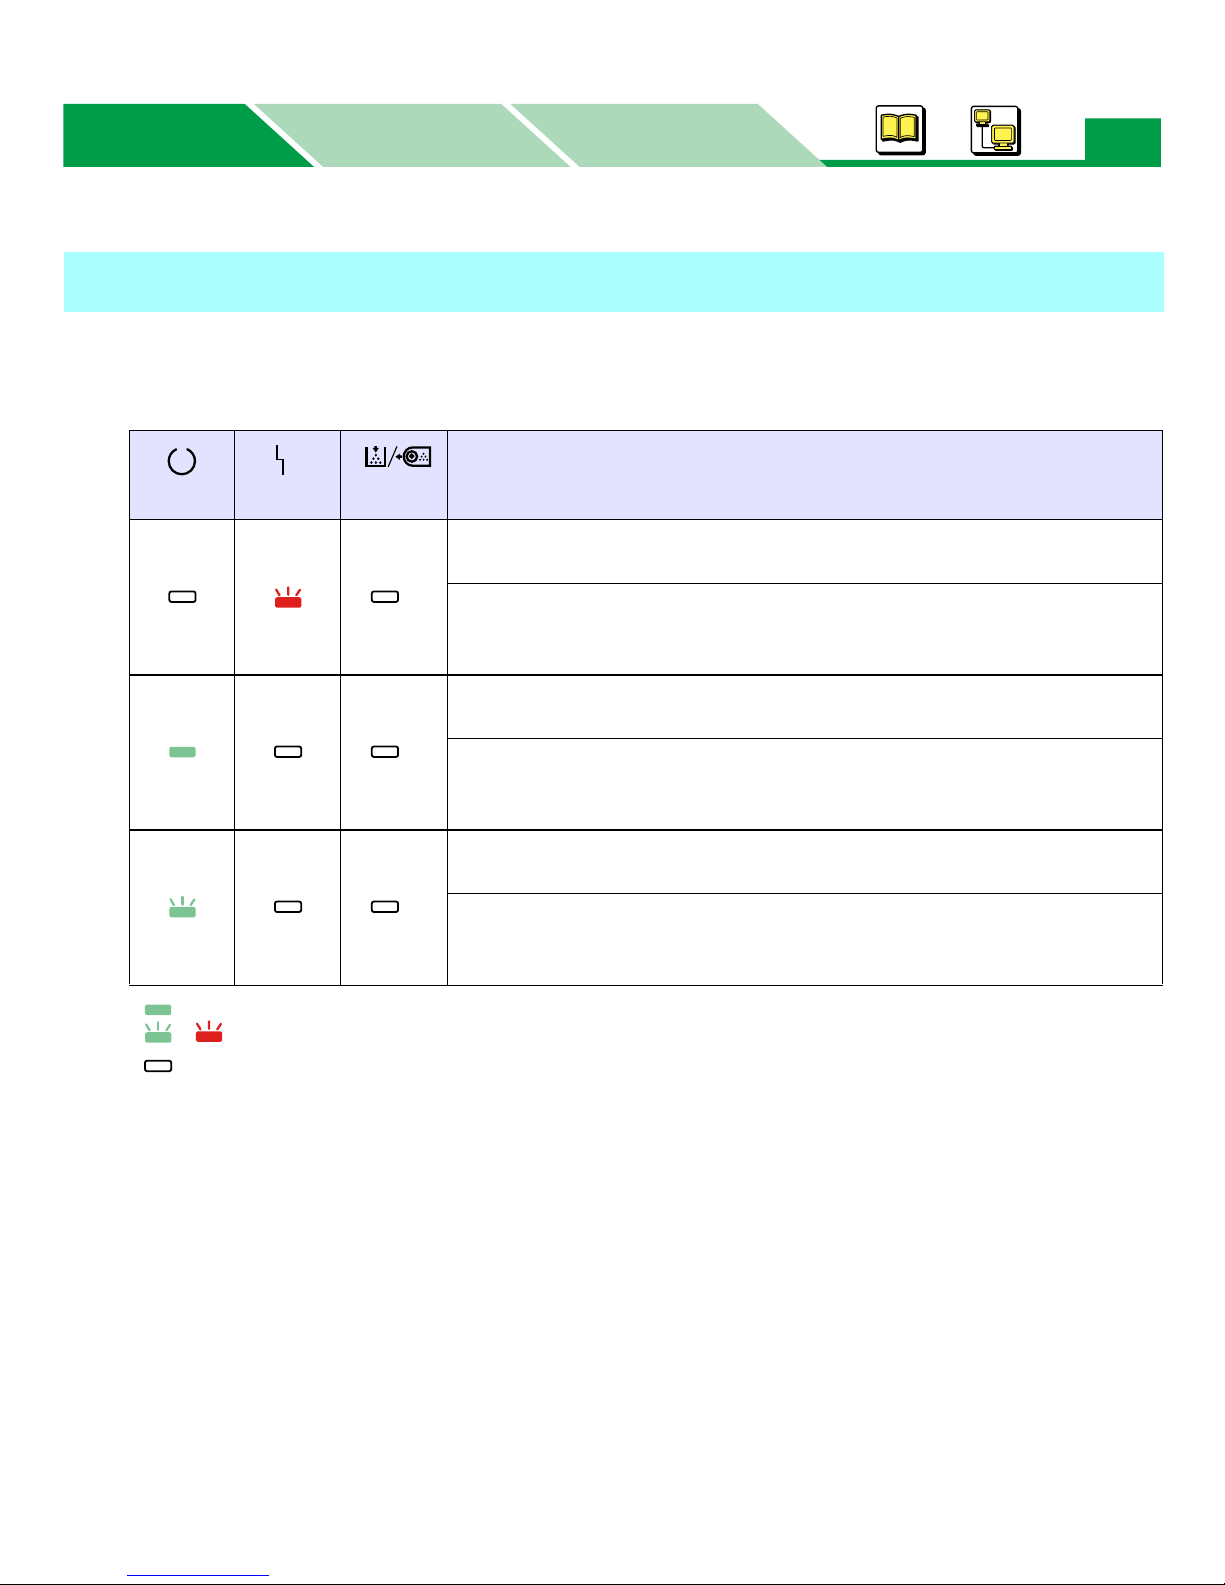
PRINT / RESET Button
Printer Status
*
1
To recover from the error status (overrun or memory overflow), press
the PRINT / RESET button less than 5 seconds.
To clear the remaining data, press the PRINT / RESET button more
than 5 seconds until the READY and ERROR indicator blinks fast,
then release it. The remaining data will be cleared.
*
1
To print the configuration page, press the PRINT / RESET button
more than 2 seconds and less than 5 seconds.
To print the demo page, press the PRINT / RESET button more
than 5 seconds until the ERROR indicator blinks fast, then release
it. The ERROR indicator is turned off and the demo page will print.
*
1
To print the remaining data, press the PRINT / RESET button less
than 2 seconds.
To clear the remaining data, press the PRINT / RESET button more
than 2 seconds until the READY and ERROR indicator blinks fast,
then release it. The remaining data will be cleared.
READY
ERROR
TONER/
DRUM UNIT
About Media
MacintoshWindows
Basics
Basics
9
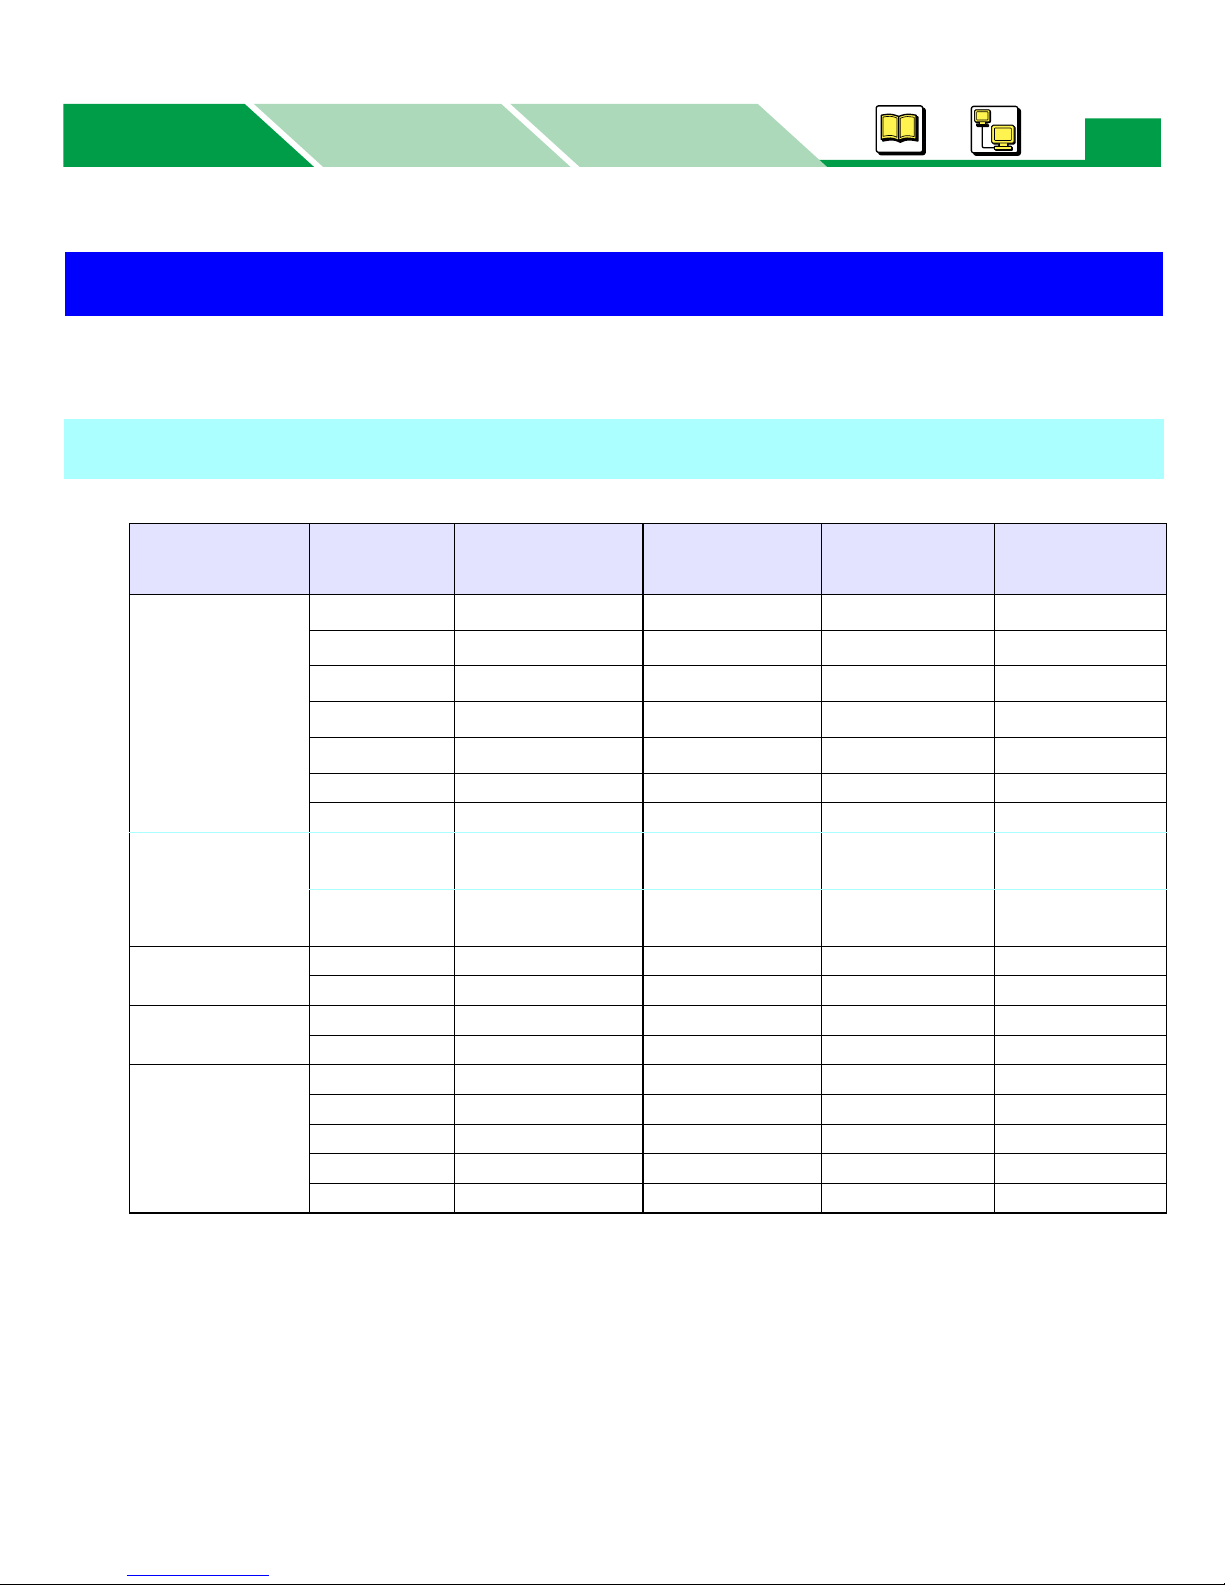
See the tables below for available media. For the notes and detailed media specification, refer
to see “Media” on page 53 in “Maintenance and Specifications”.
❍: supported X: not supported
*1Cotton paper and thick paper cannot be used for dupelx printing and printing from 2nd feeder.
*
2
If you print a document on custom size paper, print it using the application software that page
size can be set to custom size, or set the paper size to letter or A4 in the printer’s media size
setting.
About Media
Available Media and Media Size
Media
Media
size
Media tray Manual feed
Duplex
print
2nd feeder
(option)
Paper
Cotton paper
Thick
Letter ❍❍
❍*
1
❍*
1
A4 ❍❍
❍*
1
❍*
1
Legal ❍❍
❍*
1
❍*
1
B5 ❍❍
❍*
1
❍*
1
Executive ❍❍
❍*
1
❍*
1
A5 ❍❍XX
A6 ❍❍XX
Available
media size
*
2
Max.
216 x 356 mm
(8.5″ x 14″)
216 x 356 mm
(8.5″ x 14″)
216 x 356 mm
(8.5″ x 14″)
216 x 356 mm
(8.5″ x 14″)
Min.
105 x 148.5 mm
(4.1″ x 5.9″)
76.2 x 127 mm
(3″ x 5″)
182 x 257 mm
(7.2″ x 10.1″)
182 x 257 mm
(7.2″ x 10.1″)
Transparency
Letter ❍❍XX
A4 ❍❍XX
Label
Letter X ❍ XX
A4 X ❍ XX
Envelope
#9 ❍❍XX
#10 ❍❍XX
Monarch ❍❍XX
DL ❍❍XX
C5 ❍❍XX
About Media
MacintoshWindows
Basics
Basics
10
X: not supported
NOTE
• Automatic duplex printing can only be performed on plain paper [75 – 90 g/m
2
(20 – 24 lb.)]
from the media tray or 2nd feeder (option). For detailed information, see “Duplex Printing” on
page 58, 96 or 114.
*
1
When using recycled paper, select Plain Paper for media type in the printer driver or see,
“Loading Media and Printing” on page 11.
Available Paper Weights and Capacity
Media Media tray Manual feed
2nd feeder
(option)
Paper weights
Plain paper
60 - 105 g/m
2
(16 - 28 lb.)
60 - 105 g/m
2
(16 - 28 lb.)
60 - 105g/m
2
(16 - 28 lb.)
Thick paper X
106 - 165 g/m
2
(29 - 44 lb.)
X
Envelope
90 g/m
2
(24 lb.)
90 g/m
2
(24 lb.)
X
Paper capacity
Paper
250 sheets
[75 g/m
2
(20 lb.)]
1 sheet
550 sheets
[75 g/m2 (20 lb.)]
Transparency 20 sheets 1 sheet X
Label X 1 sheet X
Envelope 30 sheets 1 sheet X
Recommended Media
Media Media size Recommended media
Paper
Letter
Xerox 4024 DP paper 75 g/m
2
(20 lb.)
A4
Xerox paper 80 g/m
2
Transparency Letter / A4 3M CG3300
Label
Letter Avery 5160 – 5163, Avery 5660 – 5663
A4 Avery L7159 – L7164
Recycled paper*
1
Letter Multi Use 20 lb., 24 lb.
A4 —
Loading Media and Printing
MacintoshWindows
Basics
Basics
11
See the setup guide(s) for the following instructions.
• Installing the toner cartridge and drum unit
• Connecting cables
• Installing the printer software
The media is printed out to the output tray (top of the printer). When using thick paper [106 165 g/m
2
(29-44 lb.)] or when an envelope is printed, it may be curled. You can avoid this by
opening the rear cover and the media is printed straight out. However, it needs to be removed
after the media is printed out to avoid a media jam. For available media, see “About Media” on
page 9.
NOTE
• Be sure to use manual feed when printing a document on a thick paper [106 -165 g/m
2
(29-44 lb.)] or label.
• Plain paper (A4, Letter, Legal, B5, Executive) can be loaded in the optional 2nd feeder.
Loading Media and Printing
A
B
: Normal pass (face down)
A
B
Manual feed
Media tray
Rear cover
: Straight pass (face up)
2nd feeder
(option)
Loading Media and Printing
MacintoshWindows
Basics
Basics
12
The image (print area) is printed a bit smaller than the media size. 4.2 mm (0.17″) is required
from the top, bottom and sides margins. You may need to adjust the page margins in the
application software to match the print area.
Margins and Print Area
4.2 mm
(0.17
″
)
4.2 mm (0.17
″
)
4.2 mm (0.17
″
)
4.2 mm
(0.17″)
Loading Media and Printing
MacintoshWindows
Basics
Basics
13
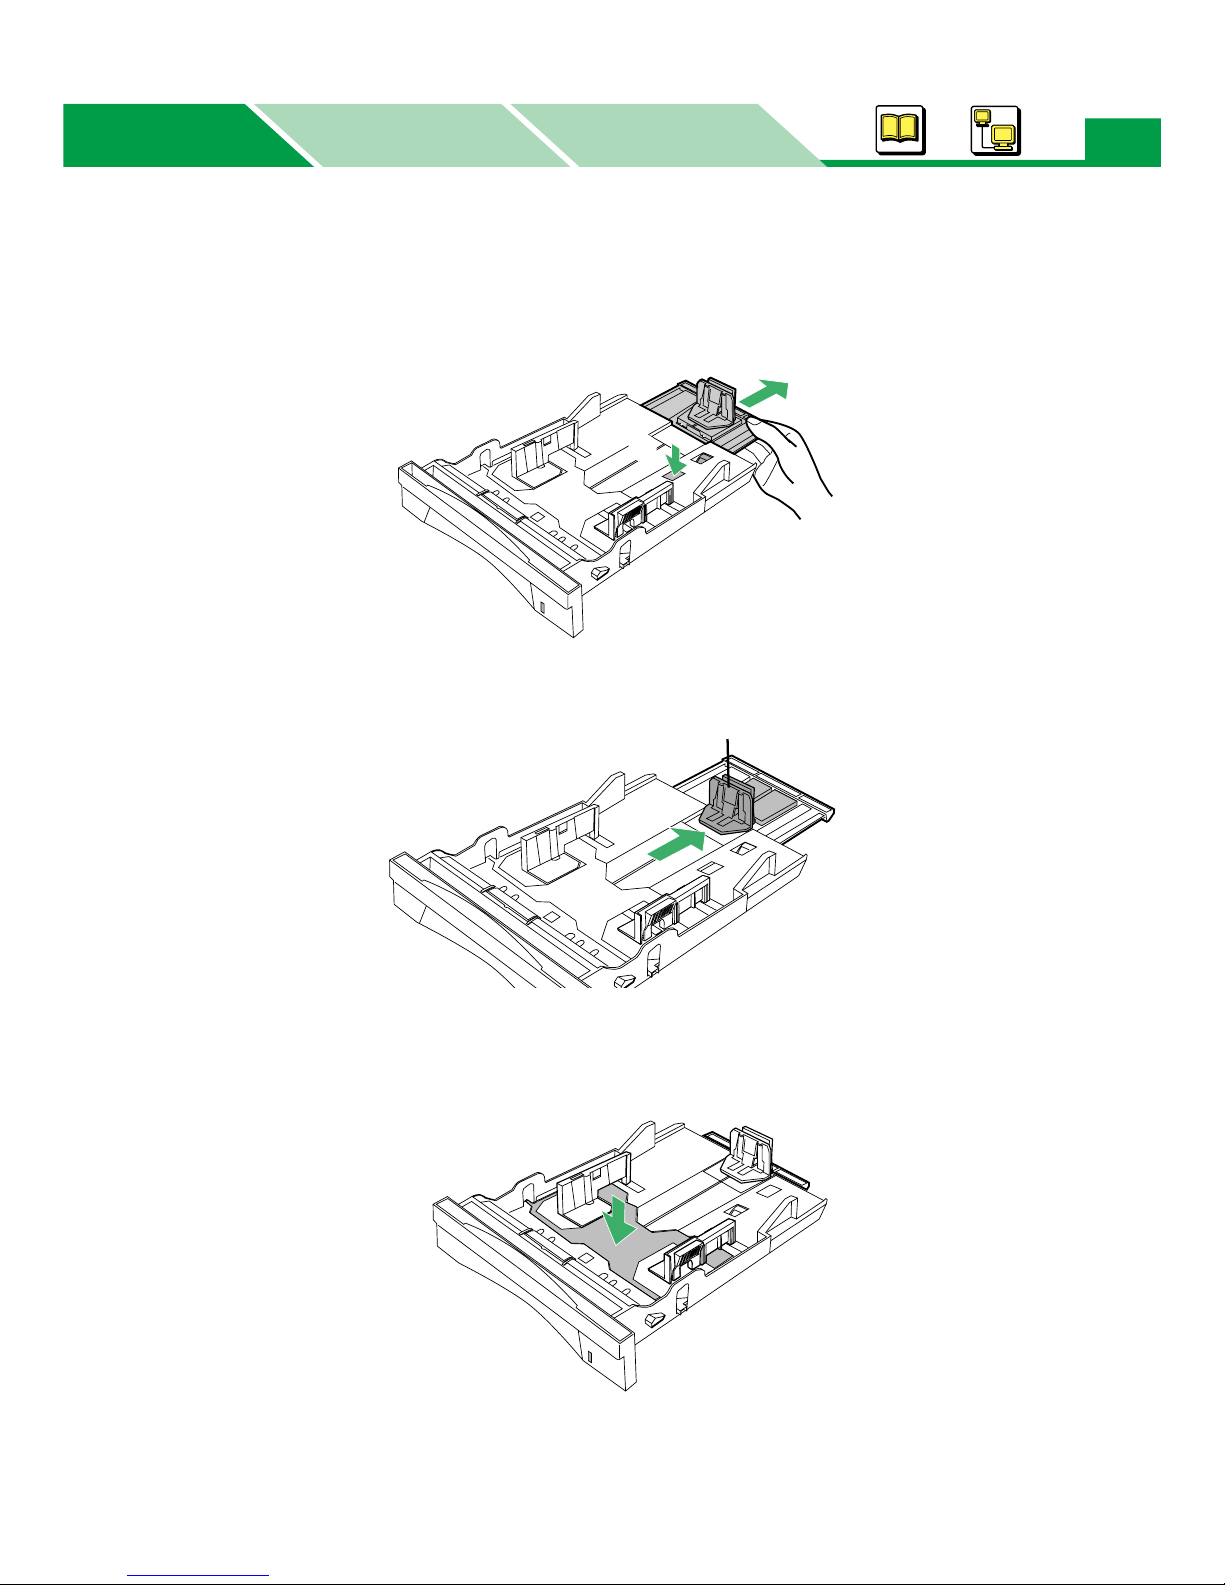
1 Pull the media tray out of the printer.
2 Pinch the media guides and slide them to the approximate width (1) and
length (2) of the media.
Using the Media Tray
1
2
Loading Media and Printing
MacintoshWindows
Basics
Basics
14
NOTE
• When loading legal paper, slide the length guide unit (2) to extend while pressing the stopper
(1).
• If the media guide is removed, slide it back in.
• If the metal plate is in the up position, the media tray cannot be inserted into the printer. Push
the metal plate down until it clicks, locking it in place.
1
2
Media guide
Loading Media and Printing
MacintoshWindows
Basics
Basics
15
3 Tap the media stack on a level surface to avoid media jams or skewed
printing.
NOTE
• Be careful not to leave fingerprints on the media, which can result in a smudged print.
• Reusing media (used paper or jammed paper) that has been fed through the printer once
can reduce the life of the consumables and paper path components.
4 Place media with the print side down.
•Transparencies, labels or envelope cannot be loaded in the optional 2nd feeder.
The height of paper
should not exceed the
limit mark on the tray, or
it may cause a jam.
Print side down
Media feed direction
Paper Full Paper Low or Empty
Paper
Loading Media and Printing
MacintoshWindows
Basics
Basics
16
NOTE
• Most media has instructions recommending the side to be printed first.
• Do not mix different types or thicknesses of media in the media tray at one time; this may
cause a jam.
• Loading media exceeding the designated sheets may cause a media jam or shifting of print.
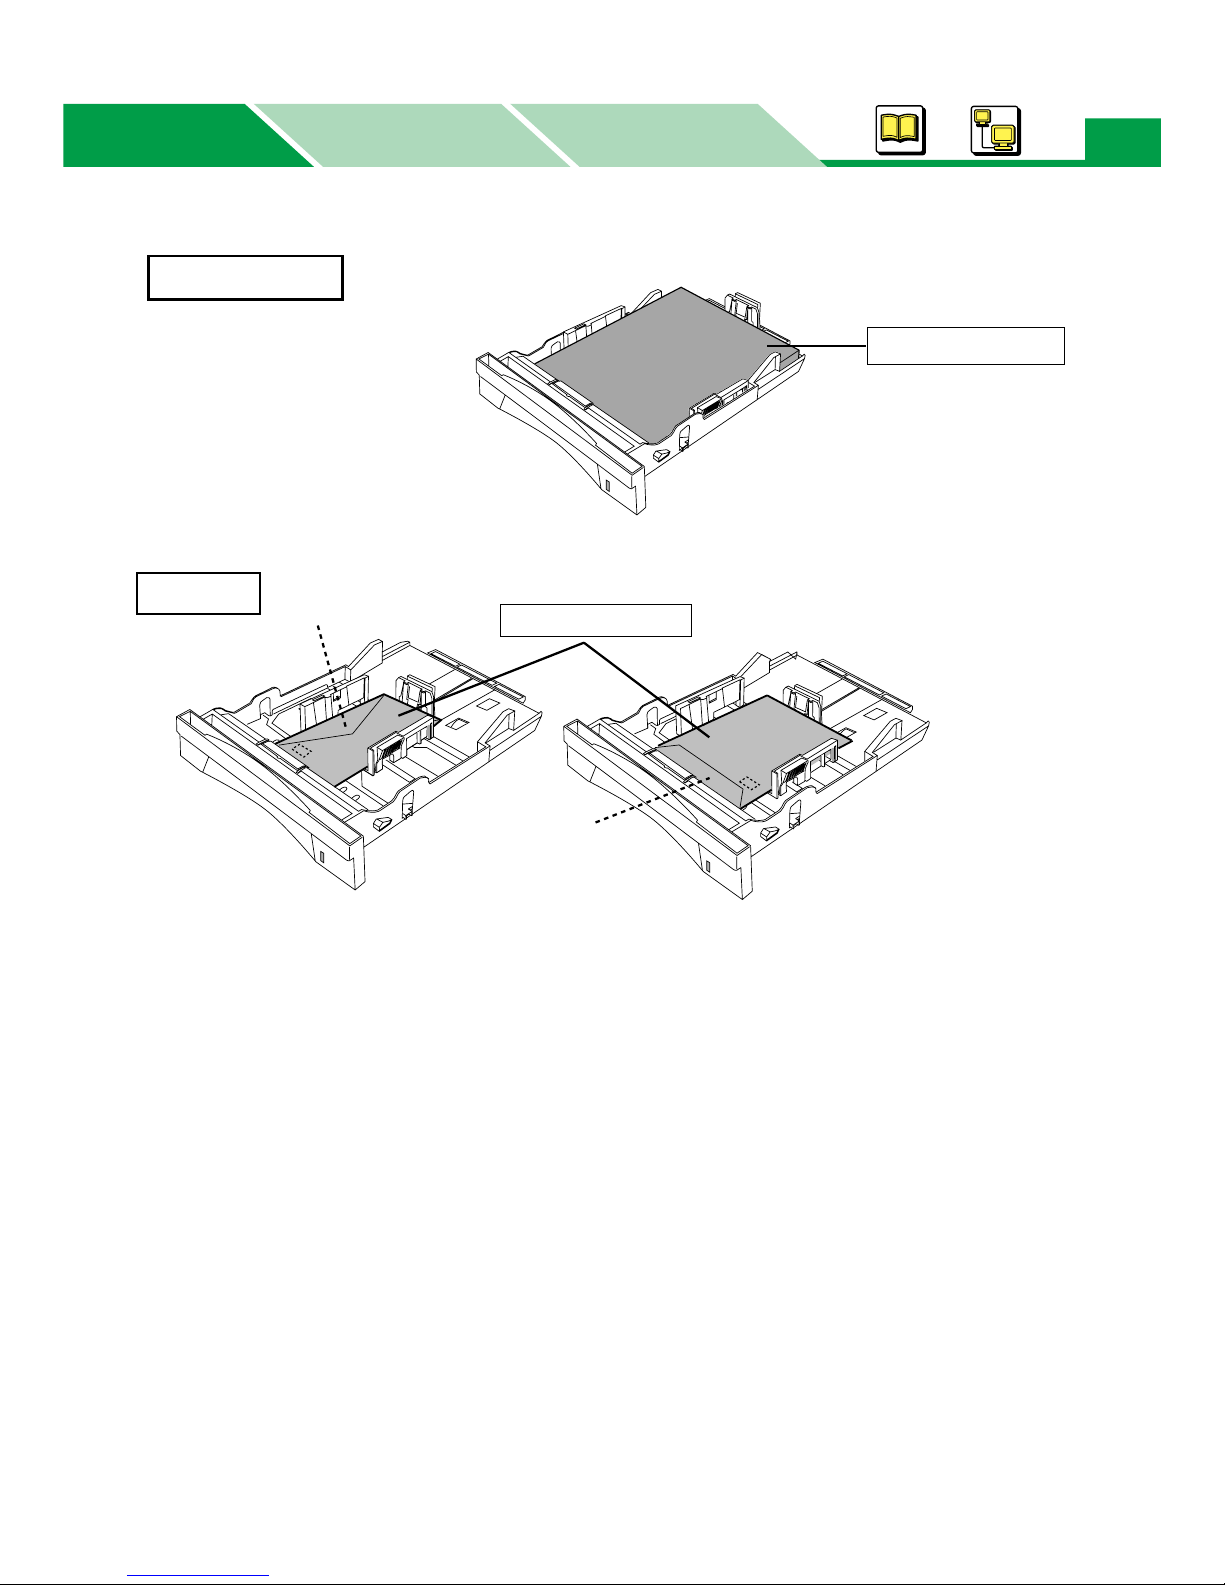
5 Adjust the media guides to the media size.
• Be sure that the stoppers of the media guides are put in the grooves of the media tray.
6 Slide the media tray completely into the slot.
CAUTION
• Be sure to hold the media tray with both hands so you do not drop it especially when it is fully
loaded.
Max. 20 sheets
Print side down
Transparency
Max. 30 sheets
Print side down
Flap
Flap
(International C5-
opening on the shorter edge)
Envelope
Loading Media and Printing
MacintoshWindows
Basics
Basics
17
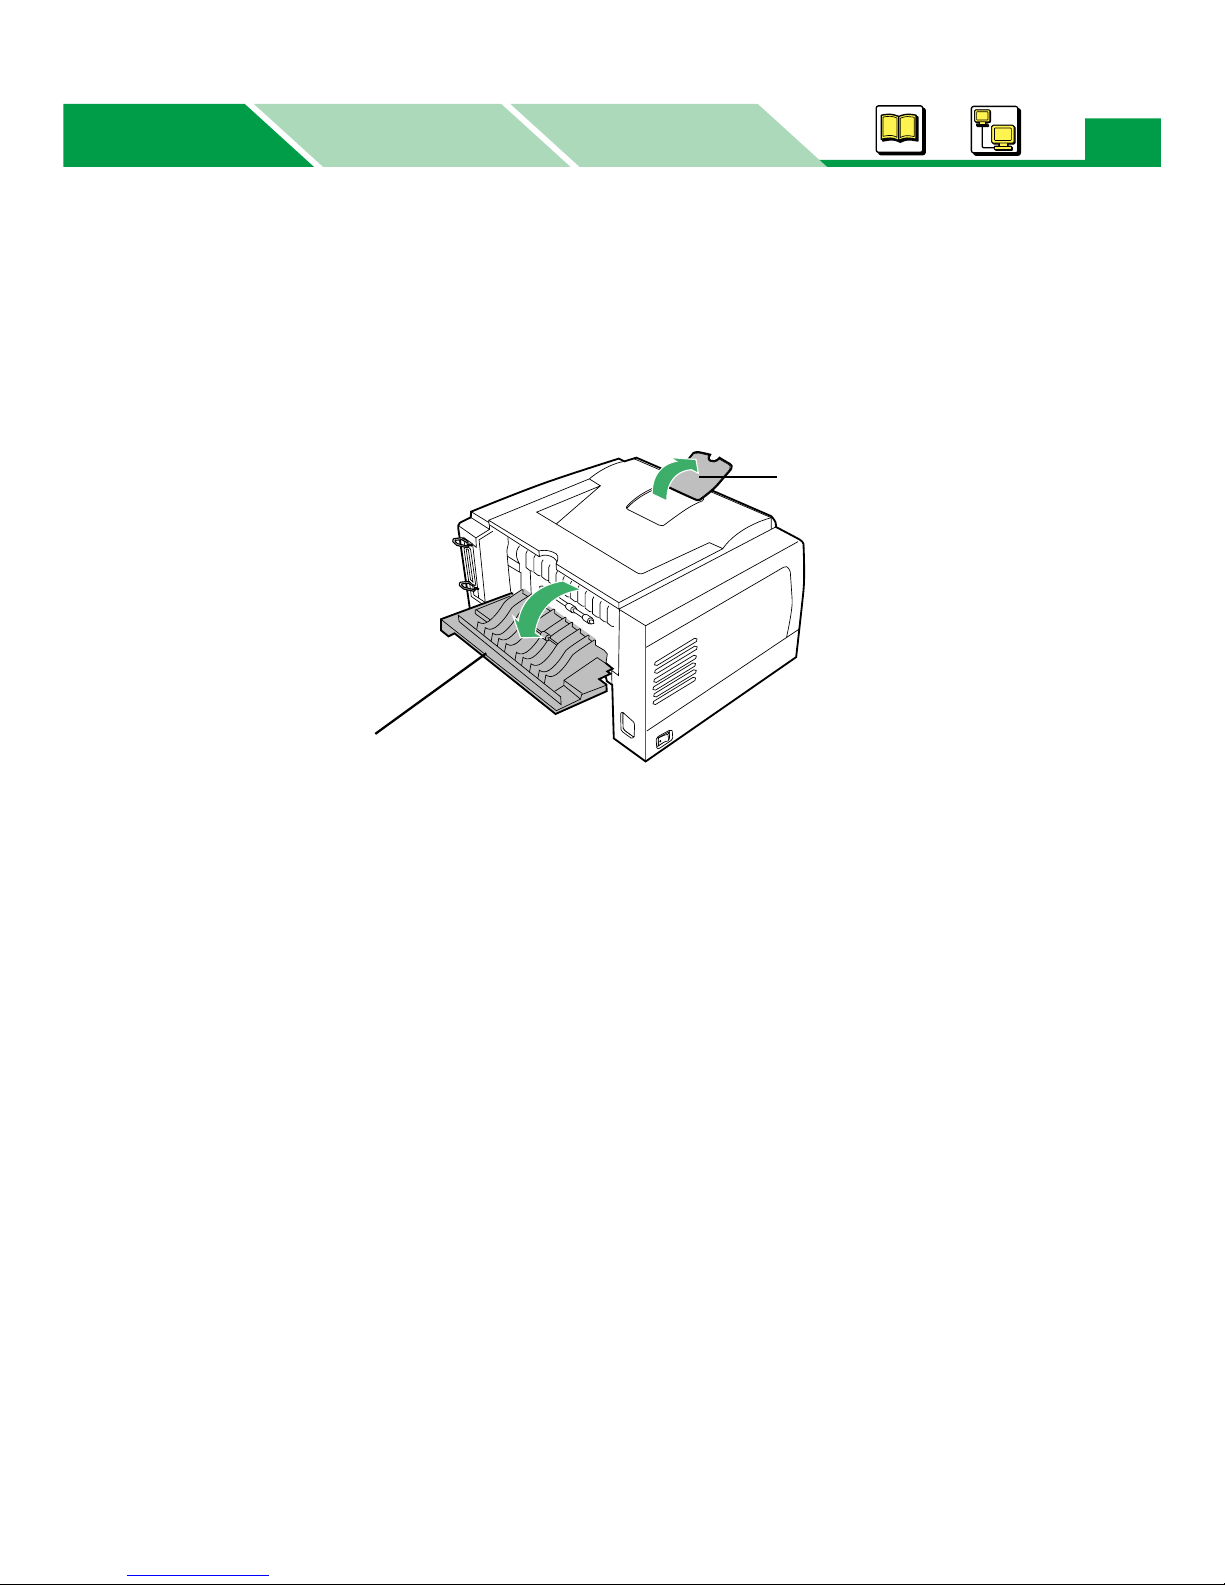
7 Raise the paper support so that the media is not dropped from the output
tray.
• It is recommended to print envelopes with the rear cover of the printer open to avoid
curling or wrinkles.
•When you notice some straight lines on the projected image on the screen (OHP), it is
recommended to open the rear cover, so the media (transparency) is printed straight
out.
Before printing a document, specify the paper size, media type and paper source from the
printer driver following the steps below.
Rear cover
(Open it when printing on an envelope.)
Paper support
Loading Media and Printing
MacintoshWindows
Basics
Basics
18
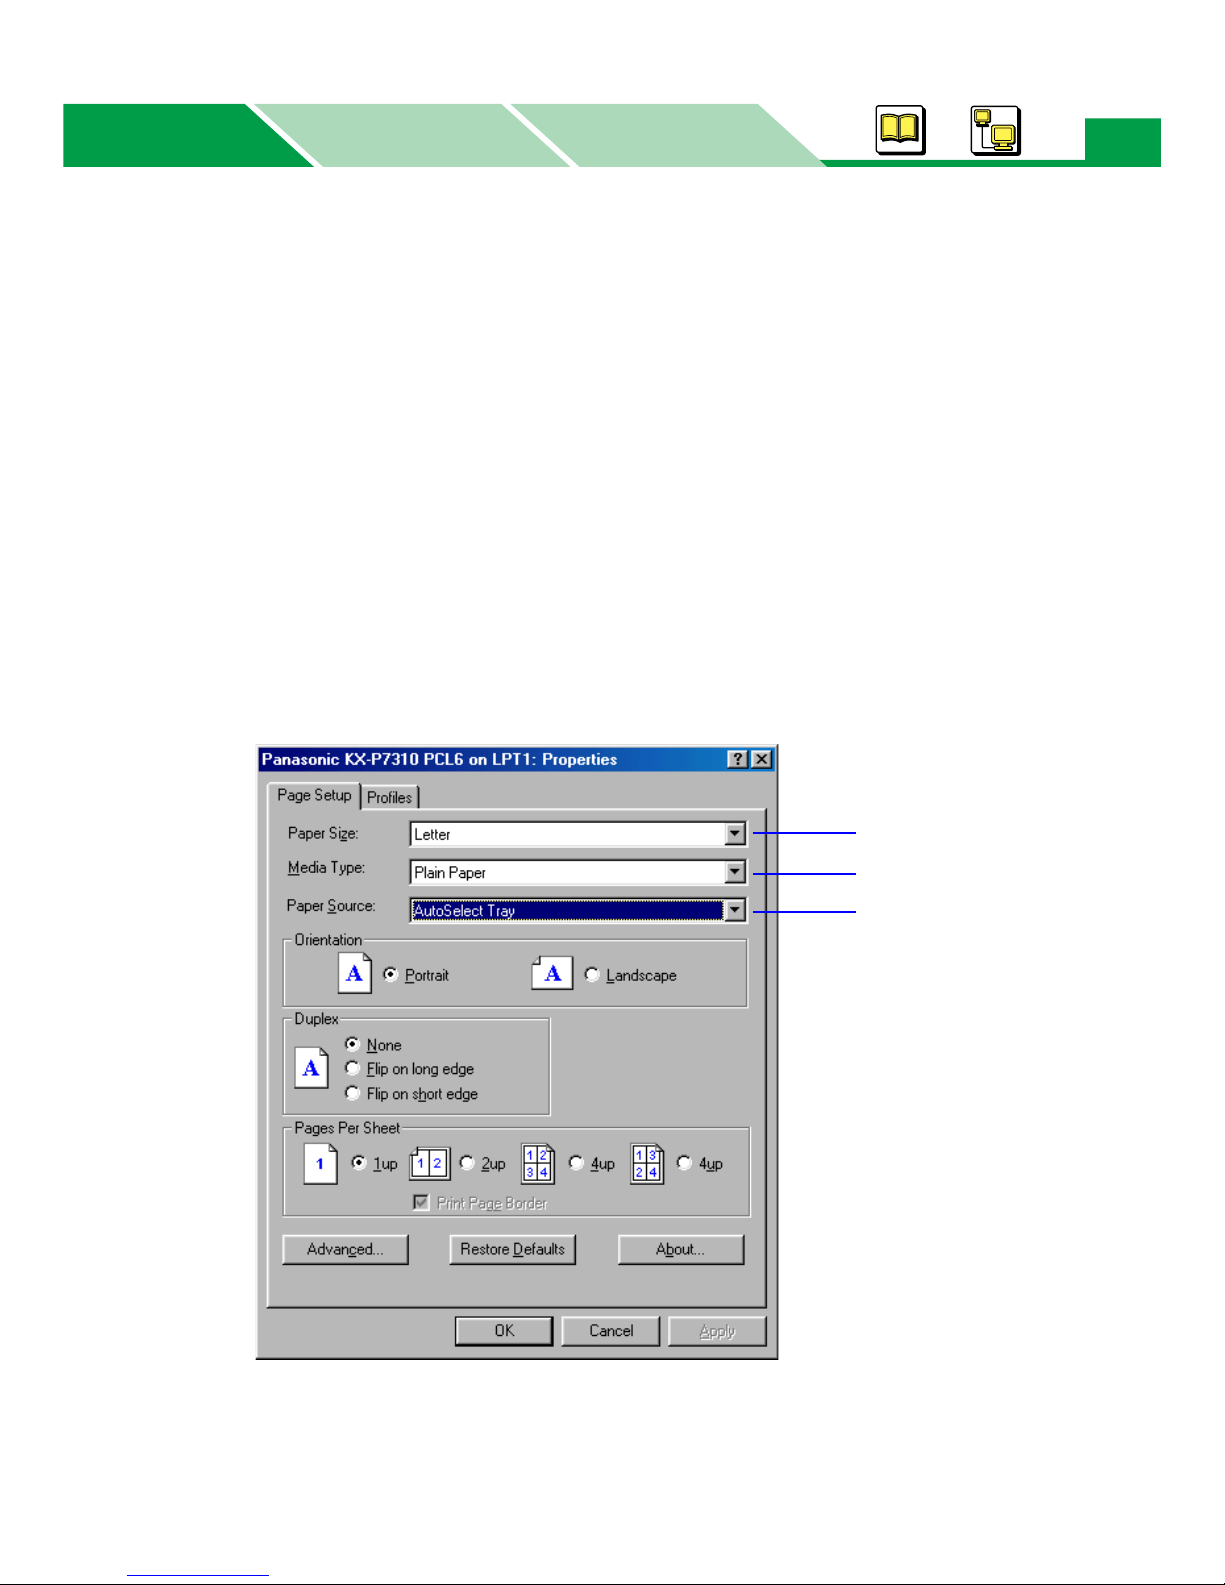
8 Specify the printer’s driver setting depending on the operating system.
For Windows®*
1
(1) Display the print window in the application software.
(2) Select Panasonic KX-P7305 PCL6, Panasonic KX-P7305 PS, Panasonic KX-
P7310 PCL6 or Panasonic KX-P7310 PS printer.
(3) Click
Properties ([Preferences]
for Windows XP
*
2
/ Windows Server™ 2003
*
3
) to display
the printer properties window.
(4) Select AutoSelect Tray for paper source (3) and specify the paper size (1) and
media type (2).
• When the optional 2nd feeder is installed in your printer, Media Tray is changed to Upper
and Lower selection is added to Paper Source.
• You cannot feed Thick Paper or Labels from the Media Tray (Upper) or (Lower) Paper
Source.
• You can only feed plain paper (A4, Letter, Legal, B5 or Executive) from the lower tray. Also
Cotton paper cannot be fed from the lower tray.
• For detailed information to setup the printer driver, refer to the Help menu (
see “Displaying
Help of the Printer Properties Window” on page 47
).
*1Microsoft® Windows® operating system (hereafter Windows)
*
2
Microsoft® Windows® XP operating system (hereafter Windows XP)
*3Microsoft® Windows Server™ 2003 operating system (hereafter Windows Server 2003)
1
2
3
Example:
Properties window of PCL
printer driver

Loading Media and Printing
MacintoshWindows
Basics
Basics
19
(5) Click [OK] and print a document.
• If you opened the rear cover at step 7, be sure to remove the media every time
media is printed out.
For Mac OS 8.5 - Mac OS 9.2
(1) Open a document to print.
(2) Select Page Setup… from the application’s File menu.
(3) Select your printer from the Format for menu.
(4) Specify the paper size (Page Attributes) and click [OK].
(5) Select Print... from the application’s File menu.
(6) Select Auto or Media Tray from All pages from of Paper Source in the General
menu.
• When selecting the Auto, be sure that the media is not inserted in the manual feed.
Otherwise, the media may be fed from the manual feed.
• If the optional 2nd feeder is installed in the printer, Option Cassette can be
available.
• Auto Select is invalid selection.
(7) Specify media type (Printer Specific Options).
• You cannot feed Thick Paper or Label from the Media Tray.
• You can only feed Plain Paper from the Option Cassette (option). Cotton paper
cannot be fed from the Option Cassette. For the detailed information, “Setting the
Printer Specific Options” on page 91.
(8) Click [Print] to print the document.
• If you opened the rear cover at step 7, be sure to remove the media every time the
media is printed out.

Loading Media and Printing
MacintoshWindows
Basics
Basics
20
For Mac OS X 10.1 - Mac OS X 10.2
(1) Open a document to print.
(2) Select Page Setup... from the application’s File menu.
(3) Select your printer from the Format for menu.
(4) Specify the paper size (Page Attributes) and click [OK].
(5) Select Print... from the application’s File menu.
(6) Select your printer from the Printer menu.
(7) Select Auto from All pages from of the Paper Feed menu and specify the media
type (Printer Features).
• When selecting the Auto, be sure that the media is not inserted in the manual feed.
Otherwise, the media may be fed from the manual feed.
• If the optional 2nd feeder is installed in the printer, Option Cassette can be
available.
• Auto Select is invalid selection.
• You cannot feed Thick Paper or Label from the Media Tray.
• You can only feed Plain Paper from the Option Cassette (option). Cotton paper
cannot be fed from the Option Cassette. For the detailed information, “Setting the
Printer Features” on page 110.
(8) Click [Print] to print the document.
• If you opened the rear cover at step 7, be sure to remove the media every time the
media is printed out.

Loading Media and Printing
MacintoshWindows
Basics
Basics
21
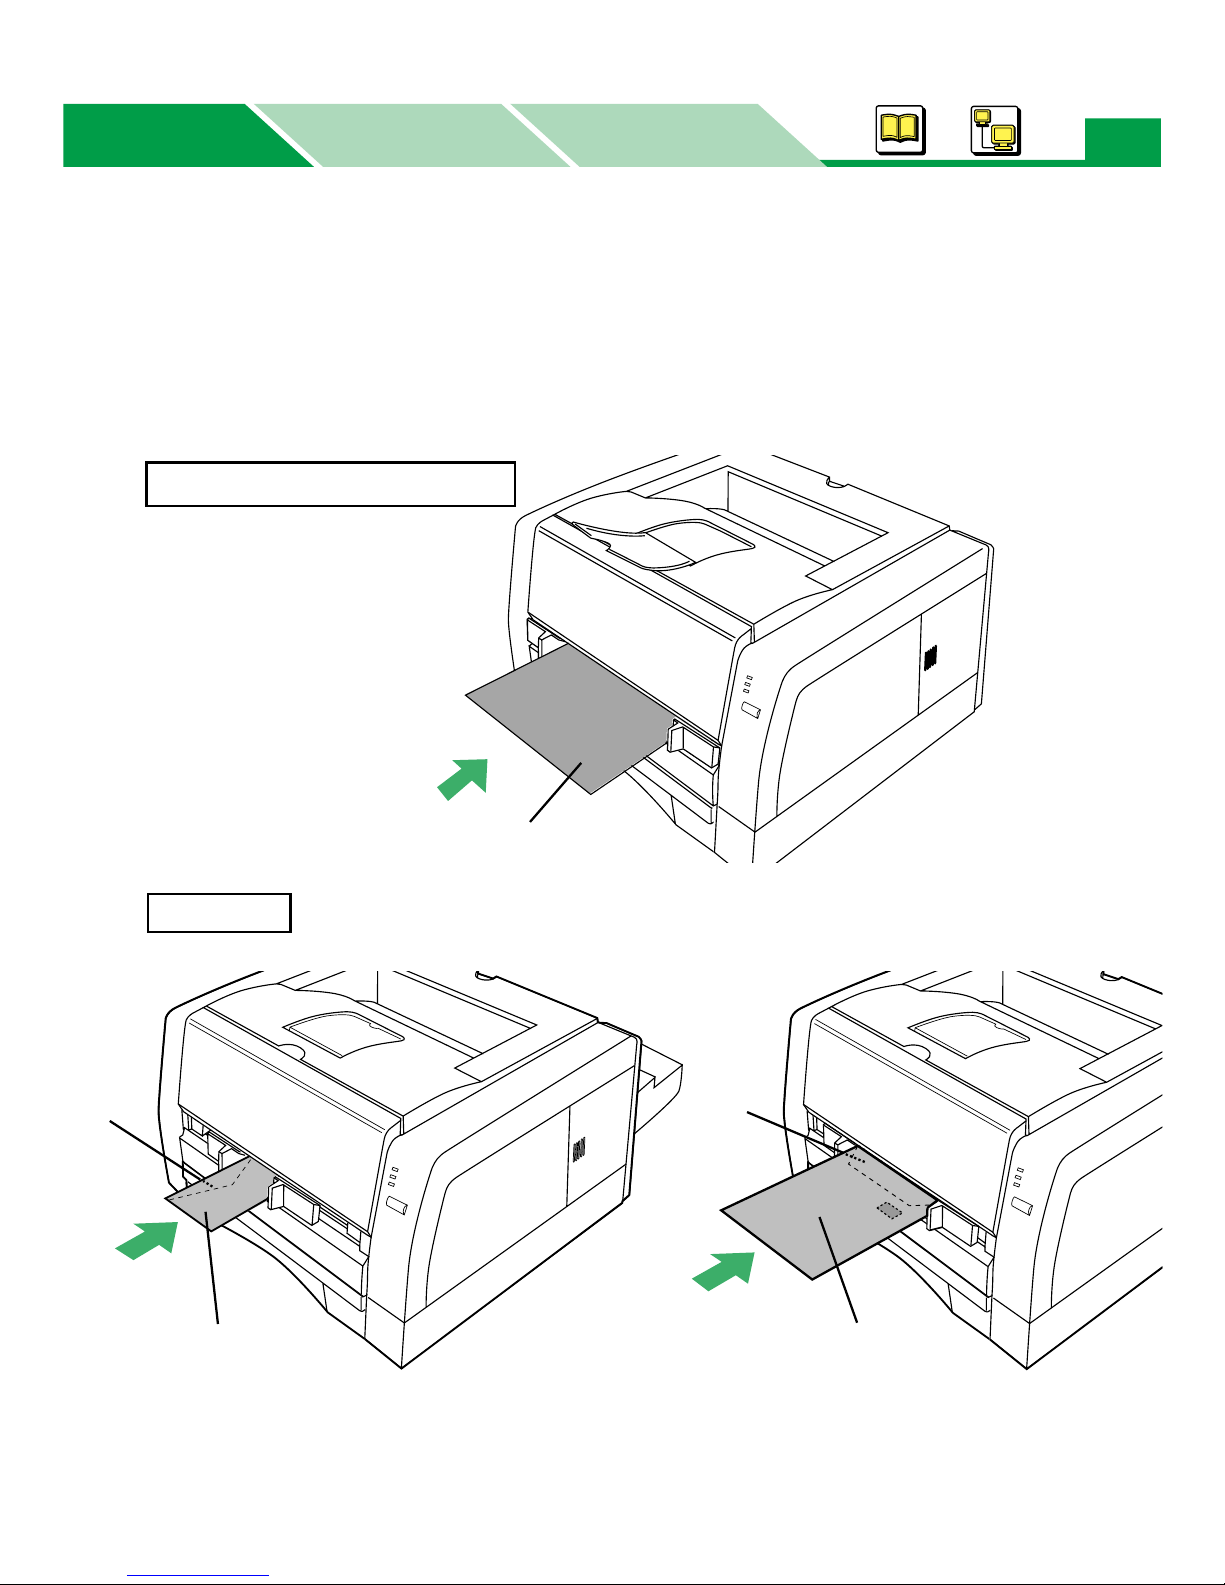
The manual feed serves as an additional tray for loading any type of media that ranges in size
from 76.2 mm x 127 mm to 216 mm x 356 mm (3″ x 5″ to 8.5″ x 14″). When using thick paper
[106 – 165 g/m
2
(29 – 44 lb.)] or labels, use the manual feed.
1 Raise the paper support so that the media is not dropped from the output
tray.
•It is recommended to open the rear cover of the printer to avoid curls or wrinkles if you
print a document on thick paper [106 – 165 g/m
2
(29 – 44 lb.)] or an envelope.
•If you notice lines on the projected image on (OHP), it is recommended to open the
rear cover, so the media (transparency) is printed using the straightest path out.
2 Separate the media guides to the approximate width of the media.
Using the Manual Feed
Rear cover
(Open it when printing on a thick paper or envelopes.)
Paper support
Loading Media and Printing
MacintoshWindows
Basics
Basics
22
3 Insert media with the printing side up into the manual feed while
adjusting the media guides to the media width.
The inserted media is slightly fed into the manual feed automatically.
• Be sure to insert media into the manual feed one at a time.
Printing side up
Paper / Label / Transparency
Envelope
Printing side up
Flap
(International C5-
opening on the shorter edge)
Printing side up
Flap
Loading Media and Printing
MacintoshWindows
Basics
Basics
23
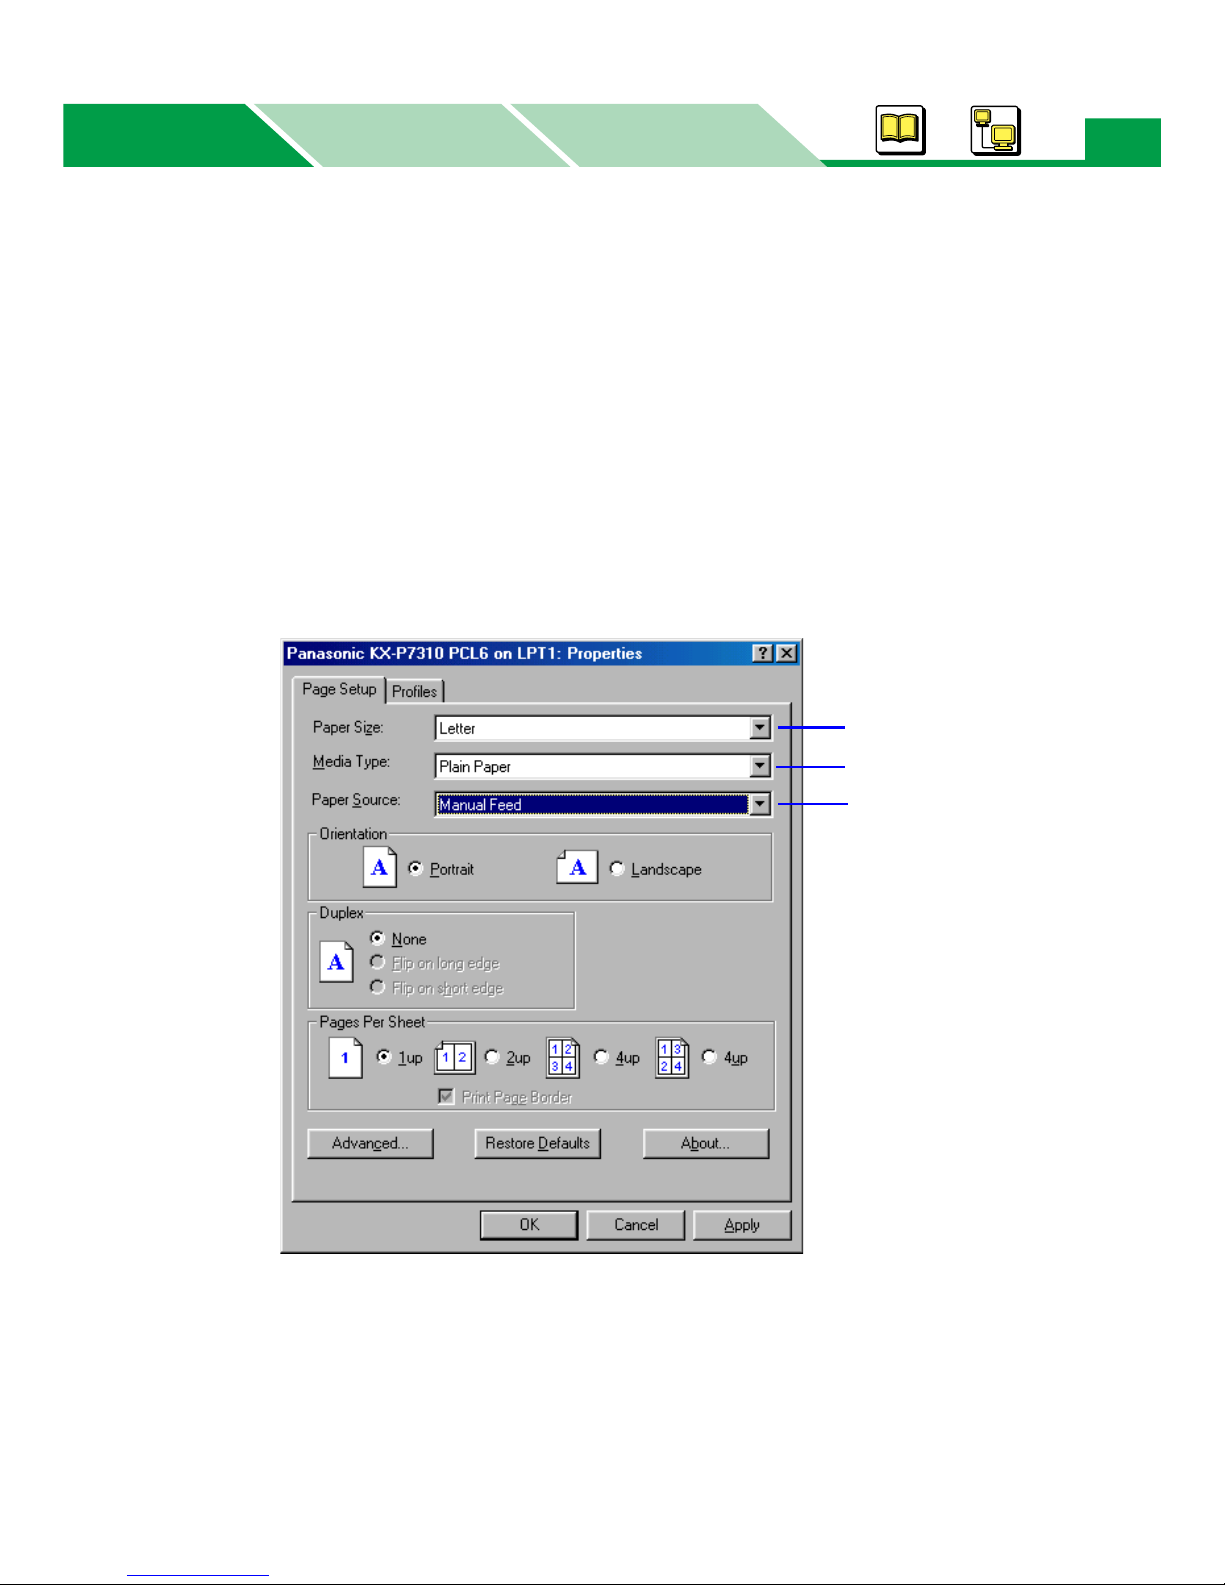
4 Specify the printer driver’s setting depending on the operating system.
For Windows
(1) Display the print window in the application software.
(2) Select Panasonic KX-P7305 PCL6, Panasonic KX-P7305 PS, Panasonic KX-
P7310 PCL6 or Panasonic KX-P7310 PS printer.
(3) Click
Properties ([Preferences]
for Windows XP / Windows Server 2003) to display the
printer properties window.
(4) Select Manual Feed for paper source (3) and specify the paper size (1) and media
type (2).
• For the detailed information to setup the printer driver, refer to the Help menu (see
“Displaying Help of the Printer Properties Window” on page 47).
(5) Click [OK] and print a document.
• If you opened the rear cover on step 1, be sure to remove the media each time
media is printed out.
1
2
3
Example:
Properties window of PCL
printer driver

Loading Media and Printing
MacintoshWindows
Basics
Basics
24
For Mac OS 8.5 - Mac OS 9.2
(1) Open a document to print.
(2) Select Page Setup… from the application’s File menu.
(3) Select your printer from the Format for menu.
(4) Specify the paper size (Page Attributes) and click [OK].
(5) Select Print... from the application’s File menu.
(6) Select Manual Feed from All pages from of Paper Source in the General menu.
(7) Specify media type (Printer Specific Options).
(8) Click [Print] to print the document.
• If you opened the rear cover at step 1, be sure to remove the media every time the
media is printed out.
For Mac OS X 10.1 - Mac OS X 10.2
(1) Open a document to print.
(2) Select Page Setup... from the application’s File menu.
(3) Select your printer from the Format for menu.
(4) Specify the paper size (Page Attributes) and click [OK].
(5) Select Print... from the application’s File menu.
(6) Select your printer from the Printer menu.
(7) Select Manual Feed from All pages from of the Paper Feed menu and specify the
media type (Printer Features).
(8) Click [Print] to print the document.
• If you opened the rear cover at step 1, be sure to remove the media every time the
media is printed out.
5 When printing multiple pages using the manual feed, and the page has
been ejected from the printer, insert the next media into the manual feed.
• If you delay inserting media into the manual feed when doing a multiple print job, a
media empty error may occur. In that case, just insert the media into the manual feed.

MacintoshWindows
Basics
Basics
Index
25
A
AC inlet . . . . . . . . . . . . . . . . . . . . . . . . . . . 5
C
Connector for 2nd feeder . . . . . . . . . . . . . 5
E
Envelope . . . . . . . . . . . . . . . . . 9, 10, 16, 22
ERROR indicator . . . . . . . . . . . . . . . . . . . . 6
F
Front cover . . . . . . . . . . . . . . . . . . . . . . . . 5
I
Indicators . . . . . . . . . . . . . . . . . . . . . . . . . . 6
J
Jam release pan . . . . . . . . . . . . . . . . . . . . 5
L
Label . . . . . . . . . . . . . . . . . . . . . . . 9, 10, 22
M
Manual feed . . . . . . . . . . . . . . . 5, 9, 10, 21
Margin . . . . . . . . . . . . . . . . . . . . . . . . . . . 12
Media . . . . . . . . . . . . . . . . . . . . . . . . . 9, 10
Media size . . . . . . . . . . . . . . . . . . . . . . . . . 9
Media tray . . . . . . . . . . . . . . . . . 5, 9, 10, 13
Media Type . . . . . . . . . . . . . . . . . . . . . . . . 9
N
Network interface . . . . . . . . . . . . . . . . . . . .5
O
Output tray . . . . . . . . . . . . . . . . . . . . . . . . .5
P
Paper . . . . . . . . . . . . . . . . . . . .9, 10, 15, 22
Paper capacity . . . . . . . . . . . . . . . . . . . . .10
Paper level indicator . . . . . . . . . . . . . . . . .5
Paper pass . . . . . . . . . . . . . . . . . . . . . . .11
Paper Size . . . . . . . . . . . . . . . . . . . . . . . . .9
Paper support . . . . . . . . . . . . . . . .5, 17, 21
Paper weights . . . . . . . . . . . . . . . . . . . . .10
Parallel interface . . . . . . . . . . . . . . . . . . . .5
Part names . . . . . . . . . . . . . . . . . . . . . . . .5
Power source . . . . . . . . . . . . . . . . . . . . . . .4
Power switch . . . . . . . . . . . . . . . . . . . . . . .5
Print area . . . . . . . . . . . . . . . . . . . . . . . . .12
PRINT/RESET button . . . . . . . . . . . . . .6, 8
Printer panel . . . . . . . . . . . . . . . . . . . . .5, 6
Printing
Using manual feed . . . . . . . . . . . . . . .21
Using media tray . . . . . . . . . . . . . . . .13
R
READY indicator . . . . . . . . . . . . . . . . . . . .6
Rear cover . . . . . . . . . . . . . . . .5, 11, 17, 21
Recommended media . . . . . . . . . . . . . . .10
T
TONER/DRUM UNIT indicator . . . . . . . . . 6
Transparency . . . . . . . . . . . . . .9, 10, 16, 22
Index
 Loading...