

Page 1
^Tr~^-TTTrr-n
--- -^-----------rn---
1—
r-r
T ■ m - - rt ~ l f i ■ ■ l
Operating Instructions
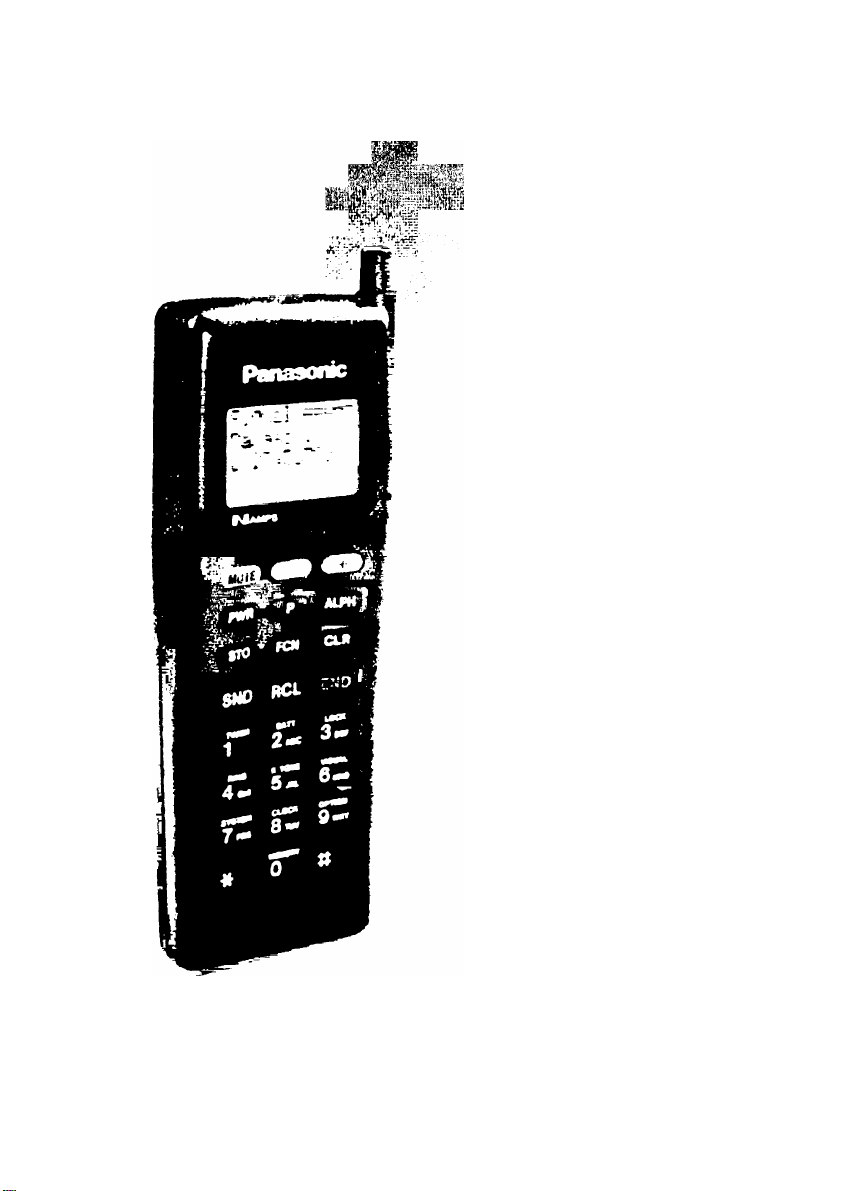
HH950 PERSONAL CELLULAR TELEPHONE
■Mamps
Panasonic
Before operating this set. piease read these instructions completely.
Charge the battery before operation
system compsllbis
102X01601
Page 2

Serial numbers appear on the outside of the Handset For future reference,
record these numbers here in this table and retain the manual to serve as a
permanent record of your purchase
HANDSET
Model Number
Serial Number
DEALER NAME
PURCHASE DATE
EB-3533
Page 3
Panasonic*
Operating
Instructions
©1993 by Matsushita Communication Industrial Co., LTD
All Rights Reserved. Published 1993
Printed In the USA
102X01601
Page 4

Table of Contents
CHAPTER 1 INTRODUCTION
Features .......................................................................................1-2
Kit Composition.............................................................................1-5
Accessories
..................................................................................
Other Accessories
.................................................................
1-6
1-9
Items To Note Before Operating
Terms......................................................................................... 1-14
...............................................
CHAPTER 2 ABOUT THE HANDSET
Keys and Indicators
Battery Pack Information
How to tnstall/Remove the Battery Pack
Charging Procedures.............................................................2-5
How to Extend/Retract the Antenna ............................................2-9
Attaching the Carrying Strap
Cleaning ....................................................................................2-11
.....................................................................
.............................................................
...............................
......................................................
CHAPTER 3 OPERATION
Powering On ...............................................................................3-1
How To Make A Call ....................................................................3-3
Auto Retry..............................................................................3-4
Automatic Redial ...................................................................3-4
Indicator Tones (with Unsuccessful Calls)
............................
1-10
2-1
2-3
2-4
2-10
3-5
Table of Contents
Page 5

CONTENTS
How To Receive A Cali
Powering Off
Additional Operations
Adjusting the Earpiece/Keytone Volume
Received Cali Indicator ......................................................3-10
Mute ...
Hold ...................................................................................3-11
Dual Tone Multi-Frequency (DTMF)
How To Enter Alphanumeric Characters
Entering Letters/Numbers
Word List .................................................................
Speed-Dial Memory
How to Store Using Speed Dial ..............................
Storing by Memory Location Number ................................3-20
Storing by Name Tag
Storing by Group Label
Recalling by Memory Location Number
Recalling by Group Label...................................................3-31
Speecf-Dial Memory Edit
Changing Memory Contents...............................................3-33
Deleting Memory Contents.................................................3-35
...............................................................................
...............................................................................3-11
DTMF Interval..............................................................3-12
Flash Request
Auto Memory Location........................................-.. - 3-21
Memory Map................................................................3-22
Override Protection .....................................................3-23
Using Recall
Super-Speed Dialing
Recalling by Name Tag .....................................................3-30
..............................................................
..................................................................
.............................
.................................
.............................................................
.................................
..................................................
..................................................................
.........................................................
.....................................................
......................................................................
.............................
..................................................
..........................................................
..........
..........
3^
3-8
3-9
3-9
3-12
3-13
3-14
3-14
3-17
3-19
3-19
3*23
3-25
3-27
3-28
3-29
3-33
Last Number Memory................................................................3-36
Scratch Pad Memory
Caller's Memory.........................................................................3-38
DTMF From Memory ................................................................3-38
Prefixed Dialing..........................................................................3-39
.................................................................
3-37
Table of Contents
Page 6

CONTENTS
Pause Dial..................................................................................3-41
How to Program and Use Pause Dial..................................3-42
Function Key Operation .............................................................3-44
Using the Function Guide....................................................3-44
Enhanced Features (Cellular System Optional)
Call-Back Number.........................................................3-46
Short'Messages
Voice Mail Notification
...........................................................
..................................................
.................
3-46
3-48
3-49
Call Length Timer (FCN 1)
Battery (FCN 2)
Battery Level Indicator (Handheld Use Only)
Pace Beep
Low Battery Alarm
Security (FCN 3) ................................................................ 3-57
Lock
Dialing Digits Restriction ..............................................3-58
Memory Secret .............................................................3-60
Theft Lock.....................................................................3-61
Master Function............................................................3-63
How to Set Theft Code
How to Set New Lock Code..........................................3-67
Ringing (FCN 4) ..................................................................3-68
Ring Volume Control.....................................................3-68
Setting Ring Tone.........................................................3-69
Escalating Ring Tone (Handheld Use Only).................3-70
Auto Answer (Car Mount Use Only) ............................3-71
Keytones On/Off (FCN 5)
Display (FCN 6)...................................................................3-73
Wake-up Display Program............................................3-73
Backlight Control (Car Mount/DC Adaptor Use Only . 3-74
Setting Backlight Color..................................................3-75
System (FCN 7)...................................................................3-76
Own Number Display....................................................3-76
A/B System Select
Clock (FCN 8)......................................................................3-80
Setting the Clock...........................................................3-80
Automatic Recall (Handheld Use Only)
Auto Power On (Alarm) ................................................3-84
Auto Power Off (Handheld Use Only)...........................3-86
Safety Timer (Car Mount Use Only)
Vehicle Use Options (FCN 9)
Call Receive .................................................................3-89
...................................................................
.....................................................
..............................................................................
..................................................
..............
-............3-55
........................................................
................................................
....................................................
........................................................
........................
............................
.......................................
3-52
3-54
3-54
3-56
3-57
3-66
3-72
3-77
3-82
3-88
3-89
Table of Contents
III
Page 7

CONTENTS
Alert Option
Radio Mute Option
Memory (FCN 0)
Memory Check
Creating/Deleting Group Labe! Program
APPENDIX A STORING NAMES & NUMBERS
APPENDIX B SPEED DIAL MEMORY INDEX
INDEX
3-91
3-92
3-93
3-93
3-94
IV
Table of Contents
Page 8
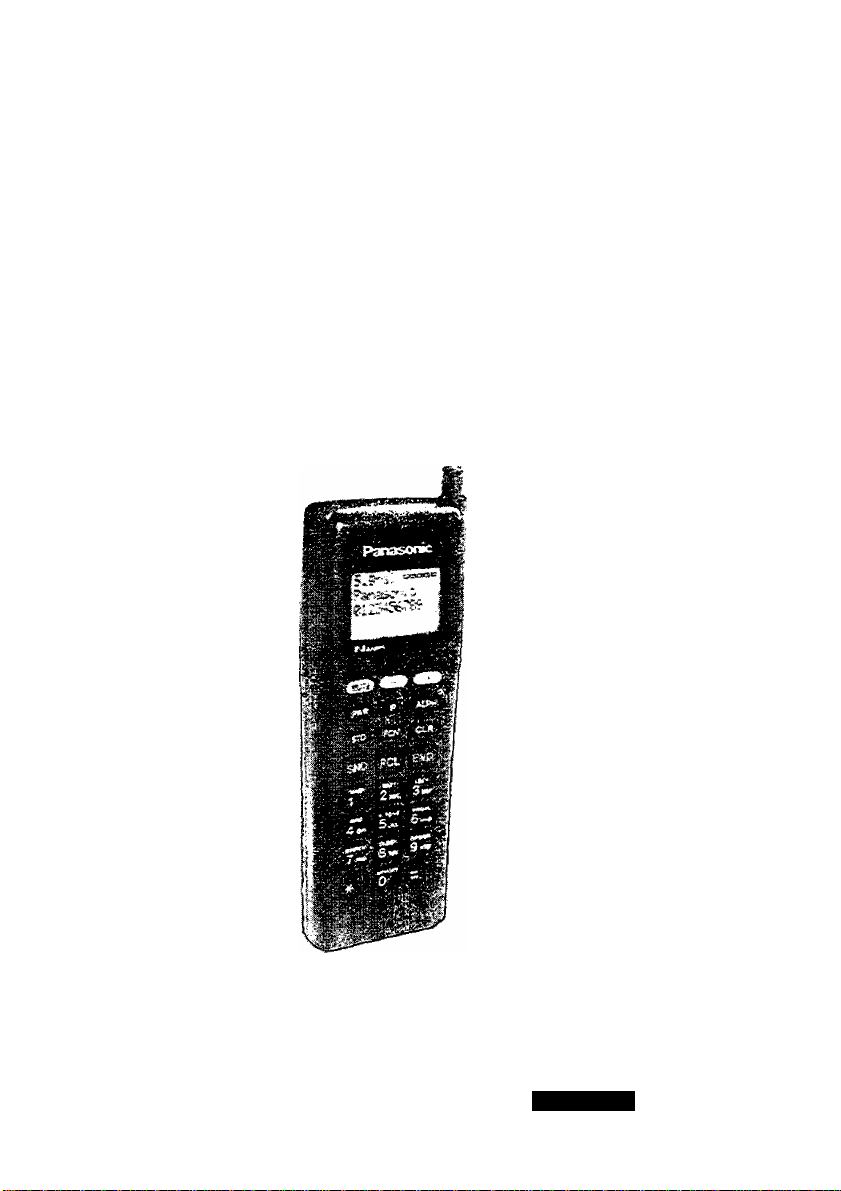
Introduction
Congratulations on the purchase of your new HH950
Handheld Portable Cellular Telephone! This manual
describes how to operate all standard and enhanced features
of your phone.
Please read this manual carefully before attempting to use
your phone. For information on available accessories, please
refer to the appropriate accessories’ Operating Instructions
Manual.
Introduction
HH950 Handheld Portable Telephone
1-1
Page 9

Features
General
• "Any key" answer (except and • Clock; shows current time and date
ra keys)
• Auto Answer; answers calls
automatically after 6 seconds
(handsfree/car mount only)
• Prefixed Dialing; store & recall
commonly used number prefixes (up
to 32 digits)
• Backlit keypad and liquid crystal
display (LCD); with automatic shut-off
when sensing no keypad activity after
seven seconds (saves battery power)
• Last digit/AII digit clear
• Silent keypad
• Multi-stepping earpiece volume control
• Retractable one-piece antenna
• Mouthpiece mute function for private
conversation while still connected to a
call
• Hold Function; mutes both the handset
microphone and earpiece
• 832-channels std. operation; 2,412
NAMPs channels
• DTMF (Toudi Tone) signaling and Flash
request
Memory
200 total memory slot capacity
48-digit, 16-character capacity per
memory location
Vacant Memory Location Search;
allows locating the next available
memory slot.
Memory Check; allows verifying the
amount of memory capacity presently
used, or the number of items currently
stored in all memory slot locations
Memory Map Review; shows available
memory locations
Override Protection; protects against
accidentally storing new information
over occupied memory location slots
Auto Memory Location; automatically
selects the smallest vacant memory
location for storing data
Scratch Pad: allows entering a
number for later reference, while
conversing
Scratch Pad Recall
Pause Dial; allows transmitting a
sequence of numbers stored in a single
memory slot for functions outside the
cellular network such as long distance
access codes and voice mail retrieval
Group Label Memory; allows arranging
stored information into individual groups
(up to 30) by assigning 12-digit character
labels
Super Speed Dialing
Selectable Memory Recall by:
- memory location #
- first letter of tag name
- group label name
- super speed dialing
- list of last ten calls
- Caller’s Memory feature
1-2 Features
Introduction
Page 10

Memory (cont.)
• Word List; contains a listing of
predefined, commonly-used words to
simplify creating/editing Group Labels
and Name Tags.
• Last number memory and redial; ten
most recently-called numbers are
automatically stored in memory with a
time/date stamp
• Auto Retry; phone redials the same
number automatically every ten
seconds {up to 15 times) after the re
order tone, i.e., the system is busy
Display/Indication:
• Signal Strength Indicator; shows the
strength of the received system
service.
• 16-character/4-line alphanumeric
Liquid Crystal Display (LCD)
• Own number recall display
• Visual and audible low battery warning
indicator
• Auto-Power On: powers the phone ON
automatically at a pre-selected time.
• Auto-Power Off: powers the phone OFF
automatically at a pre-selected time.
• DTMF Signaling from Memory; provides
access to data systems
• Received Call indicator; shows the
number of calls (up to 99) you’ve
received but not answered along with a
time/date stamp of the 10 most recent
calls
• Silent Alert; ringing tone is muted while
display shows ringing message
• Overflow character display
• Audible pace beep every minute to help
track length of calls
• Programmable Wake-up Display
Message
Selectable:
• Ringing: select volume, tone, and
escalating volume/tone
• Four-level electronic lock:
- Full: locks all incoming and outgoing
calls
- Dial: transmits only stored numbers
- Send: can only receive calls
- Receive: can only make calls
• Dual-selectable telephone number
• Total elapsed timer (for two different
numbers)
Introduction
• Resettable total call length timer
• Non-resettable total call length timer
• Separate, non-resettable total timer for
each of two numbers
• Individual call length timer
* Last Call Timer
* Auto Recall: phone reminds user to call
a specified # at preselected time
Features 1-3
Page 11

Selectable (cont.):
• Security
- Emergency call enable (dealerprogrammable)
- Unlock Code (user programmable)
- Memory Secret, selectable between
no access, full access, and read only
- Theft Alarm, unauthorized phone use
sounds the vehicle horn (requires
optional Alert Kit J10262)
Available;
• Rapid Charger Kit (£B-911), 2 slots
for rapid charging (see page 1-6)
• DC Adapter Kit (EB-912), Allows
powering phone from the vehicle
cigarette lighter outlet (see page 1-6)
• Handsfree Car Mount Kit (EB-905),
converts Model HH950 from handheld
use to handsfree car mount use (see
page 1-7)
• Wireline/Non-wireline system selection
• Roam inhibit of calls to prevent
unauthorized use
• Dialed digits restriction to prevent
unauthorized long distance calls
• In-Cabin Booster Kit (EB-910), provides
3-watt booster unit for vehicle inpassenger compartment mounting
• In-Trunk Booster Kit (EB-910A), provides
3-watt booster unit for vehicle in-trunk
mounting (includes extension cabling)
• Battery (500mAH)
• Battery (900mAH)
• Horn Alert for mobile use (EB-J10262
Alert Kit required)
Enhanced (cellular system optional):
• Call-Back Number, provides a digital
page and convenient call back (m
conjunction with the cellular system
provider)
• Short Messages, allows access to
messages received from cellular
service provider
1-4 Features
• Voice Mail Notification, shows number of
voice mail messages received by the
voice mail service provider
Introduction
Page 12
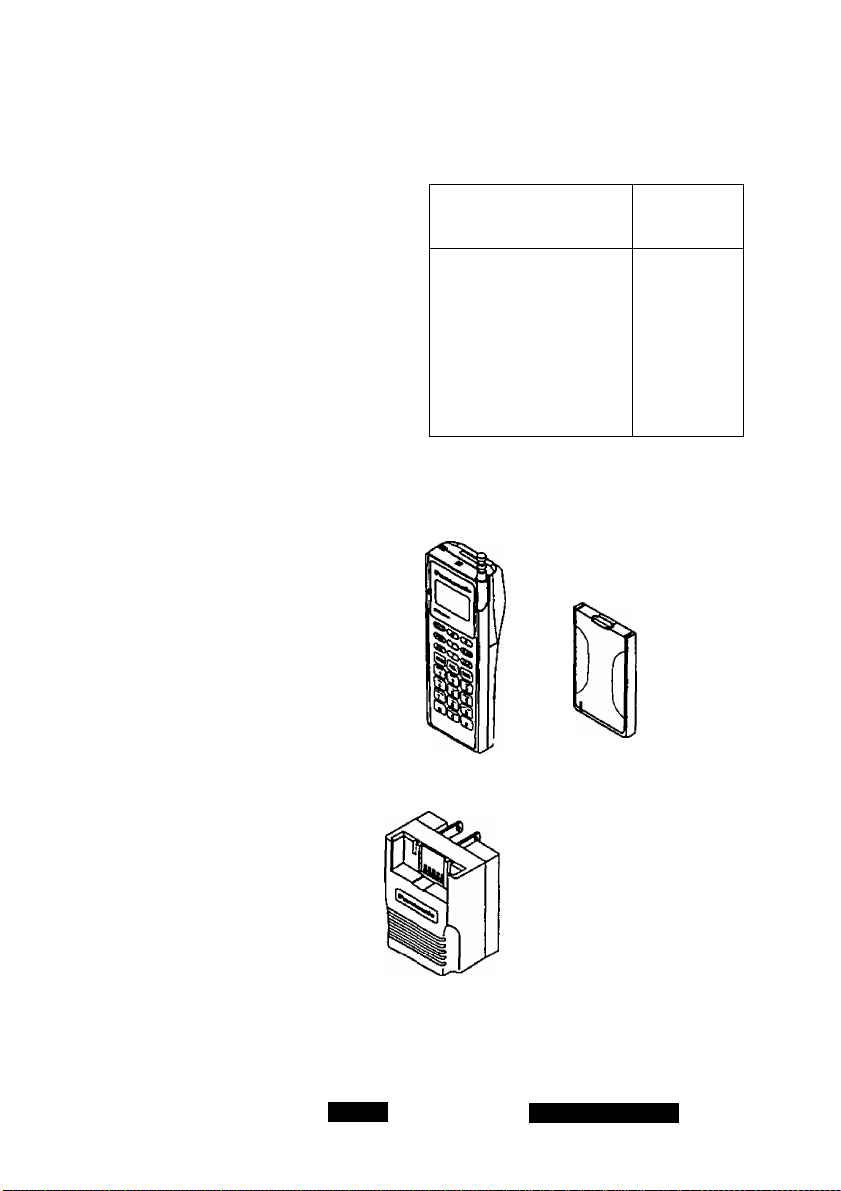
Kit Composition
Handset Kit HH950:
CONTErrrS PART
NUMBER
STRAP
CHARGER
TRAVEL
• Handset
• Travel Charger
• Battery Pack (500 mAH)
• Carrying strap
* Connector Cap
• Operating Instructions
• Quick-Reference Card
• Warranty Card
• Packing
HANDSET
EB-P10150
EB-P10180
EB-B10023
E8-Y10079
102X01601
102X01701
102X03501
BATTERY PACK
(500 mAh)
EB-3533
Introduction
Kit Composition 1-5
Page 13
Accessories
The following tables/figures describe the standard and
available accessories to further enhance the operation of your
phone See your Panasonic dealer for details
Rapid Charger Kit EB-911:
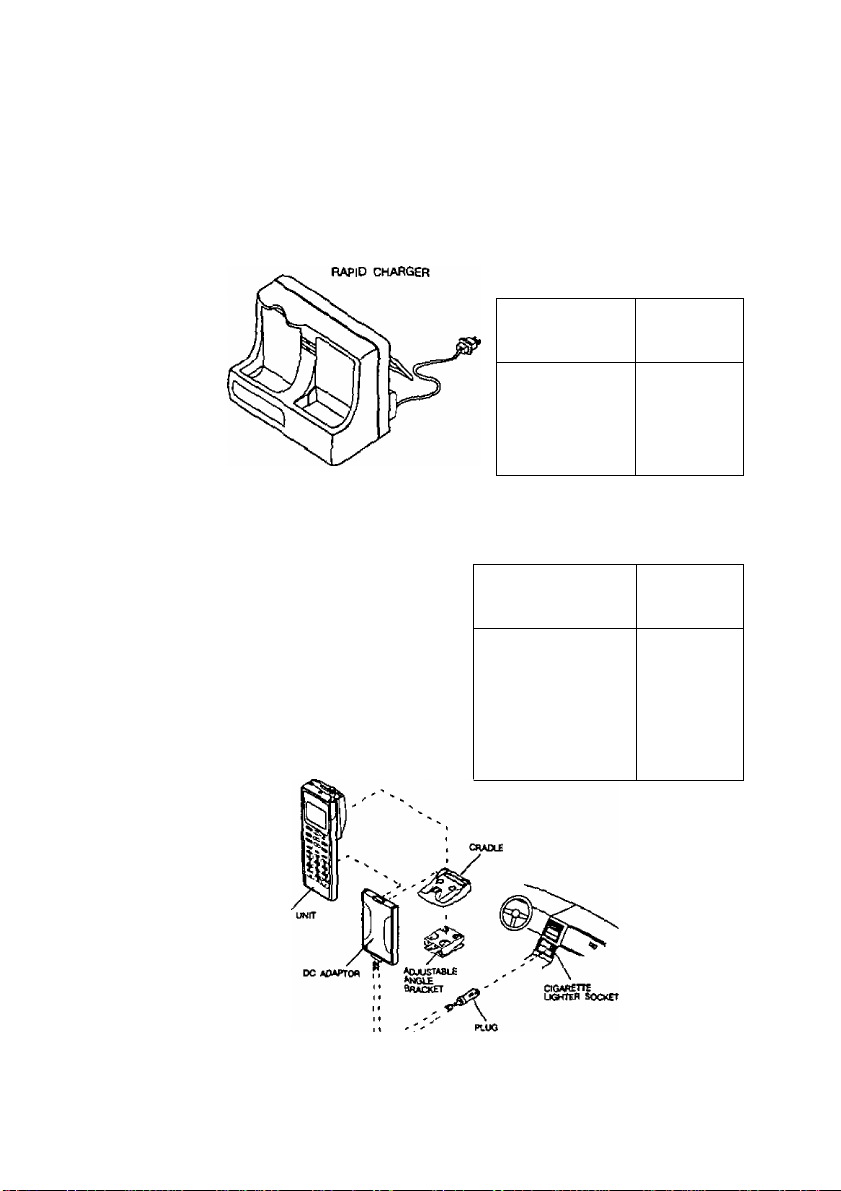
DC Adapter Kit EB-912
COMTENTS
PART
NUMBER
• Rapid Charger EB-P10151
• Operating
instructions 2D10460
• Warranty Card
- Packing
CONTENTS
ZD10205
PART
NUMBER
• DC Adapter
• Cradle
• Adj Angle Bracket
• Operating
Instructions ZD10461
• Warranty Card
• Packing
EB-P10151
EB-J10138
EB-NOOOtC
ZD10205
1-6 Accessories
Introduction
Page 14
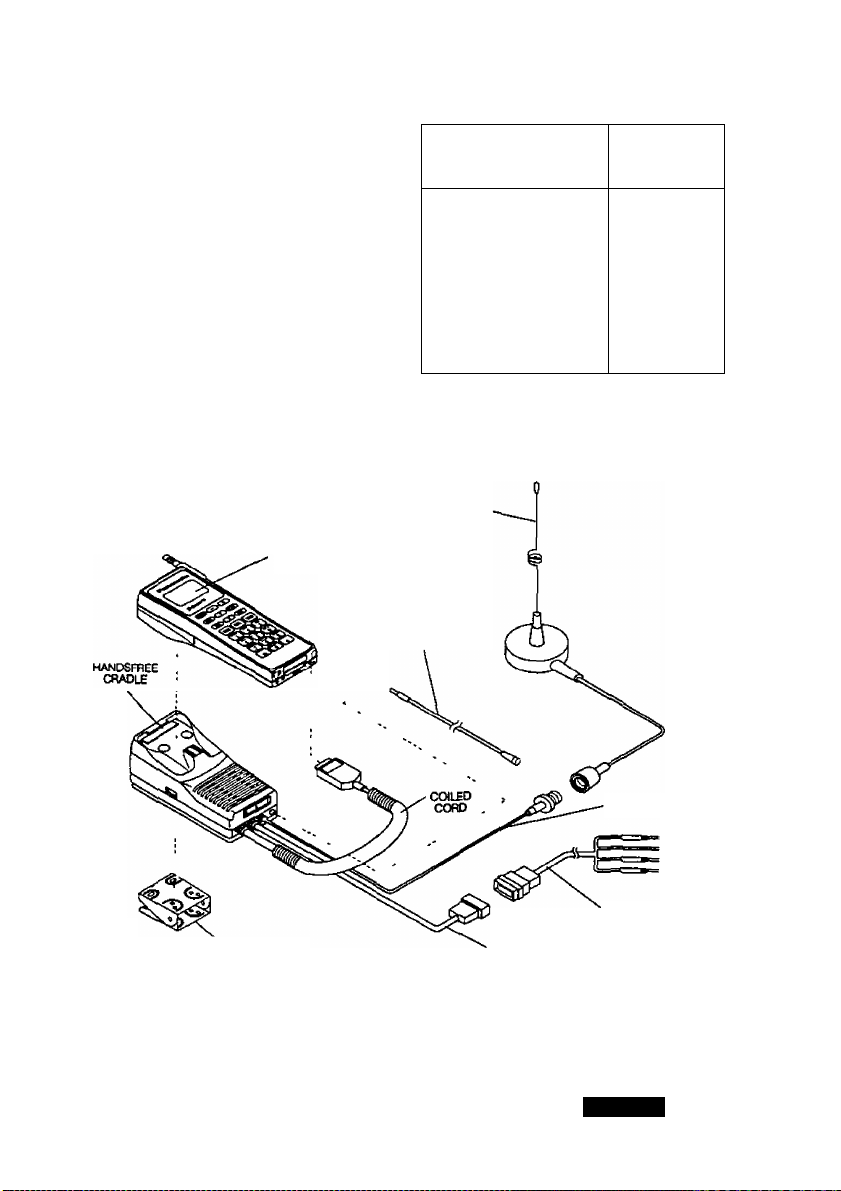
Handsfree/Car Mount
KitEB-905:
MAIN UNIT
CONTENTS
• Handsfree Unit/Rapid
Charger Cradle
• Adj Angle Bracket EB-N0001C
Microphone EB-M1177
• Power Supply Cable -
12*
* Operating Instructions
* Warranty Card
Packing
ANTENNA
{NOT SUPPUEO)
HAN06FREE
MICROPHONE
PART
NUMBER
EB-J10139
EB-W10030
ZD10463
ZD10205
Introduction
‘ADJUSTABLE
ANGLE BRACKET
INTERCONNECTING
CABLE
Kit Composition 1-7
RF CABLE
POWm
SUPPLY CABLE
Page 15
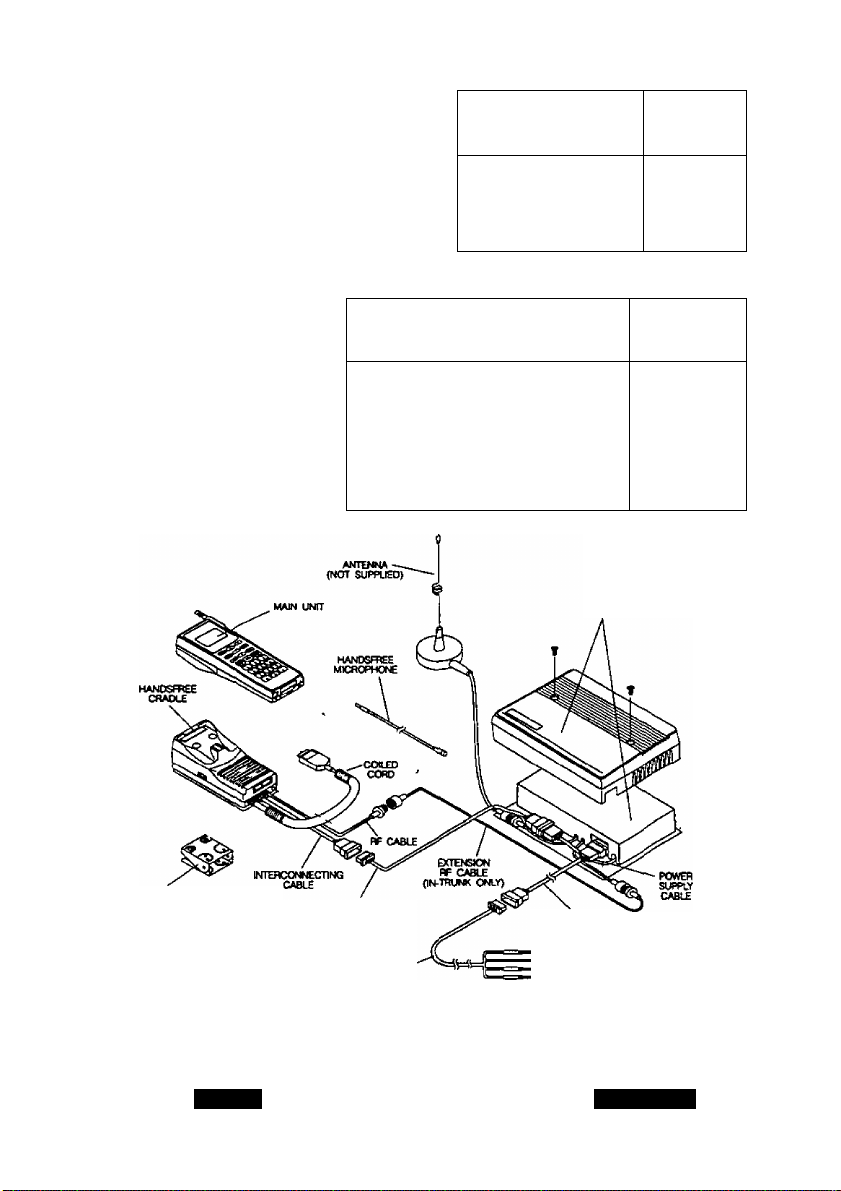
in-Cabin Booster Kit EB-910:
CONTENTS
• Booster
• Operating Instructions
• Wananty Card
• Packing
in-Trunk Booster Kit EB-910A:
CONTENTS
• Booster
• Extension Interconnect Cable -17’
• Extension RF Cable -17’ EB-W10035
• Extension Power Supply Cable -17’
* Operating Instmctions
• Warranty Card
- Packing
BOOSTER
UWT
PART
NUMBER
EB-U10022
ZD10464
ZD10205
PART
NUMBER
EB-U10022
EB-W10034
EB-W10036
ZD10465
ZD10205
ADJUSTABLE
ANGLE BRACKET
1-8 Accessories
EXTENSION
INTERCONNECTINQ
CABLE {W TRUNK ONLY)
POWER SUPPLY-
CABLE
EXTENSK3N POWER
SUPPLY CABLE
(TN-TRUNK ONLY)
Introducton
Page 16

other Accessories:
BATTERY PACK
(500 mAh)
BATTERY PACK
(900 mAh)
CONTENTS
• Battery Pack
(500mAH/Ni-MH)
* Battery Pack
(900maH Ni-Cd)
• Travel Charger
• Ext Pwr Supply
Cable (12')
• Ext Pwr Supply
Cable (17’)
• Ext Interconnect
Cable (17') EB-W10035
• Ext RF Cable
(17’)
• Alert Unit
PART
NUMBER
EB-P10180
EB-P10149
EB*P10150
EB-W10033
EB-W10034
EB-W10036
EB-J10262
Introduction
Kit Composition 1-9
Page 17
Items to Note Before Operating
* Fully charge the battery before attempting to use your phone
(see page 2-5 for charging procedures).
This unit meets or exceeds current safety standards with
respect to human exposure to electromagnetic fields (see
American National Standard, ANSI C95.1-1982). However,
it is recommended while using the phone, that the user
should avoid touching the antenna to exposed parts of the
body (particularly eyes and face). In handsfree/car mount
use, do not operate the phone if you or another person is
within 8 inches (20cm) of the vehicle antenna.
Pressing any key on the keypad may cause a loud tone
from the handset speaker. Be sure the handset is away
from your ear before pressing any keys.
• Speed-Dial memory and clock memory may be corrupted or
lost if your phone is without power for approximately 30
days.
1-10 Before Operating
Before making or receiving calls, fully extend the antenna.
The liquid crystal display on your phone may slightly change
color, or take somewhat longer than usual to display
characters in extremely high or low temperatures. This is
normal and does not indicate a defective display.
Introduction
Page 18

To prevent your phone from unauthorized use, memorize
your theft and lock codes. If you lose your lock code,
contact your Panasonic or phone dealer for assistance.
If after powering ON your phone, the display shows the
message OFF/ON, switch the power OFF and then ON
again. Please contact your dealer if OFF/ON message does
not disappear.
No Sorvice
08:00 AM
Does
• If the display shows the message No Service, you have
moved outside the service coverage area. Move into a
different location until No Service message disappears.
NOTE; If your phone operates with two phone numbers, check that
the phone number you're trying to use is the proper number
for the network in your current location.
• If you have two phone numbers, you may only receive calls
for the number currently selected on your phone.
Never store flammable liquids, gases, or explosive materials
in the same area as your phone.
Do not use your phone within an aircraft. Using cellular
telephones in an aircraft is dangerous to ttie operation of the
aircraft, may disrupt the cellular telephone network, and is
illegal. Failing to observe this restriction may lead to
suspension or denial of cellular telephone service, legal
action, or both.
Introduction
Before Operating 1-11
Page 19

Oj
---------
Acquaint yourself with the special guidelines from the
Highway Code for your state regarding the use of mobile
radios, including cellular telephones, while operating a motor
vehicle.
Do not install or connect your phone in a vehicle which uses
a positive (+) grounding system. Use negative (-) grounding
only.
Always disconnect the phone before attempting to jump start
your vehicle.
Power off your phone when potentially explosive conditions
exist, such as when refueling, or any place where a sign is
posted restricting the use of two-way radio equipment such
as construction sites, blasting areas, etc.
Electronic fuel injection, anti-skid brakes, and speed control
systems (cruise control), and similar type electronic devices
,0,
might malfunction if your car lacks adequate isolation from
RF (radio frequency) signals. If your car has any of these
type devices, contact your dealer for assistance in
determining whether such systems perform normally when
your phone is transmitting.
Do not store or transport battery packs with metallic items
such as keys, coins, etc. Damage to the items, as well as
personal injury may occur should they accidentally make
contact with the battery pack.
For service, call your local Panasonic dealer, or to locate the
nearest authorized Panasonic Service Center call 1-800526-6610.
1-12 Before Operating Introduction
Page 20

r
DONTS
___J
DON’T use this equipment in an
extreme environment where high
temperature or high humidity exists.
DON’T attempt to disassemble this
equipment. No user-serviceable
parts exist inside.
DON’T abuse this equipment.
Avoid striking, shaking, or holding it
by antenna.
DON'T expose the handset to
water, or spill beverages on it.
DO use the equipment under
conditions where temperatures are
within the-4*Fto+140®F(-20'’Cto
+60“C) in car mount use and within
14®F to 104'’F (-10'’C to +40“C) in
transportable use.
DO refer any servicing to qualified
service personnel.
DO handle this equipment with
care.
DO take immediate action if the
equipment becomes wet. Turn
power off and refer servicing to
qualified personnel.
Introduction Before Operating 1-13
Page 21

Terms
NAMPS:
Narrow-Band AMPS. A high-capacity cellular technology
which operates on 2,412 channels, as opposed to 832
channels on standard AMPS systems.
Carrier:
This is the cellular service provider. The carrier can be
associated with your local telephone company or an
independent company.
Home Carrier:
The system to which your dealer registers your phone.
Roaming:
Using your cellular phone on any carrier to which it is not
registered.
Automatic Roaming (ROAM):
If a carrier in a city which you are visiting has an agreement
with your home system, bills are charged to your account in
your home system automatically.
Credit Card Roaming (ROAM);
If the system in which you are roaming does not have
automatic roaming, you can use your credit card for billing
purposes.
1-14 Terms
Follow-Me Roaming:
An available service which allows your calls to "follow" you
to the city in which you are roaming. This means calls
made to your seven digit local mobile number are
automatically forwarded to the city where you are presently
traveling.
Wireline Carrier (W/L):
Your local telephone company.
Non-Wireline Carrier (N-W/L):
The cellular company in an area which is not associated
with the local telephone company.
Introduction
Page 22
About the Handset
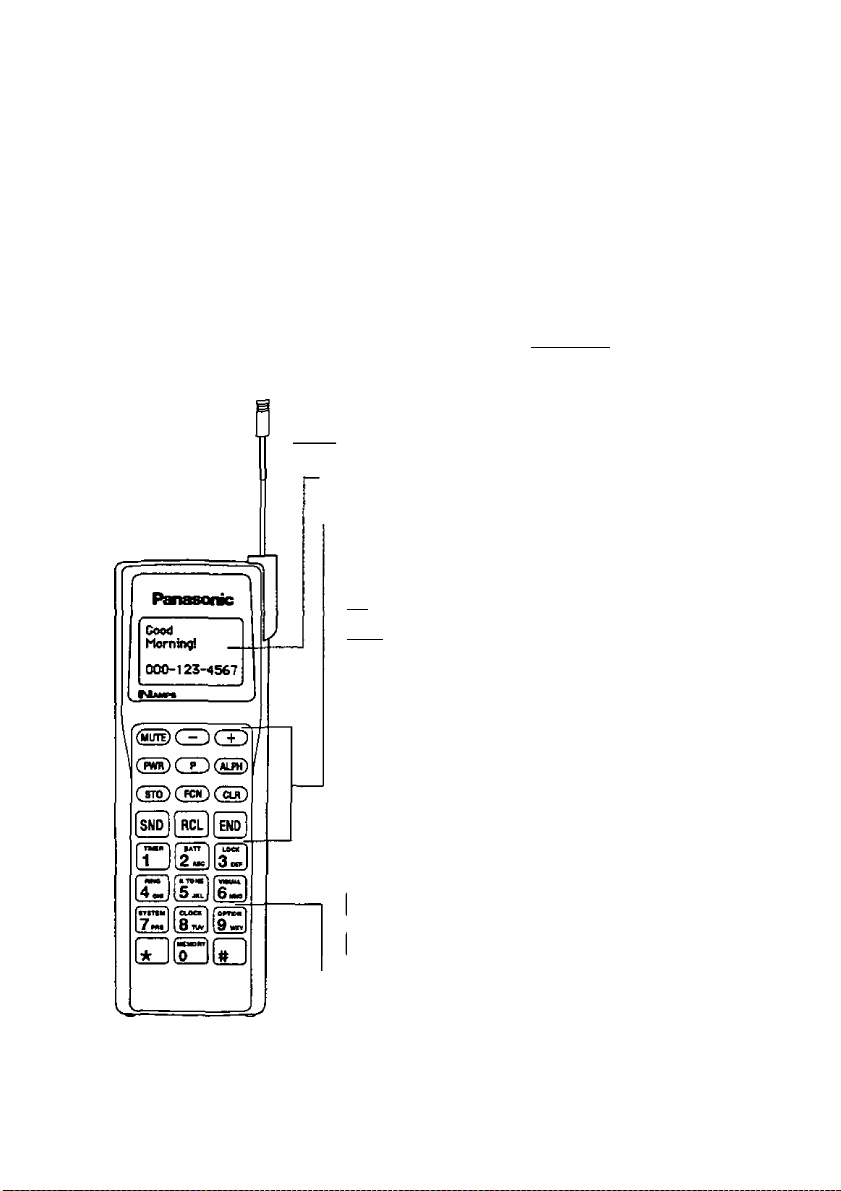
Keys and Indicators
Controlling the many Model HH950 operating features is
performed using the handset keys and display This section
provides a quick-look at these features For detailed
operating instructions, see Chapter 3 Operation
ANTENNA
DISPLAY (LCD)
r- FUNCTION KEYS
/ijTTj?! MUTE Toggles the mouthpiece
or mouih/earpiece ON ar»d OFF
PLUS/MINUS Adjusts volume scrolls tetters
____ and display, changes display menu & switches
( + ) functions ON/OFFSorward/Biackward
(PWR) PWR Switches power ON/OFF
PAUSE/PflEFlX
/ Inserts *P" in pause dial function,
Displays currently stored prefix
ALPHA KEY Enters and exits
'
-------
' alphanumeric input mode
STORE Stores phone numbers
' Name Tag, and Group Labels in memory
/"Eriiri FUNCTION Accesses various phone
functions
CLEAR Clears the last entered
^^ character, or the entire entry
SEND Transmits phone number to
originate a call
e
RECALL Recalls memory contents,
searches memory
END Terminates a call
END
DIGIT KEYS
About the Handset Keys and Indicators 2-1
Page 23

TONE SLOTS
STRAP HOLE
EARPIECE
BATTERY RELEASE
BATTERY
0 ^0 0
2-2 Keys and Indicators
MOUTHPIECE
COIL CORD CONNECTOR
(OR CAP)
About the Handset
Page 24
<6$
Ni-Cd
Low Battery
Charge
Your
Batterg!
Battery Pack information
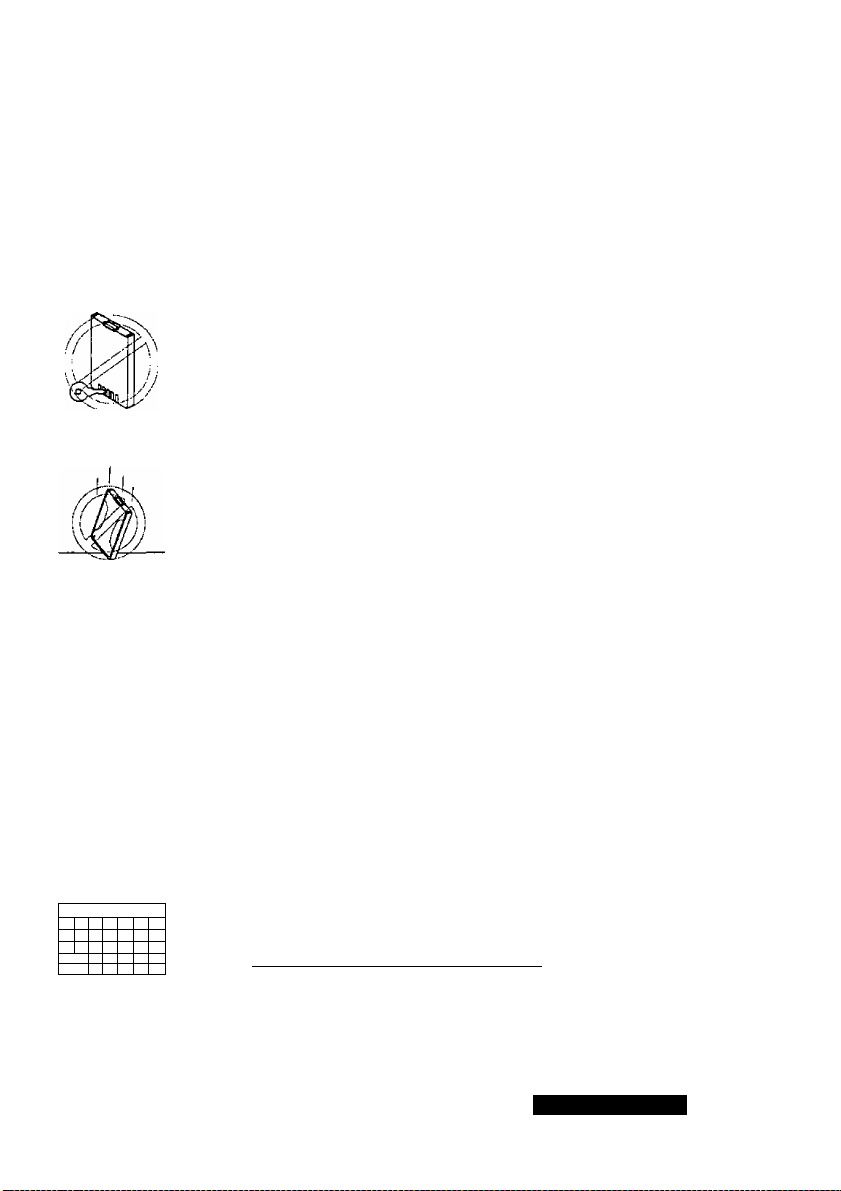
Observe the following precautions with your battery pack:
• Attention: This product uses a battery that can be recycled.
Under some state and local laws, it is illegal to discard the
battery into the municipal waste. Check with your local solid
waste officials for recycling or disposal information.
Do not short the battery contacts.
Avoid dropping or subjecting the battery to strong physical
shocks.
Repeatedly using the battery for short periods followed by
frequent charging reduces the battery’s charging capacity.
Instead, continue using the battery until the phone shuts
itself OFF.
- If battery charging capacity has deteriorated through such
use, it may be regained by using it until the phone shuts off
automatically, and then fully charging the battery. Repeat
this step several times.
- If using a fully recharged battery and the LOW BATTERY
WARNING tone sounds, contact your Panasonic Service
Center or replace your battery.
JUNE
i
>
Sn
ISUli ~TJ
2C ~7 'li U ‘Ji
iii| 'Ji
11
U
About the Handset
If you do not anticipate using the handset for long periods,
remove the battery from the handset and fully recharge the
battery at least once a month.
Battery Pack Information 2-3
Page 25

standby Time/Talk Time (typical)
Time Condition
Stand-By
Talk Mode
Duration (approx.) by Battery Type
SOOmAh
Nickel-Metal
Hydride
10 hours
80 minutes
900mAh
Nickel-
Cadmtum
(optional)
20 hours
160 minutes
How to Install/Remove the Battery Pack
To install the battery pack, perform the following steps
1 Place the handset face-down on a soft, protective surface
to avoid accidentally scratching the display window
2 Insert the battery into the back of the handset, aligning the
bottom tab of battery with the lower slot of handset case
3. Gently press the battery tn place until you hear it "click" into
place
4 Make sure the battery release is in the lock or "up"
position
2-4 Battery Pack Information *
About the Handset
Page 26
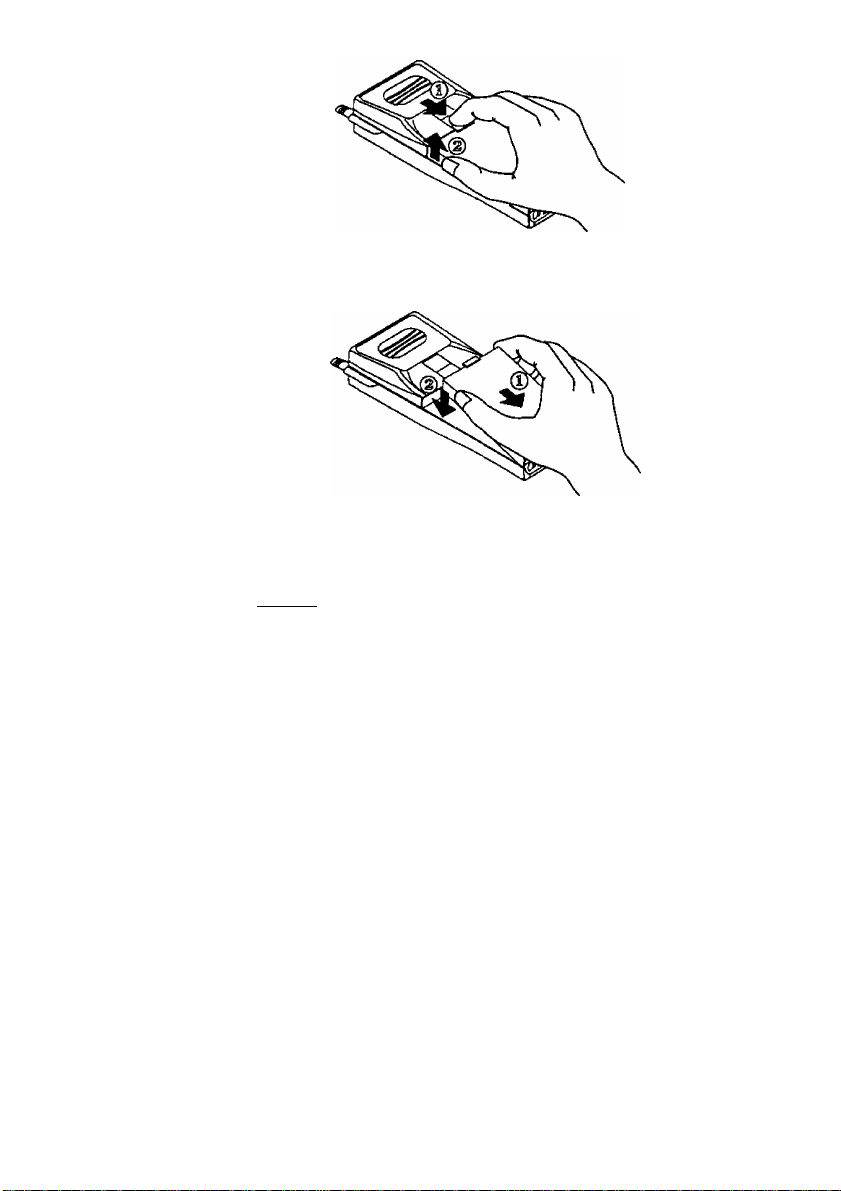
To remove the battery pack, perform the following steps
1 Place the handset face-down on a soft, protective surface
to avoid accidentally scratching the display window
2 Move the battery release to the "down" position
3 Gently lift the battery away from the back of the handset
Charging Procedures
The battery pack may be charged using one of three charger
•
units
• Travel Charger, EB-P10150
• Optional Rapid Charger, EB-P10151 (in Kit EB-911)
• Optional Handsfree Unit/Rapid Charger Cradle EB-J10139
(in Handsfree Car Mount Kit, EB-905)
About the Handset
Battery Pack Information 2-5
Page 27

I"
Regardless of the selected unit, always observe the following
charging precautions:
Only use the battery charging accessories approved by
Panasonic to maintain the full performance of your phone
and to avoid potential damage. Using attachments not
recommended or sold by Panasonic may result in fire risk,
electrical shock, or injury.
Panasonic is not responsible for damages caused by the
use of inferior accessories.
The battery may become warm while charging and remain
warm for a short time after charging has finished. This is
normal—do not consider this a malfunction!
Repeatedly inserting and removing a battery from the
charger within short time periods, may result in
overheating, ultimately shortening battery life.
Recharge batteries in well-ventilated places and in
temperatures between +41*’F to +104*F.
Avoid recharging batteries for long time periods (over 24
hours).
Never expose the charger to water, moisture, or extreme
weather conditions.
2-6 Battery Pack Information
About the Handset
Page 28
If the charger has been subjected to extreme physical
shock, do not attempt to use it. Instead, have it inspected
by your Panasonic dealer.
Do not remove the screws or open the charger. No userserviceable parts exist within the charger.
Disconnect the AC plug from the power outlet when not
using the charger.
Avoid using the Rapid Charger in places where heat
dissipation is blocked, such as on soft surfaces (towels,
blankets, etc.)
About the Handset
Battery Pack Information 2-7
Page 29

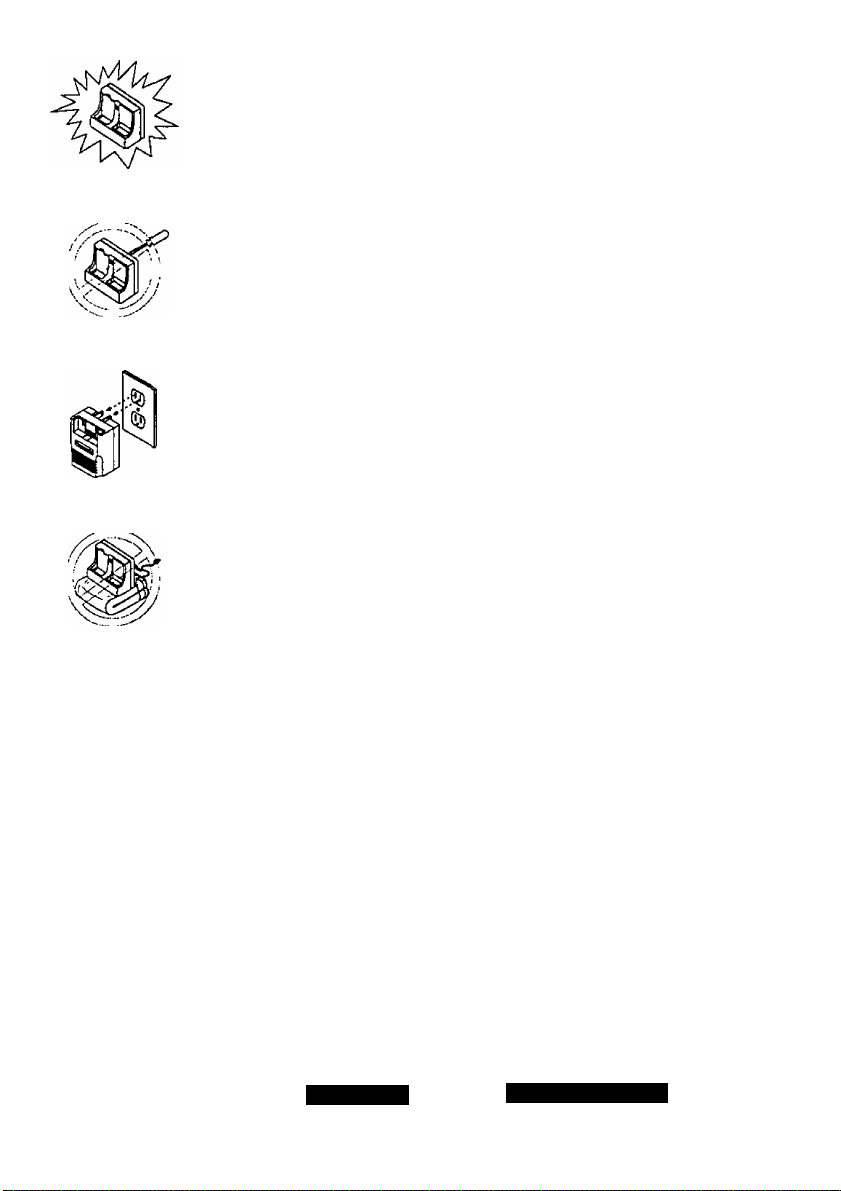
Travel Charger
The EB-P10150 Travel Charger "trickle" charges the battery to
full capacity in approximately 10 hours depending on the
surrounding room temperature
BATTERY
TYPE
Charging Time
SOOmAH Nickel-
Metal Hydride
10 hours
900mAH Nickel-
Cadmtum
10 hours
Tcf charge your battery using the Travel Charger, perform the
following steps
1 Open the prongs of the Travel Charger plug to the
horizontal position and insert the charger into an AC power
outlet
2 Remove the battery from the phone and insert the battery
into the Travel Charger by aligning the battery terminals
with the lower slot of charger case
2-8 Battery Pack Information
About the Handset
Page 30

3 Firmly press the battery in place until you see the charger
indicator lights If not, rennsert the battery into the charger
until the indicator comes "ON"
NOTE. The charging indicator may not light if the battery is
"deeply" discharged Allow a deeply discharged battery to
rest in the charger for a longer period The charging
indicator will light as the battery starts regaining its edacity
A Full charging takes about 10 hours When the battery is
fully charged, the charging indicator will go "OFF"
5 Remove the battery from the charger
NOTES*
Even under normal conditions, the Travel Charger and battery
become somewhat warm while charging
Charging automatically ceases and the indicator goes "OFF"
after approximately 10 hours To avoid interrupting this
charging cycle time, do not disconnect the charger from the
AC outlet until the battery is full charged
Charging time may vary depending on ambient room
temperature
About the Handset
Battery Pack Information 2-9
Page 31

How to Extend/Retract the Antenna
To extend the antenna, slowly pull the antenna by its tip out
and away from the base of the antenna barrel until it "clicks"
into place
To retract the antenna, grasp the antenna from its uppercenter portion and gently push the antenna back into the
antenna barrel until it "snaps" into place
2-10 Extend/Retract Antenna About the Handset
Page 32

Attaching the Carrying Strap
Attach the carrying strap to the phone through the strap hole
as shown in the following figure Place the long loop through
the smaller loop
Cleaning
Clean the handset with a soft damp cloth moistened lightly
with a mild dishwashing detergent and water To avoid
damage, never use petroleum-based cleaners or other harsh
chemicals such as benzine or thinner
About the Handset
Carrying Strap/Cteaning 2-11
Page 33

About the Handset2-12
Page 34

Operation
Powering On
Keypad Sequence
oaa
ODD
ana
□□a
DDD
Good
Morning'
000-123-4567
Ч
_______________
No Service
OFF/ON
i) (Ш)
1 - In handheld use, make sure the battery pack is fully
charged and properly installed
- In vehicle use, make sure the power supply cable
(Handsfree Car Mount Kit) or the cigarette lighter
cable (DC Adaptor Kit) is properly installed (see
appropriate manual) Most vehicles require having
the ignition switch in "ON" or "ACCESSORY" position
2 For handheld use, fully extend the antenna
3 Press (wH) key
4 Listen for the wake-up tone and observe the wake-up
display message The background of the display
window and the keypad will light up for seven seconds
every time you power ON the phone, or press any key
.
NOTES
• To change the wake-up display message, enter the (fcn)
command as described in detail on page 3-
68
Operation
If the message OFF/ON appears on the display, power the
handset OFF and then ON again If the message appears
again, contact your local Panasonic dealer
Powering On 3-1
Page 35

No Service
OaOOAM
Decs
Signal
5. In about 1 second, the wake-up display message
disappears and is replaced by the No Service
message, if No Service remains on the display for an
extended period, the handset is outside the service
coverage area. Move to another place where you can
make a call, or if your handset is programmed to
operate on two selectable numbers, check your other
number as a possible alternative.
6. When the display indicates one of the following
messages, the phone is ready for use;
08:00 AM
Doc 05
Signal =>“==
Full Lock
01:00 PM
Dec 05
• SIGNAL (within home area)
• ROAM N (non-wireline; outside home area)
• ROAM W (wireline: outside home area)
7. Note the ^ indication at the top right of
the display designates the received signal strength
levels from zero (minimum level) to five (maximum
level).
8. If any of the LOCK messages (Dial Lock, Send Lock,
Receive Lock, Theft Lock, Full Lock) appear on the
display, unlock your phone by entering the proper
"unlock" code. (See page 3-57 for Lock details.)
3-2 Powering On
Operation
Page 36

CDGDC+D
How to Make a Call
&CDCD
( )Гген)Сд^
Гт5ЕрГ) г ШАГТ 1 f L»CK 1
11 ||2«с||з^]
In Use
2224444
«Overflow»
>^011814
Keypad Sequence
ENTER
PHONE
NUMBER
SND
1 Enter the desired number by pressing the appropriate
digits on the keypad
2 Press
SND
key
3 Observe the display shows the In Use message to
indicate the phone is attempting to make the call
NOTES:
If you Ve made an error entering the number, briefly press
CciR j to dear the last entered digit, or hold down Ccir) until
the entire display dears and enter the coned number
The handset accepts 48 digits and 16 characters (Name
Tag} but only the last 24 digits and first 12 characters
appear on the initial display message When input exceeds
the limit, an Overflow condition occurs To display the
overflow digits, press (fch) , release and press (rew) again
holding It down to display the entire message In this
example, the right arrow indicates the beginning of the
number, while the left arrow indicates the end of the Name
Tag
Releasing the (fch) key returns the display to the last ten
digits entered
Operation
When connected, you’ll hear the other voice from the
earpiece Adjust the earpiece volume using the CJD
and CH)
When you’ve finished the call, press [end]
How to Make A Call 3-3
Page 37

Auto Retry
Signal
Auto Retry
08:00 AM
Dec 05
The phone redials the same number automatically (after
the re-order tone; see next page) if connection fails (carrier
system busy, low signal level, etc.). The phone redials
every ten seconds up to a maximum of 15 times without
any key operation.
To cancel Auto Retry redialing, press (or in
handsfree/car mount use, return the harii^et to the cradle).
NOTES:
Redialing automatically ceases if an incoming call i$
received during a call-repeating interval.
The phone does not redial if you reach a busy number.
if you enter into a conversation by using Auto Retry, a tone
will "beep" twice at the beginning of the call.
Automatic Redial
To manually redial and call the last number called, simply
press The most recently called number momentarily
appears on the display, and after pressing [^, is called
as indicated by the In Use message.
3-4 Operation
NOTE: To review the last number called, you may use the "Last
Ten Numbers Called" feature [5“1 and
isNol'
How to Make A Call
Page 38

Indicator Tones (with Unsuccessful Calls)
If a cal! you attempt to make on your handset is
unsuccessful, you may hear one of the following tones
INTERCEPT:
The Intercept tone ts a rapidly alternating high/low tone which
normally occurs because the phone has detected an error, or
ts otherwise unable to make the call
RE-ORDER ffast busy!:
A rapid dual tone (every l/4th second) when the phone cannot
make a call because of a busy channel within the coverage
area, when a call is terminated by the other party, or a call ts
dropped in a weak signal conditions
If you hear a re-order or intercept tone, press {emd] to stop
the tone However, if you wish to let the phone
automatically go into Auto Retry mode, do not press [e^
Operation
How to Make A Call 3-5
Page 39

How to Receive a Call
Keypad SeQuence:
ANY KEY
EXCEPT
(WR) &
END
1. With power ON and receiving an incoming call, you’ll
hear a ringing tone, and see a flashing Ring message
on the display. The entire display backlighting and
keypad flashes as well.
NOTE: With Escalating Ring Tone option ON, the ring tone
grows louder every few seconds if you do not answer
the call imrrjediately.
2. -Handheld Use:
Extend the antenna and answer the call by pressing
any key except (wr) or [gMoj.
-Handsfree/Car Mount Use:
Answer the call by pressing any key except (pwr) or
and talk into the handsfree microphone, or lift the
END
phone from the cradle and use the handset. To switch
from handsfree to handset mode, simply lift the
handset from the cradle. To switch from handset to
handsfree mode, first press and hold (Sjfgi. When the
handset displays the "HOLD" message, return the
handset to the cradle.
3-6 Operation
3. When you’ve finished the call, press
END
handsfree mode, simply return the handset to the
cradle.
How to Receive A Call
or in
Page 40

VCN 71 ==■===
Phone No 1
000-222-4444
< +, - or STO >
NOTES.
• To display your own phone number, use the Cfcn) [^^1
j!|** I command as described in detail on page 3-76
Signal
RCVD 1 Call
08:00P 12/05
If you do not answer a call, RCVD Call message shows the
number of calls received but not answered up to 99 calls
See page 3-10 for details
Operation
How to Receive A Call 3*7
Page 41

Powering Off
Keypad Sequence:
non
ooo
aan
ODD
ODD
Signal =■=’==
Horn Alert
01:00 PM
Dec 05
HOLD
U
1. Power off the handset by pressing and holding №) for
more than half a second.
2. In handsfree car mount use, press and hold (^) for
more than half a second, or turn the ignition switch to
either OFF or LOCK position (ignition OFF).
NOTES:
If you turn the vehicle ignition OFF without first pressing
(pwft) , the phone powers ON automatically the next time you
turn the vehicle ignition ON.
While conversing on the phone and turning the ignition
switch OFF, the phone wilt stay powered ON until you end
the call.
If Alert, Call Receive, or Received Call Indicator functions
are active after the ignition switch is OFF (but phone power
is ON), the display will indicate the particular function prior to
poweiing the phone OFF.
(WR)
3-8 Operation
Poweiing Off
Page 42

Additional Operations
Adjusting the Earpiece/Keytone Volume
Keypad Sequence:
To
Increase
Level
To
Decrease
Level
In Use
EarVol
L II IOD
Signal
HHKeyVol
L II IDD
Signal
HFKey Vol
L ll inn
1. Make sure a call is in process (dialing is finished and
the In Use or MUTE message appears on the display).
H
2. Adjust the earpiece volume up or down by pressing
OD or CH!) respectively. The number of black bars
indicate the present volume level (L for LOW, and H for
H
H
HIGH). In handsfree/car mount use with the handset
on the cradle, you’ll hear the audio from the handsfree
speaker. Adjust this level using the handsfree volume
control.
3. To adjust the keytone volume (produced when pressing
keys), make sure the In Use and MUTE messages ^
not appear on the display.
4. Press (3D or (3D to increase or decrease the volume.
As with earpiece volume, the number of black bars
indicate the present volume level (L for LOW, H for
HIGH, EAR VOL for earpiece volume, and HF KEY
VOL for handsfree key volume).
Operation
Additional Operations 3-9
Page 43

Signal
RCVD 1 Call
08:00P 12/05
Received Call Indicator
Keypad Sequence:
To clear:
ANY KEY
Received Call Indicator automatically informs you of up to
99 unanswered incoming calls in your absence by way of
the RCVD Call message.
When receiving a call while away from your phone, or if the
calling party terminates a call (or the call "drops" because of
a fading signal before you are able to answer), the handset
acknowledges and remembers the occurrence of these
recent incoming calls.
1. No key entries are necessary to activate this mode.
However, handset power must remain ON and Call
Receive feature (see page 3-89) must not be active.
2. If an unanswered call has occurred, observe the RCVD
Call message-on the display. The time and date show
when the most recent call was received. The number
of calls received but not answered appear at the bottom
of the display. The calling party’s actual number is not
displayed, nor does the phone store the number in this
mode.
3-10 Additional Operations
3. To clear the display, press any key,
NOTE: To recall the time of the last ten calls received but not
answered, use Caller's Memory feature.
Operation
Page 44

Mute
(^CDCD
ano
□on
□□□
□□□
Keypad Sequence
jj (S)
Mute function allows turning the mouthpiece portion of the
handset OFF dunng a call so that your voice is not
transmitted to the other party
1 To mute the mouthpiece with a call in progress, briefly
press
2 Observe the display shows the MUTE message while
the mouthpiece is muted
3 To cancel, press again
4 In handsfree car mount use, cancel Mute by placing the
handset onto the cradle and continue conversation with
the handsfree mic
Hold
Operation
Keypad Sequence
U & HOLD (mUte)
Hold function allows turning both the mouthpiece portion,
and the earpiece portion of the handset OFF during a call
This stops both your voice from transmitting, and the
caller’s voice from being heard
1 To activate Hold with a call in progress, press and hold
@jrg)
Additional Operations 3-11
Page 45

MUTE ==='
Hold
08:00 AM
Doc 05
2.3.Observe the display shows the MUTE and Hold
message white the mouthpiece and earpiece are muted.
The handset also generates a hold tone to both parties
while the hold function is active.
To cancel, press ^¡urg) again. In handsfree car mount
use. Hold function continues even after placing the
handset onto the cradle. To continue the conversation
using the handsfree mic, press
Dual Tone Multi-Frequency (DTMF)
DTMF (commonly known as touch tones) are sets of
unique tones generated when pressing a digit key (0-9), or
I ^ ] and f ^ ] keys. These tones are most commonly
used to access functions such as long distance access
codes, voice mail retrieval, and other services.
Send DTMF tones during a conversation manually by
pressing the appropriate digit keys.
NOTE: Make sure keytones are active or ”ON" (see page 3-72).
3-12 Additional Operations
DTMF Interval
When this option is activated by your dealer, the handset
generates a continuous DTMF signal as long as you are
pressing and holding the key.
NOTE: DTMF transmission takes piace regardiess of whether
Dial Lock (see page 3-57) is active or inactive.
Operation
Page 46

Flash Request
Flash Request allows accessing local phone system
features such as call waiting, 3-way calling, etc , if
available
To activate, press [snd] while a call is in progress and
follow your service provider’s instructions
NOTE: Please contact your service provider for additional
details
Operation
Additional Operations 3-13
Page 47

(ZDCZDCS
CD CD®
How to Enter Alphanumeric Characters
To take full advantage of the many additional features of
this handset, you must understand the process of entenng
alphanumeric characters and words For example, you
may wish to store a phone number with a corresponding
name (Name Tags) Additionally, you may wish to store
groups of numbers underneath a common heading (Group
Labels) The following sections describe the general
process of entering this information For typical Name
Tag and Group Label setup examples, see Appendix A.
Entering Letters/Numbers
CZDC^Cm)
nOD
ana
aaa
aaa
aaa
fALPH
Name^
fALPH
Cursor
ABCI
□
_____
_____
Keypad Sequence
jj ® dD (ZD CE) la Q (®i
1 Enter Alphanumeric Input Mode by pressing (wjh)
Observe the current input display mode appears in the
upper right-hand corner of the display
2 Use (W) to scroll between 3 possible display modes
Q Capital letters
B Lowercase letters
Numbers/symbots
>
.
D
Press C±3 or to scroll sequentially through the
characters one at a time Table 3 1 shows a complete
list of available input characters
3-14 How to Enter Alphanumeric Characters
Operation
Page 48

4, Press (~^ ] to enter the selected letter and automatically
move the cursor over to the next column
Table 3.1
Input Character List
INPUT MODE
Upper-case
CHARACTERS, DIGITS AND SYMBOLS
A
B C D E F
Letters
N 0 P
Q R S T u V w X Y
Lower-case a b c d e f
Letters
n
0
p q
Numerals/ 1 2
Symbols
*1
1
{ }
4
3
9
1
( )
& A
5 To enter a space between characters {or simply move
space
fALPH
ABC 1
^
_______
ES'
the cursor to the nght), press [ ^ j with no characters
currently selected However, do not attempt to enter a
"space" at the beginning of the line
To correct an entry mistake (or to simply move the
cursor to the left), press to move the cursor one
space at a time to the left until the cursor is on top of
the character in error
G H 1 j K L M
h 1
g
r
s t u V w X
5 6
7
8 9 0
+
_
-
$
< >
e ¥
k 1 m
J
/
z
z
y
■
\
[
%
=
Operation
For example, to change the letter "T" to "Z" as shown in
the sample displays, press several times until the
cursor covers the letter "T"
How to Enter Alphanumeric Characters 3-15
Page 49

7. Enter the new character (Z, in this case) by scrolling
with the m or CHD keys.
8. To delete characters one at time, press (cl^ . To
delete the entire entry, press and hold for about 1
second.
9. When you’re done making the entry, press .
3-16 How to Enter Alphanumeric Characters
Operation
Page 50

CZ)OC+D
CD CD®
aoD
Word List
Keypad Sequence:
Select
Desired
Letter
Press
0 to 9
ODD
□□D
□DO
□□□
rALPH
;a;
V
A(_PH,
AIRLINE
Your phone stores a large list of commonly used words in
memory (see Table 3.2) to simplify the process of entering
Name Tags and Group Labels. You may access the Word
List any time the ALPH message appears on the display. A
maximum of 10 words exist with any one single selected
character.
NOTES:
• You cannot add words to the existing list.
• Searching the Word List is only possible when the cursor
resides on the first letter of the word you're entering.
• If the sum of characters of the input word and the recalled
word from the list exceeds 16 characters, the last characters
of the recalled word are lost.
□
□
1. Verify that the phone is in ALPH mode.
j
2. Scroll to the first letter of the desired word. For
example, “A" when you wish to locate the word
"AIRLINE".
fALPH ,
AIRLINEill
Operation
0
____
3. Press any of the digits between to [^,|.
4. Scroll through the Word List using the (3D or CD)
keys until the desired word appears. (Alternatively at
this point, directly press
List described in Table 3^
5. Press I ^ j to select the word, or to delete the word
>
entirely, press Ccij}.
How to Enter Alphanumeric Characters 3-17
key according to the Word
Page 51

œ
X
о
ï
V
шЛ
KEYPAD NUMBER
m
э
>
■о
3-
Q>
э
с
3
<D
3.
О
о
3
ш
3
о
оГ
3
о
•о
Q
3
sr.
о
о
JD
а
1 2 3
А
АССТ.
В
ВАШ
С
CAS
D
DAH
Е
EAST
F
FAMILY
G
GARAGE
H
HAIRDRESSER
1
Ю
J
JAN.
К
KEY
L
IAS
M
MAR.
N
NET
0
OCCUPATIO N
P
PARKING
Q
ОТ
R
RATE
S
SAT.
T
TAXI
U
UNIO N
V
VEHICLE
w
WED.
X
хш$
Y
YES
Z
ap
4 5
ADDRESS
BANQUET BAR
CALENDAR CARRIER
DAY DEALER
EDUCATION EMERGENCY ENTREPRENEUR ETC.
FAX
GAS GENERAL
HOUOAY HOME
INC.
JULY JUNE
KILO
LAUNDRY LAWYER
MARKET MAY MEDICAL MEETING
NEW SPAPER NIGHT NO
OCT. OFF
PAY PERSONNEL
QTY QUALITY
RO. REF.
SCHEDULE SCHOOL
TECH
UNIV ERSITY URGENT USER
VENDOR V ET
WORK WEST
AFTERNOON AGENCY AIRUNE ANN IVERSARY
BEAUTICIAN BIRTHDAY eiDG.
CATEGORY CHARGE
DEBT DEC. DEPARTMENT
FEB. FINANCE FITNESS
GIFT GOV.
HOSPITAL нота
INCH
TEl£X
INFO INFORMATION IN N
LB.
OFFICE
PHARMACY
QUO TA QUOTATION QUOTE
RENT RENTAL
SECRHARY SEPT.
THEATER THU.
VIDEO VIP
LEGAL
NURSERY N ORTH
OK
PKW V,
CUY
EXAMPLE
aiGHT
GRAM
HR
LIMOUSINE
MID
ON
POUCE
RESORT
SPA
TRAIN
6
7 8
APRIL AUG.
BLVO. BOOK
CLUB CO.
OEPT on.
EXECUTIVE
FLORIST
GRATUITY GROSS
INSURANCE
LOAN
MM MON.
NOTE NOV.
OPEN
P.O, PRICE FT,
RESTAURAN T RETAIL
SOUTH ST.
TRAVa
EVENING
FBI,
INTRO
LOG
OTH ERS
TOW N
9
AVE, AVG.
BOROUGH BUSINESS
CON raiDtCE
OISTR
EXPENSES
FRIEND FT.
GUEST GUIDE
INVESTIGATE
LUNCH
CUSTOM ER
DOC TOR
EXTRA
INVESTMENT
мота MOVIE
NOV aTY
OUT
REV. RTE.
SUBJL SUN.
TRIP TUE.
01
0
о g!
а?
с W
« м
Page 52

Speed-Dial Memory
The Model HH950 uses a quick storage/recall method
called Speed-Dial Memory. This feature provides a method
of storing frequently used numbers and Name Tags, and
reoailing these numbers easily when needed. Each
memory block contains up to 48 digits of number data, 16
characters for name tags, and 12 characters for group
labels.
How to store Using Speed Dial
The following chart shows the typical method and
combination of entering and storing data in Speed-dial
Memory:
1. Enter number
2. Enter Name Tag (optional)
3. Press Csfo^
r p-Press
Group-J or CE:)
Press
MEMORY
or
Press
Press (STO)
NOTE:
In addition to the above displays.
Memory Map is also provided.
Press
®[7]
to
OPTION
Q WXT
^__*
STO <===
Group
Business
<+, - or STO>
STO
Vacant
. . . 34.6.8.
STO 03
Stored
« Mem. Map »
0:1111451189
1 :0123456789
2: 1123116781
(See "Storing by
Group Label")
(See “Storing by
Memory Location
Number")
(See "Auto
Memory Location")
(See "Storing by
Name Tag")
(See "Memory Map")
Operation
Speed-Dial Memory 3-19
Page 53

Storing by Memory Location Number
Keypad Sequence:
C^CZDCS)
aaa
STO =>■=="=
+ :Group
0-9,*: Direct
STO : Enter
STO
Vacant
...3 4.6.8 .
STO 93
ENTER
PHONE
NUMBER
The HH950 has the ability to store 200 Speed-Dial memory
numbers of which 99 are accessible directly using the [rcl
01 to 99 memory locations. The other 101 locations are
accessed directly using the [rcl] (alph) (recall by Group
Label) or [rclI FrclI (recall by Name Tag) functions.
NOTE: Do not attempt to store information in memory slot
1. Enter the desired phone number you wish to store.
2. Press (M) •
3. Select and enter the 2-digit memory location number
between 01 to 99.
For example, to store a number within memory location
number 93, first press and note the display now
shows a listing of the "nine" numbers which are
currently vacant. In this example, locations 93, 94, 96,
and 98 are vacant. Therefore, press
storage in memory location
93.
jj (STO)
location 00.
ENTER
2-DIGIT
NUMBER
(M)
to complete
3«,
Stored
3-20 Speed-Dial Memory
4. Record the number in Speed-Dial Index, Appendix B.
5. To escape from this mode, press Ccl^ .
Operation
Page 54

ST005 —
Stored
ST0 5_ =<=<===
Vacant
012 .. 5. . 89
NOTE: To recall, en/erffl^ and the 2-digit number as
described later on page 3-28.
Auto Memory Location
Auto Memory Location, as its name implies, automatically
selects the lowest available vacant memory location slot
and stores your number there.
1. To automatically store a number on the lowest available
memory slot, enter the desired phone number and
press (sfo) and Q .
2. To store on the lowest vacant memory location within a
block of ten locations, enter the desired phone number,
press (W), to , and H • For example, to
store on the lowest vacant memory location in the
series from 50 to 59 (50 on the left), press (W), ,
and Q .
3. To escape from this mode, press (clr) .
STO 5 =====
User's Mem Full
Operation
NOTES:
• When the message User's Mem Full appears on the
display, memory capacity is exhausted and will not accept
any additional information.
When the message All Occupied appears on the display, all
memory location slots in a block of ten locations are full.
You may replace an occupied location with your new name
and number (see Override Protection, page 3-23).
Speed-Dial Memory 3-21
Page 55

« Mem., Map »
0:1 111^ 511 89
1 :0123456789
2: I I23II 678I
Memory Map
Memory Map allows determining which memory location
slots are available in the Speed-Dial Memory when storing
new numbers.
1. To enter Memory Map mode, press and [ ^ ].
2. Observe the display shows the first 3 lines of the
memory map. The solid bar indicates a number has
already been stored in this particular memory location
slot. A digit, however, indicates that the slot is open. A
flashing number indicates the first available open slot
(04 in this display example). To store information at
this first open slot, press S .
3:0 1114 117 89
4:1 1234 567 19
5:0 1231 567 89
6:1 1234 567 89
7:0 1114 117 89
8:1 1234 567 19
9:0 1231 567 89
3. To scroll through the possible ten lines (0 through 9) of
the Memory Map display, press C±D or (HD •
4. Choose the memory location slot in which you wish to
store your information by entering the appropriate 2-
digit location number from 01 to 99.
3-22 Speed-Dial Memory
Operation
Page 56

ST093 —
'John Doe
'2224567
< STO or CLR'>
Override Protection
Override Protection protects you from storing new phone
numbers over an already occupied memory location slot
When attempting to store a new number over an occupied
memory location, the contents of the memory location will
flash on the second and third lines of the display
1 To escape at this point without storing the new number
and return to the previous step, press Cclr)
STO 93
2 To store the new number in this location, press (W)
Stored
3 To escape from this mode, press CciJ)
Storing by Name Tag
Keypad Sequence
ODD
f тиши 1 f ВАТТ 1 [ LOCK 1
I [filial]
f KMO 1 [ к TONS 1 rvWJALl
Storing numbers together with a Name Tag, allows you to
later recall those numbers by scrolling through each Name
Tag in alphanumeric order and recalling (see page 3-30 for
recall details)
While the new number is stored in this location, the old
number remains m memory without a memory location
slot number
Enter
Name
Tag
Enter ^^ ^
Phone CsfO^ (Sfi)
Number
____________
---------- -----------
Operation
Speed-Dial Memory 3-23
Page 57

Signal c
Joe Doe
1. To store phone numbers with a Name Tag, recall or
create a Name Tag by following the procedures
described previously. You may create your own Name
Tag, or use one from the Word List (see Table 3.2). Be
sure to press the ^lph) key when you’re done entering
the Name Tag.
Signal
Joe Doe
2224444
STO =—==
+, - :Group
0-9,*: Direct
STO : Enter
STO 93 —-
Stored
2. Enter the phone number.
3. Press .
4. At this point, to store the information also by memory
location slot number, enter the desired two-digit
Memory Location Number.
5. Othenvise, press tsfo).
6. To escape from this mode, press (M)
NOTE: To recall, enter [rcl| (3D / (3D as
described later on page 3-30.
3-24 Speed-Dial Memory
Operation
Page 58

storing by Group Label
Keypad Sequence:
i Enter
I Name
i Tag
(ALPH)
Enter
Phone
Number
U CM)CTDCM) (M)
Group Label feature allows storing information in up to
thirty different "groups" having customized group label
names. When you wish to recall data stored within a
Group Label, you simply recall the specific Group Label
first, and then search through the Speed-Dial Memory
within that group.
1. Verify the existence of, or create a Group Label by
entering (M) [qT”] and (see page 3-94 for
additional details). Press (cS) when completed.
2. Enter the desired alphanumeric information such as
Name Tags, phone numbers, etc., as described
previously on pages 3-14.
NOTE: To place "already existing" Name Tags underneath a
Group Label, use the Speed-Dial Memory Edit feature
(see page 3-33).
STO — ===
Group
Airline
< +, - or STO >
STO =====
Group
Temporary
< +, - or STO >
V
_______________
Operation
3. Press CM) and . (Observe the first Group Label
in alphabetical order appears on the display.)
NOTE; If no Group Labels are presently stored, the message
Temporary" appears.
/
Speed-Dial Memory 3-25
Page 59

fSTO
Airline
0-9,^
STO
: Direct
:Enter
____
___
4. Scroll through the Group Labels using the QD snd
keys. When you find the Group Label where you
wish to store data, press Csfo^ .
j
NOTE: At this point to store this same data also by memory
location number, enter the desired two-digit Memory
Location Number.
STO
\
_______
5. To save the data with this particular Group Label, press (|
once again.
Stored
6. To escape from this mode, press (c^ ,
NOTE: To recall from the main display, enter [rql] [rcl] 00 ^
C0) [rci) C±D / CE) fs«® page 3-31 for details).
3-26 Speed-Dial Memory
Operation
Page 60

Using Recall
The following chart shows the typical method of recalling
data in Speed-dial Memory:
Press CV)
RCL
00
Last No.
*
Scratch
tt
Callar -
“f
Press:
TMER
MEMOPIY
1
0
OPTIOH
OPTiM
9«ncv
Q WXY
Press Calph)
Press
RCL
Press:
MEMOnV
0
Press!*!
Press
E
RCL 21
ABC Comparig
to
2224444
RCL
ABC Ais
2224444
RCL ■==«
Group
Business
< + ^ - or RCL >
RCL 00 ===08:00A 12/05
0112345678
RCL * «==
3032224444
RCL tt =====
11;42A 12/05
(See "RecalUng by
Memory Location
Number")
(See "Recalling
by Name Tag")
(See "Recalling
by Group Label")
(See "Last
Number Memory")
(See "Scratch
Pad Memory")
(See "Caller's Memory")
NOTE:
In addition to the above displays.
Memory Edit mode is also provided.
With recalled memory content displayed:
Press (STO)
Operation
RCL 01 Edit
ALPH: Edit
CLR : Delete
STO :Exit
(See "Speed Dial
Memory Edit")
Speed-Dial Memory 3-27
Page 61

Recalling by Memory Location Number
CDCEDCD
□□a
r HMCiT 1 f *ATT A r LOCK 1
[l 1121113^1
r pww 1 r K TWiil r muALl
l4o^||5o.Jl6J^I
RC L2_ ==*=
Occupied
01 ...56 ...
RC L21
ABC Car Rental
2224444
Keypad Sequence:
I ENTER
RCL
1. To recall a Speed-Dial Memory using a Memory
Location Number, press i
Memory Location number from 01 to 99.
For example, to recall a number stored with memory
location 21 named "ABC Car Rental", press
A display message similar to that shown here
a^ears indicating which "2" series memory locations
contain data. For this example, note that locations
20, 21,25, and 26 contain data.
Press I to complete the 21 entry for memory
location.
2. To scroll through other occupied memory locations, use
the C±D and CH) keys. Pressing once moves the
dispiay to the next occupied memory location (in this
case, 25).
I 2-DIGIT
;NUMBER
and enter the two-digit
RCL
RCL
and
RC L25 =>==
Dry Cleaners
5558888
3-28 Speed-Dial Memory
Operation
Page 62

Signal
08:00 AM
Signal
Dec 05
NOTE: If no information is stored within any of the slots of the
required set of locations, the message "Non Occupied"
appears on the second line.
Super-Speed Dialing
Super-Speed Dialing allows dialing a number directly from
Speed-Dial Memory by merely entering a memory location
number and pressing $nd
1. To use Super-Speed Dialing, from a normal display
enter the Memory Location for the desired number. For
example, to access the contents of location 02, press
NOTE: If the memory location number starts wth zero, drop the
initial zero and enter the last digit. Enter both digits if
the first digit is 1 through 9.
Mn
2
In Use
2. Press jsNp] • Note the stored phone number temporarily
appears on the display.
2224444
In Use
08:00 AM
Dec 05
Operation Speed-Dial Memory 3-29
Page 63

CZ)CDaD
Recalling by Name Tag
Keypad Sequence:
jj (M) CE)CZ)
RC L21 ===.==
ABC Car Rental
2224444
RCL
S
RCL 32 ■=
Smith
8884444
1. To recall a Speed-Dial Memory by a Name Tag, press
jncLj and ^mj) - Observe the display shows the first
name tag found using alphabetical order.
2. Briefly press QE) to scroll through the information
whose name tag begins with the same letter. To scroll
forward through each letter, press and hold C3D to
display one letter at a time. Press CH) to scroll
backwards.
3. When you reach the letter starting with the name tag
you’re searching, release the C±D or keys. Note
the first name that begins with that particular letter
appears on the display.
4. Scroll through the information with the same letter by
pressing C+~) and CE!) •
3*30 Speed-Dial Memory
Operation
Page 64

CD(^Cr>
Recalling by Group Label
Keypad Sequence:
□@D
(SiSliS)
RCL
Group
Airline
< +, - or RCL >
RCL =>ca=i=]c
Group
Personal
< + - or RCL >
RCL
_
_____
1. To recall a Speed-Dial memory by Group Label name,
press
RCL
Group Label name found in alphabetical order.
2. Briefly press (3D or (3!) scroll through the Group
Labels.
3. When you reach the Group Label you’re searching,
press
RCL
RCL RCL
-
. Observe the display shows the first
RCL
_
____
J
RCL “
Alex
4. Scroll through the information with the same Group
Label by pressing C3 D and (3D •
2224444
Operation Speed-Diaf Memory 3-31
Page 65

RCL
Group
Temporary
NOTE: If a Group Label consists of only one label, while
scrolling the display shows a Temporary’ message, or
goes back to the original display.
3-32 Speed-Dial Memory
Operation
Page 66

CDCZ)CT3
Speed-Dial Memory Edit
CD CD®
Csto)( )CqjT)
f tWEK 1 f"ÜnD f LOCK 1
[i ll2iioll3D|
f №N0 1 r KTONil r VttUALl
onj [sCj [6i*wJ
RCL21 ==—=
ABC Car Rental
2224444
RCL21 Edit
ALPH:Edit
CLR : Delete
STO :Exit
Changing Memory Contents
The following steps describe how to edit the memory
contents of "already existing" Name Tags, phone numbers,
Group Labels, and Direct Memory Location numbers.
Keypad Sequence:
Edit i ^.
1 Dif
^^ 1 No
Name 1 CSTO)
Tag i
--------------
(^^^(^clr)
RCL (M) dfo) (ÄL^ 1
i Edit
i
-------------- i Edit
i Tel
i (STO; :Group
:
------------
: No
1. Recall the Memory contents to be edited (press rcl
i Ubel
and 01 to 99, (mJR). or I rcl I)- In this example, we’ve
used to recall Name Tag ABC Car Rental.
2. Press (sro^ .
RCL 21 Edit Q
3. Press (alph) for Edit function.
Name?
ABC Car Rental
Operation Speed Dial Memory Edit 3-33
4. Edit the name (if necessary) according to alphanumeric
entry procedures described previously on page 3-14.
Press (W) when complete.
Page 67

RCL21 Edit
Tel No?
2224444
5. Change the number (if required) using the (M) key and
re-entering the desired digits. Press (sro^ when
complete.
RCL21 Edit
Group?
BUSINESS
< +, - or STO >
RCL21 Edit
Direct No.?
< digits^ STO >
STO 93
Stored
6. Change the Group Name (if any) using the QD and
(HD keys. Press (sf^ when complete.
7. Edit the Direct No. (if any) by entering the new digits.
Press (m) when complete.
8. Press CM) to escape this mode.
3-34 Speed-Dial Memory Edit Operation
Page 68

Deleting Memory Contents
CD CD CD
C^CDC^
□@D
15-tj [6
tmm CLOCK o^tun
7fw* 8~Tw. 9 »flty
I#.
RCL21 =====
ABC Car Rental
2224444
RCL21 Edit
ALPH Edit
CLR -Delete
STO .Exit
Keypad Sequence
Recall
Data
to (M) CM) CM)
Delete
1 Recall the memory contents you wish to delete
2 Press
RCL21 Edit
ABC Car Rental
2224444
< STO:Delete >
RCL21 Edit
Deleted
Operation
3 Press cm
4 Delete the data by pressing ®
5 The phone automatically exits this mode after three
seconds
Speed Dial Memory Edit 3-35
Page 69

CD(ZDCID
Last Number Memory
(Display 10 most recently called
numbers)
Keypad Sequence:
□ □□
diaa
□DD
asa
RCL 00 =====
08:00A 12/19
2224444
MElktOfty
0
Last Number Memory feature stores the 10 most recently
called numbers in memory and maintains, along with those
numbers, a date and time log for the call. When the 11th
number is stored, the oldest number is automatically
deleted.
1. Press
2. Observe the last number, time, and date message
3. Use the C±Z) key to move back through the list of last
4. Use the CHD key to move forward through the list.
NOTE: The last call information remains in memory even when
RCL
[0 i lo J-
appears.
ten calls made.
the phone is powered OFF and then ON. but will clear
automatically when the phone enters the Dial Lock
condition (see page 3-67).
MEMOflY
0
(M)
3-36 Last Number Memory
5. Press (CL^ to escape this mode, or press [snd
the displayed phone number.
to call
Operation
Page 70

Scratch Pad Memory
Keypad Sequence:
To Store
ENTER
a
DIGITS
END
CALL
To Recall
jj @ s
Scratch Pad Memory allows using the keypad and display
as a "scratch pad" to enter and store numbers in memory
during a conversation.
1. To store numbers entered in the Scratch Pad, enter the
desired digits using the keypad.
2. The phone automatically memorizes the digits when
you END the call.
NOTE:* Remember as you enter digits during a conversation, the
key tones are sent to the party on the other end of the
conversation as well. To silence the keytone, use the
Cfcn) command (see page 3-72 for details).
When powering the phone OFF, the contents of Scratch
Pad Memory is erased.
RCL * ==
6668888
Operation
3. To recall the number stored in Scratch Pad, press
andH.
Scratch Pad Memory 3-37
RCL
Page 71

CDCZDOD
D®0
Caller’s Memory
Keypad Sequence:
J
* ' ''
-
. #,
/j
----RCL
C±3
□□a
aaa
ana
OOB
RCL #
08:00A 12/05
This feature allows reviewing the time of up to the last 10
calls you have received but not answered. When you
receive more than 10 calls, the oldest number is deleted.
1. To use Caller's Memory, press [rcl] Observe the
last caller’s time and date stamp appears.
2. Press and keys to scroll through the list of 10
calls received but riot answered.
DTMF From Memory
Keypad Sequence:
n
RCL
MEMORY
LOCATION
tp1 to 99) i
CM) SND
This feature allows sending DTMF tones from Speed-dial
memory location number.
3*38 Caller's Memory/DTMF From Memory
Operation
Page 72

RCL76 -=
12345678
1.
location number. Observe the digits appear on the
display.
2. Press and SND keys. The phone automatically
sends the displayed number with DTMF tones.
rclI and enter the memoryTo send DTMF tones, press
Prefixed Dialing
Keypad Sequence:
To store/recall:
-
---------
j ENTER i
jJCED
iOESIREDl
i DIGITS ;
CD
Prefix Dialing allows storing the prefix of commonly-dialed
numbers (area codes, common system prefixes, local
system access codes, etc.) into the handset for later recall
by merely pressing CT) . Prefixes may be up to 32 digits
long.
'
RCL
Signal
0-
Operation
1. To store a prefixed dial, first verify that no digits are
presently entered in the display, and that the handset is
not in a Dial Lock condition (see page 3-57).
2. Press (~p~). Assuming no previous prefix has been
entered, observe the "0-" display message.
3. Enter the desired sequence (up to 32 digits) and press
to store this prefix into memory. In this example,
RCL
we’ve entered 1 2 3 as the prefix.
Prefixed Dialing 3-39
Page 73

fRCL -
01-99 Direct
ALPH None
RCL
\
_______
Group
Signal ===
J
4. Press (cLR^ to escape this mode.
5. To later recall a stored prefix, make sure the display is
clear and press QD -
123-4567
6- Enter the remainder of the number using Speed Dial
Memory feature.
7. Press sND to complete the call.
NOTE:* If the sum of the digits in the prefixed dial and the
entered (or recalled) number exceeds 48 digits, the last
digits of the number will be lost
If a number already appears on the LCD, pressing C p )
displays a "P" message at the end of the number for
Pause Dial (see page 3~41).
3-40 Prefixed Dialing
Operation
Page 74

Pause Dial
With special phone services such as long distance access
codes, voice mail, and other services, you may find it
necessary to dial several groups of digits with short wait
times between the groups to allow the system time to
respond. Pause Dial simplifies this procedure by allowing
you to store and dial up to ten different total sequences of
numbers. Pauses, programmed between the digits, allow
adequate response time between the various dialing steps.
Proceeding from a "pause" simply requires pressing the
key.
SND
For example, suppose you wish to access your office voice
mailbox from your handset. With typical voice mail
systems, this requires the following steps:
• Dial your office phone number
• Access your voice mail system extension number
• Enter your personal password...and so on.
Using Pause Dial, you can simplify this operation by
programming the phone to automatically dial all of the
necessary digits, and enter pauses where appropriate to
allow the voice mail system time to complete the various
stages of processing.
Assuming you've properly programmed your phone for
Pause Dial, this procedure might operate as shown in the
following table:
STEP
Dial Office Number
Access Voice Mail extension
number
Operation
KEYPAD ENTRY/RESPONSE
• Press
• Enter proper memory number (01 to 99)
• Press ra
• SysternPauses
* Press ra
• SysternPauses
Pause Dial 3-41
Page 75

STEP
KEYPAD ENTRY/RESPONSE
Enter Personal Password
The following sections describe how to program and use
• Press ra
• System Pauses
Pause Dial.
How to Program and Use Pause Dial
CD-
Signal
2224444P111P
4. Repeat step 3 as many times as necessary to complete
the entry. The Pause Dial sequence may contain up to
48 digits (including "P”s).
333P444
5- To store this pause dial sequence into memory for later
recall, press CM) and enter the 2-digit memory slot
location number between 01 to 99.
6. Press [snd] to begin making a call using this Pause Dial
sequence. Wait for initial connection of the call.
7. Each time the handset encounters a "P" for pause,
press [sfipj to continue the entry process.
3-42 Pause Dial Operation
Page 76

RCL10 «====
1234P5678P
9101112P222
NOTES;
• During initial Pause Dial programming, if you press C p
when no dialed number is presently entered and displayed,
the current Prefixed Dialed number appears on the display.
If SO desired, you may program the Pause Dial sequence by
combining several Speed-Dial memory sequences instead of
entering actual numbers. To do so, press
previously programmed memory location number (01 to 99),
press C~P~^, press
and so on repeating this procedure as necessary.
, enter memory location number,
RCL
RCL
enter
Operation Pause Dial 3-43
Page 77

Press ( FCN^)
Function Key Operation
Using the Function Guide
FCN_ ™==™ Impress
*■ Messaging —U
1 : Call Timer
2:Bat'tery _
—И
. Press
Press m
FCN_ =
3 : Security
4 : Ringing —
5 : Key Tone
----
И
TMER
1
Press
Press
Press C + )
Press C + )
Press
ВАТТ
2 ABC
LOCK
3 WA
FCN*
1 : CallBack 3
2 : Short Msg 5
3:V.Mail 7
4|, , ■ I ■ N
FCN 1 «===
Last Timer
12min 34sec
< +, - : Scroll >
FCN2_ ====
1 :Batt Meter
2 : Pace Beep
FCN3_
------------
1 : Lock Level
2 : Dial Limit
3 : Mem Secret
FCN3_ —===
4 : The'ft Lock
5: Master FCN
6 : Theft Code
FCN4_“==
1 : Ring Voi
2 : Ring Tone
3 : Escalating
^See "Enhanced
Features, Optional")
(See "Call Length
Timer FCN1")
(See "Battery
FCN 2")
(See "Security
FCN 3")
(See "Security
FCN 3")
(See "Security
FCN 3")
(See "Ringing
FCN 4")
Press C+D
Press
3*44 Function Key Operation
(See "Auto Answer")
(See "Keytones On/Off
FCN 5")
Operation
Page 78

Press Q3
fcn_ ===== *
6 : Visual - -J
7:Sgstem --i
8 : Clock —
Press
FCN6_=°°=
1 : Wakeup Dsp
2 : Backlight
3 ; Dspi Color
(See "Display FCN 6")
Press;
Press
CLOCK
8 ^
+ Press C+3)
Press ( + )
FCN_ =
9 : Option
0 : Memorg
FCN : Overflow-
1/
Press
9'
Press
Press and
hold Cfcn)
Press QZ)
Press SND
FCN7_ «==
1 : Phone No.
2 ; A/B Select
FCN 8---------
1 : Clock Set
2 : Auto RCL
3 : Auto On
FCN 8 ===■
4 : Auto Off
5 : Safetg TMR
FCN9_ ==“
1 :Ca11Recv
2 : Horn Alert
FCN 0_
1 : Mem Check
2 : Crp Label
< < Overflow > >
RCL 16“=“
0112345678
(See "System FCN 7")
(See "Clock FCN 8"}
(See "Clock FCN 8")
(See "Vehicle Use
Options FCN 9")
(See "Memory FCN 0")
(See "How to
Make a Call")
(See "DTMF
From Memory")
Operation Function Key Operation 3>45
Page 79

Enhanced Features (Cellular System Optional)
Because the HH950 uses "extended protocol messaging",
several additional cellular features are available including:
• Call-Back Number - a digital page (permits convenient
call back)
• Short Messages - allows access to messages received
from cellular service provider
• Voice Mail Status - shows number of voice mail
messages received from cellular service provider
These features operate over a technology known as
Narrow-Band AMPS (or NAMPS), and may be offered by
your cellular phone service provider. Please contact your
service provider for additional details not covered in the
following discussions.
CIDCEDCS
CZ)Œb)(ç^
□□□
DDD
SCDCD
3-46 Enhanced Features
Call-Back Number (CLI)
Keypad Sequence:
_PCM)Q[3S fsWDÌ /(ÇLR)
Call-Back Number feature displays the last 10 digital
pages. This provides a convenient method of recalling the
numbers and easily making return calls if so desired.
Since Call-Back feature is always active when the phone is
powered ON, the phone automatically sounds one beep
tone and displays one of the following messages every
time a Call-Back Message is received:
This display appears when the phone has received only
one Calt-Back Message, and no other enhanced feature
messages (Voice Mail, Short Message, etc.) or
/conventional cellular phone calls. In this condition, the
Operation
Page 80

Signal =====.
02:18P 12/05
Call Back
2224444
message contains a time/date stamp and up to a 12-<iigit
(32 digits are possible) message. If the message is a
phone number, you may press [snd] to make a call to that
number. Otherwise, this message remains on the display
until you press any key (except (wr)).
Signal =■=====
02:ISP 12/05
Call Back
412345678987
Signal i=ic=ii=M=iiz=i
RCVD 1 Call
02:18P 12/05
FCN*:Msgs
If the message is greater than 12 digits, a display overload
indicator appears as shown here. This display, for
example, shows the final 11 digits of the number. Press
(W) j!)” I (as described later) to read ttie initial digits.
This display appears when the phone has received one or
more Call-Back Messages along with other enhanced
features messages and/or conventional cellular telephone
calls. This display example shows that 1 cellular call has
been received, as well as one or more enhanced feature
messages as indicated by the "FCN*:Msgs" line.
To recall multiple Call-Back messages, perform the
following steps:
1. Press (fc^ fjT] and observe the following display:
NOTE; The number to the right of "1: CallBack” indicates the
1 : CallBack 3
2:ShortMsg 0
2. Press ™ key to select CallBack. Observe the most
FCN*3=«“°=
09:15A 12/05
6668888
number of messages received since you last entered this
particular menu. Each time you press ”1” for CallBack,
the Callback number column resets to ”zero” the next
time you access this menu.
recent Call-Back Message appears on the display. This
display holds up to ten Call-Back Messages with the
newest message displayed first. To scroll through the
ten possible messages, use the (3D and keys.
Operation
When you’re done reading the message, either press
3.
to make a call to the displayed number, or press
SND
(ciJ) to exit.
Enhanced Features 3-47
Page 81

CDCZKS
Short Message
Keypad Sequence:
□aa
□(Eia
aao
aaa
EJdUd]
Signal ===.==
02:18P 12/05
Message:
Call home
Signal
RCVD 1 Call
02:18P 12/05
FCN *: Msgs
CED
03
Short Message feature allows recalling and displaying
actual short messages (up to 14 characters long) from the
cellular service provider system base site.
Since Short Message feature is always active when the
phone is powered ON, the phone automatically sounds fwo
beep tones and shows one of the following displays every
time a Short Message is received:
This display appears when the phone has received only
one Short Message, and no other enhanced feature
messages (Voice Mail, CLI, etc.) and/or conventional
cellular calls. In this condition, the message contains a
time/date stamp and a 14-character message. This display
remains until you press any key (except Cpwh)).
This display appears when the phone has received one or
more Short Messages along with other enhanced features
messages (such as Short Messages and CLI messages)
and/or cellular calls. This display example shows that 1
cellular call has been received, as well as one or more
enhanced feature messages as indicated by the
"FCN*:Msgs" line.
(M)
To recall multiple Short Messages, perform the following
FCN* =====
steps:
1 : CallBack 0
2:Shor'tMsg 3
3-48 Enhanced Features Operation
1. Press (M) (3 and observe the following display:
NOTE: The number to the right of "2: S/iorlMsg" indicates the
number of messages received since you fast entered this
particular menu. Each time you press ”2” for ShortMsg,
the ShortMsg number column resets to "zero" the next
time you access this menu.
Page 82

FCN *2“““==
09:15A 12/05
CALL
OFFICE
FCN
09:15A 12/05
BRIGHT AWAY
2. Press [2«] key to select Short Message. Observe the
most recent Short Message appears on the display.
This menu holds ten Short Messages with the latest
message displayed first. To scroll through the ten
messages, use the fT~) and O keys.
NOTE: If your message is longer than allowed display area, a
display overload indicator arrow appears. In this
example, the left arrow indicates more information
precedes this screen. To display the previous screens,
press i — j. To move forward through the screens,
press C±D-
FCN*2°—™
09:15A 12/05
CALL
OFFICER
3. When you’re done reading the message, press (or) to
exit.
Operation
Since Voice Mail feature is always active when the phone
is powered ON, the phone automatically sounds three beep
Enhanced Features 3-49
Page 83

Signal ==>==>=.==
02;18P 12/05
Voice Mail:
2224444
Signal <==>=«=«=
02: 18P 12/05
V.Mail: URG!
2224444
Signal i=3i=ii=ic3=j
RCVD 1 Call
02:18P 12/05
FCN * : Msgs
tones and shows one of the following displays every time a
voice mail message is received:
This display appears when the phone has received only
one Voice Mail message, and no other enhanced
messages (Short Messages, Call-Back Messages, etc.)
and/or conventional cellular calls. In this condition, note
the message contains a time/date stamp and a message.
If the message is a phone number, you may press snd to
make a call to that number.
This display appears when the phone has received one
Voice Mail message along with the URG! message, and no
other enhanced messages and/or cellular calls. Similar to
the previous display, the message contains a time/date
stamp, and a message. If the message is a phone
number, you may press [snd to make a call to that number.
Either of these displays appear until you press any key
(except (w^).
This display appears when the phone has received one or
more Voice Mail messages along with other enhanced
features messages, and/or cellular calls. This display
example shows that 1 cellular call has been received, as
well as one or more enhanced feature messages as
indicated by the "FCN*:Msgs" line.
FCN *
1 : CallBack 0
2:ShortMsg 0
3 : V. Mail 3
3-50 Enhanced Features
To recall Voice Mail status messages, perform the following
steps:
1. Press (FCN^ and observe the following display:
NOTE: The number to the right of "3: V.Mail" indicates the
number of messages received since you last entered this
particular menu. Each time you press "3" for Voice Mail,
the V.Mail message number column resets to "zero" the
next time you access this menu.
Operation
Page 84

FCN*1-=—“
09:15A 12/05
01 URGENT!
2224444
FCN * 1=====
09:15A 12/05
03 Messages
2224444
FCN*1====-
09:15A 12/05
2224444
2. Press [3^] key to select Voice Mail. Observe the most
recent Voice Mail status message appears on the
display. (Depending on your cellular service provider,
one of these 3 may messages appear.) This display
holds only one Voice Mail message at a time, and
therefore, overwrites the old message each time you
display a new message. In the first example, the 01
indicates that one Voice Mail message awaits retrieval.
3. When you're done reading the message, press (ojj to
exit, or if the message is a phone number you wish to
call, press SND •
Operation
Enhanced Features 3*51
Page 85

OQÖI
Call Length Timer (FCN 1)
Keypad Sequence:
поа
(гюа
П1 II I
ООО
ООО
(Ш)
To reset
Call Length Timer displays the length of time of single
phone conversations, as well as the total amount of time
the phone has been used. Five different timer modes are
provided:
• Last Timer - shows elapsed time during most recent
• Num 1 Timer - shows total elapsed time of the first
• Num 2 Timer - shows total elapsed time of the second
• Total Timer 1 - shows total elapsed time for all calls
• Total Timer 2 - shows total elapsed time for all calls:
TIM ER
1
call; also shows "talk time" of the cali in
progress, updating once every ten
seconds
phone number (of two selectable
numbers).
phone number (of two selectable
numbers).
resettable timer
( + )
CZD
NOTES:
3-52 Galt Length Timer (FCN 1)
• Displays talk time of both making and receiving calls
• Only Timer 2 may be reset (not Timer 1)
• Last Timer does not display more than 99 minutes
and 59 seconds, even vv/tfi a call still in progress
which exceeds this amount
• Elapsed timers reset to 000 hour and 00 minutes after
reaching 999 hours and 59 minutes
• To cancel Timer Mode anytime, press (Ж).
Operation
Page 86

FCN 1 ===’=='
Last Timer
12min 34sec
< + ^- , Scroll >
To access timers, perform the following steps
1 Press CM) ['“* j Observe the Last Timer message
appears on the display
FCN1
NUM1 Timer
123hr 45min
< +, - : Scroll >
FCN 1 =3=>Dt=5C=3
NUM2 Timer
234hr 56min
< +, - • Scroll >
FCNI
Total Timer 1
50hr 25min
< + ^ - Scroll >
fFCNI =====
Total Timer2
45hr 15min
< + . - or 0 >
2 Press rr~) to select NUM 1 Timer
3 Press C±3 again to select NUM 2 Timer (if applicable)
4 Press C±D again to select Total Timer 1
5 Press r+~) again to select Total Timer 2 (To reset,
press )
FCNI
6 Press CM)
Total Timer 2
Reset
< STO . Reset >
Operation Call Length Timer (FCN 1) 3-53
Page 87

FCNI =.=<==
Total Timer 2
OOOhr OOmin
Reset
7. The phone automatically exits this mode after three
seconds.
CDC^dD
C
STO^ c FCH^
[TDl^O
□aa
aoo
□□o
21
(fiCN
Meter
Batt
E HDD F
< CLR : Exit >
V
___
C
clr)
Battery (FCN 2)
Battery Level Indicator (Handheld Use Only)
Keypad Sequence:
BATT
(M)
2 ABC
'
______
Battery Level Indicator checks the remaining battery pack
power. Battery power level displays in 4 bars between E
(empty) and F (full).
1. Press CM) [g (^.
2. Observe the display shows black bars to indicate the
remaining battery power level.
3. To exit this mode, press (cU^ .
J
,
" TtNIEn
1
(CLR)
3-54 Battery (FCN 2)
Operation
Page 88

Pace Beep
Keypad Sequence
■■
....
.
ВАТТ
ВАТТ
jj ®
2 ABC
Pace Beep sounds a short tone once every minute during a
conversation to help you keep track of the length of your
call
2 ABC
■
§ CM)
FCN22-““°=
Pace Beep
Off
< +, - or STO >
FCN22“™=
Pace Beep
On
< +, - or STO >
FCN22«=
Pace Beep
On
Set
1 Press ГгогГ)
2 Observe the display shows the current setting
MTT
2
3 Press CE> or CH) to toggle the selection On or Off
4 When the desired setting appears, press (sra)
5 The phone automatically exits this mode after three
seconds
Operation Battery (FCN 2) 3-55
Page 89

Low Battery
Charge
Your
Battery!
Low Battery Alarm
When battery power level reaches the "zero" bar (no bars
filled), the display flashes the Low Battery warning
message and sounds a one-second high tone every 6
seconds. If ttiis occurs, immediately power the phone OFF
to reduce battery power loss any further. Otherwise, the
battery may fully discharge (zero bars) and the phone
automatically power OFF and will not be capable of
performing any normal functions, including power up.
If you don’t have a spare battery pack, recharge the battery
(See page 2-5). However, if a spare battery is available,
remove the battery pack and replace it with the spare.
NOTE: When the Low Battery indicator tones sounds, you can
replace the battery with your fully charged spare without
interrupting your call in progress, as long as you
exchange it within a four-second period or less.
3-56 Battery (FCN 2)
Operation
Page 90

CDCZ)Œ)
Security (FCN 3)
CDCDCD
DDCD
S(^[^
r fmiO 1 ÎKTOicl r muAt 1
|4o.]|5^ll6->.|
(EIDO
□□□
Signal =.=.==
Full Lock
08:00 AM
Doc 05
Lock
CAUTION: Be sure to obtein the proper unlock code before
activadng any lock functions!
Keypad Sequence:
Lock feature allows you to electronically "lock" the phone to
limit others from making and receiving unauthorized calls.
Five lock types are provided:
• UNLOCK - No restrictions
• DIAL LOCK - Calls may ^ be dialed directly, but
may be made from phone memory (00 to 99), or by
redialing the last call made from memory.
• SEND LOCK - ^ calls may be made, but calls may
be received
' FULL LOCK - № calls may be made, or received
• RECEIVE LOCK - Calls may be made, but not
received.
If any of these lock features are active, your phone
indicates the selection on the display immediately after you
power ON.
Regardless of the lock setting, (except Theft Lock, see
page 3-61) you may still make emergency calls such as
911 (if available in your area). However, emergency
numbers are normally programmed by your dealer.
Therefore, consult your dealer for emergency number
configurations.
NOTES:
• To get unlimited access to your phone, "unlock" your phone.
• The default lock code for your phone is factory set to 0000.
• To set a lock code, see page Z-Q7.
• If you enter an incorrect lock code, the phone automatically
exits the lock mode and returns to the normal operating mode.
Operation Security (FCN 3) 3-57
Page 91

To select a Lock setting:
FCN31===
Lock Code?
FCN31c:--.-==.=.
Lock Level
Recv Lock
< +, - or STO >
FCN31-=--
Lock Level
Recv Lock
Set
1. Press (M) [TH •
2. Enter your lock code and observe the display shows the
current lock setting.
3. Press C3D or CH) to toggle through the various
possible selections-Unlock, Dial Lock, Send Lock,
Full Lock, and Recv Lock.
4. When*the desired setting appears, press CM) •
5. The phone automatically exits this mode after three
seconds.
Signal ====
Dial Limit
08:00 AM
Dec 05
3-58 Security (FCN 3)
Dialing Digits Restriction
Keypad Sequence:
;EMTER; ( — ,
BATT
jJcM)
LOCK
3 BiF
2
- .
Dialing Digits Restriction feature limits the maximum
number of digits (between 1 and 31) which may be
successfully entered into the phone. For example, if setting
the maximum number of digits to seven, long distance calls
are not possible since greater than seven digits are
required when making a long distance call. Emergency
numbers, however, may still be called regardless of the
limit setting.
: >=<(ST0^:DIGITS ;Csf^
¡CODE ;( to 31;^
---------------------
Operation
Page 92

If attempting to make a call which exceeds the restricted
digits, a Dial Limit message appears for three seconds.
FCN32
-------------
Dial Limit
None
< +, - or STO >
FCN 32 =====
Dial Limit
Select
< +, - or STO >
FCN 32 =====
Dial Limit
12 digits
<digits,STO >
FCN 32 ===■
Dial Limit
12 digits
Set
1. To set the digit dialing limit, press (reS)
enter your lock code.
2. With no dial limit currently set, the message "None"
appears on the display. However, if a Dial Limit is set,
the message "Select’ appears.
3. Press C±D or O to toggle through these two possible
seiections—None or Select.
4. To leave the Dial Limit set to none, press ('sfo^ with
None selected on the display, and exit this mode by
pressing (cE) •
5. With Select, press (M) • Observe the current Dial Limit
appears on the display.
6. Enter the desired digits between 1 and 31.
7. Press fW) again to store the change to memory.
8. The phone automatically exits this mode after three
seconds.
and
Operation
SecuHty (FCN 3) 3-59
Page 93

Memory Secret
Keypad Sequence:
LOCK
LOCK
enter C - ) ^
jjCM )
30EF
I LOCK : ( ST O )
3 OEF
¡CODE : (^jT)
Memory Secret function restricts access to memory content
using three different settings:
• Open - Memory accessed and data stored freely
• Read Only - Memory may be read, but data may not be
revised, or new data stored
• Close - Memory may not be accessed (except for
Scratch Pad and Last Number memory).
If attempting to access memory with Read Only or Memory
Close active, a Mem Secret message appears for three
seconds.
-----------------------
V
FCN 33-=c
Lock Code?
FCN 33======
Mem Secret
Reed Only
< +,- orSTO >
FCN 33===.
Mem Secret
Read Only
Set
1. To set the Memory Secret, press (TctD
3«»
and
enter your lock code.
2. Press C±3 or CHD to toggle through the various
possible selections-Open, Read Only, Close.
3. When the desired setting appears, press (M) ■
4. The phone automatically exits this mode after three
seconds.
3-60 Security (FCN 3)
Operation
Page 94

Theft Lock
Keypad Sequence:
EMTER: 3
№NQ
(M)
P
LOCK
4 OHI
CODE : C + ;
Theft Lock function allows totally disabling the phone to
eliminate the possibility of unauthorized use. Theft Lock
function may be set either ON or OFF. When ON, the
Theft Lock message appears on the display immediately
after powering ON. A theft tone "buzzer" will also sound
for ten seconds.
To override the Theft Lock feature, enter ycur Theft or Lock
code within ten seconds of the Theft Lock message
appearing on the display. If you miss the ten-second
window, power the phone OFF and then ON and try again.
In handsfree/car mount use only, the phone will
automatically proceed in making a call (from a formerlyentered number) after the ten second period. This may be
helpful as an alarm to you if you are away from your phone
and an unauthorized person attempts to use your phone.
Simply enter the number where you can be reached and
the phone will automatically place a call to that number if
an attempt is made to use your phone.
ENTER
NUMBER
(M)
Operation
When you or the called party answers, an Intercept tone
begins and continues for 50 seconds after which the call
terminates. In addition, if Horn Alert feature is active, the
horn or headlights will activate after the initial ten-second
period.
NOTES:
• Set the Theft Code (see page 3-66) before setting the Theft
Lock Condition.
• If Dial Lock, Send Lock, Full Lock, or Receive Lock is active,
the display shows the particular lock setting after overriding
Theft Lock.
• With Theft Lock active, emergency override is disabled. In
other words, emergency calls cannot be made when Theft
Lock is active.
Security (FCN 3) 3-61
Page 95

1. Set the Theft Lock code number according to the
procedures described on page 3-66.
FCN 34==c
Lock Code?
FCN 34™—
Theft Lock
On
<+,- or STO >
FCN 34-Tel No?
2224444
FCN 34™
Theft Lock
On
Set
2. To activate Theft Lock, press (M) [|
your lock code. Observe the current setting appears on
the display.
3. Press OD or CED to toggle through the two possible
selections—On or Off. To activate, select On.
4. For car mount use only, enter 3 (or more) digits as a
desired forwarding phone number.
5. Press to save the setting in memory.
6- The phone automatically exits this mode after three
seconds.
and enter
3-62 Security (FCN 3)
NOTES:
If an alarm sounds when Theft Lock is displayed, stop the
tone by powering tfje phone OFF and then ON again and re
entering your lock code.
You can make a call using the pre-determined number, even
if it exceeds the Dialing Digits Restriction feature (see page
3-58).
Operation
Page 96

Master Function
Keypad Sequence:
FCN 35
Master FCN
Set
< +, - or STO >
FCN 35-—==
Master FCN
Reset
< +, - or STO >
FCN 35=====
Master FCN
Clear
< +, - or STO >
(M)
Master Function allows setting levels and conditions of
functions such as volume level, ring tone, and numerous
others as "default" settings each time you power ON.
Master Function provides three different option settings:
• Set - Current function settings are stored to memory
as "master" function
• Reset - Current function settings change to agree with
master function as set with specific function set
• Clear - Each function is set to center level, Off, or
original factory default value (See Table 3.3).
1. To select desired settings, press i^| [^1 and
enter your lock code. Observe the current setting
appears on the display.
2. Press r+~) or CH) to toggle through the various
possible selections-Set, Reset, and Clear Reset will not
appear on the display unless master function has
previously been set.
NOTE: See Table 3.3 for a complete listing of default settings
selected when you choose "Clear".
K TONE
5 JKL
Enter: C — }
. Lock •
ijQ9^?J CiD
CsT^
FCN 35.
Master FCN
Cleared
Operation
3. When the desired setting appears, press ® to save
in memory.
4. The phone automatically exits this mode after three
seconds.
Security (FCN 3) 3-63
Page 97

Function "Clear" Default Setting List
FUNCTION NAME
Table 3.3
KEYPAD
SEQUENCE
DEFAULT SETTINGS
Total Ttmer 2*
Pace Beep
Dialing Digits Restriction None
Memory Secret
Theft Lock
Pre-determined phone number
Theft Code
Volume control
- Ring volume
- Earpiece volume
- Key volume
Setting ring tone
Escalating Ring Tone
Auto Answer
C+Do'C
C3D®'C
CE)of C
® it
e:)
E)
E5
[ iOOC
3on
Reset
Off
Memory open
Off
Null
None
Center level (level 3)
Center level (level 3)
Center level (level 3)
Number 1 Standard tone
Number 2 Standard tone
Off
Off
Setting keytone on/oft
Backlight control
Setting backlight color
Own number display Phone number (No 1)
System select
®(i^
(Mlfgiiq
(H)(7Zl3
On (Keytone ON)
On
Green
Normal mode
3-64 Security (FCN 3)
Operation
Page 98

FUNCTION NAME
Automatic recall *
- Delay Time
- Phone number to be recalled
KEYPAD
SEQUENCE DEFAULT SETTINGS
Off
00 minutes
Null
Automatic Power On (alarm)
- Setting Time
Automatic Power OFF
- Setting Time
Power-off Timer after Ignition Off
Dial receive
Horn alert Off
‘Total timer 2 and Automatic Recall may not be stored to memory as part of Master Function.
/'rpipN omoM
9w„ •(
Off
12:00 AM
Off
12:00 AM
10 Hours
Off
Operation
Security (FCN 3) 3-65
Page 99

How to Set Theft Code
Keypad Sequence:
FCN 36-==
Lock Code?
ri
FCN 36=====
Theft Code
4*5*
<2-4 digits >
FCN 36=====
Theft Code
1234
< digits,STO>
VISUAL
; ENTER; ^^
i DIGtT i d5)
: CODE ;
' '
(TON)
ÿ
^ ^
LOCK
____
0 MHO
_
Theft Codes are usually any two-to-four digit number
combinations of your choice, including the * and #
characters- Select a number which is easy for you to
remember, yet not obvious to someone else.
1. To enter a new Theft Code number, press (M) [3^]
and enter your lock code. Observe the current
setting appears on the display.
NOTE: To escape from this mode without changing the theft
code, press Cclr) .
2. Enter the desired two-to-four digit number, including *
and # characters- If you make a mistake while entering
the digits, briefly press CciJ) to backspace over the
incorrect digit. '
3. Press CsTo) to save the code to memory.
a
FCN 36==.
Theft Code
1234
Set
3-66 Security (FCN 3)
4. The phone automatically exits this mode after three
seconds.
Operation
Page 100

How to Set New Lock Code
Keypad Sepuence:
-
-----------------'
(TON)
ÿ
LOC K
3
The Lock Code for your phone is factory set to 0000.
However, you may wish to change this code to any two-tofour digit number combinations of your choice, including the
* and # characters. Select a number which is easy for you
to remember, yet not obvious to someone else.
SYS TEM
7
_______-
: enter:
: 2-t0-4
2-t0-4 ; (^fO)
: DIGIT
FCN37-==
Lock Code?
FCN 37«-===
New Code
9012
< digits, STO >
FCN 37==—=
New Code
0000
< 2-4dig1ts >
FCN 37==
New Code
9012
Set
1. To set a new Lock Code number, press (Ic^
and enter your existing lock code (0000 if new). ~
Observe the current setting appears on the display.
NOTE: To escape from this mode without changing the Lock
code, press(clD .
2. Enter the desired two-to-four digit number, including *
and # characters. If you make a mistake while entering
the digits, briefly press (clr) to backspace over the
incorrect digit.
3. Press CsTo) to save the code to memory.
4. The phone automatically exits this mode after three
seconds.
Operation
Security (FCN 3) 3-67
 Loading...