

Panasonic hc-a100 installation
Dear Customer
ENGLISH
About the Upgrade of the HX-A100 Firmware
The following functions were added or changed by Ver. 1.10 of the firmware.
Please read this in conjunction with the owner’s manual for this unit.
From the Image App screen, tap # [Camera setup] # [Device info. display] to check the
firmware version.
Update the version if it is earlier than Ver. 1.10.
To update the firmware of this unit, copy an update file to the microSD card, insert it into this unit,
and press the power button to turn on this unit while pressing and holding the Wi-Fi/WPS button
and the photoshot button.
If you are using firmware Version 1.10, use the latest version of the Image App.
∫ OS versions that support the Image App
Android device: Android 2.3.3 or later
iOS device: iOS 5.0 or later
≥ The supported OS versions are current as of April 2014 and subject to change.
≥ The service may not be able to be used properly depending on the type of smartphone being
used.
For the latest information on version updates or for information on the Image App, see the
following support site.
http://panasonic.jp/support/global/cs/e_cam/index.html
(This Site is English only.)
The setup procedure using the setup wizard has been changed.
After making the settings according to the setup wizard screens, you can use the main functions of this unit.
Proceed to complete the setup by following the on-screen instructions.
≥ The setup wizard is displayed at the time of purchase and after a long period of non-use during
which the battery ran down.
1 Synchronize the time of this unit with that of smartphone.
≥
Once the clock is set, recording, live broadcasting, and other functions of this unit can be used correctly.
≥ It may take approximately 60 seconds to synchronize the time of the smartphone with that of this
unit.
≥ If the SSID and the password are set to their defaults, a message that recommends you to
change them will be displayed.
ENGLISH FRANÇAIS ESPAÑOL
한국어
VQC9867
2 Make the connection settings for the access point mode to use
devices connected to a wireless router, etc.
≥ Enter the SSID and password (authentication key) of the access point.
≥ If your device is Android, you can enter them using .
∫ When connecting by (If the device is Android)
1 Ta p .
2 Tap the wireless access point to connect.
3 Enter password.
≥ This allows you to operate this unit via an access point using your smartphone.
3 Make the connection destination settings for a live broadcast.
≥ Enter the SSID and password (authentication key) of the access point.
Up to three access points can be registered. Register the access point you use, such as the
wireless router in your home or the mobile router you use outside.
≥ You can perform a live broadcast by setting the following.
j Make the live broadcast settings. (For the live broadcast settings, refer to the owner’s manual
for this unit.)
For compatible access points, see the following support site.
http://panasonic.jp/support/global/cs/e_cam/index.html (This Site is English only.)
≥ The settings can also be made from the Image App menu.
The Wi-Fi Easy Setup function has been added.
You can use the Wi-Fi Easy Setup by settting up a Wi-Fi connection between this unit and a
smartphone.
For settings on the Setup menu, tap # [Camera Wi-Fi settings] # [Wi-Fi Easy Setup] #
respective items on the Image App screen.
Proceed to complete the setup by following the on-screen instructions.
With [Wi-Fi Easy Setup], you can set the following information:
j Clock information (Synchronize the clock information with that of the smartphone)
j Information on wireless access points (SSIDs and Passwords)
j “LUMIX CLUB” Login ID, Password
*1 In Live broadcasting mode, you can register up to three wireless access points; in Access point
mode, you can register only one access point.
*2 Acquire a Login ID and Password for the “LUMIX CLUB” in advance.
*2
*1
≥ It may take approximately 60 seconds to synchronize the time of the smartphone with that of this
unit.
≥ If your device is Android, you can tap to run an SSID search when setting wireless access
point information.
2
VQC9867 (ENG)

The following recording menu functions have been added or changed.
[Recording Mode]
You can record images with a variety of recording methods by changing the Recording Mode.
[Normal Shooting]/[Slow Motion]/[Loop Recording]
[Normal Shooting]
Recording motion pictures.
≥ 1920k1080/60p or 1280k720/60p is set, live broadcasting is not available.
[Slow Motion]
This records motion pictures in slow motion by setting a high frame rate (increasing the number of
frames).
≥ Live view is not available during recording. (Video/audio cannot be output during recording.)
≥ Live broadcasting is not available.
≥ Sound cannot be recorded.
≥ [Color Night Rec], [Level Shot Function], [Image stabilization] and Angle switchover are not
available.
[Loop Recording]
No matter how long you record, you can only record motion pictures for the last 1 hour to microSD
card.
≥ Fully charge the battery before using this function.
≥ Once you start recording, the motion picture will be recorded and divided approximately every
2minutes.
≥ When the recording time exceeds 1 hour (approximate), only the last 1 hour (approximate) part
up to the end of the recording will be saved. The part before the 1 hour part will be deleted.
≥ Live broadcasting is not available.
≥ [Pixels / Frame rate] is set to [1280k720/30p].
≥ When the approximate remaining recordable time is less than 1 hour, [Loop Recording] is not
possible.
ENGLISH FRANÇAIS ESPAÑOL
한국어
(ENG) VQC9867
3

[Pixels / Frame rate]
You can switch the image quality of the motion pictures you record. Available [Pixels / Frame rate]
differs depending on the [Recording Mode] setting.
≥ When [Recording Mode] is set to [Normal Shooting]:
The greater the number is, the higher the image quality is. However, the file size also becomes
greater.
1920k1080/60p 1920k1080/30p 1280k720/60p
1280k720/30p 848k480/30p
≥ When [Recording Mode] is set to [Slow Motion]:
1920k1080/60fps: Plays back at 1/2 times normal speed. (Actual playback time is
1280k720/120fps: Plays back at 1/4 times normal speed. (Actual playback time is four
848k480/240fps: Plays back at 1/8 times normal speed. (Actual playback time is
twice as long as the recorded time.)
times as long as the recorded time.)
eight times as long as the recorded time.)
[Delay-Start REC]
You can start recording a motion picture approximately 3 seconds after pressing the recording start/
stop button.
[Microphone]
You can set whether or not to record motion pictures with audio.
≥ This item is not available when [Recording Mode] is set to [Slow Motion].
≥ [Wind noise reduction] is not available when the microphone is turned off.
[Level Shot Function]
This is for automatically correcting the horizontal tilt of an image.
[Strong]/[Normal]/[OFF]
≥ [Level Shot Function] operates when starting to record a motion picture or still picture or when
starting to perform a live broadcast.
≥ [Image stabilization] is not available when [Level Shot Function] is set to [Normal].
≥ [Level Shot Function] will not work in the following cases:
j When the tilt of the camera is large
j When motion is continuous
≥ [Level Shot Function] cannot be set in the following cases:
j When [Recording Mode] is set to [Slow Motion]
j When the [Pixels / Frame rate] is set to [1920k1080/60p] or [1280k720/60p].
j When field of view is set to wide mode
j When [Color Night Rec] is set to
On
4
VQC9867 (ENG)
The following playback menu functions have been added.
[Create highlights]
Part that was recognized as full of motion or clearly recorded is extracted from multiple motion
pictures, and it can be stored in the microSD card in this unit and a smartphone
features)
with effects and music added.
≥ You can also set an image stored in the smartphone as a title image.
≥ You cannot save motion pictures recorded in different [Pixels / Frame rate] as a single Highlight
Playback file.
≥ You cannot use motion pictures recorded in [Slow Motion] as Highlight Playback files.
(using Wi-Fi
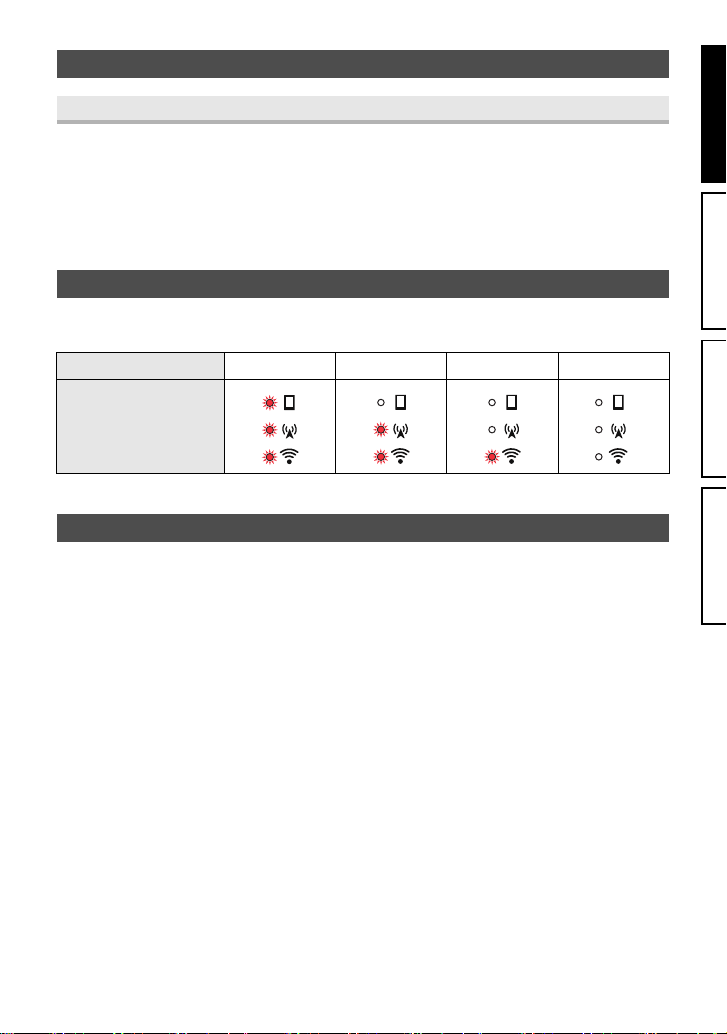
A function that displays the remaining battery level has been added.
You can check the remaining battery level by looking at the Wi-Fi mode lamp when you have turned
on this unit.
Battery capacity 100% to 76% 75% to 41% 40% to 21% 20% or less
Wi-Fi mode lamp
≥ The Wi-Fi mode lamp will go off approximately 5 seconds later.
ENGLISH FRANÇAIS ESPAÑOL
The following specifications have been changed.
Lens:
F2.5 mm Focal length; 1.68 mm
Field of view;
Approx.160
Approx.135° (Standard mode/Level Shot Function: Normal/Image stabilizer: Off)
Approx.117° (Standard mode/Level Shot Function: Strong/Image stabilizer: Off)
Approx.104° (Standard mode/Level Shot Function: Strong/Image stabilizer: On)
Minimum focus distance;
Approx. 30 cm (12q)
° (Wide mode)
(ENG) VQC9867
한국어
5

À notre chère clientèle
FRANÇAIS
À propos de la mise à jour du micrologiciel HX-A100
Les fonctions suivantes ont été ajoutées ou modifiées par la Ver. 1.10 du micrologiciel.
Veuillez lire ceci en plus du mode d'emploi de cet appareil.
À partir de l'écran de l'application « Image App », appuyez sur # [Configuration appareil]
# [Aff. infos sur appareil] pour consulter la version du micrologiciel.
Mettez la version à jour si elle est plus ancienne que la Ver. 1.10.
Pour mettre à jour le micrologiciel de cet appareil, copiez un fichier de mise à jour sur la carte
microSD, insérez-la dans cet appareil, puis appuyez sur la touche alimentation afin de mettre cet
appareil en marche tout en maintenant enfoncées les touches Wi-Fi/WPS et de prises de vues.
Si vous utilisez le micrologiciel Version 1.10, utilisez la plus récente version de « Image App ».
∫ Versions de SE qui prennent en charge l'application « Image App »
Dispositif Android : Android 2.3.3 ou plus récent
Dispositif iOS : iOS 5.0 ou plus récent
≥ Les versions de SE prises en charge sont valables à compter d'avril 2014 et peuvent faire
l'objet de changements.
≥ Il est possible que ce service ne puisse pas être utilisé correctement en fonction du type de
téléphone intelligent.
Pour les dernières informations sur les mises à jour de versions ou pour en savoir plus sur
l'application « Image App », consultez le site ci-dessous.
http://panasonic.jp/support/global/cs/e_cam/index.html
(Ce site est uniquement en anglais.)
La procédure d'installation utilisée par l'assistant d'installation a été modifiée.
Après avoir effectué les réglages selon les écrans de l'assistant d'installation, vous pouvez utiliser
les principales fonctions de l'appareil.
Terminez la configuration en suivant les instructions à l’écran.
≥ L'assistant d'installation est affiché au moment de l'achat et après une longue période
d'inutilisation au cours de laquelle la batterie s'est déchargée.
1 Synchronisez l'heure de cet appareil avec celle du téléphone intelligent.
≥ Dès que l'horloge est réglée, l'enregistrement, la diffusion en direct et les autres fonctions de
l'appareil peuvent être correctement utilisés.
≥ Il peut falloir 60 secondes pour synchroniser l'heure du téléphone intelligent et celle de l'appareil.
≥ Si le SSID et le mot de passe sont réglés sur leurs paramètres par défaut, un message vous
conseillant de les changer s'affichera.
6
VQC9867 (CFR)
 Loading...