

Page 1
Phone: 800.894.0412 - Fax: 888.723.4773 - Web: www.ctiautomation.net - Email: info@ctiautomation.net
Page 2

Safety Precautions
Phone: 800.894.0412 - Fax: 888.723.4773 - Web: www.ctiautomation.net - Email: info@ctiautomation.net
Observe the following notices to ensure personal safety or to prevent accidents.
To ensure that you use this product correctly, read this User’s Manual thoroughly before use.
Make sure that you fully understand the product and information on safety.
This manual uses two safety flags to indicate different levels of danger.
WARNING
If critical situations that could lead to user’s death or serious injury is assumed by
mishandling of the product:
- Always take precautions to ensure the overall safety of your system, so that the whole
system remains safe in the event of failure of this product or other external factor.
- DO NOT USE THE PROGRAMMABLE DISPLAY TO CONTROL SAFETY FEATURES OR
OTHER CRITICAL OPERATIONS OF EQUIPMENT OR SYSTEMS. A COMMUNICATION
ERROR (FOR ANY REASON) MIGHT PREVENT SUCH SAFETY FEATURES OR
CRITICAL OPERATIONS FROM FUNCTIONING PROPERLY.
- Do not use this product in areas with inflammable gas. It could lead to an explosion.
- Exposing this product to excessive heat or open flames could cause damage to the lithium
battery or other electronic parts.
- Battery may explode if mistreated. Do not recharge, disassemble or dispose of fire.
CAUTION
If critical situations that could lead to user’s injury or only property damage is
assumed by mishandling of the product.
- To prevent excessive exothermic heat or smoke generation, use this product at the values
less than the maximum of the characteristics and performance that are assured in these
specifications.
- Do not dismantle or remodel the product. It could cause excessive exothermic heat or smoke
generation.
- Do not touch the terminal while turning on electricity. It could lead to an electric shock.
- Use the external devices to function the emergency stop and interlock circuit.
- Connect the wires or connectors securely.
The loose connection could cause excessive exothermic heat or smoke generation.
- Do not allow foreign matters such as liquid, flammable materials, metals to go into the inside
of the product. It could cause excessive exothermic heat or smoke generation.
- Do not undertake construction (such as connection and disconnection) while the power
supply is on. It could lead to an electric shock.
- The control force of the touch switches should be less than the specification of the product.
Failure to do so could lead to a damage to the product or a personal injury.
- These touch switches operate using analog resistance membrane. Do not press more than
one point on the screen at a time. Doing so might operate a switch located in the middle of
the points pressed if one exists, and could lead to a damage to the facility or an accident.
Copyright / Trademarks
- This manual and its contents are copyrighted.
- You may not copy this manual in whole or part, without written consent of Panasonic Electric
Works SUNX Co., Ltd.
- Windows is a registered trademark of Microsoft Corporation in the United States and other
countries.
- Ethernet is a registered trademark of Fuji Xerox Co., Ltd. and Xerox Corp.
- SDHC logo and SD logo are trademarks.
- All other company names and product names are trademarks or registered trademarks of
their respective owners.
POT_GT
Page 3

Table of Contents
Phone: 800.894.0412 - Fax: 888.723.4773 - Web: www.ctiautomation.net - Email: info@ctiautomation.net
Before You Start
Manual to be Used
Available Functions and GT Versions
Chapter 1 Features and Functions ............................................................ 1-1
1.1 Features and Functions of GT Series ............................................................................ 1-2
1.2 Types of Units .................................................................................................................. 1-7
1.2.1 GT Series .................................................................................................................... 1-7
1.2.2 Options and Repair Parts ............................................................................................ 1-9
1.3 Screen Creation Tool .................................................................................................... 1-12
1.3.1 Tools Required for Screen Creation ......................................................................... 1-12
1.3.2 Software Usage Environment and Applicable Cables .............................................. 1-12
Chapter 2 Names and Functions of Parts ................................................. 2-1
2.1 Part Names ....................................................................................................................... 2-2
2.1.1 GT01, GT11 and GT21 ............................................................................................... 2-2
2.1.2 GT02/GT02L ............................................................................................................... 2-4
2.1.3 GT05/GT12/GT32 ....................................................................................................... 2-6
2.2 Terminal Layouts of COM Port ....................................................................................... 2-8
2.2.1 GT01 ........................................................................................................................... 2-8
2.2.2 GT02 ........................................................................................................................... 2-9
2.2.3 GT02L ....................................................................................................................... 2-10
2.2.4 GT11/GT12 ............................................................................................................... 2-11
2.2.5 GT21 ......................................................................................................................... 2-12
2.2.6 GT05/GT32/GT32-E ................................................................................................. 2-13
2.3 Connecting to Screen Creation Tool GTWIN .............................................................. 2-14
2.3.1 TOOL Port ................................................................................................................. 2-14
2.3.2 USB Port ................................................................................................................... 2-14
2.3.3 Ethernet Port ............................................................................................................. 2-15
Chapter 3 Installation and Wiring .............................................................. 3-1
3.1 Installation ........................................................................................................................ 3-2
3.1.1 Installation Environment .............................................................................................. 3-2
3.1.2 Restriction According to Mounting Directions ............................................................. 3-4
3.1.3 Installation Space ........................................................................................................ 3-4
3.1.4 UL/c-UL Qualification .................................................................................................. 3-4
3.1.5 Mounting Screws ........................................................................................................ 3-5
3.1.6 GT01 and GT11 Installation Method ........................................................................... 3-6
3.1.7 GT21 Installation Method ............................................................................................ 3-6
3.1.8 GT05/GT32/GT32-E Installation Method .................................................................... 3-7
Page 4

3.1.9 GT02/GT02L/GT12 Installation Method ...................................................................... 3-8
Phone: 800.894.0412 - Fax: 888.723.4773 - Web: www.ctiautomation.net - Email: info@ctiautomation.net
3.1.10 Installing in Vertical Orientation ................................................................................ 3-9
3.1.11 Precaution When reinstalling GT .............................................................................. 3-9
3.2 Wiring the Power Supply .............................................................................................. 3-10
3.2.1 Wiring the Power supply ........................................................................................... 3-10
3.2.2 Grounding ................................................................................................................. 3-11
3.3 Wiring the COM Port ...................................................................................................... 3-12
3.4 Precautions when Wiring COM Port ............................................................................ 3-14
3.4.1 GT01 (5 V DC) .......................................................................................................... 3-14
3.4.2 GT02/GT02L (5 V DC) .............................................................................................. 3-15
3.4.3 RS232C Communication ........................................................................................... 3-16
3.4.4 RS422 (RS485) Communication ............................................................................... 3-17
3.5 Precautions when Wiring Ethernet Port (GT32T1) ..................................................... 3-18
3.6 Options ........................................................................................................................... 3-19
3.6.1 Backup Battery .......................................................................................................... 3-19
3.6.2 How to Install the Battery (Lithium Button Battery) ................................................... 3-20
3.6.3 How to Install the Battery (Backup Battery) .............................................................. 3-20
3.6.4 Dead Battery Mark .................................................................................................... 3-21
3.6.5 Time for Replacement of Battery .............................................................................. 3-21
3.6.6 Replacement of Front Panel Protective Sheet .......................................................... 3-21
3.6.7 About the Waterproof Packing .................................................................................. 3-22
Chapter 4 Connecting with PLC ................................................................ 4-1
4.1 Connection with PLC ....................................................................................................... 4-2
4.1.1 PLC Multiple Connection ............................................................................................. 4-2
4.1.2 GT Link Connection .................................................................................................... 4-2
4.1.3 Connecting to the PLCs made by Other Companies .................................................. 4-3
4.1.4 Connecting to a Serial Device ..................................................................................... 4-3
4.1.5 Electric Supply from PLC (5 V DC-type ) .................................................................... 4-3
4.2 RS232C Connection ........................................................................................................ 4-4
4.2.1 Difference of Terminal blocks Between GT Models .................................................... 4-4
4.2.2 RS232C Connection with PLC Tool Port .................................................................... 4-5
4.2.3 RS232C Connection with FP-X COM Port .................................................................. 4-7
4.2.4 RS232C Connection with FP COM Port ................................................................... 4-9
4.2.5 RS232C Connection with FP0/FP0R COM Port ....................................................... 4-11
4.2.6 RS232C Connection with FP-e COM Port ................................................................ 4-12
4.2.7 RS232C Connection with FP2/FP2SH COM Port .................................................... 4-13
4.3 RS422 Connection ......................................................................................................... 4-14
4.3.1 Difference of Terminal blocks Between GT Models .................................................. 4-14
4.3.2 RS422 Connection with FP-X COM Port .................................................................. 4-15
4.3.3 RS422 Connection with FP2/FP2SH COM Port ....................................................... 4-16
4.3.4 RS422 Connection with C-NET Adapter ................................................................... 4-17
4.4 RS485 Connection ......................................................................................................... 4-18
ii
Page 5

4.4.1 Difference of Terminal blocks Between GT Models .................................................. 4-18
Phone: 800.894.0412 - Fax: 888.723.4773 - Web: www.ctiautomation.net - Email: info@ctiautomation.net
4.4.2 RS485 Connection with FP0R COM Port ................................................................. 4-19
4.4.3 RS485 Connection with FP-X COM Port .................................................................. 4-20
4.4.4 RS485 Connection with FPΣ COM Port.................................................................... 4-23
4.4.5 RS485 Connection with FP-e COM Port .................................................................. 4-25
4.4.6 RS485Connection with FP2/FP2SH ......................................................................... 4-26
4.4.7 Precautions When Communicating With RS485 ...................................................... 4-27
4.5 Connection With a PLC ................................................................................................. 4-28
4.5.1 Automatic Communication Settings Function ........................................................... 4-28
4.5.2 Through Function ...................................................................................................... 4-29
4.5.3 How to Make Communication Settings Using the FPWIN GR ................................. 4-31
Chapter 5 Troubleshooting ........................................................................ 5-1
5.1 What to DO If Something Unusual Occurs (GT01/GT11/ GT21) .................................. 5-2
5.2 What to DO If Something Unusual Occurs (GT02/GT02L/GT05/GT12/GT32)............. 5-5
5.3 Error Codes and How to Handle Them ........................................................................ 5-10
5.3.1 About Error Codes .................................................................................................... 5-10
5.3.2 GT Series Error Codes ............................................................................................. 5-10
5.3.3 When Connected to a FP Series PLC ...................................................................... 5-13
5.3.4 When Connected to a PLC (FX Series) Made by Mitsubishi Electric Corporation ... 5-15
5.3.5 When Connected to a PLC Made by Omron Corporation ........................................ 5-16
5.3.6 When Connected to Modbus .................................................................................... 5-17
5.3.7 When Connected to a PLC Made by Toshiba Machine Co., Ltd. ............................. 5-17
5.3.8 When Performing General-purpose Serial Communication ..................................... 5-18
Chapter 6 Specifications ............................................................................ 6-1
6.1 GT01 .................................................................................................................................. 6-2
6.1.1 General Specifications ................................................................................................ 6-2
6.1.2 Performance Specifications (GT01) ............................................................................ 6-3
6.1.3 Function Specifications (GT01) ................................................................................... 6-4
6.1.4 Interface Specifications (GT01) .................................................................................. 6-5
6.2 GT02 .................................................................................................................................. 6-6
6.2.1 General Specifications (GT02) .................................................................................... 6-6
6.2.2 Performance Specifications (GT02) ............................................................................ 6-7
6.2.3 Function Specifications (GT02) ................................................................................... 6-8
6.2.4 Interface Specifications (GT02) .................................................................................. 6-9
6.3 GT02L .............................................................................................................................. 6-10
6.3.1 General Specifications (GT02L) ................................................................................ 6-10
6.3.2 Performance Specifications (GT02L) ........................................................................ 6-11
6.3.3 Function Specifications (GT02L) ............................................................................... 6-12
6.3.4 Interface Specifications (GT02L) .............................................................................. 6-13
6.4 GT05 ................................................................................................................................ 6-14
6.4.1 General Specifications .............................................................................................. 6-14
Page 6

6.4.2 Performance Specifications (GT05) .......................................................................... 6-15
Phone: 800.894.0412 - Fax: 888.723.4773 - Web: www.ctiautomation.net - Email: info@ctiautomation.net
6.4.3 Function Specifications (GT05) ................................................................................. 6-16
6.4.4 Interface Specifications (GT05) ................................................................................ 6-17
6.5 GT11 ................................................................................................................................ 6-18
6.5.1 General Specifications (GT11) .................................................................................. 6-18
6.5.2 Performance Specifications (GT11) .......................................................................... 6-19
6.5.3 Function Specifications (GT11) ................................................................................. 6-20
6.5.4 Interface Specifications (GT11) ................................................................................ 6-21
6.6 GT12 ................................................................................................................................ 6-22
6.6.1 General Specifications (GT12) .................................................................................. 6-22
6.6.2 Performance Specifications (GT12) .......................................................................... 6-23
6.6.3 Function Specifications (GT12) ................................................................................. 6-24
6.6.4 Interface Specifications (GT12) ................................................................................ 6-25
6.7 GT21 ................................................................................................................................ 6-26
6.7.1 General Specifications (GT21) .................................................................................. 6-26
6.7.2 Performance Specifications (GT21) .......................................................................... 6-27
6.7.3 Function Specifications (GT21) ................................................................................. 6-28
6.7.4 Interface Specifications (GT21) ................................................................................ 6-29
6.8 GT32 ................................................................................................................................ 6-30
6.8.1 General Specifications (GT32) .................................................................................. 6-30
6.8.2 Performance Specifications (GT32) .......................................................................... 6-31
6.8.3 Function Specifications (GT32) ................................................................................. 6-32
6.8.4 Interface Specifications (GT32) ................................................................................ 6-33
6.8.5 Sound Output Specifications (GT32T1 Only)............................................................ 6-34
6.9 GT32-E ............................................................................................................................ 6-35
6.9.1 General Specifications (GT32-E) .............................................................................. 6-35
6.9.2 Performance Specifications (GT32-E) ...................................................................... 6-36
6.9.3 Function Specifications (GT32-E) ............................................................................. 6-37
6.9.4 Interface Specifications (GT32-E) ............................................................................. 6-38
Chapter 7 Dimensions and Other Documentation ................................... 7-1
7.1 Dimensions ....................................................................................................................... 7-2
7.1.1 GT01/GT01R ............................................................................................................... 7-2
7.1.2 GT02 ........................................................................................................................... 7-3
7.1.3 GT02L ......................................................................................................................... 7-4
7.1.4 GT05 ........................................................................................................................... 7-5
7.1.5 GT11 ........................................................................................................................... 7-6
7.1.6 GT12 ........................................................................................................................... 7-7
7.1.7 GT21 ........................................................................................................................... 7-8
7.1.8 GT32 ........................................................................................................................... 7-9
7.1.9 GT32-E ...................................................................................................................... 7-10
7.2 Cable Specifications ...................................................................................................... 7-11
7.2.1 AIGT8142 .................................................................................................................. 7-11
7.2.2 AIGT8152 .................................................................................................................. 7-11
7.2.3 AIGT8162/AIGT8165/AIGT8160 ............................................................................... 7-11
iv
Page 7

7.2.4 AIGT8175 .................................................................................................................. 7-12
Phone: 800.894.0412 - Fax: 888.723.4773 - Web: www.ctiautomation.net - Email: info@ctiautomation.net
7.2.5 AIP81842 .................................................................................................................. 7-12
7.3 Table of Screen Messages ............................................................................................ 7-13
7.4 BIN/HEX/BCD Code Correspondence Table ............................................................... 7-14
7.5 ASCII Code Table ........................................................................................................... 7-15
Record of changes
Page 8

Phone: 800.894.0412 - Fax: 888.723.4773 - Web: www.ctiautomation.net - Email: info@ctiautomation.net
Page 9

Before You Start
Phone: 800.894.0412 - Fax: 888.723.4773 - Web: www.ctiautomation.net - Email: info@ctiautomation.net
Usage conditions
Operating environment (Use the unit within the range of the general specifications when installing)
- Ambient temperatures: 0 to +50 C
(It varies according to models when installing the unit in a horizontal orientation or using a C-NET
adapter and FP programmer II.)
- Ambient humidity: 20 to 85% RH (at 25 C, non-condensing)
- Altitude of 2000 m or less
- For use in pollution Degree 2 environment
- Do not use it in the following environments.
- Direct sunlight, wind and rain. (This product is not designed for outdoor use.)
- Sudden temperature changes causing condensation.
- Inflammable or corrosive gas.
- Excessive airborne dust, metal particles or saline matter.
- Benzine, paint thinner, alcohol or other organic solvents or strong alkaline solutions such as
ammonia or caustic soda.
- Direct vibration, shock or places always exposed to drop of water.
(This unit is warranted by IP65/IP67 (depending on models) for panel mounting, however, this applies
to initial values.)
- Influence from power transmission lines, high voltage equipment, power cables, power equipment,
radio transmitters, or any other equipment that would generate high switching surges. (100 mm or
more)
The usage conditions for Tough series (GT32-E) are as follows.
- Ambient temperatures: -20 to +60 C (When horizontally installed, -20 to +55 C)
- Ambient humidity: 10 to 90% RH (at 25 C, non-condensing)
- The upper limit of the humidity at each temperature is as below.
(Below 40 C; 90%RH, 50 C; 55%RH, 60 C; 35%RH)
- If the product is exposed to heavy rain, condensation might be caused by sudden temperature
changes.
- Altitude of 2000 m or less
- For use in pollution Degree 2 environment
- Do not use it in the following environments.
- Direct sunlight for a long time
(Exposing the product to direct sunlight increases the surface temperature of the display higher than
ambient temperature, and causes deterioration of LDC panel.)
- Inflammable or corrosive gas.
- Excessive airborne dust, metal particles or saline matter.
- Benzine, paint thinner, alcohol or other organic solvents or strong alkaline solutions such as ammonia
or caustic soda.
- Direct vibration, shock or places always exposed to drop of water.
(This unit is warranted by IP67 for panel mounting, however, this applies to initial values.)
- Influence from power transmission lines, high voltage equipment, power cables, power equipment,
radio transmitters, or any other equipment that would generate high switching surges. (100 mm or
more)
Static electricity
- Do not touch connector pins directly to prevent static electricity from causing damage.
- Always rid yourself of any static electricity before handling this product.
- If excessive estatic electricity is applied to the panel surface, the LCD panel unit may be damaged.
vii
Page 10

Power supply
Phone: 800.894.0412 - Fax: 888.723.4773 - Web: www.ctiautomation.net - Email: info@ctiautomation.net
- Twist the wires of the power supply.
- The unit has sufficient noise immunity against the noise generated on the power line. However, it is
recommended to take measures for reducing noise such as using an isolating transformer before
supplying the power. And it is recommended to take measures such as installing a ferrite core.
- Allocate an independent wiring for each power supplying line, PLC etc and operating device.
- If using a power supply withoug a protective circuit, power should be supplied through a protective
element such as fuse. Directly applying an abnormal voltage to the unit may cause the damage to the
internal circuit.
Touch switches
- Always operate the touch switch with fingers. As the touch switch may be damaged due to the
excessive load or shock (caused when being operated with any tools), the touch switch should be
operated within the specified control force. Also, if the touch swich is pressed like kneading, the
electrode may be worn out exceptionally, and cause the malfunction. Operate with a single touch of
the switch.
- The touch position may shift due to aging variation. If the touch position has shifted, please adjust it.
LCD panel
- Do not drop or have a strong impact on the programmable display unit as glass is used for the LCD
panel.
- The liquid in the LCD panel is a hazardous substance. If the LCD panel is broken, do not put the leaked
crystalline liquid into your mouth. Should it get into your mouth, immediately gargle, and consult a
doctor. If it adheres to your skin or clothes, wash it away with soap.
- There is a case that shadows appear in the place on the screen of the GT where no graphic or part is
arranged. (The shadows appear as the extension of the characters, graphics or parts actually being
displayed.) This is a phenomenon resulting from the basic characteristics of liquid crystal devices, and
called cross talk.
Battery
Do not leave the battery in the unit when it is not used. There is a possibility of leak if it is left being
discharged.
viii
Page 11

Manuals to be Used
Phone: 800.894.0412 - Fax: 888.723.4773 - Web: www.ctiautomation.net - Email: info@ctiautomation.net
- The manuals to be used for GT series are common to all the models.
GT series User's Manual ARCT1F511E
- It is this manual. This manual describes the characteristics, specifications, installation and connections
of each GT models.
GT series Reference Manual ACGM0357V**EN
- This manual describes the screen creation of GT series and the settings of various functions.
General-purpose Serial Communication Manual ARCT1F356E
- It is required when communication is carried out with devices you developed such as a board and PC.
Connection with Other Companies' PLCs Manual ARCT1F449E
It is a manual describing the connection methods with PLCs manufactured by other companies. The
connection methods with Panasonic PLCs are described in this manual.
Installation Guide ARCT1F513E
It is a manual describing how to install GTWIN. It supplied with the GTWIN software product.
ix
Page 12
Available Functions and GT Versions
Phone: 800.894.0412 - Fax: 888.723.4773 - Web: www.ctiautomation.net - Email: info@ctiautomation.net
We recommend to keep GT-series products up to date for use as usable functions will increase
according to the upgrade.
The latest version of GT can be installed by the tool.
The upgrade of GTWIN is also necessary according to the upgrade of GT.
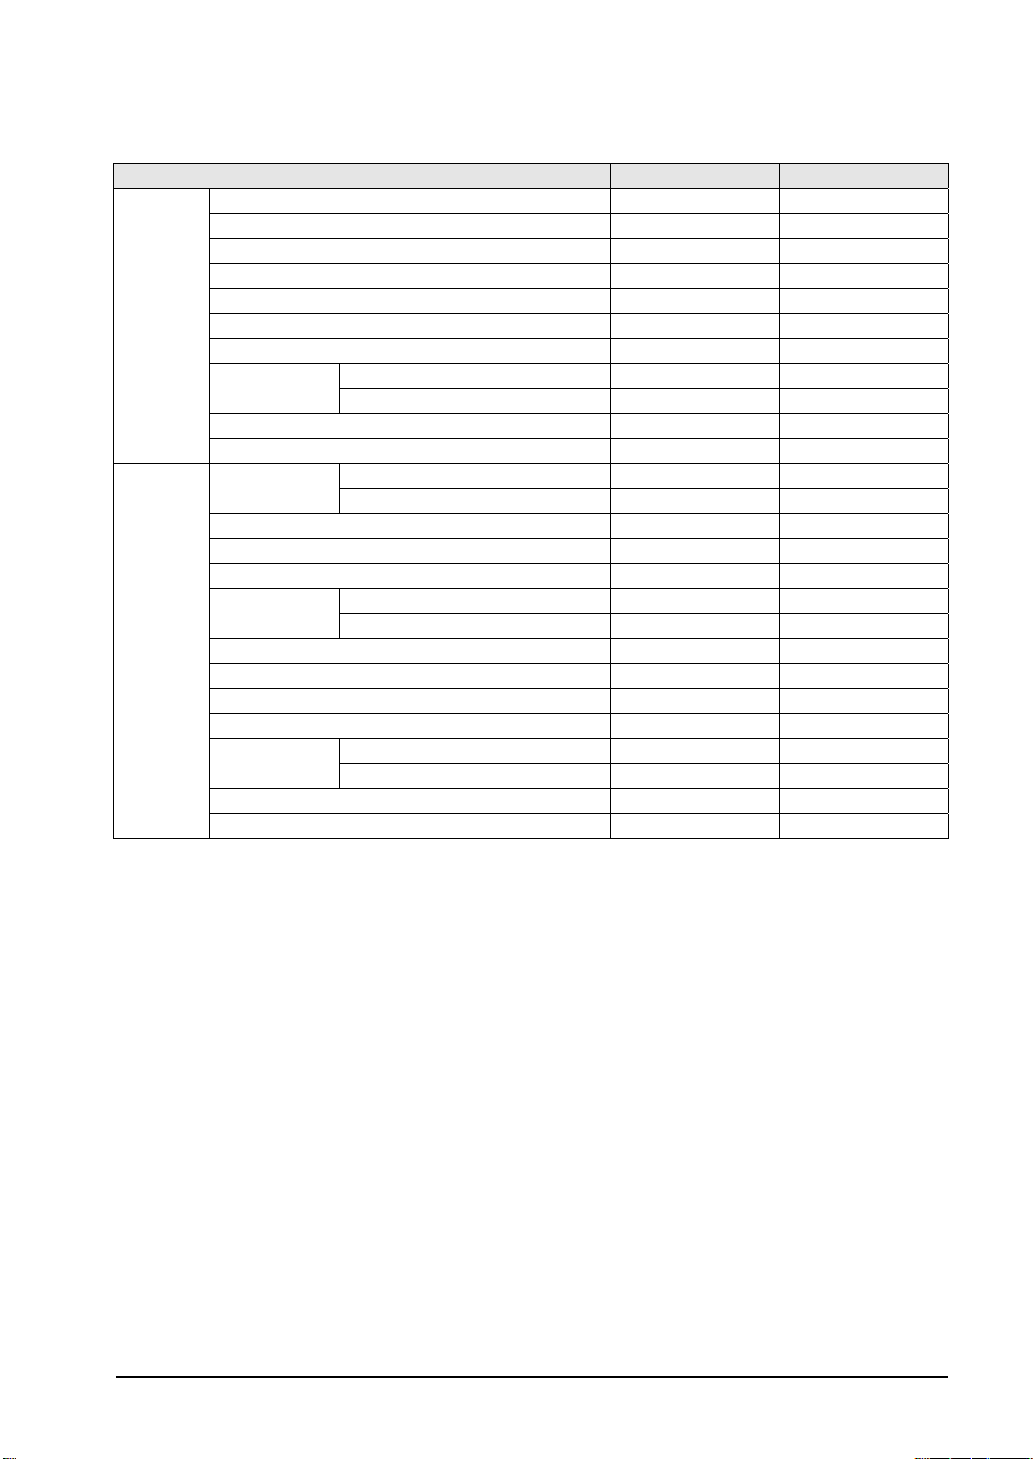
Version of GT01 and available functions
Function GT01 GTWIN
Parts
library
Other
functions
Note1) Only referring to PLC can be set.
Switch 1.00 or later 2.30 or later
Lamp 1.00 or later 2.30 or later
Message 1.00 or later 2.30 or later
Data 1.00 or later 2.30 or later
Bar graph 1.00 or later 2.30 or later
Clock 1.00 or later
Line graph 1.00 or later 2.30 or later
Alarm
Keyboard 1.00 or later 2.30 or later
Custom 1.00 or later 2.30 or later
Recipe
Flow display 1.00 or later 2.30 or later
Write device 1.00 or later 2.30 or later
Sound Not available Not available
Password
Multi language exchange 1.20 or later 2.50 or later
Logging function Not available Not available
Display panel sideways setting 1.10 or later 2.40 or later
Copy
GT link Not available Not available
PLC multiple connection Not available Not available
History Not available Not available
List Not available Not available
Recipe 1.00 or later 2.30 or later
SD recipe Not available Not available
Password 1.00 or later 2.30 or later
Operation security Not available Not available
Cable between GTs 1.30 or later SD memory card Not available Not available
Note1)
2.30 or later
x
Page 13
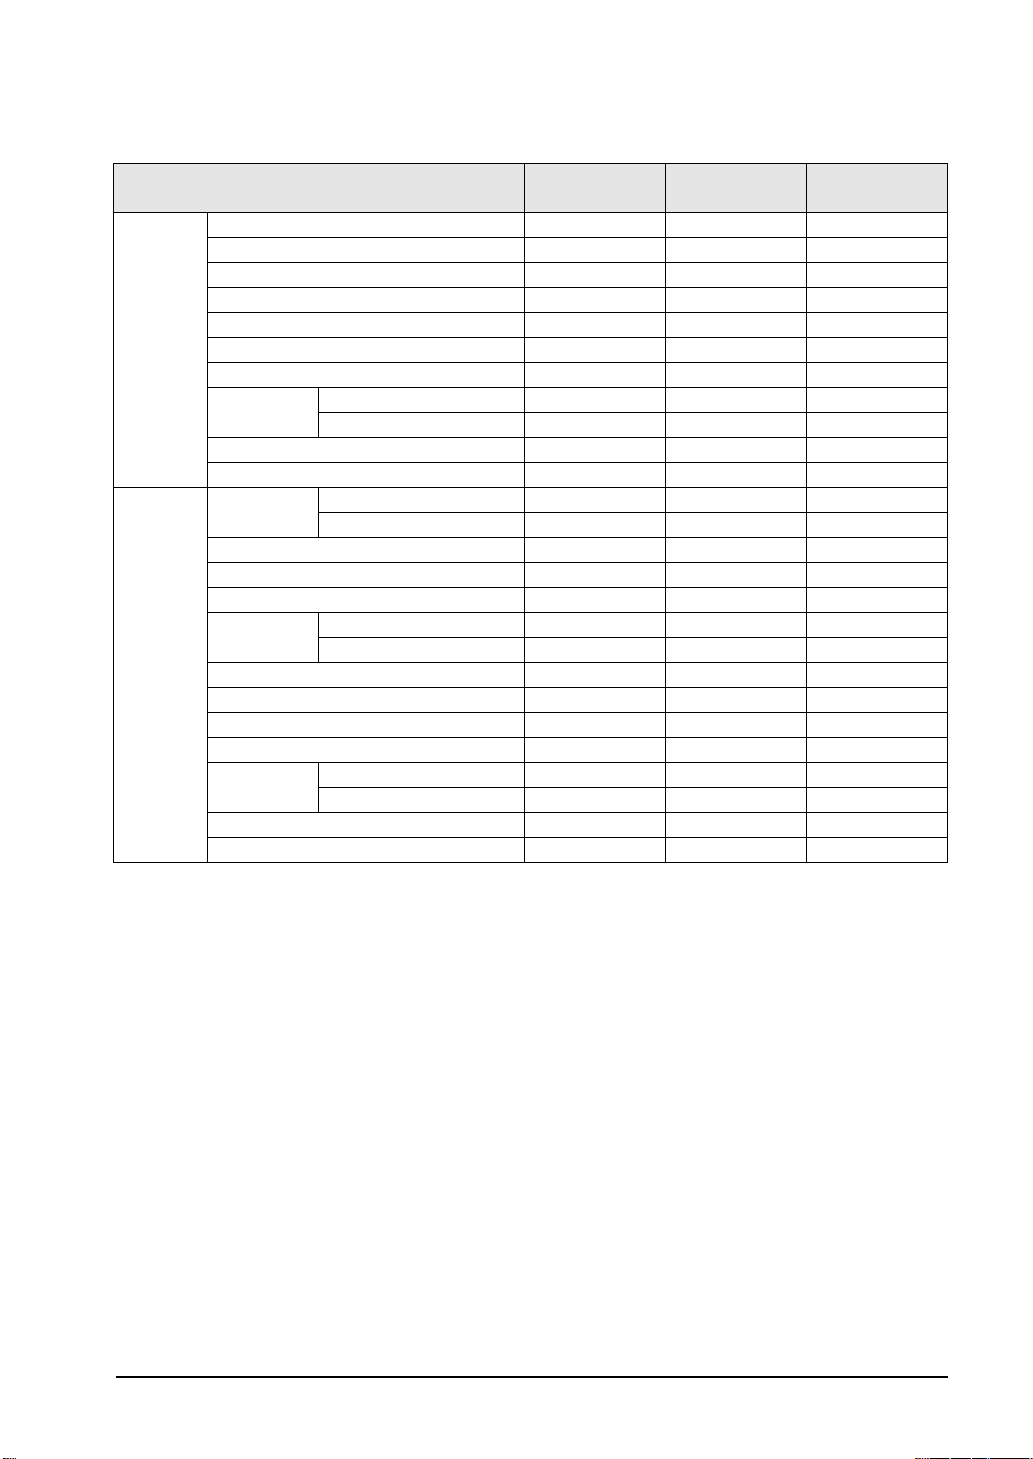
Version of GT02 and available functions
Phone: 800.894.0412 - Fax: 888.723.4773 - Web: www.ctiautomation.net - Email: info@ctiautomation.net
Function GT02M2
GT02G2
Parts
library
Switch 1.00 or later 1.00 or later 2.A0 or later
Lamp 1.00 or later 1.00 or later 2.A0 or later
Message 1.00 or later 1.00 or later 2.A0 or later
Data 1.00 or later 1.00 or later 2.A0 or later
Bar graph 1.00 or later 1.00 or later 2.A0 or later
Clock 1.00 or later 1.00 or later
Line graph 1.00 or later 1.00 or later 2.A0 or later
Alarm
History 1.00 or later Not available 2.A0 or later
List 1.00 or later 1.00 or later 2.A0 or later
Keyboard 1.00 or later 1.00 or later 1.00 or later
Custom 1.00 or later 1.00 or later 1.00 or later
Other
functions
Recipe
Recipe 1.00 or later 1.00 or later 2.A0 or later
SD recipe 1.00 or later Not available 2.A0 or later
Flow display 1.00 or later 1.00 or later 2.A0 or later
Write device 1.00 or later 1.00 or later 2.A0 or later
Sound Not available Not available Not available
Password
Password 1.00 or later 1.00 or later 2.A0 or later
Operation security 1.00 or later 1.00 or later 2.A0 or later
Multi language exchange 1.00 or later 1.00 or later 2.A0 or later
Logging function 1.00 or later Not available 2.A0 or later
FP monitor function 1.30 or later 1.30 or later 2.C0 or later
Display panel sideways setting 1.00 or later 1.00 or later 2.A0 or later
Copy
Cable between GTs Not available Not available Not available
SD memory card 1.00 or later Not available 2.A0 or later
GT link 1.00 or later 1.00 or later 2.A0 or later
PLC multiple connection 1.00 or later 1.00 or later 2.A0 or later
Note1) Only referring to PLC can be set.
GT02M0
GT02M1
GT02G0
GT02G1
Note1)
2.A0 or later
GTWIN
xi
Page 14
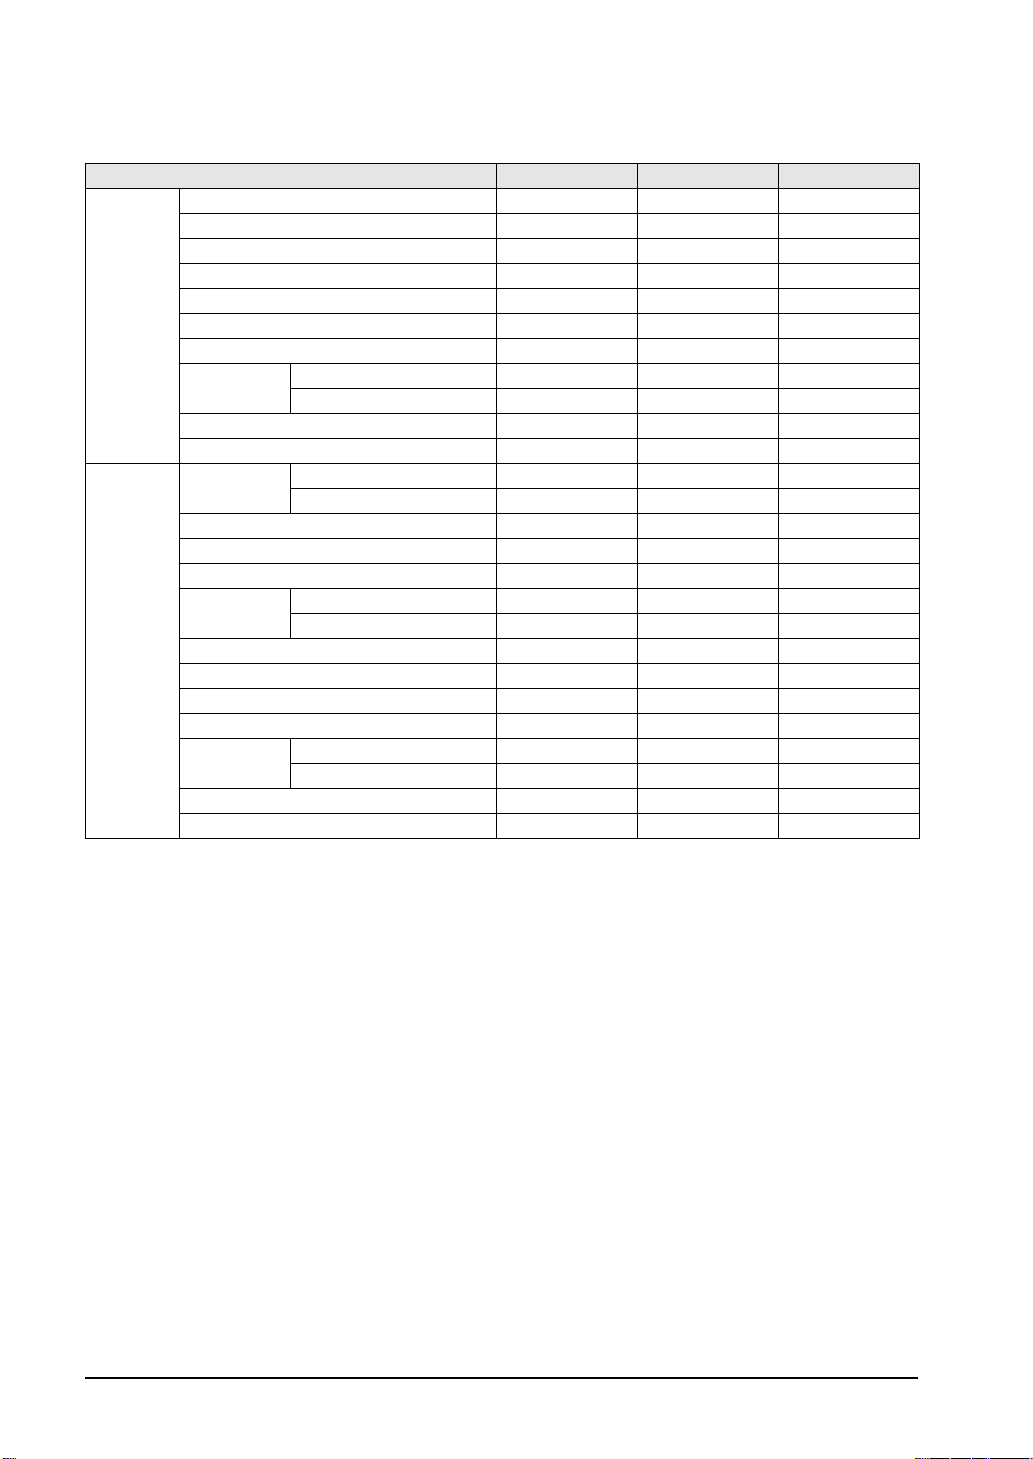
Version of GT02L and available functions
Phone: 800.894.0412 - Fax: 888.723.4773 - Web: www.ctiautomation.net - Email: info@ctiautomation.net
Function GT02L GTWIN
Parts
library
Switch 1.00 or later 2.B0 or later
Lamp 1.00 or later 2.B0 or later
Message 1.00 or later 2.B0 or later
Data 1.00 or later 2.B0 or later
Bar graph 1.00 or later 2.B0 or later
Clock 1.00 or later
Note1)
2.B0 or later
Line graph 1.00 or later 2.B0 or later
Alarm
History Not available 2.B0 or later
List 1.00 or later 2.B0 or later
Keyboard 1.00 or later 1.00 or later
Custom 1.00 or later 1.00 or later
Other
functions
Recipe
Recipe 1.00 or later 2.B0 or later
SD recipe Not available 2.B0 or later
Flow display 1.00 or later 2.B0 or later
Write device 1.00 or later 2.B0 or later
Sound Not available Not available
Password
Password 1.00 or later 2.B0 or later
Operation security 1.00 or later 2.B0 or later
Multi language exchange 1.00 or later 2.B0 or later
Logging function Not available Not available
FP monitor function 1.20 or later 2.C0 or later
Display panel sideways setting 1.00 or later 2.B0 or later
Copy
Cable between GTs Not available Not available
SD memory card Not available Not available
GT link 1.00 or later 2.B0 or later
PLC multiple connection 1.00 or later 2.B0 or later
Note1) Only referring to PLC can be set.
Note:
The buzzer function is not available for GT02L. All the functions related to the buzzer are unsupported.
xii
Page 15
Version of GT05 and available functions
Phone: 800.894.0412 - Fax: 888.723.4773 - Web: www.ctiautomation.net - Email: info@ctiautomation.net
Function GT05 GTWIN
Parts
library
Other
functions
Switch 1.00 or later 2.90 or later
Lamp 1.00 or later 2.90 or later
Message 1.00 or later 2.90 or later
Data 1.00 or later 2.90 or later
Bar graph 1.00 or later 2.90 or later
Clock 1.00 or later 2.90 or later
Line graph 1.00 or later 2.90 or later
Alarm
Keyboard 1.00 or later 2.90 or later
Custom 1.00 or later 2.90 or later
Recipe
Flow display 1.00 or later 2.90 or later
Write device 1.00 or later 2.90 or later
Sound Not available Not available
Password
Multi language exchange 1.00 or later 2.90 or later
Logging function 1.40 or later 2.98 or later
FP monitor function 1.90 or later 2.C0 or later
Display panel sideways setting 2.00 or later 2.C1 or later
Copy
GT link 1.10 or later 2.94 or later
PLC Multiple Connection 1.30 or later 2.97 or later
History 1.00 or later 2.90 or later
List 1.00 or later 2.90 or later
Recipe 1.00 or later 2.90 or later
SD recipe 1.60 or later 2.A0 or later
Password 1.00 or later 2.90 or later
Operation security 1.10 or later 2.94 or later
Cable between GTs Not available Not available
SD memory card 1.00 or later 2.90 or later
xiii
Page 16

Version of GT11 and available functions
Phone: 800.894.0412 - Fax: 888.723.4773 - Web: www.ctiautomation.net - Email: info@ctiautomation.net
Function GT11 GTWIN
Parts
library
Switch 1.00 or later 2.60 or later
Lamp 1.00 or later 2.60 or later
Message 1.00 or later 2.60 or later
Data 1.00 or later 2.60 or later
Bar graph 1.00 or later 2.60 or later
Clock 1.00 or later
Note1)
2.60 or later
Line graph 1.00 or later 2.60 or later
Alarm
History 1.00 or later 2.60 or later
List 1.00 or later 2.60 or later
Keyboard 1.00 or later 2.60 or later
Custom 1.00 or later 2.60 or later
Other
functions
Recipe
Recipe 1.00 or later 2.60 or later
SD recipe Not available Not available
Flow display 1.00 or later 2.60 or later
Write device 1.00 or later 2.60 or later
Sound Not available Not available
Password
Password 1.00 or later 2.60 or later
Operation security Not available Not available
Multi language exchange 1.00 or later 2.60 or later
Logging function Not available Not available
Display panel sideways setting 1.00 or later 2.60 or later
Copy
Cable between GTs 1.20 or later -
SD memory card Not available Not available
GT link Not available Not available
PLC multiple connection Not available Not available
Note1) Summer time cannot be set.
xiv
Page 17

Version of GT12 and available functions
Phone: 800.894.0412 - Fax: 888.723.4773 - Web: www.ctiautomation.net - Email: info@ctiautomation.net
Function GT12M1
GT12G1
Parts
library
Other
functions
Switch 1.00 or later 1.00 or later 2.97 or later
Lamp 1.00 or later 1.00 or later 2.97 or later
Message 1.00 or later 1.00 or later 2.97 or later
Data 1.00 or later 1.00 or later 2.97 or later
Bar graph 1.00 or later 1.00 or later 2.97 or later
Clock 1.00 or later 1.00 or later 2.97 or later
Line graph 1.00 or later 1.00 or later 2.97 or later
Alarm
Keyboard 1.00 or later 1.00 or later 2.97 or later
Custom 1.00 or later 1.00 or later 2.97 or later
Recipe
Flow display 1.00 or later 1.00 or later 2.97 or later
Write device 1.00 or later 1.00 or later 2.97 or later
Sound Not available Not available Not available
Password
Multi language exchange 1.00 or later 1.00 or later 2.97 or later
Logging function 1.10 or later Not available 2.98 or later
FP monitor function 1.60 or later 1.60 or later 2.C0 or later
Display panel sideways setting 1.00 or later 1.00 or later 2.97 or later
Copy
GT link 1.00 or later 1.00 or later 2.97 or later
PLC multiple connection 1.00 or later 1.00 or later 2.97 or later
History 1.00 or later 1.00 or later 2.97 or later
List 1.00 or later 1.00 or later 2.97 or later
Recipe 1.00 or later 1.00 or later 2.97 or later
SD recipe 1.20 or later Not available 2.A0 or later
Password 1.00 or later 1.00 or later 2.97 or later
Operation security 1.00 or later 1.00 or later 2.97 or later
Cable between GTs Not available Not available Not available
SD memory card 1.00 or later Not available 2.97 or later
GT12M0
GT12G0
GTWIN
xv
Page 18

Version of GT21 and available functions
Phone: 800.894.0412 - Fax: 888.723.4773 - Web: www.ctiautomation.net - Email: info@ctiautomation.net
Function GT21 GTWIN
Parts
library
Switch 1.00 or later 2.70 or later
Lamp 1.00 or later 2.70 or later
Message 1.00 or later 2.70 or later
Data 1.00 or later 2.70 or later
Bar graph 1.00 or later 2.70 or later
Clock 1.00 or later
Note1)
2.70 or later
Line graph 1.00 or later 2.70 or later
Alarm
History 1.00 or later 2.70 or later
List 1.00 or later 2.70 or later
Keyboard 1.00 or later 2.70 or later
Custom 1.00 or later 2.70 or later
Other
functions
Recipe
Recipe 1.00 or later 2.70 or later
SD recipe Not available Not available
Flow display 1.00 or later 2.70 or later
Write device 1.00 or later 2.70 or later
Sound Not available Not available
Password
Password 1.00 or later 2.70 or later
Operation security Not available Not available
Multi language exchange 1.00 or later 2.70 or later
Logging function Not available Not available
Display panel sideways setting 1.10 or later 2.71 or later
Copy
Cable between GTs 1.10 or later -
SD memory card Not available Not available
GT link Not available Not available
PLC multiple connection Not available Not available
Note1) Summer time cannot be set.
xvi
Page 19
Version of GT32 and available functions
Phone: 800.894.0412 - Fax: 888.723.4773 - Web: www.ctiautomation.net - Email: info@ctiautomation.net
Function GT32M
GT32T0
Parts
library
Other
functions
Switch 1.00 or later 1.00 or later 2.80 or later
Lamp 1.00 or later 1.00 or later 2.80 or later
Message 1.00 or later 1.00 or later 2.80 or later
Data 1.00 or later 1.00 or later 2.80 or later
Bar graph 1.00 or later 1.00 or later 2.80 or later
Clock 1.00 or later 1.00 or later 2.80 or later
Line graph 1.00 or later 1.00 or later 2.80 or later
Alarm
Keyboard 1.00 or later 1.00 or later 2.80 or later
Custom 1.00 or later 1.00 or later 2.80 or later
Recipe
Flow display 1.00 or later 1.00 or later 2.80 or later
Write device 1.00 or later 1.00 or later 2.80 or later
Sound Not available 1.00 or later 2.80 or later
Password
Multi language exchange 1.00 or later 1.00 or later 2.80 or later
Logging function 1.50 or later 1.50 or later 2.98 or later
FP monitor function 2.00 or later 2.00 or later 2.C0 or later
Display panel sideways setting 2.10 or later 2.10 or later 2.C1 or later
Copy
GT link 1.20 or later 1.20 or later 2.94 or later
PLC multiple connection 1.40 or later 1.40 or later 2.97 or later
History 1.00 or later 1.00 or later 2.80 or later
List 1.00 or later 1.00 or later 2.80 or later
Recipe 1.00 or later 1.00 or later 2.80 or later
SD recipe 1.60 or later 1.60 or later 2.A0 or later
Password 1.00 or later 1.00 or later 2.80 or later
Operation security 1.20 or later 1.20 or later 2.94 or later
Cable between GTs Not available Not available Not available
SD memory card 1.00 or later 1.00 or later 2.80 or later
GT32T1 GTWIN
xvii
Page 20
Version of GT32-E and available functions
Phone: 800.894.0412 - Fax: 888.723.4773 - Web: www.ctiautomation.net - Email: info@ctiautomation.net
Function GT32M-E GT32T1-E GTWIN
Parts
library
Other
functions
Switch 1.00 or later 1.00 or later 2.C0 or later
Lamp 1.00 or later 1.00 or later 2.C0 or later
Message 1.00 or later 1.00 or later 2.C0 or later
Data 1.00 or later 1.00 or later 2.C0 or later
Bar graph 1.00 or later 1.00 or later 2.C0 or later
Clock 1.00 or later 1.00 or later 2.C0 or later
Line graph 1.00 or later 1.00 or later 2.C0 or later
Alarm
Keyboard 1.00 or later 1.00 or later 2.C0 or later
Custom 1.00 or later 1.00 or later 2.C0 or later
Recipe
Flow display 1.00 or later 1.00 or later 2.C0 or later
Write device 1.00 or later 1.00 or later 2.C0 or later
Sound Not available Not available Not available
Password
Multi language exchange 1.00 or later 1.00 or later 2.C0 or later
Logging function 1.00 or later 1.00 or later 2.C0 or later
FP monitor function 1.00 or later 1.00 or later 2.C0 or later
Display panel sideways setting 1.10 or later 1.10 or later 2.C1 or later
Copy
GT link 1.00 or later 1.00 or later 2.C0 or later
PLC multiple connection 1.00 or later 1.00 or later 2.C0 or later
History 1.00 or later 1.00 or later 2.C0 or later
List 1.00 or later 1.00 or later 2.C0 or later
Recipe 1.00 or later 1.00 or later 2.C0 or later
SD recipe 1.00 or later 1.60 or later 2.C0 or later
Password 1.00 or later 1.00 or later 2.C0 or later
1.00 or later 1.00 or later 1.20 or later 2.C0 or later
Cable between GTs Not available Not available Not available
1.00 or later 1.00 or later 1.00 or later 2.C0 or later
xviii
Page 21
Change history
y
Phone: 800.894.0412 - Fax: 888.723.4773 - Web: www.ctiautomation.net - Email: info@ctiautomation.net
GTWIN
GT-series version Additional functions
version
Ver. 2.80 GT32 Ver. 1.00
(New release)
Ver. 2.90 GT05 Ver. 1.00
(New release)
Ver. 2.94 GT05 Ver. 1.10
GT32 Ver. 1.20
Ver. 2.96 GT01 Ver. 1.35
GT05 Ver. 1.20
GT11 Ver. 1.25
GT21 Ver. 1.15
GT32 Ver. 1.30
Ver. 2.97 GT05 Ver. 1.30
GT12 Ver. 1.00
(New release)
GT32 Ver. 1.40
GT01 Ver.1.35
GT11 Ver.1.25
GT21 Ver.1.15
Ver. 2.98 GT05 Ver. 1.40
GT12 Ver. 1.10
GT32 Ver. 1.50
GT01 Ver. 1.37
GT11 Ver. 1.27
Ver.2.983 GT05 Ver.1.42
GT12 Ver.1.12
GT32 Ver.1.52
Ver.2.99 GT05 Ver.1.50
GT12 Ver.1.20
GT32 Ver.1.60
- - Display/Hide of keyboard parts in GTWIN
Ver.2.A0 GT02 Ver.1.00
Ver.2.B0 GT02L Ver.1.00
(New release)
GT05 Ver.1.60
GT12 Ver.1.30
GT32 Ver.1.70
GT05 Ver.1.40
GT12 Ver.1.30
GT32 Ver.1.20
(New release)
GT02 Ver.1.10
GT05 Ver.1.70
GT12 Ver.1.40
GT32 Ver.1.80
- New model
- Equipped a SD memory card slot.
- Sound function
- New model
- Operation security function
- GT link function
- Touch sound disable flag in Basic communication area
(Bit area)
- New model
- "Mult Function" function
- PLC multiple connection
- Display/Hide of data parts
- Modbus slave function
- Added 4096-color parts library.
- Modbus slave function
- Logging function
- Index modifier of data parts
- Display/Hide of switch parts
- Display of data parts in kana and Chinese character,
- kana input of keyboard parts ・Unit number setting on GT
when using General-purpose serial
- SD memory card copy to password-protected GT
- Connection between multiple units with Modbus(RTU) master
- Output to Panasonic FP series "X" device.
- Jump to the prvious screen from "Screen No. Error" screen
- Reverse display function
- Jump to the prvious screen from "Screen No. Error" screen
- Reverse displa
function
Bug fixing
- Functions for devices such as Temperature control device of
MODBUS (RTU mode)
- Display of data parts in Chinese and Korean
- Graph display of logging device data for logging function
- Bar graph of line graph parts
- Fixed line of line graph parts
- Supports SDHC memory card
- New model
- SD recipe function
- Function for communication errors in case of PLC multiple
connection
- Alarm history data save in SD memory card
- Multiplication and division of write device data
- Multiplication and division of write device data
- New model (GT02L)
- True Type font for data parts
xix
Page 22

Ver.2.B1 GT01 Ver.1.39
Phone: 800.894.0412 - Fax: 888.723.4773 - Web: www.ctiautomation.net - Email: info@ctiautomation.net
GT02 Ver.1.11
GT02L Ver.1.01
GT05 Ver.1.71
GT11 Ver.1.29
GT12 Ver.1.41
GT21 Ver.1.19
GT32 Ver.1.81
Ver.2.C0
GT02 Ver.1.30
GT02L Ver.1.20
GT05 Ver.1.90
GT12 Ver.1.60
GT32 Ver.2.00
GT32-E Ver.1.00
Ver.2.C1
GT02 Ver.1.40
GT02L Ver.1.30
GT05 Ver.2.00
GT12 Ver.1.70
GT32 Ver.2.10
GT32-E Ver.1.10
-Bug fixing
- New model(GT32-E)
- FP monitor function
- Added the mode to ignore CS/RS when using general-
purpose serial communication.
- Fixed font conversion function
- Vertical type display (GT05/GT32/GT32-E)
- Device change function
- Added the SD memory card installation flag in Basic
Communication Area.
- Added parts library.
xx
Page 23

Chapter 1
Phone: 800.894.0412 - Fax: 888.723.4773 - Web: www.ctiautomation.net - Email: info@ctiautomation.net
Features and Functions
Page 24
1.1 Features and Functions of GT Series
GT series
Number of colors
GT21C
256 colors
GT05S/GT32T0/GT32T1/GT32T-E
4096 colors
Phone: 800.894.0412 - Fax: 888.723.4773 - Web: www.ctiautomation.net - Email: info@ctiautomation.net
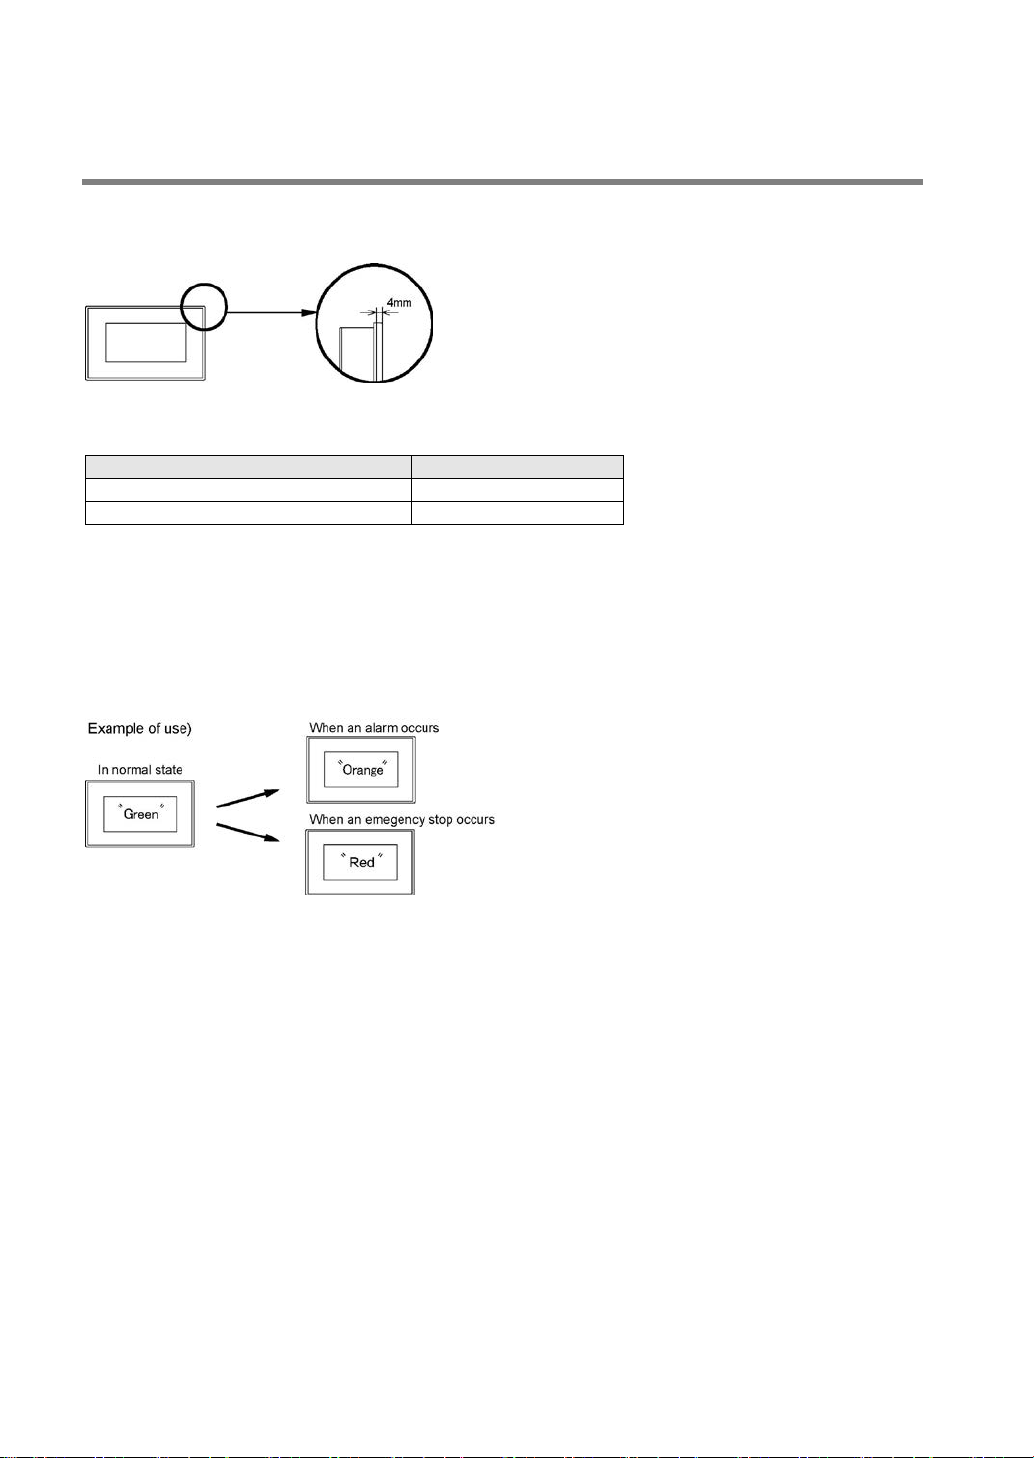
Can be installed in a small space.
As the GT series is a small and thin-shaped body, it can be installed in a small space. Also, as the
projecting part from a wall surface is 4 mm, it looks neat after installation.
The GT01, GT02, GT02L, GT11, GT12 and GT21 can be installed in vertical orientation.
Number of colors can be selected as usage.
Monochrome 8-gradation (GT12)/16-gradation (GT32M-E) display function is available.
The monochrome 8-gradation and 16-gradation displays can be selected as well as the existing
monochrome 2-gradation display, so that the screen can be displayed finely.
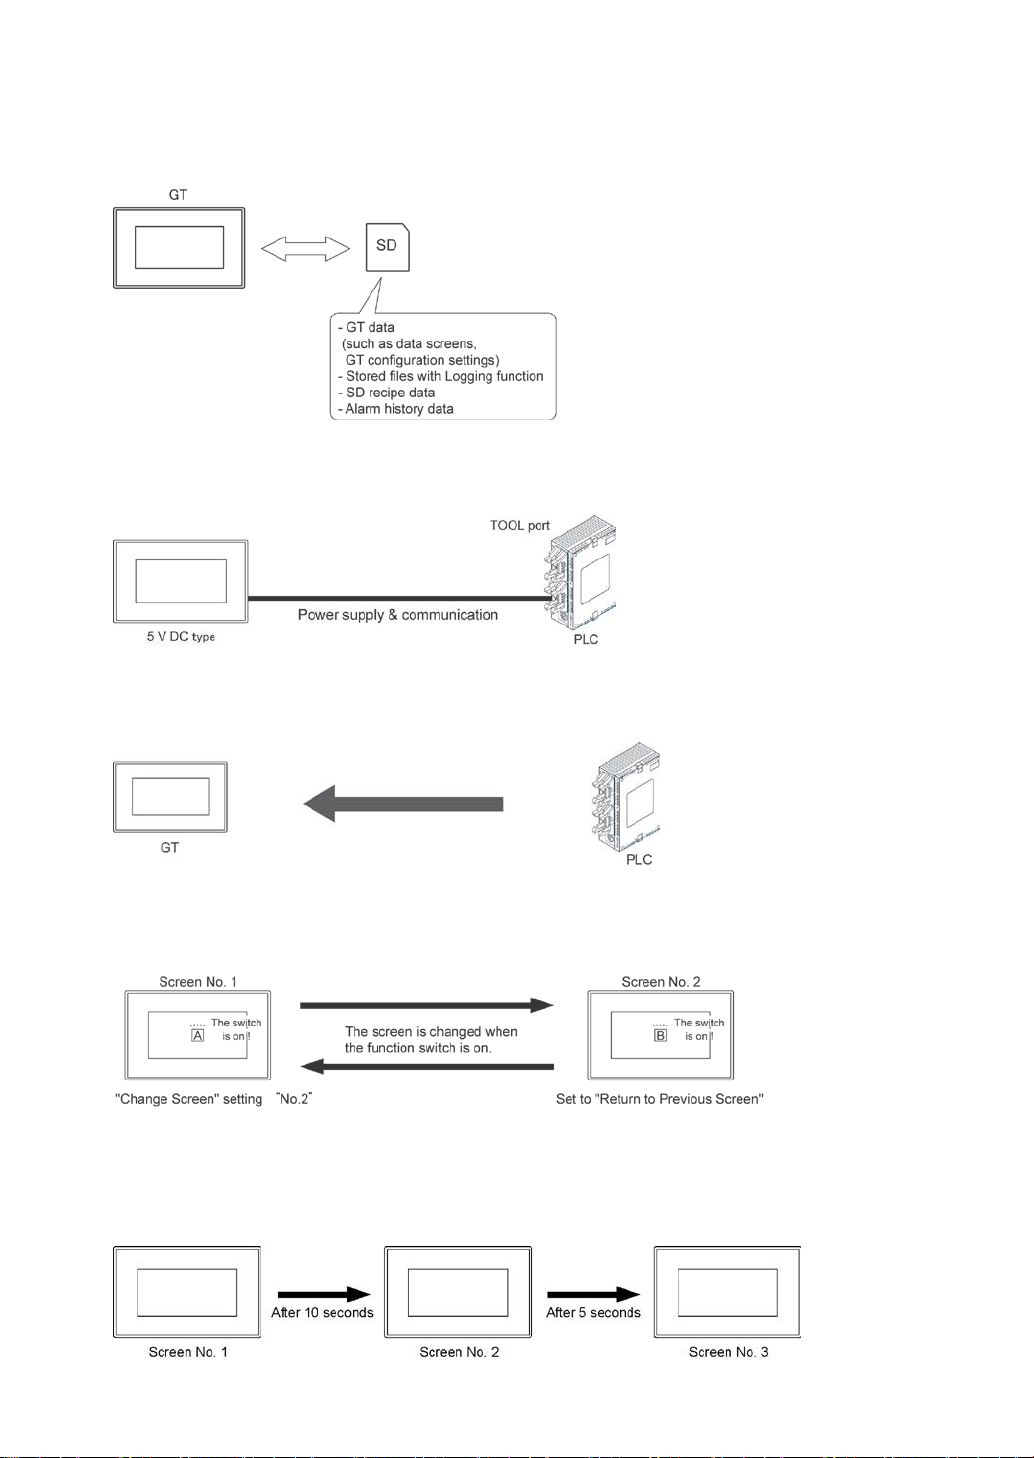
Easily shows a current state changing the backlight on the monochrome type.
For the monochrome type (3-color LED backlight type), changing in the backlight color makes it easy to
grasp a current state at a glance.
"Green, orange, red" type and "White, red, pink" type is available for the 3-color LED backlight type.
Analog touch panel provided
As an analog touch panel is provided, it allows maximum flexibility in the switch layout and size.
Screens can be created easily, using a special screen creation tool Terminal GTWIN.
Screen contents can be easily created using the dedicated Terminal GTWIN tool. Screens are put
together simply by selecting parts from libraries and positioning them in place.
Various parts for numerous applications are provided such as 256-color 3D parts.
Screen data of the other models can be used with the model conversion function.
Screen data can be converted from the low-resolution model to high-resolution model, e.g. from GT01 to
GT11, from GT21 to GT32.
The communication methods support RS232C/RS422 (RS485)
The communication methods to PLCs support RS232C/RS422(RS485). Also it can be connected to
PLCs manufactured by other companies.
Structure adapted to surrounding environments
IP65. It has a dust-proof, waterproof and drop-proof structure. (IP67 for GT02, GT12 and GT32-E)
High-intensity LED provided (LED backlight type)
As the high-intensity LED is provided, the screen is bright, and the backlight does not need to be
replaced.
Page 25
Saving various data with a SD memory card (Model equipped with SD memory card slot)
Phone: 800.894.0412 - Fax: 888.723.4773 - Web: www.ctiautomation.net - Email: info@ctiautomation.net
Various data can be saved and read out with a SD memory card.
Power can be supplied to the 5 V DC type with only one communication cable.
The power is supplied from the TOOL port of a PLC, therefore, the wiring man-hours can be significantly
reduced.
Applicable models:
Panasonic FP series
Mitsubishi Electric Corporation FX
series
Three methods are available to switch the screen.
Switching by the instruction from PLC
The screens can be switched by writing to the “basic communication area” from the PLC ladder program.
Switching with the touch-screen operation
The screens can be switched on the GT by using the “function switching parts” provided in the parts
library of the GTWIN that has a function to switch the screens.
Switching automatically
The GT man unit has an “Auto-paging” function in the configuration setting that automatically switches
the screen to a specified screen number when a certain period of time has elapsed. This function can be
used to switch screens automatically.
Page 26
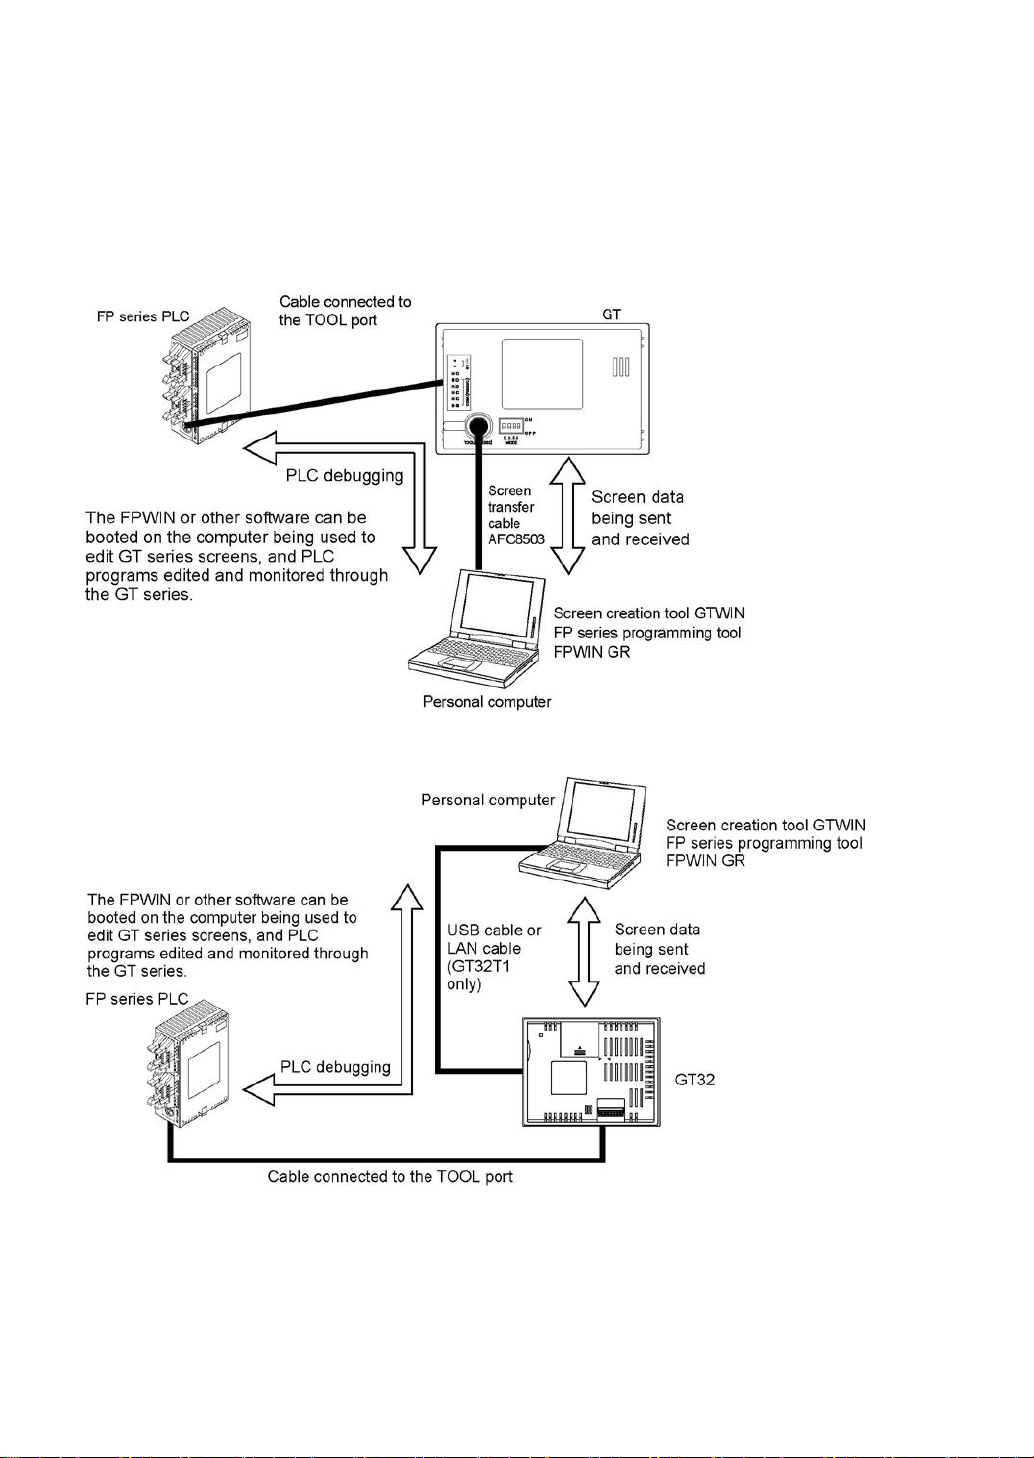
Through function is convenient for debugging
Phone: 800.894.0412 - Fax: 888.723.4773 - Web: www.ctiautomation.net - Email: info@ctiautomation.net
A convenient “through” function makes it possible to transfer data from the GT and carry out PLC
debugging at the same time that communication is going on between the GT and the FP series PLC.
This significantly boosts efficiency in the workplace.
For TOOL port models
For USB port/Ethernet port models
New functions can be available by upgrading the GT.
The GT can be easily upgraded by donwloading the latest firmware from our website or using the GT
Ver_UP tool.
Page 27
Security Function
Phone: 800.894.0412 - Fax: 888.723.4773 - Web: www.ctiautomation.net - Email: info@ctiautomation.net
- Password protection function
A password (max. 8 characters) is specified for trasferring the screen data to GT from GTWIN. This
function prevents the outflow of screen data if anyone except the administrator tries to read out the
screen data.
- Operation security function (GT02, GT02L, GT05, GT12, GT32, GT32-E)
This function is used to limit the contents of displays and operations by setting the security level of users
for each part.
The level of operators are managed with the security password.
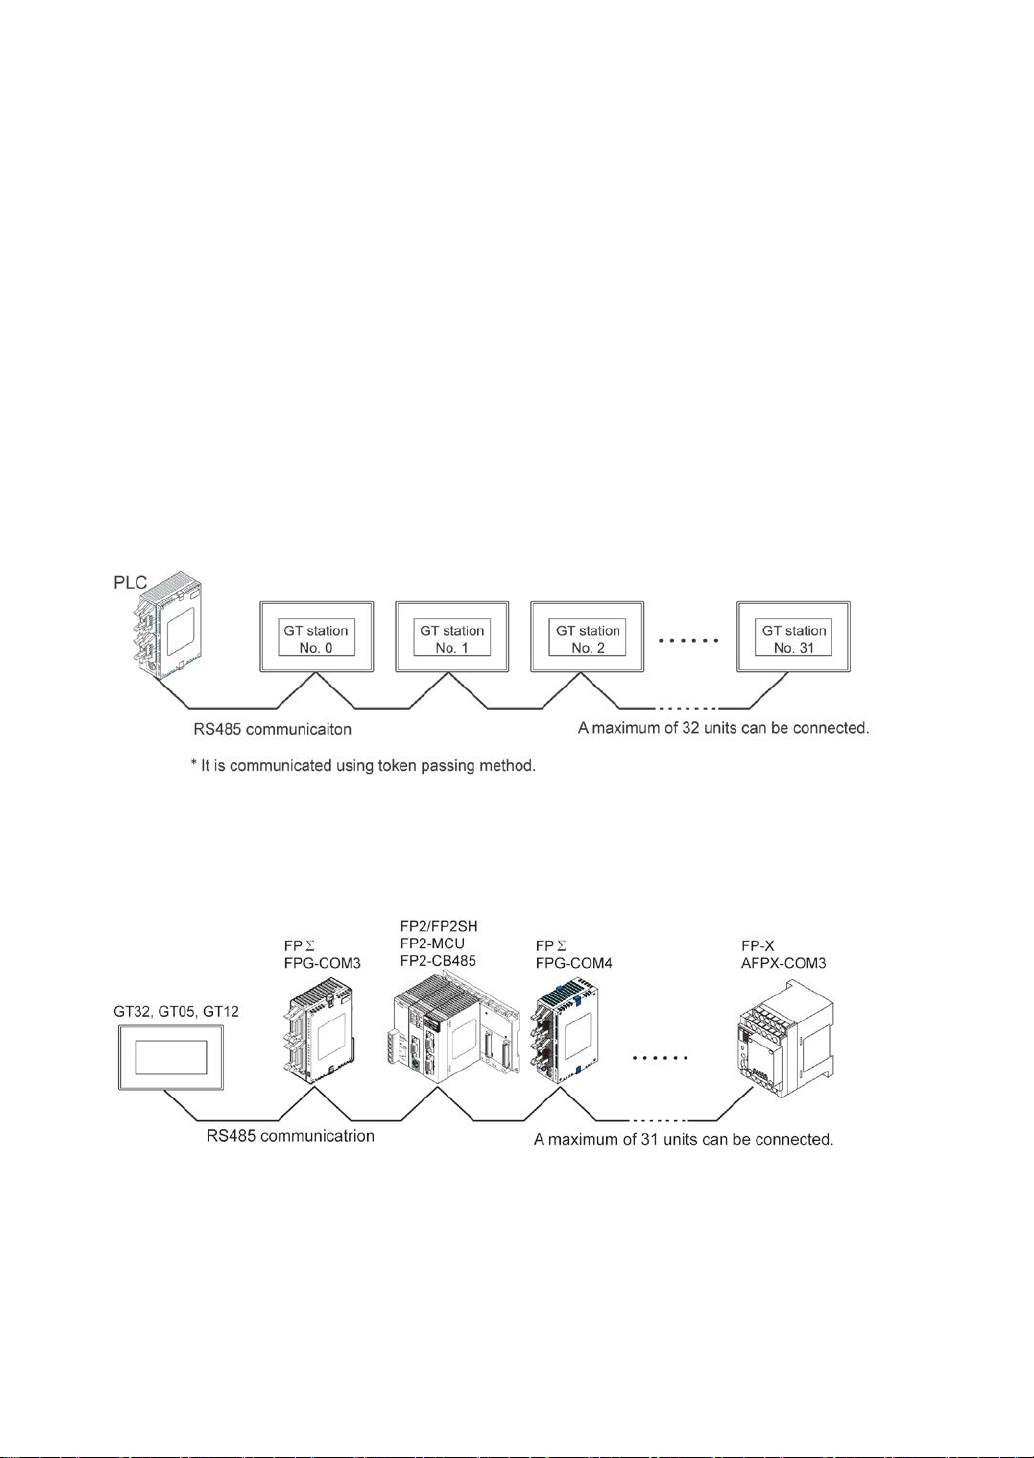
GT link function (GT02, GT02L, GT05, GT12, GT32, GT32-E)
This function is used to connect multiple GT units (up to 32 units) to a single PLC (Panasonic FP series).
RS485 communication is used.
Note) Station numbers should be set to the connected GT units. The both settings for GT and PLC are
necessary.
PLC Multiple Connection (GT02, GT02L, GT05, GT12, GT32, GT32-E)
This is a function that enables multiple Panasonic PLCs (FP series) (up to 31 units) to be connected with
one GT. Communication is performed via RS485.
Page 28
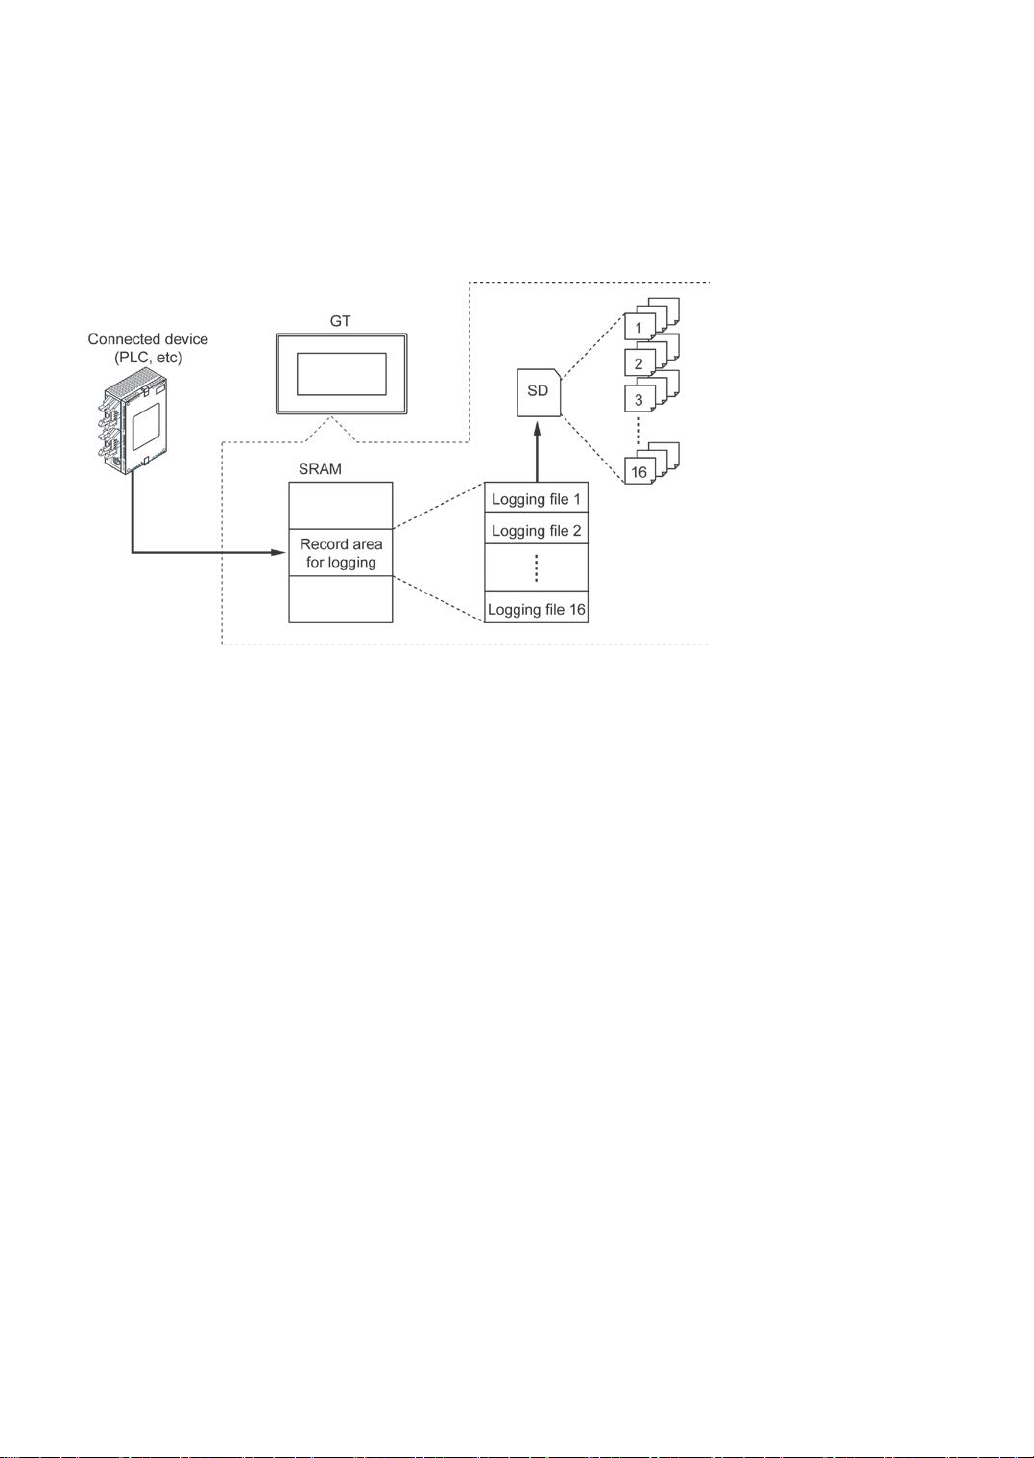
Logging function (Model equipped with SD memory card slot)
Phone: 800.894.0412 - Fax: 888.723.4773 - Web: www.ctiautomation.net - Email: info@ctiautomation.net
It is a function to collect and log arbitrary device values into a PLC at a constant period or when
conditions are met.
Logged data is saved in a SD memory card inserted in this unit in CSV format.
This function is useful for obtaining the history of data.
FP monitor function (GT02, GT02L, GT05, GT12, GT32, GT32-E)
This function is used to monitor or change the settings and data of FP-series PLC on the GT screen.
Without creating screens in advance or connecting to a PC, the operational check of equipment in the
actual environment, the start-up of equipment and daily maintenance work can be performed efficiently.
Page 29

1.2 Types of Units
cation
Black
AIGT0030B1
Ashgray
AIGT0030H1
Black
AIGT0032B1
Ashgray
AIGT0032H
Black
AIGT0130B1
Ashgray
AIGT0130H1
(RS485)
Black
AIGT0132B1
Ashgray
AIGT0132H1
Black
AIGT0130B
Silver
AIGT0230H1
Pure black
AIGT0232B1
Silver
AIGT0232H1
Pure black
AIGT0230B
Silver
AIGT0230H
Pure black
AIGT0232B
Silver
AIG02MQ05D
Pure black
AIG02MQ12D
Silver
AIG02MQ13D
(RS485)
Pure black
AIG02MQ14D
Silver
AIG02MQ15D
Pure black
AIG02GQ04D
Silver
AIG02GQ05D
Pure black
AIG02GQ12D
Silver
AIG02GQ13D
(RS485)
Pure black
AIG02GQ14D
Silver
AIG02GQ15D
Phone: 800.894.0412 - Fax: 888.723.4773 - Web: www.ctiautomation.net - Email: info@ctiautomation.net
1.2.1 GT Series
Item
name
Model Display
Interface specifi-
cations
Backlight
Power
supply
COM
port
communication
specifi-
Front
panel
color
Model No.
GT01
GT02
GT01
GT01R
GT02M0
GT02M1
GT02M2
GT02G0
GT02G1
GT02G2
STN
monochrom
e LCD
(128x64
dots)
STN
monochrom
e LCD
(240x96
dots)
COM port
TOOL port
(RS232C
compliant)
COM port
USB port (USB1.1
compliant)
COM port
USB port (USB1.1
compliant)
with SD memory
card slot
COM port
USB port (USB1.1
compliant)
COM port
USB port (USB1.1
compliant)
with SD memory
card slot
3-color
LED
(green,
red,
orange)
1-color
LED
(white)
3-color
LED
(white,
red, pink)
3-color
LED
(white,
red, pink)
3-color
LED
(green,
red,
orange)
5 V DC
24 V
DC
5 V DC
24 V
DC
5 V DC
24 V
DC
5 V DC
24 V
DC
5 V DC
24 V
DC
RS232C
RS422
(RS485)
RS232C
RS422
(RS485)
RS232C
RS422
RS232C
RS422
(RS485)
RS232C
RS422
(RS485)
RS232C
RS422
(RS485)
RS232C
RS422
(RS485)
RS232C
RS422
RS232C
RS422
(RS485)
RS232C
RS422
(RS485)
RS232C
RS422
RS232C
RS422
(RS485)
Ashgray AIGT0032H1
Black AIGT0030B
Ashgray AIGT0030H
Black AIGT0032B
Ashgray AIGT0130H
Black AIGT0132B
Ashgray AIGT0132H
Pure black AIGT0230B1
Silver AIGT0232H
Pure black AIG02MQ02D
Silver AIG02MQ03D
Pure black AIG02MQ04D
Pure black AIG02MQ22D
Silver AIG02MQ23D
Pure black AIG02MQ24D
Silver AIG02MQ25D
Pure black AIG02GQ02D
Silver AIG02GQ03D
Pure black AIG02GQ22D
Silver AIG02GQ23D
Pure black AIG02GQ24D
Silver AIG02GQ25D
Page 30

Item
cation
dots)
RS232C
AIG02LQ02D
Pure black
AIG05MQ02D
Pure black
AIG05GQ02D
Silver
AIG05GQ03D
Pure black
AIG05SQ02D
Silver
AIG05SQ03D
Black
AIGT2030B
Ashgray
AIGT2030H
Ashgray
AIGT2130H
Black
AIGT2132B
Pure black
AIG12MQ04D
Silver
AIG12MQ05D
card slot
Pure black
AIG12GQ02D
Silver
AIG12GQ03D
Pure black
AIG12GQ12D
Silver
AIG12GQ13D
dots)
Pure black
AIGT2230B
Pure black
AIGT2232B
Phone: 800.894.0412 - Fax: 888.723.4773 - Web: www.ctiautomation.net - Email: info@ctiautomation.net
name
Model Display
Interface
specifi-cations
Backlight
Power
supply
COM port
communication
specifi-
Front
panel
color
Model No.
GT02L GT02L
GT05M
GT05
GT11 GT11
GT12
GT21 GT21
GT05G
GT05S
GT12M0
GT12M1
GT12G0
GT12G1
STN
monochro
me LCD
(160x64
STN
monochro
me LCD
(320x240
dots)
4096color STN
color LCD
(320x240
dots)
STN
monochro
me LCD
(240x96
dots)
STN
monochro
me LCD
(320x120
dots)
256-color
STN color
LCD
(320x240
COM port
USB port
(USB1.1
compliant)
COM port
USB port
(USB1.1
compliant)
with SD memory
card slot
COM port
TOOL port
(RS232C
compliant)
COM port
TOOL port
(RS232C
compliant)
COM port
USB port
(USB1.1
compliant)
with SD memory
COM port
TOOL port
(RS232C
compliant)
COM port
USB port
(USB1.1
compliant)
with SD memory
card slot
COM port
TOOL port
(RS232C
compliant)
1-color
LED
(white)
3-color
LED
(white,
red, pink)
3-color
LED
(green,
red,
orange)
1-color
LED
(white)
3-color
LED
(green,red
, orange)
1-color
LED
(white)
3-color
LED
(white,
red, pink)
3-color
LED
(green,
red,
orange)
1-color
LED
(white)
5 V DC
24 V
DC
24 V
DC
24 V
DC
5 V
DC
RS422
(RS485)
RS232C
RS422
(RS485)
RS232C
RS422
(RS485)
RS232C
RS422
(RS485)
RS232C
RS422
(RS485)
RS232C
RS422
(RS485)
RS232C
RS422
(RS485)
RS232C
RS422
(RS485)
RS232C
RS422
(RS485)
RS232C
RS422
(RS485)
RS232C
RS422
(RS485)
Black
Silver AIG05MQ03D
Pure black AIG05MQ04D
Silver AIG05MQ05D
Pure black AIG05GQ04D
Silver AIG05GQ05D
Black AIG05SQ04D
Ashgray AIG05SQ05D
Black AIGT2032B
Ashgray AIGT2032H
Black AIGT2130B
Ashgray AIGT2132H
Pure black AIG12MQ02D
Silver AIG12MQ03D
Pure black AIG12MQ12D
Silver AIG12MQ13D
Pure black AIG12MQ14D
Silver AIG12MQ15D
Pure black AIG12GQ04D
Silver AIG12GQ05D
Pure black AIG12GQ14D
Silver AIG12GQ15D
Silver AIGT2230H
Silver AIGT2232H
AIG02LQ04D
Page 31

cation
Silver
AIG32MQ03D
Pure black
AIG32TQ02D
Pure black
AIG32TQ04D
Pure black
AIG32TQ12D
Item name
Contents
Product No.
For connection between GT01/GT02/GT02L (5V
* A ferrite core is supplied with the main unit.
* A ferrite core is supplied with the main unit.
2 m
AIGT8162
5 m
AIGT8165
10 m
AIGT8160
Mini-DIN 8-pin loose-wire cable
D-SUB 9-pin loose-wire cable
Phone: 800.894.0412 - Fax: 888.723.4773 - Web: www.ctiautomation.net - Email: info@ctiautomation.net
Item
name
Model Display
Interface
specifi-cations
Backlight
Power
supply
COM port
communication
specifi-
Body color Model No.
GT32
GT32-E
GT32M
GT32T0
GT32T1
GT32M-E
GT32T-E
STN
monochrome
LCD
(320x240
dots)
4096color
TFT color
LCD
(320x240
dots)
TFT
monochro
me LCD
(320x240
dots)
4096color
TFT color
LCD
(320x240
dots)
COM port
USB port
(USB1.1
compliant)
with SD memory
card slot
COM port
USB port
(USB1.1
compliant)
Ethernet port
with SD memory
card slot with
sound output
jack
COM port
USB port
(USB1.1
compliant)
with SD memory
card slot
CFL
1-color
LED
(white)
24 V
DC
24 V
DC
RS232C
RS422
(RS485)
RS232C
RS422
(RS485)
RS232C
RS422
(RS485)
RS232C
RS422
(RS485)
RS232C AIG32TQ03DE
RS422
(RS485)
Pure black AIG32MQ02D
Pure black AIG32MQ04D
Silver AIG32MQ05D
Silver AIG32TQ03D
Silver AIG32TQ05D
Silver AIG32TQ13D
Pure black AIG32TQ14D
Silver AIG32TQ15D
AIG32MQ03DE
AIG32MQ05DE
Silver
AIG32TQ05DE
1.2.2 Options and Repair Parts
PLC connecting cables
DC type (RS232C)) and our FP-series TOOL port
Mini-DIN 5-pin loose-wire cable
For connection between GT01/GT02/GT02L (5V
DC type (RS422)) and MITSUBISHI FX-series
TOOL port
Mini-DIN 8-pin loose-wire cable
For connection between 24V DC type (RS232C)
and our FP-series TOOL port
Mini-DIN 5-pin loose-wire cable
For connection between 24V DC type (RS422)
and MITSUBISHI FX-series TOOL port
For connection to COM port of FP2/FP2SH and
FP2 computer communication unit
2 m AIGT8142
2 m AIGT8152
5 m AIGT8175
2 m AIP81842
Page 32

Maintenance parts
No.
Note)
For GT05
AIG05810
For GT11
AIGT181
For GT12
AIG2810
For GT21
AIGT28121
screws)
No.
For GT01
AIGT080
For GT01R
AIGT080R
For GT02/GT02L
AIG02800
For GT05
AIG05800
For GT32
Sold separately
AIGT32800
Phone: 800.894.0412 - Fax: 888.723.4773 - Web: www.ctiautomation.net - Email: info@ctiautomation.net
Item name Contents
Product
Waterproof
packing
Attachment
fittings
Attachment
fittings
(with
dedicated
Connector
For GT01
For GT02/GT02L
For GT32 AIG32810
For GT32-E AIG32810E
GT01/GT11 repair
(4 pc/set)
For GT05/GT21 repair (2 pc/set) 5 sets AIGT28321
For GT32/GT32-E repair (2 pc/set) 5 sets AIG32830
For GT02/GT02L/GT12 repair
(4 pc each/set)
COM port connector
for repair
(8-pin)
AIG02810
For repair 10 in set
5 sets AIGT083
5 sets AIG12830
5 in set AIGT084
AIGT081
Note) Although it is for GT02, it can be also used for GT02L. It is different from the packing attached to
the GT02 unit.
Options
Item name Contents
Product
GT01
Front panel
protective
sheet
Backup
battery
For GT11 AIGT280
For GT12 AIG12800
For GT21 AIGT28021
Backup battery
for
GT02M2,GT02G2/GT05/GT12/GT32/
GT32-E
Sold separately
10 in set
1 pc AFPX-BATT
Page 33

Commercial product
Item name
Contents
Model No.
GT02G2
2GB
later
older
older
older
later
1GB
2GB
card
32GB
Phone: 800.894.0412 - Fax: 888.723.4773 - Web: www.ctiautomation.net - Email: info@ctiautomation.net
Backup
battery
Backup battery for GT11/GT21 1 pc CR2032
Item
name
SD
memor
y card
Note) Select the capacity of a SD memory card according to the logo printed on the GT and the version
of GT firmware.
Printe
d logo
on GT
GT02M2
1.00 or
later
1.00 or
later
1.00 or
1.00 or
later
GT version (Ver.) Usable SD memory card
GT05 GT12 GT32 GT32-E Card type Capacity
1.39 or
older
1.40
or later
1.39 or
1.40 or
later
1.09 or
older
1.10 or
later
1.09 or
1.10 or
later
1.49 or
older
1.50 or
later
1.49 or
1.50 or
later
1.00 or
later
1.00 or
later
1.00 or
1.00 or
later
SD memory card
SD memory card
SDHC memory
card
CLASS2, 4
SD memory card
SD memory card
SDHC memory
32M to
1GB
32M to
4GB to
16GB
32M to
32M to
4GB to
Page 34

1.3 Screen Creation Tool
Phone: 800.894.0412 - Fax: 888.723.4773 - Web: www.ctiautomation.net - Email: info@ctiautomation.net
1.3.1 Tools Required for Screen Creation
1. Tool software
It can be used for all the models in the GT series.
2. Screen transfer cable (Cable for connecting a PC)
For GT01, GT11 and GT21:
A cable between a PC (D-sub 9-pin) and GT (TOOL port) is available.
For GT02, GT02L, GT05, GT12, GT32 and GT32-E:
Prepare a commercal USB cable or LAN cable (for GT32T1 only).
1.3.2 Software Usage Environment and Applicable Cables
Screen creation tool software Terminal GTWIN Ver. 2
Software type Required OS Hard disk capacity Product No.
English-
Terminal GTWIN Ver. 2
Terminal GTWIN Ver. 2
Upgrade model
Note1) The latest version is provided free of charge via our website
(User registration is required. Free of charge)
language
version
Englishlanguage
version
Windows 7
Windows Vista
Windows 2000
Windows XP
400 MB or more
AIGT8001V2
AIGT8001V2R
Related software (Freeware)
Item name Contents
Configurator WD IP address search tool Address setting for the GT in Ethernet communication
Note) It can be downloaded from our website.
(User registration is required. Free of charge)
1-12
Page 35

Screen transfer cable
USB cable (Commercial product)
Applicable model
Cable type
Length
connector
connector
Phone: 800.894.0412 - Fax: 888.723.4773 - Web: www.ctiautomation.net - Email: info@ctiautomation.net
For connection between PC (USB) and Programmable Display (GT02/GT02L/GT05/GT12/GT32)
GT05/GT32/
GT32-E
GT02/GT02L/GT12
Note) Windows 2000 or later OS is required for the communication with a USB.
USB2.0 (or 1.1) AB type Max. 5 m
USB2.0 (or 1.1) cable
A type (Male): miniB type male
Max. 5 m
For connection between PC (RS232C) and Programmable Display (GT01/GT11/GT21)
D-sub connector cable
PC side
D-sub 9-pin
GT side
Mini DIN
round 5-pin
Specification Product No.
L type (3 m) AFC8503
Straight type
(3 m)
AFC8503S
Note) A USB/RS232C conversion cable is necessary to connect with a personal computer without a
serial port using a PC connection cable.
LAN cable (Ethernet port) (GT32T1)
Either straight cable or crossing cable can be used.
(MDI/MDI-X Automatic crossover function)
Page 36

Phone: 800.894.0412 - Fax: 888.723.4773 - Web: www.ctiautomation.net - Email: info@ctiautomation.net
Page 37

Chapter 2
Phone: 800.894.0412 - Fax: 888.723.4773 - Web: www.ctiautomation.net - Email: info@ctiautomation.net
Names and Functions of Parts
Page 38

2.1 Part Names
Phone: 800.894.0412 - Fax: 888.723.4773 - Web: www.ctiautomation.net - Email: info@ctiautomation.net
2.1.1 GT01, GT11 and GT21
GT01/GT01R
GT11
GT21
Page 39

Touch screen
Normal use
(Factory default)
Phone: 800.894.0412 - Fax: 888.723.4773 - Web: www.ctiautomation.net - Email: info@ctiautomation.net
Various screens are displayed here. Switches can be operated and data entered simply by touching the
touch screen.
(A sheet is affixed to the touch panel to protect it from scratches when shipping. Please remove it before
using the GT.)
Optional protective sheets are available to protect the touch screen surface and keep it clean.
Reference: <1.4.2 Options and Repair Parts>
COM port and power supply terminal
This is a communication port (RS232C or RS422) for connecting to a PLC, host PC, or microcomputer
board, and a power supply terminal for operation.
TOOL port (GTWIN connection port)
This port is used to connect the screen creation tool.
Operation mode setting switches
Setting the operation mode setting switches as follows when turning on the power supply enables the
setting to inhibit to move to the system menu or enables to clear F-ROM.
Setting
Switch setting
Inhibit system menu shift Clear F-ROM
Note: Do not use any settings other than the above settings.
Waterproof packing
This assures that the front panel is waterproof.
Battery cover (for GT11 and GT21)
When using a backup battery to be separately purchased, open this battery cover to install it.
The clock, PLC device hold data, alarm history and GT internal device hold data functions can be used
with the backup battery.
Reference: <3.6.2 How to Install the Battery (Lithium Button Battery)>
Page 40

2.1.2 GT02/GT02L
Phone: 800.894.0412 - Fax: 888.723.4773 - Web: www.ctiautomation.net - Email: info@ctiautomation.net
GT02M2, GT02G2
GT02M0, GT02M1, GT02G0, GT02G1
GT02L
Page 41

Liquid crystal display panel/touch panel
Normal use
(Factory default)
Inhibit system
menu shift
Phone: 800.894.0412 - Fax: 888.723.4773 - Web: www.ctiautomation.net - Email: info@ctiautomation.net
Various screens are displayed here. A touch panel is provided on the liquid crystal display panel, and
switches can be operated and data entered simply by touching the panel.
Optional protective sheets are also available to protect the touch panel and keep it clean.
(A sheet is affixed to the touch panel to protect it from scratches when shipping. Please remove it before
using the GT.)
SD memory card slot
A SD memory card is inserted in this slot.
- Saving from GTWIN: Operate on the GTWIN screen using a SD memory card read/writer.
- Savving from GT main unit: Operate on the SD memory card setting screen under the system menu.
USB port
This is a connector for connecting the screen creation tool. The commercal USB cable can be used.
SD memory access lamp
The lamp turns on while accessing a SD memory card.
Battery cover
When using a backup battery to be separately purchased, open this battery cover to install it.
The clock, PLC device hold data, alarm history and GT internal device hold data functions can be used
with the backup battery.
Operation mode setting switches
Setting the operation mode setting switches as follows when turning on the power supply enables the
setting to inhibit to move to the system menu or enables to clear F-ROM.
Setting
Clear F-ROM
Switch setting
Mounting location of connector for battery
COM port (PLC/external device conn ection port) and power supply terminal
This is a communication port (RS232C or RS422) for connecting to a PLC, host PC, or microcomputer
board, and a power supply terminal for operation.
Waterproof packing
This assures that the front panel is waterproof.
Page 42

2.1.3 GT05/GT12/GT32
Phone: 800.894.0412 - Fax: 888.723.4773 - Web: www.ctiautomation.net - Email: info@ctiautomation.net
GT05
GT12
GT32
Standard High function
GT32-E
Page 43

Liquid crystal display panel/touch panel
Phone: 800.894.0412 - Fax: 888.723.4773 - Web: www.ctiautomation.net - Email: info@ctiautomation.net
Various screens are displayed here. A touch panel is provided on the liquid crystal display panel, and
switches can be operated and data entered simply by touching the panel.
Optional protective sheets are also available to protect the touch panel and keep it clean.
(A sheet is affixed to the touch panel to protect it from scratches when shipping. Please remove it before
using the GT.)
SD memory card slot (Except GT12M0 and GT12G0)
A SD memory card is inserted in this slot.
- Saving from GTWIN: Operate on the GTWIN screen using a SD memory card read/writer.
- Savving from GT main unit: Operate on the SD memory card setting screen under the system menu.
USB port
This is a connector for connecting the screen creation tool. The commercal USB cable can be used.
Ethernet port (RJ45) (GT32T1)
This is a connector for connecting the screen creation tool. The maximum baud rate is 115200 bps when
using Ethernet.
SPEED lamp (GT32T1)
It shows the baud rate when using Ethernet.
Light on: During 100Base communication
Blinking: During 10Base communication
LINK/ACT lamp (GT32T1)
it shows the state of communciation with Ethernet.
Light on: When linked
Blinking: While data reception
Sound output jack (GT32T1)
Insert the speaker with a 3.5-mini plug amplifier for using the audio output function.
SD memory access lamp (Except GT12M0 and GT12G0)
The lamp turns on while accessing a SD memory card.
Battery cover
When using a backup battery to be separately purchased, open this battery cover to install it.
The clock, PLC device hold data, alarm history and GT internal device hold data functions can be used
with the backup battery.
Operation mode setting switches
Setting the operation mode setting switches as follows when turning on the power supply enables the
setting to inhibit to move to the system menu or enables to clear F-ROM.
Setting
Normal use
(Factory default)
Inhibit system
menu shift
Clear F-ROM
Switch setting
Mounting location of connector for battery
COM port (PLC/external device connection port) and power supply terminal
This is a communication port (RS232C or RS422) for connecting to a PLC, host PC, or microcomputer
board, and a power supply terminal for operation.
Waterproof packing
This assures that the front panel is waterproof.
2-7
Page 44

2.2 Terminal Layouts of COM Port
Pin name
Name
Signal direction
Product No.
+
+5 V
-
NC
Not connected
-
SD
Send data
GT→External device
NC
Not connected
-
NC
Not connected
-
Pin name
Name
Signal direction
Product No.
+
+5 V
-
−
0 V
-
NC
Not connected
-
+SD
Send data
GT→External device(+)
−SD
Send data
GT→External device(−)
+RD
Receive data
GT←External device(+)
−RD
Receive data
GT←External device(−)
Pin name
Name
Signal direction
Product No.
+
+24 V
-
−
0 V - FG
Functional ground
-
SD
Send data
GT→External device
RD
Receive data
GT←External device
NC
Not connected
-
NC
Not connected
-
SG
Signal ground
-
Pin name
Name
Signal direction
Product No.
+
+24 V
-
−
0 V - FG
Functional ground
-
+SD
Send data
GT→External device(+)
−SD
Send data
GT→External device(−)
+RD
Receive data
GT←External device(+)
−RD
Receive data
GT←External device(−)
E
Terminal resistance
-
Phone: 800.894.0412 - Fax: 888.723.4773 - Web: www.ctiautomation.net - Email: info@ctiautomation.net
2.2.1 GT01
5 V/RS232C type
− 0 V -
RD Receive data GT←External device
Note: There is no RS and CS (control lines).
SG Signal ground -
5 V/RS422(RS485) type
Note: There is no RS and CS (control lines).
E Terminal resistance -
24 V/RS232C type
AIGT0030B1
AIGT0030H1
AIGT0130B1
AIGT0130H1
AIGT0230B1
AIGT0230H1
AIGT0032B1
AIGT0032H1
AIGT0132B1
AIGT0132H1
AIGT0232B1
AIGT0232H1
AIGT0030B
AIGT0030H
AIGT0130B
AIGT0130H
AIGT0230B
AIGT0230H
Note: There is no RS and CS (control lines).
24 V/RS422(RS485) type
AIGT0032B
AIGT0032H
AIGT0132B
AIGT0132H
AIGT0232B
Note: There is no RS and CS (control lines).
AIGT0232H
Page 45

2.2.2 GT02
Pin name
Name
Signal direction
Product No.
+
+5 V
-
0 V
-
FG
Functional ground
-
SD
Send data
GT→External device
RD
Receive data
GT←External device
RS
Request to send
GT→External device
CS
Clear to send
GT←External device
SG
Signal ground
-
Pin name
Name
Signal direction
Product No.
+
+5 V
-
0 V
-
FG
Functional ground
-
+SD
Send data
GT→External device(+)
SD
Send data
GT→External device(−)
+RD
Receive data
GT←External device(+)
RD
Receive data
GT←External device(−)
E
Terminal resistance
-
Pin name
Name
Signal direction
Product No.
+
+24 V
-
0 V
-
FG
Functional ground
-
SD
Send data
GT→External device
RD
Receive data
GT←External device
RS
Request to send
GT→External device
CS
Clear to send
GT←External device
SG
Signal ground
-
Pin name
Name
Signal direction
Product No.
+
+24 V
-
−
0 V
-
FG
Functional ground
-
+SD
Send data
GT→External device(+)
SD
Send data
GT→External device(−)
+RD
Receive data
GT←External device(+)
RD
Receive data
GT←External device(−)
E
Terminal resistance
-
Phone: 800.894.0412 - Fax: 888.723.4773 - Web: www.ctiautomation.net - Email: info@ctiautomation.net
5 V/RS232C type
−
5 V/RS422(RS485) type
−
−
−
Note: There is no RS and CS (control lines).
24 V/RS232C type
AIG02MQ02D
AIG02MQ03D
AIG02GQ02D
AIG02GQ03D
AIG02MQ04D
AIG02MQ05D
AIG02GQ04D
AIG02GQ05D
−
24 V/RS422(RS485) type
−
−
Note: There is no RS and CS (control lines).
AIG02MQ12D
AIG02MQ13D
AIG02MQ22D
AIG02MQ23D
AIG02GQ12D
AIG02GQ13D
AIG02GQ22D
AIG02GQ23D
AIG02MQ14D
AIG02MQ15D
AIG02MQ24D
AIG02MQ25D
AIG02GQ14D
AIG02GQ15D
AIG02GQ24D
AIG02GQ25D
Page 46

2.2.3 GT02L
Pin name
Name
Signal direction
Product No.
+
+5 V
-
0 V
-
FG
Functional ground
-
SD
Send data
GT→External device
RD
Receive data
GT←External device
RS
Request to send
GT→External device
CS
Clear to send
GT←External device
SG
Signal ground
-
Pin name
Name
Signal direction
Product No.
+
+5 V
-
0 V
-
FG
Functional ground
-
+SD
Send data
GT→External device(+)
SD
Send data
GT→External device(−)
+RD
Receive data
GT←External device(+)
RD
Receive data
GT←External device(−)
E
Terminal resistance
-
Phone: 800.894.0412 - Fax: 888.723.4773 - Web: www.ctiautomation.net - Email: info@ctiautomation.net
5 V/RS232C type
5 V/RS422(RS485) type
−
AIG02LQ02D
−
−
Note: There is no RS and CS (control lines).
−
AIG02LQ04D
Page 47

2.2.4 GT11/GT12
Pin name
Name
Signal direction
Product No.
+
+24 V
-
AIG12GQ13D
0 V
-
FG
Functional ground
-
SD
Send data
GT→External device
RD
Receive data
GT←External device
RS
Request to send
GT→External device
CS
Clear to send
GT←External device
Pin name
Name
Signal direction
Product No.
+
+24 V
-
AIG12GQ15D
0 V
-
FG
Functional ground
-
+SD
Send data
GT→External device(+)
SD
Send data
GT→External device(−)
+RD
Receive data
GT←External device(+)
RD
Receive data
GT←External device(−)
Phone: 800.894.0412 - Fax: 888.723.4773 - Web: www.ctiautomation.net - Email: info@ctiautomation.net
24 V/RS232C type
24 V/RS422(RS485) type
−
SG Signal ground -
−
−
−
E Terminal resistance -
AIGT2030B
AIGT2030H
AIGT2130B
AIGT2130H
AIG12MQ02D
AIG12MQ03D
AIG12MQ12D
AIG12MQ13D
AIG12GQ02D
AIG12GQ03D
AIG12GQ12D
AIGT2032B
AIGT2032H
AIGT2132B
AIGT2132H
AIG12MQ04D
AIG12MQ05D
AIG12MQ14D
AIG12MQ15D
AIG12GQ04D
AIG12GQ05D
AIG12GQ14D
Note: There is no RS and CS (control lines).
Page 48

2.2.5 GT21
Pin name
Name
Signal direction
Product No.
+
+24 V
-
0 V
-
FG
Functional ground
-
SD
Send data
GT→External device
RD
Receive data
GT←External device
RS
Request to send
GT→External device
CS
Clear to send
GT←External device
SG
Signal ground
-
Pin name
Name
Signal direction
Product No.
+
+24 V
-
0 V
-
FG
Functional ground
-
+SD
Send data
GT→External device(+)
SD
Send data
GT→External device(−)
+RD
Receive data
GT←External device(+)
RD
Receive data
GT←External device(−)
E
Terminal resistance
-
Phone: 800.894.0412 - Fax: 888.723.4773 - Web: www.ctiautomation.net - Email: info@ctiautomation.net
24 V/RS232C type
24 V/RS422(RS485) type
−
AIGT2230B
AIGT2230H
−
AIGT2232B
−
AIGT2232H
Note: There is no RS and CS (control lines).
−
Page 49

2.2.6 GT05/GT32/GT32-E
Pin name
Name
Signal direction
Product No.
+
+24 V
-
AIG32TQ03DE
0 V
-
FG
Functional ground
-
SD
Send data
GT→External device
RD
Receive data
GT←External device
RS
Request to send
GT→External device
CS
Clear to send
GT←External device
Pin name
Name
Signal direction
Product No.
+
+24 V
-
AIG32TQ05DE
0 V - FG
Functional ground
-
+SD
Send data
GT→External device(+)
SD
Send data
GT→External device(−)
+RD
Receive data
GT←External device(+)
RD
Receive data
GT←External device(−)
Phone: 800.894.0412 - Fax: 888.723.4773 - Web: www.ctiautomation.net - Email: info@ctiautomation.net
24 V/RS232C type
SG Signal ground -
24 V/RS422(RS485) type
−
−
E
AIG05MQ02D
−
−
Terminal
resistance
-
AIG05MQ03D
AIG05GQ02D
AIG05GQ03D
AIG05SQ02D
AIG05SQ03D
AIG32MQ02D
AIG32MQ03D
AIG32TQ02D
AIG32TQ03D
AIG32TQ12D
AIG32TQ13D
AIG32MQ03DE
AIG05MQ04D
AIG05MQ05D
AIG05GQ04D
AIG05GQ05D
AIG05SQ04D
AIG05SQ05D
AIG32MQ04D
AIG32MQ05D
AIG32TQ04D
AIG32TQ05D
AIG32TQ14D
AIG32TQ15D
AIG32MQ05DE
Note: There is no RS and CS (control lines).
Page 50

2.3 Connecting to Screen Creation Tool GTWIN
Pin No.
Name
Abbre.
Signal direction
Phone: 800.894.0412 - Fax: 888.723.4773 - Web: www.ctiautomation.net - Email: info@ctiautomation.net
2.3.1 TOOL Port
1 Signal ground SG 2 Send data SD GT→External device
3 Receive data RD GT←External device
Note:
• The +5V of Pin 5 is reserved for the FP Programmer II. It should not be used for any other application.
If using it, there is a restriction on the ambient temperature. The pin 5 of GT01 is N.C.
2.3.2 USB Port
USB connection
Communication with our software such as GTWIN becomes available by connecting to a PC with a USB
cable.
Functions enabled by USB connection
• Through function using our PLCs
• Screen transfer (The communication in a speed approximately 3 times of the one with the Ethernet
connection is possible.)
4 Not connected N.C. 5 +5 V (+5V) -
Note: If more than one programmable display unit or AE20 are connected to a PC using the USB
port, the communication is not available.
Page 51

2.3.3 Ethernet Port
Phone: 800.894.0412 - Fax: 888.723.4773 - Web: www.ctiautomation.net - Email: info@ctiautomation.net
Ethernet connection
GT32T1 has a Ethernet port. Communication with our software such as GTWIN becomes available by
connecting to a PC with a LAN cable.
Ethernet communication function
• Screen transfer (Baud rate: fixed at 115200 bps. It takes at least 3 times longer than the transfer using
USB.)
• Through function using our PLCs
* Specifying the destinations to connect enables the communication with multiple units using a HUB.
Page 52

Required items for connection
IP Address
192.168.1.5
Subnetmask
255.255.255.0
Default Gateway
192.168.1.
Port No
9094
Phone: 800.894.0412 - Fax: 888.723.4773 - Web: www.ctiautomation.net - Email: info@ctiautomation.net
• LAN cable
Either straight cable or crossing cable can be used.
(MDI/MDI-X Automatic crossover function)
Settings for Ethernet connection
Follow the procedure below to communicate with the Ethernet connection.
1. Connect the GT to a PC with a Ethernet cable.
2. Specify the settings such as IP address for the GT.
3. Startup the GTWIN and specify the communication condition.
The factory settings are as follows.
Note) Setting items such as IP address for the GT can be specified in the System Menu.
GTWIN setting
IP address: When it is not displayed, set the property of the TCP/IP in the items such as Network of the
control panel. IP address can be input or changed.
Note) The setting procedure varies dep ending on the OS used. For the details, refer to
the manual/help of the OS.
Port No.: Set to 0 or within the range of 1025 to 32767 in decimal.
For using it in the GTWIN, set it to 0.
Network type: Ethernet
Title: Input an arbitrary title (Up to 38 one-byte
characters)
Computer:
Check “Acquire IP address automatically”.
The default setting is to use the IP address
currently being used in the computer.
Click [OK] to finish the setting.
Note) When sing multiple Ethernet cards,
specify manually.
Page 53

• Setting of destination (PLC side)
Phone: 800.894.0412 - Fax: 888.723.4773 - Web: www.ctiautomation.net - Email: info@ctiautomation.net
IP address: Specify the IP address of the GT to be connected in decimal.
Port No.: Set it within the range of 1 to 32767 in decimal. (Default: 9094)
Specify the same setting as the one of GT.
• Communication time out: Set the time-out period after connection establishment for every
communication within the range of 1 to 950 seconds. (Default: 15) (it is not
linked to this setting until a connection is estalished)
• Connection time out: Set the time-out period until connection establishment within the range of 1
to 180 seconds. (Default: 60)
Settin
g with IP search tool (Config WD. exe)
The settings of the GT can be specified with the IP address search tool of Configurator WD (Ver.1.11 or
later).
The IP search tool (Config WD. Exe) can be downloaded for free from our website
(User registration is required.: Free of charge)
Page 54

Phone: 800.894.0412 - Fax: 888.723.4773 - Web: www.ctiautomation.net - Email: info@ctiautomation.net
Page 55

Chapter 3
Phone: 800.894.0412 - Fax: 888.723.4773 - Web: www.ctiautomation.net - Email: info@ctiautomation.net
Installation and Wiring
Page 56

3.1 Installation
Phone: 800.894.0412 - Fax: 888.723.4773 - Web: www.ctiautomation.net - Email: info@ctiautomation.net
3.1.1 Installation Environment
When installing and using the GT series, always make sure the following conditions are observed.
Usage conditions
Operating environment (Use the unit within the range of the general specifications when installing)
- Ambient temperatures: 0 to +50 °C
(It varies according to models when installing the unit in a horizontal orientation or using a C-NET
adapter and FP programmer II.)
- Ambient humidity: 20 to 85% RH (at 25 °C, non-condensing)
- Altitude of 2000 m or less
- For use in pollution Degree 2 environment
- Do not use it in the following environments.
- Direct sunlight, wind and rain. (This product is not designed for outdoor use.)
- Sudden temperature changes causing condensation.
- Inflammable or corrosive gas.
- Excessive airborne dust, metal particles or saline matter.
- Benzine, paint thinner, alcohol or other organic solvents or strong alkaline solutions such as ammonia
or caustic soda.
- Direct vibration, shock or places always exposed to drop of water.
(This unit is warranted by IP65/IP67 (depending on models) for panel mounting, however, this applies
to initial values.)
- Influence from power transmission lines, high voltage equipment, power cables, power equipment,
radio transmitters, or any other equipment that would generate high switching surges. (100 mm or
more)
The usage conditions for Tough series (GT32-E) are as follows.
- Ambient temperatures: -20 to +60 °C (When horizontally installed, -20 to +55 °C)
- Ambient humidity: 10 to 90% RH (at 25 °C, non-condensing)
- The upper limit of the humidity at each temperature is as below.
(Below 40 °C; 90%RH, 50 °C; 55%RH, 60 °C; 35%RH)
- If the product is exposed to heavy rain, condensation might be caused by sudden temperature
changes.
- Altitude of 2000 m or less
- For use in pollution Degree 2 environment
- Do not use it in the following environments.
- Direct sunlight for a long time
(Exposing the product to direct sunlight increases the surface temperature of the display higher than
ambient temperature, and causes deterioration of LDC panel.)
- Inflammable or corrosive gas.
- Excessive airborne dust, metal particles or saline matter.
- Benzine, paint thinner, alcohol or other organic solvents or strong alkaline solutions such as ammonia
or caustic soda.
- Direct vibration, shock or places always exposed to drop of water.
(This unit is warranted by IP67 for panel mounting, however, this applies to initial values.)
- Influence from power transmission lines, high voltage equipment, power cables, power equipment,
radio transmitters, or any other equipment that would generate high switching surges. (100 mm or
more)
Page 57

Static electricity
Phone: 800.894.0412 - Fax: 888.723.4773 - Web: www.ctiautomation.net - Email: info@ctiautomation.net
- Do not touch connector pins directly to prevent static electricity from causing damage.
- Always rid yourself of any static electricity before handling this product.
- If excessive estatic electricity is applied to the panel surface, the LCD panel may be damaged.
Power supply
- Twist the wires of the power supply.
- The unit has sufficient noise immunity against the noise generated on the power line. However, it is
recommended to take measures for reducing noise such as using an isolating transformer before
supplying the power. And it is recommended to take measures such as installing a ferrite core.
- Allocate an independent wiring for each power supplying line, PLC etc and operating device.
- If using a power supply withoug a protective circuit, power should be supplied through a protective
element such as fuse. Directly applying an abnormal voltage to the unit may cause the damage to the
internal circuit.
Touch switches
- Always operate the touch switch with fingers. As the touch switch may be damaged due to the
excessive load or shock (caused when being operated with any tools), the touch switch should be
operated within the specified control force. Also, if the touch swich is pressed like kneading, the
electrode may be worn out exceptionally, and cause the malfunction. Operate with a single touch of
the switch.
- The touch position may shift due to aging variation. If the touch position has shifted, please adjust it.
LCD panel
- Do not drop or have a strong impact on the programmable display unit as glass is used for the LCD
panel.
- The liquid in the LCD panel is a hazardous substance. If the LCD panel is broken, do not put the leaked
crystalline liquid into your mouse. Should it get into your mouse, immediately gargle, and consult a
doctor. If it adheres to your skin or clothes, wash it away with soap.
- There is a case that shadows appear in the place on the screen of the GT where no graphic or part is
arranged. (The shadows appear as the extension of the characters, graphics or parts actually being
displayed.) This is a phenomenon resulting from the basic characteristics of liquid crystal devices, and
called cross talk.
- Exposing the product to direct sunlight increases the surface temperature of the display higher than
ambient temperature, and causes deterioration of LDC panel. Screen the product from the sun.
3-3
Page 58

3.1.2 Restriction According to Mounting Directions
Phone: 800.894.0412 - Fax: 888.723.4773 - Web: www.ctiautomation.net - Email: info@ctiautomation.net
If the unit is being installed in a horizontal orientation, or our Programmer II and C-NET adaptor are
being connected to the TOOL port, note that the ambient usage temperature should be as below.
Model
name
GT11
GT21
GT32 Horizontally installed 0 to 40 C
GT32-E Horizontally installed -20 to 55 C
Note) When installing the unit aslant, the restriction is the same as the one when installing horizontally.
Condition
Vertically installed
Programmger II
C-NET adapter
Horizontally installed
Programmer II
C-NET adapter
Ambient
temperature
0 to 45 C
3.1.3 Installation Space
Applicable panel thickness
A panel with a thickness of 1.0 to 5.0 mm should be used.
Clearance when the GT is installed
When installing the GT unit, if other parts are being installed to the panel or cables are being wired to it,
we recommend providing a clearance around the GT unit. This prevents cables from being damaged,
and facilitates the installation work. Also, make sure that the slits in the main unit are never obstructed.
Clearance on the surface
Model name Clearance
GT01
GT11
GT21
GT02L 60 mm -
GT02
GT05
GT12
GT32
GT32-E
* It should be 40 mm or more when using a SD memory card.
30 mm or more
(50 mm or more
recommended)
to connect the screen
transfer cable
20 mm -
60 mm 40 mm or more
Clearance on the
mounting surface when
using a SD memory card
3.1.4 UL/c-UL Qualification
Be aware of the following when applying for UL standard for the equipment that the GT has been
built in.
When the GT built in equipment, the GT should meet the standard as a part of the enclosure.
As the rear of the GT is not qualified as an enclosure, provide a fire enclosure (metal barrier) that
entirely covers the rear and lateral sides of the GT.
3-4
Page 59

3.1.5 Mounting Screws
Phone: 800.894.0412 - Fax: 888.723.4773 - Web: www.ctiautomation.net - Email: info@ctiautomation.net
Secure the GT to a mounting plate using the fitting and screws provided with the unit.
Recommended screws
Recommended product GT unit Size Others Quantity
GT01/GT11 M3 – 20
Mounting screw
GT02/GT02L/GT12 dedicated screw
The GT02/GT02L/GT12 dedicated screw is not sold on the open market.
Using screws other than the dedicated screw will cause failures such as decrease of water-proof
property.
Name Content Model No.
Attachment fitting
(with dedicated screws)
GT05/GT21/GT32/
GT32-E
5 sets for GT02/GT02L/GT12
4 pcs of attachment fittings and 4 pcs of dedicated
screws/set
M3 – 3.5
Material: SW pane-head (+)
Galvanization,
trivalent chromate
4 pcs/unit
AIG12830
3-5
Page 60

3.1.6 GT01 and GT11 Installation Method
Phone: 800.894.0412 - Fax: 888.723.4773 - Web: www.ctiautomation.net - Email: info@ctiautomation.net
Secure the GT to the installation panel using the four fittings and four screws provided with the unit.
1. Place the GT in the installation panel.
2. Insert the fittings into the grooves provided in the GT, and tighten the screws to secure the GT
to the installation panel.
The screw tightening torque sho uld be 0.1 to 0.25 N· m, and tighten them uniformly.
Tightening the scews too hard can cause deformation of the front panel, so that the touch switches will
not function properly. Install the GT within the above range.
3.1.7 GT21 Installation Me thod
Secure the GT21 to the installation panel using the two fittings and four screws provided with the unit.
1. Place the GT21 main unit in the installation panel.
2. Insert the fittings into the grooves provided in the GT21 main unit, and tighten the screws to
secure the GT21 main unit to the installation panel.
The screw tightening torque sho uld be 0.1 to 0.25 N· m, and tighten them uniformly.
Tightening the scews too hard can cause deformation of the front panel, so that the touch switches will
not function properly. Install the GT within the above range.
Page 61

3.1.8 GT05/GT32/GT32-E Installation Method
Phone: 800.894.0412 - Fax: 888.723.4773 - Web: www.ctiautomation.net - Email: info@ctiautomation.net
Secure the GT32 to the installation panel using the two fittings and four screws provided with the unit.
1. Place the GT main unit in the installation panel.
2. Insert the fittings into the grooves provided in the GT main unit, and tighten the screws to
secure the GT main unit to the installation panel.
GT05 and GT32
The screw tightening torque sho uld be 0.1 to 0.25 N· m, and tighten them uniformly.
GT32-E
The screw tightening torque should be 0.2 to 0.3 N· m, and tighten them uniformly.
Tightening the scews too hard can cause deformation of the front panel, so that the touch switches will
not function properly. Install the GT within the above range.
Page 62

3.1.9 GT02/GT02L/GT12 Installation Method
Phone: 800.894.0412 - Fax: 888.723.4773 - Web: www.ctiautomation.net - Email: info@ctiautomation.net
Secure the GT12 or GT02 to the installation panel using the two fittings and four dedicated screws
provided with the unit.
1. Place the GT main unit in the installation panel.
2. Insert the fittings into the grooves provided in the GT main unit, and tighten the screws to
secure the GT main unit to the installation panel.
Note: - The cross slot screwdriver No. 1 must be used.
- Tightening torque: 0.2 to 0.3 N m
- Tightening the scews too hard can cause deformation of the front panel, so that the touch
switches will not function properly.
3-8
Page 63

3.1.10 Ins talling in Vertical O rientation
Phone: 800.894.0412 - Fax: 888.723.4773 - Web: www.ctiautomation.net - Email: info@ctiautomation.net
Normally, the GT series is installed horizontally long, however, some models can be installed vertically
long. At that time, the right side becomes the upper side.
GT01 GT02 GT02L GT11 GT12 GT21
Note:
- The side that the COM port is situated becomes the upper side. If the GT is installed upside down, the
screen will be upside down.
- The allowable ambient temperature for GT11 is different. (Ambient temperature: 0 to 45 °C)
Key Point: Select the vertical type when selecting a GT model in GTWIN.
3.1.11 Precaution When reinstalling GT
When the GT is reinstalled after being removed from the panel, the water-proof packing should be
replaced.
Page 64

3.2 Wiring the Power Supply
Rated voltage
Operating voltage range
24 V DC
21.6 to 26.4 V DC
Phone: 800.894.0412 - Fax: 888.723.4773 - Web: www.ctiautomation.net - Email: info@ctiautomation.net
3.2.1 Wiring the Power supply
The power supply should be wired by securely connecting the terminal on the rear of the main
unit to the terminal.
Use twisted wiring for the pow er supply
In order to minimize influence from noise, the wiring for the power supply should be twisted.
Insulate the power supply insid e a protective circuit
• In order to protect the unit against abnormal voltage from the power supply line, the power supply
should be an insulated type, and should be enclosed within a protective circuit.
• If a power supply device without an internal protective circuit is being used, power should always be
supplied to the GT series through a fuse or a similar protective device.
Keep the power supply voltage within the operating voltage range
5 V DC 4.5 to 5.5 V DC
Keep the power supply wiring separate
• Wiring to the GT series, PLC, and other power equipment should have separate wiring systems.
Page 65

3.2.2 Grounding
Phone: 800.894.0412 - Fax: 888.723.4773 - Web: www.ctiautomation.net - Email: info@ctiautomation.net
Be sure to ground when the influence of noise is great
The unit is tolerant against noise in normal environments, but if the environment is particularly
susceptible to noise, please ground.
Use dedicated grounding
• For grounding purposes, use wires with a minimum of 2 mm
resistance of less than 100 Ω.
• Make the grounding point as close as possible to the GT and keep the distance of the grounding wire
short.
• Sharing the ground with another device may have an adverse effect. Therefore, be sure that grounding
is dedicated.
2
. The grounding connection should have a
Note:
Conversely, depending on your environment, grounding may cause a problem.
Example:
Since the power line of the GT unit is connected to a functional earth via electronic parts, the electronic
parts may become damaged if there is an abnormal potential between the power line and the physical
ground.
Do not ground the function earth when grounding a plus (+) terminal of the power. (excluding
GT02, GT02L, GT05, GT12, GT32 and G T32-E)
In some computers, the SG terminal of RS232C port and connector shielding are connected. Also the
tool port shielding is connected with the function earth terminal. Therefore, the GND terminal and the
function earth terminal are connected if the computer is connected. Especially when the GT is connected
to a computer with a plus (+) terminal grounded, therefore, an GT’s minus (-) terminal is connected with
the function earth terminal. As a result, short circuit occurs which may lead to the breakage of GT and its
neighboring parts.
Page 66

3.3 Wiring the COM Port
Size
Conductor cross-section surface area
AWG 28 to 16
0.08 to 1.25 mm2
Conductor
Insulator
(at 20°C)
Phone: 800.894.0412 - Fax: 888.723.4773 - Web: www.ctiautomation.net - Email: info@ctiautomation.net
Accessory communication connect or/a pplic able wirin g
The communication connector used for the COM port (provided as an accessory with the main unit) has
a screw-tightening type of terminal block. The wiring shown below should be used.
Applicable wiring (twisted wiring)
Use a special tool to tighten the terminal block of the communication connector.
Using a screwdriver made by Panasonic Electric Works Co., Ltd. (Product number: AFP0806). The
tightening torque should be 0.22 to 0.3 N· m or less.
When doing RS485 communication using RS422 type
Please use the following cables or equivalent.
Appropriate electrical cables (twisted cables)
Sample
appropriate
cable
Belden 9860
Hitachi Cable,
Ltd. KPEV-
S1.25 mm
1P
Belden 9207
Hitachi Cable,
Ltd. KPEV-
S0.5 mm
1P
Type
Shielded
twisted
pair
Cross-sectional
view
1.25 mm
(AWG16)
or greater
0.5 mm2
(AWG20)
or greater
Size
2
Resist-
ance
Max.
16.8
Ω/km
Max.
33.4
Ω/km
Material
Polye-
thylene
Polye-
thylene
Thick-
ness
Max.
0.5 mm
Max.
0.5 mm
Cable
diam.
Approx.
8.5 mm
Approx.
7.8 mm
2
x
2
x
Note:
• Use shielded twisted pair cables.
• Use only one type of transmission cable. Do not mix more than 1 type.
• When using shielded cable with crossover wiring for the RS485 transmission line, grounded one end.
Page 67

Wiring method
Phone: 800.894.0412 - Fax: 888.723.4773 - Web: www.ctiautomation.net - Email: info@ctiautomation.net
(1) Remove the sheath from the wire.
(2) Insert the wire all the way into the terminal block, and tighten the screw in the clockwise direction to
secure it.
Precautions concerning wiring
The following precautions should be observed, to avoid broken or disconnected wires.
• When removing the sheath, be careful not to scratch the core wire.
• Wire the terminal without twisting the core wire.
• The core wire should be connected without soldering it. Vibration can sometimes cause soldered
connections to break loose.
• After connecting the wiring, avoid subjecting the cable to stress.
• Because of the construction of the terminal, tightening the wire in the counterclockwise direction will
cause a faulty connection. If this happens, disconnect the wire, check the terminal hole, and connect
the wire again.
Reference:
For information on connecting the COM port of the GT series with various PLC units, refer to <Chapter 4
Connecting with the PLC>.
Page 68

3.4 Precautions when Wiring COM Port
Phone: 800.894.0412 - Fax: 888.723.4773 - Web: www.ctiautomation.net - Email: info@ctiautomation.net
Precautions are different depending on communication conditions. Arrange wirings according to the
following instructions.
3.4.1 GT01 (5 V DC)
RS232C type
- Perform wiring and placement of the cable so that there is no impression of external noise on the cable
and no induction.
- Use shielded wires for distribution cables.
(Recommended cable: AIGT8142 with one ferrite core)
- It conforms to CE marking. As conditions, the following wiring is required.
1. Make the cable do three turns around a ferrite core.
(Recommended ferrite core: Seiwa Electric’s E04RA190120080 or equivalent)
2. Perform grounding of the cable shield.
* Packaged with AIGT8142.
RS422 (RS485) type
- There is no RS and CS (control lines).
- Perform wiring and placement of the cable so that there is no impression of external noise on the cable
and no induction.
- Use shielded wires for distribution cables.
(Recommended cable: AIGT8152 with one ferrite core(Seiwa Electric’s E04RA190120080))
- When using shielded cable with crossover wiring for the RS485 transmission line, grounded one end.
- “E” is used to set the terminating station.
- It does not conform to European EMC directive.
Key Point:
The CE marking standards that the GT01 conforms to (excluding the RS422 (RS485) type)
European EMC directive 2004/108/EC
European EMC standards (EN61000-6-4 and EN61000-6-2)
Page 69

3.4.2 GT02/GT02L (5 V DC)
Phone: 800.894.0412 - Fax: 888.723.4773 - Web: www.ctiautomation.net - Email: info@ctiautomation.net
RS232C type
- Perform wiring and placement of the cable so that there is no impression of external noise on the cable
and no induction.
- Use shielded wires for distribution cables.
(Recommended cable: AIGT8142)
- It conforms to CE marking. As conditions, the following wiring is required.
1.Perform grounding of the cable shield.
2.Perform grounding of the GT.
GT02 GT02L
RS422 (RS485) type
- There is no RS and CS (control lines).
- Perform wiring and placement of the cable so that there is no impression of external noise on the cable
and no induction.
- Use shielded wires for distribution cables.
- When using shielded cable with crossover wiring for the RS485 transmission line, grounded one end.
- “E” is used to set the terminating station.
- It conforms to CE marking. As conditions, the following wiring is required.
1.Perform grounding of the cable shield.
2.Perform grounding of the GT.
GT02 GT02L
Key Point:
The CE marking standards that the GT02/GT02L conforms to
European EMC directive 2004/108/EC
European EMC standards (EN61131-2)
3-15
Page 70

3.4.3 RS232C Communication
Phone: 800.894.0412 - Fax: 888.723.4773 - Web: www.ctiautomation.net - Email: info@ctiautomation.net
- There is no RS and CS (control lines) for GT01.
- Perform wiring and placement of the cable so that there is no impression of external noise on the cable
and no induction.
- Use shielded wires for distribution cables. (Recommended cable: AIGT8162)
- It conforms to CE marking. As conditions, the following wiring is required.
1. Install a ferrite core to the cable. (For GT11 only)
(Recommended ferrite core: Seiwa Electric’s E04SR170730A or equivalent)
2. Perform grounding of the cable shield.
3. Perform grounding of the GT.
GT01/GT02/GT12
GT21
GT11
GT05/GT32/GT32-E
Key Point:
The CE marking standards that the GT series conforms to
European EMC directive 2004/108/EC
European EMC standards For GT01, GT11, GT21 (EN61000-6-4 and EN61000-6-2)
For GT02, GT12, GT05, GT32, GT32-E (EN61131-2)
Page 71

3.4.4 RS422 (RS485) Communication
Phone: 800.894.0412 - Fax: 888.723.4773 - Web: www.ctiautomation.net - Email: info@ctiautomation.net
- There is no RS and CS (control lines).
- Perform wiring and placement of the cable so that there is no impression of external noise on the cable
and no induction.
- Use shielded wires for distribution cables. (Recommended cable: AIGT8175 (for Mitsubishi FX series)
- When using shielded cable with crossover wiring for the RS485 transmission line, grounded one end.
- “E” is used to set the terminal unit.
- It conforms to CE marking. As conditions, the following wiring is required.
1. Fit a ferrite core to the cable. (For GT11 only)
(Recommended ferrite core: Seiwa Electric’s E04SR170730A or equivalent)
2. Perform grounding of the cable shield.
3. Perform grounding of the GT.
GT01/GT02/GT12
GT21
GT11
GT05/GT32/GT32-E
Key Point:
The CE marking standards that the GT series conforms to
European EMC directive 2004/108/EC
European EMC standards For GT01, GT11, GT21 (EN61000-6-4 and EN61000-6-2)
For GT02, GT12, GT05, GT32, GT32-E (EN61131-2)
3-17
Page 72

3.5 Precautions when Wiring Ethernet Port (GT32T1)
Phone: 800.894.0412 - Fax: 888.723.4773 - Web: www.ctiautomation.net - Email: info@ctiautomation.net
- Although more than one GT32T1 can be connected using a hub, communication is performed with one
unit each. Specify each destination to communicate.
- Use a UTP cable (unshielded cable) for the Ethernet cable, and take measures for noises such as
installing a ferrite core if necessary.
- It conforms to CE marking. As conditions, the following wiring is required.
1. Do not use a shield wire for the Ethernet cable.
2. Install a ferrite core to the Ethernet cable and make one turn.
(Recommended ferrite core: Kitagawa Industries SFC-10 or equivalent)
GT32T1
Key Point:
The CE marking standards that the GT32 conforms to
European EMC directive 2004/108/EC
European EMC standards (EN61131-2)
Page 73

3.6 Options
Phone: 800.894.0412 - Fax: 888.723.4773 - Web: www.ctiautomation.net - Email: info@ctiautomation.net
3.6.1 Backup Battery
Backup battery
The internal data in the GT can be backed up using the backup battery.
Use the following backup batteries.
GT model Battery type Product No.
GT11
GT21
GT02M2,GT02G2
GT05
GT12
GT32
GT32-E
Battery life
Battery life, when operating at a normal temperature (25C), a normal humidity (65% RH), and a voltage
of 24 V DC, is as follows.
GT model life
GT11
GT21
GT05S
GT32T *
GT32*-E
GT02M2,GT02G2
GT05M
GT05G
GT12
GT32M
Backup
The internal data of the GT is backed up in the following ways.
Internal data to be backed up Stored in Backup battery
Screen data (base, keyboard, login)
Flow display data
Recipe data
Write device
FP monitor screen data
Alarm history + Line graph sampling
Logging data of Logging function
Hold GT device
Hold PLC device
Button type lithium battery CR2032 (commercial item)
Backup battery
Approx. 2 years
Approx. 3 years
Approx. 5 years
Stored in the F-ROM. Not required
Stored in the SRAM. Required
AFPX-BATT
(The backup battery for the FP-X is used.)
Note:
When using a backup battery, attach the battery before the power supply is turned on.
3-19
Page 74

3.6.2 How to Install the Battery (Lithium Button Battery)
Phone: 800.894.0412 - Fax: 888.723.4773 - Web: www.ctiautomation.net - Email: info@ctiautomation.net
(The figures below is explained using the GT11.
Note: Do not touch the electronic parts when removing and installing the battery.
3.6.3 How to Install the Battery (Backup Battery)
The figures below is explained using the GT32.
1. Remove the battery cover.
2. Connect the connector to make the re d line be the (+) side, and place a battery in the circular
frame.
3. Fit the battery cover.
Page 75

3.6.4 Dead Battery Mark
When the battery voltage drops
Time for energization
Time for replacement
1 min. or more (10 min. or more for GT32)
Within 1 min.
Phone: 800.894.0412 - Fax: 888.723.4773 - Web: www.ctiautomation.net - Email: info@ctiautomation.net
If the battery voltage drops too low, the battery mark is displayed at the bottom right of the GT screen.
It can be specified in the GTWIN configuration settings, whether or not the dead battery mark is
displayed .
Note:
If the battery voltage drops too low, the BAT LOW flag of the basic communication area map goes on. If
the battery has run down completely, the BAT flag of the basic communication area map goes on.
Please be aware that the BAT flag goes on the first time that the power supply is turned on after the unit
is purchased.
* The BAT and BAT LOW flags in the basic communication area map activate in the both cases that the
battery error display is set to “On” and “Off”.
3.6.5 Time for Replacement of Battery
When replacing the backup battery, turn on electricity for the time for energization, and replace the
battery with a new one within one minute after turning off the power supply.
If the battery is not replced within the time for replacement, the saved data will be lost.
3.6.6 Replacement of Front Panel Protective Sheet
About the front panel protective sheet
Use the separately-sold protective sheets to protect the touch panel surface and to keep it clean.
Replacing the front panel protective sheet (For the type with protective film)
Follow the steps below to replace the sheet:
1. Peel off the seal from the provided protector sheet and attach it to the unit.
Take out one of the replacement front panel protective sheets and peel off the seal with the shiny side.
When attaching the sheet, align the adhesive edges with the front of the GT. Finish by peeling off the
thin film attached to the top of the front panel protective sheet.
Page 76

Replacing the front panel protective sheet (For the type without protective film)
Phone: 800.894.0412 - Fax: 888.723.4773 - Web: www.ctiautomation.net - Email: info@ctiautomation.net
1. Remove the peel-off film attached to the front panel protective sheet.
2. Attach the front panel protective sheet.
Attach the front sheet to fit the liquid crystal part of GT. At this time, try not to allow the air to get in the
attached face. If the air was in, remove the air to be out with fingers. Do not press the front panel hard as
it may cause the damage to the touch switch.
3.6.7 About the Waterproof Packing
If the panel is being detached from the GT and then reattached, the waterproof packing should be
replaced, in order to assure that the panel remains waterproof (IP65, however, IP67 for GT02, GT12 and
GT32-E).
Replacing the waterproof packing
1. Remove the currently attached waterproof packing.
Remove the attached waterproof packing from the GT.
2. Attach the provided waterproof packing.
Take out one of the replacement waterproof packing pieces and attach the outer edge as shown in the
illustration (do not use the inner edge).
When doing this, fasten it to the front frame, being sure not to twist the waterproof packing.
As for the model with a grooved front frame, surely fit the waterproof packing in the groove.
Page 77

Chapter 4
Phone: 800.894.0412 - Fax: 888.723.4773 - Web: www.ctiautomation.net - Email: info@ctiautomation.net
Connecting with PLC
Page 78

4.1 Connection with PLC
Phone: 800.894.0412 - Fax: 888.723.4773 - Web: www.ctiautomation.net - Email: info@ctiautomation.net
How to connect with PLC
・Connecting between one GT and one PLC via 1:1 communication
・Connecting between one GT and multiple PLCs via 1:N communication (PLC multiple
connection)
・Connecting between one PLC and multiple GTs via 1:N communication (GT link)
・Connecting using the general-purpose serial communication mode
・ As for the 5 V DC-type GT01, power can be supplied with a communication cable only.
4.1.1 PLC Multiple Connection
PLC multiple connection function is a function that enables more than one PLCs to connect with one GT.
4.1.2 GT Link Connection
GT link function is a function that enables more than one GT to connect with one PLC.
Wiring of Power Supply
It takes more than 5 seconds for all GT units to be operable after turning on the power supply of GT.
(The time varies according to conditions and the number of connected GT units.)
As for the power supply of GT, it is recommended to use the wiring that enables multiple GT
units to be simultaneously turned on.
If the power supplies of multiple GT units cannot be simultaneously turned on after turning on the power
supply of devices such as a PLC, an error message will be displayed and it may take some time to make
communication to be established.
(The error display disappears when all the GT units become operable.)
4-2
Page 79

4.1.3 Connecting to the PLCs made by Other Companies
PLC model
Restrictions when connecting a 5 V D C-type
FP-X
The number of units which can be expanded depends on the unit type.
FP0
Maximum of two expansion units *
FPΣ
Maximum of six expansion units *
FP-e/FP0R
There are no particular restrictions.
supply type).
Phone: 800.894.0412 - Fax: 888.723.4773 - Web: www.ctiautomation.net - Email: info@ctiautomation.net
For information on the connection with PLCs manufactured by other companies, see the latest GTWIN
HELP or our website where you can get the manual.
Reference: < Connection with Other Companies' PLCs Manual ARCT1F449E>
4.1.4 Connecting to a Serial Device
Devices other than PLCs can be connected by using the general-purpose serial communication mode of
the GT. Also, PLCs made by other companies which are not put on our website can be used. See our
website or the GT series General-purpose serial communication manual.
Reference: <GT Series General-purpose Serial Communication Manual ARCT1F356E>
4.1.5 Electric Supply fr om PLC (5 V DC-type )
The power can be supplied to the 5V DC-type with the communication cable only. The power
supply is not required separatel y. However, it is available only when it is connected with the
TOOL port.
Restriction on the capacity of the power supply depending on the PLC model to be used
The number of PLC units that can be expanded is limited.
FP2
FP2SH
FX series made by
Mitsubishi Electric
Co.
* Expansion is possible with the number of units given above, regardless of the type of unit.
The method for calculating the number of units that can be expanded is
provided in the manual. Follow that formula and keep the GT01’s power
consumption not higher than 200 mA when calculating.
The restrictions are equivalent to the restrictions on the programmable display
F920 (5 V power supply type) made by Mitsubishi.
Use the FX series according to the use conditions for the F920 (5 V power
Page 80

4.2 RS232C Connection
other than GT01
5 V DC-type GT01
5 V DC-type GT02/GT02L
Phone: 800.894.0412 - Fax: 888.723.4773 - Web: www.ctiautomation.net - Email: info@ctiautomation.net
4.2.1 Difference of Terminal blocks Between GT Models
Although the terminal blocks vary according to the GT models, the connection method is the same.
The connection diagram for 24 V DC is described with the terminal blocks other than the one for GT01.
24 V DC type
24 V DC-type GT01
Page 81

4.2.2 RS232C Connection with PLC Tool Port
PLC
PLC communication cable
Programmable display
FP2/FP2SH
Phone: 800.894.0412 - Fax: 888.723.4773 - Web: www.ctiautomation.net - Email: info@ctiautomation.net
Connecting with 5 V DC type
Usable models
FP-X
FPΣ
FP0/FP0R
FP-e
Connecting to the TOOL port
Mini-DIN 5-pin
loose-wire cable
AIGT8142 5 V DC type RS232C type
Note: Connecting to the COM port is not available.
- Keep the cable no longer than 3 m.
- In case of connecting to PLC with all expansion slots used, prepare an external 5 V DC power supply
for the GT01 due to current consumption limits.
- When using the FP2/FP2SH, check whehter or not the power can be supplied from the TOOL port
according to the calculation method of the number of expansion units described in the hardware
manual.
Page 82

Connecting with 24 V DC type
PLC
PLC communication cable
Programmable display
Phone: 800.894.0412 - Fax: 888.723.4773 - Web: www.ctiautomation.net - Email: info@ctiautomation.net
Usable models
FP-X
FPΣ
FP0/FP0R
FP-e
FP2/FP2SH
Connecting to the TOOL port
Mini-DIN 5-pin
loose-wire cable
AIGT8162
AIGT8165
AIGT8160
24 V DC RS232C type
Page 83

4.2.3 RS232C Connection with FP-X COM Port
PLC
PLC communication cable
Programmable display
AFPX-COM1
AFPX-COM2
AFPX-COM3
AFPX-COM4
Phone: 800.894.0412 - Fax: 888.723.4773 - Web: www.ctiautomation.net - Email: info@ctiautomation.net
Connecting to the COM port of FP-X Communication cassette
Usable models
FP-X
AFPX-COM5
Connecting to the 1- channel type RS232C
Connecting to the 2-channel type RS232C
Loose-wire cable
5 V DC
24 V DC
RS232C type
As for the connection to S2 and R2 for COM2, make the same
connection as S1 and S2.
Page 84

Connecting to the 1-channel type RS485 and 1-channel type RS232C
Phone: 800.894.0412 - Fax: 888.723.4773 - Web: www.ctiautomation.net - Email: info@ctiautomation.net
Connecting to the 1-channel type Ethernet and 1-channel type RS232C
It cannot be connected with Ethernet.
Page 85

4.2.4 RS232C Connection with FPΣ COM Port
PLC
PLC communication cable
Programmable display
Phone: 800.894.0412 - Fax: 888.723.4773 - Web: www.ctiautomation.net - Email: info@ctiautomation.net
Connecting to the COM port
Usable models
FPΣ Loose-wire cable
Connecting to the 1-channel type RS232C
Connecting to the 2-channel type RS232C
5 V DC
24 V DC
RS232C type
As for the connection to S2 and R2 for COM2, make the
same connection as S1 and S2.
Page 86

Connecting to the 1-channel type RS485 and 1-channel type RS232C
Phone: 800.894.0412 - Fax: 888.723.4773 - Web: www.ctiautomation.net - Email: info@ctiautomation.net
The connections with either one unit or two units are available.
Page 87

4.2.5 RS232C Connection with FP0/FP0R COM Port
PLC
PLC communication cable
Programmable display
Phone: 800.894.0412 - Fax: 888.723.4773 - Web: www.ctiautomation.net - Email: info@ctiautomation.net
Connecting to the COM port
Usable models
FP0
FP0R
Connecting to the COM port of FP0/FP0R
RS232C type
5 V DC
24 V DC
RS232C type
Page 88

4.2.6 RS232C Connection with FP-e COM Port
PLC
PLC communication cable
Programmable display
Phone: 800.894.0412 - Fax: 888.723.4773 - Web: www.ctiautomation.net - Email: info@ctiautomation.net
Connecting to the COM port
Usable models
FP-e Loose-wire cable
Connecting to the FP-e (RS232C)
5 V DC
24 V DC
RS232C type
Page 89

4.2.7 RS232C Connection with FP2/FP2SH COM Port
PLC
PLC communication cable
Programmable display
FP2/FP2CH CPU unit
Unit
FP2-CB232
Phone: 800.894.0412 - Fax: 888.723.4773 - Web: www.ctiautomation.net - Email: info@ctiautomation.net
Connecting to the COM port
FP2/FP2SH CPU unit
FP2 Computer Communication Unit
FP2 Multi Communication Unit
Usable models
FP2 Computer Communication Unit
FP2 Multi
Communication
Communication
block
D-SUB 9-pin
loose-wire cable
AIP81842 5 V DC
24 V DC
RS232C type
Connecting to the TOOL port
Page 90

4.3 RS422 Connection
24 V DC type
5 V DC-type GT01
5 V DC-type GT02/GT02L
Phone: 800.894.0412 - Fax: 888.723.4773 - Web: www.ctiautomation.net - Email: info@ctiautomation.net
4.3.1 Difference of Terminal blocks Between GT Models
Although the terminal blocks vary between the 5 V DC type and 24 V DC type, the connection method is
the same.
The connection diagram is described with the terminal block for 24 V DC.
Page 91

4.3.2 RS422 Connection with FP-X COM Port
PLC
PLC communication cable
Programmable display
Phone: 800.894.0412 - Fax: 888.723.4773 - Web: www.ctiautomation.net - Email: info@ctiautomation.net
Usable models
FP-X AFPX-COM3 Loose-wire cable
Connecting to the FP-X Communicatoin cassette, 1-channel type RS485/RS422
5 V DC
24 V DC
RS422/RS485 type
Page 92

4.3.3 RS422 Connect ion with FP2/FP2SH COM Port
PLC
PLC communication cable
Programmable display
Phone: 800.894.0412 - Fax: 888.723.4773 - Web: www.ctiautomation.net - Email: info@ctiautomation.net
Connecting to the COM port
Usable models
FP2 Multi
Communication
Unit
Connecting to the FP2 Multi Communication Unit (MCU) + Communication block (RS422)
Communication
block
FP2-CB422
D-SUB 9-pin
loose-wire cable
AIP81842
5 V DC
24 V DC
RS422/
RS485 type
Page 93

4.3.4 RS422 Connection with C-NET Adapter
PLC
PLC communication cable
Programmable display
Phone: 800.894.0412 - Fax: 888.723.4773 - Web: www.ctiautomation.net - Email: info@ctiautomation.net
Usable models
AFP8536
FP series C-NET adapter
Conneciton method
AFP8532
AFP15401
AFP15402
5 V DC
24 V DC
RS422/RS485 type
Communication settings on the PLC side
Specify the setting to match with the setting for the GT using the tool software at the PLC side.
C-NET adapter setting
Set the termination (TERMINATE) to on.
Page 94

4.4 RS485 Connection
24 V DC type
5 V DC-type GT01
5 V DC-type GT02/GT02L
Phone: 800.894.0412 - Fax: 888.723.4773 - Web: www.ctiautomation.net - Email: info@ctiautomation.net
4.4.1 Difference of Terminal blocks Between GT Models
Although the terminal blocks vary between the 5 V DC type and 24 V DC type, the connection method is
the same.
The connection diagram is described with the terminal block for 24 V DC.
Note) RS485 communicatoin is performed using the RS422 terminal blocks.
Page 95

4.4.2 RS485 Connection with FP0R COM Port
Phone: 800.894.0412 - Fax: 888.723.4773 - Web: www.ctiautomation.net - Email: info@ctiautomation.net
Connecting to the COM port
Usable models
PLC PLC communication cable Programmable display
FP0R RS485 type Loose-wire cable
Connecting to the COM port of FP0R
5 V DC
24 V DC
RS422/RS485 type
4-19
Page 96

4.4.3 RS485 Connection with FP-X COM Port
PLC
PLC communication cable
Programmable display
AFPX-COM3
AFPX-COM4
AFPX-COM6
Phone: 800.894.0412 - Fax: 888.723.4773 - Web: www.ctiautomation.net - Email: info@ctiautomation.net
Usable models
FP-X
Connecting to the FP-X Communicatoin cassette, 1-channel type RS485/RS422
Loose-wire cable
5 V DC
24 V DC
RS422/RS485 type
Note: Check the usable GT models for 1:N communication.
Page 97

Connecting to the 1-channel type RS485 and 1-channel type RS422
Phone: 800.894.0412 - Fax: 888.723.4773 - Web: www.ctiautomation.net - Email: info@ctiautomation.net
Note: Check the usable GT models for 1:N communication.
Page 98

Connecting to the 2-channel type RS485
Phone: 800.894.0412 - Fax: 888.723.4773 - Web: www.ctiautomation.net - Email: info@ctiautomation.net
Note: Check the usable GT models for 1:N communication.
Page 99

4.4.4 RS485 Connection with FPΣ COM Port
PLC
PLC communication cable
Programmable display
Phone: 800.894.0412 - Fax: 888.723.4773 - Web: www.ctiautomation.net - Email: info@ctiautomation.net
Connecting to the COM port
Usable models
FPΣ
Connecting to the 1-channel type RS485
AFPG803
AFPG806
Loose-wire cable
5 V DC
24 V DC
RS422/RS485 type
Note: Check the usable GT models for 1:N communication.
Page 100

Connecting to the 1-channel type RS485 and 1-channel type RS232C
Phone: 800.894.0412 - Fax: 888.723.4773 - Web: www.ctiautomation.net - Email: info@ctiautomation.net
Note: Check the usable GT models for 1:N communication.
 Loading...