

Page 1

Operating
Instructions
Wet/Dfy RechargeaWe Shaver
ES726
\ .
Page 2

IMPORTANT SAFETY INSTRUCTIONS
When using an electrical appli
ance, basic precautions
should always be followed,
including the following:
Read all instructions before
using this appliance.
DANGER
1. Do not install unit where
can fall into a tub or sink.
2. Do not reach for the appli
ance that has fallen into
water. Unplug immediately.
3. Do not place or store charg
ing adaptor where it can fall
into a tub or sink. Do not
place in or drop into water
or other liquid.
4. Before charging the shaver,
wipe off any moisture from
WARNING
1. Do not use this shaver with
damaged shaving blades
and/or foil, as facial injury
may occur.
2. Close supervision is neces
sary when this shaver is
used by. on or near children
or invalids.
3. Use this appliance only for
its intended use as
described in this manual.
Do not use attachments not
recommended by the man
ufacturer.
4. Never operate this appli
ance if it has a damaged
cord or plug, if it is not
To reduce the risk of electric shock:
To reduce the risk of burns, fire, electric
shock, or injury to persons:
the shaver and charging
it
adaptor. Always handle with
dry hands.
5. Always chargé.the shaver
in a cool, dry place.
6. Except when charging,
always unplug the charging
adaptor from the electrical
outlet.
7. Unplug this appliance
before cleaning.
working properly, if it has
been dropped or damaged
or dropped into water.
Return the appliance to a
service center for examina
tion and repair.
5. Never drop or insert any
object into any opening.
6. Keep the cord away from
heated surfaces.
7. Do not use outdoors or
operate where aerosol
(spray) products are being
used or where oxygen is
being administered.
8. Periodically inspect the wall
unit for secure mounting.
SAVE THESE INSTRUCTIONS
Page 3

Index
ENGLISH
ESPAÑOL Pagina
FRANÇAIS
Page
Page
6
10
16
Page 4
s
[Ц (A)
(A)
Page 5

Page 6

Before use
This Wet/Dry shaver can be used for
wet shaving with shaving lather or for
dry shaving. You can use this water
tight shaver in the shower and clean
it in water. Treat yourself to wet lather
shaves for at least three weeks and
notice the difference. Your Panasonic
WET/DRY shaver requires a little
time to get used to because your skin
and beard need about a month to
adjust to any new shaving method.
Charge the shaver for at least 8 hours
before using it for the first time or
when it has not been in use for more
than six months.
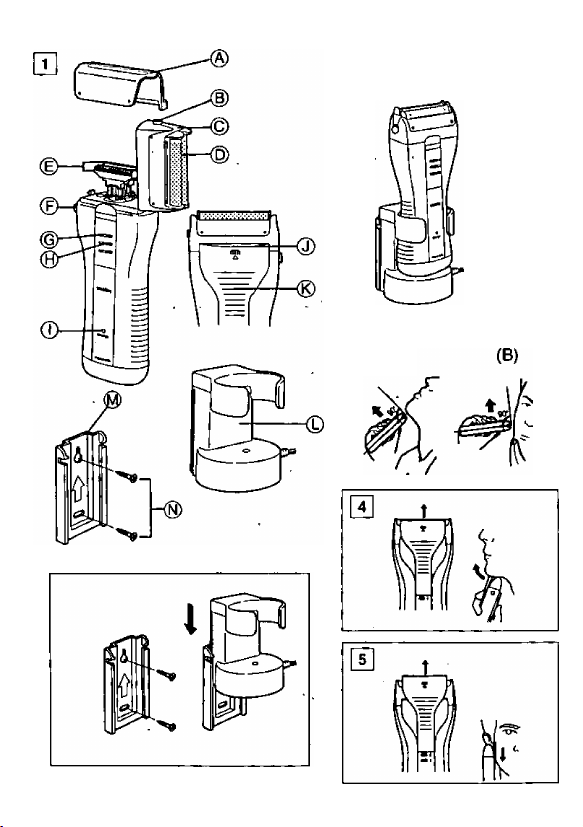
Parts identification
(see fig. 1 )
® Protective cap
(g) Outer foil release buttons
© Foil frame
® Outer foil
© Inner blade
© Foil frame release button
© On/Off switch
(B) Switch lock button
Ф Charge Indicator lamp
© Trimmer
® Trimmer switch
© Charging adaptor with auto
matic voltage adjustment
© Wall mount
® Wood screws
How to use the wall mount
The charging adaptor can be hung
on the wall using wood screws (in
cluded).
1. Select an appropriate location on
the wall where the screws can go
in.
2. Attach the wall mount to the wall
as shown with the wood screws,
making sure that the arrow points
up.
3. Slide the charging adaptor
grooves into the wall mount until
it clicks in.
To remove the charging adaptor from
the wall mount, slide the adaptor up
ward.
Charging
(see fig. 2)
Place the charging adaptor upright
on a flat surface or mount it on a wall.
Plug the adaptor into an AC outlet.
It will adjust automatically to voltages
between ^ 00-120 and 220-240V AC.
In some areas, a special plug adap
tor may be required.
Switch the shaver to the “ 0 • charge ’
position and place it upright into the
charging adaptor with the switch fac
ing toward the front.
The charge indicator lamp will glow
red and it will stay on until the shaver
is removed from the adaptor.
You can fully charge the shaver in 8
hours if it seems to be losing speed.
A full charge will supply enough
power for about 7 shaves (three min
utes per shave for a normal beard).
You can always store your shaver in
the charging adaptor to maintain full
Page 7

power capacity. This shaver cannot
be overcharged.
Before traveling, charge it fully for 8
hour if you will not be taking the
charging adaptor with you.
For a better shave
Put a thin tayer of shaving foam on
your face which works as lubricator.
Shaving foam is the most suitable
among many other shaving aids(gel,
soap, cream, etc). Do not put a thick
layer of shaving foam as it becomes
messy. If the shaving head is clogged
with foam, simply rinse it under run
ning water.
Hold the shaver at a right angle (90°)
to your skin (see fig. 3). Depress the
switch lock button and slide the On/
Off switch upward to turn the shaver
on. Start out shaving by applying
gentle pressure to your face. Stretch
your skin with your free hand and
move the shaver back and forth in
the direction of your beard. You may
gently increase the amount of pres
sure as your skin becomes accus
tomed to this shaver. Applying exces
sive pressure does not provide a
closer shave.
Using the trimmer
(see fig. 4)
Shavirig longer, curly hairs under
the chin
Slide the trimmer switch up to the 1st
position. This position makes the
trimmer an intercept cutter, cutting
long hairs while the outer foil shaves
shorter hairs. Make sure that the trim
mer is facing outward away from the
neck.
Trimming sideburns (see fig. 5)
Slide the trimmer switch up to the 2nd
position.
Place the trimmer at a right angle to
your skin and move it downward to
trim sideburns.
Cleaning your shaver
After every shave, press the foil frame
release button to pop open the foil
frame. Turn the shaver on and rinse
the inner blade(s) under running
water or in a basin (see fig. 6). After
rinsing, switch the shaver off and
leave it to dry without closing the foil
frame and the protective cap. After
the shaving head dries, close the foil
frame and replace the protective cap
on the shaver.
Replacing shaving head
components
With daily use, and depending on
thickness of beard, the outer foil may
need to be replaced every year and
the inner blade(s) every 2 years.
Replacing the outer foil
(see fig. 7)
Squeeze the outer foil release but
tons and lift the outer foil upward to
remove it. To insert the new outer foil,
press down until it snaps into place.
Replacing the inner blades
(see fig. 8)
Press the foil frame release button
to pop open the foil frame. Pull the
foil frame vertically out of the upright
shaver. Remove the inner blade one
at a time by grasping it firmly at both
ends and pulling straight away from
the shaver. To insert the new inner
Page 8

blades, hold the blade one at a time
at both ends and press downward
until it snaps into the shaver.
ATTENTION:
The product you have purchased is
powered by a nickel cadmium bat
tery which is recyclable. At the end
of its useful life, under various state
and local laws, it is illegal to dispose
of this battery into your municipal
waste stream. Please call 1-800-8BATTERY for information on how to
recycle this battery.
How to rennove the built-in re
chargeable battery before dis
posai of the shaver (see fig. 9)
The procedure described in fig. 9 is
intended only for removal of proper
disposal. Discard shaver after the
battery has been removed.
WARNING: Do not attempt to re
place the batteries for the pur
pose of reusing the shaver.This
could result In the risk of fire or
electric shock.
1. Remove the cap, outer foil frame,
inner blades and trimmer, (see
fig. 9A) (Trimmer must be pulled
away from main body using some
force.)
2. Remove the trimmer driving bar
(b) and two screws (a), (see fig.
9B)
3. Remove two screws (c) and bot
tom cover (d). (see fig. 9C)
4. Pull the chassis out of the hous-'
ing. (see fig. 9D)
5. Remove the battery from the
chassis, (see fig. 9E)'
Caution
Do not charge the shaver where the
temperature is below 0°C (32''F) or
above 40“C (104°F), where it will be
exposed to direct sunlight or a heat
source, or where there is a lot of
moisture.
Use only the included shaver charg
ing adaptor RE3-67 to charge the
ES726 shaver.
The supply cord of the charging
adaptor cannot be replaced; if the
cord is damaged, the appliance
should be discarded.
Dry the shaver completely before
setting it in the charging adaptor.
Keep the charging adaptor away from
water and handle it only with dry
hands. Do not use an extension cord
to connect the charging adaptor to
an outlet.
Do not place any metal objects like
coins and paper clips on the charg
ing adaptor as they will become
warm.
Grip the plug when disconnecting the
charging adaptor from a receptacle;
tugging on the cord may damage it.
Store the charging adaptor and its
cord set in a dry area where it will be
protected from damage.
The outer foil is very thin. If handled
improperly, it can be easily damaged.
To avoid personal injury, do not use
the shaver if it has a damaged foil or
inner blade.
Page 9

Wash the shaver in tap water Do not
use salt water, detergent or boiling
water Do not submerge the shaver
for a tong time
Do not wipe It with thinner, benzine
or alcohol Clean it by cloth with
soapy water
Do not take the housing apart as this
can affect the watertight construction
Specifications
Power source 100-120/220-240V
AC, 50-60 Hz (Automatic voltage
conversion)
Motor voltage 1 2 V DC
Charging time 8 Hour
Household Use
READ ALL INSTRUCTIONS BEFORE
USE
FOR YOUR CONVENIENCE, WE HAVE ESTABLISHED A TOLL-FREE
NATIONAL ACCESSORY PURCHASE HOT LINE AT 1-800-338-0552
9
Page 10

IMPORTANTE PARA SU SEGURIDAD
Al usar un aparato eléctrico,
siempre se debe tomar ciertas
precauciones básicas, incluyen
do las siguientes:
Lea todas las instrucciones antes
de usar este aparato.
PELIGRO Para evitar
1. No instale la unidad donde 4.
pueda caer en una bañera o
hundirse.
2. No coja el aparato que haya
caído al agua. Desenchufe 5.
inmediatamente.
3. No coloque ni guarde el adap- 6.
tador de carga donde pueda
caer en una bañera o
hundirse. No lo coloque ni lo
arroje al agua ni en ningún 7.
otro líquido.
ADVERTENCIA
No use esta afeitadora con
1.
hojas dañadas, ya que esto
podría causarle daños.
2.
El uso de esta afeitadora en
niños o inválidos, o cerca de 5.
ellos, requiere de una acuciosa
supervisión.
Use este aparato solamente 6.
3.
para el fin que ha sido
diseñado, como se describe en 7.
este manual. No use acceso
rios no recomendados por el
fabrecante.
4. NNo use el aparato si el cable o
la clavija están dañados, si el 8.
aparato no funciona correcta
mente, o si éste se ha caído,
Para evitar quemadura!, incendios,
descargas eléctricas y lesiones personales:
descargas eléctricas:
Antes de cargar la afeitadora,
seque bien la afeitadora y el
adaptador. Manipúlelos siem
pre con las manos secas.
Cargue siempre la afeitadora
en un tugar fresco y seco.
Excepto durante la operación
de carga, desconecte siempre
el adaptador de carga del
tomacorriente eléctrico.
Desenchufe este aparato
antes de limpiarlo.
está dañado o ha caído al
agua. Lleve el aparato a un
centro de sen/icio para que sea
revisado y reparado.
Nunca introduzca ningún tipo
de objetos por las aberturas del
aparato.
Mantenga el cable alejado de
las superficies calientes.
No use la afeitadora al aire libre
ni en lugares donde se estén
usando productos tipo aerosol
(pulverizadores) o donde se
esté administrando oxígeno.
Inspeccione periódicamente la
unidad de la pared para man
tener un montaje seguro.
CONSERVE ESTAS INSTRUCCIONES
10
Page 11

Antes de su utilización
Esta afeitadora para uso en hún^edo/seco puede ser empleada para
afeitarse tanto con espuma o jabón
de afeitar como en seco. Además,
por ser totalmente hermética, pue
de utilizar esta afeitadora mientras
se está duchando y limpiarla con
agua. Al principio y durante al me
nos tres semanas, procure afeitarse
con jabón y notará la diferencia. Será
necesario un cierto tiempo para que
se acostumbre a su afeitadora en
HÚMEDO/SECO puesto que su pie)
y su barba necesitan más o menos
un mes para adaptarse a un nuevo
modo de afeitarse.
Cargue la afeitadora durante al me
nos 8 horas antes de utilizarla por
primera vez o cuando haya dejado
de utilizarla durante más de seis
meses.
Identificación de lois
componentes
(véase la fig. 1)
(§) Tapa protectora
(D Botón de abertura del conjun
to de láminas
© Cabezal
© Láminas
© Cuchilla Interior
© Botón de abertura del cabezal
© Conmutador de encendido
© Botón de enclavamiento del
conmutador
Ф Lámpara Indicadora de carga
de la batería
0 Recortadora >
Ф Conmutador de la recortadora
© Adaptador de carga con ajus
te automático de la tensión
@) Soporte mural
© Tornillos de sujección
Uso del soporte mural
El adaptador de carga puede colgar
se a la pared con tornillos de suje
ción (incluidos).
1. Elija un lugar en la pared en el
que se puedan utilizar los torni
llos.
2. Fije el soporte mural a la pared
con los tornillos de sujeción, tal
como se muestra en la ilustración
y asegúrese de que la flecha sea
visible.
3. Deslice las ranuras del adapta
dor de carga sobre el soporte
mural hasta que quede bloquea
do en su posición.
Para retirar el adaptador de carga del
soporte mural, deslice el adaptador
hacia arriba.
Carga de la batería
(véase la fig. 2)
Coloque el adaptador de carga en
posición recta sobre una superficie
plana o el soporte mural a la pared.
Enchufe el adaptador en una toma
de corriente alterna.
El adaptador se ajustará
automáticamente a la tensión sumi
nistrada dentro de las gamas 100120y220-240V CA.
11
Page 12

En ciertas zonas, será necesario uti
lizar un adaptador de clavija espe
cial.
Ajuste el conmutador de la máquina
de afeitar en “la posición de carga 0"
y colóquela en posición recta en el
adaptador de carga con el conmuta
dor orientado hacía usted.
La lámpara indicadora de carga de
la batería se iluminará en color rojo
durante la operación de carga y has
ta que se retire la afeitadora del
adaptador.
Si le parece que la afeitadora está
perdiendo velocidad, puede cargar
la completamente durante 8 horas.
Una carga completa suministrará
bastante potencia para afeitarse
unas 7 veces {afeitado de tres minu
tos para una barba normal).
Si desea conservar la potencia de la
afeitadora, puede almacenarla siem
pre en el adaptador de carga. Esta
afeitadora no puede ser sobrecarga
da.
Antes de emprender un viaje y si no
desea llevarse el adaptador de car
ga, cargue completamente la máqui
na de afeitar durante 8 horas.
Para afeitarse mejor
Aplique una capa fina de espuma de
afeitar sobre la piel. La espuma ac
tuará como lubricante. De todos los
productos destinados a facilitar el
afeitado (gei, jabón, crema, etcéte
ra), la espuma de afeitar es el medio
más adecuado. No aplique demasia
da espuma de afeitar. Si el cabezal
de la máquina resulta obturado con
espuma, enjuague simplemente po
niendo la afeitadora debajo de un
chorro de agua.
Coloque la máquina de afeitar en
ángulo recto con respecto a la piel
(véase la fig. 3). Pulse el botón de
enclavamiento del conmutador y
deslice el conmutador de encendido
hacia arriba para arrancar la
afeitadora. Empiece a afeitarse si
ejerce presión leve. Tire de la piel con
la mano libre y desplace la afeitadora
en ambos sentidos siguiendo la
orientación de la barba. A medida
que su piel se acostumbre al afeita
do con está máquina, podrá aumen
tar ligeramente la presión. El afeita
do no será mejor sí se aplica dema
siada presión.
Uso de la recortadora
(véase la fig. 4)
Afeitado de pelos más largos y ri
zados debajo de la barbilla
Deslice el conmutador de la
recortadora hacia arriba, hasta la
primera posición. En esta posición
la recortadora funcionará como una
cortadora que cortará los pelos lar
gos mientras la hoja exterior afeita
rá los pelos más cortos. Asegúrese
de que la recortadora esté colocada
dando hacia afuera y alejada del
cuello.
Corte de patillas (véase la fig. 5)
Deslice el conmutador de la
recortadora hacia arriba, hasta la
segunda posición.
Coloque la recortadora en ángulo
recto con respecto a la piel y mué
vala hacia abajo para cortar las pati
llas.
12
Page 13

Limpieza de ia afeitadora
Cada vez que termine de afeitarse,
pulse el botón de abertura del mar
co de la hoja para que el marco sal
te abriéndose. Encienda la afeitadora
y enjuague la cuchilla interior ponién
dola debajo de un chorro de agua o
en el lavabo (véase la fig. 6). Cuan
do termine de limpiar la afeitadora,
apáguela y deje que se seque sin
cerrar el cabezal y la tapa protecto
ra. Cuando el cabezal esté seco, cie
rre el cabezal y coloque la tapa pro
tectora sobre la máquina de afeitar.
Sustitución de los compo
nentes del cabezal de
afeitar
Si utiliza ta afeitadora todos los días
y según el grosor de la barba, pue
de que sea necesario cambiar las
láminas una vez al año y, cada dos
años, la cuchilla interior.
Sustitución de la lámina
(véase la fig. 7)
Pulse los botones de liberación de
la lámina y retire, levantando hacia
arriba, esta lamina para extraerla.
Para colocar otra lamina nueva,
empújela hacia abajo hasta que se
asiente. Cuando asi sea, oirá un clic.
Sustitución de las cuchillas inte
riores (véase la fig. 8)
Pulse el botón del marco de la hoja
para abrir de golpe el cabezal. Tíre,
en sentido vertical, del cabezal con
la afeitadora en posición recta. Reti
re cada una de las cuchillas (una a
la vez) agarrándolas firmemente por
ambos extremos y tirando en línea
recta. Para introducir las cuchillas
nuevas, agarre cada hoja por ambos
extremos (una sota a la vez) y em
puje hasta que se asiente en su po
sición. Cuando así sea, oirá un clic.
CUIDADO;
El producto que ha adquirido funcio
na gracias a una batería níquelcadmium reciclable. Al final de su
vida útil está prohibido, según las
normas vigentes en diversos esta
dos o regiones, desechar la batería
con los demás desechos domésticos
recogidos por el municipio. Por con
siguiente, llame al número 1-800-6BATTERY [jara obtener más informa
ción sobre la manera de reciclar di
cha batería.
13
Page 14

Cómo extraer la batería recargable
incorporada antes de desechar la
afeitadora (véase la fig. 9)
El procedimiento que se describe en
la fig. 9 sólo sirve para exponer la
forma de quitar la batería con vistas
a desecharla de manera adecuada.
ADVERTENCIA: No intente re
emplazar las pilas con el propó
sito de volver a usar la
afeitadora. Esto podría causar
incendios o descargas eléctri
cas.
1. Retire la tapa, el marco de la hoja
exterior, las cuchillas interiores y
la recortadora (véase la fig. 9A),
(Para extraer la recortadora del
cuerpo de la afeitadora se debe
ejercer cierta fuerza.)
2. Retire la barra impulsora de la
recortadora (b) y los dos tornillos
(a), (véase la fig. 9B).
3. Retire los dos tornillos (c) y retire
la cubierta inferior (d). (véase la
fig. 9C).
4. Tire del bastidor hasta que salga
de su alojamiento, (véase la fig.
9D).
5. Retíre la batería del bastidor,
(véase la fig. 9E).
Cuidado
No cargue la afeitadora en lugares
donde la temperatura sea inferior a
0°C (32*F) o superior a 40“C (104
*F), en lugares expuestos directa
mente a la luz del sol, cerca de una
fuente de calor o donde la humedad
sea excesiva.
Utilice únicamente el adaptador
RE3-67 para cargar la afeitadora
ES726.
El cable de alimentación del adapta
dor no puede sustituirse. Si se dete
riora el cable de alimentación, debe
rá desecharlo.
Seque la afeitadora antes de colo
carla en el adaptador de carga. Man
tenga el adaptador alejado del agua
y manéjelo únicamente con las ma
nos secas. No utilíce ningún cable
alargador para conectar el adapta
dor de carga a la toma de corriente.
No coloque ningún objeto metálico
como, por ejemplo, piezas de mone
da y clips sobre el adaptador de car
ga puesto que se calentarían.
Al desenchufar el adaptador de car
ga de la toma de corriente, agarre el
cable por el mismo enchute. Si tira
del propio cable podría deteriorarlo.
Almacene el adaptador de carga con
su cable de alimentación en un lu
gar seco y protegido.
La lámina exterior es muy fina. Si no
se maneja con cuidado, se puede
deteriorar. Para evitar lesiones cor
porales, no utilice la afeitadora si se
deterioró la lámina o la cuchilla inte-
14
Page 15

Lave la afeitadora con agua del gri
fo No utilice agua salada, detergen
te o agua caliente No deje la
afeitadora sumergida durante perío
dos prolongados
No limpie la afeitadora con aguarrás,
benceno o alcohol Limpíela sólo con
un paño húmedo y agua jabonosa
No separe la envoltura de la
afeitadora puesto que podría afec
tar sus propiedades herméticas
Características técnicas
Fuente de alimentación
100-120/220-240V CA, 50-60 Hz
(Conversión automática de la ten
sión)
Tensión del motor 1,2 V CC
Tiempo de carga 8 horas
Uso doméstico
ANTES DE SU UTILIZACION, LEA
CUIDADOSAMENTE TODAS LAS
INSTRUCCIONES
PARA SU CONVENIENCIA, AHORA DISPONEMOS DE UNA LINEA NA
CIONAL DE LLAMADA GRATIS PARA LA COMPRA DE ACCESORIOS,
LLAME AL 1-800-338-0552
15
Page 16

INST RU CT ION S DE SE CU RI TE IM PO RTA NT ES
Lors de l’utilisation d’un appareil
électrique, les précautions de base
doivent toujours être respectées, y
DANGER
1.
Ne installez pas l’appareil dans des
endroits où il peut tomber dans une
baignoire ou un évier.
2.
Ne touchez pas l’appareil s’il est
tombé dans l’eau. Débranchez-te
immédiatement.
3.’ DNe placez pas ou ne rangez pas
l’adaptateur de charge dans des
endroits où il peut tomber dans une
baignoire ou un évier. Ne le mettez
pas ou ne le faîtes pas tomber
dans l’eau ou un autre liquide.
Afin de réduire tout risque de décharge
électrique:
MISE EN GARDE
1. N’utilisez pas ce rasoir avec des
lames de rasage et/ou une grille
endommagée, car des blessures
du visage risquent de se produire.
2.
Une surveillance sévère est
nécessaire lorsque ce rasoir est
utilisé sur des enfants, ou en
présence d’enfants ou d'invalides.
3.
Utilisez cet appareil uniquement
pour l’usage pour lequel il est des
tiné tel que décrit dans ce mode
d’emploi. N’utilisez pas des acces
soires qui ne sont pas recom-
marrdés par te fabricant.
4.
N’utilisez jamais cet appareil si le
cordon ou ta fiche est endommagé,
s’il ne fonctionne pas corréctement.
compris les points suivants:
Usez toutes les instructions avant
d'utiliser cet appareil.
4. Avant de charger le rasoir, essuyez
toute trace d'humidité du rasoir et
de l’adaptateur de charge.
Manipulez toujours avec des mains
sèches.
5.
Chargez toujours le rasoir dans un
endroit frais et sec.
6.
Débranchez toujours l’adaptateur
de charge de la prise électrique,
excepté pendant la charge.
7.
Débranchez cet appareil avant de
le nettoyer.
Afiri de tâftrâe le risque de brûlures, d’incendie, de
décharge électrique^ ou de bfesstoes corporefes;
s’il est tombé, endommagé ou
tombé dans l’eau. Retournez l’ap
pareil à un centre de réparation
pour 1e faire contrôler et réparer.
5.
Ne faites jamais tomber ou
n’insérez pas un objet dans les
ouvertures de l’appareil.
6.
Gardez le cordon à l’abri des sur
faces chauffées.
7.
N’utilisez pÊfâ à Textérieur ou dans
des endroits où des aérosols
(pulvérisateurs) sont utilisés ou
dans des endroits où l’oxygène est
en cours de chargement.
8.
Inspectez périodiquement l’unité au
mur pour un montage sûr.
CONSERVEZ CE MODE D’EMPLOI
16
Page 17

Avant utilisation
Ce rasoir Wet/Dry peut être utilisé
pour un rasage à l’eau et à la mousse
ou pour un rasage à sec. Ce rasoir
peut se nettoyer sous l’eau courante
et peut même s’utiliser sous la dou
che car il est étanche. Faites un es
sai en utilisant de l’eau et de la
mousse à raser pendant trois semai
nes et vous constaterez le résultat.
Le rasoir Panasonic WET/DRY né
cessite un temps d’adaptation car il
faut au moins un mois pour que la
peau et ta barbe s’habituent à une
nouvelle méthode de rasage.
Chargez le rasoir pendant au moins
8 heures avant la première utilisation
ou lorsque vous ne l'avez plus utilisé
pendant plus de six mois.
Nomenclature
(reportez-vous à la fig. 1.)
(S) Capuchon protecteur
© Bouton d'ouverture de la grille
extérieure
© Porte-grille
® Grille extérieure
© Lame intérieure
© Bouton d’ouverture du porte-
grille
© Interrupteur
® Bouton de déverrouillage
(D Témoin-indicateur de charge
© Tondeuse
® Interrupteur de la tondeuse
© Adaptateur de charge à recon
naissance automatique de
tension
© Support mural
© Vis de fixation •
Fixation du support mural
Uadaptateur de charge peut être fixé
au mur à l’aide des vis de fixation
(fournies).
1. Choisissez l’endroit approprié
■ pour fixer l’appareil.
2. Fixez le support au mur à l’aide
des vis de fixation en vérifiant que
la flèche indique bien le haut.
3. Faites coulisser les rainures de
l’adaptateur de charge dans le
support jusqu’à son arrêt.
Pour retirer l’adaptateur de charge de
son support, faites glisser l’adapta
teur vers le haut.
Charge
(reportez-vous à la fig. 2.)
Posez l’adaptateur de charge sur une
surface plane ou fixez-le au mur.
Branchez l’adaptateur sur le secteur.
La tension est convertie automati
quement à 100-120 V ou 220-240 V.
Dans certains cas, un adaptateur à
fiche spéciale peut être nécessaire.
Mettre le rasoir sur la position 0 et le
placer fermement dans l’adaptateur
de charge, l’interrupteur vous faisant
face.
Le témoin-indicateur de charge
rouge s’allume pendant la charge.
Si la vitesse du rasoir semble dimi
nuer, vous pouvez le recharger com
plètement pendant 8 heures.
17
Page 18

Une charge complète fournit suffi
samment d’alimentation pour 7
rasages environ (3 minutes par
rasage pour une barbe normale).
Le rasoir peut être rangé dans l'adap
tateur de charge afin d’assurer une
alimentation optimale. Néanmoins,
on veillera à ne pas atteindre une
charge excessive.
Avant un départ en voyage, procé
der au chargement complet de l'ap
pareil pendant 8 heures si vous ne
souhaitez pas emporter (’adaptateur
de charge.
Rasage optimal
Appliquez une fine couche de
mousse à raser sur votre visage en
guise de lubrifiant. La mousse à ra
ser est te produit te plus approprié
pour le rasage (par rapport aux gels,
savons, crèmes, etc.).
Une couche de mousse trop épaisse
peut rendre le rasage difficile. Si la
mousse venait à obturer la tête de
rasage, rincer simplement celle-ci
sous l’eau courante.
Maintenez le rasoir
perpendiculairement (90°) à votre vi
sage (reportez-vous à la fig. 3).
Appuyez sur le bouton de
déverrouillage et faites glisser l’inter
rupteur vers te haut pour mettre le
rasoir en service. Commencez par
vous raser en appliquant en douceur
le rasoir sur votre visage. Tendez la
peau avec l’autre main et suivez avec
le rasoir les contours du visage. Vous
pourrez augmenter la pression du
contact au fur et à mesure que votre
peau s'adaptera au rasoir. Cepen
dant, une pression excessive ne don
nera pas nécessairement de
meilleurs résultats.
Utilisation de la tondeuse
(reportez-vous à la fig. 4)
Coupe de poils longs et bouclés
sous le menton
Placez l’interrupteur de la tondeuse
sur la première position. Cette posi
tion permet à la tondeuse de couper
les poils longs et à la grille extérieure
de raser les poils plus courts. Veiller
à ce que la tondeuse soit du côté ex
térieur, éloignée du cou.
Coupe des favoris
(reportez-vous à la fig. 5)
Racez l’interrupteur de la tondeuse
sur la deuxième position.
Placez la tondeuse
perpendiculairement á votre visage
et déplacez-la vers le bas pour cou
per les favoris.
Nettoyage
Après chaque rasage, appuyez sur
le bouton d’ouverture du porte-grille.
Mettez le rasoir en service et lavez
la lame intérieure sous l'eau courante
ou dans le lavabo (reportez-vous à
la fig. 6). Ensuite, mettez le rasoir
hors tension et laissez le sécher en
laissant ouverts le porte-grille et le
capuchon protecteur. Après sé
chage, ferniez le porte-grille et
replacez sur le rasoir son capuchon
protecteur.
18
Page 19

Remplacement de la tête
de rasage
En cas d’utilisation quotidienne, en
fonction de l’épaisseur de la barbe,
il est conseillé de remplacer la grille
extérieure tous les ans et la lame intérieure tous les deux ans.
Remplacement de la grille exté
rieure
(reportez-vous à la fig. 7)
Appuyez sur les boutons de
déblocage de la grille extérieure et
tirez sur cette grille afin de la retirer.
Pour insérer la nouvelle grille, ap
puyez dessus jusqu’à ce qu’elle se
mette en place.
Remplacement des lames internes
(reportez-vous à la fig. 8)
Appuyez sur le bouton de déblocage
du porte-grille. Maintenez le rasoir
vertical et tirez verticalement sur le
porte-grille. Retirez les lames inter
nes l’une après l'autre en les saisis
sant fermement à ses extrémités et
en les tirant fermement hors du ra
soir. Pour insérer les nouvelles lames
internes, maintenez chaque lame par
ses extrémités et appuyez dessus
jusqu'à ce qu’elle se mette en place
dans le rasoir.
ATTENTION :
L’appareil que vous venez d'acheter
est alimenté par une batterie nickel-
cadmium recyclable. A la fin de la vie
utile de cette batterie, certaines lé
gislations nationales et locales inter
disent de la jeter aux ordures. Pour
plus d’informations sur la manière de
recycler cette batterie, appelez le 1 800-8-BATTERY.
Comment enlever la batterie inté-
rée rechargeable avant de se déarrasser du rasoir
g
(reportez-vous à la fig. 9)
La procédure décrite dans ta fig. 9
ne vise que le retrait de ta batterie à
la fin de sa vie utile. Après le retrait
de la batterie, vous pouvez jeter te
rasoir.
MISE EN GARDE; N'essayez pas
de remplacer les piles dans le
but de réutiliser le rasoir. Cela
risquerait de provoquer un in
cendie ou une décharge électri
que.
1. Retirez le capuchon, le portegrille extérieure, les lames inter
nes et la tondeuse (reportezvous à la fig. 9A). (Tirez
fermement pour retirer la ton
deuse du corps du rasoir.)
2. Retirez ta barre de la tondeuse
(b) et les deux vis (a) (reportezvous à la fig. 9B).
3. Retirez les deux vis (c) et le ca
pot inférieur (d) (reportez-vous
à la fig. 9C).‘
4. Retirez le châssis de son loge
ment (reportez-vous à lafig.9D).
5. Retirez la batterie du châssis (re
portez-vous à la fig. 9E).
19
Page 20

Précautions
Ne pas charger le rasoir si la tempé
rature ambiante est inférieure à 0°C
(32°F) ou supérieure à 40“C (104°F).
Ne pas charger le rasoir en l’expo
sant à la lumière directe du soleil, à
proximité d'une source de chaleur ou
dans un endroit humide.
Utilisez uniquement l’adaptateur de
charge RE3-67 pour charger le ra
soir ES726.
Le cordon d’alimentation de l'adap
tateur de charge ne peut être rem
placé. Si le cordon est endommagé,
l’appareil n'est plus utilisable.
Veillez à ce que le rasoir soit parfai
tement sec avant de le placer dans
l’adaptateur. Evitez de mouiller
l’adaptateur et veillez à te manipuler
avec les mains parfaitement sèches.
Ne pas utiliser de rallonge pour con
necter l’adaptateur de charge au sec
teur.
Ne pas placer d'objets métalliques
comme des pièces de monnaie ou
des attaches-trombones sur l’adap
tateur en raison des risques de
surchauffe.
Pour débrancher l’adaptateur, tirer
sur la fiche et non sur le cordon, ce
qui risquerait de l’endommager. Ran
ger l’adaptateur et son cordon dans
un endroit sec à l’abri des chocs.
La grille extérieure est très mince.
Veillez à ne pas l’endommager. Pour
éviter toute blessure, n’utilisez pas
le rasoir si la grille ou la lame sont
endommagées.
Nettoyer toujours le rasoir sous l’eau
courante. Ne pas utiliser d’eau de
mer, de détergent ou d'eau
bouillante. Ne pas immerger le rasoir
pendant une période prolongée.
Ne le frottez pas à l’aide d’un tissu
imbibé de solvant, d’essence ou d’al
cool. Utilisez à cette fin un tissu im
bibé d'eau savonneuse.
Si le rasoir est démonté, son
étanchéité n’est plus garantie.
Caractéristiques
Alimentation : 100-120/220-240 V
CA, 50-60 Hz (conversion automati
que du voltage)
Voltage du moteur : 1,2 V CC
Temps de charge : 8 heures
Utilisation domestique
LISEZ ATTENTIVEMENT LES INS
TRUCTIONS AVANT D’UTILISER
L’APPAREIL
PAR COMMODITE, NOUS AVONS MIS A VOTRE DISPOSITION UNE LI
GNE DIRECTE, NATIONALE ET GRATUITE POUR VOS ACHATS D'AC
CESSOIRES: 1-800-338-0552
20
Page 21

Page 22

IN USA CONTACT
Panasonic Personal and Professional
Products Company
One Panasonic Way 4A-3
Secaucus NJ 07094
Questions, Comments
Call 1-800-338-0552
No 1 EN ES FR (U S A )
IN PUERTORICO CONTACT
PANASONIC SALES COMPANY
DIVISION OF MATSUSHITA
ELECTRIC OF PUERTO RICO, INC
San Gabriel Industrial Park
65th Infantry Avenue KM9 5
Carolina, Puerto Rico 00630
Printed in China
 Loading...