


ES7036取説AU*06.11.2211:03ページ1
Wet/Dry Rechargeable Shaver
Operating Instructions
Model No. ES7036
B
Before operating this unit, please read these instructions completely.
1
A
2
(A) (B)
B
C
D
E
K
L
recharge
charge
status
recharge
charge
status
F
J
3
G
H
recharge
I
charge
status
4
M
(a)
(b)
N
O
P
Panasonic Electric Works Wanbao (Guangzhou) Co., Ltd.
Wanbao Base Shiguang Road, Panyu District,
Guangzhou, Guangdong, 511495 CHINA
No.1 EN (豪州)
5
6
7
8
Printed in China
2
9 10
11
e
c
f
d
g
e
(A) (B)
b
a
3
4

ES7036取説AU*06.11.2211:26 ページ2
Before use
This Wet/Dry shaver can be used for
wet shaving with shaving lather or for
dry shaving. You can use this watertight shaver in the shower and clean
it in water. The following is the symbol of Wet shaver. The symbol
means that hand-held part may be
used in a bath or shower.
Treat yourself to wet lather shaves
for at least three weeks and notice
the difference. Your Panasonic
Wet/Dry shaver requires a little time
to get used to because your skin
and beard need about a month to
adjust to any new shaving method.
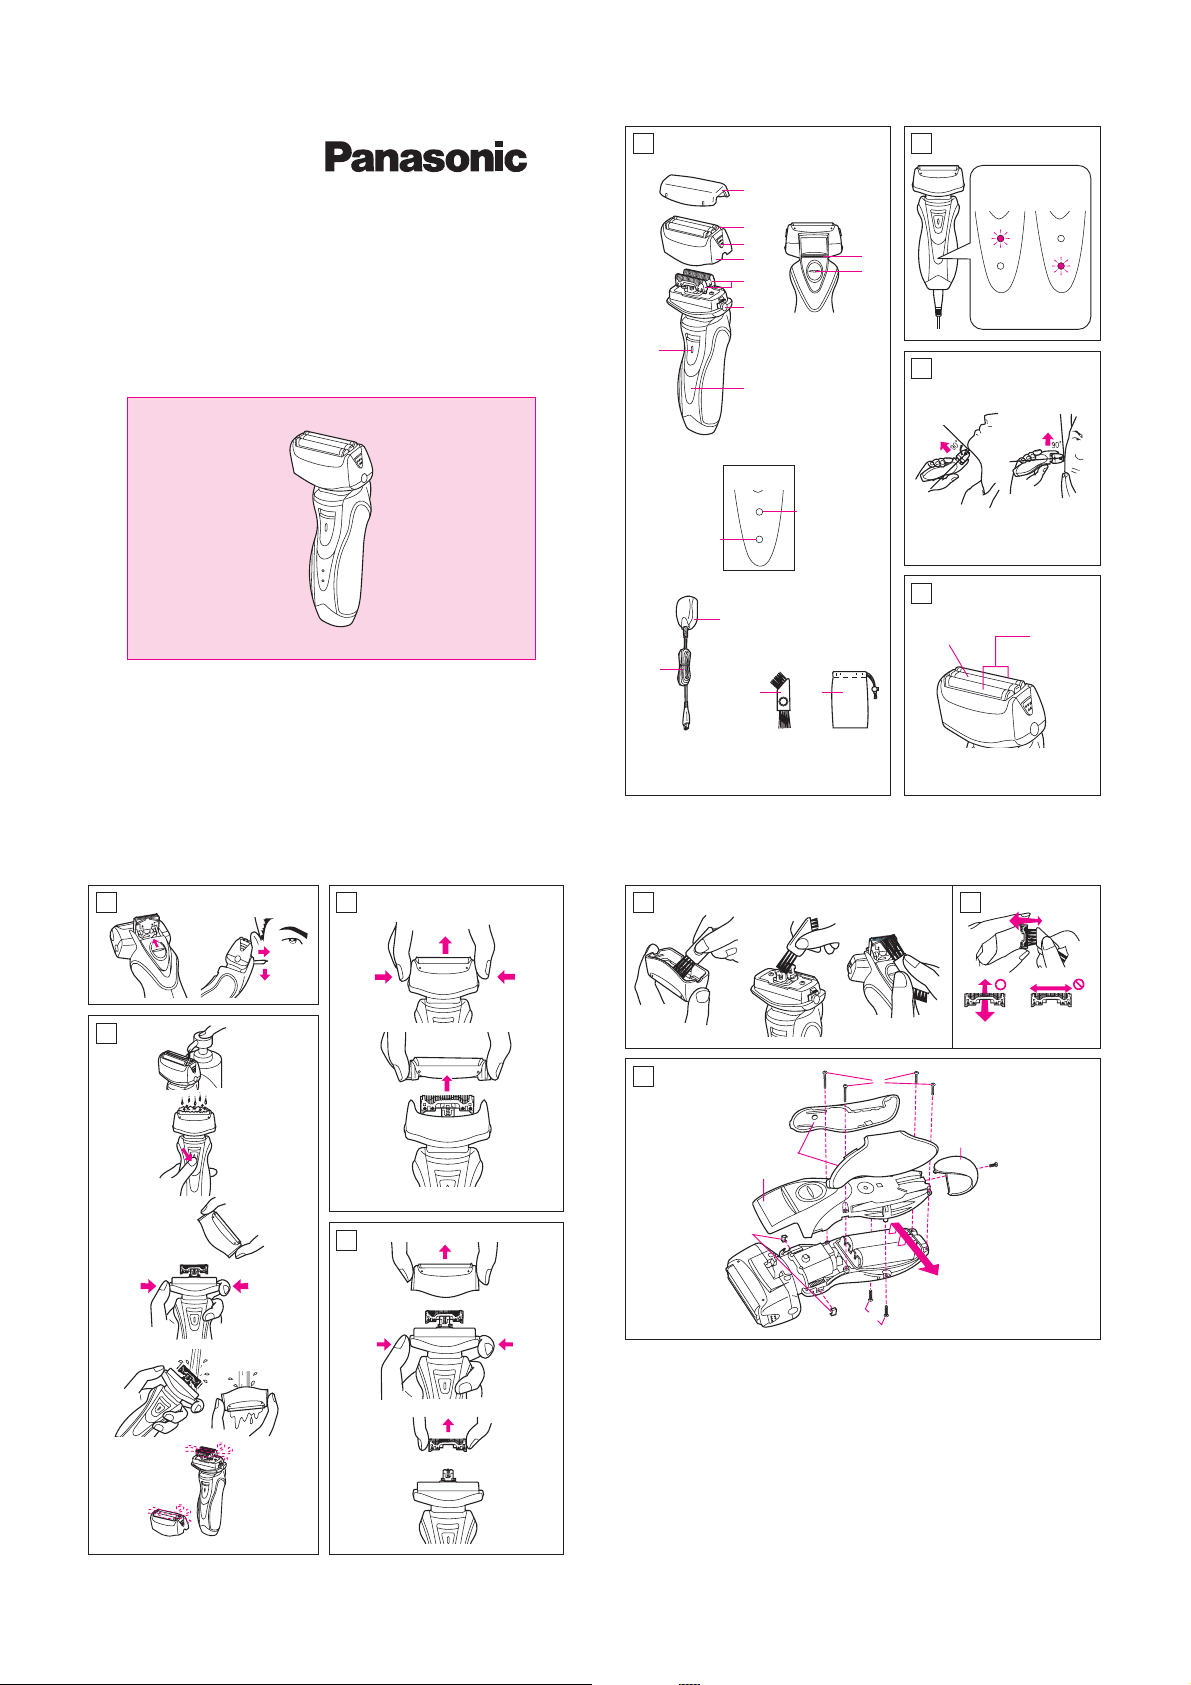
Parts identification
(see fig. 1)
A Protective cap
B System outer foil
C System outer foil release but-
tons
D Foil frame
E Inner blades
F Foil frame release buttons
G LED display
H Low battery indicator
I Charge status lamp
J On/Off switch
K Trimmer
L Trimmer handle
M Adaptor
N Power cord
O Cleaning brush
P Soft case
READ ALL INSTRUCTIONS BEFORE USE.
Charging
When charging the shaver for the first
time or when it has not been in use
for more than 6 months, charge it for
at least 8 hours before use.
Connect the power cord to the
shaver, and plug the adaptor to an
AC outlet.
The shaver will be adjusted automatically to voltages between 100-240V
AC.
In some areas, a special plug adaptor may be required.
The charge status lamp will glow
when the shaver is being charged.
It will blink when the charging is
completed (see fig. 2 (B)).
You can fully charge the shaver in
1 hour if the low battery indicator
blinks (see fig. 2 (A)).
The unit can be used once or twice
more after the low battery indicator
starts to blink.
A full charge will supply enough
power for approx. 14 shaves(3 minutes per shave for a normal beard).
Before travelling, charge it fully for
1 hour if you will not be taking the
adaptor with you.
In case your shaver is without charge,
you may quick charge it for 1 shave
in about 5 minutes.
5
Using your shaver
Caution – The system outer foil is
very thin and can be damaged if
handled improperly. Before each
use, always check the foil for
damage. To avoid personal injury,
do not use if the foil or other parts
of the shaving head is damaged.
Depress the switch lock button and
slide the On/Off switch upward to
turn the shaver on.
Hold the shaver at a right angle (90°)
to your skin (see fig. 3). Start out
shaving by applying gentle pressure
to your face. Stretch your skin with
your free hand and move the shaver
back and forth in the direction of your
beard. You may gently increase the
amount of pressure as your skin becomes accustomed to this shaver.
Applying excessive pressure does
not provide a closer shave.
System outer foil
(see fig. 4)
System outer foil has a slit blade (a)
between 2 foils (b). They move up
and down independently to follow
the contours of your face.
The slit blade catches and cuts
longer and lying hairs easily.
For wet shaving
Put a thin layer of shaving foam on
your face which works as a lubricator. Shaving foam is the most suitable among many other shaving
aids (gel, soap, cream, etc.).
Do not put a thick layer of shaving
foam as it may affect shaver’s performance. If the shaving head is
clogged with foam, simply rinse it
under running water.
Using the trimmer
(see fig. 5)
Slide the trimmer handle up to open
the trimmer.
Place the trimmer at a right angle to
your skin and move it downward to
trim sideburns.
Cleaning your shaver
(see fig. 6)
Warning – To prevent electric
shock or personal injury, disconnect the power cord from the
shaver before cleaning with water.
For cleanliness and convenience, we
recommend that you clean your
shaver with water and a liquid hand
soap. Regular cleaning will keep your
shaver in good condition while preventing odors or bacteria from developing, and maintain the cutting performance.
With the system outer foil in place,
apply some hand soap onto the outer
foil.
Turn the shaver on and pour some
water over the outer foil.
After about 10-20 seconds, turn the
shaver off.
Remove the foil frame and clean it
with running water.
Wipe off any moisture from the
shaver with a dry cloth and remove
the protective cap to allow the system outer foil to dry completely.
6
Brush cleaning
Squeeze the foil frame release buttons and lift the foil frame upward to
remove it (see fig. 8). Remove the
inner blades one at a time by grasping it firmly at both ends and pulling it
straight away from the shaver. Clean
the outer foils, the shaver body and
the trimmer with the long brush (see
fig. 9). Clean the inner blades with
the short brush by moving it in the direction in fig. 10 (A). Do not move
the brush in the direction in fig. 10
(B), as it will damage the inner blade,
and its cutting performance. Do not
use the short brush to clean the
outer foils.
Replacing shaving head
components
It is recommended that you replace
the system outer foil at least once a
year and the inner blade at least once
every 2 years to maintain your
shaver’s cutting performance.
Replacing the system outer foil
(see fig. 7)
Squeeze the system outer foil release buttons and lift the system
outer foil upward to remove it. To insert the new system outer foil, press
down until it snaps into place.
Replacing the inner blades
(see fig. 8)
Squeeze the foil frame release buttons and lift the foil frame upward
to remove it. Remove the inner
blade one at a time by grasping it
firmly at both ends and pulling
straight away from the shaver.
Do not touch the metal parts of
inner blades.
To insert the new inner blade, hold
the blade one at a time at both
ends and press downward until it
snaps into the shaver.
For environmental protection and recycling of
materials
This shaver contains Nickel-Metal
Hydride batteries.
Please make sure that the batteries
are disposed of at an officially assigned location, if there is one in your
country.
How to remove the built-in
rechargeable battery before
disposal of the shaver
(see fig. 11)
WARNING:
Do not attempt to replace the battery for the purpose of reusing the
shaver. This could result in the
risk of fire or electric shock.
The battery in this shaver is not intended to be replaced by consumers. However, the battery may
be replaced at an authorized service
center. The procedure described
below is intended only for removal
of the rechargeable battery for the
purpose of proper disposal.
1. Disconnect the power cord from
the shaver when removing the
battery.
2. Remove the bottom cover screw
(a).
3. Remove the bottom cover (b).
4. Slide the side panels (c) and
remove them.
7
5. Remove the housing clips (d).
6. Remove the six housing screws
(e).
7. Remove the housing (f).
8. Lift the batteries (g) and remove
them.
Caution
• Do not charge the shaver where
the temperature is below 0°C
(32°F) or above 40°C (104°F),
where it will be exposed to direct
sunlight or a heat source, or where
there is a lot of moisture.
• Use only the included adaptor
RE7-32 to charge the shaver.
• Dry the shaver completely before
charging it.
• The shaver and adaptor will be-
come slightly hot during use or
charging, however this is not a
malfunction.
• Keep the adaptor away from water
and handle it only with dry hands.
• Grip the adaptor when disconnect-
ing it from an AC outlet; tugging on
the power cord may damage it.
• Store the adaptor in a dry area
where it will be protected from
damage.
• Do not pull, twist, or severely bend
the power cord.
• Do not wrap the power cord tightly
around the appliance.
• If the power cord gets damaged, it
alone can not be replaced.
Contact an authorized service
center.
• In cases where static noise is
emitted from the television during
use or recharging, connect the
adaptor to a different outlet.
• Do not touch the edge (metal part)
of the inner blade.
Failure to observe this may lead to
hand injuries.
• Wash the shaver in tap water. Do
not use salt water or boiling water.
Also, do not use cleaning products that are designed for toilets,
bathrooms or kitchen appliances.
Do not submerge the shaver for a
long time.
• Do not wipe any part of the shaver
with thinner, benzine or alcohol.
Clean it by using a cloth dampened with soapy water.
• Do not take the housing apart as
this can affect the watertight construction.
• Do not clean with water when the
shaver is connected to the power
cord.
• Keep the unit away from children.
• Keep instructions in a safe place.
• This applianse is not intended for
use by young children or infirm
persons unless they have been
adequately supervised by a responsible person to ensure that
they can use the appliance safely.
• Young children should be supervised to ensure that they do not
play with the appliance.
This product is intended for
household use only.
8