

Page 1
English 2
Français 9
Español 16
Before operating this unit, please read these instructions completely.
Il est recommandé de lire attentivement ce manuel avant d’utiliser l’appareil.
Operating Instructions
Manuel d’utilisation
Rechargeable body shaver
Rasoir corporel rechargeable
Model No. ES2262
N° de modèle ES2262
Page 2

English
IMPORTANT SAFETY INSTRUCTIONS
When using an electrical appliance, basic
precautions should always be followed, including
the following:
Read all instructions before using this appliance.
DANGER
1. Do not reach for an appliance that has fallen
into water. Unplug immediately.
2. Charger unit is not for immersion or for use in
shower.
3. Do not place or store appliance where it can fall
or be pulled into a tub or sink. Do not place in
or drop into water or other liquid. Always return
hand unit to wall unit after using.
4. Except when charging, always unplug this
appliance from the electrical outlet immediately
after using.
5. Unplug this appliance before cleaning.
6. Do not use an extension cord with this
appliance.
To reduce the risk of electric
shock:
2. Use this appliance only for its intended use as
described in this manual. Do not use
attachments not recommended by the
manufacturer.
3. Never operate this appliance if it has a
damaged cord or plug, if it is not working
properly, if it has been dropped or damaged, or
dropped into water. Return the appliance to a
service center for examination and repair.
4. Keep the cord away from heated surfaces.
5. Never drop or insert any object into any
opening.
6. Do not use outdoors or operate where aerosol
(spray) products are being used or where
oxygen is being administered.
7. Do not use this appliance with a damaged or
broken comb, as facial injury may occur.
8. Always attach plug to appliance first, then to
outlet. To disconnect, turn all controls to “off”
then remove plug from outlet.
9. Periodically inspect the wall unit for secure
mounting.
WARNING
1. Close supervision is necessary when this
appliance is used by, on, or near children or
invalids.
2
To reduce the risk of burns, fire,
electric shock, or injury to persons:
SAVE THESE INSTRUCTIONS
Page 3

Important
Before use
This WET/DRY body shaver can be used for wet shaving with
soap lather or for dry shaving. Use the watertight shaver in the
shower and clean it in water. The following is the symbol of Wet
body shaver. The symbol means that the hand‑held part may be
used in a bath or shower.
We recommend using the shaver head for close shaving and
using the pop up trimmer to cut longer hairs.
Using the shaver
Caution ‑ The outer foil is very thin and can be damaged if not
used correctly.
Check that the outer foil is not damaged before using the
•
shaver. Do not use the shaver if the outer foil is damaged
because you will cut your skin.
Be sure to lubricate the outer foil or the blades before using
•
the shaver. Failure to do so may cause the shaver to pull your
hairs or damage to skin.
Do not apply strong pressure to the skin, repeatedly rub over
•
the same area, hold in one spot on the skin, or apply in a
jabbing motion when using the shaver. Doing so may cause
damage to skin, inflammation or increased pain.
Do not use for facial shaving.
•
Charging the shaver
Dry the shaver completely before charging it.
•
Do not attempt to use a charger other than the included one
•
which is specifically designed for this model. Use only the
included charger.
Keep the charger away from water and handle it only with dry
•
hands.
The shaver may become warm during use and charging.
•
However, this is not a malfunction.
Hold the adaptor when disconnecting it from the household
•
outlet. If you tug on the supply cord, you may damage it.
The supply cord cannot be replaced. If the cord is damaged,
the appliance should be scrapped.
Do not charge the shaver where the temperature is below
•
32 °F (0 °C) or above 104 °F (40 °C), where it will be exposed
to direct sunlight or a heat source, or where there is a lot of
moisture.
Charge the shaver for at least 16 hours when charging it for
•
the first time or when it has not been used for more than 6
months.
Cleaning the shaver
When you clean the shaver with water, do not use salt water
•
or hot water. Wipe it with a cloth dampened with soapy water.
Do not use thinner, benzine or alcohol.
Storing the shaver
Store the charger in a dry area where it is protected from
•
damage.
Do not disassemble the appliance. Take it to a qualified
•
service person when service or repair is required.
SPECIFICATIONS
Power source: 100‑120 V AC, 50‑60 Hz
Motor voltage: 1.2 V DC
Charging time: 8 hours
This product is intended for household use only.
(Only plug the charger in a 100‑120V AC outlet.)
English
3
Page 4
4
3
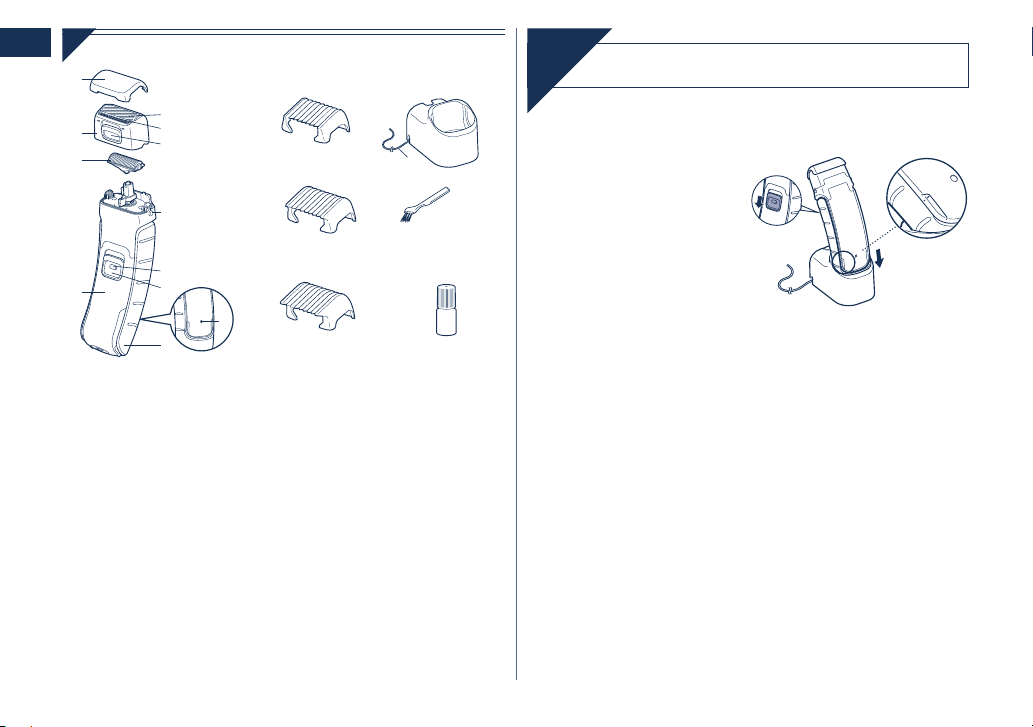
Parts identification
English
A Protective cap
B Foil frame
1 Outer foil
2 Pop up trimmer
3 Pop up trimmer switch
C Inner blade
D Main body
4 Foil frame release buttons
5 Switch lock button
4
Charge
Place the shaver on the charger to charge it.
You can charge the shaver in 8 hours.
1
1
2
2
Charging the shaver
Turn off the shaver.
Plug the power cord
into a household
outlet and place the
charger on a flat
surface.
Ensure that the
3
3
marks of the handle
6 ON/OFF switch
7 Charge indicator lamp
8 Handle
E 3 mm (1/8˝) comb attachment
F 6 mm (1/4˝) comb attachment
G 9 mm (3/8˝) comb attachment
H Charger (RE7‑49)
9 Power cord
I Cleaning brush
J Oil
and the main body
are aligned with
each other.
Insert it in the charger as illustrated.
4
4
The charge indicator lamp lights and stays on until the shaver is
•
removed from the charger.
A full charge will supply enough power for approx. 4 shaves of 7
•
minutes each.
If the shape of the plug does not fit the power outlet, use an
•
attachment plug adaptor of the proper configuration.
Page 5
Fixing the charger to the wall
1. Attach two screws to the wall as
illustrated.
Screws are sold separately.
•
2. Hook the charger onto these
screws.
3. Plug the power cord into a
household outlet.
Using the shaver
Shave
Trim your hair using the pop up trimmer if it is longer than
0.2 inches.
Wet/foam shaving
Shaving with soap lather makes the skin slippery for a closer
shave. Do not use shaving cream, skin cream or skin lotion as it
will clog the blades.
Wet your skin and remove the protective cap.
1
1
Wet the outer foil and place a small quantity of
2
2
liquid body soap on the outer foil.
While pressing the switch lock
3
3
button, slide the ON/OFF switch
upwards.
Press gently so that the whole outer foil is in
4
4
contact with the skin.
Apply the shaver to your skin
5
5
and press gently while moving
it slowly against the direction
of hair growth.
Underarm Legs Arms
Hold your arm up
enough to stretch
the skin and shave
back and forth.
For the best results
Pull the skin taut where the area is prone to sagging (on the
inside of the knees and elbows).
Dry shaving
You can also shave without wetting your skin or the outer foil.
Using the pop up trimmer
1. Slide the pop up trimmer switch upwards.
2. Slide the ON/OFF switch upwards.
3. Apply the shaver to your skin and press gently
while moving it slowly.
Move the shaver
from ankle to
knee.
Move the shaver
from outside to
inside.
English
5
Page 6

For crotch area
English
Use the pop up trimmer for crotch area.
Using the comb attachments
1. Select the attachment and attach it onto the
shaver.
2. Slide the pop up trimmer switch upwards.
3. Slide the ON/OFF switch upwards.
4. Apply the shaver to your skin and press gently
while moving it slowly against the direction the
hair grows.
Trim slowly and with care to avoid hairs being
•
caught in the comb attachment.
Clean the shaver when it is no longer shaving
•
well or when it is clogged.
Using the handle
Shaving hard-to-reach areas (calves, backs, etc.)
1. Turn off the shaver.
Handle movement will be stiff if switch is left
•
ON.
2. Extend the handle by sliding it until it clicks.
Adjustable to 1.5 inches or 3.0 inches.
•
3. Bend the handle when it is fully extended.
Adjustable by 15° in total of 6 steps.
•
4. Slide the ON/OFF switch
upwards.
5. Apply the shaver to
hard‑to‑reach areas and
slide it gently.
Cleaning the shaver
Clean
1. Press the foil frame release
buttons to remove the foil
frame.
2. Remove the inner blade by
grasping it firmly at both
ends and pulling straight
away from the shaver.
3. Clean with running water.
4. Wipe off any drops of water
with a dry cloth.
6
Page 7
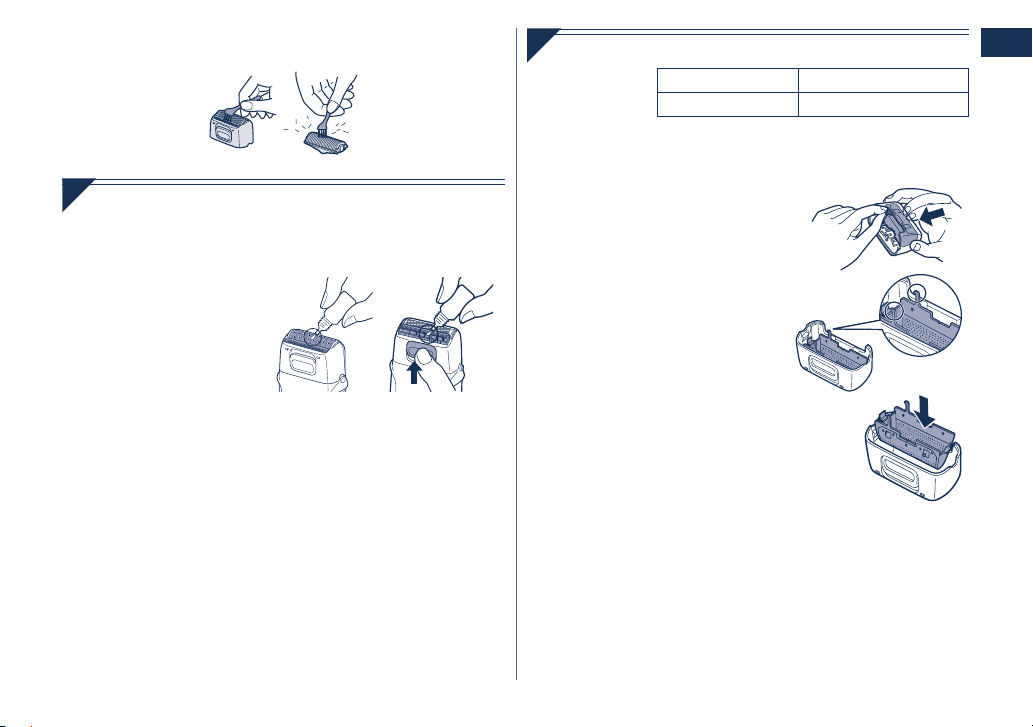
Cleaning with brush
You can also clean the shaver with the cleaning brush.
Lubrication
Apply the oil to the outer foil, the pop up trimmer, and the trimmer
for beards before and after each use.
Outer foil and pop up trimmer
1. Apply a drop of oil to the
outer foil.
2. Raise the pop up trimmer
and apply a drop of oil.
3. Turn on the shaver, and
run it for a few seconds.
Replacing the outer foil and the inner blade
outer foil once every year
inner blade once every two years
Replacing the outer foil
Never remove the outer foil at any time other than when replacing
it.
1. Press the foil frame release buttons
to remove the foil frame.
2. Squeeze the front and the back side
of the foil frame and lift up one of the
two knobs on the outer foil.
3. Slip the outer foil into the frame and
guide the plastic edges onto the
hooks in the foil frame until it clicks
into the shaver.
Replacing the inner blade
1. Press the foil frame release buttons to remove the foil frame.
2. Remove the inner blade by grasping it firmly at both ends and
pulling straight away from the shaver.
3. To insert the new inner blade, hold the blade at both ends and
press downward until it snaps into the shaver.
English
7
Page 8
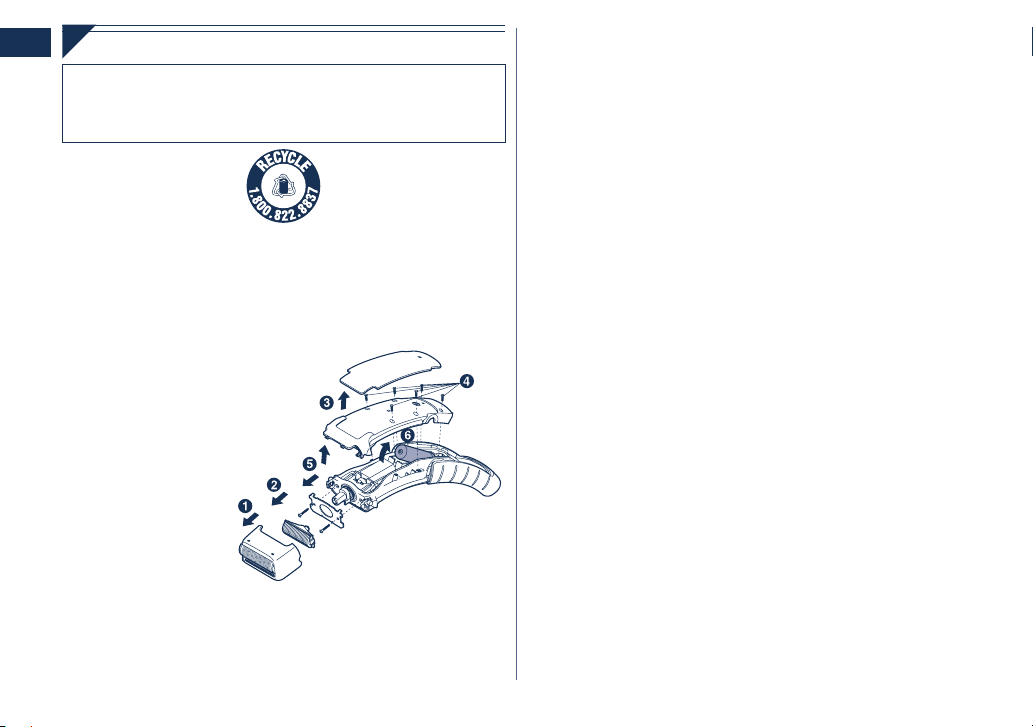
Removing the built-in rechargeable battery
R B R C
N i - M H
TM
English
ATTENTION:
A nickel metal hydride battery that is recyclable powers the
product you have purchased. Please call 1‑800‑8‑BATTERY for
information on how to recycle this battery.
Remove the built‑in rechargeable battery before disposing of the
shaver. Do not dismantle or replace the battery. Otherwise you
can’t use the shaver again. This could cause fire or an electric
shock. Replace them at an authorized service center.
Remove the battery as illustrated.
Fully discharge the battery.
•
Please take care not to short‑circuit the battery.
•
8
FOR YOUR CONVENIENCE, WE HAVE ESTABLISHED A TOLLFREE (IN USA ONLY) NATIONAL ACCESSORY PURCHASE
HOT LINE AT 1-800-332-5368.
IN CANADA, CONTACT PANASONIC CANADA INC. AT THE
ADDRESS OR TELEPHONE NUMBER ON THE BACK PAGE.
Page 9

2. Utilisez cet appareil uniquement pour son usage
CONSIGNES DE SÉCURITÉ IMPORTANTES
Lors de l’utilisation d’un appareil électrique, il faut
toujours prendre des précautions de base, y compris
les suivantes:
Lisez toutes les instructions avant d’utiliser cet
appareil.
DANGER
1. Ne touchez pas un appareil qui est tombé dans
l’eau. Débranchez‑le immédiatement.
2. N’immergez ni n’utilisez le chargeur dans la douche.
3. Ne placez ni ne rangez l’appareil là où il peut tomber
ou être précipité dans une baignoire ou un évier. Ne
déposez ou n’échappez pas dans l’eau ou dans un
autre liquide. Remettez toujours en place l’unité
portable sur le support mural après utilisation.
4. Débranchez toujours cet appareil de la prise
électrique immédiatement après usage, excepté
pendant la charge.
5. Débranchez cet appareil avant de le nettoyer.
6. N’employez pas de rallonge avec cet appareil.
Afin de réduire tout risqué
d’électrocution:
prévu, comme le décrit le présent manuel. N’utilisez
pas d’accessoires qui ne sont pas recommandés par
le fabricant.
3. N’utilisez jamais cet appareil si le cordon ou la fiche
est endommagé, s’il ne fonctionne pas correctement,
s’il est tombé, endommagé ou tombé dans l’eau.
Retournez l’appareil à un centre de réparation pour
le faire inspecter et réparer.
4. Gardez le cordon à distance des surfaces chauffées.
5. Ne faites jamais tomber ou n’insérez pas un objet
dans les ouvertures de l’appareil.
6. N’utilisez pas à l’extérieur, dans des endroits où des
aérosols (pulvérisateurs) sont utilisés ou là où de
l’oxygène est administré.
7. N’utilisez pas cet appareil avec un peigne abîmé ou
cassé, car cela pourrait causer des blessures au
visage.
8. Branchez toujours la fiche à l’appareil en premier,
puis pour débrancher, commutez toutes les
commandes sur “arrêt”.
9. Vérifiez régulièrement la prise murale pour un
montage sûr.
Français
MISES EN GARDE
1. Une grande vigilance est nécessaire lorsque cet
appareil est utilisé par des enfants ou des personnes
handicapées, sur eux ou en leur présence.
Afin de réduire le risque de brûlures, d’incendie,
d’électrocution ou de blessures corporelles:
CONSERVEZ LES PRÉSENTES INSTRUCTIONS
9
Page 10

10
Français
Important
Avant utilisation
Ce rasoir corporel est utilisable sur peau sèche ou peau mouillée (avec
mousse de savon). Vous pouvez utiliser ce rasoir étanche sous la
douche et le nettoyer dans l’eau. Le symbole suivant indique la
fonction rasage corporel humide. Ce symbole signie que la partie
portative du rasoir peut être utilisée dans un bain ou sous la douche.
Nos recherches ont démontré que votre rasage peut être plus précis et
plus doux s’il est effectué avec des lames bien aiguisées. Ce rasoir
dispose en outre d’une tondeuse rabattable permettant de raccourcir
aisément les longs poils.
Utilisation du rasoir
Attention - La grille externe de protection est très ne et peut être
endommagée en cas d’utilisation incorrecte.
Vériez que la grille externe de protection n’est pas endommagée
•
avant d’utiliser le rasoir. N’utilisez pas le rasoir si cette grille est
endommagée, car vous pourriez vous taillader la peau.
Assurez-vous de bien lubrier la grille externe de protection ou les
•
lames avant chaque utilisation du rasoir. A défaut, le rasoir risque de
vous arracher les poils ou de vous abimer la peau.
N’appuyez jamais trop fort sur la peau, évitez de repasser sur une
•
même zone, ne maintenez pas le rasoir au même endroit, et ne l’utilisez
pas par à-coups. Tout ceci pourrait en effet causer des blessures et des
inammations cutanées, voire même des douleurs intenses.
Ne l’utilisez pas pour un rasage facial.
•
Recharge du rasoir
Séchez complètement le rasoir avant de le recharger.
•
N’essayez pas d’utiliser un autre chargeur que celui qui est fourni
•
car ce dernier est spécialement conçu pour ce modèle de rasoir.
Utilisez exclusivement le chargeur fourni.
N’utilisez pas le chargeur à proximité de l’eau et manipulez-le avec
•
les mains sèches uniquement.
Il se peut que le rasoir dégage de la chaleur lors de son utilisation et
•
de sa recharge. Ceci est tout à fait normal.
Tenez l’adaptateur lorsque vous le débranchez de la prise de
•
courant. Si vous tirez sur le cordon d’alimentation, vous risquez de
l’endommager.
Le cordon d’alimentation fourni ne peut pas être remplacé. S’il était
endommagé, l’appareil doit être mis au rebut.
Ne rechargez pas le rasoir en des lieux où la température est en-
•
dessous de 32 °F (0 °C) ou au-dessus de 104 °F (40 °C), où
l’appareil est directement exposé aux rayons du soleil ou à toute
autre source de chaleur, ou encore où règne une humidité élevée.
Laissez le rasoir en charge pendant au moins 16 heures lors de la
•
première recharge ou lorsqu’il n’a pas été utilisé pendant plus de 6
mois.
Nettoyage du rasoir
Quand vous nettoyez le rasoir à l’eau, n’utilisez ni eau salée, ni eau
•
chaude. Nettoyez-le avec un chiffon trempé dans de l’eau
savonneuse. N’employez ni solvant, ni benzène, ni alcool.
Rangement du rasoir
Rangez le chargeur dans un endroit sec où il restera à l’abri de tout
•
dommage.
Ne démontez pas l’appareil. Lorsqu’un service ou une réparation est
•
nécessaire, apportez l’appareil auprès d’une personne de service
qualiée.
Spécications
Source d’alimentation: 100-120 V CA, 50-60 Hz
Tension du moteur: 1,2 V CC
Temps de chargement: 8 heures
Ce produit est destiné à une utilisation domestique uniquement.
(Le rasoir fonctionne uniquement sur 100-120 V.)
Page 11

Identication des pièces
4
3
Recharge
Placez le rasoir sur son chargeur pour le recharger.
La recharge du rasoir s’effectue en 8 heures.
1
1
2
2
Recharge du rasoir
Éteignez le rasoir.
Insérez la che du
cordon d’alimentation
dans une prise de
courant et posez le
chargeur sur une
surface plate.
Veillez à ce que les
3
A
Couvercle de protection
B
Cadre de la grille externe de
protection
1
Grille externe de protection
2
Tondeuse rabattable
3
Interrupteur de la tondeuse
rabattable
C
Lame interne
D
Boîtier principal
4
Boutons de déblocage du
cadre de la grille externe de
protection
5
Bouton de verrouillage
d’interrupteur
6
Interrupteur Marche/Arrêt
7
Témoin de charge
8
Poignée
E
Sabot de 3 mm (1/8˝)
F
Sabot de 6 mm (1/4˝)
G
Sabot de 9 mm (3/8˝)
H
Chargeur (RE7-49)
9
Cordon d’alimentation
I
Brosse de nettoyage
J
Huile
3
marques indiquées sur
la poignée soient bien
alignées sur celles de
l’appareil.
Placez-le dans le chargeur comme illustré.
4
4
Le témoin de charge s’allume et reste allumé jusqu’à ce que le rasoir
•
soit retiré du chargeur.
Une recharge complète permet d’effectuer environ 4 rasages de 7
•
minutes chacun.
Si la forme de la che ne s’adapte pas à la prise de courant, utilisez un
•
adaptateur de prise correspondant.
11
Français
Page 12

12
Français
Fixation du chargeur au mur
1. Fixez deux vis au mur comme illustré.
Les vis sont vendues séparément.
•
2. Accrochez le chargeur à l’aide de ces
vis.
3. Insérez la che du cordon
d’alimentation dans une prise de
courant.
Utilisation du rasoir
Rasage
Il est recommandé de n’utiliser la tondeuse rabattable que si la longueur
de vos poils ou de vos cheveux dépasse 0,2 po. (5 mm).
Rasage humide/à la mousse
Une mousse de qualité rend la peau glissante pour un rasage plus précis.
N’utilisez ni de crème de rasage, ni lotion ou crème pour la peau car cela
encrasse les lames.
Mouillez-vous la peau, puis retirez le couvercle de
1
1
protection.
Mouillez la grille externe de protection, puis placez
2
2
une petite quantité de savon liquide dessus.
Tout en pressant sur le bouton de
3
3
verrouillage de l’interrupteur, faites
glisser l’interrupteur Marche/Arrêt vers
le haut.
Appuyez délicatement an que toute la grille externe
4
4
de protection soit en contact étroit avec la peau.
Appliquez le rasoir contre la peau,
5
5
puis appuyez-le doucement tout en
le déplaçant lentement à
rebrousse-poil.
Aisselle Jambes Arms
Levez le bras
sufsamment haut an
de bien tendre la
peau, puis rasez de
long en large.
Pour obtenir un meilleur résultat
Tirez bien sur la peau aux endroits où elle a tendance à pendre (pli des
genoux et des coudes).
Déplacez le rasoir
de la cheville vers le
genou.
Déplacez le rasoir
de l’extérieur vers
l’intérieur.
Page 13

Rasage à sec
Vous pouvez également vous raser sans mouiller ni votre peau ni la grille
externe de protection.
1. Éteignez le rasoir.
Utilisation de la tondeuse rabattable
1. Faites glisser l’interrupteur de la tondeuse
rabattable vers le haut.
2. Faites glisser l’interrupteur Marche/Arrêt vers le
haut.
3. Appliquez le rasoir contre la peau, puis appuyez-le
doucement tout en le déplaçant lentement.
Maillot
Employez la tondeuse rabattable pour faire le maillot.
2. Rallongez la poignée en la faisant glisser jusqu’à ce
3. Inclinez la poignée lorsqu’elle est au maximum de sa
4. Faites glisser l’interrupteur
5. Appliquez le rasoir sur la
Utilisation de la poignée
Rasage de zones difciles d’accès (mollets, dos, etc.)
Le mouvement de la poignée sera fort si
•
l’interrupteur est laissé sur Marche.
qu’un déclic se fasse entendre.
Réglable sur 1,5 po. (37,5 mm) et sur 3,0 po.
•
(75 mm).
longueur.
Réglable jusqu’à 15° en 6 crans.
•
Marche/Arrêt vers le haut.
zone difcile d’accès, puis
faites-le glisser doucement.
Utilisation des sabots
1. Choisissez un des sabots, puis xez-le sur le rasoir.
2. Faites glisser l’interrupteur de la tondeuse
rabattable vers le haut.
3. Faites glisser l’interrupteur Marche/Arrêt vers le
haut.
4. Appliquez le rasoir contre la peau, puis appuyez-le
doucement tout en le déplaçant lentement à
rebrousse-poil.
Tondez lentement et avec précaution pour éviter
•
que des poils ne se coincent dans le sabot.
Nettoyez le rasoir dès que le rasage perd en
•
qualité, ou lorsqu’il s’encrasse.
Français
13
Page 14

14
Français
Nettoyage du rasoir
Nettoyage
1. Pressez sur les boutons de
déblocage du cadre de la grille
externe de protection pour
retirer le cadre de la grille.
2. Pour retirer la lame interne,
saisissez-la fermement des
deux côtés puis tirez-la d’une
traite hors du rasoir.
3. Nettoyez à l’eau courante.
4. Essuyez toute trace d’eau à
l’aide d’un chiffon sec.
Nettoyage avec la brosse
Il est également possible de nettoyer le rasoir avec la brosse prévue à cet
effet.
Lubrication
Appliquez de l’huile sur la grille externe de protection, sur la tondeuse
rabattable et sur la tondeuse à barbe avant et après chaque utilisation.
Grille externe de protection et tondeuse rabattable
1. Appliquez une goutte d’huile
sur la grille externe de
protection.
2. Relevez la tondeuse
rabattable et appliquez-y une
goutte d’huile.
3. Mettez le rasoir en marche et
faites-le tourner pendant
quelques secondes.
Page 15

Remplacement de la grille externe de protection et de la lame interne
R B R C
N i - M H
TM
grille externe de protection une fois par an
lame interne une fois tous les deux ans
Remplacement de la grille externe de protection
Ne démontez la grille externe de protection que si vous la remplacez.
1. Pressez sur les boutons de déblocage
du cadre de la grille externe de
protection pour retirer le cadre de la
grille.
2. Pressez l’avant et l’arrière du cadre de
la grille externe de protection, puis
soulevez l’un des taquets de la grille
externe de protection.
3. Faites glisser la grille externe de
protection dans son cadre, puis dirigez
les rebords en plastique vers les
crochets du cadre, jusqu’à ce qu’ils
s’encliquètent sur le rasoir.
Remplacement de la lame interne
1. Pressez sur les boutons de déblocage du cadre de la grille externe de
protection pour retirer le cadre de la grille.
2. Pour retirer la lame interne, saisissez-la fermement des deux côtés
puis tirez-la d’une traite hors du rasoir.
3.
Pour introduire la nouvelle lame interne dans le rasoir, maintenez-la des
deux côtés et appuyez dessus jusqu’à ce qu’elle s’encliquète sur le rasoir.
Retrait de la batterie rechargeable intégrée
ATTENTION:
L’appareil que vous vous êtes procuré est alimenté par une pile au
nickel-métal-hydrure (NiMH). Pour des renseignements sur le recyclage
de la pile, veuillez composer le 1-800-8-BATTERY.
Retirez la batterie rechargeable intégrée avant de vous débarrasser du
rasoir. Ne démontez ni ne remplacez la batterie. Sinon, vous ne pourrez
pas réutiliser le rasoir. Cela peut entraîner un incendie ou un choc
électrique. Faites remplacer la batterie par un centre de service agréé.
Retirez la batterie comme illustré.
Déchargez complètement la batterie.
•
Faites très attention à ne pas court-circuiter la batterie.
•
POUR PLUS DE RENSEIGNEMENTS, COMMUNIQUER AVEC L’UNE
DES SUCCURSALES MENTIONNÉES À L’ENDOS DU MANUEL.
POUR LE CANADA, CONTACTER L’UNE DES SUCCURSALES DE
VENTE INDIQUÉES AU DOS.
15
Français
Page 16

INSTRUCCIONES DE SEGURIDAD IMPORTANTES
Al utilizar un dispositivo eléctrico, deben seguirse
siempre unas precauciones básicas que incluyen las
siguientes:
Lea todas las instrucciones antes de utilizar este
dispositivo.
PELIGRO
1. No intente alcanzar un dispositivo que se haya caído
al agua. Desenchúfelo inmediatamente.
2. El cargador no debe sumergirse ni utilizarse en la
ducha.
3.
No coloque ni guarde el dispositivo donde pueda
caerse en una bañera o lavabo. No lo coloque ni lo
deje caer en agua o algún otro líquido. Siempre
regréselo a la unidad para pared después de utilizarlo.
4.
Excepto cuando lo esté cargando, desenchufe siempre
este aparato de la toma eléctrica tras utilizarlo.
5. Desenchufe este dispositivo antes de limpiarlo.
6. No utilice un alargador con este dispositivo.
ADVERTENCIA
Español
1. Es necesaria una supervisión cercana cuando el
dispositivo sea utilizado por o cerca de niños o
minusválidos.
Para reducir el riesgo de
descargas eléctricas:
Para reducir el riesgo de quemaduras, fuego,
descargas eléctricas o daños personales:
2. Utilice este dispositivo solamente para el uso para el
que se ha diseñado como se describe en este
manual. No utilice ningún accesorio no recomendado
por el fabricante.
3. Nunca utilice el dispositivo si tiene el cordón o el
enchufe dañado, si no funciona correctamente, o si
se ha caído, dañado o mojado. Devuelva el
dispositivo a un centro de servicio para examinarlo y
repararlo.
4.
Mantenga el cable alejado de las superficies calientes.
5. Nunca deje caer ni introduzca ningún objeto por
cualquier abertura.
6. No utilice la afeitadora en exteriores o donde se
estén utilizando aerosoles (spray) o donde se esté
administrando oxígeno.
7. No utilice el dispositivo con un accesorio de peinado
averiado o roto, ya que podría provocar lesiones en
el rostro.
8. Conecte siempre el enchufe al dispositivo y, a
continuación, a la toma de corriente. Para
desconectarlo, coloque todos los controles en la
posición “apagado” y, a continuación, retire el
enchufe de la toma de corriente.
9. Inspeccione periódicamente la unidad para pared
por seguridad.
GUARDE ESTAS INSTRUCCIONES
16
Page 17

Importante
Antes de usar
Esta afeitadora corporal para condiciones húmedas o secas puede
utilizarse para un afeitado en húmedo con espuma de jabón o para un
afeitado en seco. Utilice la afeitadora hermética bajo la ducha y
límpiela con agua. A continuación está el símbolo de afeitadora
corporal en húmedo. El símbolo indica que el dispositivo manual
puede utilizarse en el baño o en la ducha.
Nuestros estudios han demostrado que puede disfrutar de afeitados
más apurados y más suaves con las cuchillas aladas. Y nuestro
recortador emergente puede cortar con facilidad vellos largos.
Utilización de la afeitadora
Precaución - La lámina metálica externa es muy na y puede dañarse
si no se utiliza correctamente -.
Compruebe que la lámina metálica externa no esté dañada antes de
•
utilizar la afeitadora. No utilice la afeitadora si la lámina metálica
externa está dañada ya que podría cortarse la piel.
Asegúrese de lubricar la lámina metálica externa o las cuchillas
•
antes de utilizar la afeitadora. De lo contrario, podría ocasionar que
la afeitadora tire de los pelos o que dañe la piel.
No presione con fuerza sobre la piel, frote repetidamente en la
•
misma área, mantenga en un mismo punto de la piel ni haga
movimientos punzantes al utilizar la afeitadora. De lo contrario,
podría dañar la piel, causar inamación o aumentar el dolor.
No utilizar para el afeitado facial.
•
Carga de la afeitadora
Seque la afeitadora completamente antes de cargarla.
•
No intente utilizar un cargador que no sea el incluido; éste está
•
diseñado especícamente para este modelo. Utilice exclusivamente
el cargador incluido.
Mantenga el cargador alejado del agua y manéjelo solamente con
•
las manos secas.
La afeitadora podría calentarse durante el uso y durante la carga.
•
Sin embargo, esto no es un indicio de mal funcionamiento.
Sujete el adaptador al desconectarlo de la toma de corriente. Si tira
•
del cable de suministro, podría dañarlo.
El cable de suministro no puede ser sustituido. Si el cable está
dañado, el artefacto debe ser descartado.
No cargue la afeitadora en donde la temperatura sea menor de
•
32 °F (0 °C) o mayor de 104 °F (40 °C), en donde se encuentre
expuesta a la luz solar directa o a una fuente de calor, o en donde
haya mucha humedad.
Cargue la afeitadora durante un mínimo de 16 horas cuando la
•
cargue por primera vez, o cuando no haya sido utilizada durante
más de 6 meses.
Limpieza de la afeitadora
Al limpiar la afeitadora con agua, no utilice agua salada ni agua
•
caliente. Frótela con un paño humedecido en agua jabonosa. No
utilice disolventes, benceno ni alcohol.
Guardar la afeitadora
Guarde el cargador en un lugar seco en el que esté a salvo de
•
daños.
No desmonte el aparato. Cuando requiera servicio de mantenimiento
•
o reparación, llévelo a un técnico cualicado.
ESPECIFICACIONES
Fuente de alimentación: 100-120 V AC, 50-60 Hz
Voltaje del motor: 1,2 V CC
Tiempo de carga: 8 horas
Este producto está destinado solamente para uso doméstico.
(Utilice la afeitadora únicamente con fuentes
de alimentación de CA de 100-120 V.)
17
Español
Page 18

4
3
Identicación de las partes
A
Tapa protectora
B
Marco de la lámina
1
Lámina metálica externa
2
Recortador emergente
3
Interruptor del recortador
emergente
C
Cuchilla interna
D
Cuerpo principal
4
Botones de liberación del
marco de la lámina
5
Botón de bloqueo del
interruptor
Español
18
6
Interruptor de encendido/
apagado
7
Luz indicadora de carga
8
Asa
E
Peine guía de 3 mm (1/8˝)
F
Peine guía de 6 mm (1/4˝)
G
Peine guía de 9 mm (3/8˝)
H
Cargador (RE7-49)
9
Cable de alimentación
I
Escobilla de limpieza
J
Aceite
Carga de la afeitadora
Carga
Coloque la afeitadora sobre el cargador para cargarla.
Puede cargar la afeitadora en 8 horas.
Apague la afeitadora.
1
1
Enchufe el cable de
2
2
suministro eléctrico en
una toma de corriente y
coloque el cargador sobre
una supercie plana.
Asegúrese de que las
3
3
marcas del asa y del cuerpo
principal se encuentren
alineadas entre sí.
Insértela en el cargador como se muestra.
4
4
La luz indicadora de carga se ilumina y permanece así hasta que la
•
afeitadora sea retirada del cargador.
Una carga completa proporcionará suciente energía para aprox. 4
•
afeitados de 7 minutos (cada uno).
Si la forma del enchufe no se ajusta a la toma de corriente, utilice un
•
adaptador de enchufe con una conguración apropiada.
Page 19

Fijación del cargador en la pared.
1. Ponga dos tornillos en la pared como
se muestra.
Los tornillos se venden por separado.
•
2.
Enganche el cargador con estos tornillos.
3. Enchufe el cable de suministro eléctrico
en una toma de corriente doméstica.
5
5
Axila Piernas Brazos
Utilización de la afeitadora
Afeitado
Recorte los pelos utilizando el recortador emergente si son más largos de
0,2 pulg. (5 mm).
Afeitado en húmedo/con espuma
Afeitarse con espuma de jabón permite que la piel esté más suave,
consiguiendo así un afeitado más apurado. No utilice crema de afeitar,
crema de piel ni loción para piel ya que las cuchillas se atascarán.
Moje la piel y quite la tapa protectora.
1
1
Moje la lámina metálica externa y coloque una
2
2
cantidad pequeña de jabón corporal líquido en la
lámina.
Mientras pulsa el botón de bloqueo del
3
3
interruptor, deslice el interruptor de
encendido/apagado hacia arriba.
Mantenga el brazo
sucientemente
subido para estirar la
piel, y afeite hacia
adelante y hacia atrás.
Para obtener los mejores resultados
Estire la piel en áreas en las que sea propensa a colgarse (en la parte
de adentro de las rodillas y de los codos).
piel.
Ponga la afeitadora sobre la piel y
presione suavemente mientras la
mueve lentamente en sentido
contrario a la dirección de
crecimiento del vello.
Mueva la afeitadora
desde el tobillo
hasta la rodilla.
Mueva la afeitadora
desde fuera hacia
adentro.
Presione suavemente, de forma que la lámina
4
4
metálica externa se encuentre en contacto con la
Español
19
Page 20

Afeitado en seco
También puede afeitar sin humedecer la piel ni la lámina metálica
externa.
Utilización del recortador emergente
1. Desplace hacia arriba el interruptor del recortador
emergente.
2. Deslice el interruptor de encendido/apagado hacia
arriba.
3. Ponga la afeitadora sobre la piel y presione
suavemente mientras la mueve lentamente.
Para la línea del biquini
Utilice el recortador emergente para la línea del biquini.
Español
Utilización de los peines guía
1. Seleccione el accesorio y colóquelo en la
afeitadora.
2. Desplace hacia arriba el interruptor del recortador
emergente.
3. Deslice el interruptor de encendido/apagado hacia
arriba.
4. Ponga la afeitadora sobre la piel y presione
suavemente mientras la mueve lentamente en
sentido contrario a la dirección de crecimiento del
vello.
Recorte lentamente y con cuidado para evitar que
•
los pelos queden atrapados en el peine guía.
Limpie la afeitadora cuando ya no afeite bien o
•
cuando esté atascada.
Utilización del asa
Afeitado de áreas difíciles de alcanzar (pantorrillas, espalda, etc.)
1. Apague la afeitadora.
El movimiento de manipulación será rme si el
•
interruptor se deja ENCENDIDO.
2. Extienda el asa deslizándola hasta que haga clic.
Ajustable a 1,5 pulg. (37,5 mm) o a 3,0 pulg.
•
(75 mm).
3. Doble el asa cuando se encuentre totalmente
extendida.
Ajustable en 15 grados en un total de 6 posiciones.
•
20
Page 21

4. Deslice el interruptor de
encendido/apagado hacia
arriba.
5. Ponga la afeitadora en las
áreas difíciles de alcanzar
y deslícela suavemente.
Limpieza de la afeitadora
Limpieza
1. Pulse los botones de liberación
del marco de la lámina para
extraer el marco de la lámina.
2. Extraiga la cuchilla interna
agarrándola con rmeza por
sus extremos y tirando hacia
afuera.
3. Limpie con agua corriente.
4. Limpie las gotas de agua con
un paño seco.
Limpieza con la escobilla
También puede limpiar la afeitadora con la escobilla de limpieza.
Lubricación
Ponga aceite en la lámina metálica externa, en el recortador emergente y
en el recortador para barba, antes y después de cada uso.
Lámina metálica externa y recortador emergente
1. Ponga una o dos gotas de
aceite en la lámina externa.
2. Levante el recortador
emergente y ponga una gota
de aceite.
3. Encienda la afeitadora y
déjela funcionando durante
unos cuantos segundos.
21
Español
Page 22

Sustitución de la lámina metálica externa y de la cuchilla interna
R B R C
N i - M H
TM
lámina metálica externa una vez al año
cuchilla interna una vez cada dos años
Sustitución de la lámina metálica externa
Nunca quite en ningún momento la lámina metálica externa más que para
sustituirla.
1. Pulse los botones de liberación del
marco de la lámina para extraer el
marco de la lámina.
2. Presione las partes frontal y posterior
del marco de la lámina y levante uno de
los tiradores de la lámina metálica
externa.
3. Coloque la lámina metálica externa en el
marco deslizándola y ajuste los bordes
de plástico sobre los ganchos del marco
de la lámina hasta que ésta encaje en la
afeitadora.
Sustitución de la cuchilla interna
1. Pulse los botones de liberación del marco de la lámina para extraer el
marco de la lámina.
2. Extraiga la cuchilla interna agarrándola con rmeza por sus extremos y
Español
tirando hacia afuera.
3. Para insertar la nueva cuchilla interna, sujete la cuchilla por sus
extremos y presiónela hacia abajo hasta que encaje en la afeitadora.
22
Extracción de la batería recargable interna
ATENCIÓN:
El producto que ha comprado se alimenta con una batería de hidruros
de metal níquel (Ni-MH) reciclable.
Llame al teléfono 1-800-8-BATTERY para obtener información acerca
de cómo reciclar esta batería.
Quite la batería recargable integrada antes de desechar la afeitadora. No
desarme ni sustituya la batería. De lo contrario no podrá utilizar la
afeitadora nuevamente. Esto podría provocar un incendio o un golpe
eléctrico. Sustitúyalas en un centro de servicios autorizado.
Extraiga la batería tal y como se indica.
Descargue la batería por completo.
•
Tenga cuidado de no causar un cortocircuito en la batería.
•
PARA SU CONVENIENCIA, AHORA DISPONEMOS DE UNA LÍNEA
NACIONAL DE LLAMADA GRATIS PARA LA COMPRA DE
ACCESORIOS (SOLEMENTE EN USA); LLAME AL 1-800- 332-5368.
PARA CANADÁ, CONTACTE A NUESTRAS SUCURSALES DE VENTA
QUE SE MENCIONAN EN LA CONTRATAPA.
Page 23

MEMO
23
Page 24

IN USA CONTACT:
Panasonic Consumer Electronics Company
One Panasonic Way 2F‑3 Secaucus, NJ 07094
IN PUERTO RICO CONTACT:
Panasonic Puerto Rico, Inc.
San Gabriel Industrial Park 65th Infantry Avenue KM9.5
Carolina, Puerto Rico 00630
IN CANADA CONTACT:
AU CANADA, CONTACTER:
Panasonic Canada Inc.
5770 Ambler Drive, Mississauga, Ontario L4W 2T3
(905) 624‑5010
En México:
Panasonic de México, S.A de C.V.
México D.F.
Moras 313 Col. Tlacoquemecatl Del Valle Del. Benito Juarez Mexico, D.F.03200
Tel: 54 88 10 00
• Assistance • Accessories
Service
Dépannage
Call 1-800-338-0552 (In USA)
http://www.panasonic.com/shavers/
http://www.panasonic.com/consumersupport/
Call 1-800-561-5505 (In Canada)
Composer 1-800-561-5505 (Au Canada)
http://www.panasonic.ca/
• Assistance • Accessoires
No.1 EN FR ES (U.S.A./CANADA)
Printed in China
Imprimé en Chine
 Loading...