

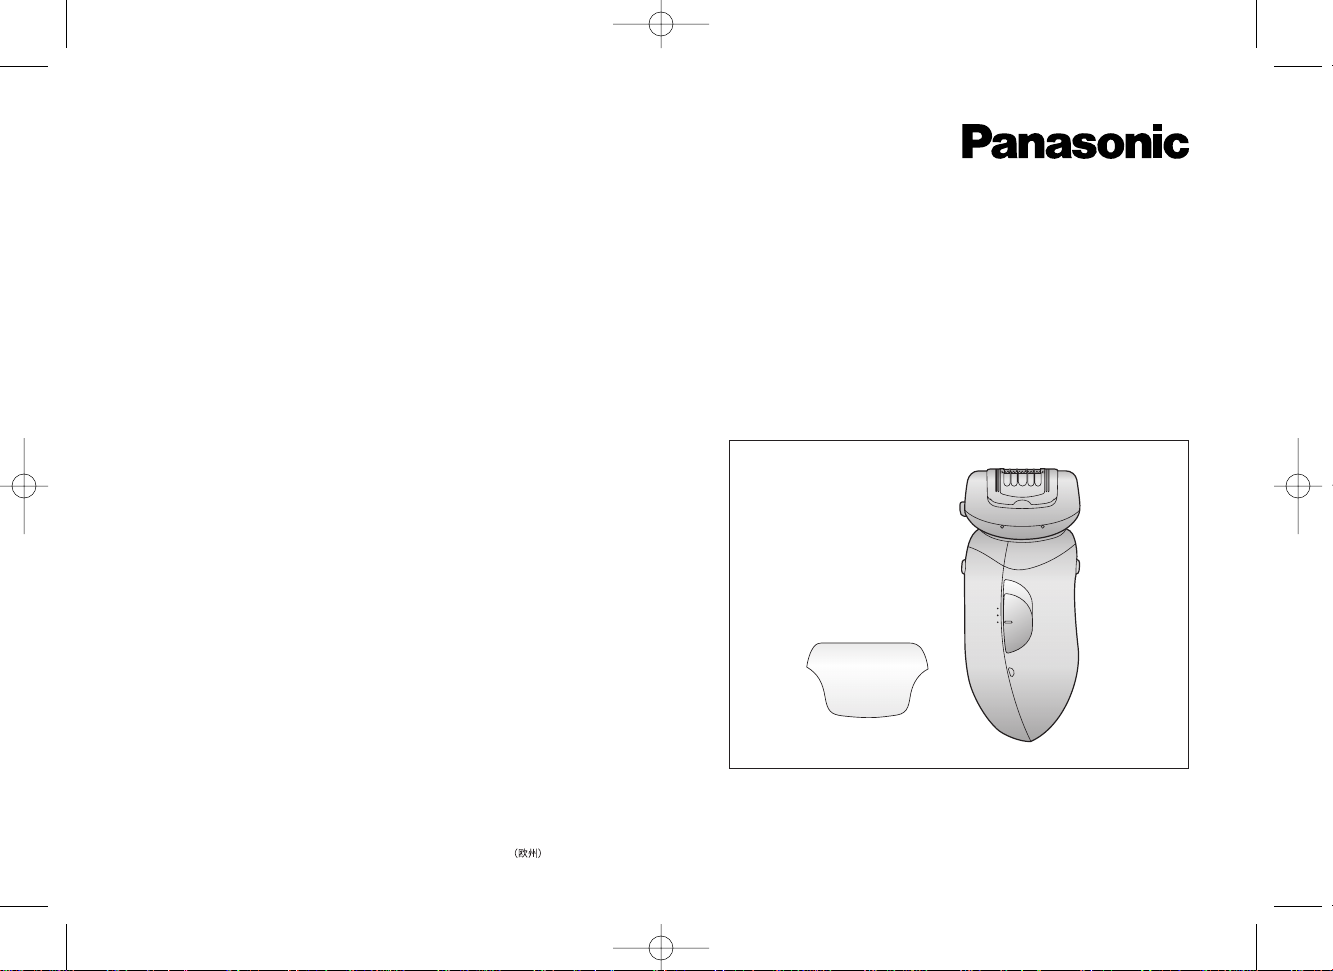
Panasonic ES-2047, ES-2044 User Manual
Before operating this unit, please read these instructions completely.
Operating Instructions
AC/Rechargeable Epilator
Model No. ES2047/ES2044
Panasonic Electric Works Wanbao (Guangzhou) Co., Ltd.
Wanbao Base Shiguang Road, Panyu District, Guangzhou, Guangdong, 511495 CHINA
No.1 EN, GR, FR, IT, NE, SP, DN, PO, NR, SW, FN, Tu, Po, Cz, Hu, Ru, Russi, Uk Printed in China
ES2047EU1.qxd 06.2.17 17:30 ページ1

3
A
B
C
D
H
I
E
G
1
6
7
8
3
4
5
2
F
1
2
4
3
5
6
7
8
9
10
11
12
13
14
15
17
16
a
b
11
10
a
b
c
g
9
e
f
i
h
a
b
d
2
SVENSKA......................Sid 75
SUOMI .........................Sivu 83
TÜRKÇE ....................Sayfa 90
POLSKI.....................Strona 98
CˇESKY .....................Strona
106
MAGYAR ....................Oldal
113
ROMANA .................Pagina
121
RUSSKIJ ...........
Stranica 129
Ukra®ns;ka ............
Stor`nka 137
INDEX
ENGLISH....................Page 4
DEUTSCH...................Seite 11
FRANÇAIS..................Page 19
ITALIANO.................Pagina 27
NEDERLANDS ........Pagina 35
ESPAÑOL................Pagina 43
DANSK.........................Side 51
PORTUGÊS.............Pagina 59
NORSK ........................Side 67
ES2047EU1.qxd 06.2.17 17:30 ページ2

54
Epilator-the Skin Protector series
are designed to remove hair on
legs, arms, and sensitive areas like
underarms or the bikini-line with
each heads depending on the
needs.
When switched on, the appliance
must never come in contact with
the hair on your head, eyelashes,
ribbons or clothes, etc. to prevent any
danger of injury as well as to prevent
blockage or damage of the appliance.
Charging the appliance
• Slide the on/off switch to the
“0·charge” position.
• Insert the power cord securely
into the epilator.
•Plug the charging adaptor securely
into an electrical outlet.
•When using the epilator for the
first time or using it for the first
time in over 6 months, please
continue to charge the appliance
for 20 hours after the appliance
has been fully charged.
•Charge the appliance for 12
hours. (The charge indicator light
will stay on even after 12 hours.)
The epilator can be used for 30
minutes on a single full (12-hour)
charge.
• After the appliance has been
thoroughly charged it is OK to
leave the appliance plugged in.
Changing the head
• Hold the head release button
down while removing the head.
• When attaching a head, push it on
until you hear a “click”.
(Press the head on until it is
attached securely to the body.)
How to operate your epilator
Warning
• Never use this appliance in the
bath or shower.
• Never use this appliance while
your skin is wet.
Check to see that the skin protector
and discs are not damaged or
deformed. If they are then please
do not use the appliance.
If you are concerned about pain
during epilation then please use
with 1 (low speed) setting.
Cordless operation of the epilator
• Remove the cap.
• Attach the head you wish to use.
• Slide the switch to the 1 (low
speed) or 2 (normal speed) position
and carry out epilation.
• After completing epilation, slide the
switch to the “0·charge” position.
Operating the epilator on AC
power (Fig. 2)
• Slide the on/off switch to the
“0·charge” position.
• Remove the cap.
• Attach the head you wish to use.
• Insert the power cord securely
into the epilator.
• Plug the charging adaptor securely
into an electrical outlet. Always
check to see that the charge
indicator light is on.
• Slide the switch to the 1 (low
speed) or 2 (normal speed) position
and carry out epilation.
Parts identification (Fig. 1)
D
A
Protective cap (#2)
DB
Large epilation head for legs/arms
q Epilation discs (inside)
w Skin protector (metal part on
the outside)
e Frame release button
r Legs/arms frame
t Protrusion (on both sides)
DC
Main body
y Head release button
u On/off switch
0·charge = off/charge
1= low speed
2= normal speed
i Charge indicator light
DD
Small epilation head for
underarms/bikini-line
o Epilation discs (inside)
!0 Skin protector (metal part on
the outside)
!1 Frame release button
!2 Underarms frame
!3 Protrusion (on both sides)
DE
Charging adaptor/power cord
DF
Cleaning brush
DG
Pouch
Type ES2047:
D
H
Pre-epilation comb
DI
Shaver head
!4 Outer foil
!5 Trimmer
!6 Trimmer handle
!7 Frame release button
BEFORE USAGE PLEASE READ
THE MANUAL CAREFULLY AND
COMPLETELY.
General information about
epilation
All methods of hair removal at the
roots can lead to minor skin injuries
and in-growing hairs. All microinjuries caused by plucking hairs
may lead to inflammation through
the penetration of bacteria into the
skin. Thoroughly cleaning the
epilation discs before each use
minimizes the risk of infection.
Depending on the condition of your
skin and hairs, you may experience
some irritation (e.g. feeling of pain,
skin reddening) when you start
using the product. When removing
hairs at root level, this is a normal
reaction that will quickly disappear
again.
If, after 48 hours, your skin still
shows irritations, we recommend
you to contact your physician.
In general, the skin reactions and
the sensation of pain tend to
diminish considerably with a
repeated use.
If you have any doubts about using
this appliance, please consult your
physician.
In the following cases, this appliance
should only be used after prior
consultation with a physician.
• eczema, wounds, inflamed skin
reactions such as folliculitis
(purulent hair follicles) and
varicose veins
• around moles
• reduced immunity of skin, e.g.
diabetes mellitus, during pregnancy,
Raynaud’ disease
• hemophilia or immune deficiency
ES2047EU1.qxd 06.2.17 17:30 ページ4
76
with pre-epilation comb.
For underarms and bikini-line
It is helpful to use a shaver head 3
to 5 days before using the epilator.
Shaving
Before using make sure the blade
is not warped or damaged, as this
may cause injury.
Apply the shaver head so that the
whole of the blade is in close
contact with the skin.
Press gently and guide the appliance
slowly against hair growth. Applying
with too much force prevents hairs
from being guided to the blades so
that some areas may be left
unshaved.
Trimmer
It is helpful to use the trimmer only
when you want to cut the long hair.
When the trimmer is up, apply the
blade gently.
Shaving with pre-epilation comb
When the hair is long before epilation,
we recommend you to use a shaver
head with pre-epilation comb.
Place the pre-epilation comb onto
the shaver head, and slide trimmer
up. When the pre-epilation comb is
in place, make sure the comb is in
close contact with the skin.
Further useful tips
• In the beginning, it is advisable to
epilate in the evening so that any
possible reddening can disappear
overnight. When you feel pain or
rash appears, cool the skin with
cold towel.
• Hair is easier to remove after
bathing or showering.
But your skin must be completely
dry!
• In order to prevent the risk of
ingrowing hairs, we recommend
the regular use of massage
sponges, e.g. after showering, or
exfoliation peelings.
Cleaning
Warning
To prevent electric shock or personal
injury, disconnect the power cord
from the appliance before cleaning
with water.
The following is the symbol of
washable appliance.
The symbol means that the handheld
part may be cleaned under water.
Never wash the charging adaptor in
water.
Switch off and unplug the appliance
before cleaning.
Washing your epilator
Epilation discs, the inner/outer blade
of shaver head and main body can
be washed.
We recommend washing each head.
Be careful not to break the skin
protector when cleaning.
• Push the frame release buttons
and remove the frame. (Fig. 7)
• Apply conventional liquid hand
soap or cleaning fluid (sold
separately) to the discs. (Fig. 8)
• After completing epilation, slide the
switch to the “0·charge” position.
• Unplug the power cord from the
electrical outlet and the appliance.
Correct usage for best epilation
results
• When the hair is long, it makes
hair removal easier and reduces
pain to trim the hair before
epilation. Leg and arm hair should
be shortened a length of 3 to 5
mm, and underarm and bikini-line
hair to a length of 1 to 2 mm.
• Apply epilator at right angles (90°)
against your skin. For best epilation
results keep in contact with the
skin surface. Pressing gently and
guide the appliance slowly against
hair growth. This switch-side of
the appliance shows against hair
growth. (Fig. 3)
• Rub your skin to lift short hairs.
• Move the epilator slowly on the
skin with the skin protector vertically
touching.
Moving head (Underarms, arms/
legs epilation head) (Fig. 4
F
a
)
• The head moves to the left and
right to quickly carry out epilation
on short hairs.
This feature promotes efficient
epilation.
Swinging head (Underarms, arms/
legs epilation head) (Fig. 4Fb)
• The head swings to ensure that it
stays in close contact with the skin.
The epilation area of the arms/legs
head is wider, which means that
the head swings more.
Legs and arms epilation (Fig. 5)
Please use the large epilation head.
Important for arms and legs epilation:
Apply epilator at right angles (90°)
against your skin.
Pressing the appliance too hard
onto the skin or using it on an angle
can cause damage to the skin.
Press gently and guide the appliance
slowly against hair growth.
If you move the appliance too fast
then you will find a large number of
missed hairs.
Underarms and bikini-line epilation
(Fig. 6)
Please use the small epilation head.
When epilating underarm, your arm
should be raised.
Be aware that these areas are
particularly sensitive to pain.
However, the pain sensation will
diminish with repeated usage. For
this specific application, we would
like to give the following advices:
• Hairs on the underarms are
growing in different directions,
therefore move the epilator in
several directions.
• Before epilating, thoroughly clean
the respective area to remove
residue (like deodorant).
Then dry carefully to avoid skin
irritation.
• Hair should not be longer than 5mm.
• Do not use alcoholic deodorants.
Shaving (ES2047)
For legs and arms
It is helpful to use a shaver head
ES2047EU1.qxd 06.2.17 17:30 ページ6

9
How to remove the built-in
rechargeable batteries
before disposal of the
epilator (Fig. 11)
The batteries in this epilator are not
intended to be replaced by consumers. However, the batteries may be
replaced at an authorized service
center. The procedure described
below is intended only for removal
of the rechargeable batteries for the
purpose of proper disposal.
•Always unplug the power cord
from the epilator before disassembling it.
•Always slide the switch to 1 or 2
until the batteries are completely
flat.
• Using a screwdriver, disassemble
the appliance in the following
order.
1. Detach the epilation head
F
a
.
2. Remove the on/off switch Fb.
3. Remove the top section Fcof
the epilator (3 screws).
4. Remove the two long screws Fd.
5. Push in the head release
buttons Fe.
6. Push hard on the connector on
the bottom and take out the
drive system Ff.
7. Remove the head release
buttons
F
g
(1 screw).
8. Remove the battery holder
section Fh(2 screws).
9. Take out the two Ni-MH
batteries Fi.
(Please take care not to allow
the batteries to short out on
anything.)
Caution
• Please charge and use the appliance at a temperature of between
5~40°C.
• Never leave children alone with
electrical appliances.
• Never pull the appliance at the
cable out of the socket.
• Never remove or insert the
charging adaptor into the socket
with wet hands.
• Dry this appliance completely
before charging it.
•The appliance and charging
adaptor will become slightly hot
during use or charging, however
this is not a malfunction.
• Store the charging adaptor in a
dry area where it will be protected
from damage.
• Always unplug this appliance from
the electrical outlet immediately
after use.
• Use this appliance only for its
intended use as described in this
manual. Do not use attachments
not recommended by the manufacturer.
• Never drop or insert any object
into any opening.
• Keep the device away from
sources of flamability.
•Do not use this appliance with a
damaged or broken epilation/
shaver head.
• Always attach the power cord to
the appliance first, then to the
outlet. To disconnect, turn the
on/off switch to the “0·charge”
position then remove the power
cord from the outlet.
8
• Turn the switch on and then pour
a little water onto the discs to
create foam.
NOTE: Always check that the
power cord has been removed
before doing this.
• Wash the head with cold or warm
water to remove any hair. (Fig. 8)
NOTE: Do not use hot water to
wash the appliance.
If soap is not completely washed
away, then a white deposit can
accumulate and prevent the
blades from moving smoothly.
• Slide the switch to the “0·charge”
position and wipe the appliance
with a dry cloth.
• After cleaning, put the cap on the
head.
Cleaning your epilator with
the supplied brush
Cleaning of the epilation head
Push the frame release buttons and
remove the frame. (Fig. 7)
Brush the epilation head. (Fig. 9)
While cleaning, you can turn the
epilation discs manually.
Be careful not to break the skin
protector when cleaning.
For disinfection of the epilation
discs please use only pure alcohol.
Attention! Wipe the main body only
with a damp cloth. The use of
alcohol etc. may cause discoloration
of deformation of the main body.
After cleaning, put the cap on the
epilation head.
Cleaning of the shaver head
(ES2047)
Push the frame release buttons and
remove the frame by lifting it from
one side.
Clean with the brush.
Be careful not to apply too much
force to the outer foil.
After cleaning, put the pre-epilation
comb on the shaver head.
Replacing the outer foil of
the shaver head (Fig. 10)
Never remove the outer foil for
other reason than to change it.
Removing the outer foil
While pushing the outer foil gently
with the fingers, use the fingernail
to release the plastic panel
F
b
on
the blade from the catches Faon
the inside of the frame.
Fitting the new outer foil
Holding the outer foil so that the
surface with the plastic panel Fb(i.e.
the surface that will contact the inner
blade) faces upward, insert into the
frame so that the catches Faon the
frame fit into the holes on the foil.
For environmental protection
and recycling of materials
This epilator contains Ni-MH
batteries.
Please make sure that the batteries
are disposed of at an officially
assigned location, if there is one in
your country.
ES2047EU1.qxd 06.2.17 17:30 ページ8
10
• Use only the included power cord.
• Do not pull, twist, or severely bent
the power cord.
• Do not wrap the power cord tightly
around the appliance.
•A damaged or defective appliance
should be returned to the customer
service center or to an authorized
customer service agent.
Do not attempt to use a defective
appliance or repair the appliance
yourself. You will also loose in
such a case your warranty.
• We advise you to replace the
outer foil and the inner blade when
you notice a reduced shaving
performance. (ES2047)
Airborne Acoustical Noise
Large epilation head:
69 (dB(A) re 1pW)
Small epilation head:
71 (dB(A) re 1pW)
Shaver head:
63 (dB(A) re 1pW) (ES2047)
Information on Disposal for
Users of Waste Electrical &
Electronic Equipment
(private households)
This symbol on the products and/or accompanying documents means
that used electrical and
electronic products
should not be mixed with
general household waste.
For proper treatment, recovery and
recycling, please take these products
to designated collection points,
where they will be accepted on a
free of charge basis. Alternatively,
in some countries you may be able
to return your products to your local
retailer upon the purchase of an
equivalent new product.
Disposing of this product correctly
will help to save valuable resources
and prevent any potential negative
effects on human health and the
environment which could otherwise
arise from inappropriate waste
handling. Please contact your local
authority for further details of your
nearest designated collection point.
Penalties may be applicable for
incorrect disposal of this waste, in
accordance with national legislation.
For business users in the
European Union
If you wish to discard electrical and
electronic equipment, please
contact your dealer or supplier for
further information.
Information on Disposal in other
Countries outside the European
Union
This symbol is only valid in the
European Union.
If you wish to discard this product,
please contact your local authorities
or dealer and ask for the correct
method of disposal.
11
Bezeichnung der Teile (Abb. 1)
D
A
Schutzkappe (#2)
DB
Großer Epilierkopf für Beine und
Arme
q Epilierscheiben (innen)
w Hautschutzvorrichtung (äußeres
Metallteil)
e Entriegelungstaste für Aufsatz
r Aufsatz für Arme und Beine
t Überstand (beide Seiten)
DC
Gehäuse mit Motor
y Entriegelungstaste für Epilierkopf
u Ein/Aus-Schalter
0·Aufladen = Aus/Aufladen
1= langsame Geschwindigkeit
2= normale Geschwindigkeit
i Ladeanzeige
DD
Kleiner Epilierkopf für
Achselbereich/Bikinizone
o Epilierscheiben (innen)
!0 Hautschutzvorrichtung (äußeres
Metallteil)
!1 Entriegelungstaste für Aufsatz
!2 Aufsatz für Unterarme
!3 Überstand (beide Seiten)
DE
Aufladegerät/Netzkabel
DF
Reinigungsbürste
DG
Beutel
Modell ES2047:
D
H
Epilierkamm (zum Aufrichten der
Haare vor dem Epilieren)
DI
Rasierkopf
!4 Äußere Scherfolie
!5 Trimmer
!6 Trimmergriff
!7 Entriegelungstaste für Aufsatz
LESEN SIE BITTE VOR DER
INBETRIEBNAHME DES GERÄTES
DIESE ANLEITUNG GRÜNDLICH DURCH.
Allgemeines über das Epilieren
Bei allen Formen der Epilation, bei denen
die Haare an den Wurzeln entfernt werden, kann es zu kleinen Hautverletzungen und zum Einwachsen von Haaren
kommen. Jede durch Haarentfernung
entstandene Kleinstverletzung birgt die
Gefahr von Entzündungen durch das
Eindringen von Bakterien.
Eine gründliche Reinigung und
Desinfektion der Epilierscheiben vor
jeder Anwendung reduziert diese
Infektionsgefahr weitestgehend.
Je nach Beschaffenheit Ihrer Haut kann
es zu Beginn zu Reizungen wie Schmerz
und Hautrötungen kommen. Für die
Haarentfernung an der Wurzel sind das
normale Reaktionen, die jedoch rasch
abklingen. Falls diese Reaktionen nach
48 Stunden immer noch anhalten,
sollten Sie sich an Ihren Arzt wenden.
In aller Regel nehmen Hautreaktionen
und das Schmerzempfinden nach
mehrmaliger Anwendung deutlich ab.
Falls Sie Zweifel haben, ob Sie dieses
Gerät benutzen sollten, fragen Sie bitte
Ihren Arzt. In den folgenden Fällen sollten
Sie das Gerät nur nach Rücksprache
mit Ihrem Arzt anwenden:
• bei Ekzemen, Wunden, entzündeten
Hautreaktionen wie Follikulitiden
(“Eiterknötchen”) und Krampfadern.
• Im Bereich von Muttermalen
• Bei Schwächung der Abwehrkraft Ihrer
Haut, die bei Diabetes, Schwangerschaft und Vorliegen des Raynaud
Syndroms auftreten kann.
• Bei Blutgerinnungsstörungen oder bei
Immunschwäche.
Epiliergerät – Die SKIN PROTECTORSerie mit wahlweise einzusetzenden
ES2047EU1.qxd 06.2.17 17:30 ページ10

13
Geschwindigkeit).
• Schieben Sie den Schalter nach
abgeschlossenem Epilieren in die
Position “0·Aufladen”.
• Ziehen Sie den Netzstecker aus der
Steckdose und lösen Sie den Stecker
am Gerät.
So wenden Sie das Gerät richtig an.
• Bei langen Haaren sollten diese gekürzt
werden, da dies die Haarentfernung
erleichtert und den Schmerz verringert.
Haare an Beinen und Armen sollten
auf etwa 3 bis 5 mm und Haare im
Achselbereich/ Bikinizone auf eine
Länge von etwa 1 bis 2 mm gekürzt
werden.
• Halten Sie Ihr Epiliergerät im rechten
Winkel (90°) zu Ihrer Haut. Für beste
Epilierergebnisse bleiben Sie mit der
Hautoberfläche in Kontakt. Führen
Sie das Gerät mit sanftem Druck
langsam gegen die Haarwuchsrichtung.
Die Geräteseite mit dem Schalter
zeigt dabei gegen Haarwuchs (Abb.3).
• Reiben Sie Ihre Haut, damit sich
kurze Haare aufstellen.
• Führen Sie das Epiliergerät langsam
auf der Haut, wobei Sie die
Hautschutzvorrichtung vertikal berührt.
Beweglicher Kopf (für das Epilieren der
Unterarme und Arme/Beine) (Abb. 4Fa)
• Der Kopf bewegt sich für das Epilieren
von kurzen Haaren rasch auf beide
Seiten.
Diese Funktion begünstigt eine
wirkungsvolle Haarentfernung.
Schwingkopf (für das Epilieren der
Unterarme und Arme/Beine) (Abb. 4 Fb)
• Mit dem Schwingkopf wird ein naher
Hautkontakt gewährleistet.
Der Epilationsbereich der Arme und
Beine ist größer, was heißt, dass sich
der Schwingkopf stärker bewegt.
Epilieren der Beine und Arme (Abb. 5)
Verwenden Sie den großen Epilierkopf.
Wichtig auch für Arm- und Beinepilation:
Halten Sie Ihr Epiliergerät im rechten
Winkel (90°) zu Ihrer Haut.
Ein starker Druck gegen die Haut oder
eine schräge Anwendung kann zu
Hautschäden führen.
Führen Sie das Gerät mit sanftem
Druck langsam entgegen der
Haarwuchsrichtung.
Bei rascher Bewegung des Epilators
bleiben viele Haare unerfasst.
Epilieren im Achselbereich und der
Bikinizone (Abb. 6)
Benutzen Sie hier bitte den kleinen
Epilierkopf.
Wenn Sie den Achselbereich epilieren,
sollten Sie den Arm nach oben
strecken.
Im Achselbereich und in der Bikini-Zone
ist mit erhöhtem Schmerzempfinden zu
rechnen, das sich aber mit jeder
weiteren Anwendung verringert. Für
diese spezielle Anwendung möchten
wir Ihnen folgende Hinweise geben:
• Haare im Achselbereich wachsen in
verschiedene Richtungen. Führen Sie
deshalb das Epiliergerät in mehrere
Richtungen.
•Vor dem Epilieren sollten Sie den
entsprechenden Bereich gründlich
reinigen, um Rückstände zu entfernen,
z.B. Deodorant.
Trocknen Sie den Bereich dann
12
Köpfen ist für die Haarentfernung an
Beinen, Armen und empfindlichen
Bereichen wie dem Achselbereich oder
der Bikinizone entwickelt worden.
Das eingeschaltete Gerät darf nicht mit
anderen Hautpartien, z.B. Wimpern,
Kopfhaaren usw., Kleidern oder Bändern
in Kontakt kommen, um jede Verletzungsgefahr oder ein Blockieren oder eine Beschädigung des Gerätes zu vermeiden.
Aufladen
• Stellen Sie den Ein/Aus-Schalter in
die Position "0·Aufladen".
• Schließen Sie das Netzkabel richtig
am Epiliergerät an.
• Schließen das Aufladegerät an einer
Netzsteckdose an.
• Für die erste Inbetriebnahme oder
falls seit der letzten Verwendung
mehr als 6 Monate zurückliegen,
sollten Sie nach vollständiger
Aufladung das Gerät für ungefähr
weitere 20 Stunden aufladen.
• Laden Sie das Gerät für 12 Stunden
auf. (Die Ladeanzeige leuchtet auch
nach 12 Stunden noch weiter.)
Das Epiliergerät lässt sich mit einer
Aufladung (12 Stunden) etwa für 30
Minuten betreiben.
• Nach dem vollständigen Aufladen
kann das Gerät weiter angeschlossen
bleiben.
Ersetzen des Epilierkopfs
•Halten Sie Entriegelungstaste zum
Abnehmen des Epilierkopfs gedrückt.
• Drücken Sie zum Anbringen auf den
Epilierkopf, bis dieser einrastet.
(Drücken Sie den Epilierkopf, so dass
er richtig am Gehäuse angebracht ist.)
Verwendung des Epiliergerätes
Warnung
• Verwenden Sie das Gerät nicht in
einem Badezimmer oder Duschraum.
• Verwenden Sie das Gerät nicht auf
nasser Haut.
Kontrollieren Sie, ob der Hautschutz
und die Scheiben keine Beschädigung
oder Deformation aufweisen. Falls eine
Beschädigung vorliegt, darf das Gerät
nicht in Betrieb genommen werden.
Für schmerzempfindliche Personen wird
empfohlen, die Einstellung 1 (langsame
Geschwindigkeit) zu verwenden.
Kabelloser Epiliergerätebetrieb
• Entfernen Sie die Kappe.
• Bringen Sie den gewünschten
Epilierkopf an.
• Schieben Sie den Schalter zum
Epilieren in die Position 1 (langsame
Geschwindigkeit) oder 2 (normale
Geschwindigkeit).
• Schieben Sie den Schalter nach
abgeschlossenem Epilieren in die
Position “0·Aufladen”.
Netzbetrieb des Epiliergerätes (Abb. 2)
• Stellen Sie den Ein/Aus-Schalter in
die Position "0·Aufladen".
• Entfernen Sie die Kappe.
• Bringen Sie den gewünschten
Epilierkopf an.
• Schließen Sie das Netzkabel richtig
am Epiliergerät an.
• Schließen das Aufladegerät an einer
Netzsteckdose an. Kontrollieren Sie
immer, ob die Ladeanzeige leuchtet.
• Schieben Sie den Schalter zum
Epilieren in die Position 1 (langsame
Geschwindigkeit) oder 2 (normale
ES2047EU1.qxd 06.2.17 17:30 ページ12
15
Schalten Sie vor dem Reinigen das Gerät
aus und ziehen Sie den Netzstecker ab.
Waschen des Epilierers
Die Epilierscheiben, das innere und
äußere Schermesser des Rasierkopfs
und das Gerät lassen sich abwaschen.
Es wird empfohlen jeden Kopf zu waschen.
Achten Sie bitte darauf, dass Sie die
Hautschutzvorrichtung während der
Reinigung nicht beschädigen.
• Drücken Sie die Entriegelungstasten,
um den Aufsatz abzunehmen. (Abb. 7)
• Wenden Sie auf den Scheiben Flüssigseife oder eine Reinigungsflüssigkeit
(separat erhältlich) an. (Abb. 8)
• Schalten Sie den Epilierer ein und
bringen Sie etwas Wasser auf die
Scheiben, so dass Schaum entsteht.
HINWEIS: Kontrollieren Sie, ob das
Netzkabel gelöst ist.
•Waschen Sie den Kopf zum Entfernen
der Haare mit kaltem oder warmem
Wasser ab. (Abb. 8)
HINWEIS: Verwenden Sie zum
Abwaschen kein heißes Wasser.
Falls die Seife nicht gründlich abgewaschen wird, können sich weiße
Rückstände bilden, die die Bewegung
der Schermesser behindern.
•Stellen Sie den Ein/Aus-Schalter in die
Position "0·charge" und reiben Sie den
Epilierer mit einem trockenen Tuch ab.
• Bringen Sie nach dem Reinigen die
Schutzkappe an.
Reinigen des Epilierers mit der
mitgelieferten Bürste
Reinigung des Epilierkopfes
Drücken Sie die Entriegelungstasten und
nehmen Sie den Kopf vom Gehäuse.
(Abb. 7)
Bürsten Sie den Epilierkopf aus. (Abb. 9)
Während der Reinigung können Sie die
Epilierscheiben mit der Hand drehen.
Achten Sie bitte darauf, dass Sie die
Hautschutzvorrichtung während der
Reinigung nicht beschädigen.
Zur Desinfektion der Epilierscheiben
bitte reinen Alkohol verwenden.
Achtung! Das Gehäuse nur mit einem
feuchten Tuch abwischen. Alkohol kann
zur Verfärbung oder Verformung des
Gehäuses führen.
Bringen Sie nach dem Reinigen bitte
wieder die Schutzkappe auf dem
Epilierkopf an.
Reinigung des Rasierkopfes (ES2047)
Drücken Sie die Entriegelungstasten,
und heben Sie den Aufsatz zum
Abnehmen an einer Seite an.
Reinigen Sie ihn mit der Bürste.
Seien Sie vorsichtig und wenden Sie an
der Scherfolie nicht zu viel Kraft an.
Setzen Sie nach dem Reinigen bitte wieder den Epilierkamm auf den Rasierkopf.
Auswechseln der äußeren
Scherfolie des Rasierkopfs
(Abb. 10)
Entfernen Sie die äußere Scherfolie
ausschließlich dann, wenn Sie diese
auswechseln möchten.
Entfernen der äußeren Scherfolie
Benutzen Sie Ihren Fingernagel, um die
Plastiklasche
F
b
an der Klinge von den
Haken Faim Inneren des Aufsatzes zu
lösen, während Sie gleichzeitig die
äußere Scherfolie mit den Fingern
schieben.
14
vorsichtig. So vermeiden Sie
Hautirritationen.
• Die Härchen sollten nicht länger als 5
mm sein.
• Benutzen Sie anschließend kein
alkoholhaltiges Deo!
Rasur (ES2047)
Für die Beine und Arme
Es ist hilfreich, den Rasierkopf mit
vorgelagertem Kamm einzusetzen.
Für den Achselbereich und die
Bikinizone
Es ist hilfreich, einen Rasierkopf 3 bis 5
Tage vor dem Epilieren zu benutzen.
Rasur
Vergewissern Sie sich vor dem
Gebrauch, dass die Klinge nicht
verzogen oder beschädigt ist, da dies
Verletzungen verursachen kann.
Halten Sie den Rasierkopf so, dass der
ganze Klingenbereich in nahem Kontakt
mit der Haut steht.
Führen Sie das Gerät mit sanftem Druck
langsam entgegen den Haarwuchs.
Wird beim Führen des Gerätes zuviel
Druck ausgeübt, können nicht alle
Haare von den Klingen erfasst werden.
Trimmer
Der Trimmer eignet sich sehr gut zum
Kürzen längerer Haare (z.B. als
Vorbereitung zur Epilation an sensiblen
Hautpartien).
Bei Einsatz des Trimmers sollte die
Klinge sanft geführt werden.
Rasieren mit Epilierkamm
Wir empfehlen, dass Sie bei langen
Haaren vor der Epilation einen
Rasierkopf mit Epilierkamm verwenden.
Setzen Sie den Epilierkamm auf den
Rasierkopf und schieben Sie den
Trimmer hoch. Vergewissern Sie sich bei
aufgestecktem Epilierkamm, dass der
Kamm direkten, festen Hautkontakt hat.
Weitere praktische Hinweise
• Entfernen Sie Ihre Haare beim ersten
Mal am besten am Abend, so daß
eventuelle Hautrötungen über Nacht
abklingen können.
Wenn Sie Schmerzen verspüren oder
eine Rötung der Haut auftritt, kühlen Sie
die Haut mit einem kalten Handtuch.
• Nach dem Baden oder Duschen lassen
sich die Haare leichter entfernen.
Achten Sie jedoch darauf, dass Haut
und Haare trocken sind.
• Um Irritationen vorzubeugen, empfehlen wir die regelmäßige Verwendung
eines Massageschwammes z.B. nach
dem Duschen, oder eines KörperPeelings.
Reinigung
Warnung
Zur Vermeidung eines elektrischen
Schlages und von Verletzungen muss
vor der Reinigung des Geräts mit
Wasser das Netzkabel gelöst werden.
Ein abwaschbares Gerät wird mit dem
folgenden Symbol gekennzeichnet.
Das Symbol bedeutet, dass das Hauptteil mit Wasser gereinigt werden kann.
Das Aufladegerät darf nicht mit Wasser
abgewaschen werden.
ES2047EU1.qxd 06.2.17 17:30 ページ14
 Loading...