

Page 1
Operating
Instructions
Air Purifier EH366
For pollen and household dust
Panasonic
Before operating this unit, please read these instructions completely.
Page 2

IMPORTANT SAFETY INSTRUCTIONS
When using an electrical appliance, basic precautions should always be observed, including
the following:
READ AND SAVE THESE INSTRUCTIONS.
WARNING: To reduce the risk of burns, fire, electric shock, injury to persons or mal
function, observe the following.
1. To avoid fire or shock hazard, plug the air cleaner directly into a 120 V.A.C. electri
cal outlet.
2. To prevent electric shock fully insert plug.
3. Always unplug the air cleaner before moving it, changing the filter, before cleaning,
or whenever the air cleaner is not in use.
4. This unit filters air. Do not use as a substitute for ventilation.
5. Do not plug in or unplug the power cord plug with wet hands.
6. Do not modify, disassemble, or repair this appliance yourself.
7. Never operate the air cleaner if it has a damaged cord or plug, if it is not working
properly, or if it has been damaged. Have unit serviced by a qualified servicer.
8. Periodically clean the dust, etc. which accumulates on the power cord plug.
9. Keep the power cord out of heavy traffic areas. To avoid fire hazard, never put the
cord under rugs, near heat registers, radiators, stoves or heaters.
10. This appliance has a polarized plug (one blade is wider than the other). To reduce
the risk of electric shock, this plug is intended to fit in a polarized outlet only one
way. If the plug does not fit fully in the outlet, reverse the plug. If it still does not fit,
contact a qualified electrician. Do not attempt to defeat this safety feature.
SAFETY PRECAUTIONS
WARNING; To reduce to risk of burns, fire, electric shock, injury to persons or mal
function.
1. Do not put foreign objects and fingers inside the air cleaner.
2. Never use your air cleaner with any part missing or damaged in any manner.
3. Do not use outdoors.
4. Do not wipe this appliance with benzene or paint thinner. Do not use aerosol sprays
near this appliance.
5. The unit should not be cleaned under running water.
6. Do not operate this appliance when using indoor fumigator (smoke-emitting type)
insecticides.
After using insecticides, ventilate the room thoroughly before using this appliance,
otherwise insecticide components accumulating inside the appliance may be re
leased later, which may be harmful to your health.
7. When unplugging the power cord plug, always grasp the plug itself and unplug;
never pull on the cord to unplug.
8. Do not use extremely close to flammable materials or lit cigarettes or incense.
9. Do not use in extremely humid areas, such as a bathroom.
Page 3

IMPORTANTES INSTRUCCIONES DE SEGURIDAD
Al utilizar un aparato eléctrico, siempre deben observarse la precauciones básicas,
incluyendo las siguientes:
LEA Y GUARDE ESTAS INSTRUCCIONES
AVISO: Para reducir el peligro de quemaduras, incendio, sacudidas eléctricas,
heridas a personas o malfuncionamiento, observe lo siguiente,
1. Para evitar incendio o sacudidas eléctricas, enchufe el purificador de aire irectamente en
un tomacorriente eléctrico de 120 V.A.C.
2. Para impedir sacudidas eléctricas inserte completamente la clavija.
3. Siempre desenchufe el purificador de aire antes de moverlo, cambiar el filtro, antes de
limpiar o siempre que el limpiador de aire no esté en uso.
4. Esta unidad filtra aire. No la utilice como un sustituto para ventilación.
5. No enchufe ni desenchufe el cordón de la corriente con las manos húmedas.
6. No modifique, desarme ni repare este aparato usted mismo.
7. Nunca opere el purificador de aire si tiene un cordón o enchufe dañados, si no está
funcionando adecuadamente o si se ha dañado. Haga que un reparador cualificado lo
revise.
8. Periódicamente limpie el polvo, etc. que se acumula en la clavija del cordón de la
corriente.
9. Mantenga el cordón de la corriente fuera de áreas de mucho tráfico. Para evitar peligro de
incendio, nunca ponga el cordón debajo de alfombras, cerca de registradores de calor,
radiadores, estufas o calefactores.
10. Este aparato tiene una clavija polarizada (una cuchilla es más ancha que la otra). Para
reducir el peligro de sacudidas eléctricas, esta clavija está hecha para ajustarse a un
tomacorriente polarizado sólo en un sentido. Si la clavija no se ajusta completamente al
tomacorriente, invierta la clavija. Si todavía no se ajusta, consulte a un electricista
cualificado. No intente frustrar esta característica de seguridad.
PRECAUCIONES DE SEGURIDAD
AVISO: Para reducir el peligro de quemaduras, incendio, sacudidas eléctricas,
heridas a personas o malfuncionamiento.
1. No meta objetos extraños y sus dedos dentro del purificador de aire.
2. Nunca utilice su purificador de aire mientras algo falta o está dañado de algún modo.
3. No utilice al exterior.
4. No limpie el aparato con bencina o un diluyante de pintura. No utilice aerosoles cerca de
este aparato.
5. La unidad debe limpiarse con agua del grifo.
6. No opere este aparato cuando utilice en el interior insecticidas por fumigador (tipo que
emite humo).
Después de utilizar insecticidas, ventile la habitación bien antes de utilizar este parato; de
lo contrario, los componentes de insecticidas acumulados dentro del aparato pueden ser
expulsados más tarde, pudiendo dañar su salud.
7. Cuando desenchufe la clavija del cordón de la corriente, siempre tire de la clavija misma, y
desenchufe: nunca tire del cordón para desenchufar.
8. No utilice muy cerca de materiales inflamables o de cigarrillos o incenso encendidos.
9. No utilice en lugares muy húmedos, tal como un cuarto de baño.
Page 4
m
Panasonic ehsss
AIR PURIFIER
AUTO INT
• •
PO' VER
L M H
u
^ (See Fig.Q].)
(Vea la Fig. Q].)
Page 5

©
High
Alto 1
Middle
Medio
Low
Bajo
0
©
Desconectado —20 minutes-
Off
20 minutos
-20 minutes20 minutos
4-"—20 minutes-
20 minutos
^x|>W<5M
AUTO INT L MH
O O O O O
^x|>Wl
1 2 4 8H
O O O O
D
Page 6

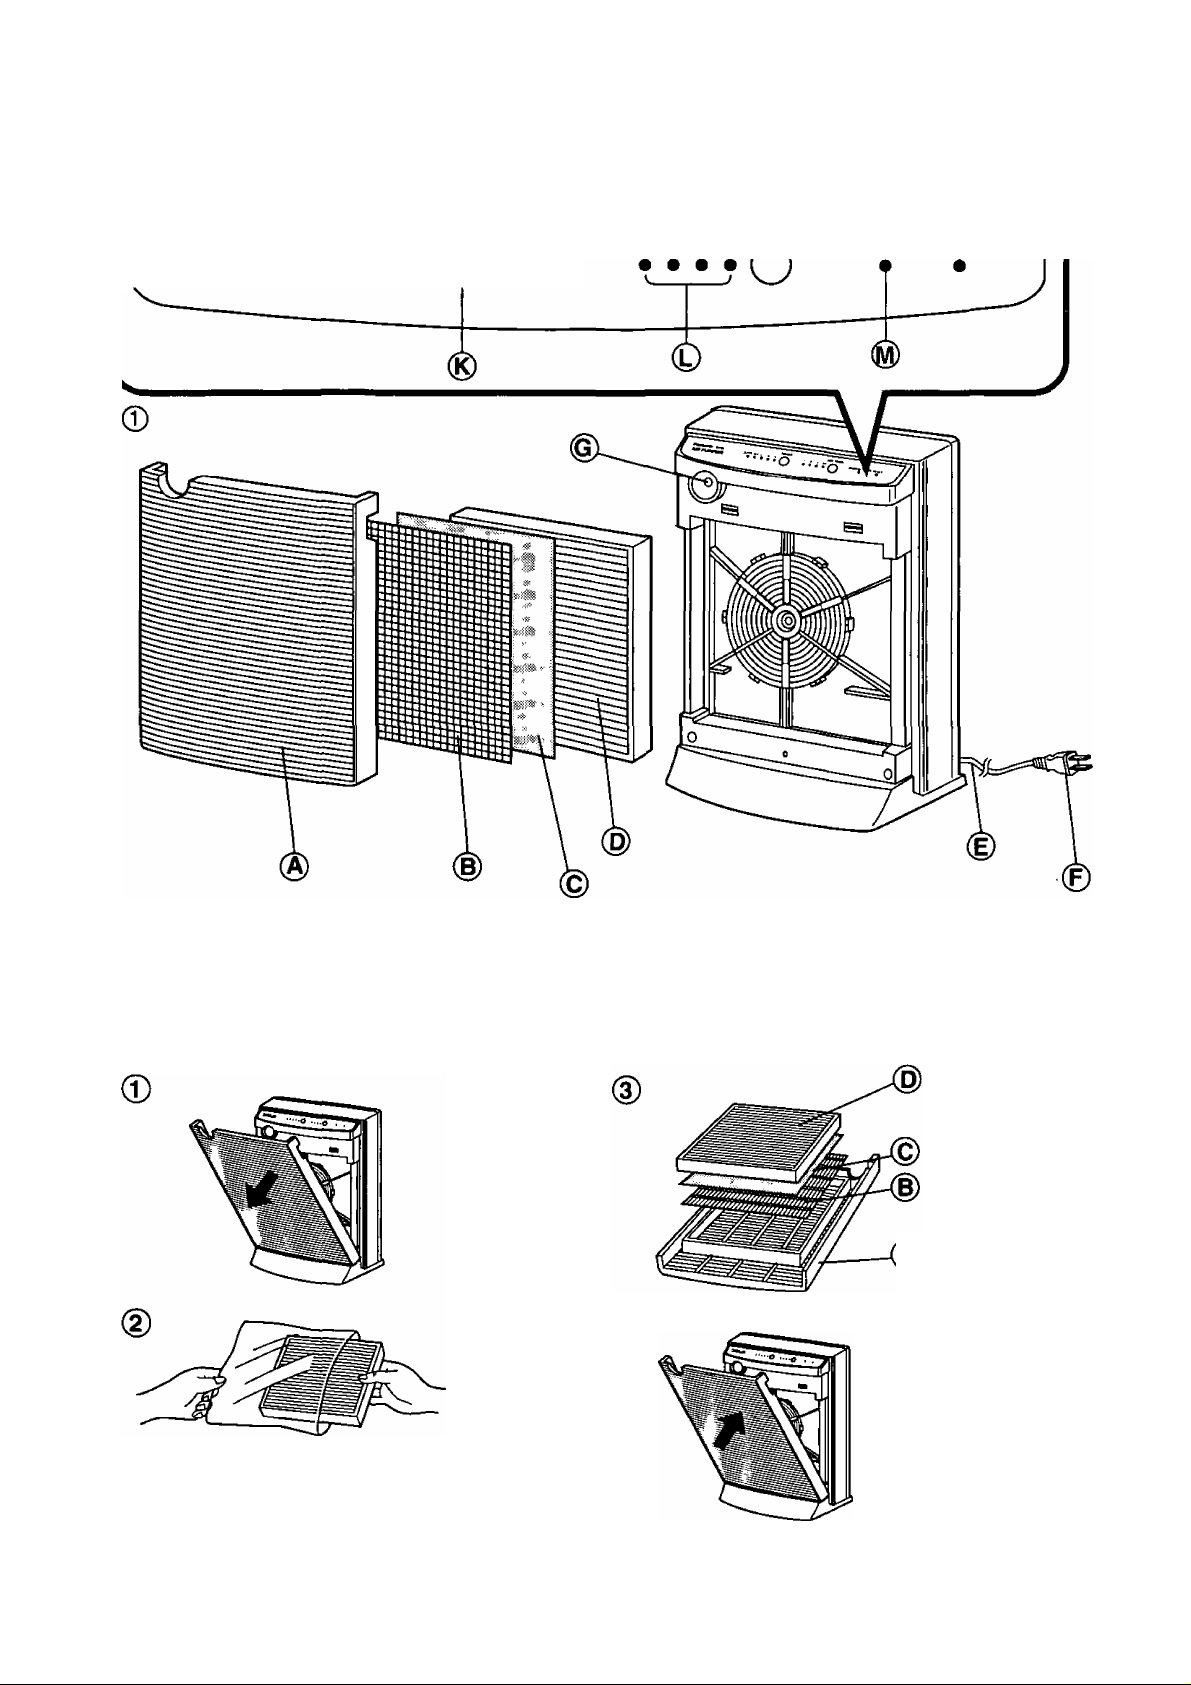
PARTS IDENTIFICATION
BEFORE USE
(See [H on page 4.)
(¡) Main Body
® Intake grill
(g) Pre-filter
© Deodorizing filter
© HEPA Filter
© Cord
© Plug
© Motion sensor
© Operation/Display Panel
@ Air flow rate button
® Timer button
® Filter reset button
® Operating lights
® Timer indication lights
(0) Replace filter indication
Installing Filter
(See \J\ on page 4.)
® Remove the intake grill.
• A pre-filter, a HEPA filter and a deodoriz
ing fiber filter must be installed in the
intake grill.
@ Remove the pre-filter, HEPA filter and
deodorizing filter from the plastic bag.
@ Install the pre-filter the deodorizing
filter © and the HEPA filter © as
shown in the intake grill.
• Install the HEPA filter according to the
instructions on the side of the filter.
® Reinstall the intake grill on the main
unit.
USE
Features
® High flow rate and special filter quickly
and reliably catch pollen and household
dust floating in the air.
@ Deodorizing filter with activated charcoal
absorbs tobacco odors.
© Design ensures quiet operation that will
not disturb sleeping person.
@ Has an action sensor to detect people’s
movement and operate automatically.
® 8-hour timer is convenient when sleeping
or for operation over a long period of
time. Economical interval operation
function is also available.
Operating Modes
You can select one of 3 operating modes on
this air refresher.
0 Automatic operation (See O-©on pages.)
For operation triggered bv person’s move
ment.
• Motion sensor adjusts air flow rate ac
cording to the activity level in the room.
© Interval operation
(See
For economical repeated on/off operation
• Automatically repeats operating cycle in
20 minute interval (at normal air flow
rate).
© Continuous operation
(See [3)-@ on page 5.)
For continuous operation at the specified air
flow rate
• Select from High, Middle, and Low.
on page 5.)
Page 7

Operation
(See B]-© on page 5.)
© Insert the plug into a wall outlet.
@ Press the POWER button.
(3) Continue pressing the POWER button
until the indicator for the desired mode
is lit.
• Interval mode operates at normal air flow
rate only.
• During automatic mode or interval mode,
the operating light for the selected mode
will light together with the air flow rate
light.
Lights light in order
© Automatic
© Interval
@ Low
0 Middle
® High
(D Off (no lights lit)
Timer operation
(Timer cannot be set during
automatic operation.)
® Heat emitted by humans body is detected
and the movement of people is determined.
• Movement of domestic animals may also
be detected.
CAUTION:
© Sensor sensitivity varies with distance
and angle in relation to the sensor.
• Aim the sensor toward the position
where people’s movements is ex
pected, using the detection area dia
grams at left as a guide.
© Do not place in areas the product in
direct sunlight or in close proximity to
heat sources.
• Sensor may not operate properly in
such cases.
MAINTENANCE
WARNING:
Unplug AC cord from the wall outlet before
cleaning.
Ensure that the dust and pollen collected on
the filter or intake grill are not spread around.
(See gKDon pages.)
© Press the Timer button.
@ Continue pressing the TIMER button
until the indicator for the desired time
period is lit.
• During timer operation, the light for the
remaining operating time will be lit.
• For example, if the timer was originally
set to 4 hours and 2 hours have passed,
the 2-hour lamp will be lit to indicate that
2 hours remain.
Lights light in order
© 1 hour
© 2 hours
@ 4 hours
0 8 hours
® Continuous (no lights lit)
Main unit
Damp a cloth with soapy water and wipe the
main unit.
Never use benzene, paint thinner, etc.
intake griii
Use the brush or other vacuum cleaner
attachment to periodically remove the dust
from the grill. You can also remove the
intake grill from the main unit and wash.
Pre-fiiter
Use a vacuum cleaner to remove dust or
wash with water and let dry completely be
fore reinstalling.
Do not rub while washing and do not blow
hot air on it or let it come in contact with
flames.
About the motion sensor
(See 5 on pages.)
© The detection region is approximately as
shown in Fig. LLl page 5.
HEPA filter
Replace with a new filter. This filter cannot
be cleaned, washed and re-used washed
with water.
Page 8

REPLACING FILTERS Replacement Time
The replace filter indication light will light
when filter should be replaced.
iBIinkinal iAImost time to
CHANGE FILTER
ceplace the filter.
The life of the fiber filter is approximately
one year (when used at Low for about 12
hours of continuous operation per day).
Households where the operating time is
longer should replace the filter sooner.
Do not use other filters than those speci
fied.
^ I [Lighting [iReplace the
filter.
Replacement Filter Details
Purchase your replacement filter at your nearest
Panasonic dealer.
After replacing the filter, press the reset
button on the main unit.
Light will
go out.
Press using a pen or^
similar object.
WHEN SOMETHING SEEMS WRONG:
Symptom
Unit is noisy and suction
is weak.
Motion sensor doesn’t
work well.
Was the filter installed without
removing it from the bag?
Is the unit (motion sensor)
aimed toward the position of
the people it should detect?
Checkpoint
HEPA FILTER with deodorizing
filter
EH36601
Solution
Remove the filter from the bag
and install it correctly. (See p. 3
&5.)
Aim the unit (motion sensor)
toward the people it should
detect. (See p. 4, 8, 6.)
Even after replacing the
filter, the replace filter
indication doesn’t go out.
Did you push the filter reset
button on the unit after replac
ing the filter?
Ratings/Specifications
Power source
Air flow rate
(CFM)
Target dust /
pollen
Power
consumption
Dimensions
(W X H X D)
Cord length /
Weight
Low
18 55
25W 37W
Press the filter reset button.
(See this page.)
120V AC 60Hz
Middle
Dust / pollen with a diameter of 0.3pm or larger
14 15/16” X 21 5/8” X 5 45/64”
98”/nibs.
High
125
73W
8
Page 9

IDENTIFICACION DE LAS
ANTES DEL USO
PARTES
(Vea [T] en la página 4.)
0 Cuerpo medio
® Rejilla de admisión
(g) Pre-filtro
© Filtro desodorante
® Filtro HEPA
© Cordón
© Clavija
© Sensor de acción
© Panel de operación/visualización
® Botón de caudal de corriente de aire
0 Botón de temporizador
0 Botón de reposición de filtro
(g) Lámparas de operación
© Lámparas indicadoras de temporizador
Instalando el filtro
(Vea en la página 4.)
0 Remueva la rejilla de admisión.
• Un pre-filtro, un filtro HEPA y un filtro
desodorante tienen que instalarse en la
rejilla de admisión.
0 Remueva el pre-filtro, filtro HEPA y filtro
desodorante de la bolsa de plástico.
0 Instale el pre-filtro ® el filtro
desodorante © y el filtro HEPA ©,
como se muestra, en la rejilla de
admisión.
• Instale el filtro HEPA de acuerdo a las
instrucciones del lado del filtro.
® Vuelva á instalar la rejilla de admisión
en la unidad principal.
(0) Indicación de filtro de reparación
Características
0 Caudal de corriente de aire alto y filtro
especial'rápidamente y con seguridad
recogen el polen y el polvo de la casa
que flota en el aire de la habitación.
@ El filtro desodorante con carbón activado
absorbe olores de tabaco.
@ El diseño asegura operación silenciosa
que no molesta aun cuando se está
durmiendo.
® Tiene un sensor de acción para detectar
el movimiento de las personas y opera
automáticamente.
® El temporizador de 8 horas de duración
es conveniente cuando se está
durmiendo o para operación por un largo
período de tiempo. Se provee también
función económica de operación a
intervalos.
uso
Modos de operación
Usted puede seleccionar uno de los 3 modos
de operación en este refrescador de aire.
0 Operación automática
(Vea [3]-®en la página 5.)
Para operación activada por el movimiento
de una persona.
• El sensor de acción ajusta el caudal de
corriente de aire de acuerdo al nivel de
actividad en la habitación.
© Operación a intervaios
(Vea [3]-@ en la página 5.)
Para operación económica de conectado/
desconectado repetido
• Autohnáticamente repite el ciclo de
operación de a intervalos de 20 minutos
(al caudal de corriente de aire normal).
© Operación continua
(Vea[3]-@ en la páginas.)
Para operación continua al caudal de
corriente de aíre especificado
• Seleccione entre Alto, Medio y Bajo.
Page 10

Operación
(Vea [4]-© en la página 5.)
© Inserte la clavija en un tomacorriente
mural.
© Pulse el botón POWER.
@ Continúe pulsando el botón POWER hasta
que el indicador para el modo deseado se
encienda.
• El modo a intervalos opera sólo al caudal de
corriente de aire normal.
• Durante el modo automático o el modo a
intervalos, la lámpara de operación para el
modo seleccionado se encenderá
juntamente con la lámpara de caudal de
corriente de aire.
Las lámparas se encienden por orden
® Automático
@ A intervalos
(
3) Bajo
® Medio
© Alto
® Desconectado
(no se enciende ninguna lámpara)
Operación por temporizador
(El temporizador no puede
fijarse durante la operación
automática.)
@ El calor emitido por cuerpos humanos se
detecta y el movimiento de la gente se
determina.
• También puede detectarse el movimiento
de animales domésticos.
Precaución:
© La sensibilidad del sensor varía de acuerdo
a la distancia y al ángulo en relación al
sensor.
• Apunte el sensor hacia la posición donde
los movimientos de la gente se supone,
utilizando los diagramas de área de
detección a la izquierda como una guía.
@ No coloque en áreas donde el producto
esté sujeto a los rayos directos del sol o
cerca de fuentes de color.
• El sensor puede que no opere
adecuadamente en tales casos.
MANTENIMIENTO
AVISO:
Desenchufe el cordón de CA de un tomacorriente
antes de limpiar.
Asegúrese de que el polvo o polen acumulados
en el filtro o en la rejilla de admisión no se
esparza alrededor.
(Vea [4]-(2) en la página 5.)
© Pulse el botón de temporizador.
@ Continúe pulsando el botón TIMER hasta
que el indicador para el período de tiempo
deseado se encienda.
• Durante la operación de temporizador, la
lámpara para el tiempo de operación
remanente se encenderá.
• Por ejemplo, si el temporizador originalmente
fue fijado a 4 horas y han pasado 2 horas, la
lámpara de 2 horas se encenderá para
indicar que quedan 2 horas.
Las lámparas se encienden por orden
® 1 hora
© 2 horas
@ 4 horas
® 8 horas
® Continuo
(no se enciende ninguna lámpara)
Sobre el sensor de acción
Unidad principal
Humedezca un paño con agua jabonosa y limpie
la unidad principal.
Nunca utilice bencina, diluyante de pintura, etc.
Rejilla de admisión
Utilice el cepillo u otro aditamento de aspiradora
para periódicamente remover el polvo de la
rejilla. Usted puede también remover la rejilla de
admisión de la unidad principal y lavarla con
agua.
Pre-filtro
Utilice una aspiradora para remover el polvo o
lave con agua y permita secar completamente
antes de volver a instalar.
No frote mientras lava y no sople aire caliente
sobre él ni permita que venga en contacto con
llamas.
(Vea 0 en la página 5.)
® La región de detección es
aproximadamente como mostrada en la
Fig. [5] de la página 5.
Filtro MAPA
Reemplace con un filtro nuevo. Este filtro no
puede limpiarse, lavarse o volverse a utilizar
lavado con agua.
10
Page 11

REEMPLAZANDO FILTROS
Tiempo de reemplazo
La lámpara indicadora de filtro de reparación
se encenderá cuando deba reemplazarse.
I Parpadeando I :Casi tiempo de
CHANGE FILTER filt/o.
I NI Encendido] iReemplace el
reemplazar el
filtro.
proximadamente un año (cuando utilizado
a Bajo por unas 12 horas de operación
ontinua por día).
Las casas donde el tiempo de operación
es más largo se debe remplazar el filtro
más pronto.
No utilice otros filtros que los
specificados.
Detalles sobre filtro de reemplazo
La vida del filtro de fibra es
Después de reemplazar el filtro, pulse el
botón de reposición de la unidad principal.
La lámpara
se apagará.
Presione utilizando un
lapicero o un objeto
similar.
Compre su filtro de reemplazo en su distribuidor de
más cercano Panasonic.
CUANDO ALGO PAREZCA ERRONEO:
FILTRO HEPA con filtro
desodorante
EH36601
Síntoma
Punto de
comprobación
La unidad es ruidosa y
la succión es débil.
El sensor de acción no
trabaja bien.
Aun después de
reemplazar el filtro, la
indicación del filtro de
reemplazo no se apaga.
¿Fue el filtro instalado sin
removerlo de la bolsa?
¿Está la unidad (el sensor de
acción) apuntada hacia la
posición de la gente que deba
detectar?
¿Pulsó usted el botón de
reposición de filtro de la
unidad después de
reemplazar el filtro?
Clasificaciones/Especificaciones
Fuente de
energía
Caudal de
corriente de aire
Propósito polvo/
pollen
Bajo
18
Polvo/pollen con un diámetro de 0,3pm o mayor
120VAC 60Hz
Medio
55
Solución
Remueva el filtro de la bolsa e
instálelo correctamente. (Vea la
pág. 3 & 5.)
Apunte la unidad (sensor de
acción) hacia la gente que deba
detectar. (Vea la pág. 4, 8, 6.)
Pulse el botón de reposición de
filtro. (Vea esta página.)
Alto
125
Consumo de
energía
Dimensiones
(An X Al X Prof)
Longitud de
cordón/peso
25W
37W
14 15/16” X 21 5/8” X 5 45/64”
98”/11 Ibs.
11
73W
Page 12

Panasonic
Personal and Professional Products Company
One Panasonic WayPanazip: 4A-3*Secaucus, NJ07094
Call 1-800-338-0552
Printed in Japan
 Loading...