

Panasonic EH2511 Installation Manual
Pore Cleanser
Nettoie-pores
Limpiador de Poros
Operating Instructions
Manuel d’utilisation
Instrucciones de operación
Model No.
N° de modèle EH2511
Modelo No.
R
B
Before operating this unit, please read these instructions completely.
B
Il est recommandé de lire attentivement ce manuel avant d’utiliser l’appareil.
B
Antes de operar este aparato, lea este instructivo en su totalidad.
(A)
(B)
(C)
(3)
(H)
(4)
(D)
(E)
(F)
(G)
(2)
(1)
1
(I) (J)
2 3
a
b
4
8
5
Wide Cup
9
Brush
Cleaning
needle
Cleaning
needle cap
6 7
Point Cup
10
12 3
45
2

Index
Indice
Indice
ENGLISH Page 4
FRANÇAIS Page 11
ESPAÑOL Página 18
3

IMPORTANT SAFETY INSTRUCTIONS
When using electrical appliances, especially when children are
present, basic safety precautions should always be followed,
including the following:
READ ALL INSTRUCTIONS BEFORE USING
DANGER
1. Do not install charging unit
where it can fall or be pulled
into a tub or sink. Always
return hand unit to charging
unit after using.
2. Do not place charging unit in or
drop into water or other liquid.
3. Never reach for charging unit
that has fallen into water.
Unplug immediately.
WARNING
1. Not for use by children. Close
supervision is necessary when
this appliance is used near
children or invalid.
2. Use this appliance only for its
intended use as described in
this manual. Do not use
attachments not recommended by the manufacturer.
3. Never operate this appliance if
it has a damaged cord or plug,
if it is not working properly. If it
has been dropped, damaged
or the charging unit has been
dropped into water, return the
appliance to a service center
for examination and repair.
To reduce the risk of electrocution:
To reduce the risk of burns, electrocution,
fire or injury to persons:
4. Before charging the appliance,
wipe off any moisture from the
appliance and charging unit.
Always handle with dry hands.
5. Always charge the appliance
in a cool, dry place.
6. Except when charging, always
unplug the charging unit from
the electrical outlet.
7. Unplug this charging unit
before cleaning.
4. Keep the cord away from heated surfaces. Do not wrap the
cord around the appliance.
5. Never use while lying down.
6. Never insert an object into any
opening.
7. Do not operate where aerosol
(spray) products are being
used or where oxygen is being
administered.
8. Do not use an extension cord
with this appliance.
9. Do not use this appliance with
a damaged or broken cup, as
facial injury may occur.
SAVE THESE INSTRUCTIONS
4

Getting started
Useful information
Congratulations!
You have chosen a new kind of
skin care product that cleanses skin
on and around the nose from deep
inside the pores as it stimulates to
improve skin tone and appearance.
Your Panasonic Pore Cleanser is
designed to provide essential treatment for well cared healthy skin on
and around the nose when used
correctly.
Please read this instruction manual
completely before use in order to
understand and obtain maximum
results from your Panasonic Pore
Cleanser (hereinafter referred to as
“the appliance”).
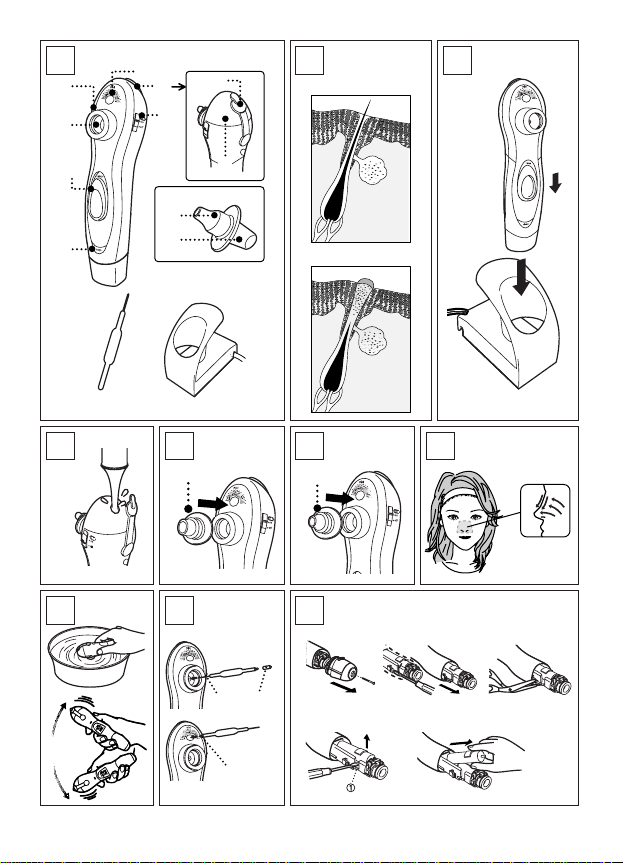
Parts identification
(See Figure 1)
(A) Mist Nozzle
(B) Water Storage Section
(1) Water Tank
(2) Cap
(C) Mist Switch
(D) Cup Socket
(E) Suction Hole (Filter)
(F) Power Switch
1 / 0-charge
(G) Charge Indicator Light
(H) Suction Cup
(3) Point Cup
(4) Wide Cup
(I) Cleaning Tool
(J) Charger
What you need to know about
blockage and inflammation of
the facial sebaceous glands.
Above-average secretion by the
sebaceous glands leads to oily
skin. This over-activity is caused by
hormonal changes, especially during puberty, inappropriate high-fat
or high-protein diet, excessive consumption of alcohol, etc.
This over-production of sebum
causes the pores to widen. Oily
skin can have a shiny or dried
appearance, depending on whether
the flow of sebum into the pore has
an oily consistency or has already
dried within the follicle.
Oily skin is usually “impure”, because
it provides an excellent feeding
ground for bacteria. The oxygen supply within a healthy pore normally
restricts the spread of bacteria. There
is a correlation between this bacterial
spread and a pore becoming visible
to the eye. If the pore becomes
blocked, the environment becomes
anaerobic (i.e. oxygen-free), ideal for
Propionibacterium acne, which
spreads like wildfire. This leads to
inflammation and blemishes.
Normal pore (See Figure 2-a)
A normal amount of oil is secreted
from the pore.
Blocked pore (See Figure 2-b)
Oil trapped in the pore oxidizes and
solidifies, causing clogged pores
and blackheads.
5

Blackheads should not be removed
by squeezing with fingertips or fingernails, as this can damage the
skin and cause further inflammation.
Cleansing two or three times a week
is recommended.
Charging your pore
cleanser
Before using the appliance for the
first time please charge it for at
least 12 hours. (See Figure 3)
Place the Charger upright on a flat
surface. Plug the Charger into an
AC outlet. It will adjust automatically
to voltages between 100-240 V AC.
In some areas, a special plug adaptor may be required.
Switch the appliance off and place it
upright into the Charger with the
switch facing toward the front. When
the appliance is placed in the correct
position, the charge indicator light
will glow and stay on until the appliance is removed from the Charger.
You can fully charge the appliance in
12 hours if it seems losing its power.
A full charge will supply enough
power for about 20 minutes of usage.
Using your pore cleanser
This personal care product is
designed to remove blackheads on
the face and nose area by application of a slight amount of suction. It is
important that you exercise care
when using this product in order to
achieve satisfactory results and to
reduce the risk of breaking capillaries
beneath the skin surface. Depending
on your complexion, you may notice
purple spots or some skin discoloration as you first learn to use this
product which will usually disappear
within two to three days. This is
dependent upon the length of time
you apply the suction on a particular
area of your face. If you are concerned about how your skin will
react, we suggest that you test the
product on a part of your face or
neck that is not normally exposed.
It is recommended that you first
start the application for no longer
than two seconds at each spot on
your skin, then gradually increase
the time to no more than ten seconds as you gain experience and
find the most suitable application
period. If discoloration occurs, discontinue use of the product.
Do not use this product on pimples,
blemishes, sunburned or broken
skin or any skin inflammations.
• For best results the pores of the
skin should be well opened. For
this reason it is a good idea to perform your skin care routine after a
bath or shower. The heat of the hot
water will tend to open your pores.
Always dry your face thoroughly
before using this appliance.
• For best results, use the appliance two or three times a week as
part of your skin care routine.
• Use your wrist in a rotating motion
to detach the reversible cups from
6

your skin.
1. Remove any make-up from your
face, leaving just bare skin.
Never use the appliance on
skin coated with cleansing
lotion or facial soap.
2. Add water to the Water Tank.
(See Figure 4)
Unplug the Cap and supply tap
water into the Water Tank, then
replace the Cap.
3. Attach the Wide Cup to the Cup
Socket, making sure that it is
facing outward. (See Figure 5)
4. Slide the Mist Switch to the “on”
position, then slide the Power
Switch to the “1” position.
• The Mist Nozzle will produce
a fine spray of water.
• If water drips from the face,
wipe it off with a towel or set
the Mist Switch to the “off”
position.
5. Move the appliance slowly
around the tip of the nose. (As
explained below and shown by
Figure 7.)
• Roughly cleanse the entire
surface of nose without focusing on any particularly spot.
6. Now turn the Power Switch off
and reverse the suction cup so
that the Point Cup is facing outward. Then turn it on again.
(See Figure 6)
7. Move the Point Cup over the
nose in the way described by
the arrows. (As explained below
and shown by Figure 7.)
8. Rinse your face, and apply moisturizing lotion or any other skin
conditioner you normally use.
• Keep your face sufficiently
moisturized.
Around the tip and wings of the
nose (See Figure 7)
1. Move the cup all over the nose.
2. Limit use of the Wide Cup over the
whole nose to one minute or less.
3. Limit use of the Point Cup to two
minutes or less.
(Do not repeatedly move over the
wings of nostrils where the skin is
thin.)
Use only the Point Cup if you have
concerns about skin irritation.
Cleaning your pore
cleanser
After using the appliance
(See Figure 8)
• Both the body of the appliance
and the cups can be washed
using water.
1. Put some water (warm if you
like) in a washbowl.
• Do not use hot water
• Do not use detergent
2. Remove the suction cup, soak
the Suction Hole (Filter) in the
water, and turn the Power
Switch on to wash for about 15
seconds.
3. Remove the appliance from the
water. Then, leaving the appliance switched on for about 30
7

seconds to allow water to drain
from the main body, shake it
about 10 times.
4. Empty the Water Tank and
allow it to dry by leaving the
Cap unplugged.
5. Wipe the body of the appliance
and the reversible cups with tissues or cotton buds, taking particular care to thoroughly wipe
the insides of the suction cup.
Regular maintenance
(See Figure 9)
• Suction Hole (Filter) and Mist
Nozzle
Turn the Power Switch off and
remove any accumulated dirt
using the Cleaning Tool provided.
• Charger
Clean the Charger using a cloth
and soapy water, then dry thoroughly before resuming use.
• Do not use detergent to avoid the
risk of discoloration, deterioration,
or cracking.
Recycling the battery
ATTENTION :
The product you have purchased is
powered by a nickel metal hydride battery which is recyclable at the end of its
useful life. Under various state and
local laws it may be illegal to dispose
of this battery in your municipal waste
stream. Please call 1-800-8-BATTERY
for information on how to recycle this
battery.
the battery must be removed following the below procedure.
WARNING : Do not attempt to replace
the battery for the purpose of reusing
the appliance. This could result in the
risk of fire or electric shock.
Removing the battery
Remove the battery as explained
below. (See Figure 10)
1. Unscrew the screw and remove
the battery cover.
2. Unlatch the hooks on either
side and pull out from the body
of the appliance.
3. Cut the red and black lead
wires on either side and further
pull out from the body of the
appliance.
4. Insert a flat-head screwdriver
into the slot (#) and lift up the
Ni-MH battery.
5. Remove the Ni-MH battery.
Please dispose of the appliance
and the battery in accordance with
the relevant environmental protection and recycling regulations.
The battery should never be incinerated!
The battery may be replaced at a
Panasonic customer service center or
an authorized customer service agent.
Before disposal of this appliance,
8
 Loading...