

Page 1

Matsushita Electric Works, Ltd.
1048, Kadoma, Osaka 571-8686, Japan
No.2 EN, GR, FR, IT
Printed in Thailand
Matsushita Electric Works, (Thailand) Ltd.
Pathum Thani 12120, Thailand
Before operating this unit, please read these instructions completely.
Operating Instructions
Pore Cleanser
Model No. EH2511
R
EH2511WOIEU4.qxd 05.9.68:19 ページ1
Page 2
33
(A)
(B)
(C)
(3)
(H)
(4)
(D)
(E)
(F)
(G)
(1)
(2)
1
4
8
7 9
5 6
2 3
12 3
45
10
INDEX
ENGLISH .....................Page 4
DEUTSCH....................Seite 10
FRANÇAIS...................Page 16
ITALIANO..................Pagina 22
EH2511WOIEU4.qxd 05.9.68:19 ページ3
a
b
a
(I) (J)
a
b
a
b
Page 3

4
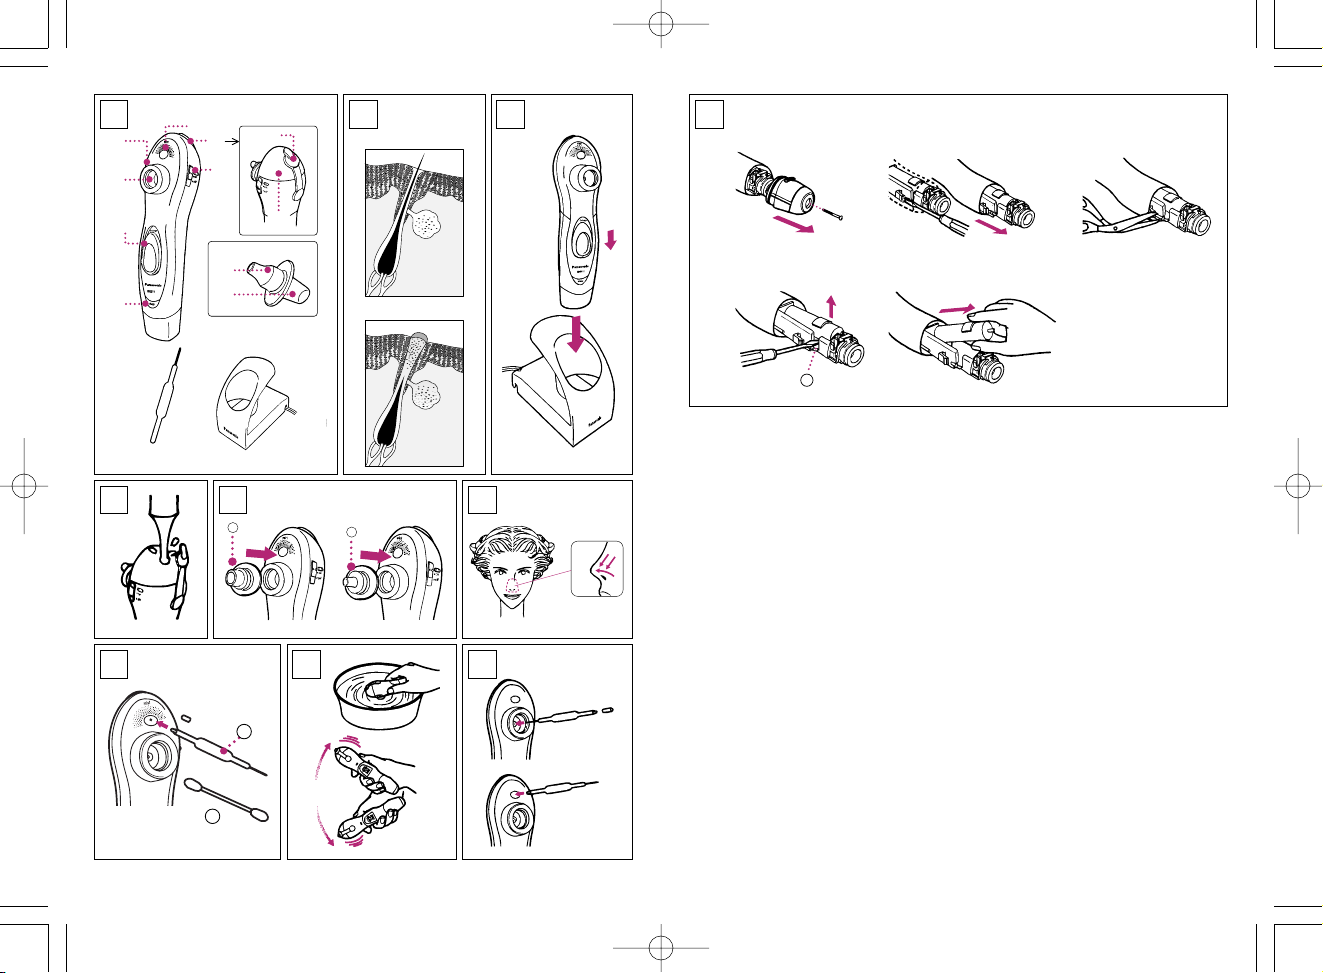
Parts identification (Fig.1)
(A) Mist Nozzle
(B) Water Storage Section
(1) Water Tank
(2) Cap
(C) Mist Switch
(D) Cup Socket
(E) Suction Hole (Filter)
(F) Power Switch
1/0·charge
(G) Charge Indicator Light
(H) Suction Cup
(3) Point Cup
(4) Wide Cup
(I) Cleaning Tool
(J) Charger
Useful information
What you need to know about
blockage and inflammation of
the facial sebaceous glands.
Above-average secretion by the
sebaceous glands leads to oily
skin. This over-activity is caused by
hormonal changes, especially
during puberty, inappropriate highfat or high-protein diet, excessive
consumption of alcohol, etc.
This over-production of sebum
causes the pores to widen. Oily
skin can have a shiny or dried
appearance, depending on whether
the flow of sebum into the pore has
an oily consistency or has already
dried within the follicle.
Oily skin is usually “impure”,
because it provides an excellent
feeding ground for bacteria. The
oxygen supply within a healthy pore
normally restricts the spread of
bacteria. There is a correlation
between this bacterial spread and a
pore becoming visible to the eye. If
the pore becomes blocked, the
environment becomes anaerobic
(i.e. oxygen-free), ideal for
Propionibacterium acne, which
spreads like wildfire. This leads to
inflammation and blemishes.
Normal pore (Fig. 2-a)
A normal amount of oil is secreted
from the pore.
Blocked pore (Fig. 2-b)
Oil trapped in the pore oxidizes and
solidifies, causing clogged pores
and blackheads.
Blackheads should not be removed
by squeezing with fingertips or
fingernails, as this can damage the
skin and cause further inflammation.
Cleansing two or three times a week
is recommended.
Charging your Pore
Cleanser
Before using the appliance for the
first time please charge it for at
least 12 hours. (Fig. 3)
Place the Charger upright on a flat
surface. Plug the Charger into an
AC outlet. It will adjust automatically
to voltages between 100-240 V AC.
Switch the appliance off and place
it upright into the Charger with the
switch facing toward the front.
When the appliance is placed in the
5
correct position, the charge
indicator light will glow and stay on
until the appliance is removed from
the Charger. You can fully charge
the appliance in 12 hours if it
seems losing its power.
A full charge will supply enough
power for about 20 minutes of usage.
Using your Pore Cleanser
• For best results the pores of the
skin should be enlarged. For this
reason it is a good idea to perform
your skin care routine when taking
your bath as heat from hot water
will enlarge your pores.
• For best results, use the appliance two or three times a week as
part of your skin care routine.
1. Remove any make-up from your
face, leaving just bare skin.
Never use the appliance on
skin coated with cleansing
lotion or facial soap.
2. Add water to the Water Tank.
(Fig. 4)
Unplug the Cap and supply tap
water into the Water Tank, then
replace the Cap.
3. Attach the Wide Cup (Fa ) to the
Cup Socket, making sure that it
is facing outward. (Fig. 5)
4. Slide the Mist Switch to the “on”
position, then slide the Power
Switch to the “1” position.
• The Mist Nozzle will produce
a fine spray of water.
• If water drips from the face,
wipe it off with a towel or set
the Mist Switch to the “off”
position.
5. Move the appliance slowly
around the tip of the nose. (As
explained below and shown by
Fig. 6.)
•
Roughly cleanse the entire
surface of nose without focusing
on any particularly spot.
6. Now turn the Power Switch off
and reverse the suction cup so
that the Point Cup (Fb ) is facing
outward. Then turn it on again.
(Fig. 5)
7. Move the Point Cup over the
nose in the way described by
the arrows. (As explained below
and shown by Fig. 6.)
8.
Rinse your face, and apply
moisturizing lotion or any other
skin conditioner you normally use.
• Keep your face sufficiently
moisturized.
Around the tip and wings of
the nose (Fig. 6)
1. Move the cup all over the nose.
2. Limit use of the Wide Cup over
the whole nose to one minute
or less.
3. Limit use of the Point Cup to
two minutes or less.
(Do not repeatedly move over
the wings of nostrils where the
skin is thin.)
Use only the Point Cup if you have
concerns about skin irritation.
EH2511WOIEU4.qxd 05.9.68:19 ページ4
Page 4

For environmental
protection and recycling
of materials
This pore cleanser contains NickelMetal Hydride (Ni-MH) battery.
Please make sure that the battery
is disposed of at an officially
assigned location if there is one in
your country.
How to remove the built-in
rechargeable battery before
disposal of the pore cleanser
(Fig. 10)
The battery in this pore cleanser is
not intended to be replaced by
consumers. However, the battery
may be replaced at an authorized
service center. The procedure
described below is intended only for
removal of the rechargeable battery
for the purpose of proper disposal.
Always make sure that the battery
have been removed from the pore
cleanser before disposing of it.
1. Unscrew the screw and remove
the battery cover.
2. Unlatch the hooks on either
side and pull out from the body
of the appliance.
3. Cut the red and black lead
wires on either side and further
pull out from the body of the
appliance.
4. Insert a flat-head screwdriver
into the slot (F
a ) and lift up the
Ni-MH battery.
5. Remove the Ni-MH battery.
Caution
• Pull out the plug of the Charger
when not in use. Always grasp the
plug while unplugging and never
unplug by pulling the cord.
• Do not cut, damage, or modify the
cord. Do not pull, twist, or bend
the cord with unnecessary force.
Do not place heavy objects on the
cord or allow the cord to get
pinched in between objects. Do
not wind the cord around the
appliance.
• The supply cord of this appliance
can not be replaced; if the cord is
damaged, the appliance should
be discarded.
• Do not use the appliance near
inflammable materials, such as
benzine, paint thinner, sprays, etc.
• Do not use this appliance with a
damaged or broken cup, since
injury may be occurred.
• When using the appliance, take
care to use it only on the nose.
Do not stop at any one point on
the skin.
• Do not use the appliance on
pimples, blemishes, sunburned or
broken skin or any skin inflammations.
• Do not pass the appliance over
the same point more than three
times if you have sensitive skin.
• Never touch the Charger plug
while your hands are wet.
• Do not place or store the Charger
near water.
• Never reach for Charger that has
fallen into water. Unplug
immediately.
7
Caution during use
When mist is not released,
follow the steps below to
clean the appliance.
(Fig. 7)
1. Turn the Power Switch off and
insert the pointed end (remove
the cap) of the Cleaning Tool
(F
a ) into the Mist Nozzle for a
few times.
2. Fill the Water Tank with water.
3. When both the Mist Switch and
Power Switch are turned on,
block the Mist Nozzle with the
pointed end of the Cleaning
Tool for approximately 10
seconds (while checking to see
if the water in the tank is
bubbling).
- A cotton swab (Fb ) may be
used instead of the Cleaning
Tool.
4. Drain the water out of the Water
Tank.
• If the mist is not released, repeat
steps 1-4. If the mist is still not
released after repeating steps 1-4,
take the appliance to your dealer
for service.
• Water droplets may sometimes be
found on the appliance. This is
the water that has remained after
inspection and is sanitary.
Cleaning
After using the appliance
(Fig. 8)
• Both the body of the appliance
and the cups can be washed
using water.
1. Put some water (warm if you
like) in a washbowl.
• Do not use hot water
• Do not use detergent
2. Remove the suction cup, soak
the Suction Hole (Filter) in the
water, and turn the Power
Switch on to wash for about 15
seconds.
3. Remove the appliance from the
water. Then, leaving the
appliance switched on for about
30 seconds to allow water to
drain from the main body,
shake the water off.
4. Empty the Water Tank and
allow it to dry by leaving the
Cap unplugged.
5. Wipe the body of the appliance
and the reversible cups with
tissues or cotton buds, taking
particular care to thoroughly
wipe the insides of the suction
cup.
Regular maintenance
(Fig. 9)
• Suction Hole (Filter) and Mist
Nozzle
Turn the Power Switch off and
remove any accumulated dirt
using the Cleaning Tool provided.
• Charger
Clean the Charger using a cloth
and soapy water, then dry
thoroughly before resuming use.
• Do not use detergent to avoid the
risk of discolouration, deterioration, or cracking.
6
EH2511WOIEU4.qxd 05.9.68:19 ページ6
Page 5

9
• Before charging the appliance,
wipe off any moisture from the
appliance and Charger.
• Keep the appliance away from
children.
• Use the appliance only for its
intended use as described in this
manual.
• Do not charge the appliance if you
have damaged it by dropping or
knocking it.
• Unplug the Charger before
cleaning.
• Do not use thinner, benzine, or
any other solvents to clean the
appliance.
• Do not charge the appliance
where the temperature is below 0
degrees Celsius or above 40
degrees Celsius, or when
exposed to direct sunlight, heat or
excessive moisture.
• Use only the included Charger
(RE6-13).
• Dry the appliance completely
before setting it in the Charger.
• Do not use an extension cord to
connect the Charger to an
electrical outlet.
• Do not leave the appliance
submerged in water for long
periods of time.
• Rinse the appliance in tap water;
do not use salt water, detergent or
boiled water.
• Do not try to repair the appliance
yourself. Doing this will invalidate
the guarantee. A damaged or
defective appliance should be
returned to the customer service
center or to an authorized
customer service agent.
Specifications
Power supply: AC 100 – 240V
Charging time: 12 hours
Weight: 170g (Main body)
150g (Charger)
Power consumption:
Approx. 35mA
Suction: 40kPa
Information on Disposal
for Users of Waste
Electrical & Electronic
Equipment (private
households)
This symbol on the
products and/or
accompanying
documents means that
used electrical and
electronic products
should not be mixed with general
household waste.
For proper treatment, recovery and
recycling, please take these
products to designated collection
points, where they will be accepted
on a free of charge basis.
Alternatively, in some countries you
may be able to return your products
to your local retailer upon the
purchase of an equivalent new
product.
Disposing of this product correctly
will help to save valuable resources
and prevent any potential negative
effects on human health and the
environment which could otherwise
arise from inappropriate waste
handling. Please contact your local
authority for further details of your
nearest designated collection point.
Penalties may be applicable for
incorrect disposal of this waste, in
accordance with national
legislation.
For business users in the
European Union
If you wish to discard electrical and
electronic equipment, please
contact your dealer or supplier for
further information.
Information on Disposal in
other Countries outside
the European Union
This symbol is only valid in the
European Union.
If you wish to discard this product,
please contact your local authorities
or dealer and ask for the correct
method of disposal.
8
EH2511WOIEU4.qxd 05.9.68:19 ページ8
Page 6

1110
ebene Fläche und schließen Sie es
an einer Netzsteckdose an. Das
Aufladegerät stellt sich automatisch
auf Netzspannungen von 100 bis
240 V ein.
Schalten Sie das Gerät aus und
stellen Sie es in das Ladegerät, so
dass der Schalter nach vorne
gerichtet ist.
Wenn sich das Gerät in der richtigen
Position befindet, leuchtet die
Ladeanzeige bis das Gerät aus dem
Ladegerät entfernt wird. Bei einem
Leistungsabfall können Sie das
Gerät 12 Stunden lang voll aufladen.
Eine volle Aufladung reicht für eine
Betriebsdauer von ungefähr 20
Minuten aus.
Verwendung des
Porenreiniger
• Für ein gutes Resultat sollten die
Hautporen erweitert werden.
Daher solten Sie die Hautpflege
beim Baden durchführen, wenn
die Poren sich durch das warme
Wasser vergrößern.
• Verwenden Sie das Gerät für die
Hautpflege zwei- bis drei Mal
wöchentlich.
1. Entfernen Sie Make-up
vollständig. Verwenden Sie das
Gerät nicht, wenn sich auf der
Haut noch Reinigungslotion
oder Gesichtsseife befindet.
2. Füllen Sie den Behälter mit
Wasser. (Abb. 4)
Öffnen sie den Deckel und
füllen Sie den Behälter mit
Wasser, bringen Sie danach
den Deckel wieder an.
3. Bringen Sie den großen Napf
(F
a ) am Ansatz an, so dass er
nach außen gerichtet ist.
(Abb. 5)
4. Stellen Sie den Nebelschalter in
die Position “on” und stellen Sie
danach den Ein-/Ausschalter in
die Position “1”.
• Aus der Nebeldüse tritt ein
feiner Nebelstrahl aus.
• Falls Wasser abtropft, können
Sie es mit einem Tuch
abwischen oder den
Nebelschalter in die Position
“off” stellen.
5. Bewegen Sie das Gerät
langsam um die Nasenspitze.
(Wie nachstehend erklärt und in
Abb. 6 gezeigt.)
• Reinigen Sie die Nase ohne
sich auf eine besondere Stelle
zu konzentrieren.
6. Schalten Sie nun den Ein-/
Ausschalter aus und kehren Sie
den Saugnapf um, so dass der
kleine Napf (Fb ) nach außen
gerichtet ist. Schalten Sie
danach das Gerät wieder ein.
(Abb. 5)
7. Bewegen Sie den kleinen Napf
in der mit den Pfeilen
dargestellten Weise über die
Nase. (Wie nachstehend erklärt
und in Abb. 6 gezeigt.)
8. Waschen Sie das Gesicht ab.
Verwenden Sie danach keine
Feuchtigkeitslotion oder
Hautpflegemittel.
• Halten Sie das Gesicht
ausreichend feucht.
Bezeichnung der Teile (Abb. 1)
(A) Nebeldüse
(B) Wasserbehälter
(1) Behälter
(2) Deckel
(C) Nebelschalter
(D) Ansatz
(E) Saugöffnung (Filter)
(F) Ein/Aus-Schalter
1/0 Aufladen
(G) Ladeanzeige
(H) Saugnapf
(3) Kleiner Napf
(4) Großer Napf
(I) Reiniger
(J) Aufladegerät
Nützliche Information
Was Sie über Verstopfung
und Entzündung von
Gesichtstalgdrüsen wissen
müssen.
Eine übermäßige Ausscheidung der
Talgdrüsen führt zu einer fettigen
Haut. Eine solche übermäßige
Ausscheidung kann durch
Hormonänderungen, besonders
während der Pubertät, durch
besonders fett- oder proteinreiche
Kost, durch übermäßigen Alkoholkonsum usw. verursacht werden.
Eine übermäßige Talgausscheidung
hat zur Folge, dass sich die Poren
weiten. Eine fettige Haut kann
glänzend oder trocken aussehen.
Dies hängt davon ab, ob der Talg
eine ölige Konsistenz aufweist oder
bereits in den Follikeln
eingetrocknet ist.
Eine fettige Haut ist normalerweise
“unrein”, weil sie einen idealen
Nährboden für Bakterien bietet. Die
Ausbreitung von Bakterien wird
durch die Sauerstoffzufuhr von
gesunden Poren geregelt. Zwischen
der Ausbreitung von Bakterien und
dem Sichtbarwerden von Poren
besteht ein Zusammenhang. Bei
verstopften Poren wird die
Umgebung anaerob sauerstoffarm,
so dass sich die Propioni-Bakterien
ungehindert ausbreiten können. Die
Folge sind Akne und Entzündungen.
Normale Pore (Abb. 2-a)
Eine normale Menge von Talg wird
von der Pore ausgeschieden.
Verstopfte Pore (Abb. 2-b)
Das Öl in der Pore ist oxidiert und
ausgehärtet, was zur Verstopfung
der Pore mit schwarzen Mitessern
führt.
Mitesser sollten nicht durch
Ausquetschen mit den Fingernägeln
entfernt werden, weil sich bei
auftretenden Hautschäden die
Entzündung noch weiter verstärkt.
Pro Woche wird eine zwei- bis
dreimalige Reinigung empfohlen.
Aufladen des
Porenreiniger
Vor der ersten Inbetriebnahme
muss der Porenreiniger für
mindestens 12 Stunden aufgeladen
werden. (Abb. 3)
Stellen Sie das Ladegerät auf eine
EH2511WOIEU4.qxd 05.9.68:19 ページ10
Page 7

1312
das Wasser ablaufen kann und
schütteln Sie das Wasser ab.
4. Leeren Sie den Wasserbehälter
und lassen Sie ihn bei
geöffnetem Deckel trocknen.
5. Wischen Sie das Gerät und die
umkehrbaren Näpfe mit
Papiertaschentüchern oder
Wattestäbchen ab und achten
Sie besonders darauf, die
Innenseite der Näpfe gründlich
abzureiben.
Regelmäßige Pflege (Abb. 9)
• Saugöffnung (Filter) und
Nebeldüse
Schalten Sie den Ein-/Ausschalter
aus und entfernen Sie den
angesammelten Schmutz mit dem
mitgelieferten Reiniger.
• Ladegerät
Reinigen Sie das Ladegerät mit
einem mit Seifenwasser
angefeuchteten Tuch und lassen
Sie es vollständig trocknen, bevor
Sie es wiederverwenden.
• Verwenden Sie kein Reinigungs-
mittel, weil Verfärbungen,
Beschädigungen oder Risse
verursacht werden können.
Für den Umweltschutz
und die Materialwiederverwertung
Im Porenreiniger wird ein Ni-MHAkku verwendet.
Der Akku muss in einer
entsprechenden Sammelstelle
entsorgt werden, falls in Ihrem Land
eine solche vorhanden ist.
Ausbau des Akkus vor dem
Entsorgen des Porenreiniger
(Abb. 10)
Es ist nicht vorgesehen, dass der
Akku in diesem Pore Cleanser
durch den Besitzer ausgetauscht
wird. Es ist jedoch möglich den
Akku von einem autorisierten
Kundendienst austauschen zu
lassen. Nachstehend wird nur der
Ausbau des Akkus für eine
fachgerechte Entsorgung
beschrieben.
Vor dem Entsorgen muss immer
sicher gestellt werden, dass der
Akku aus dem Porenreiniger
entfernt wurde.
1. Lösen Sie die Schraube und
entfernen Sie die
Akkufachabdeckung.
2. Lösen Sie den Haken auf einer
Seite und ziehen Sie den Akku
aus dem Gerät.
3. Schneiden Sie das rote und das
schwarze Kabel an einer Seite
ab und ziehen Sie den Akku
noch weiter hinaus.
4. Stecken Sie einen flachen
Schraubendreher in den Schlitz
(Fa ) und heben Sie den Akku
an.
5. Nehmen Sie den Akku heraus.
Vorsicht
• Ziehen Sie den Stecker bei
Nichtverwendung des
Ladegerätes heraus. Halten Sie
beim Herausziehen immer den
Stecker fest, ziehen Sie zum
Um die Nasenspitze und die
Nasenflügel (Abb. 6)
1. Bewegen Sie den Napf über die
Nase.
2. Wenden Sie den großen Napf
nicht länger als eine Minute auf
der ganzen Nase an.
3. Wenden Sie den kleinen Napf
nicht länger als zwei Minuten an.
(Wenden Sie den Napf nicht
wiederholt an den Nasenflügeln
und den Nasenlöchern an, da
die Haut an diesen Stellen dünn
ist.)
Verwenden Sie bei Befürchtung von
Hautreizungen nur den kleinen Napf.
Vorsicht während des
Betriebs
Falls kein Nebel erzeugt wird,
führen Sie die nachstehenden
Schritte für die
Gerätereinigung aus.
(Abb.7)
1. Schalten Sie den Ein/AusSchalter aus und stecken Sie
das spitze Ende (abgenommener Deckel) des Reinigungswerkzeugs (F
a ) ein paar Mal in
die Nebeldüse.
2. Füllen Sie den Behälter mit
Wasser.
3. Blockieren Sie bei
eingeschaltetem Nebel- und
Ein/Aus-Schalter die Nebeldüse
mit dem spitzen Ende des
Reinigungswerkzeugs für
ungefähr 10 Sekunden und
kontrollieren Sie, ob das
Wasser im Behälter siedet.
- Anstelle des Reinigungswerkzeugs kann auch ein
Wattetupfer (F
b ) verwendet
werden.
4. Gießen Sie das Wasser aus
dem Behälter.
• Falls kein Nebel erzeugt wird,
müssen Sie die Schritte 1 bis 4
wiederholen. Falls auch danach
immer noch kein Nebel erzeugt
wird, müssen Sie das Gerät zu
Ihrem Händler bringen.
• Auf dem Gerät können manchmal
Wassertröpfchen von der
Kontrolle zurück bleiben, die
jedoch hygienisch sind.
Reinigung
Nach der Verwendung des
Geräts
(Abb. 8)
• Das Gehäuse und die Näpfe des
Geräts lassen sich mit Wasser
abwaschen.
1. Füllen Sie ein Waschbecken
mit etwas warmen Wasser.
• Verwenden Sie kein heißes
Wasser.
• Verwenden Sie keine
Reinigungsmittel.
2. Entfernen Sie den Saugnapf,
legen Sie die Saugöffnung
(Filter) ins Wasser und schalten
Sie den Ein-/Ausschalter zum
Reinigen für ungefähr 15
Sekunden ein.
3. Nehmen Sie das Gerät aus
dem Wasser. Lassen Sie das
Gerät für ungefähr 30
Sekunden eingeschaltet, damit
EH2511WOIEU4.qxd 05.9.68:19 ページ12
Page 8

1514
• Das Gerät darf nicht für längere
Zeit in Wasser getaucht werden.
• Spülen Sie das Gerät mit
gewöhnlichem Wasser ab.
Verwenden Sie kein Salzwasser,
Reinigungsmittel oder gekochtes
Wasser.
• Versuchen Sie nicht das Gerät
selbst zu reparieren, weil dadurch
die Garantieleistungen
beeinträchtigt werden. Ein
beschädigtes oder defektes Gerät
sollte an das Kundendienstzentrum
oder an eine autorisierte
Kundendienststelle zurückgegeben
werden.
Technische Daten
Stromquelle: Netz 100 - 240 V
Aufladezeit: 12 Stunden
Gewicht: 170 g (Gerät)
150 g (Aufladegerät)
Leistungsaufnahme: ca. 35 mA
Saugung: 40 kPa
Benutzerinformationen zur
Entsorgung von
elektrischen und
elektronischen Geräten
(private Haushalte)
Entsprechend der
grundlegenden
Firmengrundsätzen der
Panasonic-Gruppe wurde
ihr Produkt aus
hochwertigen Materialien
und Komponenten entwickelt und
hergestellt, die recycelbar und
wieder verwendbar sind.
Dieses Symbol auf Produkten
und/oder begleitenden Dokumenten
bedeutet, dass elektrische und
elektronische Produkte am Ende
ihrer Lebensdauer vom Hausmüll
getrennt entsorgt werden müssen.
Bringen Sie bitte diese Produkte für
die Behandlung,
Rohstoffrückgewinnung und
Recycling zu den eingerichteten
kommunalen Sammelstellen bzw.
Wertstoffsammelhöfen, die diese
Geräte kostenlos entgegennehmen.
Die ordnungsgemäße Entsorgung
dieses Produkts dient dem
Umweltschutz und verhindert
mögliche schädliche Auswirkungen
auf Mensch und Umwelt, die sich
aus einer unsachgemäßen
Handhabung der Geräte am Ende
Ihrer Lebensdauer ergeben
könnten.
Genauere Informationen zur
nächstgelegenen Sammelstelle
bzw. Recyclinghof erhalten Sie bei
Ihrer Gemeindeverwaltung.
Für Geschäftskunden in
der Europäischen Union
Bitte treten Sie mit Ihrem Händler
oder Lieferanten in Kontakt, wenn
Sie elektrische und elektronische
Geräte entsorgen möchten. Er hält
weitere Informationen für sie bereit.
Informationen zur
Entsorgung in Ländern
außerhalb der
Europäischen Union
Dieses Symbol ist nur in der
Europäischen Union gültig.
Lösen des Steckers niemals am
Kabel.
• Das Kabel darf nicht
angeschnitten, beschädigt oder
modifiziert werden. Das Kabel
darf nicht mit übermäßiger Kraft
gezogen, verdreht oder gebogen
werden. Es dürfen keine
schweren Gegenstände auf das
Netzkabel gestellt werden, das
Kabel darf auch nicht zwischen
Gegenständen eingeklemmt
werden. Wickeln Sie das Kabel
nicht um das Gerät.
• Das Kabel dieses Geräts lässt
sich nicht ersetzen. Bei einem
beschädigten Kabel sollte das
Gerät nicht mehr verwendet
werden.
• Verwenden Sie das Gerät nicht in
der Nähe von brennbaren
Materialien, wie Benzin,
Farbverdünner, Sprays usw.
• Verwenden Sie das Gerät nicht
mit einem beschädigten oder
gebrochenem Napf, weil
Verletzungen verursacht werden
können.
• Beachten Sie bitte, dass das
Gerät nur an der Nase
angewendet werden sollte. Halten
Sie bei der Anwendung auf der
Haut nicht an einer Stelle still.
• Verwenden Sie das Gerät nicht
bei Pickeln, beschädigter,
sonnenverbrannter Haut oder bei
Hautentzündungen.
• Führen Sie das Gerät bei
empfindlicher Haut nicht mehr als
drei Mal über die gleiche
Hautstelle.
• Berühren Sie den Netzstecker des
Aufladegerätes niemals mit
nassen Händen.
• Das Ladegerät darf nicht in der
Nähe von Wasser aufgestellt oder
aufbewahrt werden.
• Fassen Sie nie ein ins Wasser
gefallenes Aufladegerät an. Ziehen
Sie den Stecker sofort heraus.
• Vor dem Aufladen muss jegliches
Wasser vom Gerät bzw. dem
Aufladegerät abgerieben werden.
• Halten Sie das Gerät von Kindern
fern.
• Das Gerät darf nur für den in
dieser Bedienungsanleitung
beschriebenen. Zweck verwendet
werden.
• Das Gerät darf nicht aufgeladen
werden, wenn es durch Fallenlassen oder Anstoßen beschädigt ist.
• Zum Reinigen muss der
Netzstecker aus der Steckdose
gezogen werden.
• Verwenden Sie zum Reinigen
keinen Farbverdünner, Benzin
oder andere flüchtige Substanzen.
• Laden Sie das Gerät nicht auf,
wenn die Umgebungstemperatur
unter 0 ºC oder über 40 °C liegt
oder wenn das Gerät direkter
Sonneneinstrahlung, Hitze oder
hoher Luftfeuchtigkeit ausgesetzt
ist.
• Verwenden Sie nur das mitgelieferte Aufladegerät (RE6-13).
• Das Gerät muss beim Einsetzen
in das Aufladegerät vollkommen
trocken sein.
• Verwenden Sie zum Anschließen
des Ladegerät an einer
Netzsteckdose kein
Verlängerungskabel.
EH2511WOIEU4.qxd 05.9.68:19 ページ14
 Loading...