

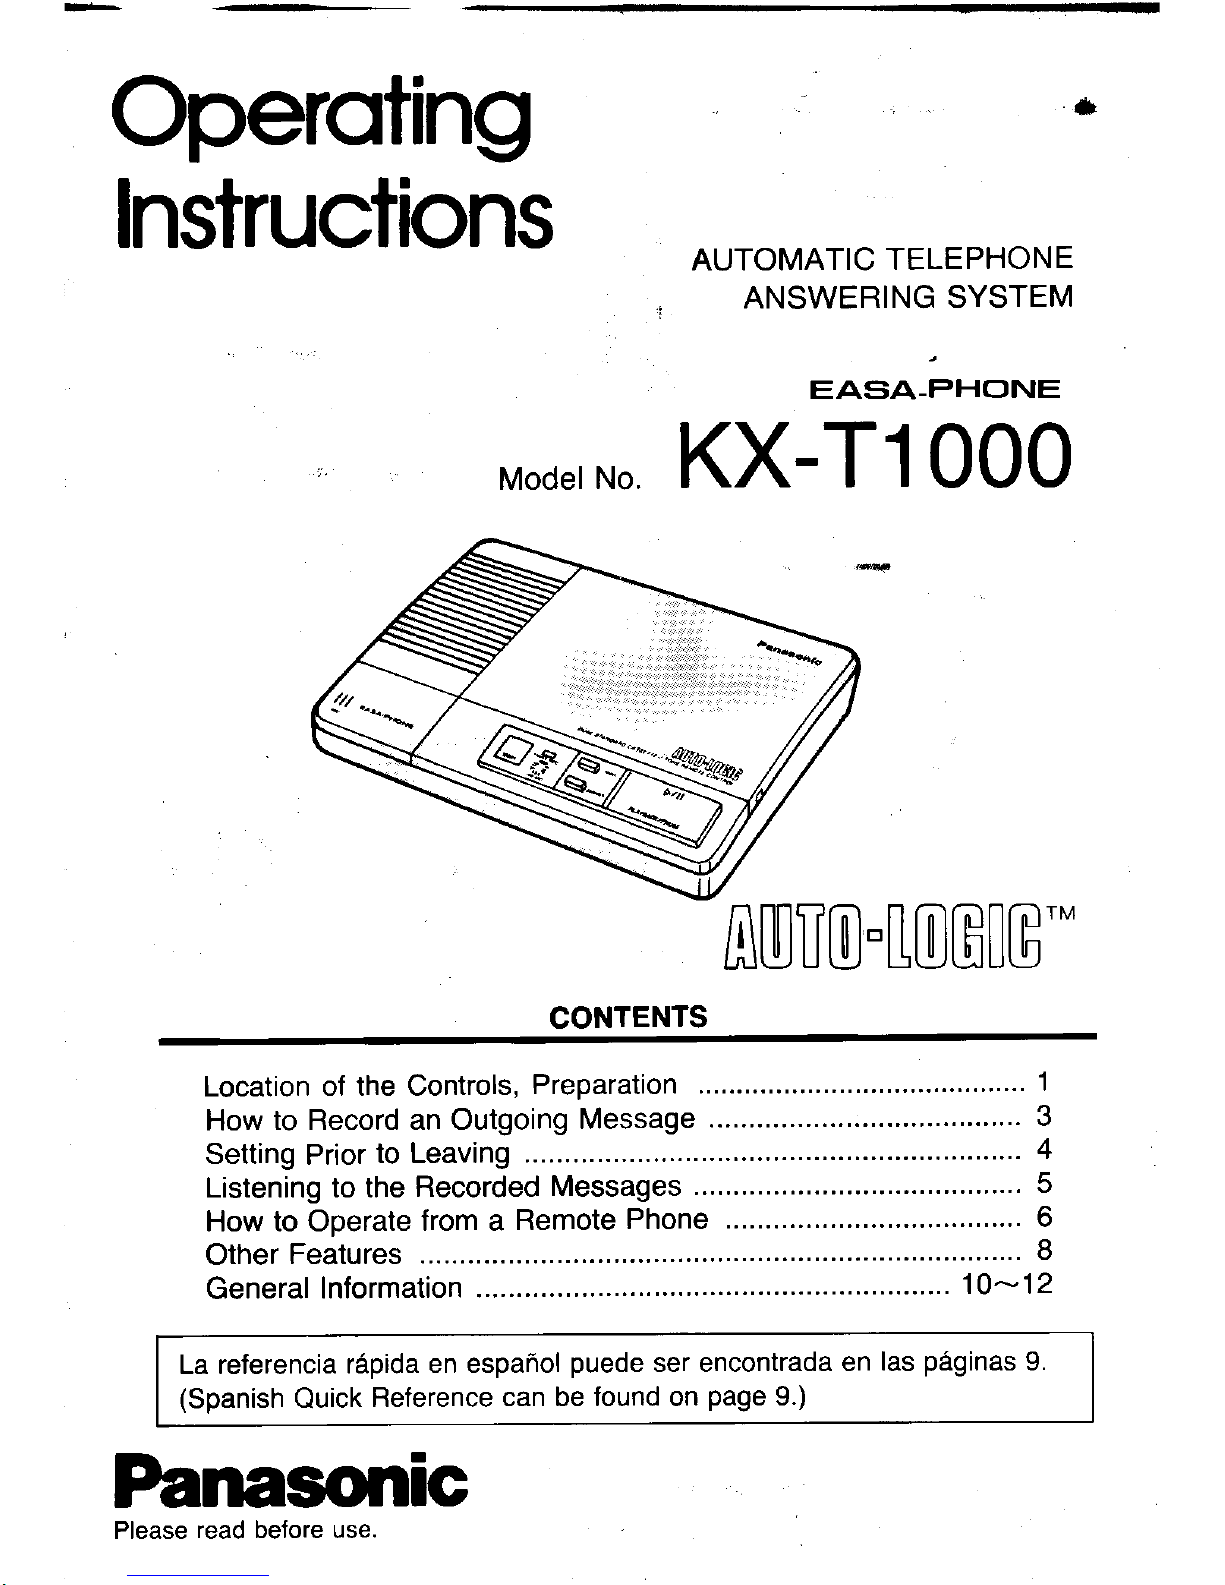
Panasonic Easa-Phone KX-T1000 Operating Instructions Manual
AUTOMATIC
TELEPHONE
ANSWERING
SYSTEM
EASA-PHONE
Mode,
No
KX-T1 000
AUUCI"IOBilG'"
CONTENTS
*@-
Location
of the Controls,
Preparation
.........................."........'.....
1
How
to Record an Outgoing
Message
...........'."...
3
Setting
Prior
to Leaving
.'..'...............
4
Listening to the
Recorded
Messages
....................
5
How to Operate
from a
Remote
Phone
.............".
6
Other
Features
...............
..................
8
General
Information
10-12
La referencia
r6pida
en espanol
puede
ser encontrada
en
las
p6ginas
9.
(Spanish
Quick
Reference
can be found on
page
9.)
Please
read before use.
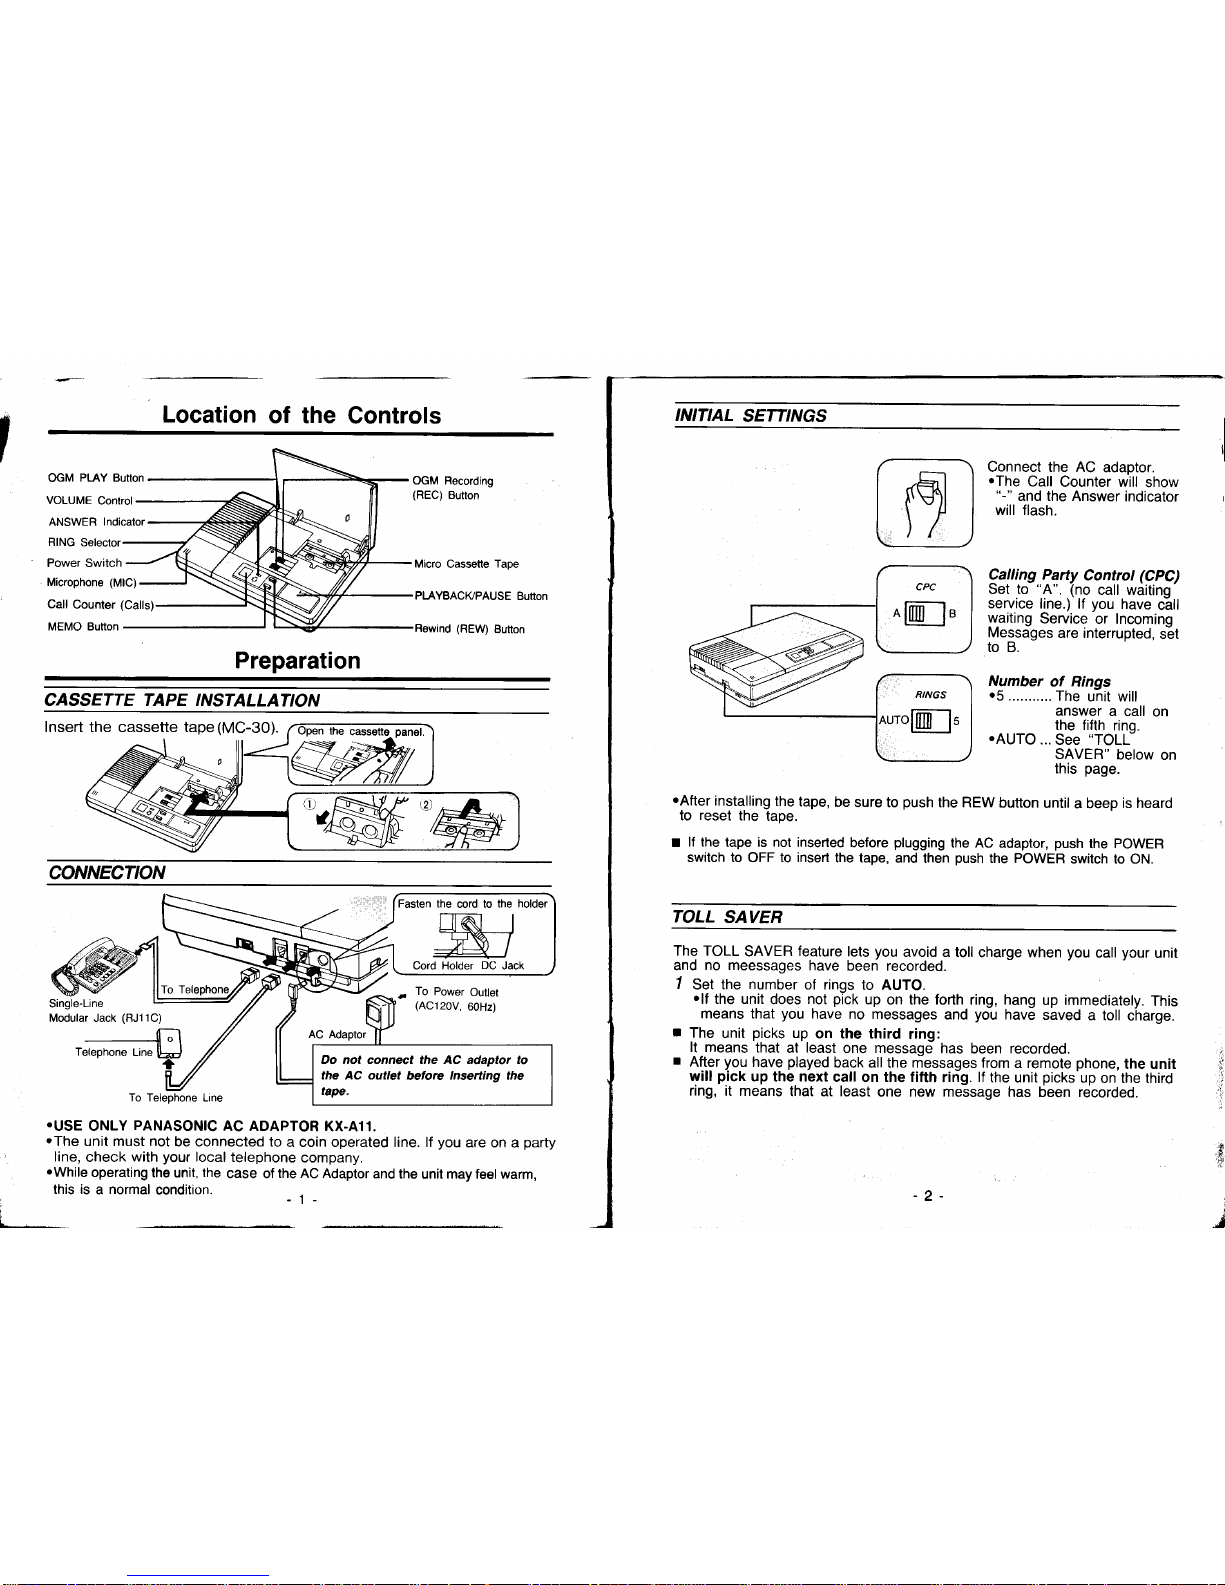
Location
of the
Controls
INITIAL
SETI''VGS
Connect the AC
adaptor
.The
Call
Counter will
show
"-"
and the Answer
indicator
will flash.
Qalling
Party
Control
(CPC)
Set to
"A".
(no
call waiting
service
line.) lf
you
have
c-all
waiting
Service
or Incoming
Messages
are interrupted,
sEt
to B.
Number
of Rings
o5
...........
The
unit will
answer
a call
on
the fifth
rino.
.AUTO
...
See
"TOLL'
SAVER"
below
on
this
page.
eAfter
installing
the
tape,
be
sure to
push
the REW
button
until
a beep
is heard
to
reset
the
tape.
I
lf the
tape is not inserted
before
plugging
the AC adaptor,
push
the POWER
switch to
OFF
to insert
the tape,
and then
push
the POWER
switch to ON.
TOLL
SAVER
OGM
PLAY Button
VOLUME
Control
ANSWER
Indicator
RING
Selector
Power Switch
Micro Cassette
Tape
P|AYBACKPAUSE
Button
Microphone
(MlC)
Call
Counter
(Calls)
MEMO Button
(REW)
Button
Preparation
CASSETTE TAPE INSTALLATION
CONNECTION
.USE
ONLY
PANASONIC
AC ADAPTOR
KX.AI1.
.The
unit must not
be connected to
a coin operated line. lf
you
are on
a
party
line,
check with
your
local
telephone
company.
oWhile
operating
the unit,
the
case of
the AC Adaptor
and
the unit may feel warm,
this is a normal
condition
-
The TOLL
SAVER
feature
lets
you
avoid a toll
charge when
you
call
your
unit
and
no
meessages have
been recorded.
1
Set the
number
of rings
to AUTO.
'lf
the unit
does
not
pick
up
on the forth ring, hang
up immediately.
This
means that
you
have
no messages
and
you
have
saved
a toll
charge.
r
The
unit
picks
up
on the third
ring:
It means
that
at
least
one messaqe
has
been
recorded.
I
After
you
have
played
back all the riessages from
a remote
phone,
the unit
will
pick
up the next
call on the fifth
ring.
lf
the
unit
picks'up
on the third
ring, it means
that at least
one new message
has been recorded.
;
]:'
',|
Insert the cassette tape
(MC-30).
Single-Line
Modular Jack
(RJ1
lC)
To
Power
Outlet
(AC120V,60Hz)
Cord Holder
DC
Jack
Do not connect the AC adaptor to
the AC outlet
belorc
Inserting
the
tape.
I
-2-
NOTE:
lf
you
pause
for over 2 seconds
while recording,
you
ry!!!
hear a
series of
warning tones
(6
beeps) and
the Call Counter
will show
"E".
If this
happens,
start
with step
1 again after the unit stops
rewinding.
olt
is
recommended to
place
an announcement
in the
OGM
as follows;
"You
have 1 minute for
ICM recording."
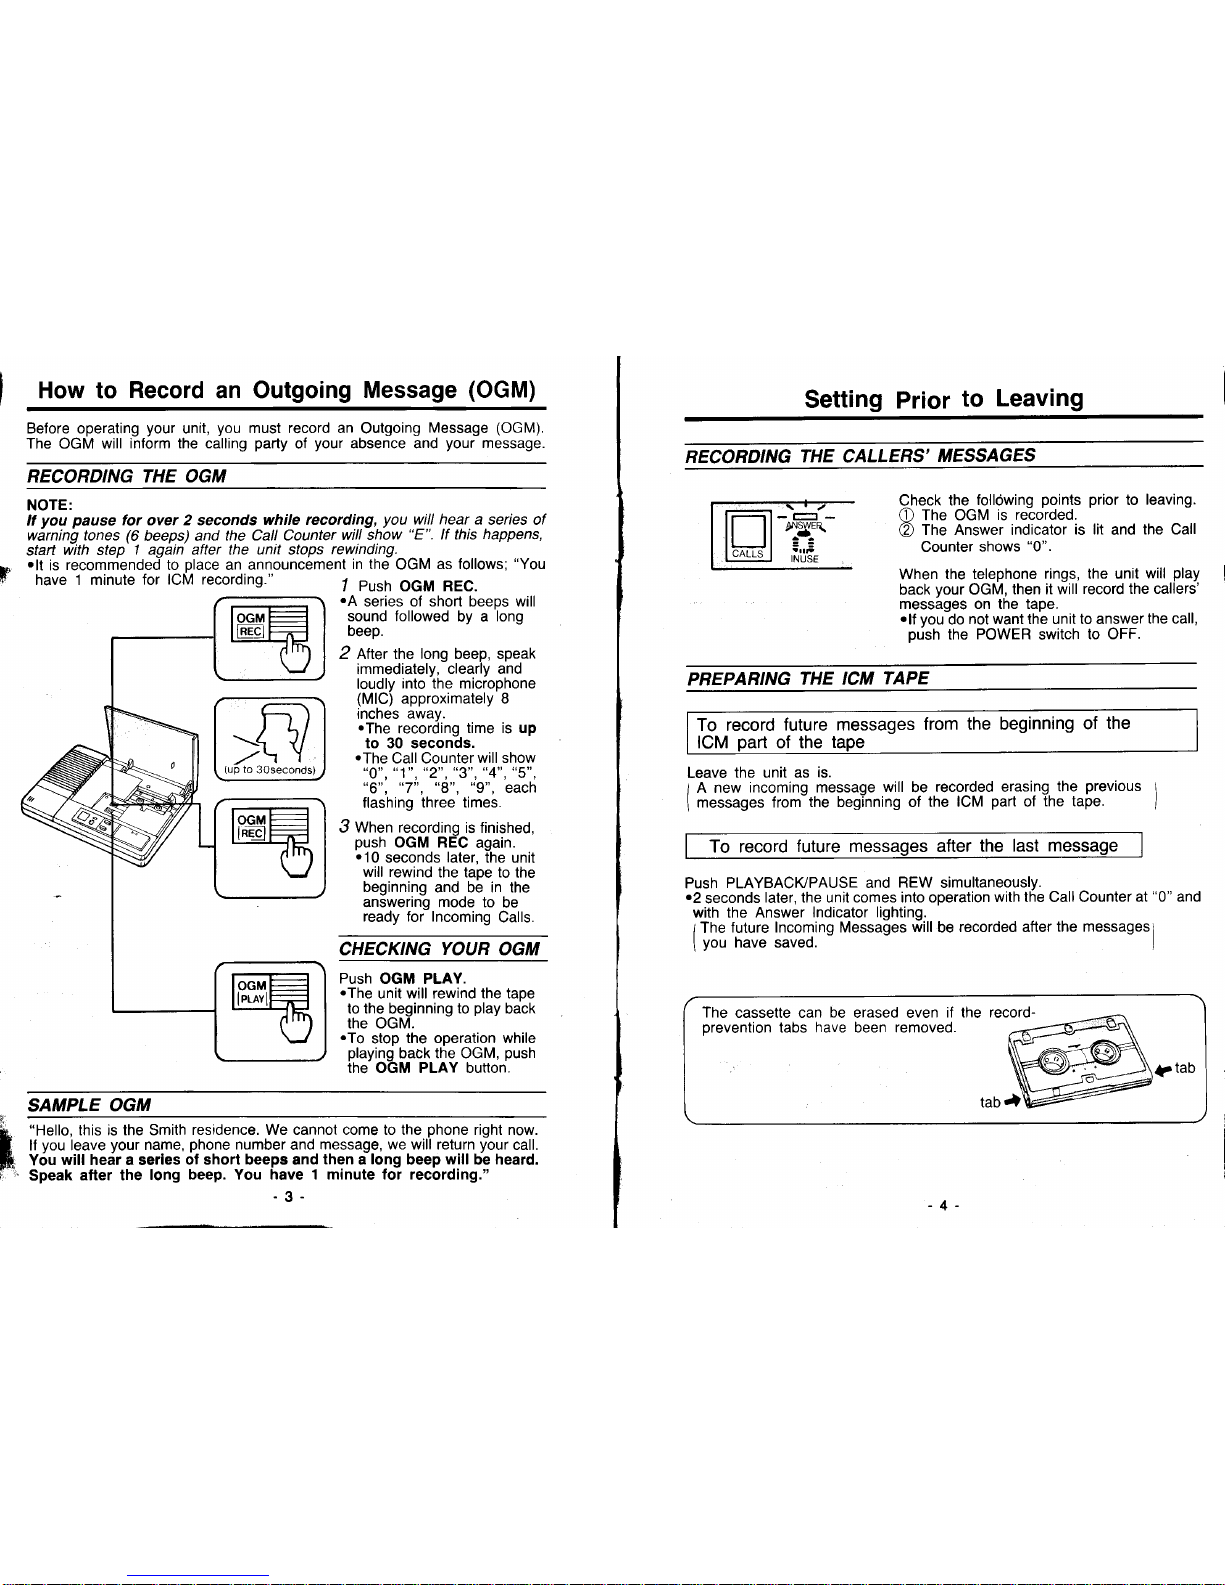
/
push
OGM REC.
How to
Record
an Outgoing
Message
(OGM)
Before operating
your
unit,
you
must record an
Outgoing
Message
(OGM).
The OGM will
inform the calling
party
of
your
absence and
your
message.
RECORDING THE OGM
.A
series of short beeps will
sound followed
by a
long
beeD.
2 After the long beep, speak
immediately,
clearly and
loudly
into the microphone
(MlC)
approximately I
inches away.
.The
recording
time is up
to 30 seconds.
.The
Call Counter
will show
"0", "1
",
"2",
"3", "4", "5",
"6",
"7", "8", "9",
each
flashing
three times.
3
When recording
is finished,
push
OGM REC
again.
o10
seconds
later,
the unit
will rewind
the tape to
the
beginning
and be in the
answering mode to
be
ready for Incoming
Calls.
CHECKING
YOUR
OGM
Push
OGM PLAY.
.The
unit will rewind the taoe
to the beginning
to
play
back
the OGM.
.To
stop
the operation while
playing
back the OGM,
push
the OGM PLAY button
SAMPLE
OGM
"Hello,
this is the Smith
residence. We cannot come to the
phone
right now.
ll
you
leave
your
name,
phone
number
and
message, we will return
your
call.
You
will hear a serles
ol short beeps and
then a long
beep
will
be heard.
Speak
after the
long
beep. You have 1 minute lor recording."
-3-
Setting
Prior
to
Leaving
RECORDING
THE
CALLERS'
MESSAGES
INUSE
Qheck
the
following
points prior
to
leaving.
(1)
The OGM is recorded.
@
ffre Answer indicator
is lit
and
the Call
Counter shows
"0".
When
the telephone
rings, the unit
will
play
back
your
OGM,
then it will
record the callers'
messages on the tape.
.lf
vou
do
not want the unit to answer
the call,
pLish
the
POWER
switch
to OFF.
PBEPARING
THE ICM
TAPE
To record
future messages
from
the beginning
of
the
ICM
part
of the
Leave
the unit as
is.
1
A new
incoming message
will be recorded erasing
the
previous
'
I
messages from
the beginning of
the ICM
part
of
the tape.
]
To record
future messaqes after
the last
Push
PLAYBACI(PAUSE and REW simultaneously.
.2
seconds
later, the unit comes into operation
with the Call Counter
at
"0"
and
with the Answer
Indicator lighting.
lThe
future Incoming Messages
will
be
recorded after
the messagesl
I
you
have saved.
I
The
cassette can
be
erased even
if the record-
Drevention
tabs have been removed.
 Loading...