

Panasonic E-37-V Operation Manual

i
E-37-V Dome Camera Operation Manual

ii
Table of Contents
1 Network Config .............................................................................................................. 1
1.1 Network Connection .......................................................................................... 1
1.2 Log in ................................................................................................................ 1
2 Live ................................................................................................................................ 6
2.1 Encode Setup ................................................................................................... 6
2.2 System Menu .................................................................................................... 7
2.3 Video Window Function Option ......................................................................... 7
2.4 Video Window Setup ......................................................................................... 8
2.4.1 Image Adjustment ....................................................................................... 8
2.4.2 Original Size ............................................................................................... 9
2.4.3 Full Screen ................................................................................................. 9
2.4.4 Width and Height Ratio ............................................................................. 10
2.4.5 Fluency Adjustment .................................................................................. 10
2.4.6 Focus zoom .............................................................................................. 10
3 Playback ...................................................................................................................... 11
3.1 Playback ......................................................................................................... 11
3.1.1 Function of Play ........................................................................................ 11
3.1.2 Playback File ............................................................................................ 12

iii
3.1.3 Playback Cut ............................................................................................ 15
3.1.4 Record Type ............................................................................................. 15
3.1.5 Progress Bar ............................................................................................. 15
3.1.6 Assistant Function .................................................................................... 16
3.2 Picture Playback ............................................................................................. 16
3.2.1 Play ........................................................................................................... 17
3.2.2 Playback File ............................................................................................ 17
3.2.3 Snapshot Type ......................................................................................... 19
4 Setup ........................................................................................................................... 21
4.1 Camera ........................................................................................................... 21
4.1.1 Conditions ................................................................................................. 21
4.1.2 Zoom and Focus ....................................................................................... 27
4.1.3 Video ........................................................................................................ 28
4.1.4 TCP/IP ...................................................................................................... 35
4.1.5 Connection ............................................................................................... 37
4.1.6 PPPoE ...................................................................................................... 39
4.1.7 DDNS ....................................................................................................... 40
4.1.8 IP filter ...................................................................................................... 42
4.1.9 SMTP (e-mail) ........................................................................................ 43

iv
4.1.10 UPnP ........................................................................................................ 44
4.1.11 Bonjour ..................................................................................................... 45
4.1.12 Multicast ................................................................................................... 46
4.1.13 802.1x ....................................................................................................... 47
4.1.14 QoS .......................................................................................................... 48
4.2 Event ............................................................................................................... 49
4.2.1 Video detect .............................................................................................. 49
4.2.2 Abnormity ................................................................................................. 54
4.3 Storage Management ..................................................................................... 56
4.3.1 Schedule ................................................................................................... 56
4.3.2 Destination ................................................................................................ 61
4.3.3 Record control .......................................................................................... 63
4.4 System ............................................................................................................ 64
4.4.1 General ..................................................................................................... 64
4.4.2 Account ..................................................................................................... 66
4.4.3 Default ...................................................................................................... 71
4.4.4 Import/Export ............................................................................................ 71
4.4.5 Auto Maintenance ..................................................................................... 72
4.4.6 Upgrade .................................................................................................... 73

v
4.5 Information ...................................................................................................... 73
4.5.1 Version ..................................................................................................... 73
4.5.2 Log ............................................................................................................ 74
4.5.3 Online User ............................................................................................... 75
5 Alarm ........................................................................................................................... 76
6 Log out ........................................................................................................................ 78
Important
The following functions are for reference only. Some series products may not
support all the functions listed below.
1
1 Network Config
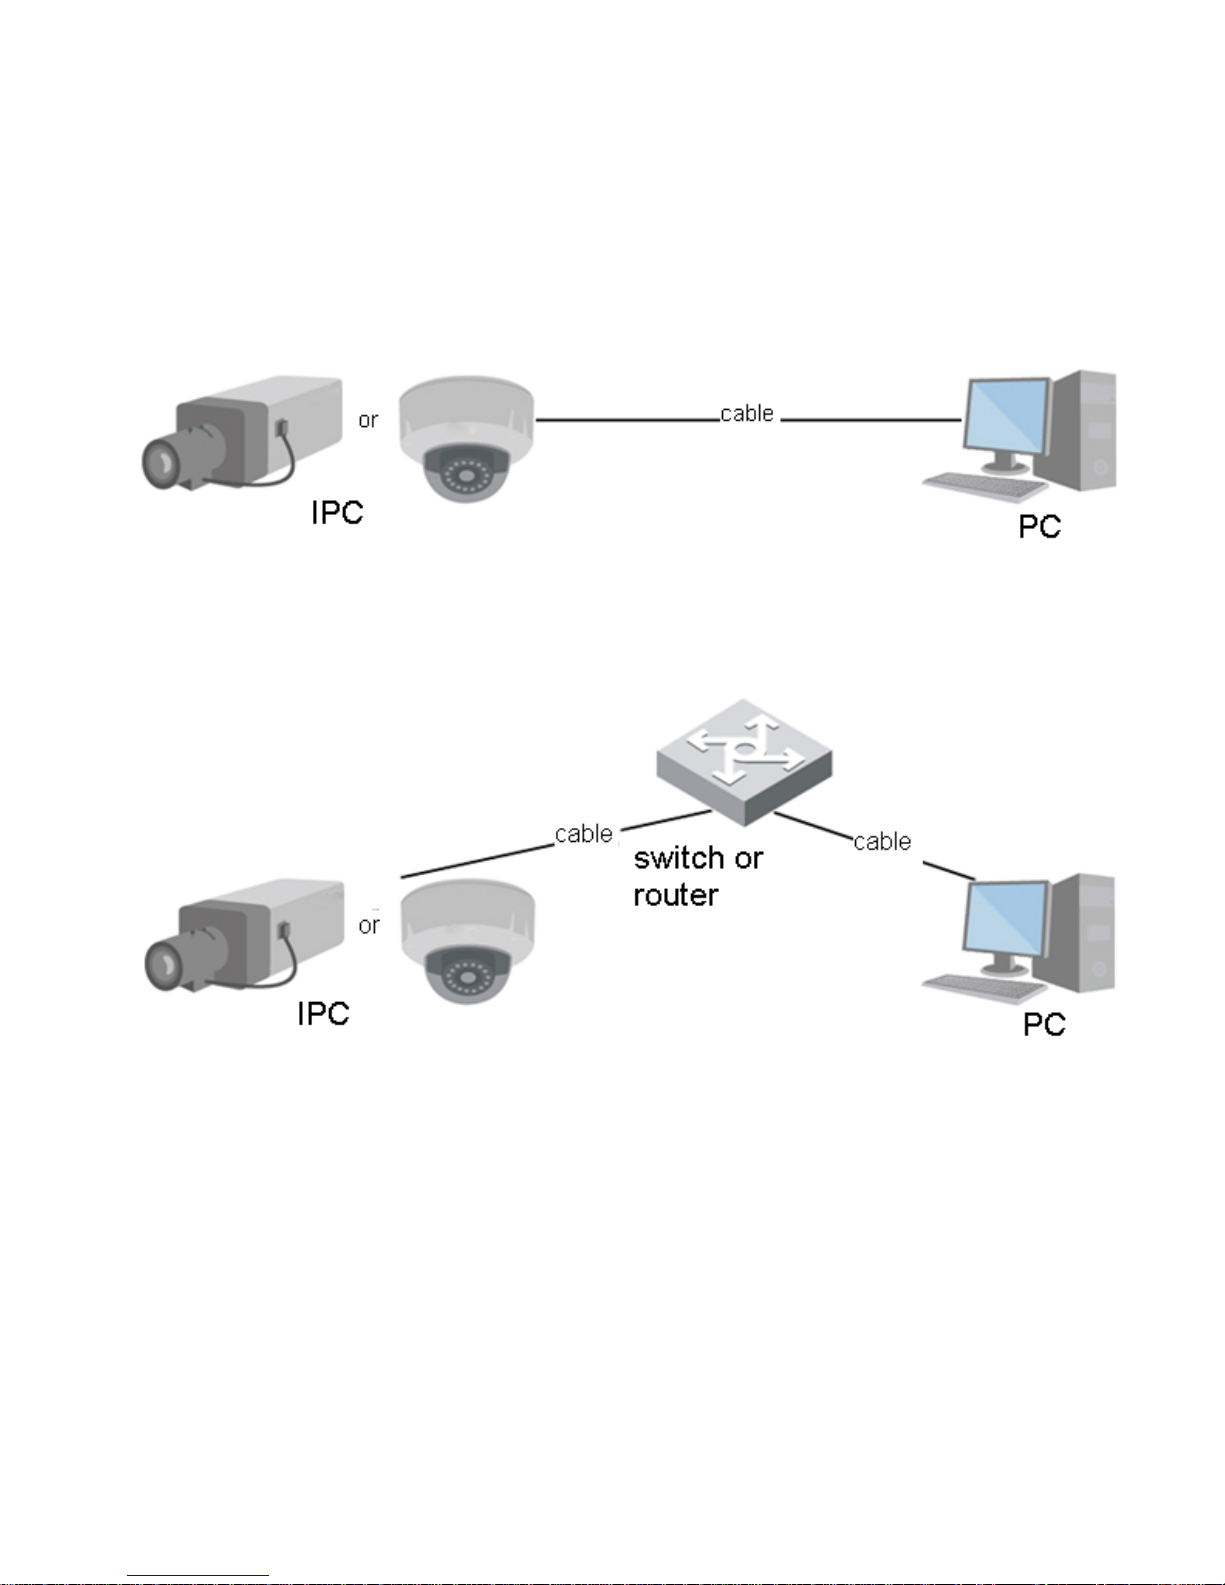
1.1 Network Connection
Network camera and PC connection mainly has two ways, see Figure 1- 1 and Figure 1-2.
Figure 1- 1
Figure 1-2
Before you access network camera via the Internet, you need to have its IP address. User can use
quick config tool to search IP of the network camera. Please refer to Quick Configuration Tool manual.
1.2 Log in
It needs to install WEB plug-in when you use WEB client for the first time, the exact operation steps are
shown as follows:
Open IE and input network camera address in the address bar. (The factory default IP address is
192.168.1.108).

2
After successful connection, the login interface is shown as in Figure 1-3; input your user name and
password. Default factory username is admin and password is 12345.
Figure 1-3
The system will display “Modify Password” prompt box for your first login, users need to modify the
password and save it properly.
Figure 1-4
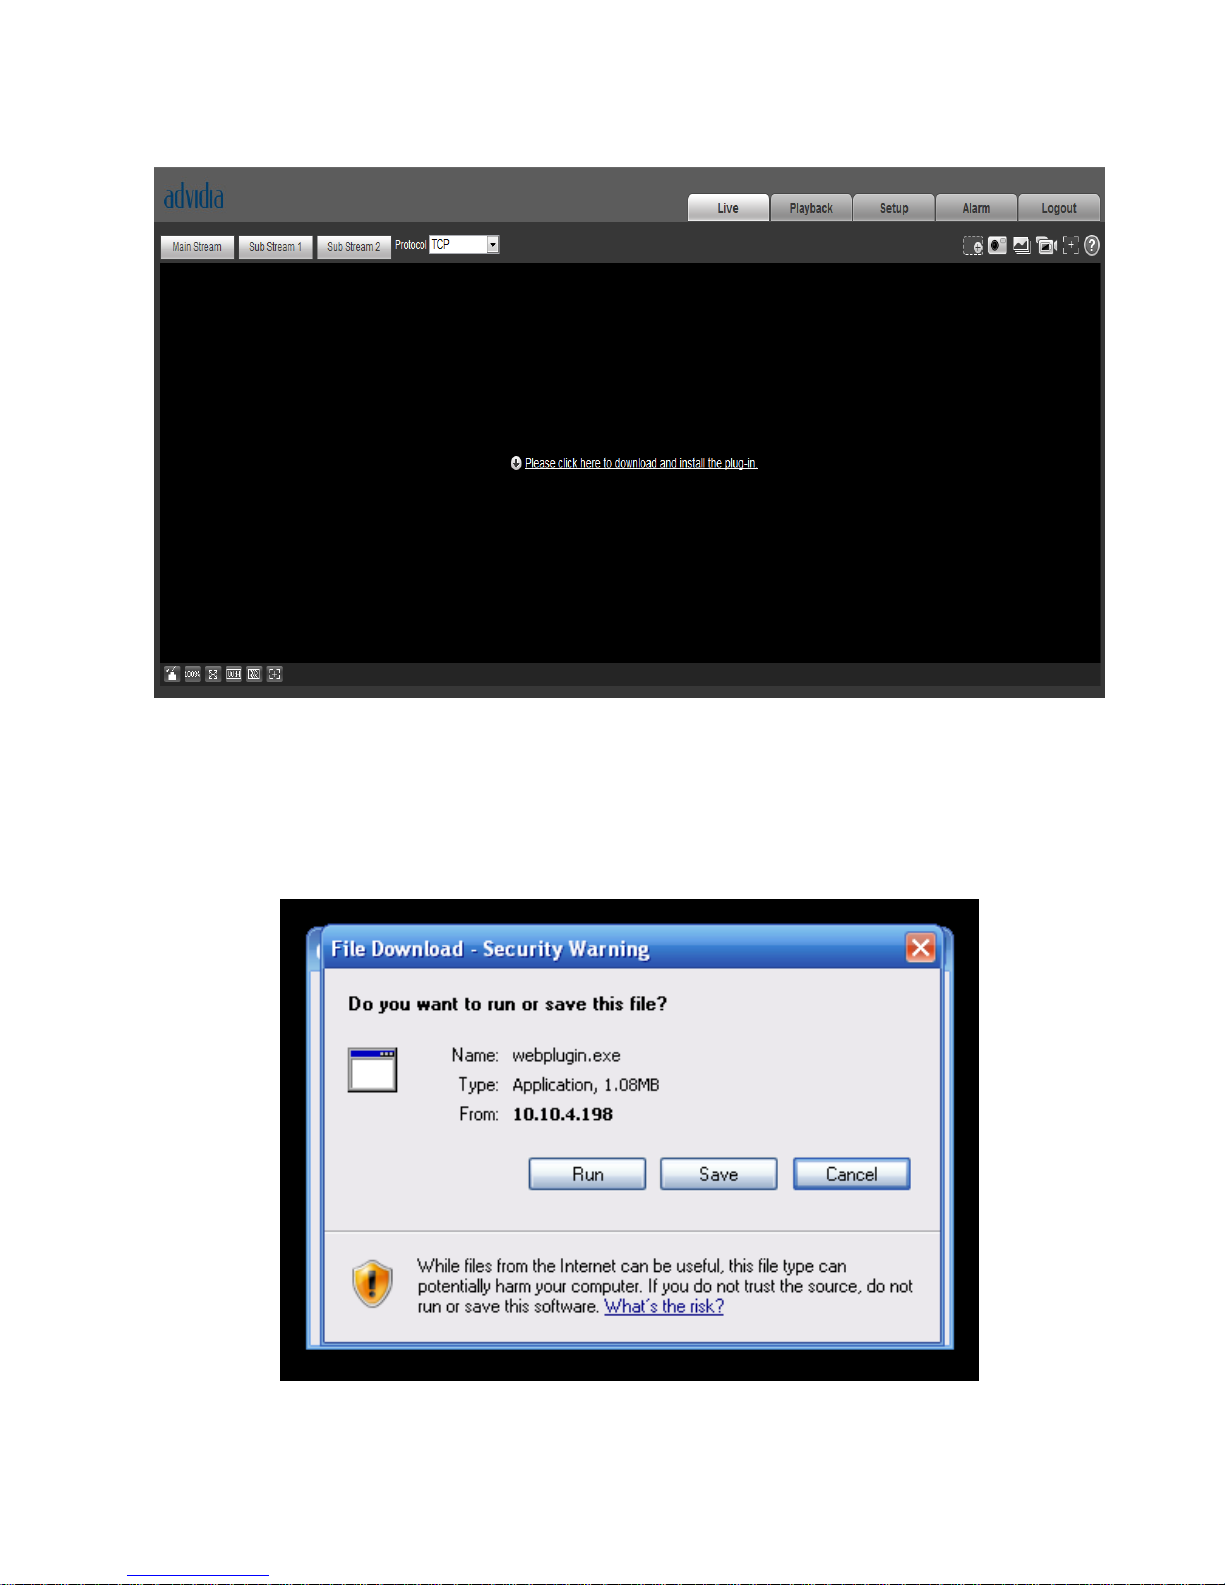
After successful login, you may see the interface shown as in Figure 1-5.
3
Figure 1-5
Click on “Please click here to download and install the plug-in”. The system pops up warning information
to ask you whether run or save this plug-in. See Figure 1-6.
4
Figure 1-6
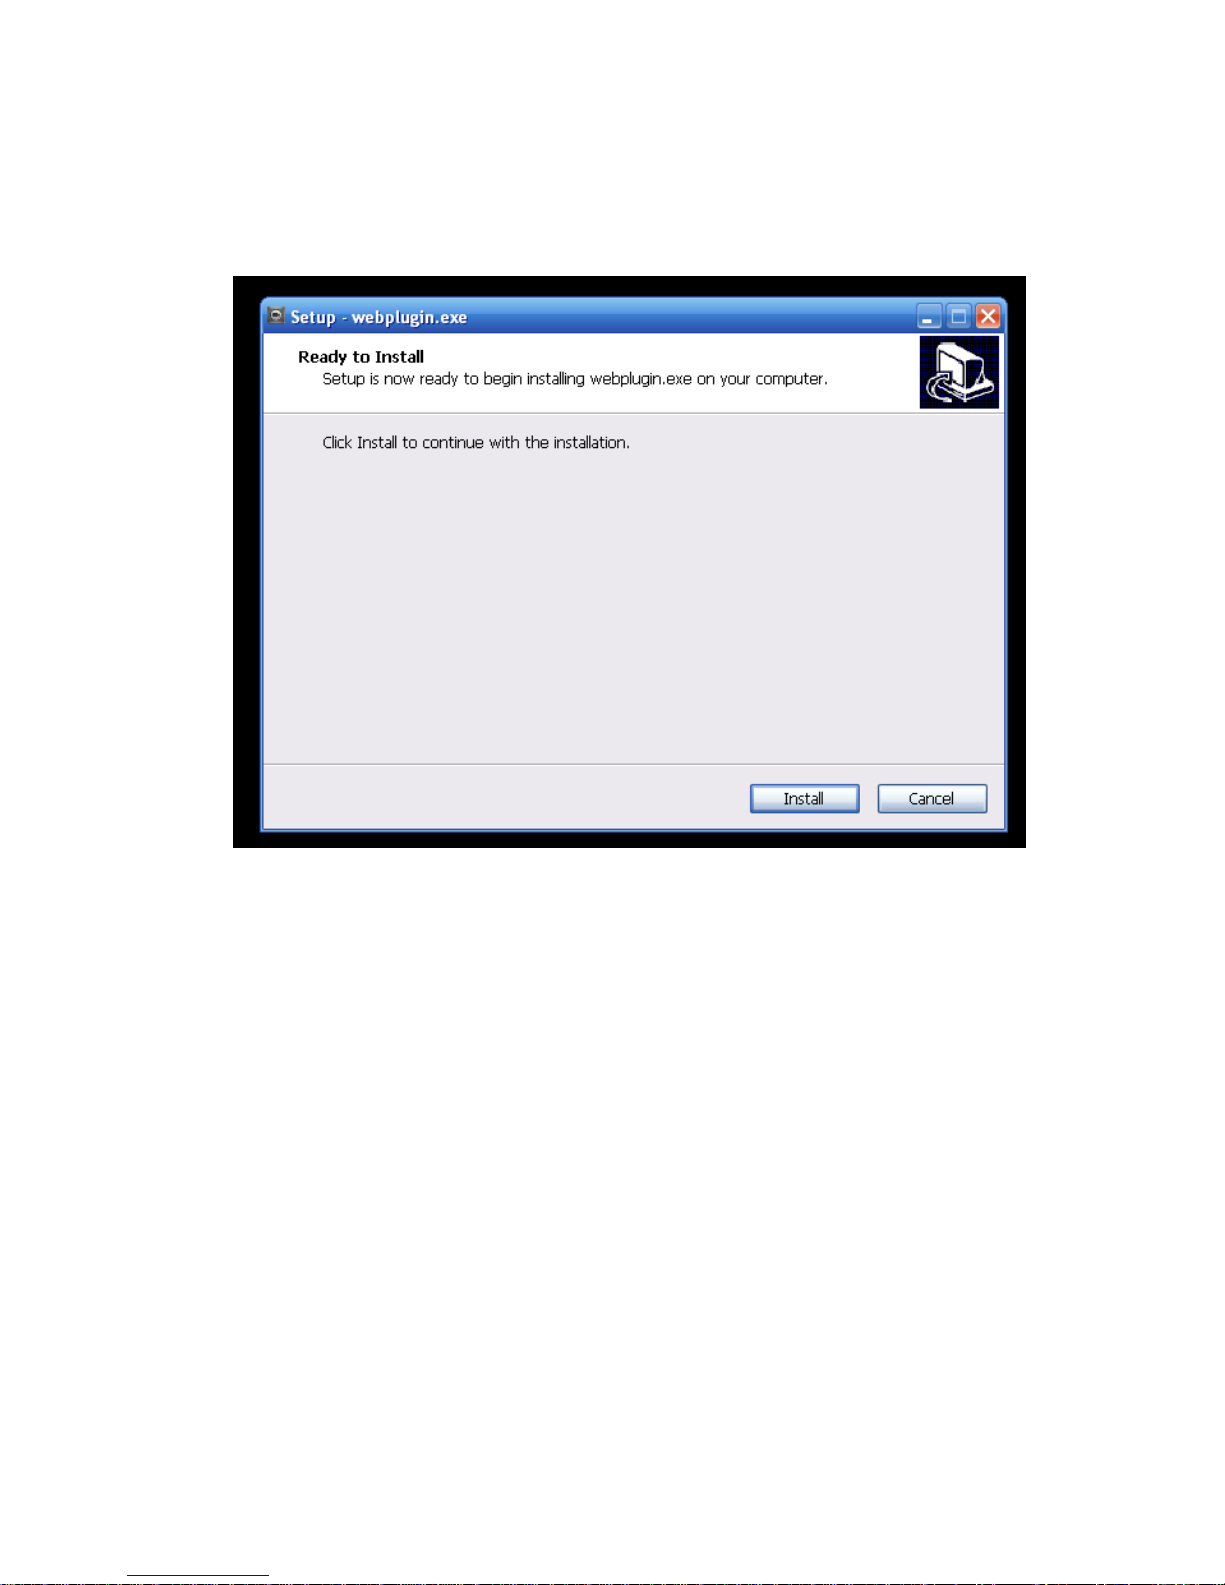
You must either run or save the file to local and install it. Follow the following steps. Click on run, you
will see Figure 1-7and Figure 1-8.
Figure 1-7
5
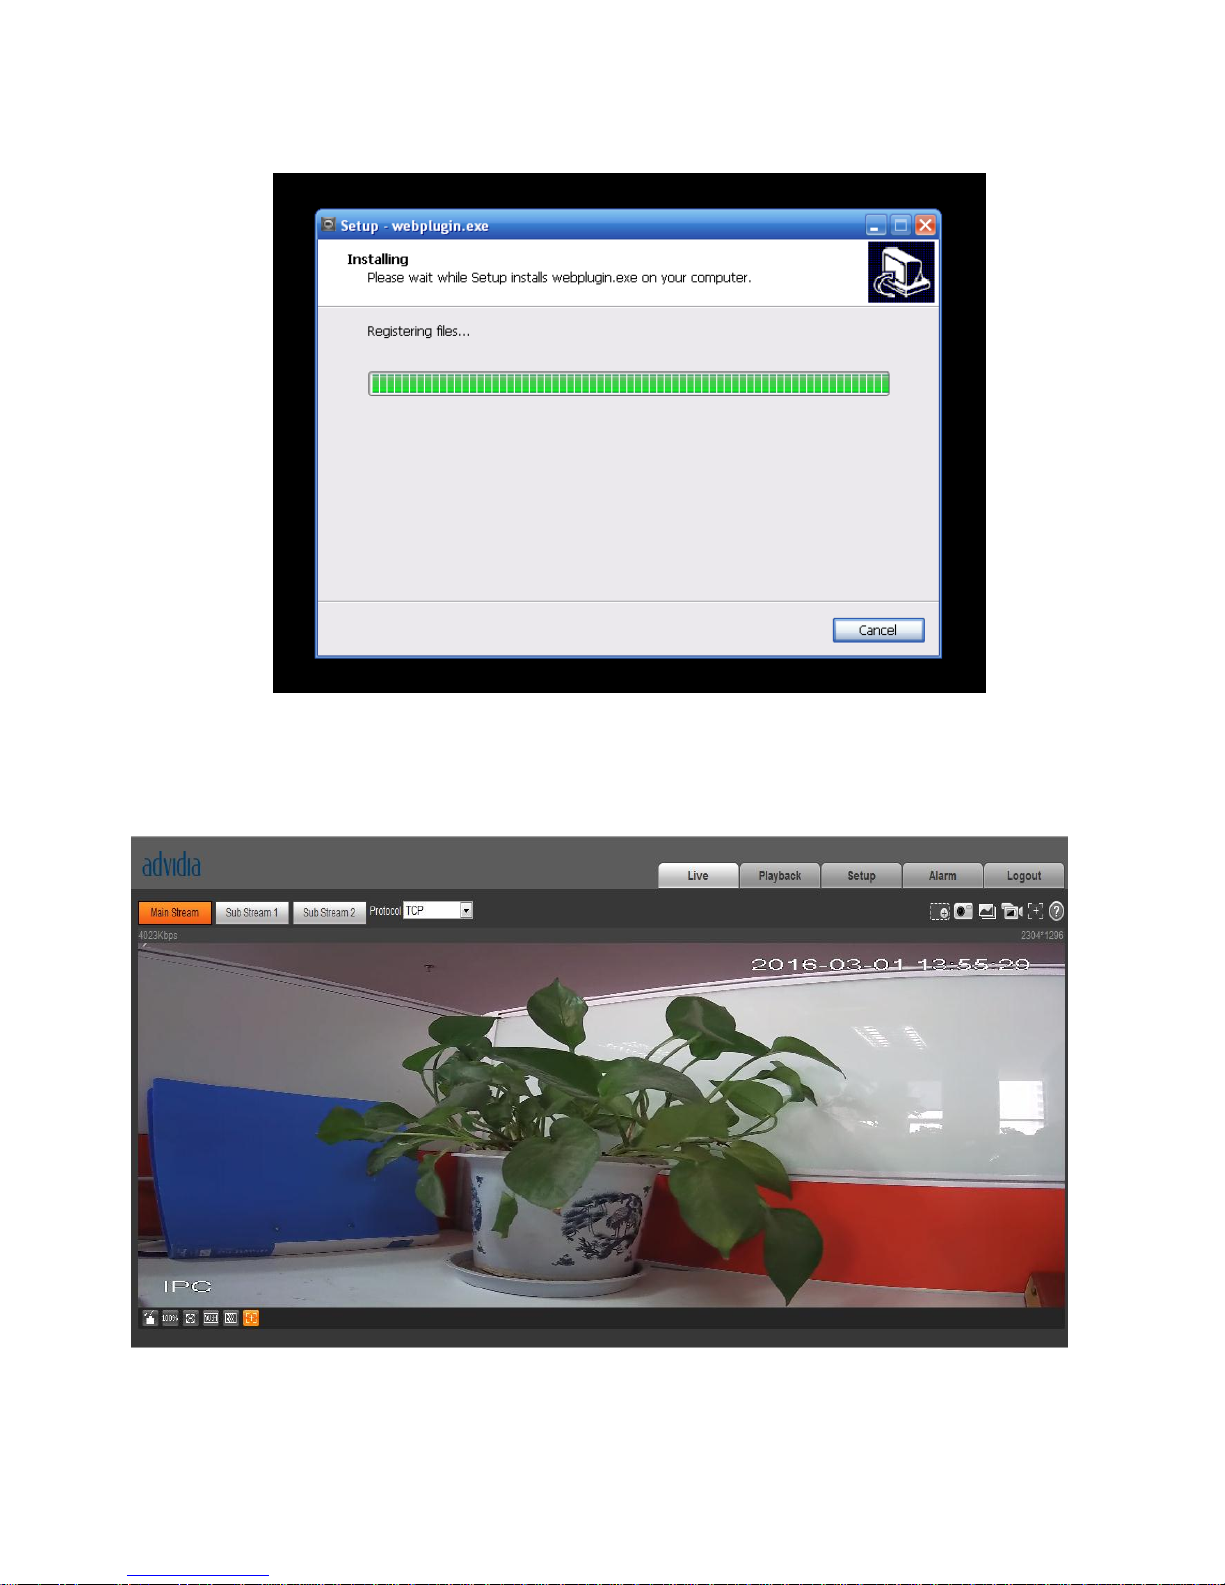
Figure 1-8
When plug-in installation completes, the installation page closes automatically. The web-end will refresh
automatically, and then you can view video captured by the camera.
Figure 1-9
6
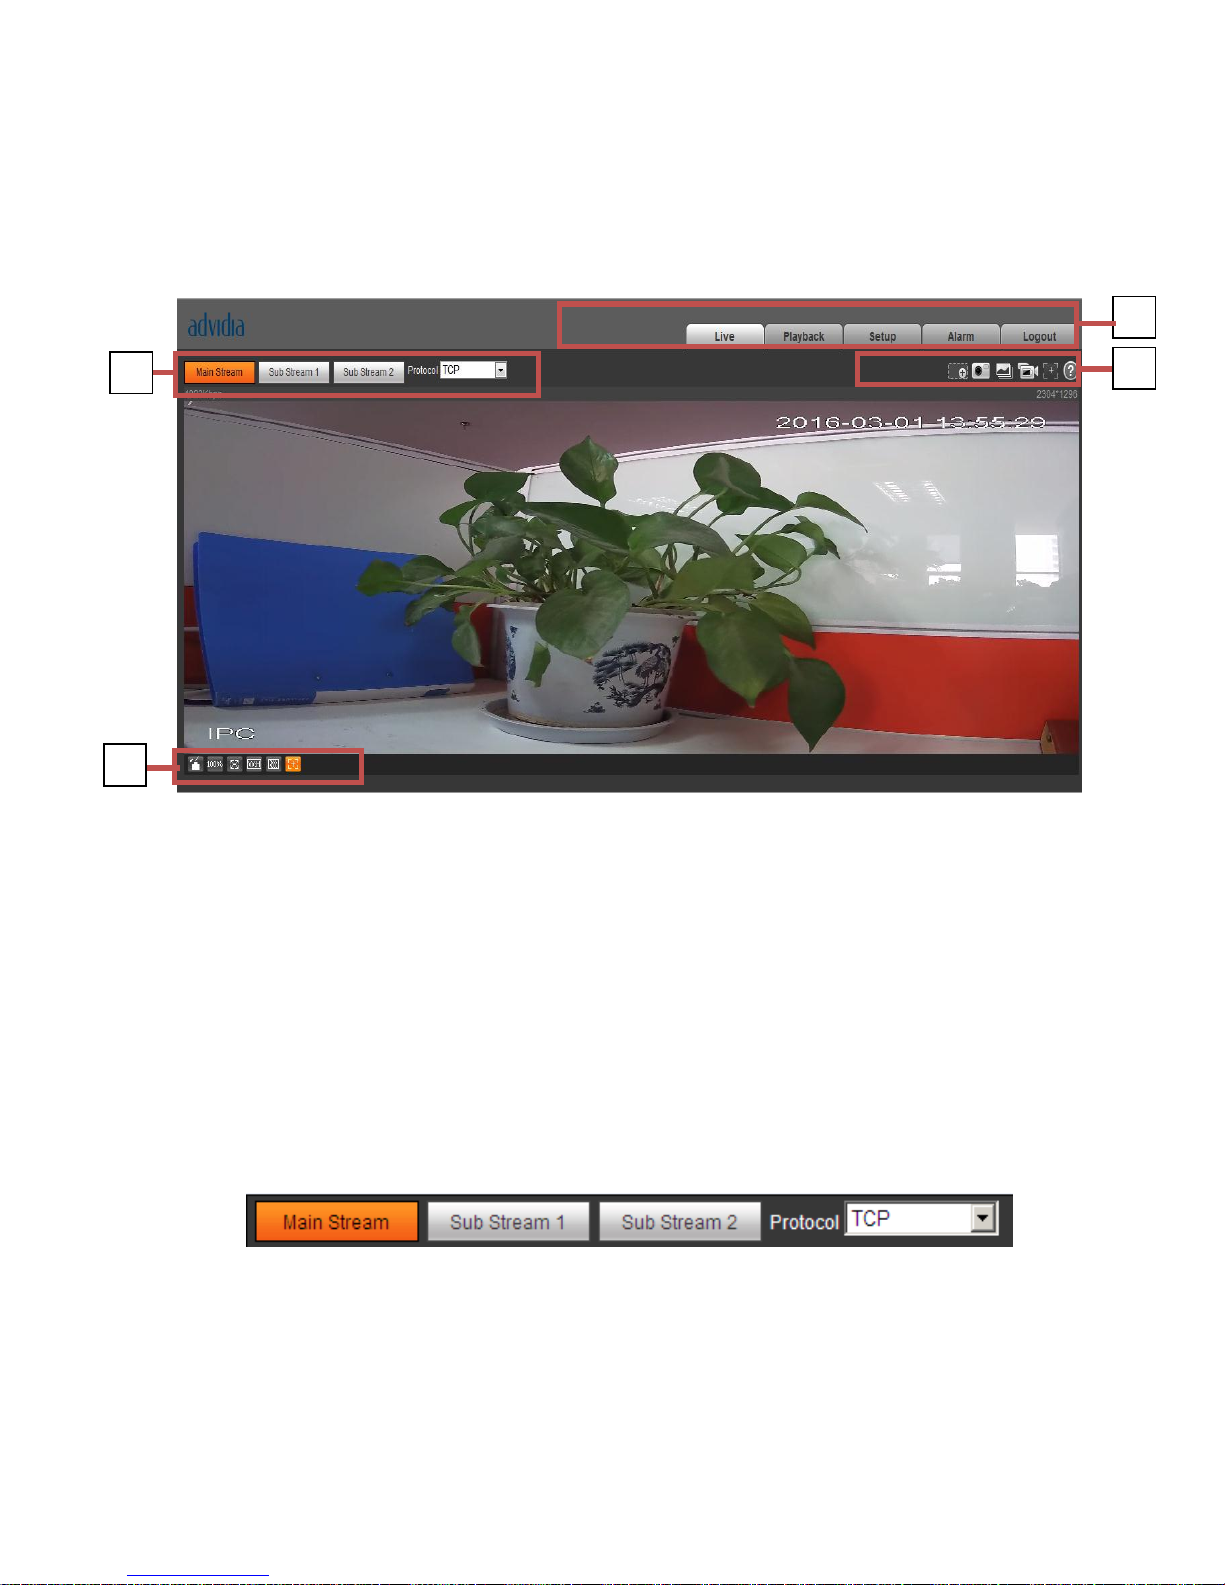
2 Live
After you logged in, you can see the live monitor window. See
Figure 2-1.
Figure 2-1
There are four sections:
Section 1: Encode setup bar
Section 2: System menu
Section 3: Window function option bar
Section 4: Window adjust bar
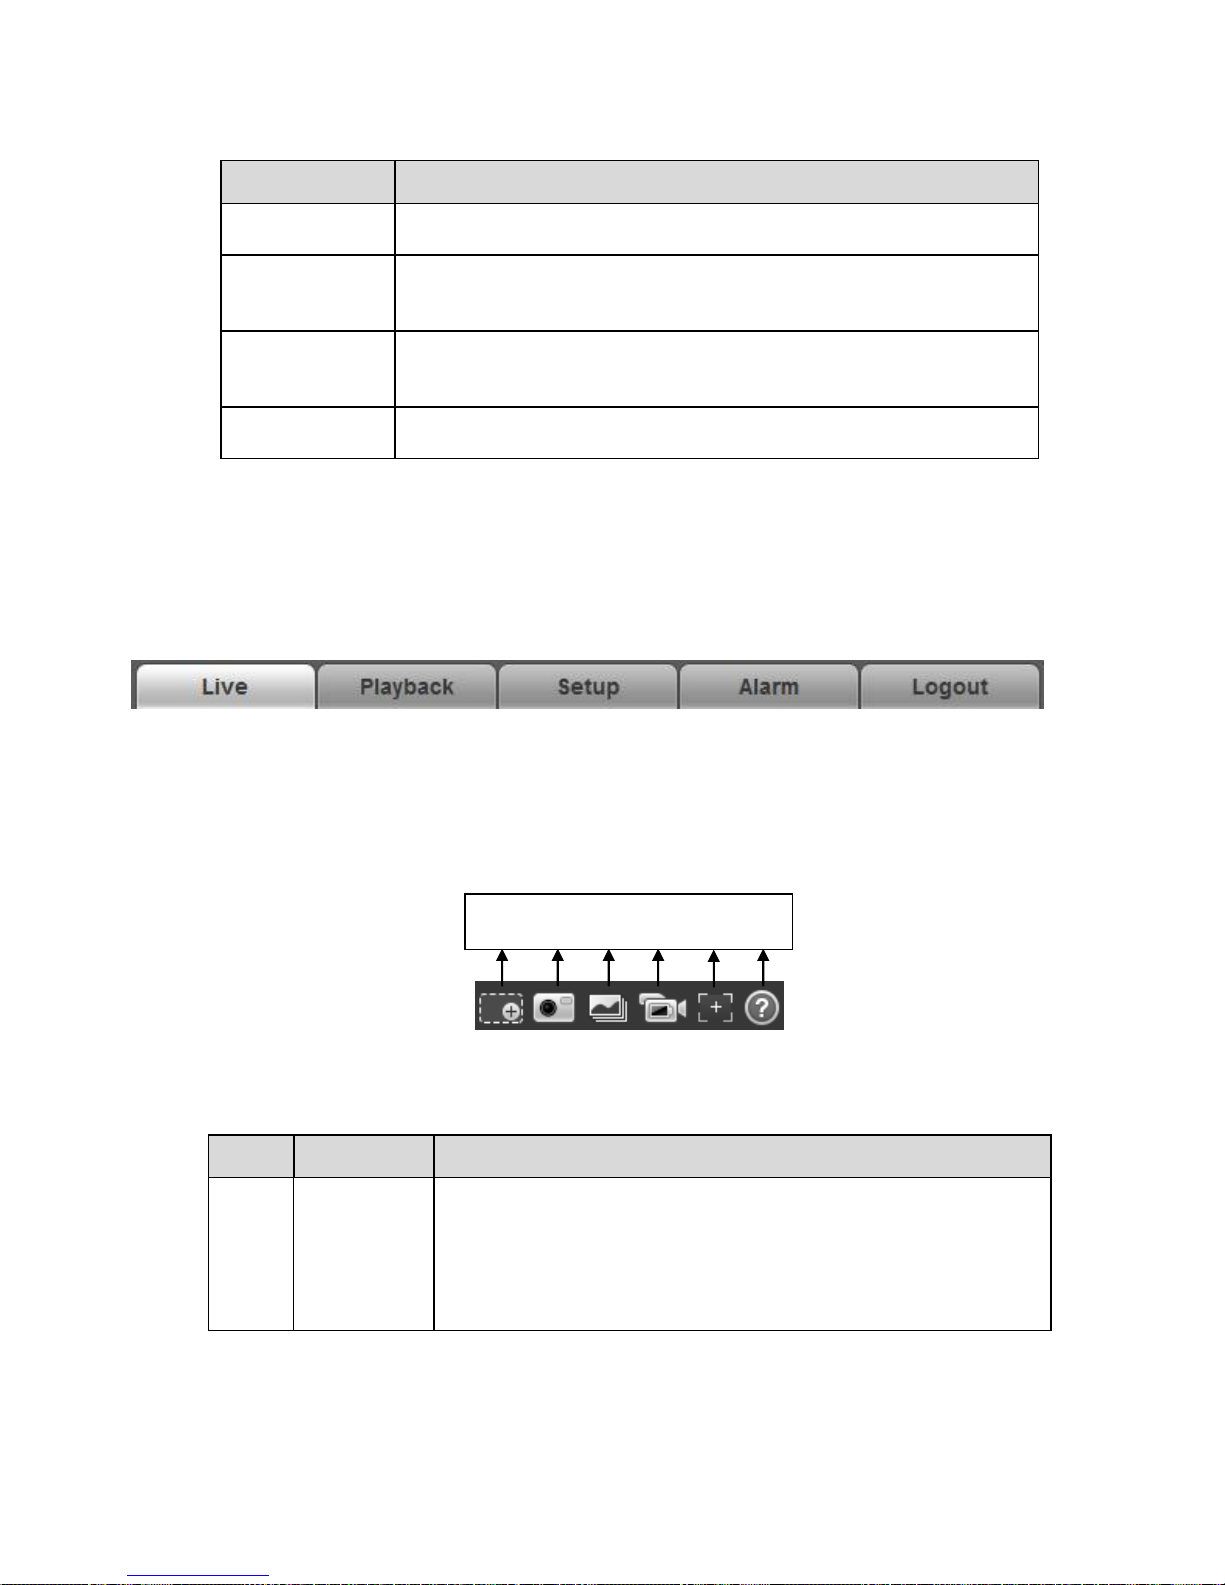
2.1 Encode Setup
The encode setup interface is shown as in Figure 2-2.
Figure 2-2
Please refer to the following sheet for detailed information.
2 3 1
4
7
Parameter
Function
Main stream
Streaming media protocol connection, under main stream config,
monitor video or not. Generally for storage and monitor.
Sub (Extra)
stream 1
Streaming media protocol connection, under sub stream 1
config, monitor video or not. When network bandwidth is
insufficient, it substitutes main stream for monitoring.
Sub (Extra)
stream 2
Streaming media protocol connection, under sub stream 2
config, monitor video or not. When network bandwidth is
insufficient, it substitutes main stream for monitoring.
Protocol
You can select stream media protocol from the dropdown list.
There are three options: TCP/UDP/Multicast
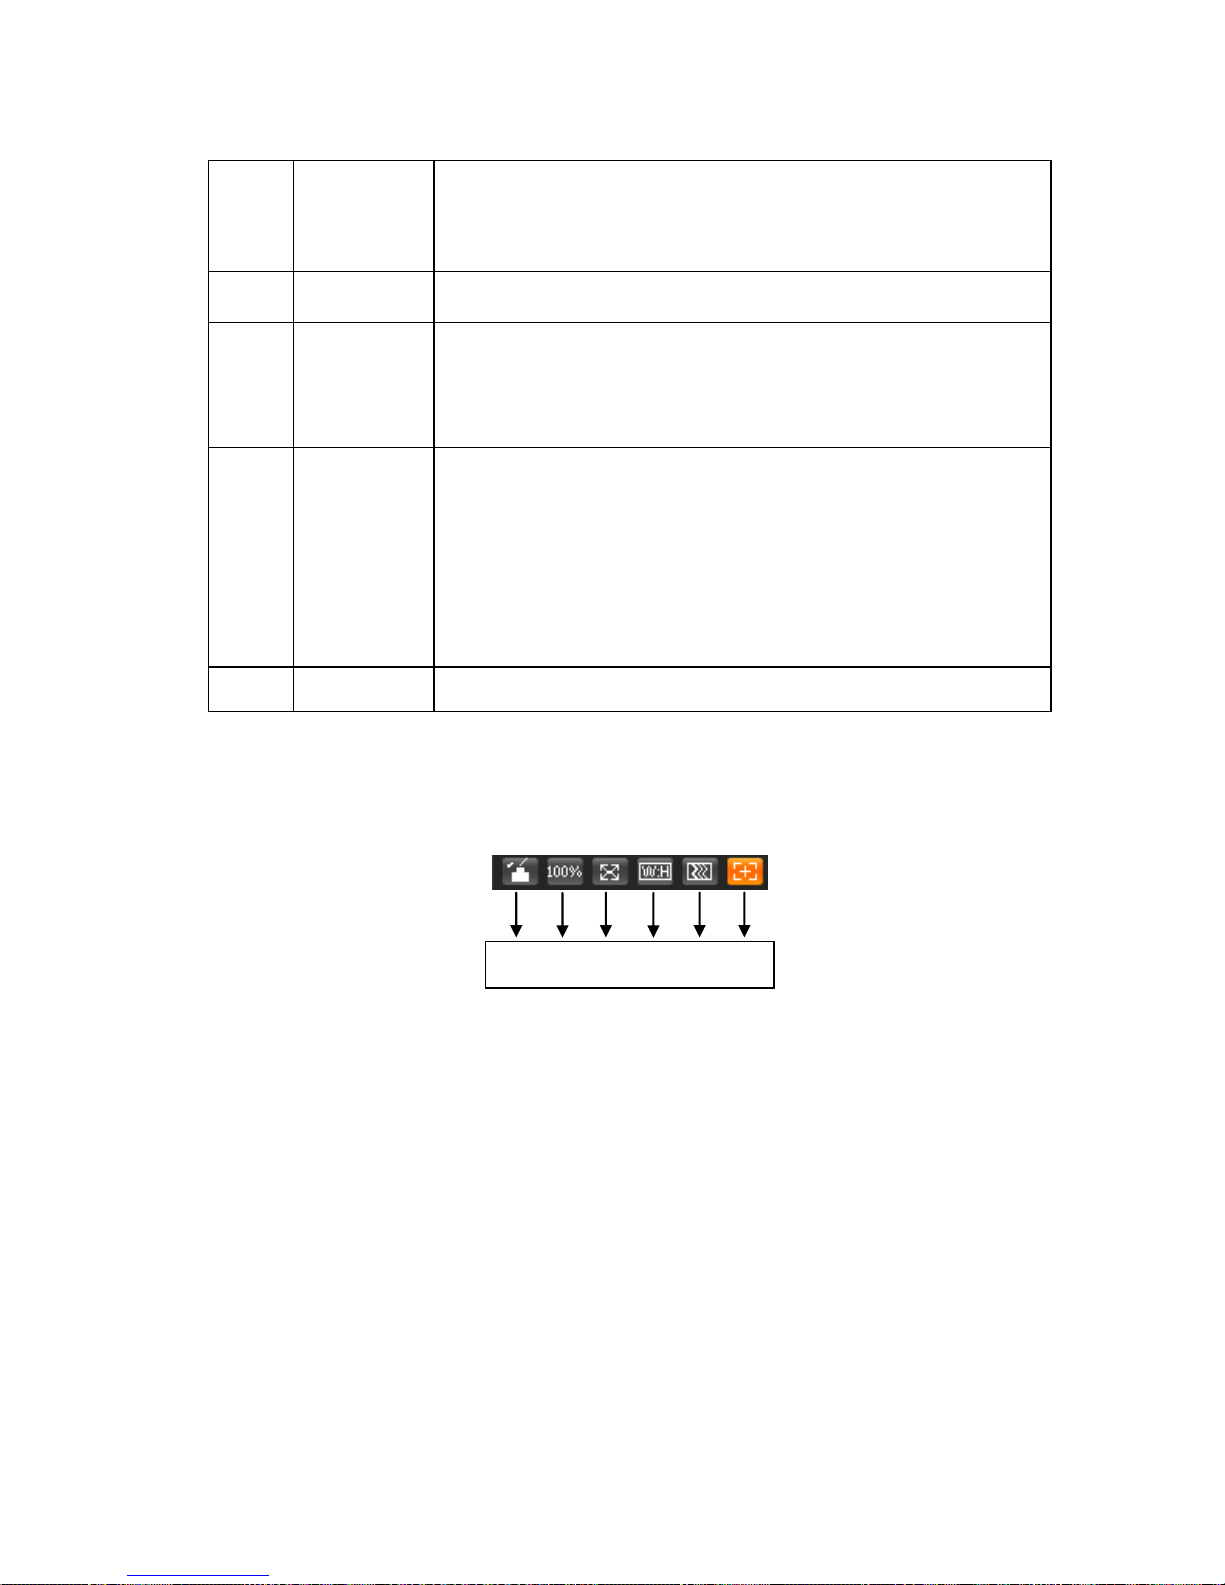
2.2 System Menu
System menu is shown as in Figure 2-3.
Please refer to chapter 2 Live, chapter 3 PTZ, chapter 4 Playback, chapter 5 Setup, chapter 6 Alarm,
chapter 7 Log out for detailed information.
Figure 2-3
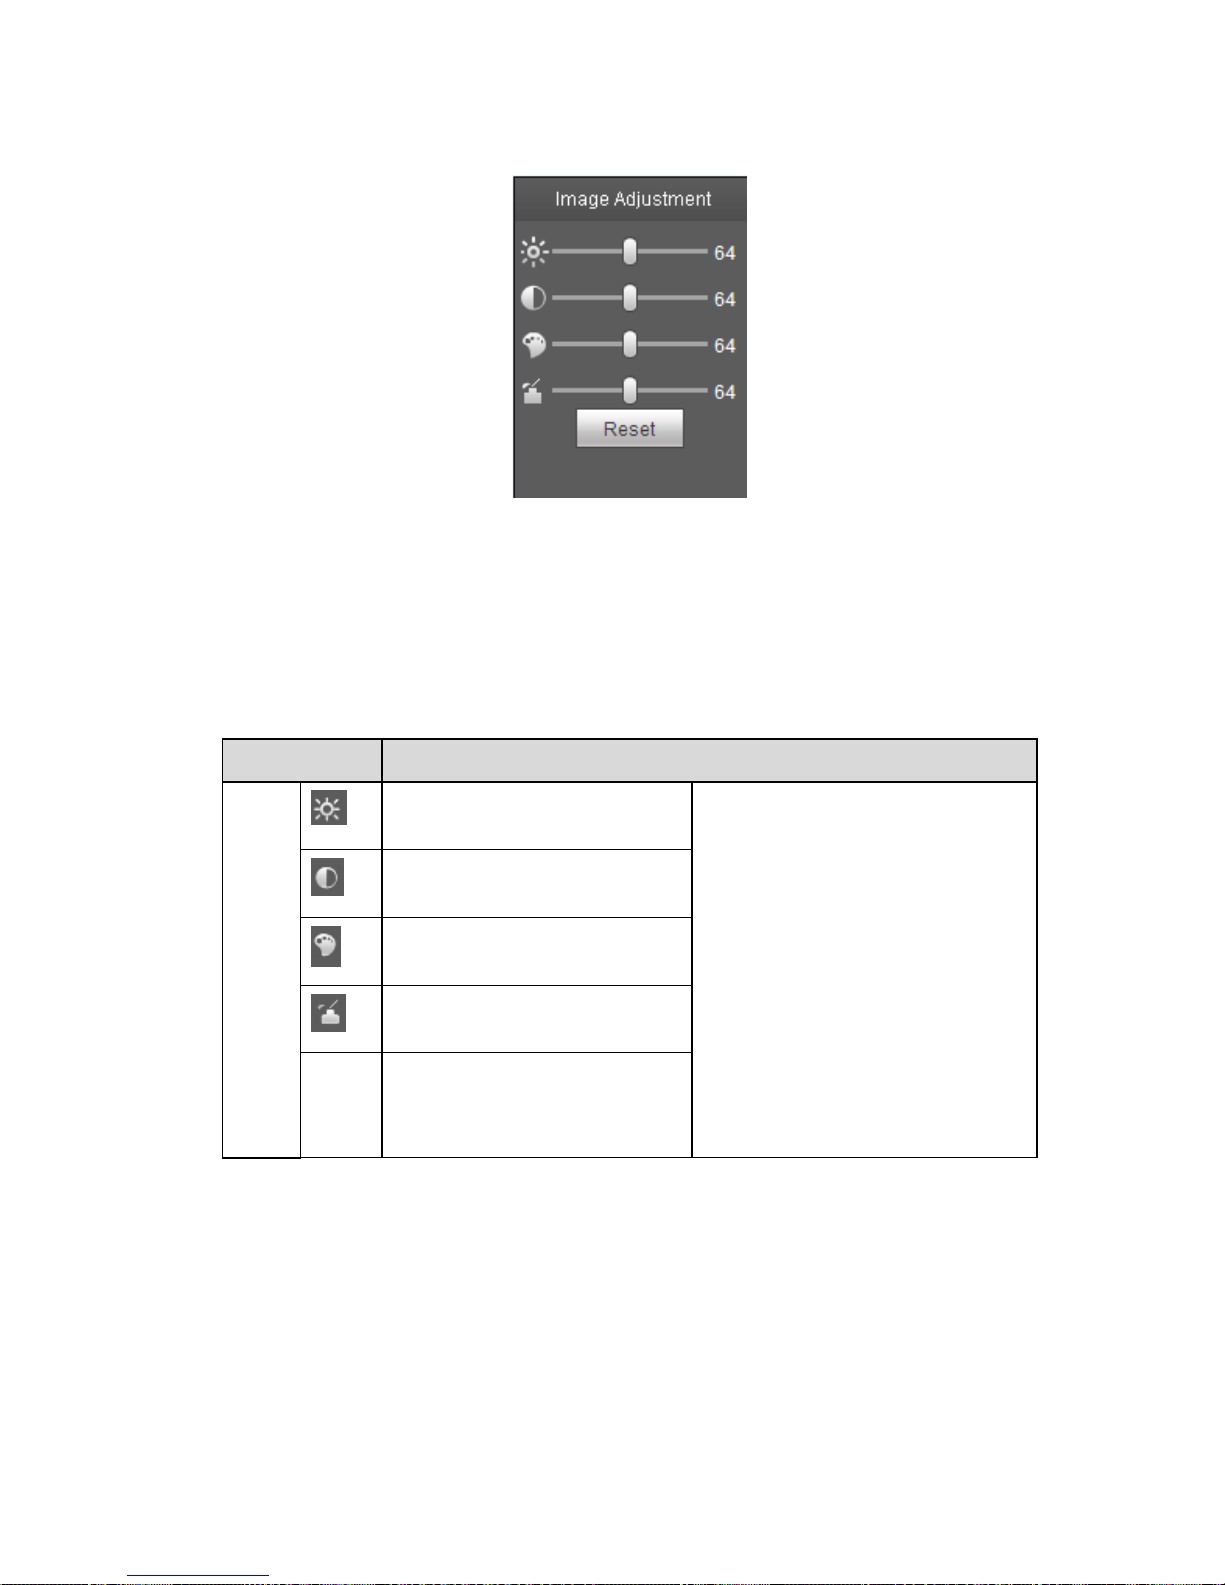
2.3 Video Window Function Option
The interface is shown as below. See Figure 2-4.
Figure 2-4
Please refer to the following sheet for detailed information.
SN
Parameter
Function
1
Zoom in
When the video is in the original status, click it you can
select any zone to zoom in. In the non-original status,
you can drag the zoom-in zone in specified range. Right
click mouse to restore previous status.
Click it; you can use the middle button of the mouse to
zoom in/out the video size.
1 2 3 4 5 6
8
2
Snapshot
Click on the button to snapshot, save picture to path in Ch
5.1.2.5.
3
Triple snap
Click it, system can snap at 1f/s. All images are saved to path
in Ch 5.1.2.5.
4
Record
Click it, system can record. All images are saved to path in Ch
5.1.2.5.
5
Easy focus
Click it, you can see there are two parameters on the preview
video:AF Peak and AF Max.
AF Peak: It is to display the video definition during the focus
process.
AF Max: It is the most suitable value for the video definition.
The close the AF Peak and AF Max is, the better the focus
effect is.
6
Help
Click it to open help file.
2.4 Video Window Setup
The interface is shown as in Figure 2-5.
Figure 2-5
2.4.1 Image Adjustment
See Figure 2-6 for image adjustment.
1 2 3 4 5 6
9
Figure 2-6
Click this button to display/hide image control interface. Click it to open picture setup interface. This
interface is on the top right pane.
Please refer to the following sheet for detailed information.
Parameter
Function
Video
setup
It is to adjust monitor video
brightness.
Note:
All the operations here apply
to WEB end only.
Please go to Setup-
>Camera->Conditions to
adjust corresponding items.
It is to adjust monitor video
contrastness.
It is to adjust monitor video
hue.
It is to adjust monitor video
saturation.
Reset
R
e
Restore brightness,
contrastness saturation and
hue to system default setup.
2.4.2 Original Size
Click this button to go to original size. It is to display the actual size of the video stream. It depends on
the resolution of the bit stream.
2.4.3 Full Screen
Click it to go to full-screen mode. Double click the mouse or click the Esc button to exit the full screen.

10
2.4.4 Width and Height Ratio
Click it to restore original ratio or suitable window.
2.4.5 Fluency Adjustment
There are three levels of fluency for you to select (real-time, normal, fluent). The default is normal.
2.4.6 Focus zoom
Click this button and the focus zooming interface appears on the right of preview interface, as shown in
Figure 2-7, click left mouse button to adjust focus zooming configuration.
Note:
· The product series which support motorized zoom, synchronous focus and back focus have this
button.
· Auto-focus after zoom and focus adjustment.
11
3 Playback
Web client playback supports video playback and picture playback.
Note:
Before playback, user shall set storage management
3.1 Playback
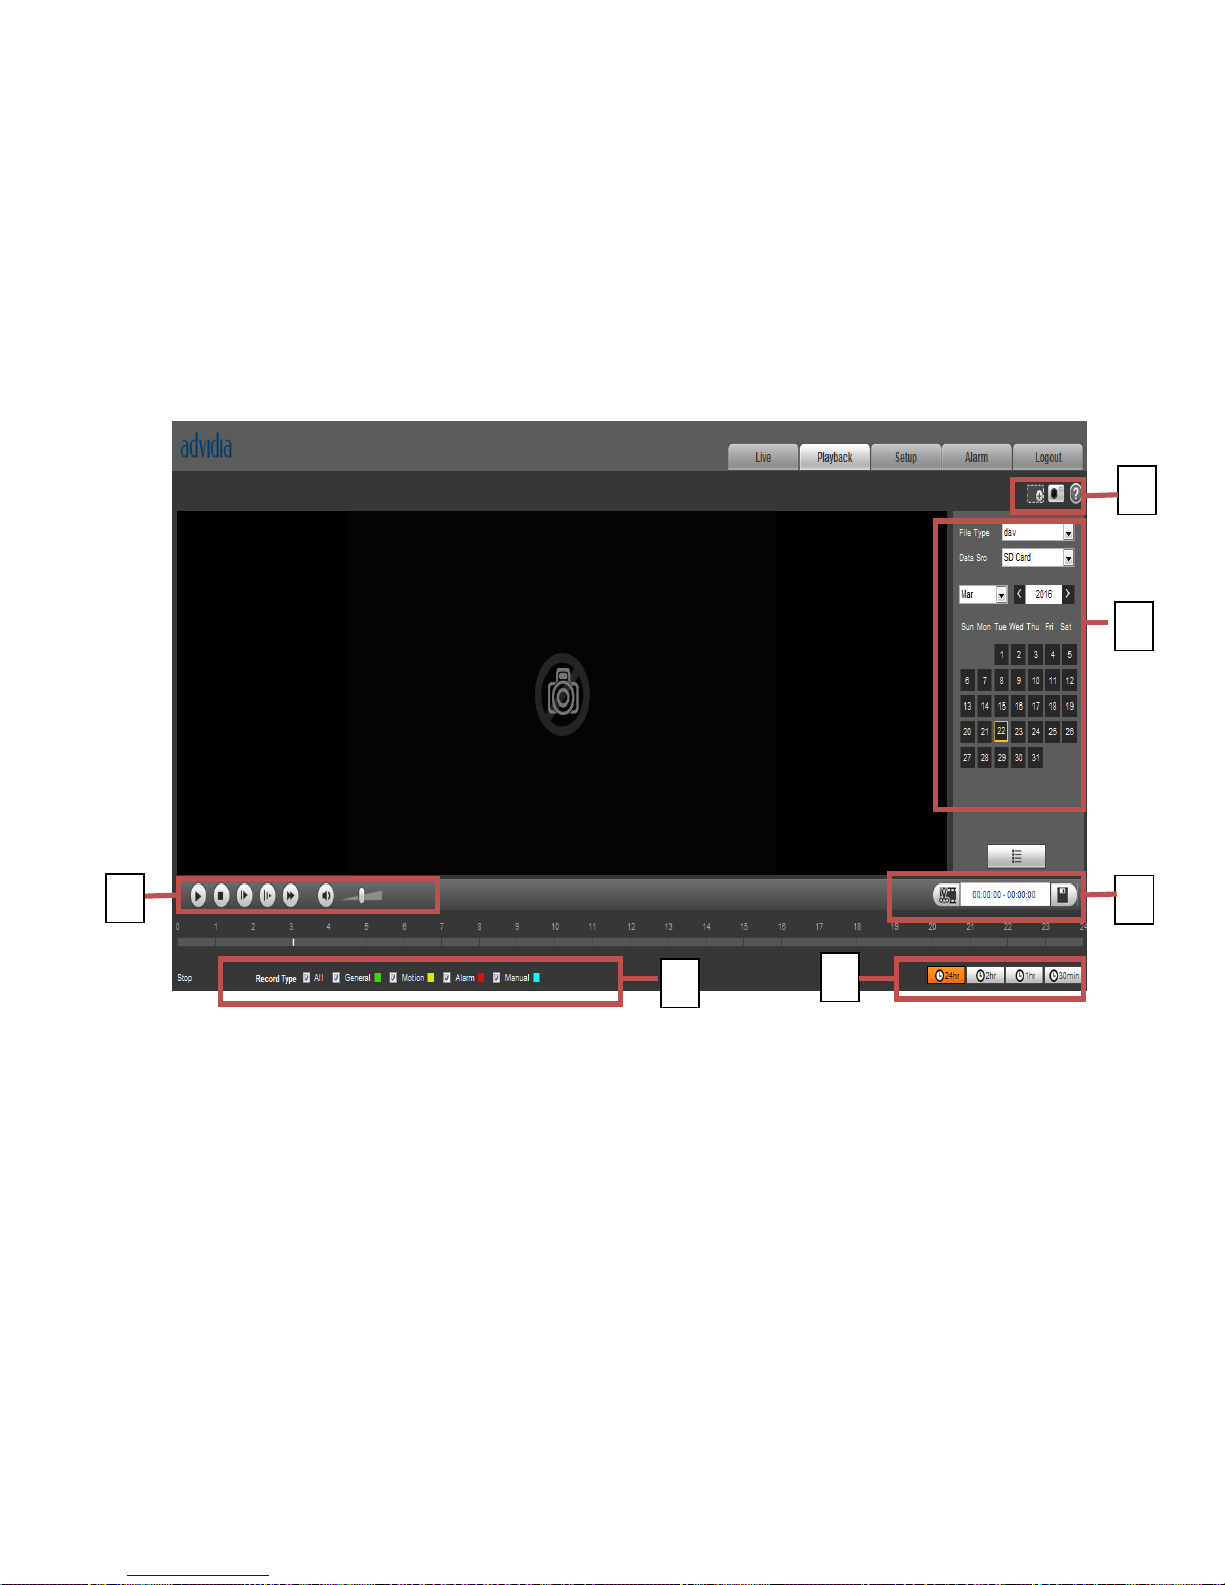
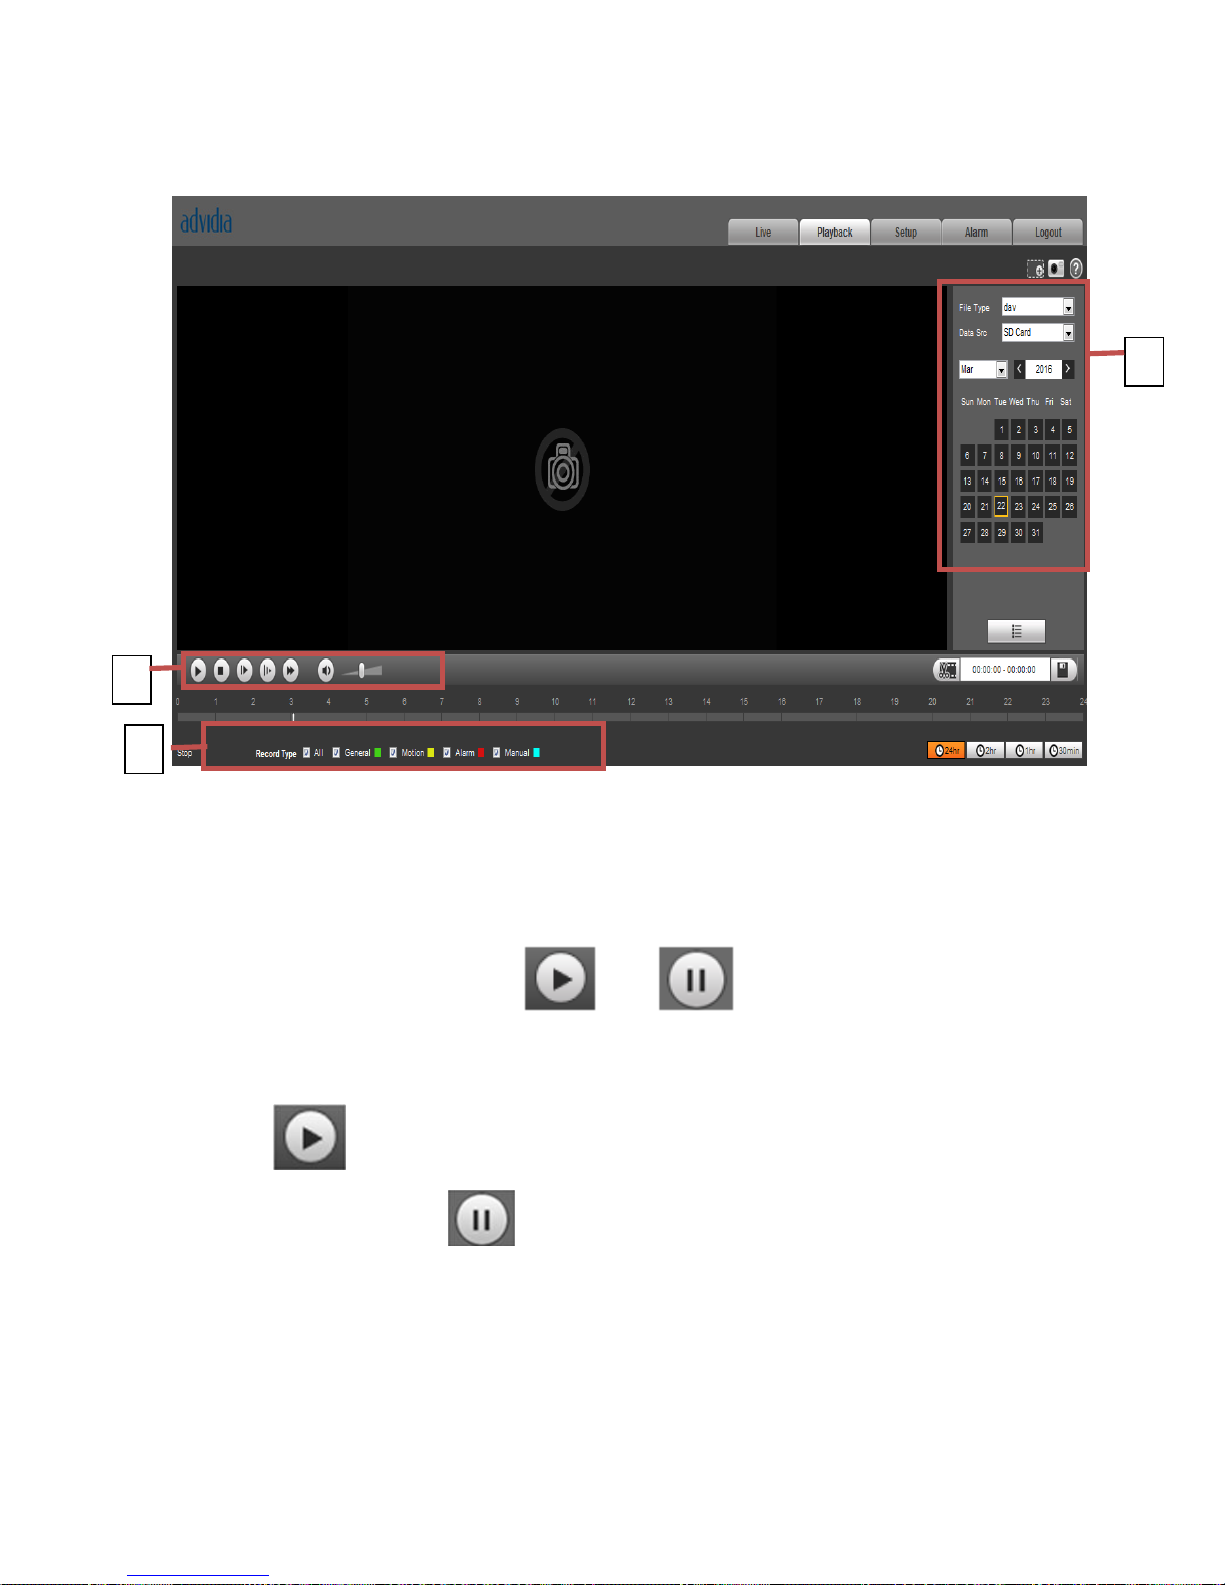
The playback interface is shown as in Figure 3- 1.
Figure 3- 1
There are four sections:
Section 1: Function of play
Section 2: Playback file
Section 3: Play time cut
Section 4: Record type
Section 5: Progress bar
Section 6: Assistant function
3.1.1 Function of Play
1 4 5
3 6 2

12
The function of play is shown as in Figure 3- 2.
Figure 3- 2
Parameter
Function
① Play
When you see this button, it means pause or not played record. Click on this
button, switch to normal play status.
② Stop
Click this button to stop playing.
③ Play by
frame
Click on this button to go to next frame.
Note:
You shall pause record when you use this function.
④ Slow
Click on this button to play slowly.
⑤ Quick
Click on this button to play quickly.
⑥ Silent
When this button displays, it means audio is silent. Click on this button to switch
back to normal.
⑦ Volume
Click on left mouse to adjust volume.
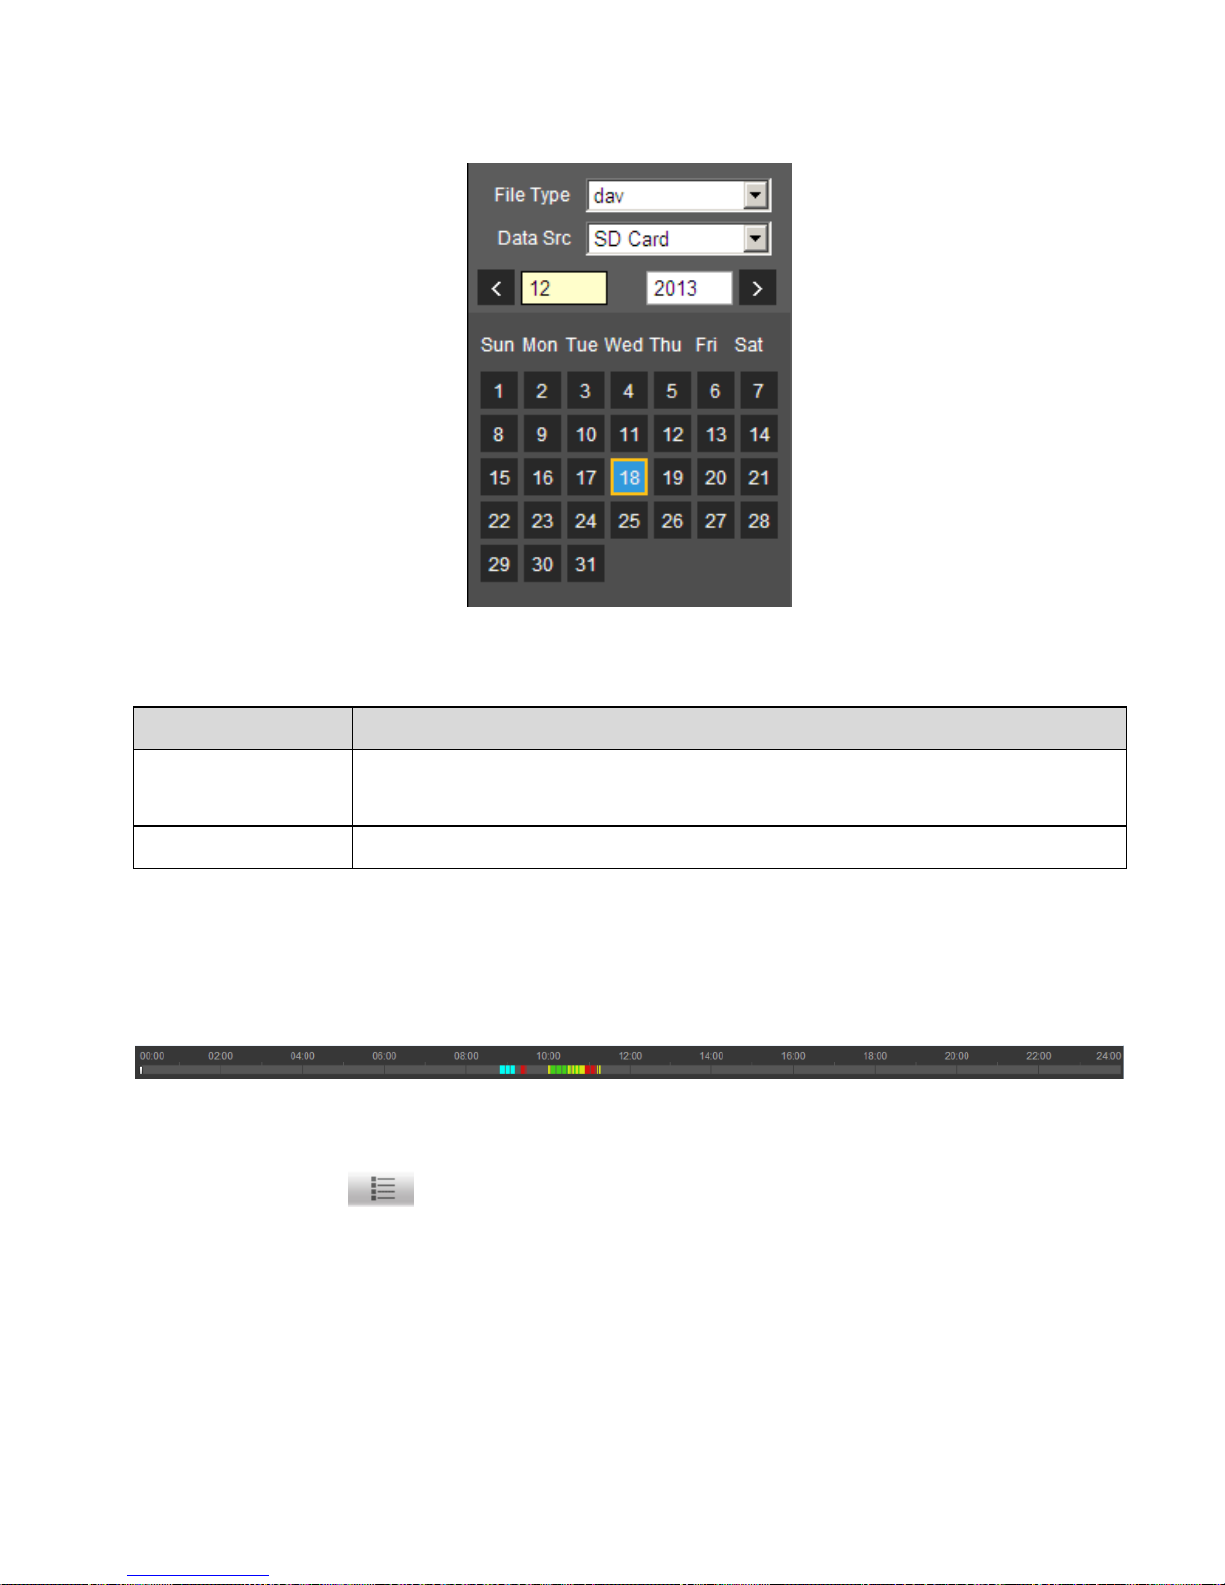
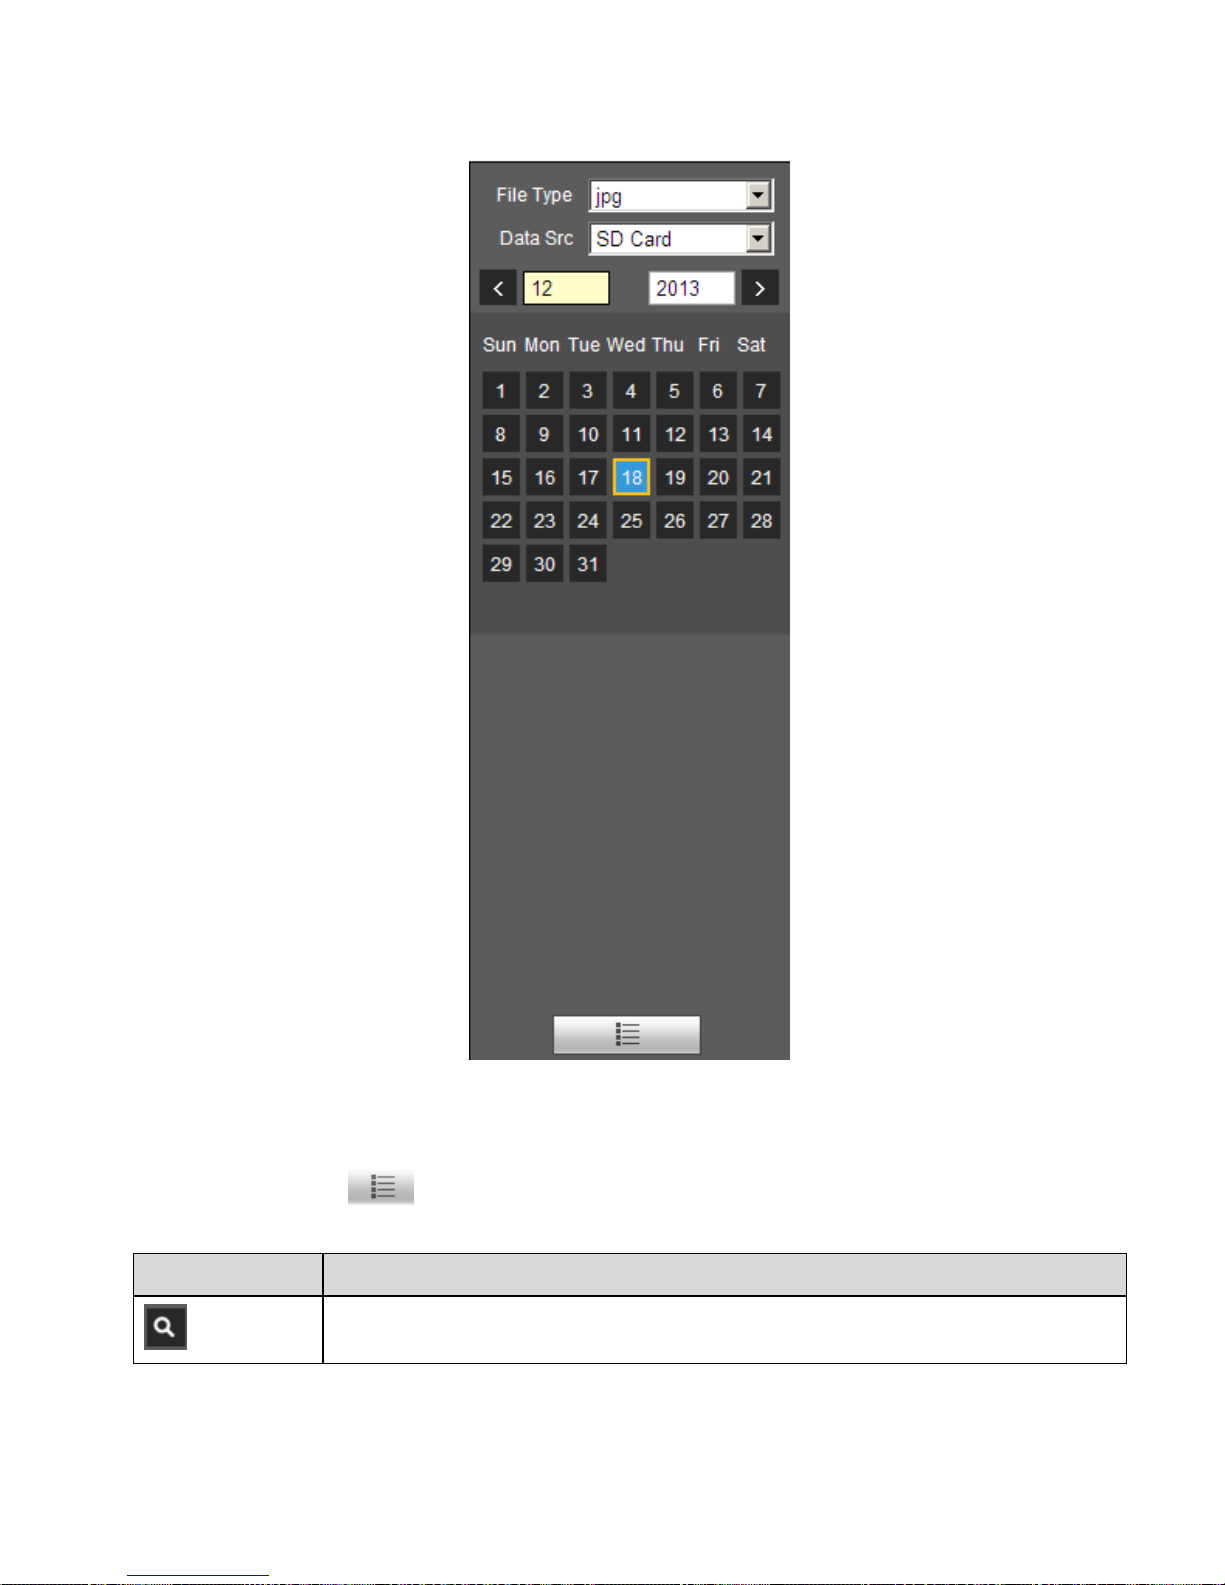
3.1.2 Playback File
In calendar, blue date represents data currently has video record or snapshot. See Figure 3-3.
1 2 3 4 5 6 7
13
Figure 3-3
Parameter
Function
File Type
Select “dav”, as video playback.
Select “jpg” as picture playback.
Data Source
Default is SD card.
Step 1. Click on data in blue, time axis displays record file progress bar in color. While, green represents
normal record, yellow represents motion detect record, red represents alarm record, and blue
represents manual record.
Step 2. Click on certain time on progress bar, playback starts from this time. See Figure 3- 4.
Figure 3- 4
Step 3. Click on file list , select date file will be displayed in list.
Step 4. Double click on file in list, playback this file and display file size, start time and end time.
See Figure 3-5.

14
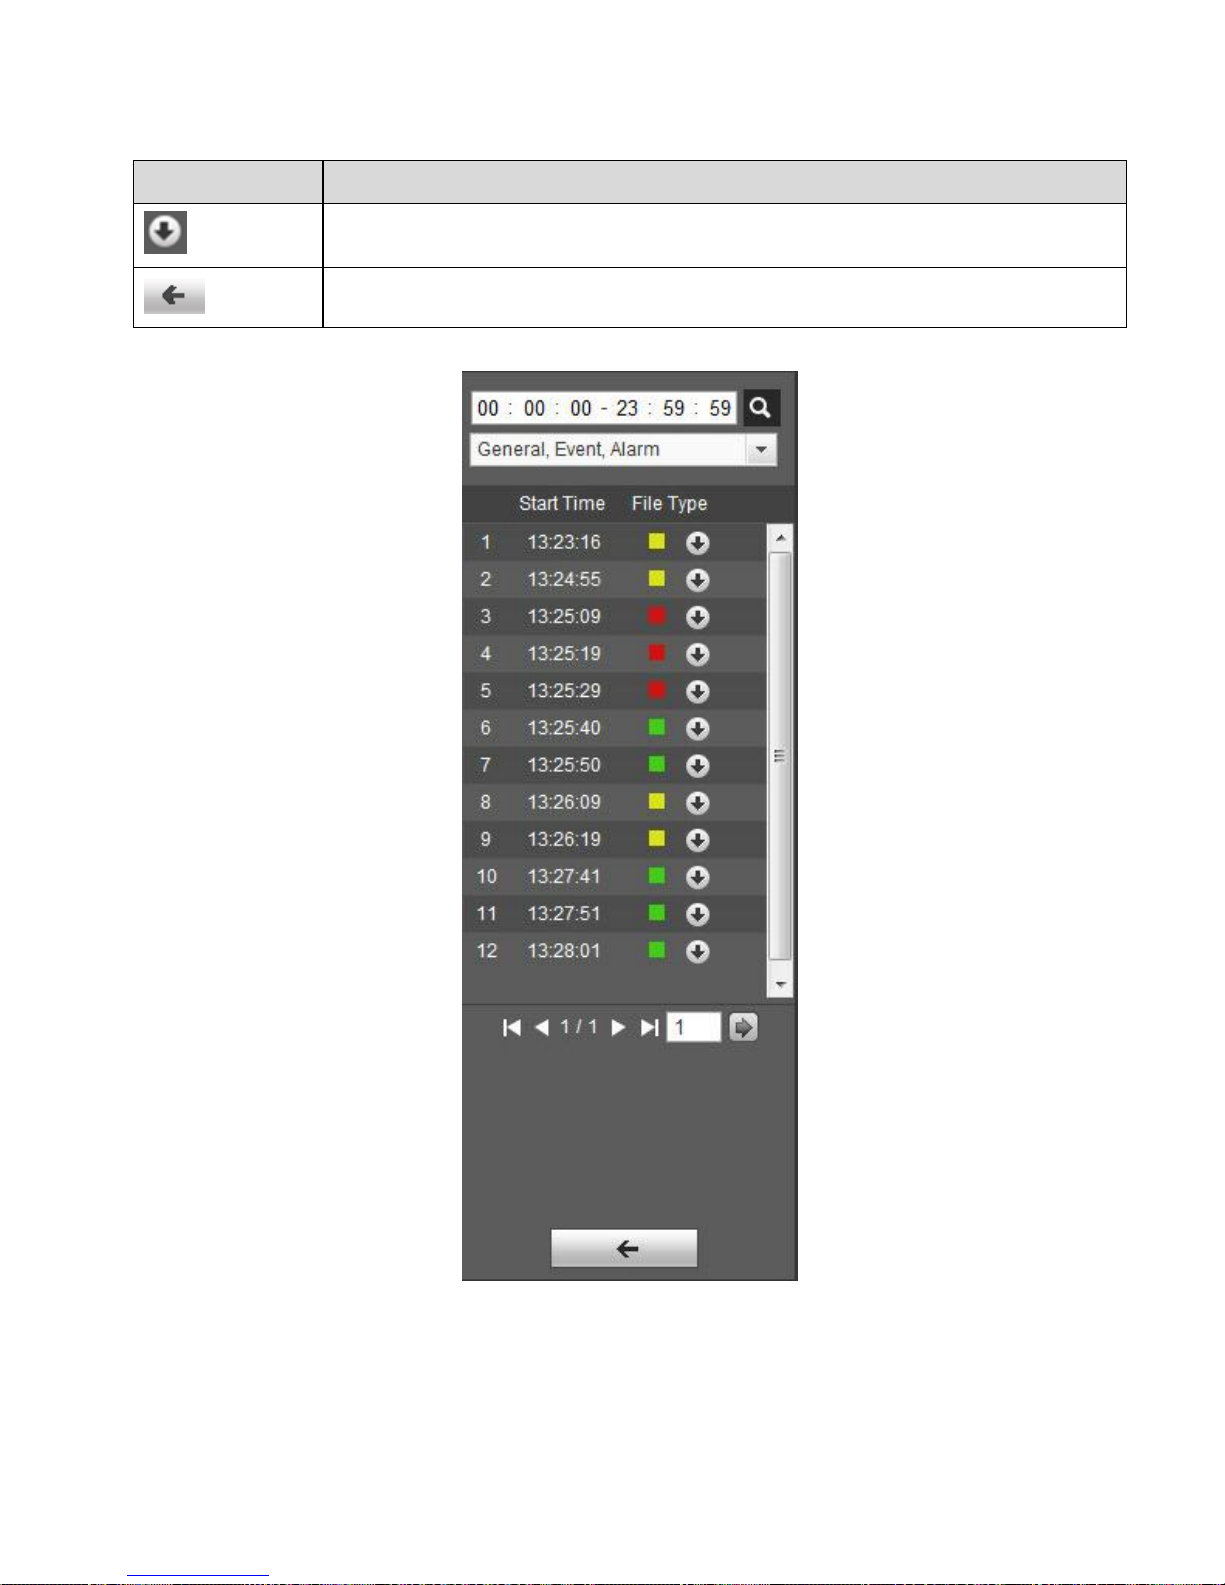
Figure 3-5
Parameter
Function
Search
It means records within searched start time and end time on the date.
Record
Download
Format
There are two formats: dav, mp4.
15
Parameter
Function
Download
Record type is “dav”, click on download button to download file to local.
Record type is “mp4”, click on download button and download file to path in
Ch 5.1.2.5.
Note:
System does not support download and playback of MP4 file.
Back
Click on back button to go to calendar interface.
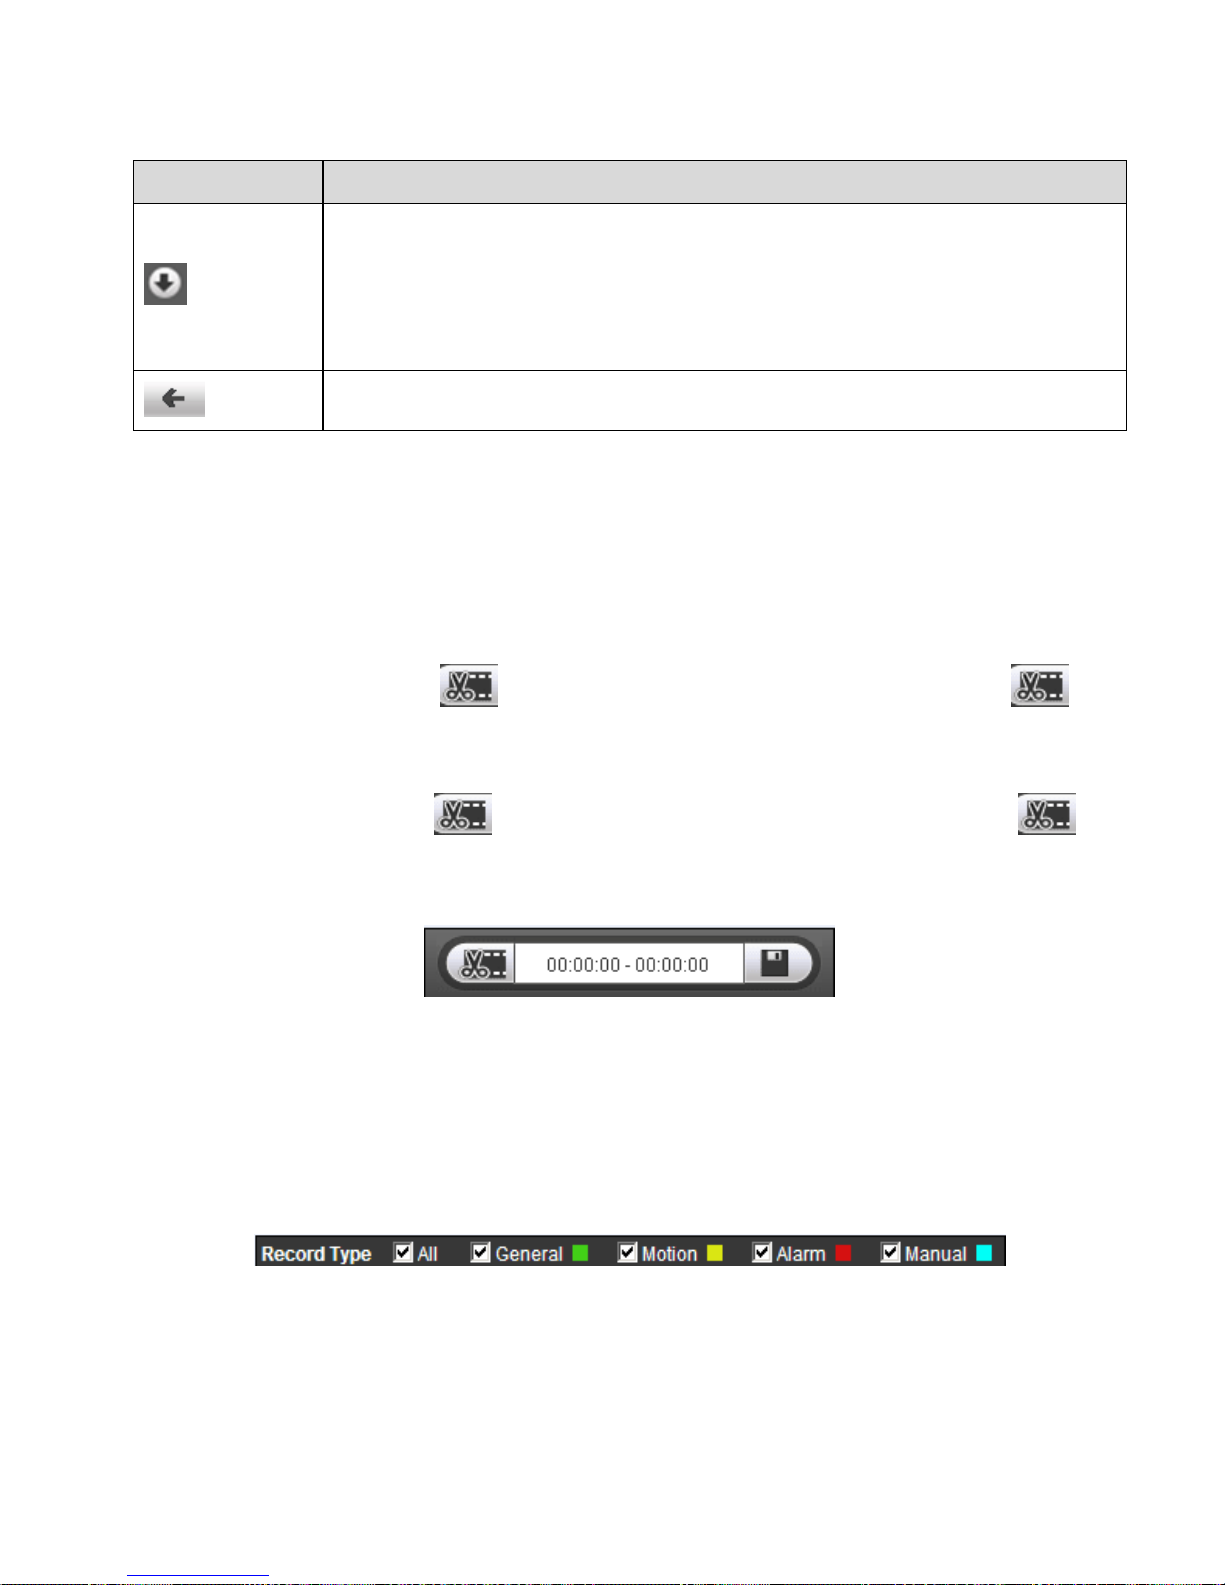
3.1.3 Playback Cut
Note:
Playback cut function will automatically pause playing record as playback cut and playback cannot be at
the same time.
Step 1. Click on start time to cut on time axis. This time must be within progress bar range.
Step 2. Move mouse to cut icon . You will be ask to select start time. Click on cur icon as
finish cutting.
Step 3. Click on playback cut end time on time axis. This time must be within progress bar range.
Step 4. Move mouse to cut icon , you will be asked to select end time. Click on cut icon as
finish cutting.
Step 5. Click on Save button to save file cut to path. See Figure 3- 6.
Figure 3- 6
3.1.4 Record Type
After checking record file type, only selected file will be displayed in progress bar and file list. Users can
also select the record type to be displayed via the dropdown box which is above the file list. See Figure
3- 7.
Figure 3- 7
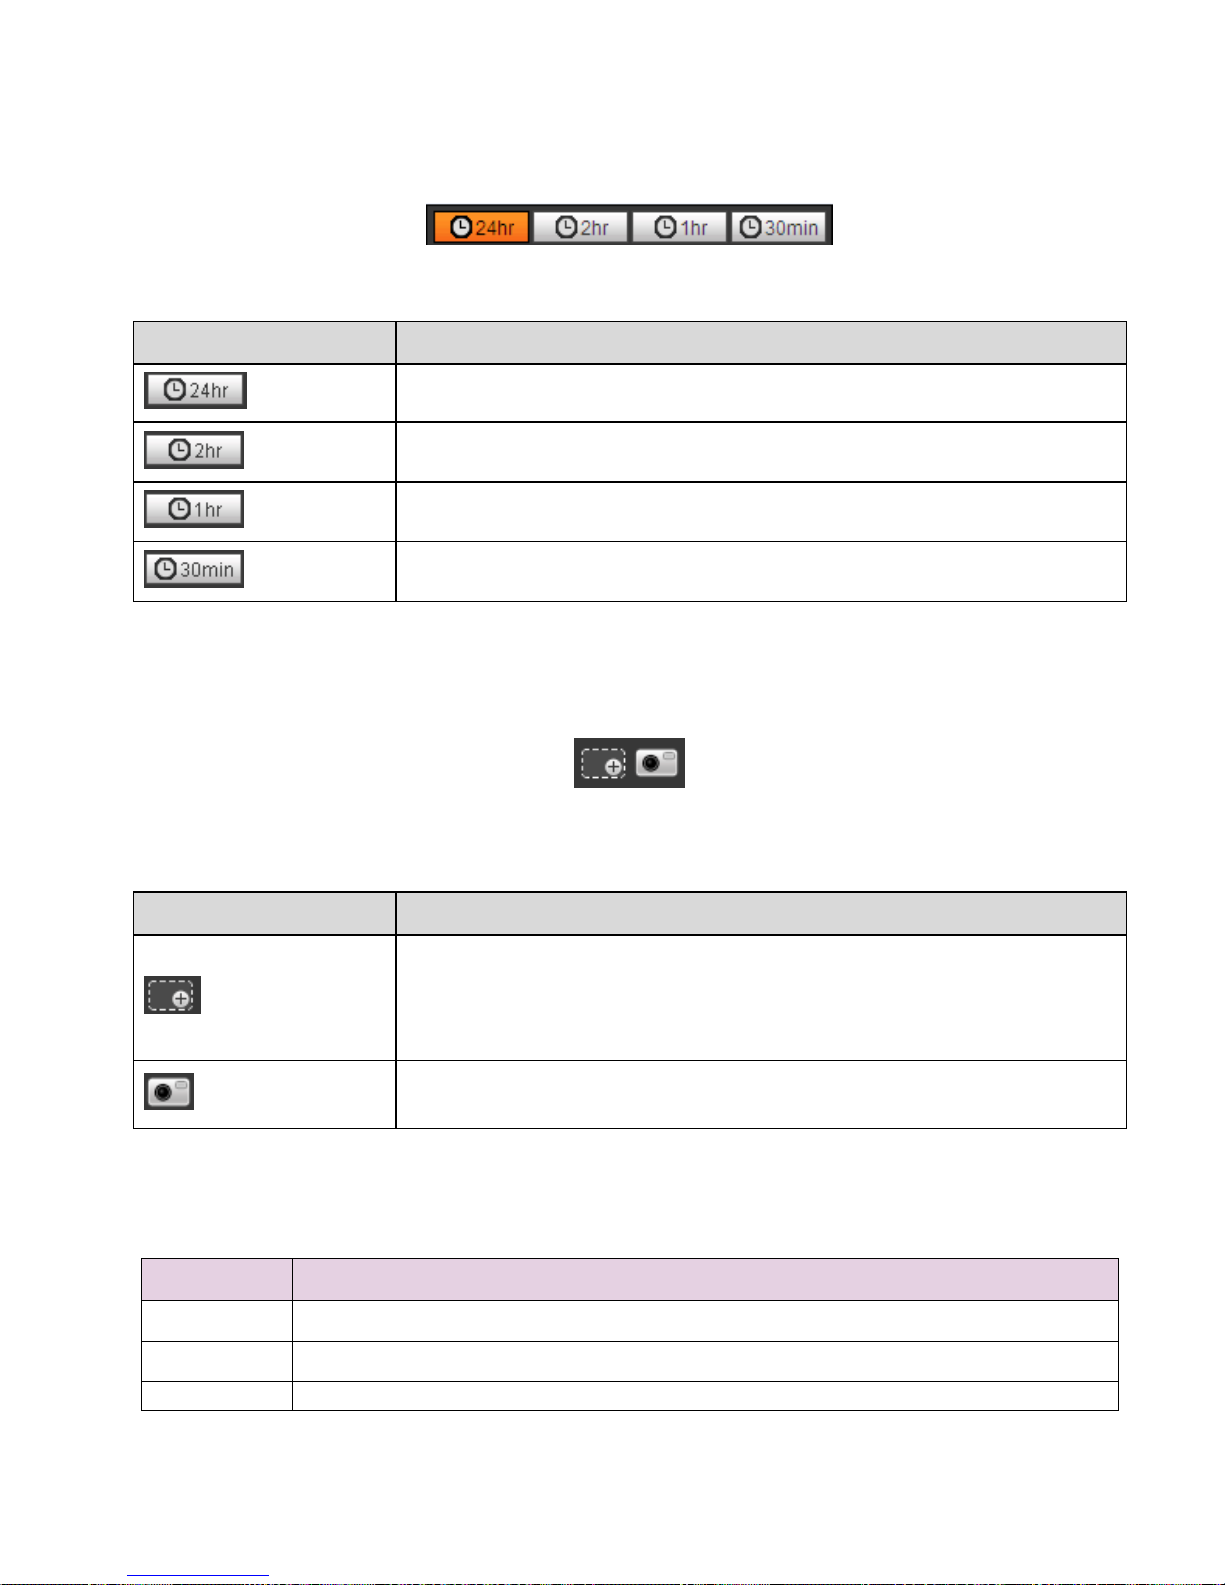
3.1.5 Progress Bar
16
Figure 3- 8
Parameter
Function
24 hours
Click on it, means video in past 24 hours.
2 hours
Click on it, means video in past 2 hours.
1 hour
Click on it, means video in past 1 hour.
30 min
Click on it, means video in past 30 min.
3.1.6 Assistant Function
Video playback assistant function is shown in Figure 3- 9.
Figure 3- 9
Parameter
Function
Zoom in
Click on it, video in playback status if is in original size, user can
zoom in any area, If it is not in its original size, click on mouse to
restore its original size.
Click on this button, you can scroll to zoom in.
Snapshot
Click on this button, you can snapshot video under playback status.
Snapshot will be saved to path in Ch 5.1.2.5.
3.2 Picture Playback
Web client picture playback interface has the following three functions:
Parameter
Function
1
Play function bar
2
Playback file bar
3
Snapshot type bar
17
See Figure 3-10.
Figure 3-10
3.2.1 Play
Figure 3-11
Default icon is and it means pause or not played picture. Click on play button to switch to
normal play status. Icon become
Click on it to pause.
3.2.2 Playback File
1
3
2
18
Figure 3-12
Step 1. Click on file list , select snapshot file of the date.
Step 2. Double click on file in list, to play this snapshot.
Parameter
Function
Search
It means all snapshot files within the start time and end time of selected date.
19
Parameter
Function
Download
Click on download button to download snapshot file to local.
Back
Click on back button to return to calendar interface and re-select time.
Figure 3-13
3.2.3 Snapshot Type

20
After checking snapshot file type, in file list only display file of selected type. Users can also select the
snapshot type to be displayed via the dropdown box above the file list. See Figure 3-14.
Figure 3-14
 Loading...