

Page 1
Facsimile
User’s Guide
DX-2000
Page 2
IMPORTANT INFORMATION
When requesting infor mation, supplies or servi ce, always refer to the model and ser ial number of your
machine. The model an d serial number plate (Main Name Plate) is located on the ma chine as shown
below. For your convenience, space is provided below to record information you may need in the future for
reference or troubleshooting.
Model No. Serial
Date of Purchase
Dealer
Address
Telephone Number ( ) –
Supplies Telephone Number ( ) –
Service Telephone Number ( ) –
For the total system to work properly via LAN, certain information and additional parameters must be set. Please
contact your network administrator for the required information and connection to the LAN.
User Information
Company Name:
Address:
Dept.:
City: State: Zip Code:
Tel. No.: Fax No.:
Internet Parameters (See page 41 to 45)
IP Address:
Subnet Mask:
SMTP Server Name: or SMTP Server IP Address:
Default Router IP Address:
Email Address:
DNS Server IP Address:
POP Server Name: or POP Server IP Address:
POP User Name:
POP Password:
Host Name:
(for security, do not write it in - but beep it in a safe place)
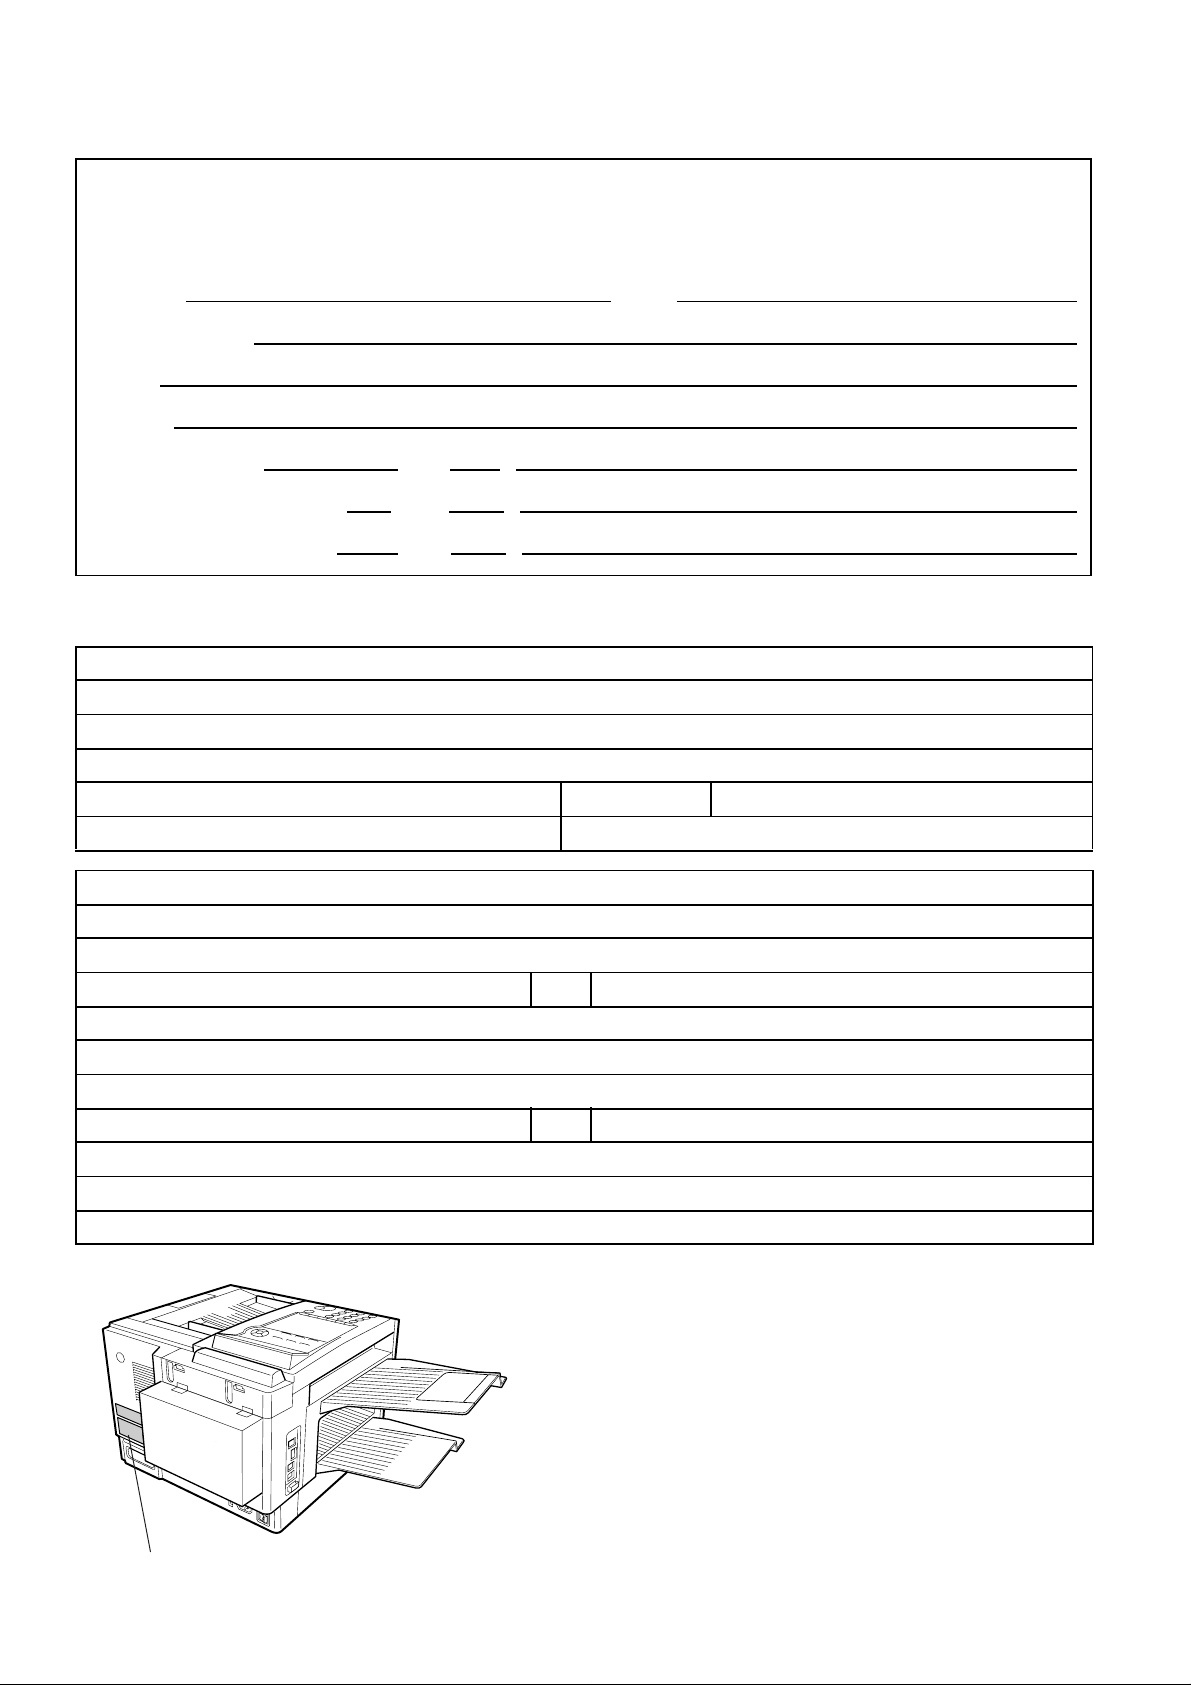
Model and Serial Number
Copyright © 1999 by Matsushita Gr ap hic C o mmunication Systems , In c.
All rights reserved. Unauthorized copying and dis tribution is a violation
of law. Printed in Japan.
The contents of this User’s Guide are subject to change without notice.
Page 3

Table of Contents
GETTING TO KNOW YOUR MACHINE
1
Safety Information............................................................................................... 6
Introduction.......................................................................................................... 9
Function Key...................................................................................................... 10
External View .......... .. .. ................ ............... .. ................ ............... ... ............... ..... 11
Control Panel..................................................................................................... 12
Pre Installation Information.............................................................................. 14
Setup as SMTP mail server 15
Setup as POP3 Client 16
Internet Communication Features................................................................... 19
Internet Fax Transm ission 19
Internet Mail Reception 19
Inbound Routing 20
Fax Forward 21
Network Scanner 21
Network Printer 22
Relayed Transmission 23
Important Info r m a t io n ........... ... ............... ............... ... ............... ................ .. ....... 2 4
Differences between Internet Fax and Regular Fax 24
Transmitted Document Confirmation 24
DX-2000 Cannot Make a Phone Call via LAN 24
Dual Port Communication 24
Transmission Resolution 24
Internet Mail Reception 24
Sending Document Size via LAN 25
Sending a Document to a PC via LAN 25
Internet Relayed Transmission 25
INSTALLING YOUR MACHINE
2
Main Unit and Accessories............................................................................... 26
Installing the Accessories................................................................................ 27
Installing the Toner Cartridge..................... ..................................................... 28
Loading the Recording Paper ................................... ....................................... 30
Paper Specification s 30
How to Load the Recording Paper 30
Connecting the Telephone Line Cables and Power Cord.............................. 32
Setting the Dialling Method (Tone or Pulse)................................................... 34
Adjusting the Volume........................................................................................ 35
Setting the Monitor Volume 35
Setting the Ringer Volume 35
User Paramete rs..... ............... ................ .. ............... ................ .. ................ ......... 36
Setting the Date and Time 36
Setting Your Time Difference 37
Setting Your LOGO 38
Setting Your Character ID 39
Setting Your ID Number (Fax Telephone Number) 40
1
Page 4

Setting the Internet Parameters........................................................................41
Setting the parameters for the LAN Interface 41
Setting the Internet Relay Station 45
Programming or Retrieving Parameters via Email .........................................46
Using Email to Program or Retrieve Parameters 46
Using a PC to Input the Internet Parameters Remotely 46
To Input the Internet Parameters for the First Time 47
To Retrieve the Internet Parameters for Backup 49
To Edit the Retrieved or Backup Internet Parameters File 51
Using a PC to Update the Auto Dialler Remotely 54
Deleting the Entire Auto Dialler 55
To Program One-Touch / ABBR No. for the First Time 56
To Retrieve One-Touch / ABBR No. Data for Backup 58
To Edit the Retrieved or Backup One-Touch / ABBR No. Data File 60
Using Email to Retrieve the Journal 62
PROGRAMMING YOUR MACHINE
3
Programming Email Address and Telephone Numbers.................................63
Entering One-Touch/Abbreviated Dialling Numbers 63
Changing or Erasing One-Touch/Abbreviated Dialling Numbers 67
Printing Out a Directory Sheet 70
Customizing Your Machine...............................................................................71
Setting the Fax Parameters 71
Fax Parameter Table 72
BASIC OPERATIONS
4
Loading Documents...........................................................................................77
Basic Transmission Settings............................................................................79
Sending Documents via LAN............................. .. .. .. .. .......................................81
Multi-Station Transmission (Broadcasting) ............................................................ 87
Transmission Reservation........................................................................................89
Redialling ...................................................................................................................90
Documents You Can Send 77
Documents You Cannot Send 77
How to Load Documents 78
Contrast 79
Resolution 79
Halftone 80
Verification Stamp 80
Manual Number Dialling 82
One-Touch Dialling 83
Abbreviated Dialling 84
Directory Search Dialling 85
Returned Email 86
Using a Mailing List 88
Memory Transmission Reservation (Multitasking) 89
Automatic Redialling 90
Manual Redialling 90
2
Page 5

Sending Documents via Telephone Line........................................................ 91
Memory Transmission ............................ ....... ............................................. ...... ....... . 91
Manual Number Dialling 93
One-Touch Dialling 94
Abbreviated Dialling 95
Directory Search Dialling 96
Multi-Station Transmission (Broadcasting).............................................. ...... ....... . 97
Direct Transmission.................................................................................................. 98
Manual Number Dialling (Direct Transmission) 98
One-Touch Dialling (Direct Transmission) 99
Abbreviated Dialling (Direct Transmission) 100
Directory Search Dialling (Direct Transmission) 101
Voice Mode Transmission ...................................................................................... 102
Off-Hook Dialling 102
On-Hook Dialling 103
Transmission Reservation...................................................................................... 104
Memory Transmission Reservation (Multi-tasking) 104
Direct Transmission Reservation (Priority Transmission Reservation) 105
Redialling ................................................................................................................. 106
Automatic Redialling 1 06
Manual Redialling 106
Receiving Documents via LAN....................................................................... 107
Internet Fax Received on a PC 107
Receiving Email from a POP Server...................................................................... 109
Setting the POP Parameters 109
Unattended Reception from the POP Server 112
Manual Reception from the POP Server 112
Receiving Documents via Telephone Line.................................................... 113
Automatic Reception...............................................................................................113
Manual Reception.................................................................................................... 113
Print Reduction........................................................................................................ 114
Selecting the Print Reduction Mode 114
Receiving Oversize Documents 115
Substitute Memory Reception................................................................................ 116
Print Collation Mode................................................................................................ 116
Making Copies .......... .. .. ................ ............... ... ............... ................ .. ............... . 117
ADVANCED FEATURES
5
Program Keys ........... .. ................ .. ............... ... ............... ................ .. ............... . 119
Entering an Email Address 119
Entering a Telephone Number 120
Setting for Group Dialing 121
Setting the POP Access Key 122
Using the POP Access Key 123
Changing or Erasing the Program Key Settings 124
Sender Selection ............................................................................................. 125
General Description ................................................................................................ 125
Setting the Sender Selection 125
Sending Document with Sender Selection 127
Printing the Sender Selection List 128
3
Page 6

Subject Line Entry............................................................................................129
General Description ................................................................................................129
Sending Email with Subject Line Entry 129
Inbound Routing ............................................ .. ........................................... .. .. .130
Setting the Routing Parameters 130
Entering One-Touch/Abbreviated Dialing Numbers for Inbound Routing 133
Sub-addressing................................................................................................135
General Description ................................................................................................135
To set the Sub-address into a One-Touch/ABBR DIalling Numbers 136
To send a Document with Sub-address 137
Fax Forward......................................................................................................138
Setting Fax Forward 138
Edit File Mode...................................................................................................139
Printing a File List 139
Viewing the Contents of a File List 140
Changing the Station of a File 141
Deleting a File 143
Printing the Contents of a File 144
Retry an Incomplete File 145
Access Code..................................................................................................... 146
Setting the Access Code 146
Operating Your Machine with the Access Code (Restrict All Operations) 147
Operating Your Machine with the Access Code
(Restrict Access of User/Fax Parameters only) 147
Distinctive Ring Detector (DRD).....................................................................148
Transaction Journal .........................................................................................149
Ifax Return Receipt ..........................................................................................150
Polling .................................... ...........................................................................151
Setting the Polling Password 151
To Poll Documents from Another Station 152
NETWORK FEATURES
6
Network Scanner.................................................................................. .. ..........153
Network Printer ................................................................................................154
Relayed Transmission.....................................................................................155
General Description ................................................................................................155
Relay Network 156
Setting up your DX-2000 as an Internet Relay Station 158
Setting Up Your Machine for Relayed Transmission...........................................159
Programming the End Receiving Station into your Auto Dialler 159
Sending Documents via Internet Relay .................................................................161
To a Location That Has a Pre-programmed Relay Station 161
To a Location That Does Not Have a Pre-programmed Relay Station 162
Sending Document(s) from a PC to a G3 Fax Machine........................................ 164
Printouts and Reports 166
4
Page 7

PRINT OUT JOURNALS AND LISTS
7
Journals and Lists.............................................................. .............................169
Transaction Journal 169
Communication Journal (COMM. JOURNAL) 172
One-Touch/Abbrev ia ted and Dir ec tory Sear ch List 174
Program List 177
FAX Parameter List 178
PROBLEM SOLVING
8
Troubleshooting.............................................................................................. 181
If You Have Any of These Problems 181
Information Codes 183
Email ABBR Programming Errors ......................................................................... 187
Error Message Sent to the Sender 187
Internet FAX Return Receipt Errors Messages 187
Clearing a Recording Paper Jam 188
Clearing a Document Jam 189
Cleaning the Document Scanning Area 190
Cleaning the Printer Roller 191
Adjusting the Automatic Document Feeder (ADF) 192
Verification Stamp 193
Replacing the Lithium Battery 194
Checking the Telephone Line 195
9
APPENDIX
Specifications.................................................................................................. 197
Recording Paper Specifications.................................................................... 200
Options and Supplies.............................................. ........................................ 201
Installing the Memory Card (Flash Memory Card and / or DRAM Card) 203
Glossary ........................................................................................................... 204
ITU-T Image No. 1................................................................................... ......... 210
INDEX................................................................................................................ 211
5
Page 8

GETTING TO KNOW YOUR MACHINE
Safety Information
This product compl ies with th e requi rements of EC C ouncil Dir ectives 73/23/E EC amende d by 93/68/EEC, and 8 9/
336/EEC amended by 92/31/EEC, 93/68/EEC and 98/13/EC.
The equipment has been approved in accordance with Council Decision 98/482/EC for pan-European single
terminal con nection to the public switched teleph one network (PSTN). However, due to differences between the
individual PSTNs provided in different countr ie s, the approval does not of, of itsel f, give an unconditional ass urance
of successful operation on every PSTN network termination point.
In the event of problems, you should contact your equipment supplier in the first instance.
!
WARNING
• TO PREVENT FIRE OR SHOCK, DO NOT EXPOSE THIS PRODUCT TO RAIN OR ANY TYPE OF MOISTURE.
• TO MINIMIZE THE POSSIBILITY OF SHOCK OR DAMAGE TO THE MACHINE, IT MUST BE PROPERLY
GROUNDED.
• THIS PRODUCT CONTAINS HAZARDOUS RADIATION. IF YOU DO NOT FOLLOW THESE INSTRUCTIONS
OR USE CONTROLS, MAKE ADJUSTMENTS OR PROCEDURES OTHER THAN THOSE SPECIFIED HEREIN,
YOU MAY EXPOSE YOURSELF TO HAZARDOUS RADIATION.
• WHEN YOU OPERATE THIS EQUIPMENT, THE SOCKET-OUTLET SHOULD BE NEAR THE EQUIPMENT AND
BE EASILY ACCESSIBLE.
• MAKE SURE THAT THE MACHINE IS INSTALLED IN A SPACIOUS OR WELL-VENTILATED ROOM SO AS NOT
TO INCREASE THE AMOUNT OF OZONE IN THE AIR. SINCE OZONE IS HEAVIER THAN AIR, IT IS
RECOMMENDED THAT AIR AT FLOOR LEVEL BE VENTILATED.
• PLUG POWER SUPPLY CORD INTO ORDINARY AC OUTLET BEFORE CONNECTING TELEPHONE LINE
CORD. DISCONNECT TELEPHONE LINE CORD BEFORE UNPLUGGING POWER SUPPLY CORD FROM AC
OUTLET.
• DISCONNECT THE EQUIPMENT IMMEDIATELY SHOULD IT EVER SUFFER PHYSICAL DAMAGE WHICH
RESULTS IN THE INTERNAL PARTS BECOMING ACCESSIBLE IN NORMAL USE. IN THIS INST ANCE USERS
SHOULD HAVE THE EQUIPMENT REPAIRED OR DISPOSE OF.
• IF THE POWER SUPPLY CORD AND/OR TELEPHO NE LINE CORD OF THIS E QUIPMENT ARE DAMAGED,
THEY MUST BE REPLACED BY THE SPECIAL CORDS SUPPLIED BY AN AUTHORIZED PANASONIC
SERVICE CENTRE.
denotes a potential hazard that could result in serious injury or death.
CAUTION
!
• THIS PRODUCT CONTAINS A LITHIUM BATTERY. DANGER OF EXPLOSION IF BATTERY ISE OF USE
INCORRECTLY REPLACED.
REPLACE ONLY WITH THE SAME OR EQUIVALENT TYPE. DISPOSE OF USED BATTERIES ACCOR DING TO
THE INSTRUCTIONS OF YOUR LOCAL SOLID WASTE OFFICIALS.
1 When you know that a thunderstorm is coming, we recommend that you:
(1) Unplug the telephone line cord from the phone jack.
(2) Turn off the power and unplug the power supply cord from AC outlet.
2 This equ ipmen t may not necessar ily provide for the effective hand-over of a call to or from a telephone connected
to the same line.
3 The ope ration of this e quipment o n the same li ne as t elepho nes or ot her eq uipme nt with a udible warn ing devices
or automatic r ing detectors w ill give rise to bel l tinkle or no ise and may cause false trip ping of the ri ng detector.
Should such problem occur, the user is not to contact telecom (telephone company) faults service.
denotes hazards that could result in minor injury or damage to the machine.
6
Page 9
Safety Information
For New Zealand Users
The grant of a Teleper mit for any item of terminal equipment indica tes only that Telecom has accepted that the
item complies with min imum conditions for connectio n to its network. It indicates noend orsement of the product
by Telecom, no r does it provide any sor t of warranty. Above all, it provides no assu rance that any item will wor k
correctly in all respect s with another item of Tel epermitted equipment of a di fferent make or model, nor does it
imply that any product is compatible with all of Telecom’s network services.
This equipment is not capa ble, under all operating con ditio ns, of correct ope ration at th e higher s peeds for which
it is designed. Telecom will accept no responsibility should difficulties arise in such circumstances.
IMPORTANT NOTICE
Under power failure conditions, this telephone m ay not operate. Please ens ure that a separate telephone, not
dependent on local power, is available for emergency use in emergencies.
This equipment should not be used under any circu mstances whic h may constitute a nuisance to other Telecom
customers.
This equipment shall not be set to make automatic calls to the Telecom ’111’ Emergency Service.
Not all telephones will respond to incoming ringing when connected to the extension socket.
1
Manufacturer’s Network Compatibility Declaration to the user
The products, Model DX-2000-** (** means country suffixes as table below.), are
designed to comply with the requirements,
and are designed to work with the Analogue Public Switched Telephone Networks under
the scope of above requirements.
If it is desired to use the equipment on anther network, ple ase contact the vender.
** Country ** Country ** Country ** Country
AA Austria AJ Spain AQ Ireland EE Itary
AD Denmark AM Switzerland AR Belgium YG Greece
AF Finland AN Norway AS Sweden
AH The Netherlands AP Portugal AV France
TBR21:1998 and EG201121 (V1.1.2): 1998
,
7
Page 10
Safety Information
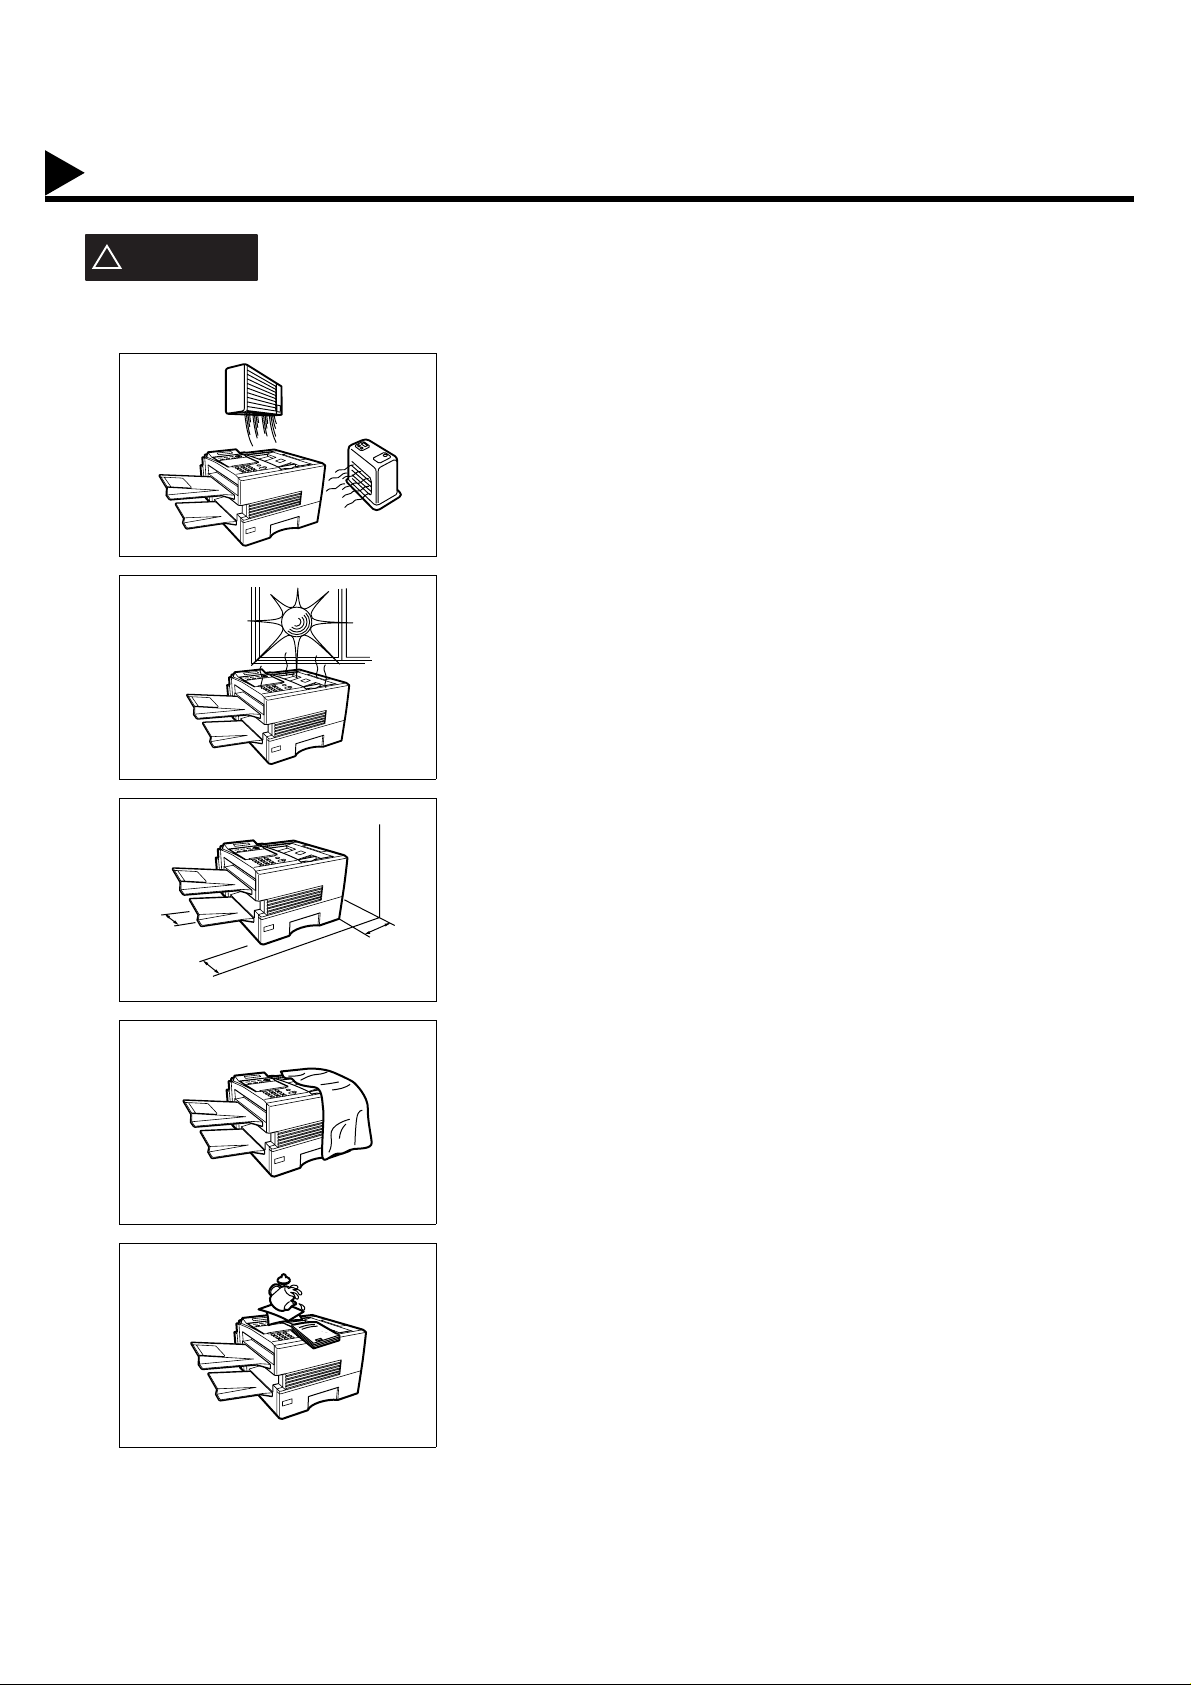
CAUTION
!
denotes hazards that could result in minor injury or damage to the machine.
Do not install the machine near heating or an air conditioning unit.
Avoid exposure to direct sunlight.
Install the machine on a flat surface, leave at least 10 cm of space
between the machine and other objects.
Do not block the ventilation openings.
Do not place heavy objects or spill liquids on the machine.
8
Page 11

Introduction
Thank y ou very much for purchasing the Panafax DX-2000.
The DX-2000 is one of t he most a dvanced mode ls i n the Panafax family of Super G 3 com patible, deskto p facsimile
machines.
Some of its many features are
1. Plain Paper Printing Plain paper print ing means you can easily wr ite on received documents
with a pen or pencil . Documents do not curl, making filing easier. In
addition, plain pap er doe s n ot fade, making it i dea l for long term storage
of important documents.
2. Quick Scanning The DX-2000 Quick S can speeds up the fax process by scanning and
storing documents into memory in about 1.0* seconds per page.
This means that you no longer have to wait around until a transmission is
completed before retrieving your originals.
(* Standard Resolution, based on ITU-T Image No. 1 Test Chart, Scanning
speed applies to the feeding process from the leading to the lagging edge of a
single page test chart. Time for the storing process is not applied for this
definition.)
3. Quick Memory
Transmission
4. Easy Maintenance Maintenance requi res on ly changi ng a toner cartridg e, making it qu icker
5. Memory Function A standard image memory feature allows you to store up to 120
6. Multi-Access
Operation
7. Internet
Communication
8. Dual Port
Communication
Unlike conventional memory-ba sed fax machines, the DX-2000 dial s as
soon as the first page has been scanned. You can continue to scan
additional pages whi le transmission is taking place. With simulta neous
scanning and sending, you will save even more time.
and easier than with other types of plain paper fax machines.
standard pages into the document memory. After th e DX-2000 stores
your documents, it can send them to selected station(s) automatically.
You do not have to wait until the transmission ends before retrieving your
originals.
A convenience feature on the DX-2000 that allows the user to perform
multiple operations simultaneously. For example, reserve the next
transmission while the m achine is s ending or receivin g document s from
or into memor y. The user can scan a dditional docu ments into memor y
or can receive during document storage.
Connected to an Ethernet LAN (local area network), the DX-2000 allows
you to send documents over the Inter net to a remote Inter net Fax or a
PC termina l. It als o al lows you to recei ve and print an email transmitted
by a remote PC. Furthe rmore, the DX-2000 is capable of performing
email and fax forwarding functions. Execute relayed transmission
requests, and can be used as a network scanner and printer.
The DX-2000’s dual port capability, allows simultaneous G3 Fax
Communication over regular telephone line (PSTN) and LAN
Communication.
1
With a little practice, anyone can learn how to use the most popular
features of the DX-2000.
This User’s Guide will help you to use your DX-2000 quickly and easily.
The Table of Conten ts shows where to find information on ea ch feature.
Although we recommend that you review each section br iefly, it will only
be necessar y to r ead th e sectio ns tha t conta in the feature(s) you will be
using.
9
Page 12

Function Key
Any function can be started by first pressing and then enter the function number, or by pressing
or scroll key repeatedly until the desired function appears on the display.
2
Relayed Transmission
(See Note)
Polling
FUNCTION
3
FUNCTION
6
7
Printout
1 = Journal (Print/View)
2 = One-Touch/Abbreviated/ Directory Search List
3 = Program List
4 = Fax Parameter List
5 = Not used
6 = Not used
7 = Directory Sheet
Set Mode
1 = User Parameters
• Date & Time
• Logo
• Character ID
• ID Number (Fax Telephone Number)
• Internet Parameters
2 = One-Touch/Abbreviat ed Numbers
3 = Program Keys
4 = Fax Parameters
5 = Not used
6 = Cleaning Printer Roller
(see Note 1)
Note:
1. If Fax Parameter is not preset to a Valid position, which enables you to use the function, the display will not show
9
the function.
Edit File Mode
1 = File List (Print/View)
2 = Change Station
3 = Delete File
4 = Print File
5 = Not used
6 = Retry Incomplete File
10
Page 13
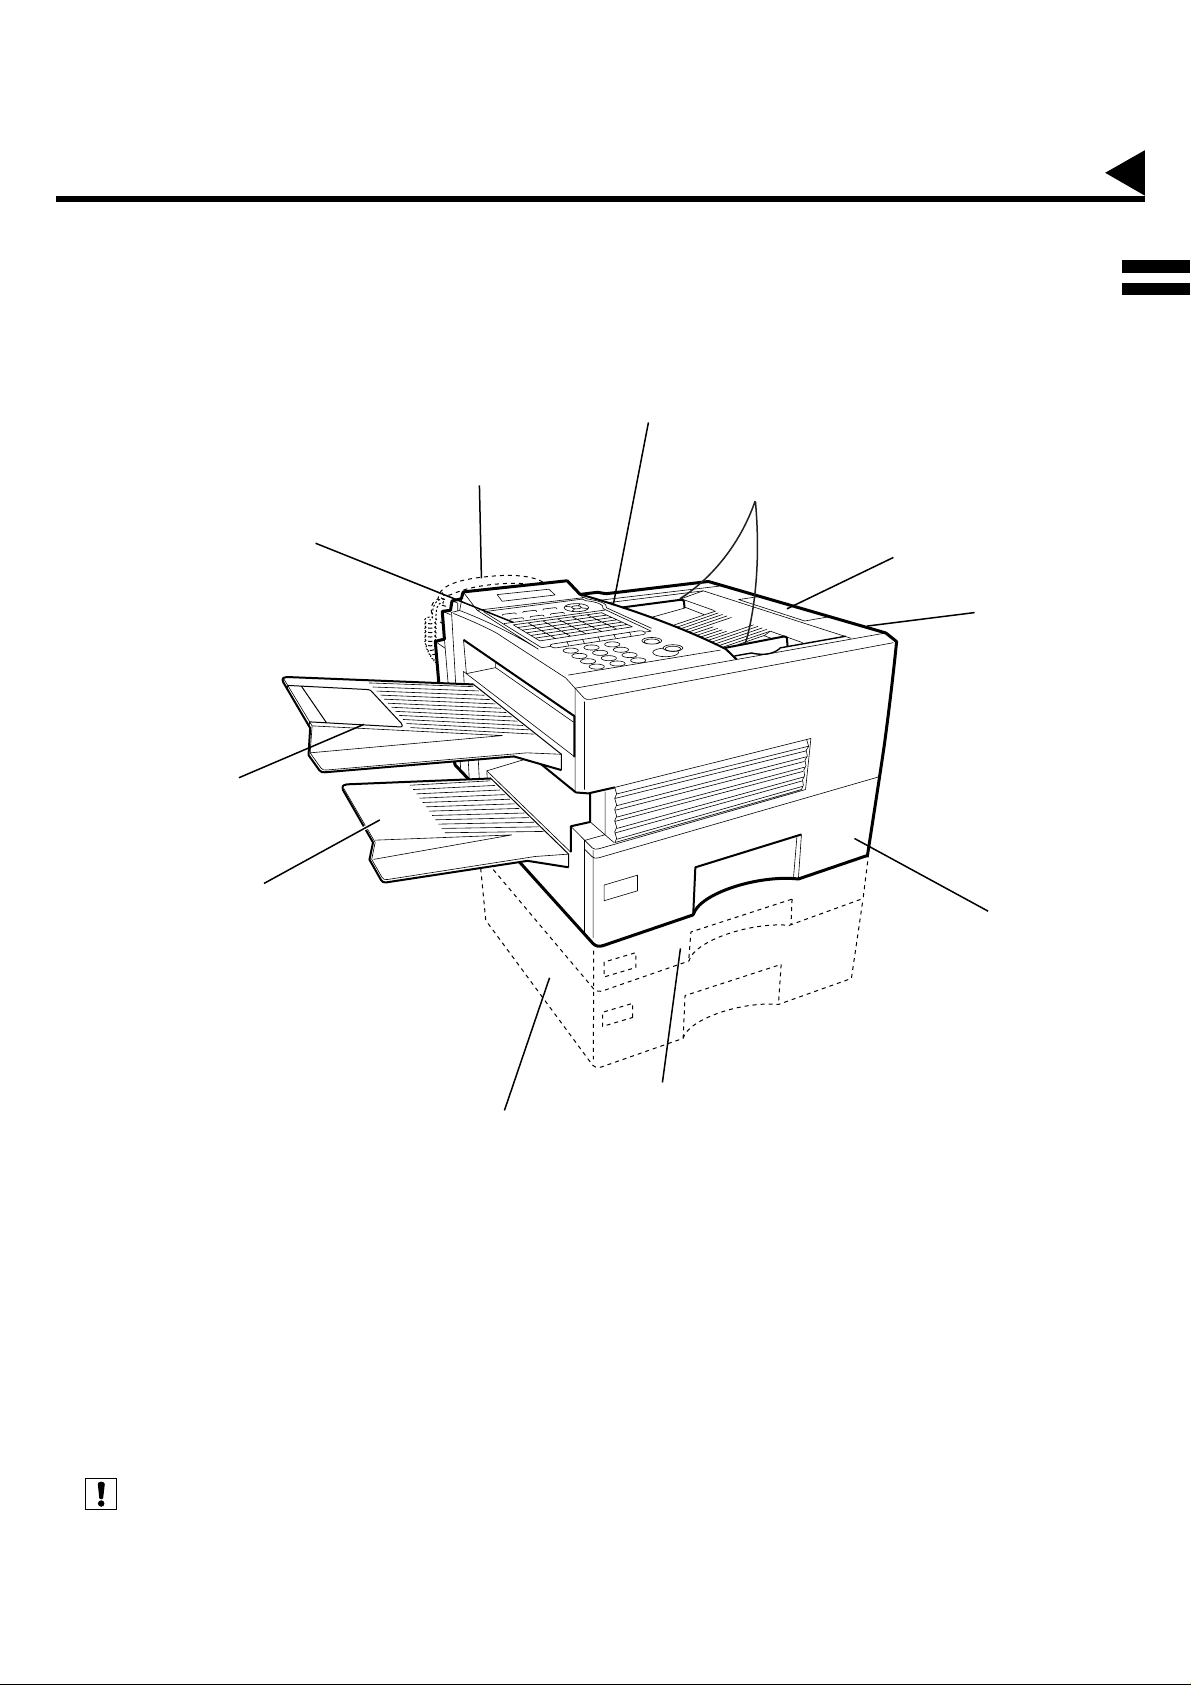
External View
r
(see Note 1)
Handset
(Available as an option, see page 201)
Control Panel
Document Return Tray
1
ADF Door
Document Guides
Document Sub Tray
Printer Cove
Recording Paper Tray
500 sheets Recording Paper Cassette
(Available as an option, see page 201)
500 sheets Recording
Paper Cassette
(Standard)
250 sheets Recording Paper Cassette
(Available as an option, see page 201)
Note:
1. For some countries, the handset may not be available because of the country’s regulation or specification.
11
Page 14
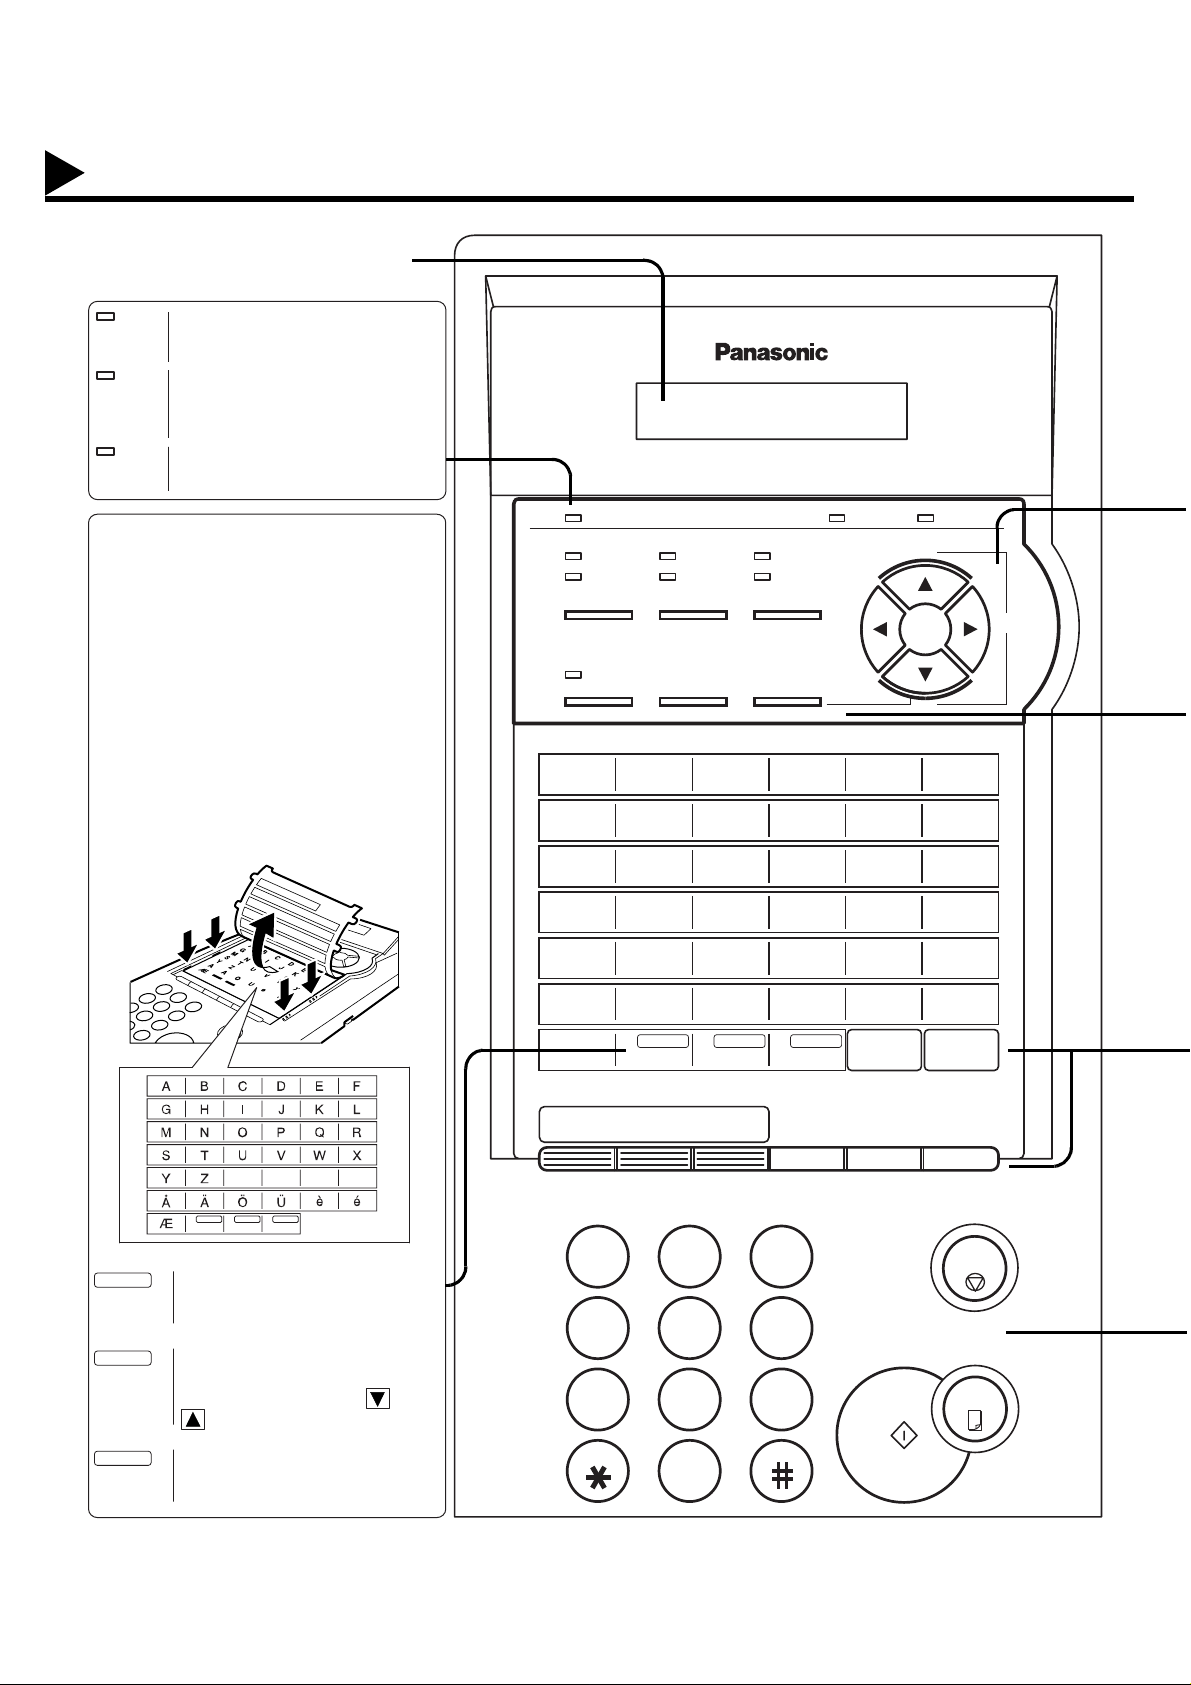
Control Panel
LCD Display
Indicates date and time, or the current
operation.
ON LINE
Blinks when the machine is
transmitting a document or
receiving.
TONER
Blinks when the remaining
toner is getting low and lights
when the toner is running out.
(See page 28)
ALARM
Lights when trouble occurs.
(See page 181)
One-Touch Keys
(01-32)
Used for One-Touch Dialling.
(See page 94 and 99)
Program Keys
(P1-P8)
Used to record long dialli ng procedu res or
Group Dialling Number keys.
(See page 119 to 124)
Character Keys
The One-Touch Keys and Program Keys
also serve as character and symbol input
keys which are used to record the Email
address, your LOGO, character ID and
station name. The character key template
is printed on the panel unde r the dire ctory
sheet cover.
01
02
03
04
05
06
07
08
09
10
11
12
13
14
15
16
17
18
19
20
21
22
23
24
25
26
27
28
29
30
31
32
P1
P2
P3
P4
P5
P6
P7
SPACE SYMBOLS CAPS
P8
ON LINE TONER ALARM
DARKER
LIGHTER FINE QUALITY
a01
02
07
13
19
25
31
P5
PAUSE
REDIAL ABBR
08
g
14
m
20
s
26
y
32
P6
400 dpi FAST
03
09
15
21
27
P1
P7
SUB-ADDR
FLASH
HALFTONE
DIRECTRY
SEARCH
04
c
10
i
16
o
22
u
28
P2
P8
05
d
11
j
17
p
23
v
29
P3
FUNCTION CLEAR SET
RESOLUTIONCONTRAST
INTERNETMEMORY
b
h
n
t
z@. - _
SPACE SYMBOLS CAPS
+
VOLUME
-
06
e
12
k
18
q
24
w
30
P4
f
l
r
x
MONITORST AMP
12
SPACE
SYMBOLS
CAPS
Used to insert a space while
entering LOGO, character ID
and station name.
Used to enter a symbol (, ’ & ( )
: + / %) for LOGO, character ID
and station name. Use or
to select the symbols.
Used to switch between upper
and lower character set.
123
456
789
TONE
0
STOP
COPY
START
Page 15
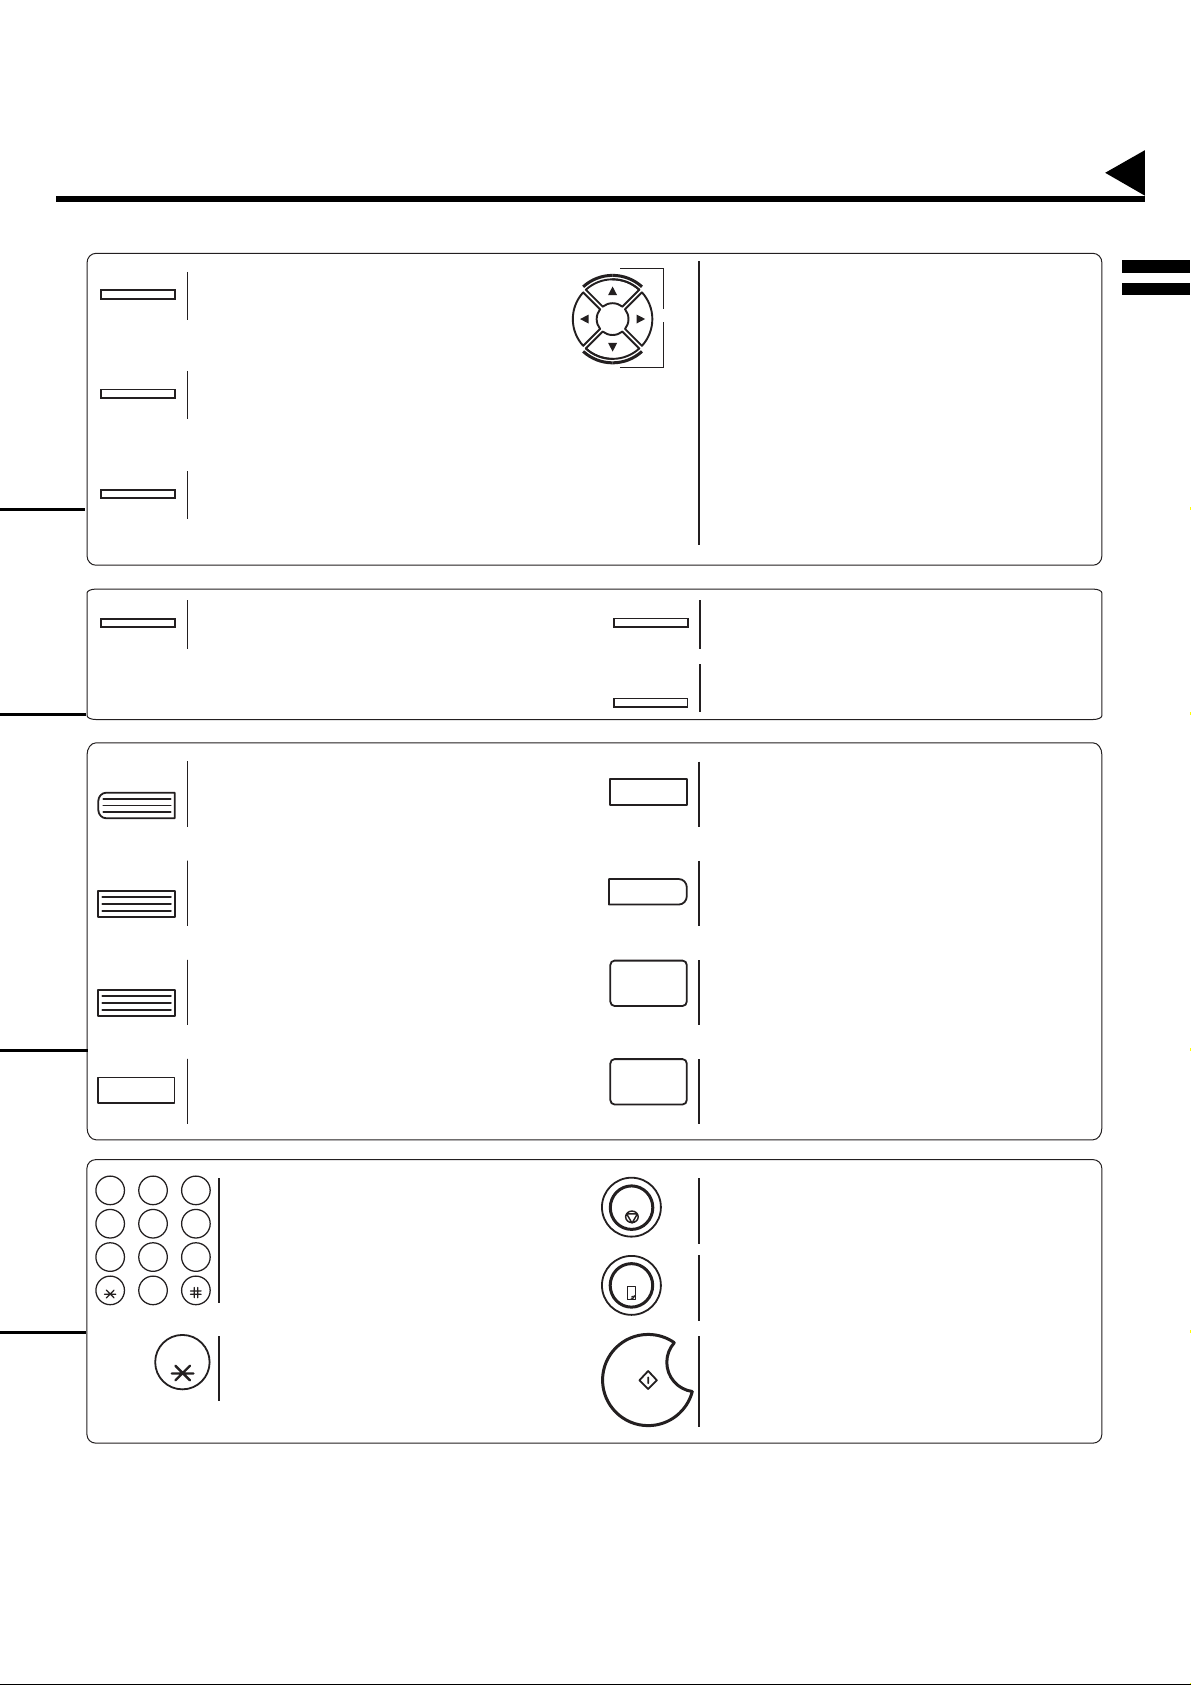
Control Panel
CONTRAST
RESOLUTION
HALFTONE
MEMORY
PAUSE
REDIAL
Used to set Normal, Lighter, or Darker.
(See page 79)
Used to set Standard, Fine and 400 dpi.
(See page 79)
Provides OFF, QUALITY or FAST settings for
halftone documents. (See page 80)
Used to select either memory or direct
communication.
(See page 91 to 101)
Used to enter a pause when recording or
dialling a telephone number, or to redial the
last dialed number. (See page 106 )
+
VOLUME
-
INTERNET
DIRECTOR Y
SEARCH
CLEAR
1
Used for the following:
• Adjust the monitor and ringer volume.
(See page 35)
• Move the cur sor while entering numbers
and characters.
• Search the station name for Directory
Search Dialling.
• Confirm the entered station for multi-station
communication.
• Select functions.
• Confirm the current communication modes
(e.g. Page number, ID, Dialed Telephone
number, File number) when the unit is ON
LINE.
Used to select Internet communication.
(See page 82)
Used to search for a station name.
(See page 85 and 96)
Used to erase the previously entered input.
ABBR
SUB-ADDR
FLASH
FUNCTION
123
456
789
TONE
0
TONE
Used to start Abbreviat ed Dia ll ing . (See pag e
95 and 100)
Used to separate the Sub-address from the
telephone number when diallin g, or to acces s
some features of your PBX.
Used to start or select the function and
sub-functions.
These functions are explained in detail on
page 10.
Used for Manual Number Dialling,
recording phone numbers, and selecting
functions.
Used to temporarily change the Dialling
Mode to Tone when Pulse mode is set.
SET
ST AMP
MONITOR
STOP
COPY
START
Used to set operations.
Used to turn the verification stamp ON or OFF.
(See page 80)
Used to start On-Hook Dialling. (See page 103)
Used to cancel operations. When it is
pressed, the machine will return to standby.
Used to make copies.
(See page 117)
Used to start operations.
13
Page 16
Pre Installation Information
Before setting up the DX-2000 on your network, please read this entire section to be familiar with its functions.
The DX-2000 is able to perform the following when connected to a 10Base-T Ethernet LAN (local area network):
• Send paper-based information as an Internet Email.
• Receive and print an Internet Email automatically.
• Forward received G3 fax message or Email automatically to the preprogrammed Email address or regular G3 fax
machine (see "Fax Forward" on pages 138).
• Route rec eived G3 fax message automatically to the sender- specified Email address or G3 fax machine using
ITU-T SUB-Address (see "Inbound Routing" on pages 130 to 134).
• Route received G3 fax messages automatically to the preprogramm ed Email addres s or G3 fax mach ine using
the sender’s fax ID code (see "Inbound Routing" on pages 130 to 134).
• Relay an Internet Email to a G3 fax machine via regular fax transmission (see "Relay Transmission" on pages 155
to 167).
• Network scanning and printing.
To util ize the above functions, the DX-2000 needs to be set up proper ly on your network.
network administrator for actual network setup.
Copy the Pre-installation Informati on form found at the end of this sectio n on page 17 , record the MAC Address
on the form and ask your network admini strator to complete the remaining i nformation on the form. The MAC
Address of your DX-2000 can be found on the 2nd page of th e Fax Parameter List printout (press
6 4
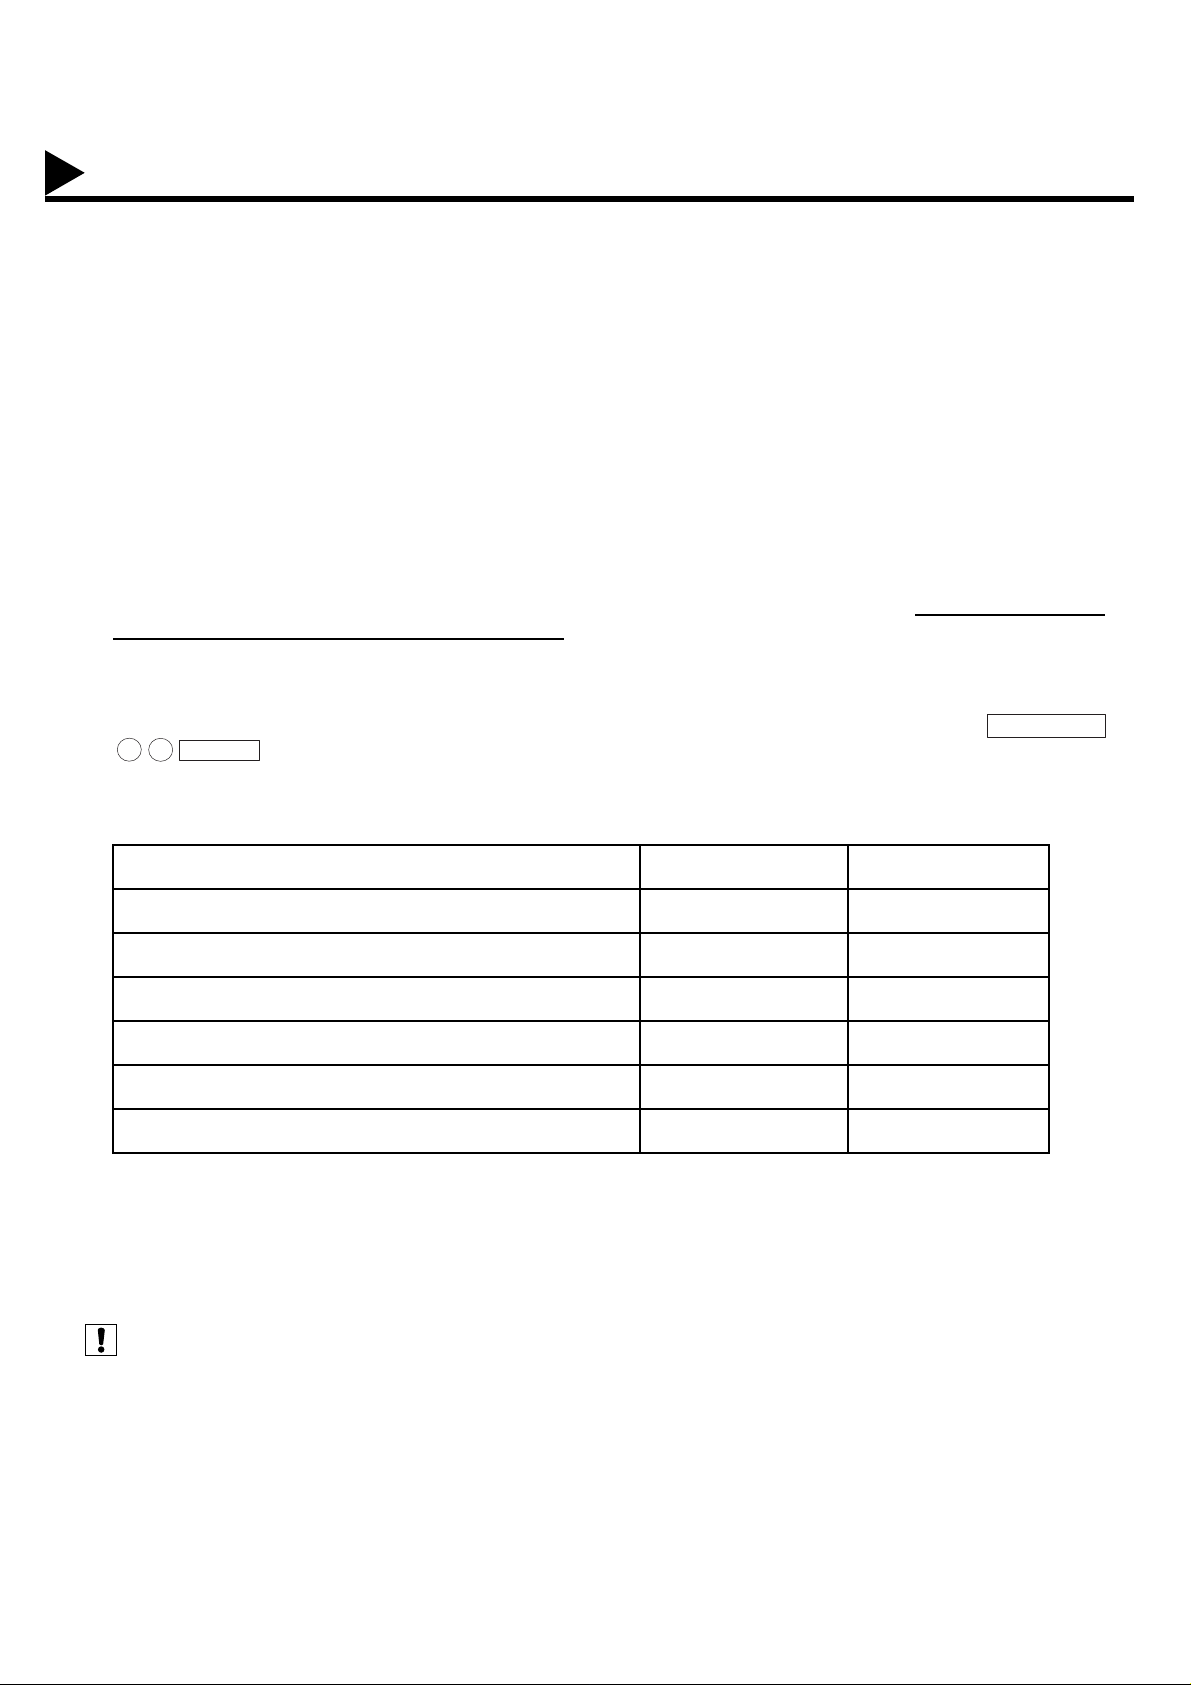
The DX-2000 can be set up as either SMTP mail server or POP3 client. Dependent on the type of setup,
different functions are available as follows.
Sending paper-based information as an Internet Email Yes Yes
Receive and print an Internet Email automatically Yes Yes
Receive and print an Internet Email manually No Yes
Forward received G3 fax message or Email automatically Yes Yes
Route received G3 fax message automatically Yes Yes
Relay an Internet Email to G3 fax machine Yes No
SET
). (see Note 1) (see Note 2) (see Note 3) (see Note 4)
Function SMTP Server Setup POP3 Client Setup
Please contact your
FUNCTION
14
Note:
1. To function as SMTP mail server, the DX-2000’s email address must include its unique Host name within your
company domain. This unique Host name must be registered within your network’s DNS (Domain Name System)
server. Example: DX2000@fax01.panasonic.com
2. Automatically refers to immediate SMTP transfer or immediate POP3 retrieval. Manually refers to manual retrieval
of mail when configured as POP3 client.
3. The DX-2000 will receive, print, forward or relay emails in text message format and TIFF-F image file attachment
only.
4. Dynamic Host Configuration Protocol (DHCP) is not supported.
Page 17
Pre Installation Information
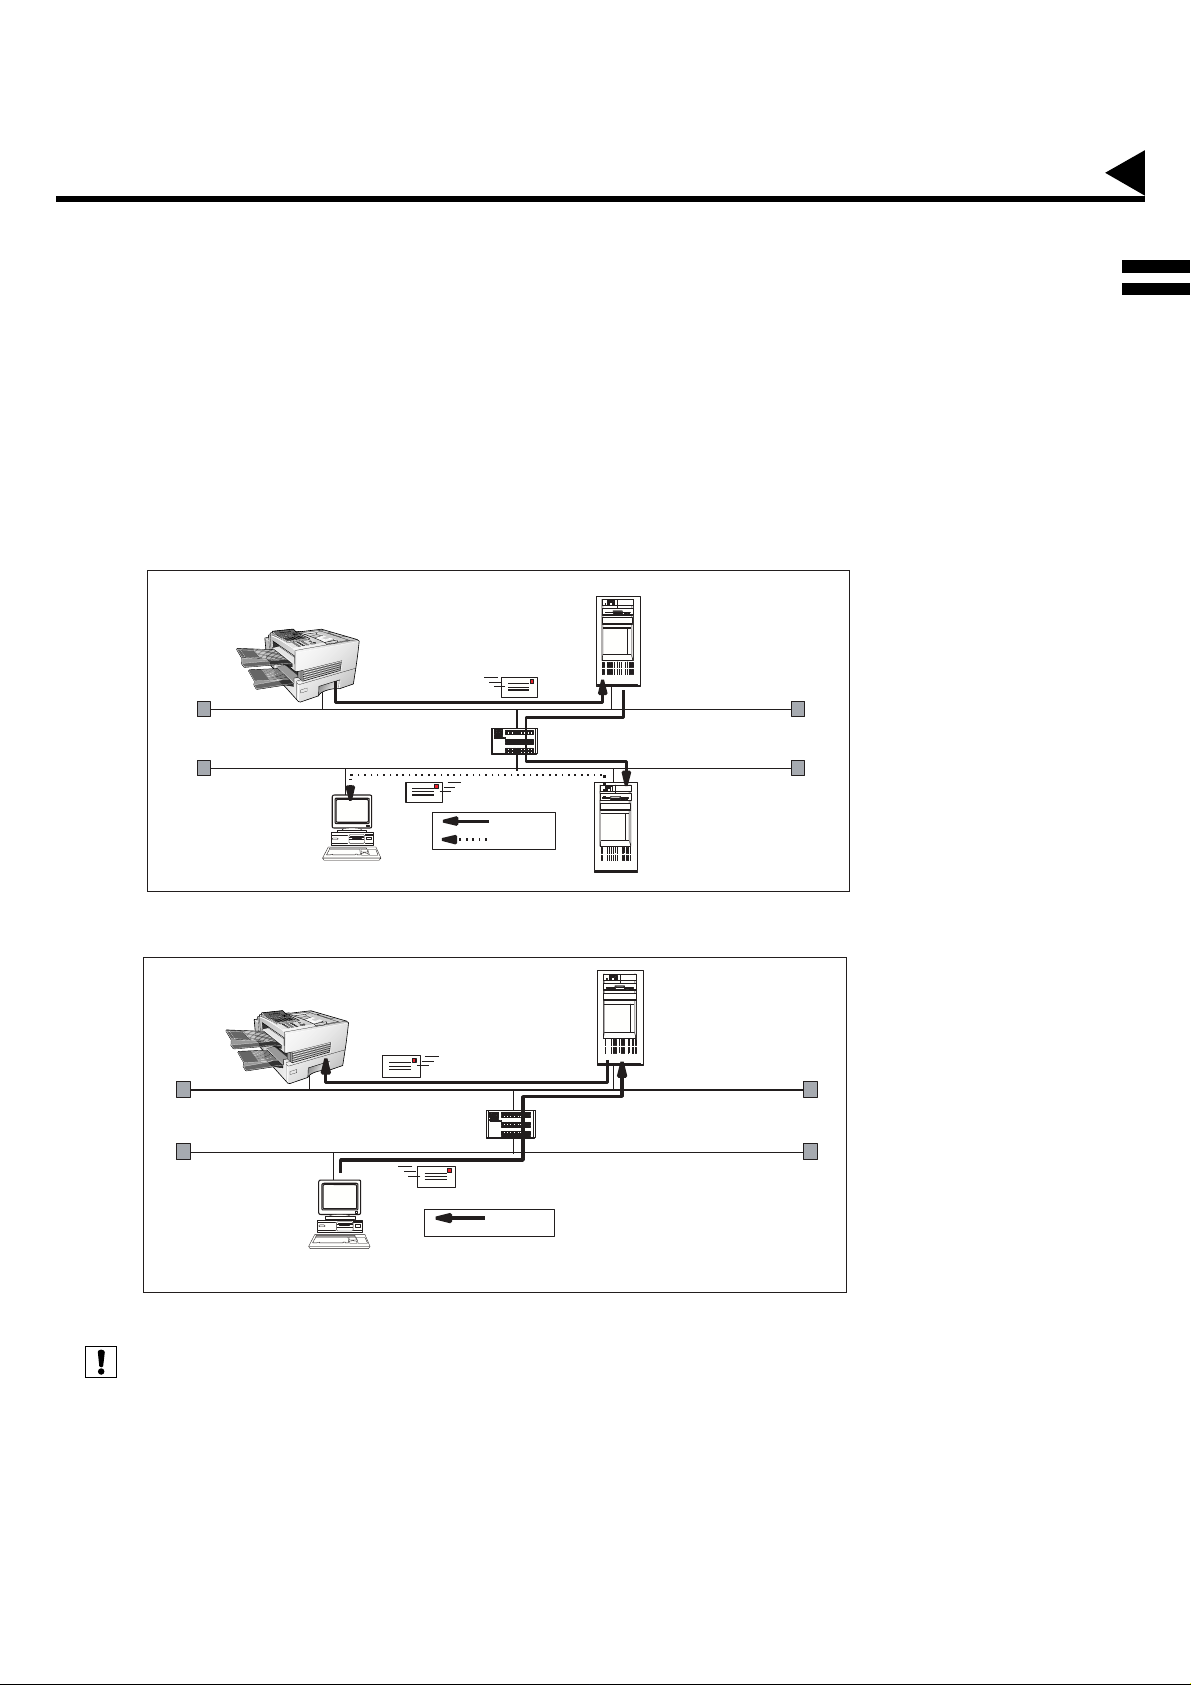
Setup as SMTP mail server
To i nstall the DX-2000 as SMTP mail s er ver, the following network parameters need to be pro grammed on your
network and on the DX-2000.
• IP Address of the DNS Server (if not available, see Note)
• IP Address of the DX-2000
• Subnet Mask of the DX-2000
• Name or IP Address of the Default SMTP mail server
• IP Address of the Default Router
• Email Address of the DX-2000 (see Note)
• Host Name
(see Note 1) (see Note 2) (see Note 3)
Email T ransmission (from the DX-2000 to a PC)
DX2000@fax01.panasonic.com
SMTP01.panasonic.com
(SMTP Mail Server)
(Router)
SMTP
POP3
popuser001@panasonic.com
POP02.panasonic.com
(POP Server)
1
Email reception (from a PC to the DX-2000)
DX2000@fax01.panasonic.com
(Router)
SMTP
popuser001@panasonic.com
Note:
1. To function as SMTP mail server, the DX-2000’s email address must include its unique Host name within your
company domain. This unique Host name must be registered within your network’s DNS (Domain Name System)
server. Example: DX2000@fax01.panasonic.com
2. By default the machine requires the IP Address of the DNS Server and prompts you to enter the SMTP Server
Name. If the D NS Server is not available, change th e Fax Parameter No. 161 (DNS SER VER) to "1:Invalid". Then
the machine will prompt you to enter the IP Address of the SMTP Server.
3. Dynamic Host Configuration Protocol (DHCP) is not supported.
SMTP01.panasonic.com
(SMTP Mail Server)
15
Page 18
Pre Installation Information
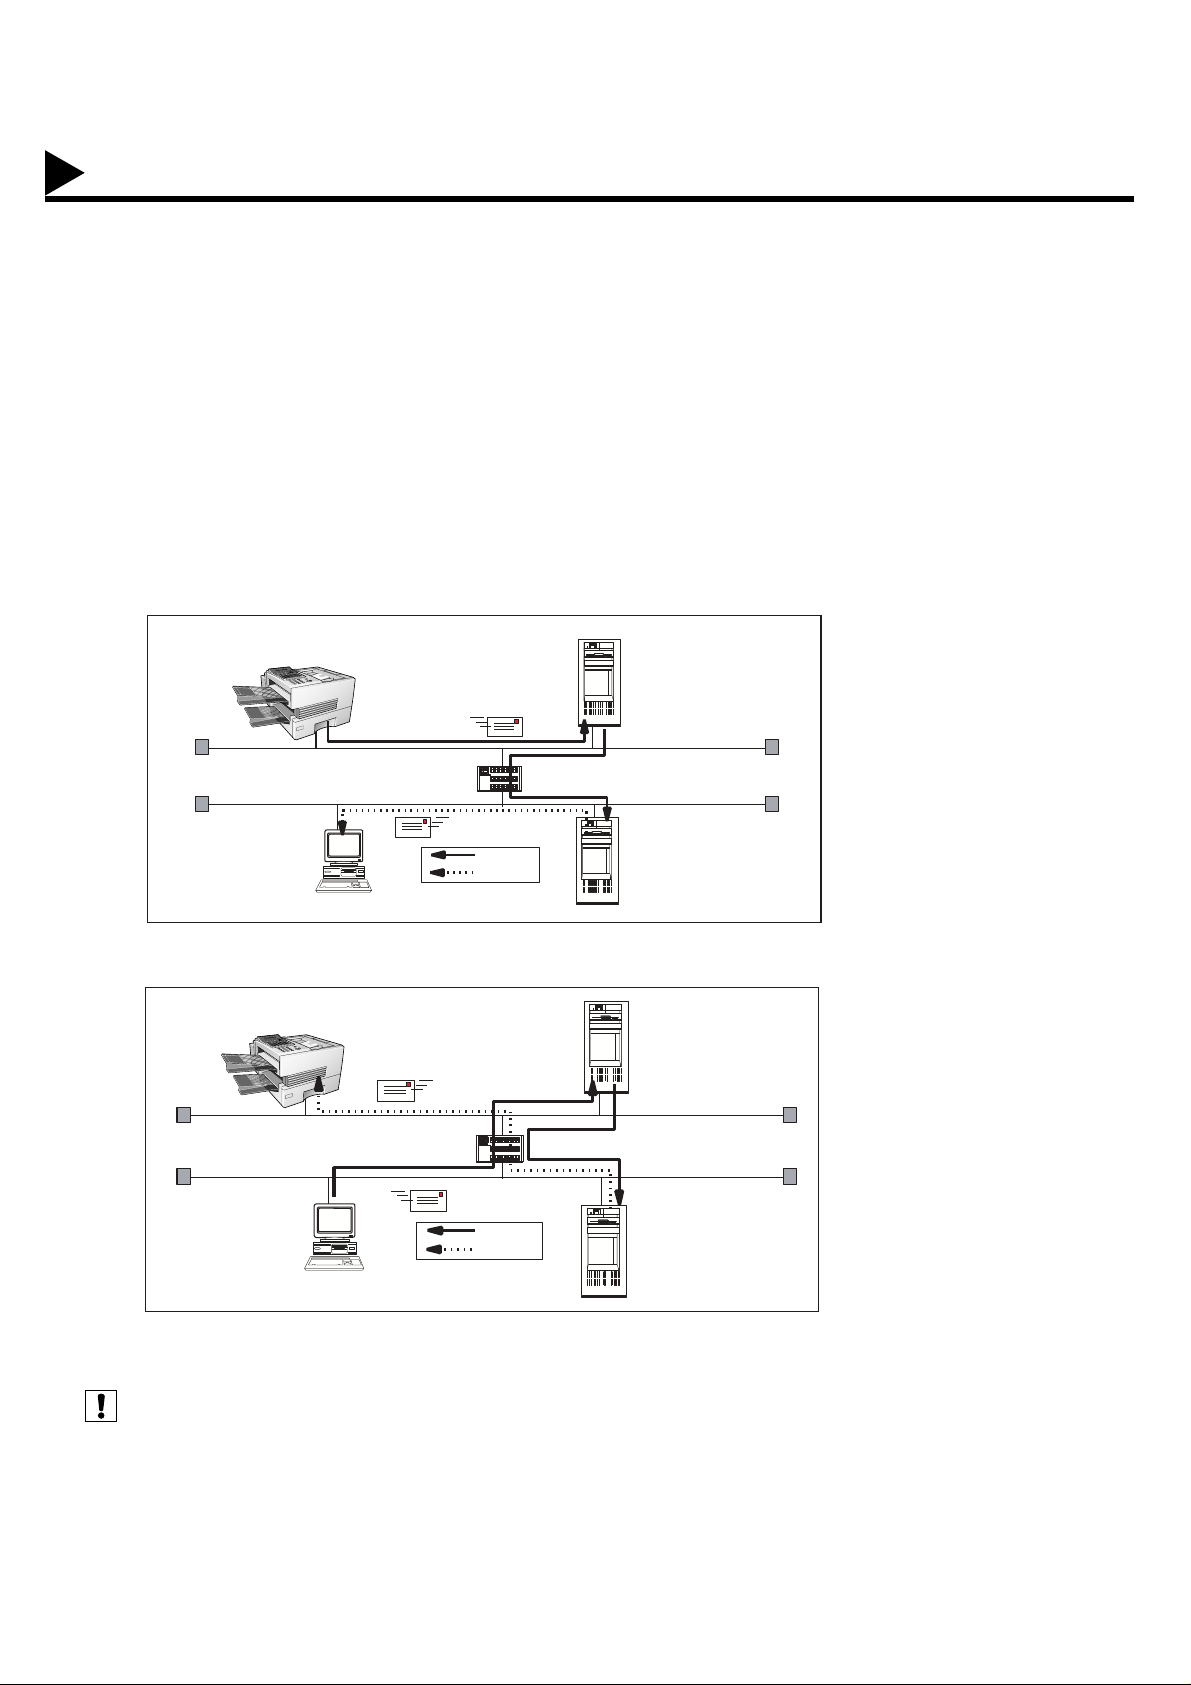
Setup as POP3 Client
To install the DX-2000 as POP3 Client, the following network parameters need to be programmed on your
network.
• IP Address of the DNS Server (if not available, see Note)
• IP Address of the DX-2000
• Subnet Mask of the DX-2000
• Name or IP Address of the Default SMTP mail server
• IP Address of the Default Router
• POP Server Name or IP Address
• POP User Account Name
• POP Password
• Email Address of the DX-2000 (see Note)
(see Note 1) (see Note 2)
Email transmission (from the DX-2000 to a PC)
DX2000@fax01.panasonic.com
SMTP01.panasonic.com
(SMTP Mail Server)
(Router)
SMTP
POP3
popuser001@panasonic.com
Email reception (from a PC to the DX-2000)
DX2000@panasonic.com
(Router)
SMTP
POP3
popuser001@panasonic.com
POP02.panasonic.com
(POP Server)
SMTP01.panasonic.com
(SMTP Mail Server)
POP02.panasonic.com
(POP Server)
16
Note:
1. The email address format can be the same as your regular email address. If your email address is
popuser001@panasonic.com, the DX-2000’s email address can be DX-2000@panasonic.com.
2. By default the machine requires the IP Address of the DNS Server and prompts you to enter the SMTP and POP
Server Names. If the DNS Server is not available, cha nge the Fax Parameter No. 161 (D NS SERVER) to "1:Invalid" .
Then the machine will prompt you to enter the IP Address of the SMTP and POP Servers.
Page 19

Pre Installation Information
For the total system to work properly via LAN, certain in formation and additional paramete rs must be set. Please
contact your network administrator for the required information and connection to the LAN.
Important: Make a copy of this page and ask the Network Administrator to complete the required information. After
its returned, transfer the information to the back side of the front cover for future reference and
troubleshooting.
User Information
Company Name
Address
Dept.
City State Zip Code
Tel. No. Fax No.
(see Note 1) (see Note 2) (see Note 3) (see Note 4)
Internet Parameters (See page 41 to 45)
(1) IP Address:
(2) Subnet Mask:
(3) *SMTP Server Name: or *SMTP Server IP Address:
(4) Default Router IP Address:
(5) Email Address:
(6) DNS Server IP Address:
(7) POP Server Name: or *POP Server IP Address:
(8) POP User Name:
(9) POP Password:
(10) Host Name:
(11) Default Subject:
(12) Default Domain:
(13) Remote Password:
(14) Relay XMT Password:
(15) Manager’s Email Address:
(16) Acceptable Domain Name(s) for Relay Transmission:
1. 6.
2. 7.
3. 8.
4. 9.
5. 10.
1
Note:
1. Items in Bold, depict information obtained from you Network Administrator.
2. By default the machine requires the IP Address of the DNS Server and prompts you to enter the SMTP and POP
Server Names (item s 3 and 7 ab ove ) . If t he DNS Server is not available , c ha nge the Fax Parameter No. 161 (DNS
SERVER) to "1:Inva lid". Then the machine will pro mp t yo u t o en ter the IP Address of the SMTP and POP Serv ers .
3. If required, the MAC Address of the DX-2000 can be obtained fro m the 2nd page of the Fa x Parameter List prin tout,
by pressing
4. Dynamic Host Configuration Protocol (DHCP) is not supported.
Continued on the next page...
FUNCTION
6 4
SET
.
17
Page 20

Pre Installation Information
Explanation of contents
MAC Address
(1) IP Address : The Internet Protocol (IP) address assigned to your machine.
(2) Subnet Mask : The Subnet Mask number.
(3) SMTP Server Name or SMTP
Server IP Address
(4) Default Router IP Address : The Default Router’s IP Address.
(5) Email Address : The email address assigned to your machine. (Up to 60 characters)
(6) DNS Ser ver IP Address : The IP address of the DNS Server.
(7) POP Server Name or POP
Server IP Address
(8) POP User Name : POP User Name. (Up to 40 characters)
(9) POP Password : POP Password. (Up to 10 characters)
(10) Host Name : The name assigned to your DX-2000. (Up to 60 characters)
(11) Default Subject : The information to be added to the Subject Line for all outgoing emails. (Up to
(12) Default Domain : Specify the Doma in Na me (up to 5 0 c haracters) to be added to frequently used
(13) Remote Password : Enter a security password (up to 10 characters) to allow Remote Programming
(14) Relay XMT Passwor d : Enter a password to prov ide netwo rk security to yo ur Rela y Statio n (f or G3 rela y
: MAC Address from the 2nd page of the Fax Parameter List printout (press
[FUNCTION][6][4][SET]).
: The SMTP Server Name (up to 60 characters). The SMTP Server IP Address.
: The POP Server Name. (Up to 60 characters) The POP Server IP Address.
40 characters)
or incomplete outgoing email addresses (i.e. @yourcompany.com).
of the Internet Parameters and the Auto Dialler and the retrieval of the Journal
via email.
purposes). (Up to 10 characters)
(15) Manager’s Email Address : Enter you Department Manager’s email address for notification of all Internet
relayed transmissions for supervision and cost control purposes. (Up to 60
characters)
(16) Domain Name (01 to 10) : Enter up to 10 Domain Names that are authorized to access your Internet Fax
for Relayed Transmission Request. (Up to 30 characters)
(see Note 1)
Note:
1. All IP Addresses consist of 4 parts separated by dots (i.e. 165.113.245.2).
18
Page 21
Internet Communication Features
Internet Fax Transmission
The DX-2000 allows you to transmit documents over the Internet to another Internet Fax or a PC. The document
is first scanned and co nverted in to a TIFF-F formatte d image file, and then transmitted to the rem ote loc ation as
an attachment file to an email using MIME encoding.
The email system at the rec eiving e nd must support MIME. Otherw ise, the attachm ent fil e will b e detach ed and
lost.
When you send an email message to someone, the DX-2000 uses Simple Ma il Transfer Protocol (SMTP) to
transfer your outgoing mail to your SMTP mail server, which in turn uses SMTP to send your mail to the Internet.
Internet Mail Reception
The DX-2000 allows you to receive and print a PC transmitte d email automati cally or manually, depending on its
setup configuration. H owever, if the received email includes file attachm ent in a format oth er than TIFF-F, such
as Word, Excel, Power Point, the DX-2000 prints an error message instead.
Internet Fax
DX-2000
LAN LAN
Internet Fax
Transmission
Internet Fax
DX-2000
Internet
1
PC
Internet Mail
Reception
PC
19
Page 22
Internet Communication Features
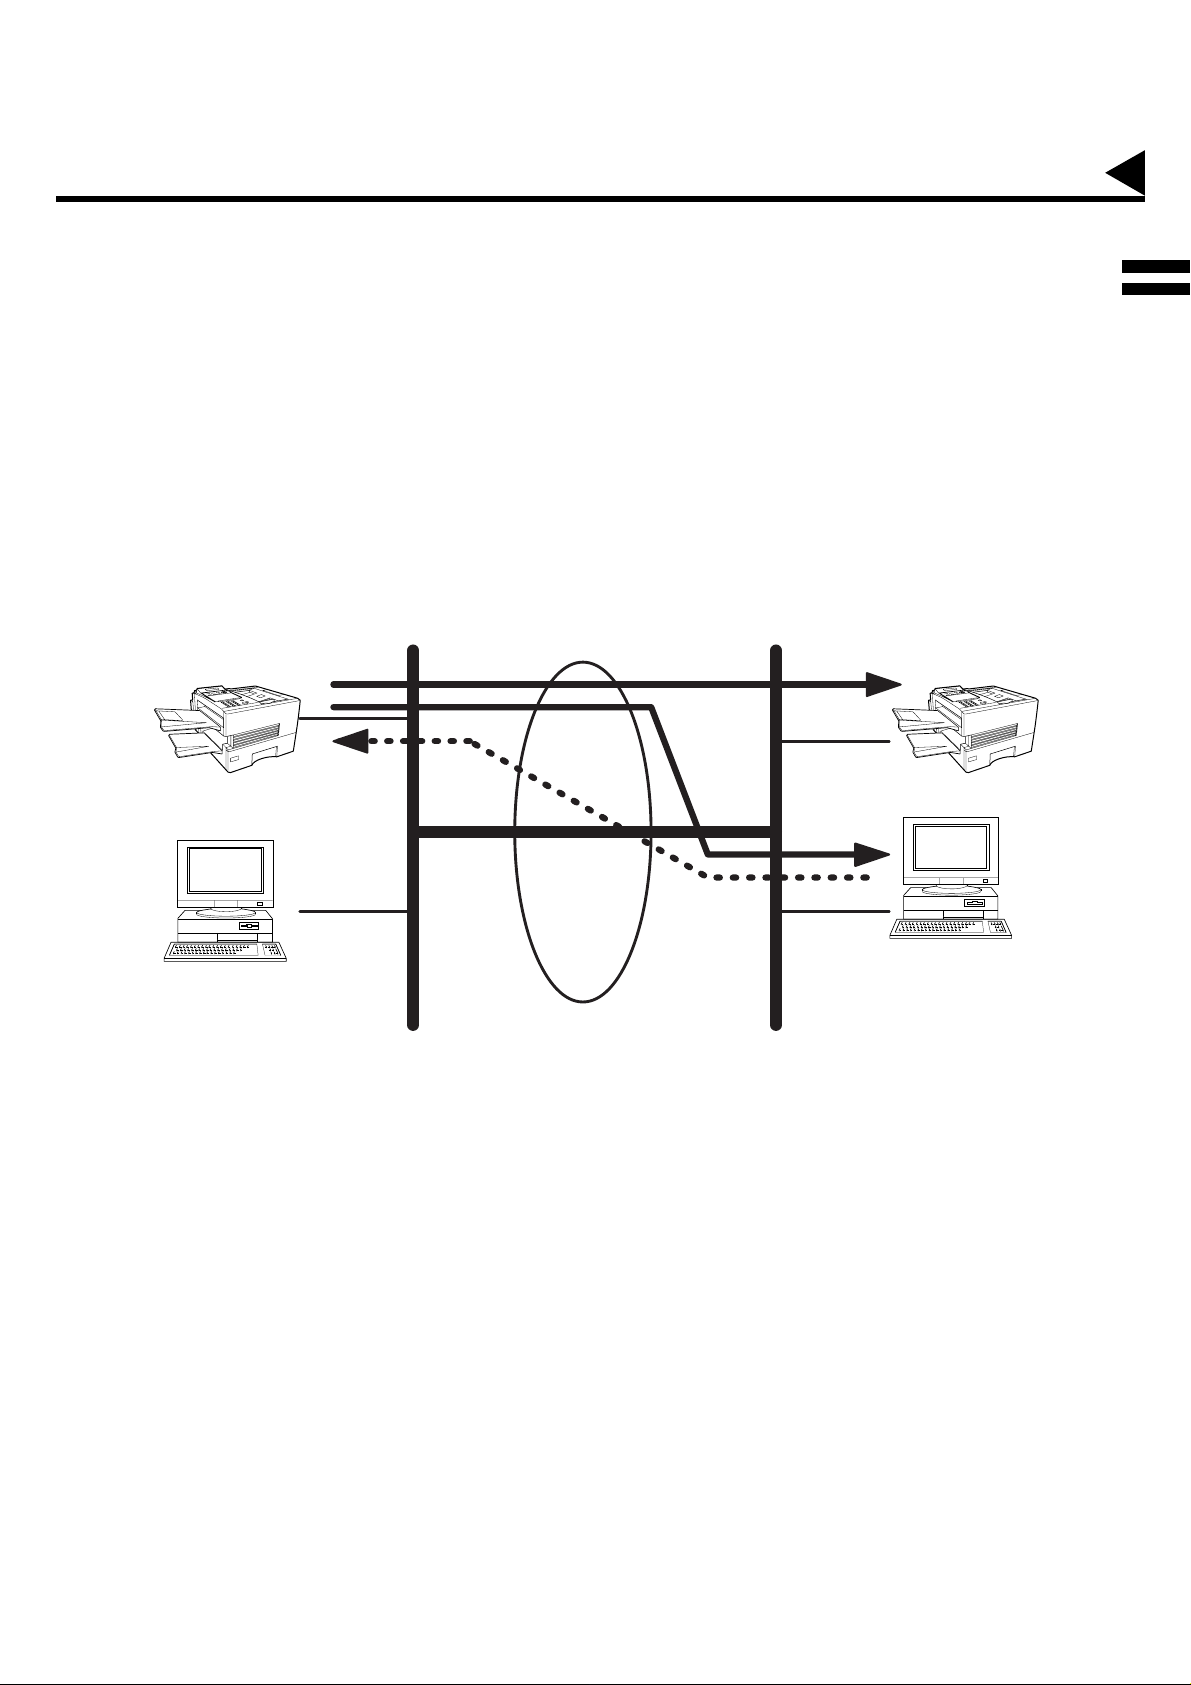
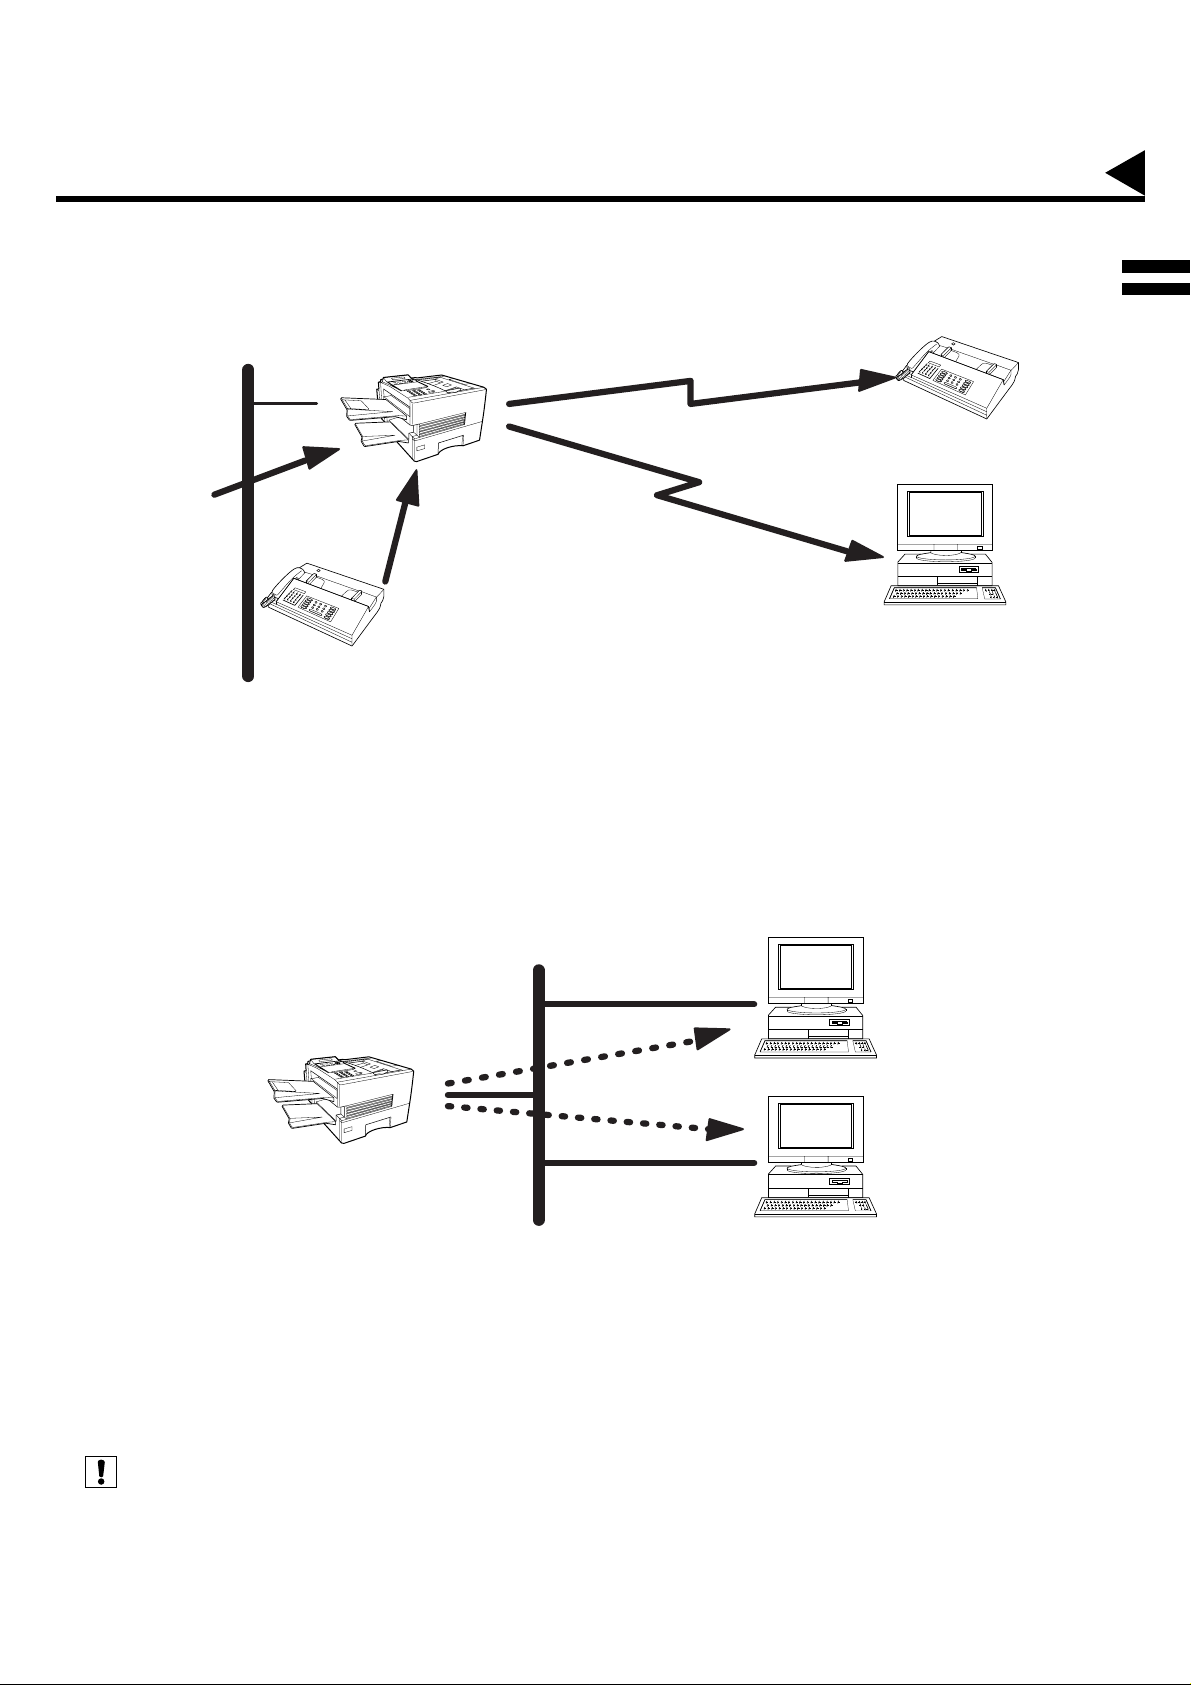
Inbound Routing
Using the Inbou nd Rou ting feature, the DX-2000 can route docu ments recei ved from a G3 fax machine to e mail
address(s) or to Internet Fax machine(s) connected to a LAN as an emai l, as well as to other G 3 fax machine(s)
over the telephone line.
When an incoming Internet Fax, email or a regular fax document is received, the DX-2000, checks for the
following:
1. First, the DX-2000 checks whether a sub-address is included. If it is, it will look for a sub-address match within
its auto dialler and will rou te the documents to the correspondin g stations emai l address(s) and/or telepho ne
number(s).
2. If no sub-address i s sp ec ifi ed, then the DX-20 00 tries to match the originating fax machine’s Numeric ID (TSI)
with the TSI routing within its auto dialler and will route the documents to the corresponding stati ons email
address(s) and/or telephone number(s).
Fax Reception
G3 Fax
(see Note 1) (see Note 2)
Internet Fax
DX-2000
Email
LAN
Transfer to
a G3 Fax
Internet Fax
DX-2000
PC
G3 Fax
20
Note:
1. If the originating fax machine does not support the above sub-address function, sub-address destination(s) cannot
be selected.
2. The DX-2000 will allow you to registe r the same sub-a ddress numb er for an email ad dress and a tele phone numbe r.
Page 23
Internet Communication Features
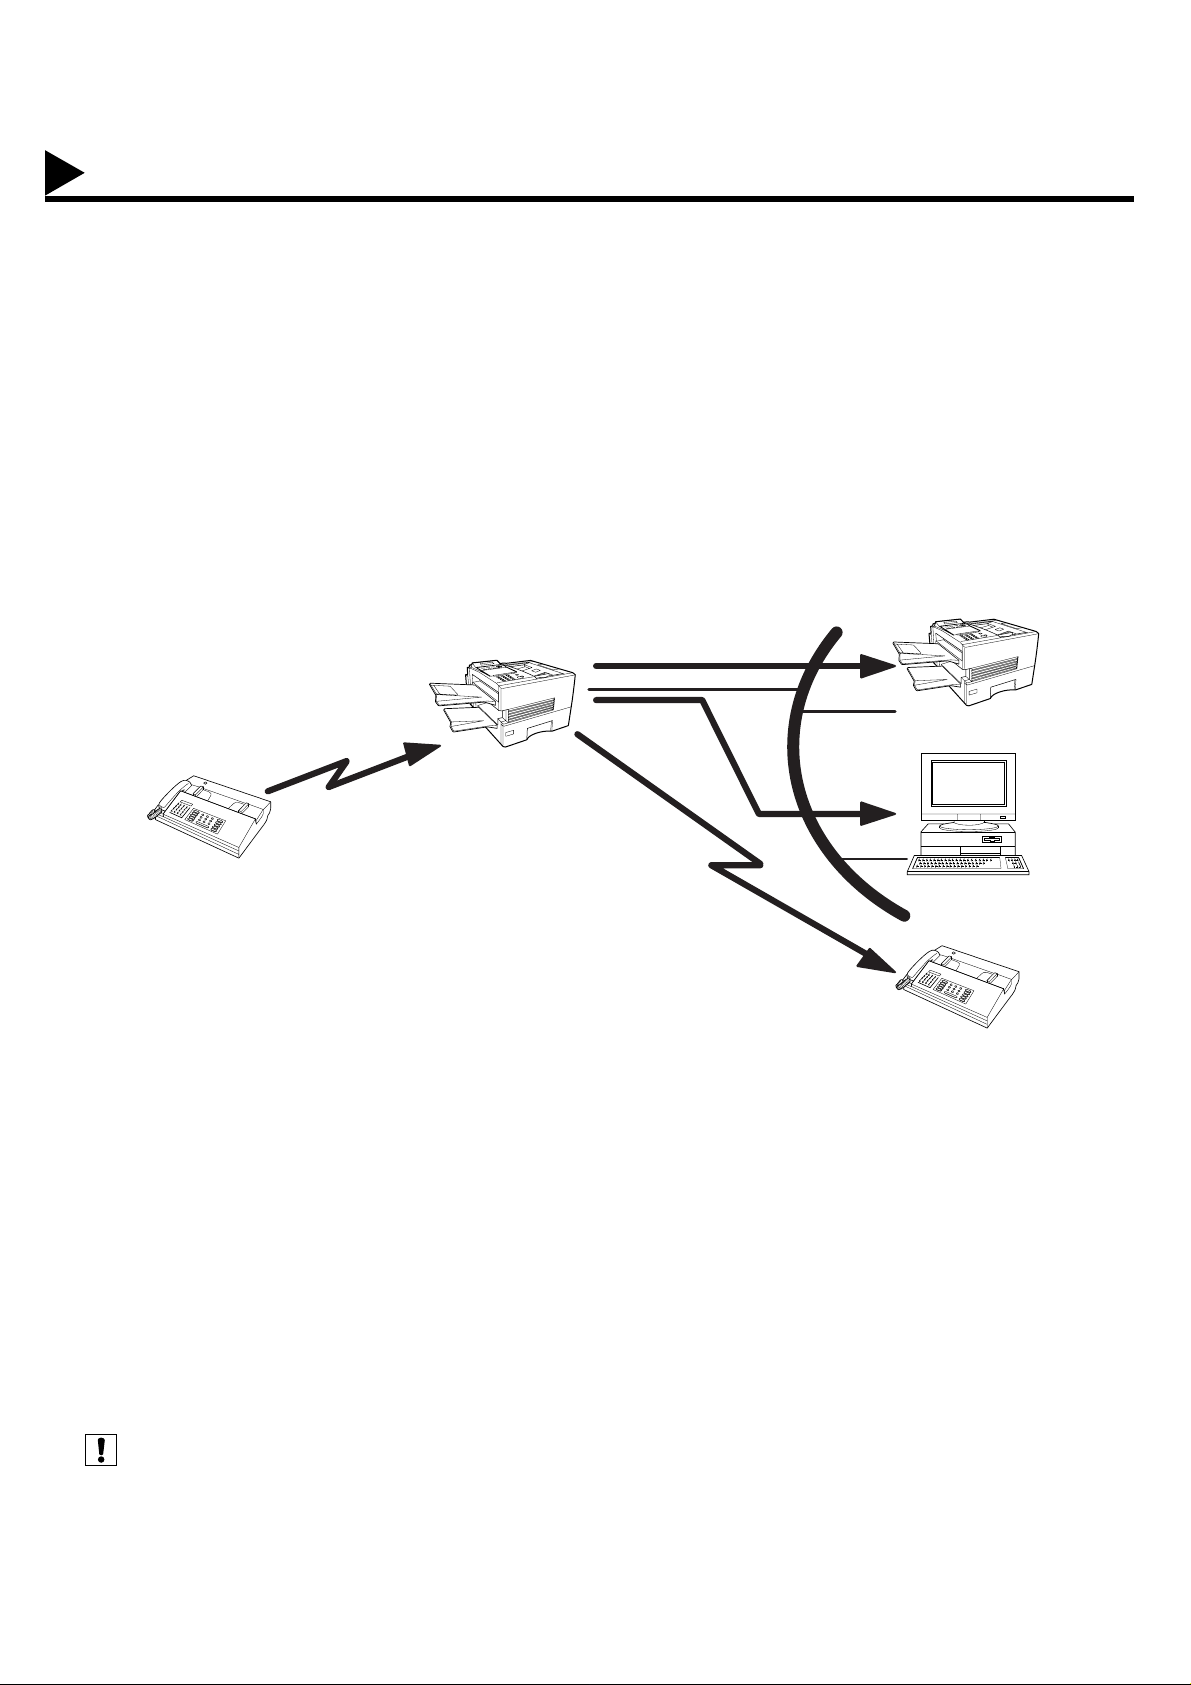
Fax Forward
The DX-2000 is capable of transferring all received Internet email or regular G3 fax documents to a preprogrammed G3 fax or a PC destination.
LAN
Email
Internet Fax DX-2000
G3 Fax
Transfer to a PC
Transfer to a G3 Fax
or
G3 Fax
PC
Network Scanner
The DX-2000 can be utilized as a network scanner by simply transmitting an image to a PC as TIFF-F attachment
to an email.
This feature was enhanced with an addition of a new Fax Parameter No. 164 (IFAX XMT HEADER), giving you a
selection of whether to inc lude the header when sendi ng a document to an address ee in the same Domain as
specified in the Default Domain parameter. (See Note 1)
1
(see Note 1)
Note:
1. When sending to a Domain other than as specified in the Default Domain parameter, the header will be included
Internet Fax
DX-2000
regardless of the selection.
LAN
PC
PC
21
Page 24
Internet Communication Features
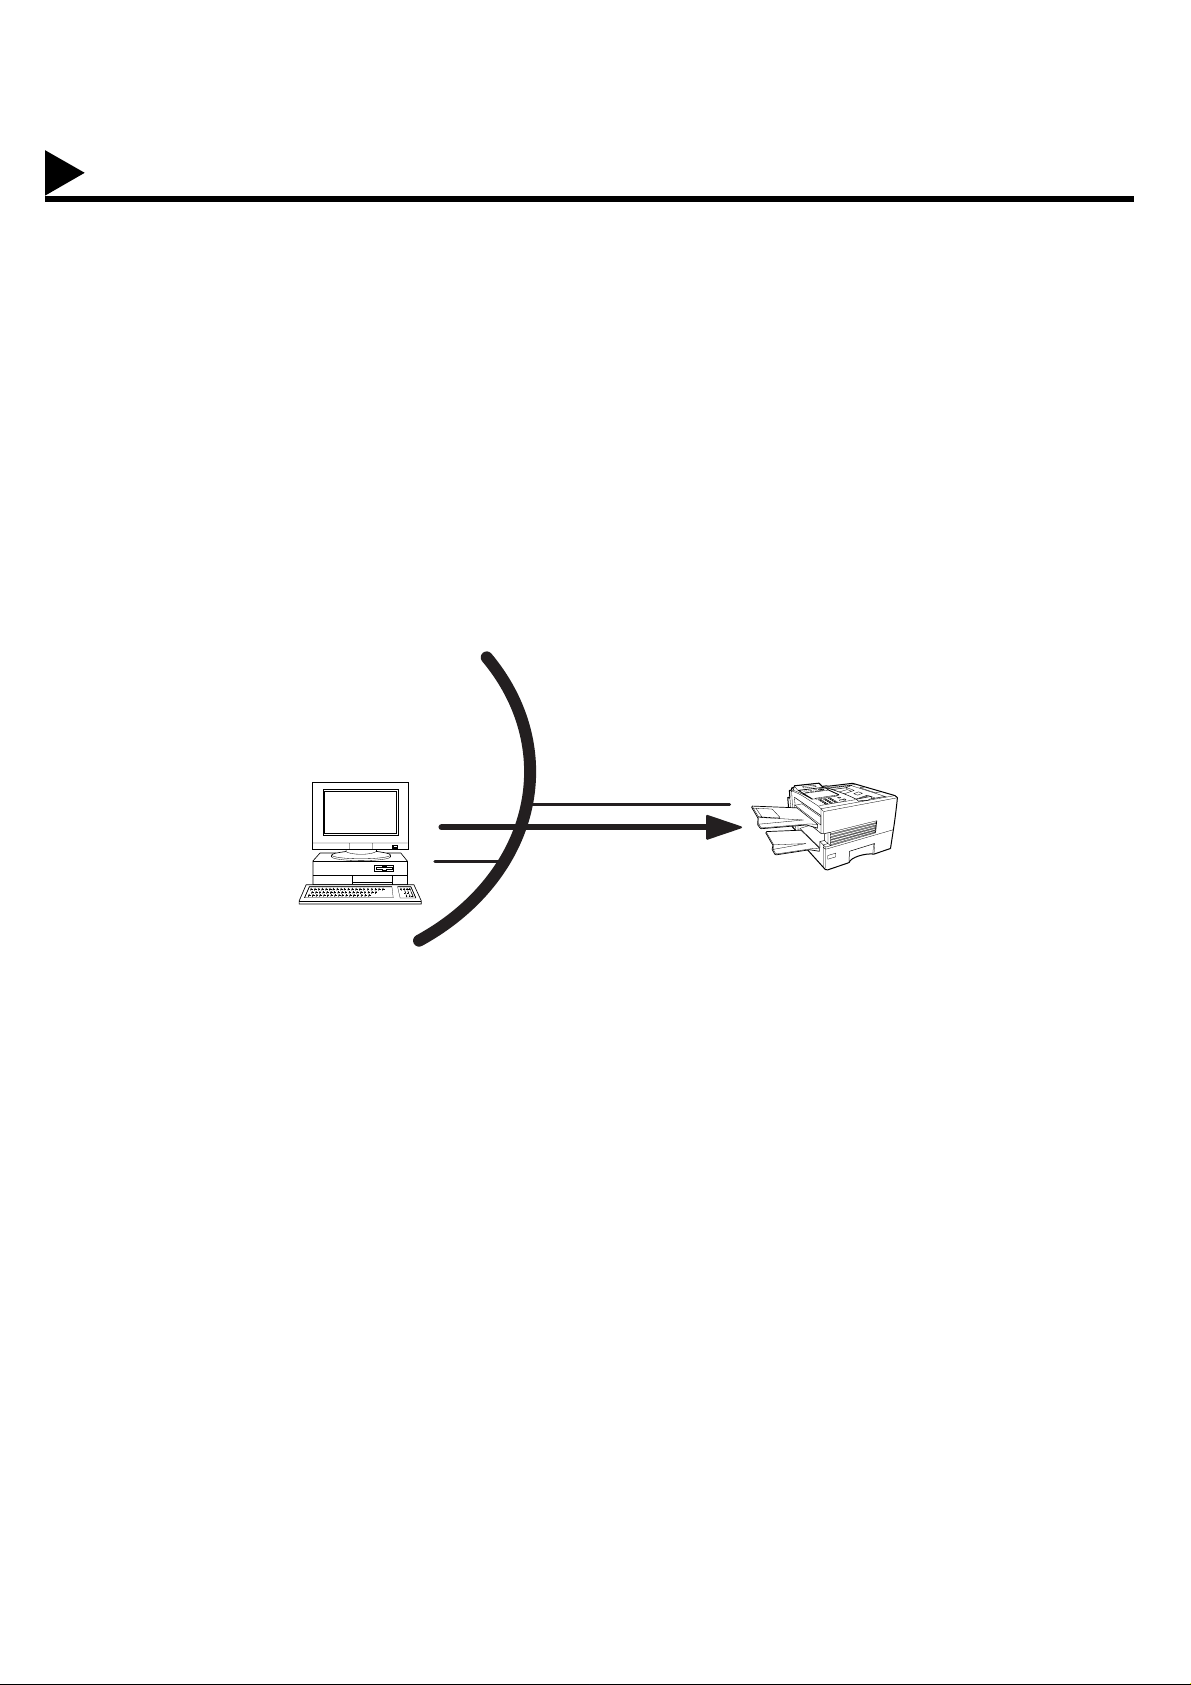
Network Printer
The DX-2000 can b e utilized as a ne twork printer by sim ply sending the documents created on your PC using
various software applications to the DX-2000 via TCP/IP protocol.
There a two parts to setting up the DX -2000 as a network print er. Par t 1 requires you to download the software
(printer driver and LPR) from the web site listed below.
The second par t requ ires you to install an d configure the software on your PC to wor k with the DX -2000. (See
the web site for details about the printer driver installation and operation.)
You can download the Panasonic’s printer driver and LPR monitor from any of the following URL addresses:
http://www.panasonic.co.jp/mgcs/internetfax/
http://www.panasonic.com/internetfax
LAN
Internet Fax
DX-2000
PC
Print
22
Page 25
Internet Communication Features
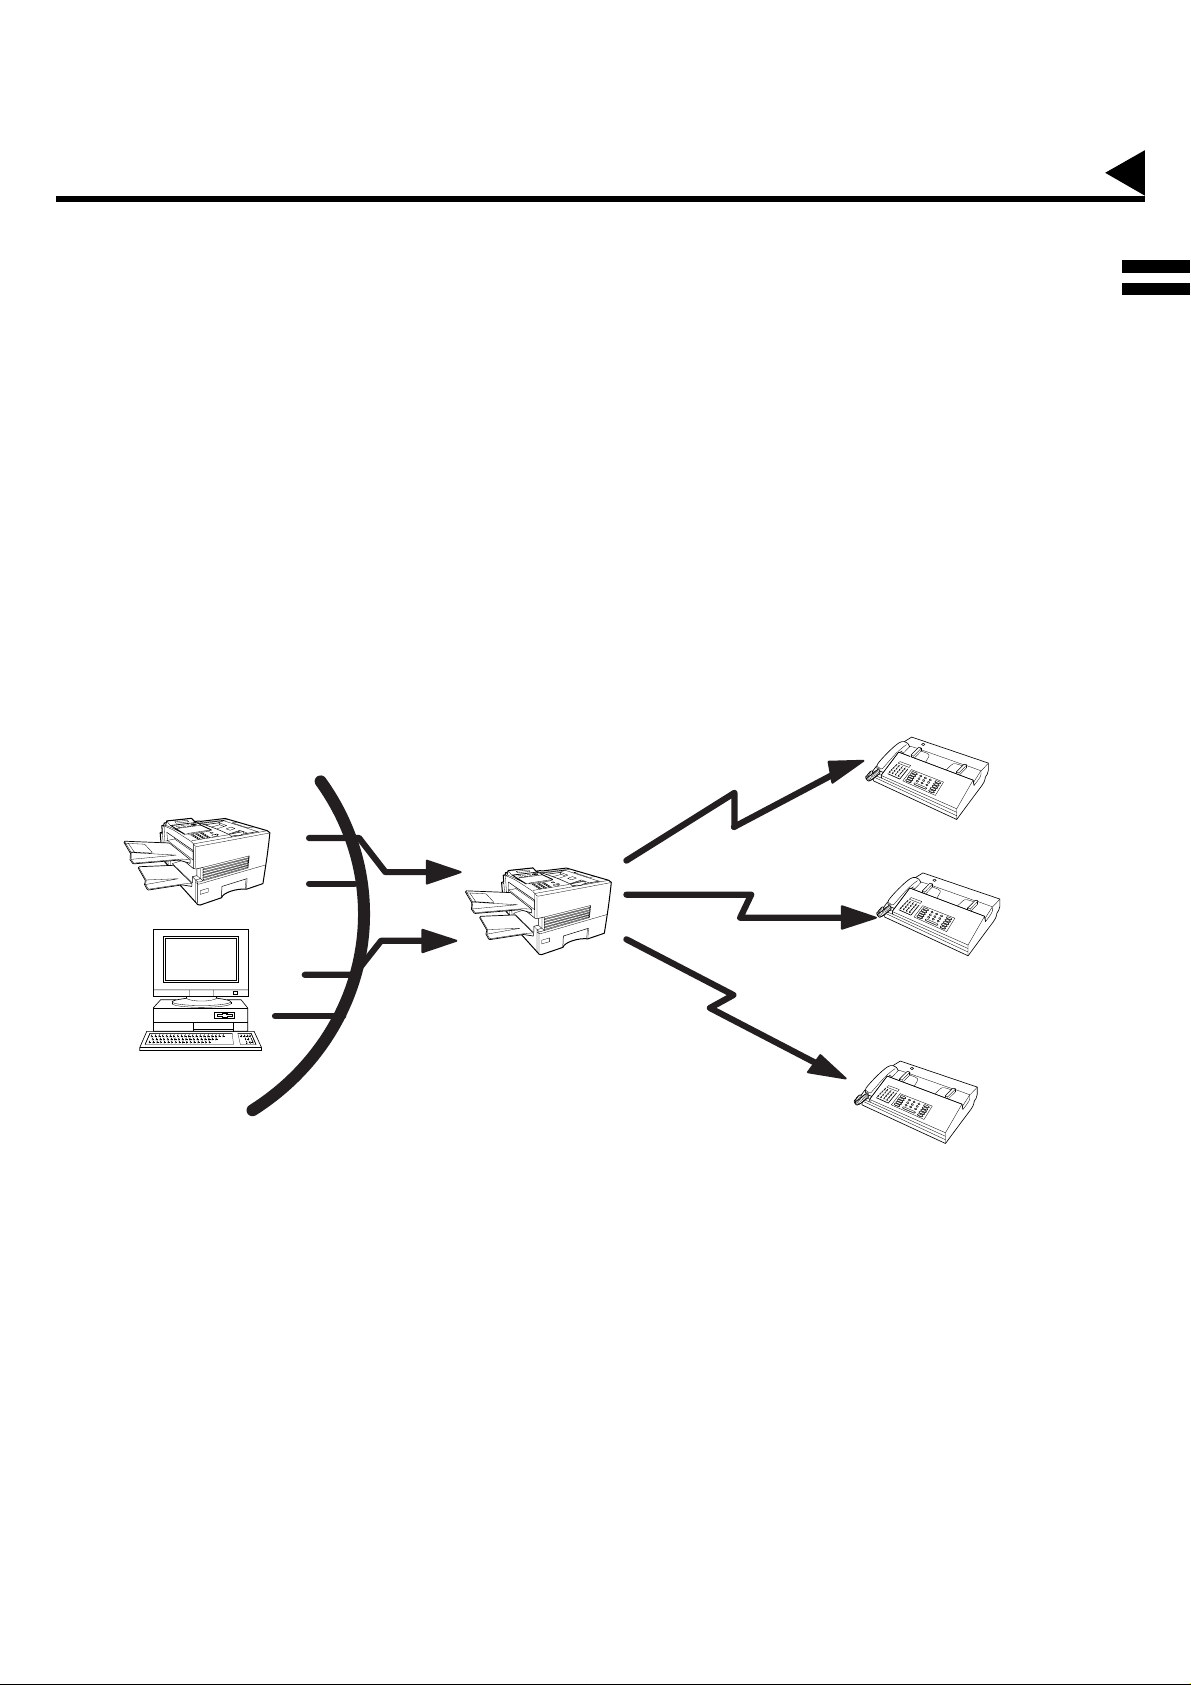
Relayed Transmission
The DX-2000 allows you to transmit an email received from an Internet Fax or PC connected to the LAN to
multiple fax machines via a telephone line. You can attach files with the TIFF-F format to this email.
Using the Sub-address specified by the originating fax machine, the DX-2000 can then route the received
documents to the remote DX-2000 via an email, which can then relay these documents to final destinations
where the final recipient is a regular G3 fax machine.
The DX-2000 also allows you to convert a data file from various application programs such as spreadsheet into a
TIFF-F format file and then transmit this file attached to an email.
To conver t applica tions into a TIFF-F format ted file, however, requires you to first download the software (printer
driver) from the web site listed below. The second part requires you to install the software on your PC. (See the
web site for details about the printer driver installation and operation.)
You can download the Panasonic’s printer driver from any of the following URL addresses:
http://www.panasonic.co.jp/mgcs/internetfax/
http://www.panasonic.com/internetfax
Transfer to a G3 Fax
Internet Fax
DX-2000
LAN
Internet Fax
DX-2000
G3 Fax
1
PC
Email
Transfer to a G3 Fax
G3 Fax
Transfer to
a G3 Fax
G3 Fax
23
Page 26

Important Information
The DX-2000 uses th e same communication protocols as email: the Simple M ail Transfer Protocol (SMTP) . The
differences from a standard G3 fax communication using the Public Telephone Network (PSTN) are as follows.
Differences between Internet Fax and Regular Fax
A regular Fax machine goes off-hook, di als, and the phone networ k completes a c ircuit over phone lines to the
receiving fax. You pay for the circuit. The two faxes negotiate a connectio n, synchronize and exchange ima ge
data.
The Interne t Fax works like an email, the imag e data is broken down in to packets and transmitted t hrough your
Local Area Network (LAN) to the Internet or Intranet instead of using a telephone company’s network, thus saving
you long distance costs.
Transmitted Document Confirmation
1. The DX-2000 does not direc tly connect to the final destination, but rather connect s to a Mail Ser ver via LAN.
Therefore, if a document cannot be co rrectl y transmi tted due to an err or, the erroneous mail m ay be retur ned
from the Mail Server to the DX-2000.
2. The erroneous mail may take a long time to retur n (20 to 30 minutes) depen ding on the destination l ocation,
traffic on the network or LAN system configuration.
3. Depending o n the Mail Se rver, it is also possible that e rroneous mai l is not retur ned at all. Therefore, when
transmitting important or time sensitive documents, it is recommended that you follow up with a telephone call
to confirm reception.
4. Documents cannot be transmitted correctly if the destination Mail Server does not conform to the MIME
protocol. Erroneous mail may not be returned depending on the Mail Server.
DX-2000 Cannot Make a Phone Call via LAN
The DX-2000 can only make a phone call using a regular telephone line (PSTN).
Dual Port Communication
The DX-2000’s dual port capability, allows simultaneous G3 Fax Communication over regular telephone line
(PSTN) and LAN Communication.
Transmission Resolution
In view of PC transmissio n, the factory default setting for the res olution is set to FINE m ode. If required, this
setting can be changed to Normal.
Internet Mail Reception
1. The DX-2000 can receive text email from a PC and print ANSI character s. It will print a "T" symbol if an
unrecognized character is received.
2. Received email font and character size are fixed and cannot be changed.
3. Text email wil l be p rinted at about 72 li nes p er page. It is recommended tha t you use A 4/Letter size recording
paper.
4. If the received text email inc ludes a fi le attachment in a forma t other than TIFF-F, su ch as Word, Excel, Power
Point, the DX-2000 prints an error message instead.
5. If the received email includes attached TIFF-F format ted image files, the text and TIFF-F formatted image fil e
will be printed on separate pages.
24
Page 27

Important Information
Sending Document Size via LAN
When transmitting via LAN, the transmitter is incapable of identifying the receiver’s recording paper size
capability, and thus it will not reduce the document size. Therefore, when transmitting via LAN, it is
recommended that you use only A4/Letter size documents. If a B4 size document is transmitted and the receiver
is only able to print A4 size, the communication will fail when the Fax Parameter No. 141 (LAN XMT
REDUCTION) is set to "1:Invalid". (See page 74.)
Sending a Document to a PC via LAN
When transmitting a document to an email address, the following instructions are sent as text message in
addition to the TIFF-F formatted image file.
An Image data in TIFF-F format has been attached to this emai l. You can download the TIFF-F Image Viewer
from the following URL addresses:
http://www.panasonic.co.jp/mgcs/internetfax/
http://www.panasonic.com/internetfax/
Internet Relayed Transmission
To p revent unauthor ized sta tio ns fr om ac c essi ng your Rel ay Station for Internet Relayed Transmi ssio n, you must
set up your Network s ecur ity. Enter a Relay Station Name, which is c oncea led f rom the final des tinati ons and a
Manager’s Email Address for notification of all Internet Relayed Transmissions.
1
25
Page 28

INSTALLING YOUR MACHINE
Main Unit and Accessories
Unpack the carton and check that you have all the illustrated accessories.
Machine
Recording Paper Tray Telephone Line Cable Power Cord
User’s Guide / Quick Guide
Toner Cartridge
Paper Size Label
Document Return Tray
Lithium Battery and Holder
26
LAN Cable
Page 29
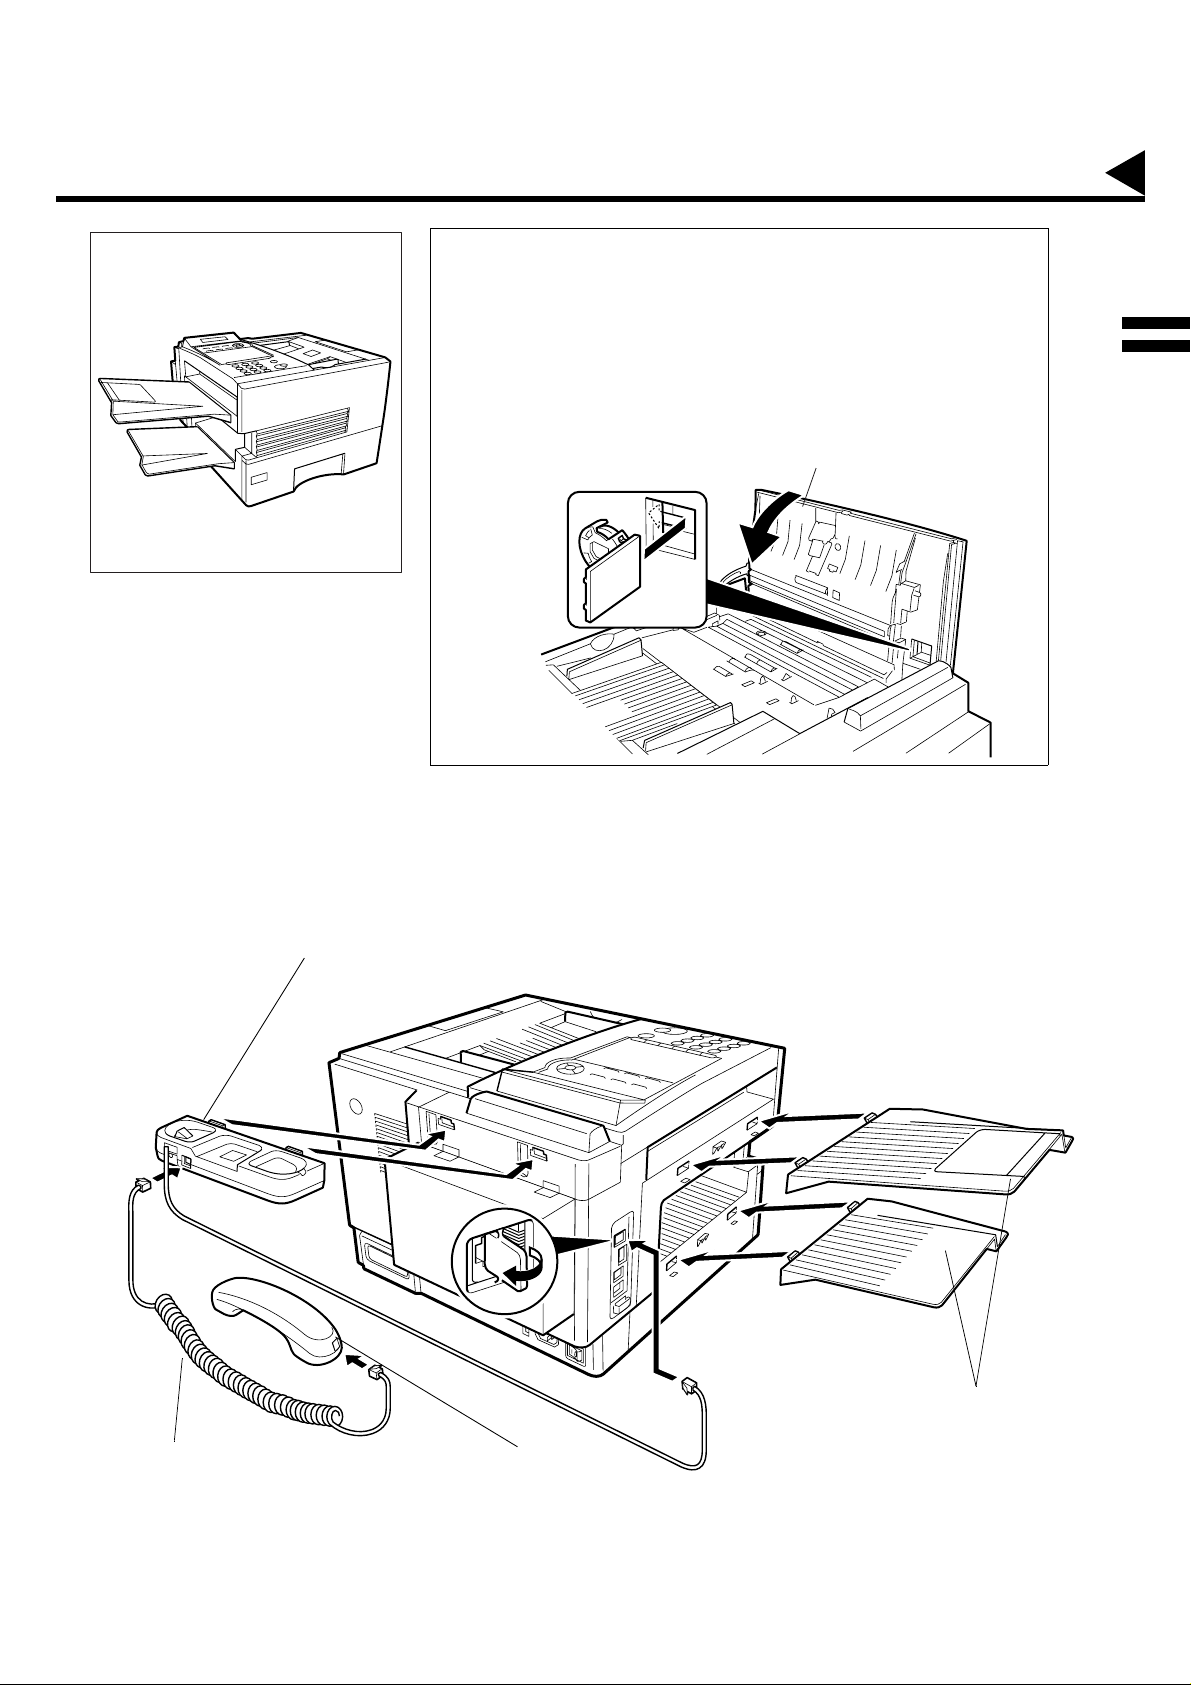
Final Installed View
Installing the Accessories
Installing the Lithium Battery
(This batter y is used to backup the clock during power failures,
see page 194.)
(1)Open the ADF Door.
(2)Install t he B att e ry Hold er, slide it to the Le f t u n til it l a tc he s an d
close the ADF Door.
ADF Door
2
Handset Cradle
Hook the projections into the square holes
on the machine.
Connect the cable into the HANDSET jack
on the machine.
Handset Cord
[Available as an Option]
[Available as an Option
Handset
[Available as an Option]
]
Document Return and
Recording Paper Trays
Hook the projections into the
square holes on the machine.
27
Page 30
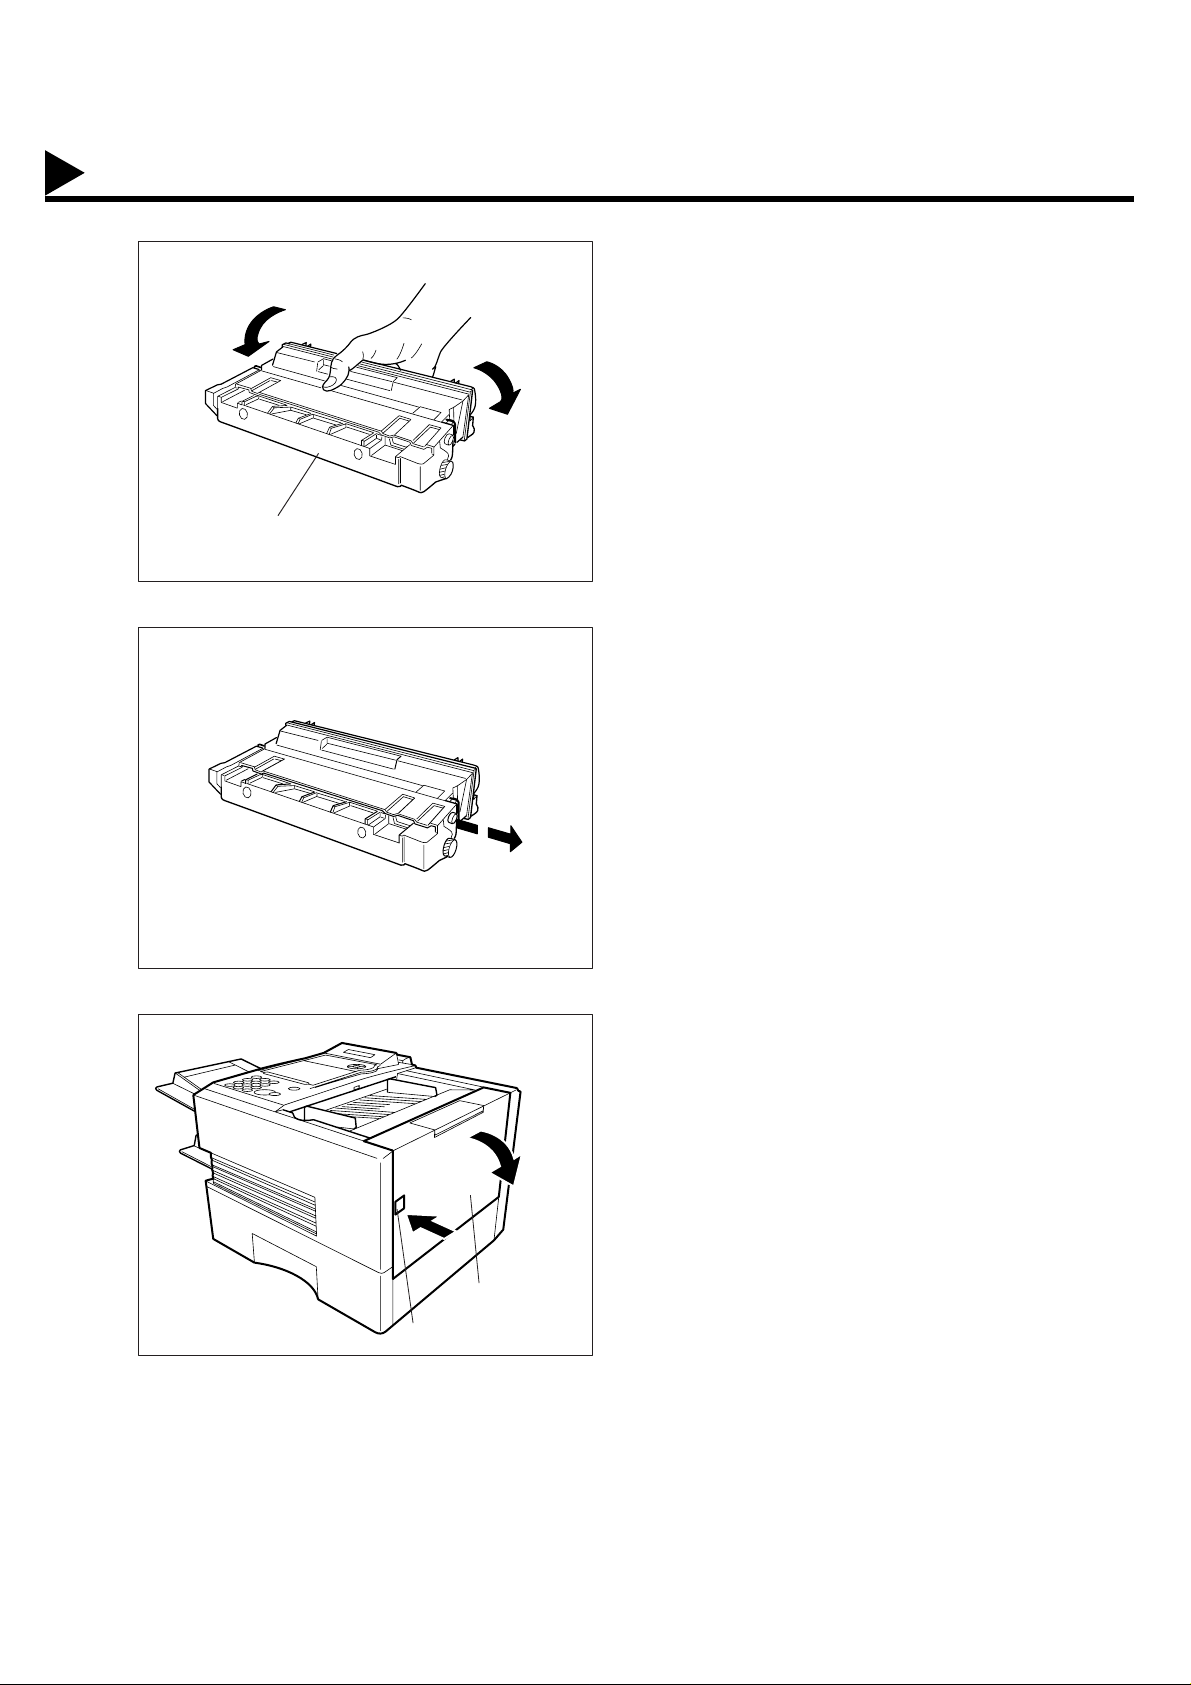
Installing the Toner Cartridge
1
2
Unpack the Toner Cartridge and rock it back
and forth as shown for 5 or 6 times to even the
toner inside.
T oner Cartridge
Remove the protective seal.
Note: Pull on the seal slowly and straight out.
3
Push the Release Button to open the Printer
Cover.
Printer Cover
Release Button
28
Page 31

Installing the Toner Cartridge
4
5
Align the arrow and the projection on both
sides as shown and insert the Toner Cartridge
into the machine.
Close the Printer Cover firmly.
2
Printer Cover
If you are replacing the Toner Cartr i dge, it is reco mmende d to clean th e Pr inte r Roll er to main tain goo d
6
printing quality. To clean the Printer Roller, follow the procedure on page 191.
29
Page 32

Loading the Recording Paper
Paper Specifications
In general, most bond papers will pr oduce excellent results. Most photocopy papers will also work very well.
There are many "name " and "gener ic" brands of pape r available. We recommend that you test various pap ers
until you obtain the results you are looking for. For detailed recommended paper specifications, see page 200.
How to Load the Recording Paper
1
2
Paper Length Guide
Slide out the Paper Cassette fr om th e mach ine .
Paper Cassette
Adjust the Paper Length Guide to the proper
paper size (A4, LTR, or LGL).
For LGL size paper , remove the Paper Length
Guide and store it in the provided slot in the
front left side of the Paper Cassette.
If reloading the same size of paper, skip the
step 2 and 3.
30
3
A
L
Paper Width Clip
Paper Width Guide
Adjust the Paper Width Guide and Clip to the
proper paper (A4, or LTR/LGL).
The factory default for the Paper Width Guide
and Clip are on A4 or LTR/LGL position. For
another paper size, adjust by following the
A
L
steps below.
(1)Replace the Paper Width Guide into the
proper slot (A4 or LTR/LGL).
(2)Release the Paper Width Clip latch.
(3)Pull upwards to remove the Paper Width
Clip.
(4)Replace the Paper Width Clip into the
A(A4) or L(LTR/LGL) slot.
(5)Push down on the Paper Width Clip to latch
it in place.
Page 33

Loading the Recording Paper
4
5
(1)Release the hook and remove the Paper
Size Selector.
(2)Rotate the Paper Size Selector until the
appropriate setting marked on the Selector
is facing upward and the wording is upright.
(3)Reinstall the Paper Size Selector.
(1)Push the Pressure Plate until it is locked
down.
(2)Load the paper into the Paper Cassette.
Caution:Make sure that the paper is set
under the clips of the Paper
Cassette. You can load about
500 sheets with standard weight
paper (20 lb. or 75 g/m
paper specification see page
200.
(3)Set the proper paper size label.
2
). For
2
Clip
1
3
Clip
1
2
Recording Paper
2
Clip
3
6
(see Note 1)
Note:
Slide the Paper Cassette into the machine.
Paper Cassette
1. Your machine will properly print on A4, L etter an d Legal size pap er only . If other size o f paper (B4 , B5, A5) is used ,
your machine may not print properly.
31
Page 34

Connecting the Telephone Line Cables and Power Cord
10Base-T Ethernet Hub
Power Cord
Plug one end of the power cord into an ordinary AC outlet and the other end into the receptacle on the rear of the
machine.
Warning : This apparatus must be properly grounded through an ordinary AC outlet.
(see Note 1)
Power Cord (Included)
Telephone Line Cable
Plug one end of th e telephone line cable into the telep hone jack supplied by the telephone company a nd the
other end into the LINE jack on the left side of the machine.
Ethernet LAN (10Base-T) Cable
Telephone Jack
32
Telephone Line Cable (Included)
Note:
1. Your machine uses little power and you should keep it ON at all times.
Page 35

Connecting the Telephone Line Cables and Power Cord
2
Power Switch
After connecting all cables
and Power Cord, turn the
power switch ON.
Note:
Attach the cables to
the Hook to prevent
recording paper jam.
33
Page 36

Setting the Dialling Method (Tone or Pulse)
Your mach ine can operate with eithe r of two dialli ng methods (Tone or Pulse), depen ding on the type of t elephone
line you are connected to. If you need to change the dialling method to Tone or Pulse, follow the procedure below.
1
2
3
4
FUNCTION
4
7
SET
0 0
1
for “PULSE”.
6
SET
SET MODE (1-6)
ENTER NO. OR
FAX PARAMETER(1-164)
NO.=
06 DIALLING METHOD
2:TONE
06 DIALLING METHOD
1:PULSE
∨ ∧
❚
or
2
for “TONE”.
5
(see Note 1)
Note:
1. For some countries, this feature is not available depending on the country’s regulation.
SET
The display may not show this feature.
STOP
or
06 DIALLING METHOD
2:TONE
34
Page 37

Adjusting the Volume
You can adj ust the monitor and r inger volume on your machine. Th e built-in speaker enables you to hear the dia l
tone, dialling signals, and busy tone. The ringer sounds when your machine receives a call. (see Note 1)
Setting the Monitor Volume
1
MONITOR
You will hear the dial tone through the speaker.
+
2
VOLUME
-
or
+
VOLUME
-
3
MONITOR
repeatedly to raise the volume.
repeatedly to lower the volume.
* MONITOR *
❚
MONITOR VOLUME
LOW
MONITOR VOLUME
LOW HIGH
❚❚❚❚❚❚❚❚
HIGH
2
Setting the Ringer Volume
Standby
1
+
2
VOLUME
-
or
+
VOLUME
-
3
Note:
1. You can also adjust the volume of the key touch tone and the volume of the buzzer in the Fax Parameter No. 010
STOP
(KEY/BUZZER VOLUME). (See page 72)
repeatedly to raise the volume.
repeatedly to lower the volume.
12-DEC-1999 15:00
00%
RINGER VOLUME
((((
RINGER VOLUME
☎
☎
))))
35
Page 38

User Parameters
Your facsimile machine has several basic settings (User Parameters) to help you keep records of the documents you
send or receive. For example, the built-in clock keeps the current date and time, and your LOGO and ID Number
help to identify you when you send or receive documents.
Setting the Date and Time
At standby the display will show the date a nd time. Once the standby display is set, it will automatically be
updated.
1
2
3
4
FUNCTION
7
1
SET
Enter the new date and time.
Ex: Date : 12th
1 2
1 2
1 9 9 9
1 5 0 0
If you make a mistake, use or to move the cursor
beyond the incorrect character, press then reenter the new character.
Month : December
Year : 1999
Time : 3:00 PM
CLEAR
SET MODE (1-6)
ENTER NO. OR
1:USER PARAME TER S?
PRESS SET TO SELECT
DATE & TIME
❚
1-01-1999 00:00
DATE & TIME
12-12-1999 15:00
∨ ∧
5
SET
STOP
36
Page 39

Setting Your Time Difference
User Parameters
The Time Zone is req uire d as part of th e E-mai l hea der infor matio n when se nding Int er ne t faxes. To se t up your
Time Zone in the machine, please follow the steps below:
SET MODE (1-6)
ENTER NO. OR
1:USER PARAME TER S?
PRESS SET TO SELECT
TIME ZONE
GMT
TIME ZONE
GMT +10:00
∨ ∧
❚
:
1
2
3
4
5
FUNCTION
7
1
SET
repeatedly until display shows
Enter the Time Difference between -12:00 to +12:00.
Press to switch between +/-.
Ex:+01:00
SET
STOP
2
Example of Time Difference:
+00:00 – UK
+01:00 – Germany
+08:00 – Hong Kong
+10:00 – Australia
(see Note 1)
Note:
1. GMT stands for Greenwich Mean Time.
37
Page 40

User Parameters
Setting Your LOGO
When you send a document, your LOGO appears on the top of the copy printed out at the other station.
The LOGO helps to identify you to som eone who receives your document.
1
2
3
4
FUNCTION
7
1
SET
repeatedly until display shows;
Enter your LOGO (max. 25 characters and digits) by using
the Character keys (see page 12).
Ex:
If you make a mistake, use or to move the cursor
beyond the incorrect character, press then reenter the new character.
If more than 19 characters are entered, the left side
characters will scroll off the display. (See Note 2)
P8 CAPS n a s o n i c
P
a
CLEAR
SET MODE (1-6)
ENTER NO. OR
1:USER PARAME TER S?
PRESS SET TO SELECT
LOGO
❚
LOGO
Panasonic
∨ ∧
❚
5
(see Note 1)
Note:
38
SET
1. To switch between upper and lower character set, press key.
STOP
P8 CAPS
Page 41

Setting Your Character ID
User Parameters
If the remote machi ne has a Cha racter ID cap abi li ties, when you are s en din g o r rec eiv in g, your Charact er ID wil l
appear on the remote machine’s display and the remote machine’s Character ID will appear on your display.
SET MODE (1-6)
ENTER NO. OR
1:USER PARAME TER S?
PRESS SET TO SELECT
CHARACTER ID
❚
∨ ∧
1
2
3
FUNCTION
1
SET
7
repeatedly until display shows;
2
Enter your Character ID (max. 16 characters and digits)
4
5
(see Note 1)20 (see Note 2)
by using the Character keys (see page 12).
Ex:
If you make a mistake, use or to move the cursor
beyond the incorrect character, press then reenter the new character.
E A D SPACE O F F I C E
H
SET
STOP
CLEAR
CHARACTER ID
HEAD OFFICE
❚
Note:
1. The special characters of Å, Ä, Ö, Ü, Æ, è and é cannot be used for Character ID.
2. To switch between upper and lower character set, press key.
P8 CAPS
39
Page 42

User Parameters41Setting the Internet Parameters
Setting Your ID Number (Fax Telephone Number)
If the remote machine does not have a Character ID but it has an ID Number, when sending or receiving, your ID
Number will appear on the remote machine’s display and their ID Number will appear on your display.
We suggest you use your facsimile telephone number as your ID number (max. 20 digits).
1
2
3
4
FUNCTION
7
1
SET
repeatedly until display shows;
Enter your ID (max. 20 digits) by using the key pad and
SPACE
Ex:
If you make a mistake, use or to move the cursor
beyond the incorrect character, press then reenter the new character.
.
2 0 1 SPACE 5 5 5
SPACE 1 2 1 2
CLEAR
SET MODE (1-6)
ENTER NO. OR
1:USER PARAME TER S?
PRESS SET TO SELECT
ID NO.
❚
ID NO.
201 555 1212
∨ ∧
❚
5
(see Note 1) (see Note 2) (see Note 3)
Note:
1. You may use to enter a "+" charac ter at the beg innin g of the ID num ber to i ndicate the fol lowing digit(s ) for
2. To enter a space, press
3. For some count ries, this feat ure i s not avail abl e depe ndi ng on the co untr y’s re gul ation . Th e disp lay may no t show
SET
your country code.
Ex : +1 201 555 1212 +1 for U.S.A. country code.
+81 3 111 2345 +81 for Japan country code.
this feature.
STOP
TONE
P6 SPACE
40
.
Page 43

Setting the parameters for the LAN Interface
Depending on how the DX-2000 will be configured to communicate on the LAN, the appropriate parameters listed
in the table below must be stored first. (See pages 14 to 18)
Parameter Comments
1 DATE & TIME Current Date and Time. (See page 36)
2 LOGO Up to 25 characters & digits. (See page 38)
3 CHARACTER ID Up to 16 characters & digits. (See page 39)
4 ID NO. Your Fax Telephone Number. (Up to 20 digits, see page 40)
5 MAC ADDRESS Hardware Address hard-coded into the DX-2000. (If required, can be obtained
from the 2nd page of the Fax Parameter List printout, by pressing
[FUNCTION][6][4][SET])
6* IP ADDRESS IP Address assigned to your DX-2000.
7* SUBNET MASK Subnet Mask assigned by the Network Administrator.
8* SMTP SERVER NAME The name of the SMTP Mail Server. (Up to 60 characters)
8* SMTP SERVER IP ADDR IP Address of the SMTP Mail Server.
9* DEF. ROUTER IP ADDR IP Address of your Default Router.
10* EMAIL ADDRESS The Email Address assigned to your DX-2000 for sending and receiving. (Up
11* DNS SERVER IP ADDRESS IP Address of the DNS Server.
12* POP SERVER NAME
12* POP SERVER IP ADDR IP Address of the POP Mail Server.
13* POP USER NAME User Name assigned to your DX-2000. (Up to 40 characters)
14* POP PASSWORD Password assigned to your DX-2000. (Up to 10 characters)
15* HOST NAME The Host Name assigned to your DX-2000. (Up to 60 characters)
16 DEFAULT SUBJECT The default information to be added to the Subject Line for all outgoing email
17 DEFAULT DOMAIN When the outgoing email address is incomplete by SMTP standards, the
18 REMOTE PASSWORD This is a security password that allows Remote Programming of the Internet
19 RELAY XMT PASSWORD A password that provides Network security for your Relay Station (used
20 MANAGER’S EMAIL ADDR Department Manager’s Email Address for notification of all Internet relayed
21 DOMAIN NAME (01) Enter the Domain Name(s) that have been authorized to access your Internet
22 DOMAIN NAME (02)
23 DOMAIN NAME (03)
24 DOMAIN NAME (04)
25 DOMAIN NAME (05)
26 DOMAIN NAME (06)
27 DOMAIN NAME (07)
28 DOMAIN NAME (08)
29 DOMAIN NAME (09)
30 DOMAIN NAME (10)
Name of the POP Mail Server.
to 60 charact ers)
(up to 40 characters). To manually input this information before transmission,
change the Fax Parameter No. 159 (SUBJECT LINE ENTRY) to "2:Valid".
Frequently Sent Domain specified here will be automatically added to the
email address. This feature is also useful as a shortcut when manually
entering email addresses to a frequently used Domain. (Up to 50 characters)
Parameters and the Auto Dialler and the retrieval of the Journal via an Email.
(Up to 10 characters)
exclusively for G3 relay purposes). (Up to 10 characters)
transmissio ns for supervision and co st c ontrol purposes. (Up to 60 cha r ac ters )
Fax for Relayed XMT Request. (Up to 30 characters)
2
* Contact your Network Administrator for this Information.
Page 44

Setting the Internet Parameters
1
2
3
4
5
FUNCTION
7
1
SET
repeatedly until display shows;
28
Enter the IP Address using the keypad. Press for
the period ".".
Ex:
1 2 3
28
SET
28
.
1 7 8
.
3
28
.
2 4 0
.
SET MODE (1-6)
ENTER NO. OR
1:USER PARAME TER S?
PRESS SET TO SELECT
IP ADDRESS
❚
IP ADDRESS
123.178.240.3
SUBNET MASK
❚
∨ ∧
❚
6
28
Enter the Subnet Mask using the keypad. Press
for the period ".".
28
Ex:
2 5 5
28
.
0
SET
Enter the SMTP Server Name using the Character Key (up to
60 characters). (See Note 3)
a i l s
m
Ex:
.
v
2 5 5
r
28
.
2 5 5
.
SUBNET MASK
255.255.255.0
SMTP SERVER NAME
❚
SMTP SERVER NAME
mailsvr
❚
❚
42
Page 45

Setting the Internet Parameters
7
8
9
SET
Enter the Default Router IP Address using the keypad.
28
2
.
28
3
.
2
27
.
com
7 8
28
.
1
@
p
a n a s o n i c
.
2
4 0
Press for the period ".".
Ex:
1
28
SET
Enter the Email Address using Character keys (up to 60
characters).
Ex:
abc
28
SET
DEF. ROUTER IP ADDR
❚
DEF. ROUTER IP ADDR
123.178.240.2
EMAIL ADDRESS
❚
EMAIL ADDRESS
abc@panasonic.com
DNS SERVER IP ADDR
❚
❚
❚
2
10
11
Enter DNS Server IP Address using the keypad. Press
28
.
to enter the period ".".
28
Ex:
1 3 3
28
.
4 5
SET
Enter the POP Server Name using the Character Key (up to
60 characters). (See Note 3)
a i l s
m
Ex:
SET
Enter the POP User Name (up to 40 characters).
Ex:
abc d e f
.
v
g
1 8 5
r
1 2 3
28
.
2 4 7
DNS SERVER IP ADDR
133.185.247.45
POP SERVER NAME
❚
POP SERVER NAME
mailsvr
POP USER NAME
❚
POP USER NAME
abcdefg123
❚
❚
❚
Continued on the next page...
43
Page 46

Setting the Internet Parameters
12
13
14
SET
Enter the POP Password (up to10 characters).
g
e f
Ex:
SET
Enter the Host Name (up to 60 characters).
Ex:
f ax
SET
Enter the Default Subject (up to 40 characters).
I N T E R N E T
Ex:
SPACE
hki
0 0
ABC
1 2 4
SPACE
M A I L
POP PASSWORD
❚
POP PASSWORD
efghik124
HOST NAME
❚
HOST NAME
fax00
DEFAULT SUBJECT
❚
DEFAULT SUBJECT
INTERNET MA IL A B C
❚
❚
❚
SET
15
Enter the Default Domain (up to 50 characters).
p
Ex:
a n a s o n i c
SET
16
Enter the Remote Password (up to 10 characters).
Ex:
abc d e f
SET
17
Enter your Relay XMT Password if applicable (up to 10
characters). (See page 45)
To return to standby, press .
(see Note 1) (see Note 2) (see Note 3)
DEFAULT DOMAIN
❚
28
.
com
g
h i
STOP
j
DEFAULT DOMAIN
panasonic.com
REMOTE PASSWO RD
❚
REMOTE PASSWO RD
abcdefghij
RELAY XMT PASSWORD
❚
❚
❚
44
Note:
1. Use or to move the cursor be yond the inco rrect character , press then re-enter the new charac ter.
2. You can search for the User Parameters by pressing or .
3. If the DNS Server is not available, cha nge the s et ting of th e Fa x Pa ram ete r N o. 16 1 (DNS Serv er) to "I nv ali d", then
enter the IP Address instead.
CLEAR
Page 47

Setting the Internet Parameters
Setting the Internet Relay Station
To use the Internet Relayed Transmission, you must first store the following parameters into your machine.
SET MODE (1-6)
ENTER NO. OR
1:USER PARAME TER S?
PRESS SET TO SELECT
RELAY XMT PASSWORD
❚
RELAY XMT PASSWORD
newyork
MANAGERS EMAI L ADD R
❚
❚
∨ ∧
1
2
3
4
5
FUNCTION
7
1
SET
repeatedly until display shows:
Enter the Relayed Transmission Password using the
Character keys (up to 10 characters).
Ex:
n e
SET
y
okr
w
2
Enter the Manager’s Email Address using the Character keys
(up to 60 characters).
27
g
Ex:
m
SET
r
28
.
com
6
SET
7
You can now set additional Domain Names by repeating
the procedures from Steps 8 to 9, or return to standby by
pressing .
(see Note 1) (see Note 2) (see Note 3)
Note:
1. Use
2. You can search for the User Parameters by pressing or .
3. Register up to 10 Domain Names that are authorized to use your DX-2000 for Relayed XMT Requests. (If the
Domain Name fields are left blank, anyone can access your machine for Relayed XMT)
or
STOP
to move the cursor be yond the inco rrect character , press then re-enter the new character.
@
p
a n a s o n i c
MANAGERS EMAI L ADD R
mgr@panasonic.com
DOMAIN NAME ( 01 )
❚
DOMAIN NAME ( 02 )
❚
CLEAR
❚
45
Page 48

Prog ramming or Retrie ving P a rameters via Email
Using Email to Program or Retrieve Parameters
This feature is a powerful tool, which provides a convenient and easy way of retrieving or programming Inter net
Parameters, One-Touch, ABBR Dialling Numbers, Program keys and Journal retrieval from your PC b y sending a
text email message to the DX-2000.
Using your email applic ati on’s "Subject:" line as a co mma nd- in put fi eld , you c an reque st the DX-2000 to perform
the following commands:
"Subject:" line command Function
1 #set parameters(password)# Programs the Internet Parameters
2 #get parameters(password)# Retrieves the Internet Parameters
3 #set abbr(password)# Programs the Auto Dialler
4 #get abbr(password)# Retrieves the Auto Dialler Data
5 #get jnl (password)# Retrieves the current Journal data
Where: "set" is used to program the data
"get" is used to retrieve the data
"parameters" represents Internet Parameters
"abbr" represents Auto Dialler
"jnl" represents Journal
"password" is the Remote Password programmed in the DX-2000’s User Parameters
(i.e. 123456789). Must be enclosed within the parenthesis "( )".
The command must be enclosed within the hash (#) signs.
Using a PC to Input the Internet Parameters Remotely
This feature provides a convenient and an easy way to input the Internet Parameters right from your PC by
sending a text email message to the DX-2000.
The following parameters can be input remotely via a PC. The other parameters must be entered from the
machine in the User Parameters (see page 41).
- Sender Selection (up to 24 User Names, see page 125)
- Domain Name (up to 10 authorized Domain Names, see page 41)
- Default Domain
- Manager’s Email Address
-Relay XMT Password
- Remote Password
The DX-2000 interprets the command that you enter in the "Subject" line of your email message and performs
one of the following functions, it Retrieves or Stores data into the Internet Parameters (User Parameters).
The two types of commands that can be entered in the "Subject" line of your email:
1) To Store data, type : #set parameters(password)# :
where the password is the Remote Password programmed
in the DX-2000’s User Parameters (i.e. 123456789).
You can enter the Internet Parameters shown abov e with this
command the first time. However, if these fields already
contain data, do not use this command as the existing
information will be deleted and overwritten. Use the
Retrieve command below instead, refer to pages 47 to 52.
2) To Retrieve data, type : #get parameters(123456789)# (see Note 1)
Note:
1. To activate this feature, change the Fax Parameter No. 158 (PC REMOTE UPDATE) to "2:Valid". (See page 76)
46
Page 49

Programming or Retrieving Parameters via Email
To Input the Internet Parameters for the First Time
Create a script in the message body of a plain text email and send it to the DX-2000’s email address. The
"Subject" line of the email must be as follows:
#set parameters(password)#: where the password is the Remote Password programmed in the DX-2000’s
User Parameters. For security, always input a Remote Password in the User
Parameters. [If it was not programmed, signify w ith " ()" (i .e. #set parameters()#)
and assign one now].
Important: Do not use the above command if these fields already contain data, the existing
information will be deleted and overwritten. Retrieve and backup the existing
data onto your PC first by following the procedures for Retrieving and Editing the
Internet Parameters on pages
The script sample to input the Internet Parameters is shown below.
(1)
47
(2)
to 52.
2
(c)
(d)
(a)
(3)
(b)
(4)
Continued on the next page...
47
Page 50

Prog ramming or Retrie ving P a rameters via Email
(see Note 1) (see Note 2)
(1) To : The DX-2000’s email address
From : This field is normally not visible when creating new email message(s). It is your default
Subject : To Store data, type: #set parameters(password)#
(2) @sender to @end : Defines the Sender information to be set in section (2) between @sender to @end block.
(3) @domain to @end : Defines the Domain Names to be set in section (3) between @domain to @end block.
(4) @system to @end : Defines the Internet Parameters to be set in section (4) between @system to @end block.
email address (email application), for retrieving the Internet Parameters and for error
message notification.
(Can be programmed with the configuration tool of your email program.)
Register up to 24 User Names and their Email Addresses for the Sender Selection feature
(See page 125).
Separate each data field with a semicolon (;). (If the remaining fields are to remain blank,
insert a semicolon (;) for each blank field)
The data string for each Sender Selection should be defined within a single line.
The syntax is: <Sender Selection Number>;<User Name>;<Email Address>
(a) 01 to 24: Indicates the Sender Selection Numbers
(b) User Name (25-characters maximum)
(c) Email Address (60-characters maximum)
Register up to 10 the Domain Names that have been authorized to access your Internet
Fax for Relayed XMT Request. (30-characters maximum)
Register the following Internet Parameters.
(a) Default Domain (30-characters maximum).
The syntax is: domain; <Default domain name>
(b) Manager’s Email Address (60-characters maximum).
The syntax is: manager; <Manager’s Email Address>
(c) Relay XMT Password (10-characters maximum).
The syntax is: relay; <Relay XMT Password>. Quotation marks " " enclosing the
password, are required, as shown in the example above.
(d) Remote Password (10-characters maximum).
The syntax is: remote; <Remote Password>. Quotation marks " " enclosing the
password, are required, as shown in the example above.
48
Note:
1. The machine cannot be programmed via email while it is communicating or printing.
2. Some email applications automatically insert a line feed in the middle of a line when the number of characters in a
line exceed a specific number. Turn "Off" the automatic line feed, or define the number of characters per line to
prevent a line feed, or the data will be ignored.
Page 51

Programming or Retrieving Parameters via Email
To Retrieve the Internet Parameters for Backup
To retr ieve the existing Inter net Parameters, send a pla in text email to th e DX-2000’s email addr ess with the
following command in the "Subject" line:
#get parameters(password)# : where the password is the Remote Password programmed in the DX-2000’s
User Parameters (i.e. 123456789). For security, always input a Remote
Passw ord in the User Parameters. If it was not programmed, signify with "()" (i.e.
#get parameters()#).
Make sure that the CC..., Bcc... lines and the body of the email message is
Blank.
Retrieving the Internet Parameters Sample
(1)
(1) To : The DX-2000’s email address.
From : This field is normally not visible when creating new email message(s). It is your default
email address (email application), for retrieving the Internet Parameters and for error
message notification.
(Can be programmed with the configuration tool of your email program.)
Subject : To Retrie ve data, type: #get parameters(password)#
2
49
Page 52

Prog ramming or Retrie ving P a rameters via Email
After receiving th e email message requesting the Internet Parameters, the DX-2000 sends b ack an email to the
address specified in the "From:" line with the Internet Parameters in the body of the email.
DX-2000 Internet Parameters Email Sample
(1)
(2)
(3)
(4)
(1) T o : Your email address (email application) that was used to retrieve the Internet Parameters.
From : The DX-2000’s email address.
Subject : DX-2000 System Parameter List
(2) @sender to @end : Defines up to 24 User Names and their Email Addresses programmed in the DX-2000 for
(3) @domain to @end : Defines up to 10 Domain Names programmed in the DX-2000 that have been authorized
(4) @system to @end : Defines the following Internet Parameters programmed in the DX-2000 in section (4)
the Sender Selection in section (2) between @sender to @end block.
to access you Internet Fax for Relayed XMT Request in section (3) between @domain to
@end block.
between @system to @end block.
50
(a) Default Domain
(b) Manager’s Email Address
(c) Relay XMT Password
(d) Remote Password
Page 53

Programming or Retrieving Parameters via Email
To Edit the Retrieved or Backup Internet Parameters File
After receiving the DX-2 000 email with the In ternet Parameters, store the email fil e as text (.txt) on your PC for
backup purposes.
To change or update the Internet Parameters, follow the steps below:
1. Create a New Email Message, fill ou t the "To" and "From" Address line and the Subjec t line information for
section 1) below:
To : The DX-2000’s email address.
From : This field is normally not visible when creating new email message(s). It is your default email
address (email application), for retrieving the Internet Parameters and for error message notification.
Subject : To Store data, type: #set parameters(password)#
2. Open the backup, Internet Parameter text file. Copy the body text and paste it on the body of the newly
created email message.
3. Delete any headers that may be pres ent in the body of the email, as uns upported data will be rejected. The
information following the "#" sign is ignored by the DX-2000.
4. Edit a parameter and/or add additional Sender Name(s) or Domain Name(s).
5. When finished, use the "File/Save as.." command and save the updated file with ".txt" extension as a backup.
6. Send the email message to the DX-2000 to update the Internet Parameters.
2
Continued on the next page...
51
Page 54

Prog ramming or Retrie ving P a rameters via Email
DX-2000 Internet Parameters Email Sample
(1)
(5)
[Delete this header before sending email.]
(3)
(2)
(4)
52
Page 55

Programming or Retrieving Parameters via Email
(1) To : The DX-2000’s email address
From : This field is normally not visible when creating new email message(s). It is your default
email address (email application), for retrieving the Internet Parameters and for error
message notification.
(Can be programmed with the configuration tool of your email program.)
Subject : To Store data, type: #set parameters(password)#
(2) @sender to @end : Defines the Sender information to be set in section (2) between @sender to @end block.
Edit, Delete or Register up to 24 User Names and their Email Addresses for the Sender
Selection feature (see page 125).
Separate each data field with a semicolon (;). (If the remaining fields are to remain blank,
insert a semicolon (;) for each blank field)
The data string for each Sender Selection should be defined within a single line. The
syntax is:
<Sender Selection Number>;<User Name>;<Email Address>
(a) 01 to 24: Indicates the Sender Selection Numbers
(b) User Name (25-characters maximum)
(c) Email Address (60-characters maximum)
(3) @domain to @end : Defines the Domain Names to be set in section ( 3) between @domain to @end block.
Register up to 10 the Domain Names that have been authorized to access your Internet
Fax for Relayed XMT Request. (30-characters maximum)
(4) @system to @end : Defines the Internet Parameters to be set in section (4) between @system to @end block.
Register the following Internet Parameters.
(a) Default Domain (30-characters maximum).
The syntax is: domain; <Default domain name>
(b) Manager’s Email Address (60-characters maximum).
The syntax is: manager; <Manager’s Email Address>
(c) Relay XMT Password (10-characters maximum. The syntax is: relay; <Relay XMT
Password>. Quotation marks " " enclosing the password, are required, as shown in
the example above)
(d) Remote Password (10-characters maximum. The syntax is: remote; <Remote
Password>. Quotation marks " " enclosing the password, are required, as shown in
the example above)
2
(Notice that for the above example, we have changed the Manager’s Email Address,
Relay XMT Password and the Remote Password)
(5) : This header must be deleted before the email is sent to the DX-2000 for reprogramming
of Internet Parameters.
The information following the "#" sign is ignored by the DX-2000, therefore, you can lea ve
it as is or delete it if you wish.
53
Page 56

Prog ramming or Retrie ving P a rameters via Email
Using a PC to Update the Auto Dialler Remotely
This feature provides a convenient and an easy way to Update, Backup or Restore the One-Touch and
Abbreviated dialling numbers right from your PC by sending a text email message to the DX-2000.
The DX-2000 inter prets the command that you enter in the "Subject" line of your email mes sage and performs
one of the following functions, it Retrieves or Stores data into the Auto Dialler (One-Touch and/or ABBR No.).
The two types of commands that can be entered in the "Subject" line of your email:
1) To Store data, type :#set abbr(password)# : where the password is the Remote Password programmed in
the DX-2000’s User Parameters (i.e. 123456789). You can
progra m any known unused Auto Dialler location(s) with this
command for the first time, without having to Retrieve the OneTouch / ABBR No. data first. If the desired Auto Dialler location
already contains data, the DX-2000 will overwrite the existing
data, therefore, we recommend that you use the Retrieve
command below instead, to edit existing Auto Dialler locations,
refer to pages 58 to 60.
2) To Retrieve data, type :#get abbr(123456789)#
(see Note 1)
54
Note:
1. To activate this feature, change the Fax Parameter No. 158 (PC REMOTE UPDATE) to "2:Valid".
(See page 76.)
Page 57

Programming or Retrieving Parameters via Email
Deleting the Entire Auto Dialler
If you wish to delete the entire Auto Dialler d ata in the DX-2000, ty pe the following command in the body of the
email message:
@command
delete
@end
This command can also be inser ted before the @begin to @end block, to erase the enti re Auto Dialler d ata fi rst,
then reprogramming it with new data.
This method will a lso prevent the "Overwrite Warning Message " that is sent back from the DX-2000, whe n the
current Auto Dialler station is overwritten.
To erase the entire Auto Dialler data, type the following command in the "Subject" line of your email:
#set abbr(password)# : where the password is the Remote Password programmed in the DX-2000’s User
Parameters. Retrieve and backup the existing data onto your PC first by following the
procedures for Retrieving and Editing on pages 58 to 61.
2
55
Page 58

Prog ramming or Retrie ving P a rameters via Email
To Program One-Touch / ABBR No. for the First Time
Create a script in the message body of a plain text email and send it to the DX-2000’s email address.The
"Subject" line of the email must be as follows:
#set abbr(password)#: where the password is the Remote Password programmed in the DX-2000’s User
Parameters.
The script sample to program One-Touch / ABBR No. f o r the first time is shown in the illustration below:
First Time Remote Programming of One-Touch / ABBR No. Sample
(1)
(b)
(c) (d)
(f)
(3)
(e)
(2)
56
Page 59

Programming or Retrieving Parameters via Email
(see Note 1) (see Note 2) (see Note 3) (see Note 4)
(1) To : The DX-2000’s email address.
From : This field is normally not visible when creating new email message(s). It is your default email address
(email application), for retrieving the One-Touch / ABBR No. data and for error message notification.
(It can be programmed with the configuration tool of your email program)
Subject : To Store data, type: #set abbr(password)#
: To Retrieve data, type: #get abbr(password)#
2
(2) @begin to @end block : De fines the data to be set into One-Touch / ABBR No. between @begin to @end block.
(3) @program to @end : Defines the data to be set into Program Keys as a Group Key or POP Access Keybetween @program to
Separate each data field with a semicolon (;). (If the remaining fields are to remain blank, insert a
semicolon (;) for each blank field)
The data string for each station should be defined within a single line.
(a) Entry-number: One-Touch, ABBR No. or Program Keys to be programmed
000 to 999: indicates ABBR No.s 000 to 999 (160 stations maximum)
1001 to 1032: indicates One-Touch numbers from 01 to 32
1033 to 1040: indicates Program Keys (P1 to P8 programmed as One-Touch dialling numbers)
(b) Station-name: Name of the station being programmed (15 alpha-numeric characters maximum)
(c) Station-address: email address or telephone number of the station being programmed
(d) Routing-subaddress: sub-address to be used for routing (20-digit maximum)
(e) Routing-id-number: TSI to be used for routing (20-digit maximum)
(f) The End Receiving Station’s telephone number is entered after the hash sign (#)
@end block.
(a) Program Key: P01 - P08
(b) Station-name as a Group Key: Name of the station being programmed (15 alpha-numeric characters
maximum)
(c) G ROUP: The syntax used to set the Program Key as a Group Key
(d) Entry-number: One-Touch, ABBR No. or Program Keys to be programmed
000 to 999: indicates ABBR No.s 000 to 999 (160 stations maximum)
1001 to 1032: indicates One-Touch numbers from 01 to 32
1033 to 1040: indicates Program Keys (P1 to P8 programmed as One-Touch dialling numbers)
(e) POP: The syntax used to set the Program Key as a POP Access Key
(f) POP User-name: Name of the station being programmed (40 alpha-numeric characters maximum)
(g) POP Password: POP Password (10 alpha-numeric characters maximum)
(h) Set whether the emails on the POP Server are deleted after retrieving the emails.
Note:
1. If a POP server is programmed into the P1 to P8 p rogram keys, the data programme d for this key can not be deleted ,
even when the delete command is specified.
2. The email address and the telephone number cannot be programmed via email when:
• A One-Touch Dialling number has been used for communication reservation.
• Received documents are stored in the image data memory of the machine.
• While the machine is communicating or printing.
3. When the email address and telephone number are programmed via email, a program result email is sent back.
4. Some email applications automa tically i nsert a line feed in the middle of a line whe n a number of characte rs in a line
exceed a specific number. Turn Off the automatic line feed, or define a number of characters per line to prevent a
line feed, or the data will be ignored.
57
Page 60

Prog ramming or Retrie ving P a rameters via Email
To Retrieve One-Touch / ABBR No. Data for Backup
To retrieve the existing auto dialler data, send a plain text email to the DX-2000’s email address with the following
command in the "Subject" line:
#get abbr(password)# : w here the password is the Remote Password programmed in the DX-2000’s User
Parameters (i.e. 123456789)
Make sure that the CC, Bcc lines and the body of the email message is Blank.
Retrieving One-Touch / ABBR No. Data Sample
(1)
To : The DX-2000’s email address.
From : This field is normally not visible when creating new email message(s). It is your default email address (email
Subject : To Retrieve data, type: #get abbr(password)#
application), for retrieving the One-Touch / ABBR No. data and for error message notification.
(It can be programmed with the configuration tool of your email program.)
58
Page 61

Programming or Retrie ving P arameter s via Emai
After receivin g t he email message reque sti ng the existing auto dial ler data , t he DX- 20 00 se nds back an e mai l to
the address specified in the "From:" line with the auto dialler information in the body of the email.
DX-2000 Auto Dialler Email Sample
2
(1)
(2)
(3)
(1) To : Your email address (email application) that was used to retrieve the Auto Dialler data.
From : The DX-2000’s email address.
Subject : DX-2000 ONE-TOUCH/ABBR List
(2) @begin to @end block : Defines One-Touch Keys, Abbreviated Dialling Numbers and Program Keys stored as a One-Touch Key
programmed in the DX-2000 in section (2) between @begin to @end block.
(3) @program to @end : Defines Program Keys stored as a Group Key or POP Access Key programmed in the DX-2000 in section
(3) between @program to @end block.
59
Page 62

Prog ramming or Retrie ving P a rameters via Email
To Edit the Retrieved or Backup One-Touch / ABBR No. Data File
After receiving the DX-2000 email with the auto dialler data, store the email file as text (.txt) on your PC for
backup purposes.
To change or update the auto dialler, follow the steps below:
1. Create a New Email Message, fill ou t the "To" and "From" Address line and the Subjec t line information for
section 1) below:
To : The DX-2000’s email address.
From : This field is normally not visible when creating new email message(s). It is your default email
address (email application), for retrieving the One-Touch / ABBR No. data and for error message
notification.
Subject : To Store data, type: #set abbr(password)#
2. Open the backup, auto dialler text file. Copy the body text and paste it on the body of the newly created email
message.
3. Delete any headers that may be present in the body of the email, as unsupported data will be rejected.
The information following the "#" sign is ignored by the DX-2000.
4. Edit and/or add additional One-Touch / ABBR No. stations.
5. When finished, use the "File/Save as..." command and save the updated file with ".txt" extension as a backup.
6. Send the email message to the DX-2000 to update the auto dialler.
DX-2000 Auto Dialler Email Sample
(b)
(a)
(a)
(h)
(1)
(d)
(5)
(e)
(2)
(4)
[Delete this header before sending email]
(c)
(f)
(e)
(c)
(d)
(3)
(b)
(f)
(g)
60
Page 63

Programming or Retrieving Parameters via Email
(1) To : The DX-2000’s email address.
From : This field is normally not visible when creating new email message(s). It is your default
email address (email application), for retrieving the One-Touch / ABBR No. data and for
error message notification.
(Can be programmed with the configuration tool of your email program.)
Subject : To Store data, type: #set abbr(password)#
2
(2) @begin to @end block: : Defines the One-T ouch Keys, Abbreviated Dialling Numbers and Program K e ys stored as a
(3) @program to @end block: : Defines the Program Ke ys stored as a Group Key or POP Access Key to be set in section
One-Touch Key to be set in section (3) between @begin to @end block. Edit, Delete or
Register the infomation.
Separate each data field with a semicolon (;). (If the remaining fields are to remain blank,
insert a semicolon (;) for each blank field)
The data string for each station should be defined within a single line. The syntax is:
<Entry-number>;<Station-name>;<Station-address>;<Routing-subaddress>;<Routing-idnumber>;<Telephone number>
(a) Entry-number: One-Touch, ABBR No. or Program Keys to be programmed
000 to 999: indicates ABBR No.s 000 to 999 (160 numbers maximum)
1001 to 1032: indicates One-Touch numbers from 01 to 32
1033 to 1040: indicates Program Keys (P1 to P8 programmed as One-Touch dialling
numbers)
(b) Station-name: Name of the station being programmed (15 alpha-numeric characters
maximum)
(c) Station-address: email address or telephone number of the station being programmed
(d) Routing-subaddress: sub-address to be used for routing (20-digit maximum)
(e) Routing-id-number: TSI to be used for routing (20-digit maximum)
(f) The End Receiving Station’s telephone number is entered after the hash sign (#)
(4) between @program to @end block.
Edit, Delete or Register the information.
(a) Program Key: P01 - P08
(b) Station-name as a Group Key: Name of the station being programmed (15 alpha-
numeric characters maximum)
(c) GROUP: The syntax used to set the Program Key as a Group Key
(d) Entry-number: One-Touch, ABBR No. or Program Keys to be programmed
000 to 999: indicates ABBR No.s 000 to 999 (160 stations maximum)
1001 to 1032: indicates One-Touch numbers from 01 to 32
1033 to 1040: indicates Program Keys (P1 to P8 programmed as One-Touch dialling
numbers)
(e) POP: The syntax used to set the Program Key as a POP Access Key
(f) POP User-name: Name of the station being programmed (40 alpha-numeric
characters maximum)
(g) POP Password: POP Password (10 alpha-numeric characters maximum)
(h) Set whether the emails on the POP Server are deleted after retrieving the emails.
(4) These 2 One-Touch stations were added to the list.
(5) This header must be deleted before the email is sent to the DX-2000 for reprogramming of One-Touch / ABBR No.
The information following the "#" sign is ignored by the DX-2000, therefore, you can leave it as is or delete it if you wish.
61
Page 64

Prog ramming or Retrie ving P a rameters via Email
Using Email to Retrieve the Journal
To r etr ieve the existing Jour na l data , sen d an e mail to the DX-2 000’s email addres s with th e following comma nd
in the "Subject" line:
#get jnl (pa ssword)#: where the password is, the Remote Password programmed in the DX-2000’s User
Parameters (i.e. 123456789).
The Journal will be send back to the originating station’s email address.
After receiving the journal, use a fixed width Font (i.e. Courier), in order to align the received journal’s contents on
the PC.
A separate email messag e is sent by the DX-2000, an " Internet Fax Retur n Receipt" to the Manager’s email
address programmed in the User Parameters, informing of the Journal Transfer.
(see Note 1)
62
Note:
1. To activate this feature, change the Fax Parameter No. 158 (PC REMOTE UPDATE) to "2:Valid". (See page 76)
Page 65

PROGRAMMING YOUR MACHINE
Programming Email Address and Telephone Numbers
Entering One-Touch/Abbreviated Dialling Numbers
One-Touch and Abbreviated Dialling are two fast ways of dialling full telephone numbers or emai l addr esses. To
use these dialling methods, you must first store the telephone number or email address using the following
procedure.
To enter a One-Touch key, follow the steps below
3
1
2
3
4
FUNCTION
2
7
SET
1
01
Ex:
To change the input mode (between "ENTER EMAIL
ADDRESS" and "ENTER TEL. NO."), press .
INTERNET
SET MODE (1-6)
ENTER NO. OR
1:ONE-TOUCH
2:ABBR NO.
ONE-TOUCH< >
PRESS ONE-TOUCH
<01>
NTER EMAIL ADDRESS
E
<01>
NTER TEL. NO.
E
∨ ∧
or
Enter the email address using character keys (up to 60
5
Continued on the next page...
characters).
Ex:
abc
28
.
or
Enter the telephone number
(up to 36 digits including pauses and spaces).
Ex:
9
PAUSE
27
@
com
5 5 5
p
a n a s o n i c
SPACE
1 2 3 4
<01>
abc@panasonic.com
or
<01>
9-555 1234
❚
❚
63
Page 66

Programming Email Address and Telephone Numbers
6
7
8
SET
Enter the station name using character keys
(up to 15 characters).
Ex:
To record another number, repeat step 4 to 8.
To return to standby, press .
S
SET
A L E S
SPACE
E P TD
STOP
<01> ENTER NAME
abc@panasonic.com
or
<01> ENTER NAME
9-555 1234
<01> SALES DE PT
abc@panasonic.com
<01> SALES DE PT
9-555 1234
ONE-TOUCH< >
PRESS ONE-TOUCH
❚
or
❚
64
Page 67

Programming Email Address and Telephone Numbers
To set an Abbreviated Dialling Number, follow the steps below
1
2
3
4
FUNCTION
2
7
SET
2
Ex: (000 to 999, up to 160 stations)
0 2 2
To change the input mode (between "ENTER EMAIL
ADDRESS" and "ENTER TEL. NO."), press .
INTERNET
SET MODE (1-6)
ENTER NO. OR
1:ONE-TOUCH
2:ABBR NO.
ABBR[
❚
ENTER ABBR NO.
[022]
NTER EMAIL ADDRESS
E
[022]
E
NTER TEL. NO.
∨ ∧
]
or
3
Enter the email address using character keys (up to 60
5
Continued on the next page...
characters).
Ex:
abc
28
.
or
Enter the telephone number
(up to 36 digits including pauses and spaces).
Ex:
9
PAUSE
27
@
com
5 5 5
p
a n a s o n i c
SPACE
2 3 4 5
[022]
abc@panasonic.com
or
[022]
9-555 2345
❚
❚
65
Page 68

Programming Email Address and Telephone Numbers
6
7
8
SET
Enter the station name using character keys
(up to 15 characters).
A C C O U N T I N G
Ex:
SET
To record another number, repeat step 4 to 8.
To return to standby, press .
STOP
[022]ENTER NAME
abc@panasonic.com
or
[022]ENTER NAME
9-555 2345
[022]ACCOUNTING
abc@panasonic.com
[022]ACCOUNTING
9-555 2345
ABBR[
❚
]
ENTER ABBR NO.
❚
or
❚
(see Note 1) (see Note 2) (see Note 3)
Note:
1. If you require a special access number to get an outside line, enter it first and then press .
A hyphen "-" is displayed for pause.
2. Use or to enter a space between the numbers to make it easier to read.
3. If you are using Pulse dialling and you wish to change to Tone dialling in the middle of dialling sequence, press
SPACE
TONE
Ex : 9 PAUSE TONE 5551234
(represented by a"/"). The dialling method will be changed from Pulse to Tone after dialling the digit "/".
MONITOR
P AUSE
66
Page 69

Programming Email Address and Telephone Numbers
Changing or Erasing One-Touch/Abbreviated Dialling Numbers
If you have to change or erase any of the One-Touch/Abbreviated dialling numbers, follow the steps below.
To change the settings of a One-Touch/ABBR dialling number
1:ONE-TOUCH
2:ABBR NO.
1
FUNCTION
7 2
SET
3
2
3
4
5
Select 1 for One-Touch Dialling number.
Select 2 for ABBR Dialling Number.
Ex:
1
Enter the station you wish to change.
01
Ex:
CLEAR
To change the input mode (between "ENTER EMAIL
ADDRESS" and "ENTER TEL. NO."), press .
INTERNET
ONE-TOUCH< >
PRESS ONE-TOUCH
<01> SALES DE PT
abc@panasonic.com
or
<01> SALES DE PT
9-555 1234
<01> SALES DE PT
E
NTER EMAIL ADDRESS
or
<01> SALES DE PT
NTER TEL. NO.
E
Enter a new email address. (See Note 1 and 2.)
6
Continued on the next page...
Ex:
or
Enter a new telephone number. (See Note 1 and 2.)
Ex:
x
28
9
y
z
.
PAUSE
27
@
p
a n a s o n i c
com
5 5 5 SPACE 3 4 5 6
<01> SALES DE PT
xyz@panasonic.com
or
<01> SALES DE PT
9-555 3456
❚
❚
67
Page 70

Programming Email Address and Telephone Numbers
7
8
9
SET
CLEAR
then enter a new station name. (See Note 1 and 3.)
Ex:
P A N A F A X
SET
<01> SALES DEPT
xyz@panasonic.com
<01> ENTER NAME
xyz@panasonic.com
or
<01> ENTER NAME
9-555 3456
<01> PANAFAX
xyz@panasonic.com
<01> PANAFAX
9-555 3456
ONE-TOUCH< >
PRESS ONE-TOUCH
❚
or
❚
(see Note 1)
(see Note 2)
(see Note 3)
Note:
1. If you make a mistake, use or to move the cursor beyond the incorrect number, press then
2. If the One-Touch/Abbreviated dialling number has been used for a c om mu ni cat ion reservation, the settings cannot
3. If you press in step 5, a previously entered telephone number or email address is erased.
To return to standby, press .
re-enter the new number.
be changed or erased until the communication has finished.
INTERNET
STOP
CLEAR
68
Page 71

Programming Email Address and Telephone Numbers
To erase the settings of One-Touch/ABBR Dialling number
1
2
3
FUNCTION
Select 1 for One-Touch Dialling number.
Select 2 for ABBR Dialling Number.
Ex:
1
Enter the station you wish to change.
01
Ex:
7 2
SET
1:ONE-TOUCH
2:ABBR NO.
3
ONE-TOUCH< >
PRESS ONE-TOUCH
<01> SALES DE PT
abc@panasonic.com
or
<01> SALES DE PT
9-555 1234
4
5
(see Note 1)
Note:
1. If the One-Touch/Abbreviated dialling number has been used for a communication reservation, the settings cannot
CLEAR
SET
To return to standby, press .
be changed or erased until the communication has finished.
STOP
<01> SALES DE PT
E
NTER EMAIL ADDRESS
or
<01> SALES DE PT
NTER TEL. NO.
E
ONE-TOUCH< >
PRESS ONE-TOUCH
69
Page 72

Programming Email Address and Telephone Numbers
Printing Out a Directory Sheet
After programming a one-to uch dialli ng number, you can print out the di rector y sheet whic h includes the first 12
characters of each station name. Cut along the dotted line and place it over the One-Touch key under the
Directory Sheet Cover. To print out a directory sheet, follow the steps below .
1
2
****************** -DIRECTORY SHEET- ******************* DATE SEP-12-1999 ***** TIME 15:00 *****
FUNCTION
7
Your machine prints out the directory sheet.
01 02 03 04 05 06
SALES DEPT ENG. DEPT ACCT. DEPT EXPORT DEPT R & D DEPT MARKET DEPT
07 08 09 10 11 12
13 14 15 16 17 18
19 20 21 22 23 24
6
SET
PRINT OUT (1-7)
ENTER NO. OR
* PRINTING *
DIRECTORY SHEET
∨ ∧
25 26 27 28 29 30
31 32 P1 P2 P3 P4
P5 P6 P7 P8
-PANASONIC ********************************************* -HEAD OFFICE - ****** - 201 555 1212- *******
(see Note 1)
Note:
dotted line
Directory Sheet Cover
1. When a station name is not pr ogrammed for an e mail auto dial er, the email add ress is printed on the Directory Sh eet.
For stations with telephone numbers, no information is printed if the station’s name is not programmed.
70
Page 73

Customizing Your Machine
Your facsimile machine has a variety of adjustable Fax Parameters. These parameters, listed in the Parameter
Table, are preset for you and do not nee d to be c han ged . If you do want to m ake a cha nge, read the table carefully.
Some parameters, such as the Resolution, Contrast, and Verification Stamp parameters, can be temporarily
changed by simple key operation just before a transmissi on is made. When the transmission ends, however, these
parameters retur n to their pre set values (Home pos ition ). Other paramete rs ca n only be chan ged by the procedure
described below.
Setting the Fax Parameters
3
1
2
3
4
5
FUNCTION
4
Enter Fax Parameter number from the Parameter Table
(see pages 72 to 76).
Ex: for CONTRAST
0 0 1
SET
Enter the new setting value.
Ex: for LIGHTER
2
7
SET
SET MODE (1-6)
ENTER NO. OR
FAX PARAMETER(1-164)
NO.=
FAX PARAMETER(1-164)
NO.=001
01 CONTRAST
1:NORMAL
01 CONTRAST
2:LIGHTER
∨ ∧
❚
SET
6
To set another parameter, press to return to step
3, or to return to standby, press .
(see Note 1) (see Note 2)
Note:
1. To scroll the Fax Parameters in Step 2 or 4, press or .
2. To print out a Fax Parameter List, see page 178.
02 RESOLUTION
2:FINE
CLEAR
STOP
71
Page 74

Customizing Your Machine
Fax Parameter Table
No. Parameter
001 CONTRAST 1 Normal Setting the home position of the CONTRAST key.
002 RESOLUTION 1 Standard Setting the home position of the RESOLUTION key.
004 STAMP 1 Off Setting the home position of the STAMP key.
005 MEMORY 1 Off Setting the home position of the MEMORY key.
006 DIALLING METHOD 1 Pulse Selecting the dialling method.
007 HEADER PRINT 1 Inside Selecting the printing position of the header.
Setting
Number
2 Lighter
3 Darker
2 Fine
3 400 dpi
2On
2On
2 Tone
2 Outside
3 No print
Setting Comments
To select the stamp function when document is stored in memory,
see Fax Parameter No. 028.
Inside : Inside TX copy area.
Outside : Outside TX copy area.
No print : Header is not printed.
008 HEADER FORMAT 1 Logo , ID No. Selecting the header format.
2 From To
009 RCV ’D TIME PRINT 1 Invalid Selecting whether the machine prints the received date & time,
2 Valid
010 KEY/BUZZER VOLUME 1 Off Selecting the volume of the Key/Buzzer tone.
2Soft
3 Loud
012 COMM. JOURNAL
013 AUTO JOURNAL PRINT 1 Invalid S electing whether the machine prints the journal automatically
014 FILE ACCEPTANCE
REPORT
017 RE CEIVE MODE 1 Manual Setting the reception mode to automatic or manual.
1 Off
2Always
3 Inc. only
2 Valid
1 Invalid Selecting whether the machine prints the file acceptance journal.
2 Valid
2Auto
remote ID, percentage of reduction and page number on the
bottom of each received page.
Selecting the home position of printout mode for COMM. Journal
Off/Always/INC.
Off : Does not print.
Always : Always prints.
Inc. only : Prints only when communication has failed.
after every 100 transactions.
If you set this parameter to valid, a journal will print after any
memory communication.
72
Page 75

Customizing Your Machine
No. Parameter
022 SUBSTITUTE RCV
024 PRINT REDUCTION
025 REDUCTION RATIO 70 70% Selecting fixed print reduction ratio from 70% to 100%. This
026 POL LING PASSWORD (----) Setting a 4-digit password for secured polling. (See page 151)
028 STAMP AT MEM. XMT 1 Invalid Selecting whether the machine stamps the original documents
030 DRD SERVICE
031 INCOMPLETE FILE SAVE 1 Invalid Selecting whether the m achine retains the document in memory if
Setting
Number
1 Invalid
2 Valid
1 Fixed
2Auto
---- ----
100 100%
2 Valid
1 Invalid
2 Valid
2 Valid
Setting Comments
Selecting whether the machine receives to memory when
recording paper runs out, toner runs out or recording paper is
jammed.
Selecting print reduction mode.
Fixed: Reduce received document according to setting of
Parameter No. 025.
Auto: Reduce received document according to the length of
received documents.
parameter functions only when fixed print reduction is selected on
Fax Parameter No. 024.
when storing the documents into memory.
(depending on the Stamp setting on the Control Panel)
Selecting whether or not the machine is available "DRD Service".
If this parameter is set to "Valid", your machine detects the
specified ring pattern only to receive a document automatically.
the document is not successfully transmitted.
3
032 COPY REDUCTION
033 XMT REDUCTION 1 Invalid Selecting whether the machine performs reduction when the
034 ENERGY SAVER MODE
035 DAYLIGHT TIME
1 Manual
2Auto
2 Valid
1 Off
2 Energy-Saver
1 Invalid
2 Valid
Selecting whether the machine performs the copy reduction ratio
automatically or manually.
Manual : The machine will prompt you for the Zoom ratio (100% to
70%) when making copies.
Auto : The machine will automatically determine the reduction
ratio according to the length of the original document.
transmitting document is wider than the recording paper used at
the receiving machine.
To reduce the power consumption in standby, specify the Delay
Time (1 to 120 minutes) for the machine to enter into the EnergySaver mode.
Off : The unit will remain in standby mode and
consume more energy than when in
Energy-Saver.
Energy-Saver Mode :Saves energy by consuming less power
than when in standby mode by turning off
the fuser unit after the specified time.
Selecting whether the clock adjusts for Daylight Saving Time
automatically. The built-in clock will advance 1 hour at 2:00 am on
the first Sunday in April and fallback 1 hour at 2:00 am on the last
Sunday in October.
Continued on the next page...
73
Page 76

Customizing Your Machine
No. Parameter
038 ACCESS CODE
048 TELEPHONE LINE 1 PSTN Selecting the type of line connected.
049 PSTN ACCESS CODE (----) Setting PSTN Access Code. (max. 4 digits)
050 FLASH KEY 1 Earth Selecting to use FLASH on control panel either as Earth key or
052 DIAGNOSTIC
PASSWORD
053 SUB-ADDRESS
PASSWORD
054 FAX FORWARD 1 Invalid Selecting whether the machine performs Fax Forwarding to the
058 LANGUAGE
Setting
Number
2PBX
2 Flash
2 Valid
1 French
Setting Comments
(----)
(----)
(----)
Enter a 4-digit Access Code to secure the machine from
unauthorized use. (See page 146)
All : Restricts access to all operations of the machine.
Parameters : Restricts access to User Parameters (F-7-1), Fax
Parameters (F-7-4) and Fax Parameter List
Printing (F-6-4) only.
Flash key.
Setting the password for Remote Diagnostic Mode. Please ask
your Panasonic Authoriz ed Dealer for details.
Setting a 20-digit password for secured sub-address
communication.
specified destination. (See page 138)
Selecting the language to be shown on the display and reports.
2
060 OPTION PAGE MEMORY
(D-RAM Card)
065 PRINT COLLA TI ON 1 Invalid Selecting whether the machine prints out documents in sequence.
082 QUICK MEMORY XMT
099 MEMORY SIZE
(Flash Memory)
140 LAN RELAY XMT
REQUEST
141 LAN XMT REDUCTION
1 0M B Set the size of the page memory to match the optional Expansion
22MB
34MB
48MB
2 Valid
1 Invalid
2 Valid
--
1 Invalid Selecting whether the machine performs LAN Relay XMT
2 Valid
1 Invalid
2 Valid
English
D-RAM Card installed in the machine. (See page 201)
(See page 116)
Selecting whether the machine performs QUICK Memory
Transmission. (See page 92 to 96)
Invalid : Stores all documents into memory first before dialling the
telephone number.
Valid : Starts dialling the telephone number immediately after
storing the first page or when the storing data reaches
10KB.
Displays the amount of base and optional memory installed.
(Base Memory + Optional Memory)
Request.
Selecting whether to automatically reduce from B4 to A4, when B4
documents are transmitted via LAN.
Invalid: No reduction
Valid : Automatic reduction from B4 to A4
142 RELAY XMT
74
(a.k.a. LAN RELAY
STATION on UF-770i)
1 Invalid Selecting whether the machine accepts and performs G3 relayed
transmission. (Relay Station Functions)
2 Valid
Page 77

Customizing Your Machine
No. Parameter
143 RELAY XMT REPORT
144 E MA IL CHARACTER
SET
145 SENDER SELECTION 1 Invalid Selecting a pre-programmed sender’s name and email address
146 POP TIMER -- 0 to 60 min. Setting the time interval for the machine to check for email on the
147 AUTO POP RCV 1 Invalid Selecting whether the machine automatically downloads an email
148 DELETE POP RCV
EMAIL
149 DELETE POP ERR
EMAIL
Setting
Number
1 Off
2Always
3 Inc. only
1 Japanese Selecting the Character Set when receiving or sending email text.
2 English
2 Valid
3 3 min.
2 Valid
1 Invalid Selecting whether the email will be deleted automatically after
2 Valid
1 Invalid Selecting whether to delete the email that includes an
2 Valid
Setting Comments
Setting how the COMM. Journal for relayed tr ansmission is sent to
the originator.
Off : Don’t send.
Always : Always send.
Inc.only : Send only if communication has failed.
before each transmission. (See page 125)
POP Server.
( 0 = Does not check the POP Server for email. )
from the POP Server.
retrieval from the POP Server.
incompatible file attachment from the POP Server.
3
150 IFAX RETURN RECEIPT 1 Invalid Selecting whether to send a return receipt when receiving from
2 Valid
151 EMAIL HEADER
FORMAT
152 SUB-ADDRESS
ROUTING
153 TSI ROUTING
154 ROUTING HEADER
FORMAT
155 PRINT ROUTED
DOCUMENT
1All
Subject/From/
2
3 Off
1 Invalid Selecting whether to automatically route a received fax or email
2 Valid
1 Invalid
2 Valid
1 Originator
2 Relay Station
1 Inc. only Selecting whether a received fax to be routed is always printed or
2Always
To
another Panafax Internet Fax.
Selecting the header information to print when an email is
received. (Normally used for Troubleshooting. It shows the path of
the email transmission before arriving at the DX-2000.)
using ITU-T sub-address.
Selecting whether to route a received f ax to a telephone n umber or
an email address preprogrammed in One-Touch, ABBR No. or
Program Key using the originating fax’s Numeric ID (TSI frame
information).
Selecting the type of email header to be included in the "From"
field of each routed faxes.
Originator : The originating fax machine’ s TSI will appear in
the "From" field of the routed email.
Relay Station : The routing station’s email address will appear in
the "From" field of the routed email.
only when the routing operation fails.
Continued on the next page...
75
Page 78

Customizing Your Machine
No. Parameter
156 P R INT FORWARDED
DOCUMENT
157 TRANSACTION
JOURNAL
158 PC REMOTE
UPDATE
159 SUBJECT LINE ENTRY 1 Invalid Selecting whether the "Subject" line can be programmed during
160 DEFAULT DOMAIN 1 Invalid Selecting whether the machine accepts to insert the Default
161 DNS SERVER 1 Invalid Selecting whether to use the DNS Server for the Internet
162 TIFF VIEWER URL
Setting
Number
1 Inc. only Selecting whether a memory received fax or email to be f orw arded
2Always
1 Invalid Selecting whether the machine sends a transaction journal to the
2 Valid
1 Invalid
2 Valid
2 Valid
2 Valid
2 Valid
1 None
2 English
Setting Comments
is always printed or only when forwarding is incomplete.
pre-programmed email address.
Selecting whether the machine will accept commands from an
email application, to: (See page 46 to 62)
(a) Program the Internet Parameters
(b) Program the Auto Dialler
(c) Allow retrieval of the Journal
each transmission.
Domain (See page 41) when entering Manual Number Dialling.
communication.
Selecting whether to include the URL address in the email
message body.
3
163 ROUTING HEADER 1 Invalid Selecting whether to add the Header Print information of the
2 Valid
164 IFA X XM T HEADER
(Email only)
1 Included
2 Not included
English
+Japanese
Routing Station on the top edge of each routed pages.
Selecting whether to include the header when sending a document
to an addressee in the same Domain as specified in the Default
Domain parameter. (This is useful when using the machine to scan
documents back to your PC)
Note:
When sending to a Domain other than as specified in the
Default Domain parameter, the header will be included
regardless of the selection.
(see Note 1)
(see Note 2)
Note:
1. The standard setting are printed on the Fax Parameter List. To print out Fax Parameter List, see page 178.
2. The contents of Fax Parameter may differ depending on the each country’s regulation or specification.
76
Page 79

BASIC OPERATIONS
Loading Documents
Documents You Can Send
In general, your machine will send any document printed on A4 size paper.
Document Size
Maximum Size Minimum Size
280 mm
148 mm
128 mm
2000 mm
Direction
Direction
Documents You Cannot Send
You must never try to send documents that are:
Wet Covered with wet ink
Document Thickness
or paste
Single sheet:
0.06 mm(45 g/m2) to
0.15 mm(112 g/m2)
Multiple sheets:
0.06 mm(45 g/m
0.12 mm(75 g/m2)
4
2
) to
ABC
Too thin (e.g., onionskin,
airmail paper, pages from
Wrinkle d, curled o r
folded
some magazines, etc.)
Coated (e.g., glossy
paper , etc . )
abcdefghijklmnopqrstuvwxyzabcdef
abcdefghijklmnopqrstuvwxyzabcdefg
abcdefghijklmnopqrstuvwxyzabcdefg
abcdefghijklmnopqrstuvwxyzabcdefg
abcdefghijklmnopqrstuvwxyzabcdefg
abcdefghijklmnopqrstuvwxyzabcdefg
abcdefghijklmnopqrstuvwxyzabcdef
abcdefghijklmnopqrstuvwxyzabcdef
abcdefghijklmnopqrstuvwxyzabcdefg
abcdefghijklmnopqrstuvwxyzabcdefg
abcdefghijklmnopqrstuvwxyzabcdefg
abcdefghi
abcd
ab
abcdefg
Chemically processed
(e.g., pressure-sensitive paper,
carbon-coated paper, etc.)
or made of cloth or metal
To transmit these kinds of documents, make a photocopy first and then transmit the copy instead.
77
Page 80

Loading Documents79Basic Transmission Settings
How to Load Documents
6. Be sure the document(s) is free of staples, paper clips and is not torn, greasy or covered by foreign objects.
7. Pl ace the document(s) FACE DOWN on the Automatic Document Feeder (ADF) until the leadi ng edge placed
into the machine stops.
If you are sending multiple pages, make sure th at the bottom sheet enters first. You can also st ack up to 50
PAGES on the ADF at one time. If you have more than 50 pag es, wait until transmission o r stori ng in memor y
starts as pages feed through, place any remaining pages on top of the last page in the feeder.
8. Adjust the Document Guides to center the document on the ADF.
Document Guides
CORRECT
When you set a document on the ADF, the display message will change from date and time (standby) to the
following message. You can now change basic transmission settings, or begin the dialling procedure.
(see Note 1)
(see Note 2)
Note:
1. Transmitting documents longer than 356 mm requires user’s assistance.
2. When transmitting documents longer than A4 size, please extend the sub-tray as shown below.
INCORRECT
ENTER STATION(S)
THEN PRESS START 00%
78
Sub - Tray
Page 81

You can temporarily change the transmission settings either before or after you place the document on the ADF.
These settings are as follows;
• Contrast
• Resolution
• Halftone
•Stamp
After your document has been sent, your machine will automatically return to the preset settings.
Contrast (see Note 1)
Your machine is preset to Normal contrast. If you wish to send a document with lighter contrast, change the
setting to Lighter. If you wish to send a document with darker contrast, change the setting to Darker.
Press to:
CONTRAST
4
DARKER
LIGHTER
CONTRAST
CONTRAST = Normal CONTRAST = Lighter CONTRAST = Darker
DARKER
LIGHTER
CONTRAST
DARKER
LIGHTER
CONTRAST
Resolution
Your machine i s preset to Fine resol ution, this setti ng is suitable for most business document s. If required, this
setting can be changed to Normal or 400 dpi.
Press to:
Compatibility with Other 400 dpi Machines
• G3: DX-1000, DX-2000, UF-595, UF-885, UF-895 and other manufacturer’s 400 dpi compatible machines.
• Internet Fax: DX-1000, DX -2000, PC email Recipien ts and other manufacturer’s 400 dpi compatible Internet
(see Note 2)
(see Note 3)
RESOLUTION
CONTRAST
Fax machines.
400 dpi
FINE
RESOLUTION
RESOLUTION = Standard RESOLUTION = Fine RESOLUTION = 400 dpi
400 dpi
FINE
RESOLUTION
400 dpi
FINE
RESOLUTION
Note:
1. To change the preset Contrast position, change the setting of Fax Parameter No. 001, see page 72.
2. To change the preset Resolution position, change the setting of Fax Parameter No. 002, see page 72.
3. If you send a photographic d oc ument with Halftone set to Fast or Quality and the Res ol uti on se t to Su per Fine (406
x 391 dpi), the reproduction of the received document will be determined by the capability of the remote station.
Page 82

Basic Transmission Settings
Halftone (see Note 1)
The Halftone setting is u se ful whe n s end ing ph otographs o r i llus trations wi th gray tones. Your m achi ne i s pres et
to HALFTONE = Off. You can select either Fast or Quality mode.
Press to:
HALFTONE
FAST
QUALITY
HALFTONE
HALFTONE = Off HALFTONE = Quality HALFTONE = Fast
FAST
QUALITY
HALFTONE
FAST
QUALITY
HALFTONE
Verification Stamp (see Note 2) (see Note 3)
The Verification Stamp helps you to confirm successful transmissions by stamping the bottom of each
successfully transmitted page with a small mark.
Press to switch it ON or OFF. Press to return to standby.
STAMP
ST AMP
STAMP = On
STAMP=ON STAMP=OFF
SET
ST AMP
STAMP = Off
80
Note:
1. When you select HALFTONE, FAST or QUALITY, your machine will automatically select Fine Resolution.
2. When you store a document in memory, the Ve rification Sta mp will stam p on the docum ent if it is successfu lly stored
in memory. In this case the Verification Stamp is not a confirmation that the document was successfully transmitted.
If you wish to disable the use of the Verificati on Stamp when storing document in mem ory, change the settin g of Fax
Parameter No. 028, see page 73.
3. To change the preset Verification Stamp position, change the setting of Fax Parameter No. 004, see page 72.
Page 83

Sending Documents via LAN
Document(s) can be s ent via LAN to a sin gle or multiple email add resses. The following dialling meth ods can be
selected:
• Manual Number Dialling
• One-Touch Dialling
• Abbreviated Dialling
• Directory Search Dialling
• Multiple Station Dialling
The Memory Transmission mode is automatically selected by your machine if an email address is registered into the
chosen One-Touch key(s), Program key(s), or Abbreviated Number key(s).
The document is always stored into memory first, then the machine starts to send the email message.
Direct Transmission, Voice Mode Transmission, an d Rediall ing features ar e not available for sending documents via
LAN.
4
81
Page 84

Sending Documents via LAN
Manual Number Dialling (see Note 1) (see Note 2)
1
Set document(s) face down.
You can temporarily change the transmission settings.
ENTER STATION(S)
THEN PRESS START 00%
2
3
4
INTERNET
To choose Internet communication.
Enter the full email address by using Character keys (up
to 60 characters). or enter part of an email address and
use
want to send to.
Ex:
If you make a mistake, press to erase the
character then reenter the correct character.
or
Ex:
The machine will complete the email address. (see Note 3)
abc
28
abc
START
or
or keys to display the email address you
27
@
p
a n a s o n i c
.
com
CLEAR
❚
ENTER EMAIL ADDRESS
abc@panasonic.com
abc
* STORE * NO.0 01
PAGES=001 01%
* STORE * COMPLETED
TOTAL PAGES= 005 2 5%
(see Note 3)
Note:
82
The document(s) is stored into memory with a file number.
Then starts sending the email message.
1. If your machine sounds an alarm (pi-pi-pi) at Step 2, this indicates that the Dialer is Full (more than 70 full email
addresses are entered or 70 transmission reservations including G3 communication have been already reserved).
2. If the transmission can not be compl eted fo r any rea son, the e mail may be retu rned und elive red, oth erwise n o reply
will be printed.
3. For the machine to perform the email address completion the Fax Parameter No. 160 (DEFAULT DOMAIN) must
be set to "Valid" and the DEFAULT DOMAIN must be preprogrammed in the Setting the Internet Parameters (see
page 41).
ON LINE * MEM.XMT *
ID:abc@panasonic.com
Page 85

Sending Documents via LAN
One-Touch Dialling
One-Touch Dialling allows you to dial a full ema il addres s or telep hone number by pressing a s ingle key. To use
this method, you must first preprogram the email address or telephone number into the One-Touch keys.
ENTER STATION(S)
1
Set document(s) face down.
You can temporarily change the transmission settings.
THEN PRESS START 00%
4
Press a One-Touch key (01-32).
2
01
Ex:
If a telephone number is stored into the One-Touch key,
the display shows:
3
START
The document(s) is stored into memory with a file number.
Then starts sending the email message.
(see Note 1) (see Note 2)
<01>(Station name)
abc@panasonic.com
<01>(Station name)
5551234
* STORE * NO.0 01
PAGES=001 01%
* STORE * COMPLETED
TOTAL PAGES= 005 2 5%
ON LINE * MEM.XMT *
ID:(Station name)
❚
Note:
1. If your machine sounds an alarm (pi-pi- pi) at Step 2, thi s indic ates th at the Diale r is Ful l (more tha n 70 trans mission
reservations including G3 communication have been already reserved).
2. If the transmission can not be compl eted fo r any rea son, the e mail may be retu rned und elive red, oth erwise n o reply
will be printed.
83
Page 86

Sending Documents via LAN
Abbreviated Dialling
Abbreviated Dialling is a speedy way to dial a frequently dialed email address or telephone number.
To use this method, you must first preprogram the email address or telephone number into the built-in auto-dialler
with a 3-digit abbreviated code.
ENTER STATION(S)
1
Set document(s) face down.
You can temporarily change the transmission settings.
THEN PRESS START 00%
Press and then enter a 3-digit code (000 to 999).
2
ABBR
Ex:
If a telephone number is stored into the ABBR key, the
display shows:
3
START
The document(s) is stored into memory with a file number.
Then starts sending the email message.
(see Note 1) (see Note 2)
ABBR
1 0 0
[100](Station name)
xyz@panasonic.com
[100](Station name)
5553456
* STORE * NO.0 01
PAGES=001 01%
* STORE * COMPLETED
TOTAL PAGES= 005 2 5%
ON LINE * MEM.XMT *
ID:(Station name)
❚
84
Note:
1. If your machine sounds an alarm (pi-pi- pi) at Step 2, thi s indic ates th at the Diale r is Ful l (more tha n 70 trans mission
reservations including G3 communication have been already reserved).
2. If the transmission can not be compl eted fo r any rea son, the e mail may be retu rned und elive red, oth erwise n o reply
will be printed.
Page 87

Sending Documents via LAN
Directory Search Di all i ng
When sending via LAN, the Directory Search function allows you to dial a full email address or telephone number
by searching for the station name or email address entered in One-Touch keys or Abbreviated dialling numbers.
ENTER STATION(S)
1
THEN PRESS START 00%
2a
2b
3a
3b
4
Set document(s) face down.
You can temporarily change the transmission settings.
DIRECTORY
SEARCH
to search for the station name.
INTERNET
to search for email address.
Enter the full or part of a station name using the Character
keys. (See page 12)
Ex: to search for PANASONIC
If you make a mistake, press to erase the
character and then re-enter the correct character.
Enter the full or part of an email address using the Character
keys.
Ex: to search for XYZ@PANASONIC.COM
P
X
A N A
SET
CLEAR
ENTER LETTER(S)
❚
❚
ENTER EMAIL ADDRESS
ENTER LETTER(S)
❚
PANA
X
xyz@panasonic.com
[100] PANASON IC
xyz@panasonic.com
4
-
repeatedly until display shows the station name or email
address you want to send to.
5
START
The document(s) is stored into memory with a file number.
Then starts sending the email message.
(see Note 1) (see Note 2)
Note:
1. If your machine sounds an alarm (pi-pi- pi) at Step 2, thi s indic ates th at the Diale r is Ful l (more tha n 70 trans mission
reservations including G3 communication have been already reserved).
2. If the transmission can not be compl eted fo r any rea son, the e mail may be retu rned und elive red, oth erwise n o reply
will be printed.
or
or
X
xyz@panasonic.com
* STORE * NO.0 01
PAGES=001 01%
* STORE * COMPLETED
TOTAL PAGES= 005 2 5%
ON LINE * MEM.XMT *
ID:PANASONIC
85
Page 88

Sending Documents via LAN
Returned Email
When using the Inte rnet communication mode, a failure repor t will print auto matically for each t ransaction if t he
email is retur ned undelivered by the mail ser ver. The one page printout will con sist of the unde livered message
contents supplied by the mail server and a portion of the first page’s image for that particular transaction.
Failure Report Sample (User unknown)
86
Page 89

Sending Documents via LAN
Multi-Station Transmission (Broadcasting)
You can store the document(s) into memory and then send to multiple stations (up to 270 addresses) via LAN.
ENTER STATION(S)
1
THEN PRESS START 00%
2
3
Set document(s) face down.
You can temporarily change the transmission settings.
Enter email addresses by any combination of the following
methods:
• One-Touch Dialling
• Abbreviated Dialling
• Directory Search Dialling, press after each
email address is entered.
• Manual Number Dialling, press after each
station is entered (up to 70 addresses).
01
Ex:
ABBR
If you want to confirm the number of stations you have
entered, press .
START
1 0 0
SET
SET
SET
<01>(Station name)
abc@panasonic.com
[100](Station name)
xyz@panasonic.com
2 STN(S) ARE SET
ADD MORE OR START
* STORE * NO.001
PAGES=001 01%
❚
❚
4
The document(s) is stored into memory with a file number.
Then starts sending the email message.
(see Note 1) (see Note 2) (see Note 3)
Note:
1. If your machine sounds an alarm (pi-pi-pi) at Step 2, this indicates that the Dialer is Full (more than 70 full email
addresses are entered or 70 transmission reservations including G3 communication have been already reserved).
2. If the transmission can not be compl eted fo r any rea son, the e mail may be retu rned und elive red, oth erwise n o reply
will be printed.
3. The unit will accept a combination of email addresses and PSTN dialling numbers.
* STORE * COMPLETED
TOTAL PAGE=0 05 25%
ON LINE * MEM.XMT *
ID:abc@panasonic.com
87
Page 90

Sending Documents via LAN
Using a Mailing List
Using a Mailing Li st stored in th e mail se r ver simpli fies t he proc ess of enter in g multipl e loca tions a nd allows you
to send to an unlimited number of email addresses with one easy operation.
Ask your Network System administrator for information on how to utilize the Mailing List.
88
Page 91

Sending Documents via LAN
Transmission Reservation
You can res erve the next transmission into memor y for up to 70 different files while send ing a document from
memory or receiving a document via LAN.
Memory Transmission Reservation (Multitasking)
If your machine is on-line busy transmitting from memory, receiving or printing received documents, you can
reserve a transmission by the following procedure. (see Note 1)
1
2
Your machine is on-line, the ON LINE lamp is blinking or
printing received documents.
ON LINE * MEM.XMT *
ID:(Identification)
ON LINE * RCV *
ID:(Identification)
ON LINE * RCV *
ID:Printing Data
* PRINTING *
MEMORY RCV’D DO C
* PRINTING *
PC DATA
ENTER STATION(S)
THEN PRESS START 00%
4
3
4
5
Set document(s) face down.
MEMORY
Make sure that the MEMORY lamp is on.
If not, press to set “On”.
Enter email addresses by any combination of the following
methods:
• One-Touch Dialling
• Abbreviated Dialling
• Directory Search Dialling, press after each
email address is entered.
• Manual Number Dialling, press after each
station is entered (up to 70 addresses).
01
Ex:
ABBR
If you want to confirm the number of stations you have
entered, press .
START
MEMORY
SET
SET
1 0 0
SET
<01>(Station name)
abc@panasonic.com
[100](Station name)
xyz@panasonic.com
2 STN(S) ARE SET
ADD MORE OR START
* STORE * NO.0 01
PAGES=001 01%
* STORE * COMPLETED
TOTAL PAGES= 005 2 5%
❚
❚
Your machine will store the document(s) into memory.
Note:
1. To cancel the memory transmission reservation, see page 143.
89
Page 92

Sending Documents via LAN
Redialling
Automatic Redialling (see Note 1)
If a communication error is detected with Information Code 710, 714,
715, 716, 717 or 725, the machine will redial the number up to 5
times at 3 minutes interval. Howev er , if other errors are detected, the
machine will redial only one time. During that time, a message will
appear as shown to the right.
A file number is shown in the upper right hand corner of the display.
Manual Redialling
You can also redial the last dialed number manually by pressing key.
REDIAL
1
Set document(s) face down.
Make sure that the MEMORY lamp is on.
PAUSE
2
REDIAL
WAIT TO DIAL NO .001
(Email addres s)
ENTER STATION(S)
THEN PRESS START 00%
abc@panasonic.com
* STORE * NO.0 01
3
START
The document is stored into memory with a file number.
Then dials the last dialed number.
Note:
1. While the unit is displaying "WAIT TO DIALL", you can press to start redialling immediately.
REDIAL
PAGES=001 01%
*CONNECTING * NO.002
ID:abc@panasonic.com
90
Page 93

Sending Documents via Telephone Line
When sending a document via telephone line, you can choose either Memory or Direct Transmission.
Use Memory Transmission if:
• You want to send the document to multiple stations.
• You have to retrieve the document immediately.
• You want to take the advantage of the Multitasking design.
Use Direct Transmission if:
• The memory is full.
• You want to send the document immediately.
Use Voice Mode Transmission:
• You want to send the document after talking with the other party.
• You want to send the document after listening to a voice prompting.
Memory Transmission
Your machine quickly stores the document into the machine’s memory.
Then, starts to dial the telephone number.
If the transmission fails, your machine will re-transmit the remaining unsuccessful page(s) automatically.
(1) (2) (3)
Store document
in memory
A
Transmit Receive
4
A
A
91
Page 94

Sending Documents via Telephone Line
(see Note 1)Å@Å@ (see Note 2)Å@Å@ (see Note 3)Å@Å@ (see Note 4) (see Note 5) Number Dialing
Note:
1. The File Number of the document being stored is shown at the upper right
corner of the display while storing the document. It is also printed on the
Communication Journal (COMM. JOURNAL), Transaction Journal and File
List. The percentage of memory used is shown on the lower right corner of
the display after each page is stored.
2. If memory overflow occurs while storing documents, the remaining
documents on the ADF w ill be ej ected. The machi ne pro mpts yo u whethe r to
transmit the successfully stored documents or to cancel the transmission.
Press to cancel or press to transmit.
If Fax Parameter No. 082 (Qu ick Memory XMT) is set to " Invalid", the machine
stores all the documents into memory first before transmitting.
After storing each document, the machine checks the available memory to
prevent memory ove rflow and stops storin g additional docum ents if the stored
data approaches a certain percentage* (around 80%).
Then the machine dials and sends the memory stored documents first and
continues the transmission of the remaining documents from the ADF during
the same phone call.
If transmitting to multiple stations or if memory overflows while storing a
document, the machine prompts you whether to transmit the successfully
stored documents or to cancel the transmiss ion. Press to cancel or press
See the Specifications on page 198 for the image memory capacity.
If no action is taken wit hin 10 seconds, the machine wi ll s tart tra ns mi ttin g the
stored documents.
* The percentage varies and its dependent on the type of d oc ume nts y ou are
storing, machin e s ett ings or whether an optional me mory card is installed.
1 2
to transmit.
2
1
* STORE * NO.003
PAGES=002 10%
* STORE * COMPLETED
TOTAL PAGES= 005 3 0%
MEMORY OVERFL OW
INFO. CODE =8 70
15 PAGES COMPLETED
DELETE? 1:YES 2:NO
3. An Informati on Code will be displa yed if the transmissi on has failed or no
answer at the receiving side after the last automatic redial.
The document stored for this transmission will be erased from the memory
automatically and the information code is printed for the transmission on the
Communication Journal (COMM. JOURNAL).
If you need to retain the incomplete documents even after the last redial,
change Fax Parameter No. 0 31 (INC. FIL E SAVE) t o "V ali d" in a dv anc e.( see
page 73) To retry the incomplete documents, refer to page 145.
4. To stop the transmission, press .
The display shows:
COMMUNICATION STOP?
1:YES 2:NO
Press to stop the transmission. The document you stored will be erased automatically.
If you do not want to erase the doc uments, change the sett ing of Fax Parameter No. 031 (INC. FILE SAVE) to "Valid"
in advance. (see page 73)
Then the following display will appear and you can select whether to save the file as an incomplete file for editing
and retry, or delete the file manually.
5. If you would l ike to print a Communication Journal (COMM. JOURNAL) after stopping a transmission, press
when the display shows:
1
SAVE AS INCOMP.FILE?
1:YES 2:NO
PRINT COMM. JOUR NAL?
1:YES 2:NO
STOP
INCOMPLETE
INFO. CODE =X XX
1
92
Page 95

Sending Documents via Telephone Line
Manual Number Dialling
To dial the telephone number manually, follow the steps below. (see Note 1) (see Note 2)
ENTER STATION(S)
1
THEN PRESS START 00%
2
3
4
Set document(s) face down.
MEMORY
Make sure that the MEMORY lamp is on.
If not, press to set “On”.
Enter a telephone number from the keypad.
Ex:
5 5 5 1 2 3 4
START
The document(s) begin to store into memory with a file
number.
Then starts dialling the telephone number immediately after
storing the first page. (See Note 3)
The remaining page(s) continue to store into memory.
MEMORY
TEL. NO.
5551234
* STORE * NO.0 01
PAGES=001 01%
* DIALLING * NO.002
5551234
❚
4
(see Note 3)
Note:
1. If you need a special access number to get an outside line, dial it first then press to enter a pause
2. If you are using Pulse dialling and you wish to change to Tone dialling in the middle of dialling, press
3. This feature is called “Quick Memory Transmission”. If you wish to store All the document(s) into memory first
P AUSE
(represented by a "-") before dialling the full number.
Ex
: 9 PAUSE 5551234
(represented by a "/").
The dialling mode will be changed from Pulse to Tone after dialling the digit "/".
Ex
: 9 PAUSE TONE 5551234
before transmitting, change the Fax Parameter No. 082 (QUICK MEMORY XMT) to “Invalid”. (See page 74)
TONE
93
Page 96

Sending Documents via Telephone Line
One-Touch Dialling
One-Touch Dialling allows you to dial a full tel eph one numb er by press ing a sing le key. To se t up t he O ne -Touch
keys, see page 63. (see Note 1)
ENTER STATION(S)
1
Set document(s) face down.
THEN PRESS START 00%
2
3
4
MEMORY
Make sure that the MEMORY lamp is on.
If not, press to set “On”.
Press a One-Touch key.
01
Ex:
START
The document(s) begin to store into memory with a file
number.
Then starts dialling the telephone number immediately after
storing the first page. (See Note 1)
The remaining page(s) continue to store into memory.
MEMORY
<01>(Station name)
5551234
* STORE * NO.0 01
PAGES=001 01%
* DIALLING* NO.002
(Station name )
94
Note:
1. This feature is called “Quick Memory Transmission”. If you wish to store All the document(s) into memory first
before transmitting, change the Fax Parameter No. 082 (QUICK MEMORY XMT) to “Invalid”. (See page 74)
Page 97

Sending Documents via Telephone Line
Abbreviated Dialling
Abbreviated dialling is a speedy way to dial a frequently dialed telephone number by preprogramming the
telephone number into th e built-in auto -d ia ler with a 3- di git abbreviated code. To p rogram an abbreviated di al ling
number, see page 65.
1
2
3
4
Set document(s) face down.
MEMORY
Make sure that the MEMORY lamp is on.
If not, press to set “On”.
Press then enter a 3-digit code.
ABBR
Ex:
START
ABBR
MEMORY
1
0 0
ENTER STATION(S)
THEN PRESS START 00%
[100](Station name)
5553456
* STORE * NO.0 01
PAGES=001 01%
4
(see Note 1)
Note:
1. This feature is called “Quick Memory Transmission”. If you wish to store All the document(s) into memory first
The document(s) begin to store into memory with a file
number.
Then starts dialling the telephone number immediately after
storing the first page. (See Note 1)
The remaining page(s) continue to store into memory.
before transmitting, change the Fax Parameter No. 082 (QUICK MEMORY XMT) to “Invalid”. (See page 74)
* DIALLING* NO.002
(Station name )
95
Page 98

Sending Documents via Telephone Line
Directory Search Di all i ng
Directory Search dialling allows you to dial a full telephone number by searching the station name entered in
One-Touch keys or Abbreviated dialling numbers.
ENTER STATION(S)
1
Set document(s) face down.
THEN PRESS START 00%
2
3
4
5
6
MEMORY
Make sure that the MEMORY lamp is on.
If not, press to set “On”.
DIRECTORY
SEARCH
Enter the full station name or part of a station name by using
the Character keys (see page 12).
Ex: to search for PANASONIC
P
-
repeatedly until the display shows the station name you want
to send to.
START
MEMORY
A N A
or
ENTER LETTER(S)
❚
ENTER LETTER(S)
❚
PANA
[100] PANASON IC
5553456
* STORE * NO.0 01
PAGES=001 01%
(see Note 1)
Note:
96
The document(s) begin to store into memory with a file
number.
Then starts dialling the telephone number immediately after
storing the first page. (See Note 1)
The remaining page(s) continue to store into memory.
1. This feature is called “Quick Memory Transmission”. If you wish to store All the document(s) into memory first
before transmitting, change the Fax Parameter No. 082 (QUICK MEMORY XMT) to “Invalid”. (See page 74)
* DIALLING * NO.002
PANASONIC
Page 99

Sending Documents via Telephone Line
Multi-Station Transmission (Broadcasting)
If you have to send the same document(s) to multiple stations, you can save time in feeding the document(s) by
using memory transmission. That is, you can store the document(s) into memory and then send it to the
station(s) automatically.
ENTER STATION(S)
1
Set document(s) face down.
THEN PRESS START 00%
4
2
3
4
MEMORY
Make sure that the MEMORY lamp is on.
If not, press to set “On”.
Dial by any combination of the following methods:
• One-Touch Dialling
• Abbreviated Dialling
• Manual Number Dialling, press after each
station is entered (up to 70 stations).
• Directory Search Dialling, press after each
station is entered
(For details, see page 93 to 96.)
01
Ex:
ABBR
If you want to confirm the number of stations you have
entered, press .
START
MEMORY
1
0 0
SET
SET
SET
<01>(Station name)
5551234
[100](Station name)
5553456
2 STN(S) ARE SET
ADD MORE OR START
* STORE * NO.001
PAGES=001 01%
* STORE * COMPLETED
TOTAL PAGE=005 25%
(see Note 1)
(see Note 2)
Note:
1. You can review the statio ns you en tered in step 3 before s toring y our docum ent into memory by pressi ng or .
2. The “Quick Memory Transmission” is disabled if multip le stations are set.
All document(s) are stored into memory with a file number.
(See Note 2)
Then starts dialling the telephone numbers in sequence.
Press to clear an entered station or group shown on the display if needed.
CLEAR
* DIALLING* NO.001
(Station name )
97
Page 100

Sending Documents via Telephone Line
Direct Transmission
If your machine’s memory is full or you wish to send the document immediately, use Direct Transmission.
Manual Number Dialling (Direct Transmission)
To dial the telephone number manually, follow the steps below.
ENTER STATION(S)
1
Set document(s) face down.
THEN PRESS START 00%
2
MEMORY
Make sure that the lamp goes off.
Enter a telephone number from the keypad.
3
Ex:
5 5 5 1 2 3
4
START
Your machine starts dialling the telephone number.
(see Note 1) (see Note 2) (see Note 3)
ENTER STATION
00%
4
PRESS START TO DIAL
5551234
* DIALLING *
5551234
❚
98
Note:
1. If you need a special access number to get an outside line, dial it first then press to enter a pause
(represented by a "-") before dialling the full number.
Ex
: 9 PAUSE 5551234
2. If you are using Pulse dialling and you wish to change to Tone dialling in the middle of dialling, press
(represented by a "/").
The dialling mode will be changed from Pulse to Tone after dialling the digit "/".
Ex
: 9 PAUSE TONE 5551234
3. To stop the transmission, press .
The display shows:
COMMUNICATION STOP?
1:YES 2:NO
Press to stop the transmission. The Communication Journal will not print out regardless of the printout mode
setting of t he Communication Journal.
1
STOP
P AUSE
TONE
 Loading...