

Page 1
Model No. DMP-BD65
DMP-BD65
Basic Operating Instructions
Blu-ray Disc Player
Mode d’emploi de base
Lecteur de Blu-ray Disc
Istruzioni per l’uso di base
Lettore Blu-ray Disc
Instrucciones básicas de funcionamiento
Reproductor de Blu-ray Disc
Beknopte gebruiksaanwijzing
Blu-ray Disc speler
Grundläggande bruksanvisning
Blu-ray-skiva spelare
Vejledning i den
grundlæggende betjening
Blu-Ray-diskafspiller
Perusasetukset Käyttöohjeet
Blu-ray-levysoitin
Kezelési utasítás kezdőknek
Blu-ray lemez lejátszó
Základní Návod k použití
Přehrávač disků Blu-ray
Skrócona instrukcja obsługi
Odtwarzacz płyt Blu-ray
English
Français
Italiano
Español
Nederlands
Svenska
Dansk
Suomi
Magyar
Česky
Polski
DMP-BD45
EG
VQT2H96-1
Page 2

Please also refer to Operating
Instructions (PDF format) recorded on
the CD-ROM containing the Operating
Instructions (supplied).
Operating Instructions (PDF format) cannot be played
back on the player itself.
You can learn about advanced operation methods and
check the Troubleshooting. (> 3)
CAUTION!
THIS PRODUCT UTILIZES A LASER.
USE OF CONTROLS OR ADJUSTMENTS OR PERFORMANCE
OF PROCEDURES OTHER THAN THOSE SPECIFIED HEREIN
MAY RESULT IN HAZARDOUS RADIATION EXPOSURE.
DO NOT OPEN COVERS AND DO NOT REPAIR YOURSELF.
REFER SERVICING TO QUALIFIED PERSONNEL.
WARNING:
TO REDUCE THE RISK OF FIRE, ELECTRIC SHOCK OR
PRODUCT DAMAGE,
≥ DO NOT EXPOSE THIS APPARATUS TO RAIN, MOISTURE,
DRIPPING OR SPLASHING AND THAT NO OBJECTS FILLED
WITH LIQUIDS, SUCH AS VASES, SHALL BE PLACED ON
THE APPARATUS.
≥ USE ONLY THE RECOMMENDED ACCESSORIES.
≥ DO NOT REMOVE THE COVER (OR BACK); THERE ARE NO
USER SERVICEABLE PARTS INSIDE. REFER SERVICING TO
QUALIFIED SERVICE PERSONNEL.
CAUTION!
≥DO NOT INSTALL OR PLACE THIS UNIT IN A BOOKCASE,
BUILT-IN CABINET OR IN ANOTHER CONFINED SPACE.
ENSURE THE UNIT IS WELL VENTILATED. TO PREVENT RISK
OF ELECTRIC SHOCK OR FIRE HAZARD DUE TO
OVERHEATING, ENSURE THAT CURTAINS AND ANY OTHER
MATERIALS DO NOT OBSTRUCT THE VENTILATION VENTS.
≥DO NOT OBSTRUCT THE UNIT’S VENTILATION OPENINGS
WITH NEWSPAPERS, TABLECLOTHS, CURTAINS, AND
SIMILAR ITEMS.
≥DO NOT PLACE SOURCES OF NAKED FLAMES, SUCH AS
LIGHTED CANDLES, ON THE UNIT.
≥DISPOSE OF BATTERIES IN AN ENVIRONMENTALLY
FRIENDLY MANNER.
CAUTION
Danger of explosion if battery is incorrectly replaced.
Replace only with the same or equivalent type
recommended by the manufacturer. Dispose of used
batteries according to the manufacturer’s instructions.
This product may receive radio interference caused by
mobile telephones during use. If such interference is
apparent, please increase separation between the product
and the mobile telephone.
The socket outlet shall be installed near the equipment and
easily accessible.
The mains plug of the power supply cord shall remain
readily operable.
To completely disconnect this apparatus from the AC Mains,
disconnect the power supply cord plug from AC receptacle.
THIS UNIT IS INTENDED FOR USE IN MODERATE
CLIMATES.
Dear customer
Thank you for purchasing this product.
For optimum performance and safety, please read these
instructions carefully.
Before connecting, operating or adjusting this product, please
read the instructions completely.
Please keep this manual for future reference.
Safety precautions
∫ Placement
Set the unit up on an even surface away from direct sunlight,
high temperatures, high humidity, and excessive vibration.
These conditions can damage the cabinet and other
components, thereby shortening the unit’s service life. Do not
place heavy items on the unit.
∫ Voltage
Do not use high voltage power sources. This can overload the
unit and cause a fire. Do not use a DC power source. Check
the source carefully when setting the unit up on a ship or other
place where DC is used.
∫ AC mains lead protection
Ensure the AC mains lead is connected correctly and not
damaged. Poor connection and lead damage can cause fire
or electric shock. Do not pull, bend, or place heavy items on
the lead.
Grasp the plug firmly when unplugging the lead. Pulling the
AC mains lead can cause electric shock. Do not handle the
plug with wet hands. This can cause electric shock.
∫ Foreign matter
Do not let metal objects fall inside the unit. This can cause
electric shock or malfunction.
Do not let liquids get into the unit. This can cause electric
shock or malfunction. If this occurs, immediately disconnect
the unit from the power supply and contact your dealer.
Do not spray insecticides onto or into the unit. They contain
flammable gases which can ignite if sprayed into the unit.
∫ Service
Do not attempt to repair this unit by yourself. If sound is
interrupted, indicators fail to light, smoke appears, or any
other problem that is not covered in these instructions occurs,
disconnect the AC mains lead and contact your dealer or an
authorized service centre. Electric shock or damage to the
unit can occur if the unit is repaired, disassembled or
reconstructed by unqualified persons.
Extend operating life by disconnecting the unit from the power
source if it is not to be used for a long time.
To dispose or transfer this unit
The unit may keep the user settings information in the unit. If
you discard this unit either by disposal or transfer, then
follow the procedure to return all the settings to the factory
presets to delete the user settings.
≥ The operation history may be recorded in the memory of
this unit.
(2)
2
VQT2H96
Page 3
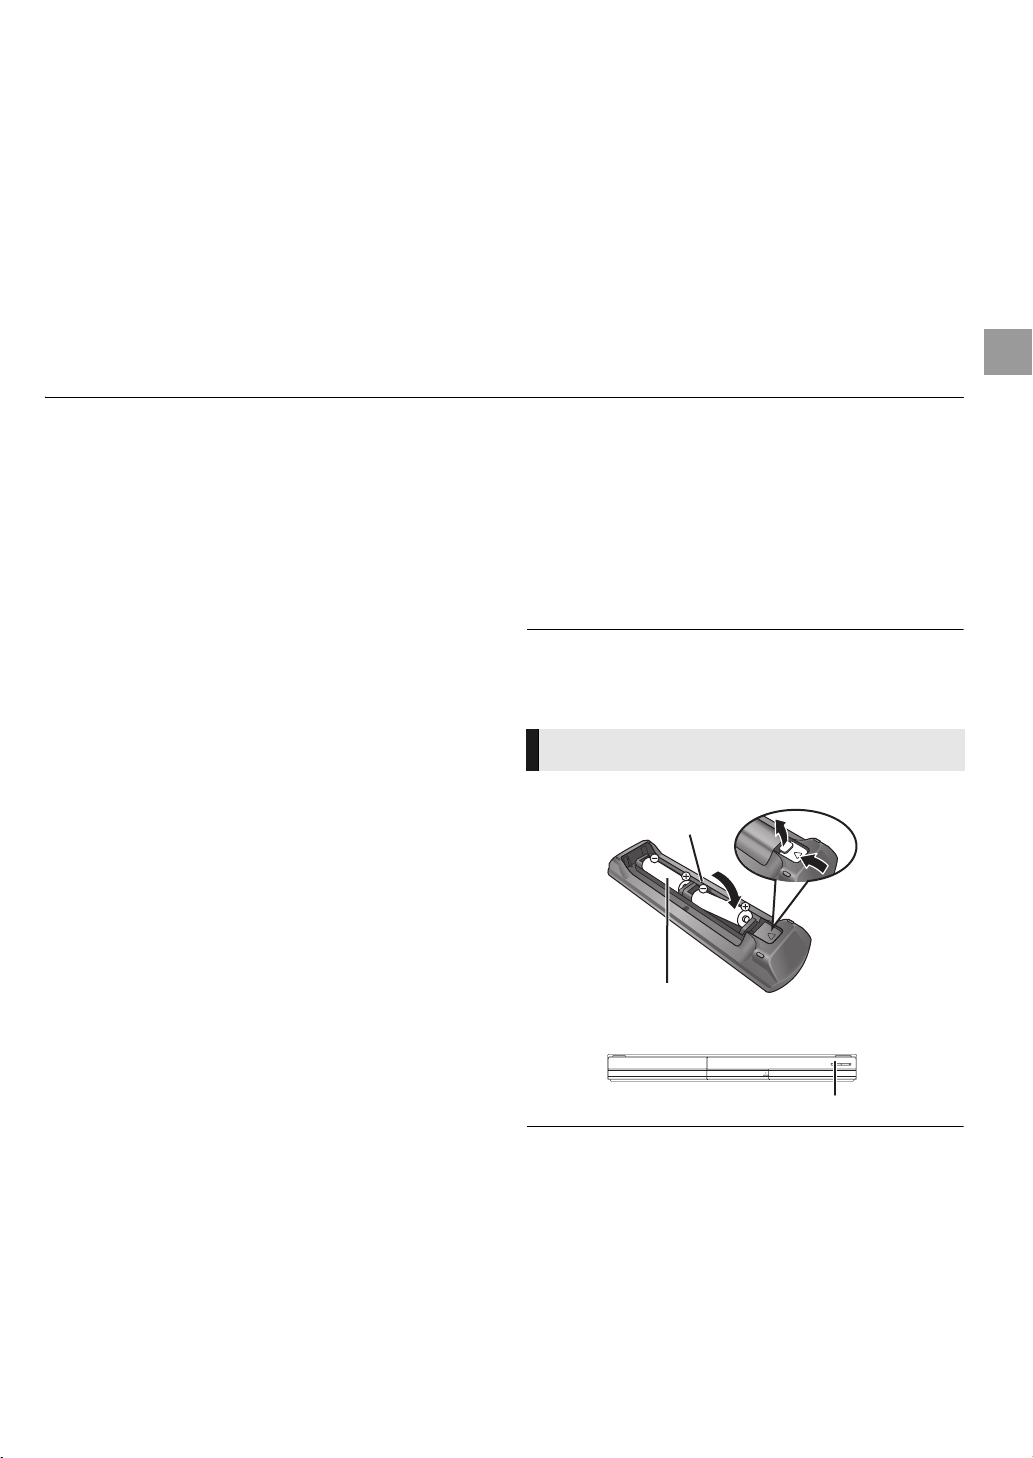
Table of contents
R6/LR6, AA
(Alkaline or manganese batteries)
Point it at remote control signal sensor on this unit.
Getting started
Safety precautions. . . . . . . . . . . . . . . . . . . . . 2
Reading the Operating Instructions
(PDF format) . . . . . . . . . . . . . . . . . . . . . . . . . 3
Accessory . . . . . . . . . . . . . . . . . . . . . . . . . . . 3
Playable discs/Cards/USB devices . . . . . . . . 4
Connection and setting
STEP 1 : Connecting to a TV . . . . . . . . . . . . 6
STEP 2 : Connecting to an
amplifier/receiver. . . . . . . . . . . . . . . . . . . . . . 6
Reading the Operating
Instructions
(PDF format)
∫ For Windows
1 Turn the PC on and insert the CD-ROM containing the
Operating Instructions (supplied).
2 Select the desired language and then click [Operating
Instructions] to install.
3 Double click the “BD65_45EG Operating Instructions”
shortcut icon on the desktop.
When the Operating Instructions (PDF format) will not
open
You will need Adobe Acrobat Reader 4.0 or later or Adobe
Reader 6.0 or later to browse or print the Operating
Instructions (PDF format).
Download and install a version of Adobe Reader that you can
use with your OS from the following Web Site.
http://get.adobe.com/reader/otherversions
STEP 3 : Connecting to a broadband network
. . . . . . . . . . . . . . . . . . . . . . . . . . . . . . . . 7
[BD65]
STEP 4 : Setting . . . . . . . . . . . . . . . . . . . . . . .7
Playback
Inserting or removing a media . . . . . . . . . . . .8
Playing video contents . . . . . . . . . . . . . . . . . .8
Linked operations with the TV
(VIERA Link “HDAVI Control
™
”) . . . . . . . . . . .9
Specifications . . . . . . . . . . . . . . . . . . . . . . . . 10
Accessory
Check the supplied accessories before using this unit.
1 Remote control
[BD65] (N2QAKB000077)
[BD45] (N2QAKB000079)
2 Batteries for remote control
1 AC mains lead
1 CD-ROM
≥ Product numbers correct as of December 2009. These may be subject to
change.
≥ Do not use AC mains lead with other equipment.
Using the remote control
Insert so the poles (i and j) match those in the remote control.
English
If using the following OS
– Windows 2000 SP4
– Windows XP SP2/SP3
–Windows Vista
–Windows 7
Insert the CD-ROM containing the Operating Instructions
(supplied), click [Adobe(R) Reader(R)] and then follow the
messages on the screen to install.
To uninstall the Operating Instructions (PDF format)
Delete the PDF file from the “Program Files\Panasonic\DMP\”
folder.
≥ When the contents in the Program Files folder cannot be
displayed, click the [Show the contents of this folder] to
display them.
∫ For Macintosh
1 Turn the PC on and insert the CD-ROM containing the
Operating Instructions (supplied).
2 Open the “Manual” folder in “VFF0537” and then copy the
PDF file with the desired language inside the folder.
3 Double click the PDF file to open it.
Mishandling of batteries can cause electrolyte leakage which can damage
items the fluid contacts and may cause a fire.
≥ Do not mix old and new batteries or different types at the same time.
≥ Do not heat or expose to flame.
≥ Do not leave the battery(ies) in an automobile exposed to direct sunlight
for a long period of time with doors and windows closed.
≥ Do not take apart or short circuit.
≥ Do not attempt to recharge alkaline or manganese batteries.
≥ Do not use batteries if the covering has been peeled off.
Remove batteries if the remote control is not going to be used for a long
period of time. Store in a cool, dark place.
(3)
VQT2H96
3
Page 4
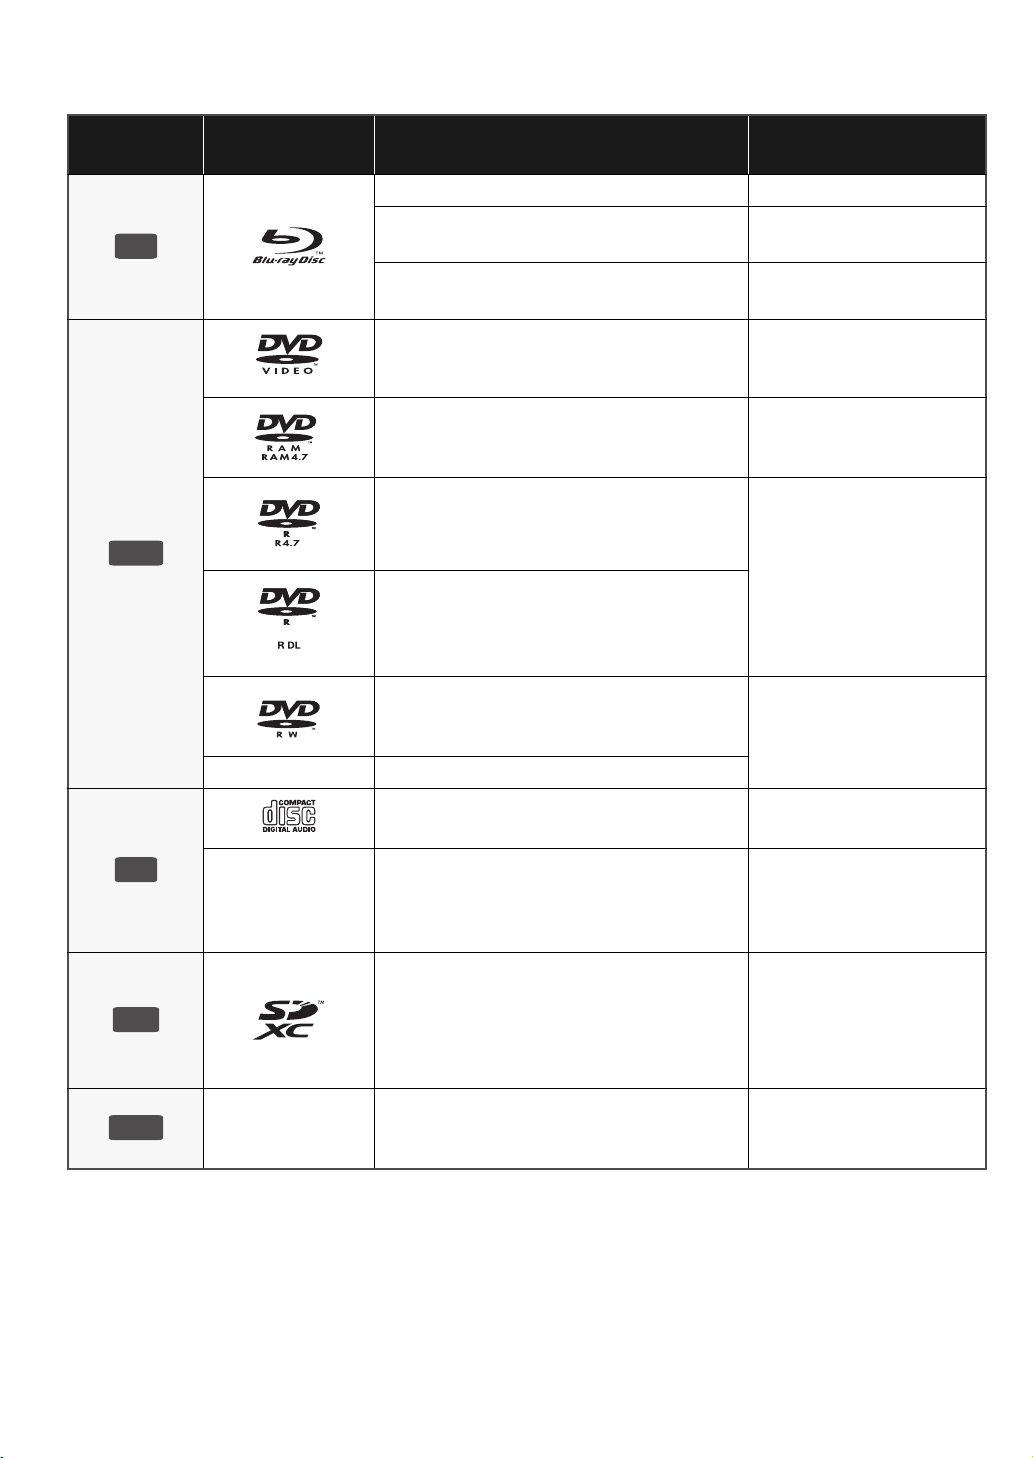
Playable discs/Cards/USB devices
BD
DVD
Type
Logo
examples
Type detail Playable contents
BD-Video Video
BD-RE
BD-R
DVD-Video Video
DVD-RAM
DVD-R
DVD-R DL
Video
JPEG
Video
®
DivX
Video
AVCHD
JPEG
Video
AVCHD
DivX
MP3
JPEG
CD
SD
USB
DVD-RW
Video
AVCHD
—
+R/+RW/+R DL
Music CD Music [CD-DA]
DivX
—
CD-R
CD-RW
Music [CD-DA]
MP3
JPEG
SD Memory Card (from 8 MB to 2 GB)
(Including miniSD Card and microSD Card)
SDHC Memory Card (from 4 GB to 32 GB)
(Includes microSDHC Card)
SDXC Memory Card (48 GB, 64 GB)
(Includes microSDXC Card)
—
USB device
(up to 128 GB)
MPEG2
AVCHD
JPEG
DivX
MP3
JPEG
(4)
4
VQT2H96
Page 5

∫ Discs that cannot be played in this unit
Any other disc that is not specifically supported or
previously described.
≥ 2.6 GB and 5.2 GB DVD-RAM
≥ DVD-RAM that cannot be removed from their cartridges
≥ Super Audio CD
≥ Photo CD
≥ DVD-Audio
≥ Video CD and Super Video CD
≥ WMA discs
≥ HD DVD
∫ Region management information
BD-Video
This unit plays BD-Video marked with labels containing the
region code “B”.
Example:
DVD-Video
This unit plays DVD-Video marked with labels containing the
region number “2” or “ALL”.
Example:
∫ SD card
≥ MiniSD Cards, microSD Cards, microSDHC
Cards and microSDXC Cards can be used, but
must be used with an adaptor card. These are
usually supplied with such cards, or otherwise
customer provided.
≥ Keep the Memory Card out of reach of children
to prevent swallowing.
≥ To protect the card’s contents, move the record
prevention tab (on the SD card) to “LOCK”.
≥ This unit is compatible with SD Memory Cards that meet SD
Card Specifications FAT12 and FAT16 formats, as well as
SDHC Memory Cards in FAT32 format (Does not support
long file name.) and SDXC Memory Cards in exFAT.
≥ If the SD card is used with incompatible computers or
devices, recorded contents may be erased due to the card
being formatted etc.
≥ Useable memory may be slightly less than the card
capacity.
∫ USB device
≥ This unit supports connecting a USB memory, digital
camera and video camera produced by Panasonic, etc. It is
not warranted that all USB devices will work with this unit.
≥ This unit does not support USB device charging.
≥ FAT12, FAT16 and FAT32 file systems are supported.
≥ This unit supports USB 2.0 High Speed.
English
2 ALL
2
3
5
∫ BD-RE, BD-R
Discs recorded in DR mode using Panasonic Blu-ray Disc
recorders may not playback the audio etc., correctly.
∫ Finalize
DVD-R/RW/R DL, +R/+RW/+R DL and CD-R/RW recorded by
a recorder, etc. needs to be finalized by the recorder to play
on this unit. Please refer to the recorder’s instructions.
∫ BD-Video
≥ Please enjoy BD-Live functions, such as the network
connection. The various functions differ depending on the
disc.
≥ This unit supports high bit rate audio (Dolby Digital Plus,
Dolby TrueHD, DTS-HD High Resolution Audio and
DTS-HD Master Audio) adopted in BD-Video.
∫ Music CD
Operation and sound quality of CDs that do not conform to
CD-DA specifications (copy control CDs, etc.) cannot be
guaranteed.
≥ It may not be possible to play the above media in some cases due to the type of media, the condition of the recording, the recording method and how the files
were created.
≥ The producers of the disc can control how discs are played. So you may not always be able to control play as described in these operating instructions. Read
the disc’s instructions carefully.
(5)
VQT2H96
5
Page 6

Connection and setting
HDMI IN
HDMI cable
HDMI IN
Multi channel
speakers
Amplifier/receiver
HDMI cable
HDMI cable
STEP 1 : Connecting to
STEP 2 : Connecting to
a TV
≥ Do not place the unit on amplifiers/receiver or equipment
that may become hot. The heat can damage the unit.
≥ Before making any connections we suggest you temporarily
disconnect all the units from AC power.
≥ Do not connect video signals through a video recorder. Due
to copy guard protection the picture may not be displayed
properly.
≥ Please use High Speed HDMI Cables that have the HDMI
logo (as shown on the cover). It is recommended that you
use Panasonic’s HDMI cable. When outputting 1080p
signal, please use HDMI cables 5.0 meters or less.
Recommended part number:
RP-CDHS15 (1.5 m), RP-CDHS30 (3.0 m),
RP-CDHS50 (5.0 m), etc.
∫ Via an HDMI AV OUT terminal
an amplifier/receiver
∫ Via an HDMI AV OUT terminal
HDMI IN
HDMI OUT
HDMI IN
≥ The HDMI connection supports VIERA Link “HDAVI
Control” (> 9) when used with a compatible Panasonic TV.
≥ Set “HDMI Video Mode” [BD65]
“On” ([FUNCTION MENU]B“To Others”B“Setup”B
“TV / Device Connection”B“HDMI Connection”).
and “HDMI Audio Output” to
≥ The HDMI connection supports VIERA Link “HDAVI
Control” (> 9) when used with a compatible Panasonic TV.
≥ Set “HDMI Video Mode” [BD65]
“On” ([FUNCTION MENU]B“To Others”B“Setup”B
“TV / Device Connection”B“HDMI Connection”).
≥ Set “Digital Audio Output” depending on the used terminal
and connected amplifier/receiver.
([FUNCTION MENU]B“To Others”B“Setup”B“Sound”)
and “HDMI Audio Output” to
(6)
6
VQT2H96
Page 7

STEP 3 : Connecting to
Broadband
router, etc.
LAN Cable
(Straight)
Internet
Using Wireless
LAN Adaptor
DY-WL10 (optional)
Wireless LAN Adaptor
(optional)
Wireless router
(Access point), etc.
Internet
STEP 4 : Setting
a broadband network
The following services can be used when this unit is
connected to broadband.
≥ Firmware can be updated
≥ You can enjoy the BD-Live
≥ You can enjoy the VIERA CAST
For details about connection method, refer to the instructions
supplied with the connected equipment.
≥ The unit is not compatible with public wireless LAN services
(Hotspot etc.) provided in airports, stations, cafes etc.
[BD65]
∫ Using LAN (ethernet) cable
Easy Setting
After connecting your new player for the first time and
pressing the [Í], a screen for the basic settings will appear.
Preparation
Turn on the television and select the appropriate video
input on the television.
1 Press [Í].
Setup screen appears.
If this unit is connected to a Panasonic TV (VIERA)
supporting HDAVI Control 2 or later via an HDMI cable,
then the setting information on the TV is acquired by this
TV.
Standby/on switch (Í/I)
Press to switch the unit from on to standby mode or vice
versa. In standby mode, the unit is still consuming a small
amount of power.
2 Follow the on-screen instructions and
make the settings with [3, 4] and press
[OK].
“On-Screen Language”, “TV Aspect” and “Quick Start” are
set. ([FUNCTION MENU]B“To Others”B“Setup”B
“Display”, “TV / Device Connection” or “General”)
After completing “Easy Setting”, you can perform
[BD65]
“Network Easy Setting”.
≥ You can perform this setup anytime by selecting “Easy Setting” in the
Setup menu. ([FUNCTION MENU]B“To Others”B“Setup”B“General”)
English
≥ Use shielded LAN cables when connecting to peripheral
devices.
≥ Inserting any cable other than a LAN cable in the LAN
terminal can damage the unit.
≥ Only the Wireless LAN Adaptor DY-WL10 (optional) can be
used.
≥ When connection conditions are poor, use the USB
extension cable supplied with the Wireless LAN Adaptor
DY-WL10 (optional).
≥ Read the operating instructions for the Wireless LAN
Adaptor DY-WL10 (optional) thoroughly when using it.
≥ For up to date compatibility information on your Wireless
router (Access Point) refer to
http://panasonic.jp/support/global/cs/
Network Easy Setting [BD65]
After completing “Easy Setting”, you will be asked to perform
“Network Easy Setting”.
Select “Wired” or “Wireless” and press [OK].
∫ “Wired” connection
Follow the on-screen instructions to make your connection
settings.
∫ “Wireless” connection
If you select “Wireless” and “Wireless LAN Adaptor is not
connected.” is displayed, check that the Wireless LAN
Adaptor is fully inserted. Alternatively, disconnect and
reconnect it. If there is still no change in the display, consult
your dealer for advice.
Select “WPS (PUSH button)” or “Search for
access point” and then follow the on-screen
instructions and make the settings.
(7)
VQT2H96
7
Page 8

Playback
SD CARD
BD
DVD
CD
SD
USB
1
Inserting or removing a
media
≥ When inserting a media, ensure that it is facing the right
way up.
≥ When indicator on this unit's display blinks, do not turn off
the unit or remove the media. Such action may result in loss
of the media's contents.
≥ When removing the SD card, press on the centre of the card
and pull it straight out.
≥ If you connect a Panasonic product with a USB connection
cable, setup screen may be displayed on connected
equipment. For details, refer to the instructions for the
connected equipment.
Playing video contents
Preparation
Turn on the television and select the appropriate video input
on the television.
1 Press [Í] to turn on the unit.
2 Insert the media.
Play starts.
≥ If the menu is displayed, press [3, 4, 2, 1] to select the
item and press [OK].
≥ If play does not start, press [1](PLAY).
∫ To show menus
You can display Top Menu, DIRECT NAVIGATOR or Pop-up
Menu.
Press [TOP MENU/DIRECT NAVIGATOR] or [POP-UP
MENU].
≥ Press [3, 4, 2, 1] to select the item and press [OK].
≥ Pop-up menu also appears by pressing [OPTION] and
selecting “Pop-up Menu”.
∫ To switch drives
Press [DRIVE SELECT] to select “BD/DVD/CD”, “SD card”
or “USB device”.
≥ If a media is inserted while the unit is stopped, the drive
switches automatically depending on the inserted media.
≥ Signal from PAL discs is output as PAL. Signal from NTSC discs is output
as “NTSC” or “PAL60”. You can select “NTSC” or “PAL60” in “NTSC
Contents Output” for NTSC discs.
([FUNCTION MENU]B“To Others”B“Setup”B“Picture”)
≥ DISCS CONTINUE TO ROTATE WHILE MENUS ARE DISPLAYED.
Press [∫] when you have finished playback to protect the unit’s motor,
your television screen and so on.
≥ Depending on media and contents, the display may change or may not
appear.
≥ DivX: Successive play is not possible.
≥ It is not possible to playback AVCHD and MPEG2 video which have
been dragged and dropped, copied and pasted to the media.
8
VQT2H96
(8)
Page 9

Other operations during play
Linked operations with
These functions may not work depending on the media and
contents.
Stop
Press [∫].
The stopped position is memorized.
Resume play function
Press [1] (PLAY) to restart from this position.
≥ The position is cleared if the tray is opened or you press [∫]
several times to display “STOP” on unit’s display.
≥ On BD-Video discs including BD-J, the resume play
function does not work.
Pause
Press [;].
≥ Press [;] again or [1] (PLAY) to restart play.
Search/Slow-motion
Search
While playing, press [6] or [5].
≥ Music and MP3: The speed is fixed to a single step.
Slow-motion
While paused, press [6] or [5].
≥ BD-Video and AVCHD: Forward direction [5] only.
The speed increases up to 5 steps.
≥ Press [1] (PLAY) to revert to normal playback speed.
Skip
While playing or paused, press [:] or [9].
Skip to the title, chapter or track you want to play.
≥ Each press increases the number of skips.
Frame-by-frame
While paused, press [2] (2;) or [1] (;1).
≥ Press and hold to change in succession forward or
backward.
≥ Press [1] (PLAY) to revert to normal playback speed.
≥ BD-Video and AVCHD: Forward direction [1] (;1) only.
Changing audio
Press [AUDIO].
You can change the audio channel number or soundtrack
language ([DISPLAY]B“Disc”B“Soundtrack”), etc.
the TV
(VIERA Link “HDAVI Control™”)
What is VIERA Link “HDAVI Control”?
VIERA Link “HDAVI Control” is a convenient function
that offers linked operations of this unit, and a
Panasonic TV (VIERA) or other device under “HDAVI
Control”.
You can use this function by connecting the equipment
with an HDMI cable. See the operating instructions for
connected equipment for operational details.
Preparation
1 Set “VIERA Link” to “On” ([FUNCTION MENU]B
“To Others”B“Setup”B“TV / Device Connection”B
“HDMI Connection”B“VIERA Link”B“On”).
(The default setting is “On”.)
2 Set the “HDAVI Control” operations on the connected
equipment (e.g., TV).
3 Turn on all “HDAVI Control” compatible equipment and
select this unit’s input channel on the connected TV so
that the “HDAVI Control” function works properly.
Also when the connection or settings are changed,
repeat this procedure.
Automatic input switching
Power on link
When the following operations are performed, the television
will automatically switch the input channel and display the
corresponding action. When the television is off, the television
will automatically turn on.
– When play starts on the unit
– When an action that uses the display screen is performed
(e.g., DIRECT NAVIGATOR screen)
– BD-Video, DVD-Video:
When playback stops, the TV will automatically return to TV
tuner mode.
Power off link
All connected equipment compatible with “HDAVI Control”,
including this unit, automatically turns off when you switch the
television off.
Playing music continuously even after turning off power
to the television
When the unit is connected to a Panasonic TV (VIERA) that
supports HDAVI Control 2 or later and an amplifier/receiver
supports VIERA Link.
1 While playing music
Press [OPTION].
2 Press [3, 4] to select “TV Power” and press [OK].
English
(9)
VQT2H96
9
Page 10

Easy control only with VIERA
Cd
remote control
Only TV supports “HDAVI Control 2” or later
By using the TV remote control, you can play discs using the
“Control Panel” and display the Top Menu or Pop-up Menu,
etc.
1 Press [OPTION].
2 Select an item, then
press [OK].
≥ The OPTION menu may not
appear while the Top Menu for
BD-Video or DVD-Video is
displayed.
≥ The buttons that you can use for this unit vary depending on the TV. For
details, refer to the operating instructions of the TV.
≥ The operation of this unit may be interrupted when you press incompatible
buttons on the TV remote control.
≥ This unit supports “HDAVI Control 5” function.
“HDAVI Control 5” is the newest standard (current as of December, 2009)
for Panasonic’s HDAVI Control compatible equipment. This standard is
compatible with Panasonic’s conventional HDAVI equipment.
≥ VIERA Link “HDAVI Control”, based on the control functions provided by
HDMI which is an industry standard known as HDMI CEC (Consumer
Electronics Control), is a unique function that we have developed and
added. As such, its operation with other manufacturers’ equipment that
supports HDMI CEC cannot be guaranteed.
≥ Please refer to individual manuals for other manufacturers’ equipment
supporting VIERA Link function.
Control Panel
Screen Aspect
Top Menu
Pop-up Menu
OK
OPTION
RETURN
Specifications
Signal system: PAL/NTS C
Operating temperature range: i5 oC to i35 oC
Operating humidity range:
Video output: 1.0 Vp-p (75 ≠)/Pin jack: 1 system
[BD65]
:
Component video output (Y: green, PB: blue, PR: red):
Audio output: 2 Vrms (1 kHz, 0 dB)/Pin jack
Number of connectors : 2 channel: 1 system
Digital audio output:
HDMI AV output: Type A (19 pin)
This unit supports “HDAVI Control 5” function.
SD card slot: Connector: 1 system
USB slot: USB2.0: 1 system
[BD65] : Ethernet: 10BASE-T/100BASE-TX: 1 system
LASER Specification
Class 1 LASER Product:
Wave length:790 nm (CDs)/655 nm (DVDs)/405 nm (BDs)
Laser power: No hazardous radiation is emitted
NORSK
Bølgelengde: 790 nm (CD)/655 nm (DVD)/405 nm (BD)
Laserstyrke: Ingen farlig stråling sendes ut
Power supply: AC 220 to 240 V, 50 Hz
Power consumption:
[BD65]: Approx. 20 W
[BD45]: Approx. 19 W
Power consumption in standby mode:
Power consumption in quick start standby mode:
Dimensions (WkDkH) : Including the projecting parts
Mass: Approx. 1.9 kg
Specifications are subject to change without notice.
10 % to 80 % RH (no condensation)
Y :1.0 Vp-p (75 ≠)/P
Optical digital output (Optical terminal)
B, PR : 0.7 Vp-p (75 ≠)/
Pin jack: 1 system
HDMI (V.1.4, Content Type)
with the safety protection
Approx. 0.2 W
Approx. 7 W
430 mmk207 mmk49 mm
Information for Users on Collection and Disposal of Old Equipment and used Batteries
These symbols on the products, packaging, and/or accompanying documents mean that used electrical and
electronic products and batteries should not be mixed with general household waste.
For proper treatment, recovery and recycling of old products and used batteries, please take them to applicable
collection points, in accordance with your national legislation and the Directives 2002/96/EC and 2006/66/EC.
By disposing of these products and batteries correctly, you will help to save valuable resources and prevent any
potential negative effects on human health and the environment which could otherwise arise from inappropriate
waste handling.
For more information about collection and recycling of old products and batteries, please contact your local
municipality, your waste disposal service or the point of sale where you purchased the items.
Penalties may be applicable for incorrect disposal of this waste, in accordance with national legislation.
For business users in the European Union
If you wish to discard electrical and electronic equipment, please contact your dealer or supplier for further
information.
[Information on Disposal in other Countries outside the European Union]
These symbols are only valid in the European Union. If you wish to discard these items, please contact your local
authorities or dealer and ask for the correct method of disposal.
Note for the battery symbol (bottom two symbol examples):
This symbol might be used in combination with a chemical symbol. In this case it complies with the requirement
set by the Directive for the chemical involved.
(10)
10
VQT2H96
Page 11

Java and all Java-based trademarks and logos are
trademarks or registered trademarks of Sun Microsystems,
Inc. in the United States and other countries.
Manufactured under license from Dolby Laboratories. Dolby
and the double-D symbol are trademarks of Dolby
Laboratories.
Manufactured under license under U.S. Patent #’s:
5,451,942; 5,956,674; 5,974,380; 5,978,762; 6,226,616;
6,487,535; 7,392,195; 7,272,567; 7,333,929; 7,212,872 &
other U.S. and worldwide patents issued & pending.
DTS and the Symbol are registered trademarks, & DTS-HD,
DTS-HD Master Audio | Essential and the DTS logos are
trademarks of DTS, Inc.
Product includes software. © DTS, Inc. All Rights Reserved.
This product incorporates copyright protection technology
that is protected by U.S. patents and other intellectual
property rights. Use of this copyright protection technology
must be authorized by Macrovision, and is intended for
home and other limited viewing uses only unless otherwise
authorized by Macrovision. Reverse engineering or
disassembly is prohibited.
HDMI, the HDMI Logo, and High-Definition Multimedia
Interface are trademarks or registered trademarks of HDMI
Licensing LLC in the United States and other countries.
This product is licensed under the AVC patent portfolio
license and VC-1 patent portfolio license for the personal
and non-commercial use of a consumer to (i) encode video
in compliance with the AVC Standard and VC-1 Standard
(“AVC/VC-1 Video”) and/or (ii) decode AVC/VC-1 Video that
was encoded by a consumer engaged in a personal and
non-commercial activity and/or was obtained from a video
provider licensed to provide AVC/VC-1 Video. No license is
granted or shall be implied for any other use. Additional
information may be obtained from MPEG LA, LLC. See
http://www.mpegla.com
HDAVI Control
x.v.Colour
VIERA CAST
™
™
is a trademark.
™
is a trademark of Panasonic Corporation.
.
is a trademark of Panasonic Corporation.
“AVCHD” and the “AVCHD” logo are trademarks of
Panasonic Corporation and Sony Corporation.
SDXC Logo is a trademark of SD-3C, LLC.
®
is a registered trademark of DivX, Inc., and is used
DivX
under license.
“Blu-ray Disc” is trademark.
“BD-LIVE” logo is trademark of Blu-ray Disc Association.
“BONUSVIEW” is trademark of Blu-ray Disc Association.
YouTube and Picasa are trademarks of Google, Inc.
®
Microsoft
, Windows® and Windows Vista® are either
registered trademarks or trademarks of the Microsoft
Corporation in the United States and/or other countries.
Macintosh and Mac OS are either registered trademarks or
trademarks of Apple Inc. in the United States and/or other
countries.
Other names of systems and products mentioned in these
instructions are usually the registered trademarks or
trademarks of the manufacturers who developed the system
or product concerned.
This product incorporates the following software:
(1) the software developed independently by or for
Panasonic Corporation,
(2) the software owned by third party and licensed to
Panasonic Corporation,
(3) the software licensed under the GNU General Public
License, Version 2 (GPL v2),
(4) the software licensed under the GNU LESSER General
Public License, Version 2.1 (LGPL v2.1) and/or,
(5) open sourced software other than the software licensed
under the GPL v2 and/or LGPL v2.1
For the software categorized as (3) and (4), please refer to
the terms and conditions of GPL v2 and LGPL v2.1, as the
case may be at
http://www.gnu.org/licenses/old-licenses/gpl-2.0.html and
http://www.gnu.org/licenses/old-licenses/lgpl-2.1.html.
In addition, the software categorized as (3) and (4) are
copyrighted by several individuals. Please refer to the
copyright notice of those individuals at
http://www.am-linux.jp/dl/JPRCBW98
The GPL/LGPL software is distributed in the hope that it will
be useful, but WITHOUT ANY WARRANTY, without even
the implied warranty of MERCHANTABILITY or FITNESS
FOR A PARTICULAR PURPOSE.
At least three (3) years from delivery of products, Panasonic
will give to any third party who contact us at the contact
information provided below, for a charge no more than our
cost of physically performing source code distribution, a
complete machine-readable copy of the corresponding
source code covered under GPL v2/LGPL v2.1.
Contact Information
cdrequest@am-linux.jp
Source code is also freely available to you and any other
member of the public via our website below.
http://www.am-linux.jp/dl/JPRCBW98
English
(11)
11
VQT2H96
 Loading...