

PP
For USA and Puerto Rico assistance, please call: 1-800-211-PANA(7262) or,
contact us via the web at: http://www.panasonic.com/contactinfo
For Canadian assistance, please call: 1-800-99-LUMIX (1-800-995-8649) or
send e-mail to: lumixconcierge@ca.panasonic.com
Operating Instructions
Digital Camera/
Lens Kit/Body
Model No. DMC-GH2H/DMC-GH2K
DMC-GH2
Before connecting, operating or adjusting this product,
please read the instructions completely.
VQT3A36
Dear Customer,
Thank you for choosing Panasonic!
You have purchased one of the most sophisticated and reliable products on the market
today. Used properly, we’re sure it will bring you and your family years of enjoyment.
Please take time to fill in the model and serial numbers in the space below. The serial
number is on the tag located on the underside of your Camera. Be sure to retain this
manual as your convenient Camera information source. Please note that the actual
controls and components, menu items, etc. of your Digital Camera may look somewhat
different from those shown in the illustrations in these Operating Instructions.
Carefully observe copyright laws.
•
Recording of pre-recorde d t ape s or d is cs or othe r pu blishe d or broadc ast materi al f or purp os es
other than your own privat e use may infringe copyright laws. Even for the purpose of private
use, recording of certain material may be restricted.
A lithium ion battery that is recyclable powers the product you have
purchased. Please call 1-800-8-BATTERY for information on how to
recycle this battery.
Information for Your Safety
WARNING:
TO REDUCE THE RISK OF FIRE, ELECTRIC SHOCK OR PRODUCT DAMAGE,
DO NOT EXPOSE THIS APPARATUS TO RAIN, MOISTURE, DRIPPING OR
•
SPLASHING AND THAT NO OBJECTS FILLED WITH LIQUIDS, SUCH AS VASES,
SHALL BE PLACED ON THE APPARATUS.
•USE ONL Y THE RECOMMENDED ACCESSORIES.
•DO NOT REMOVE THE COVER (OR BACK); THERE ARE NO USER SERVICEABLE
PARTS INSIDE. REFER SERVICING TO QUALIFIED SERVICE PERSONNEL.
THE SOCKET OUTL ET SHALL BE INSTALLE D NEAR THE EQUIPMENT A ND SHALL
BE EASILY ACCESSIBLE.
∫ Product identific a tion marking
Product Location
Digital camera Bottom
Battery char g er Bottom
VQT3A36
2

THE FOLLOWING APPLIES ONLY IN CANADA.
DMC-GH2
This Class B digital apparatus complies with Canadian ICES-003.
THE FOLLOWING APPLIES ONLY IN THE U.S.A.
FCC Note:
This equipment has been tested and found to comply with the limits for a Class B digital
device, pursuant to Part 15 of the FCC Rules. These limits are designed to provide
reasonable protection against harmful interference in a residential installation. This
equipment generates, uses, and can radiate radio frequency energy and, if not installed
and used in accordance with the instructions, may cause harmful interference to radio
communications. However, there is no guarantee that interference will not occur in a
particular installation. If this equipment does cause harmful interference to radio or
television reception, which can be determined by turning the equipment off and on, the
user is encouraged to try to correct the interference by one or more of the following
measures:
•
Reorient or relocate the receiving antenna.
•Increase the separa tion between the equipment and receiver.
•Connect the equipment into an outlet on a circuit different from that to which the receiver is
connected.
•Consult the dealer or an experienc ed radio/TV technician for help.
FCC Caution: To assure continued compliance, follow the attached installation
instructions and use only shielded interface cables with ferrite core when
connecting to computer or peripheral devices.
Any changes or modifications not expressly approved by the party responsible for
compliance could void the user’s authority to operate this equipment.
Declaration of Conformity
Trade Name: Panasonic
Model No.: DMC-GH2
Responsible party: Panasonic Corporation of North America
One Panasonic Way, Secaucus, NJ 07094
Support Contact:
Panasonic Consumer Electronics Company 1-800-211-PA NA (7262)
This device complies with Part 15 of the FCC Rules. Operation is subject to the
following two conditions: (1) This device may not cause harmful interference, and (2)
this device must accept any interference r eceived, including interference that may
cause undesired operation.
VQT3A36
3

∫ About the battery pack
CAUTION
Battery pack (Lithium ion battery pack)
•
Use the spec if i ed un i t to recharge the ba t t e ry pac k.
•Do not use the battery pack with equipment other than the specified unit.
•Do not get dirt, sand, liquids, or other foreign matter on the terminals.
•Do not touch the pl u g ter m i n als (i and j) with metal objects.
•Do not disassemble, remodel, heat or throw into fire.
If any electrolyte should come into contact with your hands or clothes, wash it off
thoroughly with water.
If any electrolyte should come into contact with your eyes, never rub the eyes. Rinse
eyes thoroughly with water, and then consult a doctor.
CAUTION
Danger of explosion if battery is incorrectly replaced. Replace only with the same or
equivalent type recommended by the manufacturer. Dispose of used batteries
according to the manufacturer’s instructions.
•
Do not heat or expose to flame.
•Do not leave the battery(ies) in an automobile exposed to direct sunlight for a long period of
time with doors and windows closed.
Warning
Risk of fire, explosion and burns. Do not disassemble, heat above 60 xC (140 oF) or
incinerate.
∫ About the battery charger
CAUTION!
•
DO NOT INST ALL OR PLACE THIS UNIT IN A BOOKCASE, BUILT-IN CABINET OR IN
ANOTHER CONFINED SPACE. ENSURE THE UNIT IS WELL VENTILATED. TO PR EVENT
RISK OF ELECTRIC SHOCK OR FIRE HAZARD DUE TO OVERHEATING, ENSURE THAT
CURTAINS AND ANY OTHER MATERIALS DO NOT OBS TRUCT THE VENTILATION
VENTS.
•DO NOT OBSTRUCT THE UNIT’S VENTILATI ON OPENINGS WITH NEWSPAPERS,
TABLECLOTHS, CURTAINS, AND SIMILAR ITEMS.
•
DO NOT PLACE SOURCES OF NAKED FLAMES, SUCH AS LIGHTED CANDLES, ON THE
UNIT.
•DISPOSE OF BATTERIES IN AN ENVIRONMENTALLY FRIENDLY MANNER.
Battery charger
This battery charger operates on AC between 110V and 240 V.
But
•
In the U.S.A. and Canada, the battery charger must be connected to a 120 V AC power
supply only.
•When connecting to an AC suppl y outside of the U.S.A. or Canada, use a plug adaptor to
suit the AC outlet configuration.
•
The battery charger is in t he standby condition when the AC power is supplied. The primary
circuit is always “live” as long as the battery charger is connected to an electrical outlet.
VQT3A36
4

∫ Care of the camera
•
Do not strongly shake or bump the camera by dropping or hitting it. Do not subject to
strong pressure.
The camera may malfunction, re cordin g pict ure s may bec ome impossible , o r the le ns, t he LCD
monitor or the external case may be damaged.
•Be particularly careful in the follow in g places as they may cause this unit to
malfunction.
– Places with a lot of sand or dust.
– Places where water can come into contact with this unit such as when using it on a rainy day
or on a beach.
•Do not touch the lens or the sockets with dirty hands. Also, be careful not to allow
liquids, sand and other foreign matter to get into the space a round the lens, buttons etc.
•This camera is not waterproof. If water or seawater splashes on the camera, use a dry
cloth to wipe the camera body carefully.
If the unit does not operate normally, please contact the dealer where you purchased the
camera or the repair service center.
•Do not place your hands inside the mount of the digital ca mera body. Since the sensor
unit is a precision apparatus, it may cause a malfunction or damage.
∫ About Condensation (When the lens, the viewfinder or LCD Monitor is fogged up)
•
Condensation occurs when the ambient temperature or humidity changes. Be careful of
condensation since it causes lens and LCD monitor stains, fungus and camera malfunction.
•If condensation occurs, turn the camera off and leave i t for about 2 hours. The fog will
disappear naturally when the temperature of the camera becomes close to the ambient
temperature.
∫ Read together with the “Cautions for Use”. (P176)
-If you see this symbolInformation on Disposal in other Countries outside the European Union
This symbol is only valid in the European Union.
If you wish to discard this product, please contact your local
authorities or dealer and ask for the correct method of disposal.
VQT3A36
5

Contents
Information for You r Safety.................... ...2
Before Use
Standard Accessories............................... 9
Names and Functions of Components ... 11
About the Lens .......................................18
Preparation
Attaching/Detaching the Lens................. 20
Attaching the Shoulder Strap.................. 22
Preparing the Battery.............................. 23
• Charging the Battery ........................23
• Inserting/Removing the Battery ........ 24
• Approximate operating time and
number of recordable pictures ......... 2 5
Preparing the Card (Optional) ................ 28
• Inserting/Removing the Card
(Optional) ......................................... 28
• About cards that can be used with
this unit................... .......................... 29
• Approximate number of recordable
pictures and operating time.............. 30
Setting Date/Time (Clock Set)................ 31
• Changing the clock setting ............... 31
Basic
Selecting the [REC] Mode ...................... 32
Taking a Still picture...............................34
• How to set focus when taking a still
picture (AFS/AFC)............................34
• Taking Pictures with Your Favorite
Settings
(³: Program AE Mode) ...................35
• Taking pictures using the Touch
Shutter function................................38
Playing Back Pictures............................. 39
• Changing the information displayed
on the playb a ck screen .... .. .............. 40
Recording Motion Picture....................... 43
• How to set focus when recording a
motion picture (Continuous AF) .......43
• Recording Motion Picture .................44
Playing Back Motion Pic tures................. 46
Taking Pictures using the Automatic
Function (ñ: Intelligent Auto Mode) . ...... 48
Deleting Pictures.................................... 52
Setting the Menu.......... ......................... .54
• Setting menu items........................... 55
Setting the Quick Menu................... ....... 56
About the Setup Menu............................ 58
Recording
Switching the Display of the LCD
Monitor/Viewfinder..................................63
• Switching the Information Displayed
on the recording screen ...................63
Taking Pictures with the Zoom...............66
• Using the Optical Zoom/
Using the Extended Tele Conversion
(EX)/Using the Digital Zoom............. 66
Taking Pictures using the Built-in
Flash.......................................................68
• Switching to the appropriate flash
setting...............................................68
• Adjust the flash output......................73
Optical Image Stabilizer.......................... 73
Compensating the Exposure .................. 75
Taking Pictures using Burst Mode.......... 76
Taking Pictures using Auto Bracket........ 78
Taking Pictures with the Self-timer......... 80
Setting the Method used to Focus
(AF Mode)............................................... 81
Taking Pictures with Manual Focus........ 84
Fixing the Focus and the Exposure
(AF/AE Lock)..........................................86
Adjusting the White Balance................... 87
Setting the Light Sensitivity .................... 90
Taking Pictures by Specifying
the Aperture/Shutter Speed.................... 92
• [±] Aperture-priority AE................... 92
• [´] Shutter-priority AE ..................... 92
Taking Picture by Setting the Exposure
Manually................................................. 93
VQT3A36
6
Confirm the Effects of Aperture and
Shutter Speed (Preview Mode)...............95
Taking Expressive Portraits and
Landscape Pictures
(Advanced Scene Mode) .................. ......96
• [PORTRAIT]...............................96
• [SCENERY]................................97
• [CLOSE-UP]...............................97
Taking Pictures that match the Scene
being recorded ( : Scene Mode)..........98
• [PERIPHERAL DEFOCUS]........98
. [NIGHT PORTRAIT]...................99
•
/ [NIGHT SCENERY]....................99
•
• ï [SUNSET]...................................99
• 2 [PARTY]...................................100
- [SPORTS] ................................100
•
• : [BABY1]/; [BABY2] .......... .. ...100
• í [PET]........................................101
Taking Pictures while Adjusting Color
( : My Color Mode).............................102
Taking Pictures in Custom Mode ..........104
Selecting the Mode and Recording
Motion Pictures
( : Creative Motion Picture Mode)......105
• [MANUAL MOVIE MODE]........105
• [24P CINEMA]..........................105
• [VARIABLE MOVIE MODE] .....106
Recording still pictures while recording
motion pictures......................................107
Taking a Picture with Face Recognition
Function................................................108
Useful Functions at Travel
Destinations..........................................114
Entering Text.........................................116
Using the [REC] Mode Menu ................117
• [FILM MODE] ...........................117
• ? [ASPECT RATIO].....................119
• @ [PICTURE SIZE] ......................119
• A [QUALITY]................................120
• [FACE RECOG.] ......................121
• C [METERING MODE] ................121
• [STABILIZER]...........................121
• [FLASH]....................................121
• [RED-EYE REMOVAL].............122
• [FLASH SYNCHRO].................122
• [FLASH ADJUST.]....................122
• [I.RESOLUTION]......................122
• [I.DYNAMIC] (Intelligent
dynamic range control).............123
• [ISO LIMIT SET].......................123
• [LONG SHTR NR]....................123
• [EX. TELE CONV.]...................123
• ) [DIGITAL ZOOM]......................124
• [BURST RATE].........................124
• [AUTO BRACKET] ...................124
• [ASPECT BRACKET]...............124
• [SELF-TIMER]..........................124
• [COLOR SPACE] .....................125
Using the [MOTION PICTURE]
Mode Menu...........................................126
• [REC MODE]............................126
• [REC QUALITY].......................126
• [EXPOSURE MODE]................127
• ! [PICTURE MODE]....................127
• [CONTINUOUS AF]..................128
• [WIND CUT].............................128
• B [MICLEVEL DISP.]..................128
• [MIC LEVEL ADJ.]....................128
• [REC HIGHLIGHT]...................128
Using the [CUSTOM] Menu..................129
Playback/Editing
Playing Back Burst Pi ctures..................136
Editing Burst Pictures.......... .. .. ............. .1 3 7
Creating Still Pictures from a Motion
Picture...................................................139
Using the [PLAYBACK] Mode Menu.....140
• [2D/3D SETTINGS]..................140
• [SLIDE SHOW].........................140
• [PLAYBACK MODE].................142
• [TITLE EDIT]............................143
• [TEXT STAMP].........................144
• [VIDEO DIVIDE] .......................145
• Q [RESIZE] Reducing the picture
size (number of pixels).............146
• [CROPPING]............................147
• ? [ASPECT CONV.].....................147
• N [ROTATE]/
M [ROTATE DISP.].......................148
• Ü [FAVORITE].............................149
• [PRINT SET].............................150
VQT3A36
7

• P [PROTECT].............................. 151
• [FACE REC EDIT] ................... 152
Connecting to other equipment
Enjoying 3D pictures............................. 153
Playing Back Pictures on a TV
Screen..................................................156
Saving the Recorded Still Pictures and
Motion Pict u re s.............. .. ............. .. ...... 16 1
Connecting to a PC ..............................163
Printing the Pictures ............................. 166
Others
Optional accessories ............................ 170
LCD Monitor Display/Viewfinder
Display..................................................173
Cautions for Use................................... 176
Message Display ..................................182
Troubleshooting....................................185
Specifications ....................................... 194
Digital Camera Accessory System .......198
Digital Camera Accessory Order Form
(For USA and Puerto Rico Customers).....200
Limited Warranty
(ONLY FOR U.S.A. AND PUERTO RICO)... 201
Index.....................................................204
Useful Information
(For Latin American Countries Only).... 207
VQT3A36
8

Before Use
Before Use
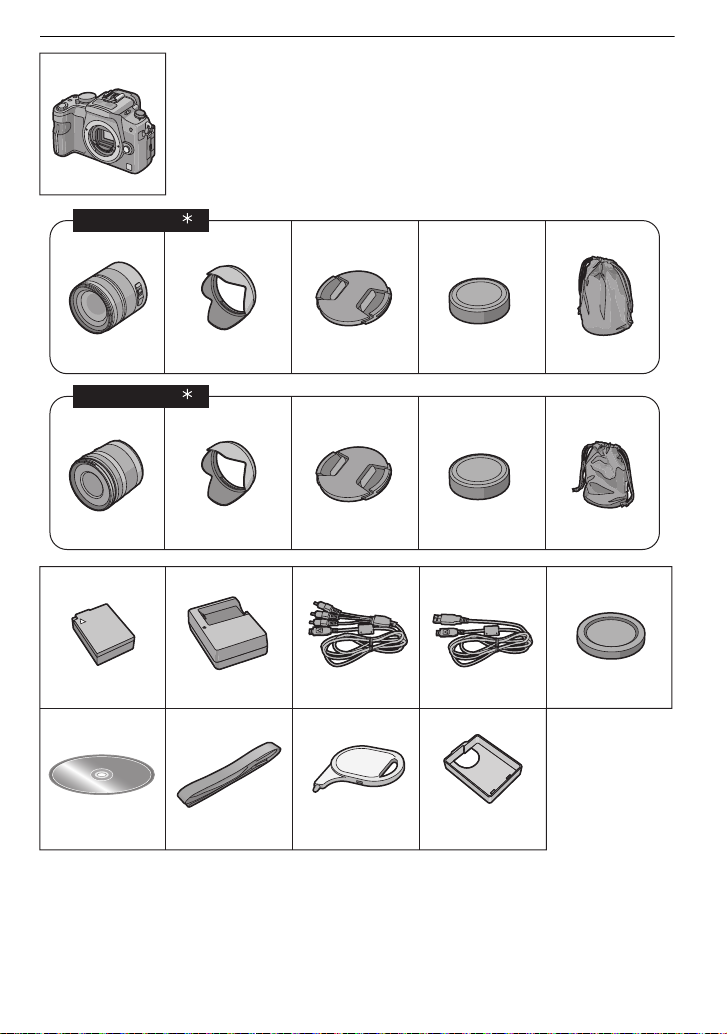
Standard Accessories
Check that all the accessories are supplied before using the camera.
Product numbers correct as of October 2010. These may be subject to change.
1 Digital Camera Body
(This is referred to as camera body in these operating instructions.)
2 Interchangeable Lens
“LUMIX G VARIO HD 14–140 mm/F4.0–5.8 AS PH./MEGA O. I.S.”
(This is referred to as lens in these operating instructions.)
3 Lens Hood
4 Lens Cap
(This is attached to the interchangeable lens at the time of purchase.)
5 Lens Rear Cap
(This is attached to the interchangeable lens at the time of purchase.)
6 Lens Storage Bag
7 Interchangeable Lens
“LUMIX G VARIO 14–42 mm/F3.5–5.6 ASPH./MEGA O.I.S.”
(This is referred to as lens in these operating instructions.)
8 Lens Hood
9 Lens Cap
(This is attached to the interchangeable lens at the time of purchase.)
10 Lens Rear Cap
(This is attached to the interchangeable lens at the time of purchase.)
11 Lens Storage Bag
12 Battery Pack
(Indicated as battery pack or battery in the text)
Charge the battery before use.
13 B a ttery Charger
(Indicated as battery charger or charger in the text)
14 AV Cable
15 US B Connect ion Cable
16 B ody Cap
(This is attached to the camera body at the time of purchase.)
17 CD-ROM
•
Software:
Use it to install the soft ware to your PC.
18 Shoulder Strap
19 Stylus pen
20 Battery Case
¢1 Supplied in DMC-GH2H only
¢2 Supplied in
•
SD Memory Card, SDHC Memory Card and SDXC Memory Card are indicated as
•The card is optional.
•Description in these operating instructions is based on the 14–42 mm/F3.5–5.6 lens supplied
in DMC-GH2K.
•For information about optional accessories, refer to the “Digital Camera Accessory System”.
(P198)
•If any accessories are lost, customers in the USA and Puerto Rico should contact Panasonic’s
parts dep artment at 1 -800-833-96 26 and custome rs in Ca nada s hould c ontact 1-80 0-99-LUMIX
(1-800-995-8649) for further information about obtaining replacement parts.
DMC-GH2K only
card
in the text.
VQT3A36
9
1
12 13 14 15 16
17 18 19 20
DMW-BLC12PP DE-A79B
K1HA14CD0004 K1HA14AD0003
VKF4385
VGQ0Q65
VFC4602 VGQ0C14
23 4 5 6
H-VS014140 VYC0997 VYF3250 VFC4315 VFC4430
78 9 1011
H-FS014042 VYC1009 VYF3201 VFC4315 VFC4456
DMC-GH2K
2
DMC-GH2H
1
Before Use
10
VQT3A36
Names and Functions of Components
23
76 5 4
1
10 12
18 19
89
11 13 14221516
17 20 21
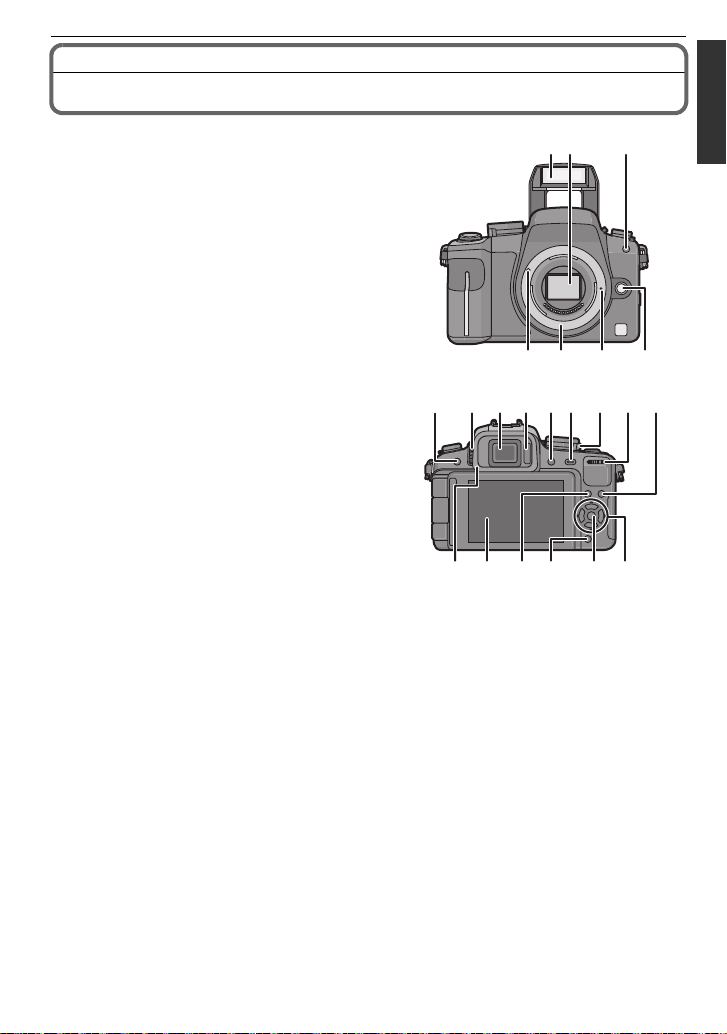
∫ Camera body
1 Flash (P68)
2 Sensor
3 Self-timer indicator (P80)/
AF Assist Lamp (P131)
4 Lens release button (P21)
5 Lens lock pin
6 Mount
7 Lens fitting mark (P20)
8 [LVF/LCD] button (P15)
9 Diopter adjustment dial (P15)
10 Viewfinder (P15, 63, 173)
11 E ye sensor (P15)
12 Playback button (P39, 46)
13 [AF/AE LOCK] button (P86)
14 Cam era ON/OFF switch (P31)
15 Rear dial (P17)
16 [DISPLAY] button (P40, 63, 95)
17 E ye Cup (P177)
18 Touch panel/LCD monitor (P15, 39, 63,
173)
19 [Q.MENU] button (P49, 56, 83)
20 Delete button (P52)/
Preview button (P95)
21 [MENU/SET] button (P16, 55)
22 Cur sor buttons (P16)
3/ISO (P90)
1/WB (White Balance) (P87)
2/Function 2 button (P17)
4/Function 3 button (P17)
Before Use
VQT3A36
11

Before Use
3029
26
27
3433
323128
MF
AFC
AFS
23
24
25
37
36
35
38
23 F ocus m ode lever (P34, 43, 81, 84)
24 Auto focus mode dial
Face Detection ([ ]) (P81): š
AF Tracking ([ ]) (P82):
23-area-focusing ([ ]) (P82):
1-area-focusing ([Ø]) (P83): Ø
25 Stereo microphone
26 Drive m ode lever
Single (P35):
Burst (P76):
Auto Bracket (P78):
Self-timer (P80):
27 Shutter button (P35)
28 F ocus distance reference mark (P85)
29 Flash open lever (P68)
30 Hot shoe (P170, 172)
31 Mode dial (P32)
32 Status indicator (P31)
33 M otion picture button (P43)
34 F unction 1 button (P17)
35 [MIC/REMOTE] socket (P171, 172)
36 Shoulder strap eyelet (P22)
•
Be sure to attach the shoulder strap when
using the camera to ensure that you will not
drop it.
37 [ HDMI ] socket (P157)
38 [AV OUT/DIGITAL] socket (P156, 161, 163,
166)
39 Card door (P28)
40 DC coupler cover
•
When using an AC adaptor, ensure that the
Panasonic DC coupler (DMW-DCC8;
optional) and AC adaptor (DMW-AC8PP;
optional) are used. (P172)
41 Battery door (P24)
42 Release lever (P 24)
43 Tripod receptacle (P181)
•
When you use a tripod, make sure the tr ipod
is stable when the camera is attached to it.
39
40
12
VQT3A36
434241
Before Use
46 47
50 51
49
48
44 45
52 53 54 55 56 5758
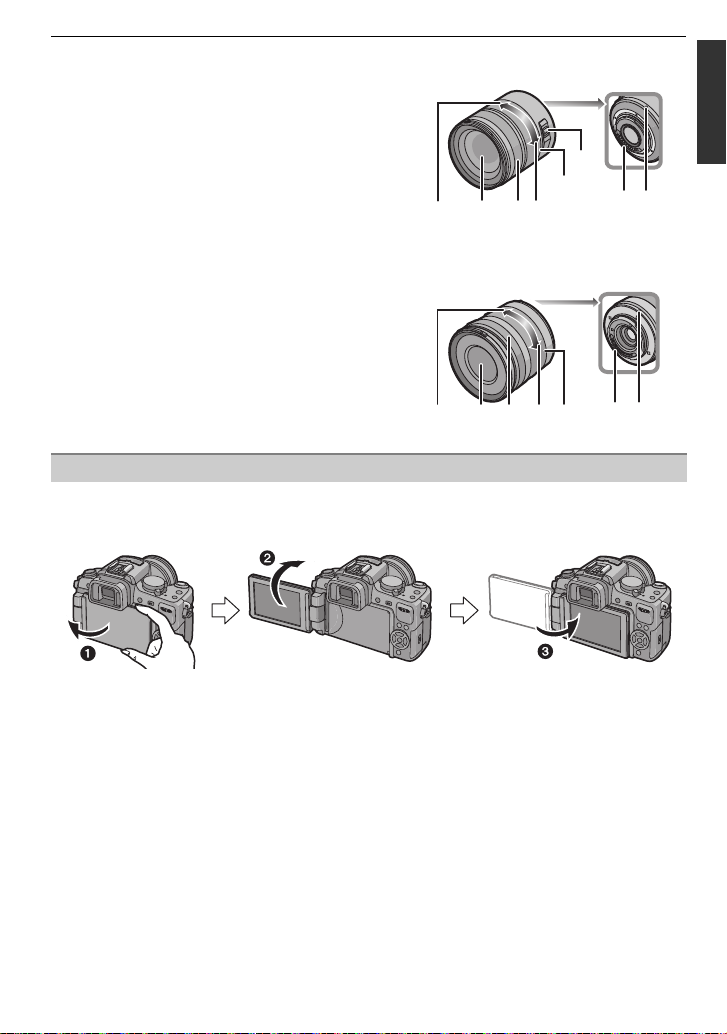
∫ Lens
H-VS014140 (LUMIX G VARIO HD 14–140 mm/F4.0–5.8 ASPH./MEGA O.I.S.)
44 Tele
45 Lens surface
46 Focus ring (P84)
47 W ide
48 Zoom ring (P66)
49 [O.I.S.] switch (P73)
50 Contact point
51 Lens fitting mark (P20)
H-FS014042 (LUMIX G VARIO 14–42 mm/F3.5 –5.6 ASPH./MEGA O.I.S.)
52 Tele
53 Lens surface
54 Focus ring (P84)
55 W ide
56 Zoom ring (P66)
57 Contact point
58 Lens fitting mark (P20)
LCD Monitor
At the time when this camera is purchased, the LCD monitor is stowed in the camera body.
Bring out the LCD monitor as shown below.
1 Open the LCD monitor. (Maximum 180o)
2 It can be rotated 180o forward.
3 Return the monitor to its original position.
•
Only rotate the LCD monitor after opening it wide enough, and be careful not to use
excessive force as it may be dam aged.
VQT3A36
13
Before Use
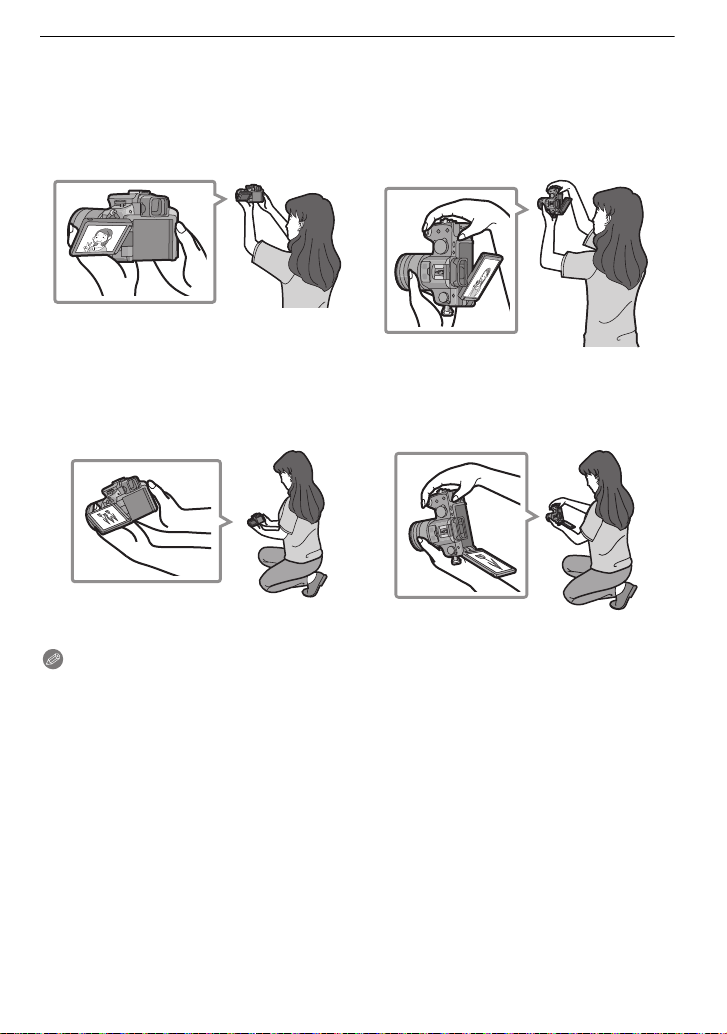
The LCD monitor can be rotated to suit your needs. This is convenient as it allows you to
take pictures from various angles by adjusting the LCD monitor.
•
Do not cover the AF Assist La mp wi th your fingers or other objects.
∫ Taki ng pictures at a high angle
•
This is convenient when there is someone in front of you and yo u cannot get close to the
subject.
•It can only be rotated 90o towards you.
∫ Taki ng pictures at a low angle
•
This is convenient when taking pictures of flowers etc. that are in a low position.
•It can be rotated 180o forward.
Note
•
When not using the LCD monitor it is recommended that you close it with the screen facing
inward to prevent dirt an d scratches.
VQT3A36
14
Before Use
Viewfinder
∫ About the eye sensor automatic switching
Eye sensor is active when the [AUTO SWITCH] of the [LVF/LCD SWITCH] (P133) in the
[CUSTOM] menu is set to [ON], switching automatically to viewfinder display when an eye
or object is moved closer to the viewfinder, and to LCD monitor display when moved away.
Sensitivity of the eye sensor can be set to [LOW] or [HIGH] with [SENSITIVITY].
•
Eye sensor might not work prope rly depending on the shape of your ey eglasses, the way you
hold the camera, or bright l i ght shining around the eyepiece. Switch manually in that case.
•The eye sensor is dis abled durin g m otion picture playback and slide show.
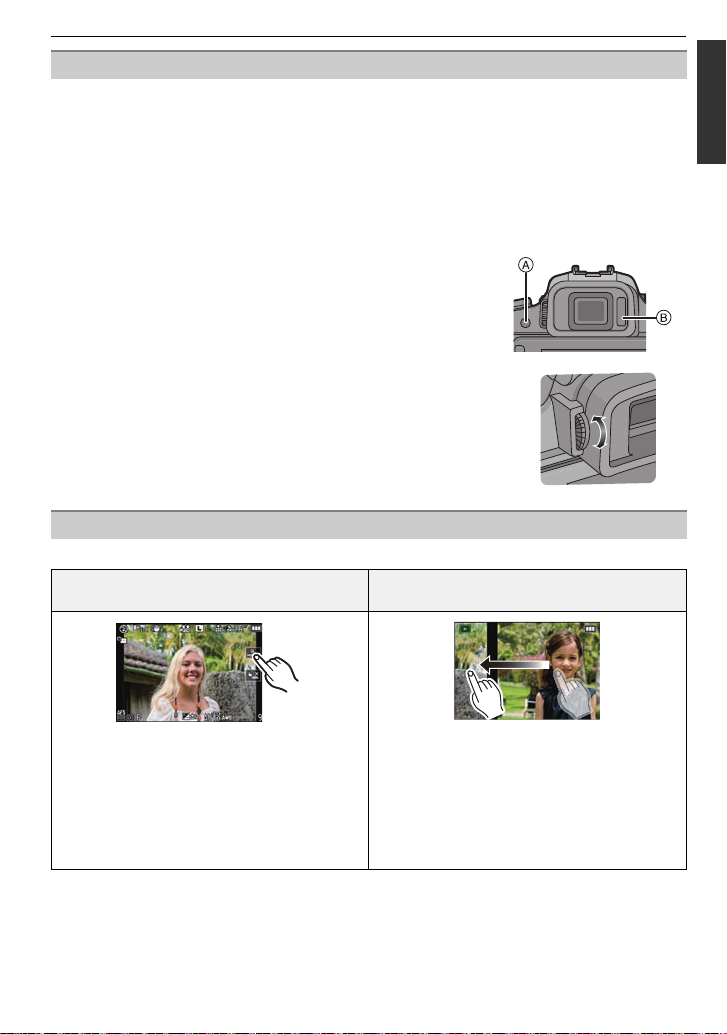
∫ Switching the LCD monitor/Viewfinder manually
Press [LVF/LCD] to switch the monitor screen.
A [LVF/LCD] button
B Eye sensor
∫ Diopter adjustment
Adjust the diopter to suit your vision so that you can see
the characters displayed in the viewfinder clearly.
Touch Panel
This touch panel is a type that detects pressure.
Touch th e screen
To touch and release the touch panel.
Drag
A movement without releasing the touch panel.
Use this to perform tasks such as selecting
icons or images displayed on the touch
panel.
•
When selecting features using the touch
panel, be sure to touch the center of the
desired icon.
This is used when performing tasks such as
moving to the next image by dragging
horizontally, or changing the range of the
displayed image.
This can also be used to perform tasks such
as switching the screen by operating the
slide bar.
VQT3A36
15
Before Use
ョㄏビ
ョㄏピ
Note
•
If you use a commercially available liquid crystal protection
sheet, please follow the instructions that accompany the
sheet. (Some liquid crystal protection sheets may impair
visibility or operability.)
•If a commercially available protection sheet is used, a little
extra pressure may be required if y ou notice that the touch
panel is not responsive.
•Avoid having the hand holding the camera accide ntly apply
pressure to the touch panel. Doing so may affect the touch
panel operation.
•Do not press on the LCD monitor with hard pointed tips, such as ball point pens.
•Do not operate with your fingernails.
•Wipe the LCD monitor with dry soft cloth when it gets dirty with finger prints and others.
•Do not scratch or press the LCD monitor too hard.
•For information about the icons displayed on the touch panel, refer to “LCD Monitor Display/
Viewfinder Display
” on P173.
∫ About the Stylus pen
It is easier to use the stylus pen (supplied) for detailed operation or if it is hard to operate
with your fingers.
Only use the supplied stylus pen.
•
•Do not place it where small children can reach.
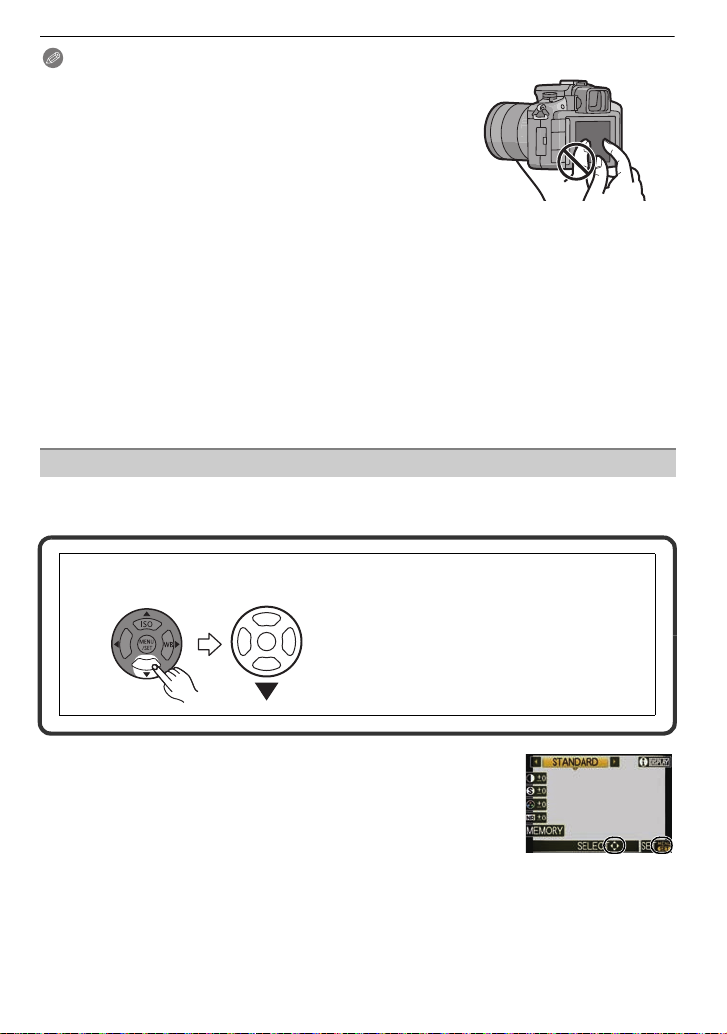
Cursor buttons/[MENU/SET] button
This document expresses the up, down, left, and right of the cursor button as follows, or as
3/4/2/1.
e.g.: When you press the 4 (down) button
or Press 4
Even when the camera is operated using the touch panel, it is
possible to operate with the cursor button and [MENU/SET] button
if a guide like the one shown on the right is displayed.
Cursor button: Selection of items or setting of values etc. is
performed.
[MENU/SET]: Confirmation of setting contents or exit from menu
is performed.
VQT3A36
16
Before Use
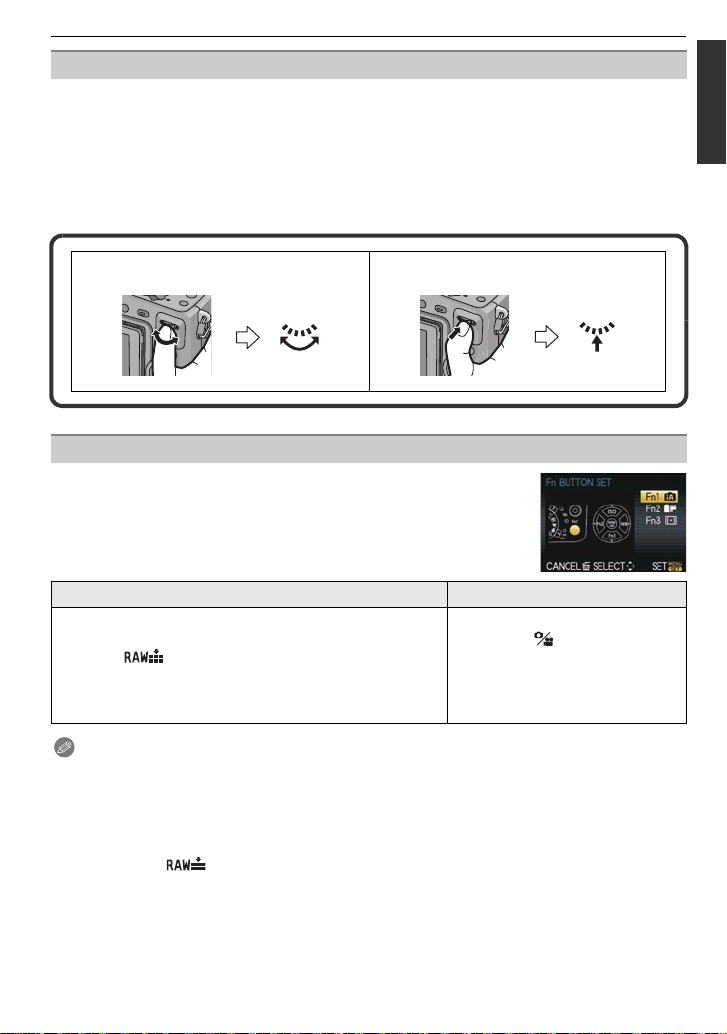
Rear Dial
There are 2 ways to operate the rear dial, rotating left or right, and deciding by pressing.
Rotating:
Selection of items or setting of values is performed during the various settings.
Pressing:
Operations that are the same as [MENU/SET] button, such as selection of settings
and exiting the menu, are per formed during the various settings.
•
Rear dial is described as follows in these op erating instructions.
e.g.: Rotating left or right e.g.: Pressing the rear dial
Function button
At the time of purchase, [INTELLIGENTAUTO] is assigned to the
[Fn1] button, [FILM MODE] to the 2 (Fn2) button and
[METERING MODE] to the 4 (Fn3) button.
•
The functions to be assigned can be selected from the menu be low
using [Fn BUTTON SET] in the [ CUS TOM] menu.
[REC] menu/Recording functions
[INTELLIGENT AUTO]/[FILM MOD E]/
[FOCUS AREA SET]/[ASP ECT RATIO]/[QUALITY]/
[CUSTOM] menu
[GUIDE LI NE]/[SHUTTER A F ]/
[PRE AF]/[ REC AREA]
[1 SHOT ]/[METERING MODE]/[1 SHOT Ù]/
[FLASH]/[FLASH ADJUST.]/[ISO LIMIT SET]/
[EX. TELE CONV.]/[BURST RATE]/
[AUTO BRACKET]
Note
Refer to P1 17 for details about [REC] Mode menu.
•
•Refer to P129 for detai l s ab o ut [CUSTOM] menu.
•When [INTELLIGENTAUTO] is set, pushing the button will switch to Intelligent Auto Mode.
(Pressing the button again or turning off the camera will cancel the setting.)
•When set to [FOCUSAREA SET], it is possible to display the positio n setting screen of either
AF area or MF Assist.
•When [1 SHOT ] is set, it will record the RAW file an d a fine JPE G image simult ane ously
once only . I t will ret urn to original quality after recording.
•When [1 SHOT Ù] is set, it will record with [METERING MODE] set to [Ù] (spot) once only. It
will return to original Metering Mode after recording.
VQT3A36
17

Before Use
About the Lens
∫ Micro Four Thirds™ mount specification lens
This unit can use the dedicated lenses compatible with
the Micro Four Thirds System lens mount specification
(Micro Four Thirds mount).
•
Select a lens that matches the scene being recorded and
your use of the pictures.
∫ Four Thirds™ mount spe c ification lens
Lens with the Four Thirds mount specification can be
used by using the mount adaptor (DMW-MA1; optional).
∫ Leica mount specification lens
When you use the M mount adaptor or R mount adaptor (DMW -MA2M, DMW -MA3R; optiona l),
•
you can use Leica M Mount or Leica R Mount interchangeable lenses.
–For certain lenses, the actua l distance at which the subject is in focus may differ slightly from
the rated distance.
–When using a Leica lens mount adaptor, set [SHOOT W/O LENS] (P135) to [ON].
About the functions of your le ns
•Depending on the type of len s, s ome func ti ons s uch as th e Direc tion Det ect ion Func ti on ( P36),
[STABILIZER] (P73), Quick AF (P130) and Continuous AF (P130) are disabled.
•The available flash ran ge e tc. dif fer s dep ending o n t he a perture value of th e lens yo u are using.
•Take some test pictures with the lens you are using.
18
VQT3A36

Before Use
•The focal length for th e l en s is twice that of a 35 mm film camera.
(A 50 mm lens is equivalent to a 100 mm lens.)
Focal length of the 3D interchangeable lens can be checked on the website below.
Interchangeable lenses that can be used with this unit and Auto Focus/Auto
Aperture Operation (As of October 2010)
(±: Usable, ¥: Some functions/features limited, —: Not usable)
Lens type
Micro Four Thirds
mount specification
lens
HD motion picture
compatible lens
supplied with the
DMC-GH2H
(H-VS014140)
when recording still
pictures
Auto
Focus
±
([AFS],
Auto
aperture
setting
±±
[AFC])
while recording
motion pictures
Auto
Focus
aperture
setting
¢4
Auto
±
(LUMIX G VARIO HD)
The Lens supplied
in DMC-GH2K.
(H-FS014042)
±
([AFS],
[AFC])
±¥
¢4, 5
¢7
¥
The 3D
interchangeable lens
————
(H-FT012; optional)
Four Thirds mount
specification lens
Other Micro Four
Thirds mount
specification lens
Four Thirds mount
¢1
specification lens
compatible to
¢3
±
([AFS],
[AFC])
¥
([AFS])
±¥
±¥
¢4, 5
¢6
¢7
¥
¢7
¥
contrast AF
Four Thirds mount
specification lens
not compatible to
¢8
¥
([AFS])
±¥
¢6, 8
¢7
¥
contrast AF
Leica mount
specification lens
Interchangeable
¢2
lens for Leica
————
¢1 Mount adaptor (DMW-MA1; optional) is necessary to use with this unit.
¢2 A Leica lens mount adaptor (DMW-MA2M or DMW-MA3R; optional) is necessary.
¢3 This f unction is not supported by some Micro Four Thirds mount specificat ion lenses.
For lens operations, please see our website.
4 When recording motion pictures, the focus is continuously adjusted for both [AFS] and [AFC] (P43).
¢
¢5 AF tracking is slower than the HD motion pict ure compatible lens, also the sound of Auto
Focus operation may be recorded.
¢6 Auto Focus is activated only when the shutter button is pressed halfway. The sound of Auto
Focus operation may be recorded at this time.
¢7 The sou nd of Aperture operation may be recorded.
¢8 AF performance may differ depending on the lens used. Refer to the website for details.
Refer to catalogues/Web pages for most current information regarding compatible lenses.
http://panasonic.jp/support/global/cs/dsc/ (This Site is English only.)
VQT3A36
19
Preparation
Preparation
Attaching/Detaching the Lens
•Check that the camera is tur ned off.
•Change lenses where there is not a lot of dirt or dust. Refer to P177, P178 when dirt or dust
gets on the lens.
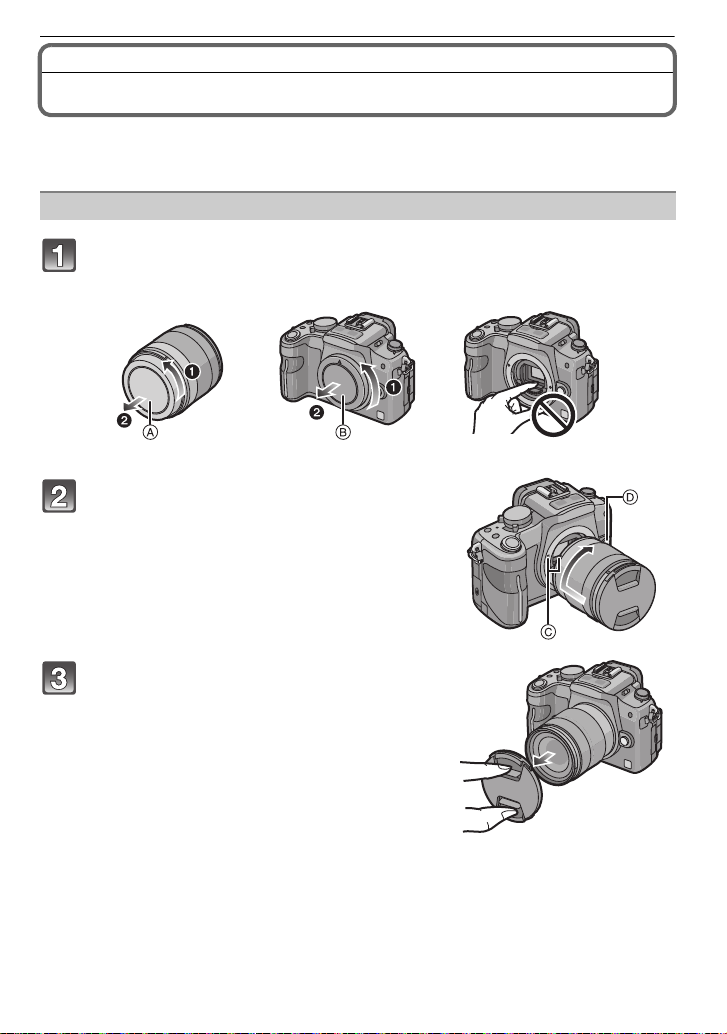
Attaching a lens to the camera body
Turn the lens rear cap A and the body cap B in the direction of the
arrow to detach them.
• Do not put y o ur ha n ds inside the mou n t.
Align the lens fitting marks C (red
marks) on the camera body and the lens
and then rotate the lens in the direction
of the arrow until it clicks.
• Do not press the lens rel e ase button D when you
attach a lens.
• Do not try to attach the lens when holding it at an
angle to the camera body as the lens mount may
get scratched.
Detach the lens cap.
20
VQT3A36
Preparation
Detaching a lens from the camera body
Attach the le ns cap.
Press the lens release button D while
turning the lens as far as possible in the
direction of the arrow to detach it.
• Always attach the body cap to the camera body so
that dirt or dust does not get ins i de.
• Attach the lens rear cap so that the lens contac t
point does not get scratched.
Note
It is recommended to attach the lens cap or attach the MC Protector (optional) to protect the
•
lens surface when carrying. (P171)
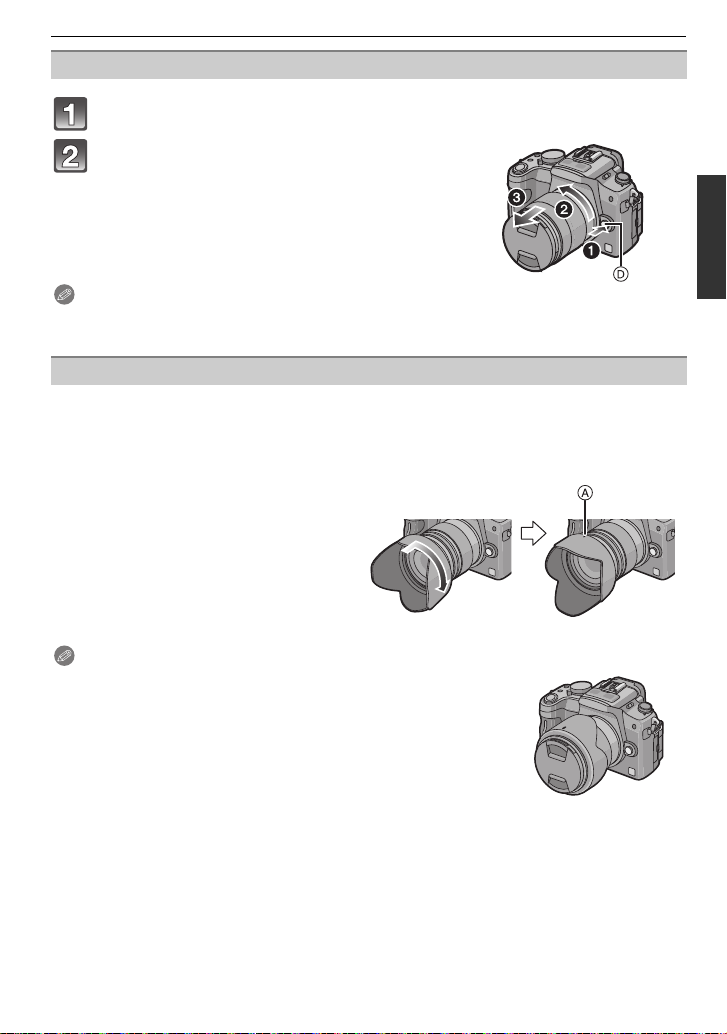
Attaching the Lens Hood
In bright sunlight or backlight, the lens hood will minimize lens flare and ghosting. The lens
hood cuts off excess lighting and improves the picture quality.
To attach the lens hood (flo wer shape) that came with the lens supplied in
DMC-GH2H/DMC-GH2K
Insert the lens hood into the lens
with the short sides at the top and
bottom, and turn in the direction
of the arrow until it stops.
A Fitting to the ma rk .
Note
•
When temporarily detaching and carrying the lens hood supplied
with the DMC-GH2H/DMC-GH2K, attach the lens hoo d to the lens
in the reverse direction.
VQT3A36
21
Preparation
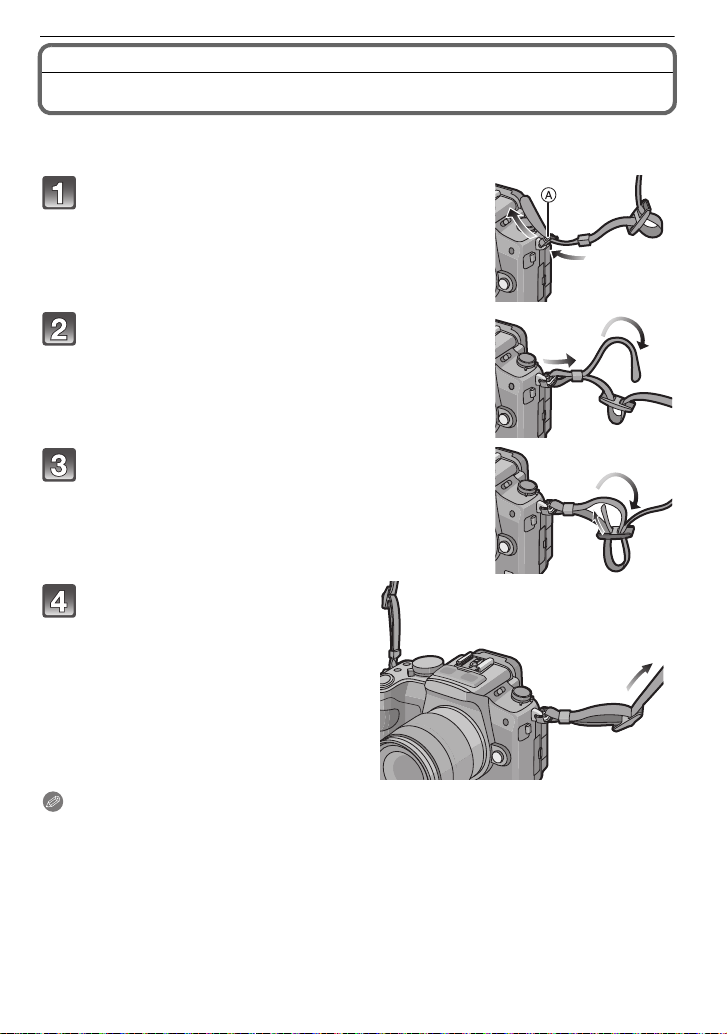
Attaching the Shoulder Strap
•We recommend attaching the shoulder strap when using the camera to prevent it from
dropping.
Pass the shoulder strap through the
shoulder strap eyelet on the camera body.
A:Shoulder strap eyelet
Pass the end of the shoulder strap through
the ring in the direction of the arrow and
then pass it through the stopper.
Pass the end of the shoulder strap through
the hole on the other side of the stopper.
Pull the other side of the
shoulder strap and then check
that it will not come out.
• Perform steps 1 to 4 and then attach
the other side of the shoulder strap.
Note
Use the shoulder strap around your shoulder.
•
–Do not wrap the strap around your neck.
–It may result in injury or accident.
•Do not leave the shoulder strap where an infant can reach it.
–It may result in an accident by mistakenly wrapping around the neck.
VQT3A36
22

Preparation
90°
Preparing the Battery
∫ About batteries that you can use with this unit
The battery that can be used wit h this unit is DMW-BLC12PP.
It has been found that counterfeit battery packs which look very similar to the
genuine product are made available to purchase in some markets. Some of these
battery packs are not adequately protected with internal protection to meet the
requirements of appropriate safety standards. There is a possibility that these
battery packs may lead to fire or explosion. Please be advised that we are not
liable for any accident or failure occurring as a result of use of a counterfeit
battery pack. To ensure that safe products are used we would recommend that a
genuine Panasonic battery pack is used.
Use the dedicated charger and battery.
•
•The camera has a function for distinguishing batteries which can be used safely. The
dedicated battery (DMW-BLC12PP) supports this function. The only batteries suitable
for use with this unit are genuine Panasonic products and batteries manufactured by
other companies and certified by Panasonic. (Batteries which do not support this
function cannot be used.) Panasonic cannot in any way guarantee the quality,
performance or safety of batteries which have been manufactured by other companies
and are not genuine Panasonic products.
Charging the Battery
•The battery is not charged when the camera is shipped. Charge the battery before use.
•Charge the battery with the charger indoors.
Attach the battery paying
attention to the direction of the
battery.
Connect the charger to the
electrical outlet.
• Disconnect the charger from the
electrical socket and det ach t he battery
after charging is completed.
VQT3A36
23
Preparation
∫ About the [CHARGE] indicator
The [CHARGE]
indicator turns on: The [CHARGE] indicator
The [CHARGE]
indicator turns off: The [CHARGE] indicator
When the [CHARGE] indicator flashes
•
–The battery temperature is too high or too low . It i s recommended to ch arge the batt ery again
in an ambient te m p er ature of between 10 oC to 30 oC (50 oF to 86 oF).
–The terminals of the charger or the battery are dirty. In this case, wipe them with a dry cloth.
∫ Charging time
Charging time Approx. 140 min
The indicated charging time is for when the battery has been discharged completely.
•
The charging time may vary depending on how the battery has been used. The charging
time for the battery in hot/cold environments or a b attery that has not been used for a
long time may be longer than normal.
Note
Do not leave any metal items (such as clips) ne ar the contact areas of the power plug.
•
Otherwise, a fire and/or electric shocks may be caused by short-circuiting or the
resulting heat generated.
•The battery can be recharged even when it still has some charge left, but it is not
recommended that the battery charge be frequently topped up while the battery is fully
charged. (Since characteristic swelling may occur.)
charging has completed without any problem.
A is turned on and charging will start.
A of the charger will turn off once the
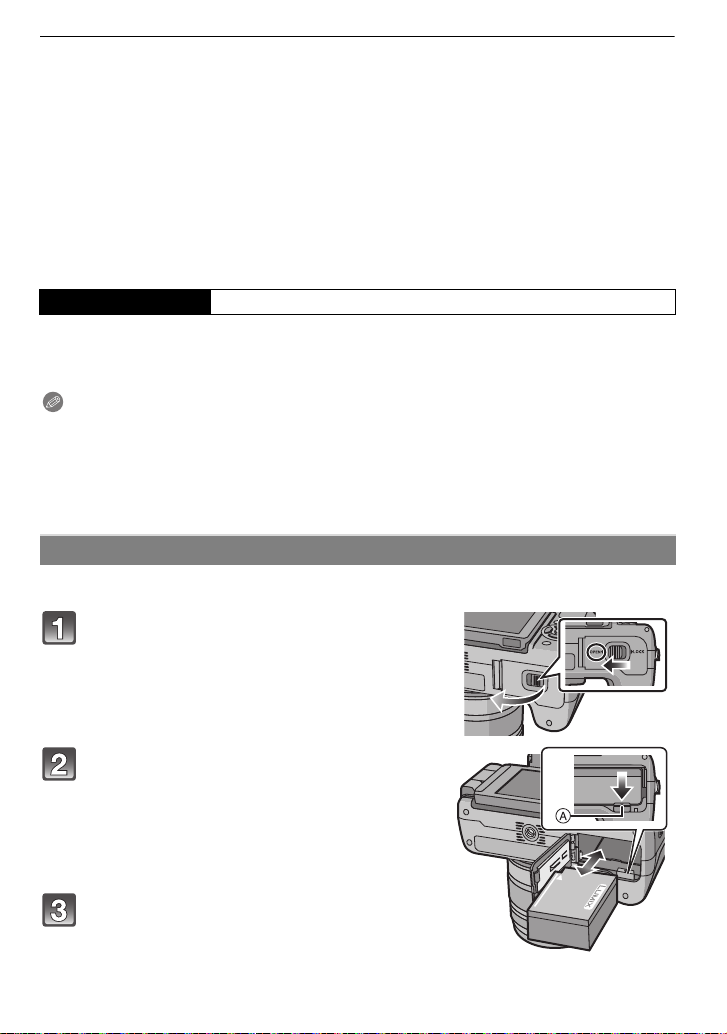
Inserting/Removing the Battery
•Check that this unit is turned off.
Slide the release lever in the direction of
the arrow and open the battery door.
• Always use genuine Panasonic batteries
(DMW-BLC12PP).
• If you use other batteries, we cannot guarantee
the quality of this product.
Being careful about the battery
orientation, insert all the way until you
hear a locking sound an d then check tha t
it is locked by lever A. Pull the lever A in
the direction of the arrow to remove the
battery.
Close the battery door, and slide the
release lever.
VQT3A36
24
Preparation
Note
•
Remove the battery after use. Store the removed battery in th e battery case (supplied).
•The battery will be exhausted if left for a long period of time after being charg ed.
•Before removing the battery, turn the camera off, and wait until the status indicator has gone off
completely. (Otherwise, this unit may no longer operate normally and the card itself may be
damaged or the recorded pict ures may be lost.)
•The supplied battery is designed only for the camera. Do not use it with any other equipment.
•The battery becomes warm after using it and during and after charging. The camera also
becomes warm during use. This is not a malfunction.
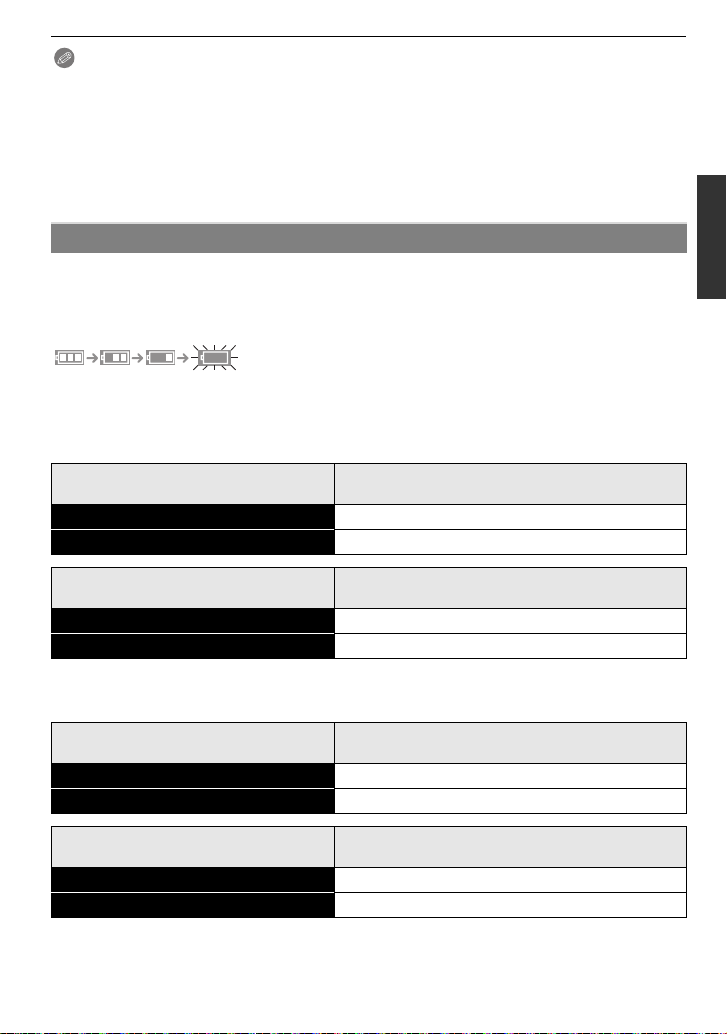
Approximate operating time and number of recordable pictures
∫ Battery indication
The battery indication is displayed on the screen.
[It does not appear when you use the camera with the AC adaptor (DMW-AC8PP;
optional) connected.]
•
The indication turns red and blinks if the remaining battery power is exhausted. (The status
indicator also blinks) Recharge the battery or replace it with a fully charged battery.
∫ Recording still pictures (when using the LCD monitor)
(By CIPA standard in Program AE Mode)
When the 14–140 mm/F4.0–5.8 lens supplied in
Number of recordable pictures Approx. 320 pictures
Recording time Approx. 160 min
DMC-GH2H is used
When the 14–42 mm/F3.5–5.6 lens supplied in
Number of recordable pictures Approx. 330 pictures
Recording time Approx. 165 min
DMC-GH2K is used
∫ Recording still pictures (when using the viewfinder)
(By CIPA standard in Program AE Mode)
When the 14–140 mm/F4.0–5.8 lens supplied in
DMC-GH2H is used
Number of recordable pictures Approx. 330 pictures
Recording time Approx. 165 min
When the 14–42 mm/F3.5–5.6 lens supplied in
Number of recordable pictures Approx. 340 pictures
Recording time Approx. 170 min
DMC-GH2K is used
VQT3A36
25
Preparation
Recording conditions by CIPA standard
CIPA is an abbreviation of [Camera &Imaging Products Association].
•
•Temperature: 23 oC (73.4oF)/Humidity: 50%RH when LCD monitor is on.
•Using a Panasonic SD Memory Card (2 GB).
•Using the supp l i ed ba ttery.
•Sta r ting recording 30 seconds after the camera is turned on.
•Recording once every 30 seconds with full flash every second recording.
•Turning th e camera off every 10 record ings and leaving it until the temperature of the battery
decreases.
The number of recordable pictures varies depending on the recording interval time.
If the recording interval time becomes longer, the number of recordable pictures
decreases. [For example, if you were to take one picture every two minutes, then the
number of pictures would be reduced to approximately one-quarter of the number
of pictures given above (based upon one picture taken every 30 seconds).]
∫ Recording motion pictures (when using the LCD monitor)
–
[AVCHD] (R ecording with picture quality set to [FSH] ([ ]))
When the 14–140 mm/F4.0–5.8 lens supplied in
Continuous recordable time Approx. 110 min
Actual recordable time Approx. 65 min
DMC-GH2H is used
When the 14 –42 mm/F3.5–5.6 lens supplied in
DMC-GH2K is used
Continuous recordable time Approx. 120 min
Actual recordable time Approx. 70 min
–[MOTION JPEG] (Recording with picture quality set to [HD] ([ ]))
When the 14–140 mm/F4.0–5.8 lens supplied in
DMC-GH2H is used
Continuous recordable time Approx. 120 min
Actual recordable time Approx. 70 min
When the 14 –42 mm/F3.5–5.6 lens supplied in
Continuous recordable time Approx. 130 min
Actual recordable time Approx. 75 min
DMC-GH2K is used
¢
¢
¢
¢
•These times are for an ambien t temperature of 23 oC (73.4oF) and a humidity of 50%RH.
Please be aware that these times are approximate.
•Actual recordable time is the time available for recording when repeating actions such as
switching the power supply [ON]/[OFF], starting/stopping recording etc.
¢ Motion picture recorded continuously in [MOTION JPEG] is up to 2 GB. Only the maximum
recordable time for 2 GB is displayed on the screen.
VQT3A36
26

∫ Playback (when using the LCD monitor)
When the 14–140 mm/F4.0–5.8 lens supplied in
Playback time Approx. 240 min
Preparation
DMC-GH2H is used
When the 14–42 mm/F3.5–5.6 lens supplied in
DMC-GH2K is used
Playback time Approx. 250 min
Note
•
The operating times and number of recordable pictures will differ according to the
environment and the operating conditions.
For example, in the following cases, the operating times shorten and the number of recordable
pictures is reduced.
–In low-temperature environments, such as on ski slopes.
–Using the [AUTO] of [LCD MODE] or [MODE1] of [LCD MODE] (P59).
–When flash is used repeatedly.
•When the operating t i me of the camera becomes extremely short even after properly charging
the battery, the life of the battery may have expired. Buy a new battery.
VQT3A36
27
Preparation
Preparing the Card (Optional)
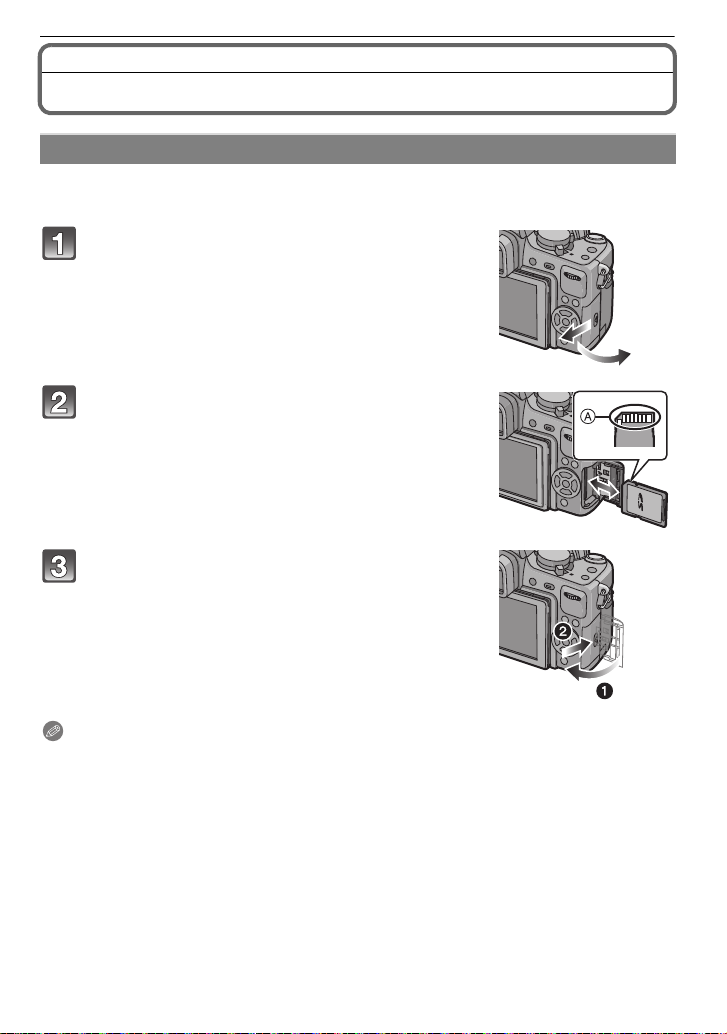
Inserting/Removing the Card (Optional)
•Check that this unit is turned off.
•We recommend using a Panasonic card.
Slide the card door to open it.
Push it securely all the way until you hear a
“click” while being care ful about the direction
in which you insert it. To remove the card,
push the card until it clicks, then pull the c ard
out upright.
A:Do not touch the connection terminals of the card.
•
The card may be damaged if it is not fully inserted.
1: Close the card door.
2: Slide the card door to the end and then
close it firmly.
• If the card door cannot be completely closed, remove the
card, check its direction and then insert it again.
Note
Always turn the camera off before opening the card door.
•
•Before removing the card, turn the camera off, and wait until the status indic ator has gone off
completely. (Otherwise, this unit may no longer operate normally and the c ard itself may be
damaged or the recorded pictures may be lost.)
VQT3A36
28
Preparation
About cards that can be used with this unit
The following cards which conform to the SD video standard can be used with this unit.
(These cards are indicated as card in the text.)
Ty pe of card which can be
used with this unit
SD Memory Card
(8 MB to 2 GB)
SDHC Memory Card
(4 GB to 32 GB)
SDXC Memory Card
(48 GB, 64 GB)
•Only cards bearing the SDHC logo (indicating that the card conforms to SD video standards)
may be used as 4 GB to 32 GB cards .
•SDHC Memory Card can be used with SDHC Memory Card
or SDXC Memory Card compatible equipment.
•SDXC Memory Card can only be used with SDXC Memory
Card compatible equipment.
•Check that the PC and other eq uipment are comp atible wh en
using the SDXC Memory C ards.
http://panasonic.net/avc/sdcard/information/SDXC.html
•Only cards bearing the SDXC log o (indicating that the card conforms to SD video standards)
may be used as 48 GB and 64 GB c ards.
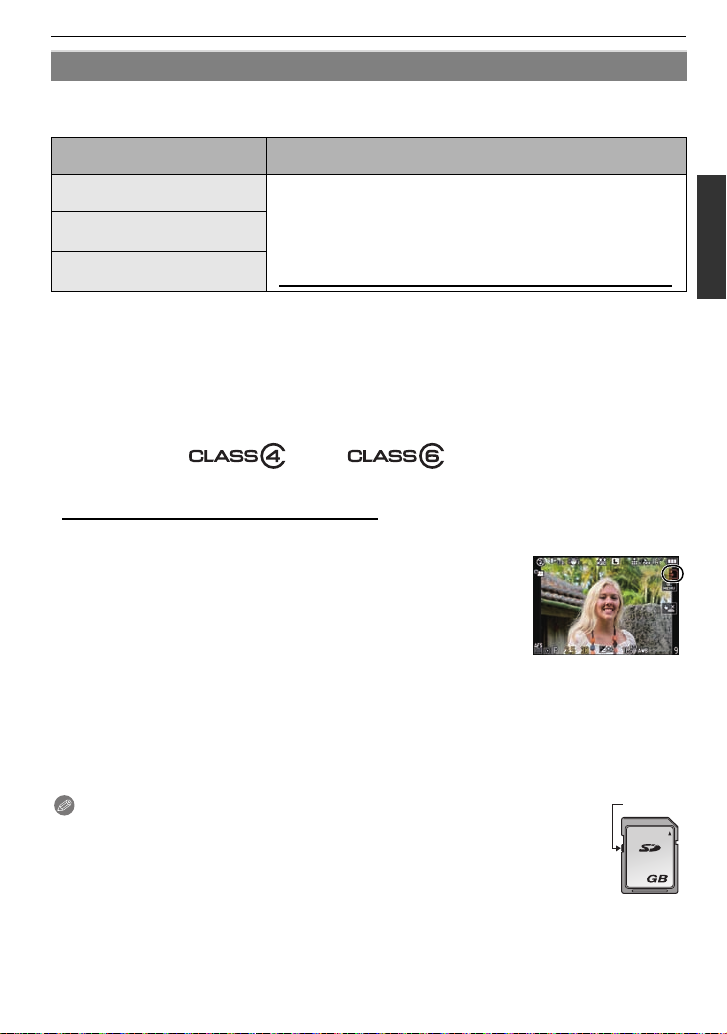
•Use a card with SD Speed Class
[AVCHD] . Also, use a card with SD Speed Class with “Class 6” or higher when recording
motion pictures in [MOTION JPEG].
SD Speed Class is the speed standard regarding continuous writing. Check via the label on the card, etc.
¢
¢
with “Class 4” or higher whe n re co rding motion pi c t ur es in
e.g.:
•Please confirm the latest information on the following websit e.
http://pa nasonic.jp/support/global/cs/dsc/
(This Site is English only .)
Access to the card
The access indication lights red when pictures are being recorded
on the card.
Remarks
•
Do not turn this unit off, remove its battery or card, or disconnect the AC adap tor
(DMW-AC8PP; optional) when the access indication is lit [when pictures are being
written, read or deleted, or the ca rd is being fo rmatted (P62)]. Furthermore , do not subject
the camera to vibration, impact or static electricity.
The card or the data on the card may be da m age d, a nd th is unit may no longe r operate
normally.
If operation fails due to vibration, impact or static electricity , perform the operation again.
Note
Write-Protect switch A provided (When this switch is set to the [LOCK] position,
•
no further data wr iti ng, delet ion or for matt in g is p ossi ble. T he abi lity to writ e, dele te
and format data is restore d when the switch is returned to its original position.)
•The data on the card may be damaged or lost due to elect romagnetic waves, st atic
electricity or breakdown of the camera or the card. We recommend storing
important data on a PC etc .
A
2
•Do not format the card on your PC or other equipment. Format it on the camera only to ensure
proper operation. (P62)
•Keep the Memory Card out of reach of children to prevent swallowing.
VQT3A36
29
Preparation
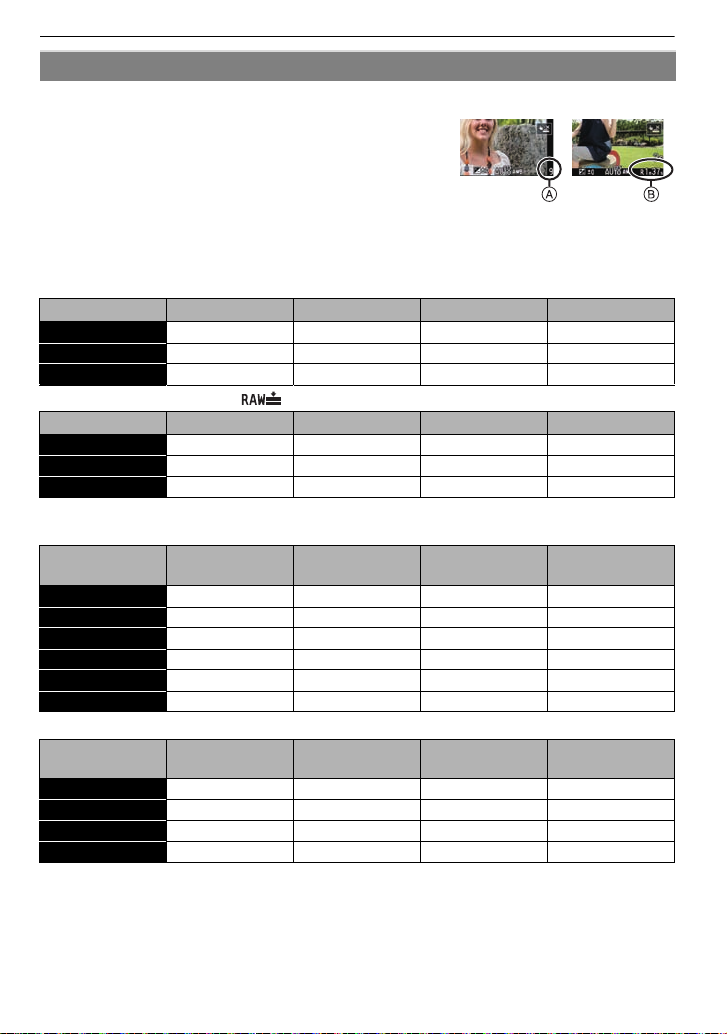
Approximate number of recordable pictures and operating time
∫ About the display of the number of recordable pictures and operating time
Switching between the dis play of number of recordable
•
pictures and operating time can be performed in the
[REMAINING DISP.] (P133) in the [CUSTOM] menu.
A Number of recordable pictures
B Available recording time
∫ Number of recordable pictures
•
[9999i] is displayed if there are more than 10000 pictures remaining.
Number of recordable pictures for more than 10000 can be checked in the LCD recording
information display (P63).
•Aspect ratio [X], Quality [A]
Picture size 2GB 4GB 16 GB 64 G B
L (16M) 220 440 1830 7260
M (8M) 410 810 3330 13000
S (4M) 680 1350 5550 21490
•Aspect ratio [X], Quality [ ]
Picture size 2GB 4GB 16 GB 64 G B
L (16M) 70 135 560 2240
M (8M) 81 160 660 2600
S (4M) 88 170 710 2820
∫ Available recording time (when recording motion pictures)
[AVCHD]
•
Recording
quality setting
24H 10 min 00 s 21 min 00 s 1 h 32 min 6 h 13 min
24L 13 min 00 s 28 min 00 s 2 h 4 min 8 h 25 min
FSH 13min 00 s 28 min 00 s 2 h 4min 8 h 25 min
FH 17 min 00 s 37 min 00 s 2 h 43 min 11 h 1 min
SH 13 min 00 s 28 min 00s 2 h 4 min 8 h 25min
H 17 min 00 s 37 min 00 s 2 h 43 min 11 h 1 min
•[MOTION JPEG]
Recording
quality setting
HD 7min 20s 15min 20s 1h 6min 4h 29min
WVGA 18 min 30s 38 min 40 s 2 h 46 min 11h 12 min
VGA 19min 10 s 40 min 10 s 2 h 52 min 11h 39 min
QVGA 53 min 20 s 1 h 51 min 7 h 58 min 32 h 16 min
•
The number of recordable pictures and operating time will increase or decrease in proportion to
the capacity of the card. (These vary depending on the recording conditions and the type of card.)
•Maximum time to record motion pictures continuously with [AVCHD] is 13 hours 3 minutes
20 seconds. Screen will only display up to 13 hours 3minutes 20 seconds. However, the
recording may stop before that depending on the remaining battery level. (P25)
•Motion picture recorded continuously in [MOTION JPEG] is up to 2 GB. Only the maximum
recordable time for 2GB is displayed on the screen.
VQT3A36
30
2GB 4GB 16 GB 64 G B
2GB 4GB 16 GB 64 G B
 Loading...