

Page 1
Playback (advanced)
L
?
SNO
G
SET
S
CT
CANCEL
U
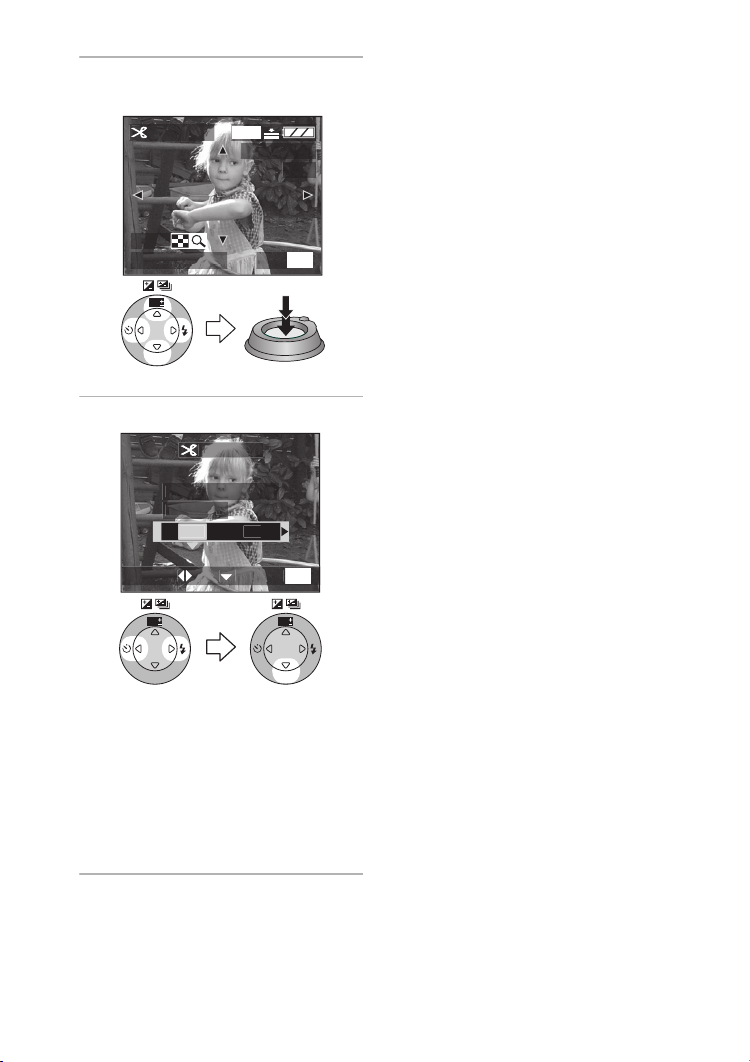
4 Shift the picture and press the
shutter button fully to set.
TRIMMING
1600
100_0001
1/19
ZOOM
TRIM:SHUTTER
WB
R
E
W
V
E
I
SET
EXIT
MENU
5 Select [YES] or [NO] and set it.
TRIMMIN
DELETE ORIGINA
PICTURE
YE
¬
Suggestions/Tips
¬
• The following pictures cannot be
trimmed.
– Pictures equal to or smaller than
640k480 pixels
– Pictures recorded with setting the
picture size to [HDTV]
– Motion images
– Flip animation
– Pictures with audio
– Rotated pictures (You can trim them
if you rotate them back.)
• It may not be possible to trim pictures
recorded with other equipment.
• The picture size of the trimmed
pictures may become smaller than that
of the original one depending on the
cut size.
• The picture quality of the trimmed
picture may be deteriorated.
ELE
WB
R
E
W
V
E
I
SET
• When you select [YES], the picture
is overwritten.
• When the original picture is
protected, you cannot overwrite the
trimmed picture.
• Close the menu by pressing the
[MENU] button 2 times after
finishing the trimming.
MEN
WB
R
E
W
V
E
I
SET
91
Page 2

Formatting the Card
/
SETUP
G
E
T
SET
S
CT
U
O
?
SNO
T
SET
S
CT
Preparation
• Set the mode dial to [ ]. (P29)
1 Select [FORMAT].
RESIZ
TRIMMIN
FORMA
ELE
MENU
WB
R
E
W
V
E
I
SET
2 Select [YES] to format.
FORMA
N THE MEMORY CARD
YE
ELE
MEN
WB
R
E
V
SET
Playback (advanced)
¬
Suggestions/Tips
• Usually, it is not necessary to format
the card (initializing). Format the card
when the message [MEMORY CARD
ERROR] appears.
• If the card has been formatted by a PC
or other equipment, format the card on
the camera again.
• After formatting, recorded pictures and
any other data cannot be recovered.
• If the card is formatted all images
and data will be permanently
erased. They cannot be reclaimed.
W
E
I
If any important pictures are on the
card, please copy them to your PC
before proceeding.
• During formatting, do not turn the
camera off.
• When the remaining battery power
(P13) is low, use the AC adaptor.
• If the card is protected, you cannot
format the card.
• If the card cannot be formatted,
consult your nearest servicentre.
¬
WB
R
E
W
V
E
I
SET
WB
R
E
W
V
E
I
SET
92
Page 3
Playback (advanced)
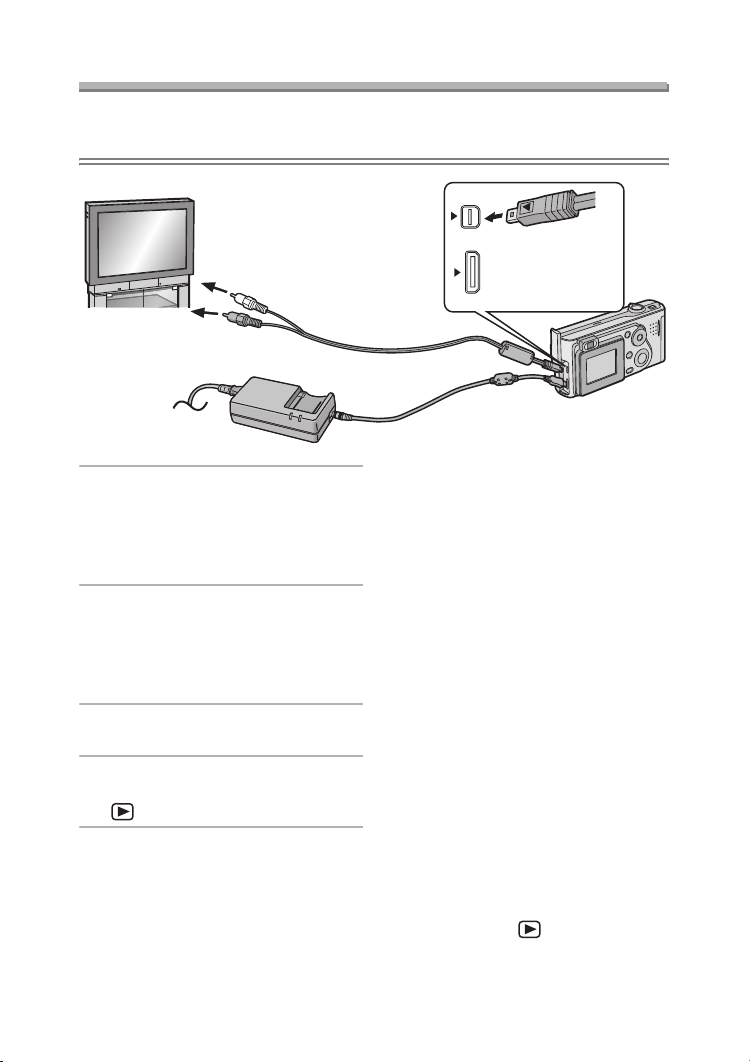
Playing Back Pictures with a TV Screen
ª Playing back pictures with AV cable (supplied)
• Turn the camera and the TV off.
DIGITAL
AV OUT
1
DC IN
2
1 Connect the AV cable to the
[AV OUT] socket of the camera.
• Align the [2] mark on the AV cable
and the [1] mark on the [AV OUT]
socket.
2 Connect the AV cable to the video
input and the audio input sockets
of the TV.
• Yellow: to the video input socket
• White: to the audio input socket
3 Turn the TV on and select external
input.
4 Turn the camera on and then set
the mode dial to playback mode
[].
EXT.
ª Viewing pictures in other
countries
When setting [VIDEO OUT] on the
menu, you can view pictures on a TV in
other countries (regions) which use the
NTSC or PAL system.
ª Playback pictures on TV with SD
Memory Card slot
An SD Memory Card can be played
back on TVs with an SD Memory Card
slot.
If you play back pictures recorded using
[HDTV] mode on a High-Definition TV,
(HDTV has 16:9 aspect) the picture
quality will be higher.
Suggestions/Tips
¬
• When connecting to a TV, we
recommend using the AC adaptor as
the power source.
• Use the supplied AV cable only.
• Only when the mode dial is set to
Playback mode [ ], the image is
displayed on the TV.
• Read the TV operating instructions
too.
¬
93
Page 4
Playback (advanced)
SET
S
CT
US
E
USB
t
ge
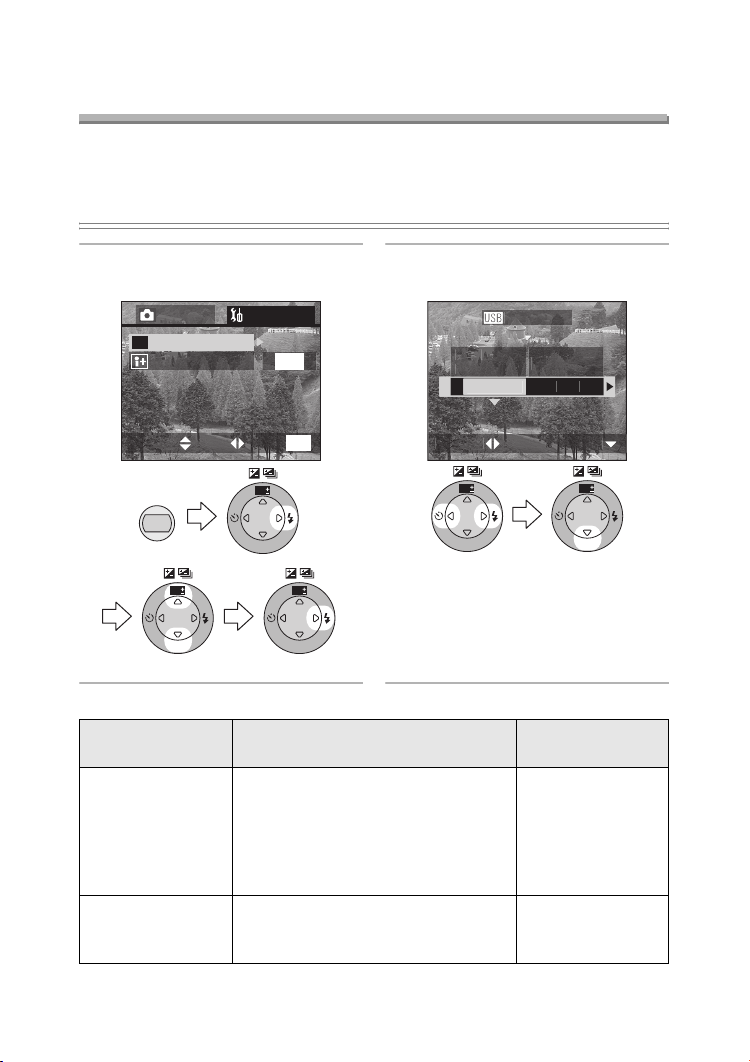
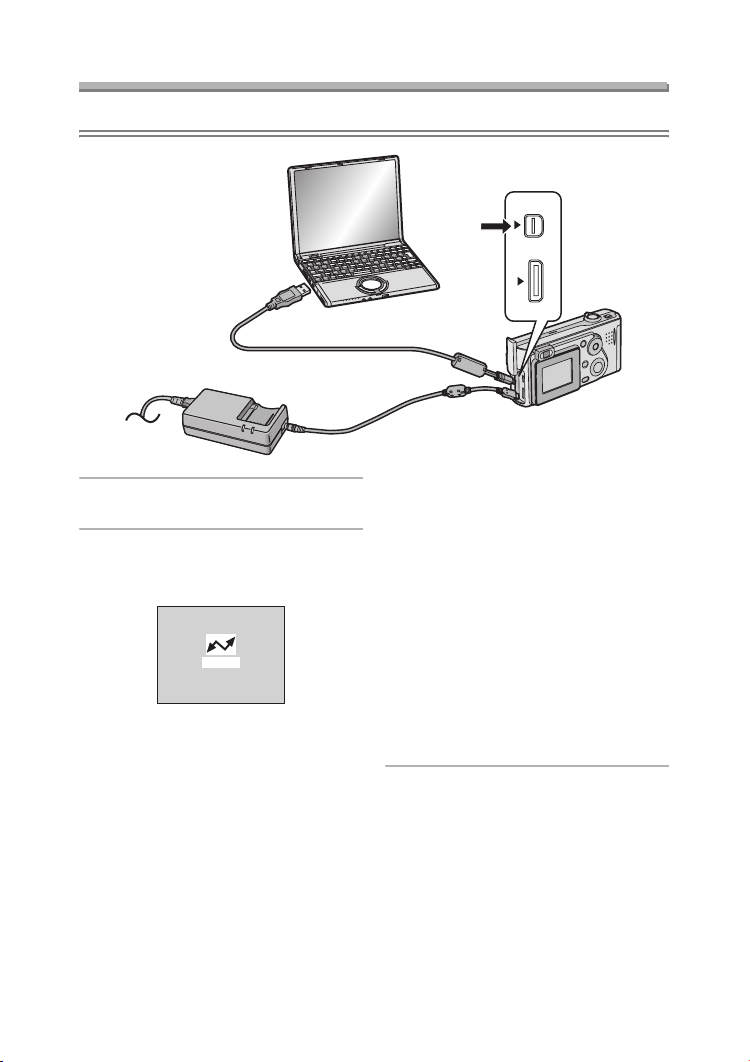
Before Connecting with USB Connection
Cable
Select the USB communication system according to the OS of your PC or your
printer before connecting them to the camera with the USB connection cable
(supplied).
Set the items on [USB MODE] in the [SETUP] menu. (P25)
1 Select [USB MODE].
(In the recording mode)
3
REC SETUP
USB
USB MODE
LANGUAGE
MENU
WB
R
E
W
V
E
I
SET
USB mode PC to be connected
Mass Storage
(USB Direct-Print)
Windows
Windows XP Professional,
Windows 2000 Professional,
Windows Me, Windows 98/98 SE or
Mac OS X (10.1 or above),
Mac OS 9.x
PTP
(PictBridge)
Windows XP Home Edition,
Windows XP Professional or
Mac OS X
/
3
ENG
MENU
EXITSETSELECT
WB
R
E
W
V
E
I
SET
WB
R
E
W
V
E
I
SET
®
XP Home Edition,
2 Select [Mass Storage] or [PTP].
B MOD
Direct-Prin
Mass Storage
ELE
WB
R
E
V
I
SET
PictBrid
W
E
Printers supporting
USB Direct-Print.
Printers supporting
PictBridge.
WB
R
E
W
V
E
I
SET
Printer to be
connected
94
Page 5

Playback (advanced)
US
ª When using Windows 2000 Professional, Windows Me,
Windows 98/98 SE or Mac OS 9.x
• When connecting the camera to a PC, do not set [USB MODE] to [PTP].
(When the camera is shipped, [Mass Storage] is selected.)
• When using Windows 98/98 SE, install the USB driver before connecting. (When
using Windows Me/2000/XP, Mac OS 9.x and Mac OS X, you do not have to install
the USB driver.)
• When connecting to the PC which includes the
above-mentioned OS with setting the [USB MODE] to [PTP],
B MODE
the messages shown on the right appear on the LCD
monitor of the camera.
The following messages appear for each OS on the display of the PC. Select
[Cancel] to close the window and disconnect the PC.
OS Message
Windows 2000 Professional [Welcome to the Found New Hardware
Wizard]
Windows Me
Windows 98/98 SE
[New Hardware Found]>
[Add New Hardware Wizard]
(When you connect to the PC more than
2 times, only [Add New Hardware Wizard]
appears.)
Mac OS 9.x [Software needed for the USB device
“DMC-FX5 or DMC-FX1” is not available.
Would you like to look for the software on the
Internet?]
95
Page 6
Playback (advanced)
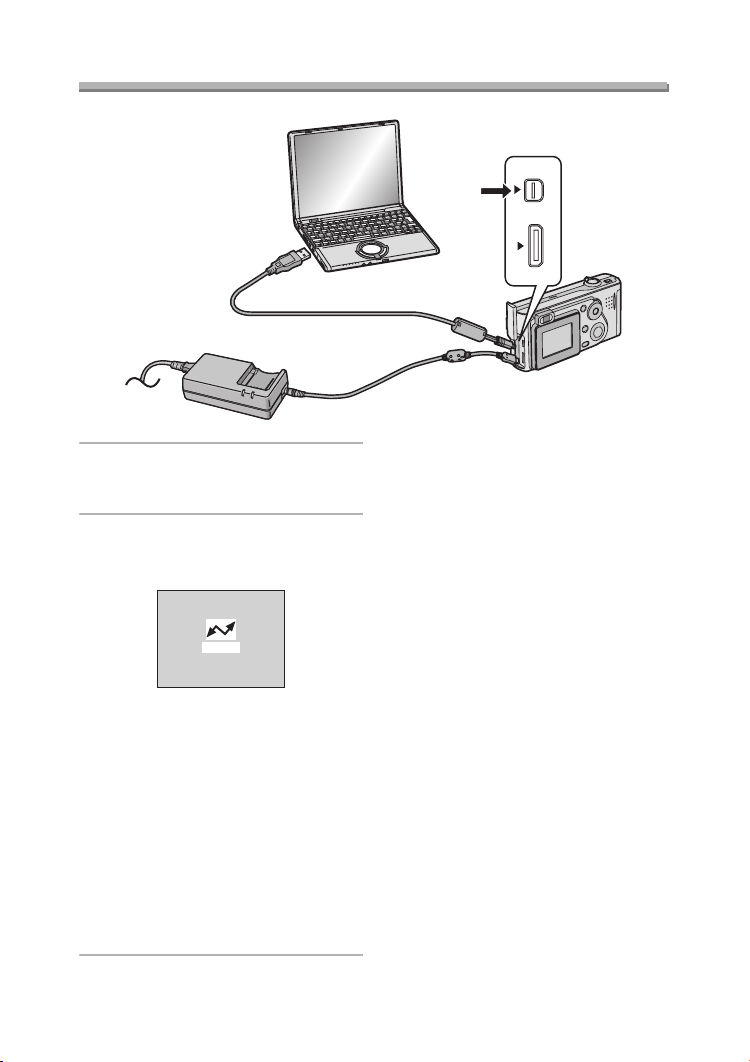
Connecting to a PC (Mass Storage)
¬
1 Turn the camera on and then set
[USB MODE] to [Mass Storage].
(P94)
2 Connect the camera to a PC via
the USB connection cable
(supplied).
ACCESS
[Windows]
The drive appears on the
[My Computer] folder.
• If it is the first time for you to
connect the camera to a PC, the
required driver is installed
automatically so that the camera
can be recognized by the Windows
Plug and Play, then it appears on
the [My Computer] folder.
[Macintosh]
The drive is shown on the screen.
Suggestions/Tips
• The flash/access indicator lights
during communication.
• When connecting to a PC, we
recommend using the AC adaptor as
the power source.
• If the remaining battery power
becomes low during communication,
the status indicator blinks and the
alarm beeps. In this case, stop the
communication. Then turn the camera
off and charge the battery.
• Use the supplied USB connection
cable only.
DIGITAL
AV OUT
DC IN
EXT.
¬
96
Page 7
Playback (advanced)
Connecting to a PC (PTP)
Do not follow the setting below on the OS except for Windows XP and Mac OS X.
DIGITAL
AV OUT
DC IN
EXT.
1 Turn the camera on and then set
[USB MODE] to [PTP]. (P94)
2 Connect the camera to a PC via
the USB connection cable
(supplied).
ACCESS
[Windows]
The camera icon appears on the
[My Computer] folder.
• If it is the first time for you to
connect the camera to a PC, the
required driver is installed
automatically so that the camera
can be recognized by the Windows
Plug and Play, then the camera
icon appears on the [My Computer]
folder.
[Macintosh]
You can read pictures with image
capture or iPhoto.
97
Page 8

Playback (advanced)
¬
Suggestions/Tips
¬
• Refer to P95 carefully when connecting to the OS except for Windows XP and Mac
OS X with setting [USB MODE] to [PTP].
• The flash/access indicator lights during communication.
• When connecting to a PC, we recommend using the AC adaptor as the power
source.
• If the remaining battery power becomes low during communication, the status
indicator blinks and the alarm beeps. In this case, stop the communication. Then
turn the camera off and charge the battery.
• It may take time to display the communication screen depending on the PC.
• You can only load pictures from the camera and cannot write them on the card or
delete them.
• Use the supplied USB connection cable only.
• When there are 1000 or more pictures on the card, the pictures may not be
imported.
• When the PC recovers from the standby mode while connecting it to a camera
with USB connection cables, they may not properly communicate each other.
98
Page 9
Playback (advanced)
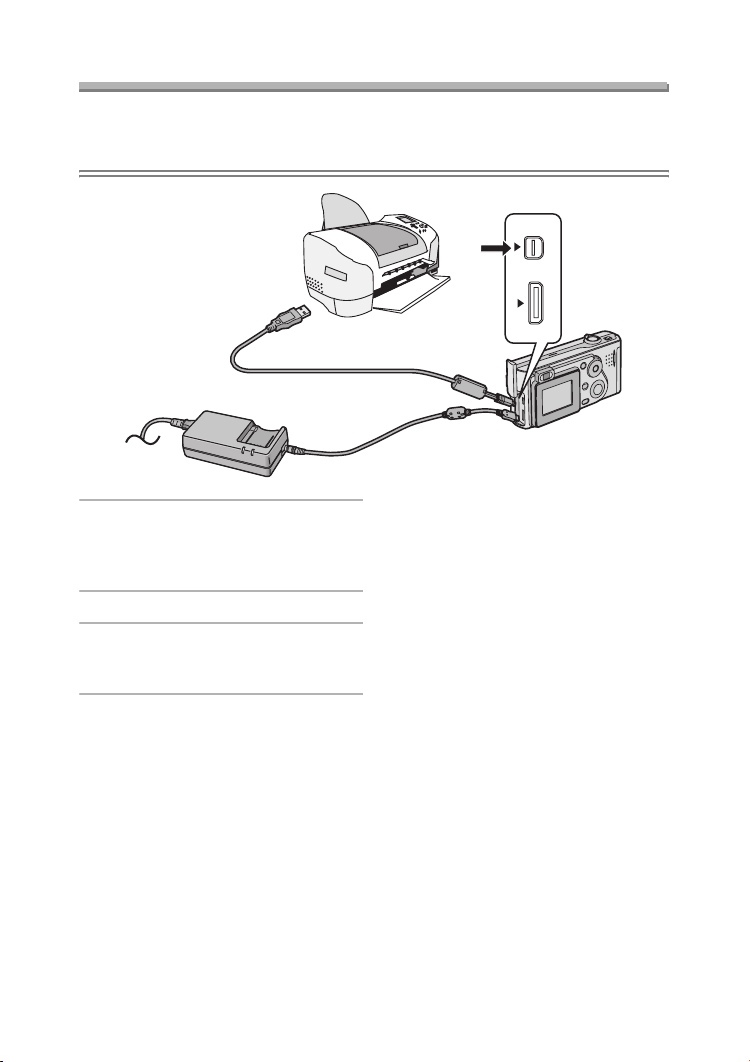
Connecting to a Printer
By connecting the camera directly to a printer supporting PictBridge or USB
Direct-Print via the USB connection cable (supplied), you can select the pictures to
be printed or start printing.
DIGITAL
AV OUT
DC IN
EXT.
¬
1 Turn the camera on and then set
the [USB MODE] to [PTP]
(PictBridge) or [Mass Storage]
(USB Direct-Print). (P94)
2 Turn on a printer.
3 Connect the camera to the printer
via the USB connection cable
(supplied).
Suggestions/Tips
• Ask the manufacturer of the printer
about the corresponding models.
(Read the printer operating
instructions too.)
• If the remaining battery power
becomes low during communication,
the status indicator blinks and the
alarm beeps. In this case, stop the
communication. Then turn the camera
off and charge the battery.
• When connecting to a printer, we
recommend using the AC adaptor as
the power source.
• Disconnect the USB connection cable
and DC cable after printing.
• Use the supplied USB connection
cable only.
¬
99
Page 10

Playback (advanced)
SINGLE
E
OF
E
SET
S
CT
ge
S
CT
600
00_0001
CT
T
ge
9
9
R
G?
Y
CT
COUNT
T
T
SNO
ge
Using a Printer (PictBridge)
Direct printing is enabled between any PictBridge compliant Digital Camera and any
PictBridge compliant printer regardless of the manufacturer.
Preparation
• Connect the camera to a printer. (P99)
• Set the paper size and print quality. (Read the printer operating instructions.)
ª Single picture
1 Select [SINGLE PICTURE].
PictBrid
DP
PICTUR
PICTUR
ELE
WB
R
E
W
V
E
I
SET
WB
R
E
V
I
SET
• The screen shown in step 2
appears when DPOF print is not
set or the printer does not support
DPOF print.
2 Select the picture to print.
PictBrid
PLEASE SELE
THE PICTURE TO PRIN
ELE
1
1
1/1
3 Select [YES] and print.
PictBrid
PLS CHECK THE PRINTE
TART PRINTIN
N
YE
ET
ELE
WB
W
E
R
E
W
V
E
I
SET
• Press the [DISPLAY] button to print
the date. (Only when connecting to
the printer supporting to printing
the date.)
•Press 3 and then press 2/1 to
set the number of prints. Press 4
to print pictures.
• Press the [MENU] button to cancel
1
printing.
DISPLA
E
WB
R
E
W
V
E
I
SET
WB
R
E
W
V
E
I
SET
WB
R
E
W
V
E
I
SET
100
Page 11

Playback (advanced)
E
E
OF
E
T
CT
ge
Y
CTET
R
G?
SNO
ge
Preparation
• Connect the camera to a printer. (P99)
• Set the DPOF print with this camera in advance. (P78)
• Set the paper size and print quality. (Read the printer operating instructions.)
ª DPOF picture
1 Select [DPOF PICTURE].
PictBrid
2 Select [YES] and print.
PictBrid
PLS CHECK THE PRINTE
INGL
DP
PICTUR
E
WB
R
E
W
V
E
I
SET
ELE
WB
R
E
SET
PICTUR
W
V
E
I
• Press the [MENU] button, and you
can change the DPOF print setting.
(P78)
• When printing under the new
settings, disconnect the USB
connection cable and connect it to
TART PRINTIN
YE
DISPLA
ELE
WB
R
E
W
V
E
I
SET
WB
R
E
W
V
E
I
SET
• Press the [DISPLAY] button to print
the date. (Only when connecting to
the printer supporting to printing
the date.)
• Press the [MENU] button to cancel
printing.
the printer again.
¬
Suggestions/Tips
¬
• When the total number of prints becomes 1000 or more, the number of remaining
pictures may appear as [---] on the screen.
• When connecting to a printer not supporting DPOF, DPOF printing cannot be set.
(The DPOF print selecting screen does not appear.)
• Do not disconnect the USB connection cable when the cable disconnection
warning icon [ ] is indicated.
• When the [¥] indication lights in yellow during printing, check if there is no
malfunction on the printer.
• When the printer does not support the date printing by DPOF setting, the date may
not be printed as it is on date setting in DPOF setting.
• The setting on the printer may have priority over the setting on the camera in the
date print. Also check the date print setting on the printer.
101
Page 12

Playback (advanced)
T
CT
T
E
E
OF
E
CT
600
00
_
CT
T
T
R
G?
Y
CT
COUNT
T
T
SNO
T
Using a Printer (USB Direct-Print)
Preparation
• Connect the camera to a printer. (P99)
• Set the paper size and print quality. (Read the printer operating instructions.)
ª Single picture
1 Select [SINGLE PICTURE].
DIRECT PRIN
INGL
DP
PICTUR
E
WB
R
E
V
I
SET
ELE
WB
R
E
SET
PICTUR
W
V
E
I
• The screen shown in step 2
appears when DPOF print is not
set.
2 Select the picture to print.
DIRECT PRIN
PLEASE SELE
THE PICTURE TO PRIN
ELE
1
1
3 Select [YES] and print.
DIRECT PRIN
PLS CHECK THE PRINTE
TART PRINTIN
N
YE
ET
ELE
WB
W
E
R
E
W
V
E
I
SET
• Press the [DISPLAY] button to print
the date.
•Press 3 and then press 2/1 to
set the number of prints. Press 4
to print pictures.
• Press the [MENU] button to cancel
printing.
DISPLA
E
WB
R
E
W
V
E
I
SET
WB
R
E
W
V
E
I
SET
WB
R
E
W
V
E
I
SET
102
Page 13

Playback (advanced)
T
CT
T
E
E
OF
E
R
G?
Y
CT
T
SNO
T
Preparation
• Connect the camera to a printer. (P99)
• Set the DPOF print with this camera in advance. (P78)
• Set the paper size and print quality. (Read the printer operating instructions.)
ª DPOF picture
1 Select [DPOF PICTURE].
DIRECT PRIN
2 Select [YES] and print.
DIRECT PRIN
PLS CHECK THE PRINTE
INGL
DP
PICTUR
E
WB
R
E
W
V
E
I
SET
ELE
WB
R
E
SET
PICTUR
W
V
E
I
• Press the [MENU] button, and you
can change the DPOF print setting.
(P78)
• When printing under the new
TART PRINTIN
YE
DISPLA
ELE
WB
R
E
SET
W
V
E
I
E
WB
R
E
W
V
E
I
SET
• Press the [DISPLAY] button to print
the date.
• Press the [MENU] button to cancel
printing.
settings, disconnect the USB
connection cable and connect it to
the printer again.
¬
Suggestions/Tips
¬
• When the total number of prints becomes 255 or more, the number of remaining
pictures appears as [---] on the screen.
• When you set the date print setting by pressing the [DISPLAY] button, the date is
printed regardless of the date print setting on DPOF setting. (P82)
• When the printer does not support the date printing by DPOF setting, the date may
not be printed as it is on date setting in DPOF setting.
• The setting on the printer may have priority over the setting on the camera in the
date print. Also check the date print setting on the printer.
103
Page 14

Others
Others
After Use
After using the camera, it is recommended that you complete the following steps:
¬
1 Turn the camera off.
OFF ON
• Check that the lens is retracted.
2 Remove the card and the battery.
(P15, 19)
Suggestions/Tips
• If you will not be using the camera for
a long time,
– Remove the battery. (When you
insert the battery again, set the
clock.)
– Do not keep the camera in a place
where it will be subjected to high
temperatures, high humidity or soot.
Fungus may be attached to the lens
or condensation may occur.
– Keep the camera in a cool, dry and
well-ventilated place and avoid
storing near dust or chemicals.
– We recommend keeping it in a
closed case with the desiccant.
¬
104
Page 15

Screen Display
600
0
9
0
0
3
5
#(
5
/
OCUS
004
Others
12 34 5 6 7
1
28
ISO10
27
26
25
24
23
1
1
1
10:00 1.JAN.2
ª In recording
1 Recording mode (P29)
2 Flash (P38)
3 White balance (P58)
4 ISO sensitivity (P64)
5 Picture size (P61)
6 Quality (data compression ratio)
(P62)
/ (Motion rate):
10 fps 30 fps
In Motion image mode (P56)
7 Battery indication (P13)
8 Frame/Time remain
In Motion image mode: e.g. 11S
9 Jitter alert indication (P32)
10 Recording indication
11 Audio recording (P65)
12 Card access indication (P17)
13 Self-timer (P43)
14 Histogram (P28)
15 AF area (P30)
2
1
2.81/2
18
16 AF Trigger (P66)
17 Shutter speed indication (P30)
18 Aperture indication (P30)
19 Exposure compensation (P41)
20
Current date and time (P21)
• This is displayed for about
5 seconds when turning the
camera on, setting the clock and
after switching from the Playback
mode to the Recording mode.
21 Auto bracket (P42)
22 Spot AF area (P63)
23 Spot metering target (P63)
24 Zoom (P37)
Digital zoom ON (P68)
25 Focus indication (P30)
26 Burst (P44)
27 Colour effect (P69)
28 Optical image stabilizer (P71)
F
1719
16
:
105
Page 16

Others
004
1 2345
13
10:00 1. JAN.2
ª In recording in Simple mode
1 Flash (P38)
2 Focus indication (P30)
3 Jitter alert indication (P32)
4 Picture mode (P34)
5 Battery indication (P13)
6 Frame remain
7 Zoom (P37)
8 Recording indication
9 Self-timer (P43)
10 Card access indication (P17)
11 AF area (P30)
12 Current date and time (
• This is displayed for about
5 seconds when turning the
camera on, setting the clock and
after switching from the Playback
mode to the Simple mode.
13 Burst (P44)
P21
)
6
7
8
9
10
11
12
106
Page 17

Others
12 34 56 7
1
14
13
PLAY AUDIO
F2.8 1/25
10:00 1.JAN. 2004
ª In playback
1 Playback mode
2 DPOF (P78, 85)
(White):
1
DPOF setting for printing
(Green):
1
DPOF setting for Slide Show
(Green with number of prints):
1
DPOF setting for printing and
Slide Show
3 Protected picture (P83)
4 Picture with audio (P75)
5 Picture size (P61)
: In Motion image mode
6 Quality (data compression ratio)
(P62)
//:
5 fps 10 fps 30 fps
In Motion image mode
In Simple mode:
:ENLARGE
:4qa6q/10a15cm
:E-MAIL
1600
100-0001
1/19
8
9
10
ISO100
AUTO
11
12
7 Battery indication (P13)
8 Folder/File number
9 Page number/Total pictures
10 Histogram (P28)
• It will be displayed when the
[DISPLAY] button is pressed.
11 Recording information (P27)
(Recording mode/Aperture
indication/Shutter speed/ISO
sensitivity/Flash/White balance)
• It will be displayed when the
[DISPLAY] button is pressed.
12 Recorded date and time
13 Audio playback (P75)
PLAY MOTION
IMAGE
In Motion image mode (P76)
14 Flip animation (P72)
:
107
Page 18

The Menu Items
/
UP
E
Y
E
O
600
F
T
CT
U
/
UP
C.
Y
R
OOM
F
F
O100200
T
CT
U
/
UP
J.
CT
R
1
D
F
/
T
CT
U
CETU
/
W
OR
Y
F
F
E
T
CT
U
CO
CETU
/
T
T
T
CT
U
T
CETU
/
GE
G
E
T
CT
U
ª [REC] mode menu
Others
ET
1
2
3
4
W.BALANCE
PICT.SIZ
UALIT
POT MOD
ELE
E
AUT
1
F
MEN
1 W.BALANCE (P58)
2 PICT.SIZE (P61)
3 QUALITY (P62)
4 SPOT MODE (P63)
REC
5
6
7
8
ENSITIVIT
AUT
AUDIO RE
AF TRIGGE
D.Z
ELE
ET
F
F
E
MEN
5 SENSITIVITY (P64)
6 AUDIO REC. (P65)
7 AF TRIGGER (P66)
8 D.ZOOM (P68)
(The screen is displayed as illustrated in
DMC-FX5.)
10
11
REC
9
L.EFFE
F
PICT.AD
TABILIZE
ET
TANDAR
MODE
12
ELE
E
MEN
9 COL.EFFECT (P69)
10 PICT.ADJ. (P70)
11 STABILIZER (P71)
12 FLIP ANIM. (P72)
RE
13
14
15
16
MONIT
AUTO REVIE
POWER SAV
E
ECONOM
ELE
E
13 MONITOR (P24)
14 AUTO REVIEW (P24)
15 POWER SAVE (P24)
16 ECONOMY (P25)
RE
17
18
19
20
NO.RESE
RESE
LOCK SE
ELE
E
17 BEEP (P25)
18 NO.RESET (P25)
19 RESET (P25)
20 CLOCK SET (P21)
RE
21
22
LANGUA
ELE
B MOD
E
21 USB MODE (P94)
22 LANGUAGE (P26)
F
F
MEN
MEN
EN
MEN
108
Page 19

ª Simple mode menu
MENU
W
GE
/
UP
CT
E
T
OW
.
T
CT
U
/
UP
T
CT
U
G
E
T
OR
E
T
CT
U
U
/
E
E
OUT
T
CT
U
U
/
T
ge
GE
G
• For items without numbers, refer to
those with the same name in [REC]
mode menu.
23
PICT.MODE
ENLAR
SELECT SET EXIT
"/1015cm-
AUTO REVIE
CLOCK SET
MENU
23 PICT.MODE (P34)
ª [PLAY] mode menu
• For items without numbers, refer to
those with the same name in [REC]
mode menu.
ET
24
25
26
27
28
ROTAT
PROTE
DPOF PRIN
LIDE SH
AUDIO DUB
ELE
E
MEN
24 ROTATE (P77)
25 PROTECT (P83)
26 DPOF PRINT (P78)
27 SLIDE SHOW (P85)
28 AUDIO DUB. (P87)
Others
MONIT
32
VOLUM
POWER SAV
ELE
32 VOLUME (P26)
LOCK SE
B MOD
33
VIDEO
LANGUA
ELE
33 VIDEO OUT (P26, 93)
ET
E
MEN
ET
Mass Stora
EN
E
MEN
ET
29
30
31
RESIZ
TRIMMIN
FORMA
ELE
E
MEN
29 RESIZE (P88)
30 TRIMMING (P90)
31 FORMAT (P92)
109
Page 20

Cautions for Use
Others
ª Optimal Use of the Camera
Keep the camera away from
magnetized equipment (such as a
microwave oven, TV, video game
equipment, etc.).
• If you use the camera on or near a TV,
pictures and sounds may be disturbed
due to electromagnetic wave radiation.
• Do not use the camera near a cell
phone because doing so may cause
noise to adversely affect the pictures
and sounds.
• Recorded data may be damaged, or
pictures may be distorted by strong
magnetic fields created by speakers or
large motors.
• Electromagnetic wave radiation
generated by a microprocessor may
adversely affect the camera, causing
the disturbance of pictures and
sounds.
• If the camera is affected by
magnetically charged equipment and
does not function properly, turn the
camera off and remove the battery or
disconnect AC adaptor and then insert
the battery or connect AC adaptor
again. Thereafter, turn the camera on.
Do not use the camera near radio
transmitters or high-voltage lines.
• If you record near radio transmitters or
high-voltage lines, recorded pictures
or sounds may be adversely affected.
Do not spray insecticides or volatile
chemicals onto the camera.
• If the camera is sprayed with such
chemicals, the camera body may be
damaged and the surface finish may
peel off.
• Do not keep rubber or plastic products
in contact with the camera for a long
period of time.
When you use the camera on a rainy
or snowy day or on a beach or similar
place, do not let grit, fine dust or
seawater get into the camera.
• Grit or dust may damage the camera
or card. (Care should be taken when
inserting and removing the card.)
• If seawater splashes onto the camera,
wet a soft cloth with tap water, wring it
well, and use it to wipe the camera
body carefully. Then, wipe it again
thoroughly with a soft, dry cloth.
When carrying this camera, take care
not to drop or hit it.
• The outer case may be destroyed by
the strong shock, and it may cause
malfunction of this camera.
• For storing or transporting the camera,
place it in a bag or case lined with soft
pads to prevent the coating on the
camera body from being worn.
Do not use benzine, thinner or
alcohol for cleaning the camera.
• Before cleaning the camera, remove
the battery or disconnect the AC
adaptor from the electrical outlet.
• The camera body may be deformed
and the surface finish may peel off.
• Wipe the camera with a soft, dry cloth.
To remove stubborn stains, wipe with a
cloth that is soaked in a detergent
diluted with water and afterward finish
wiping with a dry cloth.
110
Page 21

ª Condensation
When using the camera outdoors during
very cold weather, condensation can
form on the camera and lens when you
return to a warm place.
When condensation has taken place:
Turn the camera off and leave the
camera in this condition for about
2 hours. When the camera becomes
close to the ambient temperature, the
condensation disappears naturally.
ª Optimal Use of the Battery
The battery is a rechargeable lithium ion
battery. Its ability to generate power is
based upon the chemical reaction that
takes place inside it. This reaction is
susceptible to the surrounding
temperature and humidity, and, if the
temperature is too high or too low, the
operating time of the battery will be
shorter.
If you drop the battery accidentally,
check to see if the battery body and
terminals are deformed.
Inserting a deformed battery to the
camera may damage the camera.
Be sure to remove the battery after
use.
If it is left inserted to the camera, a
minute amount of current is consumed
even when the camera is turned off. If
the battery is left inserted in the camera
for a long time, discharge takes place.
The battery may become unusable even
after it is charged.
Others
Dispose of an unusable battery.
• The battery has a limited life.
• Do not throw the battery into fire
because it may cause an explosion.
ª Cautions for Storage
Before storing the camera, remove the
card and the battery.
Store all the components in a dry place
with a relatively stable temperature.
(Recommended temperature:
15oC to 25oC,
Recommended humidity: 40% to 60%)
Battery
• Do not leave the camera and the
battery at the place where the
temperature is too high, such as inside
a car during the summer.
• Extremely high or low temperatures
will shorten the life of the battery.
• If the battery is kept in smoky or dusty
places, the terminals may rust and
cause malfunctions.
• Do not allow the battery terminals to
come in contact with metal objects
(such as necklaces, hairpins, etc.).
This can result in a short circuit or heat
generation and, if you touch the
battery in this condition, you may be
badly burned.
• Store the battery in a completely
discharged state. To store the battery
for a long period of time, we
recommend charging it once every
year and storing it again after you
completely use up the charged
capacity.
111
Page 22

Card
• Do not leave the card in places where
there is high temperature or direct
sunlight, or where electromagnetic
waves or static electricity are easily
generated.
• Do not bend or drop the card. The
card or the recorded content may be
damaged.
• After use, be sure to remove the card
from the camera.
• Do not touch the terminals on the back
of the card with your fingers. Do not
allow dirt, dust or water to enter it.
AC adaptor
• If you use the AC adaptor near a radio,
radio reception may be disturbed.
Keep the AC adaptor 1 m or more
away from radio.
• When the AC adaptor is in use, it may
generate whirring sounds. However,
this is not a malfunction.
• After use, be sure to disconnect the
AC mains lead. (If it is left connected,
a minute amount of current is
consumed.)
• Keep the terminal of the AC adaptor
and battery clean.
ª LCD monitor
• In a place with drastic temperature
changes, condensation may form on
the LCD monitor. Wipe it with a soft,
dry cloth.
• If the camera is extremely cold when
you turn the camera on, the image on
the LCD monitor is slightly darker than
usual at first. However, as the internal
temperature increases, it goes back to
the normal brightness.
Others
ª Folder Composition
When a Memory Card with data
recorded on it is inserted into a PC, the
folders shown below will appear.
SD Memory
Card
DCIM
100_PANA
EXPORT
MISC
PRIVATE1
• In the [100_PANA] folder it is possible
to record up to 999 pictures.
• In the [MISC] folder it is possible to
record the files that have been set with
DPOF settings.
• The files recorded in flip animation
function are stored in [PRIVATE1]
folder.
• The motion images created by flip
animation function are store in
[100_PANA] or other folder.
ª Printing pictures recorded with
HDTV mode
When you print pictures recorded by
setting the picture size to [HDTV]
(1920k1080 pixels), both ends of the
pictures may be cut out.
To print pictures with ends:
When you order photo studios to print
pictures:
• Ask the photo studio if the pictures can
be printed with both ends.
When you print pictures with your
printer:
• When using the printer with a trimming
feature or a feature which cuts out
both edges of the pictures, cancel the
feature for printing.
• The feature depends on the printer
used. Refer to the operating
instructions of the printer for details.
112
Page 23

Others
Approximate number of recordable pictures
and the size
Picture
size
Quality
16 MB8 16102017342243
32 MB 17 34 22 43 36 72 47 90
64 MB 35 70 45 88 74 149 96 184
128 MB 72 142 91 178 150 301 195 372
256 MB 144 283 181 354 300 600 390 743
512 MB 291 571 365 714 604 1209 785 1497
Picture
size
Quality
16 MB 69 129 17 34
32 MB 145 270 36 72
64 MB 298 553 74 149
128 MB 602 1118 150 301
256 MB 1200 2229 300 600
512 MB 2418 4491 604 1209
• If you mix fine quality and standard quality, the number of recordable pictures
changes.
2304k1728
(DMC-FX5)
640k480
2048k1536
(DMC-FX1)
1920k1080
(HDTV)
1600k1200 1280k960
113
Page 24

Message Display
Others
[NO MEMORY CARD]
Insert the card.
[THIS MEMORY CARD IS
PROTECTED]
Cancel the card lock.
[NO VALID IMAGE TO PLAY]
Play back after recording or after
inserting the card with a recorded
picture.
[MEMORY CARD FULL]/
[NOT ENOUGH MEMORY IN THE
CARD]
Insert a new card or delete the
unnecessary data.
[MODE DIAL IS NOT IN THE PROPER
POSITION]
This message appears when you turn
the camera on with the mode dial in the
wrong position.
Rotate the mode dial to the proper
position.
[PLEASE SET THE CLOCK]
This message appears when you use
the camera for the first time or you do
not use the camera for a long time.
Set the clock.
[THIS PICTURE IS PROTECTED]
After cancelling the protect setting, you
can delete or overwrite the picture.
[THIS PICTURE CAN’T BE
DELETED] / [SOME PICTURES CAN’T
BE DELETED]
The pictures not based on the DCF
standard cannot be deleted.
[CAN’T BE SET ON THIS PICTURE] /
[CAN’T BE SET ON SOME
PICTURES]
If the pictures are not based on the DCF
standard, the DPOF print cannot be set.
[NO ADDITIONAL DELETE
SELECTIONS CAN BE MADE]
You have exceeded the number of
pictures that can be set at once with
multi-delete setting.
[MEMORY CARD ERROR
FORMAT THIS CARD?]
The format of the card cannot be
recognized by this camera. Format the
card again with this camera.
[SYSTEM ERROR]
This message appears when the
camera does not operate properly. Turn
the camera off and on. If the message
persists, contact the dealer or your
nearest servicentre.
[MEMORY CARD ERROR]
Failed access to the card.
Insert the card again.
[READ ERROR]
Data reading error.
Play it back again.
[WRITE ERROR]
Data writing error.
Turn the camera off and remove the
card. Then insert the card and turn the
camera on again. Be sure that the
camera is turned off before removing or
inserting the card to avoid damage.
114
Page 25

Troubleshooting
Others
1: The camera is not turned on.
1-1: Are the battery inserted or the AC
adaptor correctly connected?
Check the connection.
1-2: Is the battery sufficiently charged?
Use the battery that has been
sufficiently charged.
2: As the camera is turned on, it
turns off immediately.
2: Is the battery charge insufficient to
operate the camera?
Use the battery with charged one.
3: The brightness of the screen
changes dark or bright for a
moment.
3: This phenomenon appears when
pressing the shutter button
halfway to set the aperture value
and does not affect the recorded
pictures.
4: The picture cannot be recorded.
4-1: Is the card inserted?
4-2: Is the mode dial correctly set?
Check it.
4-3: There is no memory capacity left
on the card. Before recording,
delete some pictures.
6: The screen is too bright or dark.
6: Adjust the brightness of the
screen.
7: Flash is not activated.
7: The flash mode is set to forced
OFF. Change the flash mode.
8: Unreadable language was
selected by mistake.
8: Select [ ] icon on the [SETUP]
menu to set the desired language.
9: The subject is not focused
properly.
9-1: The focus range depends on the
recording mode. Set the mode dial
to the mode corresponding to the
distance to the subject.
9-2: Set the [AF TRIGGER] to
[].
SHUTTER
10: The picture is not played back.
10-1: Is the card inserted?
10-2: Is there a picture in the card?
10-3: Is the mode dial set to playback
[]?
5: The picture is not displayed on
the LCD monitor.
5: Is the LCD monitor set to OFF?
Press the [DISPLAY] button
several times to switch to LCD
monitor display.
115
Page 26

11: The picture does not appear on
the television.
11-1: Is the camera connected to the TV
correctly?
Check it.
11-2: Set the TV to video input mode.
12: When connecting to a PC,
pictures cannot be transferred.
12-1: Is the camera connected to the PC
correctly?
Check it.
12-2: Is the camera recognized by the
PC correctly?
12-3: Is the USB mode set correctly?
13: The clock setting is reset.
13-1: If you do not use the camera for a
long time, the clock setting may be
reset. When the message
[PLEASE SET THE CLOCK]
appears, set the clock again.
13-2: When you take a picture before
setting the clock, [0:00 0. 0. 0] is
recorded.
14: Some pixels are inactive or
always lit on the LCD monitor.
14: This is not a malfunction. These
pixels do not affect the recorded
pictures.
Others
15: The pictures cannot be printed
with printers supporting USB
Direct-Print or PictBridge.
15: Is the USB mode set correctly?
116
Page 27

Others
Specifications
Digital Camera Information for your safety
Power Source: DC 4.7 V
Power Consumption: 2.2 W (When recording with LCD Monitor to on)
1.0 W (When recording with LCD Monitor to off)
1.3 W (When playing back with LCD monitor)
Camera Effective pixels 4,000,000 pixels (DMC-FX5)
Image sensor 1/2.5 inch CCD
Lens Optical 3k zoom, fl5.8 – 17.4 mm (35 mm film camera
Digital zoom Max. 3k
Focus TTL Auto/Macro
Focus range 50 cm – ¶,
Shutter system Electronic shutteriMechanical shutter
Burst recording 4 frames/second (high speed), 2 frames/second (low
Motion image recording 320k240 pixels
ISO sensitivity AUTO (without flash: from ISO50 to 200/
Shutter speed 8 – 1/2,000th
White balance AUTO/Daylight/Cloudy/Halogen/White set
Exposure (AE) Programme AE
Metering mode Multi/Spot (Spot mode)
LCD monitor 1.5 inch low-temperature polycrystalline TFT LCD
Optical finder Real-image zoom finder
3,200,000 pixels (DMC-FX1)
Total pixel number 4,230,000 pixels (DMC-FX5)
Total pixel number 3,340,000 pixels (DMC-FX1)
Primary colour filter
equivalent: 35 –105 mm)/F2.8 –4.9
Spot AF (Spot mode)
Macro/Simple mode: 10 cm (Wide)/30 cm (Tele)– 
speed)
Max. 7 frames (standard)/Max. 5 frames (fine)
(DMC-FX5)
Max. 8 frames (standard)/Max. 5 frames (fine)
(DMC-FX1)
(Performance is only with SD Memory Card.
MultiMediaCard performance will be less.)
(30 or 10 frames/second with audio. The maximum
recording time depends on the capacity of the card.)
with flash: from ISO100 to 200)/50/100/200 (DMC-FX5)
AUTO (without flash: from ISO50 to 200/
with flash: from ISO100 to 200)/50/100/200/400
(DMC-FX1)
Motion image mode: 1/30th – 1/2,000th
Exposure compensation (1/3 EV Step, j2–i2 EV)
(114,000 pixels) (field of view ratio about 100%)
117
Page 28

Others
Flash Flash range: (ISO200/AUTO)
Approx. 40 cm – 3.3 m (Wide)/
Approx. 40 cm – 2 m (Tele)
AUTO, AUTO/Red-eye reduction, Forced ON,
Slow sync./Red-eye reduction, Forced OFF
Microphone Monaural
Speaker Monaural
Recording media SD Memory Card/MultiMediaCard
Picture size 2304k1728 pixels, 1600k1200 pixels,
1280k960 pixels, 640k480 pixels, 1920k1080 pixels
(Still picture) (DMC-FX5)
2048k1536 pixels, 1600k1200 pixels,
1280k960 pixels, 640k480 pixels, 1920k1080 pixels
(Still picture) (DMC-FX1)
320k240 pixels (Motion image)
Quality Fine/Standard
Recording file format
Still Picture JPEG (Design rule for Camera File system, based on
Exif 2.2 standard), DPOF corresponding
Picture with audio JPEG (Design rule for Camera File system, based on
Exif 2.2 standard)i640k480 pixels
QuickTime (picture with audio)
Motion images QuickTime Motion JPEG (motion images with audio)
Interface
Digital USB 1.1
Analogue video/audio NTSC/PAL Composite/Audio line output (monaural)
Terminal
DIGITAL/AV OUT Dedicated jack (8 pin)
DC IN/EXT. Dedicated jack (14 pin)
Dimensions (WkHkD) 107.7k50.9k27.4 mm
(excluding the projection part)
Weight Approx. 165 g
(excluding Memory Card and battery)
Approx. 185 g (with Memory Card and battery)
Operating Temperature 0oC–40oC
Operating Humidity 10% – 80%
Battery Charger/AC Adaptor
(Panasonic DE-929B) Information for your safety
Input 110 – 240 V 50/60 Hz, 0.22 A
Output DIGITAL CAMERA 4.7 V 1.5 A
CHARGE 4.2 V 0.65 A
Battery Pack (lithium-ion)
(Panasonic CGA-S001E) Information for your safety
Voltage/capacity 3.6 V, 680 mAh
118
Page 29

MEMO
119
Page 30

B
VQT0G60
F0104Mr0 ( 3000A )
C
Matsushita Electric Industrial Co., Ltd.
Web Site: http://www.panasonic.co.jp/global/
 Loading...