

Page 1
Basic Operating Instructions
Digital Camera
Model No. DMC-FT10
Before use, please read these instructions
completely.
Please also refer to the Operating Instructions
(PDF format) contained on the CD-ROM
(supplied).
You can learn about advanced operation methods and check the
Troubleshooting.
GN
VQT2X57
Page 2

To prevent water entering the camera, please be sure to read
‘(Important) About the waterproof/dustproof and anti-shock
performance of the camera’ (→6) and ‘Camera care and the waterproof
performance’ (→8) before using the camera underwater.
Dear Customer,
We would like to take this opportunity to thank you for purchasing this Panasonic
Digital Camera. Please read these Operating Instructions carefully and keep them
handy for future reference. Please note that the actual controls and components,
menu items, etc. of your Digital Camera may look somewhat different from those
shown in the illustrations in these Operating Instructions.
Carefully observe copyright laws.
• Recording of pre-recorded tapes or discs or other published or broadcast material
for purposes other than your own private use may infringe copyright laws. Even
for the purpose of private use, recording of certain material may be restricted.
Information for Your Safety
WARNING:
TO REDUCE THE RISK OF FIRE, ELECTRIC SHOCK OR PRODUCT
DAMAGE,
• DO NOT LET WATER OR OTHER LIQUIDS DRIP OR SPLASH
INSIDE THE UNIT.
• DO NOT EXPOSE ACCESSORIES (BATTERY PACK, BATTERY
CHARGER, AC ADAPTOR, SD MEMORY CARD AND ETC.) TO
RAIN, MOISTURE, DRIPPING OR SPLASHING AND THAT NO
OBJECTS FILLED WITH LIQUIDS, SUCH AS VASES, SHALL BE
PLACED ON THEM.
• USE ONLY THE RECOMMENDED ACCESSORIES.
• DO NOT REMOVE THE COVER (OR BACK); THERE ARE NO
USER SERVICEABLE PARTS INSIDE. REFER SERVICING TO
QUALIFIED SERVICE PERSONNEL.
IF THE POWER CORD OF THIS EQUIPMENT IS DAMAGED, IT MUST
BE REPLACED WITH AN ELECTRICALLY APPROVED POWER CORD.
THE SOCKET OUTLET SHALL BE INSTALLED NEAR THE
EQUIPMENT AND SHALL BE EASILY ACCESSIBLE.
■
Product identification marking
Product Location
Digital camera Bottom
Battery charger Bottom
■
About the battery pack
CAUTION
Danger of explosion if battery is incorrectly replaced. Replace only with
the same or equivalent type recommended by the manufacturer.
Dispose of used batteries according to the manufacturer’s instructions.
• Do not heat or expose to flame.
• Do not leave the battery(ies) in an automobile exposed to direct
sunlight for a long period of time with doors and windows closed.
Warning
Risk of fire, explosion and burns. Do not disassemble, heat above
60 °C or incinerate.
■
About the battery charger
CAUTION!
• DO NOT INSTALL OR PLACE THIS UNIT IN A BOOKCASE, BUILT-IN
CABINET OR IN ANOTHER CONFINED SPACE. ENSURE THE UNIT IS
WELL VENTILATED. TO PREVENT RISK OF ELECTRIC SHOCK OR FIRE
HAZARD DUE TO OVERHEATING, ENSURE THAT CURTAINS AND ANY
OTHER MATERIALS DO NOT OBSTRUCT THE VENTILATION VENTS.
• DO NOT OBSTRUCT THE UNIT’S VENTILATION OPENINGS WITH
NEWSPAPERS, TABLECLOTHS, CURTAINS, AND SIMILAR ITEMS.
• DO NOT PLACE SOURCES OF NAKED FLAMES, SUCH AS LIGHTED
CANDLES, ON THE UNIT.
• DISPOSE OF BATTERIES IN AN ENVIRONMENTALLY FRIENDLY MANNER.
• The battery charger is in the standby condition when the AC power supply cord
is connected. The primary circuit is always “live” as long as the power cord is
connected to an electrical outlet.
2 VQT2X57 (ENG) (ENG) VQT2X57 3
Page 3

■
Cautions for Use
• When using an AC adaptor, use the AC cable supplied with the AC adaptor.
• Do not use any other AV cables except the supplied one.
• Do not use any other USB connection cables except the supplied one.
In the event of abnormal operation (e.g. if the unit emits smoke or an unusual
smell), immediately stop operating the unit and consult the Panasonic Customer
Care Centre on 132600.
Keep the camera as far away as possible from electromagnetic equipment
(such as microwave ovens, TVs, video games etc.).
• If you use the camera on top of or near a TV, the pictures and sound on the
camera may be disrupted by electromagnetic wave radiation.
• Do not use the camera near cell phones because doing so may result in noise
adversely affecting the pictures and sound.
• Recorded data may be damaged, or pictures may be distorted, by strong
magnetic fields created by speakers or large motors.
• Electromagnetic wave radiation generated by microprocessors may adversely
affect the camera, disturbing the pictures and sound.
• If the camera is adversely affected by electromagnetic equipment and stops
functioning properly, turn the camera off and remove the battery or disconnect
AC adaptor (DMW-AC5G; optional). Then reinsert the battery or reconnect AC
adaptor and turn the camera on.
Do not use the camera near radio transmitters or high-voltage lines.
• If you record near radio transmitters or high-voltage lines, the recorded pictures
and sound may be adversely affected.
-If you see this symbol-
Information on Disposal in other
Countries outside the European
Union
This symbol is only valid in the
European Union.
If you wish to discard this product,
please contact your local authorities or
dealer and ask for the correct method of
disposal.
Contents
Information for Your Safety .......2
Before use
(Important) About the waterproof/
dustproof and anti-shock
performance of the camera
Camera care and the waterproof
performance ................................8
Using the camera underwater .......... 8
Opening and closing the card/
battery door and terminal cover .......9
Causes of water entering the
camera ...........................................10
Cleaning the rubber seals ..............11
Care after using the camera at a
beach or in the sea or a river .........14
Standard accessories ..............16
Names of parts..........................18
Cursor button .................................19
Preparations
Charging the battery ................20
Inserting and removing the card
(optional)/the battery ................22
Picture save destination
(cards and built-in memory) ...........23
Setting the Clock ......................24
Setting the menu ......................25
........6
Basics
Taking pictures with
automatic settings
[INTELLIGENT AUTO] Mode ....26
Selecting the Recording Mode
...28
Taking motion pictures
[MOTION PICTURE] Mode ........29
Viewing your pictures
[NORMAL PLAY] .......................30
Deleting pictures ......................30
Others
Reading the Operating
Instructions (PDF format) ........31
Specifications ...........................33
4 VQT2X57 (ENG) (ENG) VQT2X57 5
Page 4
(Important) About the waterproof/dustproof
and anti-shock performance of the camera
• Observe the following precautions, and avoid using the camera in
locations subject to high water pressure. The camera’s waterproof and
dustproof performance complies with IPX8 and IP6X.
Provided the usage and storage precautions in this document are
strictly observed, the camera can record underwater in a depth up to
3 m, for a time up to 60 minutes.
• The camera complies with MIL-STD 810F (Method 516.5-Shock). The
camera has cleared a drop test from a height of 1.5 m onto 3 cm thick
plywood. In most cases, the camera should not sustain any damage if
dropped from a height of 1.5 m or less. (→35)
• The supplied accessories are not waterproof (excluding the hand strap
and silicone jacket).
1
∗
This means that the camera can be used underwater for the
specified time and specified pressure, in accordance with the
handling method described by Panasonic. This is not a guarantee of
no breakdowns, no malfunctions, or complete waterproofing under all
conditions.
2
∗
This is not a guarantee of no breakdowns, no malfunctions, or
complete waterproofing under all conditions.
Observe the precautions described in the following section ‘Handling
the camera’. Avoid using the camera in water pressure that exceeds the
guaranteed performance, or in environments with excessive dust or sand.
The waterproof performance is not guaranteed if the camera is subjected
to an impact, such as being hit or dropped.
If the camera is subjected to an impact, it is recommended that you
contact a Panasonic Service Centre to have the camera inspected
(subject to a fee) for its waterproof performance. Any malfunction caused
by the customer’s mishandling, such as water entering the camera, is not
covered by the warranty.
1
∗
2
∗
■
Handling the camera
• Do not leave the camera for a long time in a cold environment where
the temperature is very low (such as a ski resort) or very high at
40 °C or higher (in particular locations such as under strong sunlight,
inside a hot vehicle, near a heater, on a ship, or on a beach).
(The waterproof performance will deteriorate.)
• The inside of the camera is not waterproof. Do not open or close the
card/battery door or terminal cover close to water by the sea, a lake
or river, or with wet hands.
• The waterproof function of the camera is for sea water and fresh
water only.
• Operation may not be possible or the sound may be low if snow
or water freezes on the zoom button, Power button, speaker or
microphone in a cold environment such as a ski resort.
• The lens and LCD monitor may cloud up due to changes in
temperature and humidity. For details, read (→7) of the Operating
Instructions (PDF format) contained on the CD-ROM.
■
About the [PRECAUTIONS] display
Check this information in advance to maintain
the waterproof performance.
When the card/battery door is fully closed and the
power is turned on for the first time after purchase,
[PRECAUTIONS] is displayed.
Select [YES] with ◄, and then press [MENU/SET]
• When [NO] is selected, the clock setting screen is displayed.
Check the [PRECAUTIONS] on the screen
► : View the next screen
◄ : Return to the previous screen
[MENU/SET] : Cancel
After the final screen (11/11), press [MENU/SET] to finish
• When [NO] is selected on the first screen or [MENU/SET] is pressed to
cancel partway through the screens, [PRECAUTIONS] is displayed every
time the power is turned on.
• The information can also be checked from [PRECAUTIONS] in the
[SETUP] menu.
6 VQT2X57 (ENG) (ENG) VQT2X57 7
Page 5
Camera care and the waterproof
performance
To prevent water from entering the camera, be sure to observe the
following before use.
■
Do not open or close the card/battery door or terminal
cover in sandy or dusty locations, while close to water, or
with wet hands.
When the camera is used in the locations described above, sand or
dust may enter through the gaps of the card/battery door or terminal
cover and adhere to the camera without you knowing. Make sure in
advance that the levels of the battery and card memory are sufficient.
■
The use of the supplied silicone jacket is recommended
Opening and closing the card/battery door and terminal cover
At the time of purchase, the [LOCK] switches of the card/battery door and
terminal cover are in the locked position.
■
[LOCK] switch position
: Locked position
: Unlocked position
: [LOCK] switch
: Terminal cover
: Card/Battery door
to prevent the card/battery door or terminal cover from
opening unexpectedly.
■
■
The performance of the camera’s rubber seal starts to
deteriorate after 1 year.
It is recommended that you contact a Panasonic Service Centre at
least once a year to have the rubber seal replaced (subject to a fee).
Using the camera underwater
Use this camera in a water depth of 3 m or less, in a water temperature
●
range of 0 °C to 40 °C, and do not use continuously underwater for
longer than 60 minutes.
Do not use in hot water exceeding 40 °C (such as a bath or hot springs).
●
Do not open or close the card/battery door or terminal cover.
●
Do not subject the camera to an impact underwater. (It may impair the
●
waterproof performance and allow water to enter.)
Do not dive into the water holding the camera. Do not use in locations
●
subject to strong water flows, such as in rapids or under waterfalls. (The
strong water pressure may cause a malfunction.)
The camera sinks in water. Attach the camera securely to yourself, such
●
as by wearing the hand strap around your wrist, to prevent you from
dropping and losing the camera.
If the camera is splashed by substances such as detergent, soap, hot spring
●
water, bath powder, sun oil, sunscreen or chemicals, wipe off immediately.
The card and battery are not waterproof. Do not handle them with wet
●
hands. Further, do not insert a wet card or battery into the camera.
To open
Slide the [LOCK] switch in the direction of
the arrow until the red area ( ) is visible
The lock is unlocked.
Slide the release lever ( ) to the [LOCK]
switch side
The card/battery door and terminal cover open.
■
To close
While the [LOCK] switch is unlocked,
push the card/battery door and terminal
cover closed until they click
• To prevent water from entering the camera,
make sure that no foreign objects are trapped in
the card/battery door and terminal cover, such
as liquid, sand, hair or dust.
• If the door or cover is closed while the [LOCK]
switch is locked, it may cause damage or let
water enter the camera.
Lock the [LOCK] switch by sliding it in
the direction of the arrow until the red
area is no longer visible
• If the camera is used while a door or cover is
not closed properly, it may open.
8 VQT2X57 (ENG) (ENG) VQT2X57 9
Page 6
Camera care and the waterproof
performance
(Continued)
Causes of water entering the camera
When the camera is used in the following conditions, a gap may be
formed between the camera and the card/battery door or terminal cover,
allowing water to enter and causing a malfunction.
• When the rubber seal has deteriorated
• When the [LOCK] switch of the card/battery door or terminal cover is
not locked
• When foreign objects such as lint, hair or sand are adhered to the inner
side of the card/battery door or terminal cover (rubber seal or rubber
seal contact area) and are trapped
: Foreign object
: Terminal cover
: Rubber seal
: Rubber seal contact
area
: Card/Battery door
A gap forms and
allows water to
enter
Cleaning the rubber seals
When a foreign object (such as hair, sand, dust or liquid) adheres to the
rubber seal or rubber seal contact area, water may enter within a few
seconds and cause a malfunction.
• When cleaning, make sure that no foreign objects get inside the
camera.
• Be especially careful when removing very small or wet sand particles.
Make sure that there are no foreign objects adhered to the inner
side of the card/battery door or terminal cover ( rubber seal
or rubber seal contact area)
: Terminal cover
: Rubber seal
: Rubber seal
contact area
: Card/
Battery door
: Hair or lint
: Sand or dust
: Crack or
deformation
: Liquid
• When the rubber seal attached to the inner side of the card/
battery door or terminal cover is cracked or deformed, contact
a Panasonic Service Centre.
(Continued on next page)
10 VQT2X57 (ENG) (ENG) VQT2X57 11
Page 7
Camera care and the waterproof
performance
(Continued)
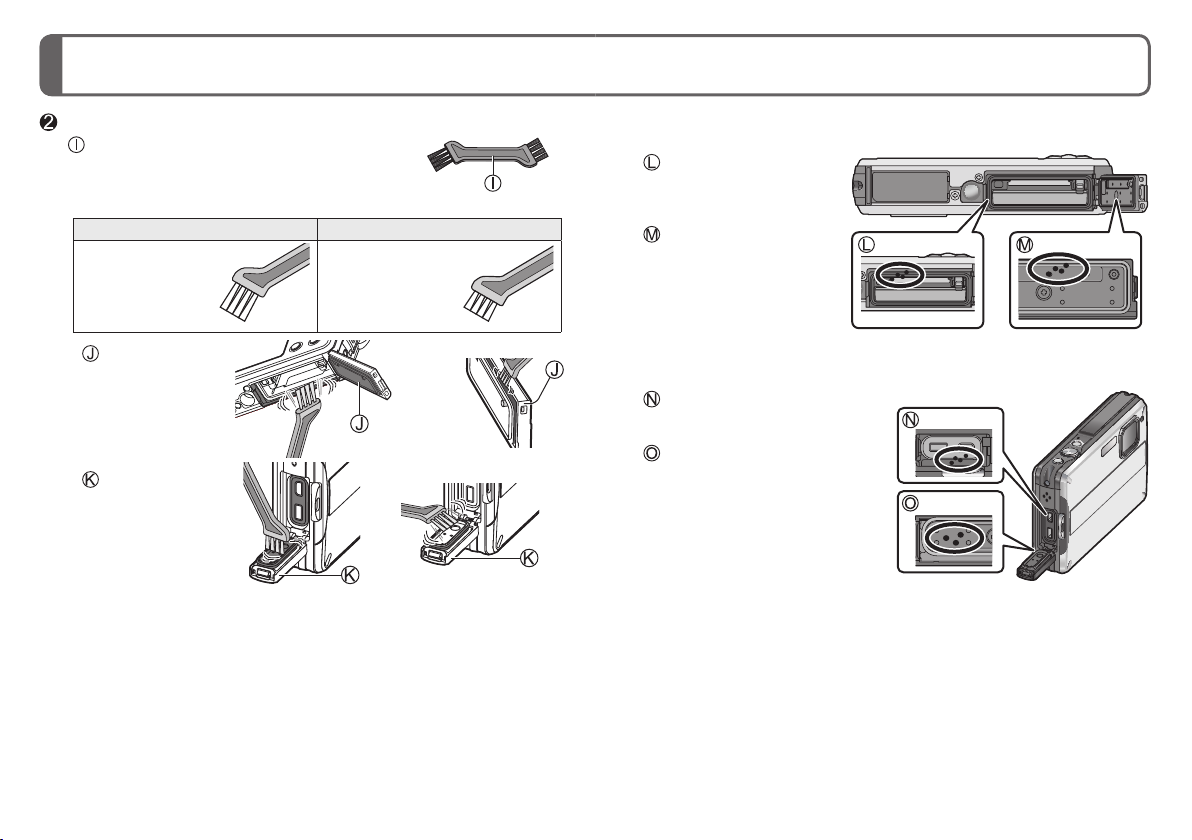
Remove adhered foreign objects with the supplied brush
: Brush (supplied)
Long brush Short brush
Use to remove
substances such
as fine or dry
sand.
: Card/
Battery door
: Terminal cover
Use to remove
large foreign
objects, and
substances such
as wet sand.
■
Example of foreign objects on the inner side of the card/
battery door
: Rubber seal contact
area
(around the card/
battery compartment)
: Rubber seal area
(around the card/
battery door)
■
Example of foreign objects on the inner side of the
terminal cover
: Rubber seal contact area
(around the connection
socket)
: Rubber seal area
(around the terminal cover)
If liquid is adhered, wipe it off with a soft and dry cloth.
●
Foreign objects may also adhere to the grooves on the side of a rubber
●
seal or at its corners. Clean with a brush.
Handling the brush
●
• Before using the brush, make sure that no foreign objects are
adhered to it.
• After using the brush, clean it by removing any adhered foreign
objects.
12 VQT2X57 (ENG) (ENG) VQT2X57 13
Page 8

Camera care and the waterproof
performance
Care after using the camera at a beach or in the sea or a river
Perform the following care procedure within 60 minutes of using the
camera at a beach or in the sea or a river, etc.
Rinse with water while the card/battery
door and terminal cover are closed,
or if the camera was used in the sea,
soak in a shallow container filled with
fresh water for approx. 10 minutes
: Locked position
• If the silicone jacket is attached, be sure to
remove it before rinsing the camera.
• Leaving foreign objects or saline substances
adhered to the camera may cause damage,
discolouration, corrosion, abnormal odors, or
deterioration.
Hold the camera with the speaker (terminal
cover side) facing down, and gently shake
it several times to drain the water
• If water accumulates in the speaker, the
sound volume may drop or distort.
• To prevent the camera from being dropped,
wear the hand strap securely.
Wipe off the water droplets, and let the
camera dry by standing it for a while
on a dry cloth in a well ventilated and
shaded area
• Do not use a device such as a hair dryer to
dry the camera.
Make sure that there are no water
droplets on the camera, and then open
the door and cover
If water droplets or sand remain adhered
to the inner side of the card/battery door
or terminal cover, remove them with a
brush (supplied) or a soft and dry cloth
14 VQT2X57 (ENG) (ENG) VQT2X57 15
(Continued)
■
About the water drainage structure
The camera has a water drainage structure.
Water that enters gaps such as those around the
Power button or zoom button flows to the outside.
For this reason, bubbles may appear when the camera
is soaked in water, but this is not a malfunction.
• Water may accumulate around the card/battery compartment or the
connection sockets after using the camera underwater or soaking it in
fresh water. If the card/battery door is opened while the camera is not
completely dry, water droplets may adhere to the card or battery. If
this happens, be sure to wipe with a soft and dry cloth.
• Do not open or close the card/battery door or terminal cover while
there are water droplets on the camera. The water droplets may get
inside the camera and cause condensation or a malfunction.
• Example of water droplets around the card/
battery compartment
: Water droplets
: Battery
: Card
If water droplets or dirt are adhered to the camera, wipe them off with a
●
soft and dry cloth.
After using the camera underwater, do not leave it for more than
●
60 minutes without performing the care procedure. The waterproof
performance may deteriorate.
If the buttons such as button or Power button do not move smoothly,
●
it may be because there are adhered foreign objects. Continuing to
use the camera in such a state may result in a malfunction where the
camera becomes inoperable. Shake the camera well in fresh water to
wash off any foreign objects. Then, confirm that buttons move smoothly.
Water, sand and other foreign objects easily enter the speaker, so after
●
using the camera, be sure to rinse with water and then shake it gently
several times to remove any water droplets.
Do not dry the camera with hot air, such as from a hair dryer.
●
Deformation may deteriorate the waterproof performance.
Do not use soap, neutral detergents, or chemicals such as benzine,
●
thinner, alcohol or cleansers.
Page 9

Standard accessories
Check that all the accessories are supplied before using the camera. Part
numbers are as of July 2010.
Battery pack
DMW-BCH7E
• Charge the battery
before use.
Battery pack is indicated as
battery pack or battery in the
text.
Battery charger
DE-A76A
Battery charger is indicated as
battery charger or charger in
the text.
Battery case
VGQ0J54
Silicone jacket
VMG1951
• The silicone jacket
is placed under the
main unit.
Brush
VYC1013
AC Cable
K2CJ29A00002
Hand strap
VFC4393
USB connection
cable
K1HA08AD0001
AV cable
K1HA08CD0027
CD-ROM
VFF0686
• Software:
Use it to install the
software on your
PC.
• Operating
Instructions
• The supplied accessories are not waterproof (excluding the hand strap
and silicone jacket).
• Keep the Brush out of reach of children to prevent swallowing.
• Cards are optional. You can record or play back pictures on the built-in
memory when you are not using a card.
• Consult the dealer or your nearest servicentre if you lose the supplied
accessories. (You can purchase the accessories separately.)
• Please dispose of all packaging appropriately.
16 VQT2X57 (ENG) (ENG) VQT2X57 17
Page 10

Names of parts
Hand strap eyelet
Cursor button
The illustrations and screens in this manual may differ from the actual
product.
button
Shutter button
Power button
LCD monitor
[MODE] button
Cursor button
[DISPLAY] button
[Q.MENU]/
(Delete) button
Microphone
Self-timer indicator/
AF Assist Lamp
Lens
Flash
Zoom button
Speaker
Terminal cover
Release lever
[LOCK] switch
Playback button
[MENU/SET]
(menu display/set/finish)
Left cursor button (◄)
• Self-timer
Down cursor button (▼)
• Macro mode
In this manual, the button that is used is shaded or indicated
●
by▲▼◄►.
We recommend using the supplied hand
strap to avoid dropping the camera.
The camera sinks in water. Attach the camera
securely to yourself, such as by wearing the
strap around your wrist, to prevent you from
dropping and losing the camera.
[AV OUT/DIGITAL] socket
Up cursor button (▲)
• Exposure
Compensation
Right cursor button (►)
• Flash
Card/Battery door
Tripod receptacle
• Ensure that the tripod is stable.
Release lever
[LOCK] switch
[DC IN] socket
Always use a genuine Panasonic AC adaptor (DMW-AC5G: optional).
●
If while recording motion pictures using the AC adaptor the power
●
supply is cut off due to a power cut or if the AC adaptor is disconnected
etc., the motion picture being recorded will not be recorded.
18 VQT2X57 (ENG) (ENG) VQT2X57 19
Page 11

Charging the battery
■
About batteries that you can use with this unit
The battery that can be used with this unit is DMW-BCH7E.
It has been found that counterfeit battery packs which look very
similar to the genuine products are made available to purchase
in some markets. Some of these battery packs are not adequately
protected with internal protection to meet the requirements of
appropriate safety standards. There is a possibility that these
battery packs may lead to fire or explosion. Please be advised
that we are not liable for any accident or failure occurring as a
result of use of a counterfeit battery pack. To ensure that safe
products are used we recommend that a genuine Panasonic
battery pack is used.
• Use the dedicated charger and battery.
• The camera has a function for distinguishing batteries which can
be used safely. The dedicated battery (DMW-BCH7E) supports
this function. The only batteries suitable for use with this unit
are genuine Panasonic products and batteries manufactured by
other companies and certified by Panasonic. (Batteries which do
not support this function cannot be used). Panasonic cannot in
any way guarantee the quality, performance or safety of batteries
which have been manufactured by other companies and are not
genuine Panasonic products.
• The battery is not charged when the camera is shipped. Charge
the battery and set the clock before use.
• Charge the battery with the charger indoors (10 °C to 30 °C).
Insert the battery terminals and attach
the battery to the charger
Ensure [LUMIX] faces outwards.
1
2
Connect the charger to the electrical outlet
Charging light
([CHARGE])
On: Charging in progress
(approx. 110 min. if
fully depleted)
Off: Charging complete
Detach the battery after charging is completed
■
Guidelines for the number of recordable pictures and
recording time
Number of recordable
pictures
Recording time Approx. 150 min
Playback time Approx. 260 min
Recording conditions by CIPA standard
• CIPA is an abbreviation of [Camera & Imaging Products Association].
• [NORMAL PICTURE] Mode
• Temperature: 23 °C/Humidity: 50 %RH when LCD monitor is on.
• Using a Panasonic SD Memory Card (32 MB).
• Using the supplied battery.
• Starting recording 30 seconds after the camera is turned on. (When the
Optical Image Stabilizer function is set to [AUTO].)
Recording once every 30 seconds with full flash every second recording.
•
•
Perform a zoom operation every recording (W end → T end, or T end → W end)
• Turning the camera off every 10 recordings and leaving it until the
temperature of the battery decreases.
∗
The number of recordable pictures and the recording time are reduced in the
following cases.
• In cold environments or at low temperatures
• When using [AUTO POWER LCD] or [POWER LCD]
Approx. 300 pictures
∗
20 VQT2X57 (ENG) (ENG) VQT2X57 21
Page 12

Inserting and removing the card
(optional)/the battery
Check that no foreign objects have adhered to the camera.
Turn off the power and open
the card/battery door
Opening and closing the card/battery
door and terminal cover (→9)
Slide the [LOCK] switch ( ) in
the direction of the arrow until
the red area ( ) is visible
The lock is unlocked.
Slide the release lever ( ) to the
[LOCK] switch side
The card/battery door opens.
Insert the battery and card,
making sure that their
orientation is correct
• Battery: Insert all the way firmly until
•
a locking sound is heard,
and check that the lever is
hooked over the battery.
Card: Insert all the way firmly until it clicks.
Close the card/battery door
properly
While the [LOCK] switch is
unlocked, push the card/battery
door closed until it clicks
Lock the [LOCK] switch by
sliding it in the direction of the
arrow until the red area is no
longer visible
■
To remove
• To remove battery:
move lever in direction of arrow.
Lever
Always use genuine Panasonic batteries (DMW-BCH7E).
●
If you use other batteries, we cannot guarantee the quality of this product.
●
The card may be damaged if it is not fully inserted.
●
• To remove card:
press down in centre.
Picture save destination (cards and built-in memory)
■
Built-in memory (approx. 40 MB)
The built-in memory can be used as a temporary storage device when the
●
card being used becomes full.
The access time for the built-in memory may be longer than the access time
●
for a card.
■
Compatible memory cards (optional)
The following SD standard-based cards
(Panasonic brand recommended)
Type of Card Capacity Notes
SD
Memory Cards
SDHC
Memory Cards
SDXC
Memory Cards
Latest information:
●
http://panasonic.jp/support/global/cs/dsc/
(This Site is English only.)
Keep the Memory Card out of reach of children to prevent swallowing.
●
8 MB – 2 GB
4 GB – 32 GB
48 GB, 64 GB
• Can be used with devices compatible with the
respective formats.
• Before using SDXC Memory Cards, check that
your computer and other devices support this
type of card.
http://panasonic.net/avc/sdcard/information/SDXC.html
• Cards in capacities not listed at left are not
supported.
22 VQT2X57 (ENG) (ENG) VQT2X57 23
Page 13

Setting the menuSetting the Clock
The Clock is not set when the camera is shipped.
Press the Power button ( )
[PRECAUTIONS] is displayed.
Press ◄ to select [YES], and
then press [MENU/SET] ( )
Press ◄► to check the
waterproof precautions, and at
the final screen (11/11), press
[MENU/SET]
Press [MENU/SET]
Press ◄► to select the items (year, month,
day, hour, minute, display order or time display
format), and press ▲▼ to set
• To cancel → Press .
Press [MENU/SET]
Confirm the setting and press [MENU/SET]
• T
o return to the previous screen, press .
• Turn on the power again and check the time display.
■
To change time setting
Select [CLOCK SET] from [REC] or [SETUP] menu, perform and .
Refer to the procedure example below when operating the [SETUP]
menu, [REC] menu and [PLAYBACK] menu.
Example: Setting [LCD MODE] from [OFF] to in the [NORMAL
PICTURE] Mode
Press [MENU/SET] to display the menu
Switching to the [SETUP] menu
1 Press ◄.
2 Press ▼ to select the [SETUP] menu
icon [
3 Press ►.
• Select a menu item next and set it.
].
Press ▲▼ to select [LCD MODE]
and then press ►
• Depending on the item, its setting may not
appear or it may be displayed in a different
way.
Press ▲▼ to select and then
press [MENU/SET] to set
Press [MENU/SET] to close the
menu
24 VQT2X57 (ENG) (ENG) VQT2X57 25
Page 14

Taking pictures with automatic settings
[INTELLIGENT AUTO] Mode
Recording Mode:
Optimum settings are made automatically from information such as ‘face,’
‘movement,’ ‘brightness,’ and ‘distance’ just by pointing the camera at
the subject, meaning that clear pictures can be taken without the need to
make settings manually.
Press the Power button ( )
The power is turned on.
Press button ( )
Take pictures
: Shutter button
Press halfway
(press lightly and focus)
• If jitter becomes noticeable, use both
hands, keep your arms close to your
body, and stand with your feet at shoulder
width.
• Focus display (
(In focus: lit / Not in focus: flashing)
• The AF area ( ) is displayed around
the subject’s face by the Face Detection
function. In other cases, it is displayed at
the point on the subject which is in focus.
• Focus: Max. W: 10 cm/
Max. T: 50 cm and above
Press fully
(press the button all the
way to record)
)
■
Automatic Scene Detection
Camera identifies scene when pointed at subject, and makes optimum
settings automatically. The type of scene detected is indicated by a blue
icon for two seconds.
[i PORTRAIT]: People are
detected
[i SCENERY]: Scenery is detected
[i MACRO]: A close-up shot is
detected
Reads subject movement to avoid blurring when scene does not
correspond to any of the above.
If the camera automatically identifies the scene and determines that
people appear as subjects in the picture (
activated, and the focus and exposure are adjusted for the recognised
faces. (Note that underwater, faces may be detected more slowly, or
they may not be detected at all.)
[i NIGHT PORTRAIT]: People and
night scenery are detected
(Only when is selected)
[i NIGHT SCENERY]: Night
scenery is detected
[i SUNSET]: A sunset is detected
or ), Face Detection is
26 VQT2X57 (ENG) (ENG) VQT2X57 27
Page 15

Selecting the Recording Mode
Taking motion pictures [MOTION PICTURE] Mode
Recording Mode:
Press the Power button ( )
The power is turned on.
Press the [MODE] button ( )
Press ▲ or ▼ to select the
Recording Mode
Press [MENU/SET] ( )
[NORMAL PICTURE] Mode
Take pictures with your own settings.
[MY SCENE MODE]
Take pictures in commonly used Scene
Modes.
[SCENE MODE]
Take pictures according to scene.
[MOTION PICTURE] Mode
Take motion pictures.
Record motion picture with audio as follows. (Note that recording without
audio is not possible.)
Press the [MODE] button
Press ▲ or ▼ to select [MOTION PICTURE] Mode
Press [MENU/SET]
Start recording
Press halfway
(adjust the focus)
Press fully
(start recording)
Remaining recording time
(approx.)
End recording
Elapsed recording time
Press fully
The focus and zoom will remain as they were at the beginning of
●
recording.
Immediately release the shutter button after pressing it all the way.
●
When there is no space left to store the motion picture, recording
●
automatically ends.
Motion pictures can be recorded continuously up to 2 GB. To record
●
more than 2 GB, press the shutter button again. (Remaining time for
continuous recording is displayed on the screen.)
28 VQT2X57 (ENG) (ENG) VQT2X57 29
Page 16

Viewing your pictures [NORMAL PLAY]
Playback Mode:
Reading the Operating Instructions
(PDF format)
Press the Playback button ( )
Press ◄► to select the picture
To play back a motion picture, select an image with ◄ or ►, and then
●
press ▲ to start playback.
Deleting pictures
Playback Mode:
Deleted pictures cannot be recovered.
Press the (Delete) button ( )
to delete the displayed picture
Press ◄ to select [YES] and
then press [MENU/SET] ( )
• You have practiced the basic operations introduced in these Operating
Instructions and want to progress to advanced operations.
• You want to check the Troubleshooting.
In these kinds of situations refer to the Operating Instructions (PDF
format) contained on the CD-ROM (supplied).
■
For Windows
Turn the PC on and insert the CD-ROM containing
the Operating Instructions (supplied)
Click the [Operating Instructions]
Select the desired language and then click
[Operating Instructions] to install
To return to the install menu.
See next page.
Double click the ‘Operating Instructions’ shortcut
icon on the desktop
30 VQT2X57 (ENG) (ENG) VQT2X57 31
Page 17

Reading the Operating Instructions
(PDF format) (Continued)
Specifications
■
When the Operating Instructions (PDF format) will not open
You will need Adobe Acrobat Reader 5.0 or later or Adobe Reader 7.0
or later to browse or print the Operating Instructions (PDF format).
Insert the CD-ROM containing the Operating Instructions (supplied),
click and then follow the messages on the screen to install.
Compatible OS: Windows 2000 SP4/Windows XP SP2 or SP3/
Windows Vista SP1 or SP2/Windows 7
• You can download and install a version of Adobe Reader that you can
use with your OS from the following Web Site.
http://get.adobe.com/reader/otherversions
■
To uninstall the Operating Instructions (PDF format)
Delete the PDF file from the ‘Program Files\Panasonic\Lumix\’ folder.
• When the contents in the Program Files folder cannot be displayed,
click the [Show the contents of this folder] to display them.
■
For Macintosh
Turn the PC on and insert the CD-ROM containing
the Operating Instructions (supplied)
Open the ‘Manual’ folder in the CD-ROM and then
copy the PDF file with the desired language inside
the folder
Double click the PDF file to open it
Digital Camera: Information for your safety
Power Source DC 5.1 V
Power
Consumption
Camera effective
pixels
Image sensor 1/2.33” CCD, total pixel number 14,500,000 pixels
Lens Optical 4 x zoom
Digital Zoom Max. 4 x
Extra Optical
Zoom
Focus range
Normal 50 cm to
Macro/
Intelligent Auto
Scene Mode There may be difference in above settings.
Shutter system Electronic shutter + Mechanical shutter
Burst recording
Burst speed 1.5 pictures/second
Number of
recordable
pictures
When recording: 1.0 W
When playing back: 0.6 W
14,100,000 pixels
Primary colour filter
f=6.3 mm to 25.2 mm (35 mm film camera
equivalent: 35 mm to 140 mm)/
F3.5 (Max. W) to F5.9 (Max. T)
Max. 8.4 x
10 cm (Wide)/
50 cm (Tele) to
Until card/built-in memory is full
32 VQT2X57 (ENG) (ENG) VQT2X57 33
Page 18

Specifications (Continued)
Hi-speed burst
Burst speed Approx. 4.6 pictures/second
Number of
recordable
pictures
Shutter speed 8 to 1/1600 th
Exposure (AE) AUTO (Programme AE)
Metering Mode Multiple
LCD monitor 2.7” TFT LCD (4:3)
Flash
Microphone Monaural
Speaker Monaural
Recording media Built-in Memory (Approx. 40 MB)/SD Memory Card/
Recording file
format
Still picture JPEG (based on Design rule for Camera File
Motion
pictures
Interface
Digital USB 2.0 (Full Speed)
Analogue
video/audio
Terminal AV OUT/DIGITAL: Dedicated jack (8 pin)
Approx. 15 pictures (When using the built-in
memory, immediately after formatting)
Max. 100 pictures (When using a card, it may differ
depending on the type of card and the recording
conditions)
[STARRY SKY] Mode: 15 seconds, 30 seconds,
60 seconds
Exposure Compensation
(1/3 EV Step, -2 EV to +2 EV)
(Approx. 230,400 dots)
(field of view ratio about 100 %)
Flash range: (ISO
SDHC Memory Card/SDXC Memory Card
system, based on Exif 2.3 standard)/
DPOF corresponding
QuickTime Motion JPEG
(motion pictures with audio)
NTSC / PAL Composite (Switched by menu),
Audio line output (Monaural)
DC IN: Dedicated jack (2 pin)
4.9 m (Wide)
) Approx. 30 cm to
Dimensions
Mass With card and battery: Approx. 172
Operating
temperature
Operating
humidity
Waterproof
performance
Anti-shock
performance
Dustproof
performance
Approx. 100.3 mm (W) x 63.5 mm (H) x 21.6 mm (D)
(excluding the projection part)
Excluding card and battery: Approx. 152
1
∗
-10 °C
to 40 °C
1
∗
The performance of the battery (number of
recordable pictures/operating time) and the LCD
monitor (ghost images appearance, etc.) may
drop temporarily when using the camera between
-10 °C and 0 °C (in cold environments such as a
ski resort).
10 %RH to 80 %RH
Equivalent to IEC 60529 ‘IPX8’
(Usable for 60 minutes in water depth of 3 m)
The camera’s test method complies with MIL-STD
810F (Method 516.5-Shock)
2
∗
‘MIL-STD 810F (Method 516.5-Shock)’ is the
test method standard of the U.S. Defense
Department, which specifies performing drop
tests from a height of 122 cm, at 26 orientations
(8 corners, 12 ridges, 6 faces) using 5 sets of
devices, and passing the 26 orientation drops
within 5 devices. (If failure occurs during the test,
a new set is used to pass the drop orientation
test within a total of 5 devices)
• Panasonic’s test method is based on MIL-STD
810F (Method 516.5-Shock) that is described
above, with the drop height changed from 122 cm
to 150 cm. The camera cleared a test of being
dropped onto 3 cm thick plywood. (Disregarding
exterior changes such as paint peeling or
deformation in the dropping impact areas.)
This is not a guarantee of no breakdowns or
malfunctions under all conditions.
Equivalent to IEC 60529 ‘IP6X’
2
∗
.
34 VQT2X57 (ENG) (ENG) VQT2X57 35
Page 19

Specifications (Continued)
Battery charger
(Panasonic DE-A76A): Information for your safety
Input 110 V to 240 V ~ 50/60Hz, 0.2 A
Output 4.2 V
Recommended
recharging
temperature
Battery pack (lithium-ion)
(Panasonic DMW-BCH7E): Information for your safety
Voltage/capacity 3.7 V / 695 mAh
Operating
temperature
10 °C∗ to 30 °C
∗
-10 °C to 40 °C (When using the camera)
10 °C to 30 °C (Recommended recharging
temperature)
0.65 A (Battery charging)
The battery cannot be recharged when the
temperature is below 0 °C.
(The charging light blinks when the battery cannot
be recharged.)
MEMO
36 VQT2X57 (ENG) (ENG) VQT2X57 37
Page 20

MEMOMEMO
38 VQT2X57 (ENG) (ENG) VQT2X57 39
Page 21

• SDXC Logo is a trademark of SD-3C, LLC.
• QuickTime and the QuickTime logo are trademarks or
registered trademarks of Apple Inc., used under license
therefrom.
• Other names, company names, and product names
printed in these instructions are trademarks or
registered trademarks of the companies concerned.
A
VQT2X57
M0810KZ0
Web Site: http://panasonic.net
© Panasonic Corporation 2010
 Loading...