

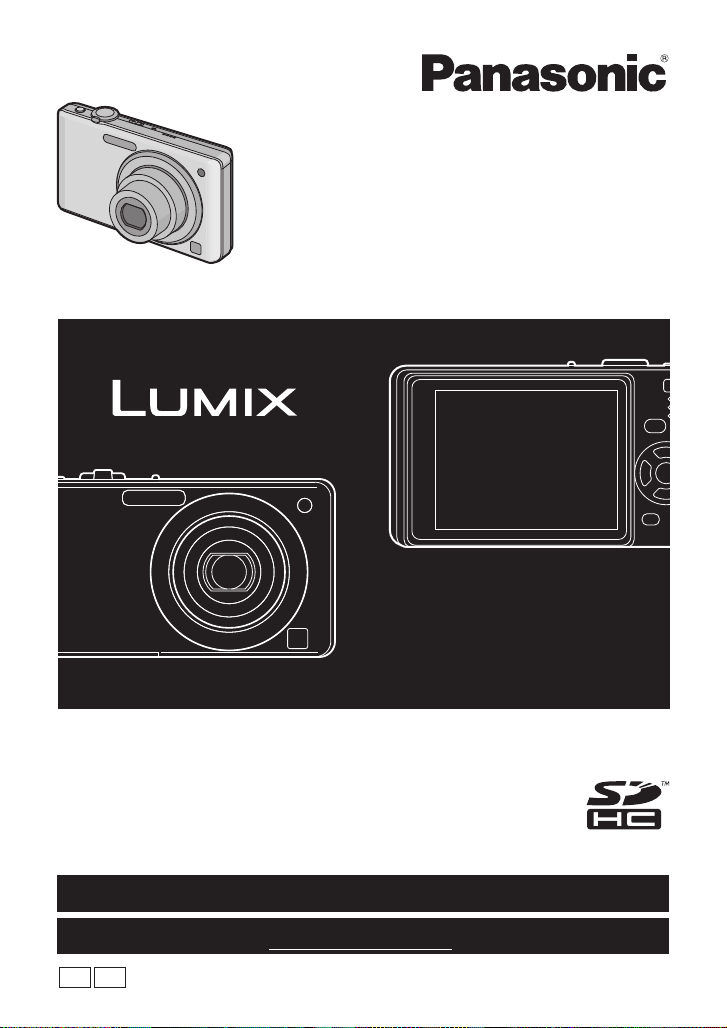
Operating Instructions
PC
P
Digital Camera
Model No. DMC-FS7
DMC-FS6
Before connecting, operating or adjusting this product,
please read the instructions completely.
For USA and Puerto Rico assistance, please call: 1-800-211-PANA(7262) or,
contact us via the web at: http://www.panasonic.com/contactinfo
For Canadian assistance, please call: 1-800-99-LUMIX (1-800-995-8649) or
send e-mail to: lumixconcierge@ca.panasonic.com
VQT1V73

Before Use
RBRC
Li-ion
TM
Before Use
Dear Customer,
Thank you for choosing Panasonic!
You have purchased one of the most sophisticated and reliable products on the market
today. Used properly, we’re sure it will bring you and your family years of enjoyment.
Please take time to fill in the information on the below. The serial number is on the tag
located on the underside of your Camera. Be sure to retain this manual as your
convenient Camera information source. Please note that the actual controls and
components, menu items, etc. of your Digital Camera may look somewhat different from
those shown in the illustrations in these Operating Instructions.
Carefully observe copyright laws.
Recording of pre-recorded tapes or discs or other published or broadcast material for purposes
•
other than your own private use may infringe copyright laws. Even for the purpose of private
use, recording of certain material may be restricted.
Model No.
Serial No.
A lithium ion battery that is recyclable powers the product you have
purchased. Please call 1-800-8-BATTERY for information on how to
recycle this battery.
Information for Your Safety
WARNING:
TO REDUCE THE RISK OF FIRE, ELECTRIC SHOCK OR PRODUCT DAMAGE,
• DO NOT EXPOSE THIS APPARATUS TO RAIN, MOISTURE, DRIPPING OR
SPLASHING AND THAT NO OBJECTS FILLED WITH LIQUIDS, SUCH AS VASES,
SHALL BE PLACED ON THE APPARATUS.
• USE ONLY THE RECOMMENDED ACCESSORIES.
• DO NOT REMOVE THE COVER (OR BACK); THERE ARE NO USER
SERVICEABLE PARTS INSIDE. REFER SERVICING TO QUALIFIED SERVICE
PERSONNEL.
THE SOCKET OUTLET SHALL BE INSTALLED NEAR THE EQUIPMENT AND
SHALL BE EASILY ACCESSIBLE.
Product Identification Marking is located on the bottom of units.
VQT1V73
2

Before Use
DMC-FS7
DMC-FS6
THE FOLLOWING APPLIES ONLY IN CANADA.
This Class B digital apparatus complies with Canadian ICES-003.
THE FOLLOWING APPLIES ONLY IN THE U.S.A.
FCC Note:
This equipment has been tested and found to comply with the limits for a Class B digital
device, pursuant to Part 15 of the FCC Rules. These limits are designed to provide
reasonable protection against harmful interference in a residential installation. This
equipment generates, uses, and can radiate radio frequency energy and, if not installed
and used in accordance with the instructions, may cause harmful interference to radio
communications. However, there is no guarantee that interference will not occur in a
particular installation. If this equipment does cause harmful interference to radio or
television reception, which can be determined by turning the equipment off and on, the
user is encouraged to try to correct the interference by one or more of the following
measures:
Reorient or relocate the receiving antenna.
•
• Increase the separation between the equipment and receiver.
• Connect the equipment into an outlet on a circuit different from that to which the receiver is
connected.
• Consult the dealer or an experienced radio/TV technician for help.
FCC Caution: To assure continued compliance, follow the attached installation
instructions and use only shielded interface cables with ferrite core when
connecting to computer or peripheral devices.
Any changes or modifications not expressly approved by the party responsible for
compliance could void the user’s authority to operate this equipment.
Declaration of Conformity
Trade Name: Panasonic
Model No.: DMC-FS7
DMC-FS6
Responsible party: Panasonic Corporation of North America One Panasonic Way,
Secaucus, NJ 07094
Support Contact: Panasonic Consumer Electronics Company 1-800-211-PANA (7262)
This device complies with Part 15 of the FCC Rules. Operation is subject to the
following two conditions: (1) This device may not cause harmful interference, and (2)
this device must accept any interference received, including interference that may
cause undesired operation.
VQT1V73
3

Before Use
∫ About the battery pack
CAUTION
Battery pack (Lithium ion battery pack)
Use the specified unit to recharge the battery pack.
•
• Do not use the battery pack with equipment other than the specified unit.
• Do not get dirt, sand, liquids, or other foreign matter on the terminals.
• Do not touch the plug terminals (i and j) with metal objects.
• Do not disassemble, remodel, heat or throw into fire.
If any electrolyte should come into contact with your hands or clothes, wash it off
thoroughly with water.
If any electrolyte should come into contact with your eyes, never rub the eyes. Rinse
eyes thoroughly with water, and then consult a doctor.
CAUTION
Danger of explosion if battery is incorrectly replaced. Replace only with the same or
equivalent type recommended by the manufacturer. Dispose of used batteries
according to the manufacturer’s instructions.
•
Do not heat or expose to flame.
• Do not leave the battery(ies) in an automobile exposed to direct sunlight for a long period of
time with doors and windows closed.
Warning
Risk of fire, explosion and burns. Do not disassemble, heat above 60 xC (140 oF) or
incinerate.
∫ About the battery charger
CAUTION!
DO NOT INSTALL OR PLACE THIS UNIT IN A BOOKCASE, BUILT-IN CABINET OR
IN ANOTHER CONFINED SPACE. ENSURE THE UNIT IS WELL VENTILATED. TO
PREVENT RISK OF ELECTRIC SHOCK OR FIRE HAZARD DUE TO OVERHEATING,
ENSURE THAT CURTAINS AND ANY OTHER MATERIALS DO NOT OBSTRUCT
THE VENTILATION VENTS.
Battery charger
This battery charger operates on AC between 110 V and 240 V.
But
In the U.S.A. and Canada, the battery charger must be connected to a 120 V AC power
•
supply only.
• When connecting to an AC supply outside of the U.S.A. or Canada, use a plug adaptor to
suit the AC outlet configuration.
VQT1V73
4
Before Use
∫ Care of the camera
Do not strongly shake or bump the camera by dropping or hitting it. Do not subject to
•
strong pressure.
The camera may malfunction, recording pictures may become impossible, or the lens, the LCD
monitor or the external case may be damaged.
• We strongly recommend you do not leave the camera in your trousers pocket
when you sit down or forcefully insert it into a full or tight bag etc.
Damage to the LCD monitor or personal injury may result.
• Do not attach any other items to the hand strap that’s included with your
camera. While being stored, that item can rest against the LCD monitor and
damage it.
• Be particularly careful in the following places as they may cause this
unit to malfunction.
– Places with a lot of sand or dust.
– Places where water can come into contact with this unit such as when using
it on a rainy day or on a beach.
• Do not touch the lens or the sockets with dirty hands. Also, be careful not to allow
liquids, sand and other foreign matter to get into the space around the lens, buttons etc.
• This camera is not waterproof. If water or seawater splashes on the camera, use a dry
cloth to wipe the camera body carefully.
If the unit does not operate normally, please contact the dealer where you purchased the
camera or the repair service center.
∫ About Condensation (When the lens is fogged up)
Condensation occurs when the ambient temperature or humidity changes. Be careful of
•
condensation since it causes lens stains, fungus and camera malfunction.
• If condensation occurs, turn the camera off and leave it for about 2 hours. The fog will
disappear naturally when the temperature of the camera becomes close to the ambient
temperature.
∫ Read together with the “Cautions for Use”. (P90)
∫ About illustrations in these operating instructions
The procedure is described for DMC-FS7 as an example.
-If you see this symbol-
Information on Disposal in other Countries outside the European Union
This symbol is only valid in the European Union.
If you wish to discard this product, please contact your local
authorities or dealer and ask for the correct method of disposal.
VQT1V73
5

Contents
Before Use
Information for Your Safety....................... 2
Quick Guide.............................................. 8
Standard Accessories............................... 9
Names of the Components ..................... 10
Preparation
Charging the Battery............................... 12
• About the Battery (charging/number
of recordable pictures)...................... 13
Inserting and Removing the Card
(optional)/the Battery .............................. 14
About the Built-in Memory/the Card........ 16
Setting Date/Time (Clock Set) ................ 18
• Changing the clock setting ............... 18
Setting the Menu..................................... 19
• Setting menu items........................... 20
• Using the quick menu .......................21
About the Setup Menu ............................22
Selecting the [REC] Mode ...................... 27
Basic
Taking pictures using the automatic
function (ñ: Intelligent Auto Mode) ........28
• Scene detection................................ 29
• About the flash.................................. 30
• Settings in Intelligent auto mode ...... 30
Taking pictures with your favorite
settings (·: Normal picture mode) ......... 31
• Focusing........................................... 32
• When the subject is not in focus
(such as when it is not in the center
of the composition of the picture
you want to take).............................. 32
• Preventing jitter (camera shake)....... 32
• Direction detection function .............. 33
Taking Pictures with the Zoom ...............33
• Using the Optical Zoom/Using the
Extended Optical Zoom (EZ)/
Using the Digital Zoom .....................33
Playing back Pictures
([NORMAL PLAY]).................................. 34
VQT1V73
6
• Displaying Multiple Screens
(Multi Playback)................................ 35
• Using the Playback Zoom.................35
• Switching the [PLAYBACK] mode .... 36
Deleting Pictures..................................... 36
• To delete a single picture.................. 36
• To delete multiple pictures (up to 50)
or all the pictures.............................. 37
Advanced (Recording pictures)
About the LCD Monitor ...........................38
Taking Pictures using the
Built-in Flash........................................... 39
• Switching to the appropriate flash
setting............................................... 39
Taking Close-up Pictures........................42
Taking Pictures with the Self-timer .........43
Compensating the Exposure .................. 44
Taking Pictures using Auto Bracket ........ 45
Taking pictures that match the scene
being recorded (Scene mode) ................46
• Registering scenes in Scene mode
( : My scene mode) ....................... 46
• Selecting the Scene mode for each
recording (¿: Scene mode) ............. 47
• * [PORTRAIT]................................47
• + [SOFT SKIN]...............................47
• [TRANSFORM] .......................... 48
• 0 [SELF PORTRAIT]...................... 48
• , [SCENERY] ................................ 48
• - [SPORTS] ................................... 49
• . [NIGHT PORTRAIT] ................... 49
• / [NIGHT SCENERY] .................... 49
• 1 [FOOD] ......................................49
• 2 [PARTY]...................................... 50
• 3 [CANDLE LIGHT]........................50
• : [BABY1]/; [BABY2].................. 50
• í [PET]...........................................51
• ï [SUNSET] ................................... 51
• 9 [HIGH SENS.]............................. 51
• ô [HI-SPEED BURST].................... 52
• [FLASH BURST] ........................52
• 5 [STARRY SKY]........................... 53
• 4 [FIREWORKS]............................ 53
• 6 [BEACH] ..................................... 53
• 8 [SNOW].......................................54
• 7 [AERIAL PHOTO] ....................... 54
• [FILM GRAIN]............................. 54
• [PHOTO FRAME]....................... 54
Motion Picture Mode ............................... 55
Useful Functions at Travel
AF
CAL
Destinations............................................ 56
• Recording which Day of the
Vacation You Take the Picture ......... 56
• Recording Dates/Times at Overseas
Travel Destinations (World Time) ..... 58
Using the [REC] Mode Menu .................. 59
• @ [PICTURE SIZE]...........................59
• A [QUALITY]...................................60
• ? [ASPECT RATIO] .......................60
• [INTELLIGENT ISO] ................... 61
• > [SENSITIVITY]............................61
• = [WHITE BALANCE] .................... 62
• [AF MODE].................................63
• ˜ [BURST]......................................64
• ) [DIGITAL ZOOM] ........................ 65
• H [COLOR MODE] ..........................65
• [STABILIZER] ............................65
• F [AF ASSIST LAMP] ................... 66
• U [CLOCK SET]...............................66
Connecting to other equipment
Connecting to a PC.................................81
Printing the Pictures................................84
• Selecting a single picture and
printing it...........................................85
• Selecting multiple pictures and
printing them.....................................85
• Print Settings ....................................86
Playing Back Pictures on a
TV Screen...............................................88
• Playing back pictures using the AV
cable (supplied)................................88
• Playing back pictures on a TV with
an SD Memory Card slot ..................88
Others
Advanced (Playback)
Playing Back Pictures in Sequence
(Slide Show) ...........................................67
Selecting Pictures and Playing them
Back ([CATEGORY PLAY]/
[FAVORITE PLAY]).................................69
• [CATEGORY PLAY] .........................69
• [FAVORITE PLAY]............................70
Playing Back Motion Pictures ................. 70
Using the [PLAYBACK] mode menu....... 71
• [CALENDAR] ..............................71
• [TITLE EDIT] ..............................72
• [TEXT STAMP]...........................73
• Q [RESIZE]
Reducing the picture size
(number of pixels).............................74
• [TRIMMING] ...............................75
• M [ROTATE DISP.]......................... 76
• Ü [FAVORITE].................................77
• [PRINT SET]...............................78
• P [PROTECT].................................79
• S [COPY] ......................................80
Screen Display........................................89
Cautions for Use .....................................90
Message Display .................................... 94
Troubleshooting ...................................... 96
Number of Recordable Pictures and
Available Recording Time.....................103
Specifications........................................107
Digital Camera Accessory System........110
Digital Camera Accessory Order Form
(For USA and Puerto Rico
Customers) ...........................................111
Request for Service Notice
(For USA and Puerto Rico Only)...........112
Limited Warranty
(For USA and Puerto Rico Only)...........113
Customer Services Directory
(United States and Puerto Rico) ...........115
Précautions à prendre
(pour le Canada)...................................116
Index .....................................................118
VQT1V73
7

Before Use
90
ON
OFF
Before Use
Quick Guide
This is an overview of how to record and play back pictures with the camera. For each
step, be sure to refer to the pages indicated in brackets.
Charge the battery. (P12)
• The battery is not charged when the
camera is shipped. Charge the battery
before use.
Insert the battery and the card.
(P14)
• When you do not use the card, you can
record or play back pictures on the
built-in memory. (P16) Refer to P17
when you use a card.
Turn the camera on to take
pictures.
1 Slide the [REC]/[PLAYBACK] selector
switch to [!].
2 Press the shutter button to take
pictures. (P28)
Play back the pictures.
1 Slide the [REC]/[PLAYBACK] selector
switch to [(].
2 Select the picture you want to view.
8
(P34)
VQT1V73
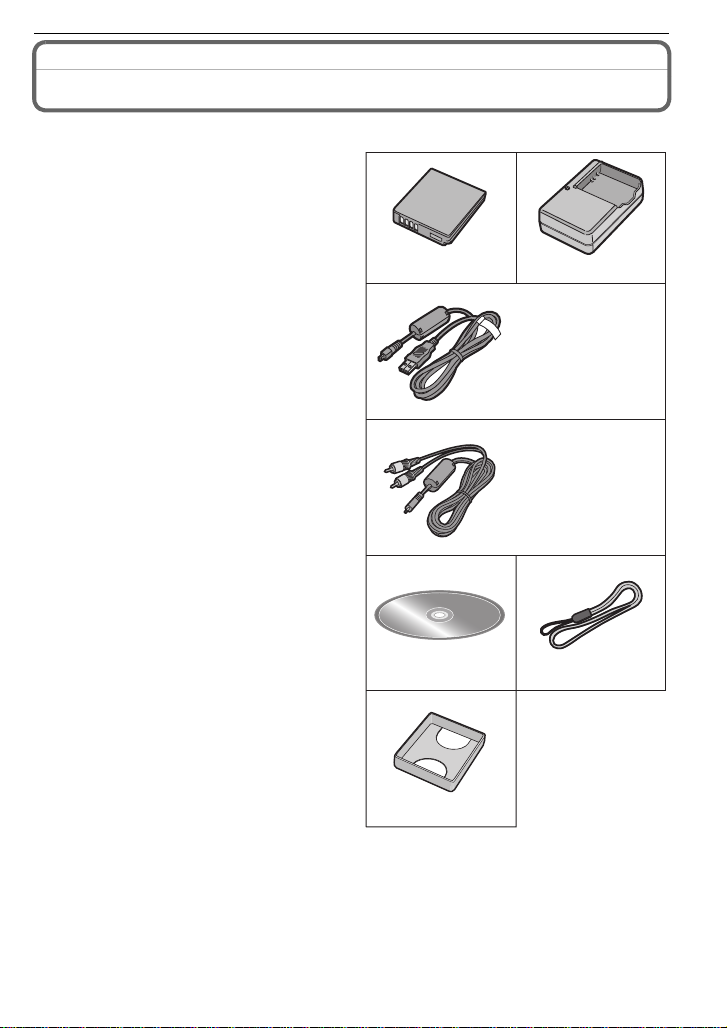
Standard Accessories
Check that all the accessories are included before using the camera.
1Battery Pack
(Indicated as battery in the text)
Charge the battery before use.
2 Battery Charger
(Indicated as charger in the text)
3 USB Connection Cable
4 AV Cable
5 CD-ROM
• Software:
Use it to install the software to your PC.
6 Hand Strap
7Battery Case
• SD Memory Card, SDHC Memory Card and
MultiMediaCard are indicated as card in the
text.
• The card is optional.
You can record or play back pictures on the
built-in memory when you are not using a
card.
• For information about optional accessories,
refer to the “Digital Camera Accessory
System”. (P110)
• If any accessories are lost, customers in the
USA and Puerto Rico should contact
Panasonic’s parts department at
1 800 833-9626 and customers in Canada
should contact 1 800 99-LUMIX
(1-800-995-8649) for further information about
obtaining replacement parts.
12
DMW-BCF10PP DE-A59B
3
4
5
7
Before Use
K1HA08AD0002
(DMC-FS7P/
DMC-FS7PC)
K1HA08AD0001
(DMC-FS6P/
DMC-FS6PC)
K1HA08CD0028
(DMC-FS7P/
DMC-FS7PC)
K1HA08CD0027
(DMC-FS6P/
DMC-FS6PC)
6
VFC4297
VGQ0D56
VQT1V73
9
Before Use
123
114 109
5786
Names of the Components
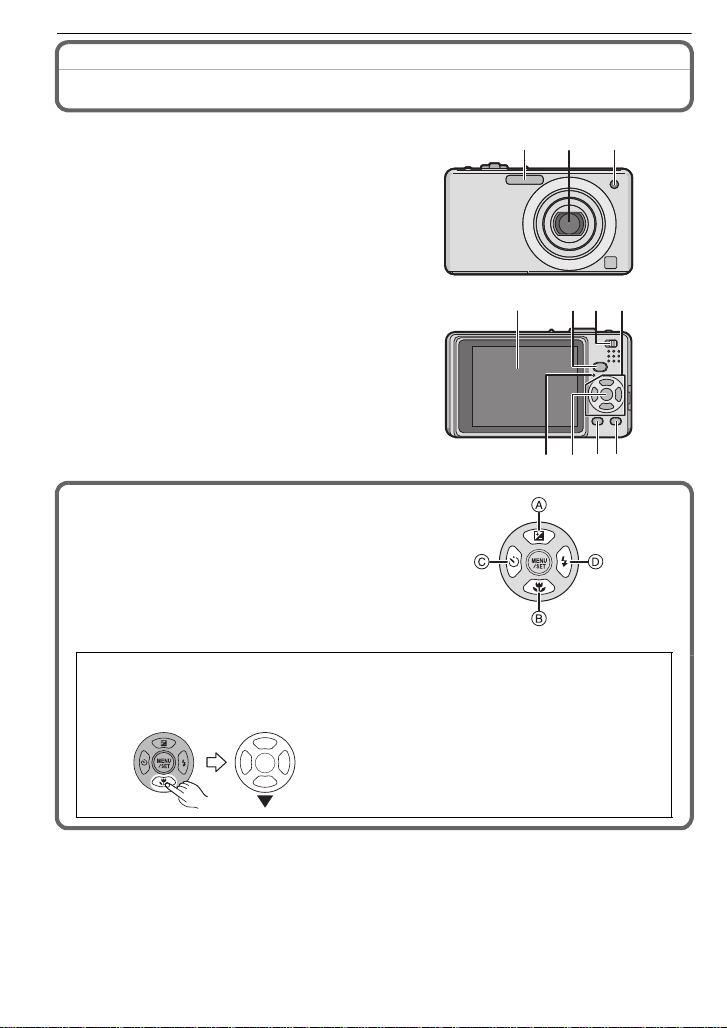
1 Flash (P39)
2 Lens (P91)
3 Self-timer indicator (P43)
AF assist lamp (P66)
4 LCD monitor (P38, 89)
5 Status indicator (P15, 23, 28)
6 [MENU/SET] button (P18)
7 [DISPLAY] button (P38)
8 [Q.MENU] (P21)/Delete (P36) button
9 [MODE] button (P27)
10 [REC]/[PLAYBACK] selector switch
(P19)
11 Cursor buttons
A: 3/Exposure compensation (P44)/
Auto bracket (P45)
B: 4/Macro mode (P42)
C: 2/Self-timer button (P43)
D: 1/Flash setting button (P39)
In these operating instructions, the cursor buttons are described as shown in the
figure below or described with 3/4/2/1.
e.g.: When you press the 4 (down) button
or Press 4
VQT1V73
10
12 Camera ON/OFF switch (P18)
12 13
14 15 16 17
19
20
18
21 22
2324
13 Zoom lever (P33)
14 Speaker (P70)
15 Microphone (P55)
16 Shutter button (P28, 55)
17 Intelligent auto button (P28)
18 Hand strap eyelet
• Be sure to attach the hand strap when
using the camera to ensure that you will
not drop it.
19 Lens barrel
20 [AV OUT/DIGITAL] socket (P81, 84, 88)
21 Tripod receptacle
• When you use a tripod, make sure the
tripod is stable when the camera is
attached to it.
22 Card/Battery door (P14, 16)
23 Release lever (P14)
24 DC coupler cover (P16)
• When using an AC adaptor, ensure that
the Panasonic DC coupler (DMW-DCC4;
optional) and AC adaptor (DMW-AC5PP;
optional) are used. For connection details,
refer to P16.
Before Use
VQT1V73
11
Preparation
Preparation
Charging the Battery
∫ About batteries that you can use with this unit
The battery that can be used with this unit is DMW-BCF10PP.
It has been found that counterfeit battery packs which look very similar to the
genuine product are made available to purchase in some markets. Some of these
battery packs are not adequately protected with internal protection to meet the
requirements of appropriate safety standards. There is a possibility that these
battery packs may lead to fire or explosion. Please be advised that we are not
liable for any accident or failure occurring as a result of use of a counterfeit
battery pack. To ensure that safe products are used we would recommend that a
genuine Panasonic battery pack is used.
• Use the dedicated charger and battery.
• The battery is not charged when the camera is shipped. Charge the battery before use.
• Charge the battery with the charger indoors.
• Charge the battery in a temperature between 10 oC to 35 oC (50 oF to 95 oF). (The battery
temperature should also be the same.)
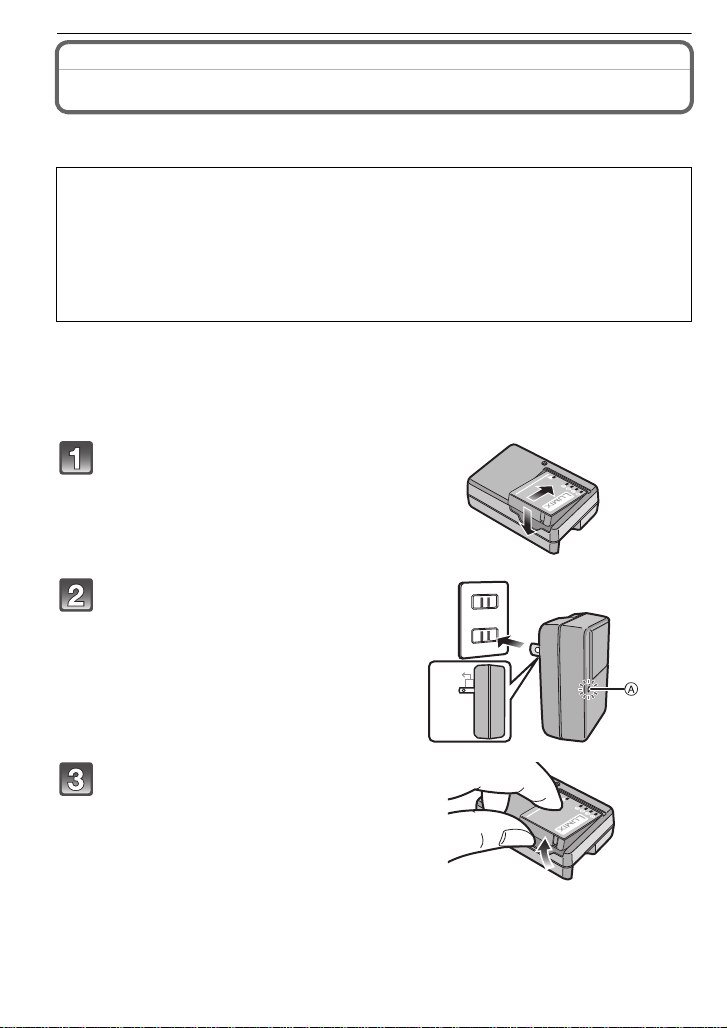
Attach the battery paying
attention to the direction of the
battery.
Connect the charger to the
electrical outlet.
• Charging starts when the [CHARGE]
indicator A lights green.
• Charging is complete when the
[CHARGE] indicator A turns off (after
approx. 130 min maximum).
90
Detach the battery after
charging is completed.
∫ When the [CHARGE] indicator flashes
• The battery temperature is excessively high or low. The charging time will be longer than
normal. Also, charging may not be completed.
• The terminals of the charger or the battery are dirty. In this case, wipe them with a dry cloth.
VQT1V73
12
Preparation
Note
• After charging is completed, be sure to disconnect the power supply device from the electrical
outlet.
• The battery becomes warm after using it and during and after charging. The camera also
becomes warm during use. This is not a malfunction.
• The battery will be exhausted if left for a long period of time after being charged.
• The battery can be recharged even when it still has some charge left, but it is not
recommended that the battery charge be frequently topped up while the battery is fully
charged. (The battery has characteristics that will reduce its operating duration and cause the
battery to swell up.)
• When the operating time of the camera becomes extremely short even after properly charging
the battery, the life of the battery may have expired. Buy a new battery.
• Do not leave any metal items (such as clips) near the contact areas of the power plug.
Otherwise, a fire and/or electric shocks may be caused by short-circuiting or the
resulting heat generated.
About the Battery (charging/number of recordable pictures)
∫ Battery indication
The battery indication is displayed on the LCD monitor.
[It does not appear when you use the camera with the AC adaptor (DMW-AC5PP;
optional) connected.]
• The indication turns red and blinks if the remaining battery power is exhausted. (The status
indicator blinks when the LCD monitor turns off.) Recharge the battery or replace it with a fully
charged battery.
∫ The battery life
Number of recordable
pictures
Recording time
Recording conditions by CIPA standard
• CIPA is an abbreviation of [Camera & Imaging Products Association].
• Temperature: 23 oC (73.4 oF)/Humidity: 50% when LCD monitor is on.
• Using a Panasonic SD Memory Card (32 MB).
• Using the supplied battery.
• Starting recording 30 seconds after the camera is turned on. (When the Optical image stabilizer
function is set to [AUTO].)
• Recording once every 30 seconds with full flash every second recording.
• Rotating the zoom lever from Tele to Wide or vice versa in every recording.
• Turning the camera off every 10 recordings and leaving it until the temperature of the battery
decreases.
¢ The number of recordable pictures decreases in Auto Power LCD mode, Power LCD mode
and High angle mode (P23).
The number of recordable pictures varies depending on the recording interval time.
If the recording interval time becomes longer, the number of recordable pictures
decreases. [e.g. When recording once every 2 minutes, the number of recordable
pictures decreases to about 90
Approx. 360 pictures (DMC-FS7)
Approx. 400 pictures (DMC-FS6)
Approx. 180 min (DMC-FS7)
Approx. 200 min (DMC-FS6)
(DMC-FS7)/100 (DMC-FS6).]
By CIPA standard in normal
picture mode
¢
VQT1V73
13
Preparation
Playback time
The number of recordable pictures and playback time will vary depending on the
operating conditions and storing condition of the battery.
∫ Charging
Charging time Approx. 130 min maximum
Charging time and number of recordable pictures with the optional battery pack
(DMW-BCF10PP) are the same as above.
The charging time will vary slightly depending on the status of the battery and the
conditions in the charging environment.
When the charging has been completed successfully, the [CHARGE] indicator turns off.
Note
• The battery may swell and its operating time may become shorter as the number of times it is
charged increases. For long term battery use, we recommend you do not frequently charge the
battery before it is exhausted.
• The performance of the battery may temporarily deteriorate and the operating time may
become shorter in low temperature conditions (e.g. skiing/snowboarding).
Approx. 390 min (DMC-FS7)
Approx. 450 min (DMC-FS6)
Inserting and Removing the Card (optional)/the Battery
• Check that this unit is turned off.
• We recommend using a Panasonic card.
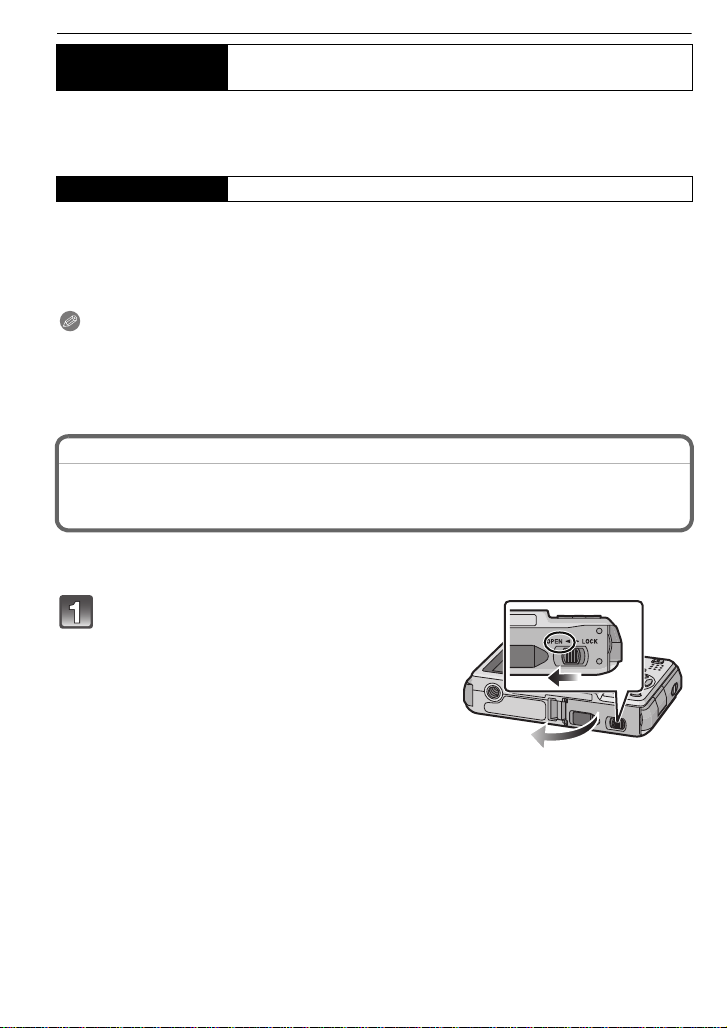
Slide the release lever in the direction
of the arrow and open the card/battery
door.
• Always use genuine Panasonic batteries
(DMW-BCF10PP).
• If you use other batteries, we cannot
guarantee the quality of this product.
14
VQT1V73
Preparation
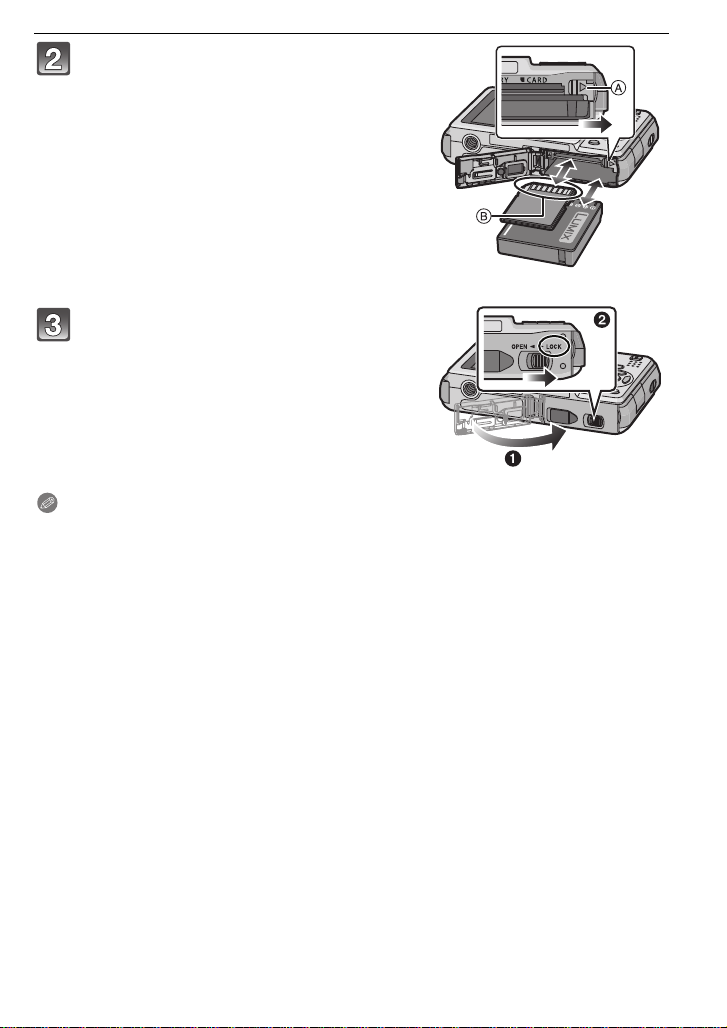
Battery: Insert it fully being careful
about the direction you insert it. Pull
the lever A in the direction of the arrow
to remove the battery.
Card: Push it fully until it clicks being
careful about the direction you insert it.
To remove the card, push the card until
it clicks, then pull the card out upright.
B: Do not touch the connection terminals of the
card.
• The card may be damaged if it is not fully
inserted.
1: Close the card/battery door.
2: Slide the release lever in the
direction of the arrow.
• If the card/battery door cannot be completely
closed, remove the card, check its direction and
then insert it again.
Note
• Remove the battery after use. Store the removed battery in the battery case (supplied).
• Do not remove the battery until the LCD monitor and the status indicator (green) turn off as the
settings on the camera may not be stored properly.
• The supplied battery is designed only for the camera. Do not use it with any other equipment.
• Before removing the card or battery, turn the camera off, and wait until the status indicator has
gone off completely. (Otherwise, this unit may no longer operate normally and the card itself
may be damaged or the recorded pictures may be lost.)
VQT1V73
15
Preparation
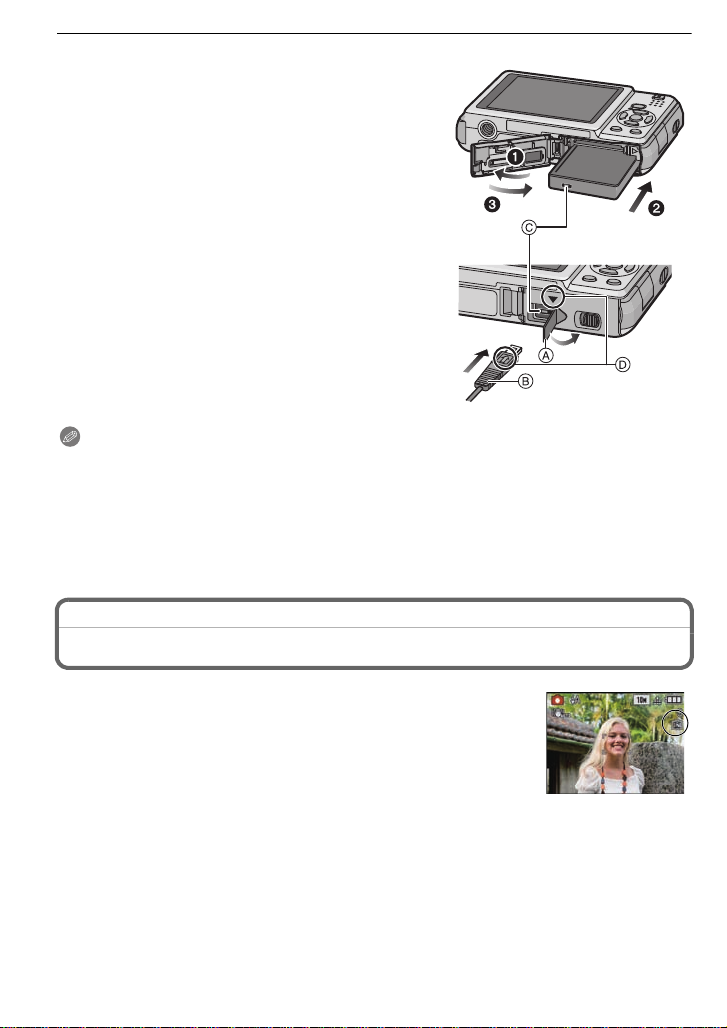
∫ Using an AC adaptor (optional) and a DC coupler (optional) instead of the battery
Ensure that the AC adaptor (DMW-AC5PP;
optional) and DC coupler (DMW-DCC4; optional)
are purchased as a set. Do not use if sold
separately.
1 Open the card/battery door.
2 Insert the DC coupler, being careful of the
direction.
3 Close the card/battery door.
• Ensure that the card/battery door is closed.
4 Open the DC coupler cover A.
5 Plug the AC adaptor into an electrical outlet.
6 Connect the AC adaptor B to the [DC IN] socket
C of the DC coupler.
D Align the marks, and insert.
• Ensure that only the AC adaptor and DC coupler for this
camera are used. Using any other equipment may
cause damage.
Note
• Always use a genuine Panasonic AC adaptor (DMW-AC5PP; optional).
• Some tripods cannot be attached when the DC coupler is connected.
• Make sure to unplug the AC adaptor when you open the card/battery door.
• If the AC adaptor and DC coupler are not necessary, then remove them from the digital
camera. Also, please keep the DC coupler cover closed.
• Also read the operating instructions for the AC adaptor and DC coupler.
• For information about optional accessories, refer to the “Digital Camera Accessory System”.
(P110)
About the Built-in Memory/the Card
The following operations can be performed using this unit.
• When a card has not been inserted: Pictures can be recorded in
the built-in memory and played back.
• When a card has been inserted: Pictures can be recorded on the
card and played back.
• When using the built-in memory
k
>ð (access indication
• When using the card
† (access indication
¢ The access indication lights red when pictures are being recorded
on the built-in memory (or the card).
16
VQT1V73
¢
)
¢
)
Preparation
2
A
Built-in Memory
• Memory size: Approx. 50 MB
• Recordable motion pictures: QVGA (320k240 pixels) only
• The built-in memory can be used as a temporary storage device when the card being used
becomes full.
• You can copy the recorded pictures to a card. (P80)
• The access time for the built-in memory may be longer than the access time for a card.
Card
The following types of cards can be used with this unit.
(These cards are indicated as card in the text.)
Type of ca rd Characteristics
SD Memory Card (8 MB to 2 GB)
(Formatted using the FAT12 or FAT16
format in compliance with the SD
standard)
SDHC Memory Card (4 GB to
¢
32 GB)
(Formatted using the FAT32 format in
compliance with the SD standard)
MultiMediaCard • Still pictures only.
¢ The SDHC Memory Card is a memory card standard decided by the SD Association in 2006
for high capacity memory cards more than 2 GB.
¢ You can use an SDHC Memory Card in equipment that is compatible with SDHC Memory
Cards however you cannot use an SDHC Memory Card in equipment that is only compatible
with SD Memory Cards. (Always read the operating instructions for the equipment being
used.)
• You can only use cards with SDHC logo (indicating compliance with the SD standard) if using
cards with 4 GB or more capacity.
• Please confirm the latest information on the following website.
• Fast recording and writing speed
• Write-Protect switch
this switch is set to the [LOCK] position,
no further data writing, deletion or
formatting is possible. The ability to
write, delete and format data is restored
when the switch is returned to its
original position.)
A provided (When
http://panasonic.co.jp/pavc/global/cs
(This Site is English only.)
Note
• Do not turn this unit off, remove its battery or card or disconnect the AC adaptor
(DMW-AC5PP; optional) when the access indication is lit [when pictures are being read
or deleted or the built-in memory or the card is being formatted (P25)]. Furthermore, do
not subject the camera to vibration or impact. The card or the data on the card may be
damaged, and this unit may no longer operate normally.
• The data on the built-in memory or the card may be damaged or lost due to electromagnetic
waves, static electricity or breakdown of the camera or the card. We recommend storing
important data on a PC etc.
• Do not format the card on your PC or other equipment. Format it on the camera only to ensure
proper operation. (P25)
• Keep the Memory Card out of reach of children to prevent swallowing.
VQT1V73
17
Preparation
ON
OFF
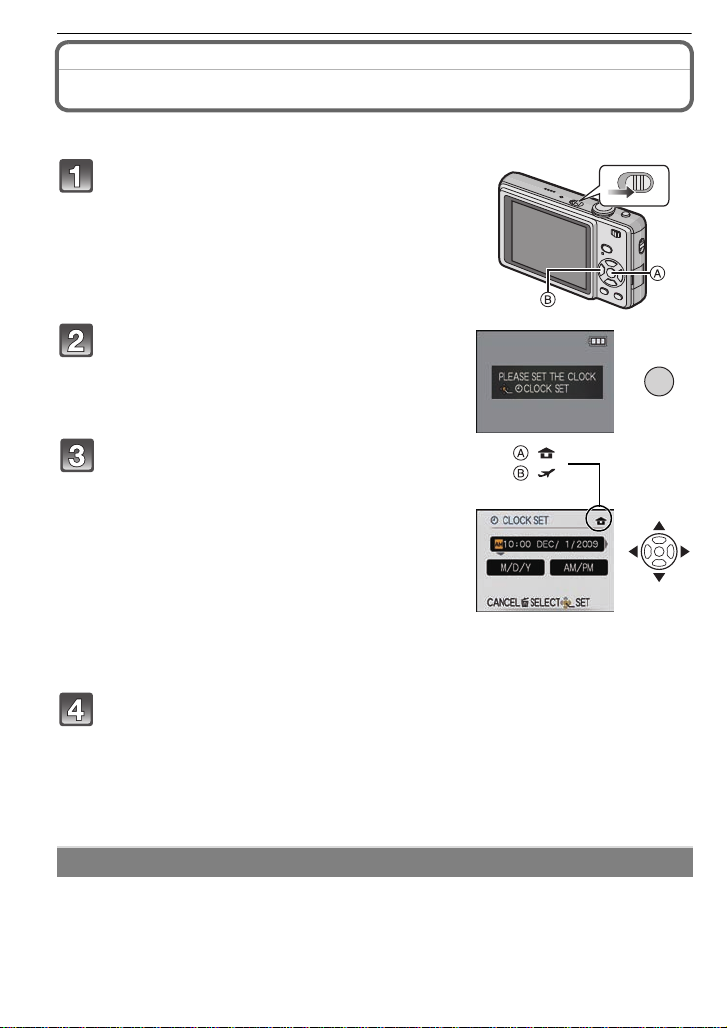
Setting Date/Time (Clock Set)
• The clock is not set when the camera is shipped.
Turn the camera on.
• The [PLEASE SET THE CLOCK] message appears.
(This message does not appear in [PLAYBACK]
mode.)
A [MENU/SET] button
B Cursor buttons
Press [MENU/SET].
MENU
/SET
Press 2/1 to select the items (year,
month, day, hour, minute, display
:
:
sequence or time display format), and
press 3/4 to set.
A: Time at the home area
B: Time at the travel destination (P58)
‚: Cancel without setting the clock.
• Select either [24HRS] or [AM/PM] for the time display
format.
• AM/PM is displayed when [AM/PM] is selected.
• When [AM/PM] is selected as the time display format, midnight is displayed as AM
12:00 and noon is displayed as PM 12:00. This display format is common in North
America and elsewhere.
Press [MENU/SET] to set.
• After completing the clock settings, turn the camera off. Then turn the camera back on,
switch to Recording mode, and check that the display reflects the settings that were
performed.
• When [MENU/SET] has been pressed to complete the settings without the clock having
been set, set the clock correctly by following the “Changing the clock setting” procedure
below.
Changing the clock setting
Select [CLOCK SET] in the [REC] or [SETUP] menu, and press 1. (P20)
• It can be changed in steps 3 and 4 to set the clock.
• The clock setting is maintained for 3 months using the built-in clock battery even
without the battery. (Leave the charged battery in the unit for 24 hours to charge the
built-in battery.)
VQT1V73
18
Preparation
Note
• The clock is displayed when [DISPLAY] is pressed several times during recording.
• You can set the year from 2000 to 2099.
• If the clock is not set, the correct date cannot be printed when you stamp the date on the
pictures with [TEXT STAMP] (P73) or order a photo studio to print the pictures.
•
If the clock is set, the correct date can be printed even if the date is not displayed on the screen of the camera.
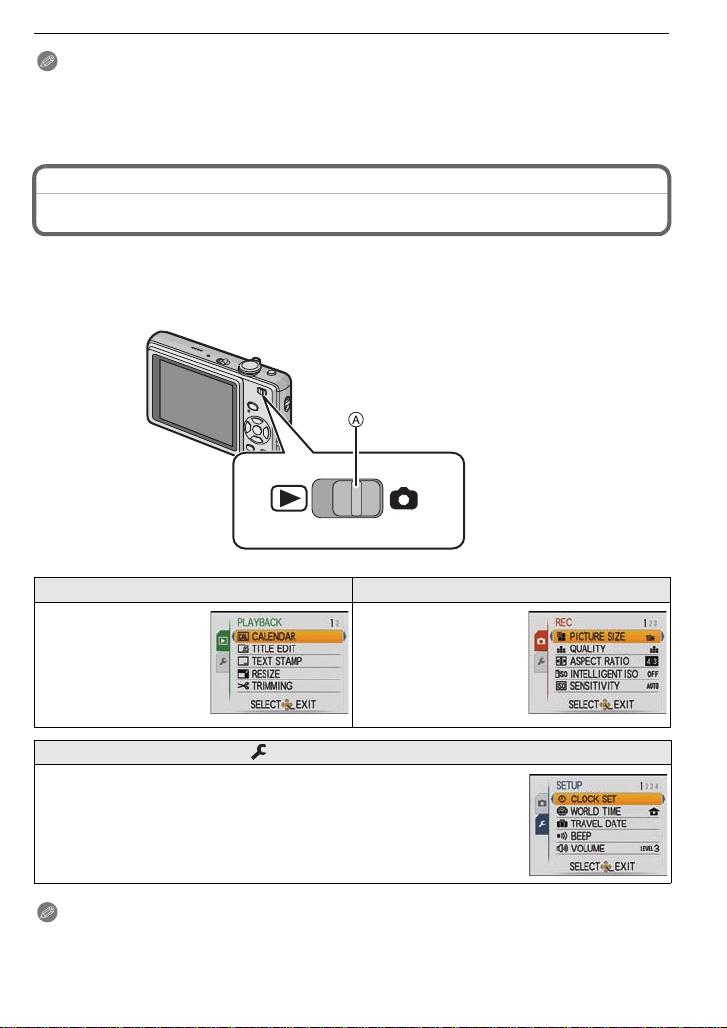
Setting the Menu
The camera comes with menus that allow you to set the settings for taking pictures and playing them
back just as you like and menus that enable you to have more fun with the camera and use it more easily.
In particular, the [SETUP] menu contains some important settings relating to the camera’s
clock and power. Check the settings of this menu before proceeding to use the camera.
A [REC]/[PLAYBACK] selector switch
( [PLAYBACK] mode menu (P71 to 80) ! [REC] mode menu (P59 to 66)
• This menu lets you
set the protection,
trimming or print
settings (DPOF), etc.
of recorded pictures.
• This menu lets you
set the coloring,
sensitivity, aspect
ratio, number of pixels
and other aspects of
the pictures you are
recording.
[SETUP] menu (P22 to 26)
• This menu lets you perform the clock settings, select the operating
beep tone settings and set other settings which make it easier for you
to operate the camera.
• The [SETUP] menu can be set from either the [REC MODE] or
[PLAYBACK MODE].
Note
Due to the camera’s specifications, it may not be possible to set some of the functions or
some functions may not work in some of the conditions under which the camera is used.
VQT1V73
19
Preparation
ON
OFF
/SET
MENU
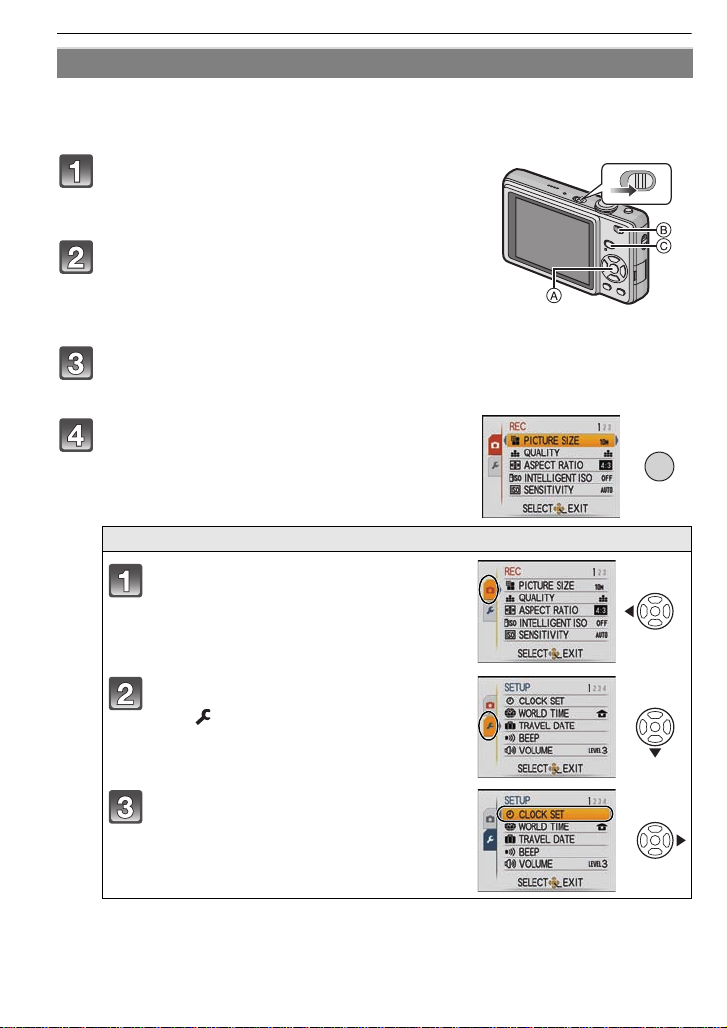
Setting menu items
This section describes how to select the normal picture mode settings, and the same
setting can be used for the [PLAYBACK] menu and [SETUP] menu as well.
Example: Setting [AF MODE] from [
Ø] to [š] in the normal picture mode
Turn the camera on.
A [MENU/SET] button
B [REC]/[PLAYBACK] selector switch
C [MODE] button
Slide the [REC]/[PLAYBACK] selector
switch to [!], and then press [MODE].
• When selecting the [PLAYBACK] mode menu settings,
set the [REC]/[PLAYBACK] selector switch to [(], and
proceed to step
4.
Press 3/4 to select [NORMAL PICTURE],
and then press [MENU/SET].
Press [MENU/SET] to display the menu.
• You can switch menu screens from any menu item by
rotating the zoom lever.
Switching to the [SETUP] menu
Press 2.
20
VQT1V73
Press 4 to select the [SETUP] menu
icon .
Press 1.
• Select a menu item next and set it.
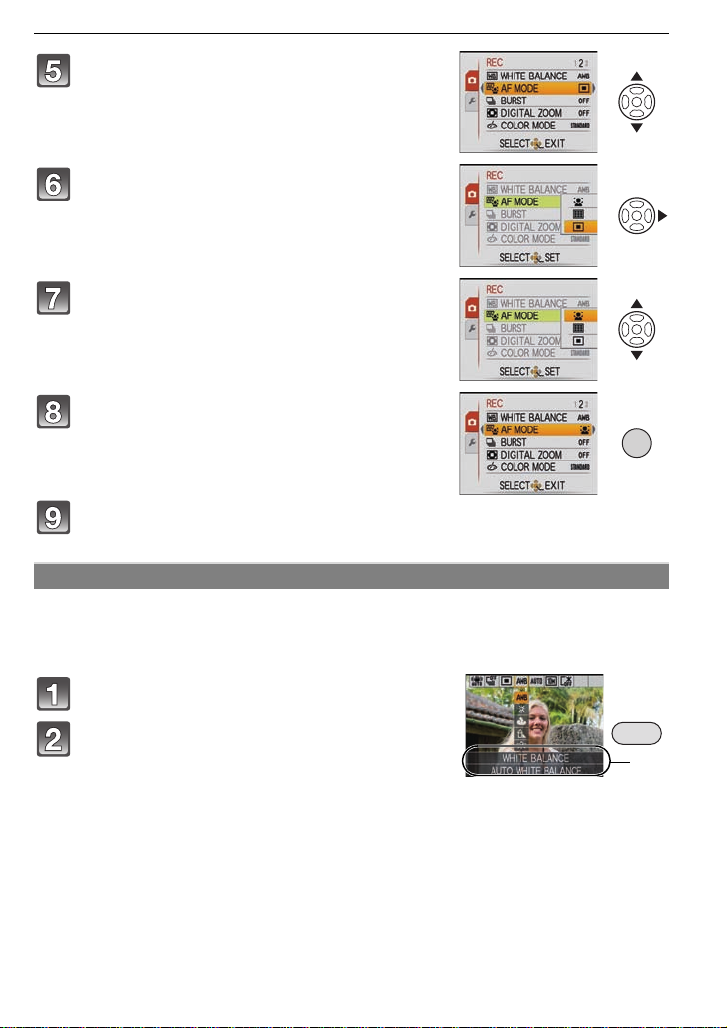
Preparation
/SET
MENU
Q.MENU
A
Press 3/4 to select [AF MODE].
• Select the item at the very bottom, and press 4 to
move to the second screen.
Press 1.
• Depending on the item, its setting may not appear or it
may be displayed in a different way.
Press 3/4 to select [š].
Press [MENU/SET] to set.
Press [MENU/SET] to close the menu.
Using the quick menu
By using the quick menu, some of the menu settings can be easily found.
• Some of the menu items cannot be set by the modes.
• When [DISPLAY] is pressed while [STABILIZER] (P65) is selected, [JITTER, SUBJ. MOVE
DEMO.] can be displayed.
Press and hold [Q.MENU] when recording.
Press 3
/4/2/1 to select the menu item
and the setting and then press [MENU/SET]
to close the menu.
A The items to be set and the settings are displayed.
VQT1V73
21
Preparation
123
123
About the Setup Menu
[CLOCK SET], [ECONOMY] and [AUTO REVIEW] are important items. Check their
settings before using them.
• In the Intelligent auto mode, only [CLOCK SET], [WORLD TIME], [BEEP] and [LANGUAGE]
can be set.
For details on how to select the [SETUP] menu settings, refer to P20.
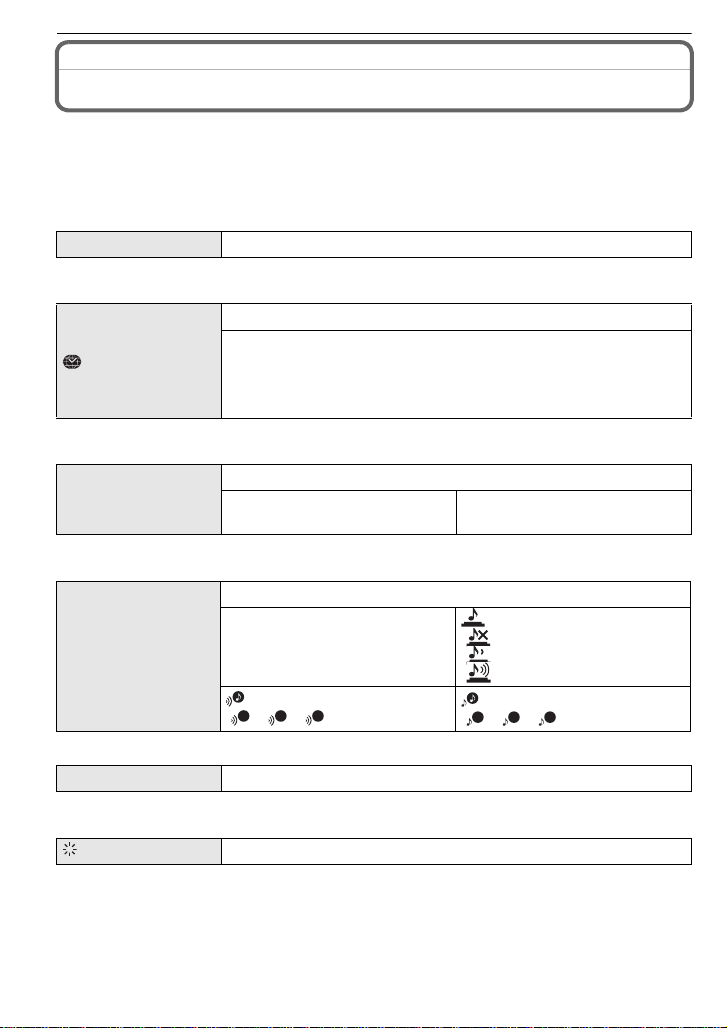
U [CLOCK SET]
• Refer to P18 for details.
Setting Date/Time.
Set the time in your home area and travel destination.
“ [DESTINATION]:
[WORLD TIME]
Travel destination area
– [HOME]:
Your home area
• Refer to P58 for details.
Set the departure date and the return date of the vacation.
— [TRAVEL DATE]
• Refer to P56 for details.
[TRAVEL SETUP]:
[OFF]/[SET]
[LOCATION]:
[OFF]/[SET]
This allows you to set the beep and shutter sound.
r [BEEP LEVEL]:
[s] (Muted)
r [BEEP]
[t] (Low)
[u] (High)
[BEEP TONE]:
[]/[]/[]
u [VOLUME]
• When you connect the camera to a TV, the volume of the TV speakers does not change.
Adjust the volume of the speaker to any of 7 levels.
[SHUTTER VOL.]:
[] (Muted)
[ ] (Low)
[ ] (High)
[SHUTTER TONE]:
[]/[]/[]
[MONITOR]
VQT1V73
22
Adjust the brightness of the LCD monitor in 7 steps.
Preparation
LCD
These menu settings make it easier to see the LCD monitor when
you are in bright places or when you are holding the camera high
above your head.
[OFF]
„ [AUTO POWER LCD]:
[LCD MODE]
The brightness is adjusted automatically depending on how bright
it is around the camera.
… [POWER LCD]:
The LCD monitor becomes brighter and easier to see even when
taking pictures outdoors.
Å [HIGH ANGLE]:
The LCD monitor is easier to see when taking pictures with the
camera held high above your head.
• High angle mode is also canceled if you turn the camera off or [POWER SAVE] is activated.
• The brightness of the pictures displayed on the LCD monitor is increased so some subjects
may appear differently from actuality on the LCD monitor. However, this does not affect the
recorded pictures.
• The LCD monitor automatically returns to normal brightness after 30 seconds when recording
in Power LCD mode. Press any button to make the LCD monitor bright again.
• If the screen is difficult to see because of light from the sun etc. shining on it, use your hand or
another object to block the light.
• The number of recordable pictures decreases in Auto Power LCD mode, Power LCD mode and
High angle mode.
• [AUTO POWER LCD] and [HIGH ANGLE] cannot be selected in Playback mode.
[DISPLAY SIZE]
[FOCUS ICON]
Change the display size of some icons and menu screens.
[STANDARD]/[LARGE]
Change the focus icon.
[ ]/[ ]/[ ]/[ ]/[ ]/[ ]
You can conserve the battery life by setting these menus.
p [POWER SAVE]:
The camera is automatically turned off if the camera has not been
used for the time selected on the setting.
q [ECONOMY]
[OFF]/[2MIN.]/[5MIN.]/[10MIN.]
[AUTO LCD OFF]:
The LCD monitor is automatically turned off if the camera has not
been used for the time selected on the setting.
[OFF]/[15SEC.]/[30SEC.]
• Press the shutter button halfway or turn the camera off and on to cancel [POWER SAVE].
• [POWER SAVE] is set to [5MIN.] in the Intelligent auto mode.
• [POWER SAVE] is fixed to [2MIN.] when [AUTO LCD OFF] is set to [15SEC.] or [30SEC.].
• The status indicator lights while the LCD monitor is turned off. Press any button to turn on the
LCD monitor again.
• [AUTO LCD OFF] does not work while operating menu or playback zoom.
• [POWER SAVE] does not work in the following cases.
VQT1V73
23

Preparation
– When using the AC adaptor
– When connecting to a PC or a printer
– When recording or playing back motion pictures
– During a slide show
–[AUTO DEMO]
• [AUTO LCD OFF] does not work in the following cases.
– When using the AC adaptor
– When connecting to a PC or a printer
– While the self-timer is set
– While recording motion pictures
– While the menu screen is displayed
–[AUTO DEMO]
Set the length of time that the picture is displayed after taking it.
[OFF]
[1SEC.]
o [AUTO REVIEW]
[2SEC.]
[HOLD]: The pictures are displayed until one any of the buttons
is pressed.
[ZOOM]: The picture is displayed for 1 second and then
enlarged 4k and displayed for 1 more second.
• [AUTO REVIEW] is activated regardless of its setting when using Auto bracket (P45),
[HI-SPEED BURST] (P52), [FLASH BURST] (P52) and [PHOTO FRAME] (P54) in Scene
mode and [BURST] (P64). (The pictures cannot be enlarged.)
• In Intelligent auto mode, the Auto review function is fixed to [2SEC.].
• [AUTO REVIEW] does not work in Motion picture mode.
v [NO.RESET]
• The folder number is updated and the file number starts from 0001. (P83)
• A folder number between 100 and 999 can be assigned.
When the folder number reaches 999, the number cannot be reset. We recommend formatting
the card (P25) after saving the data on a PC or elsewhere.
• To reset the folder number to 100, format the built-in memory or the card first and then use this
function to reset the file number.
A reset screen for the folder number will then appear. Select [YES] to reset the folder number.
w [RESET]
• When the [RESET] setting is selected during recording, the operation that resets the lens is
also performed at the same time. You will hear the sound of the lens operating but this is
normal and not indicative of malfunctioning.
• When [SETUP] menu settings are reset, the following settings are also reset. In addition,
[FAVORITE] (P77) in [PLAYBACK] mode menu is set to [OFF], and [ROTATE DISP.] (P76) is
set to [ON].
– The setting and registration for My scene mode (P46)
– The birthday and name
– The settings of [TRAVEL DATE] (P56) (departure date, return date, location)
– The [WORLD TIME] (P58) setting.
• The folder number and the clock setting are not changed.
VQT1V73
24
Reset the file number of the next recording to 0001.
The [REC] or [SETUP] menu settings are reset to the initial
settings.
settings for [BABY1]/[BABY2] (P50) and [PET] (P51) in Scene mode.
Preparation
For Canadian assistance, please call:
1-800-99-LUMIX (1-800-995-8649) or
send e-mail to: lumixconcierge@ca.panasonic.com
For USA and Puerto Rico assistance, please call:
1-800-211-PANA(7262) or, contact us via the web at:
http://www.panasonic.com/contactinfo
Select the USB communication system after or before connecting
the camera to your PC or your printer with the USB connection
cable (supplied).
y [SELECT ON CONNECTION]:
x [USB MODE]
Select either [PC] or [PictBridge(PTP)] if you connected the
camera to a PC or a printer supporting PictBridge.
{ [PictBridge(PTP)]:
Set after or before connecting to a printer supporting PictBridge.
z [PC]:
Set after or before connecting to a PC.
• When [PC] is selected, the camera is connected via the “USB Mass Storage” communication
system.
• When [PictBridge(PTP)] is selected, the camera is connected via the “PTP (Picture Transfer
Protocol)” communication system.
Set to match the type of TV.
(Playback mode only)
[TV ASPECT]
[W]: When connecting to a 16:9 screen TV.
[X]: When connecting to a 4:3 screen TV.
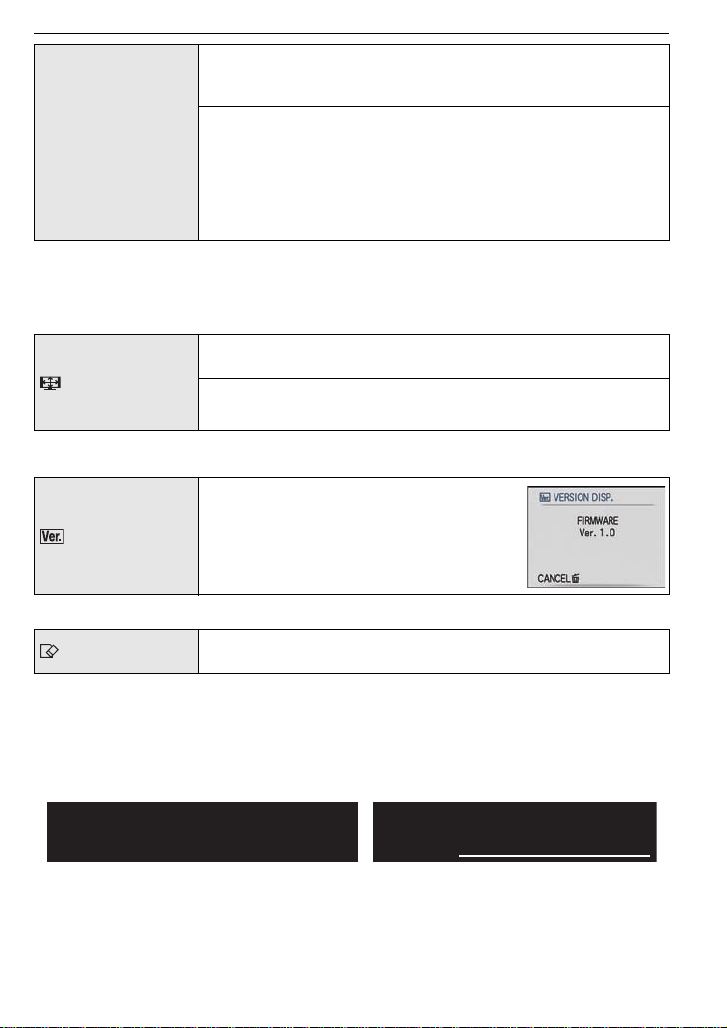
• This will work when the AV cable is connected.
It is possible to check which version of
firmware is on the camera.
[VERSION DISP.]
[FORMAT]
• Use a battery with sufficient battery power or the AC adaptor (DMW-AC5PP; optional) and DC
coupler (DMW-DCC4; optional) when formatting. Do not turn the camera off during formatting.
The built-in memory or card is formatted. Formatting irretrievably
deletes all the data so check the data carefully before formatting.
• If a card has been inserted, only the card is formatted. To format the built-in memory, remove
the card.
• If the card has been formatted on a PC or other equipment, format it on the camera again.
• It may take longer to format the built-in memory than the card.
• If the built-in memory or the card cannot be formatted, consult your nearest Service Center.
VQT1V73
25

Preparation
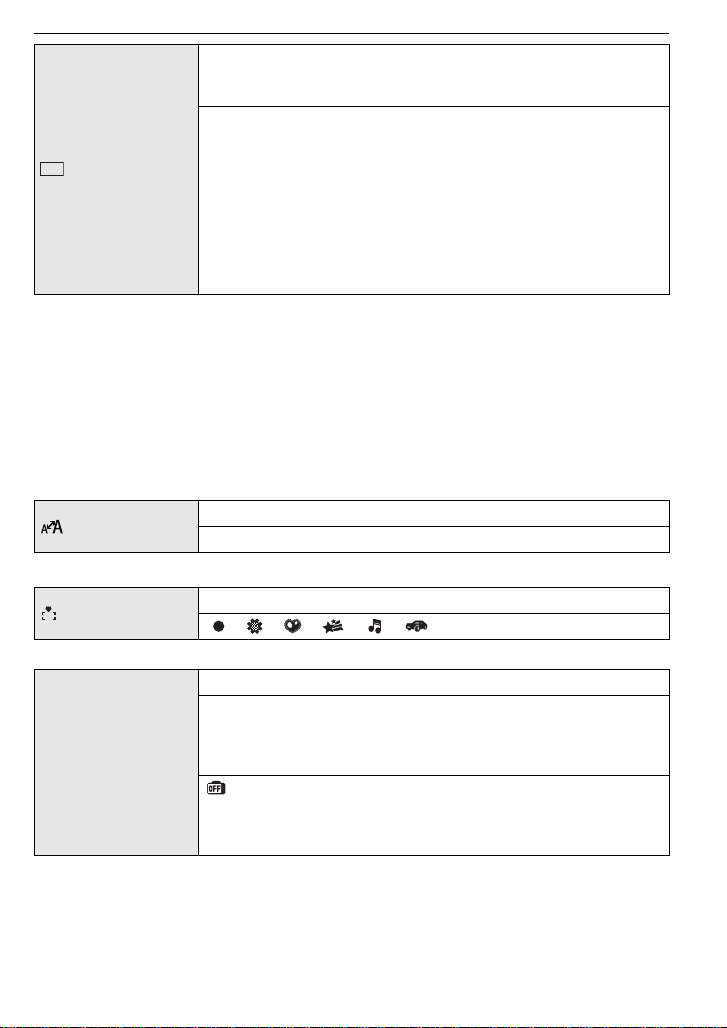
DEMO
A
B
Set the language displayed on the screen.
¢
~ [LANGUAGE]
• If you set a different language by mistake, select [~] from the menu icons to set the desired
language.
[ENGLISH]/[DEUTSCH]
[ITALIANO]
¢ Not displayed on DMC-FS7P/DMC-FS6P
¢
/[繁體中文]¢/[¢]
/[FRANÇAIS]¢/[ESPAÑOL]/
¢
The camera automatically detects jitter and the movement of the
subject and displays these on the indicator. ([JITTER, SUBJ.
MOVE DEMO.])
The camera’s features are displayed as slide shows. ([AUTO
DEMO])
[JITTER, SUBJ. MOVE DEMO.]
[DEMO MODE]
A Jitter detection demonstration
B Movement detection demonstration
[AUTO DEMO]:
[OFF]
[ON]
• In Playback mode, [JITTER, SUBJ. MOVE DEMO.] cannot be displayed.
• Press [DISPLAY] to close [JITTER, SUBJ. MOVE DEMO.].
• [JITTER, SUBJ. MOVE DEMO.] is an approximation.
• [AUTO DEMO] has no TV output capability.
26
VQT1V73
Preparation
ON
OFF
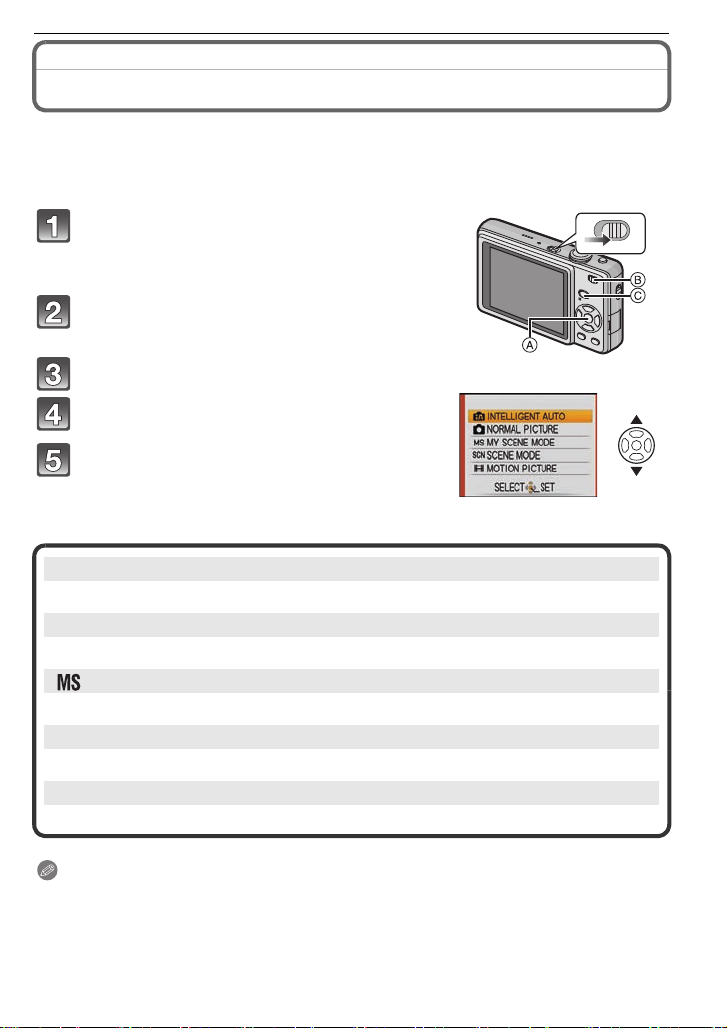
Selecting the [REC] Mode
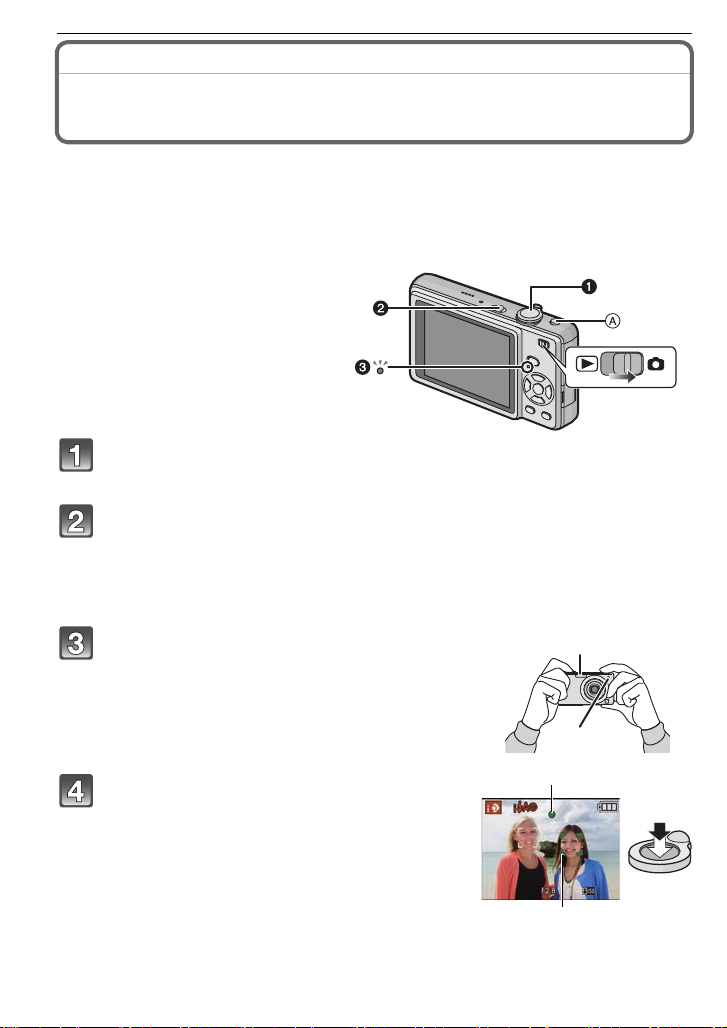
When the [REC] mode is selected, the camera can be set to the Intelligent auto mode in
which the optimal settings are established in line with the subject to be recorded and the
recording conditions, or to the Scene mode which enables you to take pictures that match
the scene being recorded.
Turn the camera on.
A [MENU/SET] button
B [REC]/[PLAYBACK] selector switch
C [MODE] button
Slide the [REC]/[PLAYBACK] selector
switch to [!].
Press [MODE].
Press 3/4 to select the mode.
Press [MENU/SET].
∫ List of [REC] modes
¦
Intelligent auto mode (P28)
The subjects are recorded using settings automatically selected by the camera.
! Normal picture mode (P31)
The subjects are recorded using your own settings.
My scene mode (P46)
Pictures are taken using previously registered recording scenes.
Û
Scene mode (P46)
This allows you to take pictures that match the scene being recorded.
$ Motion picture mode (P55)
This mode allows you to record motion pictures with audio.
Note
• When the mode has been switched from [PLAYBACK] mode to [REC] mode, the previously set
[REC] mode will be set.
• Refer to P28 for details on selecting Intelligent auto mode.
VQT1V73
27
Basic
1
2
[REC] mode: ñ
Basic
Taking pictures using the automatic function
(ñ: Intelligent Auto Mode)
The camera will set the most appropriate settings to match the subject and the recording
conditions so we recommend this mode for beginners or those who want to leave the
settings to the camera and take pictures easily.
• The following functions are activated automatically.
– Scene detection/[STABILIZER]/[INTELLIGENT ISO]/Face detection/Backlight
Compensation/Digital Red-eye Correction
• The status indicator 3 lights when you
turn this unit on 2. (It turns off after about
1 second.)
(1: Shutter button)
Slide the [REC]/[PLAYBACK] selector switch to [!], and then press
[MODE].
Press 3/4 to select [INTELLIGENT AUTO], and then press [MENU/
SET].
• You can quickly switch to Intelligent auto mode by pressing [¦] A when the [REC]/
[PLAYBACK] selector switch is set to record. Pressing [¦] again takes you back to the
previous mode.
28
Hold the camera gently with both hands,
keep your arms still at your side and stand
with your feet slightly apart.
B Flash
C AF assist lamp
Press the shutter button halfway to focus.
• The focus indication 1 (green) lights when the subject
is focused.
• The AF area 2 is displayed around the subject’s face
by the face detection function. In other cases, it is
displayed at the point on the subject which is in focus.
• The focus range is 5 cm (0.17 feet) (Wide)/50 cm
(1.64 feet) (Tele) to ¶.
• The maximum close-up distance (the shortest distance
at which the subject can be taken) differs depending on
the zoom magnification.
VQT1V73
Basic
Press the shutter button fully (push it in
further), and take the picture.
• The access indication (P16) lights red when pictures
are being recorded on the built-in memory (or the
card).
∫ When taking pictures using the flash (P39)
∫ When taking pictures using the zoom (P33)
Note
• Be careful not to move the camera when you press the shutter button.
• Do not cover the flash or the AF assist lamp with your fingers or other objects.
• Do not touch the front of the lens.
Scene detection
When the camera identifies the optimum scene, the icon of the scene concerned is
displayed in blue for 2 seconds, after which its color changes to the usual red.
¦
> [i-PORTRAIT]
[i-SCENERY]
[i-MACRO]
[i-NIGHT PORTRAIT]
[i-NIGHT SCENERY]
•[¦] is set if none of the scenes are applicable, and the standard settings are set.
• If a tripod is used, for instance, and the camera has judged that camera shake is minimal when
the Scene mode has been identified as [ ], the shutter speed will be set to a maximum of
8 seconds. Take care not to move the camera while taking pictures.
∫ Face detection
When [ ] or [ ] is selected, the camera automatically detects a person’s face, and it will
adjust the focus and exposure (P63).
Note
• Due to conditions such as the ones below, a different scene may be
identified for the same subject.
– Subject conditions: When the face is bright or dark, The size of the
subject, The distance to the subject, The contrast of the subject,
When the subject is moving, When zoom is used
– Recording conditions: Sunset, Sunrise, Under low brightness
conditions, When the camera is shaken
• To take pictures in an intended scene, it is recommended that you take pictures in the
appropriate Recording mode.
∫ The Backlight Compensation
Backlight refers to when light comes from the back of a subject.
In this case, the subject will become dark, so this function compensates the backlight by
brightening the whole of the picture automatically.
• Only when [‡] is selected
• Only when [Œ] is selected
VQT1V73
29

Basic
ISOMAX
1600
About the flash
• When [‡] is selected, [ ], [ ] or [ ] is set depending on the type of subject and
brightness.
• When [ ] or [ ] is set, the flash is activated twice.
Settings in Intelligent auto mode
• Only the following functions can be set in this mode.
[REC] mode menu
– [PICTURE SIZE]
¢ The settings which can be selected are different from when other [REC] modes are used.
[SETUP] menu
– [CLOCK SET]/[WORLD TIME]/[BEEP]/[LANGUAGE]
• The settings of the following items are fixed.
[ECONOMY]
([POWER SAVE]) (P23)
[AUTO REVIEW] (P24) [2SEC.]
Flash (P39) ‡/Œ
Self-timer (P43) 10 seconds/off
[QUALITY] (P60) A
[INTELLIGENT ISO] (P61)
[WHITE BALANCE] (P62) [AWB]
[AF MODE] (P63) š (Set to [ ] when a face cannot be detected)
[STABILIZER] (P65) [AUTO]
[AF ASSIST LAMP] (P66) [ON]
• The following functions cannot be used.
– [AUTO LCD OFF]/[EXPOSURE]/[AUTO BRACKET]/[DIGITAL ZOOM]
• The other items on the [SETUP] menu can be set in a mode such as the normal picture mode.
What is set will be reflected in the Intelligent auto mode.
¢
(P59)/[BURST] (P64)/[COLOR MODE]¢ (P65)
Item Settings
[5MIN.]
30
VQT1V73
 Loading...