


Digital Camera
Operating Instructions
Model No.
Before use, please read these
instructions completely.
DMC-F7PP
For USA assistance, please call: 1-800-272-7033 or send e-mail to : consumerproducts@panasonic.com
For Canadian assistance, please call: 1-800-561-5505 or visit us at www.panasonic.ca
VQT9757

Dear Customer,
We would like to take this opportunity to
thank you for purchasing this Panasonic
Digital Camera. Please read these
Operating Instructions carefully and keep
them handy for future reference.
Information for
Your Safety
WARNING
TO REDUCE THE RISK OF FIRE OR
SHOCK HAZARD AND ANNOYING
INTERFERENCE, USE ONLY THE
RECOMMENDED ACCESSORIES AND
DO NOT EXPOSE THIS EQUIPMENT TO
RAIN OR MOISTURE. DO NOT
REMOVE THE COVER (OR BACK);
THERE ARE NO USER SERVICEABLE
PARTS INSIDE. REFER SERVICING TO
QUALIFIED SERVICE PERSONNEL.
Notice:
This product has parts that contain a small
amount of mercury. It also contains lead in
some components. Disposal of these
materials may be regulated in your
community due to environmental
considerations. For disposal or recycling
information please contact your local
authorities, or the Electronics Industries
Alliance: <http://www.eiae.org.>
different from those shown in the
illustrations in these Operating
Instructions.
• SD Logo is a trademark.
• Other names, company names, and
product names printed in these
instructions are trademarks or registered
trademarks of the companies
concerned.
• During use, the camera becomes warm,
but it is not a malfunction.
Carefully observe copyright laws.
Recording of pre-recorded tapes or
discs or other published or broadcast
material for purposes other than your
own private use may infringe copyright
laws. Even for the purpose of private
use, recording of certain material may
be restricted.
• Please note that the actual controls and
components, menu items, etc. of your
Digital Camera may look somewhat
2
FCC Note: (U.S. only)
This equipment has been tested and
found to comply with the limits for a Class
B digital device, pursuant to Part 15 of the
FCC Rules. These limits are designed to
provide reasonable protection against
harmful interference in a residential
installation. This equipment generates,
uses, and can radiate radio frequency
energy and, if not installed and used in
accordance with the instructions, may
cause harmful interference to radio
communications. However, there is no
guarantee that interference will not occur
in a particular installation. If this
equipment does cause harmful
interference to radio or television
reception, which can be determined by
turning the equipment off and on, the user
is encouraged to try to correct the
interference by one or more of the
following measures:
• Reorient or relocate the receiving
antenna.
• Increase the separation between the
equipment and receiver.
• Connect the equipment into an outlet on
a circuit different from that to which the
receiver is connected.
• Consult the dealer or an experienced
radio/TV technician for help.
Trade Name: Panasonic
Model No.: DMC-F7
Responsible party:Matsushita Electric
Support Contact:Panasonic
This device complies with Part 15 of the
FCC Rules. Operation is subject to the
following two conditions: (1) This device
may not cause harmful interference, and
(2) this device must accept any
interference received, including
interference that may cause undesired
operation.
This Class [B] digital apparatus complies
with Canadian ICES-003.
Cet appareil num
est conforme
Canada.
Corporation of
America One
Panasonic Way,
Secaucus, NJ 07094
Consumer
Electronics
Company 1-800272-7033
é
rique de la classe [B]
á
la norme NMB-003 du
FCC Caution: To assure continued
compliance, follow the
attached installation
instructions and use only
shielded interface cables
with ferrite core when
connecting to computer
or peripheral devices.
Any changes or
modifications not
expressly approved by
the party responsible for
compliance could void
the user’s authority to
operate this equipment.
DMC-F7
3

USB Driver End User License Agreement
You (
“Licensee”) are granted a license for the Software defined in this End User Soft
Agreement (“Agreement”) on condition that you agree to the terms and conditions of
this Agreement. If Licensee does not agree to the terms and conditions of this
Agreement, promptly return the Software to Matsushita Electric Industrial Co., Ltd
(“Matsushita”), its distributors or dealers from which you made the purchase.
Article 1 License
Licensee is granted the right to use the software, including the information recorded or
described on the CD-ROM, instruction manuals, and any other media provided to
Licensee (collectively “Software”), but all applicable rights to patents, copyrights,
trademarks and trade secrets in the Software are not transferred to Licensee.
Article 2 Use by a Third Party
Licensee may not use, copy, modify, transfer or allow any third party, whether free of
charge or not, to use, copy or modify the Software, except as expressly provided for in
this Agreement.
Article 3 Restrictions on Copying the Software
Licensee may make a single copy of the Software in whole or a part solely for back-up
purpose.
Article 4 Computer
Licensee may use the Software only on the computer, and may not use it on more than
one computer.
Article 5 Reverse Engineering, Decompiling or Disassembly
Licensee may not reverse engineer, decompile, or disassemble the Software, except to
the extent either of them is permitted under law or regulation of the country where
Licensee resides. Matsushita, or its distributors will not be responsible for any defects in
the Software or damage to Licensee caused by Licensee’s reverse engineering,
decompiling, or disassembly of the Software.
Article 6 Indemnification
The Software is provided “AS-IS” without warranty of any kind, either expressed or
implied, including, but not limited to, warranties of non-infringement, merchantability
and/or fitness for a particular purpose. Further, Matsushita does not warrant that the
operation of the Software will be uninterrupted or error free. Matsushita or any of its
distributors will not be liable for any damage suffered by Licensee arising from or in
connection with Licensee’s use of the Software.
Article 7 Export Control
Licensee agrees not to export or re-export to any country the Software in any form
without the appropriate export licenses under regulations of the country where Licensee
resides, if necessary.
Article 8 Termination of License
The right granted to Licensee hereunder will be automatically terminated if Licensee
contravenes of any of the terms and conditions of this Agreement. In the event, Licensee
must destroy the Software and related documentation together with all the copies thereof at
Licensee’s own expense.
4

Contents
Safety
Information for Your Safety......................................................................................2
USB Driver End User License Agreement ...............................................................4
Preparation
Components.............................................................................................................7
Names of the Components ......................................................................................8
LCD Monitor Display ..............................................................................................10
Quick Guide ...........................................................................................................12
Inserting the Battery...............................................................................................13
Charging the Battery..............................................................................................14
Connecting to an Electrical Outlet.......................................................................... 15
Inserting the Card ..................................................................................................16
Turning Power on/off..............................................................................................18
Attaching the Strap ................................................................................................19
Using the Tripod.....................................................................................................20
Using the LCD Monitor...........................................................................................21
The Indicators ........................................................................................................22
The Shutter Button (Pressing halfway/Pressing fully)............................................23
Operating the Menu ...............................................................................................24
Setting the Date/Time (Clock Set) .........................................................................25
Recording images (basic)
Taking Pictures ......................................................................................................26
Checking the Last Picture (Review).......................................................................27
Recording Motion Images ......................................................................................28
Using the Optical Zoom .........................................................................................29
Using the Digital Zoom...........................................................................................30
Taking Pictures with the Built-in Flash...................................................................31
Taking Pictures with the Self-timer ........................................................................33
Recording images (advanced)
Changing the Picture Size .....................................................................................34
Changing the Quality (Data Compression Ratio) ...................................................35
Compensating the Exposure..................................................................................36
Using the AF/AE Lock............................................................................................37
Using the Spot AF..................................................................................................38
Setting the White Balance......................................................................................39
Setting ISO Sensitivity ...........................................................................................41
Taking Pictures with Macro Mode/Unlimited Recording.........................................42
Taking Pictures with Burst Mode ...........................................................................43
5

Playback
Playing Back Still Pictures .....................................................................................44
9 Images Multi Playback ........................................................................................45
Using the Playback Zoom...................................................................................... 46
Editing the Recorded Pictures ...............................................................................47
Adding the Date .....................................................................................................48
Playing Back Motion Images.................................................................................. 49
Editing
Deleting Images .....................................................................................................50
Writing the Print Information in the Card (DPOF Setting) ......................................52
Protecting Images on the Card ..............................................................................55
Technical use
Playing Back with Slide Show (Automatic Playback).............................................56
Formatting the Card ...............................................................................................57
Adjusting the LCD Monitor Brightness ................................................................... 58
Using the Auto Review...........................................................................................59
Setting up the Beep Sound ....................................................................................60
Setting up the Power Save Mode .......................................................................... 61
Resetting the File Number .....................................................................................62
Memorizing settings...............................................................................................63
Playing Back Images with TV Monitor ...................................................................64
After Use................................................................................................................65
Connecting to PC ...................................................................................................66
Others
The Menu Items.....................................................................................................67
Cautions for Use ....................................................................................................69
Warning Indication .................................................................................................73
Troubleshooting .....................................................................................................74
Specifications.........................................................................................................75
Digital Camera Accessory System.........................................................................77
Digital Camera Accessory Order Form..................................................................78
Request for Service Notice .................................................................................... 79
Limited Warranty....................................................................................................80
Warranty ................................................................................................................82
Servicenter List ......................................................................................................84
Index ......................................................................................................................85
Spanish Quick Use Guide/Guía española para el uso rápido................................ 86
6
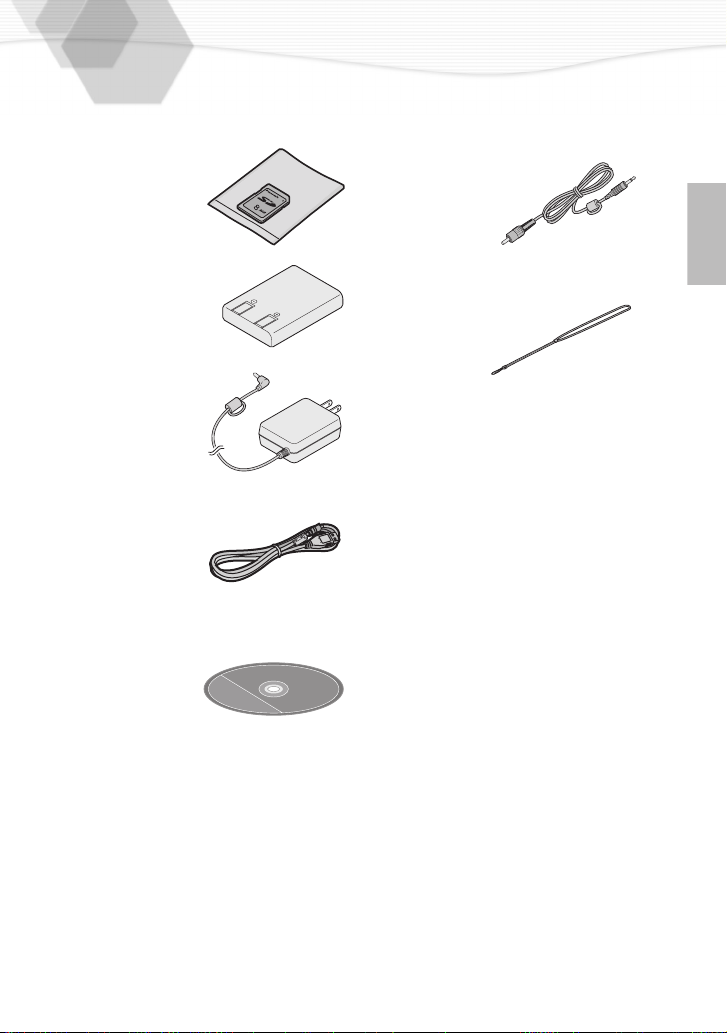
Components
Before using your camera, check the contents.
1
SD Memory Card (8MB)
RP-SD008
2
Battery Pack
CGA-S101A
3
AC Adaptor
DE-873D
4
USB Connection Kit
USB Connection Cable
K1HA05CD0001
5
6
Video Cable
VJA1153
Strap
VFC3801
CD-ROM
7
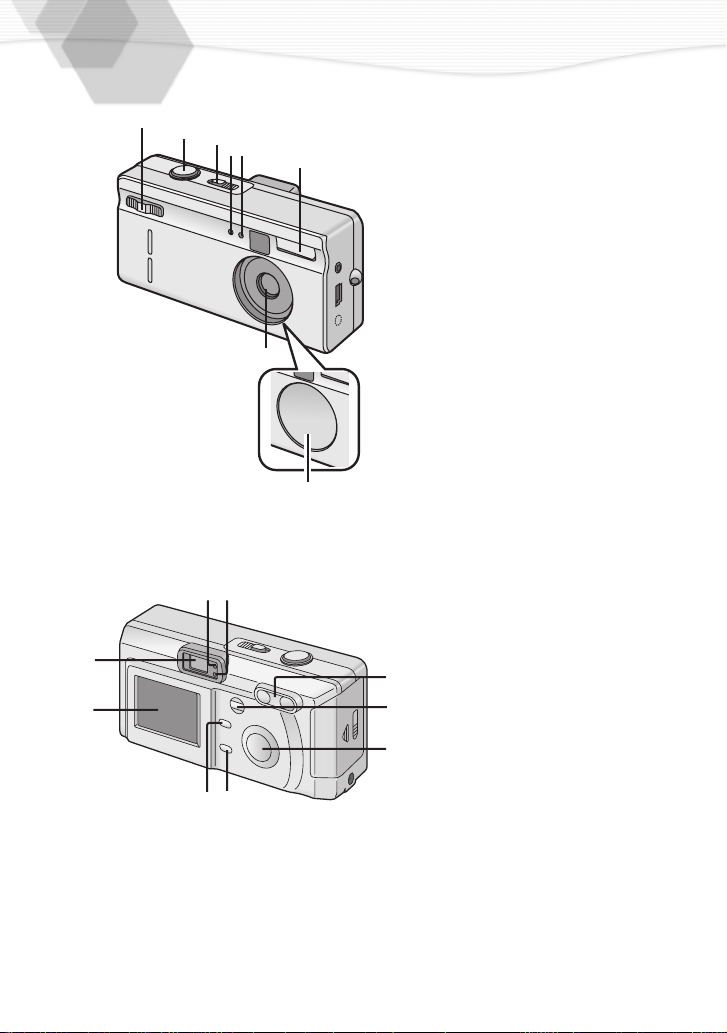
Names of the Components
[Front View]
1
7
8
2
3
4
5
6
9
10
1
2
3
4
5
6
7
8
[Back View]
9
10
11
12
13
14
15
16
17
REC/Power Switch
Self-timer Indicator (P33)
Flash Sensor (P32)
Flash
Lens
Lens Cover
Shutter Button (P23)
Playback/Power Switch (
P18, P44)
Flash Indicator (P22)
Status Indicator (P17, P22)
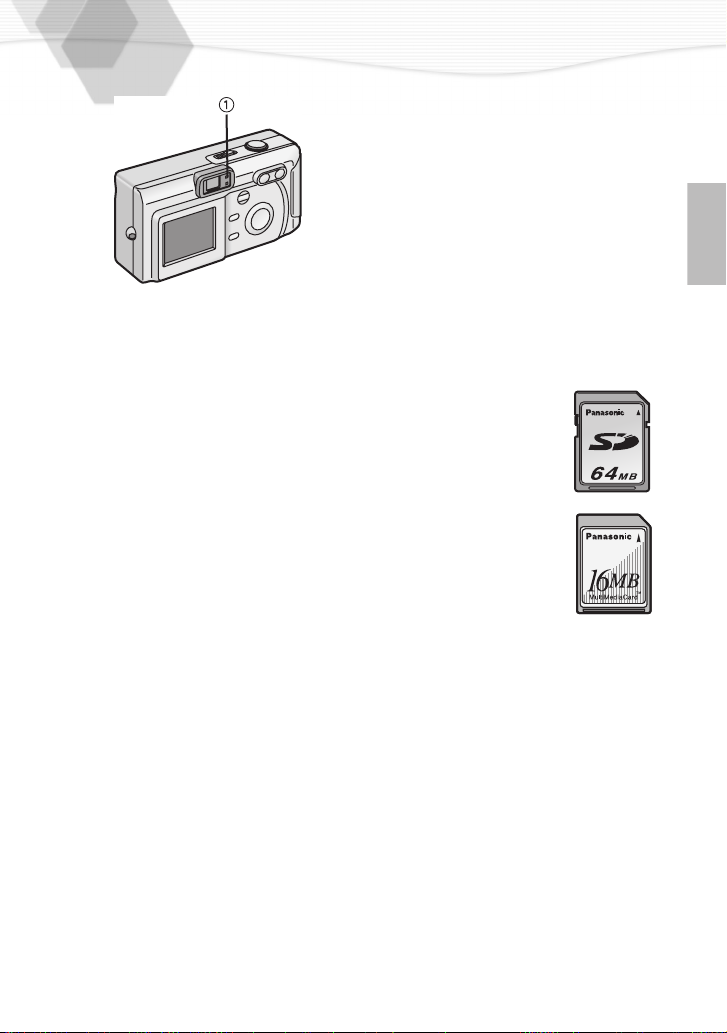
Optical Finder
LCD Monitor (P10)
MENU Button (P24)
Delete Button (P50)
Cursor (
Buttons
DISPLAY Button (P21)
Zoom Button (P29, P46)
3/4/2/1
)
11
12
1314
17
16
15
8
20
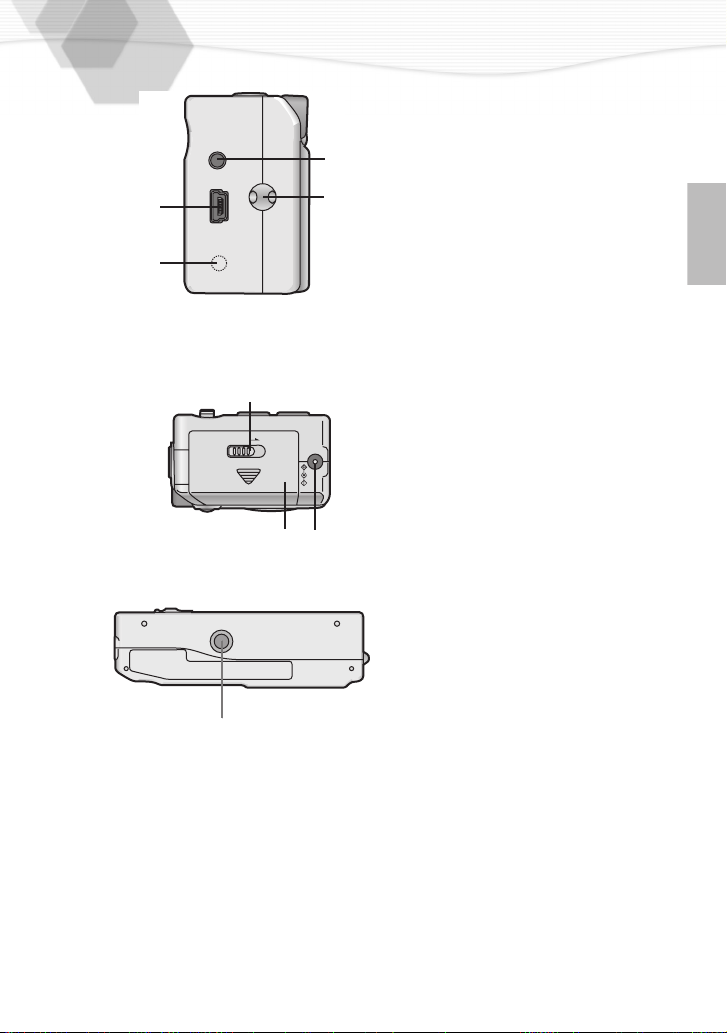
[Left View]
18
Strap Eyelet (P19)
19
Video.OUT Socket (P64)
20
USB Socket (5pin) (P66)
V. OUT
USB
19
18
A: SERIAL Socket (For Service
only)
[Right View]
21
Memory Card/Battery Door
(P13, P16)
A
22
Lock Lever
23
DC IN Socket (P14)
[Bottom View]
24
22
LOCK
MEMORY CARD / BATT.
21
DC IN
23
Tripod Receptacle (P20)
24
9

LCD Monitor Display
1600
+1.25
11MAR.1.2002
[In recording]
1
Battery indicator (P14)
(When using AC adaptor, this is
not displayed)
2
Focus mode (P42)
3
Flash mode (P31)
4
Self-timer mode (P33)
5
Exposure compensation (P36)
Camera jiggle alert (P22)
6
7
Digital zoom (P30)
8
ISO sensitivity (P41)
9
Frame remain
10
Spot mode (P38)
11
Spot area indication
12
White balance mode (P39)
13
Current date (P25)
14
Picture size (P34)
15
Quality (data compression ratio)
(P35)
16
Memory card indication (P16)
17
Motion image/Burst mode (P28,
P43)
10

F2.8
[In playback]
18
DPOF setting indication (P52)
19
Picture size (P34)
Protected image (P55)
20
21
Quality (compression ratio) (P35)
22
White balance mode (P39)
23
Folder/File number
• When the number of pictures is
more than 1000, the number
999 is displayed.
24
Recorded date
25
Shutter speed indication
26
F number indication
Motion image playback mode
27
(P49)
1600
1/125 MAR.1.2002
102-0048
11
Quick Guide
A
1
2
3
4
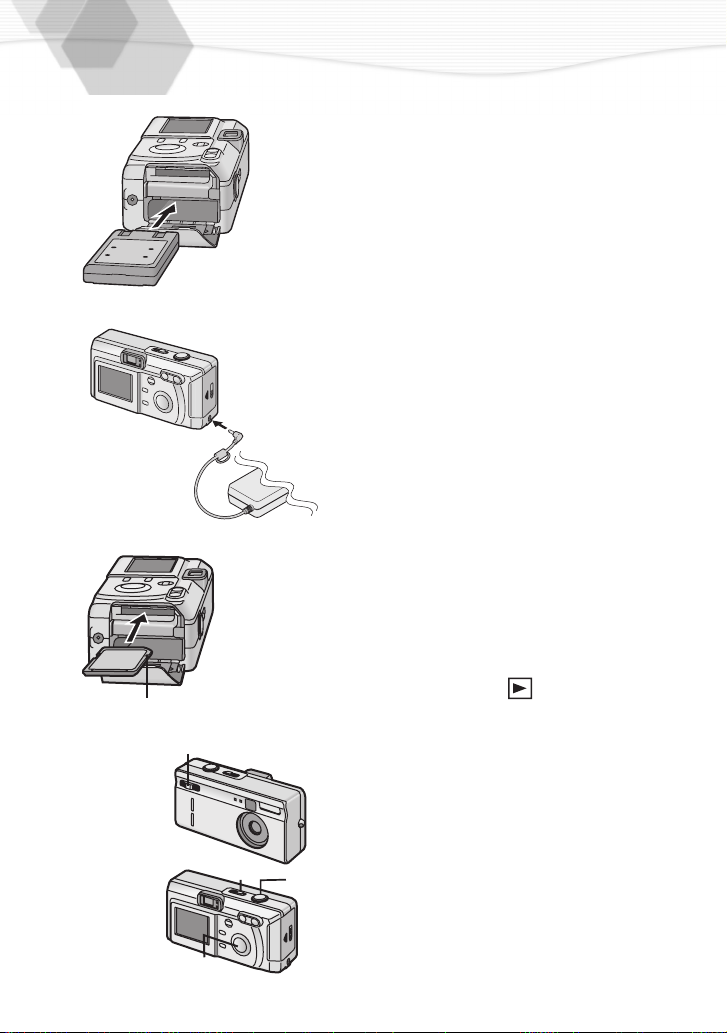
Prepare following items.
• Camera
• Battery
• Memory card
• AC adaptor
Check that the power switch is set to
[OFF].
Insert the battery into the camera.
1
(P13)
Connect the AC adaptor to the
2
camera, in order to charge the
battery. (P14)
Insert the memory card into the
3
camera. (P16)
A: Connection terminal on the back
side of the card.
Set the REC/power switch to [ON].
4
(P18)
Set the date. (P25)
5
Press the shutter button halfway to
6
set the focus. (P23)
Press the shutter button fully to take a
7
picture. (P23)
[Playback]
Set the playback[ ]/power switch
8
to [ON]. (P44)
Press
2/1
9
you want to view.
to play back a picture
12
8
6,7
9
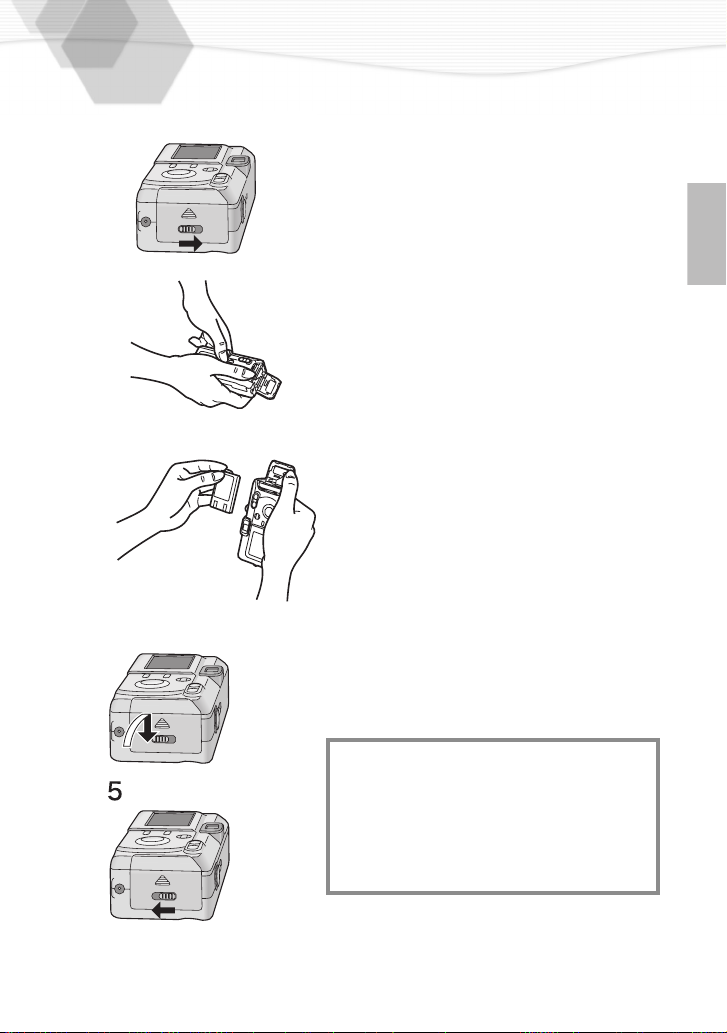
Inserting the Battery
[Preparation]
• Set the power switch to [OFF].
1
2
3
4
Slide the lock lever.
1
Open the battery door and the inside
2
door.
Insert the battery while pressing the
3
inside door.
•
Insert the battery with the arrow part
upward and terminal part downward.
Close the battery door.
4
Lock lever on battery door.
5
• When the camera will not be used for a
long time, remove the battery.
(When inserting the battery again, set the
date again)
• Before removing the battery from the
camera, turn the camera off.
• The supplied battery is for exclusive use
with this camera. Do not use it except
with this camera.
• When turning the camera on, do not put
in/out the DC input lead, the data stored
in the card could be destroyed. And the
file number is not memorized, so the
picture with same file number is recorded
in the another card.
CAUTION
Danger of explosion if battery is incorrectly
replaced.
Replace only with the same or equivalent
type recommended by the manufacturer.
Dispose of used batteries according to the
manufacturer’s instructions.
13
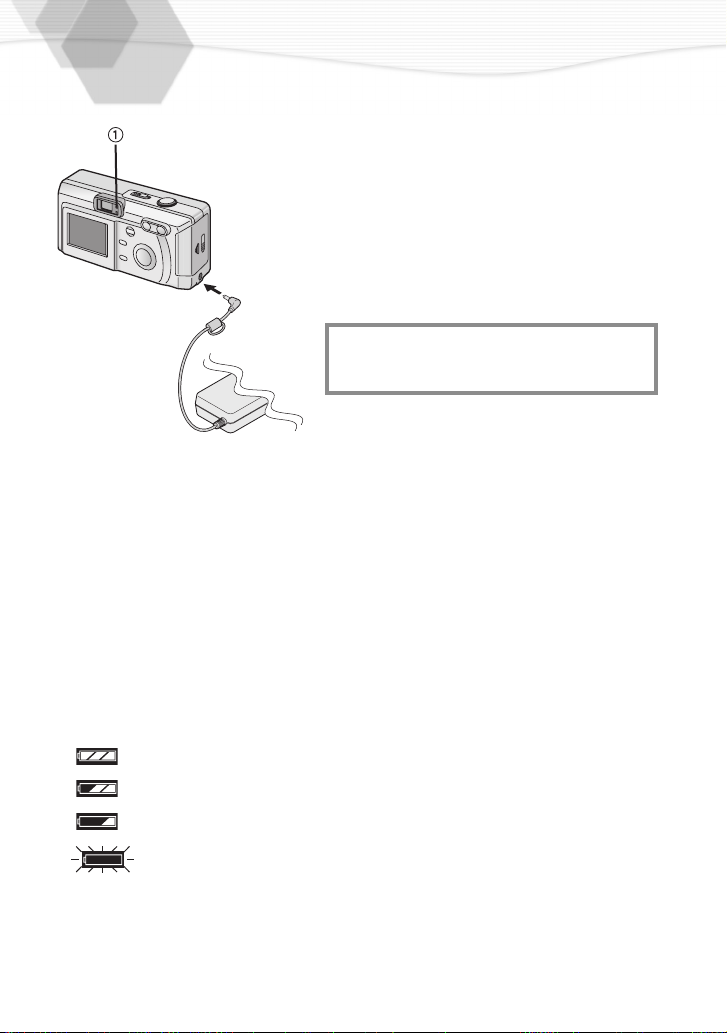
Charging the Battery
[Preparation]
• Set the power
1
2
3
THE SOCKET OUTLET SHALL BE
2
INSTALLED NEAR THE EQUIPMENT
AND SHALL BE EASILY ACCESSIBLE.
3
4
switch to
Insert the battery into the camera.
(P13)
Plug the AC adaptor into the
electrical outlet.
• The green status indicator 1 blinks
and charging starts.
• During charging the battery, do not
open the battery door.
Insert the connection plug of the AC
adaptor into the DC IN socket of the
camera.
When the status indicator stops
blinking, charging is complete.
• After charging is finished, remove the
AC adaptor from the electrical outlet
and then remove the connecting plug
from the DC IN socket.
[OFF].
ª Battery indicator
The remaining battery power is displayed on the LCD monitor. (This is
not displayed when using AC adaptor)
: The battery power is sufficient
: The remaining power is a little low
: The remaining power is low
: Replace or recharge the battery
• The status indicator also flashes. In this time, when pressing the shutter button
halfway, alarm sound rings.
14

ª Charging time and available recording time
(when the supplied 8 MB SD Memory card is used)
Charging time
A
Continuous recording time (recordable number) (If the LCD monitor is ON)
B
Continuous recording time (recordable number) (If the LCD monitor is OFF)
C
ª Charging environment and charging error
• Charge the battery in a place with the temperature of 10 to 35 °C. (The battery is
also the same temperature)
• When charging starts, the status indicator blinks at about 2 second intervals. If,
after charging starts, the status indicator blinks quicker, it’s a charging error.
In this case, remove the AC adaptor from the electrical outlet, remove the battery
and check if both room and battery temperature is too low or high and then
charge it again. (It is not possible to cancel the error by only turning the camera
off/on) If the problem persists, consult the dealer.
ª Charging the built-in battery for dating
The date/time setting can be memorized using the built-in battery. Charge it
using the AC adaptor for 3 hours approximately. (When inserting the battery,
even if the status indicator finishes blinking, keep charging the built-in battery)
• After the charging, set the date/time. (P25)
• During the charging, do not open the battery door.
Connecting to an Electrical Outlet
If you use an AC adaptor and connect it to an electrical outlet, you can use the
camera without worrying about the battery discharge. The connection method
is the same as explained in [Charging the Battery]. (P14)
• During use, the camera becomes warm, but it is not a malfunction.
15
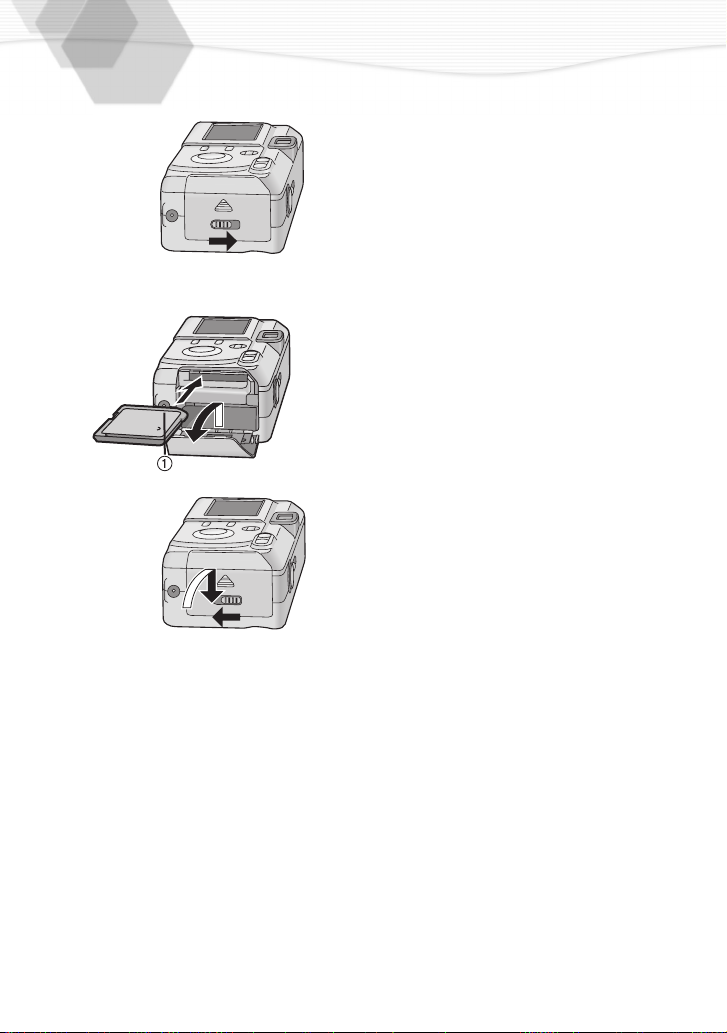
Inserting the Card
1
2,3
4,5
[Preparation]
• Set the power switch to [OFF].
Slide the lock lever.
1
Open the memory card door.
2
Insert the card all the way in until it
3
clicks.
• Check the direction of the card.
Close the memory card door.
4
Put the lock lever back.
5
[Removing the card]
Press the card.
1
Pull the card out.
2
16
• Do not touch the connection terminal
on the back side of the card.
• If the memory card door could not
completely closed, after taking out the
card, insert it again.
• If the card is not inserted, verify whether
the direction of the card is correct.
• We recommend you to use the card
manufactured by this company. (Use only
the genuine card)
• Before removing the card from the
camera, turn the camera off.
1
ª Access to the card
When you access to the card, the
green status indicator
When the status indicator lights, do
not remove the battery. Besides, do
not open the memory card door and
do not pull the card out. The card and
the card contents could be destroyed
and the camera could not operate
normally.
As the card contents could be
damaged or erased because of the
electrical noise, static electricity and
camera and card defects, store the
important data also in PC (P66) using
the USB socket.
1
lights.
ª SD Memory card (supplied) and
MultiMediaCard (optional)
The SD Memory card and
MultiMediaCard are small,
lightweight, removable external
cards. The SD Memory card is
equipped with a writing protection
switch that can inhibit writing and
formatting. (When the switch is
moved towards the [LOCK] side, it is
not possible to write or delete data on
the card and format it, but after
resetting, these functions become
available)
SD Memory card
• RP-SDH512(512MB)
• RP-SDH256(256MB)
• RP-SDH128(128MB)
• RP-SD064B (64MB)
• RP-SD032B (32MB)
• RP-SD016B (16MB)
• RP-SD008B (8MB)
MultiMediaCard
• VW-MMC16 (16MB)
• VW-MMC8 (8MB)
• When using the MultiMediaCard,
after recording motion images, the
screen may appear grey, but this is
not a malfunction.
17

Turning Power on/off
[In recording]
[Turning the power on]
1
1,2,3,4
2
[Turning the power off]
3
4
1,2
[In playback]
1
2
Slide the REC/power switch to open
the lens cover.
Furthermore, after sliding the switch
and turning on, set the REC mode.
• The status indicator wil light.
Slide back the REC/power switch and
turn the power off.
Furtermore, after sliding back the
switch, close the lens cover again.
• Check that the lens is stored in
completely and then close the lens
cover.
Slide the playback[ ]/power switch.
• The playback icon will be displayed.
Slide back the playback[ ]/power
switch, to turn the power off.
• When the REC mode is set, if you slide the playback
setting will change to playback mode.
• When switching the power on/off, do not put in front of the lens any obstacle.
18
[]/
power
switch
, the

Attaching the Strap
Let the top of the strap pass through
1
the strap eyelet.
Let the opposite side of the strap
2
pass through its ring shaped part.
Pull the strap.
3
19
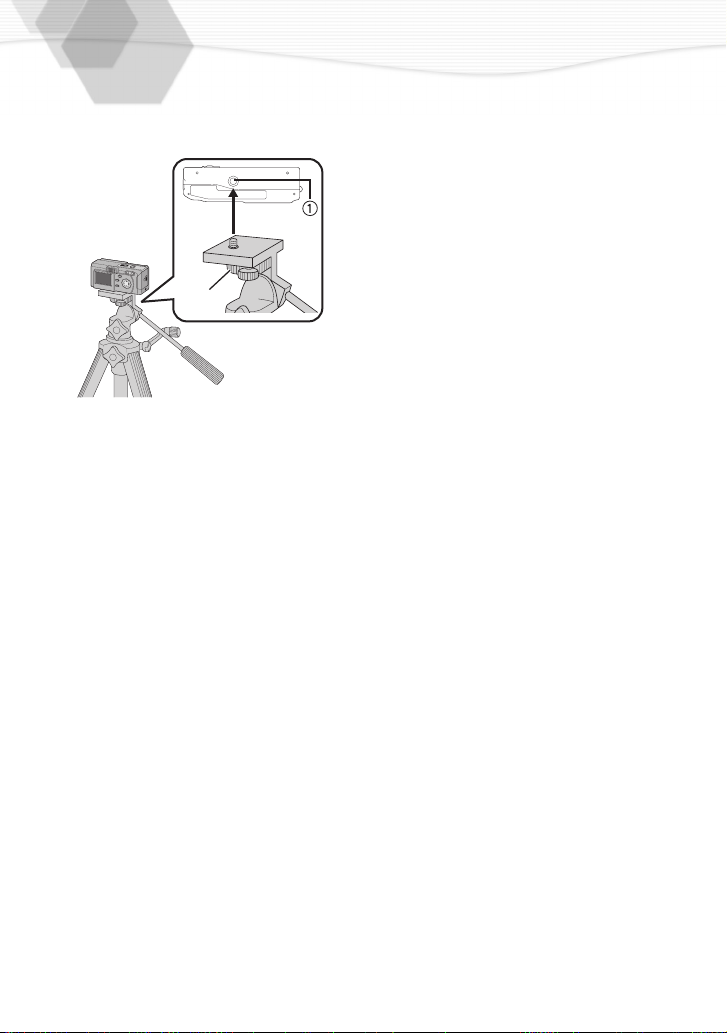
Using the Tripod
1
W
T
2
When using the tripod (optional), you can
take pictures also with low shutter speed
and zoom.
Match with the tripod receptacle
1
of the camera.
Fix the tripod receptacle.
2
• Read carefully the tripod operating
instructions.
1
20
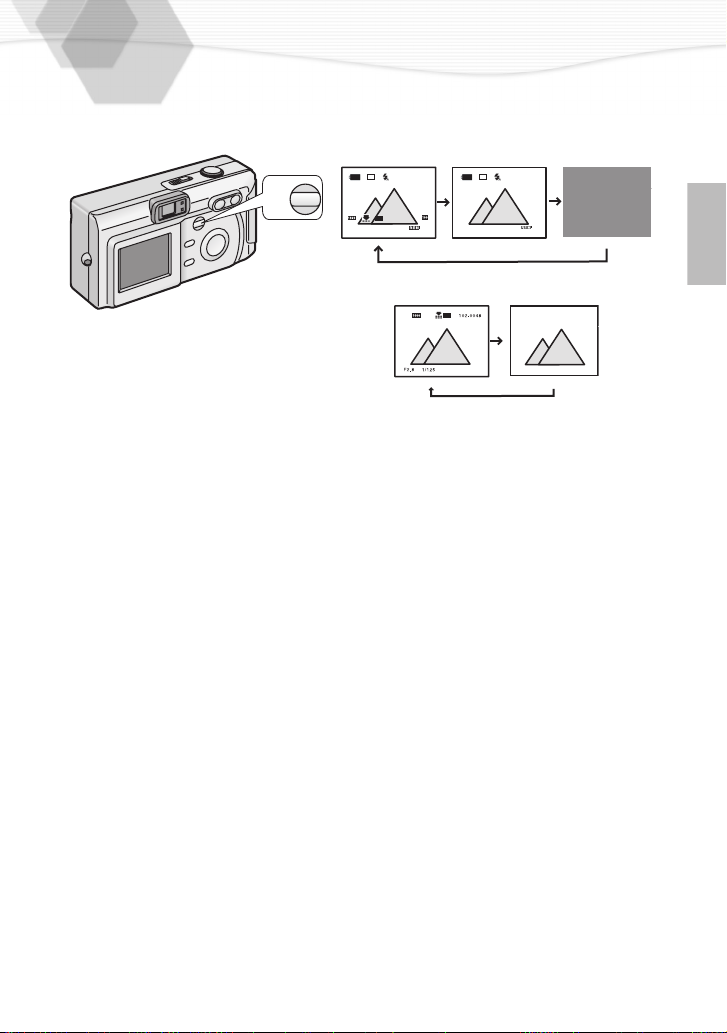
Using the LCD Monitor
Every time you press the [DISPLAY]
button, the display of the LCD monitor
changes as shown below.
[In recording]
±0.00
MAR.1.2002
AF
AUTO
11
DISPLAY
[In playback]
AUTO
MAR.1.2002
• Only in REC mode settings are kept, even if you turn the power off.
• When setting the digital zoom to [ON], the display of the LCD monitor is not set to
off.
• When setting the auto review to [ON], it is available, even if the display of the LCD
monitor is set to off. (After finishing the auto review, the display is returned to off)
• After recording, if you press the [REVIEW/SET] button, the review is displayed,
even if the LCD monitor is set to off. (After finishing the review, the display is
returned to off)
±0.00
AF
11
21
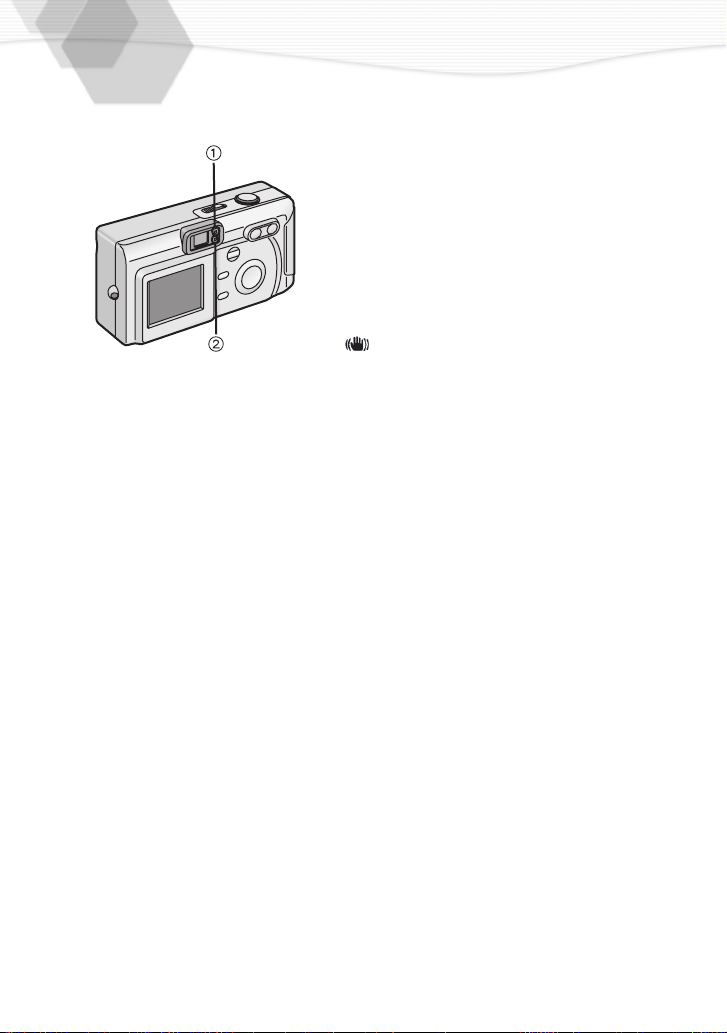
The Indicators
ª Status Indicator (Green) 1
[Blinking]
Warning indication
During recording the motion image
[Lighting]
When turning the power switch to [ON]
When accessing to the card
ª Flash Indicator (Red) 2
[Blinking]
When charging the flash (Blinking fast)
When setting the flash mode to forced off
and recording in dark places (Blinking
slowly)
[ ] is displayed on the LCD monitor.
[Lighting]
When the flash firing (It lights when the
shutter is pressed halfway)
22

The Shutter Button
(Pressing halfway/Pressing fully)
The shutter button is pressed in 2 steps:
[pressing halfway] and [pressing fully].
Pressing halfway (Press lightly)
• Focus and exposure are locked.
Pressing fully (Press all the way)
• The picture is captured in the card. In
motion image mode, the recording starts.
• You can set the beep sound in menu.
(P60)
• When pressing the shutter button fully at
a stroke, the camera is shaken or the
focus is not adjusted.
A
B
23

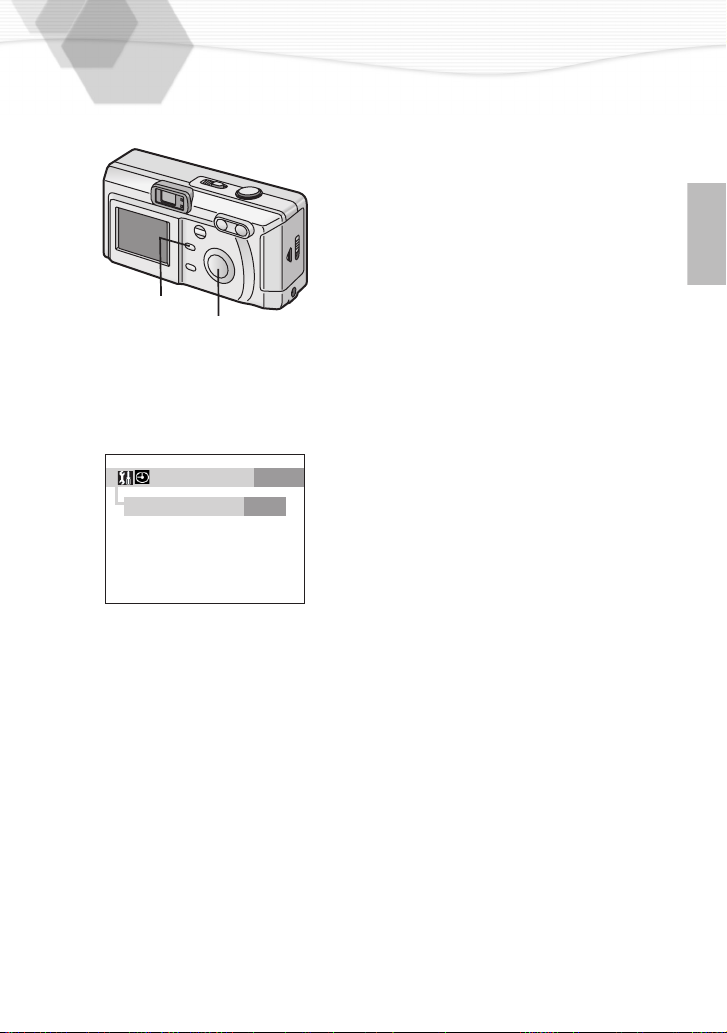
Operating the Menu
By operating the menu it is possible to set
the settings of the REC or playback mode.
Besides, it is possible to set the date and
time, the beep sound, and any sort of
settings. Follow these instructions looking
at the LCD monitor.
1
1,3
2
2
W.BALANCE
EXPOSURE
BURST
D.ZOOM
MOTION IMAGE
1 / 3
±0.00
3
Press the [MENU] button.
• If you set to the REC mode, the REC
menu is displayed; if you set to the
playback mode [ ], the playback
menu is displayed.
Press
3/4
to choose the item and
press
2/1
to confirm this setting.
• First, with step 2, if you press 3 and
1
then press
, you will access to the
setup menu. (Pressing the menu
button you will return back)
Press the [MENU] button.
• The menu will disappear.
24
D.ZOOM
W.BALANCE
EXPOSURE
BURST
MOTION IMAGE
D.ZOOM
W.BALANCE
EXPOSURE
BURST
MOTION IMAGE
1 / 3
±0.00
1 / 3
±0.00
Setting the Date/Time (Clock Set)
It is possible to set the year from 2000 to
2049. The 24-hour system is used.
[Preparations]
• Charge the built-in battery for dating.
(P14)
• Set the REC/power switch to [ON]. (P18)
Press the [MENU] button.
1
Press
3,4
1,5
2,3,4
CLOCK SET
YEAR
MONTH
DAY
TIME
STYLE
2002
MAR
1
19:04
MDY
2 / 2
2
3
4
5
• Even if the battery is not inserted or the
AC adaptor is not connected, the
camera, with a built-in power source for
back-up, can store the set time for about
10 minutes (with about 3 hour charge).
But, after this limit, the set time is
cancelled, so set date and time again.
3(or 4)
[SETUP] and press
setup menu.
Press
3(or 4) to
SET].
Press
3/4/2/1 to
time.
Press the [MENU] button.
• The menu will disappear.
to choose the
1
select [CLOCK
set date and
to open the
25
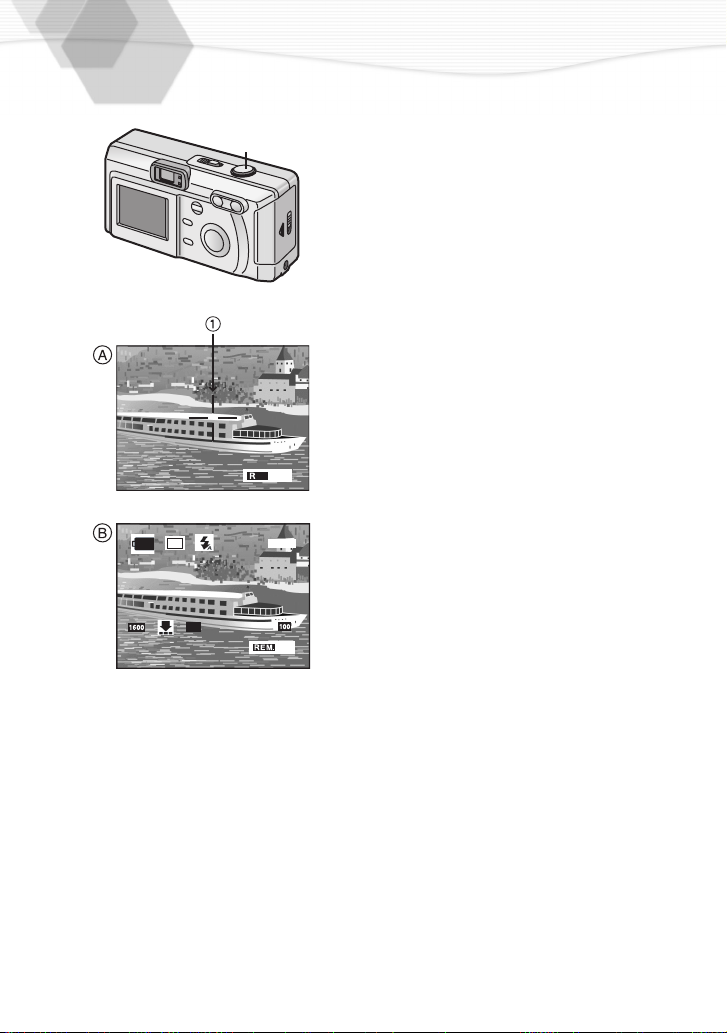
Taking Pictures
1,2
2
Only pressing the shutter button, the
exposure (shutter speed and aperture
value) will be automatically adjusted and
the picture is taken.
[Preparations]
• Insert the card. (P16)
• Set the REC/power switch to [ON]. (P18)
Let the subject be centered in the AF
1
target
and press the shutter button halfway.
You can take pictures using the LCD
monitor
• Adjust the focus.
Press the shutter button fully to take
2
the picture.
• After taking a picture, when the auto
review (P59) is set to [ON], the
picture is displayed on the LCD
monitor for about 2 seconds.
inside the optical finder A
1
.
B
AF
AUTO
• When power saving is set, if you do not operate the camera, it is automatically
turned off. To operate the camera again, set the REC/power switch first to [OFF]
and then to [ON], or press the shutter button halfway. (P61)
±0.00
11
26
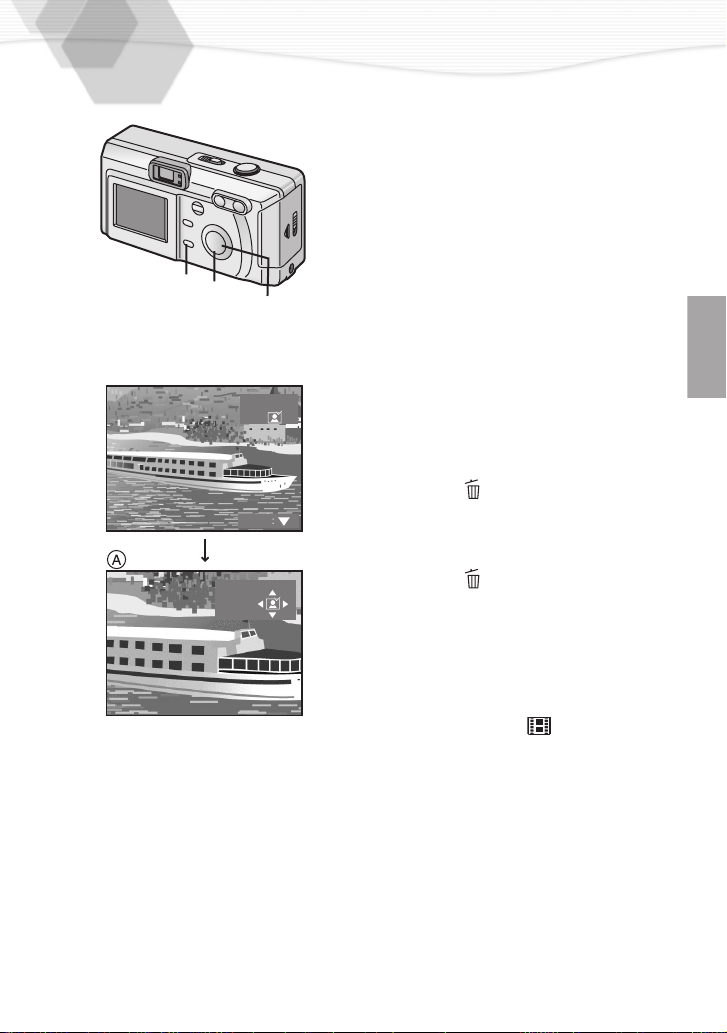
Checking the Last Picture (Review)
After taking a picture, when auto review
(P59) is set to [ON], the captured picture is
displayed on the LCD monitor for about 2
seconds, but you can also check the
picture following the methods shown
below.
After taking a picture, press the
1
[REVIEW/SET] button.
• The last captured picture is
2,4
1
3
1
REVIEW
EXIT
REVIEW
displayed. Pressing
possible to select the picture to
display. Pressing the zoom button
(T), the captured picture is zoomed
2.5 times (
press once again. Pressing the zoom
button (W), you will reduce it.
ªErasing the captured picture during
the review
Press the [ ] button.
2
Press
3
Press the [ ] button or the
4
[REVIEW/SET] button.
• The picture is erased.
• Once erased pictures cannot be
recovered.
A)
2/1
to select [YES].
2/1
and 4 times if you
, it is
• In motion image mode [ ], the index
picture is reviewed.
27
 Loading...