

Page 1
If you have any questions, visit:
USA : www.panasonic.com/support
Basic Owner’s Manual
P
Digital Camera
Model No. DMC-CM1
Please read these instructions carefully before using this product, and
save this manual for future use.
More detailed owner’s manual is available in “Owner’s
Manual for advanced features (PDF format)”. To read it,
download it from the website.
http://panasonic.jp/support/dsc/oi/index.html?model=
DMC-CM1&dest=P
≥ Click the desired language.
≥ You will need Adobe Reader to browse or print the Owner’s
Manual (PDF format).
You can download and install a version of Adobe Reader
that you can use with your OS from the following website. (As of March 2015)
http://www.adobe.com/products/acrobat/readstep2.html
Register online at www.panasonic.com/register (U.S. customers only)
SQT0433
F0415MR0
Page 2

Dear Customer,
Date of Purchase
Dealer Purchased From
Dealer Address
Dealer Phone No.
Model No.
Serial No.
Thank you for choosing Panasonic!
You have purchased one of the most sophisticated and reliable products on the
market today. Used properly, we’re sure it will bring you and your family years of
enjoyment. Please take time to fill in the information below. The serial number is
located on the nameplate inside the card slot cover. Be sure to retain this manual
as your convenient camera information source.
Please note that the actual controls and components, menu items, etc. of your
Digital Camera may look somewhat different from those shown in the illustrations
in this Owner’s Manual.
Carefully observe copyright laws.
≥ Recording of pre-recorded tapes or discs or other published or broadcast material for
purposes other than your own private use may infringe copyright laws. Even for the purpose
of private use, recording of certain material may be restricted.
2
SQT0433 (ENG)
Page 3

Information for Your Safety
WARNING:
To reduce the risk of fire, electric shock or product damage,
≥ Do not expose this unit to rain, moisture, dripping or splashing.
≥ Use only the recommended accessories.
≥ Do not remove covers.
≥ Do not repair this unit by yourself. Refer servicing to qualified service personnel.
The socket outlet shall be installed near the equipment and shall be easily
accessible.
∫ Product identification marking
Product Location
Digital Camera In the card slot cover
AC Adaptor Bottom
∫ Wi-Fi use
≥ This product is restricted to indoor use due to its operation in the 5.15 to 5.25 GHz
frequency range.
FCC requires this product to be used indoors for the frequency range 5.15 to 5.25 GHz
to reduce the potential for harmful interference to co-channel Mobile Satellite systems.
High power radars are allocated as primary users of the 5.25 to 5.35 GHz and 5.65 to
5.85 GHz bands.
These radar stations can cause interference with and/or damage this product.
≥ This transmitter must not be co-located or operated in conjunction with any other
antenna or transmitter.
≥ The usage of wireless LAN may be restricted depending on the country of use.
Check any relevant laws and regulations in the country or the region before use.
(ENG) SQT0 433
3
Page 4

FCC Note:
This product has been tested and found to comply with the limits for a Class B
digital device, pursuant to Part 15 of the FCC Rules. These limits are designed
to provide reasonable protection against harmful interference in a residential
installation. This product generates, uses and can radiate radio frequency
energy and, if not installed and used in accordance with the instructions, may
cause harmful interference to radio communications. However, there is no
guarantee that interference will not occur in a particular installation. If this
product does cause harmful interference to radio or television reception, which
can be determined by turning the product off and on, the user is encouraged
to try to correct the interference by one or more of the following measures:
≥ Reorient or relocate the receiving antenna.
≥ Increase the separation between the product and receiver.
≥ Connect the product to an outlet on a circuit different from that to which the receiver is
connected.
≥ Consult the dealer or an experienced radio/TV technician for help.
FCC Caution: To assure continued FCC emission limit compliance, use only
shielded interface cables with ferrite core when connecting to computer or
peripheral devices.
Any changes or modifications not expressly approved by the party responsible
for compliance could void the user’s authority to operate this equipment.
Responsible Party: Panasonic Corporation of North America
Two Riverfront Plaza, Newark, NJ 07102-5490
Support Contact: http://www.panasonic.com/contactinfo
This product complies with Part 15 of the FCC Rules. Operation is subject to
the following two conditions:
1. This product may not cause harmful interference, and
2. This product must accept any interference received, including interference
that may cause undesired operation.
∫ About the AC adaptor
CAUTION!
To reduce the risk of fire, electric shock or product damage,
≥ Do not install or place this unit in a bookcase, built-in cabinet or in another
confined space. Ensure this unit is well ventilated.
AC adaptor
This AC adaptor operates on AC between 110 V and 240 V.
But
≥ In the U.S.A. and Canada, the AC adaptor must be connected to a 120 V AC
power supply only.
≥ When connecting to an AC supply outside of the U.S.A. or Canada, use a plug
adaptor to suit the AC outlet configuration.
SQT0433 (ENG)
4
Page 5

∫ About the battery
≥ Do not heat or expose to flame.
≥ Do not leave the unit (including built-in battery) in a car exposed to dire ct sunli ght for a
long period of time with doors and windows closed.
∫ Using hearing aids with mobile devices
≥ When some wireless mobile devices are used near some hearing devices (hearing
aids and cochlear implants), users may detect a buzzing, humming, or whining noise.
Some hearing devices are more immune than others to this interference noise, and
mobile devices also vary in the amount of interference they generate.
In the event of interference you may want to consult your hearing aid supplier to
discuss solutions.
≥ The wireless telephone industry has developed ratings for some of their mobile
devices, to assist hearing device users in finding mobile devices that may be
compatible with their hearing devices.
Not all mobile devices have been rated.
Mobile devices that are rated have the rating on their box or label located on the box.
The ratings are not guarantees.
Results will vary depending on the user’s hearing device and hearing loss.
If your hearing device happens to be vulnerable to interference, you may not be able to
use a rated mobile device successfully.
Trying out the mobile device with your hearing device is the best way to evaluate it for
your personal needs.
≥ M-Ratings: Mobile devices rated M3 or M4 are likely to generate less interference to
hearing devices than mobile devices that are not labeled.
M4 is the better/higher of the two ratings.
T-Ratings: Mobile devices rated T3 or T4 are likely to be more usable with a hearing
device’s telecoil (“T-Coil Switch” or “Telephone Switch”) than unrated mobile devices.
T4 is the better/higher of the two ratings.
(Note that the hearing aid telecoil must be activated in order for it to function, and that
not all hearing devices have telecoils in them.)
≥ Hearing devices may also be measured for immunity to this type of interference.
Your hearing device manufacturer or hearing health professional may help you find
results for your hearing device.
The more immune your hearing aid is, the less likely you are to experience
interference noise from mobile devices.
The HAC rating and measurement procedure are described in the American National
Standards Institute (ANSI) C63.19 standard.
(ENG) SQT0 433
5
Page 6

∫ Hearing aid compatibility
This mobile device has been tested and rated for use with hearing aids for some of the
wireless technologies that it uses.
However, there may be some newer wireless technologies used in this mobile device
that have not been tested yet for use with hearing aids.
It is important to try the different features of this mobile device thoroughly and in different
locations, using your hearing aid or cochlear implant, to determine if you hear any
interfering noise.
Consult your service provider or the manufacturer of this mobile device for information on
hearing aid compatibility.
If you have questions about return or exchange policies, consult your service provider or
mobile retailer.
Regulatory information
∫ This product and your health
This product, like other radio devices, emits radio frequency electromagnetic energy.
Because this product operates within the guidelines found in radio frequency safety
standards and recommendations, we believe this product is safe for use by consumers.
These standards and recommendations reflect the consensus of the scientific
community and result from deliberations of panels and committees of scientists who
continually review and interpret the extensive research literature.
In some situations or environments, the use of this product may be restricted by the
proprietor of the building or responsible representatives of the organization.
These situations may for example include:
≥ Using this product on board of airplanes, or
≥ In any other environment where the risk of interference to other devices or services is
perceived or identified as harmful.
If you are uncertain of the policy that applies on the use of wireless devices in a specific
organization or environment (e.g. airports), you are encouraged to ask for authorization
to use this product prior to turning on the product.
∫ Information to the user
We are not responsible for any radio or television interference caused by unauthorized
modification of this product.
The correction of interference caused by such unauthorized modification will be the
responsibility of the user.
We and our authorized resellers or distributors are not liable for damage or violation of
government regulations that may arise from failing to comply with these guidelines.
6
SQT0433 (ENG)
Page 7

Additional safety precautions
∫ Posted facilities
Turn off the product when in hospitals, health care facilities, or any facility where posted
notices require you to do so.
Hospitals and health care facilities may be using equipment that could be sensitive to
external RF energy.
∫ Pacemakers
≥ The Health Industry Manufacturers Association recommends that a minimum
separation of six (6) inches be maintained between a handheld wireless product and a
pacemaker to avoid potential interference with the pacemaker.
These recommendations are consistent with the independent research by and
recommendations of Wireless Technology Research.
≥ Persons with pacemakers:
– Should always keep this product more than six (6) inches from their pacemake r
when this product is turned on;
– Should use the ear opposite the pacemaker to minimize the potential for
interference;
– Should not carry this product in a breast pocket;
– Should turn off the product immediately if there is any reason to suspect that
interference is taking place.
∫ Hearing aids
Some digital wireless products may interfere with some hearing aids.
In the event of such interference, consult the manufacturer of your hearing aid to discuss
alternatives.
∫ Other medical devices
If you use any other personal medical device, consult the manufacturer of your device to
determine if it is adequately shielded from external RF energy.
Your physician may be able to assist you in obtaining this information.
∫ Aircraft
Turn off the product after boarding an aircraft, when instructed by flight staff.
Obey instructions from flight staff regarding the use of the product in flight.
Using this product in an aircraft may be hazardous to the aircraft’s operation and disrupt
wireless communication, and may also be illegal.
(ENG) SQT0 433
7
Page 8

∫ Potentially explosive atmosphere
≥ Turn off the product in areas where a potentially explosive atmosphere exists and obey
all signs and instructions.
Sparks in such areas could cause an explosion or fire resulting in injury or even death.
≥ Areas with potentially explosive atmosphere may include fueling areas, chemical
plants, below deck on boats, fuel or chemical transfer or storage facilities, vehicles
using petroleum or natural gas, or areas where the atmosphere contains particles such
as grain, dust, or metallic powders, and any other area where you would normally be
advised to turn off your vehicle engine.
∫ Electronic devices
This product receives and transmits radio frequency signals while switched on.
Most electronic equipment is shielded from RF signals. However, certain electronic
equipment may not be shielded against the RF signals from this product. Therefore, the
use must be restricted in certain situations to avoid interference.
∫ Driving
≥ Give full attention to driving.
Driving safely is your first responsibility.
≥ Pull off the road and park before placing or answering a call.
It is unsafe to operate the product while driving.
≥ Check the laws and regulations in the areas where you drive, and always obey them.
≥ Only qualified personnel should install the product in a vehicle.
Check regularly that the product is securely mounted in your vehicle and operating
properly.
≥ Do not place or install the product in the area over the air bag or in the air bag
deployment area.
If the air bag inflates, serious injury and/or damage could result.
≥ RF signals may affect improperly installed or inadequately shielded electronic systems
in motor vehicles.
Consult the manufacturer (or its representative) of the vehicle and any equipment that
has been added to the vehicle regarding the use of class B devices.
≥ Use hands-free operation, if available and legally permitted.
∫ Emergency communications
Never rely solely on a mobile product for essential or emergency communications.
Network connections can be affected by remaining battery level, radio signals, service
networks, and other conditions, and as a result, emergency communications cannot be
guaranteed in all conditions.
8
SQT0433 (ENG)
Page 9

∫ Antenna
≥ Do not replace the antenna.
Unauthorized antennas, modifications, or attachments could damage the product and
may violate FCC regulations.
≥ Do not touch or cover the antenna area while the product is on.
Call quality, power levels, and the overall performance of the product may be affected.
∫ Camera flash
The flash uses an LED that produces strong light.
To prevent injury to human eyes, do not look directly at the flash with the naked eye or
point it at other people’s eyes.
∫ Intended use
≥ This product is not intended for use as, or as part of, nuclear equipment/systems, air
traffic control equipment/systems, aircraft cockpit equipment/systems¢1, medical
devices or accessories, life-support systems or other equipment/devices/systems that
are involved with ensuring human life or safety.
Panasonic will not be responsible for any liability resulting from the use of this product
arising out of the foregoing uses.
¢1 Aircraft cockpit equipment/systems include Class 2 Electrical Flight Bag (EFB)
Systems and Class 1 EFB Systems when used during critical phases of flight
(e.g., during take-off and landing) and/or mounted on to the aircraft. Class 1 EFB
Systems and 2 EFB Systems are defined by FAA: AC (Advisory Circular) 120-76A
or JAA: JAA TGL (Temporary Guidance Leaflets) No.36.
≥ Panasonic cannot guarantee any specifications, technologies, reliability, safety (e.g.,
Flammability/Smoke/Toxicity/Radio Frequency Emission, etc.) requirements related to
aviation standards and medical equipment standards that differ from the specifications
of our COTS (Commercial-Off-The-Shelf) products.
≥ This product is not intended for use in medical equipment including life-support
systems, air traffic control systems, or other equipment, devices or systems that are
involved with ensuring human life or safety.
Panasonic cannot be held responsible in any way for any damages or loss resulting
from the use of this unit in these types of equipment, devices or systems, etc.
(ENG) SQT0 433
9
Page 10
Contents
Information for Your Safety................ 3
Regulatory information ...................... 6
Additional safety precautions ............ 7
Preparation
Standard Accessories...................... 11
Names and Functions of
Main Parts ....................................... 12
Inserting/Removing the microSIM
card (optional) ................................. 14
About the Built-in Memory/
the microSD Card (optional) ............ 16
Charging.......................................... 18
Basic
Turning the unit on/off ..................... 19
Using the touch screen ................... 20
Home screen ................................... 21
Status bar ........................................ 22
Using apps ...................................... 23
Entering Text ................................... 24
Android™ default settings ............... 25
Accessibility settings ....................... 26
Connecting to networks
Connecting to mobile networks ....... 27
Connecting to Wi-Fi
Camera
Launching the camera ..................... 29
Viewing Recording screens ............. 29
Selecting the Recording Mode ........31
Taking a Still picture ........................ 32
Recording Motion Picture ................ 36
Viewing pictures and
motion pictures ................................ 37
®
networks........ 28
Email/Web browser/Phone
People..............................................38
Email/Gmail™..................................39
Launching the web browser .............41
Phone ..............................................42
Others
Troubleshooting ...............................44
System updates ...............................46
Cautions for Use ..............................47
FCC RF exposure information .........53
Specifications...................................54
Digital Camera Accessory Order
Form ................................................58
Limited Warranty
(ONLY FOR U.S.A.).........................59
∫ About the symbols in the text
: Indicates a general notification.
In this owner’s manual, steps for
setting a menu item are
described as follows.
From the Home screen >
[] > [].
10
SQT0433 (ENG)
Page 11
Preparation
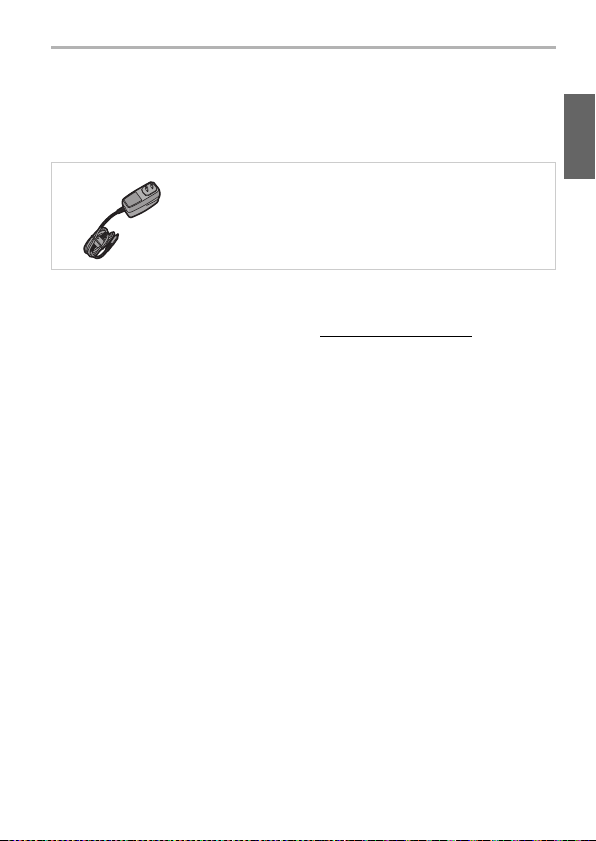
Standard Accessories
Check that all the accessories are supplied before using this unit.
Product numbers correct as of March 2015. These may be subject to change.
AC Adaptor
VSK0825
≥ microSD Memory Card, microSDHC Memory Card and microSDXC Memory Card are
indicated as microSD card in the text.
≥ microSIM card and microSD card are optional.
≥ If accessories are lost, customers can visit us at www.panasonic.com/support for further
information about obtaining replacement parts.
(ENG) SQT0 433
11
Page 12
Preparation
1
7810
2345
6
11
13 14 15
12
19
20 21
16
22
17
18
9
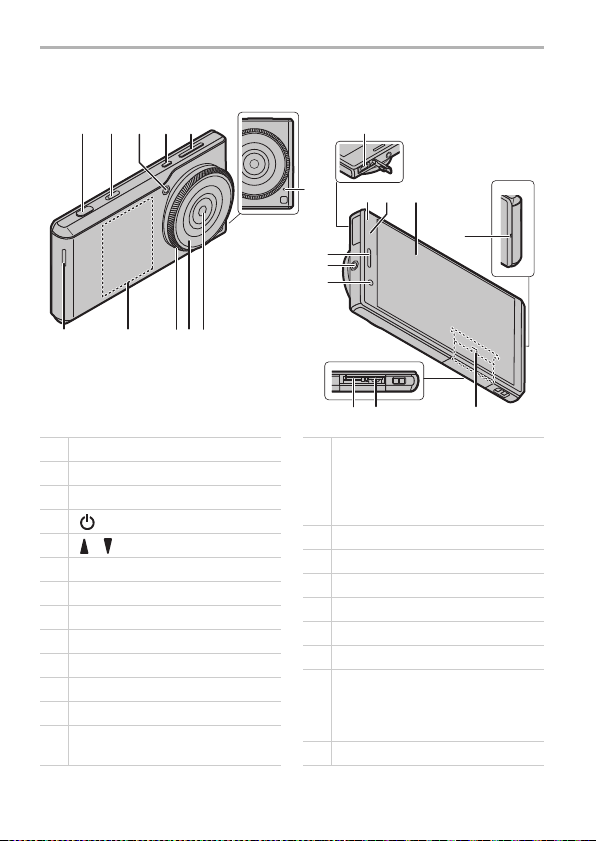
1 Shutter button (P32)
2 Camera selector switch (P29)
3 Flash/AF Assist Lamp
4 [ ] button (P19)
5 [ ]/[ ] buttons
6Speaker
7 NFC anten na
8 Control ring (P33)
9 Lens front ring (Diameter: 37 mm)
10 Outward facing camera (P29)
11 Microp hone
12 microUSB terminal (P18)
13
Ringtone lamp/Charging lamp
(P18)
14
Light sensor/Proxim ity sensor
Do not cover the sensor area with
your hand or paste stickers over it in
order to prevent incorrect operation of
the sensor.
15 Display (P20)
16 Earpiece
17 Earphone terminal (P13)
18 Inward facing camera
19 microSIM card slot (P14)
20 microSD card slot (P17)
21
Nameplate
Stowable nameplate.
Contains information such as the
mobile identification number.
22 Mouthpiece/Microphone
Names and Functions of Main Parts
12
SQT0433 (ENG)
Page 13
Preparation
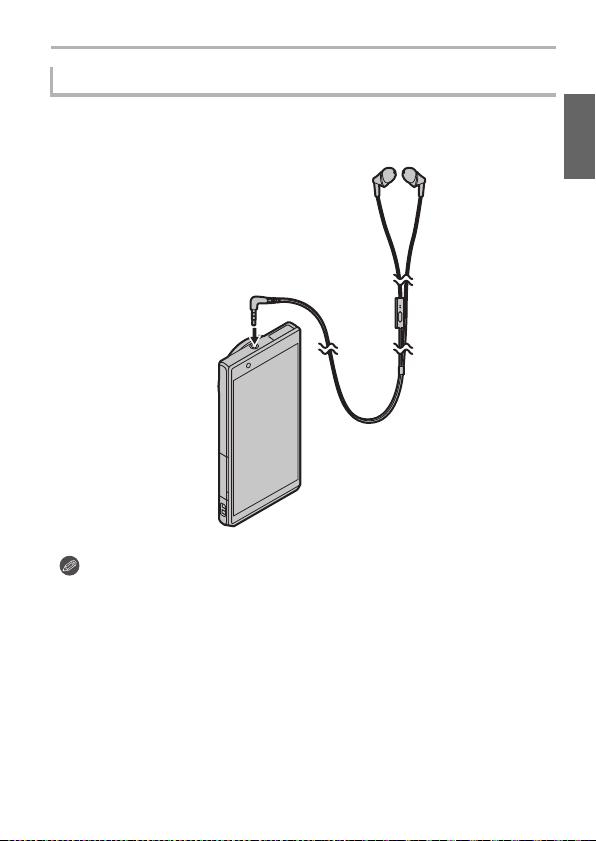
Stereo headset (optional)
You can use a headset (optional) to listen to music or watch videos.
If the headset (optional) has a microphone, you can also use it to talk on the
phone.
≥ Check that the headset (optional) plug is completely inserted into the earphone
terminal.
≥ Excessive sound pressure from earphones and headphones can cause hearing loss.
≥ To prevent possible hearing damage, do not listen at high volume levels for long
periods.
≥ Being unable to hear sounds in your environment may lead to accidents.
(ENG) SQT0 433
13
Page 14
Preparation
Inserting/Removing the microSIM card
(optional)
A microSIM card is an integrated circuit that stores the customer’s phone number
and other information.
Calls and messages (SMS) cannot be sent or received unless the microSIM card
is inserted.
If you have inserted/removed the microSIM card, do not deliberately touch or
damage the IC terminals.
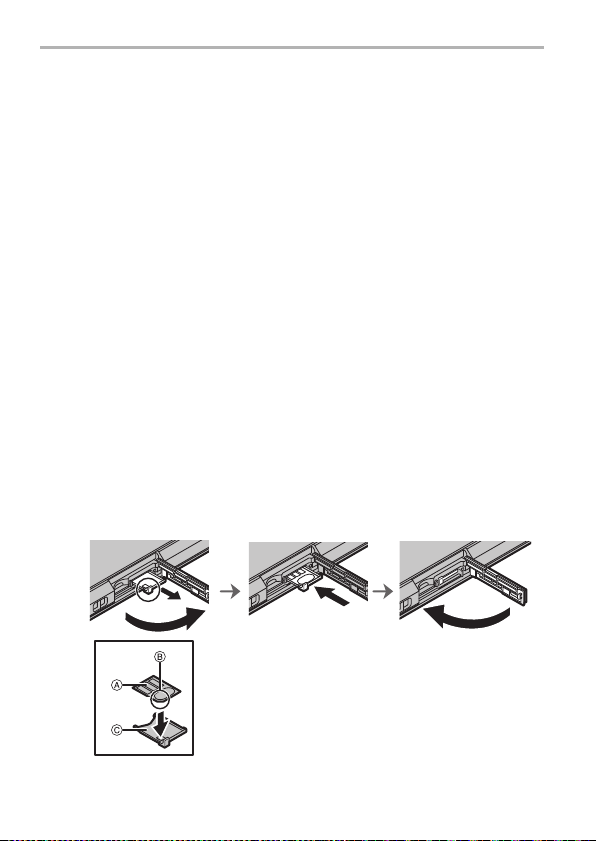
Open the card slot cover with the control ring face of this unit
1
facing upwards.
Hold the hooks of the tray with your fingertips and pull it out
2
horizontally.
Mount the microSIM card on the tray C with the IC face A on
3
top.
≥ Take note of the notch B on the microSIM card and mount it in the correct direction.
Check the orientation of this unit and insert the tray
4
horizontally into the slot of the microSIM card.
Close the card slot cover.
5
14
SQT0433 (ENG)
Page 15
≥ Keep the microSIM Card out of reach of children to prevent swallowing.
(Reverse side)
≥ Keep the microSIM Card Tray out of reach of children to prevent swallowing.
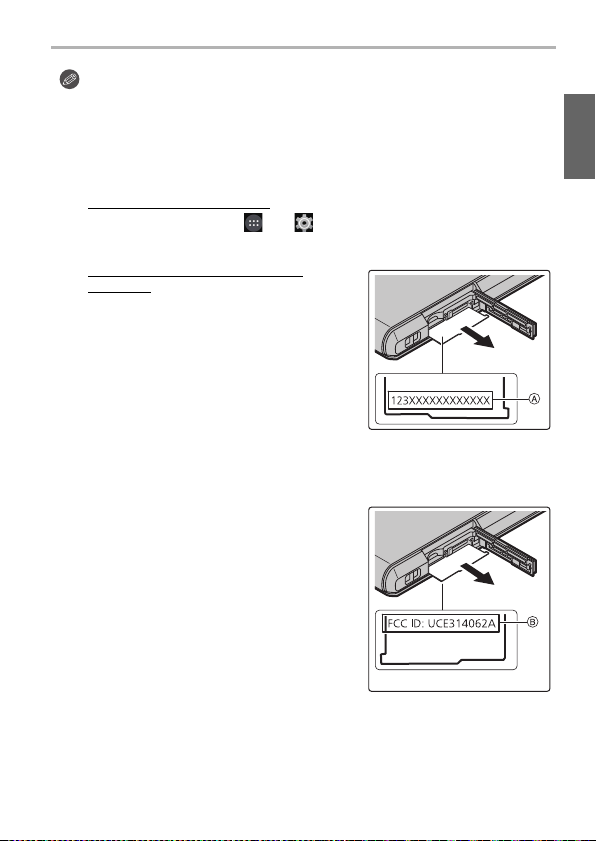
∫ About the mobile identification number
This unit has a specific mobile identification number A.
The mobile identification number is verified as follows.
To verify the number on-screen:
1 From the Home screen > [ ] > [ ].
2 [About phone] > [Status] > check the [IMEI] item.
To verify the number by checking the
nameplate:
1 Open the card slot cover.
2 Remove the microSIM card tray.
3 Pull the nameplate towards you.
≥ Be careful as the nameplate may be damaged
if it is pulled too hard.
∫ About the FCC ID
The FCC ID B is verified as follows.
1 Open the card slot cover.
2 Remove the microSIM card tray.
3 Pull the nameplate towards you.
≥ Be careful as the nameplate may be damaged
if it is pulled too hard.
4 Check the reverse side of the nameplate.
Preparation
(ENG) SQT0 433
15
Page 16
Preparation
About the Built-in Memory/the microSD
Card (optional)
About Built-in Memory
≥ Memory size: Approx. 10 GB
≥ The access time for the built-in memory may be longer than the access time for a
microSD card.
≥ You can copy the recorded pictures to a microSD card. (P37)
About microSD cards that can be used with this unit
The following microSD cards which conform to the SD standard can be used
with this unit.
(These cards are indicated as microSD card in the text.)
≥ microSD Memo ry Card (64 MB to 2 GB)
≥ microSDHC Memory Card (4 GB to 32 GB)
≥ microSDXC Memory Card (64 GB to 128 GB)
≥ Check the corresponding manufacturer, capacity and other latest compatibility
information from the following support site.
http://panasonic.jp/support/global/cs/dsc/
(This Site is English only.)
Note that this does not guarantee compatibility with all operations.
≥ microSDHC Memory Cards and microSDXC Memory Cards can be used only with
their compatible devices.
≥ A message prompting to format the microSD card may be displayed when connecting
the microSD card to other devices, but do not format.
16
SQT0433 (ENG)
Page 17
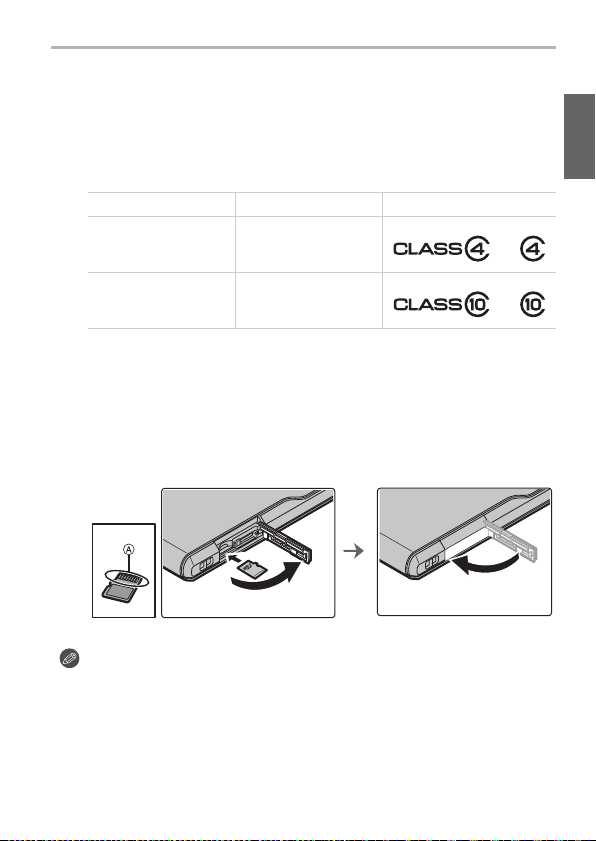
∫ About the motion picture recording and SD speed class
According to the [Rec Quality] (P36) of a motion picture, the required microSD card
differs. Use a microSD card that meets the following rating of the SD Speed Class.
≥ SD Speed Class is the speed standard regarding continuous writing. Check via the
label on the microSD card, etc.
≥ The SD speed class represents the level of performance of microSD cards. The SD
speed class does not serve as a guarantee of performance for all operations.
[Rec Quality] SD Speed class Label example
FHD/HD/VGA/1:1 Class 4 or higher
4K Class 10
∫ Inserting/Removing the microSD card
Open the card slot cover, ensure that the connection terminal of the microSD card
1
is facing down, and insert it firmly in the correct direction until it makes a “click”
sound.
A Do not touch the connection terminals of the microSD card.
≥ To remove, push in the card until it makes a “click” sound and then pull it out straight.
2 Close the card slot cover.
Preparation
≥ The data on the built-in memory or the microSD card may be damaged or lost due to
electromagnetic waves, static electricity or breakdown of this unit or the microSD ca rd.
We recommend storing important data on a PC etc.
≥ Keep the microSD Card out of reach of children to prevent swallowing.
(ENG) SQT0 433
17
Page 18
Preparation
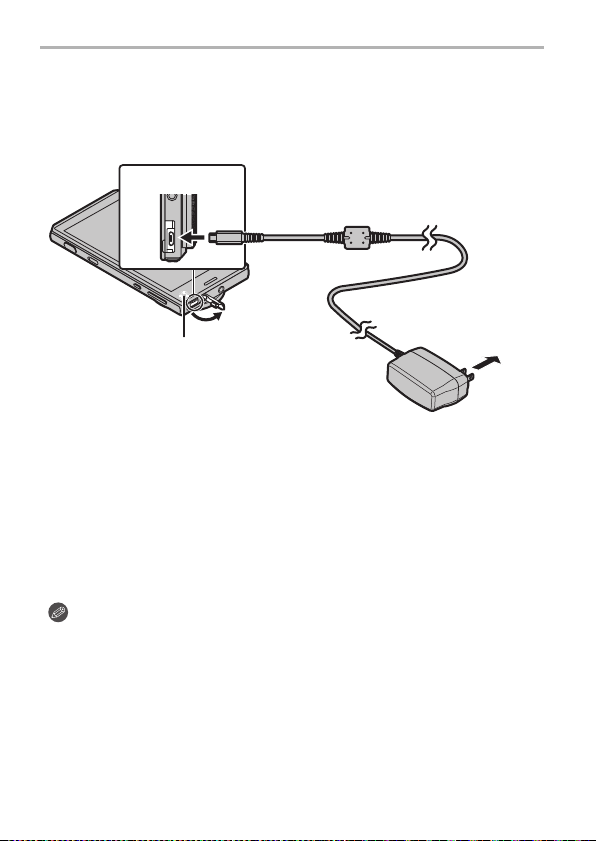
To power outlet
AC adaptor
microUSB terminal
Charging lamp
On: Charging.
Off: Charging has completed.
Charging
Connect the unit and AC adaptor to charge.
≥ The battery is not charged when this unit is shipped. Charge the battery before use.
≥ For details on charging time, refer to P54.
Open the microUSB terminal cover, check the direction of the AC
1
adaptor cable terminal, and insert it into the microUSB terminal.
Insert the AC adaptor power plug into the power outlet.
2
∫ When charging is complete
Remove the AC adaptor p ower plug fr om the power outlet.
1
2 Remove the AC adaptor cable terminal from the unit.
≥ The unit and AC adaptor may become warm while charging, however this is not
a malfunction.
≥ Remove the AC adaptor from the power outlet after completely charging the
battery in order to save power and maintain battery performance.
≥ The shape of the AC adaptor power plug and power outlet may differ depending on
each country/region.
≥ Do not use any other AC adaptors except the supplied one.
≥ Do not leave any metal items (such as clips) near the contact areas of the power
plug.
≥ When you start charging an empty battery, the charging lamp may flash. This is not a
malfunction. The charging lamp stops flashing and lights up after the battery is
charged for a while.
SQT0433 (ENG)
18
Page 19
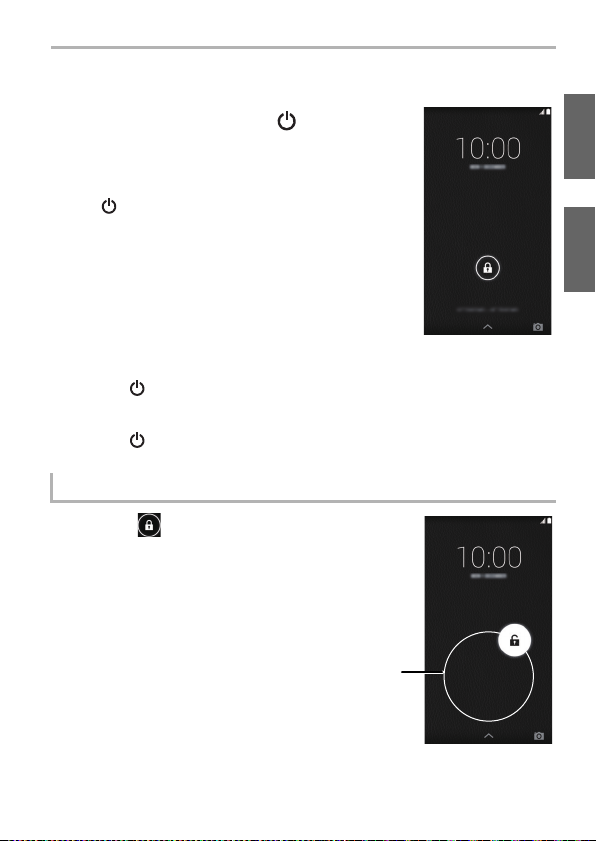
Turning the unit on/off
A
Turn on the unit by pressing [ ] for
2 seconds or more.
≥ The lock screen will be displayed after a short time.
≥ The default settings screen will be displayed when you turn the
unit on for the first time. (P25)
≥ Press [ ] to enter/release sleep mode, when the unit is turned
on.
∫ To turn the unit off
Press [ ] for 1 second or more > [Power off] > [OK].
∫ To restart
Press [ ] for 1 second or more > [Reboot] > [OK].
Release the lock screen
Slide [ ] until the guide (white line
on the outer circumference) A.
≥ If the [Screen lock] settings have been changed,
use the method configured to release the lock.
Basic
(ENG) SQT0 433
19
Page 20

Basic
Using the touch screen
The unit features a touch screen, which you can operate by touching directly with
your fingers.
≥ Peel off the sheet pasted to the touch screen when first bought before use.
≥ The touch screen is designed to be lightly touched with a finger.
Do not press the touch screen strongly with your finger or press objects with sharp tips (claws/
ball point pens/pins etc.) against it.
≥ The touch screen may not work even when touched in the following cases. Please note that
they may also result in incorrect operations.
– Operating with gloves on your hand
– Operating with your fingertips
– Operating with foreign objects on top of the operating surface
– Operating with a protective sheet, seal, etc. pasted on top
– Operating with the touch screen wet
– Operating with your fingers wet with sweat or water
Tap pi ng
Tap an item or icon to select
it.
Double-tapping
Tap the touch screen
quickly two times when you
want to zoom in and out of
webpages, etc.
Tapping and holding
Tap an item or icon without
releasing your finger.
Use this to display a context
menu.
Dragging
Tap an item or icon without
releasing your finger and
slide it.
Pinching
When displaying a webpage
or picture, use two fingers
to push the screen apart
and zoom in (pinch out), or
bring them together to zoom
out (pinch in).
SQT0433 (ENG)
20
Flicking
Moving your finger quickly
across the touch screen will
move back and forth
through numerous pictures.
Scrolling
Flick/drag your finger
around the screen to
display a hidden area.
∫ Switching between vertical
and horizontal viewing modes
The unit switches the screen between
vertical and horizontal viewing modes
depending on its motion sensor that
can detect the unit’s direction and
movement.
Page 21

Home screen
1 2 3
1
3
544
2
The Home screen is the main screen for launching apps.
Tapping [ ] when other screens are displayed will return to the Home screen.
∫ Control icons
Control icons are displayed at the bottom of the screen.
∫ Home screen operations
1 Google Search™
2 Area for adding shortcuts, widgets or folders.
3 Displays the current page if there are numerous home
screen pages.
The page can be switched by flicking in a horizontal
direction.
4 Frequently used shortcuts or folders
Drag frequently used shortcuts to store them here.
5 Displays the app list. (P23)
1 Return to the previous screen.
2 Display the Home screen.
3 Display a thumbnail of recently used apps.
Tapping a thumbnail launches that app.
Basic
Moving an item
Adding a widget
Adding a
shortcut
Deleting an item
Changing the
wallpaper
1 Tap and hold an item.
2 Drag the item to the desired location.
1 Tap and hold the background > [ ].
2 Tap and hold the widget you want to add.
3 Drag the item to the desired location.
1 Tap [ ].
2 Tap and hold the app you want to add.
3 Drag the item to the desired location.
1 Tap and hold an item.
2 Drag the item and drop it on [Remove].
1 Tap and hold the background > [ ].
2 Select the desired wallpaper.
3 Tap [Set wallpaper].
(ENG) SQT0 433
21
Page 22

Basic
List of main status icons List of main notification icons
Network strength
Battery level
Battery is charging
Airplane mode is on
Vibrate mode is on
Silent mode is on
Microphone is muted
New Gmail™ received
New email received
New SMS message received
New voicemail received
Open (unsecured) wireless network
is available
Missed call
Call in progress
Call is on hold
Status bar
The status bar displays icons that let you know
the status of the unit, and other indicators.
∫ Open the notifications panel
The notifications panel allows you to check notifications
such as missed calls and incoming email messages.
Drag the status bar down.
∫ Set to vibration mode
Press [ ] for 1 second or more > .
∫ Set to silent mode
Press [ ] for 1 second or more > .
∫ Configure airplane mode
This turns off all wireless features of the unit to prevent interference with aircraft
equipment.
Press [ ] for 1 second or more > [Airplane mode].
SQT0433 (ENG)
22
Page 23
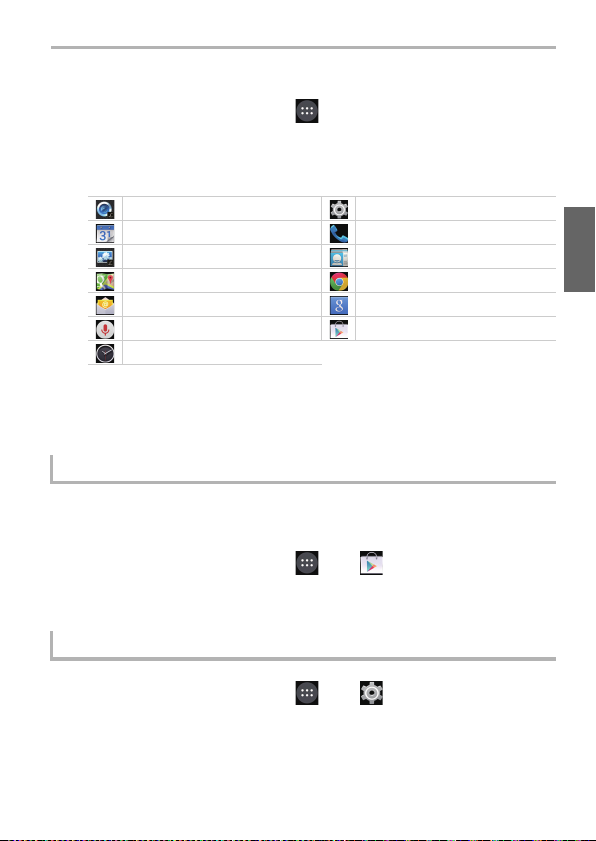
Using apps
From the Home screen > [ ].
1
Tap the app that you want to launch.
2
∫ List of main app
[Camera] [Settings]
Google Calendar™ [Phone]
[Gallery] [People]
Google Maps™ Google Chrome™
[Email] Google Search™
Google Voice Search™ Google Play™ Store
[Clock]
≥ The app list spans multiple pages.
The page can be switched by flicking in a horizontal direction.
≥ Firmware updates may add additional apps and change the control methods and
screen displays of the apps installed on the unit without notice.
Google Play Store
Search for fun games or useful apps in the [Play Store], and install them on
the unit.
From the Home screen > [ ] > [ ].
1
Searching and installing apps.
2
Basic
Deleting installed apps
From the Home screen > [ ] > [ ] > [Apps].
1
[DOWNLOADED] tab > tap the app to delete.
2
[Uninstall] > [OK].
3
(ENG) SQT0 433
23
Page 24

Basic
456
8
9
1
2
3
7
Entering Text
The keyboard is displayed automatically when you tap a text entry field.
1 Tap to enter text.
2 Tap to change the character case.
Double-tap to turn on the caps lock.
3 Tap to switch the type of text entered.
4 Tap to enter text.
Tap and hold to configure the input options.
5 Tap to enter a space.
6 Tap to enter text.
Tap and hold to enter symbols.
7 Tap and use voice input.
8 Delete the character before the cursor.
9 Tap to enter a line break.
Tap and hold to enter pictograms.
24
SQT0433 (ENG)
Page 25

Android™ default settings
The first time you turn the unit on after purchase, follow the on-screen
instructions and configure the language and Wi-Fi settings.
Select language > [ ].
1
Follow the on-screen instructions to configure various
2
settings.
After configuring various settings, read through description
3
on diagnosis information > [Deny]/[Allow].
≥ Information concerning the condition of the terminal and information required for
resolution is sent to the manufacturing source e.g. during system update or when an
error occurs. This information is used for quality and service improvement purposes
only.
Data communication charges may be incurred when sending data.
≥ The tutorial screen is displayed when the default settings are completed.
Confirm the details on the screen, and tap [OK].
≥ The unit will acquire the date and time from the network to automatically set the date
and time, however they may not be set properly depending on the environment that
the unit is used in. In this case, set the date and time manually.
Account settings
Adding an account allows you to synchronize data with services such as
Google™.
≥ Setting up a Google account will allow apps to be downloaded from the Google Play
Store, and backup various types of data.
Setting up a Google account is recommended.
Basic
From the Home screen > [ ] > [ ].
1
[Add account] > tap the services to add.
2
≥ Follow the on-screen instructions and enter account information.
(ENG) SQT0 433
25
Page 26

Basic
Accessibility settings
The unit provides a variety of settings that allow you to change how the user and
unit interact.
From the Home screen > [ ] > [ ] > [Accessibility].
1
Select the desired feature or option and configure it as
2
desired.
[TalkBack] Turns [TalkBack] on/off.
[Captions] Configures subtitles.
[Magnification gestures] Configures zoom in/zoom out of the screen when
[Large text] Increases the text size.
[Power button ends call] Allows the call to be ended by pressing the [ ].
[Auto-rotate screen] Automatically switches from vertical/horizontal display
[Speak passwords] Reads out the entered password.
[Accessibility shortcut] Allows you to quickly enable accessibility features.
[Text-to-speech output] Configures the text-to-speech output settings.
[Touch & hold delay] Configures the time required for tapping and holding
tapping the screen 3 times in a row.
to suit the orientation of the unit.
screen.
26
SQT0433 (ENG)
Page 27

Connecting to networks
Connecting to mobile networks
2G/3G/LTE networks can be used to access email, messages and the internet.
For most mobile network operators, the connection is configured automatically
when a microSIM card is inserted.
If the connection is not configured automatically, an access point must be
configured manually.
Check with the mobile network operator with whom you signed the network
contract for the information required when setting the access points.
Configure access point
From the Home screen > [ ] > [ ].
1
[More...] > [Mobile networks] > [Access Point Names] >
2
[].
[Name] > enter the name for the new settings > [OK].
3
[APN] > enter the access point name > [OK].
4
Enter other information as required.
5
≥ The details to enter differ depending on your mobile network operator.
[] > [Save].
6
Check the current access point
From the Home screen > [ ] > [ ].
1
[More...] > [Mobile networks] > [Access Point Names].
2
≥ If multiple access points are configured, the currently connected access point will be
indicated.
(ENG) SQT0 433
27
Page 28

Connecting to networks
Connecting to Wi-Fi® networks
This unit is compatible with Wi-Fi networks.
You can use email and the internet with wireless LAN services.
Turning on the Wi-Fi function
From the Home screen > [ ] > [ ].
1
Turn on [Wi-Fi].
2
≥ [ ] is displayed in the status bar if connection settings have already completed.
≥ When Wi-Fi is turned on, the Wi-Fi connection will take priority even if a mobile
network connection is enabled.
≥
When Wi-Fi is turned off, the unit will automatically switch to the mobile ne twork connection.
≥ The Wi-Fi feature consumes additional power from the unit’s battery. If Wi-Fi operation
is not desired, disabling this feature can extend the overall operating time.
Connecting to a Wi-Fi network
From the Home screen > [ ] > [ ].
1
Tap [Wi-Fi].
2
≥ A list of detected Wi-Fi networks is displayed.
Select a Wi-Fi network.
3
≥ If a Wi-Fi network that is protected with security is selected, enter the password and
tap [Con nect].
≥ If the desired Wi-Fi network is not displayed, add the Wi-Fi network manually.
≥ After you connect to a Wi-Fi network, the unit will automatically switch to that Wi-Fi
network the next time it is within range.
≥ Some Wi-Fi networks require you to enter a user name and password when accessing
a webpage.
For details, contact the network administrator.
∫ Adding a Wi-Fi network manually
From the Home screen > [ ] > [ ].
1
2 [Wi-Fi] > [ ].
3 Enter the network SSID.
4 Select the network’s security type and enter its password > [Save].
SQT0433 (ENG)
28
Page 29

Launching the camera
ヮユワヶ
0500
2.8
AUToAUTo
AWB
0 33
A
GPS
OFF
HDR
OFF
DISP.DISP.
ヮユワヶ
0500
2.8
AWB
0 33
A
HDR
OFF
DISP.DISP.
GPS
OFF
AU
TO
Slide and release the camera
selector switch.
≥ Home screen > [ ] also starts the camera.
∫ To end the camera
Releasing the camera selector switch after sliding it, or using the steps below returns to
the Home screen.
1 Flick the right edge of the screen to
the left.
2 Tap [ ] .
05000500
MP4
3:2
AFAFAF
p
A
L
30
Camera
AF
HDRHDR
GPSGPS
OFFOFF
OFFOFF
Viewing Recording screens
MP4
3:2
p
A
L
30
05000500
ヮユワヶ
2.8
6060602.8
AFAFAF
AU
AU
ヮユワヶ
Q.
DISP.
DISP.
6060602.8
2.8
HDRHDR
GPSGPS
OFFOFF
OFFOFF
TO
TO
AWB
AWB
AU
AUTo
AF
Q.
DISP.
DISP.
MENUQ.MENU
(ENG) SQT0 433
MENUQ.MENU
AWB
AWB
29
Page 30

Camera
L
3:2
AF
0 33
1 Recording Mode (P31)
Storage location/Number of recordable pictures/Available recording time
2
≥ m: minute, s: second
Indicates the setting status.
≥ An explanation of the main icons is given here as an example.
Refer to the “Owner’s Manual for advanced features (PDF format)” for details.
Photo Style HDR
‡ Flash Mode Touch Settings
AF
Recording quality Jitter alert
Aspect Ratio/Picture size Histogram
A Quality (P35) Program Shift
3
Drive Mode 2.8 Aperture value (P32)
Metering Mode (P35) 60 Shutter speed (P32)
Focus Mode
Exposure compensation value/
Brightness/
Manual Exposure Assistance
š AF Mode (P35) ISO sensitivity
White Balance/
Location Logging AWB
White Balanc e Fine Adj ustment/
Color (Fine adjustment of the
White Balance)
4 Camera Mode (outward facing camera/inward facing camera) switch
5 4K Pre-Burst
6 Menu
7 AF area (P32)
8 Control ring menu
9 Battery indication
: Start/End recording motion picture (P36)
; Picture taking
< Image playback
= Switch to High Brightness Mode
> Quick menu
? Switching display
SQT0433 (ENG)
30
Page 31

Selecting the Recording Mode
ヮユワヶヮユワヶ
050005000500
6060602.82.82.8
AUAUToAUToAUTo
AWBAWBAW B
0 33
AFAFAF
L
3:2
MP4
30
p
AA
GPSGPSGPS
OFFOFFOFF
HDRHDRHDR
OFFOFFOFF
AF
Q.
MENUQ.MENU
DISP.DISP.DISP.DISP.
From the Recording screen
1
> Recording Mode icon.
Select the Recording Mode.
2
≥ It can also be selected by rotating the control ring.
Intelligent Auto Mode
The subjects are recorded using settings automatically selected by this unit.
Intelligent Auto Plus Mode
Allows you to adjust the brightness and color hue when in Intelligent Auto Mode.
Program AE Mode
Records at the aperture value and shutter speed set by this unit.
Aperture-Priority AE Mode
The shutter speed is automatically determined by the aperture value you set.
Shutter-Priority AE Mode
The aperture value is automatically determined by the shutter speed you set.
Manual Exp osure Mode
The exposure is adjusted by the aperture value and the shutter speed which
are manually adjusted.
Custom Mode
Use this mode to take pictures with previously registered settings.
Scene Guide Mode
This mode allows you to take pictures that match the scene being recorded.
This mode allows you to select any of the 22 scenes including [Clear Portrait],
[Distinct Scenery], and [Clear Nightscape].
Creative Control Mode
Record while checking the image effect.
This mode allows you to select any of the 18 image effects including [Old
Days], [High Key], and [Dynamic Monochrome].
Panorama Shot Mode
This mode allows you to take panorama pictures.
This mode allows you to select any of the 13 image effects including [Old
Days], [High Key], and [Dynamic Monochrome].
Camera
(ENG) SQT0 433
31
Page 32

Camera
2.8
D
C
AB
Taking a Still picture
≥ Make sure that your fingers or hair do not cover the lens when taking pictures.
≥ Be careful not to move the unit when you press the shutter button.
If the unit moves, it may cause blurry images.
Dim areas become blur easily in particular.
Select the Recording Mode. (P31)
1
Press the shutter button halfway to focus.
2
6060602.8
2.8
≥ Aperture value and shutter speed are displayed.
(Flashes in red if the correct exposure is not achieved.)
A Aperture value
B Shutter speed
Focus
Focus
indication C
AF area D Green Red
Sound Beeps 2 times —
When the subject is
focused
On Blinks
When the subject is not
focused
Press the shutter button fully (push it in
3
further), and take the picture.
SQT0433 (ENG)
32
Page 33

Camera
××
2.02.0×2.0×2.0
iAiAiAiA
WWW
TTT
A
B
Taking Pictures with the Zoom
You can zoom-out to record landscapes etc. in wide angle (Wide) or
zoom-in to make people and objects appear closer (Tele).
(Maximum magnification: 4k)
Pinching in/pinching out the screen.
or
Operating with the control ring.
≥ When [ ] is not displayed on the control ring menu, change its setting to the zoom
function.
≥ The zoom can also be operated by tapping [ ]/[ ].
≥ The zoom can be operated continuously by tapping and holding [ ]/[ ].
A Zoom magnification
B Zoom types
≥ This function is not available in the following cases:
– [Impressive Art]/[Toy Effect]/[Toy Pop]/[Miniature Effect] (Creative Control Mode)
– [Handheld Night Shot] (Scene Guide Mode)
– When [Burst] in the [Rec] menu is set to [SH]
– W hen [HDR] is set to [ON]
– When [Quality] is set to [ ] or [ ]
(ENG) SQT0 433
33
Page 34

Camera
Menus convenient for taking pictures
From the Recording screen > [ ] > [Rec] > menu
item.
∫ [Drive Mode]
You can change what this unit will do when you press the shutter button.
[]([Single])
[]([Burst])
([Auto
[]
Bracket])
[]([Self Timer])
∫ [Aspect Ratio]
This allows you to select the aspect ratio of the pictures to suit printing or the playback
method.
[4:3] [Aspect Ratio] of a 4:3 TV
[3:2] [Aspect Ratio] of a 35 mm film camera
[16:9] [Aspect Ratio] of a high-definition TV, etc.
[1:1] Square aspect ratio
∫ [Picture Size]
A picture taken with this unit is saved as picture data of up to approximately 20,1 million
pixels.
We recommend to decrease the number of pixels for recordings that will be printed to
smaller paper or when uploading to a Website or other Internet service.
Picture size and number of recordable pictures
≥ Aspect ratio [3:2], Quality [A]
microSD Card (8 GB) 720 1310 2290 6010
microSD Card (32 GB) 2910 5310 9250 24300
When the shutter button is pressed, only one picture is
recorded.
Recordings are made in succession while the shutter
button is pressed.
Press the shutter button to take 3 pictures continuously in
accordance with the exposure compensation range.
When the shutter button is pressed, recording takes place
after the set time has elapsed.
L (20M) M (10M) S (5M) XS (2.5M)
34
SQT0433 (ENG)
Page 35

∫ [Quality]
Set the compression rate at which the pictures are to be stored.
[A] ([Fine]) A JPEG image in which image quality was given priority.
[›] ([Standard]) A standard image quality JPEG image.
[]
([RAWiFine])
[] You can only record RAW images.
You can record a RAW image and a JPEG image ([A])
simultaneously.
∫ [AF Mode]
This allows the focusing method that suits the positions and number of the subjects to be
selected.
([Face
[š]
Detection])
([AF
[]
Tracking])
[]([23-Area]) Up to 23 points for each AF area can be focused.
[Ø] ([1-Area])
The unit automatically detects the person’s face. (max.
15 areas)
Focus can be adjusted to a specified subject.
The unit focuses on the subject in the AF area on the
center of the screen.
∫ [Metering Mode]
Type of optical measurement to measure brightness can be changed.
([Multi
[]
Metering])
([Center
[]
Weighted])
[]([Spot])
This is the method in which the unit measures the most
suitable exposure by judging the allocation of brightness on
the whole screen automatically.
Usually, we recommend using this method.
This is the method used to focus on the subject on the
center of the screen and measure the whole screen evenly.
This is the method to measure the subject in the spot
metering target.
Camera
(ENG) SQT0 433
35
Page 36
Camera
1m37s1m37s1m37s
13s13s13s
A
C
B
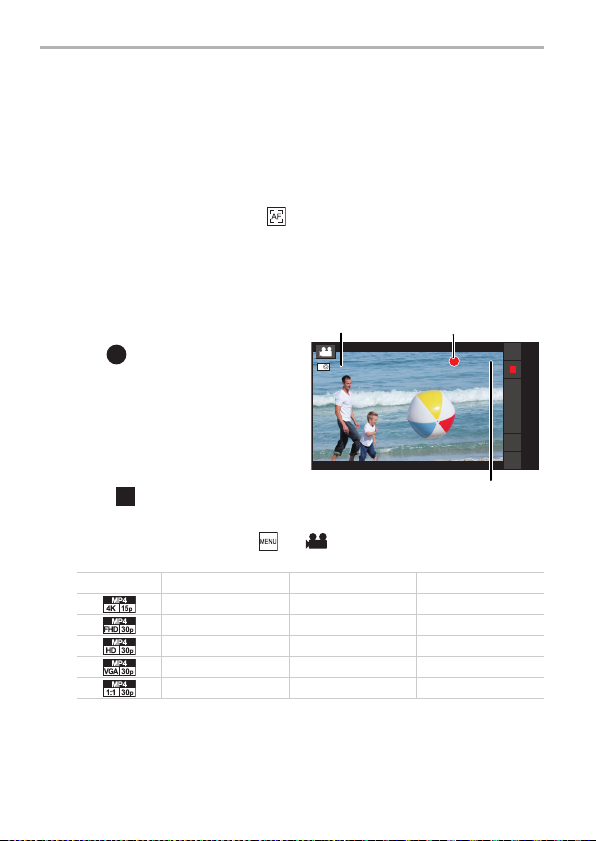
Recording Motion Picture
Motion pictures can be recorded in the MP4 format.
Audio will be recorded in stereo.
≥
When recording a motion picture, do not cover the microphone with your fingers or other objects.
≥ You can operate the zoom even when recording motion pictures.
≥ If you use the zoom before recording a motion picture, the zoom factor will be maintained, but
the zoom type may change.
≥ The focus is fixed at the position where the recording of the motion picture starts.
To adjust the focus while recording, tap [ ] to refocus.
≥ Still picture recording is also possible during the motion picture recording by fully pressing the
shutter button.
≥ When recording motion pictures, the sounds of camera operations such as the control ring or
button operations may also be recorded.
≥ If the temperature of the unit increases when taking pictures under high temperature
conditions or taking pictures continuously, stop recording and end the camera app.
From the Recording screen
1
> [ ].
A Available recording time
B Elapsed recording time
≥ Recording of motion picture
appropriate for each mode is possible.
≥ The recording state indicator (red) C
will flash while recording motion
pictures.
Tap [ ] .
2
∫ Configuring the recording quality
From the Recording screen > [ ] > [Motion Picture] > [Rec Quality] >
select the item.
Item Size Frame rate Bit rate
[] 3840k2160 15p 50 Mbps
[] 1920k1080 30p 20 Mbps
[] 1280k720 30p 10 Mbps
[] 640k48 0 30p 4 Mbps
[] 640k64 0 30p 4 Mbps
≥ The maximum continuous recordable time of a motion picture is 29 minutes and
59 seconds, which is equivalent to a file size of approximately 4GB.
You can check the recordable time on the screen. (With [4K 15p]/[FHD 30p], the file
size becomes larger, causing the recordable time to become shorter than 29 minutes
and 59 seconds)
SQT0433 (ENG)
36
Page 37

Viewing pictures and motion pictures
From the Home screen >
1
[] > [ ].
≥ The Album list screen is displayed.
≥ During initial start-up, a screen to
confirm whether to turn on the
automatic backup to the Google drive
is displayed.
Select album.
2
≥ The File list screen is displayed.
Tap picture or motion picture.
3
≥ The picture or motion picture is displayed in full screen.
≥ Flick in a horizontal direction to display the next/previous picture or motion picture.
≥ Pinch out/pinch in or double tap to zoom in/zoom out of a picture.
≥ Tap [ ] to set the screen brightness to the highest level.
≥ Tap [ ] to display the picture information.
≥ Tap [ ] to playback a motion picture.
∫ Deleting pictures and motion pictures
From the Full screen display > [ ] > [OK].
≥ Tapping [ ] from the Album list screen or File list screen > [Sele ct albu m] or [S ele ct
item] can delete multiple items.
∫ Copying, moving
Copy or move pictures or motion pictures to the unit or microSD card, or create folders.
1 From the Full screen display > [ ] > [Move]/[Copy].
≥ Tapping [ ] from the Album list screen or File list screen > [Sele ct albu m] or [S ele ct
item] can move/copy multiple items.
2 Select move or copy destination.
≥ Create a new folder to move or copy items to.
Camera
(ENG) SQT0 433
37
Page 38
Email/Web browser/Phone
People
Importing contacts from storage
≥ Data can be synchronized using your Google account.
From the Home screen > [ ] > [ ].
1
[] > [Import/export] > [Import from storage] > [OK].
2
≥ Select the account and file if there are several accounts and files.
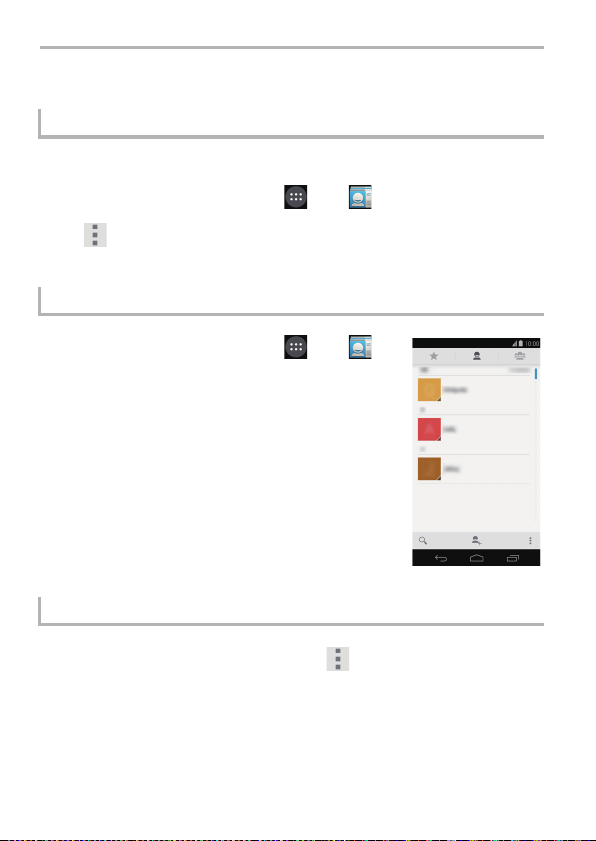
Displaying contacts
From the Home screen > [ ] > [ ].
≥ The Contact list screen is displayed.
∫ Making calls/sending emails
From the Contact list screen > tap contact > tap
telephone number or email address.
≥ Tap the image icon of the contact, and tap the phone or
email icons to make a call or send an email.
Backing up contacts
From the Contact list screen > [ ] > [Import/export].
1
Tap [Export to storage]/[Share visible contacts].
2
Follow the guidance on the screen.
3
SQT0433 (ENG)
38
Page 39

Email/Web browser/Phone
Email/Gmail™
Configuring an email account
From the Home screen > [ ] > [ ].
1
Enter the email address and password > [Next].
2
Follow the guidance on the screen.
3
Creating an email and sending
From the Home screen > [ ] > [ ].
1
Tap [ ].
2
Tap [To] and enter the email address of the recipient.
3
≥ Tap [ ] > [Add Cc/Bcc] to enter Cc or Bcc.
Tap [Subject] and enter a subject.
4
Tap [Compose email] and enter a message.
5
≥ To send an email with attachments, tap [ ] > [Attach picture]/[Attach video], and
select the file to attach.
Tap [ ].
6
(ENG) SQT0 433
39
Page 40

Email/Web browser/Phone
Reading received email
From the Home screen > [ ] > [ ].
1
≥ The Email inbox list screen is displayed.
≥ To update the email inbox, tap [ ] > [Refresh].
Tap the email to display.
2
∫ Replying to emails
From the Email inbox list screen > tap the email to reply to.
1
2 Tap [ ] .
≥ To reply to all, tap [ ] > [Reply all].
3 Enter message > [ ].
Gmail
Gmail can be sent and received using a Google account.
≥ Each Gmail operation is similar to email.
See “Creating an email and sending” on P39 and the above-mentioned “Reading
received email” for the details on how to send and receive email.
From the Home screen > [ ] > [ ].
40
SQT0433 (ENG)
Page 41

Email/Web browser/Phone
Launching the web browser
The unit can be used to browse web pages, manage bookmarks and download
images and other files.
Viewing a web page
From the Home screen > [ ] > [ ].
1
Enter the web address in the address bar > [Go].
2
∫ Returning to the previous page
[] > [ ].
≥ Tapping [ ] will also return to the previous page.
∫ Jumping to the previous page
[] > [ ].
≥ Tapping after using the [ ] or [ ] to return to the previous page jumps to the pa ge
that was being viewed immediately before.
Searching for a web page
From the Home screen > [ ] > [ ].
1
Enter the search text in the address bar > [Go].
2
Viewing a web page from the history
From the Home screen > [ ] > [ ].
1
[] > [History] > tap the web page.
2
(ENG) SQT0 433
41
Page 42

Email/Web browser/Phone
Phone
Making a call
From the Home screen > [ ] > [ ].
1
Enter the telephone number > [ ].
2
≥ If the incorrect telephone number has been entered, tap [ ] to clear the entered
number.
Tap [ ] after the call has ended.
3
Operations while on a call
∫ Adjusting the call volume
When during a call > Press [ ]/[ ].
∫ Displaying the screen during a call
The screen will fade out when pressing the unit against your ear during a call due to the
proximity sensor. This not only helps to limit battery consumption, but also prevents
unintended operations during a call.
The screen is displayed when moving the unit away from your ear.
Press [ ] if the unit is during sleep.
∫ Putting a call on hold
When during a call > [ ].
∫ Muting a call
The other person will not be able to hear your voice during the call.
When during a call > [ ].
∫ Using speakerphone
The other person’s voice will audible over the speakerphone.
When during a call > [ ].
SQT0433 (ENG)
42
Page 43

Email/Web browser/Phone
∫ Entering numbers during a call
Operation required if numbers need to be entered during a call, such as when sending a
key signal to navigate through voice guidance menus or other purposes.
When during a call > [ ] > enter the number.
Making a call from the call log
From the Home screen > [ ] > [ ].
1
≥ The Call log screen is displayed.
≥ The following icons are used in the call log to indicate
different types of calls.
[ ]: Outgoing calls
[ ]: Answered calls
[ ]: Missed calls
Tap the phone number or name of the
2
person to call.
Answering a call
When a call is being received, drag [ ] to [ ].
1
≥ To reject the call, drag [ ] to [ ].
Tap [ ] after the call has ended.
2
(ENG) SQT0 433
43
Page 44

Others
Troubleshooting
≥ Please also refer to the “Owner’s Manual for advanced features (PDF format)”, which
describes more detailed information.
Cannot turn the unit on.
≥ Check that the battery is adequately charged.
Touch screen does not operate even when tapping it.
≥ Check that the unit is not in sleep mode.
> If the unit is in sleep mode, press the [ ] to release sleep mode.
The unit does not operate as expected.
≥ Check the following methods.
> Turn the unit on/off.
> Turn the unit off, remove the microSIM card and reinsert it.
> Run an update. (P46)
> With the microUSB terminal disconnected from an AC adaptor or other devices, press
and hold the [ ] for approximately 10 seconds until the unit restarts. The unit vibr ates
as it restarts.
> Reset the unit.
Cannot charge the battery.
≥ Check the connection of the AC adaptor. (P18)
≥ Check the surrounding temperature.
44
SQT0433 (ENG)
Page 45

The battery usage time is short.
≥ The usage time becomes shorter due to various factors, including how often the unit is
used, the configuration settings in the unit, the network status, and the apps used.
> In such cases, please check the [Battery] setting (From the Home screen > [ ] >
[] > [Battery]) to determine what installed component is consuming the most
power.
The unit becomes warm.
≥ The unit may become warm during use or while charging. This is not a problem from an
operational perspective, and should be left as is.
Cannot receive calls.
≥ The reception may be weak in the area.
> Move to another area.
≥ Check that you are connected properly to the mobile network.
Calls are being dropped.
≥ The reception may be weak in the area.
> Move to another area.
Others
(ENG) SQT0 433
45
Page 46

Others
System updates
If the software needs to be updated, update files can be obtained to update the
unit.
≥ Perform system update in an area with good reception without moving around.
≥ Perform system update with sufficient battery strength remaining.
≥ During system update, telephone calls, messages, various communication functions and
other functions cannot be used.
≥ Update files cannot be obtained during international roaming, or when outside the sphere of
communications.
≥ System update may take a while.
≥ Do not turn off the unit during system update. System update may fail.
≥ During system update, information specific to this unit (e.g. model, manufacturing number
etc.) will be sent to the system update server of Panasonic.
Panasonic will not use the information sent for purposes other than system update.
≥ The unit will restart after a system update.
If a PIN code has been set, this has to be entered in the PIN code input screen displayed
during start-up.
≥ Some of the settings may be initialized when a system update is performed. In this case,
configure the settings one more time.
≥ You cannot return to the previous version if a system update is performed.
≥ System update can be carried out with data such as the contact list, pic tures, mails, down load
data, etc. that is registered in the unit remaining intact. However, data protection may not be
possible depending on the condition of the customer’s terminal (malfunctions, damages,
water ingress, etc.). We recommend that you take a backup copy of necessary data.
However, please note that there is some data such as download data etc. for which backup
copies cannot be taken.
≥ If system update fails, the unit may not start up and all functions indicated as [Software
update failed.] may be disabled. Contact the dealer or Panasonic in this case.
When an update is required
[ ] is displayed on the notification panel if system update is required.
Open the notifications panel > tap the notification.
1
Follow the guidance on the screen.
2
SQT0433 (ENG)
46
Page 47

Cautions for Use
∫ About the operating environment
Do not leave the unit in the following areas, as there is the risk of damage.
≥ Near electronic products. The image may become distorted, and static may be
introduced.
≥ Extremely hot or cold areas.
∫ Optimal use of this unit
≥ Do not drop or subject the unit to shock when carrying it around.
≥ Do not place the unit in the back pocket of your trousers.
Doing so may cause damage to the unit when sitting down.
≥ This unit is not dust/splash/water proof.
Avoid using this unit in places with a lot of dust, water, sand, etc.
Liquid, sand and other foreign material may get into the space around the lens,
buttons, etc. Be particularly careful since it may not just cause malfunctions, but
it may also become irreparable.
– Places with a lot of sand or dust.
– Places where water can come into contact with this unit, such as when using it on a
rainy day or at the beach.
≥ Keep this unit as far away as possible from electromagnetic equipment (such as
microwave ovens, TVs, video games etc.).
– If you use this unit on top of or near a TV, the pictures and/or sound on this unit may
be disrupted by electromagnetic wave radiation.
– Do not use this unit near smartphones or other cell phones because doing so may
result in noise adversely affecting the pictures and/or sound.
– Recorded data may be damaged, or pictures may be distorted, by strong magnetic
fields created by speakers or large motors.
– Electromagnetic wave radiation may adversely affect this unit, disturbing the
pictures and/or sound.
– If this unit is affected and does not operate correctly, disconnect the AC adaptor,
reconnect it and turn on the unit.
≥ Do not use this unit near radio transmitters or high-voltage lines.
– If you record near radio transmitters or high-voltage lines, the recorded pictures and/
or sound may be adversely affected.
≥ Do not connect the unit to products or parts that it is not compatible with.
Others
(ENG) SQT0 433
47
Page 48

Others
≥ Do not paint the unit, or cover it with thick stickers.
Doing so may interfere with correct operation.
≥ Do not spray this unit with insecticides or volatile chemicals.
– If the unit is sprayed with such chemicals, the body of the unit may be damaged and
the surface finish may peel off.
≥ Do not keep rubber or plastic products in contact with this unit for a long period
of time.
≥ This unit is equipped with GPS functionality, however must not be used as
aircraft, vehicle or personal navigation device, or precision surveying device.
Panasonic shall not be liable for all damages suffered as a result of inaccurate
measurements and information that are caused by external factors (including
running out of battery power) e.g. use of this unit outside of its intended
purpose, or malfunctions and wrong operations of this unit etc.
≥ When the un it OS is upda ted, the functions o r operation procedures of the unit
may change, or certain apps may cease operating.
≥ Check the safety and security of software before downloading or installing
software.
There is the risk of damage or information leakage due to malware or viruses,
and the volume of the unit may increase significantly.
∫ About the lens, screen
≥ Do not press the lens with excessive force.
≥ Do not leave the unit with the lens facing the sun as rays of light from the sun
may cause it to malfunction. Also, be careful when placing the unit outside or
near a window.
≥ Do not place objects on top of the screen, or press sharp objects against it.
Doing so may scratch the surface of the screen.
∫ When using peripheral devices
To prevent damage to peripheral devices, adhere to the following points.
Also refer to the operating instructions of peripheral device for details.
≥ Use peripheral devices that comply with the specifications of the unit.
≥ Check the shape and direction of the connector and connect it correctly.
≥ If a device has difficulty connecting, do not force the terminal, but instead check the
shape, orientation, pin layout or other features of the terminal.
48
SQT0433 (ENG)
Page 49

∫ Cleaning
When cleaning the unit, remove the AC adaptor cable terminal from the unit and
wipe the unit with a dry, soft cloth.
≥ When the unit is soiled badly, it can be cleaned by wiping the dirt off with a wrung wet
cloth, and then with a dry cloth.
≥ Do not use solvents such as benzine, thinner, alcohol, kitchen detergents, etc., to
clean the unit, since it may deteriorate the external case or the coating may peel off.
≥ When using a chemical cloth, be sure to follow the accompanying instructions.
∫ About the personal information
≥ Always check the recipient before sending messages or attachments, in order to
prevent leakage of personal information.
≥ This unit is equippe d with GPS. If enable d, the location info rmation is embedded
into photographs taken with this unit. If these photos are shared on social
media, the location where the photos were taken can be determined. Where
privacy is desired, GPS should be disabled.
∫ Battery
≥ The battery is a consumable item.
While performance depends on the usage status of the unit, if the amount of
time that the u nit can be u sed bec ome s drast ically shor ter eve n after c har ging it ,
the battery may require replacement.
Contact the dealer or Panasonic for replacement of the battery.
≥ When the battery is replaced, your personal information will be deleted and
settings will return to their default settings. We recommend that you take a
backup copy of important information.
≥ The charging and usage time of the battery differs with the usage environment.
≥ Charge the battery in an area where the temperature is between 5 oC and 35 oC
(41 oF and 95 oF).
≥ If the unit is not used for an extended period of time (1 month or more),
discharge the battery (by using the unit) until the battery level is 30% to 40%,
and store in a cool, dry place.
≥ The unit’s battery is a rechargeable lithium ion battery.
Battery used for this unit
Name: Lithium ion (Li-ion) rechargeable battery
Nominal voltage: DC 3.8 V
∫ Returning the unit for repair
≥ Contact the dealer or Panasonic for repair.
≥ When the unit is repaired, your personal information will be deleted and settings
will return to their default settings. We recommend that you take a backup copy
of important information.
≥ To protect your personal information, before returning the unit for repair, reset it
from the Home screen > [ ] > [ ] > [Backup & reset] > [Factory data
reset].
Others
(ENG) SQT0 433
49
Page 50

Others
∫ Disposing of this unit
≥ When disp osing of the used product, pe rform [F actory data reset] to completely
erase all data, remove the built-in battery and recycle it.
For details on how to remove the battery, see P51.
≥ Please make sure that the battery is disposed of at an officially assigned location, if
there is one in your country.
Do not disassemble this unit other than when disposing of this unit.
This is the rechargeable battery for this unit.
Do not use other than with this unit.
Do not charge the rechargeable battery when it has been removed.
≥ Do not place in fire or heat it.
≥ Do not puncture with nails, subject it to impact, disassemble or modify it.
≥ Do not charge, use or leave in hot places such as next to fires or in extremely
hot weather.
This may cause leaking, overheating, fire or rupture.
≥ Do not touch metal to the r and s terminals.
≥ Do not store or carry together with necklaces or hairpins, etc.
≥ Do not heat in microwaves or ovens, etc.
≥ Do not put into water.
This may cause leaking, overheating, fire or rupture.
If a leak should occur, by no means touch the liquid with bare hands.
If the liquid gets on the body or clothes, wash well with water. If the liquid gets into your
eyes, there is a danger of blindness. Do not rub the eyes; after washing immediately with
clean water, consult your physician.
Keep removed screws etc. out of the reach of small children.
If accidentally ingested there will be adverse physical effects.
≥ Should you suspect that such an object has been ingested, consult your physician
immediately.
A lithium ion battery that is recyclable powers the product
you have purchased. Please call 1-800-8-BATTERY for
information on how to recycle this battery.
USA Only: Disposal may be regulated in your community due to
environmental considerations. For disposal or recycling information, please
visit Panasonic website:
http://www.panasonic.com/environmental/ or call 1-888-769-0149.
SQT0433 (ENG)
50
Page 51
Others
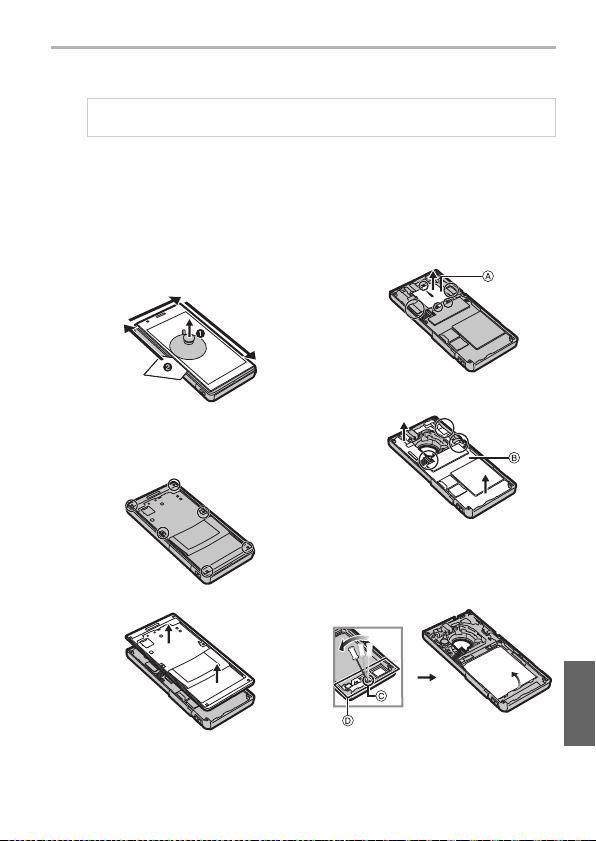
1 Use a suction cap (commercially
available) to lift up the LCD panel,
and insert a thin object such as a
card between the panel and the unit
to remove the LCD panel.
2 Remove all screws (6) in the image
below.
≥ Use a cross-slot screwdriver
(commercially available).
3 Remove the case.
4 Remove the screws (3), cover and
flexible board connectors (2), and
remove the le ns tube module A.
5
Remove the flexible board connectors
(3), and remove the board B.
6 Insert a flathead screwdriver
(commercially available) into the
slot antenna holder C, lift up the
antenna holder D and remove it,
and then remove the battery.
How to remove the battery
When disposing of the used product, perform [Factory data reset] to completely erase all data.
This fi gure de scribes the disposal o f this unit, i t is not instruction for repair. If
disassembled, repair is not possible.
≥ Disassemble after the battery runs out.
≥ Wearing gloves is recommended during disassembly to prevent injury.
≥ If it cannot be removed smoothly, contact the dealer or Panasonic.
≥ Keep disassembled parts out of reach of children.
≥ Regarding the handling of used batteries
– Insulate the terminals with cellophane tape or similar.
– Do not disassemble.
(ENG) SQT0 433
51
Page 52

Others
∫ When used during overseas travel etc.
≥ The usage of GPS etc., may be restricted depending on the country or the
region.
This unit has a GPS function, so check with the embassies or travel agencies
etc. prior to your overseas travel regarding any restrictions on cameras with a
built-in GPS function.
∫ About the microSIM card, microSD card
≥ Turn the unit off when removing the microSIM card or microSD card.
Failure to do so may cause data loss, or damage to the microSIM card, m icroSD
card or the unit.
≥ Making backups of the data stored on the microSIM card or microSD card is
recommended to prevent data loss.
52
SQT0433 (ENG)
Page 53

Others
FCC RF exposure information
This product meets the government’s requirements for exposure to radio waves.
This product is a radio transmitter and receiver.
This product is designed and manufactured not to exceed the emission limits for
exposure to radio frequency (RF) energy set by the Federal Communications
Commission of the U.S. Government.
The guidelines are based on standards that were developed by independent
scientific organization through periodic and thorough evaluation of scientific
studies.
The standards include a substantial safety margin designed to assure the safety
of all persons, regardless of age and health.
The exposure standard for wireless handsets employs a unit of measurement
known as the Specific Absorption Rate, or SAR.
The SAR limit set by the FCC is 1.6 W/kg.
The tests are performed in positions and locations (e.g., at the ear and worn on
the body) as required by the FCC for each model.
The highest SAR value for this product as reported to the FCC when tested for
use at the ear is 0.468 W/kg, and when worn on the body in a holder or carry case,
is 1.511 W/kg.
For body-worn operation, this product has been tested and meets FCC RF
exposure guidelines when used with a Panasonic accessory designated for this
product and when used with an accessory that contains no metal and that
positions the mobile device a minimum of 1.0 cm (0.033 feet) from the body.
Use of other accessories may not ensure compliance with FCC RF exposure
guidelines.
The FCC has granted an Equipment Authorization for this product with all reported
SAR levels evaluated as in compliance with the FCC RF emission guidelines.
SAR information on this product is on file with the FCC and can be found under
the Display Grant section of http://www.fcc.gov/oet/ea/
after searching on FCC ID: UCE314062A.
(ENG) SQT0 433
53
Page 54

Others
Specifications
Specifications are subject to change without notice.
Digital Camera: Information for your safety
Power Source: 3.8 V (when using the battery)
Power Consumption: 3.1 W (When recording)
Dimensions
(excluding the projecting
parts)
Mass (weight) Approx. 203 g/0.45 lb
Memory ROM 16 GB
RAM 2GB
External
SIM card slot microSIM card slotk1
Continuous
standby
¢1
time
Continuous
talk time
Charging time
Screen Method TFT
Tou ch scr een Capacitive (10-point multi-touch)
¢1 Approximate time when radio reception is normal.
The continuous standby time may be shortened by the charging condition, functional
settings, operating environment such as atmospheric temperature etc., reception status in
the area of use and so on.
¢2 Approximate talk time when radio reception is normal.
¢3 Approximate charging time when the battery is drained and the unit is turned off.
The charging time is longer if the unit is turned on during charging.
memory
3G (WCDMA)/
4G (LTE)
2G (GSM) Approx. 560 hours
3G (WCDMA) Approx. 12 hours
¢2
2G (GSM) Approx. 11 hour s
¢3
Size 4.7q
Number of
dots (pixels)
5.0 V/9.0 V (when using the supplied AC adaptor)
2.4 W (When playing back)
Approx. 135.4 mm (W)k68.0 mm (H)k
21.1 mm (Body: 15.2 mm) (D)
[Approx. 5.33q (W)k2.68q (H)k0.83q (Body: 0.60q) (D)]
Approx. 204g/0.45 l b (with microSIM card and microSD ca rd)
microSD/microSDHC/microSDXC (Up to 128 GB)
Approx. 630 hours
Approx. 150 min
Approx. 6,220,000 dots (Full HD: 1920k1080 RGB)
54
SQT0433 (ENG)
Page 55

Others
Outward
facing
camera
¢4 Based on “Exif 2.2” standard when taking pictures in Panorama Shot Mode or when
recording motion picture.
Effective
pixels
Picture size
(Max.)
Zoom Still picture Max. 4k
Image se nsor 1q MOS sensor, total pixel number 20,900,000 pixels,
Lens fl10.2 mm (35 mm film camera equivalent: 28 mm)
Focus range 10 cm (0.33 feet) to ¶
Shutter
system
Minimum
Illumination
Shutter
speed
Exposure
(AE)
Metering
mode
Recording
file format
Approx. 20,100,000 pixels
Approx. 20,000,000 pixels
Motion
pictures
Primary color filter
F2.8 to F11
Electronic shutteriMechanical shutter
Approx. 9 lx (when i-low light is used, the shutter speed is
1/30th of a second)
Still picture 60 to 1/16000th (with the [Shutter Type]
Motion
pictures
Program AE (P)/Aperture-Priority AE (A)/
Shutter-Priority AE (S)/Manual Exposure (M)
Multiple/Center weighted/Spot
Still picture RAW/JPEG (based on “Design rule for
Motion
pictures
Max. 4k
set to [Auto])
60 to 1/2000th (with the [Shutter Type] set
to [Mechanical Shutter])
1/30th seconds to 1/16000th of a second
Camera File system”, based on “Exif 2.3”
¢4
standard)
MP4
[Audio compression format: AAC (2 ch)]
(ENG) SQT0 433
55
Page 56

Others
Inward facing
camera
Microphone Stereo
Speaker Monaural
Operating temperature 5 oC to 35 oC (41 oF to 95 oF)
Operating humidity 10%RH to 80%RH
Earphone mic terminal ‰ 3.5, 3-pole/4-pole
Interface microUSB (USB 2.0 High Speed)
Sensors Electronic compass/Accelerometer/Angular velocity/
Music playback AAC/AAC+/enhanced AAC+/AMR-NB/WB/MP3/FLAC/
Motion picture playback H.263/MPEG4/H.264
Wireless LAN Compliance
Effective
pixels
Picture size
(Max.)
Recording
file format
standard
Frequency
range used
(central
frequency)
Security Client Wi-Fi compliant
Access
method
Approx. 1,070,000 pixels
Approx. 920,000 pixels
Still picture JPEG (based on “Exif 2.2” standard)
Motion
pictures
Illumination/Proximity/Atmospheric pressure
MIDI/Vorbis/WAVE
IEEE 802.11a/b/g/n/ac (standard wireless LAN protocol)
2.4 GHz 2412 MHz to 2462 MHz (1 to 11ch)
5.2 GHz/
5.3 GHz
5.6 GHz 5500 MHz to 5700 MHz
5.8 GHz 5745 MHz to 5825 MHz
Tethering Wi-Fi compliant
Infrastructure mode
MP4
[Audio compression format: AAC (2 ch)]
5180 MHz to 5320 MHz
W52: 36, 40, 44, 48ch
W53: 52, 56, 60, 64ch
100, 104, 108, 112, 116, 120, 124, 128,
132, 136, 140ch
149, 153, 157, 161, 165ch
WEP, WPA™/WPA2™ (encryption
method: TKIP/AES, authentication
method: PSK)
WPA/WPA2 (encryption method: TKIP/
AES, authentication method: PSK)
56
SQT0433 (ENG)
Page 57
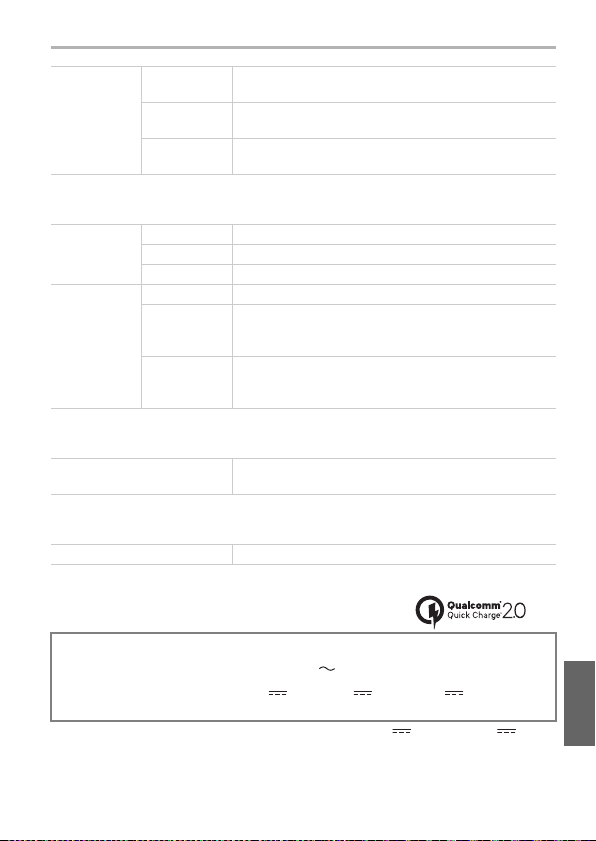
Others
Bluetooth®
function
Compatible
version
Compatible
profile
Frequency
range u sed
Conforms to Bluetooth standards Ver. 4.0
HFP/HSP/OPP/A2DP/AVRCP/SPP/PBAP/HID/MAP/
HOGP
2402 MHz to 2480 MHz
Cellular functions
Compliance
standard
Communication
method
4G (LTE) 3GPP TS 36.521-1 clause 6 and 7
3G (WCDMA) 3GPP TS 34.121-1 clause 5 and 6
2G (GSM) 3GPP TS 51.010 clause 12, 13 and 14
4G (LTE) Supported Band: 2, 4, 5, 7, 17
3G (WCDMA) Supported Band: I, II, IV, V, VIII
2G (GSM) Supported Band: 850, 900, 1800, 1900
HSDPA Category: 24
HSUPA Category: 6
GPRS Class: 10
EGPRS Class: 10
NFC
Complia nce standa rd RW operations: ISO 14443
Peer to Peer operations: ISO 18092
GPS
Complia nce standa rd GPS, GLONASS
AC Adaptor (Model No. VSK0825):
Information for your safety
Complia nce standa rd: Quick Charge 2.0 Class A
Input: 110 V to 240 V , 50/60 Hz, 0.5 A
Output¢5: 5.0 V 1.8 A, 9.0 V 1.8 A, 12.0 V 0.9 A
¢5 When connected to the unit, the AC adaptor supports 5.0 V 1.8 A and 9.0 V 1.8 A.
(for Panasonic system)
(ENG) SQT0 433
57
Page 58

Others
TO OBTAIN ANY OF OUR DIGITAL CAMERA ACCESSORIES YOU CAN DO ANY OF
THE FOLLOWING:
VISIT YOUR LOCAL PANASONIC DEALER
OR
YOU MAY CONTACT US DIRECTLY AT:
1-800-237-9080 (FAX ONLY)
OR
MAIL THIS ORDER TO: PANASONIC NATIONAL PARTS CENTER
20421 84th Avenue South, Kent, WA 98032
Ship To:
Mr.
Mrs.
Ms.
tsaLtsriF
Street Address
City State Zip
Phone#:
Day
( )
Night
()
4. Shipping information (UPS delivery requires complete street address)
Please photocopy this form when placing an order.
3. Method of payment (check one)
American Express
VISA
MasterCard
(Please do not send cash)
2. Items Ordered
QuantityhcaE ecirP # yrosseccA ecirP latoTnoitpircseD
$6.95
Subtotal
Your State & Local Sales Tax
Shipping & Handling
Tot a l
1. Digital Camera Model #
Discover
Expiration Date
Credit Card #
Customer Signature
Digital Camera Accessory Order Form
SQT0433 (ENG)
58
Page 59

Others
Limited Warranty (ONLY FOR U.S.A.)
Panasonic Products Limited Warranty
Limited Warranty Coverage (For USA Only)
If your product does not work properly because of a defect in materials or
workmanship, Panasonic Corporation of North America (referred to as “the
warrantor”) will, for the length of the period indicated on the chart below, which
starts with the date of original purchase (“warranty period”), at its option either (a)
repair your product with new or refurbished parts, (b) replace it with a new or a
refurbished equivalent value product, or (c) refund your purchase price. The
decision to repair, replace or refund will be made by the warrantor.
Product or Part Name Parts Labor
Digital Camera 1 Year 1 Year
All included Accessories
(Except Non-Rechargeable Batteries)
Only Non-Rechargeable Batteries 10 Days Not Applicable
During the “Labor” warranty period there will be no charge for labor. During the
“Parts” warranty period, there will be no charge for parts. This Limited Warranty
excludes both parts and labor for non-rechargeable batteries, a ntennas, and
cosmetic parts (cabinet). This warranty only applies to products purchased and
serviced in the United States. This warranty is extended only to the original
purchaser of a new product which was not sold “as is”.
Mail-In Service--Online Repair Request
Online Repair Request
To submit a new repair request and for quick repair status visit our Web Site at
www.panasonic.com/support
When shipping the unit, carefully pack, include all supplied accessories listed in
the Owner’s Manual, and send it prepaid, adequately insured and packed well in a
carton box. When shipping Lithium Ion batteries please visit our Web Site at
www.panasonic.com/BatteryHandling
most up to date information. Include a letter detailing the complaint, a return
address and provide a daytime phone number where you can be reached. A valid
registered receipt is required under the Limited Warranty.
IF REPAIR IS NEEDED DURING THE WARRANTY PERIOD, THE
PURCHASER WILL BE REQUIRED TO FURNISH A SALES RECEIPT/PROOF
OF PURCHASE INDICATING DATE OF PURCHASE, AMOUNT PAID AND
PLACE OF PURCHASE. CUSTOMER WILL BE CHARGED FOR THE REPAIR
OF ANY UNIT RECEIVED WITHOUT SUCH PROOF OF PURCHASE.
.
90 Days Not Applicable
as Panasonic is committed to providing the
(ENG) SQT0 433
59
Page 60

Others
Limited Warranty Limits and Exclusions
This warranty ONLY COVERS failures due to defects in materials or
workmanship, and DOES NOT COVER normal wear and tear or cosmetic
damage. The warranty ALSO DOES NOT COVER damages which occurred in
shipment, or failures which are caused by products not supplied by the warrantor,
or failures which result from accidents, misuse, abuse, neglect, mishandling,
misapplication, alteration, faulty installation, set-up adjustments, misadjustment of
consumer controls, improper maintenance, power line surge, lightning damage,
modification, introduction of sand, humidity or liquids, commercial use such as
hotel, office, restaurant, or other business or rental use of the product, or service
by anyone other than a Factory Service Center or other Authorized Servicer, or
damage that is attributable to acts of God.
THERE ARE NO EXPRESS WARRANTIES EXCEPT AS LISTED UNDER
“LIMITED WARRANTY COVERAGE”.
THE WARRANTOR IS NOT LIABLE FOR INCIDENTAL OR CONSEQUENTIAL
DAMAGES RESULTING FROM THE USE OF THIS PRODUCT, OR ARISING
OUT OF ANY BREACH OF THIS WARRANTY.
(As examples, this excludes damages for lost time, travel to and from the servicer,
loss of or damage to media or images, data or other memory or recorded content.
The items listed are not exclusive, but for illustration only.)
ALL EXPRESS AND IMPLIED WARRANTIES, INCLUDING THE WARRANTY
OF MERCHANTABILITY, ARE LIMITED TO THE PERIOD OF THE LIMITED
WARRANTY.
Some states do not allow the exclusion or limitation of incidental or consequential
damages, or limitations on how long an implied warranty lasts, so the exclusions
may not apply to you.
This warranty gives you specific legal rights and you may also have other rights
which vary from state to state. If a problem with this product develops during or
after the warranty period, you may contact your dealer or Service Center. If the
problem is not handled to your satisfaction, then write to:
Consumer Affairs Department
Panasonic Corporation of North America
661 Independence Pkwy
Chesapeake, VA 23320
PARTS AND SERVICE, WHICH ARE NOT COVERED BY THIS LIMITED
WARRANTY, ARE YOUR RESPONSIBILITY.
SQT0433 (ENG)
60
Page 61

Others
As of November 2014
(ENG) SQT0 433
61
Page 62

Others
≥ microSDXC Logo is a trademark of SD-3C,
LLC.
≥ Adobe is a trademark or registered
trademark of Adobe Systems Incorporated
in the United States and/or other countries.
≥ Google, Android, Google Play and other
marks are trademarks of Google Inc.
≥ The Bluetooth® word mark and logos are
registered trademarks owned by Bluetooth
SIG, Inc. and any use of such marks by
Panasonic Corporation is under license.
Other trademarks and trade names are
those of their respective owners.
≥ The Wi-Fi CERTIFIED™ Logo is a
certification mark of Wi-Fi Alliance®.
≥ The Wi-Fi Protected Setup™ Identifier
mark is a certification mark of Wi-Fi
Alliance®.
≥ “Wi-Fi®” is a registered trademark of Wi-Fi
Alliance®.
≥ “Wi-Fi Protected Setup™”, “WPA™”, and
“WPA2™” are trademarks of Wi-Fi
Alliance®.
≥ Other names of systems and products
mentioned in these instructions are usually
the registered trademarks or trademarks of
the manufacturers who developed the system or product concerned.
≥ This product is licensed under the MPEG-4 patent portfolio license and AVC patent
portfolio license for the personal use of a consumer or other uses in which it does not
receive remuneration to (i) encode video in compliance with the MPEG-4 Visual Standard
and AVC Standard (“MPEG-4/AVC Video”) and/or (ii) decode MPEG-4/AVC Video that
was encoded by a consumer engaged in a personal activity and/or was obtained from a
video provider licensed to provide MPEG-4/AVC Video. No license is granted or shall be
implied for any other use. Additional information may be obtained from MPEG LA, L.L.C.
See http://www.mpegla.com .
≥ This product is manufactured or sold under license from InterDigital Technology
Corporation.
62
SQT0433 (ENG)
Page 63

≥ This product contains open source software licensed in compliance with GNU General
Public License, Version 2 (GPL v2), GNU Lesser General Public License (LGPL), and
other licenses.
The program is free software; you can copy it, redistribute it, and modify it under the
terms of the GPL v2 or LGPL as published by the Free Software Foundation.
At least three (3) years from delivery of products, Panasonic Corporation wi ll give to any
third party who contacts us at the contact information provided below, for a charge no
more than our cost of physically performing source code distribution, a complete
machine-readable copy of the corresponding source code covered under GPL v2 and
LGPL.
Contact Information
oss-cd-request@gg.jp.panasonic.com
Source code is also freely available to the public via the web site listed below.
http://panasonic.net/avc/oss/index.html
Please note that we cannot respond to any inquiries regarding the source code. You
cannot download the source code from a mobile phone. Use your PC to download the
source code.
For more details on the relevant software (including license information of GPL v2 and
LGPL), refer to the information included in your product on the following screen:
From the Home screen > [ ] > [ ] > [About phone] > [Legal information] >
[Open source licenses].
≥ Furthermore, this product contains the following software:
– the software developed by Apache Software Foundation and licensed under Apache
License (v.2.0)
– the software licensed under the Free Type Project License
– ICU License-ICU 1.8.1 and later Copyright © 1995–2011 International Business
Machines Corporation and others
– the software licensed under the MIT-License
– the software developed by the Independent JPEG Group
For more details on the relevant software (including license information), follow these
steps:
From the Home screen > [ ] > [ ] > [About phone] > [Legal information] >
[Open source licenses].
Others
(ENG) SQT0 433
63
Page 64

Panasonic Corporation 2015
Two Riverfront Plaza, Newark, NJ 07102-5490
Panasonic Corporation of North America
Printed in China
http://www.panasonic.com
 Loading...