

Panasonic PV-DV102, Digital Palmcorder PV-DV102 Operating Instructions Manual
Before attempting to connect, operate or adjust this product, please read these
instructions thoroughly.
Spanish Quick Use Guide is included.
Guía para rápida consulta en español está incluida.
LSQT0574B
Model No. PV-DV102
Digital Video Camcorder
Operating Instructions
Mini
R
For assistance, please call : 1-800-211-PANA(7262) or send e-mail to : consumerproducts@panasonic.com
DV102.p 1-4.p65 02/03/05, 12:551

2
For assistance, please call : 1-800-211-PANA(7262) or send e-mail to : consumerproducts@panasonic.com
Things You Should Know
Date of Purchase
Dealer Purchased From
Dealer Address
Dealer Phone No.
Model No.
Serial No.
Thank you for choosing Panasonic!
You have purchased one of the most
sophisticated and reliable products on the
market today. Used properly, we’re sure it
will bring you and your family years of
enjoyment. Please take time to fill in the
information below. The serial number is on
the tag located on the underside of your
Palmcorder. Be sure to retain this manual
as your convenient Palmcorder information
source.
This symbol warns the user that uninsulated
voltage within the unit may have sufficient
magnitude to cause electric shock.
Therefore, it is dangerous to make any kind
of contact with any inside part of this unit.
This symbol alerts the user that important
literature concerning the operation and
maintenance of this unit has been included.
Therefore, it should be read carefully in order
to avoid any problems.
CAUTION
RISK OF ELECTRIC SHOCK
DO NOT OPEN
CAUTION: TO REDUCE THE RISK OF ELECTRIC SHOCK,
DO NOT REMOVE COVER (OR BACK)
NO USER-SERVICEABLE PARTS INSIDE
REFER SERVICING TO QUALIFIED SERVICE PERSONNEL
The above markings are located on the appliance bottom cover.
Note: This equipment has been tested and found to comply with Part 15 of the FCC
Rules. These limits are designed to provide reasonable protection against harmful
interference when operated in a residential environment.
If this equipment does cause interference to radio or television reception, which can be
determined by turning the equipment off and on, use the equipment in another location
and/or utilize an electrical outlet different from that used by the receiver.
If necessary, consult the dealer or an experienced radio/TV technician for help. You may
find the booklet, ‘Something About Interference’ available from FCC local regional offices
helpful.
FCC Warning: To assure continued FCC compliance, use only the provided shielded
interface cable when connecting digital video camcorder to computer in
accordance with instruction herein. Also, any unauthorized changes or
modifications to this equipment would void the user’s authority to operate.
Your
Mini
Palmcorder is designed to record and play back in Standard Play (SP) mode
and Long (LP) mode.
It is recommended that only cassette tapes that have been tested and inspected for use in
VCR machines with the
Mini
mark be used.
WARNING: TO PREVENT FIRE OR SHOCK HAZARD,
DO NOT EXPOSE THIS EQUIPMENT TO RAIN OR MOISTURE.
Safety Precautions
Declaration of Conformity
Model Number : PV-DV102
Trade Name : Panasonic
Responsibility Party : Matsushita Electric Corporation of America
Address : One Panasonic Way Secaucus New Jersey 07094
Telephone Number : 1-800-211-PANA(7262)
This device complies with Part 15 of the FCC Rules. Operation is subject to the
following two conditions: (1) This device may not cause harmful interference, and
(2) this device must accept any interference received, including interference that
may cause undesired operation.
DV102.p 1-4.p65 02/03/05, 12:552
3
Before Use
11. Grounding or Polarization — This video unit may be
equipped with either a polarized 2-wire AC
(Alternating Current) line plug (a plug having one
blade wider than the other) or 3-wire grounding type
plug, a plug having a third (grounding) pin.
The 2-wire polarized plug will fit into the power outlet
only one way. This is a safety feature. If you are
unable to insert the plug fully into the outlet, try
reversing the plug. If the plug still fails to fit, contact
your electrician to replace your obsolete outlet. Do
not defeat the safety purpose of the polarized plug.
The 3-wire grounding type plug will fit into a
grounding type power outlet. This is a safety feature.
If you are unable to insert the plug into the outlet,
contact your electrician to replace your obsolete
outlet. Do not defeat the safety purpose of the
grounding type plug.
12. Power-Cord Protection — Power-supply cords
should be routed so that they are not likely to be
walked on or pinched by items placed upon or
against them, paying particular attention to cords of
plugs, convenience receptacles, and the point
where they exit from the unit.
13. Outdoor Antenna Grounding — If an outside
antenna or cable system is connected to the video
unit, be sure the antenna or cable system is
grounded so as to provide some protection against
voltage surges and built-up static charges. Part 1 of
the Canadian Electrical Code, in USA Section 810
of the National Electrical Code, provides information
with respect to proper grounding of the mast and
supporting structure, grounding of the lead-in wire to
an antenna discharge unit, size of grounding
conductors, location of antenna discharge unit,
connection to grounding electrodes, and
requirements for the grounding electrode.
14. Lightning — For added protection of this video unit
receiver during a lightning storm, or when it is left
unattended and unused for long periods of time,
unplug it from the wall outlet and disconnect the
antenna or cable system. This will prevent damage
to the video unit due to lightning and power-line
surges.
1. Read Instructions — All the safety and operating
instructions should be read before the unit is
operated.
2. Retain Instructions — The safety and operating
instructions should be retained for future reference.
3. Heed Warnings — All warnings on the unit and in the
operating instructions should be adhered to.
4. Follow Instructions — All operating and maintenance
instructions should be followed.
5. Cleaning — Unplug this video unit from the wall outlet
before cleaning. Do not use liquid or aerosol
cleaners. Use a dry cloth for cleaning.
6. Attachments — Do not use attachments not
recommended by the video product manufacturer as
they may be hazardous.
7. Water and Moisture — Do not use this video unit near
water — for example near a bath tub, wash bowl,
kitchen sink, or laundry tub, in a wet basement, or
near a swimming pool, and the like.
8. Accessories — Do not place this video unit on an
unstable cart, stand, tripod, bracket, or table. The
video unit may fall, causing serious injury to a child or
adult, and serious damage to the unit. Use only with
a cart, stand, tripod, bracket, or table recommended
by the manufacturer, or sold with the video unit. Any
mounting of the unit should follow the manufacturer’s
instructions and should use a
mounting accessory
recommended by the
manufacturer. An appliance and
cart combination should be moved
with care. Quick stops, excessive
force, and uneven surfaces may
cause the appliance and cart
combination to overturn.
9. Ventilation — Slots and openings in the cabinet are
provided for ventilation and to ensure reliable
operation of the video unit and to protect it from
overheating. These openings must not be blocked or
covered. Never place the video unit on a bed, sofa,
rug, or other similar surface, or near or over a radiator
or heat register. This video unit should not be placed
in a built-in installation such as a bookcase or rack
unless proper ventilation is provided or the
manufacturer’s instructions have been adhered to.
10. Power Sources — This video unit should be operated
only from the type of power source indicated on the
marking label. If you are not sure of the type of power
supply to your home, consult your appliance dealer
or local power company. For video units intended to
be operated from battery power, or other sources,
refer to the operating instructions.
GROUND
CLAMP
ANTENNA
LEAD IN
WIRE
ANTENNA
DISCHARGE UNIT
(NEC SECTION 810-20)
GROUNDING CONDUCTORS
(NEC SECTION 810-21)
GROUND CLAMPS
POWER SERVICE GROUNDING
ELECTRODE SYSTEM
(NEC ART 250, PART H)
NATIONAL ELECTRICAL CODE
NEC
ELECTRIC
SERVICE
EQUIPMENT
-
Important Safeguards
DV102.p 1-4.p65 02/03/05, 12:553

4
For assistance, please call : 1-800-211-PANA(7262) or send e-mail to : consumerproducts@panasonic.com
15. Power Lines — An outside antenna system should
not be located in the vicinity of overhead power lines
or other electric light or power circuits, or where it can
fall into such power lines or circuits. When installing
an outside antenna system, extreme care should be
taken to keep from touching such power lines or
circuits as contact with them might be fatal.
16. Overloading — Do not overload wall outlets and
extension cords as this can result in a risk of fire or
electric shock.
17. Objects and Liquids — Never push objects of any
kind into this video unit through openings as they
may touch dangerous voltage points or short out
parts that could result in a fire or electric shock.
Never spill liquid of any kind onto the video unit.
18. Servicing — Do not attempt to service this video unit
yourself as opening or removing covers may expose
you to dangerous voltage or other hazards. Refer all
servicing to qualified service personnel.
19. Damage Requiring Service — Unplug this video unit
from the wall outlet and refer servicing to qualified
service personnel under the following conditions:
a. When the power-supply cord or plug is damaged.
b. If any liquid has been spilled into, or objects have
fallen onto, the video unit.
c. If the video unit has been exposed to rain or water.
d. If the video unit does not operate normally by
following the operating instructions. Adjust only
those controls that are covered by the operating
instructions, as an improper adjustment of other
controls may result in damage and will often
require extensive work by a qualified technician to
restore the video unit to its normal operation.
e. If the video unit has been dropped or the cabinet
has been damaged.
f. When the video unit exhibits a distinct change in
performance — this indicates a need for service.
20. Replacement Parts — When replacement parts are
required, be sure the service technician has used
replacement parts specified by the manufacturer or
have the same characteristics as the original part.
Unauthorized substitutions may result in fire, electric
shock or other hazards.
21. Safety Check— Upon completion of any service or
repairs to this video unit, ask the service technician to
perform safety checks to determine that the video
unit is in safe operating order.
USE & LOCATION
• TO AVOID SHOCK HAZARD ... Your Palmcorder and power supply should not be exposed to rain or moisture. Do
not connect the power supply or operate your Palmcorder if it gets wet. Your Palmcorder has been designed for
outdoor use, however it is not designed to sustain direct exposure to water, rain, sleet, snow, sand, dust, or direct
splashing from a pool or even a cup of coffee. This action could permanently damage the internal parts of your
Palmcorder. Do not attempt to disassemble this unit. There are no user serviceable parts inside. Unplug your
Palmcorder from the power supply before cleaning.
• DO NOT AIM YOUR PALMCORDER AT THE SUN OR OTHER BRIGHT OBJECTS
• DO NOT LEAVE THE PALMCORDER WITH THE EVF AIMED DIRECTLY AT THE SUN AS THIS MAY CAUSE
DAMAGE TO THE INTERNAL PARTS OF THE EVF
• DO NOT EXPOSE YOUR PALMCORDER TO EXTENDED HIGH TEMPERATURE ... Such as, direct sunlight,
inside a closed car, next to a heater, etc... This action could permanently damage the internal parts of your
Palmcorder.
• AVOID SUDDEN CHANGES IN TEMPERATURE ... If the unit is suddenly moved from a cold place to a warm
place, moisture may form on the tape and inside the unit.
• DO NOT LEAVE YOUR PALMCORDER OR THE POWER SUPPLY TURNED ON WHEN NOT IN USE.
• STORAGE OF YOUR PALMCORDER ... Store and handle your Palmcorder in a manner that will not subject it to
unnecessary movement (avoid shaking and striking). Your Palmcorder contains a sensitive pick-up device which
could be damaged by improper handling or storage.
CARE
• TO CLEAN YOUR PALMCORDER ... Do not use strong or abrasive detergents when cleaning your Palmcorder
body.
• TO PROTECT THE LENS ... Do not touch the surface of the lens with your hand. Use a commercial Palmcorder
lens solution and lens paper when cleaning the lens. Improper cleaning can scratch the lens coating.
• TO PROTECT THE FINISH OF YOUR PALMCORDER ... Before handling your Palmcorder, make sure your hands
and face are free from any chemical products, such as suntan lotion, as it may damage the finish.
Important Safeguards
Precautions
DV102.p 1-4.p65 02/03/05, 12:554

5
Before Use
Table of Contents
Camera VCR
For Your InformationSpecial Features
Things You Should Know ................................................................................................ 2
Important Safeguards ..................................................................................................... 3
Precautions .....................................................................................................................4
Before Using ....................................................................................................................6
• Easy Cassette Eject ..................................................................................................... 7
Quick Guide ................................................................................................................... 10
Supplying Power ........................................................................................................... 13
Setting the Clock ...........................................................................................................15
Using the Palmcorder Menu......................................................................................... 16
Camera Recording ........................................................................................................ 17
• Simple Recording .................................................................................................. 17
• Digital PhotoShot™ Mode ..................................................................................... 19
• Zoom ..................................................................................................................... 20
Special Effect Features................................................................................................. 22
Advanced Settings ........................................................................................................ 27
Palmcorder Accessory System ...................................................................................89
Palmcorder Accessory Order Form ............................................................................ 90
Notes On Operations .................................................................................................... 91
Specifications ................................................................................................................ 93
Before Requesting Service .......................................................................................... 94
On-Screen Displays (OSD) ........................................................................................... 96
Request for Service Notice .......................................................................................... 97
Limited Warranty ........................................................................................................... 98
Customer Services Directory ...................................................................................... 99
Spanish Quick Use Guide/Guía Para Uso Rápido ....................................................100
MENU OSD ................................................................................................................... 104
Electronic Viewfinder/LCD Monitor Indications ........................................................108
Index of Controls .........................................................................................................112
Index ............................................................................................................................. 115
Playback Your Recordings ........................................................................................... 31
Special Effect Features................................................................................................. 33
Digital Features ................................................................................................................. 39
Editing Features ............................................................................................................... 43
Card (Optional) Features .................................................................................................. 47
PC Connection
• Transferring Your Images (Windows) ......................................................................... 54
• PHOTOVU/MPEG4 Movie Messenger™ System ...................................................... 57
• Transferring Your Images (i.LINK) (Windows) ............................................................ 69
• PHOTOVU/MPEG4 Movie Messenger™ System (i.LINK) ......................................... 70
• Palmcorder USB Device Driver/SD Drive ................................................................... 72
• Palmcorder File Converter ......................................................................................... 75
• Web Camera (For Windows XP users/For Windows 98SE, Me, 2000 users) ............. 77
• Warning Indications ................................................................................................... 86
PC Connection
• Transferring Your Images (Macintosh) ........................................................................ 87
DV102.p 5-9.p65 02/03/05, 12:555
6
For assistance, please call : 1-800-211-PANA(7262) or send e-mail to : consumerproducts@panasonic.com
record tab
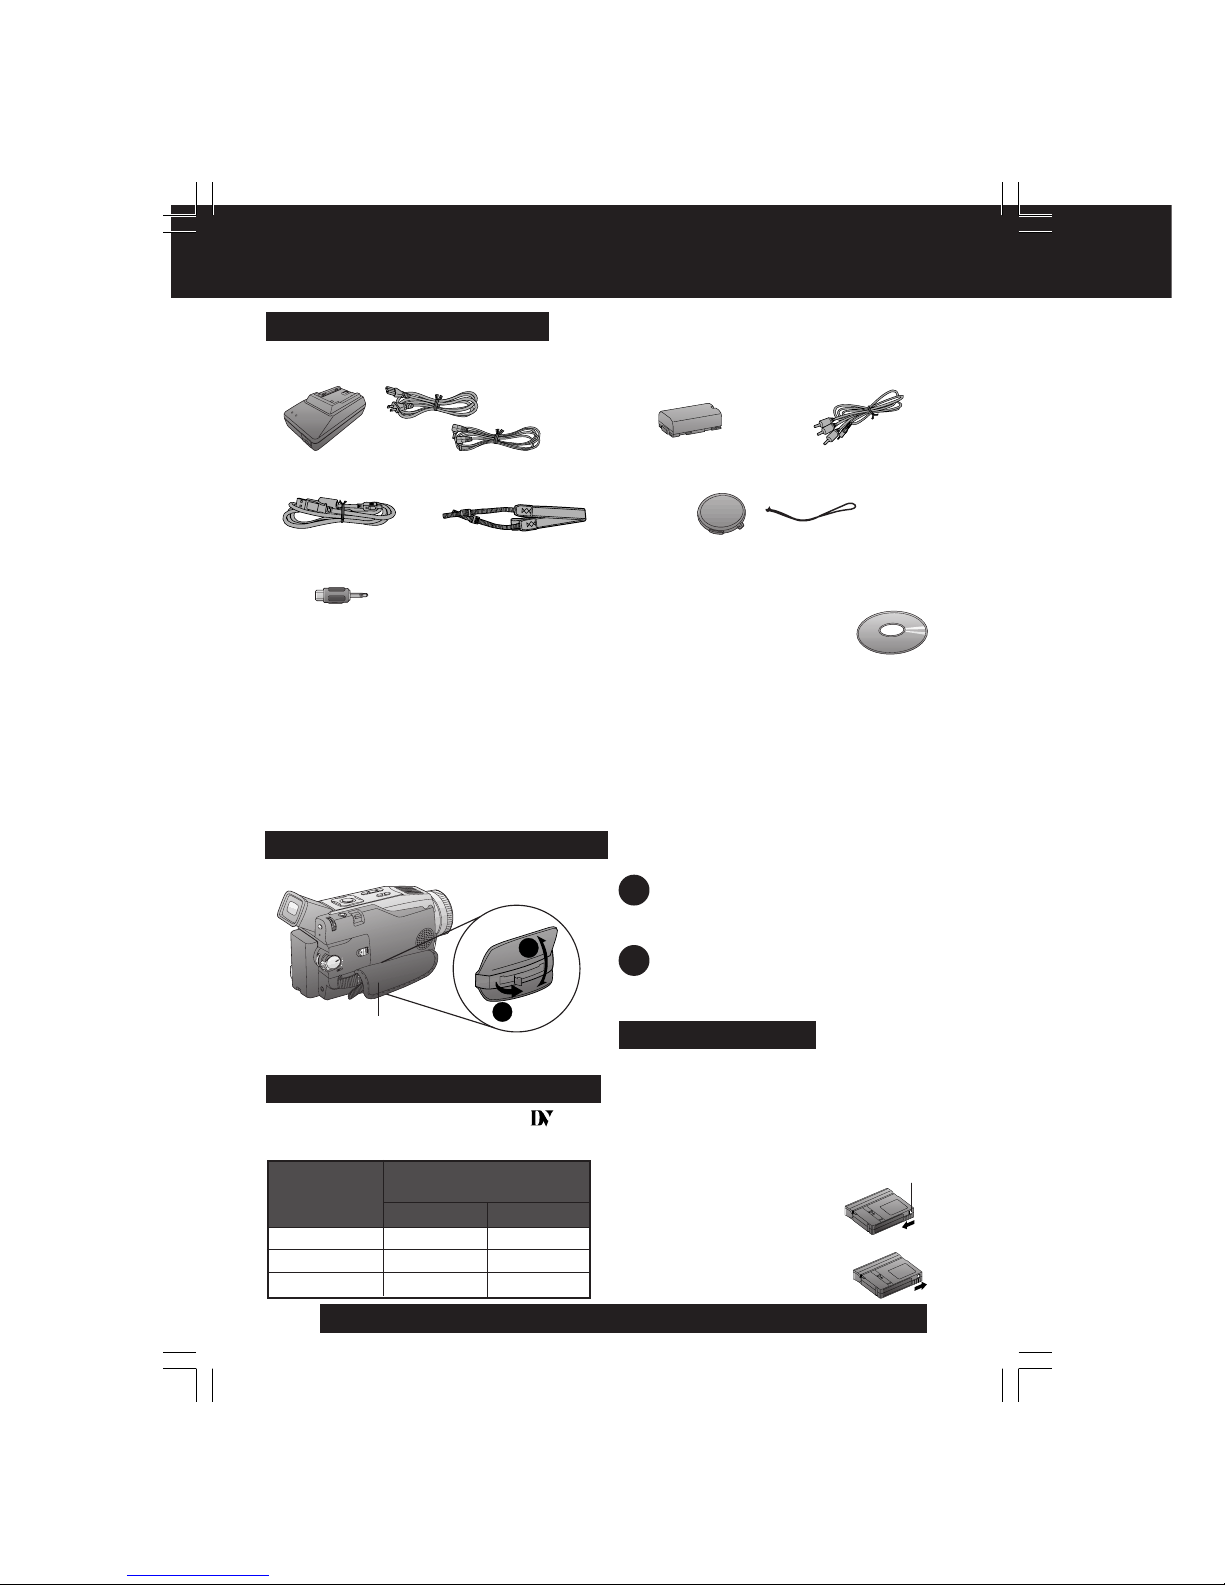
AY-DVM30EA
AY-DVM60EA
Cassette type
60 minutes
45 minutes
SP
LP
90 minutes
30 minutes
Record Speed/
Playback time
AY-DVM80EA 80 minutes 120 minutes
Use only those tapes having the
Mini
logo indicating the 6.35 mm digital
standard.
Record Speed/Playback Time
Cassettes have a sliding record tab to
ensure recordings are not accidentally
erased.
Erase Protection
Before Using
1 pc. AC Adaptor (PV-DAC11) with AC
Cable and DC Cable
1 pc. Shoulder
Strap (LSFC0016)
1 pc. Battery Pack
(CGR-D08/
CGR-D08R)
1 pc. Lens Cap (LSYF0521)
with Lens Cap Strap (LSGQ0066)
1 pc. A/V Cable
(LSJA0280)
1 pc. CD-ROM of Driver Software for Windows 98SE/Me/2000/XP
and Macintosh; USB Device Driver for Windows 98SE/Me/2000/
XP; PHOTOVU/MPEG4 Movie Messenger™ System for Windows
98SE/Me/2000/XP; Built-in SD Drive for Macintosh (LSFT0491)
Microsoft®, Windows® and Windows Media are registered trademarks of Microsoft in the United States
and other countries.
Macintosh, iMac, iBook, PowerBook, Power Macintosh, Power Mac, and Mac are trademarks or
registered trademarks of Apple Computer, Inc.
Intel® Pentium® is a registered trademark.
i.LINK is a trademark.
PHOTOVU/MPEG4 Movie Messenger™ System is a registered trademark.
IBM is a registered trademark of IBM Company.
MultiMediaCard is a registered trademark.
SD is a trademark.
Unpack your Palmcorder
1 pc. USB Cable
(K1HA05CD0001)
1 To prevent accidental erasure:
Slide the tab to the left (open).
2 To record again:
Slide the tab to the right (close).
1 pc. Audio Adaptor
(LSJP0831)
How to remove the Sensor tag
1
2
1
Open the Hand Strap as illustrated
at left.
2
Remove the Sensor tag.
Then, replace the Hand Strap.
Hand Strap
DV102.p 5-9.p65 02/03/05, 12:556
7
Before Use
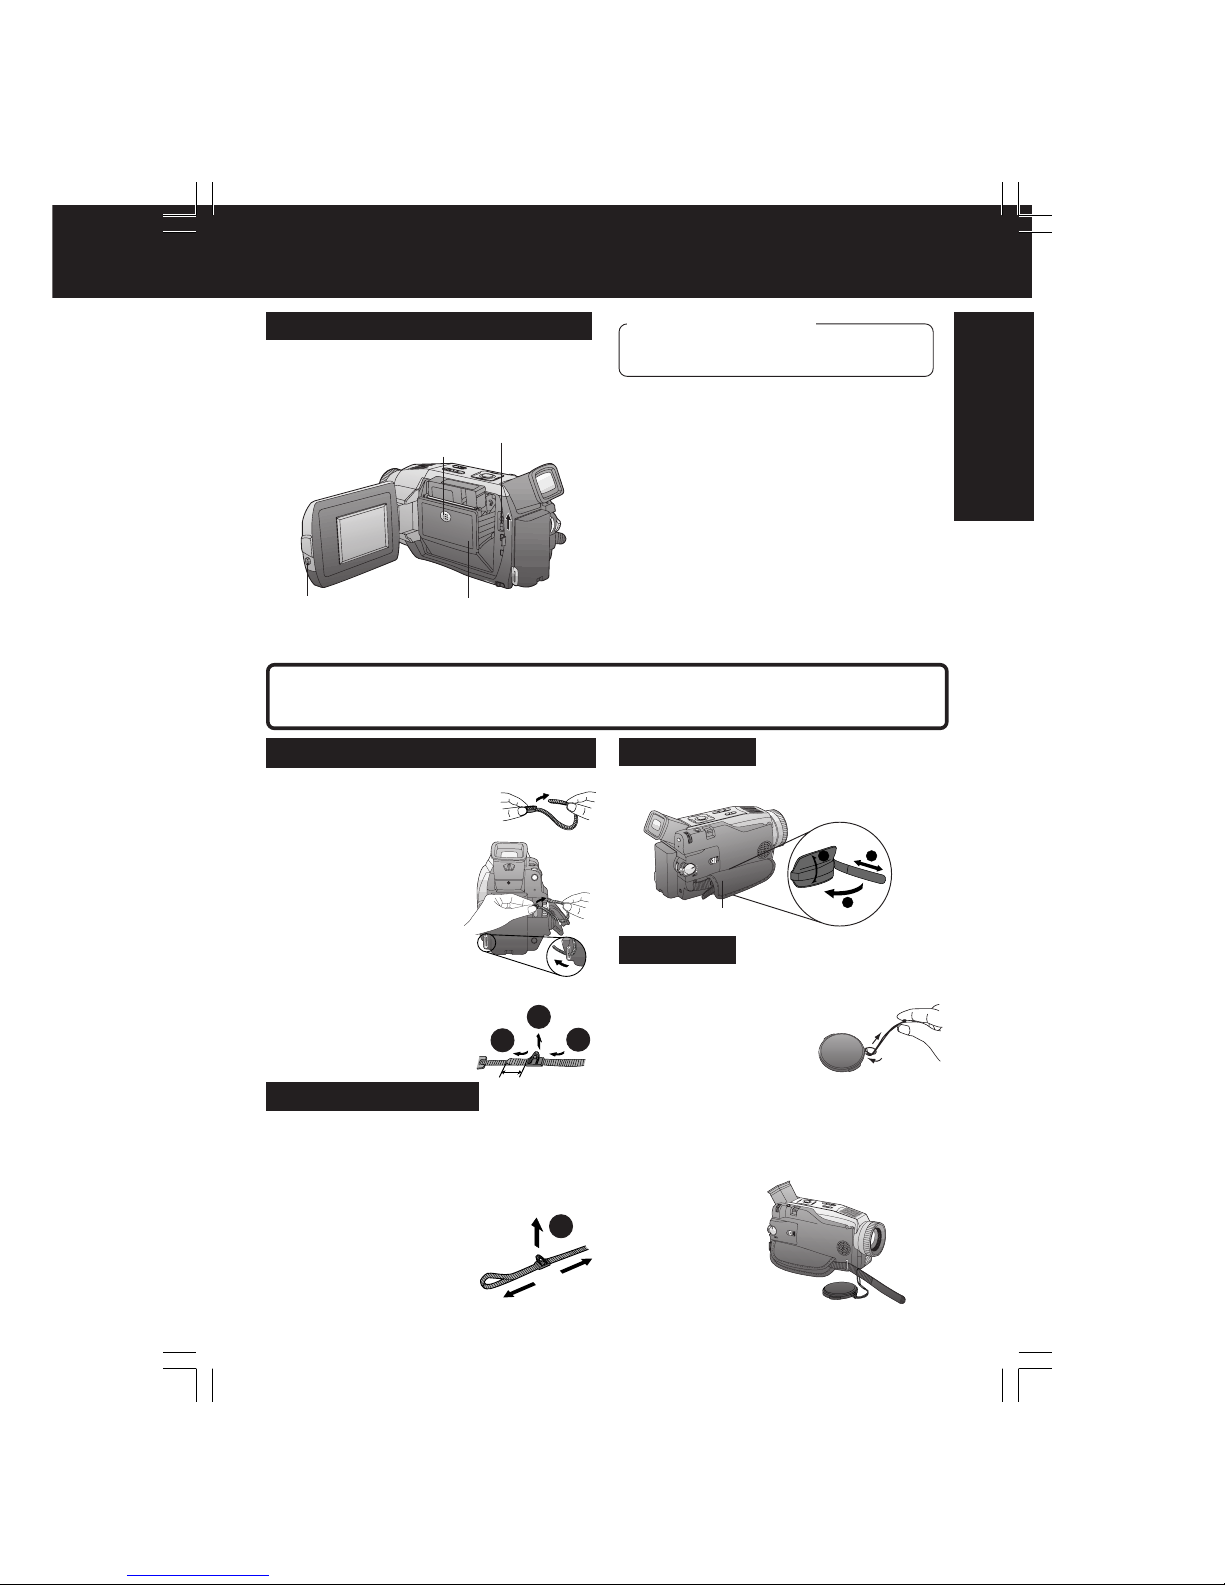
1 Undo the two strap ends
from their buckles.
2 Thread the strap ends
through the Strap
Attachment Rings.
3 Reinsert the strap ends through their
buckles.
• Make sure the straps
are not twisted.
Before Using
1 Press LCD-OPEN to unlock the LCD
monitor, and swing it fully open.
2 Slide TAPE EJECT to open the
Cassette Compartment Cover.
3 Insert a cassette record tab up,
window side facing out.
4 Press PUSH CLOSE to close the
Cassette Compartment Cover.
Note
• When inserting the cassette, make sure it is facing the right direction and then push it
in completely.
Easy Cassette Eject/Insertion
• If the Palmcorder is connected to a power
source, the cassette can be inserted and
ejected without turning the Palmcorder
on.
• To remove the cassette...
Slide TAPE EJECT to open the Cassette
Compartment Cover and pull the cassette
tape straight out.
1LCD-OPEN
Cassette Compartment
Cover
2TAPE EJECT
4PUSH
CLOSE
Before you begin
• Connect the Palmcorder to a power
source. (pp. 13, 14)
1
2
3
OR
1 Loosen the strap from the Buckle and
create a loop.
2 Pull the strap firmly through the
Buckle to shorten or lengthen the
strap.
1
Adjust the Length
Adjust the length of the Hand Strap to the
size of your hand as illustrated.
Attaching the Lens Cap Cord to the Hand
Strap:
Remove the Hand Strap from the front
clasp and thread the Strap through the loop
in the Lens Cap Cord.
Reattach the Hand Strap.
Lens Cap
Attaching the Shoulder Strap
2
1
3
Attaching the Lens Cap Strap:
Thread the Lens Cap Strap through the
Strap Attachment Ring as shown.
Hand Strap
Hand Strap
DV102.p 5-9.p65 02/03/05, 12:557

8
For assistance, please call : 1-800-211-PANA(7262) or send e-mail to : consumerproducts@panasonic.com
Before Using
To operate Camera functions:
Set POWER to CAMERA.
To operate VCR functions:
Set POWER to VCR.
You can operate the major functions of your Palmcorder from up to approximately 5 m
(16 feet) away (indoors). Aim the IR Remote Control toward the front of the Palmcorder
and press the desired buttons (Remote Sensor is located under the lens).
Remote Control (Optional)
○○○○
Remote Sensor
Controlled Functions
• Rec/Pause (p. 17)
• Tele (Zoom) (p. 20)
• Wide (Zoom) (p. 20)
• Date/Time (p. 108)
• Reset (p. 44)
• PhotoShot (p. 19)
• Display On TV (p. 38)
• Counter/Time Code (p. 109)
• Audio Dubbing (p. 43)
• Record (p. 46)
• Menu (p. 16)
• Play (p. 31)
• FF/Search (p. 33)
• REW/Search (p. 33)
• Pause/Select (pp. 15, 16, 35)
• Stop/Set (pp. 15, 16, 31, 46)
• Slow/Frame Advance (Forward)
(pp. 34, 35)
• Slow/Frame Advance (Backward)
(pp. 34, 35)
• Index Search (Forward) (pp. 35, 36)
• Index Search (Backward) (pp. 35, 36)
• Speaker Volume (p. 32)
1 Hold down LIGHT for more than 0.7
seconds to turn ON or OFF.
•“ ” will appear on the screen.
To brighten the natural colors in a scene.
Using the Built-in Light
Caution
This light becomes hot during operation.
Make sure nothing covers the light during
operation.
• Using Light reduces battery time.
• Provide adequate ventilation if using
Light in a hot environment for a long time.
• Set LIGHT to OFF when not in use.
• When replacing the bulb, see page 91.
Built-in Light
Note
Before you begin
• Connect the Palmcorder to a power
source. (pp. 13, 14)
• Set POWER to CAMERA or M-CARD.
1LIGHT
DV102.p 5-9.p65 02/03/05, 12:568

9
Before Use
Replace battery with Panasonic PART NO. VSBW0004 (CR2025) only. Use of another battery may
present a risk of fire or explosion.
Caution: battery may explode if mistreated. Dispose of used battery properly. Keep away from
children. Do not recharge, disassemble or dispose of in a fire.
+
Replace the Battery
A
Before Using
You can control any two Panasonic
Palmcorders with one Remote control
(Optional). In order for the remote to
distinguish between the two units, it is
necessary to set one of the Palmcorders to
VCR 2. On the remote, press VCR 1 or
VCR 2 to control the desired Palmcorder.
Remote Controlling Two
Palmcorders
Note
1Set POWER to VCR or CAMERA.
• The POWER Lamp lights red.
• Be sure POWER is fully turned to
VCR or CAMERA position.
2 Press MENU to display the VCR or
CAMERA mode menu screen.
3 Rotate JOG KEY to select SET-UP in
the CAMERA mode menu screen or
PLAY MODE in the VCR mode menu
screen, then press JOG KEY to
display the CAMERA SET-UP or VCR
PLAY MODE menu screen.
4 Rotate JOG KEY to select REMOTE ,
and then press JOG KEY to select
VCR 2. (Menu OSD: pp. 105, 106).
Leave the other Palmcorder set to
VCR1.
5 Set the Remote Control (Optional) to
VCR 1 or VCR 2 to correspond with
the Palmcorder you wish to control.
(See above left.)
• When the Palmcorder and remote are
not set to the same mode (VCR1 or
VCR2), “CHECK REMOTE MODE
(REMOTE)” will appear.
• After replacing the Remote Control
Battery, the remote will default to VCR 1.
Optional
1Insert a slender pointed object, such as the tip of a ball-
point pen into the slot so that it fits into the hole (as shown
A). Then, while sliding to the right, pull the Battery Tray out
with your fingernail.
2Insert the battery into the Battery Tray with the + mark
facing down.
Do not reverse the polarity.
3Insert the Battery Tray.
B
Optional
For VCR 2:
Press these
buttons at the
same time.
For VCR 1:
Press these
buttons at the
same time.
DV102.p 5-9.p65 02/03/05, 12:569
10
For assistance, please call : 1-800-211-PANA(7262) or send e-mail to : consumerproducts@panasonic.com
Quick Guide
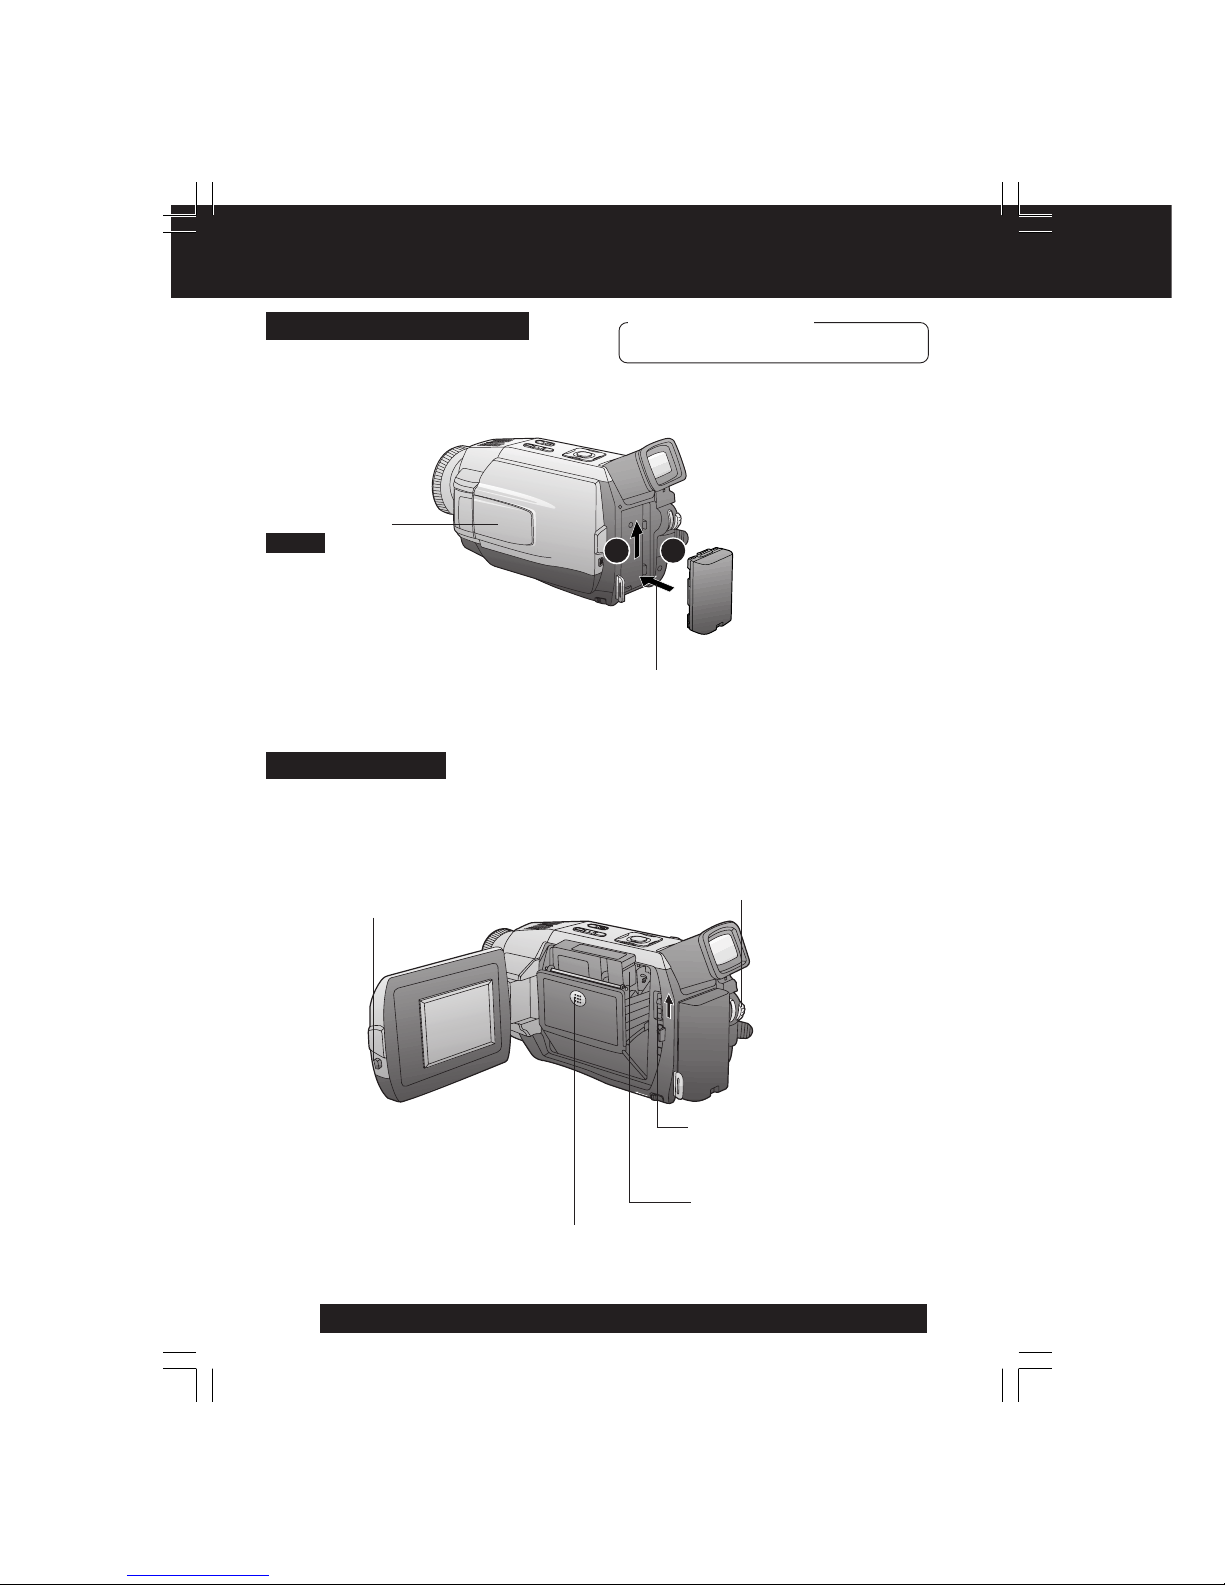
Insert the Battery Pack
Insert Cassette
1 Insert the Battery Pack and slide
it up until it locks with a click.
1 Press LCD-OPEN to unlock the LCD
monitor, and swing it fully open.
3 Slide TAPE EJECT to open
the Cassette Compartment
Cover.
Protection Film
Note
• Remove the
Protection Film before use.
Before you begin
• Charge the Battery. (p. 13)
2Set POWER to VCR or
CAMERA.
12
These Palmcorders are equipped with the Easy Cassette Eject System so
it is easy to insert or remove tapes, even when on a tripod. (p. 7)
4 Insert a cassette record tab
up, window side facing out.
• Make sure the record tab
is closed. (p. 6)
5 Press PUSH CLOSE mark to
close the Cassette
Compartment Cover.
DV102.p 10-13.p65 02/03/05, 12:5610
11
Before Use
Quick Guide
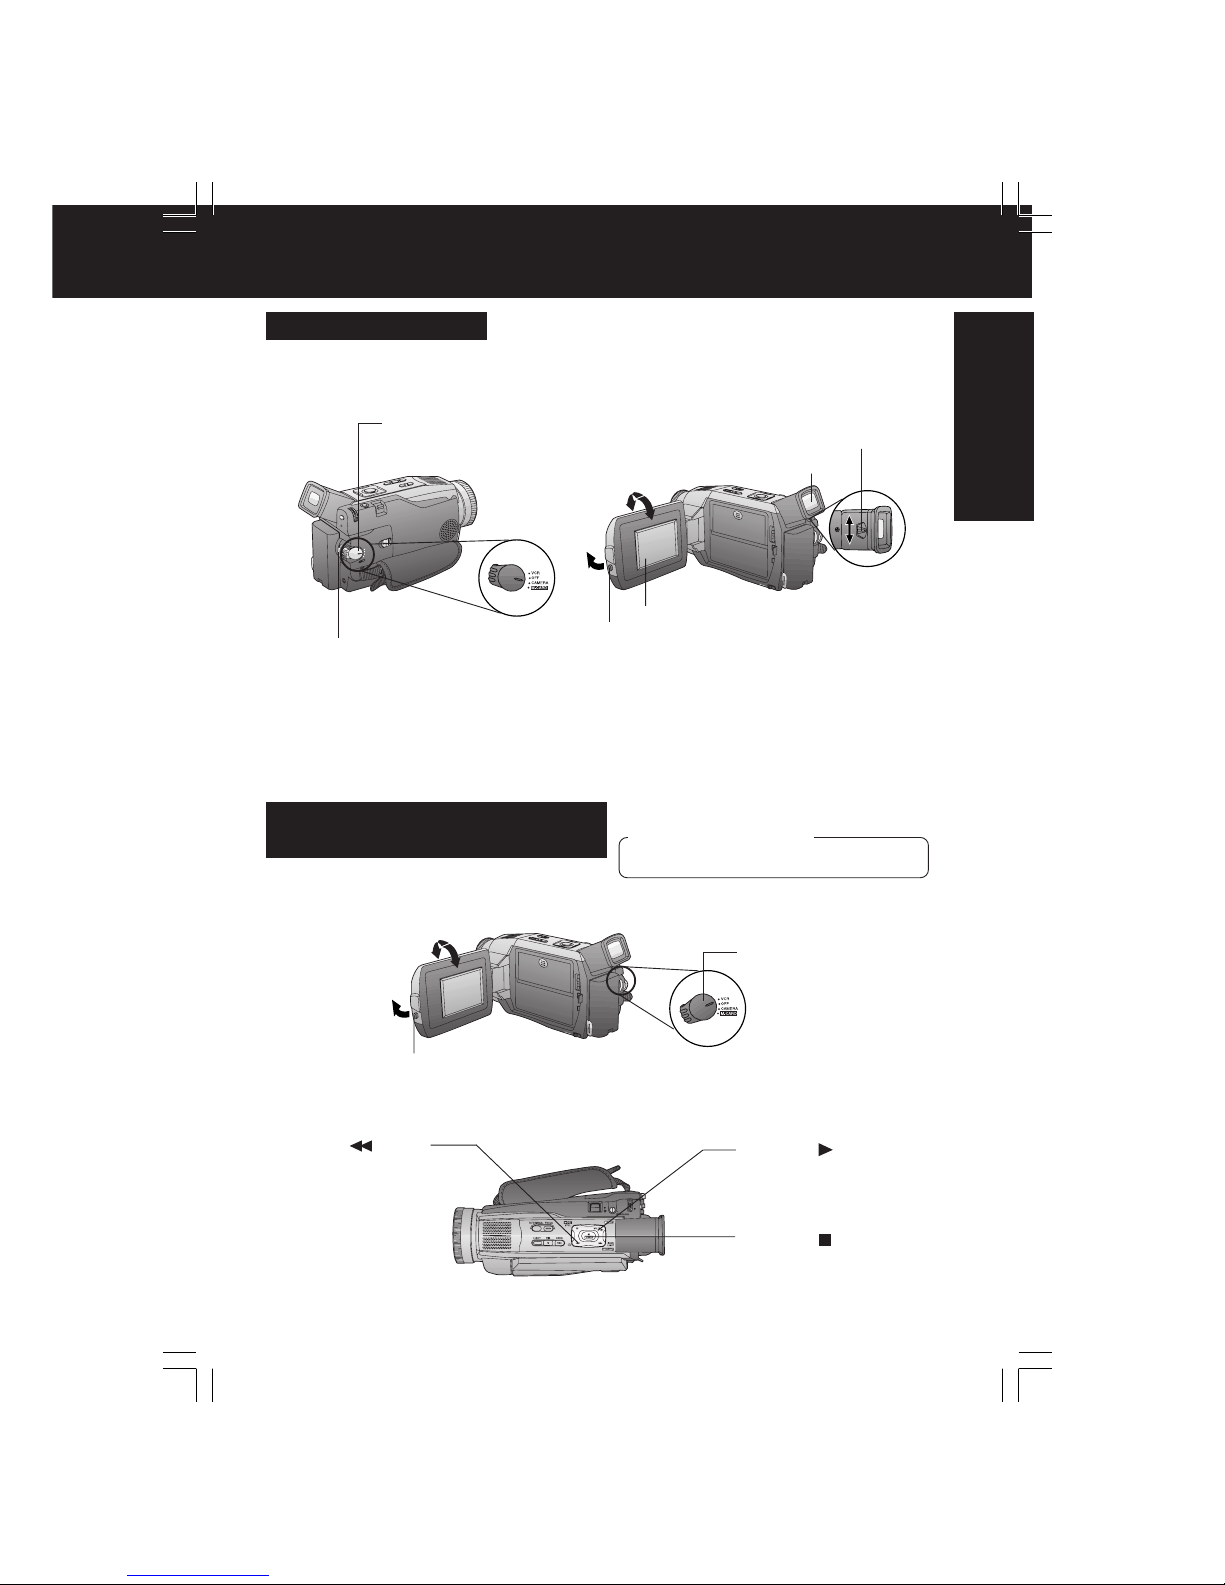
Camera Recording
When the LCD monitor is fully open, the
Viewfinder automatically turns OFF.
180°
90°
LCD Monitor
2 Adjust the Vision Adjustment
Control to your eyesight.
4 Press REC/PAUSE to start recording.
Press REC/PAUSE again to pause
recording.
Viewfinder
1 Set POWER to
CAMERA.
3 Press LCD-OPEN to unlock
the LCD monitor. Swing it fully
open and adjust the angle.
To Watch Playback in the LCD
(Liquid Crystal Display)
When the LCD monitor is fully open, the
Viewfinder automatically turns OFF.
2 Press LCD-OPEN to unlock the LCD
monitor. Swing it fully open and
adjust the angle.
3 Press (REW)
to rewind the tape.
4 Press (PLAY) to start
playback.
5 Press (STOP) to stop
playback.
Before you begin
• Charge the Battery. (p. 13)
180°
90°
1 Set POWER to VCR.
DV102.p 10-13.p65 02/03/05, 12:5611

12
For assistance, please call : 1-800-211-PANA(7262) or send e-mail to : consumerproducts@panasonic.com
Insert Memory Card (Optional)*
3 Insert the Memory Card and hold
in place until you hear a click.
4 Close the M-CARD Door.
2 Slide DOOR OPEN to open
M-CARD door.
1 Set POWER to OFF.
Before you begin
• Charge the Battery. (p. 13)
*Memory Card: MultiMediaCard or SD Memory Card (p. 91)
• Be sure to insert the Memory Card before using the Card PhotoShot. (p. 47)
Below is a list of memory cards which can be used in this Palmcorder.
Memory Card
MultiMediaCard (SanDisk brand)
SD Memory Card (optional) (p. 89)
Capacity
8 MB, 16 MB
8 MB, 16 MB, 32 MB, 64 MB
SD Memory Card write protection switch
A write protection switch is located on the SD Memory Card. Sliding the
switch to the “LOCK” position prevents writing on or formatting the card.
Write protection Switch
To remove the Memory Card...
Press here to eject the card.
About the M-CARD Lock
Switch
Note
• By sliding M-CARD Lock to LOCK, you
can prevent POWER from accidentally
entering the M-CARD position when
changing POWER to CAMERA.
M-CARD Lock
POWER
cropped corner
Note
• When inserting the Memory Card, insert
with the cropped corner down as shown in
the illustration above.
When inserting the Memory
Card
Quick Guide
DV102.p 10-13.p65 02/03/05, 12:5612

13
Before Use
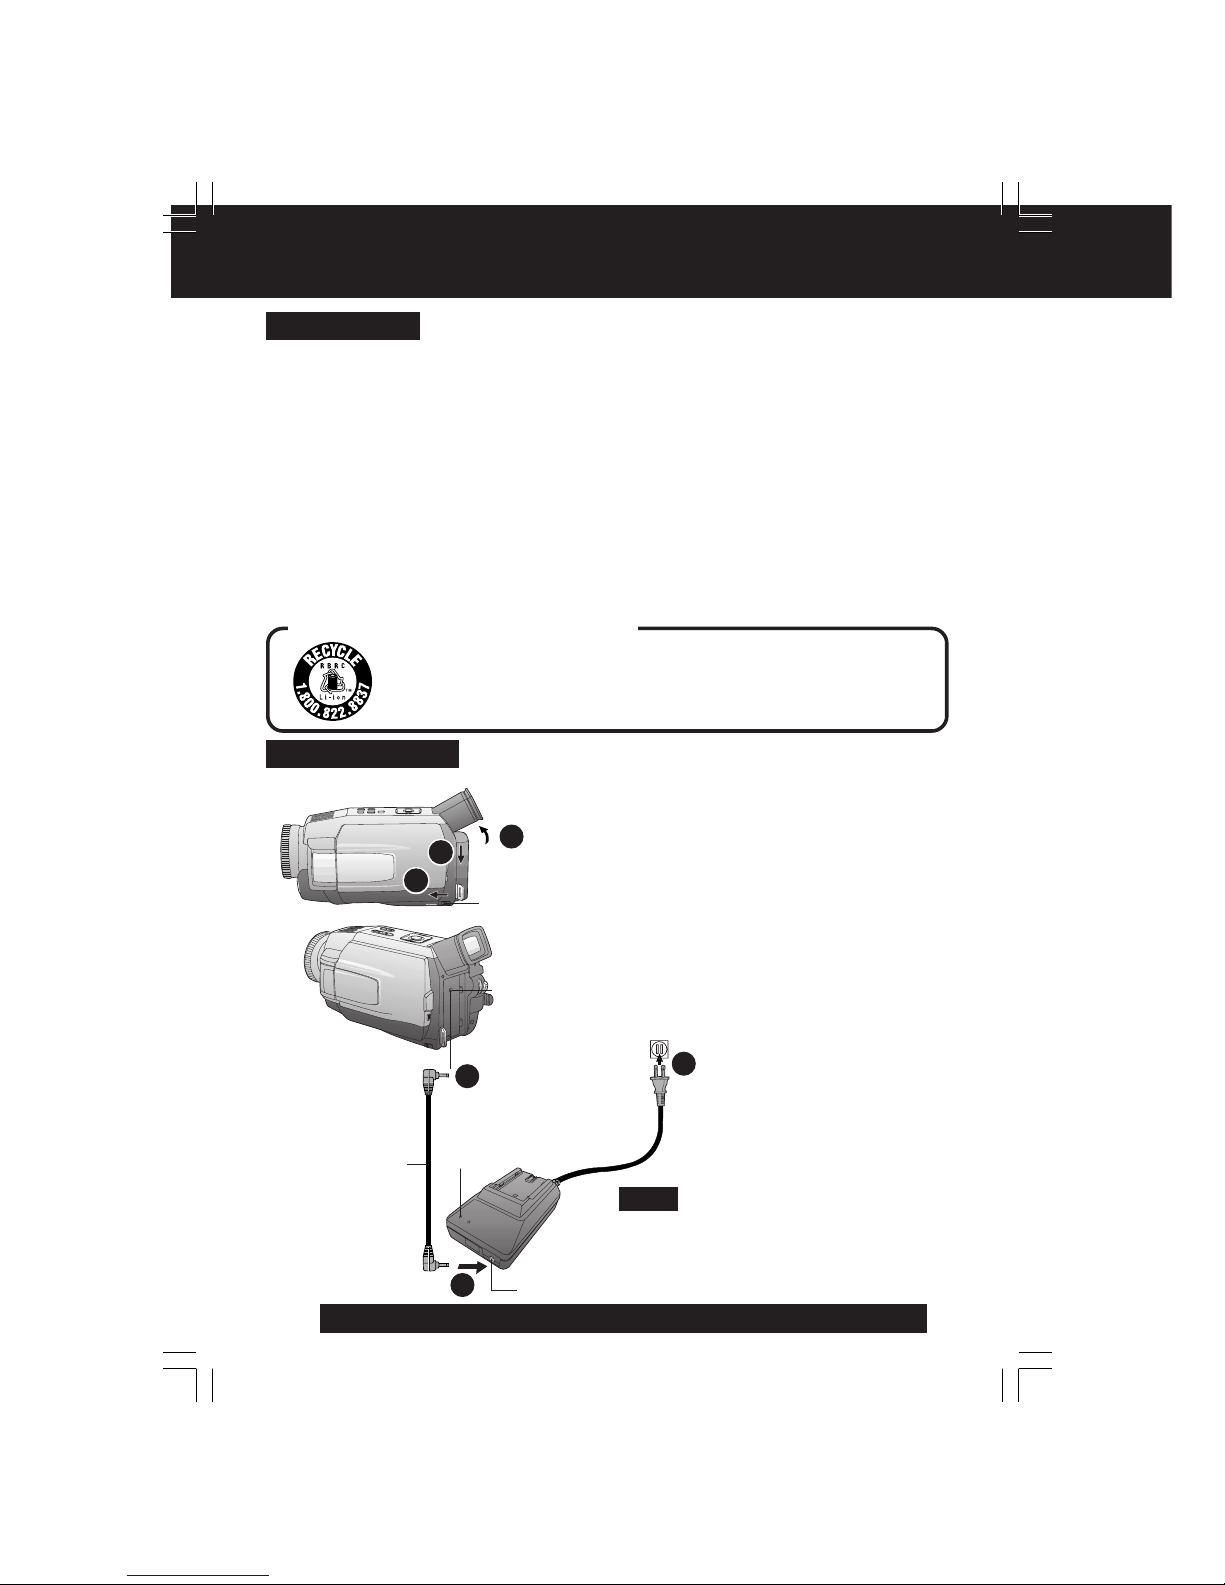
Supplying Power
Charge the Battery Pack on
the AC Adaptor
1Connect and plug in the Power Cord
as shown.
• POWER Lamp will light.
• Remove the DC Cable, if attached,
from the adaptor.
2Attach the Battery as shown to
charge.
• CHARGE Lamp lights up. It goes out
when charging is complete (approx.
1 hour). Expect approx. 1 hour
30 minutes of operation (EVF usage)
when fully charged.
3Remove the Battery.
Slide the Battery out and then lift up.
POWER Lamp
CHARGE Lamp
About the Flashing of the CHARGE Lamp
• Charge the Battery within an ambient temperature range of 10 °C (50 °F) and
30 °C (86 °F).
• If charging is done in extreme low or high temperatures, Battery charge time increases.
CHARGE Lamp flashes when...
• The Battery is being charged, but charging is taking longer than normal.
• Charging is not possible. Remove the Battery once, wait a short time, then re-attach it
for charging.
Note
1 Insert the Battery Pack and slide it up
until it locks with a click.
Remove the Battery Pack
2
3
BATT RELEASE
1
2
Insert the Battery Pack
1 Tilt Viewfinder upward.
2 Remove the Battery Pack and slide
the Battery downward while sliding the
BATT RELEASE.
1
DV102.p 10-13.p65 02/03/05, 12:5613
14
For assistance, please call : 1-800-211-PANA(7262) or send e-mail to : consumerproducts@panasonic.com
1 Slide the Battery downward while
sliding BATT RELEASE to remove the
Battery Pack. (p. 13)
2 Insert the DC Cable into the DC IN
Terminal.
3 Connect the other end of the DC
Cable to the AC Adaptor as shown.
4 Plug in the AC Adaptor.
• The POWER Lamp on the AC
Adaptor lights up.
• When not in use, unplug the AC Adaptor
from the AC outlet. (AC Adaptor consumes
1 W of electric power when plugged into
an AC outlet even when not in use.)
DC Cable
(Supplied)
DC IN Terminal
Note
1
2
3
POWER
Lamp
Supplying Power
Caution:
• Charge only with specified charger.
• Charge the Battery within an ambient
temperature range of 10 °C (50 °F) and
30 °C (86 °F).
• The Battery may be warm after charging or just
after use. This is normal.
• Do not use an insufficiently charged or worn out
Battery.
• If charging is done in extreme low or high
temperatures, Battery charge time increases.
Safety precautions:
• Do not place the Battery near, or dispose of in fire.
• Do not directly connect (short circuit) the positive
(+) and negative (–) terminals.
• Never attempt to disassemble or reassemble the
Battery.
To avoid damage to the Battery:
• Do not drop or jar the Battery.
• Use the Battery with specified models only.
• If the Battery is used in extremely high
temperatures, a safety device will automatically
prevent operation.
To insure longer battery life:
• While not in use, remove Battery from the
Palmcorder and AC Adaptor and store in a
cool, dark, dry place. If you leave the Battery in
the Palmcorder or on the AC Adaptor, the Battery
will no longer be rechargeable.
• Keep the Battery terminals clean.
Battery Care
DC Output Connector
2
3
Use AC Adaptor
BATT RELEASE
A lithium ion/polymer battery that is recyclable powers the product
you have purchased. Please call 1-800-8-BATTERY for information
on how to recycle this battery.
U.S.A. CONSUMERS: ATTENTION:
1
DV102.p 14-16.p65 02/03/05, 12:5614

15
Before Use
1 Press MENU to display the Camera or
VCR mode menu screen.
(p. 16)
2 Rotate JOG KEY to select DISPLAY
SETTING , and then press JOG KEY
to display the DISPLAY SETTING
menu screen.
3 Rotate JOG KEY to select CLOCK-
SET , and then press JOG KEY to set
to ON. (Menu OSD: pp. 105, 107.)
• The DATE/TIME SETTING menu
is displayed.
4 Rotate JOG KEY to select YEAR, then
press JOG KEY to fix and move to the
next item. Likewise, set the month,
day, hour, and minutes.
.
Setting the Clock
• To make corrections,
Press JOG KEY repeatedly to move back
to an item and correct.
• A built-in Battery maintains clock
operation. If the Palmcorder is not
connected to a power source for a few
months, the built-in battery may discharge
and “CLOCK BATTERY” indication
appears. (p. 96)
EXAMPLE:
When DATE/TIME setting is
completed, press MENU three times to
start the clock and exit.
: 2002
YEAR
Push
PUSH
Rotate
PUSH
: JAN
: FEB
MONTH
MONTH
The date and time is calculated, including
leap year, up to DEC 31 2089.
Note
[ CAMERA MENU ]
[ VCR MENU ]
Set the Date and Time
Before you begin
• Connect the Palmcorder to a power
source. (pp. 13, 14)
• Set POWER to CAMERA or VCR.
1MENU
2, 3, 4
JOG KEY
DV102.p 14-16.p65 02/03/05, 12:5615

16
For assistance, please call : 1-800-211-PANA(7262) or send e-mail to : consumerproducts@panasonic.com
APress JOG KEY to set your selection.
BRotate JOG KEY to select a menu
item.
CPress JOG KEY to set your selection.
• The “●” mark indicates selection.
DPress MENU twice to exit the menu.
The Palmcorder features three menu
displays: one for CAMERA mode
(recording), one for M-CARD (Memory Card
Photo Mode) and one for VCR mode
(Playback). (pp. 104~107)
Using the Palmcorder Menu
• While the Menu screen is displayed, you
cannot record on or play a tape.
• While recording, the Menu screen cannot
be displayed.
• During playback, the Menu screen can be
displayed.
1Press MENU to display the CAMERA
or VCR menu (according to the
POWER setting).
2Rotate JOG KEY to select a menu
item.
Displaying the MENU
Before you begin
• Connect the Palmcorder to a power
source. (pp. 13, 14)
• Set POWER to CAMERA or VCR.
1 : D. FUNCTION
CAMERA FUNCTION menu is
displayed. To select D.FUNCTION,
D.ZOOM, or PROGRESSIVE.
2 : ADJUST
CAMERA ADJUST menu is displayed.
To select PROG. AE or CINEMA.
3 : REC MODE
CAMERA REC-MODE menu is
displayed. To select REC-SPEED,
AUDIO-REC, INDEX, SHUTTER,
SELF-REC, WIND-CUT, or ZOOM-MIC.
4 : SET-UP
CAMERA SET-UP menu is displayed.
To select REMOTE or BEEP.
5 : DISPLAY SETTING
DISPLAY SETTING menu is displayed.
To select DISPLAY, C.RESET, DATE/
TIME, or CLOCK-SET.
6 : LCD/EVF SETTING
LCD/EVF SETTING menu is displayed.
To select LCD BRIGHTNESS, LCD
COLOR or EVF BRIGHTNESS.
7 : PHOTO TITLE
PHOTO TITLE menu is displayed. To
select TITLE or MODE.
1 : PLAY FUNCTION
VCR PLAY FUNCTION menu is
displayed. To select D. FUNCTION,
D.EFFECT, or D.ZOOM.
2 : REC MODE
VCR REC MODE menu is displayed.
To select REC-SPEED or AUDIO-DUB.
3 : PLAY MODE
VCR PLAY MODE menu is displayed.
To select INDEX, AUDIO, REMOTE, or
B.SEARCH.
4 : MULTI SETTING
MULTI SETTING menu is displayed.
To select SPEED.
5 : DISPLAY SETTING
DISPLAY SETTING menu is displayed.
To select DISPLAY, C.RESET, DATE/
TIME, or CLOCK-SET.
6 : LCD/EVF SETTING
LCD/EVF SETTING menu is displayed.
To select LCD BRIGHTNESS, LCD
COLOR or EVF BRIGHTNESS.
CAMERA Main menu
VCR Main menu
Setting the MENU Items
(EX. VCR Mode menu)
1, D
MENU
2, A, B, C
JOG KEY
DV102.p 14-16.p65 02/03/05, 12:5616

17
Camera
Camera Recording
Remove the lens cap and clip it to the hand
strap.
1 Set POWER to CAMERA.
• The POWER Lamp lights red.
• Be sure POWER is fully turned to the
CAMERA position.
2 With the Viewfinder Eye Cup held up
against your eye, adjust the Vision
Adjustment Control to your eyesight.
• Adjust the EVF Brightness of the
Viewfinder if necessary.
Please refer to “To adjust the LCD/
EVF BRIGHTNESS or COLOR” on
page 18.
3 Set to REC-SPEED “SP” or “LP” in
the CAMERA Mode Menu.
(Menu OSD: p. 104)
4 Press REC/PAUSE to start recording.
•“REC” is displayed on the screen.
Press REC/PAUSE again to pause
recording.
5 Set POWER to OFF when finished.
• To remove the cassette, slide TAPE
EJECT.
EVF
To conserve power
After 5 minutes, the Record/Pause mode
will automatically change to Standby
mode.
To resume recording, set POWER to
OFF and then ON again.
• When the Palmcorder is aimed at
excessively bright objects, or bright lights,
a vertical bar may appear in the picture.
This is a normal characteristic of the CCD
pick-up device. Try to avoid this whenever
possible.
Simple Recording
Before you begin
• Connect the Palmcorder to a power
source. (pp. 13, 14)
• Insert a cassette with the record tab
closed. (p. 6)
REC/PAUSE mode
1, 5
POWER
4REC/PAUSE
2Vision
Adjustment
Control
POWER Lamp
Clip here
3MENU
WARNING:
• Do not leave the Palmcorder with the
EVF aimed directly at the sun as this
may cause damage to the internal parts
of the EVF.
• Do not lift, or carry, the Palmcorder
by the EVF or the LCD Monitor.
DV102.p 17-21.p65 02/03/05, 12:5617

18
For assistance, please call : 1-800-211-PANA(7262) or send e-mail to : consumerproducts@panasonic.com
The LCD (Liquid Crystal Display) monitor
can be used while recording.
1Press LCD-OPEN to unlock the LCD
monitor.
2 Swing the LCD monitor fully open
and adjust the viewing angle.
• The LCD monitor will automatically
turn on.
• When the LCD monitor is completely
closed, it will shut off automatically to
save power.
• Adjust the LCD Brightness and/or
color of the LCD monitor if necessary.
Please refer to “To adjust the LCD/
EVF BRIGHTNESS or COLOR”
below.
3 Start recording.
• Using the LCD monitor will reduce battery
operating time.
• Close the LCD monitor completely when
not in use.
Using the LCD Monitor
1LCD-OPEN
Note
180°
90°
90°
Camera Recording
To adjust the LCD/EVF
BRIGHTNESS or COLOR
1Press MENU to display the main menu
screen.
2 Rotate JOG KEY to select LCD/EVF
SETTING from the main menu screen.
(Menu OSD: pp. 105, 107)
3 Press JOG KEY to display the LCD/
EVF SETTING screen.
4 Press JOG KEY to select LCD
BRIGHTNESS, LCD COLOR, or
EVF BRIGHTNESS, then rotate JOG
KEY to adjust.
5 Press MENU twice to exit this mode.
1, 5
MENU
2, 3, 4
JOG KEY
EVF/LCD
DV102.p 17-21.p65 02/03/05, 12:5618

19
Camera
Camera Recording
1 Set POWER to CAMERA.
2 Press MENU to display the CAMERA
mode menu screen.
3 Rotate JOG KEY to select
D.FUNCTION , and press JOG KEY
to display the CAMERA FUNCTION
menu screen.
4 Rotate JOG KEY to select
PROGRESSIVE , and press JOG
KEY to select ON or OFF.
• Press MENU twice to exit.
•“P” will appear in the EVF or the
LCD monitor.
5 Press PHOTOSHOT in Record/Pause
mode.
Use this feature to record a seven second
(approx.) still image from the current camera
picture. Audio is also recorded for on-thespot narration. Or, you can add narration
later with the Audio Dubbing feature to make
an interesting slide show, etc. (p. 43)
1 Set POWER to CAMERA.
2 Press PHOTOSHOT in Record/Pause
mode. “PHOTO” will appear in the
EVF or the LCD monitor.
• If SHUTTER on the menu screen is set to
ON, a sound effect similar to the shutter
of a film camera will be heard when
PHOTOSHOT is pressed.
• When PHOTOSHOT is pressed, the
playback image takes approx. 7 seconds
to process. After that, the Camera mode
screen will be displayed.
Digital PhotoShot™ Mode
With the progressive PhotoShot Function,
you can record still pictures with higher
resolution than with the normal PhotoShot
Function.
Progressive PhotoShot™
Mode
• This Function may not work with some
function settings.
Note
Note
1POWER
1POWER
2MENU
3, 4
JOG KEY
5
PHOTOSHOT
EVF/LCD
EVF/LCD
2PHOTOSHOT
DV102.p 17-21.p65 02/03/05, 12:5619

20
For assistance, please call : 1-800-211-PANA(7262) or send e-mail to : consumerproducts@panasonic.com
Zoom
You can gradually zoom in for close ups or
zoom out for wide angle shots.
• The zooming speed ranges from a slow
17 seconds to a fast 1.5 seconds
according to the amount of pressure
applied to the POWER ZOOM.
1 Set POWER to CAMERA.
2 Zoom slowly:
by lightly pressing the “T” (Telephoto)
or the “W” (Wide Angle) side of the
POWER ZOOM.
Zoom quickly:
by applying more pressure.
3 Start recording.
Note
2POWER
ZOOM
Camera Recording
Zoom Microphone Function
1Set POWER to CAMERA.
2 Press MENU to display the CAMERA
mode menu screen.
3 Rotate JOG KEY to select REC
MODE , then press JOG KEY to
display the CAMERA REC-MODE
menu screen.
4 Rotate JOG KEY to select ZOOM-MIC
in the CAMERA REC-MODE menu.
(Menu OSD: p. 104)
5 Press JOG KEY to select ON.
• Press MENU twice to exit.
•“Z.MIC” will appear on the screen.
• The Zoom Microphone Function may not
work effectively if the surrounding noise is
too loud.
Note
Along with the zooming operation, the
microphone’s directional angle and
sensitivity are varied for recording sounds.
3REC/PAUSE
1POWER
1POWER
2MENU
3, 4, 5
JOG KEY
DV102.p 17-21.p65 02/03/05, 12:5620
21
Camera
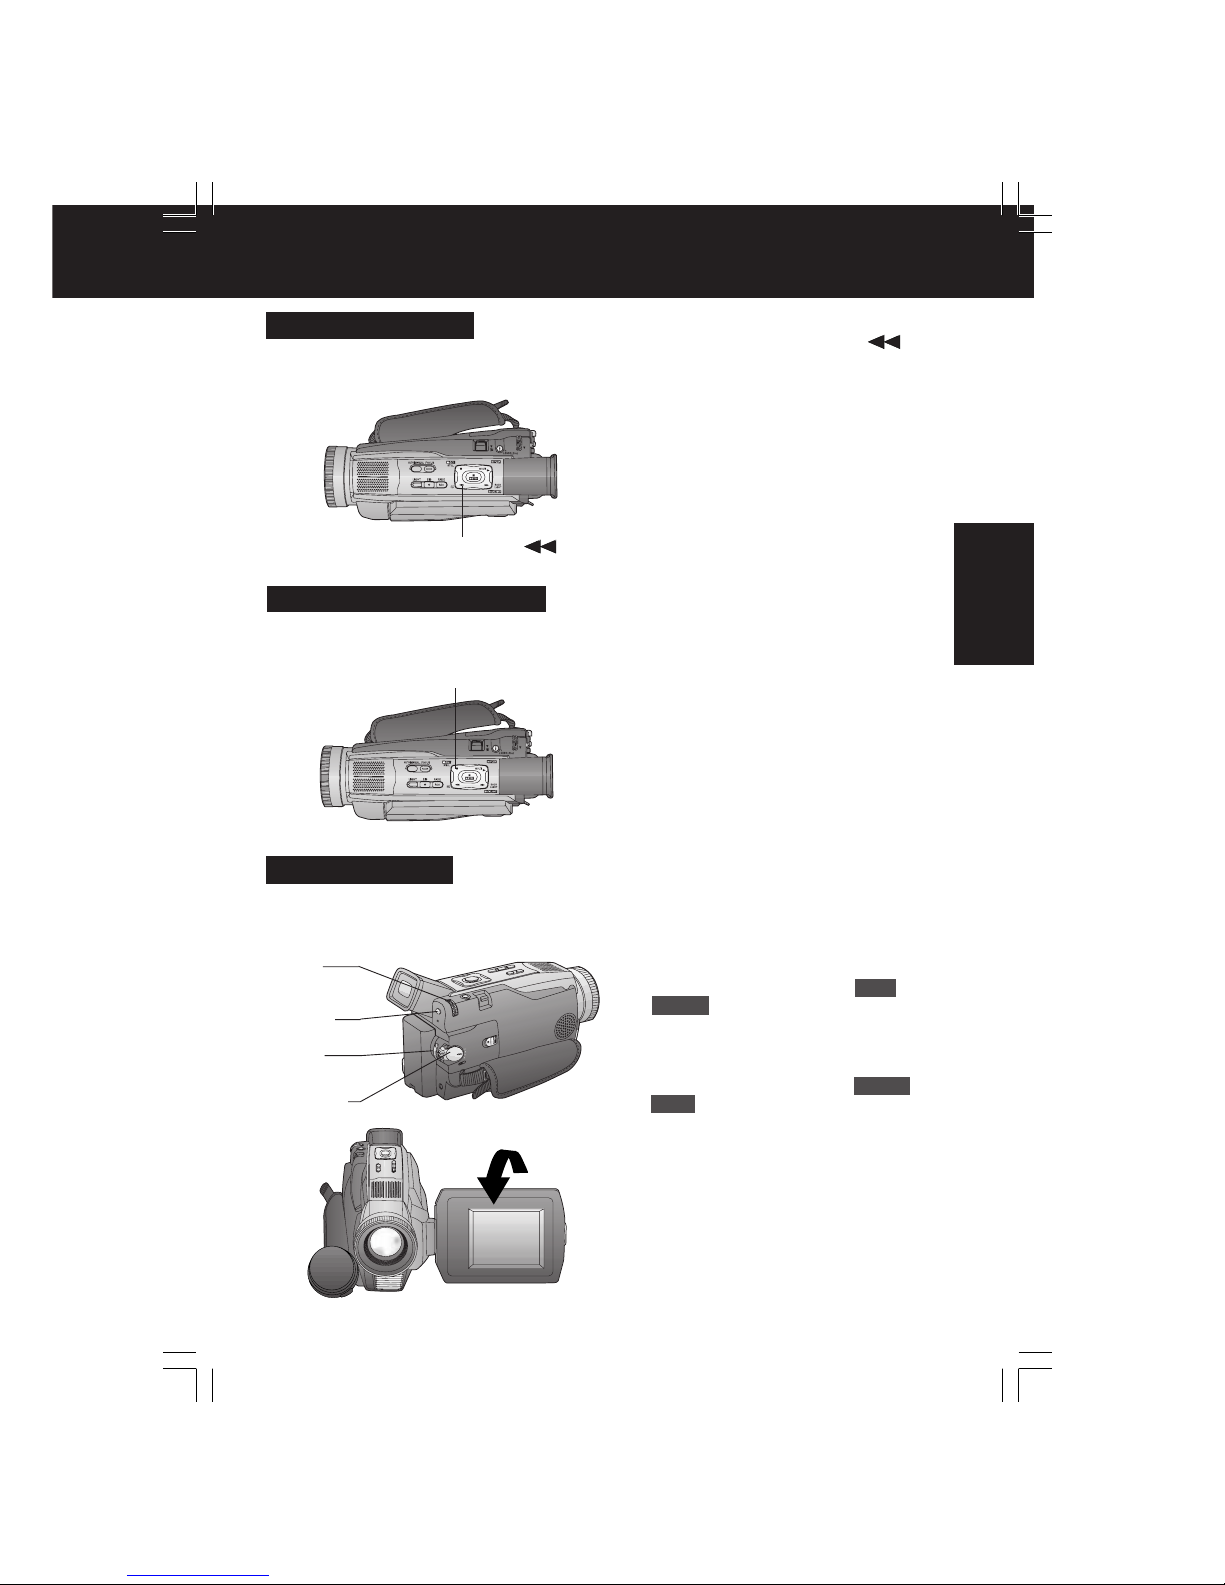
Self Recording
180°
Camera Recording
1Press RECORDING CHECK
briefly in the REC/PAUSE mode.
The [CHK] indication appears.
After checking, the Palmcorder returns
to the REC/PAUSE mode.
• For Recording Check, the Palmcorder
must be in the same mode (SP or LP) as
was used for recording, otherwise the
playback picture is distorted.
Recording Check
To playback the final few seconds of the
last recorded scene in the REC/PAUSE
mode.
1RECORDING CHECK
1, 2STILL
You can record still pictures of any desired
duration together with sound.
Recording Still Pictures
1 While in RECORD mode, press STILL
and hold for 2 seconds to capture a
still picture. The captured still picture
will be recorded together with sound.
2 Press STILL once again to release
the still picture. The camera will
resume recording real-time pictures.
Rotate the LCD monitor 180 degrees so it
faces the same direction as the lens to
record yourself.
1 Set POWER to CAMERA.
2 Press MENU to display the CAMERA
mode menu screen.
3 Rotate JOG KEY to select REC
MODE , then press JOG KEY to
display the CAMERA REC-MODE
menu screen.
4 Rotate JOG KEY to select SELF-
REC , and then press JOG KEY to
select MIRROR.
• The picture in the LCD monitor will
appear reversed.
5 Start recording.
1POWER
2MENU
3, 4
JOG KEY
5REC/
PAUSE
DV102.p 17-21.p65 02/03/05, 12:5621

22
For assistance, please call : 1-800-211-PANA(7262) or send e-mail to : consumerproducts@panasonic.com
CINEMA Mode
1Set POWER to CAMERA.
2Press MENU to display the CAMERA
mode menu screen.
3Rotate JOG KEY to select ADJUST ,
then press JOG KEY to display the
CAMERA ADJUST menu screen.
4Rotate JOG KEY to select CINEMA ,
and then press JOG KEY to select
ON.
• A black strip will appear at the top
and bottom of the picture.
• Press MENU twice to exit.
•“CINEMA” will appear on the screen.
5Start recording.
You can record a picture compatible with a
wide-screen TV equipped with an S2
picture terminal.
Backlight
2, 3BACK LIGHT
• The Indicator “
” will not appear in the
EVF or LCD monitor when OFF is
selected in the DISPLAY menu.
Note
Use when recording a subject that is darker
than the surrounding scene, is in a
shadowed area, or when the light source is
in back of your subject.
3, 4
JOG KEY
5REC/PAUSE
1POWER
EVF/LCD
2MENU
1 Set POWER to CAMERA.
2 Press BACK LIGHT to activate the
Backlight feature.
• The Indicator “
” will appear in the
EVF or LCD monitor.
3 Press BACK LIGHT again to cancel
the Backlight feature.
EVF/LCD
1POWER
Special Effect Features
DV102.p 22-26.p65 02/03/05, 12:5622

23
Camera
Special Effect Features
SPORTS mode
• The recorded images will not be so blurred
when they are viewed later using slow or
still picture playback.
• When playing back a sports mode
recording, the movement may appear
slightly jerky.
• Do not use this mode when recording
under fluorescent, mercury, or sodium
lighting. These types of lights will affect
the color and brightness of the images.
• A vertical band of light might appear when
recording objects that are brightly
illuminated or highly reflective.
• If the amount of light is insufficient, the
SPORTS “
” indicator will flash in the
EVF or the LCD monitor.
• The image may flicker if this mode is
used indoors.
PORTRAIT mode
• The image may flicker if this mode is
used indoors.
LOW-LIGHT mode
• Scenes recorded in extremely low light
levels may not come out properly.
SPOT-LIGHT mode
• If the recorded subject is extremely bright,
the picture may appear whitish.
SURF&SNOW mode
• If the recorded subject is extremely bright,
the picture may appear whitish.
• It is not possible to select the SPORTS
mode or PORTRAIT mode together with
the MagicPix mode in the Digital function
camera menu.
Program AE
3MENU
The Auto Exposure feature can be used to
make quality recordings in a variety of
scene situations.
Note
1 Set POWER to CAMERA.
2 Hold down AUTO/MANUAL for more
than 0.7 seconds so that the “MNL”
indication appears in the EVF or the
LCD monitor.
3 Press MENU to display the menu
screen.
4 Rotate JOG KEY to select ADJUST ,
and then press JOG KEY to display
the CAMERA ADJUST menu screen.
5 Rotate JOG KEY to select
PROG.AE , then press JOG KEY
repeatedly to select one of the five
modes shown below.
6 Repeat steps 2~5 to select OFF to
cancel this feature.
1POWER
For recording fast action scenes.
For recording only subjects in the
foreground, while ignoring
subjects in the background.
For recording in extreme low light
conditions.
Recording in situations where
subjects are under a spotlight(s).
For recording in locations with a
high degree of “Dazzle,” such as
snow slopes and the seashore.
Mode
Indication
(No display)
SPORTS
PORTRAIT
LOW-LIGHT
SPOT-LIGHT
SURF&SNOW
4, 5
JOG KEY
2AUTO/MANUAL
DV102.p 22-26.p65 02/03/05, 12:5623
24
For assistance, please call : 1-800-211-PANA(7262) or send e-mail to : consumerproducts@panasonic.com
Special Effect Features
1, 3, AFADE
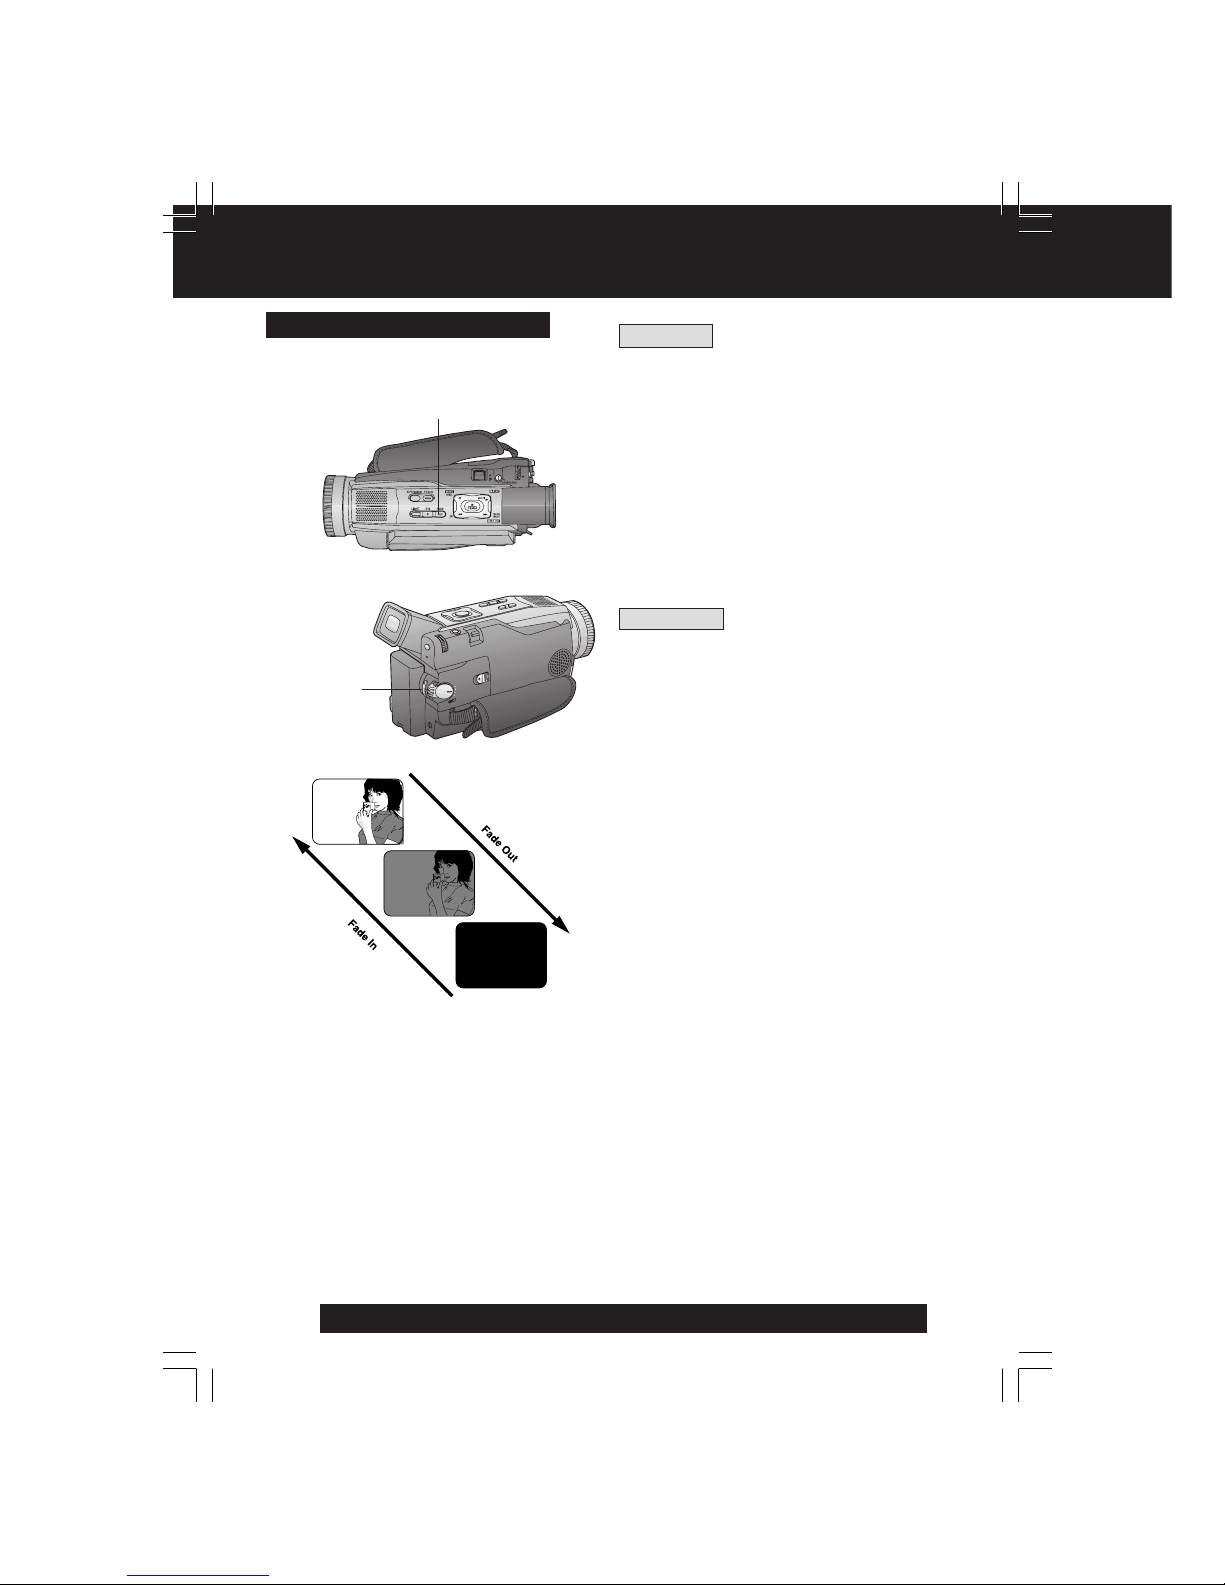
Audio/Video Fade In/Out
2, BREC/
PAUSE
Fade In
Starting the first scene with “fade in” is very
effective.
1 In REC/PAUSE mode, hold down
FADE until the picture fades out.
2 Press REC/PAUSE to start
recording.
3 Release FADE and the picture will
gradually fade in.
Fade Out
Use to create a soft ending or (together
with fade in) for a soft transition from one
scene to the next.
ADuring recording, hold down FADE
until the picture fades out.
BPress REC/PAUSE to pause the
recording.
You can make smoother scene transitions
for a more professional look.
DV102.p 22-26.p65 02/03/05, 12:5624
25
Camera
Special Effect Features
3, 4JOG
KEY
1POWER
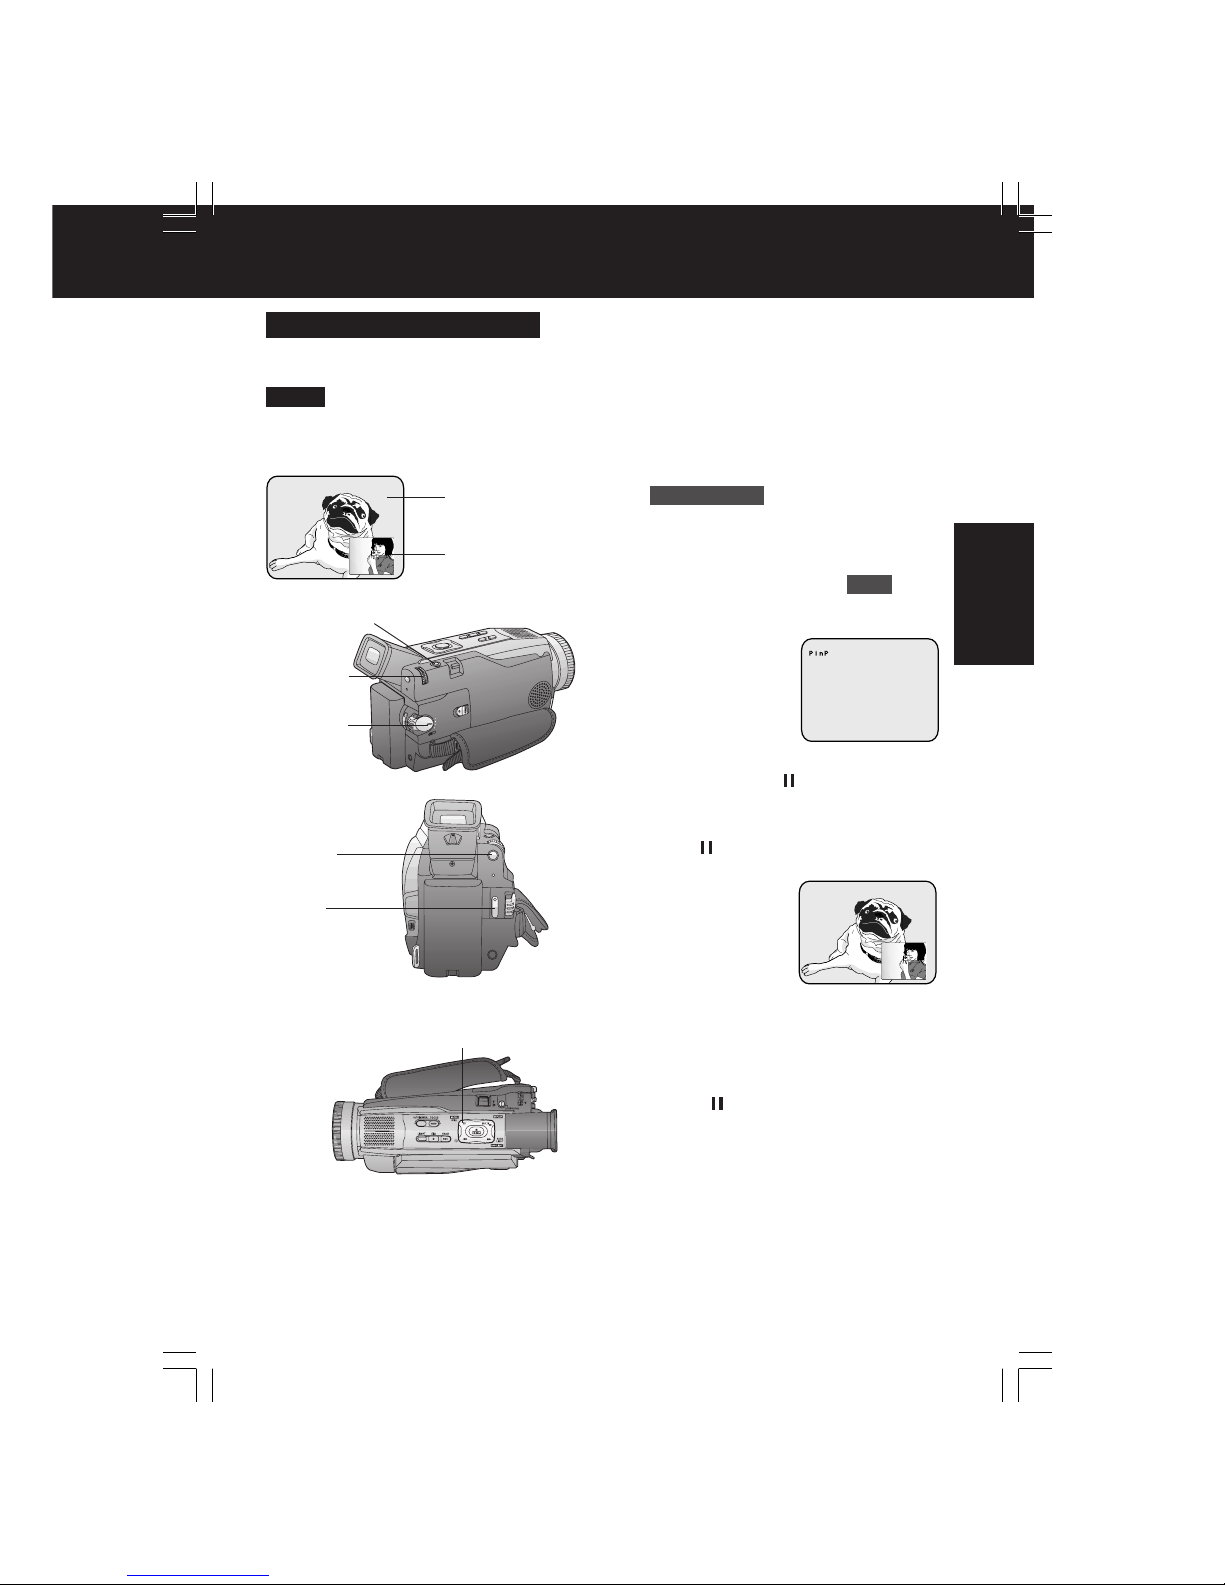
Picture in Picture (PinP)
You can display a PinP (still image) screen
on the Main Picture.
• PinP position is fixed at the bottom right
of the screen.
Note
1 Set POWER to CAMERA.
2 Press MENU to display the menu
screen.
3 Rotate JOG KEY repeatedly to select
D.FUNCTION , then press JOG KEY
to display the CAMERA FUNCTION
menu screen.
4 Press JOG KEY to select PinP .
• Press MENU twice to exit this menu.
•“PinP” will appear in the EVF or the
LCD monitor.
5 Aim at the scene you wish to place as
PinP, then press (CAMERA STILL)
to freeze the image.
6 Press (CAMERA STILL) again to
place the frozen image as PinP.
7 Press REC/PAUSE to record a scene
with PinP image.
• Press PHOTOSHOT to record a
scene with PinP image in PhotoShot
mode.
• Press (CAMERA STILL) again to
remove PinP image.
Main Picture
Picture in Picture
(PinP still image)
5, 6, 7
CAMERA STILL
PHOTOSHOT
7REC/
PAUSE
2MENU
DV102.p 22-26.p65 02/03/05, 12:5625

26
For assistance, please call : 1-800-211-PANA(7262) or send e-mail to : consumerproducts@panasonic.com
1Set POWER to CAMERA.
2Press MENU to display the CAMERA
menu screen. Then rotate and press
JOG KEY to select PHOTO TITLE .
3Rotate and press JOG KEY to select
and set MODE and then TITLE .
1st : Select and set MODE (WIPE or
MIX).
2nd : Select and set TITLE to “SET”.
•“PLEASE WAIT” appears on-screen.
• The Multi image screen is displayed.
4Rotate and press JOG KEY to select
and set an image.
•“PLEASE WAIT” is displayed while
image is processed. Then, “PHOTO
TITLE SET” is displayed for approx.
3 seconds, and the screen goes back
to the Camera mode screen.
• After Photo Title is performed, Digital
Function turns off.
5Press REC/PAUSE to start recording
with Photo Title.
• WIPE or MIX screen is displayed at
the beginning of the recording. Then
the Photo Title setting will be cleared
automatically.
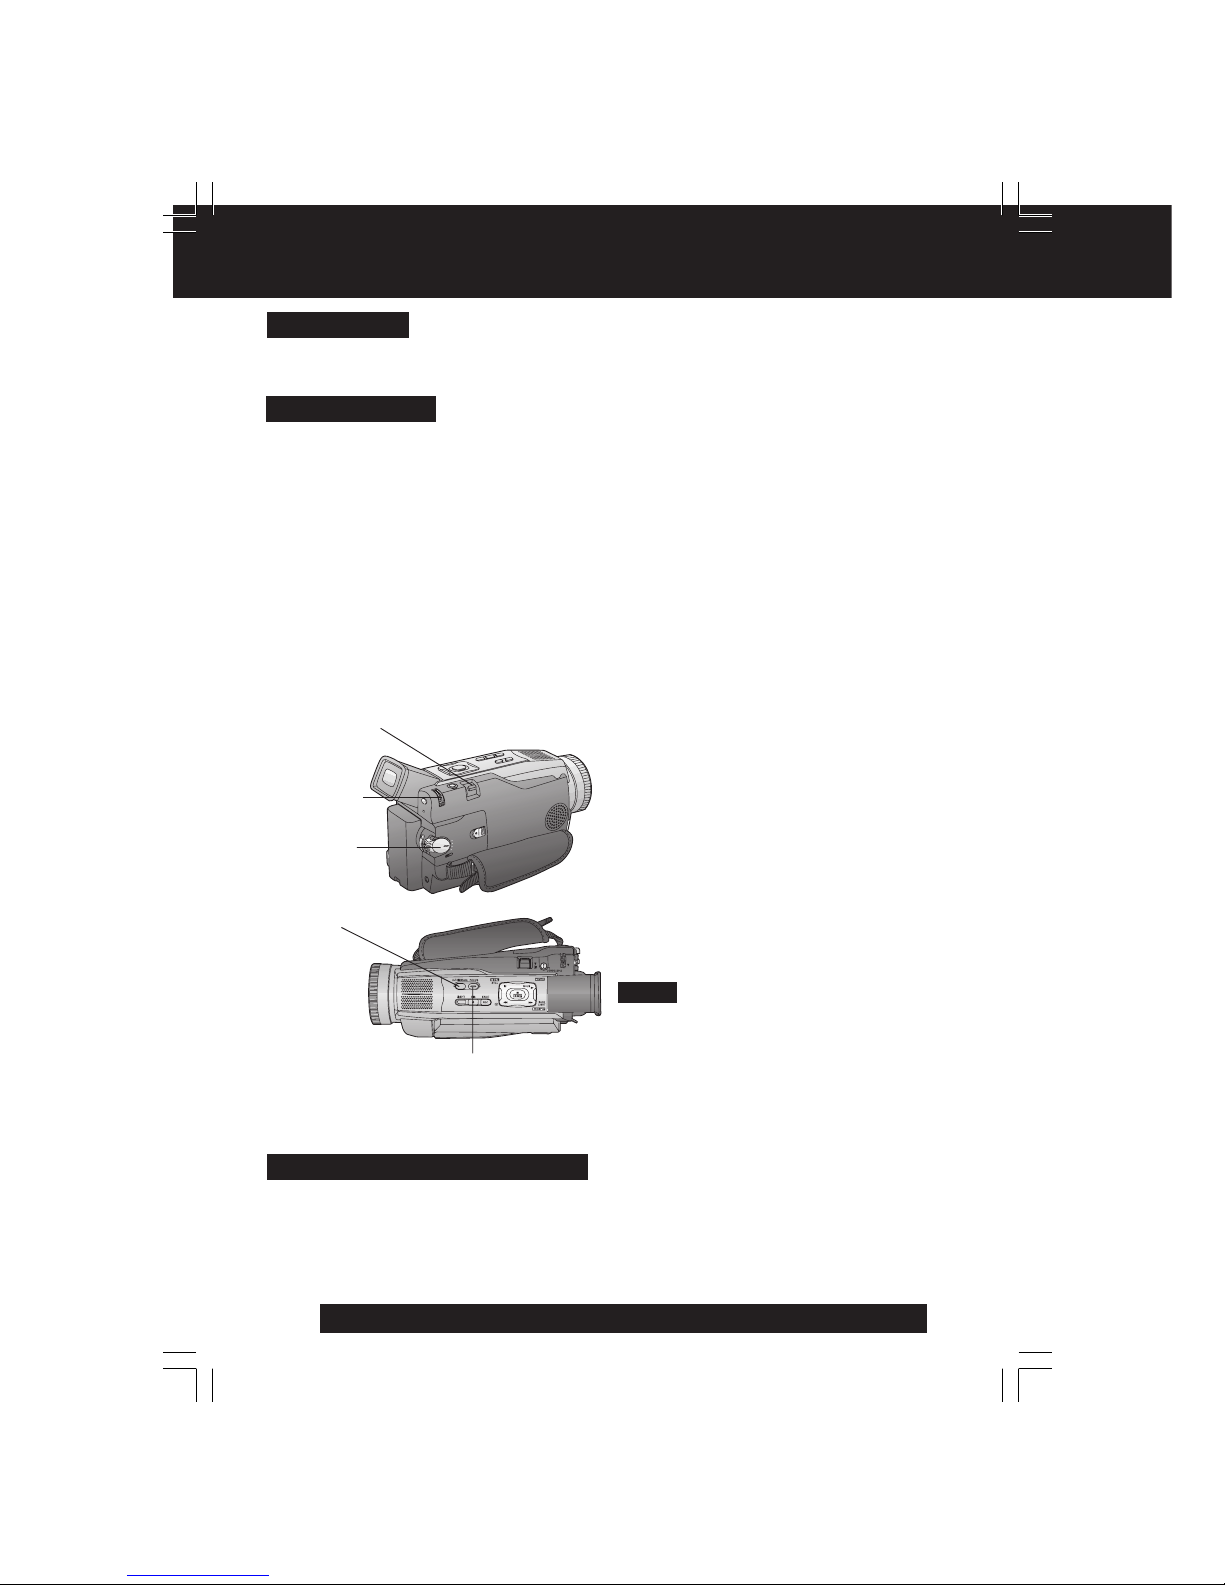
You can use PhotoShot images stored on a
Memory Card to record a WIPE or MIX
effect on a cassette.
When Photo Title is set to ON, the selected
image and Title will appear before each
recording is made.
WIPE : The Photo title is replaced with the
current scene in a wiping motion.
MIX : The photo title is replaced with the
current scene in a gradual mixing
effect.
1POWER
2, 3, 4
JOG KEY
Note
Before you begin
• Connect the Palmcorder to a power
source. (pp. 13, 14)
• Set POWER to OFF before inserting a
recorded Memory Card. (pp. 47, 48)
Photo Title
5REC/
PAUSE
2MENU
Special Effect Features
DV102.p 22-26.p65 02/03/05, 12:5626

27
Camera
Advanced Settings
1 Set POWER to CAMERA.
2 Hold down AUTO/MANUAL for more
than 0.7 seconds so that the “MNL”
indication appears in the EVF or the
LCD monitor.
3 Press JOG KEY repeatedly until
“AWB” appears in the EVF or LCD
monitor.
4 Rotate JOG KEY to select other
modes. (See mode chart at left.)
• Hold down AUTO/MANUAL for more
than 0.7 seconds to cancel the
setting.
Mode
AWB
*
3, 4, A, B
JOG KEY
White Balance
Auto White Balance (“AWB”) automatically
maintains optimum color balance in most
lighting conditions. However, when using
Digital Functions, etc., you may get better
results by using the manual adjustment.
1POWER
Description
Automatically maintains optimum
color balance in most lighting
conditions.
When the source illumination is a
halogen lamp.
When shooting outdoors on a
sunny day.
The White Balance setting that
was previously set manually.
* For manual White Balance
adjustment:
A. Rotate JOG KEY to select “ ” .
B. Point the Palmcorder at a white
object (full-screen) and hold JOG
KEY down until “
” indication stops
flashing.
• If “ ” indication flashes when the
Palmcorder is turned on, the previous
manual White Balance setting is in
effect.
In the following cases, the “
”
indication flashes:
• The flashing indicates that the
previously adjusted White Balance
setting is still kept. This setting will be
kept until White Balance is adjusted
again.
• Correct White Balance may not be
attainable manually in poor lighting.
• When ZOOM is set to 10X or higher,
White Balance cannot be adjusted.
Note
2AUTO/MANUAL
DV102.p 27-30.p65 02/03/05, 12:5627
28
For assistance, please call : 1-800-211-PANA(7262) or send e-mail to : consumerproducts@panasonic.com
Advanced Settings
Use Manual Focus (MF) when recording ...
• a subject through glass.
• a scene where the subject is far from the
Palmcorder and there are objects in the
foreground.
• a subject with distinct horizontal stripes.
• a subject not centered in the Viewfinder.
• subjects with shiny surfaces.
• an obliquely angled subject.
• a bright, flat subject such as a white wall.
• in low light situations.
• a scene with fast motions, like a golf swing.
Re-focusing may be required
• when your Palmcorder is aimed at a new
scene.
1 Set POWER to CAMERA.
2 Hold down AUTO/MANUAL for more
than 0.7 seconds so that the “MNL”
indication appears in the EVF or the
LCD monitor.
3 Press FOCUS so that the “MF”
(Manual Focus) indication appears in
the EVF or the LCD monitor.
4 Press and hold POWER ZOOM, “T”
side (Telephoto), until the lens is at
maximum zoom in.
5 Turn M.FOCUS DIAL until the picture
is in focus.
• It may be necessary to back away
from the subject to focus the image
properly.
6 Press POWER ZOOM to “W” or “T”
as desired.
• The subject will remain in focus over
the entire zooming range.
• It may be necessary to back away
from the subject to focus the image
properly.
Macro Focus (for close-ups)
Auto Focus
Manual Focus
4, 6POWER
ZOOM
Press the “W” side of POWER ZOOM to the maximum wide angle position.
Auto Focus will function with the subject as close as 25 mm (1 inch) in front of the lens.
1POWER
5M.FOCUS
DIAL
• DISPLAY must be set to on for MF, AE,
W.BALANCE, or BACK LIGHT to be
displayed on the LCD or EVF.
Note
The Palmcorder automatically adjusts the focus over the entire zoom range.
2AUTO/
MANUAL
3FOCUS
DV102.p 27-30.p65 02/03/05, 12:5728
29
Camera
Advanced Settings
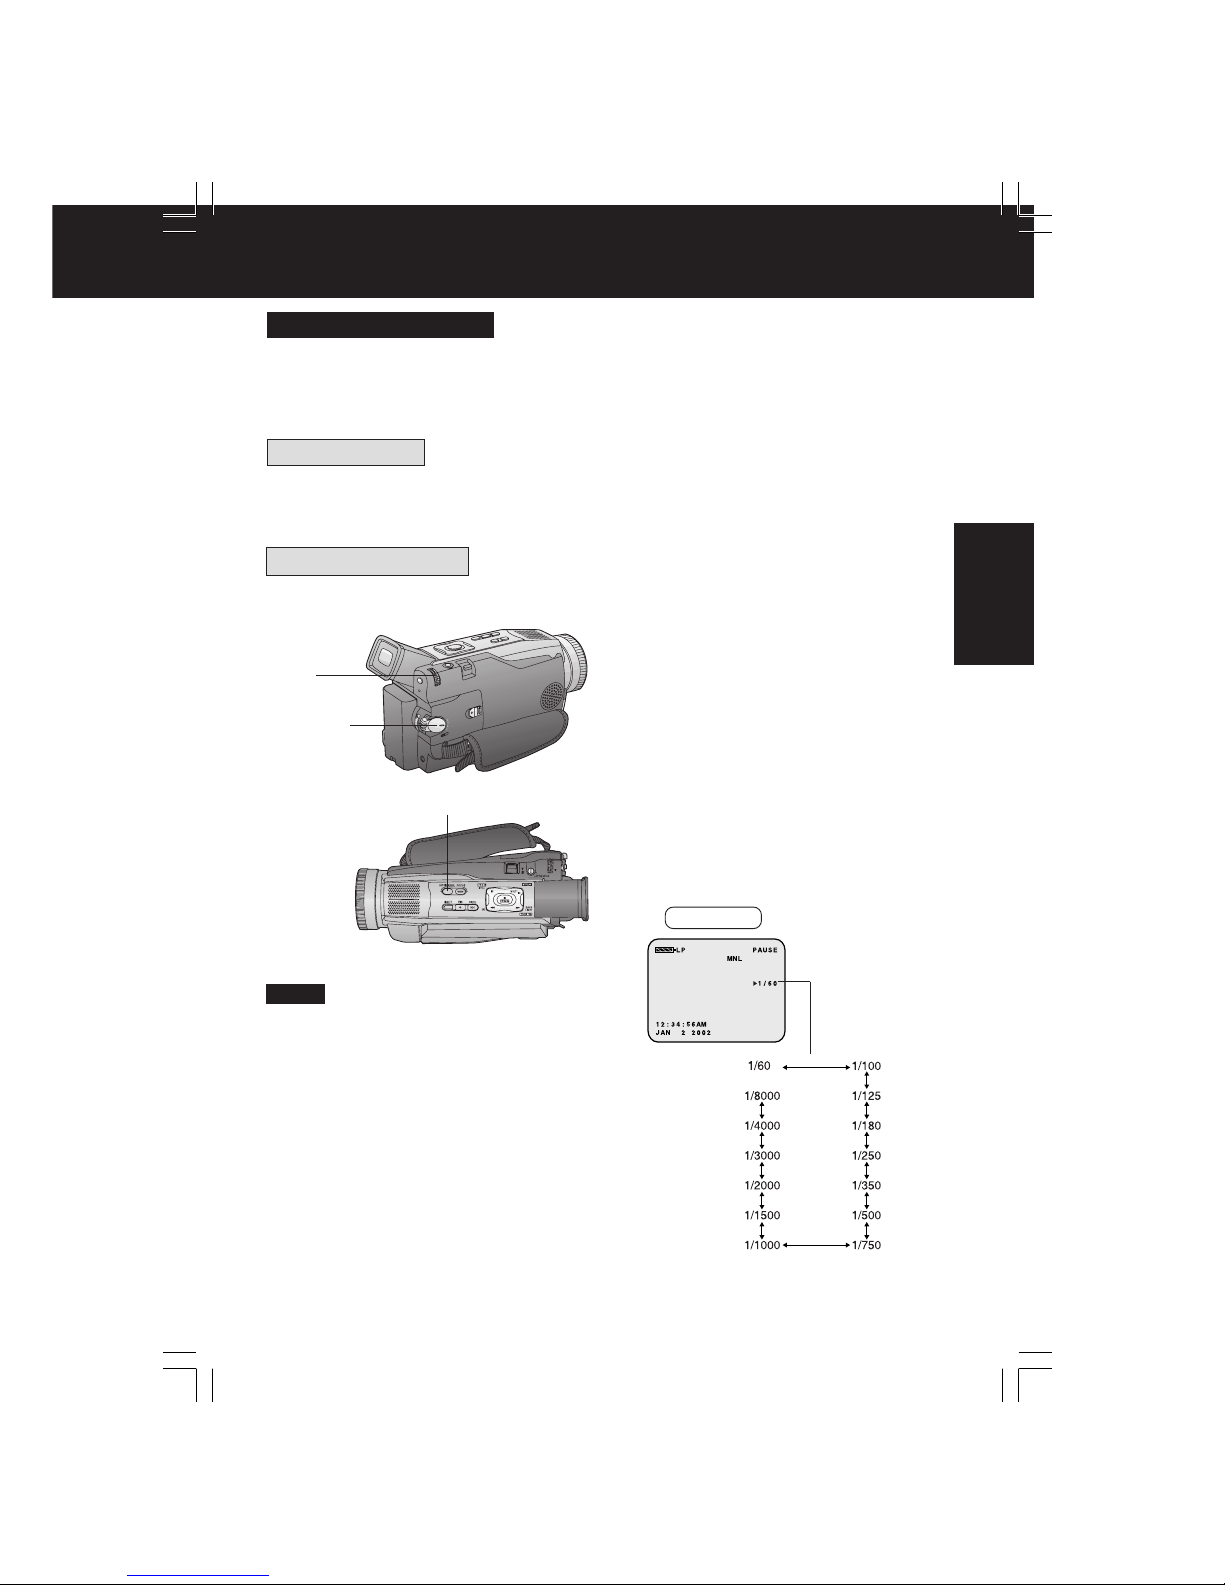
High Speed Shutter
Auto Shutter
Manual Selection
3, 4
JOG KEY
To record high speed motion (e.g. tennis
stroke) with improved STILL or SLOW
MOTION playback when watching the tape
on this Palmcorder.
In the AUTO mode (no indication in the EVF and LCD monitor), the Palmcorder will
automatically adjust the shutter speed (up to 1/350).
• AUTO mode is automatically selected whenever the POWER Switch is set to CAMERA.
1 Set POWER to CAMERA.
2 Hold down AUTO/MANUAL for more
than 0.7 seconds so that the “MNL”
indication appears in the EVF or the
LCD monitor.
3 Press JOG KEY repeatedly to display
the shutter speed.
4 Rotate JOG KEY to choose one of the
following shutter speeds.
• Hold down AUTO/MANUAL for more
than 0.7 seconds to cancel the
setting.
• For proper color reproduction, it is
recommended that you use this feature
outdoors. For indoor High Speed Shutter
recording, additional halogen or tungsten
light should be provided. Fluorescent light
will degrade the picture quality.
• This feature requires ample light. More
light is required for the fastest shutter
speeds.
• The Auto Focus system may not operate
properly in insufficient light when using
the High Speed Shutter.
• When PROG.AE is ON, you cannot
manually select the shutter speed.
• When MagicPix is ON, H.S.S. cannot
manually select the shutter speed.
Note
2AUTO/MANUAL
1POWER
EVF/LCD
DV102.p 27-30.p65 02/03/05, 12:5729

30
For assistance, please call : 1-800-211-PANA(7262) or send e-mail to : consumerproducts@panasonic.com
Advanced Settings
Adjusting the Iris Manually
Normally, the Palmcorder adjusts the
exposure automatically. However, when
the background is extremely bright, or
when the subject is backlit, you can
compensate by adjusting the Iris manually.
1 Set POWER to CAMERA.
2 Hold down AUTO/MANUAL for more
than 0.7 seconds so that the “MNL”
indication appears in the EVF or the
LCD monitor.
3 Press JOG KEY repeatedly so that
Iris setting indication appears in the
EVF or the LCD monitor.
4 Rotate JOG KEY to adjust the iris;
• When a value closer to “CLOSE” is
selected, the image becomes darker.
• When a value closer to “OP+18dB” is
selected, the image becomes
brighter.
• Hold down AUTO/MANUAL for more
than 0.7 seconds to cancel the
setting.
• The value to which +dB is attached
indicates a gain value. If this value is too
large, the quality of the image
deteriorates.
• Depending on ZOOM magnification, the
iris value may not be displayed correctly.
• If you are using Program AE mode, you
cannot adjust the iris. If the iris is adjusted
manually, the above modes will be
canceled.
Note
3, 4
JOG KEY
1POWER
Iris
Setting
WIND-CUT
You can reduce sound distortion caused by
wind hitting the microphone.
1 Set POWER to CAMERA.
2 Press MENU to display the CAMERA
mode menu screen.
3 Rotate JOG KEY to select REC
MODE , then press JOG KEY to
display the CAMERA REC-MODE
menu screen.
4 Rotate JOG KEY to select WIND-
CUT , and then press JOG KEY to
select ON.
• Press MENU twice to exit.
•“WIND-CUT” will appear in the
EVF or LCD monitor.
5 Start recording.
3, 4
JOG KEY
5REC/PAUSE
1POWER
2MENU
2AUTO/MANUAL
EVF/LCD
DV102.p 27-30.p65 02/03/05, 12:5730
 Loading...