

Page 1
Operating Instructions
Air Conditioner
Model No.
Indoor Unit Outdoor Unit
CS-E28QKES CU-E28QKE
Operating Instructions
Air Conditioner
Thank you for purchasing Panasonic Air Conditioner.
Installation instructions attached.
Before operating the unit, read these operating
instructions thoroughly and keep them for future
reference.
Comment utiliser l’appareil
Climatiseur
Nous vous remercions d’avoir porté votre choix sur un
climatiseur Panasonic.
Instructions d’installation jointes.
Avant d’utiliser l’appareil, lisez ce mode d’emploi dans
son intégralité et conservez-le pour toute référence
ultérieure.
Instrucciones de funcionamiento
Climatizador de aire
Muchas gracias por elegir una unidad de aire
acondicionado Panasonic.
Incluye instrucciones de instalación.
Antes de utilizar la unidad, sírvase leer atentamente
estas instrucciones de funcionamiento y conservarlas
como futuro elemento de consulta.
Bedienungsanleitung
Klimagerät
Wir danken Ihnen für den Kauf Ihres PanasonicKlimageräts.
Die Montageanleitung liegt dem Gerät bei.
Bevor Sie das Gerät in Betrieb nehmen, lesen Sie bitte
diese Bedienungsanleitung aufmerksam durch und
bewahren Sie sie für die künftige Verwendung auf.
Istruzioni di funzionamento
Condizionatore d’aria
Grazie per aver acquistato un climatizzatore Panasonic.
Istruzioni d’installazione allegate.
Prima di utilizzare l’unità si prega di leggere
attentamente le istruzioni e di conservare questo
opuscolo per potervi fare riferimento in futuro.
2-11
12-21
22-31
32-41
42-51
Handleiding
Airconditioner
Hartelijk dank voor de aanschaf van de
Panasonicairconditioner.
Installatie-instructies bijgevoegd.
Lees voor u het apparaat gebruikt deze
gebruiksinstructies grondig en bewaar ze voor
toekomstig gebruik.
52-61
Nederlands Italiano Deutsch Español Français English
F569455
Page 2

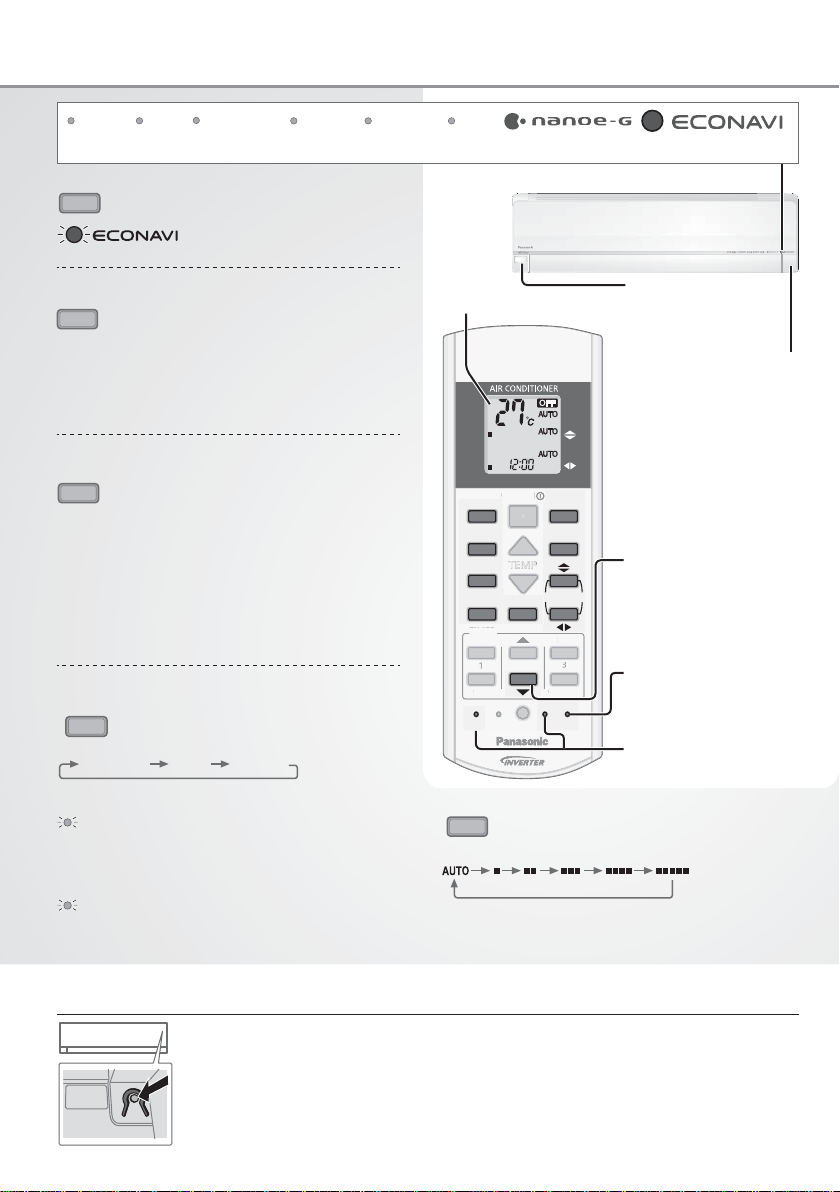
Provide maximum comfort,
clean air and optimise energy saving
ECONAVI and AUTO COMFORT
Equipped with the human activity sensor, the air conditioner ensures to deliver cool or warm air to you,
and keeps the room consistently comfortable with minimum energy consumption.
Furthermore, the sunlight sensor detects the sunlight intensity and helps control heating/cooling
temperatures to provide optimum comfort.
See “To learn more” for details.
nanoe-G
Deactivates harmful micro-organisms such as viruses, bacteria, etc. to keep air clean.
It also deactivates viruses and bacteria on the fi lter to keep inside of the unit clean.
2
Page 3

Quick guide
TIMER
CANCEL
ON
O
1
3
S
CK
RES
AC
RC
AUTOCOMFO
Q
TIMER
S
CANCEL
ON
O
1
2
3
G
F
D
MILD DRY
G
S
K
RES
AC
RC
MILD
DRY
FAN
S
D
AIR
S
G
AUTO
HEAT
OOL
DRY
I
NANOE-G
3
1
2
3
1
1
TIMER
ON
1
OFF
FF
SET CHECK CLOCK RESET
ETCHE
AUTO
HEAT
C
COOL
DRY
MILD
DRY
OFF/ON
ECONAVI
ECONAV
MODE
MILD DRY
COOLIN
COOLING
POWERFUL/
POWERFUL/
FAN SPEED
UIET
QUIET
TIMER
ON
1
OFF
FF
SET CHECK CLOCK RESET
ETCHECKCLOC
2 3
2
CANCEL
AC
AUTO
COMFORT
NANOE-G
TEMP
AIR SWING
AIR SWIN
AN SPEE
2
CANCEL
AC
SET
3
RC
ET
SET
ET
3
ET
FAN
SPEED
PEE
AIR
SWING
WIN
RT
RC
2
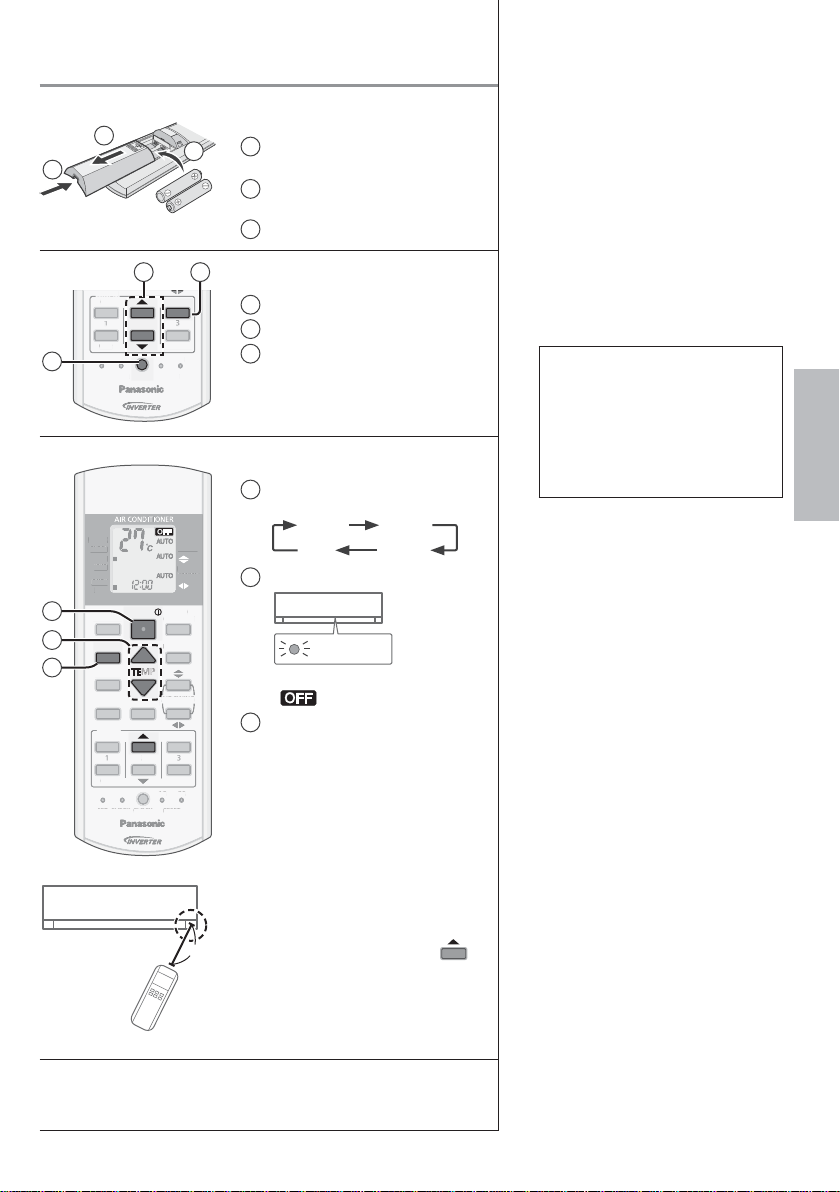
Inserting the batteries
1
Pull out the back cover of
remote control
Insert AAA or R03 batteries
2
(can be used ~ 1 year)
3
Close the cover
Clock setting
1
Press CLOCK
2
Set the time
3
Confi rm
Basic operation
Select the desired mode
1
AUTO HEAT
DRY
Start/stop the operation
2
COOL
POWER
• Please note that the OFF
indication is on to start.
3
Select the desired
temperature
• Selection range:
16 °C ~ 30 °C.
•
Operating the unit within the
recommended temperature
may save energy.
HEAT : 20 °C ~ 24 °C.
COOL: 26 °C ~ 28 °C.
DRY : 1 °C ~ 2 °C lower than
room temperature.
Table of contents
Safety precautions ...................4-5
How to use...............................6-7
To learn more... .......................8-9
Cleaning instructions ................10
Troubleshooting ....................... 11
Information................................62
Accessories
• Remote control
• AAA or R03 batteries × 2
• Remote control holder
• Screws for remote control
holder × 2
English
• To dim or restore the unit’s
indicator brightness, press
8m
and hold for 5 seconds.
• Use remote control within 8 m
from the remote control receiver
of the indoor unit.
The illustrations in this manual are for explanation purposes
only and may differ from the actual unit. They are subject to
change without notice for future improvement.
3
Page 4
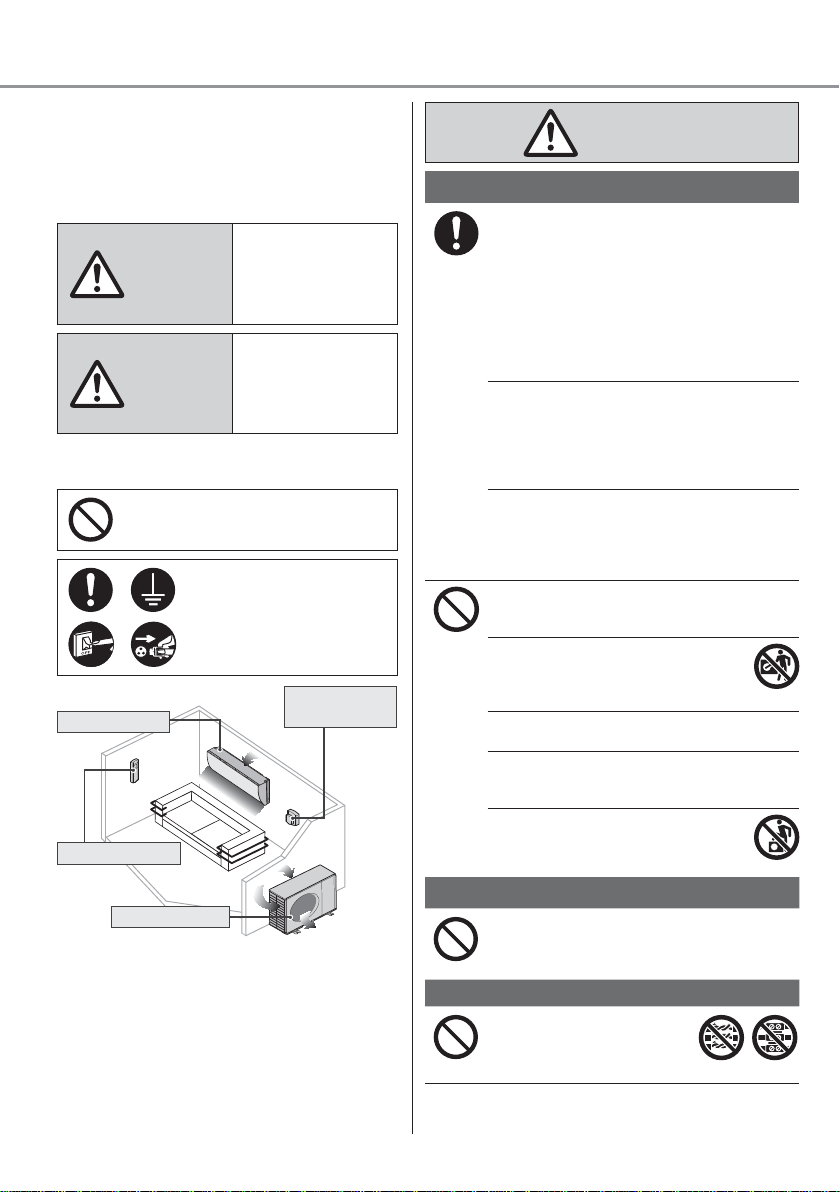
Safety precautions
Air inlet
Air inlet
Air outlet
Air outlet
To prevent personal injury, injury to others
or property damage, please comply with the
following:
Incorrect operation due to failure to follow
instructions below may cause harm or damage,
the seriousness of which is classifi ed as below:
This sign warns of
WARNING
CAUTION
The instructions to be followed are classifi ed by
the following symbols:
Indoor unit
Air outlet
Remote control
Outdoor unit
death or serious
injury.
This sign warns of
injury or damage to
property.
This symbol denotes an
action that is PROHIBITED.
These symbols denote
actions COMPULSORY.
Power supply
Air inlet
Air inlet
Air outlet
WARNING
Indoor unit and outdoor unit
This appliance can be used by children aged
from 8 years and above and persons with
reduced physical, sensory or mental capabilities
or lack of experience and knowledge if they
have been given supervision or instruction
concerning use of the appliance in a safe way
and understand the hazards involved. Children
shall not play with the appliance. Cleaning and
user maintenance shall not be made by children
without supervision.
Please consult authorised dealer or specialist to
clean the internal parts, repair, install, remove
and reinstall the unit. Improper installation and
handling will cause leakage, electric shock or fi re.
Confi rm with authorised dealer or specialist on
usage of any specifi ed refrigerant type.
Using refrigerant type other than the specifi ed
may cause product damage, burst and injury etc.
Do not install the unit in a potentially explosive
or fl ammable atmosphere. Failure to do so could
result in fi re.
Do not insert your fi ngers or other
objects into the air conditioner indoor or
outdoor unit, rotating parts may cause
injury.
Do not touch the outdoor unit during lightning, it
may cause electric shock.
Do not expose yourself directly to cold air for a
long period to avoid excess cooling.
Do not sit or step on the unit, you may
fall down accidentally.
Remote control
Do not allow infants and small children to play
with the remote control to prevent them from
accidentally swallowing the batteries.
Power supply
Do not use a modifi ed cord,
joint cord, extension cord or
unspecifi ed cord to prevent
overheating and fi re.
4
Page 5
To prevent overheating, fi re or electric shock:
•
Do not share the same power outlet with
other equipment.
•
Do not operate with wet hands.
•
Do not over bend the power supply cord.
•
Do not operate or stop the unit by inserting
or pulling out the power plug.
If the supply cord is damaged, it must be
replaced by the manufacturer, service agent
or similarly qualifi ed persons in order to avoid
a hazard.
It is strongly recommended to be installed
with Earth Leakage Circuit Breaker (ELCB)
or Residual Current Device (RCD) to prevent
electric shock or fi re.
To prevent overheating, fi re or electric shock:
•
Insert the power plug properly.
•
Dust on the power plug should be
periodically wiped with a dry cloth.
Stop using the product if any abnormality/
failure occurs and disconnect the power plug
or turn off the power switch and breaker.
(Risk of smoke/fi re/electric shock) Examples
of abnormality/failure
•
The ELCB trips frequently.
•
Burning smell is observed.
•
Abnormal noise or vibration of the unit is
observed.
•
Water leaks from the indoor unit.
•
Power cord or plug becomes abnormally hot.
•
Fan speed cannot be controlled.
•
The unit stops running immediately even if it
is switched on for operation.
•
The fan does not stop even if the operation
is stopped.
Contact your local dealer immediately for
maintenance/repair.
This equipment must be earthed to prevent
electrical shock or fi re.
Prevent electric shock by switching off the
power supply and unplug:
- Before cleaning or servicing,
- When extended non-use, or
- During abnormally strong lightning activity.
CAUTION
Indoor unit and outdoor unit
Do not wash the indoor unit with water,
benzine, thinner or scouring powder to
avoid damage or corrosion at the unit.
Do not use for preservation of precise
equipment, food, animals, plants, artwork
or other objects. This may cause quality
deterioration, etc.
Do not use any combustible equipment
in front of the airfl ow outlet to avoid fi re
propagation.
Do not expose plants or pet directly to airfl ow
to avoid injury, etc.
Do not touch the sharp aluminium
fi n, sharp parts may cause injury.
Do not switch ON the indoor unit when waxing
the fl oor. After waxing, aerate the room
properly before operating the unit.
Do not install the unit in oily and smoky areas
to prevent damage to the unit.
Do not dismantle the unit for cleaning purpose
to avoid injury.
Do not step onto an unstable bench when
cleaning the unit to avoid injury.
Do not place a vase or water container on the
unit. Water may enter the unit and degrade
the insulation. This may cause an electric
shock.
Do not open window or door for long time
during COOL/DRY mode operation.
Prevent water leakage by ensuring drainage
pipe is:
- Connected properly,
- Kept clear of gutters and containers, or
- Not immersed in water
After a long period of use or use with any
combustible equipment, aerate the room
regularly.
After a long period of use, make sure the
installation rack does not deteriorate to
prevent the unit from falling down.
Remote control
Do not use rechargeable (Ni-Cd) batteries. It
may damage the remote control.
To prevent malfunction or damage of the
remote control:
•
Remove the batteries if the unit is not going
to be used for a long period of time.
•
New batteries of the same type must be
inserted following the polarity stated.
Power supply
Do not disconnect the plug by pulling the cord
to prevent electric shock.
English
Safety precautions
5
Page 6
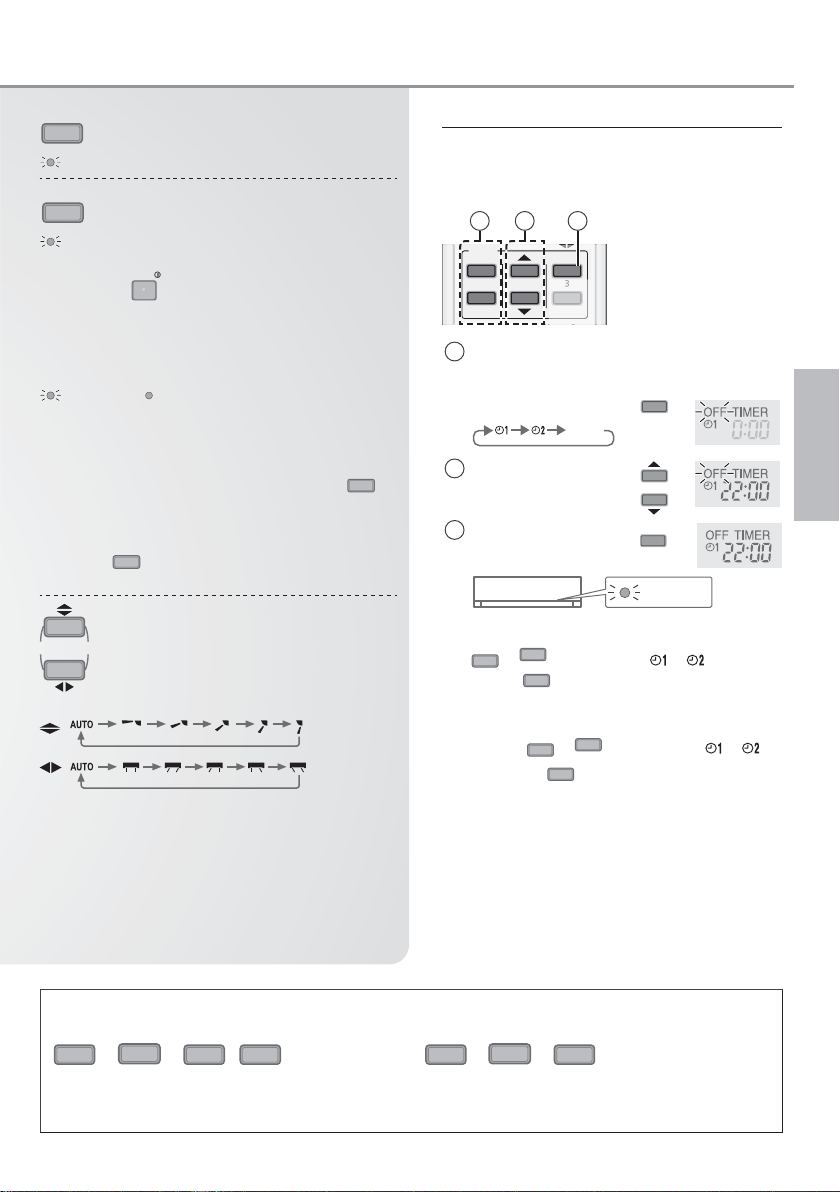
TEMP
OFF/ON
TIMER
S
CANCEL
ON
O
2
3
CHECK
K
How to use
POWER
TIMER
AUTO COMFORT
NANOE-G
POWERFUL
QUIET
(Green) (Green) (Blue) (Orange)(Orange)(Orange) (Green)
ECONAVI
To optimise energy saving
MODE
To select operation mode
AUTO - For your convenience
HEAT - To enjoy warm air
COOL - To enjoy cool air
DRY - To dehumidify the environment
MILD DRY
COOLING
To improve humidity and
moisture level
•
This operation reduces air dryness and provides
you with a comfortable living environment
during COOL mode only.
•
When vertical airfl ow direction is set to AUTO, it
stops at lower position to avoid cold air contact.
However, you can adjust the louver direction
manually.
POWERFUL/
QUIET
To switch between
powerful & quiet
QUIETPOWERFUL NORMAL
Remote control display
AUTO
HEAT
COOL
DRY
MILD
DRY
OFF/ON
ECONAVI
MODE
MILD DRY
COOLING
POWERFUL/
QUIET
TIMER
ON
1
OFF
FF
SET CHECK CLOCK RESET
TEMP
FAN SPEED
2
CLOC
FAN
SPEED
AIR
SWING
AUTO
COMFORT
NANOE-G
AIR SWING
ET
SET
3
CANCEL
AC
RC
Human activity
sensor
Sunlight sensor and
remote control receiver
Press and hold for
approximately
10 seconds to show
temperature setting in
°C or °F.
Press to restore the
remote control to
default setting.
Not used in normal
operations.
Indicator
POWERFUL: To reach temperature quickly
POWERFUL
•
This operation stops automatically after 20
minutes.
QUIET: To enjoy quiet operation
QUIET
• This operation reduces airfl ow noise.
Auto OFF/ON button
Use when remote control is misplaced or a malfunction occurs. Raise the front panel:
1. Press the button once to use in AUTO mode.
2. Press and hold the button until you hear 1 beep, then release to use in forced
AUTO
OFF/ON
COOL mode.
3. Repeat step 2. Press and hold the button until you hear 2 beeps, then release to
use in forced HEAT mode.
• Press the button again to turn off.
6
FAN SPEED
To select fan speed
(Remote control display)
• For AUTO, the indoor fan speed is automatically
adjusted according to the operation mode.
Page 7

TIMER
CANCEL
3
2
See "To learn more..." for details.
A
AUTO
COMFORT
To maximise comfort
AUTO COMFORT
NANOE-G
To purify the air
NANOE-G
• nanoe-G starts automatically when the unit is
turned on with
OFF/ON
.
• Can be activated even when the unit is turned
off. In this condition, the unit will operate as a fan
with AUTO fan speed and louver swing.
To deactivate viruses/bacteria on the fi lter
NANOE-G
• After the unit is turned off, the nanoe-G in-fi lter
deactivation may activate up to 150 minutes.
Turning on the unit cancels this operation.
• To disable this operation in the future, press and
NANOE-G
hold
will not disable the nanoe-G to purify the air.
• To restore the nanoe-G in-fi lter deactivation,
press and hold
heard.
IR SWING
(Remote control display)
• Keeps the room ventilated.
• In COOL/DRY mode, if AUTO is set, the louver
swings left/right and up/down automatically.
• In HEAT mode, if AUTO is set, the horizontal
louver is fi xed at the predetermined position.
The vertical louver swings left/right after the
temperature rises.
• Do not adjust the louver by hand.
POWER
until a short beep sound is heard. This
NANOE-G
until a long beep sound is
To adjust airfl ow direction
To set the timer
2 sets of ON and OFF timers are available
to turn ON or OFF the unit at different preset
times.
21 3
ON
1
OFF
Select ON or OFF
1
timer
• Each time pressed:
Set the time
2
Confi rm
3
SET
3
2
CANCEL
Example:
OFF at 22:00
Cancel
OFF
SET
TIMER
• To cancel ON or OFF timer, press ON or
to select respective or then press
• If timer is cancelled manually or due to power
failure, you can restore the timer again by
pressing ON or
then press
to select respective or
OFF
SET
.
• The nearest timer setting will be displayed and
will activate in sequence.
• When ON Timer is set, the unit may start
earlier (up to 35 minutes) before the actual
set time in order to achieve the desired
temperature on time.
• Timer operation is based on the clock set in
the remote control and repeats daily once set.
For clock setting, please refer to Quick guide.
CANCEL
OFF
.
English
How to use
Note
POWERFUL/
ECONAVI
QUIET
,
• Can be activated in all modes and can be
cancelled by pressing the respective button
again.
AUTO
COMFORT
,
NANOE-G
,
ECONAVI
POWERFUL/
QUIET
,
AUTO
COMFORT
,
• Cannot be selected at the same time.
•
Cannot be activated during MILD DRY COOLING.
7
Page 8

To learn more...
Operation mode
AUTO: During operation mode selection the POWER indicator blinks.
• Unit selects operation mode every 10 minutes according to setting temperature and room temperature.
HEAT: Unit takes a while to warm up. The POWER indicator blinks during this operation.
COOL: Use curtains to screen off sunlight and outdoor heat to reduce power consumption during COOL mode.
DRY : Unit operates at low fan speed to give a gentle cooling operation.
• For system which HEAT mode has been locked, if operation mode other than HEAT is selected, the indoor unit stops
and the POWER indicator blinks.
nanoe-G in-fi lter deactivation
Depending on the unit’s accumulated operation time, nanoe-G in-fi lter deactivation may activate only once a day after
the unit turned off.
To remove the moisture left in the internal parts, the fan will operate for 30 minutes with louver opened slightly. This
process only applicable when the unit is operated in COOL/DRY mode before turned off. Then, nanoe-G deactivates
viruses/bacteria on the fi lter for 2 hours with fan stopped and louver closed.
Do not turn off the power supply during this operation. After power failure, this operation will not resume.
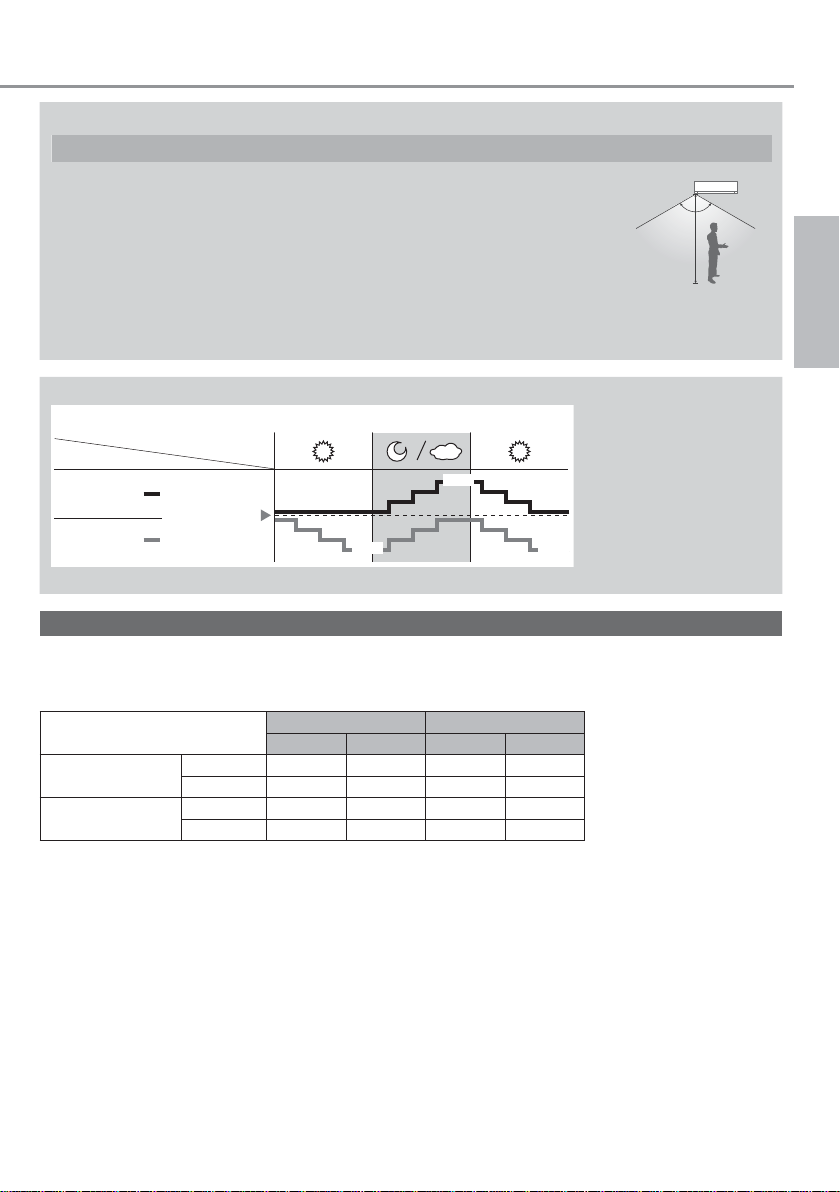
ECONAVI and AUTO COMFORT
ECONAVI
The unit will start to initialise
(for approximately 1 minute)
AUTO
COMFORT
or
Human activity sensor operation
ECONAVI
Mode
COOL/DRY
HEAT
; Detecting human presence and activity, the unit controls room temperature to save energy.
Human
Set
temperature
The human activity sensor
and the sunlight sensor will
start to detect.
Low activity Normal activity
+1 °C
Note
AIRSWING
When manual AIR SWING is selected,
the ECONAVI and AUTO COMFORT
operations will be cancelled.
High activity Absent
+2 °C
-2 °C-2 °C
AUTO COMFORT ; Detecting human presence and activity, the unit controls room temperature to keep human
comfortable consistently.
Mode
COOL/DRY
HEAT
ECONAVI and AUTO COMFORT
Precise control of temperature during low activity to maximise energy saving.
Mode
COOL/DRY
* During low activity, fan speed 1 tap up for first 15 minutes or until set temperature is reached.
** During human absence, maximum fan speed for COOL/DRY mode is medium fan.
Human
Set
temperature
Set
Fan Speed
Human
Set
temperature
Low activity Normal activity
+1 °C
+0.3 °C
+1 tap*
Low activity
ECONAVI and AUTO COMFORT take advantage of
the human nature that human being takes time to feel
the temperature rise during low activity level; the unit
adjusts temperature to maximise energy saving
without sacrificing the comfort.
High activity Absent
-1 °C
-2 °C
+1 tap
8
+2 °C
-2 °C
0HGLXP)DQ
Page 9
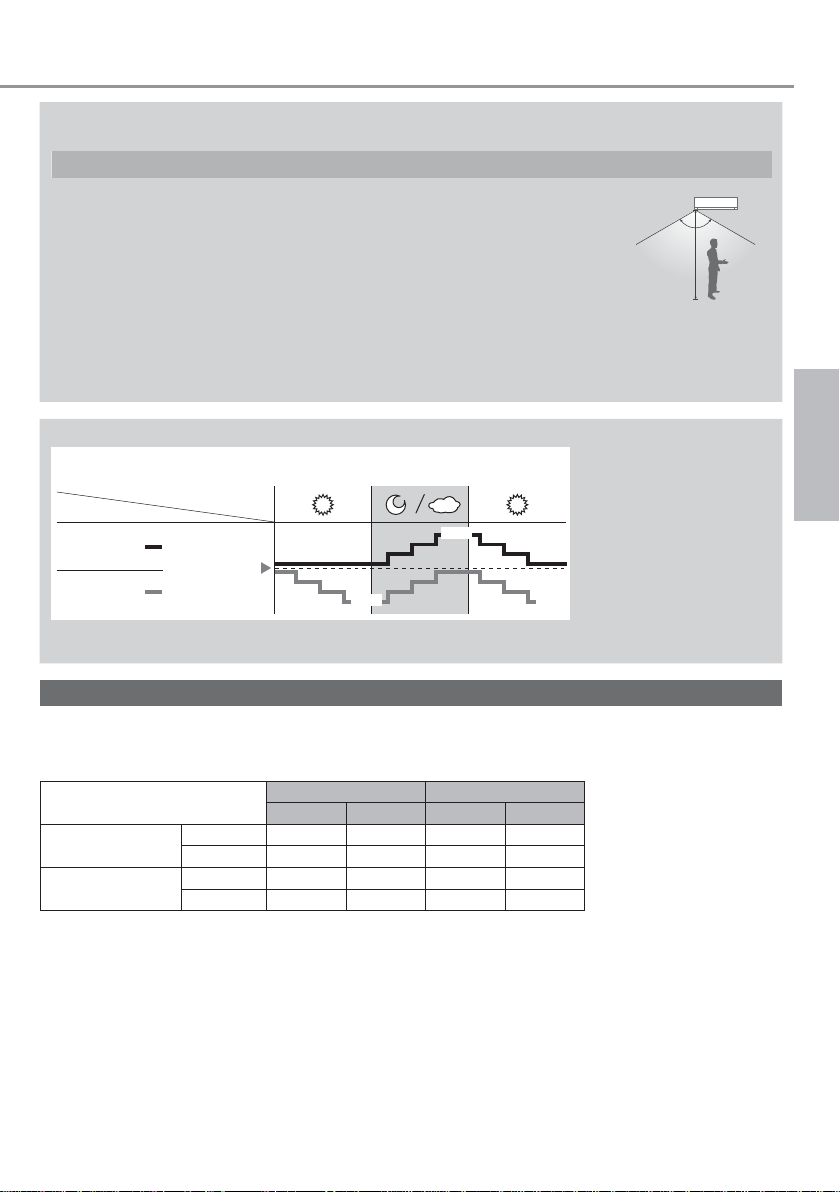
The human activity sensor will also scan for area of heat source and movement in a room.
Detection area
• Based on area activeness horizontal airfl ow direction louver will adjust either fi x at
predetermined position or swing left/right periodically.
• The human activity sensor performance is infl uenced by indoor unit location, movement
speed, temperature range, etc.
• The human activity sensor may:
- mistakenly detect an object with heat source & movement similar to human, such as
pets, etc.
- mistakenly detect as non-heat source & movement if a human stays motionless for
certain period of time.
• Do not place large objects near the sensor and keep away heating units or humidifi er
from the sensor’s detection area. They may cause sensor malfunction.
120º
7m
English
Sunlight Sensor operation
ECONAVI ; Detecting sunlight intensity, the unit adjust temperature to save energy.
Mode
COOL/DRY
HEAT
• In a room without window or with thick curtain, the sunlight sensor will judge as cloudy/night.
Ambient condition
+1 °C
Set
temperature
-1 °C -1 °C
ECONAVI is activated,
the unit maintains set
temperature until a high
sunlight intensity is detected.
The sunlight sensor detects
sunlight intensity during
weather or day/night
changes, and the unit adjusts
temperature.
Operation conditions
Use this air conditioner under the following temperature range.
DBT : Dry bulb temperature
WBT : Wet bulb temperature
Temperature (°C)
COOL
HEAT
Max. 32 23 43 26
Min. 16 11 -10 -
Max. 30 - 24 18
Min. 16 - -15 -16
Indoor Outdoor
DBT WBT DBT WBT
To learn more...
9
Page 10
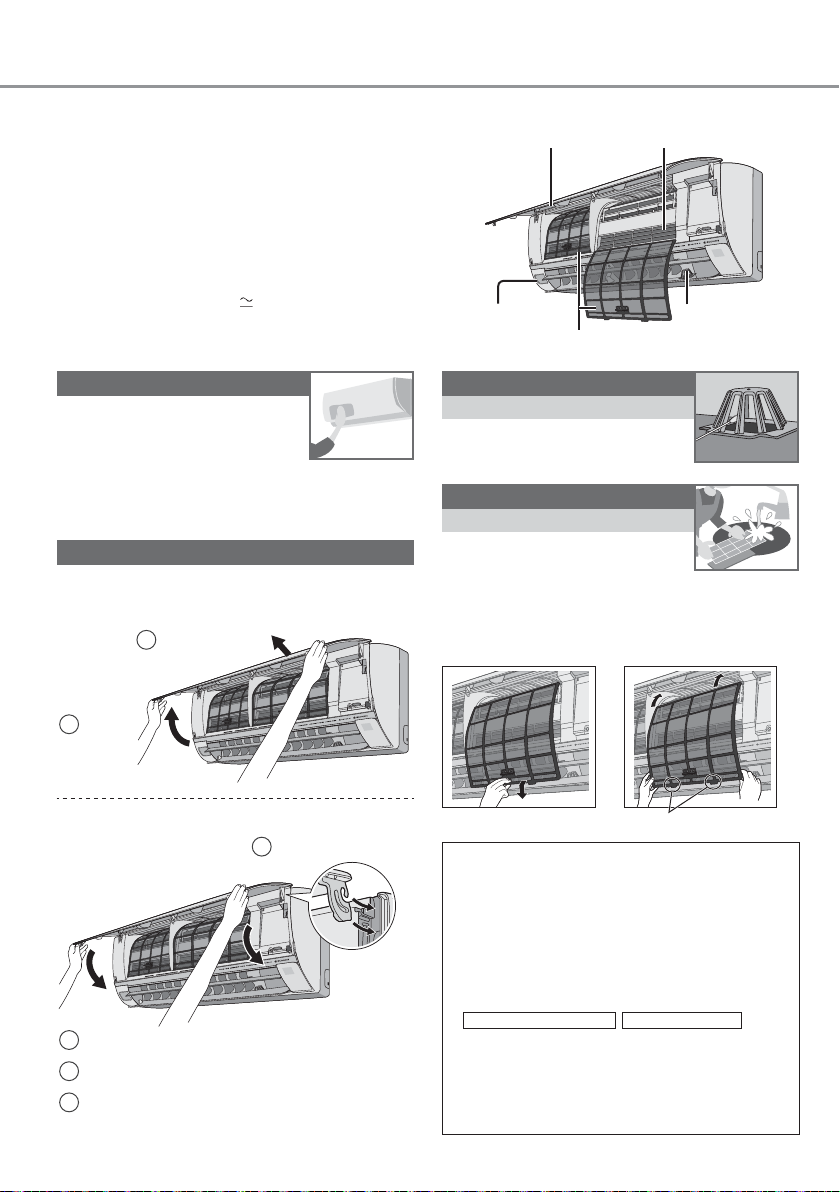
Cleaning instructions
To ensure optimal performance of the unit,
cleaning has to be carried out at regular
intervals. Dirty unit may cause malfunction
and you may see nanoe-G indicator blinks or
error code “H99”. Please consult authorised
dealer.
• Switch off the power supply and unplug before
cleaning.
• Do not touch the aluminium fi n, sharp parts may
cause injury.
• Do not use benzine, thinner or scouring powder.
• Use only soap (
detergent.
• Do not use water hotter than 40 °C.
pH 7) or neutral household
Indoor unit
Wipe the unit gently with a soft,
dry cloth.
Human activity sensor
Do not hit or violently press or poke it with a sharp
object. This can lead to damage and malfunction.
Front panel
Wash gently and dry.
Remove the front panel
Pull out
2
Indoor unit
Aluminium fi nFront panel
Human activity
sensor
Air fi lters
nanoe-G
Generator
nanoe-G Generator
Every 2 weeks
• Clean with dry cotton bud.
• Do not touch during operation.
Air fi lters
Every 2 weeks
• Wash/rinse the fi lters gently
with water to avoid damage to
the fi lter surface.
• Dry the fi lters thoroughly under shade, away
from fi re or direct sunlight.
• Replace any damaged fi lters.
Remove air fi lter Attach air fi lter
Raise
1
Close it securely
2 Close down
3 Press both ends of the front panel
4 Press at center of the front panel.
10
Insert at both sides1
For seasonal inspection after extended
non-use
• Checking of remote control batteries.
• No obstruction at air inlet and air outlet vents.
• Use Auto OFF/ON button to select COOL/
HEAT operation. After 15 minutes of
operation, it is normal to have the following
temperature difference between air inlet and
air outlet vents:
COOL: ≥ 8 °C HEAT: ≥ 14 °C
For extended non-use
•
Activate HEAT mode for 2~3 hours to remove
moisture left in the internal parts thoroughly to
prevent mould growth.
• Turn off the power supply and unplug.
• Remove the remote control batteries.
Insert into the unit
Page 11
Troubleshooting
TIMER
S
CANCEL
ON
O
1
3
S
K
RES
AC
RC
The following symptoms do not indicate malfunction.
Symptom Cause
Mist emerges from indoor unit. • Condensation effect due to cooling process.
Water fl owing sound during operation. • Refrigerant fl ow inside the unit.
The room has a peculiar odour. • This may be due to damp smell emitted by the wall,
Indoor fan stops occasionally during automatic
fan speed setting.
Airfl ow continues even after operation has
stopped.
Operation is delayed a few minutes after
restarting.
Outdoor unit emits water/steam. • Condensation or evaporation occurs on pipes.
TIMER indicator is always on. • The timer setting repeats daily once set.
POWER indicator blinks during HEAT mode
with no warm air supply (and louver is closed).
Indoor fan stops occasionally during heating
operation.
POWER indicator blinks before the unit is
switched on.
Cracking sound during operation. • Changes of temperature caused the expansion/
During COOL/DRY mode, the indoor unit
stops and POWER indicator blinks.
Check the following before calling for servicing.
Symptom Check
Operation in HEAT/COOL mode is not working
effi ciently.
Noisy during operation. • Check if the unit has been installed at an incline.
Remote control does not work.
(Display is dim or transmission signal is weak.)
The unit does not work. • Check if the circuit breaker is tripped.
The unit does not receive the signal from the
remote control.
carpet, furniture or clothing.
• This helps to remove the surrounding odour.
• Extraction of remaining heat from the indoor unit
(maximum 30 seconds).
• The delay is a protection to the unit’s compressor.
• The unit is in defrost mode (and AIR SWING is set to
AUTO).
• To avoid unintended cooling effect.
• This is a preliminary step in preparation for the
operation when the ON timer has been set.
contraction of the unit.
• The system has locked to operate in HEAT model only.
• Set the temperature correctly.
• Close all doors and windows.
• Clean or replace the fi lters.
•
Clear any obstruction at the air inlet and air outlet vents.
• Close the front panel properly.
• Insert the batteries correctly.
• Replace weak batteries.
• Check if timers have been set.
• Make sure the receiver is not obstructed.
• Certain fl uorescent lights may interfere with signal
transmitter. Please consult authorised dealer.
English
Cleaning instructions / Troubleshooting
NON SERVICEABLE CRITERIAS
TURN OFF POWER SUPPLY AND
UNPLUG then please consult authorised
dealer under the following conditions:
• Abnormal noise during operation.
• Water/foreign particles have entered the
remote control.
• Water leaks from Indoor unit.
• Circuit breaker switches off frequently.
• Power cord becomes unnaturally warm.
• Switches or buttons are not functioning
properly.
The unit stops and the TIMER indicator blinks.
Use remote control to retrieve error code.
Press for
5 seconds
3
Press for
5 seconds
to quit
checking
TIMER
ON
1
2
OFF
FF
SET CHECK CLOCK RESET
ET CLOC
AC
SET
ET
3
CANCEL
ET
21
Press until you
hear beep sound,
then write down
RC
the error code
4
Turn the unit off
and reveal the
error code to
authorised dealer
• For certain errors, you may restart the unit for limited
operation with 4 beeps when operation starts.
11
Page 12

Fournir un confort maximal, nettoyer l’air
et optimiser les économies d’énergie
ECONAVI et AUTO COMFORT
Équipé du capteur d’activité humaine, le climatiseur garantit la diffusion d’air frais ou chaud et permet à
la pièce d’offrir un confort constant avec une consommation d’énergie minimale.
En outre, le capteur de lumière du soleil détecte l’intensité de la lumière du soleil et aide à contrôler les
températures de chauffage/refroidissement pour fournir un confort optimal.
Voir « Pour en savoir plus… » pour les détails.
nanoe-G
Désactive les micro-organismes nocifs tels que les virus, bactéries, etc. pour que l’air reste propre.
Désactive également les virus et les bactéries sur le fi ltre pour maintenir l’intérieur de l’unité propre.
12
Page 13
Guide rapide
TIMER
CANCEL
ON
O
1
3
S
CK
RES
AC
RC
AUTOCOMFO
Q
TIMER
S
CANCEL
ON
O
1
2
3
G
F
D
MILD DRY
G
S
K
RES
C
RC
MILD
DRY
FAN
S
D
AIR
S
G
AUTO
HEAT
OOL
DRY
ECO
I
G
Insertion des piles
1
2
2
3
Réglage de l’horloge
1
2
3
Fonctionnement de base
1
PEE
WIN
2
RT
3
•
Pour atténuer ou restaurer la luminosité du
voyant de l’unité, maintenez la touche
8m
enfoncée pendant 5 secondes.
3
1
2
3
1
1
2 3
TIMER
ON
1
2
OFF
FF
SET CHECK CLOCK RESET
ETCHE
AUTO
HEAT
C
COOL
DRY
MILD
DRY
OFF/ON
ECONAVI
NAV
MODE
MILD DRY
TEMP
COOLIN
COOLING
POWERFUL/
POWERFUL/
FAN SPEED
AN SPEE
UIET
QUIET
TIMER
ON
1
2
OFF
FF
SET CHECK CLOCK RESET
ETCHECKCLOC
SET
3
CANCEL
AC
RC
ET
AUTO
COMFORT
NANOE-G
NANOE-
AIR SWING
AIR SWIN
SET
ET
3
CANCEL
A
AC
ET
FAN
SPEED
AIR
SWING
RC
Retirez le couvercle arrière de la
télécommande
Placez des piles AAA ou R03 (valables
environ 1 an)
Fermez le couvercle
Appuyez sur CLOCK
Réglez l’heure
Confi rmez
Sélectionnez le mode de
fonctionnement souhaité
AUTO HEAT
DRY
COOL
Mettez l’appareil sous/hors tension
POWER
•
Veuillez noter que le voyant ARRÊT
est allumé au démarrage.
Sélectionnez la température souhaitée
•
Plage de sélection : 16 °C ~ 30 °C.
•
Le fait de faire fonctionner l’appareil dans
la plage de température recommandée
peut économiser de l’énergie.
CHAUFFAGE : 20 °C ~ 24 °C.
REFROIDISSEMENT : 26 °C ~ 28 °C.
DÉSHUMIDIFICATION :
Inférieure de
1°C à 2°C par
rapport à la
température de
la pièce.
Table des matières
Consignes de sécurité .........................14-15
Consignes d’utilisation ......................... 16-17
Pour en savoir plus... ......................... 18-19
Instructions de nettoyage ......................... 20
Dépannage .............................................. 21
Informations .............................................. 62
Accessoires
•
Télécommande
•
Piles AAA ou R03 × 2
•
Support de la télécommande
•
Vis pour le support de la
télécommande × 2
Français
•
Utilisez la télécommande dans les 8 m du
récepteur de la télécommande de l’unité
intérieure.
Les illustrations de ce mode d’emploi sont fournies à titre d’exemple uniquement
et peuvent présenter des différences par rapport à l’appareil proprement dit.
Celui-ci peut être modifi é sans préavis à des fi ns d’amélioration.
13
Page 14
Consignes de sécurité
Entrée d’air
Entrée d’air
Sortie d’air
Sortie d’air
Pour éviter des blessures corporelles sur vous-même
et sur les autres ou des dégâts matériels, respectez les
instructions ci-dessous :
Tout dysfonctionnement dû au non-respect des instructions
peut occasionner des nuisances ou des dégâts dont la
gravité est classée comme décrit ci-après :
Ce symbole signale la
AVERTISSEMENT
ATTENTION
Les instructions à respecter sont classées d’après les
symboles suivants :
Unité intérieure
Sortie d’air
Télécommande
Unité extérieure
présence d’un danger
pouvant provoquer des
blessures graves ou
mortelles.
Ce symbole signale la
présence d’un danger
pouvant provoquer des
blessures corporelles ou
des dégâts matériels.
Ce symbole désigne une action
INTERDITE.
Ces symboles désignent des actions
OBLIGATOIRES.
Alimentation
électrique
Entrée d’air
Entrée d’air
Sortie d’air
Unité intérieure et unité extérieure
Télécommande
AVERTISSEMENT
Cet appareil peut être utilisé par des enfants âgés de 8
ans et plus et par des personnes ayant des capacités
physiques, sensorielles ou mentales réduites, ou
dénuées d’expérience et de connaissances si elles
ont été formées et encadrées pour l’utilisation de
cet appareil en toute sécurité et comprennent bien
les dangers auxquels ils s’exposent. Les enfants ne
doivent pas jouer avec l’appareil. Le nettoyage et
l’entretien par l’utilisateur ne doivent pas être effectués
par des enfants sans surveillance.
Veuillez consulter un revendeur agréé ou un
spécialiste pour le nettoyage des pièces internes
et pour la réparation, l’installation, le retrait et la
réinstallation de l’unité. Une installation et une
manipulation incorrectes pourraient occasionner des
fuites, un choc électrique ou un incendie.
Validez auprès du revendeur agréé ou du spécialiste
l’usage de tout type de réfrigérant spécifi é.
L’utilisation d’un type de réfrigérant autre que le type
spécifi é peut endommager le produit ou provoquer des
explosions, des brûlures, etc.
N’installez pas l’appareil dans une atmosphère
potentiellement explosive ou infl ammable. Sinon, il y a
un risque d’incendie.
N’insérez jamais vos doigts ou des objets
dans l’unité intérieure ou extérieure du
climatiseur, les parties tournantes peuvent
causer des blessures.
Ne touchez pas l’unité extérieure au cours d’un orage,
cela pourrait provoquer un choc électrique.
Ne vous exposez pas directement à de l’air froid
pendant une période prolongée afi n d’éviter un
refroidissement excessif.
Ne vous asseyez pas et ne piétinez
pas sur l’unité, vous risquez de tomber
accidentellement.
Maintenez la télécommande hors de portée des
bébés et des enfants pour éviter qu’ils n’avalent
accidentellement les piles.
14
Alimentation électrique
N’utilisez pas de cordon modifi é,
de raccords, de rallonge ou de
cordon non spécifi é afi n d’éviter une
surchauffe et un incendie.
Page 15

Pour éviter une surchauffe, un incendie ou un choc
électrique :
•
Ne partagez pas la prise d’alimentation avec un
autre appareil.
•
N’utilisez pas l’unité avec des mains mouillées.
•
Ne pas plier excessivement la fi che électrique.
•
Ne pas opérer ou arrêter l’unité en insérant ou en
tirant sur la fi che électrique.
Si le cordon d’alimentation est endommagé, il doit
être remplacé par le fabriquant, par un de ses
techniciens ou par une personne qui possède des
qualifi cations équivalentes afi n d’éviter tout risque.
Il est fortement conseillé d’installer un disjoncteurdétecteur de fuite à la terre (DDFT) ou un dispositif
à courant résiduel (DCR) afi n d’éviter un choc
électrique ou un incendie.
Pour éviter une surchauffe, un incendie ou un choc
électrique :
•
Insérez la fi che d’alimentation correctement.
•
Il faut régulièrement essuyer la poussière sur la
fi che d’alimentation à l’aide d’un chiffon sec.
Cesser d’utiliser le produit lorsqu’une anomalie ou
défaillance quelconque se produit et débrancher
la fi che d’alimentation ou mettre hors tension
l’interrupteur et le disjoncteur.
(Risque de fumée / feu / choc électrique) Exemples
d’anomalie ou défaillance
•
L’ELCB se déclenche fréquemment.
•
Odeur de brûlé est observée.
•
Un bruit ou des vibrations anormales de l’unité
sont observés.
•
Fuite d’eau de l’unité intérieure.
•
Le cordon d’alimentation ou la prise deviennent
anormalement chaud.
•
La vitesse du ventilateur ne peut pas être
contrôlée.
•
L’unité s’arrête de fonctionner immédiatement
même si elle est activée pour opérer.
•
Le ventilateur ne s’arrête pas même si l’opération
est arrêtée.
Contacter immédiatement votre revendeur local
pour l'entretien / réparation.
Cet équipement doit être raccordé à la terre afi n
d’éviter un choc électrique ou un incendie.
Prévenez les chocs électriques en coupant
l’alimentation et en débranchant l’unité :
- Avant le nettoyage ou l’entretien.
- En cas de non utilisation prolongée, ou
- En période d’activité orageuse anormalement
forte.
ATTENTION
Unité intérieure et unité extérieure
Afi n d’éviter des dommages ou de la corrosion sur
l’unité, ne nettoyez pas l’unité intérieure avec de
l’eau, du benzène, du solvant ou de la poudre à
récurer.
N’utilisez pas l’unité pour conserver des appareils
de précision, des aliments, des plantes, des œuvres
d’art ou autres objets. Cela pourrait entraîner une
détérioration de la qualité, etc.
N’utiliser pas d’appareil à combustibles dans la
direction du fl ux d’air afi n d’éviter toute propagation
du feu.
N’exposez pas des plantes ou des animaux de
compagnie directement au fl ux d’air pour éviter des
blessures, etc.
Ne touchez pas l’ailette pointue
d’aluminium, les parties pointues peuvent
causer des dommages.
Ne mettez pas l’unité intérieure sous tension
lorsque vous cirez le sol. Après le cirage, aérez
suffi samment la pièce avant de faire fonctionner
l’unité.
Afi n d’éviter d’endommager l’unité, ne l’installez pas
dans des zones grasses et enfumées.
Afi n d’éviter des blessures, ne démontez pas l’unité
pour la nettoyer.
Afi n d’éviter des blessures, ne marchez pas sur un
banc instable lors du nettoyage de l’unité.
Ne placez pas de vas ou de récipient d’eau sur
l’unité. De l’eau peut pénétrer à l’intérieur de l’unité
et dégrader l’isolation. Cela pourrait entraîner un
choc électrique.
Ne pas ouvrir la fenêtre ou la porte pendant
longtemps au cours du fonctionnement en mode
REFROIDISSEMENT/DÉSHUMIDIFICATION.
Prévenez les fuites d’eau en vous assurant que le
tuyau de vidange est :
- Correctement raccordé,
- Dégagé de toute gouttière et récipient, ou
- Non immergé dans l’eau
Après une longue période d’utilisation ou après une
utilisation avec un appareil à combustibles, aérez
régulièrement la pièce.
Après une longue période d’utilisation, assurezvous que le support d’installation n’est pas détérioré
afi n d’éviter une chute de l’unité.
Télécommande
N’utilisez pas de piles rechargeables (Ni-Cd). Cela
pourrait endommager la télécommande.
Pour éviter tout dysfonctionnement ou dommages à
la télécommande :
•
Retirez les piles si vous envisagez de ne pas
utiliser l’appareil pendant une période prolongée.
•
De nouvelles piles du même type doivent être
insérées en respectant la polarité indiquée.
Alimentation électrique
Ne débranchez pas la fi che en tirant sur le cordon
d’éviter un choc électrique.
Français
Consignes de sécurité
15
Page 16

TEMP
OFF/ON
TIMER
S
CANCEL
ON
O
2
3
CHECK
K
Consignes d’utilisation
POWER
TIMER
AUTO COMFORT
NANOE-G
POWERFUL
QUIET
(Vert) (Vert) (Bleu) (Orange)(Orange)(Orange) (Vert)
ECONAVI
Pour optimiser les économies
d’énergie
Capteur d’activité
humaine
Capteur de lumière
du soleil et récepteur de
la télécommande
Maintenez la touche enfoncée
pendant environ 10 secondes
pour que le réglage de la
température passe en °C ou
en °F.
Appuyez pour revenir aux
réglages par défaut de la
télécommande.
Non utilisé dans les
opérations normales.
MODE
Pour sélectionner un mode de
fonctionnement
AUTO - Selon vos préférences
CHAUFFAGE - Pour un air chaud
REFROIDISSEMENT - Pour un air frais
DÉSHUMIDIFICATION - Pour déshumidifi er l’atmosphère
MILD DRY
COOLING
Pour améliorer le niveau d’humidité et
de teneur en eau
•
Ce mode réduit la sécheresse de l’air et vous fournit un
environnement de vie confortable uniquement en mode
REFROIDISSEMENT.
•
Lorsque la direction du fl ux d’air vertical est réglée sur
AUTO, la grille s’immobilise dans la position la plus basse
afi n d’éviter le contact avec l’air froid. Toutefois, vous
pouvez ajuster la direction de la grille manuellement.
POWERFUL/
QUIET
Pour passer de puissant à silencieux
QUIETPOWERFUL NORMAL
PUISSANT : Pour atteindre rapidement la température
souhaitée
POWERFUL
•
Cette opération s'arrête automatiquement au bout de 20
minutes.
SILENCE : Pour un fonctionnement silencieux
QUIET
•
Cette opération réduit le bruit du fl ux d’air.
Affi chage
de la télécommande
AUTO
HEAT
COOL
DRY
MILD
DRY
ECONAVI
MODE
MILD DRY
COOLING
POWERFUL/
QUIET
TIMER
ON
1
OFF
FF
SET CHECK CLOCK RESET
FAN SPEED
OFF/ON
FAN
SPEED
AIR
SWING
AUTO
COMFORT
NANOE-G
TEMP
AIR SWING
FAN SPEED
ET
SET
3
2
CANCEL
AC
RC
CLOC
Pour sélectionner la vitesse du
ventilateur
(Affi chage de la télécommande)
•
Pour AUTO, la vitesse du ventilateur intérieur est
automatiquement ajustée en fonction du mode de
fonctionnement.
Voyant
Touche Auto OFF/ON (MARCHE/ARRÊT Automatique)
Utilisée lorsque la télécommande est perdue ou en panne. Soulevez le panneau avant :
1. Appuyez une fois sur la touche pour utiliser en mode AUTO.
2. Maintenez la touche enfoncée jusqu’au retentissement d’un bip, puis relâchez pour utiliser en mode
AUTO
OFF/ON
REFROIDISSEMENT forcé.
3. Répétez l’étape 2. Maintenez la touche enfoncée jusqu’au retentissement de 2 bips, puis relâchez pour
utiliser en mode CHAUFFAGE forcé.
•
Appuyez à nouveau sur la touche pour mettre l’appareil hors tension.
16
Page 17
TIMER
CANCEL
3
Voir « Pour en savoir plus… » pour les détails.
A
AUTO
COMFORT
Pour un confort optimal
AUTO COMFORT
NANOE-G
Pour purifi er l’air
NANOE-G
•
nanoe-G démarre automatiquement lorsque l’unité est
allumée avec
•
Peut être activé même lorsque l’unité est hors tension. Dans
OFF/ON
.
cette condition, l’unité fonctionnera en tant que ventilateur
avec la vitesse de ventilateur AUTO et l’oscillation de l’évent.
Pour désactiver les virus/bactéries sur le fi ltre
NANOE-G
•
Après la mise hors tension de l’unité, la désactivation du
fi ltre intégré nanoe-G peut s’activer pendant une durée allant
jusqu’à 150 minutes. La mise sous tension de l’unité annule
cette opération.
•
Pour désactiver cette opération à l’avenir, maintenez
enfoncé jusqu’à ce qu’un court bip sonore retentisse. Ceci ne
désactivera pas nanoe-G pour purifi er l’air.
•
Pour rétablir la désactivation du fi ltre intégré nanoe-G,
maintenez
retentisse.
IR SWING
(Affi chage de la télécommande)
•
Permet de ventiler la pièce.
•
En mode REFROIDISSEMENT/DÉSHUMIDIFICATION, si
AUTO est défi ni, le volet oscille automatiquement vers la
gauche et la droite et vers le haut et le bas.
•
En mode CHAUFFAGE, si AUTO est réglé, l’évent horizontal
est défi ni sur une position prédéterminée. Le volet vertical
bascule vers la gauche/droite après l’augmentation de la
température.
•
Ne réglez pas le volet manuellement.
POWER
NANOE-G
NANOE-G
enfoncé jusqu’à ce qu’un long bip sonore
Pour ajuster l’orientation du fl ux d’air
Pour régler l’heure
2 jeux de minuteurs de MARCHE et ARRÊT sont disponibles
pour allumer et éteindre l’unité à différentes heures
préréglées.
21 3
ON
1
OFF
Sélectionnez le mode
1
marche (ON) ou arrêt
SET
3
2
CANCEL
Exemple :
ARRÊT à 22h00
de la minuterie (OFF)
•
À chaque pression :
Réglez l’heure
2
Confi rmez
3
Cancel
OFF
2
SET
Français
TIMER
•
Pour annuler le minuteur de MARCHE ou ARRÊT, appuyez
ON
ou
sur
appuyez sur
•
Si le minuteur est annulé manuellement ou à cause d’une
panne d’électricité, vous pouvez restaurer le minuteur en
appuyant sur
puis appuyer sur
•
Le réglage de la minuterie le plus proche s’affi chera et sera
activé en séquence.
•
Lorsque le mode minuterie est activé, il se peut que
l’appareil démarre avant l’heure réelle défi nie de façon à
atteindre la température que vous avez choisie (environ 35
minutes avant).
•
L’opération de minuterie se base sur le réglage de l’horloge
de la télécommande et se répète quotidiennement une fois
défi nie. Pour régler l’horloge, veuillez consulter le Guide
rapide.
pour sélectionner ou , puis
OFF
.
CANCEL
ON
ou
pour sélectionner ou ,
OFF
SET
.
Consignes d’utilisation
Remarque
POWERFUL/
ECONAVI
QUIET
,
•
Peut être activé dans tous les modes et annulé en appuyant à
nouveau sur la touche respective.
AUTO
COMFORT
,
NANOE-G
,
POWERFUL/
ECONAVI
QUIET
,
•
Ne peut pas être sélectionné en même temps.
•
Ne peut pas être activé en mode REFROIDISSEMENT SEC
AUTO
COMFORT
,
DOUX.
17
Page 18
Pour en savoir plus...
Mode de fonctionnement
AUTO : Lors de la sélection du mode de fonctionnement, le voyant d’alimentation POWER clignote.
• L’unité choisit le mode d’opération toutes les 10 minutes selon le réglage de la température et la température ambiante.
CHAUFFAGE : L’appareil met un certain temps à démarrer. Le voyant d’alimentation POWER clignote en cours de fonctionnement.
REFROIDISSEMENT : Utilisez des rideaux pour faire barrage à la lumière du soleil et à la chaleur extérieure pour réduire la
DÉSHUMIDIFICATION : L’unité fonctionne en vitesse lente du ventilateur pour fournir un refroidissement en douceur.
• Sur les systèmes dont le mode HEAT (CHAUFFAGE) a été verrouillé, si un mode de fonctionnement autre que le mode HEAT
(CHAUFFAGE) est sélectionné, l’unité intérieure s’arrête et le voyant d’alimentation POWER clignote.
Désactivation du fi ltre intégré nanoe-G
Selon le temps de fonctionnement accumulé de l’unité, la désactivation du fi ltre intégré nanoe-G ne peut être activée qu’une seule
fois par jour.
Pour éliminer l’humidité laissée sur les pièces internes, le ventilateur fonctionnera pendant 30 minutes avec l’évent légèrement
ouvert. Ce processus ne s’applique que lorsque l’unité fonctionne en mode REFROIDISSEMENT/CHAUFFAGE avant d’être mise
hors tension. L’opération nanoe-G désactive ensuite les virus/bactéries sur le fi ltre pendant 2 heures avec le ventilateur à l’arrêt et
l’évent fermé.
Ne débranchez pas l’alimentation électrique pendant cette opération. Cette opération ne reprendra pas après une panne de courant.
ECONAVI et AUTO COMFORT
ECONAVI
L’unité commencera à s’initialiser
(pendant environ 1 minute)
Fonctionnement du capteur d’activité humaine
ECONAVI ; En détectant la présence et l’activité humaine, l’unité contrôle la température de la pièce pour économiser l’énergie.
Mode
REFROIDISSEMENT/
DÉSHUMIDIFICATION
CHAUFFAGE
AUTO COMFORT ; En détectant la présence et l’activité humaines, l’unité contrôle la température ambiante de manière à
ce que les humains bénéficient d’un confort constant.
Mode
REFROIDISSEMENT/
DÉSHUMIDIFICATION
CHAUFFAGE
consommation électrique en mode REFROIDISSEMENT.
AUTO
COMFORT
ou
Le capteur d’activité humaine et
le capteur de lumière du soleil
commenceront à détecter.
Humain
Température
définie
Humain
Température
définie
Régler la
vitesse
du ventilateur
Faible activité Activité normale Activité élevée Absent
+1 °C
Faible activité Activité normale Activité élevée Absent
+1 °C
+0.3 °C
+1 cran*
Remarque
AIRSWING
Lorsque la fonction d’oscillation
d’air (AIR SWING) manuelle est
sélectionnée, les fonctions ECONAVI
et AUTO COMFORT sont annulées.
-1 °C
-2 °C
+1 cran
+2 °C
-2 °C-2 °C
+2 °C
-2 °C
9HQWLODWHXUPR\HQ
ECONAVI et AUTO COMFORT
Contrôle précis de la température en cas de faible activité pour maximiser les économies d’énergie.
Mode
REFROIDISSEMENT/
DÉSHUMIDIFICATION
*
En cas de faible activité, la vitesse de ventilateur 1 est activée pendant les 15 premières minutes ou jusqu’à ce que la
température définie soit atteinte.
**
En l’absence de présence humaine, la vitesse de ventilateur maximale en mode REFROIDISSEMENT/CHAUFFAGE
correspond au ventilateur moyen.
Humain
Température
définie
Faible activité
Les fonctions ECONAVI et AUTO COMFORT tirent parti
de la nature humaine, qui prend le temps de sentir la
température augmenter pendant une activité de faible
niveau ; l’unité ajuste ainsi la température de manière à
maximiser les économies d’énergie sans sacrifier le confort.
18
Page 19
Le capteur d’activité humaine effectue un balayage pour repérer la zone de source de chaleur et de mouvement dans une
pièce.
Zone de détection
•
En fonction du degré d’activité dans la zone, l’unité ajuste l’évent de
direction du fl ux d’air horizontal soit fi xe à une position prédéterminée,
soit basculé vers la gauche/droite.
•
La sensibilité du capteur d’activité humaine est infl uencée par l’emplacement de l’unité
intérieure, la vitesse du mouvement, la plage de température, etc.
•
Le capteur d’activité humaine peut:
- détecter par erreur un sujet dont la source de chaleur et le mouvement sont similaires à
ceux d’un être humain, tels qu’animaux domestiques, etc.
- échouer à détecter une source de chaleur et un mouvement si une personne reste immobile
pendant un certain temps.
•
Ne posez pas d’objets volumineux à proximité du capteur et éloignez les unités de chauffage
ou les humidifi cateurs de la zone de détection du capteur. Ils pourraient provoquer un
dysfonctionnement du capteur.
120º
7m
Fonctionnement du capteur de lumière du soleil
ECONAVI
;
En détectant l’intensité de la lumière du soleil, l’unité ajuste la température
pour économiser l’énergie.
Mode
REFROIDISSEMENT/
DÉSHUMIDIFICATION
CHAUFFAGE
•
Dans une pièce sans fenêtre ou équipée d’épais rideaux, le capteur de lumière du soleil considérera que le temps est
nuageux/nuit.
Condition ambiante
+1 °C
Température
définie
-1 °C -1 °C
La fonction ECONAVI est
activée, l’unité maintient la
température défi nie jusqu’à ce
que l’intensité de la lumière du
soleil soit détectée. Le capteur
de lumière du soleil détecte
l’intensité de la lumière du
soleil lors des changements
du passage jour/nuit et l’unité
ajuste la température.
Conditions d’utilisation
Utilisez ce climatiseur en respectant la plage de températures suivante.
DBT : Température sèche
WBT : Température humide
Température (°C)
REFROIDISSEMENT
CHAUFFAGE
Max. 32 23 43 26
Min. 16 11 -10 -
Max. 30 - 24 18
Min. 16 - -15 -16
Unité intérieure Unité extérieure
DBT WBT DBT WBT
Français
Pour en savoir plus...
19
Page 20
Instructions de nettoyage
Pour garantir une performance optimale de l’unité, un
nettoyage doit être effectué à intervalles réguliers. Une
unité encrassée peut provoquer un dysfonctionnement
qui entraîne le clignotement des voyants du nanoe-G ou
l’affi chage du code d’erreur « H99 ». Veuillez consulter un
revendeur agréé.
•
Coupez l’alimentation et débranchez l’appareil avant le
nettoyage.
•
Ne touchez pas l’ailette en aluminium, la partie tranchante
peut provoquer des blessures.
•
N’utilisez pas de benzène, de solvant ou de poudre à récurer.
•
Utilisez uniquement du savon ( pH 7) ou un détergent
ménager neutre.
•
N’utilisez pas de l’eau dont la température est supérieure à
40 °C.
Unité intérieure
Frottez délicatement l’appareil avec un
chiffon doux et sec.
Capteur d’activité humaine
Ne faites pas subir de chocs, de pression violente ou de coups
par objet tranchant. Cela pourrait occasionner des dommages
et un dysfonctionnement.
Panneau avant
Lavez avec soin et séchez.
Retirez le panneau avant
Retirez
2
Unité intérieure
Capteur d’activité
humaine
Générateur nanoe-G
Toutes les 2 semaines
•
Nettoyez-le avec un coton-tige sec.
•
Ne pas toucher pendant le
fonctionnement.
Filtre à air
Toutes les 2 semaines
•
Lavez/rincez les fi ltres avec précaution
avec de l’eau afi n d’éviter d’endommager
leur surface.
•
Séchez complètement les fi ltres à l’ombre, à distance du feu
ou de la lumière directe du soleil.
•
Si le fi ltre est endommagé, remplacez-le immédiatement.
Retirez le fi ltre à air Fixez le fi ltre à air
Ailette en aluminiumPanneau avant
Générateur nanoe-G
Filtre à air
Soulevez
1
Refermez bien
Insérez des deux côtés
1
2
Fermer
3
Appuyez sur les deux extrémités du panneau avant
4
Appuyez au centre du panneau avant.
20
Insérez dans l’unité
Inspection annuelle après une période prolongée
d’inutilisation
•
Vérifi ez que les piles de la télécommande sont en bon état.
•
Assurez-vous de l’absence d’obstruction des orifi ces
d’entrée et de sortie d’air.
•
Utilisez le bouton de marche/arrêt automatique pour
sélectionner le mode REFROIDISSEMENT/CHAUFFAGE.
Après 15 minutes d’opération, il est normal d’avoir la
différence suivante de température entre la prise d’air et la
sortie de bouches d’aération :
REFROIDISSEMENT : ≥8 °C CHAUFFAGE : ≥14 °C
Préparation en cas d’inutilisation prolongée
•
Activez le mode CHAUFFAGE pendant 2 à 3 heures pour
éliminer en profondeur l’humidité restée dans les pièces
internes afi n d’éviter la formation de moisissures.
•
Couper l’alimentation et débrancher.
•
Retirez les piles de la télécommande.
Page 21

Dépannage
TIMER
S
CANCEL
ON
O
1
3
S
K
RES
AC
RC
Les рhénomènes suivants ne correspondent pas à un dysfonctionnement.
De la vapeur se dégage de l’unité intérieure.
Lors du fonctionnement, vous entendez un bruit d’eau qui
coule.
La pièce a une odeur étrange.
En mode de réglage automatique de la vitesse du ventilateur,
le ventilateur intérieur s’arrête de temps en temps.
Le fl ux d’air continue même après l’arrêt de l’unité.• Extraction de la chaleur restante dans l’unité intérieure (30 seconde
Le fonctionnement ralentit quelques minutes après avoir
remis en marche l’appareil.
L’unité extérieure dégage de la vapeur ou de l’eau.
Le voyant TIMER reste allumé.
Le voyant POWER clignote pendant le mode CHAUFFAGE
sans fourniture d’air chaud (et le volet est fermé).
En mode de chauffage, le ventilateur intérieur s’arrête de
temps en temps.
Le voyant POWER clignote avant que l’unité ne soit mise
en route.
Bruit de craquement pendant le fonctionnement.• Les fl uctuations de température provoquent l’expansion/ la contraction de
En mode COOL/DRY (REFROIDISSEMENT/
DÉSHUMIDIFICATION), l’unité intérieure s’arrête et le voyant
d’alimentation POWER clignote.
Vérifi fi ez les éléments suivants avant de faire appel au service de maintenance.
La fonction CHAUFFAGE/REFROIDISSEMENT ne fonctionne
pas effi cacement.
L’appareil fait du bruit lorsqu’il fonctionne.
La télécommande ne fonctionne pas.
(L’affi chage est atténué ou le signal émis est faible.)
L’appareil ne fonctionne pas.
L’appareil ne reçoit pas le signal de la télécommande.
PIECES NON SUSCEPTIBLES D’ETRE
REPAREES PAR VOS SOINS
COUPEZ L’ALIMENTATION ÉLECTRIQUE ET
DÉBRANCHEZ LA PRISE, puis contactez un
revendeur agréé dans les conditions suivantes :
•
Bruits anormaux pendant la mise en service.
•
Pénétration d’eau ou de corps étrangers à l’intérieur
de la télécommande.
•
Fuite d’eau de l’unité intérieure.
•
Désactivation fréquente du disjoncteur.
•
Le cordon d’alimentation est inhabituellement chaud.
•
Les interrupteurs ou les boutons ne fonctionnent pas
correctement.
Phénomène Cause
•
Il s’agit d’un effet de condensation dû au refroidissement.
•
Fluide frigorigène à l’intérieur de l’appareil.
•
Il est possible qu’il s’agisse d’une odeur d’humidité provenant du mur, du
tapis, d’un meuble ou d’un vêtement.
•
Ceci contribue à dissiper les odeurs ambiantes.
maximum).
•
Le ralentissement est une protection du compresseur de l’appareil.
•
De l’eau se condense ou s’évapore dans les tuyaux.
•
Une fois qu’une minuterie est réglée, son fonctionnement est quotidien.
•
L’unité est en mode dégivrage (et la fonction d’oscillation de l’air (AIR
SWING) est réglée sur AUTO).
•
Pour éviter un effet de refroidissement indésirable.
•
C’est une étape de préparation préliminaire à la mise en route lorsque la
minuterie de départ ON a été réglée.
l’appareil.
•
Le système est verrouillé pour fonctionner en mode HEAT (CHAUFFAGE)
uniquement.
Phénomène Vérifi cation
•
Réglez la température correctement.
•
Fermez toutes les portes et fenêtres.
•
Nettoyez ou remplacez les fi ltres.
•
Dégagez toute obstruction dans les ouvertures d’entrée et de sortie d’air.
•
Vérifi ez que l’appareil est installé sans inclinaison.
•
Fermez correctement le panneau avant.
•
Insérez les piles correctement.
•
Remplacez les piles faibles.
•
Vérifi ez si le coupe-circuit est déclenché.
•
Vérifi ez si des minuteries ont été réglées.
•
Vérifi ez que le récepteur n’est pas obstrué.
•
Certaines lampes fl uorescentes peuvent interférer avec le signal de
l’émetteur. Veuillez consulter un revendeur agréé.
L’appareil s’arrête et le voyant TIMER clignote.
Utilisez la télécommande pour récupérer le code d’erreur.
1
Appuyez sur
cette touche
pendant
au moins 5
secondes
3
Appuyer sur
pendant 5
secondes
pour quitter la
vérifi cation
Pour certaines erreurs, il suffi t de redémarrer l’unité en fonctionnement
•
limité avec 4 bips au cours du démarrage.
TIMER
ON
1
2
OFF
FF
SET CHECK CLOCK RESET
ET CLOC
AC
SET
ET
3
CANCEL
ET
RC
2
Appuyez sur cette
touche jusqu’à ce que
vous entendiez un
bip, puis notez le code
d’erreur
4
Éteindre l’appareil
et donner le code
d’erreur à un
revendeur agréé
Français
Instructions de nettoyage / Dépannage
21
Page 22

Ofrece máximo confort, aire limpio y
optimiza el ahorro energético
ECONA VI Y AUT O COMFORT
Este aire acondicionado equipado con sensor de actividad humana le garantiza el suministro de aire
fresco o caliente y mantiene la habitación a una temperatura agradable de manera continuada y con un
consumo de energía mínimo.
Además, el sensor de luz solar detecta la intensidad de luz solar y ayuda a controlar las temperaturas
de calefacción/refrigeración para ofrecer un confort óptimo.
Para más información, consulte “Obtener más información...”.
nanoe-G
Desactiva microorganismos dañinos como virus, bacterias, etc. manteniendo así el aire limpio.
También neutraliza los virus y bacterias para mantener limpio el interior de la unidad.
22
Page 23

Guía rápida
TIMER
CANCEL
ON
O
1
3
S
CK
RES
AC
RC
AUTOCOMFO
Q
TIMER
S
CANCEL
ON
O
1
2
3
G
F
D
MILD DRY
G
S
K
RES
C
RC
MILD
DRY
FAN
S
D
AIR
S
G
AUTO
HEAT
OOL
DRY
ECO
I
G
3
1
2
3
1
1
TIMER
ON
1
OFF
FF
SET CHECK CLOCK RESET
ETCHE
AUTO
HEAT
C
COOL
DRY
MILD
DRY
OFF/ON
ECONAVI
NAV
MODE
MILD DRY
COOLIN
COOLING
POWERFUL/
POWERFUL/
FAN SPEED
AN SPEE
UIET
QUIET
TIMER
ON
1
OFF
FF
SET CHECK CLOCK RESET
ETCHECKCLOC
2 3
2
CANCEL
AC
AUTO
COMFORT
NANOE-G
NANOE-
TEMP
AIR SWING
AIR SWIN
2
CANCEL
A
AC
SET
3
RC
ET
SET
ET
3
ET
FAN
SPEED
PEE
AIR
SWING
WIN
RT
RC
2
Introducir las pilas
1
Retire la tapa trasera del mando a
distancia
Inserte pilas AAA o R03 (puede ser
2
usado ~ 1 año)
3
Cierre la tapa
Confi guración del reloj
1
Presione CLOCK
2
Ajuste la hora
3
Confi rmar
Funcionamiento básico
Seleccione el modo deseado
1
AUTO HEAT
DRY
Inicie/detenga el funcionamiento
2
COOL
POWER
•
Asegúrese de que aparezca la
indicación OFF .
3
Seleccione la temperature deseada
•
Gama de selección: 16 °C ~ 30 °C.
•
El funcionamiento de la unidad
dentro de la temperatura
recomendada podría ahorrar
energía.
CALOR : 20 °C ~ 24 °C.
FRÍO : 26 °C ~ 28 °C.
SECO : 1 °C ~ 2 °C menos que la
temperatura ambiente.
Contenido
Precauciones de seguridad .............24-25
Forma de uso ..................................26-27
Obtener más información... ...........28-29
Instrucciones de lavado ........................30
Localización de averías ....................... 31
Información ........................................... 62
Accesorios
•
Mando a distancia
•
2 x pilas AAA o R03
•
Soporte del control remoto
•
2 x tornillos para el soporte del
mando a distancia
Español
•
Pulse y mantenga pulsado durante 5
segundos para oscurecer o restablecer el
8m
brillo del indicador de la unidad.
•
Utilice el mando a distancia a un máximo
de 8 metros desde el receptor del mando
a distancia de la unidad interior.
Las ilustraciones de este manual sirven únicamente para describir las
explicaciones y pueden no coincidir exactamente con las del aparato
suministrado. Están sujetas a cambios sin previo aviso con el fi n de mejorar
el producto.
23
Page 24

Precauciones de seguridad
Entrada de
aire
Entrada de aire
Salida de aire
Salida de
aire
Para evitar lesiones personales, lesiones a terceros, o
daños materiales, cumpla lo siguiente:
El uso incorrecto por no seguir las instrucciones puede
causar daños o averías; su gravedad se clasifi ca con las
indicaciones siguientes:
Esta indicación advierte
ADVERTENCIA
PRECAUCIÓN
Las instrucciones que deben seguirse están clasifi cadas
mediante los siguientes símbolos:
Unidad interior
Salida de aire
Mando a
distancia
Entrada de aire
del posible peligro de
muerte o de daños
graves.
Esta indicación advierte
de los posibles daños o
desperfectos materiales.
Este símbolo denota una acción
que está PROHIBIDA.
Estos símbolos indican aquellas
acciones que son OBLIGATORIAS.
Fuente de energía
Entrada de
aire
Unidad interior y unidad exterior
Este aparato puede ser utilizado por niños a
partir de 8 años y personas con dicapacidad
física, sensorial o mental o falta de experiencia
y conocimientos si están bajo supervisión o
han recibido instrucciones relativas al uso del
aparato de un modo seguro y comprenden los
riesgos implícitos. Los niños no deben jugar con
el aparato. La limpieza y el mantenimiento no
debe ser realizado por niños sin supervisión.
Por favor, consulte a un distribuidor autorizado
o especialista para limpiar las partes internas,
reparar, instalar, eliminar y reinstalar la unidad.
Una incorrecta manipulación e instalación puede
causar fugas, descargas eléctricas o incendios.
Confi rme con el servicio técnico autorizado o
el especialista el uso del tipo de refrigerante
especifi cado.
Utilizar un tipo de refrigerante diferente al
tipo especifi cado puede provocar daños en el
producto, explosiones y lesiones, etc.
No instale la unidad en ambientes
potencialmente explosivos o infl amables. En
caso contrario, podría provocar accidentes de
incendios.
No introduzca los dedos u otros objetos
en la unidad exterior o interior del
aire acondicionado, ya que las partes
rotatorias podrían provocarle lesiones.
No toque la unidad exterior durante un
relámpago, ya que podría causar una descarga
eléctrica.
Para evitar el excesivo enfriamiento no se
exponga directamente al aire frío durante un
prolongado período.
No se siente o apoye sobre la unidad, se
podría caer accidentalmente.
ADVERTENCIA
24
Unidad exterior
Salida de
aire
Mando a distancia
No permita que bebés y niños pequeños
jueguen con el mando a distancia para evitar
que ingieran accidentalmente las pilas.
Suministro eléctrico
No comparta la misma salida
eléctrica con otros equipos
para evitar el calentamiento e
incendios.
Page 25

Para evitar el sobrecalentamiento, incendio o
descarga eléctrica:
•
No comparta la misma toma de corriente con
otros equipos.
•
No lo manipule con las manos mojadas.
•
No doble excesivamente el cable de alimentación.
•
No encienda ni apague la unidad conectando o
desconectando el enchufe de alimentación.
Para evitar riesgos, si el cable de alimentación está
dañado y es necesario cambiarlo, deberá hacerlo el
fabricante, un representante del servicio técnico o
una persona cualifi cada.
Se recomienda altamente instalarlo con un
disyuntor de fuga a tierra (ELCB) o un dispositivo
residual actual (RCD) para evitar descargas
eléctricas o incendios.
Para evitar el sobrecalentamiento, incendio o
descarga eléctrica:
•
Inserte el enchufe correctamente.
•
El polvo en el enchufe de alimentación debe ser
limpiado periódicamente con un paño seco.
Deje de utilizar el producto cuando haya cualquier
anormalidad/fallo y desconecte el cable de corriente
o desactive el interruptor de alimentación.
(Riesgo de humo/fuego/descarga eléctrica)
Ejemplos de anormalidad
•
El ELCB se desconecta frecuentemente.
•
Se percibe olor a humo.
•
Se observa ruido anormal o vibración en la
unidad.
•
Filtraciones de agua desde la unidad interior.
•
El cable de alimentación o el enchufe está
excesivamente caliente.
•
No se puede controlar la velocidad del ventilador.
•
La unidad se para inmediatamente incluso
estando en funcionamiento.
•
El ventilador no se para incluso habiendo cesado
la operación.
Contacte inmediatamente con su proveedor local
para su mantenimiento/reparación.
Este equipo deberá conectarse a tierra para evitar
descargas eléctricas o incendios.
Evite las descargas eléctricas apagando el
interruptor de alimentación y desenchufando la
unidad:
- Antes de limpiarlo o repararlo,
- Cuando no vaya a utilizarla durante un largo
periodo, o
- Durante tormentas eléctricas especialmente
violentas.
PRECAUCIÓN
Unidad interior y unidad exterior
No lave la unidad interior con agua, benceno,
disolvente o limpiador en polvo para evitar daños o
corrosión en la unidad.
No utilice la unidad a fi nes de conservación de:
equipos de precisión, alimentos, animales, plantas,
obras de arte u otros objetos. Podría causar un
deterioro en su calidad, etc.
No utilice ningún equipo combustible delante de
la salida de aire pare evitar que se propague un
incendio.
Para prevenir lesiones, etc no exponga
directamente al fl ujo del aire plantas o animales de
compañía.
No toque el borde de las aletas de
aluminio del intercambiador, las piezas
afi ladas pueden causar lesiones.
No encienda la unidad cuando encere el
suelo. Después de encerar, airee la habitación
correctamente antes de usar la unidad.
Para evitar daños a la unidad no la instale en zonas
grasas y con humo.
Para evitar lesiones no desmonte la unidad para
su limpieza.
Para evitar lesiones durante la limpieza de la
unidad sitúese sobre una superfi cie estable.
No coloque un jarrón o un recipiente que contenga
liquido sobre la unidad. El agua podría entrar en
el interior de la unidad y degradar el aislamiento
causando una descarga eléctrica.
No abrir la ventana o la puerta por un periodo de
tiempo prolongado durante la modalidad de FRIO/
SECO.
Evite las fugas de agua asegurándose de que la
tubería de drenaje esté:
- Correctamente conectada,
- Libre de colmos de agua y recipientes, o
- No sumergida en el agua
Airear la habitación regularmente después de su
uso durante un prolungado período o tras el empleo
de cualquier equipo combustibile.
Después de un largo periodo de uso, asegúrese
de que la ranura de instalación no se encuentre
deteriorada, para evitar que la unidad se caiga.
Mando a distancia
No utilice pilas recargables (Ni-Cd). Podría dañar el
control remoto.
Para evitar mal funcionamiento o deterioro del
control remoto:
•
Extraiga las pilas si no va a utilizar la unidad
durante un periodo prolongado de tiempo.
•
Las baterías nuevas deben ser del mismo tipo
y se insertan siguiendo las indicaciones de la
polaridad segnaladas.
Suministro eléctrico
Para evitar descargas eléctricas durante la
desconexión del enchufe no tire del cable para
desenchufarlo.
Español
Precauciones de seguridad
25
Page 26

TEMP
OFF/ON
TIMER
S
CANCEL
ON
O
2
3
CHECK
K
Forma de uso
POWER
TIMER
AUTO COMFORT
NANOE-G
POWERFUL
QUIET
(Verde) (Verde) (Azul) (Naranja)(Naranja)(Naranja) (Verde)
ECONAVI
Para optimizar el ahorro de energía
MODE
Seleccionar modo de operación
Pantalla del
mando a distancia
AUTOMÁTICO - Para su comodidad
CALOR - Para disfrutar de aire caliente
FRÍO - Para disfrutar de aire frío
SECO - Para deshumidifi car el ambiente
MILD DRY
COOLING
Para mejorar el nivel de humedad
•
Esta operación reduce la sequedad del aire y le
proporciona un ambiente cómodo durante el modo de sólo
COOL.
•
Cuando la dirección del fl ujo de aire vertical está
establecida en AUTO, se detiene en una posición más
baja para evitar el contacto con el aire frío. Sin embargo,
puede ajustar la dirección de la aleta de forma manual.
POWERFUL/
QUIET
Para cambiar entre potente y
silencioso
QUIETPOWERFUL NORMAL
POTENTE: Para alcanzar temperatura rápidamente
POWERFUL
•
Este funcionamiento se detiene automáticamente después
de 20 minutos.
SILENCIOSO: Para disfrutar del funcionamiento
silencioso
QUIET
•
Esta operación reduce el ruido de corriente de aire.
FAN SPEED
(Pantalla del mando a distancia)
•
Para AUTO (automático), la velocidad de ventilador de
interior es ajustada automáticamente según el modo de
operación.
AUTO
HEAT
COOL
DRY
MILD
DRY
OFF/ON
ECONAVI
MODE
MILD DRY
COOLING
POWERFUL/
QUIET
TIMER
ON
1
OFF
FF
SET CHECK CLOCK RESET
TEMP
FAN SPEED
2
CLOC
FAN
SPEED
AIR
SWING
AUTO
COMFORT
NANOE-G
AIR SWING
ET
SET
3
CANCEL
AC
RC
Para seleccionar la velocidad del
ventilador
Sensor de presencia
humana
Sensor de luz solar y
receptor de mando a
distancia
Presione y sostenga durante
aproximadamente 10
segundos para mostrar la
temperatura en °C o °F.
Pulse para restablecer el
ajuste de fábrica del mando a
distancia.
No utilizado en funciones
normales.
Indicador
Botón de ENCENDIDO/APAGADO automático (Auto OFF/ON)
Utilizado cuando el mando a distancia está extraviado o funciona mal. Abra el panel frontal:
1. Para usar en modo AUTOMÁTICO, pulse el botón una vez.
2. Pulse el botón y manténgalo pulsado hasta que oiga 1 pitido. A continuación, suelte el botón para usar
AUTO
OFF/ON
el modo FRÍO forzado.
3. Repita el paso 2. Pulse el botón y manténgalo pulsado hasta que oiga 2 pitidos. A continuación, suelte
el botón para usar en el modo CALOR forzado.
•
Vuelva a pulsar el botón para apagarlo.
26
Page 27

TIMER
CANCEL
3
2
Para más información, consulte “Obtener más información...”.
AUTO
COMFORT
Para maximizar la comodidad
AUTO COMFORT
NANOE-G
Para purifi car el aire
NANOE-G
•
nanoe-G se inicia automáticamente cuando la unidad se
enciende con
•
Se puede activar incluso cuando la unidad esté apagada.
OFF/ON
.
Para ajustar el temporizador
Están disponibles 2 conjuntos de temporizadores de
encender y apagar, para encender y apagar la unidad a
diferentes tiempos predefi nidos.
En estas condiciones, la unidad funcionará con la velocidad
AUTO de ventilador y oscilación de la rejilla.
Para desactivar los virus y las bacterias en el fi ltro
NANOE-G
•
Después de apagar la unidad, la desactivación del fi ltro
interior de nanoe-G puede estar activado hasta 150 minutos.
Al encender la unidad esta operación se cancela.
•
Para deshabilitar esta operación, mantenga pulsado
hasta que se perciba un breve pitido. Esta acción no
deshabilita la función de purifi cación del aire de nanoe-G.
•
Para restaurar la activación del fi ltro interior de nanoe-G,
mantenga pulsado
largo.
AIR SWING
POWER
NANOE-G
NANOE-G
hasta que se perciba un pitido
Para regular la dirección de la corriente
de aire
•
(Pantalla del mando a distancia)
•
•
Mantiene la habitación ventilada.
•
En el modo FRÍO/SECO, si AUTOMÁTICO está confi gurado,
la rejilla gira hacia la izquierda/derecha y arriba/abajo
automáticamente.
•
En el modo CALOR, si se ha seleccionado AUTOMÁTICO,
la aleta horizontal se fi ja en la posición predeterminada. La
rejilla vertical gira a la izquierda/derecha después de subir la
temperatura.
•
No ajuste la rejilla manualmente.
•
•
•
21 3
ON
1
OFF
Ajuste el temporizador
1
de activación (ON) o de
SET
3
2
CANCEL
Ejemplo:
Apagar a las 22:00
desactivación (OFF)
•
Cada vez que se pulsa:
Cancel
Ajuste la hora
2
Confi rmar
3
OFF
SET
TIMER
Para cancelar el temporizador de encender y apagar,
pulse ON o
y luego pulse
Si el temporizador se cancela manualmente o a causa
para seleccionar respectivamente o
OFF
.
CANCEL
de un fallo de alimentación, puede restablecer de nuevo
el temporizador pulsando ON o
respectivamente o y luego pulse
para seleccionar
OFF
SET
.
El ajuste de temporizador más próximo aparecerá y se
activará en modo secuencial.
Cuando el temporizador es ajustado en ON, la unidad
puede comenzar (hasta 35 minutos) antes de la hora
real programada para alcanzar la temperatura deseada
a tiempo.
La función de temporizador está basada en la hora
programada en el mando a distancia y se repite
diariamente. Para confi gurar el reloj, consulte la Guía
rápida.
Español
Forma de uso
Nota
POWERFUL/
ECONAVI
QUIET
,
•
Se puede activar en todos los modos y se puede cancelar
pulsando de nuevo el botón respectivo.
AUTO
COMFORT
,
NANOE-G
,
POWERFUL/
ECONAVI
QUIET
,
•
No se puede seleccionar al mismo tiempo.
•
No se puede activar durante la operación DRY COOLING
AUTO
COMFORT
,
NEUTRO.
27
Page 28

Obtener más información...
Modo de operación
AUTOMÁTICO: Durante la selección del modo de funcionamiento el indicador de POWER parpadea.
• La unidad selecciona el modo de funcionamiento cada 10 minutos de acuerdo con la confi guración de temperatura y la temperatura
ambiente.
CALOR: La unidad para calentarse requiere de un instante. Durante esta operación el indicador de POWER parpadea.
FRÍO: Use cortinas para proteger el espacio de la luz solar y del calor exterior y así reducir el consumo eléctrico durante el modo de FRÍO.
SECO: La unidad funciona en la velocidad de ventilador bajo para proporcionar una agradable refrigeración.
• Para los sistemas en los que el modo CALOR está bloqueado, si se selecciona un modo de funcionamiento distinto de CALOR, la unidad
de interior se detiene y el indicador de encendido parpadea.
Desactivación del fi ltro interior de nanoe-G
Dependiendo del tiempo de funcionamiento acumulado de la unidad, puede que la desactivación del fi ltro interior de nanoe-G se active
solamente una vez al día.
Para eliminar la humedad presente en las partes internas, el ventilador funcionará durante 30 minutos con la aleta ligeramente abierta. Este
proceso solo tiene lugar cuando la unidad funciona con el modo FRÍO/SECO antes de apagarse. A continuación, nanoe-G neutraliza los
virus/bacterias en el fi ltro durante 2 horas con el ventilador apagado y la rejilla cerrada.
Durante esta operación, no desconecte la alimentación eléctrica. Si se produce un corte eléctrico, esta operación no se reanudará.
ECONAVI y AUTO COMFORT
ECONAVI
La unidad comenzará a inicializarse
(durante 1 minuto aproximadamente)
AUTO
COMFORT
o
El sensor de actividad humana y el
sensor de luz solar comenzarán a
detectar ambas cosas.
Funcionamiento del sensor de actividad humana
ECONAVI
Modo
FRÍO/SECO
CALOR
AUTO COMFORT ;
siempre resulte agradable.
Modo
FRÍO/SECO
CALOR
; Al detectar la presencia y actividad humanas, la unidad controla la temperatura de la habitación para ahorrar energía.
Humano
Ajustar
temperatura
Al detectar la presencia y la actividad humana, la unidad controla la temperatura de la habitación para que
Humano
Ajustar
temperatura
Definir la
velocidad del
ventilador
Actividad baja Actividad normal
+1 °C
Actividad baja Actividad normal
+1 °C
+0.3 °C
+1 punto
*
Nota
AIRSWING
Cuando se selecciona la modalidad manual
AIR SWING, se cancelarán las modalidades
de funcionamiento ECONAVI y AUTO
COMFORT.
Actividad alta Ausente
Actividad alta Ausente
-1 °C
-2 °C
+1 punto
+2 °C
-2 °C-2 °C
+2 °C
-2 °C
9HQWLODGRUPHGLR
ECONAVI Y AUTO COMFORT
Control exacto de la temperatura durante periodos de actividad baja para maximizar el ahorro de energía.
Modo
FRÍO/SECO
*
En los momentos de baja actividad, la velocidad del ventilador se ajusta en 1 punto durante los primeros
15 minutos o hasta que se alcanza la temperatura fijada.
** Cuando no hay presencia humana, la velocidad máxima del ventilador para el modo FRÍO/SECO es la ventilación media.
Humano
Ajustar
temperatura
Actividad baja
ECONAVI y AUTO COMFORT suplen la falta de sensibilidad
que los seres humanos tenemos para detectar subidas de
temperatura en niveles de baja actividad y, gracias a estas
funciones, la unidad ajusta la temperatura para maximizar
el ahorro de energía sin comprometer el confort.
28
Page 29

El sensor de presencia humana también realizará la escanción por area de fuente de calor y de movimiento en una
habitación.
Zona del sensor
• En función de la actividad de la zona, la rejilla de fl ujo de aire horizontal
se ajustará en una posición predeterminada u oscilará a izquierda/derecha
periódicamente.
• El rendimiento del sensor de actividad humana está determinado por la ubicación de la
unidad interior, la velocidad de movimiento, el rango de temperatura, etc.
• El sensor de actividad humana puede:
- detecta erróneamente un objeto con fuente de calor y movimiento similar a los
humanos, como mascotas, etc.
- detecta erróneamente como una no fuente de calor y movimiento si una persona
permanece inmóvil durante un determinado periodo de tiempo.
• No coloque objetos voluminosos cerca del sensor y mantenga distantes las unidades
de calefacción o humidifi cadores de su zona de cobertura. Puede provocar un
funcionamiento erróneo del sensor.
120º
7m
Funcionamiento del sensor de luz solar
ECONAVI ; Al detectar la intensidad de la luz solar, la unidad ajusta la temperatura
Modo
FRÍO/SECO
CALOR
• En una sala sin ventana o con una cortina gruesa, el sensor de luz solar lo juzgará como nuboso/noche.
para poder ahorrar energía.
Condición ambiente
Ajustar
temperatura
+1 °C
-1 °C -1 °C
Cuando ECONAVI está
activado, la unidad mantiene
la temperatura ajustada hasta
que se detecta una elevada
intensidad de la luz solar. El
sensor detecta la intensidad
de la luz solar cuando el
tiempo varía o hay cambios
día/noche, y la unidad ajusta
la temperatura.
Condiciones de funcionamiento
Utilice este aparato de aire acondicionado dentro del siguiente intervalo de temperaturas.
DBT : Temperatura en seco
WBT : Temperatura en húmedo
Temperatura (°C)
FRÍO
CALOR
Máx. 32 23 43 26
Mín. 16 11 -10 -
Máx. 30 - 24 18
Mín. 16 - -15 -16
Interior Exterior
DBT WBT DBT WBT
Español
Obtener más información...
29
Page 30

Instrucciones de lavado
Para garantizar un desempeño óptimo de la unidad,
la limpieza se debe realizar en intervalos regulares.
La unidad sucia puede causar un mal funcionamiento
y puede ver parpadear el indicador nanoe-G o puede
recuperar un código de error “H99”. Consulte con su
distribuidor autorizado.
•
Apague la unidad y desenchúfela antes de limpiarla.
•
No toque la las partes angulosas de aluminio pueden causar
heridas.
•
No utilice benceno, disolvente o limpiador en polvo.
•
Utilice sólo jabones ( pH 7) o detergentes domésticos
neutros.
•
No utilice agua con una temperatura superior a 40 °C.
Unidad interior
Limpie la unidad suavemente con un paño
suave y seco.
Sensor de presencia humana
No golpee ni presione violentamente el sensor ni introduzca un
objeto punzante. Podría provocar daños y mal funcionamiento.
Panel frontal
Lávelo con cuidado y séquelo.
Retire el panel frontal
Quite
2
Unidad interior
Sensor de presencia
humana
Generador nanoe-G
Cada 2 semanas
•
Límpielos con un bastoncillo de algodón
seco.
•
No toque durante el funcionamiento.
Filtros de aire
Cada 2 semanas
•
Lave/enjuague los fi ltros con agua, con
cuidado para evitar dañar la superfi cie del
mismo.
•
Secar minuciosamente los fi ltros a la sombra, lejos del fuego
o la luz solar directa.
•
Reemplace los fi ltros dañados.
Retirar el fi ltro de aire Fijar el fi ltro de aire
Aleta de aluminioPanel frontal
Generador nanoe-G
Filtros de aire
Abrir
1
Cerrar con fi rmeza
Insertar en ambos lados
1
2
Cerrar
3
Presionar ambos extremos del panel delantero
4
Presionar en el centro del panel delantero.
30
Introducir en la unidad
Para inspección estacional después de un largo
período en desuso
•
Verifi que las pilas del mando a distancia.
•
Compruebe que las tomas de entrada y salida de las
rejillas de ventilación no estén obstruidas.
•
Utilice el botón Auto OFF/ON (apagado/encendido
automático) para seleccionar la operación FRÍO/CALOR.
Después de 15 minutos de funcionamiento, es normal
tener la siguiente diferencia de temperatura entre la
ventilación del aire que ingresa y el aire que sale:
FRÍO: ≥8 °C CALOR: ≥14 °C
Si no se va a utilizar la unidad durante un periodo
prolongado de tiempo
•
Active el modo de CALOR durante 2 ~3 horas para
retirar la humedad restante en todas las partes internas y
evitar así la acumulación de moho.
•
Apague la unidad y desenchúfela.
•
Extraiga las pilas del mando a distancia.
Page 31

Localización de averías
TIMER
S
CANCEL
ON
O
1
3
S
K
RES
AC
RC
Las siguientes señales no indican un mal funcionamiento.
Sale neblina de la unidad interior.
Se escucha un sonido similar a agua fl uyendo durante el
funcionamiento.
Hay un olor extraño en la habitación.
El ventilador interior se para de vez en cuando con la
velocidad del ventilador automática.
El fl ujo de aire continúa aún después de que se haya parado
el funcionamiento.
El aparato tarda varios minutos en funcionar tras volver a
encenderlo.
La unidad exterior emite agua o vapor.
El indicador está TIMER siempre está encendido.
El indicador POWER parpadea durante el modo CALOR sin
suministro de aire caliente (y la rejilla está cerrada).
El ventilador interior se para de vez en cuando durante la
función de calentamiento.
El indicador POWER parpadea antes de encender la unidad.
Sonido seco (de chasquido) durante el funcionamiento.• Los cambios de temperatura causan la expansión/ contracción de la
Durante el modo FRÍO/SECO, la unidad de interior se detiene
y el indicador de encendido parpadea.
Compruebe lo siguiente antes de llamar a un técnico.
El modo CALOR/FRÍO no funciona efi cientemente.
Funcionamiento ruidoso.
El mando a distancia no funciona.
(La pantalla está oscura o la señal de transmisión es débil.)
La unidad no funciona.
La unidad no recibe la señal del mando a distancia.
Señal Causa
•
Efecto de condensación producido durante el proceso de enfriamiento.
•
Flujo del refrigerante en el interior de la unidad.
•
Puede ocurrir debido al olor a humedad producido por las paredes, las
alfombras, los muebles o las telas de la habitación.
•
Con esto se eliminan los malos olores del ambiente.
•
Extracción de calor restante de la unidad interior (máximo 30 segundos).
•
El retraso responde a un dispositivo de protección del compresor de la
unidad.
•
Se produce condensación o evaporación en los tubos.
•
Una vez confi gurado, el ajuste del temporizador se repite todos los días.
•
La unidad se encuentra en el modo de descongelación (y AIR SWING
está ajustado en AUTO).
•
Para evitar un efecto de enfriamiento indeseado.
•
Se trata de un paso preliminar para preparar el funcionamiento cuando se
ha ajustado el temporizador de encendido.
unidad.
•
El sistema se ha bloqueado para funcionar solo en modo CALOR.
Señal Compruebe
•
Programe la temperatura correctamente.
•
Cierre todas las puertas y ventanas.
•
Limpie o sustituya los fi ltros.
•
Limpie cualquier obstrucción en la entrada y salida de aire.
•
Compruebe si la unidad ha sido instalada en una inclinación.
•
Cierre el panel delantero correctamente.
•
Inserte las baterías correctamente.
•
Reemplace las baterías débiles.
•
Compruebe si el disyuntor está activado.
•
Compruebe si los temporizadores han sido programados.
•
Asegúrese de que el receptor no esté obstruido.
•
Ciertas luces fl uorescentes puede interferir con el transmisor de señal.
Consulte al distribuidor autorizado.
Español
NO UTILICE LA UNIDAD SI
APAGUE LA FUENTE DE ALIMENTACIÓN Y
DESENCHUFE, por favor consulte un distribuidor
autorizado en caso se verifi quen las siguientes
condiciones:
•
Si escucha ruidos extraños durante el
funcionamiento.
•
Si entra agua o elementos extraños en el mando a
distancia.
•
Si hay escapes de agua de la unidad interior.
•
Si el interruptor del circuito salta frecuentemente.
•
El cable de alimentación está demasiado caliente.
•
Los interruptores o los botones no funcionan
correctamente.
La unidad se detiene y el TIMER parpadea.
Use el control remoto para recuperar el código de error.
1
Pulse
durante 5
segundos
3
Pulse para
abandonar
la comprobación
TIMER
ON
1
2
OFF
FF
SET CHECK CLOCK RESET
ET CLOC
AC
SET
ET
3
CANCEL
ET
2
Pulse hasta escuchar
un pitido y, después,
apunte el código del
RC
error
4
Apague la unidad
y comunique el
código de error a un
distribuidor autorizado
•
Para cierto error, puede reiniciar la unidad con el funcionamiento
limitado con 4 pitidos durante el inicio de la operación.
Instrucciones de lavado / Localización de averías
31
Page 32

Optimaler Komfort, saubere Luft und
hohe Energieersparnis
ECONAVI und AUTO COMFORT
Das mit dem Personen-Aktivitätssensor ausgestattete Klimagerät erzeugt nicht nur kühle Luft, sondern
sorgt auch für stets angenehme Raumluftbedingungen und einen minimalen Energieverbrauch.
Der Sonnenlichtsensor erfasst darüber hinaus die Intensität der Sonneneinstrahlung und hilft auf diese
Weise, jederzeit den optimalen Komfort zu gewährleisten.
Näheres siehe unter „Funktionsdetails...“.
nanoe-G
Mit dieser Funktion werden schädliche Mikroorganismen wie Viren, Bakterien usw. inaktiviert, um eine
saubere Raumluft zu gewährleisten.
Um das Geräteinnere sauber zu halten, werden Viren und Bakterien auch auf dem Filter inaktiviert.
32
Page 33

Kurzanleitung
TIMER
CANCEL
ON
O
1
3
S
CK
RES
AC
RC
AUTOCOMFO
Q
TIMER
S
CANCEL
ON
O
1
2
3
G
F
D
MILD DRY
G
S
K
RES
C
RC
MILD
DRY
FAN
S
D
AIR
S
G
AUTO
HEAT
OOL
DRY
ECO
I
G
3
1
2
3
1
1
2 3
TIMER
ON
1
2
OFF
FF
SET CHECK CLOCK RESET
ETCHE
AUTO
HEAT
C
COOL
DRY
MILD
DRY
OFF/ON
ECONAVI
NAV
MODE
MILD DRY
TEMP
COOLIN
COOLING
POWERFUL/
POWERFUL/
FAN SPEED
AN SPEE
UIET
QUIET
TIMER
ON
1
2
OFF
FF
SET CHECK CLOCK RESET
ETCHECKCLOC
SET
3
CANCEL
AC
RC
ET
AUTO
COMFORT
NANOE-
NANOE-G
AIR SWING
AIR SWIN
SET
ET
3
CANCEL
A
AC
ET
FAN
SPEED
PEE
AIR
SWING
WIN
RT
RC
Einlegen der Batterien
1
2
Deckel der Fernbedienung nach
unten wegziehen.
Batterien einlegen (AAA oder R03)
2
(Betriebsdauer etwa ein Jahr).
3
Batteriefach schließen.
Einstellen der Uhr
1
CLOCK drücken.
2
Gewünschte Uhrzeit einstellen.
3
Bestätigen.
Grundlegender Betrieb
Gewünschte Betriebsart
1
auswählen.
AUTO HEAT
DRY
Gerät ein- bzw. ausschalten.
2
POWER
•
Achten Sie darauf, dass auf der Anzeige
erscheinen muss, bevor Sie das
Gerät einschalten können.
3
Gewünschte Temperatur einstellen.
•
Einstellbereich: 16 °C bis 30 °C.
•
Ein Betreiben des Geräts bei der
empfohlenen Temperatur kann
helfen, Strom zu sparen.
HEIZEN: 20 °C bis 24 °C.
KÜHLEN: 26 °C bis 28 °C.
ENTFEUCHTEN: 1°C bis 2°C
COOL
niedriger als die
Raumtemperatur.
Inhalt
Sicherheitshinweise .......................... 34-35
Bedienung ........................................ 36-37
Funktionsdetails... ............................ 38-39
Reinigungsanweisungen ........................40
Störungssuche........................................41
Informationen..........................................62
Zubehör
•
Fernbedienung
•
2 Batterien des Typs AAA bzw. R03
•
Fernbedienungshalter
•
2 Schrauben für
Fernbedienungshalter
Deutsch
•
Um die Helligkeit der Symbole in der
8m
Anzeigenleiste zu verringern bzw.
wiederherzustellen, ist die Taste
5
Sekunden lang zu drücken.
•
Die Reichweite der Fernbedienung zum
Empfänger beträgt maximal 8 m.
Die Abbildungen in diesem Handbuch dienen nur Erläuterungszwecken und
können sich von dem tatsächlichen Gerät unterscheiden. Sie können durch
künftige Verbesserungen am Gerät ohne vorherige Ankündigung geändert
werden.
33
Page 34

Sicherheitshinweise
Lufteintritt
Lufteintritt
Luftaustritt
Luftaustritt
Um Personen- oder Geräteschäden zu vermeiden, sind die
nachfolgend aufgeführten Sicherheitshinweise zu beachten:
Die verwendeten Warnhinweise untergliedern sich
entsprechend ihrer Wichtigkeit wie folgt:
Die Nichtbeachtung
VORSICHT
ACHTUNG
Bei den folgenden Symbolen handelt es sich um Verbote bzw.
Gebote:
dieses Hinweises kann zu
schweren Verletzungen
oder gar zum Tod führen.
Die Nichtbeachtung
dieses Hinweises kann
zu Verletzungen oder zu
Beschädigungen führen.
Dieses Symbol weist darauf hin,
dass eine bestimmte Tätigkeit NICHT
durchgeführt werden darf.
Diese Symbole weisen darauf hin,
dass bestimmte Tätigkeiten
durchgeführt werden MÜSSEN.
Stromversorgung
Innengerät
Lufteintritt
Luftaustritt
Fernbedienung
Lufteintritt
Außengerät
Luftaustritt
Innen- und Außengerät
Fernbedienung
VORSICHT
Dieses Gerät kann von Kindern ab 8 Jahren sowie
Personen verwendet werden, welche eingeschränkte
körperliche, sensorische oder geistige Fähigkeiten
aufweisen bzw. fehlende Erfahrung und Kenntnis im
Umgang mit diesem Gerät haben, wenn sie zuerst
auf sichere Weise instruiert wurden oder während der
Gerätebedienung beaufsichtigt werden und die damit
verbundenen Gefahren verstanden haben. Kinder
sollten nicht mit dem Gerät spielen. Reinigung und
Benutzerwartung sollten nur von Kindern durchgeführt
werden, wenn diese dabei beaufsichtigt werden.
Bitten wenden Sie sich an einen Fachhändler oder
Kundendienst, um die Einbauteile reinigen zu lassen, und
wenn das Gerät repariert, montiert, ausgebaut oder neu
installiert werden soll. Eine unsachgemäße Installation
und Handhabung kann elektrische Schläge oder Brände
verursachen oder dazu führen, dass Wasser aus dem
Gerät tropft.
Zur Verwendung des korrekten Kältemittels wenden Sie
sich an Ihren Fachhändler bzw. Kundendienst.
Durch den Einsatz eines anderen als des angegebenen
Kältemittels kann das Produkt beschädigt werden oder gar
Verletzungen hervorrufen.
Das Gerät darf nicht in einer potenziell explosiven oder
entfl ammbaren Atmosphäre verwendet werden, da
ansonsten Brandgefahr besteht.
Fassen Sie nicht in das Innen- oder Außengerät
und stecken Sie auch keine Gegenstände hinein,
drehende Teile könnten sonst zu Verletzungen
führen.
Fassen Sie bei Gewittern nicht das Außengerät an, da die
Gefahr von Stromschlägen besteht.
Halten Sie sich nicht zu lange im kalten Luftstrom auf.
Stellen oder setzen Sie sich nicht auf das
Außengerät, Sie könnten herunterfallen und sich
verletzen.
Kinder sollten Sie nicht mit der Fernbedienung spielen
lassen, da sonst die Gefahr besteht, dass sie Batterien
verschlucken könnten.
34
Stromversorgung
Verwenden Sie keine modifi zierten oder
miteinander verbundenen oder nicht
spezifi zierten Netzkabel und auch keine
Verlängerungskabel, um Überhitzung
und Brandgefahr zu vermeiden.
Page 35

Beachten Sie Folgendes, um eine Überhitzung, Feuer
oder Stromschläge zu vermeiden:
•
Schließen Sie keine anderen elektrischen Geräte
zusammen mit dem Klimagerät an.
•
Das Klimagerät darf nicht mit nassen oder feuchten
Händen bedient werden.
•
Das Netzkabel darf nicht geknickt werden.
•
Das Klimagerät darf nicht durch Einstecken oder
Herausziehen des eventuell vorhandenen Steckers
ein- bzw. ausgeschaltet werden.
Bei Beschädigung des Netzkabels muss das Kabel
durch den Hersteller, seinen Kundendienst oder eine
entsprechend autorisierte Person ausgewechselt
werden, um eine Gefährdung für Personen zu
vermeiden.
Es wird dringend empfohlen, das Klimagerät zusätzlich
mit einem FI-Schutzschalter zu versehen, um
Stromschläge oder Brände zu vermeiden.
Beachten Sie Folgendes, um eine Überhitzung, Feuer
oder Stromschläge zu vermeiden:
•
Stecken Sie den eventuell vorhandenen Netzstecker
richtig in die Steckdose.
•
Staub auf dem eventuell vorhandenen Stecker sollte
regelmäßig mit einem trockenen Tuch weggewischt
werden.
Im Fall einer Funktionsstörung oder einer Fehlfunktion
ist das Produkt auszuschalten und der Netzstecker zu
ziehen bzw. der Sicherungsautomat zu öffnen (Gefahr
von Rauchbildung, Feuer oder elektrischen Schlägen).
Beispiele für Funktionsstörungen bzw. Fehlfunktionen
•
Der Fehlerstrom-Schutzschalter löst häufi g aus.
•
Es riecht verbrannt.
•
Ungewöhnliche Geräusche oder Vibrationen.
•
Wasser tropft aus dem Innengerät.
•
Das Netzkabel bzw. der Netzstecker wird
ungewöhnlich warm.
•
Die Ventilatordrehzahl wird nicht geregelt.
•
Das Gerät bleibt sofort stehen, wenn es eingeschaltet
wird.
•
Der Ventilator bleibt nicht stehen, wenn das Gerät
abgeschaltet wird.
Wenden Sie sich für Wartungs- und Reparaturarbeiten
umgehend an Ihren Fachhändler.
Dieses Gerät muss geerdet sein, um Stromschläge
oder Brände zu vermeiden.
Um Stromschläge zu vermeiden, schalten Sie das
Gerät aus und unterbrechen Sie die Stromversorgung,
- das Gerät gereinigt oder gewartet werden soll,
- wenn das Gerät längere Zeit außer Betrieb
genommen werden soll, oder
- wenn starke Gewitter herrschen.
ACHTUNG
Innen- und Außengerät
Um Beschädigungen oder eine Korrosion des Geräts
zu vermeiden, reinigen Sie das Innengerät nicht mit
Wasser, Benzin, Verdünner oder Scheuerpulver.
Verwenden Sie das Gerät nicht zum Kühlen von
Präzisionsgeräten, Nahrung, Tieren, Pfl anzen,
Kunstwerken oder ähnlichen Objekten, da diese sonst
in Mitleidenschaft gezogen werden könnten.
Um eine Ausbreitung von Feuer zu vermeiden, dürfen
keine Verbrennungsgeräte in den Luftstrom des Geräts
gestellt werden.
Um Unterkühlungen zu vermeiden, sollten Haustiere
oder Pfl anzen nicht direkt dem Luftstrom ausgesetzt
werden.
Es sollten keine scharfkantigen
Aluminiumlamellen anfasst werden, weil
diese Verletzungen hervorrufen könnten.
Das Klimagerät darf nicht eingeschaltet sein, wenn
der Fußboden gewachst wird. Belüften Sie den Raum
nach dem Wachsen sorgfältig, bevor Sie das Gerät
einschalten.
Um Beschädigungen des Geräts zu vermeiden, sollte
es nicht in fett- und rauchhaltigen Bereichen montiert
werden.
Um Verletzungen zu vermeiden, darf das Gerät nicht
zu Reinigungszwecken auseinandergebaut werden.
Steigen Sie nicht auf eine instabile Unterlage, wenn Sie
das Gerät reinigen, sonst besteht Verletzungsgefahr.
Stellen Sie keine Vase oder andere Wassergefäße
auf das Gerät. Ansonsten könnte Wasser in das Gerät
gelangen und die Isolierung beeinträchtigen, was zu
Stromschlägen führen könnte.
Im Kühl- und im Entfeuchtungsbetrieb sollte vermieden
werden, Fenster bzw. Türen längere Zeit offen zu
halten.
Um ein Austreten von Wasser zu verhindern, ist darauf
zu achten, dass die Kondensatleitung
- fachgerecht angeschlossen wird,
- nicht direkt in einen Abfl uss geführt wird, bei dem
Rückstaugefahr besteht,
- nicht in einen mit Wasser gefüllten Behälter geführt
wird.
Nach einer längeren Nutzung von Kaminen oder
ähnlichem sollte der Raum regelmäßig gelüftet werden.
Nach einer langen Nutzungsdauer ist zu kontrollieren,
ob die Montagehalterung noch einwandfrei ist, damit
das Gerät nicht herunterfällt.
Fernbedienung
Es sollten keine wiederaufl adbaren Ni-Cd-Akkus
verwendet werden. Diese könnten die Fernbedienung
beschädigen.
Beachten Sie Folgendes, um Fehlfunktionen oder eine
Beschädigung der Fernbedienung zu vermeiden:
•
Nehmen Sie die Batterien aus dem Batteriefach,
wenn die Fernbedienung längere Zeit nicht benutzt
wird.
•
Es sind stets neue Batterien gleichen Typs
einzulegen, wobei die Polarität zu beachten ist.
Stromversorgung
Um Stromschläge zu vermeiden, ziehen Sie den
eventuell vorhandenen Stecker nicht am Netzkabel
heraus.
Sicherheitshinweise
Deutsch
35
Page 36

TEMP
OFF/ON
TIMER
S
CANCEL
ON
O
2
3
CHECK
K
Bedienung
POWER
TIMER
AUTO COMFORT
NANOE-G
POWERFUL
QUIET
(Grün) (Grün) (Blau) (Orange)(Orange)(Orange) (Grün)
ECONAVI
Anzeigeleiste
Optimierte Energieersparnis
MODE
Anzeige auf dem Display
Personen-Aktivitätssensor
Einstellen der Betriebsart
AUTOMATIK - Für einen hohen Komfort
HEIZEN - Für ein warmes Raumklima
KÜHLEN - Für ein kühles Raumklima
ENTFEUCHTEN - Zum Entfeuchten der Raumluft
MILD DRY
COOLING
Verbessern des Feuchtegehalts der Luft
•
Diese Betriebsart reduziert im Kühlbetrieb die Trockenheit
der Luft und schafft somit ein behaglicheres Klima.
•
Wenn die vertikale Luftschwenkautomatik eingestellt ist,
bleibt die Lamelle in der untersten Stellung stehen, um
einen kalten Luftzug zu vermeiden. Die Lamellenstellung
kann jedoch auch an der Fernbedienung manuell
eingestellt werden.
POWERFUL/
QUIET
Umschalten zwischen QUIET
(Flüsterbetrieb) und POWERFUL
(Turbobetrieb)
QUIETPOWERFUL NORMAL
POWERFUL: Turbobetrieb
POWERFUL
•
Diese Betriebsart endet automatisch nach 20 Minuten.
QUIET: Flüsterbetrieb
QUIET
•
In dieser Betriebsart wird der Schallpegel verringert.
AUTO
HEAT
COOL
DRY
MILD
DRY
ECONAVI
MODE
MILD DRY
COOLING
POWERFUL/
QUIET
TIMER
ON
1
OFF
FF
SET CHECK CLOCK RESET
FAN SPEED
OFF/ON
FAN
SPEED
AIR
SWING
AUTO
COMFORT
NANOE-G
TEMP
AIR SWING
FAN SPEED
ET
SET
3
2
CANCEL
AC
RC
CLOC
Einstellen der ventilatordrehzahl
(Anzeige auf dem Display)
•
In der Stellung AUTO wird die Drehzahl des
Innengeräteventilators automatisch an die jeweilige
Betriebsart angepasst.
Sonnenlichtsensor und
Fernbedienungsempfänger
Um zur Temperatureinstellung
zwischen °C und °F zu
wechseln, ist diese Taste
ca. 10 Sekunden lang zu
drücken.
Drücken Sie diese Taste,
um die Fernbedienung
zurückzusetzen.
Diese Taste wird im
Normalbetrieb nicht benötigt.
T aste AUTO OFF/ON
AUTO
OFF/ON
36
Bedienung, wenn die Fernbedienung ausgefallen oder unauffi ndbar ist. Klappen Sie zunächst die
Frontabdeckung hoch und verfahren Sie dann wie folgt:
1. Drücken Sie die Taste einmal, um den Automatikbetrieb zu nutzen.
2. Drücken Sie die Taste solange, bis 1 Piepton ertönt, und lassen Sie sie los. Das Gerät befi ndet sich
jetzt im Zwangskühlbetrieb.
3. Wiederholen Sie Schritt 2. Drücken Sie die Taste solange, bis 2 Pieptone ertönen, und lassen Sie sie
los. Das Gerät befi ndet sich jetzt im Zwangsheizbetrieb.
•
Drücken Sie die Taste erneut, um das Gerät auszuschalten.
Page 37

TIMER
CANCEL
3
2
Näheres siehe unter „Funktionsdetails...“.
A
AUTO
COMFORT
Maximierter Komfort
AUTO COMFORT
NANOE-G
Reinigen der Raumluft
NANOE-G
•
nanoe-G startet automatisch, wenn das Gerät mit
eingeschaltet wird.
•
Diese Funktion kann auch bei ausgeschaltetem Klimagerät
genutzt werden. Dabei arbeitet das Gerät im Umluftbetrieb
mit Ventilatorautomatik und Lamellenschwenkautomatik.
OFF/ON
Einstellen des Timers
Um das Gerät zu bestimmten Zeiten ein- bzw.
auszuschalten, stehen jeweils 2 Ein- und Ausschalt-Timer
zur Verfügung.
Inaktivieren von Viren und Bakterien am Luftfi lter
NANOE-G
•
Nach Ausschalten des Geräts arbeitet die nanoe-G-Funktion
zur Inaktivierung von Viren und Bakterien am Filter bis zu
150 Minuten lang. Beim Einschalten des Geräts wird diese
Funktion deaktiviert.
•
Wenn diese Funktion nicht genutzt werden soll, drücken Sie
die Taste
Piepton ertönt. Hiermit wird nicht die nanoe-G-Funktion zum
Reinigen der Raumluft abgeschaltet.
•
Um die nanoe-G-Funktion zur Inaktivierung von Viren und
Bakterien am Filter wieder einzuschalten, drücken Sie die Taste
NANOE-G
und halten Sie sie gedrückt, bis ein langer Piepton ertönt.
IR SWING
(Anzeige auf dem Display)
•
Durch die richtige Lamellenposition wird die Luft gleichmäßig
im Raum verteilt.
•
In der Einstellung AUTO schwingt die Lamelle in den
Betriebsarten Kühlen bzw. Entfeuchten automatisch nach
rechts und links.
•
Wenn im Heizbetrieb die Einstellung AUTO gewählt wurde,
wird die horizontale Luftlenklamelle in einer bestimmten
Stellung fi xiert. Die vertikalen Lamellen schwenken bei einem
Temperaturanstieg automatisch horizontal hin und her.
•
Die Luftlenklamelle darf nicht von Hand verstellt werden.
POWER
NANOE-G
und halten Sie sie gedrückt, bis ein kurzer
Ausrichten des Luftstroms
•
•
•
•
•
21 3
ON
1
OFF
Wählen Sie den Einschalt-
1
bzw. den Ausschalt- Timer
SET
3
2
CANCEL
Beispiel:
AUS at 22:00
aus
•
Mit jedem Tastendruck:
Cancel
Stellen Sie die gewünschte
2
OFF
Uhrzeit ein
Bestätigen
3
SET
TIMER
Um den Ein- bzw. Ausschalt-Timer zu löschen, drücken Sie
die Taste ON bzw.
dann die Taste
Nach einem Stromausfall oder dem Deaktivieren
, um bzw. auszuwählen,
OFF
.
CANCEL
der Timerfunktion kann die vorherige Einstellung
wiederhergestellt werden. Hierzu ist zunächst die Taste ON
bzw.
zum Auswählen von bzw. zu drücken,
OFF
dann die Taste
SET
.
Die nachfolgende Timer-Einstellung wird angezeigt und zur
angegebenen Zeit aktiviert.
Wenn der Einschalt-Timer gestellt ist, kann das Gerät bis zu
35 Minuten vor der eingestellten Uhrzeit anlaufen, damit die
gewünschte Raumtemperatur zu diesem Zeitpunkt erreicht
ist.
Die Timerfunktion richtet sich nach der in der Fernbedienung
eingestellten Uhrzeit und wird täglich ausgeführt. Zum
Einstellen der Uhrzeit siehe die Kurzanleitung.
Bedienung
Deutsch
Hinweis
POWERFUL/
ECONAVI
QUIET
,
•
Diese Funktionen können in allen Betriebsarten verwendet
und durch erneutes Drücken der jeweiligen Taste wieder
beendet werden.
AUTO
COMFORT
,
NANOE-G
,
POWERFUL/
ECONAVI
QUIET
,
•
Diese Funktionen können nicht gleichzeitig verwendet werden.
•
Sie können auch nicht während des Kühlens mit sanfter
AUTO
COMFORT
,
Entfeuchtung verwendet werden.
37
Page 38

Funktionsdetails...
Betriebsart
AUTOMATIK: Während die Betriebsart bestimmt wird, blinkt das POWER-Symbol.
• Das Gerät wählt die Betriebsart alle 10 Minuten in Abhängigkeit von der eingestellten Temperatur und der
Raumlufttemperatur.
HEIZEN : Es dauert etwas, bis das Gerät aufgeheizt ist. Während dieser Zeit blinkt das POWER-Symbol.
KÜHLEN: Um den Stromverbrauch im Kühlbetrieb zu verringern, schließen Sie die Vorhänge, damit kein direktes
ENTFEUCHTEN : Das Innengerät läuft mit niedriger Ventilatordrehzahl, um sanft zu kühlen.
• Bei einem System, in dem der Heizbetrieb gesperrt wurde und eine andere Betriebsart als der Heizbetrieb (HEAT)
In Abhängigkeit von der Gesamtbetriebszeit des Geräts wird die nanoe-G-Inaktivierung am Filter eventuell nur einmal
pro Tag eingeschaltet, sobald das Gerät ausgeschaltet wird.
Um die auf den Einbauteilen verbliebene Feuchtigkeit zu entfernen, läuft der Ventilator 30 Minuten lang bei leicht
geöffneter Lamelle. Diese Funktion wird nur aktiviert, wenn das Gerät vor dem Ausschalten in den Betriebsarten Kühlen
bzw. Entfeuchten genutzt wurde. In der Folge werden durch die nanoe-G-Funktion 2 Stunden lang Viren und Bakterien
inaktiviert, wobei der Ventilator nicht läuft und die Lamelle geschlossen bleibt.
Während dieser Zeit sollte die Stromversorgung nicht unterbrochen werden. Nach einem Stromausfall wird der
Inaktivierungsbetrieb nicht wieder aufgenommen.
Das Gerät benötigt beim
Einschalten einer dieser Funktionen
etwa eine Minute Vorlauf.
Sonnenlicht bzw. keine Wärme in den Raum gelangt.
ausgewählt ist, stoppt das Innengerät und das POWER-Symbol blinkt.
nanoe-G-Inaktivierung von Viren und Bakterien am Filter
ECONAVI und AUTO COMFORT
ECONAVI
oder
AUTO
COMFORT
Der Personen-Aktivitätssensorund der Sonnenlichtsensor
beginnen mit der Erfassung.
Funktionsweise des Personen-Aktivitätssensors
ECONAVI ;
Mode
KÜHLEN/
ENTFEUCHTEN
HEIZEN
AUTO COMFORT:
Mode
KÜHLEN/
ENTFEUCHTEN
HEIZEN
Anpassung der Raumtemperatur für eine erhöhte Energieersparnis durch Erfassung der Intensität der Sonneneinstrahlung.
Person(en)
Solltemperatur
Raumtemperaturregelung für einen hohen Komfort durch Erfassung des Aktivitätsgrads von Personen.
Person(en)
Solltemperatur
Eingestellte
Ventilatordrehzahl
Geringe Aktivität Normale Aktivität Hohe Aktivität Absent
+1 °C
Geringe Aktivität Normale Aktivität Hohe Aktivität Absent
+1 °C
+0.3 °C
+1 Stufe*
Hinweis
AIRSWING
Wenn manuell eine Lamellenstellung
eingestellt wird, werden der ECONAVIund der AUTO-COMFORT-Betrieb
deaktiviert.
+2 °C
-2 °C-2 °C
+2 °C
-1 °C
-2 °C
+1 Stufe
0LWWOHUH'UHK]DKO
-2 °C
ECONAVI und AUTO COMFORT
Präzise Temperaturregelung bei geringer Aktivität für eine maximale Energieersparnis.
Mode
KÜHLEN/
ENTFEUCHTEN
Bei niedriger Aktivität wird die Ventilatordrehzahl während der ersten 15 Minuten oder bis zum Erreichen der Solltemperatur um eine Stufe erhöht.
*
** Sind keine Personen anwesend, wird im Kühl- bzw. Entfeuchtungsbetrieb als höchste Drehzahl die mittlere Drehzahl zugelassen.
Person(en)
Solltemperatur
Geringe Aktivität
ECONAVI und AUTO COMFORT nutzen die Tatsache,
dass der Mensch bei geringer Aktivität einen
Temperaturanstieg nur verzögert wahrnimmt.
Das Gerät passt die Temperatur an, um möglichst viel Energie
zu sparen, ohne an Komfort einzubüßen.
38
Page 39

Der Personen-Aktivitätssensor erfasst bereits die Wärmequelle und deren Bewegung.
Erfassungsbereich
• Das Gerät stellt die senkrechten Lamellen automatisch in eine feste Position oder lässt
sie automatisch hin- und herschwenken.
• Die Leistung des Aktivitätssensors wird durch die Position des Innengeräts, die
Bewegungsgeschwindigkeit, den Temperaturbereich usw. beeinfl usst.
• Der Personen-Aktivitätssensor kann:
- Objekte, die sich wie Menschen bewegen und eine entsprechende Temperatur
aufweisen, wie z. B. Haustiere, fälschlicherweise als Menschen erkennen.
- Personen, die sich eine gewisse Zeit nicht bewegen, fälschlicherweise als Objekte
erkennen.
• Legen Sie keine größeren Gegenstände in der Nähe des Sensors ab, und stellen Sie
keine Heizgeräte oder Befeuchter im Erfassungsbereich des Sensors auf, da dies zu
Fehlfunktionen des Sensors führen kann.
120º
7m
Funktionsweise des Sonnenlichtsensors
ECONAVI:
Mode
KÜHLEN/
ENTFEUCHTEN
HEIZEN
• In fensterlosen Räumen bzw. in Räumen mit dicken Vorhängen wird der Sonnenlichtsensor von starker Bewölkung
bzw. Dunkelheit ausgehen.
Anpassung der Raumtemperatur für eine erhöhte Energieersparnis durch Erfassung der
Intensität der Sonneneinstrahlung.
Umgebungsbedingungen
+1 °C
Solltemperatur
-1 °C -1 °C
ECONAVI wird aktiviert,
und das Gerät behält die
Solltemperatur bei, bis
sich die Intensität der
Sonneneinstrahlung ändert.
Der Sonnenlichtsensor
erfasst die Intensität der
Sonneneinstrahlung während
Wetter- und Tag/NachtWechseln und passt die
Temperatur entsprechend an.
Betriebsbereiche
Verwenden Sie dieses Klimagerät in folgenden Temperaturbereichen.
TK : Trockenkugeltemperatur
FK : Feuchtkugeltemperatur
Temperatur (°C)
KÜHLEN
HEIZEN
Max. 32 23 43 26
Min. 16 11 -10 -
Max. 30 - 24 18
Min. 16 - -15 -16
Innen Außen
TK FK TK FK
Funktionsdetails...
Deutsch
39
Page 40

Reinigungsanweisungen
Um eine optimale Leistung des Geräts zu gewährleisten,
muss es in regelmäßigen Abständen gereinigt werden. Ein
verschmutztes Gerät kann Störungen verursachen, dabei
kann die nanoe-G-Anzeige aufblinken oder der Fehlercode
„H99“ auftreten. Wenden Sie sich in diesem Fall an Ihren
Fachhändler.
•
Unterbrechen Sie die Stromversorgung, bevor Sie das Gerät
reinigen.
•
Fassen Sie nicht die scharfkantigen Aluminiumlamellen an,
Sie könnten sich sonst verletzen.
•
Verwenden Sie kein Benzin, Verdünner oder Scheuerpulver.
•
Verwenden Sie nur Seife oder neutrale Haushaltsreiniger
( pH-Wert ca. 7).
•
Verwenden Sie kein Wasser, das über 40 °C warm ist.
Innengerät
Wischen Sie das Gerät mit einem weichen,
trockenen Tuch ab.
Personen-Aktivitätssensor
Der Sensor sollte nicht mit harten, spitzen Gegenständen in
Berührung kommen, da er dadurch beschädigt werden und
Fehlfunktionen verursachen könnte.
Frontverkleidung
Waschen Sie sie vorsichtig ab und trocknen Sie sie.
Entfernen der Frontabdeckung
Nach unten
2
ziehen
Innengerät
Personenaktivitätssensor
nanoe-G-Generator
Alle zwei Wochen
•
Mit einem trockenen Wattestäbchen
reinigen.
•
Nicht während des Betriebs berühren.
Luftfi lter
Alle zwei Wochen
•
Gehen Sie beim Waschen und Ausspülen
der Luftfi lter vorsichtig vor, damit die
Filteroberfl äche nicht beschädigt wird.
•
Lassen Sie den Luftfi lter im Schatten trocknen, nie in
direktem Sonnenlicht oder an einem Feuer.
•
Beschädigte Filter sind zu ersetzen.
Entfernen des
Luftfi lters
AluminiumlamellenFrontverkleidung
nanoe-G-Generator
Luftfi lter
Einsetzen des
Luftfi lters
Nach
1
oben
klappen
Anbringen der Frontabdeckung
Auf beiden Seiten einhängen
1
2
Nach unten klappen
3
Beide Enden der Frontabdeckung nach unten drücken
4
Drücken Sie in der Mitte auf die Frontabdeckung.
40
Im Gerät einhaken
Kontrollen nach einer längeren Betriebsunterbrechung
•
Überprüfen Sie, ob die Batterien der Fernbedienung
ersetzt werden müssen.
•
Stellen Sie sicher, dass die Luftein- und -austritte frei sind.
•
Schalten Sie das Gerät mit der Auto OFF/ON-Taste in den
Kühl- bzw. Heizbetrieb. Nach einem 15-minütigen Betrieb
sollte die Temperaturdifferenz zwischen Lufteintritt und
Luftaustritt folgende Werte aufweisen:
KÜHLEN: ≥8 °C HEIZEN: ≥14 °C
Längere Betriebsunterbrechung
•
Schalten Sie für 2 bis 3 Stunden den Heizbetrieb ein, um
im Gerät verbliebene Feuchtigkeit restlos zu entfernen und
Schimmelbildung zu verhindern.
•
Schalten Sie das Gerät ab und unterbrechen Sie die
Stromversorgung.
•
Entfernen Sie die Batterien aus der Fernbedienung.
Page 41

Störungssuche
TIMER
S
CANCEL
ON
O
1
3
S
K
RES
AC
RC
Die nachfolgend aufgeführten Symptome sind kein Anzeichen für eine Fehlfunktion.
Aus dem Innengerät tritt Nebel aus.
Während des Betriebs ist das Geräusch fl ießenden Wassers
zu hören.
Im Raum herrscht ein eigenartiger Geruch.
Der Innengeräteventilator bleibt in der Ventilatorautomatik
gelegentlich stehen.
Es strömt trotz Ausschaltens des Geräts weiter Luft aus.
Nach dem Neustart verzögert sich der Betrieb um einige
Minuten.
Aus dem Außengerät tritt Wasser oder Dampf aus.
Das TIMER-Symbol leuchtet immer.
Das POWER-Symbol am Innengerät blinkt im Heizbetrieb,
die Lamelle ist geschlossen, und es wird keine warme Luft
ausgeblasen.
Der Innengeräteventilator bleibt im Heizbetrieb gelegentlich
stehen.
Das POWER-Symbol blinkt, bevor das Gerät eingeschaltet
wird.
Knackgeräusche während des Betriebs.
Im Kühl- bzw. Entfeuchtungsbetrieb stoppt das Innengerät,
und das POWER-Symbol blinkt.
Überprüfen Sie folgende Punkte, bevor Sie sich an den Kundendienst wenden.
Das Gerät kühlt bzw. heizt nicht richtig.
Das Gerät arbeitet laut.
Die Fernbedienung funktioniert nicht.
(Die Anzeige oder das Sendesignal ist schwach.)
Das Gerät funktioniert nicht.
Das Gerät empfängt kein Signal von der Fernbedienung.
KRITERIEN FÜR
BETRIEBSUNTERBRECHUNG
Unter den folgenden Umständen sollten Sie
die STROMZUFUHR UNTERBRECHEN, DEN
EVENTUELL VORHANDEN NETZSTECKER ZIEHEN
und sich an Ihren Fachhändler wenden:
•
Ungewöhnliche Geräusche während des Betriebs.
•
Wasser/Fremdpartikel sind in die Fernbedienung
gelangt.
•
Wasser tropft aus dem Innengerät.
•
Der Sicherungsautomat schaltet sich häufi g ab.
•
Das Stromkabel wird ungewöhnlich warm.
•
Schalter oder Tasten funktionieren nicht
ordnungsgemäß.
Symptom Mögliche Ursache
•
Durch die Abkühlung der Raumluft kondensiert Feuchtigkeit.
•
Durch das Gerät strömt Kältemittel.
•
Dieser Geruch kann von Feuchtigkeit stammen, die von Wänden,
Teppichen, Möbeln oder Kleidungsstücken an die Raumluft abgegeben
wird.
•
Dies dient dazu, Gerüche zu entfernen.
•
Aus dem Innengerät wird Restwärme abgeführt (max. 30 Sekunden
lang).
•
Hierbei handelt es sich um einen Schutzmechanismus des Geräts.
•
Auf den Rohren kann Wasser kondensieren oder verdunsten.
•
Die Timer-Funktion wird täglich ausgeführt.
•
Das Gerät befi ndet sich im Abtaubetrieb (der Lamellenbetrieb steht auf
AUTO).
•
Hierdurch wird verhindert, dass kalte Luft austritt.
•
Während dieser Zeit bereitet sich das Gerät für den Betrieb mit
programmiertem Einschalttimer vor.
•
Dehnung bzw. Kontraktion von Geräteteilen aufgrund von
Temperaturänderungen.
•
Das System wurde gesperrt, damit es nur im Heizbetrieb läuft.
Symptom Zu überprüfen
•
Stellen Sie die Temperatur richtig ein.
•
Achten Sie darauf, dass Fenster und Türen geschlossen sind.
•
Reinigen oder ersetzen Sie die Luftfi lter.
•
Stellen Sie sicher, dass die Luftein- und -austritte frei sind.
•
Überprüfen Sie, ob das Gerät schief steht.
•
Schließen Sie das Frontgitter richtig.
•
Legen Sie die Batterien richtig ein.
•
Ersetzen Sie schwache Batterien.
•
Überprüfen Sie, ob der Sicherungsautomat ausgelöst hat.
•
Überprüfen Sie, ob der Timer gestellt wurde.
•
Stellen Sie sicher, dass der Empfänger nicht verdeckt ist.
•
Bestimmte Leuchtstoffröhren können die Signalübertragung stören.
Wenden Sie sich in diesem Fall an Ihren Fachhändler.
Das Gerät bleibt stehen, und das TIMER-Symbol blinkt.
Verwenden Sie die Fernbedienung, um den Fehlercode zu ermitteln.
1
CHECK-Taste 5
Sekunden lang
drücken
3
CHECK-Taste 5
Sekunden lang
drücken, um die
Störungssuche
zu beenden
•
Je nach Störung kann das Gerät nach erneutem Einschalten eventuell
eingeschränkt verwendet werden. Beim Einschalten ertönen in diesem
Fall 4 Pieptöne.
TIMER
ON
1
2
OFF
FF
SET CHECK CLOCK RESET
ET CLOC
AC
SET
ET
3
CANCEL
ET
RC
2
Pfeiltaste drücken,
bis ein Piepton ertönt,
dann den Fehlercode
ablesen
4
Schalten Sie das Gerät
aus und teilen Sie
den Fehlercode Ihrem
Fachhändler mit
Reinigungsanweisungen / Störungssuche
Deutsch
41
Page 42

Garantire la massima sensazione di
benessere, aria pulita e ottimizzare il
risparmio energetico
ECONAVI e AUTO COMFORT
Provvisto del sensore di attività umana, il climatizzatore assicura l’erogazione di aria fredda o calda e
mantiene l’ambiente regolarmente confortevole con un minimo consumo di energia.
Inoltre, il sensore di luce solare rileva l’intensità della luce solare e aiuta a controllare le temperature di
riscaldamento/raffreddamento per ottimizzare la sensazione di benessere.
Per dettagli, vedere “Per saperne di più...”.
nanoe-G
Disattiva microrganismi pericolosi quali virus, batteri, ecc. per mantenere l’aria pulita.
Disattiva anche virus e batteri sul fi ltro per mantenere pulito l’interno dell’unità.
42
Page 43

Guida rapida
TIMER
CANCEL
ON
O
1
3
S
CK
RES
AC
RC
AUTOCOMFO
Q
TIMER
S
CANCEL
ON
O
1
2
3
G
F
D
MILD DRY
G
S
K
RES
C
RC
MILD
DRY
FAN
S
D
AIR
S
G
AUTO
HEAT
OOL
DRY
ECO
I
G
Inserimento delle batterie
1
2
2
3
Impostazione dell’orario
1
2
3
Funzionamento di base
1
PEE
WIN
2
RT
3
8m
•
Per oscurare o ripristinare la luminosità
dell’indicatore dell’unità, tenere premuto
3
1
2
3
1
1
2 3
TIMER
ON
1
2
OFF
FF
SET CHECK CLOCK RESET
ETCHE
AUTO
HEAT
C
COOL
DRY
MILD
DRY
OFF/ON
ECONAVI
NAV
MODE
MILD DRY
TEMP
COOLIN
COOLING
POWERFUL/
POWERFUL/
FAN SPEED
AN SPEE
UIET
QUIET
TIMER
ON
1
2
OFF
FF
SET CHECK CLOCK RESET
ETCHECKCLOC
SET
3
CANCEL
AC
RC
ET
AUTO
COMFORT
NANOE-G
NANOE-
AIR SWING
AIR SWIN
SET
ET
3
CANCEL
A
AC
ET
FAN
SPEED
AIR
SWING
RC
Estrarre il coperchio posteriore
del telecomando
Inserire batterie AAA o R03 (può
essere utilizzato per circa 1 anno)
Chiudere il coperchio
Premere CLOCK
Impostazione timer
Confermare
Selezionare la modalità
desiderata
AUTO HEAT
DRY
Avviare/arrestare
COOL
l’apparecchio
POWER
• Verifi care che l’indicazione
OFF sia attivata per
iniziare.
Selezionare la temperatura
desiderata
•
Gamma di selezione:
16 °C ~ 30 °C.
•
L’utilizzo dell’unità entro la
temperatura consigliata può far
risparmiare energia.
CALDO : 20 °C ~ 24 °C.
FREDDO: 26 °C ~ 28 °C.
SECCO: 1 °C ~ 2 °C in meno
della temperatura
ambiente.
per 5 secondi.
Indice
Precauzioni per la sicurezza
Modalità d’uso .....................46-47
Per saperne di più... ...........48-49
Istruzioni per il lavaggio ............ 50
Soluzione dei problemi ...........51
Informazioni .............................. 62
....44-45
Accessori
• Telecomando
• 2 batterie AAA o R03
• Supporto telecomando
• 2 viti per supporto
telecomando
Italiano
•
Usare il telecomando entro 8 metri dal
ricevitore telecomando dell’unità interna.
Le illustrazioni contenute in questo manuale sono riportate esclusivamente
a scopo esplicativo e potrebbero differire dall’apparecchio vero e proprio. I
contenuti del presente manuale sono soggetti a modifi ca senza preavviso e
verranno aggiornati in base alle innovazioni future.
43
Page 44

Precauzioni per la sicurezza
Ingresso aria
Ingresso aria
Presa d’aria
Presa d’aria
Per evitare lesioni personali, lesioni ad altri o
danni alla proprietà, rispettare quanto segue:
In caso di uso scorretto dovuto alla mancata
osservanza delle istruzioni, si possono
provocare iincidenti o danni di varia natura, la
cui gravità è indicata dai seguenti simboli:
Questo simbolo
AVVERTENZA
ATTENZIONE
Le istruzioni sono classifi cate in varie tipologie,
contrassegnate dai seguenti simboli:
Questo simbolo indica
un’azione PROIBITA.
Questi simboli indicano
azioni OBBLIGATORIE.
Unità interna
Presa d’aria
Controllo remoto
Ingresso aria
indica un pericolo
di morte o lesioni
gravi.
Questo simbolo
indica un rischio
di lesioni o danni
materiali.
Alimentazione elettrica
Ingresso aria
Unità interna e unità esterna
L’uso di questo apparecchio non è destinato a
bambini di 8 anni e oltre e persone con capacità
fi siche, sensoriali o mentali ridotte, o mancanza
di esperienza o competenza, a meno che non
siano supervisionate o istruite sull’uso sicuro
dell’apparecchio e comprendano i rischi implicati.
I bambini non devono giocare con l’apparecchio.
La pulizia e la manutenzione da parte dell’utente
non devono essere effettuate da bambini senza
supervisione.
Per la pulizia delle parti interne, la riparazione,
l’installazione, la rimozione e la reinstallazione
dell’unità, consultare un rivenditore autorizzato o
uno specialista. L’installazione e la manipolazione
sbagliate causeranno perdite, scosse o incendio.
Consultare un rivenditore autorizzato o uno
specialista per l’uso di qualunque tipo di
refrigerante specifi cato.
L’uso di un refrigerante diverso da quello
specifi cato potrebbe causare danni al prodotto,
ustioni e lesioni, ecc.
Non installare l’unità in un ambiente con atmosfera
potenzialmente esplosiva o infi ammabile. La
mancata esecuzione di ciò può causare un
incendio.
Non inserire dita o altri oggetti nell’unità
interna o esterna del condizionatore d’aria,
i componenti rotanti possono provocare
lesioni.
Non toccare l’unità esterna durante temporali
con fulmini, ciò potrebbe provocare una scossa
elettrica.
Non esporsi direttamente all’aria fredda per un
periodo di tempo prolungato al fi ne di evitare un
raffreddamento eccessivo.
Non sedersi o salire sull’unità, si potrebbe
cadere in modo accidentale.
AVVERTENZA
44
Unità esterna
Presa d’aria
Controllo remoto
Non permettere a bambini piccoli di giocare con
il telecomando, al fi ne di evitare che ingeriscano
accidentalmente le batterie.
Alimentazione elettrica
Per evitare surriscaldamento
e incendio, non utilizzare un
cavo modifi cato, un connettore,
una prolunga o un cavo non
specifi cato.
Page 45

Per evitare surriscaldamento, incendio o shock
elettrico:
•
Non condividere la presa di corrente con alri
apparecchi.
•
Non utilizzare con mani bagnate.
•
Non piegare eccessivamente il cavo di
alimentazione elettrica.
•
Non mettere in funzione o arrestare l’unità
inserendo o tirando la spina di alimentazione.
Se il cavo di alimentazione è stato danneggiato,
rivolgersi al produttore, ad un centro di assistenza
autorizzato o ad un tecnico qualifi cato onde evitare
rischi.
Per evitare scosse o incendio, si raccomanda
fortemente l’installazione di un salvavita contro le
perdite a terra (ELCB) o un interruttore differenziale
(RCD).
Per evitare surriscaldamento, incendio o shock
elettrico:
•
Inserire correttamente la spina di alimentazione.
•
La polvere che si deposita sulla spina di
alimentazione deve essere periodicamente
rimossa con un panno asciutto.
Smettere di usare il prodotto quandosi verifi ca
un’anormalità/guasto escollegare la spina dalla
presa di corrente o portare l’interruttore o il
salvavita su OFF.
(rischio di fumo/fi amme/scosse elettrice) Esempi di
anormalità/guasto
•
L’interruttore differenziale (ELCB) scatta di
frequente.
•
Si sente un odore di bruciato.
•
Si nota un rumore o vibrazione anormale
dell’unità.
•
L’unità interna perde acqua.
•
Il cavo o spina di alimentazione si scaldano in
maniera anormale.
•
Non è possibile controllare la velocità della
ventola.
•
L’unità smette immediatamente di funzionare
quando la si accende.
•
La ventola non si ferma neanche se si interrompe
il funzionamento.
Contattare immediatamente il rivenditore locale per
la manutenzione/riparazione.
Il presente apparecchio deve avere la messa a
terra per prevenire scosse o incendio.
Evitare scosse togliendo la corrente e staccando la
spina nei seguenti casi:
- Prima di pulire o eseguire la manutenzione,
- In caso di inutilizzo prolungato dell’apparecchio,
oppure
- Durante attività anomala delle spie luminose.
Controllo remoto
Non usare per la conservazione di attrezzatura
di precisione, cibo, animali, piante, lavori d’arte e
altri oggetti. Ciò può provocare un deterioramento
qualitativo, ecc.
Per evitare la propagazione di un incendio, non
utilizzare apparecchi combustibili davanti alla presa
d’aria.
Non esporre piante o animali direttamente al fl usso
dell’aria per evitare lesioni, ecc.
Non toccare l’aletta affi lata in alluminio,
le parti taglienti possono provocare delle
lesioni.
Non accendere l’unità interna quando si passa la
cera sul pavimento. Dopo tale operazione, aerare
accuratamente la stanza prima di mettere in
funzione l’unità.
Non installare l’unità in aree con presenza di olio e
fumo per prevenire danni all’unità.
Non smontare l’unità per la pulizia al fi ne di evitare
lesioni.
Quando si pulisce l’unità, non salire su una panca
instabile per evitare lesioni.
Non posizionare un vaso o un contenitore d’acqua
sull’unità. L’acqua può entrare nell’unità e ridurre
l’isolamento. Ciò può causare uno shock elettrico.
Non aprire la fi nestra o la porta per un periodo
di tempo prolungato durante il funzionamento in
modalità FREDDO/SECCO.
Evitare perdite d’acqua assicurandosi che il tubo di
scarico sia:
- Collegato correttamente,
- Mantenuto libero da canali di scolo e contenitori,
oppure
- Non immerso in acqua
Dopo un lungo periodo di uso o un utilizzo
con qualsiasi attrezzatura che funziona con
combustibile, areare regolarmente la stanza.
Quando l’apparecchio è stato utilizzato per un lungo
periodo, assicurarsi che la struttura di sostegno
installata non si sia deteriorata, in modo da evitare
la caduta dell’unità.
Non utilizzare batterie ricaricabili (Ni-Cd). Può
danneggiare il telecomando.
Per prevenire malfunzionamenti o danni del
telecomando:
•
Se si prevede che l’apparecchio rimarrà
inutilizzata per un periodo di tempo prolungato,
rimuovere le batterie.
•
Devono essere inserite nuove batterie dello stesso
tipo che rispettano la polarità indicata.
Precauzioni per la sicurezza
Italiano
ATTENZIONE
Unità interna e unità esterna
Non lavare l’unità interna con acqua, benzina,
diluenti o polveri detergenti aggressive al fi ne di
evitare danni o corrosione all’unità.
Alimentazione elettrica
Non staccare la spina tirando il cavo al fi ne di
prevenire uno shock elettrico.
45
Page 46

TEMP
OFF/ON
TIMER
S
CANCEL
ON
O
2
3
CHECK
K
Modalità d’uso
POWER
TIMER
AUTO COMFORT
NANOE-G
POWERFUL
QUIET
(Verde) (Verde) (Blu) (Arancione)(Arancione)(Arancione) (Verde)
ECONAVI
Per ottimizzare il risparmio
energetico
MODE
Per selezionare la modalità
operativa
Display telecomando
Sensore di attività
umana
AUTO - Per la propria comodità
CALDO - Per godere dell’aria calda
FREDDO - Per godere dell’aria fresca
SECCO - Per deumidifi care l’ambiente
MILD DRY
Per migliorare l’umidità e il
COOLING
livello di condensa
•
Questa operazione riduce la secchezza dell’aria
e crea un ambiente domestico confortevole con
la sola modalità FREDDO.
•
Quando la direzione del fl usso dell’aria
verticale è impostata su AUTO, essa si arresta
alla posizione più bassa per evitare il contatto
con l’aria fredda. È però possibile regolare
manualmente la direzione delle alette.
POWERFUL/
QUIET
Per alternare tra il livello
potente e silenzioso
QUIETPOWERFUL NORMAL
POTENTE: Per raggiungere rapidamente la
temperatura
POWERFUL
•
La funzione si arresta automaticamente dopo
20 minuti.
SILENZIOSO: Per godere di un
AUTO
HEAT
COOL
DRY
MILD
DRY
ECONAVI
MODE
MILD DRY
COOLING
POWERFUL/
QUIET
TIMER
ON
1
OFF
FF
SET CHECK CLOCK RESET
FAN SPEED
OFF/ON
FAN
SPEED
AIR
SWING
AUTO
COMFORT
NANOE-G
TEMP
AIR SWING
FAN SPEED
ET
SET
3
2
CANCEL
AC
RC
CLOC
Selezione della velocità ventola
(Display telecomando)
Sensore di luce solare e
ricevitore telecomando
Tenere premuto per circa
10 secondi per mostrare
l’impostazione della
temperatura in °C o °F.
Premere per ripristinare
l’impostazione
predefi nita del
telecomando.
Da non utilizzare in
operazioni normali.
funzionamento silenzioso
QUIET
•
• Questa operazione riduce il rumore del fl usso
d’aria dell’unità.
Per la modalità AUTO, la velocità della ventola interna
viene regolata automaticamente in base alla modalità
operativa.
T asto Auto OFF/ON
Da utilizzare quando il telecomando è fuori posto o presenta anomalie. Sollevare il pannello anteriore:
1. Premere il tasto una volta per usare la modalità AUTO.
2. Premere e tenere premuto il tasto fi no a quando non si sente 1 bip, quindi rilasciare, per usare la
AUTO
OFF/ON
modalità FREDDO forzato.
3. Ripetere il punto 2. Premere e tenere premuto il tasto fi no a quando non si sentono 2 bip, quindi
rilasciare per usare la modalità CALDO forzato.
•
Premere nuovamente il tasto per spegnere.
Indicatore
46
Page 47

TIMER
CANCEL
3
2
Per dettagli, vedere “Per saperne di più...”.
A
AUTO
Per aumentare al massimo il
COMFORT
benessere
AUTO COMFORT
NANOE-G
Per purifi care l’aria
NANOE-G
•
nanoe-G si avvia automaticamente quando si accende
l’unità con
•
Può essere attivato anche quando l’unità è spenta. In
questa condizione, l’unità opererà come una ventola in
base all’impostazione AUTO della velocità della ventola e
OFF/ON
.
Impostazione timer
2 apparecchi per il timer ON e OFF sono disponibili
per l’ACCENSIONE o lo SPEGNIMENTO dell’unità a
orari diversi predefi niti.
1
dell’oscillazione delle alette.
Per disattivare i virus/batteri nel fi ltro
NANOE-G
•
Dopo lo spegnimento dell’unità, la disattivazione del fi ltro
incorporato nanoe-G può attivarsi per 150 minuti al massimo.
L’accensione dell’unità annulla questa operazione.
•
Per disattivare questa operazione in futuro, premere e tenere
premuto
Questo non disattiverà il nanoe-G per purifi care l’aria.
•
Per ripristinare la disattivazione del fi ltro incorporato
nanoe-G, premere e tenere premuto
non si sente un lungo bip.
IR SWING
(Display telecomando)
•
Mantenere l’ambiente ventilato.
•
In modalità FREDDO/SECCO, se è impostata l’opzione
AUTO, la griglia per lo spostamento dell’aria si muoverà a
destra/sinistra e si alzerà e abbasserà automaticamente.
•
In modalità CALDO, se è impostata l’opzione AUTO, la
griglia orizzontale per lo spostamento dell’aria si porta a una
posizione predeterminata. La griglia verticale si sposta a
sinistra/destra dopo che la temperatura aumenta.
•
Non regolare manualmente la direzione delle alette.
POWER
NANOE-G
fi no a quando non si sente un breve bip.
NANOE-G
fi no a quando
Regolazione della direzione del
fl usso dell’aria
2
3
•
Per annullare il timer ON o OFF, premere ON o
selezionare i rispettivi o quindi premere
•
Se il timer è annullato manualmente o a causa di
un’interruzione di corrente, è possibile ripristinarlo
nuovamente premendo ON o
rispettivi o quindi premere
•
L’impostazione del timer più prossimo sarà visualizzata e
attivata in sequenza.
•
Quando si imposta il Timer ON (accensione), l’unità
potrebbe iniziare a funzionare prima dell’orario impostato
(fi no a 35 minuti prima), al fi ne di raggiungere in tempo la
temperatura desiderata.
•
Il funzionamento del timer si basa sull’orario impostato
sul telecomando e si ripete quotidianamente una volta
impostato. Per l’impostazione dell’orario, fare riferimento
alla guida rapida.
21 3
ON
1
OFF
SET
3
2
CANCEL
Selezionare
l’accensione (ON) o
lo spegnimento (OFF)
del timer
• Ogni volta che viene
premuto:
Cancel
Impostazione timer
Confermare
Esempio:
OFF alle 22:00
OFF
SET
TIMER
per selezionar i
OFF
SET
.
CANCEL
per
OFF
.
Modalità d’uso
Italiano
Nota
POWERFUL/
ECONAVI
QUIET
,
•
Può essere attivato in qualsiasi modalità e può
essere annullato premendo nuovamente il tasto
corrispondente.
AUTO
COMFORT
,
NANOE-G
,
POWERFUL/
ECONAVI
QUIET
,
•
Non può essere selezionato contemporaneamente.
•
L’attivazione non è permessa durante
AUTO
COMFORT
,
RAFFREDDAMENTO SECCO LEGGERO.
47
Page 48

Per saperne di più...
Modo di funzionamento
AUTO: Durante la selezione della modalità operativa l’indicatore di alimentazione POWER lampeggia.
• L’unità seleziona la modalità operativa ogni 10 minuti sulla base dell’impostazione della temperatura e della temperatura ambiente.
CALDO : L’unità richiede un po’ di tempo per riscaldarsi. Durante questa operazione, l’indicatore POWER lampeggia.
FREDDO : Per risparmiare energia mentre il condizionatore è in modalità FREDDO, utilizzare delle tende per impedire l’ingresso di
SECCO : La ventola dell’unità opera a bassa velocità, al fi ne di eseguire l’operazione di raffreddamento in maniera molto delicata.
• Nei sistemi in cui la modalità CALDO è stata bloccata, se viene selezionata una modalità operativa diversa da CALDO, l’unità
In base al tempo di funzionamento accumulato dell’unità, la disattivazione del fi ltro incorporato nanoe-G può attivarsi solamente una
volta al giorno.
Per rimuovere l’umidità rimasta nelle parti interne, la ventola funzionerà per 30 minuti con la griglia leggermente aperta. Questo
processo è applicabile solamente quando l’unità funziona in modalità FREDDO/SECCO prima di essere spenta. Poi, nanoe-G
disattiva i virus/batteri sul fi ltro per 2 ore con la ventola spenta e la griglia chiusa.
Non spegnere l’alimentazione elettrica durante questo funzionamento. In caso di interruzione di corrente, questo funzionamento non
viene ripristinato.
L’unità comincerà ad
inizializzare
(per circa 1 minuto)
calore e della luce solare.
interna si arresta e l’indicatore POWER lampeggia.
Disattivazione fi ltro incorporato nanoe-G
ECONAVI e AUTO COMFORT
ECONAVI
AUTO
COMFORT
o
Il sensore di attività umana
e il sensore di luce solare
inizieranno i rilevamenti.
Funzionamento del sensore di attività umana
ECONAVI ;
Modalità
FREDDO/
SECCO
CALDO
AUTO COMFORT ; Rilevando la presenza e l’attività umana, l’unità controlla la temperatura ambiente per
mantenere la sensazione di benessere fisico in modo regolare.
Modalità
FREDDO/
SECCO
CALDO
Rilevando la presenza umana e l’attività, l’unità controlla la temperatura ambiente per risparmiare energia.
Bassa attività Normale attivitàUmana
Temperatura
impostata
Temperatura
impostata
Imposta Velocità
Ventilatore
+1 colpetto*
+1 °C
Bassa attività Normale attivitàUmana
+1 °C
+0.3 °C
Nota
AIRSWING
Quando è stato selezionato l’AIR
SWING manuale, le funzioni ECONAVI
e AUTO COMFORT saranno
cancellate.
Alta attività Assente
Alta attività Assente
-1 °C
-2 °C
+1 colpetto
9HQWLODWRUHPHGLR
+2 °C
-2 °C-2 °C
+2 °C
-2 °C
ECONAVI e AUTO COMFORT
Controllo accurato della temperatura durante la bassa attività per massimizzare il risparmio energetico.
Modalità
FREDDO/
SECCO
*
Durante l’attività ridotta, regolare la velocità della ventola 1 colpetto in sù per i primi 15 minuti o finché non si raggiunge
la temperatura impostata.
**
Durante l’assenza di esseri umani, la velocità massima della ventola per la modalità FREDDO/SECCO è la ventola media.
Umana
Temperatura
impostata
Bassa attività
ECONAVI e AUTO COMFORT approfittano del fatto
che per sua natura, l’essere umano impiega del tempo
ad avvertire l’aumento della temperatura in condizioni
di bassa attività; pertanto l’unità regola la temperatura
per massimizzare il risparmio energetico senza
compromettere la sensazione di benessere.
48
Page 49

Il sensore di attività umana inizierà anche ad eseguire una scansione dell’area della fonte di calore e di movimento
in una stanza.
Area di rilevamento
• In base all’attività dell’area la griglia direzionale del fl usso d’aria orizzontale si regolerà
fi ssa ad una posizione predeterminata o oscillante a sinistra/destra.
• La prestazione del sensore di attività umana è infl uenzata dalla posizione dell’unità
interna, dalla velocità di movimento, dalla gamma di temperatura, ecc.
• Il sensore di attività umana può:
- scambiare erroneamente un oggetto con fonte di calore e movimento simile ad un
essere umano, quali animali domestici, ecc.
- scambiare erroneamente come fonte di non calore e movimento una persona che non si
muove per un certo periodo di tempo.
• Non collocare oggetti di grandi dimensioni vicino al sensore e tenere le unità di
riscaldamento o gli umidifi catori lontano dalla zona di rilevamento del sensore Possono
causare un malfunzionamento del sensore.
120º
7m
Funzionamento del sensore di luce solare
ECONAVI ; Rilevando l’intensità della luce solare, l’unità regola la temperatura per
Modalità
FREDDO/
SECCO
CALDO
In una stanza senza fi nestre o con tende spesse, il sensore di luce solare la valuta come condizione nuvolosa/notturna.
•
risparmiare energia.
Condizioni ambientali
+1 °C
Temperatura
impostata
-1 °C -1 °C
ECONAVI è attivato, l’unità
mantiene la temperatura
impostata fi nché non viene
rilevata un’elevata intensità
della luce solare. Il sensore
di luce solare rileva l’intensità
della luce solare quando
cambia il tempo o il giorno/
la notte, e l’unità regola la
temperatura.
Condizioni operative
Questo condizionatore può essere utilizzato con temperature rientranti nel seguente intervallo.
DBT : Temperatura con bulbo secco
WBT : Temperatura con bulbo bagnato
Temperatura (°C)
FREDDO
CALDO
Max. 32 23 43 26
Min. 16 11 -10 -
Max. 30 - 24 18
Min. 16 - -15 -16
Interna Esterna
DBT WBT DBT WBT
Per saperne di più...
Italiano
49
Page 50

Istruzioni per il lavaggio
Per assicurare una performance ottimale
dell’unità, la pulizia deve essere eseguita
a intervalli regolari. Una unità sporca può
causare malfunzionamento e può essere
visualizzato il lampeggio dell’indicatore
nanoe-G o il codice di errore “H99”. Rivolgersi
a un rivenditore autorizzato.
• Spegnere l’apparecchio e staccare la spina
prima di pulirlo.
• Non toccare l’aletta in alluminio, le parti affi liate
potrebbero causare lesioni.
• Non lavare l’apparecchio con benzina, solventi o
polveri abrasive.
• Impiegare esclusivamente saponi o detergenti
neutri per la casa (
• Non usare acqua ad una temperatura superiore
a 40 °C.
pH 7).
Unità interna
Asciugare l’apparecchio con un
panno morbido e asciutto.
Sensore di attività umana
Non colpirlo o premere con forza su di esso, né
maneggiarlo con un oggetto affi lato. Ciò può
causare danni e malfunzionamento.
Pannello anteriore
Lavare delicatamente ed asciugare.
Rimuovere il pannello anteriore
Estrarre
2
Unità interna
Sensore di
attività umana
Filtro dell’aria
Aletta in alluminioPannello anteriore
Generatore
nanoe-G
Generatore nanoe-G
Ogni 2 settimane
•
Pulire con un bastoncino di cotone
asciutto.
•
Non toccare mentre l’apparecchio
è in funzione.
Filtro dell’aria
Ogni 2 settimane
Lavare/risciacquare delicatamente
•
i fi ltri con acqua al fi ne di evitare
danni alla loro superfi cie.
•
Asciugare accuratamente i fi ltri all’ombra,
lontano da fi amme o dalla luce diretta del sole.
•
Sostituire i fi ltri danneggiati.
Togliere il fi ltro dell’aria Fissare il fi ltro dell’aria
Sollevare
1
Chiuderlo saldamente
Inserire ad entrambi i lati
1
2 Chiuderlo
Premere sulle estremità del pannello
3
anteriore
4 Premere al centro del pannello anteriore.
50
Inserire nell’unità
Per l’ispezione stagionale dopo un periodo di
inattività prolungato
•
Controllo delle batterie del telecomando.
•
Nessuna ostruzione alle bocchette di ingresso ed
uscita dell’aria.
•
Usare il tasto OFF/ON automatico per selezionare
il funzionamento FREDDO/CALDO. Dopo 15 minuti
dal funzionamento, è normale avere la seguente
differenza di temperatura tra le bocchette di entrata e
di uscita dell’aria:
FREDDO: ≥8 °C
Prima di lunghi periodi di inattività
•
Attivare la modalità CALDO per 2-3 ore per rimuovere
completamente l’umidità rimasta nelle parti interne, in
modo da evitare la formazione di muffa.
•
Spegnere l’apparecchio e scollegare il cavo di
alimentazione.
•
Togliere le batterie dal telecomando.
CALDO: ≥14 °C
Page 51

Soluzione dei problemi
TIMER
S
CANCEL
ON
O
1
3
S
K
RES
AC
RC
Le condizioni seguenti indicano un guasto.
Sembra che dall’unità interna fuoriesca della nebbia.• Effetto di condensa dovuto al processo di raffreddamento.
Rumore di acqua durante il funzionamento.
L’ambiente ha un odore particolare.
La ventola interna si arresta di tanto in tanto quando si
imposta la modalità di regolazione automatica della velocità
della ventola.
Il fl usso continua anche dopo l’interruzione del
funzionamento.
L’operazione è ritardata di qualche minuto dopo il riavvio.
Dall’unità esterna fuoriesce acqua/vapore.
L’indicatore TIMER rimane sempre acceso.
La spia POWER lampeggia durante la modalità CALDO
mentre l’aria fornita non è più calda (e la griglia è chiusa).
La ventola interna si arresta di tanto in tanto quando si
imposta la modalità riscaldamento.
L’indicatore POWER lampeggia prima che si accenda l’unità.
Rumori di urti durante il funzionamento.
Durante la modalità FREDDO/SECCO, l’unità interna si
arresta e l’indicatore POWER lampeggia.
Eseguire i controlli seguenti prima di rivolgersi all’assistenza.
La modalità CALDO/FREDDO non funziona in maniera
effi ciente.
Rumore durante il funzionamento.
Il telecomando non funziona.
(Il display è oscurato oppure il segnale di trasmissione è
debole.)
L’apparecchio non funziona.
L’unità non riceve il segnale dal telecomando.
Condizione Causa
•
Flusso del refrigerante all’interno dell’unità.
•
Può essere dovuto a un odore di umido proveniente dai muri, ai tappeti,
dai mobili o dagli indumenti presenti nella stanza.
•
Ciò consente di eliminare gli odori circostanti.
•
Eliminazione del calore restante dall’unità interna (massimo 30 secondi).
•
Il ritardo è una protezione del compressore dell’apparecchio.
•
Condensa o evaporazione nei condotti.
•
L’impostazione Timer si ripete quotidianamente una volta impostata.
•
L’unità è in modalità di sbrinamento (e l’ALETTA DELL’ARIA è impostata
su AUTO).
•
Funzionalità studiata per evitare un effetto di raffreddamento non
intenzionale.
•
Si tratta di un passo preliminare in vista del funzionamento quando si
imposta il timer di accensione.
•
I cambiamenti di temperatura causano l’espansione/ contrazione
dell’unità.
•
Il sistema si è bloccato per funzionare solo in modalità CALDO.
Condizione Controllare
•
Impostare la temperatura corretta.
•
Chiudere tutte le porte e fi nestre.
•
Pulire o sostituire i fi ltri.
•
Eliminare le eventuali ostruzioni alle bocchette di ingresso ed uscita
dell’aria.
•
Verifi care che l’unità sia stata installata in maniera inclinata.
•
Chiudere correttamente il pannello anteriore.
•
Inserire le batterie in maniera corretta.
•
Sostituire le batterie quasi scariche.
•
Verifi care se è si è attivato l’interruttore di circuito.
•
Verifi care se sono stati impostati i timer.
•
Assicurarsi che il ricevitore non sia ostruito.
•
Alcune luci fl uorescenti potrebbero interferire con il trasmettitore di
segnale. Consultare un rinvenitore autorizzato.
Istruzioni per il lavaggio / Soluzione dei problemi
FUNZIONAMENTO ANOMALO
TOGLIERE LA CORRENTE E STACCARE LA SPINA,
quindi consultare un rivenditore autorizzato in base
alle seguenti condizioni:
•
Durante il funzionamento si sentono rumori anomali.
•
Penetrazione di acqua o di corpi estranei nel
telecomando.
•
L’unità interna perde acqua.
•
L’interruttore salvavita scatta frequentemente.
•
Il cavo di alimentazione su surriscalda in modo
anomalo.
•
Funzionamento anomalo di interruttori o pulsanti.
L’unità si arresta e l’indicatore TIMER
lampeggia.
Usare il telecomando per vedere il codice di errore.
Premere per 5
1
secondi
Premere per
3
5 secondi
per uscire dal
controllo
Per alcuni errori è possibile riavviare l’unità con una operazione
•
TIMER
ON
1
2
OFF
FF
SET CHECK CLOCK RESET
ET CLOC
AC
SET
ET
3
CANCEL
ET
Premere fi nché non
2
si sente un “beep”,
quindi annotare il
codice di errore
RC
Spegnere l’unità e
4
mostrare il codice di
errore al rivenditore
autorizzato
limitata con 4 bip durante l’avvio.
51
Italiano
Page 52

Biedt maximaal comfort, schone lucht en
een optimaal energieverbruik
ECONAVI en AUTO COMFORT
Uitgerust met een bewegingssensor. De airconditioner combineert een consistent comfortabele, koele of
warme luchtstroom met een minimaal energieverbruik.
De zonlichtsensor detecteert daarnaast de intensiteit van het zonlicht en helpt bij het regelen van de
verwarmings-/koeltemperatuur, voor een optimaal comfort.
Lees "Meer weten…" voor meer informatie.
nanoe-G
Deactiveert schadelijke micro-organismes zoals virussen, bacteriën en houdt de lucht schoon.
Het deactiveert ook virussen en bacteriën in het fi lter, om de binnenkant van unit schoon te houden.
52
Page 53

Snelle gids
TIMER
CANCEL
ON
O
1
3
S
CK
RES
AC
RC
AUTOCOMFO
Q
TIMER
S
CANCEL
ON
O
1
2
3
G
F
D
MILD DRY
G
S
K
RES
C
RC
MILD
DRY
FAN
S
D
AIR
S
G
AUTO
HEAT
OOL
DRY
ECO
I
G
3
1
2
3
1
1
TIMER
ON
1
OFF
FF
SET CHECK CLOCK RESET
ETCHE
AUTO
HEAT
C
COOL
DRY
MILD
DRY
OFF/ON
ECONAVI
NAV
MODE
MILD DRY
COOLIN
COOLING
POWERFUL/
POWERFUL/
FAN SPEED
AN SPEE
UIET
QUIET
TIMER
ON
1
OFF
FF
SET CHECK CLOCK RESET
ETCHECKCLOC
2 3
2
CANCEL
AC
AUTO
COMFORT
NANOE-G
NANOE-
TEMP
AIR SWING
AIR SWIN
2
CANCEL
A
AC
SET
3
RC
ET
SET
ET
3
ET
FAN
SPEED
PEE
AIR
SWING
WIN
RT
RC
2
8m
De batterijen plaatsen
1
Open het klepje van de
afstandsbediening
Plaats AAA- of R03-batterijen
2
(kan ~ 1 jaar gebruikt worden)
3
Sluit het deksel
Instellen van de klok
1
Druk op CLOCK
2
Stel de tijd in
3
Bevestig
Eenvoudige bediening
Selecteer de gewenste stand
1
AUTO HEAT
DRY
Start/stop het apparaat
2
COOL
POWER
• Merk op dat de aanduiding
OFF aan staat bij het
starten.
3
Stel de gewenste
temperatuur in
Instellingsbereik: 16 °C ~ 30 °C.
•
•
Het gebruik van het apparaat
binnen de aanbevolen
temperatuursgrenzen
kan energie besparen.
VERWARMEN : 20 °C ~ 24 °C.
KOELEN: 26 °C ~ 28 °C.
DROGEN: 1˚C ~ 2˚C onder
• Om het helderheid van het
scherm te dimmen kunt u 5
seconden ingedrukt houden.
kamertemperatuur.
Inhoudsopgave
Veiligheidsmaatregelen .......54-55
Het gebruik ..........................56-57
Meer weten... ......................58-59
Reinigingsinstructies.................60
Problemen oplossen ................ 61
Informatie..................................62
Accesoires
• Afstandsbediening
• AAA of 2 x R03 batterijen
• Afstandsbedieningshouder
• 2 x schroeven voor de
afstandbedieninghouder
• Gebruik de afstandsbediening
binnen 8 meter van de ontvanger
van de binnen-unit.
De afbeeldingen in deze handleiding zijn alleen bedoeld
als toelichting en kunnen afwijken van het daadwerkelijke
uiterlijk van het apparaat. Deze handleiding kan zonder
voorafgaande kennisgeving worden gewijzigd ter verbetering.
Nederlands
53
Page 54

Veiligheidsmaatregelen
Luchtinlaat
Luchtinlaat
Luchtuitlaat
Luchtuitlaat
Houd u aan de volgende instructies zodat
persoonlijk letsel, bij u of bij iemand anders, of
materiële schade wordt voorkomen:
Onjuiste bediening wegens het niet opvolgen
van de instructies kan leiden tot letsel of
schade, waarvan de ernst wordt geclassifi ceerd
zoals hieronder is aangegeven:
Met dit teken
wordt u
WAARSCHUWING
VOORZICHTIG
De op te volgen instructies worden aangeduid
met de volgende symbolen:
Dit symbool verwijst naar een
handeling die VERBODEN is.
Deze symbolen geven
VERPLICHTE acties aan.
Binnenunit
Luchtuitlaat
gewaarschuwd
voor de dood of
ernstig letsel.
Met dit teken
wordt u
gewaarschuwd
voor letsel of
schade aan
eigendommen.
Luchtinlaat
Voedingsbron
Binnenunit En Buitenunit
WAARSCHUWING
Dit apparaat kan worden gebruikt door kinderen
vanaf de leeftijd van 8 jaar en door personen
met verminderde fysieke, sensorische of mentale
capaciteiten, of zonder ervaring of kennis, als dat
plaatsvindt onder toezicht of na instructie over het
veilig gebruik van het apparaat en zij begrijpen
welke risico’s er zijn. Kinderen mogen niet met het
apparaat spelen. Reiniging en door gebruiker uit te
voeren onderhoud mag niet zonder toezicht door
kinderen worden uitgevoerd.
Vraag advies aan een geautoriseerde dealer
of gespecialiseerde vakman, wanneer de unit
schoongemaakt, gerepareerd, geïnstalleerd,
verwijderd of opnieuw geïnstalleerd moet worden.
Onjuiste installatie en behandeling zal lekkage, een
elektrische schok of brand tot gevolg hebben.
Vraag een gekwalifi ceerde dealer of specialist voor
eventueel te gebruiken koelmiddel.
Het gebruik van koelmiddelen anders dan
aangegeven kan schade aan het product,
ongevallen en letsel veroorzaken, enz.
Installeer de unit niet in een ruimte waar explosieof brandgevaar kan ontstaan. Houdt u zich niet
aan deze instructie, dan kan dat brand tot gevolg
hebben.
Steek niet uw vingers of een voorwerp
in de binnen- of buitenunit van de
airconditioner, draaiende delen kunnen
letsel veroorzaken.
Raak de buitenunit niet aan tijdens onweer, het zou
kunnen leiden tot een elektrische schok.
Stel het apparaat niet voor lange tijd direct bloot
aan koude lucht. Dit om overmatige afkoeling te
vermijden.
Ga niet op het toestel zitten of staan,
omdat u eraf zou kunnen vallen.
Afstandsbediening
54
Buitenunit
Luchtinlaat
Luchtuitlaat
Afstandsbediening
Laat peuters en jonge kinderen niet met de
afstandsbediening spelen om te voorkomen dat zij
de batterijen per ongeluk doorslikken.
Voedingsbron
Voorkom oververhitting of brand,
gebruik niet een snoer waarin
wijzigingen zijn aangebracht
of dat uit meerdere stukken is
samengesteld of een verlengsnoer
of een snoer van onbekende
herkomst.
Page 55

Om oververhitting, brand of elektrische schokken
te voorkomen:
•
Sluit geen andere apparaten aan op hetzelfde
stopcontact.
•
Bedien het apparaat niet met natte handen.
•
Laat geen knikken in het stroomsnoer komen.
•
Werk niet met de unit en stop deze ook niet
door de stekker in te steken of juist uit te
trekken.
Als het netsnoer beschadigd is, moet deze door
de fabrikant, een onderhoudsmonteur of een
vergelijkbaar gekwalifi ceerd persoon vervangen
worden om mogelijk risico te voorkomen.
U wordt ten zeerste geadviseerd de apparatuur
te installeren met een differentieelschakelaar of
een aardlekschakelaar.
Om oververhitting, brand of elektrische schokken
te voorkomen:
•
Steek de stekker goed in het stopcontact.
•
Men moet het stof op de stekker periodiek
afvegen met een droge doek.
Stop met het gebruiken van het product,
wanneer er een abnormaliteit/storing optreedt en
haal de stekker uit het stopcontact of schakel de
stroomschakelaar en de circuitbreker uit.
(Risico op rook/brand/elektrische schok)
Voorbeelden van abnormaliteit/storing
•
De ELCB stopt vaak.
•
Men merkt een brandgeur op.
•
Er wordt een abnormaal geluid of trilling van de
eenheid opgemerkt.
•
Er lekt water uit de binnenunit.
•
Stroomsnoer of stekker wordt abnormaal heet.
•
Ventilatorsnelheid kan niet geregeld worden.
•
De eenheid stopt onmiddellijk met werken,
zelfs als deze ingeschakeld is om te werken.
•
De ventilator stopt niet, zelfs niet als de
eenheid stopt met werken.
Neem onmiddellijk contact op met uw
plaatselijke leverancier voor onderhoud/
reparatie.
Deze apparatuur moet worden geaard om te
voorkomen dat een elektrische schok of brand
ontstaat.
Voorkom een elektrische schok door het
apparaat uit te schakelen en de stekker uit het
stopcontact te trekken:
- Voordat de apparatuur wordt gereinigd of
nagezien.
- Bij langdurige perioden zonder gebruik of
- Tijdens zware onweersbuien.
VOORZICHTIG
Binnenunit En Buitenunit
Was de interne unit niet met water, benzeen,
thinner of schuurpoeder om schade en roest bij
de unit te vermijden.
Deze stoffen mogen niet gebruikt worden voor
tere apparatuur, voedsel, dieren, planten,
versieringen of andere objecten. Doet u dit wel,
dan kan dit leiden tot verslechtering van de
kwaliteit.
Voorkom dat een eventuele brand wordt
aangewakkerd, gebruik geen apparatuur die
brand kan veroorzaken, vóór de luchtuitlaat.
Stel planten of ook huisdieren niet direct bloot
aan de luchtstroming om letsel te voorkomen.
Raak de scherpe aluminium vin niet
aan, omdat de scherpe delen letsel
kunnen veroorzaken.
Schakel de binnenunit niet in wanneer u de vloer
in de was zet. Lucht het vertrek goed voordat u
de unit inschakelt, wanneer u de vloer in de was
hebt gezet.
Installeer de unit niet in ruimten waar een
oliedamp of rook hangt om schade aan de unit
te voorkomen.
Haal de unit niet uit elkaar om schoon te maken.
Hierdoor voorkomt u letsel.
Stap niet op een bank die niet stevig staat.
Zo voorkomt men letsel.
Zet geen vaas of object met water op de unit.
Water kan de unit binnendringen en de kwaliteit
van de isolatie verslechteren. Dit kan tot een
elektrische schok leiden.
Zet niet in de stand KOELEN/DROGEN lange
tijd een raam of deur open.
Voorkom lekkend water door te zorgen dat de
aftapslang:
- Goed aangesloten is,
- Uit de buurt van dakgoten en containers loopt
of,
- Niet ondergedompeld is in water
Na een lange periode van gebruik of ook gebruik
met brandbare apparatuur, moet u de ruimte
goed luchten.
Controleer, wanneer u de apparatuur lange tijd
hebt gebruikt, dat het installatierek nog in goede
staat is, zodat u er zeker van kunt zijn dat de unit
niet kan vallen.
Afstandsbediening
Gebruik geen oplaadbare (Ni-Cd) batterijen.
Hierdoor kan de afstandsbediening beschadigd
raken.
Om disfunctie of schade aan de
afstandsbediening te voorkomen:
•
Verwijder de batterijen indien het apparaat
gedurende lange tijd niet zal worden gebruikt.
•
Men moet nieuwe batterijen van hetzelfde
type insteken en daarbij de vermelde polariteit
volgen.
Voedingsbron
Trek de stekker niet via het snoer uit het
stopcontact, om een elektrische schok te
vermijden.
Veiligheidsmaatregelen
Nederlands
55
Page 56

TEMP
OFF/ON
TIMER
S
CANCEL
ON
O
2
3
CHECK
K
Het gebruik
POWER
TIMER
AUTO COMFORT
(Groen) (Groen) (Blauw) (Oranje)(Oranje)(Oranje) (Groen)
ECONAVI
Om energiebesparing te
optimaliseren
MODE
De bedrijfsmodus kiezen
AUTO - Voor uw gemak
VERWARMEN - Genieten van warme lucht
KOELEN - Genieten van koude lucht
DROGEN - Drogen van de omgeving
MILD DRY
Om het vochtigheidsniveau te
COOLING
verbeteren
•
Deze bedieningshandeling maakt de lucht minder
droog en biedt u een comfortabele leefomgeving,
alleen in de stand KOELEN.
•
Wanneer u de richting van de verticale luchtstroom
instelt op AUTO, wordt gestopt bij een lagere stand
zodat de koude lucht u niet raakt. U kunt echter de
stand van de lamellen met de hand aanpassen.
POWERFUL/
QUIET
Overschakelen tussen krachtig
en rustig
QUIETPOWERFUL NORMAL
MET KRACHT: Snel temperatuur bereiken
POWERFUL
•
Deze functie stopt automatisch na 20 minuten.
STIL: Genieten van een stille werking
QUIET
•
Deze bedrijfsfunctie reduceert het geruis van de
luchtstroom.
Knop Auto OFF/ON
Wordt gebruikt, wanneer u de afstandsbediening niet bij de hand hebt of bij storingen. Het frontpaneel
omhoog brengen:
1. Druk een keer op de knop om het apparaat te gebruiken in de modus AUTO.
AUTO
OFF/ON
2. Druk op de knop en houd deze ingedrukt totdat u 1 pieptoon hoort, laat de knop dan los om de
krachtige modus KOELEN te gebruiken.
3. Herhaal stap 2. Druk op de knop en houd deze ingedrukt totdat u 2 pieptonen hoort, laat de knop dan
los om de krachtige modus VERWARMEN te gebruiken.
•
Nogmaals op de knop drukken om het apparaat uit te schakelen.
56
NANOE-G
POWERFUL
QUIET
Indicator
Display
van de afstandsbediening
Sensor menselijke
activiteit
Zonlichtsensor
en ontvanger
afstandsbediening
AUTO
HEAT
COOL
DRY
MILD
DRY
OFF/ON
ECONAVI
MODE
MILD DRY
COOLING
POWERFUL/
QUIET
TIMER
ON
1
OFF
FF
SET CHECK CLOCK RESET
TEMP
FAN SPEED
2
CLOC
FAN
SPEED
AIR
SWING
AUTO
COMFORT
NANOE-G
AIR SWING
ET
SET
3
CANCEL
AC
RC
Houd deze toets
ongeveer 10 seconden
ingedrukt, om de
ingestelde temperatuur
in °C of °F te tonen.
Indrukken om de
standaardinstelling van
de afstandsbediening te
herstellen.
Deze toets wordt in
normaalbedrijf niet
gebruikt.
FAN SPEED
Ventilatiesnelheid selecteren
(Display van de afstandsbediening)
•
Op AUTO wordt de snelheid van de binnenventilator
automatisch aangepast, in overeenstemming met de
bedrijfsmodus.
Page 57

TIMER
CANCEL
3
Lees "Meer weten..." voor meer informatie
A
AUTO
COMFORT
Voor maximaal comfort
AUTO COMFORT
NANOE-G
De lucht zuiveren
NANOE-G
•
nanoe-G start automatisch, zodra de unit ingeschakeld wordt
OFF/ON
met
•
Kan ook worden geactiveerd als de unit is uitgeschakeld.
.
De timer instellen
Er zijn 2 stel AAN- en UIT-timers beschikbaar
voor het IN- of UIT-schakelen van de unit op
verschillende voorafi ngestelde tijdstippen.
In deze situatie werkt de unit als een ventilator met AUTO
ventilatorsnelheid en draaibare lamellen.
Virussen/bacteriën in het fi lter deactiveren
NANOE-G
•
Nadat de unit is uitgeschakeld, kan de uitschakeling van het
POWER
1
nanoe-G in-fi lter tot 150 minuten geactiveerd zijn.
Het inschakelen van de unit annuleert deze functie.
•
Druk op
NANOE-G
en houd de knop ingedrukt totdat u een korte
2
pieptoon hoort, als u deze functie voortaan wilt uitschakelen.
Deze handeling schakelt niet de nanoe-G uit om de lucht te
zuiveren.
•
Druk op
NANOE-G
en houd de knop ingedrukt totdat u een lange
3
pieptoon hoort, om de uitschakeling van het nanoe-G in-fi lter
terug te zetten.
•
Richting van de luchtstroom
IR SWING
aanpassen
Druk als u de AAN- of UIT-timer wilt uitschakelen op
druk daarna op
•
(Display van de afstandsbediening)
Als de timer is uitgeschakeld, handmatig of als
gevolg van een stroomstoring, kunt u de timer
herstellen door ON respectievelijk
selecteren door op of te drukken en daarna
•
Hiermee houdt u de kamer geventileerd.
•
In de stand KOELEN/DROGEN, zwaaien de jaloezieën
automatisch naar links/naar rechts en omhoog/omlaag, als
AUTO is ingesteld.
•
In de modus VERWARMEN, als AUTO is ingesteld, is de
horizontale luchtspleet op een vooraf bepaalde positie
aangebracht. De verticale jaloezie draait naar links/rechts,
nadat de temperatuurt stijgt.
•
Verplaats de blazer niet met de hand.
op
•
De dichtstbijzijnde timerinstelling wordt
weergegeven en wordt in volgorde ingeschakeld.
•
Wanneer de ON-timer ingeschakeld is, start het
apparaat eventueel (tot 35 minuten) vóór het
eigenlijke geprogrammeerde tijdpunt, om op tijd de
gewenste temperatuur te bereiken.
•
De timer-functie baseert op de, op de
afstandsbediening ingestelde, uurtijd en wordt,
eenmaal geprogrammeerd, dagelijks herhaald. Zie
de snelstartgids voor het instellen van de klok.
21 3
ON
1
OFF
SET
3
2
CANCEL
Stel de timer in op
ON of OFF
• Bij elke keer
indrukken:
Cancel
Stel de tijd in
Bevestig
ON
of
en selecteer respectievelijk of en
OFF
CANCEL
SET
te drukken.
Voorbeeld:
UIT om 22:00
OFF
2
SET
TIMER
.
te
OFF
Het gebruik
Opmerking
POWERFUL/
ECONAVI
QUIET
,
• Kan worden geactiveerd in alle standen en kan
worden uitgeschakeld door de betreffende knop
weer in te drukken.
AUTO
COMFORT
,
NANOE-G
,
ECONAVI
POWERFUL/
QUIET
,
AUTO
COMFORT
,
• Kunnen niet tegelijkertijd worden geselecteerd.
•
Kan niet worden ingeschakeld tijdens MILD DROOG
KOELEN.
Nederlands
57
Page 58

Meer weten...
Bedieningsstand
AUTO: Tijdens de bedrijfsmodus knippert de POWER-indicator.
• Het apparaat kiest elke 10 minuten een bedrijfsstand, afhankelijk van de temperatuurinstelling en de kamertemperatuur.
VERWARMEN: Het duurt even voordat de eenheid opwarmt. De POWER-indicator knippert tijdens dit process.
KOELEN: Gebruik de gordijnen om het zonlicht en de hitte buiten te houden en om tijdens het koelen het
DROGEN: Het apparaat werkt bij lage ventilatorsnelheid om zo voor een aangename koeling te zorgen.
• Voor een systeem waarbij de HEAT-modus is vergrendeld, als een bedrijfsmodus anders dan HEAT is geselecteerd,
Afhankelijk van de geaccumuleerde bedrijfstijd, kan de uitschakeling van het nanoe-G in-fi lter slechts een keer per dag
geactiveerd worden.
Om het achtergebleven vocht in de interne onderdelen te verwijderen, wordt de ventilator 30 minuten ingeschakeld
en de luchtspleet een beetje geopend. Dit proces kan alleen worden toegepast als de unit bediend wordt in de modus
KOELEN/DROGEN voordat de unit wordt uitgeschakeld. Vervolgens deactiveert de nanoe-G ongeveer 2 uur lang de
virussen en bacteriën in het fi lter, waarbij de ventilator is uitgeschakeld en de luchtspleet gesloten is.
Schakel de voeding tijdens deze werking niet uit. Na een stroomstoring wordt deze werking niet hervat.
Het apparaat begint met
initialiseren
(ongeveer 1 minuut)
energieverbruik te verminderen.
stopt de binnenunit en gaat de POWER-indicator knipperen.
Uitschakeling nanoe-G in-fi lter
ECONAVI en AUTO COMFORT
ECONAVI
AUTO
COMFORT
of
De bewegingssensor en de
zonlichtsensor nemen
activiteit waar.
Werking bewegingssensor
ECONAVI ;
Stand
KOELEN/
DROGEN
VERWARMEN
AUTO COMFORT ; Neemt de menselijke aanwezigheid en activiteit waar. De unit regelt de kamertemperatuur zodat de omgeving voor
de mensen in die kamer consistent comfortabel is.
Stand
KOELEN/
DROGEN
VERWARMEN
Detecteert de aanwezigheid van mensen en activiteit. Het apparaat regelt de kamertemperatuur om energie te besparen.
Mens
Lage activiteit Normale activiteit
Ingestelde
temperatuur
Ingestelde
temperatuur
Ingestelde
Ventilatorsnelheid
Mens
+1 kraan*
+1 °C
Lage activiteit Normale activiteit
+1 °C
+0.3 °C
Opmerking
AIRSWING
Als AIR SWING (luchtcirculatie) is
geselecteerd, zijn ECONAVI en AUTO
COMFORT uitgeschakeld.
Hoge activiteit Afwezig
Hoge activiteit Afwezig
-1 °C
-2 °C
+1 kraan
+2 °C
-2 °C-2 °C
+2 °C
-2 °C
0LGGHOVWHYHQWLODWRU
ECONAVI en AUTO COMFORT
Nauwkeurigheidsregeling van de temperatuur tijdens lage activiteit om de energiebesparing te maximaliseren.
Mens
Stand
KOELEN/
DROGEN
*
Tijdens lage activiteit, ventilatorsnelheid 1 niveau omhoog voor de eerste 15 minuten of tot de ingestelde temperatuur bereikt is.
**
Tijdens menselijke afwezigheid is maximale ventilatorsnelheid voor de modus KOELEN/DROGEN de middelste ventilator.
Ingestelde
temperatuur
Lage activiteit
ECONAVI en AUTO COMFORT maakt gebruik van het feit dat
de menselijke natuur zich de tijd neemt om te voelen dat de
temperatuur stijgt bij een laag activiteitsniveau, de unit past de
temperatuur aan om de energiebesparing te maximaliseren
zonder in te boeten op comfort.
58
Page 59

De sensor voor menselijke activiteit zal ook zoeken naar de ruimte van de hittebron en de beweging in een ruimte.
Opmerkingsgebied
• Op basis van de activiteit in het gebied past de richting van de horizontale luchtstroom
zich aan op een vooraf ingestelde vaste stand of draait periodiek naar links/rechts.
• De prestaties van de bewegingssensor worden beïnvloed door de plaatsing van de
binnen-unit, de bewegingssnelheid en het temperatuurbereik, enz.
• De sensor voor menselijke activiteit zal misschien:
- Per ongeluk een voorwerp waarnemen waarvan de warmtebron en beweging lijken op
die van mensen, zoals huisdieren enz.
- Ten onrechte niet de warmte-uitstraling en beweging van iemand waarnemen als een
persoon zich een bepaalde tijd niet beweegt.
• Plaats geen grote voorwerpen in de buurt van de sensor en zorg dat geen verwarming
of bevochtiger binnen het detectiebereik van de sensor staat. Dit kan een slecht
functionerende sensor tot gevolg hebben.
120º
7m
Werking zonlichtsensor
ECONAVI; Via het waarnemen van de intensiteit van het zonlicht wordt de
Stand
KOELEN/
DROGEN
VERWARMEN
• In een vertrek zonder venster of met een dik gordijn zal de zonlichtsensor de omstandigheden beoordelen als
bewolkt/nachtelijk.
temperatuur aangepast, om energie te besparen.
Omgevingsomstandigheden
Ingestelde
temperatuur
-1 °C -1 °C
+1 °C
ECONAVI is geactiveerd,
het apparaat behoudt de
ingestelde temperatuur totdat
een hoge intensiteit van het
zonlicht gedetecteerd wordt.
De zonlichtsensor detecteert
de intensiteit van het zonlicht
tijdens weersveranderingen
of tijdens wisselingen van
dag/nacht en de unit past de
temperatuur aan.
Gebruiksomstandigheden
Gebruik deze airconditioner binnen het volgende temperatuurbereik.
DBT : Droge bolttemperatuur
WBT : Natte bolttemperatuur
Temperatuur (°C)
KOELEN
VERWARMEN
Max. 32 23 43 26
Min. 16 11 -10 -
Max. 30 - 24 18
Min. 16 - -15 -16
Binnen Buiten
DBT WBT DBT WBT
Meer weten...
Nederlands
59
Page 60

Reinigingsinstructies
Voor optimale prestaties moet het apparaat
regelmatig gereinigd worden. Wanneer de unit
vuil is, kan dat leiden tot storingen en u ziet
dan de nanoe-G indicator knipperen of u ziet
foutcode “H99” verschijnen. Vraag advies aan
een offi ciële dealer.
• Schakel de voeding uit en trek de stekker uit het
stopcontact, voordat u het apparaat reinigt.
• Raak niet de aluminium vin aan, het scherpe
deel kan letsel veroorzaken.
• Gebruik geen benzeen, verdunner of
schuurpoeder.
• Gebruik alleen zeep ( pH 7) of milde
reinigingsmiddelen voor huishoudelijk gebruik.
• Gebruik geen water dat warmer is dan 40 °C.
Binnenunit
Veeg de unit zachtjes af met een
zachte, droge doek.
Sensor menselijke activiteit
Niet op slaan, met geweld indrukken of inprikken
met een scherp voorwerp. Hierdoor kan de sensor
beschadigd worden of fout functioneren.
Voorpaneel
Was het voorzichtig af en droog het.
Verwijder het voorpaneel
Verwijderen
2
Binnenunit
Aluminium vinVoorpaneel
Sensor
menselijke
activiteit
Luchtfi lter
Nanoe-GGenerator
Nanoe-G-Generator
Elke 2 weken
•
Reinig met een droog wattenstaafje.
•
Niet aanraken als het apparaat in
bedrijf is.
Luchtfi lter
Elke 2 weken
•
Was/spoel de fi lters voorzichtig met
water om schade aan het oppervlakte
van de fi lters te voorkomen.
•
Droog de fi lters goed in de schaduw, uit de buurt van
vuur of direct zonlicht.
•
Vervang beschadigde fi lters.
Luchtfi lter verwijderen Luchtfi lter bevestigen
Optillen
1
Goed afsluiten
Aan beide zijden insteken
1
2 Sluiten
3 Druk op beide zijden van het frontpaneel
4 Druk in het midden van het frontpaneel.
60
In het apparaat plaatsen
Voor Seizoensinspectie, Nadat Het Apparaat Lang Niet
In Gebruik Was
•
Controleer de batterijen van de afstandsbediening.
•
Controleer de inlaat- en uitlaatopeningen op obstructies.
•
Gebruik de AUTO OFF/ON-knop om de modus KOELEN/
VERWARMEN te selecteren. Na 15 minuten looptijd
is het volgende temperatuurverschil tussen inlaat- en
uitlaatlucht normaal:
KOELEN: ≥8 °C
Bij Langdurige Inactiviteit
•
Schakel de modus VERWARMEN gedurende 2 – 3 uur
in. Dit is een manier om vocht dat is achtergebleven
in de interne onderdelen grondig te verwijderen en
schimmelgroei te voorkomen.
•
Schakel de voeding uit en ontkoppel.
•
Verwijder de batterijen uit de afstandsbediening.
VERWARMEN: ≥14 °C
Page 61

Problemen Oplossen
TIMER
S
CANCEL
ON
O
1
3
S
K
RES
C
RC
De volgende symptomen geven niet een defect aan.
Er komt damp uit de binnenunit.
Tijdens werking klinkt er geluid van stromend water.
De ruimte heeft een vreemde geur.
De binnenventilator stopt af en toe wanneer de
ventilatorsnelheid is ingesteld op automatisch.
De lucht stroomt zelfs nog verder nadat het bedrijf reeds
gestopt is.
Het apparaat begint pas na enkele minuten vertraging
nadat het opnieuw is opgestart.
Er komt water/stoom uit de buitenunit.
TIMER-indicator is altijd aan.
POWER-indicator knippert in de stand VERWARMEN
zonder toevoer van warme lucht (en jalouzie isgesloten).
De binnenventilator stopt af en toe tijdens verwarmen.• Onbedoeld koelen voorkomen.
De POWER-indicator knippert voordat de unit wordt
ingeschakeld.
Krakend geluid tijdens bedrijf.
Tijdens de COOL/DRY-modus, stopt de binnenunit en
gaat de POWER-indicator knipperen.
Controleer het volgende voordat u een onderhoudsmonteur belt.
De stand VERWARMEN/KOELEN werkt niet goed.• Stel de temperatuur correct in.
Luidruchtig tijdens werking.
Afstandsbediening werkt niet.
(De display is gedimd of het transmissiesignaal is zwak.)
Het apparaat werkt niet.
Het apparaat ontvangt geen signaal van de
afstandsbediening.
Symptoom Oorzaak
•
Condensatie door koelproces.
•
Stromend koelmiddel in het apparaat.
•
Dit is mogelijk een geur van vochtigheid die afkomstig is van de muur,
het tapijt, meubels of kleding.
•
Zo verdrijft u de omgevingsgeur.
•
Extractie van de resterende warmte uit de binnenunit (hoogstens 30
seconden).
•
De vertraging dient ter bescherming van de compressor van de unit.
•
In de leidingen vindt condensatie of verdamping plaats.
•
Nadat de timer is ingesteld, worden de instellingen dagelijks
uitgevoerd.
•
De unit staat in de ontdooistand (en AIR SWING (Luchzwenking) is
ingesteld op AUTO).
•
Dit is een initiële stap tijdens de voorbereiding voor werking wanneer
de ON timer is ingeschakeld.
•
Temperatuurveranderingen veroorzaken expansie of contractie van
het apparaat.
•
Het systeem is vergrendeld om alleen in de HEAT-modus te werken.
Symptoom Controleer
•
Sluit alle deuren en ramen.
•
Maak de fi lters schoon of vervang ze.
•
Verwijder elke obstructie bij de lucht in- en uitlaatopingen.
•
Controleer of de unit is geinstalleerd op een helling.
•
Sluit het voorpaneel correct.
•
Plaats de batterijen correct.
•
Vervang zwakke batterijen.
•
Controleer of de stroomonderbreker ontkoppeld is.
•
Controleer of de timers zijn ingesteld.
•
Controller, of de ontvanger niet geblokkeerd wordt.
•
Het een en ander fl uorescerend licht kan eventueel de signaalzender
storen. Vraag advies aan een offi ciële dealer.
OMSTANDIGHEDEN WAARIN U
HULP MOET INROEPEN
SCHAKEL DE STROOMTOEVOER UIT EN
TREK DE STEKKER UIT HET STOPCONTACT
en raadpleeg een bevoegde handelaar, onder de
volgende omstandigheden:
•
Een abnormaal lawaai tijdens de werking.
•
Water of vreemde deeltjes zijn in de
afstandsbediening binnengedrongen.
•
Er lekt water uit de binnenunit.
•
De zekering springt regelmatig uit.
•
De stroomdraad wordt onnatuurlijk warm.
•
De schakelaars of knoppen werken niet zoals het
hoort.
De unit stopt en de TIMER-indicator knippert.
Laat de foutcode verschijnen met behulp van de afstandsbediening.
Houd de knop
Houd de knop
1
5 seconden
ingedrukt
Druk op de
3
knop om de
TIMER
ON
1
2
OFF
FF
SET CHECK CLOCK RESET
ET CLOC
AC
A
CANCEL
controle te
stoppen
•
Bij bepaalde fouten kunt u de unit opnieuw opstarten met beperkte
2
SET
ET
3
RC
ET
ingedrukt totdat
u een pieptoon
hoort en noteer de
foutcode
4
Schakel de eenheid
uit en deel de
Reinigingsinstructies / Problemen Oplossen
foutcode mee aan
de geautoriseerde
leverancier
Nederlands
functies, er klinken dan 4 piepgeluiden bij het opstarten.
61
Page 62

Information/Informations/Información
Informationen/Informazioni/Informatie
English
Information for Users on Collection and Disposal of Old Equipment and Used Batteries
These symbols on the products, packaging, and/or accompanying documents mean that used electrical
and electronic products and batteries should not be mixed with general household waste.
For proper treatment, recovery and recycling of old products and used batteries, please take them to
applicable collection points, in accordance with your national legislation and the Directives 2002/96/EC
and 2006/66/EC.
By disposing of these products and batteries correctly, you will help to save valuable resources and
prevent any potential negative effects on human health and the environment which could otherwise arise
from inappropriate waste handling.
For more information about collection and recycling of old products and batteries, please contact your
local municipality, your waste disposal service or the point of sale where you purchased the items.
Penalties may be applicable for incorrect disposal of this waste, in accordance with national legislation.
For business users in the European Union
If you wish to discard electrical and electronic equipment, please contact your dealer or supplier for
further information.
[Information on Disposal in other Countries outside the European Union]
These symbols are only valid in the European Union. If you wish to discard these items, please contact
your local authorities or dealer and ask for the correct method of disposal.
Note for the battery symbol (bottom two symbol examples):
This symbol might be used in combination with a chemical symbol. In this case it complies with the
requirement set by the Directive for the chemical involved.
Pb
Français
Avis aux utilisateurs concernant la collecte et l’élimination des piles et des appareils
électriques et électroniques usagés
Apposé sur le produit lui-même, sur son emballage, ou fi gurant dans la documentation qui
l’accompagne, ce pictogramme indique que les piles et appareils électriques et électroniques usagés
doivent être séparés des ordures ménagères.
Afi n de permettre le traitement, la valorisation et le recyclage adéquats des piles et des appareils
usagés, veuillez les porter à l’un des points de collecte prévus, conformément à la législation nationale
en vigueur ainsi qu’aux directives 2002/96/CE et 2006/66/CE.
En éliminant piles et appareils usagés conformément à la réglementation en vigueur, vous contribuez à
prévenir le gaspillage de ressources précieuses ainsi qu’à protéger la santé humaine et l’environnement
contre les effets potentiellement nocifs d’une manipulation inappropriée des déchets.
Pour de plus amples renseignements sur la collecte et le recyclage des piles et appareils usagés,
veuillez vous renseigner auprès de votre mairie, du service municipal d’enlèvement des déchets ou du
point de vente où vous avez acheté les articles concernés.
Le non-respect de la réglementation relative à l’élimination des déchets est passible d’une peine
d’amende.
Pour les utilisateurs professionnels au sein de l’Union européenne
Si vous souhaitez vous défaire de pièces d’équipement électrique ou électronique, veuillez vous
renseigner directement auprès de votre détaillant ou de votre fournisseur.
[Information relative à l’élimination des déchets dans les pays extérieurs à l’Union européenne]
Ce pictogramme n’est valide qu’à l’intérieur de l’Union européenne. Pour connaître la procédure
applicable dans les pays hors Union Européenne, veuillez vous renseigner auprès des autorités locales
compétentes ou de votre distributeur.
Note relative au pictogramme à apposer sur les piles (voir les 2 exemples ci-contre):
Le pictogramme représentant une poubelle sur roues barrée d’une croix est conforme à la
Pb
réglementation. Si ce pictogramme est combiné avec un symbole chimique, il remplit également les
exigences posées par la Directive relative au produit chimique concerné.
62
Page 63

Español
Información para Usuarios sobre la Recolección y Eliminación de aparatos viejos y baterías
usadas
Estos símbolos en los productos, embalajes y/o documentos adjuntos, signifi can que los aparatos
eléctricos y electrónicos y las baterías no deberían ser mezclados con los desechos domésticos.
Para el tratamiento apropiado, la recuperación y el reciclado de aparatos viejos y baterías usadas,
por favor, observe las normas de recuperación aplicables, de acuerdo a su legislación nacional y a las
Directivas 2002/96/CE y 2006/66/CE.
Al desechar estos aparatos y baterías correctamente, Usted estará ayudando a preservar recursos
valiosos y a prevenir cualquier potencial efecto negativo sobre la salud de la humanidad y el medio
ambiente que, de lo contrario, podría surgir de un manejo inapropiado de los residuos.
Para mayor información sobre la recuperación y el reciclado de aparatos y baterías viejas, por favor,
contacte con su comunidad local, su servicio de eliminación de residuos o al comercio donde adquirió
estos aparatos.
Podrán aplicarse penas por la eliminación incorrecta de estos residuos, de acuerdo a la legislación
nacional.
Para usuarios empresariales en la Unión Europea
Si usted desea desechar aparatos eléctricos y electrónicos, por favor contacte con su distribuidor o
proveedor a fi n de obtener mayor información.
[Informacion sobre la Eliminación en otros Países fuera de la Unión Europea]
Estos símbolos sólo son válidos dentro de la Unión Europea. Si desea desechar estos objetos, por favor
contacte con sus autoridades locales o distribuidor y consulte por el método correcto de eliminación.
Nota sobre el símbolo de la bateria (abajo, dos ejemplos de símbolos):
Este símbolo puede ser usado en combinación con un símbolo químico. En este caso, el mismo cumple
con los requerimientos establecidos por la Directiva para los productos químicos involucrados.
Pb
Deutsch
Benutzerinformation zur Sammlung und Entsorgung von veralteten Geräten und benutzten
Batterien
Diese Symbole auf den Produkten, Verpackungen und/oder Begleitdokumenten bedeuten, dass
benutzte elektrische und elektronische Produkte und Batterien nicht in den allgemeinen Hausmüll
gegeben werden sollen.
Bitte bringen Sie diese alten Produkte und Batterien zur Behandlung, Aufarbeitung bzw. zum Recycling
gemäß Ihrer Landesgesetzgebung und den Richtlinien 2002/96/EG und 2006/66/EG zu Ihren
zuständigen Sammelpunkten.
Indem Sie diese Produkte und Batterien ordnungsgemäß entsorgen, helfen Sie dabei, wertvolle
Ressourcen zu schützen und eventuelle negative Auswirkungen auf die menschliche Gesundheit und
die Umwelt zu vermeiden, die anderenfalls durch eine unsachgemäße Abfallbehandlung auftreten
können.
Wenn Sie ausführlichere Informationen zur Sammlung und zum Recycling alter Produkte
und Batterien wünschen, wenden Sie sich bitte an Ihre örtlichen Verwaltungsbehörden, Ihren
Abfallentsorgungsdienstleister oder an die Verkaufseinrichtung, in der Sie die Gegenstände gekauft
haben.
Gemäß Landesvorschriften können wegen nicht ordnungsgemäßer Entsorgung dieses Abfalls
Strafgelder verhängt werden.
Für geschäftliche Nutzer in der Europäischen Union
Wenn Sie elektrische oder elektronische Geräte entsorgen möchten, wenden Sie sich wegen genauerer
Informationen bitte an Ihren Händler oder Lieferanten.
[Informationen zur Entsorgung in Ländern außerhalb der Europäischen Union]
Diese Symbole gelten nur innerhalb der Europäischen Union. Wenn Sie solche Gegenstände
entsorgen möchten, erfragen Sie bitte bei den örtlichen Behörden oder Ihrem Händler, welches die
ordnungsgemäße Entsorgungsmethode ist.
Hinweis zum Batteriesymbol (unten zwei Symbolbeispiele):
Dieses Symbol kann in Kombination mit einem chemischen Symbol verwendet werden. In diesem Fall
Pb
erfüllt es die Anforderungen derjenigen Richtlinie, die für die betreffende Chemikalie erlassen wurde.
63
Page 64

Italiano
Informazioni per gli utenti sulla raccolta e l’eliminazione di vecchie apparecchiature e batterie usate
Questi simboli sui prodotti, sull’imballaggio, e/o sulle documentazioni o manuali accompagnanti i
prodotti indicano che i prodotti elettrici, elettronici e le batterie usate non devono essere buttati nei rifi uti
domestici generici.
Per un trattamento adeguato, recupero e riciclaggio di vecchi prodotti e batterie usate, vi preghiamo di
portarli negli appositi punti di raccolta, secondo la legislazione vigente nel vostro Paese e le Direttive
2002/96/EC e 2006/66/EC.
Smaltendo correttamente questi prodotti e le batterie, contribuirete a salvare importanti risorse e ad evitare
i potenziali effetti negativi sulla salute umana e sull’ambiente che altrimenti potrebbero verifi carsi in seguito
ad un trattamento inappropriato dei rifi uti.
Per ulteriori informazioni sulla raccolta e sul riciclaggio di vecchi prodotti e batterie, vi preghiamo di
contattare il vostro comune, i vostri operatori per lo smaltimento dei rifi uti o il punto vendita dove avete
acquistato gli articoli.
Sono previste e potrebbero essere applicate sanzioni qualora questi rifi uti non siano stati smaltiti in modo
corretto ed in accordo con la legislazione nazionale.
Per utenti commerciali nell’Unione Europea
Se desiderate eliminare apparecchiature elettriche ed elettroniche, vi preghiamo di contattare il vostro
commerciante od il fornitore per maggiori informazioni.
[Informazioni sullo smaltimento rifi uti in altri Paesi fuori dall’Unione Europea]
Questi simboli sono validi solo all’interno dell’Unione Europea. Se desiderate smaltire questi articoli,
vi preghiamo di contattare le autorità locali od il rivenditore ed informarvi sulle modalità per un corretto
smaltimento.
Nota per il simbolo delle batterie (esempio con simbolo chimico riportato sotto il simbolo
principale):
Pb
Questo simbolo può essere usato in combinazione con un simbolo chimico; in questo caso è conforme
ai requisiti indicati dalla Direttiva per il prodotto chimico in questione.
Nederlands
Informatie voor gebruikers betreffende het verzamelen en verwijderen van oude uitrustingen en lege batterijen
Deze symbolen op de producten, verpakkingen, en/of begeleidende documenten betekenen dat
gebruikte elektrische en elektronische producten en batterijen niet met het algemene huishoudelijke
afval gemengd mogen worden.
Voor een correcte behandeling, recuperatie en recyclage van oude producten en lege batterijen moeten zij naar
de bevoegde verzamelpunten gebracht worden in overeenstemming met uw nationale wetgeving en de Richtlijnen
2002/96/EC en 2006/66/EC.
Door deze producten en batterijen correct te verwijderen draagt u uw steentje bij tot het beschermen
van waardevolle middelen en tot de preventie van potentiële negatieve effecten op de gezondheid van
de mens en op het milieu die anders door een onvakkundige afvalverwerking zouden kunnen ontstaan.
Voor meer informatie over het verzamelen en recycleren van oude producten en batterijen, gelieve
contact op te nemen met uw plaatselijke gemeente, uw afvalverwijderingsdiensten of de winkel waar u
de goederen gekocht hebt.
Voor een niet-correcte verwijdering van dit afval kunnen boetes opgelegd worden in overeenstemming
met de nationale wetgeving.
Voor zakengebruikers in de Europese Unie
Indien u elektrische en elektronische uitrusting wilt vewijderen, neem dan contact op met uw dealer voor
meer informatie.
[Informatie over de verwijdering in andere landen buiten de Europese Unie]
Deze symbolen zijn enkel geldig in de Europese Unie. Indien u wenst deze producten te verwijderen,
neem dan contact op met uw plaatselijke autoriteiten of dealer, en vraag informatie over de correcte
wijze om deze producten te verwijderen.
Opmerking over het batterijensymbool (beneden twee voorbeelden):
Dit symbool kan gebruikt worden in verbinding met een chemisch symbool. In dat geval wordt de eis,
Pb
vastgelegd door de Richtlijn voor de betrokken chemische producten vervuld.
Panasonic Corporation
Website: http://panasonic.net/
© Panasonic Corporation 2013
Printed in Malaysia
Authorised representative in EU
Panasonic Testing Centre
Panasonic Marketing Europe GmbH
Winsbergring 15, 22525 Hamburg, Germany
F569455
SS0813-0
 Loading...