

Page 1
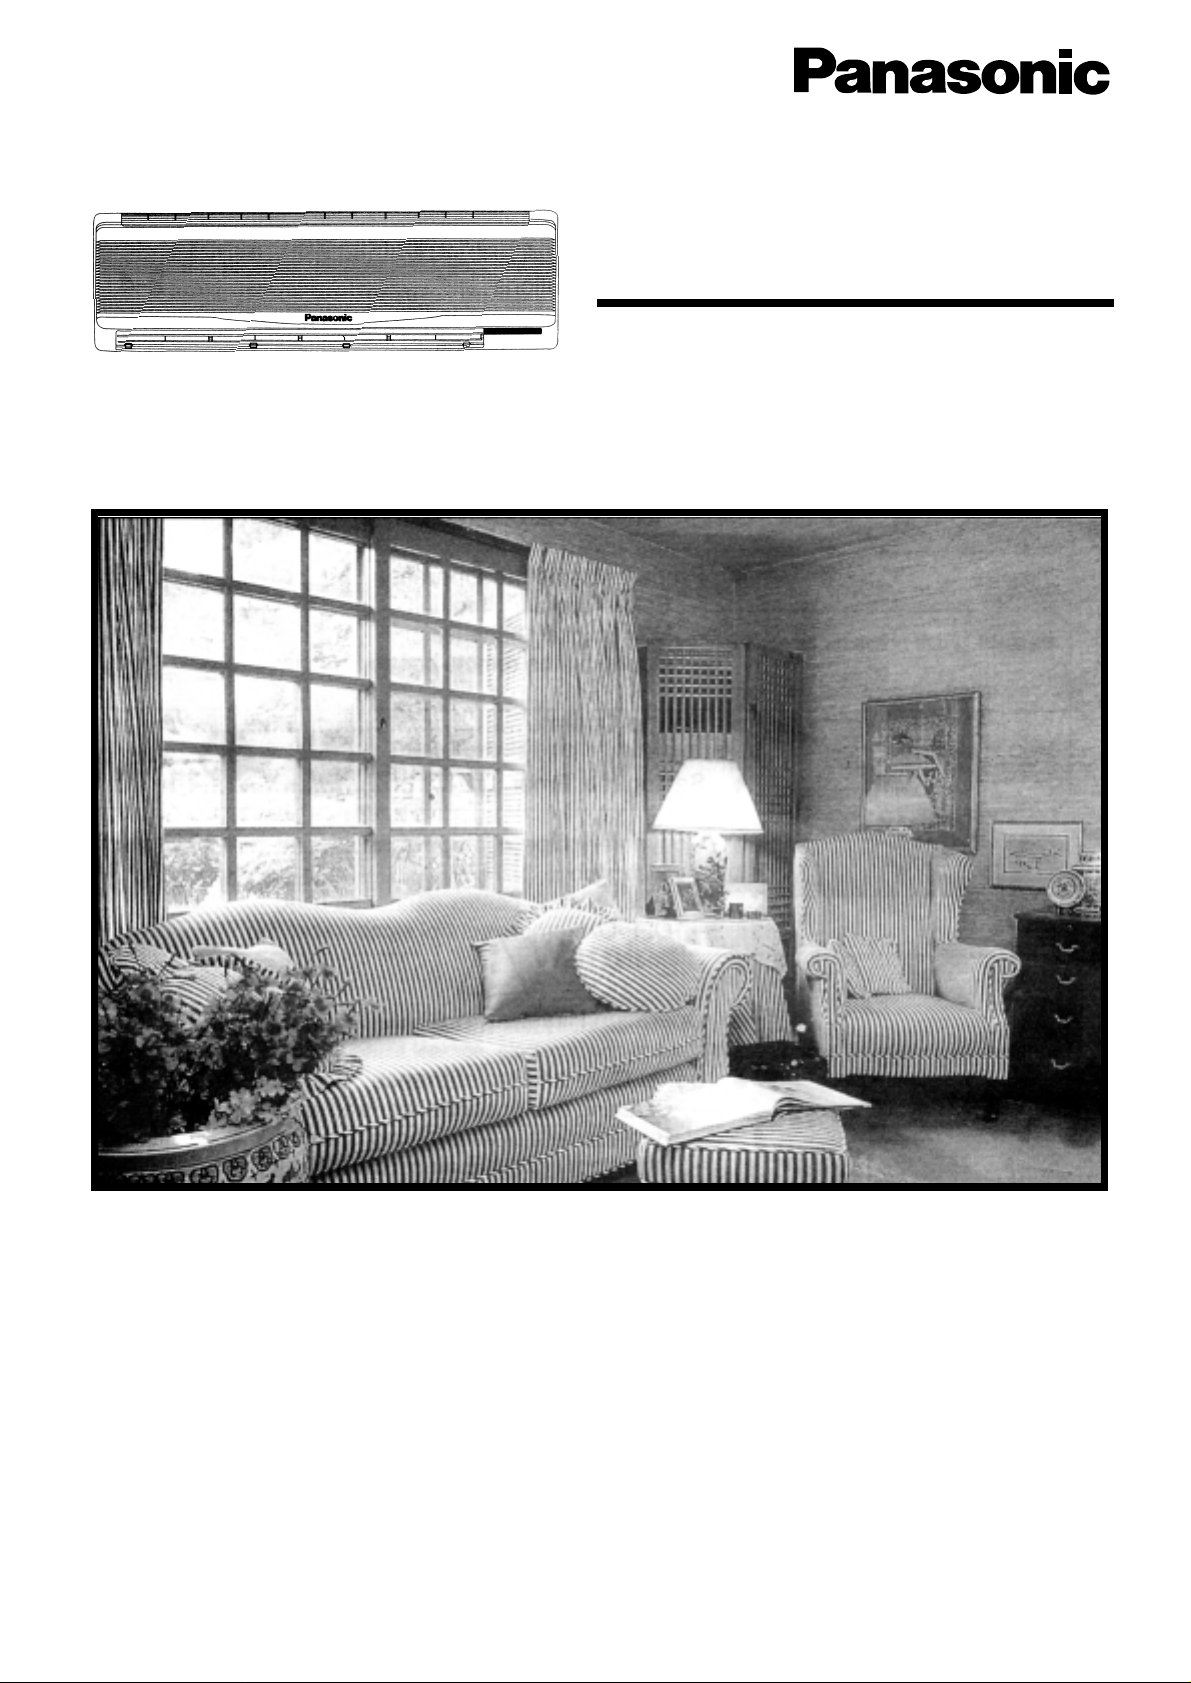
Room Air conditioner
Operating Instructions
Model CS–C281KR (Indoor)
CU–C281KR (Outdoor)
Before using your air-conditioner, please
read this operating instructions carefully
and keep it for future reference.
Page 2
Contents
1
Safety Precautions.........................................2-4
– Installation precautions
– Operation precautions
Name of Each Part
.........................................
5-6
– Indoor unit
– Outdoor unit
– Accessories
– Remote control
Preparation Before Operation..........................7-8
– Before operating the unit
– How to insert batteries
– Operating the remote control
How to Operate...........................................9-10
Setting the Timer ......................................11-12
Convenient Operation................................13-14
– Sleep mode
– When remote control cannot be used
– OFF/ON remote control signal receiving
sound
Operation Hints.........................................15-16
Better Care and Maintenance.....................17-18
– Cleaning the air conditioner and air filters
– Replacement of air purifying filters
– When not using the air conditioner for a
long period
– Pre-season inspection
Troubleshooting ........................................19-20
– Normal operation
– Abnormal operation
– Call the dealer immediately
Before use
If necessary
How to use
Page 3
Safety Precautions
2
Before operating, please read the following “Safety Precautions” carefully.
To prevent personal injury, injury to others and property damage, the following instructions must be followed.
Incorrect operation due to ignoring of instructions will cause harm or damage, the seriousness of which is
classified as follows:
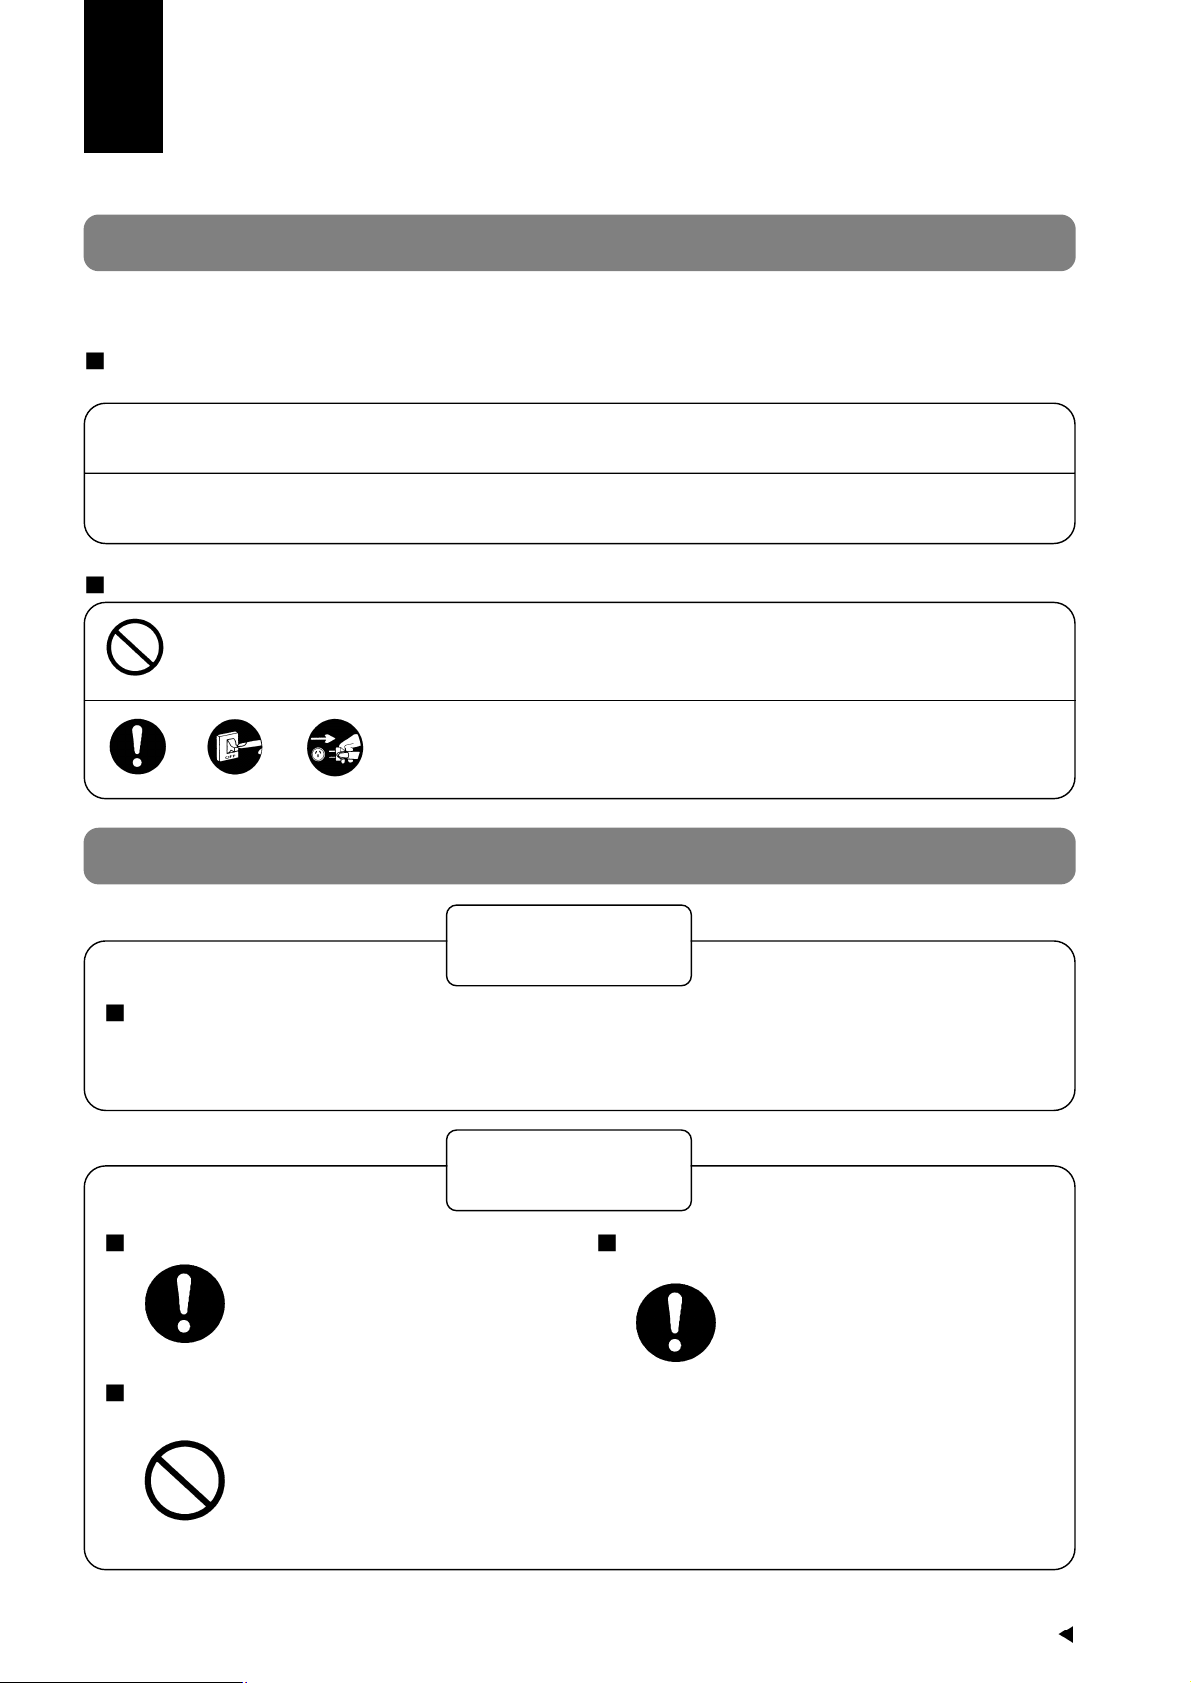
The instructions to be followed are classified by the following symbols:
Warning:
Caution :
This sign warns of death or serious injury.
This sign warns of injury or damage to property only.
This symbol (with a white background) denotes an action that is PROHIBITED.
These symbols (with a black background) denote an action that is COMPULSORY.
Installation precautions
Do not install, remove and reinstall the unit yourself.
Improper installation will cause leakage, electric shock or fire. Please consult an authorized dealer or
specialist for the installation work.
Warning
This room air conditioner must be earthed. Ensure that drainage piping is connected
properly.
Do not install the unit in a place where there
may be explosive gas leaks.
Caution
Improper grounding could cause
electric shock.
Gas leaks near the unit could cause
fires.
Otherwise, water will leak out.
Y
Y
Y
Y
Page 4
3
Operation precautions
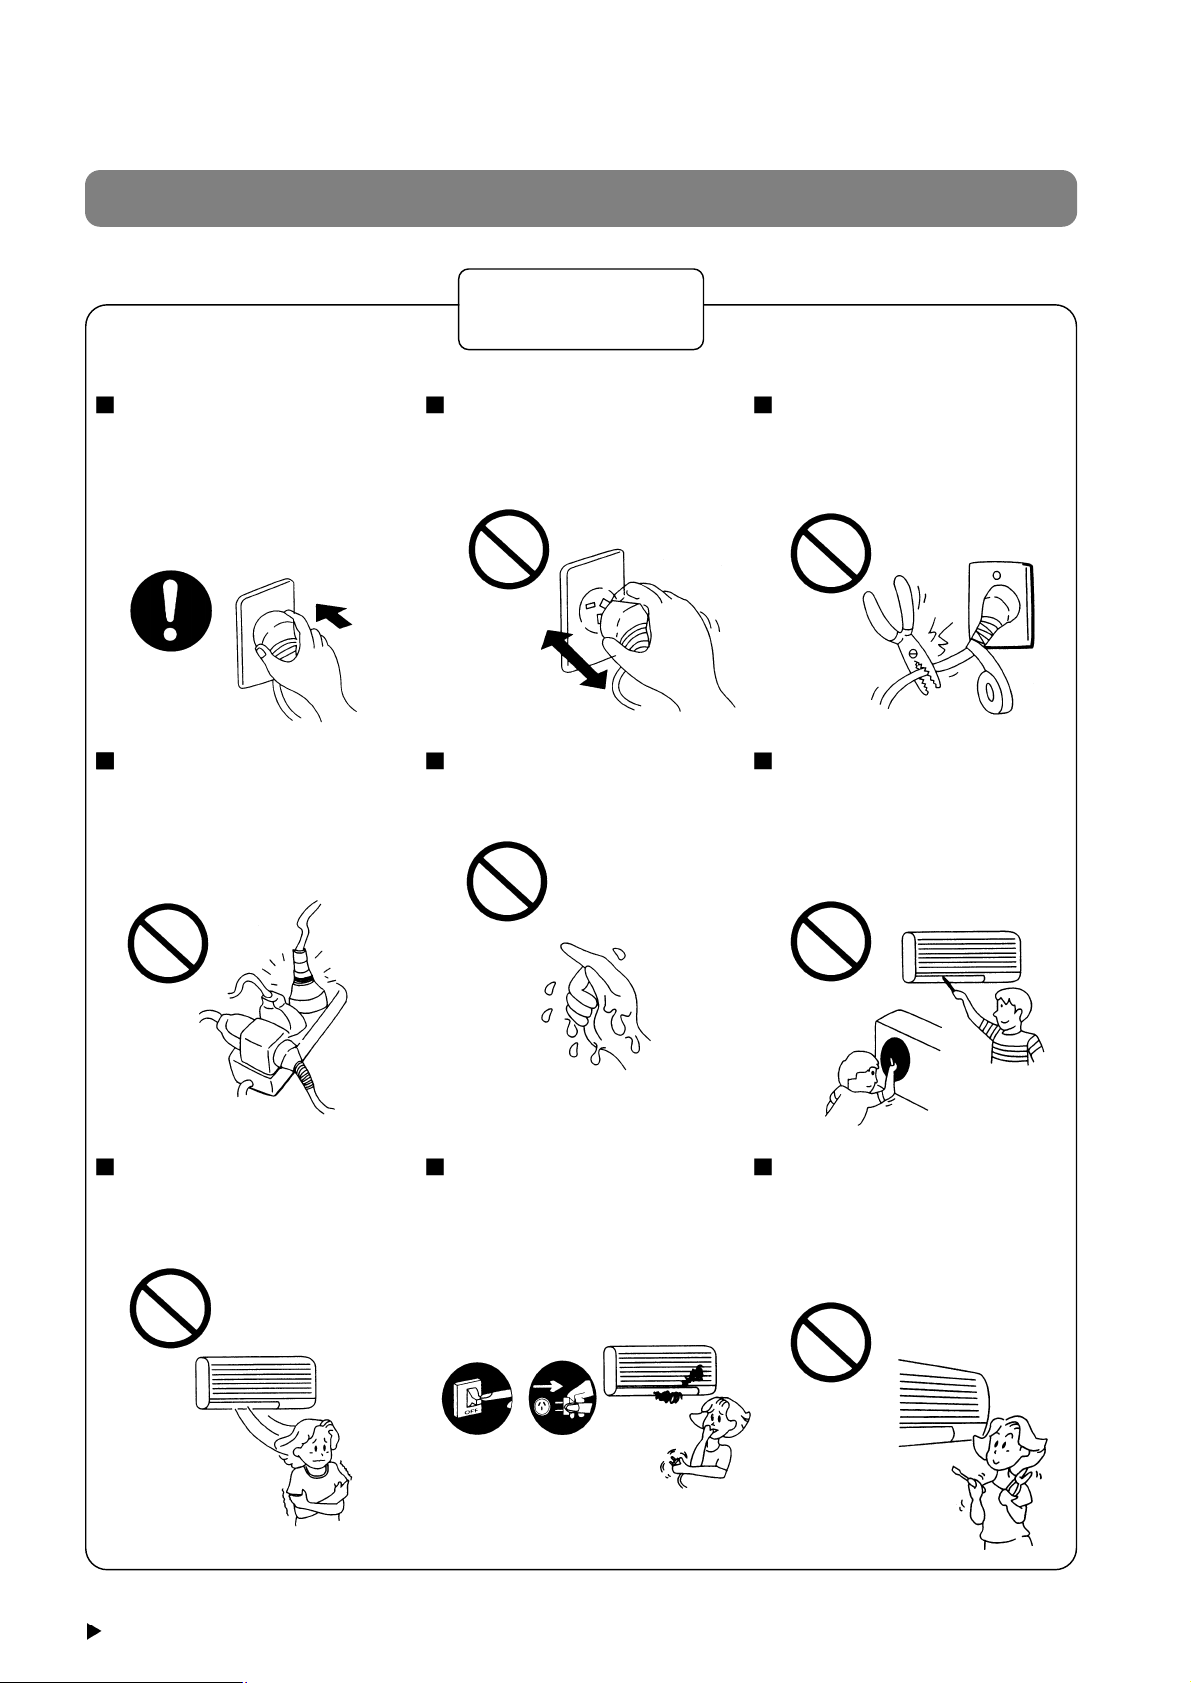
Insert the power plug properly.
Heat generated by a loose
power plug could cause electric
shock or fire.
Electrical outlet and power plug
shall be easilly accessible.
Do not operate or stop the
unit by inserting or pulling
out the power plug.
It could cause electric shock or
fire.
Do not damage or use an
unspecified power cord.
It will cause electrical shock or
fire.
Do not modify the length of
the power cord or use an
extension cord.
It could cause electric shock or
fire.
Do not modify the length of
the power cord or use an
extension cord.
It could cause electric shock or
fire.
Do not operate the unit with
wet hands.
It could cause an electric shock.
Do not insert finger, sticks or
other objects into the units.
It could lead to physical injury
and cause damage to the units.
Do not be directly exposed
to the cold airstream for too
long.
It could lead to health problems.
If there is a smell of burning,
stop the air conditioner and
disconnect the power supply.
The heat generated could
cause electric shock or fire.
Please consult an authorized
dealer or service centre.
Do not try to repair the unit
yourself.
It could lead to fire or cause an
electric shock. Please call an
authorized dealer or service
centre.
Switch off
the breaker.
Disconnect
the power
plug.
Warning
Y
Page 5
4
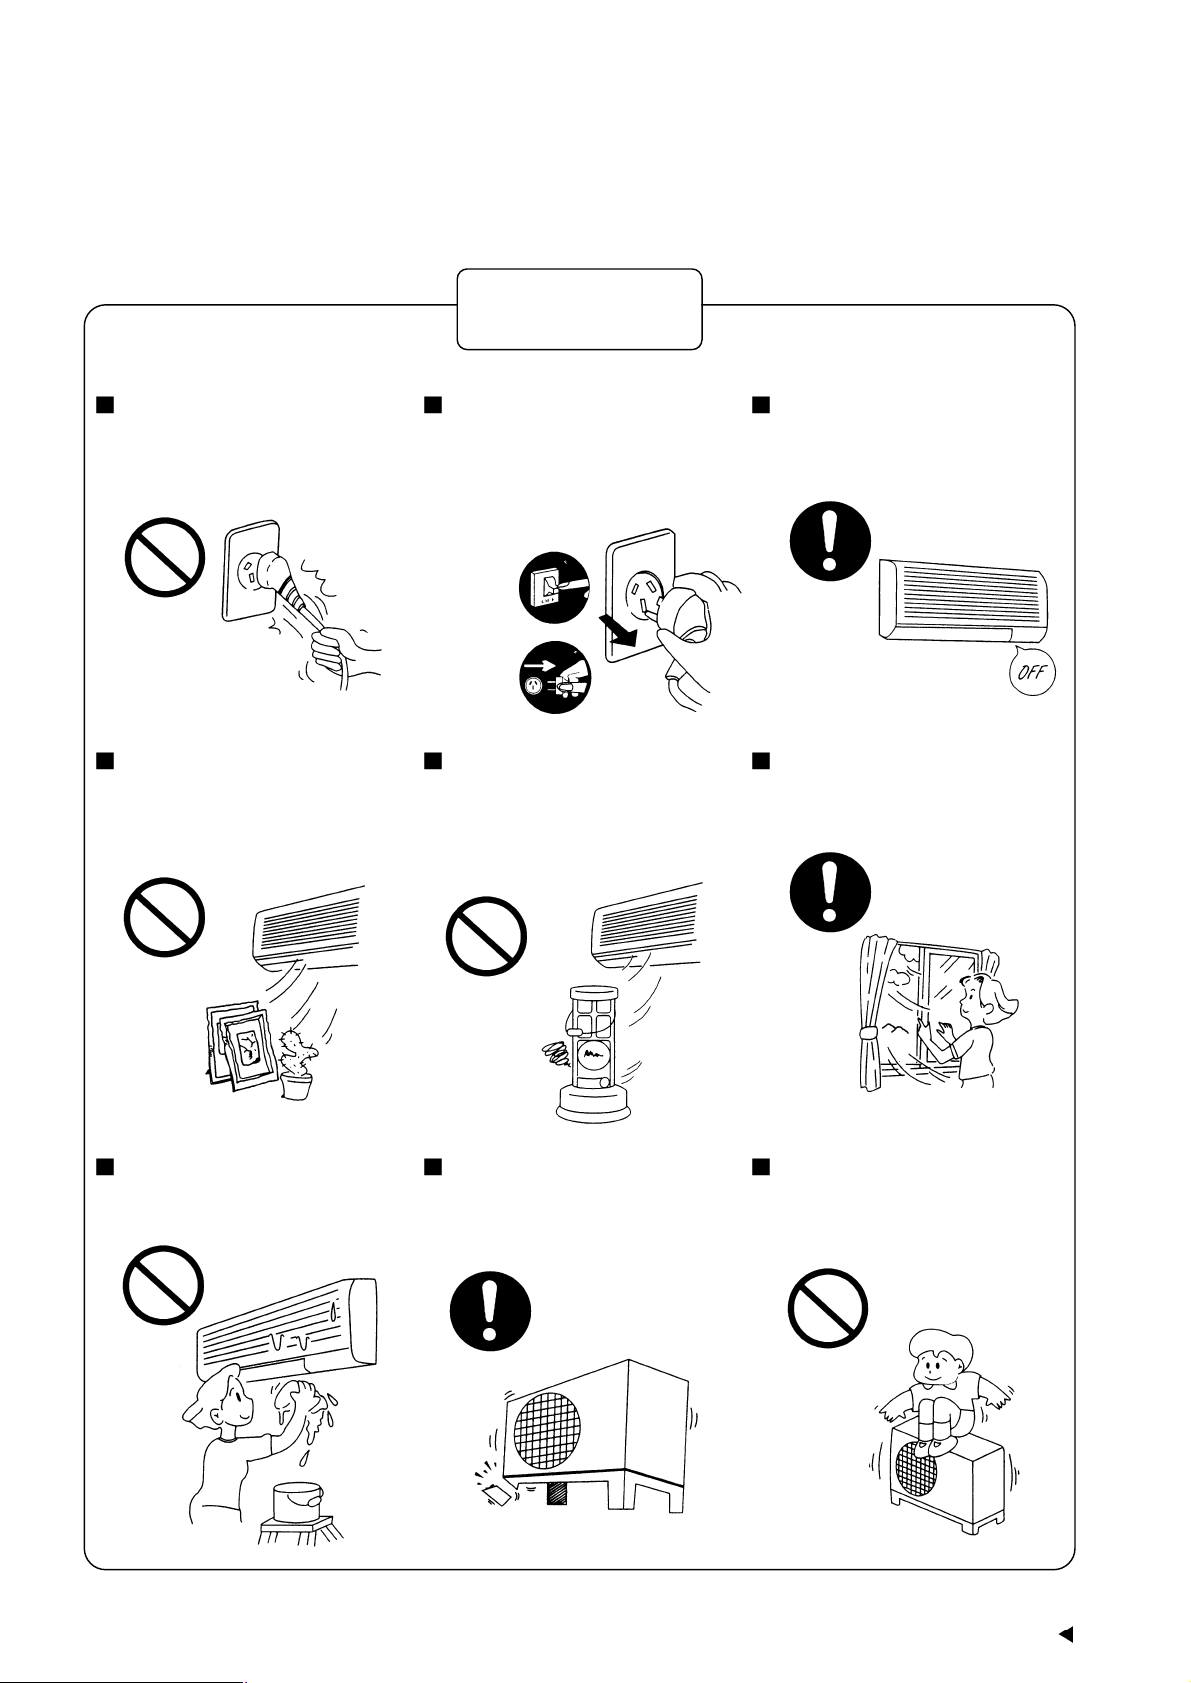
Do not remove the power
plug by pulling the cord.
Hold the plug when disconnecting the plug from the wall outlet.
Switch off the power supply if
the unit is not going to be
used for a long period of time.
If dust accumulates on the plug, it
will generate heat and this could
cause a fire.
When cleaning the unit, remove the plug.
This is to prevent injury due to
the rotating fan in the unit.
Do not use for other purposes.
Do not use for preservation purposes. It will affect food quality,
animals or plants.
Do not place combustor in
the path of the airflow from
the unit.
Incomplete combustion could
cause toxic gas (CO) poisoning.
Ventilate the room regularly.
If not ventilated regularly, the
lack of oxygen could cause
headaches.
Do not wash the unit with
water.
It could cause an electric shock.
Inspect the unit for any damage.
Ensure that the necessary
repairs are carried out.
Do not sit or place anything
on the outdoor unit.
You might fall off or the unit
might collapse.
Switch off
the breaker.
Disconnect
the power
plug.
Caution
Y
Page 6
Name of Each Part
5
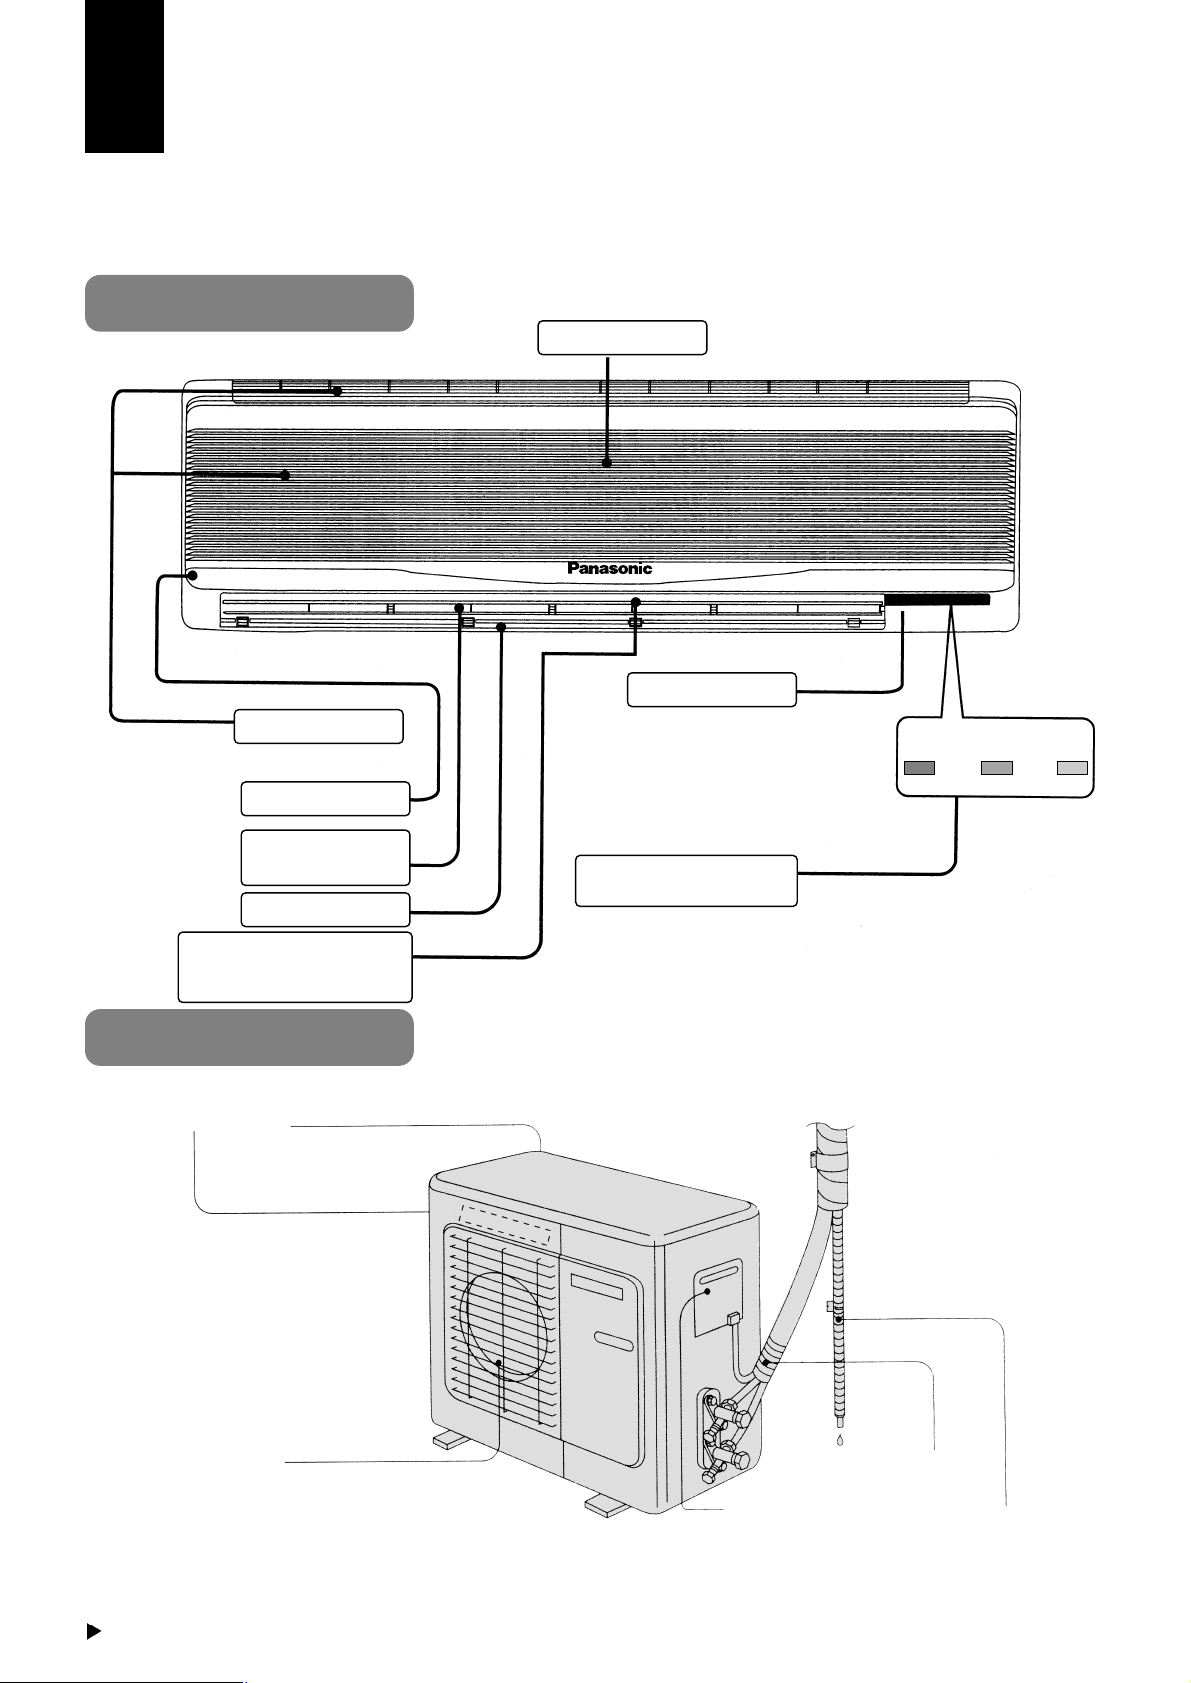
Indoor unit
Outdoor unit
Front Panel
Air Intake Vent
Panel Opener
Vertical Airflow
Direction Louver
Air Outlet Vent
Horizontal
Airflow Direction Louver
(Manually adjusted)
Signal Receptor
Operation Indication
Lamps (LED)
Air Intake Vents
Air Outlet Vents
(Side)
(Rear)
Ground
Terminal
(Inside Cover)
Piping
Drain Hose
Power Sleep Timer
Red Orange Orange
Page 7
6
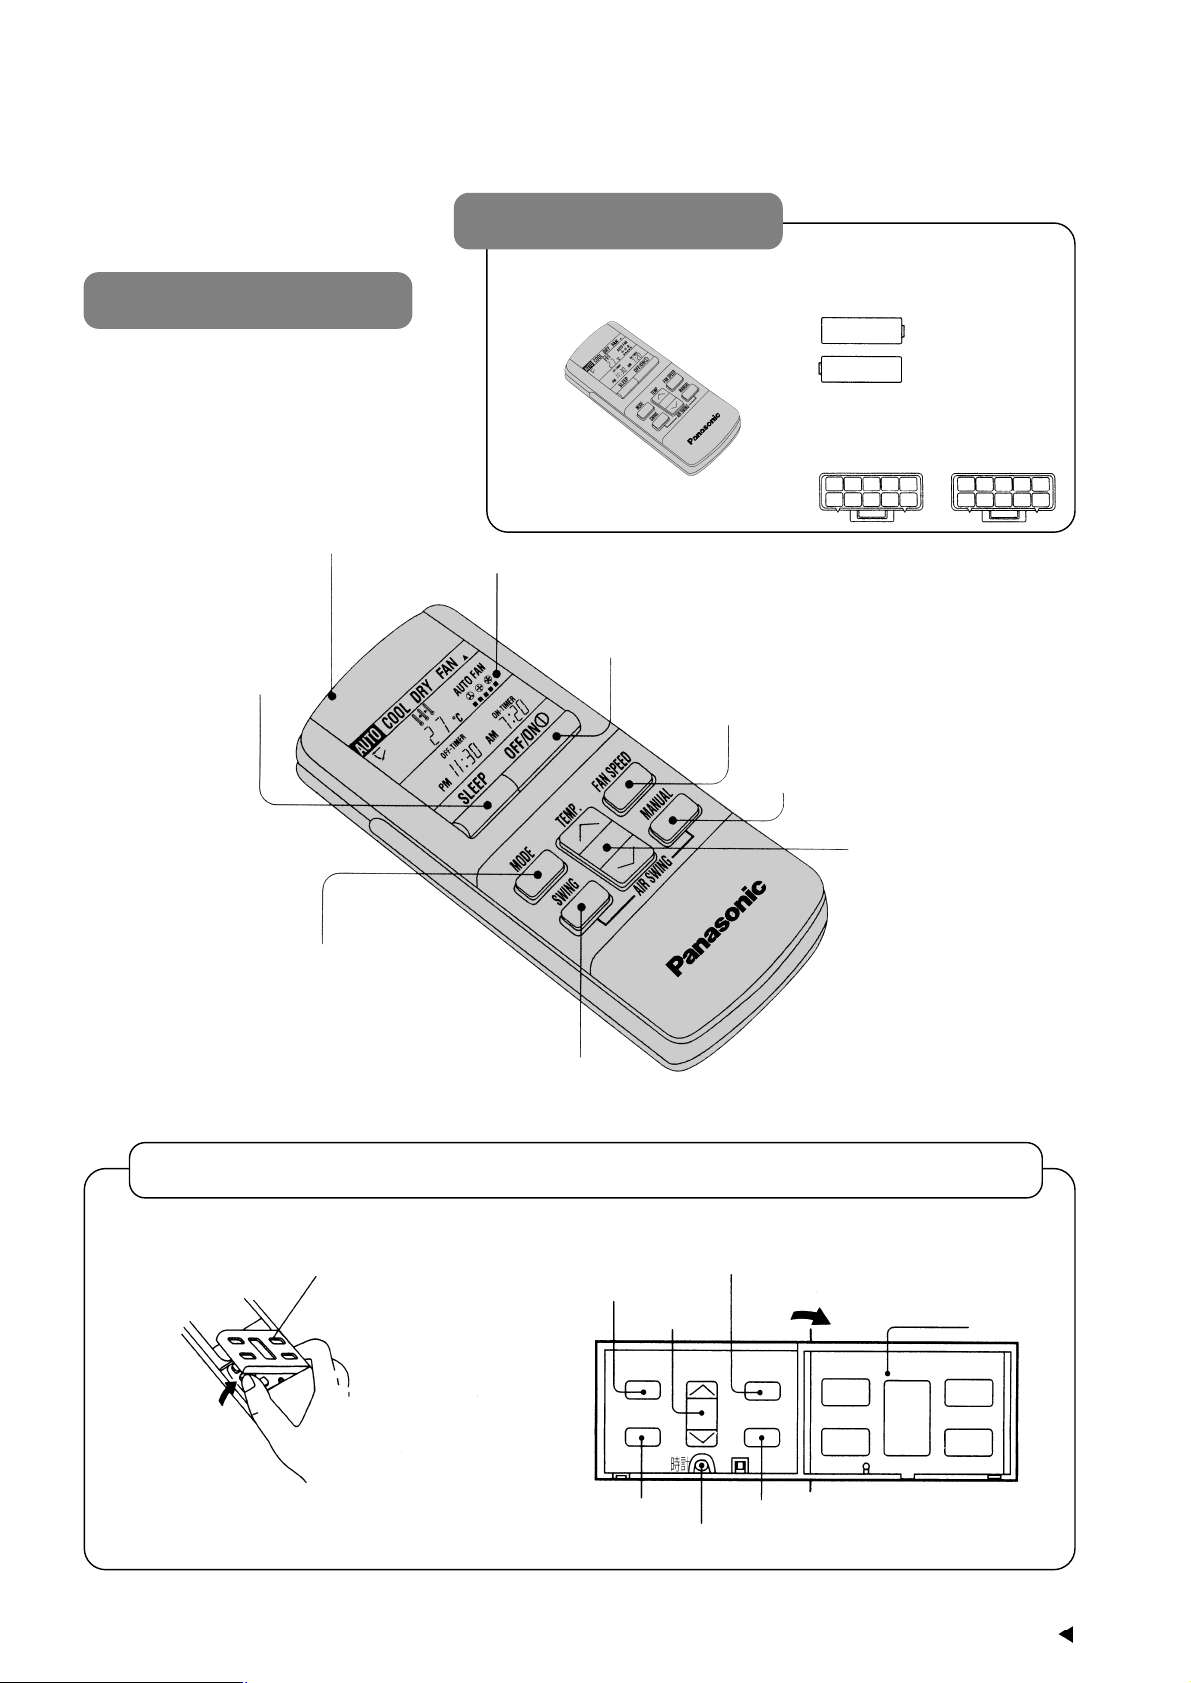
Remote control
Accessories
Remote Control
Two R03 dry-cell
batteries or equivalent
Air Purifying Filters
Signal Transmitter
Operation Display
Sleep Mode
Operation Button
OFF/ON Button
Airflow Volume
Selection Button
Airflow Direction Manual
Control Button
Room Temperature
Setting Button
Operation Mode
Selection Button
Airflow Direction Auto
Control Button
Separate displays and functions are available when the door is opened.
Door
OFF-Timer Button
Time
Button
ON-Timer Button
Door
Cancellation Button
Clock Button
Set Button
OFF-TIMER TIME ON-TIMER
SETCANCEL
Page 8
Preparation Before Operation
7
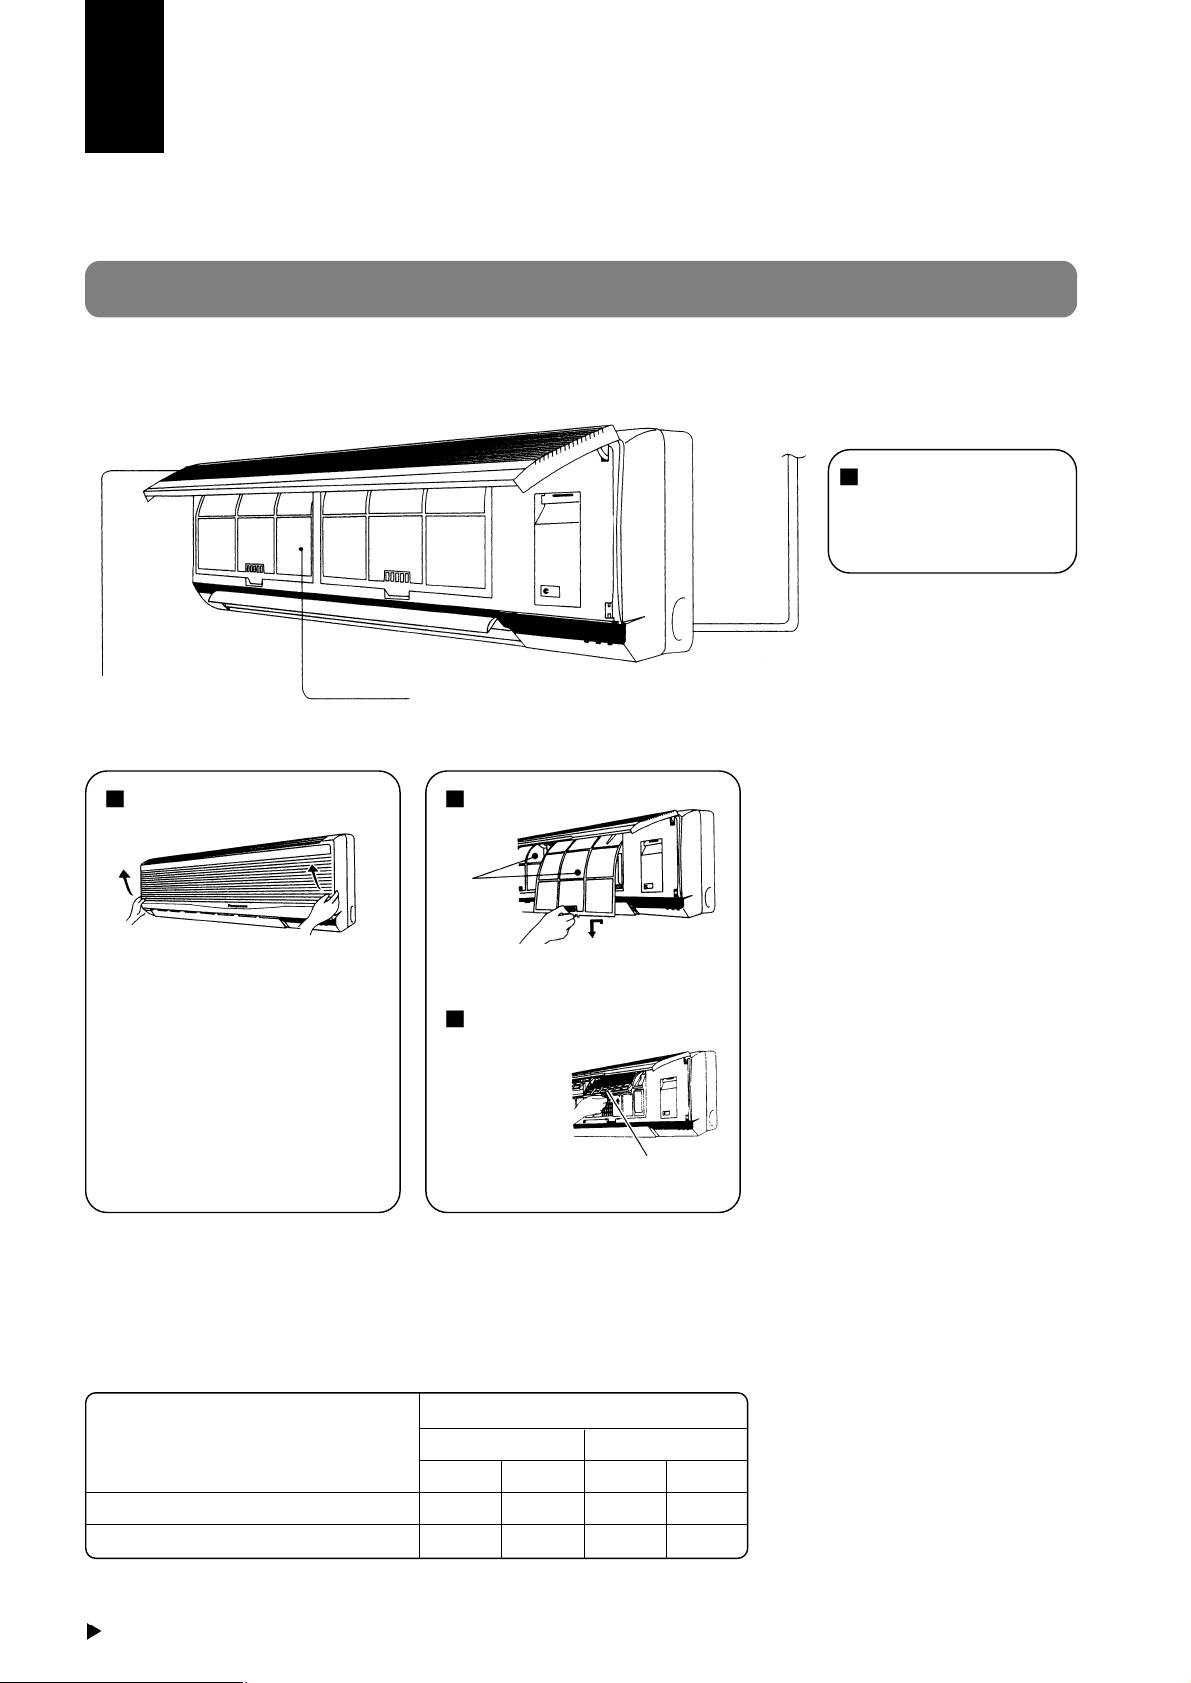
Before operating the unit
Connect the power
supply cord to an
independent power
supply.
1
2
Open the front panel.
Hold the panel openers at both
sides and pull up the front panel.
3
Remove air filter.
Insert air purifying filter.
Insert the air filters.
Hold the tab to raise up slightly
and then pull down.
Air
filter
Be careful not to
hurt your hands by
metal parts.
Air purifying
filter
<Note>
Use under the following conditions:
(Unit in ˚C)
DBT: Dry Bulb Temperature
Cooling
WBT: Wet Bulb Temperature
In door Out door
DBT WBT DBT WBT
Maximum Temperature 32 23 43 26
Minimum Temperature 16 11 16 11
Page 9
8
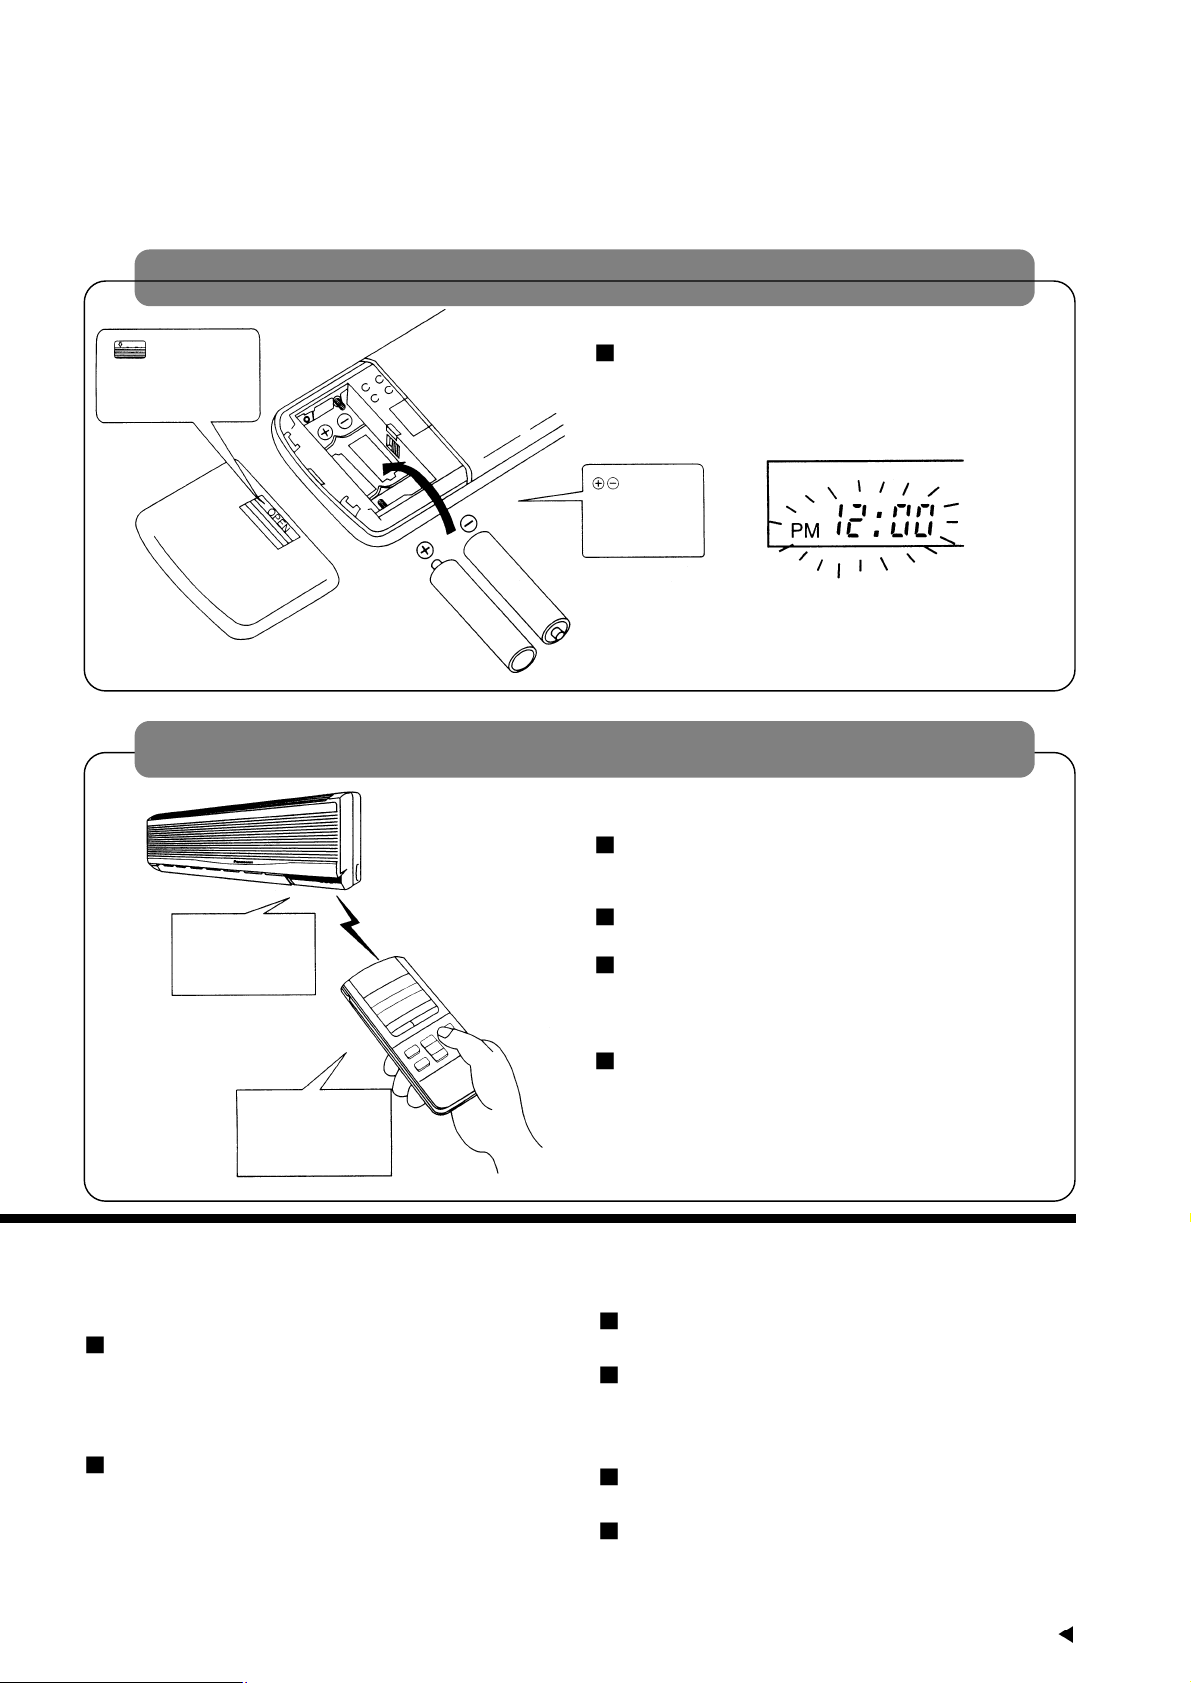
How to insert batteries
Operating the remote control
Gently press the
place marked
[OPEN] and
slide the cover
toward you.
(Two R03 dry-cell
batteries or equivalent)
Fix the cover to the back of the remote control
(“PM 12:00” will flash in the operation display.)
If the display does not appear when the batteries are inserted, remove the batteries and insert
them once more.
Be sure
that the (+) and
(–) directions
are correct.
Make sure that the
signal path is not
obstructed.
The maximum distance at which signals can be received
is about 10 m.
Aim at the signal receptor on the room air conditioner when operating.
Do not drop or throw the remote control.
Do not place the remote control in a location that
is exposed to direct sunlight or next to a heating
unit or other heat source.
Signal received sound:
One short beep or one long beep.
Pull out the power plug or turn off the power
breaker when:
The air conditioner is not going to be used for
an extended period of time.
If the power supply cord connect, approximately
3.25 watts of electric power are used even if the
main unit is turned off by remote control.
There is a danger of lightning.
The air conditioner is provided with a built-in protective device, but the control equipment may be
adversely affected depending on the extent of
lightning activity.
Regarding the batteries.
The batteries can be used for approximately one
year.
Do not use rechargeable (Ni-Cd) batteries,
because such batteries differ from standard drycell batteries in shape, dimensions and performance.
Be sure to replace the batteries with two new batteries of the same type.
Remove the batteries if the air conditioner is not
going to be used for an extended period of time.
Page 10
How to Operate
9
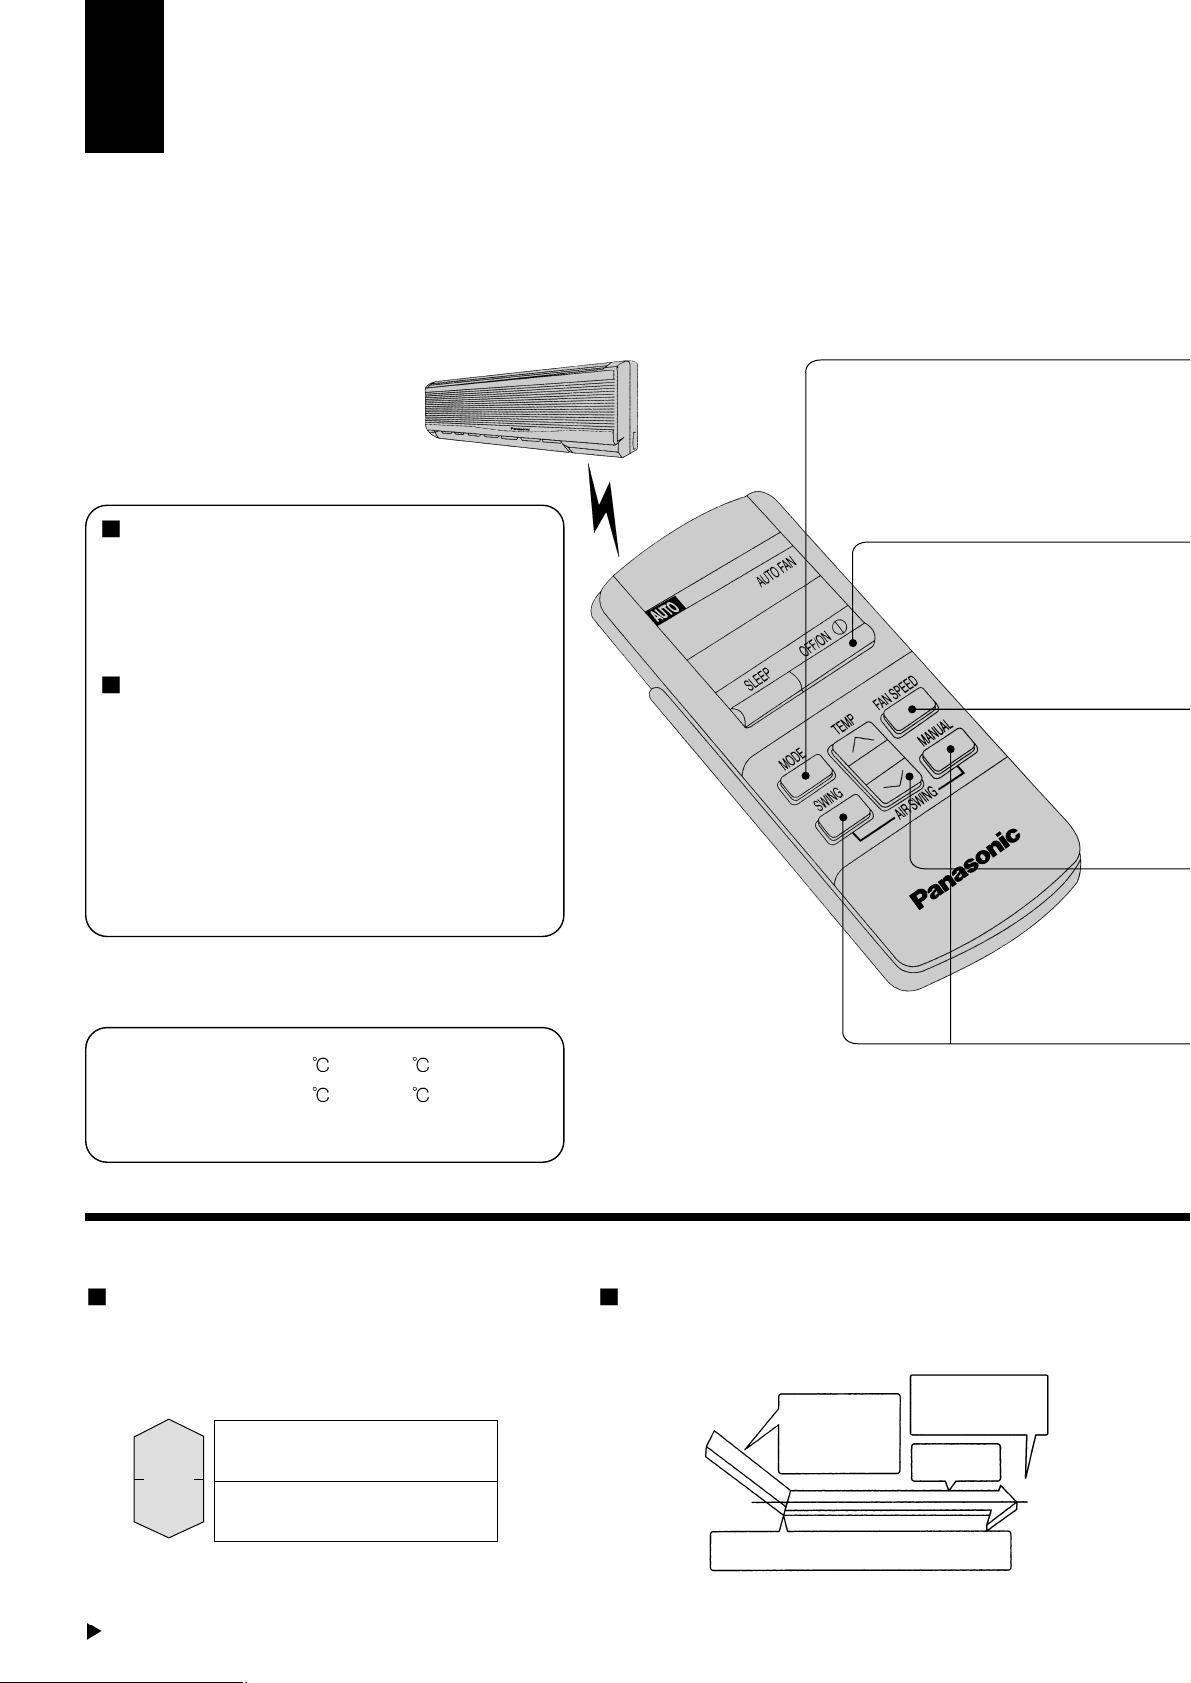
If there is a power failure, operation will be
automatically restarted after 3 minutes when
the power is resumed with previous operation
mode and airflow direction.
(when the operation is not stopped by remote
control.)
If you do not intend to continue the operation
when the power is resumed, pull out the power
plug at main unit or power supply.
When you insert the power plug the operation
will be automatically restarted with previous
operation mode and airflow direction.
Note: 1. If you do not require Auto Restart con-
trol, please consult your dealer.
2. Auto Restart Control is not available
when Timer or Sleep Mode is set.
Auto Restart Control.
For Cooling : 26 –28
For Soft Dry : 1 –2lower than
room temperature.
Recommended temperature for health
and comfort.
<Operation Details>
AUTO-Automatic Operation.
Once the Automatic Operation is selected, the indoor temperature sensor operates automatically
to select the desired operation mode with Cooling
or Soft Dry.
DRY-Soft Dry Operation.
Soft Dry is a very gentle Cooling Operation
consisting primarily of dehumidifying. It does not
lower the room temperature very much.
Cooling Operation
until room temperature reaches the
setting temperature
Super Low airflow amount
When room temperature reaches the setting temperature, operation will switch to Soft Dry.
Setting
Temperature
Operation will be switched on and off for up to
10 min on and 6 min off
during Soft Dry
Temperature
23˚C
COOLING
SOFT DRY
Temp. set at
25˚C
Temp. set at
22˚C
Page 11
10
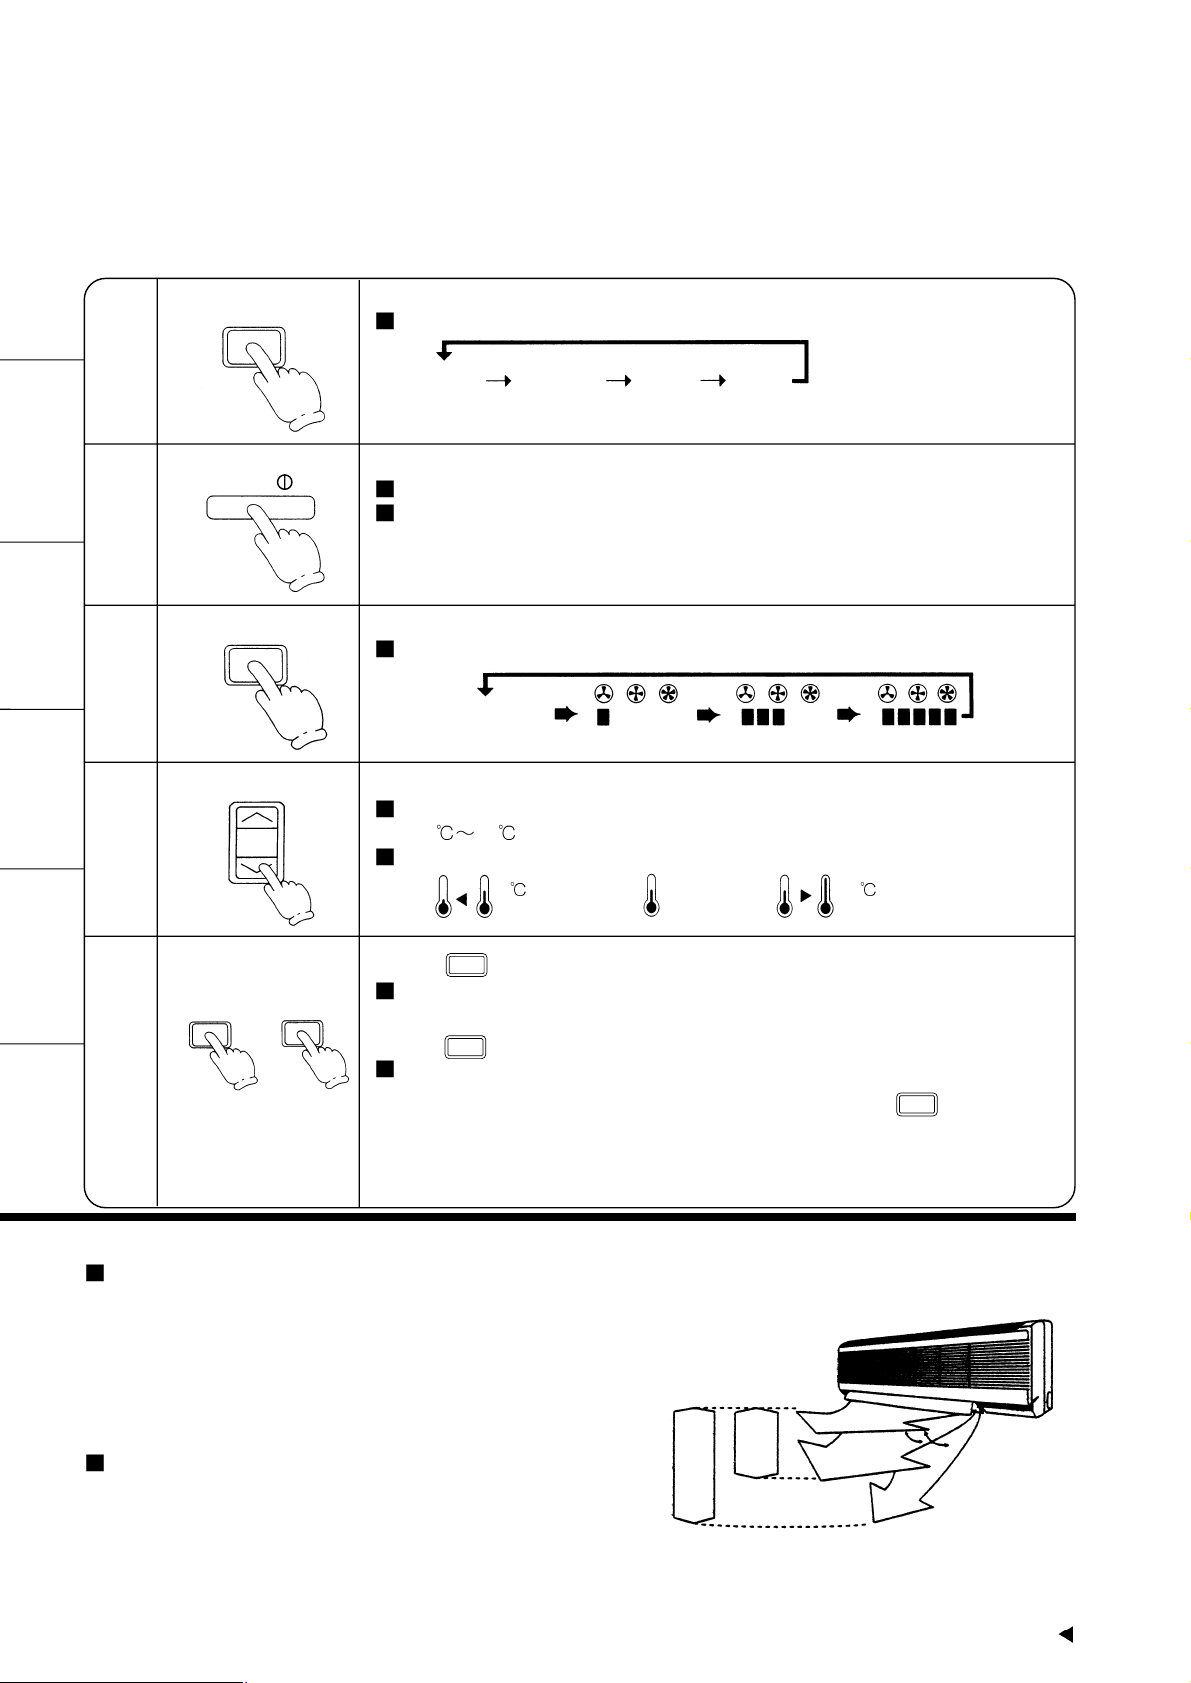
FAN – Air Circulation Operation.
When the room temperature reaches the setting
temperature, operation commences at Low airflow volume. It stops when the room temperature
drops to 2˚C below the setting temperature (It is
useful when using a heater).
Automatic Airflow Volume
The speed of the indoor fan is adjusted automatically according to the operation. The indoor fan
stops occasionally during cooling operation.
Range of louver adjustment.
1
2
3
4
5
MANUAL
Press to select operation mode.
The display changes in the order
Press to start the operation.
Operation indication lamp (RED) will light up.
Press once more, to stop the operation.
each time the button is pressed.
AUTO
Press to select airflow volume.
The display changes in the order.
Press to select room temperature.
Cooling, Soft Dry, Air Circulation – Select temperature as desired.
(16
30 )
Automatic.
Press continuously.
The vertical airflow direction louver will move up and down. Release the
button when the louver is at the desired position.
Press
The vertical airflow direction louver will swing up and down automatically.
To stop the automatic airflow direction operation, press button.
Automatic Low Medium High
AUTO FAN
COOL DRY FAN
2 lower than
standard
standard
2 higher than
standard
MANUAL
SWING
Air
Circulation
Cooling
Soft Dry
34°
57°
MODE
FAN SPEED
TEMP
SWING MANUAL
OFF/ON
MANUAL
Page 12
Setting the Timer
11
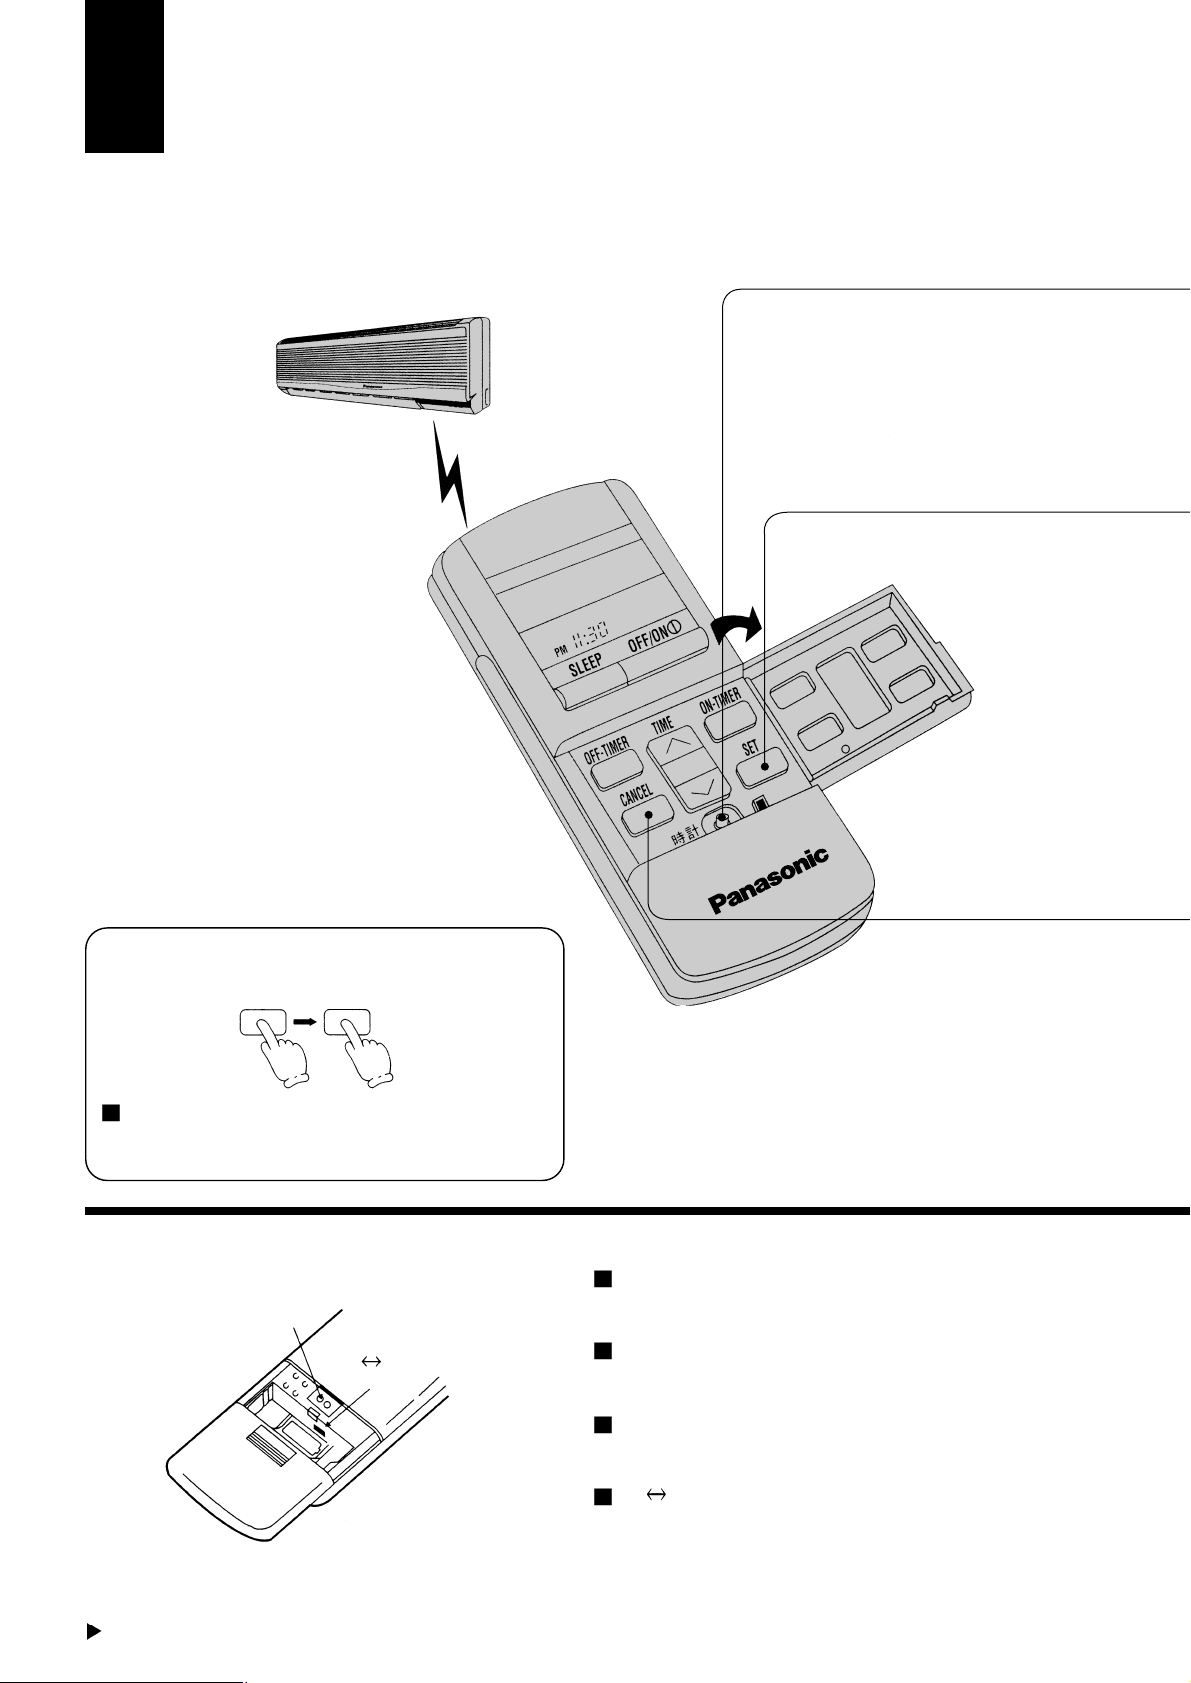
To reset the Timer.
(Example) If the OFF Timer has been set.
Even if there is a power failure, the setting time
is still stored in the memory because the
remote control is a battery operated type.
If there is a power failure.
OFF-TIMER SET
<Note>
Regarding remote control.
If the current time is not set correctly, correct Timer
setting will not be possible.
When the Timer is set, the current time display will
vanish.
[RESET] points will clear the memory once they are
shorted.
[B A] switch is used when two air conditioners
units have been installed in one room. Please consult your dealer.
OPEN
Page 13
12
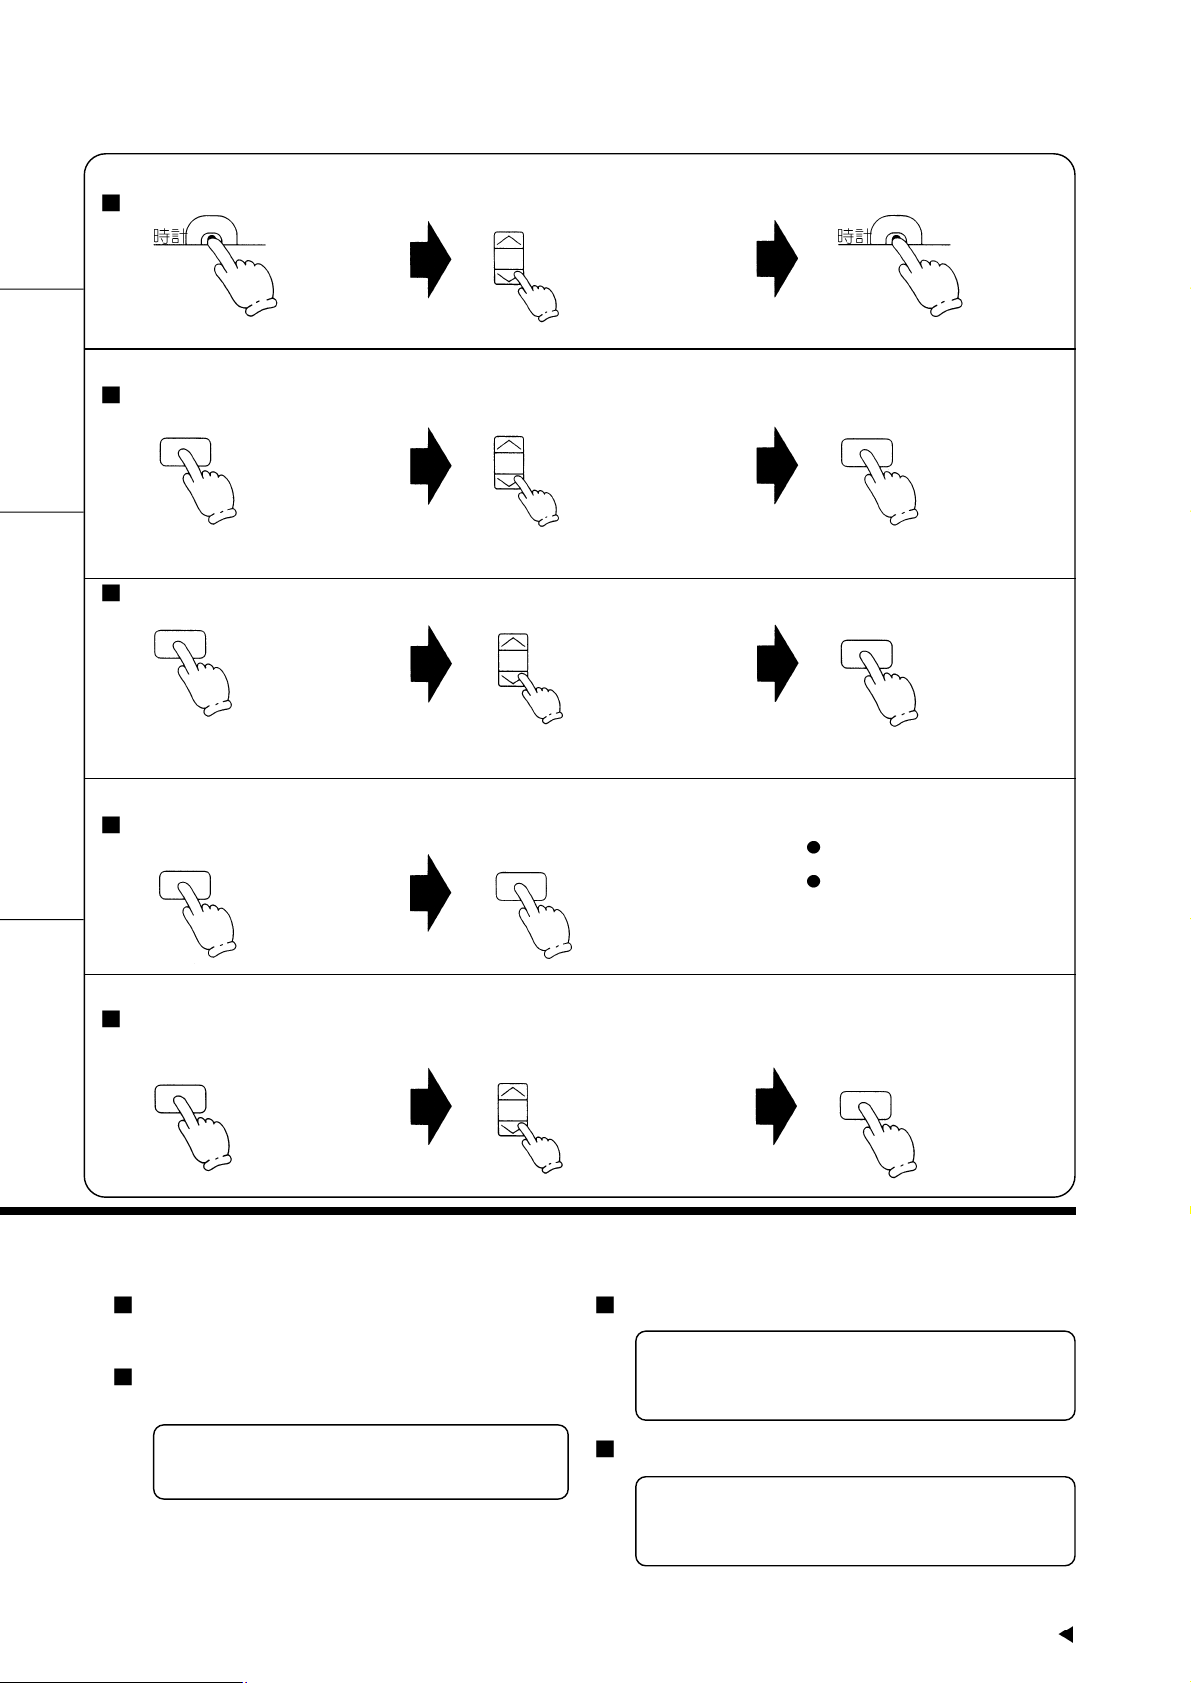
To set the current time.
Set hours and minutes
...to advance the time
...to reverse the time
To set the Timer.
OFF Timer
To cancel the Timer.
OFF Timer
To change the Timer setting time.
(Example) To change the ON timer
setting time.
Set hours and minutes
ON Timer
Set hours and minutes
...to increase 10 minutes
each step.
...to decrease 10 minutes
each step.
The “OFF-TIMER” will blink.
The “ON-TIMER” will blink.
The Timer indication lamp at main
unit will light up. LED colour: Orange.
...to increase 10 minutes
each step.
...to decrease 10 minutes
each step.
Change hours and minutes setting
...to increase 10 minutes
each step.
...to decrease 10 minutes
each step.
The Timer indication lamp at main
unit will light up. LED colour: Orange.
The Timer indication lamp at main
unit will go off.
To cancel the ON Timer, follow the
same procedure.
Timer
The ON Timer and OFF Timer can only be set
once during a day.
The operation will start before the actual setting
time with ON Timer setting.
Automatic, Cooling and Soft Dry:
15 minutes before
This is to allow time to attain your desired set
temperature.
Setting the OFF Timer.
This is useful for saving electricity costs incurred by forgetting to turn off the air conditioner.
Setting the ON Timer.
If the air conditioner is set before you go out,
the room temperature will be close to your
desired temperature when you return.
TIME
OFF-TIMER SET
OFF-TIMER
ON-TIMER
TIME
ON-TIMER
SET
TIME
TIME
CANCEL
SET
Page 14
Convenient Operation
13
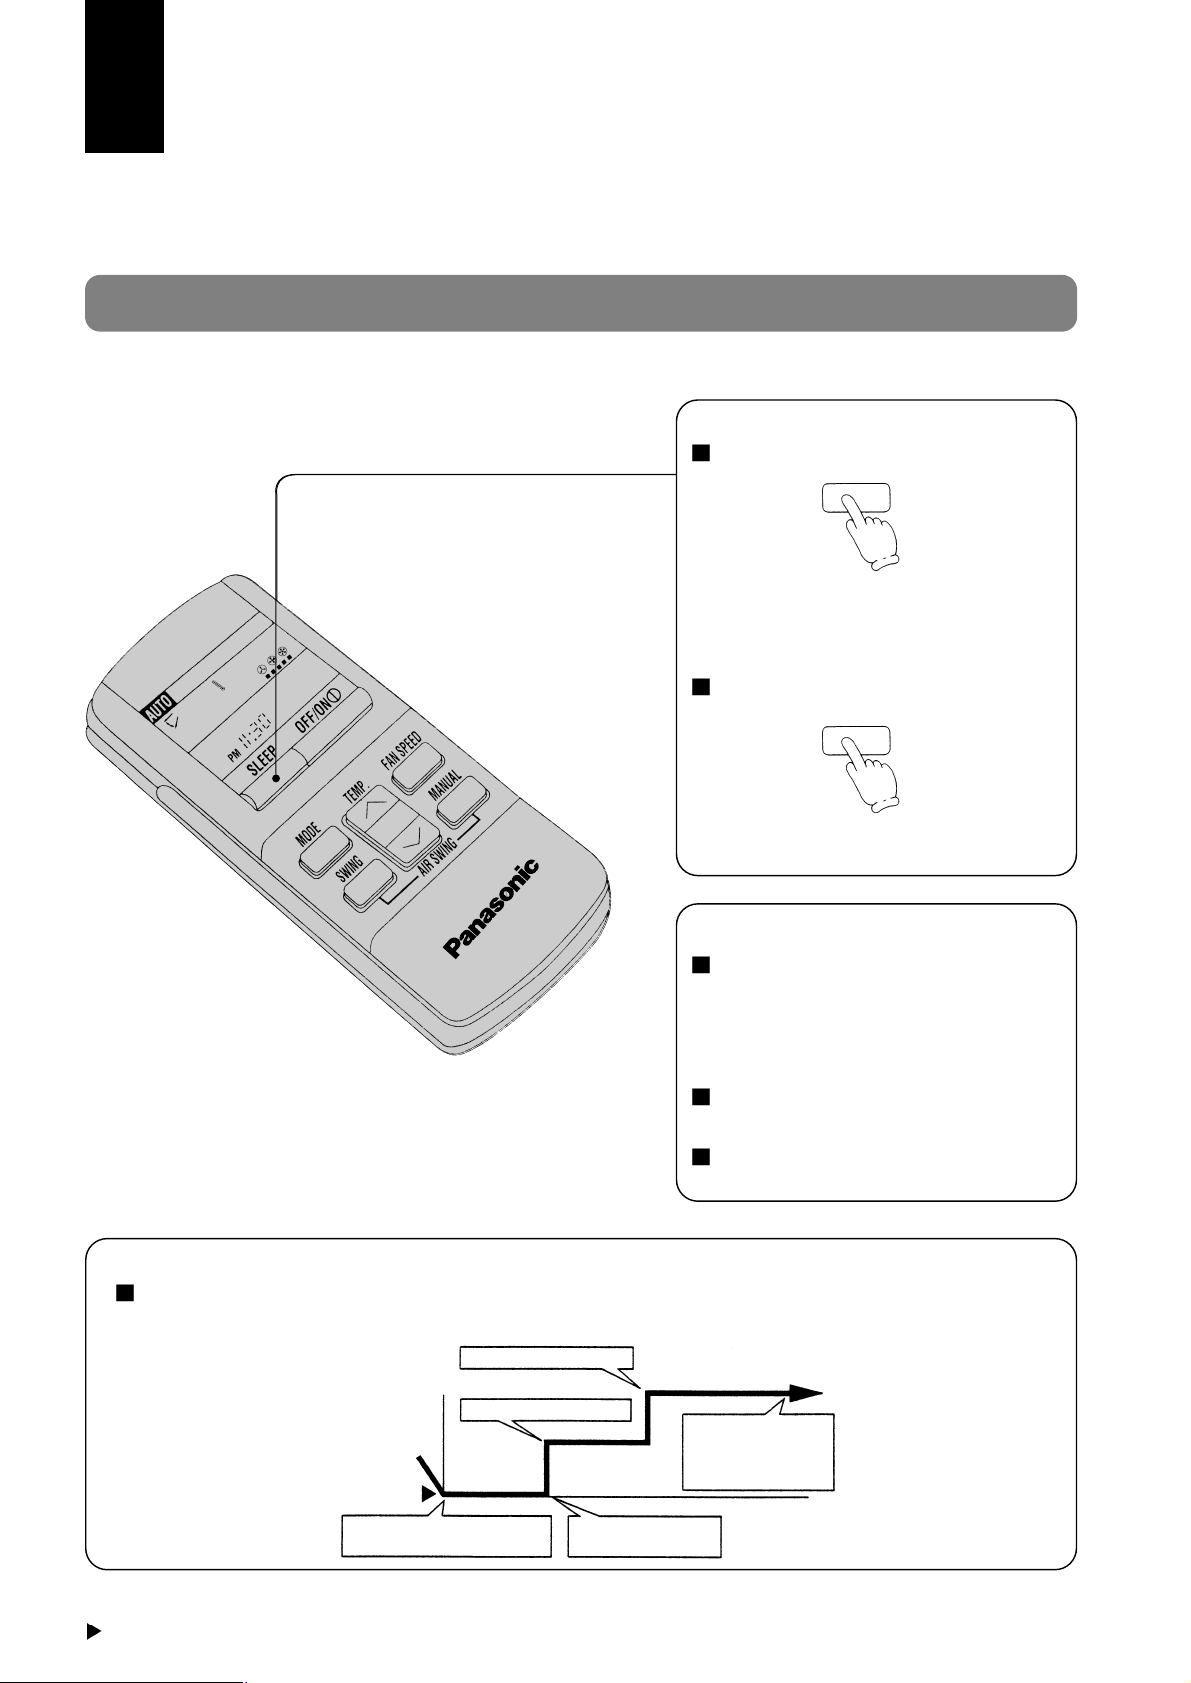
Sleep Mode
This is to gain a comfortable room temperature while sleeping.
To set Sleep Mode.
Press
To cancel Sleep Mode.
Press once more
Sleep Mode Operation.
when the room temperature reaches
the setting temperature or after 1
hour of operation, sleep shift operation starts and the airflow volume will
automatically change to low.
Sleep Mode Operation time is 8
hours.
When using together with the Timer,
the Timer has priority.
(The sleep indication lamp on the
main unit will light up.)
(The sleep indication lamp on the
main unit will switch off.)
SLEEP
SLEEP
<Information>
Cooling or Soft Dry Operation for Sleep Mode movement will start to avoid overcooling.
Sleep Operation button is
pressed
Sleep shift operation
starts
Approx. 0.5°C increase
Approx. 0.5°C increase
Approx. 8 hours after
sleep shift operation
starts, stops automatically.
TEMP.
SETTING
TEMPERATURE
0–1 hour
1 hour
TIME
Page 15
14
When the remote control cannot be used
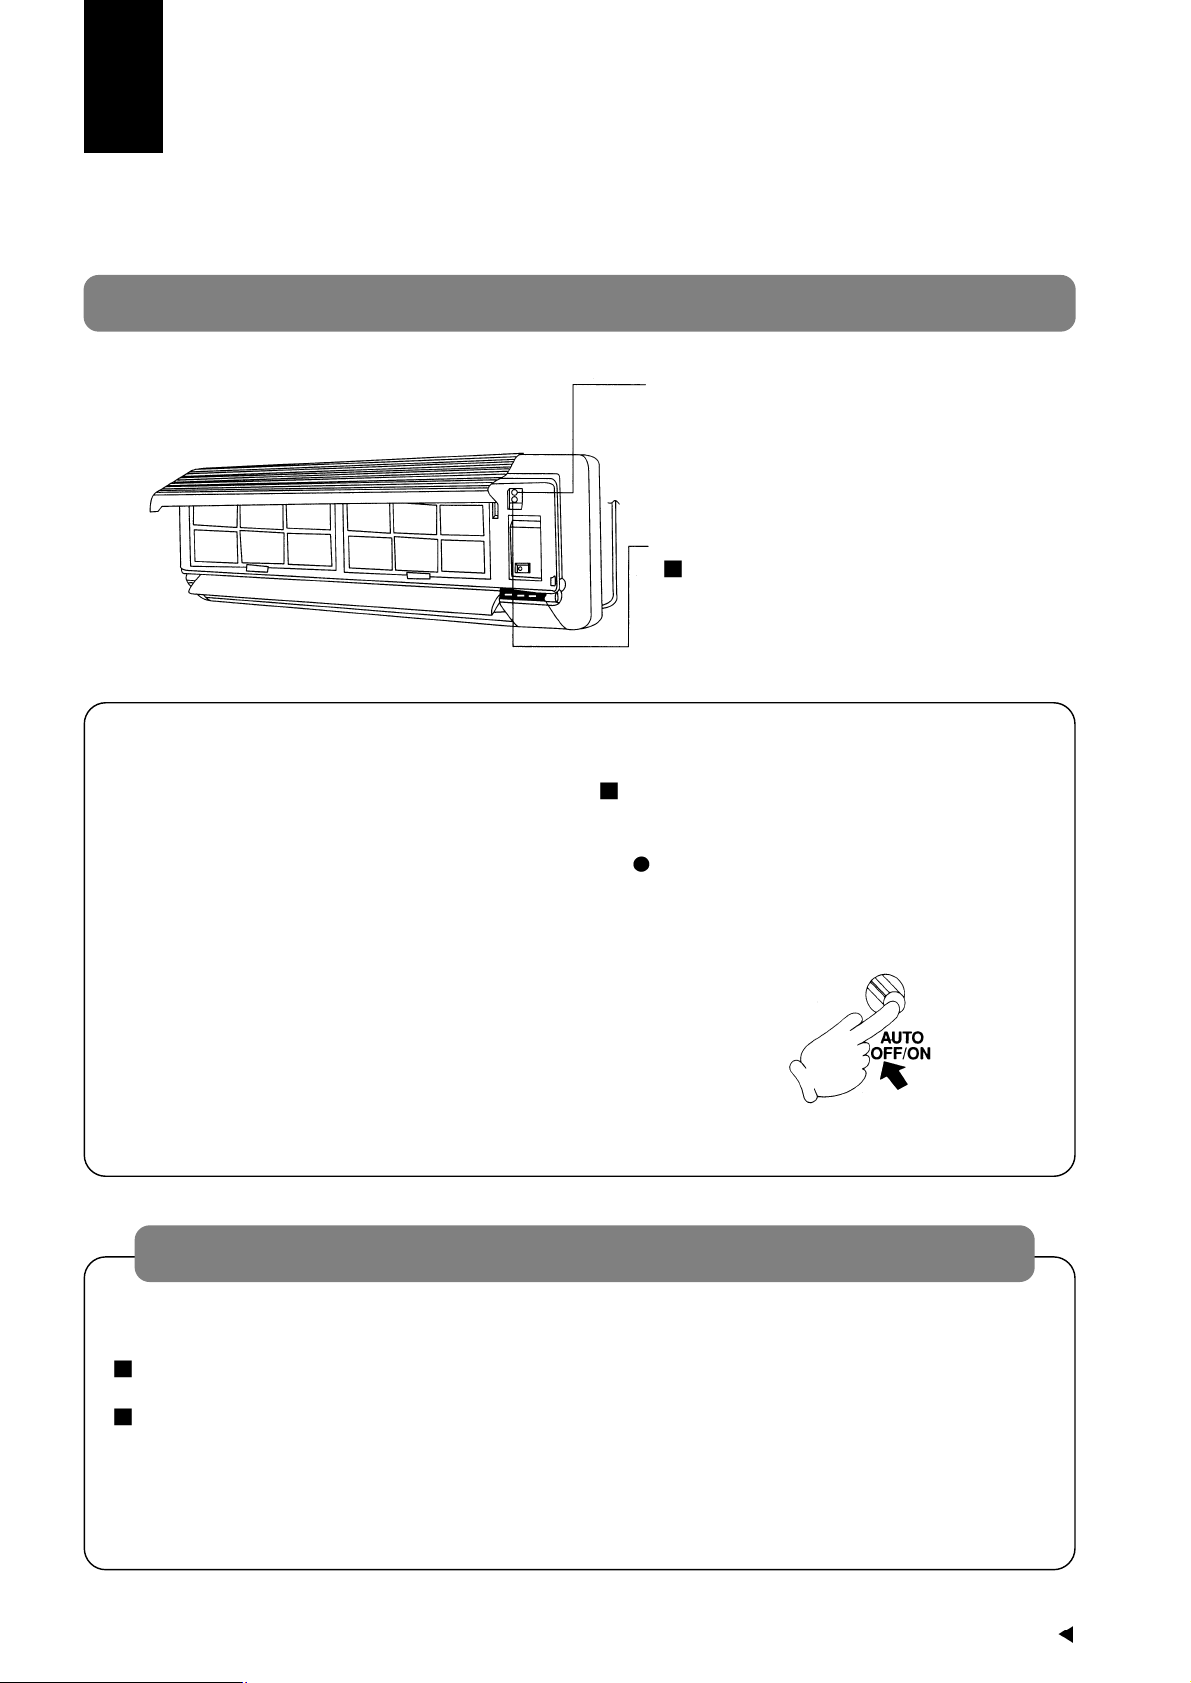
Test Run Button.
(Use when installing and moving)
Auto Operation Button.
When the remote control cannot be used,
press Auto Operation Button to run automatic Operation.
(airflow direction setting will be automatic.)
Press Auto Operation Button.
(The operation indication lamp will blink for 20
seconds, and then light up)
If the button is pressed once more, the air conditioner will stop.
(The operation indication lamp will switch off.)
OFF/ON remote control signal receiving sound
The Remote Control signal receiving sound can be omitted as desired.
To switch OFF the signal receiving sound, press Auto Operation Button for 10 seconds or more. At
the same time, Automatic Operation starts.
(To switch ON, press Auto Operation Button once more for 10 seconds or more.)
Page 16
Operation Hints
15
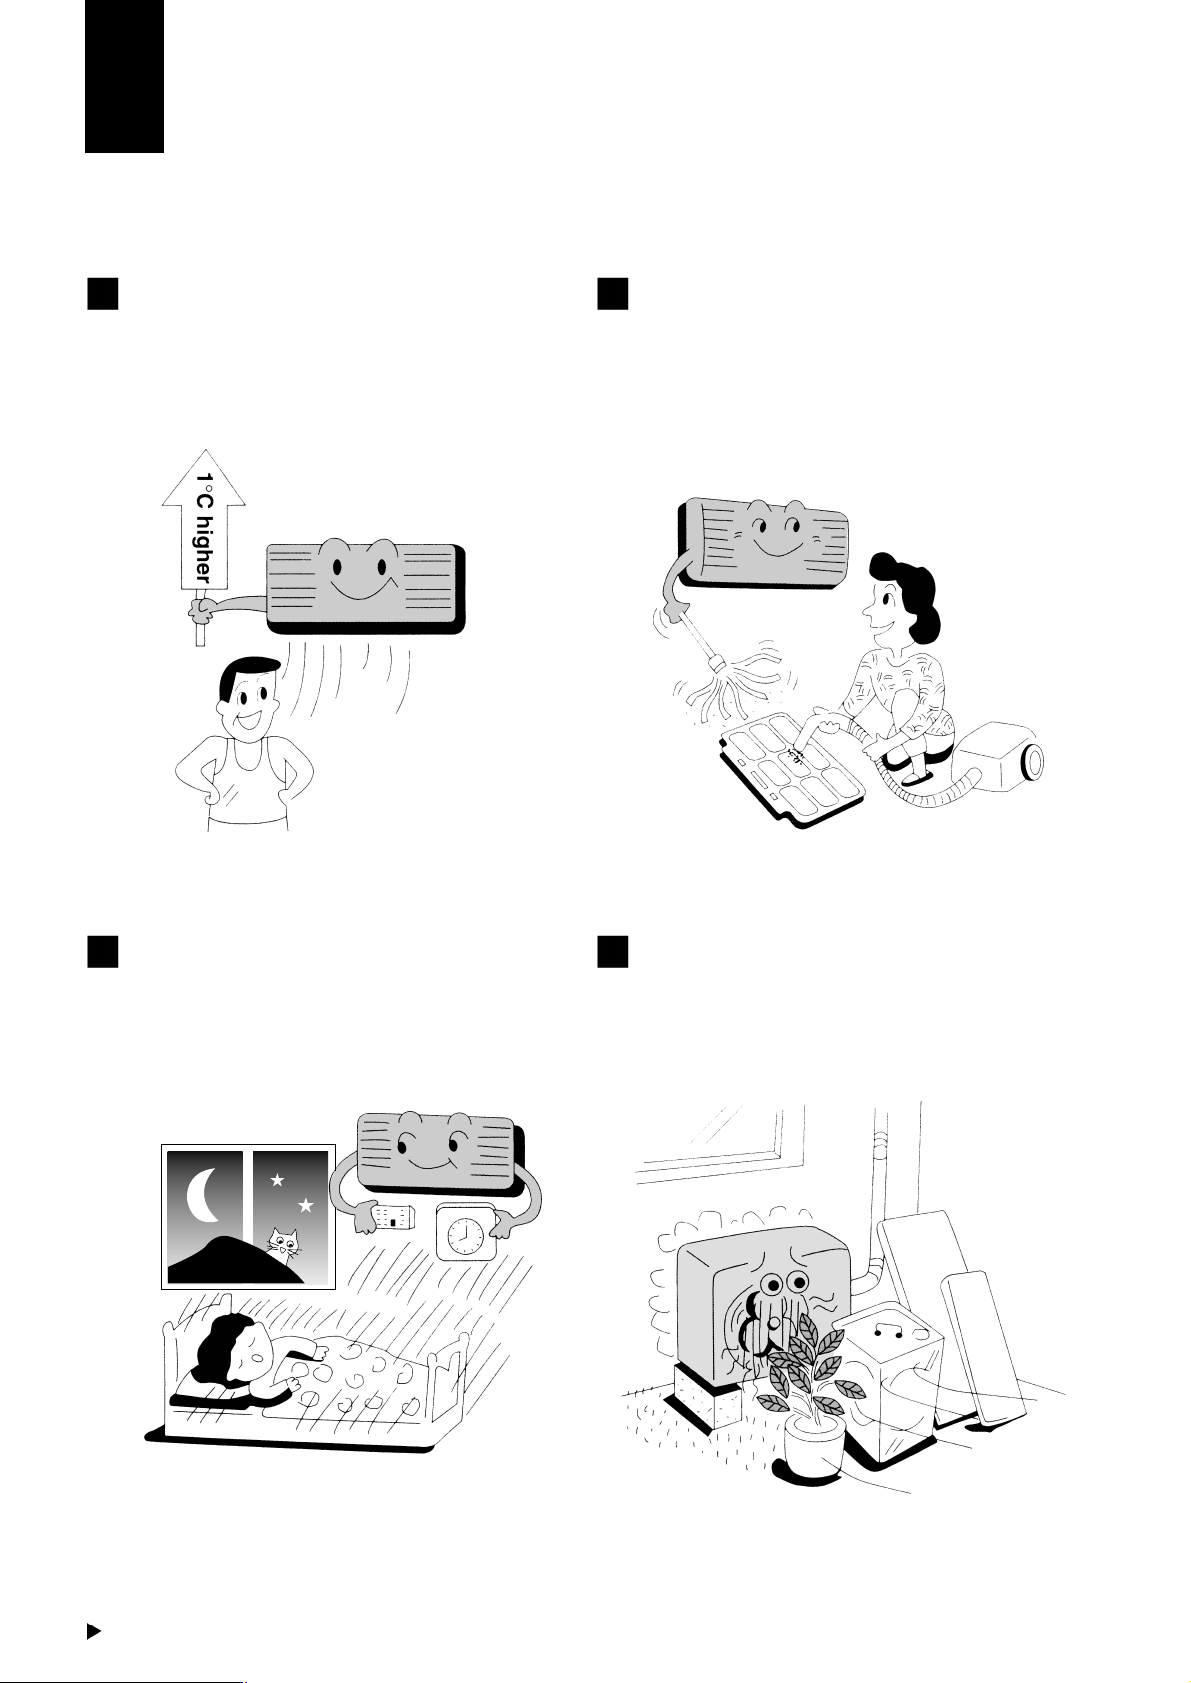
Adjust room temperature properly. Set the temperature 1°C higher than actually desired.
Approximately 10% of electricity costs can be
saved.
Clean the air filter regularly. Blockage in the air
filter reduces the airflow and lowers the cooling
or heating. Clean at least once every 2 weeks.
Otherwise, about 6% of electricity cost will be
wasted.
Prevent wastage with the Timer. Use Timer
when sleeping or going out to save electricity
cost.
Do not block the air outlet vents at outdoor unit.
Otherwise, it will lower the cooling or heating
performance.
Page 17
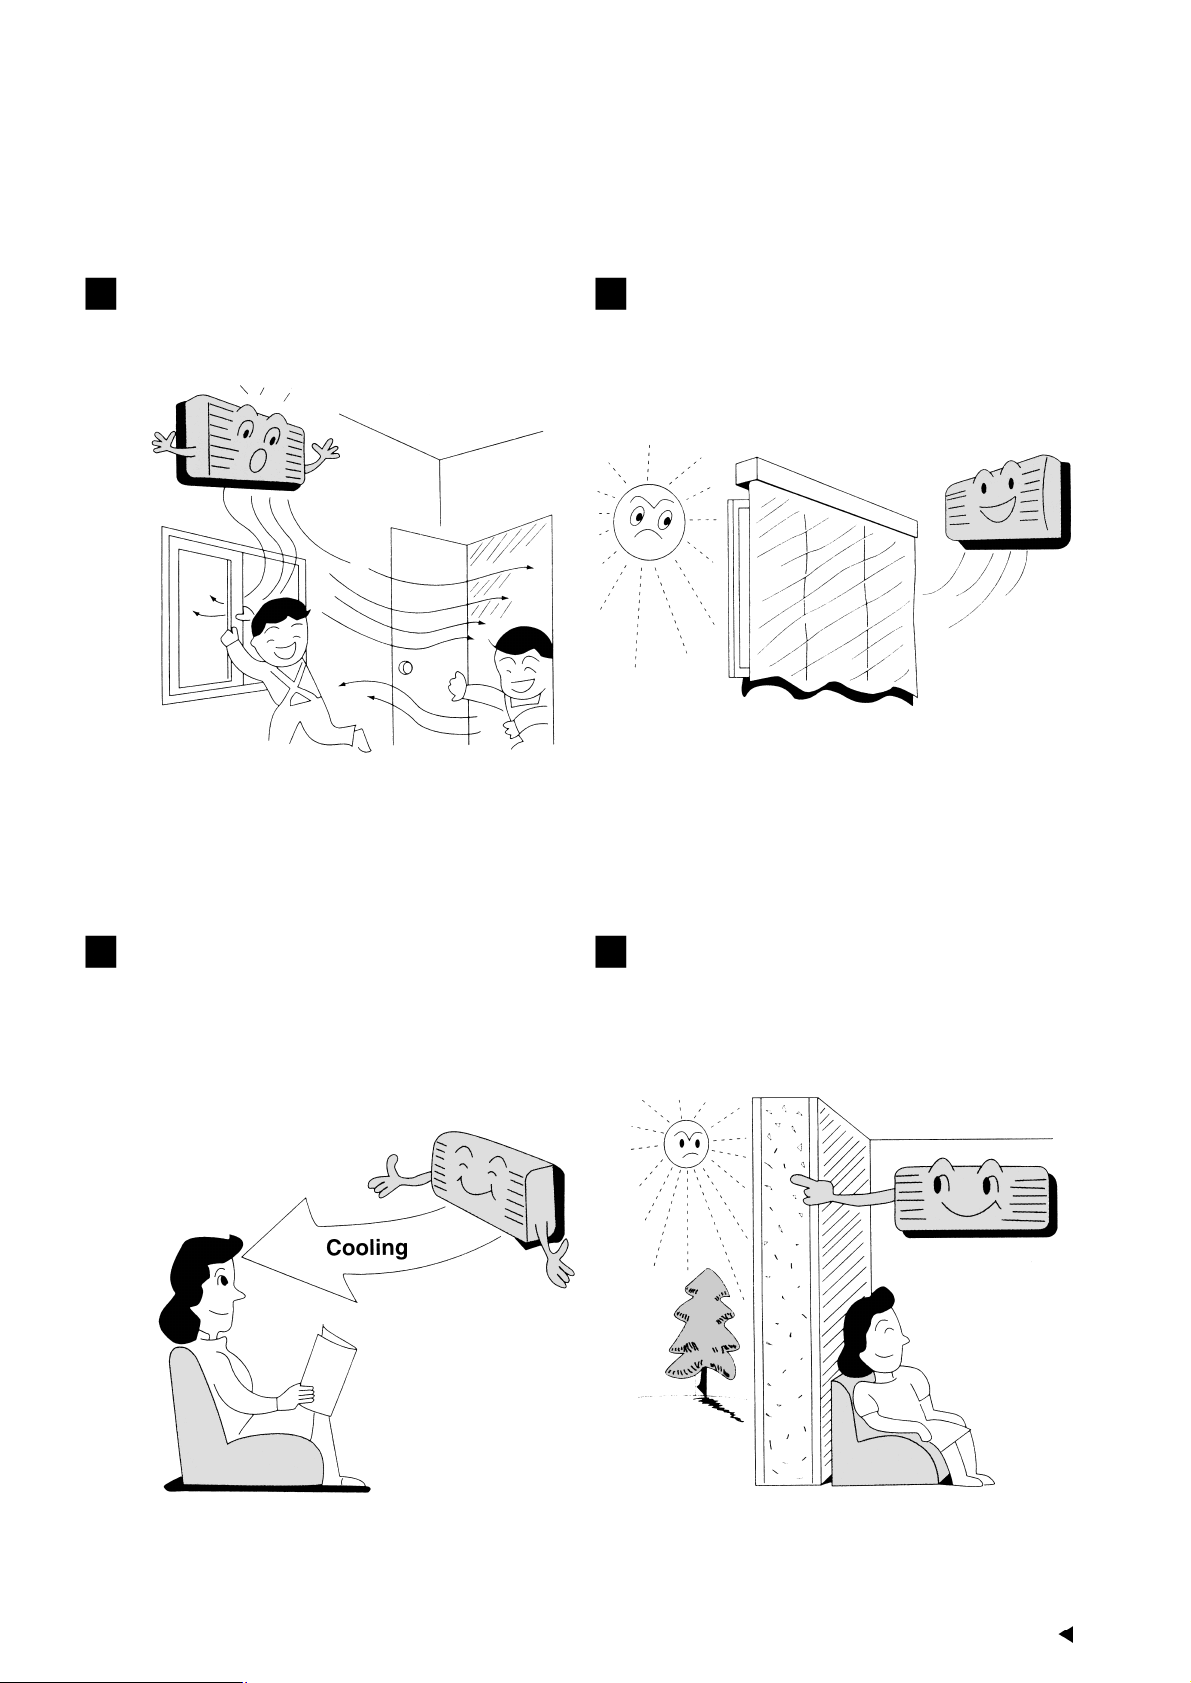
16
Make sure that the doors and windows are shut.
Otherwise, cooling and heating performance will
be reduced and electricity cost is wasted.
Keep blinds or curtains closed. Do not let sunshine enter the room directly. About 5% of
electricity cost can be saved.
Proper airflow direction adjustment. Set the airflow direction louvers horizontal for Cooling
Operation. Operation result will be better.
Use insulating material for better performance.
Use insulating material during construction or
renovations. It will save electricity cost.
Page 18
Better Care and Maintenance
17
Regular care and maintenance will extend the life of the air conditioner and prevent wastage of electricity. Before
performing any maintenance procedure, be sure to switch off the main power supply.
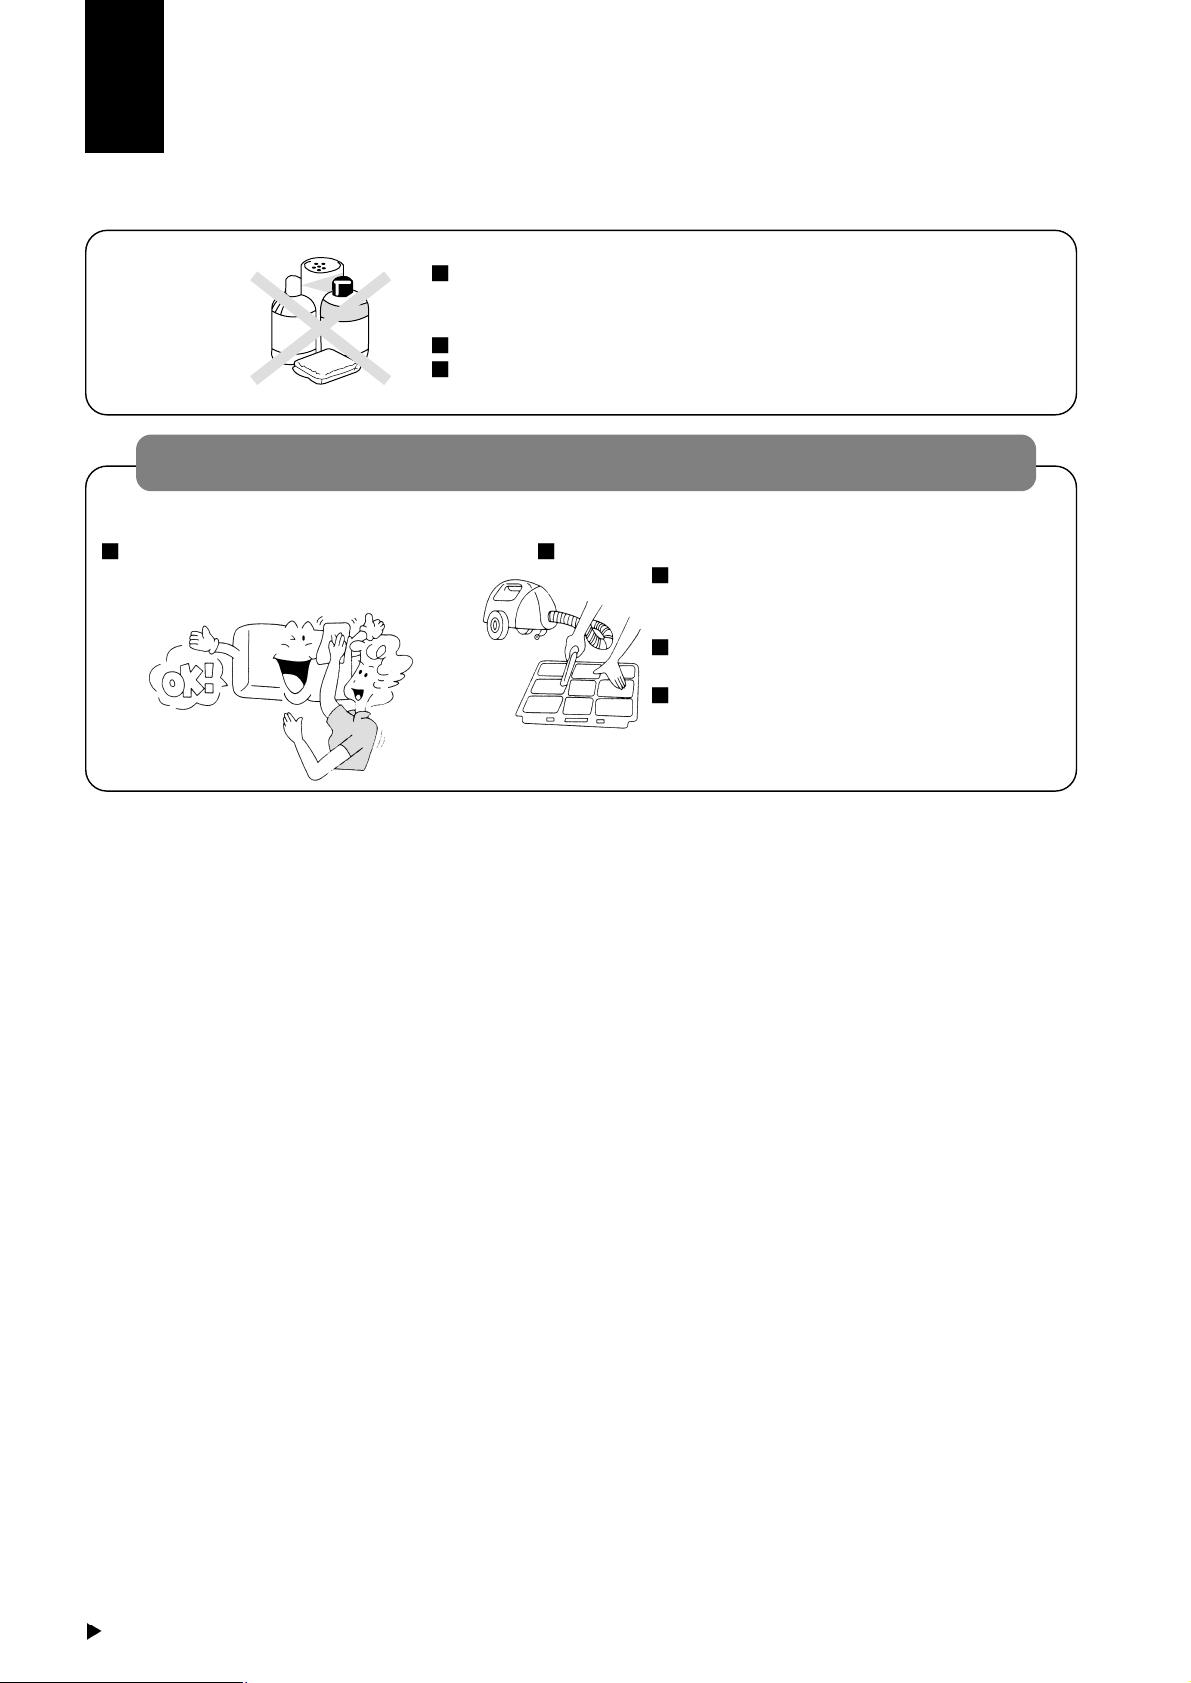
Caution
Do not use water or volatile liquids.
Do not make air conditioner wet, as there is the danger that it could
cause electric shocks.
Be sure not to apply water when cleaning or at any other time.
Using water above 40°C could cause deformation and/or discolouration.
Volatile liquids such as thinner or benzene may damage the air conditioner.
Cleaning the air conditioner and air filters
Once every 2 weeks is recommended.
Clean the air conditioner.
Wipe gently with a soft, dry cloth.
Clean the air filters.
To remove the dust adhering to the filters,
either use a vacuum cleaner, or wash them
in water and dry in the shade.
Re-insert the filters correctly at the left and right,
with the side marked [FRONT] facing forw ard.
Purchase replacement filters from your air conditioner dealer if the air filters become damage.
Air Filter No. C4209-180
T
H
I
N
N
E
R
B
N
E
E
E
N
Z
Page 19
18
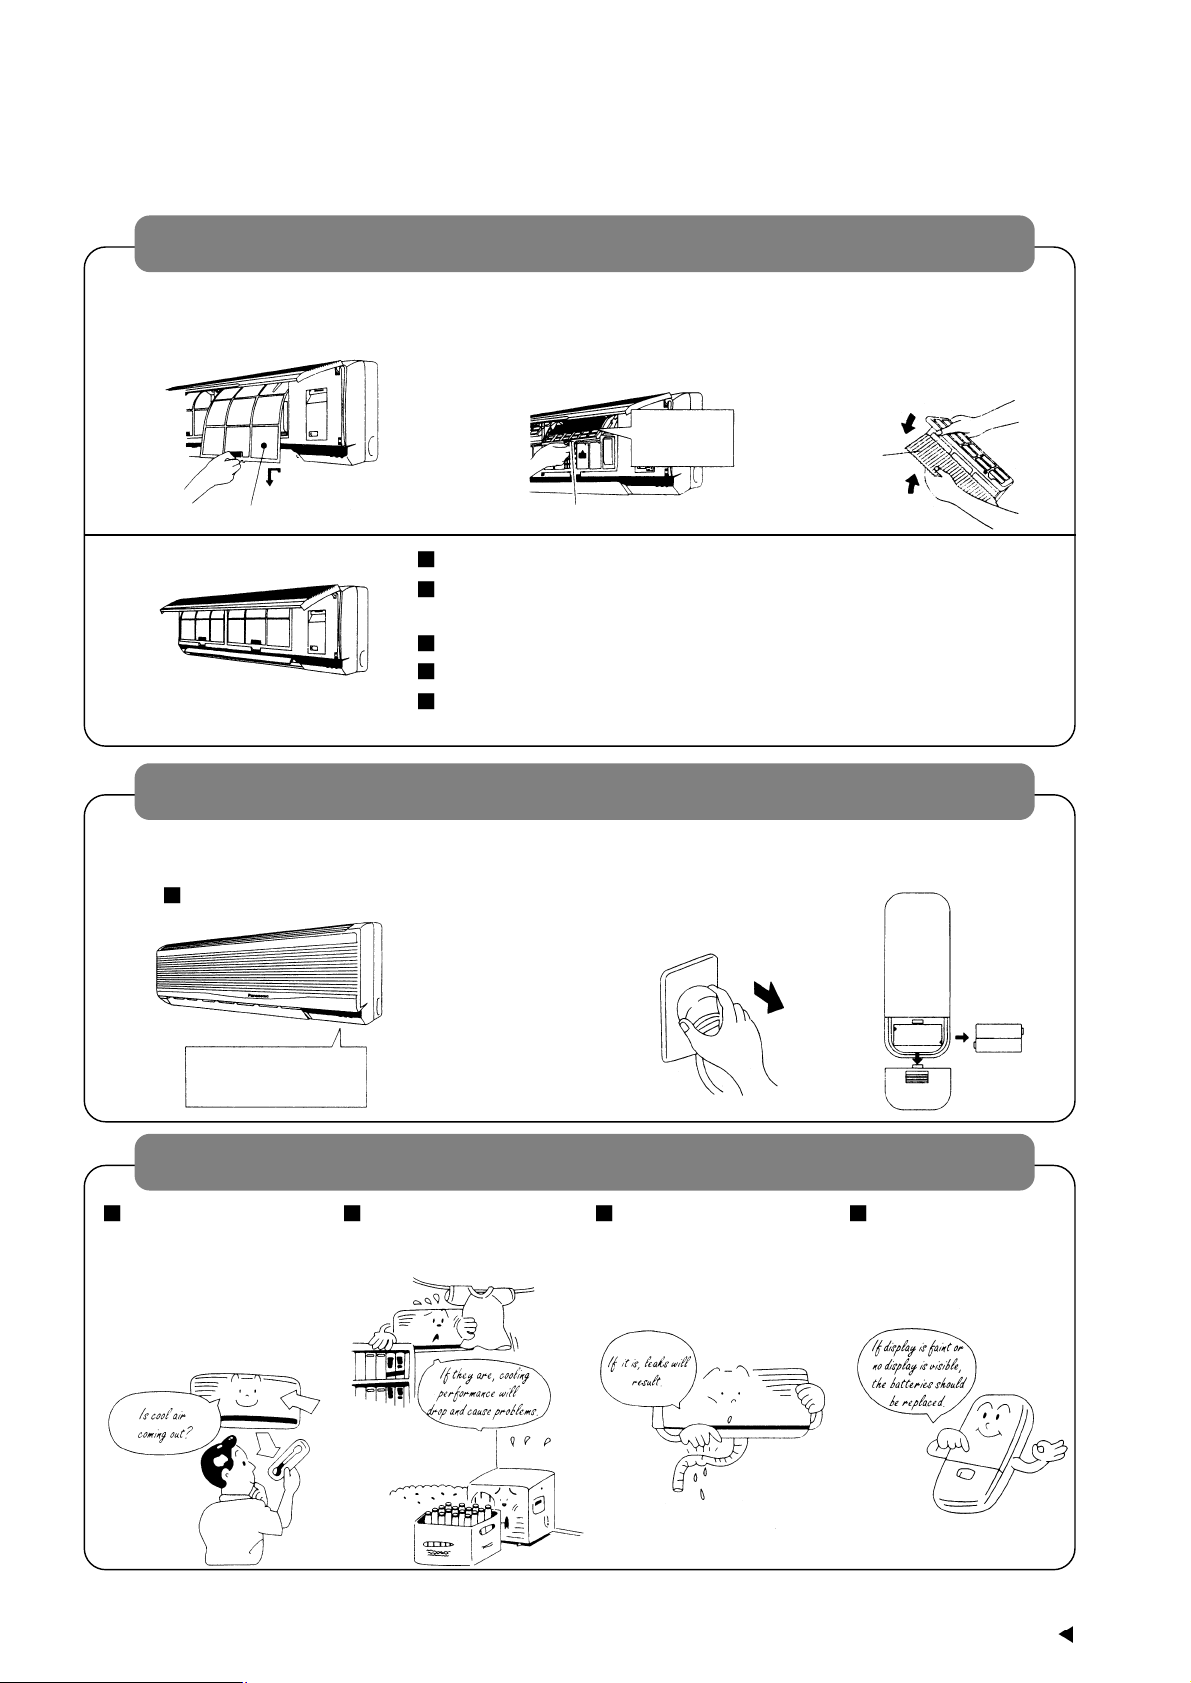
Replacement of air purifying filters
Recommended about once every 3 months.
1
Remove the air filters.
Air filter
2
Remove the air purifying
filters.
purifying filter
3
Remove the filters from the
filter frame.
Caution
Be careful not to
hurt your hands
on metal parts.
Filters
1
Operate the air conditioner for 2 to 3 hours.
Type of operation: Fan.
In order to dry out the
internal mechanisms
2
For air conditioners with a
power plug, stop operation
by remote control and pull
out the power plug.
Note: If the unit is not off by
remote control, the
unit will operate
when you plug in
(because of Autorestart Control is
provided).
3
Remove the batteries
from the remote control.
The indoor unit within a three month period, replace the purifying filters.
Re-insert the filters correctly at the left and right with the side marked
[FRONT] facing forward.
Dusty filters cannot be re-used, even if they are cleaned and washed.
Purchase replacement filters from your air conditioner dealer.
Part number for air purifying filters: CZ-SFD30N
<Note>
When not using the air conditioner for a long period
Pre-season inspection (The earlier the better)
Operate for 15 minutes.
If the difference in temperature between the air
outlet vent and air intake vent is 8˚C or more
when cooling, the unit is
normal.
Are the air outlet vents
and air intake vents
obstructed?
Is the drain hose
cracked or crushed?
Are the remote
control batteries in
good condition?
Y
Page 20
Troubleshooting
19
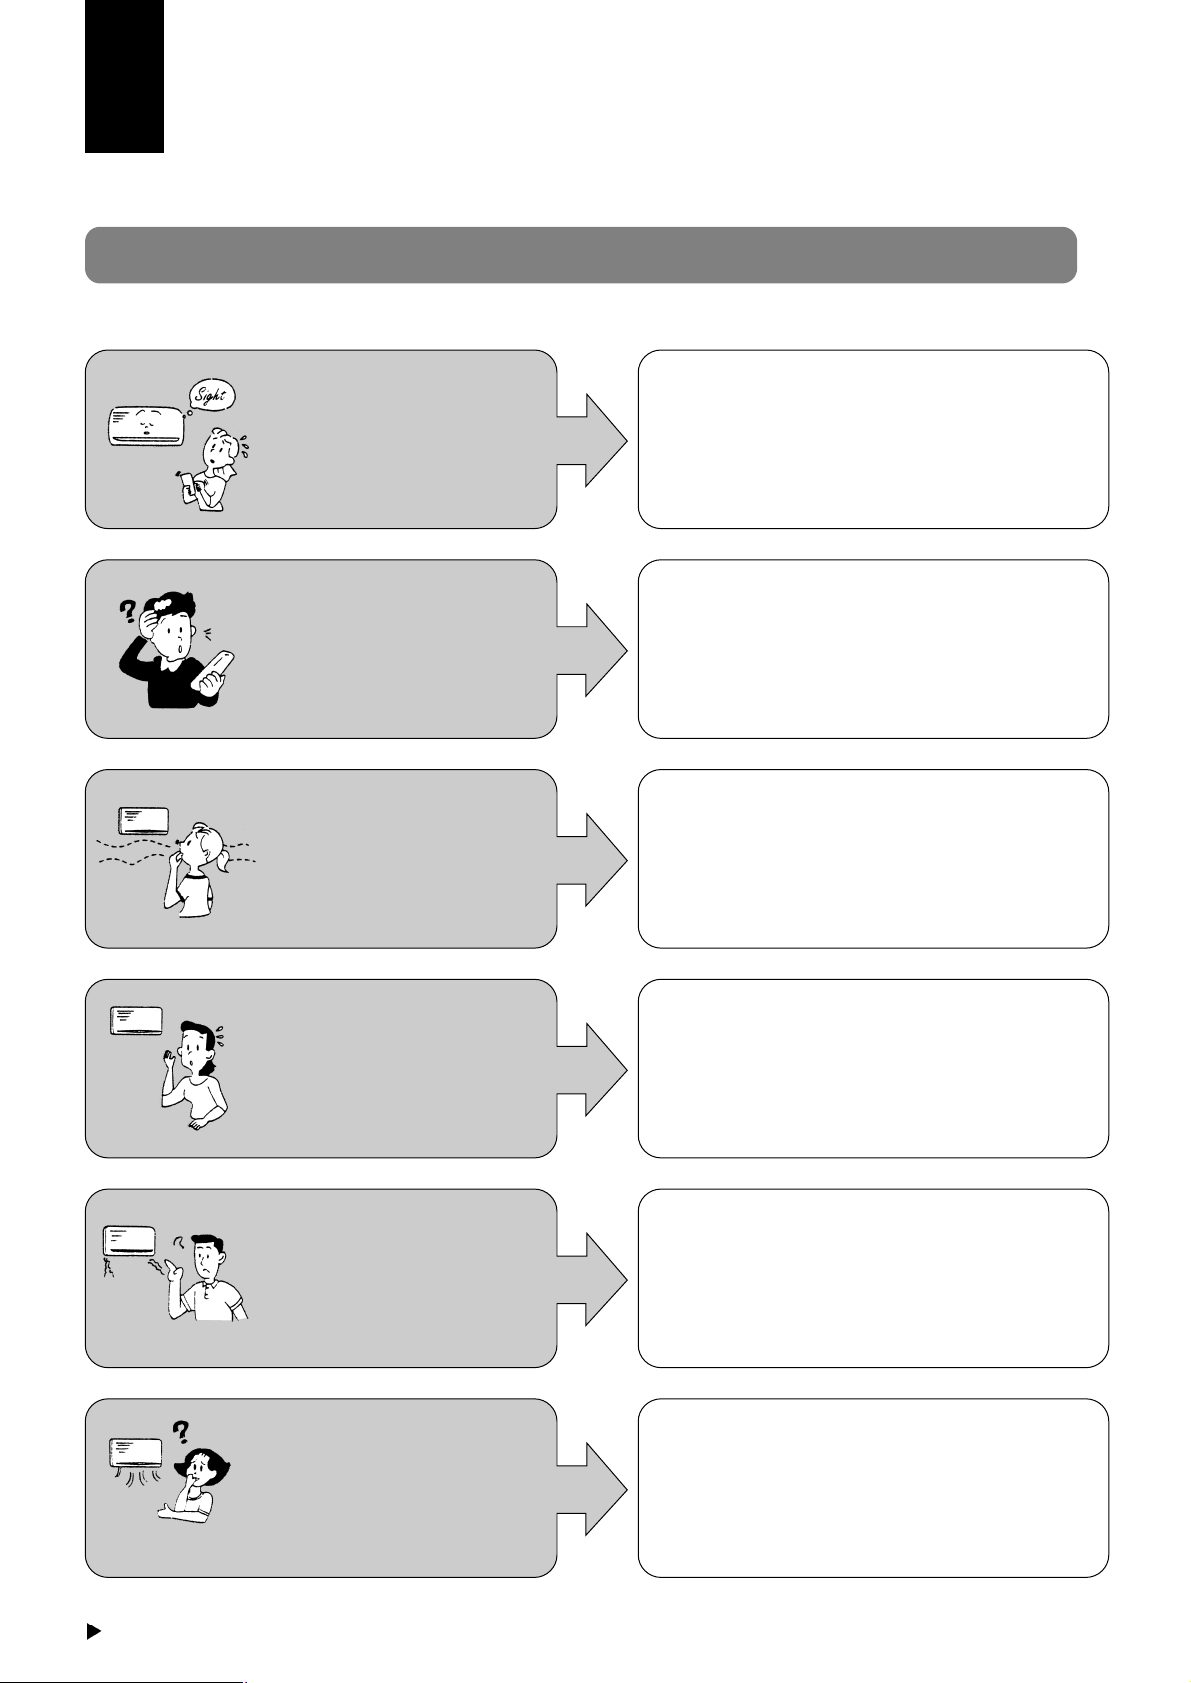
Normal operation
Air conditioner has been
restarted, but does not
operate for 3 minutes.
This is to protect the air conditioner. Wait until
the air conditioner begins operating.
Soft Dry Mode Operation is a very gentle Cooling
Operation consisting primarily of dehumidifying.
The air conditioner may stop for approximately 6
minutes in order to prevent o v ercooling.
If the room temperature rises again, the operation
will recommence.
This may be a damp smell exuded by the walls,
carpet, furniture or clothing in the room.
This is the sound of refrigerant flowing inside the
air conditioner unit.
Condensation occurs when the airflow from the
air conditioner cools the room air.
This is to remove the smell exuded by the
surroundings.
During Soft Dry Mode
Operation, the air conditioner stops.
The room has a peculiar
odour.
A sound like water flowing
can be heard.
It seems that fog is coming
out from the air conditioner.
During Automatic Airflow
Volume setting, indoor fan
stops occasionally.
Q
Is it okay?
A
This is the answer.
Page 21
20
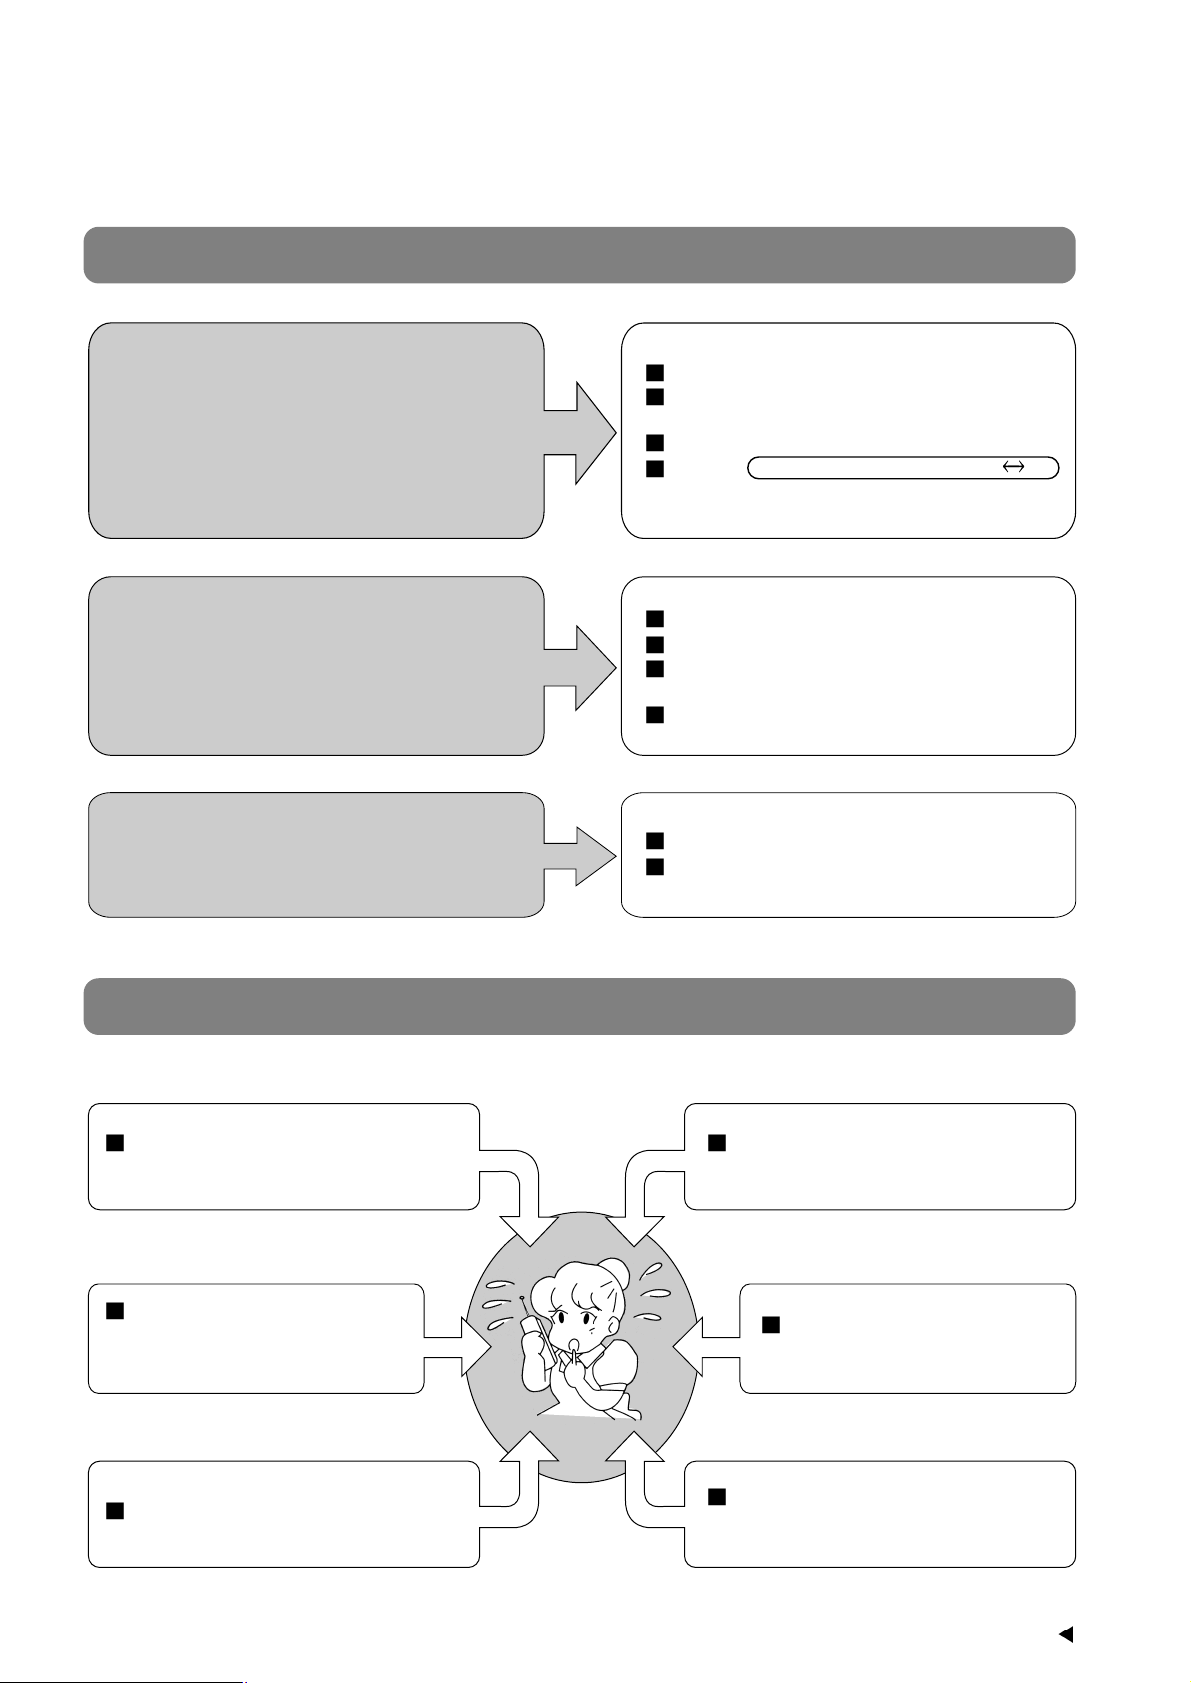
Abnormal operation
Call the dealer immediately
Has the circuit breaker been tripped?
Has the power plug been removed from the
wall outlet?
Is the Timer being used correctly?
Has the REMOTE CONTROLLER B A
switch been set to “B”
Has the temperature been set incorrectly?
Are the filters dirty?
Are the intake or outlet vents of the outdoor
unit obstructed?
Are all windows and doors closed?
Is the installation work slanted?
Is the front grille closed properly?
The air conditioner
does not operate.
The air conditioner
does not cool effectively.
Air conditioner operation
noise too loud.
If the following conditions occur , immediatel pull out the po wer plug or turn off the power break er
Abnormal noise is heard during
operation.
Switches or buttons do not
operate properly.
Water or foreign material
gets into the remote control
by mistake.
The circuit breaker switches
off frequently.
Water leaks from the indoor unit.
Power supply cord and plug
become unusually warm.
Page 22
21
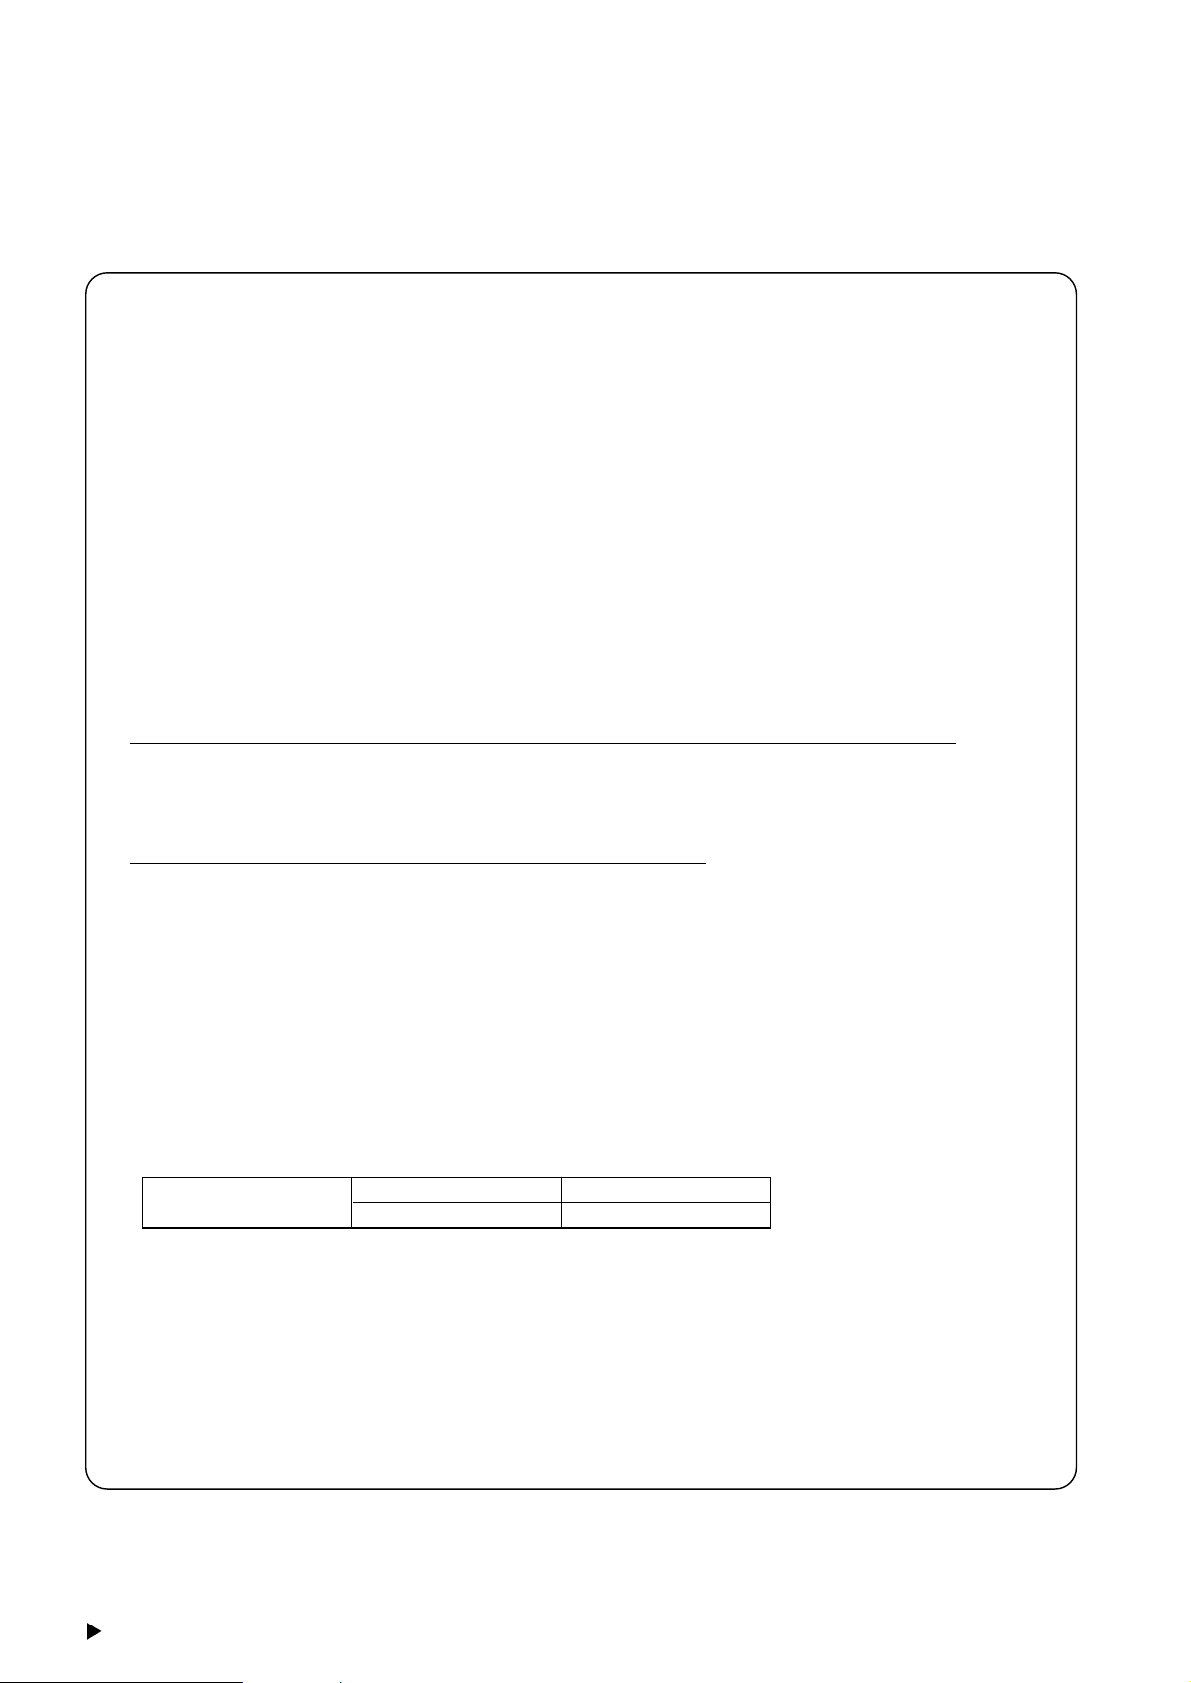
WARNING
(1) REMOVE POWER PLUG OR DISCONNECT FROM THE MAINS BEFORE SERVICING THIS APPLIANCE.
(2) THIS APPLIANCE MUST BE EARTHED.
(3) THE APPLIANCE IS NOT INTENDED FOR USE BY YOUNG CHILDREN OR INFIRM PERSONS WITH-
OUT SUPERVISION.
(4) YOUNG CHILDREN SHOULD BE SUPPERVISED TO ENSURE THAT THEY DO NOT PLAY WITH THE
APPLIANCE.
1. WHEN THE POWER CORD IS CONNECTED TO THE MAINS THROUGH A MULTIPOLAR SWITCH
THERE MUST BE A MULTI POLAR SWITCH (DISCONNECTING MEANS) WITH A MINIMUM 3 mm
CONTACT GAP IN THE FIXED INSTALLATION CIRCUIT.
2. WHEN THE POWER PLUG IS CONNECTED TO THE RECEPTACLE
The wires in this main lead are coloured in accordance with the following code:
Green-and-yellow : Earth
Blue : Neutral
Brown : Live
If the colours of the wires in the main lead of this appliance do not correspond with the coloured markings
indentifying the terminals in your plug, proceed as follows:
The green-and-yellow wire must be connected to the terminal in the plug which is marked with letter E or by
the earth symbol
I
or coloured green or green-and-yellow.
The blue wire must be connected to the terminal which is marked with the letter N or coloured black.
The brown wire must be connected to the terminal which is marked with the letter L or coloured red.
IF THE SUPPLY CORD IS DAMAGED, IT MUST BE REPLACED BY A SPECIAL CORD OR ASSEMBLY
AVAILABLE FROM THE MANUFACTURER OR IT’S SERVICE AGENT.
IMPORTANT
NOTE
Fuse Specifications
In door Out door
T 3.15(A), L250(V) T3.15(A), L250(V)
Y
Page 23
22
Note
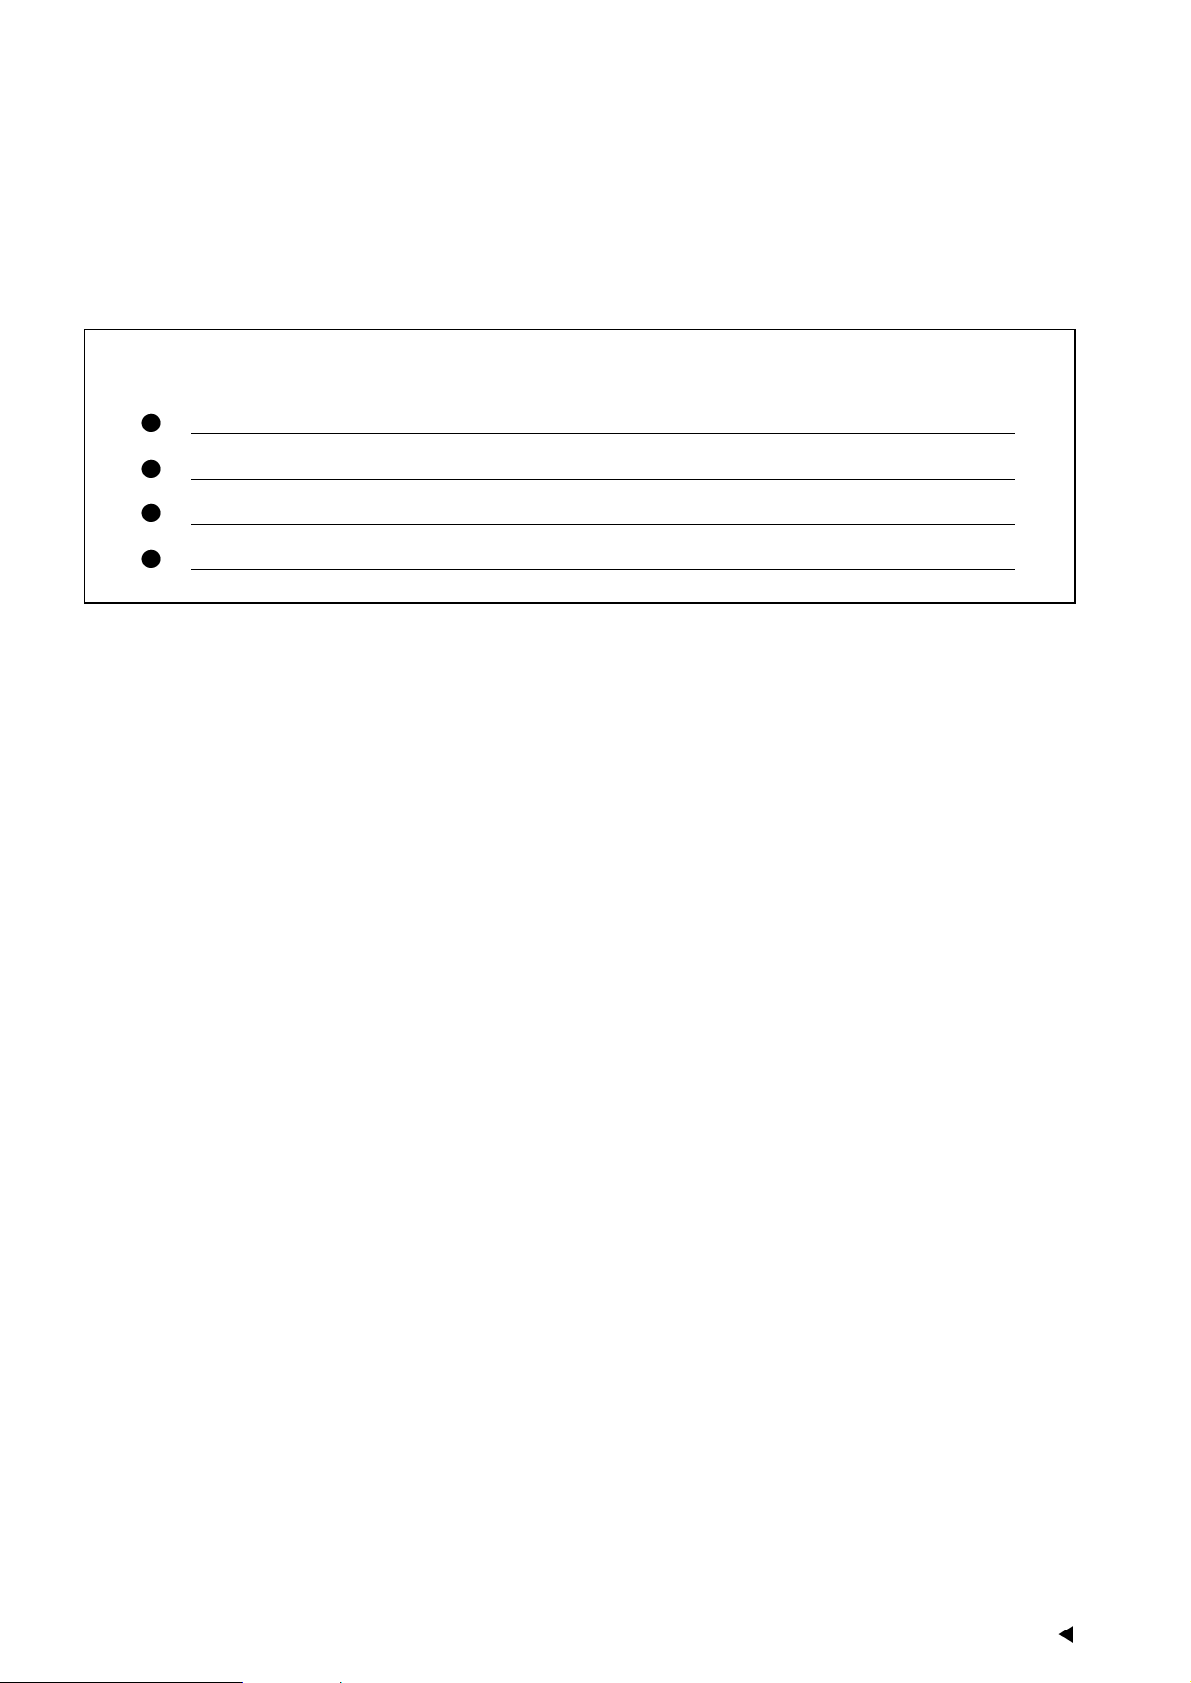
Please remember to record the following:
Model Number
Serial Number
Dealer’s Name
Date Purchased
Page 24

C8036-880
Matsushita Electric Industrial Co., Ltd.
Web Site: http://www.panasonic.co.jp/global/
Printed in Taiwan
 Loading...