

Panasonic CT-27SL15 Owner’s Manual
m ®
_-ZZZZZZZZZZZZZZZZZZZZZZZZZZZZZZZZZZZZ-_
CT-20SL15
CT-27SCl 5
CT-27SL15
TQB2AA0561 50301
PRINTED IN THAILAND
llVIPRESO EN TAILANDIA
llVlPRllVll_ EN THA'ILANDE
WARNING
The lightning flash with arrow head within
a triangle is intended to tell the user that
parts inside the product are a risk of
electric shock to persons.
The exclamation point within a triangle
is intended to tell the user that important
operating and servicing instructions are
in the papers with the appliance.
r_ he Class II insulation symbol (square within a square) indicates that this product has been evaluated and
tested to comply with Class II insulation requirements.
WARNING: TO REDUCE THE RiSK OF FiRE OR ELECTRIC SHOCK, DO NOT EXPOSE THiS
APPARATUS TO RAiN OR MOISTURE AND OBJECTS FILLED WiTH LiQUiDS, SUCH
AS VASES, SHOULD NOT BE PLACED ON THIS APPARATUS.
IMPORTANT SAFETY INSTRUCTIONS
1. Read these instructions.
2. Keep these instructions.
3. Heed all warnings.
4. Follow all instructions.
5. Do not use this apparatus near water.
6. Clean only with dry cloth.
7. Do not block any ventilation openings, install in accordance with the manufacturer's instructions.
8. Do not install near any heat sources such as radiators, heat registers, stoves, or other apparatus (including
amplifiers) that produce heat.
9. Do not defeat the safety purpose of the polarized or grounding type plug. A polarized plug has two blades with
one wider than the other. A grounding type plug has two blades and a third grounding prong. The wide blade
or the third prong are provided for your safety. If the provided plug does not fit into your outlet, consult an
electrician for replacement of the obsolete outlet.
10. Protect the power cord from being walked on or pinched particularly at plugs, convenience ,_l"-Ill,'lL.
receptacles, and the point where they exit from the apparatus.
11. Only use attachments/accessories specified by the manufacturer.
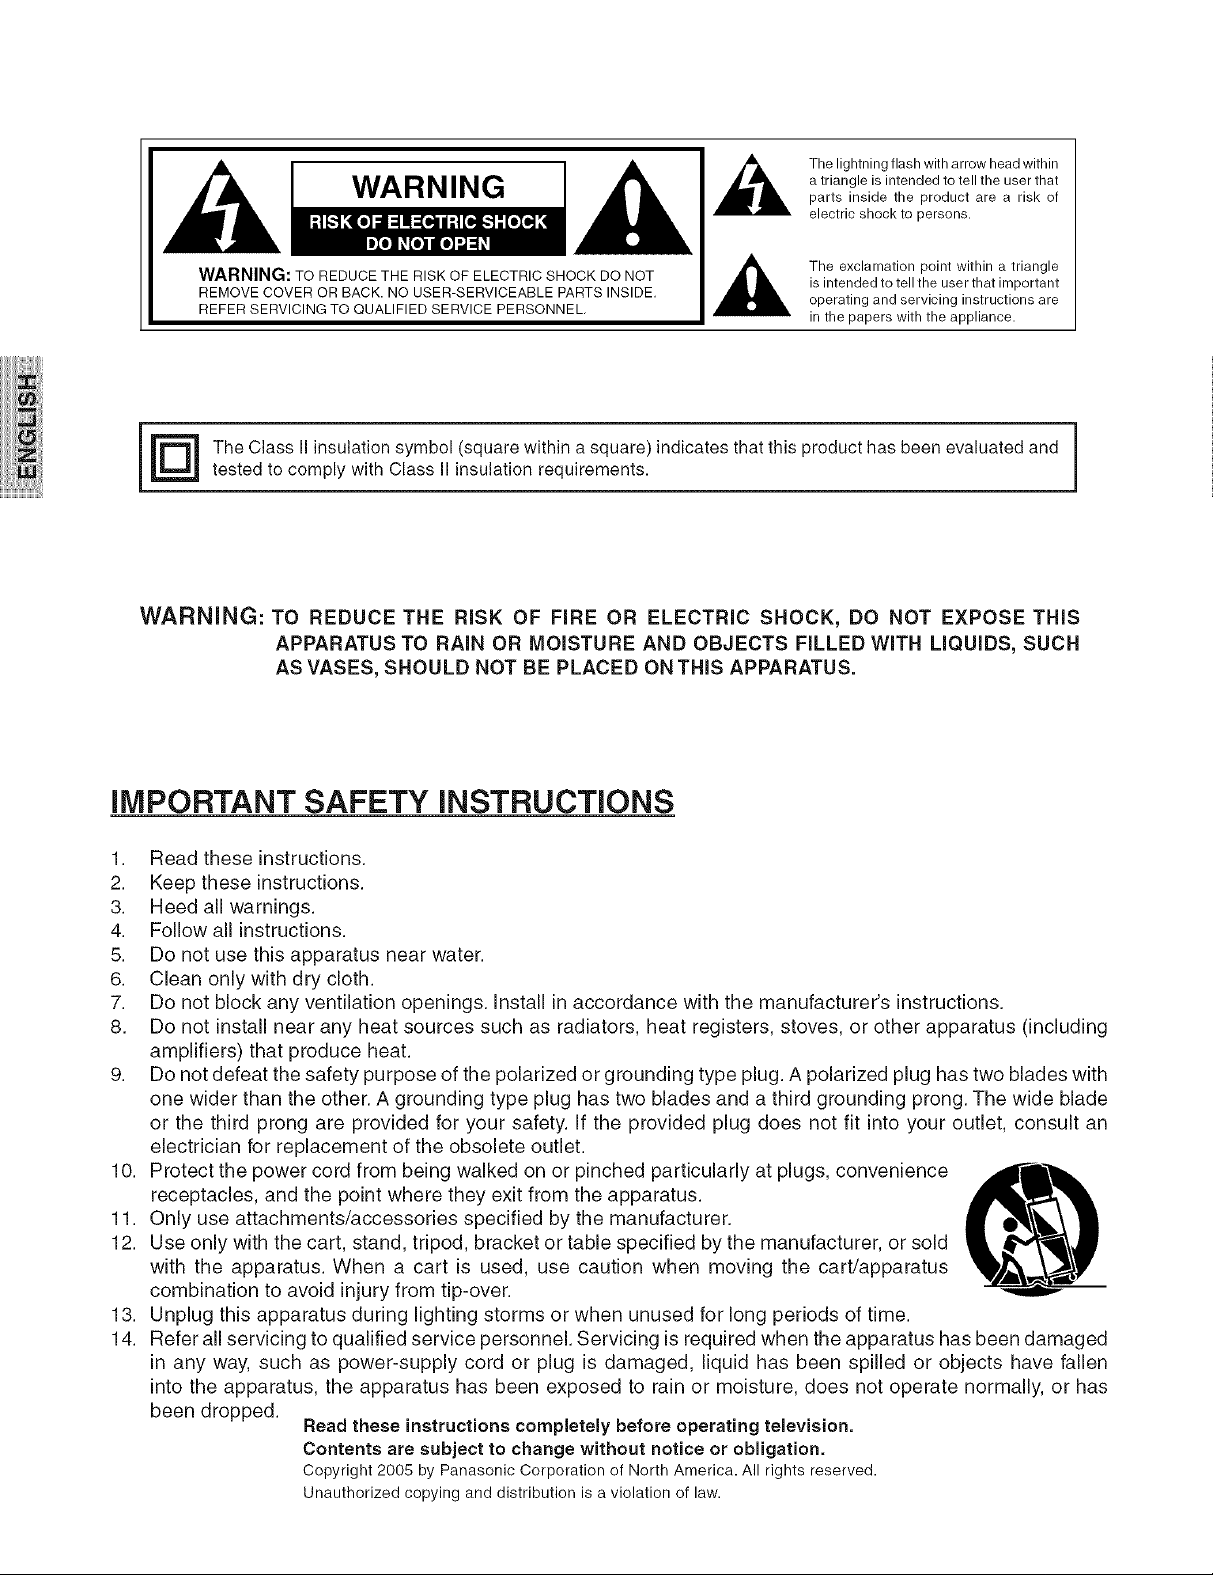
12. Use only with the cart, stand, tripod, bracket or table specified by the manufacturer, or sold
with the apparatus. When a cart is used, use caution when moving the cart/apparatus
combination to avoid injury from tip-over.
13. Unplug this apparatus during lighting storms or when unused for long periods of time.
14. Refer all servicing to qualified service personnel. Servicing is required when the apparatus has been damaged
in any way, such as power-supply cord or plug is damaged, liquid has been spilled or objects have fallen
into the apparatus, the apparatus has been exposed to rain or moisture, does not operate normally, or has
been dropped.
Read these instructions completely before operating television.
Contents are subject to change without notice or obligation.
Copyright 2005 by Panasonic Corporation of North America. All rights reserved.
Unauthorized copying and distribution is a violation of law.
_MPORTANT _NFORMATION
Important Information
FCC CAUTION: ANY CHANGES OR MODIFICATIONSTOTHIS TV RECEIVER NOT EXPRESSLY APPROVED BY PANASONIC
CORPORATION OF NORTH AMERICA COULD CAUSE HARMFUL iNTERFERENCE, WHICH WOULD VOiD
THE USER'S AUTHORITY TO OPERATE THiS EQUIPMENT.
ENVIRONMENTAL NOTICE: THiS PRODUCT UTiLiZES CATHODE RAY TUBES (CRT) AND OTHER COMPONENTS THAT
CONTAIN LEAD. DISPOSAL OFTHESE MATERIALS MAY BE REGULATED IN YOUR COMMU-
NiTY DUE TO ENVIRONMENTAL CONSiDERATiONS. FOR DISPOSAL OR RECYCLING INFOR-
MATION PLEASE CONTACTYOUR LOCAL AUTHORiTiES, ORTHE ELECTRONICS iNDUSTRiES
ALLIANCE: <HTTP://WWW.EIAE.ORG.>
important information Regarding The Use Of Video Games, Computers, Or Other Fixed
image Displays
WARNING: The marking or retained image on the picture tube resulting from viewing fixed image is
not an operating defect and as such is not covered by Warranty.
This television is designed to display constantly moving images on the screen. Continuous viewing of stationary
images such as letterbox pictures on standard screen TVs (with top/bottom bars), nonexpanded standard
(4:3) pictures on wide screen TVs (with side bars shown on each side of an image), stock market report bars
(ticker running at the bottom of the screen), video game patterns, fixed scoreboards, bright station Iogos, on-
line (Internet) or repetitive computer style patterns should be limited.
The extended use of fixed image program material can cause permanent picture tube damage, shown as a
"shadow image" viewable on normal programs. This type of irreversible picture tube deterioration can be
limited by performing the following steps:
• Do not display the fixed image for extended periods of time.
Turn the power off when not in use.
WARNING: KEEP UNNEEDED PARTS AND OTHER OBJECTS OUT OFTHE REACH OF SMALL CHILDREN.THESE OBJECTS
CAN BE ACCIDENTALLY SWALLOWED. ALSO, BE CAREFUL ABOUT PACKAGING MATERIALS AND PLASTIC
SHEET.
1

TABLE OF CONTENTS
Table of Contents
Congratulations ........................................... 3
Customer Record .................................................... 3
Care and Cleaning .................................................. 3
Specifications .......................................................... 3
Feature Chart .......................................................... 3
Installation ................................................... 4
Television Location ................................................. 4
Optional Cable Connections ................................... 4
AC Power Supply Cord ........................................... 4
Cable / Antenna Connection ................................... 4
Remote Control Battery Installation ........................ 4
initial Setup Menu ....................................... 5
Optional Equipment Connections ............. 6
VCR Connection ..................................................... 6
Front Control Panel ................................................. 6
Cable Box Connection ............................................ 6
Digital TV - Set-Top Box (DTV-STB) or DVD Player
Connection .............................................................. 6
Remote Control Operation ......................... 7
Operating Components with Remote Control ......... 8
Programming the Remote Control .......................... 9
Programming Without A Code ................................ 9
Component Codes .................................................. 9
icon Menu Navigation ............................... 11
icon Menu Operation ................................ 12
SET UP ................................................................. 12
PICTURE .............................................................. 13
TIMER ................................................................... 13
AUDIO ................................................................... 13
LOCK .................................................................... 14
V-Chip Menu Operation ............................ 15
Troubleshooting Chart .............................. 18
index ........................................................... 19
2
Congratulations
Your new TV Monitor/Receiver features a solid state chas-
sis that is designed to give you many years of enjoyment.
It was thoroughly tested and tuned at the factory for best
performance.
Customer Record
The model and serial number of this product are located
on the back of the TV. You should note the model and
serial number in the space provided and retain as a per-
manent record of your purchase. This will aid in identifi-
cation in the event of theft or loss. Product registration
for U.S. customers is available at: www.prodreg.com/
panasonic.
Model
Number
Serial
Number
CONGRATULATIONS
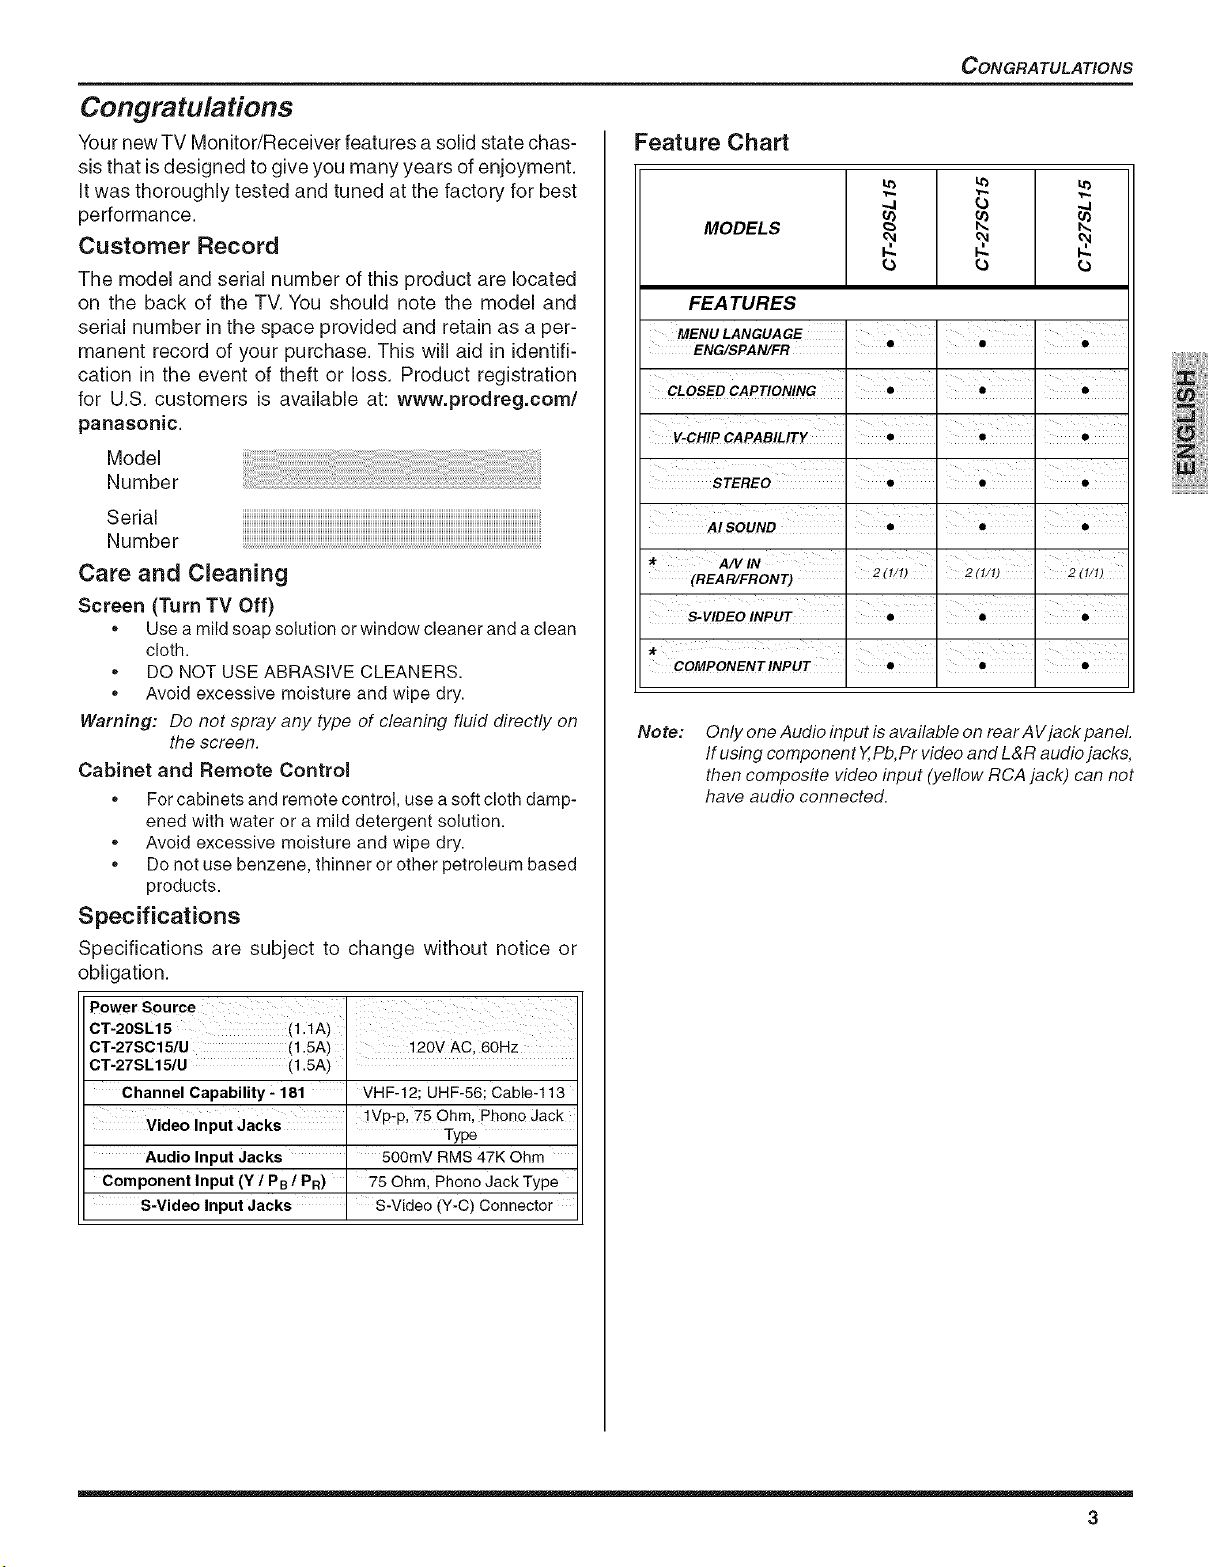
Feature Chart
.4
MODELS
(3 (3
FEATURES
MENU LANGUAGE
ENG/SPAN/FR . e . 0 .
CLOSED CAPTIONING . • '. • '. •
V-CHIP CAPAB/LITy e 0 0
STEREO ' • I • I •
A/ SOUND I e I 0 I 0
I
I I I
I
I
Care and Cleaning
Screen (Turn TV Off)
,, Use amildsoapsolution or windowcleaner andaclean
cloth.
,, DO NOT USEABRASIVE CLEANERS.
,, Avoid excessive moisture and wipe dry.
Warning: Do not spray any type of cleaning fluid directly on
the screen.
Cabinet and Remote Control
,, Forcabinets and remotecontrol, usea softcloth damp-
ened with water or a mild detergent solution.
,, Avoid excessive moisture and wipe dry.
,, Donot use benzene,thinner or other petroleumbased
products.
Specifications
Specifications are subject to change without notice or
obligation.
Power Source
c,-2os,t,
CT-27SC15/U (1.5A) 120V AC, 60Hz
CT-27SL15/U (1.5A)
Channel Capability - 181 VHF-12; UHF-56; Cable-113
Video Input Jacks !',/p-p, 75 Ohm, Phono Jack
Audio Input Jacks 500mY RMS 47K Ohm
Component Input (Y 1PB / PR) 75 Ohm, Phono Jack Type
S-Video Input Jacks S-Video (Y-C) Connector
Type
(REAR/FRONT) 2(!/!)
S-VIDEO INPUT : • : • : •
COMPONENTINpUT I e I e I
Note:
Only one Audio input is available on rear A Vjack panel.
If using component Y,Pb,Pr video and L&R audio jacks,
then composite video input (yellow RCA jack) can not
have audio connected.
3
_NSTALLATION
Installation
Television Location
Follow these recommendations before deciding the
location of your television.
,, Avoid excessive sunlight or bright lights, including re-
flections.
,, Keep away from excessive heat or moisture. Inad-
equate ventilation may cause internal component fail-
ure.
,, Fluorescent lighting may reduce remote control
transmitting range.
,, Keep away from magnetic equipment, including mo-
tors, fans and external speakers.
WARNING: Use this television receiver only
with the cart, stand, tripod, bracket, or table
specified by the manufacturer, or sold with
the apparatus. When a cart is used, use cau-
tion when moving the cart/apparatus combi-
nation to avoid injury from tip-over. In order to avoid in-
jury to children, never place your television receiver on a
piece of furniture that is capable of being tilted by a child
leaning on it, pulling on it, standing on it, or climbing on it.
A falling television can cause serious injury or even death.
Optional Cable Connections
Shielded audio and video cables should be used
between components. For best results:
,, Use 75-ohm coaxial shielded cables.
,, Use appropriate input and output connectors, that
match your component connectors.
,, Avoid long cables to minimize interference.
AC Power Supply Cord
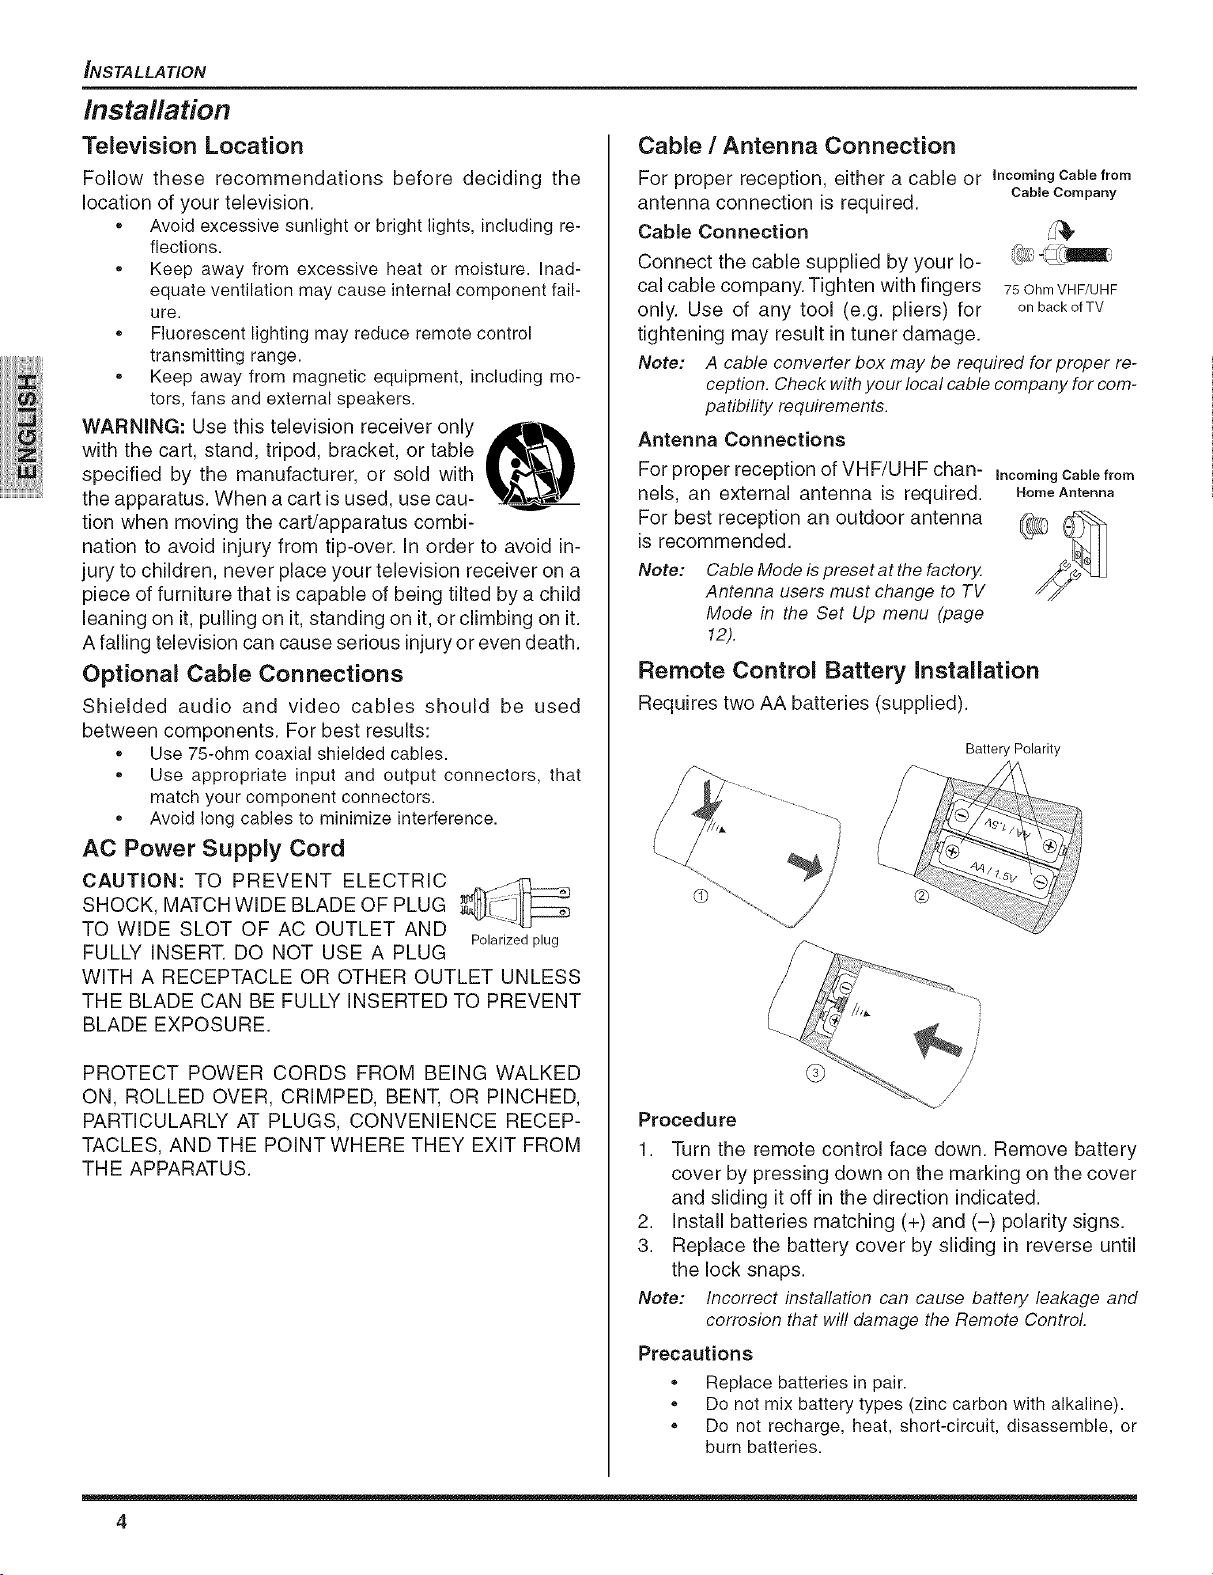
Cable / Antenna Connection
For proper reception, either a cable or Incomingcamefrom
antenna connection is required. CableCompany
Cable Connection ._,
Connect the cable supplied by your lo-
cal cable company. Tighten with fingers 75OhmVHF/UHF
only. Use of any tool (e.g. pliers) for onbackofTV
tightening may result in tuner damage.
Note: A cable converter box may be required for proper re-
ception. Check withyour local cable companyfor com-
patibility requirements.
Antenna Connections
For proper reception of VHF/UHF chan- IncomingCablefrom
nels, an external antenna [s required. Home Antenna
For best reception an outdoor antenna
is recommended.
Note: CableMode is preset at the factory.
Antenna users must change to TV
Mode in the Set Up menu (page
12).
Remote Control Battery Installation
Requires two AA batteries (supplied).
Battery Polarity
SHOCK, MATCH WIDE BLADE OF PLUG
CAUTION: TO PREVENT ELECTRIC __
TO WIDE SLOT OF AC OUTLET AND
FULLY INSERT. DO NOT USE A PLUG
WITH A RECEPTACLE OR OTHER OUTLET UNLESS
THE BLADE CAN BE FULLY INSERTED TO PREVENT
BLADE EXPOSURE.
PROTECT POWER CORDS FROM BEING WALKED
ON, ROLLED OVER, CRIMPED, BENT, OR PINCHED,
PARTICULARLY AT PLUGS, CONVENIENCE RECEP-
TACLES, AND THE POINT WHERE THEY EXIT FROM
THE APPARATUS.
Polarized plug
®
Procedure
1. Turn the remote control face down. Remove battery
cover by pressing down on the marking on the cover
and sliding it off in the direction indicated.
2. install batteries matching (+) and (-) polarity signs.
3. Replace the battery cover by sliding in reverse until
the lock snaps.
Note: Incorrect instaflation can cause battery leakage and
corrosion that will damage the Remote Control.
Precautions
,, Replace batteries in pair.
,, Do not mix battery types (zinc carbon with alkaline).
,, Do not recharge, heat, short-circuit, disassemble, or
burn batteries.
4
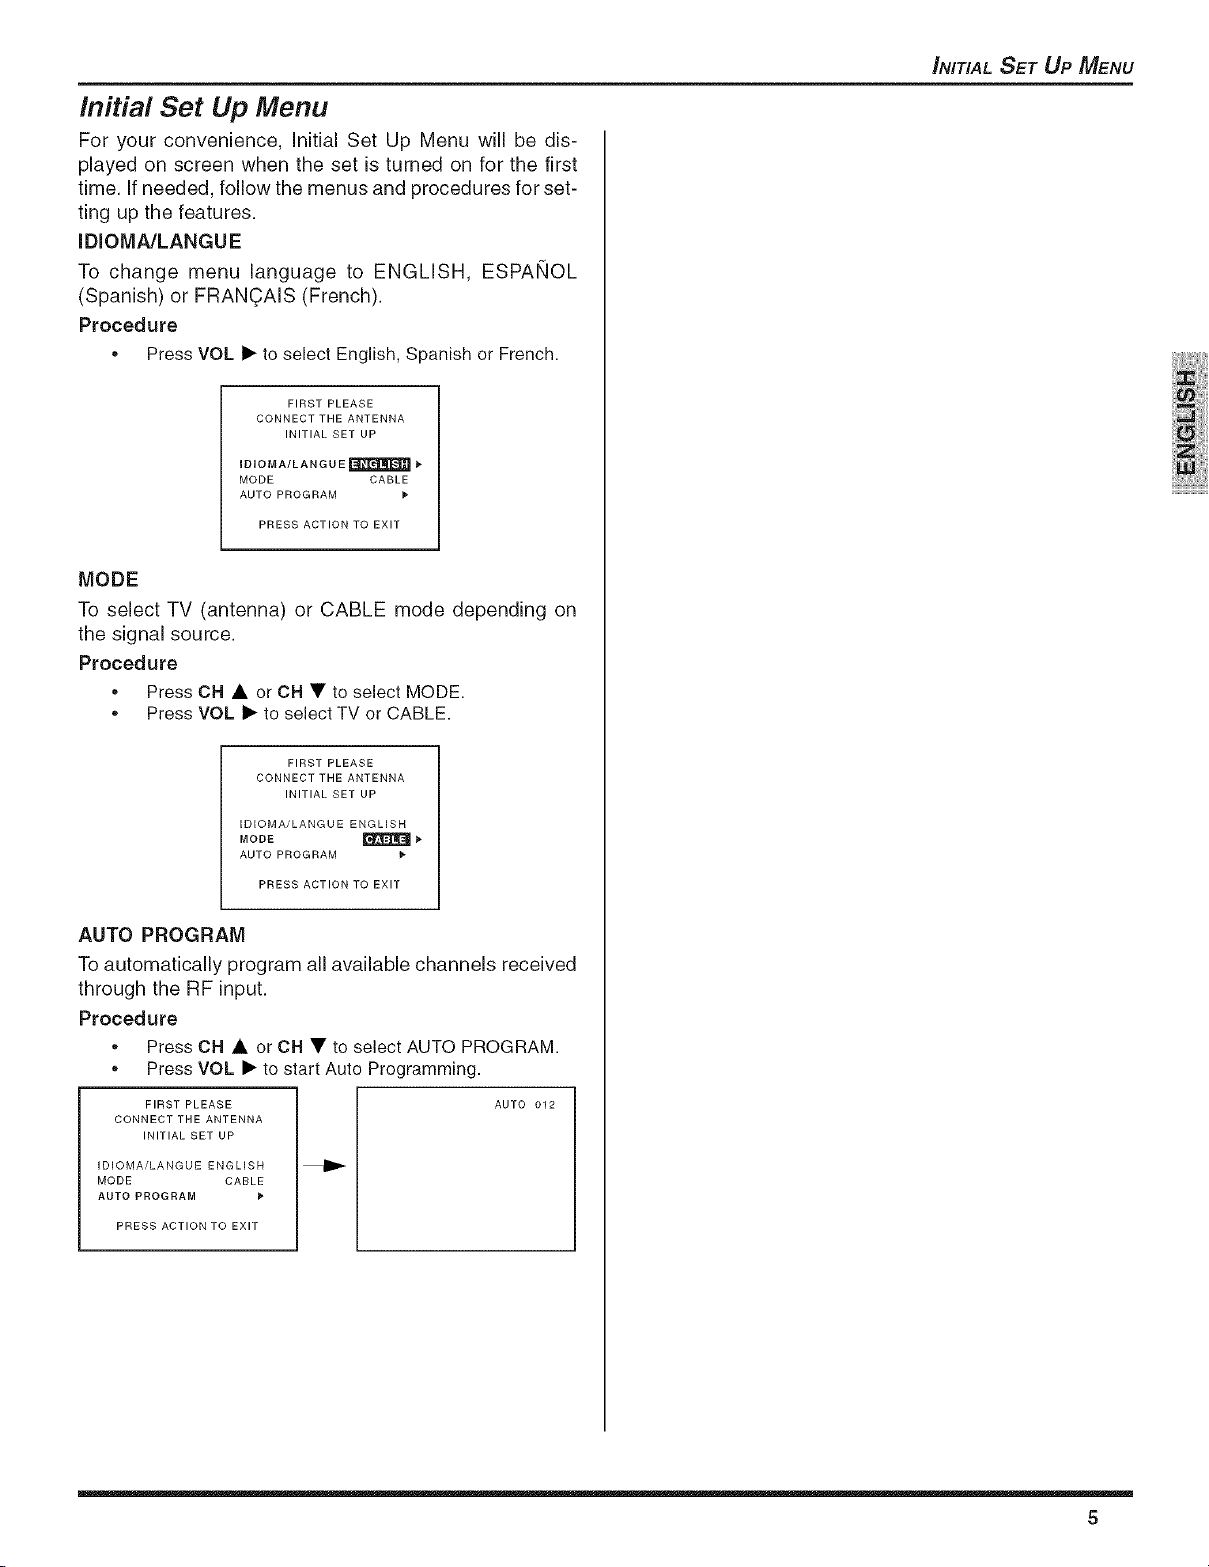
Initial Set Up Menu
For your convenience, initial Set Up Menu will be dis-
played on screen when the set is turned on for the first
time. if needed, follow the menus and procedures for set-
ting up the features.
IDIOMA/LANGUE
To change menu language to ENGLISH, ESPAI_OL
(Spanish) or FRAN(_AIS (French).
Procedure
,, Press VOL • to select English, Spanish or French.
FIRST PLEASE
CONNECT THE ANTENNA
INITIAL SET UP
IDIOMA/LANGUE_
MODE CABLE
AUTO PROGRAM
PRESS ACTION TO EXIT
MODE
To select TV (antenna) or CABLE mode depending on
the signal source.
Procedure
,, Press CH • or CH • to select MODE.
,, Press VOL • to select TV or CABLE.
_NITIAL SET UP MENU
FIRST PLEASE
CONNECT THE ANTENNA
INITIAL SET UP
IDIOMAiLANGUE ENGLISH
MODE _ 1,
AUTO PROGRAM
PRESS ACTION TO EXIT
AUTO PROGRAM
To automatically program all available channels received
through the RF input.
Procedure
,, Press CH • or CH • to select AUTO PROGRAM.
,, Press VOL • to start Auto Programming.
FIRST PLEASE
CONNECT THE ANTENNA
INITIAL SET UP
IDIOMAiLANGUE ENGLISH
MODE CABLE
AUTO PROGRAM
PRESS ACTION TO EXIT
AUTO 012
5
OPTIONAL EQUIPMENT CONNECTIONS
Optional Equipment Connections
Note: The remote control must be programmed with suppfied
codes to operate the optional equipment.
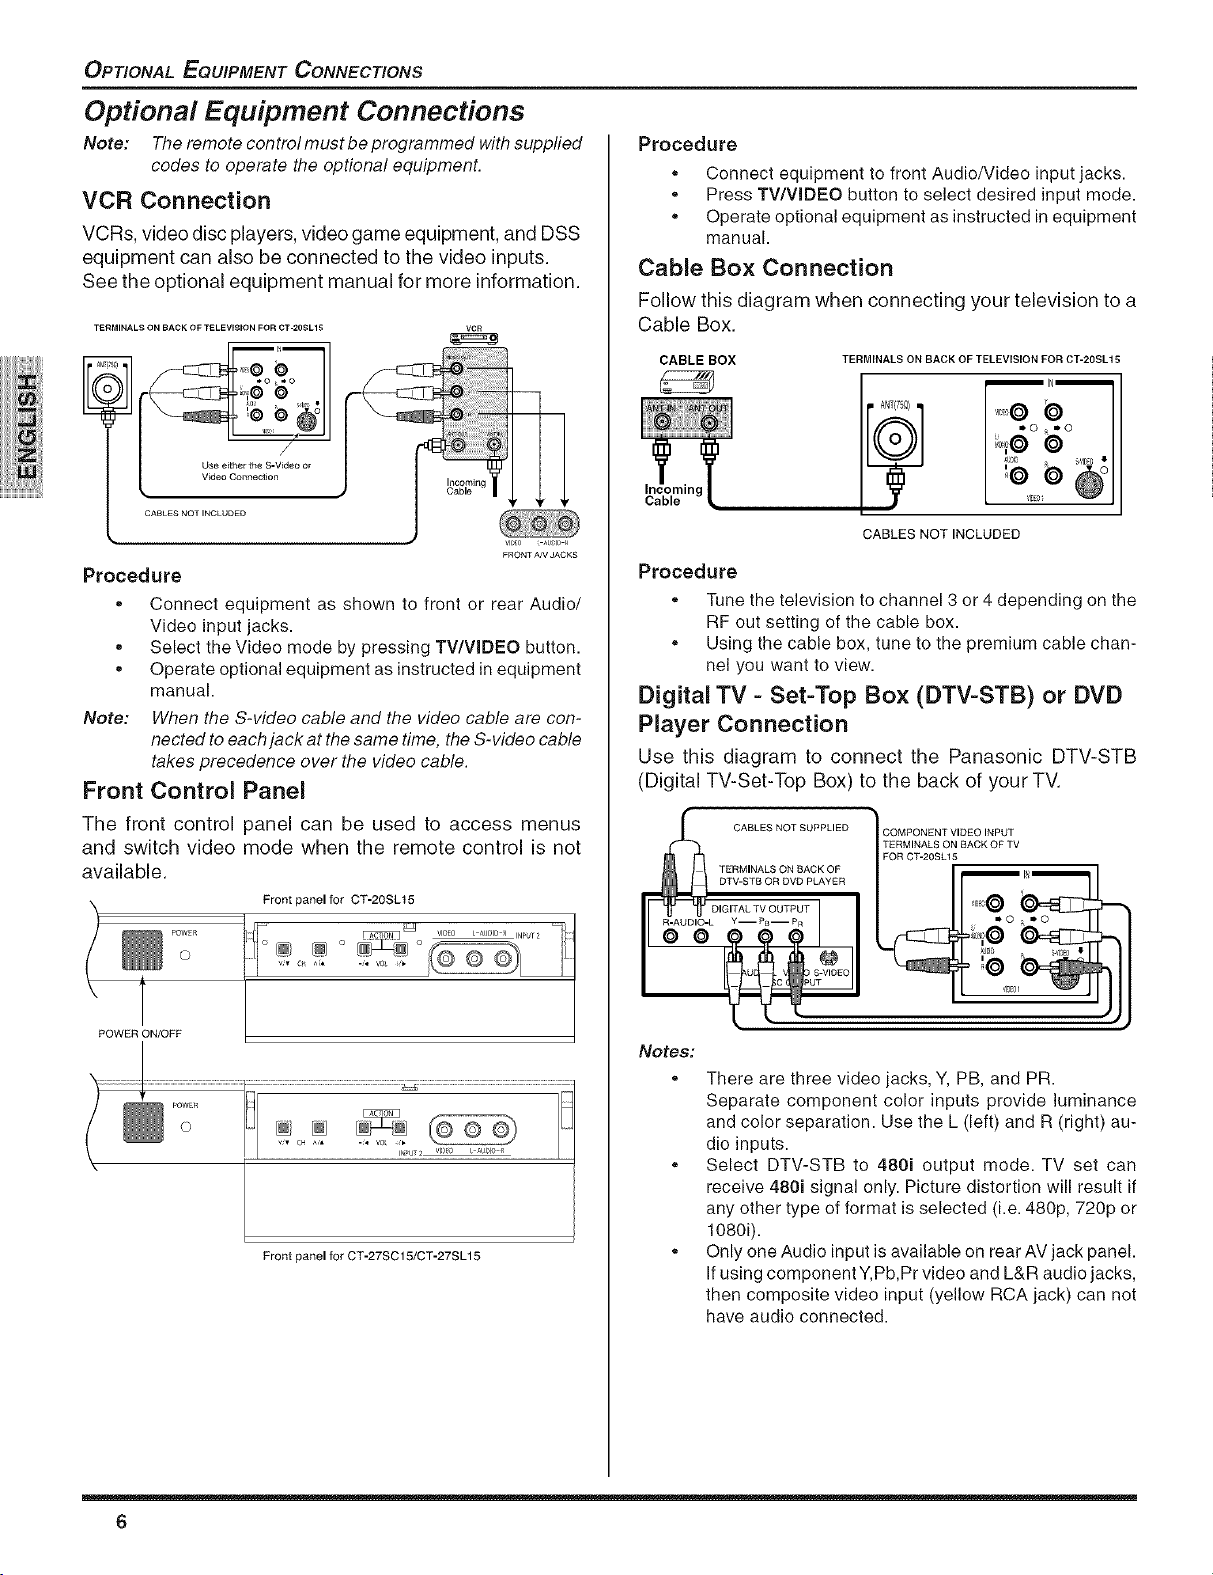
VCR Connection
VCRs, video disc players, video game equipment, and DSS
equipment can also be connected to the video inputs.
See the optional equipment manual for more information.
TERMINALS ON BACK OF TELEVISION FOR CT-20SL15
Procedure
,, Connect equipment to front Audio/Video input jacks.
,, Press TV/VlDEO button to select desired input mode.
,, Operate optional equipment as instructed in equipment
manual.
Cable Box Connection
Follow this diagram when connecting your television to a
Cable Box.
CABLE BOX
TERMINALS ON BACK OF TELEVISION FOR CT-2OSL15
Use e_ther the B-V_deo or
V_deo Connection
CABLES NOT INCLUDED
/
Procedure
,, Connect equipment as shown to front or rear Audio/
Video input jacks.
,, Select the Video mode by pressing TV/VIDEO button.
,, Operate optional equipment as instructed in equipment
manual.
Note: When the S-video cable and the video cable are con-
nected to each jack at the same time, the S-video cable
takes precedence over the video cable.
Front Control Panel
The front control panel can be used to access menus
and switch video mode when the remote control is not
available.
Front panel for CT-20SL15
POWE_
O
CABLES NOT INCLUDED
Procedure
,, Tune the television to channel 3 or 4 depending on the
RF out setting of the cable box.
,, Using the cable box, tune to the premium cable chan-
nel you want to view.
Digital TV - Set=Top Box (DTV-STB) or DVD
Player Connection
Use this diagram to connect the Panasonic DTV-STB
(Digital TV-Set-Top Box) to the back of your TV.
TERMINALS ON BACK OF TV
TERMINALS ON BACK OF
DTV-STB OR DVD PLAYER
DIGITAL TV OUTPUT
Y--PB-- pR
_L CABLES NOT SUPPLIED COMPONENT VIDEO INPUT
FOR CT-20SL15
POWER ON/OFF
6
Front panel for CT-27SC15/CT-27SL15
Notes:
e
There are three video jacks, Y, PB, and PR.
Separate component color inputs provide luminance
and color separation. Use the L (left) and R (right) au-
dio inputs.
Select DTV-STB to 480i output mode. TV set can
receive 480i signal only. Picture distortion will result if
any other type of format is selected (i.e. 480p, 720p or
1080i).
Only one Audio input is available on rear AV jack panel.
If using component Y,Pb,Pr video and L&R audio jacks,
then composite video input (yellow RCA jack) can not
have audio connected.
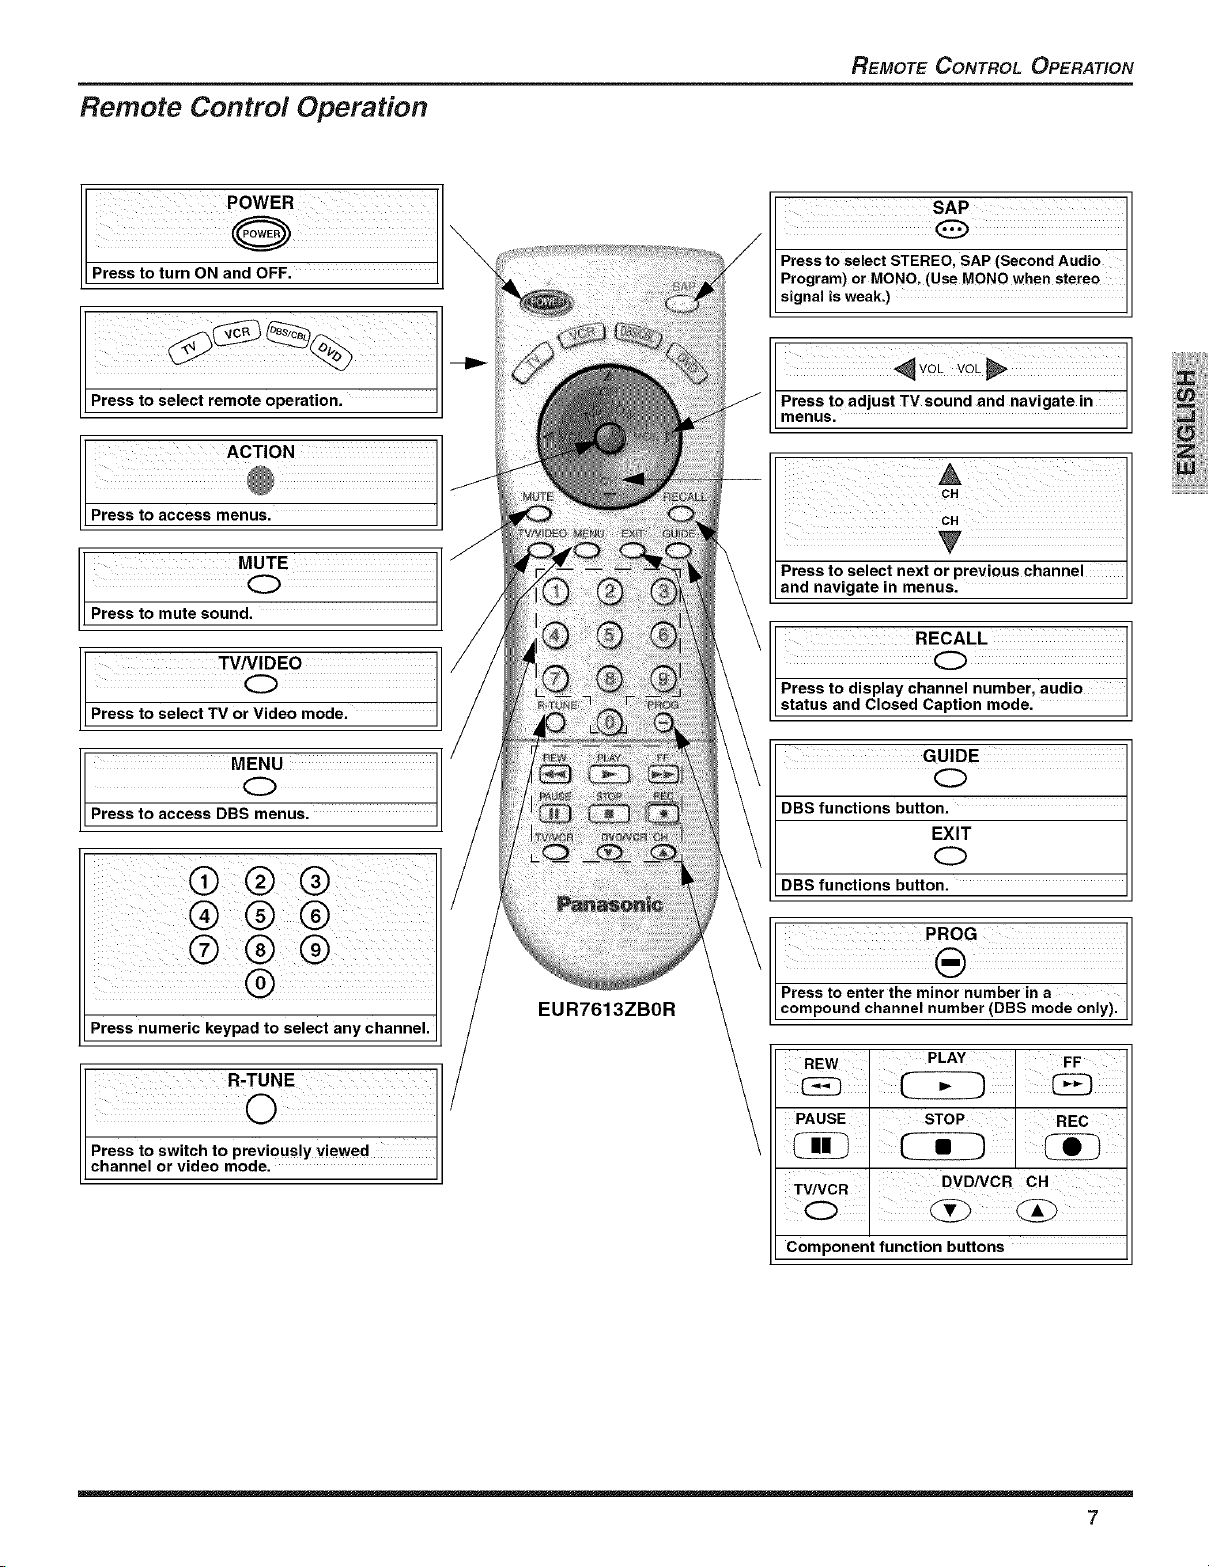
Remote Control Operation
REMOTE CONTROL OPERATION
Press to turn ON and OFF.
Press to select remote operation.
Press to access menus,
Press to mute sound.
POWER
ACTION
MUTE
TV/VIDEO
Q
Press to select TV or Video mode.
Program) or MONO. (Use MONO when stereo II
signal is weak.) Jl
CH
Press to select next or previous channel
and navigate in menus.
Press to display channel number, audio I
status and Closed Caption mode. JJ
GUIDE
C)
DBS functions button.
EXIT
Q
DBS functions button.
Press numeric keypad to select any channel.
EUR7613ZBOR
Press to enter the minor number in a H
compound channel number (DBS mode only).//
PAUSE STOP _ REC
TV/VCR DVDNCR OH
Component function buttons
7
//
_J
REMOTE CONTROL OPERATION
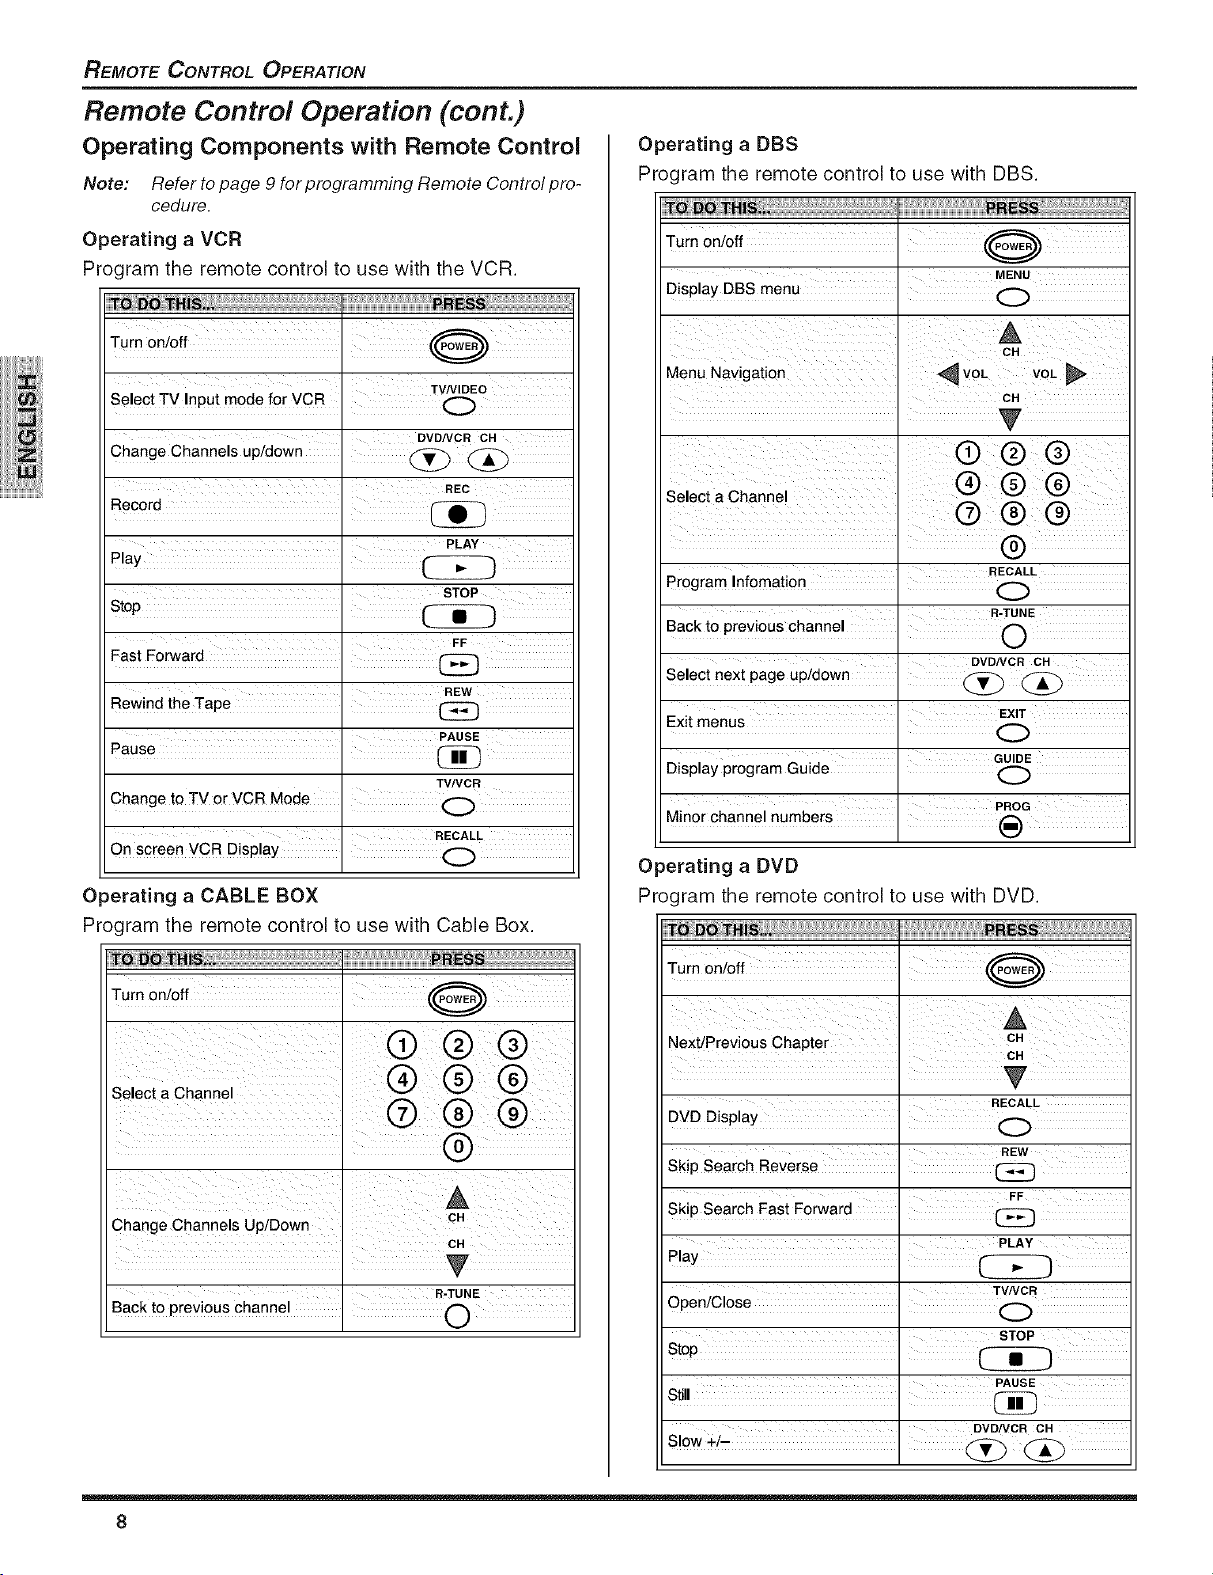
Remote Control Operation (cont.)
Operating Components with Remote Control
Note: Refer to page 9 for programming Remote Control pro-
cedure.
Operating a VCR
Program the remote control to use with the VCR.
Operating a DBS
Program the remote control to use with DBS.
TO DOTHiS._ ............... j " ........ PRESS .........
MENU
Display DBS menu . C)
Select TV Input mode for VCR
TV/VIDEO
DVDNCR OH
Change Channels up/down . _
I REC
PLAY
STOP
FF
Fast Forward .
REW
Rewind the Tape . (_
PAUSE
TV/VCR
ChangetoTV°rvCRMa_e O
I RECALL
On screen VCR Display . (_
Operating a CABLE BOX
Program the remote control to use with Cable Box.
CH
T
SeectaOhannel I Q Q Q
' RECALL
Program Infomation . (_
R-TUNE
Back to previous channel . O
I DVDNCR OH
Select next page up/down I (_ (_
' EXIT
I GUIDE
Display program Guide . O
, PROG
Minor channel numbers . _)
Operating a DVD
Program the remote control to use with DVD.
TO DO THIS.i : .............. , : ........ PRESS ...........
Change Channels Up/Down I
Back t0 Previ0us channa I i
, CH
R-TUNE
CH
CH
RECALL
, REW
Skip Search Reverse . (_
SkiP Search East Forward
PLAY
TVNCR
STOP
PAUSE
DVD/VCR CH
s,ow+ - .
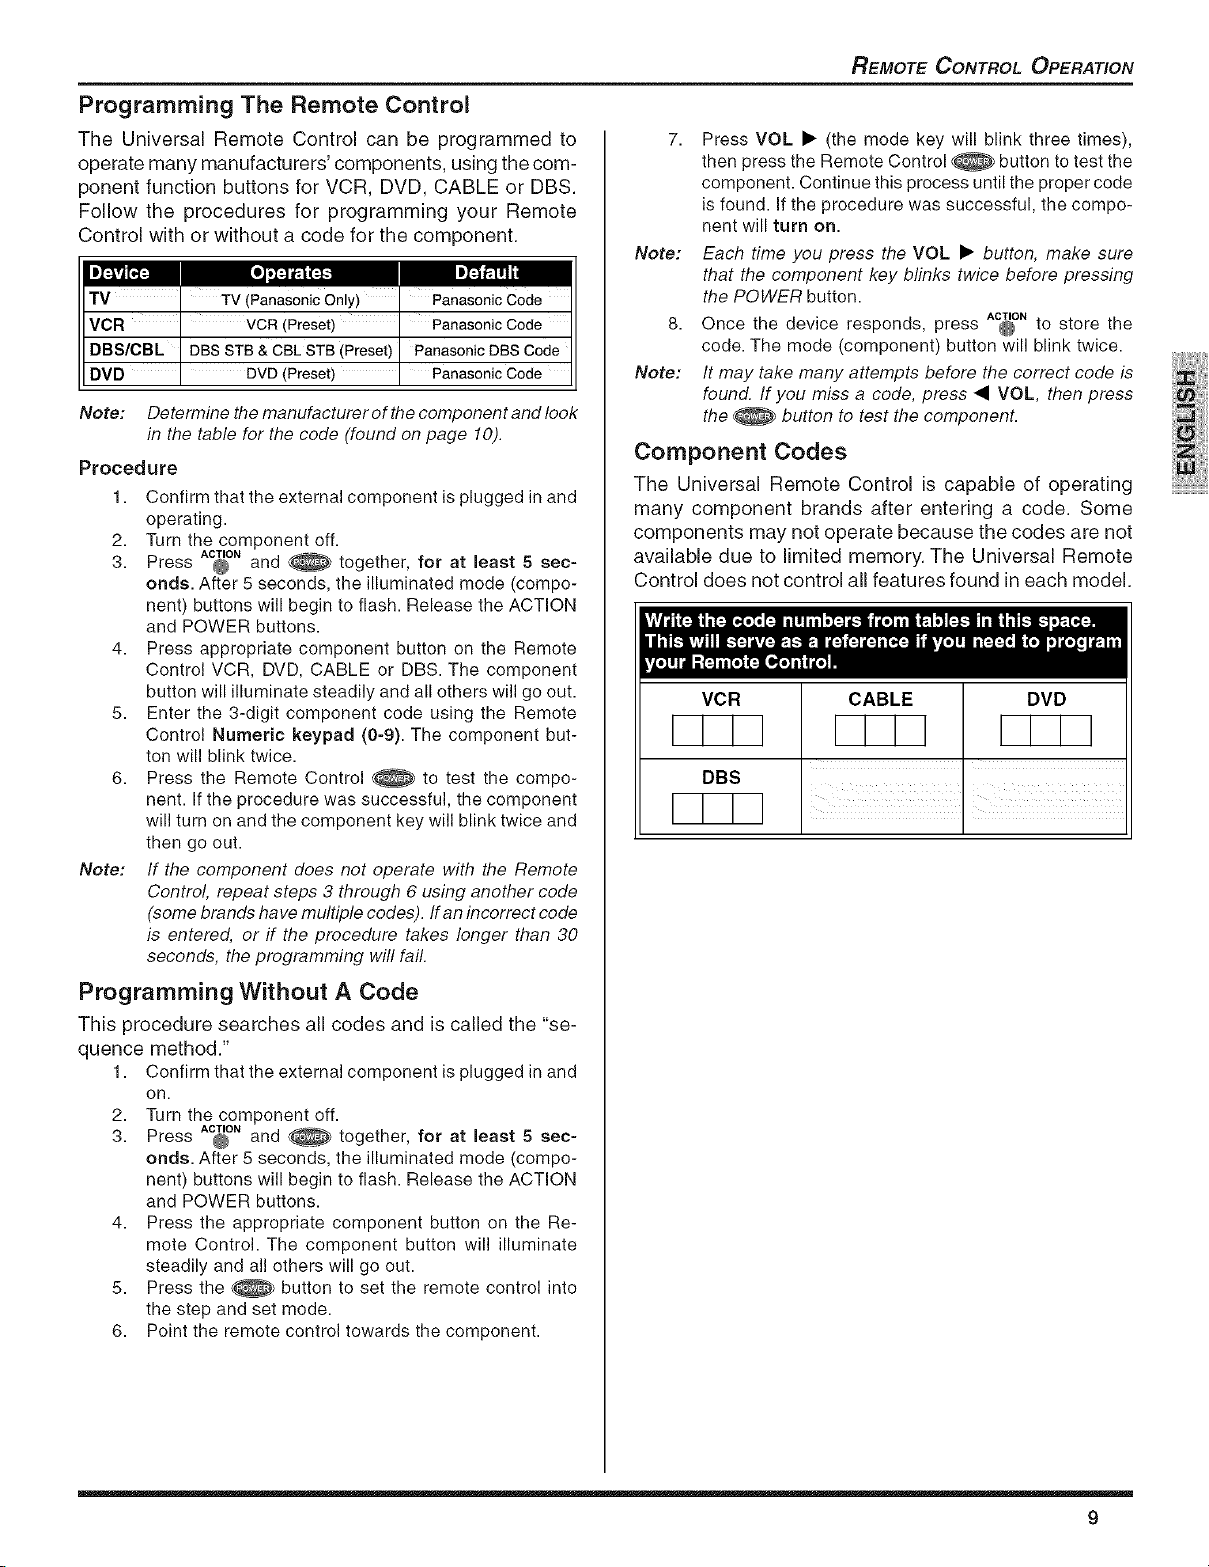
Programming The Remote Control
The Universal Remote Control can be programmed to
operate many manufacturers' components, using the com-
ponent function buttons for VCR, DVD, CABLE or DBS.
Follow the procedures for programming your Remote
Control with or without a code for the component.
TV I TV (PanasonicOnly) PanasonicCode
VCR I VCR (Preset) I PanasonicCode
DBS/CBL I DBSSTB & CBLSTB (Preset) PanasonicDBSCode
DVD DVD(Preset) PanasoncCode
Note: Determine the manufacturer of the component and look
in the table for the code (found on page 10).
Procedure
1. Confirm that the external component is plugged in and
operating.
2. Turn the component off.
4. Press appropriate component button on the Remote
5. Enter the 3-digit component code using the Remote
6. Press the Remote Control _ to test the compo-
Note: If the component does net operate with the Remote
ACTION
together, for at least 5 sec-3. Press @ and ....
onds. After 5 seconds, the illuminated mode (compo-
nent) buttons will begin to flash. Release the ACTION
and POWER buttons.
Control VCR, DVD, CABLE or DBS. The component
button will illuminate steadily and all others will go out.
Control Numeric keypad (0-9). The component but-
ton will blink twice.
nent. If the procedure was successful, the component
will turn on and the component key will blink twice and
then go out.
Control, repeat steps 3 through 6 using another code
(some brands have multiple codes). If an incorrect code
is entered, or if the procedure takes longer than 30
seconds, the programming will fail.
REMOTE OONTROL OPERATION
7. Press VOL • (the mode key will blink three times),
then press the Remote Control @ button to test the
component. Continue this process until the proper code
is found. If the procedure was successful, the compo-
nent will turn on.
Note: Each time you press the VOL • button, make sure
that the component key blinks twice before pressing
the POWER button.
8. Once the device responds, press AC_ONto store the
code. The mode (component) button will blink twice.
Note: It may take many attempts before the correct code is
found. If you miss a code, press _I VOL, then press
the _ button to test the component.
Component Codes
The Universal Remote Control is capable of operating
many component brands after entering a code. Some
components may not operate because the codes are not
available due to limited memory. The Universal Remote
Control does not control all features found in each model.
VCR
DBS
CABLE DVD
Programming Without A Code
This procedure searches all codes and is called the "se-
quence method."
1. Confirm that the external component is plugged in and
on.
2. Turn the component off.
3. Press AC_ONand _ together, for at least 5 sec-
onds. After 5 seconds, the illuminated mode (compo-
nent) buttons will begin to flash. Release the ACTION
and POWER buttons.
4. Press the appropriate component button on the Re-
mote Control. The component button will illuminate
steadily and all others will go out.
5. Press the _ button to set the remote control into
the step and set mode.
6. Point the remote control towards the component.
9
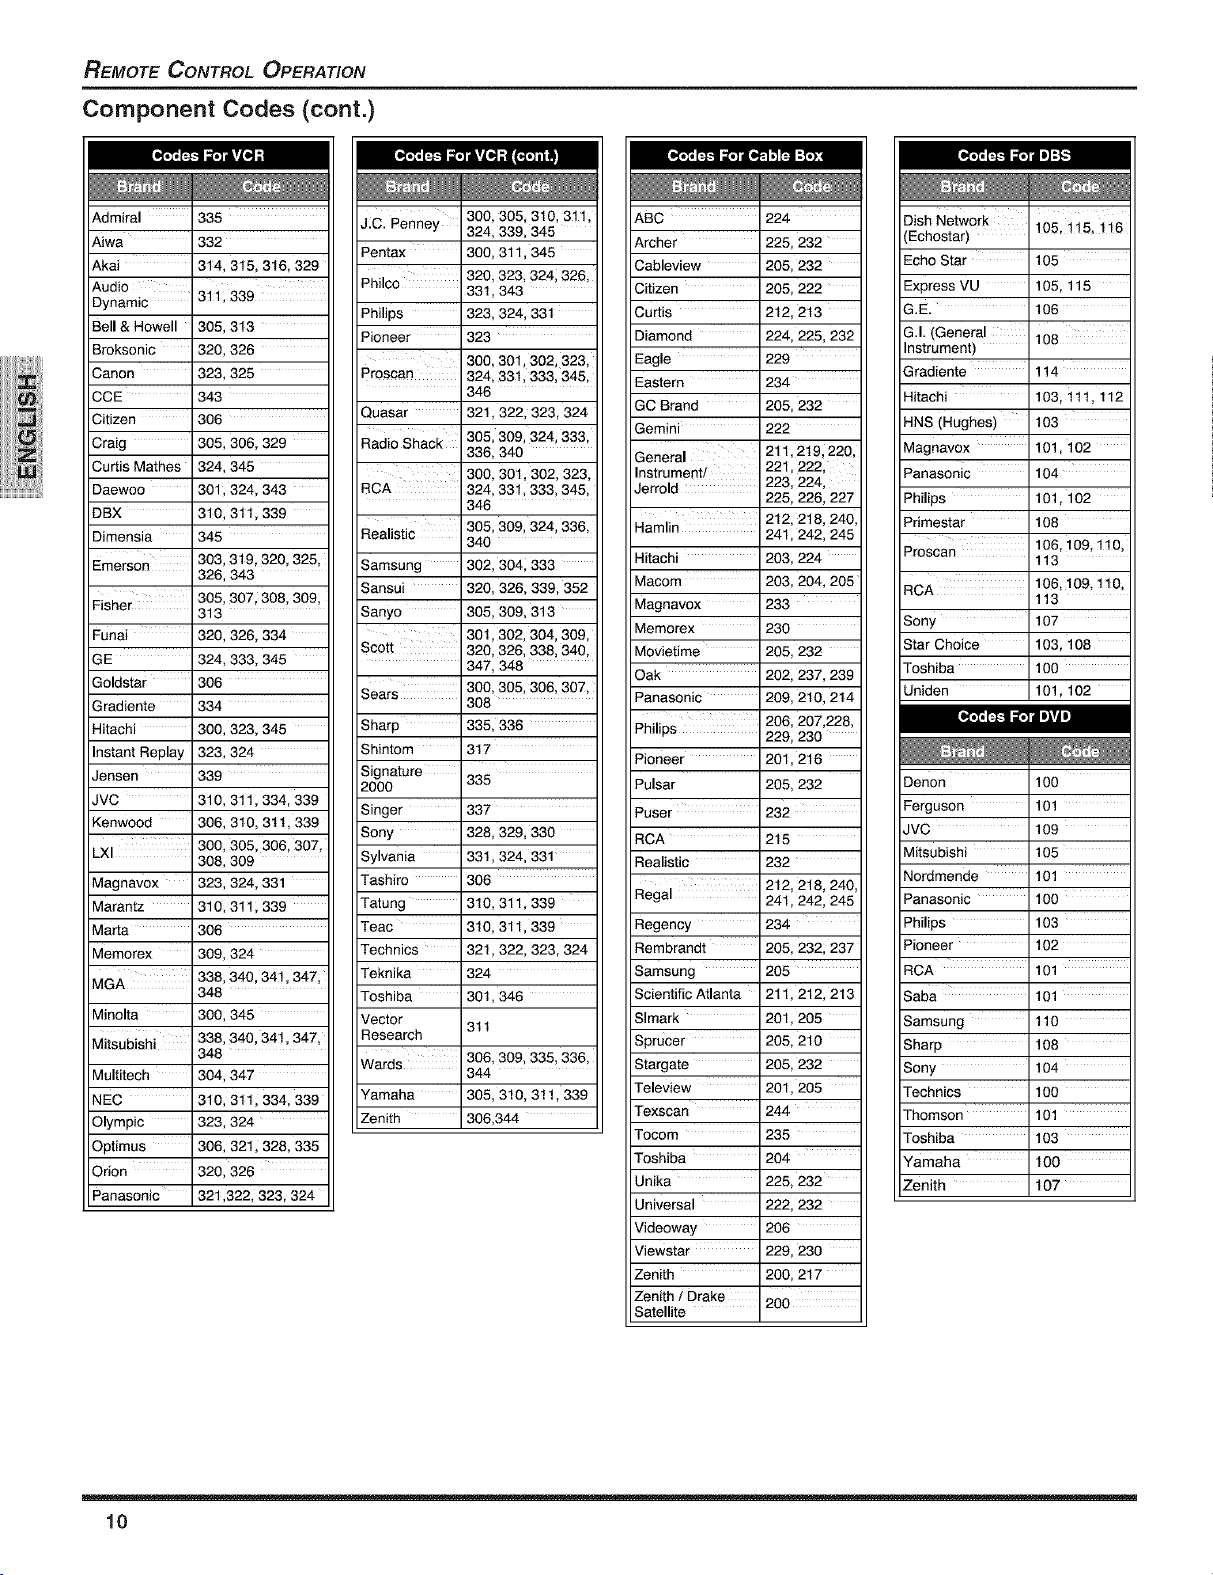
REMOTE CONTROL OPERATION
Component Codes (cont.)
[_ FJLL'41_fll m];[,._
Admiral 335
Aiwa 332
Akai 314, 315, 3t6, 329
Audio
Dynamic 311,339
Bell & Howell 305, 313
Broksonic 320, 326
Canon 323, 325
CCE 343
Citizen 306
Craig 305, 306, 329
Curtis Mathes 324, 345
Daewoo 301,324, 343
DBX 310, 311,339
Dimensia 345
Emerson 303,319,320,325,
Fisher 305, 307,308,309,
Funai 320, 326, 334
GE 324, 333, 345
Goldstar 306
Gradiente 334
Hitachi 300, 323, 345
Instant Replay 323, 324
Jensen 339
JVC 310, 311,334, 339
Kenwood 306, 310, 3tt, 339
LXI 300, 305, 306, 307,
Magnavox
Marantz
Marta
Memorex
MGA
Minolta 300,345
Miisubishi 338,340,341,347,
Multitech 304,347
NEC 310, 311,334, 339
Olympic 323, 324
Optimus 306, 321,328, 335
Orion 320,326
Panasonic 321,322,323,324
326, 343
313
308, 309
323,324,331
310,311,339
306
309,324
338,340,341,347,
348
348
JIC. Penney 300,305,310,311,
Pentax 300,311,345
Philco 331,343
Philips 323,324,331
Pioneer 323
Proscan 324,331,333,345,
Quasar 321,322,323,324
Radio Shack 305, 309, 324, 333,
RCA 324,331,333,345,
Realistic 305,309,324,336,
Samsung 302,304,333
Sansui 320,326,339,352
Sanyo 305,309,313
Sco_ 320,326,338,340,
Sears 300,305,306,307,
Sharp 335, 336
Shintom 317
Signature
2000 335
Singer 337
Sony 328,329,330
Sylvania 331,324,331
Tashiro 306
Tatung 310,311,339
Teac 310,311,339
Technics 321,322,323,324
Teknika 324
Toshiba 301,346
Vector 311
Research
Wards 306, 309, 335, 336,
Yamaha 305,310,311,339
Zenith 306,344
324,339,345
320,323,3241326,
300,301,302,323,
346
336,340
300,301_302,323,
346
340
301,302,304,309,
347,348
308
344
ARC 224
Archer 225, 232
Cableview 205, 232
Citizen 205, 222
Curtis 212, 2t3
Diamond 224, 225, 232
Eagle 229
Eastern 234
GC Brand 205, 232
Gemini 222
General 221, 2221
Instrument!
Jerrold 223, 224,
Hamlin 241,242, 245
Hitachi 203, 224
Macom 203, 204, 205
Magnavox 233
Memorex 230
Movietime 205, 232
Oak 202, 237, 239
Panasonic 209, 2t0, 214
Philips 206, 207,228,
Pioneer 201, 2t6
Pulsar 205, 232
Puser 232
RCA 215
Realistic 232
Regal 241,242, 245
Regency 234
Rembrandt 205, 232, 237
Samsung 205
Scientific Atlanta 211,212, 213
Slmark 201,205
Sprucer 205, 219
Stargate 205, 232
Teleview 201,205
Texscan 244
Tocom 235
Toshiba 204
Unika 225, 232
Universal 222, 232
Videoway 206
Viewstar 229, 230
Zenith 200, 217
Zenith/Drake 200
Satellite
211,2t 9,220,
225, 226, 227
212, 218, 240,
229, 230
212, 218, 240,
Dish Networ k 105, 115, 116
(Echostar)
Echo Star 105
Express VU 105, 115
G.E. 106
G.I. (General
Instrument)
Gradiente 114
Hitachi 103, 111,112
HNS (Hughes) 103
Magnavox 101,102
Panasonic 104
Philips 101,102
Primestar 108
Proscan 106,109,110,
RCA 106, 109,110,
Sony 107
Star Choice 103, 108
Toshiba 100
Uniden 101,102
Denon 100
Ferguson 101
JVC 109
Mitsubishi 105
Nordmende 101
Panasonic 100
Philips 103
Pioneer 102
RCA 101
Saba 101
Samsung 110
Sharp 108
Sony 104
Technics 100
Thomson 101
Toshiba 103
Yamaha 100
Zenith 107
I
113
113
10
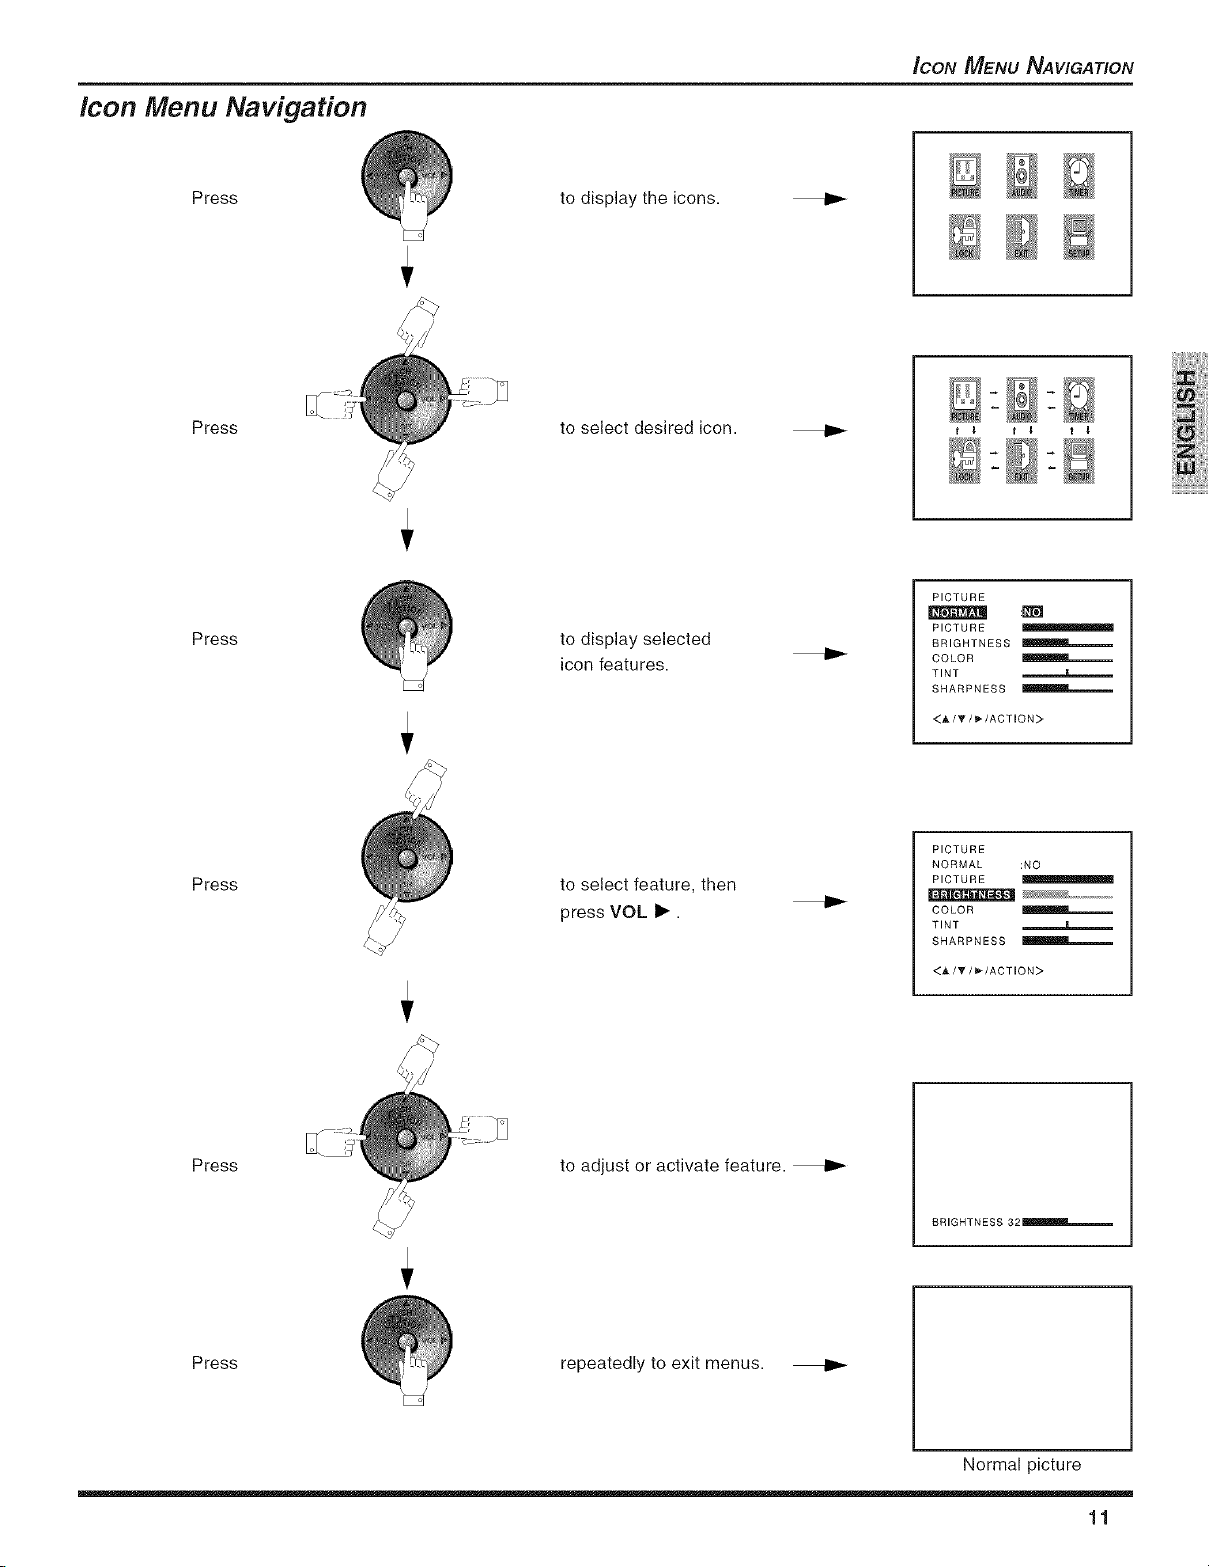
Icon Menu Navigation
ICON MENU NAVIGATION
Press
to display the icons.
Press to select desired icon.
Press
to display selected
icon features.
PICTURE
_ :INI
PICTURE
BRIGHTNESS
COLOR
TINT
SHARPNESS
<_/T/_/ACTION>
Press
Press
Press
to selectfeature, then
press VOLI_.
to adjust or activate feature.
repeatedly to exit menus.
PICTURE
NORMAL :NO
PICTURE
COLOR
TINT
SHARPNESS
<AI_/_/ACTION>
BRIGHTNESS 32 _
Normal picture
11

_CON MENU OPERATION
Icon Menu Operation
Notes: Refer to page 11 for Icon Menu Navigation procedures.
SET UP
LANGUAGE/IDIOMA/LANGU E
Select IDIOMA/LANGUE to change menu language to
ENGLISH, ESPAI_OL (Spanish) or FRAN(_AIS (French).
Procedure
,, Press CH • or CH • to select LANGUAGE/IDIOMA/
LANGUE, then press VOL •.
,, Press CH • or CH • to select ENGLISH, ESPAI/OL
or FRAN(_AIS.
SET UP
, , D • , ,
MODE :CABLE
AUTO PROGRAM
MANUAL PROGRAM
CC :OFF
<&/T/_-/ACTION>
MODE
To select TV (antenna) or CABLE mode depending on
the signal source.
Procedure
,, Press CH • or CH • to select MODE, then press
VOL •.
,, Press • VOL or VOL • to select TV or CABLE.
SET UP
LANGUAGE/IDIOMA/LANGUE
AUTO PROGRAM
MANUALPROGRAM
CC :OFF
<_,/T/_/ACTION>
AUTO PROGRAM
To automatically program all available channels received
through the RF input.
Procedure
SET UP AUTO 012
LANGUAGE/IDIOMA/LANGUE
MODE :CABLE
MANUALPROGRAM
CC :OFF
<A/_" / _*/ACTION>
:CABLE
,, Press CH • or CH • to select AUTO PROGRAM.
,, Press VOL • to start Auto Programming.
LANGUAGE/IDIOMA/LANG UE
ESPAitOL
FRAN_AIS
<A/T/ACTION>
SET UP
LANGUAGE/IDIOMA/LANG UE
MODE :TV _
AUTO PROGRAM
MANUAL PROGRAM
CC :OFF
<_1/I_/ACTION >
MANUAL PROGRAM
To manually add or delete channels.
Procedure
,, Press CH • or CH • to select MANUAL PROGRAM,
then press VOL •.
,, Select the desired channel to be added or deleted us-
ing Numeric keypad (0-9) or CH •/•.
,, Press • VOL or VOL • to select ADD or DELETE.
BET UP
LANGUAGE/IDIOMA/LANG UE
MODE :CABLE
AUTO PROGRAM
CC :OFF
<A/V/_-/ACTION>
ADD CH 012
<0- 9/_,/T/4 / _/ACTION>
CC (CLOSED CAPTiONiNG)
This television contains a built-in decoder that displays
CC (Closed Captioned) text across the screen. It allows
the viewer to read the dialogue of a television program or
other information. The program viewed must include
Closed Captioning for the feature to work.
Procedure
- Press CH • or CH • to select CC, then press VOL
•.
,, Press CH • or CH • to select the desired Closed
Caption mode.
BET UP
LANGUAGE/IDIOMA/LANG UE
MODE :CABLE
AUTO PROGRAM
MANUAL PROGRAM
m :OFF
<_,/T / _'/ACTION>
Note:
Activates the onscreen Closed Caption feature by se-
lecting one of the foflowing modes.
e
OFF - When Closed Caption is not desired.
e
CAPTION CH1 - For video related information to be
displayed, up to 4 lines onscreen at a time. (it does not
block relevant parts of the picture). Text may be in any
language.
e
CAPTION CH2 - For other modes of video related in-
formation.
e
TEXT CH1, CH2 - For program guide and other infor-
mation to be displayed, when available. (Blocks a large
portion of the picture on the television screen).
Note:
CAPTION CH1 mode is recommended for viewing
Closed Caption.
m
CAPTION CH1
CAPTION CH2
TEXT CH1
TEXT CH2
<_,/T/ACTION >
12
Icon Menu Operation (cont.)
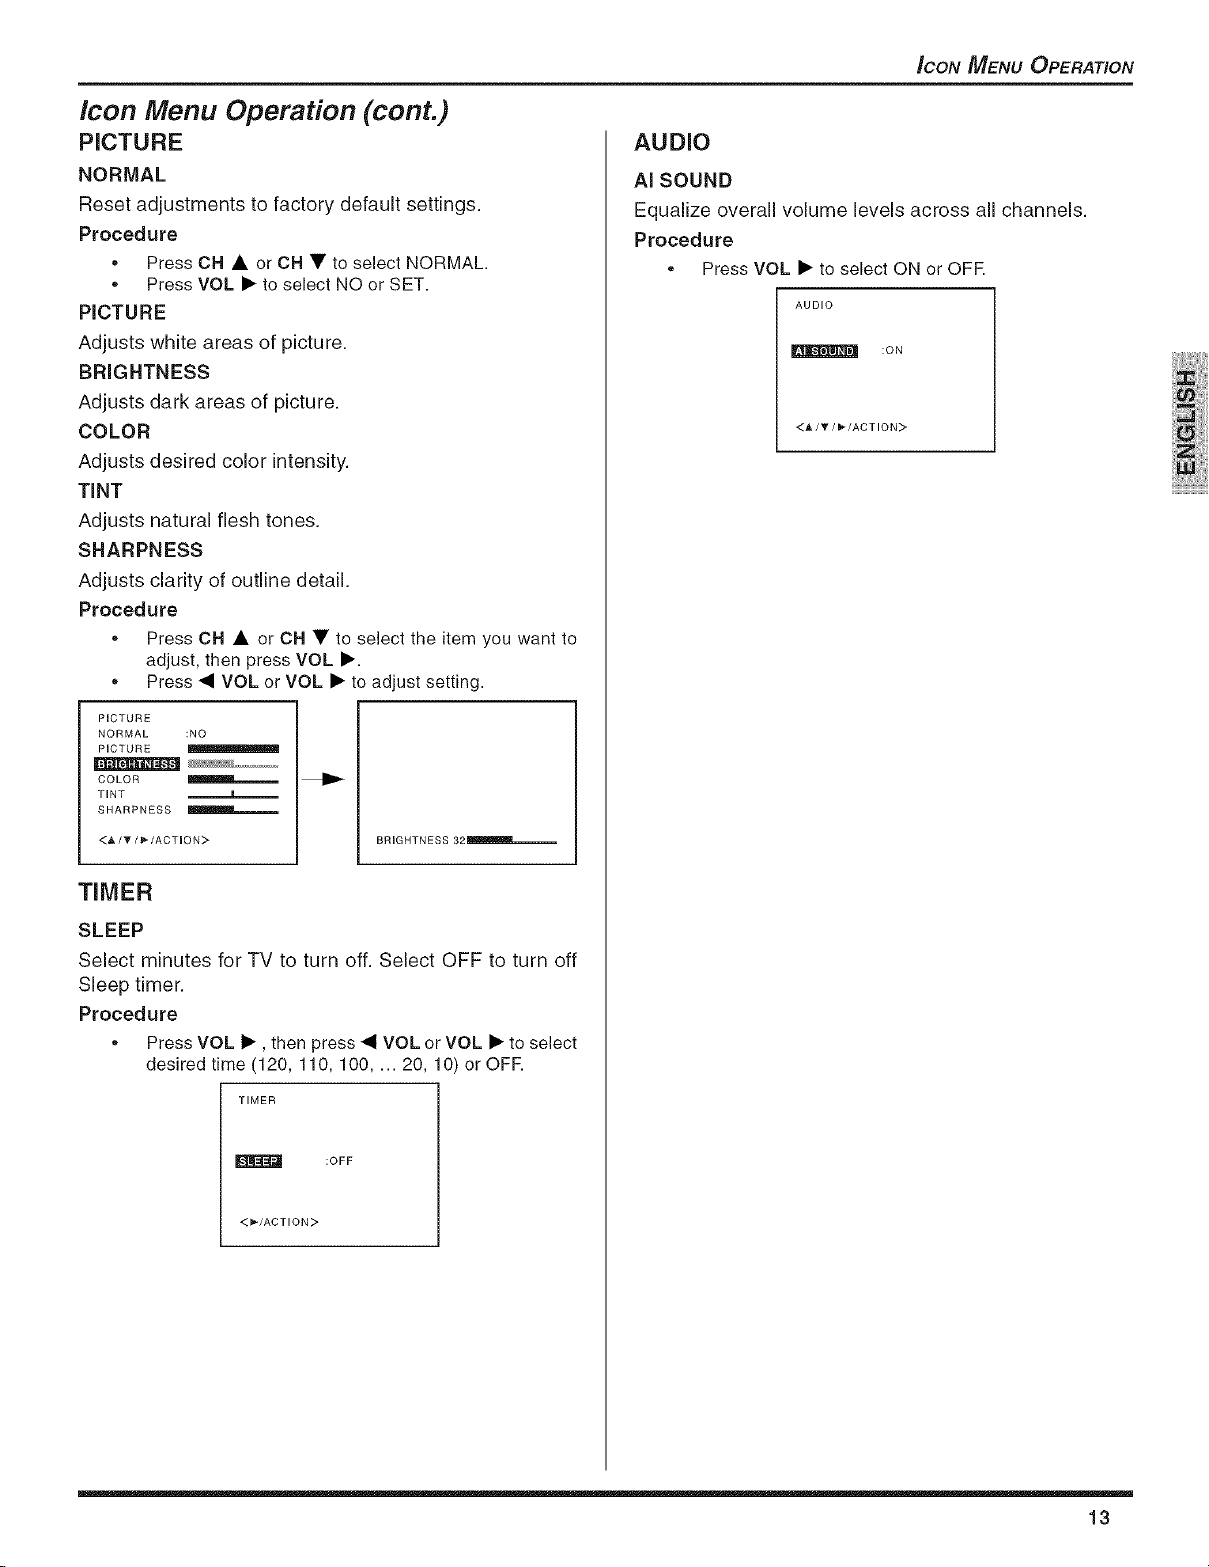
PICTURE
NORMAL
Reset adjustments to factory default settings.
Procedure
,, Press CH • or CH • to select NORMAL.
,, Press VOL • to select NO or SET.
PICTURE
Adjusts white areas of picture.
BRIGHTNESS
Adjusts dark areas of picture.
COLOR
Adjusts desired color intensity.
TiNT
Adjusts natural flesh tones.
SHARPNESS
Adjusts clarity of outline detail.
Procedure
,, Press CH • or CH • to select the item you want to
adjust, then press VOL •.
,, Press • VOL or VOL • to adjust setting.
PICTURE
NORMAL :NO
PICTURE
COLOR _
TINT a
SHARPNESS
<A/_/_,/ACTION:> BRIGHTNESS 32 IIImlmm,_
ICON MENU OPERATION
AUDIO
AI SOUND
Equalize overall volume levels across all channels.
Procedure
,, Press VOL • to select ON or OFR
AUDIO
_N[L'_"J_'I_J :ON
<h, / Y//_-/ACTION:>
TIMER
SLEEP
Select minutes for TV to turn off. Select OFF to turn off
Sleep timer.
Procedure
,, Press VOL •, then press • VOL or VOL • to select
desired time (120, 110, 100 .... 20, 10) or OFR
TIMER
:OFF
<_'/ACTION >
13
_CON MENU OPERATION
Icon Menu Operation (cont.)
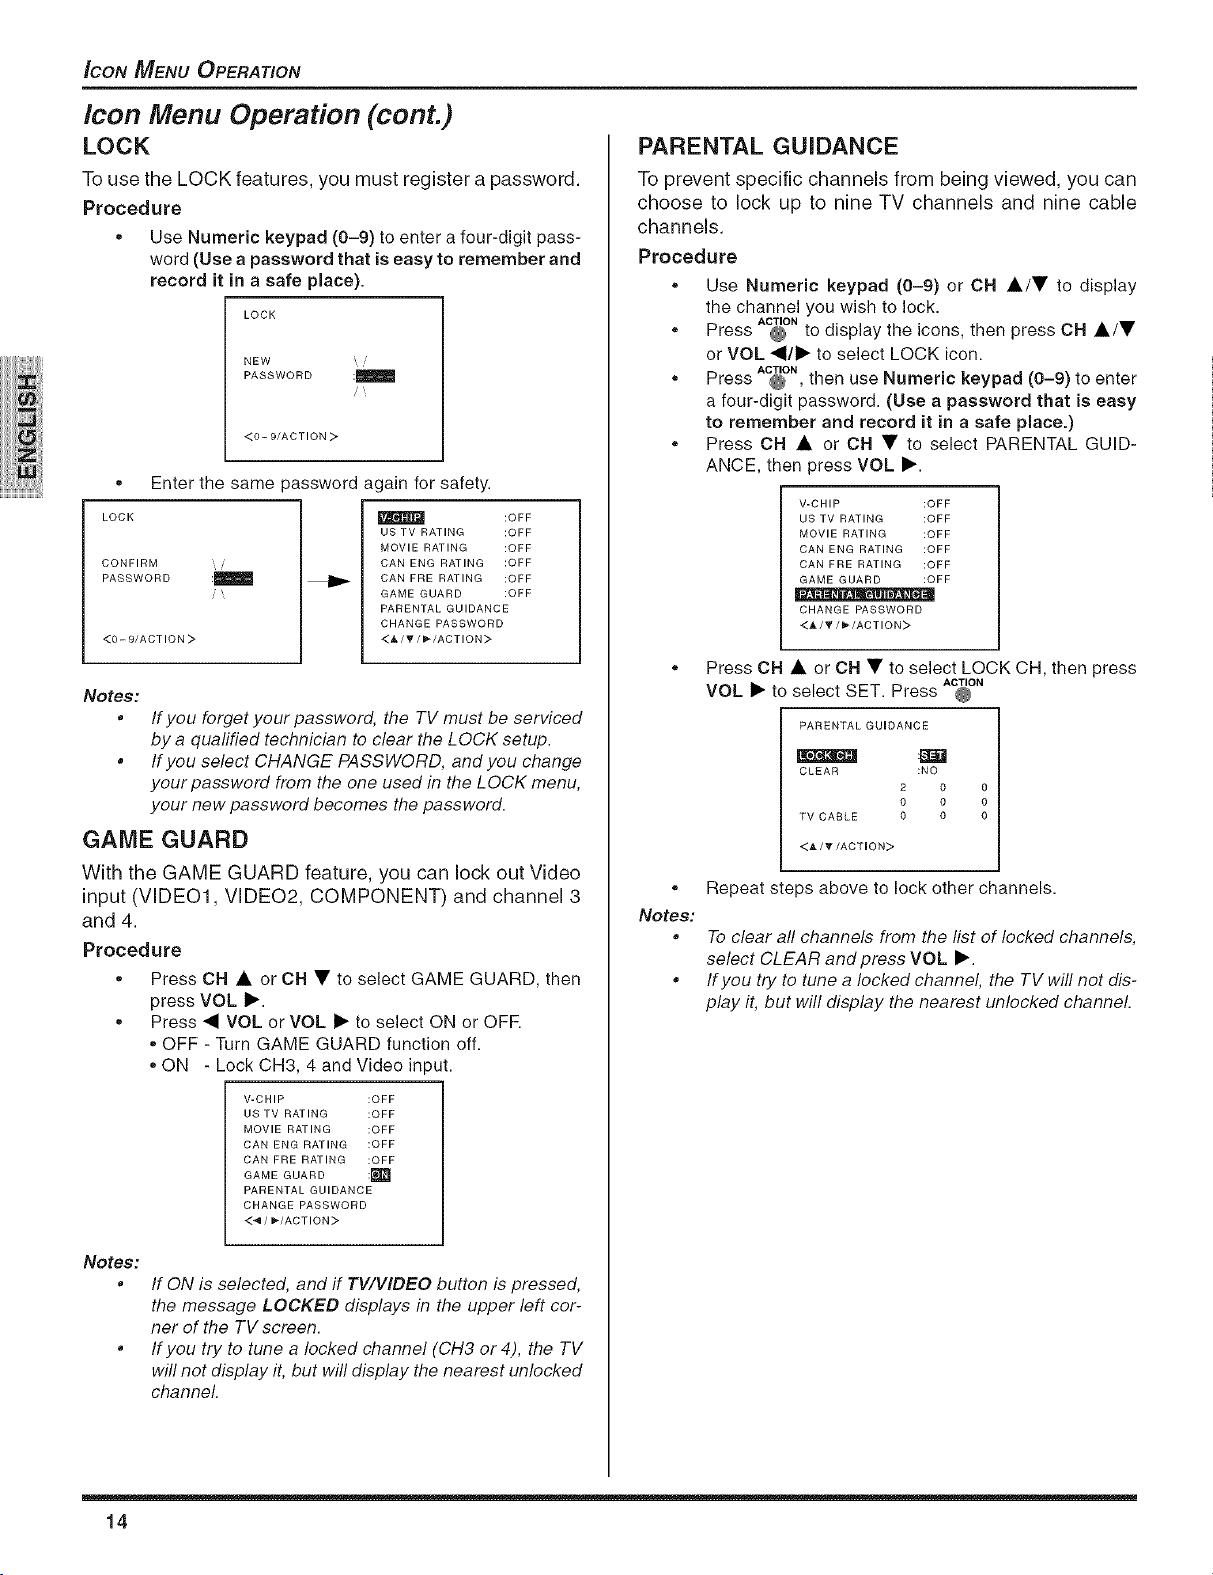
LOCK
To use the LOCK features, you must register a password.
Procedure
,, Use Numeric keypad (0-9) to enter a four-digit pass-
word (Use a password that is easy to remember and
record it in a safe place).
LOCK
NEW ,i
PASSWORD :_
<0- 9/ACTION >
,, Enter the same password again for safety.
LOCK
CONFIRM
PASSWORD
<0 - 9/ACT ION >
Ill
US TV RATING :OFF
MOVIE RATING :OFF
CAN ENG RATING :OFF
CAN FRE RATING :OFF
GAME GUARD :OFF
PARENTAL GUIDANCE
CHANGE PASSWORD
<_/_'/_'/ACTION>
Notes:
If you forget your password, the TV must be serviced
by a quafified technician to clear the LOCK setup.
• If you select CHANGE PASSWORD, and you change
your password from the one used in the LOCK menu,
your new password becomes the password.
GAME GUARD
With the GAME GUARD feature, you can lock out Video
input (VIDE01, VIDE02, COMPONENT) and channel 3
and 4.
Procedure
,, Press CH • or CH • to select GAME GUARD, then
press VOL I_.
,, Press • VOL or VOL I_ to select ON or OFR
,, OFF - Turn GAME GUARD function off.
,,ON - Lock CH3, 4 and Video input.
V-CHIP :OFF
US TV RATING :OFF
MOVIE RATING :OFF
CAN ENG RATING :OFF
CAN FRE RATING :OFF
GAME GUARD :['_'_
PARENTAL GUIDANCE
CHANGE PASSWORD
<4/_'/ACTION >
:OFF
PARENTAL GUIDANCE
To prevent specific channels from being viewed, you can
choose to lock up to nine TV channels and nine cable
channels.
Procedure
,, Use Numeric keypad (0-9) or CH A/• to display
the channel you wish to lock.
,, Press @ to display the icons, then press CH •/•
,, Press @ , then use Numeric keypad (0-9) to enter
,, Press OH • or OH • to select PARENTAL GUID-
®
Notes:
e
ACTION
or VOL •/1_ to select LOCK icon.
ACTION
a four-digit password. (Use a password that is easy
to remember and record it in a safe place.)
ANCE, then press VOL I_.
V-CHIP :OFF
US TV RATING :OFF
MOVIE RATING :OFF
CAN ENG RATING :OFF
CAN FRE RATING :OFF
GAME GUARD :OFF
.... D.
CHANGE PASSWORD
<A/_f/_'/ACTION>
Press CH • or CH • to select LOCK CH, then press
VOL I> to select SET. Press @
PARENTAL GUIDANCE
CLEAR :NO
T• CABLE 0 0 0
<A/T/ACTION>
ACTION
2 0 0
0 0 0
Repeat steps above to lock other channels.
To clear all channels from the list of locked channels,
select CLEAR and press VOL I_.
If you try to tune a locked channel, the TV will not dis-
play it, but will display the nearest unlocked channel.
Notes:
14
If ON is selected, and if TWVIDEO button is pressed,
the message LOCKED displays in the upper left cor-
ner of the TV screen.
If you try to tune a locked channel (CH3 or4), the TV
will not display it, but will display the nearest unlocked
channel.
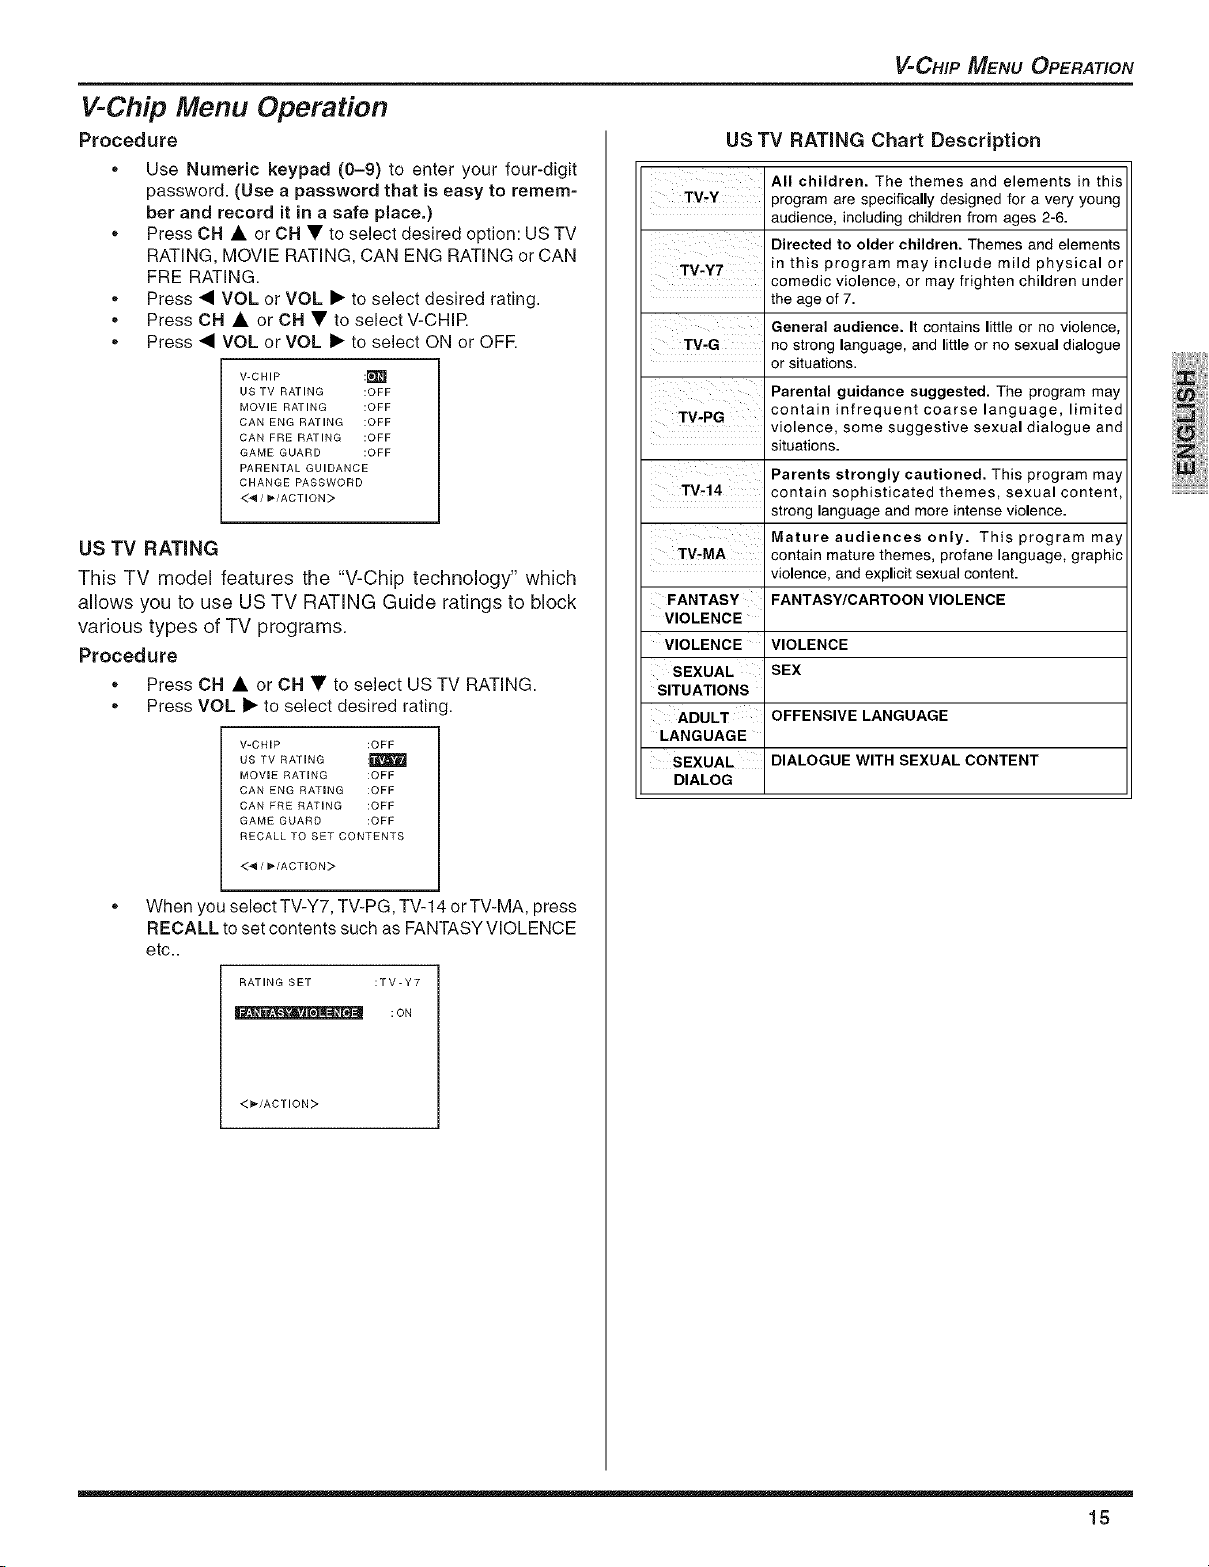
V-Chip Menu Operation
Procedure
, Use Numeric keypad (0-9) to enter your four-digit
password. (Use a password that is easy to remem-
ber and record it in a safe place.)
,, Press CH • or CH • to select desired option: US TV
RATING, MOVIE RATING, CAN ENG RATING or CAN
FRE RATING.
,, Press • VOL or VOL • to select desired rating.
, Press CH • orCH • to selectV-CHIR
,, Press • VOL or VOL • to select ON or OFR
V-CHIP :m
US TV RATING :OFF
MOVIE RATING :OFF
DAN ENG RATING :OFF
DAN FRE RATING :OFF
GAME GUARD :OFF
PARENTAL GUIDANCE
CHANGE PASSWORD
<4/_/ADTION>
US TV RATING
This TV model features the "V-Chip technology" which
allows you to use US TV RATING Guide ratings to block
various types of TV programs.
Procedure
,, Press CH • or CH • to select US TV RATING.
,, Press VOL • to select desired rating.
V-CHIP :OFF
US TV RATING :_
MOVIE RATING :OFF
CAN ENG RATING :OFF
CAN ERE RATING :OFF
GAME GUARD :OFF
RECALL TO SET CONTENTS
<4 / _/ACTION>
V'CHIP MENU OPERATION
US TV RATING Chart Description
All children. The themes and elements in this
TV-Y programare specificallydesignedfor a very young
TV-Y7 in this program may include mild physical or
TM-G no stronglanguage,and littleor no sexualdialogue
TV-PG contain infrequent coarse language, limited
TV,,14 contain sophisticated themes, sexual content,
TV,MA contain maturethemes, profane language, graphic
FANTASY FANTASY/CARTOONVIOLENCE
VIOLENCE
VIOLENCE VIOLENCE
SEXUAL SEX
SITUATIONS
ADULT OFFENSIVELANGUAGE
LANGUAGE
SEXUAL DIALOGUE WITH SEXUAL CONTENT
DIALOG
audience,includingchildren fromages 2-6.
Directed to older children. Themes and elements
comedic violence, or may frighten children under
the ageof 7.
General audience. It contains little or no violence,
or situations.
Parental guidance suggested. The program may
violence, some suggestive sexual dialogue and
situations.
Parents strongly cautioned. This program may
stronglanguageand moreintense violence.
Mature audiences only. This program may
violence, and explicit sexualcontent.
,, When you select TV-Y7, TV-PG, TV-14 or TV-MA, press
RECALL to set contents such as FANTASY VIOLENCE
etc..
RATING SET :TV-Y7
_k = • _ :ON
<_'/ACTION>
15

V=CHIP MENU OPERATION
V-Chip Menu Operation (cont.)
MOVie RATING
This TV model features the "V-Chip technology" which
allows you to use MOVE RATING when viewing movies
or video tapes. This innovation allows parents to block
various types of movies and video tapes at their discre-
tion.
Note: Some movies are not rated for a variety of reasons.
Old movies and foreign films are usually net rated.
Procedure
, Press CH • or CH • to select MOVIE RATING.
,, Use _1 VOL or VOL I_ to select desired rating.
V-CHIP :OFF
US TV RATING :OFF
MOVIE RATING :F._
CAN ENG RATING :OFF
DAN FRE RATING :OFF
GAME GUARD :OFF
PARENTAL GUIDANCE
CHANGE PASSWORD
<4/_'/ACTION >
MOVie RATING Chart Description
G GENERAL AUDIENCES. All ages admitted.
PG
PG,13 material may be inappropriate for children under
NC-17 NO ONE 17 AND UNDER ADMITTED.
X ADULTS ONLY.
PARENTAL GUIDANCE SUGGESTED. Some
material may not be suitable for children.
PARENTS STRONGLY CAUTIONED. Some
13.
RESTRICTED. Under 17 requires accompanying
parent or adult guardian.
CAN ENG RATING
The V-CHIP used in this TV model allows you to block
various types of movies and television programs based
on the two rating systems used in Canada.
Note: E(Exempt)programming includes: news, sports, docu-
mentaries and other information programming, talk
shows, music videos, and variety programming.
Procedure
, Press CH • or CH • to select CAN ENG RATING.
, Use<1 VOL or VOL I_ to select desired rating.
V-CHIP :OFF
US TV RATING :OFF
MOVIE RATING :OFF
CAN ENG RATING :_
DAN FRE RATING :OFF
GAME GUARD :OFF
PARENTAL GUIDANCE
CHANGE PASSWORD
<4/_'/ACTION >
CAN ENG RATING Chart Description
Exempt - Exempt programming includes:
E news, sports, documentaries and other
C age 8. No offensive language, nudity or
08+ acceptable for children 8 years and over.
G
PG Parental Guidance suggested. Some material
14+ the age of 14. Parents are strongly cautioned
18+ ADULTS ONLY
information programming, talk shows, music
videos, and variety programming.
Programming intended for children under
sexual content.
Programming generally considered
No profanity, nudity or sexual content.
General programming, suitable for all
audiences.
may not be suitable for children.
Programming contains themes or content
which may not be suitable for viewers under
to exercise discretion in permitting viewing
by pre-teens and early teens.
16
V-Chip Menu Operation (cont.)
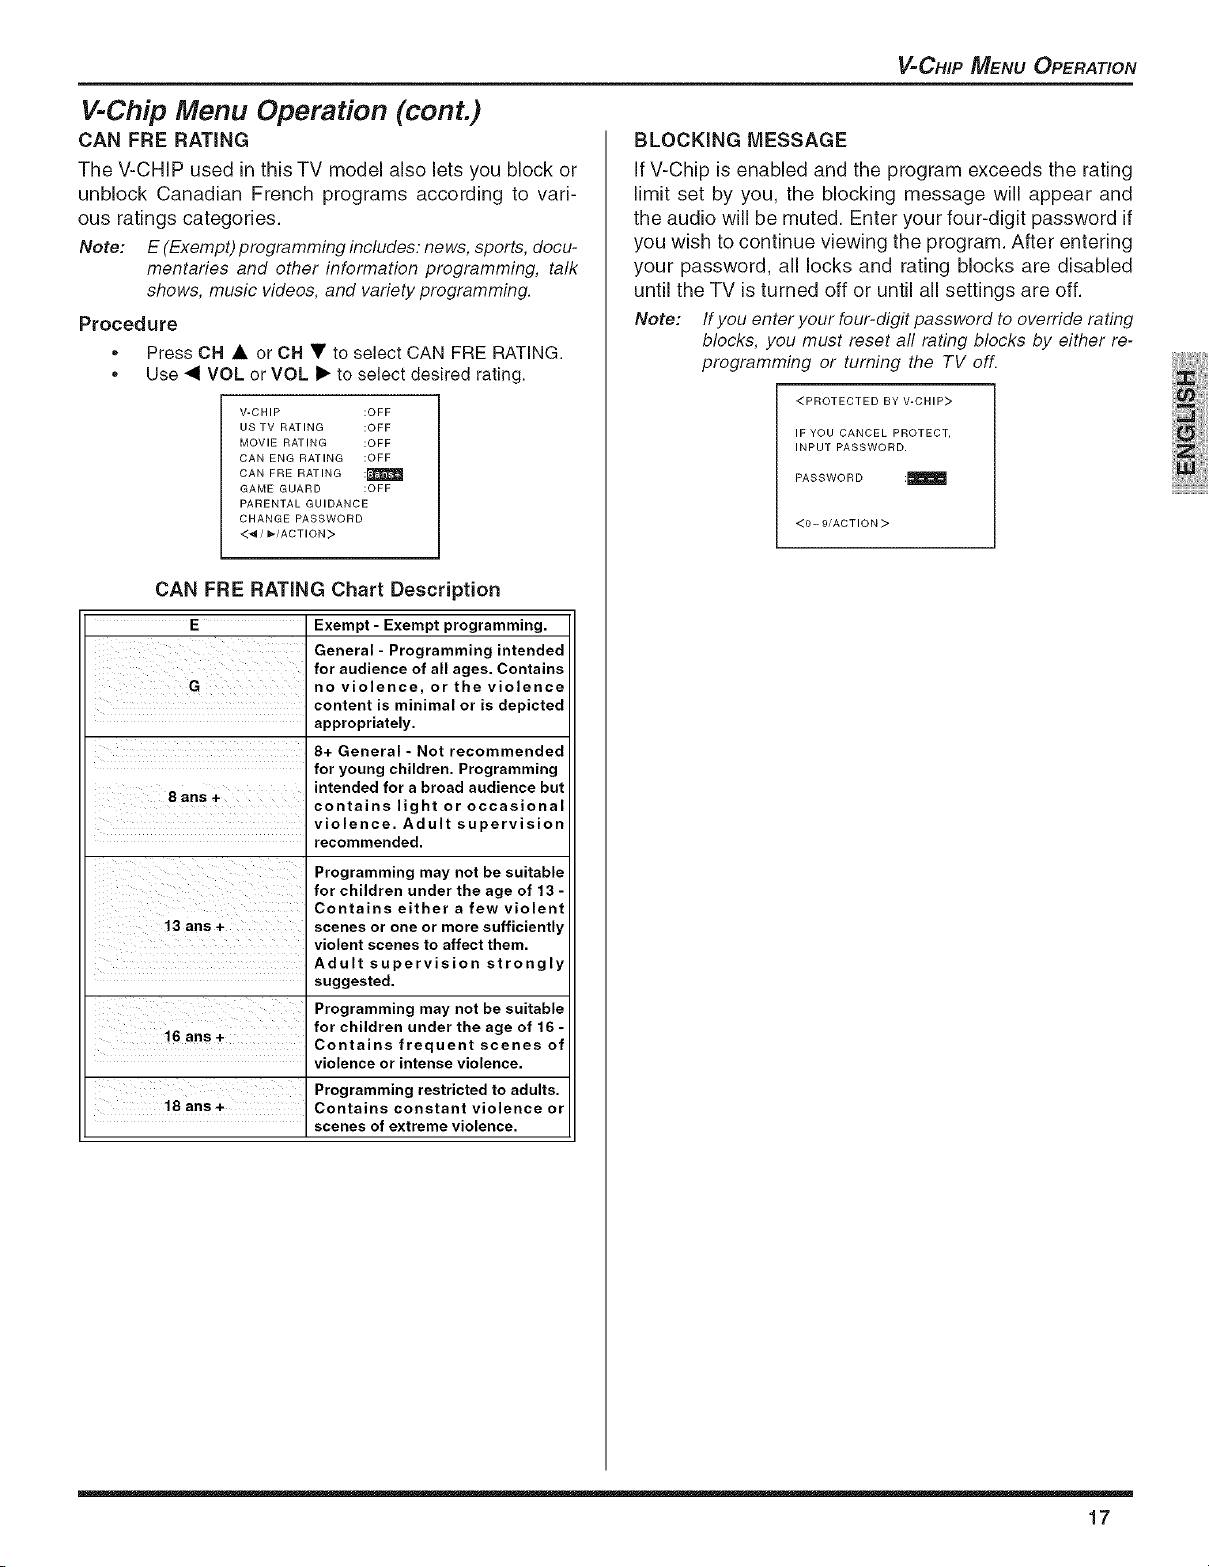
CAN FRE RATING
The V-CHIP used in this TV model also lets you block or
unblock Canadian French programs according to vari-
ous ratings categories.
Note: E (Exempt) programming includes: news, sports, docu-
mentaries and other information programming, talk
shows, music videos, and variety programming.
Procedure
,, Press CH • or CH • to select CAN FRE RATING.
,, Use 4 VOL or VOL 1_ to select desired rating.
V-CHIP :OFF
US TV RATING :OFF
MOVIE RATING :OFF
DAN ENG RATING :OFF
DAN FRE RATING :_
GAME GUARD :OFF
PARENTAL GUIDANCE
CHANGE PASSWORD
<4/_/ACTION>
CAN FRE RATING Chart Description
E Exempt - Exempt programming.
General - Programming intended
G no violence, or the violence
8 ans + intended for a broad audience but
13 ans + scenes or one or more sufficiently
16 ans+ for children under the age of 16-
18 ans+ Contains constant violence or
for audience of all ages. Contains
content is minimal or is depicted
appropriately.
8+ General - Not recommended
for young children. Programming
contains light or occasional
violence. Adult supervision
recommended.
Programming may not be suitable
for children under the age of 13-
Contains either a few violent
' violent scenes to affect them.
Adult supervision strongly
suggested.
Programming may not be suitable
Contains frequent scenes of
violence or intense violence.
Programming restricted to adults.
scenes of extreme violence.
V=CHIP MENU OPERATION
BLOCKING MESSAGE
IfV-Chip is enabled and the program exceeds the rating
limit set by you, the blocking message will appear and
the audio will be muted. Enter your four-digit password if
you wish to continue viewing the program. After entering
your password, all locks and rating blocks are disabled
until the TV is turned off or until all settings are off.
Note: Ifyou enter your four-digit password to override rating
blocks, you must reset aft rating blocks by either re-
programming or turning the TV off.
<PROTECTED BY V-CHIP>
IF YOU CANCEL PROTECT,
INPUT PASSWORD.
PASSWORD :_
<0- 9/ACTION >
17
TROUBLESHOOTING CHART
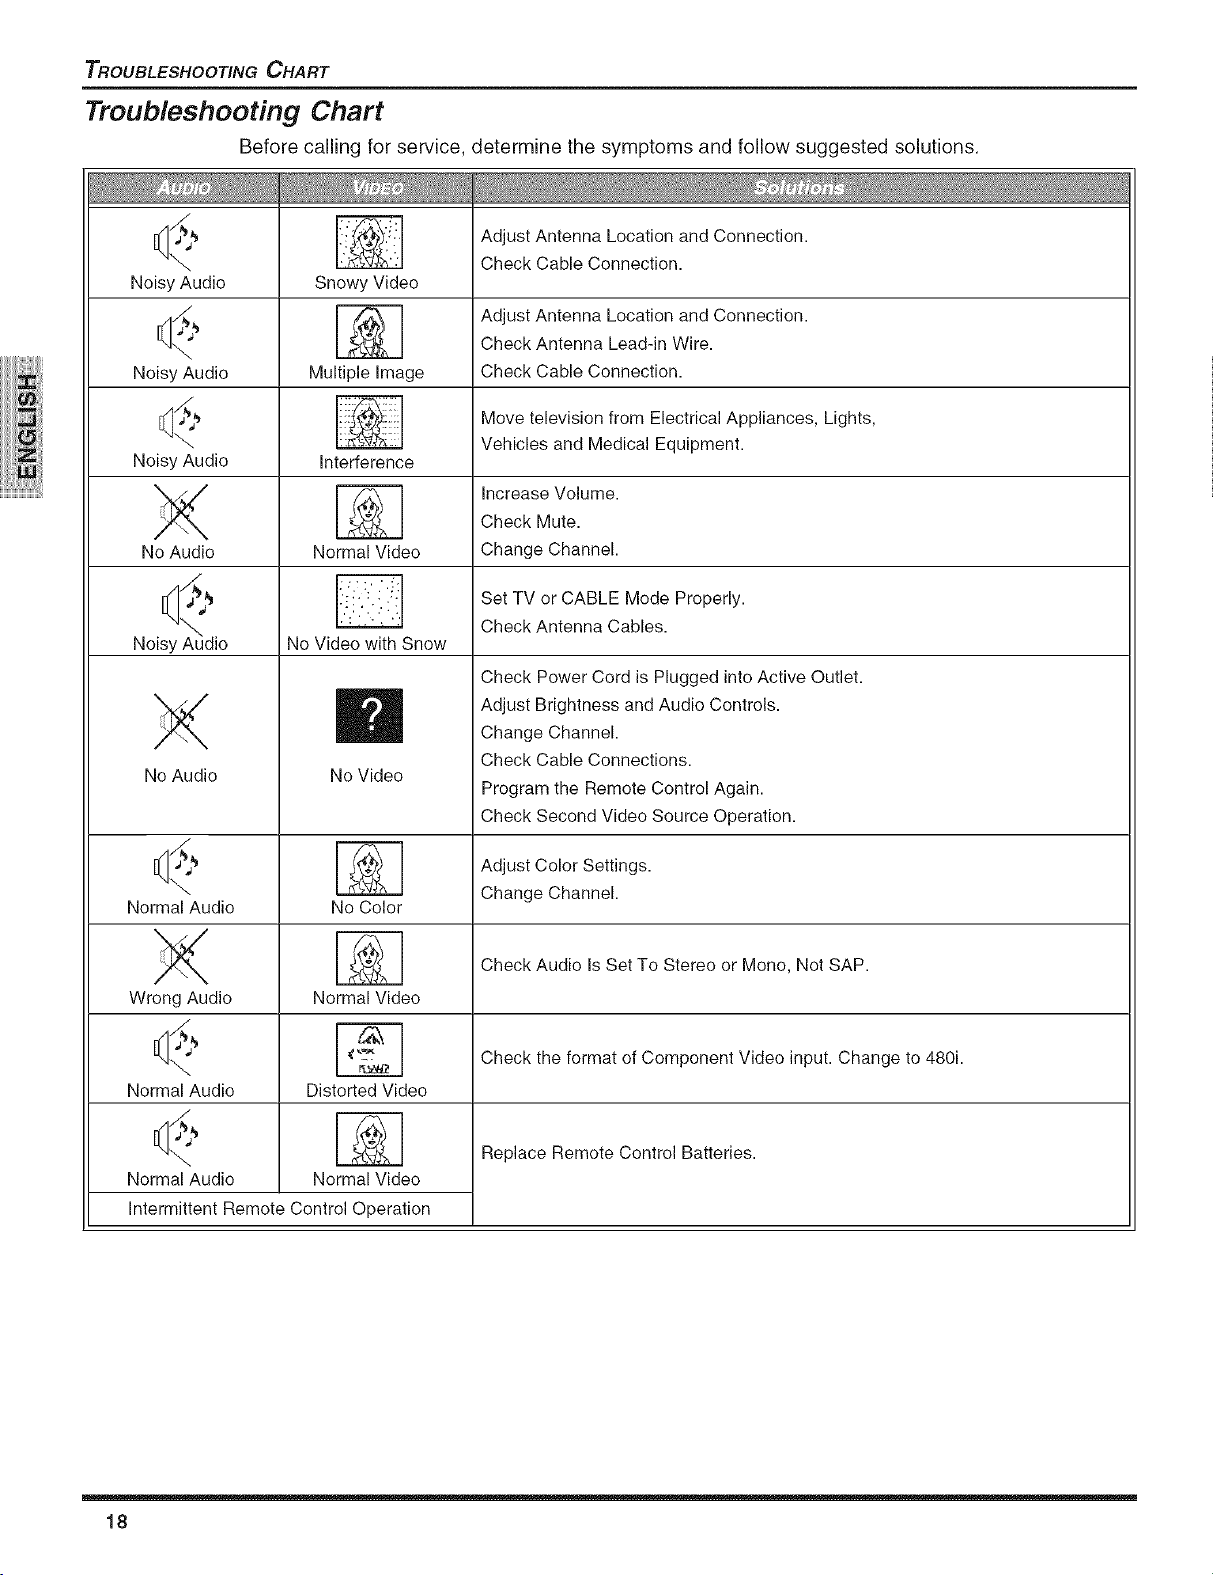
Troubleshooting Chart
Before calling for service, determine the symptoms and follow suggested solutions.
_ _//_ _ Adjust Antenna Location and Connection.
"_ Check Cable Connection.
Noisy Audio Snowy Video
[_, _ Adjust Antenna Location and Connection.
-_. Check Antenna Lead-in Wire.
Noisy Audio Multiple Image Check Cable Connection.
_ _ Move television from Electrical Appliances, Lights,
\-. _ Vehicles and Medical Equipment.
Noisy Audio Interference
_'_ Increase Volume.
No Audio Normal Video Change Channel.
[_ _"_ _ Set TV or CABLE Mode Properly.
_ Check Antenna Cables.
Noisy Audio No Video with Snow
m
No Audio
\
Normal Audio
No Video
No Color
X
Wrong Audio
d,
\
Normal Audio
Normal Video
Distorted Video
Check Mute.
Check Power Cord is Plugged into Active Outlet.
Adjust Brightness and Audio Controls.
Change Channel.
Check Cable Connections.
Program the Remote Control Again.
Check Second Video Source Operation.
Adjust Color Settings.
Change Channel.
Check Audio Is Set To Stereo or Mono, Not SAP.
Check the format of Component Video input. Change to 480i.
\
Normal Audio
Intermittent Remote Control Operation
18
Normal Video
Replace Remote Control Batteries.
Index
A
AC Power Supply Cord 4
AI Sound 13
Antenna Connections 4
Audio 13
Auto Program 5, 12
B
Blocking Message 17
Brightness 13
C
Cabinet and Remote Control 3
Cable / Antenna Connection 4
Cable Box Connection 6
Cable Connection 4
Can Eng Rating 16
Can Eng Rating Chart Description 16
Can Fre Rating 17
Can Fre Rating Chart Description 17
Caption CH1 12
Caption CH2 12
Care and Cleaning 3
Change Password 14
Closed Captioning 12
Codes For Cable Box 10
Codes For DBS 10
Codes For DVD 10
Codes For VCR 10
Color 13
Component Codes 9, 10
Congratulations 3
Customer Record 3
D
Digital TV - Set-Top Box (DTV-STB)
or DVD Player Connection 6
F
FCC Caution 1
Feature Chart 3
Front Control Panel 6
G
Game Guard 14
I
icon Menu Navigation 11
icon Menu Operation 12
Idioma/langue 5
Initial Set Up Menu 5
installation 4
L
Language 5, 12
Lock 14
M
Manual Program 12
Mode 5, 12
Movie Rating 16
Movie Rating Chart Description 16
N
Normal 13
0
Operating a Cable Box 8
Operating a DBS 8
Operating a DVD 8
Operating a VCR 8
Operating Components with Remote
Control 8
Optional Cable Connections 4
Optional Equipment Connections 6
_NDEX
P
Parental Guidance 14
Password 14, 15, 17
Picture 13
Programming The Remote Control 9
Programming Without A Code 9
FI
Remote Control Battery installation 4
Remote Control Operation 7
S
Screen 3
Set Up 12
Sharpness 13
Sleep 13
Specifications 3
T
Television Location 4
Text CH1 12
Text CH2 12
Timer 13
Tint 13
Troubleshooting Chart 18
U
US TV Rating 15
US TV Rating Chart
Description 15
V
V-Chip Menu Operation 15
VCR Connection 6
19
 Loading...