

Page 1

Color Television/DVD Combo
Operating Instructions
CT-20DC50 CT-27DC50
CT-27DC50U
®
For assistance, please call: 1-800-211-PANA (7262) or
send e-mail to: consumerproducts@panasonic.com (USA only)
TQB2AA0339-2 10417
PRINTED IN USA
Page 2
Information For Your Safety
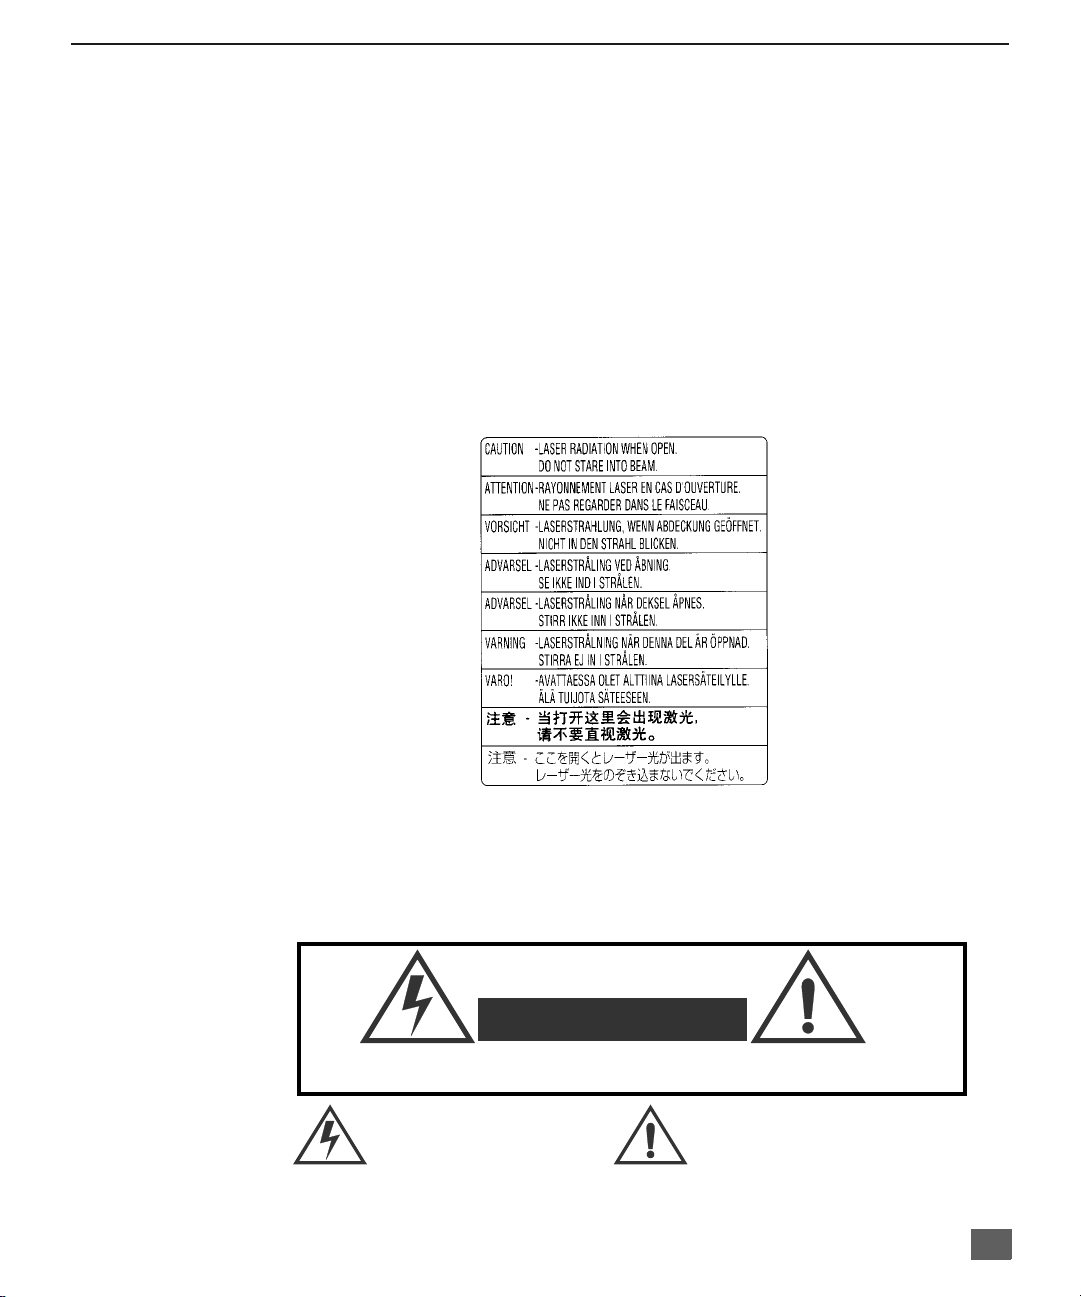
CAUTION:
DVD PLAYER IS A CLASS I LASER PRODUCT. HOWEVER THIS DVD PLAYER
USES A VISIBLE LASER BEAM WHICH COULD CAUSE HAZARDOUS RADIATION
EXPOSURE IF VIEWED DIRECTLY. BE SURE TO OPERATE THE PLAYER
CORRECTLY AS INSTRUCTED.
WHEN THIS UNIT IS PLUGGED INTO THE WALL OUTLET, DO NOT PLACE YOUR
EYES CLOSE TO THE OPENING OF THE DISC TRAY AND OTHER OPENINGS TO
LOOK INTO THE INSIDE OF THIS UNIT.
USE OF CONTROLS OR ADJUSTMENTS OR PERFORMANCE OF PROCEDURES
OTHER THAN THOSE SPECIFIED HEREIN MAY RESULT IN HAZARDOUS
RADIATION EXPOSURE. DO NOT OPEN COVERS AND DO NOT REPAIR
YOURSELF. REFER SERVICING TO QUALIFIED PERSONNEL.
I
NFORMATION FOR YOUR SAFETY
(LABEL INSIDE OF TV)
WARNING:
TO REDUCE THE RISK OF FIRE OR ELECTRIC SHOCK, DO NOT EXPOSE THIS
EQUIPMENT TO RAIN OR MOISTURE.
WARNING
RISK OF ELECTRIC SHOCK
DO NOT OPEN
WARNING: To reduce the risk of electric shock do not remove cover or back.
No user-serviceable part s in side. Ref er servicin g t o quali fied se rvice person nel.
The lightning flash with arrow
head within a triangle is intended
to tell the user that parts inside
the product are a risk of electric
shock to persons.
The exclamation point within a triangle
is intended to tell the user that
important operating and servicing
instructions are in the papers with the
appliance.
1
Page 3

I
NFORMATION FOR YOUR SAFETY
Information for your Safety (cont.)
FCC NOTE:
This unit has been tested and found to comply with limits for a class B digital device
unit, pursuant to Part 15 of the FCC Rules. These limits are designed to provide
reasonable protection against harmful interference in a residential installation. This
equipment generates, uses and can radiate radio frequency energy and, if not
installed and used in accordance with the instruction, may cause harmful interference
to radio communications. However, there is no guarantee that interference will not
occur in a particular installation. If this equipment does cause harmful interference to
radio or television reception, which can be determined by turning the equipment off
and on, the user is encouraged to try to correct the interference by one or more of the
following measures:
• Reorient or relocate the receiving antenna.
• Increase the separation between the equipment and receiver.
• Connect the equipment into an outlet on a circuit different from th at to which
the receiver is connected.
• Consult the dealer or an experienced radio/TV technician for help.
FCC Caution: To assure continued compliance, follow the attached installation
instructions and use only shielded cables when connecting to other devices. Also, any
changes or modifications not expressly approved by the party responsible for
compliance could void the user’s authority to operate equipment.
2
Page 4

Ta ble of Contents
Information For Your Safety....................................1
Congratulations........................................................5
Customer Record .................. ...... ....... ...... ....... .........................5
Care and Cleaning.....................................................................5
Specifications.............................................................................5
Installation.................................................................6
Television Location.....................................................................6
Optional Cable Connections.......................................................6
AC Power Supply Cord ..............................................................6
Cable / Antenna..........................................................................6
Cable Connection............................... ........................................6
Antenna Connection...................................................................6
Remote Control Operation.......................................7
Remote Control..........................................................................7
Quick Reference Functional Key Chart......................................8
Battery Installation....................................................................10
Programming The Remote.......................................................11
Component Codes ...................................................................12
Optional Equipment Connections.........................14
VCR Connection.......................................................................14
To Audio Amplifier....................................................................14
Dolby Digital Decoder Connection...........................................15
Main Menu...............................................................16
ACTION Button ........................................................................16
CH / VOL Buttons.................. ...................................................16
Front Control Panel Buttons.....................................................16
Main Menu Feature Chart.......................................17
Special Features.....................................................19
Languages................................................................................19
Timer........................................................................................19
Sleep Timer..............................................................................19
Program Timer .........................................................................19
CH CAP (Channel Caption)......................................................20
Lock .........................................................................21
Game Guard Lock and Unlock...............................................21
V-Chip Operation....................................................22
Motion Picture Ratings ....................................................... ....2 2
Motion Picture Ratings Chart .................................................23
TV Parental Guide..................................................................23
TV Parental Guide Ratings Chart...........................................24
Blocking Message ..................................................................25
Child Lock...............................................................................25
Remote Control Buttons - DVD Operation ...........26
DVD Quick Reference Functional Chart...................................26
Top Menu ................................................................................28
T
ABLE OF CONTENTS
3
Page 5

T
ABLE OF CONTENTS (CONT
.)
Ta ble of Contents (cont.)
Menu .......................................................................................28
Angle ........................................................................................28
Subtitle ....................................................................................29
Audio ........................................................................................30
Play Mode ................................................................................30
Marker......................................................................................32
Repeat Mode.................................. ..........................................33
A-B Repeat ..............................................................................34
VSS..........................................................................................35
DVD Operation........................................................36
Volume Adjustment in DVD Mode............................................36
General information about On-Screen Menu Icons..................36
DVD Setup Menus ...................................................37
Disc Languages........................................................................37
Ratings Level............................................................................38
Selecting Languag e of On-Screen display Menus ...................39
On-Screen Messages...............................................................40
TV Aspect.................................................................................41
Digital Audio Output.................................................................41
Other Settings ..........................................................................42
Still Mode ...... ... ... ... . ... ... ... . ... ... ... ... . ... ... ... .... ... ... ... . ... ... ... ... . ...42
Audio During Search .............................................................42
TV Mode................................................................................43
Dynamic Range Compression...............................................43
Still Picture Display................................................................43
Black Level Control................................................................44
Language Code List ...............................................45
Troubleshooting Chart-TV.....................................46
Troubleshooting Chart-DVD..................................47
IMPORTANT INFORMATION REGARDING USE OF VIDEO GAMES,
COMPUTERS, DSS OR OTHER FIXED IMAGE DISPLAYS.
The extended use of fixed image program material can cause a permanent “shadow
image” on the picture tube. This background image is viewable on normal programs in
the form of a stationary fixed image. This type of irreversible picture tube deterioration
can be limited by observing the following steps:
A. Reduce the brightness/contrast setting to a minimum viewing level.
B. Do not display the fixed image for extended periods of time.
C. Turn the power off when not in actual use.
Note: The marking or retained image on the picture tube resulting from fixed image use is not
an operating defect and as such is not covered by Warranty. This product is not
designed to display fixed image patterns for extended periods of time.
Read these instructions completely before operating TV.
Contents are subject to change without notice or obligation.
Copyright 2001 by Matsushita Electric Corporation of America. All rights reserved.
Unauthorized copying and distribution is a violation of law.
4
Page 6

Congratulations
Your new TV/DVD combo features a solid state chassi s tha t is d es igned to give you many years
of enjoyment. It was thoroughly tested and tuned at the factory for best performance.
Customer Record
The model and serial number of this prod uct are lo cated o n the back of the TV. You should note
the model and serial number in the space provided and retain as a permanent record of your
purchase. This will aid in identification in the event of theft or loss. Product registration is
available to U.S. customers at www.prodreg.com/panasonic.
Care and Cleaning
Screen (Turn TV Off)
Note: Do not spray any type of cleaning fluid directly on the screen.
Cabinet and Remote Control
r Use a soft cloth dampened with water or a mild detergent solution.
r Avoid excessive moisture and wipe dry.
Model
Number
Serial
Number
• Use a mild soap solution or window cleaner with a soft clean cloth.
DO NOT USE ABRASIVE CLEANERS.
• Avoid excessive moisture and wipe dry.
Do not use benzene, thinner, or other petroleum based cleaners.
C
ONGRATULATIONS
Specifications
Power Source
CT-27DC50 (2.0A)
CT-27DC50U (2.0A)
CT-20DC50 (1.5A)
Channel Capability - 181 VHF-12; UHF-56; Cable-113
3 Video Input Jacks 1Vp-p, 75 Ohm, Phono Jack Type
6 Audio Input Jacks 500mV RMS 47K Ohm
To Audio AMP Jack 0-2.0V RMS 4.7K Ohm
S-VHS Input Jack S-Video (Y-C) Connector
Digital Optical Output Optical Connector
Operating Humidity Range 5 to 90% RH (no condensation)
Specifications are subject to change without notice or obligation.
120V AC; 60Hz
5
Page 7
I
NSTALLATION
Installation
Television Location
This unit is intended to be used with an optional stand or entertainment center. Consult your
dealer for available options.
• Avoid excessive sunlight or bright lights, including reflections.
• Keep away from excessive heat or moisture. Inadequate ventilation may cause internal
component failure.
• Fluorescent lighting may reduce remote control transmitting range.
• Avoid magnetic equipment, including motors, fans, or external speakers.
CAUTION: Use this television receiver only with the cart, stand, tripod,
bracket, or table specified by the manufacturer, or sold with the apparatus. When
a cart is used, use caution when moving the cart/ apparatus combination to avoi d
injury from tip-over. In order to avoid injury to children, never place your
television receiver on a piece of furniture that is capable of being tilted by a child
leaning on it, pulling on it, standing on it, or climbing on it.
Optional Cable Connections
Shielded audio and video cables should be used between components. For best results:
• Use 75 -ohm coaxial shielded cables.
• Use appropriate input and output connectors that match your component connectors.
• Avoid long cables to minimize interference.
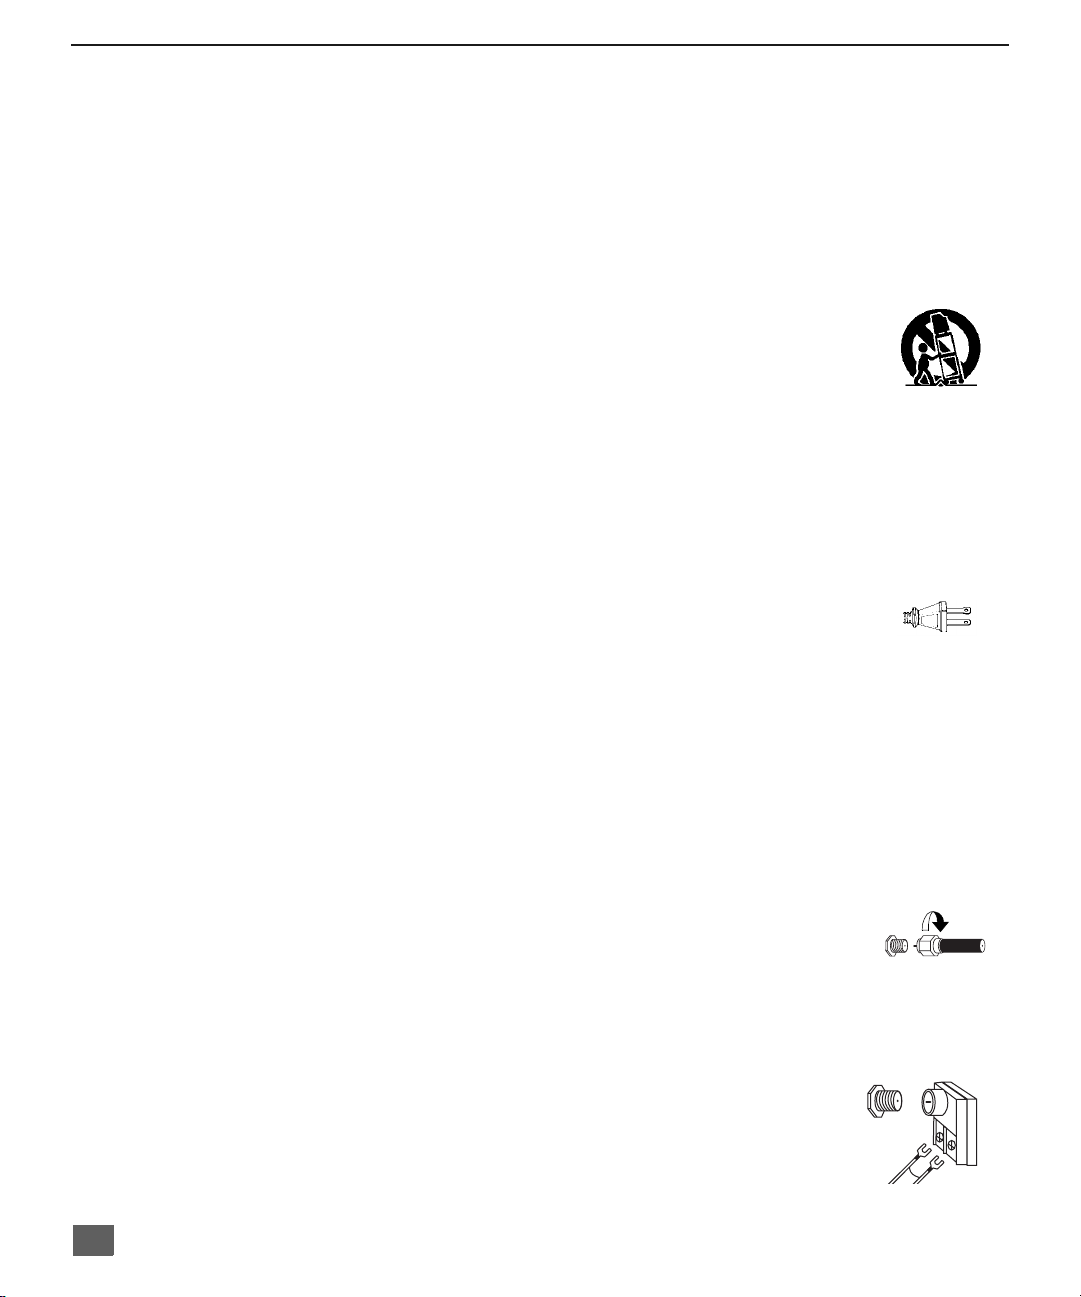
AC Power Supply Cord
CAUTION: TO PREVENT ELECTRIC SHOCK MATCH WIDE BLADE OF PLUG TO
WIDE SLOT OF AC OUTLET AND FULLY INSERT. DO NOT USE A PLUG WITH A
RECEPTACLE OR OTHER OUTLET UNLESS THE BLADE CAN BE FULLY
INSERTED TO PREVENT BLADE EXPOSURE. FOR SOME MODELS THAT ARE
NON-POLARIZED, THE USE OF AN AC ADAPTOR CONNECTOR MAY
BE NECESSARY.
PROTECT POWER CORDS FROM BEING WALKED ON, ROLLED OVER, CRIMPED, BENT OR
PINCHED, PARTICULARLY AT PLUGS, CONVENIENCE RECEPTACLES, AND THE POINT WHERE
THEY EXIT FROM THE APPARATUS.
Cable / Antenna
For proper r eception, either a cable or antenna connection is required.
Cable Connection
Connect the cable supplied by your local cable company.
Note: A cable converter box may be required for proper reception.
Check with your local cable company for compatibility
requirements.
Antenna Connection
• For proper reception of VHF/UHF channels, an external
antenna is requ ired . F or bes t rece pti on an outdoor antenna
is recommended.
• Antenna Mode must be set to TV in the SETUP menu.
Note: Cable Mode is preset at the factory. Antenna users must change
to Antenna Mode in the Setup Menu.
Polarized plug
Incoming Cable from
Cable Company
75 Ohm VHF/UHF
on back of TV
Incoming Cable from
Home Antenna
6
Page 8
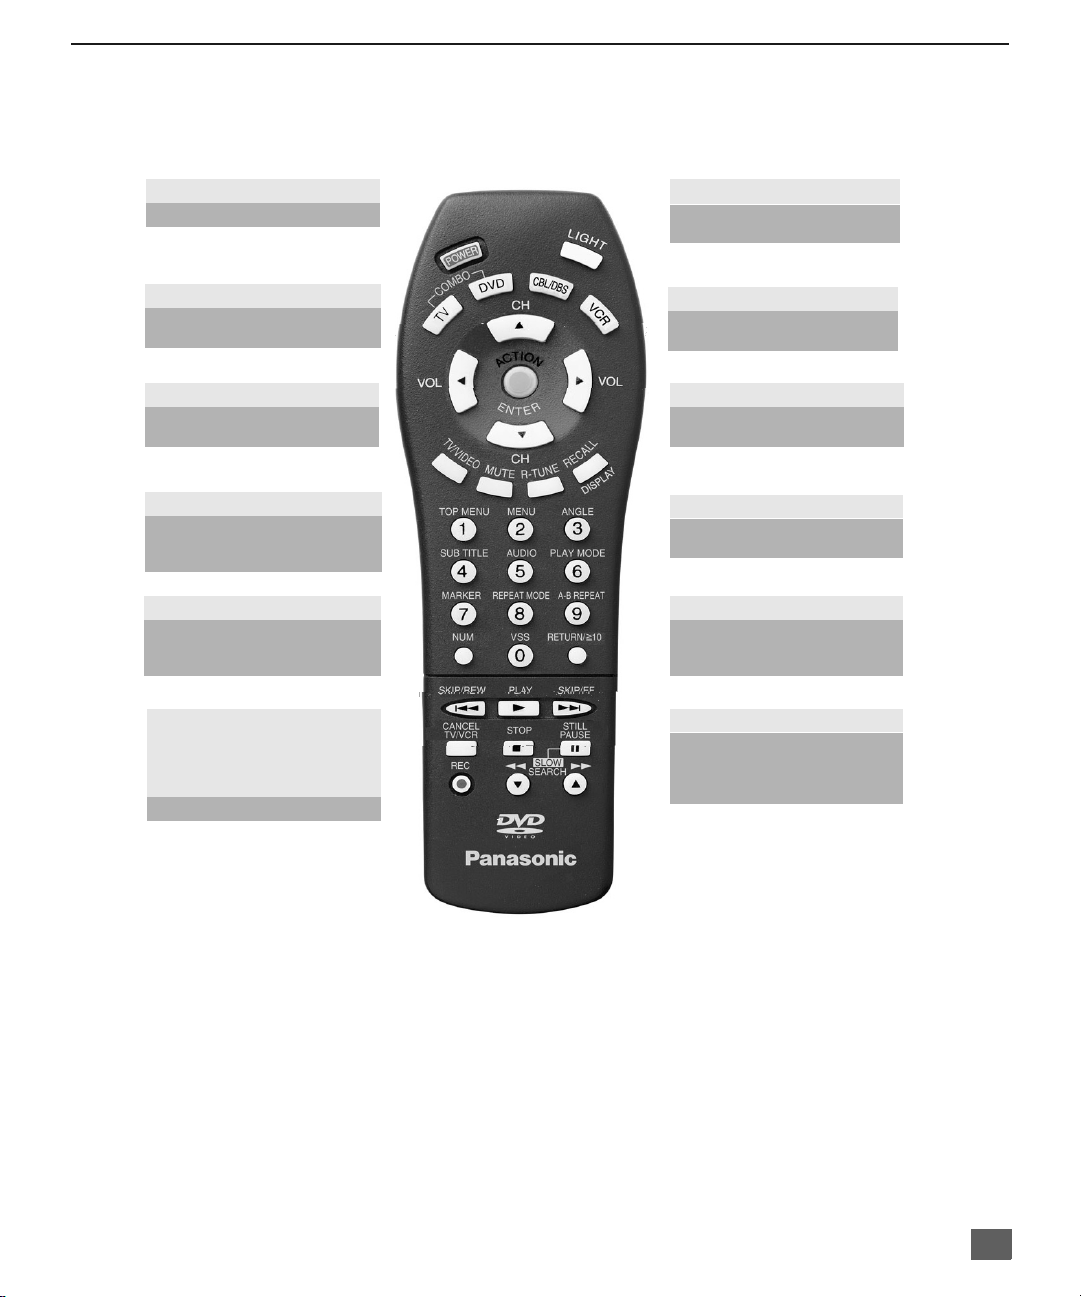
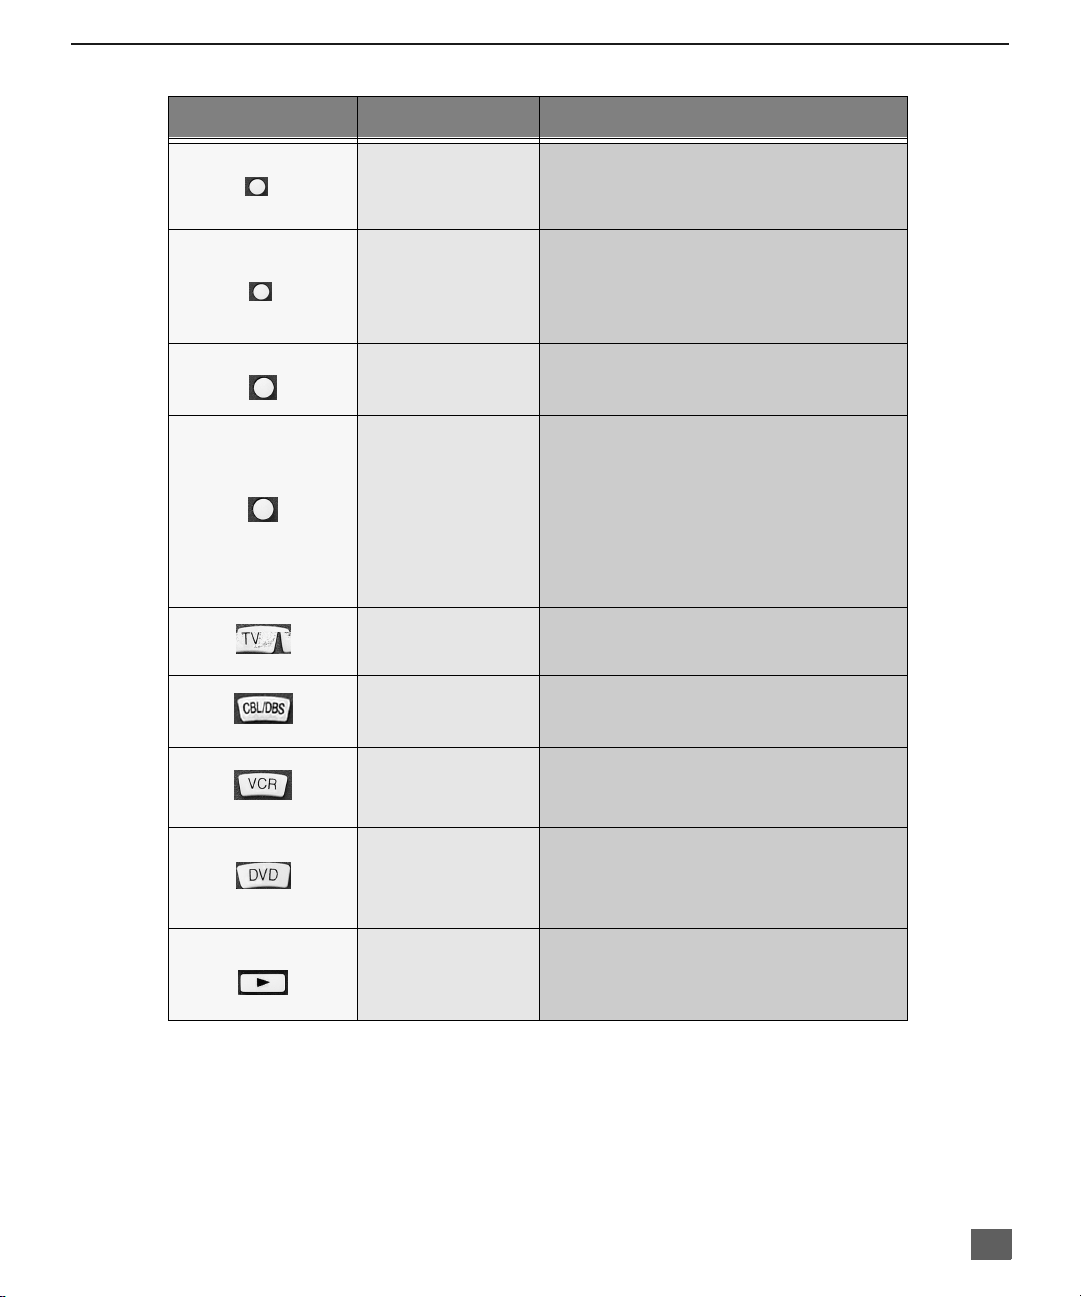
Remote Control Operation
Remote Control
R
EMOTE CONTROL OPERATION
POWER
Press to turn ON and OFF.
VOL
Press to adjust TV sound and
navigate in menus.
TV/VIDEO
Press to select TV, Video or
DVD Mode.
MUTE
Press to mute sound. Press
to access and cancel (CC)
Closed Caption.
“0”~ “9”
Press numeric keypad to
select any channel. Selects
DVD functions in DVD mode.
SKIP/REW, PLAY, SKIP/FF,
CANCEL/TV/VCR, STOP,
STILL/PAUSE, REC,
VCR/DBS CHANNEL SLOW/
SEARCH
Component function buttons.
LIGHT
Press to light remote control
buttons.
TV, DVD, CBL/DBS, VCR
Press to select remote
operation.
CH
Press to select next channel
and navigate in menus.
ACTION/ENTER
Press to access menus or
enter selections
R-TUNE
Press to switch to previously
viewed channel or video
mode.
RECALL/DISPLAY
Press to display time,
channel, sleep timer, and
other options. Display onscreen menus in DVD mode
EUR511503
*To prolong the life of the batteries,
turn the light off and on pressing
R-TUNE and RECALL buttons,
simultaneously.
7
Page 9
R
CH
CH
EMOTE CONTROL OPERATION
Key Operates Function
POWER
Quick Reference Functional Key Chart
All Components Turns On and Off selected components
MUTE
TV/VIDEO
ACTION
ENTER
TV
TV
TV
DVD
DBS
TV
CABLE
DBS
DVD
VCR
All Components
Mutes TV audio
Selects the input mode
Activates TV menus/Enter
Activates DVD Action/Selection
Activates DBS menus
Channel up/down, Menu navigation
Channel up/down
Channel up/down, Navigation up/down
Navigation up/down
Channel up/down
Search code
VOLVOL
TV
Cable
VCR
DBS
*DVD
TV
VCR
CABLE
All Components
DVD
TV Volume left/right, Menu navigation
Navigation left/right
Selects channel
Selects code
Note: Refer to the DVD section in this manual
for DVD buttons operation.
*Press TV mode button to adjust volume for DVD.
8
Page 10
R
EMOTE CONTROL OPERATION
Quick Reference Functional Key Chart cont.
Key Operates Function
RETURN 10RETURN
NUM
R-TUNE
RECALL
DISPLAY
>
10
=
DVD
DBS
DVD
DBS
TV
CABLE
DBS
TV
Cable
VCR
DVD
DBS
TV
CABLE
DBS
Return
>
10
=
Guide
Press to Access 0~9 Number buttons
while in DVD mode
Exit
Previous channel
Display Channel, time and audio
On screen display
On screen display
Display
Program Info
TV mode selection for remote control
DBS/Cable mode selection for remote control
PLAY
VCR
DVD
VCR
DVD
VCR mode selection for remote control
Digital Videodisc mode selection for
remote control
Play
Play
9
Page 11

R
EMOTE CONTROL OPERATION
Key Operates Function
SKIP/FF
Quick Reference Functional Key Chart (cont.)
VCR
DVD
Fast forward
Skip search fast forward
SKIP/REW
STOP
REC
CANCEL
TV/VCR
STILL
PAUSE
SLOW
SEARCH
VCR
DVD
VCR
DVD
VCR
VCR
DVD
VCR
DVD
VCR
DBS
DVD
Rewind
Skip search rewind
Stop
Stop
Record
Select TV/VCR mode
Cancel
Pause
Still
Channel up/down
Page Up/Down
Channel up button (search forward))
Channel down button (search backward)
After pressing PAUSE key, press button for
Slow Forward and button for Slow
Backward. You can press these buttons five
(5) times to speed up the Slow Search in
either direction.
10
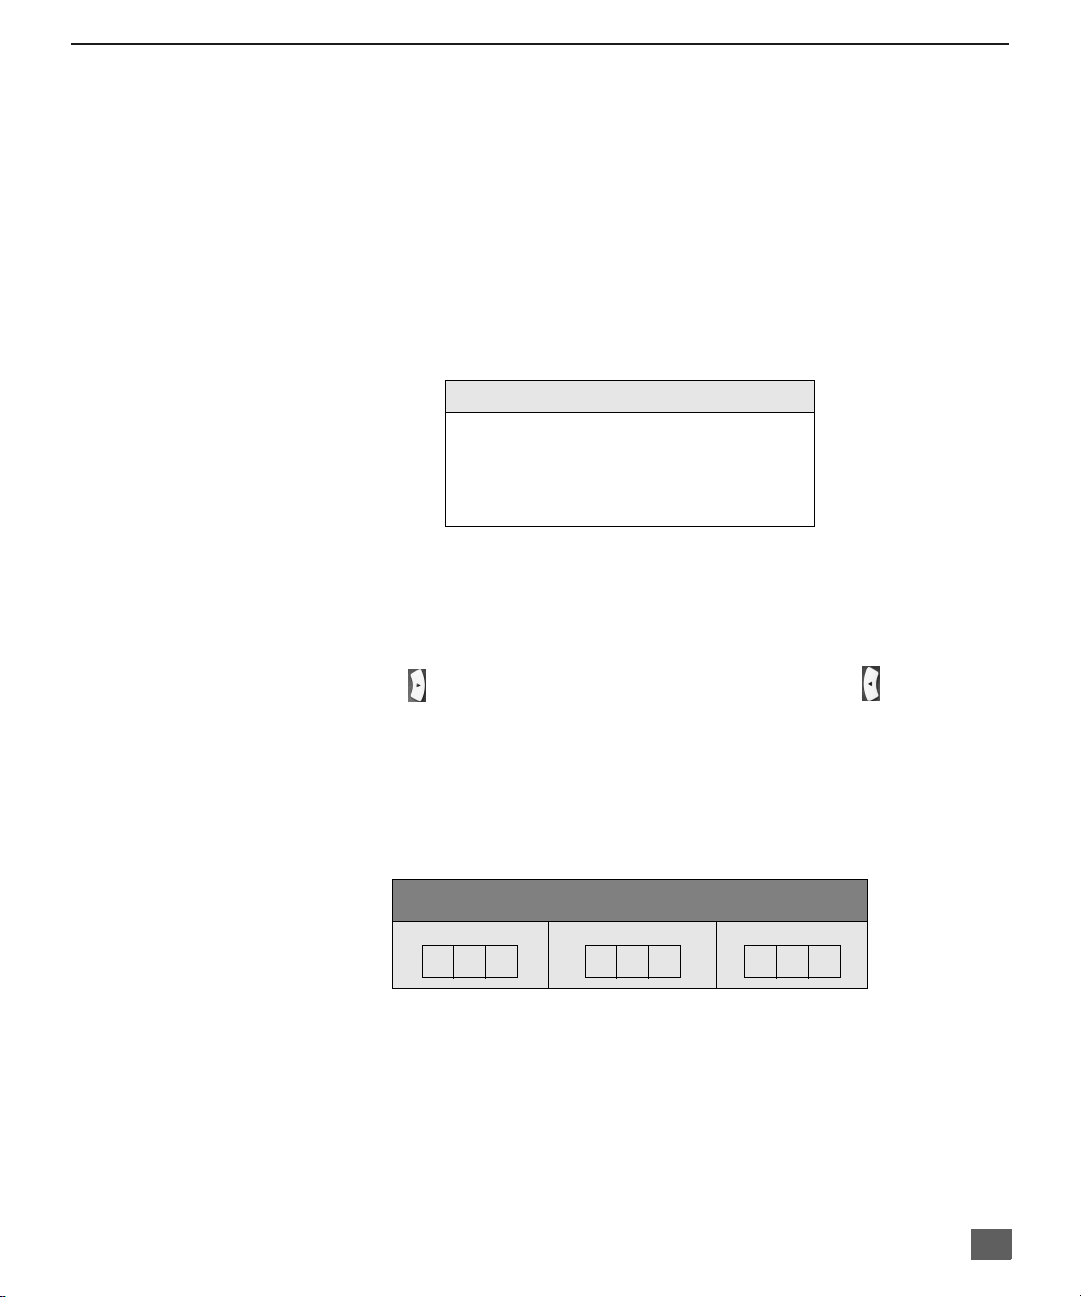
Battery Installation
Use two AA batteries:
Remove battery cover by pushing in and up near arrow.
Install batteries matching (+) and (-) polarity signs.
Replace the battery cover.
Precautions
• Repla ce batteries in pairs.
• Do not mix battery types (zinc carbon with alkaline).
• Do not recharge, heat, short-circuit, disassemble, or burn batteries.
Note: Incorrect instal lation can caus e battery le akage and corr osion that wi ll damage the
Remote Control.
Page 12
Programming The Remote
The Universal Remote Control can be programmed to operate many manufacturers’
components, using the component function buttons for CABLE, DBS, VCR, or DVD. Follow the
procedures for programming your Remote Control with or without codes for the component.
Determine the manufacturer of the component and look in the table for the code.
With A Code
• Confirm that the external component is plugged in and on.
• Turn the component off.
• Press the ACTION and POWER button, together, for at least 5 seconds.
• Press appropriate component button on the Remote Control (VCR, DBS/CBL, or DVD).
• Enter the 3-digit component code using the Remote Control numeric keypad (0 ~
9 buttons).
• Press the Remote Control POWER b utton to test th e com ponent . If the p rocedu re was
successful, the component will turn on.
Without A Code
This procedure searches all codes and is called the “sequence method”.
• Confirm that the external component is plugged in and on.
• Turn the component off.
• Press the ACTION and POWER button, together, for at least 5 seconds.
• Press appropriate component button on the Remote Control.
R
EMOTE CONTROL OPERATION
Helpful Hints: Unsuccessful Code
If the component does not operate with the
Remote Control, repeat the procedure using
another code. (Some brands have multiple codes.)
If an incorrect code is entered, or if the procedure
takes longer than 30 seconds, the programming
will fail.
•Press the button to move forward to the next code. Press the button to move
backward.
• Press the Remot e Contr ol POWER button to test the componen t. If the pr ocedure w a s
successful, the component will turn on.
Note: Repeat the abo ve ste ps until the component code is fou nd. It may take many
attempts before the correct code is found.
• After the code is found, press the ACTION button to store the code.
Write the code numbers from tables in this space. This will serve as a
reference if you need to program your Remote Control.
CABLE BOX
VCR
DBS
11
Page 13
R
EMOTE CONTROL OPERATION
The Universal Remote Control is capable of operating many component brands after entering code.
Some components may not operate because the codes are not available due to limited memory.
The Universal Remote Control does not control all features in all models.
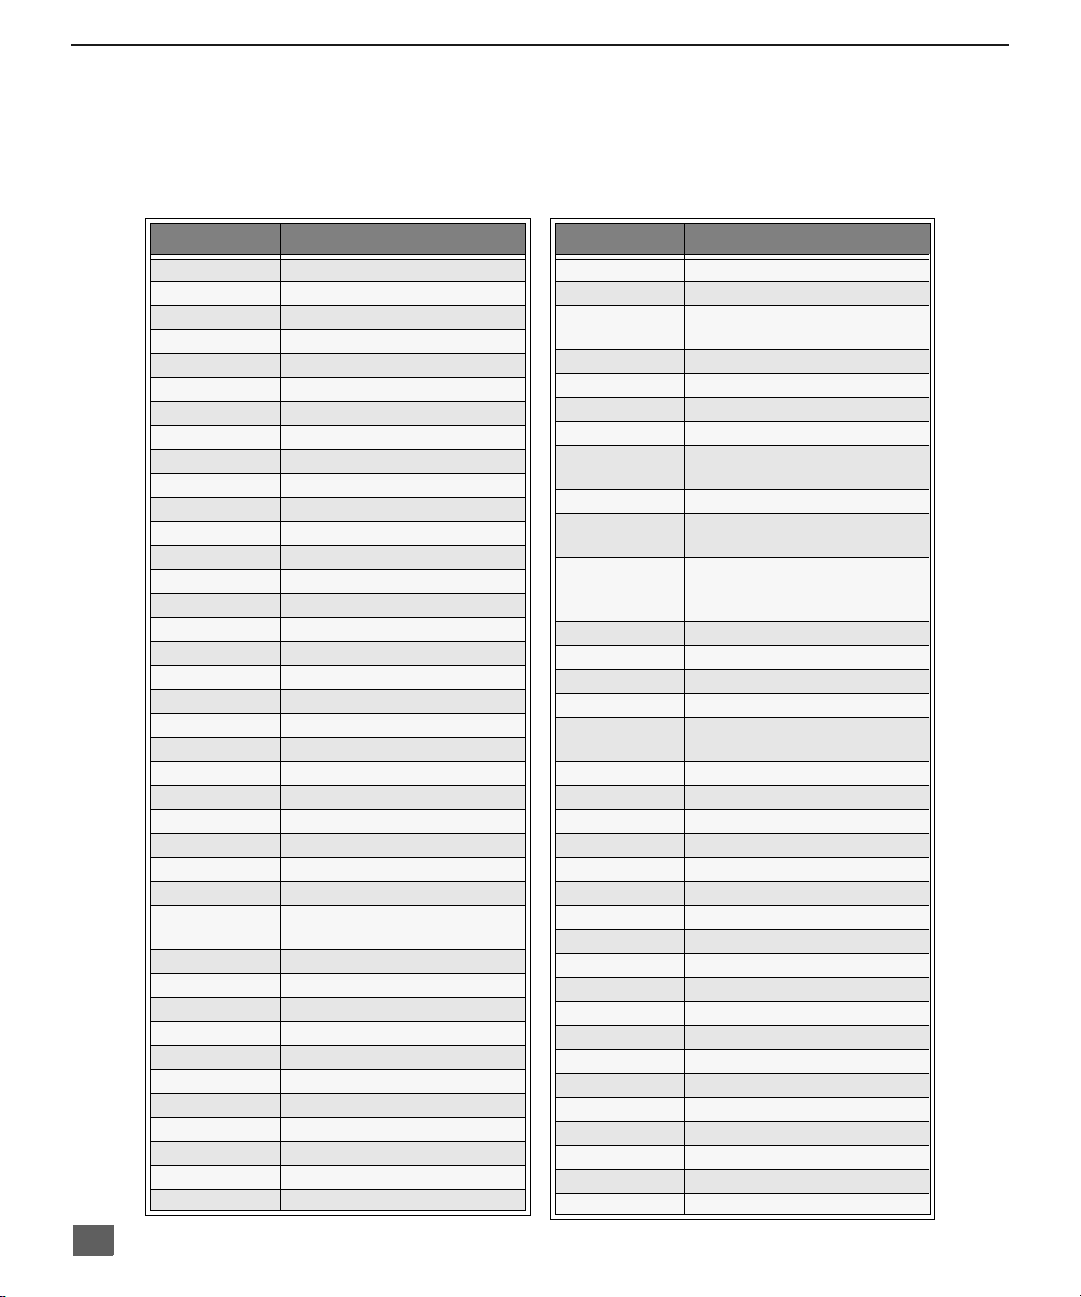
Component Codes
Codes for VCR
Brand Code
Admiral 135
Aiwa 127, 132
Akai 129, 114, 115, 116
Audio Dynamic 139, 111
Bell & Howell 105, 113
Broksonic 120, 126
Canon 123, 125
CCE 143
Citizen 106
Craig 105, 129, 106
Curtis Mathes 145, 124, 127
Daewoo 143, 124, 175
DBX 139, 110, 111
Dimensia 145
Emerson 143, 126, 119, 103, 125, 120
Fisher 105, 108, 109, 107, 113
Funai 120, 126. 127. 134
GE 124, 133, 145
Go Video 137, 151, 163
Goldstar 106
Gradiente 134, 156, 168, 170
Hitachi 100, 123, 127, 145, 168
Instant Replay 123, 124
Jensen 139
JVC 110, 111, 134, 139
Kenwood 106, 110, 111, 134, 139
LG 106
LXI
Magnavox 123, 124, 131
Marantz 110, 111, 139
Marta 106
Memorex 109, 124
MGA 138, 140, 141, 147, 148, 161
Minolta 100, 145
Mitsubishi 138, 140, 141, 147, 148, 161
Multitech 137
NEC 110, 1 11, 134, 139
Olympic 123, 124
Optimus 106, 121, 128, 135
100, 105, 106, 107, 108, 109,
127
Brand Code
Orion 120, 126
Panasonic 121, 122, 123, 124
Penney
Pentax 100, 111, 145
Philco 120, 123, 124, 126, 127, 143
Philips 123, 124, 131, 173
Pioneer 123
Proscan
Quasar 121, 122, 123, 124
Radio Shack
RCA
Realistic 105, 109, 124, 127, 136, 140
Samsung 102, 104, 133, 137
Sansui 120, 126, 139, 152
Sanyo 105, 109, 113
Scott
Sears 100, 105, 106, 107, 108
Sharp 135, 136, 137
Shintom 117
Signature 2000 127, 135
Singer 117
Sony 128, 129, 130
SV2000 127
Sylvania 1123, 124, 127, 131, 178
Symphonic 127, 168, 177
Tashiro 106
Tatung 110, 111, 139
Teac 110, 111, 127, 139
Technics 1121, 122, 123, 124
Teknika 124, 127
Toshiba 10 1, 146, 166
Vector Research 111
Wards 106, 109, 135, 136
Yamaha 105, 110, 111, 139
Zenith 106, 169
100, 105, 110, 111, 124, 139,
145,
100, 101, 102, 123, 124, 131,
133, 145, 146, 174
105, 109, 124, 127, 133, 136,
140
100, 101, 102,123, 124, 131,
133, 145, 146, 170, 172, 174,
176
102, 104, 109, 120, 126, 138,
140, 147, 148
12
Page 14
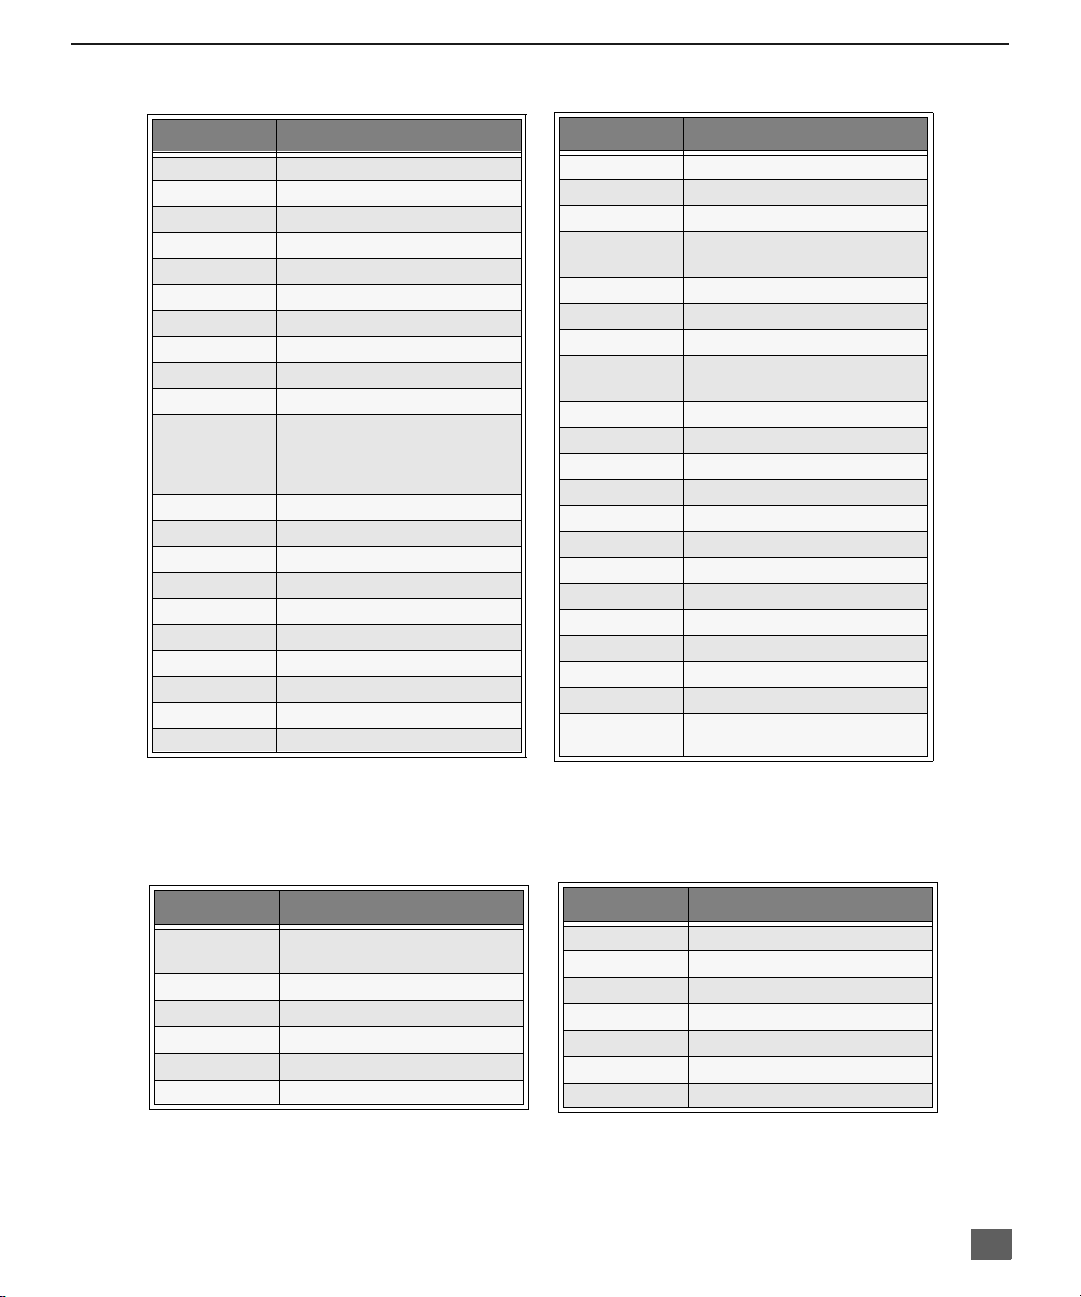
Codes for Cable Box
R
EMOTE CONTROL OPERATION
Brand Code
ABC 224
Archer 225, 232
Cableview 205, 232
Citizen 205, 222
Curtis 212, 213
Diamond 224, 225, 232
Eagle 229
Eastern 234
GCbrand 205, 232
Gemini 222
General
Instrument/
Jerrold
Hamlin 212, 218, 240, 241, 242, 245
Hitachi 203, 224
Macom 203, 204, 205
Memorex 230
Movietime 205, 232
Oak 202, 237, 239
Panasonic 209, 210, 214
Philips 206, 207, 228, 229, 230
Pioneer 201, 216
Pulsar 205, 232
211, 219, 220, 221, 222, 224,
225, 226, 227
Brand Code
Puser 232
RCA 215
Realistic 232
Regal
Regency 234
Rembrandt 205, 232, 237
Samsung 205
Scientific
Atlanta
Slmark 201, 205
Sprucer 205, 210
Stargate 205, 210
Telecaption 248
Teleview 201, 205
Texscan 244
Tocom 235, 236, 247
Unika 225, 232
Universal 222, 232
Videoway 206
Viewstar 229, 230
Zenith 200, 227
Zenith/.Drake
Satellite
212, 218, 240, 241, 242, 245,
249
211, 212, 213
200
Brand Code
Dish Network
(Echostar)
Echostar 105
G. E. 106
Gradiente 114
Hitachi 103, 111, 112
HNS (Hughes) 103
105
Codes for DBS
Brand Code
Panasonic 104
Philips 101, 102
Primestar 108
RCA 106, 109, 110, 113
Sony 107
Toss-up 100
Uniden 101, 102
13
Page 15
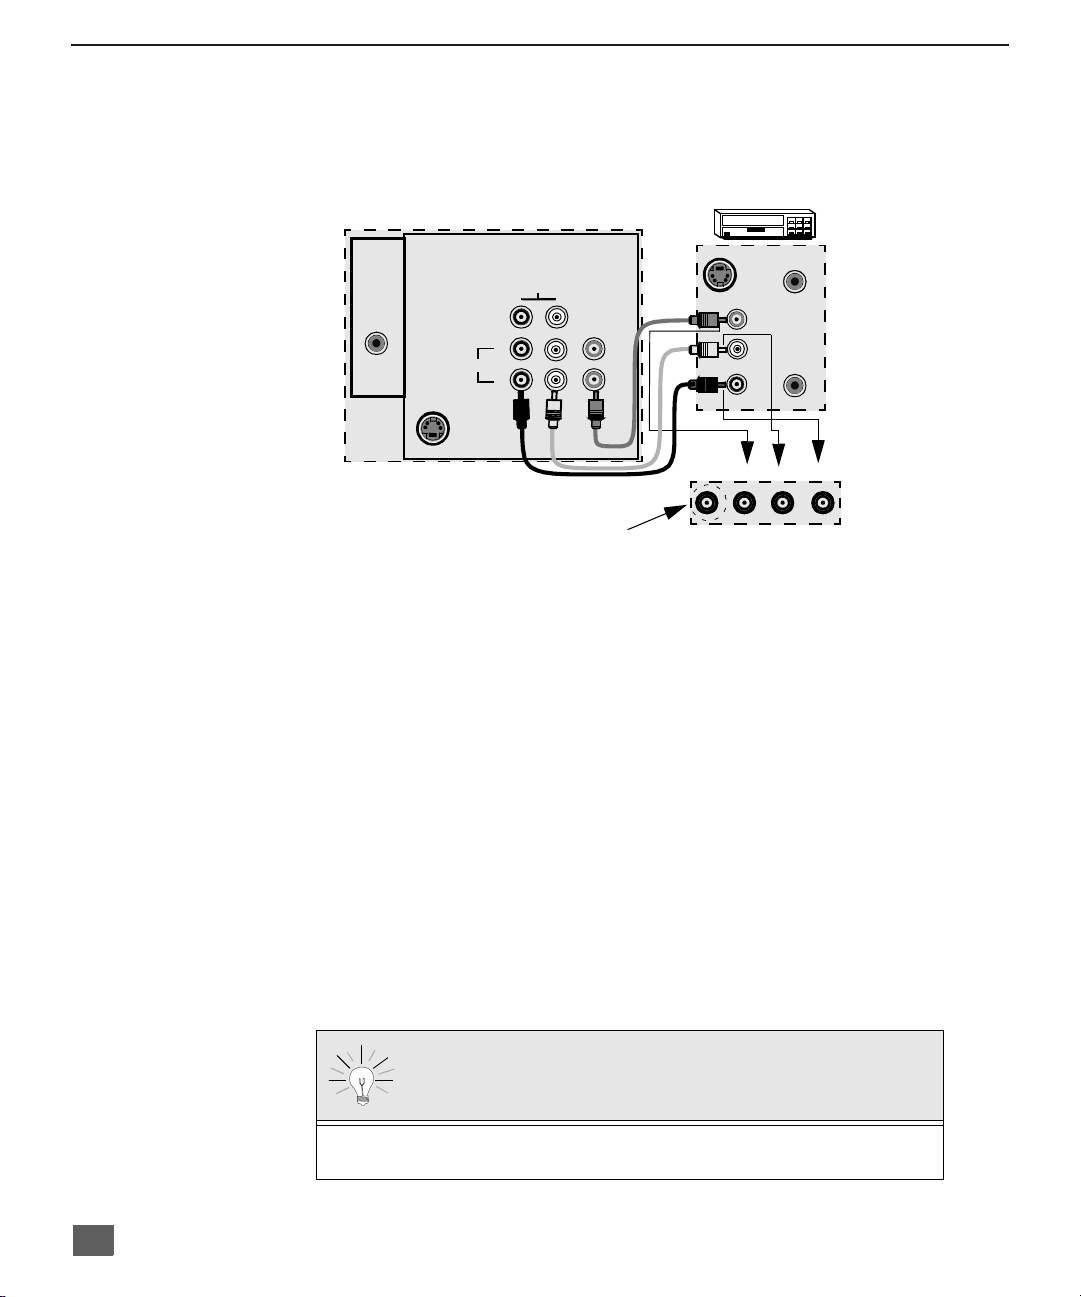
O
PTIONAL EQUIPMENT CONNECTIONS
Optional Equipment Connections
VCR Connection
VCRs, video disc players, video game equipment , and DSS equipment can also be connected
to the video inputs. See the optional equipment manual for details.
TERMINALS ON BACK OF TV
VCR
Procedure
1. Connect equipment as shown to front or rear Audio/Video input jacks.
2. Select the Video mode by pressing TV/VIDEO button.
3. Operate optional equipment as instructed in equipment manual.
TO AUDIO AMPLIFIER
Connect to an external audio amplifier input for listening to a stereo system.
Audio Adjustments
1. Select TV SPEAKERS ON from AUDIO menu.
2. Set amplifier volume to minimum.
3. Adjust TV volume to desired level.
4. Adjust amplifier volume to match the TV.
5. Select TV SPEAKERS OFF&VAO from AUDIO menu.
6. Volume, mute, bass, treble and balance are now controlled from the TV.
Note: In OFF&FAO the volume is c ontrolled by the external amplifier.
S-VIDEO
TO AUDIO
AMP
INPUT
2
1
ANT
CABLES NOT SUPPLIED
AUDIO
VIDEO
R
L
Jack used for 1/8”
headphone plug
S-VIDEO OUT
VIDEO OUT
AUDIO OUT
TERMINALS ON FRONT OF TV
VIDEO 2
ANT INPUT
L
OUTPUT
R
L AUDIO R
Note: Video 2 Front and Rear Audio/Video connectors cannot be operated at the
same time.
Note: TO AUDIO AMP t erm ina ls ca nno t be connected directly to exter nalspeakers.
14
Adjusting volume while in DVD mode
Press TV button on the remote control. Press VOL left/right to adjust the volume. After
adjusting volume, press DVD button to return to DVD mode.
Page 16

Dolby Digital Decoder Connection
When DVDs are recor de d i n Dol by* D igi tal or D TS , fol low this di agram to connect the
TV/DVD unit to a Dolby Digital decoder.
Note:
• Remove the dust protection cap from the optical digital audio output connection.
• For protecting against dust, reattach the dust protection cap w h en n ot u si ng the con nector.
O
PTIONAL EQUIPMENT CONNECTIONS
ON BACK OF TV/DVD SET
DIGITAL AUDIO OUT
(PCM/BITSTREAM)
OPTICAL
*Manufactured under license from Dolby Laboratories. “Dolby” and the double-D sym bol are trademarks of
Dolby Laboratories. Confidential unpublished works. © 1992-1997 Dolby Laboratories, Inc. All rights
reserved.
15
Page 17

M
AIN MENU
Main Menu
ACTION Button
Press the ACTION button to display the Main Menu and submenus. Press the ACTION button
repeatedly to exit.
CH / VOL Buttons
Press the CH (channel) or VOL (volume) buttons to select an icon. Use the CH buttons to
highlight the desired features. Use VOL buttons to select and adjust features.
Main Menu
Remote Action / Navigation Buttons
CH
Front Control Panel Buttons
1
POWER - Press to turn ON or OFF.
2
VOLUME - Press to adjust sound and navigate in menus.
3
CHANNEL - Press to select next or previous channel and navigate in menus.
4
ACTION - Press to access menus.
5
TV/VIDEO - Press to select TV or Video modes.
6
SKIP/SEARCH (Reverse) - Press during play to return to previous chapter or track.
7
PLAY - Press to play disc.
8
SKIP/SEARCH (Forward) - Press during play to select next chapter or track.
9
STOP - Press during play to stop disc.
10
PAUSE - Press during play to pause disc.
11
OPEN/CLOSE - Press to open or close the disc tray.
VOL
1
POWER VOLUME CHANNEL
SKIP/SEARCH SKIP/SEARCH
2 3 4
PLAY STOP PAUSE
8 9 10 117
VOL
CH
ACTION TV/VIDEO
OPEN/CLOSE
=
16
Page 18

M
Main Menu Feature Chart
ENU
M
AIN MENU FEATURE CHART
D
ESCRIPTION
SETUP
SET TIME
ANT
AUTO PROG
MANUAL PROG Manually add or delete channels from memory.
AUTO POWER ON
CC MODE
AUTO ASPECT
LANGUAGES Select English, Spanish, or French menu.
AUDIO NORM
BASS Increase or decrease the bass response.
TREBLE Increase or decrease the treble response.
BALANCE Emphasize the left/right speaker volume.
MODE
AI SOUND
SURROUND Enhances audio response when listening to stereo.
TV SPEAKERS
When entered, TIME will display on screen after
pressing POWER button, RECALL button, or
changing channels.
Choose CABLE or TV to match the signal at your
antenna input.
Automatically program channels with a signal
into memory.
Select SET to power up the TV at the same time as
the Cable Box or other components or select OFF .
Select C1 or C2 for Closed Captioning display. Select
OFF to display closed captioning when MUTE button
is pressed.
Select ON to automatically set aspect ratio 4:3 or
16:9. This feature works only in DVD mode.
AUDIO
Reset BASS, TREBLE and BALANCE to factory
default.
Select the audio mode:
r
STEREO - Two channel audio reception.
r
SAP - (Second Audio Program) Tune to the
alternate audio channel if available in your area
(bilingual or descriptive audio).
r
MONO - One channel audio. Use when stereo
signal is weak.
Automatically maintain constant volume between
programs and commercials.
Select TV SPEAKERS:
r
ON - TV SPEAKERS operate normally.
r
OFF&VAO (Variable Audio Output) - TV
Speakers off — audio adjustable by TV.
r
OFF&FAO (Fixed Audio Output) - TV
SPEAKERS off — audio adjustable only by the
external amplifier.
17
Page 19

M
AIN MENU FEATURE CHART
M
Main Menu Feature Chart (Cont.)
ENU
D
ESCRIPTION
TIMER
SLEEP TIMER
PROGRAM TIMER
DVD SETUP
PICTURE NORM
COLOR Adjust desired color intensity.
TINT Adjust natural flesh tones.
BRIGHTNESS Adjust dark areas for crisp detail.
PICTURE Adjust white areas of picture.
SHARPNESS Adjust clarity of outline detail.
Program TV to automatically turn off in 30, 60, or
90 minutes. Select NO to turn timer off.
Program TV to automatically turn on and off at
selected time on a selected channel, daily or only one
day.
DVD SETUP
Accessed only in DVD Mode with Disc in STOP
mode. Refer to the DVD section for information on
DVD setup menus.
PICTURE
Reset all picture adjustments to factory default
settings.
CH CAP
18
CHANNEL CAPTION
GAME GUARD
Provide labels for up to 30 stations using up to four
characters for each station.
LOCK
Program to prevent video games, cable box, and
VCRs from being viewed.
Note: For information about Motion Picture and
TV Parental Guide ratings, refer to the
V-Chip section in this manual.
Page 20

Special Features
CC
Languages
In SETUP menu, select ENGLISH, ESPAÑOL, or FRANÇAIS to change the menu language.
Timer
Sleep Timer
In TIMER menu, program to turn TV OFF in 30, 60, or 90 minutes. Select NO to turn off timer.
SET-UP
SET TIME _ _ : _ _ AM
ANT CABLE
AUTO PROG NO
MANUAL PROG NO
AUTO POWER ON OFF
MODE OFF
AUTO ASPECT ON
ENGLISH ESPAÑOL FRANÇAIS
TIMER CONTROL
SLEEP TIMER NO
PROGRAM TIMER
ON _ _ : _ _
OFF _ _ : _ _
CHANNEL 3
SET TIME FIRST
S
PECIAL FEATURES
Program Timer
In Timer menu, prog ram TV to automatical ly turn on and off at selec ted time on a selected
channel, daily or one day.
TIMER CONTROL
SLEEP TIMER NO
PROGRAM TIMER
ON _ _ : _ _
OFF _ _ : _ _
CHANNEL 3
SET TIME FIRST
Note: TIME must be entered in the SETUP menu to operate PROGRAM TIMER.
19
Page 21

S
PECIAL FEATURES
Timer (cont.)
The TV automatically turns OFF after 90 minutes when
turned on by the PROGRAM TIMER. If the OFF time is
programmed or if a key is pressed, the automatic OFF
after 90 minutes will be cancelled.
The PROGRAM TIMER is active when the TV is OFF or
ON. The TV will switch to the selected channel at the
selected time set by the PROGRAM TIMER.
CH CAP (Channel Caption)
Program channel captions (station labels) for 30 stations using up to four characters. Use the
numeric keypad for entering numbers unavailable with the select arrows.
Turn Off After 90 Minutes
PROGRAM TIMER Activation
20
Note: Delete channel captions by entering dashes (-) in all four character slots.
Page 22

LOCK
S
PECIAL FEATURES
Game Guard Lock and Unlock
Select GAME GUARD to prevent video games and videotapes from being viewed.
Lock Channel 3, Channel 4, and video inputs for 12, 24, or 48 hours by entering a four-digit
secret code, then selecting GAME GUARD ON.
Note: Understand how to unlock GAME GUARD before using it. Use a code that is easy to
remember or record it in a safe place.
Unlock GAME GUARD by reentering your four-digit secret code, then selecting GAME GUARD
OFF.
LOCK
GAME GUARD OFF
MOTION PICT. STATUS OFF
CHANGE SETTINGS
TV PARENTAL STATUS OFF
CHANGE SETTINGS
HOW LONG? 12 HRS
CHILD LOCK OFF
ENTER CODE FIRST - - - -
Note: If GAME GUARD is ON, and if a blocked channel or video input is selected, the
.
message GAME GUARD ON displays in the upper right corner of the TV screen.
u
u
Unlocking
If you do not remember your code, the LOCK will
unlock in 12, 24, or 48 hours depending on the
current setup. Be cautious when selecting
ALWAYS. If ALWAYS is selected, and you forget
your secret code, the TV must be serviced by a
qualified technician in order to clear the
LOCK setup.
21
Page 23

V-CHIP O
PERATION
V-CHIP Oper ation
22
Page 24

V-Chip Operation (cont.)
NR
G
PG
PG-13
R
NC-17
X
TV Parental Guide
This TV model features the “V-Chip technology” which allows you to use TV Parental Guide
ratings when viewing TV programs. This innovation allows parents to block various types of TV
Programming at their discretion.
V-CHIP O
PERATION
Motion Picture Ratings Chart
CONTAINS NO RATING. (NOT RATED) AND NA (NOT AP PLICABLE) PROGRAMS.
MOVIE HAS NOT BEEN RATED OR RATINGS DO NOT APPLY.
GENERAL AUDIENCES. All ages admitted.
PARENTAL GUIDANCE SUGGESTED. Some material may not be suitable for children.
PARENTS STRONGLY CAUTIONED. Some material may be inappropriate for children
under 13.
RESTRICTED. Under 17 requires accompanying parent or adult guardian.
NO ONE 17 AND UNDER ADMITTED.
ADULTS ONLY
LOCK
GAME GUARD OFF
MOTION PICT. STATUS OFF
CHANGE SETTINGS
TV PARENTAL STATUS OFF
CHANGE SETTINGS
HOW LONG? 12 HRS
CHILD LOCK OFF
ENTER CODE FIRST - - - -
Fig. 4
u
u
TV PARENTAL GUIDE
VIEW NR PROGRAMS?YES
TV-Y
TV-Y7 FV
TV-G
TV-PG V S L D
Fig. 5
Procedure
1. In the Main Menu press the CH pq or VOL tu buttons to highlight LOCK icon.
2. Press ACTION button to display LOCK menu.
3. Use the nume ric keypad to enter yo ur four digit code. (
remember and record it in a safe place.
)
4. Press CH pq buttons to highlight TV PARENTAL STATUS.
5. Press VOL tu buttons to select OFF or ON.
6. Press CH q button to highlight CHANGE SETTINGS. (See Fig. 4)
7. Press the VOL tu buttons to display TV PARENTAL GUIDE sub menu. (See Fig. 5).
8. Press the VOL tu buttons to select VIEW NR PROGRAMS? YES or NO.
(Selecting, “Yes” NR programs will be received. Selecting “NO”, NR programs
will be blocked. See Customer Caution below.)
9. Press CH pq buttons to move between different ratings. Use VOL tu buttons to
select the ratings you want to block.
Note: See the TV PARENTAL GUIDE RATINGS chart.
10. Press VOL tu buttons to block (RED) and unblock (GREEN).
11. Press ACTION button repeatedly to exit menus.
Use a code that is easy to
23
Page 25

V-CHIP O
PERATION
TV Parental Guide (cont.)
Customer Caution
The V-Chip system that is used in this set is capable of blocking
“NR” programs (non rated, not applicable and none) per FCC Rules
Section 15.120(e)(2). If the option of blocking “NR” programs is
“
chosen
you may not receive emergency bulletins or any of the following
types of programming:
unexpected and possibly confusing results may occur, and
”
• Emergency Bulletins (Such as EAS messages, weather
warnings and others)
• Locally originated programming
•News
• Political
• Public Service Announcements
• Religious
• Sports
• Weather
NR
TV-Y
TV-Y7
TV-G
TV-PG
TV-14
TV-MA
FV
V
S
L
D
TV PARENTAL GUIDE RATINGS CHART
Not Rated. SEE CUSTOMER CAUTION on previous page.
All children. The themes and elements in this program are
specifically designed for a very young audience, including
children from ages 2-6.
Directed to older children. Themes and elements in this
program may include mild physical or comedic violence, or
may frighten children under the age of 7.
General audience. It contains little or no violence, not
strong language, and little or no sexual dialogue or
situations.
Parental guidance suggested. The program may contain
infrequent coarse language, limited violence, some
suggestive sexual dialogue and situations.
Parents strongly cautioned. This program may contain
sophisticated themes, sexual content, strong language and
more intense violence.
Mature audiences only. This program may contain mature
themes, profane language, graphic violence, and explicit
sexual content.
FANTASY/CARTOON VIOLENCE
VIOLENCE
SEX
OFFENSIVE LANGUAGE
DIALOGUE WITH SEXUAL CONTENT
24
Page 26

Blocking Message
If V-Chip is enabled and the program exceeds the rating limit set by the user, the blocking
message will appear and the audio will be muted. (See Fig. 6). Enter your code if you wish to
continue viewing the program. After entering the code, all locks and ratings are disabled until
the TV is turned off or until all settings are off.
V-CHIP O
PROGRAM RATING EXCEEDED
ACCESS CODE _ _ _ _
Fig. 6
Unlocking
If you do not remember your code, the LOCK will unlock
in 12, 24, or 48 hours depending on last setup. Be
cautious when selecting ALWAYS. If ALWAYS has been
selected, and you forget your secret code, the TV must be
serviced by a qualified technician in order to clear the
LOCK options that are set.
Resetting
If the secret code is entered to
override ratings, you must reset all
ratings by either reprogramming or
turning the TV off.
PERATION
Child Lock
This feature allows parents to lock the DVD disc tray to prevent children from playing DVDs or
CDs. To unlock disc tray select O FF.
LOCK
GAME GUARD OFF
MOTION PICT. STATUS OFF
CHANGE SETTINGS
TV PARENTAL STATUS OFF
CHANGE SETTINGS
HOW LONG? 12 HRS
CHILD LOCK OFF
ENTER CODE FIRST - - - -
u
u
Procedure
1. In the Main Menu press the CH pq or VOL tu buttons to highlight LOCK icon.
2. Press ACTION button to display LOCK menu.
3. Use the numeric keypad to enter your four digit code (
remember and record it in a safe place
).
Use a code that is easy to
4. Press the CH pq buttons to highlight CHILD LOCK.
5. Press VOL tu buttons to select DVD or OFF.
6. Press ACTION button repeatedly to exit menus.
Note: When CHILD LOCK is set to DVD, all keys for the DVD player on the control
panel are locked.
25
Page 27

R
EMOTE CONTROL BUTTONS
- DVD O
PERATION
Remote Control Buttons - DVD Operation
DVD Quick Reference Functional Chart
Remote
Key
TOP MENU
MENU
ANGLE
SUBTITLE
AUDIO
PLAY MODE
(VIDEO CD / CD)
MARKER
Description
Displays the complete menu of the particular DVD with top most item
highlighted.
Press MENU during play. The DVD menu available on the disc is now
displayed. Press MENU again to resume play.
Press ANGLE during play. Number of angle being played back is displayed. P ress pquntil the preferred angle is selected. Press ANGLE
or ENTER to clear the display.
Press SUBTITLE duri ng pl ay. When no subt itl e s are availa b le, “ --” wil l
be displayed instead of the language number. Press pquntil the preferred language is selected. Press SUBTITLE or ENTER to clear the
display.
Press AUDIO during pl ay. When no audio sound track is avail able, “-”
will be displayed instead of the language number. Press pquntil the
preferred language is selected. Press AUDIO or ENTER to clear the
display.
Press PLAY MODE in the stop mode. The program playback screen
appears on the TV screen. Press pq to select the preferred track
number. Press ENTER to store in memory. Repeat to program up to
18 tracks. Press PLAY to begin the programmed sequence. To return
to normal play, press STOP, PLAY MODE twice, and PLAY.
Press MARKER during play. The marker screen appears on the TV
screen. “*” indicates no marker has been stored yet. Press ENTER
during play at the starting point to be viewed (listened to) again. Up to
5 markers can be stored in the memory. Press MARKER to clear the
display.
26
REPEAT MODE
Press REPEAT MODE during play. Each time this button is pressed,
the TV screen changes and the disc will repeat a chapter or title
(DVD). To return to normal play, press REPEAT MODE several times
until “OFF” is displayed.
Page 28

R
VOLVOL
EMOTE CONTROL BUTTONS
- DVD O
DVD Quick Reference Functional Chart (Cont.)
PERATION
Remote
Key
A-B REPEAT
VSS
NUM
CANCEL
TV/VCR
STOP
>
10
=
RETURN 10RETURN
Description
Press A-B REPEAT during play at the point where repeat play is to
start (A). Press A-B REPEAT at the point where repeat play is to be
concluded (B). To return to normal play press A-B REPEAT several
times until “OFF” is displayed.
This set can reproduce a virtual surround sound effect. Press VSS
during play.
Press NUM key in DVD mode to access the number keys.
When the MENU continues onto another screen, press RETURN to
return to the previous menu screen.
This key also lets you enter a number equal to or greater than 10
while in the DVD mode.
Press CANCEL in DVD mode to cancel select ions .
Press STOP in DVD mode to stop play.
STILL
PAUSE
PLAY
SKIP/REW
SKIP/FF
SLOW
SEARCH
Press STILL during play, the DVD player will be in the still picture
mode.
Press PAUSE during play, the CD player is placed in the pause mode.
Press PLAY to resume the normal operation.
Press PLAY in DVD mode to start pla y.
Adjusting volume in DVD mode:
• Press TV mode button.
• Press VOL left/right to adjust volume.
• Press DVD mode button.
Press SKIP/REW in DVD mode to skip search or fast rewind
(search or fast rewind with compact disc).
Press SKIP/FF in DVD mode to skip search or fast forward
(search or fast forward with compact disc).
Press SLOW/SEARCH in the STILL mode to view slow motion play in
reverse or forward direction. Press PLAY to resume normal operation.
27
Page 29

R
EMOTE CONTROL BUTTONS
TOP MENU
Press TOP MENU during Play. This will bring up the DVD menu with the top menu
highlighted. Press ENTER button twice to exit TOP MENU.
MENU
DVDs may offer special menus. These menus may include guides to unique contents,
audio subtitle, languages, special features, etc. Contents and operation may vary
depending on the disc. Following steps show the basic procedure.
1. Press MENU during play. The menu of the particular disc is displayed.
2. Press cursor buttons (tupq) to select the desired feature.
3. If the selected feature has s ub-menu, repeat s tep 2 to select t he desired featur e
from the sub-menu.
4. Press ENTER. The desired feature is activated. Press MENU again resumes play
from the scene when MENU was first pressed.
ANGLE
Viewing from another angle (DVD)
Some DVDs may contain scenes which have been shot simultaneously from a
number of different angles. For these discs, the same scene can be viewed from each
of these different angles using the ANGLE button. (The recorded angles differ
depending on the disc used.)
Press ANGLE during play.
Number of angle being played back.
- DVD O
PERATION
DVD MENU
1. SUBTITLE
2. AUDIO
3. SPECIAL FEATURES
28
Press the cursor buttons pq until the preferred angle is
selected.
Pressing the numeric buttons also changes the angle.
• Press ANGLE or ENTER to clear the display.
Note: This function only w orks for titles having scenes recorded at
different angles.
For your reference:
• The angle number can be programmed beforehand with some DVDs; the angle
will be switched to the selected number when ANGLE lights up.
Note: When appears on the TV s cre en whil e a button is being pressed, it mea ns tha t th e
corresponding operation is unavailable on the disc.
Page 30

SUBTITLE
R
EMOTE CONTROL BUTTONS
- DVD O
PERATION
Changing subtitle language (DVD)
It is sometimes possible to change subtitles to a different language. This operation
works only with discs on which multiple subtitle languages are available.
Press SUBTITLE during play.
When no subtitles are available, “--” will be displayed instead of the language number.
Number of the
subtitle language
being played back
Press the cursor buttons (pq) until the preferred language is selected.
Pressing the numeric buttons also selects the subtitle language.
Press ENTER to clear the display.
To display subtitles or clear screen:
Press the cursor buttons tu to select ON or OFF.
Note:
• In some cases, the subtitle language will not change to the selected one
immediately.
• When a disc supporting closed captioning is played, subtitles and closed
captioning may overlap on the TV screen. In this case, turn the subtitle off.
For your reference:
• When the preferred language is not selected even after pressing the cursor
buttons pq several times, it means that the language is not available on the disc.
• When the power is turned on or the disc is removed, subtitles appear in the
language selected at the initial settings. If this language is not recorded on the
disc, subtitles appear in the disc’s priority language.
29
Page 31

R
EMOTE CONTROL BUTTONS
AUDIO
Changing audio sound track language (DVD)
It is sometimes possible to change the audio sound track to a different language.
This operation works only with discs on which multiple audio sound track languages
are available.
Press AUDIO during play.
When no audio sound track is available, “-” will be displayed instead of the language
number.
Press the cursor buttons (pq) until the preferred language is selected.
Pressing the numeric buttons also changes the audio sound track language.
Press ENTER to clear the display.
For your reference:
• When the preferred language is not selected even after pressing the cursor
buttons pq several times, it means that the language is not available on the
disc.
• When the power is turned on or the dis c is removed, the language heard is the
one selected at the initia l settings. If mul tiple languag es are not availabl e on the
disc, only the language recorded on the disc will be heard.
- DVD O
PERATION
Number of the audio
sound track language
being played back
PLAY MODE
30
PLAY MODE (VIDEO CD/CD) feature lets you play the tracks in an order you specify.
Press PLAY MODE in the stop mode.
The program playback menu appears on the TV screen.
Press ENTER, then cursor buttons (pq) to select the preferred track number or
press NUM key and the numeric buttons on the remote control to enter the preferred
track number.
Choose a track, then press ENTER
Track Time
1
5
2
6
3
4
4
3
5
6
6
7
8
4:16
2:50
3:24
3:42
2:50
Press PLAY to start
Clear
Clear all
Total time
17:02
Press ENTER. The selected track is stored in memory.
Page 32

Play Mode (cont.)
Repeat steps to select another track.
Press PLAY.
Play now begins in the programmed sequence.
After playback
Play is stopped and the program playback menu is displayed.
To return to normal play
• Press STOP. (Program play is suspended.)
• Press PLAY MODE twice.
• Press PLAY.
Normal play begins from the beginning of the disc. (The content of the program is still
retained in the memory.)
Clearing the program
When the program playback menu is displayed.
• To clear the last program one by one:
Move to “Clear” and press ENTER.
• To clear all the programs:
Move to “Clear All” and press ENTER. (The programs are also cleared when the
player is turned off, or OPEN/CLOSE is pressed.)
Random Play (Video CD/CD)
R
EMOTE CONTROL BUTTONS
- DVD O
PERATION
The player plays the tracks on the disc in random order.
• Press PLAY MODE twice in STOP mode. The random playback screen appears
on the screen.
Random Playback
Press PLAY to start
• Press PLAY.
To exit the random playback mode and return to normal operation:
• Press STOP. (Random play is suspended.)
• Press PLAY MODE once.
• Press PLAY. (Normal play begins from the beginning of the disc.)
31
Page 33

R
EMOTE CONTROL BUTTONS
MARKER
To Store markers in memory to be viewed (listened to) again.
Press MARKER during play.
The MARKER menu appears on the TV screen.
“*” indicates no marker has been stored yet.
Press ENTER during play at the starting point to be viewed (listened to) again.
Indicates MARKER 1 is stored in the memory
(If ENTER is pressed where any number is already displayed, the previous starting
point will be replaced by the new one.)
Up to 5 markers can be stored in the memory.
Press MARKER to clear the display.
- DVD O
PERATION
32
Recalling/clearing a marker
Press MARKER during play.
Press the cursor buttons (tu) to select the marker to be recalled/cleared.
Press the cursor button (p) to recall a marker.
or
Press CANCEL to clear a marker.
Play resumes from the point corresponding to the selected marker.
or
The selected marker is cleared. (Press MARKER to clear the display.)
Note:
• Some subtitles recorded around the marker may fail to appear. (DVD)
• These operations do not work with an interactive DVD or during menu play of a
Video CD with playback control.
For your reference:
• All the markers are cleared when the player turned off, or OPEN/CLOSE is
pressed.
Page 34

REPEAT MODE
R
EMOTE CONTROL BUTTONS
- DVD O
PERATION
Repeat play/viewing (listening)
Press REPEAT MODE during play.
Each time this button is pressed, the TV screen changes as shown below and the disc
will repeat a chapter or title (DVD) or a track or the entire disc (Video CD/CD).
CD/VIDEO CD DVD
Normal Play
Repeat of chapter
being played
Repeat of title
being played
Cancel repeat
mode
(normal play)
C
T
OFF
Normal Play
Repeat of track
being played
Repeat of entire
disc contents
Cancel repeat
mode
(normal play)
T
A
OFF
To return to normal play
Press REPEAT MODE several times until “OFF” is displayed.
Notes:
• Repeat play may not work correctly with some DVDs.
• Repeat play does not work with an interactive DVD or during menu play of a Video
CD with playback control.
T o enjoy program repeat play while playing CDs.
If REPEAT MODE is pressed during program play the display changes as follows:
Program play
Repeat of programmed
track being played
Repeat of all programs
Cancel repeat mode
(Program play)
T
A
OFF
PRG
PRG
PRG
To return to program play
Press REPEAT MODE several times until “OFF” is displayed.
33
Page 35

R
EMOTE CONTROL BUTTONS
A-B REPEAT
A-B Repeat allows you to repeat sections between two specific points (A-B repeat)
Press A-B REPEAT during play at the point where repeat play is to start (A).
Press A-B REPEAT at the point where repeat play is to be concluded (B).
Repeat play of the selection between points A and B.
To return to normal play
Press A-B REPEAT several ti mes until the following display is shown.
- DVD O
PERATION
A
A B
34
Notes:
• A-B repeat play does not work with an interactive DVD.
• Some subtitles recorded around point A or B may fail to appear. (DVD)
• A-B repeat play works only within a title (DVD) or a track (Video CD/CD).
For your reference:
• If the title/track is completed before end location B is specified, the end point of
the title/track serves as end location B.
Page 36

VSS
R
EMOTE CONTROL BUTTONS
- DVD O
PERATION
Reproducing Virtual Surround Sound effect.
Dolby Digital DVD
This set can reproduce a virtual surround sound effect which provides sound as if
heard from the front speakers located at the horizontally further position or heard from
nonexistent speakers even when only a 2-channel stereo system is connected (for
playback of Dolby Digital DVD software (2ch and above) only.
Press VSS during play.
• Select OFF to hear normal audio range.
• Select VSS 1 to hear natural effect.
• Select VSS 2 to hear enhanced effect.
•
Notes:
• The virtual surround sound effect may not work with some Dolby Digital 2.1ch or
3.1ch DVDs. Additionally, this effect may not work properly with some Dolby Digital DVDs other than 2.1ch or 3.1ch, depending on the software.
• Turn off other surround effects when using this virtual surround sound effect.
For your reference:
For optimum effect, it is recommended that the distance between the TV set and the
listening position be about 3 or 4 times the distance between the right and left front
speakers.
Differences between VSS 1 and VSS 2
VSS 1 VSS 2
Dolby Digital DVD
(2 ch)
Dolby Digital DVD
(3-5.1ch) (Surround
signal recorded)
It sounds as if sound were
heard from the front speakers
located at a wide separation.
It sounds as if sound were
heard from nonexistent surround speakers.
It sounds as if sound were
heard from the front
speakers located at an
even wider separation.
In addition to the effect
described on the left, it
sounds as if sound were
heard from the front
speakers located at a
widely separated position.
35
Page 37

DVD O
PERATION
DVD Operation
Volume Adjustment in DVD Mode
Follow these steps to adjust volume in the DVD mode.
1. Press the TV MODE on the remote control.
2. Press the VOL tu buttons on the remote control to adjust the volume.
3. Press the DVD MODE button on the remote control to return to DVD operation.
Note: Volume can also be adjusted by pressing the VOL
General information about On-Screen Menu Icons
The DVD player in this unit features On-Screen Menu Icons providing various functions. A banner will be displayed on the television screen by pressing the DISPLA Y on
the remote control. Operating the cursor buttons and ENTER button on the remote
control will show the following disc information:
• Title/chapter/track numbered playing time, audio/subtitle language, and angle.
• Player information such as repeat play, play mode, marker, Virtual Surround
Sound, etc.
Common procedures
Press DISPLAY button during Play or in the STOP mode.
Each time this button is pressed, the following display sequence appears on-screen:
tu
buttons on the front control panel.
36
1:56:37 1 48k 16b
OFF OFF
PCM
ENG
*****
2
ON
ENG
1
1. Press the cursor buttons tu to sel ect the preferred item. The selected item is
indicated by the yellow frame on the On-Screen Menu Icons.
2. Press the cursor buttons pq to sele ct the prefe rred setti ng. For some ite ms, th e
selection will be registered immediately; for others, ENTER or PLAY must be
pressed. When numbers are displayed in the on-screen menus, the numeric
buttons are also effective for selecting instead of the cursor buttons (pq).
3. Press RETURN or CANCEL to clear the three different styles for On-Screen Menu
Icons.
Page 38

DVD Setup Menus
Using the DVD SETUP menus, you can pre-program the following choices:
1. Disc Languages
2. Ratings Level
3. Menu Languages
4. On-Screen Messages
5. TV Aspect
6. Digital Audio Output
7. Other Settings
Procedure
• Press the TV button on the remote control.
•Press ACTION/ENTER button to display the Main Menu.
•Press pq or tu button to highlight the DVD SETUP Icon.
•Press ACTION/ENTER button to display the DVD SETUP menu.
•Press DVD button on the remote control and stop the disc (if playing).
• Press the cursor buttons pq to select the preferred item and press ENTER to display
the sub-menus of the preferred item.
1 Disc Languages
2 Ratings
3 Menu Language
4 On-Screen Messages
5 TV Aspect
6 Digital Audio Output
9 Other Settings
Press RETURN to exit
Level 8
English
4:3
DVD S
ETUP MENUS
Disc Languages
•Press RETURN repeatedly to exit menus.
This menu selects the audio sound track language, sub-title language and the language used in the menus of DVD menus. The same settings will be used for every
disc to be played back.
Procedure
• In DVD SETUP menu, press pq buttons to highlight DISC LANGUAGES.
• Press ACTION/ENTER button to display the sub-menu.
•Press p or q button to select the Audio, Subtitle or Menus.
Disc Languages
1 Audio
2 Subtitle
3 Menus
Press RETURN to exit
Original
French
English
• Press ACTION/ENTER button to enter your selection.
• To select a non-listed language, select OTHER ****, then refer to the language
codes in back of this manual.
• Press the NUM button, then use the 0~9 button to enter code.
• Press CANCEL if an incorrect language code is entered.
• Press RETURN to exit the Disc Languages sub-menu.
37
Page 39

DVD S
ETUP MENUS
Ratings Level
The Ratings Level menu lets parents set a specified rating level. If the rating level of
the disc is higher than the preset level, playback of the disc is prohibited.
Procedure
• In DVD SETUP menu, press p or q button to highlight Ratings.
• Press ACTION/ENTER button to display Ratings menu.
•Pressp or q button to select the preferred rating level.
• Press ACTION/ENTER button to enter your selection.
Ratings
Please set a rating limit
8 No Limit
7
6
5
4
3
2
1
0 Lock All
Press RETURN to exit
Following is the explanation of Rating Levels:
Level 8 All DVDs can be played back. (Factory preset)
Level 7 to 2 DVDs for general audiences/children can be played back. (DVDs for
adults are prohibited .)
Level 1 DVDs for children can be played back. (DVDs for adults/general audi-
ences are prohibited.)
Level 0 (Lock All) Playback of DVDs are prohibited (e.g. playback of DVDs for adults
which are not encoded with rating level information).
• When a level 7 or lower is selected, an on-screen display appears and prompts
you enter a four digit code. Press NUM key and the 0 - 9 number keys on the
remote control to enter the four digit code. Make sure to remember this code.
You’ll need to input this code to change the rating level if you decide later.
• Press ENTER to activate your rating level selection.
The rating is locked. Any disc whose rating is higher than the setting cannot be played
back unless the correct password (4-digit code) is entered.
When the player is locked and you wish to play a DVD whose rating is different than
the rating level you selected, enter the four digit secret code, press ENTER, and the
following menu appears on the screen.
Ratings
1 Unlock Player
2 Change Password
3 Change Level
4 T emporary Unlock
Press RETURN to exit
38
Page 40

Rating Level (cont.)
To unlock the player follow the procedure below.
Procedure
• Highlight Unlock Player, then press ENTER.
• Highlight Change Password and press ENTER. Enter a new password and press
Note: Press NUM key and 0 - 9 number keys on the remote control to enter the four digit
• Highlight Change Level and press ENTER.
• Select a new rating by usin g p or q button, then press ENTER.
T o unlock the player temporarily
• Highlight Temporary Unlock and press ENTER. The player is unlocked tempo-
ENTER twice.
passw ord .
rarily only for the disc.
Ratings
Enter your 4-digit password,
then press ENTER.
****
Press RETURN to exit
DVD S
ETUP MENUS
Selecting language of On-Screen display menus
This menu lets you to select the language to be used to display the on-screen menus.
Procedure
• In the DVD SETUP menu, press p or q button to highlight Menu Languages.
• Press ACTION/ENTER button to display the sub-menu.
Select the language
for these Menus.
1 English
2 Français
3 Español
Press RETURN to exit
• Press p or q button to select English, Français or Español.
• Press ACTION/ENTER button. Initial setting menu is displayed.
39
Page 41

DVD S
ETUP MENUS
On-Screen Messages
This menu lets you decide whether “Play”, “Still”’ and other on-screen displays will be
displayed or not. It also lets you select the color and positioning of displays.
Procedure
• In the DVD SETUP menu, press p or q button to highlight On-Screen Mes-
sages.
• Press ACTION/ENTER button.The following sub-menu is displayed.
On-Screen Messages
1 On-Screen Messages
2 Color and Position
Press RETURN to exit
On
Blue
• Press p or q button to select the preferred item and press ENTER.
• If On-screen Message is highlighted, select On or Off.
• If Color and Position is selected, make your selection from the screen displayed
on-screen.
On-Screen Messages
Color and Position
1
2
3
4
5
6
Blue
Violet
Green
Blue
Violet
Green
Press RETURN to exit
• Press ACTION/ENTER button to enter your selection.
• Press RETURN to exit the menu.
40
Page 42

TV Aspect
This menu lets you select the aspect ratio of your television. Select 4:3 (conventional
TV) or 16:9 (wide screen).
Procedure
• In the DVD SETUP menu, press p or q button to highlight TV Aspect.
• Press ACTION/ENTER button to display the sub-menu.
• Press p or q button to select either 4:3 or 16:9.
• Press ACTION/ENTER button to enter your selection.
Note: When AUTO ASPECT is ON and the TV As pect i s set to 16:9, a DVD disc in
Digital Audio Output
This menu lets you select the digital output to be outputted from the optical digital
audio output connector of the TV set.
Select your TV aspect
4 : 3
1
2
16 : 9
Press RETURN to exit
DVD S
ETUP MENUS
widescreen mode (squeeze or anamorphic widescreen) will be played back in
vertical compressed 16:9 mode.
Procedure
• In the DVD SETUP menu, press p or q button to highlight Digital Audio Output.
• Press ACTION/ENTER button to display the sub-menu.
Digital Audio Output
1 PCM Down Conversion
2 Dolby Digital
3 DTS Digital Surround
Press RETURN to exit
No
Bitstream
Off
• Highlig ht PC M Down Conv ersion (It em 1) . Pres s ENTER to display the sub-menu.
Select either No or Yes.
• Press ACTION/ENTER button.
• Highlight Dolby Digital. Press ACTION/ENTER button to display Dolby Digital
sub-menu.
• Select either Bitstream or PCM.
Example: in the case of the P-Picture
If Bitstream is selected, Dolby Digital bitstream (6 Ch) is output during playback of
DVDs recorded in the Dolby Digital. (Factory preset)
Use this setting when the audio output is connected to the Dolby Digital Decoder.
41
Page 43

DVD S
ETUP MENUS
Digital Audio Output (cont.)
If PCM is selected the digital audio is converted to PCM (2ch) of 48kHz/16 bit and is
output during playback of DVDs recorded in the Dolby Digital.
• Press ACTION/ENTER button.
• Highlig ht DTS Digital Surr ound.
• Press ACTION/ENTER button to display sub-menu.
• Select either Off or Bitstream.
Off - No digital audio is output from the Dolby Digital output jack during playback of the
DVDs recorded in DTS. (factory preset)
Bitstream - DTS bitstream is output from the Dolby Digital audio output jack during
playback of the DVDs recorded in DTS. Select this setting when the player is connected to a DTS decoder.
• Press ACTION/ENTER.
Other Settings
This menu lets you perform other special features of the DVD player.
Procedure
• In the DVD SETUP menu, press p or q button to highlight Other Settings.
• Press ACTION/ENTER button to display the sub-menus.
Other Settings
1 Still Mode
2 Audio during Search
3 TV Mode (4:3)
4 D. Range Compression
5 Still Picture Display
6 Black Level Control
Automatic
On
Pan&Scan
Off
Off
Lighter
42
Press RETURN to exit.
Still Mode
Lets you select Automatic, Field or Frame still. In Automatic mode, Field still and
Frame still are automatically selected (Factory preset). Field still or Frame still prevents jittering from occurring or let the small text or fine patterns seen clearly in the still
picture mode.
Audio During Search
This menu lets you decide whether you want hear the audio during search at the initial
scan speed.
Procedure
• In the Other Settings menu, press p or q button to highlight Audio During
Search.
• Press ACTION/ENTER button to display the sub-menu.
• If you wish to hear audio during initial search, select On.
• If you do not wish to hear the audio during initial search, select Off.
• Press ACTION/ENTER button after you have made the choice.
Page 44

Other Settings (Cont.)
TV Mode
Select either Pan & Scan or Letterbox.
Pan & Scan: The video material for a wide-screen will be played back in the Pan &
Scan style on a conventional television.
Note: Video material not formatted in the Pan & Scan style will be played back in the
letterbox style.
Letterbox: The video material for a wide-screen will be played back in the letterbox
style with black bars top and bottom on the screen.
D. Range Compression
Select D.(Dynamic) Range Compression Off or On.
Off mode is selected to hear the normal audio range.
On mode is selected to listen to dynamic sound even on low volume. Dynamic range
is the difference in volume between the quietest and loudest sounds heard. Dynamic
compression limits the level for listening at low volume. This is useful late at night, for
example.
Other Settings
TV Mode (4:3)
1 Pan & Scan
2 Letterbox
Press RETURN to exit
DVD S
ETUP MENUS
Note: This function only works with Dolby Digital DVD.
Still Picture Display
This menu is used to select the type of still picture displayed on the screen. Select
either Off or On.
If Off mode, the picture type (I/P/B) will not be displayed on the TV screen in the still
picture mode. (Factory preset)
If On mode is selected, the picture type (I/P/B) will be displayed on the TV screen in
the still picture mode.
For your reference:
When On is selected in the Still Picture Display, the following screen is displayed in
the still picture mode.
43
Page 45

DVD S
ETUP MENUS
Explanation of I/P/B
The MPEG 2 standard adopted for DVD uses the following 3 picture types for the
coding of each picture (frame) on the TV screen.
• I-Picture (Intra coded picture)
This is the standard picture type, and each picture is coded separately. Since it
features the best picture quality, it is recommended that the screen be frozen with
I-Picture when the picture quality is to adjusted.
• P-Picture (Predictive coded picture)
This picture type is computed on the basis of a past I-Picture or P-Picture.
• B-Picture (Bidirectionally-predictive coded picture)
This picture type is computed by comparing the previous and subsequent I-Picture or
P-Picture. It has the lowest volume of information.
Black Level Control
This menu lets you select the black level of the picture, “Lighter” or “Darker”.
Procedure
• In Other Settings menu, press p or q button to select Black Level Control.
• Press ACTION/ENTER button to display the sub-menu.
• Press p or q button to select either Lighter” or “Darker”.
• Press ENTER.
• Press RETURN repeatedly to exit the DVD SETUP menu.
44
Page 46

LANGUAGE CODE LIST
LANGUAGE CODE LIST
Enter the appropriate code number for the initial settings “Audio”, “Subtitle” and/or
“Menus”.
Code Language Code Language Code Language Code Language
6565 Afar 7079 Faroese 7678 Lingala 8375 Slovak
6566 Abkhazian 7082 French 7679 Laothian 8376 Slovenian
6570 Afrikaans 7089 Frisian 7684 Lithuanian 8377 Samoan
6577 Ameharic 7165 Irish 7686 Latvian, Lettish 8378 Shona
6582 Arabic 7168 Scots Gaelic 7771 Malagasy 8379 Somali
6583 Assamese 7176 Galician 7773 Maori 8381 Albanian
6588 Aymara 7178 Guarani 7775 Macedonian 8382 Serbian
6590 Azerbaijani 7185 Gujarati 7776 Malayalam 8385 Sundanese
6665 Bashkir 7265 Hausa 7778 Mongolian 8386 Swedish
6669 Byelorussian 7273 Hindi 7779 Moldavian 8387 Swahili
6671 Bulgarian 7282 Croatian 7782 Marathi 8465 Tamil
6672 Bihari 7285 Hungarian 7783 Malay 8469 Telugu
6678 Bengali, Bangla 7289 Armenian 7784 Maltese 8471 Tajik
6679 Tibetan 7365 Interlingua 7789 Burmese 8472 Thai
6682 Breton 7378 Indonesian 7865 Nauru 8473 Tigrinya
6765 Catalan 7383 Icelandic 7869 Nepali 8475 Turkmen
6779 Corsican 7384 Italian 7876 Dutch 8476 Tagalog
6783 Czech 7387 Hebrew 7879 Norwegian 8479 Tonga
6789 Welsh 7465 Japanese 7982 Oriya 8482 Turkish
6865 Danish 7473 Yiddish 8065 Panjabi 8484 Tatar
6869 German 7487 Javanese 8076 Polish 8487 Twi
6890 Bhutani 7565 Georgian 8083 Pashto, Pushto 8575 Ukrainian
6976 Greek 7575 Kazakh 8084 Portuguese 8582 Urdu
6978 English 7576 Greenlandic 8185 Quechua 8590 Uzbek
6979 Esperanto 7577 Cambodian 8277 Rhaeto-Romance 8673 Vietnamese
6983 Spanish 7578 Kannada 8279 Romanian 8679 Volapük
6984 Estonian 7579 Korean 8285 Russian 8779 Wolof
6985 Basque 7583 Kashmiri 8365 Sanskrit 8872 Xhosa
7065 Persian 7585 Kurdish 8368 Sindhi 8979 Yoruba
7073 Finnish 7589 Kirghiz 8372 Serbo-Croatian 9072 Chinese
7074 Fiji 7665 Latin 8373 Singhalese 9085 Zulu
45
Page 47

T
ROUBLESHOOTING CHART
- TV
Troubleshooting Chart - TV
Before calling for service, determine the symptoms and follow suggested solutions.
A
UDIO
V
IDEO
Solutions
Adjust Antenna Location and Connection
Noisy Audio
Noisy Audio
Noisy Audio
No Audio
Noisy Audio
Snowy Video
Multiple Image
Interference
Normal Video
No Video
?
No Audio
Normal Audio No Color
No Video
No PIP
Adjust Antenna Location and Connection
Check Antenna Lead-in Wire
Move TV from Electrical Appliances, Lights, Vehicles,
and Medical Equipment
Increase Volume
Check Mute
Check TV SPEAKERS on/off
Change Channel
Set TV or Cable Mode Properly
Check Antenna Cables
Check Power Cord is Plugged into Active Outlet
Adjust Brightness and Audio Controls
Change Channel
Check Cable Connections
Program the Remote Control Again
Check Second Video Source Operation
Adjust Color Settings
Change Channel
46
Wrong Audio
Normal Audio Normal Video
Intermittent Remote Control Operation
Normal Video
Check Audio Is Set To Stereo Or Mono, Not SAP
Replace Remote Control Batteries
Page 48

Troubleshooting Chart - DVD
Before calling for service, determine the symptoms and follow suggested solutions.
S
YMPTOMS
Play fails to start even after PLAY
Can’t adjust Volume with remote
Play does not start even when title
Picture distorted during rapid
is pressed.
Play starts but then stops
immediately.
control while in DVD mode
No sound.
is selected.
advance or rapid reverse.
T
ROUBLESHOOTING CHART
Solutions
This player cannot play a disc other than DVD,
VIDEO CD and CD.
The disc may be dirty and may require cleaning.
Make sure that the disc is installed with the label side
facing up.
Press the TV Mode button, then press VOL buttons.
Press the DVD mode button to return to DVD
operation.
Make sure that the TV speakers are turned On.
If connected to stereo systems, check all the
connections and check the amplifier’s input selection.
Check the Ratings level setting. The disc has a
different rating than the one selected in the DVD
SETUP menu.
The picture will be somewhat distorted at times: this
is normal.
- DVD
No key operation (by the controls
on the TV set or remote control
unit) is effective.
No 4:3 (16:9) picture. Choose the correct TV aspect from the DVD SETUP
No on-screen display.
No subtitles
Angle cannot be changed. This function dependent on software availability.
Audio sound track and/or subtitle
language is not the one selected at
the initial settings.
Some operations may be prohibited by the disc.
menu.
The “Off” setting is selected for On-screen
Messages. Select “On” to view the On-screen
Messages.
Subtitles appear only with discs containing them.
Subtitle option turned Off. Select “On” from subtitle
sub-Menu.
Even if a disc has a number angles recorded, these
angles are for specific scenes only.
If the audio sound track and/or subtitle language
does not exist on the disc, the language selected at
the initial settings will not be seen or heard.
47
Page 49

N
OTES
48
Panasonic Consumer E lectro nics Co mp any,
Division of Matsushita Electric Corporation
of America
One Panasonic Way
Secaucus, New Jersey 07094
www.panasonic.com
(800) 222-4213
Panasonic de Mexico, S.A. de C.V.
Amores No. 1120
Col. del Valle C.P. 031000
México, D.F.
Tel. (915 ó 015) 488-1000
Fax (915 ó 015) 575-6763, 575-6765
Panasonic Sales Company, Division of
Matsushita Electric of Puerto Rico Inc.
(“PSC”)
Ave. 65 de Infantería, Km 9.5
San Gabriel Industrial Park Carolina,
Puerto Rico 00985
Tel. (787) 750-4300
Fax (787) 768-2910
 Loading...