

Page 1
Panasonic
Interactive Television
Operating instructions
CT-27D42
For sssiatanc«. ptoasacall: 1>600>211*PANA (7262) or
B«nd «-mail to: congumerproductsOpenaoonlc.com {USA only)
TQB2AA393-0 1 0710
PRINTED IN USA
Page 2

WARNING
/7\
/ y \
WARNING: To reduce the risk of electric shock do not remove cover or back.
No user-senriceable parts inside. Refer servicing to qualified service personnel.
RISK OF ELECTRIC SHOCK
DO NOT OPEN
A
/ • \
A
WARNING: TO REDUCE THE RISK OF FIRE OR ELECTRIC SHOCK, DO
ENVIRONMENTAL NOTICE:
TTie lightning flash with arrow
head within a triangle b
intended to tail the user that
parts inside the product are a
risk of electric shock to
persons.
NOT EXPOSE THIS APPARATUS TO RAIN OR MOISTURE.
THIS PRODUCT UTILIZES BOTH A CATHODE RAY TUBE (CRT) AND
OTHER COMPONENTS THAT CONTAIN LEAD. DISPOSAL OF THESE
MATERIALS MAY BE REGULATED IN YOUR COMMUNITY DUE TO
ENVIRONMENTAL CONSIDERATIONS. FOR DISPOSAL OR RECYCLING
INFORMATION PLEASE CONTACT YOUR LOCAL AUTHORITIES, OR THE
ELECTRONICS INDUSTRIES ALLIANCE: <
A
The exclamation point within a
triangle is Intended to tell the
user that important operating
and servicirtg instructiorts are
in the papers with the
appliance.
HTTP://WWW.EIAE.ORG>
Read these Instructions completely before operating television.
Contents are subject to change without notice or obligation.
Copyright 2002 by Matsushita Electric Corporation of America. All rights reserved.
Unauthorized copying and distribution is a violation of law.
Page 3

Table of Contents
Table of Contents
Important Information
..............................................
2
Congratulations......................................................... 3
Introduction....................................................................................... 3
Customer Record...............................................................................3
Care and Cleaning............................................................................. 3
Specifications.................................................................................... 3
Installation
Television Location.............................................................................4
Optional Cable Connections................................................................4
AC Power Supply Cord.......................................................................4
Cable / Antenna Connection................................................................4
Battery Installation..............................................................................5
Getting Started
Connecting To Analog Phone Line.......................................................6
Connecting Wireless Jack For Modems
Connecting To an Ethernet Broadband Source
Remote Control Operation
.................................................................
............................................................
...............................................
.....................................
..........................................
4
Wireless Keyboard Operation.................................... 8
TV Front Control Panel Operation
Optional Equipment Connections
Turning On The TV For The First Time
AC Plug In.......................................................................................13
License Agreement.......................................................................... 13
Auto Set Up.....................................................................................13
Earthlink Registration........................................................................14
Displaying Main Menu Icons..............................................................14
Main Menu Navigation......................................................................14
Setup For Different Users
..........................................
Parentai Control Rating Description Chart
Unlock Parental Control Menu...........................................................18
Main Menu Icon Features
TV Icon........................................................................................... 19
My Info Icon.....................................................................................24
E-Mail Icon...................................................................................... 24
Web Icon.........................................................................................24
.......................................
...........................
.............................
.....................
................
10
11
13
15
17
....19
PIP Remote Function Buttons
(When Main Picture Is TV)......................................25
PIP Operation (When Main Picture Is Earthlink
Home Page Or Web)
Keyboard PIP Buttons Operation....................................................... 27
..........................................
27
Troubleshooting Chart For Normal TV
Operation............................................................. 28
Troubleshooting Chart When Using TV For
Interactive Operation
.............................................
29
Limited Warranty.......................................................30
Customer Services Directory
....................................
32
Index........................................................................ 33
6
6
6
7
Page 4

iMPORTANT Information
Important Information
FCC INFORMATION
This equipment complies with part 68 of the FCC rules and the requirements adopted by the Administrative Council for Ter
minal Attachments (ACTA). On the back cover of this equipment is a label that contains, among other information, a prod
uct identifier in the format US: AAAEQ## TXXXX. If requested, this number must be provided to the telephone company.
Radio Interference
This equipment has been tested and found to comply with the limit for a Class B Digital Device, pursuant to Part 15 of the FCC
Rules. These limits are designed to provide reasonable protection against radio and television interference in a residential instal
lation. This equipment generates, uses and can radiate radio frequency energy and, if not installed and used in accordance with
the instructions, may cause harmful interference to radio communications. However, there is no guarantee that interference will
not occur in a particular installation.
If this equipment does cause harmful interference to radio or television reception which you can determine by turning the equip
ment off and on, tty to correct the interference by one or more of the following measures.
• Reposition or relocate the receiving antenna for the radio or television that is “receiving" the interference.
• Change the position of the Receiver with respect to the radio or television equipment that is receiving interference.
• Move the Receiver away from equipment receiving interference.
• Plug the Receiver into a different wall outlet so the Receiver and equipment receiving the interference are on different branch
circuits.
If these measures do not eliminate interference, please consult your dealer or an experienced radio/television technician
for assistance.
FCC CAUTION:
Pursuant to 47 CFR, Part 15.21 of the FCC rules, any changes or modifications to this Receiver not expressly
approved by Matsushita Electric Corporation of America could cause harmful Interference and would void the
user's authority to operate this device.
A plug and Jack used to connect this equipment to the premises wiring and telephone network must comply with the
applicable FCC Part 68 rules and requirements adopted by the ACTA. A compliant telephone cord and modular plug
is provided with this product. It Is designed to be connected to a compatible modular Jack that is also compliant
See Installation Instructions for details.
Ringer Equivalence Number
The REN is used to determine the number of devices that may be connected to a telephone line. Excessive RENs on a
telephone line may result in the devices not ringing in response to an incoming call. In most but not all areas, the sum of
RENs should not exceed five (5.0). To be certain of the number of devices that may be connected to a line, as determined
by the total RENs, contact the local telephone company. The REN for this product is part of the product identifier that has
the format US:AAAEQ##TXXXX. The digits represented by the ## are the REN without a decimal point (e.g., 03 is a REN
of 0.3). For earlier products, the REN is separately shown on the label.
Notes: This equipment may not be used on coin service provided by the telephone company. Connection to party line ser
vice is subject to state tariffs, and therefore, you may not be able to use your own telephone equipment if you are on a party
line. Contact the State Pubic Utility Commission, Public Service Commission, or Corporate Commission For Information.
Notice must be given to the telephone company upon permanent disconnection of your Receiver from your line.
Rights of the Telephone Company
Should this interactive television receiver cause harm to the telephone network, the telephone company will notify you in
advance that temporary discontinuance of service may be required. But, where prior notice is not practicable and the
circumstances warrant such action, the telephone company may temporarily discontinue service immediately. In case of
such temporary discontinuance, the telephone company must: (1) promptly notify you of such temporary discontinuance (2)
afford you the opportunity to correct the situation which gave rise to the temporary discontinuance and (3) inform you of
your right to bring a complaint to the Commission pursuant to procedures set forth in Subpart E of Part 68, FCC Rules and
Regulations if you believe it is necessary. If trouble is experienced with this interactive television receiver, for repair or
warranty Information, please refer to the information provided at the rear of this manual.
The telephone company may make changes in ifs communications facilities, equipment, operations or procedures where
such action is required in the operation of it’s business and not inconsistent with the rules and regulations in Part 68. If
these changes are expected to affect the use or performance of your telephone equipment, the telephone company must
give you adequate notice, in writing, to allow you to maintain uninterrupted service.
Alarm Dialing Equipment Caution:
If your home has specially wired alarm equipment connected to the telephone line, ensure that the installation of this
interactive television receiver does not disable your alarm equipment. If you gave questions about what will disable alarm
equipment, consult your telephone company or a qualified installer.
2*
Page 5

CONGRATULATiONS
Congratulations
Your new Interactive TV Receiver features a solid state chassis that is designed to give you many years of enjoyment. It
was thoroughly tested and tuned at the factory for best performance.
Introduction
The Interactive TV Powered by Telecruz Technology and the Earthlink service is intended to support the growing Interactive
TV market. This TV has built-in features including: a)access to the Internet, b)enable consumers to quickly access daily
“cached" information (news, sports, weather, customized user preferred information, etc.), c) e-mail capability, d) shopping
convenience, e) ATVEF compliant content.
Note: This interactive TV is not capable of downloading software from fhe internet. Some web pages on the internet may not be
viewable if the confenis requires a specified software to view them.
Consumers will be required to subscribe to Earthlink, the number two Internet service provider, for the dial-up or broadband
service for at least 12 months. The dial-up service is priced at $21.95 per month, and the DSL (Broadband) is priced at
$49.95 per month. The option exists to use the same account for the PCs as well as this new TV based product.
Customer Record
The model and serial number of this product are located on the back of the television. You should note the model and serial
number in the space provided and retain as a permanent record of your purchase. This will aid in identification in the event
of theft or loss. Product registration for U.S. customers is available at
Model
Number
www.prodreg.com/panasonic.
Serial
Number
L
Care and Cleaning
Screen (Turn TV Off)
• Use a mild soap solution or window cleaner with a soft clean cloth. DO NOT USE ABRASIVE CLEANERS.
• Avoid excessive moisture and wipe dry.
A/ote; Do not spray any type of cleaning fluid directly on the screen.
Cabinet, Wireless Keyboard and Remote Control
□ For cabinets, keyboard and rermte control, use a soft cloth dampened with water or a mild detergent solution. Avoid excessive
moisture and wipe dry.
□ Do not use benzene, thinner or other petroleum based products.
Specifications
Power Source
CT-27D42 (2.2A)
CT-27D42U (2.2A)
Channel Capability -181
Video Input Jacks 1 Vp-p, 75 Ohm, Phono Jack Type
Audio Input Jacks SOOmV RMS 47K Ohm
Audio Output Jacks
Component Input (Y/Pg/ P|0
120V AC, 60Hz
VHF-12; UHF-56; Cabte-113
0-2.0V RMS 4.7K Ohm
75 Ohms, Phono Jack Type
S-VIdeo Input Jacks
Modem Jack
Ethernet 10 Base-T jack
Specifications are subject to change without notice or obligation.
S-Video (Y-C) Connector
USOC RJ-11C, 4 Conductor
USOC RJ-45, 8 Conductor
3 •
Page 6
Installation
Installation
Television Location
Follow these recommendations before deciding the location of your Interactive television.
□ Avoid excessive sunlight or bright lights, including reflections.
□ Keep away from excessive heat or moisture. Inadequate ventilation may cause internal component failure.
O Fluorescent lighting may reduce remote control transmitting range.
G Keep away from magnetic equipment, including motors, fans and external speakers.
CAUTION: Use this television receiver oniy with the cart, stand, tripod, bracket, or table specified by the
manufacturer, or sold with the apparatus. When a cart is used, use caution when moving the cart/apparatus
combination to avoid injury from tip-over. In order to avoid injury to children, never place your television receiver
on a piece of furniture that is capable of being tilted by a child leaning on it, pulling on it. standing on it, or
climbing on it.
Optional Cable Connections
Shielded audio and video cables should be used between components. For best results:
G Use 75-ohm coaxial shielded cables.
G Use appropriate input and output connectors that match your component connectors.
G Avoid long cables to minimize interference.
AC Power Supply Cord
CAUTION: TO PREVENT ELECTRIC SHOCK MATCH WIDE BLADE OF PLUG TO WIDE SLOT OF AC OUTLET
AND FULLY INSERT. DO NOT USE A PLUG WITH A RECEPTACLE OR OTHER OUTLET UNLESS THE BLADE
CAN BE FULLY INSERTED TO PREVENT BLADE EXPOSURE.
PROTECT POWER CORDS FROM BEING WALKED ON, ROLLED OVER, CRIMPED, BENT OR PINCHED, PARTICULARLY AT
PLUGS, CONVENIENCE RECEPTACLES. AND THE POINT WHERE THEY EXIT FROM THE APPARATUS.
Cable / Antenna Connection
For proper reception, either a cable or antenna connection is required.
Cable Connection
Incoming C^le from
Connect the cable supplied by your local cable company.
Note: A cable converter box may be required for proper reception. Check with your local cable company for
compatibility requirements.
Antenna Connection
• For proper reception of VHF/UHF channels, an external antenna is required. For best reception, an
outdoor antenna is recommended.
» Connect home antenna to ANT on the back of television.
Note: Cable Mode is preset at the far^ory. Arrtenna users must change to TV mode in the Set Up Menu under
Prog Chan.
incoming came from
Battery Installation
Remote Control and Wireless Keyboard
Use two AA batteries:
Battery cover is located on back of keyboard and remote.
Remove battery cover.
Install batteries matching (+) and (-) polarity signs.
Replace the battery cover.
Note: Incorrect installation can cause battery leakage and corrosion that will damage the Remote Control or Wireless Keyboard.
Precautions
• Replace batteries in pairs.
• Do not mix battery t^s (zinc carixrn with alkaline).
• Do not recharge, heat, short-circuit, disassemble, or bum batteries.
1
Polarized plug
Cable Company
He
75 Ohm VHF/UHF
on back of TV
Home Antenna
Wireless Keyboard
Battery Cover
Page 7

S-VIDEO INPUT (REAR/FRONT)
[| ACCESSORY 1
Feature Chart
MODEL CT-27D42
Features
2 TUNER PIP
75 OHM INPUT
VIDEO PICTURE MEMORY
CHANNEL INFO BANNER
VIDEO INPUT SKIP □
INTERNET/EMAIL
V-CH/P CAPABILITY n
CLOSED CAPTIONING
VIDEO NORM □
AUDIO NORM o
STEREO
BASS/TREBLE/BALANCE
Al SOUND
A/VIN (REAR/FRONT)
COMPONENT VIDEO INPUT
PHONE JACK (RJ11)
ETHERNET JACK (RJ4S)
HEADPHONE JACK
WIRELESS KEYBOARD
PHONE CABLE □
PHONEX TRANSMITTER
PHONEX RECEIVER
Feature Chart
n
n
n
n
□
□
n
□
□
3 (2/1)
(1/0)
□
□
□
o
o
□
□
IMPORTANT INFORMATION REGARDING THE USE OF VIDEO GAMES, COMPUTERS, OR
OTHER FIXED IMAGE DISPLAYS.
WARNING: The marking or retained image on the picture tube resulting from viewing fixed image is
not an operating defect and as such is not covered by Warranty.
This television is designed to display constantly moving images on the screen. Continuous viewing
of stationary images such as letterbox pictures on standard screen TVs (with top/bottom bars), nonexpanded standard (4:3) pictures on wide screen TVs (with side bars shown on each side of an
image), stock market report bars (ticker running at the bottom of the screen), video game patterns,
fixed scoreboards, bright station logos, on-line (internet) or repetitive computer style patterns should
be limited.
The extended use of fixed image program material can cause a permanent picture tube damage,
shown as a “shadow image" viewable on normal programs. This type of irreversible picture tube
deterioration can be limited by performing the following steps:
• Do not display the fixed image for extended periods of time.
5 •
Page 8
Getting Started
Getting Started
Connecting to Analog Phone Line
Plug in an analog phone line into the RJ-11C phone 4 conductor located in the rear panel of the receiver. This is the upper
rectangular jack located in the jack pack area on the back panel of the receiver.
Located On Back Of Set
Connecting Wireless Jack for Modems
If the phone jack is located to far from the receiver to make connections, use the pair of wireless modules that is packed in
the carton with the receiver. To install, refer to the manual part # TQB2AA0410 located in the carton.
Connecting to an Ethernet Broadband Source
Plug In cable connected to an Ethernet source to the RJ-45 8 conductor on the receiver on the back panel. This is the
rectangular connector just below the RJ-11 phone jack. Make sure the cable for the phone connection is not plugged into
the RJ-45 connector on the back panel for the Ethernet connection.
Located On Back Of Set
6 •
Page 9
Remote Control Operation
Remote Control Operation
The remote control is designed to allow you to control not only the normal TV functions but also navigate links provided
from the interactive content displays.
Remote Keys Operation
MOVE
PIP
@
mm
SIZE SWAP
rai (Ml
PIP CHANNEL
© ©
Panasonic
Keys
POWER
QUIT
Non-Menu Operations
On/oft
Press to exH onscreen displays.
Menu Operations
MUTE TV Mute
Identifies the User that is
USER
TV/VIDEO
INFO
EMAIL
ACTION
CH UP
CH DOWN
VOL LEFT
VOL RIGHT
PAGE
UP/DOWN
WEB
0-9
R-TUNE
RECALL
BACK
RELOAD
FWD
MOVE
SIZE
SWAP
-
Press to select desire video input.
-
-
Upon direct channel entry, tunes to
channel.
Tunes to next higher number channel
Tunes to next tower number channel Navigation Down
Decreases the volume
Increase the volume
Press to page up or down while on-line.
-
Channel tuning
Tune to previously viewed TV chanrtel. Displays current TV settings (ex: SAP,
Channel Number, ratings).
While surfing the WEB, allows for
*t)aging” back to a previously viewed web
site.
While Surfing the WEB, allows for
“refresh” of a loading web page.
While surfing the WEB, allows the
consumer to fonward to a previously
viewed web page.
While in PIP mode, allows for the
quadrant movement of 1/16 or 1/4 PIP
window.
While in PIP mode, allows for the resizing
of the PIP FROM 1/16 to 1/9 window.
While in PIP mode, allows to SWAP
between TV as the main window, and
Internet as PIP or vice versa.
signed on to the Earthlink
Personal Start Page.
PIP Activates the PIP mode. -
PIP
CHANNEL
If TV video is in the PIP window, allows
for channel changing of the programs.
On/off
Press to exit menus
-
-
Displays Info Menu allowing
for access to the cached
informatbn.
Displays the Email menu,
aibwing for read, write of
email on-line or off-line.
Accepts entry (Enter)
Navigation Up
Navigation Left
Navigation Right
-
Displays Web Menu,
allowng for quit access to
the Internet.
Alphanumeric input
-
-
-
-
-
-
-
-
7#
Page 10
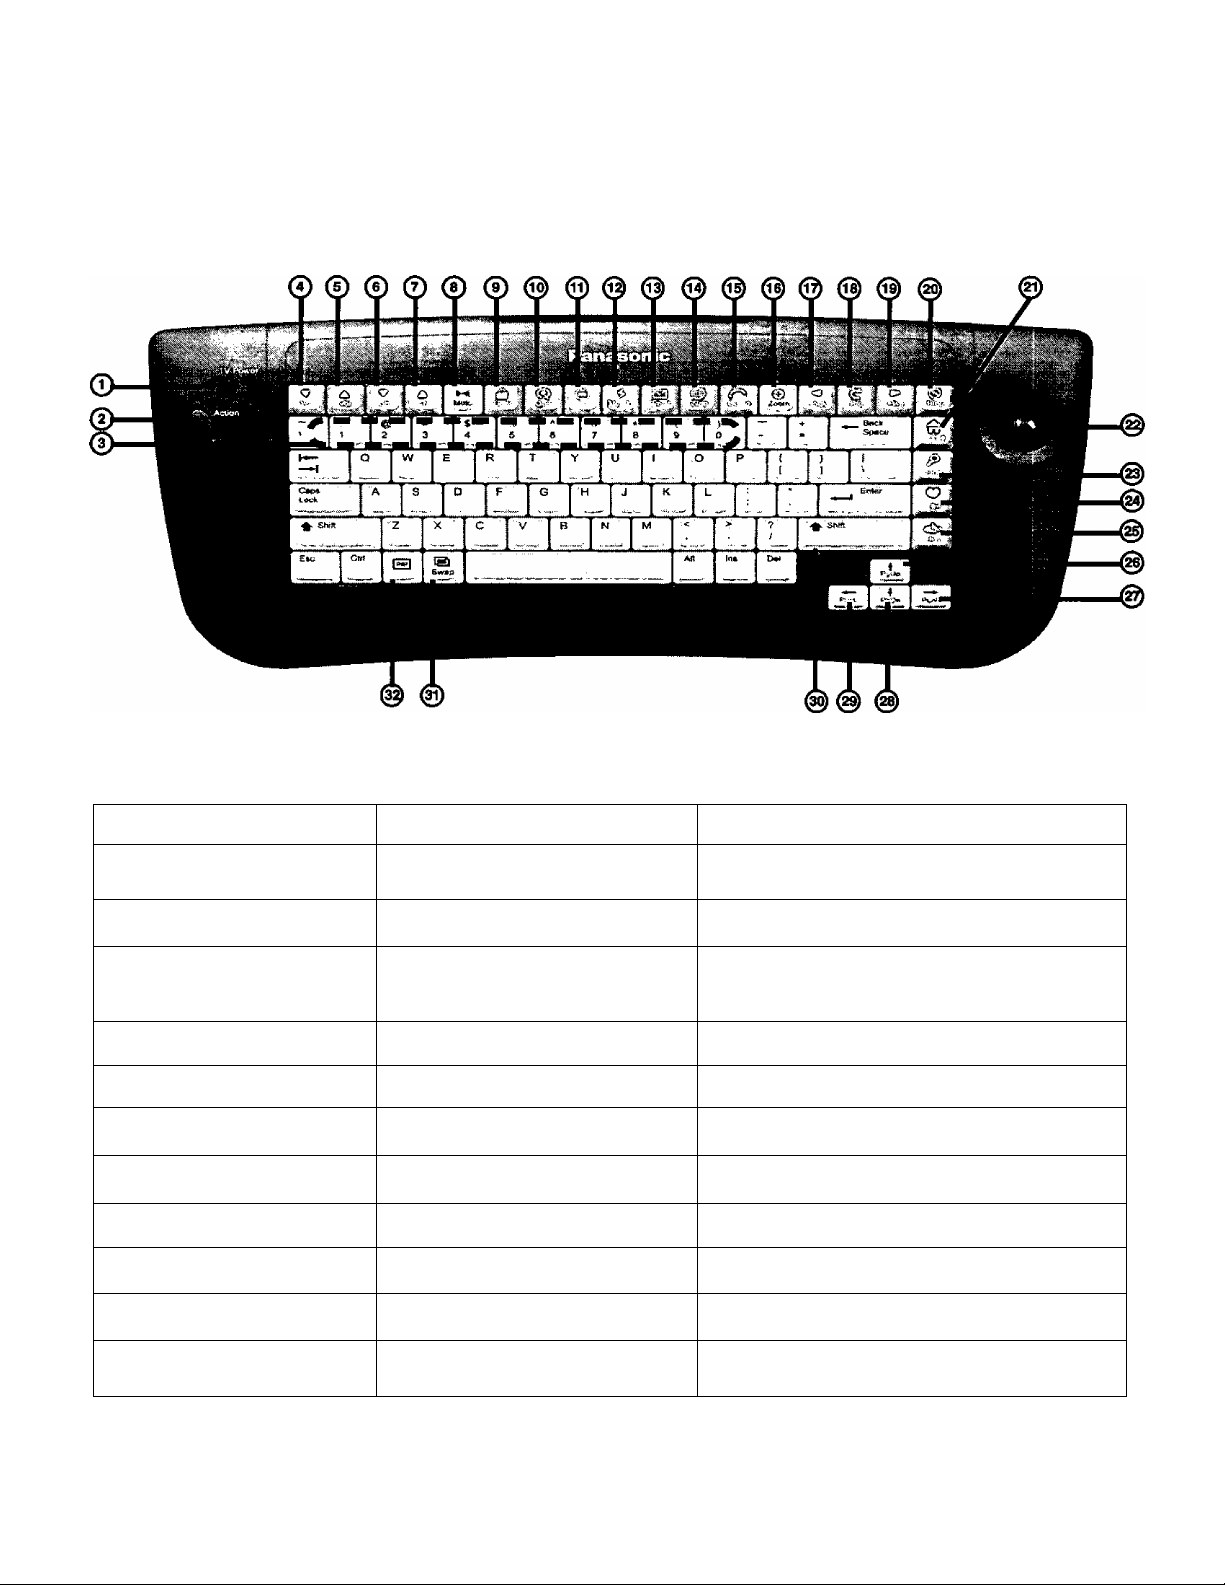
Wireless Keyboard Operation
Wireless Keyboard Operation
The wireless keyboard also provides the ability to not only control most TV functions but also to enter text into interactive
content pages and to navigate the on-screen with the trackball mounted on the wireless keyboard.
Keys
O TV POWER
© ACTION
© 0-9
© VOL DOWN
© VOL UP
© CHDOWN
© CHUP
© MUTE
© USER
® QUIT
® TV
Wireless Keyboard Operation
Non-Menu Operation
On/off
-
select channels
Note: Press and hold ALT key,
then press number keys.
Increases the volume
Decreases the volume
Times to next lower number
channel.
Tunes to next higher number
channel.
Mutes Audio from the TV
-
-
-
Menu Operation
On/off
Activate Menus
While menus are displayed
Alphanumeric Input
-
-
-
-
-
Identifies the User that Is signed on to the
SystemA’ersonal Start Page.
Exit from the Web mode or onscreen
menus.
TV Menu selection allowing for access to
the sub menus for TV control.
8 •
continued on next page
Page 11

continued from previous page
Wireless Keyboard Operation
WiRELESS Keyboard Ope rati on
@ MY INFO
® E-MAIL
® WEB
® GOTO
® ZOOM
® BACK
® RLD
® FWD
@ STOP
@ HOME
Keys
Non-Menu Operation
-
-
-
Enables the Go to screen allowing for entry
of a web address. The go to screen should
always have the httor/Awww prefix.
While web surfing, enables the user to
Zoom in and out of a web page area of
interest.
While surfing the WEB, allows for **paging**
back to a previously viewed web site.
While Surfing the WEB, allows for “refresh”
of a loading web page.
While surfing the WEB, allows the
consumer to forward to a previously viewed
web page.
While surfing the Internet, can STOP the
loading of a web page.
While connected to the Internet, the
Earthlink Personal Start Page Is accessed.
Menu Operation
Displays Info Menu allowing for
access to the cached information.
Displays the Email menu, allowing
for read, write of email on-line or
off-line.
Displays Web Menu, allowing for
quick access to the Internet and
Earthlink Personal Start Page.
-
-
-
-
-
-
-
@ TRACKBALL
@ FIND
@ FAV
® HIST
@ PGUP
@ PANR
@ PGDN
® PANL
@ ENTER
® SWAP
® PIP
On-Screen Navigation
Quick pop-up menu enabling the user to
search for specified text while connected to
the Internet
Displays list of Internet Favorite web sites.
Activates the listings of previously viewed
pages up to 5 days.
Pages up an Internet page.
Navigates Right
Pages Down an Internet page.
Navigates left
-
While In PIP mode, allows to SWAP between
TV as the main window, and Internet as PIP
or vice versa.
Activates the PIP mode.
On-Screen Navigation
-
-
-
-
-
-
-
-
Displays On-Line symbol when
connected to the Internet and full
screen video is displayed.
-
9*
Page 12

TV Front Control Panel Operation
TV Front Control Panel Operation
POWER ^VOLUME^ ▼ CHANNEL A ACTION TV/VIDEO
^ ^ ^ ^ i ^ ^
Keys Non-Menu Operation
© POWER
© VOLUME DOWN
© VOLUME UP
© CHANNEL DOWN
© CHANNEL UP
® ACTION
© TV/VIDEO
KPJ VIDEOS L-AUDIOIN-R
©'© 0 ©'
Front Control Panel Operation
Menu Operation
On/off
Increases the volume
Decreases the volume
Tunes to next lower number channel Highlight menu features
TUnes to next higher number channel
Activates №e Menu system as
-
To select the desired input
<RF, Video 1,2,3, S-Video 2 or Component)
well as confirms a selection
(Enter).
On/off
Adjust or Activate features
Adjust or Activate features
Highlight menu features
-
© HPJ
© VIDEO INPUTS
10*
Use for connection of external headphones -
Use for connection of an external device
(ex: game machine, VCR, Camcorder).
-
Page 13

Optional Equipment Connectíons
Optional Equipment Connections
Connecting Video Signals Sources
RF/Channel 3/4 (from antenna, cable or satellite box, or VCR)
Plug in cable from your antenna, cable or satellite box or VCR Channel 3 or 4 output to the ANT input connector. This
connector has threads to allow a screw on cable connector to be used.
CABLES NOT SUPPLIED
Video Signal
Sources
TERMINALS ON BACK OF TV
VCR Connection
VCRs, video disc players, video game equipment, and DSS equipment can also be connected to the video inputs jack. See
the optional equipment manual for more information.
Procedure
1. Connect equipment as shown to rear Audio/Video input jacks.
2. Select the Video mode by pressing TV/VIDEO button.
Notes:
* VIDEO 1 input is a dual-purpose input. It is primarily intended for connection with 480Í devices such as a DVD player using
the Y Pq Pp component video jacks and Audio L & R jacks. However, it can also be connected to conventional composite
video sources such as a VCR, using only the Y/Video jack and Audio L & R jacks. The on-screen label will display
Component or Video 1 depending on which source is connected.
• S-Video (input 2) provides a higher quality video input signal to the TV. The audio from the source can be connected to
INPUT 2 L and R audio.
TERMINALS ON BACK OF TV
11 •
Page 14

Optional Equipment Connections
Amplifier Connection (To Audio Amp)
Connect to an external audio amplifier input for listening to a stereo system.
Note: TO AUDIO AMP terminals cannot be connected direcdy to external speakers.
Audio Adjustments
1. Select TV SPEAKERS ON from AUDIO menu.
2. Set amplifier volume to minimum.
3. Adjust TV volume to desired level.
4. Adjust amplifier volume to match the TV.
5. Select TV SPEAKERS OFF&VAO from AUDIO menu.
6. Volume, mute, bass, treble and balance are now controlled from the TV.
Note: In OFF&FAO the volume is controlled by the external amplifier.
TERMINALS ON BACK OF TV
Digital TV - Set-Top Box (DTV-STB) or DVD Player Connection
Use this diagram to connect the Panasonic DTV-STB (Digital TV-Set-Top Box) to the back of your TV.
TERMINALS ON BACK OF DTV-STB OR DVD PLAYER
S-V1[K0
(input 2)
V
FWWjraOL
® <§>
------P,------
<3) @ ®
CABLES NOT SUPPLIED
P„
S-VIDEO
©L
[-TO AUDIO
R AMP
COMPONENT VIDEO INPUT TERMINALS ON BACK OF TV
Notes:
□ There are three video inputs, Y, Pq, and Pp|. Separate component color inputs provide luminance and color separation. Use the L
(left) and R (right) audio from Inputsl.
□ Select DTV-STB to 4801 output mode. TV set can receive 4801 signal only.
12
Page 15

Turning On The TV for the First Time
Turning On The TV for the First Time
AC Plug In
After making all the appropriate connections described on previous pages, plug in the AC line cord. There Is an initialization
period of 10-15 seconds after the AC line cord is plugged in before the TV will respond to a POWER ON command from
the front panel, remote control, or wireless keyboard POWER keys.
License Agreement
Please carefully read the terms and conditions of this software agreement before continuing.
□ Press and hold Action button on Keyboard, then use trackball arrow to view
more license agreement text.
□ After reading Licence Agreement, click on I Accept at the bottom of the
screen.
Note: This Licence Agreement is located under the Web
Icon in the About menu.
Auto Set Up
For your convenience. Auto Set up menu will be displayed on screen when the set is turned on for the first time. If needed,
follow the menus and procedures for setting up the features.
□ MODE - To select TV (antenna) or CABLE mode depending on the signal source.
Auto Setup
Please Connect Antenna First
Kgaaa
Auto Program
I EXrr ]
o 'Action" to Exit
O AUTO PROGRAM - To automatically program all channels with a signal.
Auto Setup
Rease Connect Antenna Rrst
Mode
Auto Program
EXTT
0 "Action" to Exit
□ Press VOL ► to select TV or CABLE.
Note: To exit highlight EXIT with the traci<ball, then press the
ACTION on the keyboard or press the ACTION on the
remote.
□ Press VOL ► to start Auto Programming.
Note: To cancel select (“Action’' to cancel)
with trackball, then press Action on
the keyboard or press Action on the
remote.
Auto Program
Channel - # NotFound
Channels Found 0
Progress I i 1111111111111111111 i I
o "Actìon" to Cancel
13
Page 16

Turning On The TV for the First Time
Earthlink Registration
After turning on TV and setting up Auto set up, an Earthlink Registration page will appear on-screen over the video
selected. The Earthlink Registration Page will continue to appear each time the TV is turned on until a registration process
is completed. If you decide to register later, just exit the screen by pressing QUIT. If you decide to register during TV
viewing, press Wed button on keyboard or remote and select Set-Up menu.The registration is done through the modem
connection, even for an existing Earthlink DSL customer. This allows Earthlink to identify the Panasonic TV when Internet
access is requested. Earthlink can then download content pages that have been created specifically for a TV display, using
personalization information from the Earthlink databases selected for each user, based on the user’s profile of favorites
which will be filled out at the time of registration.
Earthlink Registration
Displaying Main Menu Icons
The Main Menu Icons provides access to the features of the TV. The Main Menu may be displayed by the following
methods:
• Pressing the ACTION, INFO, MAIL or WEB button on the remote control.
• Pressing the TV, INFO, MAIL or WEB button on the wireless keyboard.
• Pressing the ACTION button on the TV.
Main Menu Navigation
With the Wireless Keyboard
Using the trackball on the wireless keyboard, and moving the cursor over the icons with the trackball, causes drop downs to
appear below each of the Icons. These drop downs contain options related to the selected Icons. As the cursor moves over
the drop downs, each function is highlighted as the cursor moves over it. Pressing the ACTION button while each feature is
highlighted, will then cause that function to be initiated.
With the Remote Control Hand Unit
Using the Volume UP and Volume DN keys will move the highlight from one of the icons to the next adjacent one, triggering
the drop down items associated with that icon.
With the TV Front Panel Keys
Using the Volume UP and Volume DN buttons will move the highlight from one of the icons to the next adjacent one,
triggering the drop down items associated with that icon.
To Exit Main Menu
Highlight EXIT with the trackball on the keyboard or the remote navigation buttons, then press the Action button.
14
Page 17

Setup For Administrator And Different Users
Setup For Administrator And Different Users
With the Main Menu display active, highlight the USER icon under the word “Welcome” at the left of the Main Menu. Initially
this icon will have the word “Family” displayed. Then press the Action to display the Users and Administration menu.
User Icon
Users And Administration Screen
First an Administrator function needs to be set up by having the user assigned to be the administrator.
1. From the Users and Administration screen, click on Admin. This will display a sub menu for entering the Administrator
password.
Users and Administration
Password:
Click on Admin to
Family
display sub menu.
OK
fCancel
Current User: Family
2. Use the keyboard to enter password, then verify password by entering the password word again {Use a passvrord that Is easy
to remember and record It In a safe place).
Note: After turning set off the user wifi default to ktmily. The family setting will be the same as the user with the most
prohibited setting.
3. Click on “OK” when password is completed, another sub menu will be displayed to remind you that this password is permanent.
4. Click on “Yes” to display the Administrator Set up screen.
Users and Administration
IMPORTANT
Action is permanent. Is
this password OK?
rW1 [No"
Click on Yes to display the
New Users set up screen.
Password:
Admin
User List -»[t New User
Name: <
I
-------
I—
>
_________
Password
Verify ,—
O E-Mail OK
...........
___
--------------) Web OK
__ _
_ _ _
; ("IghkIj
! Nan^n
;
15
Page 18

Setup For Administrator And Different Users
Adding New Users
A new user is setup by entering the name of the new user in the Name Box, entering a password in the Password and
Password Verify boxes below the name. Clicking on the WEB OK and EMAIL OK buttons in this display will enable the new
user to access the web and their web email account using the TV. Clicking on the TV Rating in this display will bring up an
additional screen that allows the Administrator to set the acceptable V-Chip TV ratings for this user to view various
programs that support the V-Chip rating system.
Note: Refer to Parental Control Rating Criarts section on page (17) for description of rating.
2. After setting Other click on “Done'’.
3. The Users and Administration will be displayed, then click on “OK".
4. The “Confirm add user" menu will be displayed, then click on “Yes”.
Note: The Administrator must also have a user name and password.
Comfirm Add User
Click on “OK” to display the
Confirm Add User menu.
5. To set up additional users name and separate passwords, repeat the process for “Adding New Users”.
Note; Each time a additional user is added, dick on "Admin’.
Are you sure you want
to add 'Children 1'?
16
No j I Cancel
Page 19

Parental Control Rating Description Charts
TV RATINGS CHART
Parental Control Rating DEscmPTiON Charts
TV-Y
All children. The themes and elements in this program are specifically
designed for a very young audience, including children from ages 2-6.
Directed to older children. Themes and elements in this program may
TV-Y7
TV-G
TV-PG
TV-14
TV-MA
include mild physical or comedic violence, or may frighten children under the
age of 7.
General audience. It contains little or no violence, no strong language, and
little or no sexual dialogue or situations.
Parental guidance suggested. The program may contain infrequent coarse
language, limited violence, some suggestive sexual dialogue and situations.
Parents strongly cautioned. This program may contain sophisticated
themes, sexual content, strong language and more intense violence.
Mature audiences only. This program may contain mature themes, profane
language, graphic violence, and explicit sexual content.
FV FANTASY/CARTOON VIOLENCE
V VIOLENCE
S SEX
L OFFENSIVE LANGUAGE
D DIALOGUE WITH SEXUAL CONTENT
OTHER RAVNGS MPAA CHART
G GENERAL AUDIENCES. All ages admitted.
PG
PG-13
R RESTRICTED. Under 17 requires accompanying parent or adult guardian.
N017 NO ONE 17 AND UNDER ADMITTED.
X
PARENTAL GUIDANCE SUGGESTED. Some material may not be suitable for
children.
PARENTS STRONGLY CAUTIONED. Some material may be inappropriate for
children under 13.
ADULTS ONLY.
CANADA ENGLISH RAVNGS CHART
C
ca+
G General programming, suitable for all audiences.
PG
14+
18 ADULTS ONLY
Programming intended for children under age 8. No offensive language,
nudity or sexual content.
Programming generally considered acceptable for children 8 years and over.
No profanity, nudity or sexual content.
Parental Guidance suggested. Some material may not be suitable for children.
Programming contains themes or content which may not be suitable for
viewers under the age of 14. Parents are strongly cautioned to exercise
discretion in permitting viewing by pre-teens and early teens.
17
Page 20

Parental Control Rating Descriptíon Charts
Parental Control Rating Description Charts (contd.)
General - Programming intended for audience of all ages. Contains
G
Sans +
16 ans -f
16 ans +
no violence, or the violence content is minimal or is depicted
appropriately.
8+ General - Not recommended for young children. Programming
intended for a broad audience but contains light or occasional
violence. Adult supervision recommended.
Programming may not be suitable for children under the age of 16 Contains frequent scenes of violence or intense violence.
Programming restricted to adults. Contains constant violence or
scenes of extreme violence.
CANADA FRENCH RATINGS CHART
GAME AND UNRATED CHART
Game
Unrated
Unlock Parental Control Menu
1. Select ‘Press Action to unlock” with trackball, then press Action button.
Note: Only the administrator password can unlock this menu.
Click on Admin, then enter administrator password.
2.
The administrator can now change setting to unlock.
3.
Locks out channel 3,4 and all Video Input modes.
CONTAINS NO RATING (NOT RATED) AND NA (NOT APPLICABLE)
PROGRAMS. Movie has not been rated or rating does not apply.
INPUT:
0
Press » "Action" to unlock
LOCKED
18
Page 21

Main Menu Icon Features
Main Menu icon Features
TV Icon
□ Programs - The Programs submenu will enable the user to connect to the Internet and View
a TV Guide via the Internet.
□ Listings - The Listings submenu will enable the user to connect to the Internet and to view
listing from the cable company in the area.
n Setting - The Settings drop down will enable the TV settings series of menus beginning with
the Timer menu.
□ Infoactive - This menu will enable the user to be notified about on-line content.
Settings
Timer
When the Timer Icon is highlight, pressing the Channel Down key will move the highlight to Time Set Mode." Pressing
the Channel down key again will move the highlight down to the next item on the menu, Time (hh.mm)" Subsequent
presses of the Channel Down key will continue to move the highlight to the next successive items on the menu (Date,
Sleep Timer, etc.). Pressing the Channel Up key will move the highlight up to the menu item directly above the current
highlighted function.
TV Settings
O Time set Mode - Press VOL buttons to select MANUAL or AUTO.
D Sleep Timer - Select to turn television off in 30, 60 or 90 minutes.
Select NO to turn off timer.
□ On/off Timer -To turn the television on and off at selected times, on
selected channels. TIME of day must be entered to operate the
Timer Program feature.
NotB: Highlight Exit, then press Action button to exit menu.
/Tltnar
Tim» Set Mode
Timo (hh:nun)
Date (mm:dd:yy)
Sleep Timer
On/Off Timer
OnTime(hh:mm)
OKTime(hh:mm)
OnChar^
^ * Move - - Ar^ust
P!K
EXIT.
Win
1 Manual 1
off
- -
- -
off
3
J
5
Audio
□ Audio Mode - Select STEREO, SAP (Second Audio Program) or
MONO. (Use MONO when stereo signal is weak.)
G Bass - Increase or decrease the low frequency response.
□ Treble - Increase or decrease the high frequency response.
□ Balance - Emphasize the lefVright speaker volume.
O Surround - Enhances audio response when listening to stereo.
G Al Sound - Equalize overall volume levels across all channels. (At
sound is not available In VIDEO mode.)
G Speaker - Select to control audio from the TV speakers:
• ON - TV speakers operate normally.
• OFF & Variable Audio Out - TV speakers off - audio adjustable by
television.
• OFF & Fixed Audio Out - TV speakers off - audio adjustable by the
external amplifier only.
G Normal Settings - Reset BASS, TREBLE and BALANCE
adjustments to factory default settings.
Note: Highlight Exit, (hen press Action button to exit menu.
TV Settings
19*
Page 22

Main Menu Icon Features
Channel
□ Channel Caption - Provide labels for stations using up to four characters
for each station (see below for procedures).
□ Input Label - Lets you label the video input connections for onscreen
display (see next page for procedures).
□ Favorite Channel - After entering favorite channels and selecting
Channel Scan FAV, only favorite channels will be scan when pressing
channel Up/Down buttons (see page 22 for procedures).
□ Channel Scan - To scan ALL channels or Favorite channels when using
CH Up/Down buttons.
Note: Highlight Exit, then press Action button to exit menu.
Channel Caption Procedure
1. Press TV button on Keyboard.
2. Highlight SETTING on the drop down menu.
3. Press ACTION button to display TV Setting menu.
4. Highlight the Channel
5. Highlight Channel Caption
ACTION button to display the Channel Labeling menu (see menu 2).
6. Select desire channel number to apply Channel Labeling. Use trackball
or navigation buttons to select, then press ACTION button to display
Channel Labeling sub-menu (see menu 3).
7. Highlight first dash, then press CH Uptown or use letter keys on
keyboard to enter character. Repeat until all characters are enter up to
four.
Note: To delete a channel Labeling, highlight Clear, then press
ACTION button. To return to a previous sethng, highlight
Cancel, then press the ACTION button.
8. To continue adding Channel Labeling, highlight EXIT, then press
ACTION button and repeat steps 6 through 8.
icon.
] (see menu 1), then press the
Channel Caption
Input Label
Favorite Channel
Channel Scan
L
Chennel Caption
Input Label
Favorite Channel
Channel Scan
i ; Mwe - - A4|ust
CHANNEL LABELING
TV Settings
All
Move - - Ad^
TV Settings
Channel
All
Menu 1
20
CHANNEL LABELING
Menu 3
Page 23

Input Label Procedure
Press TV button on Keyboard.
1.
Highlight SETTING on the drop down menu.
2.
Press ACTION button to display TV Setting menu.
3.
Main Msnu Icon Features
TV Settings
4.
Highlight the Channel
Highlight Input Label
5.
ACTION button to display the Input Labeling menu (see menu 2).
Select desire Video Input 1,2 or 3. Use trackball or navigation buttons
6.
to select, then press ACTION button to display Input Labeling sub
menu (see menu 3).
Highlight first dash, then press CH Up/Down or use letter keys on
7.
keyboard to enter character. Repeat until all characters are enter up to
eight.
Note: To delete a Input Labeling, highlight Clear, then press
ACTION button. To return to a previous setting, highlight
Cancel, ffie/7 press the ACTION button.
To continue adding Input Labeling, highlight EXIT, then press ACTION
8.
button and repeat steps 6 through 9.
To skip desire video mode when pressing TVA/IDEO button, highlight
9.
first dash, then press CH E>own button to display SKIP or use the
keyboard to type the word SKIP, (see menus 3 and 4).
fe]'
r
icon.
3 (see menu 1), then press the
INPUT LABELING
O/IDEOJ
O/IDE02
CVIDEO:3
INPUT LABELING
(VlDEOJi
c
D CZD C
To move t To s^ect letter
To move o ‘Action* to input text
Menu 2
Menu 3
INPUT LABELING
Menu 4
Note: Press CH Down button while first
dash is highlighted to display SKIP.
21
Page 24

Main Menu ¡con Features
Favorite Channel Procedure
1. Press TV button on Keyboard.
2. Highlight SETTING on the drop down menu.
3. Press ACTION button to display TV Setting menu.
4. Highlight the Channel icon.
5. Highlight Favorite Channel I ^ I (see menu 1), then press the
ACTION button to display the Favorite Channels menu (see menu 2).
Highlight desire channel number to add to favorite channel list (see menu
6.
2), then press the Action button {Channel number background will change
to purple).
Note: To view more channels highlight the ball on the right side of the
menu, then use CH Up/Down or select with the tracMOall and
press and hold Action button while rota^ng trackball Up or Down.
7.
Repeat step 6 to continue adding favorite channels.
8.
To delete all Favorite Channels, highlight Clear All, then press the ACTION
button. To select all channels, highlight “Select Air, then press the ACTION
button. To delete an unwanted channel, highlight the channel number, then
press the Action button.
9.
Highlight EXIT, then press Action button to exit (see menu 2).
Channel Caption
Input Label
Favortt* Channel
Channel Scan
^ J Move ' - AcQust ^
FAVORITE CHANNELS
3 4< 5' 6; 7 :8 * 9 X10
"13 14'15 16C17, 18 19.20
;ii ;
(2r
23^24 25:26.27^ 28 '29; 30
33 34 .35 36’ 37 38^39^40
.31 :
43 44 ;45 46.47, 48 < 49 i 50,
f41
:53"54v55 56 57.58'59J60
'51
*61 ^
'63:64 65 66. 67<68t69X70
cS
Ptotpram C:
To move
TV Settings
Channel
►
►
1
All
Menu 1
(CHZ2)
channels
O 'Action*tosateci
..J
Menu 2 Qjjjjg yp
view more channels
while in cable mode.
Picture
□
□
n
Color - Adjusts desired color intensity.
Tint - Adjusts natural flesh tones.
Brightness - Adjusts dark areas of picture.
□
Picture - Adjusts white areas of picture.
□
Sharpness - Adjusts clarity of outline detail.
□
Color Temp - To increase and decrease WARM (red) and COOL (blue) colors
to suit personal preferences or select NORMAL.
Normal Setting - Reset picture adjustments (Color, Tint, Brightness, Picture,
Color Temp and Sharpness) to factory default settings or select No.
Notes:
• Highlight Exit, then press Action button to exit menus.
• Video adjustments can be individually set for TV RF and each video input
mode.
Color
Tmt
Brigtitness
PicturB
Sharpness
Color Temp
Normal Setting
More ^ - At^ust
TV Settings
I • I I I • • • I • I
Normal
No
220
Page 25

Set Up
n
Mode - To select TV (antenna) or CABLE mode depending on the signal
source.
Auto Program - To automatically program all channels with a signal.
□
Manual Program - To manually add or delete channels.
□
CC on Mute - Activates the Closed Caption feature when the MUTE
□
button on the remote control is pressed.
Recommended setting for CC on Mute:
• CC on Mute; Cl
• CC Mode: Off
CC Mode - This television contains a built-in decoder that displays |CC|
(Closed Captioned) text across the screen (white or colored letters on
black background). It allows the viewer to read the dialogue of a
television program or other information. The program viewed must
include Closed Captioning for the feature to work.
Activate the onscreen Closed Caption feature by selecting one of the
following modes:
• OFF - When Closed Caption is not desired.
• C1 - For video related information to be displayed, up to 4 lines onscreen at
a time. (It does not block relevant parts of the picture). Text may be in any
language.
• C2 - C4 - For other modes of video related information.
Note: Highlight Exit, then press Action button to ax# menu.
^AtN Menu Icon Features
TV Settings
User/Admin (Parental Control)
InfoActIve
1. Highlight User/Admln(Parental Control), then press Action.
2. User and Administration screen will be displayed.
TV Settings
Press Action to display Users
And Administration menu.
Note:
Refer to “Set Up for Administrator and Different Users” on page (15) for setting Users and Administration menu.
The InfoActive submenu will enable the user to be notified about on-line
content related to the program you are watching and download it right
to your TV.
Users and Administration
Password:
[ Useis I
nwSnTl
[ftmiiir'
1
!
i
L _ _
, Current User: Family
InfoActive Setup
This TV enables you to be notffied abCHit
ordine content r^ted to the program you
are watching and to download tt right to
your TV with ttie touch of a txittont Set
the checktxjx t>elow to be remended whertever
an InfoActive progr^ is being viewed.
[^1
1 rotri
.........
- J
Enable link reminder; O
( O Exit ]
23*
Page 26

MAtN Menu Icon Features
My Info Icon
My info
Home
News
Sports
Weather
Stocks
□ When the user selects the Home option, the Interactive TV will first
begin a dialing sequence to the Earthlink service.
This series of submenus is created by having the user define the
preferred cached content when registering with the Earthlink service.
This content will be downloaded to the TV on a daily basis not less than
5 times a day.
Set Up
Select to display the Info Download Setup screen. This screen is used to program up to three time periods for the system to
automatically connect and preload your data for later viewing. Click (+) for time fonvard and (-) for time backwards.
Info Download Setup
O Enable ®012:OOAM-12:30AM l^
O Enable 0©12:OOAM-12:3OAM
O Enable 0©12:OOAM-12:3OAM
Program up to three time periods for
the system to automatlcany connect
and preload your data for later viewing.
(o Update Now) (o Online Setupl
E-mail Icon
Web Icon
These submenus will enable the user to create (write) emails as well as check incoming
emails. This system will utilize IMAP protocol, which enables the user to retain the email
that is read on the TV for viewing on their PC account. This is an important consideration,
since the Interactive TV does not have a printer port, and consumer may select to print
their emails at a later date. Only when the user specifically deletes the email will the email
be deleted. Select setup to organize e-mail.
□ Go To and Search - The various submenu’s will enable the user to access their home page,
which in this case is defaulted to the Earthlink Personal Start page (
www.earthlink.net).
□ About - This feature lets you download the latest software or read the Telecruz Agreement,
n Setup - This feature is used to set up your account and get connected.
24«
Page 27

PIP Remote Function Buttons (when main picture is TV)
PIP Remote Function Buttons (when main picture is TV)
This Interactive television includes a two tuner Picture In Picture (PIP) feature. This allows watching two (2) live broadcasts
at the same time without or with an external video source (VCR).
PIP (PIcture-ln-Picture) Button
PIP
□ Press
to display PIP frame.
Swap Button
Size Button
Main Picture
large PIP frame
small PIP frame
□ Press
desired input rTKxie.
n Press
Note: Audio is from Main Picture only.
□ Press
the main picture with the picture in the PIP frame.
SE23E
n Press
large or small PIP frame.
while PIP frame Is displayed to select
PIP
m
SWAP
(when PIP frame is displayed) to choose either the
again to cancel the PIP feature.
(when PIP frame is displayed) to interchange
PIP Channel Buttons
Main Picture
PIP frame
PIP Channel
□ Press the
through channels.
PIP CHANNEL
O O
while PIP frame is displayed to scan
25*
Page 28

PIP Remote Function Buttons {when maín picture is TV)
PIP Remote Function Buttons (contd.)
Move Button
TV/VIDEO Button
□ The PIP frame may be placed at any comer of the Main Picture by pressing the
button. Each time the MOVE button is pressed, the PIP frame will move counterclockwise eis
illustrated.
- VIDEO 1
VIDEO 3
VIDEO 2
□ Press while PIP frame is displayed to
select desired input mode (RF, Videol, Video2 or
Video 3).
MOVE
26 0
Page 29

__________________________
PIP Operation (when main picture is Earthlink home page or Web)
PIP Operation (when main picture Is Earthlink home page or Web)
Once connected to the web, the browser will launch and the consumer can also select to watch TV, by activating the PIP
mode. The PIP mode can be activated by pressing the PIP button on the remote or on the keyboard. If the PIP button is
pressed while connected to the Internet, the following type of screen shall appear:
The PIP window will have a specified area when in this Web-PIP mode. The PIP size and move functions will not be
available in this mode.
Top of screen with PIP being dispiayed
Select, then click here to quit and return to normal picture
* PIP frame channel or video display^
23
4
CH
▼
This screen shall also enable the user to access the main menu item such as TV, My Info, and Email. In addition, various
TV controls (Channel Up/down and Volume up/down) shall be made available on the screen as shown. The icons listed
next to the PIP window are specific web navigation icons. These icons also exist on the wireless keyboard.
Note: * To select a direct channel number for trie PIP frame from tee keyboard, press and hold the ALT key, then press 0^9
keys to select desire channel.
Select, then press Action button to change channels
or volume level.
Clid( here to hide PIP frame
Q
A
VOL
▼
©1
Top of screen without PIP being displayed
Click here to display PIP frame
MODES WEBTOOLS
Keyboard PIP Buttons Operation
PIP Button - To display or delete PIP frame.
Swap - Press SWAP while on-line to interchange web page with normal Main Picture, a small On-line icon will be displayed
in the top left comer of the picture to remind you that web is active. Press SWAP again to return to web page.
Note: To exit on-line connection, press the Quit key
27*
Page 30

Troubleshooting Chart For Normal TV Operation
Troubleshooting Chart For Normal TV Operation
Before calling for service, determine the symptoms and follow suggested solutions.
Solutions
p'J'
Noisy Audio
\
Noisy Audio
Noisy Audio
No Audio
Noisy Audio
No Audio
Snowy Video
Multiple image
Interference
Normal Video
No Video with
Snow
No Video/No PIP
Adjust Antenna Location and Connection
Adjust Antenna Location and Connection
Check Antenna Lead-in Wire
Move television from Electrical Appliances, Lights,
Vehicles and Medical Equipment
Increase Volume
Check Mute
Check television SPEAKERS on/off
Change Channel
Set TV or Cable Mode Properly
Check Antenna Cables
Check Power Cord is Plugged into Active Outlet
Adjust Brightness and Audio Controls
Change Channel
Check Cable Connections
Check Second Video Source Operation
28«
X
Normal Audio
Wrong Audio
Normal Audio
Intermittent Remote Control Operation
No Color
Normal Video
Normal Video
Adjust Color Settings
Change Channel
Check Audio Is Set To Stereo or Mono, Not SAP
Replace Remote Control Batteries
Page 31

Troubleshooting Chart For Normal TV Operation
Troubleshooting Chart When Using TV For Interactive Operation
Snowy Video
Can’t connect to Internet
TV will not come ON after
pressing POWER button
Can’t select desire channel
No Video
No PIP
Weak Color Adjust Color Settings
Can’t load Web page
Intermittent Keyboard
Operation
Adjust Antenna Location and Connection
Change Channel
Check Telephone or Ethernet Connection
Check Modem Connection
Try To connect Again
Wait 10 to 15 seconds in try again
Check Power Cord is Plugged into Active Outlet
Set TV or Cable Mode Properly
Check Antenna Cables
Check Power Cord is Plugged into Active Outlet
Adjust Brightness and Audio Controls
Change Channel
Check Cable Connections
Deselect Video Mode
Press PIP button Again.
Check Second Video Source Operation
Change Channel
Try loading Web page Again
Try typing Web page address again.
Replace Wireless Keyboard Batteries
Make sure you point the Keyboard at the TV remote sensor
Move closer to the TV, you may be outer range
29
Page 32

LiMUED WARRANTY
PANASONIC CONSUMER ELECTRONICS COMPANY,
DIVISION OF:
MATSUSHITA ELECTRIC CORPORATION OF AMERICA
One Panasonic Way
Secaucus, New Jersey 07094
PANASONIC SALES COMPANY,
DIVISION OF:
MATSUSHITA ELECTRIC OF PUERTO RICO,
INC., Ave. 65 de Infanteria, Km. 9.5
San Gabriel Industrial Park
Carolina, Puerto Rico 00985
Panasonic Color Television
Limited Warranty
Limited Warranty Coverage
If your product does not work properly because of a defect in materials or workmanship, Panasonic
Consumer Electronics Company or Panasonic Sales Company (collectively referred to as “the warrantor"’) will, for the length of the period indicated on the chart below, which starts with the date of original
purchase (“warranty period"), at its option either (a) repair your product with new or refurbished parts,
or (b) replace it with a new or a refurbished product. The decision to repair or replace will be made by
the warrantor.
TV CATEGORIES
22”-27” diagonal 1 (ONE) YEAR
ALL PARTS EXCEPT CRT
CRT LABOR SERVICE
2 (TWO) YEARS 90 DAYS
IN-HOME OR CARRY-IN
During the "Labor" warranty period there will be no charge for labor. During the "Parts" warranty
period, there will be no charge for parts. You must carry-in your product or arrange for in-home service
(in-home service available only for 22” [diagonal] and larger screen), as applicable, during the
warranty period. If non-rechargeabte batteries are included, they are not warranted. This warranty
only applies to products purchased and serviced in the United States or Puerto Rico. This warranty is
extended only to the original purchaser of a new product which was not sold "as is". A purchase receipt
or other proof of the original purchase date is required for warranty service.
Carry-in or In-Home Service
For Carry-In or In-Home Service (as applicable) in the United States call 1-800-211-PANA(7262) or
visit Panasonic Web Site: http://www.panasonic.com.
For assistance in Puerto Rico call Panasonic Sales Company (787)-750-4300 or fax (787)-768-2910.
In-Home service, if applicable, requires clear, complete and easy access to the product by the autho
rized servicer and does not include removal or re-installation of an installed product. It is possible that
certain in-home repairs will not be completed in-home, but will require that the product, or parts of the
product, be removed for shop diagnosis and/or repair and then returned.
30*
Limited Warranty continued on next page
Page 33

LiMUED WARRANTY
Limited Warranty continued from previous page
Limited Warranty Limits And Exclusions
This warranty ONLY COVERS failures due to defects in materials or workmanship, and DOES NOT
COVER normal wear and tear or cosmetic damage, nor does it cover markings or retained images on
the picture tube resulting from viewing fixed images (including, among other things, letterbox pictures
on standard 4:3 screen TV’s, or non-expanded standard 4:3 pictures on wide screen TV’s, or onscreen
data in a stationary and fixed location). The warranty ALSO DOES NOT COVER damages which
occurred in shipment, or failures which are caused by products not supplied by the warrantor, or
failures which result from accidents, misuse, abuse, neglect, mishandling, misapplication, alteration,
faulty installation, set-up adjustments, misadjustment of consumer controls, improper maintenance,
power line surge, lightning damage, modification, or commercial use (such as in a hotel, office,
restaurant, or other business), rental use of the product, service by anyone other than a Factory
Servicenter or other Authorized Servicer, or damage that is attributable to acts of God.
THERE ARE NO EXPRESS WARRANTIES EXCEPT AS LISTED UNDER "LIMITED WARRANTY
COVERAGE". THE WARRANTOR IS NOT LIABLE FOR INCIDENTAL OR CONSEQUENTIAL
DAMAGES RESULTING FROM THE USE OF THIS PRODUCT, OR ARISING OUT OF ANY
BREACH OF THIS WARRANTY. (As examples, this excludes damages for lost time, cost of having
someone remove or re-install an installed unit if applicable, or travel to and from the servicer. The
items listed are not exclusive, but are for illustration only.) ALL EXPRESS AND IMPLIED WARRAN
TIES, INCLUDING THE WARRANTY OF MERCHANTABILITY, ARE LIMITED TO THE PERIOD OF
THE LIMITED WARRANTY.
Some states do not allow the exclusion or limitation of incidental or consequential damages, or limita
tions on how long an implied warranty lasts, so the exclusions may not apply to you.
This warranty gives you specific legal rights and you may also have others rights which vary
from state to state. If a problem with this product deveiops during or after the warranty period,
you may contact your dealer or Servicenter. If the problem is not handled to your satisfaction,
then write to the warrantor's Consumer Affairs Department at the addresses listed for the
warrantor.
PARTS AND SERVICE (INCLUDING COST OF AN IN-HOME SERVICE CALL, WHERE
APPLICABLE) WHICH ARE NOT COVERED BY THIS LIMITED WARRANTY ARE YOUR
RESPONSIBILITY.
THIS WARRANTY DOES NOT COVER DAMAGES OR MISOPERATION TO THIS INTERACTIVE TV DUE TO VIRUS THROUGH THE INTERNET.
Limited Warranty continued on next page
31 •
Page 34

CUSTOMER SERVICES DtRECTORY
For Product information. Operating Assistance, Literature Request, Dealer Locations, and
all Customer Service inquiries please contact:
1-800-211-PANA (7262), Monday-Friday Sam - 9pm; Saturday-Sunday 9am - 7pm, EST.
Web Site: http:/Avww.panasonic.com
You can purchase parts, accessories or
locate your nearest servicenter by visiting
our Web Site.
Accessory Purchases:
1-800-332-5368 (Customer Orders Only)
Panasonic Services Company 20421 84th Avenue South, Kent, WA 98032
(6 am to 5 pm Monday - Friday; 6 am to 10:30 am Saturday; PST)
(Visa, MasterCard, Discover Card, American Express, Check)
Service in Puerto Rico
Matsushita Electric of Puerto Rico, ine. Panasonic Sales Company/Factory Servicenter:
Ave. 65 de Infanteria, Km. 9.5, San Gabriel Industrial Park, Carolina, Puerto Rico 00985
Phone (787) 750-4300 Fax (787) 768-2910
Z2^
Page 35

Index
Index
A
About 24
AC Plug In 13
AC Power Supply Cord 4
Adding New Users 16
Al Sound 19
Amplifier Connection
(To Audio Amp) 12
Antenna Connection 4
Audio 19
Audio Mode 19
Auto Program 13, 23
Auto Set Up 13
B
Balance 19
Bass 19
Battery Installation 4
Brightness 22
C
Cabinet and Remote Control 3
Cable / Antenna Connection 4
Cable Connection 4
Canadian English Ratings Chart 17
Canadian French Ratings Chart 18
Care and Cleaning 3
Caution 4
CC Mode 23
CC on Mute 23
Channel 20
Channel Caption 20
Channel Caption Procedure 20
Channel Scan 20
Color 22
Color Temp 22
Congratulations 3
Connecting to an Ethernet
Broadband Source 6
Connecting to Analog Phone Line 6
Connecting Video Signals
Sources 11
Customer Record 3
Customer Services Directory
D
Digital TV - Set-Top Box (DTV-STB)
or DVD Player Connection 12
Displaying Main Menu loons 14
E
Earthlink Registration 14
E-mail Icon 24
F
Favorite Channel 20
Favorite Channel Procedure 22
Feature Chart 5
Front Control Panel Operation 10
G
Game And Unrated Chart 18
Getting Started 6
Go To 24
H
Home 24
I
Important Information 2, 5
Infoactive 19
Input Label 20
Input Label Procedure 21
Installation 4
Introduction 3
K
Keyboard PIP Buttons Operation 27
L
License Agreement 13
Limited Warranty 30
Listings 19
M
Main Menu Icon Features 19
Main Menu Navigation 14
Manual Program 23
Move Button 26
My Info Icon 24
N
News 24
Normal Setting 22
Normal Settings 19
O
On/off Timer 19
Optional Cable Connections 4
Optional Equipment Connections 11
Other Ratings MPAA Chart 17
P
Parental Control Rating Description
Charts 17
Picture 22
PIP Button 25,27
PIP Channel Buttons 25
PIP Operation (when main picture is
Earthlink home page or Web) 27
PIP Remote Function Buttons (when
main picture is TV) 25
Programs 19
R
Radio Interference 2
Remote Control Operation 7
Remote Keys Operation 7
S
Screen 3
Search 24
Search Button 26
Set Up 23,24
Setting 19
Settings 19
Setup 24
Setup For Administrator And
Different Users 15
Sharpness 22
Size Button 25
Sleep Timer 19
Speaker 19
Specifications 3
Sports 24
Stocks 24
Surround 19
Swap 27
Swap Button 25
T
Television Location 4
Time set Mode 19
Timer 19
Tint 22
Treble 19
Troubleshooting Chart For Normal
TV Operation 28
Troubleshooting Chart When Using
TV For Interactive Operation 29
Turning On The TV for the First
Time 13
TV Front Control Panel Operation 10
TV Icon 19
TV or Cable 13
TV Ratings Chart 17
TV/Video Button 26
U
Unlock Parental Control Menu 18
User/Admin (Parental Control) 23
Users And Administration Screen 15
V
VCR Connection 11
W
Weather 24
Web 24
Web Icon 24
Wireless Keyboard Operation 8
33*
Page 36

PenMonle COMumM Etoctronlca Compnmy,
DMslon of IM*U«hlta
Elaetric Corporation ol AiMflca
One Panasonic Way
Secaucus. New Jersey 070d4
www.panasonic.com
 Loading...