

Page 1
F565101
Operating Instructions
Air Conditioner
CS-XE9EKE CU-XE9EKE
CS-XE12EKE CU-XE12EKE
ENGLISH Before operating the unit, read these operating instructions thoroughly and keep them for future reference. 2 ~ 17
ESPAÑOL Antes de utilizar la unidad, sírvase leer atentamente estas instrucciones de funcionamiento y conservarlas como futuro elemento
de consulta. 18 ~ 33
ITALIANO Prima di utilizzare l’unità si prega di leggere attentamente le istruzioni e di conservare questo opuscolo per potervi fare riferimento
in futuro. 34 ~ 49
NEDERLANDS Leest u voor het gebruik de instructie en bewaar deze om later te kunnen raadplegen. 50 ~ 65
PORTUGUÊS Antes de ligar a unidade, leia cuidadosamente este manual de utilização e guarde-o para futura referência. 66 ~ 81
EΛΛΗΝΙΚΆ Προτού θέσετε τη μονάδα σε λειτουργία, διαβάστε προσεκτικά αυτές τις οδηγίες χρήσης και φυλάξτε τις για μελλοντική αναφορά. 82 ~ 97
БЪЛГАРСКИ Преди да задействате климатика, прочетете внимателно инструкциите за употреба и ги запазете за бъдещи справки. 98 ~ 113
Manufactured by:
Panasonic HA Air-Conditioning (M) Sdn. Bhd.
Lot 2, Persiaran Tengku Ampuan, Section 21, Shah Alam Industrial Site,
40300 Shah Alam, Selangor, Malaysia.
© 2005 Panasonic HA Air-Conditioning (M) Sdn Bhd
(11969-T). All rights reserved. Unauthorized copying
and distribution is a violation of law.
Page 2
Thank you for purchasing Panasonic Air Conditioner
During Installation
During Operation
During Installation
During Operation
■ Definition
To prevent personal injury,
injury to others, or property
damage, please observe the
following.
Incorrect operation due to
failure to follow instructions
may cause harm or damage,
the seriousness of which is
classifi ed as below:
Warning
This sign warns of death
or serious injury.
Caution
This sign warns of injury
or damage to property.
The instructions to be
followed are classifi ed by
the following symbols:
SAFETY PRECAUTIONS
Warning
During Installation
• Do not install, remove and reinstall the unit by yourself; improper installation will cause leakage, electric
shock or fi re. Please consult an authorized dealer or specialist for the installation work.
• This equipment must be earthed and installed with ELCB. It may cause electrical shock or fi re in case of
malfunction
During Operation
• Do not share the same power outlet with
other equipment.
• Do not modify power cords.
• Do not use extension cords.
• Do not operate with wet hands.
• Do not operate or stop the unit by inserting
or pulling out the power plug.
• Do not insert your fi ngers or other objects
into the indoor or outdoor unit.
• Do not attempt to repair the unit by
yourself.
• Do not use rechargeable (Ni-Cd) batteries.
• Keep the remote control away from infants
and small children to prevent them from
accidentally swallowing the batteries.
• Insert the power plug properly.
• Use the specifi ed supply cord.
• If the supply cord is damaged, it must be
replaced by the manufacturer, its service
agent or similarly qualifi ed persons in
order to avoid a hazard.
• Remove the batteries if the unit is not
going to be used for a long period of
time.
• New batteries of the same type must
be inserted following the polarity stated
to prevent malfunction of the remote
control.
• In case of emergency or abnormal
conditions (burning, unusual odour, etc),
turn off the power supply and unplug.
This symbol denotes
an action that is
PROHIBITED.
These symbols denote
actions that are
COMPULSORY.
During Installation
• Ensure that the drainage pipe is connected properly. Otherwise, leakage may occur.
• Do not install the unit in a potentially explosive atmosphere.
During Operation
• Do not pull the cord to disconnect the
plug.
• Do not wash the unit with water, benzene,
thinner or scouring powder.
• Do not use for other purposes such as
preservation of food.
• Do not use any combustible equipment in
front of the airfl ow outlet.
• Do not sit or place anything on the indoor
or outdoor unit.
• Do not expose directly to cold air for a
long period.
• Aerate the room regularly.
• After long periods of use, make sure the installation rack is not damaged.
Caution
• Switch off the power supply and unplug
before cleaning or servicing.
• Turn off the power supply and unplug if
the unit is not used for a long period of
time.
• This air conditioner is equipped with
a built-in surge protective device.
However, in order to further protect your
air conditioner from being damaged by
abnormally strong lightning activity, you
may want to disconnect it from the power
supply. Do not touch the air conditioner
during lightning, it may cause electric
shock.
TABLE OF CONTENT
SAFETY PRECAUTIONS, REGULATORY INFORMATION ........................................................................................................... 2~3
PRODUCT OVERVIEW .................................................................................................................................................................. 4~5
INTRO TO FILTER CLEANING ........................................................................................................................................................... 6
AUTO FILTER CLEANING, TIMER FILTER CLEANING ................................................................................................................ 7~8
MANUAL FILTER CLEANING ............................................................................................................................................................. 9
CHANGE FILTER CLEANING DEFAULT SETTING ......................................................................................................................... 10
AUTO, HEAT, COOL, DRY, VENTILATION ..................................................................................................................................11~12
FAN SPEED, AIR SWING ................................................................................................................................................................. 13
POWERFUL, QUIET, TIMER ...................................................................................................................................................... 14~15
CARE & MAINTENANCE ............................................................................................................................................................ 16~17
2
Page 3
REGULATORY INFORMATION
EEnvironmental Requirements
End-of-Life Disposal
The appliance is not intended for use by young children or the infi rm person without supervision. Young
children should be supervised to ensure that they do not play with the appliance.
nvironmental Requirements
Battery disposal
The batteries must be recycled or disposed of properly.
■ Operation Condition
Use this air conditioner under the
following temperature range.
Temperature (°C)
COOLING
HEATING
Maximum 32 23
Minimum 16 11
Maximum 30 –
Minimum 16 –
Indoor
*DBT *WBT
ENGLISH
End-of-Life Disposal
“Instructions for end-user” for air conditioners:
This air conditioner bears the above mark, indicating that electrical equipment should not be disposed
of alongside general household waste. European Community countries (*), should have a dedicated
collection system for these products. Do not try to dismantle the system yourself as this could have harmful
effects on your health and on the environment as a result of incorrect waste handling. This dismantling
and disposal of refrigerant, oil and other parts must be done by a qualifi ed installer in accordance with
relevant local and national regulations. Air conditioners must be treated at a specialized treatment facility
for re-use, recycling and recovery and should not be disposed of in the municipal waste stream. Please
contact your installer, dealer or local authority for more information. Penalties may also be applicable for
incorrect disposal of waste products, in accordance with national legislation.
*subject to the national law of each member state
Information on Disposal in other countries outside the European Union
This symbol is only valid in the European Union. If you wish to discard this product, please contact
your installer, dealer or local authority and ask for the correct method of disposal.
Temperature (°C)
COOLING
HEATING
*DBT: Dry bulb temperature
*WBT: Wet bulb temperature
• This unit is still able to operate as a
cooler with outdoor temperature as
low as -15°C in a non-living room,
such as a computer room, with a
room temperature of 16°C or above,
and room humidity up to 80%.
• When the outdoor temperature drops
to -15°C, compressor will be cut off
and resume operation again once
the temperature rises to more than
-15°C.
Maximum 43 26
Minimum -15 –
Maximum 24 18
Minimum -15 –
Outdoor
*DBT *WBT
Replacement or installation of power plugs shall be performed by authorized/qualifi ed
personnel only.The wires in this mains lead are coloured in accordance with the
following code:
wires
Terminals
red
black
green/yellow
Wiring colour may vary depending on a country wiring code’s standard.
live
neutral
earth
colours (GB Standard)
brown
blue
green-yellow
Note:
The illustrations in this manual
are for explanation purposes only
and may differ from the actual unit. It
is subjected to change without notice
for future improvement.
3
Page 4
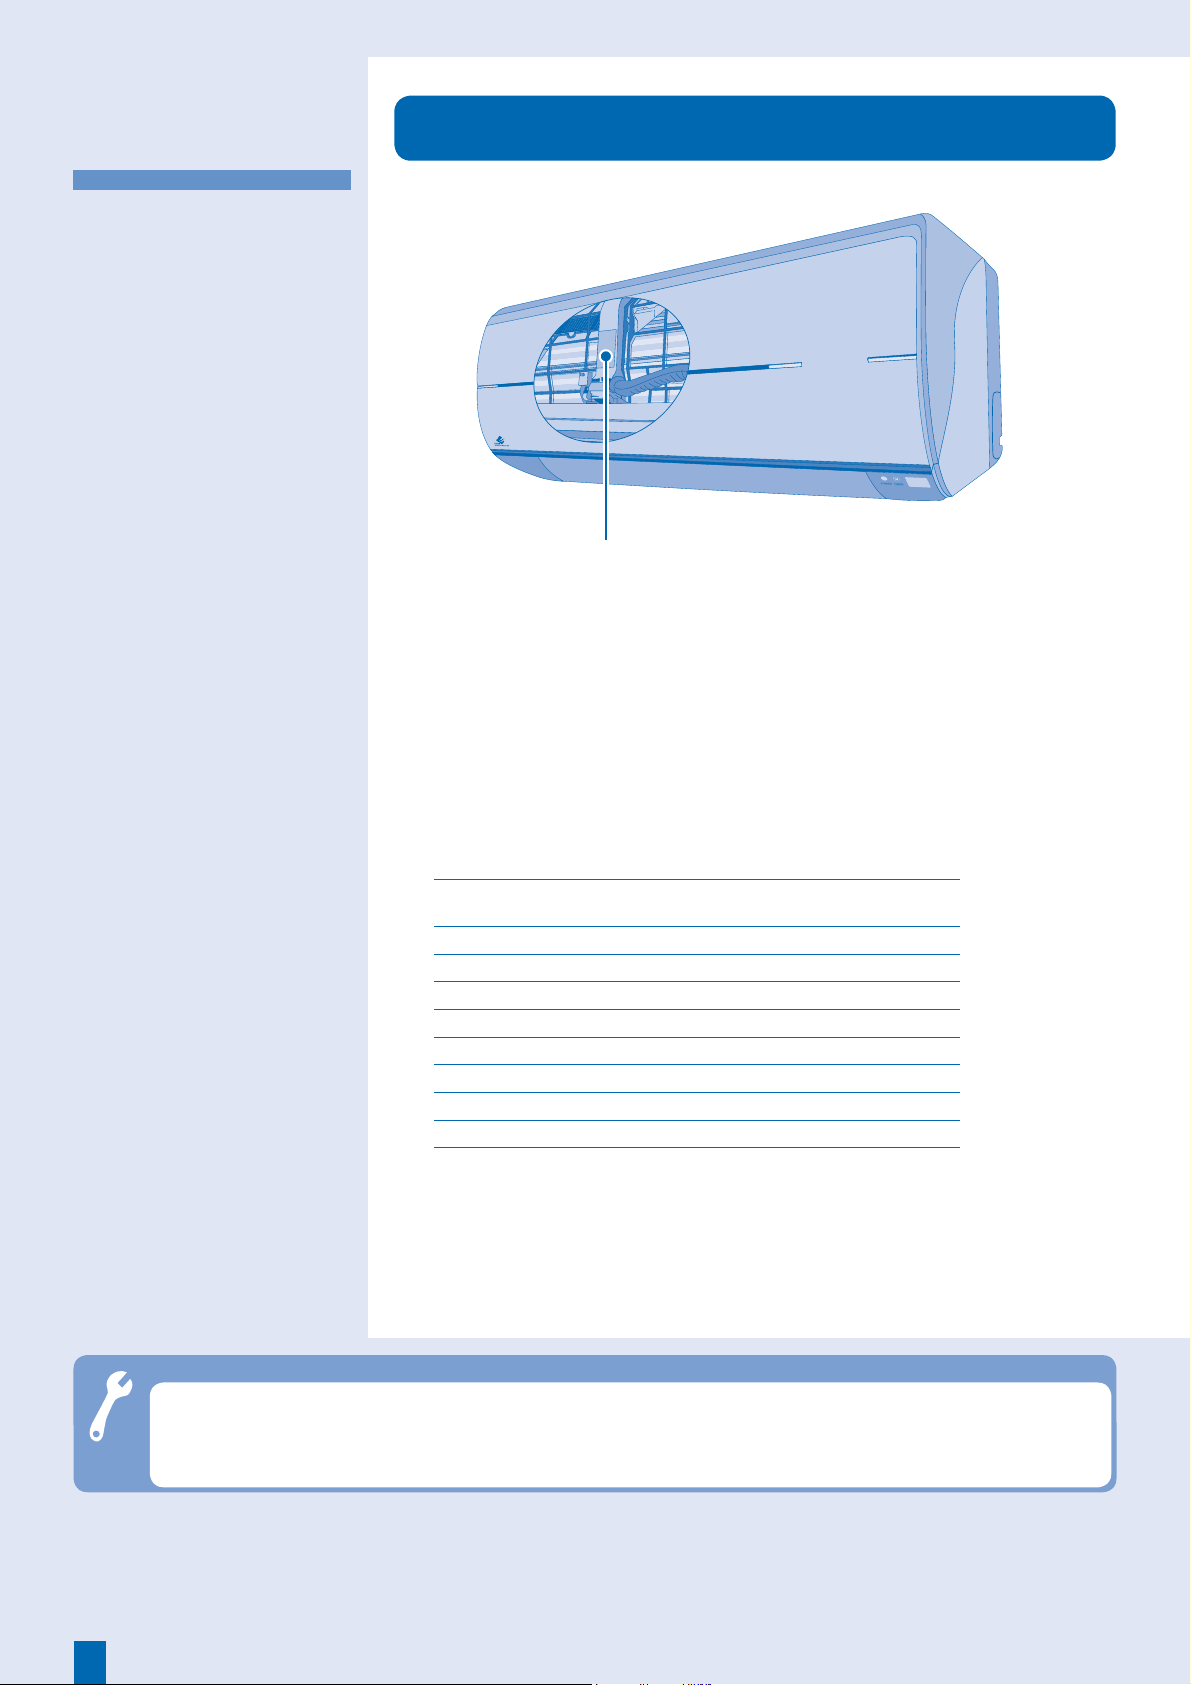
■ About
Outdoor Unit
Indoor Unit
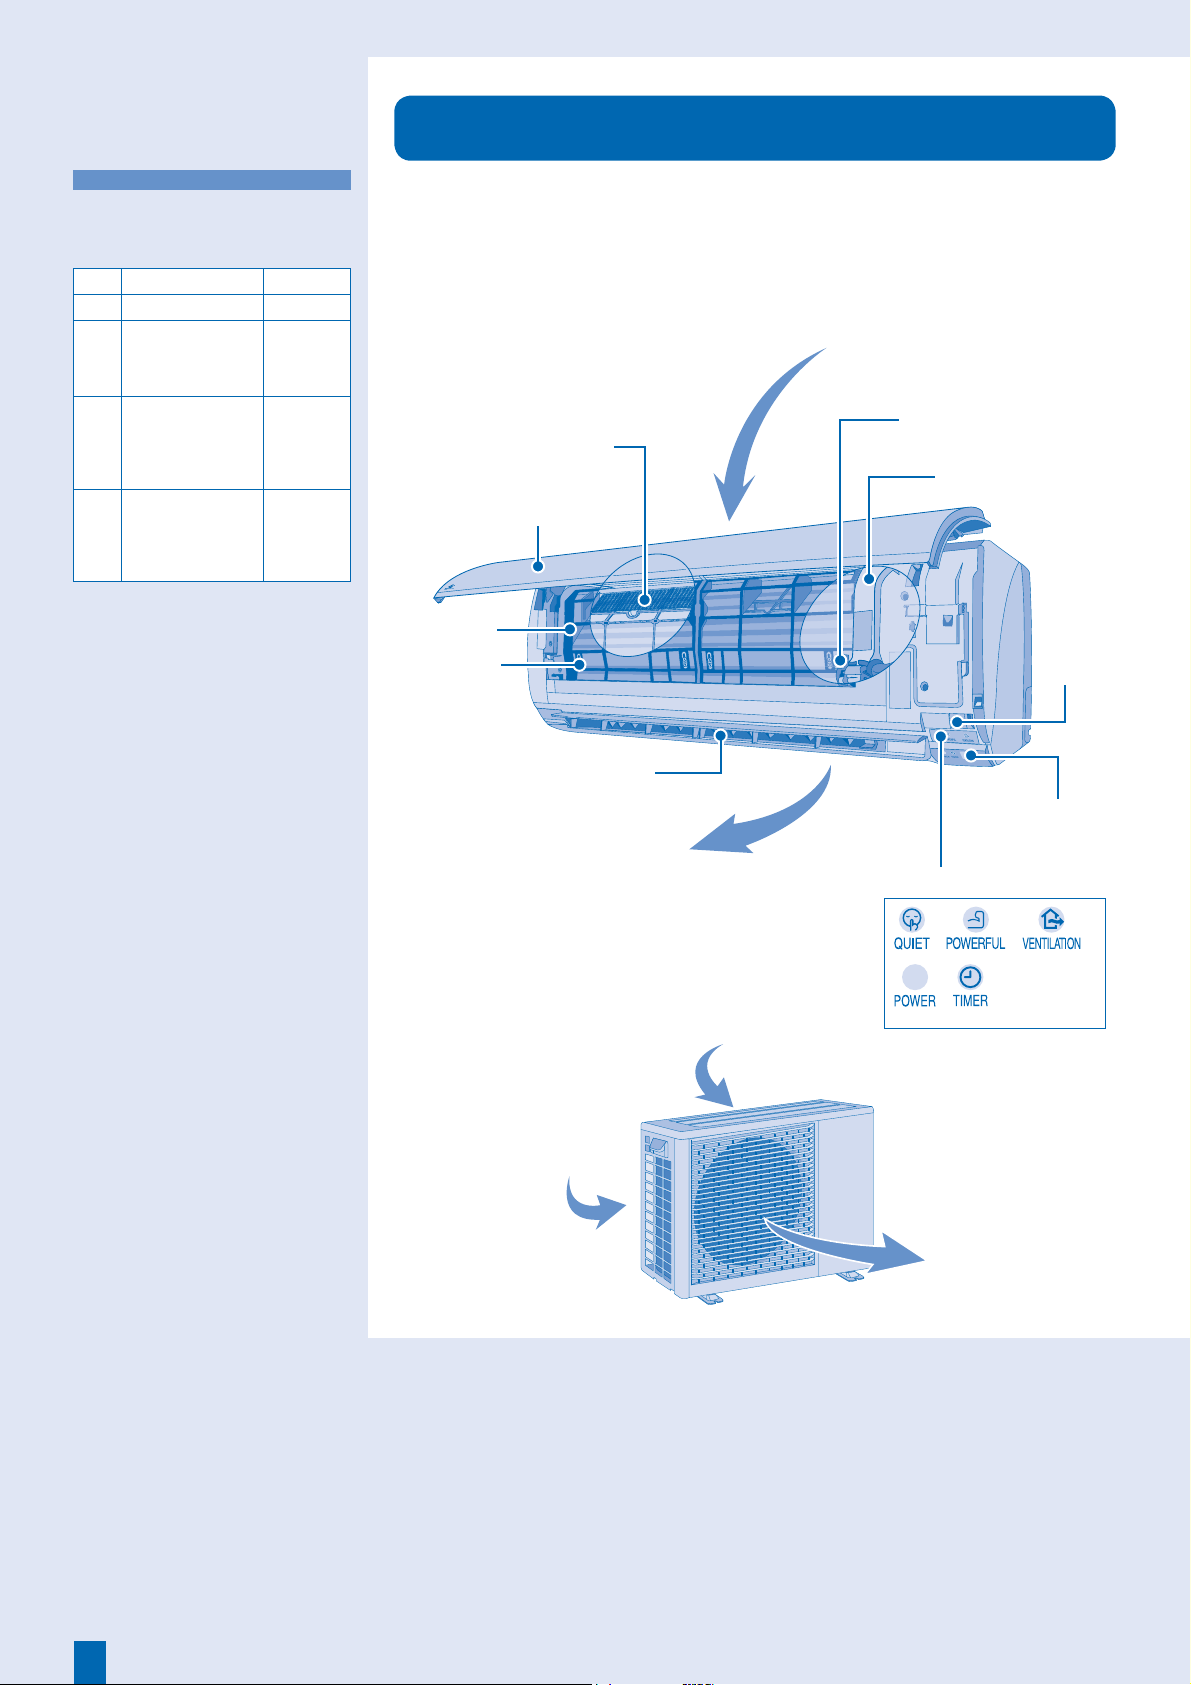
PRODUCT OVERVIEW
Auto OFF/ON Button
• To operate the unit if the
remote control is misplaced or
malfunctioning.
Step Action Mode
1 Press once. Automatic
Press and hold
until you hear
2
one beep, then
release.
Repeat step 2.
Press and hold
3
until you hear
two beeps, then
release.
Repeat step 3.
Press and hold
4
until you hear
three beeps, then
release.
• To turn off, press the AUTO OFF/ON
button again.
Force
cooling
Normal
cooling
Force
heating
Note:
* Movable front panel will open slightly for air intake purposes once the air conditioner operation starts.
Movable front panel will remain open during air conditioner operation. It will close automatically once the
air conditioner operation stops. In such a condition, do not interrupt the movable front panel movement
as this may cause malfunction or unit breakdown. The above condition does not apply for fi lter cleaning.
Indoor Unit
Super alleru
buster filter
Movable
front panel*
Air filter
Air filter
fastener
Airflow
direction
louver
Air intake
Filter cleaning
indication light
Filter cleaning
device
Auto
OFF/ON
button
Receiver
Discharged air
Outdoor Unit
Air inlet (side)
Indicator
Air inlet (rear)
Air outlet
4
Page 5
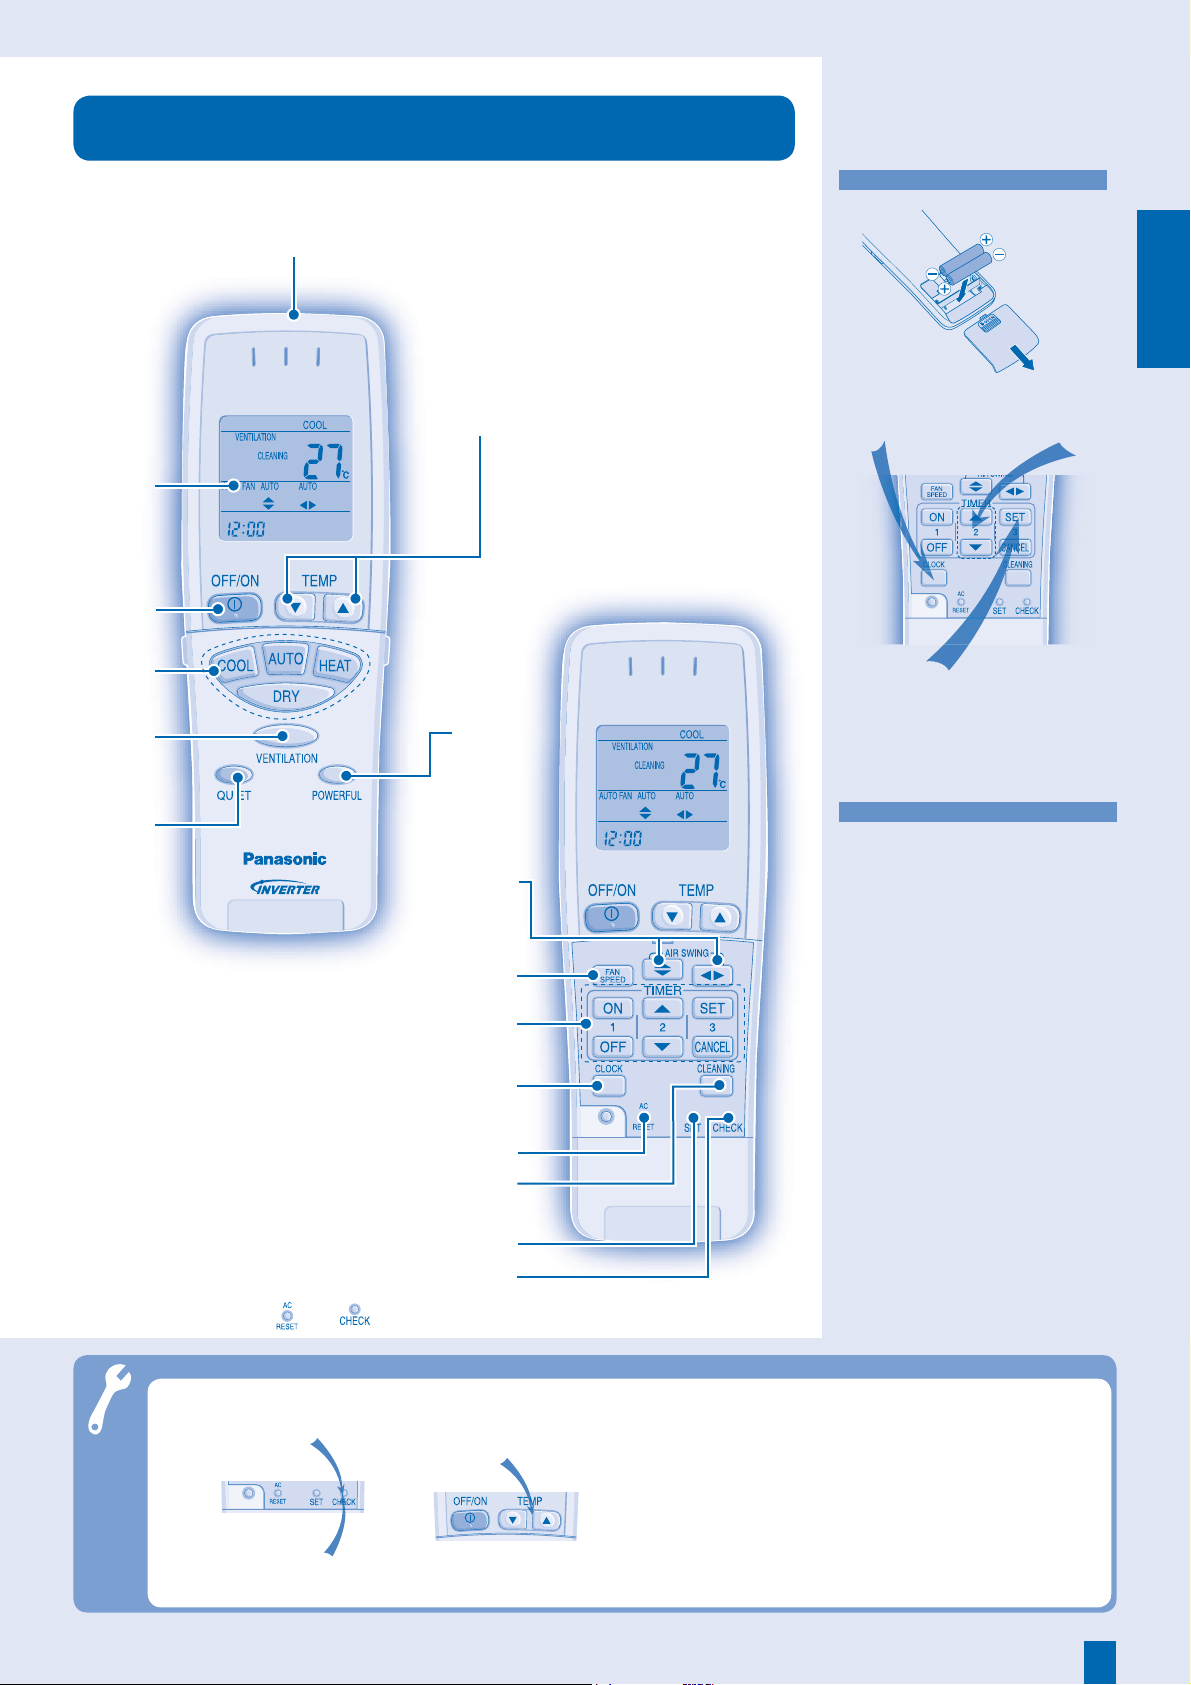
Remote Control
PRODUCT OVERVIEW
■ About
Remote Control
Transmitter
LCD
display
Off/On
Cooling,
Auto,
Heating,
Dry mode
Ventilation
operation
Quiet
operation
Temperature
setting
Powerful
operation
Airflow
direction
adjustment
Fan speed selection
Remote Control Preparation
1. Pull out the
cover.
2. Insert AAA
or LR03 batteries.
3. Close the cover.
4. Press CLOCK.
6. Press to confi rm.
• Timer operation will be based on
current time set.
• The batteries can be used for
approximately 1 year.
Remote Control Signal
• Make sure it is not obstructed.
• Maximum distances: 8m.
• Certain fluorescent lights may
interfere with signal transmission.
Please consult your nearest
authorized dealer.
5. Press to
set time.
ENGLISH
Timer setting
Clock setting
Air conditioner reset
Manual filter cleaning
Timer filter cleaning setting
* For normal operation, the and buttons are not in use.
operation
Check
Troubleshooting - error code checking
● In the event of an error, the unit will stop and the timer indicator will blink.
1. Press for 5 seconds.
3. Press for 5 seconds to
quit checking.
2. Press until you hear beep sound,
then jot down the error code.
4. Turn the unit off and reveal the error
code to your nearest dealer.
Notes:
• The unit may be operable (with 4 beeps)
on a limited basis, depending on the error.
5
Page 6
■ About
Filter cleaning
Filter cleaning function helps to:
• Clean the filters automatically on a
regular basis.
• Avoid airflow blockage caused by
dusty filter.
• Prevent growth of mold inside the
unit.
• Improve heating/cooling effect that
saves energy consumption.
INTRO TO FILTER CLEANING
eaning
ilter Cl
o F
Aut
Filter Cleaning Device
• By default, filter cleaning will run automatically once the unit is turned off if the air
conditioner:
- Operates continuously for at least 2 hours and above, and
- Accumulative operation time is at least 2 hours and above.
• The filter surface is divided into rows. Each cleaning cycle will clean one row at a time.
The numbers of rows to be cleaned will be based on the air conditioner’s accumulative
operation time and model purchased. The following table is an example for model 1.5 HP.
Accumulative operation time
(<: less than)
< 2 hours 0
2 hours and < 6 hours 2
6 hours and < 9 hours 3
9 hours and < 12 hours 4
12 hours and < 15 hours 5
15 hours and < 18 hours 6
18 hours and < 21 hours 7
21 hours and < 24 hours 8
• The number of cleaning cycle depends on the fan speed setting as well. The table above is
an example when the fan speed setting is HI. The number of cleaning cycle will be lesser if
the fan speed setting is lower.
• You can also set the filter cleaning manually. For details, see Timer Filter Cleaning and
Manual Filter Cleaning in the following pages.
Number of cleaning cycle
(1 cycle: < 4 minutes)
Troubleshooting
● When the fi rst air conditioner operation is initialized,
fi lter cleaning will run one cycle automatically.
► This is a normal operation to make sure the fi lter cleaning device is able
to move smoothly.
► Filter cleaning will not be terminated by pressing any of the remote
control buttons. Filter cleaning will stop by itself after operates for one
cycle.
6
Page 7

AUTO FILTER CLEANING
AUTO
AIR CONDITIONER TIMER
FORCE CLEANING
eaning
ilter Cl
Auto F
Filter Cleaning Indicator
■ About
Filter cleaning
• The fi lter cleaning indicator light
will move to left or right when fi lter
cleaning is in progress.
• Filter cleaning in progress will be
cancelled if:
- Certain button on the remote
control are pressed.
- The air conditioner main unit’s
movable front panel is lifted up.
- There is a power failure.
ENGLISH
AUTO
• Filter cleaning will run automatically after the air conditioner operation stops (air conditioner is turned
off using remote control).
• After the filter cleaning is completed, the air conditioner operation will remain off.
AIR CONDITIONER TIMER
• Filter cleaning will run automatically after the air conditioner operation stops (air conditioner is turned
off by the air conditioner timer).
• After the filter cleaning is completed, the air conditioner operation will remain off.
FORCE CLEANING
• Once the air conditioner operation time exceeds 24 hours, the unit is forced to run filter cleaning.
• After the filter cleaning is completed, the air conditioner operation will resume automatically.
Troubleshooting
● Timer indicator is blinking and error code H51 is
revealed on the display.
●
Timer indicator is blinking and error code H52 is
revealed on the display.
Note :
• To reveal the error code, please refer to Product Overview’s troubleshooting-error code checking.
• The condition above does not affect the unit’s operation.
• In case of malfunction, please consult your nearest authorized dealer.
► The fi lter cleaning device is jammed because the fi lter is not installed
correctly.
► The fi lter cleaning device is malfunction.
► The fi lter cleaning device is malfunction.
► Printed circuit board is malfunction.
7
Page 8

1
2
3
■ About
Timer Filter Cleaning
• Filter cleaning timer can be set
to run at a specified time daily,
given that the air conditioner
accumulative operation time is at
least 30 minutes and above.
• Filter cleaning timer overrides
air-conditioner’s timer in any given
setting.
• Once filter cleaning timer starts, air
conditioner operation will stop. After
the filter cleaning is completed,
the air conditioner operation will
resume automatically.
• To reveal filter cleaning timer start
time:
Press
• To restore the filter cleaning timer
after power is resumed:
Press , then press .
• To return to normal display / exit:
Press
control cover.
.
or close the remote
TIMER FILTER CLEANING
3
1
Press to set
cleaning
timer.
Press to
select
your desired
time.
■ Hint
• Set the fi lter cleaning timer to run
at an appropriate time to avoid any
interruption during normal operation.
4
2
Press to turn
on cleaning
timer. ON is
shown on the
display.
● To cancel fi lter cleaning timer, press , then press
Press to
confi rm the
setting.
shown on
the display.
is
.
8
Page 9

MANUAL FILTER CLEANING
■ About
Manual Filter Cleaning
• Press once to run a
comprehensive fi lter cleaning.
• A comprehensive fi lter cleaning may
take less than an hour to complete.
Press to clean
the fi lter
manually.
• When is pressed, this operation
has the highest priority over other
operation modes. The air conditioner
operation will stop. After the fi lter
cleaning is completed, the air
conditioner operation will resume
automatically.
■ Hint
• After extended non-use, it is
recommended to manually run
fi lter cleaning before air conditioner
operation is initialized.
ENGLISH
● Press to cancel manual fi lter cleaning.
Troubleshooting
● The fi lter cleaning device stops half way in the
middle of the main unit.
► To return the fi lter cleaning device to the original position, press and
► To change the fi lter cleaning device from right side (original position) to
hold
left side, press and hold for more than 5 seconds, then press .
for more than 5 seconds.
9
Page 10

■ Setting
1
2
4
3
Disable Filter Cleaning
• To disable the fi lter cleaning
permanently, follow steps 1 to 3 as
shown below.
CHANGE FILTER CLEANING
DEFAULT SETTING
• As a default setting, fi lter cleaning will run automatically once the air conditioner unit is turned off.
1
Press and hold for more than
20 seconds. ON will blink on
the display.*
2
Press to select OFF.
3
Press to confi rm the setting.
CLEANING will disappears
from the display.
• Auto and timer fi lter cleaning are no
longer valid.
• Select ON in step 2 above to
enable fi lter cleaning.
Press and hold until you
hear 3 beeps (about 11
1
seconds).
Auto OFF/
ON button.
4
Press to select your desired fi lter cleaning setting:
When you hear Setting
1 beep • Filter cleaning will run automatically after the air conditioner
2 beeps ** • Filter cleaning will run automatically before the air conditioner
3 beeps ** • Filter cleaning will run automatically before the air conditioner
1 long beep
(default setting)
* Use a sharp end object to press this button.
** The setting is valid only if the following conditions are fulfi lled:
1. The air conditioner is turned off for at least 3 minutes.
2. The air conditioner has operated continuously for at least 2 hours in previous operation.
operation stops (air conditioner is turned off using remote control).
• After the fi lter cleaning is completed, the air conditioner operation
will remain off.
operation starts (air conditioner is either turned on using remote
control or turned on by the air conditioner timer).
• After the fi lter cleaning is completed, the air conditioner operation
will start automatically.
operation starts (air conditioner is turned on using remote control).
• After the fi lter cleaning is completed, the air conditioner operation
will start automatically.
• Filter cleaning will run automatically after the air conditioner
operation stops (air conditioner is either turned off using remote
control or turned off by the air conditioner timer).
• After the fi lter cleaning is completed, the air conditioner operation
will remain off.
Press once.
You will hear 1 beep.*
2
Press 3 times until you
hear 3 continuous beeps.*
3
■ Hint
• Manual fi lter cleaning is operable
by pressing
manual fi lter cleaning page.
10
. For detail, see
Page 11

AUTO, HEAT, COOL, DRY
1
2
1
Select your
desired
operation.
2
Select your
desired
temperature.
(16°C~30°C)
■ Operation Details
AUTO - Automatic Operation
• Unit selects the operation mode
according to temperature setting,
outdoor and room temperature.
• The power indicator blinks during
operation.
• Operation mode is reselected
every 30 minutes.
HEAT - Heating Operation
• In heating mode, it takes a while
for the unit to warm up. The
power indicator blinks during this
operation.
COOL - Cooling Operation
• Enjoy cool air at your desired
temperature.
DRY - Soft Dry Operation
• Keeps your environment
dehumidifi ed by running a very
gentle cooling operation.
• During soft dry operation, the
indoor fan operates at low fan
speed.
ENGLISH
● , and operations are available in all modes.
Press
●
Troubleshooting
to stop the operation.
● Mist emerges from indoor unit. ► Condensation effect due to cooling process.
●
Heating/cooling operation does not work.
● Water fl owing sound during operations. ► Cause by refrigerant fl ow inside the unit.
► Ensure temperature is set correctly.
► Make sure windows and doors are closed.
► Make sure inlet and outlet vents are cleared.
■ Hint
• A temperature setting 1°C higher
in cooling operation or 2°C lower in
heating operation than the desired
temperature equates to a 10%
power saving.
11
Page 12

■ Operation Details
• To aerate the room.
• As a default setting, ventilation will
be turned on automatically once the
air conditioner operation starts.
VENTILATION
VENTILATION : Simultaneous
• Operates simultaneously with Auto/
Cooling/Heating/Drying operation.
• Press
your desired ventilation setting.
Auto/Cooling/Heating/Drying
operation remains as normal
regardless of ventilation setting.
• When is pressed, all of the air
conditioner operations are turned
off.
VENTILATION : Independent
• Ventilation operates independently.
• Ventilation can be turned on when
the air conditioner is in nonoperation mode.
• Fan speed in this setting remains as
AUTO.
Operation
repeatedly to select
Low Ventilation
No Ventilation
Auto Ventilation
Operation
Select your
desired
ventilation
setting.
• Press
operation.
to turn off the ventilation
Troubleshooting
● Timer indicator is blinking and error code H50 is
revealed on the display.
Note :
• To reveal the error code, please refer to Product Overview’s troubleshooting-error code checking.
• The condition above does not affect the unit’s operation.
• In case of malfunction, please consult your nearest authorized dealer.
► Ventilation fan motor may be locked due to piles of dust accumulated in
the ventilation area and fails to discharge.
► Printed circuit board is malfunction.
► Ventilation fan motor is malfunction.
12
Page 13

FAN SPEED, AIR SWING
Press to
select
fan speed
■ Operations Details
• There are 5 fan speeds, as well as
automatic*.
* For automatic fan speed, the
speed of the indoor fan is
automatically adjusted according
to the operation.
AIR SWING
• Keeps the room ventilated.
• There are 5 options for vertical/
horizontal airfl ow direction.
• Do not adjust the vertical and
horizontal louvers by hand.
• If automatic vertical airfl ow direction
has been set, the louvers swing up
and down automatically.
• For HEATING operation, the air
blows horizontally for a while, then
starts to blow downwards.
ENGLISH
Adjust the airfl ow
direction louver.
• If automatic horizontal airfl ow
direction has been set, the louvers
swing left and right automatically.
• For HEATING operation, the airfl ow
louvers start to swing left/right after
the temperature rises.
Troubleshooting
● The room has a peculiar odour. ► This may be a damp smell emitted by the wall, carpet, furniture or
● Indoor fan stops occasionally during automatic fan
speed setting.
● Indoor fan stops occasionally during heating
operation.
clothing.
► This helps to remove the surrounding odours.
► To avoid unintended cooling effect.
13
Page 14

■ Operations Details
• To reach the desired set temperature
quickly.
• To provide a quiet surrounding.
■ Hint
• To reduce power consumption
during cooling operation, close the
curtains to prevent the sunlight and
heat from coming in.
POWERFUL, QUIET
To enable
quiet
operation.
To enable
powerful
operation.
14
● and operations are not able to operate at the
same time.
● and operations could be cancelled by pressing
the respective button again.
Troubleshooting
● Noisy during operation. ► The unit may have been installed at an incline, or the movable front
panel is not closed properly.
● Operation is delayed a few minutes after restart. ► The delay is a protection to the unit’s compressor.
● Outdoor unit emits water/steam. ► Condensation or evaporation occurs on pipes.
Page 15

TIMER
1
2
1
To select ON
or OFF timer.
2
To select
your desired
time.
■ Operation Details
• The timer allows you to turn the air
conditioner on or off automatically.
• The unit may start in preliminary
operation before the actual set time
when ON timer has been set.
• The set timer repeats daily once
set.
• If there is a power failure, you can
restore the previous setting (once
power is resumed) by pressing the
button.
• If the timer is cancelled, press
to restore the previous setting.
■ Hint
• To dim the indicator display:
ENGLISH
3
To confi rm
the setting.
● The timer is valid only when the clock is set correctly.
● You can set your preferred time for ON and OFF timers. The
unit will turn on or off automatically.
● To cancel ON or OFF timer, press
.
or , then press
Press and
hold for 5
seconds.
To cancel,
press
the
again for 5
seconds.
Troubleshooting
● Timer indicator always on. ► The timer setting repeats daily once set.
● Power indicator blinks before the unit is switched on. ► This is a preliminary step in preparation for the operation when the ON
timer has been set.
● Remote control does not work. ► The batteries are inserted incorrectly or need replacing.
● The unit does not work. ► The circuit breaker is tripped or the timer is set incorrectly.
15
Page 16

■ Washing Instructions
SSwitch off the power supply
before cleaning
MOVABLE FRONT PANEL
TOP GRILL
INDOOR UNIT
• Do not use benzene, thinner, bleach
or scouring powder.
• Use only soaps (
household detergent .
• Do not use water hotter than 40°C.
INDOOR UNIT
• Wipe the unit gently with a soft, dry
cloth.
MOVABLE FRONT PANEL &
TOP GRILL
• Do not remove the movable part
from the front panel.
• Soak cloth/sponge in lukewarm
water with detergent. Squeeze it
dry and wipe the panels. Repeat
same step again, but this time soak
cloth in lukewarm water without any
detergent.
• Do not dry the parts with a hair
dryer, a stove, or under direct
sunlight.
• Dry the parts under the shades.
pH7) or neutral
≃
■ Hint
• Please consult your nearest
authorized dealer for seasonal
inspection.
CARE & MAINTENANCE
witch off the power supply
before cleaning
MOVABLE FRONT PANEL
Raise and pull to remove.
Wash gently and dry.
TOP GRILL
Push up and pull to remove.
Wash gently and dry.
Top air fi lter
Super allerubuster fi lter
Front air fi lter
■ For extended non-use
• Activate heating for 2~3 hours to thoroughly dry the unit.
• Turn off the power supply and unplug.
• Remove the remote control batteries.
INDOOR UNIT
Wipe gently.
16
Page 17

CARE & MAINTENANCE
SSwitch off the power supply
before cleaning
REMOVE THE FRONT AIR FILTER
REMOVE THE TOP AIR FILTER
REMOVE THE SUPER ALLERU-BUSTER FILTER
1
2
3
4
witch off the power supply
before cleaning
REMOVE THE FRONT AIR FILTER
Push upwards to unlock the
air fi lter fastener.
1
Press both hollow parts with
fi ngers and pull out the air
2
fi lter.
■ About
AIR FILTER
• Wash any dusty fi lter whenever
necessary.
• Wash/rinse the fi lter gently with
water to avoid damage to the unit
surface.
• Replace any damage fi lters.
SUPER ALLERU-BUSTER
• Vacuum the fi lter whenever
necessary.
• Replace the fi lter every 10 years or
purchase the replacement fi lter if it
is damaged.
Part no: CZ-SA15P
FILTER INSTALLATION
• To make sure the front air fi lter is
inserted correctly:
1. Press both hollow parts until the
projections are clicked.
2. Push downwards to lock the air
fi lter fastener.
Projections
ENGLISH
REMOVE THE TOP AIR FILTER
Pull the air fi lter towards you.
3
REMOVE THE SUPER ALLERU-BUSTER FILTER
Detach the fi lter gently.
4
● To reinstall the fi lter after cleaning is completed, repeats the
illustration steps in a backward order, from step 4 to step 1.
Air filter fastener
• To make sure the fi lter cleaning
device is able to move smoothly:
Press and
hold for 10
seconds.
■ Hints
• For best performance, it is
recommended to install the air
conditioner in a room away from the
kitchen.
• Air conditioner installed near a
kitchen is more likely to run a risk of
damaging the air conditioner fi lter
caused by oily air and dust. A fi lter
exposed to excessive oily air cannot
be cleaned thoroughly with auto fi lter
cleaning.
17
Page 18

SEASONAL INSPECTION AFTER EXTENDED NON-USE:
• Checking of remote control batteries.
• No obstruction at inlet and outlet vents.
• After 15 minutes of operation, it is normal to have the following temperature difference between inlet and outlet vents:
Cooling: ≥ 8°C
Heating: ≥ 14°C
INSPECCIÓN PERIÓDICA TRAS NO UTILIZAR LA UNIDAD DURANTE UN TIEMPO PROLONGADO
DE TIEMPO:
• Verifi que las pilas del mando a distancia.
• Compruebe que las tomas de entrada y salida de aire no están obstruidas.
• Tras 15 minutos de funcionamiento, es normal que se produzca la siguiente diferencia de temperatura entre las tomas de entrada y
salida de aire:
Enfriamiento: ≥ 8°C
Calentamiento: ≥ 14°C
ESEGUIRE L’ISPEZIONE STAGIONALE DOPO UN PERIODO DI INATTIVITÀ PROLUNGATO:
• Controllo delle batterie del telecomando.
• Nessuna ostruzione alle bocchette di ingresso ed uscita dell’aria.
• Dopo 15 dall’avvio, è normale che vi sia una differenza di temperatura tra l’aria in ingresso e le aperture di uscita:
Raffreddamento: ≥ 8°C
Riscaldamento: ≥ 14°C
SEIZOENINSPECTIE NA LANGDURIGE INACTIVITEIT:
• Controleer de batterijen van de afstandsbediening.
• Controleer de inlaat- en uitlaatopeningen op obstructies.
• Het is normaal dat na 15 minuten gebruikstijd het temperatuurverschil tussen de inlaat- en uitlaatopeningen als volgt is:
Bij koelen: ≥ 8°C
Bij verwarmen: ≥ 14°C
INSPECÇÃO SAZONAL APÓS UM PERÍODO DE INACTIVIDADE PROLONGADO:
• Verifi que as pilhas do controlo remoto.
• Os orifícios de entrada e saída devem estar desobstruídos.
• Após 15 minutos de funcionamento, é normal que a seguinte diferença de temperatura se verifi que entre os orifícios de entrada e saída:
Arrefecimento: ≥ 8°C
Aquecimento: ≥ 14°C
ΕΠΟΧΙΑΚΗ ΕΠΙΘΕΩΡΗΣΗ ΜΕΤΑ ΑΠΟ ΠΑΡΑΤΕΤΑΜΕΝΗ ΠΕΡΙΟΔΟ ΠΟΥ ΔΕΝ ΕΧΕΙ
ΧΡΗΣΙΜΟΠΟΙΗΘΕΙ:
• Έλεγχος των μπαταριών του τηλεχειριστήριου.
• Έλεγχος αν παρεμποδίζονται οι αεραγωγοί εισόδου και εξόδου αέρα.
• Μετά από 15 λεπτά λειτουργίας, είναι φυσιολογικό να έχετε τις παρακάτω διαφορές θερμοκρασίας μεταξύ των αγωγών εισόδου και
εξόδου:
Ψύξη: ≥ 8°C
Θέρμανση: ≥ 14°C
СЕЗОНЕН ПРЕГЛЕД СЛЕД ПРОДЪЛЖИТЕЛНО НЕИЗПОЛЗВАНЕ:
• Проверка на батериите на дистанционното управление.
• Премахване на евентуални прегради на входните и изходните вентилационни отвори.
• След 15 минути работа е нормално да има следната температурна разлика между входните и изходните вентилационни отвори:
Охлаждане: ≥ 8°C
Отопляване: ≥ 14°C
114
Page 19

NON SERVICEABLE CRITERIAS
TURN OFF POWER SUPPLY and CALL Authorized Distributor under the following conditions:
• Abnormal noise during operation. • Circuit breaker switches off frequently.
• Water/foreign particles have entered the Remote Control. • Power cord becomes unnaturally warm.
• Water leak from Indoor unit. • Switches or buttons are not functioning properly.
NO UTILICE LA UNIDAD SI...
Si se dan las siguientes circunstancias, CORTE LA ALIMENTACIÓN y LLAME al distribuidor
autorizado
• Si escucha ruidos extraños durante el funcionamiento • Si el interruptor del circuito salta frecuentemente
• Si entra agua o elementos extraños en el mando a distancia • Si el cable de alimentación y el enchufe se recalientan
• Si hay escapes de agua de la unidad interior • Los interruptores o los botones no funcionan correctamente
FUNZIONAMENTO ANOMALO
Se si verifi ca una delle seguenti condizioni, spegnere immediatamente l’interruttore
generale e chiamare il rivenditore autorizzato:
• Durante il funzionamento si sentono rumori anomali. • L’interruttore salvavita scatta frequentemente.
• Penetrazione di acqua o di corpi estranei nel telecomando. • Il cavo di alimentazione su surriscalda in modo
• L’unità interna perde acqua. anomalo.
• Funzionamento anomalo di interruttori o pulsanti.
OMSTANDIGHEDEN WAARIN U HULP MOET INROEPEN
SCHAKEL DE STROOMTOEVOER UIT en RAADPLEEG een erkend verdeler onder de volgende
omstandigheden:
• Een abnormaal lawaai tijdens de werking. • De zekering springt regelmatig uit.
• Water of vreemde deeltjes zijn in de afstandsbediening • De stroomdraad wordt onnatuurlijk warm.
binnengedrongen. • De schakelaars of knoppen werken niet zoals het hoort.
• Er lekt water uit de binneneenheid.
CRITÉRIOS SEM MANUTENÇÃO
DESLIGUE O SISTEMA DE ALIMENTAÇÃO e CONTACTE o Distribuidor Autorizado nas
seguintes condições:
• Ruído anormal durante o funcionamento. • Os interruptores do disjuntor desligam-se
• Água/partículas estranhas entraram no controlo remoto. frequentemente.
• Fuga de água da unidade interior. • O fi o distribuidor de corrente aquece de forma anormal.
• Os interruptores ou botões não estão a funcionar
devidamente.
ΠΕΡΙΠΤΩΣΕΙΣ ΠΟΥ ΔΕΝ ΑΝΤΙΜΕΤΩΠΙΖΟΝΤΑΙ ΑΠΟ ΤΟ ΧΡΗΣΤΗ
ΔΙΑΚΟΨΤΕ ΤΗΝ ΠΑΡΟΧΗ ΡΕΥΜΑΤΟΣ και ΚΑΛΕΣΤΕ κάποιο εξουσιοδοτημένο κατάστημα στις
παρακάτω περιπτώσεις:
• Θόρυβος κατά τη λειτουργία. • Συχνή πτώση του ασφαλειοδιακόπτη.
• Είσοδος νερού/σωματιδίων στο τηλεχειριστήριο. • Αποσυνδέστε την παροχή ρεύματος.
• Διαρροή νερού από την εσωτερική μονάδα. • Οι διακόπτες ή τα πλήκτρα δε λειτουργούν σωστά.
КРИТЕРИИ ЗА ПОВРЕДА
ИЗКЛЮЧЕТЕ ЗАХРАНВАНЕТО и се ОБАДЕТЕ на оторизирания дистрибутор при следните
условия:
• Необичаен звук по време на работа. • Прекъсвачът на ел. верига се изключва често.
•
Вода/чужди частици са попаднали в дистанционното управление.
• Изтича вода от Вътрешния уред. • Копчетата или бутоните не функционират правилно.
• Захранващият кабел се загрява необичайно.
115
Page 20

F565101
Matsushita Electric Industrial Co., Ltd.
Web Site: http://www.panasonic.co.jp/global/
Printed in Malaysia
OPSC0601-02
 Loading...