

Page 1
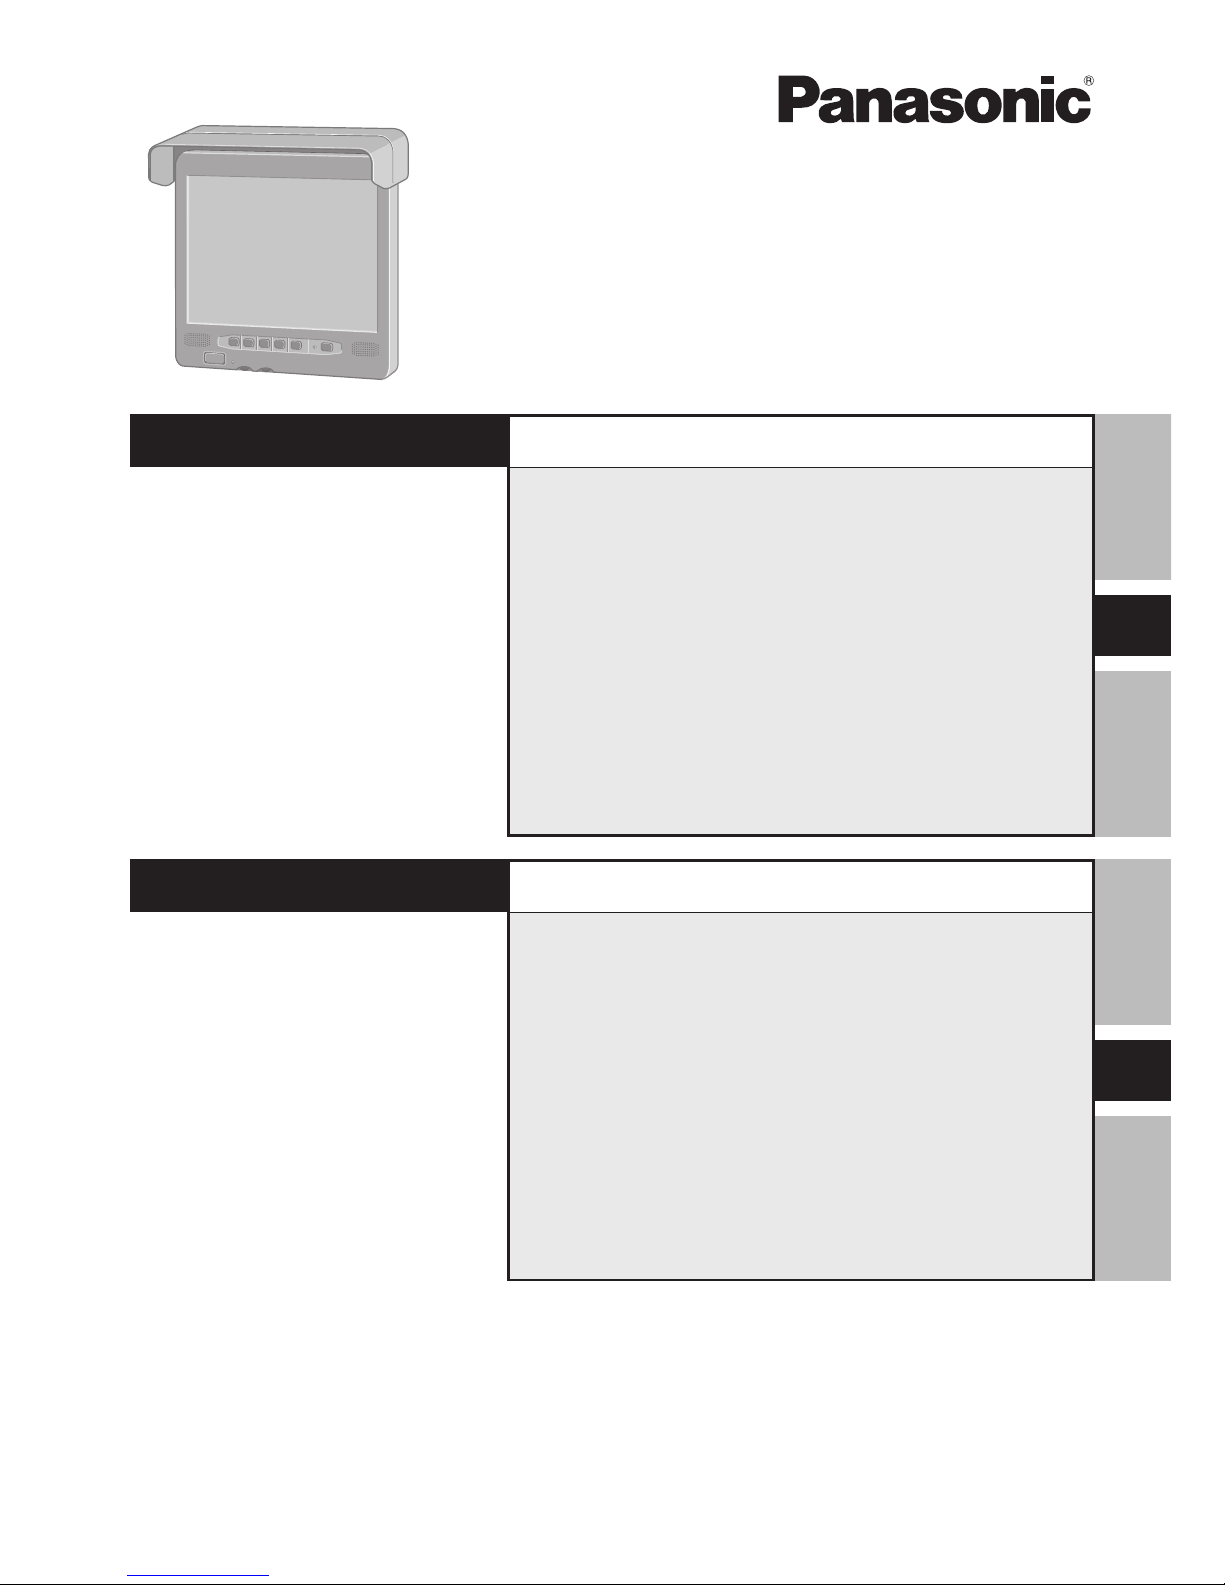
LCD Monitor
CF-VDL02BM
ENGLISH
OPERATING INSTRUCTIONS
Introduction......................................4
Names and Functions of Parts .......5
Mounting the LCD Monitor ..............6
Starting Up/Shutting Down .............8
Touchscreen ....................................9
Adjusting the LCD Monitor ........... 13
Troubleshooting ............................17
Specifications ................................ 19
E
FRANÇAIS
INSTRUCTIONS D’UTILISATION
F
Introduction................................. 22
Noms et fonctions des pièces ... 23
Montage du Moniteur LCD ......... 24
Mise en marche/Arrêt ................. 26
Écran tactile ................................ 27
Réglage du Moniteur LCD.......... 31
Dépannage .................................. 36
Spécifications ............................. 38
Page 2
E
2
ENGLISH
To avoid risk of serious injury or possible violation of laws, make sure that the monitor
is placed visible to the driver for no other purpose than navigational or with the use of
rear view camera only.
When Driving
The driver must not operate the LCD monitor.
(Operating the LCD monitor while driving is a distraction and may lead to an accident.)
As a safety factor, driving with the television, video or DVD player is prohibited.
Keep the unit at an appropriate sound level. Driving with the sound at a level that
prevents you from hearing sounds outside and around the car may cause an accident.
CAUTION
Warning: A LCD monitor may be installed in a motor vehicle and visible to the driver only if
used to support vehicle related functions such as vehicle information, system control, rear or
side observation and navigation. If used for entertainment purpose, such as television reception or video play, it must be installed to the rear of the driver’s seat where it will not be
visible, directly or indirectly, to the operator of the motor vehicle. Check with individual
state/provincial laws to determine lawful use of this product while operating within a motor
vehicle.
For Used in Motor Vehicle
Page 3
E
3
When Car Washing
Do not expose the LCD monitor to water or excessive moisture. This could cause electrical
shorts, fire or other damage.
When Parked
Parking in direct sunlight can produce very high temperatures inside your car. Let the
interior of the car cool down before switching the unit on.
Do not watch the LCD monitor with the engine off. It will consume battery power and
may prevent the engine from starting.
Use Panasonic Technical Support
Do not attempt to disassemble or adjust this precision product. Contact Panasonic Technical
Support.
For Installation
Be sure to install the LCD monitor in a position that does not obstruct the driver’s vision.
If the LCD monitor has been installed for the rear seat passengers, they must be careful to
prevent injury by hitting their heads on the LCD monitor in case of an accident.
Do not expose the LCD monitor to direct sunlight or excessive heat.
Be sure not to install the LCD monitor in a location at which it is exposed to water, hot air
such as near heater duct, or where it may stepped on.
Do not install the LCD monitor in an area where it would obstruct the operation of an air
bag.
Ask a trained technician to install the unit. Installation and wiring require training and
experience.
To be safe, ask the sales outlet where you purchased the unit to perform the installation.
When Operating
Make sure the LCD monitor is firmly secured and protected from strong impact, because this
may cause a malfunction or possible fire.
Precautions
Page 4
E
4
Thank you for purchasing the LCD Monitor for the Panasonic notebook computer series.
This LCD monitor features a touchscreen function, which makes computer operation possible by simply touching the surface of the LCD monitor and pressing buttons – even when
the computer is not being held.
Introduction
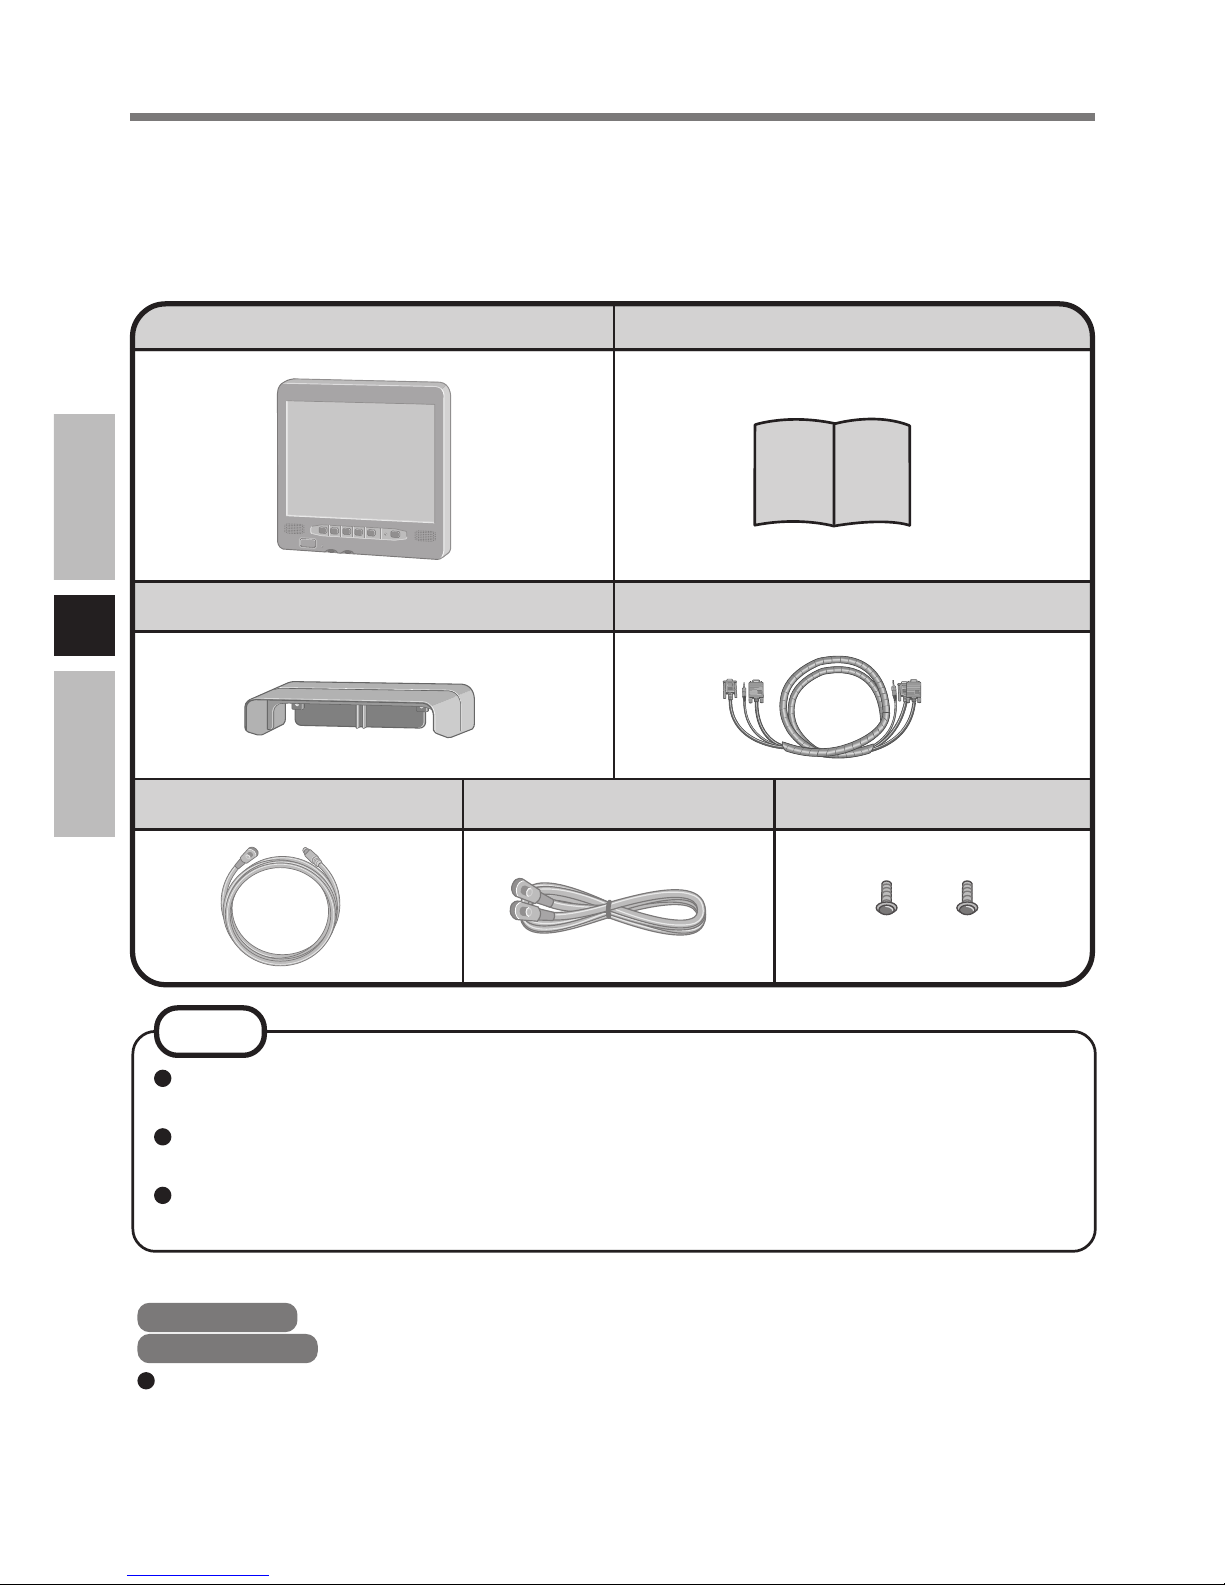
Operating Instructions ............... 1
RGB/Serial/Sound Cable ............ 1
Sun Shade ................................... 1
PS/2 Cable ................1
LCD Monitor ................................ 1
Function Cable .......1 Screws .................... 2
NOTE
A Port Replicator with a display port, serial port, and sound port is required for computers without these ports. For more information, refer to the computer’s Reference Manual.
An optional keyboard (Model no. CF-VKBL01/CF-VKBL02) is required to use the
Function Buttons of the LCD Monitor.
This manual explains the procedure for default settings. The procedure may differ
according to the settings.
[Illustration in this manual]
Windows XP : Information for Microsoft
®
Windows® XP Professional users.
Windows 2000 : Information for Microsoft
®
Windows® 2000 Professional users.
Windows XP screens are used in this manual when no specific OS notes are required.
Microsoft® and Windows® are registered trademarks of Microsoft Corporation of the United
States and/or other countries.
PS/2
®
is a registered trademark of International Business Machines Corporation.
Panasonic
is a registered trademark of Matsushita Electric Industrial Co., Ltd.
Page 5
E
5
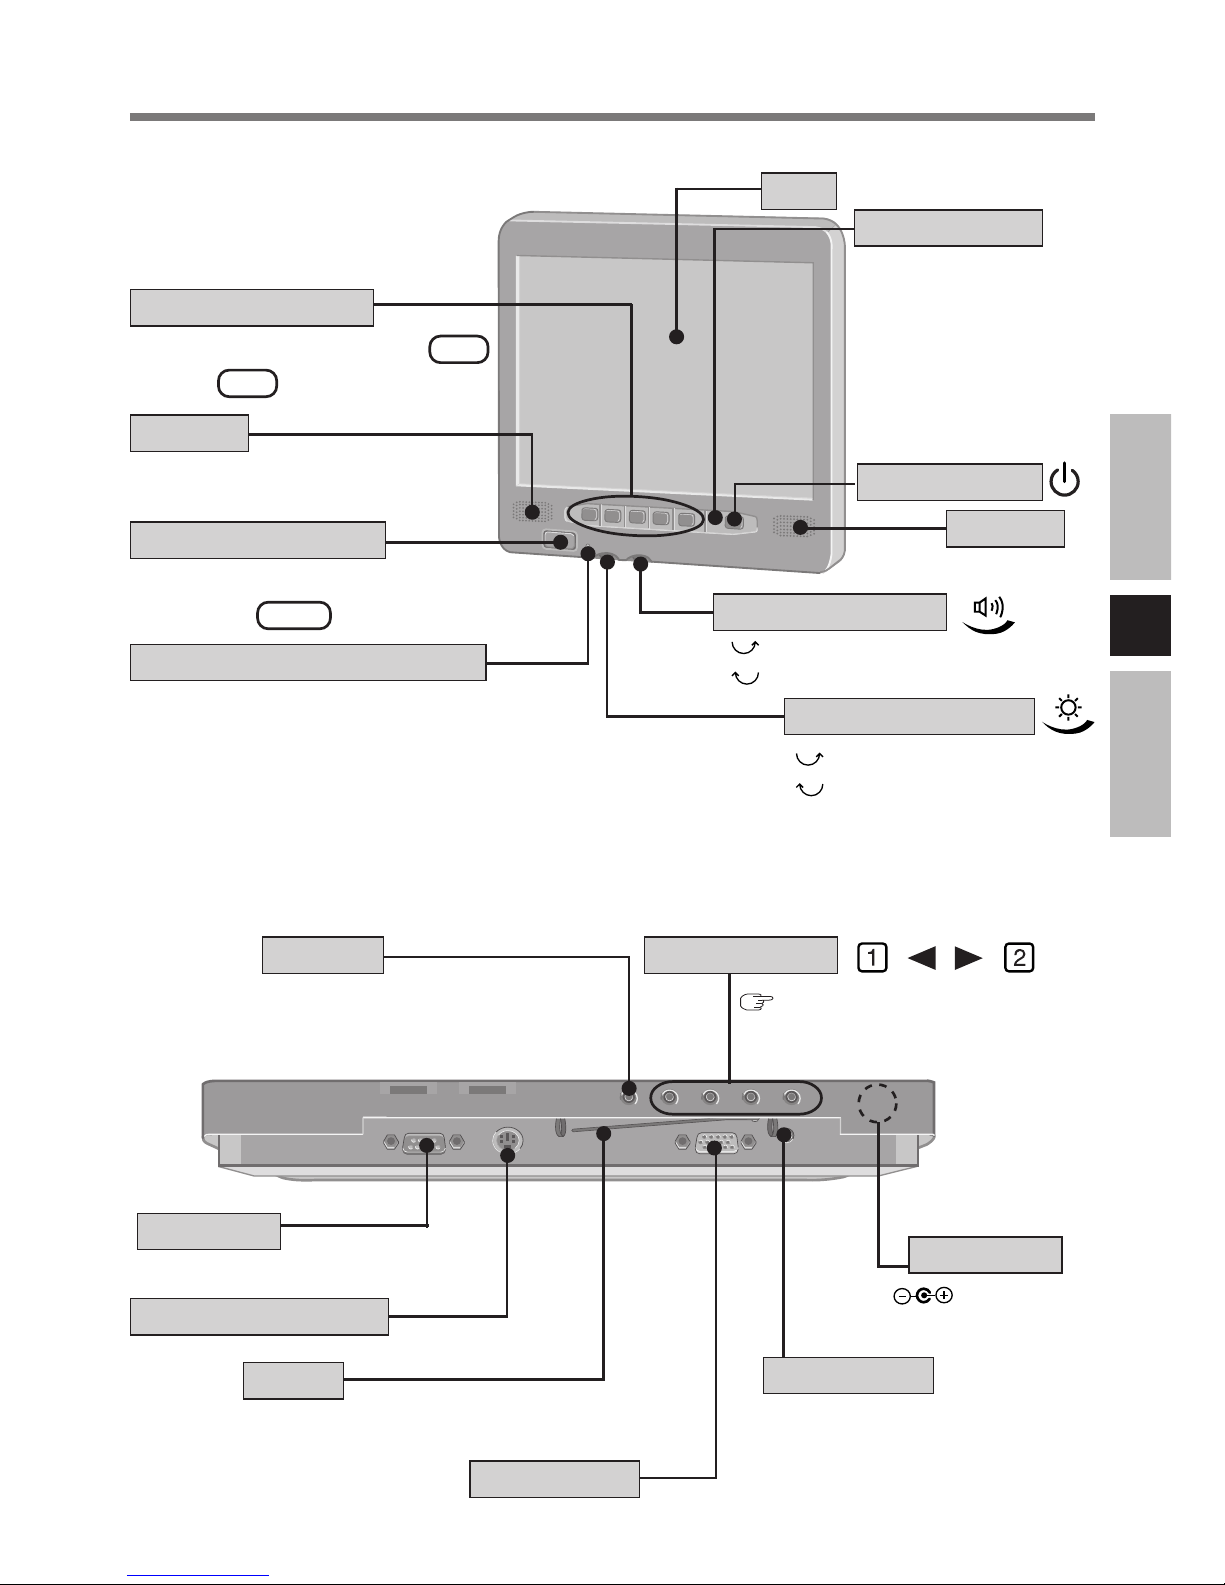
Names and Functions of Parts
Function Buttons
LCD
<Front>
Does the same operation as
through F5 of the keyboard.
F1
Speaker
The application software
allocated to F11 is started up.
Emergency Button
Green : Normal
The brightness can be adjusted freely.
Orange : Drops the brightness automatically due to an
increase in the internal temperature.
Red : The backlight goes OFF automatically due to
an increase in the internal temperature.
Temperature LED Indicator
Power Switch
LED Indicator
Speaker
Green : power on
Orange : power on but
no VGA Signal or the
cable is not
connected.
Brightness Volume
up
down
Speaker Volume
up
down
Do not have anyone except an
authorized repairperson push this
button.
OSD buttons
page13
DC-IN 15.6 V
Serial Port
SERIAL I/F
Sound Port
Function Key Port
LINE IN
Fn KEY
RGB IN
Binder
Bind the cables and fix
firmly.
<Bottom>
Reserve
DC-IN Jack
Display Port
Page 6
E
6
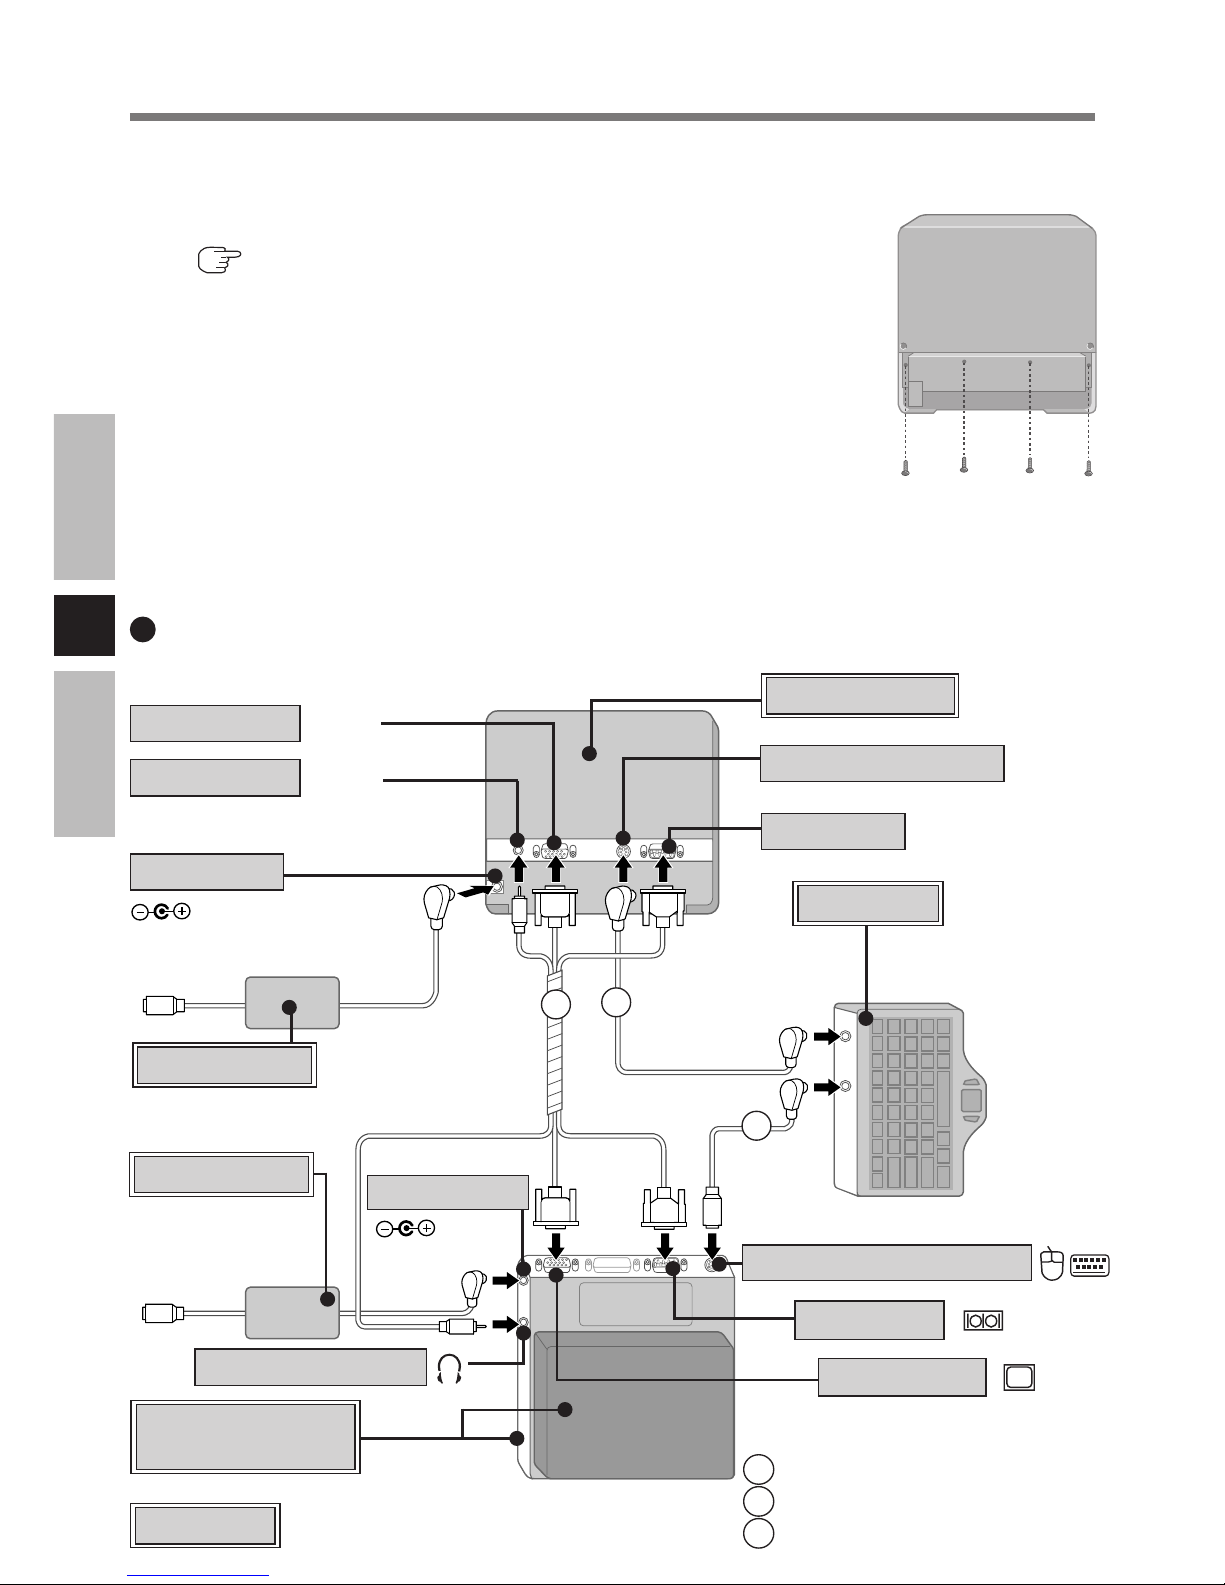
1
<Only for models without a display port, serial port, and sound port>
Connect your computer to the port replicator
(
Operating Instructions of the port replicator)
2
Remove the cover of the LCD Monitor
Remove the four screws, and remove the cover.
3
Connect the LCD Monitor to your computer via the connection cables (included)
Mounting the LCD Monitor
Function Key Port
Fn KEY
SERIAL I/F
Sound Port
LINE IN
DC-IN Jack
Serial Port
1
2
3
Display Port
RGB IN
DC-IN Jack
Keyboard
(commercially available product)
Car Adaptor
(commercially
available product)
Car Adaptor
LCD Monitor
<Rear View>
<Top View>
(Model no.
CF-VKBL01/
CF-VKBL02)
Example of connection
DC-IN 15.6 V
Keyboard/Mouse Port
Serial Port
1 RGB/Serial/Sound cable
2 PS/2 cable
3 Function cable
<Top View>
Headphone Jack
Port Replicator
and Computer
Computer
or
Display Port
Page 7
E
7
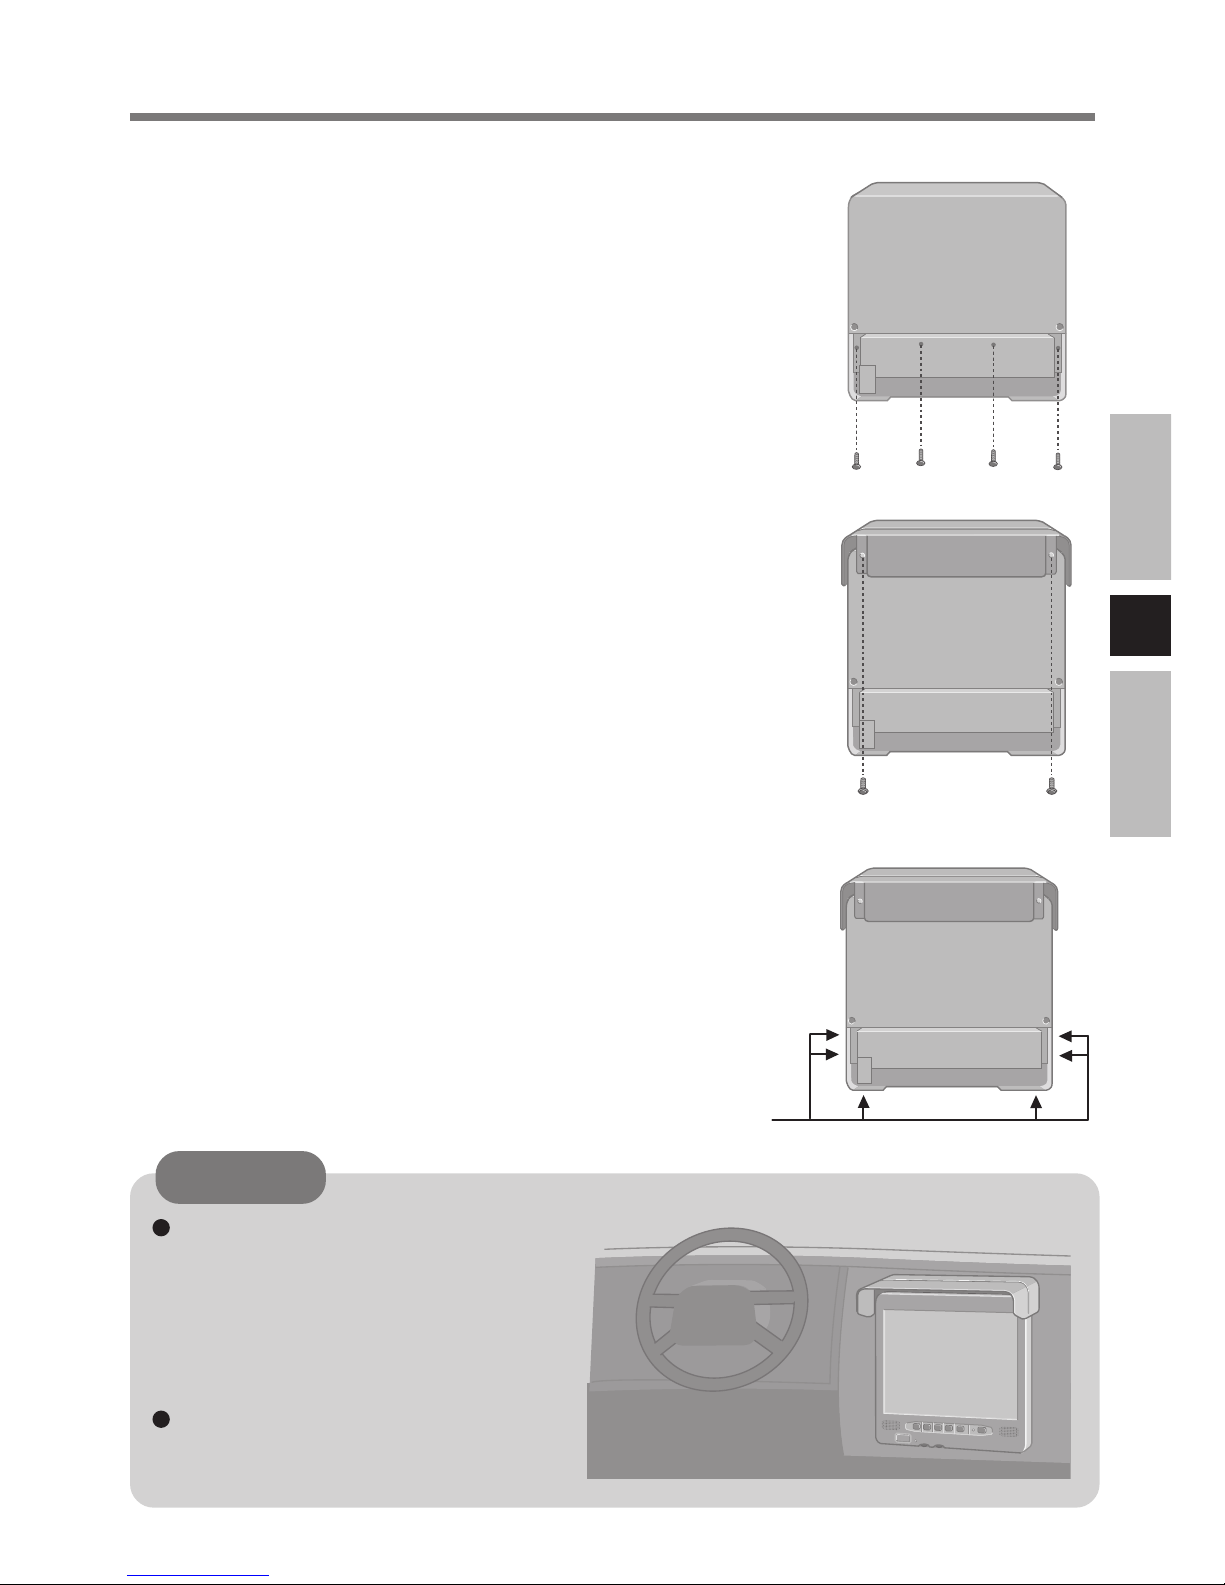
When installing the LCD monitor, locate the monitor under the dashboard
as shown in the figure to prevent the
monitor from interrupting the sight
of the driver and to prevent the monitor from being hit by direct sunlight.
Do not expose the computer to direct
sunlight or excessive heat.
4
Attach the cover of the LCD Monitor
Attach the four screws.
5
Mount the Sun Shade
Attach the two screws (included).
6
Mount the LCD Monitor
CAUTION
Use these M4 screw holes to mount the LCD Monitor.
Page 8
E
8
1
Save important data and close each application
2
Display the shut down screen
Windows XP
Select [start] - [Turn Off Computer].
Windows 2000
Select [Start] - [Shut Down].
3
Confirm shut down
Windows XP
Select [Turn Off].
Windows 2000
Select [Shut Down], then select [OK].
The computer will power off automatically.
4
Press the power switch of the LCD Monitor
The LCD Monitor will turn off after the computer is shut down completely.
Starting Up/Shutting Down
Starting Up
1
Press the power switch of the LCD Monitor
The LCD Monitor will turn on.
2
Turn your computer on ( Operating Instructions of the computer)
3
Select your application
You are able to start working on your computer.
Shutting Down (power off your computer)
This procedure is for shutting down the computer without using the standby or hibernation
function. (
Reference Manual of the computer)
NOTE
Some computers will shut down automatically when the LCD Monitor is turned off
according to power switch settings.
You can modify power switch settings on the following menus.
Windows XP : [start] - [Control Panel] - [Performance and Maintenance] - [Power
Options] - [Advanced] - [When I press the power button on my
computer]
Windows 2000 : [Start] - [Settings] - [Control Panel] - [Power Options] -
[Advanced] - [When I press the power button on my computer]
NOTE
Some computers will turn on automatically when the LCD Monitor is turned on.
Page 9
E
9
Touchscreen
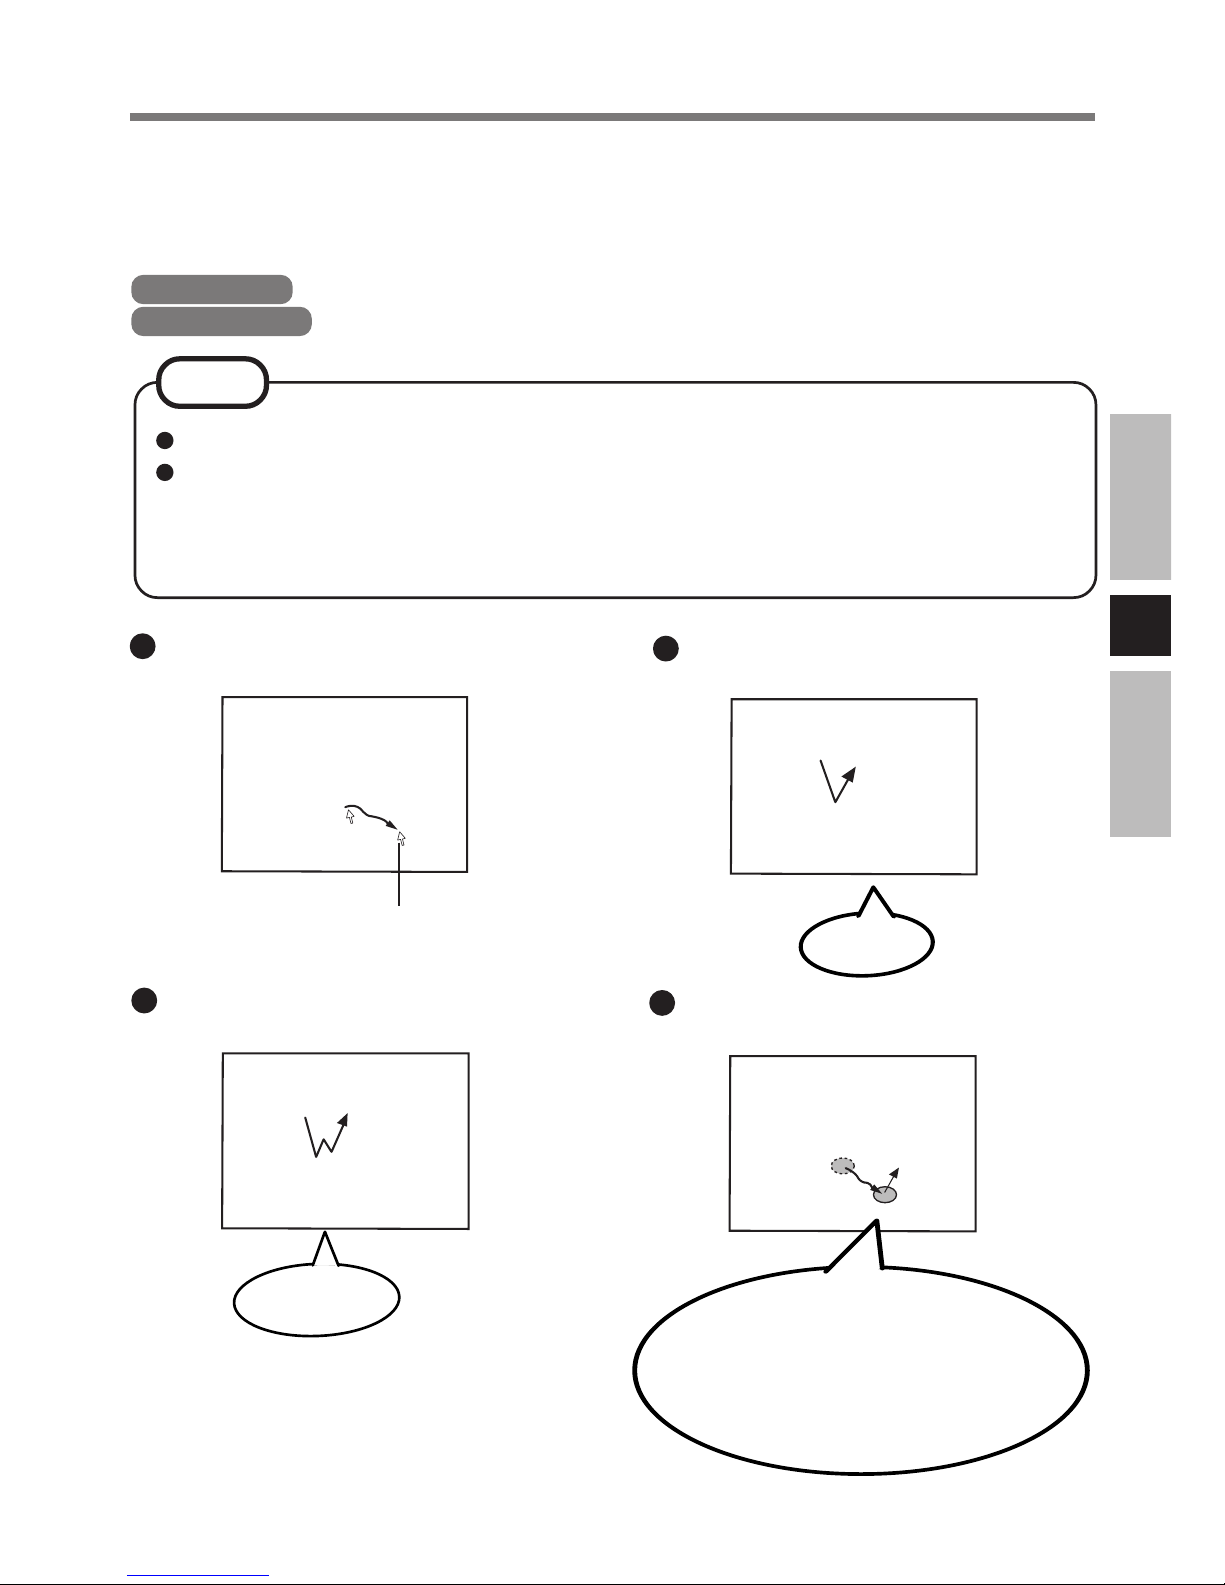
The LCD Monitor is equipped with a touchscreen function allowing you to perform the
same operations as the touch pad or mouse by touching the surface of the display with the
finger or stylus.
The operation settings can be changed in the following menu.
Windows XP : [start] - [All Programs] - [UPDD] - [Settings].
Windows 2000 : [Start] - [Programs] - [UPDD] - [Settings].
NOTE
Moving the cursor
Clicking
Double-clicking
Dragging
Cursor
Touch and hold the object (i. e.
file or icon), move the finger or
stylus on the surface (dragging
the object to the desired location), then release the finger or
stylus.
Two quick
taps
One tap
The touchscreen feature cannot be used with models which do not have a serial port.
For some models, you first need to install the touchscreen driver. Follow the installation instructions that come with the driver CD-ROM.
For more information, ask your system administrator or contact Panasonic Technical
Support.
Page 10
E
10
CAUTION
Handling the Touchscreen
Do not place any object on the surface or press down forcefully with sharp-pointed objects (e.g., nails), hard objects that can leave marks (e.g., pencils and ball point pens).
Do not apply pressure within 5 mm of the perimeter of the display panel. The cursor may
move to the edge of the display.
Do not operate the computer when such things as dust are on the screen, or allow contact
with substances that could dirty the touchscreen, such as oil. The cursor may not work
properly in such cases.
When the touchscreen becomes dirty:
Use a dry soft cloth such as a gauze to clean the dirty areas.
Do not use benzene, thinner, or disinfectant- type alcohol.
The touchscreen function can not be used when using the full screen in [Command
Prompt].
When the operation of panning is performed, the touchscreen function will not work
properly.
If a change is made to the screen resolution, or the cursor can not be pointed correctly
with the finger or stylus, be sure to perform calibration.
Touchscreen
Page 11
E
11
Advanced
Set the advanced settings.
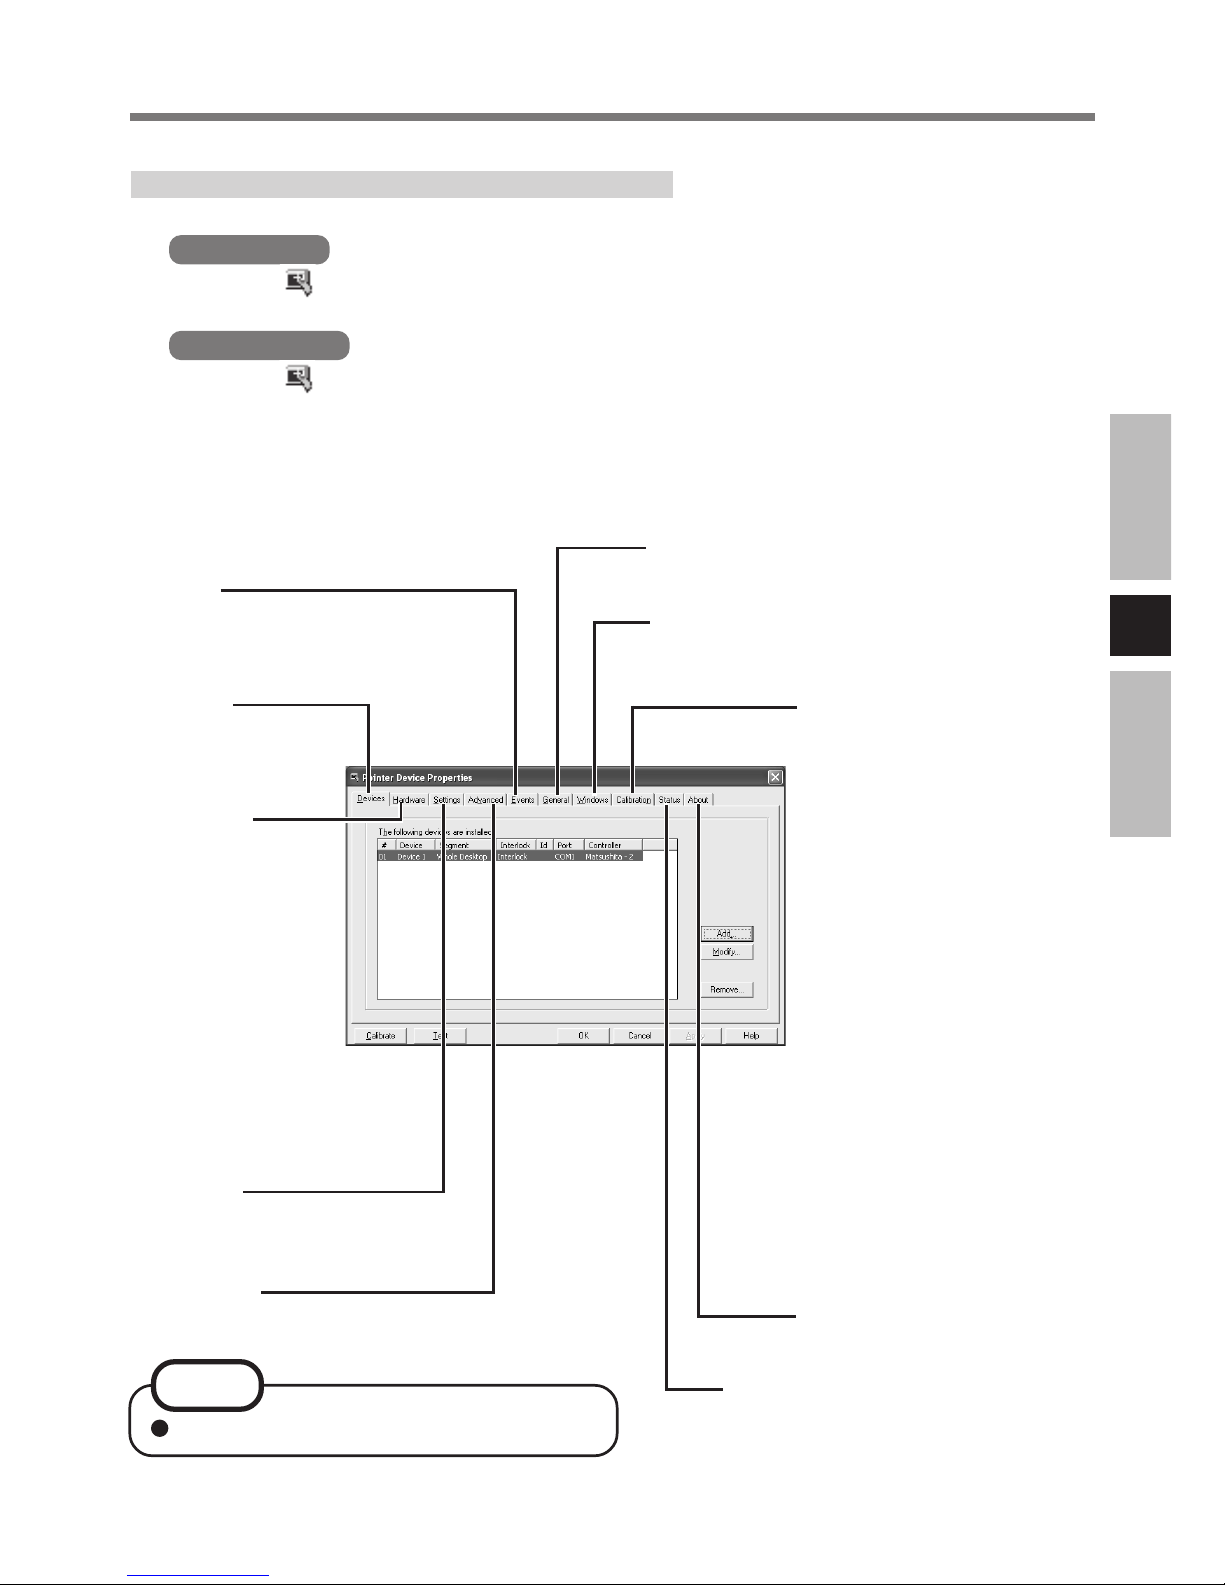
When needed, the touchscreen can be configured using the following steps.
1
Windows XP
Select
from the taskbar and select [Adjust settings], or select
[Settings] from [start] - [All Programs] - [UPDD]
Windows 2000
Select
from the taskbar and select [Adjust settings], or select
[Settings] from [Start] - [Programs] - [UPDD]
The following screen will be displayed.
Configuring the Touchscreen
For more information, refer to [Help].
Hardware
Set the hardware
resources. Make
sure that this setting matches the
[Serial Port] to
which the LCD
monitor has been
connected as set
using the Setup
Utility.
Calibration
Define the calibration setup.
Use when the cursor can not
be pointed correctly with the
finger or stylus. (Needed if
the alignment of the
touchscreen with the visual
image change or adjust the
display resolution).
<Only for CF-M34 series
models other than the CFM34C
******>
Before you run the calibration, you need to set the device at [Calibration Settings
For] as followings.
[Device 1] is for the com-
puter
[Device 2] is for the LCD
Monitor
Devices
Configure
the device controller.
About
Display the version number.
Status
Display the status of the controller.
Windows
Set the “double-click” settings.
General
Set the general settings and functions.
Events
Set the events that can
be generated by a controller.
Settings
Set the general protocol
settings.
NOTE
Page 12
E
12
2
Make necessary changes
3
Select [OK]
Adjustments can be made when double-click operations are assumed by the computer although single-click operations are intended, by clicking [Windows] from the
display shown in the previous page and decreasing the value for [Time] in [Double
Click Settings].
Immediately run [Calibrate] when the number of Calibration Points is changed.
It is also possible to change the double click speed for [Tap and Buttons]*1.
It is important to note that when the double click speed for [Mouse] is changed, the
double click time for [Windows] is also changed.
*1
Windows XP : in [start] - [Control Panel] - [Printers and Other Hardware] - [Mouse].
Windows 2000 : in [Start] - [Settings] - [Control Panel] - [Mouse].
<Only for CF-M34 series models other than the CF-M34C******>
You can use the touchscreen without changing the settings when the LCD Monitor is
connected to Serial Port B. To connect to Serial Port A, select [Hardware] and set
[Settings For] to [Device 2] and [Com port] to [COM1].
<Only for the models with the Display Rotation Tool>
Rotate the display to landscape mode (0 degrees) before performing the calibration.
NOTE
Touchscreen
Page 13
E
13
Adjusting the LCD Monitor
1
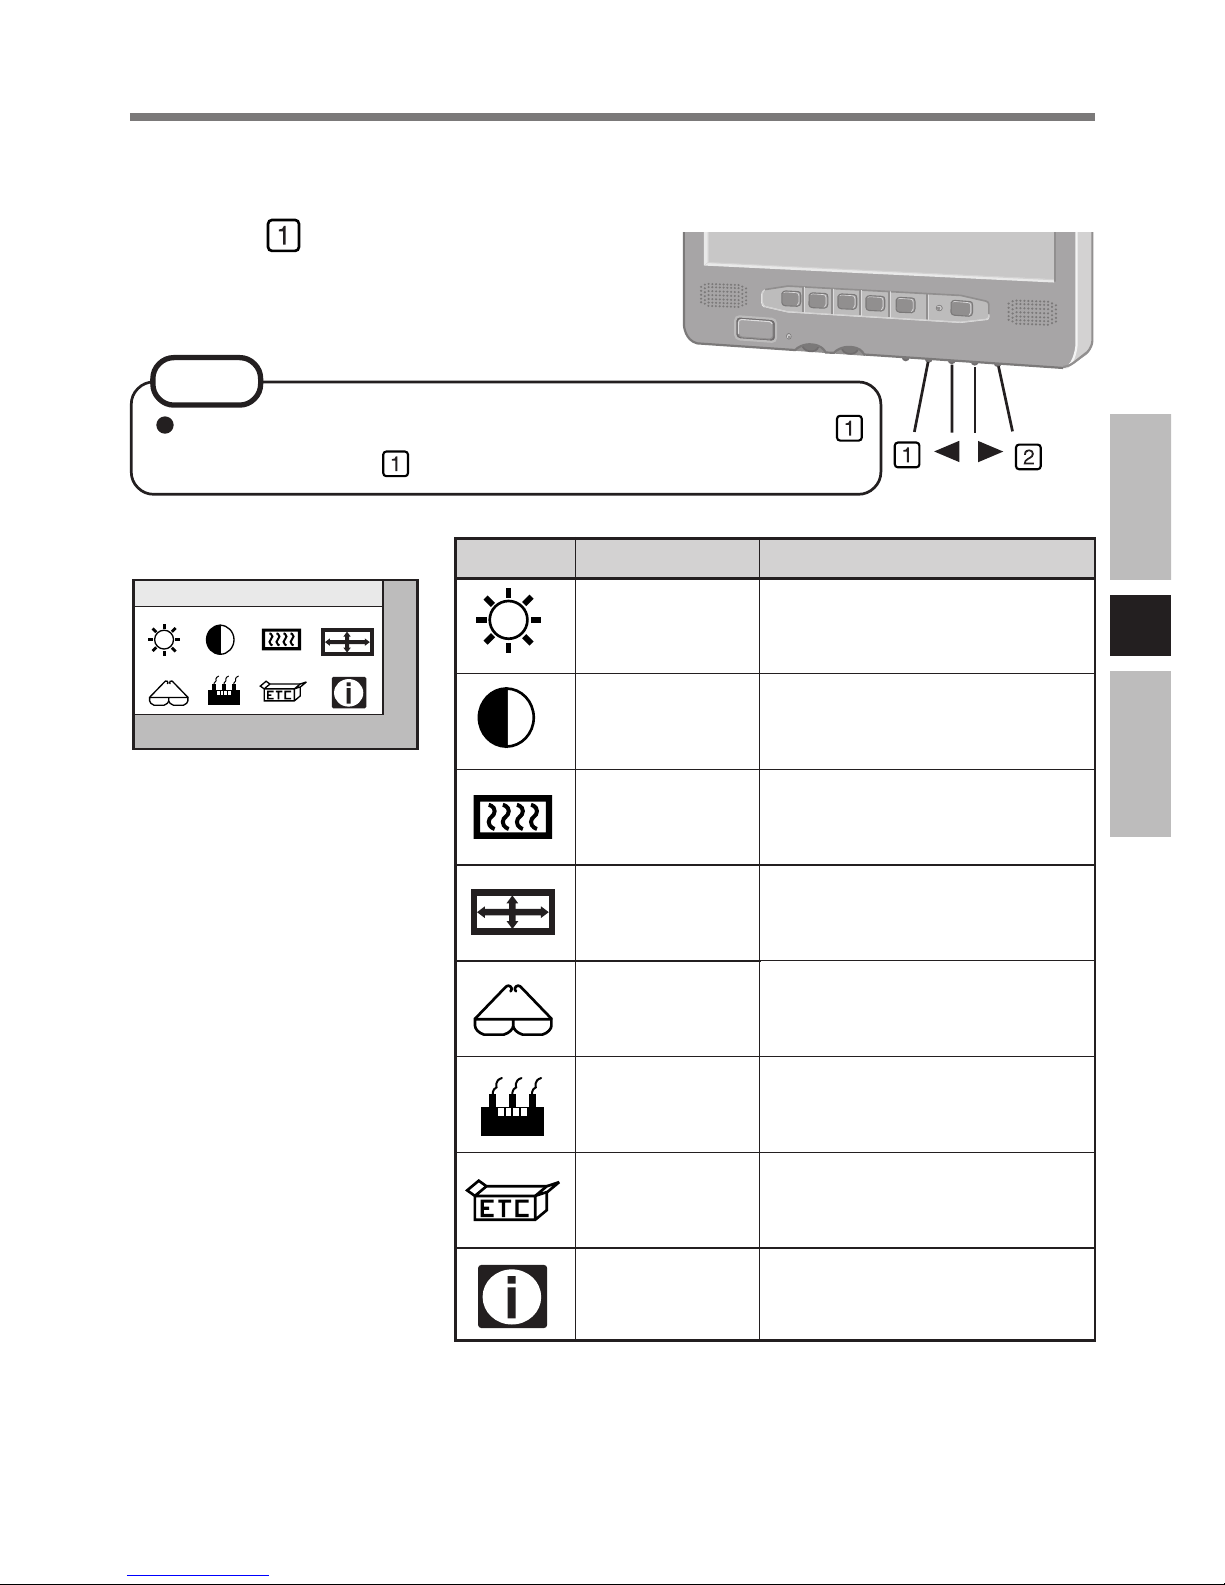
Press
The OSD main menu is displayed.
Brightness
1:Exit 2:Select
Fine adjustment on the display size, position, and so on, may be necessary since the signal
timing differs depending on the computer.
<OSD main menu>
NOTE
ICON
DESCRIPTION
Adjust brightness
Adjust contrast
Set RGB color
Move input image capture
window
Adjust clock and phase
Automatically optimize
the image quality
Miscellaneous settings
Display RGB input signal
information
FUNCTION
Brightness
Contrast
Color
Position
Image
Auto Config
Miscellaneous
Information
The OSD window may not be displayed properly when pressing .
In this case, press
again after waiting for about 10 seconds.
Page 14
E
14
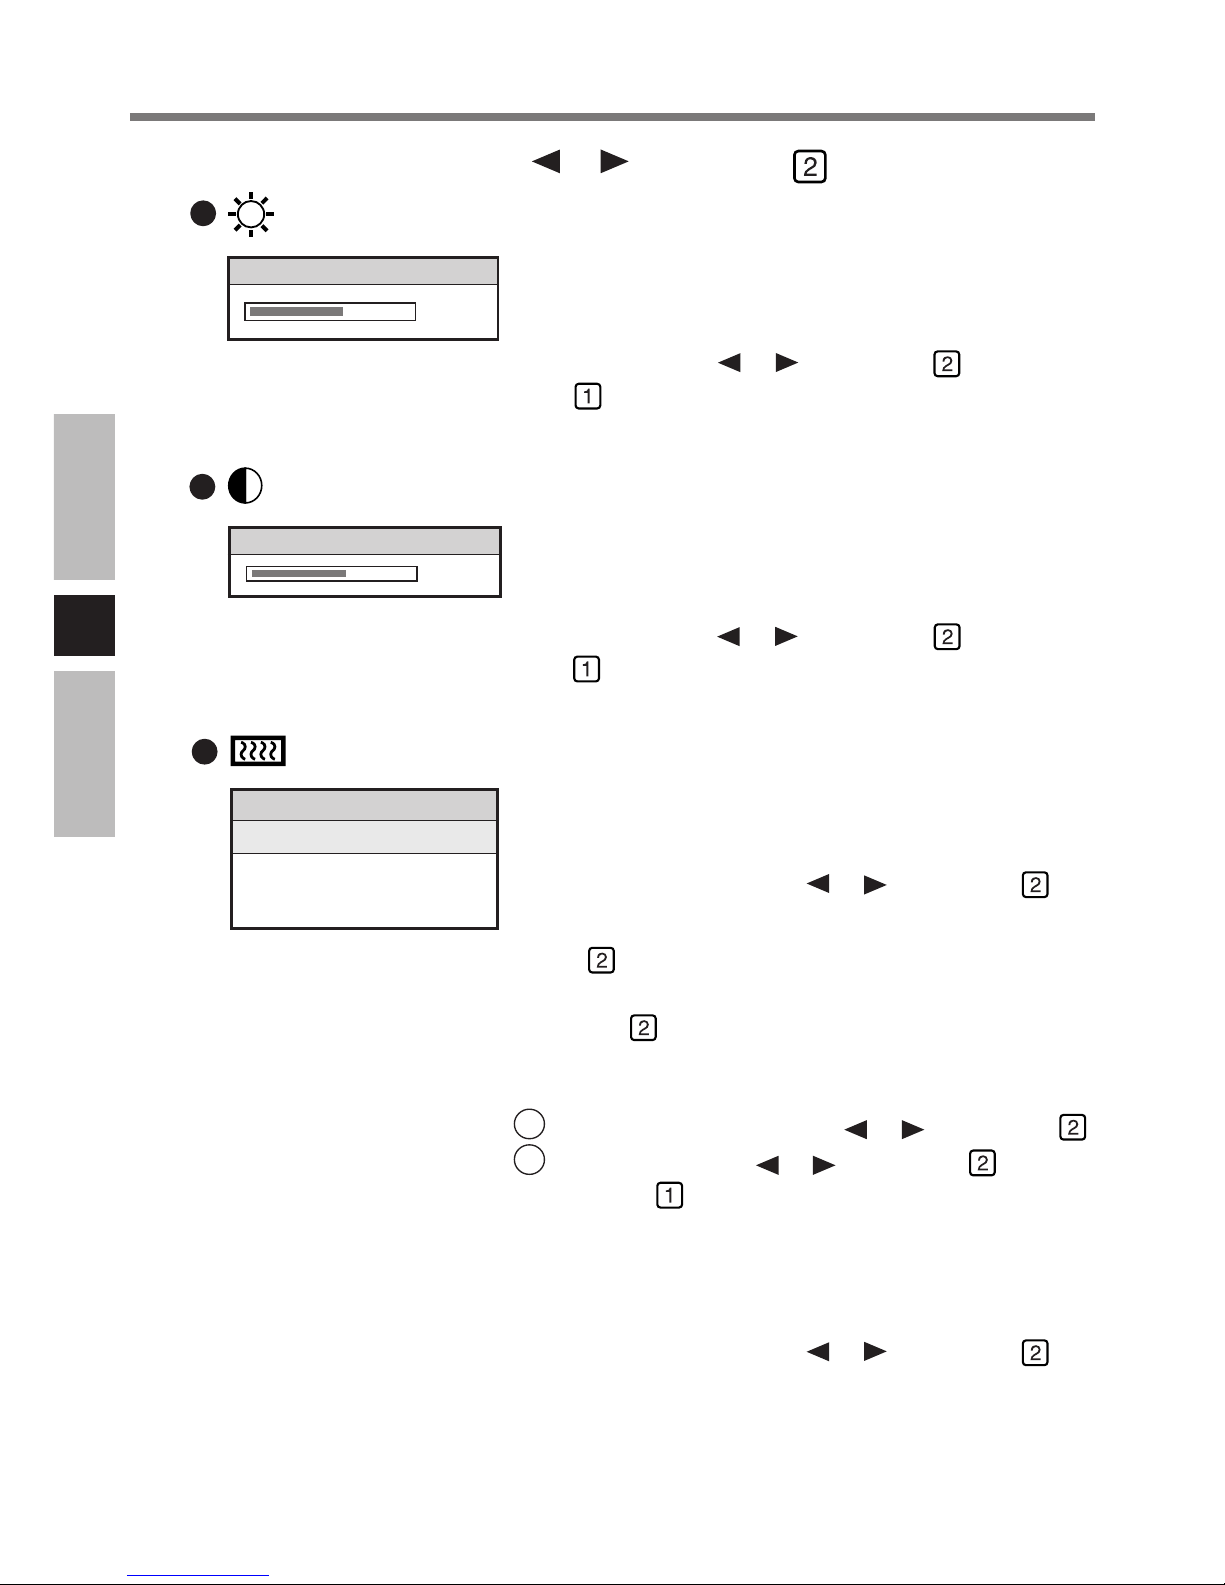
The Brightness menu item is used to adjust the brightness. A slider indicating the current brightness value is
displayed. The adjustment range is 0 to 63.
Adjust by pressing
or , then press . (To cancel,
press
and then turn off the power to the LCD Monitor. When the power is turned on again, the operation
will be canceled.)
(Brightness)
The Contrast menu item is used to adjust the contrast. A
slider indicates the current contrast value. The range of
adjustment is 0 to 255.
Adjust by pressing
or , then press . (To cancel,
press
and then turn off the power to the LCD Monitor. When the power is turned on again, the operation
will be canceled.)
(Contrast)
2
Select the icon by pressing or , then press
Brightness
32
Contrast
90
Adjusting the LCD Monitor
The Color menu is used to adjust the brightness of Red,
Green, Blue, or all color channels.
Select the item by pressing
or , then press .
Auto Balance
Select
, the color is adjusted automatically.
To save the adjusted value, select [Color Temperature],
then press
.
RGB
The sub-menu is displayed.
1 Select the item by pressing or , then press .
2 Adjust by pressing or , then press . (To can-
cel, press
and then turn off the power to the LCD
Monitor. When the power is turned on again, the
operation will be canceled.)
Color Temperature
The sub-menu is displayed.
Select the item by pressing
or , then press .
(Color)
Color
Auto Balance
RGB
Color Temperature
Page 15
E
15
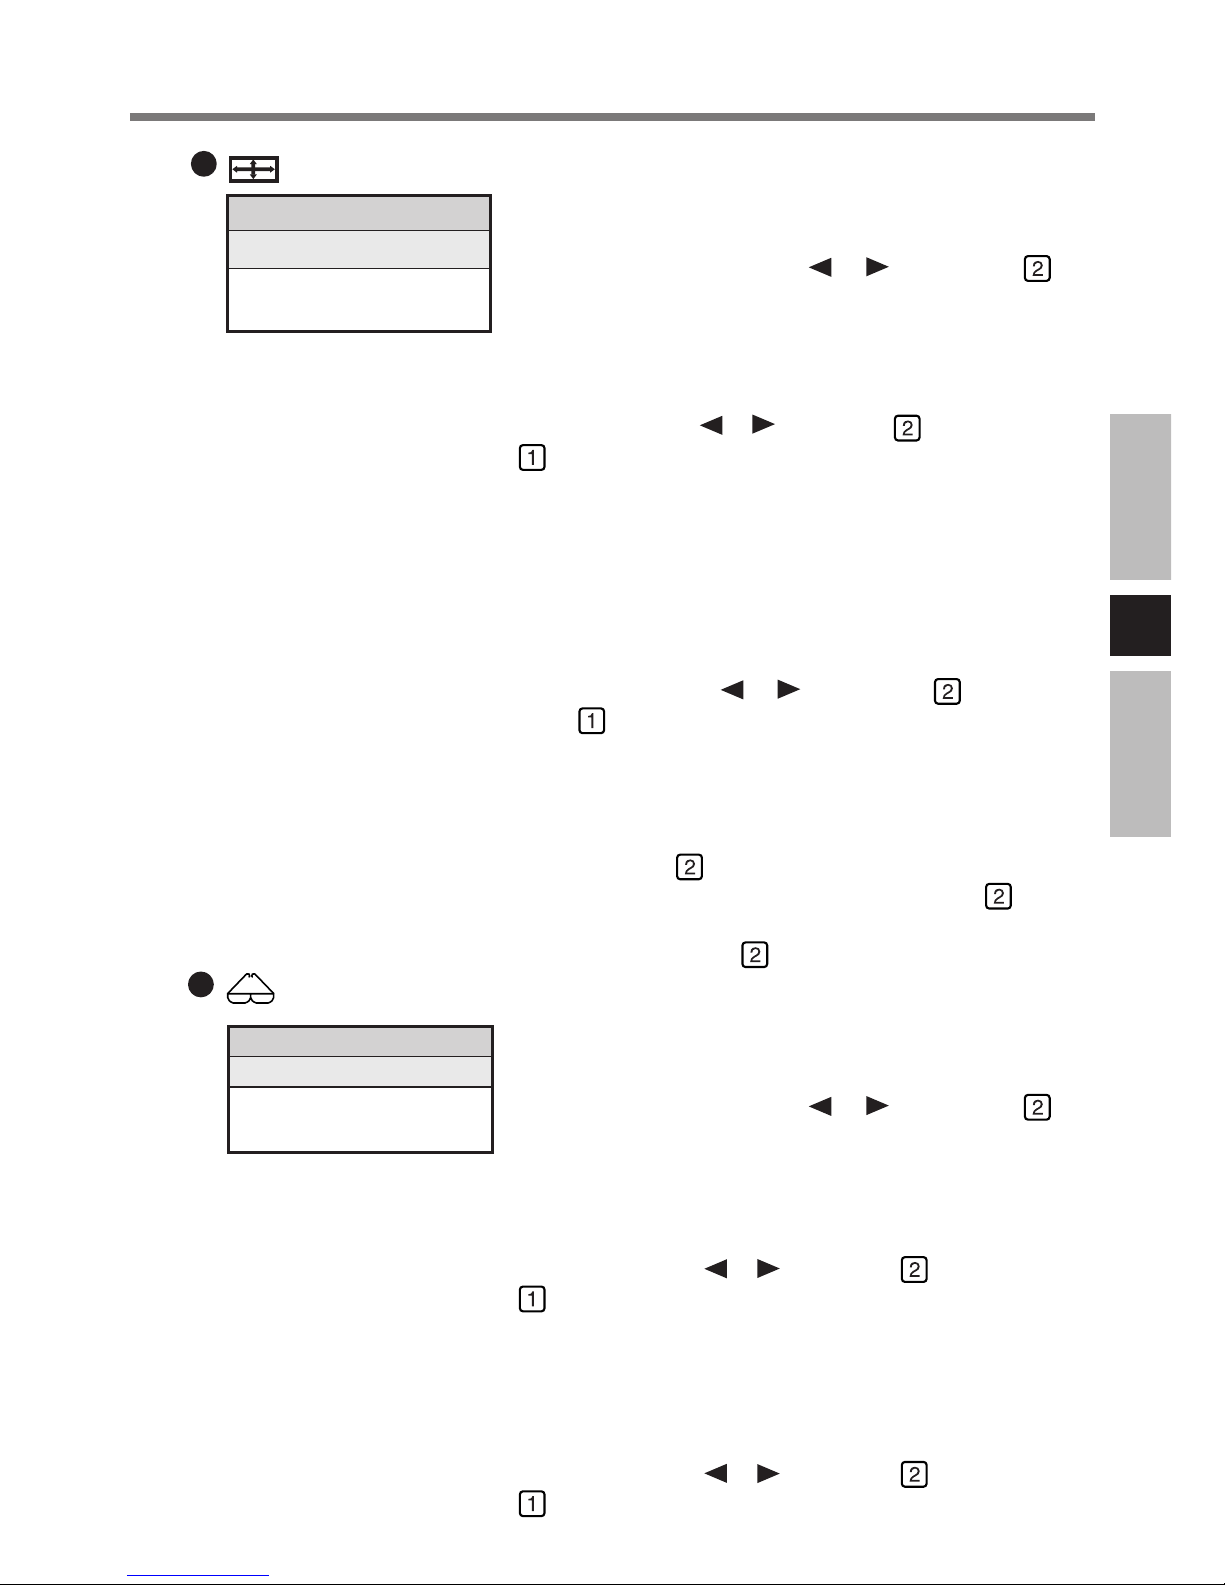
The Position menu allows the adjustment of image position in Analog input mode.
Select the item by pressing
or , then press .
H-Position
H-position is used to adjust the horizontal image position manually. A slider and the current value are displayed. The adjustment range is 0 to 127.
Adjust by pressing or , then press . (To cancel, press
and then turn off the power to the LCD Monitor. When
the power is turned on again, the operation will be canceled.)
V-Position
V-position is used to adjust the vertical image position
manually. A slider and the current value are displayed.
The maximum value for Vertical Position is to 1 to 47.
(Depending on the RGB input signal, the upper value
of this range may be below 47.)
Adjust by pressing
or , then press . (To cancel,
press
and then turn off the power to the LCD Monitor. When the power is turned on again, the operation
will be canceled.)
Auto Center
A confirmation box is displayed. The default selection
is [Yes]. Press
to adjust the position automatically.
If you want to cancel, select [No] and press
.
To save the adjusted value, select [H-Position] or [VPosition], then press
.
(Position)
Image Position
H-Position
V-Position
Auto Center
The image menu allows the adjustment of ADC clock
and phase in Analog input mode.
Select the item by pressing
or , then press .
Phase
Phase adjustment is used to adjust the phase of ADC sample
pixel clock. A slider and the current value are displayed.
The adjustment range is 1 to 31, representing 0-360 degrees.
Adjust by pressing
or , then press . (To cancel, press
and then turn off the power to the LCD Monitor. When
the power is turned on again, the operation will be canceled.)
Clock
Clock adjustment is used to adjust the number of ADC
sample clocks per line (samples per line). A slider and
the current value are displayed.
Adjust by pressing or , then press . (To cancel, press
and then turn off the power to the LCD Monitor. When
the power is turned on again, the operation will be canceled.)
Image
Phase
Clock
Auto Phase
(Image)
Page 16
E
16
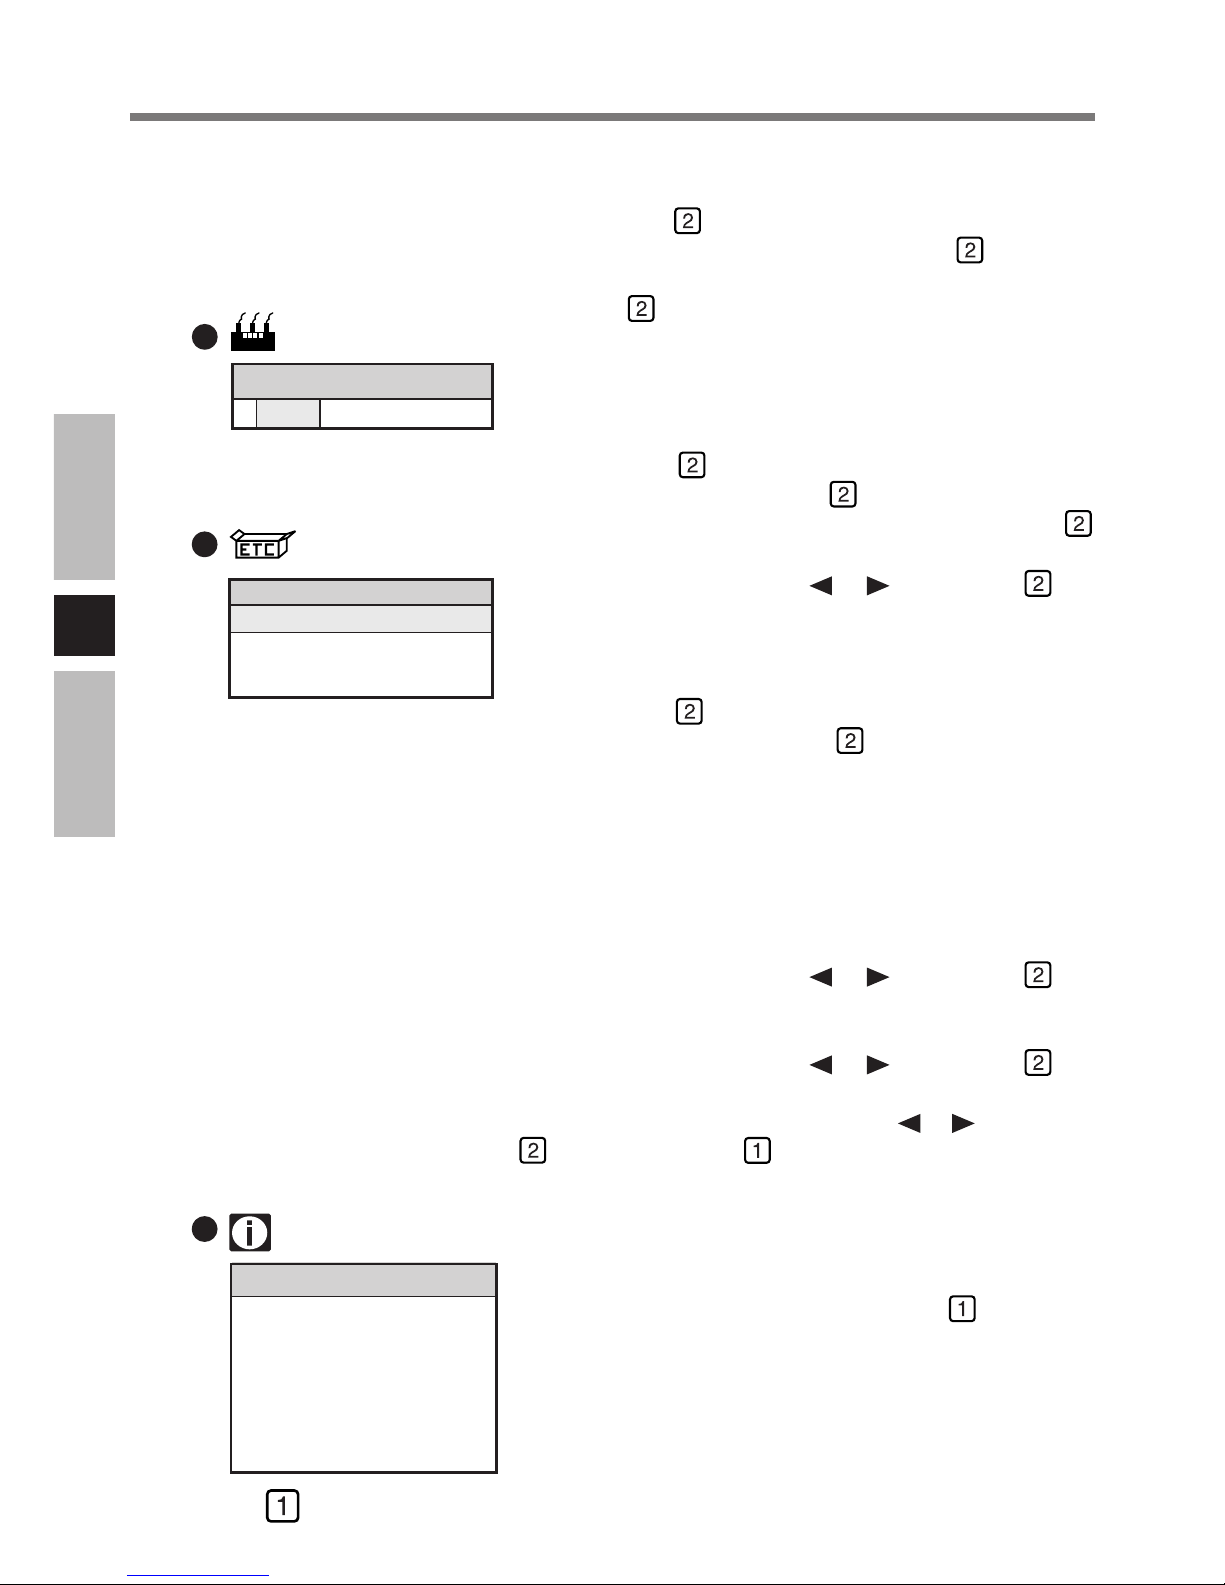
Auto Config
Auto Configuration automatically adjusts image position, clock, and phase.
A confirmation box is displayed. The default selection
is [Yes]. Press
to execute the menu. If you want to
cancel, select [No] and press
.
To save the adjusted value, select [Brightness], then press
.
(Auto Configuration)
Yes
No
Miscellaneous
Init NVRam
OSD Timeout
OSD Position
Select the item by pressing or , then press .
Init NVRam
All values of the OSD menu are set to default.
A confirmation box is displayed. The default selection
is [Yes]. Press
to execute the menu. (If you want to
cancel, select [No] and press
.) This setting is activated by turning off the power to the LCD Monitor and
then turning the power back on again.
OSD Timeout
OSD Timeout is used to set the OSD idle time-out. If
no active action, key press or automatic configuration
occurs for the defined period, the OSD menu is closed.
There are four OSD time-out values available.
Select the item by pressing
or , then press .
OSD Position
The sub-menu is displayed.
Select the item by pressing
or , then press .
The sub-menu is displayed.
Adjust the OSD Position by pressing
or , then press
. (To cancel, press and then turn off the power to
the LCD Monitor. When the power is turned on again,
the operation will be canceled.)
(Miscellaneous)
This menu is used to display information about the system. The OSD window is displayed. If
is pressed,
the information window is closed and the main menu is
displayed.
(Information)
Information
Version:
V-Freq-:
H-Freq-:
PixelCLk:
Width:
Height:
3
Press
The OSD main menu disappears.
Adjusting the LCD Monitor
Auto Phase
A confirmation box is displayed. The default selection
is [Yes]. Press
to adjust the phase automatically. If
you want to cancel, select [No] and press
.
To save the adjusted value, select [Phase] or [Clock],
then press
.
Page 17
E
17
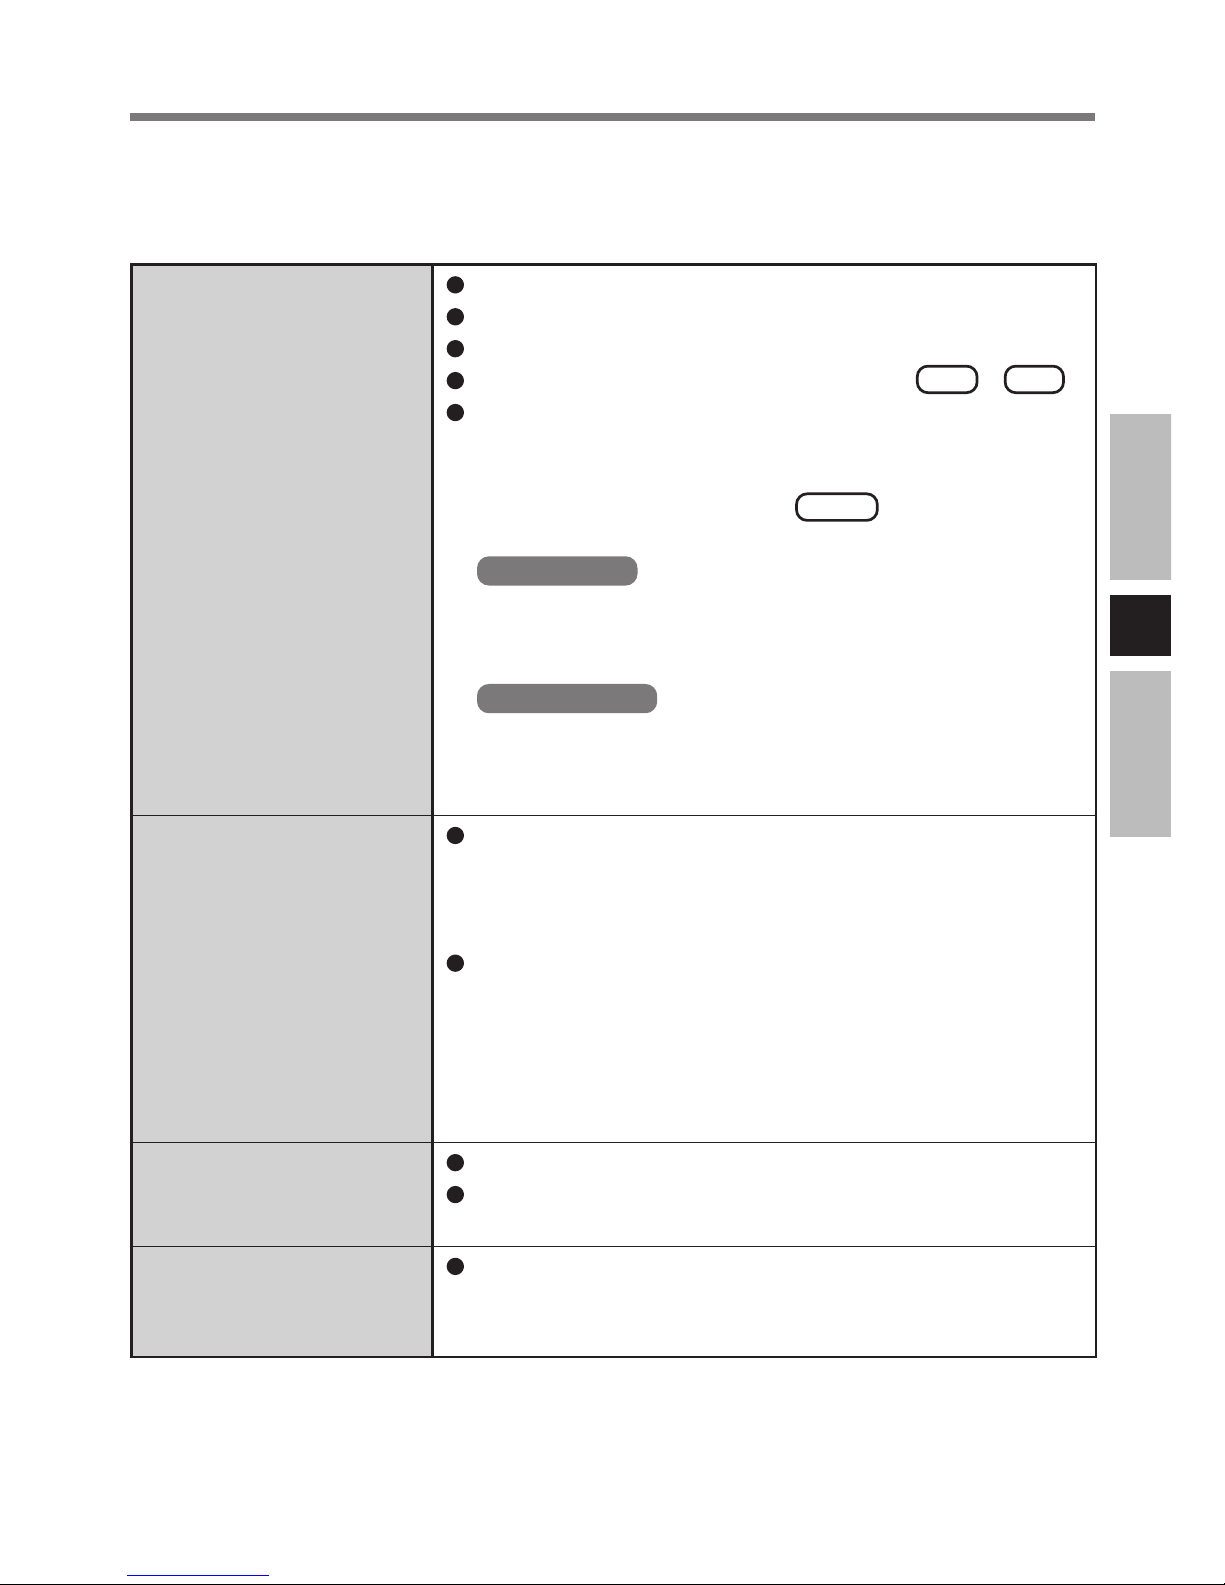
No display after powering on
or
“Cable not connected” is
displayed
An afterimage appears
(i.e., green, red, and blue
dots remain on the display) or there are dots
not displaying the correct colors
The sound is not heard
“Input Not Supported”
is displayed
Troubleshooting
When a problem occurs, refer to this page. If a problem appears to be related to a software
application, read the software related manual. If you still cannot troubleshoot the problem,
contact Panasonic Technical Support.
Check the cable connection for the car adaptor.
Check the cable connection to the LCD Monitor.
Check the brightness of the LCD Monitor.
If the LCD of the computer is ON, press Fn + F3 .
Has the computer been set to the power-saving mode?
To resume operation of your computer from the condition
the power of the display is OFF (for energy conservation
purposes), press any key (like Ctrl ).
Set the power-saving mode to disable.
Windows XP
Set [Turn off monitor], [System standby] and [System hibernates] in [start] - [Control Panel] - [Performance and
Maintenance] - [Power Options] to [Never].
Windows 2000
Set [Turn off monitor], [System Standby], and [System
hibernates] in [Start] - [Settings] - [Control Panel] - [Power
Options] to [Never].
If an image is displayed for a prolonged period of time, an
afterimage may appear. This is not a malfunction. The
afterimage will disappear when a different screen is displayed.
High-precision and advanced technologies are necessary
in the production of color liquid crystal displays (color
LCDs). Therefore, if 0.002% or less of the picture elements either fail to light or remain constantly lit (that is,
more than 99.998% of elements are functioning properly),
no defect is considered to exist.
Check the cable connection to the LCD Monitor.
Check the volume setting of the computer and the LCD
Monitor.
The mode not supported is has been selected.
Set the display mode to 640 × 480 60 Hz, 800 × 600 60 Hz
or 1024 × 768 60 Hz.
Page 18
E
18
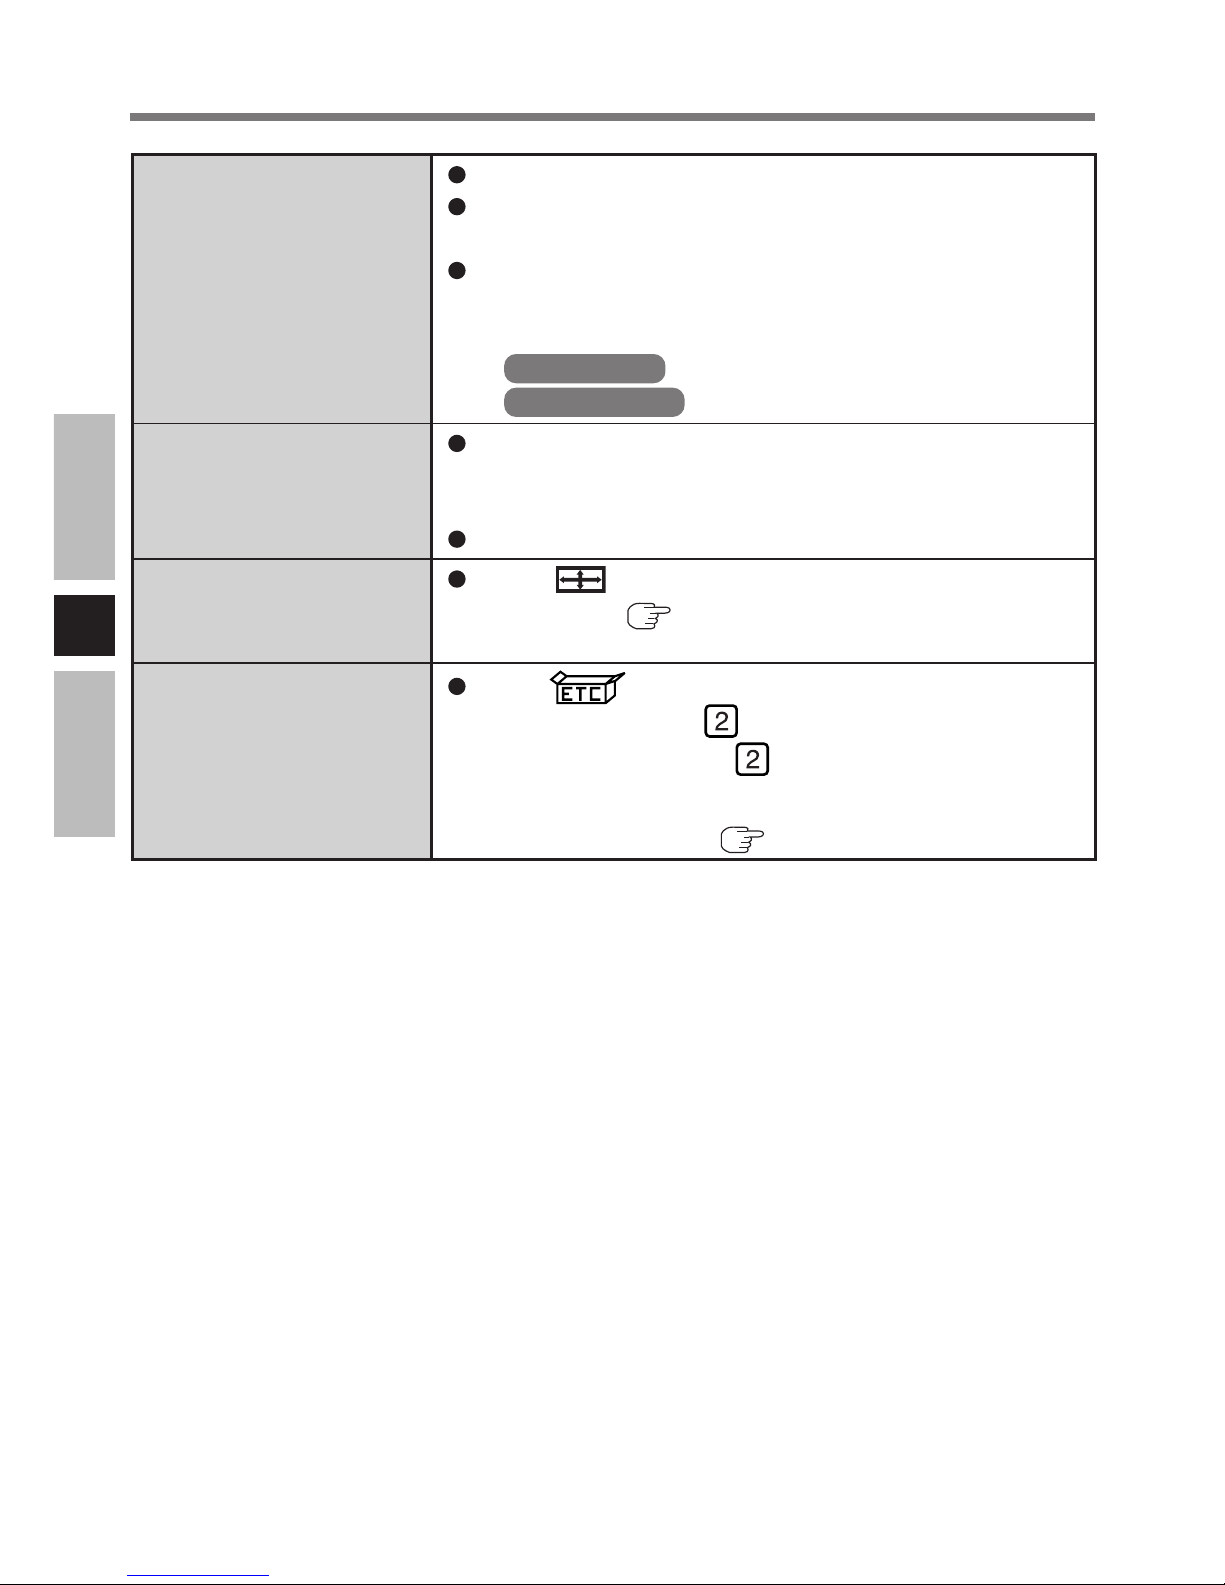
Check the cable connection to the LCD Monitor.
Confirm that the [Serial Port] has not been set to [Disable] in the Setup Utility.
Confirm that the setting for resource in [UPDD]*1 - [Settings] - [Hardware] and the setting of the Serial Port in the
Setup Utility are the same.
*
1
Windows XP : [start] - [All Programs] - [UPDD]
Windows 2000 : [Start] - [Programs] - [UPDD]
The mode not supported has been selected.
Set the display mode to 640 × 480 60 Hz, 800 × 600 60
Hz or 1024 × 768 60 Hz.
Check the cable connection to the LCD Monitor.
Select on the OSD main menu and perform fine
adjustments. (
page 15)
Select from the OSD main menu, then select [Init
NVRam], then press
.
Select [Yes], then press
.
Turn off the power to the LCD Monitor and then turn the
power back on again. (
page 16)
Unable to input by
touching the display
The display is affected
The screen is shifted
horizontally or vertically.
The display no longer
displays properly
Troubleshooting
Page 19
E
19
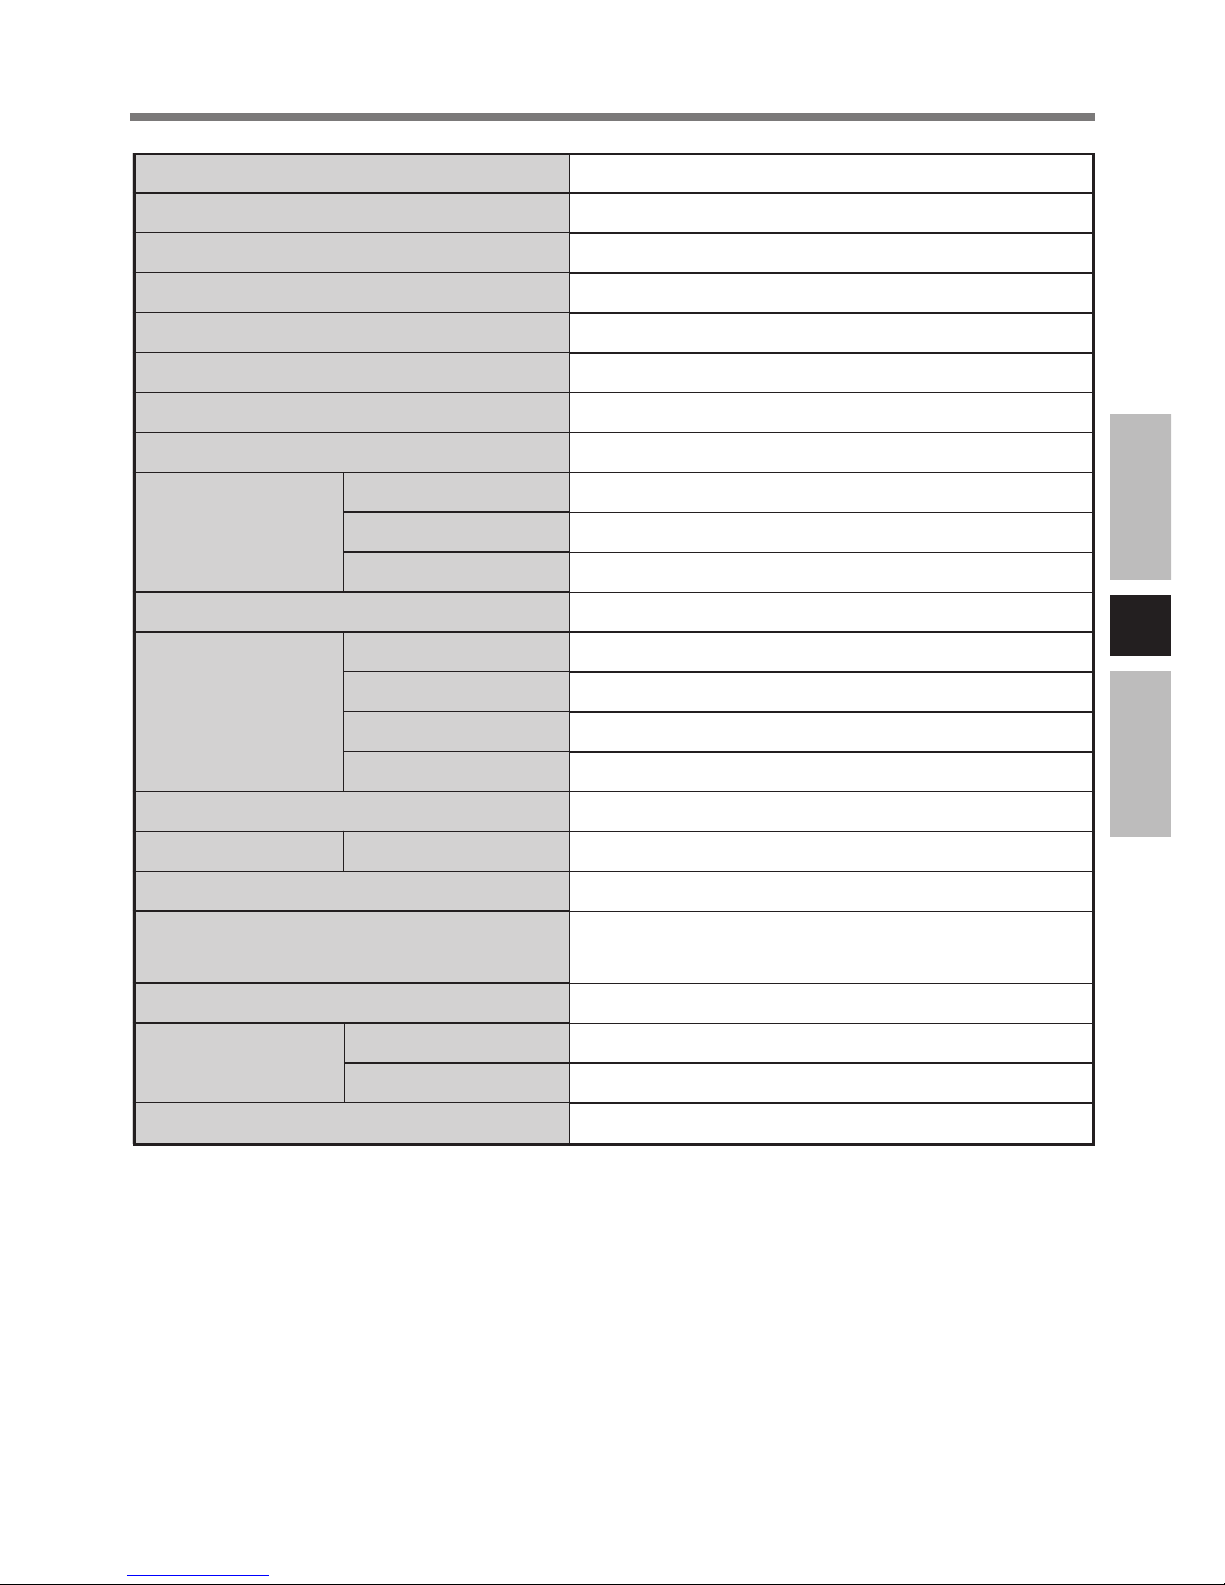
Model No.
Input Interface
LCD Type
Display Area
Resolution
Color
Pixel Pitch
Brightness
Display Modes VGA
SVGA
XGA
Touchscreen
Interface Display Port
Serial Port
Line IN
Function Key
Speaker
DC-IN Input
Power Consumption
Physical Dimensions (W X H X D)
Weight
Environment Temperature
Humidity
Guaranteed Computer *
2
Specifications
CF-VDL02BM
Analog RGB Signal
12.1 type TFT Color Active Matrix LCD
247.2 mm × 185.7 mm
1024 × 768 dots
262,144 (simulated 16,777,216) Colors
0.24 mm × 0.24 mm
1200 cd/m
2
640 × 480 60 Hz
800 × 600 60 Hz
1024 × 768 60 Hz
Resistive
Dsub 15-pin female
Dsub 9-pin male
Miniature jack, 3.5 DIA
F1-F5, Emergency (F11)
Stereo Speaker (built in)
DC 15.6 V, 3.85 A*
1
60 W
280 mm × 270 mm × 30 mm {11.0 " × 10.6 "
× 1.2 "} (except Sun Shade)
Approx. 2.5 kg {5.5 lb.} (except Sun Shade)
5 °C to 35 °C {41 °F to 95 °F}
10 % to 90 % RH (No condensation)
CF-18 series, CF-29 series
*1DC input Voltage Range 14.25 V-15.75 V
DC input Current 2.6 A or more.
*2Contact Panasonic Technical Support for further details.
Page 20

F
20
FRANÇAIS
Pour éviter de se blesser gravement ou d’enfreindre la loi, veiller à placer le moniteur à
une position visible du conducteur uniquement pour la navigation ou avec l’utilisation
de la caméra à vision arrière uniquement.
Lors de la conduite
Le conducteur ne doit pas actionner le Moniteur LCD.
(Actionner le Moniteur LCD lorsque l’on conduit est une distraction et peut entraîner
un accident).
En guise de sécurité, il est interdit de conduire avec la télévision, le lecteur vidéo ou
DVD en marche.
Maintenir le volume de l’appareil à un niveau raisonnable. La conduite avec le son
poussé à un niveau empêchant d’entendre les bruits extérieurs autour du véhicule peut
causer un accident.
ATTENTION
Pour L’utilisation Dans Un Véhicule Motorisé
Avertissement : Le Moniteur LCD peut être installé dans un véhicule motorisé et dans le
champ de vision du conducteur uniquement en tant que dispositif d’aide aux fonctions du
véhicule, comme par exemple pour fournir des informations sur le véhicule, comme dispositif
de contrôle de système, pour l’observation à l’arrière ou sur les côtés du véhicule, ainsi que
pour fournir de l’information routière. Pour toute utilisation à fin de divertissement, comme
par exemple pour regarder la télévision ou jouer à des jeux vidéo, il doit être installé à
l’arrière du siège du conducteur, en un emplacement où il ne sera pas visible, ni directement
ni indirectement, pour le conducteur du véhicule motorisé. Vérifiez les lois fédérales et
nationales qui régissent l’utilisation légale de cet appareil à l’intérieur d’un véhicule motorisé.
Page 21
F
21
Lors du lavage du véhicule
Ne pas exposer le Moniteur LCD à l’eau ou à une humidité excessive. Ceci pourrait provoquer
des courts-circuits, un incendie ou d’autres dégâts.
En stationnement
Un stationnement en plein soleil peut générer des températures très élevées dans le véhicule.
Laisser l’intérieur de la voiture refroidir avant de mettre en marche le moniteur.
Ne pas regarder le Moniteur LCD avec le moteur arrêté. Il consomme la puissance de la
batterie et peut empêcher le moteur de démarrer.
Recours au Support technique Panasonic
Ne pas essayer de démonter ou de régler ce produit de précision. Contacter le Support technique Panasonic.
Pour l’installation
Veiller à installer le Moniteur LCD à une position qui ne gêne pas la vision du conducteur.
Si le Moniteur LCD a été installé pour les passagers arrière, recommander à ceux-ci d’éviter
de se cogner la tête sur le moniteur en cas d’accident.
Ne pas exposer le moniteur à la lumière directe du soleil ou à une chaleur excessive.
Ne pas installer le moniteur à une position exposée à l’eau, à de l’air chaud tel qu’une
canalisation de chauffage ou à un endroit où il risque d’être piétiné.
Ne pas installer le Moniteur LCD à une position qui empêcherait le bon fonctionnement
d’un coussin d’air.
Faire installer l’appareil par un technicien qualifié. L’installation et le câblage exigent des
compétences particulières.
Pour plus de sécurité, demander au vendeur de l’appareil d’effectuer l’installation.
En fonctionnement
S’assurer que le Moniteur LCD est fermement fixé et protégé contre les risques d’impact qui
peuvent entraîner un mauvais fonctionnement ou causer un incendie.
Précautions
Page 22
F
22
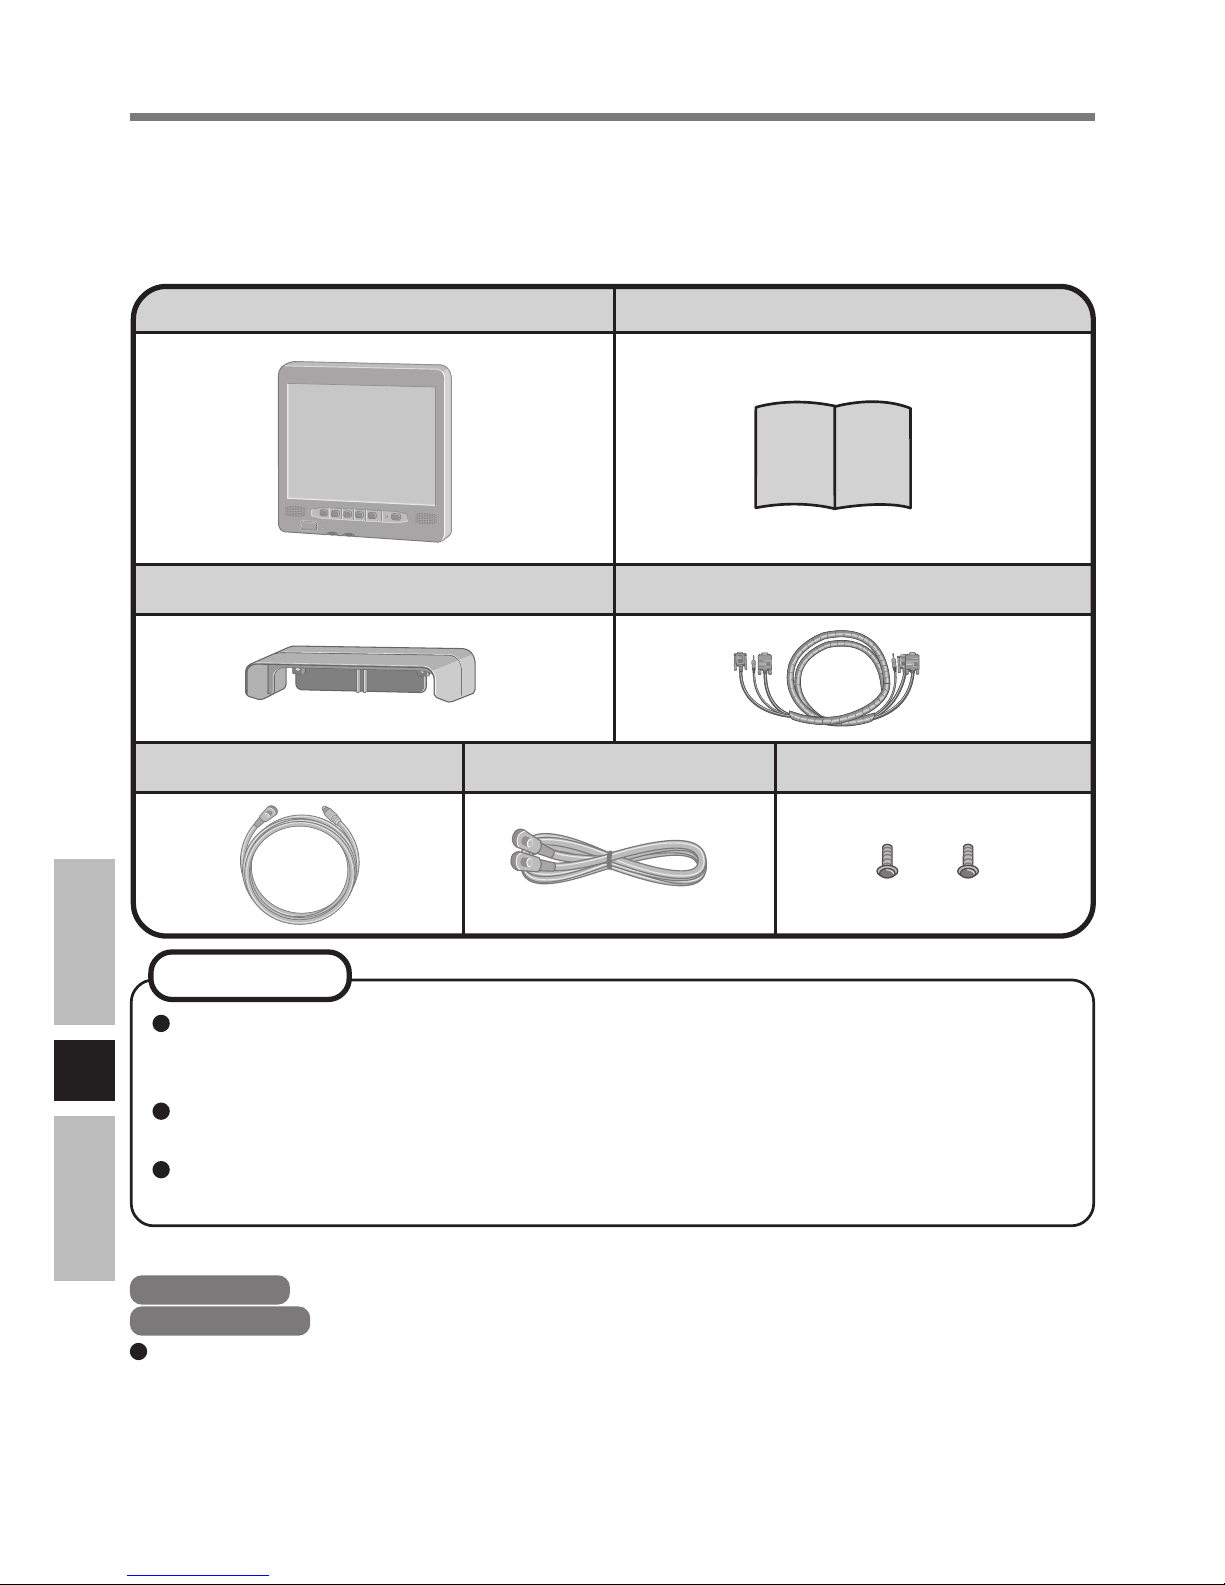
Instructions d’utilisation ............ 1
Câble RGB/série/audio ............... 1
Câble PS/2 ................ 1
Moniteur LCD .............................. 1
Câble de fonction ... 1 Vis ...........................2
Nous vous remercions pour votre achat du Moniteur LCD de la série informatique Notebook de Panasonic.
Ce Moniteur LCD comporte une fonction d’écran tactile qui permet d’actionner l’ordinateur
en touchant simplement la surface du moniteur et en appuyant sur des boutons – même lorsque
l’on ne tient pas l’ordinateur dans les mains.
Pare-soleil .................................... 1
Introduction
Un duplicateur de ports comprenant un port d’écran, un port série et un port audio est
nécessaire si l’ordinateur n’est pas équipé desdits ports. Pour plus d’informations,
consultez le Reference Manual de l’ordinateur.
Un clavier en option (no de modèle CF-VKBL01/CF-VKBL02) est nécessaire pour
utiliser les touches de fonction du Moniteur LCD.
Ce “instructions d’utilisation” explique la procédure en fonction des réglages d’usine.
La procédure peut être différente suivant les réglages effectués.
[Illustration dans ce manuel]
Windows XP : Information pour les utilisateurs de Microsoft
®
Windows® XP Professionnel.
Windows 2000 : Information pour les utilisateurs de Microsoft
®
Windows® 2000 Professionnel.
Les écrans qui sont représentés dans ce manuel, lorsqu’ aucune remarque spécifique sur
les écrans affichés n’est nécessaire, sont ceux de Windows XP.
Microsoft
®
et Windows® sont des marques déposées de Microsoft Corporation aux EtatsUnis et/ou dans d’autres pays.
PS/2
®
est une marque de commerce déposée d’International Business Machines Corporation.
Panasonic est une marque de commerce déposée de Matsushita Electric Industrial Co., Ltd.
REMARQUE
Page 23
F
23
Noms et fonctions des pièces
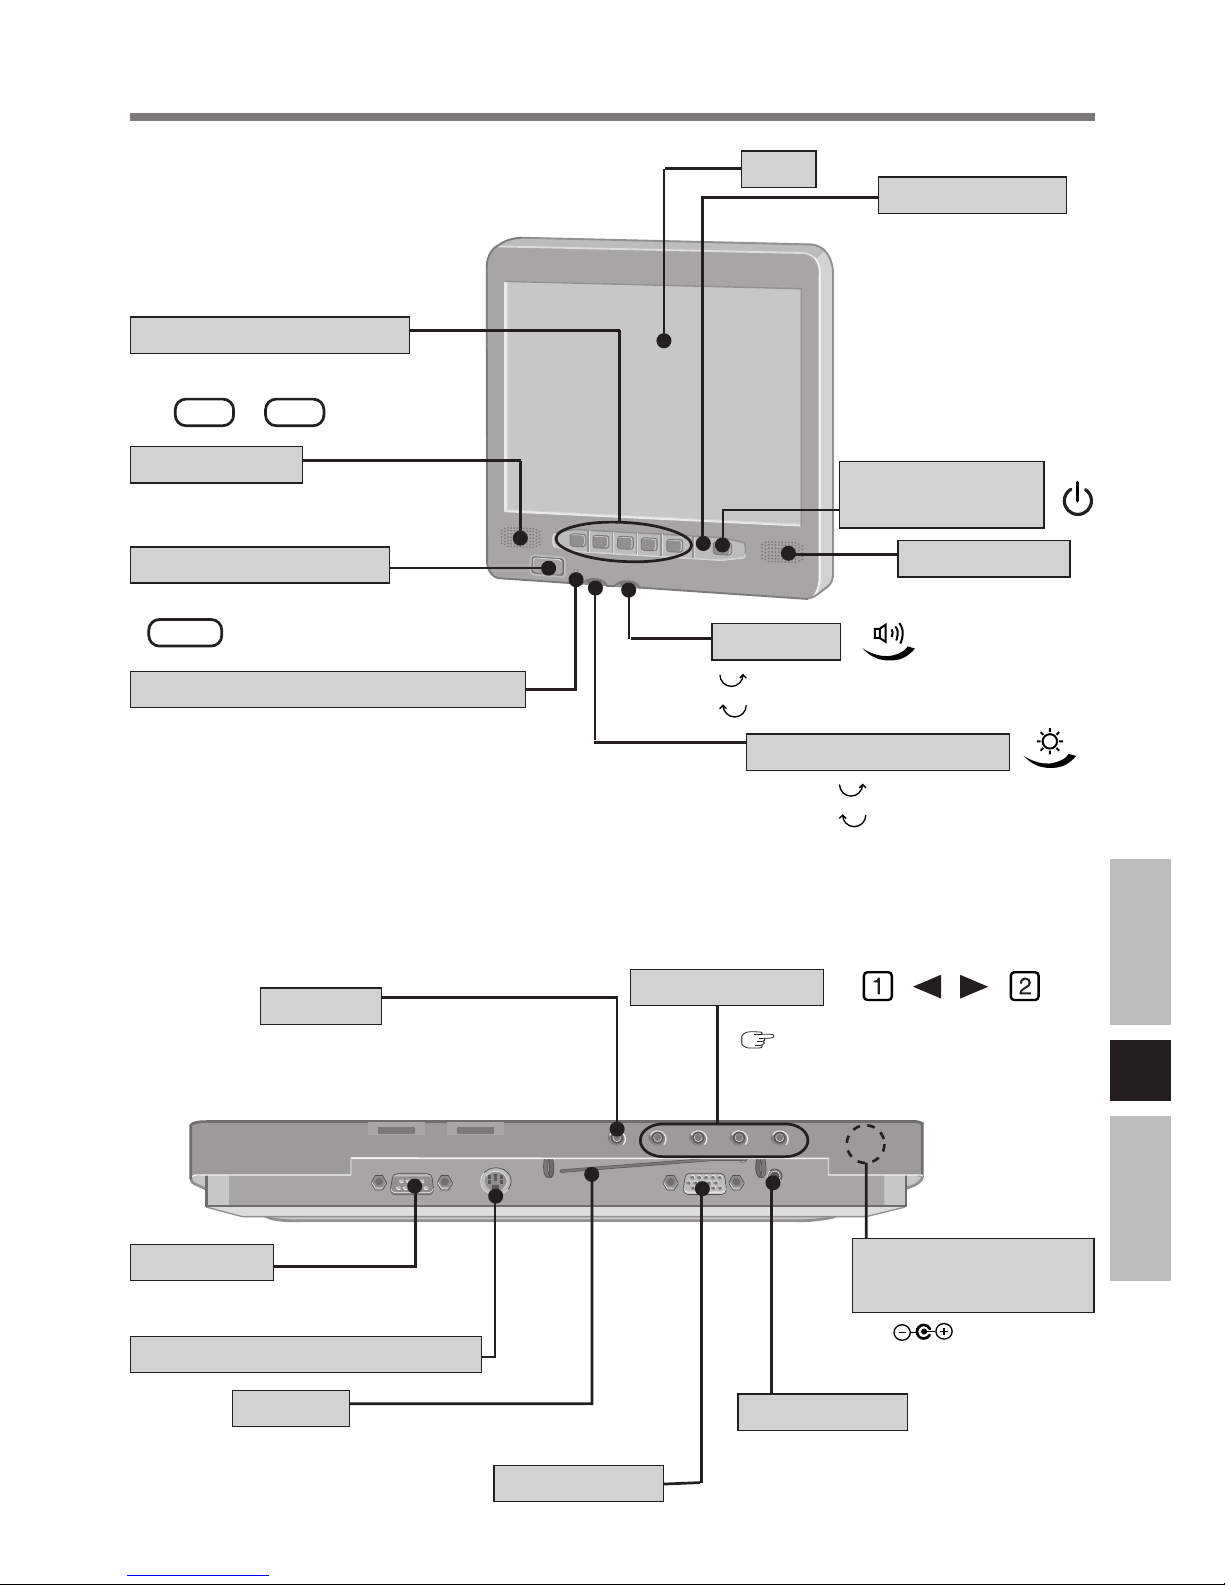
Vert : Appareil en
marche
Orange : Appareil en
marche mais
absence de signal VGA ou de
connexion du
câble
<Devant>
LCD
Témoin à DEL
Haut
Bas
Bouton d’urgence
Le logiciel d’application attribué
à F11 est lancé.
Haut
Bas
Volume
Témoin de température à DEL
Vert : Normal
La brillance peut être réglée librement.
Orange : Réduction automatique de la brillance en
raison d’une augmentation de la
température interne
Rouge : Arrêt automatique du rétroéclairage en
raison d’une augmentation de la
température interne
Niveau de brillance
Boutons de fonction
Haut-parleur
Ces boutons ont la même fonction
que F1 à F5 sur le clavier.
Haut-parleur
Commutateur
d’alimentation
Boutons OSD
<Dessous>
page31
SERIAL I/F
Seul un réparateur agréé doit
avoir accès à ce bouton.
Réserve
Port série
Port de touche de fonction
Attache
Lie et fixe fermement les câbles.
LINE IN
RGB IN
Port d’écran
Port audio
DC-IN 15.6 V
Fn KEY
Fiche pour
alimentation C.C.
Page 24
F
24
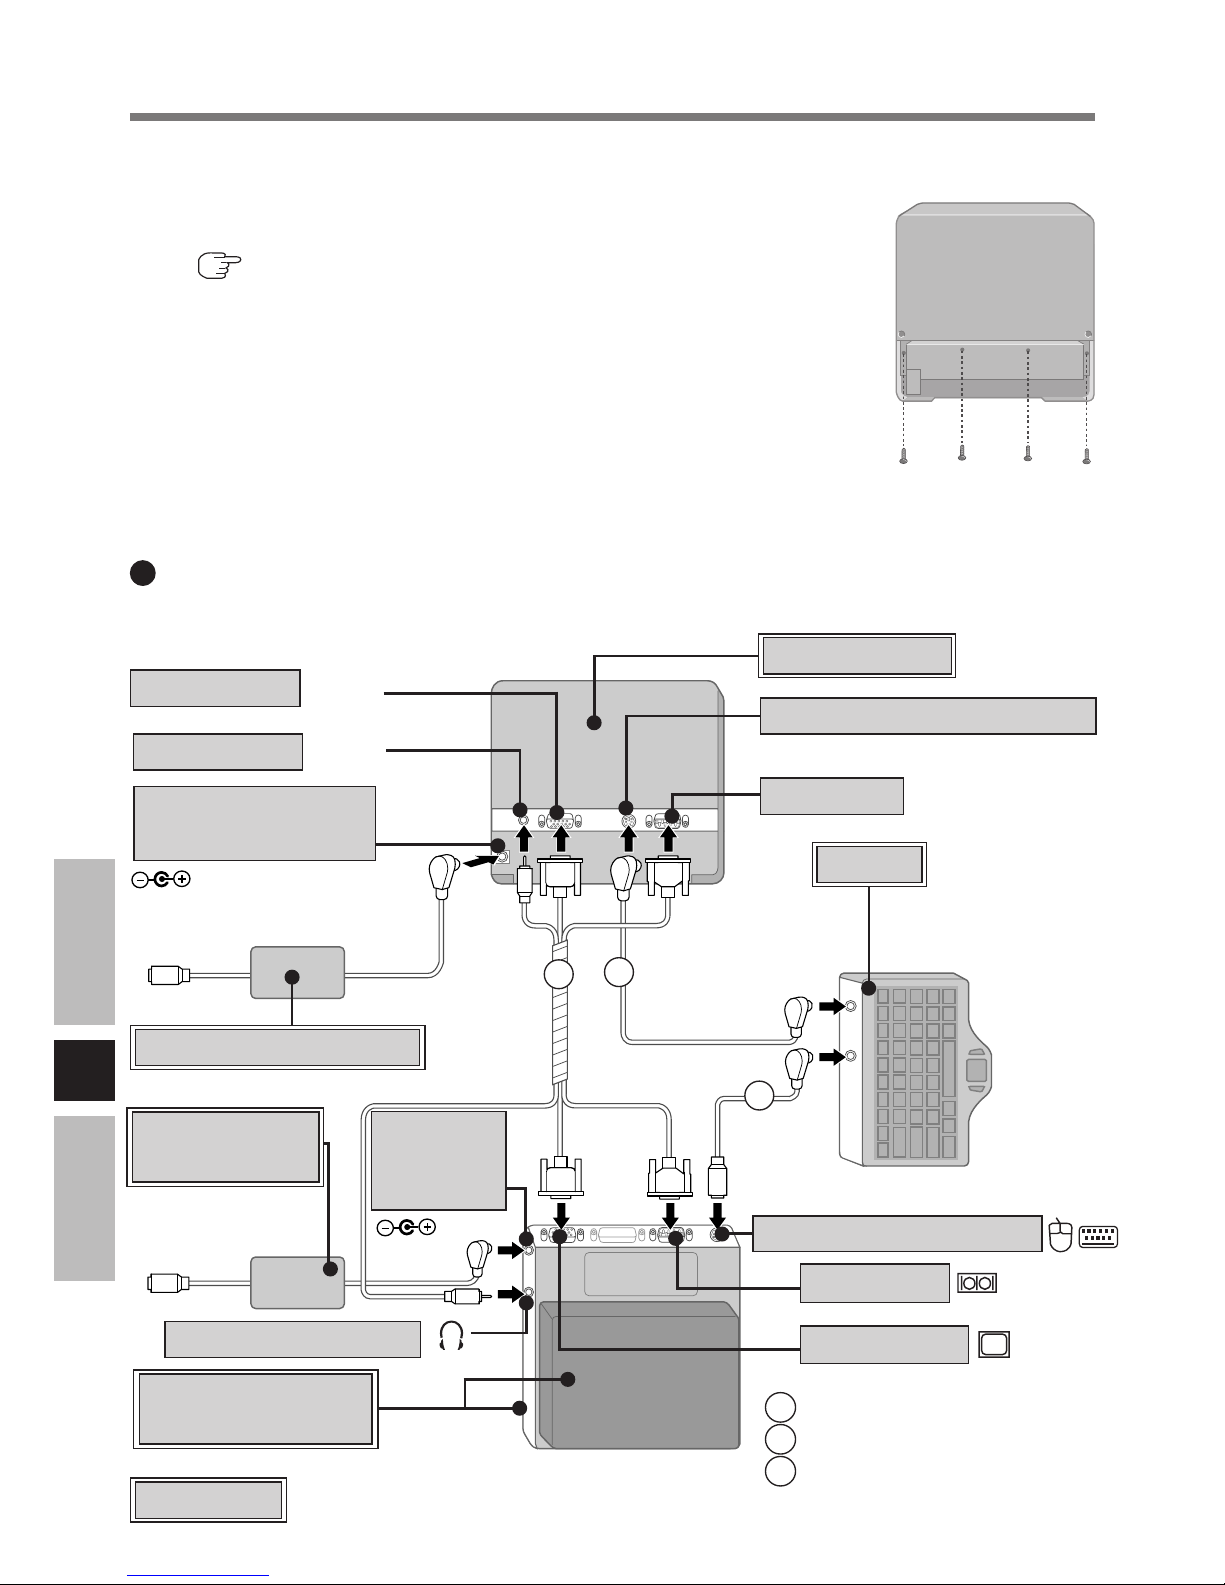
1
<Uniquement pour les modèles sans port d’écran, sans port série et sans
port audio>
Connectez l’ordinateur au duplicateur de port
(
Instructions d’utilisation du duplicateur de port)
2
Retirez le couvercle du Moniteur LCD
Retirez les quatre vis et déposez le couvercle.
3
Connecter le Moniteur LCD à l’ordinateur au moyen des câbles de
connexion (fourni)
Montage du Moniteur LCD
Exemple de raccordement
1
2
3
LINE IN
1 Câble RGB/série/audio
2 Câble PS/2
3 Câble de fonction
RGB IN
ou
(n
o
de modèle
CF-VKBL01/
CF-VKBL02)
DC-IN 15.6 V
<Vue arrière>
Port de touche de fonction
Port série
Moniteur LCD
(produit disponible dans le commerce)
Adaptateur de voiture
(produit disponible
dans le commerce)
Duplicateur de
port et Ordinateur
Port d’écran
Port audio
<Vue de dessus>
Ordinateur
Port de clavier/souris
Port série
Port d’écran
<Vue de dessus>
Clavier
SERIAL I/F
Prise pour casque
Adaptateur de
voiture
Fn KEY
Fiche pour
alimentation C.C.
Fiche pour
alimentation
C.C.
Page 25
F
25
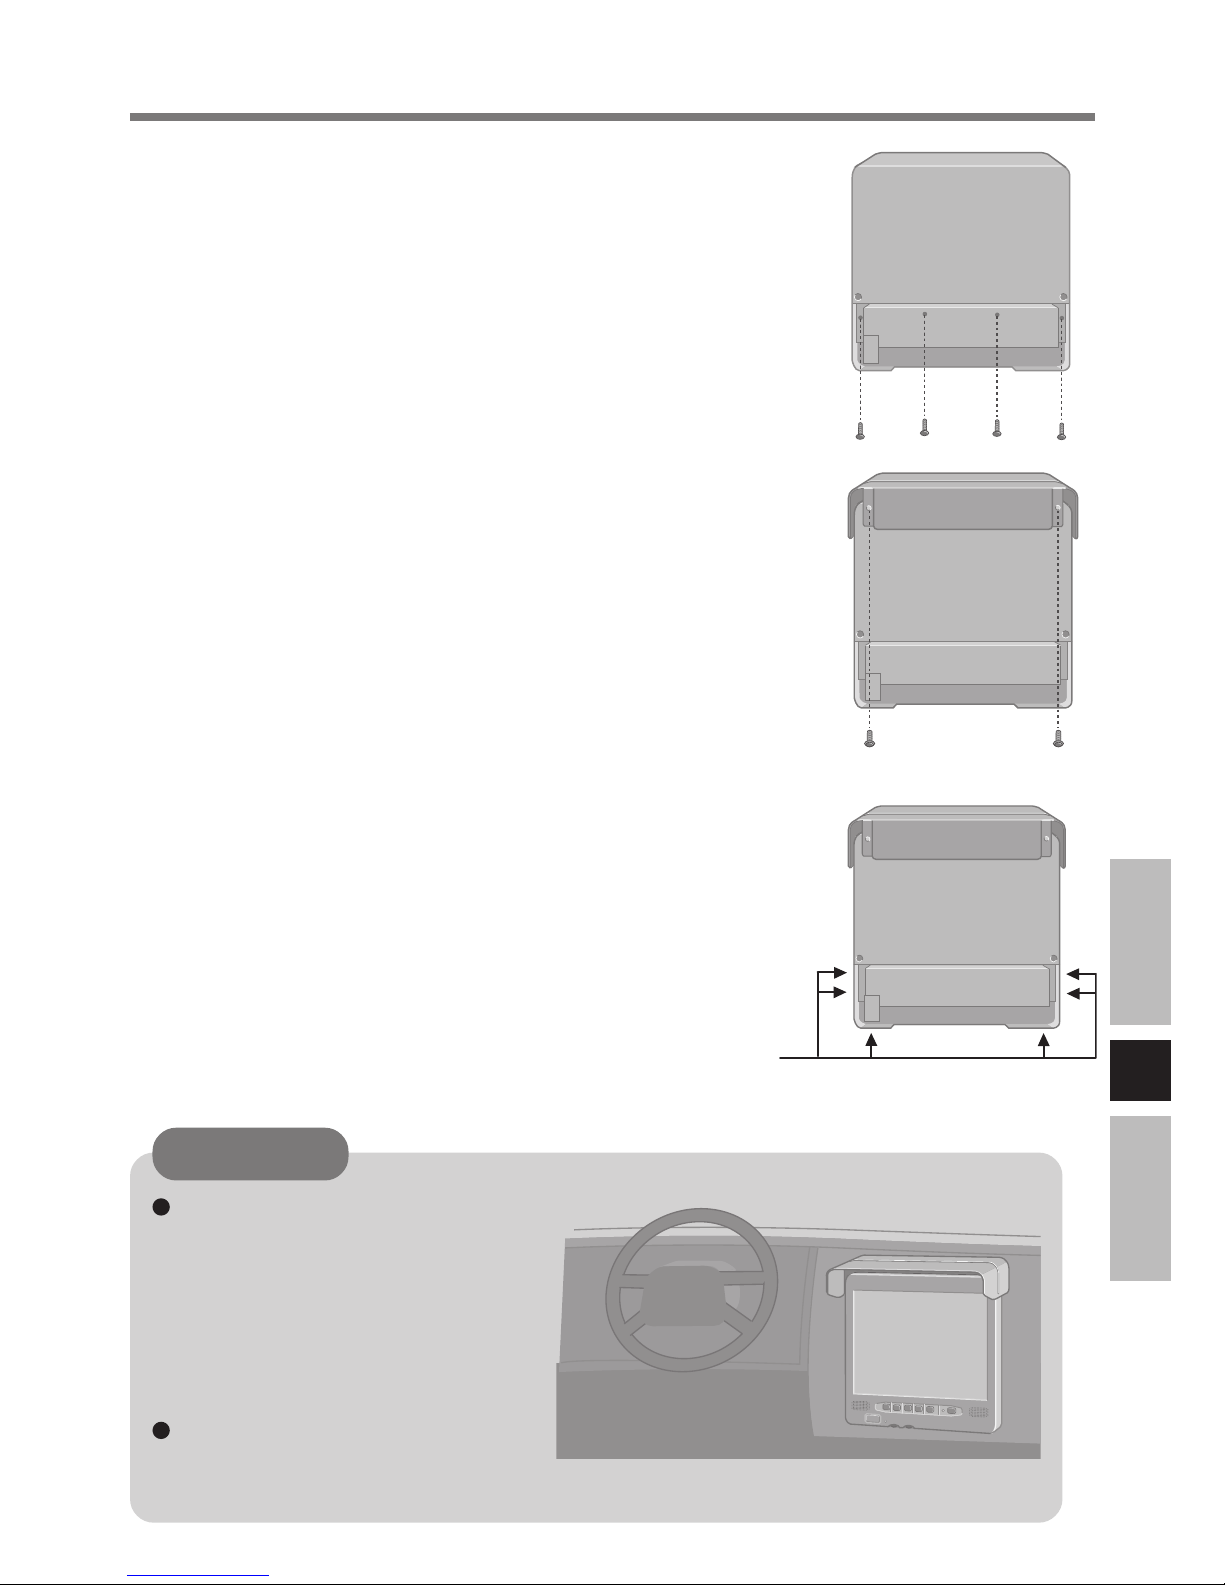
Lors de l’installation du Moniteur
LCD, placer l’écran sous le tableau
de bord comme cela est illustré
pour empêcher qu’il ne gêne le
champ de vision du conducteur et
pour protéger l’appareil contre les
rayons directs du soleil.
Ne pas exposer le moniteur aux
rayons directs du soleil ni à une
chaleur excessive.
4
Fixez le couvercle du Moniteur LCD
Fixez les quatre vis.
5
Montez le pare-soleil
Fixez les deux vis (fourni).
6
Montez le Moniteur LCD
Montez le Moniteur LCD à travers ces trous pour vis M4.
ATTENTION
Page 26
F
26
1
Enregistrez les données importantes et fermez chacune des applications
2
Affichez l’écran d’arrêt
Windows XP
Sélectionnez [démarrer] - [Arrêter l’ordinateur].
Windows 2000
Sélectionnez [Démarrer] - [Arrêter].
3
Confirmez l’arrêt
Windows XP
Sélectionnez [Arrêter].
Windows 2000
Sélectionnez [Arrêter le système] puis [OK].
L’ordinateur s’arrêtera automatiquement.
4
Appuyez sur le commutateur d’alimentation du Moniteur LCD
Le Moniteur LCD s’éteindra après l’arrêt complet de l’ordinateur.
Mise en marche/Arrêt
Mise en marche
1
Appuyez sur le commutateur d’alimentation du Moniteur LCD
2
Allumez l’ordinateur ( Instructions d’utilisation de l’ordinateur)
3
Sélectionnez l’application
Vous pouvez maintenant commencer à travailler sur votre ordinateur.
Arrêt (mise hors tension de l’ordinateur)
Cette procédure consiste à arrêter l’ordinateur sans utiliser la fonction de suspension
ou de veille. (
Reference Manual de l’ordinateur)
Certains ordinateurs s’éteignent automatiquement lorsque le Moniteur LCD est éteint
conformément aux réglages de la fonction de gestion de l’alimentation.
Les menus suivants permettent de modifier les réglages de la fonction de gestion de
l’alimentation.
Windows XP :
[démarrer] - [Panneau de configuration] - [Performances et maintenance]
- [Options d’alimentation] - [Avancé] - [Lorsque j’appuie sur le
bouton de mise sous tension]
Windows 2000 : [Démarrer] - [Paramètres] - [Panneau de configuration]
- [Options d’alimentation] - [Avancé] - [Lorsque j’appuie sur le
bouton de mise sous tension]
REMARQUE
REMARQUE
Certains ordinateurs s’allument automatiquement lorsque l’on allume le Moniteur LCD.
Page 27
F
27
Écran tactile
Le Moniteur LCD est doté d’une fonction d’écran tactile qui permet d’effectuer les mêmes
opérations qu’en utilisant le clavier ou la souris en touchant la surface du moniteur avec le
doigt ou le stylo.
Le menu suivant permet de modifier les paramètres d’utilisation.
Windows XP : [démarrer] - [Tous les programmes] - [UPDD] - [Settings].
Windows 2000 : [Démarrer] - [Programmes] - [UPDD] - [Settings]
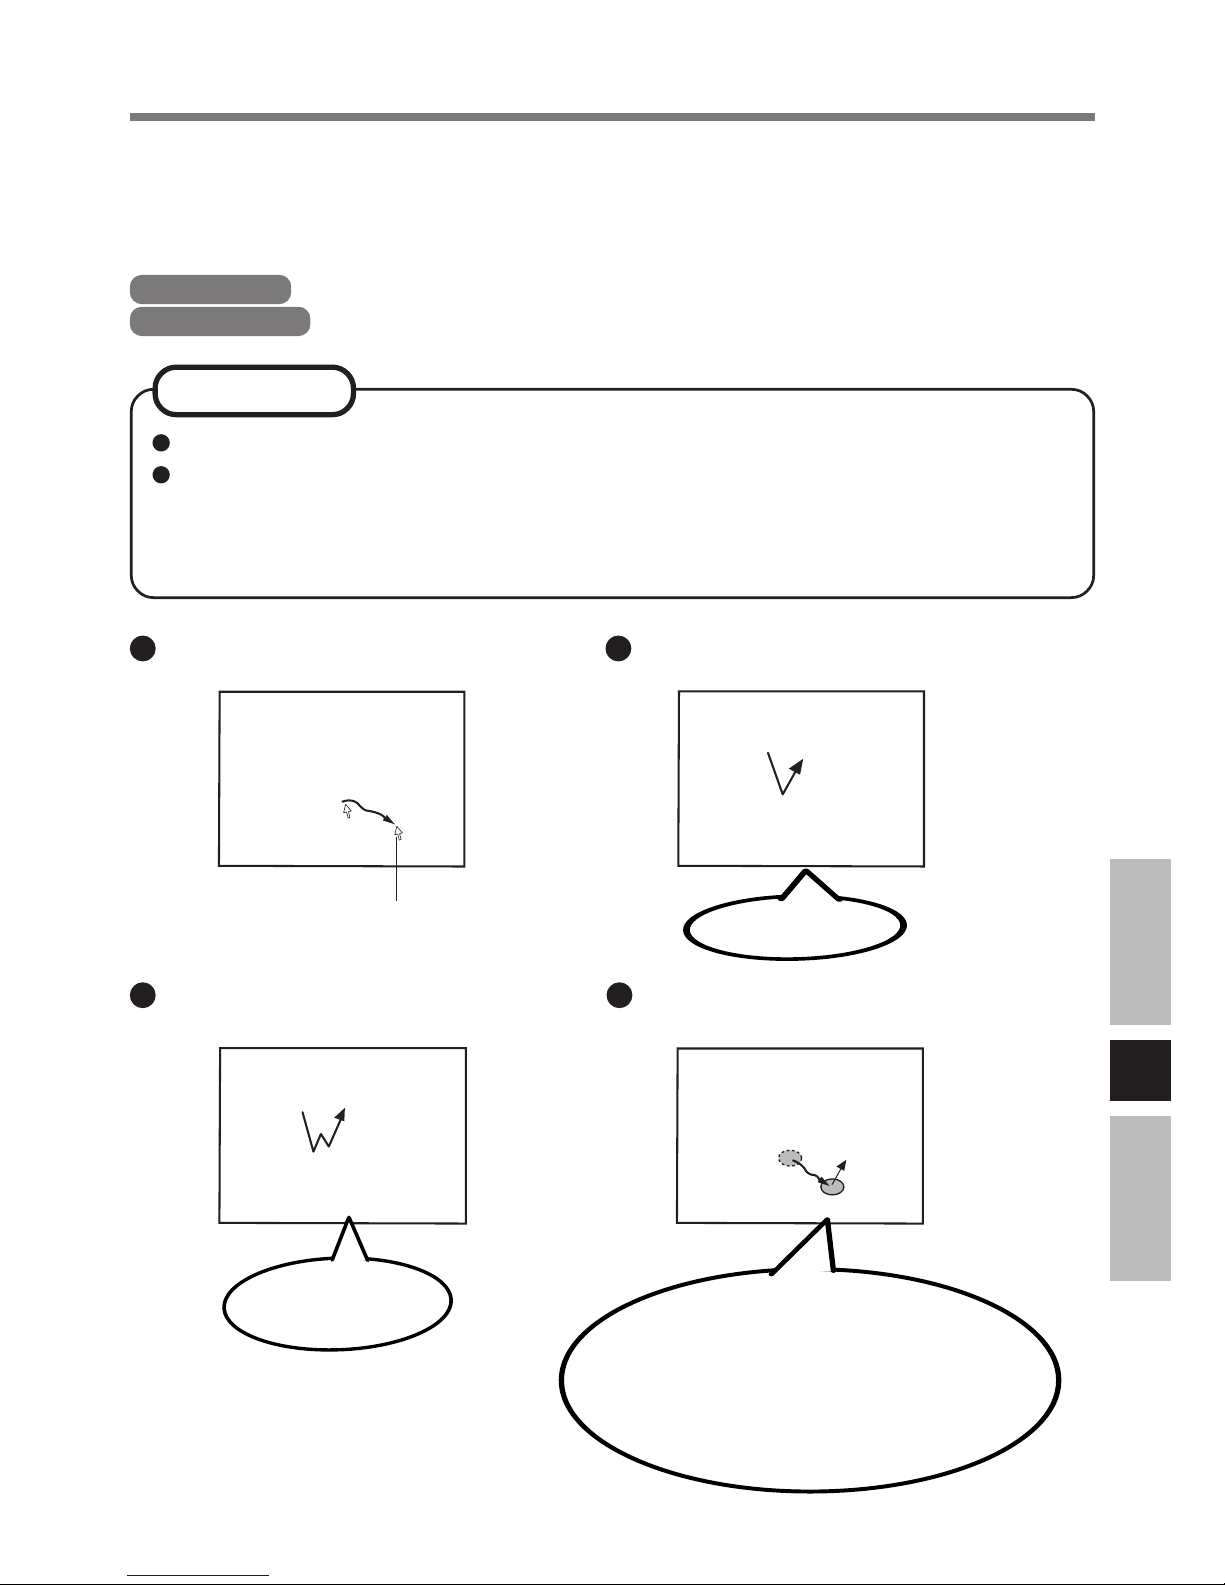
Déplacement du curseur Cliquage
Double cliquage Déplacement
Curseur
Touchez l’objet (c.-à-d. un fichier ou une
icône) sans retirer le doigt ou le stylo et
déplacez-le sur la surface (ceci faisant
glisser l’objet jusqu'à l’emplacement
voulu), puis retirez le doigt ou le stylo.
Deux tapotements
rapides
Tapotement simple
REMARQUE
La fonction d’écran tactile n’est pas disponible avec les modèles sans port série.
Avec certains modèles il faudra d’abord installer le pilote d’écran tactile. Suivez les
instructions qui accompagnent le CD-ROM du pilote pour procéder à l’installation.
Pour plus d’informations, consultez l’administrateur du système ou contactez le
service technique après-vente de Panasonic.
Page 28
F
28
ATTENTION
Manipulation de l’écran tactile
Ne pas placer d’objets sur la surface de l’écran et ne pas appuyer avec force avec des
objets pointus (p. ex., des clous), ou des objets durs susceptibles de laisser des marques
(p. ex., crayons et stylos).
Ne pas exercer de pression en deçà des 5mm de périphérie du panneau d’affichage. Le
curseur risque de se déplacer jusqu’au bord de l’affichage.
Ne pas utiliser l’ordinateur quand de la poussière séjourne sur l’écran et éviter le contact
de toute substance salissante, telle que de l’huile, sur l’écran tactile. Le curseur risque
alors de ne pas fonctionner correctement.
Quand l’écran tactile est sale :
Nettoyer les parties souillées au moyen d’un chiffon doux sec tel que de la gaze.
Ne pas utiliser de benzène, de diluant ou d’alcool du type désinfectant.
La fonction d’écran tactile est inutilisable avec le plein écran sous [Invite de
commandes].
La fonction d’écran tactile ne fonctionnera pas correctement si l’on utilise le
panoramique.
Si l’on change la résolution de l’écran ou si l’on n’arrive pas à pointer correctement
sur le curseur avec le doigt ou le stylo, étalonner l’appareil.
Écran tactile
Page 29
F
29
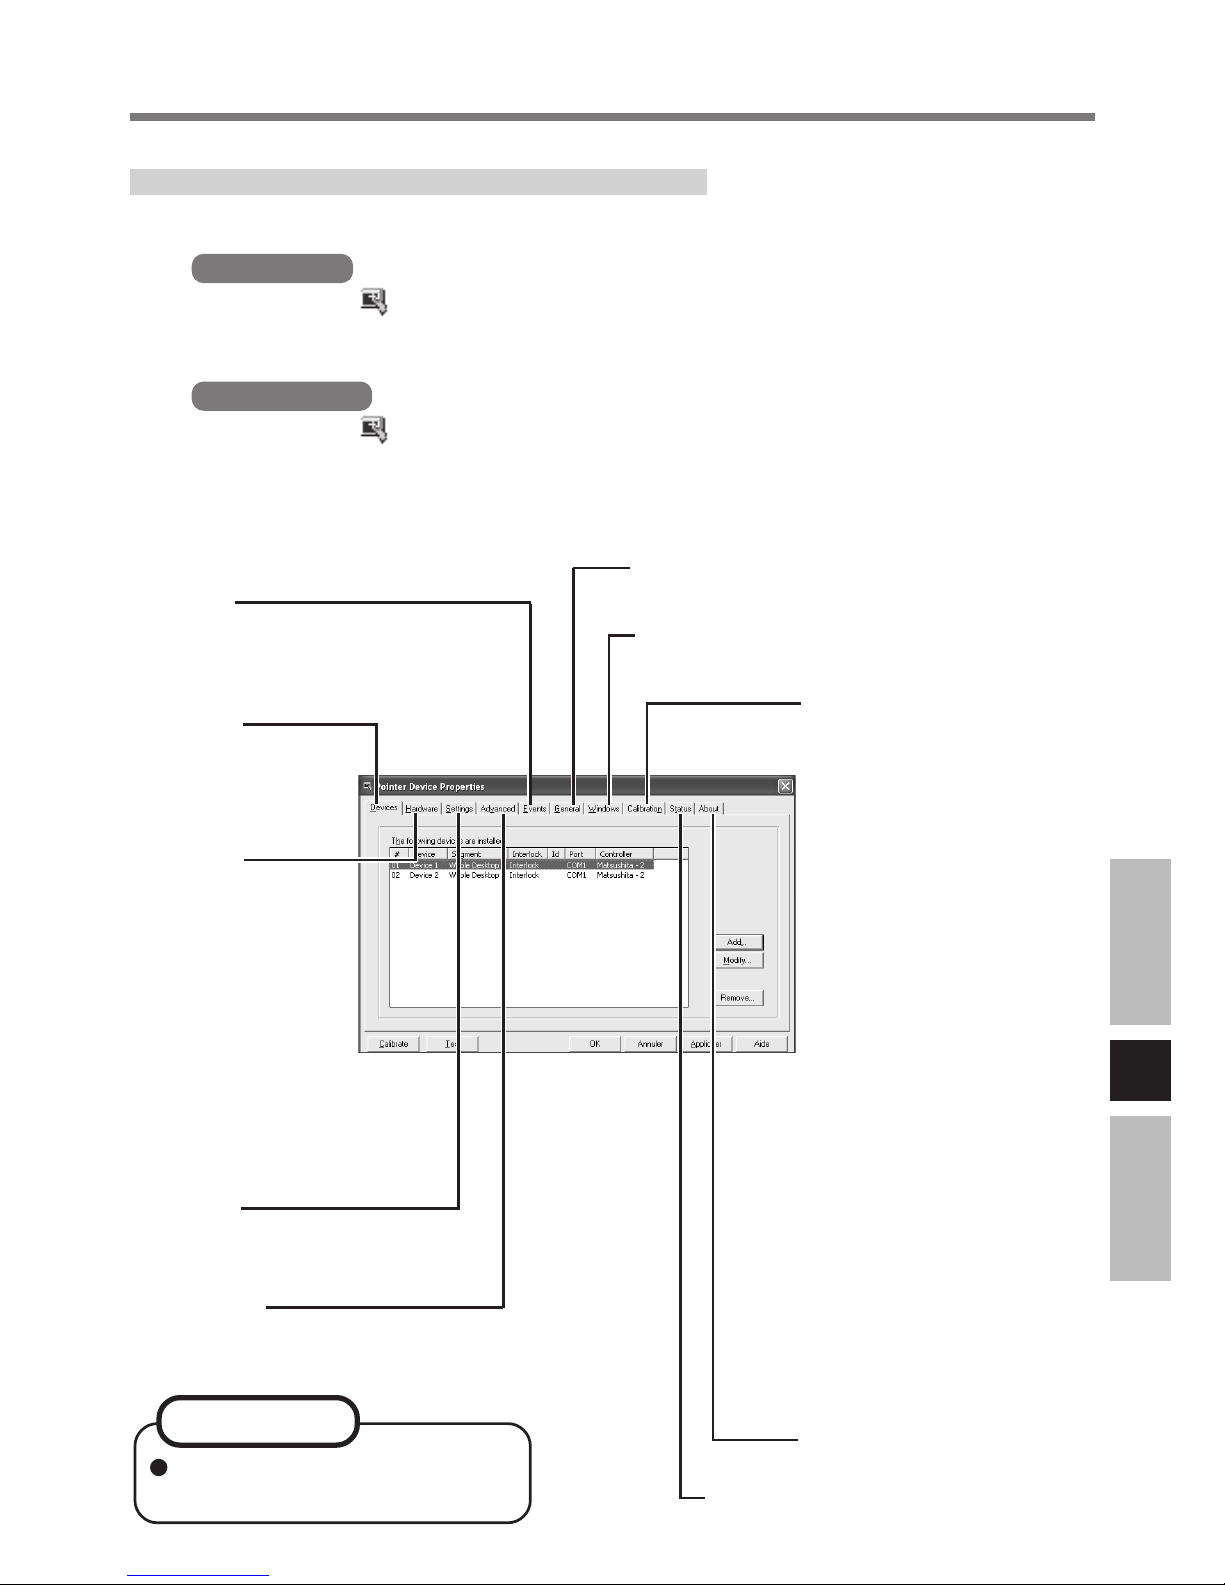
S’il y a lieu, vous pouvez configurer l’écran tactile comme suit:
1
Windows XP
Sélectionnez dans la barre des tâches et sélectionnez [Adjust settings],
ou sélectionnez [Settings] dans le menu [démarrer] - [Tous les
programmes] - [UPDD]
Windows 2000
Sélectionnez
dans la barre des tâches et sélectionnez [Adjust settings],
ou sélectionnez [Settings] dans le menu [Démarrer] - [Programmes] [UPDD]
L’écran suivant s’affiche :
Configuration de l’écran tactile
Devices
Configure le
contrôleur de
périphérique.
Events
Configure les événements qu’un
contrôleur peut générer.
Hardware
Configure les
ressources
matérielles.
Assurez-vous que ce
réglage correspond
au [Serial Port]
auquel le Moniteur
LCD a été connecté
tel que spécifié au
moyen de le
Setup Utility.
Advanced
Configure les paramètres
évolués.
Settings
Configure les paramètres
généraux de protocole.
Calibration
Définit la configuration
d’étalonnage.
A utiliser si vous n’arrivez
pas à pointer correctement
sur le curseur avec le doigt
ou le stylo. (Ceci est
nécessaire si l’alignement
de l’écran tactile avec
l’image visuelle change ou
pour régler la résolution
d’affichage).
<Uniquement pour les
modèles de la série CFM34 autres que le modèle
CF-M34C******>
Avant de passer au
calibrage, configurez le
périphérique indiqué au
[Calibration Settings For]
comme suit:
[Device 1] se rapporte à
l’ordinateur
[Device 2] se rapporte au
Moniteur LCD
About
Affiche le numéro de version.
Status
Affiche l’état du contrôleur.
Windows
Active le paramètre “double cliquage”.
General
Configure les paramètres généraux et fonctions.
Pour de plus amples informations, consultez [Aide].
REMARQUE
Page 30
F
30
2
Effectuez les changements nécessaires
3
Sélectionnez [OK]
On peut procéder à des changements quand l’ordinateur suppose des opérations à
double-cliquage alors que des opérations à cliquage simple sont prévues en cliquant
sur [Windows] sur la vue montrée à la page précédente et en diminuant la valeur du
[Time] dans [Double Click Settings].
Lancer immédiatement [Calibrate] si l’on change le nombre de points d’étalonnage.
Il est également possible de modifier la vitesse de double cliquage pour [Tap and
Buttons]*
1
.
Il est important de noter que lorsque la vitesse de double cliquage est modifiée pour
[Souris], cela entraîne la modification du temps de double cliquage pour [Windows].
*
1
Windows XP : Dans [démarrer] - [Panneau de configuration] - [Imprimantes et autres
périphériques] - [Souris]
Windows 2000 : Dans [Démarrer] - [Paramètres] - [Panneau de configuration] - [Souris]
<Uniquement pour les modèles de la série CF-M34 autres que le modèle CFM34C******>
Lorsque le Moniteur LCD est raccordé au port série B, vous pouvez utiliser l’écran
tactile sans modifier les réglages. Pour effectuer le raccordement sur le port série A,
sélectionnez [Hardware] puis réglez [Settings For] sur [Device 2] et [Com port] sur
[COM1].
<Uniquement pour les modèles avec Outil de rotation de l’écran>
Faites pivoter l’écran en mode paysage (0 degré) avant d’effectuer l’étalonnage.
REMARQUE
Écran tactile
Page 31
F
31
Un réglage fin de la taille, la position, etc. du moniteur s’avérera peut-être nécessaire en
raison des différences de synchronisation des signaux entre les ordinateurs.
Réglage du Moniteur LCD
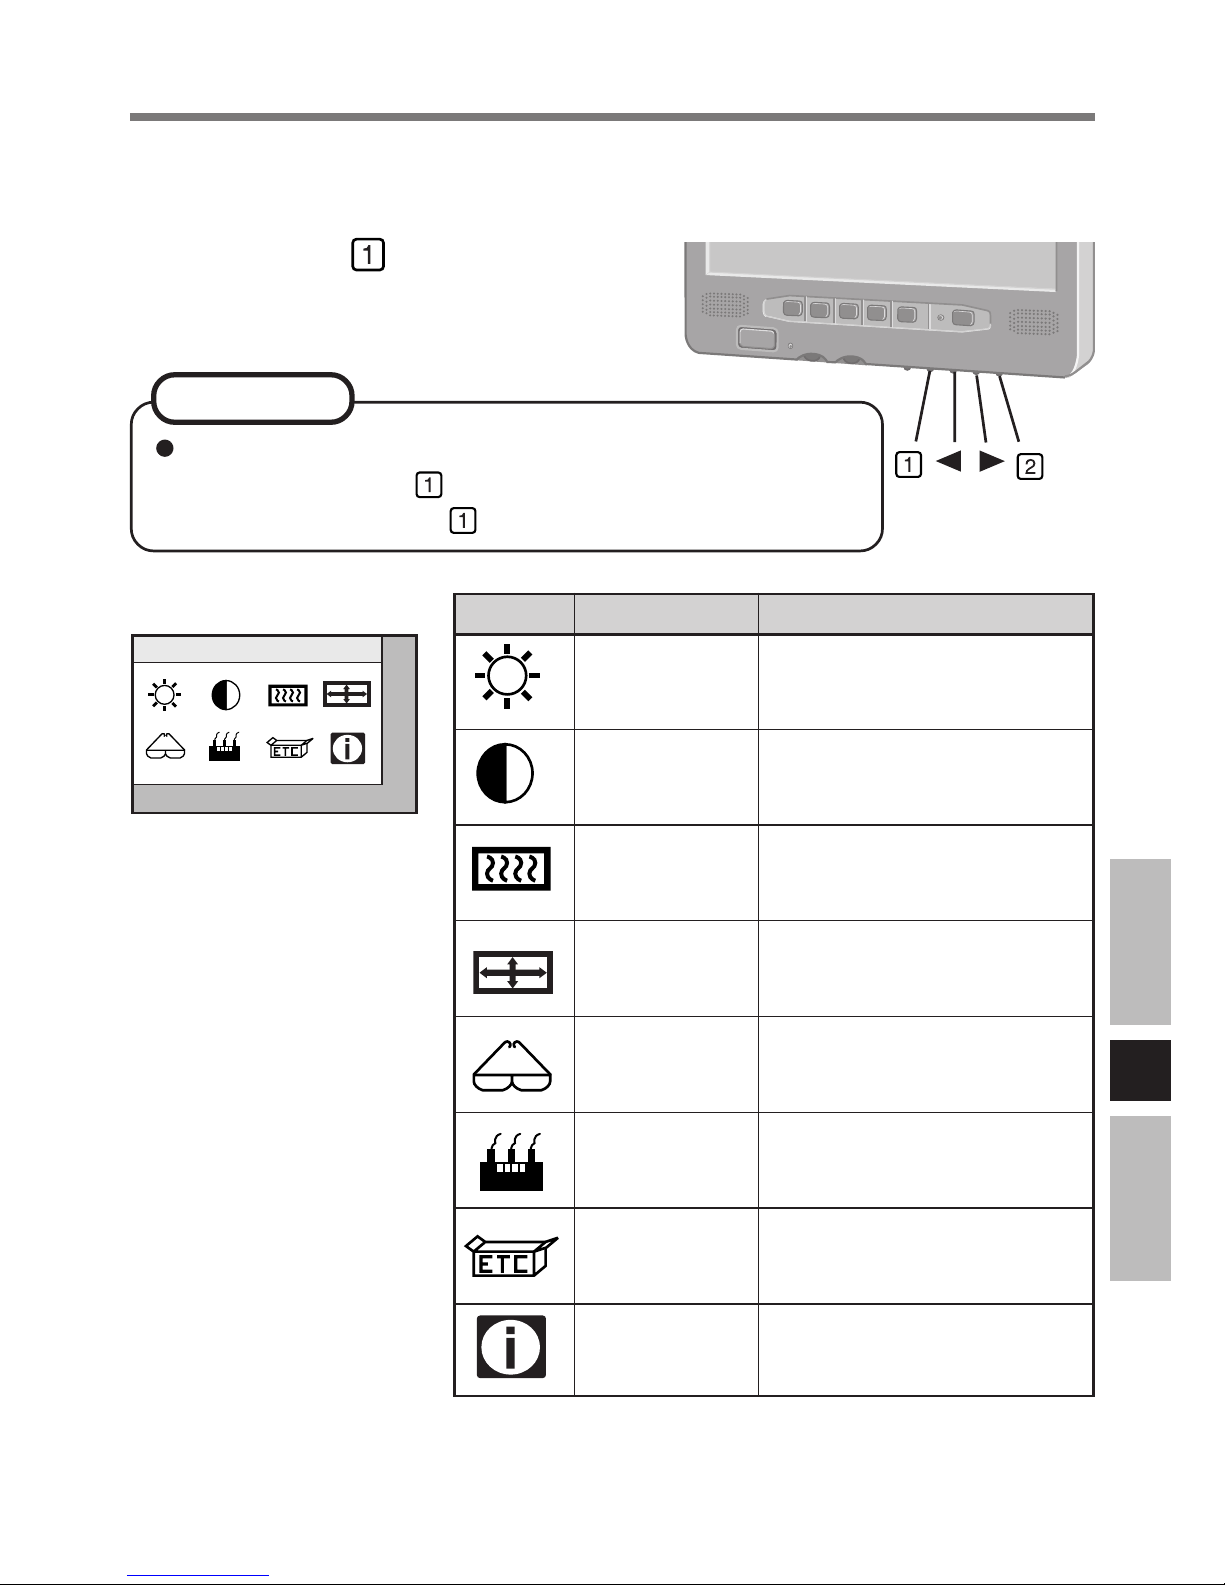
1
Appuyez sur
Le menu principal OSD s’affiche.
Il est possible que la fenêtre OSD ne s’affiche pas correctement
lorsque l’on appuie sur
. Dans ce cas, attendre environ 10 secondes
et appuyer à nouveau sur
.
REMARQUE
Brightness
1:Exit
2:Select
ICONE
DESCRIPTION
Règle la brillance
Règle le contraste
Spécifie les couleurs RGB
(RVB)
Déplace la fenêtre de capture des images d’entrée
Règle l’horloge et la phase
Optimise automatiquement
la qualité de l’image
Réglages divers
Affiche les informations de
signal d’entrée RGB (RVB)
FONCTION
Brightness
Contrast
Color
Position
Image
Auto Config
Miscellaneous
Information
<Menu principal OSD>
Page 32
F
32
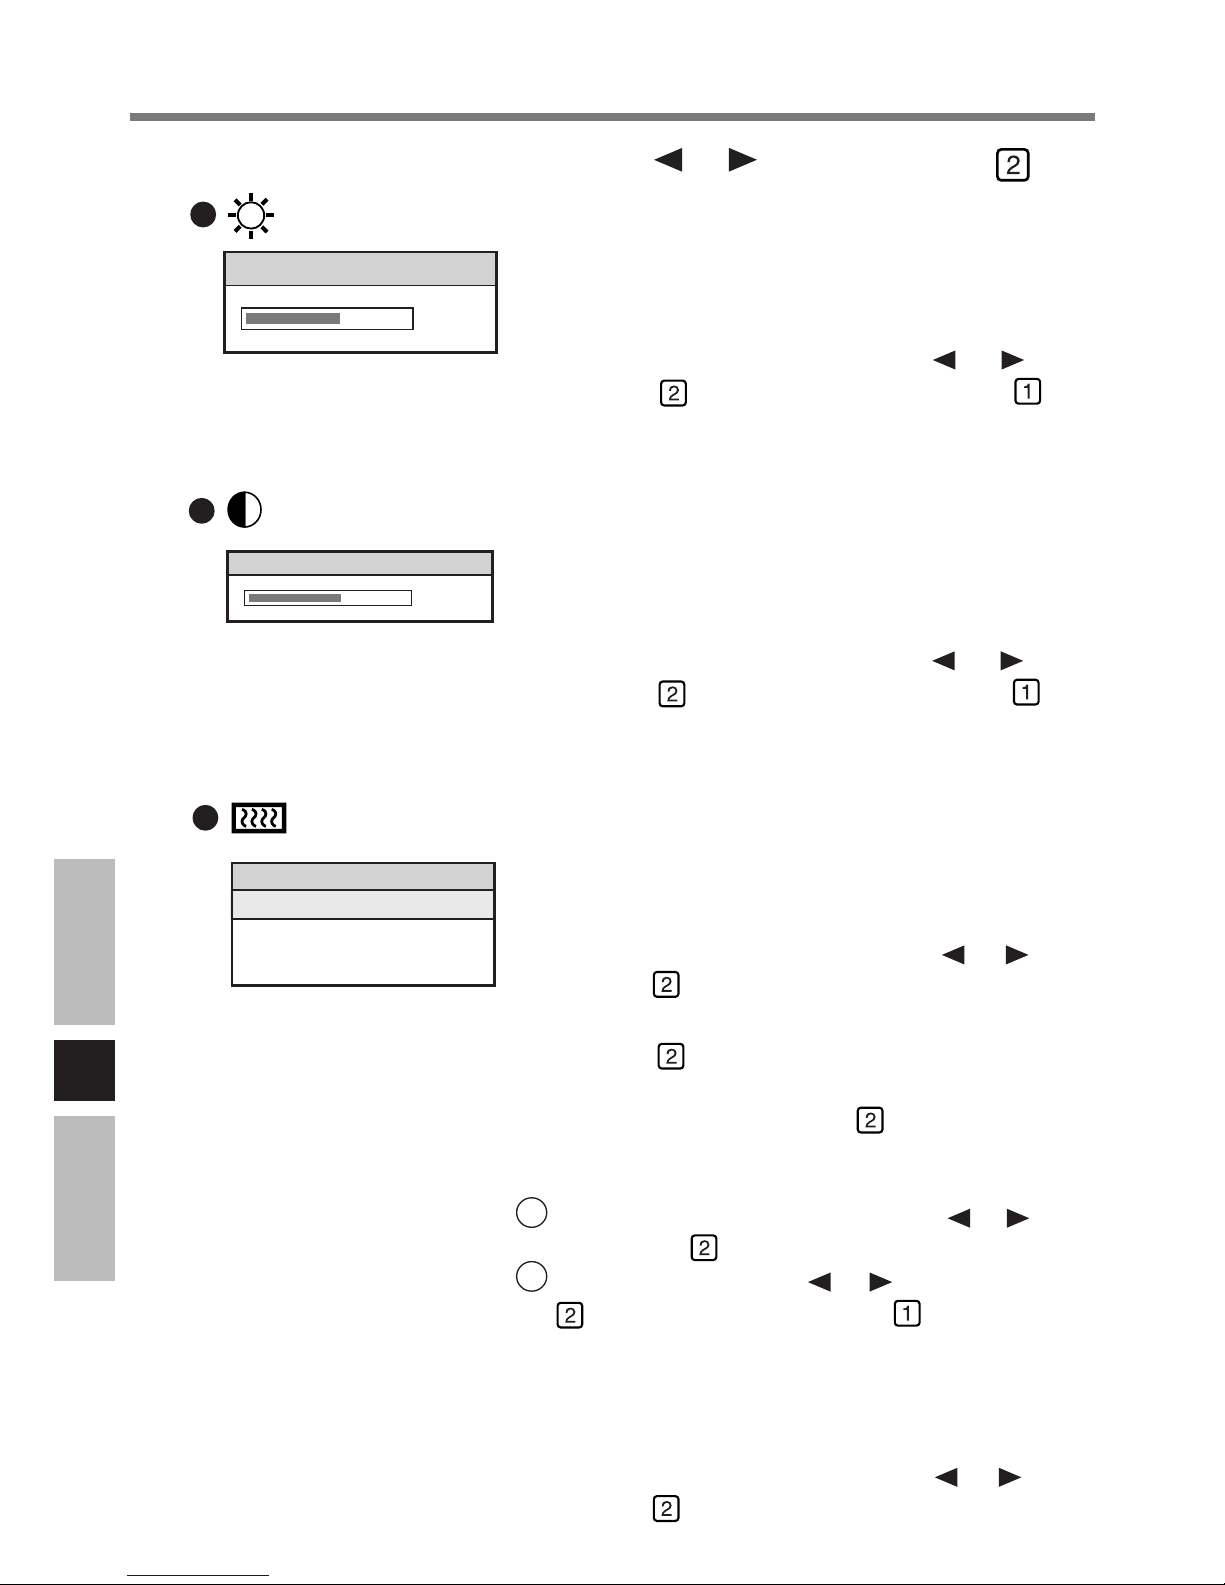
L'option de menu Brillance sert à régler la brillance.Un
curseur indique la valeur de brillance en cours. La plage
de réglage va de 0 à 63.
Réglez la brillance en appuyant sur
ou , puis
appuyez sur
. (Pour annuler, appuyez sur puis
éteignez le Moniteur LCD. À la remise sous tension,
l’opération sera annulée.)
L'option de menu Contrast sert à régler le contraste. Un
curseur indique la valeur de contraste en cours.
La plage de réglage va de 0 à 255.
Réglez le contraste en appuyant sur
ou , puis
appuyez sur
. (Pour annuler, appuyez sur puis
éteignez le Moniteur LCD. À la remise sous tension,
l’opération sera annulée.)
(Contrast)
2
Sélectionnez l’icône en appuyant sur ou , puis appuyez sur
Brightness
32
Contrast
90
(Brightness)
Le menu Couleur sert à régler la brillance des canaux
Rouge, Vert, Bleu ou des canaux toutes couleurs.
Sélectionnez l’option en appuyant sur
ou , puis
appuyez sur
.
Auto Balance
Sélectionnez
, la couleur est réglée automatiquement.
Pour sauvegarder la valeur réglée, sélectionnez [Color
Temperature] puis appuyez sur .
RGB (RVB)
Le sous-menu s’affiche.
1 Sélectionnez l’option en appuyant sur ou , puis
appuyez sur
.
2 Réglez en appuyant sur ou , puis appuyez sur
. (Pour annuler, appuyez sur puis éteignez le
Moniteur LCD. À la remise sous tension, l’opération
sera annulée.)
Color Temperature
Le sous-menu s’affiche.
Sélectionnez l’option en appuyant sur
ou , puis
appuyez sur
.
(Color)
Color
Auto Balance
RGB
Color Temperature
Réglage du Moniteur LCD
Page 33
F
33
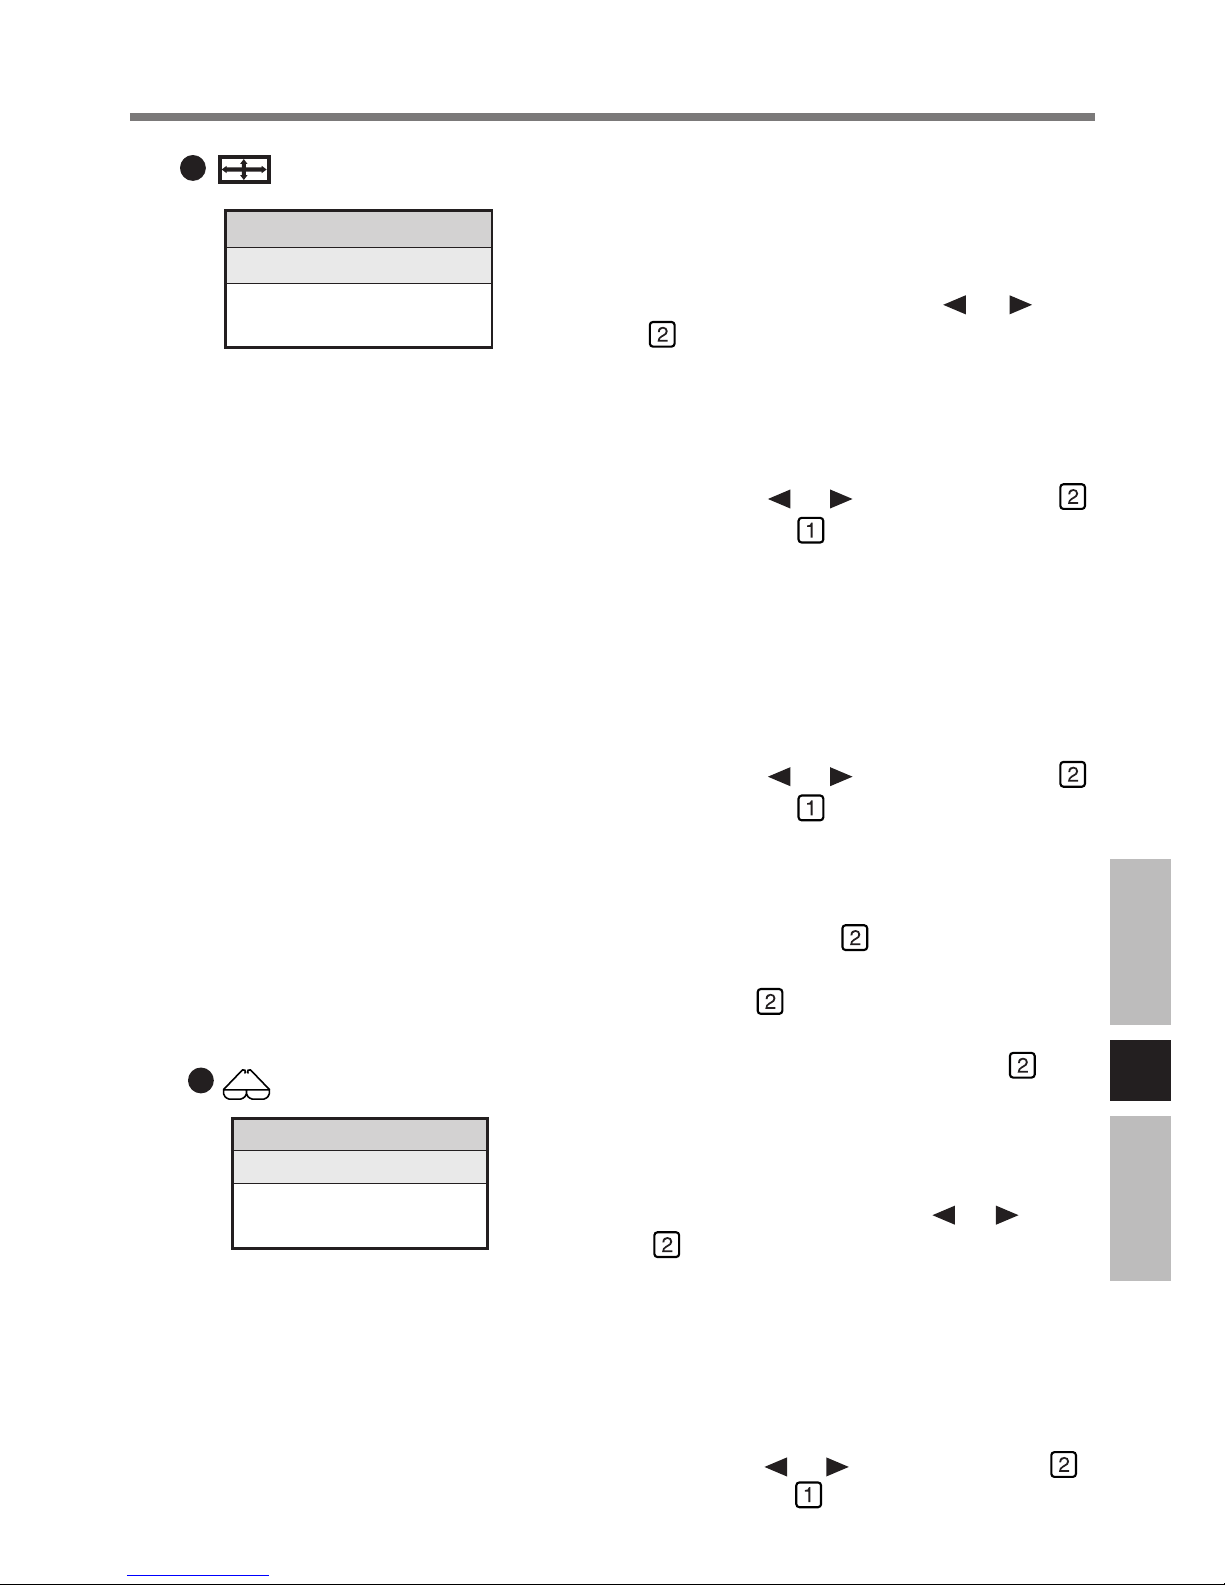
Le menu Position permet de régler la position de l’image
dans le mode d’entrée analogique.
Sélectionnez l’option en appuyant sur
ou , puis
appuyez sur
.
H-Position
Position H permet de régler manuellement la position
horizontale de l’image. Un curseur et la valeur en cours
sont affichés. La plage de réglage va de 0 à 127.
Réglez en appuyant sur
ou , puis appuyez sur .
(Pour annuler, appuyez sur
puis éteignez le Moniteur
LCD. À la remise sous tension, l’opération sera annulée.)
V-Position
Position V permet de régler manuellement la position
verticale de l’image. Un curseur et la valeur en cours
s’affichent. La plage de réglage va de 1 à 47.
(Suivant le signal d’entrée RGB (RVB), la valeur
supérieure de cette plage peut être inférieure à 47.)
Réglez en appuyant sur
ou , puis appuyez sur .
(Pour annuler, appuyez sur
puis éteignez le Moniteur
LCD. À la remise sous tension, l’opération sera annulée.)
Auto Center
Une boîte de confirmation s’affiche. La sélection par
défaut est [Yes]. Appuyez sur
pour que la position
soit réglée automatiquement. Pour annuler, sélectionnez
[No] puis appuyez sur
.
Pour sauvegarder la valeur réglée, sélectionnez
[H-Position] ou [V-Position] puis appuyez sur
.
Le menu Image permet de régler l’horloge et la phase ADC
en mode d’entrée analogique.
Sélectionnez l’option en appuyant sur
ou , puis
appuyez sur
.
Phase
Le réglage de phase sert à régler la phase de l’horloge
d’échantillonnage des éléments d’image ADC. Un
curseur et la valeur en cours s’affichent. La
plage de réglage va de 1 à 31, représentant 0360 degrés.
Réglez en appuyant sur ou , puis appuyez sur .
(Pour annuler, appuyez sur
puis éteignez le Moniteur
LCD. À la remise sous tension, l’opération sera annulée.)
(Image)
Image Position
H-Position
V-Position
Auto Center
Image
Phase
Clock
Auto Phase
(Position)
Page 34
F
34
Auto Configuration règle automatiquement la position
d’image, l’horloge et la phase.
Une boîte de confirmation s’affiche. La sélection par
défaut est [Yes]. Appuyez sur
pour valider l’option
du menu. Pour annuler, sélectionnez [No] puis appuyez
sur
.
Pour sauvegarder la valeur réglée, sélectionnez
[Brightness] puis appuyez sur
.
(Auto Configuration)
Miscellaneous
Init NVRam
OSD Timeout
OSD Position
Sélectionnez l’option en appuyant sur ou , puis
appuyez sur
.
Init NVRam
Toutes les valeurs par défaut de l’affichage OSD sont
rétablies.
Une boîte de confirmation s’affiche. La sélection par
défaut est [Yes]. Appuyez sur
pour valider l’option
du menu. (Pour annuler, sélectionnez [No] puis appuyez
sur
.) Ce réglage s’active en éteignant puis rallumant
le Moniteur LCD.
(Miscellaneous)
Clock
Le réglage d’horloge sert à régler le nombre de signaux
d’horloges à échantillonnage ADC par ligne
(échantillons par ligne). Un curseur et la valeur en cours
s’affichent.
Réglez en appuyant sur
ou , puis appuyez sur .
(Pour annuler, appuyez sur
puis éteignez le Moniteur
LCD. À la remise sous tension, l’opération sera
annulée.)
Auto Phase
Une boîte de confirmation s’affiche. La sélection par
défaut est [Yes]. Appuyez sur
pour que la phase soit
réglée automatiquement. Pour annuler, sélectionnez
[No] puis appuyez sur
.
Pour sauvegarder la valeur réglée, sélectionnez [Phase]
ou [Clock] puis appuyez sur
.
Réglage du Moniteur LCD
Auto Config
Yes
No
Page 35
F
35
Ce menu sert à afficher les informations au sujet du
système. La fenêtre OSD s’affiche. Si l’on appuie sur
, la fenêtre d’information se ferme et le menu prin-
cipal s’affiche.
(Information)
Information
Version:
V-Freq-:
H-Freq-:
PixelCLk:
Width:
Height:
3
Appuyez sur
Le menu principal OSD disparaît.
OSD Timeout
Délai OSD sert à régler le temps d’inactivité autorisé
de l’OSD. Si durant la période définie aucune action
active, pression de touche ou configuration
automatique ne se produit, le menu OSD se ferme. Il
existe quatre valeurs de délai OSD.
Sélectionnez l’option en appuyant sur ou , puis
appuyez sur
.
OSD Position
Le sous-menu s’affiche.
Sélectionnez l’option en appuyant sur
ou , puis
appuyez sur
.
Le sous-menu s’affiche.
Réglez OSD Position en appuyant sur
ou , puis
appuyez sur
. (Pour annuler, appuyez sur puis
éteignez le Moniteur LCD. À la remise sous tension,
l’opération sera annulée.)
Page 36
F
36
Dépannage
En cas de problème, référez-vous à cette page. Si le problème semble lié à une application
logicielle, lisez le manuel se rapportant au logiciel. Si vous n’arrivez toujours pas à remédier
au problème, contactez le Support technique Panasonic.
Aucun affichage après
la mise sous tension
ou
“Cable not connected”
s’affiche
Une image latente
apparaît (c.-à-d., des
points verts, rouges et
bleus restent sur
l’affichage) ou certains
points n’affichent pas les
bonnes couleurs
Il n’y a pas de son
Vérifiez la connexion de câble de l’adaptateur de voiture.
Vérifiez la connexion de câble allant au Moniteur LCD.
Vérifiez la brillance du Moniteur LCD.
Si l’affichage à cristaux liquides de l’ordinateur est activé,
appuyez sur Fn + F3 .
L’ordinateur est-il en mode d’économie d’énergie ?
Pour quitter le mode d’arrêt d’alimentation de l’ordinateur
(permettant l’économie d’énergie), appuyez sur n’importe
quelle touche (comme Ctrl ).
Désactivez le mode d’économie d’énergie.
Windows XP
Réglez [Extinction du moniteur], [Mise en veille] et [Mise
en veille prolongée] sur [démarrer] - [Panneau de configuration] - [Performances et maintenance] - [Options
d’alimentation] sur [Jamais].
Windows 2000
Réglez [Extinction du moniteur], [Mise en veille] et [Mise
en veille prolongée] sur [Démarrer] - [Paramètres] [Panneau de configuration] - [Options d’alimentation] sur
[Jamais].
Si une image est affichée pendant une période de temps
prolongée, il est possible qu’une image latente apparaisse.
Ceci n’est pas une anomalie de fonctionnement. L’image
latente disparaîtra quand une autre vue sera affichée.
La production d’affichages à cristaux liquides en couleurs
fait appel à des technologies évoluées de haute précision.
En conséquence, si 0,002% ou moins des éléments d’image
soit ne s’allument pas, soit restent constamment allumés,
(autrement dit, si plus de 99,998% des éléments
fonctionnent correctement), le fonctionnement est jugé
normal.
Vérifiez la connexion de câble allant au Moniteur LCD.
Vérifiez le réglage de volume de l’ordinateur et le Moniteur
LCD.
Page 37
F
37
“Input Not Supported”
s’affiche
Saisie impossible en
touchant l’affichage
L’affichage est affecté
L’écran est inversé
horizontalement ou
verticalement.
L’affichage n’affiche
plus correctement
Le mode non supporté a été sélectionné.
Réglez le mode d’affichage sur 640 × 480 60 Hz, 800 ×
600 60 Hz ou 1024 × 768 60 Hz.
Vérifiez la connexion de câble allant au Moniteur LCD.
Assurez-vous que le [Serial Port] n’a pas été réglé sur
[Disable] dans le Setup Utility.
Assurez-vous que le réglage de la ressource dans [UPDD]
*1
- [Settings] - [Hardware] et que le réglage du port série
dans le Setup Utility sont identiques.
*1
Windows XP : [démarrer] - [Tous les programmes] -
[UPDD]
Windows 2000 : [Démarrer] - [Programmes] - [UPDD]
Le mode non supporté a été sélectionné.
Réglez le mode d’affichage sur 640 × 480 60 Hz, 800 ×
600 60 Hz ou 1024 × 768 60 Hz.
Vérifiez la connexion de câble allant au Moniteur LCD.
Sélectionnez du menu principal OSD et effectuez
les réglages détaillés. (
page 33)
Sélectionnez dans le menu principal OSD puis [Init
NVRam] et appuyez sur
.
Sélectionnez [Yes] puis appuyez sur
.
Éteignez puis rallumez le Moniteur LCD. (
page 34)
Page 38
F
38
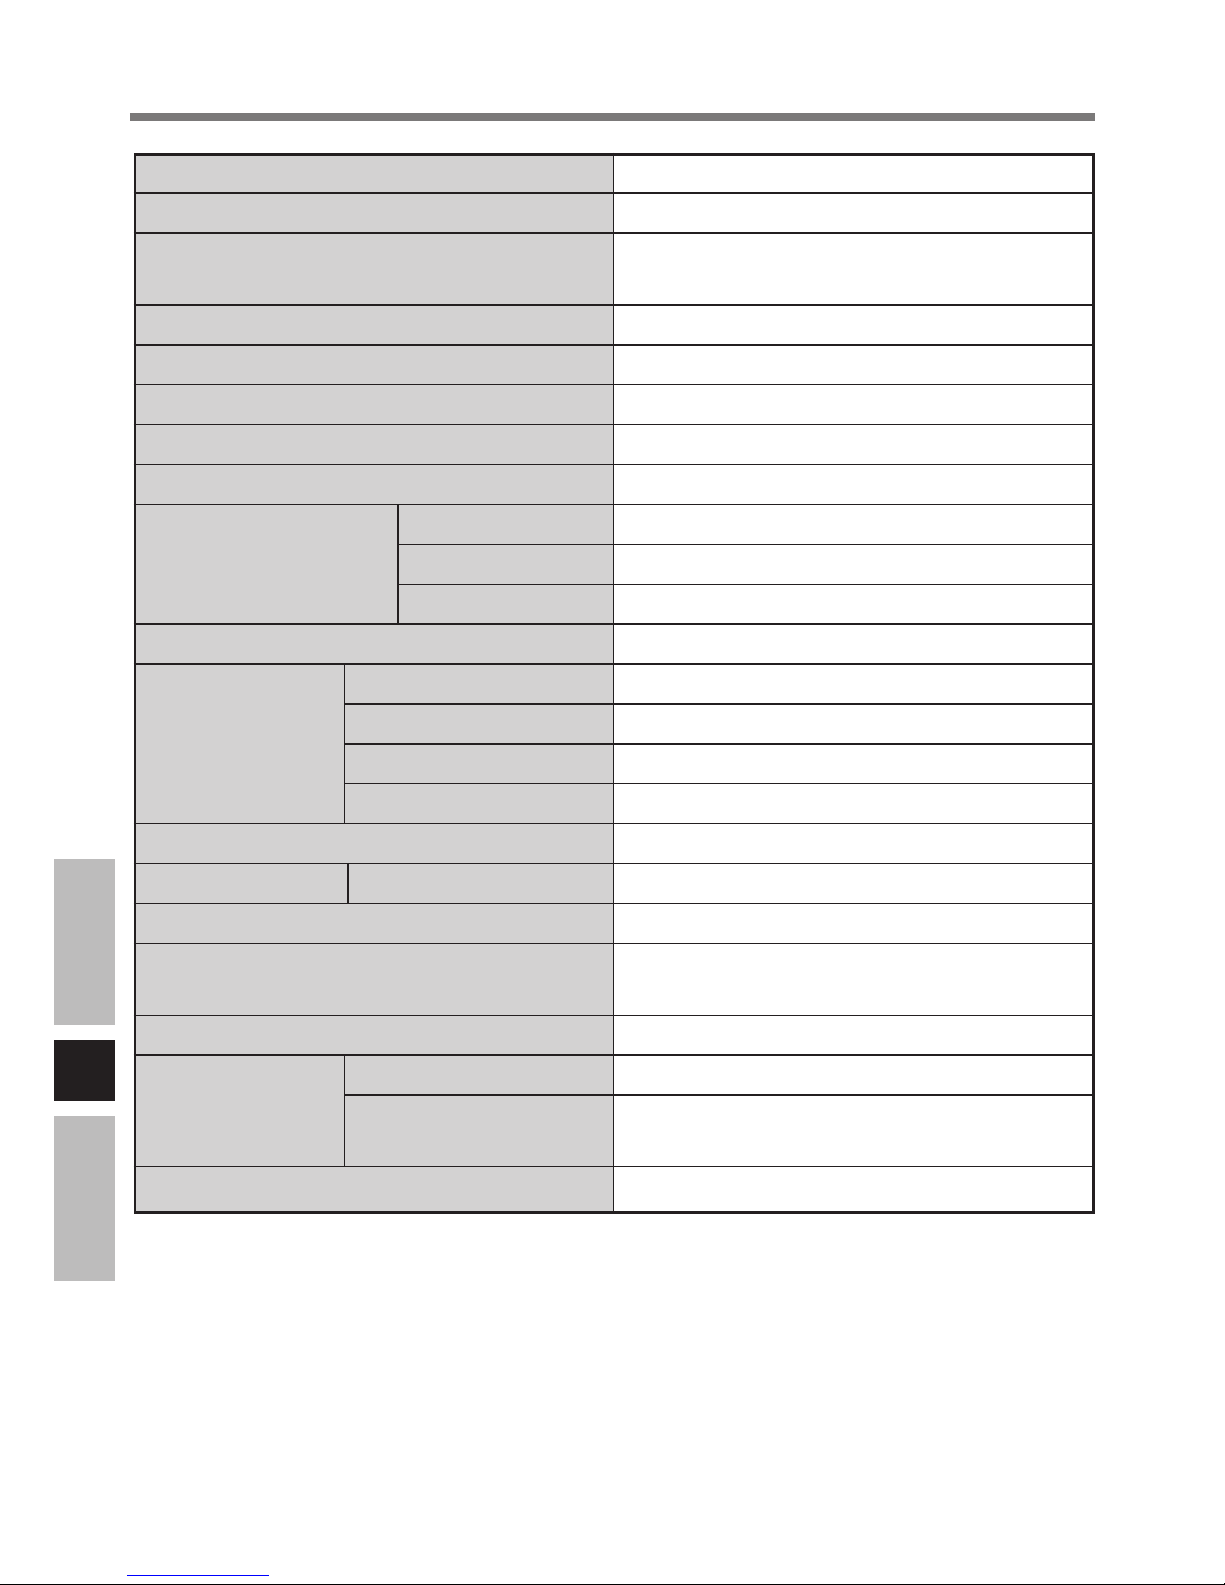
Spécifications
N° de modèle
Interface d’entrée
Type d’affichage à cristaux liquides
Surface d’affichage
Résolution
Couleur
Pas des éléments d’image
Brillance
Modes d’affichage VGA
SVGA
XGA
Écran tactile
Interface Port d’affichage
Port série
Entrée de ligne
Touche de fonction
Haut-parleur
Entrée C.C. Entrée
Consommation de puissance
Dimensions physiques (L x P x H)
Poids
Conditions Température
d’utilisation Humidité
Ordinateurs garantis*
2
CF-VDL02BM
Signal RGB (RVB) analogique
Écran LCD couleur à matrice active
TFT de 12,1 pouces
247,2 mm × 185,7 mm
1024 × 768 points
262,144 (16,777,216 simulé) couleurs
0,24 mm × 0,24 mm
1200 cd/m
2
640 × 480 60 Hz
800 × 600 60 Hz
1024 × 768 60 Hz
Résistif
Femelle 15 broches D
Mâle 9 broches D
Jack miniature, 3,5 DIA
F1 à F5, Urgence (F11)
Haut-parleur stéréo (intégré)
C.C. 15,6 V, 3,85 A*
1
60 W
280 mm × 270 mm × 30 mm
(Sauf pare-soleil)
2,5 kg environ (Sauf pare-soleil)
5 °C à 35 °C
10 % à 90 % (humidité relative)
(sans condensation)
Série CF-18, Série CF-29
*1Plage de tension d’entrée C.C. 14,25 V à 15,75 V
Courant d’entrée C.C 2,6 A ou plus.
*
2
Contactez le Support technique Panasonic pour plus d’informations.
Page 39

39
Memo
Page 40

FJ0505-0
DFQX5547ZA
© 2005 Matsushita Electric Industrial Co., Ltd. All Rights Reserved.
Printed in Japan
 Loading...