

Panasonic CF-U1AQB1GAM, CF-U1AQB2Z2M, CF-U1AQB1Z2M, CF-U1AQB1ZAM, CF-U1AQB2ZAM Operating Instructions Manual
...Page 1
Contents
Getting Started
OPERATING INSTRUCTIONS
Personal Computer
Model No. CF-U1 series
Introduction ......................................... 2
Read Me First .....................................4
Description of Parts ...........................15
Useful Information
On-screen Manual .............................32
Handling and Maintenance ................33
Troubleshooting
Troubleshooting (Basic) .....................39
Appendix
LIMITED USE LICENSE AGREEMENT
..47 Specifi cations ....................................49
Preparation ........................................ 19
First-time Operation ...........................24
Reinstalling Software .........................35
Getting Started
Useful Information
TroubleshootingAppendix
For further information about the computer, you can refer to the
on-screen manual.
To access the on-screen manual page 32 “On-screen Manual”
Please read these instructions carefully before using this product and save this
manual for future use.
Page 2
Introduction
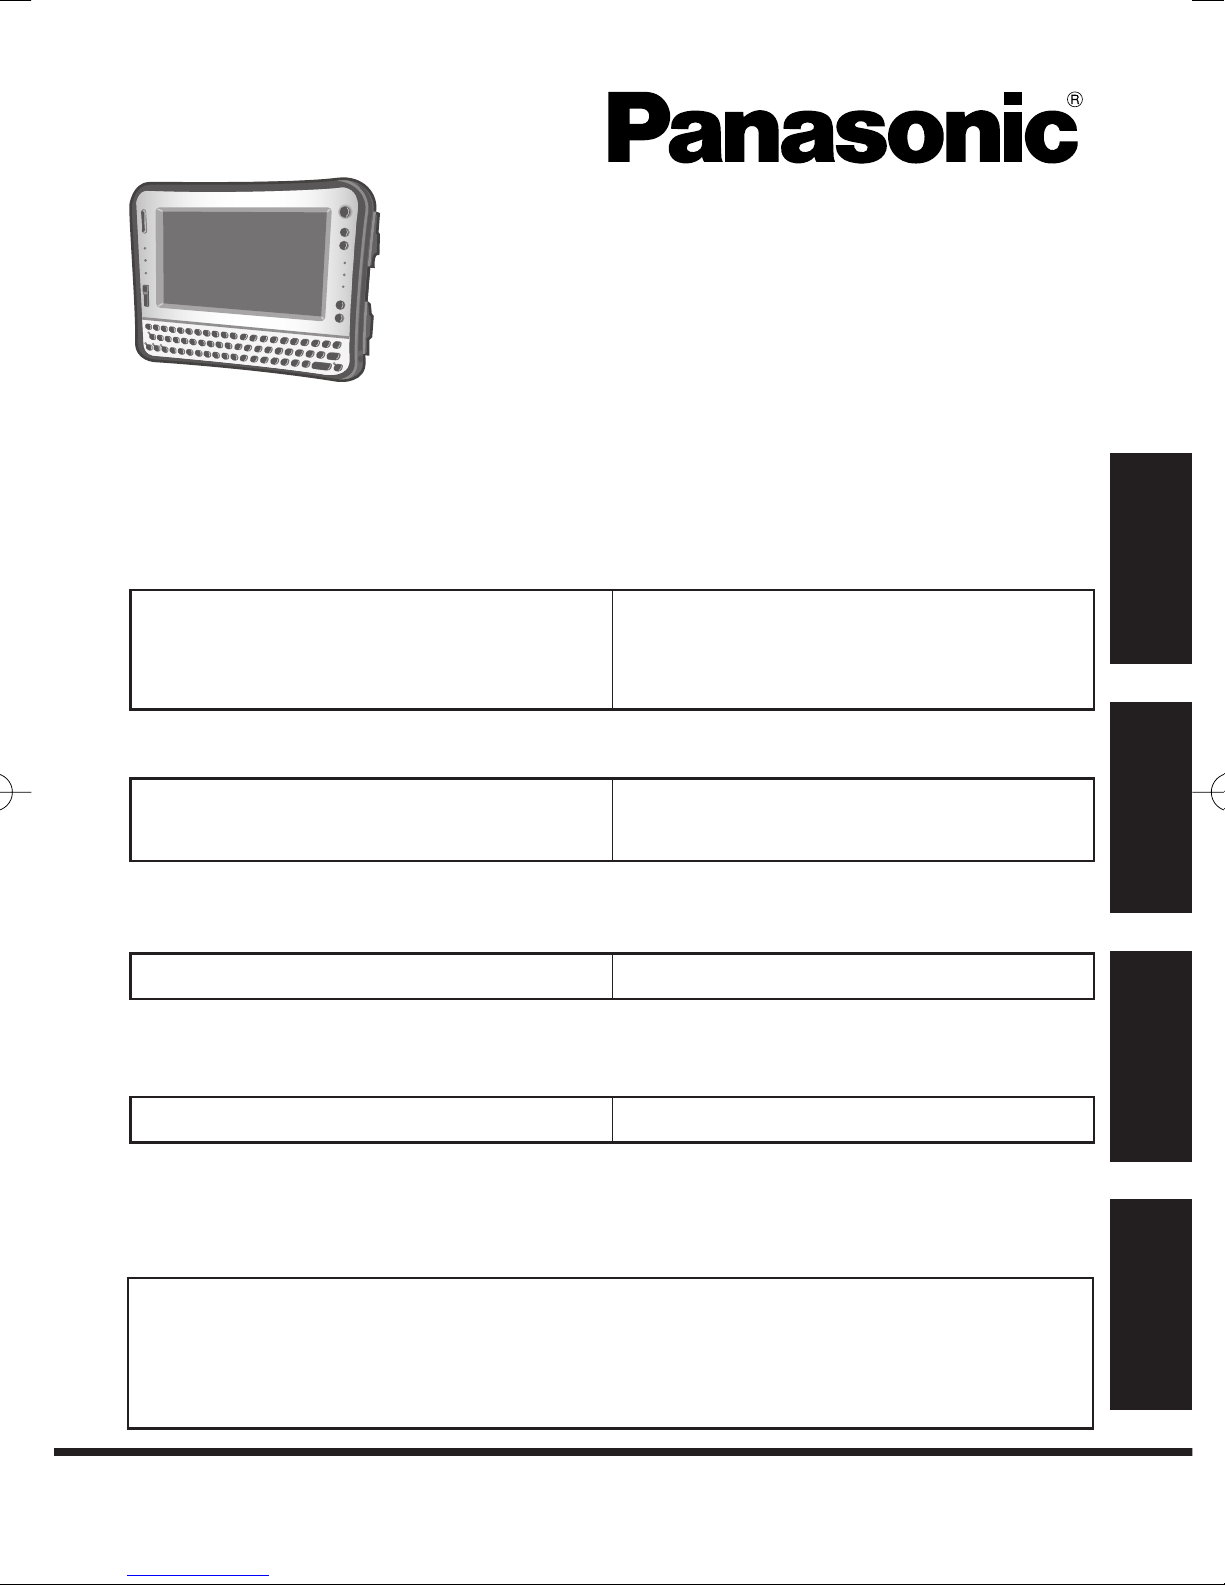
Thank you for purchasing this Panasonic computer. For optimum performance
and safety, please read these instructions carefully.
In these instructions, the names are referred as follows.
®
“Windows Vista
“Microsoft
®
Windows® XP Professional Service Pack 2 with Advanced Security
Technologies” as “Windows”, “Windows XP”
Terms and illustrations in these instructions
Business” as “Windows” or “Windows Vista”
:
Page in these Operating Instructions or in the Reference Manual.
: Reference to the on-screen manuals.
Getting Started
CAUTION
NOTE
: Conditions that may result in minor or moderate injury.
: Useful and helpful information.
: Press [ ] (Enter) key.
+ (Del)
: Press and hold [Fn] key, and then press [ ] (Del) key.
This manual explains key operations based on QWERTY keyboard models for US-English.
When the key combinations differ in using Numeric keyboard
model, see the footnote.
The key combinations may differ when using QWERTY keyboards
other than US-English models. In such cases, look for the functions or icons (printed in blue) on your keyboard that correspond
to the key functions in parenthesis in this manual, and press the
key that is above or below these functions.
Click : Touch the screen with the stylus.
Right-click
:
Touch and hold with the stylus, or touch and select the right button
of “touch pointer”.
A Click on the notifi cation area.
B Click the object you want to right-click.
(Start) - [All Programs] :
Click (Start), and then click [All Programs].
[start] - [All Programs] :
Click [start], and then click [All Programs].
You may need to double-click in some cases.
2
Page 3
Some illustrations are simplifi ed to help your understanding and may look
different from the actual unit.
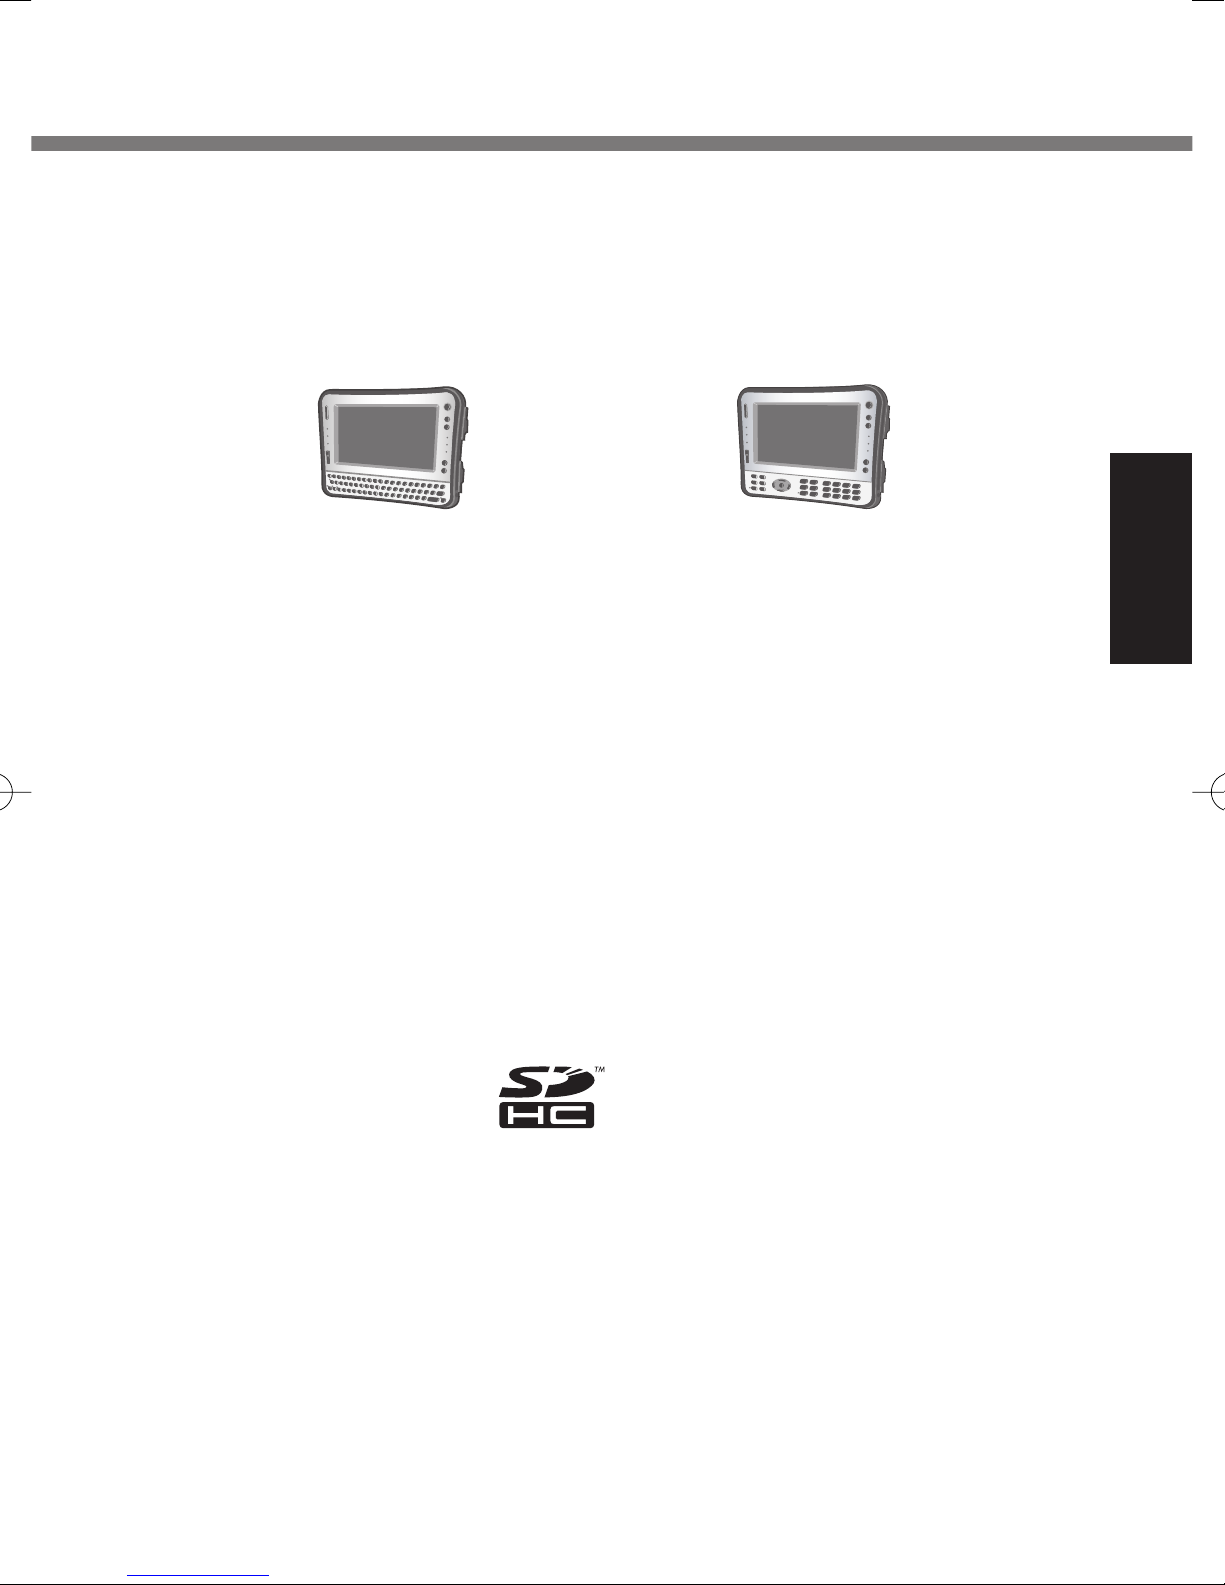
The CF-U1 series personal computer comes with two different models; the
QWERTY keyboard model and the Numeric keyboard model.
This operating instructions manual uses illustrations of the QWERTY keyboard
model.
<QWERTY keyboard model> <Numeric keyboard model>
If you do not log on as an administrator, you cannot use some functions or
cannot display some screens.
Refer for the latest information about optional products to the catalogs, etc.
Disclaimer
Computer specifi cations and manuals are subject to change without notice. Pana-
sonic Corporation assumes no liability for damage incurred directly or indirectly
from errors, omissions or discrepancies between the computer and the manuals.
Trademarks
Microsoft®, Windows®, Windows Vista®, and the Windows logo are registered
trademarks of Microsoft Corporation of the United States and/or other countries.
Intel, Core, Centrino and PROSet are either registered trademarks or trademarks
of Intel Corporation.
Getting Started
SDHC Logo is a trademark.
Adobe, the Adobe logo and Adobe Reader are either registered trademarks or
trademarks of Adobe Systems Incorporated in the United States and/or other
countries.
Computrace® is a registered trademark of Absolute® Software Corp.
Bluetooth™ is a trademark owned by Bluetooth SIG, Inc., U.S.A. and licensed to
Panasonic Corporation.
Panasonic® is a registered trademark of Panasonic Corporation.
Names of products, brands, etc., appearing in this manual are trademarks or
registered trademarks of their respective own companies.
3
Page 4

Read Me First
Models for Europe
<Only for model with a “CE ” mark on the bottom of the computer>
Declaration of Conformity (DoC)
“Hereby, Panasonic declares that this Personal Computer is in
compliance with the essential requirements and other relevant
provisions of the Directive 1999/5/EC.”
Hint:
If you want to get a copy of the original DoC of our above mentioned products,
please contact our web address: http://www.doc.panasonic.de
Authorized Representative:
Panasonic Testing Centre
Panasonic Marketing Europe GmbH
Winsbergring 15, 22525 Hamburg, Germany
Getting Started
Indication of the countries where WLAN is intended to be used:
AT BE BG CH CY CZ DE DK EE ES
FI FR GB GR HU IE IS IT LT LU
LV MT NL NO PL PT RO SE SI SK
Models for UK
Warning
This apparatus must be earthed for your safety.
To ensure safe operation the three-pin plug must be inserted only into a standard
three-pin power point which is effectively earthed through the normal household
wiring.
Extension cords used with the equipment must be three-core and be correctly
wired to provide connection to earth. Wrongly wired extension cords are a major
cause of fatalities.
The fact that the equipment operates satisfactorily does not imply that the power
point is earthed and that the installation is completely safe.
For your safety, if you have any doubt about the effective earthing of the power
point, consult a qualifi ed electrician.
4
Page 5

FOR YOUR SAFETY PLEASE READ THE FOLLOWING TEXT CAREFULLY
This appliance is supplied with a moulded three pin mains plug for your safety and
convenience.
A 3 amp fuse is fi tted in this plug.
Should the fuse need to be replaced please ensure that the replacement fuse has
a rating of 3 amps and that it is approved by ASTA or BSI to BS 1362.
A S A
Check for the ASTA mark
or the BSI mark on the body of the fuse.
If the plug contains a removable fuse cover you must ensure that it is refi tted
when the fuse is replaced.
If you lose the fuse cover the plug must not be used until a replacement cover is
obtained.
A replacement fuse cover can be purchased from your local Panasonic Dealer.
IF THE FITTED MOULDED PLUG IS UNSUITABLE FOR THE SOCKET OUTLET
IN YOUR HOME THEN THE FUSE SHOULD BE REMOVED AND THE PLUG
CUT OFF AND DISPOSED OF SAFELY.
THERE IS A DANGER OF SEVERE ELECTRICAL SHOCK IF THE CUT OFF
PLUG IS INSERTED INTO ANY 13 AMP SOCKET.
If a new plug is to be fi tted please observe the wiring code as shown below.
If in any doubt please consult a qualifi ed electrician.
Getting Started
Warning: THIS APPLIANCE MUST BE EARTHED.
Important
The wires in this mains lead are coloured in accordance with the following code:
Green-and-yellow: Earth
Blue: Neutral
Brown: Live
As the colours of the wires in the mains lead of this apparatus may not correspond with the coloured markings identifying the terminals in your plug, proceed
as follows:
The wire which is coloured GREEN-and-YELLOW must be connected to the
terminal in the plug which is marked by the letter E or by the safety earth symbol
coloured GREEN or GREEN-and-YELLOW.
The wire which is coloured Blue must be connected to the terminal which is
marked with the letter N or coloured BLACK.
The wire which is coloured Brown must be connected to the terminal which is
marked with the letter L or coloured RED.
The mains plug on this equipment must be used to disconnect the mains power.
Please ensure that a socket outlet is available near the equipment and shall be
easily accessible.
5
Page 6

Read Me First
How to replace the fuse
Open the fuse compartment with a screwdriver and replace the fuse.
Warnings
This equipment is not designed for connection to an IT power system.
(An IT system is a system having no direct connections between live parts and
Earth; the exposed-conductive-parts of the electrical installation are earthed.
An IT system is not permitted where the computer is directly connected to
public supply systems in the U.K.)
Disconnect the mains plug from the supply socket when the computer is not in
use.
Getting Started
This equipment is produced to BS800/1983.
8-E-1
Important Safety Instructions
When using your telephone equipment,
basic safety precautions should always
be followed to reduce the risk of fi re,
electric shock and injury to persons,
including the following:
1. Do not use this product near water,
for example, near a bath tub, wash
bowl, kitchen sink or laundry tub, in
a wet basement or near a swimming pool.
2. Avoid using a telephone (other than
a cordless type) during an electrical
storm. There may be a remote risk
of electric shock from lightning.
3. Do not use the telephone to report a
gas leak in the vicinity of the leak.
4. Use only the power cord and batteries indicated in this manual. Do not
dispose of batteries in a fi re. They
may explode. Check with local
codes for possible special disposal
instructions.
SAVE THESE INSTRUCTIONS
19-E-1
6
Page 7

Information to the User
<Only for model with wireless LAN/
Bluetooth>
This product and your Health
This product, like other radio devices,
emits radio frequency electromagnetic
energy. The level of energy emitted by
this product however is far much less
than the electromagnetic energy emitted by wireless devices like for example mobile phones.
Because this product operates within
the guidelines found in radio frequency
safety standards and recommendations, we believe this product is safe
for use by consumers. These standards and recommendations refl ect the
consensus of the scientifi c community
and result from deliberations of panels
and committees of scientists who
continually review and interpret the
extensive research literature.
In some situations or environments,
the use of this product may be restricted by the proprietor of the building or
responsible representatives of the
organization. These situations may for
example include:
Using this product on board of
airplanes, or
In any other environment where the
risk of interference to other devices
or services is perceived or identifi ed
as harmful.
If you are uncertain of the policy that
applies on the use of wireless devices
in a specifi c organization or environ-
ment (e.g. airports), you are encouraged to ask for authorization to use
this product prior to turning on the
product.
Regulatory Information
We are not responsible for any radio or
television interference caused by unauthorized modifi cation of this product.
The correction of interference caused
by such unauthorized modifi cation will
be the responsibility of the user. We
and its authorized resellers or distributors are not liable for damage or violation of government regulations that
may arise from failing to comply with
these guidelines.
26-M-1
Getting Started
Safety Precautions
<Only for model with wireless WAN>
The following safety precautions must be observed during all phases of the operation, usage, service or repair of any Personal Computer or Handheld Computer
incorporating wireless WAN modem. Manufacturers of the cellular terminal are
advised to convey the following safety information to users and operating personnel and to incorporate these guidelines into all manuals supplied with the product.
Failure to comply with these precautions violates safety standards of design,
manufacture and intended use of the product. Panasonic assumes no liability for
customer failure to comply with these precautions*1.
7
Page 8

Read Me First
When in a hospital or other health care facility, observe the restrictions
on the use of mobiles. Switch Personal Computer or Handheld Computer incorporating wireless WAN modem off, if instructed to do so by
the guidelines posted in sensitive areas. Medical equipment may be
sensitive to RF energy.
The operation of cardiac pacemakers, other implanted medical equipment and hearing aids can be affected by interference from Personal
Computer or Handheld Computer incorporating wireless WAN modem
placed close to the device. If in doubt about potential danger, contact
the physician or the manufacturer of the device to verify that the equipment is properly shielded. Pacemaker patients are advised to keep their
Personal Computer or Handheld Computer incorporating wireless WAN
modem away from the pacemaker, while it is on.
Switch off Personal Computer or Handheld Computer incorporating
wireless WAN modem before boarding an aircraft. Make sure it cannot
Getting Started
be switched on inadvertently. The operation of wireless appliances in an
aircraft is forbidden to prevent interference with communications systems. Failure to observe these instructions may lead to the suspension
or denial of cellular services to the offender, legal action, or both.
Do not operate Personal Computer or Handheld Computer incorporating
wireless WAN modem in the presence of fl ammable gases or fumes.
Switch off the cellular terminal when you are near petrol stations, fuel
depots, chemical plants or where blasting operations are in progress.
Operation of any electrical equipment in potentially explosive atmospheres can constitute a safety hazard.
Your Personal Computer or Handheld Computer incorporating wireless
WAN modem receives and transmits radio frequency energy while
switched on. Remember that interference can occur if it is used close to
TV sets, radios, computers or inadequately shielded equipment. Follow
any special regulations and always switch off Personal Computer or
Handheld Computer incorporating wireless WAN modem wherever
forbidden, or when you suspect that it may cause interference or danger.
Road safety comes fi rst! Do not use a Personal Computer or Handheld
Computer incorporating wireless WAN modem while driving a vehicle.
Do not place the computer with wireless WAN modem in an area where
it could cause personal injury to the driver or passengers. It is recommended to stow the unit in the boot or secure stowage area while driving.
Do not place the computer with wireless WAN modem in an area over
an air bag or in the vicinity where an air bag may deploy.
Air bags infl ate with great force and if the computer with wireless WAN
modem is placed in the air bag deployment area may be propelled with
great force and cause serious injury to occupants of the vehicle.
8
Page 9

IMPORTANT!
Personal Computer or Handheld Computer incorporating wireless WAN
modem operate using radio signals and cellular networks cannot be
guaranteed to connect in all conditions. Therefore, you should never rely
solely upon any wireless device for essential communications, for example emergency calls.
Remember, in order to make or receive calls, Personal Computer or
Handheld Computer incorporating wireless WAN modem must be
switched on and in a service area with adequate cellular signal strength.
Some networks do not allow for emergency calls if certain network
services or phone features are in use (e.g. lock functions, fi xed dialing
etc.). You may need to deactivate those features before you can make
an emergency call.
Some networks require that a valid SIM card be properly inserted in
Personal Computer or Handheld Computer incorporating wireless WAN
modem.
27-1-2
*1 In locations where the use of wireless devices is prohibited, please
turn your Wireless Switch off, or check to make sure that your Wireless Ready Indicator is off . Please note that in some cases, wireless
devices may be operating even in Sleep/Standby modes.
Getting Started
Lithium Battery
Lithium Battery!
This computer contains a lithium battery to enable the date, time, and other data
to be stored. The battery should only be exchanged by authorized service personnel.
Warning!
A risk of explosion from incorrect installation or misapplication may possibly occur.
15-E-1
For Used in Motor Vehicle
Warning: Notebook Computer may be installed in a motor vehicle and visible to
the driver only if used to support vehicle related functions such as vehicle information, system control, rear or side observation and navigation. If used for entertainment purpose, such as television reception or video play, it must be installed to
the rear of the driver’s seat where it will not be visible, directly or indirectly, to the
operator of the motor vehicle. Check with individual state/provincial laws to determine lawful use of this product while operating within a motor vehicle.
9
Page 10
Read Me First
Information for Users on Collection and Disposal of
Old Equipment and used Batteries
These symbols on the products, packaging, and/or accompanying
documents mean that used electrical and electronic products and
batteries should not be mixed with general household waste.
For proper treatment, recovery and recycling of old products and used
batteries, please take them to applicable collection points, in accordance with your national legislation and the Directives 2002/96/EC and
2006/66/EC.
By disposing of these products and batteries correctly, you will help to
save valuable resources and prevent any potential negative effects on
human health and the environment which could otherwise arise from
Getting Started
inappropriate waste handling.
For more information about collection and recycling of old products and
batteries, please contact your local municipality, your waste disposal
service or the point of sale where you purchased the items.
Penalties may be applicable for incorrect disposal of this waste, in
accordance with national legislation.
For business users in the European Union
If you wish to discard electrical and electronic equipment, please contact your dealer or supplier for further information.
[Information on Disposal in other Countries outside the European
Union]
These symbols are only valid in the European Union. If you wish to
discard this product, please contact your local authorities or dealer and
ask for the correct method of disposal.
Note for the battery symbol (bottom two symbol examples):
This symbol might be used in combination with a chemical symbol. In
this case it complies with the requirement set by the Directive for the
chemical involved.
53-E-1
10
Page 11

Precautions
THIS PRODUCT IS NOT INTENDED FOR USE AS, OR AS PART OF, NUCLEAR
EQUIPMENT/SYSTEMS, AIR TRAFFIC CONTROL EQUIPMENT/SYSTEMS, OR
AIRCRAFT COCKPIT EQUIPMENT/SYSTEMS
SPONSIBLE FOR ANY LIABILITY RESULTING FROM THE USE OF THIS PRODUCT ARISING OUT OF THE FOREGOING USES.
*2
AIRCRAFT COCKPIT EQUIPMENT/SYSTEMS include Class2 Electrical Flight Bag
(EFB) Systems and Class1 EFB Systems when used during critical phases of fl ight
(e.g., during take-off and landing) and/or mounted on to the aircraft. Class1 EFB
Systems and 2 EFB Systems are defi ned by FAA: AC (Advisory Circular) 120-76A or
JAA: JAA TGL (Temporary Guidance Leafl ets) No.36.
Panasonic cannot guarantee any specifi cations, technologies, reliability, safety (e.g.
Flammability/Smoke/Toxicity/Radio Frequency Emission, etc) requirements related
to aviation standards that exceed the specifi cations of our COTS (Commercial-
Off-The-Shelf) products.
*2
. PANASONIC WILL NOT BE RE-
39-E-1
Getting Started
This computer is not intended for use in
medical equipment including life-support
systems, air traffi c control systems, or
other equipment, devices or systems that
are involved with ensuring human life or
safety. Panasonic cannot be held responsible in any way for any damages or loss
resulting from the use of this unit in these
types of equipment, devices or systems,
etc.
The CF-U1 was developed based on
thorough research into the real-world
portable computing environments. Exhaustive pursuit of usability and reliability
under harsh conditions led to innovations
such has the magnesium alloy exterior,
vibration damped fl ash memory disk
drive, fl exible internal connections. The
CF-U1’s outstanding engineering has
been tested using the strict MIL-STD810F (for vibration and shock) and IP (for
dust and water) based procedures.
As with any portable computer device
precautions should be taken to avoid any
damage. The following usage and handling procedures are recommended.
Before putting the computer away, be
sure to wipe off any moisture.
If a Malfunction Occurs, Immediately
Unplug the AC Plug and the Battery
Pack
This product is damaged
Foreign object inside this product
Smoke emitted
Unusual smell emitted
Unusually hot
Continuing to use this product while any
of the above conditions are present may
result in fi re or electric shock.
If a malfunction occurs, immediately
turn the power off and unplug the AC
plug, and then remove the battery
pack. Then, contact your technical
support offi ce.
Do Not Touch This Product and Cable
When It Starts Thundering
Electric shock may result.
Do Not Connect the AC Adaptor to a
Power Source Other Than a Standard
Household AC Outlet
Otherwise, a fi re due to overheating may
result. Connecting to a DC/AC converter
(inverter) may damage the AC adaptor.
On an airplane, only connect the AC
adaptor/charger to an AC outlet specifi -
cally approved for such use.
11
Page 12

Read Me First
Do Not Do Anything That May Damage
the AC Cord, the AC Plug, or the AC
Adaptor
Do not damage or modify the cord, place
it near hot tools, bend, twist, or pull it
forcefully, place heavy objects on it, or
bundle it tightly.
Continuing to use a damaged cord may
result in fi re, short circuit, or electric
shock.
Do Not Pull or Insert the AC Plug If
Your Hands Are Wet
Electric shock may result.
Clean Dust and Other Debris of the AC
Plug Regularly
If dust or other debris accumulates on
the plug, humidity, etc. may cause a
Getting Started
defect in the insulation, which may result
in a fi re.
Pull the plug, and wipe it with a dry
cloth.
Pull the plug if the computer is not
being used for a long period of time.
Insert the AC Plug Completely
If the plug is not inserted completely, fi re
due to overheating or electric shock may
result.
Do not use a damaged plug or loose
AC outlet.
Close the Connector Cover Tightly
When Using This Product Where Is a
Lot of Water, Moisture, Steam, Dust,
Oily Vapors, etc.
The entry of foreign matter may cause a
fi re or electric shocks.
If foreign matter has found its way
inside, immediately turn the power off
and unplug the AC cord, and then
remove the battery pack. Then contact
your technical support offi ce.
Do Not Disassemble This Product
There are high-voltage areas inside
which may give you an electric shock if
you should touch them. Do not touch the
pins and circuit boards inside, and do not
allow foreign matter to enter inside.
Also, remodeling or disassembly may
cause a fi re.
Keep SD Memory Cards Away from
Infants and Small Children
Accidental swallowing will result in bodily
injury.
In the event of accidental swallowing,
see a doctor immediately.
Do Not Place This Product on Unstable Surface
If balance is lost, this product may fall
over or drop, resulting in an injury.
Avoid Stacking
If balance is lost, this product may fall
over or drop, resulting in an injury.
Do Not Leave This Product in High
Temperature Environment for a Long
Period of Time
Leaving this product where it will be
exposed to extremely high temperatures
such as near fi re or in direct sunlight may
deform the cabinet and/or cause trouble
in the internal parts. Continued use in
such a resulting condition may lead to
short-circuiting or insulation defects, etc.
which may in turn lead to a fi re or electric
shocks.
Hold the Plug When Unplugging the
AC Plug
Pulling on the cord may damage the
cord, resulting in a fi re or electric shock.
Do Not Move This Product While the
AC Plug Is Connected
The AC cord may be damaged, resulting
in fi re or electric shock.
If the AC cord is damaged, unplug the
AC plug immediately.
Use Only the Specifi ed AC Adaptor
With This Product
Using an AC adaptor other than the one
supplied (attached to your product or
supplied by Panasonic) may result in a
fi re.
Do Not Subject the AC Adaptor to Any
Strong Impact
Using the AC adaptor after a strong
impact such as being dropped may result
in electric shock, short circuit, or fi re.
12
Page 13

Take a Break of 10-15 Minutes Every
Hour
Using this product for long periods of
time may have detrimental health effects
on the eyes or hands.
Do Not Turn the Volume Up to Loud
When Using Headphones
Listening at high volumes that overstimulate the ear for long periods of time may
result in loss of hearing.
Do Not Use with Exposing the Skin to
This Product for a Long Period of
Time
Using this product with exposing the skin
to the heat source of this product or AC
adaptor for a long period of time can
cause a low-temperature burn.
Precautions (Battery Pack)
Do not place the computer near a
television or radio receiver.
Keep the computer away from mag-
nets. Data stored on the hard disk may
be lost.
Interface Cable
Use of an interface cable longer than
3 m {9.84 feet} is not recommended.
11-E-1
Getting Started
Do Not Use with Any Other Product
The battery pack is rechargeable and
was intended for the specifi ed product. If
it is used with a product other than the
one for which it was designed, electrolyte
leakage, generation of heat, ignition or
rupture may result.
Do Not Charge the Battery Using
Methods Other Than Those Specifi ed
If the battery is not charged using one of
the specifi ed methods, electrolyte leak-
age, generation of heat, ignition or rupture may result.
Do Not Throw the Battery Pack into a
Fire or Expose It to Excessive Heat
Generation of heat, ignition or rupture
may result.
Avoid Extreme Heat (Near the Fire, in
Direct Sunlight, for Example)
Electrolyte leakage, generation of heat,
ignition or rupture may result.
Do Not Insert Sharp Objects into the
Battery Pack, Expose It to Bumps or
Shocks, Disassemble, or Modify It
Electrolyte leakage, generation of heat,
ignition or rupture may result.
If this product is subjected to a strong
impact, stop using it immediately.
Do Not Short the Positive (+) and
Negative (-) Contacts
Generation of heat, ignition or rupture
may result.
Do not place the battery pack togeth-
er with articles such as necklaces or
hairpins when carrying or storing.
Do Not Use This Product with a Battery Pack Other Than the One Specifi ed
Use only the specifi ed battery pack (CF-
VZSU53W) with your product. Use of
battery packs other than those manufactured and supplied by Panasonic may
present a safety hazard (generation of
heat, ignition or rupture).
When the Battery Pack Has Become
Degraded, Replace It with a New One
Continued use of a degraded battery
pack may generate high levels of heat,
cause a fi re to start and cause the pack
to burst or explode.
Do not touch the terminals on the
battery pack. The battery pack may
no longer function properly if the
contacts are dirty or damaged.
13
Page 14

Read Me First
Do not expose the battery pack to
water, or allow it to become wet.
If the battery pack will not be used for
a long period of time (a month or
more), charge or discharge (use) the
battery pack until the remaining
battery level becomes 30% to 40%
and store it in a cool, dry place.
This computer prevents overcharging
of the battery by recharging only
when the remaining power is less
than approx. 95% of capacity.
The battery pack is not charged when
the computer is fi rst purchased. Be
sure to charge it before using it for the
Getting Started
fi rst time. When the AC adaptor is
connected to the computer, charging
begins automatically.
Should the battery leak and the fl uid
get into your eyes, do not rub your
eyes. Immediately fl ush your eyes
with clear water and see a doctor for
medical treatment as soon as possible.
NOTE
The battery pack may become
warm during recharging or normal
use. This is completely normal.
Recharging will not commence if
internal temperature of the battery
pack is outside of the allowable
temperature range (0 °C to 50 °C).
( Reference Manual “Battery
Power”) Once the allowable range
requirement is satisfi ed, charging
begins automatically. Note that the
recharging time varies based on the
usage conditions. (Recharging
takes longer than usual when the
temperature is 10 °C or below.)
In high-temperature environments,
the battery takes longer to fully
recharge and the operating time is
shorter. Only use the computer
within the allowable temperature
range.
This computer has a high tempera-
ture mode function that prevents the
degradation of the battery in high
temperature environments. (
Reference Manual “Battery Power”)
A level corresponding to a 100%
charge for high temperature mode
is approximately equivalent to an
80% charge level for normal temperature mode.
The battery pack is a consumable
item. If the amount of time the
computer can be run by using a
particular battery pack becomes
dramatically shorter and repeated
recharging does not restore its
performance, the battery pack
should be replaced with a new one.
When transporting a spare battery
inside a package, briefcase, etc., it
is recommended that it be placed in
a plastic bag so that its contacts are
protected.
Always power off the computer
when it is not in use. Leaving the
computer on when the AC adaptor
is not connected will exhaust the
remaining battery capacity.
14
Page 15
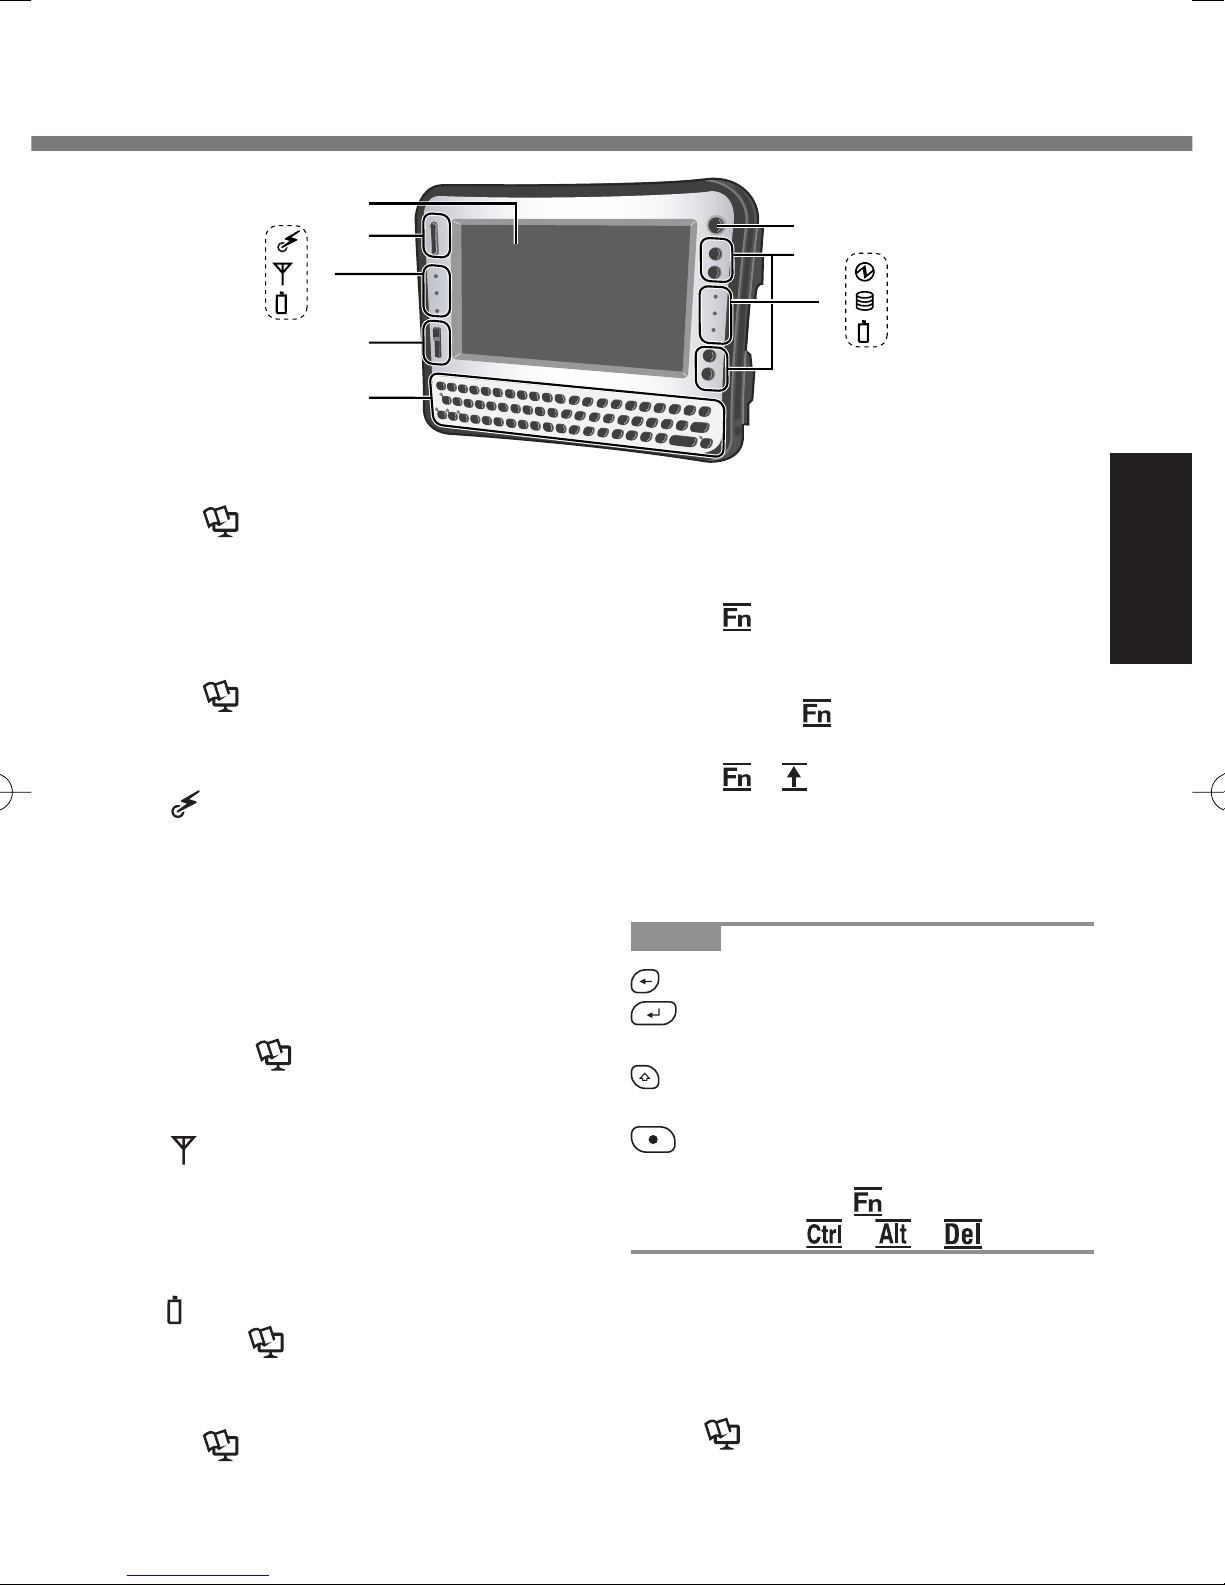
Description of Parts
A
B
C
1
D
E
F
G
H
2
A: LCD
Reference Manual
“Touchscreen”
B: Scroll Button
You can scroll the screen, etc. This
works as a mouse wheel.
Reference Manual
“Hardware Button Setting”
C: LED Indicator
: Wireless ready
This indicator lights when
Wireless LAN, Bluetooth, and/
or Wireless WAN are connected and ready. It does not
necessarily indicate the On/Off
condition of the wireless connection.
Reference Manual
“Disabling/Enabling
Wireless Communication”
: Wireless WAN status
<Only for model with wireless
WAN>
Refer to the instruction manual
of the wireless device.
1
: Battery 1 status
Reference Manual
“Battery Power”
D: Zoom Button
Reference Manual
“Zoom Function”
E: Keyboard
Blue letters and icons indicate
functions that are operated by
pressing the key in combination
with . If a key has two blue-letter
or blue-icon functions, the lower
right function is operated in combination with , while the upper left
function is operated in combination
with + (Shift).
(On Turkish keyboards, the placement of blue-letter/blue-icon functions is reversed.)
NOTE
: [Back space] key
: [Enter] key
<For QWERTY keyboard model only>
: [Shift] key
<For Numeric keyboard model only>
: Does not function when pressed
alone. Pressing this key in combination with performs the
same as + + .
F: Power Switch
G: Application Buttons
You can register your favorite application fi les to 4 buttons respectively.
Reference Manual
“Hardware Button Setting”
Getting Started
15
Page 16
Description of Parts
H: LED Indicator
Right side
Getting Started
: Power status
Off: Power off/Hibernation
Green: Power on
Blinking green
: Flash memory status
: Battery 2 status
Reference Manual
“Battery Power”
: Sleep
: Standby
When recording in stereo using a
stereo microphone:
Click (Start) - [Control Panel] [Hardware and Sound] - [Sound] [Recording] - [Microphone] [Properties], and then add a
check mark for [No Audio enhancements] in [Microphone
Enhancements].
Click [start] - [All Programs] [SoundMAX] - [Control Panel] and
select [Microphone], and then add
a check mark for [No Filtering] in
[Microphone Enhancements].
When using a monaural micro-
phone with a 2-terminal plug:
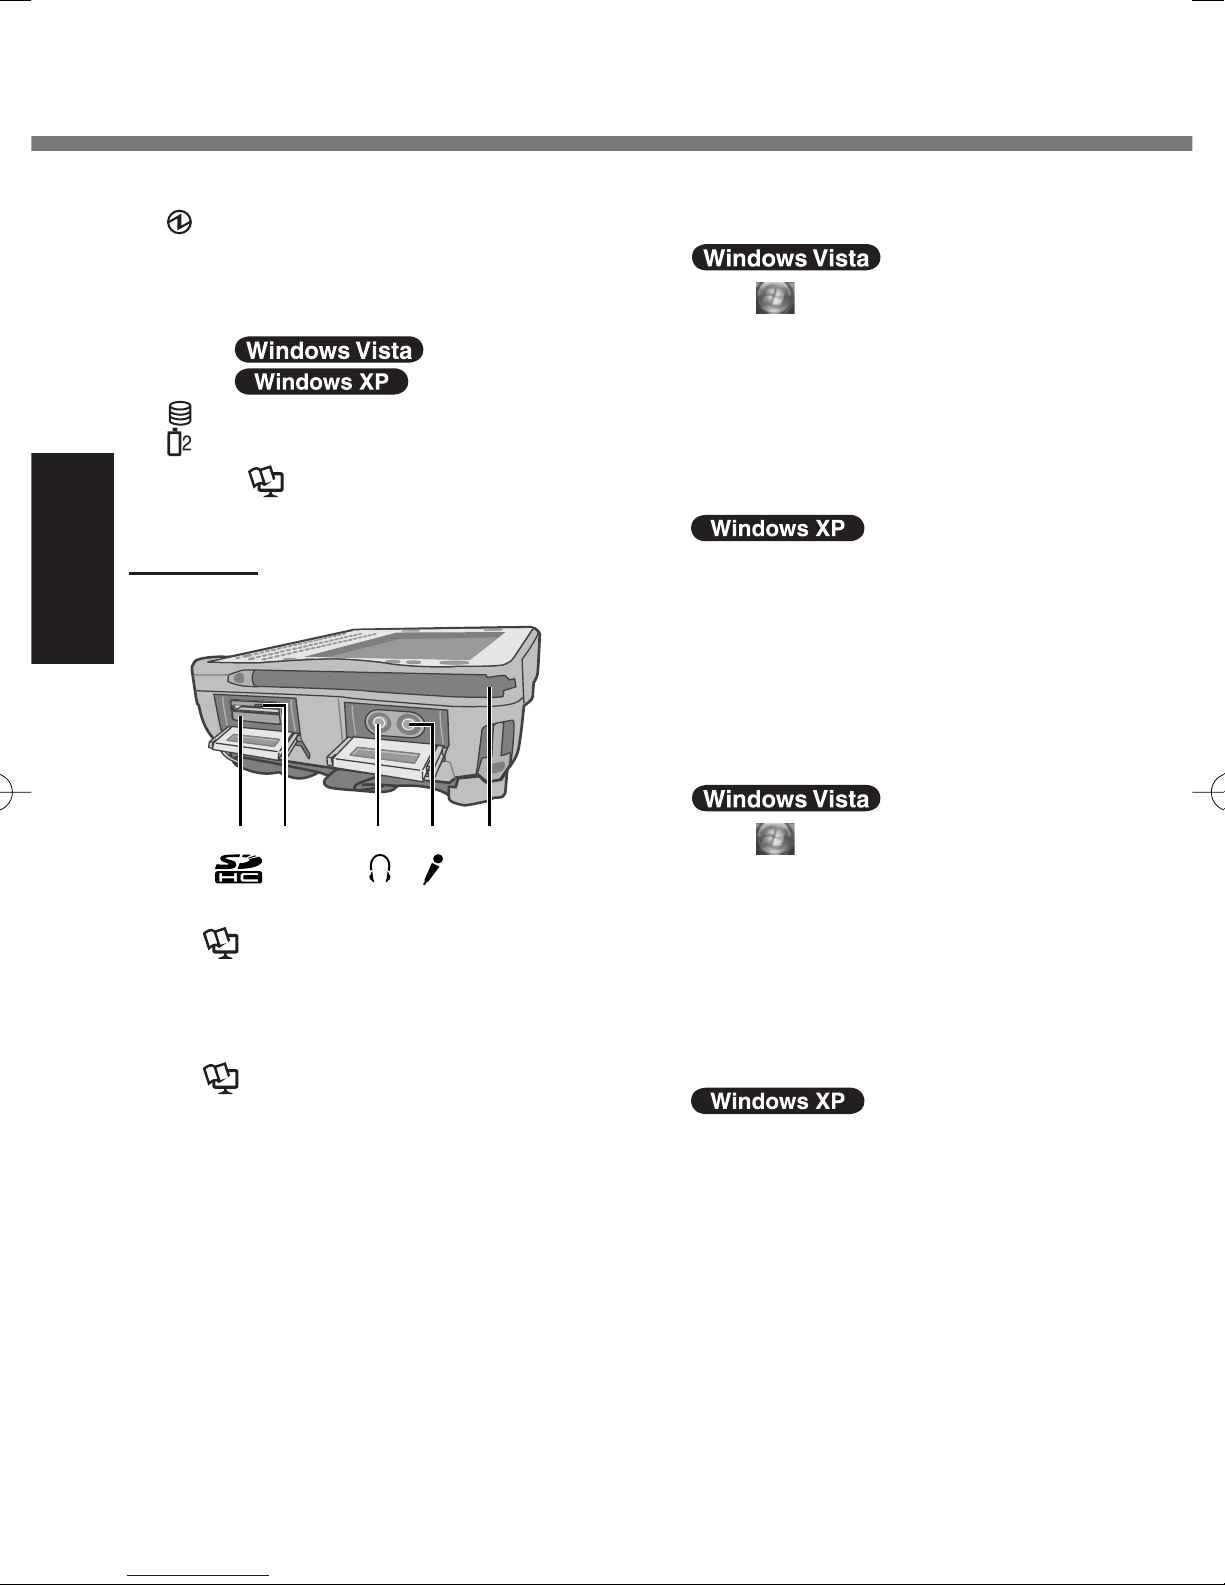
AB D EC
A: SD Memory Card Slot
Reference Manual
“SD Memory Card”
B: SD Memory Card Indicator
(Blinking: During access)
Reference Manual
“SD Memory Card”
C: Headphone Jack
You can connect headphones or
amplifi ed speakers. When they are
connected, audio from the internal
speakers is not heard.
D: Microphone Jack
A condenser microphone can be
used. If other types of microphones
are used, audio input may not be
possible, or malfunctions may occur
as a result.
Click (Start) - [Control Panel] [Hardware and Sound] - [Sound] [Recording] - [Microphone] [Properties], and then add a
check mark for [Voice enhancements] in [Microphone Enhancements].
the left track will be recorded.
Click [start] - [All Programs] [SoundMAX] - [Control Panel] and
select [Microphone], and then add
a check mark for [Voice Recording] in [Microphone Enhancements]. Otherwise, only audio on
the left track will be recorded.
E: Stylus Holder (right side)
Otherwise, only audio on
16
Page 17
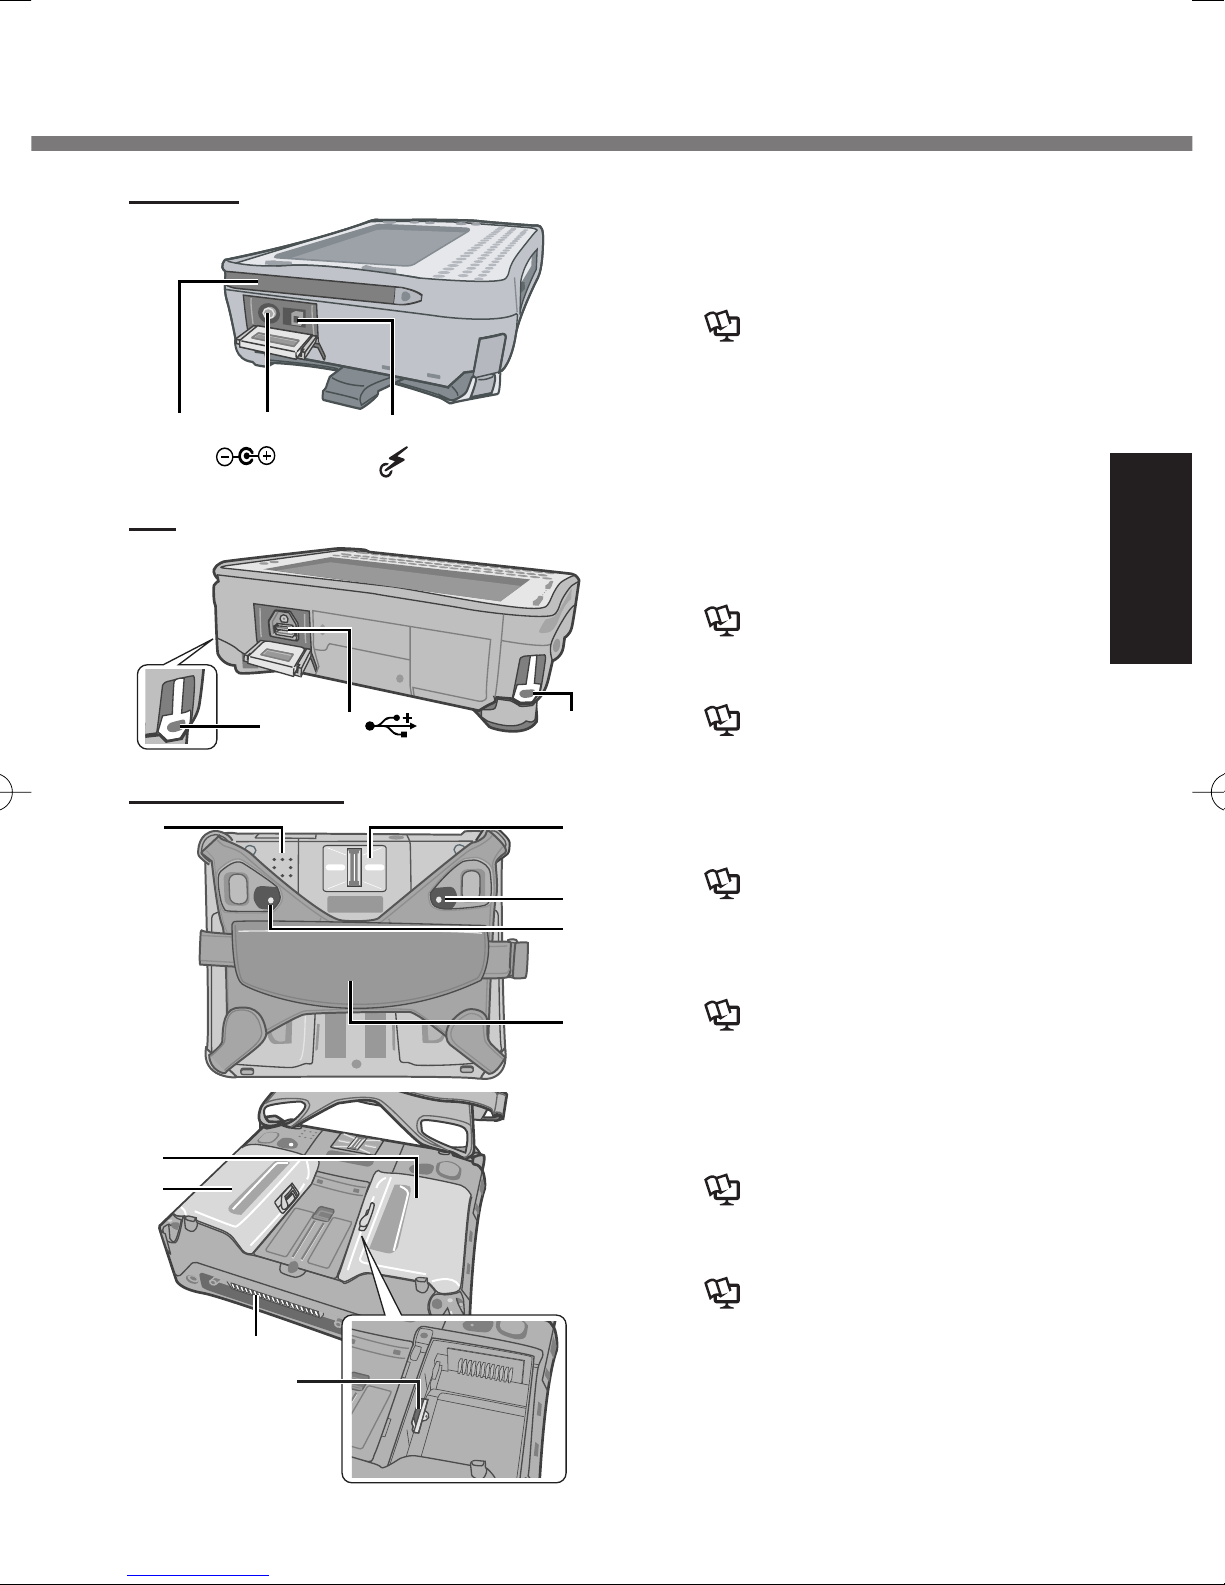
Left side
A: Stylus Holder (left side)
B: DC-IN Jack
C: Wireless Switch
Reference Manual
“Disabling/Enabling Wireless
Communication”
BA
DC IN 16V
Top
DE D
Rear and Bottom
F
C
G
H
I
J
D: Security Lock (2 holes)
A Kensington cable can be con-
nected.
For further information, read the
manual that comes with the cable.
E: USB Port
Reference Manual “USB
Devices”
F: Speaker
Reference Manual
“Key Combinations”
G: Fingerprint Reader
<Only for model with Fingerprint
Reader>
Reference Manual
“Fingerprint Reader”
H: Battery 1 Indicator
I: Battery 2 Indicator
Reference Manual “Battery
Power”
Getting Started
K
L
M
N
J: Hand Strap
K: Battery 1 Case
L: Battery 2 Case
Reference Manual “Battery
Power”
M: Expansion Bus Connector
Reference Manual “Cradle /
Mini Dock”
N: SIM Card Slot
To open the battery cover page
19 “Inserting the Battery Packs”.
17
Page 18

Description of Parts
Inside
A
B
C
Getting Started
NOTE
D
B
A
A: Wireless WAN antenna
<Only for model with wireless WAN>
B: Wireless LAN antenna
<Only for model with wireless LAN>
Reference Manual
“Wireless LAN”
C: Bluetooth antenna
<Only for model with Bluetooth>
Reference Manual
“Bluetooth”
D: GPS antenna
<Only for model with GPS>
This computer contains a magnet and magnetic
products at the locations circled in the illustration.
The battery cover also has the magnet on the back
side.
Avoid leaving metallic object or magnetic media in
contact with these areas.
18
Page 19

Preparation
A
Confi rmation
A Check and identify the supplied accessories.
If you do not fi nd the described accessories, contact Panasonic Technical
Support.
• AC Adaptor . . . . . 1
Model No: CF-AA1633A
• Stylus . . . . . . . . . . . . . . . . . . . 1 • Tether . . . . . . . . . . . . . . . . . . . 1
• Soft Cloth . . . . . . . . . . . . . . . . . . . . . . . . . . . . . . . . . . . . . . . . . . . . . . . .1
• Operating Instructions (This book) . . . . . . . . . . . . . . . . . . . . . . . . . . .1
• Product Recovery DVD-ROM Windows Vista® Business SP1 . . . . . .1
• Product Recovery DVD-ROM Windows XP Professional SP2 . . . . .1
B Read the LIMITED USE LICENSE AGREEMENT before breaking the seal
on the computer’s packaging ( page 47).
• AC Cord . . . . . . . 1 • Battery Packs . . 2
Model No: CF-VZSU53W
Getting Started
Inserting the Battery Packs
Insert the battery pack to 2 battery cases.
Place the computer on a soft cloth with the panel side down.
1
A Remove the edge (A) of hand strap passing
through the clip. (The illustration shows the
left side of hand strap as an example.)
19
Page 20

C
B
F
E
D
Preparation
2
3
4
Getting Started
5
6
B Tip the clip (B) front to pull it out of the com-
puter. (Do the same for the right side of hand
strap.)
C Open up the whole hand strap.
D Press and hold (C) and slide the latch to
unlock the battery cover. (The illustration
shows Battery 1 as an example.)
E Remove the battery cover.
F Insert the battery pack matching with (D)
side.
Then, slide down the battery pack (E).
G Attach the battery cover.
Insert the claw (F) of the cover matching the
dent of computer, and press down the latch
side of cover to close.
Make sure the latch is on the “OPEN”
side.
If the cover does not close fi rmly, insert
the claw again. If the problem persists,
check if the battery is inserted properly.
H Press and hold the battery cover and slide
the latch to fi x.
(Take the steps D to H for Battery 2 as well.)
I Attach the hand strap back to the original
form.
Take the steps A and B in the reverse order.
7
8
20
CAUTION
The computer does not operate without the
battery cover attached.
Make sure the latch is securely locked.
Otherwise the battery pack may fall when
you carry the computer.
Do not touch the terminals of the battery
pack and the computer. Doing so can make
the terminals dirty or damaged, and may
cause malfunction of the battery pack and
the computer.
Page 21

About the battery for this computer
This computer uses 2 battery packs.
The battery is charged (
page 24) and power is consumed only on either bat-
tery pack. Those operations switch to the other battery pack automatically.
When the computer is connected to the Cradle (optional: CF-VEBU11U), the
battery pack is charged when the AC adaptor is connected to the Cradle.
With the battery charger (optional: CF-VCBU11U) or the Cradle (optional: CF-
VEBU11U), you can remove the empty battery pack and charge it while using
the computer.
You can insert or remove the battery pack while the computer is ON. Be sure
not to remove the battery pack being used by mistake. (Refer to
Reference
Manual “Battery Power” )
NOTE
To conserve power, the following power saving methods are set at the time of
purchase.
The screen automatically turns off after 15 minutes of inactivity.
The computer automatically enters sleep*1 after 20 minutes of inactivity.
*1
Refer to Reference Manual “Sleep and Hibernation Functions” about
resuming from sleep.
Getting Started
The computer automatically enters standby*2 after 20 minutes of inactivity.
*2
Refer to Reference Manual “Standby and Hibernation Functions” about
resuming from standby.
Note that the computer consumes electricity even when the computer power is
off. If the battery pack is fully charged, the battery will fully discharge in the
following period of time:
When power is off: Approx. 7 weeks
In sleep ( ) / standby ( ) : Approx. 2 days
In hibernation: Approx. 3 days
When the DC plug is not connected to the computer, disconnect the AC cord
from your AC wall outlet. Power is consumed simply by having the AC adaptor
plugged into an electrical outlet.
Power consumption in each mode is as follows. (When AC adaptor is connected)
When the screen is off: Approx. 6.7 W
In sleep ( ) / standby ( ) : Approx. 1 W
The battery pack is fully charged (or not being charged) and the computer is
off: Approx. 0.9 W
21
Page 22

Preparation
Attaching the stylus to the computer
We recommend you fi x the stylus in safe to the
computer using the tether (supplied).
A Attach the tether to the stylus.
B Insert the tether to (A) of computer and pass
the stylus to fi x.
You can store the stylus at (B) or (C) of the
computer.
A
Getting Started
Using the stylus
C B
You can use the touchscreen function to perform the same operation as the mouse. Touch
the screen surface with the stylus (included).
To right-click
22
Touch and hold with the stylus, or touch and
select the right button of “touch pointer”.
A Click on the notifi cation area.
B Click the object you want to right-click.
Page 23

Using the hand strap
A
When using the computer holding with hand,
insert your hand to (A) part of the hand strap.
Fix the hand strap fi rmly so that the computer
does not come off, and then turn it over.
When the hand strap is too loose or too
tight, you can adjust the hand strap according to the instructions below.
CAUTION
If the hand is not securely fi xed to the hand
strap, the computer may drop.
Getting Started
Adjusting the hand strap
A
B
C
3
ED
Adjust the fastening strength of hand strap as
below.
A Remove (A) from the strap joint and next
remove (B).
B Adjust the position (C).
C Attach (D), then (E) to the joint.
Attach the hand strap fi rmly so that the strap
does not come off.
CAUTION
If the hand strap loosens, the computer may
fall down.
Do not use the strap if it becomes worn or
damaged.
23
Page 24

First-time Operation
Setting up the computer
NOTE
Be sure the Wireless switch (A) is ON before setting. The computer may not
be set properly if the switch is OFF.
1 Connect your computer to a power
outlet.
The battery charging starts automatically. ( page
21).
CAUTION
Do not disconnect the AC adaptor until the “Setting up
Getting Started
A
the computer” procedure is completed.
When using the computer for the fi rst time, do not
connect any peripheral device except the battery pack
and AC adaptor.
Handling the AC adaptor
Problems such as sudden voltage drops may arise during periods of thunder and lightning. Since this could
adversely affect your computer, an uninterruptible
power source (UPS) is highly recommended unless
running from the battery pack alone.
<For Numeric keyboard model>
Connecting the USB keyboard to the computer or
USB port of the Cradle is necessary.
B
24
2 Turn on the computer.
A Press the power switch (B).
The power indicator lights.
CAUTION
Do not press the power switch repeatedly.
The computer will forcibly be turned off if you press
and hold the power switch for 4 seconds or longer.
Once you turn off the computer, wait for 10 seconds or
more before you turn on the computer again.
Page 25

Do not perform the following operation until the fl ash
memory drive indicator turns off.
Connecting or disconnecting the AC adaptor
Pressing the power switch
Touching the keyboard, touchscreen or external
mouse
Turn on/off the wireless switch
When the CPU temperature is high, the computer may
not start up to prevent overheating of the CPU. Wait
until the computer cools down, and then turn the
power on again. If the computer does not power on
even after cooling down, contact Panasonic Technical
Support.
Any changes from the default setting of the Setup
Utility must not be made until the “Setting up the
computer” procedure is completed.
3 <For MUI OS model>
Select OS language.
Getting Started
A Select OS language on “Select Language” screen
and click [OK].
The language setting will start by clicking [OK] on
the confi rmation screen. You can return to the
“Select Language” screen by clicking [Cancel].
The language setting will be complete in about 20
minutes.
B Click [OK] on the termination screen.
The power of the computer goes off by clicking
[OK].
C Turn on the computer.
Carefully choose your language because you
cannot change it later. If you set a wrong language,
you need to reinstall Windows ( page 35).
25
Page 26

First-time Operation
4 Setup Windows.
During setup of Windows, use the stylus to move the
cursor and to click an item. ( page 22)
A Follow the on-screen instructions.
After turning on the computer, “Please wait while
windows sets up your computer .........” appears,
and then a small circle circulates on the screen.
This will take a few minutes.
Setup of Windows will take approximately 20 min-
utes. Go to the next step, confi rming each mes-
sage on the display.
<For MUI OS model>
Getting Started
For some languages, the characters on the key
and inputted character may not match. Set the keyboard properly after the setup is complete. Then
set the password.
CAUTION
You cannot choose the following words for user name
and password: CON, PRN, AUX, CLOCK$, NUL,
COM1 to COM9, LPT1 to LPT9.
You can change the user name, password, image and
security setting after setup of Windows.
Remember your password. If you forget the password,
you cannot use the Windows. Creating a password
reset disk beforehand is recommended.
The wallpaper for the fi rst logon user has already been
set on “4 Setup Windows.” .
When using this computer under the sun, the screen
becomes easily viewable by changing the wallpaper to
the white wallpaper.
A Right-click on the desktop, and click [Personalize] -
[Background].
B Select [Solid Colors] at [Location].
C Select the white wallpaper and click [OK].
<For MUI OS model>
When setting up the keyboard, choose the appropriate
one to your computer. Otherwise, input by the keyboard may become unavailable.
26
Page 27

When you set date/time/time zone and click [Next],
the screen may not go to the next step for a few minutes. Do not touch the keyboard, and wait until the
screen changes.
If “An unexpected error has occurred…” (or a similar
message) is displayed, click [OK]. This is not a malfunction.
Wait until the fl ash memory drive indicator
turned off.
<For MUI OS model>
The keyboard will operate as the US keyboard until
the keyboard setting is changed. Because of this,
some alphabets shown on display may differ from
inputted ones.
To avoid the accidental selections, during setting up
Windows,
Use the touchscreen to make some selections.
To match the languages, change the language set-
tings after setting up Windows ( page 29). Do not
change the settings in [To change system or these
settings, click Customize] of [Regional and Language
Options] during setting up Windows.
has
Getting Started
5 <For MUI OS model>
Install Adobe Reader.
NOTE
Install Adobe Reader to read the Important Tips and the
Reference Manual.
Click (Start) and input the following in [Start
Search], then press (Enter).
Click [start] - [Run], input the following, then click [OK].
English: [c:\util\reader\m\setup.exe]
Dutch: [c:\util\reader\nl\setup.exe]
Finnish: [c:\util\reader\fi \setup.exe]
French: [c:\util\reader\f\setup.exe]
German: [c:\util\reader\g\setup.exe]
Italian: [c:\util\reader\t\setup.exe]
27
Page 28

First-time Operation
Norwegian: [c:\util\reader\no\setup.exe]
Russian: [c:\util\reader\ru\setup.exe]
Spanish: [c:\util\reader\p\setup.exe]
Swedish: [c:\util\reader\s\setup.exe]
Turkish: [c:\util\reader\tr\setup.exe]
Getting Started
Depending on the model, the following languages may
also be supported.
Arabic: [c:\util\reader\ar\setup.exe]
Bulgarian: [c:\util\reader\bg\setup.exe]
Chinese (Simplifi ed): [c:\util\reader\sc\setup.exe]
Chinese (Traditional): [c:\util\reader\tc\setup.exe]
Croatian: [c:\util\reader\yx\setup.exe]
Czech: [c:\util\reader\cs\setup.exe]
Danish: [c:\util\reader\da\setup.exe]
Estonian: [c:\util\reader\et\setup.exe]
Greek: [c:\util\reader\el\setup.exe]
Hebrew: [c:\util\reader\he\setup.exe]
Hungarian: [c:\util\reader\hu\setup.exe]
Japanese: [c:\util\reader\ja\setup.exe]
Korean: [c:\util\reader\ko\setup.exe]
Latvian: [c:\util\reader\lv\setup.exe]
Lithuanian: [c:\util\reader\lt\setup.exe]
Polish: [c:\util\reader\pl\setup.exe]
Portuguese: [c:\util\reader\pt\setup.exe]
Romanian: [c:\util\reader\ro\setup.exe]
Slovak: [c:\util\reader\sk\setup.exe]
Slovenian: [c:\util\reader\sl\setup.exe]
28
6 <For MUI OS model>
Change the language settings.
Page 29

<Languages installed in this computer>
• English • Dutch • Finnish • French
• German • Italian • Norwegian • Russian
• Spanish • Swedish • Turkish
Depending on the model, the following languages may
also be supported.
• Arabic • Bulgarian • Chinese (Simplified)
• Chinese (Traditional) • Croatian • Czech
• Danish • Estonian • Greek • Hebrew
• Hungarian • Japanese • Korean • Latvian
• Lithuanian • Polish • Portuguese
• Portuguese (Brazilian) • Romanian • Slovak
• Slovenian • Thai
Change the language settings in the following menu.
[start] - [Control Panel] - [Date, Time, Language, and
Regional Options] - [Regional and Language Options]
[Regional Options] - [Standards and Formats]
[Languages] - [Language used in menus and dia-
logs]
[Languages] - [Details] - [Default input language]
[Advanced] - [Language for non-unicode Programs]
NOTE
When you use MUI OS and localized OS versions
together on the same network, use English computer
names on localized versions of Windows.
Some UI (User Interface) strings remain in English
even if the user’s UI is set to another language.
For more information, refer to “c:\windows\mui\
relnotes.txt”.
If you change the language in [Languages] - [Language used in menus and dialogs], the desktop color
will be changed when logging on to Windows next
time.
The desktop color can be changed by following the
procedure below.
Click [start] - [Control Panel] - [Appearance and
Themes] - [Display] - [Desktop] and select color from
[Color], then click [OK].
Getting Started
29
Page 30

First-time Operation
7 Perform the touchscreen calibration.
At fi rst, log on to Windows as an administrator, and per-
form this calibration.
A Click (Start) - [Control Panel] - [Additional
Options] - [Tablet Calibration].
B Using the stylus, touch each of the 9 “+” target
marks one by one.
Perform the following calibration for each user.
A Click (Start) - [Control Panel] - [Mobile PC] -
[Tablet PC Settings].
B Click [Calibrate].
Getting Started
C Using the stylus, touch each of the 4 “+” target
marks one by one, and then click [OK].
A Click [start] - [Control Panel] - [Other Control Panel
Options] - [Touch Panel].
B Select [Calibration] in [Touch Panel Settings].
C Select [9 point], [12 point] or [20 point] in [Accuracy
required], and click [Apply].
D Click [Calibrate Now] in [Calibration].
E Using the stylus, touch each of the “+” target marks
one by one until it blinks, and then press (Enter).
F Click [Update] in [Calibration].
G Click [OK].
8 Create a new account.
A Click [start] - [Control Panel] - [User Accounts] -
[Create a new account].
CAUTION
30
Remember your password. If you forget the password,
you cannot use the Windows operation system.
Creating a password reset disk beforehand is recommended.
Page 31

NOTE
PC Information Viewer
This computer periodically records the management information of the fl ash mem-
ory, etc. The maximum data volume for each record is 1024 bytes. This information
is only used for estimating the cause when the fl ash memory goes down by any
possibility. They are never sent to outside via network nor used for any other purpose except for the purpose described the above.
To disable the function, add the check mark for [Disable the automatic save func-
tion for management information history] in [Hard Disk Status] of PC Information
Viewer, and click [OK].
(
Reference Manual “Checking the Computer’s Usage Status”)
Precaution against Starting Up/Shutting Down
Do not do the following
Connecting or disconnecting the AC adaptor
Pressing the power switch
Touching the keyboard, touchscreen or external mouse
Turn on/off the wireless switch
Getting Started
To change the partition structure
You can shrink a part of an existing partition to create unallocated drive space,
from which you can create a new partition. This computer has a single partition in
the default setting.
A Click (Start) and right-click [Computer], then click [Manage].
A standard user needs to enter an administrator password.
B Click [Disk Management].
C Right-click the partition for Windows (“c” drive in the default setting), and
click [Shrink Volume].
The partition size depends on the computer specifi cations.
D Input the size in [Enter the amount of space to shrink in MB] and click
[Shrink].
You cannot input a larger number than the displayed size.
E Right-click [Unallocated] (the shrunk space in the step D) and click [New
Simple Volume].
F Follow the on-screen instructions to make the settings, and click [Finish].
Wait until formatting is completed.
NOTE
You can create an additional partition using remaining unallocated space or
newly creating unallocated space.
To delete a partition, right-click the partition and click [Delete Volume] in the
step C.
31
Page 32

On-screen Manual
You can access the Reference Manual and the Important Tips on the computer screen.
When you access the Reference Manual and the Important Tips for the fi rst time, the
License Agreement of the Adobe Reader may be displayed. Read it carefully and
select [Accept] to proceed.
Reference Manual
The Reference Manual contains the practical information to help you fully enjoy
the computer’s performance.
To access the Reference Manual:
A Double-click
Alternatively click (Start) - [All Programs] - [Panasonic] - [On-Line
Manuals] - [Reference Manual].
A Click [start] - [Reference Manual].
Important Tips
The Important Tips will provide you with the battery information so that you can
use the battery pack in the optimum condition to obtain longer operation time.
Useful Information
The Important Tips will provide you with the helpful information about the battery
and touchscreen. Read to use the battery pack in the optimum condition to obtain
longer operation time.
To access the Important Tips:
A Double-click
Alternatively click (Start) - [All Programs] - [Panasonic] - [On-Line
Manuals] - [Important Tips].
on the desktop.
on the desktop.
A Double-click
Alternatively click [start] - [All Programs] - [Panasonic] - [Battery] -
[Important Tips] or click [start] - [All Programs] - [Panasonic] - [On-Line
Manuals] - [Important Tips].
NOTE
When Adobe Reader update notice is displayed, we recommend you follow the
on-screen procedure and update.
See http://www.adobe.com/ for the latest version of Adobe Reader.
on the desktop.
32
Page 33

Handling and Maintenance
Operation environment
Temperature: Operation : 5 °C to 35 °C
Storage : -20°C to 60 °C
Humidity: Operation : 30% to 80% RH (No condensation)
Storage : 30% to 90% RH (No condensation)
Even within the above temperature/humidity ranges, using for a long time in an
extreme environment will result in the product deterioration and will shorten the
product life.
Do not place the computer in the following areas, otherwise the computer may
be damaged.
Near electronic equipment. Image distortion or noise may occur.
In extremely high or low temperature.
As the computer can become hot during operation, keep it away from items
that are sensitive to heat.
Handling cautions
This computer is designed to minimize shock to parts such as the LCD and the
fl ash memory and equipped with a drip-proof keyboard, but no warranty is provided against any trouble caused by shock. Be extremely careful when handling
the computer.
When carrying the computer:
Turn off the computer.
Remove all external devices, cables and other protruding things and then
close all terminal covers.
Do not drop or hit the computer against solid objects.
Do not grip the display part.
When you board an airplane, take the computer with you and never put it in
your checked luggage. When using the computer on airplane, follow the airline’s instructions.
When carrying a spare battery, put it in a plastic bag to protect its terminals.
Be careful of computer drop resulting from the hand strap damage.
Use only the included stylus to touch the screen. Do not place any object on its
surface and do not press down strongly with sharp-pointed or hard objects that
may leave marks (e.g., nails, pencils and ball point pens).
Do not use the stylus when dust or dirt (e.g., oil) is on the screen. Otherwise
foreign particles on the screen/stylus can scratch the screen surface or obstruct the stylus operation.
Use the stylus only for touching the screen. Using it for any other purpose may
damage the stylus and result in scratches on the screen.
Useful Information
33
Page 34

Handling and Maintenance
When using peripheral devices
Follow these instructions and the Reference Manual to avoid any damage to the
devices. Carefully read the instruction manuals of the peripheral devices.
Use the peripheral devices conforming to the computer’s specifi cations.
Connect to the connectors in the correct direction.
If it is hard to insert, do not try forcibly but check the connector’s shape, direc-
tion, alignment of pins, etc.
If screws are included, fasten them securely.
Remove the cables when you carry the computer. Do not pull the cables forc-
ibly.
Preventing your computer from unauthorized use via wireless LAN/Blue-
tooth/Wireless WAN
<Only for model with wireless LAN/Bluetooth/Wireless WAN>
Before using wireless LAN/Bluetooth/Wireless WAN, make the appropriate
security settings such as data encryption.
Computrace
Computrace® software tracks your stolen computer.
Computrace® software is not included or installed in this computer.
Consult Absolute Software Corp. before disposal.
Refer to the following URL for Computrace® software for installation and avail-
Useful Information
able service regions. Note that this service is only available in certain regions.
http://www.absolute.com
®
Software
Maintenance
Wipe with a soft dry cloth such as gauze.
To clean areas other than the LCD panel
Wipe with a soft dry cloth such as gauze. When using detergent, dip a soft cloth in
water-diluted detergent and wring it thoroughly.
CAUTION
Do not use benzene, thinner, or rubbing alcohol since it may adversely affect
the surface causing discoloration, etc. Do not use commercially-available
household cleaners and cosmetics, as they may contain components harmful
to the surface.
Do not apply water or detergent directly to the computer, since liquid may enter
inside of the computer and cause malfunction or damage.
34
Page 35

Reinstalling Software
Reinstalling software will return the computer to the default condition. When you
reinstall the software, the fl ash memory data will be erased.
Back up important data to other media or an external hard disk before reinstallation.
Preparation
Prepare the following items:
The Product Recovery DVD-ROM (included)
Product Recovery DVD-ROM Windows Vista® Business SP1
Product Recovery DVD-ROM Windows XP Professional SP2
Panasonic USB CD/DVD drive (optional) (refer to recent catalogs and
other sources for information about the products available)
Remove all peripherals (except for the CD/DVD drive).
Connect the AC adaptor and do not remove it until reinstallation is com-
plete.
<For Numeric keyboard model>
Connecting the USB keyboard to the computer or USB port of the Cradle is necessary.
The following explanations show operations using key combinations of and
other keys. When using USB keyboard, press buttons indicated in ( ).
Example: Press + (F2) → Press
Reinstalling Windows Vista
1 Turn off the computer and connect the CD/DVD drive to
the USB port ( page 17).
2 Turn on the computer, and press
+ (F2) or +
(Del) while [Panasonic] boot screen is displayed.
The Setup Utility starts up.
If the password is requested, enter the Supervisor Password.
3 Write down all of the contents of the Setup Utility and
press + (F9).
Useful Information
At the confi rmation message, select [Yes] and press (Enter).
4 Press + (F10).
At the confi rmation message, select [Yes] and press (Enter).
The computer will restart.
35
Page 36

Reinstalling Software
5 Press + (F2) or + (Del) while [Panasonic] boot
screen is displayed.
The Setup Utility starts up.
If the password is requested, enter the Supervisor Password.
6
Set the Product Recovery DVD-ROM into the CD/DVD drive.
7 Select the [Exit] menu, then select your CD/DVD drive in
[Boot Override].
8 Press
The computer will restart.
(Enter).
9 Select [Reinstall Windows] and press (Enter).
The License Agreement screen appears.
10 Select [Yes, I agree to the provisions above and wish to
continue!] and press (Enter).
11 Select the settings and press
[Reinstall Windows to the whole Hard Disk to factory default.]
You will have a single partition.
[Reinstall Windows to the operating system partition.]
You can keep the partition structure.
12 At the confi rmation message, press (Enter).
Useful Information
Reinstallation starts automatically. (It will take approximately 30 - 120 minutes.)
Do not interrupt reinstallation, for example by turning off the computer or
pressing , and + (Del). Otherwise reinstallation may
become unavailable as Windows may not start up or the data may be
corrupted.
(Enter).
13
Remove the Product Recovery DVD-ROM, and then select
[OK] and press (Enter) to turn off the computer, then
remove the CD/DVD drive.
14 Turn on the computer.
If the password is requested, enter the Supervisor Password.
15 Perform the steps 3, 4, 5 and 7 for setting up the computer
( pages 25 to 30).
16
Start the Setup Utility and change the settings as necessary.
17 Perform Windows Update.
36
Page 37

Reinstalling Windows XP
1 Turn off the computer and connect the CD/DVD drive to
the USB port ( page 17).
2 Turn on the computer, and press
+ (F2) or +
(Del) while [Panasonic] boot screen is displayed.
The Setup Utility starts up.
If the password is requested, enter the Supervisor Password.
3 Write down all of the contents of the Setup Utility and
press + (F9).
At the confi rmation message, select [Yes] and press (Enter).
4 Press + (F10).
At the confi rmation message, select [Yes] and press (Enter).
The computer will restart.
5 Press + (F2) or + (Del) while [Panasonic] boot
screen is displayed.
The Setup Utility starts up.
If the password is requested, enter the Supervisor Password.
6 Set the Product Recovery DVD-ROM into the CD/DVD
drive.
Useful Information
7 Select the [Exit] menu, then select your CD/DVD drive in
[Boot Override].
8 Press
The computer will restart.
(Enter).
9 Press to execute [1. [Recovery]].
The License Agreement screen appears.
To cancel partway, press .
10 Press to select [1. Yes, I agree to the provisions above
and wish to continue!].
37
Page 38

Reinstalling Software
11 Select the settings.
[2]: Enter the size of operating system partition and press Enter.
(The size of data partition will be determined by subtracting the
operating system partition size from the maximum size.)
[3]: Windows will be installed in the fi rst partition.
(The size of the fi rst partition must be 13 GB or more. If smaller,
installation will not be possible.)
At the confi rmation message, press
Reinstallation starts automatically. (It will take approximately 30 - 75 minutes.)
Do not interrupt reinstallation, for example by turning off the computer or
pressing , and + (Del). Otherwise reinstallation may
become unavailable as Windows may not start up or the data may be
corrupted.
or .
12 Remove the Product Recovery DVD-ROM, and then press
any key to turn off the computer.
If additional instructions are included with the computer, be sure to read
them. It may be necessary to perform additional operations during the
following procedure.
13 Turn on the computer.
If the password is requested, enter the Supervisor Password.
Useful Information
14 Perform the steps 4 to 8 for setting up the computer
( pages 26 to 30).
15 Start the Setup Utility and change the settings as neces-
sary.
38
Page 39

Troubleshooting (Basic)
Follow the instructions below when a problem has occurred. There is also an
advanced troubleshooting guide in the “Reference Manual”. For a software problem, refer to the software’s instruction manual. If the problem persists, contact
Panasonic Technical Support. You can also check the computer’s status in the PC
Information Viewer
(
Starting Up
Reference Manual “Checking the Computer’s Usage Status”).
Cannot start up.
The power indicator
or battery indicator
is not lit.
Cannot turn on the
computer.
The computer does
not resume from
sleep ( )
/standby
( ).
(The power indicator
blinks quickly in
green.)
Connect the AC adaptor.
Insert a fully charged battery.
Remove the battery pack and the AC adaptor, then con-
nect them again.
If a device is connected to the USB port, disconnect the
device, or set [Legacy USB Support] to [Disabled] in
the [Advanced] menu of the Setup Utility. (
ence Manual “Setup Utility”)
Leave it in an environment of 5 °C or higher temperature
for about an hour, then turn on the power again.
Refer-
You have forgotten
the password.
Supervisor Password or User Password: Contact Pana-
Administrator password:
sonic Technical Support.
If you have a password reset disk, you can reset the ad-
ministrator password. Set the disk and enter any wrong
password, then follow the on-screen instructions and set
a new password.
If you do not have a password reset disk, reinstall
( page 35) and set up Windows, and then set a new
password.
Troubleshooting
39
Page 40

Troubleshooting (Basic)
Starting Up
“Remove disks or
other media. Press
any key to restart”
or a similar message appears.
Windows startup
and operation is
slow.
A fl oppy disk is in the drive and it does not contain system
startup information. Remove the fl oppy disk and press any
key.
If a device is connected to the USB port, disconnect the
device, or set [Legacy USB Support] to [Disabled] in
the [Advanced] menu of the Setup Utility. (
Refer-
ence Manual “Setup Utility”)
If the problem persists after having tried the above solu-
tions, it may be a fl ash memory failure. Contact Panasonic
Technical Support.
Press + (F9)*1 in the Setup Utility (
Reference
Manual “Setup Utility”) to return the Setup Utility settings
(excluding the passwords) to the default values. Start the
Setup Utility and make the settings again. (Note that the
processing speed depends on the application software, so
this procedure may not make Windows faster.)
*1
For Numeric keyboard model, select [Load Default Value]
in [Exit] menu by using
or connect a USB keyboard and press
and press (Enter),
.
Troubleshooting
If you installed a resident software after purchase, turn off
the residence.
Disable the pop-up menu and Input Panel Tab.
Open the Input Panel, and click [Tools] - [Options] -
A
[Opening].
Remove the check mark of [Show the Input Panel tab]
B
and click [OK].
Disable Indexing Service in the following menu.
Click [start] - [Search] - [Change preferences] - [With
Indexing Service (for faster local service)].
40
Page 41

Starting Up
The date and time
are incorrect.
[Executing Battery
Recalibration]
screen appears.
[Enter Password]
does not appear
when resuming from
sleep ( )
/standby
( )
or
hibernation.
Make the correct settings.
Click (Start) - [Control Panel] - [Clock, Language, and
Region] - [Date and Time].
Click [start] - [Control Panel] - [Date, Time, Language, and
Regional Options] - [Date and Time].
If the problem persists, the internal clock battery may need
to be replaced. Contact Panasonic Technical Support.
When the computer is connected to LAN, check the date
and time of the server.
The 2100 A.D. or later year will not be correctly recognized
on this computer.
The Battery Recalibration was canceled before Windows
was shut down last time. To start up Windows, turn off the
computer by the power switch, and then turn on.
The password you have set in the Setup Utility is not
requested at resuming. To use the password security at
resuming, set the Windows password.
Click
A
accounts] and select the account, and set the password.
Click
B
tenance] - [Require a password when the computer
wakes] and add a check mark for [Require a password].
(Start) - [Control Panel] - [Add or remove user
(Start) - [Control Panel] - [System and Main-
Set the Windows password. The password you have set in
the Setup Utility is not requested at resuming.
Click [start] - [Control Panel] - [User Accounts] and
A
select the account, and set the password.
Click [start] - [Control Panel] - [Performance and Main-
B
tenance] - [Power Options] - [Advanced] and add a
check mark for [Prompt for password when computer
resumes from standby].
Troubleshooting
41
Page 42

Troubleshooting (Basic)
Starting Up
Cannot resume.
An error may occur when the computer automatically enters
the
sleep ( ) / standby ( ) or
hibernation mode while the screensaver is active. In this
case, turn off the screensaver or change the pattern of the
screensaver.
If you press and hold the power switch for 4 seconds or
longer, the power will be turned off forcibly and the computer
will not resume. In this case, all unsaved data will be lost.
You disconnected the AC adaptor and the battery pack while
the computer was in
sleep ( ) / standby
( ). If the computer’s power supply is discon-
nected in
unsaved data will be lost and the computer will not resume.
The battery is exhausted.
by ( )
sleep ( ) / standby ( ),
and hibernation consume some power.
Sleep ( ) / stand-
Other startup
problems.
Troubleshooting
Press + (F9)*2 in the Setup Utility (
Reference
Manual “Setup Utility”) to return the Setup Utility settings
(excluding the passwords) to the default values. Start the
Setup Utility and make the settings again.
*2
For Numeric keyboard model, select [Load Default Value]
in [Exit] menu by using
or connect a USB keyboard and press
Remove all peripheral devices.
Check to see if there was a disk error.
and press (Enter),
.
Remove all peripheral devices including an external
A
display.
Click
B
(C:)], and click [Properties].
Click [Tools] - [Check Now].
C
A standard user needs to enter an administrator
password.
Select the option in [Check disk options] and click
D
[Start].
Click [Schedule disk check] and restart the computer.
E
(Start) - [Computer] and right-click [Local Disk
42
Click [start] - [My Computer] and right-click [Local
A
Disk(C:)], and click [Properties].
Click [Tools] - [Check Now].
B
Select the option in [Check disk options] and click
C
[Start].
Page 43

Starting Up
Other startup
problems.
(continued)
Shutting down
Windows does not
shut down.
Display
No display.
Start the computer in Safe Mode and check the error
*3
details. When the [Panasonic] boot screen disappears
startup, press and hold
+ (F8)*4 until the Windows
at
Advanced Options Menu is displayed.
*3
When [Password on boot] is set to [Enabled] in the [Secu-
rity] menu of the Setup Utility, [Enter Password] appears
after the [Panasonic] boot screen disappears. As soon as
you enter the password and press
hold
*4
For Numeric keyboard model, connect a USB keyboard
and press
+ (F8).
.
(Enter), press and
Remove the USB device.
Wait one or two minutes. It is not a malfunction.
The external display is selected. Press + ( )*5
to switch the display. Wait until the display has been
switched completely before pressing
+ ( )*5
again.
*5
For Numeric keyboard model: + ( )
When using an external display,
Check the cable connection.
Turn on the display.
Check the settings of external display.
The display is turned off by the power-saving function. To
resume, do not press the direct selection keys, but press
any other key like
The computer entered
( )
or hibernation by the power-saving func-
.
sleep ( ) / standby
tion. To resume, press the power switch.
The screen may not be displayed even after the computer
resumed from standby or hibernation. In this case, press
+ ( )*6 to enter standby and resume the computer
again.
*6
For Numeric keyboard model: + ( )
Troubleshooting
43
Page 44

Troubleshooting (Basic)
Display
The screen is dark.
The LCD brightness
changes a number
of times when the
AC adaptor is disconnected.
The screen is disordered.
During Simultaneous display, one of
the screens becomes disordered.
The screen is darker when the AC adaptor is not connect-
ed. Press
you increase the brightness, battery consumption increases.
You can separately set the brightness for when the AC
adaptor is connected and when not connected.
*7
For Numeric keyboard model: + ( )
Intel(R) Display Power Saving Technology is active and
automatically changes the LCD brightness. This is not a
malfunction.
Changing the number of display colors and resolution may
affect the screen. Restart the computer.
Connecting/disconnecting an external display may affect
the screen. Restart the computer.
Simultaneous display cannot be used until Windows
startup is complete (during Setup Utility, etc.)
+ ( )*7 and adjust the brightness. As
.
When using the Extended Desktop, use the same display
colors for the external display as those used by the LCD.
If you continue to experience problems, try changing the
display.
Right-click on the desktop, and click [Graphics Properties]
- [Display Devices].
If the [Command Prompt ] is displayed in full-screen,
Troubleshooting
The external display
does not work normally.
When the computer
starts up, simultane-
*8
For Numeric keyboard model: + ( )
ous display becomes active.
44
reduce the display size.
If the external display does not support the power saving
function, it may not work normally when the computer enters
the power saving mode. Turn off the external display.
When simultaneous display is activated, press
(
)*8 to switch the display.
+
Page 45

Display
<Only for model
with GPS>
The cursor cannot
be controlled properly.
Operate the following steps.
Set [GPS] to [Disabled] in the [Advanced] - [Serial Port
A
Confi guration] of the Setup Utility.
Press
B
tion message, and press
+ (F10)*9 and select [Yes] at the confi rma-
(Enter).
The computer will restart.
Log on to Windows as an administrator.
C
Click
D
reg” in [Start Search], and press
Click [Yes] and click [OK].
E
(Start) and input “c:\util\drivers\gps\GPSVista.
(Enter)
.
The computer will restart.
Press
F
+ (F2)
*10
or + (Del) while [Panasonic]
boot screen is displayed.
Set [GPS] to [Enabled] in the [Advanced] - [Serial Port
G
Confi guration].
Press
H
tion message, and press
*9
For Numeric keyboard model, select [Load Default Value]
in [Exit] menu by using
or connect a USB keyboard and press
*10
For Numeric keyboard model, connect a USB keyboard
and press
+ (F10)*9 and select [Yes] at the confi rma-
(Enter).
and press (Enter),
.
.
Touchscreen
The cursor does not
work.
When using the external mouse, connect it correctly.
Restart the computer using the keyboard.
Cannot input using
Set [Touchscreen Mode] to [Auto] or [Tablet] in the [Main]
the touchscreen.
Cannot point the
Perform the touchscreen calibration ( page 30).
correct position
using the included
stylus.
Press (Windows) and press three times, and press
to select [Restart] and press (Enter).
Press (Windows), and
to select [Restart].
If the computer does not respond to keyboard commands,
read “No response.” ( page 46)
.
menu of the Setup Utility.
Troubleshooting
45
Page 46

Troubleshooting (Basic)
Reference Manual
The Reference
Manual is not displayed.
Keyboard
The LED below
lights when is
pressed.
Install Adobe Reader.
<For localized OS model>
Log on to Windows as an administrator.
A
B
Click (Start) and input “c:\util\reader\setup.exe” in
[Start Search] then press
(Enter)
.
Click [start] - [Run], input “
c:\util\reader\setup.exe
then click [OK].
Follow the on-screen instructions.
Update Adobe Reader to its latest version.
C
If your computer is connected to the internet, start up
Adobe Reader and click [Help] - [Check for Updates].
<For MUI OS model>
page 27
This is normal in Windows, and is not a malfunction.
”,
Others
No response.
Troubleshooting
Press , (Shift), and (ESC) to open Task
Manager and close the software application that is not
responding.
An input screen (e.g., password input screen at startup)
may be hidden behind another window. Press
to check.
Press the power switch for 4 seconds or longer to shut
down the computer, and then press the power switch to
turn it on. If the application program does not work normally, uninstall and reinstall the program.
To uninstall:
Click (Start) - [Control Panel] - [Uninstall a program].
+
Click [start] - [Control Panel] - [Add or Remove Programs].
46
Page 47

LIMITED USE LICENSE AGREEMENT
THE SOFTWARE PROGRAM(S) (“PROGRAMS”) FURNISHED WITH THIS
PANASONIC® PRODUCT (“PRODUCT”) ARE LICENSED ONLY TO THE ENDUSER (“YOU”), AND MAY BE USED BY YOU ONLY IN ACCORDANCE WITH
THE LICENSE TERMS DESCRIBED BELOW. YOUR USE OF THE PROGRAMS
SHALL BE CONCLUSIVELY DEEMED TO CONSTITUTE YOUR ACCEPTANCE
OF THE TERMS OF THIS LICENSE.
Panasonic Corporation (“PC”) has developed or otherwise obtained the Programs
and hereby licenses their use to you. You assume sole responsibility for the selection of the Product (including the associated Programs) to achieve your intended
results, and for the installation, use and results obtained therefrom.
LICENSE
A. PC hereby grants you a personal, non-transferable and non-exclusive right
and license to use the Programs in accordance with the terms and conditions
stated in this Agreement. You acknowledge that you are receiving only a LIMITED LICENSE TO USE the Programs and related documentation and that
you shall obtain no title, ownership nor any other rights in or to the Programs
and related documentation nor in or to the algorithms, concepts, designs and
ideas represented by or incorporated in the Programs and related documentation, all of which title, ownership and rights shall remain with PC or its suppliers.
B. You may use the Programs only on the single Product which was accompa-
nied by the Programs.
C. You and your employees and agents are required to protect the confi dentiality
of the Programs. You may not distribute or otherwise make the Programs or
related documentation available to any third party, by time-sharing or otherwise, without the prior written consent of PC.
D. You may not copy or reproduce, or permit to be copied or reproduced, the
Programs or related documentation for any purpose, except that you may
make one (1) copy of the Programs for backup purposes only in support of
your use of the Programs on the single Product which was accompanied by
the Programs. You shall not modify, or attempt to modify, the Programs.
E. You may transfer the Programs and license them to another party only in
connection with your transfer of the single Product which was accompanied by
the Programs to such other party. At the time of such a transfer, you must also
transfer all copies, whether in printed or machine readable form, of every
Program, and the related documentation, to the same party or destroy any
such copies not so transferred.
Appendix
4747
Page 48

LIMITED USE LICENSE AGREEMENT
F. You may not remove any copyright, trademark or other notice or product identi-
fi cation from the Programs and you must reproduce and include any such
notice or product identifi cation on any copy of any Program.
YOU MAY NOT REVERSE ASSEMBLE, REVERSE COMPILE, OR MECHANICALLY OR ELECTRONICALLY TRACE THE PROGRAMS, OR ANY COPY
THEREOF, IN WHOLE OR IN PART.
YOU MAY NOT USE, COPY, MODIFY, ALTER, OR TRANSFER THE PROGRAMS OR ANY COPY THEREOF, IN WHOLE OR IN PART, EXCEPT AS EXPRESSLY PROVIDED IN THE LICENSE.
IF YOU TRANSFER POSSESSION OF ANY COPY OF ANY PROGRAM TO
ANOTHER PARTY, EXCEPT AS PERMITTED IN PARAGRAPH E ABOVE, YOUR
LICENSE IS AUTOMATICALLY TERMINATED.
TERM
This license is effective only for so long as you own or lease the Product, unless
earlier terminated. You may terminate this license at any time by destroying, at
your expense, the Programs and related documentation together with all copies
thereof in any form. This license will also terminate effective immediately upon
occurrence of the conditions thereof set forth elsewhere in this Agreement, or if
you fail to comply with any term or condition contained herein. Upon any such
termination, you agree to destroy, at your expense, the Programs and related
documentation together with all copies thereof in any form.
YOU ACKNOWLEDGE THAT YOU HAVE READ THIS AGREEMENT, UNDERSTAND IT AND AGREE TO BE BOUND BY ITS TERMS AND CONDITIONS.
YOU FURTHER AGREE THAT IT IS THE COMPLETE AND EXCLUSIVE STATEMENT OF THE AGREEMENT BETWEEN US, WHICH SUPERSEDES ANY
PROPOSAL OR PRIOR AGREEMENT, ORAL OR WRITTEN, AND ANY OTHER
COMMUNICATIONS BETWEEN US, RELATING TO THE SUBJECT MATTER
OF THIS AGREEMENT.
Appendix
4848
Page 49

Specifi cations
This page provides the specifi cations for the basic model.
The model number is different according to the unit confi guration.
To check the model number:
Check the bottom of the computer or the box the computer came in at the time
of purchase.
To check CPU speed, memory size and the fl ash memory drive (HDD) size:
Run the Setup Utility (
[Information] menu.
[Processor Speed]: CPU speed, [Memory Size]: Memory size, [Hard Disk]:
Flash memory drive size
Main Specifi cations
Model No. CF-U1ANB Series CF-U1AQB Series
CPU/
Secondary cache memory
Chipset Intel
Main Memory
Video Memory
Flash Memory Drive
*2
Reference Manual “Setup Utility”) and select
®
Atom™ Processor Z520 (1.33 GHz, 512 KB*1
Intel
cache, 533 MHz FSB)
®
System Controller Hub
1 GB*1 DDR2 SDRAM (1 GB*1 Max.)
256
16
MB
GB
*1
*4
Max.
*3
Display Method 5.6 WSVGA type (TFT) (1024 × 600 dots)
Wireless LAN
Bluetooth
TM
65,536/16,777,216 colors (800 × 600 dots/1024 × 600
dots/1024 × 768 dots*5)
Intel® WiFi Link 5100 ( page 51 “Wireless LAN”)
( page 51 “Bluetooth™”)
*6
Sound WAVE and MIDI playback, Monaural speaker,
®
High Defi nition Audio subsystem support
Intel
Card Slot SD Memory Card
Slot
*7
Interface USB port (4-pin, USB 2.0)
x 1
*8
x 1, Microphone Jack (Miniature jack, 3.5 DIA, Stereo), Headphone Jack (Miniature
jack, 3.5 DIA, Impedance 32 Ω, Output Power 4 mW x 2,
Stereo), Expansion Bus Connector (Dedicated 19-pin
female)
Keyboard / Pointing Device 29 keys Numeric Keyboard
/ Touchscreen
61 keys US or UK English
Mini Qwerty Keyboard /
Touchscreen
Button Scroll (up/down), Zoom (up/down) Application× 4
Power Supply AC adaptor or Battery pack
AC Adaptor
*9
Input: 100 V to 240 V AC, 50 Hz/60 Hz,
Output: 16.0 V DC, 3.75 A
Appendix
4949
Page 50

Specifi cations
Main Specifi cations
Model No CF-U1ANB Series CF-U1AQB Series
Battery Pack (typ.)
Operating Time
Charging
*11
Time
Power Consumption
*10
Power on Approx. 10 hours
Power off Approx. 7 hours
*12
Physical Dimensions
(W × D × H)
(excluding the hand strap)
Weight
(including the hand strap)
Operation Environment
Storage Environment
Software
Operating System
*14
Li-ion 7.2
V, 2900 mAh x 2 packs
Approx. 9 hours
Approx. 12 W
*13
/ Approx. 20 W (Maximum when re-
charging in the ON state)
mm × 151 mm × 57 mm
184
Approx. 1.06
Temperature: 5
kg
°C to 35 °C
Humidity: 30% to 80% RH (No condensation)
Temperature: -20
°C to 60 °C
Humidity: 30% to 90% RH (No condensation)
Windows Vista® Business
Service Pack 1
Microsoft® Windows® XP
Professional Service Pack
2 with Advanced Security
Technologies
Utility Programs Adobe Reader 8, PC Information Viewer, Full Screen
Zoom, Keyboard Button Manager, Intel® PROSet/Wireless WiFi Connection Utility, Bluetooth™ Stack for Win-
®
dows
by TOSHIBA, Wireless Switch Utility, Hotkey
Settings, Battery Recalibration Utility, Setup Utility
Appendix
5050
Page 51

Wireless LAN <Only for model with wireless LAN>
Data Transfer Rates
IEEE802.11a: 54/48/36/24/18/12/9/6 Mbps (automatically switched)
IEEE802.11b: 11/5.5/2/1 Mbps (automatically
switched)
IEEE802.11g: 54/48/36/24/18/12/9/6 Mbps (automatically switched)
*15
*15
*15
IEEE802.11n:
(HT20) 144.4/130/117/115.6/104/86.7/78/65/58.5/57.8/
52/43.3/39/28.9/26/19.5/14.4/13/6.5 Mbps (automatically
switched)
*15
(HT40) 300/270/243/240/216/180/162/130/120/117/108/
104/90/81/78/60/54/52/39/30/27/26/13 Mbps (automatically switched)
*15
Standards Supported IEEE802.11a/IEEE802.11b/IEEE802.11g/IEEE802.11n
(Draft 2.0)
Transmission method OFDM system, DS-SS system
Wireless Channels Used IEEE802.11a: Channels 36/40/44/48/52/56/60/64/100/
104/108/112/116/132/136/140
IEEE802.11b/IEEE802.11g: Channels 1-13
IEEE802.11n: Channels 1-11 /36/40/44/48/52/56/60/
64/100/104/108/112/116/132/136
RF Frequency Band
IEEE802.11a:
IEEE802.11b/IEEE802.11g:
IEEE802.11n:
5.18 GHz - 5.32 GHz, 5.5 GHz - 5.7 GHz
2.412 GHz - 2.472 GHz
2.412 GHz - 2.472 GHz, 5.15 GHz - 5.35 GHz,
5.5 GHz - 5.7 GHz
BluetoothTM <Only for model with Bluetooth>
Bluetooth Version 2.0 + EDR
Transmission method FHSS system
Wireless Channels Used Channels 1 to 79
RF Frequency Band 2.402 GHz - 2.48 GHz
*1
1 KB = 1,024 bytes / 1 MB = 1,048,576 bytes / 1 GB = 1,073,741,824 bytes
*2
You can physically expand the memory up to 4 GB, but the total amount of usable
memory available will be less depending on the actual system confi guration.
*3
A segment of the main memory is allotted automatically depending on the computer’s
operating status. The size of the Video Memory cannot be set by the user. The size of
Video memory is allotted depending on the operating system.
*4
1 GB = 1,000,000,000 bytes. Your operating system or some application software will
report as fewer
*5
The monitor will be reduced to the area of 1024 × 600 dots.
Only with 16,777,216 colors can be displayed.
GB.
Appendix
5151
Page 52

Specifi cations
The screen resolution of 1024 × 768 dots may not be chosen with the factory presets
depending on the computer’s model.
In that case, perform the following procedure to set up the screen resolution of 1024 ×
768 dots.
A Click [start] - [Control Panel] - [Appearance and Themes] - [Display] - [Settings] -
[Advanced] - [Monitor].
B Remove a check mark for [Hide modes that this monitor cannot display] in [Monitor
settings], then click [OK].
C Slide the bar of [Screen resolution] to both sides and choose [1024 by 768 pixcels],
then click [OK].
[Color quality] appearing on the right side of [Screen resolution] needs to be used
with [Highest [32 bit]].
*6
A 16,777,216 color display is achieved by using the dithering function.
*7
This slot is compatible with High-Speed Mode. Operation has been tested and con-
fi rmed using Panasonic SD/SDHC Memory Cards with a capacity of up to 32 GB.
Operation on other SD equipment is not guaranteed.
*8
Does not guarantee operation of all USB-compatible peripherals.
*9
<Only for North America>
The AC adaptor is compatible with power sources up to 240 V AC adaptor. This computer is supplied with a 125 V AC compatible AC cord.
*10
Measured at (LCD brightness: 60 cd/m2, Windows XP Mobile Mark2005)
Varies depending on the usage conditions, or when an external device is attached.
*11
Varies depending on the usage conditions.
*12
Approx. 0.9 W when the battery pack is fully charged (or not being charged) and the
computer is OFF.
*13
Rated power consumption 23-E-1
*14
Operations of this computer are not guaranteed except for the pre-installed OS and the
OS which is installed by using the Product Recovery DVD-ROM provided by
Panasonic.
*15
These are speeds specifi ed in IEEE802.11a+b+g+n standards. Actual speeds may
differ.
20-M-2-1
Appendix
5252
Page 53

Memo
5353
Page 54

Memo
5454
Page 55

5555
Page 56

As an ENERGY STAR® Partner, Panasonic Corporation has
determined that this product meets the ENERGY STAR® guidelines for energy effi ciency.
Outline of the International ENERGY STAR® Offi ce Equipment Program
The international ENERGY STAR® Offi ce Equipment Program is an international
program that promotes energy saving through the use of computers and other of-
fi ce equipment. The program backs the development and dissemination of products
with functions that effectively reduce energy consumption. It is an open system in
which business proprietors can participate voluntarily. The targeted products are of-
fi ce equipment such as computers, displays, printers, facsimiles, and copiers. Their
standards and logos are uniform among participating nations.
22-E-1
Importer’s name & address pursuant to the EU GPSD (General Product Safety
Directive) 2001/95/EC Art.5
Panasonic Computer Products Europe, Panasonic Marketing
Europe GmbH
Hagenauer Straße 43
65203 Wiesbaden
Germany
© Panasonic Corporation 2009
Printed in Japan
FJ0409-0
DFQW5307ZA
 Loading...