

Page 1

®
Personal Computer
Reference Manual
Model No. CF-T1 Series
Contents
Read Me First................................................................2
Key Combinations........................................................3
LED Indicators..............................................................6
Touch Pad.....................................................................7
Touchscreen* .............................................................11
Display Rotation Tool*...............................................14
Standby/Hibernation Functions................................15
Security Measures .....................................................19
Computing on the Road ............................................23
Battery Power.............................................................25
SD-MovieStage Windows XP
PC Cards.....................................................................32
SD Memory Card/MultiMedia Card ...........................34
RAM Module ...............................................................44
External Display ........................................................45
USB Devices ..............................................................48
Modem ........................................................................50
LAN..............................................................................52
Setup Utility ................................................................54
Technical Information................................................61
DMI Viewer..................................................................62
List of Error Codes.....................................................63
Dealing with Problems (Advanced) .........................65
* Only for models with touchscreen
........................................30
When the cursor is moved to an item under [Contents] or to page number (green display), the shape of the
cursor will change to . Under this condition, if characters are tapped (or a click is made), the corresponding
page in the Reference Manual will be displayed.
We recommend that this Reference Manual be printed.
Page 2

Read Me First
● If the user has logged on without the administrator authority, some functions may not be
executable, and some screens may not be displayed as shown in this manual. If this
happens, log on with the administrator authority to enable these functions.
● This manual covers two types of models, as distinguished by the type of LCD screen
(models with touchscreen and models without touchscreen).
● Confirm the latest information on optional products in catalogs, etc.
Illustrations and Terminology in this Reference Manual
NOTE : NOTE provides a useful fact or helpful information.
CAUTION : CAUTION indicates a condition that may result in
minor or moderate injury.
WARNING : WARNING indicates a hazard that may result in
moderate or serious injury.
2
Windows 2000
Windows 2000 : Information for Microsoft Windows 2000
Windows 2000Windows 2000
Professional users.
Windows XP
Windows XP : Information for Microsoft Windows XP
Windows XPWindows XP
Professional users.
Enter
Fn
+
F5
[Start]* - [Run] : This illustration means to select [Start]*, then to
For U.S.A. and Canada
For U.S.A. and Canada : Information for CF-T1RxxxxxM users.
For U.S.A. and CanadaFor U.S.A. and Canada
For Hong Kong
For Hong Kong : Information for CF-T1RxxxxxH users.
For Hong KongFor Hong Kong
: This illustration means to refer to the Operating
● Windows 2000 screens are used in this manual when no specific OS notes are
required.
● Some of the illustrations in this manual may differ slightly in shape from the actual items
in order to make the explanation easier to understand.
: This illustration means to press [Enter] key.
: This illustration means to press and hold [Fn] key,
then press [F5] key.
select [Run].
For some applications, you may need to select.
Windows XP
Windows XP : [start]
*
Windows XPWindows XP
Instructions.
®®
®®
● About the terminology used in this manual and the Setup Utility concerning the internal
LCD and an external display
To display the same screen on
both the internal LCD and external display
Windows 2000 : Select
*
Windows XP : Select
Extreme
[Start] - [Settings] - [Control Panel] - [Intel® Extreme Graphics].
[start] - [Control Panel
Graphics].
This manual and the
Setup Utility
Simultaneous display Intel(R) Dual Display Clone
] - [
Other Control Panel Options
[Intel(R) 82830M Graphics
Controller Properties]*
] - [Intel®
Page 3

Key Combinations
CAUTION
● Do not press the following key combinations while using the touch pad (external mouse), touchscreen (only for mod-
els with touchscreen) or other keys.
NOTE
● Do not press the following key combinations until you log on to Windows and the hard disk drive indicator turns off.
Note, however, that the key combinations
● The key combinations below may not work while some applications are running. Besides, the popup window may not
be displayed depending on the state of the application you are using (e.g., when [Command Prompt] screen is set to
“Full Screen”).
Key Functions Function Descriptions
Fn
Fn
Fn
+
+
+
F1
F2
F3
LCD brightness control
(down)
LCD brightness control
(up)
Display change By pressing this key combination, you can
Fn
+ F1, Fn + F2 and Fn + F3 are operable in the Setup Utility.
Pressing this key combination adjusts the
brightness of LCD. The brightness setting is
stored in memory separately under the condition the AC adaptor is connected and under the
condition the AC adaptor is not connected.
select either an external display, LCD or
simultaneous. (
This combination does not work when
[Command Prompt] screen is set to “Full
Screen”.
page 45)
Popup Window
(Displayed after logging on to
Windows)
3
CAUTION
● Do not press another key until the dis-
play destination has been completely
switched.
● Do not press this key combination while
MPEG files are playing.
NOTE
● Windows XP
When switching to a different user with
the Fast User Switching function, this key
combination may not work. In this case,
log on with the administrator authority
again, not using the Fast User Switching
function, and try the operation once
more.
Page 4
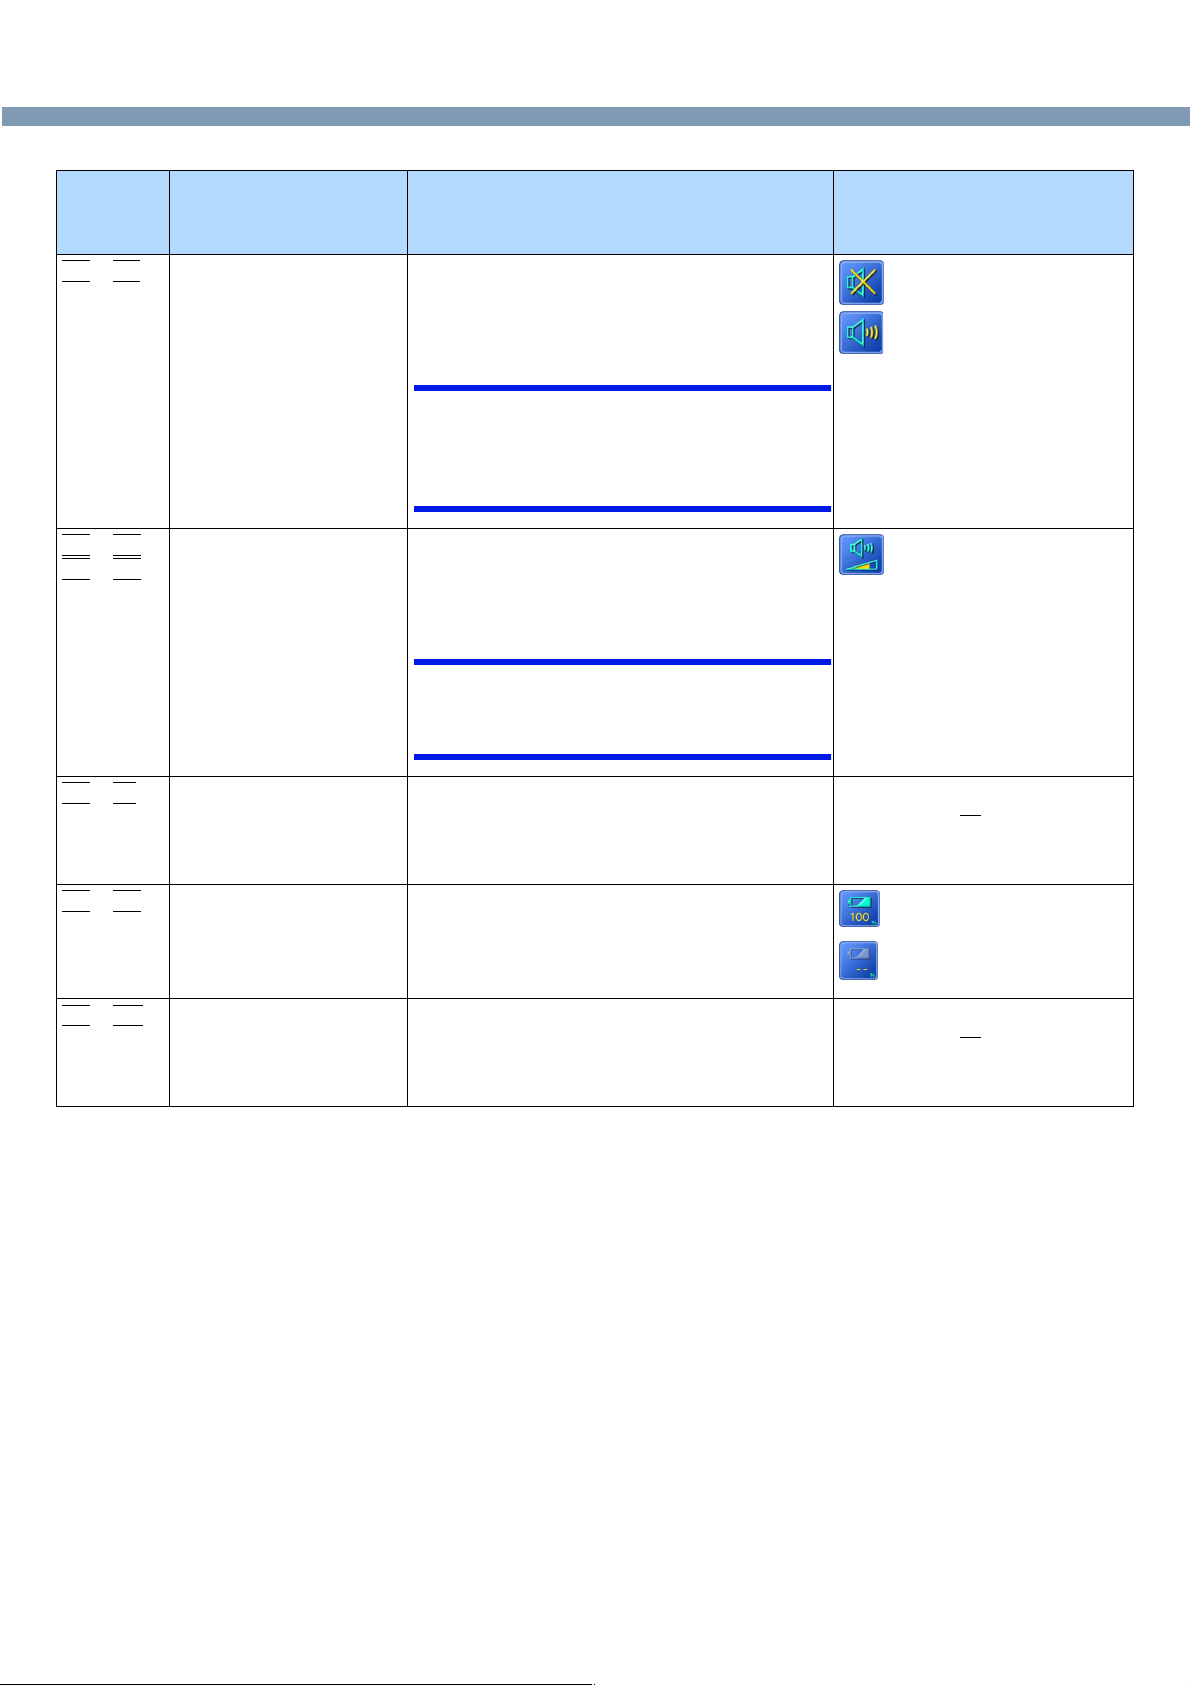
Key Combinations
Key Functions Function Descriptions
Fn
+
F4
Speaker on/off switch Pressing this key combination turns on/off
audio from the internal speaker and headphone
jack.
NOTE
● Disabling the speaker will also disable
the warning beep.
● Speakers connected to the USB port
cannot be muted.
4
Popup Window
(Displayed after logging on to
Windows)
OFF (MUTE)
ON
Fn
Fn
Fn
Fn
Fn
+
+
+
+
+
F5
F6
F7
F9
F
Volume control (down)
Volume control (up)
Power off using the
standby function
Remaining capacity of the
battery pack
Power off using the
10
hibernation function
Pressing this key combination adjusts the
volume of the internal speaker and headphone
jack.
NOTE
● This key combination cannot be used to
adjust the volume of the warning beep or
speakers connected to the USB port.
Pressing this key combination causes the
current status of the computer to be saved to
memory, and powers off the computer.
page 15)
(
Pressing this key combination displays the
remaining battery capacity on the screen.
page 26)
(
Pressing this key combination causes the
current status of the computer to be saved to
the hard disk, and powers off the computer.
page 15)
(
Remaining capacity (%)
display.
Battery pack is not
inserted.
Page 5

Key Combinations
Hotkey Settings
There are two Fn key functions as follows:
●Fn key lock function
●Popup windows display ON/OFF
After
Fn
is pressed once, it stays in the “pressed” position until another key is pressed.
This is convenient when it is difficult to press two buttons simultaneously.
1 Run the Hotkey Settings.
Windows 2000 : Select [Start] - [Programs] - [Panasonic] - [Hotkey Settings].
Windows XP : Select [start] - [All Programs] - [Panasonic] - [Hotkey Settings].
5
A
2 Set the parameters.
A.Use Fn key lock
Add the check mark if you want to enable the Fn key lock function.
The following Fn key lock function will then be enabled.
Fn
To use
B
C
To use
B.Notification
This setting is only available when [Use Fn key lock] is checked.
[Make sounds when Fn key is pressed]*:
Notifies the user with a sound when
*(If MUTE is set, you will not hear a beep.)
[Show status on screen]:
Displays the Fn key status on the taskbar.
only once: 1 Press Fn once. (Locked)
2 Press another key for combination.
(Lock released)
Fn
successively: 1 Press Fn twice. (Locked)
2 Press another key for combination.
Fn key remains locked until
more.
Fn
is pressed, locked, or released.
Fn
is locked
:
:
Fn
is not locked
Fn
is pressed once
C.Disable popup
Add the check mark if you want to turn the popup window display function OFF.
The full-screen display of [Command Prompt] screen or MPEG files may change to
Fn
a window display if
display function OFF.
+ Fx* are pressed. To prevent this, turn the popup window
3 Select [OK].
NOTE
● The Fn key lock function also works with
Fx
*.
● Each user can select separate settings for whether or not to use the Hotkey settings.
* “
Fx
” indicates any function key from F1 to
Fn
and other keys (e.g., Í, Î) aside from
F10
.
Page 6

LED Indicators
Power status Not lit : Power off / Hibernation mode
Green● : Power on
Blinking green● : Standby mode
6
Battery pack status Not lit
Orange●*
Green● *
Red●
Blinking red● *
Blinking orange●*
Caps Lock This indicator lights green when
non-shifted input is capitalized.
NumLk (Numeric key) This indicator lights green when
of the keyboard to function as a numeric keypad. [Enter] key functions
differently depending on the application.
ScrLk (Scroll lock) This indicator lights green when
differently depending on the application.
: AC adaptor not connected or charging not being
performed.
: Charging in progress.
: Charging finished.
: Battery is low.
(remaining battery capacity is approx. 9% or less).
: Battery pack or charging malfunction.
: Unable to recharge due to violation of temperature
limits. The ambient temperature is outside the
allowable range. Once the allowable range requirement
is satisfied, charging begins automatically.
NumLk
Caps Lock
is pressed. This causes a portion
ScrLk
is pressed. Scroll lock functions
is pressed. Subsequent
Hard disk drive status This indicator lights when the hard disk drive is accessed.
SD memory card status
* When the AC adaptor is connected.
This indicator lights when the SD memory card or MultiMedia Card is
accessed.
Page 7

Touch Pad
Use the touch pad to move the cursor on the display and perform normal computer
operations.
NOTE
● By design the touch pad is to be used with a finger tip only. Therefore, do not use
A.Work Surface (Touch Pad)
B.Left Button
C.Right Button
Moving the Cursor
Tapping/Clicking
7
any implement which causes damage on the work surface.
Function Operation
Move the tip of your finger lightly over the
work surface.
Double-Tapping/
Double-Clicking
Dragging
Scroll
NOTE
tapping or clicking
double-tapping or double-clicking
Two quick taps, but
on the second tap
leaving your finger
down (applying
pressure) and mov-
ing it on the work
surface.
page 8
or
While holding down
the button, moving
your finger on the
work surface.
●
Refer to [Mouse Properties]* for information on basic operations other than the above.
*
Windows 2000 : Select [Start] - [Settings] - [Control Panel] - [Mouse].
Windows XP : Select [start] - [Control Panel] - [Printers and Other Hardware] -
[Mouse].
● The help message in [Settings] for [Mouse Properties] - [Device Settings] will be
displayed in the same language as the one set for [Control Panel] - [Date, Time,
Language, and Regional Options] - [Regional and Language Options] - [Standards
and formats].
Page 8

Touch Pad
Using the Touch Pad Utility
The Touch Pad Utility enables you to scroll easily by tracing a circle around the touch pad.
NOTE
● Depending on the application software, the scroll operation may differ, or the scroll
function may not operate properly.
How to Scroll
1 Select the screen you want to scroll.
2 Position the cursor over the area you want to scroll.
3 Trace a circle around the edge of the touch pad as indicated in
the following diagrams.
8
To scroll down (trace clockwise)
To scroll up (trace counter-clockwise)
Scrolling will begin more easily if you start from the position marked by the and
trace as indicated by the arrow.
4 Once scrolling has begun, continue to trace a circle on the touch
pad without removing your finger from the pad.
●As long as you are tracing a circle, you can continue scrolling using any position
on the touch pad. It is not necessary to trace a circle around the edge of the pad.
●To scroll in the opposite direction, trace a circle in the opposite direction without
removing your finger from the touch pad.
5 When you are finished scrolling, remove your finger from the
touch pad.
Hints for Easier Touch Pad Operation
●You can change various touch pad settings using the following procedure:
Windows 2000:
[Start] - [Programs] - [Panasonic] - [Touch Pad Utility Setting]
Windows XP:
[start] - [All Programs] - [Panasonic] - [Touch Pad Utility Setting]
Settings can be changed for the following functions:
• Use Touch Pad function (On/Off)
• Display icon in task tray (On/Off)
• Animated icon in task tray (On/Off)
• Rotate icon when wheel is operated (On/Off)
Page 9

Touch Pad
• Scroll item under mouse cursor (On/Off)
• Scroll speed setting
• Set initial scroll scope
●On screens that cannot be scrolled (e.g., desktop screen), if you use the touch pad
as described in Step 3 (
the cursor to freeze. If this happens, remove your finger from the touch pad and begin
again, this time starting from the center of the touch pad.
Using the Virtual Scrolling Function
Because the Touch Pad Utility and the Virtual Scrolling function both offer scrolling
functions that use the touch pad, these two features cannot be used simultaneously.
If you try to use them at the same time, a message may be displayed asking you if you
want to enable the Touch Pad Utility.
• To use the Touch Pad Utility:
Select [Yes]. The Virtual Scrolling function will be disabled.
• To use the Virtual Scrolling function:
Select [No], and then remove the Touch Pad Utility and set the Virtual Scrolling
function using the procedure shown below. In this case, the Touch Pad Utility will
be disabled.
9
page 8), the computer may try to scroll the screen, causing
Windows 2000
1 Log on with the administrator authority.
2 Select on the taskbar with the right button, and select [Exit].
• If is not displayed on the taskbar, display it using the following procedure.
In [Start] - [Programs] - [Panasonic] - [Touch Pad Utility Setting] - [General
settings], add a check mark for [Display icon in task tray] and select [OK].
3 In [Start] - [Settings] - [Control Panel] - [Add/Remove Programs],
select [TouchPadUtility], then select [Change/Remove].
4 At the confirmation message, select [OK], then select [Finish].
5 Select at [Add/Remove Programs].
6 Select [Start] - [Settings] - [Control Panel] - [Mouse] - [Device
Settings].
7 Select the device name in [Devices] (e.g., Synaptics TouchPad),
and select [Settings].
8 Select [Virtual Scrolling], add a check mark for the scroll
functions you want to use, and select [OK].
9 Select [OK] at [Mouse Properties].
Page 10

Touch Pad
10
Windows XP
1 Log on with the administrator authority.
Do not use the Fast User Switching function.
2 Select on the taskbar with the right button, and select [Exit].
• If is not displayed on the taskbar, display it using the following procedure.
In [start] - [All Programs] - [Panasonic] - [Touch Pad Utility Setting] - [General
settings], add a check mark for [Display icon in task tray] and select [OK].
3 In [start] - [Control Panel] - [Add or Remove Programs], select
[TouchPadUtility], then select [Change/Remove].
4 At the confirmation message, select [OK], then select [Finish].
5 Select at [Add or Remove Programs].
6 Select [start] - [Control Panel] - [Printers and Other Hardware] -
[Mouse] - [Device Settings].
7 Select the device name in [Devices] (e.g., Synaptics TouchPad),
then select [Settings].
8 Select [Virtual Scrolling], add a check mark for the scroll
9 Select [OK] at [Mouse Properties].
NOTE
To begin using the touch pad again:
1 Log on with the administrator authority.
2 Windows 2000
3 Select [Next] at [Welcome].
4 Select [Finish].
● At the confirmation message asking if you want to enable the Touch Pad Utility,
● When the setup is complete, will be displayed on the taskbar.
Handling the Touch Pad
functions you want to use, then select [OK].
Select [Start] - [Run], input [c:\util\touchpad\setup.exe], then select [OK].
Windows XP
Select [start] - [Run], input [c:\util\touchpad\setup.exe], then select [OK].
select [Yes].
● Do not place any object on the work surface or press down forcefully with sharp-pointed
objects (e.g., nails) or hard objects that can leave marks (e.g., pencils and ball point
pens).
● Try to avoid having any harmful substances such as oil, come in contact with the touch
pad. The cursor may not work properly in such cases.
● When the touch pad becomes dirty:
Wipe to remove dirt by using a dry soft cloth such as gauze or a soft cloth first applied
with detergent diluted with water and then thoroughly wrung. Do not use benzene or
thinner, or rubbing alcohol. Doing so may adversely affect the surface, e.g., discoloration. In addition, do not use commercially-available household cleaners and cosmetics,
as they may contain components harmful to the surface.
Page 11

Touchscreen
Your computer is equipped with a touchscreen display allowing you to perform the same
operations as the touch pad or mouse by touching the surface of the display with the stylus
(included). The following explanation gives one example (for the default settings).
The operation settings can be changed. (
● Moving the cursor ● Clicking
● Double-clicking ● Dragging
<Only for models with touchscreen>
page 12)
One tap
Cursor
11
Two quick
taps
Touch and hold the object (e.g.
file or icon), move the stylus on
the surface (dragging the object
to the desired location), then release the stylus.
CAUTION
● When the LCD is used alone or with an external display simultaneously, the
touchscreen function cannot be used when the area of either display is set larger
than default setting of the screen resolution.
● If a change is made to the screen resolution, or the cursor can not be pointed
correctly, be sure to perform [Calibration]. (
● Even when only an external display is in use, the cursor will move on the external
display if the surface of the internal LCD is touched when the touchscreen driver is
active. Therefore, do not touch the LCD when only an external display is in use.
● The touchscreen function can not be used when using the full screen in [Command
Prompt].
page 12)
Page 12

Touchscreen <Only for models with touchscreen>
Configurating the Touchscreen
When needed, the touchscreen can be configured using the following steps.
1 Windows 2000
Select on the taskbar and then select [TouchScreen] or select
[TouchScreen] in [Control Panel] - [Mouse].
Windows XP
Select
[TouchScreen] in [Control Panel] - [Printers and Other Hardware]
- [Mouse].
on the taskbar and then select [TouchScreen] or select
12
A
C
A. Double click settings
Set the width and height of the double click.
B. Test
Test for the “Double click settings”.
B
C. Advanced configuration
Set the advanced settings.
D
D.Calibration & Test
Define the calibration setup. Use this procedure when the cursor does not
appear properly. (Necessary for changes in the alignment of the touchscreen with visual images or an adjustment of the display resolution.)
Touch the “+” mark on the calibration screen for about one second.
After the calibration procedure is executed (e.g., after the nine “+” marks
are touched), the procedure ends when
Enter
Enter
EnterEnter
is pressed.
2 Make necessary changes.
3 Select [OK].
NOTE
● For more information about each item
Select at the upper right corner in [Mouse Properties], then, using , select
the item about which you want more information.
● The double-click speed of the touchscreen can be changed in [Buttons].
Page 13

Touchscreen <Only for models with touchscreen>
Handling the Touchscreen
● Use the stylus included with the computer. Do not use an implement other than the
stylus that comes with the computer.
● Do not place any object on the surface or press down forcefully with sharp-pointed
objects (e.g., nails), hard objects that can leave marks (e.g., pencils and ball point pen).
● Do not apply pressure within 5 mm of the perimeter of the display panel. The cursor
may move to the edge of the display.
● Do not operate the computer when such things as dust are on the screen. Do not allow
contact with substances that could dirty the touchscreen, such as oil. The cursor may
not work properly in such cases.
● When the touchscreen becomes dirty:
Wipe lightly to remove dirt by using a dry soft cloth included with the computer.
Do not use benzene or thinner, or rubbing alcohol.
For more information, refer to “Suggestions About Cleaning the LCD Surface” that
comes with the soft cloth.)
13
Handling the Stylus
● Clean the stylus tip and screen prior to operation. Foreign particles can scratch the
screen and impede the operation of the stylus.
● Use the accessory stylus only for the computer screen. Using it for any other purpose
may damage the stylus and scratch the screen.
● Do not use pencils, implements with sharp tips or hard objects for screen operations.
The screen may be damaged as a result.
● Since the stylus is retractable tip, be sure to use the stylus only after the stylus tip is
ready for use (i.e., clicked open). Otherwise, scratches may result on the screen.
Page 14

Display Rotation Tool
By running the Display Rotation Tool, you can rotate the display and perform the touch
pad and touchscreen operations in the rotated mode.
CAUTION
● Be sure to log on with the administrator authority when running the Display Rotation
To ol .
Rotating the Display
Windows 2000
<only for models with touchscreen>
14
Select
Each time this operation is performed, the screen display switches between the landscape
mode (0 degrees) and the previously set angle (
● To select the angle and rotate the display
Changing the Settings
Exiting the Tool
on the taskbar or press
Ctrl
Ctrl
+
Alt
Alt
+
CtrlCtrl
AltAlt
below “Changing the Settings”).
RRRR
Select on the taskbar with the right button, and then select the angle.
You can select rotation angles of 90, 180, or 270 degrees from the landscape mode.
1 Select
on the taskbar with the right button, and then select
[Setting].
2 Change the settings.
Changing the key combination (Default : R)
(Only the third key can be changed.)
Changing the angle
(Default: 180 degrees)
3 Select [OK].
1 Rotate the display to landscape mode.
2
Select on the taskbar with the right button, and then select [Exit].
●
In the default mode, the Display Rotation Tool will start up when Windows starts up.
●
To restart the tool after exiting:
Select [Start] - [Programs] - [Panasonic] - [Display Rotation Tool].
NOTE
● While the display is rotated:
• Do not use the Extended Desktop (The touch pad or touchscreen may fail to
operate properly.)
• Do not calibrate the touchscreen
● Be sure to use the Display Rotation Tool to rotate the display.
● The display cannot be rotated in the following cases:
• When the display resolution is set to 1280 x 1024 pixels or more
• When [Command Prompt] is set to “Full Screen”
• When some applications are running
• When the computer is in the Extended Desktop
• When [Intel(R) 82830M Graphics Controller Properties] is displayed by selecting
[Start] - [Settings] - [Control Panel] - [Intel ® Extreme Graphics]
● If the display is rotated when the resolution is set to 800x600 pixels or 640x480
pixels, depending on the Windows specifications, the resolution displayed in
[Screen area] of [Display Properties] may show [640 by 480 pixels]. Continue using
these settings, without changing [Screen area].
Page 15

Standby/Hibernation Functions
Starting Up Your Computer Quickly
If you use the standby or hibernation function, you can shut down the computer without
closing programs and documents. Upon restarting your computer from either the standby
or hibernation mode, you can immediately continue working in all programs, or documents
that were open at the time the computer was placed into standby or hibernation mode.
Differences between the Standby and Hibernation Functions
15
Function Where data is
saved to
Standby function
Hibernation
function
Memory Fast Yes (if power is cut, all data is lost)
Hard disk Somewhat
Speed Requires power supply
slow
NOTE
● We recommend plugging in the AC adaptor if the standby function is to be used for
a long period of time. If the AC adaptor cannot be connected, we recommend that
hibernation mode be used instead of the standby mode.
● If the standby or hibernation function is used repeatedly, the computer may not work
properly. To stabilize computer operations, we recommend shutting down Windows
on a regular basis (about once a week) without using the standby or hibernation
function.
Entering the Standby or Hibernation Mode
Use any of the following methods to enter the standby or hibernation mode.
To use the hibernation mode, make the setting in advance (
factory preset.)
●Fn key combinations ( page 4)
●Using the power switch ( page 17)
●From the shutdown screen:
<Standby>
Windows 2000
In [Start] - [Shut Down], select [Stand by] and select [OK].
Windows XP
In [start] - [Turn Off Computer], select [Stand By].
<Hibernation>
Windows 2000
In [Start] - [Shut Down], select [Hibernate] and select [OK].
Windows XP
In [start] - [Turn Off Computer], press and hold
Power is not required to maintain data
page 16). (Enabled in
Shift
, then select [Hibernate].
Page 16

Standby/Hibernation Functions
Setting for Using the Hibernation Mode
Windows 2000
1 Select [Start] - [Settings] - [Control Panel] - [Power Options].
2 In [Hibernate], add the check mark for [Enable hibernate support]
and select [OK].
Windows XP
1 Select [start] - [Control Panel] - [Performance and Maintenance] -
[Power Options].
2 In [Hibernate], add the check mark for [Enable hibernation] and
select [OK].
Precautions
■ Before entering the standby or hibernation mode
● Save all data.
● When a file in an external device such as a CD drive, external hard disk, or ATA
card is opened, close the file.
● Even when a password has been set in the Setup Utility, [Enter Password] does
not appear when the computer resumes from the standby or hibernation mode.
If you want to use the security function when using the standby or hibernation
mode, use the Windows password as follows:
Windows 2000
1 Set the password in [Control Panel] - [Users and Passwords].
2 Add the check mark for [Prompt for password when computer goes off standby]
in [Control Panel] - [Power Options] - [Advanced].
Windows XP
1 Select the account to change in [Control Panel] - [User Accounts].
2 Set the password.
3 Add the check mark for [Prompt for password when computer resumes from
standby] in [Control Panel] - [Performance and Maintenance] - [Power Options] [Advanced].
● Do not enter either the standby or hibernation mode under the following
conditions. You may corrupt your data or file, the standby or hibernation function
may not work, or the computer (or peripherals) may fail to work properly.
• While the floppy disk drive is being accessed, or hard disk drive indicator ( ) or
SD memory card indicator ( ) is on.
• When playing/recording audio files and displaying images (such as MPEG files).
• When using communications software or the network function.
• When using LAN cards (port), SCSI cards and modem cards (port) etc. (If these
cards fail to work properly, restart the computer.)
16
■ When entering the standby or hibernation mode*
● Avoid the following:
2
• Touching the keyboard, pointing device (touch pad, touchscreen*
mouse, etc.), or power switch.
• Connecting or disconnecting the AC adaptor.
• Closing or opening the display.
1
Standby mode: until the power indicator blinks green
*
Hibernation mode: until the power indicator goes off
2
*
Only for models with touchscreen.
, external
1
Page 17

Standby/Hibernation Functions
■ In standby or hibernation mode
● Do not insert or remove peripherals; abnormal operation may result.
● In standby mode, power is consumed. If PC Cards are inserted, more of that power
is consumed. When all power has been consumed, all data saved at standby is lost
since it is retained in memory. We therefore recommend plugging in the AC adaptor
when using the standby function.
Using the Power Switch
■ Setting
Windows 2000
1 Select [Start] - [Settings] - [Control Panel] - [Power Options] -
[Advanced].
2 Select [Standby] or [Hibernate] for [When I press the power
button on my computer] and then select [OK].
Windows XP
1 Select [start] - [Control Panel] - [Performance and Maintenance] -
[Power Options] - [Advanced].
17
2 Select [Stand by] or [Hibernate] for [When I press the power
button on my computer], then select [OK].
■ Shutting down
Slide the power switch (A) ; at the “Beep*” sound, release your
finger.
The computer will enter either the standby or hibernation mode, depending on the
setting.
CAUTION
● After releasing your finger from the power switch, do not touch the power switch until
the power indicator goes off or blinks.
● At the “beep*” sound, release your finger from the power switch. If you continue to
slide the switch and hold it for more than four seconds, the computer will emit a
second “beep*” then power off. Data not previously saved will be lost.
Windows 2000
Even when [When I press the power button on my computer] is set to [Power Off]
with [Start] - [Settings] - [Control Panel] - [Power Options] - [Advanced], if you slide
the power switch for more than four seconds and do not release it, a second “beep*”
will sound and the power will be turned off forcibly. Data not previously saved will be
lost.
Windows XP
Even when [When I press the power button on my computer] is set to [Shut down]
with [start] - [Control Panel] - [Performance and Maintenance] - [Power Options] [Advanced], if you slide the power switch for more than four seconds and do not
release it, a second “beep*” will sound and the power will be turned off forcibly.
Data not previously saved will be lost.
*
When the speaker function is disabled, e.g., by the key combination Fn + F4 , there will
be no beep sound.
Page 18

Standby/Hibernation Functions
Resuming Operation
Slide the power switch (A).
When [Standby]*1 or [Hibernate] is selected as the setting for [When I close the lid of
my portable computer] in [Control Panel]*
computer will enter either the standby or hibernation mode when the LCD panel is
closed. Operation will resume when the LCD panel is opened. Even if the display is
closed after the computer has entered either the standby or hibernation mode,
operation will resume when the display is opened. If the computer does not resume
when the LCD panel is opened, slide the power switch.
1
Windows XP : [Stand by]
*
2
*
Windows XP : [Control Panel] - [Performance and Maintenance]
CAUTION
● When resuming operation, avoid the following:
• Touching the keyboard (except for password input), pointing device (touch pad,
touchscreen*, external mouse, etc.), or power switch.
• Connecting or disconnecting the AC adaptor.
• Closing or opening the display.
* Only for models with touchscreen.
● After the display returns, the computer needs about 15 seconds to reinitialize.
Do not shut down or restart Windows, or enter either the standby or hibernation
mode again during this time, as this may subsequently cause Windows to operate
abnormally.
2
- [Power Options] - [Advanced], the
18
NOTE
● Windows 2000
When the computer enters standby/hibernation mode and then resumes while a
USB 1.1 device (e.g., USB floppy disk drive (optional)) is connected, a device
disconnection warning message may appear on the screen, but this will not impede
the computer’s operation.
Page 19

Security Measures
t
To prevent unauthorized access of your computer, the various security measures are
provided below.
Situation Function to use Reference
You do not want your
computer to be used without
permission.
You do not want the data
saved on your hard disk to be
read or written over, or you
want to prevent data from
being lost due to theft of the
hard disk.
NOTE
● Windows has a security function that differs from the security function of the Setup
Utility. For detailed information, refer to the Windows help.
Supervisor Password
User Password
SD Memory Card
Security Function
Hard Disk Lock
19
below
page 37
page 22
When you do not want your computer to be used without permission
You should set your “Supervisor Password” and “User Password” (The User Password can
only be set when the Supervisor Password has been set).
Without the password, access to your computer is impossible.
Starting Up When the Password is Set
When [Password on boot] of [Security] menu is set to [Enable],
enter your password*
Enter Password [ ]
1
*
Supervisor Password or User Password set in the Setup Utility (not the Windows
password).
2
*
Even if no password is entered for about a minute when starting up the Setup Utility,
the power will not be turned off.
■ When the Setup Utility is started with Supervisor
Password.
1
and press
Enter
.
The correct password
Three incorrect attempts
or
No password for about a minute*
Will Not Star
2
(Power off)
Will Start
You can register all items of the Setup Utility. ( page 54)
■ When the Setup Utility is started with User Password
● You can not register [Advanced] menu and [Boot] menu.
● [Clear registered SD card], [Set Supervisor Password] and [Hard Disk Lock] will not
be displayed on [Security] menu. The User Password can be changed only when
[User Password Protection] has been set to [No Protection]. The User Password
cannot be deleted.
●
F9
does not work.
Page 20

Security Measures
NOTE
● When [Password on boot] in the Setup Utility is set to [Disable], the password is not
necessary when the computer is started up, but the password becomes necessary
when the Setup Utility is started up. This alternative makes it possible to prevent the
contents of the Setup Utility from being changed.
Setting the Supervisor Password (enabling, changing, disabling)
1 Run the Setup Utility. ( page 54)
20
2 Using either
3 Using either
Enter
press
Enter
EnterEnter
ÎÎÎÎ
ÏÏÏÏ
.
or
or
ÍÍÍÍ
, select [Security].
ÐÐÐÐ
, select [Set Supervisor Password] and
4 <Only when the Supervisor Password has been set>
Enter your password at [Enter Current Password] and press
Enter
Enter
EnterEnter
5 Enter your password at [Enter New Password] and press
●To disable the Supervisor Password
.
Press only
Enter
Enter
Enter
EnterEnter
.
6 Re-enter your password at [Confirm New Password] and press
Enter
Enter
EnterEnter
● To disable the Supervisor Password
7 At [Setup Notice], press
8 Press
.
Press only
F10
F10
F10F10
Enter
.
Enter
Enter
EnterEnter
.
and select [Yes], then press
Enter
Enter
EnterEnter
.
.
NOTE
● Your password will not be displayed on the screen.
● Limit your password to seven characters. Note that there is no distinction between
upper and lower case letters.
● Do not input your password while holding down on
● Use only the upper horizontal row of numeric keys to input your password.
● Only the alphabet keys or number keys can be used. Note that the space bar and
function keys cannot be used.
● Disabling the Supervisor Password also disables the User Password.
Shift
or
Ctrl
.
CAUTION
● Do not forget your password. If your Supervisor Password is forgotten you will be
unable to use your computer. Contact your technical support office.
● When running the Setup Utility, do not leave your computer even for a short time, as
the possibility exists for the password to be set/changed by another person.
Page 21

Security Measures
Setting the User Password (enabling, changing, disabling)
NOTE
● When the Supervisor Password has not been set, the User Password can not be
set. Set the Supervisor Password if you have not done so. ( page 20)
1 Run the Setup Utility. ( page 54)
21
2 Using either
3 Using either
Enter
Enter
EnterEnter
.
ÎÎÎÎ
ÏÏÏÏ
or
or
ÍÍÍÍ
, select [Security].
ÐÐÐÐ
, select [Set User Password] and press
4 <Only when the User Password has been set>
Enter your password at [Enter Current Password] and press
Enter
Enter
EnterEnter
5 Enter your password at [Enter New Password] and press
<When the Setup Utility is started up with Supervisor Password>
● To disable the User Password
.
Press only
Enter
Enter
Enter
EnterEnter
.
6 Re-enter your password at [Confirm New Password] and press
Enter
Enter
EnterEnter
<When the Setup Utility is started up with Supervisor Password>
● To disable the User Password
7 At [Setup Notice], press
8 Press
.
Press only
F10
F10
F10F10
Enter
.
Enter
Enter
EnterEnter
.
and select [Yes], then press
Enter
Enter
EnterEnter
.
.
NOTE
● Your password will not be displayed on the screen.
● Limit your password to seven characters. Note that there is no distinction between
upper and lower case letters.
● Do not input your password while holding down on
● Use only the upper horizontal row of numeric keys to input your password.
● Only the alphabet keys or number keys can be used. Note that the space bar and
function keys cannot be used.
● When you do not want the User Password enabled or changed without
permission:
Shift
or
Ctrl
.
1 Run the Setup Utility and enter the Supervisor Password.
2 Using
3 Using
press
Ï
and Ð , select [User Password Protection] in [Security] menu and
Enter
Ï
.
and Ð , select [Protected] and press
Enter
.
CAUTION
● Do not forget your password. If a password is forgotten, you will be unable to use
your computer. Contact your technical support office.
● When running the Setup Utility, do not leave your computer even for a short time, as
the possibility exists for the password to be set/changed by another person.
Page 22

Security Measures
When you do not want the data on the hard disk to be read/written
When the Hard Disk Lock is set to [Enable], it is impossible to read/write data from/to the
hard disk when the hard disk is inserted in a different computer, since a password is also
set for the hard disk. When the hard disk is returned to the original computer, you can read
and write data as before. In this case, however, make the settings in the Setup Utility
exactly the same as they were before the hard disk was removed.
It is possible to set the Hard Disk Lock even if [Password on boot] is set to [Disable], but we
recommend that [Password on boot] be set to [Enable] for security reasons.
(Note that this Hard Disk Lock does not guarantee complete protection of data.)
NOTE
● In the default setting, [Hard Disk Lock] is set to [Disable].
● You cannot set [Hard Disk Lock] without setting the Supervisor Password. Set the
Supervisor Password if you have not done so. (
● The hard disk protection function only works with the internal hard disk. This
function does not work with the external hard disk.
page 20)
22
Setting the Hard Disk Lock (enabling, disabling)
1 Run the Setup Utility. ( page 54)
2 Using either
3 Using either
ÎÎÎÎ
ÏÏÏÏ
or
or
ÍÍÍÍ
, select [Security].
ÐÐÐÐ
, select [Hard Disk Lock] and press
4 ● To enable the Hard Disk Lock
Select [Enable] and press
At [Caution], press
●
To disable the Hard Disk Lock
Select [Disable] and press
5 Press
F10
F10
and select [Yes], then press
F10F10
CAUTION
Enter
.
Enter
Enter
EnterEnter
Enter
Enter
EnterEnter
Enter
Enter
EnterEnter
.
.
.
Enter
Enter
EnterEnter
.
● If your computer requires repair
• Contact your technical support office.
• Be sure to set [Hard Disk Lock] to [Disable].
Page 23

Computing on the Road
Saving Power
One of the main features of notebook-type computers is that you have the power of
computing away from your home or office. In the following, information is provided on how
to maximize use of the battery pack which is necessary for such computing. Select or
to view important tips for using the battery pack.
You can also view important tips using the following procedures.
Windows 2000
Select [Important Battery Tips] or [Important Tips] in [Start] - [Programs] - [Panasonic] [On-Line Manuals].
Windows XP
Select [Important Battery Tips] or [Important Tips] in [start] - [All Programs] - [Panasonic] [On-Line Manuals].
● Four Important Points
POINT 1 : Be sure to charge your battery before and after use.
23
POINT 2:
POINT 3 : Check to see that you have your AC adaptor with you before leaving your
POINT 4 : Always watch your battery level!
Power Saving Methods
● Leave your computer off when it is not in use
● Adjust the brightness (darker) with
● Before stepping away from your computer, press
● Use the power saving function
To get the maximum use of your battery, set the power management mode.
home or office.
Purchasing a spare battery (CF-VZSU24) is highly recommended.
( “ Starting Up/Shutting Down”)
Fn
Fn
+
F1
F1
F1F1
Fn
Fn
+
F7
F7
or
Fn
Fn
FnFn
F7F7
FnFn
+
FnFn
F10
F10
to put your computer in the standby or hibernation mode
F10F10
( page 15)
Windows 2000
In [Control Panel] - [Power Options], make settings in detail for the timeout, alarm, etc.
to save power.
Windows XP
In [Control Panel] - [Performance and Maintenance] - [Power Options], make settings in
detail for the timeout, alarm, etc. to save power.
By selecting [Max Battery] in [Power Schemes], the battery’s operating time can be
extended even further.
● Use the Video Power Saving Mode
In [Advanced] menu of the Setup Utility, select [Video Power Saving Mode]
- [Battery Optimized] to save power.
Windows 2000
● Setting the Intel
®
SpeedStep™ technology ( page 24)
Page 24

Computing on the Road
Setting the Intel(R) SpeedStep (TM) technology Windows 2000
By using the Intel(R) SpeedStep(TM) technology applet, you can set the computer's
performance to optimize power consumption.
Starting up the Intel(R) SpeedStep (TM) technology
Select on the taskbar.
NOTE
● The icon differs depending on the current setting.
Maximum Performance (The CPU performance is maximized at all times.)
Automatic (The CPU performance is automatically maximized only when
necessary.)
Battery Optimized Performance
24
Maximum Battery (Maximum battery life)
● You can also start using [Start] - [Settings] - [Control Panel] - [Power Options] -
[Intel(R) SpeedStep(TM) technology].
Displays settings currently in effect.
Do not add the check mark.
Page 25

Battery Power
Use the Battery Indicator to Check the Battery Status
Battery Indicator Battery Status
25
Orange
Green
Red Battery charge is low (the charge is less than approx. 9%
Blinking red
Blinking orange
Not lit Battery pack is not connected or charging not being
* When the AC adaptor is connected.
*
*
*
*
Charging
Fully-charged
capacity).
Battery pack or charger may not be working properly.
Quickly remove the battery pack and disconnect the AC
adaptor, then connect them again. If the problem persists,
contact your technical support office.
Unable to recharge due to violation of temperature limits.
The ambient temperature is outside the allowable range.
Once the allowable range requirement is satisfied, charging
begins automatically.
performed.
NOTE
● This computer prevents overcharging of the battery by recharging only
when the remaining power is less than approx. 95% of capacity after the
battery is fully charged.
Page 26

Battery Power
Checking the Remaining Battery Power
There are two methods to check the remaining battery power.
●Press
●Check the number of lighting LED indicators. (When the power is off or in standby/
Fn+F9
hibernation mode.)
. (After logging on to Windows)
NOTE
● The actual remaining battery capacity and the displayed indication may differ.
To correct this, perform the “Refresh Battery” utility. (
• The battery indicator light remains red.
• The battery remaining displays 99% and the indicator light is orange for a long
period of time.
• Low battery warning appears after a short period of time. This may be caused by
the use of standby mode for long periods of time. The battery is discharging while
the computer is in standby mode when the AC adaptor is not connected.
● There may be a discrepancy with the % value that is displayed on the taskbar of
Windows, but this is not a malfunction.
26
page 28)
Press Fn + F9 to Check the Remaining Battery Power on the Screen
When the battery pack is inserted in the
Fn
+ F9
computer (example)
When the battery pack is not inserted in the
computer
(After logging on to Windows)
Page 27

Battery Power
Check the Remaining Battery Capacity When the Power is Off or in Standby/
Hibernation Mode
You can view the number of lighting LED indicators (B) to check the remaining battery
capacity when the AC adaptor is not connected and you slide the power switch (A) with the
display closed and the latch locked.
27
BA
The number of lighting LED indicators Remaining Battery Capacity
00 % - 4 %
1 5 % - 24 %
2 25 % - 49 %
3 50 % - 74 %
4 75 % - 94 %
5 95 % - 100 %
When the Remaining Battery Charge Becomes Low
The following is factory default setting.
When remaining battery capacity falls to 10%
[Low battery alarm]
●Displays a message indicating the low
battery level.
ÐÐ
●Displays a message indicating the low
Windows 2000
●The computer will enter standby mode.
Windows XP
●
When remaining battery capacity falls to 5%
[Critical battery alarm]
battery level.
The computer will enter hibernation mode.
Charge your battery. Connect the AC adaptor before
starting up the computer next
time.
●Connect the AC adaptor immediately.
If you do not have the AC adaptor with
you, exit any programs currently running,
then exit Windows, and confirm that the
power indicator is off.
●Use a spare battery if you have one.
(
page 29)
●If you have neither the AC adaptor nor an
extra battery, power the computer off.
Above settings can be changed.
●If the computer starts up or resumes
while the AC adaptor is not connected,
Windows may not operate properly or
alarm operations may not work properly.
1 Windows 2000
Select [Start] - [Settings] - [Control Panel] - [Power Options] - [Alarms].
Windows XP
Select [start] [Alarms].
[Control Panel] - [Performance and Maintenance] - [Power Options] -
2 Set alarm operations and remaining battery level for operating alarm functions.
Fn
+
F4
When disabling the speaker by pressing
, the sound alarm is also disabled.
Page 28

Battery Power
When making a setting for [When the alarm goes off, the computer will] in [Alarms] - [Alarm
Action], add a check mark for [Force stand by or shutdown even if a program stops
responding].
Set the value for [Critical battery alarm] to 5% or more. This is necessary for the standby
or hibernation function to be completed (assuring data is saved) when the battery level is
low.
Accurately Displaying Battery Capacity
The battery pack has a function for measuring, storing and learning about battery capacity.
Using this function properly to accurately display remaining battery capacity requires that
the battery pack be fully charged (charged to 100%), then fully discharged, and then fully
charged again.
This procedure should be performed once after you purchase the computer. As you use
the battery pack over a long period of time, the remaining capacity display may become
inaccurate due to aging of the battery pack and other factors. The procedure described
below should be performed again.
28
NOTE
● If the computer is turned off while refreshing the battery (electrical power outage,
accidental removal of the AC adaptor or battery pack, etc.), the battery will not be
refreshed correctly.
1 Attach the battery pack, then connect the AC adaptor.
Remove all peripherals (except for the battery pack and AC adaptor).
2 Use the “Refresh Battery” utility to fully discharge the battery
pack.
1 Run the Setup Utility. ( page 54)
2 Select [Refresh Battery] from [Exit] menu and press
3 At the confirmation message, select [Yes] and press
indicator turns green, the battery pack will be completely discharged. It takes
approximately 3 hours until the power automatically goes off through the
complete discharge of the battery from the fully charged state.
Enter
Enter
.
. Once the battery
3 Allow the battery pack to charge until the battery indicator turns
green.
Charging Time: Approximately 3 hours.
Page 29

Battery Power
Replacing the Battery Pack
When the charge provided by your battery pack is supplied for only a short period of time,
even after fully charging according to the instructions, it may be time to replace your
battery pack. The battery pack is a consumable item and therefore will require
replacement (CF-VZSU24).
CAUTION
● Do not touch the terminals on the battery pack and the computer. The battery pack
may no longer function properly if the contacts are dirty or damaged.
● The battery pack is not charged when the computer is first purchased. Be sure to
charge it before using it for the first time. When the AC adaptor is connected to the
computer, charging begins automatically.
● Use only the specified battery pack (CF-VZSU24) with your computer.
● In the standby mode, do not remove/change the battery pack. Removing the pack in
the standby mode will erase your data and may damage the computer.
29
1 Power off your computer. ( “Starting Up/Shutting Down”)
Do not shut down using the standby function.
2 Turn your computer over and remove the battery pack.
Remove the battery pack while sliding the latches (A) inward.
3 Insert the battery pack.
Make sure the battery pack is facing the correct direction, then slide it in the direction of the arrow, and then check to ensure that the battery pack is held firmly by the
latches (A) on the left and right sides.
CAUTION
● Be sure the battery pack is properly connected to the connector.
Page 30

SD-MovieStage
SD-MovieStage makes it possible to record the multimedia contents stored on your hard
disk drive or various other media onto an SD memory card.
Windows XP
Setting Up the SD-MovieStage For U.S.A and Canada
1 Select [start] - [Run].
2 Input [c:\util\sdmovie\setup.exe], then select [OK].
Follow the on-screen instructions.
NOTE
● At [Choose Destination Location], do not change the destination folder.
● At [Select the Video System], select [NTSC] or [PAL].
30
Page 31

SD-MovieStage
Windows XP
Running the SD-MovieStage
CAUTION
● Be sure to log on with the administrator authority when running the SD-MovieStage.
Select [start] - [All Programs] - [Panasonic] - [SD-MovieStage] [SD-MovieStage].
NOTE
● The screensaver may not work while SD-MovieStage is running.
● For more detailed information, refer to the operation manual of the SD-MovieStage.
Select [start] - [All Programs] - [Panasonic] - [SD-MovieStage] - [manual].
For Hong Kong
In [manual], there are PDF files in English, Traditional Chinese, and Simplified
Chinese. Before displaying these files, you must install the Acrobat Reader for each
language. ( “First-time Operation”)
31
Page 32

PC Cards
Your computer has one PC Card slot. This slot conforms to the PC Card Standard;
therefore, communications and SCSI devices may be utilized. The slot allows you to use
one Type I or Type II card.
CAUTION
● Check the PC Cards’ specifications. Be sure the total operating current does not
exceed the specified limit. Damage may result otherwise.
Allowable Current: 3.3 V: 400 mA, 5 V: 400 mA
● ZV card, SRAM card, FLASH ROM card (except for an ATA interface) and card
requiring 12V are not supported.
● With the repeated insertion/removal of a PC Card, the computer may no longer
recognize the PC Card (depending on the type of card).
In such cases, restart the computer.
● If the computer freezes after resuming from the standby or hibernation mode,
restart the computer.
Inserting/Removing the PC Card
32
Inserting a PC Card
Simply slide the PC Card in with label-side up (A) until it snaps
into place.
Refer to the operation manual of each card on how to insert the card.
After the card is inserted, bend the eject button (B).
CAUTION
● When using a PC Card to connect a peripheral device (SCSI, etc.):
1 Connect the peripheral device to the card.
2 Turn the device ON.
3 Slide the card in until it snaps into place.
● When inserting a card, do not force the card in if difficulty is encountered.
Depending on the shape of the card, a segment may remain protruding from the slot
after insertion. Do not try to force the card all the way in. You may damage the slot,
making it impossible to remove the card.
Page 33

PC Cards
Removing a PC Card
33
CAUTION
● Do not remove a PC Card while your computer is in the standby or hibernation
mode.
● Note that the operation of removing the PC Card may not be complete, depending
on the status of the PC Card or device connected to the PC Card, such as when a
SCSI card is used to connect an external hard disk to the computer. In such cases,
turn off the power from [Start]* menu, then remove the card.
*Windows XP : [start]
1 Windows 2000
Select on the taskbar, select the PC Card, then select [Stop].
Follow the on-screen instructions.
(When the PC Card has been removed after the computer is turned off, this step is
not necessary.)
Windows XP
Select on the taskbar, select the PC Card, then select [Stop].
Follow the on-screen instructions.
(When the PC Card has been removed after the computer is turned off, this step is
not necessary.)
2 Raise the bent part of the eject button (B).
3 Press the button and slide the PC Card out.
Page 34

SD Memory Card/MultiMedia Card
How to Use the SD Memory Card/MultiMedia Card
SD Memory Card
The SD memory card is a small, lightweight memory card developed using advanced
copyright protection technology which is compatible with content on-demand services.
The SD memory card may be used in ways such as the following.
● Write music data (checkout) to the card and listen to the music.
● Use to exchange data with devices equipped with an SD memory card slot. When an
SD memory card is formatted on a computer, other peripheral devices may not be able
to use the card. For further details, refer to the operation manuals provided with your
peripheral devices.
● Use as a memory card. (The SD memory card can be used as a drive for storing files,
etc.)
● You can insert an SD memory card instead of entering a password to start your
computer or log on to Windows. (
page 37)
34
■ Opening and closing the case
To ensure that the card performs properly, always use both hands to open and close
the case, making sure that the sides (four locations) remain horizontal.
■ Removing and storing the SD memory card
When removing or inserting the card, always slide it along the tray. When storing the
card, make sure it is properly inserted in the tray before closing the case.
■ Important handling and storage information
● Always store the SD memory card in its case after removing it from a computer.
● Do not take the SD memory card apart or try to modify it.
● Do not hit, bend, or drop the card, or allow it to get wet.
● Do not touch the metal terminals with your hands or with metal.
● Do not remove the labels on the card.
● Do not attach other labels or seals to the card.
● Do not leave the card in locations that can become very hot, such as inside a car
that can become hot or in direct sunlight.
● Do not leave the card in dusty locations or locations that are very humid.
● Do not leave the car in locations subject to corrosive gas, etc.
■ When resuming from standby or hibernation mode
● After resuming from standby or hibernation mode, do not access the SD memory
card for about 30 seconds.
Page 35

SD Memory Card/MultiMedia Card
■ Protecting important data
● Set the write-protect switch (A) to the LOCK position. Unlock the switch when you
want to record (checkout) or edit data.
● Use an oil-base felt-tip pen to write in the memo area (B) on the card. Do not use a
A
B
Back Side
pencil or ball-point pen. Doing so can damage the card body or destroy data stored
in the card.
● Do not remove the card or turn off the device while data is being read from or written
to the card. Doing so can destroy data stored in the card. (Note that Panasonic
assumes absolutely no liability for any loss of data recorded by the user, or any
other damages, direct or indirect.)
● We recommend backing up important data to another storage medium.
■ Data transfer rate
The transfer rate using the SD memory card slot on this computer is 2MB per second.
The transfer rate is 2MB per second even if you use an SD memory card that supports
high-speed transfer rates.
Windows 2000
■ Formats for SD memory cards
● This computer does not support formats for NTFS file systems. Do not format the
SD memory card using the NTFS file format.
35
MultiMedia Card (MMC)
The MultiMedia Card can be used in ways such as the following.
● Use to exchange data with devices equipped with a MultiMedia Card slot.
● Use as a memory card. (The MultiMedia Card can be used as a drive for storing files,
etc.)
This computer may not support some cards.
Page 36

SD Memory Card/MultiMedia Card
Inserting/Removing the SD Memory Card/MultiMedia Card
Inserting the Card
Insert the card firmly with the label side facing up and with the cut
corner in front.
CAUTION
● Make sure you insert the card in the proper direction. If the card is inserted in the
wrong direction, the card or slot may be damaged.
● Even when there is no SD memory card or MultiMedia Card inserted, the drive
name (D:) will be displayed as Removable Disk in Explorer, etc.
Removing the Card
36
When you press the card, it will come out of the slot a little bit. Now
pull it all the way out.
CAUTION
● When removing the card, always press it and allow it to come out a little bit
(unlocking the card) before you remove it. If you try to force the card out of the slot
while it is locked in place, the card or slot may be damaged.
● The computer may continue to access the card for some length of time after
operations such as writing to the card. Do not remove the card until the SD memory
card indicator (A) turns off completely. If you try to remove the card before the
operation is completed, important data may be damaged, or it may not be possible
to properly access the card the next time it is inserted.
Page 37

SD Memory Card/MultiMedia Card
SD Memory Card Security Function
When you initialize an SD memory card, you can provide the card a security function.
You can insert an SD Memory Card instead of entering a password for purposes such as
the following.
● In order to start your computer.
● In order to log on to Windows.
● When you want to use the computer while the screensaver is active.
In addition, you can set the security function on a single SD memory card for multiple
computers. Note, however, that this can only be done if all of the computers use the same
password.
This security function only works in the SD memory card slot. It does not work in devices
such as an SD card reader connected through a USB connection.
37
Page 38

SD Memory Card/MultiMedia Card
Initialization (SD Card Setup)
An SD memory card must be initialized in order to use the security function. Use the
following procedure to initialize an SD memory card.
1 Turn on your computer.
2 Insert the SD memory card in the SD memory card slot.
Windows XP
When [Removable disk] appears, select [Take no action], then select [OK].
3 Start the SD card setup program.
Windows 2000
Select [Start] - [Programs] - [Panasonic] - [SD Card Setup].
Windows XP
Select [start] - [All Programs] - [Panasonic] - [SD Card Setup].
If an SD memory card has not been inserted, the following message appears: “Set
the SD card in place”. Insert an SD memory card and select [Retry].
38
4 Select [Next] in the Welcome screen.
5 Select the functions you want to use and the SD memory card
setting method, then select [Next].
A. Use when starting computer
Add the check mark if you want to use the SD memory card instead of a
password entry in order to start the computer.
A
B
C
D
B. Use when logging on to Windows
Add the check mark if you want to use the SD memory card instead of a
password entry on the Windows logon screen.
The Windows logon user and a password must be set in advance.
As many as two SD
memory cards can be
registered for a single
computer.
Setting
Private folder
User name
Password
Windows XP
If the check mark is added, the Welcome screen will no longer appear and the
user switching function will be disabled.
C. Leave set*
Add the check mark if you want to leave the SD memory card put in place
instead of entering a password. The card may be removed after the computer is
started or after you log on to Windows.
Page 39

SD Memory Card/MultiMedia Card
D. Set and eject*
Add the check mark if you want to set and eject
entering a password.
* The setting method is set separately for each computer. Different SD memory
cards may not use different setting methods on the same computer. To change
only the setting for [Use when starting computer], change the setting in
[Security] menu of the Setup Utility.
(
page 58)
6 Select [Restart the computer after entering settings], then select
[Finish].
7 Change the settings as necessary.
Operation differs depending on the setting in step 5.
If you add the check mark for [Use when starting computer] in step 5:
<If the Supervisor Password has been set>
Enter the Supervisor Password, then select [OK].
<If the Supervisor Password has not been set>
1 Enter the Supervisor Password, then press
2 Reenter the Supervisor Password entered in step 1, then select [OK].
3 Select [Yes] on the confirmation screen.
the SD memory card instead of
Tab
.
39
If you add the check mark for [Use when logging on to Windows] in step 5:
1 Enter the user name, then press
2 Enter the password, then press
Tab
Tab
.
.
3 Reenter the password entered in step 2, then select [OK].
4 Select [Yes] on the confirmation screen.
CAUTION
● An SD memory card with the above settings can be used as an ordinary memory
card in other devices as well. When using the SD memory card in another device,
do not delete [Private] folder. Doing so will cancel [Use when logging on to
Windows].
Page 40

SD Memory Card/MultiMedia Card
Using an SD Memory Card
An SD memory card that has been initialized (SD Card Setup) can be used as described
below.
■ If the card is set for [Use when starting computer]
When the screen on the left appears...
40
<If [Leave set] was selected in step
Insert the SD memory card.
If an SD memory card is already inserted, the password input screen does not
appear.
<If [Set and eject] was selected in step
Insert the SD memory card, then eject it.
5 for “Initialization (SD Card Setup)”>
5 for “Initialization (SD Card Setup)”>
NOTE
● You can also start your computer by entering the Supervisor Password or User
Password.
■ If the card is set for [Use when logging on to Windows]
If you are prompted to enter your password during Windows logon...
<If [Leave set] was selected in step
Insert the SD memory card.
(If the card has already been inserted, reinsert it. However, if it is already inserted
when starting the computer, the Windows logon screen does not appear when the
computer is started.)
<If [Set and eject] was selected in step
Insert the SD memory card, then eject it.
5 for “Initialization (SD Card Setup)”>
5 for “Initialization (SD Card Setup)”>
If you are prompted to enter your password when you try to use the computer in
standby or hibernation mode, or while the screensaver is active...
<If [Leave set] was selected in step
Insert the SD memory card.
(If the card has already been inserted, reinsert it.)
<If [Set and eject] was selected in step
Insert the SD memory card, then eject it.
5 for “Initialization (SD Card Setup)”>
5 for “Initialization (SD Card Setup)”>
NOTE
● Without using the SD memory card, you can also enter your password to log on to
Windows or resume from standby or hibernation mode when the computer is in
standby or hibernation mode, or when the screensaver is active.
Page 41

SD Memory Card/MultiMedia Card
CAUTION
● If the card is set for [Use when logging on to Windows]
When you are logging on to Windows or trying to resume computer while the
screensaver is active, if the SD memory card indicator is blinking, enter the
password through the keyboard without removing the SD memory card.
A software application, etc. may be accessing the SD memory card.
We recommend removing the SD memory card in the following cases:
• Before logging off.
• Before the computer enters either the standby or hibernation mode
• If there is a possibility that the screensaver will be activated
● If you use an SD memory card with incorrect settings.
• When the computer is being started, an icon appears for approximately three
seconds, after which the computer will turn off.
• You cannot log on to Windows
• You cannot resume computer from standby or hibernation mode.
• You cannot disable the screensaver.
Reinsert an SD memory card with correct settings, or enter the appropriate
password.
● If the card is set for [Use when logging on to Windows] and [Set and eject], insert
the SD memory card, then eject if after you hear a beep indicating card recognition.
(If MUTE is set, you will not hear a beep.)
● If the computer does not respond properly when you insert the SD memory card,
remove the card and wait a few seconds, then reinsert it.
● Do not remove or insert the SD memory card until Windows has completed loading.
41
Setting Up an SD Card after the SD Card Setup Program Has Been Used
After you run the SD Card Setup program once, the setup screen that appears the next
time you run it will be different. This section describes how to set up an SD card in such
cases.
1 Turn on the computer.
2 Insert the SD memory card in the SD memory card slot.
Windows XP
When [Removable disk] appears, select [Take no action], then select [OK].
3 Start the SD card setup program.
Windows 2000
Select [Start] - [Programs] - [Panasonic] - [SD Card Setup].
Windows XP
Select [start] - [All Programs] - [Panasonic] - [SD Card Setup].
4 Change the settings as necessary.
Page 42

SD Memory Card/MultiMedia Card
[Setting for this computer]
[Use the SD card when starting the computer]:
● Add the check mark if you want to use the SD memory card instead of a
password entry in order to start the computer.
● Removing the check mark erases the information pertaining to all SD memory
cards currently registered on the computer. You will no longer be able to start
the computer with any previously registered SD memory card. Remove the
check mark if there is a possibility of unauthorized card use by another party
(e.g., if you lose an SD memory card).
<If you remove the check mark>
• Removing the check mark from [Use the SD card when starting the
computer] does not disable the Supervisor Password. (The password input
screen appears when the computer is started.)
• To prevent the password input screen from appearing, run the Setup Utility
and disable the Supervisor Password. (
● Note that once you remove the check mark, if you want to use the SD memory
card again, you will need to reenter [Use when starting the computer] under
[Setting for this SD card].
● This setting can also be done on [Security] menu of the Setup Utility.
42
page 20)
[Use the SD card when logging on to Windows]:
● Add the check mark if you want to use the SD memory card instead of a
password entry in order to log on to Windows.
● If you remove the check mark, you will not be able to log on to Windows by
inserting an SD memory card with a set password.
[Key setting methods]:
● Perfor m step 5 under [Initialization (SD Card Setup)]. ( page 38)
● Changing the setting for [Use the SD card when starting the computer] can also
be done on [Security] menu of the Setup Utility.
● If you want to change the setting method between [Use the SD card when
starting the computer] and [Use the SD card when logging on to Windows],
select the setting method using this screen when you log on to Windows, then
select the setting method using [Security] menu in the Setup Utility during
computer startup. When the setting method is changed in this way, the settings
in the Setup Utility will also be changed.
Page 43

SD Memory Card/MultiMedia Card
[Setting for this SD card] (Settings for the SD memory card currently in use)
If no SD memory card is inserted, all of the fields under [Setting for this SD card] are
grayed out and none of them can be selected.
[Use when starting the computer]:
● Add the check mark if you want to use the SD memory card instead of a
password entry in order to start the computer.
● When this box is selected, a check mark is also entered automatically in [Use
the SD card when starting the computer].
[Use when logging on to Windows]:
● Add the check mark if you want to use the SD memory card instead of a
password entry in order to log on to Windows.
● Removing the check mark erases the user name and password from the SD
memory card.
[User name and password]:
● You can change the Windows logon user name and password which are set in
the inserted SD memory card. The set user name appears, so enter the
password and select [OK]. Next, enter the new user name and password.
● [User name and password] is grayed out if [Use when logging on to Windows] is
not selected.
43
5 Select [OK].
Operation differs depending on the setting in step 4.
If you add the check mark for [Use the SD card when starting the computer] or
[Use when starting the computer] :
<If the Supervisor Password has been set>
Enter the Supervisor Password, then select [OK].
<If the Supervisor Password has not been set>
1 Enter the Supervisor Password, then press
2 Reenter the Supervisor Password entered in step 1, then select [OK].
3 Select [Yes] on the confirmation screen.
4 Restart the computer.
If you add the check mark for [Use when logging on to Windows]:
1 Enter the user name, then press
2 Enter the password, then press
Tab
Tab
3 Reenter the password entered in step 2, then select [OK].
4 Select [Yes] on the confirmation screen.
5 Restart the computer.
If you remove the check mark from [Use when logging on to Windows]:
Tab
.
.
.
1 Enter the password and select [OK].
2 At the confirmation message [The user name and password registered in the
SD card will be erased. Are you sure you want to proceed?], select [Yes].
3 Restart the computer.
Page 44

RAM Module
Inserting additional RAM modules and increasing memory will enable you to run Windows
and application software more easily, and to increase overall operating efficiency.
Use a RAM module meeting the RAM module specifications below. If a module is used
that does not meet the specifications, there are cases in which data may become unusable
or the computer may not operate properly. We recommend using the optional RAM module
“Specifications”).
(
RAM module specifications
144 pins, Micro DIMM, SDRAM, PC133 Compliant
CAUTION
● RAM modules are extremely sensitive to static electricity. There are cases where
static electricity generated by the human body has adversely affected such
modules. When inserting or removing a RAM module, do not touch the terminals or
internal components, insert objects other than the module, or allow foreign particles
to enter. Doing so has been known to cause damage, fire or electric shock.
Inserting/Removing RAM Module
44
CAUTION
● If the RAM module is difficult to insert or difficult to press down, do not force it.
Check once more to ensure that the module is positioned correctly.
1 Power off your computer.
( “Starting Up/Shutting Down”)
Do not shut down using the standby or hibernation function.
Disconnect the AC adaptor and remove the battery pack.
2 Turn the computer over and remove the cover (B) after removing
the screw (A) holding it in place.
3 ● Inserting the RAM module
1 Match the notch (E) in the RAM module (C) with the protrusion at the edge of
the slot (D), and insert the module diagonally. Insert it firmly until the gold
colored terminals are no longer visible.
2 Press the module down until the right and left hooks lock into place.
●
Removing the RAM module
1 Gently open the left and right hooks (F).
2 Gently remove the RAM module from the slot.
4 Put the cover back in place.
1 Insert the cover diagonally, then fit it in place.
2 Fasten the screw.
NOTE
● Whether the RAM module is properly recognized or not can be confirmed in
[Information] menu of the Setup Utility (
recognized, power off the computer and insert it again.
page 55). If the RAM module is not
Page 45

External Display
1 Power off your computer.
( “Starting Up/Shutting Down”)
Do not shut down using the standby or hibernation function.
2 Connect the external display to the external display port (A) on
your computer.
3 Turn on the external display, then turn on your computer.
After Windows starts up, the screen is displayed on the display destination set in the
following menu.
Windows 2000
[Start] - [Settings] - [Control Panel] - [Intel® Extreme Graphics] - [Devices]
Windows XP
[start] - [Control Panel] - [Other Control Panel Options] - [Intel® Extreme Graphics] [Devices]
It is possible to change the setting to display only on the external display or on both
the internal LCD and the external display with
NOTE
Fn
45
+ F3 .
● The display destination after resuming from hibernation mode or after restarting
may differ from the display destination before entering hibernation mode or before
restarting.
● When changing the display destination after Windows has started, do not press any
keys or slide the power switch until the display destination has changed completely.
●
Fn
+ F3 does not work when [Command Prompt] screen is set to “Full Screen”.
● If the screen resolution is set to 800 x 600 or less and the screen is set to
simultaneous display, the screen will not fill up the entire display.
4 Set your external display.
Windows 2000
Select [Start] - [Settings] - [Control Panel] - [Display] - [Settings] - [Advanced] [Monitor] and make the monitor settings.
When a monitor that does not conform to the Plug & Play standards is connected,
select [Monitor] - [Properties] - [Driver] - [Update Driver] to update the driver.
Windows XP
Select [start] - [Control Panel] - [Appearance and Themes] - [Display] - [Settings] -
[Advanced] - [Monitor] and make the monitor settings.
When a monitor that does not conform to the Plug & Play standards is connected,
select [Monitor] - [Properties] - [Driver] - [Update Driver] to update the driver.
NOTE
● For more detailed information, refer to the operation manual of the external display.
● Set number of colors, screen resolution, or refresh rate correctly to suit the external
display.
Page 46

External Display
About [Intel® Extreme Graphics]
About [Intel® Extreme Graphics]
The selection of the display destination, adjustment of the brightness
and contrast can be done in the following procedure:
Windows 2000
[Start] - [Settings] - [Control Panel] - [Intel® Extreme Graphics] - [Devices]
Windows XP
[start] - [Control Panel] - [Other Control Panel Options] - [Intel® Extreme Graphics] [Devices]
Extended Desktop
With Extended Desktop, you can use both the internal LCD and the external display as an
extended display domain. You can also drag a window from the internal LCD to the
external display.
1 Windows 2000
Select [Start] - [Settings] - [Control Panel] - [Intel® Extreme
Graphics] - [Devices].
Windows XP
Select [start] - [Control Panel] - [Other Control Panel Options] [Intel® Extreme Graphics] - [Devices].
46
2 Select [Extended Desktop], make the settings for [Primary
Device] and [Secondary Device].
To make the settings for each display (colors, screen area, etc.), select [Device
Settings] and change the settings where necessary, then select [OK].
3 Select [OK].
At the confirmation message, select [OK].
NOTE
● There are some applications that cannot be used in the Extended Desktop. (e.g.,
the Display Rotation Tool)
● When the button to maximize a window is pressed, one of the displays will show the
maximized display.
● A window that has been maximized cannot be moved to the other display.
● You cannot switch the display destination by pressing
● Popup windows that are displayed using
displayed only on the primary device.
Fn
key combination operations are
Fn
+ F3 .
Page 47

External Display
Precautions
47
● When the application running is not shown on the display, refer to the following items.
Under the condition the application is in the external display, or after the application is
closed in the external display, there are cases the application will not be shown in the
display when performed the next time if the position of the extended display is changed
or the Extended Desktop is closed.
When there is no display after the position of the Extended Display is changed:
The application running is being displayed at the position of the extended display
before the change. Return the position of the extended display to the condition before
the change. Move the application to the internal LCD, and then correct the position of
the extended display.
When there is no display when the Extended Desktop is disabled:
The application running is being displayed in the external display. Set the Extended
Desktop again, move the application from the external display to the internal LCD
and then disable the Extended Desktop.
● To prevent images from being burned onto the external display, manually shut off the
power to the external display when the display does not have to be used.
● When the display domain for the Extended Desktop is changed, there are cases the
wallpaper and icons become displaced.
Wallpaper: Change the setting for the wallpaper.
Icons: Run the command to automatically realign the icons. (Auto Arrange)
● When an animated pointer is used for the mouse pointer (e.g., when changing the
theme in [Appearance and Themes] of [Control Panel]), an error may occur when
resuming from the standby or hibernation mode. In such cases, change the mouse
pointer to the standard pointer with the following procedure.
1 Windows 2000
In [Control Panel], select [Mouse].
Windows XP
In [Control Panel], select [Printers and Other Hardware] - [Mouse].
2 Select [Pointers].
3 Select [None] in [Scheme], then select [OK].
Page 48

USB Devices
Connecting/Removing USB devices
Connecting USB Devices
Connect the USB device to the USB port (A) of your computer.
For information on how to connect to the USB device or install the driver, refer to the operation manual of the USB device.
NOTE
● USB devices may be inserted or removed without turning off the computer’s power.
● When a USB device is connected, there are cases the standby or hibernation
function will not operate in a normal manner due to the USB device. In addition, a
USB device may have to be removed temporarily and the computer restarted in
cases where the computer is unable to start up properly.
● Some devices will not operate when connected to a USB HUB; these devices must
be connected directly to the USB port on your computer.
● When a USB device is removed and then inserted, may appear in the Device
Manager and the device may not be correctly recognized. If this happens, try
removing and connect the device once more.
● Windows 2000
When the computer enters standby or hibernation mode and then resumes while a
USB 1.1 device (e.g., USB floppy disk drive (optional)) is connected, a device
disconnection warning message may appear on the screen, but this will not impede
the computer’s operation.
● Windows XP
If noise is generated when speakers are used with a USB connection, perform the
following operations after logging on with the administrator authority.
1 Input [c:\util\cpupower\setup.exe] in [start] - [Run] and select [OK].
Follow the on-screen instructions.
2 Select [Performance] in [start] - [All Programs] - [Panasonic] - [CPU Idle Setting]
and select [OK], then [Yes].
The computer will restart automatically.
3 In [start] - [Control Panel] - [Performance and Maintenance] - [Power Options],
select [Always On] in [Power Schemes] and select [OK].
• These operations will reduce the noise from speakers with USB connections
generated as a result of the CPU’s power saving function, but the noise will not be
completely eliminated. Furthermore, these operations will have no effect on noise
generated due to other factors (e.g., noise generated during periods of
exceptionally high load on the CPU, such as during video playback).
• When these operations are performed, the battery running time will be reduced to
some extent. We thus recommend that when not using speakers with USB connections, select [Battery (Windows XP Standard)] in [CPU Idle Setting], and return
[Power Schemes] in [Power Options] to [Portable/Laptop].
48
Page 49

USB Devices
Removing USB Devices
49
CAUTION
● Do not remove a USB device while your computer is in the standby or hibernation
mode.
● Save important data and close each application.
1 Windows 2000
Select on the taskbar and select the USB device, then select
[Stop].
Follow the on-screen instructions.
(When is not displayed or when the USB device has been removed after the
computer is turned off, this step is not necessary.)
Windows XP
Select on the taskbar and select the USB device, then select
[Stop].
Follow the on-screen instructions.
USB Floppy Disk Drive
Note the following when using a USB floppy disk drive (CF-VFDU03).
● Do not power off your computer or press the floppy disk drive eject button while
● Use care when handling floppy disks.
● Confirm the contents of a floppy disk before formatting it.
A
● Use the write-protect tab (A).
Write Enable
● The USB floppy disk drive cannot be used at the same time as other floppy disk
● Do not directly open application files (e.g., Microsoft Word, Microsoft Excel)
Write Disable
(When is not displayed or when the USB device has been removed after the
computer is turned off, this step is not necessary.)
2 Remove the USB device.
the floppy disk drive being accessed.
Doing so may damage the data on the floppy disk and render the floppy disk useless.
To protect the data on your floppy disks or to prevent a floppy disk from becoming stuck
in your computer, avoid the following:
• Sliding the shutter on the floppy disk manually.
• Exposing the disk to a magnetic field.
• Storing the disk in locations prone to high temperatures, low pitched noise,
dampness, or dust.
• Applying more than one label on the disk.
Confirm that no important data is on the floppy disk, because all data on the floppy disk
will be erased.
This is a must for preserving important data. This prevents your data from being erased
or overwritten.
drives.
which are stored on the floppy disk.
First copy the files to the hard disk, then open the copied files from the hard disk.
Page 50

Modem
Connecting the Internal Modem with a Telephone Jack
CAUTION
● Do not use the PBX internal phone lines inserted in company offices. Doing so may
lead to a fire or electric shock.
● It is not possible to connect the modem to any of the following lines.
• Internal home phones
• Intercoms
● Be sure to connect the modular cable into the modem port, not into the LAN port.
1 Connect the computer and the telephone jack using a modem
telephone cable.
Open the modem cover, position the cable so that the tab matches the port ( ), and
insert the cable until you hear a “click”.
2 Set the modem.
Windows 2000
1 Select [Edit] in [Start] - [Settings] - [Control Panel] - [Phone and Modem
Options] - [Dialing Rules].
2 Input the necessary information (items such as the country, area code, etc.),
select [OK], then select [OK].
50
Windows XP
1 Select [Edit] in [start] - [Control Panel] - [Printers and Other Hardware] - [Phone
and Modem Options] - [Dialing Rules].
2 Input the necessary information (items such as the country, area code, etc.),
select [OK], then select [OK].
NOTE
● Do not enter either the standby or hibernation mode during communications.
Page 51

Modem
Ring Resume Function
With this function, if the telephone that is connected to the modem rings in the standby
mode, the power of the computer automatically switches ON.
This function is convenient when using automatic information receiving applications such
as a FAX application.
When using this function, it is necessary to run a software application able to maintain the
condition to receive telephone calls and to return the computer to the original condition
after a call. For further details, refer to the operation manuals provided with software
applications.
Enabling the Ring Resume Function
1 Windows 2000
Select [Device Manager] in [Start] - [Settings] - [Control Panel] - [System] [Hardware].
Windows XP
Select [Device Manager] in [start] - [Control Panel] - [Performance and Maintenance]
- [System] - [Hardware].
2 Select the modem you are using from [Modems].
3 Select [Power Management], add the check mark for [Allow this device to bring the
computer out of standby], then select [OK].
51
NOTE
● This function does not work when the computer is off or is in hibernation mode.
● After operations are resumed from standby status, the screen remains dark. The
former screen display will be restored when the keyboard, touch pad or touchscreen
(only for models with touchscreen) is touched.
● The computer cannot resume if a telephone is connected to the line of a modem
(e.g., a PC Card modem) other than the internal modem.
CAUTION
● When using this function, it is recommended that the AC adaptor be connected to
the computer.
● Concerning the setting for [System standby]*
• Roughly consider the communication time and then set [System standby]. There
may be cases where the computer enters the standby mode after the time set for
[System standby] elapses even during communications, and cuts off the
communications.
• If [Never] is set, the computer will not enter the standby mode during
communications, but once the computer resumes, the power of the computer will
remain on while the user is absent.
Windows 2000 : Select [Start] - [Settings] - [Control Panel] - [Power Options] -
*
[Power Schemes].
Windows XP : Select [start] -
[Power Options] - [Power Schemes].
● When the Ring Resume function is being used, some time elapses before a
connection is established (equal to the time for the computer to resume). To allow
the computer to resume, set the “Call” to a larger value than a typical telephone call.
If it is not possible for the sending side to set a long “Call”, set the “Number of rings
until answer” (with the software application that is able to maintain the condition to
receive telephone calls) to a small value.
[Control Panel] - [Performance and Maintenance] -
Page 52

LAN
Connecting LAN
52
When using the computer as a network computer, some additional settings may have to be
made depending on the usage conditions. We recommend asking your system administrator or the person in charge of the network.
1 Power off your computer.
( “Starting Up/Shutting Down”)
Do not shut down using the standby or hibernation function.
2 Connect the cable.
Connect the LAN port (A) and the network system (server, HUB, etc.) using a LAN
cable.
CAUTION
●
Do not use the standby or hibernation functions during communications (except
when the Wake up from LAN function is in use), as this may cause an error in data
transmission or reception. The timeout function may engage even during data
transmissions, causing the computer to automatically go into standby or hibernation
mode. When not using the Wake up from LAN function, we recommend disabling
the timeout function using the following procedure:
Windows 2000
[Start] - [Settings] - [Control Panel] - [Power Options] - [Power Schemes]
Windows XP
[start] - [Control Panel] - [Performance and Maintenance] - [Power Options] - [Power
Schemes]
NOTE
●
If you are unable to connect to the network (when the indicator of your HUB unit
does not light):
1 Windows 2000
Select [Device Manager] in [Start] - [Settings] - [Control Panel] - [System] [Hardware].
Windows XP
Select [Device Manager] in [start] - [Control Panel] - [Performance and Maintenance] - [System] - [Hardware].
2 Select the network adaptor you are using from [Network adapters].
3 Select [Advanced].
4 Confirm the settings of each item.
Page 53

LAN
Wake up from LAN
This is a function of the internal LAN to automatically power the computer on from a network
server when the computer is in the standby or hibernation mode. To use this function, it is
necessary to have a network environment that accommodates Wake up from LAN.
Enabling the Wake up from LAN Function
Windows 2000
1
Select [Device Manager] in [Start] - [Settings] - [Control Panel] - [System] - [Hardware].
2
Select the network adaptor name you are using from [Network adapters].
3 Select [Power Management], add the check mark for [Allow this device to bring the
computer out of standby] and [Allow the computer to turn off this device to save
power], then select [OK].
4 Remove the check mark from [Prompt for password when computer goes off
standby] in [Control Panel] - [Power Options] - [Advanced], then select [OK].
Windows XP
1 Select [Device Manager] in [start] - [Control Panel] - [Performance and Mainte
nance] - [System] - [Hardware].
2
Select the network adaptor name you are using from [Network adapters].
3 Select [Power Management], add the check mark for [Allow this device to bring the
computer out of standby] and [Allow the computer to turn off this device to save
power], then select [OK].
4 Remove the check mark from [Prompt for password when computer resumes from
standby] in [Control Panel] - [Performance and Maintenance] - [Power Options] [Advanced], then select [OK].
53
NOTE
●
Be sure to connect the AC adaptor, and enable the supply of power.
●
Even when a password is set in the Setup Utility and [Password on boot] is set to
[Enable], it is not necessary to input the password set in the Setup Utility when the
computer resumes from standby or hibernation mode.
●
The Wake up from LAN function will not operate under the following conditions:
• When the computer has been shut down
• When the power switch is slid over for four seconds or longer to turn off the power
(e.g., when the computer hangs)
• When the AC adaptor and battery pack are removed from the computer or
reattached to the computer
●
After operations are resumed from standby status, the screen remains dark. The
former screen display will be restored when the keyboard, touch pad or touchscreen
(only for models with touchscreen) is touched.
●
The computer may start up if accessed by another computer on the network.
Windows XP
The following procedure can be used to prevent startup due to unintentional access
by a computer.
1 Select [start] - [Control Panel] - [Performance and Maintenance] - [System] -
[Hardware] - [Device Manager] - [Network adapters], then select the network
adaptor name you are using, and then select [Power Management].
2 Add the check mark for [Only allow management stations to bring the computer
out of standby], then select [OK].
Page 54

Setup Utility
Running the Setup Utility
54
Key Operations
1 Slide the power switch, and immediately hold down
F2.
2 Release the key when the Setup Utility starts up.
If [Enter Password] is displayed, enter your password.
When a User Password is entered, some contents cannot be changed (
NOTE
● If you fail to press F2 at the right moment, the Setup Utility will not start up. In this
case, power off the computer and try again.
Esc
● To close the Setup Utility, press
press
F1
Esc
Enter
: To display the corresponding “help” file.
: To display [Exit] menu.
.
, select the exiting method in [Exit] menu, then
: To move among the items.
: To move among the menus.
page 19).
F5 F6
Enter
F9
F10
: To move among the values.
: To display sub-menu of each item selected by .
: To set default settings (except the password).
(When starting up the Setup Utility with the User Password, this key is not
available.)
: To save the settings and exit.
NOTE
● When setting date and time,
Tab
can be used to move the cursor.
Page 55

Setup Utility
Information Menu
55
Language:
Model No.:
Serial No.:
CPU Type:
CPU Speed:
BIOS :
Embedded Controller:
System Memory:
Primary Master:
[English]
CF-xxxxxx
xxxx
xxxxxxxxxxxxxxxxxxxxxxxxxxxxxxxx
xxx MHz
Vx.xxLxx
Vx.xxLxx
xxx MB
xx GB
■ Parameters ( : Default)
Language English
Japanese
Select the language for displaying the Setup Utility.
Page 56

Setup Utility
Main Menu
56
System Date:
System Time:
Touch Pad:
Display:
Display Expansion:
[xx:xx:xx]
[xx/xx/xxxx]
[Enable]
[Simultaneous]
[Enable]
■ Parameters ( : Default)
Touch Pad Disable
Enable
Display
Display Expansion Disable
*
*
The display destination in cases where Windows is not running is set here. If an external
display is not connected, all information will appear on the internal LCD even if [External
Monitor] or [Simultaneous] is selected.
After Windows starts, the setting made in the following field is enabled.
Windows 2000 [Start] - [Settings] - [Control Panel] - [Intel® Extreme Graphics]-
[Devices]
Windows XP [start] - [Control Panel] - [Other Control Panel Options] - [Intel® Extreme
Graphics]
External Monitor
Internal LCD
Simultaneous
Enable
Page 57

Setup Utility
Advanced Menu
57
Modem:
LAN:
Boot up from LAN:
Legacy USB Support:
Video Power Saving Mode:
[Enable]
[Enable]
[Enable]
[Enable]
[Battery Optimized]
■ Parameters ( : Default)
Modem Disable
Enable
LAN Disable
Enable
*
Boot up from LAN
Legacy USB Support Disable
Video Power Saving Mode Battery Optimized
*
This can be set only when [LAN] is set to [Enable]. This does not work for a LAN card.
Disable
Enable
Enable
Max Performance
Page 58

Setup Utility
Security Menu
58
Password on boot:
SD Startup:
SD Setting Method:
Clear registered SD card:
Set Supervisor Password:
Display Boot Menu:
Hard Disk Lock:
User Password Protection:
Set User Password:
[Enable]
[Disable]
[Leave Set]
[Enter]
[Enter]
[Enable]
[Disable]
[No Protection]
[Enter]
NOTE
● When the Setup Utility is started up with the User Password:
• [Clear registered SD card], [Set Supervisor Password] and [Hard Disk Lock] will
not be displayed.
• The User Password can be changed only when [User Password Protection] has
been set to [No Protection]. The User Password cannot be deleted.
■ Parameters ( : Default)
Password on boot Disable
Enable
SD Startup
SD Setting Method
*1
*1*2
Disable
Enable
Leave Set
Set and Eject
Clear registered SD card
Set Supervisor Password To the sub-menu
Display Boot Menu Disable
Hard Disk Lock
User Password Protection No Protection
Set User Password
*1
This is displayed only when an SD memory card has been registered. However, [SD
Startup] and [SD Setting Method] cannot be set if [Password on boot] is set to
[Disable].
*2
This can be set only if [SD Startup] has been set to [Enable].
*3
Setting impossible when the Supervisor Password is not set.
*3
*1
*3
To the sub-menu
Enable
Disable
Enable
Protected
To the sub-menu
Page 59

Setup Utility
Boot Menu
59
Floppy Drive
*1
Hard Disk Drive
USB CD Drive
*2
LAN
The default order is as follows:
[Floppy Drive]
To move a device up by one in the order, select the device with
F6
.
To move a device down by one in the order, select the device with and , and then
press
F5
.
*1
This is displayed even if a floppy disk drive or CD drive is not connected.
The following drive can be used for startup (recommended).
• Panasonic USB floppy disk drive: (optional:CF-VFDU03)
For U.S.A. and Canada
For U.S.A. and Canada
For U.S.A. and CanadaFor U.S.A. and Canada
• Panasonic CD drive : (optional:CF-VDRRT1<USB>)
*2
This is not displayed when [LAN] is set to [Disable] or [Boot up from LAN] is set to
[Disable] on [Advanced] menu.
*1
*1
[Hard Disk Drive] [USB CD Drive]*1 [LAN]*2.
and , and then press
NOTE
Boot Menu
● The device for starting up the Operating System can also be selected during com-
ESC
puter start-up. After the computer is turned on and
screen, [Boot Menu] (the device selection display) will appear. When the setting of
[Boot] menu is changed, the selection screen display will also change. [Boot Menu]
is displayed only when [Display Boot Menu] in [Security] menu is set to [Enable].
is pressed at [Panasonic]
Page 60

Setup Utility
Exit Menu
Save Values & Exit
Exit Without Saving Changes
Get Default Values
Load Previous Values
Save Current Values
Refresh Battery
■ Parameters
Save Values & Exit Exit the Setup Utility and save your changes to CMOS.
Exit Without Saving Changes Exit the Setup Utility without saving your changes to
CMOS.
Get Default Values
*
Set the default settings.
60
Load Previous Values Load previous values from CMOS for all Setup items.
Save Current Values Save your changes to CMOS.
Refresh Battery Refreshing the Battery.
(
page 28)
*
This item may not be displayed when starting up the Setup Utility with the User
Password.
Page 61

Technical Information
61
Network Connections and Communications Software
If the power saving function (standby or hibernation mode) activates while communications
software is being used, the network connection may be interrupted, or performance may
be adversely affected. If this happens, restart the computer.
Be sure to close the communications software before using the power saving function.
When using the computer in a network environment, we recommend that you set [System
standby] and [System hibernates] to [Never], using the following procedure:
Windows 2000 :
[Start] - [Settings] - [Control Panel] - [Power Options] - [Power Schemes]
Windows XP :
[start] - [Control Panel] - [Performance and Maintenance] - [Power Options] - [Power Schemes]
When using the Files on the Retail Version of the Windows CD-ROM
The Windows files included in the Retail Version of the Windows CD-ROM for each OS are
contained in the following folders:
Windows 2000
c:\winnt\cdimage
Windows XP
c:\windows\docs, c:\windows\dotnetfx, c:\windows\i386, c:\windows\support, c:\windows\valueadd
Precautions When Using a CardBus Type LAN Card
Prior to usage, optimize the LAN card settings by following the procedure given below.
Failure to do so may result in an error message being displayed when performing a copy
operation via the LAN card with a computer on the network.
1 Select the LAN card you are using from [Network adapters] in
[Control Panel] - [System] - [Hardware] - [Device Manager].
2 Select [Advanced], select [Store And Forward] from [Property],
then set [Enable] for [Value] if it is set to [Disable].
(This item may be unavailable for some types of LAN cards.)
Recovery Console Windows XP
If you install the Recovery Console, you can use the command prompt to perform
operations such as CHKDSK in cases where, for example, Windows XP will not start. Use
the following procedure to install Recovery Console. This procedure allows you to select
Recovery Console as a startup option during startup.
1 Select [start] - [Run].
Windows 2000
2 Input [c:\windows\i386\winnt32.exe /cmdcons], then select [OK].
Follow the on-screen instructions.
NOTE
● For an overview of Recovery Console, refer to [Help and Support].
1 Select [start] - [Help and Support].
2 Enter “Recovery Console” under [Search], then select .
Page 62

DMI Viewer
This computer conforms to the specifications of the Desktop Management Interface (DMI).
The DMI Viewer can be used when you want to know information on the internal systems
this computer supports, starting with the CPU and memory.
Running DMI Viewer
62
Windows 2000
Select [DMI Viewer] from [Start] - [Programs] - [Panasonic].
Windows XP
Select [DMI Viewer] from [start] - [All Programs] - [Panasonic].
The screen shown below is displayed.
When you select an item, detailed information on that item will be displayed.
Saving Information to a File
Displayed information can be saved to a text file (.txt). Run the DMI Viewer and display the
information you wish to save.
1 ● To save the item that is displayed
Select [Save Selected Data] from [File] menu.
●To save all items
Select [Save All Data] from [File] menu.
2 Select the folder, input the file name, then select [Save].
Page 63

List of Error Codes
The following is a list of the messages that BIOS can display. Most of them occur during POST. Some of them display
information about a hardware device, e.g., the amount of memory installed. Others may indicate a problem with a device,
such as the way it has been configured. Following the list are explanations of the messages and remedies for reported
problems.
If your system displays any of the below error messages other that the ones marked with an asterisk (*), write down the
message and contact your technical support office. If your system fails after you make changes in the Setup menus, reset
the computer, enter Setup and install Setup defaults or correct the error.
0200 Failure Fixed Disk
Fixed disk in not working or not configured properly. Check to see if fixed disk is attached properly. Run Setup.
Find out if the fixed-disk type is correctly identified.
0210 Stuck key
Stuck key on keyboard.
0211 Keyboard error
Keyboard not working.
0212 Keyboard Controller Failed
Keyboard controller failed test. May require replacing keyboard controller.
0213 Keyboard locked - Unlock key switch
Unlock the system to proceed.
0230 System RAM Failed at offset : nnnn
System RAM failed at offset nnnn of in the 64k block at which the error was detected.
0231 Shadow RAM Failed at offset : nnnn
Shadow RAM failed at offset nnnn of the 64k block at which the error was detected.
0232 Extended RAM Failed at offset : nnnn
Extended RAM Failed at address line : nnnn
Extended memory not working or not configured properly at offset or address line nnnn.
0250 System battery is dead - Replace and run SETUP
The CMOS clock battery indicator shows the battery is dead. Replace the battery and run Setup to reconfigure the
system.
*0251 System CMOS checksum bad - Default configuration used
System CMOS has been corrupted or modified incorrectly, perhaps by an application program that changes data stored
in CMOS. The BIOS installed Default SETUP Values. If you do not want these values, enter Setup and enter your own
values. If the error persists, check the system battery or contact your technical support office.
0260 System timer error
The timer test failed. Requires repair of system board.
0270 Real time clock error
Real-time clock fails BIOS test. May require board repair.
*0280 Previous boot incomplete - Default configuration used
Previous POST did not complete successfully. POST loads default values and offers to run Setup. If the failure was
caused by incorrect values and they are not corrected, the next boot will likely fail. On systems with control of wait
states, improper Setup settings can also terminate POST and cause this error on the next boot. Run Setup and verify
that the wait-state configuration is correct. This error is cleared the next time the system is booted.
0281 Memory Size found by POST differed from EISA CMOS
Memory size found by POST differed from EISA CMOS.
02B0 Diskette drive A error
02B1 Diskette drive B error
Drive A: or B: is present but fails the BIOS POST diskette tests. Check to see that the drive is defined with the proper
diskette type in Setup and that the diskette drive is attached correctly.
02B2 Incorrect Drive A type - run SETUP
Type of floppy drive A: not correctly identified in Setup.
02B3 Incorrect Drive B type - run SETUP
Type of floppy drive B: not correctly identified in Setup.
02D0 System cache error - Cache disabled
Contact your technical support office.
02F0: CPU ID:
CPU socket number for Multi-Processor error.
63
Page 64

List of Error Codes
02F4: EISA CMOS not writable
ServerBIOS2 test error: Cannot write to EISA CMOS.
02F5: DMA Test Failed
ServerBIOS2 test error: Cannot write to extended DMA (Direct Memory Access) registers.
02F6: Software NMI Failed
ServerBIOS2 test error: Cannot generate software NMI (Non-Maskable Interrupt).
02F7: Fail - Safe Timer NMI Failed
ServerBIOS2 test error: Fail-Safe Timer takes too long.
device address Conflict
Address conflict for specified device.
Allocation Error for: device
Run ISA or EISA Configuration Utility to resolve resource conflict for the specified device.
Failing Bits : nnnn
The hex number nnnn is a map of the bits at the RAM address which failed the memory test. Each 1 (one) in the map
indicates a failed bit. See error 230,231 or 232 for offset address of the failure in System, Extended or Shadow memory.
Invalid System Configuration Data
Problem with NVRAM (CMOS) data.
I/O device IRQ conflict
I/O device IRQ conflict error.
Operating System not found
Operating system cannot be located on either drive A: or drive C:. Enter Setup and see if fixed disk and drive A: are
properly identified.
Parity Check 1 nnnn
Parity error found in the system bus. BIOS attempts to locate the address and display it on the screen. If it cannot locate
the address, it displays ????. Parity is a method for checking errors in binary data. A parity error indicates that some
data has been corrupted.
Parity Check 2 nnnn
Parity error found in the I/O bus. BIOS attempts to locate the address and display it on the screen. If it cannot locate the
address, it displays ????.
Press <F1> to resume, <F2> to Setup
Displayed after any recoverable error message. Press <F1> to start the boot process or <F2> to enter a Setup and
change the settings. Write down and follow the information shown on the screen.
64
Page 65

Dealing with Problems (Summary)
When a problem occurs, refer to this page. If a problem appears to be related to a software application, read the software
related manual. If you still cannot troubleshoot the problem, contact your technical support office.
65
●Starting Up
The power indicator or battery
indicator is not lit
The computer does not operate
when a USB device is connected
[Enter Password] is displayed
POST Startup Error(s) is displayed
Windows startup, or an
operation is extremely slow
The date and time are incorrect
When resuming from the
standby or hibernation mode,
[Enter Password] does not
appear even if a password has
been set in the Setup Utility
When “Invalid system disk.
Replace the disk, and then
press any key.” (or a similar
message) is displayed
When the administrator
password is forgotten
●Check the cable connection for the AC adaptor.
●Check to see if a fully charged battery is properly inserted.
●Remove the battery pack and disconnect the AC adaptor, then connect them again.
●
The computer may not operate when certain USB devices are connected. Disconnect the
USB device, or set [Legacy USB Support] to [Disable] in [Advanced] menu of the Setup Utility.
●Input your password. If you have forgotten it, contact your technical support office.
page 63
●Press
F9
in the Setup Utility ( page 54). This will restore the Setup Utility’s
settings to their default values (except the password settings). Then, the Setup
Utility must be run once again for you to input the appropriate operating
environment settings. (The processing speed depends on the application software
used, so this operation may not cause the processing speed to increase.)
●If operations slow down during streaming playback, try changing the number of
colors of the display.
●You can set the date and time using the following procedure:
Windows 2000
[Control Panel] - [Date/Time].
Windows XP
[Control Panel] - [Date, Time, Language, and Regional Options] - [Date and Time].
●If you continue to experience problems, the internal battery maintaining the clock
may need to be replaced. Contact your technical support office.
●When the computer is connected to a LAN, confirm the date and time of the server.
●This computer will not correctly recognize the date and time starting from the year
2100 A.D.
●Even when a password has been set in the Setup Utility, [Enter Password] does not
appear when the computer resumes from the standby or hibernation mode. If you
want to use the security function when using the standby or hibernation mode, use
the Windows password as follows:
Windows 2000
Set the password in [Control Panel] - [Users and Passwords], then add the check
mark for [Prompt for password when computer goes off standby] in [Control Panel] [Power Options] - [Advanced].
Windows XP
Select the account to change in [Control Panel] - [User Accounts] and set the
password, then add the check mark for [Prompt for password when computer
resumes from standby] in [Control Panel] - [Performance and Maintenance] - [Power
Options] - [Advanced].
●This means a floppy disk that does not contain system startup information has been
left in the floppy disk drive. Remove the floppy disk, and press any key.
●This message may appear when certain USB devices are connected. Remove the
USB device, or set [Legacy USB Support] in [Advanced] menu of the Setup Utility to
[Disable].
●If the message still appears even after trying the above two measures, this may be
an indication that some type of hard disk failure has occurred. Contact your
technical support office.
●Windows 2000
After reinstalling, setup Windows and then set the password again.
Windows XP
If you have created a password reset disk ( “First-time Operation”), a message
is displayed when you fail to correctly enter the password. Follow the message’s
instructions and set the password again by using the password reset disk.
If you have not created a password reset disk, after reinstalling, setup Windows and
then set the password again.
Page 66

Dealing with Problems (Summary)
●Starting Up (continued)
66
When the previous item is not
the cause
●Display
No display after powering on
The power has not been turned
off, but after a certain period of
time, there is no display
When the battery pack is used,
the screen is darker than when
the AC adaptor is connected
The cursor cannot be
controlled properly
An afterimage appears (e.g.,
green, red, and blue dots
remain on the display) or there
are dots not displaying the
correct colors properly
●Press
F9
in the Setup Utility ( page 54). This will restore the Setup Utility’s
settings to their default values (except the password settings).
●Try removing all peripheral devices.
●Check a disk error using the following procedure.
Windows 2000
1 Select [Local Disk(C:)] with the right button in [Start] - [My Computer], and
select [Properties].
2 Select [Tools] - [Check Now].
3 Select [Start] after selecting required items in [Check disk options].
Windows XP
1 Select [Local Disk(C:)] with the right button in [start] - [My Computer], and
select [Properties].
2 Select [Tools] - [Check Now].
3 Select [Start] after selecting required items in [Check disk options].
●At startup, hold down
finger when the Windows Advanced Option Menu is displayed. Start the computer
in Safe Mode, and confirm the details of the error.
●When there is no display to an external display,
• Check your cable connection to the external display.
• Confirm your display is powered on.
• Check the settings for your external display.
●Try switching the display destination by pressing
●Has the computer been set to the power-saving mode?
To resume operation of your computer from the condition the power of the display is
off (for energy conservation purposes), press any key unrelated to the direct
triggering of a selection, like
●To save power, your computer may have automatically entered the standby mode
(power indicator blinks green) or hibernation mode (power indicator turns off).
In such cases, slide the power switch.
●There is a possibility that an external display is set as the display destination.
Press
Fn
+ F3 to switch the display destination.
●If you want to switch the display destination repeatedly by pressing
sure that the display destination has switched completely each time before pressing
Fn
+ F3 again.
●Press
Fn
+ F2 and adjust the brightness. Note, however, that when the brightness
is increased, the battery running time will become shorter.
Brightness can be set to separate levels for when the AC adaptor is connected and
when it is disconnected.
●If you are using an external mouse, ensure that the external mouse has been
connected correctly.
●Restart the computer by using the keyboard (Press ,
with
Î Í Ï Ð
●If the computer does not respond to keyboard commands, read “Computer hangs”
page 71).
(
●If an image is displayed for a prolonged period of time, an afterimage may appear.
This is not a malfunction. The afterimage will disappear when a different screen is
displayed.
●High-precision and advanced technologies are necessary in the production of color
liquid crystal displays (color LCDs). Therefore, if 0.002% or less of the picture
elements either fail to light or remain constantly lit (that is, more than 99.998% of
elements are functioning properly), no defect is considered to exist.
F8
when [Panasonic] screen disappears, and release your
Fn
+ F3 .
Ctrl
.
Fn
U
, and select [Restart]
, then press
Enter
.
+ F3 , make
Page 67

Dealing with Problems (Summary)
●Display (continued)
67
The screen becomes
disordered
The external display no longer
displays properly
During simultaneous display,
the screen of the external
display becomes disordered
The screen does not fill up the
entire display (i.e., the screen is
shown in the center of the
display)
When an MPEG file is being
played with Media Player, the
display destination cannot be
Fn
Fn
+
F3
F3
switched using
For Hong Kong
For Hong Kong
For Hong KongFor Hong Kong
Application is not displayed
properly, or characters are
garbled
FnFn
F3F3
●Changing the number of colors or resolution of the display may affect the screen.
Restart the computer.
●When an external display not compatible with the power saving mode is used with
the computer, the external display may no longer display properly when the
computer enters the condition the power of the display is off (for energy
conservation purposes). In such cases, turn off the power to the external display.
●Try switching the display destination by pressing
Fn
+ F3 .
●If the screen of external display is not displayed even after switching screens using
Fn
+ F3 , try switching the display destination using the following procedure:
Windows 2000
[Start] - [Settings] - [Control Panel] - [Intel® Extreme Graphics]
Windows XP
[start] - [Control Panel] - [Other Control Panel Options] - [Intel® Extreme Graphics]
●If the screen resolution is set to 800 x 600 or less and the screen is set to
simultaneous display, the screen will not fill up the entire display. Also, if the screen
is set to Extended Desktop, the screen may not fill up the entire display.
●The display destination cannot be switched while an MPEG file is playing.
Stop playing the MPEG file before switching the display destination.
●Is the application a non-Unicode program? When non-Unicode programs are run
on Windows XP, you must select the language appropriate to that program.
Set [Language for non-Unicode programs] in [Control Panel] - [Date, Time,
Language, and Regional Options] - [Regional and Language Options] - [Advanced].
●Setup Utility
[Enter Password] is displayed
[Advanced] and [Boot] menu
can not be registered
Some items in [Security] menu
can not be registered
F9
F9
does not work
F9F9
●Enter the User Password or Supervisor Password. If you have forgotten it, contact
your technical support office.
●Restart the Setup Utility with the Supervisor Password.
●Restart the Setup Utility with the Supervisor Password.
●Restart the Setup Utility with the Supervisor Password.
●Shutting Down
Windows cannot be shut down
or restarted
●If a USB device is connected, try removing it.
●Standby/Hibernation Function
Unable to enter standby or
hibernation mode
The computer does not resume
●If a USB device is connected to the computer (note: only for some USB devices),
remove the USB device temporarily. If the problem persists, restart the computer.
●Did you slide the power switch and hold it for four seconds or more?
If you slide the power switch and hold it for four seconds or more, the power will be
turned off forcibly. In this case, all unsaved data will be lost.
Page 68

Dealing with Problems (Summary)
●Battery Indicator
68
The red indicator lights
The red indicator blinks
The orange indicator blinks
●Keyboard
Only numbers can be inputted
Only capital letters are being
input
How to input European
characters (
Euro Currency Symbol is
unclear
Windows 2000
Windows 2000
Windows 2000Windows 2000
After resuming, input keys do
not work properly
ß,à,ç), symbols or
●The battery level is low. Save your data and power off your computer.
After connecting the AC adaptor or replacing the battery pack with a fully charged
one, turn your computer on.
●The battery pack or recharging function may be defective. Quickly save current data
and exit Windows. Remove the battery pack and disconnect the AC adaptor, then
connect them again.
If the problem persists, contact your technical support office.
●Unable to recharge due to violation of temperature limits. The ambient temperature
is outside the allowable range. Once the allowable range requirement is satisfied,
charging begins automatically.
●Check whether the indicator is on. If it is on, the computer is in ten-key keyboard
mode. To disable the ten-key mode, press
NumLk
.
●Check whether the indicator is on. If it is on, the computer is in Caps Lock mode.
To disable the Caps Lock mode, press
Caps Lock
.
●Windows 2000
Select [Start] - [Programs] - [Accessories] - [System Tools] - [Character Map].
The Character Map will be displayed. Point to the desired font name and select it.
Windows XP
Select [start] - [All Programs] - [Accessories] - [System Tools] - [Character Map].
The Character Map will be displayed. Point to the desired font name and select it.
●When the computer enters standby or hibernation mode while
are held down, these keys may remain in “pressed” mode when the computer
resumes operation. Pressing these keys once will return the keys to normal.
Alt
,
Ctrl
or
Shift
●Network
Unable to connect to a network
Windows 2000
Windows 2000
Windows 2000Windows 2000
When performing a copy
operation via a LAN card with a
computer on the network, an
error message is displayed and
the copy operation fails
●Confirm that either [Modem] or [LAN] is set to [Enable] in the Setup Utility.
●When using the computer as a network computer, some additional settings may
have to be made depending on the usage conditions. We recommend asking your
system administrator or the person in charge of the network.
●If the standby or hibernation mode is entered, the computer may have to be
restarted.
●Are the I/O address, interrupt levels, and memory address set correctly?
Also, check whether these settings for network are competing with other peripheral
devices.
●If the link lamp on the HUB unit is not on and the network cannot be accessed, set
the speed to match the HUB unit. (
page 52)
●The settings for the LAN card you are using may not be optimized. Confirm this with
the following procedure.
1 Select the network card you are using from [Network adapters] in [Control
Panel] - [System] - [Hardware] - [Device Manager].
2 Select [Advanced], select [Store And Forward] from [Property], then set
[Enable] for [Value] if it is set to [Disable].
(This item may be unavailable for some types of network cards.)
●Confirm that the computer on the network is operating properly and that the file is
not corrupt.
Page 69

Dealing with Problems (Summary)
●Connecting Peripherals
69
An error occurs while installing
the driver
Your peripheral does not work
The cursor does not move from
mouse operations
The device will not operate if a
different mouse driver is
installed
A PC Card does not work
You do not know the available
RAM module
Cannot tell whether the RAM
module has been correctly
installed
The RAM module has not been
recognized
The address map for IRQ, I/O
port address, etc. is unclear
A USB device does not work
●When you install the driver for a PC Card or peripheral device, be sure to use a
driver that is compatible with the operating system. If you use an incompatible
driver, malfunction may occur. For information on drivers, contact the manufacturer
of the peripheral device you purchased.
●When operation resumes from the standby or hibernation mode, devices such as a
mouse, modem or PC Cards may not function properly. In such cases, you will need
to restart your computer or reinitialize the individual devices.
●Check your mouse connection, then restart the computer by using the keyboard.
●A driver which is compatible with the connected mouse must be installed.
●If the device does not operate when the driver is installed:
In the Setup Utility, set [Touch Pad] to [Disable].
●When you install a different mouse driver, such as IntelliPoint for Microsoft’s
IntelliMouse, the mouse driver currently installed in the computer may be
uninstalled. Use the following procedure to uninstall this driver.
1 Windows 2000
Select [Start] - [Settings] - [Control Panel] - [Add/Remove Programs].
Windows XP
Select [start] - [Control Panel] - [Add or Remove Programs].
2 Select [Synaptics TouchPad] and uninstall the driver.
●Make sure the card is properly inserted.
●Confirm that the card conforms to the PC Card Standard.
●Note that after a driver (PC Card driver or other) is installed, the computer must be
restarted.
●Check that the proper port settings have been made.
●Read the PC Card’s manual. Or, you may need to call the manufacturer of the PC
Card.
●Try removing/reinserting the PC Card by following the proper procedure ( page
32).
●Confirm that a driver for your operating system has been installed.
page 44
●You can check whether the RAM module is recognized using [Information] menu in
the Setup Utility. If the RAM module is not recognized, turn the computer off and
reinsert the RAM module.
●Make sure the RAM module has been properly inserted.
●Use the RAM module that supports the recommended specifications ( page 44).
●Windows 2000
Check the address map by going to [View] - [Resources by type] in [Control Panel] [System] - [Hardware] - [Device Manager].
Windows XP
Check the address map by going to [View] - [Resources by type] in [Control Panel] [Performance and Maintenance] - [System] - [Hardware] - [Device Manager].
●Make sure a driver is installed.
●Contact the manufacturer of the product.
●When is displayed in the Device Manager, try removing and inserting the device
once more. If the problem persists, restart the computer.
Page 70

Dealing with Problems (Summary)
●Disk Operations
70
Cannot read/write to a floppy
disk
Unable to write to a disk
How to format a floppy disk is
unclear
Unable to read/write to the hard
disk
When the previous item is not
the cause
●Touch Pad
Unable to input using the touch
pad
●Has the floppy disk been correctly inserted?
●Has the floppy disk been correctly formatted?
●Your floppy disk content may be corrupted.
●Is the floppy disk write-protected?
●Windows 2000
Select [Format] in [My Computer] - [3 1/2 Floppy (A:)] - [File]. After confirming the
disk volume and format type, start formatting.
Windows XP
Select [Format] in [start] - [My Computer] - [3 1/2 Floppy (A:)] - [File].
After confirming the disk volume and format type, start formatting.
●Your drive or file may not have been properly set.
●Check to see if the hard disk is full. If it is full, delete unnecessary files.
●Your hard disk content may be corrupted. Contact your technical support office.
●Try testing another drive or media.
●Has the Setup Utility been used to set [Touch Pad] to [Enable]?
●When external mouse drivers are installed, the touch pad may not be used.
●Has the touch pad driver been properly installed?
●Touchscreen (Only for models with touchscreen)
Unable to input by touching the
display
●When mouse drivers are installed (e.g., Intellimouse), the touchscreen is unable to
be used.
●Has the touchscreen driver been properly installed?
●It is necessary to perform [Calibration] to point correctly with the stylus included with
the computer.
●Sound
The sound is not heard
Volume does not change when
Fn
Fn
+
F5
F5
or
Fn
Fn
+
F6
F6
FnFn
F5F5
FnFn
The audio is distorted
is pressed
F6F6
●Try changing the mute by pressing
●If the Windows sound function is not active, the volume will not change even if is
displayed.
●Audio distortion may occur when operations are performed by pressing
combination with another key. Stop playing and start again.
●SD Memory Card
Cannot use SD memory card
security function
Windows XP
Cannot log on with the SD
memory card
●The SD memory card must be set up in order to use the security function
(
page 37).
●If you change the setting for Language for non-Unicode programs after the check
mark has been added in [Use when logging on to Windows] under [SD Card
Settings] - [Setting for this SD card], remove the check mark from [Use when
logging on to Windows] under [SD Card Settings] - [Setting for this SD card], and set
the user name and password again. (
Fn
+ F4 or Fn + F6 .
page 37)
Fn
in
Page 71

Dealing with Problems (Summary)
●Fast User Switching Function Windows XP
71
Some applications do not work
properly
●Others
Computer hangs
●When switching to a different user with the Fast User Switching function, the
following problems may occur.
• Some applications may not work properly (for example, PDF files may not be
printed properly).
• It may not be possible to set the settings of the display.
If any of the above occur, log on with the administrator authority again, not using the
Fast User Switching function, and try the operation once more.
●Do not switch screens continuously (e.g., using [Command Prompt] full screen
display) while an MPEG file is running.
●Press
Ctrl
+
Shift
+
ESC
to open Task Manager and close the software
application which is not responding.
●After shutting down by sliding the power switch for more than four seconds, slide the
power switch to power on and open the application again.
If the program no longer works normally, delete the program using the following procedure.
Then reinstall the program.
Windows 2000
[Start] - [Settings] - [Control Panel] - [Add/Remove Programs]
Windows XP
[start] - [Control Panel] - [Add or Remove Programs]
Page 72

Copyright
This manual is copyrighted by Matsushita Electric Industrial Co., Ltd. with all rights reserved. No part of this manual may be
reproduced in any form without the prior written permission of Matsushita Electric Industrial Co., Ltd.
No patent liability is assumed with respect to the use of the information contained herein.
© 2002 Matsushita Electric Industrial Co., Ltd. All Rights Reserved.
Disclaimer
Computer specifications and manuals are subject to change without notice. Matsushita Electric Industrial Co.,
Ltd. assumes no liability for damage incurred directly or indirectly from errors, omissions or discrepancies
between the computer and the manuals.
Trademarks
Microsoft, Windows, the Windows logo and IntelliMouse are registered trademarks of Microsoft Corporation of
the United States and/or other countries.
Intel, Pentium and SpeedStep are either registered trademarks or trademarks of Intel Corporation.
SD Logo is a trademark.
Adobe® and Acrobat® are either registered trademarks or trademarks of Adobe Systems Incorporated in the United States
and/or other countries.
Panasonic is a registered trademark of Matsushita Electric Industrial Co., Ltd.
PCE0101A_2K/XP
 Loading...