

Page 1

Supplementary Instructions
for Fingerprint Reader
Personal Computer
Model No. CF-19 / CF-30 / CF-52 / CF-74 Series
Contents
Names and Functions of Parts ................................... 2
Overview ....................................................................... 6
Installation .................................................................... 8
More Advanced Security ........................................... 12
Useful Information ..................................................... 13
Troubleshooting ......................................................... 18
Specifi cations ............................................................. 25
Terms and illustrations in this Manual
NOTE: Useful and helpful information.
CAUTION: Condition that may result in minor or moderate injury.
<Model with Windows XP>
[start] - [Run]: Click [start], and then click [Run].
<Model with Windows Vista>
(Start) - [All Programs]:
Click (Start), and then click [All Programs].
Î : Page in these Supplementary Instructions or in the
Reference Manual for the computer.
Some of the illustrations in this manual may differ slightly in shape from the
actual items in order to make the explanation easier to understand.
Page 2
Names and Functions of Parts
Except the following, refer to the Operating Instructions for the computer.
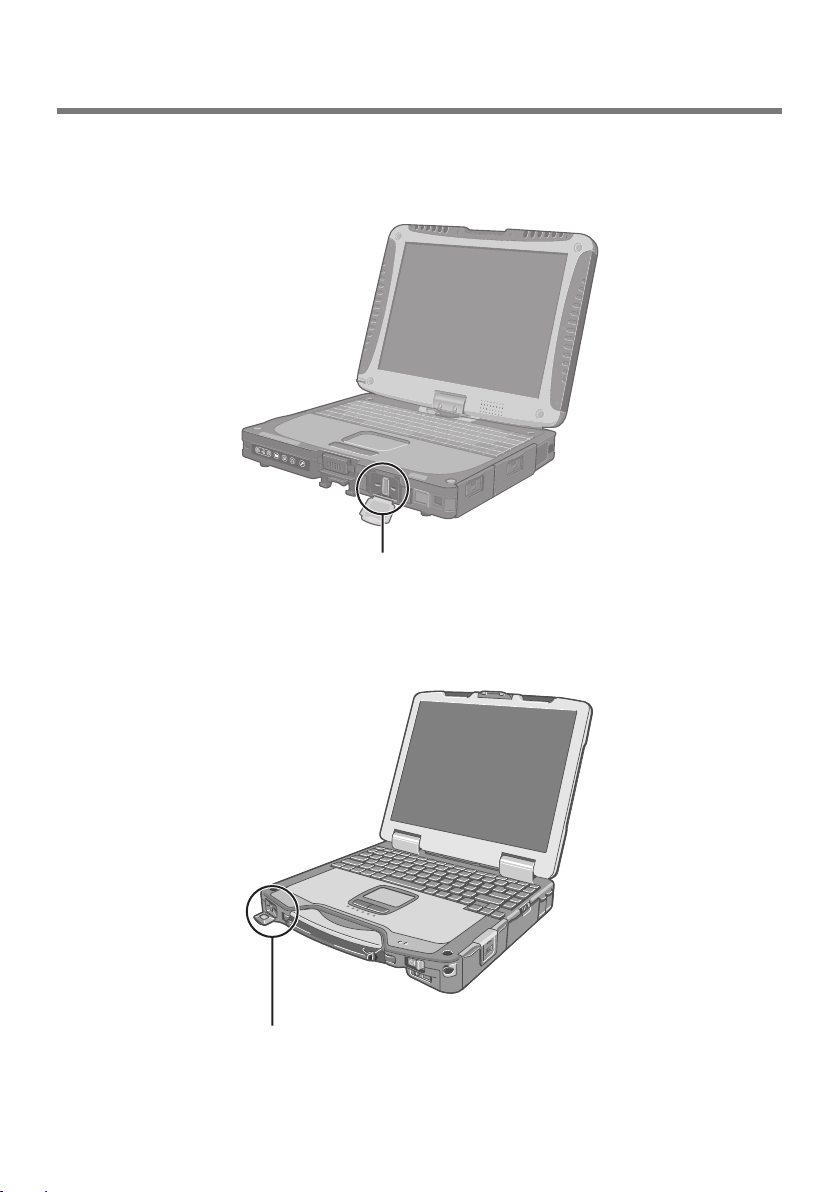
<CF-19 Series>
Fingerprint Reader
(Appearance may differ, depending on specifi cations.)
<CF-30 Series>
2
Fingerprint Reader
(Appearance may differ, depending on specifi cations.)
Page 3
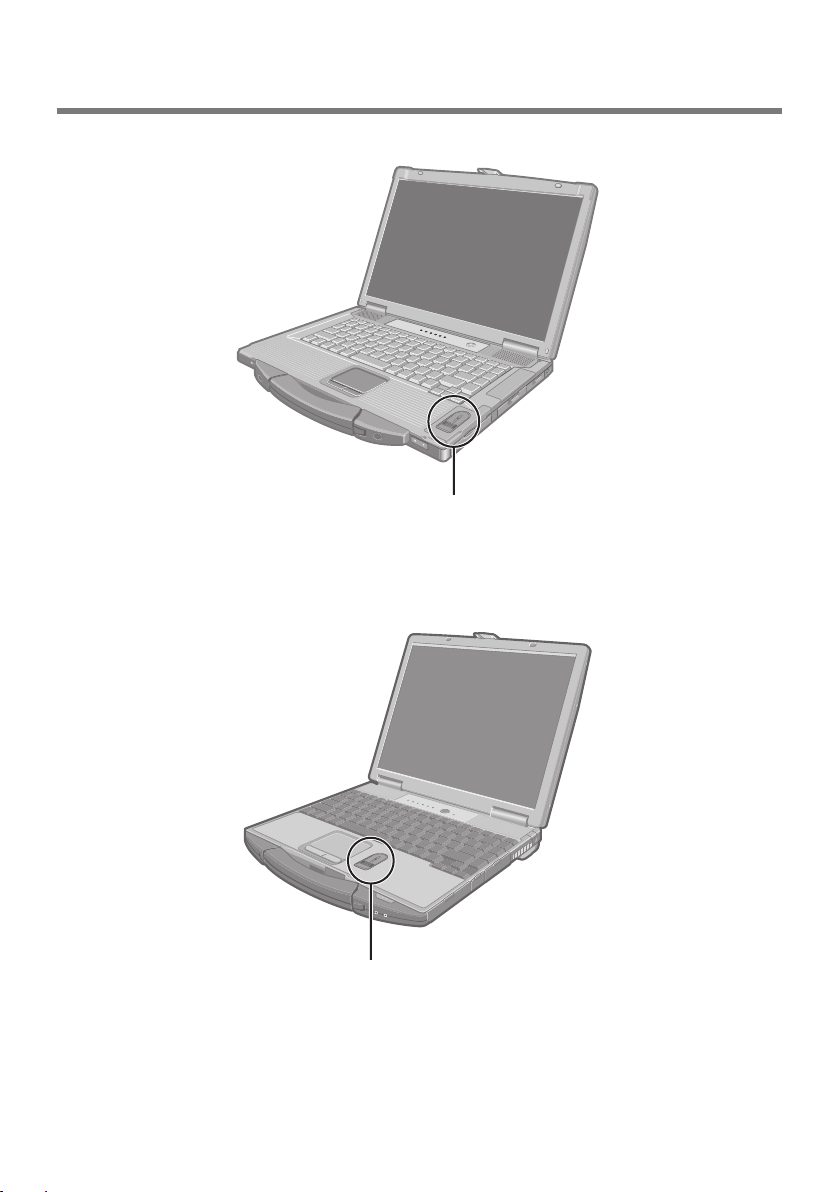
<CF-52 Series>
(Appearance may differ, depending on specifi cations.)
<CF-74 Series>
Fingerprint Reader
Fingerprint Reader
(Appearance may differ, depending on specifi cations.)
3
Page 4
Names and Functions of Parts
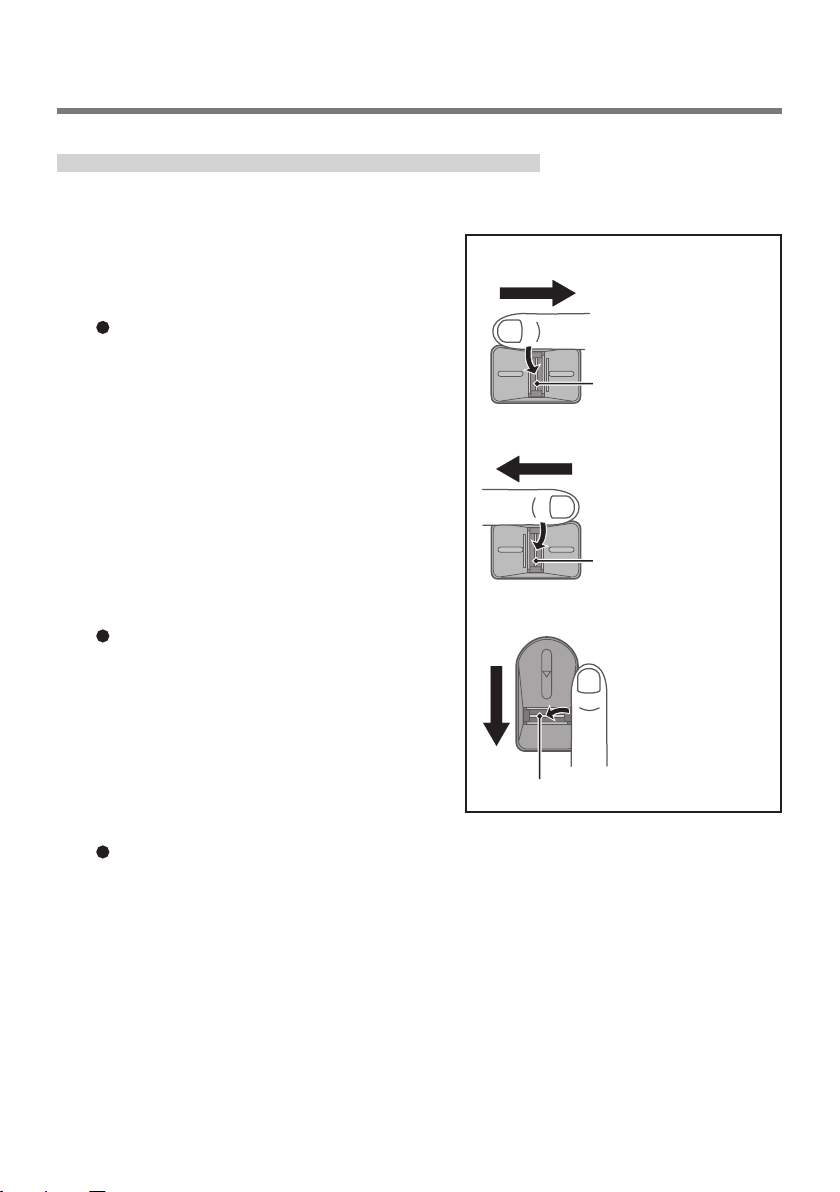
How to Use the Fingerprint Reader
This section explains how your fi ngerprints are enrolled and authenticated.
1 <CF-19 and CF-30 Series>
Slide your fi nger to the right or
<CF-19 and CF-30 Series>
left.
To prevent a reading error.
A Set the fi rst joint of your fi nger on
the sensor as illustrated to the
right.
B Slide your fi nger to the right or left
while keeping it in contact with the
fi ngerprint sensor.
C Slide your fi nger to the right or left
until the sensor is visible.
<CF-52 and CF-74 Series>
or
Fingerprint sensor
Fingerprint sensor
Slide your fi nger toward
yourself.
To prevent a reading error.
A Set the fi rst joint of your index
fi nger on the sensor as illustrated
to the right.
B Slide your fi nger toward yourself
while keeping it in contact with the
fi ngerprint sensor.
C Slide your fi nger down until the
sensor is visible.
When the fi ngerprint sensor does not enroll or authenticate your
fi ngerprint properly:
• You slid your fi nger too fast or too slow.
• Your fi nger was soiled or it has a scar on the surface.
• Your fi nger was wet or extremely dry.
• Your fi ngerprint does not have suffi cient data for personal identifi cation.
For further information, refer to “Troubleshooting (For Devices)”. (Î page
18)
<CF-52 and CF-74 Series>
Fingerprint sensor
4
Page 5

CAUTION
We shall not be liable for any loss or damage whatsoever resulting
from your Fingerprint device or neglect of Fingerprint device use,
or any data loss resulting from such developments as Fingerprint
authentication device malfunctioning.
<Only for CF-19 and CF-30 Series>
To protect the fi ngerprint sensor, be sure to close the cover when not
using the fi ngerprint reader.
5
Page 6
Overview
Fingerprint’s Outline
The conventional security systems use ID/passwords and token devices such as
IC cards to authenticate users. Therefore the passwords and token devices are
exposed to the risk of being lost, stolen and hacking.
The Fingerprint authentication method uses user’s fi ngerprints instead of
passwords for security authentication. You can use your fi ngerprints to start up
your computer and log on Windows.
We recommend you use the Fingerprint Reader in combination with the TPM
(Trusted Platform Module) to increase the security level of your computer.
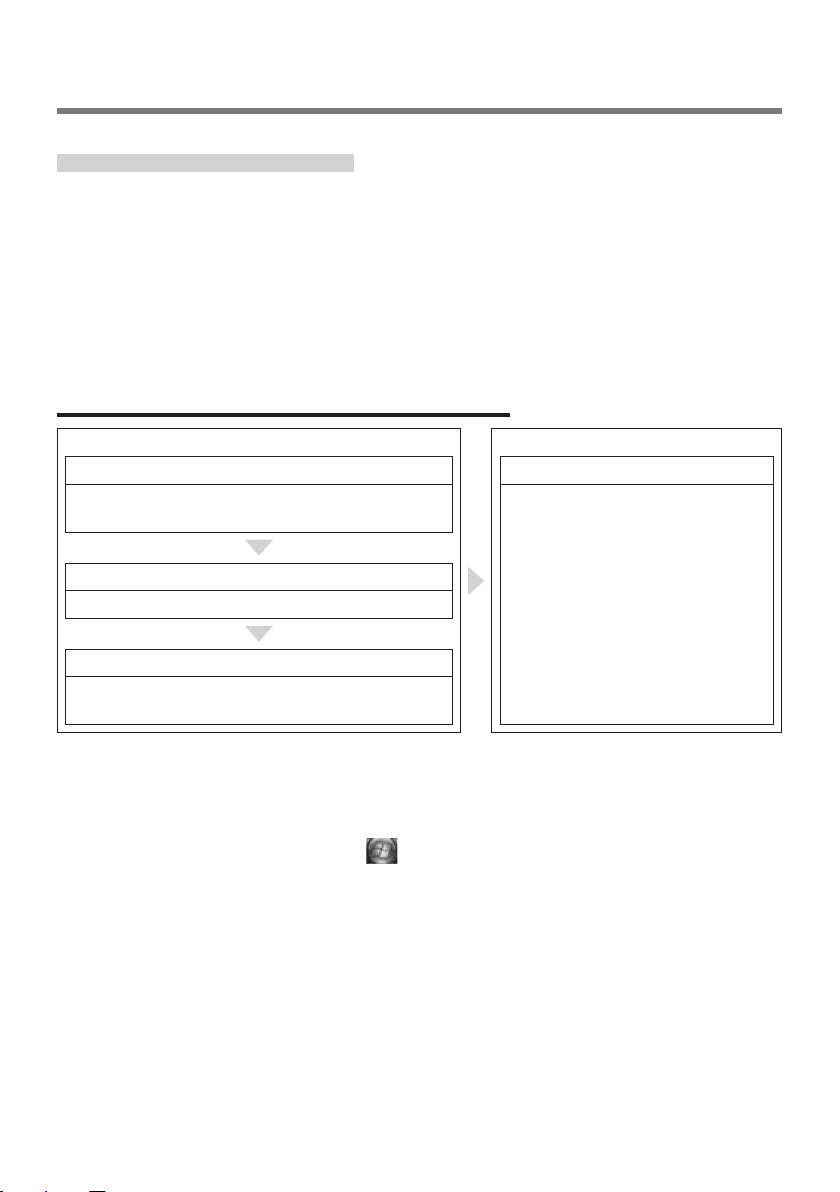
Recommended Installation Procedure
Performed by the Computer Administrator Performed by each user
Step 1 Step 4
TPM Installation (Î “Installation Manual of TPM”)
(If the TPM is not being used, skip this step.)
Step 2
Fingerprint Utility Installation
Step 3
TPM Fingerprint Utility Initialization
(If the TPM is not being used, skip this step.)
User Fingerprint Enrollment
User’s Data
• Windows Logon Password
• Fingerprint
• Fingerprint Backup Password
• Power-on Password
This manual describes Steps 2, 3 and the initial part of Step 4.
For further steps, refer to the UPEK Protector Suite QL Help menu.
(<Model with Windows XP> Click [start] - [All Programs] - [Protector Suite QL]
- [Help] /
<Model with Windows Vista> Click (Start) - [All Programs] - [Protector Suite
QL] - [Help]).
6
Page 7

Precautions
Security Functions
Fingerprint Authentication Technology does not guarantee complete
authentication and individual identifi cation. Please acknowledge we shall not be
liable for any loss or damage whatsoever resulting from the use of, or inability
to use your Fingerprint device.
The Fingerprint authentication method uses multiple fi ngerprints, encryption
keys, credentials data and passwords. You might not be able to use your data if
you lose fi ngerprints, keys, credentials and passwords. Back up the Fingerprint
authentication data in a safe place. For further information, refer to “Backup”.
(Î page 13)
General interaction with third-party applications: There is no guarantee
that there will not be any negative interaction with any third-party
software, and will not accept any responsibility for such an interaction.
<Model with Windows XP>
You cannot use this function at the same time as the SD security function
is being used. When SD security is set, disable SD security function in the
following order before initial setting of fi ngerprint authentication.
A Log on to Windows as an Administrator.
B Click [start] - [All Programs] - [Panasonic] - [SD Card Setup].
C Remove a check mark from [Use the SD card when starting the computer].
D Click [OK].
• Follow the on-screen instructions.
• SD security is disabled and all registered SD memory cards become
unavailable when your computer starts up.
7
Page 8

Installation
Step1 TPM Installation
Refer to on-screen manuals “Installation Manual Trusted Platform Module (TPM)”.
(<Model with Windows XP> Click [start] - [Run], enter [C:\util\drivers\tpm\
README.pdf], and click [OK]. /
<Model with Windows Vista> Click
README.pdf], and press
Step2 Fingerprint Utility Installation
Performed by the Computer Administrator.
Preparation
<Only for CF-19 Series with Windows XP Tablet PC Edition>
Move Tablet PC Input Panel from upper right to the bottom right or bottom left.
If this procedure is skipped, the “Please swipe you fi nger” message may
overlap the Tablet PC Input Panel.
Enter
(Start) and input [C:\util\drivers\tpm\
.)
1 Log on to Windows as an Administrator.
2 Close all other programs.
3 <Model with Windows XP>
Click [start] - [Run], enter “C:\util\drivers\fngprint\psql\
setup.exe”, and click [OK].
<Model with Windows Vista>
Click
application\x86\install\setup.exe”, and press
The “Protector Suite QL ∗.∗ Setup” screen appears.
(Start) and input “C:\util\drivers\fngprint\
4 Click [Next].
Installation starts. Follow the on-screen instructions.
<Model with Windows XP>
Carefully read the License Agreement, select “I accept the license
agreement”, and click [Next].
8
Enter
.
Page 9
5 When the “Protector Suite ∗.∗ has been successfully
installed.” message appears, click [Finish].
At the confi rmation message, click [Yes].
The computer restarts.
6 Log on to Windows as an Administrator.
The “Protector Suite QL Icon” appears in the notifi cation area.
Step 3 TPM Fingerprint Utility Initialization
Performed by the Computer Administrator.
The “Invalid TPM status” message is displayed by the “Protector Suite QL Icon”
in the notifi cation area.
If the TPM is not being used, skip this step.
1 Click on the “Invalid TPM status” message to start
“Advanced Security Initialization Wizard”.
Follow the on-screen instructions.
NOTE
If the “Invalid TPM status” message is not displayed
<Model with Windows XP>
Click [start] - [All Programs] - [Protector Suite QL] - [Control Center] [Settings] - [System Settings] - [TPM] - [Initialized TPM].
<Model with Windows Vista>
Click (Start) - [All Programs] - [Protector Suite QL] - [Control Center] [Settings] - [System Settings] - [TPM] - [Initialized TPM].
9
Page 10

Installation
Step 4 User Fingerprint Enrollment
Performed by each user.
1 <Model with Windows XP>
Click [start] - [All Programs] - [Protector Suite QL] - [User
Enrollment].
The “Welcome” message appears, read the description carefully.
<Model with Windows Vista>
Click
[User Enrollment].
Carefully read the License Agreement, select “I Accept the License
Agreement” and click [OK].
(Start) - [All Programs] - [Protector Suite QL] -
2 Click [Next].
3 Select an enrollment mode, and click [Finish].
Enrollment mode
You can make the confi guration for the enrollment only once during this
initialization phase.
• Enrollment to the biometric device
All enrolled fi ngerprints are stored directly in the fi ngerprint sensor. The
user data will be secured by the hardware protection keys obtained by the
fi ngerprint sensor. This mode allows up to 21 fi ngerprints to be enrolled.
• Enrollment to the hard disk
All enrolled fi ngerprints are stored on the hard disk. Hardware protection
of the user data is not possible, but multiple users can enroll their
fi ngerprints.
When the “Finish” screen appears, read the description carefully.
10
Page 11

“User Enrollment” wizard starts. Follow the on-screen instructions.
NOTE
Enroll at least two fi ngers. Even if one of them is injured, you can
use another one to access your account and secret data. For further
information about the enrollment, refer to “How to Use the Fingerprint
Reader” (Î page 4) and “Fingerprint Tutorial”.
(<Model with Windows XP> Click [start] - [All Programs] - [Protector
Suite QL] - [Fingerprint Tutorial] /
<Model with Windows Vista> Click (Start) - [All Programs] [Protector Suite QL] - [Fingerprint Tutorial].)
We recommend you use the Power-on Security feature. This feature
prevents unauthorized access to the user’s computer at the BIOS
level.
After fi rst fi nger enrollment, “Power-on Security” message appears. Select
[Yes].
A When the “Power-on Security” screen appears, click [Manage
Passwords...].
B Select [Power-On] in [Password Types], and click [Set password...].
C Enter the password for “Power-on Security”, and click [OK].
D Click [Close].
E Add a check mark for [Power-On] in [Password Types].
F Enter the password (step C), and click [OK].
G Click [Next].
• Follow the on-screen instructions.
NOTE
The number of fi ngerprints for “Power-on Security” is maximum of 21,
because they are stored in the fi ngerprint sensor regardless of the
selected enrollment mode.
11
Page 12

More Advanced Security
You can increase your computer’s security level by setting the BIOS level
described in this section.
Performed by the Computer Administrator.
1 Register the Supervisor Password.
You have to register the Supervisor Password to proceed to the next step.
If you have already registered the Supervisor Password, you can skip this
step, and move on to step 2.
If you have not done this, have enrolled your fi ngerprint using Protector Suite
QL, and have already made Power-on Security effective, after step B, your
fi ngerprint authentication will be necessary.
A Turn on or restart the computer.
B Press F2 several times while [Panasonic] boot screen is displayed soon
after the computer starts the startup procedure.
C Select the [Security] menu.
D Select [Set Supervisor Password], and press
E Enter your password in the [Enter New Password], and press
• The password will not be displayed on the screen.
• You can use up to 32 alphanumeric characters (including spaces).
• The case (upper/lower) is ignored.
• To input numbers for the password, use the numbered keys on the
keyboard.
• You cannot use
F Enter your password again in [Confi rm New Password], and press
G In [Setup Notice], press
Shift
and
Enter
to input a password.
Ctrl
.
Enter
.
Enter
.
Enter
.
2 Set the High Security Level.
A Select [Fingerprint Security Sub-Menu], and press
B Select [Security mode:], and select [High].
• Default setting: Simple
C Press
D Press
NOTE
In the “High” security mode, you have to enter the Supervisor or User
Password even after fi ngerprint authentication.
In the “Simple” security mode, you do not have to enter the Supervisor
or User password after fi ngerprint authentication.
12
to close the sub-menu.
ESC
, select [Yes], and press
F10
Enter
.
Enter
to exit the Setup Utility.
Page 13

Useful Information
Backup
The fi le described below is necessary for recovering the Fingerprint authentication
data. Back up this fi le periodically in a safe location such as removable disk to
avoid data loss resulting from some accidents. We recommend you to store
the fi le in a removable disk or network drive because the benefi t of Fingerprint
authentication security can be reduced if you keep the fi le in the internal hard disk
drive.
The backup password described below is necessary for bypassing the Fingerprint
authentication. We recommend you set the backup password using the “User
Enrollment” wizard. If you do not defi ne the backup password, you may lose your
data in case of authentication hardware failure.
File used by each user
• Backup user passport data
(Default name: <UserAccount>.vtp)
You need this fi le when you replace the embedded fi ngerprint chip, or the hard
disk drive, or when reinstalling Windows.
This fi le contains the fi ngerprints, encryption keys, and logon authentication
data.
NOTE
How to Backup:
Select “Export” in “Import or Export User Data” to save the user data.
(<Model with Windows XP> Click [start] - [All Programs] - [Protector Suite QL]
- [Control Center] - [Fingerprints] /
<Model with Windows Vista> Click (Start) - [All Programs] - [Protector
Suite QL] - [Control Center] - [Fingerprints])
For further information, refer to the UPEK Protector Suite QL Help menu.
(<Model with Windows XP> Click [start] - [All Programs] - [Protector Suite QL]
- [Help] /
<Model with Windows Vista> Click (Start) - [All Programs] - [Protector
Suite QL] - [Help])
13
Page 14

Useful Information
Password used by each user
• Backup Password for Enrollment
This backup password can be used in case of hardware failure to bypass the
fi ngerprint authentication.
CAUTION
The passwords other than those explained above are also used for security,
so do not lose them. For further information, refer to the UPEK Protector
Suite QL Help menu.
(<Model with Windows XP> Click [start] - [All Programs] - [Protector Suite
QL] - [Help] /
<Model With Windows Vista> Click (Start) - [All Programs] - [Protector
Suite QL] - [Help])
Limitations in Use
Password Bank*1 limitations: The following web pages cannot be
supported.
Web pages which are created by the following technologies:
• Web forms created on the fl y using javascript.
• Web forms which looks as one form (e.g. login fi eld, password fi eld), but
internally created with two independent forms.
• There can be auto submit problems with web forms which do not have
Submit button. All forms that you cannot submit with
Password Bank, but not submitted.
Password Bank*1 limitations: The following Windows applications cannot
be supported.
• Applications which do not use standard Windows controls and draw controls
by their own.
• This includes any Java based application.
<Model with Windows XP>
My Safe*1: Antivirus software should be confi gured to ignore the “My Safe”
data fi le (C:\Documents and Settings\(user account)\Application Data\Protector
Suite\My Safe.fdp). Otherwise the user may experience problems when
unlocking “My Safe”.
“My Safe” data fi le cannot be backed up by using File back up function in
Recover Pro. To back up “My Safe” data fi le, use Quick Backup/Complete
Backup functions in Recover Pro and back up each data.
will be entered by
Enter
14
Page 15

*1 For information of these functions, refer to the UPEK Protector Suite QL Help menu.
(<Model with Windows XP> Click [start] - [All Programs] - [Protector Suite QL] - [Help]
/ <Model with Windows Vista> Click
- [Help])
(Start)- [All Programs] - [Protector Suite QL]
Handling & Maintenance
The enrolling and authentication sensitivity may decline under the
conditions below. Wipe off stains or moisture on the sensor surface with
a soft cloth.
• The surface of the fi ngerprint sensor is soiled with dust, skin oil, or sweat.
• The surface of the fi ngerprint sensor is wet as a result of moisture or
condensation.
Static electricity may also cause the sensor to malfunction. To make your
fi nger static-free, touch a metal surface before placing it on the fi ngerprint
sensor. Exercise caution against static electricity in winter and other dry
conditions.
Malfunction or damage may occur when:
• The fi ngerprint sensor surface was damaged by the strong rubbing of a solid
material, scratches, or being pecked with a pointed item.
• The sensor was touched with a fi nger soiled with mud, damaging the sensor
surface with a tiny substance, and staining the surface.
• The sensor surface was covered with a seal, or soiled with ink.
Deleting (Initializing) Owner’s Data
When you dispose of the computer or transfer the ownership, delete (initialize) the
owner’s data to avoid unauthorized access.
NOTE
The data enrolled in the fi ngerprint sensor is not image data. You cannot
restore fi ngerprint image data from the data enrolled in the fi ngerprint sensor.
1 Disable Power-on Security
Performed by the Computer Administrator.
A <Model with Windows XP>
Click [start] - [All Programs] - [Protector Suite QL] - [Control Center].
<Model with Windows Vista>
Click (Start) - [All Programs] - [Protector Suite QL] - [Control Panel].
• The “Fingerprint Software Management” screen appears.
15
Page 16

Useful Information
B Click [Settings], and click [Power-on Security].
C <Model with Windows XP>
Remove the check mark from [Replace the power-on and hard drive
passwords with the fi ngerprint reader.], and click [OK].
<Model with Windows Vista>
Remove the check mark from [Enable power-on security using
fi ngerprints], and click [OK].
D Click [Fingerprints], and click [Enroll or Edit Fingerprints].
• “User Enrollment” wizard starts. Follow the on-screen instructions.
E When the “User’s Fingers” screen appears, click [Next] without deleting
fi ngerprint samples.
F Click [Manage Passwords...].
G Select [Power-On] in [Password Types], and click [Unset password...].
H Enter the password for Power-on Security, and click [OK].
I Click [Close].
• Confi rm that there is no item in [Password Types].
J <Model with Windows XP>
Click [Next].
• At the confi rmation message, click [Yes].
K Click [Next].
L Click [Finish].
• Follow the on-screen instructions.
2 Delete Fingerprint Data.
Performed by each user.
A Click [Fingerprints], and click [Delete].
The “Swipe fi nger” screen will appear.
B Swipe user’s fi nger.
• If the authentication is successfully completed, the confi rmation message
appears.
C Click [Yes].
• Confi rm that all users’ data was deleted.
16
Page 17
NOTE
If the enrollment mode is set to “Enrollment to the hard disk” (Î page
10), you need to remove the fi ngerprints data after Step 2.
Performed by the Computer Administrator.
A <Model with Windows XP>
Click [start] - [All Programs] - [Protector Suite QL] - [Control Center].
<Model with Windows Vista>
Click (Start) - [All Programs] - [Protector Suite QL] - [Control
Center].
B Click [Settings], and click [Power-on Security].
C Select the fi ngerprint, and click [Remove].
• Surely remove all of the fi ngerprints.
3 Uninstall Protector Suite
Performed by the Computer Administrator.
A Log on to Windows as an Administrator.
B Close all programs.
C <Model with Windows XP>
Click [start] - [Control Panel] - [Add or Remove Programs].
<Model with Windows Vista>
Click (Start) - [Control Panel] - [Uninstall a program].
D <Model with Windows XP>
Click [Protector Suite ∗.∗], and click [Change].
<Model with Windows Vista>
Double-click [Protector Suite ∗.∗], and select [Remove].
E <Model with Windows XP>
Select [Remove], and click [Next].
F Select [Remove all Protector Suite *.* data], and click [Next].
• Uninstallation starts. Follow the on-screen instructions.
G When the “Protector Suite ∗.∗ has been successfully uninstalled.”
Message appears, click [Finish].
• If the confi rmation message appears, click [Yes].
• The computer restarts.
17
Page 18

Troubleshooting
When a problem occurs, refer to this page. If you still cannot troubleshoot the
problem, contact PANASONIC TECHNICAL SUPPORT.
For Devices
The sensor does
not enroll or
authenticate my
fi ngerprint.
Slide your fi nger correctly. (For further information
about enrollment and authentication, refer to “How
to Use the Fingerprint Reader” (Î page 4) and
“Fingerprint Tutorial”.
(<Model with Windows XP> Click [start] - [All Programs]
- [Protector Suite QL] - [Fingerprint Tutorial] /
<Model with Windows Vista> Click (Start) [All Programs] - [Protector Suite QL] - [Fingerprint
Tutorial])
The sensor enrolls or authenticates no fi ngerprint, or
performs authentication poorly, despite the correct
way of fi nger sliding when your fi nger is in any of the
conditions stated below:
• Rough skin, or injured fi nger (with a cut or a skin
infl ammation)
• Extremely dry
• Soiled with mud or oil
• Fingerprint has been worn and has faded
• Wet with water or sweat
<You can improve enrolling and authentication
sensitivity by taking the following steps when any of
the conditions described above exists>
• Wash your hands or wipe them dry.
• Use a different fi nger for registration or
authentication.
• Treat your fi nger with a hand cream when it is rough
skin or dry.
Clean the fi ngerprint sensor. (For further information,
refer to “Handling & Maintenance” (Î page 15))
The fi ngerprint sensor may be malfunctioning when it
continues to perform poorly after the steps described
above have been performed. Contact PANASONIC
TECHNICAL SUPPORT.
(Enrollment and authentication is unavailable to an extremely minority of people
including those whose fi ngerprints give little data for personal identifi cation.)
18
Page 19

For Application
Sensor does not
work.
User cannot use
enrolled fi nger.
(e.g. injury)
Exported passport can help you if you need to
replace the sensor.
• Log on to Windows as an Administrator.
You can always access the computer by using your
Windows log on password. In convenient mode,
any user can access the computer by using your
Windows log on password.
• To access “My Safe” *
1
“My Safe” *1 can be always accessed by using the
“My Safe” *1 backup password.
*1 : <Model with Windows Vista> “File Safe”
• Other functions
Replace/Repair the sensor, then follow the
instructions in section “Replacing sensor”.
Some limited functions (e.g. deleting passport)
is available without a functional sensor. In case
of deleted operation, it is necessary to cancel
the fi ngerprint verifi cation operation to get to the
password dialog.
It is strongly recommended to enroll at least two
fi ngers to avoid this problem.
If you enrolled multiple fi ngers, simply use other fi nger.
If you only enrolled one fi nger that can be used, we
recommend to use the “Enroll or Edit Fingerprints”
wizard and enroll additional fi ngerprints.
If none of your enrolled fi ngers can be used, follow this
procedure:
A Log on to Windows as an Administrator.
You can always access the computer by using your
Windows log on password. In convenient mode,
any user can access the computer by using your
Windows log on password.
B Update the enrolled fi ngerprints.
To be able to fully use Protector Suite QL, you
need to have usable enrolled fi ngerprints. Enter the
“Enroll or Edit Fingerprints” wizard.
19
Page 20
Troubleshooting
User cannot use
enrolled fi nger.
(e.g. injury)
(continued)
• If you do not use “Advanced Security”, you can still
enter using the Windows password.
• If you use “Advanced Security” with backup
password, you can enter using the backup
password.
• If you use “Advanced Security” without backup
password, there is no other way to add a different
fi ngerprint. In this case we recommend either to
wait until your fi nger is usable again (e.g. the injury
heals), or to delete the passport (Use “Delete”
wizard) and then reenroll new fi ngerprints.
Please note that in the latter case all your stored
secret data (passwords, “My Safe”
*2
encryption
keys) will be lost. To perform the delete operation
it is necessary to cancel the fi ngerprint verifi cation
operation to get to the password dialog, then enter
your Windows log on password.
• To access “My Safe” *
2
If you did not perform the procedure in step B or
it did not work, you can still access “My Safe” *2 by
using the “My Safe” *2 backup password.
*2 : <Model with Windows Vista> “File Safe”
TPM failure. If you use “Advanced Security” with TPM (Trusted
Platform Module) and TPM is broken, erased or
disabled, the “Advanced Security” will not work
anymore.
If you do not use the “Advanced Security” backup
password, follow the instructions “Starting Over”.
Otherwise, if you use “Advanced Security” backup
password, you can follow these steps:
A Enter the “Enroll or Edit Fingerprints” wizard using
the backup password.
B Disable “Advanced Security” and fi nish.
C
After the TPM is repaired and enabled (or if you only
erased its contents) you can enter the “Enroll or Edit
Fingerprints” wizard again using your fi nger and enable
the “Advanced Security” with TPM again.
20
Page 21

Replacing sensor. If you need to replace a non-functioning fi ngerprint
reader, follow this procedure:
Enrollment to the hard disk:
If enrollment to hard disk is used, “Protector Suite QL”
has not stored any data on the device and therefore
has no problem to continue after you replaced the
sensor. However, in case you use the Power-on
security (Preboot Authentication), you may need to use
the “Enroll or Edit Fingerprints” wizard to update the
related data.
Enrollment to the device:
If the fi ngerprint have been enrolled to the device, a
new passport will be required. Follow the procedure in
the section “Starting Over”.
Lost Advanced
Security backup
password.
Protector Suite
QL reinstallation.
<Model with
Windows XP>
Lost “My
Safe” backup
password.
To change the “Advanced Security” backup password,
go to the “Enroll or Edit Fingerprints” wizard and swipe
your fi nger and go through the Fingerprint enrollment.
On the Advanced Security page you can change the
backup password.
During Protector Suite QL uninstallation, you can
select whether to delete the Protector Suite Data including passports.
If you want to reinstall the product, select button to
leave the Protector Suite QL data on the computer.
After the new installation, you will be able to use your
data again.
If the Protector Suite QL was uninstalled including the
passports, then in case of enrollment to device the
fi ngerprints will still be stored in the device and the
user can use them reenrollment.
“My Safe” backup password cannot be changed
directly. It is necessary to create a new “My Safe”.
You have to:
A Unlock “My Safe”.
B Copy the data from “My Safe” to some other folder.
C Delete “My Safe” from “My Safe” settings.
D Create a new “My Safe” and defi ne the new “My
Safe” backup password.
21
Page 22
Troubleshooting
<Model with
Windows Vista>
Lost “File
Safe” backup
password.
Accessing “My
Safe” *3 after
Protector Suite
QL uninstallation.
Accessing “My
Safe” *3 after
computer crash.
“My Safe” *3 data
fi le cannot be
backed up using
Recover Pro.
It is necessary to change the backup password for
“File Safe”, refer to the UPEK Protector Suite QL Help
menu.
(Click
- [Help])
“My Safe” *3 data can be accessed only using Protector
Suite QL. If you accidentally uninstalled Protector Suite
QL, you have to reinstall it. If passport data was not
removed during uninstallation, everything will work
automatically including “My Safe” *3. If the passport data
was removed during uninstallation the “My Safe” *3 will
recognize that the installation was changed and will
offer to use the backup password, instead.
If you have an exported passport, import it now so
you can access “My Safe” *3 directly using fi ngerprints.
Otherwise you can access “My Safe” *3 using the “My
Safe” *3 backup password: “My Safe” *3 will recognize
that the installation was changed and will offer to use
the backup password, instead.
“My Safe” *3 data fi le cannot be backed up by using
File back up function in Recover Pro. To back up “My
Safe” *3 data fi le, use Quick Backup/Complete Backup
functions in Recover Pro and back up each data.
(Start) - [All Programs] - [Protector Suite QL]
Removing data
from the reader.
*3 : <Model with Windows Vista> “File Safe”
22
When enrollment to the device is used, passport data
is stored to the device. To remove it, go to the “Delete”
passport wizard and delete existing passports, and then use
the “Fingerprint Inspector” to remove remaining fi ngerprints
(e.g. left over from previous installations).
In convenient mode, the “Fingerprint Inspector” does
not allow deleting the last fi ngerprint for an existing
passport and only user’s own fi ngerprints can be deleted.
Therefore it is necessary to delete passports fi rst.
Page 23

<Only for CF-19
Series with
Windows XP Tablet
PC Edition>
Tablet PC Input
Panel is hidden
under “Please
swipe your fi nger
” message.
Move Tablet PC Input Panel according to the following
order.
A Log on to Windows.
B Click [start] - [All Programs] - [Protector Suite QL]
- [Control Center] - [Settings] - [System Settings].
C Remove a check mark for [Enable logon support],
and click [OK].
D Log off Windows.
E Move Tablet PC Input Panel to the bottom right or
bottom left.
F Log on to Windows.
G Click [start] - [All Programs] - [Protector Suite QL]
- [Control Center] - [Settings] - [System Settings].
H Add a check mark for [Enable logon support], and
click [OK].
Starting Over
If the specifi c solutions for your problem do not work, you can use these
instructions as the last measure and start over. However, please note that you can
lose your data - passwords, secret keys and fi ngerprints.
A Log on to Windows as an Administrator.
• You can always access the computer by using your Windows log on
password.
In convenient mode, any user can access the computer by using the
Windows log on password.
B Try to export your passport to a fi le if you are planning to use your
passwords, secret keys or enrolled fi ngers in the future.
• If you exported your passport recently, this step is not required.
• If biometrics authorization works and your fi nger is recognized, use “Import
or Export User Data” wizard, swipe your fi nger and continue according to
wizard’s instructions.
• If biometrics authorization works, but your fi nger is not recognized, you
can start the “Import or Export User Data” wizard and export the passport
even without using your fi ngerprint. You need to cancel fi ngerprint dialog,
and you will be prompted for a password. If you do not use “Advanced
Security”, enter your Windows log on password. Otherwise, enter your
“Advanced Security” backup password.
23
Page 24

Troubleshooting
CAUTION
If you used “Advanced Security” without a backup password. There is no
way to backup your data.
If biometrics authorization does not work, there is no way to backup
your data.
C Deleting the passport.
• Use the “Delete” wizard. Please note that all your stored secret data
(passwords, “My Safe” *4 encryption keys) will be lost. If you backed
up the data, you can restore it in the next step; otherwise it will be lost
permanently. To perform the delete operation it is necessary to cancel the
fi ngerprint verifi cation operation to get to the password dialog, then enter
your Windows log on password or backup password.
*4 : <Model with Windows Vista> “File Safe”
D Make sure your fi ngerprint sensor is working.
• Use the Tutorial wizard to verify that the fi ngerprint sensor works. If not,
reboot and try again. If it still does not work, please contact PANASONIC
TECHNICAL SUPPORT.
E Restore or create passport.
• If you have a backup of your data, you can now use “Import or Export
User Data” wizard to restore your data. Otherwise you can create a new
passport by using the “Enroll or Edit Fingerprints” wizard.
24
Page 25

Specifi cations
Array Size
Image Size
Image Resolution
248 x 4 pixels
248 x 360 pixels
508 DPI
25
Page 26

Memo
26
Page 27

27
Page 28

Matsushita Electric Industrial Co., Ltd.
Web Site : http://panasonic.net
© 2008 Matsushita Electric Industrial Co., Ltd. All Rights Reserved.
Printed in Japan
HS1206-1018
DFQX5628YA
 Loading...