

Page 1
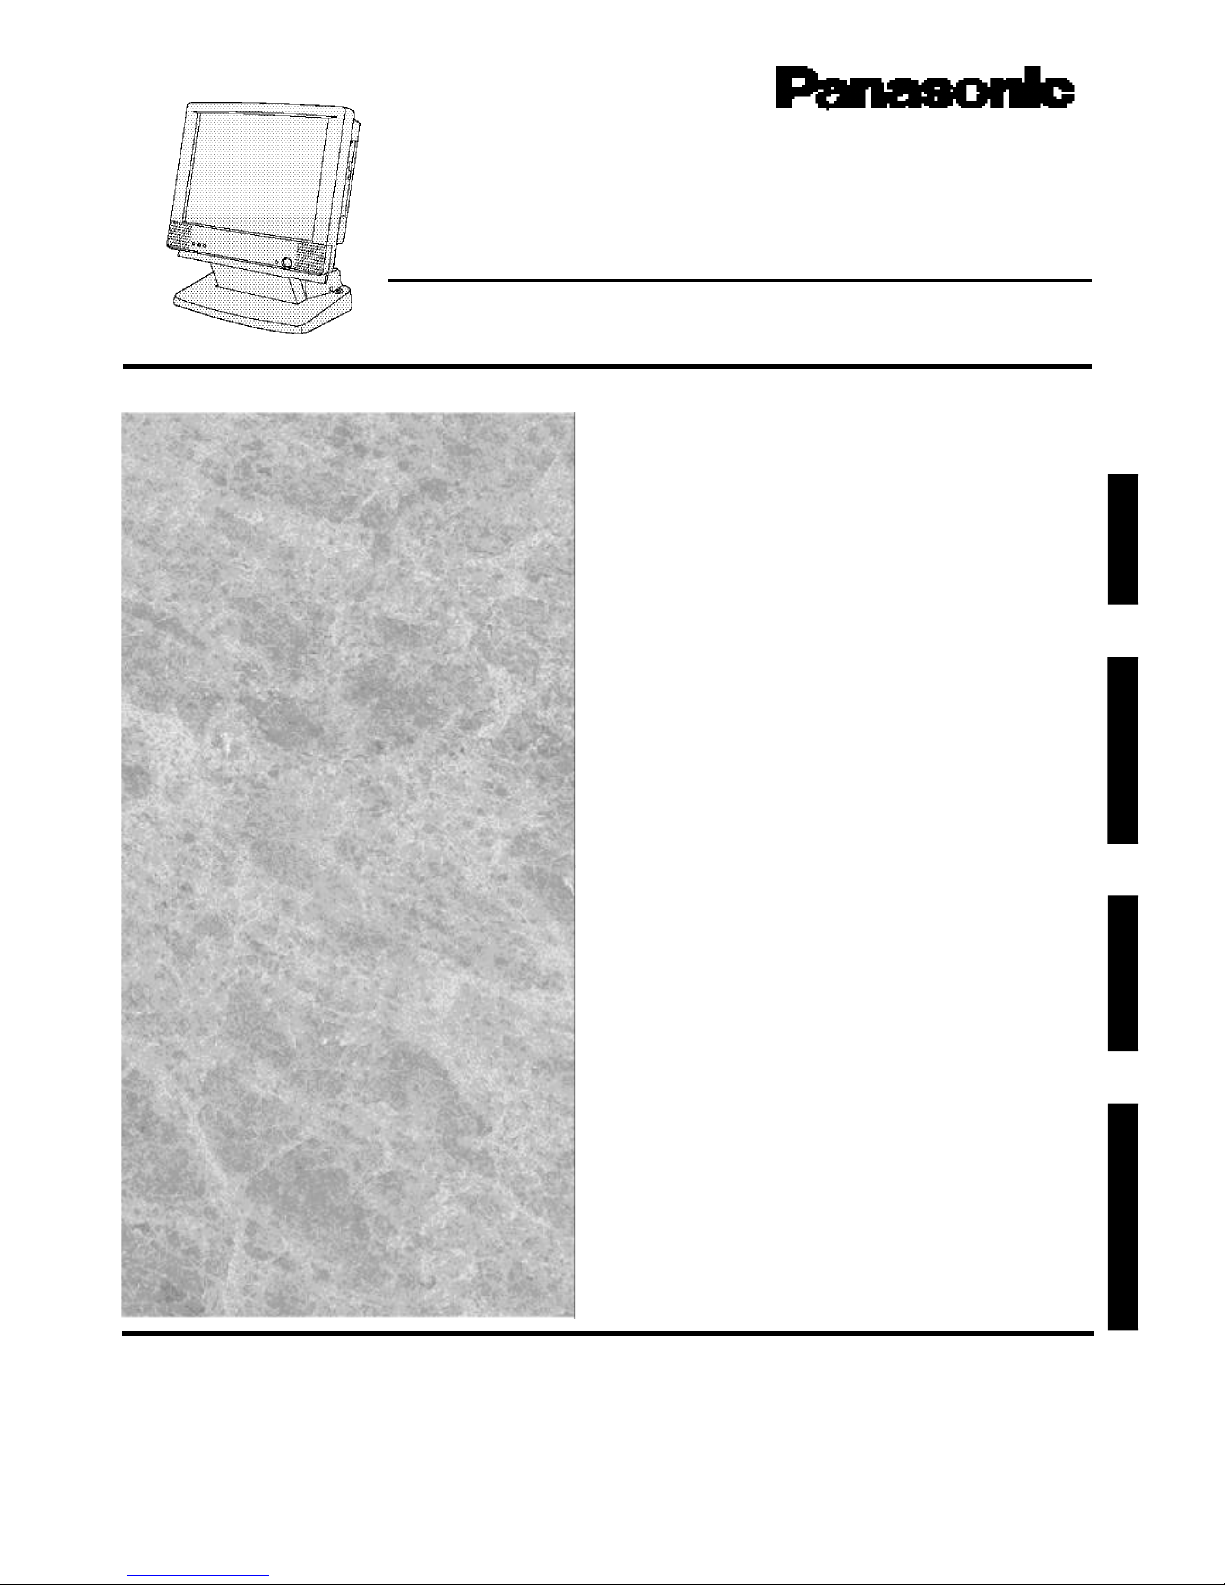
CF-55 Series
OPERATING INSTRUCTIONS
Personal Computer
®
Contents
Troubleshooting
Computer Diagnosis ........................................... 23
Dealing with Problems ........................................ 24
Technical Information .......................................... 27
Reinstalling Software .......................................... 28
Getting Started
Read Me First .......................................................... 5
First-time Operation ...............................................6
CD-ROM Drive ........................................................9
Operation
Starting Up/Shutting Down................................ 10
Conserving Power ............................................... 13
Security Measures............................................... 14
Add-ons/Peripherals ............................................ 18
Storage, Carrying and Maintenance ............... 22
Appendix
LIMITED USE LICENSE AGREEMENT......... 30
Windows 95 Setup Procedure .......................... 33
Setup Utility ........................................................... 34
Names and Functions of Parts.....................36
Specifications ....................................................38
Index .....................................................................39
Page 2
2
Introduction
Thank you for purchasing the Panasonic CF-55 series computer. Please read the Operating Instructions thoroughly for proper
operation of your new computer.
Customer's Record
Serial
No.
or
Date
of
Purchase
Model
No.
Code
No.
Dealer's
Name
Dealer's
Address
NOTE : NOTE provides a useful fact or helpful information.
CAUTION : CAUTION indicates a condition that may result in minor or moderate injury.
WARNING : WARNING indicates a hazard that may result in moderate or serious injury, or even death.
[Start]-[Shut Down] : This illustration means to click [Start], and then to click [Shut Down].
(For some applications, you may need to double-click.)
: This illustration means to press the [Enter] key.
+ : This illustration means to press [Alt], and while holding down on [Alt], to press [Ctrl].
Illustrations in this Manual
Copyright
This manual is copyrighted by Matsushita Electric Industrial Co., Ltd. with all rights reserved. No part of this manual may be
reproduced in any form without the prior written permission of Matsushita Electric Industrial Co., Ltd.
No patent liability is assumed with respect to the use of the information contained herein.
©Matsushita Electric Industrial Co., Ltd. 1997. All Rights Reserved.
Disclaimer
Computer specifications and manuals are subject to change without notice. Matsushita Electric Industrial Co., Ltd. assumes no
liability for damage incurred directly or indirectly from errors, omissions or discrepancies between the computer and the manuals.
Trademarks
PS/2™ is a trademark of International Business Machines Corporation.
Microsoft®, MS-DOS® and Windows® are registered trademarks of Microsoft Corporation of the United States and/or other
countries.
Pentium® is a registered trademark of Intel Corporation.
PhoenixCard ManagerTM is a trademark of Phoenix Technologies Ltd.
Panasonic® is a registered trademark of Matsushita Electric Industrial Co., Ltd.
Page 3

3
This device complies with Part 15 of the FCC Rules. Operation
is subject to the following two conditions:
(1) This device may not cause harmful interference, and
(2) This device must accept any interference received, including
interference that may cause undesired operation.
CD Drive Caution
Warning
To assure continued compliance, use only shielded interface
cables when connecting to a computer or peripheral. Also, any
changes or modifications not expressly approved by the party
responsible for compliance could void the user's authority to
operate this equipment.
Federal Communications Commission Radio
Frequency Interference Statement
For U.S.A.
CAUTION!
THIS PRODUCT UTILIZES A LASER.
USE OF CONTROLS, ADJUSTMENTS OR ADOPTION OF
PROCEDURES OTHER THAN THOSE SPECIFIED HEREIN
MAY RESULT IN HAZARDOUS RADIATION EXPOSURE.
DO NOT OPEN COVERS AND DO NOT REPAIR YOURSELF.
REFER SERVICING TO QUALIFIED PERSONNEL
WARNUNG!
DIESES PROUKT ERZEUGT LASERSTAHLUNG.
DURCHFÜHRUNG ANDERER VORGÄNGE ALS DER
HIER ANGEGEBENEN KANN ZU GEFÄHRLICHER
STRAHLUNG FÜHREN.
REPARATUREN DÜRFEN NUR VON QUALIFIZIERTEM
FACHPERSONAL DURCHGEFÜHRT WERDEN.
AVERTISSEMENT!
CET APPAREIL UTILISE UN LASER.
L'UTILISATION DE COMMANDES OU DE RÉGLAGES OU
L'EXÉCUTION DE PROCÉDURES AUTRES QUE CELLES
SPÉCIFIÉES ICI PEUVENT PROVOQUER UNE EXPOSITION À DES RADIATIONS DANGEREUSES.
NE PAS OUVRIR LES COUVERCLES NI ESSAYER DE
RÉPARER SOI-MÊME.
CONFIER TOUT TRAVAIL D'ENTRETIEN À UN PERSONNEL QUALIFIÉ.
Note: This equipment has been tested and found to comply with
the limits for a Class B digital device, pursuant to Part 15 of the
FCC Rules. These limits are designed to provide reasonable
protection against harmful interference in a residential
installation. This equipment generates, uses and can radiate radio
frequency energy and, if not installed and used in accordance
with the instructions may cause harmful interference to radio
communications. However, there is no guarantee that interference
will not occur in a particular installation. If this equipment does
cause harmful interference to radio or television reception, which
can be determined by turning the equipment off and on, the user
is encouraged to try to correct the interference by one or more
of the following measures:
Reorient or relocate the receiving antenna.
Increase the separation between the equipment and receiver.
Connect the equipment into an outlet on a circuit different
from that to which the receiver is connected.
Consult the Panasonic Service Center or an experienced radio/TV technician for help.
To ensure safe operation the three-pin plug must be inserted only
into a standard three-pin power point which is effectively earthed
through the normal household wiring.
Extension cords used with the equipment must be three-core and
be correctly wired to provide connection to earth. Wrongly wired
extension cords are a major cause of fatalities.
The fact that the equipment operates satisfactorily does not
imply that the power point is earthed and that the installation
is completely safe.
For your safety, if you have any doubt about the effective earthing
of the power point, consult a qualified electrician.
If the plug contains a removable fuse cover you must ensure that
it is refitted when the fuse is replaced.
If you lose the fuse cover the plug must not be used until a replacement cover is obtained.
A replacement fuse cover can be purchased from your local
Panasonic Dealer.
IF THE FITTED MOULDED PLUG IS UNSUITABLE FOR
THE SOCKET OUTLET IN YOUR HOME THEN THE FUSE
SHOULD BE REMOVED AND THE PLUG CUT OFF AND
DISPOSED OF SAFELY.
THERE IS A DANGER OF SEVERE ELECTRICAL SHOCK
IF THE CUT OFF PLUG IS INSERTED INTO ANY 13 AMP
SOCKET.
If a new plug is to be fitted please observe the wiring code as
shown below.
If in any doubt please consult a qualified electrician.
Check for the ASTA mark or the BSI mark on the body
of the fuse.
This appliance is supplied with a moulded three pin mains plug
for your safety and convenience.
A 3 amp fuse is fitted in this plug.
Should the fuse need to be replaced please ensure that the replacement fuse has a rating of 3 amps and that it is approved by
ASTA or BSI to BS 1362.
FOR YOUR SAFETY PLEASE READ THE FOLLOWING
TEXT CAREFULLY
For U.K.
Warning
This apparatus must be earthed for your safety.
Page 4
4
Cables
Use of an interface cable longer than 3 m (9.84 feet) is not
recommended.
Handling
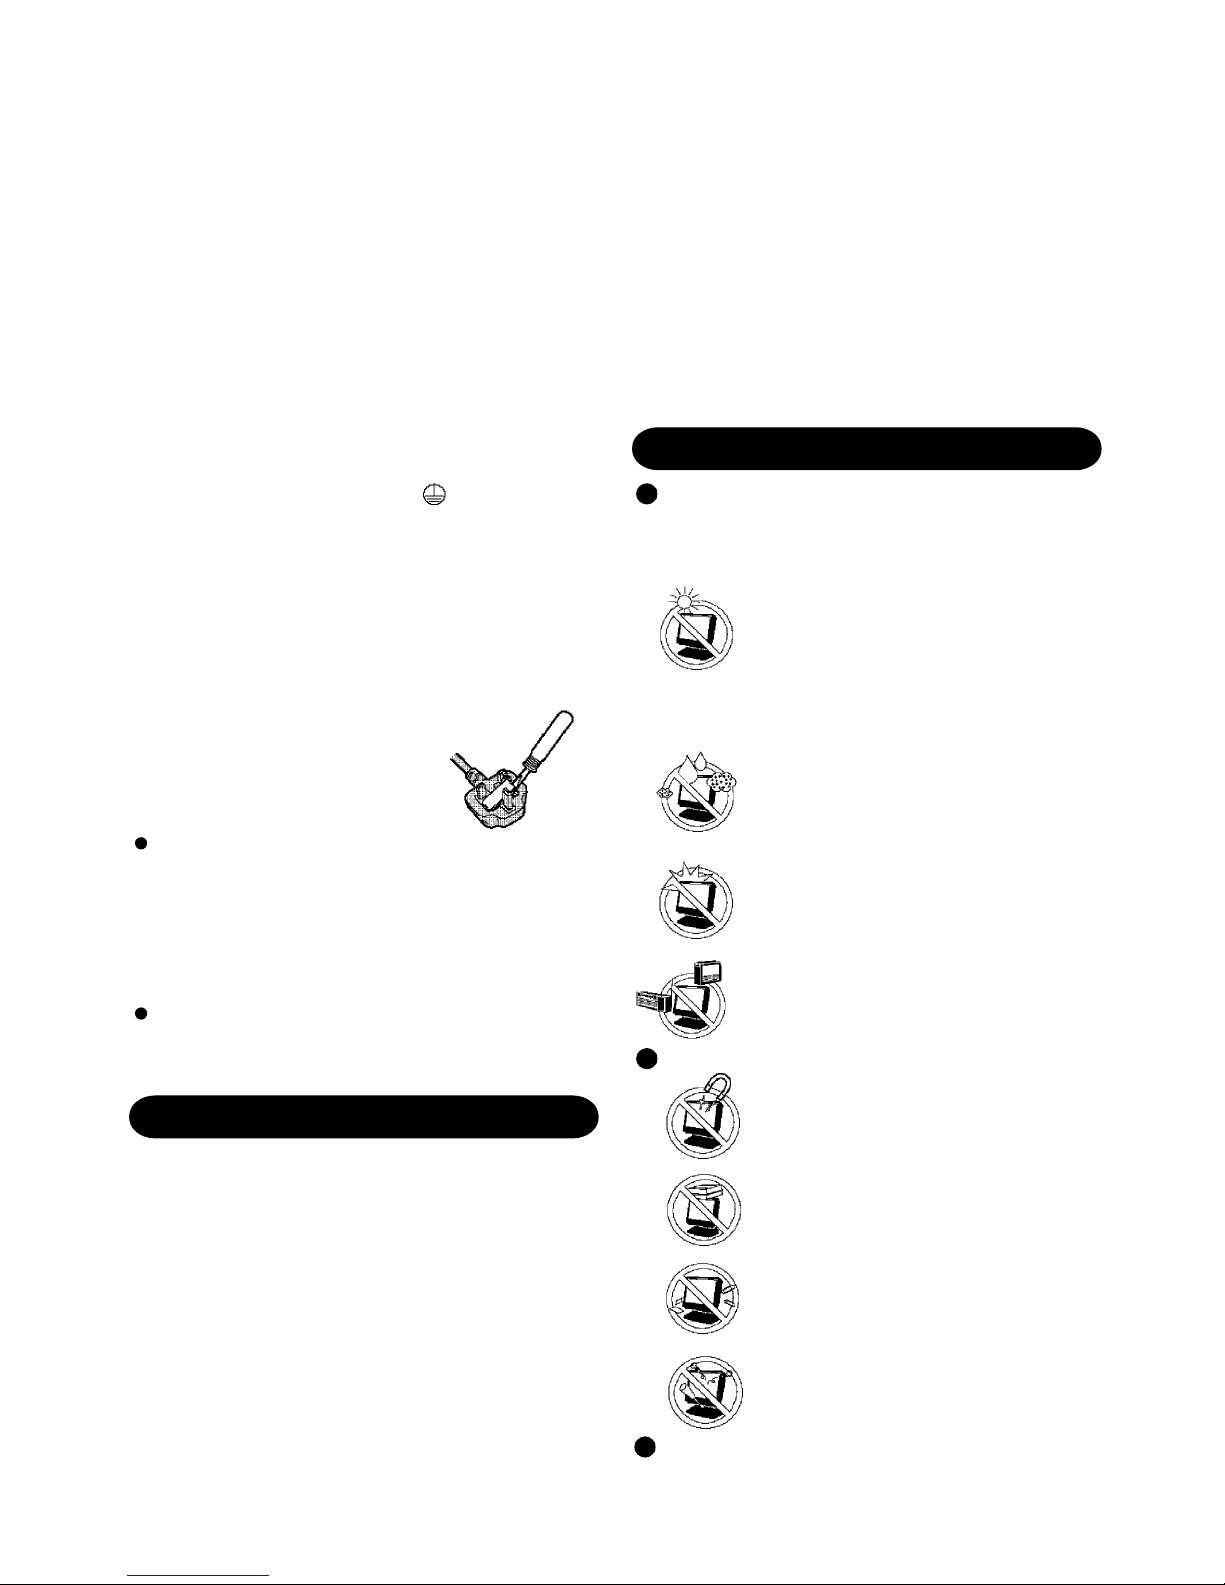
Avoid Magnetic Fields
Keep the computer away from magnets.
Avoid Stacking
Do not place heavy objects on top of the
computer.
Do Not Disassemble the Computer
Do not attempt to disassemble your computer.
Keep Small Objects Away
Do not insert paper clips or other small objects
into the computer.
Avoid Radio Frequency Interference
Do not place the computer near a television or
radio receiver.
Prevent Shock
Avoid subjecting the computer to severe
vibrations or impact. Do not place the computer
inside a car trunk.
Avoid Humidity Liquids and Dust
Do not store or use the computer in locations
exposed to high humidity, liquids (including rain)
or dust.
Avoid Direct Sunlight on the LCD Panel
The LCD panel should not be exposed to direct
sunlight or ultraviolet light.
Avoid Extreme Heat and Cold
Do not store or use the computer in locations
exposed to heat, direct sunlight, or extreme cold.
Avoid moving the computer between locations
with large temperature differences.
Operation: 5 oC to 35 oC (41 oF to 95 oF)
Storage: -20 oC to 60 oC (-4 oF to 140 oF)
Usage
Precautions
Warnung bezüglich der Lithiumbatterie
(Sicherungsbatterie)
Lithiumbatterie!
Dieser Computer enthält eine Lithiumbatterie zur Sicherung von
Datum und Uhrzeit der eingebauten Uhr sowie anderer
Systemdaten im Speicher bei einer Unterbrechung der
Hauptstromversorgung. Diese Sicherungsbatterie darf nur von
Kundendienstpersonal ausgewechselt werden.
Warnung! Bei falschem Gebrauch besteht Explosionsgefahr!
Entsorgung gebrauchter Batterien nach Angaben des Herstellers.
Lithium Battery!
This computer contains a lithium battery to enable the date,
time, and other data to be stored in it.
The battery should only be exchanged by service personnel.
Warning! Risk of explosion from incorrect installation or misapplication!
Lithium Battery
Avertissement concernant la pile au lithium
(pile de sauvegarde)
Pile au lithium!
Le micro-ordinateur renferme une pile au lithium qui permet de
sauvegarder certaines données comme la date et l'heure
notamment. Elle ne devra être remplacée que par un technicien
qualifié.
Avertissement! Risque d'explosion en cas de non respect de cette
mise en garde!
Warnings
This equipment is not designed for connection to an IT power
system.
(An IT system is a system having no direct connections between live parts and Earth; the exposed-conducive-parts of the
electrical installation are earthed.
An IT system is not permitted where the computer is directly
connected to public supply systems in the U.K.)
Disconnect the mains plug from the supply socket when the
computer is not in use.
This equipment is produced to BS800/1983.
Green-and-yellow: Earth
Blue: Neutral
Brown: Live
Important
The wires in this mains lead are coloured in accordance with the
following code:
Warning: THIS APPLIANCE MUST BE EARTHED.
As the colours of the wires in the mains lead of this apparatus
may not correspond with the coloured markings identifying the
terminals in your plug, proceed as follows:
The wire which is coloured GREEN-and-YELLOW must be
connected to the terminal in the plug which is marked by the
letter E or by the safety earth symbol coloured GREEN or
GREEN-and-YELLOW.
The wire which is coloured Blue must be connected to the terminal which is marked with the letter N or coloured BLACK.
The wire which is coloured Brown must be connected to the
terminal which is marked with the letter L or coloured RED.
The mains plug on this equipment must be used to disconnect
the mains power.
Please ensure that a socket outlet is available near the equipment and shall be easily accessible.
How to replace the fuse
Open the fuse compartment with a
screwdriver and replace the fuse.
Page 5
5
Read Me First
Do not expose your computer to shock.
Shock may damage your hard disk or make your software applications and data unusable.
Therefore, please use care when handling your computer.
Do not cut the power to your computer or adjust the angle of the display while the
HDD indicator ( ) is on or while software applications are running.
Properly shut Windows* down to avoid problems ([Start]-[Shut Down]).
This computer houses the hard disk drive (HDD) in the back of the display, so if you adjust
the angle of the display while the HDD indicator ( ) is on, malfunction may result.
Save all valuable data to floppy disks.
To limit damage should trouble occur to your computer or should you inadvertently change
or erase data, it is a good idea to make backups on floppy disks.
Use the security function for all important data.
page 14 - Security Measures
Saving Data on the Hard Disk
Write Enable
Write Disable
Write-protect Tab
* This computer uses Microsoft
®
Windows® 95 Operating System.
Saving Data on Floppy Disks
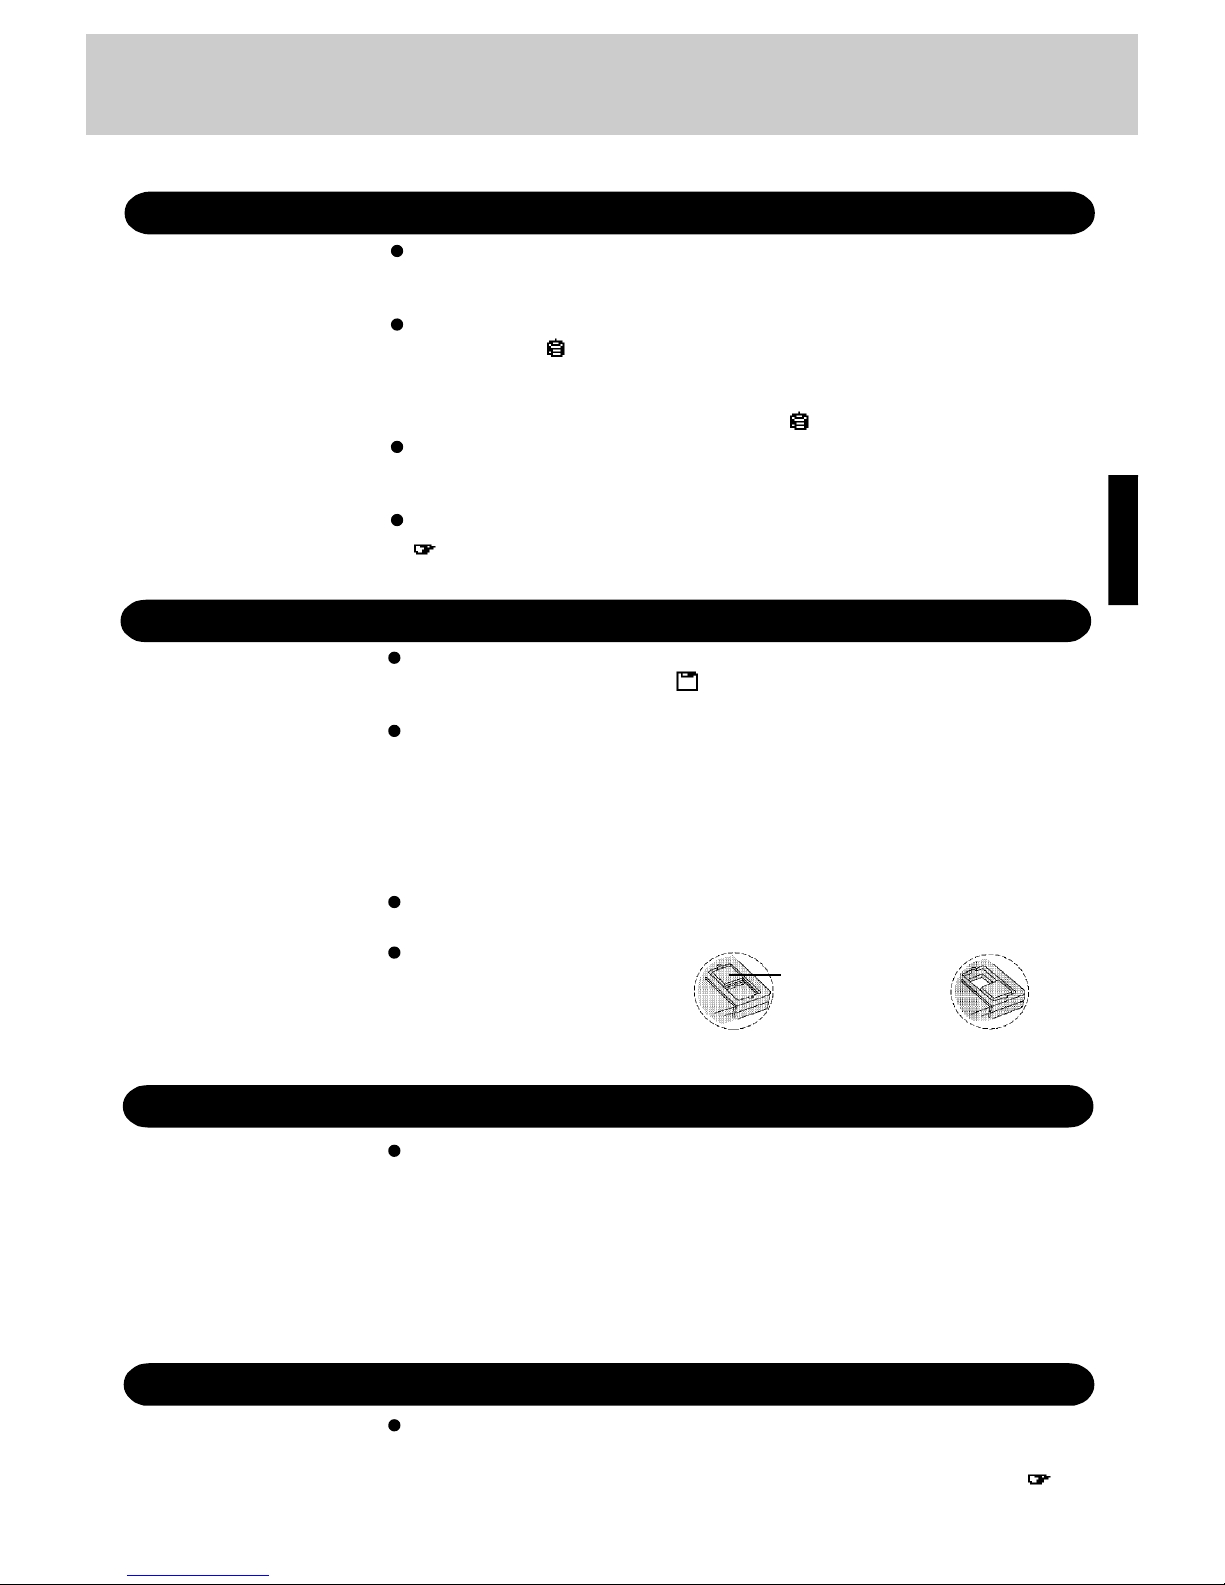
Do not cut the power to your computer or press the floppy disk drive (FDD) eject
button while the FDD Indicator ( ) is on.
Doing so may damage the data on the floppy disk and make the disk useless.
Use care when handling floppy disks.
To protect the data on your floppy disks or to prevent a floppy disk from becoming stuck in
your computer, avoid the following:
• Sliding the shutter on the floppy disk manually.
• Exposing the disk to a magnetic field.
• Storing the disk in locations prone to high temperatures, dampness, or dust.
• Applying more than one label on the disk.
Confirm the contents of a floppy disk before formatting it.
Confirm that no important data is on the disk, because all data on the disk will be erased.
Use the write-protect tab.
This is a must for preserving
important data. This prevents
your data from being erased or
overwritten.
About Disk Utilities
Computer Viruses
Users are advised to purchase the latest versions of virus protection software and use
them regularly.
We recommend you run the software:
• When booting your computer.
• After receiving data.
We recommend that you check data received on floppy disks or from external sources, such
as data downloaded from the Internet, e-mail, etc. (For compressed files, please uncompress
them before running the software).
Disk Utilities not conforming to FAT32 should not be used in the computer.
Running such programs may result in the incorrect display of HDD content or damage to
data on the HDD. For more information, please read the "Technical Information" ( page
27).
Page 6
6
First-time Operation
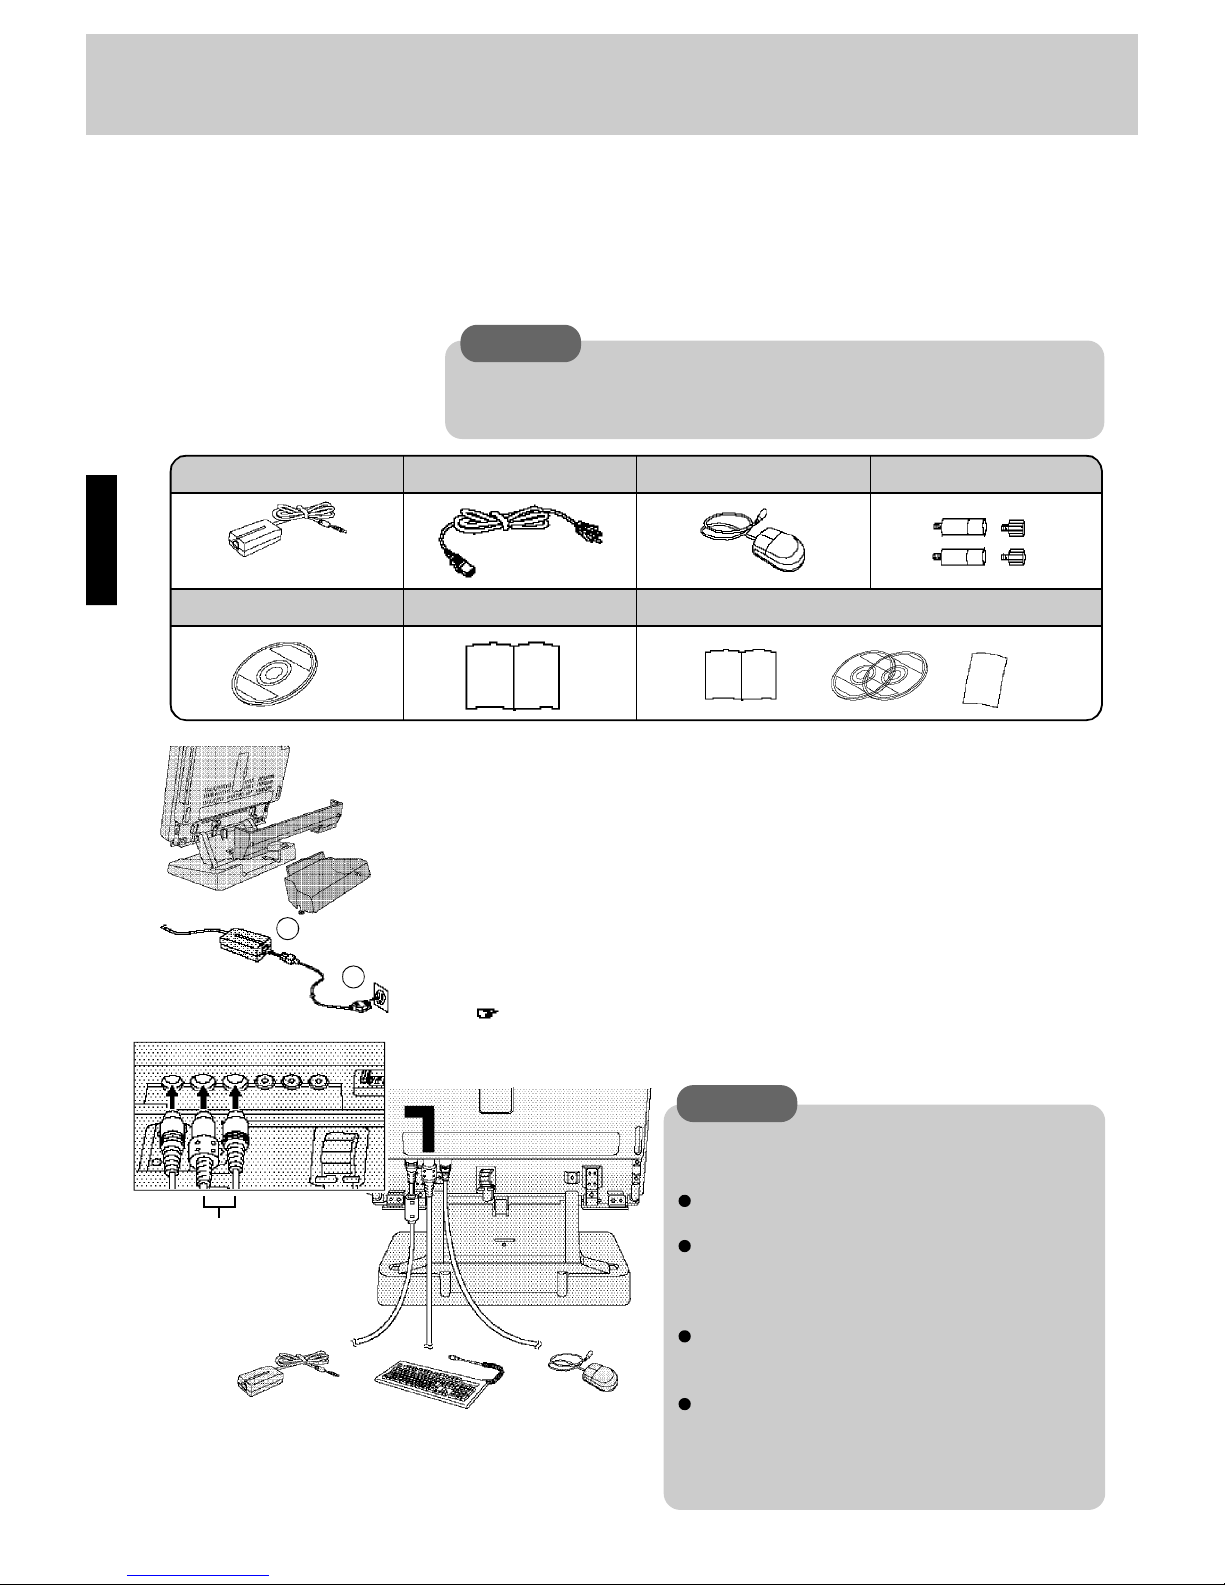
1
Confirm the inclusion of all parts
Make sure the parts shown in the figure have been supplied. If any of them is missing
or is not working properly, please consult your nearest Panasonic dealer.
It’s now time to get started. Please read the steps below to help you learn what parts are included, and to gain an understanding of some basic computer-related operations.
CF-AA159
AC Cord....................................
1
AC Adapter .............................
1
Firstaid CD..............................
1
Screws.......................................
4
Mouse ........................................
1
2
Remove the rear panels to connect the AC adapter and other
external devices
Remove the seal and then remove the back cover.
3
1
▼
Line up the arrow on the
keyboard or mouse connector with the label attached to the computer.
Operating Instructions .....
1
Windows 95 System Pack .....................................................
1
Connect the cables
Connect an AC adapter, a mouse, an optional keyboard and other optional devices
(printer, serial devices etc.).
(Option:CF-VKB001)
2
Adjust the angle of the display vertically, so that it is easy to see the connectors.
( page 7)
CAUTION
Handling the AC adapter
Do not twist or pull the AC power cord forcefully.
Doing so may damage the connections.
Use only the specified AC adapter (factory control
number: CF-AA159) with your computer. Using an
AC adapter other than the one supplied might damage
the battery and/or the computer.
When the DC plug is not connected to the computer,
disconnect the AC cord from your AC wall outlet as
well.
Problems such as sudden voltage drops/surges may
arise during periods of thunder and lightning. Since
this could adversely affect your computer, an
uninterruptible power source (UPS) is highly recommended.
Be sure the AC adapter is connected until completing Step
9 on page 8.
CAUTION
Please prepare one 2HD formatted floppy disk to create Firstaid FD of the Panasonic
utilities. This Firstaid FD is to be used when reinstallation of the Panasonic utilities
becomes necessary.
Page 7
7
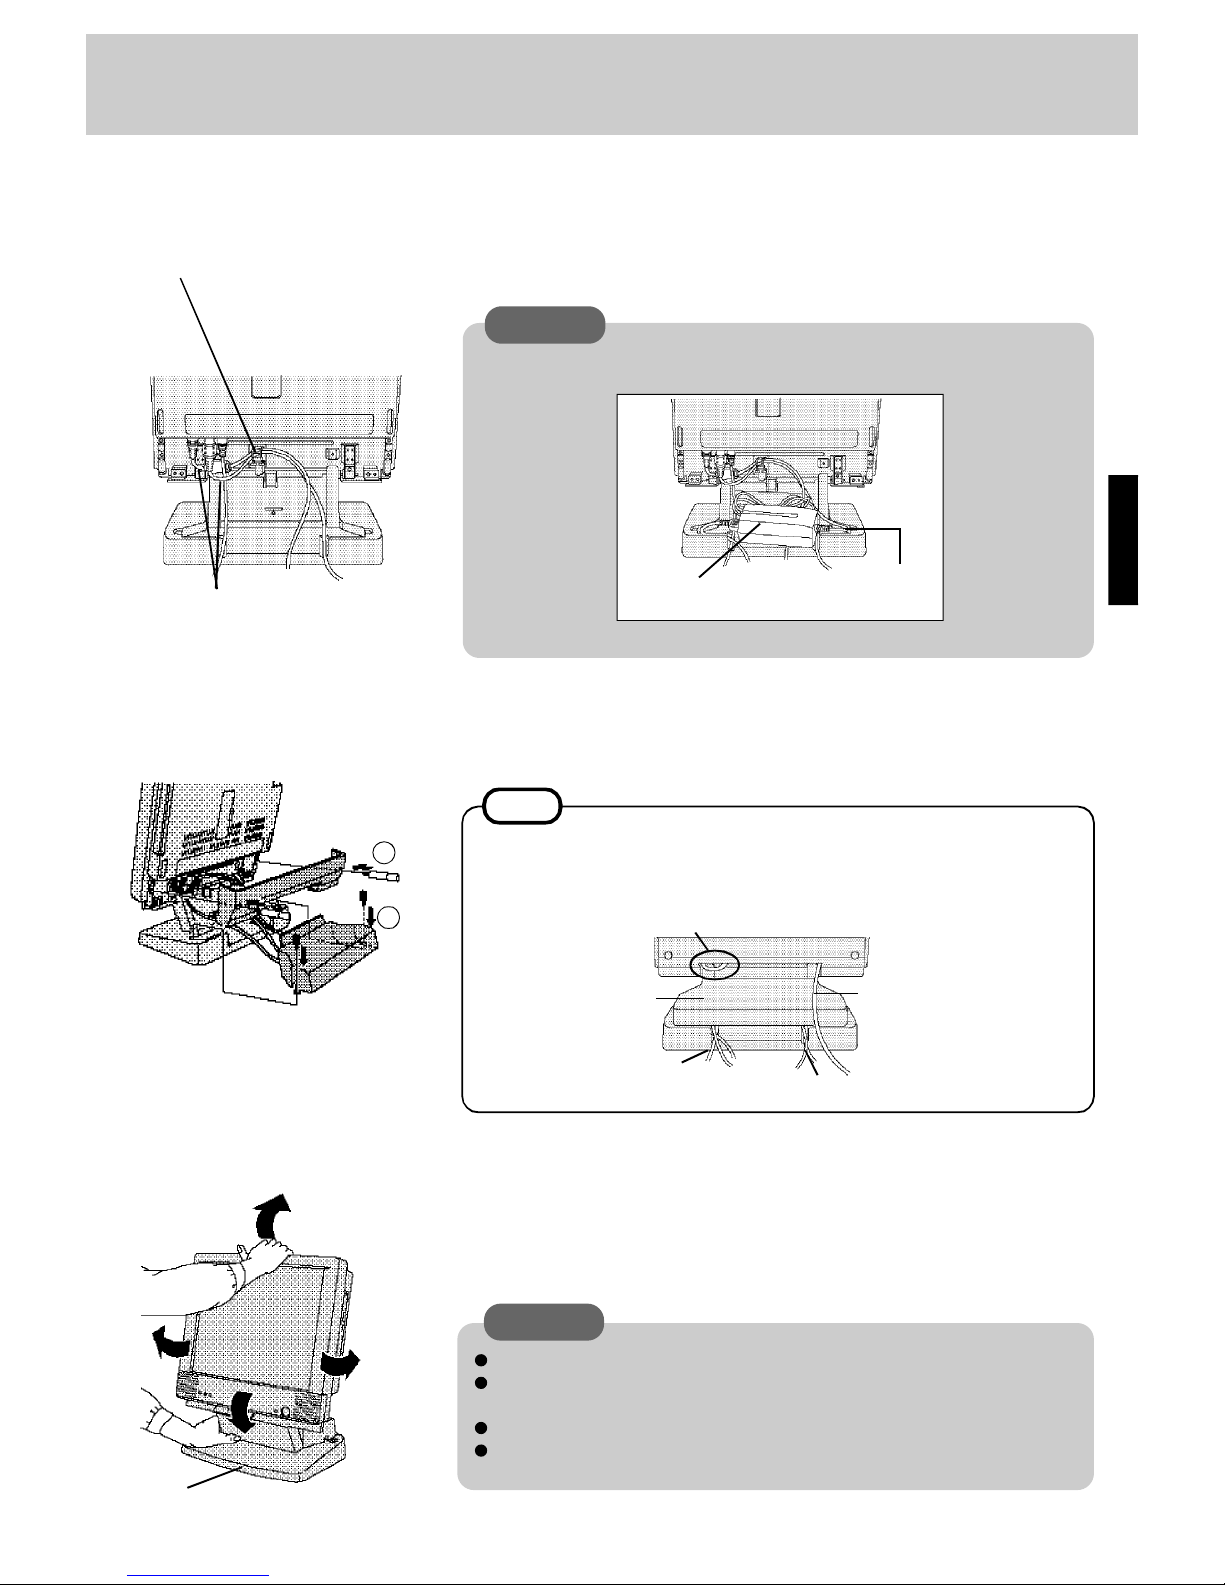
Clamp
Only the cables for the AC
adapter and/or keyboard
should pass through this
clamp.
Slacken here.
Connect and store the cables
Bundle the cables with the clamp. You can store the AC adapter in the cover.
Stand
Attach the cover by tightening the four screws by hand
5
4
CAUTION
When you store the AC adapter in the cover, do not twist the cables forcefully.
AC Adapter
Do not bend the
cables forcefully.
NOTE
The cables should partially extend behind the cover.
If an external display is connected, the cable will extend through the bottom of the
cover.
Cover
Slacken
External Display Cable
6
Adjust the angle of the display
Grasp the stand in hand and adjust by holding the upper part of the display.
CAUTION
Place the computer on a flat and stable surface.
Do not adjust the angle of the display while the HDD, FDD, CD-ROM indicators on.
Do not place the computer near a television, radio receiver or magnet.
Do not use the computer in a location where there is a lot of oily smoke or
tobacco smoke. Doing so could shorten the service life of the CD-ROM drive.
1
2
Parallel, Serial Cable etc.
Mouse, Keyboard, AC adapter
Cable
Page 8
8
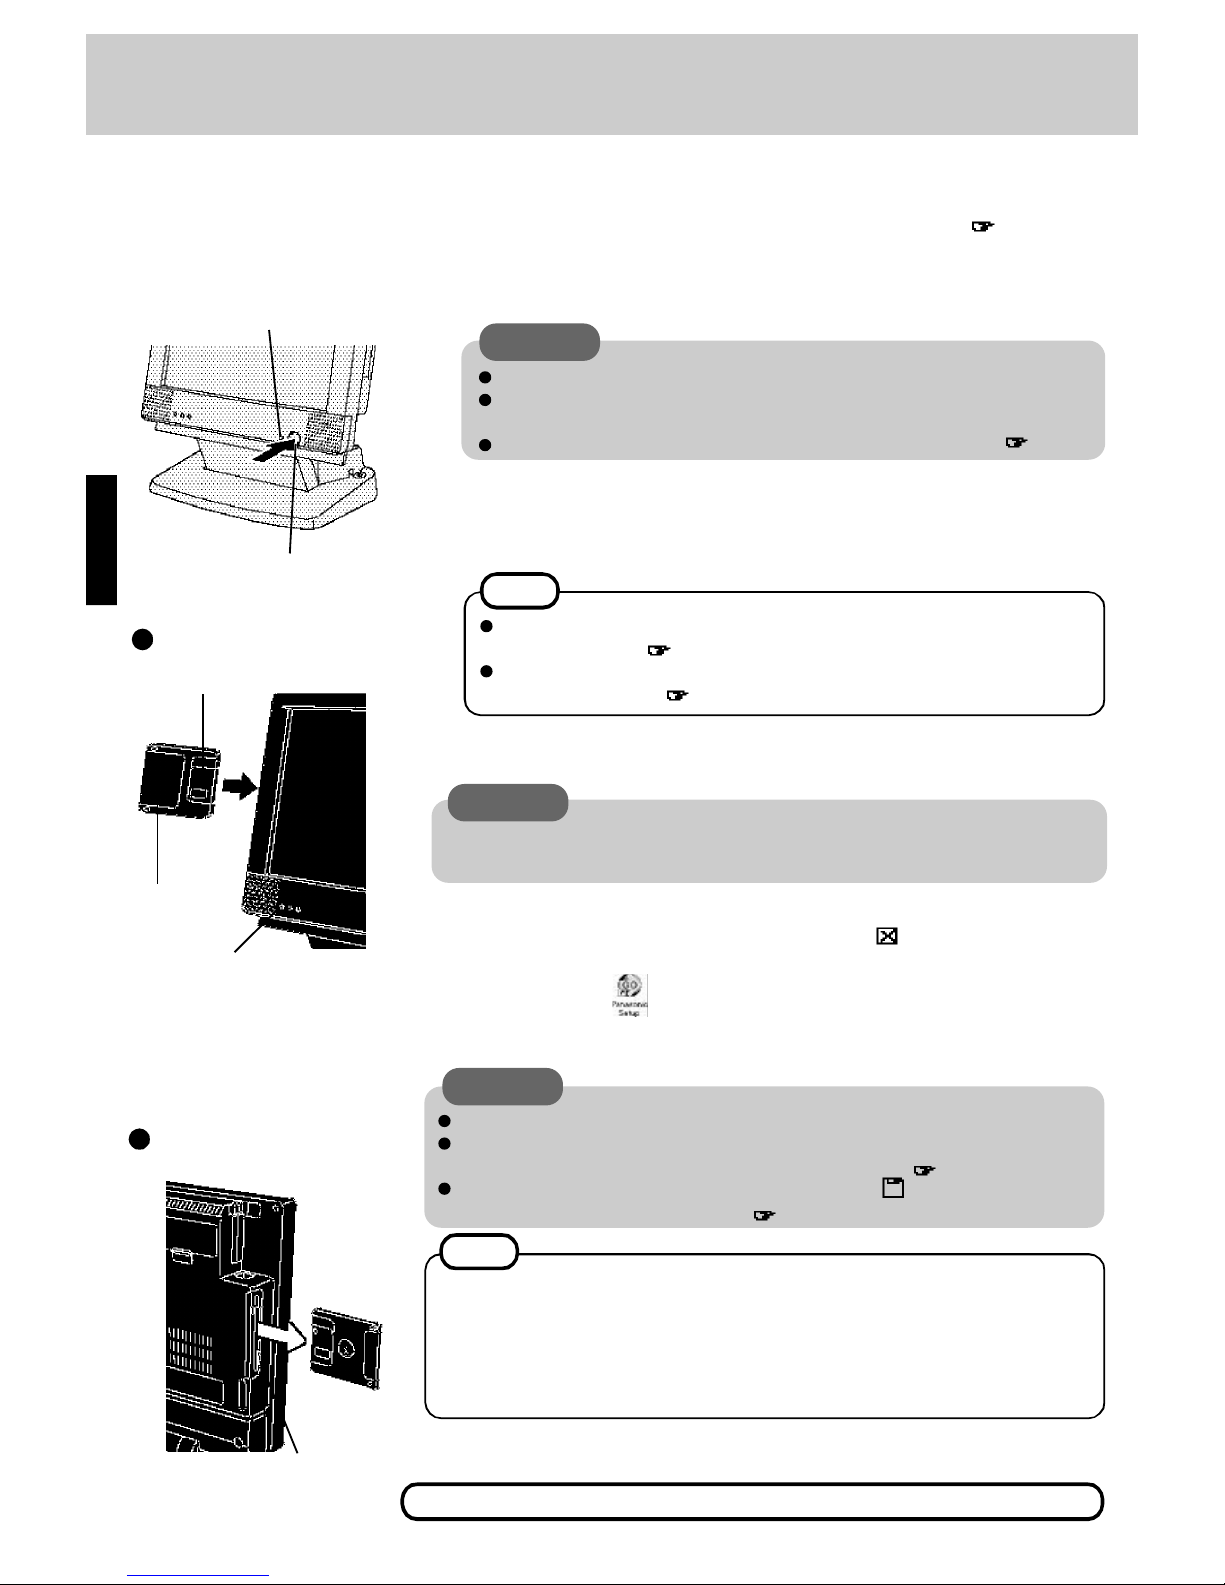
Press the power switch and hold
until the power indicator goes on
before releasing it.
This concludes the first-time use operation guidelines.
Shutter
FDD Indicator
Label-side
Inserting a floppy disk
7
Read the LIMITED USE LICENCE AGREEMENT ( page 30)
Before removing the seal covering the power switch, please read the LIMITED USE
LICENCE AGREEMENT. Removal of this seal indicates agreement to the terms specified. After you have agreed to the terms, you may turn your computer on.
CAUTION
Do not press the power switch repeatedly.
After you have turned your computer off, you must wait more than ten seconds
before you can turn it back on.
Remove the lens protect sheet attached to the lens in the CD drive.( page 9)
8
Set Windows up
The [Windows 95 Setup] will run after the computer is turned on. Simply follow the
instructions on the screen.
NOTE
Please read the supplemental "Windows 95 Setup Procedure" for a more detailed explanation ( page 33).
If the display or the sound quality is not right, you can adjust the brightness,
contrast and volume ( page 36).
Power Switch
Power Indicator
Label side toward you while
inserting the shutter-side
head first.
Eject Button
Ejecting a floppy disk
CAUTION
It may take several minutes to reboot the computer.
Please store the firstaid FD in a safe place. They will enable you to return your computer to factory default settings should any problems occur ( page 27).
Do not remove the floppy disk while the FDD indicator ( ) is on, power down your
computer or use the suspend function ( page 11).
10
Double-click (Panasonic Setup icon) on Windows
Be sure to have a blank floppy disk on hand then simply follow the instructions on the
screen.
CAUTION
When removing a floppy disk, the floppy disk may spring out of the floppy disk drive. It
may not a malfunction.
First-time Operation
9
Close the Internet Explorer 4.0 window
At the [Welcome - Microsoft Internet Explorer], select at the upper right portion to
close the screen.
About the CF-55 series Readme
Please read the Readme file, as it contains important information. To access it, please
click [Start] - [Programs] - [Panasonic] - [Read me please].
NOTE
About Internet Explorer 4.0
Please select the item that you want to open from the menu on the [Welcome - Microsoft
Internet Explorer].
Page 9
9
CD-ROM Drive
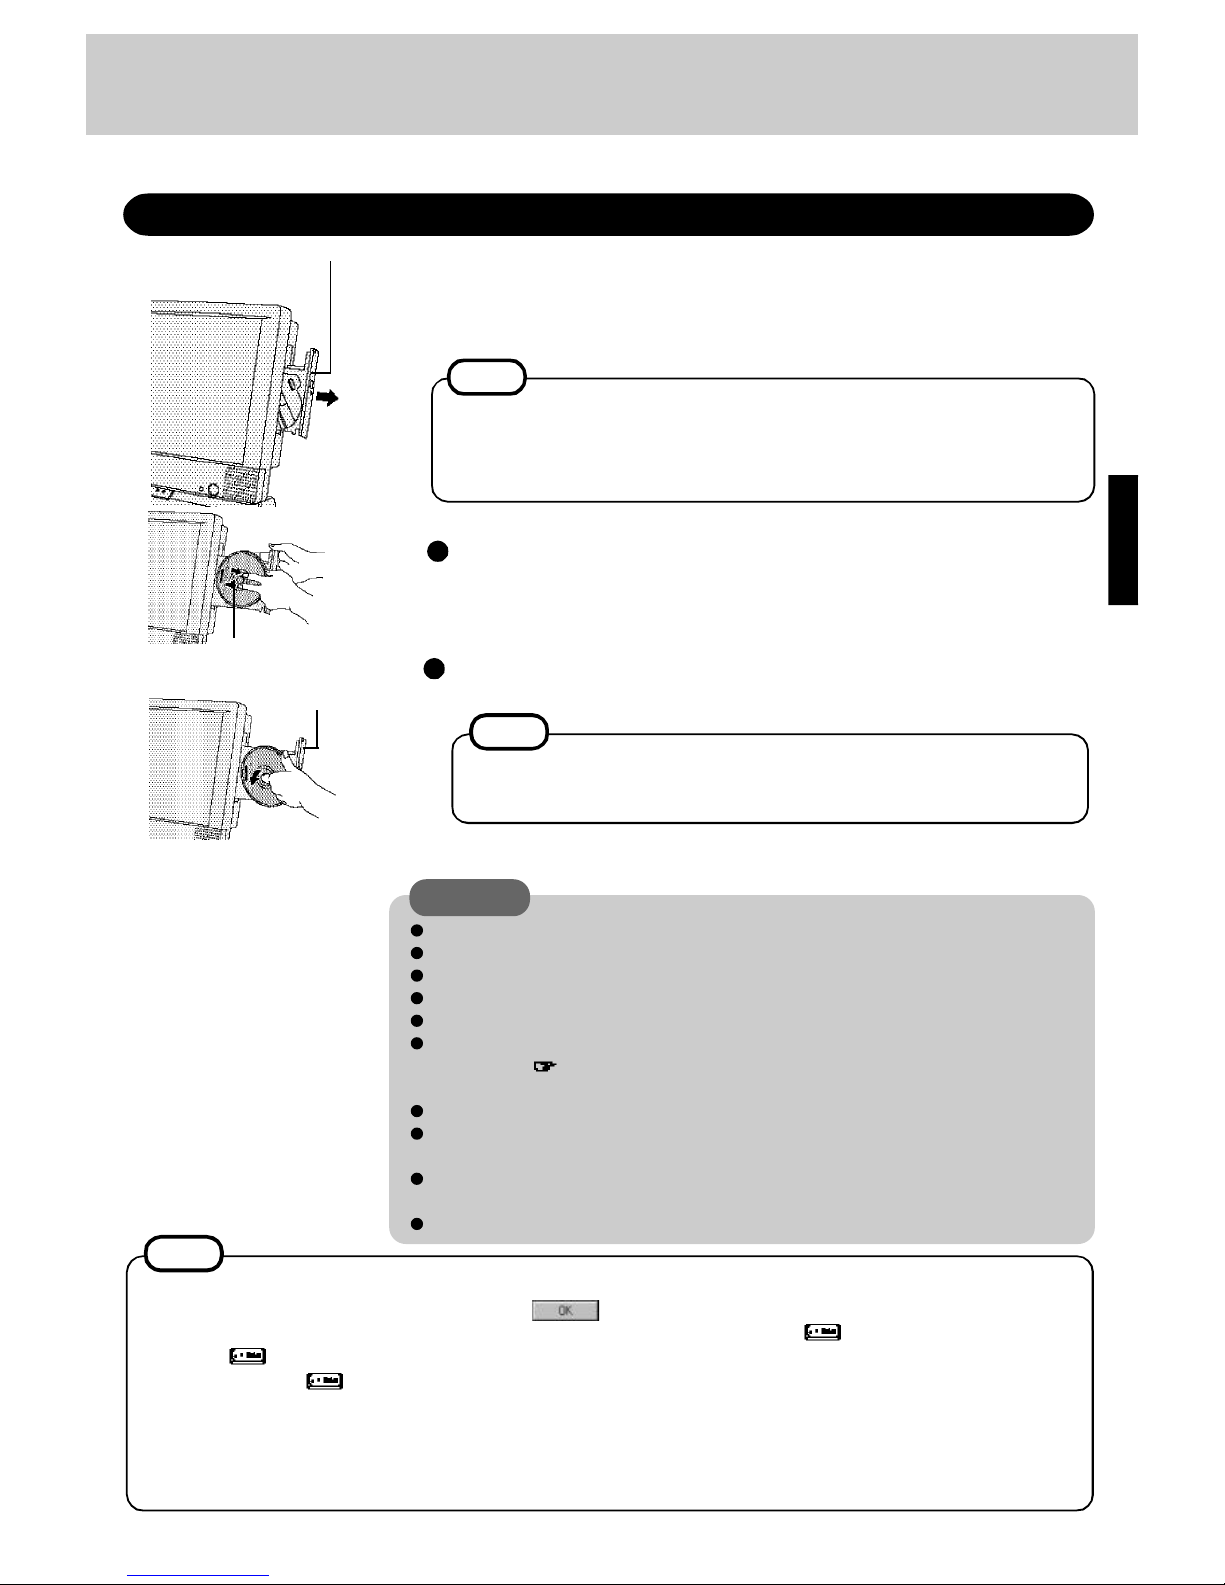
Loading and Removing a CD
NOTE
When you use the CD for the first time, remove the lens protect sheet attached to the
lens in the CD-ROM drive.
While moving the computer, or if powered off for and extended period, attach this
sheet to protect the lens.
1
Turn your computer on
2
CD Eject Button
Press the CD eject button
The tray is partially extended automatically, slowly extend the remainder by hand.
3
Inserting a CD
Hold the CD so that your hand does not touch the data surface. With the label side
facing up, set it into the center holder.
Center Holder
Removing a CD
Place your finger on the center holder and lift up on the edge of the CD.
To remove a CD when the computer is power off, insert a sharp object such as
the bent-out tip of a paper clip into the emergency hole. Pushing it completely to
the end will free the tray so that it can be pulled out.
NOTE
4
Close the tray
Manually slide the tray closed.
Emergency Hole
CAUTION
Do not leave the tray open or touch the lens.
When the tray is open, applying too much force on the tray could damage it.
Do not open the CD drive during CD access.
Do not insert paper clips or other small objects into the CD drive.
Be careful so that the computer does not fall when setting or removing a CD.
Touching the data surface can make it dirty or even damage the CD. (For details on
maintenance page 22) Particularly a video CD is influenced by dirt or damage, so it
may not play or work properly. Be careful not to scratch a CD when handling.
Do not use a CD that has become deformed (warped), not completely round, etc.
The image can not be displayed smoothly when MPEG data or video CD is played by the
software.
The image may be disturbed when a photo CD is played. In a case like this, the image
will be displayed properly when the photo CD is played again.
If the CD is removed during CD playback, the computer may not work properly.
1 Select [Start] - [Shut Down] - [Restart in MS-DOS], click .
2 Type the following.
cd \
edit config.sys
3 Move the cursor to the line containing "ATAPICD.SYS" and
delete the characters "REM" at the beginning of the line.
device=c:\windows\command\atapicd.sys /d:mscd000
4 Press Alt -F, then "S" to save the file. Then press Alt-F, then
"X" to exit the Edit program.
NOTE
5 Type the following.
edit autoexec.bat
6 Move the cursor to the line containing "MSCDEX.EXE" and
delete the characters "REM" at the beginning of the line.
c:\windows\command\mscdex.exe /d:mscd000 /L:L
7 Press Alt -F, then "S" to save the file. Then press Alt-F, then
"X" to exit the Edit program.
8 Restart the computer.
In order to use the CD-ROM drive in the MS-DOS mode, follow the additional steps below to install the necessary driver.
Page 10
10
Starting Up/Shutting Down
Starting Up
1
Turn your computer on
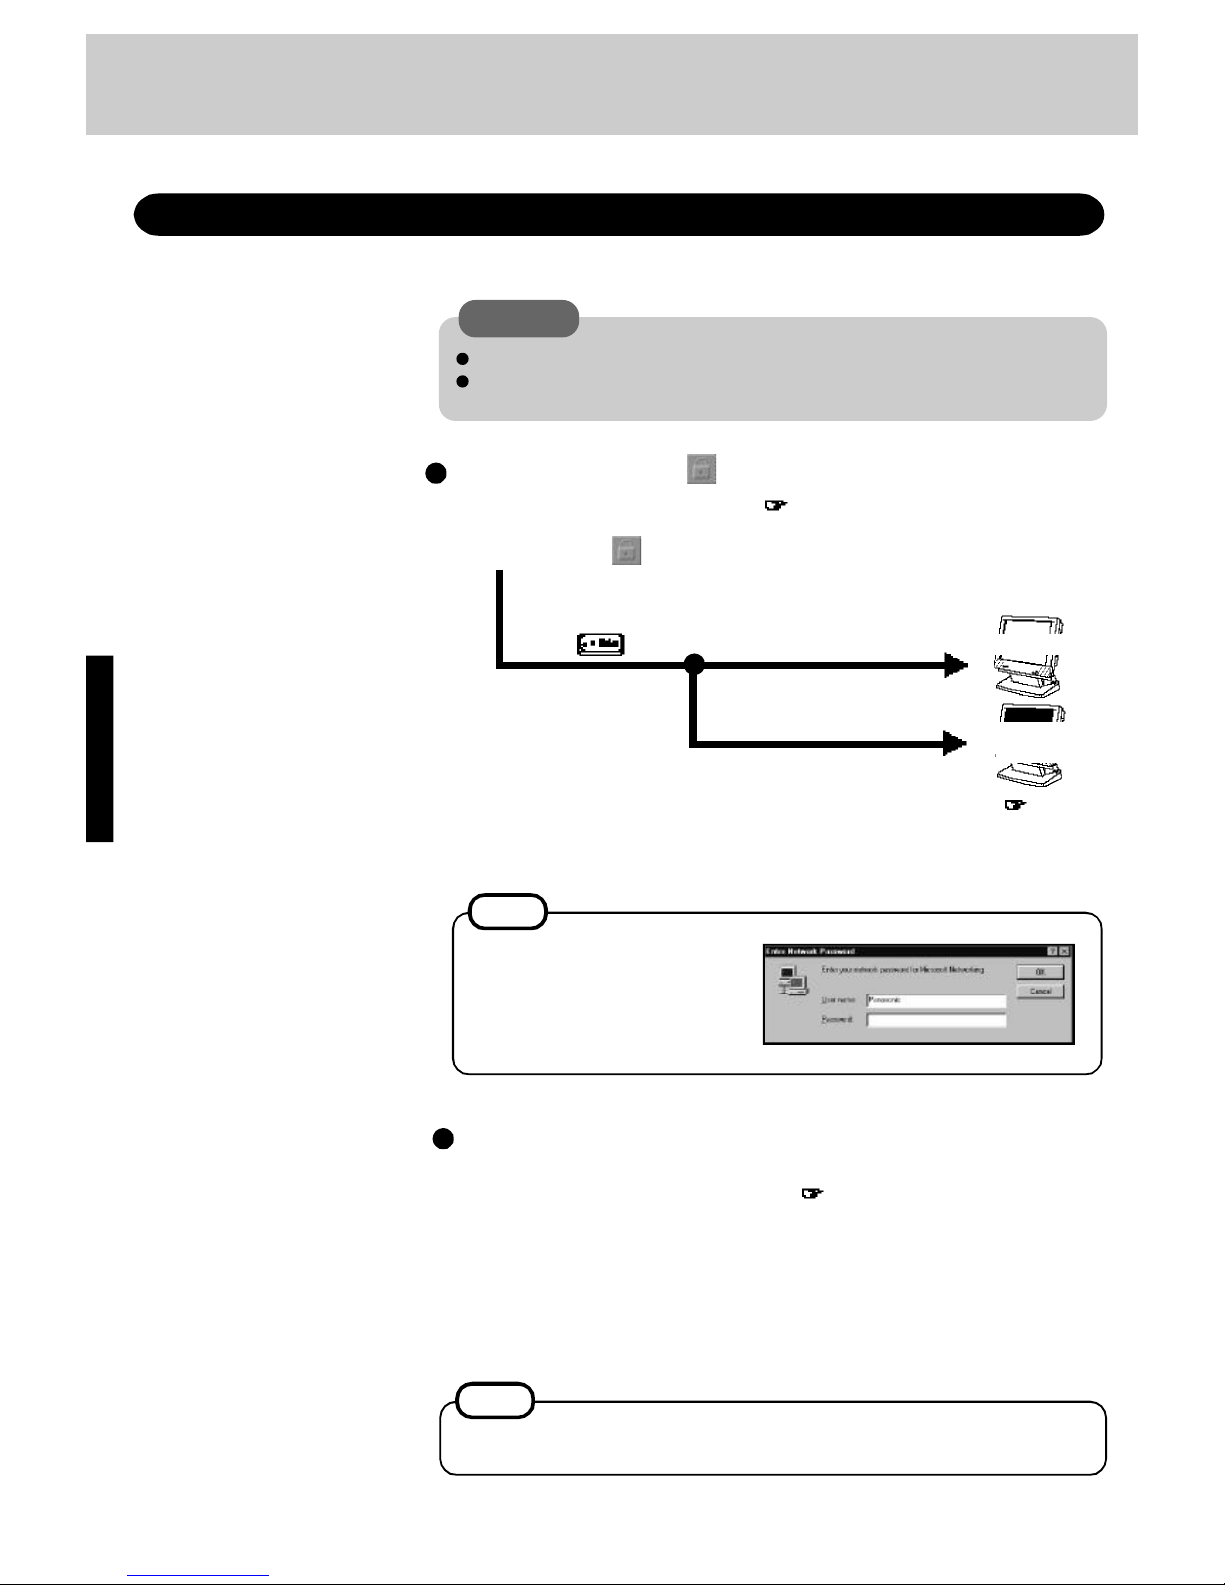
If [Enter Password:] or is displayed,
you must first enter your User Password ( page 14).
2
Select your application
You are able to start working on your computer.
If the correct password is input,
Over three incorrect attempts,
Will Start
Will Not Start*
(Power off)
* If you are starting from the suspend mode ( page 11), if
after three attempts the correct password is not input, or if no
password is entered for about a minute, the computer returns
to the suspend mode.
Upon entering your
User Password and
pressing ,
[Enter Password:] or
NOTE
If the display on the right appears,
the network password has been set.
To read and write data to other
computers, the correct password
must be entered.
When an application or file that was previously displayed appears on your screen,
this means the suspend or hibernation mode ( page 11) has been set.
CAUTION
Do not press the power switch repeatedly.
After you have turned your computer off, you must wait more than ten seconds
before you can turn it back on.
NOTE
[System Devices] in [Device Manager] contains a device bearing an exclamation mark.
This does not indicate a malfunction.
Page 11
11
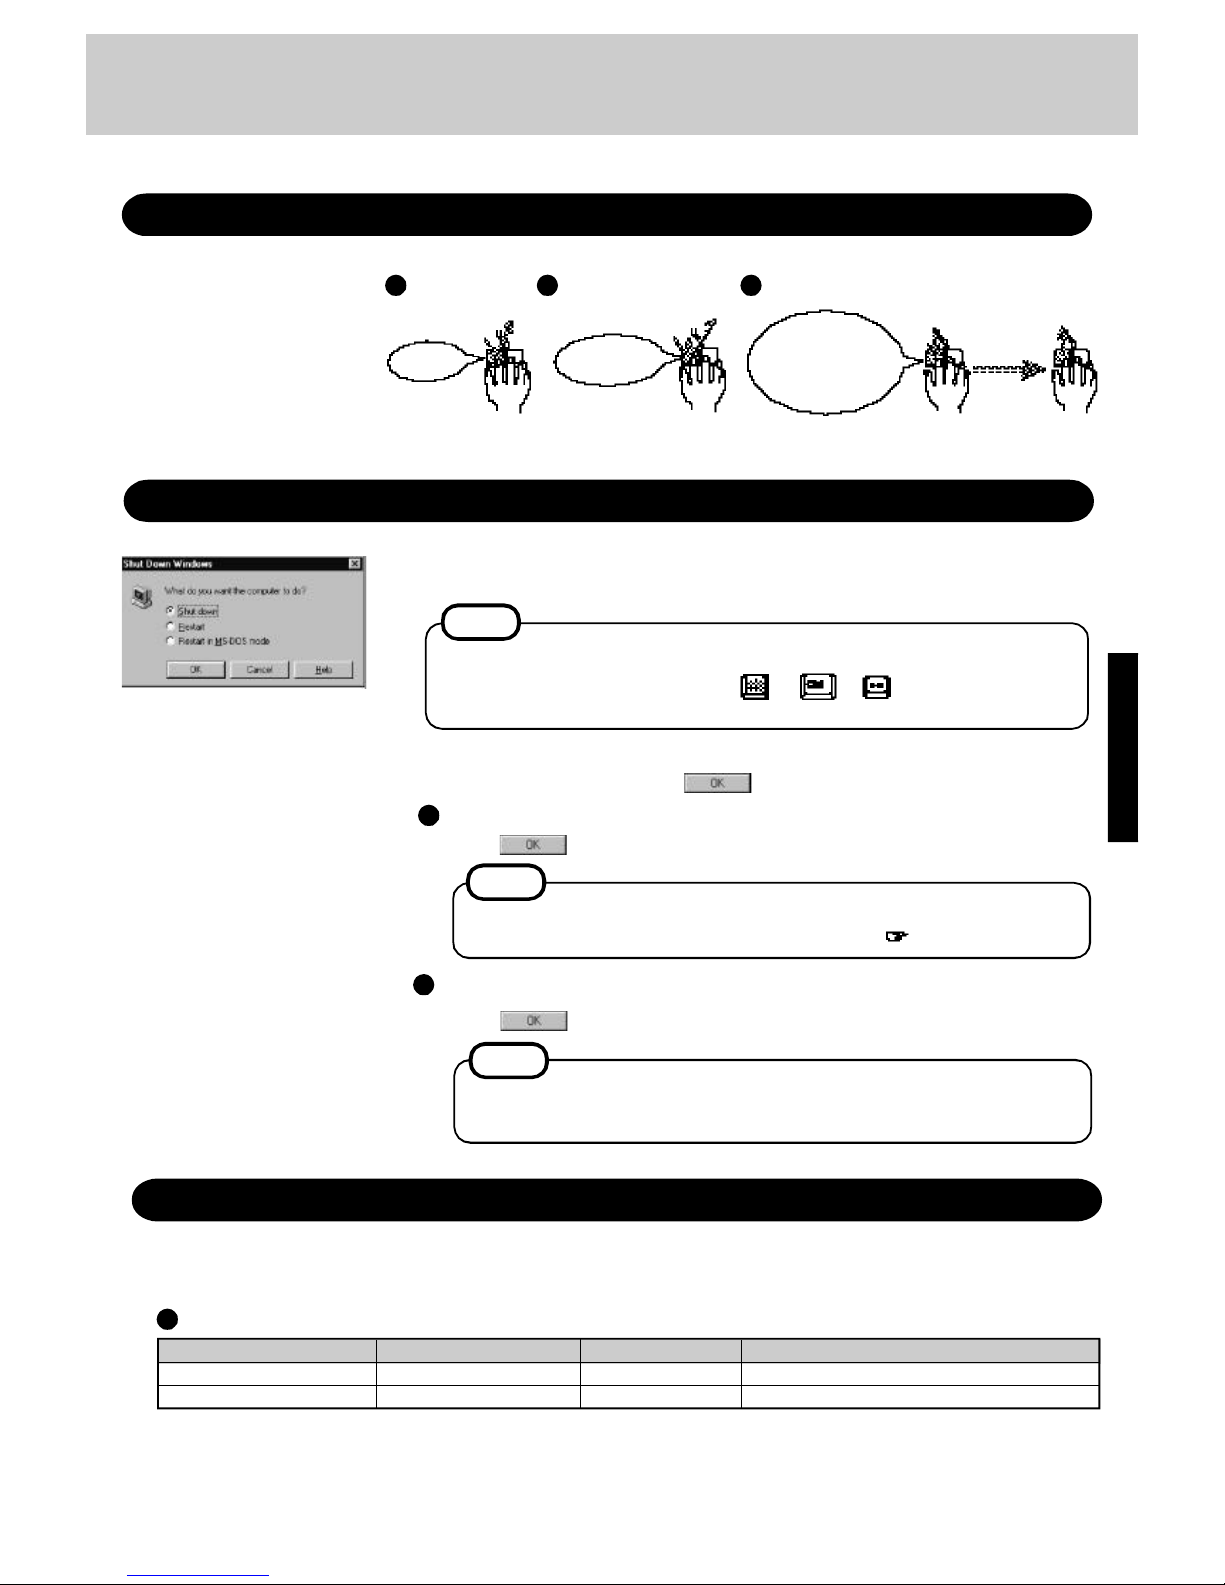
Using the Mouse
Clicking Dragging
Two quick
taps
Double-clicking
One tap
While holding
down the button, moving on
the surface
2
Confirm shutdown
Shutting Down (power off your computer)
To shut down, save all data and select [Shut Down] from the
[Start] menu
1
NOTE
From the keyboard,
you may choose to press down on or + and then select [Shut
Down].
Differences between suspend function and hibernation function
Function Where data is saved to Speed Requires power supply
Suspend function Memory Fast Yes (if power is cut, all data is lost)
Hibernation function Hard disk Somewhat slow Power is not required to maintain data
Starting Up Your Computer Quickly
If you want to immediately start up and continue an application after shutting down your computer, you can do so by using the suspend or hibernation function.
Problems such as sudden voltage drops/surges may arise during periods of lightning. It is recommended to use the hibernation
function when such incident is likely to occur. Since this could adversely affect your computer, an uninterruptible power supply
is highly recommended.
To quickly resume computer operation after shutting down,
the suspend and hibernation functions are available ( below).
Restarting your computer in MS-DOS mode
Select after selecting [Restart in MS-DOS].
When returning to Windows 95 from the MS-DOS mode, type "EXIT" and not "WIN".
Returning to Windows 95 using the "WIN" command may result in a malfunction.
NOTE
NOTE
Restarting your computer (without shutting down)
Select after selecting [Restart].
Select [Shut down], then press . Your computer will power off automatically. .
Page 12
12
Shutting Down
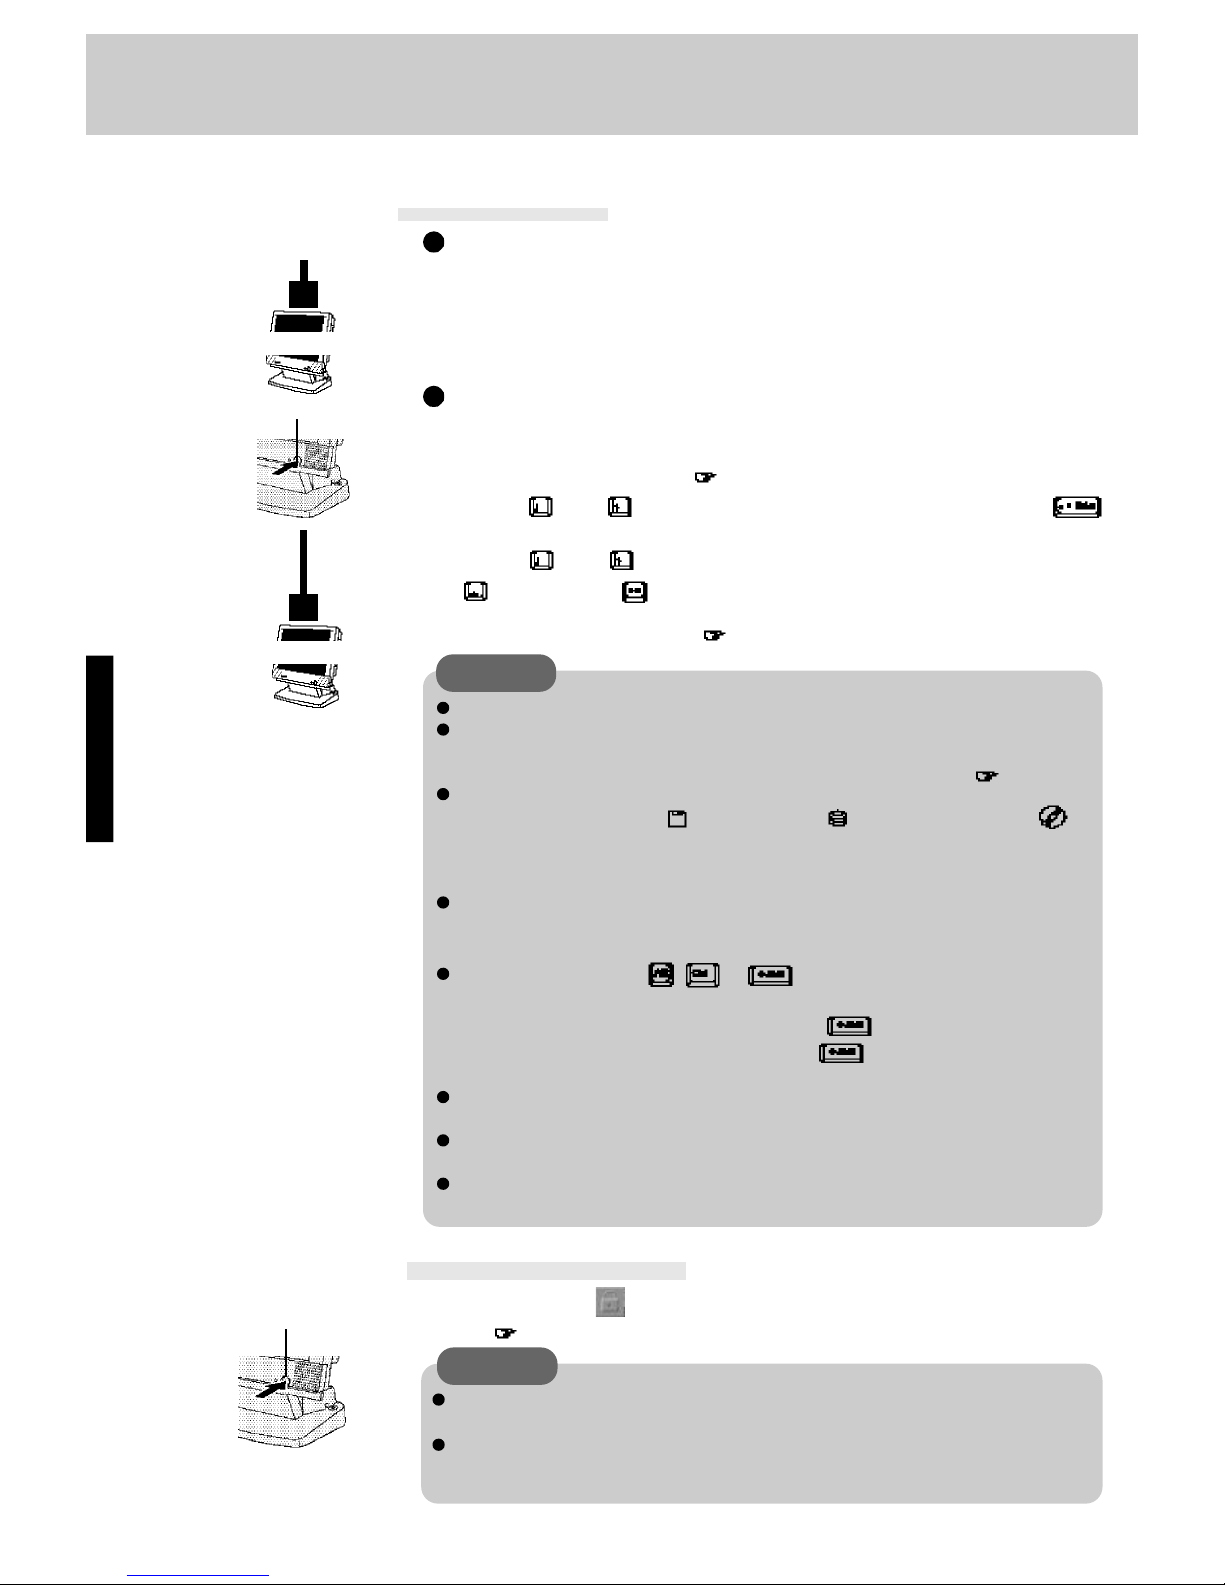
Select [Start] - [Suspend]
It is necessary to set the hibernation function using the Setup Utility.
1
Run the Setup Utility ( page 34)
2
Using and , select [Power Management] then press
4
CAUTION
Save all data before powering off your computer.
When restarting from or shutting down to the suspend or hibernation mode, do not
touch the mouse (serial or PS/2 type). There are cases where the mouse will fail to
operate; you will have to restart your computer using the keyboard ( page 11).
Do not power off during the following periods (you may corrupt your data or file):
• While the FDD indicator ( ), HDD indicator ( ) or CD-ROM indicator ( ) is
on.
• While playing/recording audio files.
• While communications software is being used.
Do not use the suspend or hibernation function when using an OS other than Windows 95, the diagnostics program (DIAG55), or the Setup Utility, or when experiencing static electricity or noise.
If you hold down on the , or key while pressing the power switch to
enter the suspend or hibernation mode, after resuming operation, you must press the
same key. For example, if you hold down on the key while pressing the power
switch, upon resuming, if you do not press the key again, only capital letters
will result from typing.
If your computer locks up, press the reset button. All data is lost when this button is
pressed.
When a file in an external device such as an external hard disk or ATA card is opened,
the suspend or hibernation function may not work. In such cases, close the file.
SCSI cards may not recover properly after entering the suspend or hibernation mode.
If this occurs, restart the computer.
Using and , select [Power Switch], set [Hibernation] with
, then press
3
Close the Setup Utility ( page 34)
Power Switch
Resuming Operation
If [Enter Password:] or is displayed upon pressing the power switch, your password has
been set ( page 10).
Starting Up/Shutting Down
CAUTION
Do not install or remove peripherals while your computer is in the suspend or hibernation mode; abnormal operation may result.
When operation resumes, serial devices such as a mouse or modem, or your PC Cards
may not work. In such cases, you will need to restart your computer or reinitialize the
individual devices.
Using the suspend function
Using the hibernation function
Do not touch the
power switch while
your computer is
entering the hibernation mode.
Suspend Mode
Hibernation Mode
Power Switch
[Start] - [Suspend]
Page 13
13
Conserving Power
Things to Remember
In the power management mode, the setting of [Advanced] is
recommended ( below)
The suspend or hibernation function ( page 111) allows you to save power by automatically cutting off power when the computer is idle or there is no access to individual devices
for 4 or 16 minutes.
Setting the suspend/hibernation timeout ( below)
Leave your computer off when it is not in use ( page 11)1)
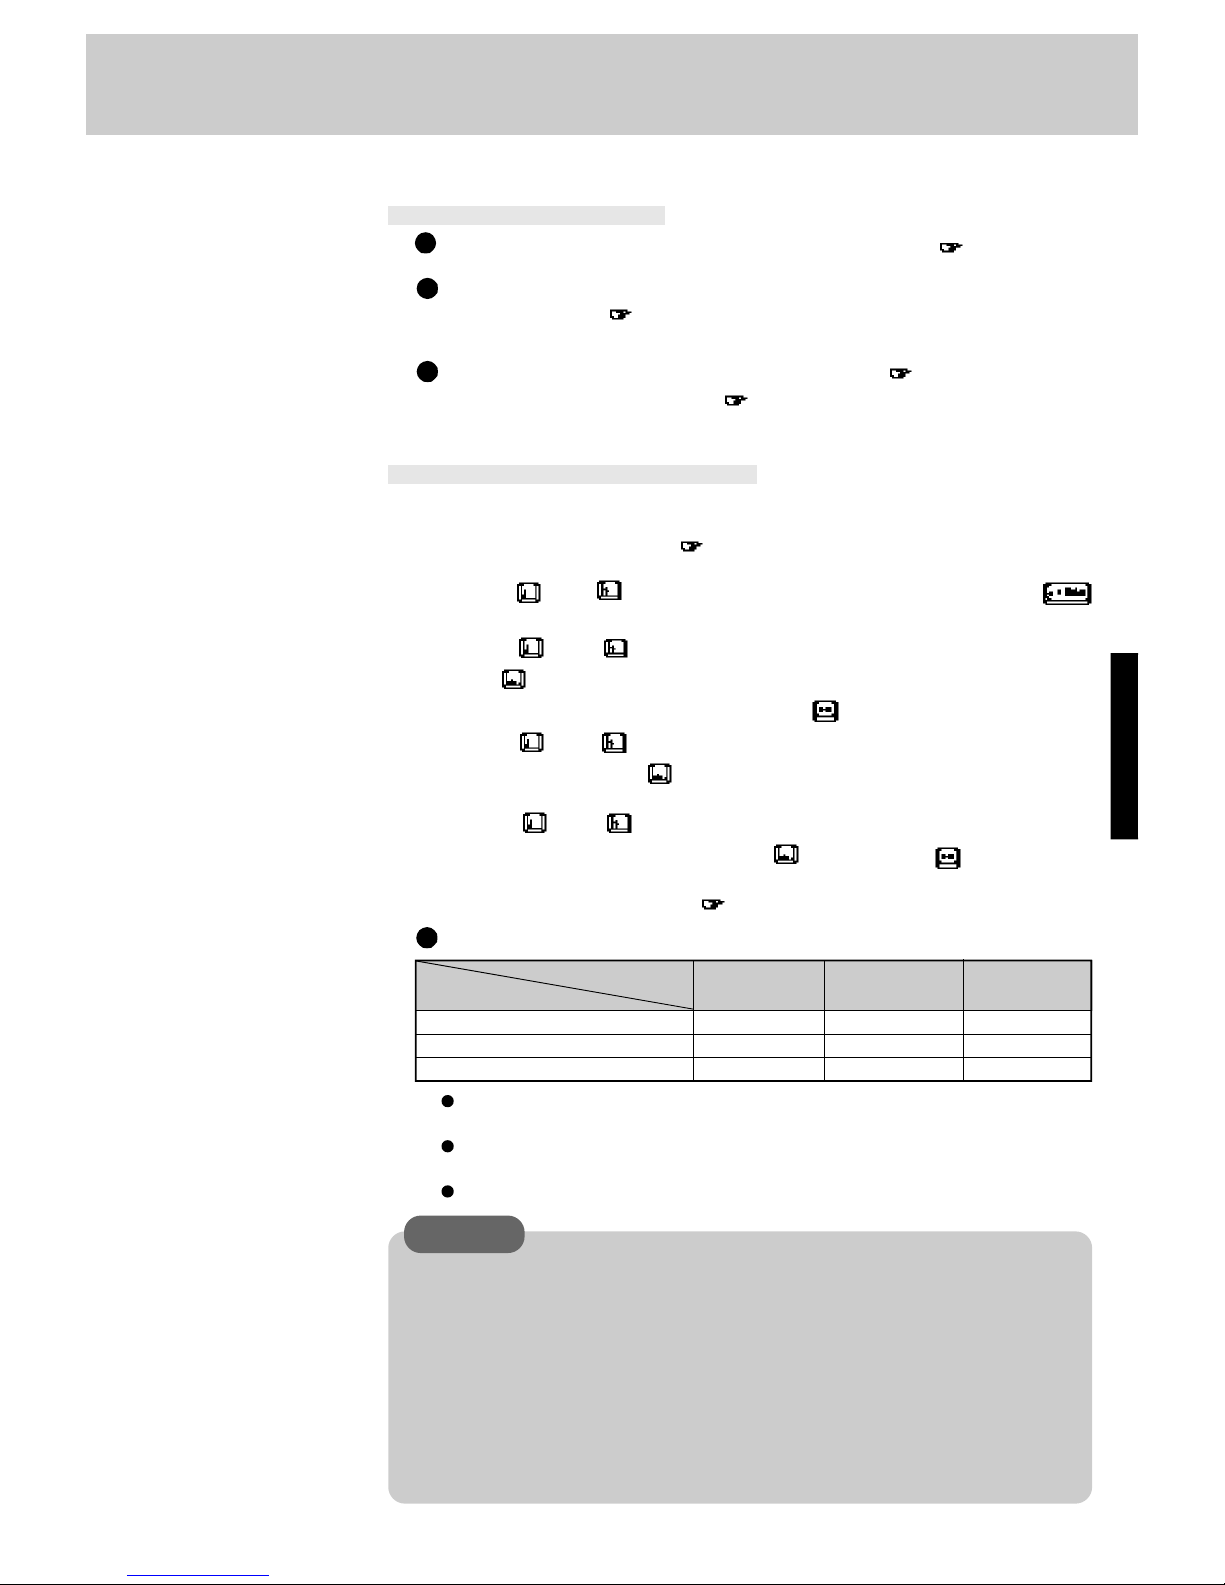
With the Setup Utility, you can set the [Advanced] mode.
CPU Speed HDD Motor Display Off
Change Mode Timeout Timer
Advanced
Enable 5 min 5 min
Standard
Disable Never 10 min
OFF
Disable Never Never
6
1
Power
Management
Power Management settings
Functions automatically
set
CPU Speed Change Mode
:
When there are no operations, the CPU is automatically
stopped.
HDD Motor Timeout
:
When the hard disk drive is not accessed for more than
five minutes, power to the HDD motor is cut off.
Display Off Timer
:
When the computer is idle or a device is not accessed for
five or ten minutes, power to the display is cut off.
Setting Power Management
(How to set [Advanced] and the suspend/hibernation timeout)
3
Using and , select [Power Saving] and set [Advanced]
with
(To avoid setting the hibernation timeout, press and proceed on to step 6.)
Using and , select [Power Management] then press
Run the Setup Utility ( page 34)
Using and , select [Suspend/Hibernation Timeout], set
either [4 min] or [16 min] with , then press
Using and , select [Power Switch] and set [Suspend] or
[Hibernation] with
Close the Setup Utility ( page 34)
4
5
2
CAUTION
When you need a network environment.
Be sure to disable the hibernation timeout settings with the Setup Utility .
After resuming operation from the hibernation mode, the network connection may be severed or the
computer will not work properly.
In communications when a device like a high-speed modem or ISDN terminal adapter
is connected to the serial port, etc.
There are times when high-speed communication is adversely affected if the power management
function is enabled.
Key operation and music playback
When the power saving function is running, the keyboard and mouse operations may feel sluggish.
Also, music may not be play correctly when entering the standby mode during operation.
Page 14
14
Security Measures
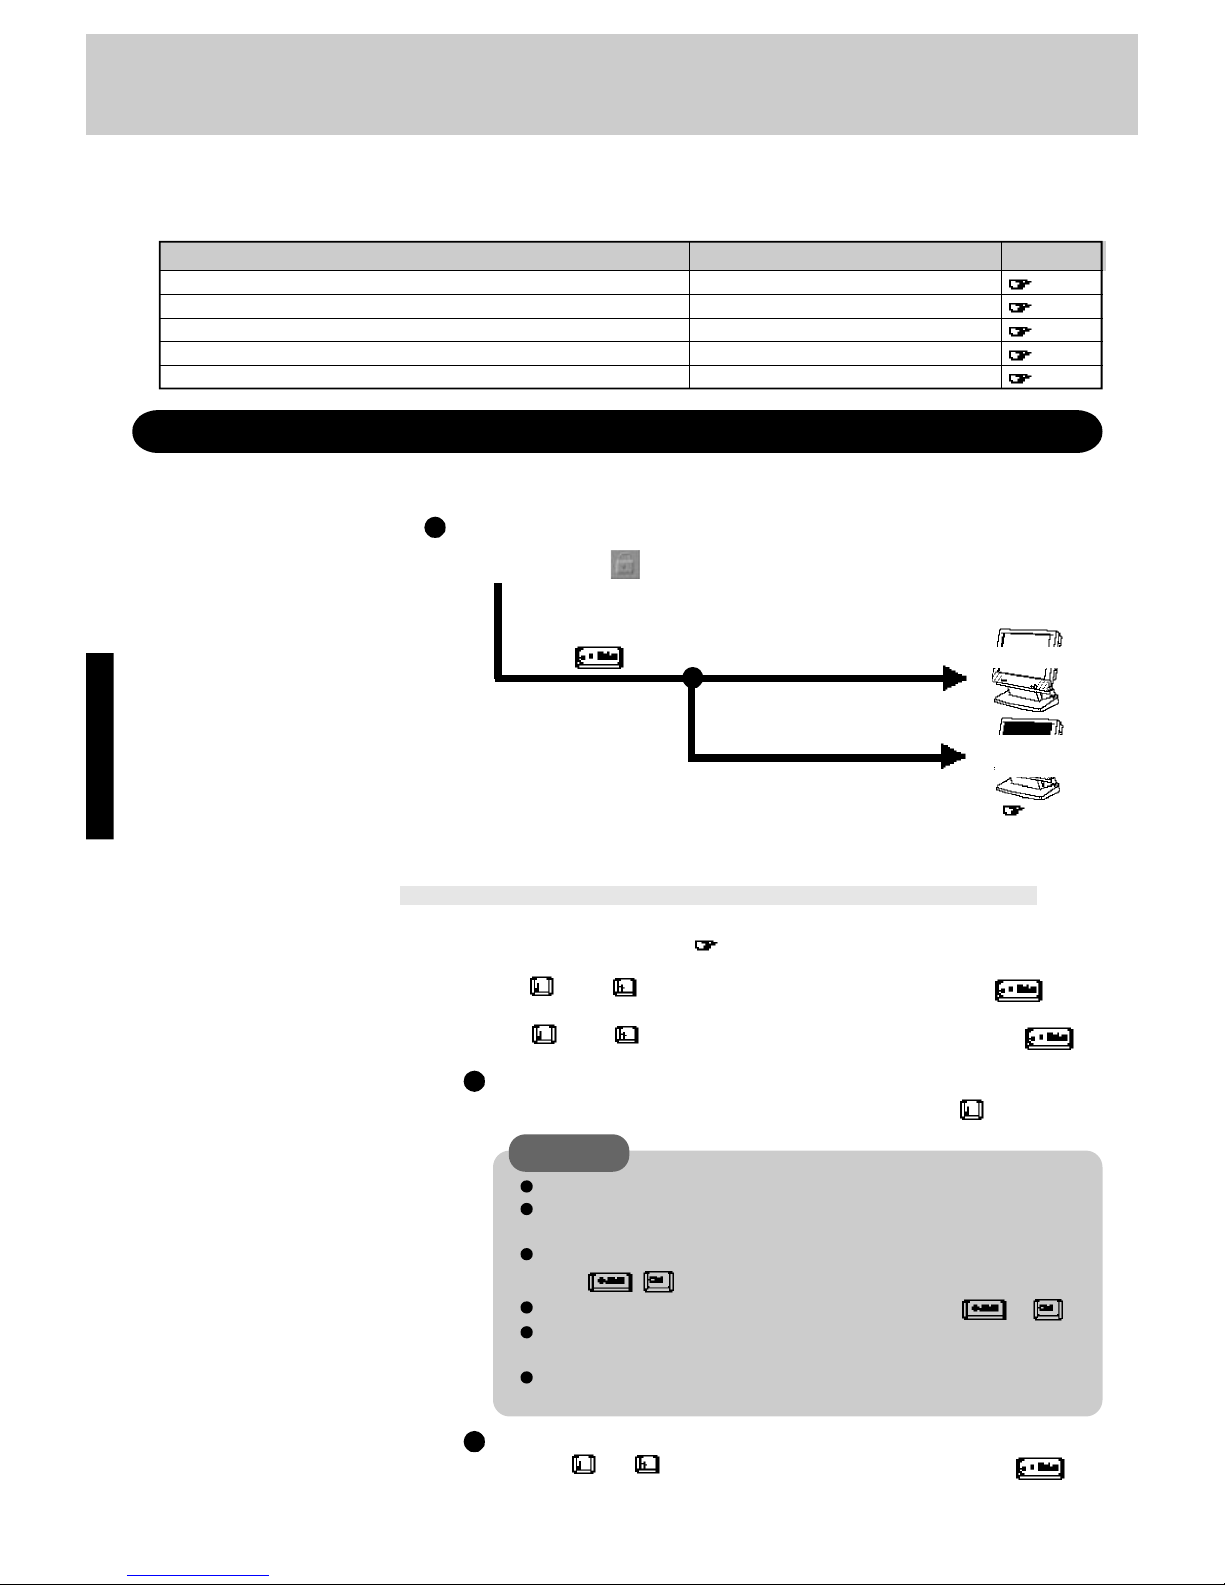
Situation Function to use Reference
User Password below
Coffee break Password page 15
Prevent operation by floppy disk page 16
Supervisor Password page 16
Use a security lock page 37
You do not want your computer to be used without permission
Same as above, but while you’re away temporarily
You want to prevent theft or damage to data by using a floppy disk
You do not want your Supervisor Setup changed without permission
You want to prevent theft of your computer
Set the User Password.
Without the password, access to your computer is impossible.
When you do not want your computer to be used without permission
When the User Password is set
If the correct password is input,
Over three incorrect attempts,
Will Start
Will Not Start*
(Power off)
Upon entering your
User Password and
pressing ,
[Enter Password:] or
CAUTION
Your password will not be displayed on the screen.
Please limit your password to seven characters. Note that there is no distinction between upper and lower case letters.
Only the alphabet keys and numeric keys can be used. (Note: the special
keys ( , etc.) cannot be used).
Do not input your password while holding down on the or .
Use only the upper horizontal row of numeric keys to input user passwords. Keys on the right side of the enhanced keyboard can not be used.
Do not forget your password. If a password is forgotten you will be unable to use your computer.
Setting the user password (enabling, changing, disabling)
3
2
4
1
Using and , select [User Password] then press
Using and , select [System Setup] then press
Run the Setup Utility ( page 34)
To enable or change your password
Enter your password at the [Enter User Password], then press .
* If you are starting from the suspend mode ( page 11), if
after three attempts the correct password is not input, or if no
password is entered for about a minute, the computer returns
to the suspend mode.
To prevent illegal data access or theft, or theft of your computer, various security measures are provided below.
Using the and keys, select [Delete User Password] then press . Go
to step 7.
To disable your password
Page 15
15
5
Re-enter your password at the [Enter User Password Again]
(This is for confirmation purposes.)
Using and , select [Set User Password] then press
6
9
Close the Setup Utility ( page 34)
7
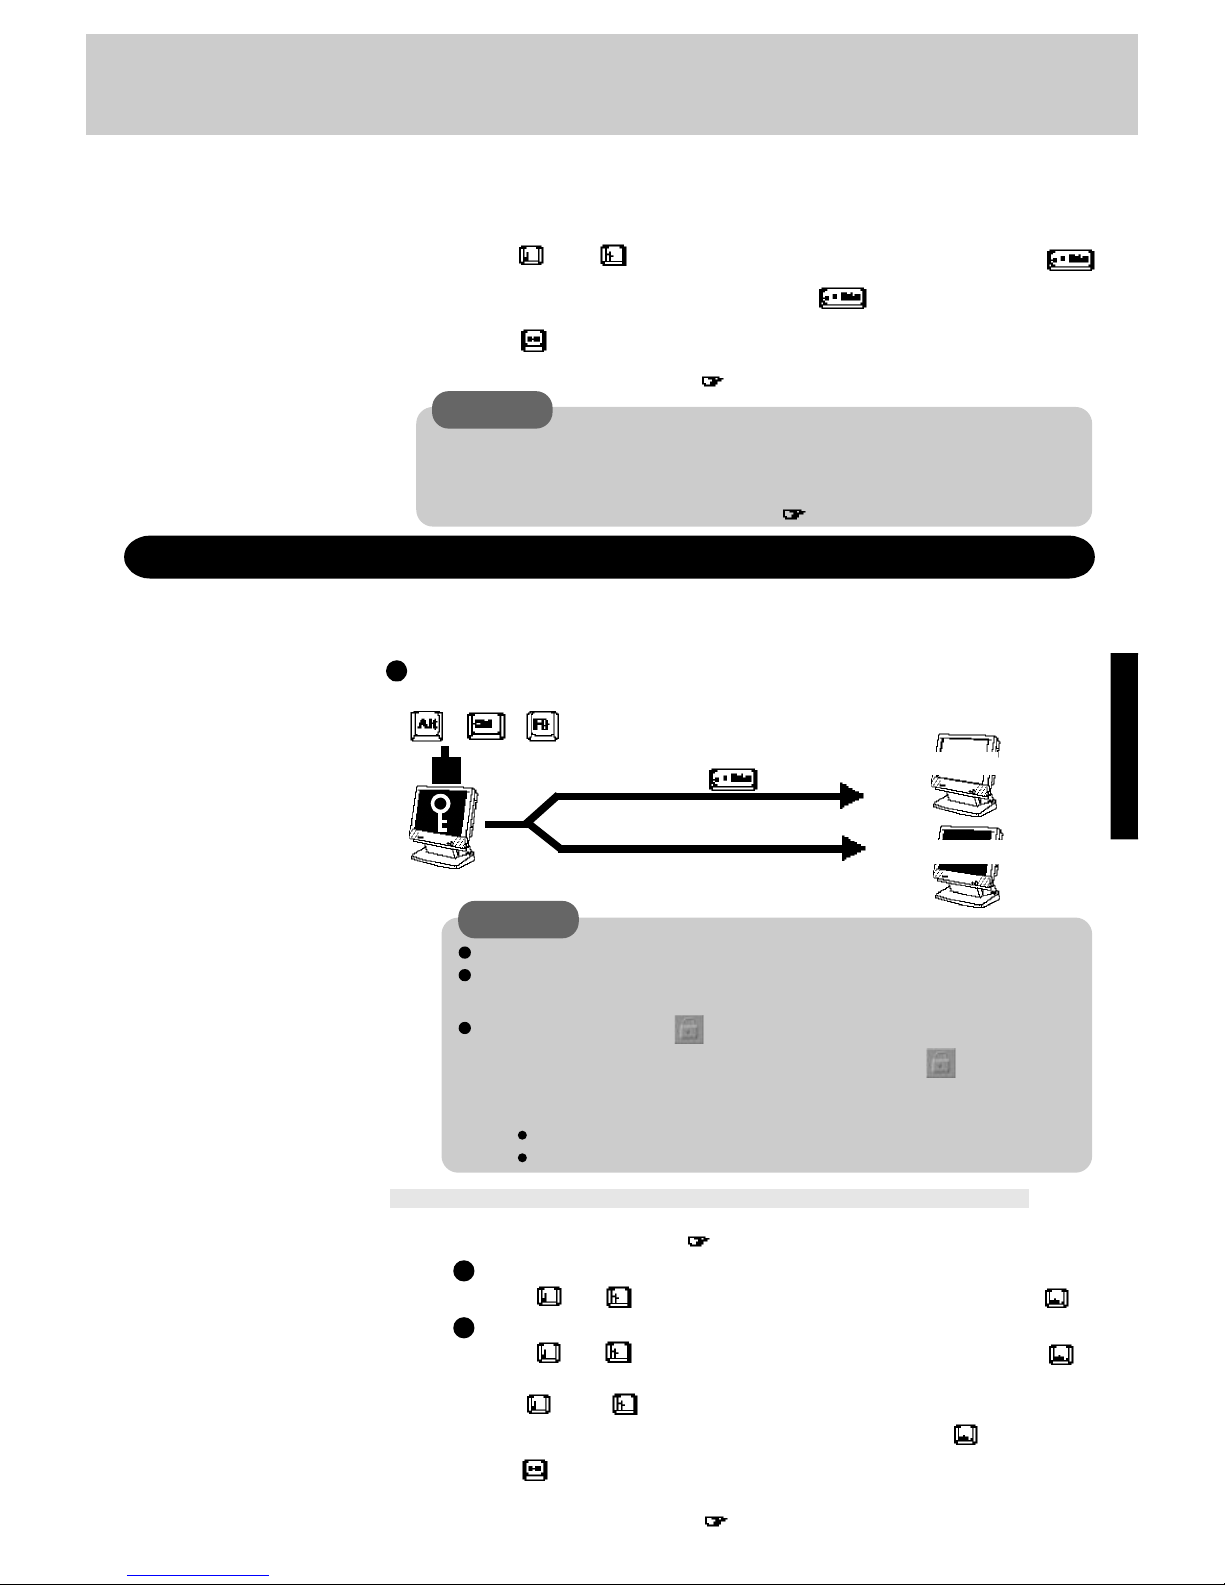
You should set the “Coffee break Password” (Note that you must first set the User Password).
When you input your selected key combination, the computer locks (key input and use of a
mouse are no longer possible).
You do not want your computer to be used without permission while away temporarily
At the confirmation screen, press
8
Press to end the password setting procedure
CAUTION
To prevent the changing of your password without permission
• When running the Setup Utility program, do not leave your computer even for a
short time.
• Set the User Password Protection option ( page 17).
Setting the Coffee break Password (enabling or disabling)
1
Set the User Password ( page 14 step 1 to 7), if it hasn’t already
2
To disable the Coffee break Password
Using and , select [Coffee break Password] and set [Disable] with .
Go to step 4.
Close the Setup Utility ( page 34)
4
3
5
Using and keys, select [Key Combination for Coffee
break] then set your combination of keys with
To enable the Coffee break Password
Using and , select [Coffee break Password] and set [Enable] with .
Input the correct password used at
startup and press ,
The computer
is locked
Operation resumes
Operation does not resume
Do not leave your computer just after sensitive data had been shown on the screen.
It is impossible to lock your computer from an external device, such as a mouse
connected through the serial port.
During the coffee break, is displayed on the screen. If the operations described below are performed during the coffee break, the indication may
disappear. In order to quit the coffee break and begin using the computer, input
your password.
CAUTION
Press to end the password setting procedure
When the coffee break password is set
+ +
(Example of a selected key combination.)
When leaving your desk,
When an incorrect password is inputted,
If the computer is returned from the standby mode.
If the serial mouse is moved.
Page 16
16
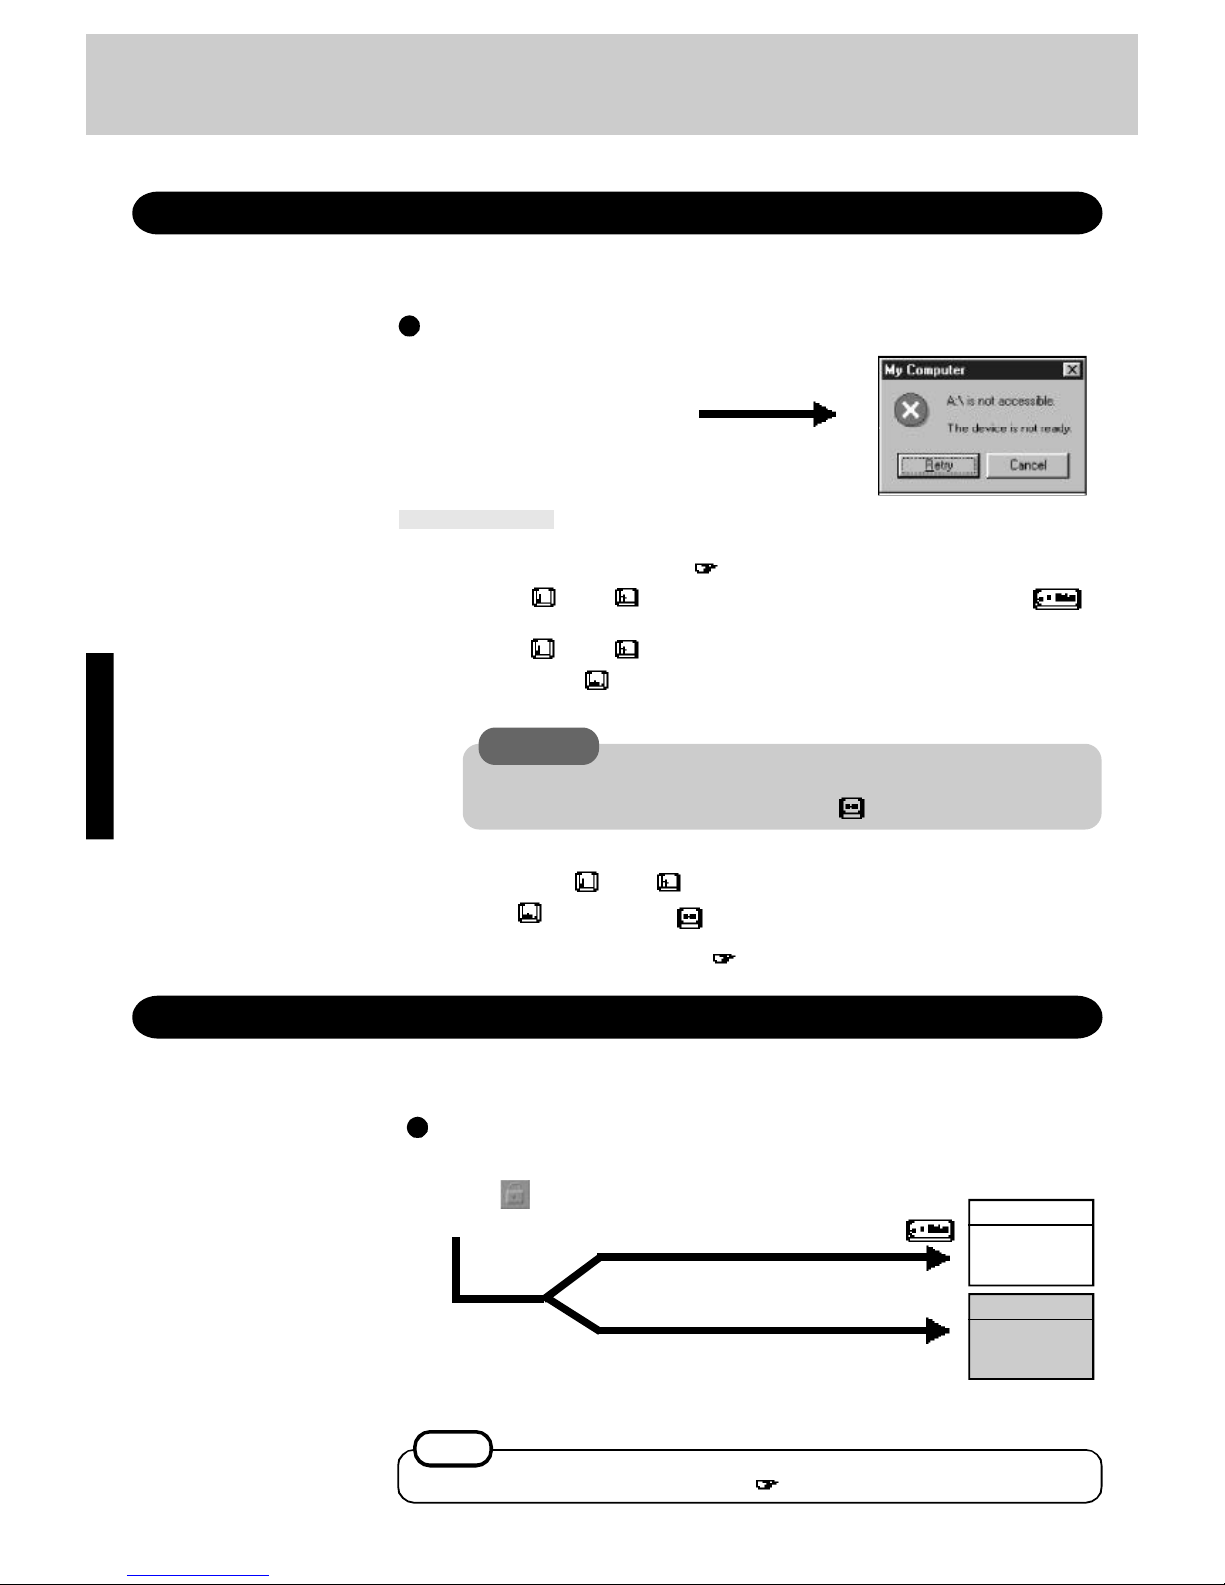
You may choose to protect the data on your computer from being accessed illegally or overwritten accidentally by a floppy disk. You can also set your computer to be unbootable from a floppy
disk.
This error message is displayed.
Procedure
1
Run the Setup Utility ( page 34)
Using and , select [Supervisor Setup] then press
2
4
Using the and , select [Floppy Operation], set [Disable]
with , then press
5
Close the Setup Utility ( page 34)
CAUTION
When changing to [Hard Disk Drive] setting, to continue read/write operation from
a floppy disk and to use the HDD to start, press and go to step 5.
When you do not want your Supervisor Setup changed without permission
Set the Supervisor Password. After it has been set, no changes can be made to the Supervisor
settings unless the password is entered.
When the supervisor password is set
Using and , select [Boot Up Drive] then set [Hard Disk
Drive] with
3
Preventing the use of a floppy disk
Even when one tries to access a
floppy disk,
Supervisor Setup
Supervisor Setup
Can not be
Opened
Input the correct supervisor password and press ,
When the supervisor password is incorrect,
In the Setup Utility, if [Enter Password:] or is displayed,
NOTE
You may wish to protect the User Password ( page 17).
When you want to prevent theft of or damage to data by using a floppy disk
Opened
Security Measures
Page 17
17
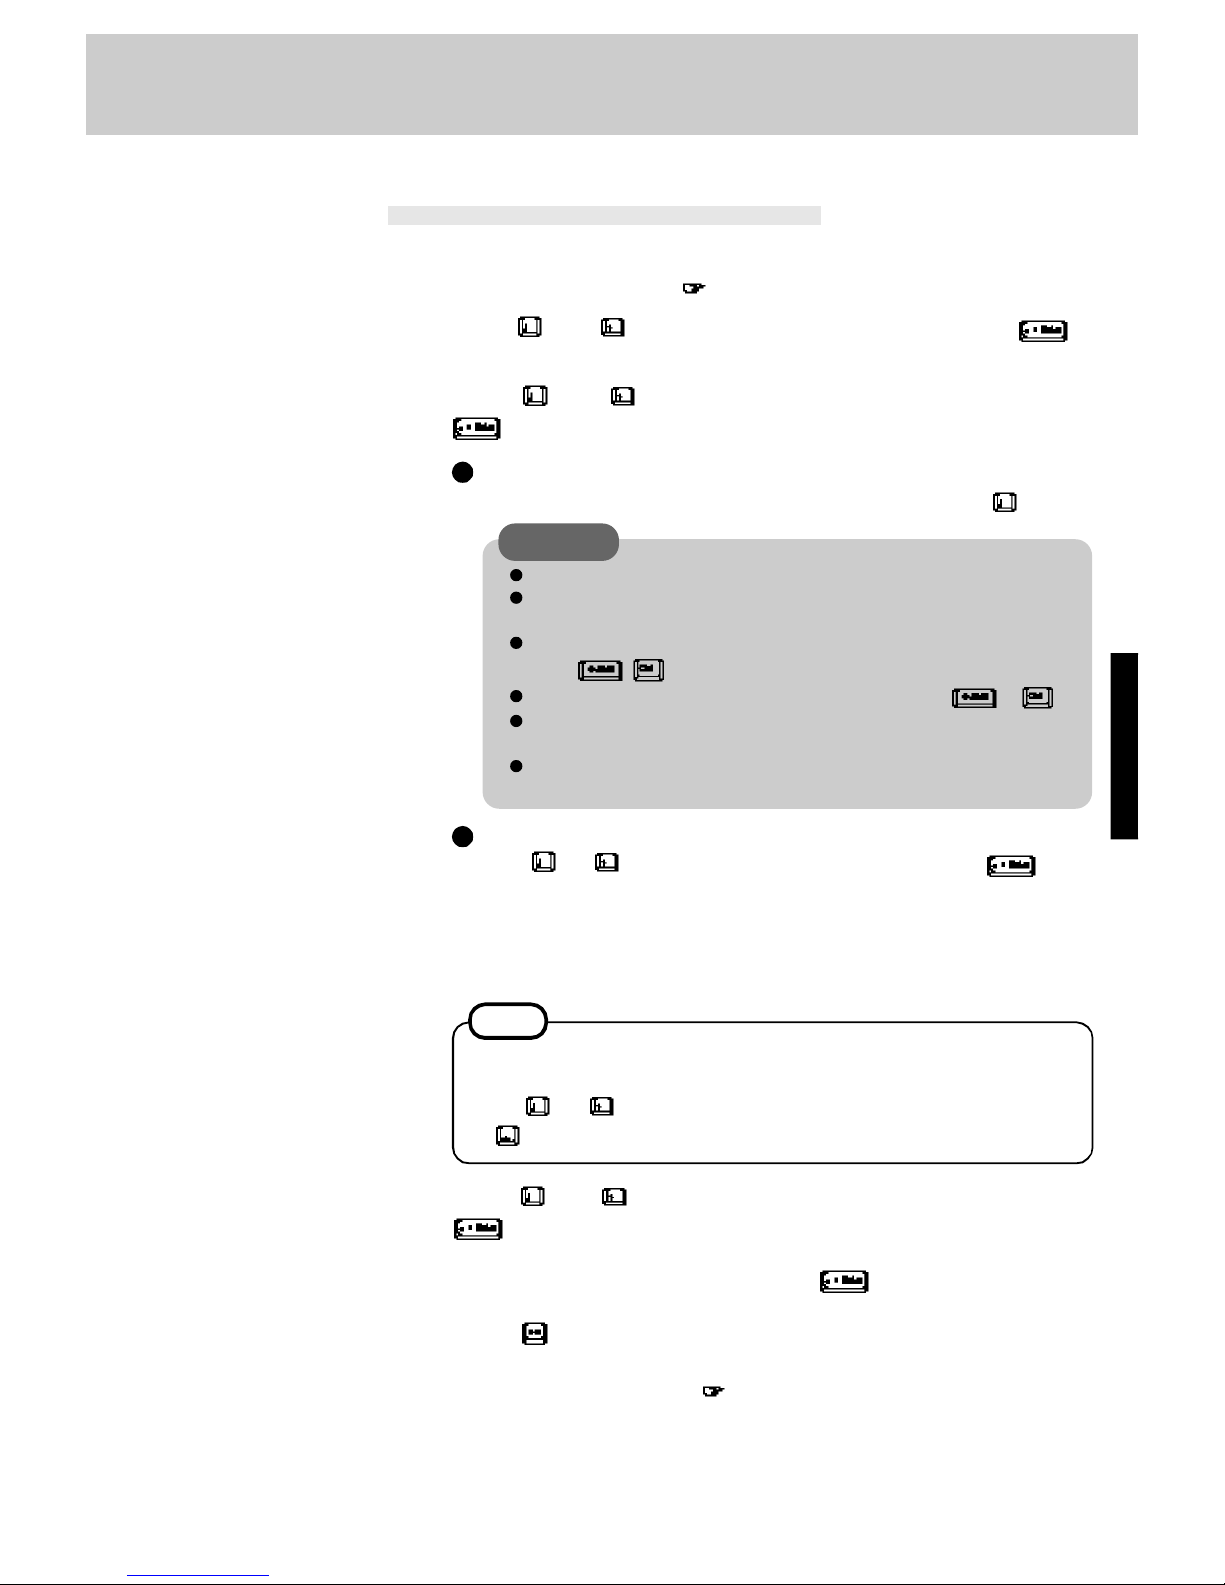
Setting the Supervisor Password
(enabling, changing, disabling)
1
2
Run the Setup Utility ( page 34)
Using and , select [Supervisor Setup] then press
3
Using and , select [Supervisor Password] then press
4
To enable or change your supervisor password
Enter your password at the [Enter Supervisor Password], then press .
5
Re-enter your password at the [Enter Supervisor Password
Again]
(This is for confirmation purposes.)
NOTE
Using and , select [Set Supervisor Password] then press
6
At the confirmation screen, press
7
8
Press to end the password setting procedure
9
Close the Setup Utility ( page 34)
When you do not want the user password enabled, changed, or disabled
without permission,
use and to select [User Password Protection], and set [Enable] with
.
CAUTION
Your password will not be displayed on the screen.
Please limit your password to seven characters. Note that there is no distinction between upper and lower case letters.
Only the alphabet keys and numeric keys can be used. (Note: the special
keys ( , etc.) cannot be used).
Do not input your password while holding down on the or .
Use only the upper horizontal row of numeric keys to input user passwords. Keys on the right side of the enhanced keyboard can not be used.
Do not forget your password. If a password is forgotten you will be unable to use your computer.
Using and , select [Delete Supervisor Password] then press . Go to
step 7.
To disable your supervisor password
Page 18
18
Add-ons/Peripherals
Using PC Cards
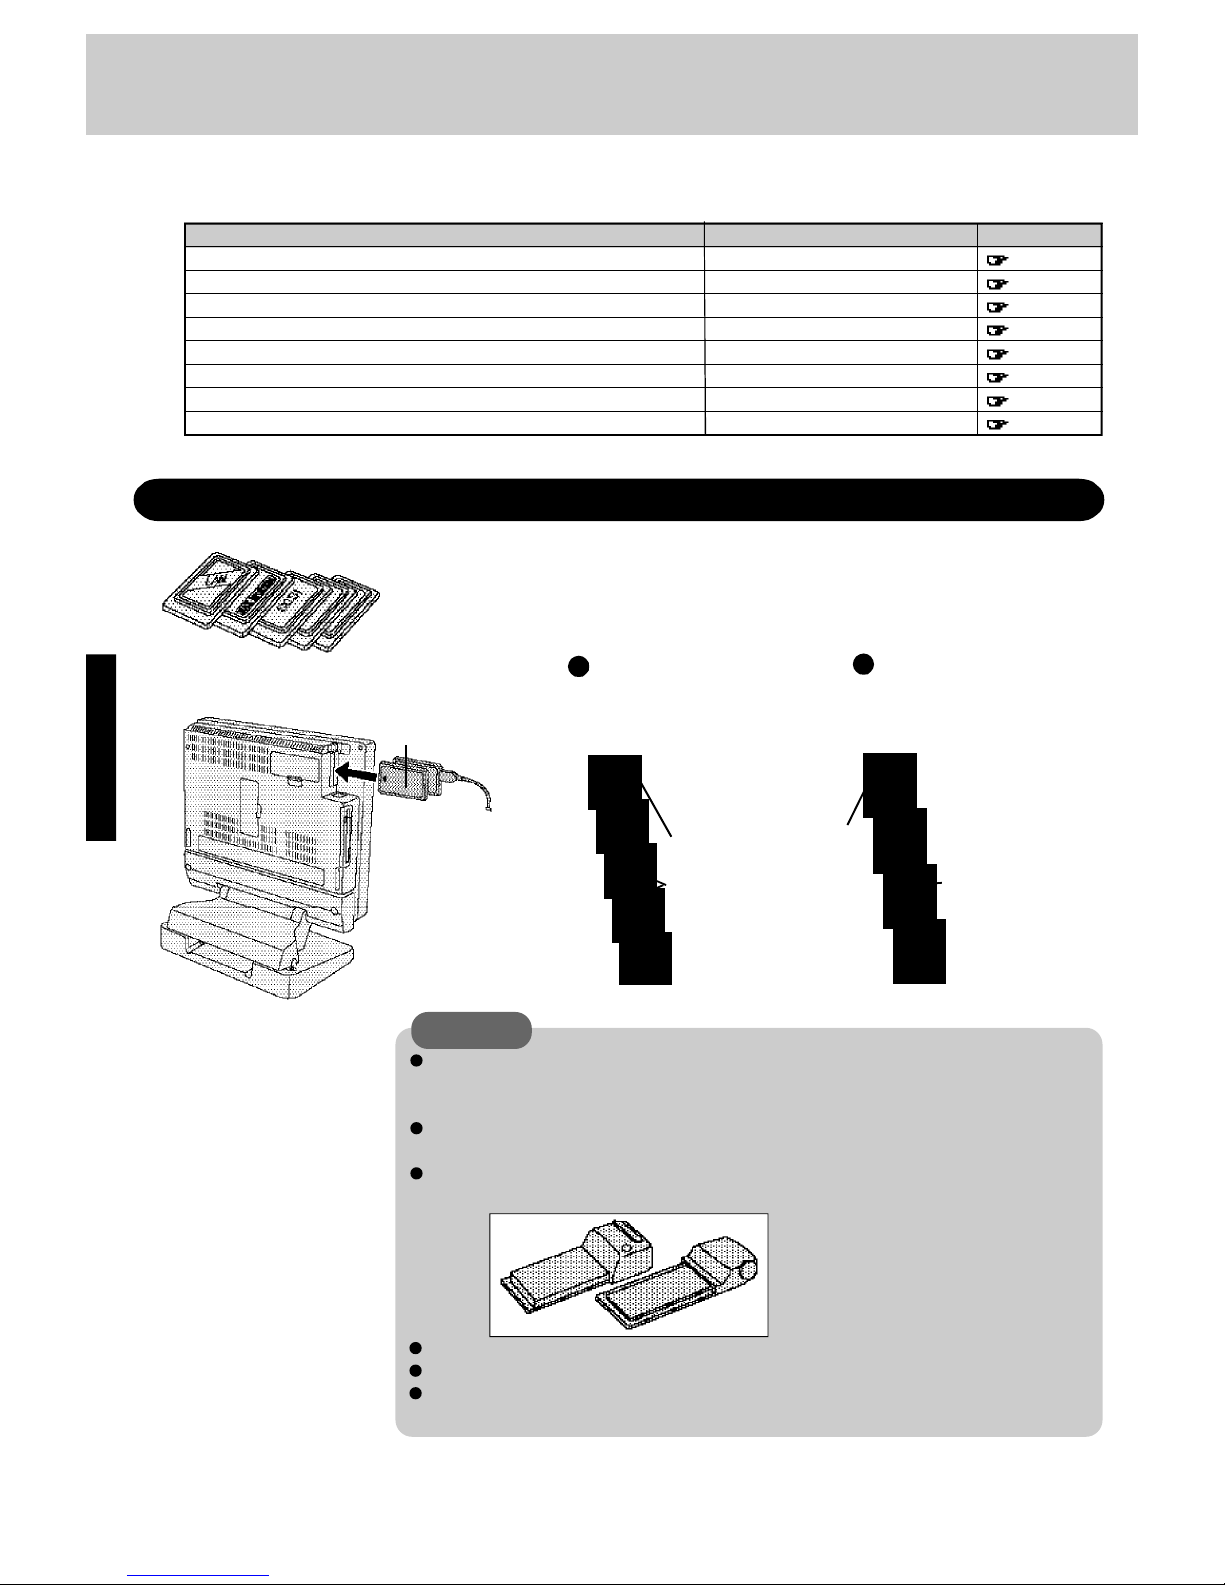
This computer has two PC Card slots. These slots conform to the PC Card Standard, and
therefore, communications and SCSI devices can be utilized. The slot allows you to use two
Type I or Type II cards (or one Type I and one Type II), or one Type III card.
Back of the card
Front
PC Card Eject Button
Type I or Type II Card
Type III Card
Back Front
Back
Type I or II
Type III
One card can be used only in the
back slot.
Two cards can be used simultaneously.
Devices capable of being used by your computer are listed in the table below.
PC Card Slots below
Serial Port page 37
RAM Module Slot page 20
Ext. Display Port page 21
Parallel Port page 21
Headphone Jack page 37
Audio-in Jack page 37
Microphone Jack page 37
Reference
Where to connectDevice(s)
PC cards (Modem, LAN, SCSI etc.)
Serial Devices (Mouse, Modem etc.)
Extra Memory
External Display
Printer
Speaker/Headphone
Audio device
Microphone
SRAM and FLASH ROM cards (except for ATA interface) are not supported.
When using a CardBus type card, use only that card; do not insert any other PC Cards.
Only the back slot can support a Zoomed Video (ZV) card. When you use a Zoomed
Video card, the driver software is needed.
CAUTION
Please check the PC cards’ specifications. Be sure the total operating current does not
exceed the specified limit, damage may result.
Allowable current (total for two slots) : 3.3 V: 400 mA, 5 V: 400 mA, 12 V: 120 mA
There are times when both a Type I card and a Type II card will not work simultaneously.
Some PC cards, example shown below, can not be used. The PC card's cable connector
determines its physical compatibility.
Page 19
19
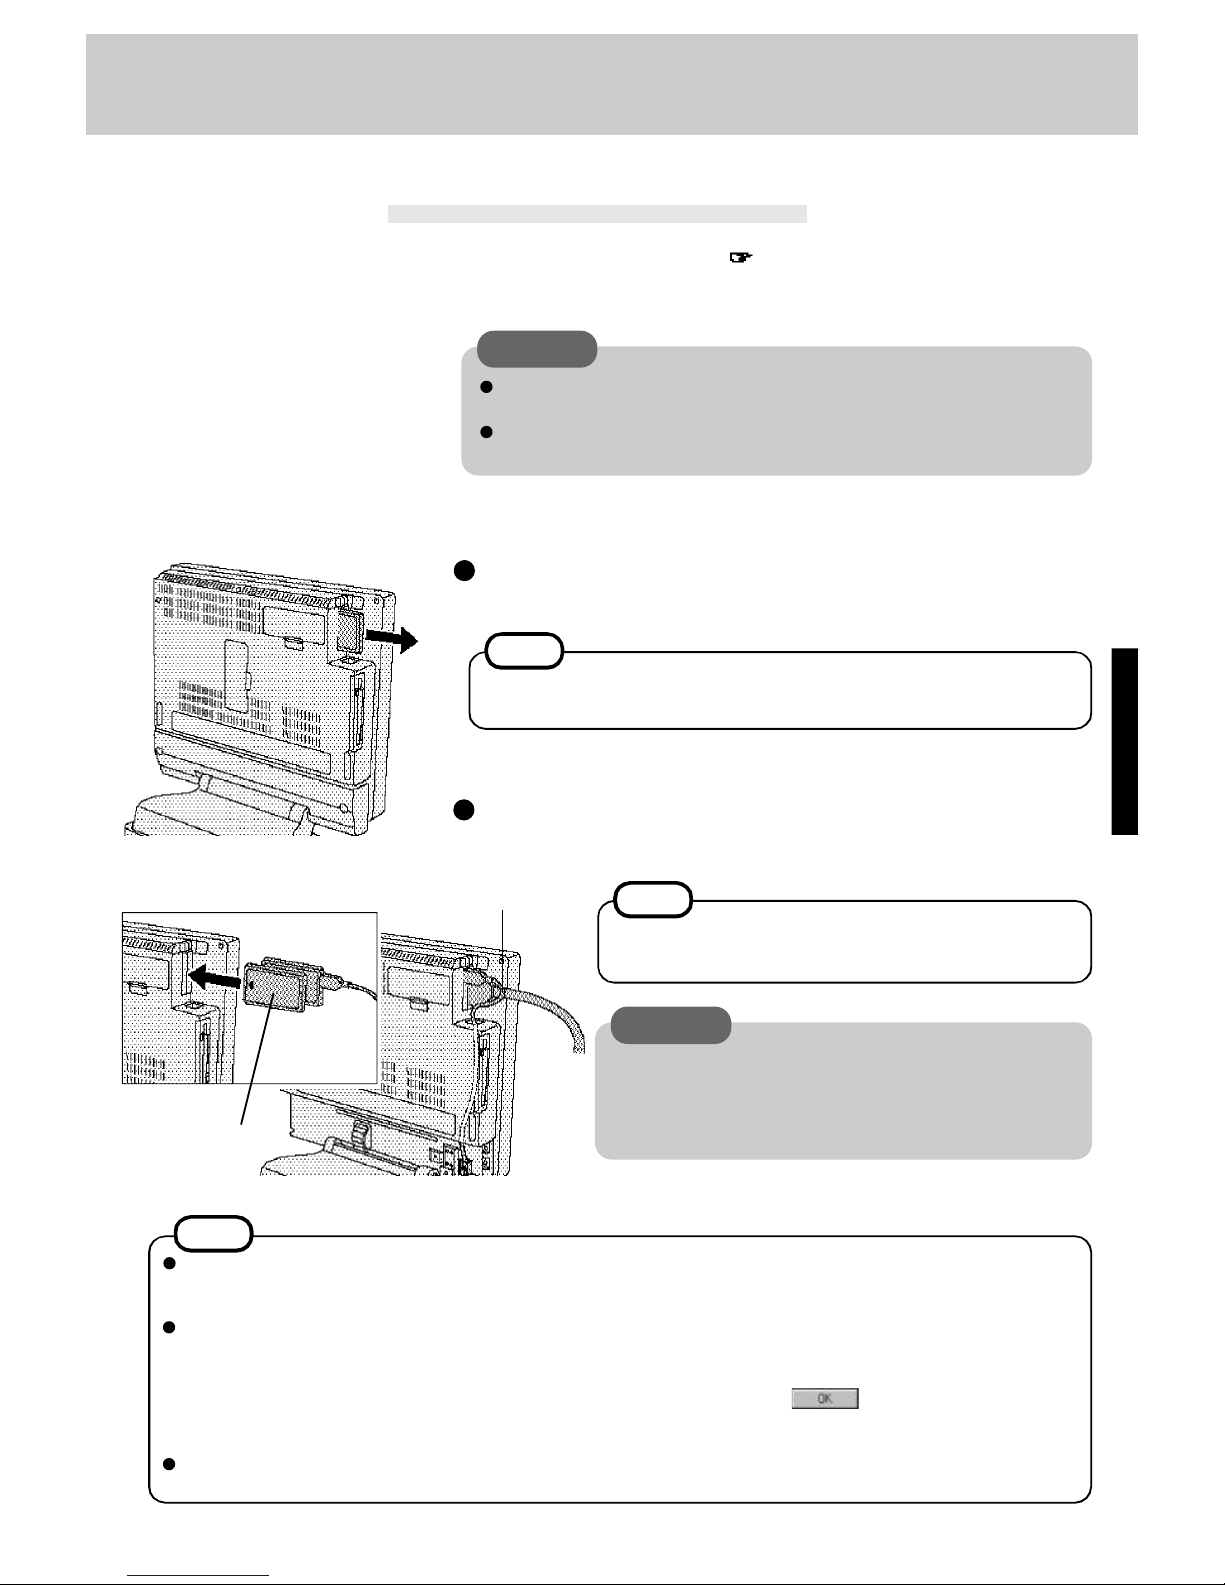
Power off your computer ( page 11)
Do not shut down using the suspend or hibernation mode.
1
Installing/Removing the PC Card
NOTE
Dummy cards are provided at the time of purchase. They provide protection for
the PC card slots against such things as dust.
CAUTION
Do not install or remove peripherals while your computer is in the suspend or
hibernation mode; abnormal operation may result.
Before removing a PC card, go to [Socket Status] (in [Start] - [Settings] - [Control Panel] - [PC Card (PCMCIA)]), select the PC card slot and press [Stop].
2
Simply slide the PC card in until it snaps into place.
Please refer to the manual for each card on how to install the card.
Installing the PC card
Removing the PC card (or the dummy card)
Back of the card
Slacken here.
NOTE
In case of a PC card with a cable, you can pass the cable through
the hole of the computer. Do not pass a bold cable forcefully.
Turn your computer on
3
CAUTION
After you insert a PC Card, a message may appear instructing
you to insert the Windows 95 CD-ROM. If this happens, press
the [Browse] button, then type "c:\windows\options\cabs". If you
have a floppy disk with a driver, insert the disk in the floppy disk
drive, then type "a:".
You may need to install a driver from the Windows 95 CD-ROM (included) or a PC Card's floppy disk. Simply
follow the on-screen instructions and read the PC Card's operation manual on how to install the driver.
NOTE
PhoenixCard Manager:
Follow the installation procedure below only if you will be using the ZV card. Otherwise, do not perform the installation;
abnormal operation may result.
1 Set the items of [Sound Chip] to [Automatic (PnP)] in the Setup Utility.
2 Select [Start] - [Run] and type "c:\util\drivers\pccard\disk1\setup.exe", press , then follow the on-screen
instructions.
If the computer has been reinstalled, follow the instructions in "Installing PhoenixCard Manager95" on page 29.
After PhoenixCard Manager95 has been installed, make sure to power off the computer before installing or removing the
card. Also, do not use the suspend or hibernation functions if the card is installed.
Page 20
20
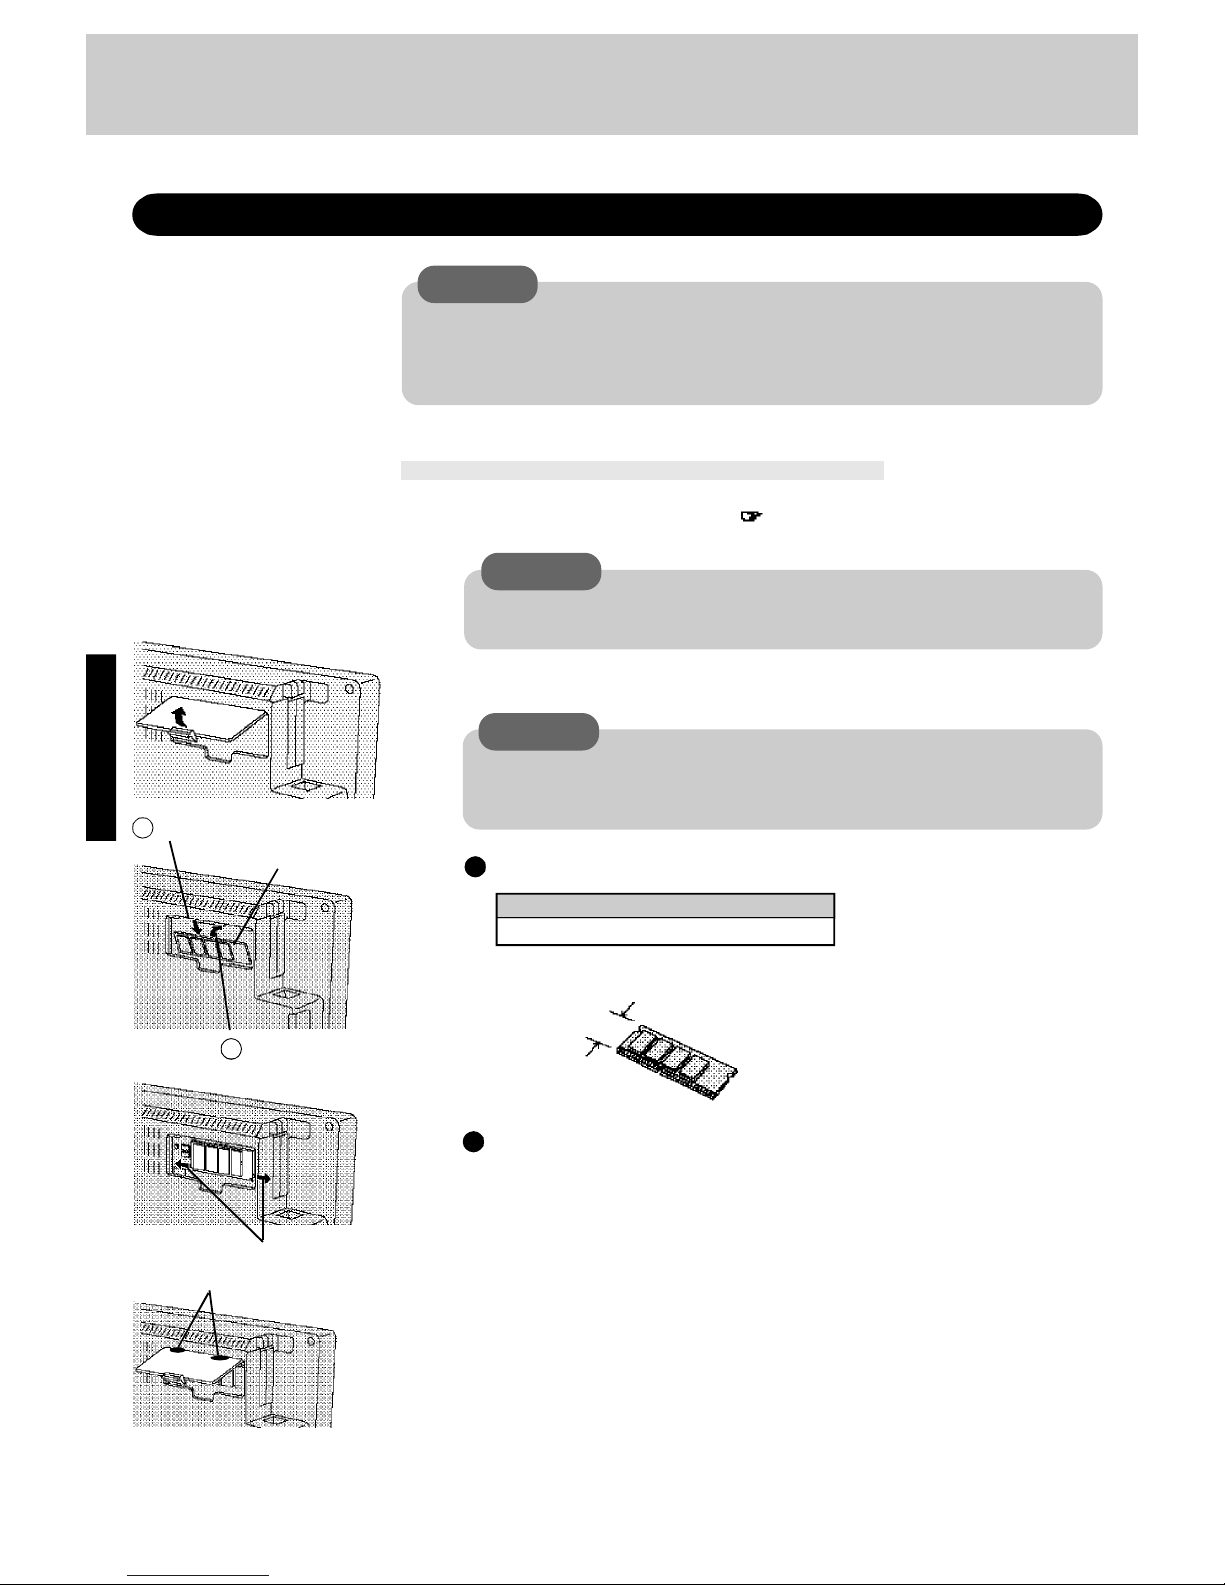
Adding Memory
Add-ons/Peripherals
2
Remove the memory cover
CAUTION
RAM modules are extremely sensitive to static electricity. There are cases where static
electricity generated by the human body has adversely affected such modules. In addition,
it is easy to damage the RAM modules or internal components of the computer. Therefore,
when installing or removing a RAM module, handle the module with extreme care.
Installing/Removing the RAM Module
Do not shut down using the suspend or hibernation mode.
1
Power off your computer ( page 11)
Do not install or remove peripherals while your computer is in the suspend or
hibernation mode; abnormal operation may result.
CAUTION
CAUTION
Do not touch the terminals or internal components, insert objects other than the
module, or allow foreign particles to enter. Doing so has been known to cause
damage, fire or electric shock.
3
Installing the RAM module
RAM module specifications
144 pins, 60/70 ns, 3.3 V, SO-DIMM, EDO
Slide the module in at an angle.
1
2
Snap the module into place
by pushing it down.
Removing the RAM module
Open the left and right hooks.
Put the cover back into place4
5
Turn your computer on
Fix the hooks
RAM Module Slot
31.7 mm (1.25")
or less
Page 21
21
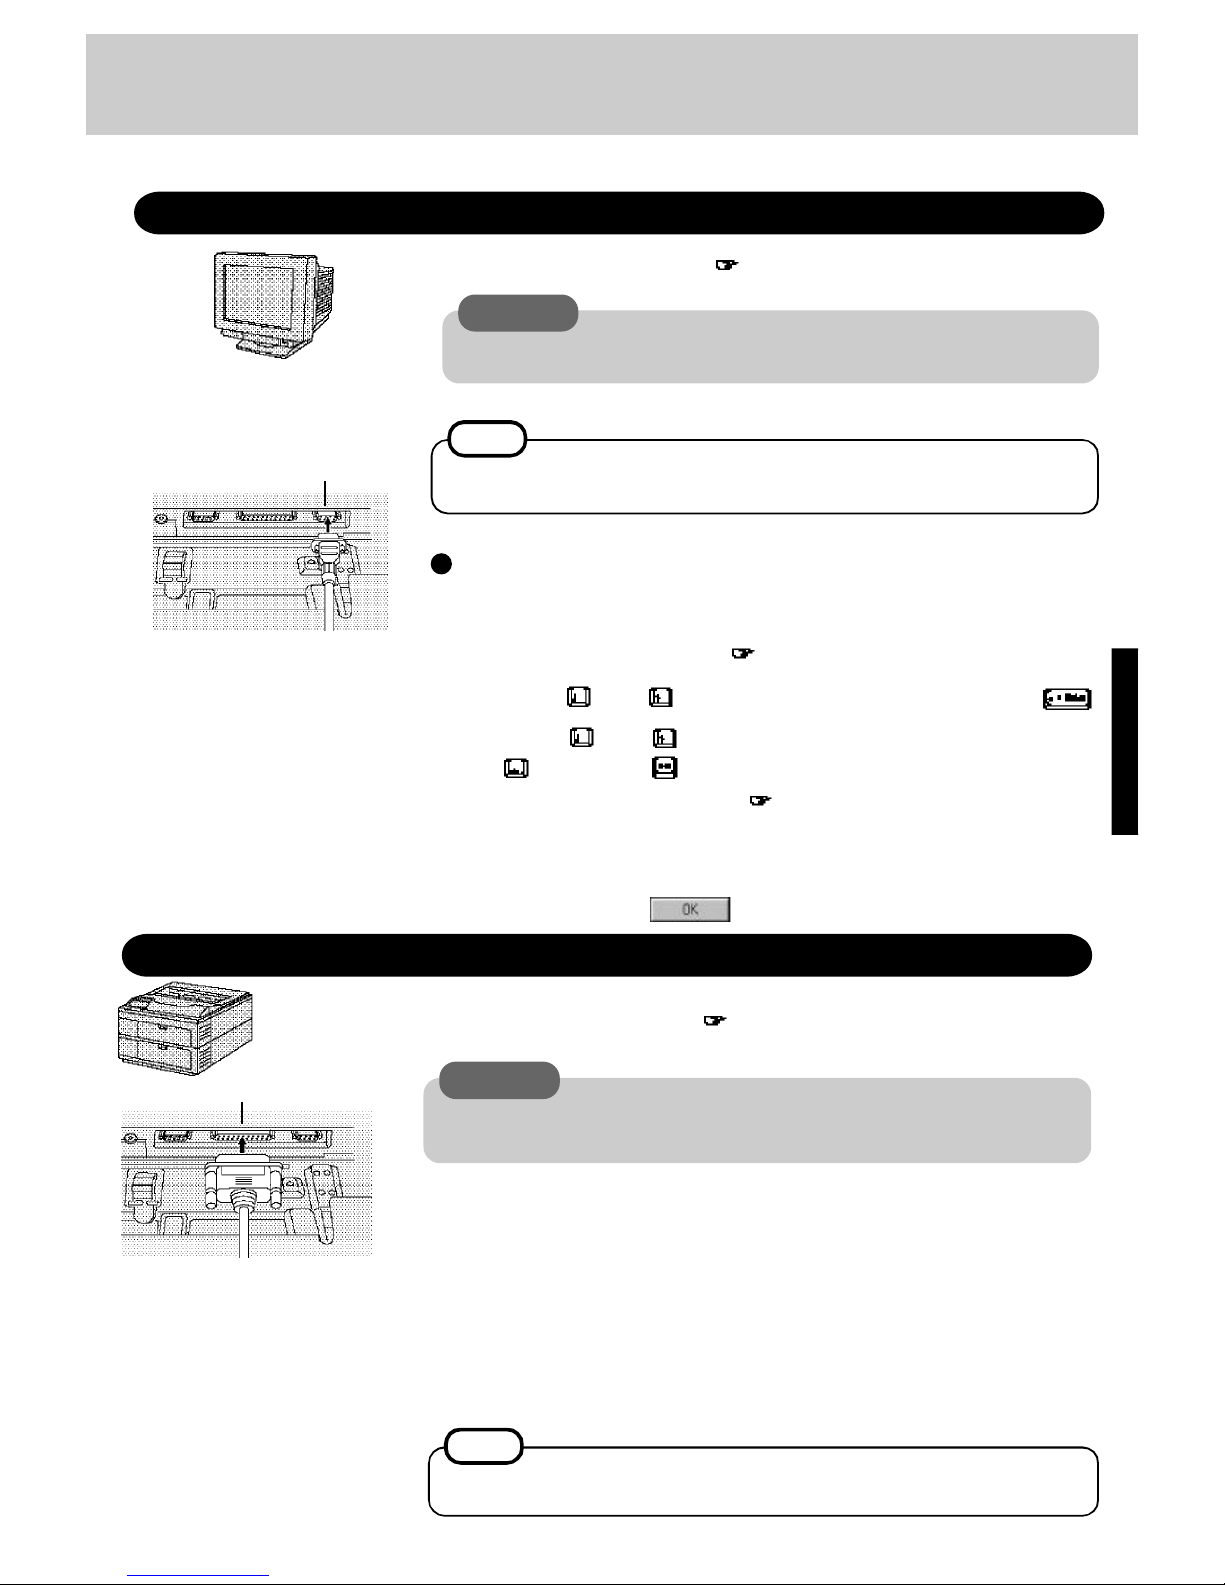
Using an External Display
1
CAUTION
Do not install or remove peripherals while your computer is in the suspend or hibernation mode; abnormal operation may result.
2
Connect the external display to your computer
Do not shut down using the suspend or hibernation mode.
Power off your computer ( page 11)
1
Power off your computer ( page 11)
Turn on the printer, then turn on your computer
3
You may need to install a driver for your printer. Simply follow the on-screen
instructions and read the printer’s operation manual on how to install the driver.
Setting your printer
NOTE
4
Go to [My Computer] - [Printers]. Find your printer’s icon, double-click on it, and click
[File] - [Set As Default]. If no icon is available, select [Add Printer] and install the driver
program.
Turn on the display, then turn on your computer
3
NOTE
For more detailed information, please refer to the operation manual for the external
display.
Be careful with the direction of
the connector.
2
Connect the printer to your computer
CAUTION
Do not install or remove peripherals while your computer is in the suspend or hibernation mode; abnormal operation may result.
Do not shut down using the suspend or hibernation mode.
Some external display connectors do not match the computer's
connector. In this case, consult
your nearest Panasonic dealer.
To display on both the LCD of your computer and the external
display
2
1
After this settings, [True Color (24bit)] can not be displayed on the external display.
Using a Printer
3
4
Run the Setup Utility ( page 34).
Using and , select [System Setup] then press
Using and , select [Display], set [Simultaneous] with
then press
Close the Setup Utility ( page 34).
Be careful with the direction of
the connector.
Ext. Display Port
Parallel Port
Select your external display
Set your external display for [Models] in [Start] - [Settings] - [Control Panel] [Display] - [Settings] - [Advanced Properties] - [Monitor] - [Change] - [Show all
devices], then press .
5
Page 22
22
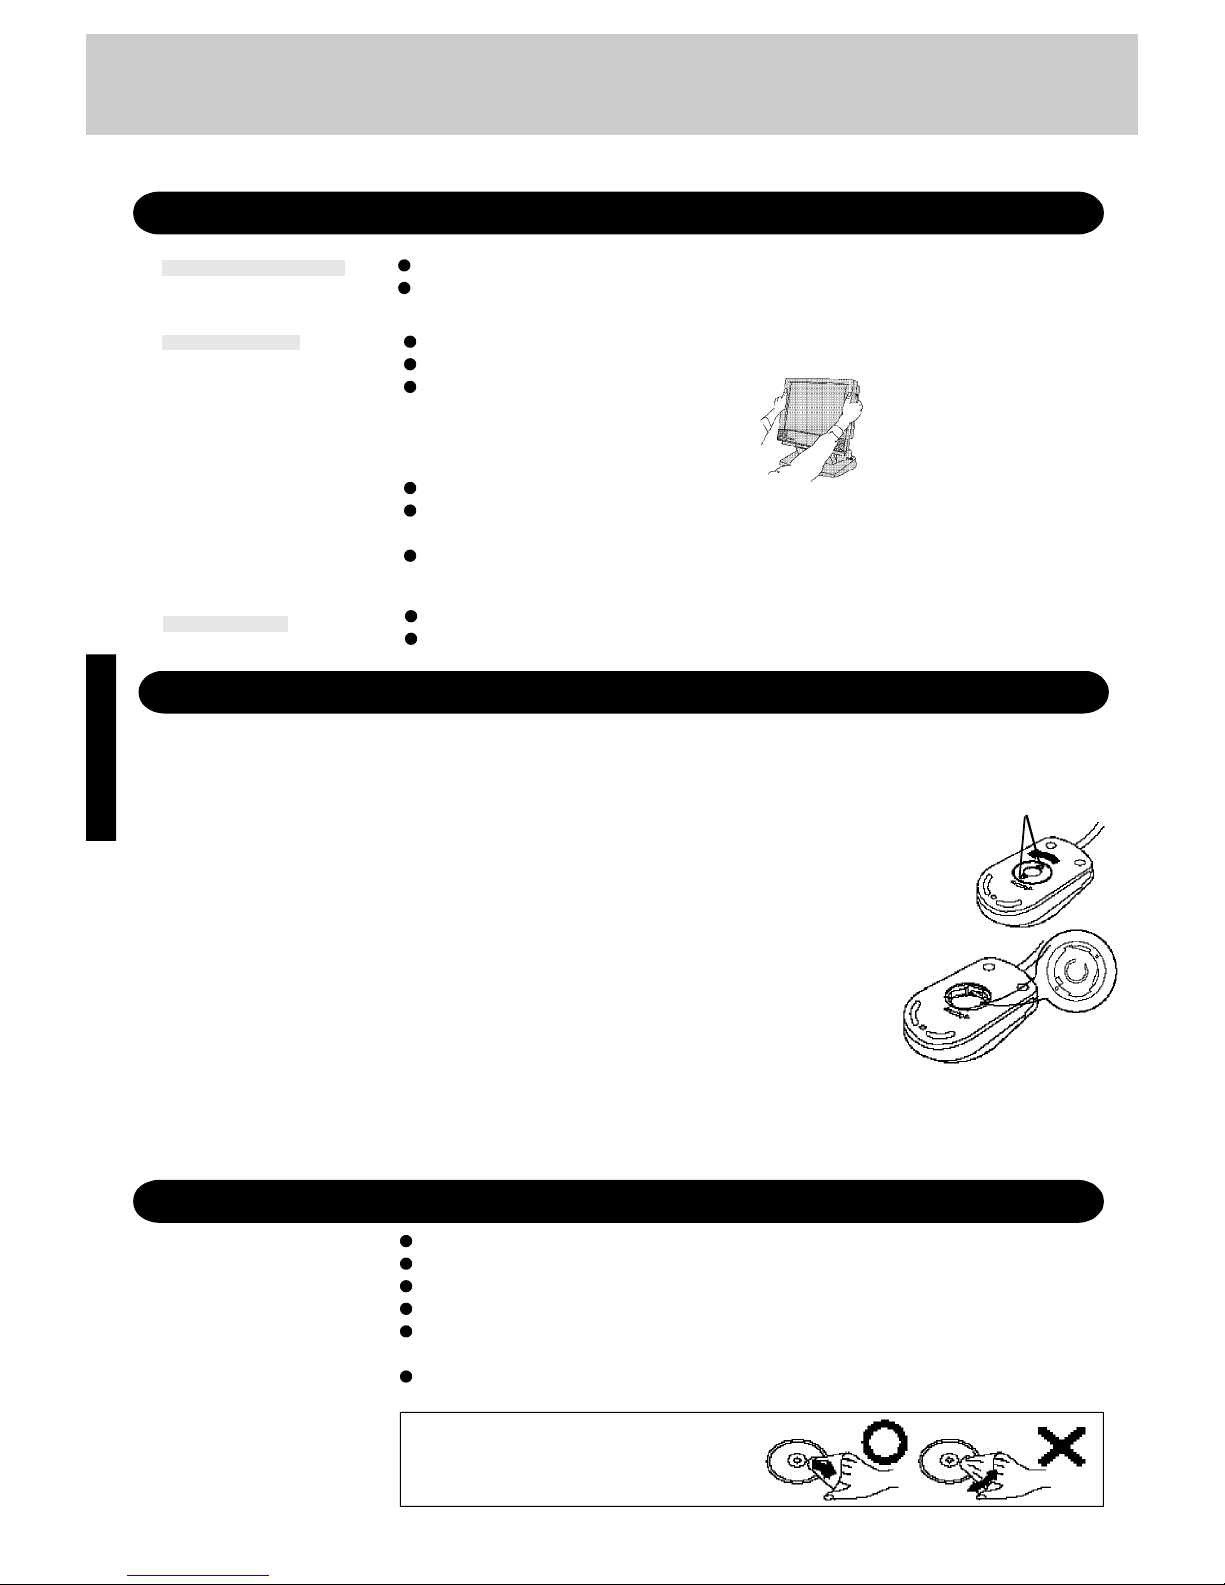
Storage
Computer
Maintenance
Do not use solutions such as benzene or thinner. A soft, dry cloth is recommended.
Cleaning the CD drive using a CD lens cleaner is recommended, not a liquid type cleaner.
Carrying
Do not leave a floppy disk in the drive while transporting your computer.
Do not carry your computer when it is ON.
Do not hold the edges of the display. Doing
so may damage the computer.
Do not drop or hit your computer against solid objects.
If you have occasion to ship your computer, make absolutely sure that it is packed with
adequate protection.
Insert the lens protect sheet in the CD drive.
Do not place in areas exposed to direct sunlight or extremely high/low temperatures.
Insert the lens protect sheet in the CD drive.
CD-ROM
Power off your computer then remove the mouse.
1
Remove the mouse
Turn the mouse over, turn the ring counterclockwise while holding the
two marks on the cover to unlock.
Remove the cover by sliding the mouse, then remove the ball.
2
Remove the cover and then remove the ball
3
Wash the ball and then wipe the cover and roller
After washing the ball in soapy water, rinse it in water
thoroughly and wipe it with a dry, soft cloth.
Wipe the surface of the cover and the roller in the mouse
with a dry, soft cloth as well.
Return the ball to its original position, attach the cover and turn it clockwise to lock.
4
Return the ball and cover
Return the mouse to its original position.
5
Return the mouse
Mouse
Do not allow CDs to become dirty or scratched.
Do not place or store CDs in locations exposed to heat, direct sunlight, humidity or dust.
Do not write on the surface of the CD with ball-point pen or other writing instrument.
Do not drop, bend, or place heavy objects on top of CDs.
If the CD is brought from cold into a warm environment, moisture may form on the disc.
Wipe this moisture off with a soft, dry, lint-free cloth before using the CD.
Cleaning the CD using a CD disk cleaner (LF-K022DC) is recommended once every 2 or 3
months.
If the mouse cursor does not move, or skip erratically, dust may have built up in the track ball
well. Cleaning the mouse is recommended.
If a CD gets dirty, after wiping the CD with a
moist, soft cloth, wipe it with a dry cloth. Always wipe from the center toward the edge.
Marks
Storage, Carrying and Maintenance
Page 23
23
Computer Diagnosis
List of Error Codes
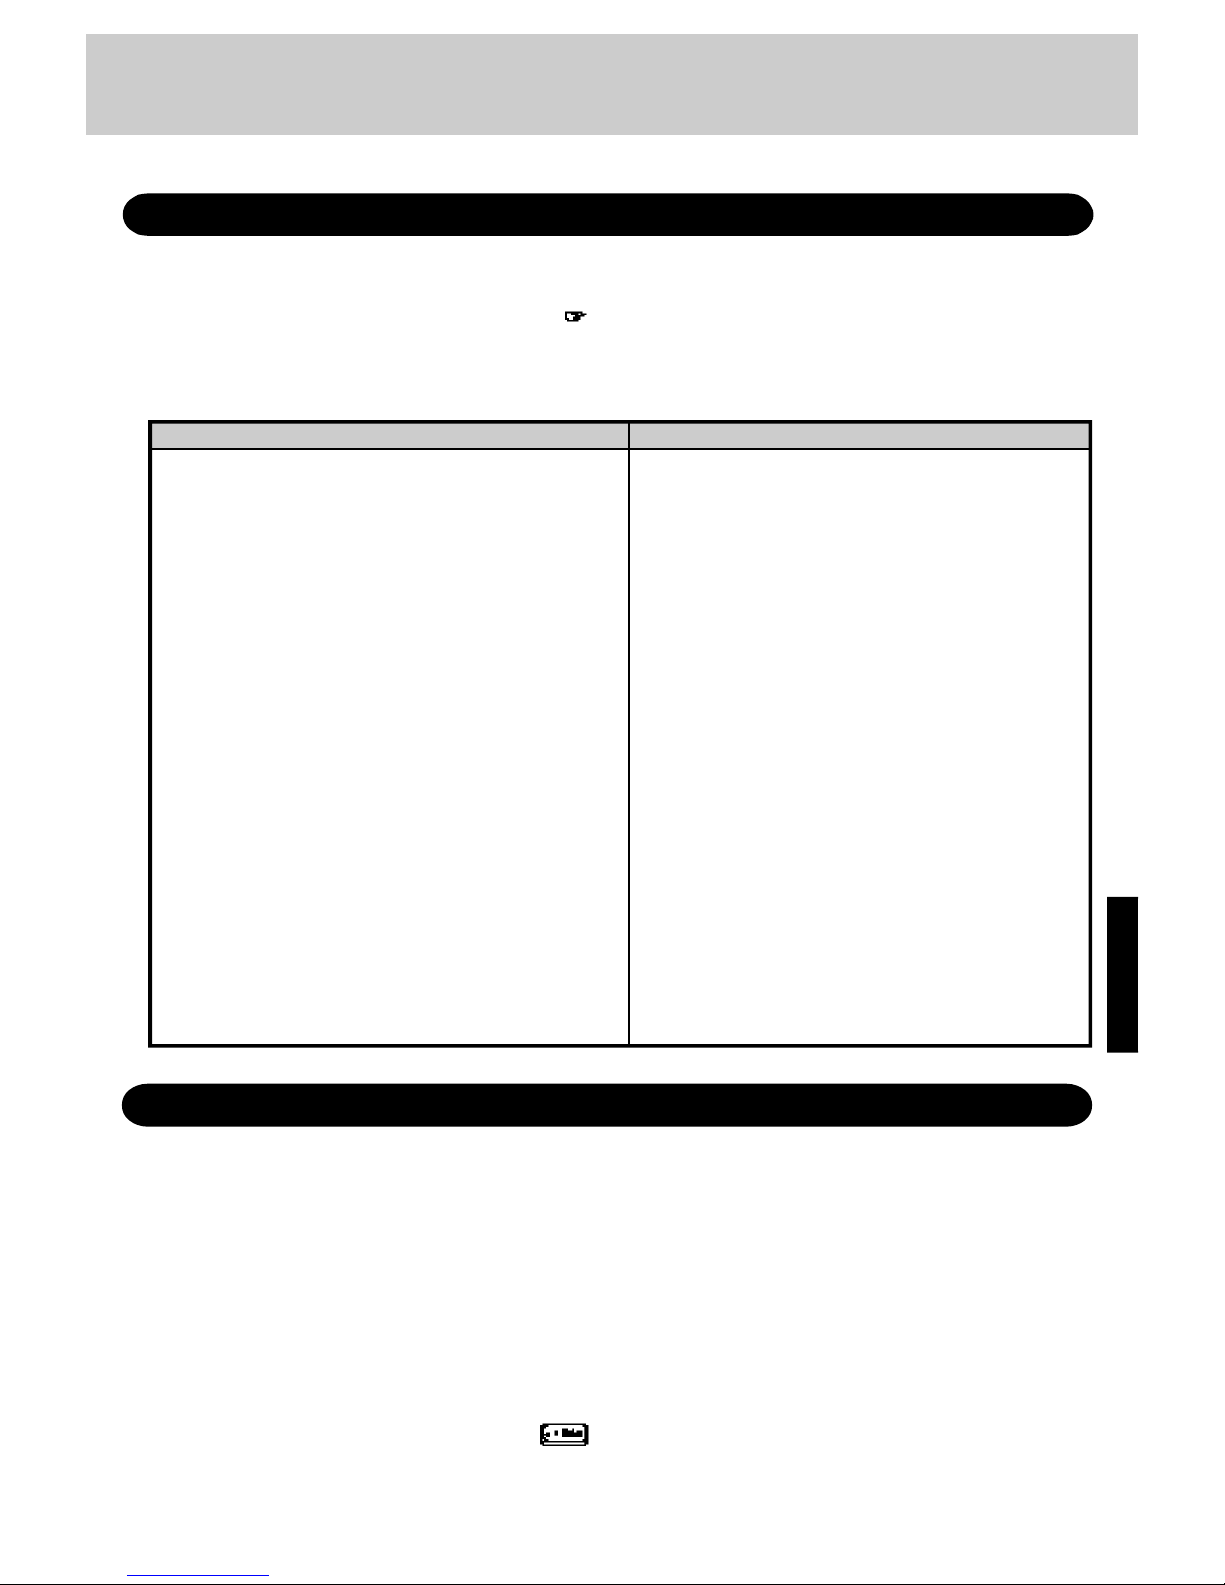
If a problem occurs with your hardware, [POST Start up Error(s)] is displayed along with the
error code(s), follow the on-screen instructions.
Setup: Setup utility ( page 34) is started. Run [Load Default Settings (PnP)].
Next the Setup Utility must be run again to input the appropriate operating environment settings.
Exit: Ignore the error message(s), and restart the computer.
1
To run the program, insert the Firstaid FD you created into the
floppy disk drive, then turn your computer on
2
Using the Self-diagnosis Program
Follow the procedure below to check whether each part of your computer is operating properly.
3
When the display below is shown, select [1. Boot]
1. Boot
2. Restore HDD to factory default (For beginners)
3. Restore HDD to factory default (For advanced users)
At the MS-DOS prompt (A:\WINDOWS\COMMAND>), input the
following:
diag55
Follow the messages on the screen.
062 Boot failure--default configuration used Default configuration in use
101 System Board Failure Interrupt controller failure
102 System Board Failure Timer 2 test failure
106 System Board Failure Diskette controller failure
114 Adapter ROM Error Adapter ROM checksum error
151 System Board Failure Real-time clock failure
161 Bad CMOS Battery Dead battery
162 Configuration Change Has Occurred Configuration error
162 Configuration Error CMOS checksum error
163 Date and Time Incorrect Real-time clock is not updating
173 Configuration Change Has Occurred ROM configuration has changed
201 Memory Size Error Memory size/data error
301 Keyboard Error Keyboard failure
303 Keyboard Error Keyboard controller failure
604 Diskette Drive Error Diskette drive 0 configuration error
605 Diskette Drive Error Diskette unlocked problem
1780 Hard Disk Error Fixed disk 0 failure
1800 PCI Error No more IRQs available
1801 PCI Error No more room for optional ROM
1802 PCI Error No more I/O space available
1803 PCI Error No more memory (above 1 MB) available
1804 PCI Error No more memory (below 1 MB) available
1805 PCI Error Checksum error or 0 size optional ROM
8601 Pointing Device Error Pointing device failure
I9990301 Hard disk failure
I9990305 An operating system could not be found
Code Description
Page 24
24
Dealing with Problems
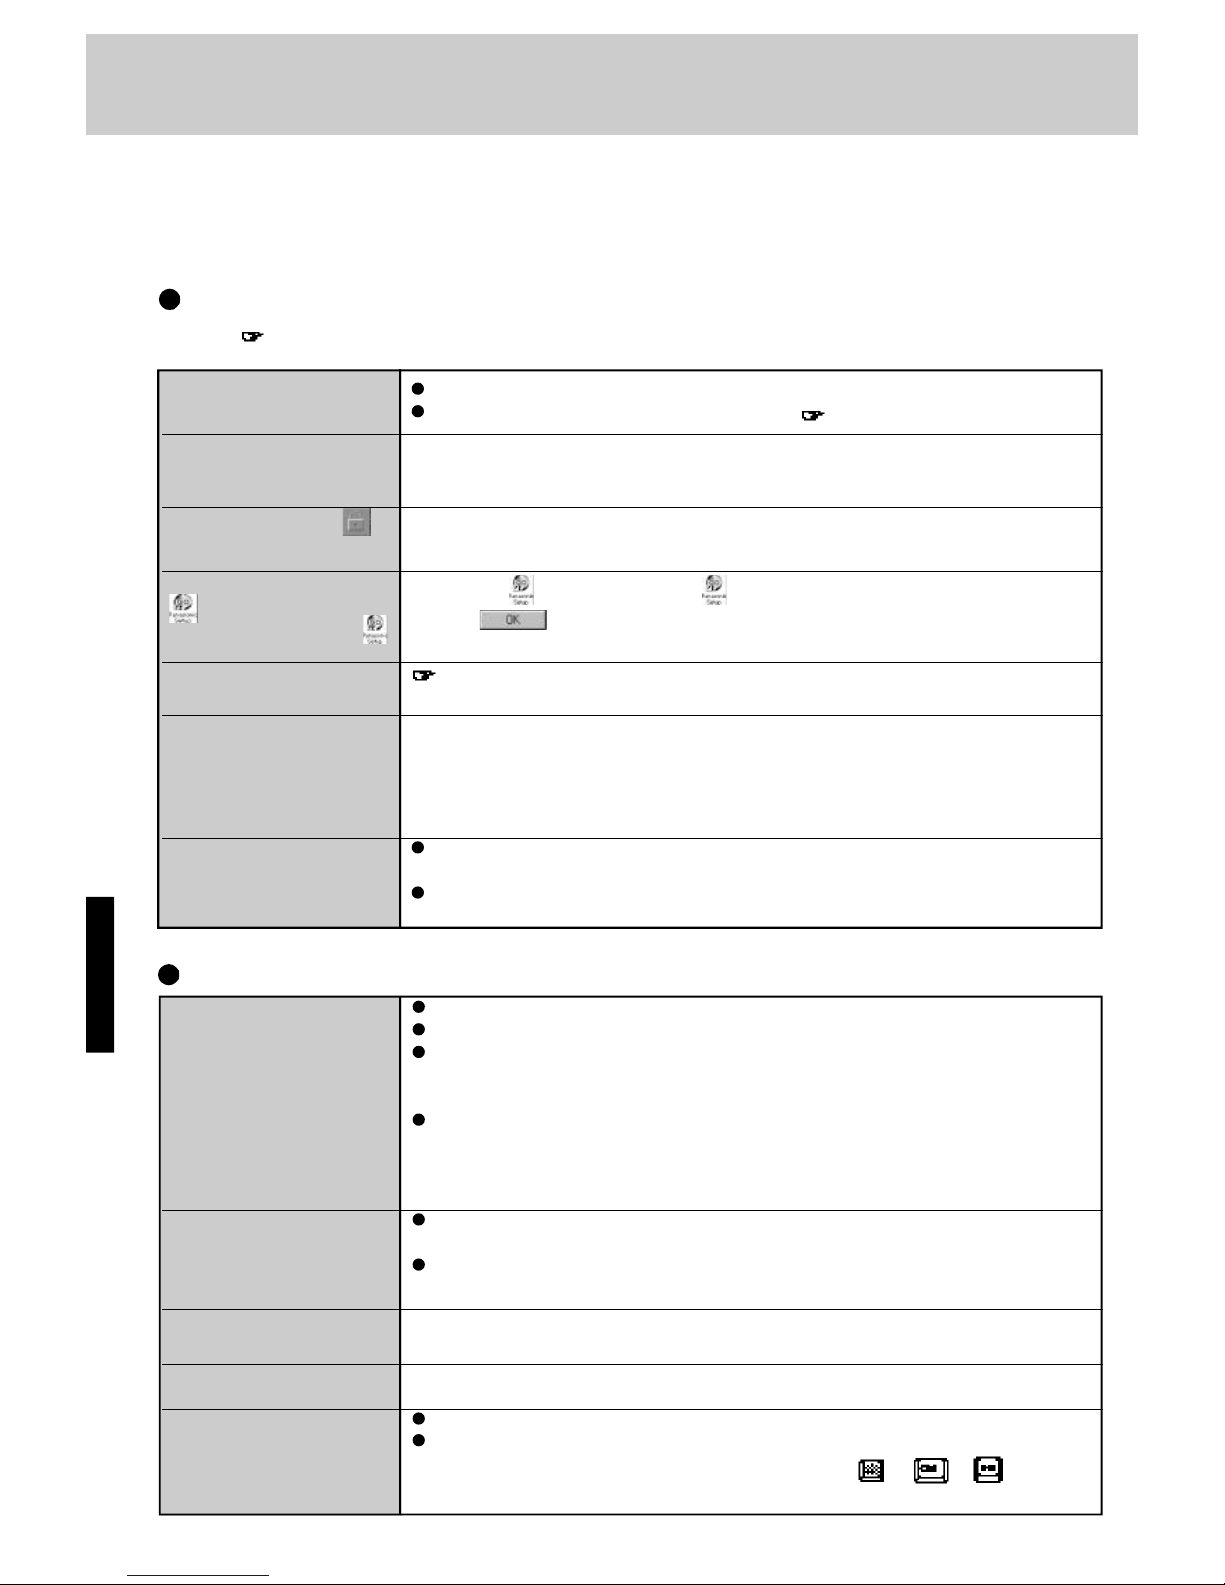
When a problem occurs, please refer to this page. If you think it has to do with the software application you are using, please
read the related manual. If you cannot find a solution to a problem, please consult your nearest Panasonic dealer.
Starting Up
If the fan ( page 37) in the back of the computer does not work, it may be a malfunction. Consult your nearest Panasonic
dealer.
Display
Even after powering on, no
display
The power has not been cut,
but after a certain period of
time, there is no display
An afterimage appears
The motion of a mouse
cursor is not smooth
The cursor does not move
from mouse operations
The power indicator is not
lit
The power indicator is
flashing orange and power
remains OFF
[Enter Password:] or is
displayed
is not displayed
(Once this icon is executed,
will not be displayed later)
[Post Start Up Error(s)] is
displayed
The pre-memory count,
Windows startup, or an
operation is extremely
slow
The date and time are
incorrect
The AC adapter may not be properly connected.
Pressing the reset button will solve the problem ( page 36).
The CPU temperature is too hot. When the temperature of the CPU drops, power on again.
Please input your password. If you have forgotten it, consult your nearest Panasonic dealer.
If you deleted before you double-click , select [Start]-[Run], input [c:\util\avapp\psetup.bat],
and press . Follow the message on the screen.
page 23
Run [Load Default Settings (PnP)] in the Setup Utility. This will restore the Setup Utility's
settings to their default values (except the password settings), then the Setup Utility must be run
once again for you to input the appropriate operating environment settings. (The processing
speed depends on the application software used, so this operation may not cause the processing
speed to increase.)
You can set the date and time through [Date/Time] in [Start] - [Settings] - [Control Panel].
Another way is with the DATE and TIME commands in MS-DOS.
If you continue to experience problems, the internal battery maintaining the clock may
need to be replaced. Please consult your nearest Panasonic dealer.
Adjust the brightness or contrast.
When purchasing the computer, the display setting has been preset for an external display.
When there is no display to an external display,
• Check your cable connection for an external display.
• Confirm an external display is on.
If your computer is connected to an external display and the internal LCD has been set to
"off", and the unit is placed in the hibernation or suspend mode, the internal LCD will
remain in the "off" mode if the external display is not connected when the computer is
restarted. In this case, re-connect the external display and reboot the computer.
Has your computer been set to the power-saving mode? To resume operation of your
computer, press any key.
To save power, your computer may have automatically entered the suspend or hibernation mode.
If an image is displayed for a prolonged period of time, an afterimage may appear. This is
not a malfunction. The afterimage will disappear when a different screen is displayed.
[Start]-[Settings]-[Control Panel]-[Mouse]-[Motion] and check [Show pointer trails].
The Coffee break Password may be set.
Check your mouse connections, and then reboot the computer from the keyboard.
From the keyboard, you may choose to press down on or + then select
[Shut Down].
Page 25
25
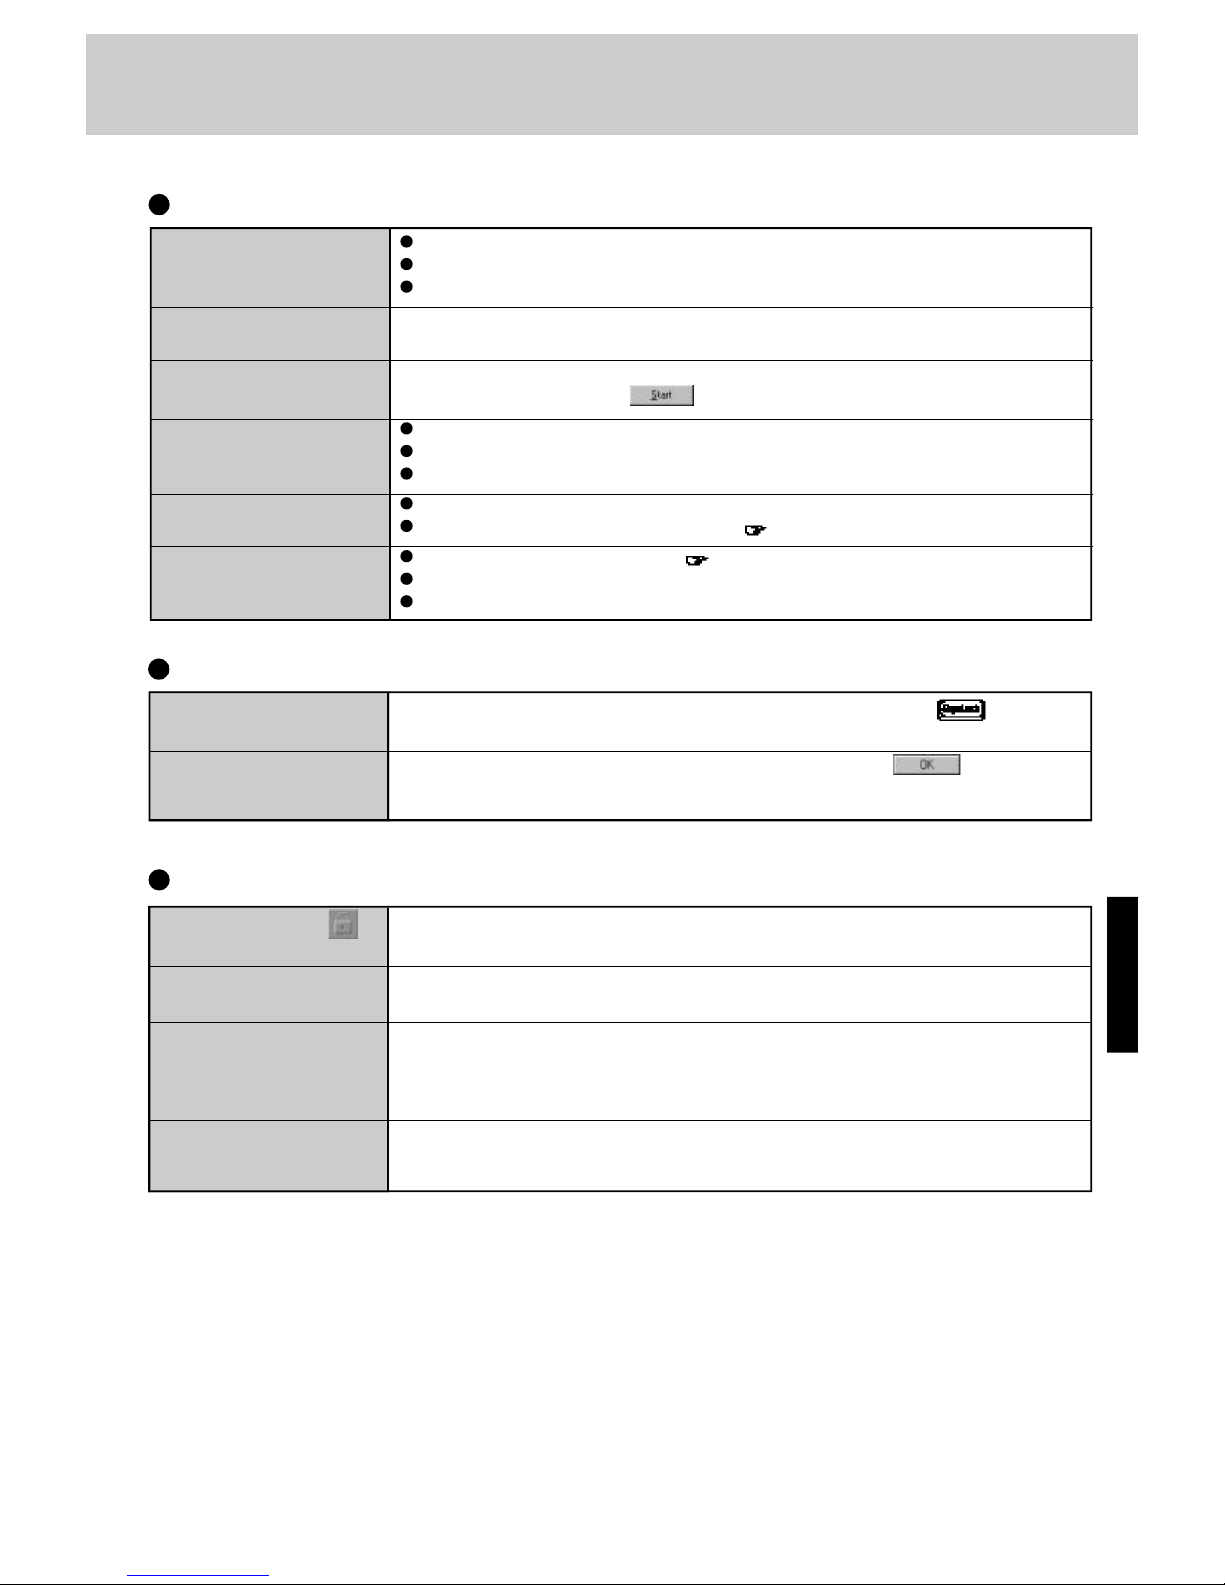
Cannot read/write to a
floppy disk
Unable to write to a floppy
disk
How to format a floppy disk
is unclear
Unable to read/write to the
hard disk
The Tray of the CD drive
does not extend
Unable to read the CD
Has the floppy disk been correctly inserted?
Has the floppy disk been correctly formatted?
Has the Setup Utility been used to set [Floppy Operation] to [Enable]?
Is the floppy disk write-protected?
Select [Format] in [My Computer] - [3 1/2 Floppy (A:)] - [File]. After confirming the disk
volume and format type, click .
Your drive or file may not have been properly set.
Check to see if the hard disk is full.
Your hard disk content may be corrupted. Consult your nearest Panasonic dealer.
Is the computer on?
Extend the tray by using emergency hole. ( page 9)
Is the CD dirty, wet or scratched? ( page 22)
Has the CD been inserted correctly?
Check the specification of the drive or file.
Disk Operations
Only capital letters are
being input
How to input European
characters (ß, à, ç) or
symbols is unclear
Character Input
If the CapsLk lamp is lit, the Caps Lock is ON. To switch it OFF, press .
Select [Start] - [Run], input [c:\windows\charmap.exe] and press . The Character
Map will be displayed. Point to the desired font name and select it.
Setup Utility
[Enter Password:] or is
displayed
[User Password] cannot be
selected
[Coffee break Password]
or [Key Combination for
Coffee break] cannot be
selected
[Supervisor Password]
cannot be set
Enter the User Password or Supervisor Password. If you have forgotten it, consult your nearest Panasonic dealer.
[User Password Protection] in [Supervisor Setup] may be enabled.
You need to set the User Password.
If the User Password has been set first, the Supervisor Password can not be the same as the
User Password. Another password needs to be entered.
Page 26
26
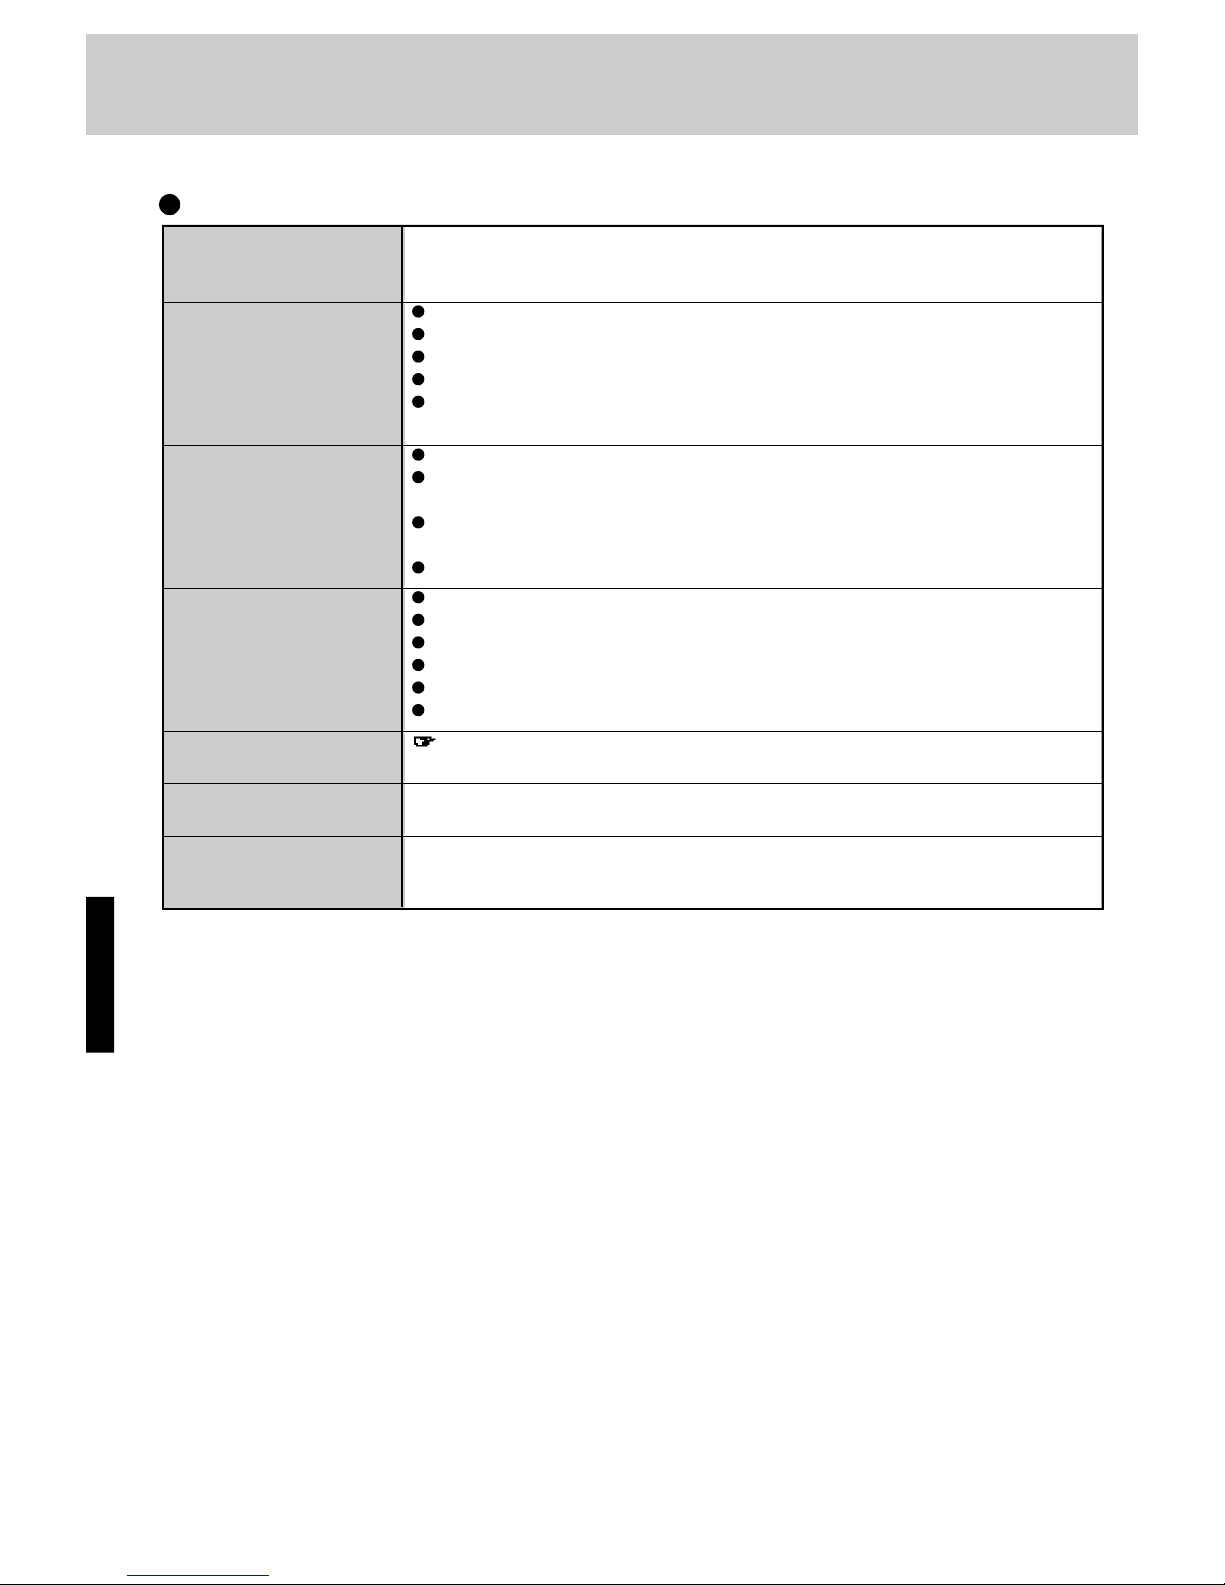
Your peripheral does not
work. An error occurs
while installing the driver
Unable to print
The device connected to the
serial port does not work
A PC card does not work
You do not know the
available RAM module
The RAM module has not
been recognized
The address map for IRQ,
I/O port address, etc. is
unclear
Connecting Peripherals
You need to use drivers conforming to Windows 95 Version 4.00.950B (OSR-2). Some
earlier drivers will no longer work.
For more information, please ask the source of the driver in question.
Check the computer-printer connection.
Make sure the printer is on.
Make sure the printer is in the online state.
Make sure paper is in the printer tray and there is no paper jam.
Has the Setup Utility been used to set [Parallel Port (Address)] to [Automatic (PnP)],
[378] or [3BC]?
Check the connection.
Confirm that the device driver for the serial port works. Please refer to the reference
manual for the device.
Confirm that two mouse devices are not connected, one through the mouse jack and the
other through the serial port.
Has the Setup Utility been used to set [Serial Port] to [Automatic (PnP)] or [3F8]?
Make sure the card is properly inserted.
Confirm that the card conforms to the PC Card Standard.
A driver for Windows 95 may need to be installed.
Note that after a driver is installed, the computer must be rebooted.
Check that the proper port settings have been made.
Read the PC card’s manual. Or, you may need to call the source of the PC card.
page 20
Make sure the RAM module has been properly inserted.
Check the address map by going to [View Resources] in [Start] - [Settings] - [Control Panel]
- [System] - [Device Manager] - [Computer] - [Properties].
Dealing with Problems
Page 27
27
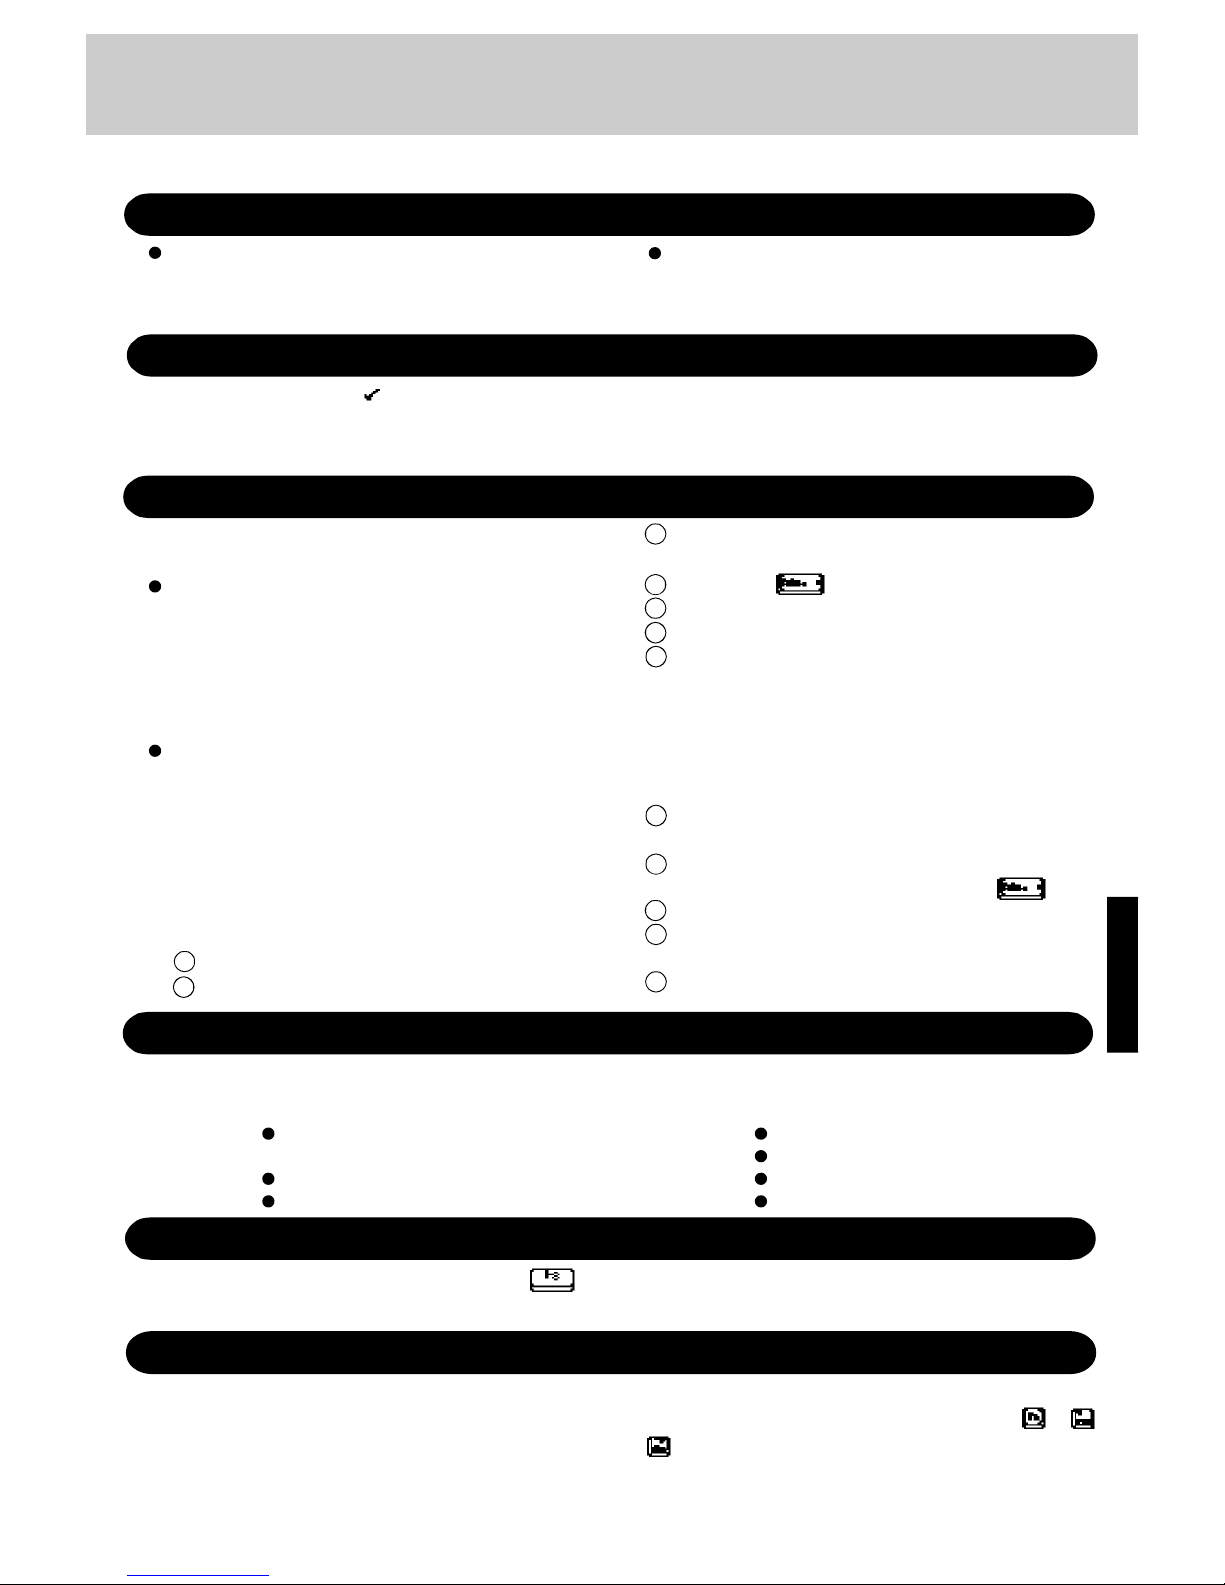
Back up the contents of your hard disk.
Start up with the Firstaid FD.
Technical Information
The network connection may be severed when entering the
standby and suspend (hibernation) mode. Be sure to disable
the hibernation timeout settings with the Setup Utility if you
require a network environment.
When the power saving function is running, communications software may malfunction. For example, communications may be halted if the suspend mode (hibernation)
is activated.
This computer uses a new, highly efficient file system called
FAT32. Please note the following regarding FAT32.
Some software will not run normally:
Do not run disk utilities and other software not compatible
with FAT32. Doing so could cause incorrect information such
as hard disk capacity to be shown or could destroy hard disk
data.
Contact the dealer or other outlet for the software and obtain
the latest version.
Non-recognition from other operating systems:
You will not be able to view the contents of your hard disk
from other operating systems. (For example, you will not be
able to view the contents of your hard disk even when starting
up using a floppy disk created with another computer.)
Other operating systems cannot therefore be installed. To install the operating system, please refer to the method listed
below. If you are unsure about this explanation, do not proceed with installation of operating system.
When Windows is started up while pressing the key, ,
the [Microsoft Windows 95 Startup Menu] is displayed. After
Network
2
3
4
5
6
7
8
9
10
11
12
FAT32
Reinstallation
The sound chip has its own power saving function. You can
enable this function in the [OPL3-SAx power management] tab
(select [Start] - [Settings] - [Control Panel] - [Power]).
In [Non Power Save mode], the power saving function is disabled. This is the default value.
In [Minimum level of power save], the power saving function is
Power saving function in the sound chip
When the [Windows 95 Startup Menu] appears, select
[1. Boot].
Enter FDISK .
Select [3. Delete partition or Logical DOS Drive].
Select [1. Delete Primary DOS Partition].
Start up again following the instructions on the screen.
These steps will allow you to install most operating systems.
The contents of the hard disk will be deleted. Always make
sure to back up the hard disk beforehand.
The following steps will normally be unnecessary, however,
if installation is not possible, try performing them.
Start up again using the Firstaid FD to open FDISK in the
same way.
When [Do you wish to enable large disk support (Y/N)...?]
appears on the first screen, press “N”, then .
Select [1. Create DOS partition or Logical DOS Drive].
Set the partition following the instructions on the screen
and activate it.
Start up again following the instructions on the screen.
reinstalling Windows, [Previous version of MS-DOS] also
appears in this menu, however, do not select this item as MSDOS is not installed.
enabled. You may encounter problems, such as no sound from
music CDs, and the keyboard’s volume control ( +
) will not function.
Do not select [Intermediate level of power save] or [Maximum level of power save] because noise is likely.
Internet Explorer 4.0 places a tremendous load on the system in
order to execute the wide variety of functions that it provides.
As a result, some unexpected faults may occur.
Example: It takes a long time to reboot or the computer
locks up.
The software cannot be upgraded.
A system module error occurs.
Internet Explorer 4.0
If any of these faults occurs, try using the software with some
Internet Explorer 4.0 functions turned off. (See Internet Explorer Help for more details.)
Example: Close the channel bar..
Close the welcome message.
Set the wallpaper to "None".
Uninstall Internet Explorer 4.0.
Do not add the check mark to [DMA] in [Start] - [Settings] [Control Panel] - [System] - [Device Manager] - [Disk drives] [GENERIC IDE DISK TYPE**] - [Settings].
This may damage data on the hard disk.
About HDD DMA Transfer
1
Page 28
28
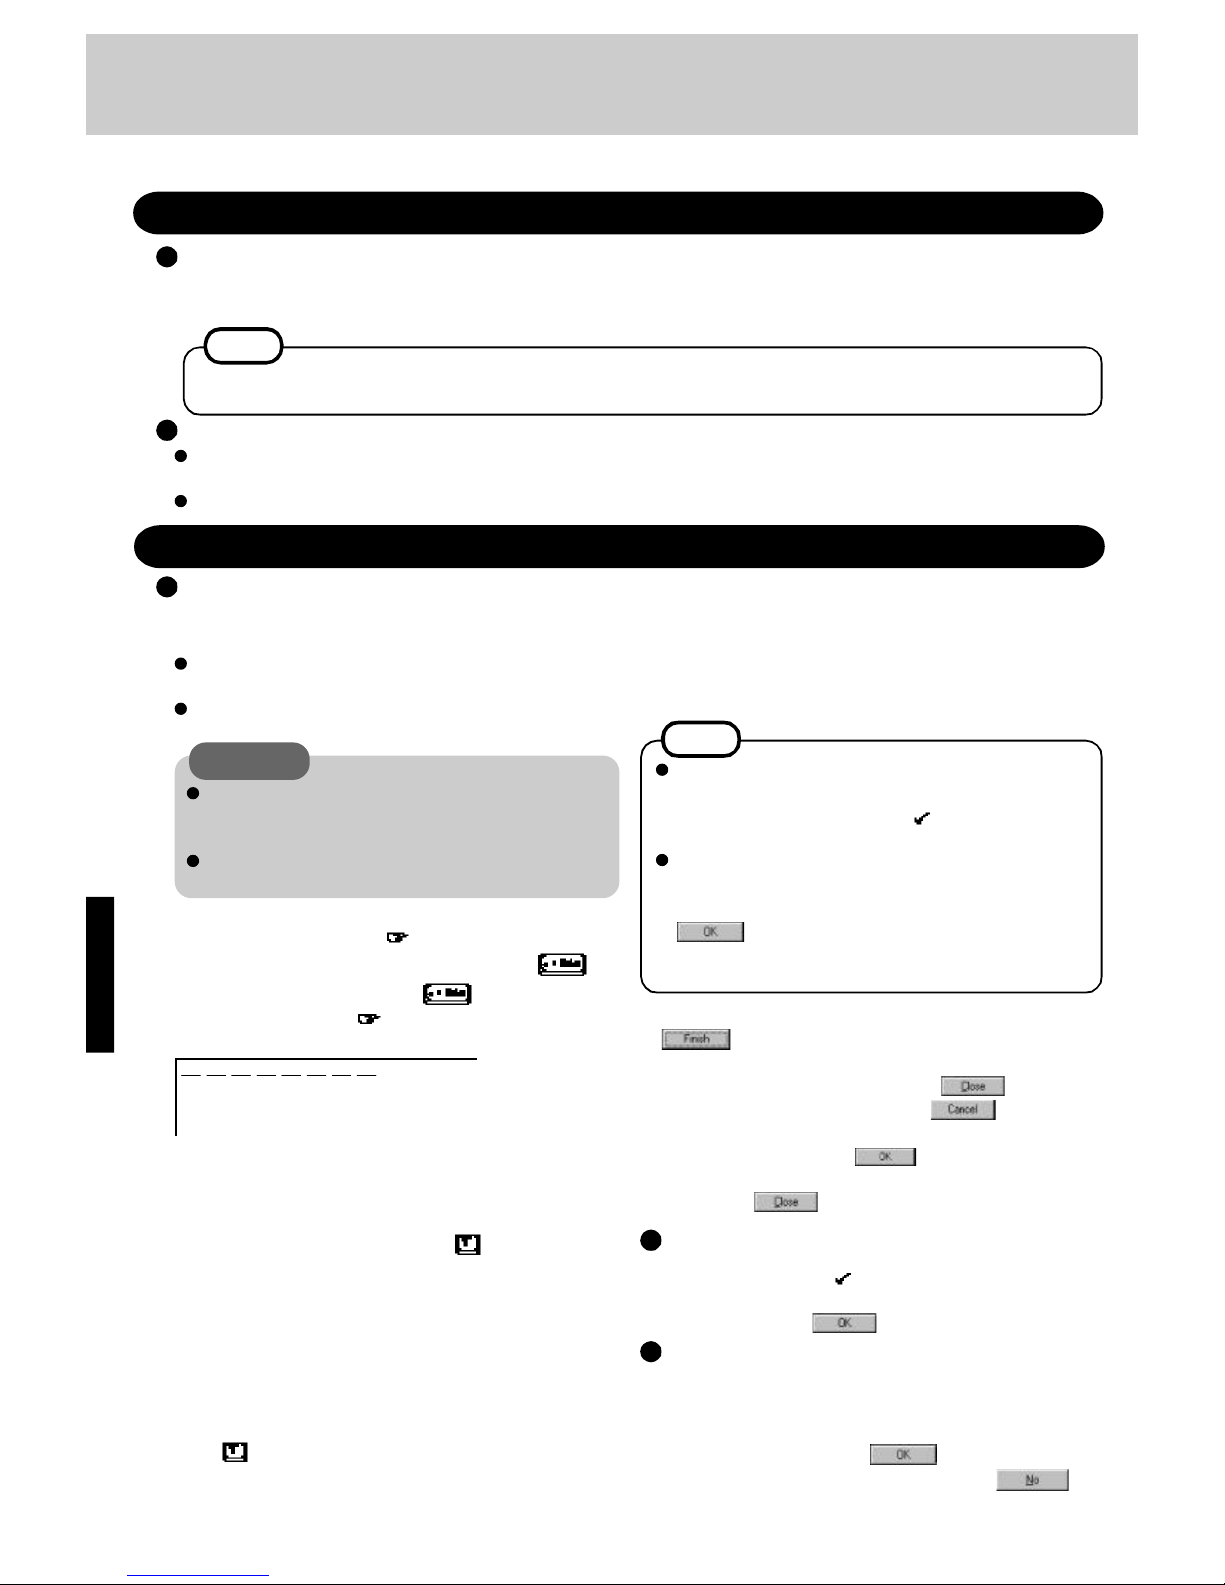
1 2 Delete the check mark for [When powered by AC power]
in [Start] - [Settings] - [Control Panel] - [Power] - [Disk
Drives], then press .
8 At the [Finishing Setup], remove the floppy disk and press
. Windows will restart after all the settings have
automatically been made.
9 At the [Date/Time Properties], press .
10 At the [Add Printer Wizard], press .
11 When the display appears indicating the establishment of
the system settings, press .
The computer will reboot. (When the welcome screen appears, press .)
Reinstalling Software
You will need the Firstaid FD (you earlier made copies of), Firstaid CD (included), Windows 95 CD (only use enclosed CD) and
a blank floppy disk for the startup disk.
With the exception of the instruction below, please select all default values displayed by the Setup Wizard.
Be sure to add the check mark for [Sound, MIDI, or
Video Capture Card] at the [Analyzing Your Computer].
Have a blank disk on hand to create a "Windows 95
Startup Disk". Immediately after creating this disk, enter the "Firstaid FD" into the floppy disk drive and press
. (Note: A system error will result if the
"Firstaid FD" is not inserted. If this occurs, insert the
"Firstaid FD" and press [Retry].)
NOTE
4 For beginners: select [2. Restore HDD to factory de-
fault (For beginners)].
For advanced users: select [3. Restore HDD to factory de-
fault (For advanced users)]
At the confirmation message, press . Simply follow the
on-screen instructions .
5 <For beginners only>
When your computer prompts you to insert the "Firstaid CD",
please do so. When the computer reboots, the startup menu
will appear, select 2 and continue to follow the on-screen instructions.
6 <For beginners only>
When your computer prompts you to insert the "Firstaid FD",
press . When the computer reboots, the startup menu will
appear, select 2 and continue to follow the on-screen instruc-
tions.
Microsoft Windows 95 Startup Menu
1. Boot
2. Restore HDD to factory default (For beginners)
3. Restore HDD to factory default (For advanced users)
Enter a choice: 1
1 Insert the "Firstaid FD", and turn the computer on, then run
the Setup Utility program. ( page 34)
2 Select [Load Default Settings (PnP)], then press . At
the confirmation message, press .
3 Close the Setup Utility ( page 34); this screen should ap-
pear.
NOTE
If you have not created these disks, a message will appear at startup urging you to make backup copies. If there is no
message, backup copies have already been created.
Before Reinstallation
Preparing
Important
Save all important data. If reinstallation is carried out, all data existing prior to the installation will be lost. The reinstal-
lation will return the computer to factory condition.
Be sure to remove all PC Cards and disconnect all peripherals before the reinstallation procedure.
Reinstalling
Two options are available, one for beginners and the other
for advanced users.
CAUTION
The Advanced Users option should only be performed when
the hard disk has been formatted into two or more partitions.
If data on your hard disk is compressed, the data should
be uncompressed.
Windows 95 (HDD format)
For beginners: Returning to factory default
condition.
For advanced users: Returning drive C to factory
default condition.
Power 1
Device Manager 1
1 3 Set [Start drive letter] and [End drive letter] in [Control
Panel] - [System] - [Device Manager]- [CDROM][MATSHITA UJDCD8710]- [Settings] - [Reserved drive
letters] to [L:], then press If the message to restart or shut down Windows appears, select .
7 When your computer prompts you to insert the "Windows 95
CD", please do so.
Windows 95 has setup started. Follow the on-screen instructions.
Page 29
29
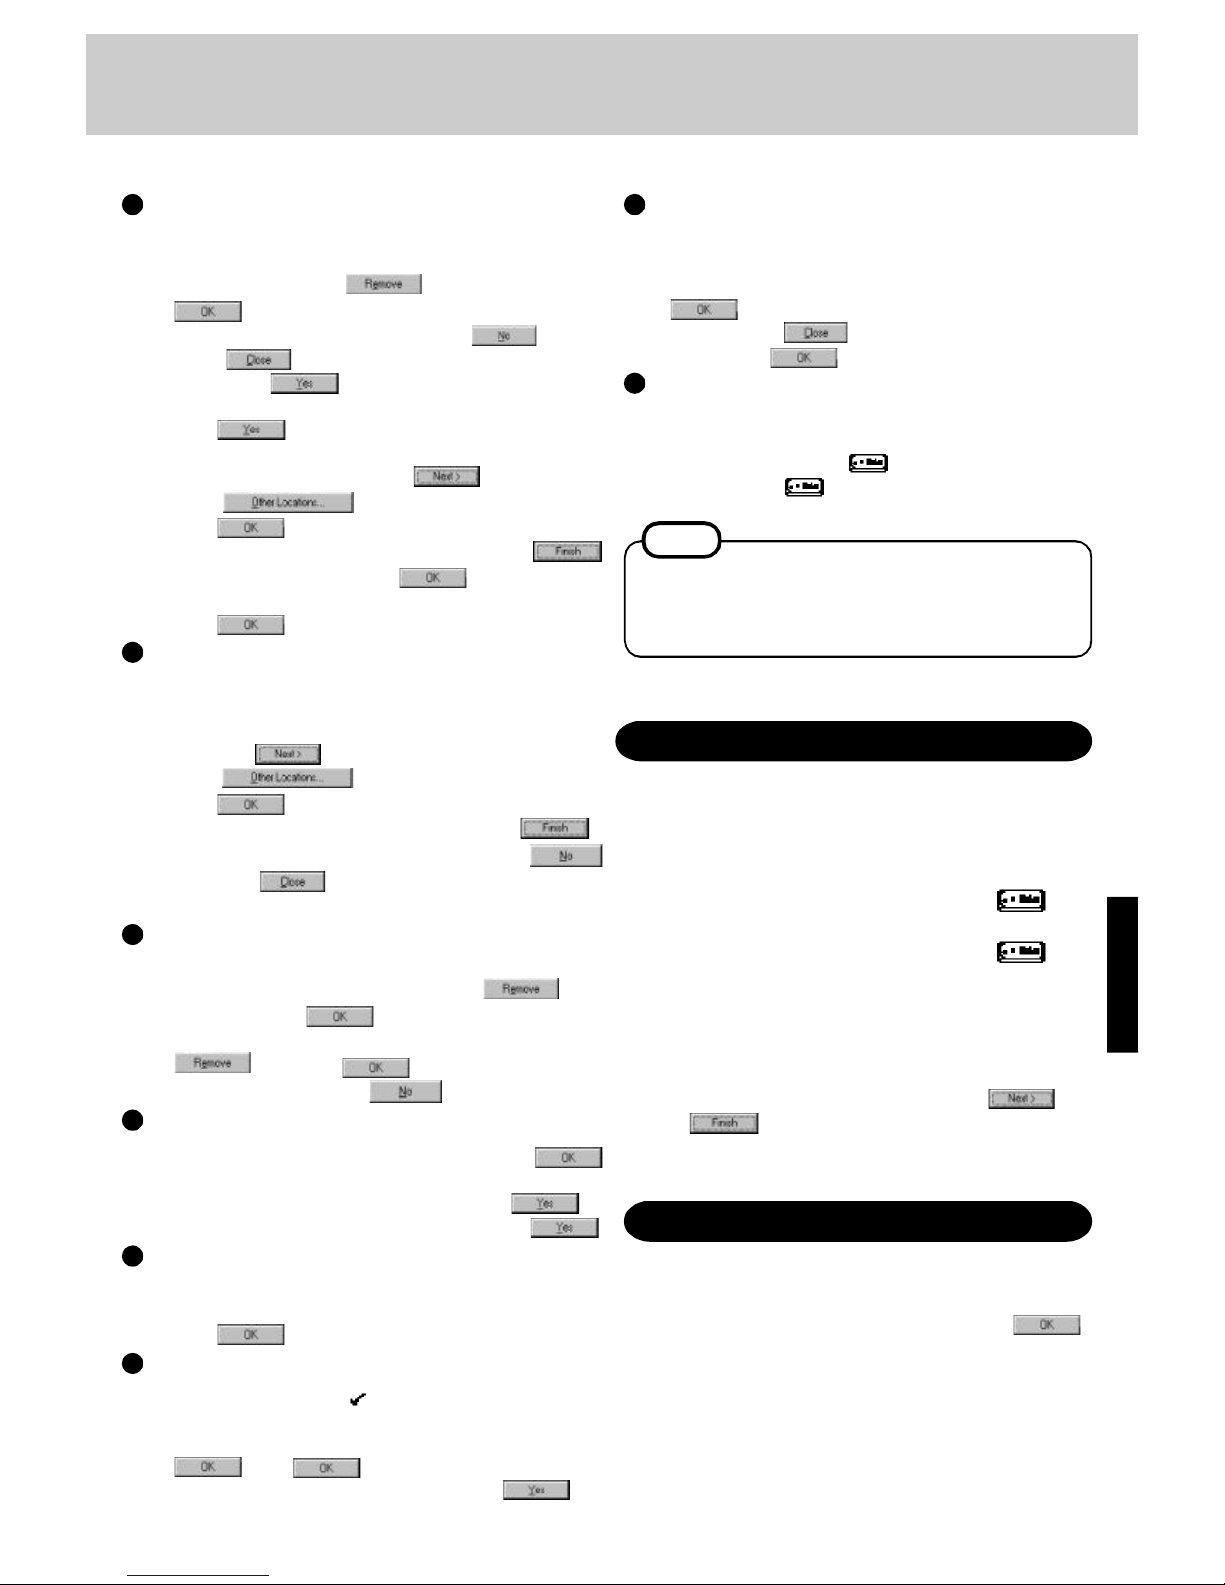
28 Delete the check mark for [Auto insert notification] in
[Control Panel] - [System] - [Device Manager] - [CDROM]
- [MATSHITA UJDCD8710] - [Settings], then press
. Press at the [System Properties]. If the
message to restart Windows appears, select .
14 In [Control Panel] - [System] - [Device Manager], for each
item in [Sound, video and game controllers] and [Ports
(COM&LPT)], press to delete it, then press
to confirm the deletion. If the message to restart
or shut down Windows appears, select .
1 5 Select . If the message to restart Windows ap-
pears, select . If the message does not appear, select [Start] - [Shut Down] - [Restart the computer], then
press .
If [Unknown Device] appears at the [Update Device Driver
Wizard] while restarting, select .
1 6 Select , input [c:\util\drivers\sound], then
press .
17 At the [Update Device Driver Wizard], select ,
and at the [Insert Disk] select .
18 At the [Copying Files], type [c:\util\drivers\sound], then
press .
Sound driver
19 In [Control Panel] - [System] - [Device Manager] - [Dis-
play adapters] - [Standard PCI Graphics Adapter (VGA)] [Driver] - [Update Driver], select [Yes (Recommended).]
then press .
20 Select , input [c:\util\drivers\video], then
press .
21 At the [Update Device Driver Wizard], select .
22 If the message to restart Windows appears, select ,
then select at the [S3 Inc. Virge MX (Panasonic
Release) Properties].
Video driver
23 For each item in [System] - [Device Manager] - [Other
Devices] and [PCMCIA Sockets], select to delete it, then press .
24 Select the item [System devices] - [PCI bus], then select
, then press . If the message to restart
Windows appears, select .
Device Manager 2
25 In [Start] - [Run], input [c:\install.bat] then press .
Windows restart.
26 When the [Version Conflict] appears, select . If
the message to restart Windows appears, select .
System setup 1
Power 2
27 In [Start] - [Settings] - [Control Panel] - [Power] - [OPL3-
SAx power management], set [Non Power Save mode] then
press .
Device Manager 3
Display
Installing PhoenixCard Manager
If necessary, install PhoenixCard Manager95 with the following steps.
1 Insert the "PhoenixCard Manager95 disk1".
2 Select [Start] - [Settings] - [Control Panel] - [Add/Remove
Programs].
3 Select [Install/Uninstall] - [Install] then press .
4 Press , then follow the on-screen instructions.
If necessary, install Internet Explorer 4.0 with the following steps.
1 Insert the Internet Explorer CD-ROM.
2 In [Start] - [Run], input [L:\setup.exe], then press .
Follow the on-screen instructions.
Installing Internet Explorer 4.0
NOTE
Some Windows applications differ in use from their factory-set state. To add or delete items from the menu, select
[Add/Remove Programs] in [Start] - [Settings] - [Control
Panel].
Please prepare two 2HD formatted floppy disks to create
backup disks for PhoenixCard Manager95.
Select [Start] - [Program] - [MS-DOS prompt], then type
the following.
For PhoenixCard Manager95 disk1:
xcopy c:\util\drivers\pccard\disk1 a:\ /s
For PhoenixCard Manager95 disk2:
xcopy c:\util\drivers\pccard\disk2 a:\ /s
29 Set [Super VGA 1024 X 768] for [Models] in [Start] -
[Settings] - [Control Panel] - [Display] - [Settings] - [Advanced Properties] - [Monitor] - [Change], then press
.
After pressing at the [Advanced Display Properties], press .
30 Select [Start] - [Programs] - [MS-DOS prompt], then type
the following.
del \install.*
exit
System setup 2
Page 30

30
YOU MAY NOT REVERSE ASSEMBLE, REVERSE COMPILE, OR MECHANICALLY OR ELECTRONICALLY TRACE
THE PROGRAMS, OR ANY COPY THEREOF, IN WHOLE OR IN PART.
YOU MAY NOT USE, COPY, MODIFY, ALTER, OR TRANSFER THE PROGRAMS OR ANY COPY THEREOF, IN
WHOLE OR IN PART, EXCEPT AS EXPRESSLY PROVIDED IN THE LICENSE.
IF YOU TRANSFER POSSESSION OF ANY COPY OF ANY PROGRAM TO ANOTHER PARTY, EXCEPT AS PERMITTED IN PARAGRAPH E ABOVE, YOUR LICENSE IS AUTOMATICALLY TERMINATED.
This license is effective only for so long as you own or lease the Product, unless earlier terminated. You may terminate
this license at any time by destroying, at your expense, the Programs and related documentation together with all
copies thereof in any form. This license will also terminate effective immediately upon occurrence of the conditions
therefor set forth elsewhere in this Agreement, or if you fail to comply with any term or condition contained herein. Upon
any such termination, you agree to destroy, at your expense, the Programs and related documentation together with all
copies thereof in any form.
A. MEI hereby grants you a personal, non-transferable and non-exclusive right and license to use the Programs in
accordance with the terms and conditions stated in this Agreement. You acknowledge that you are receiving
only a LIMITED LICENSE TO USE the Programs and related documentation and that you shall obtain no title,
ownership nor any other rights in or to the Programs and related documentation nor in or to the algorithms,
concepts, designs and ideas represented by or incorporated in the Programs and related documentation, all of
which title, ownership and rights shall remain with MEI.
B. You may use the Programs only on the single Product which was accompanied by the Programs.
C. You and your employees and agents are required to protect the confidentiality of the Programs. You may not
distribute or otherwise make the Programs or related documentation available to any third party, by time-sharing
or otherwise, without the prior written consent of MEI.
D. You may not copy or reproduce, or permit to be copied or reproduced, the Programs or related documentation
for any purpose, except that you may make one (1) copy of the Programs for backup purposes only in support
of your use of the Programs on the single Product which was accompanied by the Programs. You shall not
modify, or attempt to modify, the Programs.
E. You may transfer the Programs and license them to another party only in connection with your transfer of the
single Product which was accompanied by the Programs to such other party. At the time of such a transfer, you
must also transfer all copies, whether in printed or machine readable form, of every Program, and the related
documentation, to the same party or destroy any such copies not so transferred.
F. You may not remove any copyright, trademark or other notice or product identification from the Programs and
you must reproduce and include any such notice or product identification on any copy of any Program.
LICENSE
TERM
YOU ACKNOWLEDGE THAT YOU HAVE READ THIS AGREEMENT, UNDERSTAND IT AND AGREE TO BE BOUND
BY ITS TERMS AND CONDITIONS. YOU FURTHER AGREE THAT IT IS THE COMPLETE AND EXCLUSIVE STATEMENT OF THE AGREEMENT BETWEEN US, WHICH SUPERSEDES ANY PROPOSAL OR PRIOR AGREEMENT,
ORAL OR WRITTEN, AND ANY OTHER COMMUNICATIONS BETWEEN US, RELATING TO THE SUBJECT MATTER OF THIS AGREEMENT.
THE SOFTWARE PROGRAM(S) ("PROGRAMS") FURNISHED WITH THIS PANASONIC® PRODUCT ("PRODUCT")
ARE LICENSED ONLY TO THE END-USER ("YOU"), AND MAY BE USED BY YOU ONLY IN ACCORDANCE WITH
THE LICENSE TERMS DESCRIBED BELOW. YOUR USE OF THE PROGRAMS SHALL BE CONCLUSIVELY DEEMED
TO CONSTITUTE YOUR ACCEPTANCE OF THE TERMS OF THIS LICENSE.
Matsushita Electric Industrial Co., Ltd. ("MEI") has developed or otherwise obtained the Programs and hereby licenses
their use to you. You assume sole responsibility for the selection of the Product (including the associated Programs) to
achieve your intended results, and for the installation, use and results obtained therefrom.
LIMITED USE LICENSE AGREEMENT
Page 31

31
Das (die) mit diesem Panasonic®-Produkt (im weiteren als "Produkt" bezeichnet) gelieferte(n) Programm(e) (im weiteren
als "Programme" bezeichnet) wird (werden) nur für den Gebrauch durch den Endnutzer (im weiteren als "der Käufer"
bezeichnet ) lizenziert und darf (dürfen) ausschließlich gemäß den unten aufgeführten Lizenzbedingungen benutzt
werden. Der Gebrauch der Programme durch den Käufer gilt als konkludente Zustimmung des Käufers zu den
Bestimmungen dieser Lizenz.
Die Programme wurden von Matsushita Electric Industrial Co., Ltd. (im weiteren als "MEI" bezeichnet) entwickelt oder
sie wurden auf andere Weise von MEI erworben, und MEI lizenziert die Programme hiermit für den Gebrauch des
Käufers. Der Käufer übernimmt die alleinige Verantwortung dafür, daß die Wahl des Produkts (einschließlich der
zugehörigen Programme) die beabsichtigten Zwecke erfüllt, sowie für die Installation, den Gebrauch und die damit
erzielten Ergebnisse.
A. Hiermit erteilt MEI dem Käufer das persönliche, nicht übertragbare und nicht ausschließliche Recht und die
Lizenz zur Nutzung der Programme gemäß den Bestimmungen und Bedingungen dieser Vereinbarung. Der
Käufer bestätigt, daß er lediglich eine BESCHRÄNKTE LIZENZ ZUM GEBRAUCH der Programme und der
dazugehörigen Dokumentation erhält und daß mit dieser Lizenz kein Rechtsanspruch, kein Besitzanspruch und
keine anderen Rechte verbunden sind, weder auf die Programme und die dazugehörige Dokumentation, noch
auf die Algorithmen, Konzepte, Ausführungen und ldeen, die von den Programmen und der dazugehörigen
Dokumentation dargestellt werden oder in diese aufgenommen sind, und daß alle Rechte bei MEI verbleiben.
B. Der Käufer darf die Programme nur mit genau dem Produkt verwenden, zu dessen Lieferumfang die Programme
gehören.
C. Der Käufer und seine Angestellten und Bevollmächtigten sind zum Schutz der Vertraulichkeit der Programme
verpflichtet. Der Käufer darf die Programme und die dazugehörige Dokumentation ohne vorherige schriftliche
Genehmigung von MEI nicht an Dritte weitergeben oder sie auf andere Weise, einschließlich von Time-Sharing,
Dritten zugänglich machen.
D. Der Käufer darf die Programme und die dazugehörige Dokumentation zu keinerlei Zwecken kopieren oder
reproduzieren und darf auch nicht zulassen, daß sie von anderen kopiert oder reproduziert werden, au ßer daß
der Käufer eine (1) Kopie der Programme ausschließlich für Sicherungszwecke und nur zur Unterstützung der
Verwendung der Programme mit genau dem Produkt erstellen darf, zu dessen Lieferumfang die Programme
gehören. Der Käufer darf die Programme weder modifizieren noch solche Modifikationen versuchen.
E. Der Käufer darf die Programme und eine diesbezügliche Benutzerlizenz nur zusammen mit der Übergabe genau
des Produktes, zu dessen Lieferumfang die Programme gehören, an einen Dritten übergeben. Zur Zeitpunkt
einer solchen Übergabe ist der Käufer verpflichtet, sämtliche von ihm erstellten Kopien, sowohl in gedruckter, als
auch in Maschinensprache abgefaßter Form, jedes einzelnen Programms und der dazugehörigen Dokumentation
an die gleiche Person zu übergeben und alle nicht übergebenen Kopien zu zerstören.
F. Der Käufer darf kein Copyright, Warenzeichen oder keine andere Bekanntmachung oder Produktkennzeichnung
von den Programmen entfernen und muß jede solche Bekanntmachung oder Produktkennzeichnung auf jeder
Kopie eines der Programme reproduzieren.
Lizenz
Der Käufer darf die Programme und davon erstellten Kopien, weder insgesamt noch teilweise, nicht im Reversierverfahren
assemblieren, kompilieren oder auf mechanischem bzw. elektronischen Wege abtasten. Der Käufer darf die Programme
und deren erstellte Kopien, weder insgesamt noch teilweise benutzen, kopieren, modifizieren, verändern oder
weitergeben, es sei denn dies ist im Rahmen dieser Lizens gestattet.
Falls der Käufer eine Kopie eines der Programme, außer gemäß Absatz E, an Dritte weitergibt, wird diese Lizenz
automatisch außer Kraft gesetzt.
Laufzeit der Lizenz
Diese Lizenz ist nur so lange gültig, wie der Käufer das Produkt zu eigen hat oder im Leasing-Verfahren betreibt, falls
sie nicht vorher widerrufen wird. Der Käufer darf diese Lizenz zu einem beliebigen Zeitpunkt aufheben, indem er die
Programme und die dazugehörige Dokumentation zusammen mit allen davon in jeglicher Form erstellten Kopien auf
eigene Kosten zerstört. Diese Lizenz wird außerdem mit sofortiger Wirkung aufgehoben, wenn eine der oben
aufgeführten Bedingungen eintritt oder der Käufer irgenwelche Bestimmungen oder Bedingungen dieser
Lizenzvereinbarung verletzt. Der Käufer verpflichtet sich, nach einer solchen Aufhebung der Lizenz die Programme
und die dazugehörige Dokumentation zusammen mit allen davon in jeglicher Form erstellten Kopien auf eigene Kosten
zu zerstören.
Der Käufer bestätigt, diese Vereinbarung gelesen und verstanden zu haben, und verpflichtet sich, ihre Bestimmungen
und Bedingungen einzuhalten. Der Käufer bestätigt weiterhin, daß es sich bei der vorliegenden Vereinbarung um
eine vollständige und ausschließliche Aufzeichnung der Vereinbarung zwischen dem Käufer und MEI handelt, die
alle Vorschläge oder früheren Vereinbarungen, in mündlicher oder schriftlicher Form, sowie jegliche Unterredungen
zwischen dem Käufer und MEI in Bezug auf die Gegenstände der vorliegenden Vereinbarung ablöst.
Beschränkte Benutzerlizenz-Vereinbarung
Page 32

32
A. MEI vous octroie par les présentes le droit et la licence personnels, non cessibles et non exclusifs d'utiliser les
Logiciels conformément aux termes, clauses et conditions de ce Contrat. Vous reconnaissez ne recevoir qu'un
droit limité d'utiliser les Logiciels et la documentation les accompagnant et vous vous engagez à n'obtenir aucun
droit de titre, propriété ni aucun autre droit vis-à-vis des Logiciels et de la documentation les accompagnant ni
vis-à-vis des algorithmes, concepts, dessins, configurations et idées représentés par ou incorporés dans les
Logiciels et la documentation les accompagnant, dont les titres, propriété et droits resteront tous à MEI.
B. Vous ne pouvez utiliser les Logiciels que sur le Produit unique qui est accompagné par les Logiciels.
C. Vous et vos employés ou agents êtes requis de protéger la confidentialité des Logiciels. Vous ne pouvez ni
distribuer ni mettre les Logiciels et la documentation les accompagnant à la disposition d'un tiers, par partage de
temps ou de quelque autre manière que ce soit, sans l'autorisation écrite préalable de MEI.
D. Vous ne pouvez ni copier ni reproduire ni permettre la copie ni la reproduction des Logiciels ni de la documen-
tation les accompagnant pour quelque fin que ce soit, à l'exception d'une (1) copie des Logiciels à des fins de
sauvegarde uniquement pour soutenir votre utilisation des Logiciels sur le Produit unique qui est accompagné
par les Logiciels. Vous ne pouvez ni modifier ni tenter de modifier les Logiciels.
E. Vous ne pouvez céder les Logiciels et en octroyer la licence à une autre partie qu'en rapport avec votre cession
du Produit unique qui est accompagné par les Logiciels à cette autre partie. Au moment de cette cession, vous
devez céder également toutes les copies, que ce soit sous forme imprimée ou lisible par la machine, de tous les
Logiciels ainsi que de la documentation les accompagnant, à la même partie ou détruire les copies non cédées.
F. Vous ne pouvez retirer aucune marque de droits d'auteur, marque ou autre ni aucune identification de produit
des Logiciels et vous devez reproduire et inclure toutes ces notices ou identifications de produit sur toutes les
copies des Logiciels.
Vous ne pouvez assembler en sens inverse, compiler en sens inverse ni retracer les Logiciels ni aucune de leurs
copies, de façon électronique ou mécanique, en tout ou en partie.
Vous ne pouvez utiliser, copier, modifier, altérer ni céder les Logiciels ni aucune de leurs copies, en tout ou en partie,
à l'exception de ce qui est expressément stipulé dans ce contrat.
Si vous cédez la possession de toute copie ou de tout Logiciel à une autre partie, à l'exception de ce qui est autorisé
au paragraphe E ci-dessus, votre licence est automatiquement résiliée.
Licence
Termes, clauses et conditions
Cette licence n'est effective que pour la durée de possession ou de crédit-bail du Produit, à moins d'une résiliation
antérieure. Vous pouvez résilier cette licence à tout moment en détruisant, à vos frais, les Logiciels et la documentation les accompagnant avec toutes leurs copies, sous quelque forme que ce soit. Cette licence sera également
résiliée, avec application immédiate, si les conditions de résiliation définies ailleurs dans ce contrat se sont réalisées
ou si vous ne respectez pas les termes, clauses et conditions qui y sont contenues. Au moment de la résiliation, vous
acceptez de détruire, à vos frais, les Logiciels et la documentation les accompagnant avec toutes leurs copies, sous
quelque forme que ce soit.
Vous reconnaissez avoir lu ce contrat, en avoir compris toute la substance et avoir accepté de respecter ses termes,
clauses et conditions. Vous reconnaissez en outre qu'ils sont la description complète et exclusive du contrat conclu
entre nous, contrat qui remplace et annule toute proposition ou contrat précédent, écrit ou oral, et toute autre communication entre nous, relativement à l'objet du présent contrat.
Matsushita Electric Industrial Co., Ltd. ("MEI") a mis au point ou obtenu les Logiciels et vous en concède l'utilisation par
les présentes. Vous assumez l'entière responsabilité du choix de ce Produit (y compris des Logiciels associés) pour
obtenir les résultats escomptés, ainsi que de l'installation, de l'utilisation et des résultats obtenus.
Le(s) logiciel(s) (les "Logiciels") fournis avec ce produit Panasonic® (le "Produit") sont exclusivement concédés en
licence à l'utilisateur ultime ("vous"), et ils ne peuvent être utilisés que conformément aux clauses contractuelles cidessous. En utilisant les logiciels, vous vous engagez de manière définitive à respecter les termes, clauses et conditions des présentes.
Contrat de licence d'usage limité
Page 33
33
Windows 95 Setup Procedure
1
This procedure explains step 8 on page 8 in more detail.
Select settings for your region, then press
2
Select your keyboard layout, then press
3
Enter your name and your company’s name, and then press
The License Agreement will be displayed.
After reading the agreement, select [I accept the agreement]
or [I don't accept the agreement] then press
If the former is selected, the [Certificate of Authenticity] will appear. If the latter is
selected, the Windows setup will be aborted.
4
Input the Product Number written on the “Certificate of Authenticity” located in the “Introducing Microsoft Windows 95
book” that comes with this computer. After doing so, press
5
Press
6
If the instruction to restart appears, press
7
8
Insert the correct time, date and time zone and click
You can also make these settings at a later time.
If you want to complete the printer settings, press
Simply follow the instructions given on the display.
If not, press
You can also complete these settings at a later time.
9
Page 34
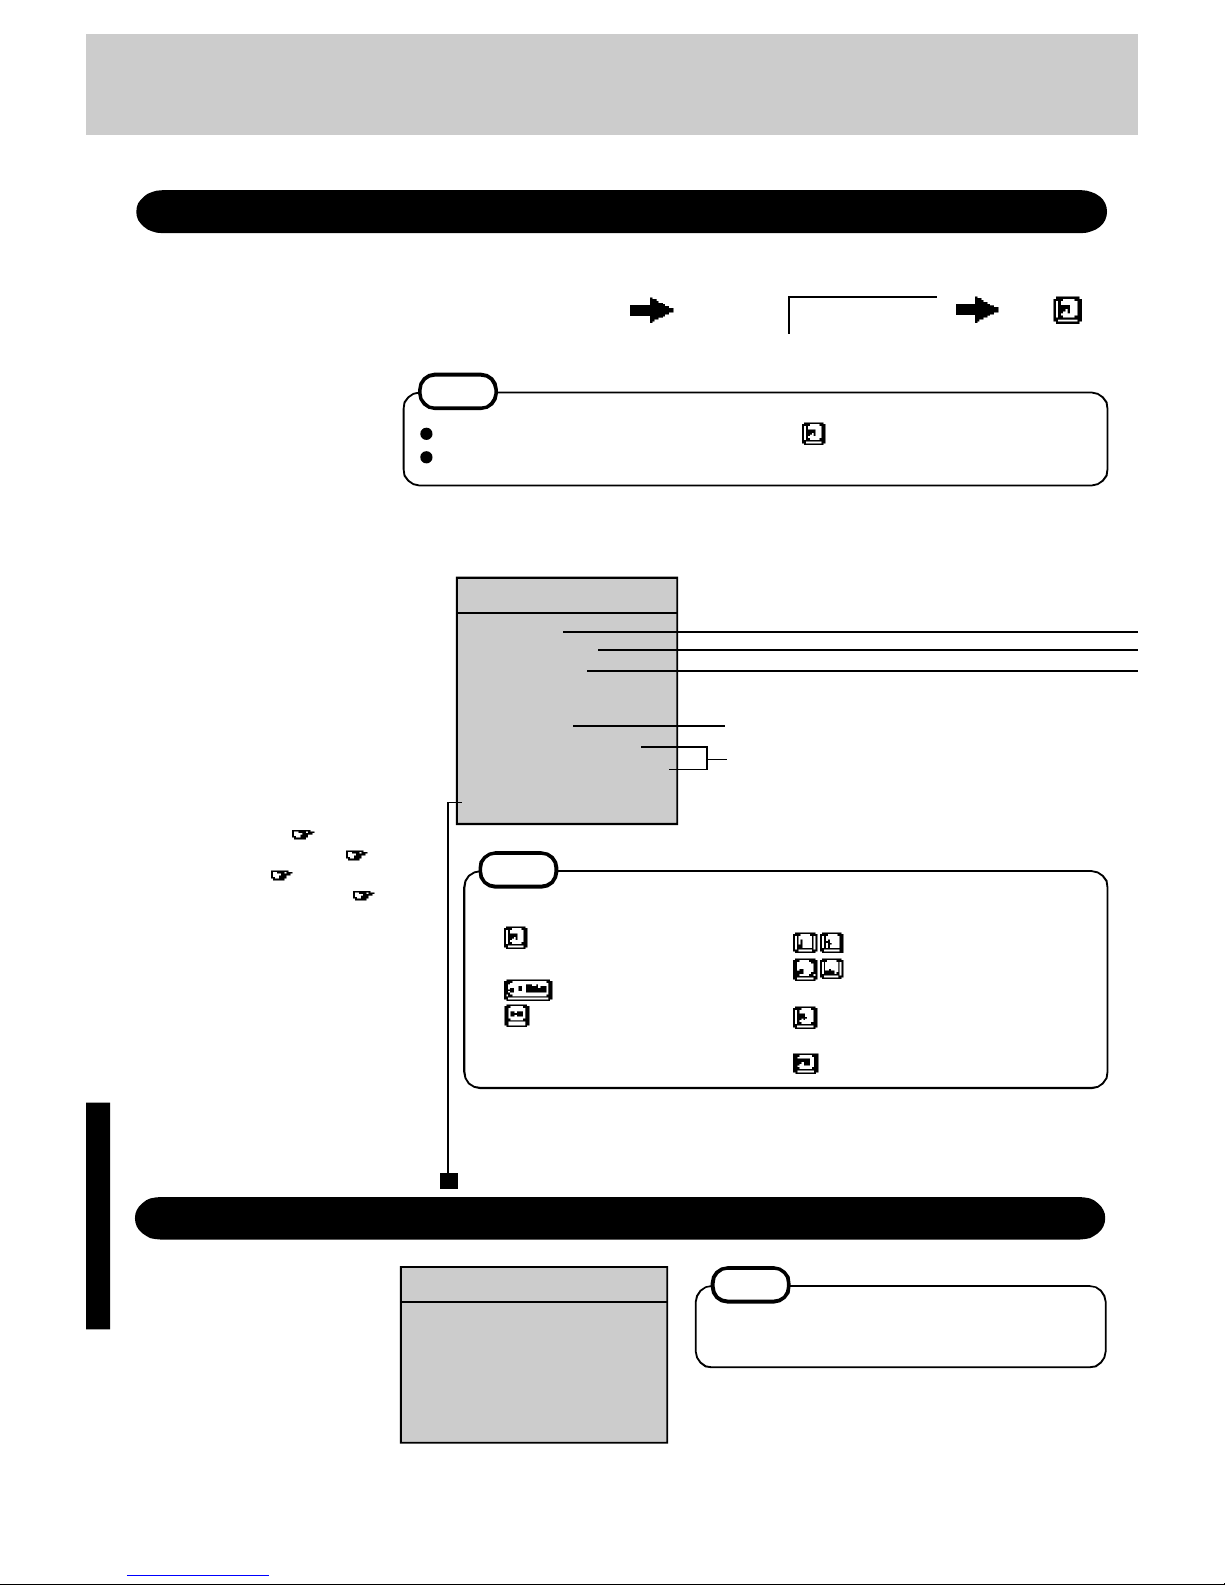
34
Setup Utility
Running the Setup Utility
NOTE
Setup Utility does not run if you delay pressing . Restart Windows.
If [Enter Password:] is displayed, enter your password.
Press F1 for Setup
Setup Utility
•System Setup
•Power Management
•Supervisor Setup
Save Settings
Restore Settings
Load Default Settings (PnP)
Load Default Settings (Non-PnP)
Exit Setup
Set Default settings.
• (PnP) denotes "for Windows 95".
• (Non-PnP) denotes "for other than Windows 95".
• When the Supervisor Password has been set, input of
the password is necessary.
Return to the state existing at the time of Setup Utility
startup, or to the settings saved with [Save Settings].
Program Completion
• Hibernation settings ( page 111)
• Power Management settings ( page 13)
• Security Settings ( page 14)
• Add-ons/Peripherals Settings ( page 18)
After you have completed all settings, you may
exit the Setup Utility program.
<Main Screen>
Key Operations
NOTE
: To move among the items.
: To move among the values of
each item.
To return to the setting before a
change.
: To set the default values.
: To display the correspond-
ing “help” file.
: To make a selection.
: To display previous screen
(To exit the program at the
main screen).
press
Closing the Program
Exit Setup
Settings were changed.
Do you want to save them?
Yes, save and exit the Setup Utility.
No, exit the Setup Utility without saving.
No, return to the Setup Utility.
NOTE
If the User Password has been set, the password
must be entered before Windows can start.
(The display may be different if no changes to the settings are made.)
Upon seeing
this message
To run the Setup Utility, you
need to restart your computer.
Page 35
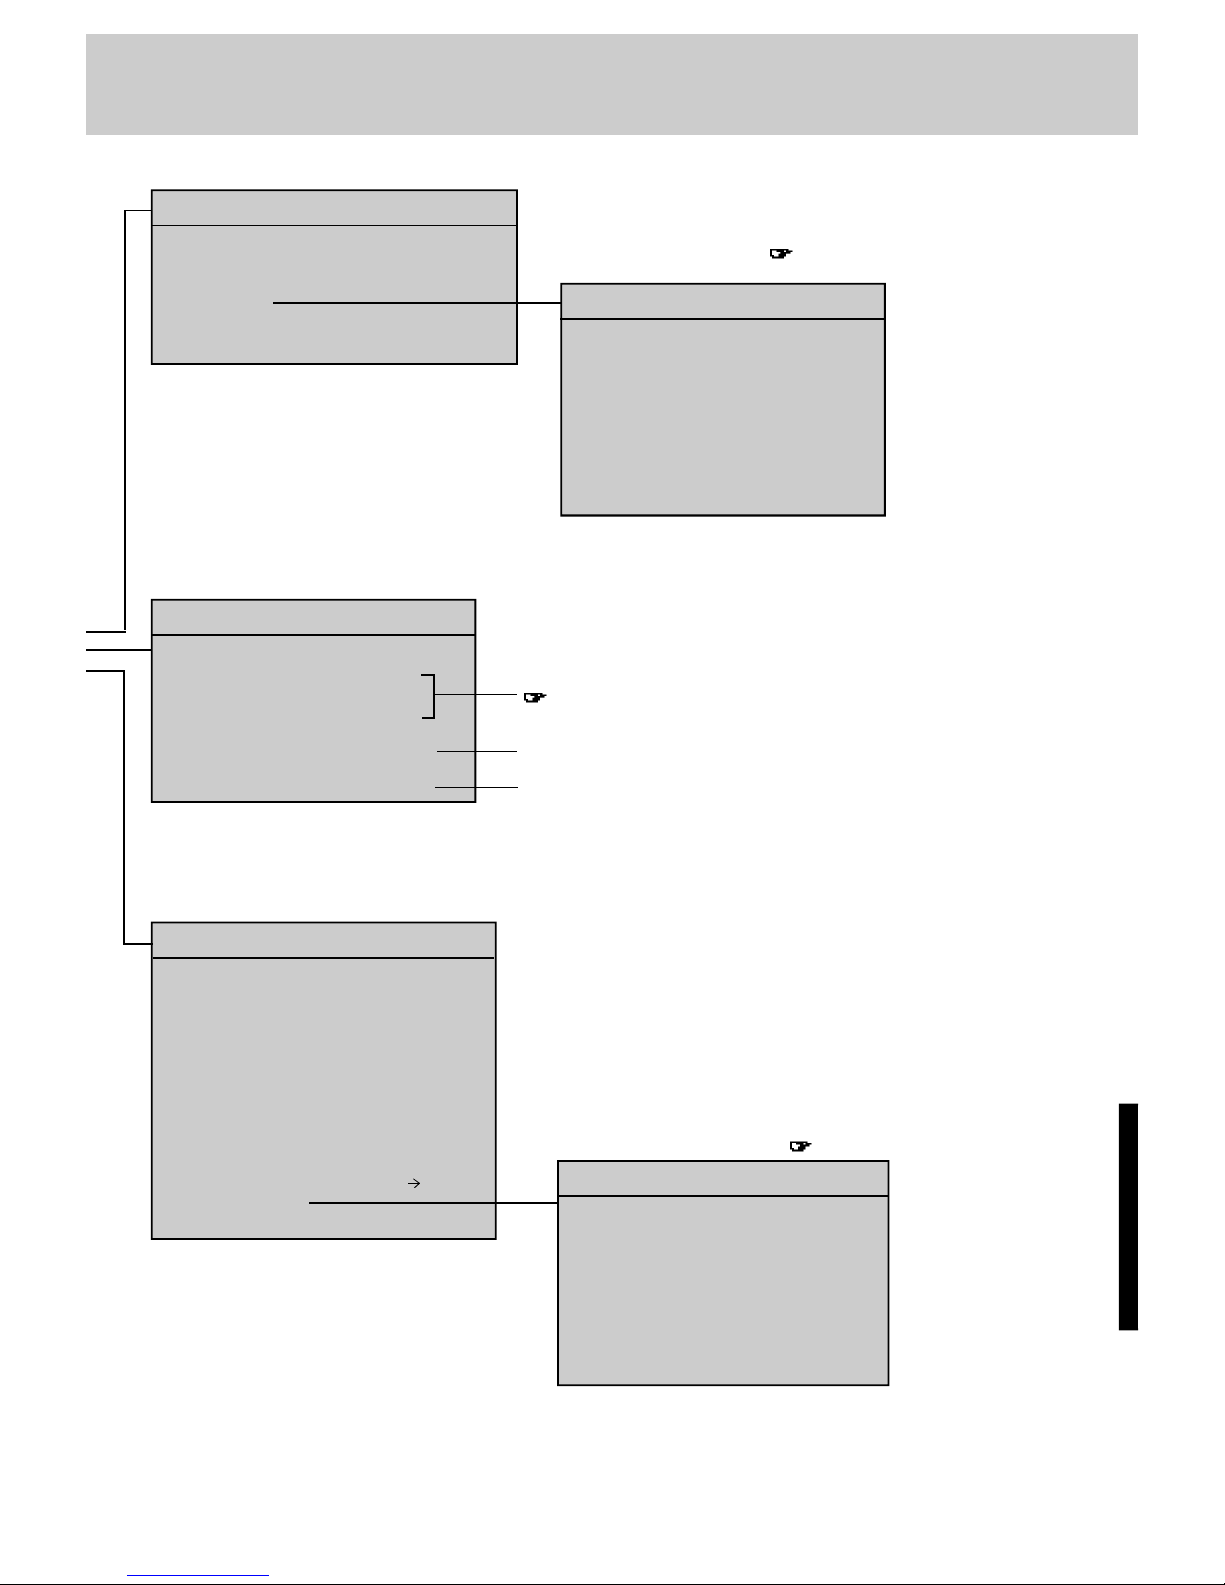
35
Power Management
Power Saving [OFF ]
CPU Speed Change Mode Disable
HDD Motor Timeout Never
Display Off Timer Never
Power Switch [On-Off ]
Suspend/Hibernation Timeout
*
3
Never
System Setup
Speaker [Enable]
Display
*
1
[External Monitor]
*
1
• User Password
Coffee break Password
*
2
[Enable]
Key Combination for Coffee break [Alt+Ctrl+F9]
User Password
User Password Status Enable
Enter your new User Password twice.
Enter User Password [ ]
Enter User Password Again [ ]
Set User Password
Delete User Password
Supervisor Setup
Parallel Port (Address) [Automatic (PnP)]
Parallel Port (Data Direction) [Bidirectional ]
Serial Port [Automatic (PnP)]
Sound Chip [Enable]
Sound Blaster Compatible I/O [Automatic (PnP)]
WSS CODEC I/O [Automatic (PnP)]
Sound IRQ-A [Automatic (PnP)]
Sound IRQ-B [Automatic (PnP)]
Sound DMA-A [Automatic (PnP)]
Sound DMA-B [Automatic (PnP)]
Floppy Operation [Enable]
Boot Up Drive [FDD HDD]
• Supervisor Password
User Password Protection [Disable]
Setting the User Password ( page 14)
(Unable to select when the User Password Protection has been set.)
*1
When no external display is connected, display will be through the LCD.
*2
Can only be selected when the User Password has been set.
*3
Can only be selected when [Power Switch] has been set [Suspend] or [Hibernation].
Supervisor Password
Supervisor Password Status Enable
Enter your new Supervisor Password twice.
Enter Supervisor Password [ ]
Enter Supervisor Password Again [ ]
Set Supervisor Password
Delete Supervisor Password
Setting Supervisor Password ( page 17)
page 13
Sets the function of the power switch.
Able to set how long the interval will be until hibernation.
Page 36
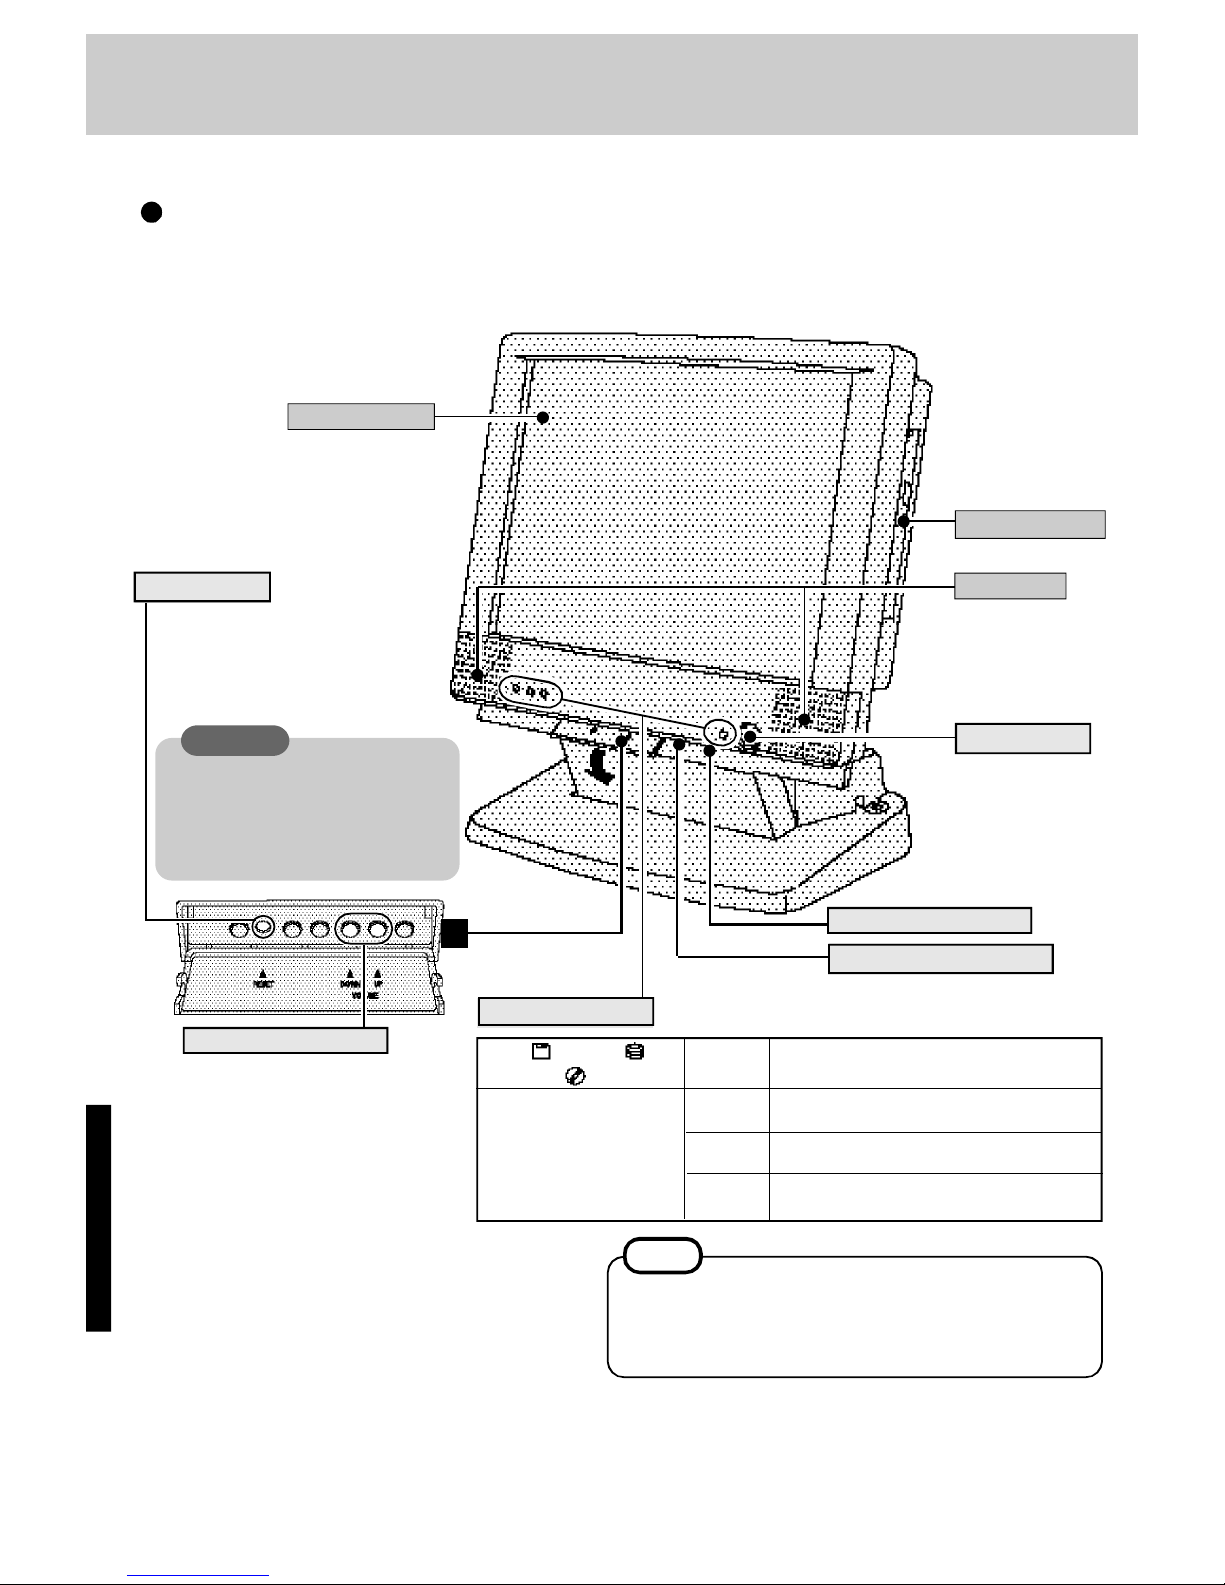
36
FDD ( ), HDD ( ), Green Lit during access of the corresponding
CD-ROM( ) devices
POWER Green Power on
CPU normal speed mode
Orange Power off (during the suspend function)
CPU slow speed mode
Flashing CPU temperature too hot;
Orange power remains OFF
Contrast Adjustment
Brightness Adjustment
Reset Button
CAUTION
If a problem occurs but your computer
does not lock, we recommend not resetting the machine.
Pressing the reset button will cause you
to lose data if an application is open.
Power Switch
Only the three buttons shown
above can be used.
Front
CD-ROM Drive
Speakers
Display (LCD)
Volume Adjustment
Left: down
Right: up
When the temperature of the CPU rises, the processing speed
is automatically reduced to protect the CPU from overheating.
When the temperature of the CPU drops, the normal processing speed is automatically restored.
NOTE
When resetting your computer, use a
dull pointed object like a ball point pen.
Do not use a pencil. Pencil lead can
break off inside the computer and damage the computer's circuit.
Names and Functions of Parts
LED Indicators
Page 37
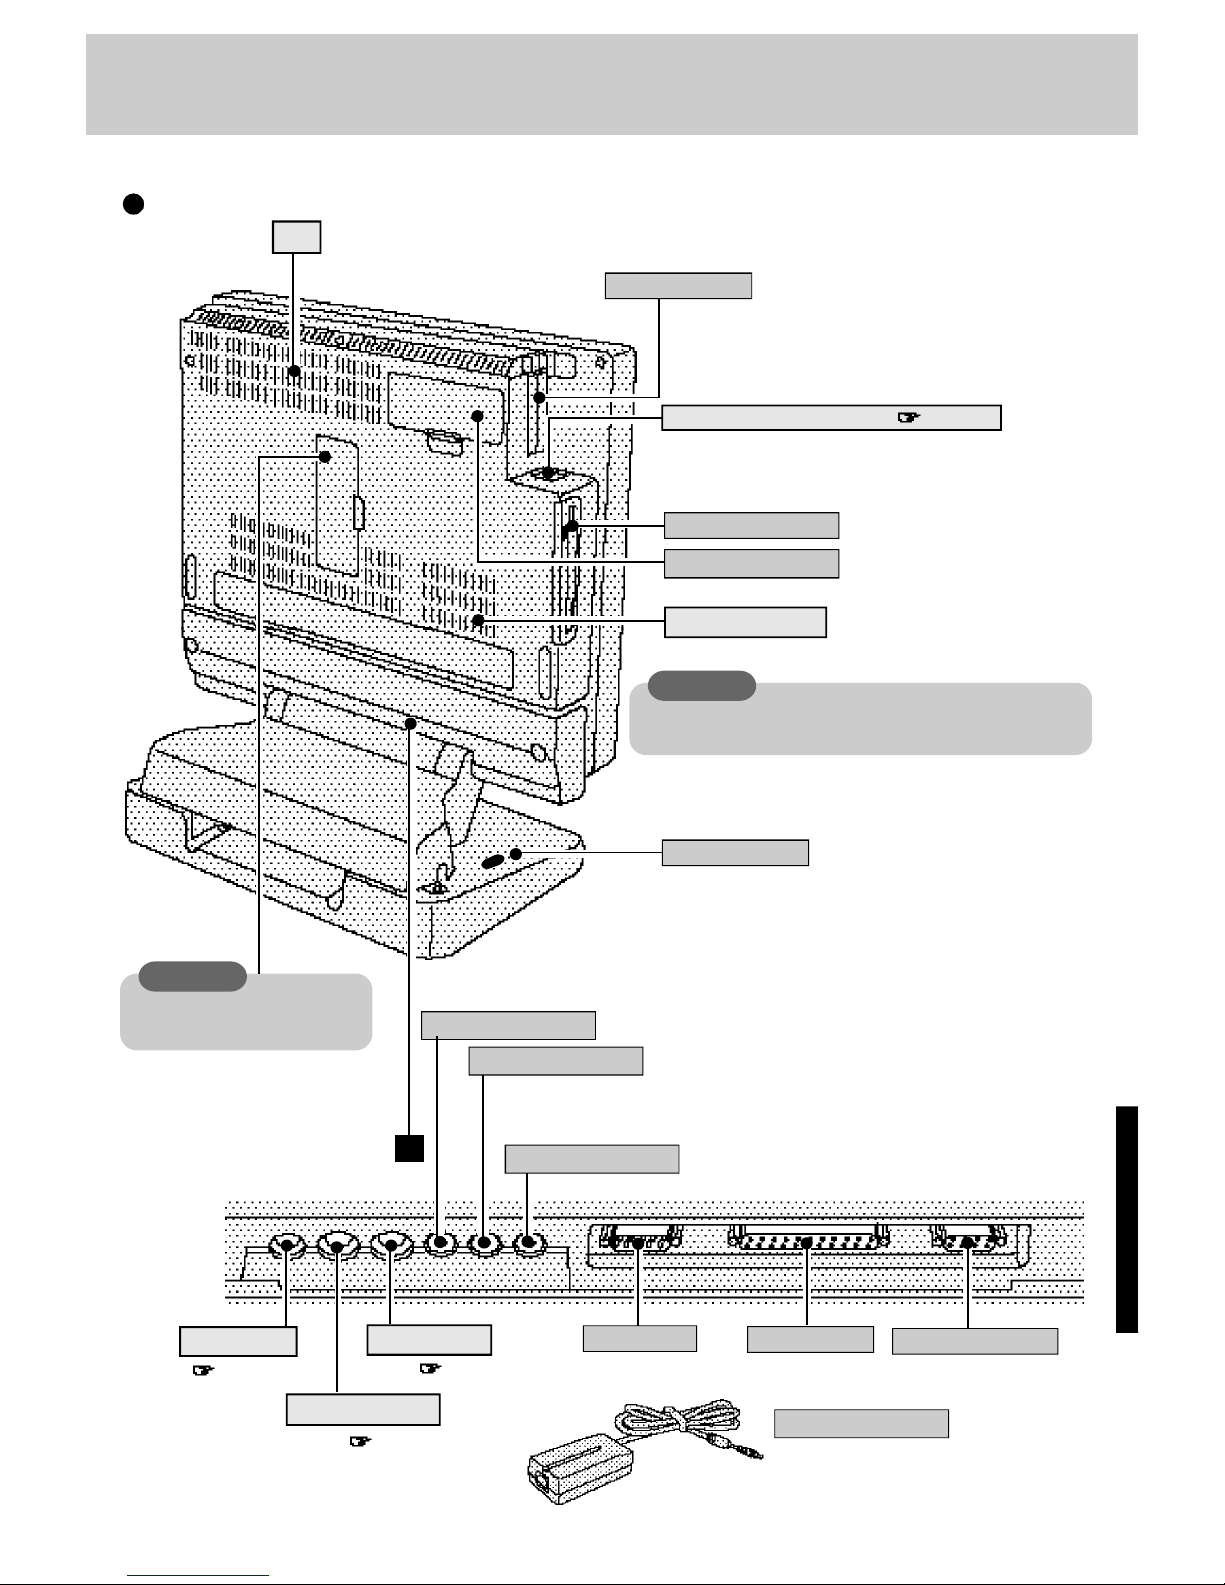
37
Ventilation Holes
CAUTION
Do not remove, for service purpose only.
PC Card Cable Guide Slot( page 19)
DC-In Jack
CAUTION
Do not block or place the computer in a location that may
prevent proper ventilation.
Fan
PC Card Slots
Floppy Disk Drive
RAM Module Slot
Security Lock
A Kensington cable can be connected to
prevent theft of your computer.
Headphone Jack
Audio-in Jack
Microphone Jack
page 6
page 6
Keyboard Jack
page 6
Mouse Jack
Serial Port
Parallel Port
Ext. Display Port
Use this connector to connect headphones or amplifier-equipped speakers. Audio output from the internal speaker is disabled when headphones
or outside speakers are connected.
Use the condenser microphone. Do not use the dynamic microphone.
Back
AC Adapter
Page 38
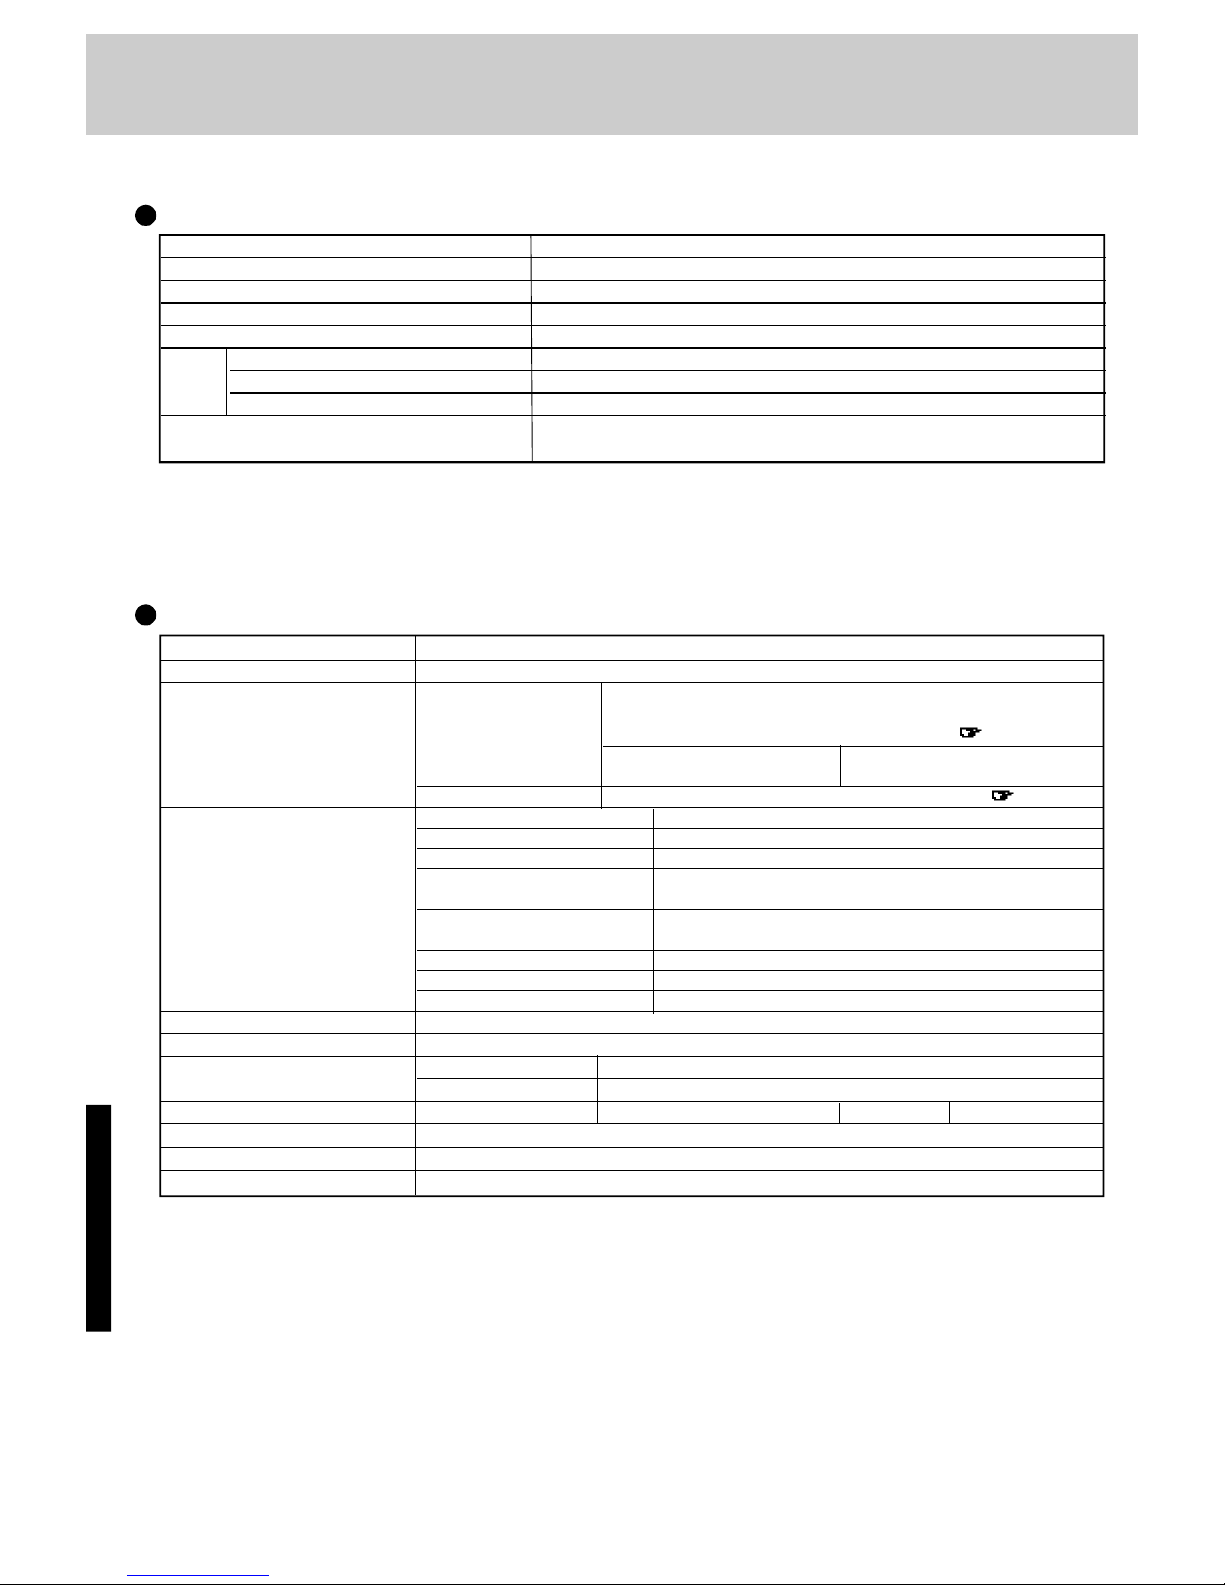
38
Floppy Disk Drive 720 KB/1.44 MB (two-mode)
CD-ROM Drive 10 x speed, Access time 250 ms.
PC Card Slots Two Type I or Type II, or one Type III
CardBus / ZV Port (back slot) Compatible
Slots (Confirmation with the dealer required beforehand) page 18
Allowable current 3.3 V: 400 mA, 5 V: 400 mA,
(total for two slots) 12 V: 120 mA
RAM Module Slot 144-pin, 3.3-V, SO-DIMM, 31.7 mm(1.25") or less page 20
Parallel Port Dsub 25 pin female
Ext. Display Port Mini Dsub 15 pin female
Serial Port Dsub 9 pin male
Interface Microphone Jack Miniature jack, 3.5 DIA
Input impedance 600 Ω, Input voltage range 0.01 Vp-p
Headphone Jack Miniature jack, 3.5 DIA
Impedance 32 Ω, Output Power 4 mW (Impedance 32 Ω) x 2
Audio-in Jack Miniature jack, Stereo
Keyboard Jack Mini DIN 6-pin female
Mouse Jack Mini DIN 6-pin female
Speaker Stereo Speaker (built in)
Sound 16 bits, 44.1 kHz PCM/FM sound (Sound Blaster PRO Compatible)
Software Operating System Microsoft
®
Windows® 95 (FAT32 File System)
Utility Programs Diagnostics program, PhoenixCard Manager95
AC Adapter Input 100 -240 V AC, 50 / 60 Hz Output 15.0 V DC, 4.0 A
Power Consumption Approx. 55 W** (Power Off: 1.2 W)
Physical Dimensions (W X H X D) 364 mm X 392 mm X 209 mm (14.3" X 15.4" X 8.2")
Weight Approx. 6.6 kg (Approx. 14.6 lbs)
Model No. CF-55M5M8AM
CPU Pentium
®
Processor with MMXTM technology 200 MHz
Cache Memory (second cache memory) 32 KB (256 KB)
EDO Memory (Expandable to) 32 MB (96 MB Max. )
Video Memory 2 MB
LCD Type 14.5" (TFT)
Displayed Colors 256/65536
Tilt Angle 3° to 25°
Hard Disk Drive (including about 110 MB used 4.3 GB*
specifically by the system)
Main Specifications
Specifications
Other Specifications
* 1GB = 109 bytes
Page 39
39
Index
A
Firstaid CD .................................................................6,28
Firstaid FD ..................................................... 6,8,23,27,28
Floppy disk .............................................................. 5,8,16
Floppy disk drive ...................................................... 37,38
Floppy operation ............................................................16
F
Emergency hole............................................................... 9
Enter password........................................... 10,14,16,24,25
Error codes ....................................................................23
Ext. display port ........................................................ 21,37
External display.............................................................. 21
E
Data protection ............................................................5,14
DC-IN jack ....................................................................37
DIAG55 .........................................................................23
Display ................................................................ 21,24,36
Display off timer ............................................................13
Double-clicking..............................................................11
Dragging ........................................................................11
D
Carrying.........................................................................22
CD-ROM ....................................................................9,22
CD-ROM drive ...................................................... 9,22,36
Coffee break password ...................................................15
CPU.......................................................................... 36,38
CPU speed change mode ................................................13
Clicking .........................................................................11
Computer Viruses .............................................................5
Conserving power ..........................................................13
Contrast adjustment ........................................................36
C
AC adapter ............................................................... 6,7,37
AC cord ...........................................................................6
Angle of the display adjustment ........................................ 7
B
Boot Up Drive........................................................... 16,35
Brightness adjustment.....................................................36
Hard disk drive (HDD) ........................................... 5,36,38
HDD motor timeout........................................................13
Headphone jack..............................................................37
Hibernation function .......................................................11
Hibernation timeout........................................................13
H
K
Keyboard jack ................................................................ 37
I/O port address..............................................................26
IRQ................................................................................26
I
L
W
Windows 95 setup ..........................................................33
Write-protect tab ............................................................. 5
RAM module .................................................................20
RAM module slot ......................................................20,37
Reinstalling software ......................................................28
Reset button ...................................................................36
Restarting.......................................................................11
R
V
Ventilation hole ..............................................................37
Volume ..........................................................................36
User password................................................................14
U
S
Saving data ......................................................................5
Security lock ..................................................................37
Security measures...........................................................14
Self-diagnosis program ...................................................23
Serial port ......................................................................37
Setup utility............................................................... 25,34
Shutting down ................................................................11
Speaker ..........................................................................36
Starting up ................................................................ 10,24
Storage ........................................................................... 22
Supervisor password.......................................................16
Supervisor setup .............................................................16
Suspend function ............................................................11
Suspend timeout .............................................................13
Panasonic setup icon ........................................................8
Parallel port .............................................................. 21,37
PC Card .........................................................................18
PC Card slots ............................................................ 18,37
Peripherals ................................................................ 18,26
Power switch ...............................................................8,36
Printer ............................................................................21
Network password..........................................................10
N
P
LCD...............................................................................36
LED indicators ...............................................................36
Limited use license agreement ........................................30
Load default settings ......................................................34
Maintenance...................................................................22
Microphone jack ............................................................37
Mouse .................................................................... 6,11,22
Mouse jack.................................................................. 6,37
M
Page 40
The international ENERGY STAR Office Equipment Program is an international program
that promotes energy saving through the use of computers and other office equipment.
The program backs the development and dissemination of products with functions that
effectively reduce energy consumption. It is an open system in which business proprietors
can participate voluntarily. The targeted products are office equipment such as computers,
displays, printers, facsimiles, and copiers. Their standards and logos are uniform among
participating nations.
Outline of the International ENERGY STAR Office Equipment Program
As an ENERGY STAR Partner, Panasonic has determined that this product
meets the ENERGY STAR guidelines for energy efficiency.
FJ1197-0
DFQX2551ZAPrinted in Japan
 Loading...