

Panasonic CF-52, CF-52TKGBZ1M User Manual
1
Reference Manual
Personal Computer
Model No. CF-52 Series
We recommend that this Reference Manual be printed.
Key Combinations
NOTE
z Do not repeatedly press the keys in quick succession.
z Do not use the key combinations together with touch pad (external mouse) or other key operations.
z Do not use the key combinations before you log on to Windows. Wait until the hard disk drive indicator turns off.
On the Setup Utility screen, you can use the key combinations of
binations of
play.
z The key combinations may not work with some applications.
z The popup menu icon appears after logging on to Windows. It may not appear in some application conditions (e.g.,
when [Command Prompt] is set to “Full Screen”).
*1
Only for model with Mobile Intel® PM965 Express Chipsets
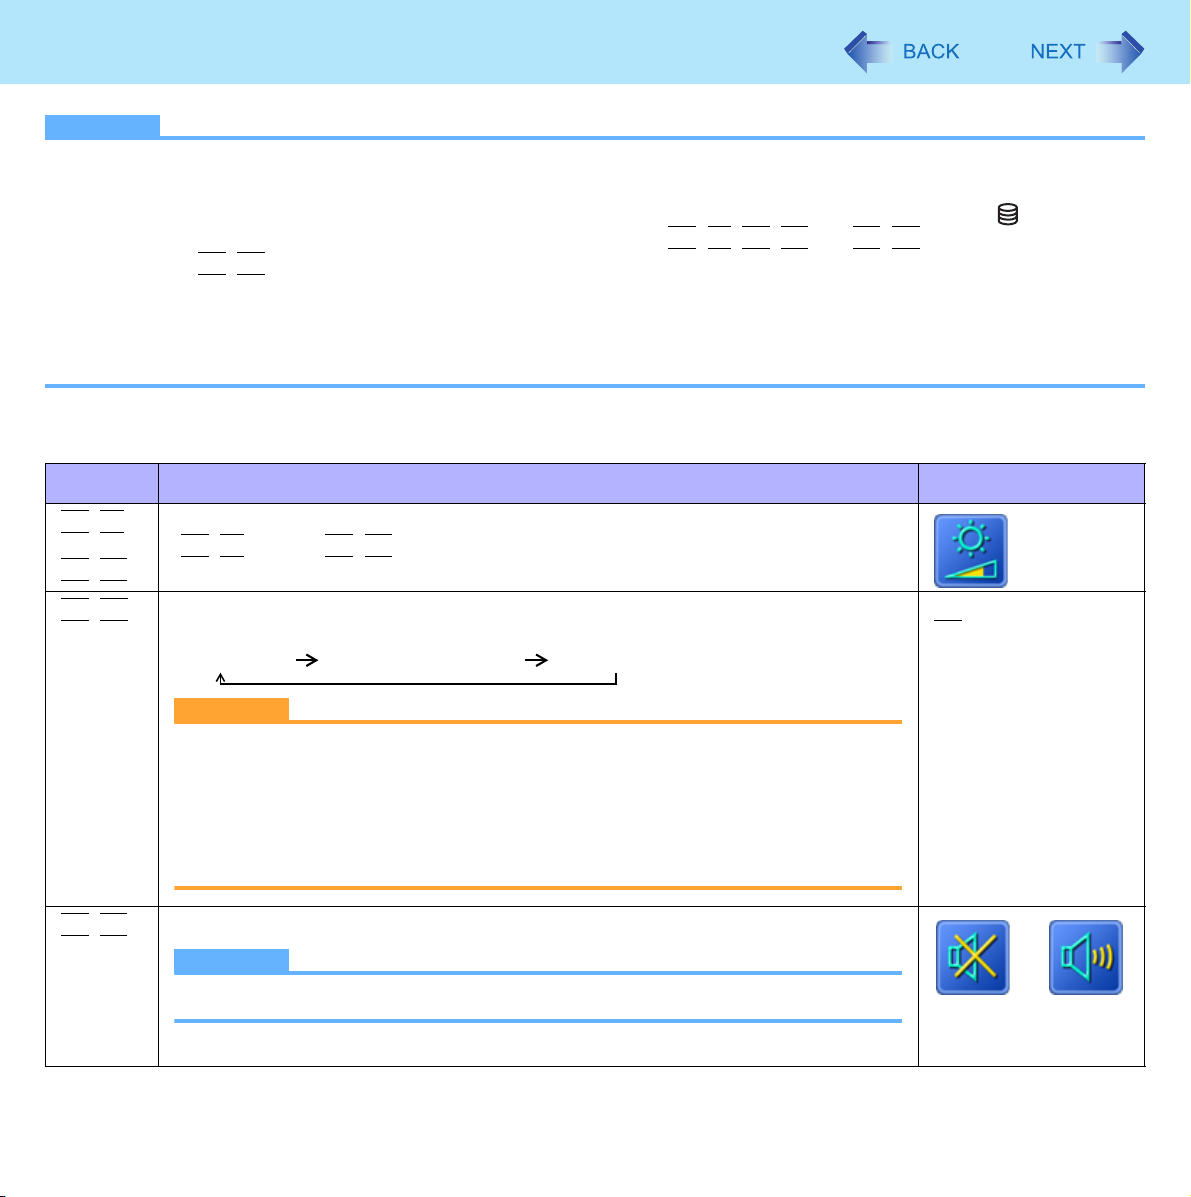
Key Function Popup menu icon
Fn+F3
, the display is switched between the internal LCD, simultaneous display*1 and the external dis-
Fn+F1, Fn+F2
and Fn+F3. By using the key com-
2
Fn+F1
Fn+F2
Fn+F3
Fn+F4
LCD brightness
Fn+F1
(
Display switching (Î page 45)
(When an external display is connected)
Internal LCD Simultaneous display External display
Speaker on/off
= down / Fn+F2= up)
CAUTION
z Do not press any keys until the display has finished switching.
z Do not use this function:
• When an external display is not connected.
• When playing motion video such as DVD or MPEG.
• When using the Extended Desktop.
• When showing a game screen such as pinball.
NOTE
z Beeps do not sound if you turn off the speaker sound.
OFF
(MUTE)
ON

Key Combinations
Key Function Popup menu icon
3
Fn+F5
Fn+F6
Fn+F7
Fn+F9
Fn+F10
Volume
Fn+F5
(
Activate standby (Î page 6)
Remaining battery level
(When the battery pack is inserted in the computer)
Activate hibernation (Î page 6)
= down / Fn+F6= up)
NOTE
z When fine-tuning the sound volume, press and hold
F6
intermittently.
z This does not work on beeps or speakers connected to the USB port.
Fn
, and press F5 or
Î page 12
Key Combinations
Hotkey Settings
You can make two settings:
• Fn key lock
Fn
is locked (pressed-down) until you press another key. Use this when pressing difficult key combinations.
• Popup menu icon on/off
1 Start up the Hotkey Settings.
Click [start] - [All Programs] - [Panasonic] - [Hotkey Settings].
2 Make the settings.
[Use Fn key lock]
Fn
z When using an
A Press
B Press another key. (Lock released)
z When using successive
A Press
B Press another key.
Fn
Fn
Fn key remains locked until you press
key combination
once. (Locked)
Fn
twice. (Locked)
key combinations
Fn
4
again.
[Notification]
[Make sounds when Fn key is pressed]
[Show status on screen]: Displays the Fn key status on the notification area.
Fn
•:
•:
[Disable popup]
The popup menu icon will not be displayed.
is locked.
Fn
is not locked.
3 Click [OK].
NOTE
z You can have different settings for each user.
*2
If the speakers are muted, beeps do not sound.
*2
Standby or Hibernation Functions
The standby/hibernation functions allow you to shut off the computer without closing programs and documents. You can
quickly return to the programs and documents that you were working on before standby or hibernation.
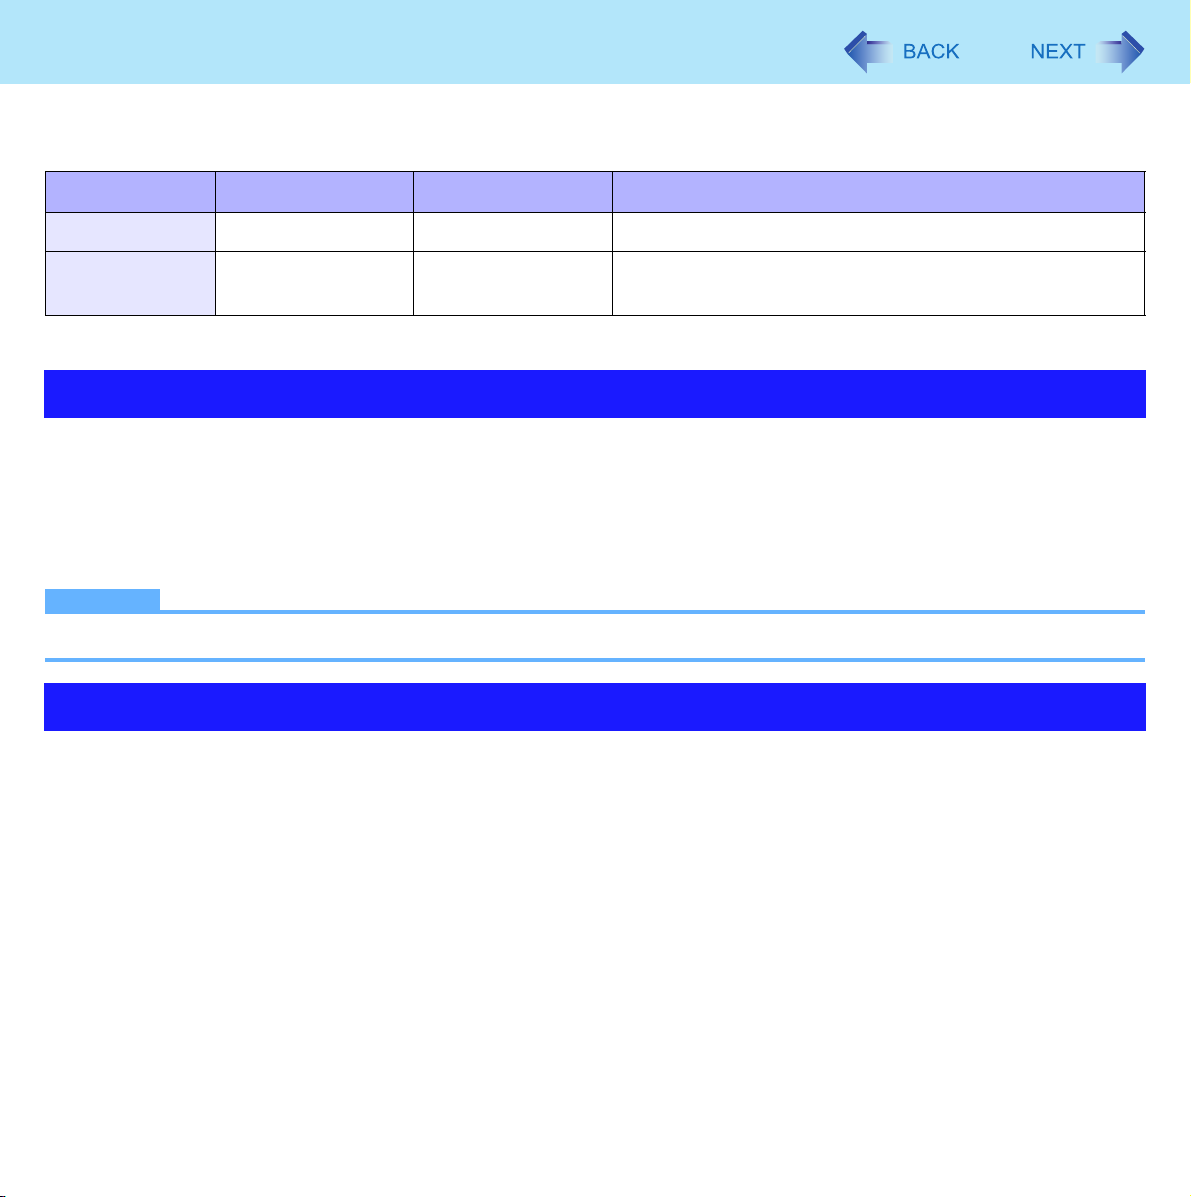
Function Data is saved to Recovery time Power supply
Standby Memory Short Required. (If power is not supplied, all data will be lost.)
Hibernation Hard disk Rather long Not required. (However power is slightly consumed to
keep the hibernation.)
5
Setting Standby or Hibernation
1 Click [start] - [Control Panel] - [Performance and Maintenance] - [Power Options] -
[Advanced].
2 Select [Stand by] or [Hibernate] for [When I close the lid of my portable computer:] /
[When I press the power button on my computer:], and then click [OK].
NOTE
z You do not need to make the setting if you use the Windows menu to enter standby or hibernation.
Precautions
z Connect the AC adaptor if the computer will be in standby mode for a long period of time. If you cannot use the AC adap-
tor, use hibernation instead.
z Using standby or hibernation repeatedly may cause malfunction of the computer. To stabilize computer operation, restart
Windows regularly (about once a week) without using standby or hibernation.
z Save the necessary data.
z Close files you have opened from removable disk and network drive.
z The password you set in the Setup Utility is not requested at resuming. You can use the Windows password for security in
standby or hibernation.
A Click [start] - [Control Panel] - [User Accounts], and select the account.
B Click [Create a password] and set the password.
C Click [start] - [Control Panel] - [Performance and Maintenance] - [Power Options] - [Advanced], and add the
check mark in [Prompt for password when computer resumes from standby].
Standby or Hibernation Functions
z Do not enter standby or hibernation in the following conditions, otherwise the data or file may be corrupted, standby/hiber-
nation may not work, or malfunction may occur in the computer or the peripheral devices.
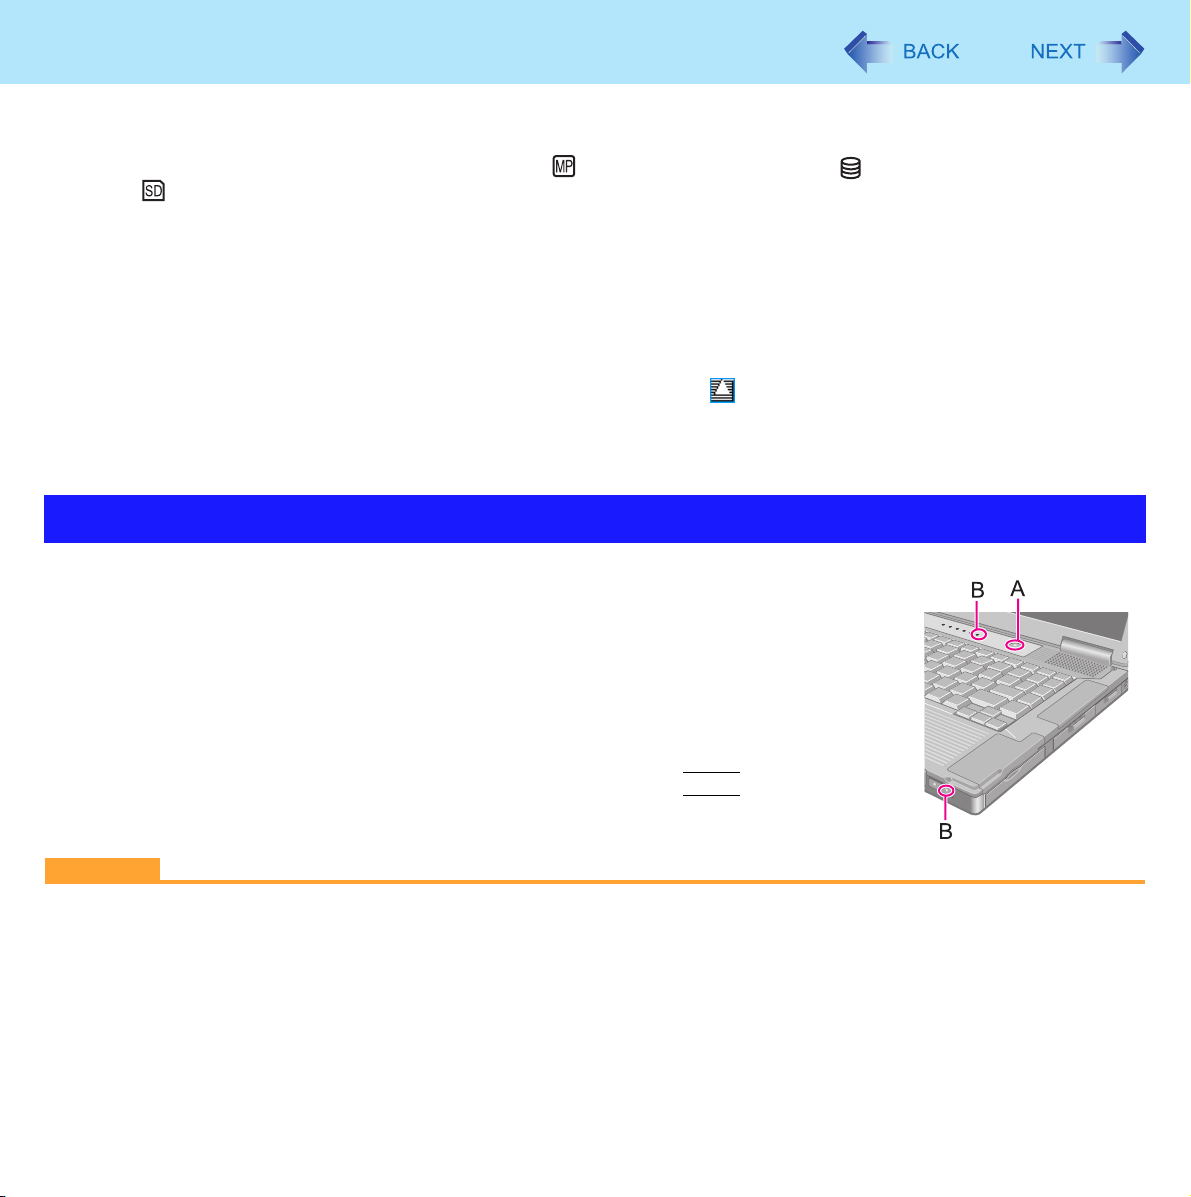
• When any of the multimedia pocket device indicator , the hard disk drive indicator and the SD Memory Card indicator is on.
• When playing/recording audio files or displaying motion video such as MPEG files.
• When playing a DVD-Video.
• When writing to a disk.
• When using communication software or network function.
• When using a PC Card.
(If the card fails to work normally, restart the computer.)
• When an external mouse is connected to the serial port.
z If a disc formatted with B’s CLiP is inserted into the CD/DVD drive (while is displayed on the notification area), the com-
puter cannot enter standby or hibernation. Eject the disc beforehand.
z The computer does not enter standby or hibernation immediately after resuming. Wait approximately one minute.
6
Entering/Resuming from Standby or Hibernation
To enter standby or hibernation
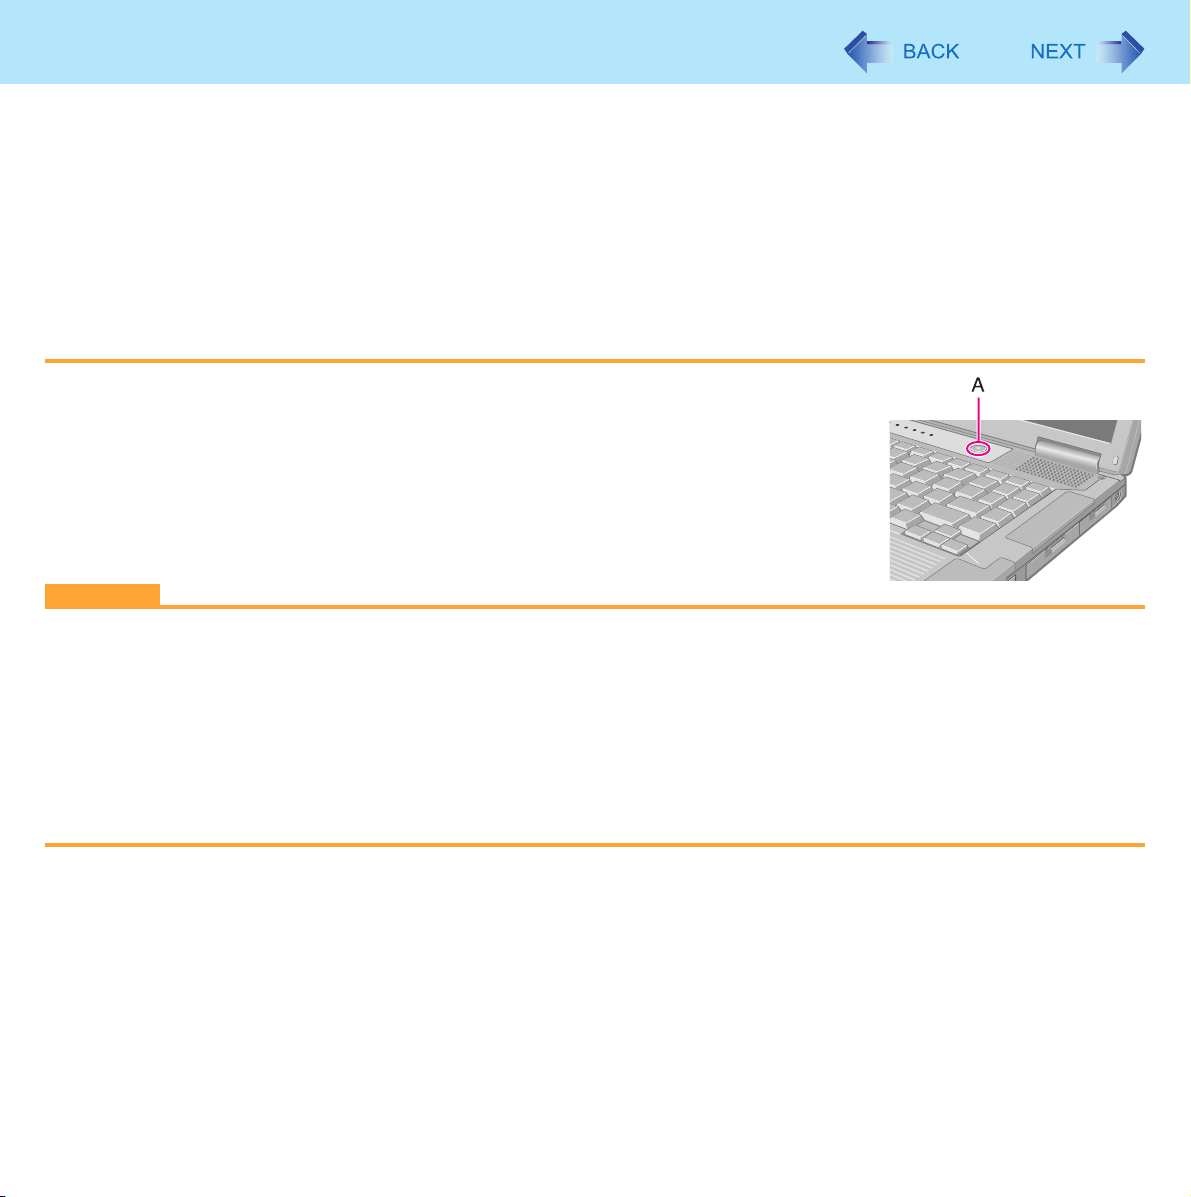
1 Close the display, or press the power switch (A) until a beep
sounds.
Standby: The power indicator (B) blinks green.
Hibernation: The power indicator (B) goes off.
z You can alternatively use the Windows menu to enter standby or hibernation. To
enter standby, click [start] - [Turn Off Computer] - [Stand By]. To enter hiberna-
Shift
tion, click [start] - [Turn Off Computer], then press and hold
[Hibernate].
CAUTION
While the computer is entering standby or hibernation
z Do not:
• Touch the keyboard, touch pad, or power switch.
• Use an external mouse or other peripheral device.
• Connect or disconnect the AC adaptor.
• Close or open the display.
Wait until the power indicator blinks green (standby) or goes off (hibernation).
z It may take one or two minutes to enter standby or hibernation.
and click
*1
Standby or Hibernation Functions
z At the beep*1, immediately release the power switch. If you press and hold the power switch for longer than four sec-
onds, the computer will forcibly shut down and unsaved data will be lost even if you have set [Shut down] in [When I
press the power button on my computer:] (Î page 5 “Setting Standby or Hibernation“).
*1
If the speakers are muted, beeps do not sound.
In standby or hibernation mode
z Do not attach or remove a multimedia pocket device and peripheral device. Doing so may cause malfunction.
z Power is consumed in standby mode. Power consumption may increase when a PC Card is inserted. When power is
exhausted, the data retained in memory will be lost. Connect the AC adaptor when using the standby function.
z Do not turn on/off the wireless switch.
7
To resume from standby or hibernation
1 Open the display, or press the power switch (A).
z When [Stand by] or [Hibernate] is selected as the setting for [When I close the
lid of my portable computer:] (Î page 5), you can resume operation opening
the display.
CAUTION
z Do not perform the following operations until resuming is complete. After the display is resumed, wait approximately
15 seconds (normally) or 60 seconds (when the computer is on a network).
• Touch the keyboard (except for password input), touch pad, or power switch.
• Use an external mouse or other peripheral device.
• Connect or disconnect the AC adaptor.
• Close or open the display.
• Shut down or restart Windows.
• Enter standby or hibernation.
• Turn on/off the wireless switch.

Security Measures
Use these features to protect your data.
z Other security measures
• SD Security (
• Embedded Security (TPM) (
Module (TPM)”.
Setting the Supervisor Password/User Password
Set the Supervisor Password before setting the User Password.
1 Start up the Setup Utility (Î page 63).
2 Select [Security].
Î page 37)
Î page 67): For further information, refer to the Installation Manual of “Trusted Platform
8
3 Select [Set Supervisor Password] or [Set User Password], and press
4 Enter your password in [Enter New Password] and press
z When the password has been set, you need to enter your password in [Enter Current Password] and press
Enter
z To disable the password, leave the input field empty and press
.
Enter
Enter
.
.
5 Enter your password again in [Confirm New Password] and press
6 In [Setup Notice], press
7 Press
CAUTION
z Do not forget your password. If you forget your Supervisor Password, you will not be able to use your computer. Con-
tact Panasonic Technical Support.
z When running the Setup Utility, do not leave and go away from your computer even for a short time, since other people
may set or change the password.
NOTE
z The password will not be displayed on the screen.
z You can use up to 32 alphanumeric characters (including spaces).
• The case (upper/lower) is ignored.
• Use only the upper horizontal row of numeric keys to input your password.
• You cannot use
z Disabling the Supervisor Password also disables the User Password.
F10
, and then select [Yes] and press
Shift
and
Enter
Ctrl
to input a password.
.
Enter
.
Enter
Enter
.
.

Security Measures
9
Preventing Your Computer from Unauthorized Use
You can set a start-up password to protect your computer from unauthorized use.
1 Set the password (Î page 8), and select [Enable] in [Password on boot] in the [Security]
menu of the Setup Utility (Î page 67).
NOTE
z If the Supervisor Password or User Password has been set, the password input screen will be displayed on starting-up
of the Setup Utility even though [Password on boot] is set to [Disable].
Preventing Your Hard Disk Data from Being Read or Written
The hard disk lock function protects the hard disk data from being read or written when the hard disk is attached to another
computer. The data can be read/written when the hard disk is returned to the original computer.
1 Select [Enable] in [Hard Disk Lock] in the [Security] menu of the Setup Utility (Î page 67).
CAUTION
z For the data being read/written on the original computer, the Setup Utility settings must be the same as when the hard
disk was removed.
z You cannot use the hard disk lock function without setting the Supervisor Password. Set the Supervisor Password
beforehand (Î page 8).
z When you have your hard disk drive repaired
• Contact Panasonic Technical Support.
• Before sending back the hard disk drive, be sure to set the [Hard Disk Lock] to [Disable].
NOTE
z The hard disk lock function works with the built-in hard disk. It does not work with the external hard disk.
z We recommend you to set [Password on boot] to [Enable] to ensure security though it is not required to enable the
hard disk lock. (Note that the hard disk lock does not guarantee complete protection of the data.)

Security Measures
10
Disabling CD/DVD Drive
Disable CD/DVD drive operation to prevent the drive(s) from being read/written and from being used to start the computer.
You can protect your data from unauthorized access or accidental overwriting.
1 Select [Disable] in [DVD Operation] in the [Security] menu of the Setup Utility
(Î page 67).
NOTE
z This does not work for USB CD/DVD drive.

Battery Power
Battery Indicator
Battery indicator Battery status
Not lit The battery pack is not inserted or not being charged.
Orange Charging is in progress.
Green The battery is fully-charged.
11
Blinking green
Red The remaining battery is approximately 9% or less.
Blinking red The battery pack or the charging circuit is not operating properly.
Blinking orange The battery cannot be charged temporarily due to the following reasons:
*1
In high temperature mode, the 100% battery level is equivalent to 80% level of the normal temperature mode.
NOTE
z Once the battery is fully charged, the computer performs recharging only when the battery level becomes less than
approximately 95%, so overcharging is avoided.
In high temperature mode, the battery pack is discharging the power to 80%
perature mode (Î page 13). Do not remove the battery pack in this status.
• Its internal temperature is out of the acceptable range.
• The power supply is not enough because software applications or peripheral devices
are consuming a large amount of power.
*1
of normal tem-
Battery Power
Checking the Remaining Battery Charge
You can check the remaining battery charge on the screen.
(After logging on to Windows)
12
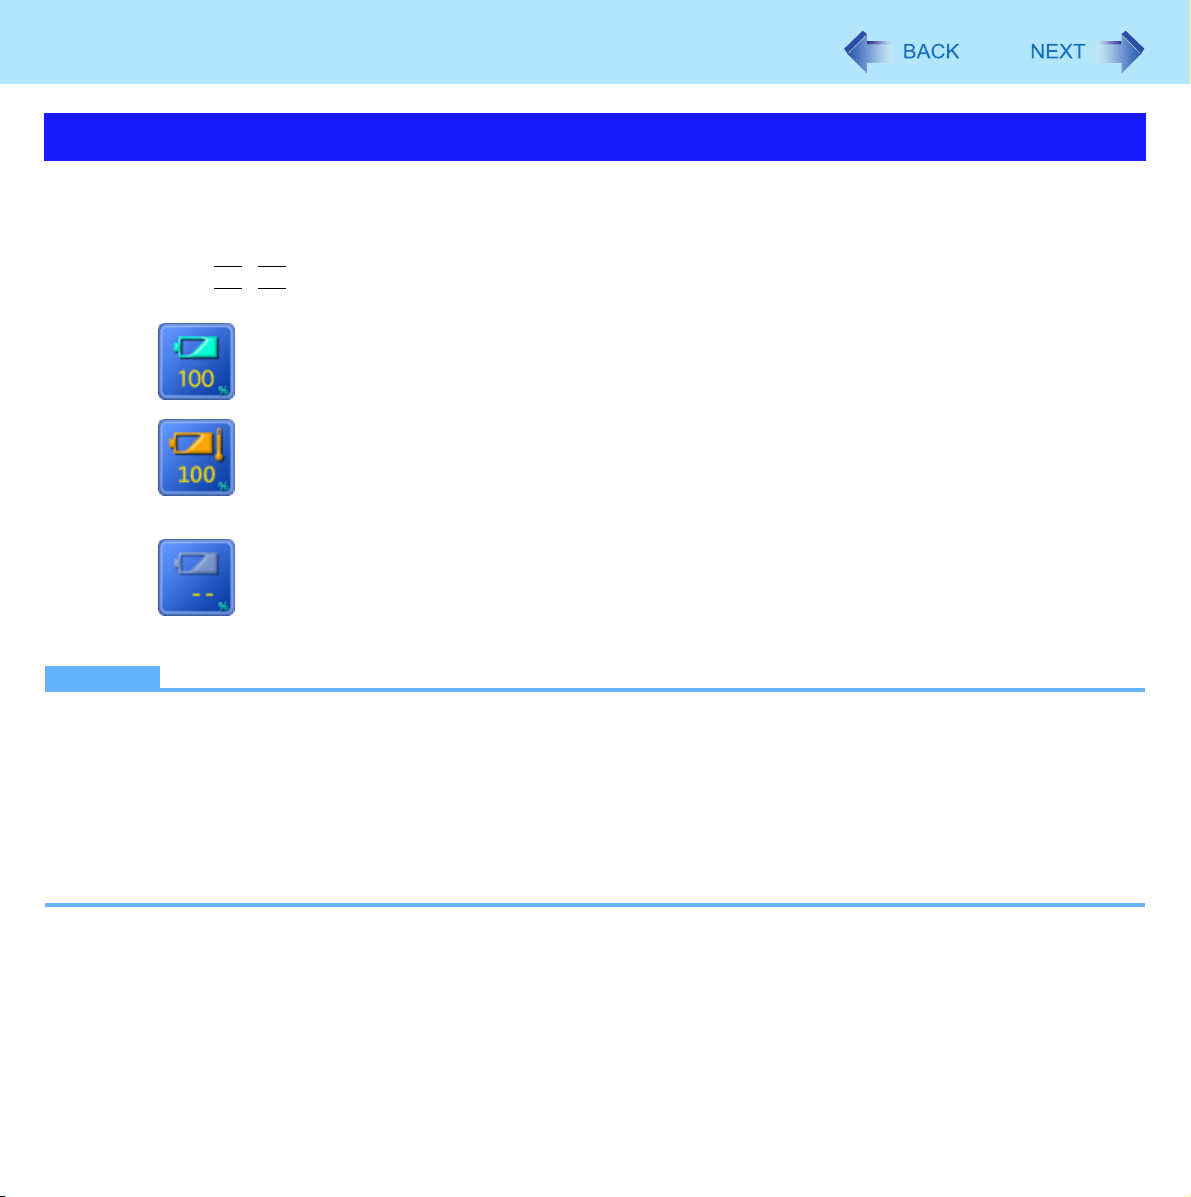
1 Press
z When the battery pack is inserted (example)
z When the battery pack is not inserted
NOTE
z The battery display may not correspond to the actual remaining battery charge in the cases as below. To correct the
display, perform the Battery Recalibration (Î page 15).
• The battery indicator remains red.
• The indicator lights orange and the display shows 99% for a long time.
• Low battery warning appears soon after a short time of use.
This can occur when the computer is in standby mode for a long time without power supply from the AC adaptor.
z The battery display may not be the same as that of notification area or of [Power Meter] in [Power Options Properties].
This is not a malfunction.
Fn+F9
.
: Normal temperature mode (Î page 13)
: High temperature mode (Î page 13)

Battery Power
13
High temperature mode
The high temperature mode can prevent the battery from deteriorating when the computer is used in high-temperature environment or used for a long time with its battery fully charged.
Select [Auto] (default) or [High Temperature] in [Environment] of the [Main] menu of the Setup Utility (Î page 65).
NOTE
z Note that a level corresponding to a 100% charge for high temperature mode is approximately equivalent to an 80%
charge level for normal temperature mode.
z After switching from [Normal Temperature] to [High Temperature] or vice versa, the remaining battery capacity will not
be displayed correctly until the battery pack is completely discharged or fully charged.
z In the [Auto] mode:
Once the computer has automatically switched from the normal temperature mode to the high temperature mode, the
computer will not switch back to the normal temperature mode until the battery has been used and recharged to a total
charge level of about five times as much as that of the fully-charged state. This is to avoid battery deterioration.

Battery Power
Computer behavior with low battery
The default settings are as follows.
14
When the battery level becomes 10%
[Low battery alarm]
z Displays a message that the battery level is low. z Displays a message that the battery level is low, and
↓↓
Charge the battery. Connect the AC adaptor or replace the battery to start up
z Connect the AC adaptor immediately. If you do not
have the AC adaptor, exit the running programs and
Windows, then confirm that the power indicator is off.
z If you have a fully charged spare battery, turn off the
computer, replace the battery and turn the computer on
again.
Do not replace the battery pack when the computer is in standby mode.
When the battery level becomes 5%
[Critical battery alarm]
then the computer enters hibernation.
the computer.
z Connect the AC adaptor and charge the battery.
z If you have a fully charged spare battery, replace the
battery and turn the computer on again.
When the computer enters hibernation with the battery
down and you resume the operation without charging
the battery, Windows may not start up normally or the
alarm function may not operate normally from then on.

Battery Power
15
Correcting the Battery Display (Battery Recalibration)
The “Battery Recalibration” function measures and memorizes the battery capacity. To correct the battery display, use this
function to fill the battery and then discharge it completely. Perform the procedure at least once immediately after purchasing
the computer. Normally the interval of battery recalibration is three months. The battery display may not be correct when the
battery pack deteriorates after a long time use. In this case, perform the procedure again.
1
Connect the AC adaptor.
2
Close all the applications.
3
Perform “Battery Recalibration”.
A Click [start] - [All Programs] - [Panasonic] - [Battery Recalibration].
B When the confirmation message appears, click [Start].
z Frequent recalibration of the battery can degrade the battery. A caution message appears when the battery
recalibration is performed at the shorter interval than approximately a month. In this case, cancel the battery
recalibration.
C When the message requests shut down of Windows, click [Yes].
The battery recalibration starts.
After the battery pack is fully charged, discharging starts. When the discharging is completed, the power goes off
automatically.
After the battery recalibration is finished, normal charging starts.
NOTE
z The temperature range should be 10
z The battery recalibration may take a long time due to the large battery capacity. This is not a malfunction.
• Full charge: Approximately 4 hours
• Complete discharge: Approximately <CF-52A/B series> 3.5 hours, <CF-52C/D series> 4.5 hours
z If the computer is turned off during the battery recalibration (e.g., due to power failure, or accidental removal of the AC
adaptor and battery pack), the battery recalibration will not be completed.
z You can also perform the battery recalibration with the following procedure.
A Restart the computer.
F9
B Press
C When the remaining battery capacity is displayed, press
D Follow the on-screen instructions.
while the [Panasonic] boot screen is displayed just after the computer starts the startup procedure.
°C to 30°C {50°F to 86°F}.
Enter
.
Battery Power
16
Replacing the Battery Pack
The battery pack (CF-VZSU29AU) is a consumable item so the replacement will be necessary. If the battery operation time
becomes noticeably short and not recovered even after recalibrating the battery, replace with a new battery.
CAUTION
z The battery pack is not charged when you first purchase it. Be sure to charge it before using for the first time. Charging
starts automatically when the AC adaptor is connected to the computer.
z Use only the specified battery pack with your computer.
z In the standby mode, do not remove/replace the battery pack. Otherwise your data will be lost and the computer may
be damaged.
1
Turn off the computer.
z Do not use the standby function.
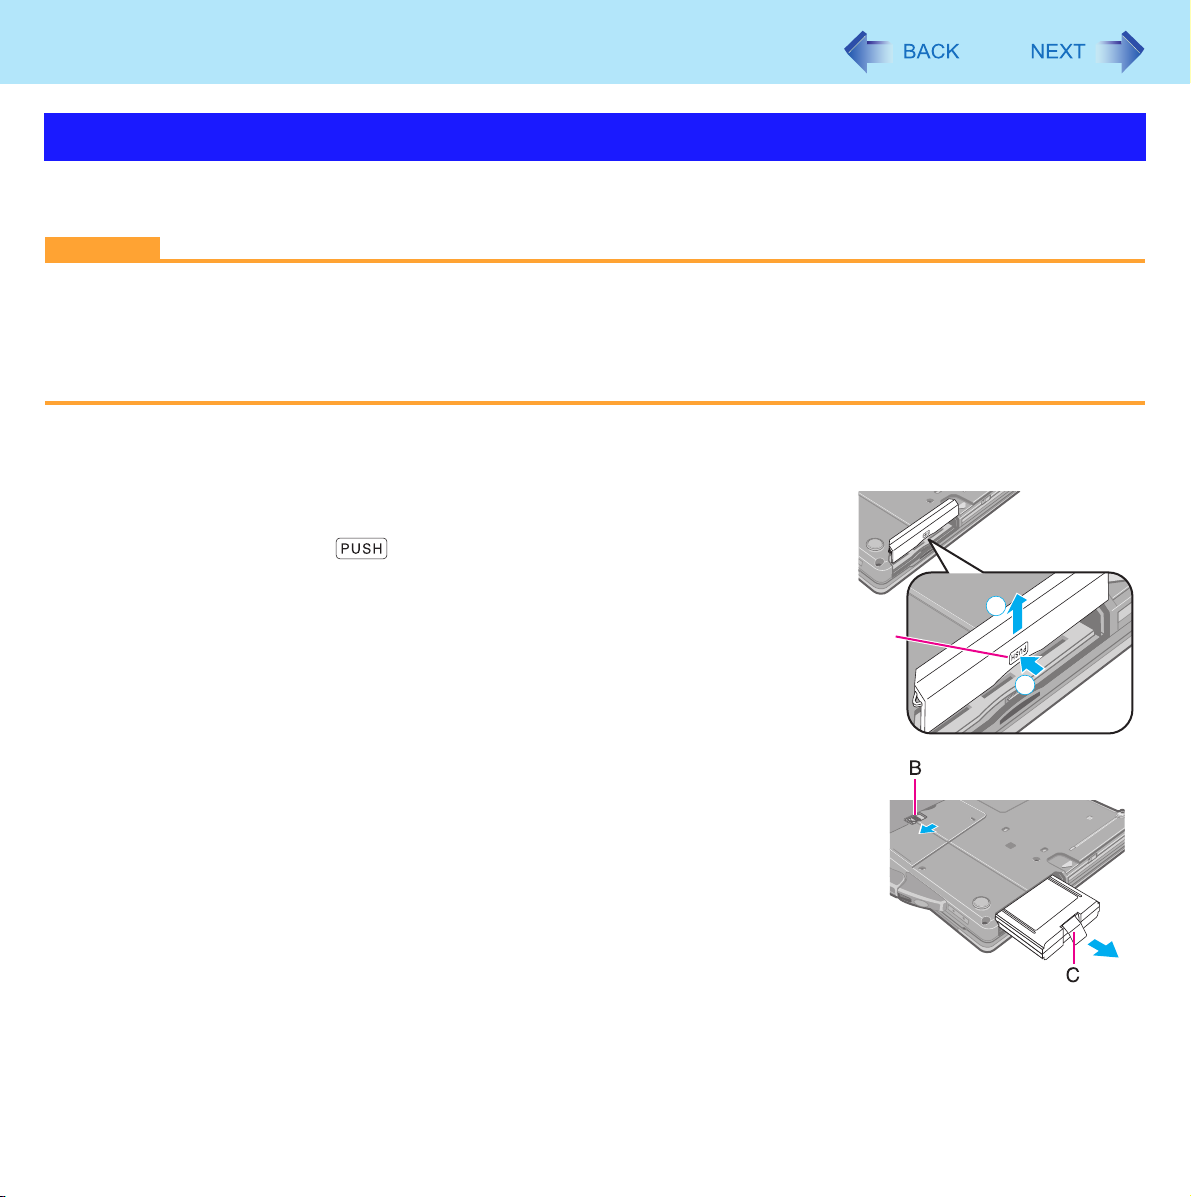
2
Reverse the computer and remove the cover.
A Press and hold the mark part (A).
B Slide and remove the cover.
2
A
3
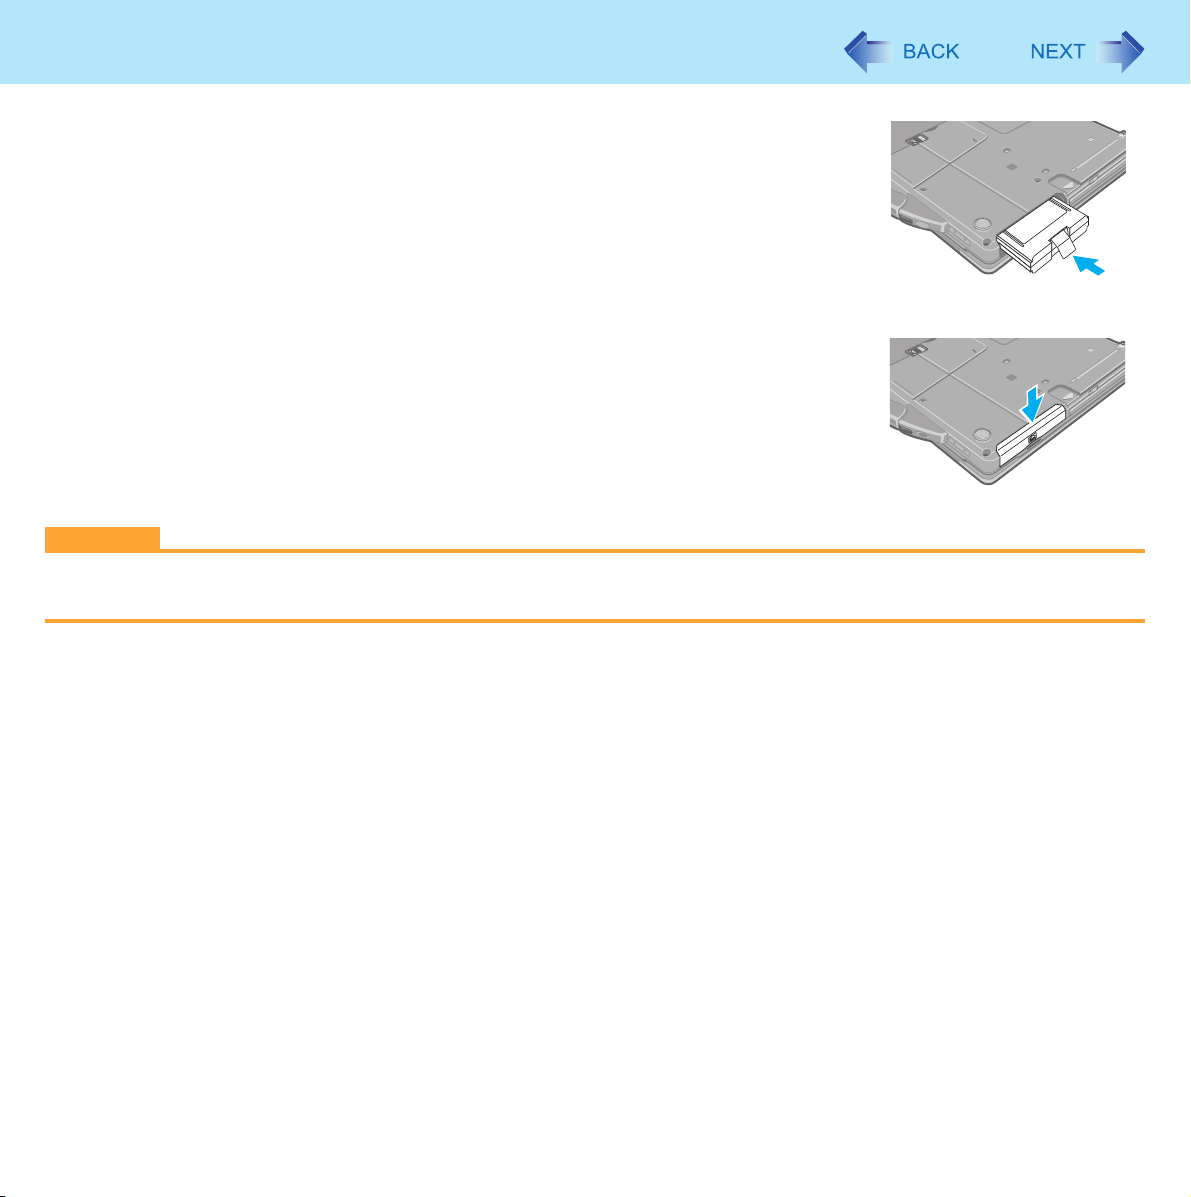
Remove/Insert the battery pack.
z To r em ov e
Slide and hold the latch (B), and pull the tab (C) of the battery pack.
1
Battery Power
z To i ns er t
Insert the battery pack until it securely fits the connector.
4 Slide the cover back.
CAUTION
z Make sure the latch is securely locked, otherwise the battery pack may fall when you carry the computer.
z Do not remove the battery pack forcibly when the latch is locked. Doing so may damage the battery pack.
17
Multimedia Pocket
You can attach the following device. (refer to recent catalogs and other sources for information about the products available)
z DVD MULTI drive
CAUTION
z Do not insert/remove the multimedia pocket device in standby or hibernation, or when the multimedia pocket device
indicator or the hard disk drive indicator is on.
z Do not leave a disc formatted with B’s CLiP in the multimedia pocket device because the computer cannot enter
standby/hibernation even if you selected [Stand by] or [Hibernate] in [When I close the lid of my portable computer:]
(Î page 5 “Setting Standby or Hibernation”).
NOTE
z Refer to the catalogs etc. for the latest information about optional devices.
z Read the instruction manuals of the devices carefully.
18
Replacing the Multimedia Pocket Device
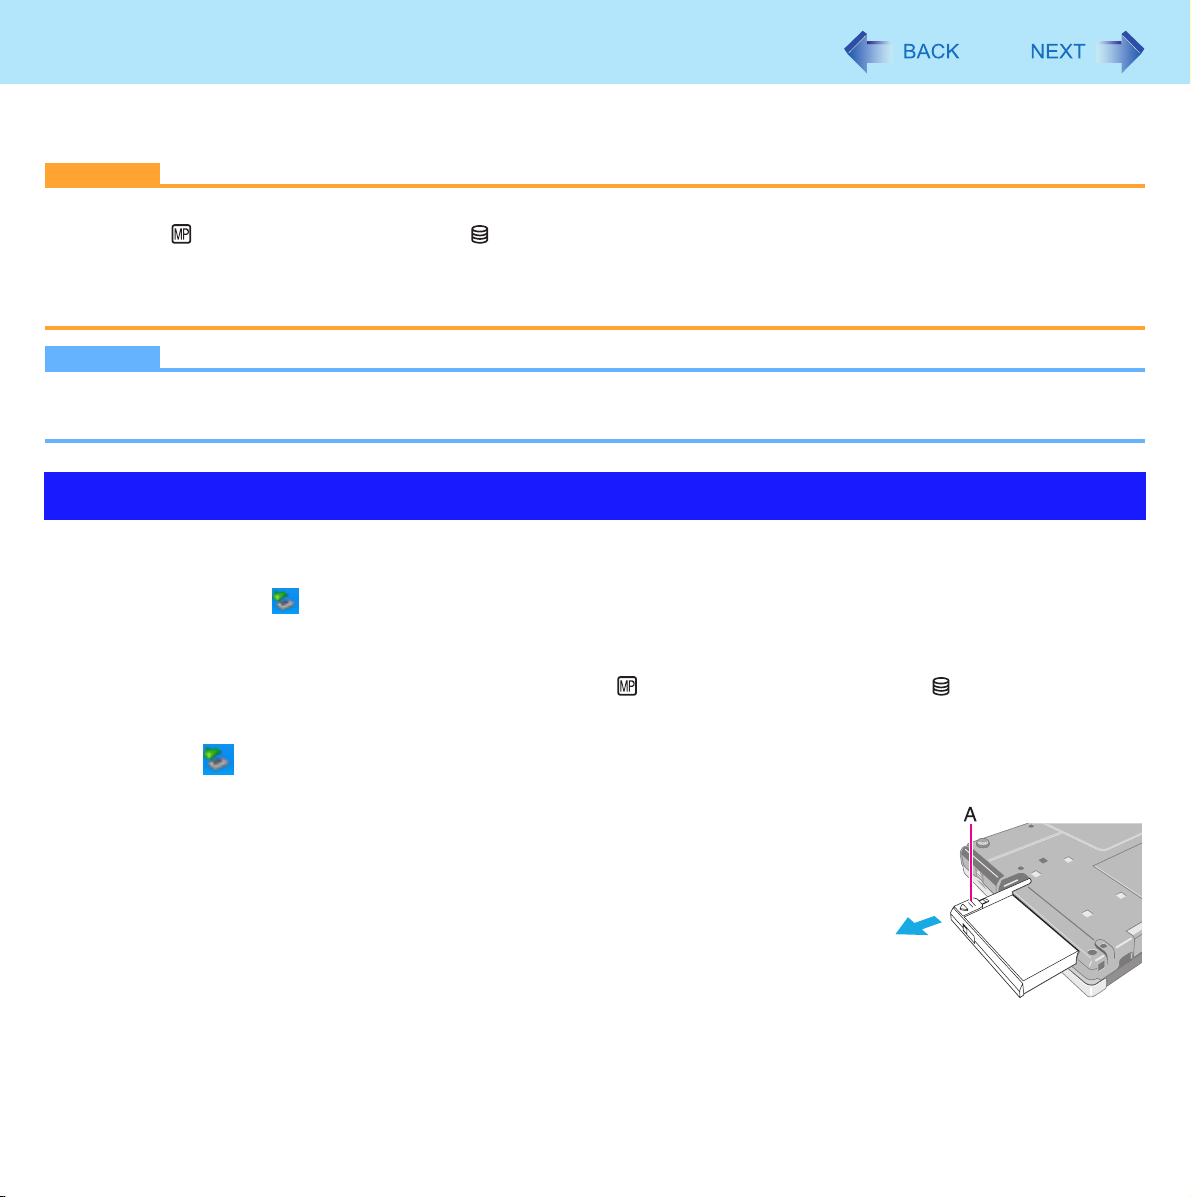
1 Disable the multimedia pocket device function.
A Double-click on the notification area.
B Select the multimedia pocket device and then click [Stop].
C Follow the on-screen instructions.
D Confirm that the multimedia pocket device indicator and the hard disk drive indicator indicators are not lit.
z This step is not necessary when;
• Removing the device after turning off the computer.
• is not displayed.
• The device does not appear in the list in step B.
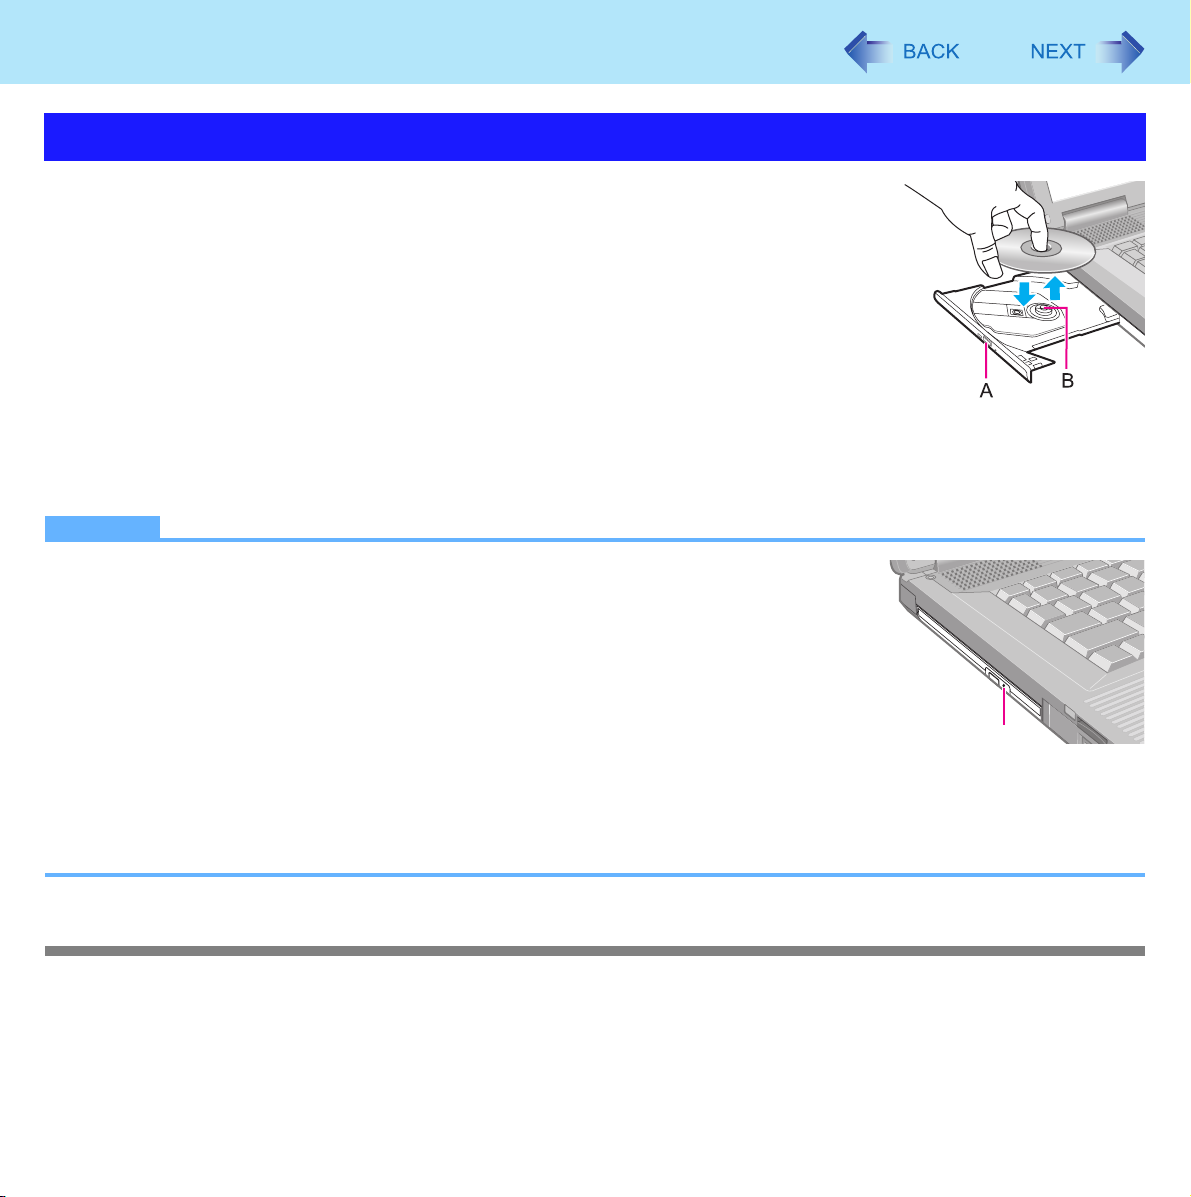
2 Press and hold the release button (A), and slide the device out
of the multimedia pocket.
Multimedia Pocket
19
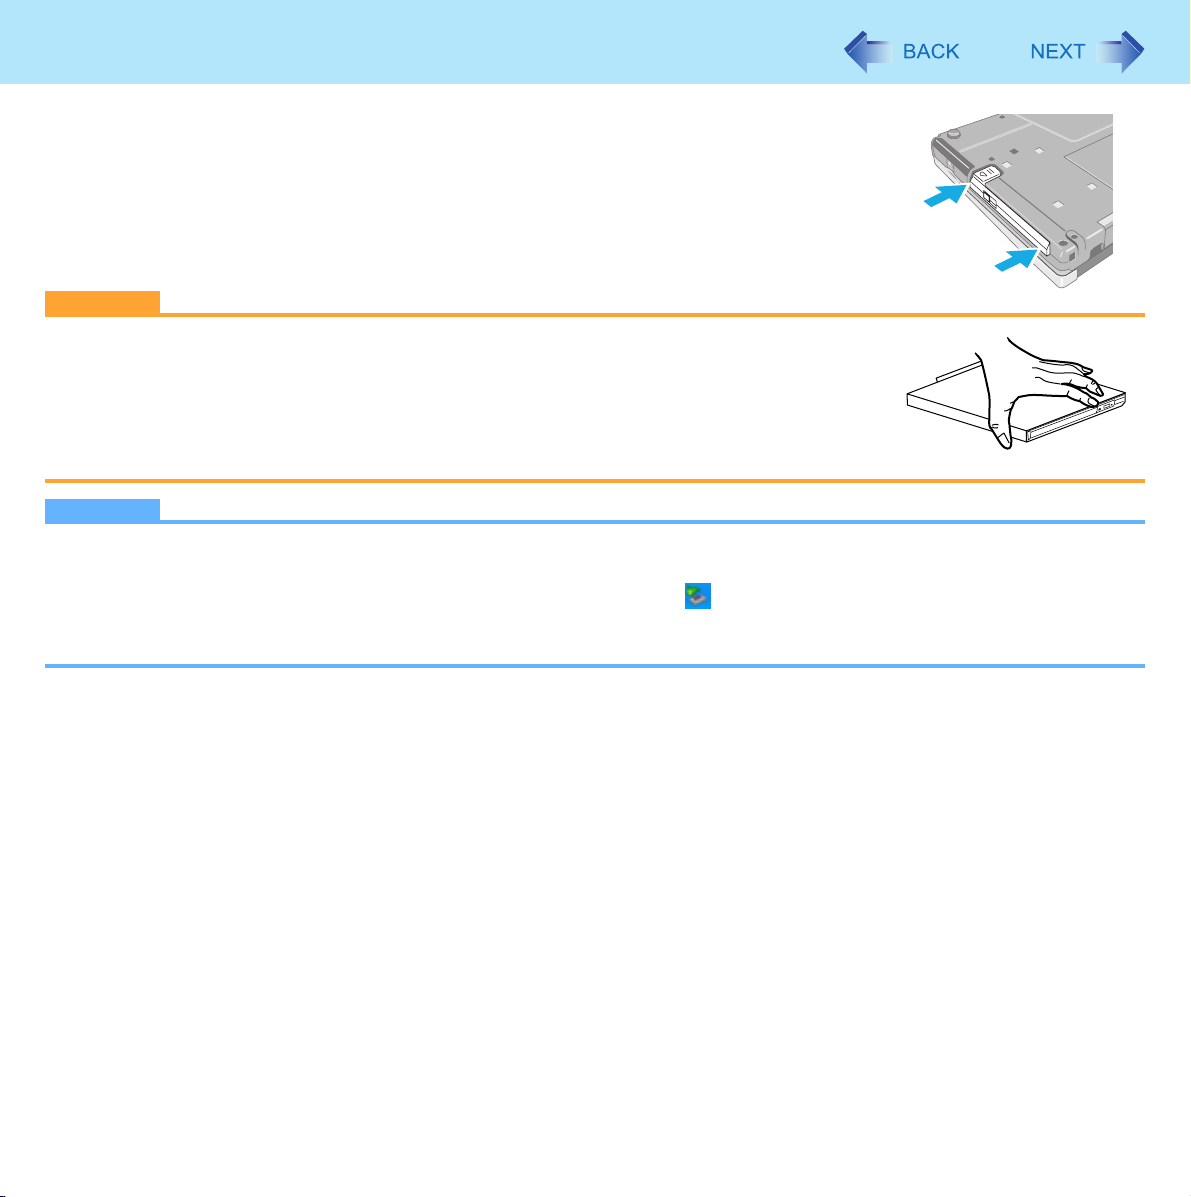
3 Carefully insert the device into the multimedia pocket by push-
ing both corners until it surely fits in the slot.
z The computer must be on when inserting the device.
z Insert the device with the label side up.
CAUTION
z Hold the device on its both sides. Otherwise the device may be damaged.
z Do not apply excessive force when raising the slot side upward and inserting the
device.
z When you carry the computer, confirm that the release button is surely locked so that
the device does not fall.
z Be sure to insert the device into the multimedia pocket for use.
NOTE
z The procedure to disable the multimedia pocket device is not necessary when you remove the device after turning off
the computer.
z You can see that the device is recognized or not by double-clicking
mation] menu in the Setup Utility (Î page 64). If the device is not recognized (or if the media cannot be accessed),
turn off the computer and reinsert the device.
on the notification area, or checking the [Infor-

CD/DVD Drive
20
Handling Precautions
CD/DVD drive handling care
z Do not expose the CD/DVD drive to excessive smoke that may leave a residue, e.g., oil smoke, or tobacco smoke. Doing
so can shorten the life of the drive lens.
z We recommend cleaning the drive lens with an air puffer used for camera lenses.
(Do not use any spray-type of lens cleaning products.)
When opening/closing the tray
z When the computer is on, use the eject button (Î page 25) or eject through Windows.
z When is displayed on the notification area, right-click and click [Eject] to eject a disc.
Eject discs only as described above.
z When inserting or removing a disc, be careful not to touch the lens of the drive.
z Do not leave the tray open and do not touch the lens.
The lens and disc can become dusty in some conditions. It may cause malfunction in reading or writing.
z Do not apply excessive force to the tray in the open position.
z Never insert a foreign object such as a paper clip into the CD/DVD drive.
Doing so may cause malfunction.
z Do not place items other than discs on the tray.
z Do not access the drive until after the tray is closed and the multimedia pocket device indicator is off.
While the CD/DVD drive is being accessed
z Do not open the CD/DVD drive or move the computer while the CD/DVD drive is being accessed.
Doing so could cause the disc to shift position and this may damage the disc, or cause the CD/DVD drive to malfunction.
In addition, after running an application involving access to a disc, close the application before opening the CD/DVD drive.
CD/DVD Drive
21
Disc handling care
z Do not use deformed, warped, or irregularly shaped discs.
Reading of disc may not be possible depending on the disc conditions (cracks, dirt, modification, data recording quality,
copy protection, recording equipment/software that was used to create the disc, etc.)
z Before using a disc, carefully read the operating/handling instructions and package of the disc.
z If the discs are not handled appropriately, they may become dirty or scratched. Furthermore the writing speed may get
slower and the data may not be correctly written on or read from the disc. Other damage may cause a drive failure.
z Note the following precautions.
• Do not touch the disc surface (the side with no printing).
• Keep the disc surface clean and free from dirt, dust, fingerprints and scratches.
• Do not write on the surface of the disc with a ballpoint pen or other writing instrument.
• Do not attach stickers to discs.
• Do not drop, bend, or place heavy objects on top of discs.
• Do not place or store discs in locations exposed to heat, direct sunlight, humidity or dust.
• If a disc is brought from a cold to a warm location, condensation may form on the disc. For read-only discs, wipe off the
condensation using a soft, dry, lint-free cloth before using the disc. For recordable/rewritable discs, wait until the condensation dries.
• When not using discs, keep them in their protective cases or cartridges.
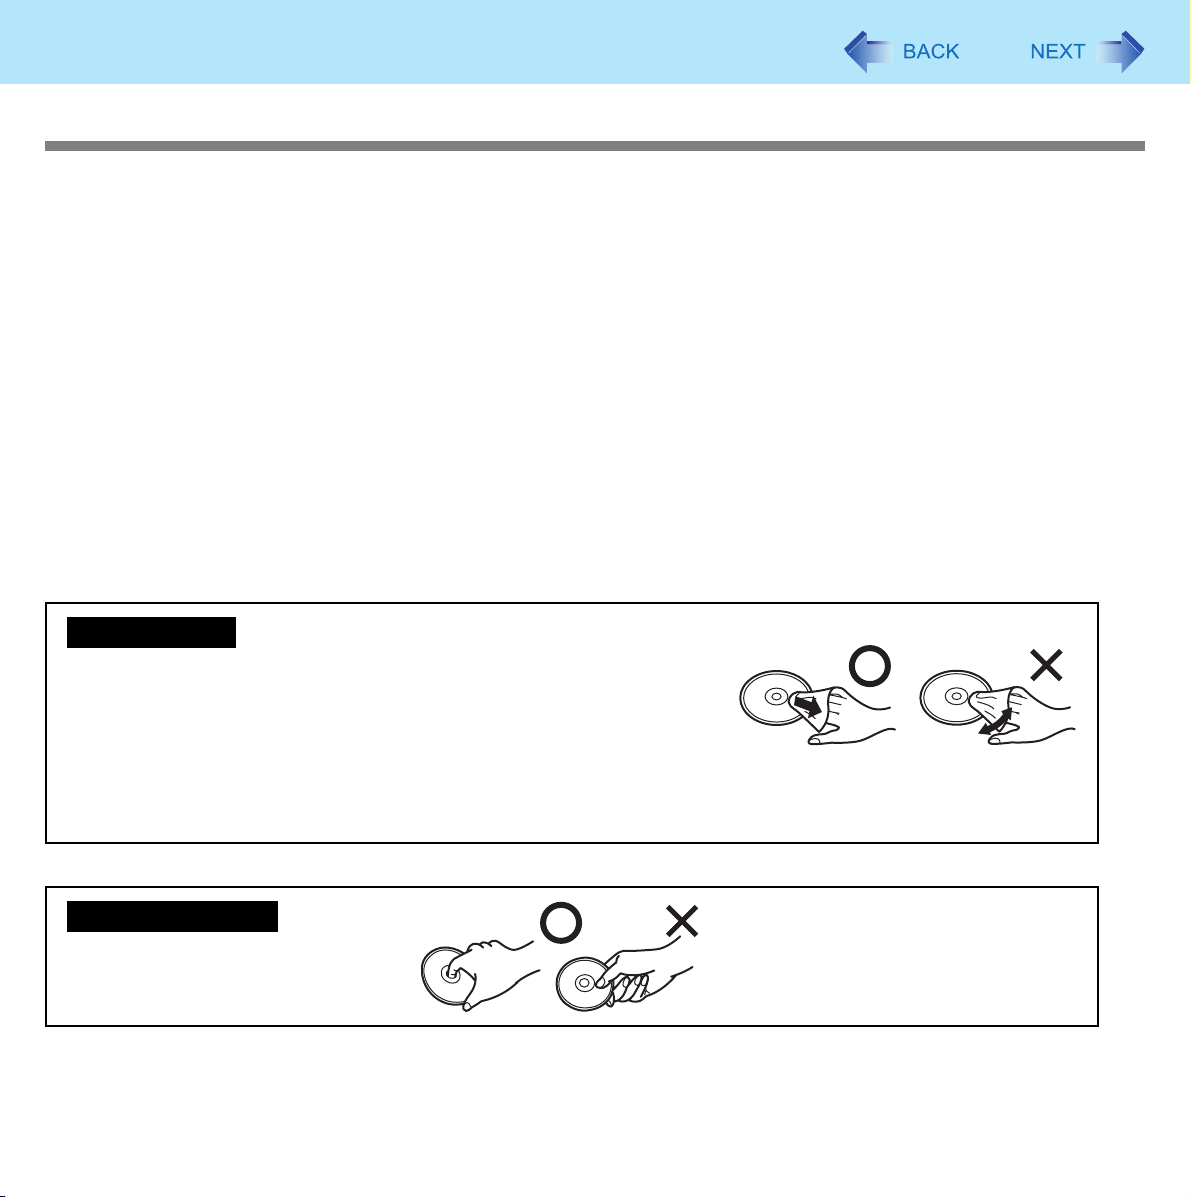
To clean discs
<For read-only discs>
Wipe discs with a dry, soft cloth from the center toward the edge.
If discs get very dirty, wipe with a moist, soft cloth from the center toward
the edge, then wipe again with a dry cloth to take up remaining moisture.
<For recordable/rewritable discs>
Use the Panasonic disc cleaner to clean these discs.
Do not use a cloth, CD cleaners or any other such cleaners under any circumstances.
How to hold a disc
CD/DVD Drive
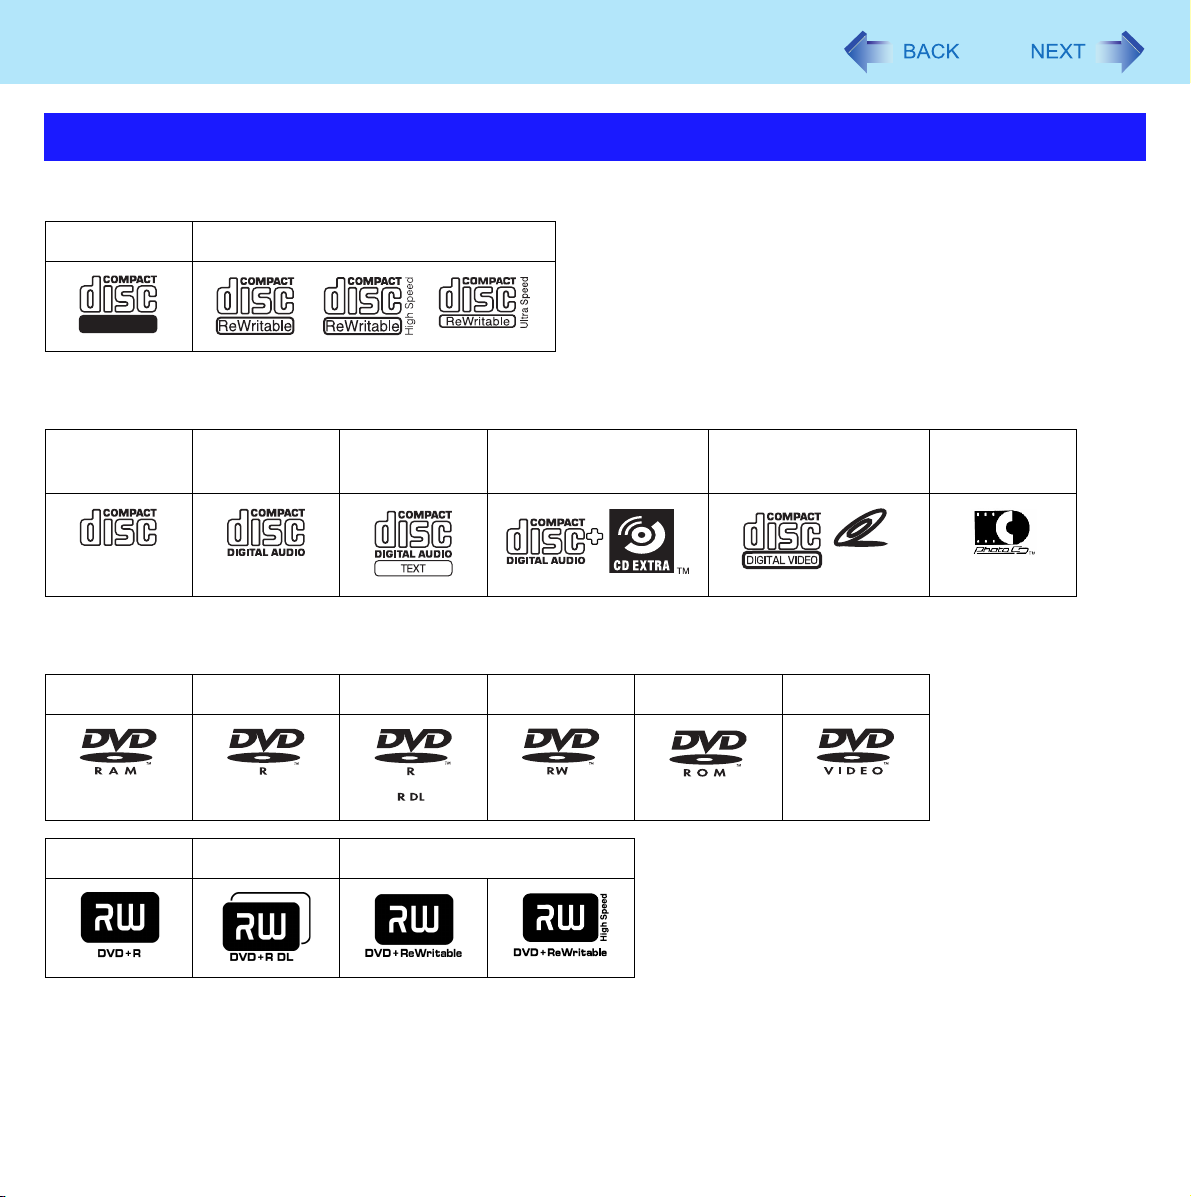
Disc Information
z You can read from/write to the following discs.
CD-R CD-RW
Recordable
z You can read from the following discs.
22
CD-ROM CD DIGITAL
AUDIO
z You can write to the following discs.
DVD-RAM
*1
DVD-RAM: Only non-cartridge type or removable cartridge type can be used.
*2
Does not support DVD-RW Ver.1.0.
*1
+R +R DL +RW
DVD-R DVD-R DL DVD-RW
CD TEXT CD-EXTRA Video CD Photo CD
*2
VIDEO CD
DVD-ROM DVD-Video

CD/DVD Drive
Recommended discs for writing
23
• CD-R
HITACHI MAXELL, Ltd.
MITSUBISHI KAGAKU MEDIA CO., Ltd.
TAIYO YUDEN Co., Ltd.
• CD-RW/High-Speed CD-RW
MITSUBISHI KAGAKU MEDIA CO., Ltd.
RICOH Co., Ltd.
• Ultra-Speed CD-RW
MITSUBISHI KAGAKU MEDIA CO., Ltd.
DVD discs you can use for writing
• DVD-R for General
1X-SPEED (4.7 GB)
1–2X-SPEED (4.7 GB)
1–4X-SPEED (4.7 GB)
1–8X-SPEED (4.7 GB)
1–16X-SPEED (4.7 GB)
•DVD-R DL
2–4X-SPEED (8.5 GB)
2–8X-SPEED (8.5 GB)
•DVD-RW
1X-SPEED (4.7 GB/9.4 GB)
1–2X-SPEED (4.7 GB/9.4 GB)
2–4X-SPEED (4.7 GB/9.4 GB)
2–6X-SPEED (4.7 GB/9.4 GB)
•DVD-R
Matsushita Electric Industrial Co., Ltd.
MITSUBISHI KAGAKU MEDIA CO., Ltd.
TAIYO YUDEN Co., Ltd.
•DVD-R DL
MITSUBISHI KAGAKU MEDIA CO., Ltd.
•DVD-RW
MITSUBISHI KAGAKU MEDIA CO., Ltd.
Victor Company of Japan, Limited
• DVD-RAM
Matsushita Electric Industrial Co., Ltd.
HITACHI MAXELL, Ltd.
•+R / +RW
MITSUBISHI KAGAKU MEDIA CO., Ltd.
RICOH Co., Ltd.
• High-Speed +RW
RICOH Co., Ltd.
• +R DL
MITSUBISHI KAGAKU MEDIA CO., Ltd.
• DVD-RAM
2X-SPEED (4.7 GB/9.4 GB)
2–3X-SPEED (4.7 GB/9.4 GB)
2–5X-SPEED (4.7 GB/9.4 GB)
•+R
1–2.4X-SPEED (4.7 GB)
1–4X-SPEED (4.7 GB)
1–8X-SPEED (4.7 GB)
1–16X-SPEED (4.7 GB)
• +R DL
2.4X-SPEED (8.5 GB)
2.4–8X-SPEED (8.5 GB)
•+RW
1–2.4X-SPEED (4.7 GB)
1–4X-SPEED (4.7 GB)
• High-Speed +RW
3.3–8X-SPEED (4.7 GB)

CD/DVD Drive
24
Using DVD Media
To play DVD-Video or MPEG2 files, you need to use DVD playback software such as WinDVD (Î page 27).
Region code setting
DVD-Video are allocated to region codes according to where they are sold. To play a DVD-Video, the player’s software and
the drive must have the corresponding region code.
e.g.,
For U.S.A. and Canada: “1”
For Europe: “2”
z The region code of the drive is not set at purchase. The operation depends on the DVD-Video that is first played.
• DVD-Video with a specific region code:
The drive will automatically be set at the same region code as the DVD-Video.
• DVD-Video with multiple region codes:
[Confirm Region] appears. Select the region code and click [OK]. Play now begins.
CAUTION
z You can change the region code setting up to five times including the initial setting. Be extremely careful because you
cannot change the region code anymore after the fifth change, even if you reinstalled the operating system.
z Any problem resulting from illegal changing or altering of the region code is the user’s responsibility.
NOTE
z [Confirm Region] appears when the DVD-Video has only one region code and the drive is set for another region code.
([Confirm Region] may not appear with some DVD-Video discs. To check the current region code and the number of
remaining times of changing the code, right-click on the WinDVD screen and click [Setup] - [Region].)
CD/DVD Drive
Setting a Disc
1 Turn on the computer.
2 Press the eject button (A) and slowly pull out the tray.
3 Insert/Remove the disc.
z To i ns er t
Set the disc with the label side up and press the center of the disc until it clicks
in place.
z To r em ov e
Press on the center spindle (B) and carefully lift up the edge of the disc.
4 Close the tray.
Do not press the eject button.
NOTE
z To remove a disc when the computer is powered off, insert a pointed object (e.g., the
bent-out tip of a paper clip, or the tip of a pencil or ballpoint pen) into the emergency
hole (C). Pushing it to the end allows the tray to come out. (The position of the emergency hole depends on the drive.)
z If the vibration of the CD/DVD drive is excessive, check the disc. If the disc is normal
and is inserted correctly, set [DVD Drive Speed] to [Low] in the [Main] menu of the Setup
Utility (Î page 65).
When using B’s Recorder, select writing speed [8x] or less to minimize vibration.
z For AutoPlay CD:
• If an AutoPlay CD does not start after the computer resumes from standby or hibernation, remove the disc from the drive and then reinsert it after waiting 15 seconds.
• An AutoPlay CD may start during file access depending on the status of the disc.
z When playing back video from a disc, playback may not be smooth in some conditions.
25
C
Power-saving mode
If the CD/DVD drive is not accessed for 30 seconds, the drive motor will automatically be shut down to reduce the power consumption. When the CD/DVD drive is accessed again, the drive motor is turned on. In this case, reading of the disc data will
take approximately 30 seconds.

CD/DVD Drive
26
DVD MULTI Drive
z If a DVD MULTI drive has already been set at the time of initial startup of the computer, you do not need to install the DVD-
RAM Driver. You can write to a DVD-RAM disc without installation. If you purchase a DVD MULTI drive after the initial startup of the computer, install the DVD-RAM Driver according to the operating instructions supplied with the drive.
 Loading...