

Page 1

®
Personal Computer
OPERATING INSTRUCTIONS
CF-47 Series
Contents
Getting Started
Read Me First ................................................. 7
First-time Operation ........................................ 8
9895
Getting Started
[Additional Manual]
Reference Manual
This manual can be accessed on your computer. Please
refer to page 19 on how to access the Reference Manual.
Contents
• Key Combinations
• LED Indicators
• Panasonic Hand Writing
(T ouch Pad)
• Suspend/Hibernation
Functions
• Security Measures
• Computing On the Road
• Battery Power
• Using PC Cards
• Adding Memory
• Port Replicator
• Using a Printer
• Using an External Display
• Using USB Devices
• Infrared Data
Communications
• Using Modem
• SuperDisk™ Drive
• Hard Disk Drive
• Using LAN
• Setup Utility
• Technical Information
• List of Error Codes
• DMI Viewer
• Dealing With Problems
Operation
Starting Up/Shutting Down............................12
Handling and Maintenance ...........................20
Troubleshooting
List of Error Codes ......................................... 21
Dealing with Problems ..................................23
Reinstalling Software ....................................26
Appendix
LIMITED USE LICENSE AGREEMENT .......27
Names and Functions of Parts......................29
Specifications................................................ 31
LIMITED W ARRANTY...................................34
Operation
Tr oubleshooting
Appendix
Page 2
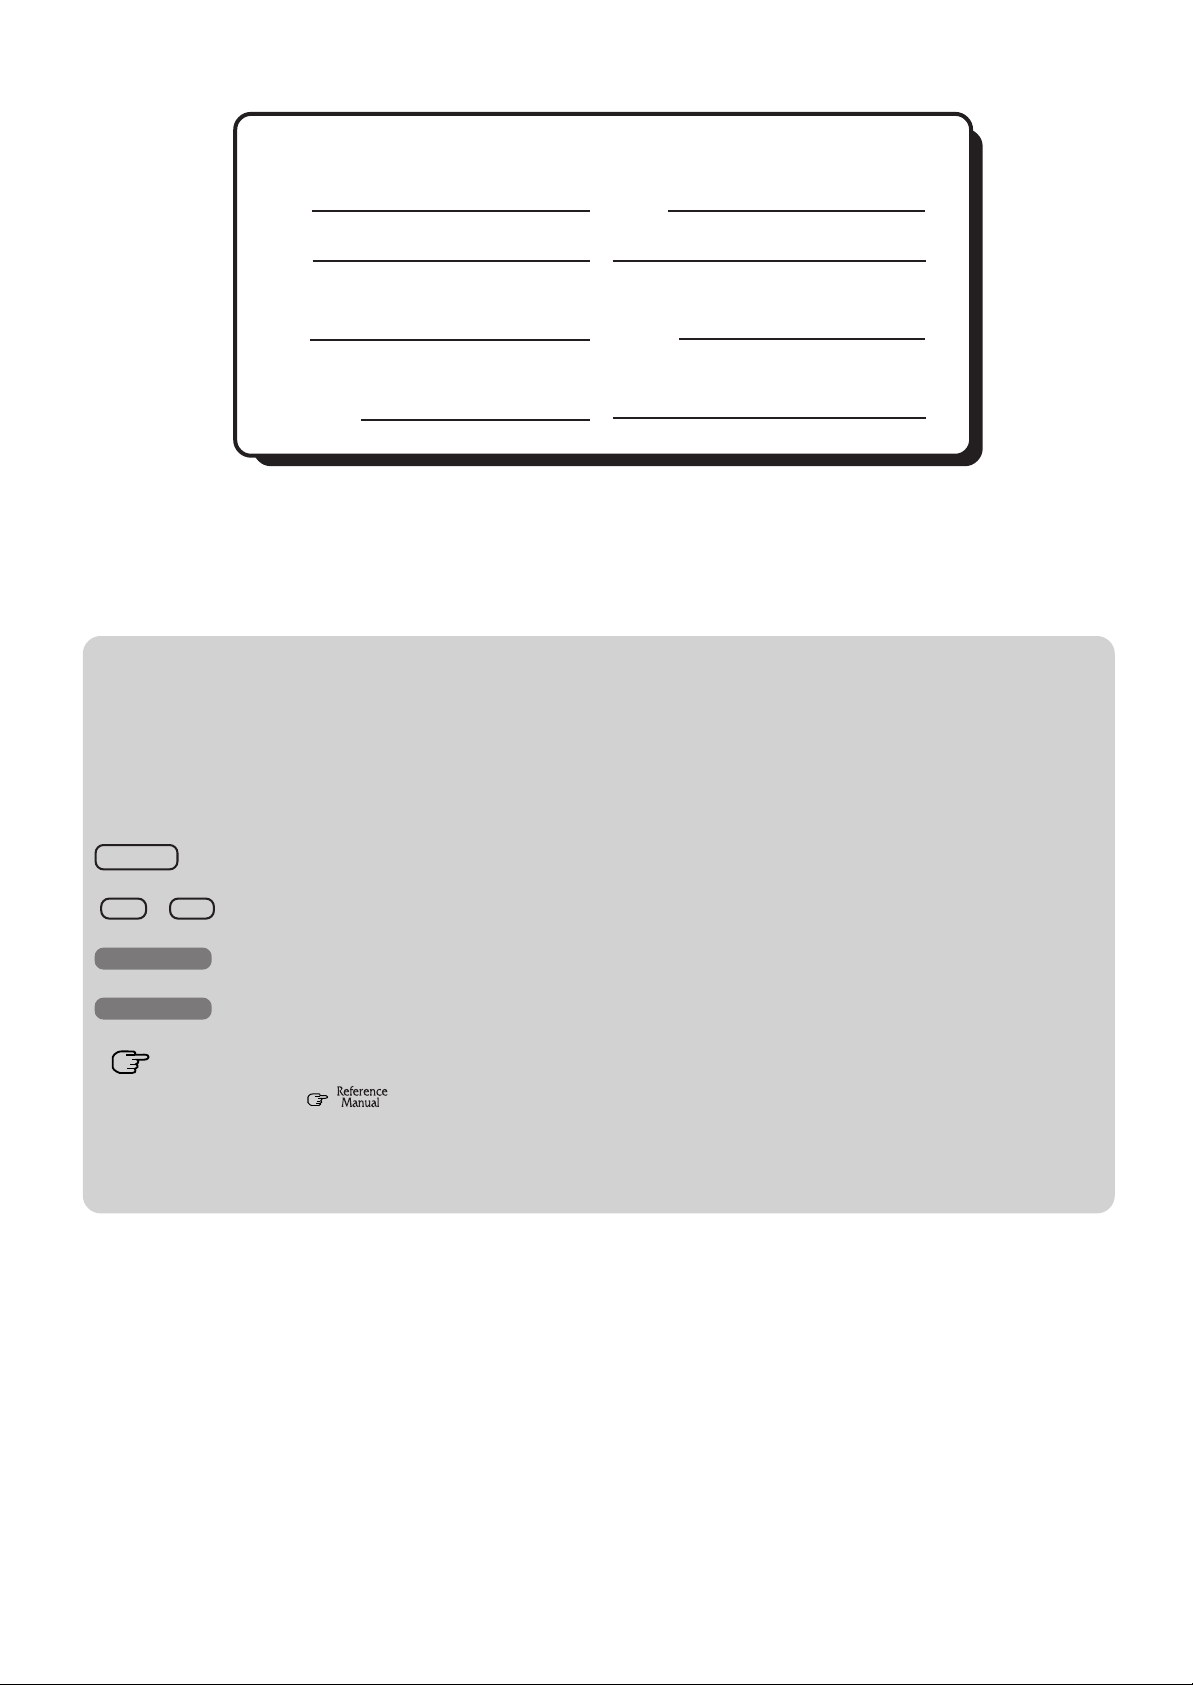
Customer's Record
Model
No.*
Serial
No.
or
Code
No.
Date
of
Purchase
Dealer's
Name
Dealer's
Address
For the Model No., insert the 11 digit number (for example, CF-47K4CJAAM) located on the
bottom of the computer.
Introduction
Thank you for purchasing the Panasonic computer. Please read the operating instructions thoroughly for proper operation of your
new computer.
Illustrations in this Manual
NOTE: NOTE provides a useful fact or helpful information.
CAUTION: CAUTION indicates a condition that may result in minor or moderate injury.
W ARNING: WARNING indicates a hazard that may result in moderate or serious injury .
[Start]-[Shut Down]: This illustration means to click [Start], then to click [Shut Down].
(For some applications, you may need to double-click.)
Enter : This illustration means to press the [Enter] key.
Fn + F5 : This illustration means to press and hold the [Fn] key, then press the [F5] key.
Windows 95 : Information for Microsoft Windows® 95 users.
Windows 98 : Information for Microsoft Windows® 98 users.
: Where to go for referred information.
: This illustration means to refer to the Reference Manual, which is available on your
computer. Please refer to page 19 on how to access this manual.
The descriptions for “Floppy disk drive” in the manual apply to the internal SuperDisk drive. Similarly , the descriptions for
“CD-ROM drive” in the manual apply to the internal DVD drive.
Copyright
This manual is copyrighted by Matsushita Electric Industrial Co., Ltd. with all rights reserved. No part of this manual may be
reproduced in any form without the prior written permission of Matsushita Electric Industrial Co., Ltd.
No patent liability is assumed with respect to the use of the information contained herein.
©Matsushita Electric Industrial Co., Ltd. 1999. All Rights Reserved.
Disclaimer
Computer specifications and manuals are subject to change without notice. Matsushita Electric Industrial Co., Ltd. assumes no
liability for damage incurred directly or indirectly from errors, omissions or discrepancies between the computer and the manuals.
Trademarks
PS/2™ is a trademark of International Business Machines Corporation.
Microsoft
tries.
Intel
SuperDisk
Acrobat
Panasonic
2
®
, MS-DOS® and Windows® are registered trademarks of Microsoft Corporation of the United States and/or other coun-
®
and Pentium® are registered trademarks of Intel Corporation.
TM
and SuperDisk logo are trademarks of Imation Corp.
®
is a registered trademark of Adobe Systems Incorporated.
®
is a registered trademark of Matsushita Electric Industrial Co., Ltd.
Page 3

For U.S.A.
Federal Communications Commission Radio
Frequency Interference Statement
Note: This equipment has been tested and found to comply with
the limits for a Class B digital device, pursuant to Part 15 of the
FCC Rules. These limits are designed to provide reasonable
protection against harmful interference in a residential
installation. This equipment generates, uses and can radiate radio
frequency energy and, if not installed and used in accordance
with the instructions, may cause harmful interference to radio
communications. However, there is no guarantee that
interference will not occur in a particular installation. If this
equipment does cause harmful interference to radio or television
reception, which can be determined by turning the equipment
off and on, the user is encouraged to try to correct the interference
by one or more of the following measures:
Reorient or relocate the receiving antenna.
Increase the separation between the equipment and receiver.
Connect the equipment into an outlet on a circuit different
from that to which the receiver is connected.
Consult the Panasonic Service Center or an experienced radio/TV technician for help.
Warning
To assure continued compliance, use only shielded interface
cables when connecting to a computer or peripheral. Also, any
changes or modifications not expressly approved by the party
responsible for compliance could void the user's authority to
operate this equipment.
This device complies with Part 15 of the FCC Rules. Operation
is subject to the following two conditions:
(1) This device may not cause harmful interference, and
(2) This device must accept any interference received, including
interference that may cause undesired operation.
Responsible Party: Matsushita Electric Corporation of America
One Panasonic Way
Secaucus, NJ 07094
T el No:1-800-LAPTOP-5 (1-800-527-8675)
FCC Regulation Notice for modem
This equipment contains a FCC approved modem.
Manufacturer of modem: Xircom
Model No. MPCI2B-56G
Tested To Comply
With FCC Standards
FOR HOME OR OFFICE USE
1.This equipment complies with Part 68 of the FCC rules. On
the computer is a label that contains, among other information, the FCC registration number and ringer equivalence
number(REN)for this equipment. If required, this information
must be provided to the telephone company .
2.An FCC compliant telephone cord and modular plug is provided with this equipment. This equipment is designed to be
connected to the telephone network or premises wiring using
a compatible modular jack which is Part 68 compliant. See
Installation Instructions for details.
3.The REN is used to determine the quantity of devices which
may be connected to the telephone line. Excessive RENs on the
telephone line may result in the devices not ringing in response
to an incoming call. In most, but not all area, the sum of RENs
should not exceed five (5.0). To be certain of the number of
devices that may be connected to a line, as determined by the
total RENs, contact the local telephone company .
4.If your telephone equipment cause harm to the telephone network, the telephone company will notify you in advice that temporary discontinuance of service may be required. But if advice
notice isn’t practical, the telephone company will notify the customer as soon as possible. Also, you will be advised of your right
to file a complaint with the FCC if you believe it is necessary.
5. The telephone company may take changes in it’s facilities,
equipment, operations or procedures that could affect the operation of the equipment. If this happens the telephone company will provide advance notice in order for you to make
necessary modifications to maintain uninterrupted service.
6. If trouble is experienced with this equipment, for repair or
warranty information, please contact Matsushita Electric
Corporation of America at DIAL TOLL FREE 1-800LAPTOP5 (1-800-527-8675). If the equipment is causing harm
to the telephone network, the telephone company may request
that you disconnect the equipment until the problem is resolved.
7.There are no user serviceable parts contained in this equipment.
8.This equipment may not be used on coin service provided by
the telephone company. Connection to party lines is subject
to state tariffs.
9.
The T elephone Consumer Protection Act of 1991 makes it unlawful for any person to use a computer or other electronic device to
send any message via a telephone fax machine unless such message
clearly contains in a margin at the top or bottom of each transmitted
page or on the first page of the transmission, the date and time it is
sent and an identification of the business or other entry, or other
individual sending the message and the telephone number of the
sending machine or such business, other entity, or individual. In
order to program this information into your fax software, you should
refer to the manual of the Fax software being used.
3
Page 4

For Canada
Industry Canada (IC) Notice for modem
This equipment contains an Industry Canada approved modem unit.
The Industry Canada label is affixed on the modem unit.
EQUIPMENT ATTACHEMENT LIMITATIONS
“NOTICE: The Industry Canada label identifies certified
equipment. This certification means that the equipment meets
telecommunications network protective, operational and
safety requirements as prescribed in the appropriate T erminal
Equipment Technical Requirements document(s). The
Department does not guarantee the equipment will operate
to the user’s satisfaction.
Before installing this equipment, users should ensure that it
is permissible to be connected to the facilities of the local
telecommunications company . The equipment must also be
installed using an acceptable method of connection. The
customer should be aware that compliance with the above
conditions may not prevent degradation of service in some
situations.
Repairs to certified equipment should be coordinated by a
representative designated by the supplier. Any repairs or
alterations made by the user to this equipment, or equipment
malfunctions, may give the telecommunications company
cause to request the user to disconnect the equipment.
Users should ensure for their own protection that the electrical
ground connections of the power utility, telephone lines and
internal metallic water pipe system, if present, are connected
together. This precaution may be particularly important in
rural areas. Caution: Users should not attempt to make such
connections themselves, but should contact the appropriate
electric inspection authority, or electrician, as appropriate.”
“NOTICE: The Ringer Equivalence Number (REN) assigned
to each terminal device provides an indication of the
maximum number of terminals allowed to be connected to a
telephone interface. The termination on an interface may
consist of any combination of devices subject only to the
requirement that the sum of the Ringer Equivalence Numbers
of all the devices does not exceed 5.”
RESTRICTIONS CONCERNANT LE RACCORDEMENT
DE MATÉRIEL
“AVIS: L’étiquette d’Industrie Canada identifie le matériel
homologué. Cette étiquette certifie que le matériel est
conforme aux normes de protection, d’exploitation et de
sécurité des réseaux de télécommunications, comme le
prescrivent les documents concernant les exigences
techniques relatives au matériel terminal. Le Ministère
n’assure toutefois pas que le matériel fonctionnera à la
satisfaction de l’utilisateur.
A vant d’installer ce matériel, l’utilisateur doit s’assurer qu’il
est permis de le raccorder aux installations de l’entreprise
locale de télécommunication. Le matériel doit également être
installé en suivant une méthode acceptée de raccordement.
L’abonné ne doit pas oublier qu’il est possible que la
conformité aux conditions énoncées ci-dessus n’empêche pas
la dégradation du service dans certaines situations.
Les réparations de matériel homologué doivent être
coordonnées par un représentant désigné par le fournisseur .
L’entreprise de télécommunications peut demander à
l’utilisateur de débrancher un appareil à la suite de réparations
ou de modifications effectuées par l’utilisateur ou à cause
de mauvais fonctionnement.
Pour sa propre protection, l’utilisateur doit s’assurer que tous
les fils de mise à la terre de la source d’énergie électrique,
des lignes téléphoniques et des canalisations d’eau
métalliques, s’il y en a, sont raccordés ensemble. Cette
précaution est particulièrement importante dans les régions
rurales. A vertissement: L ’utilisateur ne doit pas tenter de faire
ces raccordements lui-même; il doit avoir recours à un service
d’inspection des installations électriques, ou à un électricien,
selon le cas.”“AVIS: L’indice d’équivalence de la sonnerie
(IES) assigné à chaque dispositif terminal indique le nombre
maximal de terminaux qui peuvent être raccordés à une
interface. La terminaison d’une interface téléphonique peut
consister en une combinaison de quelques dispositifs, à la
seule condition que la somme d’indices d’équivalence de la
sonnerie de touts les dispositifs n’excède pas 5.”
4
REN: See bottom of the computer
REN: Voir sous le fond de l’ordinateur
Page 5
Lithium Battery
Precautions
Lithium Battery!
This computer contains a lithium battery to enable the date, time,
and other data to be stored. The battery should only be exchanged
by authorized service personnel.
Warning! A risk of explosion from incorrect installation or misapplication may possibly occur.
Warnung bezüglich der Lithiumbatterie
(Sicherungsbatterie)
Lithiumbatterie!
Dieser Computer enthält eine Lithiumbatterie zur Sicherung von
Datum und Uhrzeit der eingebauten Uhr sowie anderer
Systemdaten im Speicher bei einer Unterbrechung der
Hauptstromversorgung. Diese Sicherungsbatterie darf nur von
Kundendienstpersonal ausgewechselt werden.
Warnung! Bei falschem Gebrauch besteht Explosionsgefahr!
Entsorgung gebrauchter Batterien nach Angaben des Herstellers.
Avertissement concernant la pile au lithium
(pile de sauvegarde)
Pile au lithium!
Le micro-ordinateur renferme une pile au lithium qui permet de
sauvegarder certaines données comme la date et l'heure
notamment. Elle ne devra être remplacée que par un technicien
qualifié.
A vertissement! Risque d'explosion en cas de non respect de cette
mise en garde!
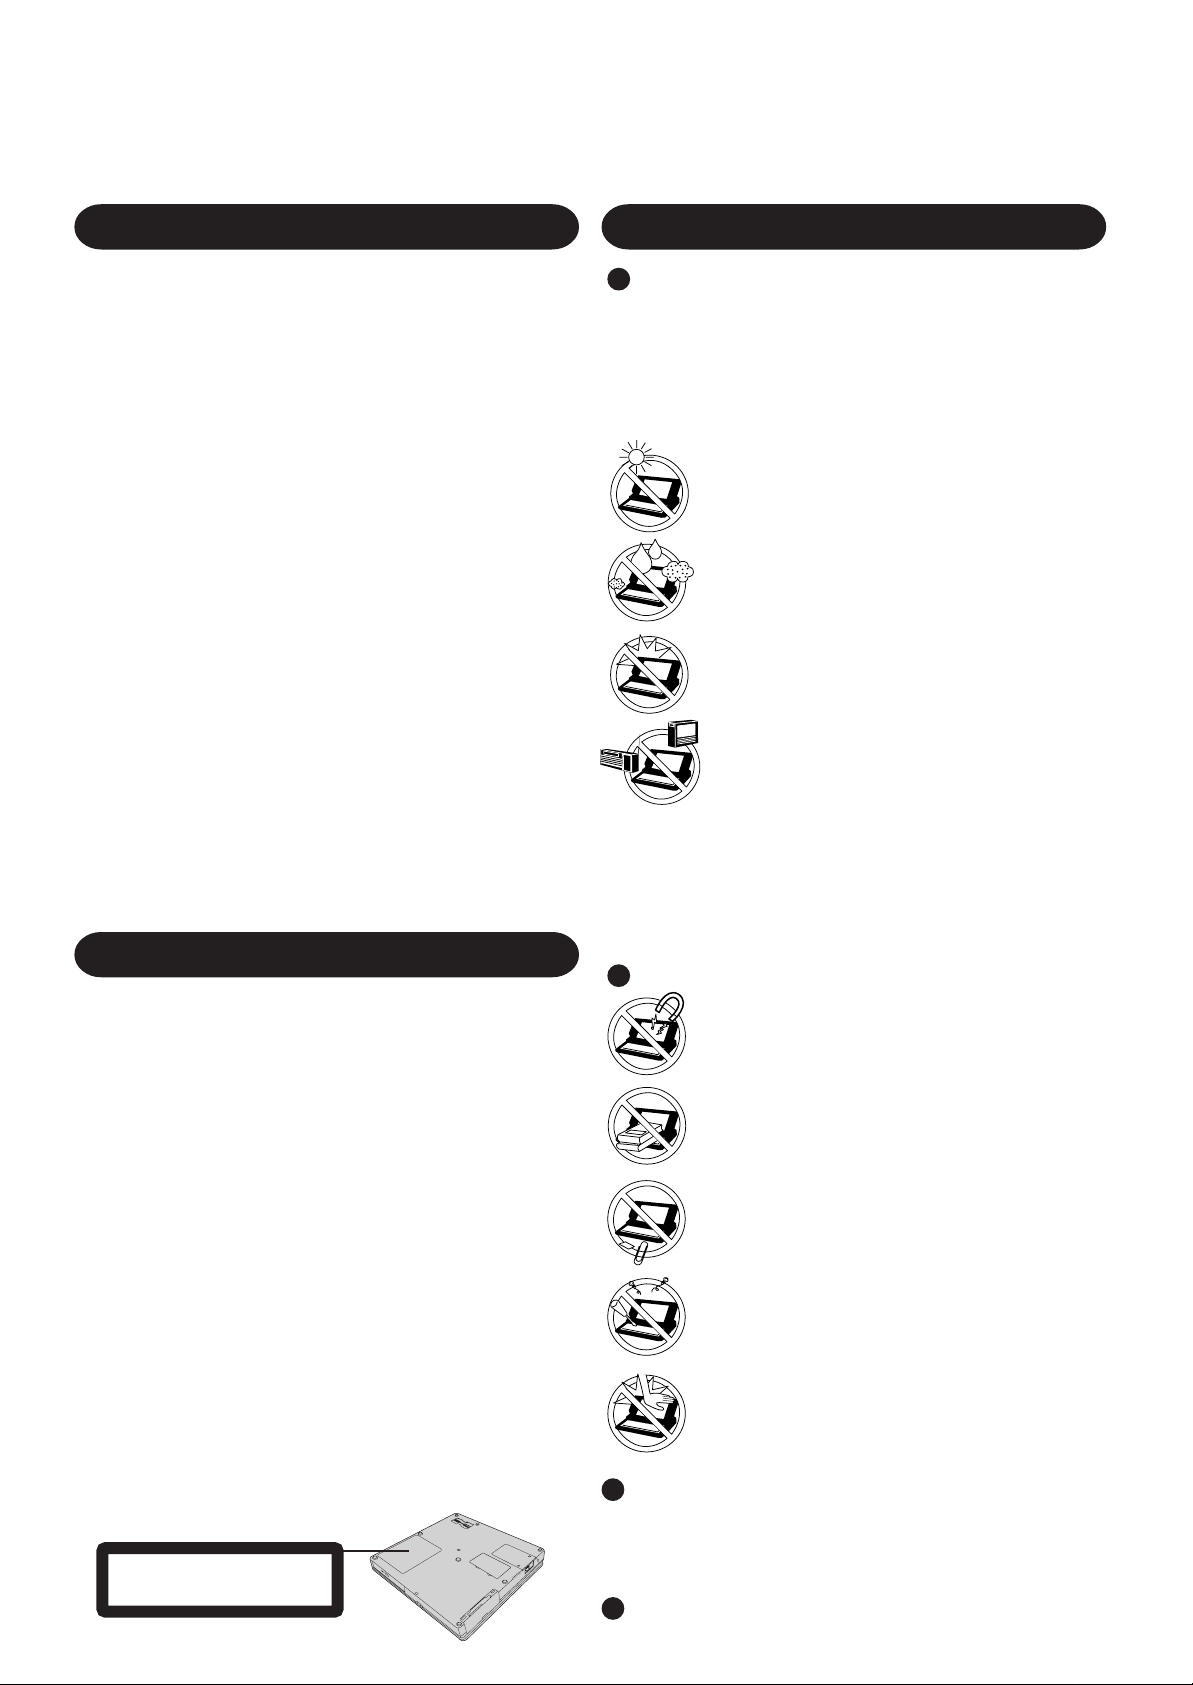
CD-ROM Drive Caution
CAUTION!
THIS PRODUCT UTILIZES A LASER.
USE OF CONTROLS, ADJUSTMENTS OR PERFORMANCE OF
PROCEDURES OTHER THAN THOSE SPECIFIED HEREIN MA Y
RESULT IN HAZARDOUS RADIATION EXPOSURE.
DO NOT OPEN COVERS AND DO NOT REPAIR YOURSELF.
REFER SERVICING TO QUALIFIED PERSONNEL
WARNUNG!
DIESES PROUKT ERZEUGT LASERST AHLUNG.
DURCHFÜHRUNG ANDERER VORGÄNGE ALS DER HIER
ANGEGEBENEN KANN ZU GEFÄHRLICHER STRAHLUNG
FÜHREN.
REPARATUREN DÜRFEN NUR VON QUALIFIZIERTEM
F ACHPERSONAL DURCHGEFÜHRT WERDEN.
AVERTISSEMENT!
CET APPAREIL UTILISE UN LASER.
L'UTILISATION DE COMMANDES OU DE RÉGLAGES OU
L'EXÉCUTION DE PROCÉDURES AUTRES QUE CELLES
SPÉCIFIÉES ICI PEUVENT PROVOQUER UNE EXPOSITION À
DES RADIATIONS DANGEREUSES.
NE P AS OUVRIR LES COUVERCLES NI ESSAYER DE RÉPARER
SOI-MÊME.
CONFIER TOUT TRAVAIL D'ENTRETIEN À UN PERSONNEL
QUALIFIÉ.
CLASS 1 LASER PRODUCT
LASER KLASSE1
Bottom
Usage
Avoid Extreme Heat and Cold
Do not store or use the computer in locations
exposed to heat, direct sunlight, or extreme cold.
A void moving the computer between locations with
large temperature differences.
o
Operation: 5
Storage: -20
C to 35 oC (41 oF to 95 oF)
o
C to 60 oC (-4 oF to 140 oF)
Avoid Direct Sunlight on the LCD Panel
The LCD panel should not be exposed to direct
sunlight or ultraviolet light.
A void Humidity, Liquids and Dust
Do not store or use the computer in locations exposed
to high humidity, liquids (including rain) or dust.
Prevent Shock
A void subjecting the computer to severe vibrations
or impact. Do not place the computer inside a car
trunk.
Avoid Radio Frequency Interference
Do not place the computer near a television or radio receiver.
Avoiding low-temperature burns
A void more than casual contact with any heat producing area
of the notebook computer, power adapter , and any option or
accessory you use with it. Even low heat, if warmer than body
temperature, can cause a burn, if the skin is exposed to the
heat source for a long enough period of time.
Handling
Avoid Magnetic Fields
Keep the computer away from magnets.
A void Stacking
Do not place heavy objects on top of the computer.
Keep Small Objects Away
Do not insert paper clips or other small objects into
the computer.
Do Not Disassemble the Computer
Do not attempt to disassemble your computer.
Avoid Excessive Force on the Display
Do not apply excessive downward force on the display
when it is completely opened, especially when plugs
and/or cables are connected to the rear of the computer.
Peripherals
Incorrectly using peripheral devices may lead to a decrease in performance,
an increase in temperature and/or damage your computer. For more information on peripheral devices, please refer to the Reference Manual.
Cables
Use of an interface cable longer than 3 m (9.84 feet) is not recommended.
5
Page 6

Precautions
Peripherals
Incorrectly using peripheral devices may lead to a decrease
in performance, an increase in temperature and/or damage
to your computer. For more information on peripheral devices, please refer to the Reference Manual.
CAUTION
The charging terminal of the
battery pack is used with the
battery charger, which is sold
separately.
Never connect anything to the charging terminal other than
the exclusive adapter that is supplied with the battery charger.
Doing so could damage the device connected to the battery
pack, the cable, and the battery pack itself. It could also
result in overheating or bursting.
Care should be exercised with regard to the following in
order to avoid the possibility of liquid leakage, overheating, or bursting.
Avoid Heat
Do not throw the battery pack into a fire or
expose it to excessive heat.
Charging Terminal
Discontinue Use
Should the battery emit an abnormal odor, become hot to the touch, become discolored,
change shape, or become in any way different
from normal, remove it from the computer or
charger and discontinue use.
Do not touch the terminals on the battery pack. The battery
pack may no longer function properly if the contacts are dirty
or damaged.
Do not expose the battery pack to water, or allow it to become wet.
If the battery pack will not be used for a long period of time
(a month or more), charge or discharge (use) the battery pack
until the remaining battery level becomes 30% to 40% and
store it in a cool, dry place.
This computer prevents overcharging of the battery by recharging only when the remaining power is less than approx.
95% of capacity.
The battery pack is not charged when the computer is first
purchased. Be sure to charge it before using it for the first
time. When the AC adapter is connected to the computer,
charging begins automatically.
Should the battery leak and the fluid get into your eyes, do not
rub your eyes. Immediately flush your eyes with clear water
and see a doctor for medical treatment as soon as possible.
Keep Articles Away
Do not place the battery pack together with articles such as necklaces or hairpins when carrying or storing.
Do Not Disassemble
Do not insert sharp objects into the battery pack,
expose it to bumps or shocks, deform, disassemble, or modify it.
Do Not Short
Do not short the positive (+) and negative (-)
contacts.
Avoid Extreme Heat, Cold and Direct Sunlight
Do not charge, use or leave the battery pack for
extended periods where it will be exposed to direct sunlight, in a hot place (in an automobile on
a sunny day, for example), or in a cold place.
Do Not Use With Any Other Computer
The battery pack is rechargeable and was intended for the specified computer or charger . Do
not use it with a computer other than the one for
which it was designed.
Do Not Put into a Microwave
Do not put the battery pack into a microwave
oven or a pressurized chamber.
NOTE
The battery pack may become warm during recharging or
normal use. This is completely normal.
Recharging will not commence outside of the allowable
temperature range (0 °C to 45 °C {32°F to 113 °F})
"Battery Power". Once the allowable range requirement is satisfied, charging begins automatically . Note
that the recharging time varies based on the usage conditions. (Recharging takes longer than usual when the temperature is 10 °C {50 °F} or less.)
If the temperature is low, the operating time is shortened. Only
use the computer within the allowable temperature range.
Although the battery has remaining capacity, the battery
indicator may light up red or emit a beep. This indicates a
significant rise in the temperature (60 °C {140 °F} or more)
of the battery pack (
typically caused by the fact that the battery pack has been
delivering a high level of power because the computer has
been used with the display at the brightest setting and with
the power-saving function off.
T o protect the battery pack from increases in temperature,
the brightness of the display automatically decreases, allowing the temperature of the battery to drop. In this condition, if the computer is left as is, it will automatically go
off after about three minutes have elapsed. Within that
period, therefore, be sure to connect the AC adapter or
shut the computer OFF after saving any open data (if necessary).
"Battery Power"). This is
6
Page 7

Read Me First
Saving Data on the Hard Disk
Do not expose your computer to shock.
Please use care when handling your computer, shock may damage your hard disk or make
your software applications and data unusable.
Do not power down your computer while software applications are running or HDD
indicator (
Properly shut Windows* down to avoid problems ([Start]-[Shut Down] ).
Save all valuable data to floppy disks.
Backing up data to floppy disks will limit damage should trouble occur to your computer or
should you inadvertently change or erase data.
Use the security function for all important data. ( "Security Measures")
) is on.
Saving Data on Floppy Disks
Do not power down your computer or press the floppy disk drive eject button while the
FDD indicator (
Doing so may damage the data on the floppy disk and render the disk useless.
Use care when handling floppy disks.
To protect the data on your floppy disks or to prevent a floppy disk from becoming stuck in
your computer, avoid the following:
• Sliding the shutter on the floppy disk manually.
• Exposing the disk to a magnetic field.
• Storing the disk in locations prone to high temperatures, low pitched noise, dampness, or dust.
• Applying more than one label on the disk.
Confirm the contents of a floppy disk before formatting it.
Confirm that no important data is on the disk, because all data on the disk will be erased.
Use the write-protect tab.
This is a must for preserving important data. This prevents your
data from being erased or overwritten.
Windows 95 : This computer uses Microsoft
*
Windows 98 : This computer uses Microsoft
) is on.
Write-protect T ab
Write Enable
®
Windows® 95 Operating System.
®
Windows® 98 Operating System.
Write Disable
Computer Viruses
Users are advised to purchase the latest versions of virus protection software and use
them regularly.
We recommend you run the software:
• When booting your computer.
• After receiving data.
We recommend that you check data received on floppy disks or from external sources, such
as data downloaded from the Internet, e-mail, etc. (For compressed files, please uncompress
them before running a check).
7
Page 8
First-time Operation
Please read the steps below to help you learn what parts are included, and to gain an understanding of some basic computer-related operations.
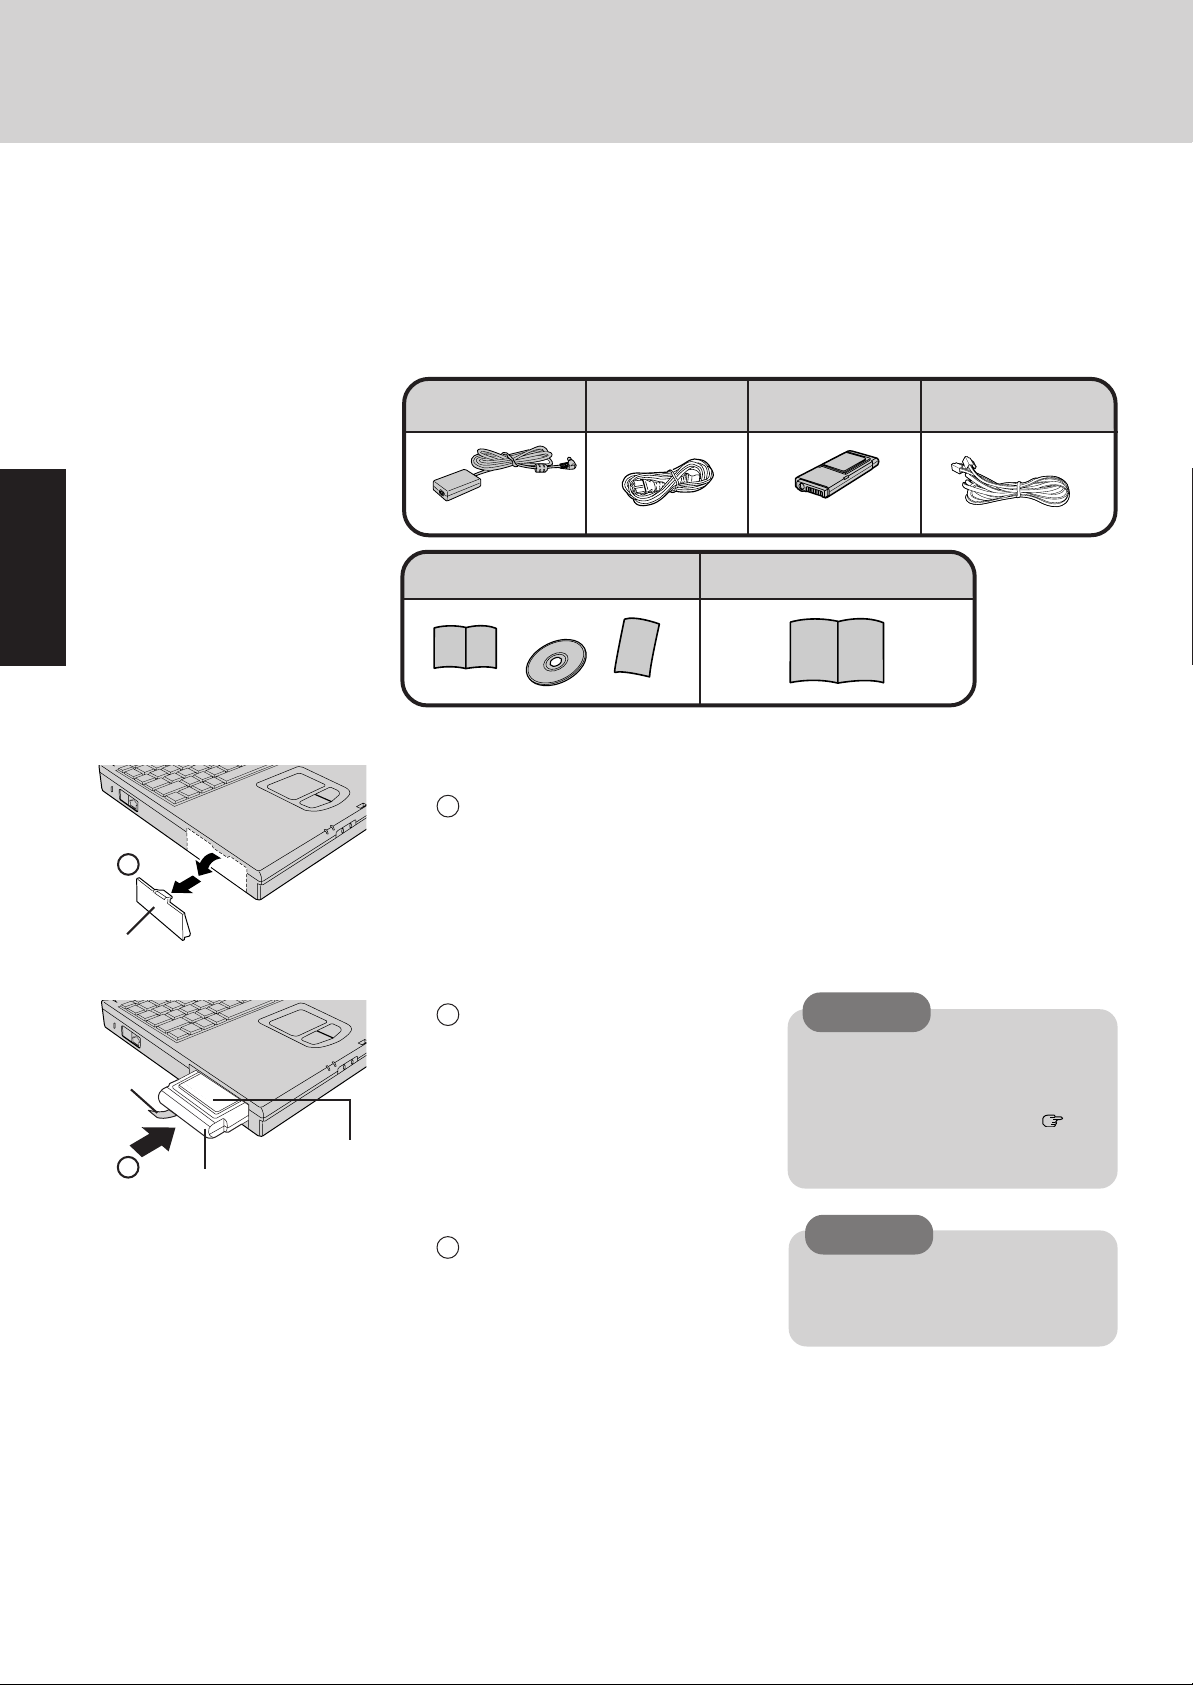
Confirm the inclusion of all parts
1
Make sure the parts shown in the figure have been supplied. If any of these items are
missing or is not working properly, please contact Panasonic Technical Support.
1
Cover
AC Cord ....... 1AC Adapter.....1 Battery Pack...1
CF-AA1639
Windows System Pack ....... 1
Product Recovery CD-ROM
Windows® Book
Connect the battery pack
2
Remove the outside cover for the battery pack.
1
Registration Card
Modem Telephone Cable
CF-VZSU09
Operating Instructions ...1
.1
Tab
2
Battery Pack
Label-side up
Push the pack in until it is in place.
2
3
Reattach the outside cover.
Be sure the tab does not get caught when
closing the cover.
CAUTION
Be sure the battery pack is properly
connected to the connector.
If the battery indicator goes ON when
the AC adapter is connected (
9, Step 3 ), this indicates that the battery pack is properly connected.
page
CAUTION
If the cover is not attached properly,
the battery may fall out while the computer is being carried.
8
Page 9

2
Connect your computer to a power outlet
3
3
1
2
1
Be sure the AC adapter is connected until completing Step 8 on page 11.
Handling the AC adapter
Do not twist or pull the AC power cord forcefully. Doing so may damage the
connections.
Use only the specified AC adapter with your computer. Using an AC adapter
other than the one supplied might damage the battery and/or the computer.
When the DC plug is not connected to the computer, disconnect the AC cord
from your AC wall outlet.
Problems such as sudden voltage drops may arise during periods of thunder and
lightning. Since this could adversely affect your computer, an uninterruptible
power source (UPS) is highly recommended unless the battery pack is installed.
Open the display
4
To open the display , slide the latch located at the front and lift open the display.
Read the LIMITED USE LICENSE AGREEMENT ( page 27)
5
Before removing the seal covering the power switch, please read the LIMITED USE LICENSE AGREEMENT .
Turn your computer on
6
Slide the power switch toward the rear of the computer and hold it for approximately
one second until the power indicator turns on before releasing it.
CAUTION
Po wer Indicator
Po wer Switc h
CAUTION
Do not slide the power switch repeatedly.
Once the computer is powered off, you must wait at least ten seconds before
powering it on again.
NOTE
Windows 95
The power saving function is factory set, so if there is no input from a key, the touch
pad, or the external mouse for two minutes, the LCD is powered off (ECO mode).
The LCD will resume operation when the touch pad or the external mouse is used or
a key is pressed.
The computer may enter the ECO mode while Windows is setting up or even when
an application software is being installed. In this case, because it is conceivable
that a selection dialog box will be shown, for resuming from the ECO mode, do not
press Enter which may trigger a selection, instead, press a key unrelated to the
direct triggering of a selection, like the key.
Windows 98
The power saving mode ([Power Scheme] in [Control Panel] - [Power Management]) is
factory set, so if there is no input from a key, the touch pad, or an external mouse (when one
is connected) for a certain interval of time, the power to the LCD is cut, and the power to
the hard disk is shut off. In addition, when the computer is left alone, it automatically
enters the suspend* mode (
The LCD will resume operation when the touch pad is used or a key, or an external
mouse is pressed.
The power to the LCD may be turned off while Windows is setting up or even when
an application software is being installed. In this case, because it is conceivable
that a selection dialog box will be shown, do not press the Enter key to attempt
to resume from this condition as doing so may trigger a selection, but instead, press
a key unrelated to the direct triggering of a selection, like the Ctrl key .
*With W indows 98, "Suspend" is called "Standby".
"Suspend/Hibernation Functions").
Ctrl
9
Page 10

First-time Operation
Setup Windows
7
NOTE
Model with both an internal modem and an internal LAN port
Please read the attached sheet for the Windows Setup procedure.
Moving the cursor (
Windows 95
Select settings for your region, then press [Next].
1
2
Select your keyboard layout, then press [Next].
(for U.S.A.: United States 101)
3
Enter your name and your company’s name, then press [Next].
(It is possible to omit the company name item.)
The License Agreement will be displayed.
4
After reading the agreement, select [I accept the agreement] or [I don't accept
the agreement], then press [Next].
) or clicking buttons can be performed with the touch pad ( page 14).
NOTE
If [I accept the agreement] is selected, the [Certificate of Authenticity] will appear.
If [I don't accept the agreement] is selected, the Windows setup will be aborted.
Input the Product Number (Key) written on the “Certificate of Authenticity” located in
5
the Windows
6
Press [Finish].
7
Input the correct time, date and time zone and press [Close] .
You can also complete these settings at a later time.
8
Press [Next] to complete the printer setup or [Cancel] to skip.
®
book provided with this computer then press [Next].
Label-side up
Label on the top surface, and
inserting the shutter-side
headfirst.
10
Eject Button
Windows 98
Select settings for your region and your keyboard layout, then press [Next].
1
(for U.S.A.: United States 101)
2
Enter your first name and last name, then press [Next].
Select [Skip] at the [Using Your Modem to Connect].
3
Select [Yes] at the [Cancel Dialing], then press [Next].
4
The License Agreement will be displayed.
5
After reading the agreement, select [I accept this agreement] or [I do not accept the
agreement], then press [Next].
NOTE
If [I accept this agreement] is selected, the [Certificate of Authenticity] will appear. If
[I do not accept the agreement] is selected, the Windows setup will be aborted.
6
Input the Product Number written on the “Certificate of Authenticity” located in the
Windows
7
Press [Finish].
Input the correct date, time and time zone and press [Close].
8
You can also complete these settings at a later time.
®
book provided with this computer, then press [Next].
NOTE
Simply follow the on-screen instructions. You can complete these settings at a later
time.
Page 11

Create floppy disks
8
Prepare 2HD floppy disks and make sure they are not in the write-protected state, then
select [Start] - [Programs] - [Panasonic] - [Create BACKUP DISK] and follow the onscreen instructions. Place a label identifying the contents on each disk.
Name of created backup disk
FIRST AID FD
(When the display for creating the UPDATE FD is shown, create the disk by following the on-screen
instructions.)
CAUTION
Please store the floppy disks in a safe place. They will enable you to return your
computer to close to the condition at the time of purchase should any problems
occur.
When creating floppy disks, do not run any other application program.
When creating floppy disks and the message [Insufficient files to copy] is displayed,
click [OK] and then contact Panasonic Technical Support.
While the floppy disk drive indicator is on, do not remove the floppy disk, power
down your computer or use the suspend or hibernation function (
pend/Hibernation Functions").
"Sus-
This concludes the first-time use operation guidelines.
NOTE
When using the files in the following folders available on the retail version of the
Windows CD-ROM, it is necessary to run a separate file decompression program.
Windows 95
T o uncompress the file, it is necessary to have approximately 150 MB
/80 MB ( ) of free disk space available on the hard disk.
T o use the CD-ROM drive in MS-DOS mode, perform the operation below after modifying config.sys and autoexec.bat. ( page 18)
File decompression method:
1
Turn your computer on.
Windows 95 Windows 98
2
When [Starting Windows 95] is displayed, press F8 .
3
Select [Command prompt only].
4
Insert the Product Recovery CD-ROM.
5
At the prompt, input the following:
L:\en\addfile Enter
Follow the message on the screen.
(If the computer enters the ECO mode while copying, press Ctrl . )
Windows 95 Windows 98
After this program is executed, the contents of the above folders will be decompressed to the c:\util\win95add folder.
\admin
\datalink
\drivers
\help
\other
Windows 98
Windows 98
2
When [Press <F2> to enter SETUP]
is displayed, immediately press
Ctrl (until the menu is displayed).
After this program is executed, the contents of the above folders will be decompressed to the c:\util \win98add folder.
\tsclient
\tools
( )
Windows 95
11
Page 12
Starting Up/Shutting Down
Starting Up
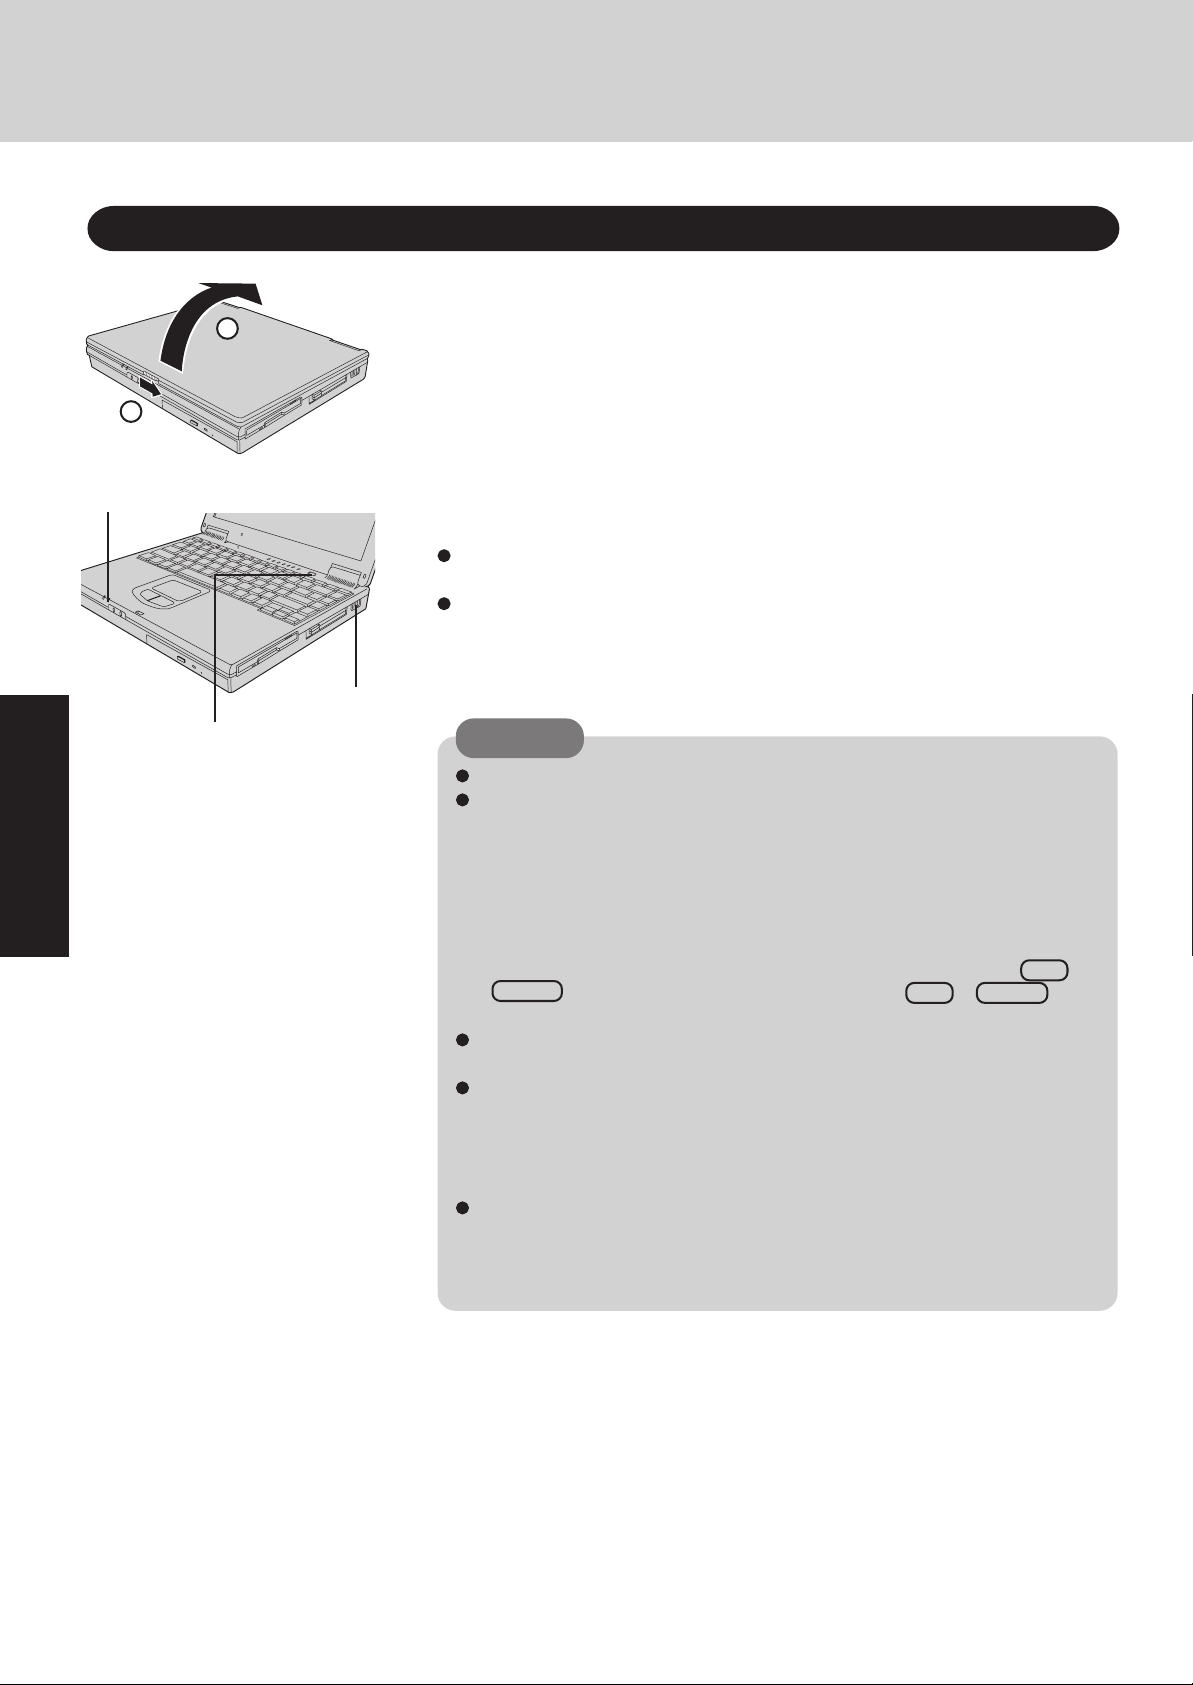
Open the display
1
2
1
Slide the latch as shown and lift open the display .
Po wer Indicator
Sleep Switch
Po wer Switc h
Turn your computer on
2
The following two methods are available.
Slide the power switch toward the rear of the computer and hold it for approximately one second until the power indicator turns on before releasing it.
Press the sleep switch* and hold it until the power indicator turns on before releasing it.
*
Power cannot be turned on with the sleep switch when the power goes off by holding down the sleep
switch for more than four seconds, or when both the AC adapter and battery pack are reconnected after
having been disconnected.
CAUTION
The computer will not power on when the display is closed.
After confirming that the power indicator has turned on, avoid the following
until Windows has completed loading.
• Touching the power switch or the sleep switch.
• Performing any keyboard or touch pad (or external mouse) operations.
• Closing the display .
If the display is closed while Windows is starting up, it is possible that color , etc.,
will not be displayed properly . Run the [MS-DOS Prompt] ([Start] - [Programs]
- [MS-DOS Prompt]), and use full screen display mode by pressing
Enter . After returning from the full screen mode ( again),
the display will be shown correctly .
Once the computer is powered off, you must wait at least ten seconds before
powering it on again.
When the CPU temperature rises, the computer may not power on to prevent the
CPU from overheating. Should this happen, allow the computer to cool down
then switch the power on again.
If the computer still does not power on, please contact Panasonic T echnical Support.
If the computer has not been used for a long period of time, it may produce an
unusual sound at start up. The sound may continue for a short period of time,
but if the computer starts up in a normal manner, then the problem is not serious.
If, however, the computer fails to start up, contact Panasonic Technical Support.
Alt
+ Enter
Alt +
12
Page 13
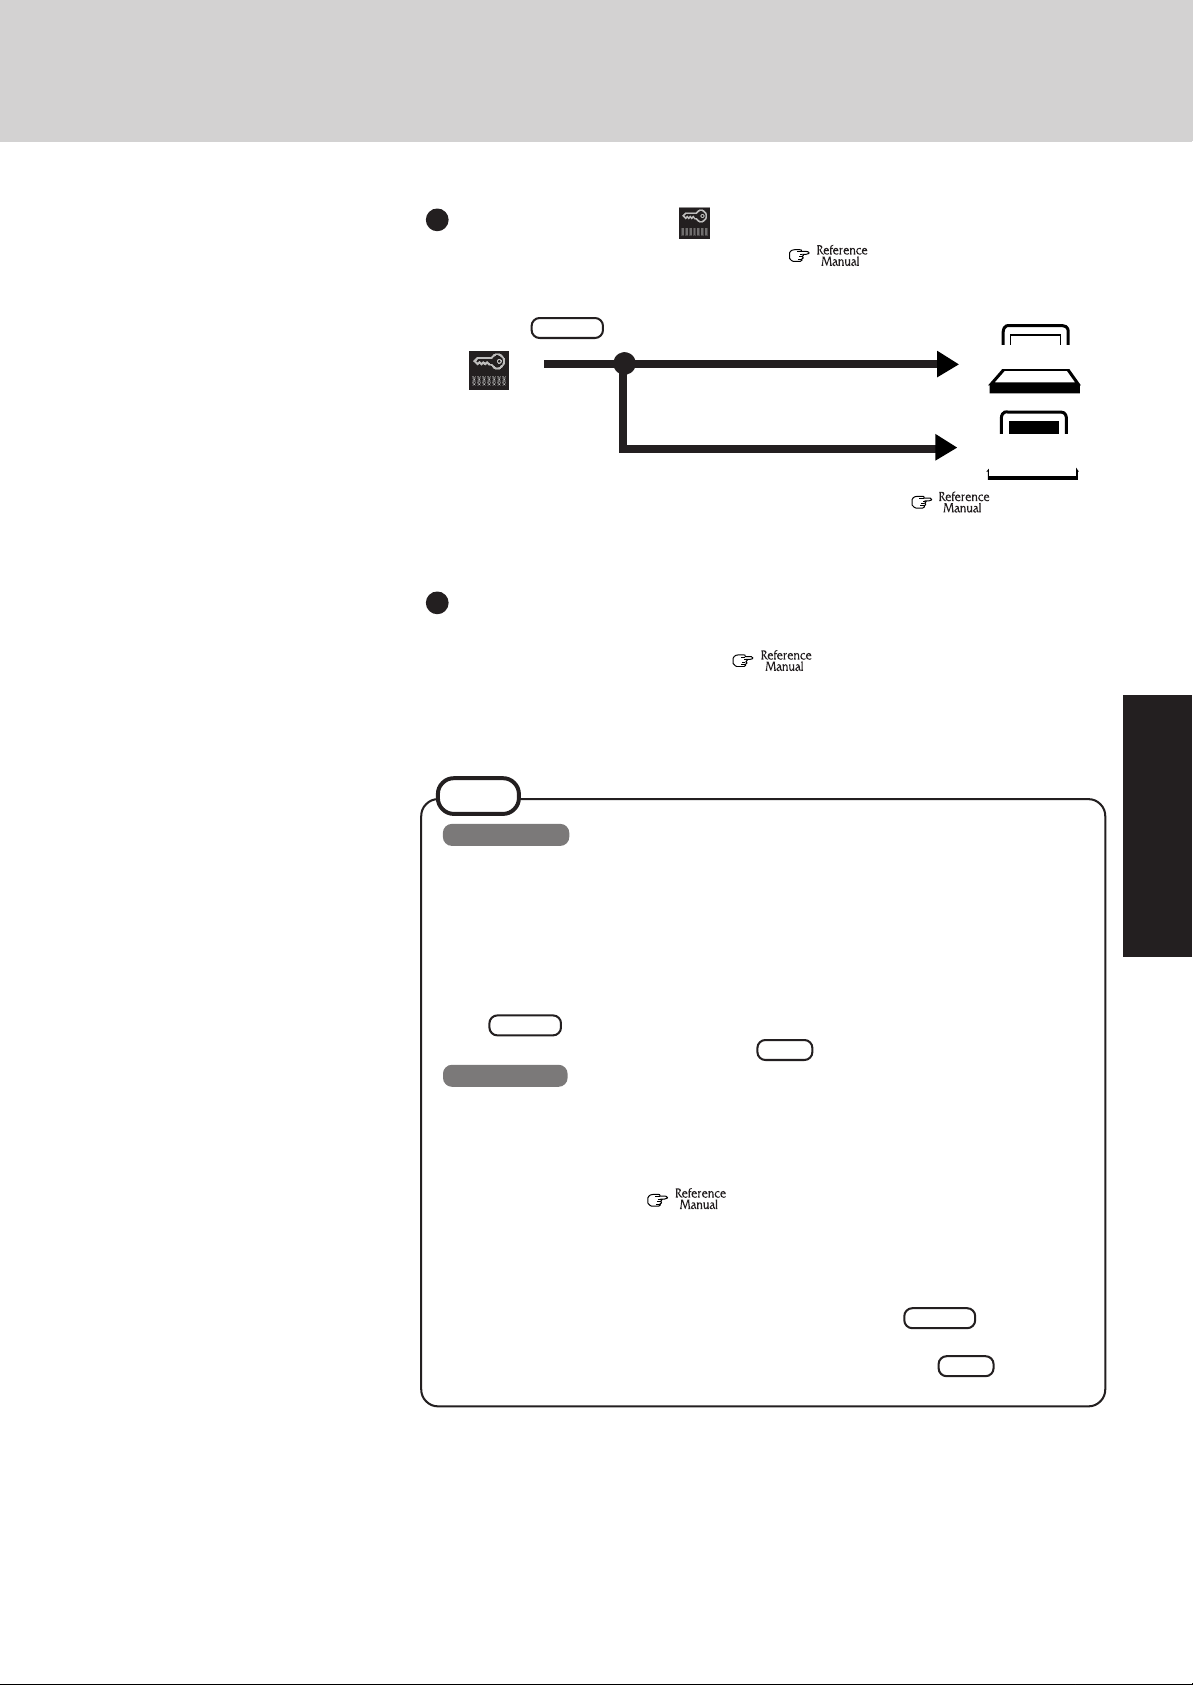
If security indicator ( ) is displayed,
you must first enter your User Password (
Upon entering your User
Password and pressing
Enter
If the correct password is input,
"Security Measures")
Will Start
Over three incorrect attempts,
Will Not Start*
1
*
If you are starting from the suspend mode (
nation Functions"), if after three attempts the correct password is not in-
put, or if no password is entered for about a minute, the computer returns
to the suspend mode.
When an application or file that was previously displayed
appears on your screen,
the suspend or hibernation mode (
has been set.
Select your application
3
You are able to start working on your computer.
NOTE
Windows 95
The power saving function is factory set, so if there is no input from a key, the touch
pad, or the external mouse for two minutes, the LCD is powered off (ECO mode).
The LCD will resume operation when the touch pad or the external mouse is used or
a key is pressed.
The computer may enter the ECO mode while Windows is setting up or even when
an application software is being installed. In this case, because it is conceivable
that a selection dialog box will be shown, for resuming from the ECO mode, do not
press Enter which may trigger a selection, instead, press a key unrelated to the
direct triggering of a selection, like the key.
Windows 98
The power saving mode ([Power Scheme] in [Control Panel] - [Power Management]) is
factory set, so if there is no input from a key, the touch pad, or an external mouse (when one
is connected) for a certain interval of time, the power to the LCD is cut, and the power to
the hard disk is shut off. In addition, when the computer is left alone, it automatically
enters the suspend* mode (
The LCD will resume operation when the touch pad is used or a key, or an external
mouse is pressed.
The power to the LCD may be turned off while Windows is setting up or even when
an application software is being installed. In this case, because it is conceivable
that a selection dialog box will be shown, do not press the Enter key to attempt
to resume from this condition as doing so may trigger a selection, but instead, press
a key unrelated to the direct triggering of a selection, like the Ctrl key .
*With W indows 98, "Suspend" is called "Standby".
"Suspend/Hibernation Functions").
Ctrl
"Suspend / Hibernation Functions")
1
(Power off)
"Suspend / Hiber-
13
Page 14
Starting Up/Shutting Down
Using the Touch Pad
Use the touch pad to move the cursor on the display and perform normal computer operations.
For instructions on how to handle the touch pad, refer to page 15.
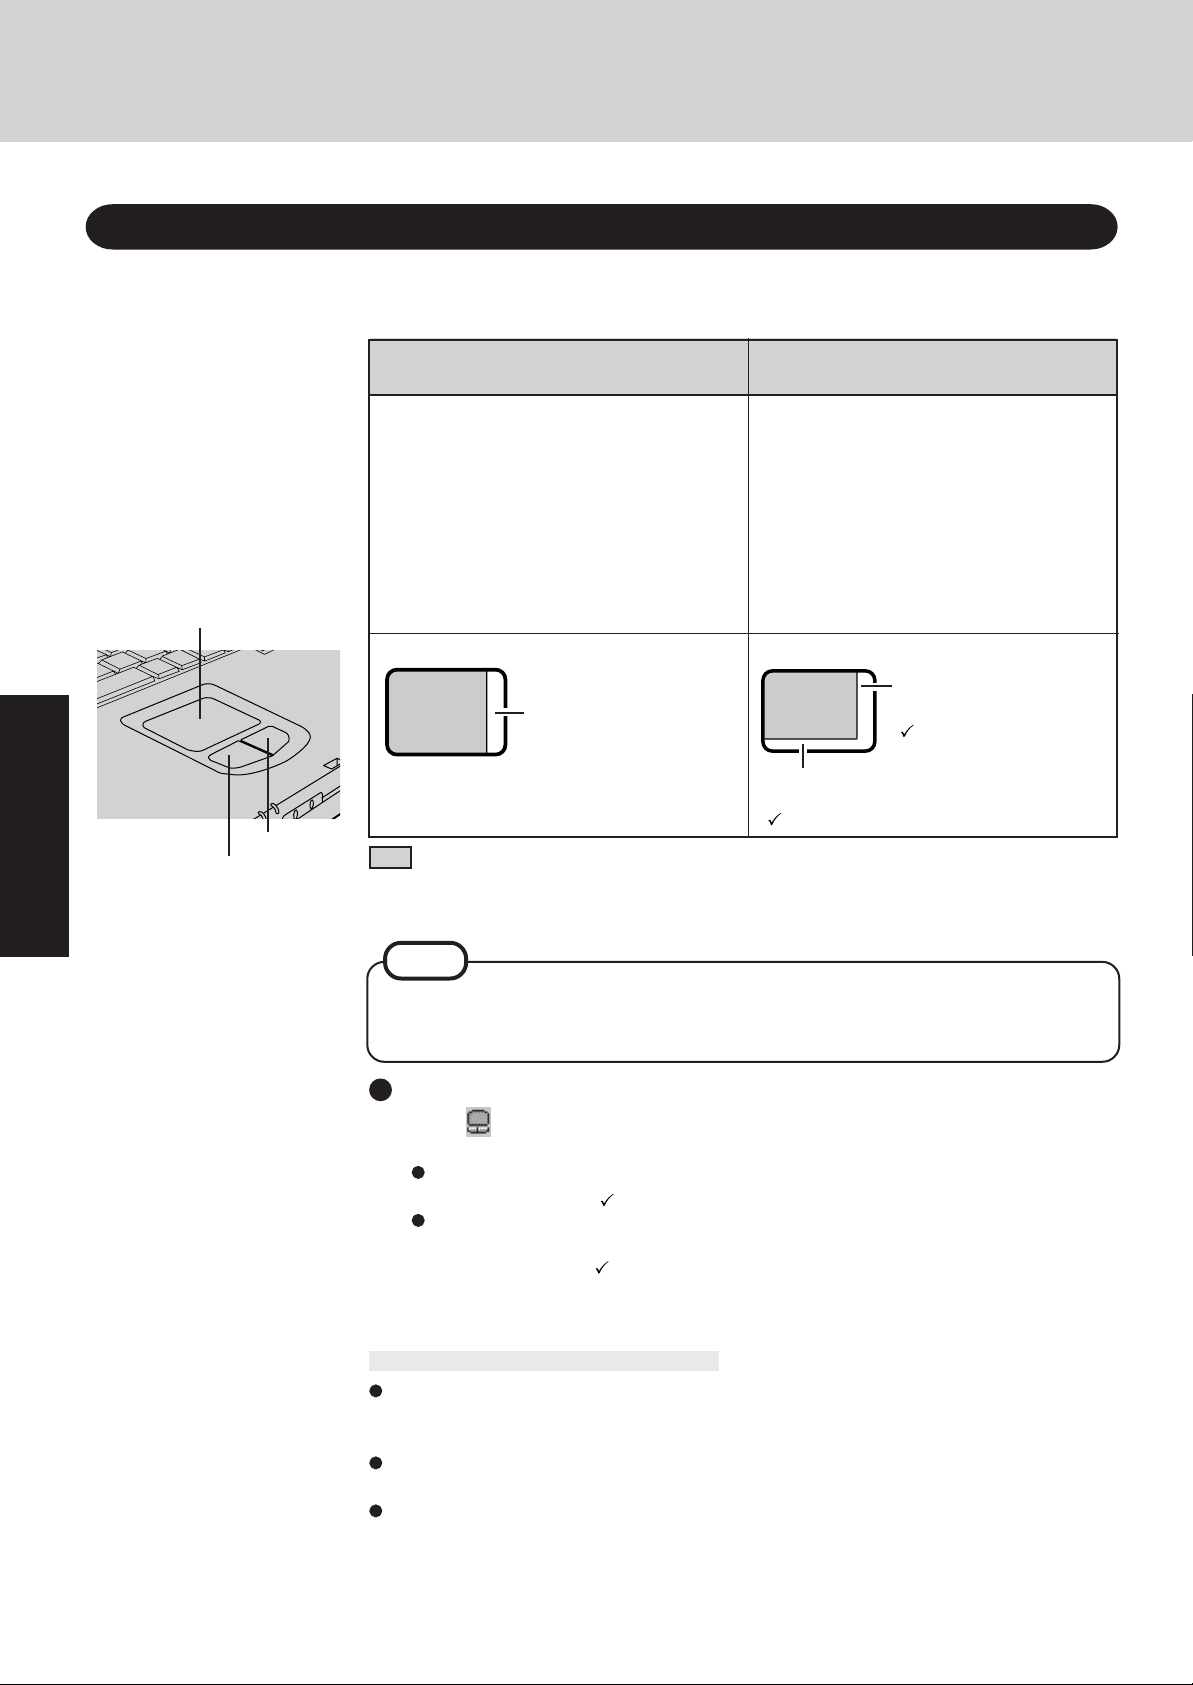
The touch pad has the following two modes of operation.
W ork Surface
Right Button
Left Button
Microsoft® IntelliMouseTM Wheel Mode
(Setting at the time of purchase)
Wheel mode operations (almost identical to
the case of using the Microsoft
for scroll, zoom, etc., operations) are possible
for Microsoft
plications.
Microsoft
vice that, in addition to the two conventional
buttons, incorporates a wheel able to rotate
forwards/backwards.
Scrolling Area
For the Pan and Auto Scroll functions, the entire
work surface of the touch pad can be used for scrolling.
: Typical mouse operations use this area.
®
wheel function-compatible ap-
®
IntelliMouseTM is a mouse-type de-
Scrolling up/down
When no check mark is added for [IntelliMouse Wheel mode], [Horizontal] and [Vertical] of [Scroll Configuration], the entire surface can be used for typical mouse opera-
tions.
®
IntelliMouse
Only scroll operation is possible for appli-
TM
cations not compatible with the Microsoft
wheel function.
Even for applications compatible with the
Microsoft
where only vertical scrolling or only horizontal scrolling is possible in this mode.
Scrolling Area
Scrolling side-to-side
Possible when a check mark
is added for [Horizontal].
Original Mode
®
wheel function, there are cases
Scrolling up/down
Possible when a check mark
is added for [Vertical].
®
NOTE
When you are not sure whether an application is compatible with the Microsoft® wheel
function or not, try using both modes. Furthermore, depending on the application, there are
cases where scrolling may not be possible with either mode.
Changing the mode of the touch pad
1 Select from the taskbar or select [Motion] in [Start] - [Settings] - [Control Panel] -
[Mouse].
T o set the Microsoft® IntelliMouseTM Wheel mode
2
Add the check mark
T o set the original mode
Delete the check mark for [IntelliMouse Wheel mode] of [Scroll Configuration] and
add the check mark
3 Press [OK].
for [IntelliMouse Wheel mode] of [Scroll Configuration].
for [Horizontal] and/or [Vertical].
Handling the Touch Pad
Do not place any object on the work surface or press down forcefully with sharp-pointed
objects (i.e. nails), hard objects or objects that can leave marks (i.e. pencils and ball point
pen).
Do not allow things that could dirty the touch pad, such as oil. The cursor may not work
properly in such cases.
When the touch pad becomes dirty:
Wipe to remove dirty areas by using a dry soft cloth such as gauze or a soft cloth first applied
with detergent diluted with water and then thoroughly wrung.
Do not use benzene or thinner, or disinfectant-type alcohol.
14
Page 15
Basic Operation
Wheel
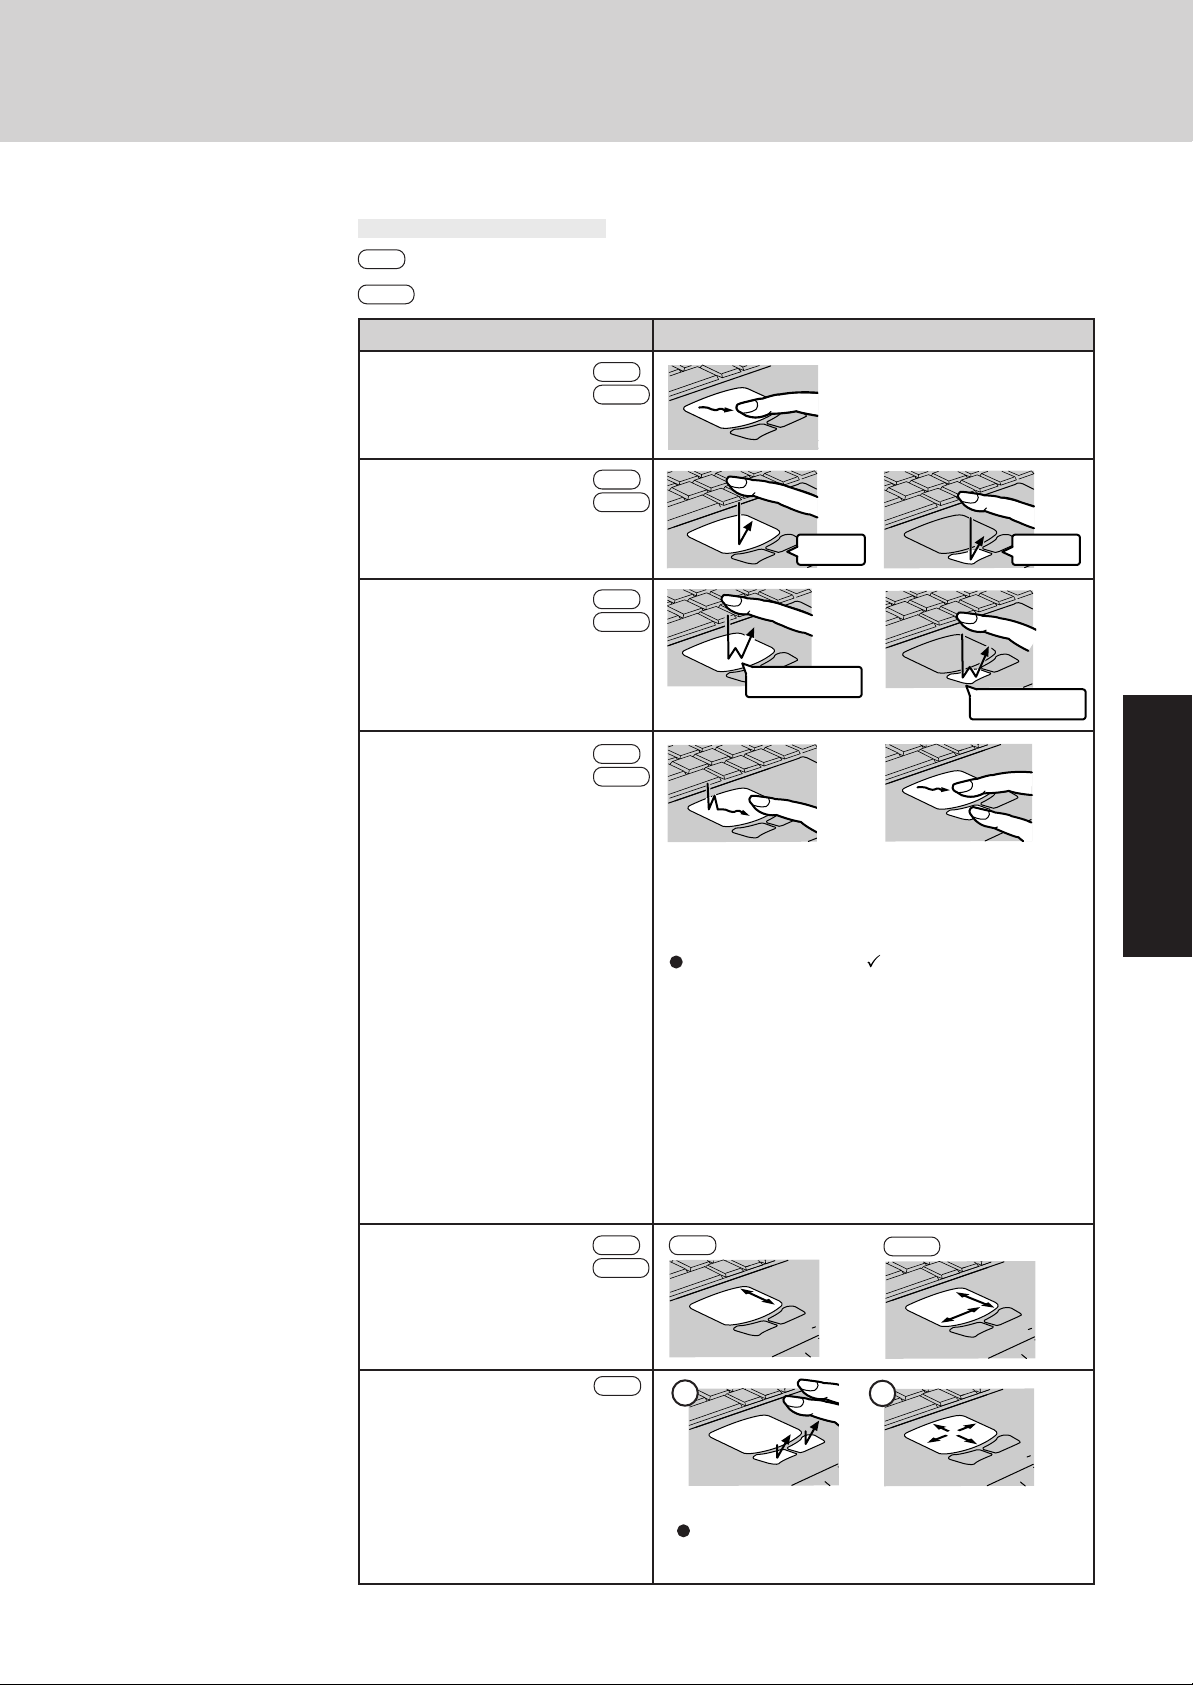
Indicates an operation applicable to the Microsoft® IntelliMouseTM Wheel mode.
Original
Indicates an operation applicable to the original mode.
Function
Moving the Cursor
Tapping/Clicking
Double-Tapping/
Double-Clicking
Dragging
Wheel
Original
Wheel
Original
Wheel
Original
Wheel
Original
Touch Pad Operation
Move the tip of your finger
lightly over the surface.
or
tapping
clicking
or
double-tapping
double-clicking
or
Two quick taps, but on
the second tap leaving
your finger down (applying pressure) and moving
While holding down the
button, moving your finger on the work surface.
it on the work surface.
When a check mark is added for [use Drag
Lock] *
After the drag operation (above : left side), it is
necessary to determine the destination (i.e., location of drop) by one tap. Under the condition no
destination is selected, do not use the suspend or
hibernation function. Nothing is shown on the display, even after resuming from the suspend or hibernation mode.
In this case, the display will return after a tap or
click is made.
* In [Start] - [Settings] - [Control Panel] - [Mouse] - [Tap and Buttons]
Scroll*
Wheel
Original
Scroll a document
(rotate the wheel)
Auto Scroll*
Wheel
Automatically scroll a document
(move the mouse after clicking the
wheel)
The illustrations shown may differ from the actual physical appearances.
Wheel
1
Original
2
Operate after pressing the two buttons simultaneously.
When releasing the auto scroll function:
One tap on the work surface.
15
Page 16
Starting Up/Shutting Down
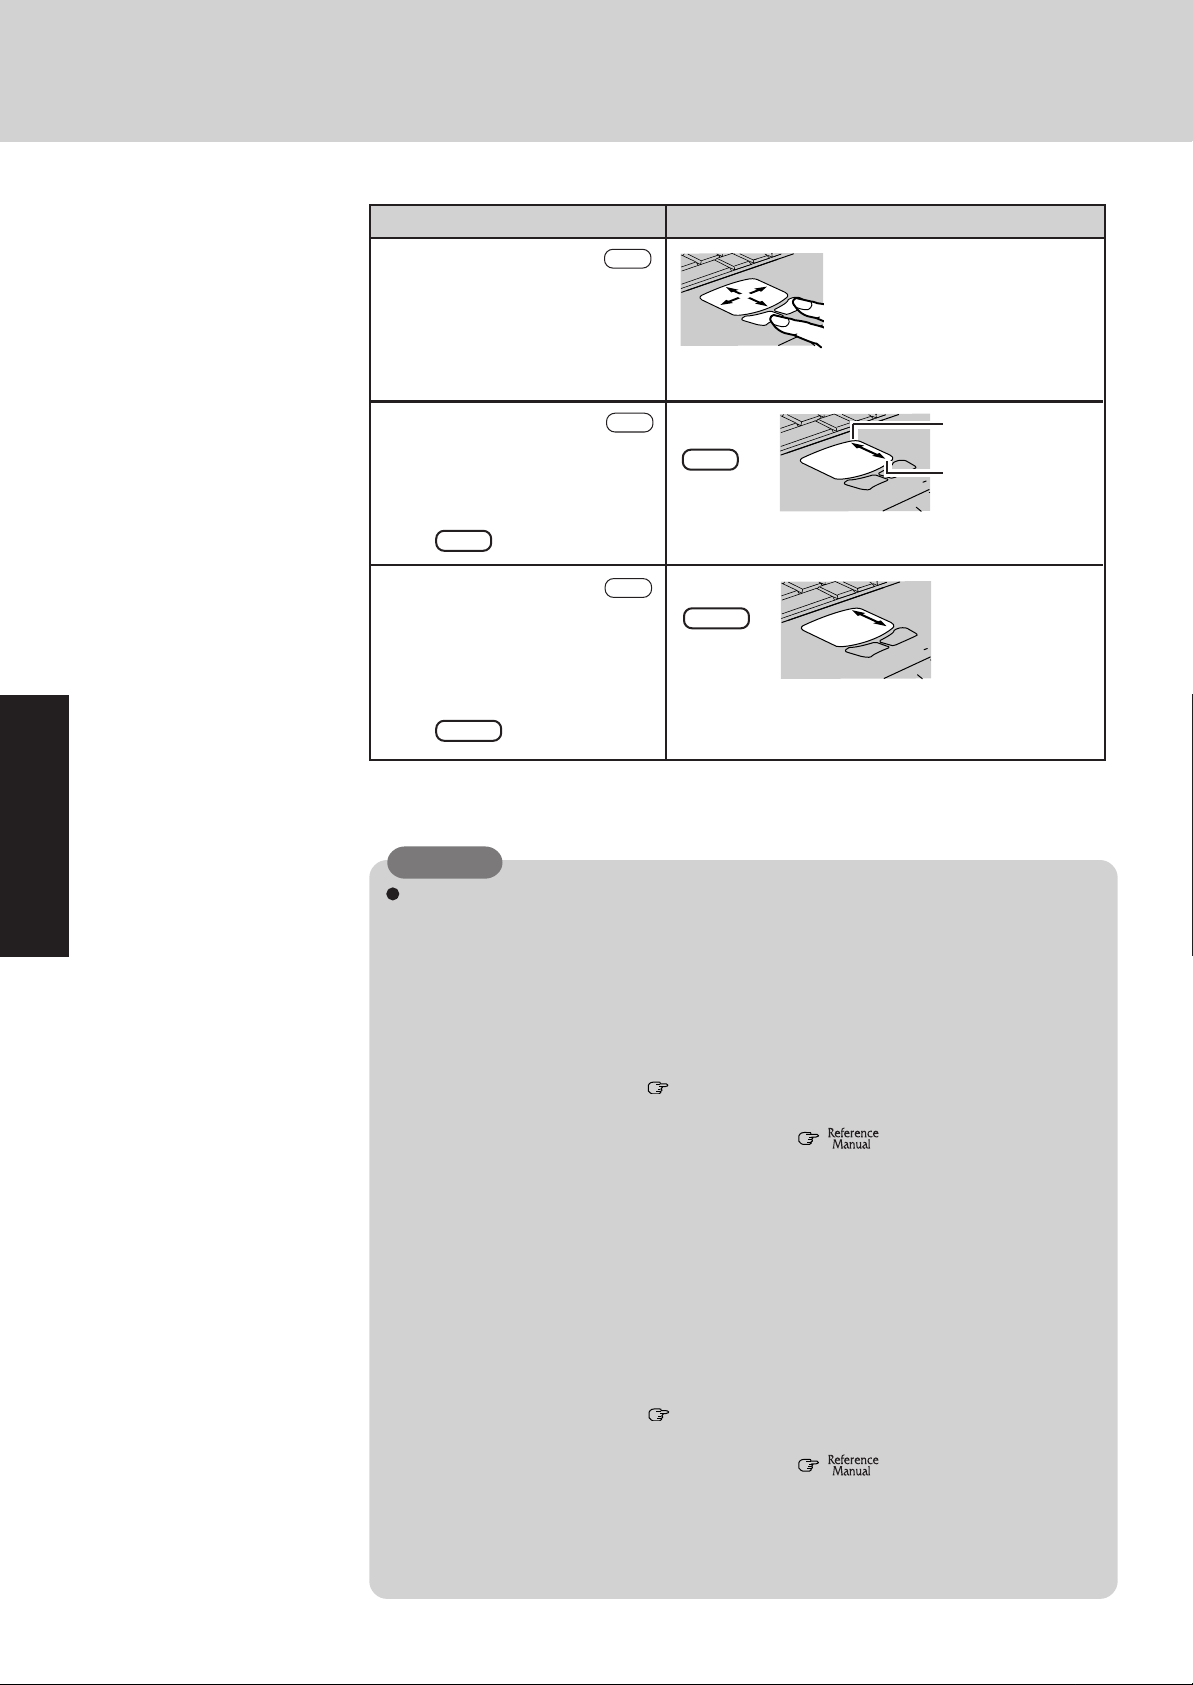
Function
Pan*
Scroll in various directions of a
document
(move the mouse slightly while
holding down the wheel)
Zoom*
Magnify/reduce the display of a
document.
(rotate the wheel while holding
down Ctrl )
Data Zoom*
Display or hide a document, or
perform operations to return to or
proceed with Internet Explorer.
(rotate the wheel while holding
down Shift )
Within the parentheses () are operations to follow when using an external Microsoft
IntelliMouseTM.
Indicates that the movements will differ depending on the application.
*
Wheel
Wheel
Wheel
Touch Pad Operation
Operate while holding down the two buttons.
Magnify
Ctrl +
Shift +
Reduce
®
CAUTION
When an external mouse or trackball with additional functions (e.g., wheel function) is
connected, a part or all of the additional functions may fail to operate. To use these
additional functions, install the driver or application software of the external device by
following the procedure below. However, once the driver or application software is installed, touch pad functions (e.g., auto scroll) may not operate even if the touch pad is
enabled. (see the procedure for “When you want to re-enable the touch pad.”).
1 In [Control Panel] - [System] - [Device Manager], select [touch pad] in [Mouse], press
[Remove] to delete it, then press [OK] to confirm the deletion.
2 Power off your computer (
device to the computer.
3 Turn the power on and run the Setup Utility (
menu, set [Touch Pad] to [Disable] and close the Setup Utility.
4 Following the operating instructions for the connected external mouse, install the nec-
essary driver.
After the installation, set [T ouch Pad] to [Disable] in the Setup Utility.
Do not enter the suspend or hibernation mode when an external mouse is connected to the
serial port.
When you want to re-enable the touch pad;
1 In [Control Panel] - [System] - [Device Manager], when an external mouse or trackball
device is displayed in [Mouse], press [Remove] to delete it, and then press [OK] to
confirm the deletion.
2 Power off your computer (
device.
3 Turn the power on and run the Setup Utility (
menu, set [Touch Pad] to [Enable] and close the Setup Utility.
4 Confirm whether [touch pad] exists in [Mouse] (in [Control Panel] - [System] -[Device
Manager]).
page 17) and connect the external mouse or trackball
"Setup Utility"). In [Main]
page 17) and remove the external mouse or trackball
"Setup Utility"). In [Main]
16
(To next page)
Page 17
CAUTION
Windows 95
When [Microsoft PS/2 Port Mouse] is displayed in [Mouse]:
1 Select [Microsoft PS/2 Port Mouse] and then press [Properties].
2 Select [Driver] - [Update Driver] and then press [Next].
3 At the [Update Device Driver Wizard], press [Other Locations].
4 Input [C:\util\drivers\mouse] and then press [OK].
5 Press [Finish].
6 At the [Insert Disk], press [OK].
7 Input [C:\util\drivers\mouse] and then press [OK].
8 The display will ask you to restart Windows, press [Yes].
Windows 98
When [PS/2 Compatible Mouse Port] is displayed in [Mouse]:
1 Select [PS/2 Compatible Mouse Port] and then press [Properties].
2 Select [Driver] - [Update Driver] and then press [Next].
3 Select [Display a list of all the drivers....] and then press [Next].
4 Press [Next].
5 At the [Update Driver Warning], press [Yes] and then press [Next].
6 At the [Insert Disk], press [OK].
7 Input [C:\util\drivers\mouse] and then press [OK].
8 Press [Finish].
9 The display will ask you to restart Windows, press [Yes].
NOTE
The double-tapping speed of the touch pad cannot be changed.
Shutting Down (power off your computer)
This procedure is shutting down without using the suspend or hibernation function.
(
1
2
"Suspend/Hibernation Functions"
Display the shut down screen
After saving important data and closing each application, select [Shut Down] from the
[Start] menu.
NOTE
From the keyboard,
You may choose to press down on , then select the menu with or .
Confirm shut down
Select [Shut down].
Your computer will power off automatically.
(In the OFF state, if you are not recharging your battery pack or if the pack is fully charged, your computer
consumes approximately 1.5 W.)
Restarting your computer (without shutting down)
Select [OK] after selecting [Restart].
NOTE
)
To quickly resume computer operation after shutting down,
The suspend* or hibernation function is available. (
Hibernation Functions"
*With W indows 98, "Suspend" is called "Stand by".
)
"Suspend/
17
Page 18
Starting Up/Shutting Down
Using the CD-ROM Drive
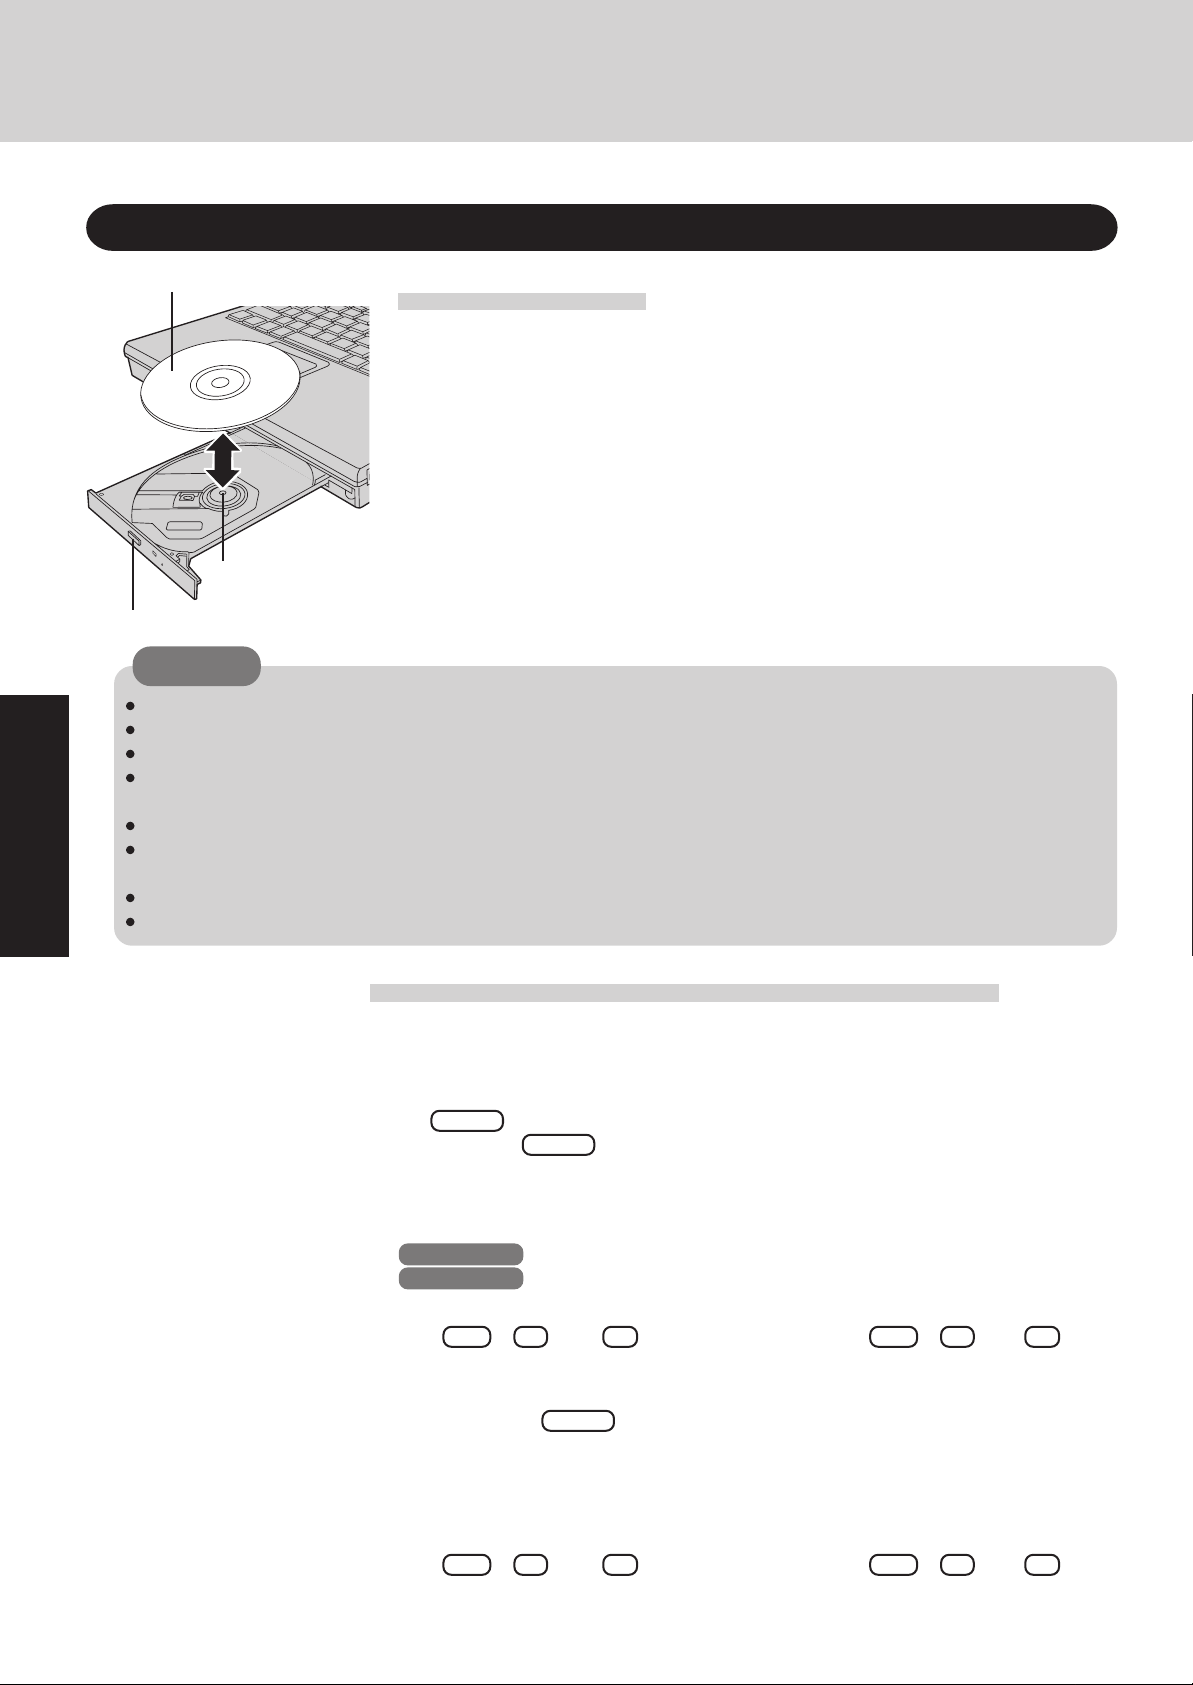
Title-side up
Center Holder
Eject Button
CAUTION
Do not place items other than CDs on the tray .
Do not leave the tray in the open position. Also, do not touch the lens area with your fingers.
When the tray is opened, applying too much force to it could cause it to break.
Do not open the CD-ROM drive or move the computer while an application is in the process of accessing the CD-ROM
drive. Doing so could cause it to malfunction.
Cleaning the CD-ROM drive using a CD lens cleaner (except the liquid type cleaner) is recommended if it malfunctions.
Do not use the CD-ROM drive in a location where there is a lot of oily smoke or tobacco smoke. Doing so could shorten
the service life of the lens.
Never insert foreign objects such as paper clips into the slot in the CD-ROM drive.
Do not use CDs that have become deformed (warped, not completely round, etc.).
Installing the CD
Turn your computer on
1
Press the eject button
2
Secure the CD on the center holder
3
Close the tray
4
Using the CD-ROM pack in the MS-DOS mode
1 Click the [Start] button then select [Shut Down].
2 Select [Restart in MS-DOS mode] and click [OK].
3 Open the "CONFIG.SYS" file for editing by issuing the following commands:
cd \ Enter
edit config.sys Enter
4 Move the cursor to the line containing "ATAPICD.SYS" or "OAKCDROM.SYS", and de-
lete the characters "rem" at the beginning of the line. (Deleting "rem" causes the item to
become valid.)
Windows 95
Windows 98
(If this line is missing, add it.)
DEVICEHIGH=C:\WINDOWS\COMMAND\ATAPICD.SYS /D:MSCD000
DEVICEHIGH=C:\WINDOWS\COMMAND\OAKCDROM.SYS /D:MSCD000
5 Press Alt + F , then S to save the file. Then press Alt + F , then X to exit
the Edit program.
6 Follow the same steps to edit the "AUTOEXEC.BAT" file.
edit autoexec.bat Enter
7 Move the cursor to the line containing "MSCDEX.EXE" and delete the characters "rem" at
the beginning of the line. (Deleting "rem" causes the item to become valid.)
LOADHIGH C:\WINDOWS\COMMAND\MSCDEX.EXE /D:MSCD000 /L:L
(If this line is missing, add it.)
18
8 Press Alt + F , then S to save the file. Then press Alt + F , then X to exit
the Edit program.
9 Restart the computer.
Page 19
About the "Reference Manual"
The Reference Manual can be accessed on your computer. When a printer is connected, it is
also possible to print.
This manual explains functions for you to make greater use of the computer, such as how to add
peripheral devices, how the Setup Utility works and other useful information.
Run the Reference Manual
Turn your computer on
1
Select [Reference Manual] in [Start] - [Programs] - [Panasonic]
2
- [On-Line Manuals]
When the Reference Manual is started up for the first time, the License Agreement will
be displayed. After reading the agreement, select [Accept] to access the Reference
Manual.
NOTE
When the Reference Manual is run for the first time, an error message may appear if the
Reference Manual is run using a method that differs from the above explanation. If an error
message appears, press [OK].
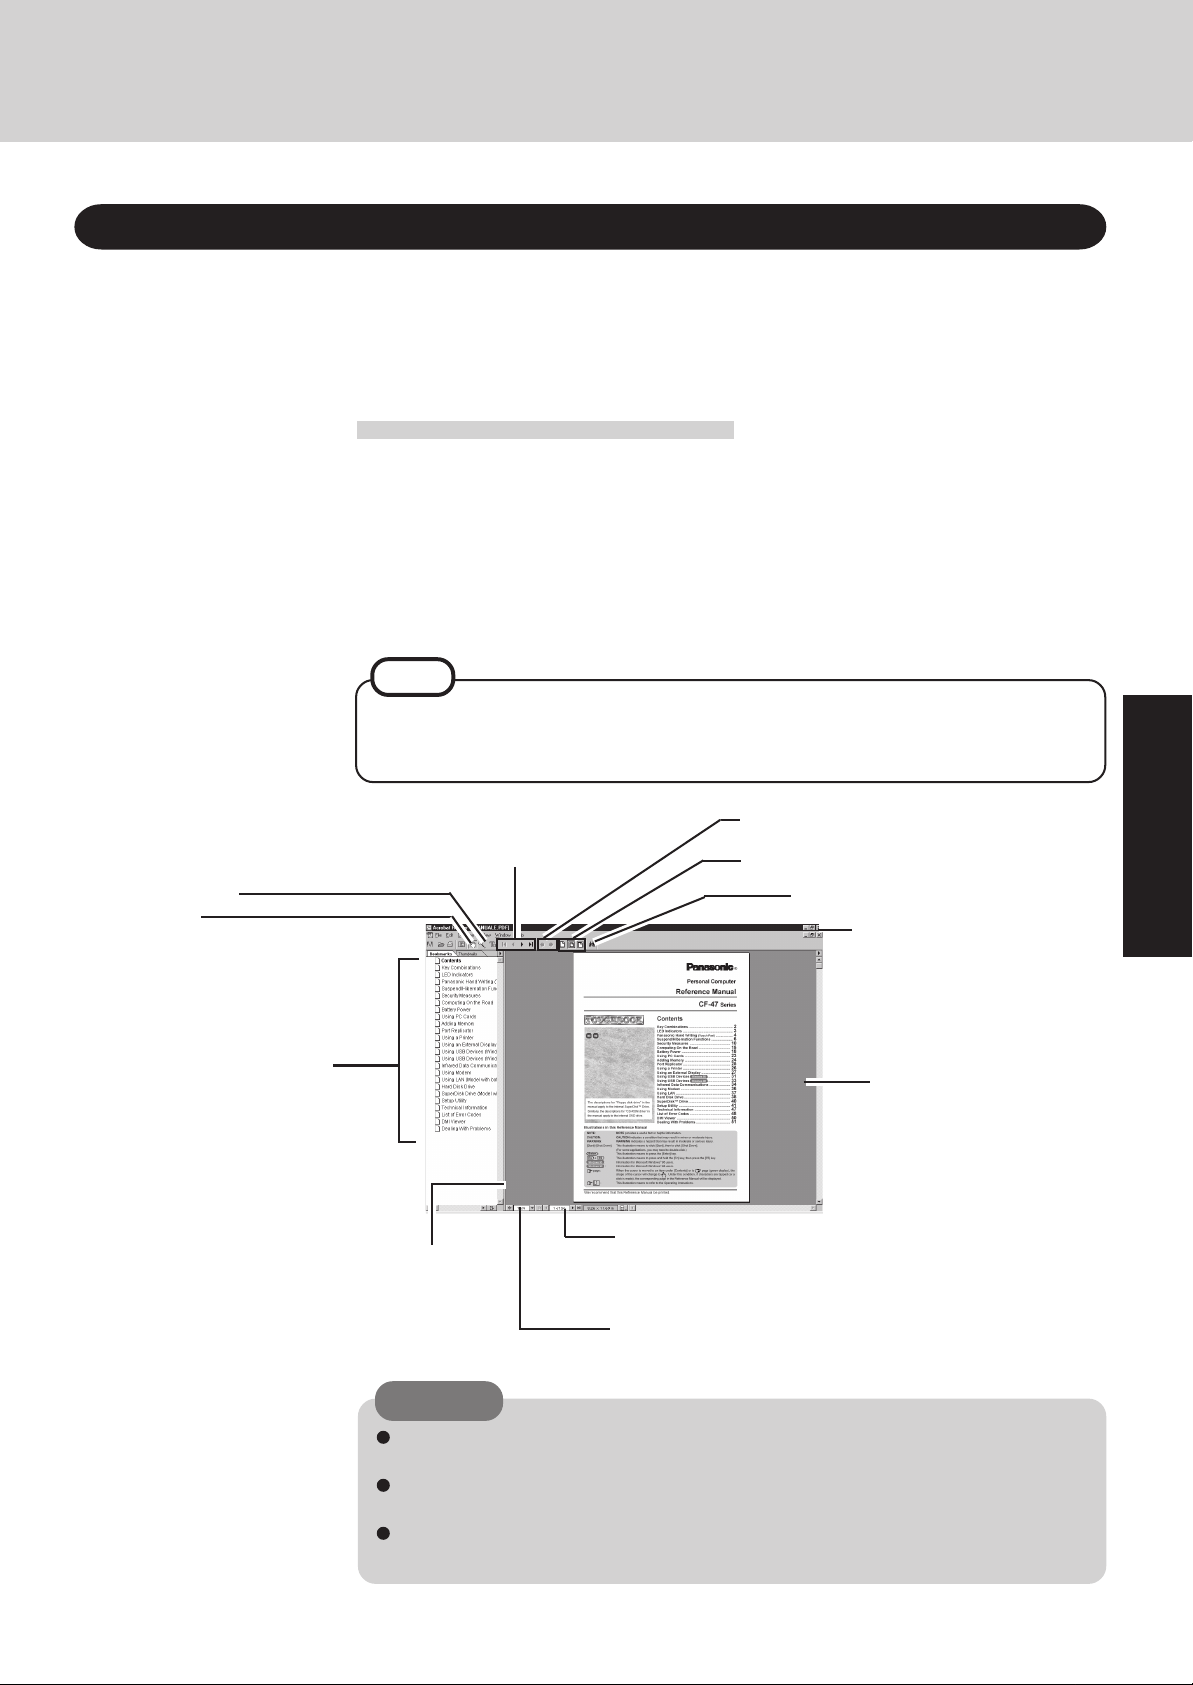
Display the page
Go forward or backward a page, or to the beginning or end of a document.
Zoom-in
Hand tool
To move around
the current page.
Table of Content (Items)
By clicking an item, the corresponding page will be displayed at
100%.
Movab le splitter bar
This bar can be dragged, for
example, to the right to enlarge the display of the
Table of Contents.
Change the display size
Cancel or correct an operation
Perform a “Find” operation
Exit
Display of
the manual
Page indicator
A desired page can be displayed by inputting the page
number after clicking here.
Change the display size
You can choose to magnify/de-magnify the display.
CAUTION
Illustrations may be difficult to view depending on the magnification. If this is the case,
we recommend that the display be magnified.
When the taskbar is hidden at the bottom portion of Acrobat® Reader, set the maximum
display window size.
If a printer is connected, we recommend printing the Reference Manual. The illustrations and display samples may not print with a high quality.
19
Page 20
Handling and Maintenance
Usage Environment
Environment
Place the computer on a flat stable surface.
In use:
Not in use:
T emperature: 5 °C to 35 °C {41 °F to 95 °F}
Humidity: 30% to 80% RH
T emperature: -20 °C to 60 °C {-4 °F to 140 °F}
Humidity: 30% to 90% RH (No condensation)
(No condensation)
Places not to use your computer
Such areas may result in damage to the computer.
Areas exposed to direct sunlight
Handling
Do not drop or hit your computer against solid objects.
Do not stand the computer on its side or allow it to tip over. When
the computer receives extremely strong shock after falling, the hard
disk or floppy disk drive, etc., may become inoperable.
It is a good idea to make backup copies on floppy disks and
carry them with you.
Do not leave a floppy disk in the drive while transporting your
computer.
Do not carry your computer when it is ON.
Remove all cables before transporting your computer.
We recommend preparing a fully charged battery (and optional charger, if possible).
Areas with electronic equipment
These areas may interfere with your
display or cause your computer to
produce strange sounds.
Areas with extremely high/low
temperatures
Do not leave things near the computer that are sensitive
to heat. During operation, the computer may become
warm.
When transporting spare batteries inside a package, briefcase, etc., it is recommended that the batteries be stored
in a plastic bag.
Do not carry the computer while the display is open, or
carry it by gripping the display.
Do not put anything (e.g., a piece of paper) between the
display and keyboard.
Always carry your computer with you. Never check it
with luggage. For use of the computer inside an aircraft,
we recommend asking the airlines regarding their policy
on this issue.
Maintenance
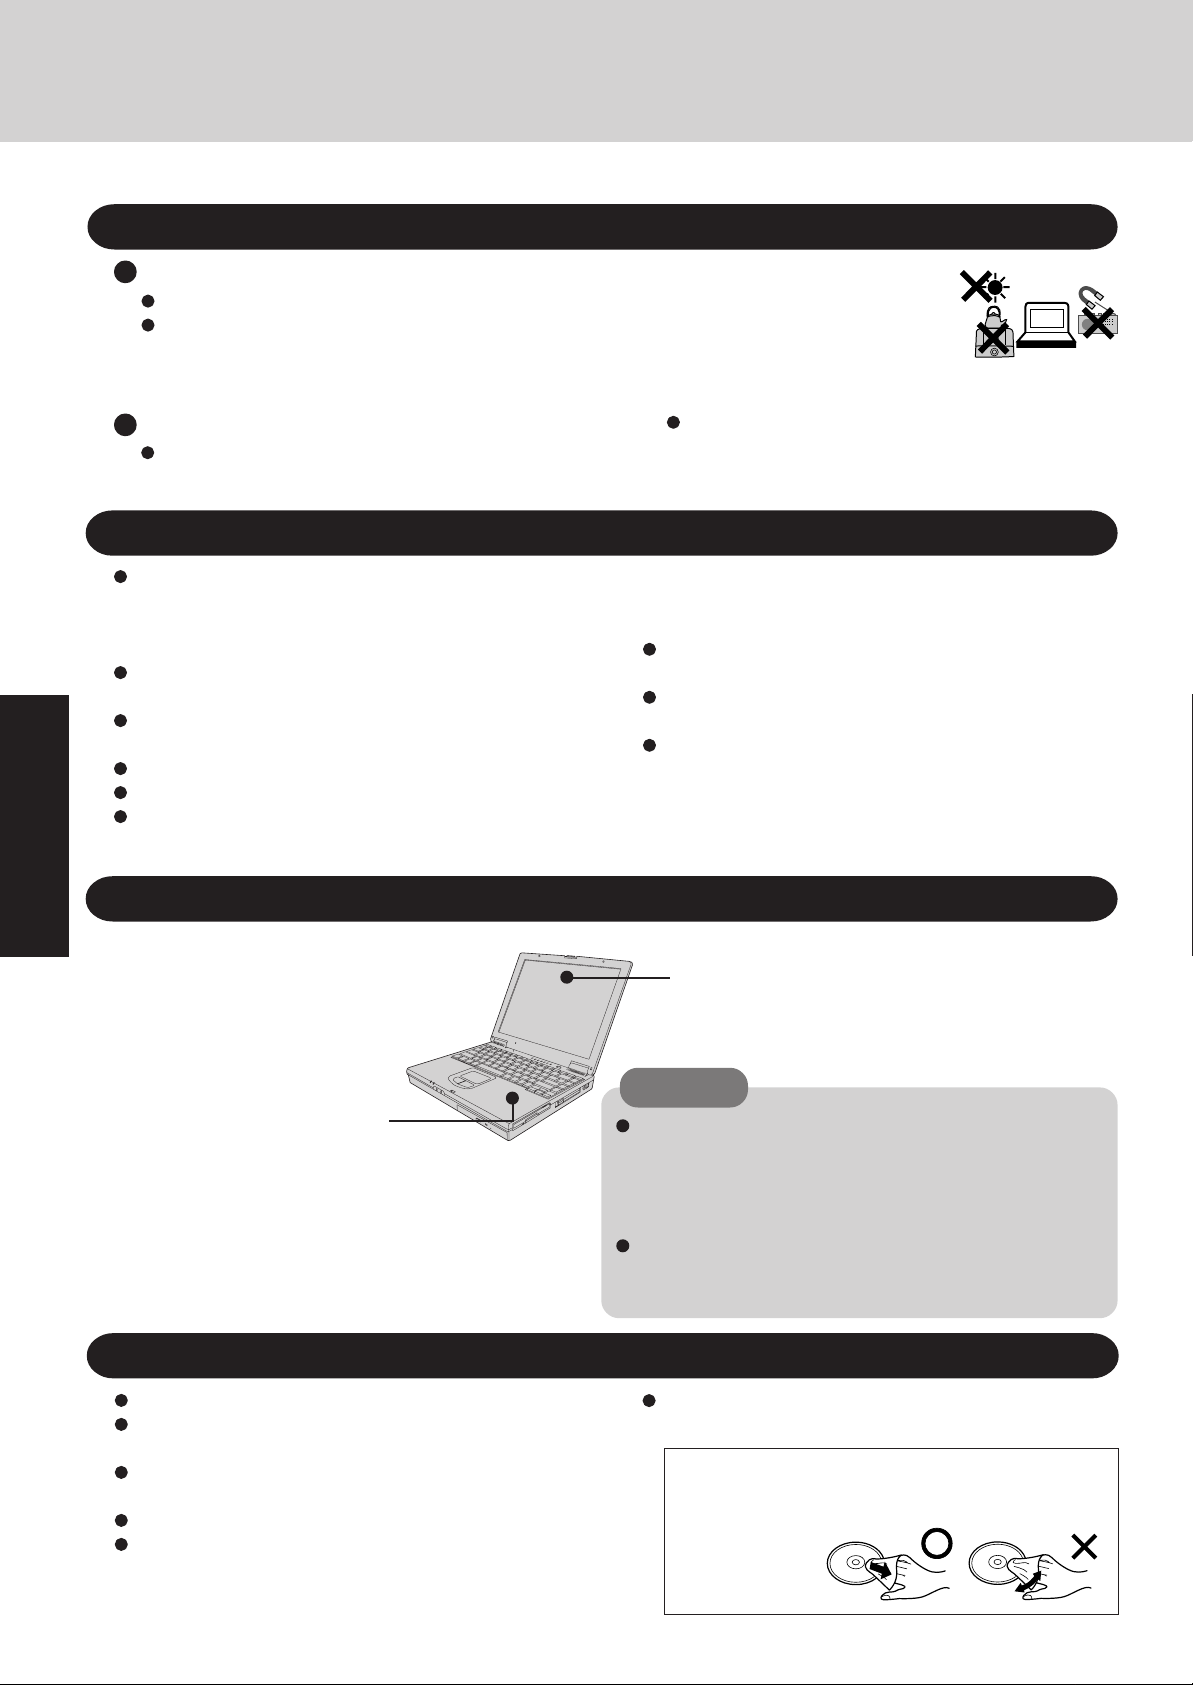
Areas excluding the displa y:
Firmly squeeze a soft wet cloth
containing water or detergent (for
kitchen use) diluted with water and
gently wipe the computer. If a detergent other than a detergent for
kitchen use is used (e.g., low-alkaline detergent), it may adversely
affect the surface (e.g., discoloration).
CD-ROM
Do not allow CDs to become dirty or scratched.
Do not place or store CD in locations exposed to heat, direct
sunlight, humidity or dust.
Do not write on the surface of the CD with a ball-point pen or
other writing instrument, or apply label on the CD.
Do not drop, bend, or place heavy objects on top of CDs.
If the CD is brought from a cold into a warm environment,
moisture may form on the disc. Wipe this moisture off with a
soft, dry, lint-free cloth before using the CD.
Display:
Use a soft dry cloth like gauze
to lightly wipe the display .
CAUTION
Do not use benzene or thinner, or rubbing alcohol. Doing
so may adversely affect the surface, e.g., discoloration. In
addition, do not use commercially-available cleaners and
cosmetics, as they may contain components harmful to the
surface.
Do not directly add or spray water or detergent. If liquid
enters the inside, this may cause the computer to work improperly or be damaged.
Cleaning the CD using a CD disc cleaner is recommended
once every 2 or 3 months.
After wiping the CD with a moist, soft cloth, wipe it
with a dry cloth. Always wipe from the center toward
the edge.
20
Page 21

List of Error Codes
The following is a list of the messages that BIOS can display. Most of them occur during POST. Some of them
display information about a hardware device, e.g., the amount of memory installed. Others may indicate a problem with a device, such as the way it has been configured. Following the list are explanations of the messages and
remedies for reported problems.
If your system displays one of except the messages marked below with an asterisk (*), write down the message and
contact Panasonic T echnical Support. If your system fails after you make changes in the Setup menus, reset the
computer, enter Setup and install Setup defaults or correct the error.
0200 Failure Fixed Disk
Fixed disk in not working or not configured properly. Check to see if fix ed disk is attached properly. Run Setup. Find out
if the fixed-disk type is correctly identified.
0210 Stuck key
Stuck key on keyboard.
0211 Keyboard error
Keyboard not working.
0212 Keyboard Controller Failed
Keyboard controller failed test. May require replacing keyboard controller.
0213 Keyboard locked - Unlock key switch
Unlock the system to proceed.
0220 Monitor type does not match CMOS - Run SETUP
Monitor type not correctly identified in Setup.
0230 Shadow RAM Failed at offset : nnnn
Shadow RAM failed at offset nnnn of the 64k block at which the error was detected.
0231 System RAM Failed at offset : nnnn
System RAM failed at offset nnnn of in the 64k block at which the error was detected.
0232 Extended RAM Failed at offset : nnnn
Extended memory not working or not configured properly at offset nnnn.
0250 System battery is dead - Replace and run SETUP
The CMOS clock battery indicator shows the battery is dead. Replace the battery and run Setup to reconfigure the
system.
0251* System CMOS checksum bad - Default configuration used
System CMOS has been corrupted or modified incorrectly, perhaps by an application program that changes data
stored in CMOS. The BIOS installed Default SETUP Values. If you do not want these values, enter Setup and enter
your own values. If the error persists, check the system battery or contact Panasonic Technical Support.
0260 System timer error
The timer test failed. Requires repair of system board.
0270 Real time clock error
Real-time clock fails BIOS test. May require board repair.
0280* Previous boot incomplete - Default configuration used
Previous POST did not complete successfully. POST loads default values and offers to run Setup. If the failure was
caused by incorrect values and they are not corrected, the next boot will likely fail. On systems with control of wait
states, improper Setup settings can also terminate POST and cause this error on the next boot. Run Setup and verify
that the wait-state configuration is correct. This error is cleared the next time the system is booted.
0281 Memory Size found by POST differed from CMOS
Memory size found by POST differed from CMOS.
02B0 Diskette drive A error
02B1 Diskette drive B error
Drive A: or B: is present but fails the BIOS POST diskette tests. Check to see that the drive is defined with the proper
diskette type in Setup and that the diskette drive is attached correctly.
02B2 Incorrect Drive A type - run SETUP
Type of floppy drive A: not correctly identified in Setup.
02B3 Incorrect Drive B type - run SETUP
Type of floppy drive B: not correctly identified in Setup.
02D0 System cache error - Cache disabled
RAM cache failed and BIOS disabled the cache. On older boards, check the cache jumpers. You may have to replace
the cache. See Panasonic Technical Support. A disabled cache slows system performance considerably.
02F0: CPU ID:
CPU socket number for Multi-Processor error.
02F4: EISA CMOS not writable
ServerBIOS2 test error: Cannot write to EISA CMOS.
21
Page 22

List of Error Codes
02F5: DMA Test Failed
ServerBIOS2 test error: Cannot write to extended DMA (Direct Memory Access) registers.
02F6: Software NMI Failed
ServerBIOS2 test error: Cannot generate software NMI (Non-Maskable Interrupt).
02F7: Fail - Safe Timer NMI Failed
ServerBIOS2 test error: Fail-Safe Timer takes too long.
device address Conflict
Address conflict for specified device.
Allocation Error for: device
Run ISA or EISA Configuration Utility to resolve resource conflict for the specified device.
CD ROM Drive
CD-ROM Drive identified.
Entering SETUP ...
Starting Setup Utility.
Failing Bits : nnnn
The hex number nnnn is a map of the bits at the RAM address, which failed the memory test. Each 1 (one) in the map
indicates a failed bit. See error 230,231 or 232 for offset address of the f ailure in System, Extended or Shado w memory.
Fixed Disk n
Fixed disk n (0-3) identified.
Invalid System Configuration Data
Problem with NVRAM (CMOS) data.
I/O device IRQ conflict
I/O device IRQ conflict error.
PS/2 Mouse Boot Summary Screen:
PS/2 Mouse installed.
nnnn kB Extended RAM Passed
Where nnnn is the amount of RAM in kilobytes successfully tested.
nnnn Cache SRAM Passed
Where nnnn is the amount of system cache in kilobytes successfully tested.
nnnn kB Shadow RAM Passed
Where nnnn is the amount of shadow RAM in kilobytes successfully tested.
nnnn kB System RAM Passed
Where nnnn is the amount of system RAM in kilobytes successfully tested.
Operating system not found
Operating system cannot be located on either drive A: or drive C:. Enter Setup and see if fixed disk and drive A: are
properly identified.
Parity Check 1 nnnn
Parity error found in the system bus. BIOS attempts to locate the address and display it on the screen. If it cannot
locate the address, it displays ????. Parity is a method for checking errors in binary data. A parity error indicates that
some data has been corrupted.
Parity Check 2 nnnn
Parity error found in the I/O bus . BIOS attempts to locate the address and display it on the screen. If it cannot locate the
address, it displays ????.
Press <F1> to resume, <F2> to Setup, <F3> for previous
Displayed after any recoverable error message. Press <F1> to start the boot process or <F2> to enter a Setup and
change the settings. Press <F3> to display the previous screen (usually an initialization error of an Option ROM, I.e.,
an add-on card). Write down and follow the information shown on the screen.
Press <F2> to enter Setup
Optional message displayed during POST. Can be turned off in Setup.
PS/2 Mouse:
PS/2 mouse identified.
System BIOS shadowed
System BIOS copied to shadow RAM.
UMB upper limit segment address : nnnn
Displays the address nnnn of the upper limit of Upper Memory Blocks, indicating released segments of the BIOS
which can be reclaimed by a virtual memory manager.
Video BIOS shadowed
Video BIOS successfully copied to shadow RAM.
22
Page 23
Dealing with Problems
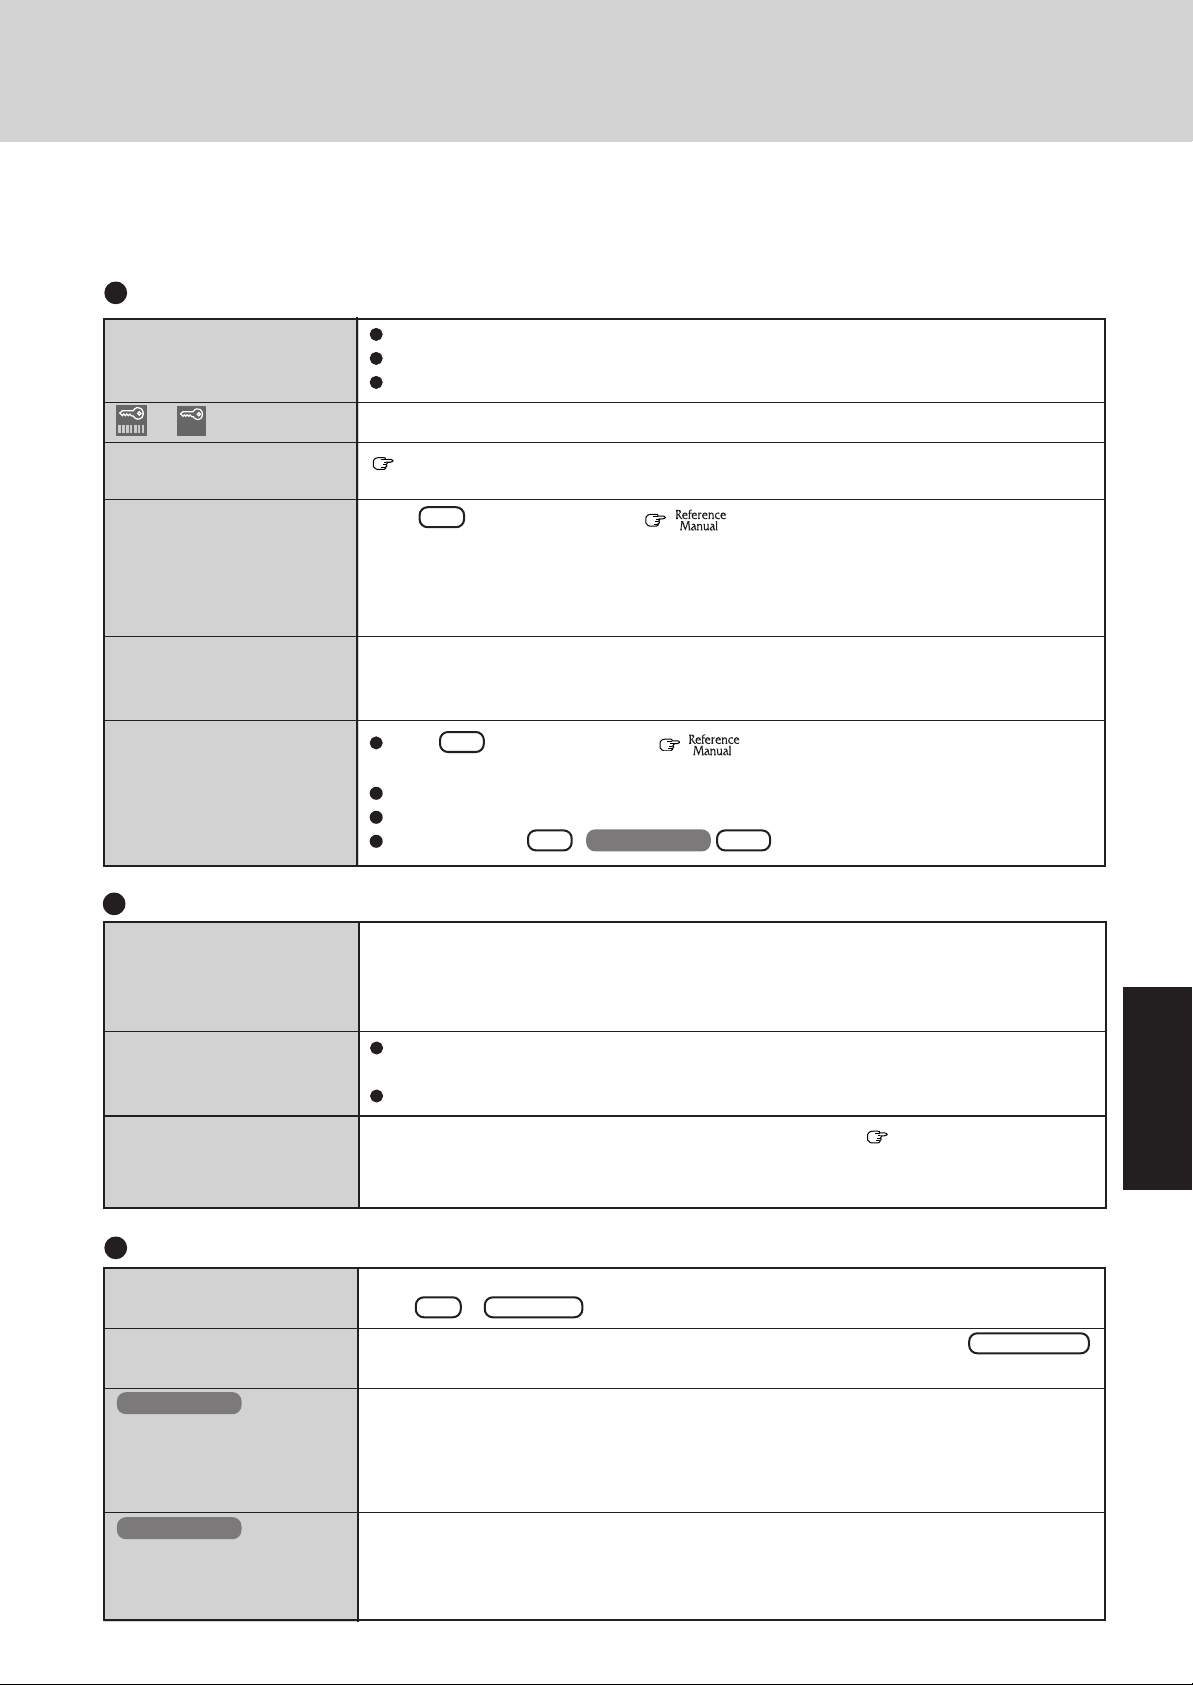
When a problem occurs, please refer to this page. The "Reference Manual" also contains detailed information. If a problem
appears to be related to a software application, read the software related manual. If you still cannot troubleshoot the problem,
please contact Panasonic T echnical Support.
Starting Up
The power indicator or battery indicator is not lit
or is displayed
[POST Startup Error(s)] is
displayed
Windows startup, or an operation is extremely slow
The date and time are
incorrect
Others
Battery Indicator
The red battery indicator
lights.
Repeated beeping sound
while the computer is in use.
Check the cable connection for the AC adapter.
Check to see if a fully charged battery is properly installed.
Remove the battery pack and disconnect the AC adapter, then connect them again.
Please input your password. If you have forgotten it, contact Panasonic Technical Support.
page 21
Press F9 in the Setup Utility ( "Setup Utility"). This will restore the Setup
Utility's settings to their default values (except the password settings). Then, the Setup Utility
must be run once again for you to input the appropriate operating environment settings. (The
processing speed depends on the application software used, so this operation may not cause the
processing speed to increase.)
You can set the date and time through [Date/Time] in [Start] - [Settings] - [Control Panel].
If you continue to experience problems, the internal battery maintaining the clock may need
to be replaced. Please contact Panasonic Technical Support.
Press F9 in the Setup Utility ( "Setup Utility"). This will restore the Setup
Utility's settings to their default values (except the password settings).
Try removing all peripheral devices.
In the MS-DOS mode, run SCANDISK to check the hard disk.
At start-up, press F8 ( Ctrl ) to operate the computer in the Safe mode.
The battery level is low . Save your data and power off your computer.
After connecting the AC adapter or replacing the battery pack with a fully charged one, turn
your computer on.
Windows 98
The red indicator blinks
After the AC adapter is connected, the orange indicator
blinks five times
Character Input
Unable to input anything
but numerals
Only capital letters are
being input
Windows 95
How to input European
characters (ß, à, ç),
symbols or Euro Currency
Symbol is unclear
Windows 98
How to input European
characters (ß, à, ç) or
symbols is unclear
The battery pack or recharging function may be defective. Quickly remove the battery
pack and disconnect the AC adapter, then connect them again.
If the problem persists, contact Panasonic Technical Support.
Unable to charge because of an improper temperature range. ( page 6)
If NumLk and Key P ad are on, the Numeric Key Pad is ON. To switch it OFF,
press Fn + Key Pad .
If CapsLock is on, the Caps Lock function is ON. To switch it OFF, press Caps Loc k .
Select [Start] - [Programs] - [Accessories] - [Character Map].
The Character Map will be displayed. Point to the desired font name and select it.
Select [Start] - [Programs] - [Accessories] - [System Tools] - [Character Map].
The Character Map will be displayed. Point to the desired font name and select it.
23
Page 24
Dealing with Problems
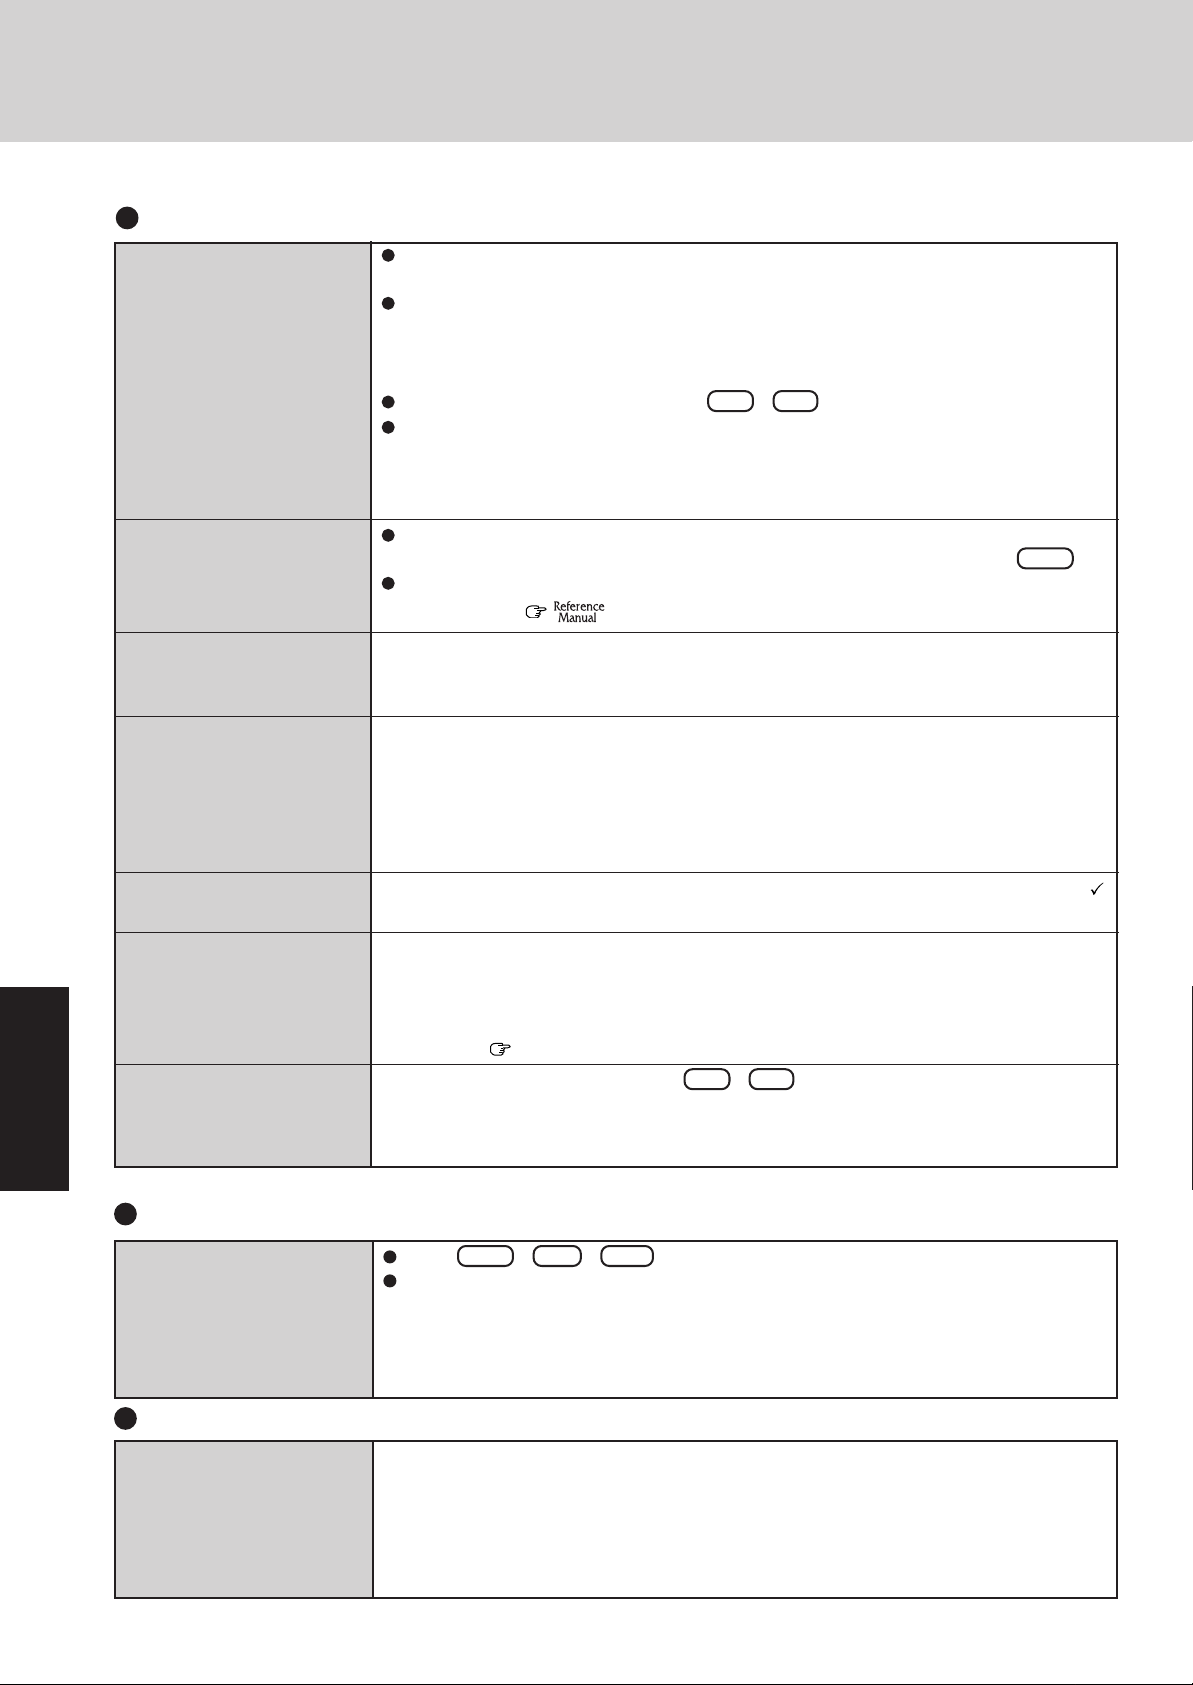
Display
No display after powering
on
The power has not been cut,
but after a certain period of
time, there is no display
The resolution of the display
cannot be changed
An afterimage appears (i.e.,
green, red, and blue dots
remain on the display) or
there are dots not displaying the correct colors.
At the time of purchase, the display setting is preset for an external display. If you connect an
external display, the screen is displayed on the external display.
When there is no display to an external display,
• Check your cable connection to the external display.
• Confirm your display is powered on.
• Check the settings for your external display.
Try changing the display by pressing Fn + F3 .
When displaying only through an external display, if the computer is shut down by using
the suspend or hibernation function, there will be no display on the LCD unless the external display is connected when operations are resumed. In this case, connect the external
display.
Has the computer been set to the power-saving mode?
T o resume operation of your computer from ECO mode, press any key (like Ctrl ).
T o save power, your computer may have automatically entered the suspend (or hiberna-
tion*) mode. (
Set [None] for [W allpaper] in [Start] - [Settings] - [Control Panel] - [Display] - [Background],
and then press [OK]. Then, once again try changing the resolution. After the change, be sure
to restart the computer.
If an image is displayed for a prolonged period of time, an afterimage may appear. This is
not a malfunction. The afterimage will disappear when a different screen is displayed.
High-precision and advanced technologies are necessary in the production of color liquid
crystal displays (color LCDs). Therefore, if 0.002% or less of the picture elements either fail
to light or remain constantly lit (that is, more than 99.998% of elements are functioning
properly), no defect is considered to exist.
"Computing On the Road")
The motion of the mouse
cursor is not smooth
The cursor does not move in
scrolling area of the touch
pad
During simultaneous display, the scr een of the external display becomes disordered
Application Software
Computer hangs
Sound Files
Interfering noise is generated while a sound file is being played
Select [Start] - [Settings] - [Control Panel] - [Mouse] - [Motion] and add the check mark
for [Show trails].
When the Microsoft® IntelliMouseTM Wheel mode or the original mode is set for the touch
pad, only scroll operations are possible for the right part or bottom part of the touch pad. In
this case, cursor operations are possible by using the work surface excluding the right part or
bottom part. When no mode is set, the entire surface of the touch pad can be used for cursor
operations. (
Try changing the display be pressing Fn + F3 .
* Windows 95 only
Press Ctrl + Alt + Del to reboot the computer.
After powering down by pressing the sleep switch for more than four seconds, slide the
power switch to power on and open the application again.
If the program no longer works normally, go to [Start] - [Settings] - [Control Panel] [Add/Remove Programs] to delete the program. Then, try installing the program once
again.
Continuous interfering noise may be generated while a sound file is being played if the AC
adapter is removed/inserted, the key combination [Fn] + [F10] is pressed, or the LCD panel
is closed.
In such cases, after the playback of the sound file ends, select [Disable All] for [Secondary
Buffer] in [Control Panel] - [YAMAHA DS-XG Audio Config] - [DirectSound], and then
press [OK]. (Sound file = *.mpg, *.mid, *.wav, *.avi, etc.)
page 14)
24
Page 25
Disk Operations
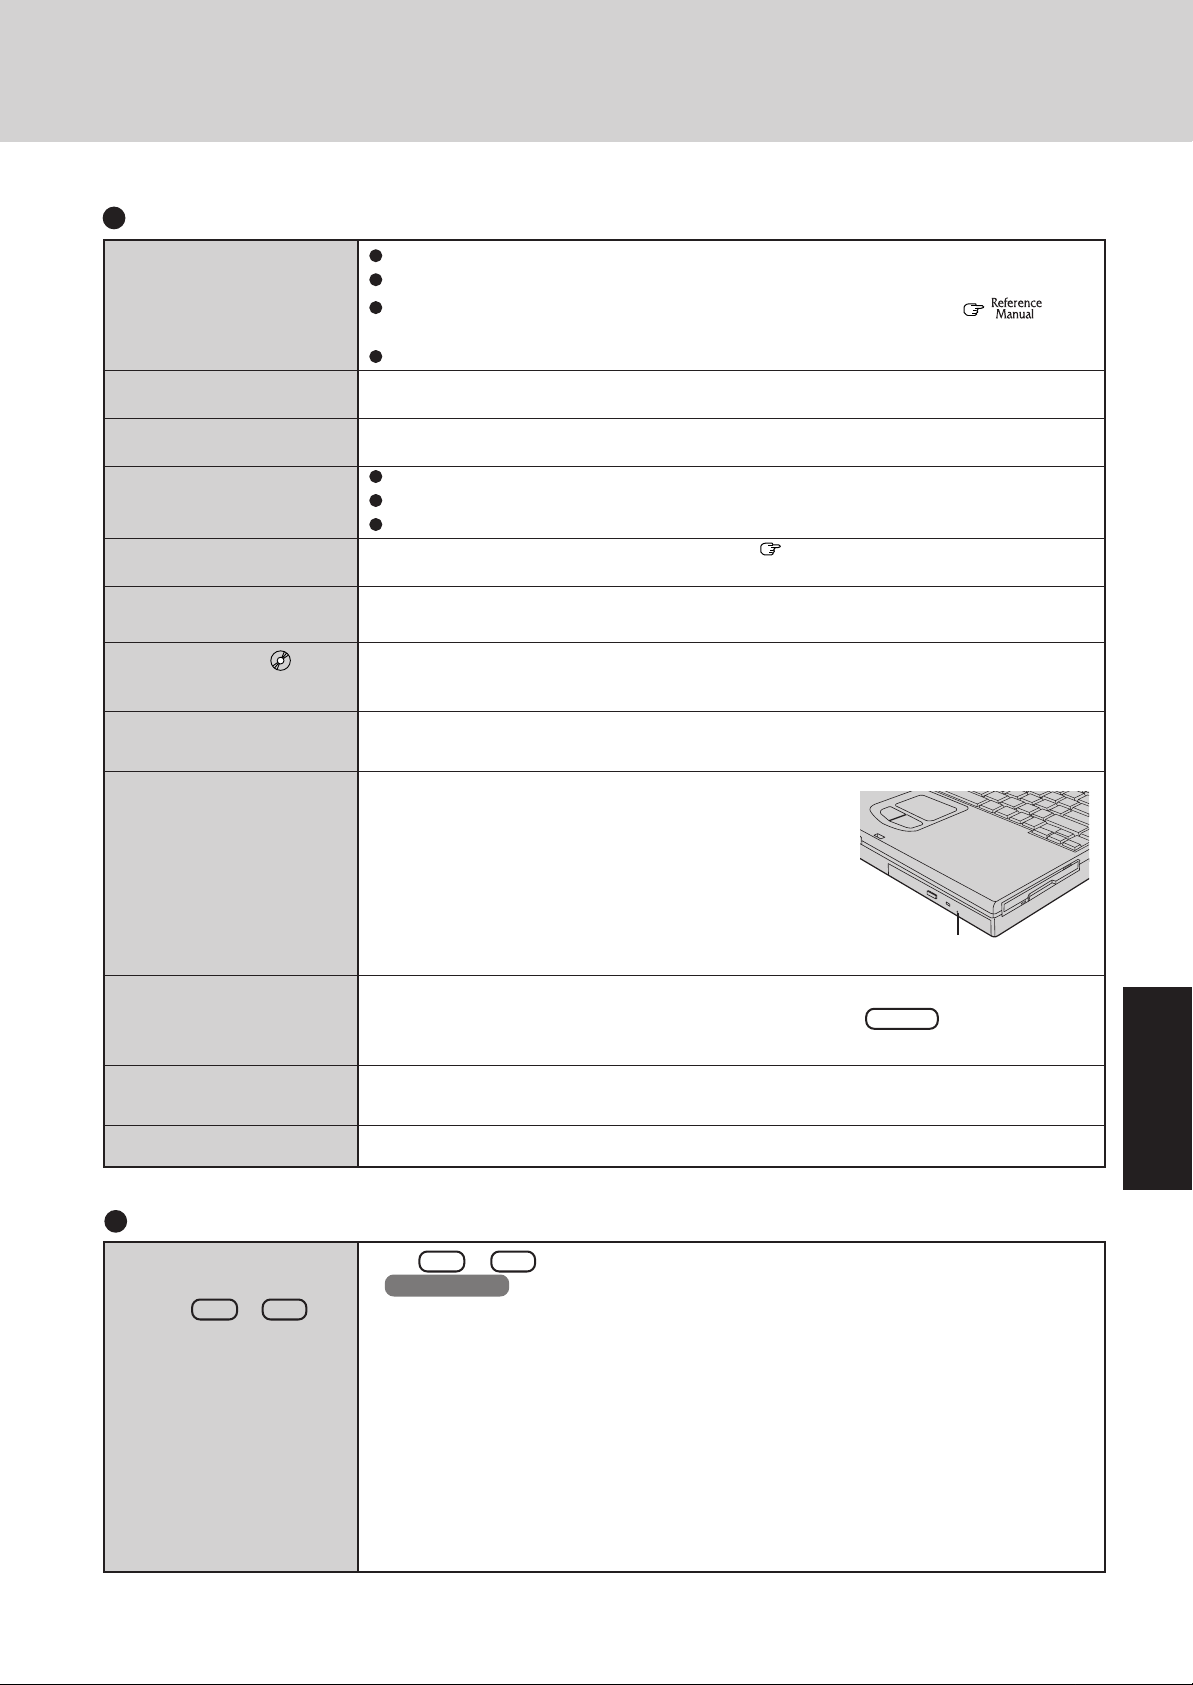
Cannot read/write to a
floppy disk
Unable to write to a floppy
disk
How to format a floppy
disk is unclear
Unable to read/write to the
hard disk
Trouble has occurred with
the CD
When the previous item is
not the cause
The access lamp (
not light
) does
Has the floppy disk been correctly inserted?
Has the floppy disk been correctly formatted?
Has the Setup Utility been used to set [Floppy Operation] to [Enable]? (
Utility"
)
Your floppy disk content may be corrupted.
Is the floppy disk write-protected?
Select [Format] in [My Computer] - [3 1/2 Floppy (A:)] - [File]. After confirming the disk
volume and format type, start formatting.
Your drive or file may not have been properly set.
Check to see if the hard disk is full. If it is full, delete unnecessary files.
Your hard disk content may be corrupted. Contact Panasonic Technical Support.
You may need to clean the lens or CD; refer to ( page 18) on how to do so.
Try testing another drive or media.
Is the CD loaded on the tray correctly?
"Setup
Cannot play CD or read
data from it
Cannot eject CD
A blue background appears on the screen with
the MPEG image
The CD-ROM drive vibrates a lot
No sound from music CDs
Key Operation
If you change the video
output destination by
pressing Fn + F3
under the condition the full
DOS screen is open (in
[Start]-[Programs]-[MSDOS Prompt]), when you
close the MS-DOS screen
by typing “Exit”, the
computer will return to the
output destination existing
at the time you entered the
MS-DOS mode
Is the CD bent, scratched, or dirty?
Is the computer powered on?
To remove a CD when the computer is powered off, insert
a sharp object such as the bent-out tip of a paper clip into
the emergency hole. Pushing it completely to the end will
free the tray so that it can be pulled out.
Emergency Hole
Did you open the CD-ROM drive or remove the MPEG CD while it was operating?
Re-insert the MPEG CD and close the CD-ROM drive. Press Enter .
Is the CD bent or labeled?
In [Control Panel] - [Power] - [DS-XG Power], select [Full power level].
Press Fn + F3 again.
( Windows 98 The combination does not work when the computer is in the Dual-Display
Mode.)
25
Page 26
Reinstalling Software
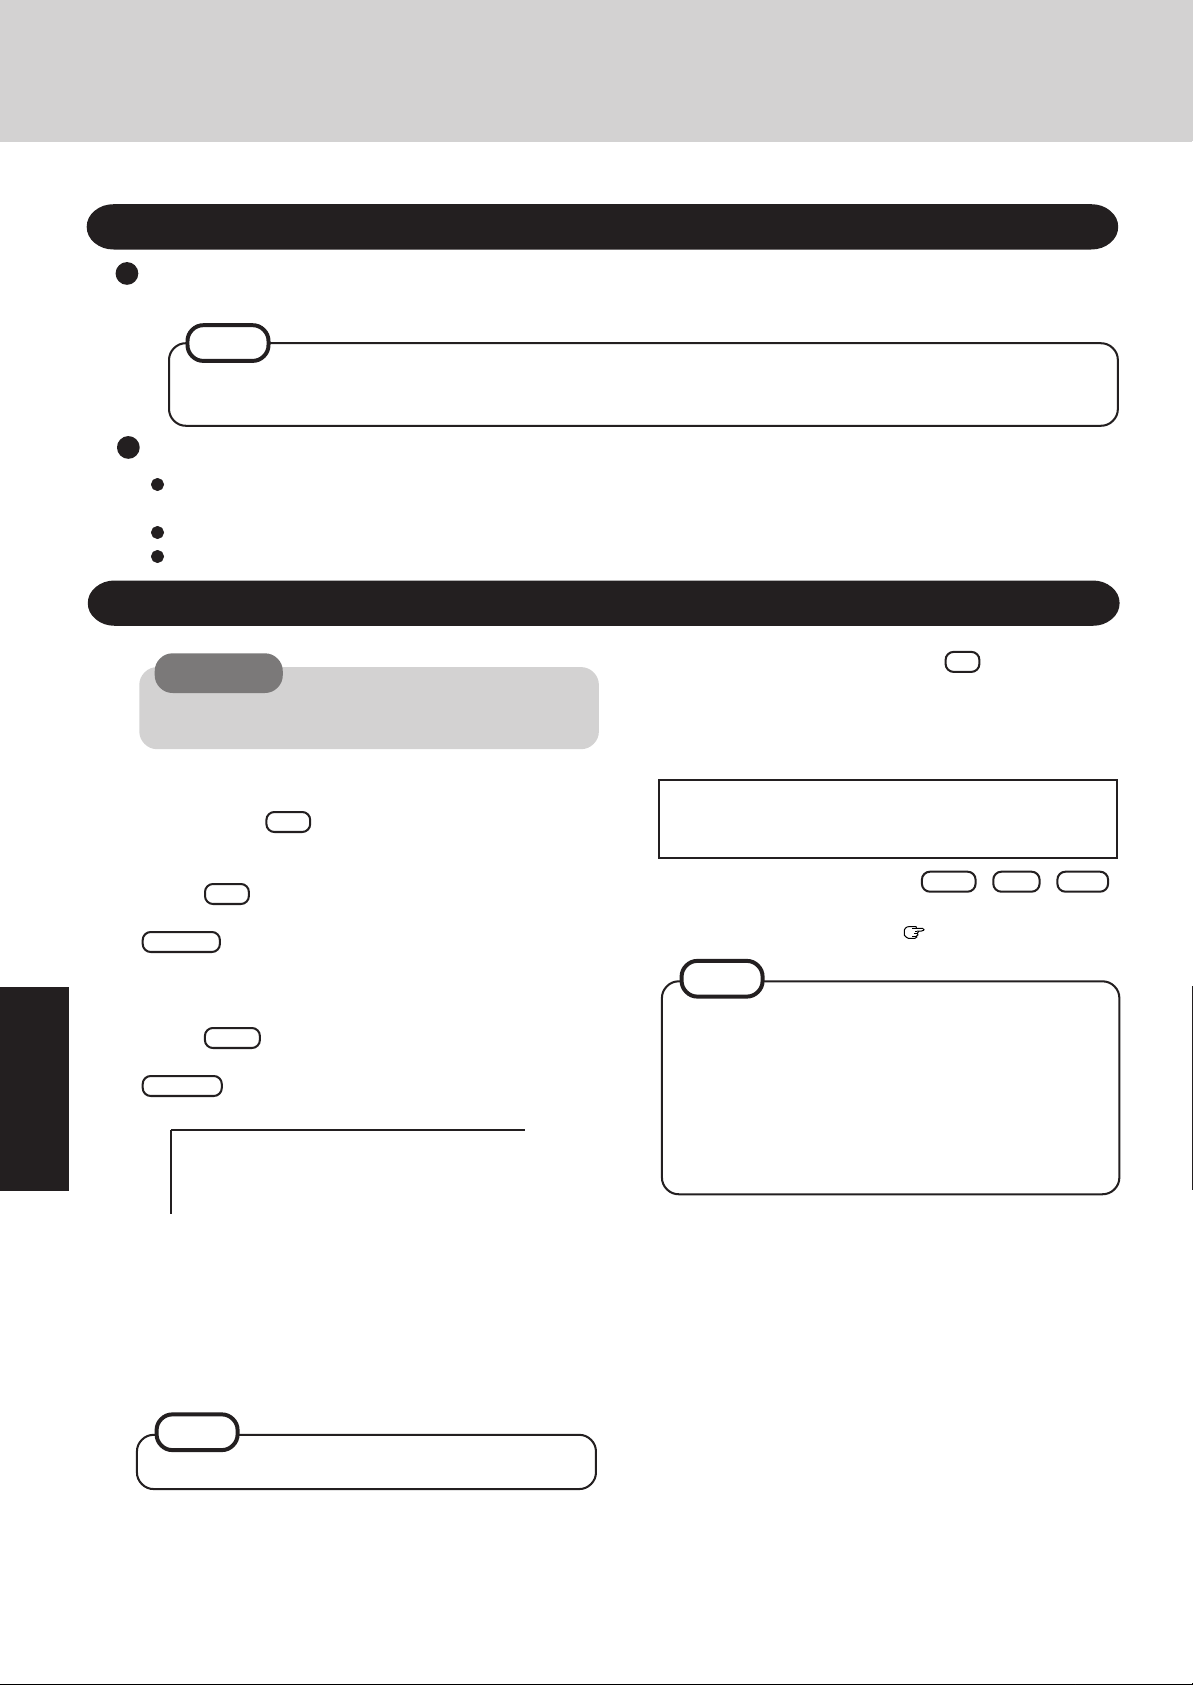
Before Reinstallation
Preparing
Y ou will need the Product Recovery CD-ROM included in the W indows System Pack and the FIRSTAID FD you made earlier.
NOTE
If you have not created the FIRSTAID FD, you can create by selecting [Create BACKUP DISK] in [Start] - [Programs] - [Panasonic]. If you can not create this disk, please contact Panasonic T echnical Support.
Important
Save all important data. If reinstallation is carried out, all data existing prior to the installation will be lost. The
reinstallation will return the computer to close to the conditions at time of purchase.
Before the reinstallation procedure, remove all peripherals.
Be sure the AC adapter is connected until the reinstallation procedure is completed.
Reinstalling
CAUTION
If data on your hard disk is compressed, the data should
be uncompressed.
1 Turn the computer on.
2 When the message [Press <F2> to enter SETUP] is dis-
played, press F2 and then run the Setup Utility.
If the password has been set, enter the supervisor password.
3 Press F9 .
At the confirmation message, select [Yes] and press
Enter .
4 Select [Security] menu and set [Boot Up Drive] to
[CDD/A:/C:].
5 Set the Product Recovery CD-ROM and FIRSTAID FD.
Press F10 .
6
At the confirmation message, select [Yes] and press
Enter . The computer will reboot, and this screen
should appear.
Select the number
------------------------------------------------------
1. Restore the whole HDD to factory default
2. Restore the drive C to factory default
3. End
7 Make a selection from the menu.
To restore all contents of the hard disk to factory
default, including the partition setting(s):
Select [1. Restore the whole HDD to factory default].
T o r estor e the hard disk (C drive) to factory default,
excluding the partition setting(s):
Select [2. Restore the drive C to factory default].
8 At the confirmation message , press Y .
The operations of “format” and “restore” for the hard disk
start automatically . (The operations take about one hour.)
9 After the reinstallation procedure completes, the following
message will appear on the display.
All data on the whole HDD has been restored to the factory default.
After removing floppy disk and the Product Recovery CD-ROM, restart the
computer and set up Windows .....
Restart the computer by pressing Ctrl + Alt + Del ,
and perform the setup procedure for W indows by following
the instructions on the screen.
page 10
NOTE
During the reinstallation procedure, the settings of the
Setup Utility are changed as follows.
When necessary, please change these settings again.
Power Menu Power Management :Disable
Sleep Switch :No Action
When necessary, in the Setup Utility, set [Boot Up
Drive] to [A:/C:].
26
NOTE
FAT16 file system is not supported.
Page 27

LIMITED USE LICENSE AGREEMENT
THE SOFTWARE PROGRAM(S) ("PROGRAMS") FURNISHED WITH THIS PANASONIC
ARE LICENSED ONLY TO THE END-USER ("YOU"), AND MAY BE USED BY YOU ONLY IN ACCORDANCE WITH
THE LICENSE TERMS DESCRIBED BELO W. YOUR USE OF THE PROGRAMS SHALL BE CONCLUSIVELY DEEMED
TO CONSTITUTE Y OUR ACCEPTANCE OF THE TERMS OF THIS LICENSE.
Matsushita Electric Industrial Co., Ltd. ("MEI") has developed or otherwise obtained the Prog rams and hereby licenses
their use to you. You assume sole responsibility for the selection of the Product (including the associated Programs) to
achieve your intended results, and f or the installation, use and results obtained therefrom.
LICENSE
A. MEI hereby grants you a personal, non-tr ansferable and non-exclusive right and license to use the Programs in
accordance with the terms and conditions stated in this Agreement. You acknowledge that you are receiving only
a LIMITED LICENSE TO USE the Programs and related documentation and that y ou shall obtain no title, ownership nor any other rights in or to the Programs and related documentation nor in or to the algorithms, concepts,
designs and ideas represented by or incorporated in the Programs and related documentation, all of which title,
ownership and rights shall remain with MEI or its suppliers.
B. You may use the Programs only on the single Product which was accompanied by the Programs.
C. You and your employees and agents are required to protect the confidentiality of the Programs. You may not
distribute or otherwise make the Programs or related documentation a vailable to any third party, by time-sharing
or otherwise, without the prior written consent of MEI.
D . You may not cop y or reproduce, or permit to be copied or reproduced, the Programs or related documentation f or
any purpose, except that you ma y mak e one (1) cop y of the Programs f or bac kup purposes only in support of your
use of the Programs on the single Product which was accompanied by the Programs. You shall not modify, or
attempt to modify, the Programs.
®
PRODUCT ("PRODUCT")
E. You may transfer the Programs and license them to another party only in connection with your transfer of the
single Product which was accompanied by the Programs to such other party. At the time of such a transfer, you
must also transfer all copies, whether in printed or machine readable form, of every Program, and the related
documentation, to the same party or destroy any such copies not so transferred.
F. You may not remov e any copyright, trademark or other notice or product identification from the Programs and you
must reproduce and include any such notice or product identification on any cop y of any Program.
YOU MAY NOT REVERSE ASSEMBLE, REVERSE COMPILE, OR MECHANICALLY OR ELECTRONICALLY TRACE
THE PROGRAMS, OR ANY COPY THEREOF, IN WHOLE OR IN PART.
YOU MAY NOT USE, COPY, MODIFY, ALTER, OR TRANSFER THE PROGRAMS OR ANY COPY THEREOF, IN
WHOLE OR IN PART, EXCEPT AS EXPRESSLY PROVIDED IN THE LICENSE.
IF YOU TRANSFER POSSESSION OF ANY COPY OF ANY PROGRAM TO ANOTHER PARTY, EXCEPT AS PERMITTED IN PARAGRAPH E ABOVE, YOUR LICENSE IS AUTOMATICALLY TERMINATED.
TERM
This license is effectiv e only for so long as you o wn or lease the Product, unless earlier terminated. You may terminate
this license at any time by destro ying, at y our e xpense, the Progr ams and related documentation together with all copies
thereof in any form. This license will also terminate effectiv e immediately upon occurrence of the conditions therefor set
forth elsewhere in this Agreement, or if you fail to comply with any term or condition contained herein. Upon any such
termination, you agree to destroy, at your expense, the Programs and related documentation together with all copies
thereof in any form.
YOU ACKNOWLEDGE THAT YOU HAVE READ THIS AGREEMENT, UNDERSTAND IT AND AGREE TO BE BOUND
BY ITS TERMS AND CONDITIONS. YOU FURTHER AGREE THAT IT IS THE COMPLETE AND EXCLUSIVE STATEMENT OF THE AGREEMENT BETWEEN US, WHICH SUPERSEDES ANY PROPOSAL OR PRIOR AGREEMENT,
ORAL OR WRITTEN, AND ANY OTHER COMMUNICATIONS BETWEEN US, RELATING T O THE SUBJECT MA TTER
OF THIS AGREEMENT.
27
Page 28

Contrat de licence d'usage limité
Le(s) logiciel(s) (les "Logiciels") fournis avec ce produit Panasonic
licence à l'utilisateur ultime ("vous"), et ils ne peuvent être utilisés que conformément aux clauses contractuelles cidessous. En utilisant les logiciels, v ous v ous engagez de manière définitive à respecter les termes, clauses et conditions
des présentes.
Matsushita Electric Industrial Co., Ltd. ("MEI") a mis au point ou obten u les Logiciels et v ous en concède l'utilisation par
les présentes. Vous assumez l'entière responsabilité du choix de ce Produit (y compris des Logiciels associés) pour
obtenir les résultats escomptés, ainsi que de l'installation, de l'utilisation et des résultats obtenus.
Licence
A. MEI vous octroie par les présentes le droit et la licence personnels, non cessibles et non exclusifs d'utiliser les
Logiciels conformément aux termes, clauses et conditions de ce Contrat. Vous reconnaissez ne recevoir qu'un
droit limité d'utiliser les Logiciels et la documentation les accompagnant et vous vous engagez à n'obtenir aucun
droit de titre, propriété ni aucun autre droit vis-à-vis des Logiciels et de la documentation les accompagnant ni visà-vis des algorithmes, concepts, dessins, configurations et idées représentés par ou incorporés dans les Logiciels
et la documentation les accompagnant, dont les titres, propriété et droits resteront tous à MEI ou à leurs
propriétaires.
B. Vous ne pouvez utiliser les Logiciels que sur le Produit unique qui est accompagné par les Logiciels.
C. Vous et vos employés ou agents êtes requis de protéger la confidentialité des Logiciels. Vous ne pouvez ni
distribuer ni mettre les Logiciels et la documentation les accompagnant à la disposition d'un tiers, par partage de
temps ou de quelque autre manière que ce soit, sans l'autorisation écrite préalable de MEI.
D . Vous ne pouv ez ni copier ni reproduire ni permettre la copie ni la reproduction des Logiciels ni de la documenta-
tion les accompagnant pour quelque fin que ce soit, à l'exception d'une (1) copie des Logiciels à des fins de
sauvegarde uniquement pour soutenir votre utilisation des Logiciels sur le Produit unique qui est accompagné
par les Logiciels. Vous ne pouvez ni modifier ni tenter de modifier les Logiciels.
®
(le "Produit") sont exclusivement concédés en
E. Vous ne pouvez céder les Logiciels et en octroyer la licence à une autre partie qu'en rapport avec votre cession
du Produit unique qui est accompagné par les Logiciels à cette autre partie. Au moment de cette cession, vous
dev ez céder également toutes les copies, que ce soit sous forme imprimée ou lisible par la machine, de tous les
Logiciels ainsi que de la documentation les accompagnant, à la même partie ou détruire les copies non cédées.
F. Vous ne pouvez retirer aucune marque de droits d'auteur, marque ou autre ni aucune identification de produit des
Logiciels et vous devez reproduire et inclure toutes ces notices ou identifications de produit sur toutes les copies
des Logiciels.
V ous ne pouv ez assemb ler en sens inv erse, compiler en sens in v erse ni retracer les Logiciels ni aucune de leurs copies ,
de façon électronique ou mécanique, en tout ou en partie.
Vous ne pouvez utiliser, copier, modifier, altérer ni céder les Logiciels ni aucune de leurs copies, en tout ou en partie, à
l'exception de ce qui est e xpressément stipulé dans ce contr at.
Si vous cédez la possession de toute copie ou de tout Logiciel à une autre partie, à l'exception de ce qui est autorisé au
paragraphe E ci-dessus, votre licence est automatiquement résiliée.
T ermes, clauses et conditions
Cette licence n'est effective que pour la durée de possession ou de crédit-bail du Produit, à moins d'une résiliation
antérieure. V ous pouvez résilier cette licence à tout moment en détruisant, à v os fr ais, les Logiciels et la documentation
les accompagnant avec toutes leurs copies , sous quelque f orme que ce soit. Cette licence ser a également résiliée, av ec
application immédiate, si les conditions de résiliation définies ailleurs dans ce contrat se sont réalisées ou si vous ne
respectez pas les termes, clauses et conditions qui y sont contenues. Au moment de la résiliation, vous acceptez de
détruire, à vos frais, les Logiciels et la documentation les accompagnant avec toutes leurs copies, sous quelque forme
que ce soit.
Vous reconnaissez avoir lu ce contrat, en avoir compris toute la substance et avoir accepté de respecter ses termes,
clauses et conditions. Vous reconnaissez en outre qu'ils sont la description complète et exclusiv e du contrat conclu entre
nous, contrat qui remplace et annule toute proposition ou contrat précédent, écrit ou oral, et toute autre communication
entre nous, relativement à l'objet du présent contrat.
28
Page 29
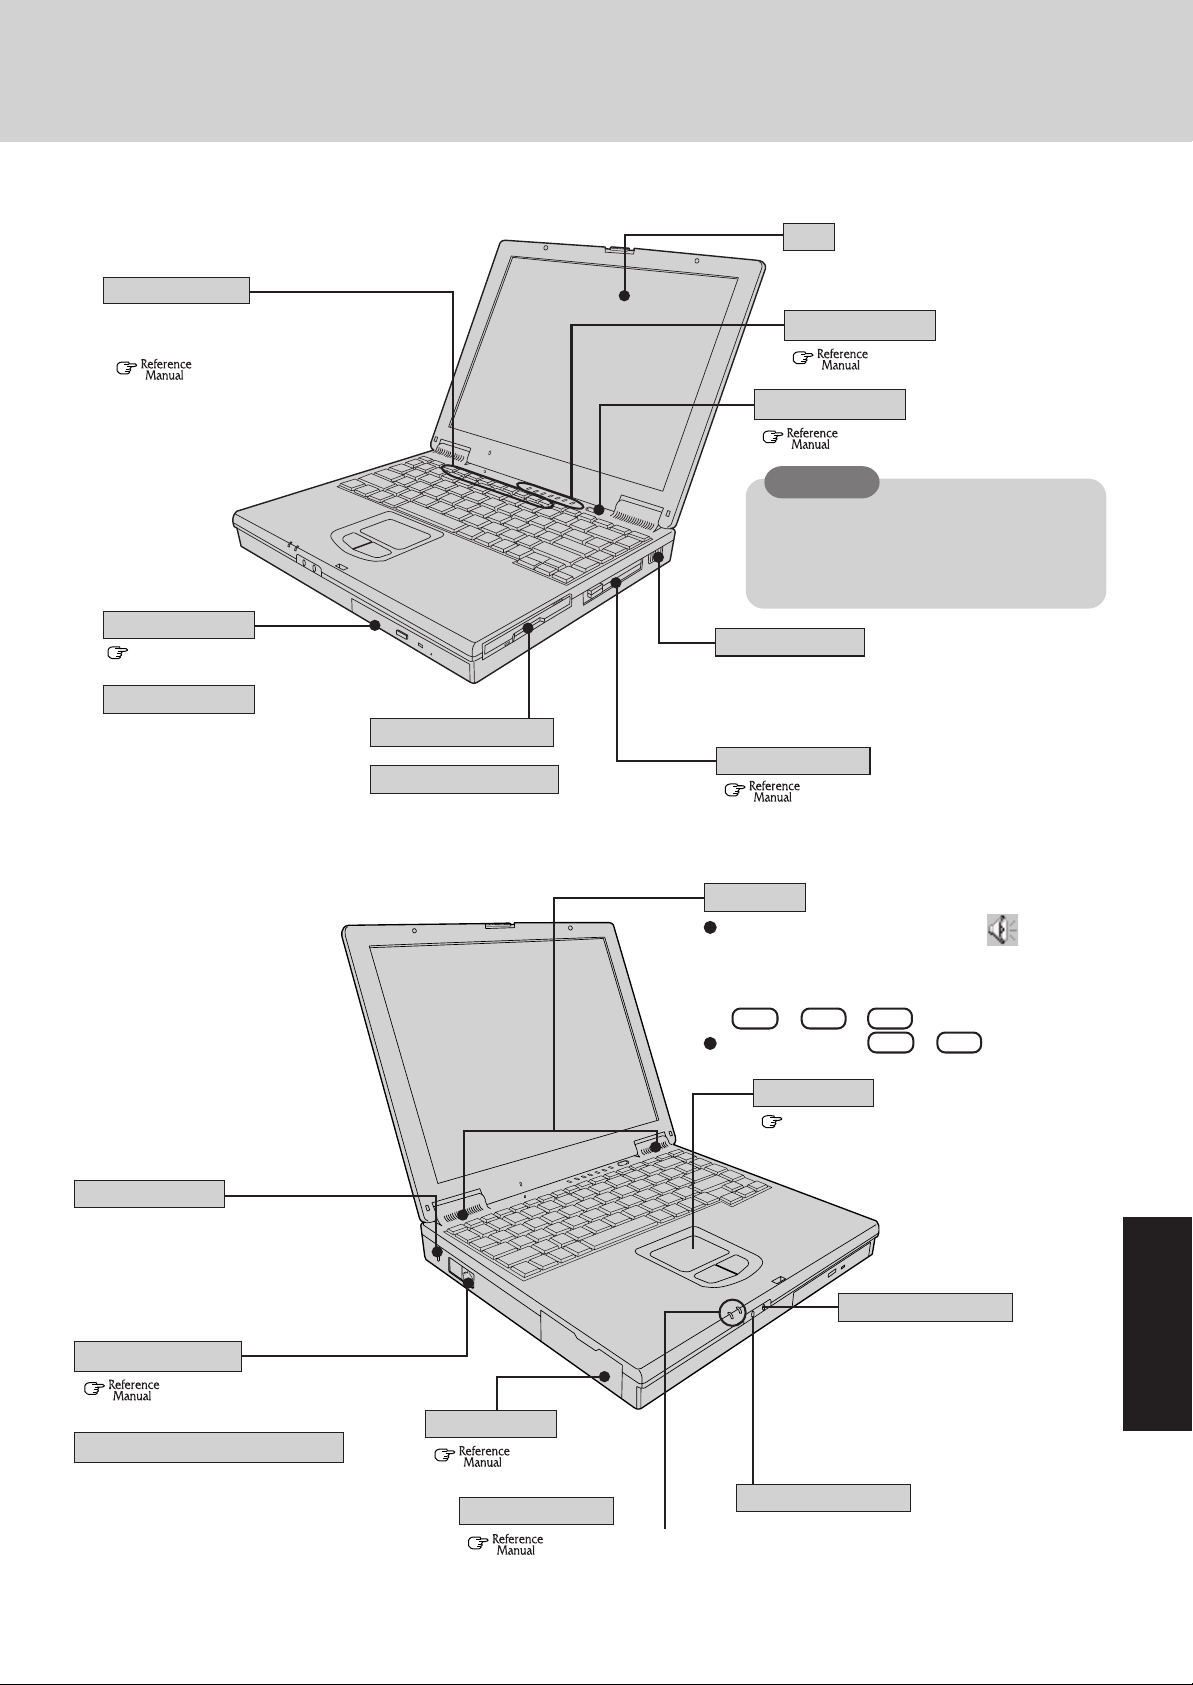
Names and Functions of Parts
The illustrations shown may differ from the actual physical appearances.
LCD
Function Keys
For information on the key combinations available.
( "Key Combinations").
LED Indicators
( "LED Indicators")
Sleep Switch
( "Suspend/Hibernation Function")
CAUTION
Only when the computer locks up should the
sleep switch be held more than four seconds to power off the computer. Data not
previously saved will be lost.
CD-ROM Drive
page 18
or
DVD-R OM Drive
Security Lock
A Kensington cable can be connected to prevent theft of your computer. For more information, please
read the manual that comes with the
cable.
Internal Modem
(
Internal Modem & LAN Port
"Using Modem")
or
Po wer Switc h
Before using the computer for the first time, carefully read the [Limited Use License Agreement].
Floppy Disk Drive
or
SuperDiskTM Drive
*1
SuperDiskTM and SuperDisk logo are trademarks of Imation Corp.
Battery Pack
(
*1
"Battery Power")
If you agree to the conditions, remove the seal.
PC Card Slots
(
Speakers
T o adjust the volume*2, select the on the task
bar, then [Volume Control].
*2
Y ou may also use the function keys to perform this operation
( Fn + F5 or F6 ).
Speaker on/off : Fn + F4
Touch Pad
( page 14)
"Using PC Cards")
Headphone Jack
Use this connector to connect
headphones or amplifier-equipped
speakers. Audio output from the
internal speaker is disabled when
headphones or external speakers
are connected.
LED Indicators
(
Right: Power Indicator
Left: Battery Indicator
"LED Indicator")
Microphone Jack
Use only a monaural condenser microphone.
Using an input source other than a monaural
condenser microphone may not allow audio to
be input or may damage the equipment.
29
Page 30
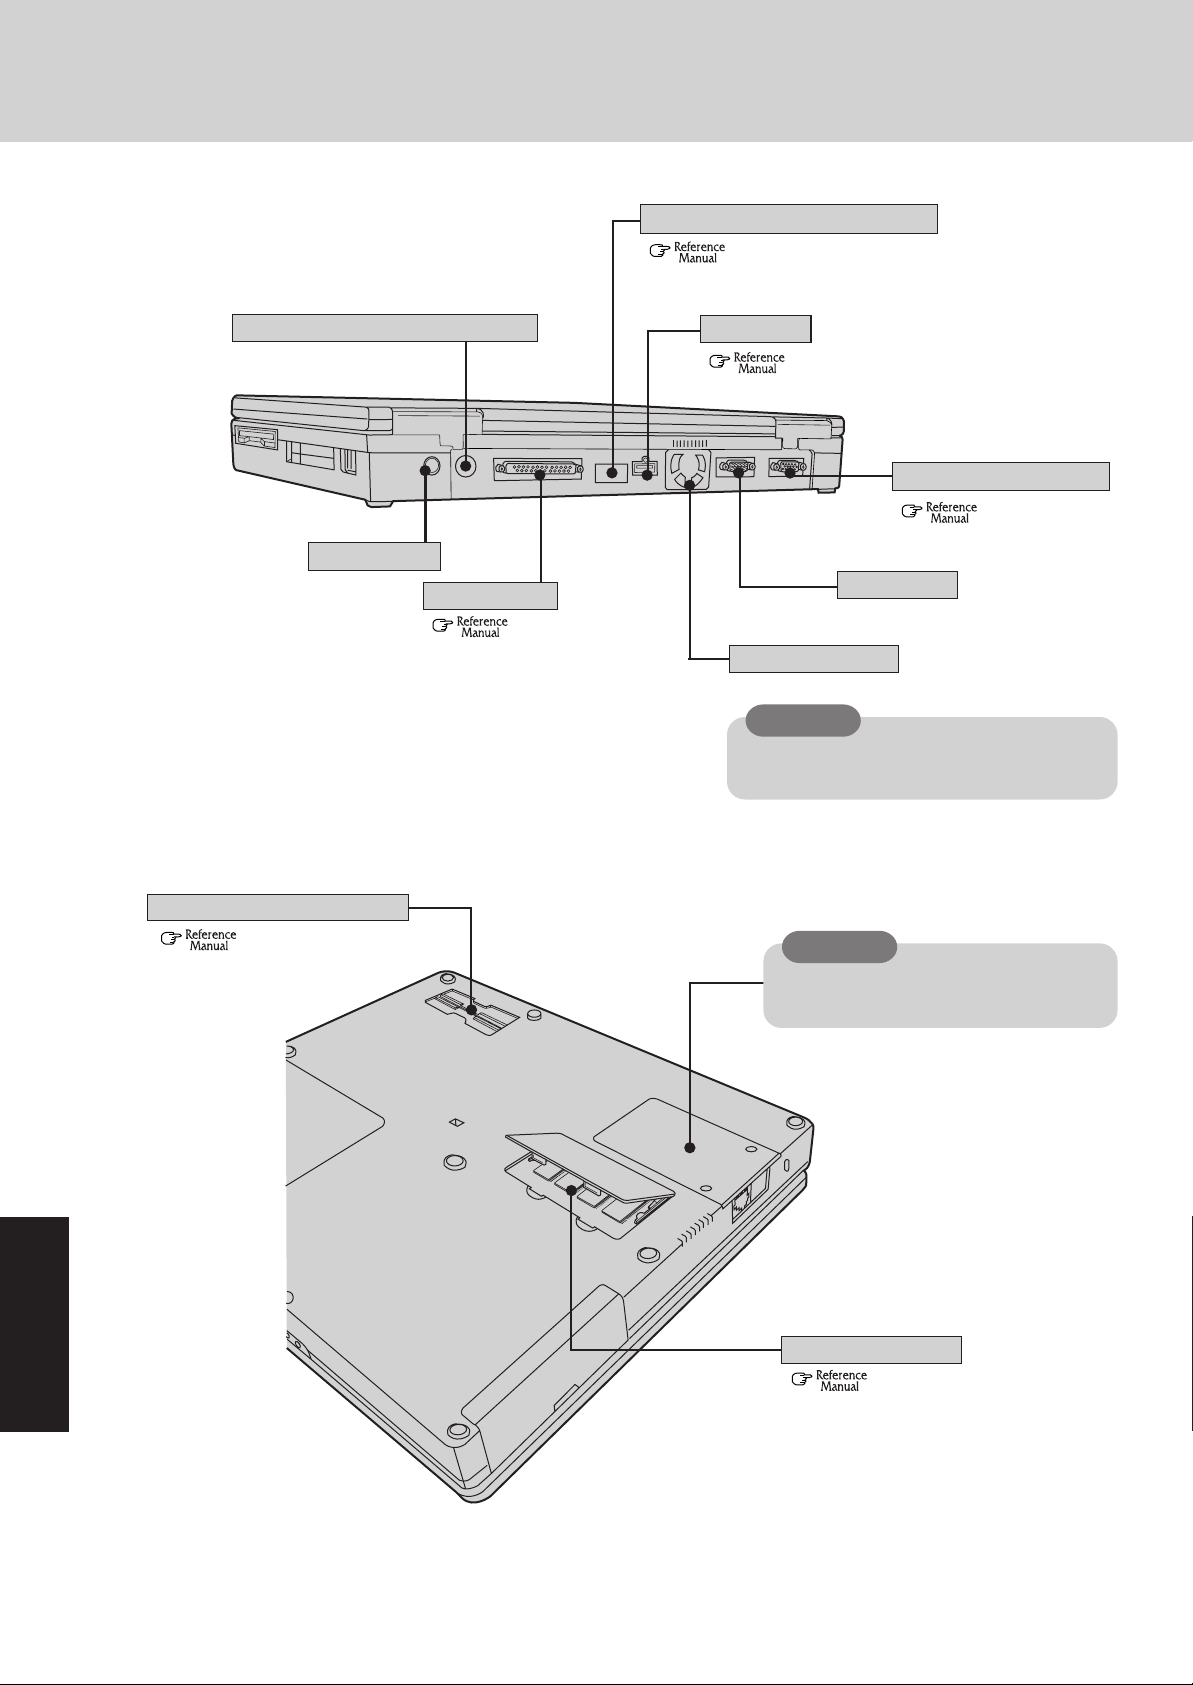
Names and Functions of Parts
Infrared Communication P ort
( "Infrared Data Communications")
External Keyboar d/Mouse Port
DC-IN Jack
Expansion Bus Connector
( "Port Replicator")
Parallel Port
(
"Using a Printer")
USB Port
(
"Using USB Devices")
External Display P ort
( "Using an External Display")
Serial Port
Ventilation Hole
These holes allow heat to exit.
CAUTION
Do not block or place the computer in a location that may prevent proper ventilation.
CAUTION
This cover is not to be opened by anyone
except authorized service personnel.
30
RAM Module Slot
(
"Adding Memory")
Page 31
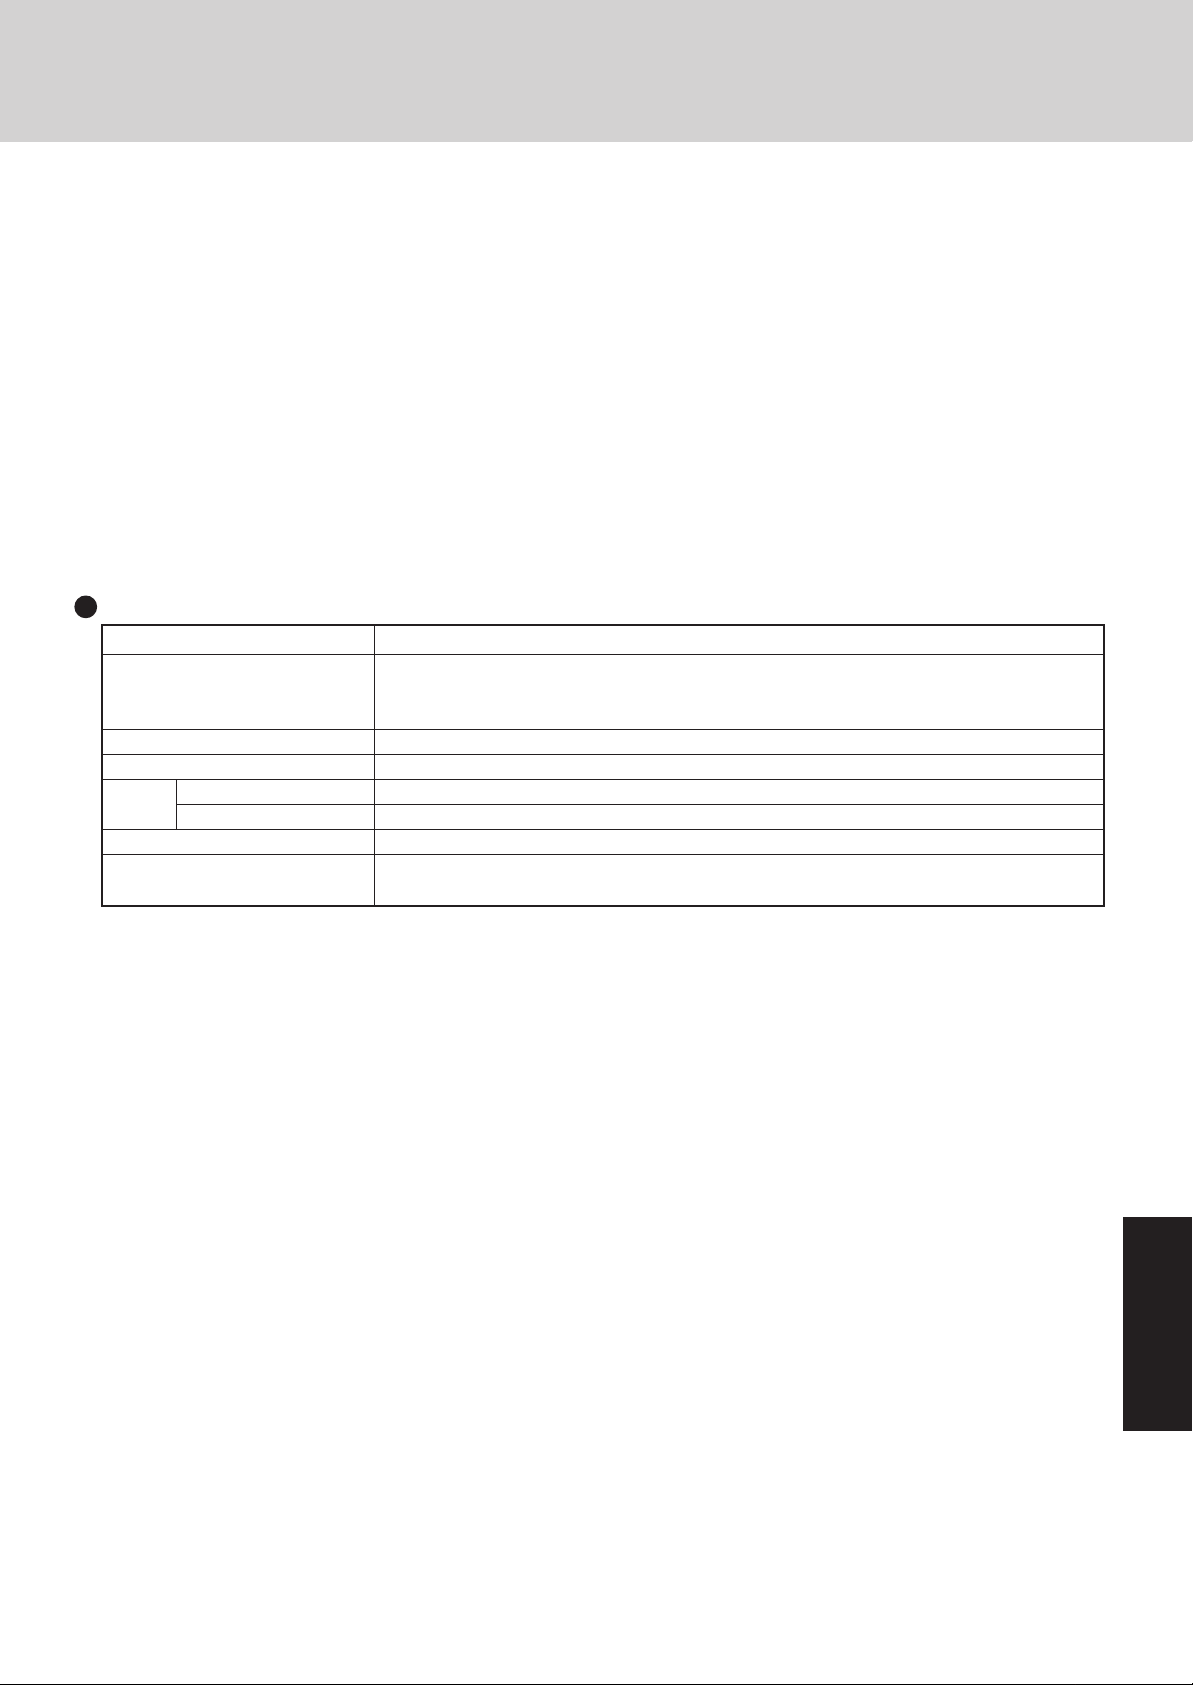
Specifications
This page provides the specifications for the basic model CF-47K4CJAAM. The model names differ depending on whether or not
a SuperDisk drive, DVD drive, and LAN port are included, and on the specifications of the CPU, memory size, hard disk, and OS.
The specifications of the computer can be checked as follows.
Model Name:
Check the bottom of the computer or the box the computer came in at the time of purchase.
CPU or Memory:
Use DMI Viewer to check these specifications (Select [Start] - [Programs] - [Panasonic] - [DMI Viewer]).
Hard Disk Drive (HDD):
Access the HDD’s “Properties” to check its capacity.
1.Double click [My Computer].
2. Select the [C:] drive, and then click the right mouse button.
3. Select [Properties].
Main Specifications
Model No. CF-47K4CJAAM
CPU Intel
Memory (Expandable to) 96 MB (224 MB Max. )
Video Memory 2.5 MB
LCD Type 14.1" (TFT)
Displayed Colors*
1
Hard Disk Drive 12 GB*
Operating System Microsoft
®
Mobile Pentium® III Processor
L1 Cache Memory: 32 KB L2 (Second) Cache Memory: 256 KB
450 MHz
256/65536/262144 colors (640 x 480 dots/800 x 600 dots/1024x768 dots)
2
®
Windows® 95
(FAT32 File System)
*1800 x 600 16-color resolution is not supported. If this resolution is selected, the message "There is an error in the display settings" will appear
when you reboot. Start up again, selecting 256 Colors, High Color (16 bits), or True Color (24 bits), following the instructions on the screen.
Besides this phenomenon, you might encounter some unexpected behavior. Do not select 16 color mode in any resolution.
A 16 M color display is achieved by using the dithering function.
2
1GB = 109 bytes, 11.7 GB FAT32 partition + 280 MB special partition.
*
31
Page 32
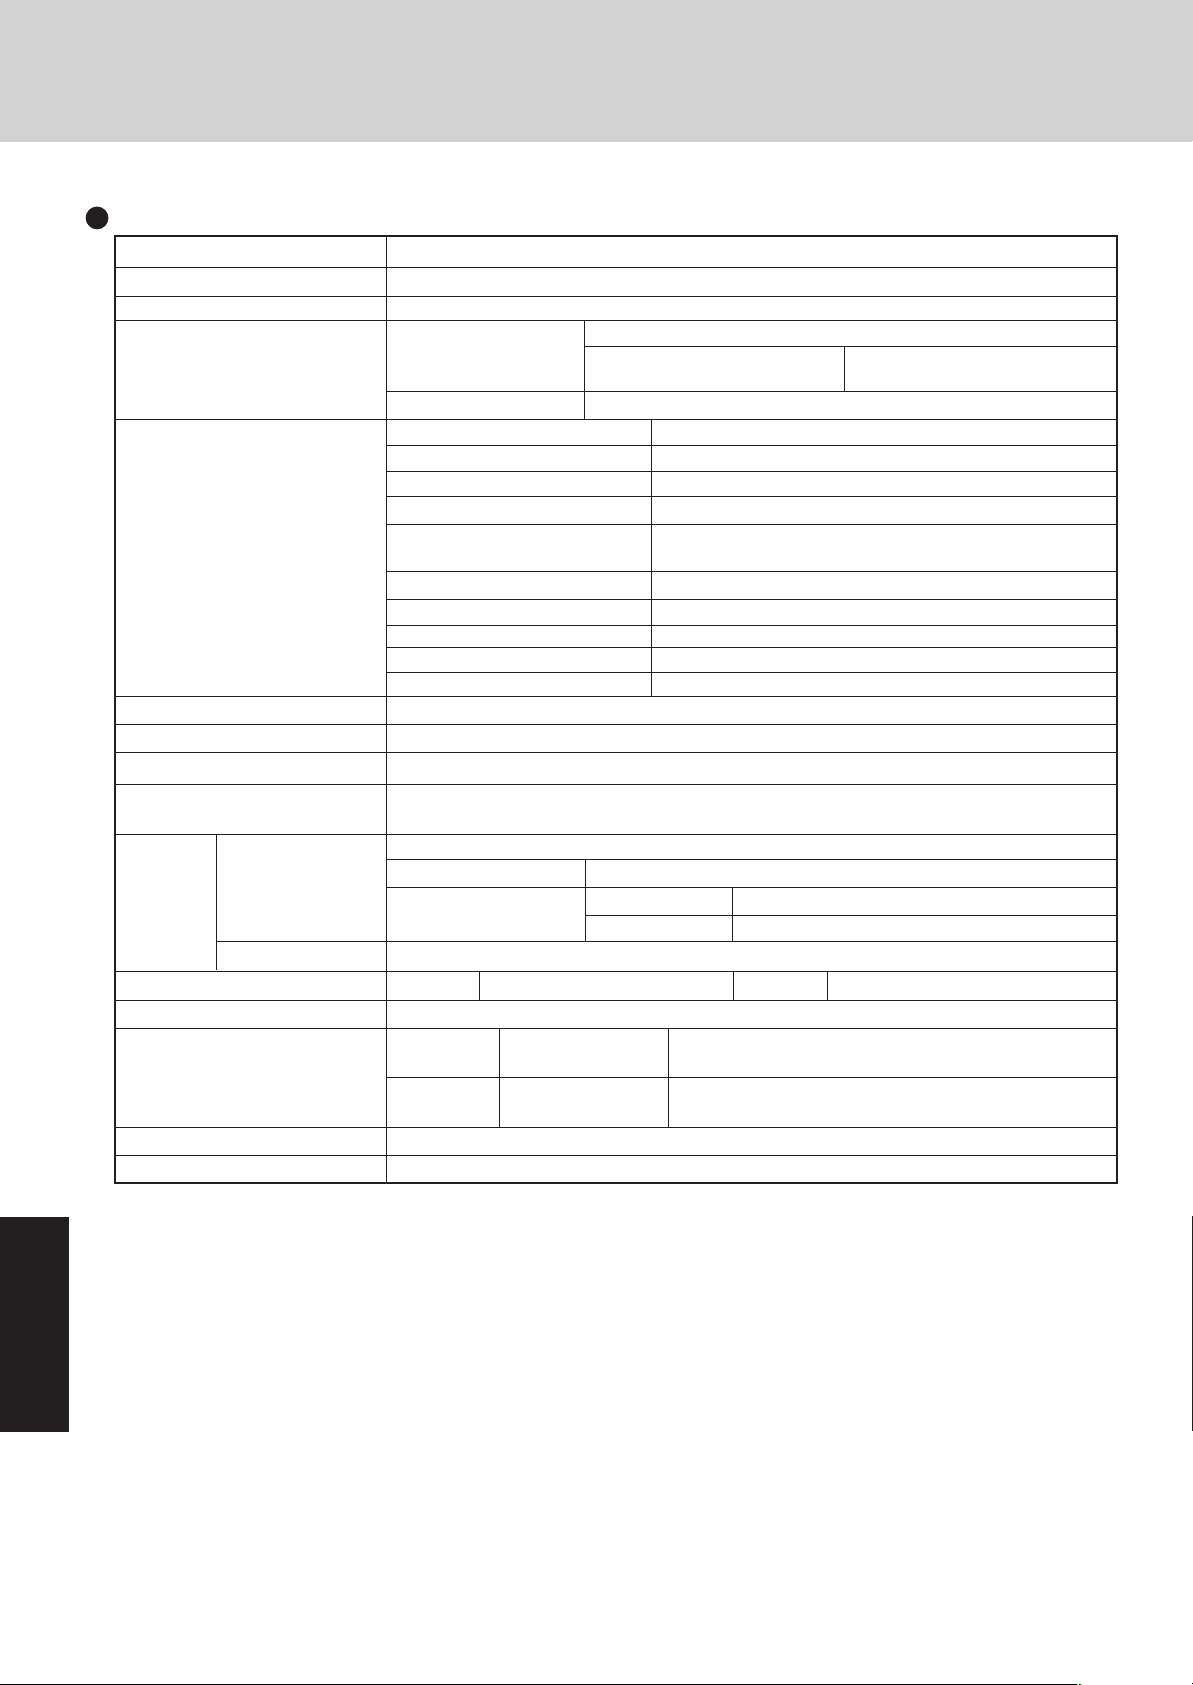
Specifications
Other Specifications
Keyboard 87 keys
Floppy Disk Drive 720 KB/1.44 MB (two-mode)
CD-ROM Drive 24X speed (MAX)
PC Card Slots Two Type I or T ype II, or one Type III
Slots Allowable current 3.3 V: 400 mA, 5 V: 400 mA,
(total for two slots) 12 V: 120 mA
RAM Module Slot*
Parallel Port Dsub 25-pin female
External Display Port Mini Dsub 15-pin female
Serial Port Dsub 9-pin male
Microphone Jack*
Interface Headphone Jack Miniature jack, 3.5 DIA
Infrared Communication Port IrDA 1.1 compliant, 4 Mbps data transmission speed*
External Keyboard/Mouse Port Mini DIN 6-pin female
Expansion Bus Connector Dedicated 100-pin female
USB Port 4-pin
Internal Modem Data: 56 kbps (V.90 & K56flex) FAX:14.4 kbps
Pointing De vice Touch Pad
Speaker Stereo Speaker (built in)
Utility Programs Setup Utility, DMI Viewer, Panasonic Hand Writing, Panasonic Battery Monitor
Sound PC'98 specification Compliant, Maximum 64-voice XG capital Wavetable,
Synthesizer including GM compatibility, Sound Blaster Pro Compatibility
Battery Pack Li-ion 10.8 V, 4.5 Ah
Operating Time*
Battery Charging Time*
Clock Battery Coin type lithium batter y 3.0 V
AC Adapter*
5
Input 100 V - 240 V AC, 50 Hz/60 Hz Output 15.6 V DC, 3.85 A
Po wer Consumption Approx. 60 W*
In use Temperature 5 °C to 35 °C {41 °F to 95 °F}
Environment Humidity 30% to 80% RH (No condensation)
Not in use Temperature -20 °C to 60 °C {-4 °F to 140 °F}
Physical Dimensions
(W X H X D)
307 mm X 45 mm X 253 mm {12.1 " X1.8 " X 10 "}
Weight Approx. 3.1 kg {Approx. 6.8 lb.}
*1Only a RAM card designed for PC100 can be added.
2
*
Use only a monaural condenser microphone.
3
Separate communications software is necessary.
*
4
Varies depending on the usage conditions.
*
5
The AC adapter is compatible with power sources up to 240 V AC adapter.
*
This computer is supplied with a 125 V AC compatible AC cord.
6
Approx. 1.5 W when the battery pack is fully charged (or not being charged) and the computer is OFF.
*
Approx. 3.0 W when the [Wake up from LAN] has been set [Enable] (Model with both an internal modem and an internal LAN port).
1
144-pin, 3.3-V, SO-DIMM, SDRAM, PC100 Compliant
2
Miniature jack, 3.5 DIA
Impedance 32 Ω, Output Po w er 4 mW x 2
4
4
Approx. 1.5 hours - 4.0 hours
Power On Approx. 5.5 hours
Power Off Approx. 3.0 hours
6
(maximum when recharging in the ON state)
Humidity 30% to 90% RH (No condensation)
3
32
Page 33

<MEMO>
33
Page 34

LIMITED W ARRANTY
For U.S.A.
PANASONIC PERSONAL COMPUTER AND PERIPHERALS LIMITED WARRANTY
Panasonic Personal Computer Company (referred to as “Panasonic”) will repair this product (other than software , which is covered by a separate
warranty) with new or rebuilt parts, free of charge in the U.S.A. for three (3) years from the date of original purchase in the event of a defect in
materials or workmanship. This warranty includes the AC Adapter but excludes the batteries and all other options and accessories which are
covered for a period of one (1) year from the date of purchase.
This warranty is extended solely to the original purchaser. A purchase receipt or other proof of date of original purchase will be required before
warranty performance is rendered.
This warranty only covers failures due to defects in materials or workmanship which occur during normal use. It does not cover damage which
occurs in shipment or failures which are caused by products not supplied by Panasonic, or f ailures which result from alteration, accident, misuse,
introduction of liquid or other foreign matter into the unit, abuse, neglect, installation, maladjustment of consumer controls , improper maintenance ,
modification or service by anyone other than a Factory Service Center or authorized Panasonic Service Dealer, or damage that is attributable to
acts of God.
Limits and Exclusions:
There are no other express warranties except as listed below.
PANASONIC SHALL NOT BE LIABLE FOR LOSS OF DATA OR OTHER INCIDENTAL OR CONSEQUENTIAL DAMAGES RESULTING FROM
THE USE OF THIS PRODUCT, OR ARISING OUT OF ANY BREACH OF THIS WARRANTY. ALL EXPRESS AND IMPLIED WARRANTIES,
INCLUDING THE WARRANTIES OF MERCHANTABILITY AND FITNESS FOR A PARTICULAR PURPOSE ARE LIMITED TO THE APPLICABLE WARRANTY PERIOD SET FORTH ABOVE. Some states do not allo w the exclusion or limitation of incidental or consequential damages,
or limitations on how long an implied warranty lasts, so the above limitations or exclusions may not apply to you.
This limited warranty gives you specific legal rights, and you may also have other rights which vary from state to state. If a problem with your
product develops during or after the warranty period, you may contact our representatives at 1-800-LAPTOP5. If the problem is not handled to
your satisfaction, then write to the Consumer Affairs Division at the address indicated below.
SOFTWARE LIMITED WARRANTY
Panasonic Personal Computer Company (referred to as “Panasonic”) warrants to you only that the disk(s) or other media on which the Programs
are furnished will be free from defects in materials and workmanship under normal use for a period of sixty (60) days from the date of delivery
thereof to you, as evidenced by your purchase receipt.
This is the only warranty Panasonic makes to you. Panasonic does not warrant that the functions contained in the Programs will meet your
requirements or that the operation of the Programs will be uninterrupted or error free.
Panasonic’s entire liability, and your exclusive remedy under this warranty shall be limited to the replacement, in the United States, of any
defective disk or other media which is returned to Panasonic’s Authorized Service Center, together with a copy of the purchase receipt, within the
aforesaid warranty period.
Anything in the foregoing to the contrary notwithstanding, Panasonic shall ha ve no obligation for an y defects in the disk(s) or other media on which
the Programs are furnished resulting from your storage thereof, or for defects that have been caused by operation of the disk(s) or other media
otherwise than on the Product or in environmental conditions other than those specified by Panasonic by alteration, accident, misuse, abuse,
neglect, mishandling, misapplication, installation, maladjustment of consumer controls, improper maintenance, modification of damage that is
attributable to acts of God. In addition, Panasonic shall have no obligation for any defects in the disk(s) or other media if you have modified, or
attempted to modify any Program.
DURATION OF IMPLIED WARRANTIES, IF ANY, IS LIMITED TO SIXTY (60) DAYS.
PANASONIC ASSUMES NO RISK OF AND SHALL NOT IN ANY CASE BE LIABLE FOR ANY DAMAGES, INCLUDING, WITHOUT LIMITATION,
ANY SPECIAL, INCIDENTAL, CONSEQUENTIAL, OR PUNITIVE DAMAGES ARISING FROM BREACH OF WARRANTY OR CONTRACT,
NEGLIGENCE OR ANY OTHER LEGAL THEORY, INCLUDING, WITHOUT LIMITATION LOSS OF GOODWILL, PROFITS OR REVENUE,
LOSS OF USE OF THE PR OGRAMS OR PRODUCTS OR ANY ASSOCIATED EQUIPMENT, COST OF CAPITAL, COST OF ANY SUBSTITUTE
EQUIPMENT, FACILITIES, SERVICES, DOWNTIME COSTS, OR CLAIMS OF ANY PARTY DEALING WITH YOU FOR SUCH DAMAGES.
Some states do not allow the exclusion or limitation of incidental or consequential damages, or limitations on how long an impl ied warranty lasts,
so the above limitations or exclusions may not apply to you.
This limited warranty gives you specific legal rights, and you may also have other rights which vary from state to state.
This Limited Warranty will be governed by the laws the State of New York, without regard to its conflict-of-laws rules.
34
* * *
To obtain service or technical assistance within the continental U.S.A. and Alaska.
DIAL T OLL FREE: 1-800-LAPTOP5
Correspondence requesting product information should be sent
to: Panasonic Personal Computer Company,
50 Meadowlands Parkway, Panazip 2F-5, Secaucus, NJ 07094
Page 35
For Canada
PANASONIC COMPUTER AND PERIPHERALS LIMITED WARRANTY
Coverage – Panasonic Canada Inc. (“PCI”) w arrants to you, the first end user customer , this computer product (excluding software media), when
purchased from PCI or from a PCI authorized reseller, to be free from defects in materials and workmanship under normal use, subject to the
terms set forth below, during the period of warranty coverage specified.
Scope of Coverage Period of Coverage Type of Failure Coverage
Whole Product (except Batteries), AC Adapter, CD-ROM (if
factory installed), Port Replicator, Extra Memory Modules
and all other Options and Accessories
Batteries, CD-ROM (unless factory installed), Port
Replicator, Extra Memory Modules and all other Peripherals, Options and Accessories
Remedy – In the event of a warranty claim, contact PCI’s representatives within the applicab le w arr anty period, identifying the nature of the def ect
claimed, at 1-800-668-8386 between 9:00 A.M. and 5:00 P.M., Eastern Time Zone, Mon. – Fri. (excluding holidays) for instructions on how to
obtain service. A purchase receipt or other proof of date of original purchase is required before warranty service is performed. Defective parts
covered by this Limited Warranty will be repaired or replaced with new or comparable rebuilt parts on an exchange basis. Warranty replacement
or repair is subject to the terms of this Limited Warranty for the balance of the original period of warranty coverage.
No Coverage – This Limited Warranty does not cov er products purchased outside Canada. Neither does it cover damage to, failure of, or defects
in a product or accessory through mishandling, improper installation, abnormal use, misuse, neglect, accident, introduction of liquid or other
foreign matter into the product, alteration or servicing by anyone not authorized by PCI, or act of God.
IF YOU SHIP THE PRODUCT FOR WARRANTY SERVICE
Carefully pack the product, preferab ly in the original carton. Include details of defect claimed and proof of date of original purchase. No liability
is assumed for loss or damage to the product while in transit, if you chose your own transportation carrier.
Three (3) Years from Date of Original End
User Customer Purchase
One (1) Year from Date of Original End
User Customer Purchase
Defective Materials or Workmanship
Defective Materials or Workmanship
SOFTWARE MEDIA LIMITED WARRANTY
Coverage - Panasonic Canada Inc. (“PCI”) warrants to you, the first end user customer, that the disk(s) or other media on which software
program(s) is/are supplied will be free from defects in materials and workmanship under normal use in Canada for a period of sixty (60) days from
date of receipt as evidenced by your purchase receipt for your Panasonic Computer product.
THIS IS THE ONLY WARRANTY THAT PCI MAKES RESPECTING THE SOFTWARE MEDIA. PCI does not warrant the software. Please refer
to the software licensor’s written warranty (accompanying the copy of the software) for any software warranty claim.
Claim Procedure – In the event of a defect in material or workmanship in the media during the sixty (60) day warranty period, and you return it,
transportation costs prepaid, to Panasonic Canada Inc., Computer Products Marketing, at the above address , within the warranty period, together
with a copy of your purchase receipt, and an explanation of the suspected defect, PCI will replace in Canada the def ective disk(s) or other media.
Remedy – PCI’s entire liability, and your only remedy for any breach of this software media warranty is limited to replacement of the media only.
It does not cover any other damages, including, but not limited to, loss of use or profit loss, or special, indirect or consequential damages , or other
claims, whether or not of similar character.
No Coverage – This limited warranty does not apply if the disk(s) or other media has been used in other than a Panasonic product, or in
environmental conditions other than those specified by PCI or the manufacturer, or if subjected to misuse, neglect, mishandling, modification or
attempted modification of the program, or if damaged by accident or act of God. PCI is not responsible for damage to or loss of any prog ram, data
or removable storage media.
GENERAL
NO OTHER WARRANTIES – PCI DISCLAIMS ALL OTHER WARRANTIES, EITHER EXPRESS OR IMPLIED, INCLUDING, BUT NOT LIMITED
TO , IMPLIED WARRANTIES OF MERCHANTABILITY AND FITNESS FOR A PARTICULAR PURPOSE, WITH RESPECT TO THE SOFTWARE,
SOFTWARE MEDIA, COMPUTER PRODUCT, OPTIONS AND ACCESSORIES.
NO LIABILITY FOR CONSEQUENTIAL DAMA GES – IN NO EVENT SHALL PCI BE LIABLE FOR ANY SPECIAL, INDIRECT OR CONSEQ UENTIAL DAMAGES ARISING FROM ANY BREACH OF THE LIMITED WARRANTIES SET OUT IN THIS DOCUMENT, OR FROM THE USE OF
THE COMPUTER PRODUCT, INCLUDING, WITHOUT LIMITATION, LOSS OF DATA, BUSINESS, PROFIT OR GOODWILL.
IN ANY EVENT, PCI’S MAXIMUM LIABILITY FOR ANY BREACH SHALL NOT EXCEED THE AMOUNT ACTUALLY PAID BY YOU FOR THE
COMPUTER PRODUCT.
NO ACTION, REGARDLESS OF ITS BASIS, MAY BE BEGUN AGAINST PCI MORE THAN TWO (2) YEARS AFTER THE CAUSE OF ACTION
AROSE.
Statutory Warranties – Some jurisdictions do not allow these limitations or exclusions, so they may not apply to you.
35
Page 36
As an
ENERGY STAR
determined that this product meets the
®
Partner , Matsushita Electric Industrial Co., Ltd. has
ENERGY STAR
®
guidelines for energy
efficiency.
Outline of the International ENERGY STAR® Office Equipment Program
The international
ENERGY STAR
®
Office Equipment Program is an international program
that promotes energy saving through the use of computers and other office equipment.
The program backs the development and dissemination of products with functions that
effectively reduce energy consumption. It is an open system in which business proprietors
can participate voluntarily . The tar geted products are office equipment such as computers,
displays, printers, facsimiles, and copiers. Their standards and logos are uniform among
participating nations.
Panasonic Personal Computer Company,
50 Meadowlands Parkway, Panazip 2F-5,
Secaucus, NJ 07094
© Matsushita Electric Industrial Co., LTD. 1999
Printed in Japan
Panasonic Canada Inc.
5770 Ambler Drive Mississauga,
Ontario L4W 2T3
FJ1199-0
DFQX2720ZA
 Loading...