

Panasonic CF-30KQPAXLM Reference Manual

1
Reference Manual
Personal Computer
Model No. CF-30 Series
We recommend that this Reference Manual be printed.

Key Combinations
NOTE
Do not repeatedly press the keys in quick succession.
Do not use the key combinations together with touch pad (external mouse), touchscreen (only for model with touch-
screen) or other key operations.
Do not use the key combinations before you log on to Windows. Wait until the hard disk drive indicator turns off.
On the Setup Utility screen, you can use the key combinations of
The key combinations may not work with some applications.
The popup menu icon appears after logging on to Windows. It may not appear in some application conditions (e.g.,
when [Command Prompt] is set to “Full Screen”).
Key Function Popup menu icon
*1
Fn+F1
Fn+F2
LCD brightness
(
Fn+F1
*1
= down / Fn+F2= up)
Fn+F1, Fn+F2
and Fn+F3.
2
Fn+F3
Fn+F4
Display switching ( page 37)
(When an external display is connected)
Internal LCD Simultaneous display External display
CAUTION
Do not press any keys until the display has finished switching.
Do not use this function:
• When an external display is not connected.
• When playing motion video such as DVD or MPEG.
• When using the Extended Desktop.
• When showing a game screen such as pinball.
*1
Speaker on/off
NOTE
Beeps do not sound if you turn off the speaker sound.
*2
OFF
(MUTE)
ON

Key Combinations
3
Key Function Popup menu icon
*1
*1
Volume
(
Fn+F5
= down / Fn+F6= up)
Fn+F5
Fn+F6
Fn+F7
Fn+F8
Activate standby ( page 8)
Concealed Mode on/off
You can select on/off of LCD Backlight, LED, Sound
*2
, Wireless Radio and Backlit
Keyboard.
NOTE
You have to set [Concealed Mode] to [Enabled] in Setup Utility
( page 72).
You can set the devices turned off in [Concealed Mode] with Setup Utility
( page 72).
If you press
Fn+F8
in succession, the Concealed Mode may not be
switched. More than 4 minutes interval is necessary to switch on/off.
Fn+F9
Fn+F10
*1
These key combinations are disabled when [Concealed Mode] is enabled.
*2
Even if [Sound] is set to [OFF] on the [Concealed Mode Configuration] menu, icon on the notification area and [Device volume]
display do not show mute state.
However, audio from the speaker is not heard.
Remaining battery charge ( page 16)
Activate hibernation ( page 8)
Key Combinations
Hotkey Settings
You can make 2 settings:
• Fn key lock
Fn
is locked (pressed-down) until you press another key. Use this when pressing difficult key combinations.
• Popup menu icon on/off
1 Start up the Hotkey Settings.
Click [start] - [All Programs] - [Panasonic] - [Hotkey Settings].
2 Make the settings.
[Use Fn key lock]
When using an
A Press
B Press another key. (Lock released)
When using successive
A Press
B Press another key.
Fn
Fn
Fn key remains locked until you press
Fn
key combination
once. (Locked)
twice. (Locked)
Fn
key combinations
Fn
again.
4
[Notification]
[Make sounds when Fn key is pressed]
[Show status on screen]: Displays the Fn key status on the notification area.
Fn
•:
•:
[Disable popup]
The popup menu icon will not be displayed.
is locked.
Fn
is not locked.
*3
3 Click [OK].
NOTE
You can have different settings for each user.
*3
If the speaker is muted or [Sound] is turned off in [Concealed Mode Configuration], beeps do not sound.

Touchscreen
<Only for model with touchscreen>
You can use the touchscreen function to perform the same operation as the touch pad and mouse. Touch the screen surface
with the stylus (included).
To right-click
A Click on the notification area.
changes to .
B Click the object you want to right-click.
returns to .
NOTE
You need to make the following setting for each user.
A Click [start] - [All Programs] - [Fujitsu Touch Panel (USB)] - [Touch Panel Configuration].
B Select the settings, and then click [OK].
Do not add a check mark to [Delete Cursor] since the display may be distorted.
If you add a check mark for [Use] in [Hold [Ctrl] key down + Touch the screen] of [Touch Panel Configuration], touching
the screen may always be recognized as a right-click. To return to the normal operation, press
The touchscreen function does not work in the Setup Utility, in the full screen of [Command Prompt].
Ctrl
5
on the keyboard.
Touchscreen Calibration
1 Run [Touch Screen Calibration Utility].
Click [start] - [All programs] - [Fujitsu Touch Panel (USB)] - [Touch Screen Calibration Utility].
2 Using the stylus, touch each of the 12 “+” target marks one by one until it blinks, and then
press
3 Press
NOTE
Perform the touchscreen calibration for each user.
Enter
Enter
.
.

Panasonic Hand Writing
You can make a bitmap file (.bmp) of a simple character and a figure such as signature by handwriting on the touch pad and
the touchscreen (only for model with touchscreen).
CAUTION
Do not use the Fast User Switching function while Panasonic Hand Writing is active.
If you install other pointing devices (e.g., commercially available mouse driver) and overwrite the touch pad driver,
Panasonic Hand Writing will not work.
NOTE
The display of Panasonic Hand Writing may be distorted if the number of display colors is changed. Right-click on
the notification area and click [Exit Panasonic Hand Writing], and then restart Panasonic Hand Writing.
Panasonic Hand Writing may not work properly if another application software is active. In this case, close the applica-
tion software and try handwriting again.
6
Starting Panasonic Hand Writing
1 Double-click on the notification area.
Alternatively you can click [start] - [All Programs] - [Panasonic] - [Panasonic Hand Writing].
NOTE
Select the image size before handwriting by clicking [Option] - [Window size]. If you change the size after handwriting,
the image quality will become lower.
You can copy the bitmap image by clicking [Edit] - [Copy], and paste it in another application software that supports bit-
map format.
The touch pad mode will not work properly when using the extended desktop.
The touch pad mode will be canceled in the following cases.
• Switching to another application
• Resuming from standby or hibernation
•Pressing
• Touching the touchscreen (only for model with touchscreen)
An external mouse or trackball connected via the port replicator (optional) will not work during handwriting in the touch
pad mode.
Alt

Standby and Hibernation Functions
The standby or hibernation function allows you to shut off the computer without closing programs and documents. You can
quickly return to the programs and documents that you were working on before standby or hibernation.
Function Data is saved to Recovery time Power supply
Standby Memory Short Required. (If power is not supplied, all data will be lost.)
Hibernation Hard disk Rather long Not required. (However power is slightly consumed to
keep the hibernation.)
7
Setting Standby or Hibernation
1 Click [start] - [Control Panel] - [Performance and Maintenance] - [Power Options] -
[Advanced].
2 Select [Stand by] or [Hibernate] for [When I close the lid of my portable computer:] /
[When I press the power button on my computer:], and then click [OK].
NOTE
You do not need to make the setting if you use the Windows menu to enter standby or hibernation.
Precautions
Connect the AC adaptor if the computer will be in standby mode for a long period of time. If you cannot use the AC adap-
tor, use hibernation instead.
Using standby or hibernation repeatedly may cause malfunction of the computer. To stabilize computer operation, restart
Windows regularly (about once a week) without using standby or hibernation.
Save the necessary data.
Close files you have opened from removable disk and network drive.
The password you set in the Setup Utility is not requested at resuming. You can use the Windows password for security in
standby or hibernation.
A Click [start] - [Control Panel] - [User Accounts], and select the account.
B Click [Create a password] and set the password.
C Click [start] - [Control Panel] - [Performance and Maintenance] - [Power Options] - [Advanced], and add the check mark
in [Prompt for password when computer resumes from standby].

Standby and Hibernation Functions
Do not enter standby or hibernation in the following conditions, otherwise the data or file may be corrupted, standby or
hibernation may not work, or malfunction may occur in the computer or the peripheral devices.
• When any of the multimedia pocket device indicator
cator is on.
• When playing/recording audio files or displaying motion video such as MPEG files.
• When playing a DVD-Video.
• When writing to a disk.
• When using communication software or network functions.
• When using a PC Card.
(If the card fails to work normally, restart the computer.)
• When an external mouse is connected to the serial port.
The computer does not enter standby or hibernation immediately after resuming. Wait approximately one minute.
*1
Except when using a second battery pack
*1
, the hard disk drive indicator and the SD Memory Card indi-
8
Entering/Resuming from Standby or Hibernation
To enter standby or hibernation
1 Close the display, or slide the power switch (A) until a beep
*2
sounds.
Standby: The power indicator (B) blinks green.
Hibernation: The power indicator (B) goes off.
You can alternatively use the Windows menu to enter standby or hibernation. To
enter standby, click [start] - [Turn Off Computer] - [Stand By]. To enter hibernation, click [start] - [Turn Off Computer], then press and hold
[Hibernate].
CAUTION
While the computer is entering standby or hibernation
Do not:
• Touch the keyboard, touch pad, touchscreen (only for model with touchscreen), or power switch.
• Use an external mouse or other peripheral device.
• Connect or disconnect the AC adaptor.
• Close or open the display.
Wait until the power indicator blinks green (standby) or goes off (hibernation).
It may take 1 or 2 minutes to enter standby or hibernation.
Shift
and click

Standby and Hibernation Functions
At the beep*2, immediately release the power switch. If you slide and hold the power switch for longer than 4 seconds,
the computer will forcibly shut down and unsaved data will be lost even if you have set [Shut down] in [When I press
the power button on my computer] ( page 7 “Setting Standby or Hibernation”).
In standby or hibernation
Do not attach or remove a multimedia pocket device (excluding a second battery pack) and peripheral device. Doing
so may cause malfunction.
Power is consumed in standby mode. Power consumption may increase when a PC Card is inserted. When power is
exhausted, the data retained in memory will be lost. Connect the AC adaptor when using the standby function.
Do not turn on/off the wireless switch.
*2
If the speaker is muted or [Sound] is turned off in [Concealed Mode Configuration], beeps do not
sound.
9
To resume from standby or hibernation
1 Open the display, or slide the power switch (A).
When [Stand by] or [Hibernate] is selected as the setting for [When I close the
lid of my portable computer] ( page 7), you can resume operation opening the
display.
CAUTION
Do not perform the following operations until resuming is complete. After the display has resumed, wait approximately
30 seconds (normally) or 60 seconds (when the computer is on a network).
• Touch the keyboard (except for password input), touch pad, touchscreen (only for model with touchscreen), or power
switch.
• Use an external mouse or other peripheral device.
• Connect or disconnect the AC adaptor.
• Close or open the display.
• Shut down or restart Windows.
• Enter standby or hibernation.

Saving Power
You can extend battery life and save power also during AC adaptor usage.
10
Reducing Power Consumption
Use the methods below to reduce power consumption.
Change [Power Options]
Click [start] - [Control Panel] - [Performance and Maintenance] [Power Options] to select [Max Battery] under [Power schemes].
While [Portable/Laptop] is selected under [Power Options] as the factory default, selecting [Max Battery] will further reduce power consumption.
Also, make detailed settings such as reducing the time entered in the
[Turn off monitor] setting.
Use Power Saving Utility ( page 11)
Power Saving Utility provides additional power saving functions not
available in [Power Options].
Press
Reducing internal LCD brightness will reduce power consumption.
Turn off the computer when it is not in use
You can also turn off only the wireless LAN or Bluetooth power.
Disconnect external devices (USB devices, PC cards, external
mice, etc.) that are not being used
Use Standby/Hibernation
Press
to hibernation when you have to leave the computer. This shuts
down computer operation to reduce power consumption.
Disable Wake Up from wired LAN and Wake Up from wireless LAN functions when they are not needed. This reduces
power consumption in Standby/Hibernation.
To confirm current settings, click [start] - [All Programs] - [Panasonic] - [Power Saving Utility] to view [Wired LAN standby
power saving function] or [Wireless LAN standby power saving function].
Fn
+ F1 to reduce LCD brightness
Fn
+ F7 to set the computer to standby or Fn +
F10
to set it

Saving Power
11
Using Power Saving Utility
A single setting allows you to enable all the following power saving features. Enable each of these functions to prolong battery operation time.
Intel video driver power saving function (Intel(R) Display Power Saving Technology)
This function adjusts video contrast, color and other factors to lower internal LCD power consumption while retaining adequate image quality.
Disable this function for work that requires subtle image and color nuances or in video editing using video editing applications.
Wired LAN standby power saving function
Enabling this function disables the Wake Up from wired LAN function to save power in standby/hibernation.
Disable this function if you want to use the Wake Up from wired LAN function.
Wireless LAN standby power saving function
Enabling this function disables the Wake Up from wireless LAN function to save power in standby/hibernation.
Disable this function if you want to use the Wake Up from wireless LAN function.
Setup
1 Click [start] - [All Programs] - [Panasonic] - [Power Saving Utility].
2 Click [Enable] for each function.
Click [OK] in the confirmation screen that appears.
To enable “Intel video driver power saving function”
Select [Enable], and slide the slide bar to the “Maximum
Battery” end.

Saving Power
12
3 Click [OK].
Click [Restore initial settings] to return to the factory default settings, and click [OK].
NOTE
You can also enable the Intel video driver power saving function as follows.
A Click [start] - [Control Panel] and click [Other Control Panel Options] under [See Also] on the left side of the screen
and select [Intel(R) GMA Driver for Mobile].
B Click [Notebook], [Apply] and [OK].
C Click [Display Settings].
D Click [Power Settings].
E Click [Modify Settings].
F Click [Intel(R) Display Power Saving Technology] to add a check mark.
G Move the slide bar to [Maximum Battery] and click [OK].
H Click [OK].
There is no need to reboot the computer.
For how to enable/disable the Wake Up from wired LAN function ( page 55)
For how to enable/disable the Wake Up from wireless LAN function ( page 65)

Security Measures
Use these features to protect your data.
Another security measure
• Embedded Security (TPM) (
Module (TPM)”.
Setting the Supervisor Password/User Password
Set the Supervisor Password before setting the User Password.
1 Start up the Setup Utility ( page 69).
2 Select [Security].
page 77): For further information, refer to the Installation Manual of “Trusted Platform
13
3 Select [Set Supervisor Password] or [Set User Password], and press
4 Enter your password in [Create New Password] and press
When the password has been set, you need to enter your password in [Enter Current Password] and press
Enter
To disable the password, leave the input field empty and press
.
Enter
Enter
.
5 Enter your password again in [Confirm New Password] and press
6 Press
CAUTION
Do not forget your password. If you forget your Supervisor Password, you will not be able to use your computer. Con-
tact Panasonic Technical Support.
When running the Setup Utility, do not leave and go away from your computer even for a short time, since other people
may set or change the password.
NOTE
The password will not be displayed on the screen.
You can use up to 32 alphanumeric characters (including spaces).
• The case (upper/lower) is ignored.
• To input numbers for the password, you cannot use the numbered keys on the keyboard.
• You cannot use
Disabling the Supervisor Password also disables the User Password.
F10
, and then select [Yes] and press
Shift
and
Ctrl
to input a password.
Enter
.
.
Enter
Enter
.
.

Security Measures
14
Preventing Your Computer from Unauthorized Use
You can set a start-up password to protect your computer from unauthorized use.
1 Set the password ( page 13), and select [Enabled] in [Password on boot] in the [Secu-
rity] menu of the Setup Utility ( page 77).
NOTE
If the Supervisor Password or User Password has been set, the password input screen will be displayed on starting-up
of the Setup Utility even though [Password on boot] is set to [Disabled].
Preventing Your Hard Disk Data from Being Read or Written
The hard disk lock function protects the hard disk data from being read or written when the hard disk is attached to another
computer. The data can be read/written when the hard disk is returned to the original computer. (Note that the hard disk lock
does not guarantee complete protection of the data.)
1 Select [Enabled] in [Hard Disk Lock] in the [Security] menu of the Setup Utility ( page
77).
CAUTION
For the data being read/written on the original computer, the Setup Utility settings must be the same as when the hard
disk was removed.
You cannot use the hard disk lock function without setting the Supervisor Password. Set the Supervisor Password
beforehand ( page 13).
When you have your hard disk drive repaired
• Contact Panasonic Technical Support.
• Before sending back the hard disk drive, be sure to set the [Hard Disk Lock] to [Disabled].
NOTE
The hard disk lock function works with the built-in hard disk. It does not work with the external hard disk.
We recommend you to set [Password on boot] to [Enabled] to ensure security though it is not required to enable the
hard disk lock.

Battery Power
Battery Indicator
Battery indicators: Main battery pack, Second battery pack
Battery indicator Battery status
Not lit The battery pack is not inserted or not being charged.
Orange Charging is in progress.
Green The battery is fully-charged.
15
Blinking green
Red The remaining battery is approximately 9% or less.
Blinking red The battery pack or the charging circuit is not operating properly.
Blinking orange The battery cannot be charged temporarily due to the following reasons:
Blinking green and
orange alternately
Blinking orange slowly When you set [Battery Charging Indicator] to [Flashing] on the [Main Menu] of [Setup Util-
*1
Only for the main battery pack.
*2
In high temperature mode, the 100% battery level is equivalent to 80% level of the normal temperature mode.
NOTE
Once the battery is fully charged, the computer performs recharging only when the battery level becomes less than
approximately 95%, so overcharging is avoided.
When [LED] is set to [OFF] on the [Concealed Mode Configuration] menu, LED disappears ( page 72).
*1
In high temperature mode, the battery pack is discharging the power to 80%*2 of normal
temperature mode ( page 17). Do not remove the battery pack in this status.
• Its internal temperature is out of the acceptable range.
• The power supply is not enough because software applications or peripheral
devices are consuming a large amount of power.
The temperature is low and the computer is warming up to prevent the hard disk drive
from malfunctioning. The computer will start automatically after warming-up.
ity].

Battery Power
Checking the Remaining Battery Charge
You can check the remaining battery charge on the screen.
(After logging on to Windows)
16
1 Press
When the battery pack is inserted (example)
When the battery pack is not inserted
When the battery pack is discharged (AC adaptor is disconnected)
Left icon: Main battery
Right icon: Second battery (optional)
NOTE
Fn+F9
.
: Normal temperature mode ( page 17)
: High temperature mode ( page 17)
: The discharging battery is surrounded with the yellow frame.
The battery display may not correspond to the actual remaining battery charge in the cases as below. To correct the
display, perform the Battery Recalibration ( page 19).
• The battery indicator remains red.
• The indicator lights orange and the display shows 99% for a long time.
• Low battery warning appears soon after a short time of use.
The battery display may not be the same as that of notification area or of [Power Meter] in [Power Options Properties].
This is not a malfunction.

Battery Power
17
High temperature mode
The high temperature mode can prevent the battery from deteriorating when the computer is used in high-temperature environment or used for a long time with its battery fully charged.
Select [Auto] (default) or [High Temperature] in [Environment] of the [Main] menu of the Setup Utility ( page 72).
NOTE
Note that a level corresponding to a 100% charge for high temperature mode is approximately equivalent to an 80%
charge level for normal temperature mode.
After switching from [Normal Temperature] to [High Temperature] or vice versa, the remaining battery capacity will not
be displayed correctly until the battery pack is completely discharged or fully charged.
In the [Auto] mode:
Once the computer has automatically switched from the normal temperature mode to the high temperature mode, the
computer will not switch back to the normal temperature mode until the battery has been used and recharged to a total
charge level of about 5 times as much as that of the fully-charged state. This is to avoid battery deterioration.

Battery Power
Computer behavior with low battery
The default settings are as follows.
18
When the battery level becomes 10%
[Low battery alarm]
Displays a message that the battery level is low. Displays a message that the battery level is low, and
↓↓
Charge the battery. Connect the AC adaptor or replace the battery to start up
Connect the AC adaptor immediately. If you do not
have the AC adaptor, exit the running programs and
Windows, then confirm that the power indicator is off.
If you have a fully charged spare battery, turn off the
computer, replace the battery and turn the computer on
again.
Do not replace the battery pack when the computer is in standby mode.
When the battery level becomes 5%
[Critical battery alarm]
then the computer enters hibernation.
the computer.
Connect the AC adaptor and charge the battery.
If you have a fully charged spare battery, replace the
battery and turn the computer on again.
When the computer enters hibernation with the battery
down and you resume the operation without charging
the battery, Windows may not start up normally or the
alarm function may not operate normally from then on.

Battery Power
19
Correcting the Battery Display (Battery Recalibration)
The “Battery Recalibration” function measures and memorizes the battery capacity. To correct the battery display, use this
function to fill the battery and then discharge it completely. Perform the procedure at least once immediately after purchasing
the computer. Normally the interval of battery recalibration is 3 months. The battery display may not be correct when the battery pack deteriorates after a long time use. In this case, perform the procedure again.
1 Connect the AC adaptor.
2 Close all the applications.
3 Perform “Battery Recalibration”.
A Click [start] - [All Programs] - [Panasonic] - [Battery] - [Battery Recalibration].
B When the confirmation message appears, click [Start].
Frequent recalibration of the battery can degrade the battery. A caution message appears when the battery
recalibration is performed at the shorter interval than approximately a month. In this case, cancel the battery
recalibration.
C When the message requests shut down of Windows, click [Yes].
The battery recalibration starts.
After the battery pack is fully charged, discharging starts. When the discharging is completed, the power goes off
automatically.
After the battery recalibration is finished, normal charging starts.
NOTE
The temperature range should be 10
The battery recalibration may take a long time due to the large battery capacity. This is not a malfunction.
• Full charge: Approximately 5 hours [max.]
• Complete discharge: Approximately 5 hours (only for model with touchscreen)
Approximately 6 hours (only for model without touchscreen)
If the computer is turned off during the battery recalibration (e.g., due to power failure, or accidental removal of the AC
adaptor and battery pack), the battery recalibration will not be completed.
You can also perform the battery recalibration with the following procedure.
A Restart the computer.
B Press and hold
dure.
C When the remaining battery capacity is displayed, press
D Follow the on-screen instructions.
F9
while the [Panasonic] boot screen is displayed just after the computer starts the startup proce-
°C to 30°C {50°F to 86°F}.
Enter
.

Battery Power
20
Replacing the Battery Pack
The battery pack is a consumable item so the replacement will be necessary. If the battery operation time becomes noticeably
short and not recovered even after recalibrating the battery, replace with a new battery.
If necessary, attach the second battery pack to the multimedia pocket ( page 22).
CAUTION
The battery pack is not charged when you first purchase it. Be sure to charge it before using for the first time. Charging
starts automatically when the AC adaptor is connected to the computer.
Use only the specified battery pack with your computer.
In the standby mode, do not remove/replace the battery pack. Otherwise your data will be lost and the computer may
be damaged.
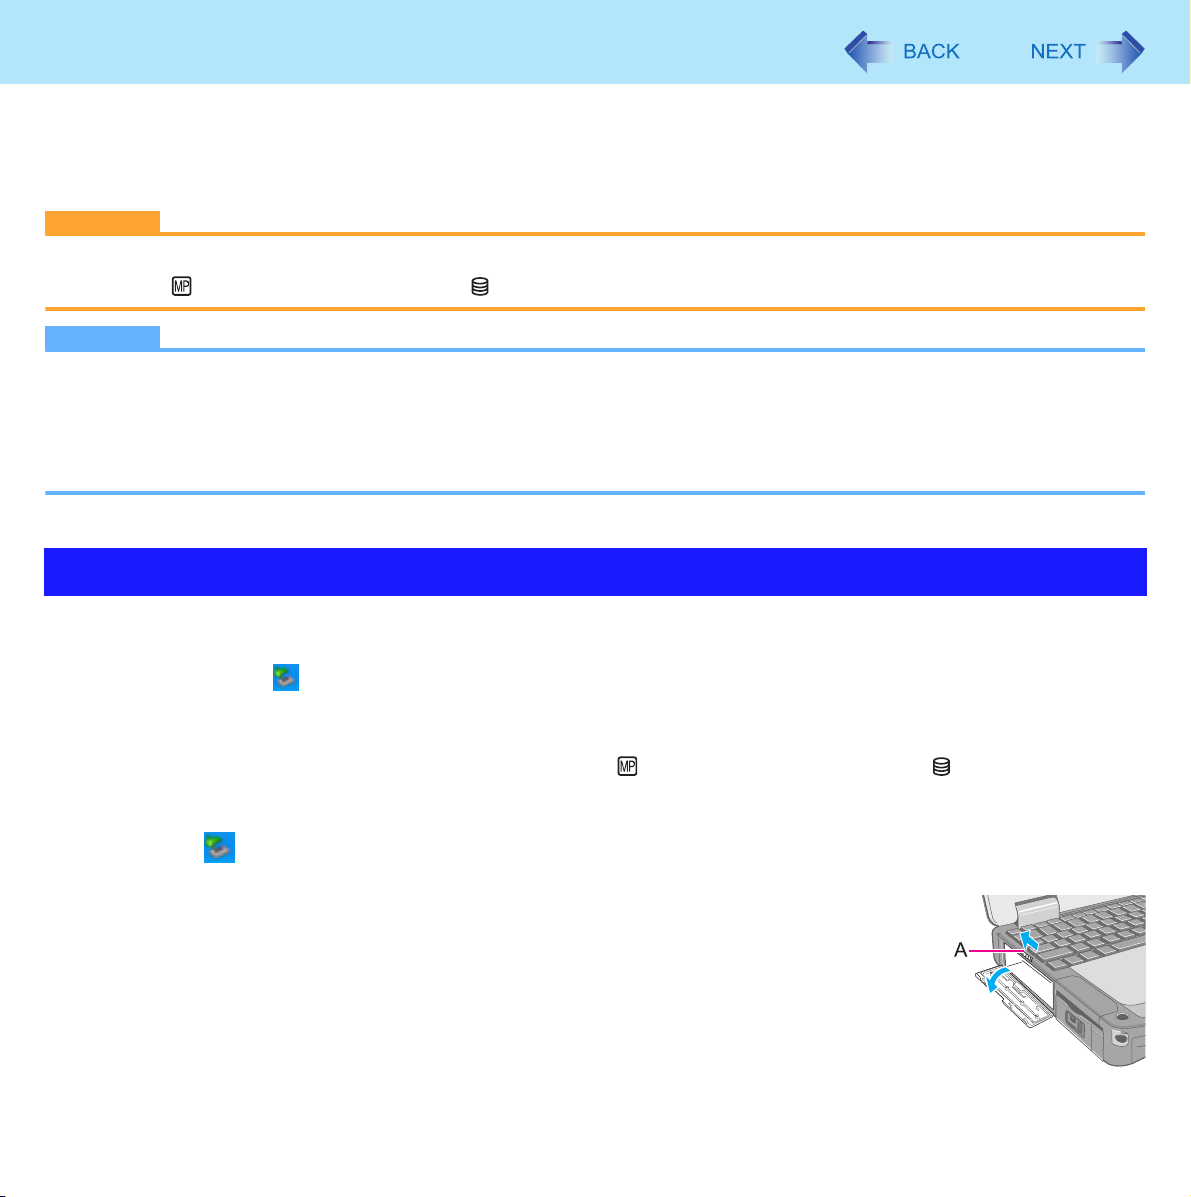
1 Turn off the computer.
Do not use the standby function.
2 Remove/Insert the battery pack.
To r em o v e
A Slide the latch (A) to the right to unlock the cover.
B Slide the latch (B) down, and open the cover.

Battery Power
C Pull the tab (C) of the battery pack.
To i ns e r t
A Insert the battery pack until it securely fits the connector.
B Close the cover until it clicks.
21
C Slide the latch (D) to the left to lock the cover.
CAUTION
Make sure the latch is securely locked, otherwise the battery pack may fall when you carry the computer.
Multimedia Pocket
You can attach the following devices. (refer to recent catalogs and other sources for information about the products available)
DVD-ROM & CD-R/RW drive (optional)
DVD MULTI drive (optional)
Second battery pack (optional)
CAUTION
Do not insert/remove the multimedia pocket device in standby or hibernation, or when the multimedia pocket device
indicator or the hard disk drive indicator is on.
NOTE
Refer to the catalogs etc. for the latest information about optional devices.
Read the instruction manuals of the devices carefully.
A dummy pack is inserted into the multimedia pocket at the factory.
First remove the dummy pack by holding the projection on the dummy pack and pulling it out.
Be sure to insert the dummy pack when the multimedia pocket is not in use.
22
Replacing the Multimedia Pocket Device
1 Disable the multimedia pocket device function.
A Double-click on the notification area.
B Select [Standard Dual Channel PCI IDE Controller] and then click [Stop].
C Follow the on-screen instructions.
D Confirm that the multimedia pocket device indicator and the hard disk drive indicator indicators are not lit.
This step is not necessary when;
• Removing the device after turning off the computer.
• is not displayed.
• The device does not appear in the list in step B.
• Removing the second battery pack.
2 Slide the latch (A) and open the cover.

Multimedia Pocket
3 Press the release handle (B).
The release handle pops out.
4 Pull the release handle (B) to draw out the device partway, and hold
the device on its both sides to remove.
5 Carefully insert the device into the multimedia pocket by pushing
both corners until it surely fits in the slot.
Press the release handle (C) to set in.
You can insert the device with the computer turned on.
Insert the device with the label side up.
6 Close the cover until it clicks.
23
CAUTION
Hold the device by both sides. Otherwise the device may be damaged.
Do not apply excessive force when raising the slot side upward and inserting the device.
NOTE
You can see that the device is recognized or not by double-clicking
mation] menu in the Setup Utility ( page 70). (When using a second battery pack, press
recognized (or if the media cannot be accessed), turn off the computer and reinsert the device.
on the notification area, or checking the [Infor-
Fn+F9
.) If the device is not

PC Card / ExpressCard
You can insert the following cards.
ExpressCard/34 or ExpressCard/54 to the ExpressCard slot (A)
(Only for model with ExpressCard slot)
PC Card Type I (3.3 mm) or II (5.0 mm) to the PC Card slot (B)
For model with Smart Card slot ( page 30)
NOTE
The following types of card are not supported:
PC Card Type III (10.5 mm), ZV card, SRAM card, FLASH ROM card (excluding ATA interface type), and other cards
that require 12 V of operating voltage.
Dummy cards are inserted into both of the slots at the factory.
First remove the dummy cards. ( page 26 Step
Be sure to insert each dummy card when the slots are not in use.
Insert the appropriate dummy card in the correct card slot. Insert the dummy PC Card in the PC Card slot, and the
dummy ExpressCard in the ExpressCard slot.
Inserting a dummy card in the wrong slot may cause malfunction of the computer.
2)
24

PC Card / ExpressCard
25
Inserting/Removing the Card
Preparation
Attach the device for the media containing the card driver (e.g., CD-ROM). Equipment connected to the multimedia
pocket cannot be recognized if connected after the card driver installation screen appears.
To insert the card
1 Slide the latch (C) and open the cover.
2 Insert the ExpressCard (left slot) (D) or the PC Card (right slot)
(E) with the label side up until it securely fits in to the slot.
For further information, refer to the instruction manual of the card.

PC Card / ExpressCard
To remove the card
1 Disable the card function.
A Double-click on the notification area and select the card, then click [Stop].
B Follow the on-screen instructions.
This step is not necessary when removing the card after turning off the computer.
2 Open the cover and remove the card.
ExpressCard (F)
A Press the card so it comes out of the slot.
B Draw the card straight out.
PC Card (G)
A Press the eject button so the card comes out of the slot.
B Draw the card straight out.
NOTE
26
Check the card’s specification to prevent the total operating current from exceeding the allowable limit. Otherwise mal-
function may occur.
Permissible Current: 3.3 V: 400 mA, 5 V: 400 mA
Some types of cards cannot be used simultaneously.
After repeating insertion and removal, some types of card will not be recognized. In this case, restart the computer.
If the computer freezes after resuming from standby or hibernation, remove and reinsert the card. If the problem per-
sists, restart the computer.
When a card is inserted, power consumption increases. Remove the card when it is not in use, especially when oper-
ating by battery power.
To connect peripheral devices (SCSI, IEEE 1394, etc.) using a PC Card or an ExpressCard, follow the steps below
(one example).
A Connect the peripheral device to the card.
B Turn on the power of device.
C Insert the card until it surely fits in the slot.
SD Memory Card
27
SD Memory Card Information
The SD Memory Card has a copyright protection function which is compatible with content on-demand services on the
Internet, etc.
To format the SD Memory Card on this computer, do not use [Format] of Windows, but use the SD Memory Card format
software.
You can download the software from the web site below.
http://panasonic.jp/support/global/cs/sd/download/sd_formatter.html
To use the SD Memory Card on other devices, format the card on those devices. For further information, refer to the
instruction manual of the devices.
This computer supports SDHC Memory Cards (SD Memory Cards with a capacity of more than 2 GB).
Handling and storage cautions
Store the SD Memory Card in the case after removing it from the computer.
Do not:
• Disassemble or modify the card.
• Hit, bend, or drop the card.
• Touch the terminals with fingers or metal object.
• Remove the labels of the card / Attach other labels or stickers to the card.
Do not place the card in the following locations.
• In direct sunlight or in very hot location such as inside of a car.
• In very dusty or humid location.
• In location subject to corrosive gas, etc.
Data handling cautions
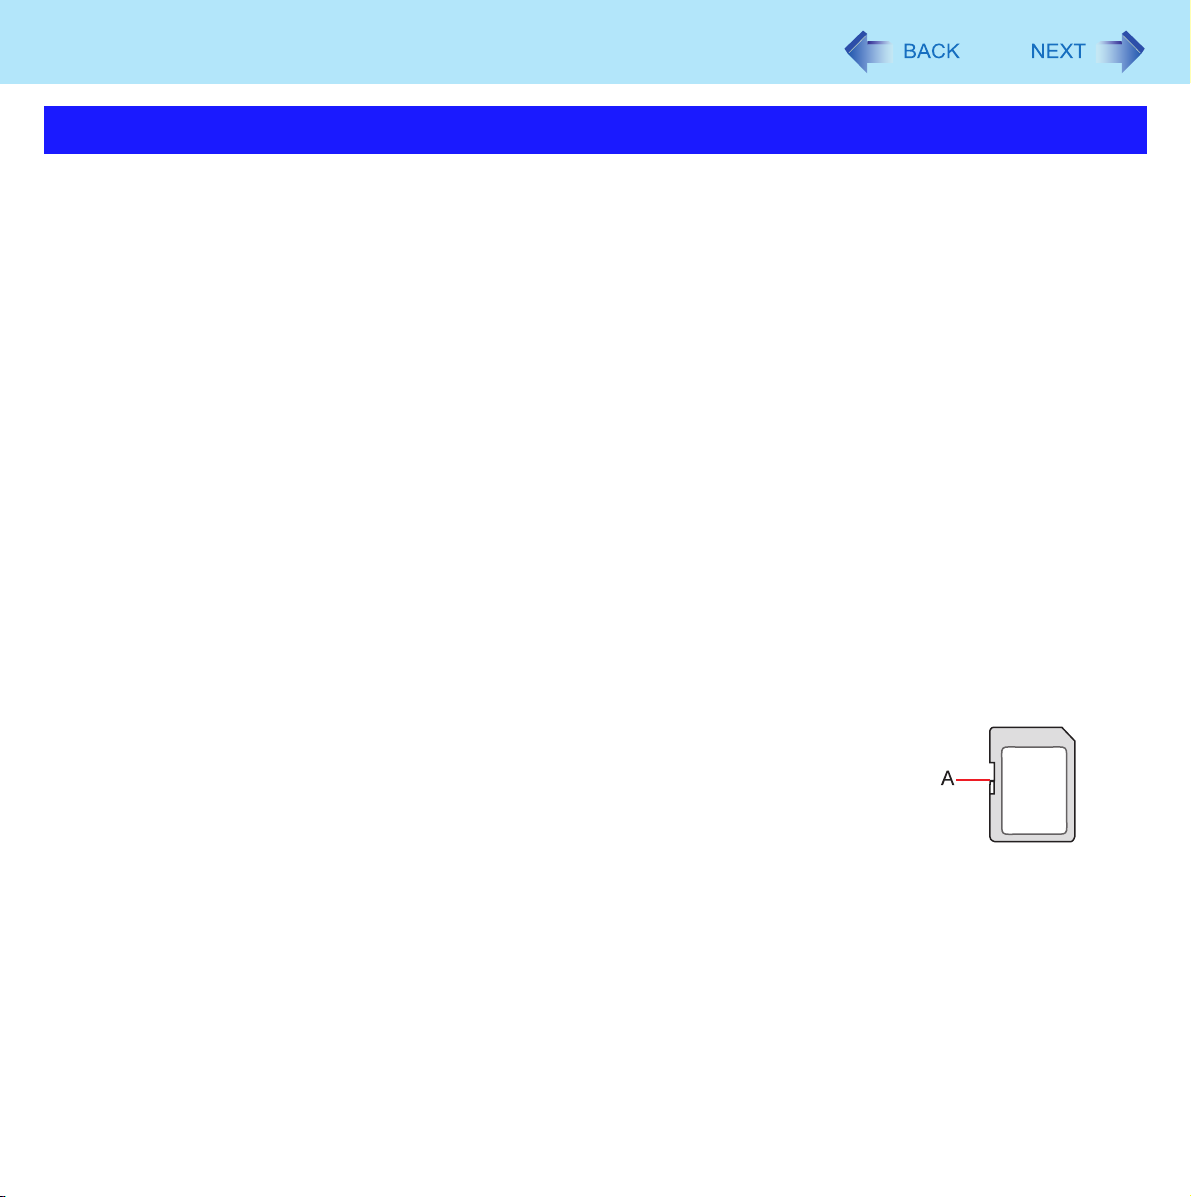
Set the write-protect switch (A) to the LOCK position. Unlock the switch when recording
(checkout), saving, or editing data.
We recommend you to back up the important data to another storage medium.
When disposing the card, we recommend you to physically destroy the card (using a ham-
mer, etc.) to prevent personal or confidential data leakage.
SD Memory Card
28
Inserting/Removing the SD Memory Card
CAUTION
Do not remove or insert the SD Memory Card until Windows has completed loading.
Do not remove the card or turn off the computer in the following cases, otherwise the data may be corrupted.
• While the computer is in standby or hibernation.
• Immediately after the writing operation.
The computer may still continue the access to the card just after writing operation. If you remove the card before the
operation is completed, the data may be damaged or the card access may no longer be performed normally.
Note that Panasonic assumes absolutely no liability for any loss of data recorded by the user, or any other damages,
direct or indirect.
Do not forcibly draw out the card, otherwise the slot may be damaged.
Insert the card in the correct direction, otherwise the card and the slot may be damaged.
After resuming from standby or hibernation, do not access the SD Memory Card for approximately 30 seconds.
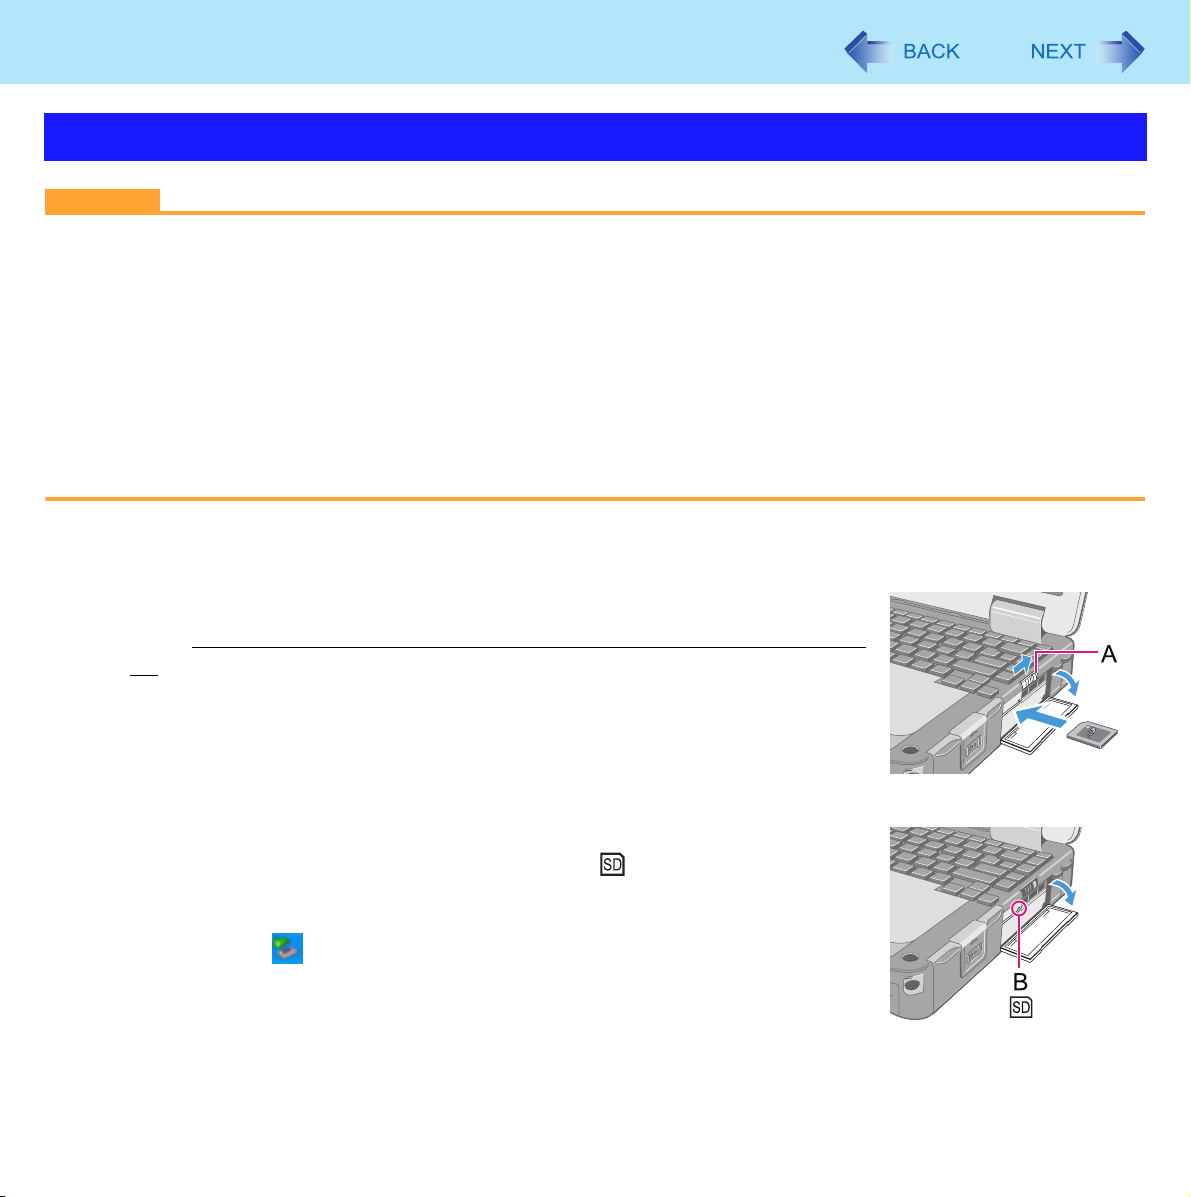
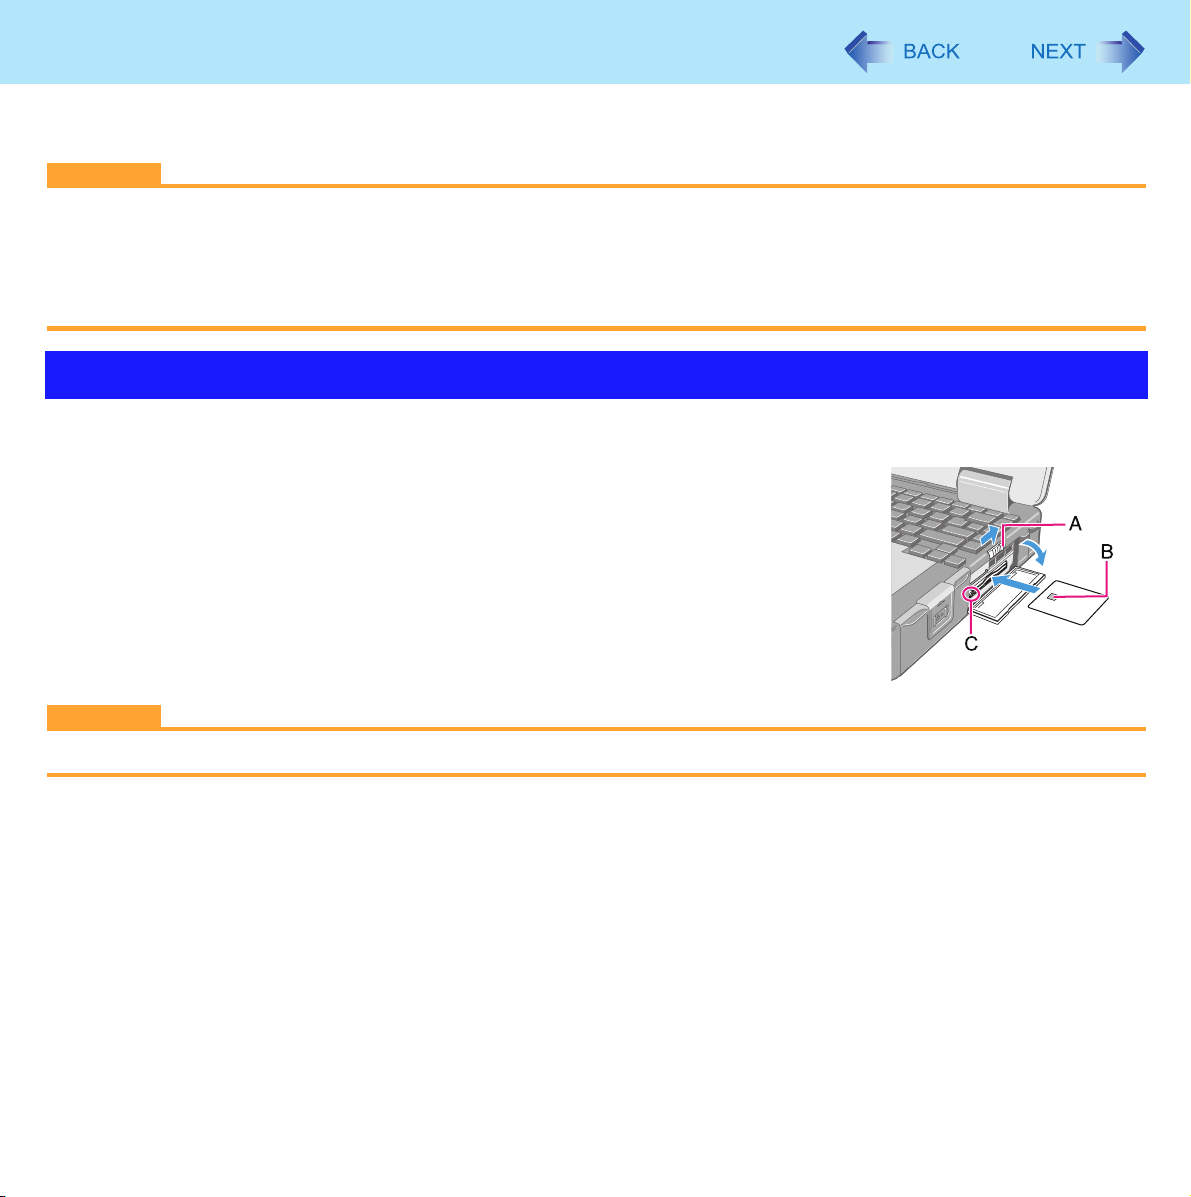
To insert the card
1 Slide the latch (A) and open the cover, and insert the SD Memory
Card with the label side facing up and with the cut corner facing
in.
To remove the card
Preparation
Save the data and close all applications.
Open the cover and confirm the SD Memory Card indicator (B) is off.
1 Disable the card function.
A Double-click on the notification area and click [Secure Digital Storage Device],
then click [Stop].
B Follow the on-screen instructions.
This step is not necessary when removing the card after turning off the computer.

SD Memory Card
2 Remove the card.
A Press the card so it comes out of the slot.
B Draw it straight out.
29
Smart Card
<Only for model with Smart card slot>
You need software and a driver to use a Smart card.
CAUTION
Do not:
• Hit, bend, or drop the card.
• Touch the contact part with fingers or metal object.
• Place the card in very hot location for a long time.
• Remove the card immediately after inserting it.
Inserting/Removing the Smart Card
To insert the card
1 Slide the latch (A) and open the cover, and insert the Smart card
with the contact part (B) in front.
Insert the card until it surely fits in the slot.
To remove the card
30
1 Press the eject button (C).
The Smart card pops out.
CAUTION
Use the eject button to remove the card, otherwise the reading contact may be damaged.
 Loading...