

Panasonic CF-18BCAKXMM, CF-18BCAMXMM, CF-18BCAZAMM, CF-18BCAZBMM, CF-18BCAZCMM Reference Manual
...
1
Reference Manual
Personal Computer
Model No. CF-18 Series
Ta blet PC
We recommend that this Reference Manual be printed.
Read Me First
z Some of the illustrations in this manual may differ slightly in shape from the actual items in
order to make the explanation easier to understand.
z If the user has logged on without the administrator authority, some functions may not be
executable, and some screens may not be displayed as shown in this manual.
If this happens, log on with the administrator authority to enable these functions.
2
z In this manual, "Microsoft
"Windows" or "Windows XP".
z Confirm the latest information on optional products in catalogs, etc.
z The following drives may be described as "CD/DVD drive".
CD-ROM drive, DVD-ROM drive, CD-R/RW drive, DVD-ROM & CD-R/RW drive, DVD
MULTI drive
®
Windows® XP Tablet PC Edition 2005" is indicated as
Illustrations and Terminology in this Reference Manual
NOTE NOTE provides a useful fact or helpful information.
CAUTION CAUTION indicates a condition that may result in
minor or moderate injury.
Enter
Fn+F5
[start] - [Run] This illustration means to click [start], then to click
Î or ⇒ These symbols indicated related pages.
*1
xxxx
This illustration means to press the [Enter] key.
This illustration means to press and hold the [Fn] key,
then press the [F5] key.
[Run]. For some applications, you may need to doubleclick.
Î : Refer to the page in this Reference Manual
⇒ : Refer to the Operating Instructions
If *1 is selected, it will jump to a related explanatory
note.

Read Me First
About Display Mode
Internal LCD (Notebook) This computer's display
External Display (Monitor) External display connected to this computer
Simultaneous display
(Intel(R) Dual Display Clone)
Extended Desktop To use both the internal LCD and the external display as
The terminology in ( ) is the one used in [Mobile Intel(R) 915GM/GMS, 910GML Express
Chipset Family Properties].
To display [Mobile Intel(R) 915GM/GMS, 910GML Express Chipset Family Properties]:
Select [start] - [Control Panel] - [Other Control Panel Options] - [Intel(R) GMA Driver for
Mobile].
3
To display the same screen on both the LCD and
external display
an extended display domain. You can drag a window
from the internal LCD to the external display and vice
versa.
Key Combinations
CAUTION
z Do not press the following key combinations repeatedly in (quick) succession. Also, do
not press different key combinations quickly one after another.
z Do not press the following key combinations while using the touch pad (external
mouse), digitizer, tablet buttons, or other keys.
NOTE
z Do not press the following key combinations until you log on to Windows and the hard
disk drive indicator turns off. Note, however, that the key combinations
Fn+F2
z The key combinations below may not work while some applications are running. The
popup window may not be displayed depending on the state of the application you are
using (e.g., when [Command Prompt] is set to "Full Screen").
Key Functions Popup Window
Fn+F1
Fn+F2
and Fn+F3 are operable in the Setup Utility.
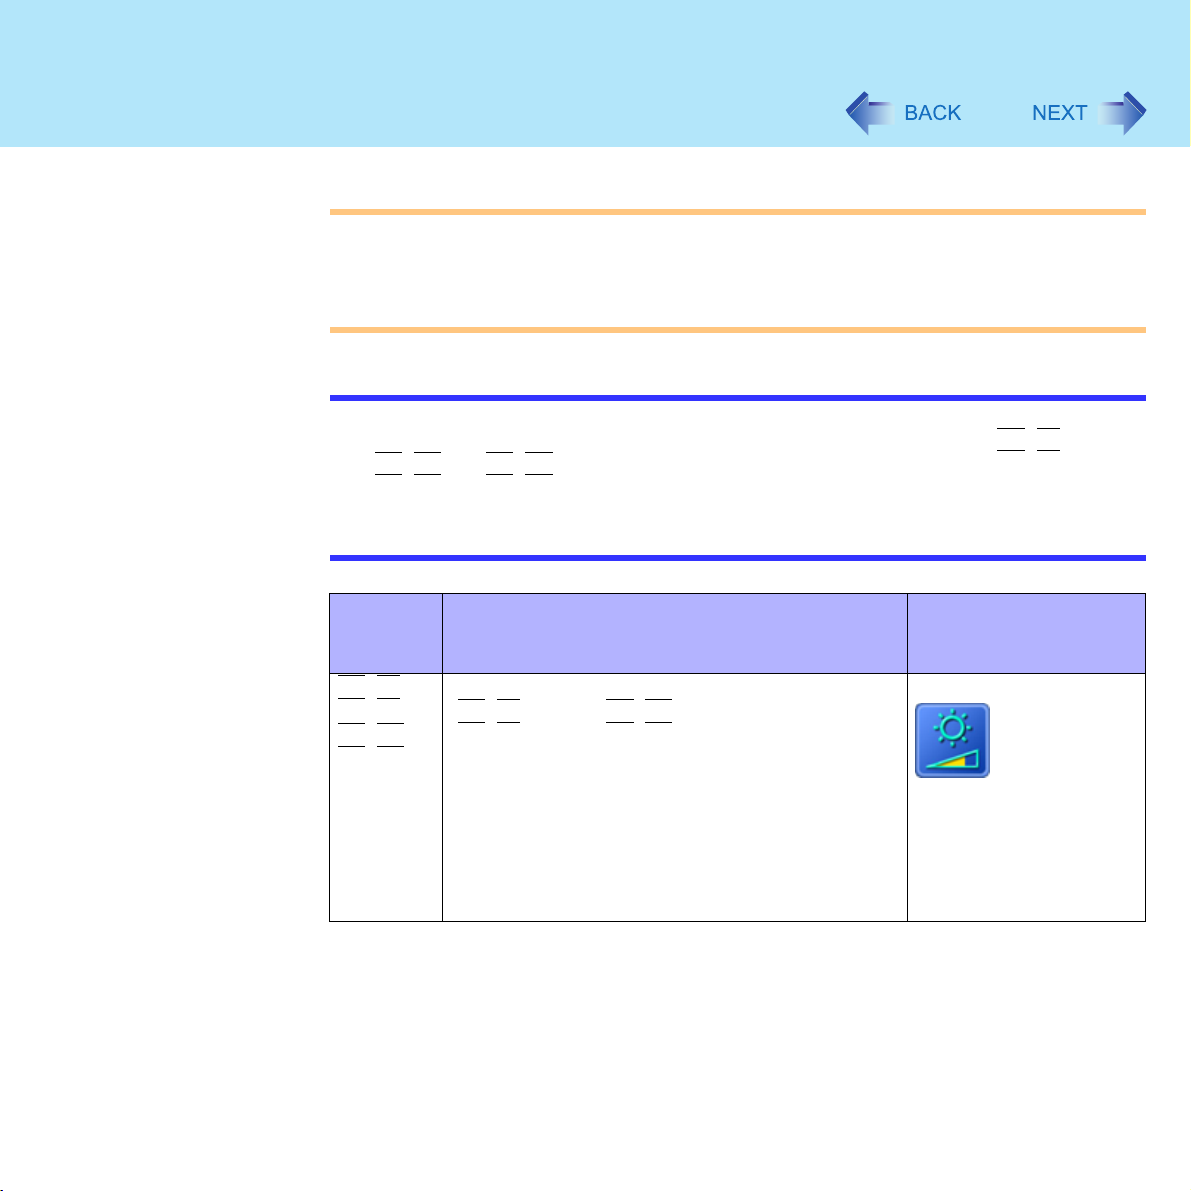
LCD brightness control
(
Fn+F1
Pressing this key combination adjusts the LCD
brightness.
You can select a different brightness level setting
for when the AC adaptor is connected and for when
it is not connected.
(At the time of purchase, the LCD brightness is set
to be darker when the AC adaptor is not
connected.)
= down / Fn+F2= up)
4
Fn+F1
(Displayed after logging
on to Windows)
,

Key Combinations
5
Key Functions Popup Window
(Displayed after logging
on to Windows)
Fn+F3
Display change
(When the external display is connected)
By pressing this key combination, you can select
either an external display, internal LCD or
simultaneous. (Î page 69)
CAUTION
z Do not press another key until the display
destination has been completely switched.
z Do not press this key combination in the
following conditions.
• When the external display is not
connected.
• When a video such as an MPEG file is
playing.
• When the Extended Desktop is being
utilized.
• When a game such as pinball is
displayed.
NOTE
z This key combination does not work when
[Command Prompt] is set to "Full Screen".
z When switching to a different user with the
Fast User Switching function, this key
operation may not work. In this case, log off
all users and restart the computer.
z Simultaneous display cannot be used until
Windows startup is complete (during Setup
Utility etc.). When
screen is displayed on the external display
or internal LCD.
Fn+F3
is pressed, the

Key Combinations
6
Key Functions Popup Window
(Displayed after logging
on to Windows)
Fn+F4
Speaker on/off switch
Pressing this key combination turns on/off audio
from the internal speaker and headphone jack.
OFF
(MUTE)
Fn+F5
Fn+F6
Fn+F7
NOTE
z Turning off the speaker will also turn off the
warning beep.
z Speakers connected to the USB port
cannot be turned off.
Volume control
(
Fn+F5
Pressing this key combination adjusts the volume
of the internal speaker and headphone jack.
= down / Fn+F6= up)
NOTE
z This key combination cannot be used to
adjust the volume of the warning beep or
speakers connected to the USB port.
Forcing the standby function
Pressing this key combination causes the current
status of the computer to be saved to memory, and
puts the computer into the standby mode. (Î page
25)
ON
Key Combinations
7
Key Functions Popup Window
(Displayed after logging
on to Windows)
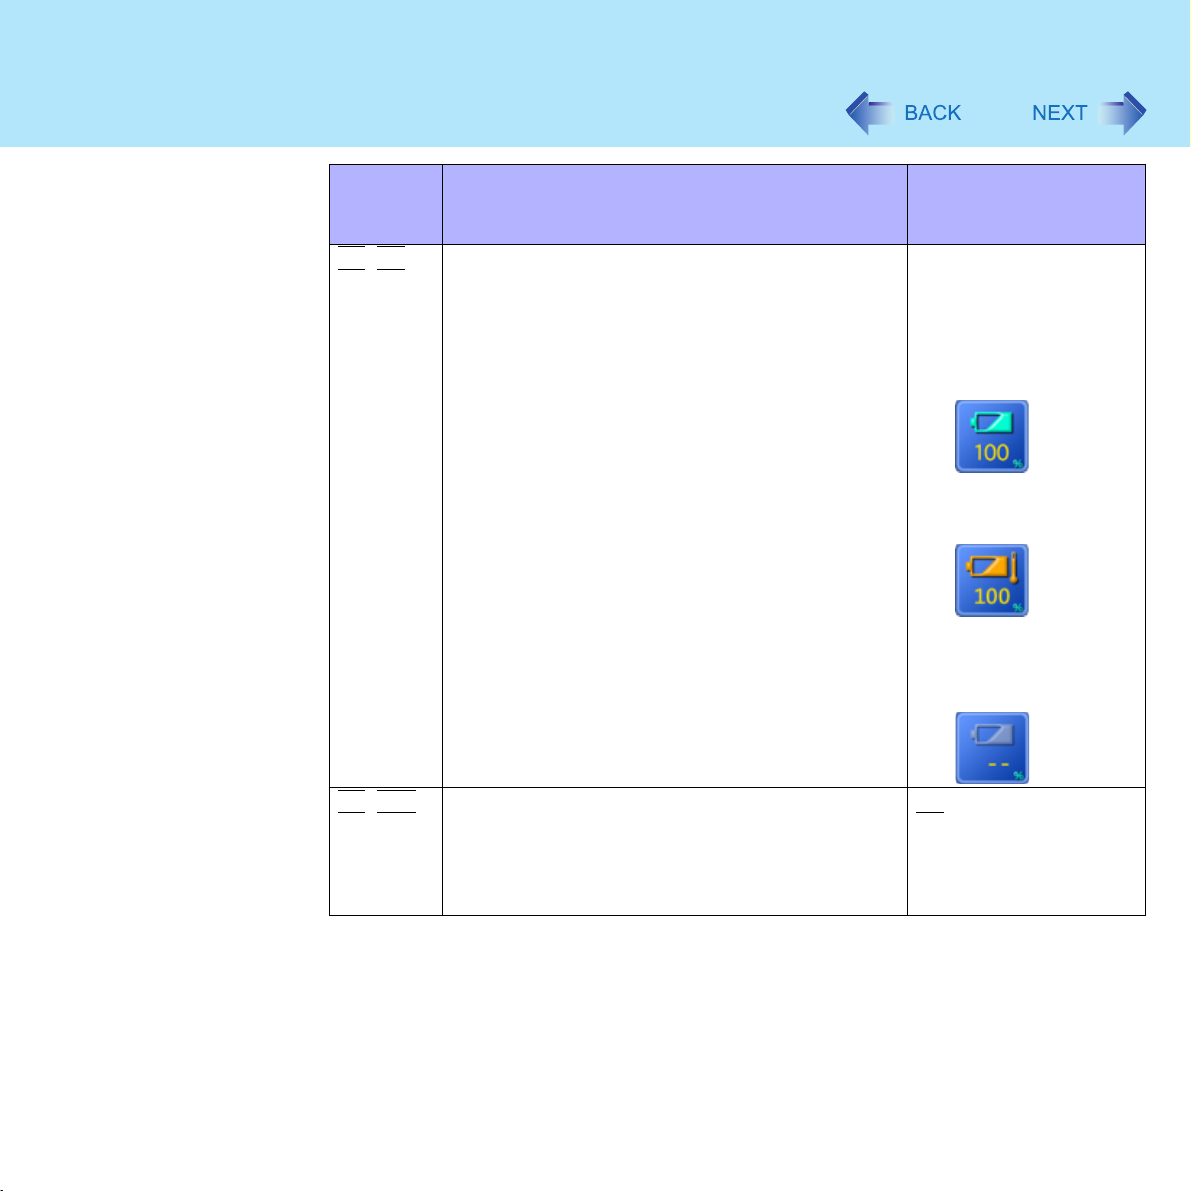
Fn+F9
Remaining capacity of the battery pack
Pressing this key combination displays the
remaining battery capacity on the screen.
When the battery pack is
inserted in the computer
(example)
z In normal
temperature mode
(Î page 42)
z In high temperature
mode (Î page 42)
Fn+F10
Forcing the hibernation function
Pressing this key combination causes the current
status of the computer to be saved to the hard disk,
and puts the computer the into the hibernation
mode. (Î page 25)
When the battery pack is
not inserted in the
computer

Key Combinations
Hotkey Settings
There are two Fn key functions as follows:
z Fn key lock function
After
Fn
is pressed once, it stays in the "pressed" position until another key is pressed.
This is convenient when it is difficult to press two buttons simultaneously.
z Popup windows display ON/OFF
1 Run the Hotkey Settings.
Select [start] - [All Programs] - [Panasonic] - [Hotkey Settings].
2 Set the parameters.
A. Use Fn key lock
Add the check mark if you want to enable the Fn key lock function. The following
Fn key lock function will then be enabled.
z To use
A Press
B Press another key for combination. (Lock released)
z To use
A Press
B Press another key for combination.
Fn key remains locked until
B. Notification
This setting is only available when [Use Fn key lock] is checked.
[Make sounds when Fn key is pressed]
Notifies the user with a sound when Fn is locked or released.
[Show status on screen]:
Displays the Fn key status on the taskbar.
:
Fn
:
Fn
C. Disable popup
Add the check mark if you want to turn the popup window display function OFF.
The full-screen display of [Command Prompt] screen or MPEG files may change
to a window display if
window display function OFF.
Fn
only once:
Fn
once. (Locked)
Fn
successively:
Fn
twice. (Locked)
is locked
is not locked
Fn
is pressed once more.
*1
Fn+Fx*2 are pressed. To prevent this, turn the popup
8

Key Combinations
9
3 Select [OK].
NOTE
z The Fn key lock function also works with Fn and other keys (e.g. Î, Í) aside from
Fx*2.
z Each user can select separate settings for whether or not to use the Hotkey settings.
*1
If MUTE is set, you will not hear a beep.
*2
"Fx" indicates any function key from F1 to
F10
.

LED Indicators
10
Power status z Not lit
Power off / Hibernation mode
z Green
Power on
z Blinking green
Standby mode
Battery pack status Î page 40
Hard disk drive status This indicator lights when the hard disk drive is
accessed.
See (A) in
the figure
at left.
ScrLk
(Scroll lock)
NumLk
(Numeric key)
Caps Lock This indicator lights green when
SD Memory Card status This indicator lights when the SD Memory Card
This indicator lights green when
pressed. Scroll lock functions differently
depending on the application.
This indicator lights green when
pressed. This causes a portion of the keyboard
to function as a numeric keypad. The [Enter] key
functions differently depending on the
application.
pressed. Subsequent non-shifted input is
capitalized.
is accessed.
Fn+ScrLk
NumLk
Caps Lock
is
are
is

Tablet Buttons
When the Windows screen is displayed, you can use the tablet buttons to perform the
following operations.
Button Functions Function Descriptions
11
LCD brightness control
:down
:up
Input Panel Pressing this button turns Tablet PC Input
Enter Same operations as when
Rotation Pressing this button rotates the display.
Pressing these buttons adjusts the brightness
of the LCD. (Î page 4)
Panel on or off. For detailed information, refer
to Windows help. (This button will not work on
the Welcome screen.)
Enter
(Î page 22)
is pressed.
NOTE
z Do not press the rotation button again
until the display has completely
stopped rotating.
Security z Same operation as when
Del
are pressed.
Ctrl
+
Alt
+
NOTE
z When you press the tablet button, there may be cases that the message “Your tablet
computer can not perform this action. For assistance, contact your software
manufacturer.” is displayed. This, however, is not a malfunction. Select [OK] and press
the button again.

Tablet Buttons
Changing the Settings of Tablet Buttons
You can change the functions (key operations, application software and Windows operations)
which are assigned to the Input Panel ( ), Enter ( ) and Rotation ( ) buttons.
Changing the Settings
1 Select [start] - [Control Panel] - [Printers and Other Hardware] -
[Tablet and Pen Settings] - [Tablet Buttons].
2 Select the tablet button you want to change and select [Change].
3 Select the function to be assigned to the button from the [Action] list.
z When you select [Press a key or key combination], select the keys box and
press the key or the key combination you want to use.
•
Fn
cannot be used.
z When you select [Launch an application], select [Browse] to set an application
to launch.
12
4 Select [OK].
5 Select [OK].

Touch Pad
13
Use the touch pad to move the cursor on the screen and perform computer operations.
A. Work Surface (Touch Pad)
B. Left Button
C. Right Button
Function Operation
Moving the Cursor
Move the tip of your finger lightly over the work
surface.
Tapping/Clicking
tapping or clicking
z To right-click: click with the right button
Double-Tapping/DoubleClicking
double-tapping or double-clicking
Dragging
Two quick taps, but on the second tap leaving your finger
down (applying pressure) and moving it on the work surface.
or
While holding down the button, moving your finger on the work
surface.
*1
Scroll
Scroll a document.
*1
The movements will differ depending on the application.

Touch Pad
14
NOTE
z Refer to [Mouse Properties] for information on basic operations other than the above.
To display [Mouse Properties]:
Select [start] - [Control Panel] - [Printers and Other Hardware] - [Mouse].
z The operations of Scroll, Pan or Zoom will differ depending on the application. There
are cases the touch pad will not support these operations even with an application
that supports the functions.
z The touch pad cannot be used in the Setup Utility.
When you want to use an external mouse through the external keyboard/mouse port of
the port replicator (optional)
When an external mouse or trackball with additional functions (e.g., wheel function) is
connected, a part or all of the additional functions may fail to operate. To use these additional
functions, perform the operation below.
When the operation below is performed, a part or all of the touch pad functions cannot be
used.
If you are using a USB mouse, the following operation is unnecessary.
1 Select [start] - [Control Panel] - [Performance and Maintenance] -
[System] - [Hardware] - [Device Manager] - [Mice and other pointing
devices].
2 Select [touchpad], then select [Update Driver] at [Driver].
3 Select [No, not this time], then select [Next].
4 Select [Install from a list or specific location] and select [Next].
5 Select [Don't search. I will choose driver to install.], then select [Next].
6 Select [PS/2 Compatible Mouse], then select [Next].
7 At the confirmation message, select [Yes].

Touch Pad
15
8 Select [Finish], then select [Close].
9 The display will ask you to restart Windows, select [Yes].
The computer will restart.
NOTE
z If the additional functions of the external mouse or trackball cannot be used, even
after performing the operation above, perform the operation below.
A Power off your computer (⇒ Operating Instructions "Starting Up/Shutting Down")
and connect the computer to the port replicator (⇒ Operating Instructions of the
Port Replicator).
B Connect the external mouse or trackball to the port replicator.
C Turn the computer on and run the Setup Utility (Î page 102).
D In [Main] menu, set [Touch Pad] to [Disable].
E Close the Setup Utility by pressing
F Log on to Windows with the administrator authority.
G If the message [Completing the Found New Hardware Wizard] is displayed, select
[Finish].
It may take a few minutes to complete this operation.
H If the display asks you to restart Windows, select [Yes].
The computer will restart.
I Following the operating instructions of the connected external mouse or trackball,
install the necessary driver.
. At the confirmation message, select [Yes].
F10

Touch Pad
When you want to re-enable the touch pad
NOTE
z If you performed the operation under the "Note" (Î page 15) when using the external
mouse or trackball, perform the following steps A - H, and then perform steps
described below.
A Uninstall the driver or application software of an external mouse or trackball. (Refer
to the operating instructions of the external device on how to uninstall the driver.)
<Only if the explanation of uninstalling the driver or application software cannot be found
in the operating instructions for the external device, execute the following steps B - C.>
B In [start] - [Control Panel] - [Performance and Maintenance] - [System] -
[Hardware] - [Device Manager], when an external mouse or trackball device is
displayed in [Mice and other pointing devices], press
C If the confirmation message is displayed, select [OK].
D If the display asks you to restart Windows, select [No].
E Power off your computer (⇒ Operating Instructions "Starting Up/Shutting Down")
and remove the external mouse or trackball.
F Turn the power on and run the Setup Utility (Î page 102).
G In [Main] menu, set [Touch Pad] to [Enable].
H Close the Setup Utility by pressing
16
Del
to delete it.
F10
. At the confirmation message, select [Yes].
1 - 4
1 Log on to Windows with the administrator authority.
2 Select [start] - [Control Panel] - [Printers and Other Hardware] -
[Mouse] - [Hardware].
3 Confirm that [touchpad] is displayed at [Devices].
<When [touchpad] is not displayed>
A Select your mouse and then select [Properties].
B Select [Driver] and then select [Update Driver].
C At [Welcome to the Hardware Update Wizard], select [No, not this time], and
then select [Next].
D Select [Install from a list or specific location] and then select [Next].
E Select [Don't search. I will choose the driver to install.] and then select [Next].

Touch Pad
F Select [Have Disk], input [c:\util\drivers\mouse] at [Copy manufacturer's files
G Select [touchpad] and then select [Next].
H Select [Finish] and then select [Close].
I The display will ask you to restart Windows. Select [Yes].
<When [touchpad] is displayed>
A Select [OK].
Handling the Touch Pad
z By design the touch pad is to be used with a finger tip only. Do not place any object on the
work surface or press down forcefully with sharp-pointed objects (e.g., nails) or hard
objects that can leave marks (e.g., pencils and ball point pens).
z Try to avoid having any harmful substances such as oil, come in contact with the touch
pad. The cursor may not work properly in such cases.
z When the touch pad becomes dirty:
Wipe to remove dirt by using a dry soft cloth such as gauze or a soft cloth first applied with
detergent diluted with water and then thoroughly wrung.
Do not use benzene or thinner, or rubbing alcohol. Doing so may adversely affect the
surface, e.g., discoloration. In addition, do not use commercially-available household
cleaners and cosmetics, as they may contain components harmful to the surface.
17
from], then select [OK].
If the some item names are displayed, select one.
The computer will restart.
Digitizer (Advanced)
Your computer is equipped with a digitizer function allowing you to perform the same
operations as the touch pad or mouse by touching the surface of the display with the pen
(included).
The following explanation gives one example (for the default settings).
The operation settings can be changed. (Î page 20)
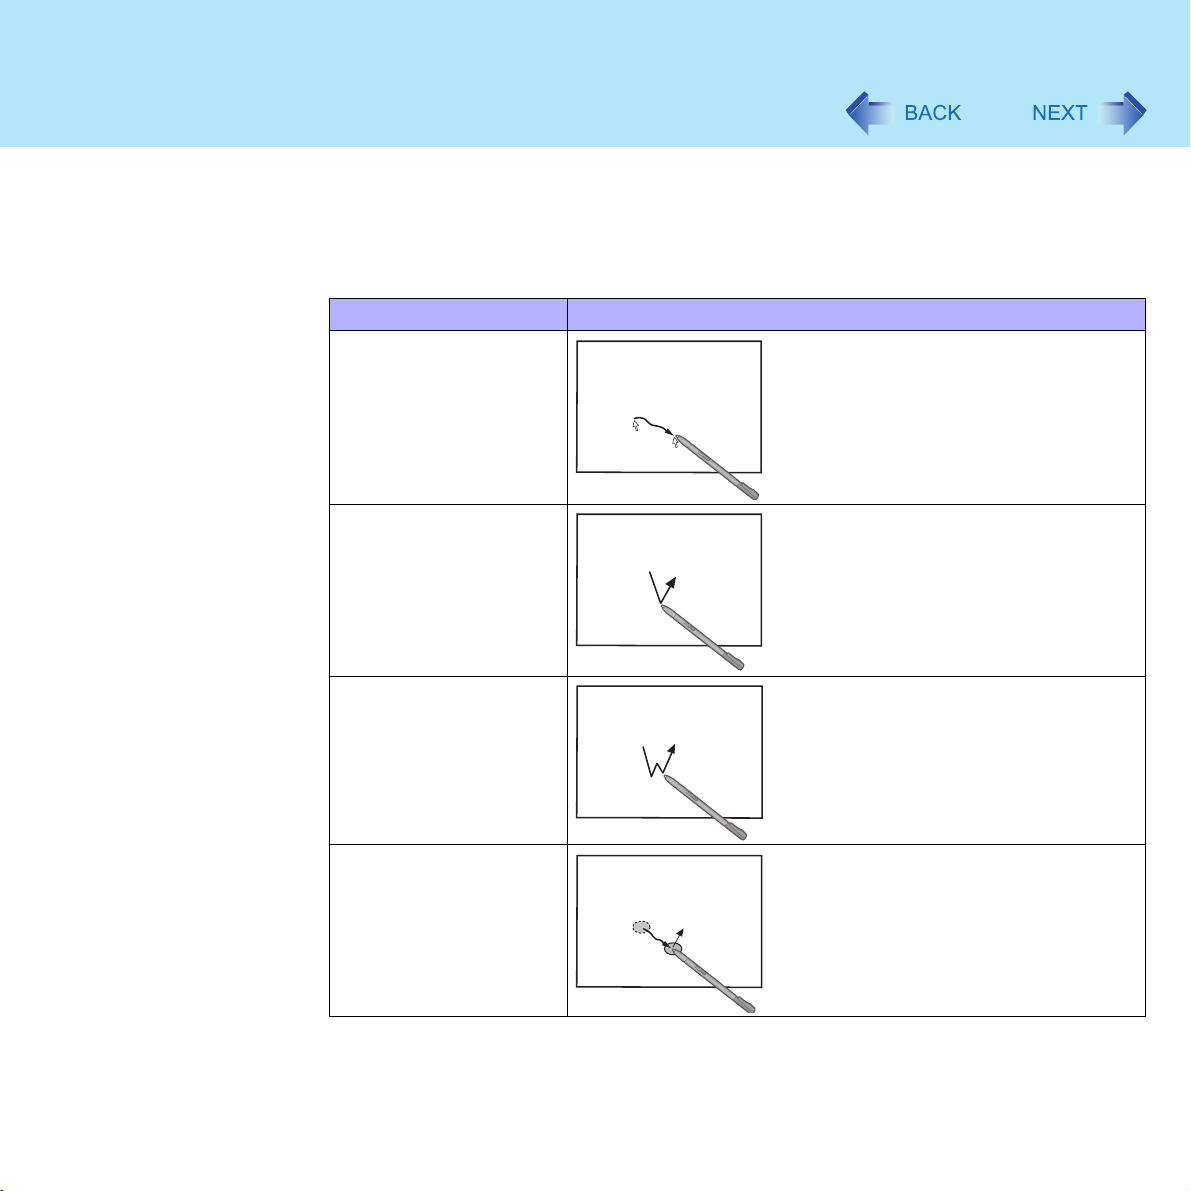
Functions Operation
Moving the cursor
Clicking
18
The cursor is moved to the location
pointed by the pen.
One tap
Double-clicking
Dragging
Two quick taps
Touch and hold the object (i.e. file or
icon), move the pen on the surface
(dragging the object to the desired
location), then release the pen.

Digitizer (Advanced)
Right-clicking
CAUTION
z When the internal LCD is used alone or with an external display simultaneously, the
z Even when only an external display is in use, the cursor will move on the external
z If a change is made to the display resolution, or the cursor can not be pointed
z The digitizer function can not be used in the Setup Utility or when using the full screen
19
Functions Operation
Press and hold down the pen button (A),
then tap the object.
digitizer function cannot be used when the area of either display is set larger than
default setting of the display resolution.
display if you touch the surface of the internal LCD with the pen or bring the pen close
to the surface of the internal LCD when the digitizer driver is active. Therefore, do not
touch the internal LCD when only an external display is in use.
correctly with the pen, be sure to perform [Calibration]. (Î page 20)
in [Command Prompt].
NOTE
z You can move the cursor by bringing the pen close to the screen, without actually
touching the screen’s surface.
z For information on how to use the pen (included), refer to [Get Going with Tablet PC]
in [start] - [All Programs].
z Do not move the pen too quickly. If the pen moves too quickly, the cursor may be
unable to follow its movement.
z If you cannot click on the edge of the screen, hold the pen perpendicular to the display
and try clicking again.

Digitizer (Advanced)
Configuring the Digitizer
When needed, the digitizer can be configured using the following steps.
1 Display [Tablet and Pen Settings] screen.
Double-click on the taskbar or select [start] - [Control Panel] - [Printers and
Other Hardware] - [Tablet and Pen Settings].
The screen at left will be displayed.
A. Display
Set the display angle and the order of display rotation positions.
B. Tablet Buttons
Change the settings of the tablet buttons (Î page 11).
C. Pen Options
Set the pen actions.
D. Calibration
Define the calibration setup. Use when the cursor can not be pointed correctly
with the pen.
• Calibration must be performed when the display resolution has been changed.
• When you perform the calibration, hold the pen at the same angle as you would
when actually using it.
• Perform the calibration separately for [Landscape] and [Portrait]. (Î page 22)
20
2 Make necessary changes and select [OK].
NOTE
z Rotates the display to [Primary landscape] before performing the calibration. (Î page
22)
z For more information, refer to [Help].
Handling the Digitizer
z Use the pen included with the computer. You cannot use implements other than the pen
that comes with the computer.

Digitizer (Advanced)
z Do not place any object on the surface or press down forcefully with sharp-pointed objects
z Do not operate the computer when such things as dust are on the screen. Doing so may
z When the screen becomes dirty:
z Because the digitizer uses electromagnetic induction, it may malfunction in locations such
Handling the Pen
z The pen has a built-in pressure sensor to detect the touch of the pen tip. Avoid strong
z Clean the pen tip and screen prior to operation. Foreign particles can scratch the screen
z Use the pen only for the computer screen. Using it for any other purpose may damage the
21
(e.g., nails), or hard objects that can leave marks (e.g., pencils and ball point pens).
scratch the screen.
• Wipe to remove dirt by using a dry soft cloth included with the computer.
• Do not use benzene or thinner, or rubbing alcohol.
• For more information, refer to "Suggestions About Cleaning the LCD Surface" that
comes with the soft cloth.
as the following, where strong electrical fields or magnetic fields occur:
• Near AM radio base station or relay station antennas
• Near some CRT displays that generate strong electromagnetic field noise
Even if the digitizer does malfunction, it will return to normal operations when the
computer is no longer in close proximity to the locations described above.
shocks (such as dropping the pen), excessive pressure on the pen tip, or allowing the pen
to become wet. These may result in malfunctions or damage to the pen.
and impede the operation of the pen.
pen and scratch the screen.

Display Rotation
After Windows is started up, you can rotate the display and perform the touch pad and digitizer operations in the rotated mode.
Rotating the Display
1 Press the rotation button .
Each time this button is pressed, the screen display rotates counter-clockwise by
°. (Î page 23)
90
22
Primary
Landscape
Secondary
Por trait
Secondary
Landscape
Primary
Por trait
NOTE
z You can also rotate the display in the following menu.
[start] - [Control Panel] - [Printers and Other Hardware] - [Tablet and Pen Settings] [Display]
z Be sure to use the above procedures to rotate the display.
z If the screen display resolution has been set to 800 x 600 pixels, you can rotate the
display to [Primary Landscape] and [Secondary Landscape] only.
z While the display is rotated:
• Do not use the Extended Desktop. (The touch pad or the digitizer may fail to operate
properly.)
• Do not set the display resolution larger than the resolution of the internal LCD.
• If you exit Windows, the next time Windows is started up, the operation of the touch
pad will not match the display angle for a few seconds.
• The computer's performance will decrease somewhat.
• If a video is played, the picture may not be displayed properly or the sound may be
broken up. This problem can be corrected by rotating the display to [Primary Landscape].

Display Rotation
• The touch pad scroll, zoom, and data zoom functions do not work.
z The display cannot be rotated when the [Command Prompt] is set to "Full Screen".
Changing the Settings
By using the Display Rotation Tool, you can change the settings of the display rotation.
1 Right-click on the taskbar, and then select [Setting].
2 Change the settings.
A. In the following cases, the display is automatically set to the default angle.
3 Select [OK].
23
z When switching from Laptop mode to Tablet mode, or vice versa (⇒ Operating
Instructions "Operating in Tablet Mode")
z When Windows is started up
z When another user logs on with the Fast User Switching function
NOTE
z You can set the order of display rotation positions in the following menu.
[start] - [Control Panel] - [Printers and Other Hardware] - [Tablet and Pen Settings] [Display] - [Change]

Display Rotation
Exiting the Tool
24
1 Right-click on the taskbar, and then select [Exit].
z If you exit the tool:
• The operation of touch pad will not match the display angle when the
display is rotated.
• The setting of the display rotation (see above) will not be effective.
z In the default mode, the Display Rotation Tool will start up when Windows starts
up.
z To restart the tool after exiting:
Select [start] - [All Programs] - [Panasonic] - [Display Rotation Tool].

Standby/Hibernation Functions
Starting Up Your Computer Quickly
If you use the standby or hibernation function, you can shut down the computer without
closing programs and documents. Upon restarting your computer from either the standby or
hibernation mode, you can immediately continue working in all programs, or documents that
were open at the time the computer was placed into the standby or hibernation mode.
Differences between the Standby and Hibernation Functions
25
Function Where data is
saved to
Standby
function
Hibernation
function
*1
In hibernation mode, power is not required to maintain data. However, power is consumed.
Memory Short Yes
Hard disk Rather long
Time until
recovery
Requires power supply
(if power is cut, all data is lost)
Power is not required to maintain data
NOTE
z We recommend plugging in the AC adaptor if the standby function is to be used for a
long period of time. If the AC adaptor cannot be connected, we recommend that
hibernation mode be used instead of the standby mode in order to maintain data.
z If the standby or hibernation function is used repeatedly, the computer may not work
properly. To stabilize computer operations, shut down Windows on a regular basis
(about once a week) without using the standby or hibernation function.
Entering the Standby or Hibernation Mode
Use any of the following methods to enter the standby or hibernation mode.
To use the hibernation mode, set [Power Options] in advance (Î page 26).
(Enabled in factory preset.)
z Using Fn key combinations (Î page 6)
z Using the power switch (Î page 27)
z Using the display (Î page 28)
*1
Standby/Hibernation Functions
z From the shutdown screen
• Standby
In [start] - [Turn Off Computer], select [Stand By].
• Hibernation
In [start] - [Turn Off Computer], press and hold
Setting for Using the Hibernation Mode
At the time of purchase, the computer is set so that hibernation mode can be used.
1 Select [start] - [Control Panel] - [Performance and Maintenance] -
[Power Options].
2 In [Hibernate], add the check mark for [Enable hibernation] and select
[OK].
Precautions
Shift
, then select [Hibernate].
26
Before entering the standby or hibernation mode
z Be sure to save all data.
z When a file in an external device such as an external CD/DVD drive, hard disk, or ATA
card is opened, close the file.
z Even when a password has been set in the Setup Utility, [Enter Password] does not
appear when the computer resumes from the standby or hibernation mode. If you want to
use the security function when using the standby or hibernation mode, use the Windows
password as follows:
A Select [start] - [Control Panel] - [User Accounts] and select the account for
which the password will be set.
B Select [Create a password], input the password, and then [Create Password].
C Add the check mark for [Prompt for password when computer resumes from
standby] in [start] - [Control Panel] - [Performance and Maintenance] - [Power
Options] - [Advanced].

Standby/Hibernation Functions
z Do not enter either the standby or hibernation mode under the following conditions. You
may corrupt your data or file, the standby or hibernation function may not work, or the
computer (or peripherals) may fail to work properly.
• When the hard disk drive indicator or SD Memory Card indicator is on.
• When playing/recording audio files and displaying images (such as MPEG files).
• When using communications software or the network function.
• When using PC Cards.
(If these cards fail to work properly, restart the computer.)
When entering the standby or hibernation mode
Standby mode: until the power indicator blinks green
Hibernation mode: until the power indicator goes off
z Avoid the following:
• Using the keyboard, touch pad, digitizer, tablet buttons, or power switch.
• Using external mouse or other peripheral devices.
• Connecting or disconnecting the AC adaptor.
• Closing or opening the display.
z It may take one or two minutes to enter the standby or hibernation mode.
27
In standby or hibernation mode
z Do not insert or remove peripherals; abnormal operation may result.
z In standby mode, power is consumed. If PC Cards are inserted, more power is consumed.
Using the Power Switch
Setting
When all power has been consumed, all data saved at standby is lost since it is retained in
memory. We therefore recommend plugging in the AC adaptor when using the standby
function.
1 Select [start] - [Control Panel] - [Performance and Maintenance] -
[Power Options] - [Advanced].

Standby/Hibernation Functions
2 Select [Stand by] or [Hibernate] for [When I press the power button
on my computer], and then select [OK].
Entering the standby or hibernation mode
28
Using the Display
1 Slide the power switch (A); at the beep
The computer will enter either the standby or hibernation mode, depending on the
setting.
*1
sound, release your finger.
CAUTION
z After releasing your finger from the power switch, do not touch the power switch until
the power indicator goes off or blinks.
*1
z At the beep
slide the power switch and hold it for more than four seconds, the computer will emit a
second beep
Even when [When I press the power button on my computer] is set to [Shut down] with
[start] - [Control Panel] - [Performance and Maintenance] - [Power Options] [Advanced], if you slide the power switch for more than four seconds and do not
release it, a second beep
not previously saved will be lost.
*1
When the speaker function is disabled, e.g., by the key combination Fn+F4, there will be no beep
sound.
sound, release your finger from the power switch. If you continue to
*1
then power off. Data not previously saved will be lost.
*1
will sound and the power will be turned off forcibly. Data
Setting
1 Select [start] - [Control Panel] - [Performance and Maintenance] -
[Power Options] - [Advanced].
2 Select [Stand by] or [Hibernate] for [When I close the lid of my
portable computer], and then select [OK].

Standby/Hibernation Functions
Entering the standby or hibernation mode
1 Close the display.
The computer will enter either the standby or hibernation mode, depending on the
setting.
z When entering the standby or hibernation mode, close the display correctly. If
you do not do so, (for example, if you open the display soon after you close it)
the computer may not enter the standby or hibernation mode.
Resuming Operation
CAUTION
z Until resuming is complete (requires about 15 seconds, or 60 seconds if connected to
a network, after the display returns), avoid the following:
• Using the keyboard (except for password input), touch pad, digitizer, tablet buttons,
or power switch.
• Using external mouse or other peripheral devices.
• Connecting or disconnecting the AC adaptor.
• Closing or opening the display.
• Shutting down or restarting Windows.
• Entering either the standby or hibernation mode again.
29

Standby/Hibernation Functions
Using the Power Switch
1 Slide the power switch (A).
Using the Display
When [Stand by] or [Hibernate] is selected as the setting for [When I close the lid of my
portable computer] (Î page 28), you can resume operation using the following procedure.
30
1 Open the display.
Even if the display is closed after the computer has entered either the standby or
hibernation mode, operation will resume when the display is opened. This function
will not work in Tablet mode. If the computer does not resume when the display is
opened, slide the power switch.
 Loading...