

Panasonic 9TGCF-P21 User Manual
®
OPERATING INSTRUCTIONS
Handheld Computer
Model No. CF-P2 Series
Please read this instructions manual carefully before using this product and save this manual
for future use. Refer to the provided Safety Precautions regarding precautions for this computer.

Customer's Record
Model No.*
Serial No.
or
Code No.
Date of Purchase
* For the Model No., insert the 12 digit number (for example, CF-P2T1FDF7E) located on the back of
the computer.
Introduction
Thank you for purchasing the Panasonic Handheld Computer. Read the operating instructions thoroughly for proper operation of your new computer.
Illustrations and Terminology in this Manual
NOTE: NOTE provides a useful fact or helpful information.
CAUTION: CAUTION indicates a condition that may result in minor or mod-
erate injury.
- [Programs]: This illustration means to tap at the top of the screen, then to
tap [Programs].
: Where to go for referred information.
Some of the illustrations in this manual may differ slightly in shape from the actual
items in order to make the explanation easier to understand.
Dealer's Name
Dealer's Address
2

Contents
Getting Started
What’s in the Box? .................................................. 4
Names and Functions of Parts ............................... 5
First-time Operation ................................................ 9
Operation
Starting Up/Shutting Down ................................... 12
LCD (Touchscreen) ............................................... 17
Backlight Settings ................................................. 19
Entering Information ............................................. 21
Using T9® Text Input .......................................................... 21
Using the Input Panel ........................................................ 24
Using the Keyboard ........................................................... 25
Changing the Assignment of Program Buttons .... 26
Setting to Resume ............................................................. 26
Quick Menu........................................................................ 27
Battery Power ....................................................... 29
Remaining Battery ............................................................. 29
Setting for Auto Powering Off ............................................ 29
Replacing the Battery Pack ............................................... 30
SD Memory Card/SDIO Card/MultiMedia Card .... 31
Panasonic Backup ................................................ 32
Pocket Internet Explorer ....................................... 35
Connecting to Your Computer ............................... 36
Wireless Functions ............................................... 39
Changing the Wireless Power Status ................................ 39
Setting Up the Remote Network for GPRS ........................ 40
Connecting to Wireless LAN ............................................. 43
Connecting to Bluetooth Devices ...................................... 49
Dialer and Telephony ............................................ 53
Customizing the Computer ................................... 58
Troubleshooting
Dealing with Problems .......................................... 61
Resetting Your Computer .................................................. 61
Troubleshooting ................................................................. 62
Diagnostic Tool .................................................................. 65
Appendix
For Effective Use .................................................. 67
Specifications ....................................................... 68
3
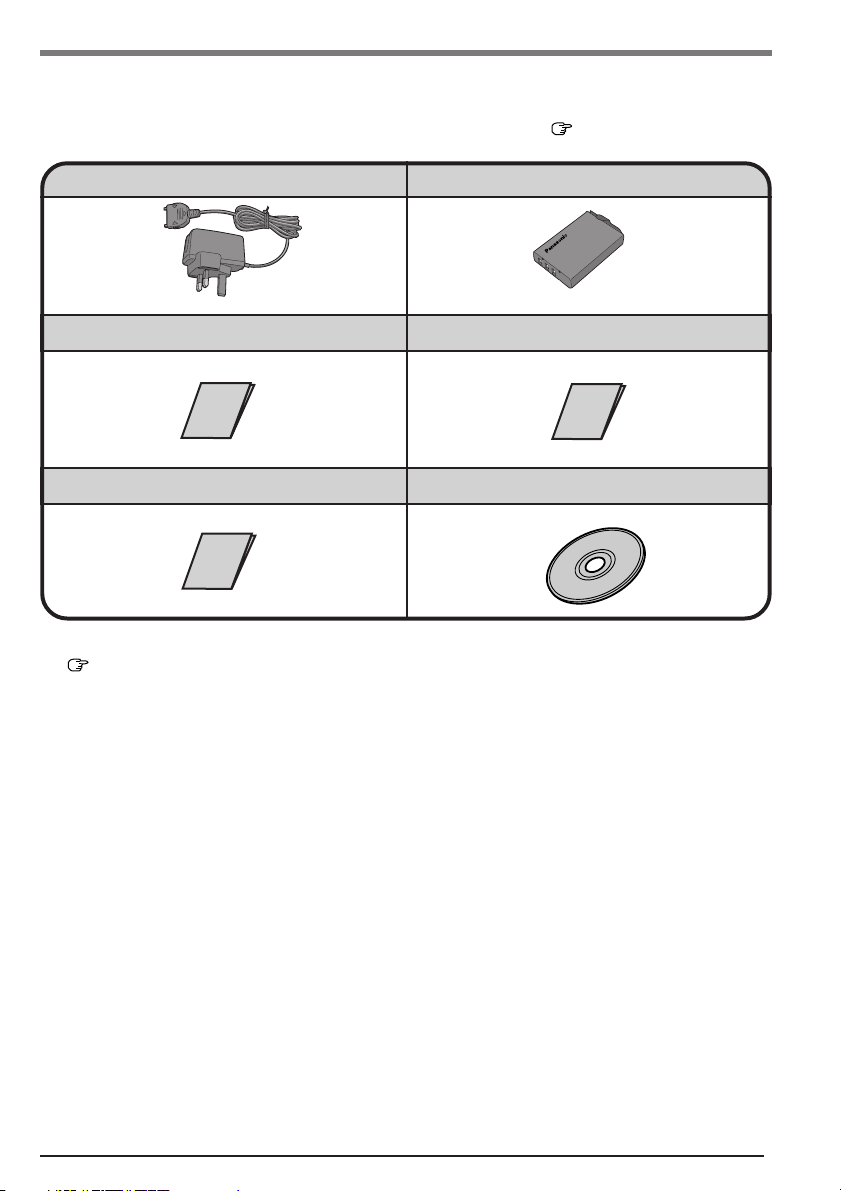
What’s in the Box?
Make sure the parts shown in the figure have been supplied. If any of these items is missing
or is not working properly, contact Panasonic Technical Support.
Make sure the provided stylus has been stored to the computer ( page 17).
Fast Travel Charger......................... 1 Battery Pack .................................... 1
Model No: EB-CAD95UK
License Agreement
Model No: CF-VZSU33
............................ 1Safety Precautions ......................... 1
Companion CD*1................................ 1End User License Agreement ........ 1
*1 You can use the Companion CD to install various software, including Microsoft® ActiveSync
( page 36).
®
4
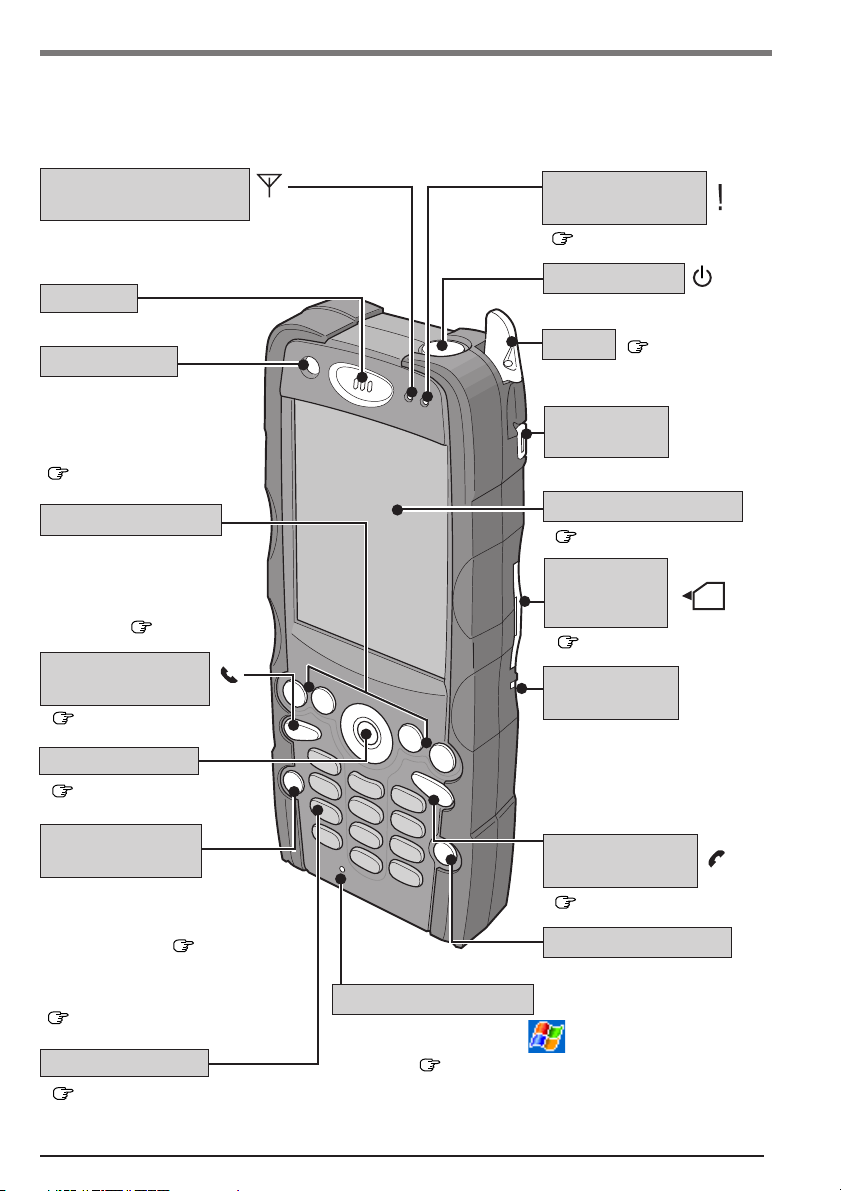
Names and Functions of Parts
The illustrations shown may differ from the actual physical appearances.
Wireless Power LED
Indicator
When wireless power is on, LED
indicator is blinking green.
Receiver
Light Sensor
Brightness of backlight
changes according to
level of ambient light
( page 19).
Program Buttons
By pressing the program
button, the program assigned to the button is
started up ( page 26).
OFF Hook (Talk)
Button
( pages 53)
Cursor Control
( page 8)
Wireless Power
Button
Turns GSM/GPRS(Phone) or
Wireless LAN or Bluetooth
power ON/OFF ( page 39).
This button also functions as
one of the program buttons
( page 26).
Numeric Keypad
( page 25)
Notification LED
Indicator
( page 7)
Power Switch
Stylus
Accessory
Connector
LCD (Touchscreen)
( page 18)
SD Card/
MultiMedia
Card Slot
( page 31)
SD Card LED
Indicator
When the SD card or
MultiMedia card is accessed, LED indicator is
lighting green.
ON Hook (End)
Button
( pages 53)
Backspace Button
Internal Microphone
For detailed settings, tap - [Settings] - [System] tab
- [Audio] ( page 59).
( page 17)
SD
5
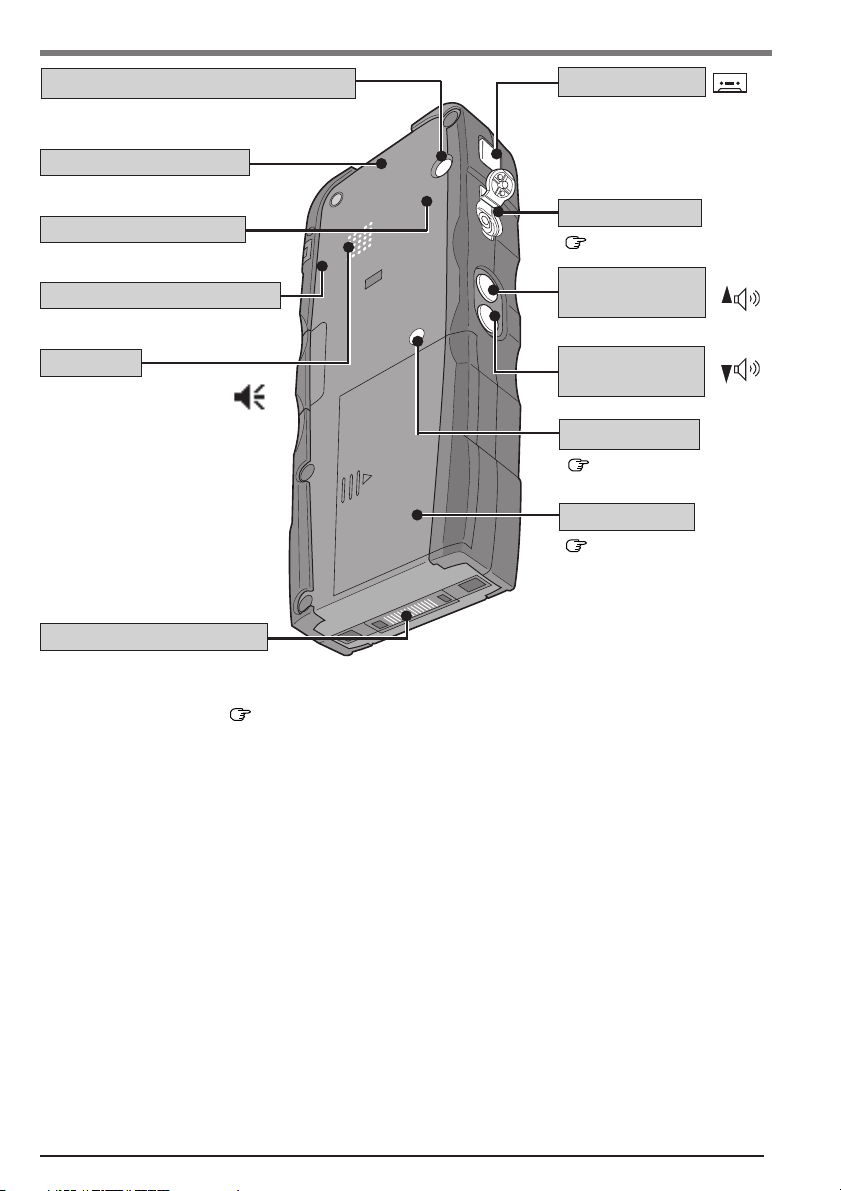
Names and Functions of Parts
GSM/GPRS Antenna Connector
Used for a car mounter (optional)
connected to CF-P2.
GSM/GPRS Antenna
(built-in)
Bluetooth Antenna
(built-in)
Wireless LAN Antenna
(built-in)
Speaker
To adjust the volume, tap
on the navigation bar, or press
the Volume Up/Down Buttons.
Expansion Connector
You can connect CF-P2 directly to the
Fast Travel Charger, or the computer
using the proper cable ( pages 10, 38).
Record Button
Can be recorded
while pressing this
button.
Headset Jack
( page 8)
Volume Up
Button
Volume Down
Button
Reset Switch
( page 61)
Battery Pack
( pages 9, 30)
RESET
6
Names and Functions of Parts
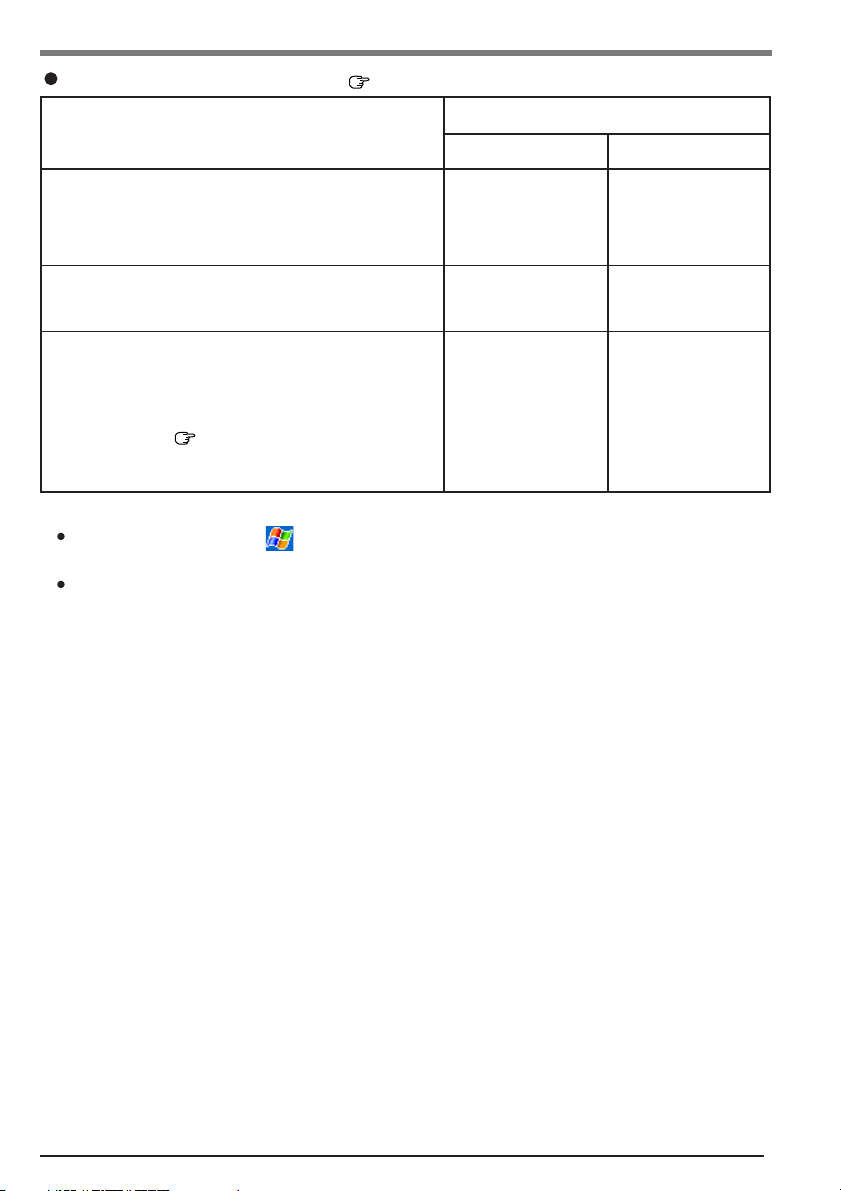
Notification LED Indicator
Status
Not connected to the Fast Travel Charger
or unable to recharge outside the allowable
temperature range.
Connected to the Fast Travel Charger
(No charging)
• Connected to the Fast Travel Charger
• Connected to USB cable, and add a
check mark for [Supply power from PC by
using USB] ( page 29).
(Charging in progress)
*1Examples of notification are shown below.
When the alarm is set in - [Settings] - [System] tab - [Clock & Alarms] - [Alarms]
tab and the alarm is ringing.
When you miss phone calls, etc.
( page 5)
None
Not lit
Green
Orange
Notification
Given*
Blinking Green
Blinking Green
Blinking Orange
1
7
Names and Functions of Parts
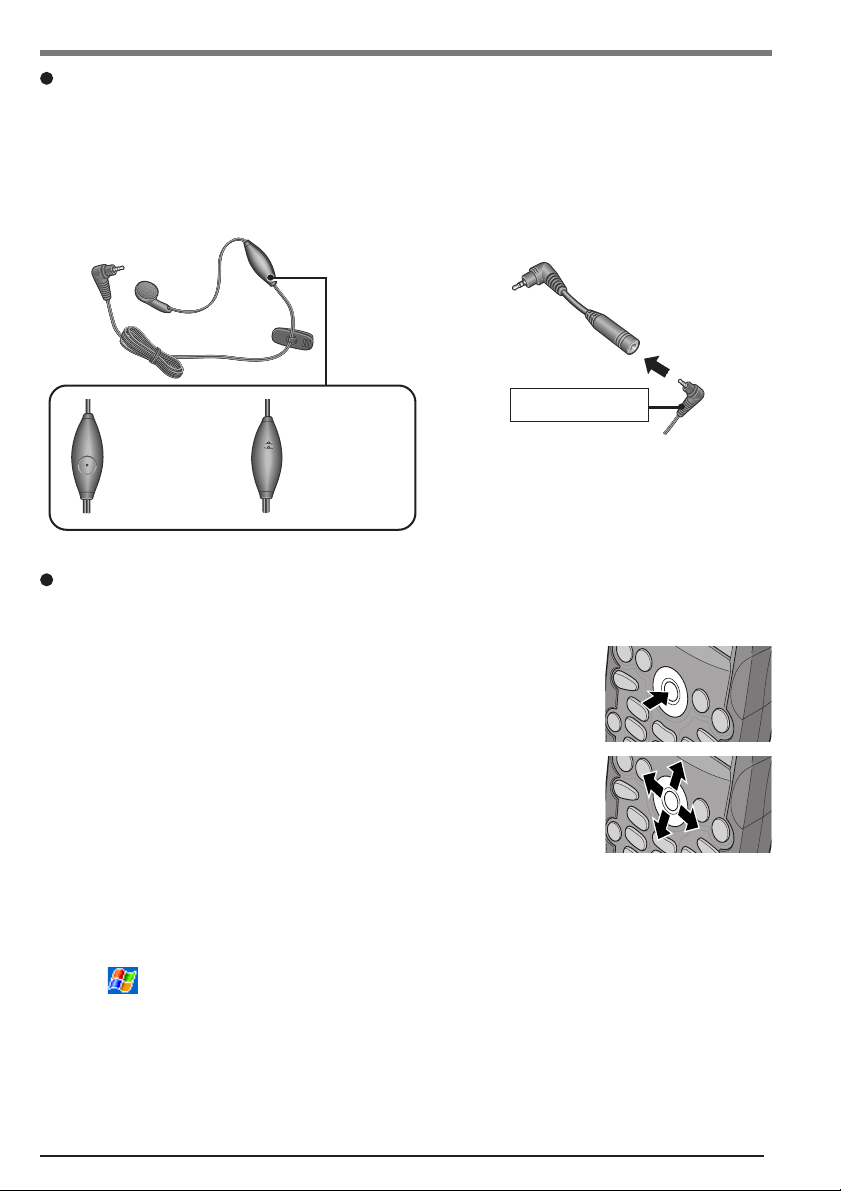
Headset and 3.5 DIA plug adaptor
Only the CF-VHSP11W (sold separately) can connect to the headset jack.
CF-VHSP11W includes A and B. When using a 3.5 DIA plug, B is required. This adaptor
can be connected to stereo headphones.
Audio output from the internal speaker is disabled when the headset or the 3.5 DIA plug
adaptor is connected.
A. Headset B. 3.5 DIA plug adaptor
3.5 DIA plug
*1 Press for about one second to answer/
Front
*1Answer switch
Cursor Control
Using the cursor control, the following operations can be performed.
“Press Center” Operation:
Executes a selected item from a menu, or a selected icon. For
example, after an item within a menu is selected, center of the
cursor control can be pressed to execute this selected item.
“Press Up/Down Right/Left” Operations:
Performs the same function as the up/down right/left cursor
control. For example, the “Press Up” operation can be performed
to select an item towards the top within a menu.
Back
Microphone
hang up voice calls. Function will not
operate if the switch is not pressed
long enough.
Changing the Cursor Control Settings
The cursor control settings allow you to adjust the interval between the waiting time until the
repetition of an input begins (from the first input to the second input) if the cursor control is
held down, and the repeat of the input (from the second input and on).
1
Tap - [Settings] - [Personal] tab - [Buttons] - [Up/Down Control] tab.
2
Customize the way your cursor control repeats.
3
Tap [ok].
8

First-time Operation
1
Turn your computer over and
slide the battery pack cover to
remove it.
2
Install the SIM card.
CAUTION
The contacts of the SIM card slot are extremely sensitive to static electricity. When
inserting or removing a SIM card, do not touch the contacts. Doing so has been
known to cause damage or electric shock.
SIM Card Slot
Battery Pack Cover
(1) Unlock the Latch and open (A).
(2) Insert the card all the way into (A). Make sure that the
beveled corner of the SIM card matches up with (B).
CAUTION
Insert with care, because if the SIM card is not inserted correctly, the computer will not operate, and
the SIM card may be damaged by contact with the
battery.
(3) Snap (A) into place by pushing down on it.
(4) Slide the Latch in the direction of the arrow to lock.
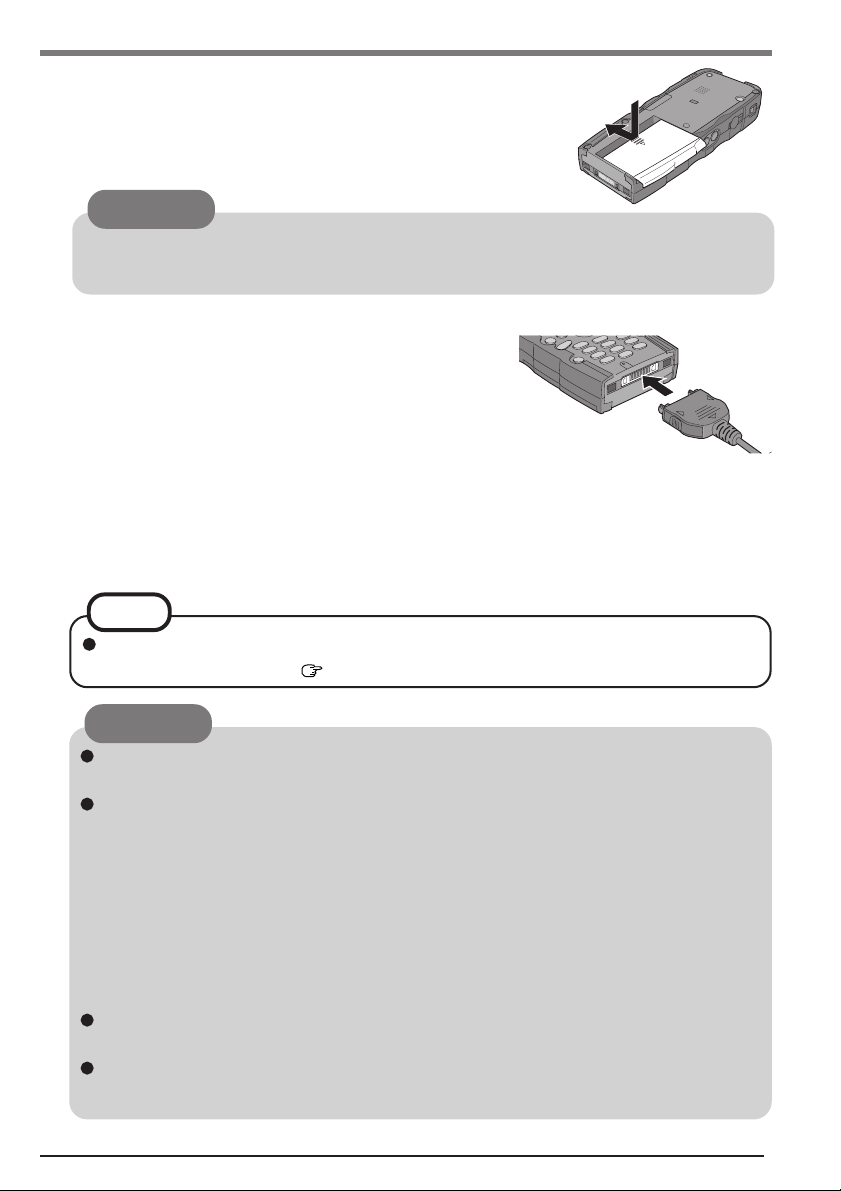
3
Install the battery pack.
(1) Hold the battery pack so that the name “Panasonic” is fac-
ing upwards and the tab (C) is placed as shown at right,
and put the battery pack into the computer so that the battery connector and the CF-P2 connector match up.
Latch
(A)
(A)
(A)
(C)
(B)
Latch
9
First-time Operation
(2) Set the cover in place and slide it in the direction indi-
cated by the arrow to close.
CAUTION
After changing the SIM card and inserting the battery pack (except for first-time operation), reset the CF-P2.
4
Connect your computer to a power outlet.
Connect the Fast Travel Charger to CF-P2 with arrow
marks facing up. Charging begins automatically.
Charging Time:(Power Off) Approx. 4 hours
(Power On) Varies depending on
the usage conditions.
This computer is equipped with a memory backup battery which automatically charges
from the fully-charged lithium-ion battery (main battery). This backup battery retains
data in memory when the lithium-ion battery is removed, and takes 24 hours to charge
when you first use this computer.
NOTE
When the backup battery or main battery becomes low, some alert messages and
icons will be displayed ( page 14).
CAUTION
Do not remove the main battery before the backup battery is fully charged. Otherwise, data in RAM will be lost.
Take care to ensure that the remaining power in the main battery and the backup
battery never discharges completely.
When any remaining power discharges completely, the computer will no longer
function properly, and the computer powers off automatically. Connect the Fast
Travel Charger and recharge the battery. If the computer is left for 72 hours or more
without recharging, the computer may be fully reset. When the computer is fully
reset, all user-added data except for Flash Storage will be lost. The computer will be
returned to the condition at the time of purchase except for Flash Storage.
Handling the Fast Travel Charger
Do not twist or pull the Fast Travel Charger cord forcefully. Otherwise, the connections will be damaged.
Use only the provided The Fast Travel Charger with your computer. Using a charger
other than the one provided might damage the battery and the computer.
10
First-time Operation
5
Turn your computer on
(1) Using the provided stylus ( page 17), push the center of the
reset switch straight in for 1 second while holding down on the
power switch ( page 12).
CAUTION
When the battery pack is not fully charged, if the Fast Travel
Charger is connected, CF-P2 may not turn on.
Use only the provided stylus to push the reset switch.
Do not push the reset switch with any other sharp-pointed
objects, i.e. pencils, and ball point pens. The reset switch
or other parts may become damaged.
(2) Tap the screen to set up your Pocket PC.
The Windows*1 alignment screen is displayed.
*1 This computer uses Microsoft® Windows Mobile
for Pocket PC, Premium with Phone Edition.
(3) Align the touchscreen.
(For alignment, tapping operations are required. For information on tapping, refer to page 17.)
"+" is displayed in the center, upper left, lower left, lower right,
and upper right portions of the touch screen, in that order. Each
time the "+" mark is displayed, tap the center of the "+" mark
with the stylus.
TM
2003 Second Edition Software
Reset Switch
NOTE
In this operation, the "+" mark may not move smoothly. This
is not a malfunction. Continue the operation.
(4) At [complete], tap the screen to begin using CF-P2.
6
Set the time and date
(1) Tap - [Settings] - [System] tab - [Clock & Alarms].
(2) Set the time zone, time and date.
(3) Tap [ok].
NOTE
You can also set the date and time by tapping on [Today] screen ( page 15).
This concludes the first-time use operation guidelines.
11

Starting Up/Shutting Down
Starting Up (from the second time)
Lightly press the power switch once.
Programs and files that were previously displayed appear
on your screen.
Power Switch
Power Switch
Lightly press the power switch (within 0.5 seconds) to turn on/off CF-P2.
To turn the LCD backlight on/off:
Turn on CF-P2, and press the power switch until the LCD backlight goes on/off and release
the switch.
At the time of purchase, the brightness of the LCD backlight and the keyboard backlight
changes according to the level of ambient light. To change this setting, refer to page 19.
If the CF-P2 powers off while the backlight is off, the backlight will remain off when the
CF-P2 powers on again.
NOTE
When the backlight is on, more power is consumed, and the battery operating time is
reduced.
12
Starting Up/Shutting Down
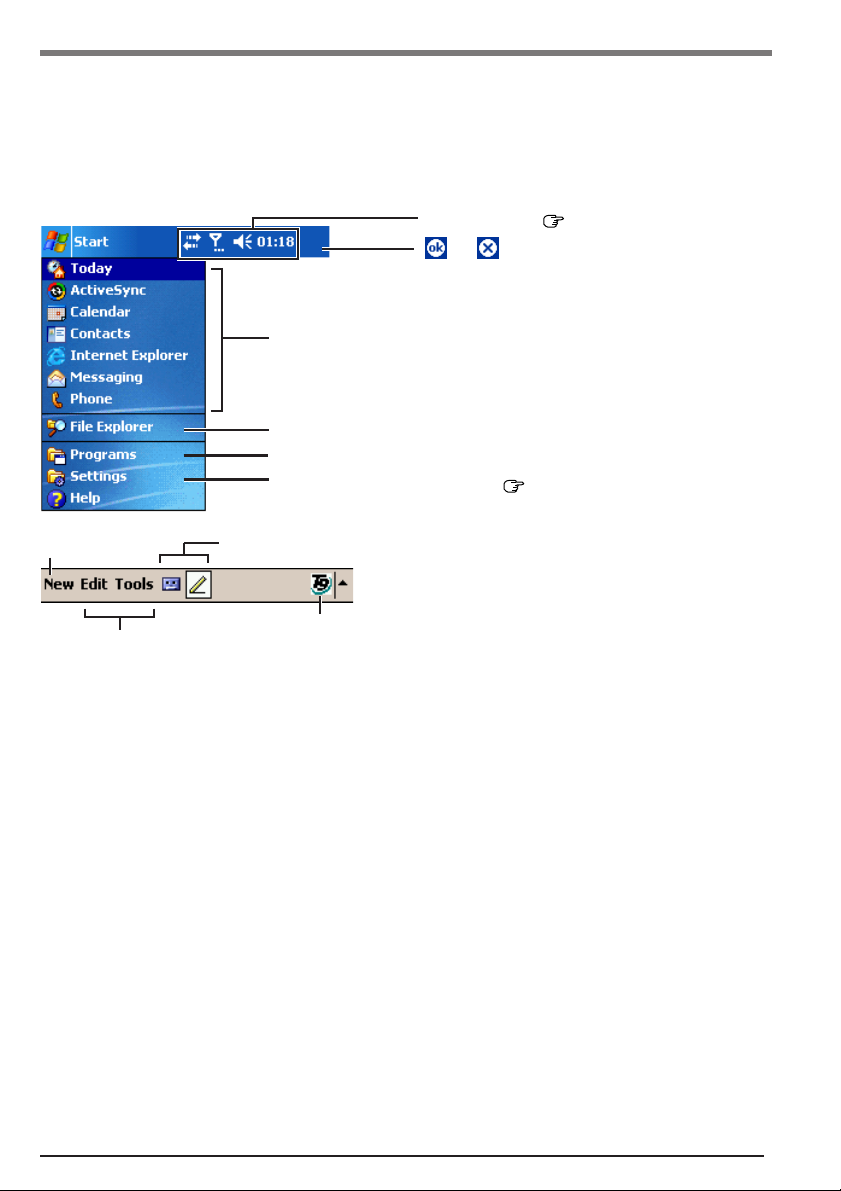
The Navigation Bar and Command Bar
The navigation bar is located at the top of the screen. It displays the active program and
current time, and allows you to switch to programs and close screens.
Use the command bar at the bottom of the screen to perform tasks in programs. The command
bar includes menu names, buttons, and the input panel button.
Status Icon ( page 14)
or may be displayed depending
on the program that is running.
Tap to select a program.
Tap to quickly select a program you have recently used.
Tap to see additional programs.
Tap to customize CF-P2 ( pages 58-60).
New Button
Menu Names
Buttons (Example for [Notes])
Input Panel Button
13

Starting Up/Shutting Down
Following are some of the status icons you may see.
Status Icon & Meaning
Turn all sounds on and off
Backup battery is very low
Main battery is charging
Main battery is full
Main battery is low
Main battery is very low
Notification that one or more instant
messages were received
Notification that one or more e-mail
messages were received
More Notification icons need to be
displayed. Tap the icon to view all.
Voice Call in progress
ActiveSync®/CSD Connection in
progress
GPRS available
GPRS Connection in progress
Roaming
Radio off
Playing sound disable
Vibrate ON
Missed Call
Full Signal Strength
Wireless LAN data call
Wireless LAN on
Wireless LAN Connection in progress
14
Starting Up/Shutting Down
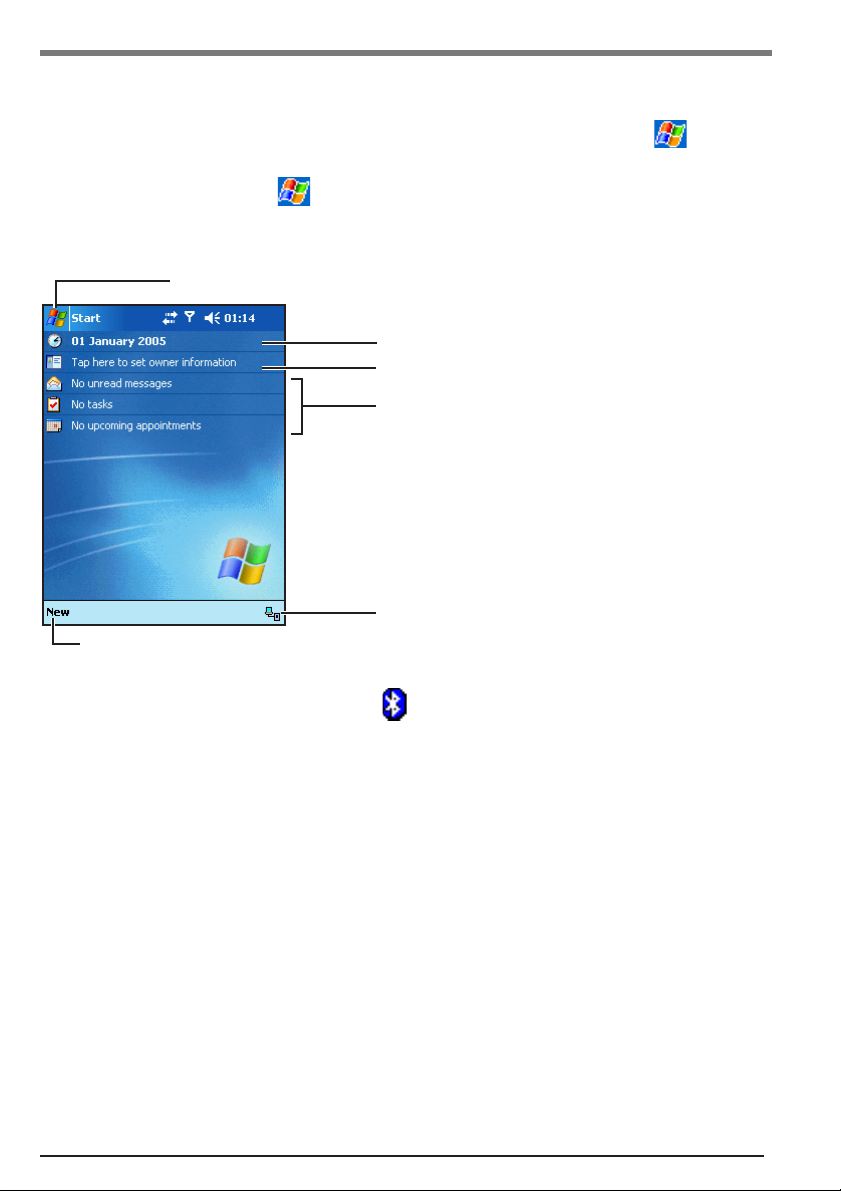
Today Screen
You’ll see the Today screen when you turn on the computer for the first time each day (or
after 4 hours of inactivity*1). The Today screen can be displayed by tapping - [Today].
On the Today screen, you can see at a glance important information for the day.
*1To change the setting, tap - [Settings] - [Personal] tab - [Today] - [Items] tab.
Tap to switch to a program.
Tap to change date and time.
Tap to open an item.
Your day at a glance.
Displayed when synchronizing with a host
Tap to create a new item.
computer using Microsoft® ActiveSync®.
Tap to view connection status.
is displayed when Panasonic Bluetooth has
started.
15
Starting Up/Shutting Down
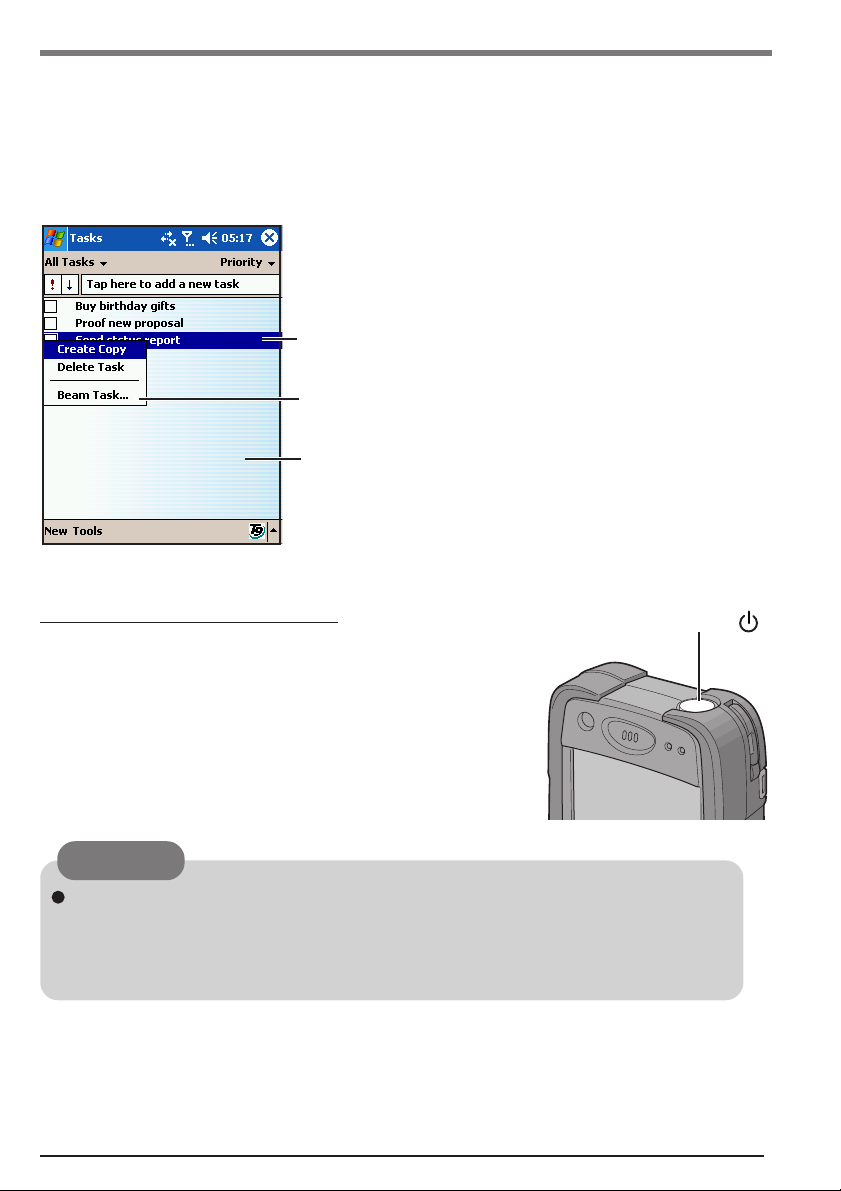
Pop-up Menus
With pop-up menus, you can quickly choose an action for an item. For example, you can use
the pop-up menu in the contact list to quickly delete a contact, make a copy of a contact, or
send an e-mail message to a contact. The actions in the pop-up menus vary from program to
program.
(1) To access a pop-up menu:
Tap and hold to display the pop-up menu.
(2) Lift the stylus and tap the action you want to perform.
Tap outside the menu to close it without performing an action.
Shutting Down (power off)
Lightly press the power switch once (within 0.5 seconds).
CF-P2 shutdown is the same as the standby state of a computer. (Standby state is a function allowing you to turn off
the power without closing applications. The settings before
the power was turned off are stored in the memory, so when
the power is turned back on, the screen is the same as it was
before the power was turned off (the same applications and
files are opened) and you can start working immediately.)
Power Switch
CAUTION
Check to see the SD card LED indicator if the SD card/MultiMedia Card is not
being accessed before turning off the power. If the power is turned off while the
card is being accessed, the data stored on the card may be damaged and the computer may stop working properly.
16

LCD (Touchscreen)
Using the Stylus
Use the provided stylus to perform operations on the
touchscreen. The stylus is located in the stylus holder at
the upper right of the computer, and can be held like a pen
or a pencil. The following operations are possible on the
touchscreen.
Tapping
You can select an item on the screen by tapping it with the stylus.
This operation is called a “tap”.
Dragging
You can drag on an item on the screen by holding the stylus down
over the item and then moving the stylus. This operation is called a
“drag”.
Tapping and Holding
You can tap and hold the stylus on an item to see a list of actions
available for the item. On the pop-up menu that appears, tap the
action you want to perform.
Handling the Stylus
Clean the stylus tip and screen prior to operation. Foreign particles can scratch the screen
and impede the operation of the stylus.
Use the provided stylus only on the screen or when pushing the reset switch. Using it for
any other purpose may damage the stylus and scratch the screen.
17
LCD (Touchscreen)
Handling the Touchscreen
Use the provided stylus with CF-P2. Do not use an implement other than the stylus provided with the computer.
Do not place any object on the surface or press down forcefully with sharp-pointed objects
(e.g., nails), or hard objects that may become damaged (e.g., pencils and ball point pens).
Do not operate the computer when such things as dust are on the LCD. Do not allow
substances such as oil to contact the LCD. The cursor may not work properly in such
cases.
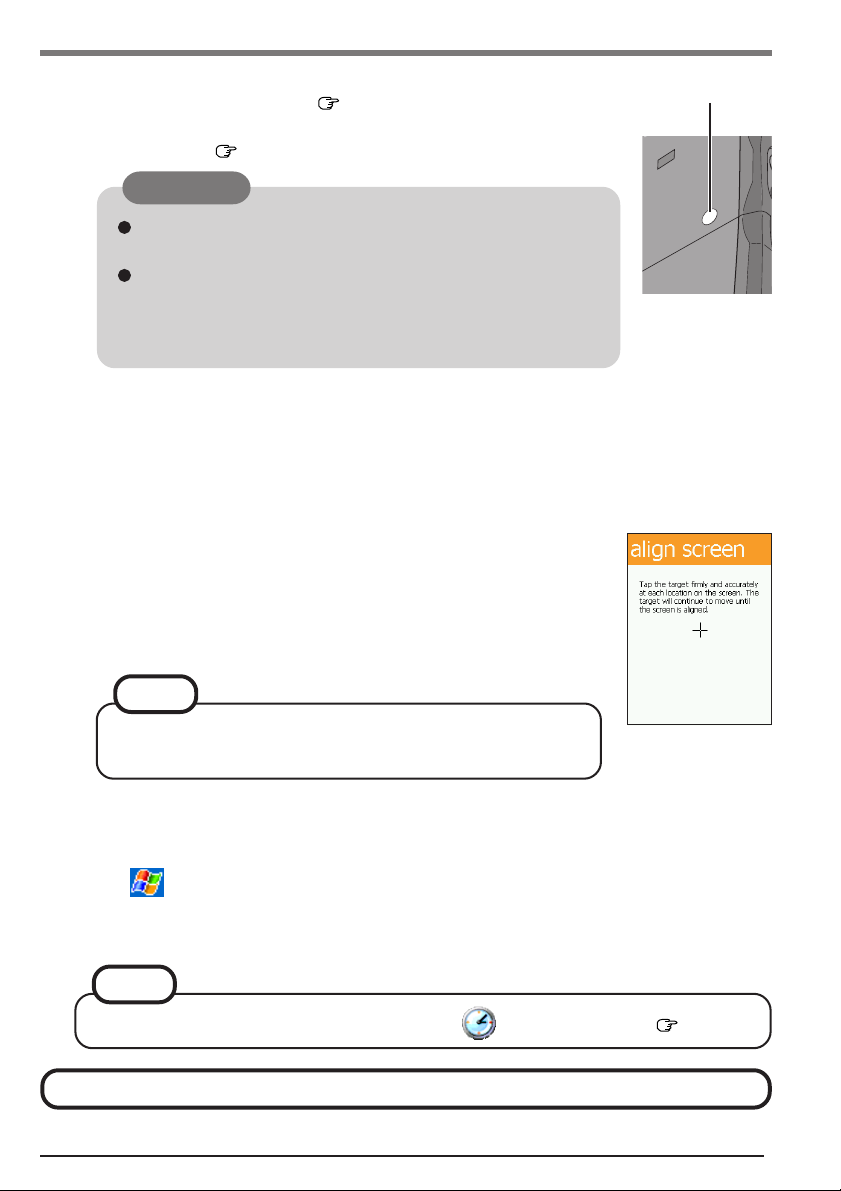
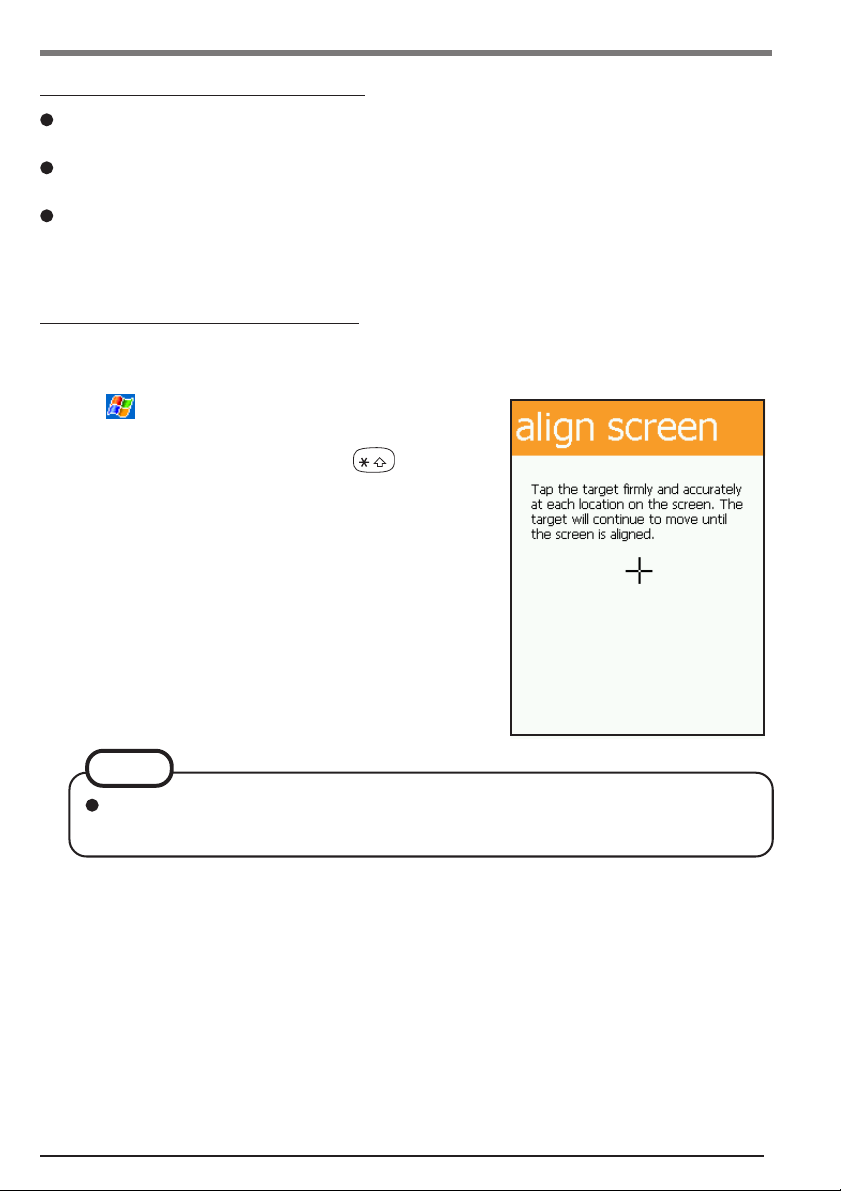
Aligning the Touchscreen
Align the touchscreen if the cursor does not correctly move to the position where the stylus
touches the touchscreen of the computer.
1
Tap - [Settings] - [System] tab - [Screen]
and tap [Align Screen].
You can also align the screen when + center
of the cursor control are pressed.
2
"+" is displayed in the center, upper left, lower
left, lower right, and upper right portions of
the touchscreen, in that order.
Each time the "+" mark is displayed, tap the center of
the "+" mark with the stylus.
The alignment procedure is executed after the five
"+" marks are touched.
NOTE
When performing a full reset, the "+" mark may not move smoothly in this operation. This is not a malfunction. Continue the operation.
18

Backlight Settings
Adjust the LCD Brightness
Screen brightness can be adjusted in accordance with the usage conditions.
1
Tap - [Settings] - [System] tab - [Backlight].
2
Tap the [Brightness] tab and adjust the brightness with the slider.
3
Tap [ok].
CAUTION
If there are check marks at [Advanced] tab (see
below), this function may not work. In such a
case, remove those check marks and adjust the
brightness with the slider.
Settings of the Backlight Automatically
The backlight can be set automatically.
1
Tap - [Settings] - [System] tab - [Backlight].
2
Tap the [Advanced] tab.
3
Tap [ok].
Add the check mark so that the sensor detects the
amount of light, and the backlight automatically become dimmer so that the LCD screen is not too bright
when using CF-P2 in a car or other dark places.
Add the check mark so that the dimming function is
enabled only when CF-P2 is docked in its car mounter’s
cradle.
Add the check mark so that when LCD backlight turns
on, keyboard backlight turns on automatically at dark
place.
Add the check mark so that the sensor detects the
amount of light, and the backlight automatically turn
off at bright places.
19
Backlight Settings
LCD Backlight ON/OFF
Turn on CF-P2, and press the power switch until the LCD backlight goes on/off and release
the switch. (Depending on the setting under the [Advanced] tab, the LCD backlight may not
be turned on.)
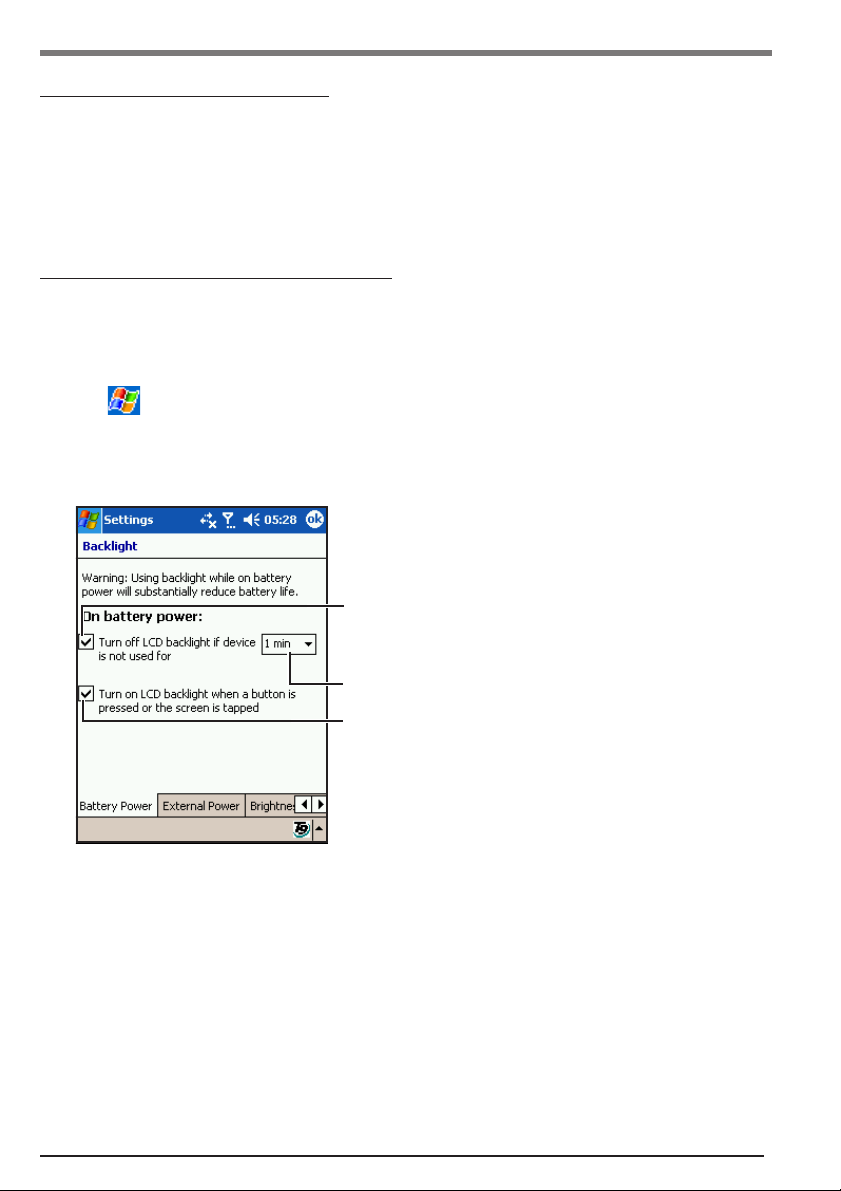
Setting of the LCD Backlight
The LCD backlight can be set to turn off automatically (e.g., for conserve power) by setting
the timeout function. Individual settings can be made for battery use and The Fast Travel
Charger use.
1
Tap - [Settings] - [System] tab - [Backlight].
2
Battery use setting: Tap the [Battery Power] tab.
The Fast Travel Charger use setting: Tap the [External Power] tab.
Add a check mark so that when the device is not operated, the LCD backlight switches off automatically
when the timeout expires.
Timeout
(Example for [Battery Power])
3
Tap [ok].
Add a check mark so that tapping the screen turns the
LCD backlight on.
20

Entering Information
You can use the following options to enter information:
Use the numeric keypad to input typed text by using T9 ( below) or the number shown
on the key top.
Use the input panel to input typed text, either by using the soft keyboard or other input
method.
Write directly on the screen.*
Draw pictures on the screen.*
Speak into the internal microphone to record a message.*
Use Microsoft® ActiveSync® to synchronize or copy information from a host computer to
CF-P2. For more information on Microsoft® ActiveSync®, see ActiveSync® Help on the
host computer ( page 36).
*1 For more information, tap - [Help] - [Settings] - [Input].
Using T9® Text Input
With T9® Text Input software, you can enter text easier and faster than with the “Multitap”
method of text entry. Instead of pressing a key repeatedly to enter a letter, you press a key
only once for each letter.
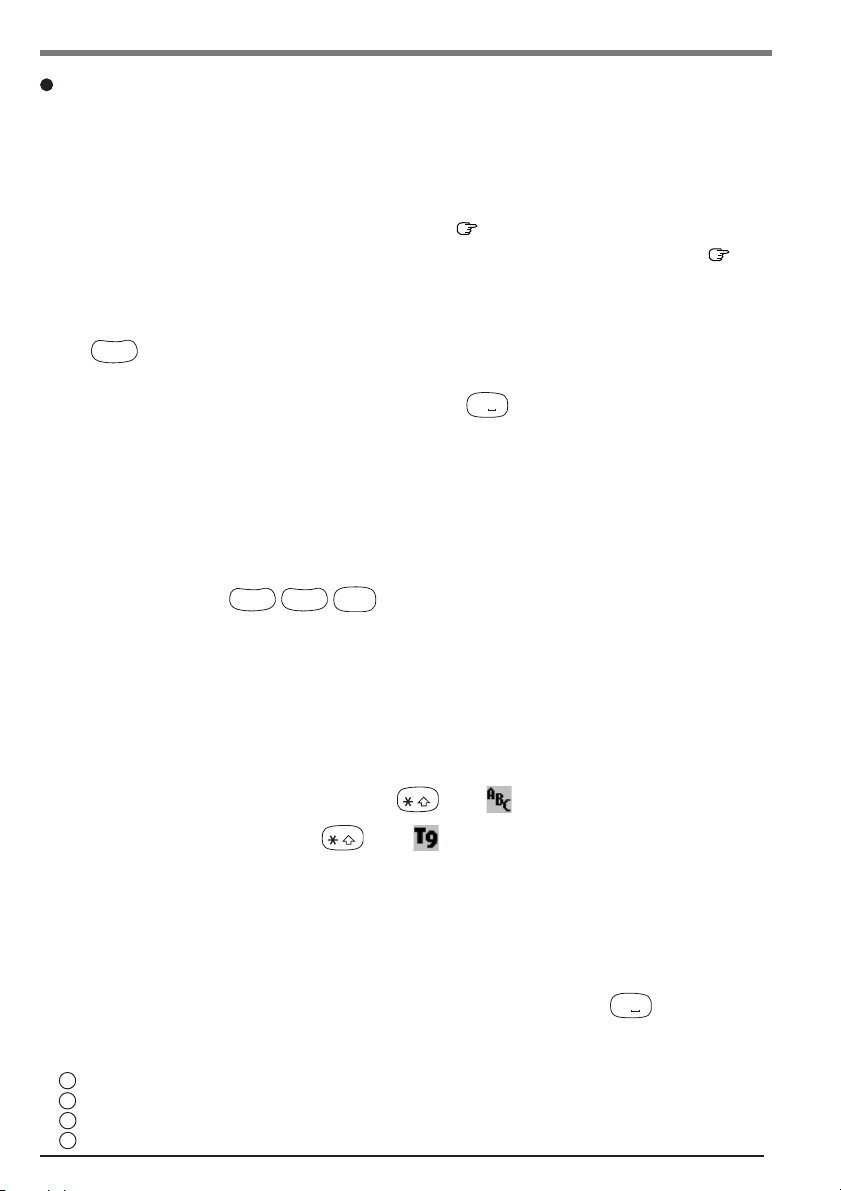
Changing the text entry mode
(1) Tap the arrow (A) and tap [Alphabetic T9].
(2) Tap (B) and select a text entry mode.
The current mode is indicated at (B).
CF-P2 has four text entry modes:
(T9): Used to enter letters,
(ABC): Used to enter letters and numbers. You press keys repeatedly to
(123): Used to enter numbers.
1
1
1
numbers, and symbols.
You press a key only once for each letter.
cycle to the desired character.
(B)
Help
(A)
(Symbols): Used to enter symbols and punctuation marks.
To change the text entry mode, press for more than one second or tap (B)
repeatedly until the icon of the mode you want is displayed.
21
Entering Information
Entering Letters in T9 Mode
Important T9 concepts:
• Type to the end of the word if it does not appear after you enter the first few letters.
• Don’t be concerned about what appears on screen while entering a word.
• Press the up/down cursor control to scroll through word choices.
• You can enter words that contain capital letters ( page 23 “Changing the Shift State”).
• You can use the Smart Punctuation feature to quickly add punctuation to words ( page
23 “Entering Symbols”).
(1) Press the corresponding number key one time. For example, to enter the letter c, press
once. Although each key represents several letters, T9 determines from the keys
abc
2
you press which letter you want.
(2) If the word displayed is the one you want, press
word.
(3) Press center of the cursor control to enter the word.
The following section describes what to do if T9 doesn’t display the word you want.
When the Word You Want Isn’t on Screen
Sometimes the word T9 displays isn’t the one you want. For example, to enter “cat” you
would press the keys
. For this key sequence, however, “act” is the most
abc
tuv
8
abc
2
2
likely matching word. Although T9 displays “act”, it has prepared a list of all the words
that match the key sequence.
To view the next matching words, press the up/down cursor control. Pressing this cursor
control replaces the current word with the next matching word.
to add a space and begin the next
#
When the Word Isn’t in T9’s List
Sometimes the word you want to enter isn’t in T9’s list of matching words. In this situation,
you can switch to ABC mode by pressing until is displayed and enter the word.
Return to T9 mode by pressing until is displayed. T9 automatically also adds
words input in ABC mode to its dictionary.*
Entering Completed Words*
1
1
Sometimes T9 places in the selection list completed words. Completed words match the
keys you’ve entered but contain additional characters. If the completed word isn’t the one
you want, just keep entering letters. T9 will remove the completed portion of the word for
you automatically. If the completed word is the one you want, press
to add a space
#
and begin the next word.
*1 This setting can be changed as follows.
1 Tap the arrow on the command bar.
2 Tap [Options] - [Input Method] tab - tap [Options].
3 Add/remove a check mark from each setting.
4 Tap [ok].
22
 Loading...