

Page 1

Operating
Instructions
Find the model number and serial number on
either the back or bottom of the unit. Please
record them in the space below and retain this
booklet as a permanent record of your pur
chase to aid in identification in case of theft.
MODEL NUMBER CY-ftMBSOrSOOEUC SERIAL NLIM8ER.
DATE PURCHASED FROM
Universal FM Modutator/Controlter
(with Wireless Remote)
CY-RM850/800EUC
Panasonic»
Please read these instructions completely before op
erating this unit.
Panasonic welcomes you to our ever growing family of electronic product owners. We know (hat this
product will bring you many hours of enjoyment. Our reputation is built on precise electronic and mechanical engineering, manufactured with carefully selected components and assembled by people who take
pride in their work. Once you discover the quality, reliability and value we have built into this product, you
too will be proud to be a member of our family.
Usage:
This controller is mainly used with CD changers (CX-DP801EUC. etc) by connecting it to the antenna jack for your
existing FM car stereo (radio) for your listening enjoyment.
Note: The remote control unit is supplied only with CY-RM850EUC.
Use This Equipment Safely
When Driving
Keep the volume level low enough to be aware of road
arxJ traffic conddions.
When Parked
Pari(tr>g in direct sunlight can produce very high tem
peratures inside your vehicle. Give the interior a
chance to cool down before switching the unit on.
Use the Proper Power Supply
This equipment is designed to operate off a 12 volt,
negative ground battery system. (The normal system
in a North American car.)
Use Authorized Servicenters
Do not attempt to disassemble or adjust this precision
equipment. Please refer to the Servicenter list induded with tNs product for service assistance.
Page 2
Installation Instructions-
Installation Precautions
• This equipment, if possible, should be installed by a professional installer. In case of difficulty, please consult
your nearest authorized PASC, Panasonic (in Canada) Servicenter.
• Before installation and wiring, remove the negative (-) terminal of the battery.
Note : For installation in cars with trip or navigational computers, all electronic memory settings previously regis
tered in the computer will be lost when the battery terminal is disconnected. For this type of car, the battery should
not be disconnected. Therefore, extra care should be taken to prevent short circuiting.
• Insulate all exposed wires to prevent short circuiting.
• Avoid installing the remote control unit or the Display Control Unit in a place where it may be exposed to direct
sunlight and high temperature.
Supplied Hardwares
Description Q’ty.
Magic Tape
1
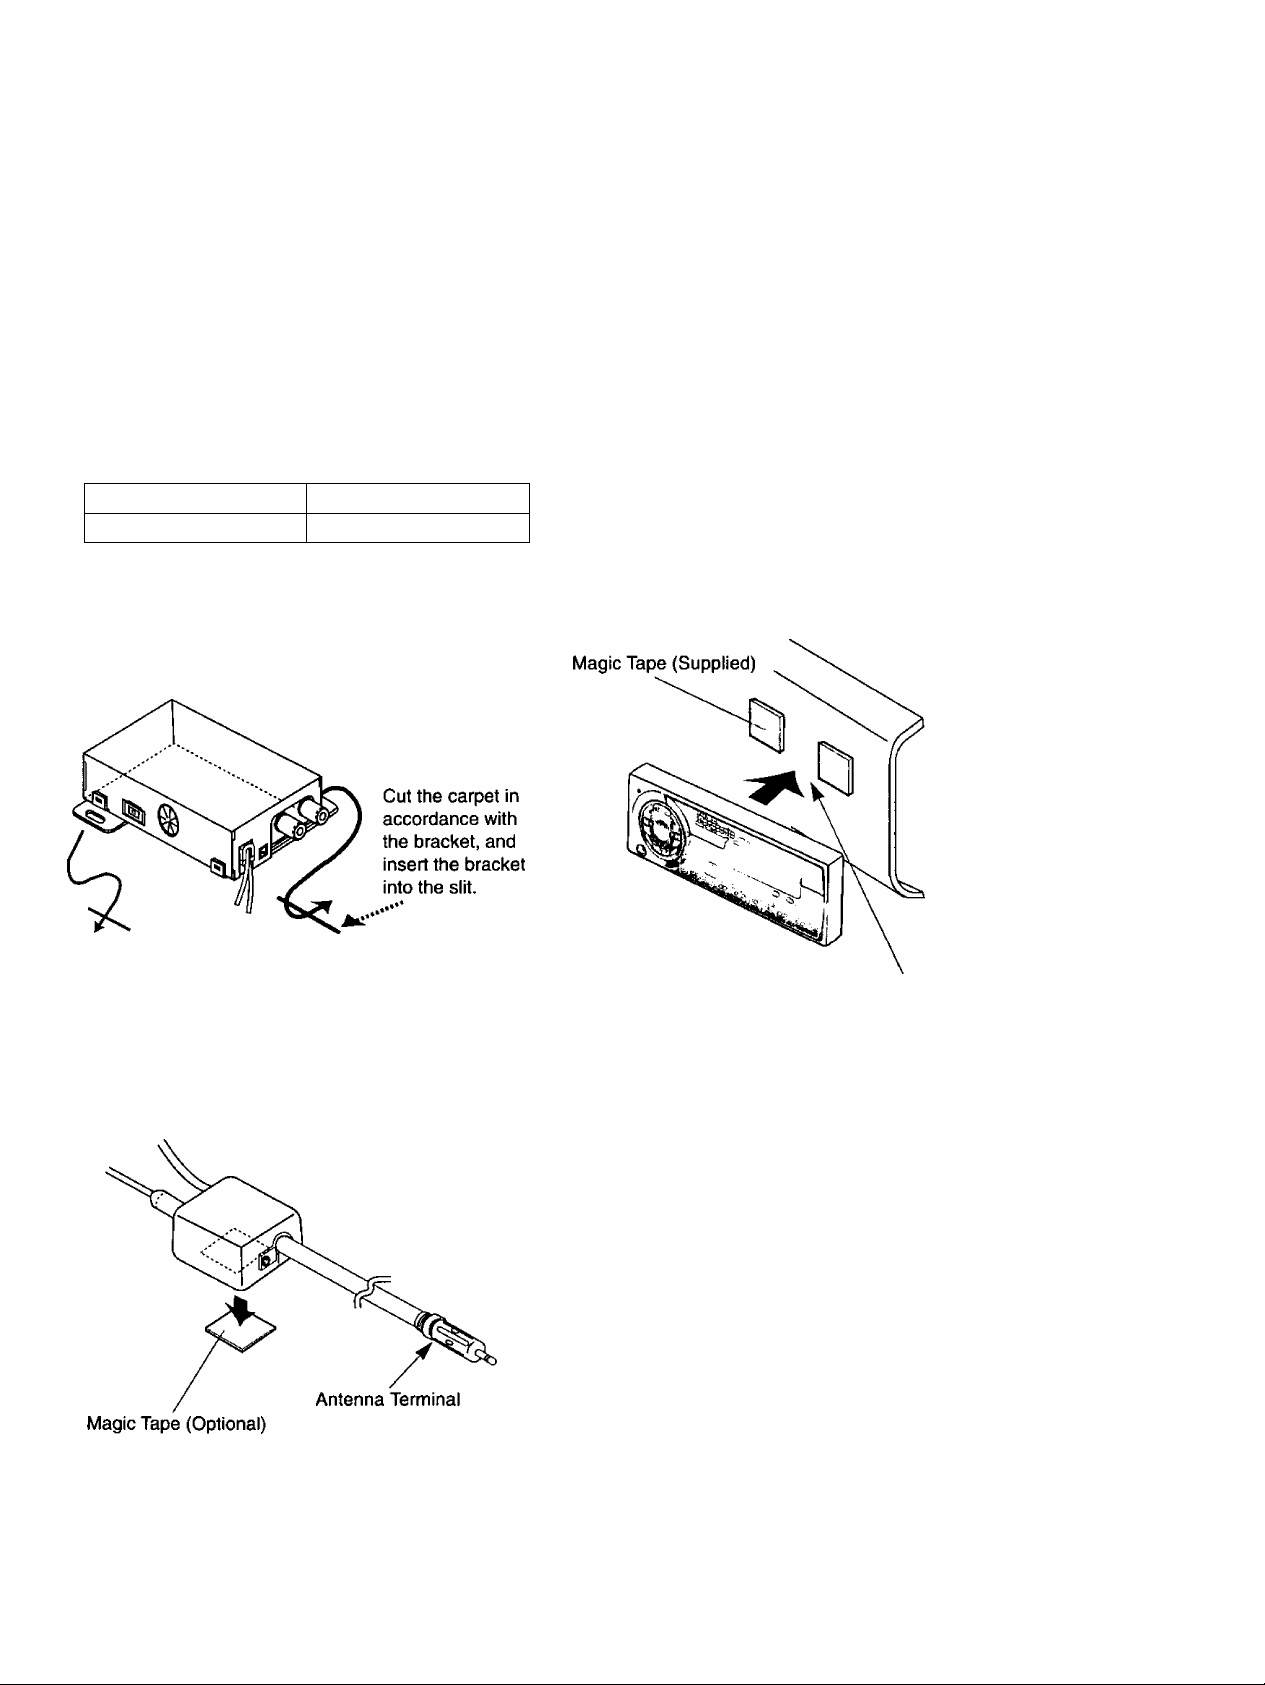
1. Installation of the Main Control Unit
Mount the Main Control unit on the carpet.
3. Installation of the Antenna Switch
Mount the Antenna Switch on the inner side of the console.
2. Installation of the Display Control Unit
Mount the Display Control Unit on the console.
Separate the magic tape and put them on the
face of the console not to lean the Unit.
n
Caution:
Please wipe clean the face of the console to put on
the magic tape.
Page 3

Specifications
Power Supply
Current Consumption
CD Input Impedance
CD Input Level
Transmitting Frequency
Dimensions (W x H x D)
Main Control Unit
Display Control Unit
Antenna Switch
Remote Control Unit
Weight
Main Control Unit
Display Control Unit
Antenna Switch
Remote Control Unit
12V DC {11V -16V) Test Voltage 14.4V, Negative Ground
0.65A (If connected to CX-DP801EUC, at CD play mode)
10kii
2 Vrms (1 kHz)
87.9 - 99.9 MHz
0.2 MHz/Step
2-3/4” X 1-3/16" X 4-11/32” (70 x 30 x 110 mm)
4-17/32” x 1-3/4” X 7/8” (115 x 44 x 22 mm)
1-21/32” x 7/8" X 2-7/32” (42 x 21 x 56 mm)
1 -9/32” X 9/32” X 3-3/8” (33 x 7 x 86 mm) <Only for RM850EUC>
8 oz (230g)
4oz (122g)
3 oz (80g)
0.5oz(13g)
<OnIy for RM850EUC>
Panasonic Consumer Electronics Panasonic Sales Company.
Company, Division of Matsushita
Electric Corporation of America
One Panasonic Way, Secaucus,
New Jersey 07094
Accessories
1. Operating Instructions
2. Installation Hardwares.......................................1 set
3. Limited Warranty Card
----------------------
....................................
...................................
Division of Matsushita Electric of Puerto Rico, Inc. (“PSC”)
Ave. 65 de Infanteria, Km. 9.5
San Gabriel Industrial Park, Carolina,
Puerto Rico 00985
1
1
YEFM282866
4. Directory of PASC Factory Senricenter
5. Remote Control Unit <0nly for RM850EUC>- --1
6. Battery (Remote Control Unit)
<Onlyfor RM850EUC>- •1 set(CR2025)
Panasonic Canada Inc.
5770 Ambler Drive,
Mississauga, Ontario L4W 2T3
B1297-0 Printed in Japan
..................
1
Maintenance
Your product is designed and manufactured to ensure a minimum of maintenance. Use a soft cloth for routine ex
terior cleaning. Never use benzine, thinner or other solvent.
Product Servicing
If you are in doubt about the check point, or if the remedies indicated on the chart don't solve the problem, refer to
the enclosed directory of PASC, Panasonic (in Canada) authorized Servicenter.
Replacing the Fuse
Use fuses of the same specified rating (3 amps). Using different substitutes or fuses with higher ratings, or con
necting the unit directly without a fuse, could cause fire or damage to the stereo unit.
If the replacement fuse fails, contact your nearest PASC, Panasonic (in Canada) Servicenter for service.
Helpful Hints
• The operating temperature of the CD Changer is +14°F (-10°C) to +131°F (+55°C).
• Improper installation of the unit and/or driving on poorly paved roads may cause the CD Changer to skip during
music playback. (Please note: the disc and unit will not be damaged by these conditions.)
• Please detach the Panasonic Purchase Information Card from the Warranty Card. Fill it in and mail it to us at
your earliest convenience. It will help us serve you better and enable us to contact you in the event it becomes
necessary to do so,
• Please read your Limited Warranty Card.
Page 4

Electrical Connection
• This system is to be used only in a 12-volt, DC battery system (car) with negative ground.
• Follow the wiring connection diagram. Failure to do so may result in damage to the unit.
• Please carefully read the operating and installation instructions of the respective equipment before connecting it
to this unit.
• CA-CD55EUC (Dual CD Changer Selector) cannot be connected.
Composition
Remote Control Unit
<Only for RM850EUC>
Page 5

Display Control Unit Operation
■ Names of Controls and Functions
The following description is based on the assumption
that this unit is connected to the optional CD changer
CX-DP801EUC, etc.
O Reset Button
O Disc Change Button
O Track/Search Up Button
O Repeat/Random Button
0 Power Button
0 Track/Search Down Button
To reset this unit
Use this unit for the first time, press the reset but
ton when the ignition is on.
Note:
• Press the reset button if you removed display con
trol unit and installed it again.
• Press the reset button when this unit does not work
properly.
« Press the reset button to return intialization.
To press the reset button, use the slender and strong
stick.
■ Operating Procedures
1 To operate your car FM (stereo) radio
Switch on your car FM (stereo) radio.
2 Make sure the CD in the CD changer
Setting Transmitting Frequency
1. Switch on the power of your car FM radio.
2. Press PWR to switch on the power of display control
unit.
3. Press and hold PWR again for more than 2 seconds.
Then, display changes to transmitting frequency.
4. Press ►► to change and select the frequency,
then press PWR to set.
Set frequency away from public FM stations, {away
more than ±0.4 MHz)
Note:
When you make sure the transmitting frequency,
press and hold PWR for more than 2 seconds. And
press PWR again to return.
3 To start disc play: PWR Button
• Press PWR on display control unit.
• Set the radio as your selected frequency of display control unit.
Note:
When you make sure the transmitting frequency, press and hold PWR for more than 2 seconds. And press PWR
again to return.
4 To stop CD play (to switch to FM tuner): PWR Button
Press PWR again to stop the CD playing. To listen a CD again, press PWR.
5 To select the disc : DISC Button
Press DISC sequentially advance to the next disc while disc plays.
Page 6

6 To select the desired track on the disc: ►► button
• Press ►► once to go to the next track.
• Press once to play from the beginning of the track you are listening to. Press twice to play the previous
track.
• Press repeatedly to skip the desired number of tracks.
7 To search a Track
Press and hold ►► or for more than a half second to activate fast forward or reverse through a track.
Release ►► or to resume normal CD play from that position.
8 Repeat/Random Play : R/R ^ Button
© Press R/R ► to repeat the current selection. {“REPEAT indicator lights.)
Press R/R ► again to cancel.
® Press and hold R/R ► for more than 2 seconds. A random selection of music is played from all available
tracks. (“RANDOM” indicator lights.)
Press and hold R/R again for more than 2 seconds to cancel.
Note: In random play mode, the tracks are played at random as selected by the built-in microcomputer.
9 To power the modulator off
Press PWR on display control unit.
Sensor Display
Changing the Display : DISP button
Use the remote control unit, press DISP while a CD is playing to display playing time and disc/track number al
ternately.
Disc Number/Track Number Time Counter
Disc/Track Number Display
Transmitting Frequency
Operating Mode Display
Lights the CD changer's operating mode display
(disc/track number, playing time counter).
REPEAT Indicator
Lights when the repeat mode is activated.
® RANDOM Indicator
Lights when the random play mode is activated.
Page 7

Remote Control Unit Operation <Only for CY-RM850EUC>
■ Names of Controls and Functions
The following description is based on the assumption
that this unit is connected to the optional CD changer
CX-DP801EUC, etc.
O Play Button
O Stop Button
O Display Change Button
Track/Search Up Button
(D Track/Search Down Button
Disc Down Button
(El Disc Up Button
(El Repeat/Random Button
O Light Emitter
Direct it to the Display Control Unit.
(D Battery Case
On the back. See the battery replacement method.
■ Operating Procedures
1 To operate your car FM (stereo) radio
Switch on your car FM (stereo) radio.
2 Make sure the CD in the CD changer
3 To start disc play
• Press PWR on display control unit.
• Set the radio as your selected frequency of display control unit.
Note:
When you make sure the transmitting frequency, use display control unit. Press and hold PWR for more than 2
seconds. And press PWR again to return.
4 To stop CD play (to switch to FM tuner): STOP ■ Button
Press ■ to stop the CD playing. To listen a CD again, press Play ►.
5 To select the disc : DISC A DISC V
Press DISC A or V button during disc playback to select the desired number of discs.
Page 8

6 To select the desired track on the disc: ^ button
• Press ►► once to go to the next track.
• Press once to play from the beginning of the track you are listening to. Press twice to play the previous
track.
• Press repeatedly to skip the desired number of tracks.
7 To search a Track
Press and hold ►► or for more than a half second to activate fast forward or reverse through a track.
Release ►► or to resume normal CD play from that position.
8 Repeat/Random Play : R ► Button
© Press R ► to repeat the current selection. (“REPEAT" indicator lights.)
Press R ► again to cancel.
@ Press and hold R ► for more than 2 seconds. A random selection of music is played from all available
tracks. (“RANDOM” indicator lights.)
Press and hold R ► again for more than 2 seconds to cancel.
Note: In random play mode, the tracks are played at random as selected by the built-in microcomputer.
Battery Replacement (Remote Control Unit)
1. Remove the battery holder.
Pull the holder by Position B while pushing
Position A in the direction indicated by the arrow,
2. Replace the battery.
Set a new battery properly with (+) side up
as illustrated.
3. Insert the battery holder.
Push in the holder to the original position.
Position A
Note on Batteries
Old batteries must immediately be removed and disposed of.
Battery Information:
• Designated Battery: Panasonic Lithium Battery (CR2025)
• Battery Life: 6 months with normal use (in normal room temperature)
Battery holder
Position B
Caution:
• Improper use of batteries may cause overheating, explosion or ignition, resulting in injury or fire.
Battery leakage may cause damage to the unit.
• Do not disassemble or short the batteries. Do not throw the batteries into a fire.
• To avoid the risk of accident, keep the batteries out of reach of children.
 Loading...